

SC2002

2
I


ENGLISH 6
FRANÇAIS 31
РУССКИЙ 58
106
127
SC2002

6
ENGLISH
Table of contents
Introduction 7
Benets 7
Intense Pulsed Light (IPL) technology for home use 7
Effective hair regrowth prevention for everyday smoothness 7
Gentle treatment, even on sensitive body areas 7
Cordless operation for maximum freedom and exibility 8
Lamp does not require replacement 8
How Philips’ Intense Pulsed Light technology works 8
Hair growth 8
Working principle 8
General description 8
Important 9
Danger 9
Warning 9
To prevent damage: 10
Caution 10
Keep the following things in mind to avoid compromising
the lifetime of your Philips Lumea Precision: 10
For whom is Philips Lumea Precision not suitable? 10
Contraindications 10
Never use the appliance if you are pregnant or breast feeding 10
Never use the appliance if you have an unsuitable
skin and/or hair colour, i.e.: 10
Never use the appliance if you suffer from any of the
diseases listed below, i.e.: 11
Never use the appliance if you take any of the medications
listed below, i.e.: 11
Never use the appliance on the following areas: 11
Never use the appliance on sunburnt, recently
tanned (last 48 hours) or fake-tanned skin: 12
Electromagnetic elds (EMF) 12
Charging 12
Preparing for use 13
Preparing treatment areas 13
Setting the light intensity 14
Important 15
Tanning advice 15
Using the appliance 16
Choosing the right attachment 16
First use and skin test 16
Subsequent use 17
Guidelines for treatment 19
Average treatment time 19
Intended treatment areas 20
Using the appliance on the legs 20
Using the appliance in the bikini area 20
Using the appliance on the underarms 21
Using the appliance on the face (upper lip, chin, sideburns) 21
How to achieve optimal results 22
Maintenance phase 22
Possible side effects and skin reactions 22

ENGLISH 7
After use 23
Cleaning and maintenance 23
Storage 24
Replacement 24
Replacement parts 24
Environment 25
Removing the rechargeable batteries 25
Guarantee and service 26
Technical specications 26
Troubleshooting 27
Introduction
Congratulations on your purchase and welcome to Philips!
To fully benet from the support that Philips offers, register your product
at www.philips.com/lumea.
Light-based hair removal is one of the most effective methods to
treat unwanted body hair with longer-lasting results. It is different from
current home hair removal methods because it signicantly reduces
hair regrowth. Philips has been investigating this method together with
leading dermatologists for over 10 years. You can now use this innovative
technology comfortably in the privacy of your own home, whenever and
wherever you want.
This appliance has been specically designed and optimised for use by
women, but can be used by men as well.
Philips Lumea Precision enables treatment of unwanted hair on the whole
body, including the face (upper lip, chin and sideburns), using two tailored
attachments.
Philips Lumea Precision is designed for use by one person only.
For more information about Philips Lumea Precision, see
www.philips.com/lumea. Check our homepage regularly for updates.
Benets
This appliance provides the following benets:
Intense Pulsed Light (IPL) technology for home use
Philips Lumea Precision uses a light-based technology called ‘Intense
Pulsed Light’ (IPL). IPL is also used in the professional beauty market for
hair removal and has been in use for the last fteen years. Philips Lumea
Precision now brings this innovative technology to the comfort of your
home.
Effective hair regrowth prevention for everyday smoothness
This method provides you with long-lasting hair regrowth prevention and
silky-smooth skin. Our studies have shown a signicant hair reduction
already after two treatments. Optimal results were generally achieved after
four to ve treatments. A reduction in hair density is visible from treatment
to treatment. How fast the effect becomes visible and how long the results
last varies from person to person. For more information, see section ‘How
to achieve optimal results’ in chapter ‘Using the appliance’.
Gentle treatment, even on sensitive body areas
Philips Lumea Precision has been developed in close cooperation with
leading dermatologists for an effective and gentle treatment, even on the
most sensitive body areas and the face.
ENGLISH8
Cordless operation for maximum freedom and exibility
Because the appliance runs on rechargeable batteries, it is portable and can
be used anywhere.
Lamp does not require replacement
Philips Lumea Precision is equipped with a high-performance lamp which
does not require replacement. This lamp can generate over 80,000 ashes
and should enable you to continuously maintain results for more than 5
years* while saving money on expensive replacement lamps.
*Based on average usage scenario and recommended treatment regime for
one user.
How Philips’ Intense Pulsed Light technology works
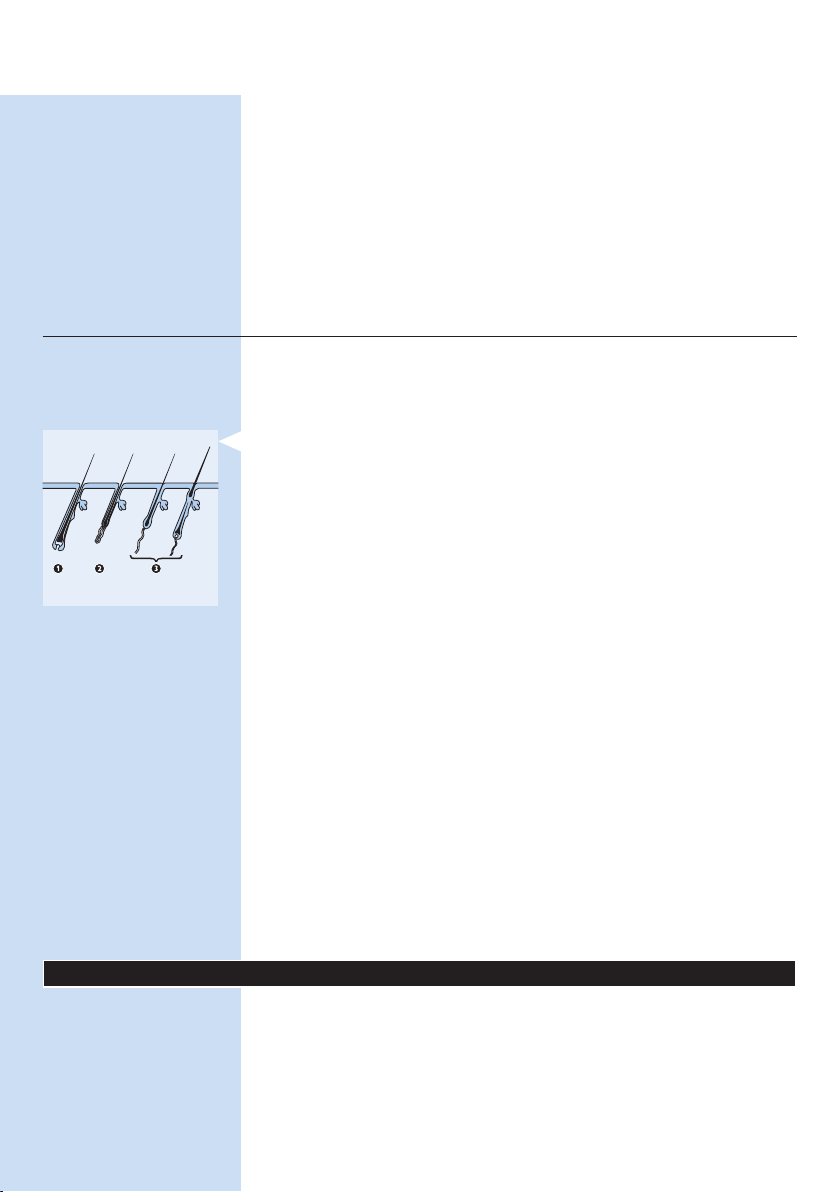
Hair growth
Hair growth rates differ from person to person, depending on age,
metabolism and other factors. However, everyone’s hair normally grows in
3 phases.
1 Growing phase (anagen phase)
The hair grows actively from the root. In this phase the concentration of
melanin is highest. Melanin is responsible for the pigmentation of the hair.
Melanin concentration is also the determining factor for the efcacy of this
method. Only hairs in the growing phase are susceptible to treatment with
light.
2 Degradation phase (catagen phase)
Hair growth stops and the root shrinks before the hair sheds.
3 Resting phase (telogen phase)
The old hair separates from its hair follicle and sheds. The follicle remains
at rest until the biological clock tells it to become active again and grow a
new hair.
Working principle
The appliance works by heating up the hair and root beneath the skin.
The melanin in the hair and hair root absorbs the released light pulses. The
darker the colour of the hair, the more light can be absorbed. This process
stimulates the hair to go into the resting phase.
The hair now sheds naturally and the hair growth is inhibited. Hairs can
take one or two weeks to shed. Optimal hair removal cannot be obtained
with a single session, since only hairs in the growing phase are susceptible
to treatment with light. During a treatment, hairs on the treated area are
usually in different stages of the hair growth cycle. To effectively treat all
hairs you have to repeat the treatment every two weeks for a few times.
An integrated optical lter ensures that no UV light reaches the skin
and guarantees that the appliance is safe for the skin.
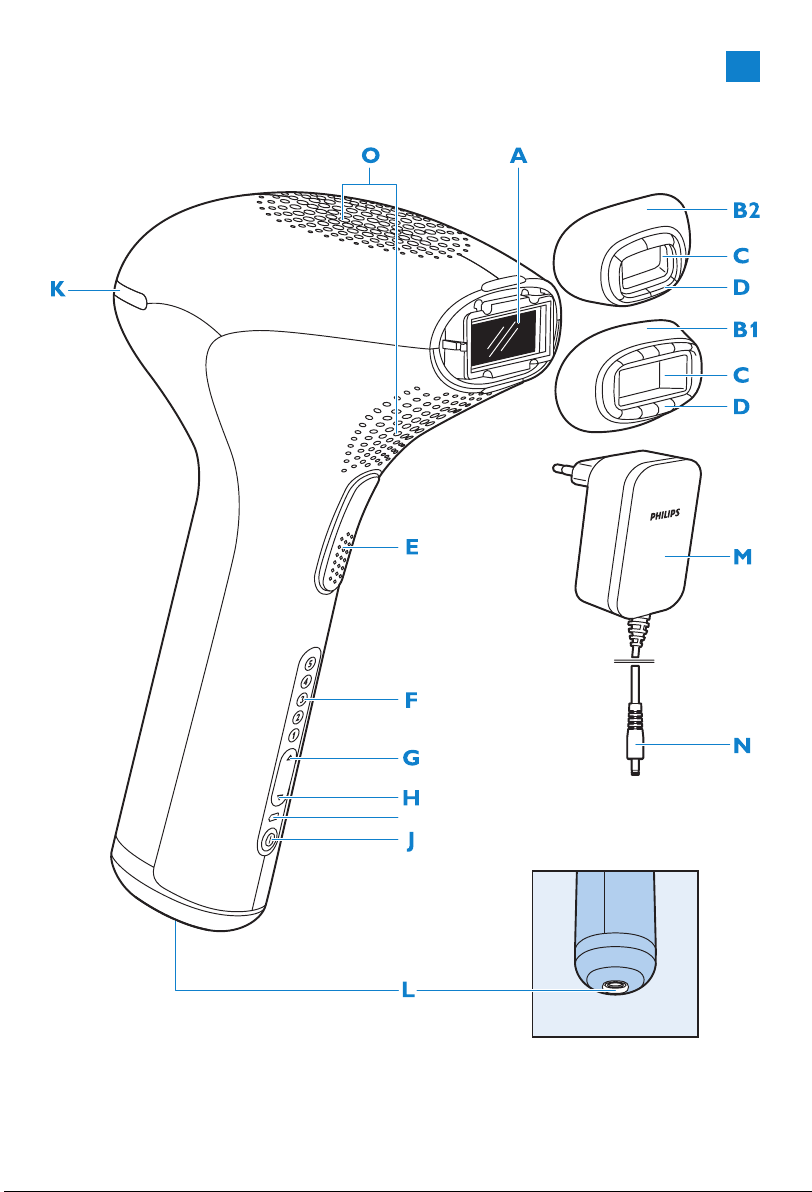
General description (Fig. 2)
A Light exit window with integrated UV lter
B Attachments
1 Body attachment (suitable for all body areas below the neck)
2 Precision attachment (suitable for all body areas, including upper lip,
chin and sideburns)
C Metallic frame inside the attachment
D Safety system (safety ring with contact switches)
E Flash button
ENGLISH 9
F Intensity lights (1- 5)
G % Intensity increase button
H ^ Intensity decrease button
I Charging light and battery low indication
J On/off button
K ’Ready to ash’ light
L Appliance socket
M Adapter
N Small plug
O Air vents
Also included: case and cleaning cloth
Important
Read this user manual carefully before you use the appliance and save it for
future reference.
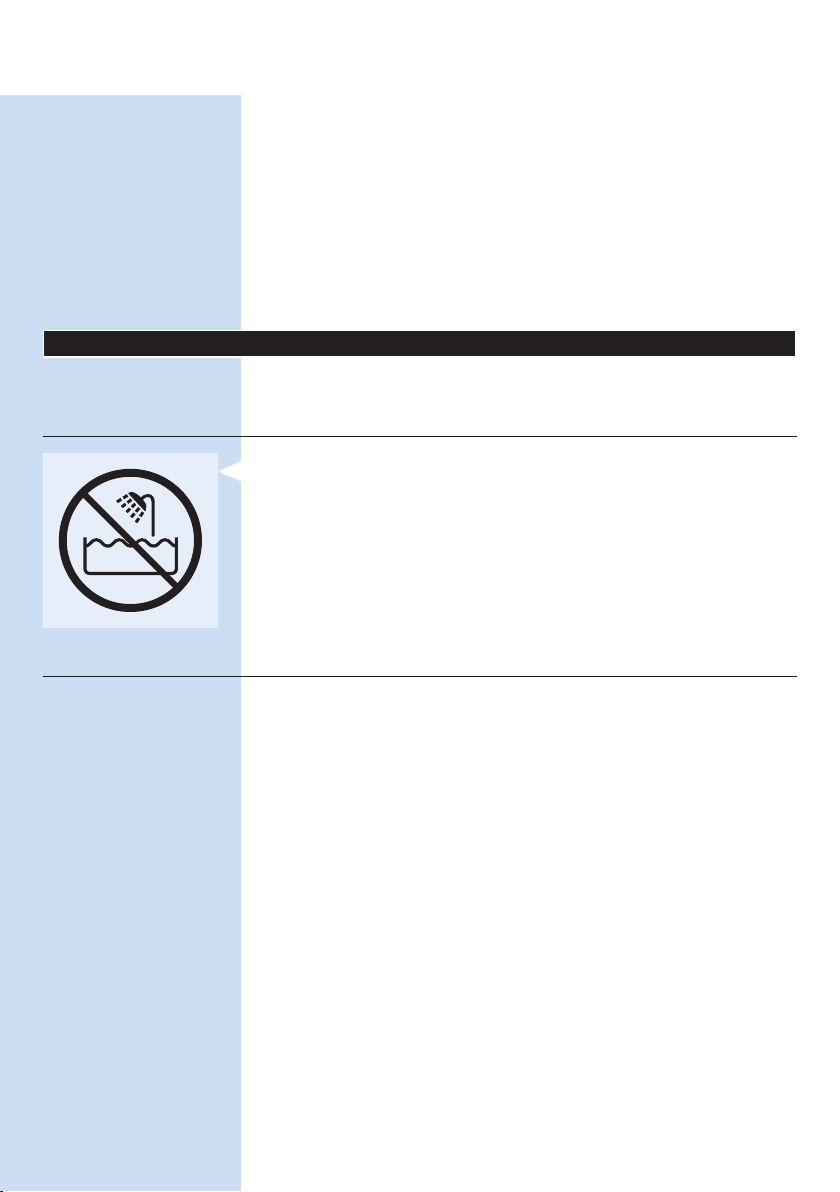
Danger
- Water and electricity are a dangerous combination. Do not use this
appliance in wet surroundings (e.g. near a lled bath, a running shower
or a lled swimming pool).
- Keep the appliance and the adapter dry.
- If the appliance is broken, do not touch any inner part to avoid electric
shock.
- Never insert any objects into the appliance.
Warning
- This appliance is not intended for use by persons (including children)
with reduced physical, sensory or mental capabilities, unless they have
been given supervision or instruction concerning use of the appliance
by a person responsible for their safety.
- Children should be supervised to ensure that they do not play with the
appliance.
- The appliance is not intended for children under the age of 15 years.
Teenagers aged between 15 and 18 years can use the appliance with
the consent and/or assistance of their parents or the persons who have
parental authority over them. Adults from 19 years and older can use
the appliance freely.
- Only charge the appliance with the adapter supplied.
- Do not use the appliance or the adapter if it is damaged.
- The adapter contains a transformer. Do not cut off the adapter to
replace it with another plug, as this causes a hazardous situation.
- If the adapter is damaged, always have it replaced with one of the
original type in order to avoid a hazard.
- Do not use the appliance if the UV lter of the light exit window is
broken.
- Do not use the precision attachment if its reddish glass is broken.

ENGLISH10
To prevent damage:
- Make sure nothing obstructs the air ow through the ventilation slots.
- Never subject the appliance to heavy shocks and do not shake or drop
it.
- If you take the appliance from a very cold environment to a very warm
environment or vice versa, wait approximately 3 hours before you use
it.
- Store the appliance in the case so that it does not become dusty.
- Never leave the appliance unattended when it is switched on. Always
switch off the appliance after use.
- Do not expose the appliance to direct sunlight or UV light for several
hours.
- Do not ash against any other surface than the skin. This can cause
severe damage to the attachments and/or the light exit window. Only
ash when the appliance is in contact with skin.
Caution
- Never use the appliance around the eyes and near the eyebrows to
avoid the risk of eye damage.
- Use this appliance only at settings suitable for your skin type. Use at
higher settings than those recommended can increase the risk of skin
reactions and side effects.
- This appliance is only intended for removing unwanted body hair from
areas below the cheek bones with the two attachments supplied. Do
not use it for any other purpose.
Keep the following things in mind to avoid compromising the
lifetime of your Philips Lumea Precision:
- Do not expose the appliance to temperatures lower than 15°C or
higher than 35°C during use.
- The appliance is equipped with a built-in overheat protection. If the
appliance overheats, it does not ash. Do not switch off the appliance,
but let it cool down for approx. 15 minutes before you continue with
your treatment.
- Always return the appliance to a service centre authorised by Philips
for examination or repair. Repair by unqualied people could cause an
extremely hazardous situation for the user.
- Never use the appliance in any of the cases mentioned in the section
‘Contraindications’.
For whom is Philips Lumea Precision not suitable?
Philips Lumea Precision is not designed for everyone. If any of the following
is true for you, then this appliance is not suitable for you to use!
Contraindications
Never use the appliance if you are pregnant or breast feeding.
Never use the appliance if you have an unsuitable skin and/or
hair colour, i.e.:
- If your natural hair colour in the treatment areas is light blond, white,
grey or red.
- If you are of skin type VI (you rarely or never get sunburnt and you tan
very darkly; your skin colour is brownish black or darker). In this case

ENGLISH 11
you run a high risk of developing skin reactions, such as strong redness,
burns or discolourations, when you use Philips Lumea Precision.
Never use the appliance if you suffer from any of the diseases
listed below, i.e.:
- If you have a skin disease such as active skin cancer, you have a history
of skin cancer or any other localised cancer in the areas to be treated.
- If you have pre-cancerous lesions or multiple atypical moles in the areas
to be treated.
- If you have a history of collagen disorder, including a history of keloid
scar formation or a history of poor wound healing.
- If you have a history of vascular disorder, such as the presence of
varicose veins or vascular ectasia in the areas to be treated.
- If your skin is sensitive to light and easily develops a rash or an allergic
reaction.
- If you have infections, eczema, burns, inammation of hair follicles,
open lacerations, abrasions, herpes simplex, wounds or lesions and
haematomas in the areas to be treated.
- If you have had surgery in the areas to be treated.
- If you have epilepsy with ashlight sensitivity.
- If you have diabetes, lupus erythematodes, porphyria or congestive
heart disease.
- If you have any bleeding disorder.
- If you have a history of immunosuppressive disease (including HIV
infection or AIDS).
Never use the appliance if you take any of the medications
listed below, i.e.:
- If your skin is currently being treated with or has recently been treated
with Alpha-Hydroxy Acids (AHAs), Beta- Hydroxy Acids (BHAs),
topical isotretinoin and azelaic acid.
- If you have taken any form of isotretinoin Accutane
the last six months.This treatment can make skin more susceptible to
tears, wounds and irritations.
- If you are on painkillers, which reduce the skin’s sensitivity to heat.
- If you are taking photosensitising agents or medications, check the
package insert of your medicine and never use the appliance if it is
stated that it can cause photo-allergic reactions, photo-toxic reactions
or if you have to avoid sun when taking this medicine.
- If you take anticoagulation medications, including heavy use of aspirin, in
a manner which does not allow for a minimum 1-week washout period
prior to each treatment.
- If you take immunosuppressive medications.
Never use the appliance on the following areas:
- Around the eyes and near the eyebrows.
- On nipples, areolas, labia minora, vagina, anus and the inside of the
nostrils and ears.
- Men must not use it on the scrotum and face.
- Over or near anything articial like silicone implants, pacemakers,
subcutaneous injection ports (insulin dispenser) or piercings.
- On moles, freckles, large veins, darker pigmented areas, scars, skin
anomalies without consulting your doctor. This can result in a burn and
®
or Roaccutane® in

ENGLISH12
a change in skin colour, which makes it potentially harder to identify
skin-related diseases (e.g. skin cancer).
- On warts, tattoos or permanent make-up. This can result in a burn and
a change in skin colour.
- On areas, where you use long-lasting deodorants. This can result in skin
reactions. See chapter ‘Using the appliance’, section ‘Possible side effects
and skin reactions’.
Never use the appliance on sunburnt, recently tanned (last 48
hours) or fake-tanned skin:
- All types of tanning can inuence the safety of the treatment. This
applies to exposure to natural sunlight as well as articial tanning
methods, such as tanning lotions, tanning appliances etc. If you are
tanned or are planning to tan, see chapter ‘Preparing for use’, section
‘Tanning advice’.
Note: This list is not exhaustive. If you are not sure whether you can use the
appliance we advise you to consult a doctor.
Electromagnetic elds (EMF)
This Philips appliance complies with all standards regarding electromagnetic
elds (EMF). If handled properly and according to the instructions in this
user manual, the appliance is safe to use based on scientic evidence
available today.
Charging
Fully charge the batteries before you use the appliance for the rst time
and when the batteries are empty. Fully charging the batteries takes up to 1
hour and 40 minutes.
Charge the appliance when the charging light lights up orange during use to
indicate that the battery is low. When this happens, the remaining capacity
is at least 30 ashes.
Fully charged batteries provide at least 320 ashes at light intensity 5.
Fully charge the appliance every 3 to 4 months, even if you do not use the
appliance for a longer time.
Charge the appliance in the following way:
ENGLISH 13
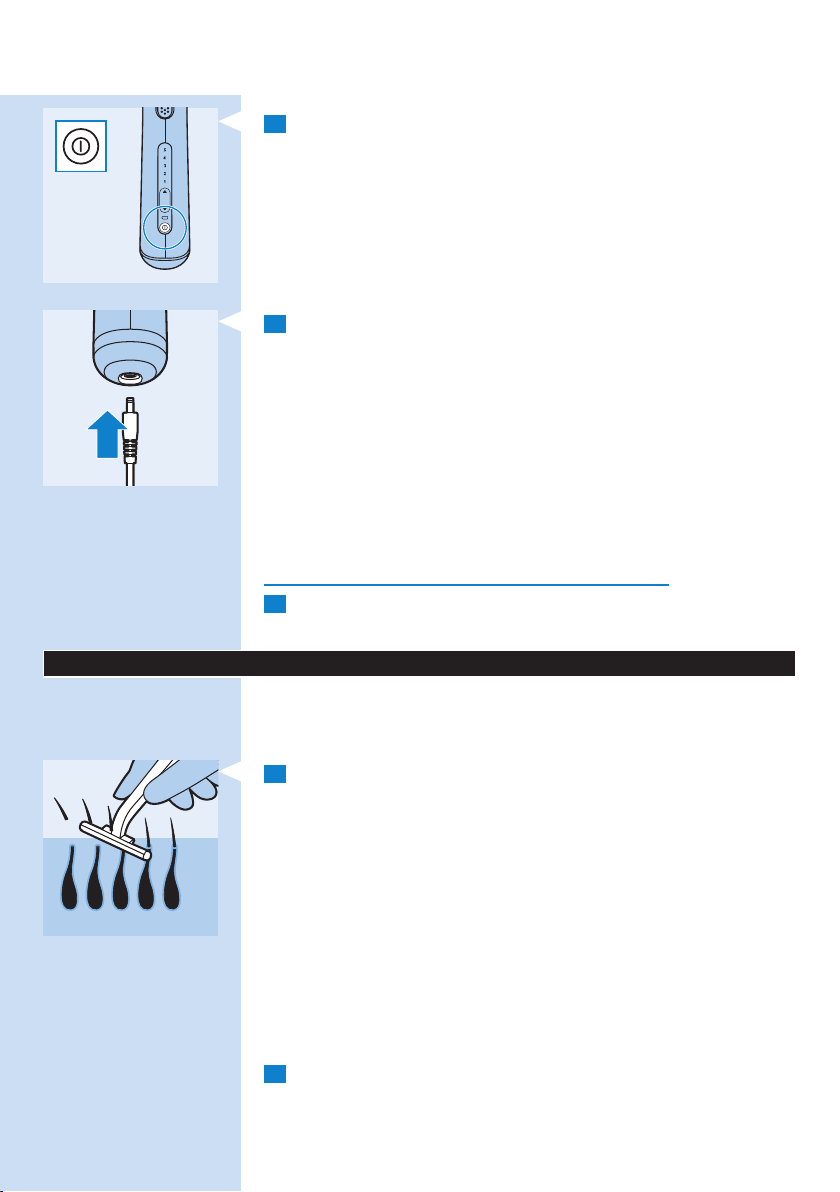
1 Switch off the appliance.
2 Insert the small plug into the appliance and put the adapter in the
wall socket.
, The charging light ashes green to indicate that the appliance is
charging.
, When the batteries are fully charged, the charging light
lights up green continuously.
Notes:
- The adapter and the appliance feel warm during charging. This is
normal.
- You cannot use the appliance during charging.
- This appliance is equipped with battery-overheat protection and does
not charge if the room temperature exceeds 40°C.
Never cover the appliance and adapter during charging.
3 After charging, remove the adapter from the wall socket and pull the
small plug out of the appliance.
Preparing for use
For optimal results and greatest effect, prepare the areas on which you
intend to use the appliance in the manner described below.
Preparing treatment areas
1 Shave the areas you intend to treat as long as you still experience
hair regrowth.
Note: If your last depilation method involved removing hairs by the roots (e.g
epilating, waxing etc.), wait until you notice signicant hair regrowth before you
use Philips Lumea Precision. Do not use depilatory creams instead of shaving.
Please note that treatment on unshaved or improperly shaved
areas has a number of undesired effects:
- The light exit window and attachment may become contaminated with
stray hairs and dirt. A contaminated light exit window and attachment
can reduce the life and efcacy of the appliance. In addition, burns or
black spots that appear on the light exit window and attachments due
to contamination can cause the treatment to become painful or cause
skin reactions like redness and discolouration.
- Hairs on your skin can burn, which can result in an unpleasant smell.
2 Clean your skin and make sure it is hair-free, entirely dry and
free from oily substances (e.g. present in cosmetic products like
deodorants, lotions, perfumes, tanning creams and sunscreens).

ENGLISH14
3 Check the appliance, especially the light exit window and attachment,
for trapped hair, dust and bres. If you see any contamination, clean
the appliance according to the instructions in chapter ‘Cleaning and
maintenance’.
Notes:
- If shaving causes wounds or lesions, your skin may be more sensitive
and the light treatment may sometimes feel uncomfortable.
- Once the hairs stop growing back, which usually happens after 4-5
treatments, you no longer have to shave before you use the appliance.
Setting the light intensity
Philips Lumea Precision is an appliance developed for consumer use
at home and therefore not comparable with professional light-based
appliances with respect to pain sensation. The pulses of light delivered by
Philips Lumea Precision are gentler than those from professional appliances
and therefore you can expect a convenient and effective treatment.
You have to adjust the light intensity to your skin and body hair colour and
to a level you nd comfortable.
The recommended light intensities table below helps you to establish the
right light intensity.
1 Consult the table below to determine which light intensities are
most suitable for your skin and body hair colour and to check if this
method is suitable for you (if it is not, this is indicated with x in the
table).
2 Each body area and possibly even parts of a body area may require a
separate appropriate light intensity according to the recommended
light intensities table below. The method is more effective at higher
intensities, but you should reduce the light intensity if you experience
any pain or discomfort.
Persons with darker skin run a higher risk of skin irritation because their
skin absorbs more light. Therefore lower intensities are recommended
for persons with darker skin.
The light pulse can feel warm or hot on the skin but should never be
painful. To prevent skin reactions, see chapter ‘Using the appliance’,
section ‘Possible side effects and skin reactions’.
Recommended light intensities (1-5)
In the table below, ‘x’means that the appliance is not suitable for you.

ENGLISH 15
Skin colour and
characteristics:
Body hair colour:
dark blond/light
brown/brown/
dark brown/black
white/grey/red/
light blond
White
(always
sunburn,
no
tanning)
4/5 4/5 4/5 3/4 1/2/3 x
x x x x x x
Beige
(easy
sunburn,
minimal
tanning)
Important
To check whether Philips Lumea Precision is suitable for you, see section
‘For whom is Philips Lumea Precision not suitable?’.
If your skin has been exposed to natural sunlight or an articial tanning
method, it may be darker than during the previous treatment. Check the
table above to determine which settings are suitable for your skin colour.
Tanning advice
Sun exposure before treatment
- Wait at least 48 hours after sunbathing before you use the appliance.
Sunbathing can cause skin to darken (tan) and/or can cause sunburn
(reddening of the skin).
- After these 48 hours, check the skin for any remaining sunburn. Do not
use Philips Lumea Precision as long as sunburn persists.
- When the sunburn has disappeared, perform a skin test (see chapter
‘Using the appliance’, section ‘First use’) on the area to be treated to
determine the appropriate light intensity.
- If your skin is tanned, perform a skin test (see chapter ‘Using the
appliance’, section ‘First use’) on the area to be treated to determine
the appropriate light intensity. A failure to do so causes a risk of
developing skin reactions after treatment with Philips Lumea Precision.
Sun exposure after treatment
- Wait at least 24 hours after treatment before you expose treated
areas to the sun. Even after 24 hours, make sure that the treated skin
does not show any redness from the treatment anymore before you
expose it to the sun.
- Cover treated areas when you go out into the sun or use a sunblock
(SPF 30+) in the two weeks after treatment.
- Exposing treated areas to sunlight without protection immediately
after treatment can increase the risk of adverse side effects and skin
reactions. See chapter ‘Using the appliance’, section ‘Possible side effects
and skin reactions’.
Tanning with articial light
- Follow the instructions in ‘Sun exposure before treatment’ and ‘Sun
exposure after treatment’ above.
Tanning with creams
Light brown
(sometimes
sunburn, good
tanning)
Mid
brown
(rarely
sunburn,
fast and
good
tanning)
Dark
brown
(rarely
sunburn,
very good
tanning)
Brownish
black and
darker (rarely
to never
sunburn, very
dark tanning)

ENGLISH16
- If you have used an articial tanning lotion, wait until the articial tan
has fully disappeared before you use Philips Lumea Precision.
Note: For more details on unwanted skin reactions, see chapter ‘Using the
appliance’, section ‘Possible side effects and skin reactions’.
Using the appliance
Check the recommended light intensities table in chapter ‘Preparing for
use’, section ‘Setting the light intensity’ to determine which light intensities
are most suitable for your skin and body hair colour. Use the appliance in
a well-lit room; this reduces the perceived brightness of the ash. Shave
the area you intend to treat before you use the appliance (see chapter
‘Preparing for use’, section ‘Preparing treatment areas’).
If the treatment becomes intolerably painful at any point in time, reduce
the light intensity setting until the treatment is comfortable again. If you
notice skin reactions stronger than slight redness, stop the treatment
immediately and read section ‘Possible side effects and skin reactions’ in
this chapter.
Choosing the right attachment
- Body attachment
The body attachment can be used to treat unwanted body hair on all
body areas below the neck (for exceptions, see chapter ‘Important’, section
‘Contraindications’).The body attachment can cover an area of 3cm and is
ideal to treat large areas efciently.
Do not use the body attachment on the face.
- Precision attachment
The precision attachment includes an extra integrated light lter and can
be used to treat unwanted facial hair on the upper lip, chin and sideburns. It
may also be used on other sensitive areas on the body, such as underarms
and bikini area or hard-to-reach areas.
Never use around the eyes and near the eyebrows.
First use and skin test
1 Choose the attachment appropriate for the area you intend to treat.
2 Choose an area close to the area you intend to treat.
ENGLISH 17
Note: Before you use the appliance on the upper lip, chin or sideburns, choose
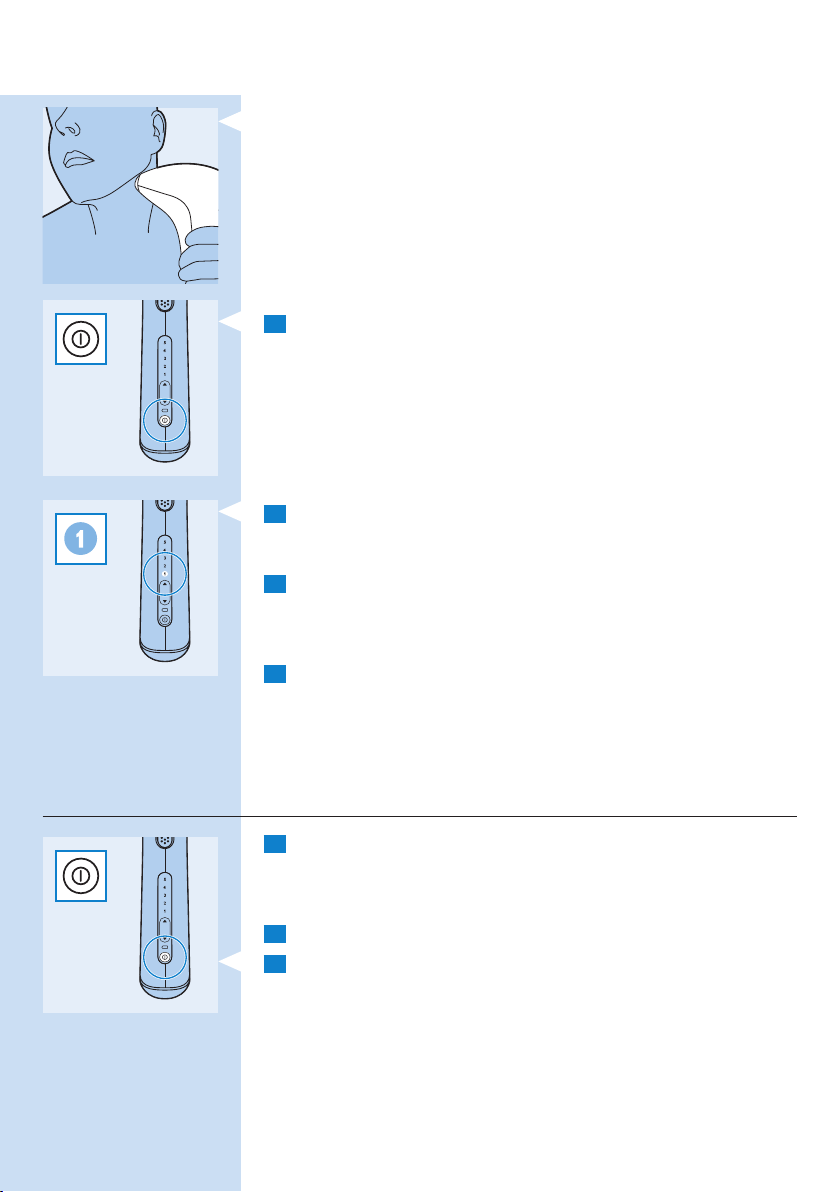
a mole- and hair-free area below your ear to perform the skin test.
3 Press the on/off button to switch on the appliance.
, The appliance always starts automatically at the lowest setting.
4 Apply one ash at the lowest recommended intensity for your skin
type (for instructions on how to release a ash, see steps 6 to 9
of section ‘Subsequent use’ in this chapter).
5 As long as it feels comfortable (not painful), increase the setting by
one level within the recommended range for your skin type and
apply one ash for each setting. Do not apply more than one ash on
the same spot.
6 After the skin test, wait for 24 hours and check your skin for
any reaction. If your skin shows reactions, choose the highest setting
that did not result in any skin reaction for subsequent use.
When you use the appliance for the rst time, we advise you to perform
a skin test on the area to be treated to check your skin’s reaction to the
treatment and to get accustomed to light-based treatment.
Subsequent use
1 Before every treatment, clean the attachments, the light exit
window and the metallic frame inside the attachments of Philips
Lumea Precision. For more information see chapter ‘Cleaning and
maintenance’.
2 Choose the attachment appropriate for the area you intend to treat.
3 Press the on/off button to switch on the appliance.
Note: It is normal that the appliance and the attachment become warm during
use.
ENGLISH18
4 Start each treatment by selecting the light intensity very carefully,
based on your skin’s sensitivity and on how comfortable treatment
feels.
Your skin may react differently on different days/occasions for a number of
reasons. See section ‘Possible side effects and skin reactions’ in this chapter
for more information.
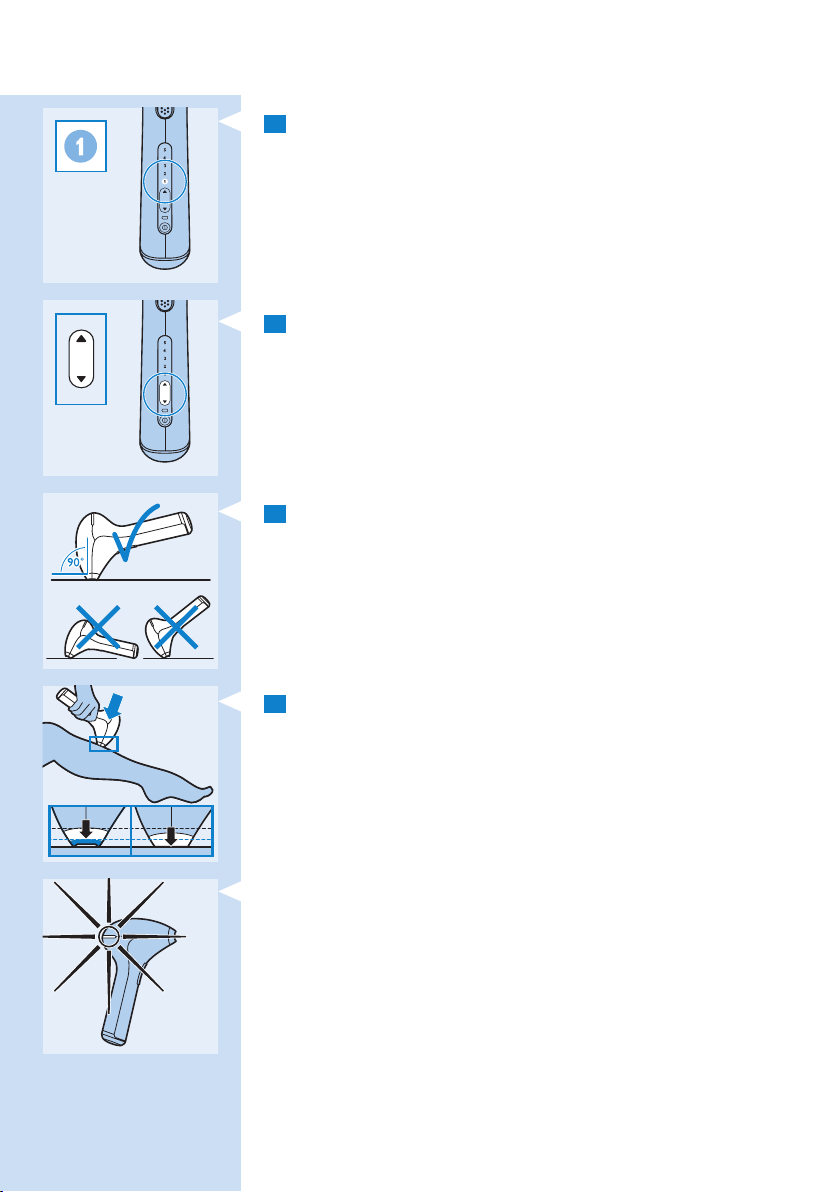
5 Press the % button to increase the intensity. To lower the intensity,
press the ^button.
, Every time you press the button, the corresponding intensity
light starts to ash. This takes a few seconds.
6 Place the appliance in a 90° angle on the skin so that the attachment
and the safety ring are in contact with the skin.
7 Press the safety ring fully onto the skin with slight pressure.
Note: The safety ring has contact switches that together are the safety system
of the appliance. This safety ring prevents unintentional ashing without skin
contact.
, The ‘ready to ash’ light on the back of the appliance lights up green
when all contact switches of the safety ring are in contact with the
skin and the device is charged. This may take up to 3.5 seconds.
Tip: For easier use, stretch the area of skin you want to treat. On areas with
softer skin, you may need to exert more pressure on the appliance to push in
all contact switches.
ENGLISH 19
8 Press the ash button to release a ash.
Note: The visible light produced by the appliance is the reection of the ash
on the skin and is harmless to your eyes. It is not necessary to wear goggles
during use.
9 Let go of the ash button after the appliance has ashed.
10 For the next ash, repeat steps 6 to 9. After each ash it takes up to
3.5 seconds until the appliance is ready to ash again.
Do not treat exactly the same area multiple times during one session.
This does not improve the effectiveness of the treatment, but increases
the risk of skin reactions.
11 To avoid untreated areas, always make sure there is some overlap
with the previously treated area when you place the appliance on the
skin.The effective light only comes out of the light exit window. Make
sure the ashes are produced close to each other.
12 Switch off the appliance after you have nished the treatment.
13 Check the light exit window and the attachment for hairs and
dirt and clean the appliance after use (see chapter ‘Cleaning and
maintenance’).
Guidelines for treatment
Average treatment time
Area Approx. treatment time Recommended attachment
Underarms 1.5 minutes per underarm Body/Precision attachment
Bikini line 1.5 minutes per side Body/Precision attachment
Entire bikini area 5 minutes Body/Precision attachment
One lower leg 12 minutes Body attachment
One full leg 20 minutes Body attachment
Upper lip/ chin/ sideburns 1 minute Precision attachment
Note: The average treatment times above have been observed during research
and tests. Individual treatment times may vary from person to person.
Note: Fully charged batteries offer at least 320 ashes at intensity 5. How long
you can use the appliance depends on the size of the area to be treated and
the intensity setting used.
ENGLISH20
Intended treatment areas
The appliance is intended to treat unwanted hairs from the upper lip, chin,
sideburns, underarms, arms, stomach, bikini area and legs.
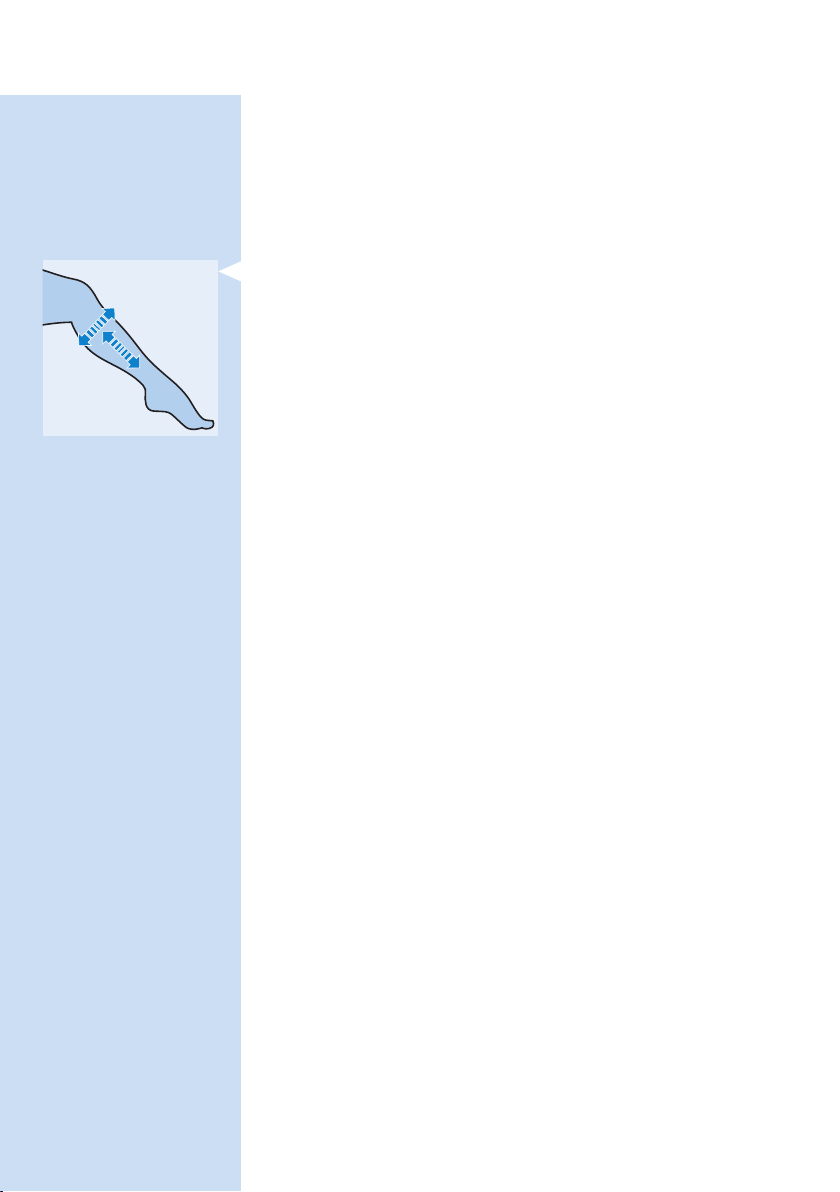
Using the appliance on the legs
Check the recommended light intensities table in chapter ‘Preparing for
use’, section ‘Setting the light intensity’ to see which settings are suitable for
your legs.
- You can move the appliance up and down or across the leg, whichever
is more convenient to you.
Note: Bony areas like shinbone and ankles are more sensitive than other areas
of the body. When you press the attachment hard onto these areas, the skin
can be more susceptible to skin reactions, such as skin irritation and redness.
See section ‘Possible side effects and skin reactions’ in this chapter. Press the
attachment onto the skin just hard enough to make the ‘ready to ash’ light go
on, but not harder.
Tip: The appliance may leave imprints on the skin in the treated areas. These
imprints may show you where you can make the treated areas overlap.
If you use the appliance to treat both your lower and upper legs, you may
have to recharge the appliance during the treatment. This is normal. How
long you can use the appliance depends on the size of the treatment area
and the intensity setting used.
Tip: Many users combine leg treatments with other activities around the house
such as watching TV or listening to music. You can also try this to make the
experience more enjoyable and relaxing.
Using the appliance in the bikini area
Check the recommended light intensities table in chapter ‘Preparing for
use’, section ‘Setting the light intensity’ to see which settings are suitable for
your bikini area.
In principle, Philips Lumea Precision is safe and gentle enough for treatment
of the entire bikini area (e.g. for ‘Brazilian’ or ‘Hollywood’ style). Use a lower
setting on darker pigmented, more sensitive skin in the bikini area. Do not
use the appliance on inner labia, vagina and anus. Men who wish to treat
their pubic area must not use the appliance on the scrotum.
Note: For hygienic reasons, always clean the attachment used before you start
treating another body area.

ENGLISH 21
Using the appliance on the underarms
Check the recommended light intensities table in chapter ‘Preparing for
use’, section ‘Setting the light intensity’ to see which settings are suitable for
your underarms.
Make sure you remove any deodorant, perfume, cream or other skin care
product from your underarms before treatment.
Tip: To achieve optimal results on your underarms, stand in front of a mirror to
get a good view of the area to be treated and the ‘ready to ash’ light. Raise
your arm and place your hand in your neck to stretch the skin in the underarm
area. In this way the safety ring can be pressed more easily onto the skin,
which makes the treatment easier to perform.
Note: The reected light does not harm your eyes. If the scattered light is
unpleasant, close your eyes when you release a ash.
Using the appliance on the face (upper lip, chin, sideburns)
Check the recommended light intensities table in chapter ‘Preparing for
use’, section ‘Setting the light intensity’ to see which settings are suitable for
your face (upper lip, chin, sideburns).
Always use only the precision attachment to treat the upper lip, chin
and sideburns. Never use the appliance around the eyes or near the
eyebrows. When you treat your upper lip, chin or sideburns, make sure you
do not expose your face to direct sunlight in the 24 hours following the
treatment. Apply a sunblock (SPF 30+) after the treatment for the next
two weeks when you expose your face to direct sunlight.

ENGLISH22
Tip: To achieve optimal results on your upper lip, chin and sideburns stand in
front of a mirror to get a good view of the area to be treated and the ‘ready to
ash’ light.
Tip: Because of the contours of the jaws, it may be difcult to bring the safety
ring into full contact with the skin and to release a ash. Put your tongue
between your teeth and upper lip or puff up your cheeks to make this easier.
Tip: The reected light does not harm your eyes. If the scattered light is
unpleasant, close your eyes when you release a ash.
How to achieve optimal results
- It is normal that hairs are still visible after the rst few treatments (see
chapter ‘Introduction’, section ‘Working principle’ for more information).
- To remove all hairs successfully and prevent the hair follicle from
becoming active again, the treatments have to be repeated once every
two weeks for the rst two months. Your skin should be smooth and
hair-free by then. Please read section ‘Maintenance phase’ to nd out
how you can keep these results.
Maintenance phase
- To ensure that your skin stays smooth and hair-free, we advise you
to repeat the treatment every four to six weeks. The time between
treatments may vary based on your individual hair regrowth and also
across different body areas. If too many hairs grow back between
treatments, simply shorten the treatment interval again, but do not
treat any area more often than once every two weeks. When you use
the appliance more frequently than recommended, you do not increase
the effectiveness but you do increase the risk of skin reactions.
Possible side effects and skin reactions
Common skin reactions:
- Your skin may show slight redness and/or may prickle, tingle or feel
warm. This reaction is absolutely harmless and disappears quickly.
- A skin reaction similar to sunburn may occur on the treated area for a
short while. If this does not disappear within 3 days, we advise you to
consult a doctor.
- Dry skin and itching may occur because of the combination of shaving
and light treatment. This is harmless and disappears within a few days.
You can cool the area with an ice pack or a wet facecloth. If dryness
persists, you can apply a non-scented moisturiser on the treated area
24 hours after the treatment.
Rare side effects:
- Burns, excessive redness and swelling: these reactions occur very rarely.
They are the result of using a light intensity that is too high for your
skin colour. If these reactions do not disappear within 3 days, we advise
you to consult a doctor. Wait with the next treatment until the skin has
healed completely and make sure you use a lower light intensity.

ENGLISH 23
- Skin discolouration: this occurs very rarely. Skin discolouration manifests
itself as either a darker or lighter patch than the surrounding area.
This is the result of using a light intensity that is too high for your skin
colour. If the discolouration does not disappear within 2 weeks, we
advise you to consult a doctor. Do not treat discoloured areas until the
discolouration has disappeared and your skin has regained its normal
skin colour.
- Skin infection and inammation: This occurs very rarely and may be
caused by using the appliance on wounds or cuts that resulted from
shaving, on already existing wounds or on ingrown hairs.
- Excessive pain: this can occur during or after treatment if you have
used the appliance on unshaved skin, if you use the appliance at a light
intensity that is too high for your skin colour, if you ash the same
area more than once and if you use the appliance on open wounds,
inammations, infections, tattoos, burns, etc. See chapter ‘Important’,
section ‘Contraindications’ for more information.
After use
- Do not apply any perfumed cosmetics to the areas treated immediately
after treatment.
- Do not use deodorant immediately after treating the underarms. Wait
until any skin redness has disappeared completely.
- See chapter ‘Preparing for use’, section ‘Tanning advice’ for information
about sun exposure and articial tanning.
Cleaning and maintenance
To ensure optimal results and a long life for the appliance, clean the
appliance before and after each use and, if necessary, also during the
treatment. The appliance loses its effectiveness if you do not clean it
properly.
Never clean the appliance or any of its parts under the tap or in the
dishwasher.
Never use scouring pads, abrasive cleaning agents or aggressive liquids
such as petrol or acetone to clean the appliance.
Never scratch the light exit window or the metallic frame inside
the attachments.
Note: Make sure that the contact switches of the safety ring do not get
congested with dirt.
Note: Stop using the appliance when it is no longer possible to clean the light
exit window or the attachments.
1 Switch off the appliance, unplug it and let it cool down.
Note: The light exit window becomes hot during use. Make sure it has cooled
down before you clean it.
ENGLISH24
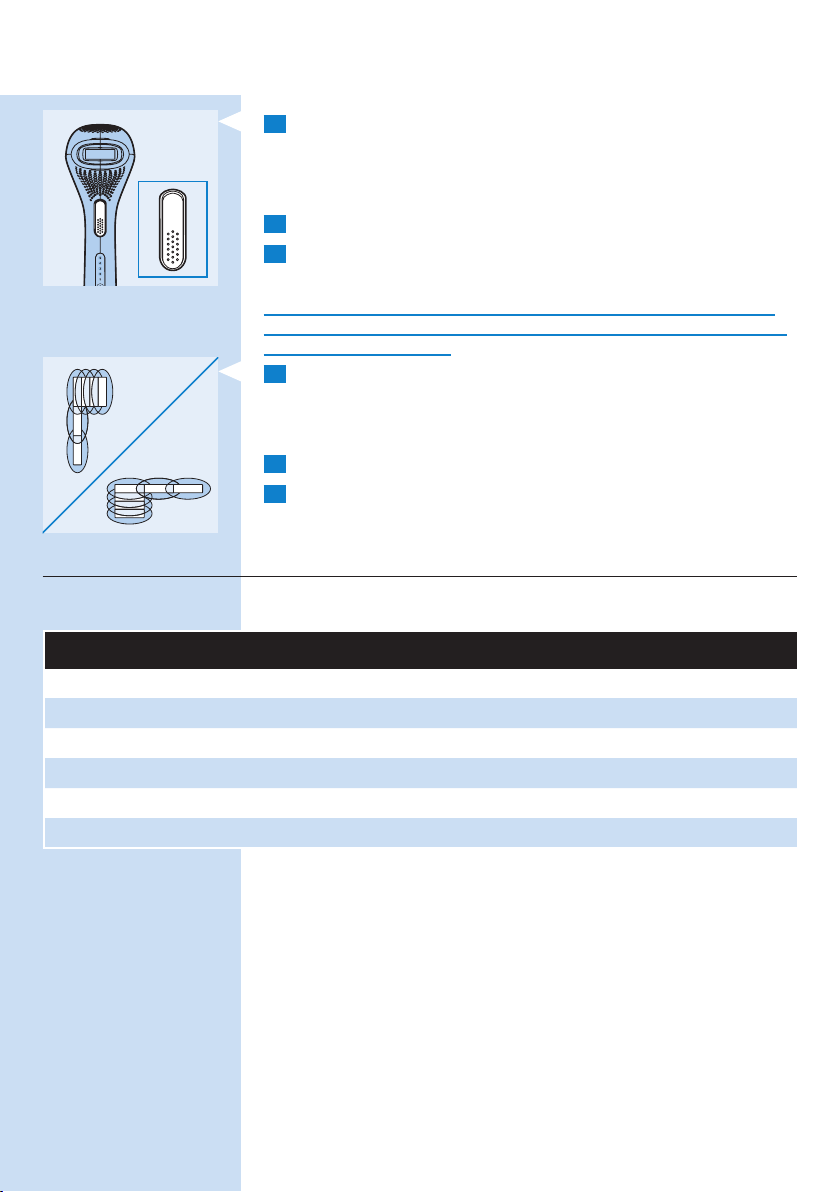
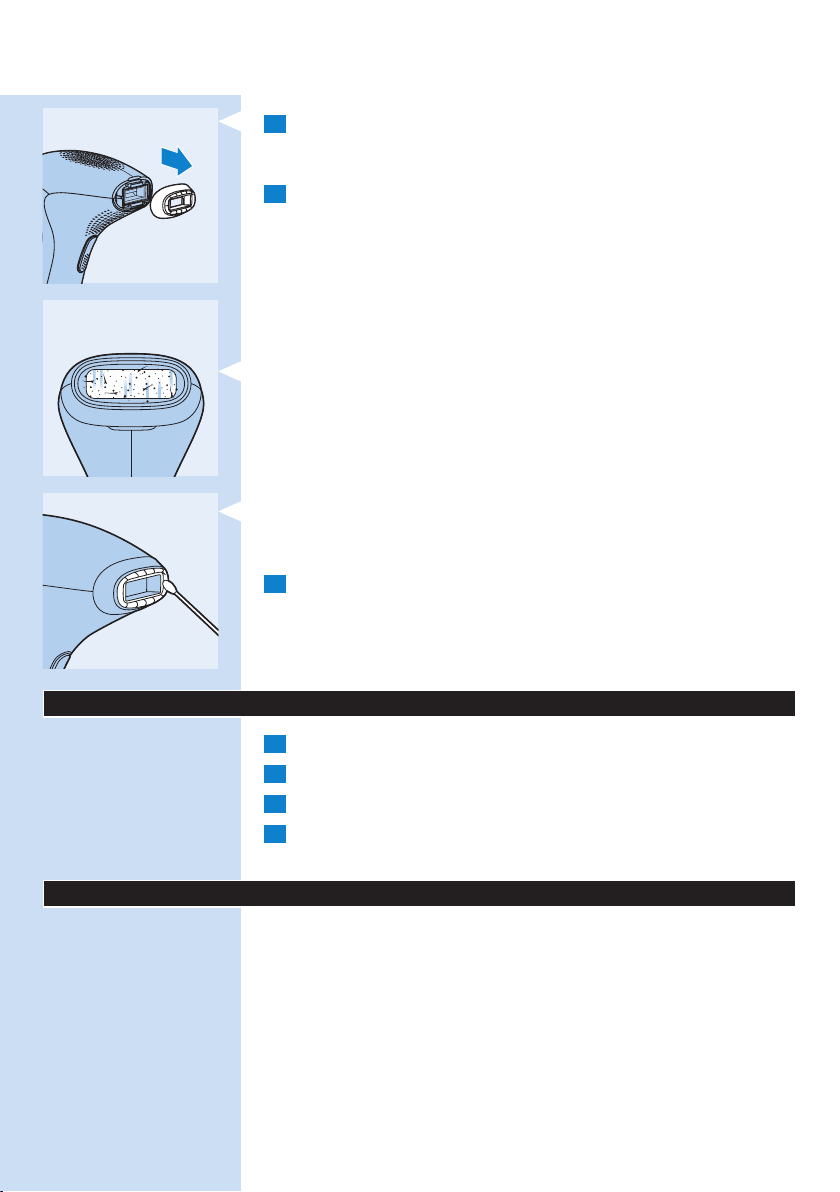
2 To remove the attachment, put your ngers in the recesses at the
top and bottom and pull gently. The attachment should come off
easily.
3 Moisten the soft cloth supplied with the appliance with a few drops
of water and use it to clean the following parts:
- the light exit window
- the outside surface of the attachments
- the metallic frame inside the attachments
- the reddish lter glass inside the precision attachment
Note: If water does not clean effectively, use a few drops of high-percentage
alcohol to clean the parts mentioned above.
Note: A contaminated light exit window and/or attachment can look like this
picture. Make sure you clean the appliance before and after each use and,
if necessary, also during the treatment according to the instructions in this
section.
Tip: If it is no longer possible to clean the edges of the attachments with the
enclosed cleaning cloth, use a cotton bud instead. Make sure that no uff
or bres stay behind on the attachments or on the light exit window.
4 If necessary, clean the outside of the appliance with the dry soft
cleaning cloth supplied with the appliance.
Storage
1 Switch off the appliance, unplug it and let it cool down.
2 Clean the appliance before you store it.
3 Put the appliance in the case supplied.
4 Store the appliance in a dry place at a temperature between 0°C and
60°C.
Replacement
If you have to replace a part or want to purchase an additional part, go to
your Philips dealer or visit www.philips.com/suppor t.
If you have problems obtaining the par ts, please contact the Philips
Consumer Care Centre in your country.
Replacement parts
The following replacement parts are available:
- Body attachment
- Precision attachment
- Adapter
- Case
ENGLISH 25
Environment
- Do not throw away the appliance with the normal household waste
at the end of its life, but hand it in at an ofcial collection point for
recycling. By doing this, you help to preserve the environment.
- The built-in rechargeable batteries contain substances that may pollute
the environment. Always remove the batteries before you discard and
hand in the appliance at an ofcial collection point. Dispose of the
batteries at an ofcial collection point for batteries. If you have trouble
removing the batteries, you can also take the appliance to a Philips
service centre. The staff of this centre will remove the batteries for you
and will dispose of them in an environmentally safe way.
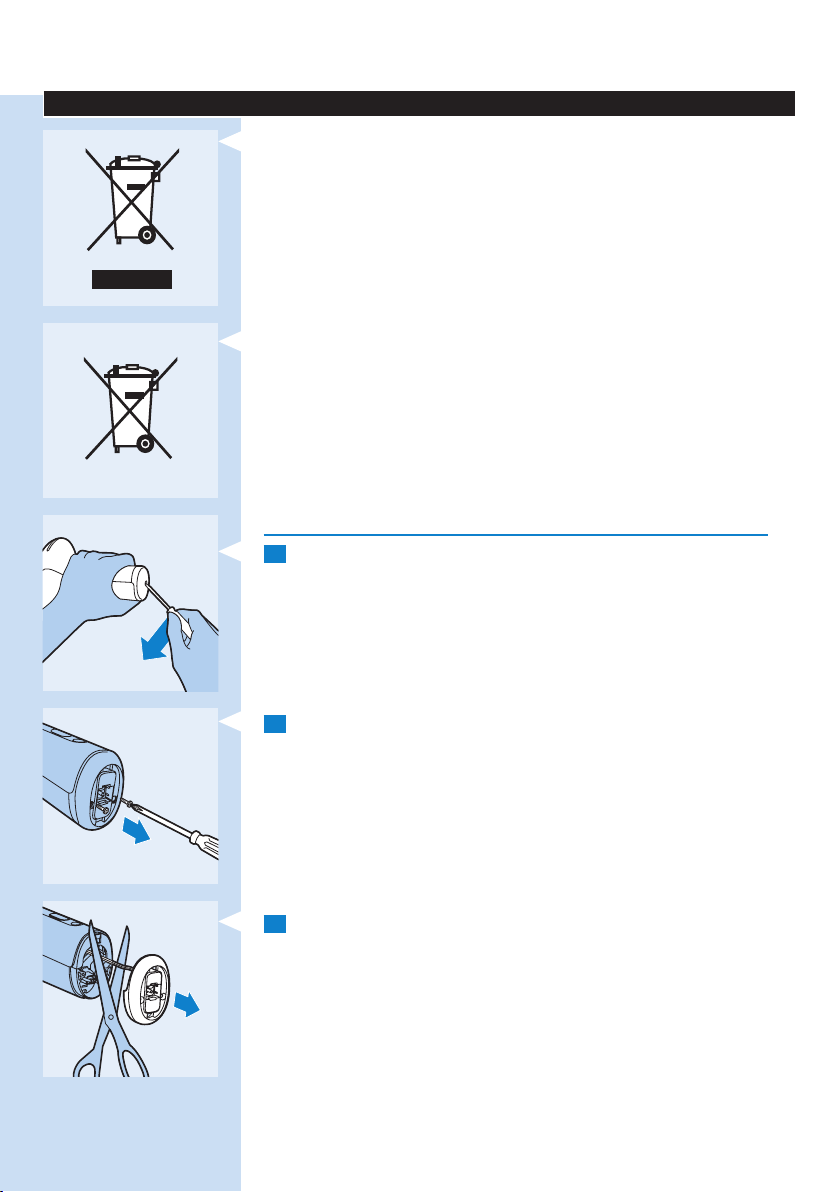
Removing the rechargeable batteries
Only remove the rechargeable batteries if they are completely empty.
1 Insert an awl or another pointed tool into the bottom cap of the
appliance and pry off the bottom cap.
2 Undo the two screws in the bottom of the handle with a
screwdriver.
3 Remove the bottom part of the handle and cut the two wires that
connect the bottom part to the appliance.

ENGLISH26
4 Pull the battery connectors off the battery terminals with long nose
pliers.
5 Pull the rechargeable batteries out of the appliance with long
nose pliers.
6 Cut the two wires one at a time to ensure that no mishaps due to
possible residual charge occur.
Guarantee and service
If you need service or information or if you have a problem, please visit the
Philips website at www.philips.com or contact the Philips Consumer
Care Centre in your country (please look for the phone number in the
worldwide guarantee leaet). If there is no Consumer Care Centre in your
country, go to your local Philips dealer.
Technical specications
Model SC2002
Rated voltage 100V-240V
Rated frequency 50Hz-60Hz
Rated input 7.5W
Protection against electric shock Class II Q
Protection rating IP 30 (EN 60529)
Operating conditions Temperature: +15° to +35°C
Relative humidity: 25% to 95%

Model SC2002
Storage conditions Temperature: 0° to +60°C
Relative humidity: 5% to 95%
Spectrum of body attachment >570nm
Spectrum of precision attachment >600nm
Lithium-ion battery 2 x 3.7 Volt 1500 mAh
Troubleshooting
This chapter summarises the most common problems you could
encounter with the appliance. If you are unable to solve the problem with
the information below, contact the Consumer Care Centre in your country
(please look for the phone number in the worldwide guarantee leaet).
Problem Possible cause Solution
ENGLISH 27
The appliance does not
work.
The appliance suddenly
switches off.
The adapter becomes
warm during charging.
The charging light does
not go on when I put
the small plug in the
appliance socket.
The rechargeable
batteries are
empty.
The appliance is
defective.
The rechargeable
batteries
are empty.
This is normal. No action required.
You have not put
the adapter in the
wall socket.
The wall socket is
not live.
The adapter is not
inserted properly
into the wall
socket and/or the
small plug is not
inserted properly
into the appliance
socket.
The appliance is
defective.
Charge the appliance (see chapter ‘Charging’).
Contact the Consumer Care Centre in your country,
your Philips dealer or a Philips service centre.
Charge the appliance (see chapter ‘Charging’).
Insert the small plug into the appliance socket and put
the adapter in the wall socket.
Connect another appliance to the wall socket to check
if the wall socket is live. If the socket is live but the
appliance still does not charge, contact the Consumer
Care Centre in your country, your Philips dealer or a
Philips service centre.
Make sure the adapter is inserted properly into the
wall socket and/or the small plug is inserted properly
into the appliance socket.
Contact the Consumer Care Centre in your country,
your Philips dealer or a Philips service centre.

ENGLISH28
Problem Possible cause Solution
I have switched on the
appliance but I cannot
increase or decrease the
light intensity.
The ‘ready to ash’ light
does not go on when I
place the appliance on
the skin.
The ‘ready to ash’ light
does not go on when I
place an attachment on
my skin, but the cooling
fan works.
The ‘ready to ash’ light is
green but the appliance
does not produce a ash
when I press the ash
button.
The appliance becomes
warm during use.
The appliance does not
show light intensity 1
when I switch it on.
The appliance produces
a strange smell.
The appliance has
to be reset.
You have not put
the attachment
with safety ring
properly on the
skin.
The safety ring is
dirty.
The overheat
protection has
been activated.
The appliance
needs to be reset.
This is normal. No action required.
The appliance
needs to be reset.
The attachment
and/or the lter
glass is dirty.
To reset the appliance, switch off the appliance and
then switch it on again. If you still cannot adjust the light
intensity, contact the Consumer Care Centre in your
country, your Philips dealer or a Philips service centre.
Place the appliance in a 90° angle onto the skin in such
a way that all contact switches touch the skin. Then
check if the ‘ready to ash’ light is on and press the
ash button.
If this does not work, place the appliance on a part
of your body where it is easy to establish full skin
contact, for example on your lower arm.Then check
if the ‘ready to ash’ light works. If the ‘ready to ash’
light still does not go on when you place the appliance
on the skin, contact the Consumer Care Centre in your
country, your Philips dealer or a Philips service centre.
Clean the safety ring carefully. If you are unable to clean
the safety ring properly, contact the Consumer Care
Centre in your country, your Philips dealer or a Philips
service centre to replace the attachment.
When the overheat protection has been activated, the
fan still works. Do not switch off the appliance and let it
cool down for approx. 15 minutes before you continue
to use it. If the ‘ready to ash’ light still does not go on
when you place the appliance on the skin, contact the
Consumer Care Centre in your country, your Philips
dealer or a Philips service centre.
To reset the appliance, switch off the appliance and
switch it on again. If the ‘ready to ash’ light is green
but the appliance still does not produce a ash when
you press the ash button, contact the Consumer Care
Centre in your country, your Philips dealer or a Philips
service centre.
To reset the appliance, switch it off and on again. If the
appliance still does not show light intensity 1, contact
your Customer Care Centre, your Philips dealer or a
Philips Service Centre.
Clean the attachment carefully. If you are unable to
clean the attachment properly, contact the Consumer
Care Centre in your country, your Philips dealer or a
Philips service centre to replace the attachment.

Problem Possible cause Solution
ENGLISH 29
The skin feels more
sensitive than usual
during treatment.
I experience an
unacceptable pain
sensation when I use the
appliance.
You have not
shaved the area
to be treated
properly.
You stored the
appliance in a
dusty environment.
The light intensity
you use is too high.
You did not shave
the areas to be
treated.
The UV lter
of the light exit
window is broken.
The appliance is
defective.
You did not shave
the areas to
be treated
You treated an
area for which the
appliance is not
intended.
You have used
a light intensity
which is too high
for you.
The light exit
window or reddish
lter glass of the
attachment is
broken.
The appliance is
not suitable for
your skin colour.
If there are hairs on the area to be treated, these
hairs may get burnt when you use the appliance. As
a result, you notice a strange smell. Shave the area to
be treated properly before you use the appliance. If
shaving causes skin irritation, trim hairs as short as
possible and use a comfortable setting.
The strange smell disappears after a few ashes.
Check if you have selected the right light intensity. If
necessary, select a lower light intensity.
Shave the areas to be treated before you use the
appliance. If shaving causes skin irritation, trim hairs as
short as possible and use a comfortable setting.
If the UV lter of the light exit window is broken, do
not use the appliance anymore. Contact the Consumer
Care Centre in your country, your Philips dealer or a
Philips service centre.
Contact the Consumer Care Centre in your country,
your Philips dealer or a Philips service centre.
Shave the areas to be treated before you use the
appliance. If shaving causes skin irritation, trim hairs as
short as possible and use a comfortable setting.
You must not use the appliance on your inner labia,
vagina, anus, nipples, areolas, lips, inside the nostrils and
ears, in the region of your eyes and eyebrows. Men
must not use it on their face or scrotum.
Reduce the light intensity to a level that is comfortable
for you. See chapter ‘Preparing for use’, section ‘Setting
the light intensity’.
If the light exit window or reddish lter glass of
the precision attachment is broken, do not use the
appliance with this attachment any more. Go to
your dealer or a Philips service centre or contact
the Consumer Care Centre to have the attachment
replaced.
Do not use the appliance if you have a very dark skin.
Do not use it either if your body hair is light blond, red,
grey or white.

ENGLISH30
Problem Possible cause Solution
The treated areas
become red after the
treatment.
The skin reaction after
the treatment lasts
longer than usual.
The hair-removal results
are not satisfactory.
Hair starts to grow again
in some spots on the
treated areas.
Slight redness
is harmless and
normal and
disappears quickly.
You have used
a light intensity
which is too high
for you.
You have used
a light intensity
which is too low
for you.
You did not make
enough overlaps
when you used
the appliance.
You do not use
the appliance
as often as
recommended.
The appliance is
not suitable for
your hair or skin
colour.
You did not make
enough overlaps
when you used
the appliance.
Hair starts to grow
again as part of
the natural cycle of
hair growth.
No action required.
Select a lower light intensity the next time. See chapter
‘Preparing for use’, section ‘Setting the light intensity.
If the skin reaction lasts longer than 3 days, contact
your doctor.
Select a higher light intensity the next time.
For proper hair-removal results, you have to make
overlaps when you use the appliance. See chapter
‘Using the appliance’, step 11.
To remove all hairs successfully and to prevent the
hair root from becoming active again, the treatments
have to be repeated once every two weeks for the
rst two months. To ensure that your skin stays smooth
and hair-free, we advise you to repeat the treatment
every four to six weeks. The time between treatments
may vary based on your individual hair regrowth and
also across different body areas. If too many hairs
grow back between treatments, simply shorten the
treatment interval again, but do not treat any area
more often than once every two weeks. When you use
the appliance more frequently than recommended, you
do not increase the effectiveness but you do increase
the risk of skin reactions.
Do not use the appliance if your body hair is light
blond, red, grey or white. Do not use the appliance
either if you have very dark skin.
For proper hair-removal results, you have to make
overlaps when you use the appliance. See chapter
‘Using the appliance’, step 11.
This is normal. It is part of the natural cycle of hair
growth that hair starts growing again. The hairs that
come back, however, tend to be softer and thinner.

FRANÇAIS
Table des matières
Introduction 32
Avantages 32
Technologie dite de « lumière intense pulsée » ou IPL pour une
utilisation à domicile 32
Prévention efcace de la repousse des poils pour une douceur
incomparable, jour après jour 33
Une application tout en douceur, même sur les zones sensibles
du corps 33
Fonctionnement sans l pour une liberté et une
exibilité maximales 33
La lampe n’a pas besoin d’être remplacée 33
Quel est le principe de fonctionnement de la technologie de lumière
intense pulsée de Philips ? 33
Cycle de vie du poil 33
Principes de fonctionnement de l’appareil 33
Description générale 34
Important 34
Danger 34
Avertissement 35
Pour éviter tous dommages : 35
Attention 35
Pour une durée de vie optimale, tenez compte des considérations
suivantes : 36
Quelles sont les personnes auxquelles Philips Lumea Precision ne
convient pas ? 36
Contre-indications 36
N’utilisez jamais l’appareil si vous êtes enceinte ou si vous allaitez. 36
N’utilisez jamais l’appareil si la couleur de votre peau et/ou
de vos poils n’est pas adaptée, à savoir : 36
N’utilisez jamais l’appareil si vous souffrez d’une des maladies
répertoriées ci-dessous : 36
N’utilisez jamais l’appareil si vous prenez l’un des
traitements suivants : 37
N’utilisez jamais l’appareil sur les zones suivantes : 37
N’utilisez jamais l’appareil sur des coups de soleil ou sur une peau
teintée par un bronzage récent (moins de 48 heures) ou articiel : 37
Champs électromagnétiques (CEM) 38
Charge 38
Avant l’utilisation 38
Préparation des zones à asher 38
Réglage de l’intensité lumineuse 39
Intensités lumineuses recommandées (1-5) 40
Important 40
Conseils de bronzage 40
Utilisation de l’appareil 41
Choix du bon accessoire 42
Première utilisation et test cutané 42
Utilisation ultérieure 43
Recommandations relatives à la séance 44
Durée moyenne de la séance 44
Zones d’épilation recommandées 45
31

FRANÇAIS32
Utilisation de l’appareil sur les jambes 45
Utilisation de l’appareil pour l’épilation du maillot 45
Utilisation de l’appareil sur les aisselles 46
Utilisation de l’appareil sur le visage
(lèvre supérieure, menton, pattes) 46
Pour des résultats optimaux 47
Phase d’entretien 47
Éventuels effets secondaires et réactions cutanées 47
Après utilisation 48
Nettoyage et entretien 48
Rangement 49
Remplacement 49
Pièces de rechange 49
Environnement 50
Retrait des batteries 50
Garantie et service 51
Spécicités techniques 52
Dépannage 52
Introduction
Félicitations pour votre achat et bienvenue dans l’univers Philips !
Pour proter pleinement de l’assistance Philips, enregistrez votre produit
sur le site suivant : www.philips.com/lumea.
L’épilation à lumière pulsée est l’une des méthodes les plus efcaces pour
épiler durablement les poils indésirables. Elle se distingue des méthodes
actuelles d’épilation à domicile par sa capacité à réduire considérablement
la repousse des poils. Philips s’est investi depuis plus de 10 ans dans la
recherche aux côtés de dermatologues de renom. Protez de cette
technologie innovante à domicile.
Cet appareil a été particulièrement conçu et optimisé pour les femmes,
mais peut être également utilisé par les hommes.
Grâce à deux accessoires adaptés, Philips Lumea Precision permet d’épiler
les poils indésirables sur l’ensemble du corps, y compris le visage (la lèvre
supérieure, le menton et les pattes).
Philips Lumea Precision a été conçu pour être utilisé par une seule
personne.
Pour plus d’informations sur la technologie Philips Lumea Precision, rendezvous sur www.philips.com/lumea. Consultez régulièrement notre page
d’accueil pour découvrir les mises à jour.
Avantages
Cet appareil offre les avantages suivants :
Technologie dite de « lumière intense pulsée » ou IPL pour une
utilisation à domicile
Philips Lumea Precision utilise la technologie dite de « lumière intense
pulsée » ou IPL, employée depuis quinze ans dans le secteur de l’esthétique
professionnelle pour les épilations. Avec Philips Lumea Precision, bénéciez
de cette technologie innovante chez vous.

FRANÇAIS 33
Prévention efcace de la repousse des poils pour une douceur
incomparable, jour après jour
Cette méthode offre une prévention longue durée de la repousse des poils
et vous laisse une peau douce comme de la soie. Nos études ont mis en
évidence une diminution considérable des poils après seulement 2 séances.
Les résultats optimaux ont généralement été obtenus après 4 ou
5 séances. La pilosité diminue visiblement de séance en séance. La rapidité
d’apparition de cet effet et la durée du résultat dépendent de l’individu.
Pour plus d’informations, reportez-vous à la section « Pour des résultats
optimaux » du chapitre « Utilisation de l’appareil ».
Une application tout en douceur, même sur les zones sensibles
du corps
Conçu en étroite collaboration avec des dermatologues de renom,
Philips Lumea Precision offre une épilation efcace et douce, même sur les
zones les plus sensibles.
Fonctionnement sans l pour une liberté et une exibilité
maximales
L’appareil fonctionne avec une batterie rechargeable : vous pouvez donc
l’emporter partout et l’utiliser où que vous soyez.
La lampe n’a pas besoin d’être remplacée
Philips Lumea Precision est équipé d’une lampe haute performance qui
n’a pas besoin d’être remplacée. Cette lampe peut produire plus de
80 000 ashs : elle vous permettra d’obtenir des résultats continus sur plus
de 5 ans* et de réaliser des économies sur le remplacement des lampes.
*Basé sur une utilisation et une fréquence de séances moyennes pour une
utilisatrice.
Quel est le principe de fonctionnement de la technologie de
lumière intense pulsée de Philips ?
Cycle de vie du poil
La vitesse de pousse des poils varie en fonction de l’individu, de son âge
et de son métabolisme, entre autres facteurs. Toutefois, la pousse des poils
s’effectue normalement en 3 phases.
1 Phase de pousse (la phase anagène)
Le poil pousse à la racine. C’est lors de cette phase que la concentration
de mélanine, le pigment responsable de la couleur du poil, est la plus
élevée. La concentration de mélanine est également déterminante pour
l’efcacité de cette méthode. Seuls les poils en phase anagène sont
réceptifs à l’exposition à la lumière intense pulsée.
2 Phase de dégradation (phase catagène)
Le poil arrête de pousser, la racine passe en phase de repos, puis le poil
tombe.
3 Phase de repos (phase télogène)
Le poil mort se détache de son follicule et tombe. Le follicule reste au
repos jusqu’à ce que l’horloge biologique la réactive et lui fasse produire un
nouveau poil.
Principes de fonctionnement de l’appareil
L’appareil chauffe le poil et la racine sous la peau. La mélanine contenue
dans le poil et sa racine absorbe la lumière pulsée émise. Plus le poil est

FRANÇAIS34
foncé, plus la lumière absorbée est élevée. Ce processus permet au poil de
passer en phase de repos.
Le poil tombe alors naturellement, et sa repousse est inhibée. Il peut
falloir une ou deux semaines pour que les poils tombent. Une épilation
optimale nécessite plusieurs séances, car seuls les poils en phase anagène
sont réceptifs à l’épilation à la lumière. Les poils d’une zone traitée sont
généralement chacun à différents stades de leur cycle de vie. Pour réussir
à épiler tous les poils et prévenir la réactivation des racines, vous devez
répéter les séances toutes les 2 semaines.
Un ltre optique intégré protège votre peau des UV, pour une utilisation
sans danger.
Description générale (g. 2)
A Verre ltrant avec ltre UV intégré
B Accessoires
1 Accessoire corps (pour toutes les parties du corps au-dessous du cou)
2 Accessoire de précision (pour toutes les parties du corps, y compris la
lèvre supérieure, le menton et les pattes)
C Cadre métallique intégré à l’accessoire
D Système de sécurité (anneau de sécurité avec interrupteurs de
contact)
E Bouton Flash
F Voyants d’intensité (1- 5)
G % Bouton d’augmentation de l’intensité
H ^ Bouton de diminution de l’intensité
I Voyant de charge et indication de batterie faible
J Bouton marche/arrêt
K Voyant « Prêt-à-asher »
L Prise de l’appareil
M Adaptateur secteur
N Petite che
O Fentes de ventilation
Également inclus : coffret et tissu de nettoyage
Important
Lisez attentivement ce mode d’emploi avant d’utiliser l’appareil et
conservez-le pour un usage ultérieur.
Danger
- L’eau et l’électricité ne font pas bon ménage ! N’utilisez jamais l’appareil
dans un environnement humide (p. ex. près d’une baignoire remplie
d’eau, d’une douche en fonctionnement ou d’une piscine).
- Évitez de mouiller l’appareil et l’adaptateur secteur.
- Si l’appareil est cassé, ne touchez aucun de ses composants internes
an d’éviter tout risque d’électrocution.
- N’introduisez jamais d’objets dans l’appareil.

FRANÇAIS 35
Avertissement
- Cet appareil n’est pas destiné à être utilisé par des personnes
(notamment des enfants) dont les capacités physiques, sensorielles
ou intellectuelles sont réduites, à moins que celles-ci ne soient sous
surveillance ou qu’elles n’aient reçu des instructions quant à l’utilisation
de l’appareil par une personne responsable de leur sécurité.
- Veillez à ce que les enfants ne puissent pas jouer avec l’appareil.
- Cet appareil n’est pas destiné à être utilisé par des enfants de moins
de 15 ans. Les adolescentes de 15 à 18 ans peuvent l’utiliser avec
l’autorisation et l’aide de leurs parents ou des personnes qui exercent
sur elles l’autorité parentale. Les adultes de plus de 18 ans peuvent
utiliser cet appareil en toute liberté.
- Chargez toujours l’appareil à l’aide de l’adaptateur secteur fourni.
- N’utilisez pas l’appareil ou l’adaptateur secteur s’il est endommagé.
- L’adaptateur contient un transformateur. Pour éviter tout accident,
n’essayez pas de remplacer la che de l’adaptateur secteur.
- Si l’adaptateur secteur est endommagé, il doit toujours être remplacé
par un adaptateur secteur de même type pour éviter tout accident.
- N’utilisez pas l’appareil si le ltre UV du verre ltrant est cassé.
- N’utilisez pas l’accessoire de précision si le verre de couleur rouge est
cassé.
Pour éviter tous dommages :
- Veillez à ce que rien n’obstrue le ux d’air à travers les fentes de
ventilation.
- Ne soumettez jamais l’appareil à des chocs violents, des secousses ou
des chutes.
- Lorsque l’appareil passe d’un environnement très froid à un
environnement très chaud, et inversement, attendez environ 3 heures
avant de l’utiliser.
- Rangez l’appareil dans le coffret pour éviter l’accumulation de
poussière.
- Ne laissez jamais l’appareil branché sans surveillance. Éteignez
impérativement l’appareil après utilisation.
- N’exposez pas l’appareil pendant plusieurs heures aux rayons directs
du soleil ou à des rayons UV.
- Ne faites pas fonctionner le ash sur d’autres surfaces que votre peau,
car vous pourriez endommager les accessoires et/ou le verre ltrant.
Utilisez le ash uniquement lorsque l’appareil est en contact avec la
peau.
Attention
- N’utilisez jamais l’appareil autour des yeux et près des sourcils an
d’éviter tout risque de lésion oculaire.
- N’utilisez cet appareil qu’avec une intensité adaptée à votre type
de peau. Une utilisation avec une intensité supérieure à celle
recommandée augmente le risque de réactions cutanées et d’effets
secondaires.
- Cet appareil ne doit être utilisé avec les deux accessoires fournis que
pour épiler les poils indésirables se trouvant dans les zones situées sous
les pommettes. Ne l’utilisez à aucune autre n.

FRANÇAIS36
Pour une durée de vie optimale, tenez compte des
considérations suivantes :
- Utilisez votre appareil à une température comprise entre 15 °C et
35 °C.
- L’appareil est équipé d’une protection anti-surchauffe intégrée. Le ash
ne fonctionne pas en cas de surchauffe. N’éteignez pas l’appareil, mais
laissez-le refroidir pendant environ 15 minutes avant de reprendre la
séance.
- Conez toujours l’appareil à un Centre Service Agréé Philips pour
réparation ou vérication. Toute réparation par une personne non
qualiée peut s’avérer dangereuse pour l’utilisateur.
- N’utilisez jamais l’appareil dans les conditions mentionnées dans la
section « Contre-indications ».
Quelles sont les personnes auxquelles Philips Lumea Precision
ne convient pas ?
Philips Lumea Precision n’est pas destiné à tout le monde. Si l’une des
conditions ci-dessous s’applique à vous, n’utilisez pas cet appareil !
Contre-indications
N’utilisez jamais l’appareil si vous êtes enceinte ou si vous
allaitez.
N’utilisez jamais l’appareil si la couleur de votre peau et/ou de
vos poils n’est pas adaptée, à savoir :
- Dans les zones d’application, la couleur naturelle de vos poils est blond
clair, blanc, gris ou roux.
- Votre peau est de type VI (vous attrapez rarement, voire jamais, des
coups de soleil et vous obtenez un bronzage très foncé ; votre peau
est brune ou noire). Dans ce cas, vous risquez sérieusement d’avoir
des réactions cutanées (vives rougeurs, brûlures ou altérations de la
pigmentation) lorsque vous utilisez Philips Lumea Precision.
N’utilisez jamais l’appareil si vous souffrez d’une des maladies
répertoriées ci-dessous :
- Si vous avez une maladie de peau comme un cancer de la peau actif,
si vous avez des antécédents de cancer de la peau ou un autre cancer
localisé dans les zones à asher.
- Si vous avez des lésions précancéreuses ou plusieurs grains de beauté
atypiques dans les zones à asher.
- Si vous présentez des antécédents de maladie du collagène, y
compris des antécédents de formation de cicatrices chéloïdes ou de
cicatrisation difcile.
- Si vous présentez des antécédents de troubles vasculaires, tels que
varices ou ectasie vasculaire dans les zones à asher.
- Si votre peau est sensible à la lumière et développe facilement une
irritation ou une réaction allergique.
- Si vous souffrez d’infections, d’eczéma, de brûlures, de follicules
enammées, de lacérations ouvertes, d’abrasions, d’herpès simplex,
de plaies ou de lésions, d’hématomes, ou que vous avez subi une
intervention chirurgicale sur les zones à asher.
- Si vous subi une intervention chirurgicale sur les zones à asher.
- Si vous souffrez d’épilepsie avec sensibilité aux ashs.

FRANÇAIS 37
- Si vous souffrez de diabète, de lupus érythémateux, de porphyrie ou
d’une maladie cardiaque congestive.
- Si vous présentez un trouble de la coagulation.
- Si vous avez des antécédents de maladie immunodépressive (y compris
infection par le VIH ou le SIDA).
N’utilisez jamais l’appareil si vous prenez l’un des traitements
suivants :
- Si vous suivez un traitement ou avez récemment subi un traitement à
base d’acides alpha hydroxylés (AHA), d’acides bêta hydroxylés (BHA),
d’isotrétinoïne topique et d’acide azélaïque.
- Si vous avez pris de l’Accutane
au cours des six derniers mois. Ce traitement rend la peau plus sujette
aux déchirures, plaies et irritations.
- Si vous prenez des analgésiques, qui réduisent la sensibilité de votre
peau à la chaleur.
- Si vous prenez des médicaments ou produits photosensibilisants,
reportez-vous à leur notice, et n’utilisez en aucun cas l’appareil si cette
dernière indique des risques de réaction photo-allergique ou phototoxique, ou si elle précise qu’il faut éviter une exposition au soleil.
- Si vous prenez des médicaments anticoagulants, y compris de fortes
doses d’aspirine, à un rythme ne permettant pas d’aménager une
période d’élimination d’une semaine avant chaque séance.
- Si vous prenez des immunosuppresseurs.
N’utilisez jamais l’appareil sur les zones suivantes :
- Autour des yeux et près des sourcils.
- Sur les mamelons, les aréoles, les petites lèvres, le vagin, l’anus et
l’intérieur des narines et des oreilles.
- Les hommes ne doivent pas l’utiliser sur le scrotum et le visage.
- Au-dessus ou près de produits articiels tels que des implants en
silicone, des stimulateurs cardiaques, des points d’entrée d’injection
sous-cutanée (pompe à insuline) ou des piercings.
- Sur les grains de beauté, les taches de rousseur, les veines de taille
importante, les zones à la pigmentation plus foncée, les cicatrices et les
anomalies cutanées sans consultation préalable avec un médecin, en
raison d’un risque de brûlure ou de modication de la pigmentation,
qui rendrait difcile le dépistage d’éventuelles maladies de peau telles
que le cancer de la peau.
- Sur des verrues, des tatouages ou un maquillage permanent en raison
du risque de brûlure ou de modication de la pigmentation.
- Sur les zones où vous utilisez du déodorant longue durée, car cela
pourrait entraîner des réactions cutanées. Reportez-vous à la section
« Éventuels effets secondaires et réactions cutanées » du chapitre
« Utilisation de l’appareil ».
N’utilisez jamais l’appareil sur des coups de soleil ou sur une
peau teintée par un bronzage récent (moins de 48 heures) ou
articiel :
- Tous les types de bronzage peuvent inuer sur la sécurité de la séance,
qu’il s’agisse d’une exposition au soleil ou de méthodes de bronzage
articiel telles que crèmes de bronzage, appareils de bronzage, etc. Si
vous êtes bronzée ou prévoyez de bronzer, lisez le chapitre « Avant
utilisation », section « Conseils de bronzage ».
®
ou du Roaccutane® à l’isotrétinoïne

FRANÇAIS38
Remarque : Cette liste n’est pas exhaustive. En cas de doute concernant
l’utilisation de l’appareil, veuillez consulter votre médecin.
Champs électromagnétiques (CEM)
Cet appareil Philips est conforme à toutes les normes relatives aux champs
électromagnétiques (CEM). Il répond aux règles de sécurité établies
sur la base des connaissances scientiques actuelles s’il est manipulé
correctement et conformément aux instructions de ce mode d’emploi.
Charge
Chargez entièrement les batteries avant d’utiliser l’appareil pour la
première fois et lorsque celles-ci sont épuisées. Une charge complète
prend jusqu’à environ 1 heure et 40 minutes.
Chargez l’appareil lorsque le voyant de charge devient orange pendant
l’utilisation, indiquant que les batteries sont faibles. Lorsque ceci se produit,
la capacité de l’appareil est de 30 ashs.
Des batteries entièrement chargées permettent d’émettre au moins
320 ashs d’une intensité lumineuse de 5.
Rechargez entièrement l’appareil tous les 3 à 4 mois, même en cas
d’inutilisation prolongée.
Pour charger l’appareil, suivez la procédure ci-dessous :
1 Éteignez l’appareil.
2 Insérez la petite che dans l’appareil et l’adaptateur secteur dans la
prise secteur.
, Le voyant de charge clignote en vert pour indiquer que l’appareil se
charge.
, Lorsque les batteries sont complètement chargées, le voyant de
charge cesse de clignoter et devient vert.
Remarques :
- L’adaptateur et l’appareil chauffent pendant la charge. Ce phénomène
est normal.
- Il est impossible d’utiliser l’appareil pendant la charge.
- Cet appareil est équipé d’un dispositif de protection de surchauffe
de la batterie et ne se recharge pas si la température ambiante est
supérieure à 40 °C.
Ne recouvrez jamais l’appareil ou l’adaptateur secteur lors de la charge.
3 Une fois la charge terminée, débranchez l’adaptateur de la prise
murale, puis retirez la petite che de l’appareil.
Avant l’utilisation
Pour une efcacité et des résultats optimaux, préparez les zones sur
lesquelles vous souhaitez utiliser l’appareil de la manière suivante :
Préparation des zones à asher

FRANÇAIS 39
1 Rasez les zones que vous souhaitez asher tant que vous observez
une repousse des poils.
Remarque : Si votre dernière méthode d’épilation consistait à éliminer les
poils à la racine (par exemple épilation électrique, à la cire, etc.), attendez la
repousse des poils avant d’utiliser Philips Lumea Precision. N’utilisez pas de
crèmes dépilatoires.
Sachez que asher des zones mal ou non rasées entraîne un
certain nombre de réactions indésirables :
- Le verre ltrant et l’accessoire peuvent être contaminés par la
présence de poils et de saletés. Si le verre ltrant et l’accessoire
sont contaminés, cela peut réduire la durée de vie et l’efcacité de
l’appareil. En outre, la présence de brûlures/points noirs sur le verre
ltrant et l’accessoire peut rendre la séance inconfortable ou entraîner
des réactions cutanées telles que rougeurs ou altérations de la
pigmentation.
- Les poils présents sur votre peau risquent de brûler et de dégager une
odeur désagréable.
2 Nettoyez votre peau et assurez-vous qu’elle est débarrassée de
tout poil, parfaitement sèche et exempte de substance grasse (les
produits cosmétiques tels que les déodorants, laits, parfums, crèmes
de bronzage et crèmes solaires en contiennent).
3 Vériez l’appareil. Regardez notamment si des poils, de la poussière
et des bres ne sont pas piégés au niveau du verre ltrant ou de
l’accessoire. En cas de salissures, nettoyez l’appareil en suivant les
instructions du chapitre « Nettoyage et entretien ».
Remarques :
- Si le rasage cause des plaies ou des lésions, il est possible que votre
peau soit extrêmement sensible et la séance désagréable.
- Une fois que les poils ne repoussent plus, ce qui est généralement
le cas après 4-5 séances, vous n’avez plus besoin de vous raser avant
utilisation.
Réglage de l’intensité lumineuse
Philips Lumea Precision est un appareil (système de contrôle de la
repousse des poils) destiné à un usage à domicile qui n’est donc pas
comparable aux appareils professionnels qui utilisent une lumière pulsée
plus forte. Les impulsions lumineuses émises par Lumea sont modérées et
permettent une séance pratique et efcace.
Réglez l’intensité lumineuse en fonction de la couleur de votre peau et de
vos poils, tout en recherchant un niveau confortable.
Le tableau ci-dessous indique les intensités lumineuses recommandées an
de vous aider à trouver le niveau qui vous convient.
1 Consultez le tableau ci-dessous pour déterminer les intensités
lumineuses les plus adaptées à la couleur de votre peau et de vos
poils, et pour vérier que cette méthode d’épilation vous convient
(une croix gure dans le tableau lorsque ce n’est pas le cas).
2 Chaque zone du corps et même certaines parties de celle-ci peuvent
nécessiter une intensité lumineuse différente, conformément aux
valeurs recommandées dans le tableau ci-dessous. La méthode est

FRANÇAIS40
plus efcace à intensité élevée, mais nous vous invitons à réduire
l’intensité lumineuse en cas de douleur ou d’inconfort.
Le risque d’irritation cutanée est plus important pour les personnes à
peau foncée car leur peau absorbe plus de lumière. Les faibles intensités
sont alors recommandées.
L’impulsion lumineuse peut produire des sensations de chaleur plus ou
moins importantes sur la peau, mais ne doit jamais être inconfortable.
Pour éviter les réactions cutanées, reportez-vous au chapitre
« Utilisation de l’appareil », section « Éventuels effets secondaires et
réactions cutanées ».
Intensités lumineuses recommandées (1-5)
Dans le tableau ci-dessous, la croix signie qu’il n’est pas recommandé
d’utiliser l’appareil.
Couleur et
caractéristiques
de la peau :
Couleur des poils :
blond foncé/brun
clair/brun/brun
foncé/noir
blanc/gris/roux/
blond clair
Blanc
(coups
de soleil
à chaque
exposition,
aucun
bronzage)
4/5 4/5 4/5 3/4 1/2/3 x
x x x x x x
Beige
(coups
de soleil
réguliers,
léger
bronzage)
Important
Pour savoir si Philips Lumea Precision vous convient, consultez la section
« Quelles sont les personnes auxquelles Philips Lumea Precision ne
convient pas ? ».
Si votre peau a été exposée au soleil ou à une méthode de bronzage
articiel, elle peut être plus foncée que lors de la séance précédente.
Consultez le tableau ci-dessus an de déterminer le réglage le plus adapté
à la couleur de votre peau.
Conseils de bronzage
Exposition au soleil avant la séance
- Après un bain de soleil, attendez au moins 48 heures avant d’utiliser
l’appareil. Les bains de soleil peuvent rendre la peau plus foncée
(bronzée) et/ou provoquer des coups de soleil (rougeurs).
- Après 48 heures, regardez si votre peau présente toujours des coups
de soleil. N’utilisez pas Philips Lumea Precision tant que le coup de
soleil persiste.
Marron
clair
(quelques
coups de
soleil, bon
bronzage)
Marron
moyen
(rares
coups
de soleil,
bronzage
bon et
rapide)
Marron
foncé (rares
coups
de soleil,
très bon
bronzage)
Brun très
foncé, noir
(coups
de soleils
rares voire
inexistants,
bronzage très
foncé)

FRANÇAIS 41
- Une fois que le coup de soleil a disparu, faites un test (voir le chapitre
« Utilisation de l’appareil », section « Première utilisation ») sur la zone
à asher pour déterminer l’intensité lumineuse appropriée.
- Si votre peau est bronzée, faites un test (voir le chapitre « Utilisation
de l’appareil », section « Première utilisation ») sur la zone à asher
pour déterminer l’intensité lumineuse appropriée. Si vous ne respectez
pas cette consigne, vous risquez de développer des réactions cutanées
après avoir utilisé Philips Lumea Precision.
Exposition au soleil après la séance
- Après la séance, attendez au moins 24 heures avant d’exposer les
zones ashées au soleil. Même après 24 heures, assurez-vous que la
peau ne présente plus de rougeurs dues aux ashs avant de l’exposer
au soleil.
- Pendant les deux semaines qui suivent la séance, couvrez les zones
ashées quand vous allez au soleil ou utilisez un écran total d’indice
SPF 30+.
- L’exposition au soleil sans protection des zones tout juste traitées
peut accroître le risque d’effets secondaires et de réactions cutanées.
Reportez-vous au chapitre « Utilisation de l’appareil », section
« Éventuels effets secondaires et réactions cutanées ».
Bronzage à la lumière articielle
- Suivez les instructions décrites ci-dessus dans « Exposition au soleil
avant la séance » et « Exposition au soleil après la séance ».
Bronzage avec des crèmes
- Si vous avez utilisé une crème de bronzage articiel, attendez la
disparition totale du bronzage articiel avant d’utiliser Philips Lumea
Precision.
Remarque : Pour plus d’informations sur les réactions cutanées indésirables,
reportez-vous au chapitre « Utilisation de l’appareil », section « Éventuels
effets secondaires et réactions cutanées ».
Utilisation de l’appareil
Reportez-vous au tableau du chapitre « Avant utilisation », section
« Réglage de l’intensité lumineuse », pour connaître les intensités
lumineuses les plus adaptées à la couleur de vos poils et à la pigmentation
de votre peau. Utilisez l’appareil dans une pièce bien éclairée de
manière à réduire l’impression lumineuse du ash. Rasez la zone à asher
avant d’utiliser l’appareil (voir le chapitre « Avant utilisation », section
« Préparation des zones à asher »).
Si, à un moment, Lumea provoque une douleur intolérable, réduisez
l’intensité lumineuse jusqu’à ce que l’utilisation du produit redevienne
plus confortable. Si vous remarquez des réactions cutanées plus
importantes qu’une légère rougeur, arrêtez immédiatement la séance et
lisez la section « Éventuels effets secondaires et réactions cutanées »,
dans le présent chapitre.

FRANÇAIS42
Choix du bon accessoire
- Accessoire corps
L’accessoire corps peut être utilisé pour épiler les poils indésirables sur
toutes les parties du corps situées en dessous du cou (pour connaître les
exceptions, reportez-vous au chapitre « Important », section « Contreindications »). L’accessoire corps peut couvrir une zone de 3 cm² et est
idéal pour traiter efcacement les zones étendues.
N’utilisez pas l’accessoire corps sur le visage.
- Accessoire de précision
L’accessoire de précision comprend un ltre lumière intégré
supplémentaire et peut être utilisé pour épiler les poils du visage (sur la
lèvre supérieure, le menton et les pattes). Vous pouvez également l’utiliser
sur les autres zones sensibles du corps, comme les aisselles, le maillot ou les
zones difciles à atteindre.
N’utilisez jamais l’appareil autour des yeux et près des sourcils.
Première utilisation et test cutané
1 Choisissez l’accessoire adapté à la zone que vous souhaitez asher.
2 Choisissez une zone proche de celle que vous allez asher.
Remarque : Avant d’utiliser l’appareil sur la lèvre supérieure, le menton ou les
pattes, effectuez le test cutané sous l’oreille, sur une zone sans poils ni grains
de beauté.
3 Mettez l’appareil en marche en appuyant sur le bouton marche/arrêt.
, L’appareil se met toujours en marche au réglage le plus bas.
4 Appliquez un ash à l’intensité la plus faible recommandée pour
votre type de peau (pour savoir comment émettre un ash, consultez
les étapes 6 à 9 de la section « Utilisation ultérieure » du présent
chapitre).
5 Tant que l’utilisation de Lumea reste sans douleur, augmentez
l’intensité d’un niveau dans la plage recommandée pour votre type
de peau et appliquez un ash pour chaque intensité. N’appliquez pas
plus d’un ash à un même endroit.

FRANÇAIS 43
6 Après ce test, attendez 24 heures et vériez si votre peau a réagi.
Si elle présente des réactions, lors des utilisations ultérieures,
choisissez l’intensité la plus élevée n’ayant pas provoqué de réaction
cutanée.
Lors de la première utilisation, nous vous conseillons d’effectuer un test
sur la zone à asher pour voir comment votre peau réagit et pour vous
habituer à cette méthode d’épilation.
Utilisation ultérieure
1 Avant chaque séance, nettoyez les accessoires, le verre ltrant et
le cadre métallique à l’intérieur des accessoires de Philips Lumea
Precision. Pour en savoir plus, reportez-vous au chapitre « Nettoyage
et entretien ».
2 Choisissez l’accessoire adapté à la zone que vous souhaitez asher.
3 Mettez l’appareil en marche en appuyant sur le bouton marche/arrêt.
Remarque : Il est normal que l’appareil et l’accessoire chauffent au cours de
l’utilisation.
4 Commencez chaque séance en sélectionnant très soigneusement
l’intensité lumineuse en fonction de la sensibilité de votre peau et de
votre sensation de confort.
Pour plusieurs raisons, votre peau peut réagir différemment selon les jours/
occasions. Pour plus d’informations, reportez-vous à la section « Éventuels
effets secondaires et réactions cutanées », dans le présent chapitre.
5 Appuyez sur le bouton % pour augmenter l’intensité, et sur le
bouton ^ pour la diminuer.
, À chaque fois que vous appuyez sur le bouton, le voyant d’intensité
correspondant au niveau clignote au bout de quelques secondes.
6 Placez l’appareil perpendiculairement à la peau de sorte que
l’accessoire et l’anneau de sécurité soient en contact avec la peau.

FRANÇAIS44
7 L’anneau de sécurité doit exercer une légère pression sur la peau, de
manière à ce que le contact soit total.
Remarque : L’anneau de sécurité est équipé d’interrupteurs de contact servant
de système de sécurité de l’appareil. Il évite tout ash indésirable lorsque
l’appareil ne touche pas la peau.
, Le voyant « Prêt-à-asher » situé à l’arrière de l’appareil s’allume
en vert lorsque tous les interrupteurs de contact de l’anneau de
sécurité sont en contact avec la peau et que l’appareil est chargé.
Ceci peut prendre jusqu’à 3,5 secondes.
Conseil : Pour faciliter l’utilisation, étirez la peau à asher. Il vous faudra peut-
être exercer une pression plus forte sur les zones moins fermes du corps pour
que tous les interrupteurs de contacts s’enfoncent.
8 Appuyez sur le bouton du ash pour émettre un ash.
Remarque : La lumière visible produite par l’appareil correspond au ash
reété par la peau, et ne représente aucun danger pour vos yeux. Il n’est pas
nécessaire de porter des lunettes de protection pendant l’utilisation.
9 Une fois que l’appareil a émis un ash, relâchez le bouton du ash.
10 Pour le ash suivant, réitérez les étapes 6 à 9. Après chaque ash,
il faut attendre jusqu’à 3,5 secondes avant que l’appareil soit de
nouveau prêt à asher.
Ne ashez pas plusieurs fois la même zone au cours d’une même séance.
Cela n’améliore pas l’efcacité de l’épilation, mais augmente le risque de
réactions cutanées.
11 Pour vous assurer que toutes les zones sont ashées, veillez à ce que
les zones d’application successives se chevauchent. Seule la lumière
émise par le verre ltrant de sortie de lumière est efcace. Assurezvous que les ashs sont rapprochés.
12 À la n de la séance, mettez l’appareil hors tension.
13 Vériez si des poils et de la poussière ne sont pas présents sur le
verre ltrant et l’accessoire, et nettoyez l’appareil après utilisation.
Reportez-vous au chapitre « Nettoyage et entretien ».
Recommandations relatives à la séance
Durée moyenne de la séance
Zone Durée approximative d’une séance Accessoire recommandé
Aisselles 1,5 minute par aisselle Accessoire corps/de précision
Maillot 1,5 minute par côté Accessoire corps/de précision

FRANÇAIS 45
Zone Durée approximative d’une séance Accessoire recommandé
Bikini 5 minutes Accessoire corps/de précision
Demi-jambe 12 minutes Accessoire corps
Jambe entière 20 minutes Accessoire corps
Lèvre supérieure/menton/
pattes
1 minute Accessoire de précision
Remarque : Les durées moyennes des séances indiquées ci-dessus ont été
observées au cours de tests et d’études. La durée des séances peut varier
d’une personne à l’autre.
Remarque : À pleine charge, les batteries permettent d’émettre au moins
320 ashs d’une intensité de 5. La capacité d’utilisation de l’appareil dépend
de la taille de la zone à asher et de l’intensité utilisée.
Zones d’épilation recommandées
L’appareil a été conçu pour asher les poils indésirables de la lèvre
supérieure, du menton, des pattes, des aisselles, des bras, du ventre, du
maillot et des jambes.
Utilisation de l’appareil sur les jambes
Consultez le tableau du chapitre « Avant utilisation », section « Réglage
de l’intensité lumineuse » pour déterminer les intensités lumineuses
recommandées pour vos jambes.
- Vous pouvez déplacer l’appareil de haut en bas ou en transversale,
selon votre confort.
Remarque : Les zones osseuses telles que le tibia et les chevilles sont plus
sensibles que d’autres. Si vous pressez l’accessoire très fort sur ces zones,
la peau peut être plus susceptible de développer des réactions cutanées
comme des irritations ou des rougeurs. Reportez-vous à la section « Éventuels
effets secondaires et réactions cutanées », dans le présent chapitre. Pressez
l’accessoire sur la peau sufsamment fort pour que le voyant « Prêt-à-asher »
s’allume, mais pas plus.
Conseil : L’appareil peut laisser des marques sur la peau au niveau des
zones ashées. Ces marques peuvent vous aider à identier le point de
chevauchement des zones ashées.
Si vous utilisez l’appareil sur toute la longueur de vos jambes, vous devrez
peut-être le recharger au cours de l’opération. Ceci est normal. La capacité
d’utilisation de l’appareil dépend de la taille de la zone à asher et de
l’intensité utilisée.
Conseil : De nombreux utilisateurs combinent l’épilation des jambes à d’autres
activités : par exemple regarder la télévision ou écouter de la musique. Essayez,
vous aussi : l’expérience sera plus agréable et reposante.
Utilisation de l’appareil pour l’épilation du maillot
Consultez le tableau du chapitre « Avant utilisation », section « Réglage
de l’intensité lumineuse » pour déterminer les intensités lumineuses
recommandées pour le maillot.
En principe, Philips Lumea Precision a été conçu pour épiler entièrement
la zone du maillot (style « Brésilien » ou « Hollywood », par exemple)

FRANÇAIS46
en douceur et en toute sécurité. Utilisez un réglage plus bas sur la peau
plus sombre de la zone du maillot. N’utilisez pas l’appareil sur les lèvres
intérieures, le vagin et l’anus. Les hommes qui souhaitent asher leur zone
pubienne ne doivent pas utiliser l’appareil sur le scrotum.
Remarque : Pour des raisons d’hygiène, nettoyez toujours l’accessoire avant de
commencer à asher une autre partie du corps.
Utilisation de l’appareil sur les aisselles
Consultez le tableau du chapitre « Avant utilisation », section « Réglage
de l’intensité lumineuse » pour déterminer les intensités lumineuses
recommandées pour vos aisselles.
Veillez à éliminer soigneusement toute trace de déodorant, parfum, crème
ou autre produit d’hygiène de vos aisselles avant de vous asher.
Conseil : Pour des résultats optimaux, tenez-vous face à un miroir de façon à
obtenir une bonne visibilité de la zone à asher et à bien distinguer le voyant
« Prêt-à-asher ». Levez votre bras et placez votre main au niveau de votre cou
pour tendre la peau de l’aisselle. De cette façon, vous pouvez maintenir plus
facilement l’anneau de sécurité en contact avec la peau, pour un traitement
plus aisé.
Remarque : La lumière rééchie ne représente aucun danger pour vos yeux.
Si elle produit une sensation désagréable, fermez les yeux lorsque vous
déclenchez un ash.
Utilisation de l’appareil sur le visage (lèvre supérieure, menton,
pattes)
Consultez le tableau du chapitre « Avant utilisation », section « Réglage
de l’intensité lumineuse » pour déterminer les intensités lumineuses
recommandées pour votre visage (lèvre supérieure, menton, pattes).
Utilisez uniquement l’embout de précision pour traiter la lèvre
supérieure, le menton et les pattes. N’utilisez jamais l’appareil autour des
yeux ou près des sourcils. Lorsque vous traitez votre lèvre supérieure, le
menton ou les pattes, évitez d’exposer votre visage à la lumière directe
du soleil dans les 24 heures suivant le traitement. Après le traitement,
appliquez un écran total (SPF 30+) pendant les deux semaines suivantes
lorsque vous exposez votre visage à la lumière directe du soleil.
Conseil : Pour des résultats optimaux, tenez-vous devant un miroir de façon à
obtenir une bonne visibilité de la zone à asher et à bien distinguer le voyant
« Prêt-à-asher ».
Conseil : Les contours des mâchoires peuvent rendre difcile le contact de
l’anneau de sécurité avec la peau, compliquant ainsi l’épilation. Mettez votre
langue entre vos dents et votre lèvre supérieure ou gonez vos joues pour
faciliter l’application.
Conseil : La lumière rééchie ne représente aucun danger pour vos yeux. Si elle
produit une sensation désagréable, fermez les yeux lorsque vous déclenchez
un ash.

FRANÇAIS 47
Pour des résultats optimaux
- Il est normal que des poils restent visibles après les premières séances.
Pour plus d’informations, reportez-vous au chapitre « Introduction »,
section « Fonctionnement de l’appareil ».
- Pour éliminer efcacement tous les poils et bloquer la réactivation des
follicules pileux, les séances doivent être répétées tous les quinze jours
pendant les deux premiers mois. Vous aurez alors une peau douce et
nette. Pour obtenir des astuces qui vous permettront de prolonger ces
résultats, reportez-vous à la section « Phase d’entretien ».
Phase d’entretien
- Pour une peau durablement douce et parfaitement épilée, nous vous
recommandons de renouveler les séances toutes les 4 à 6 semaines. La
durée entre chaque séance peut varier selon la repousse des poils de
chacun et également selon les différentes parties du corps. Si vos poils
ont repoussé en abondance entre deux séances, réduisez simplement
l’intervalle entre les séances, en veillant toutefois à respecter une
fréquence maximale de deux semaines. En choisissant une fréquence
supérieure à celle recommandée, vous augmentez le risque de
réactions cutanées sans gagner en efcacité.
Éventuels effets secondaires et réactions cutanées
Réactions cutanées courantes :
- Des rougeurs et/ou des fourmillements, des picotements ou une
sensation de chaleur sur la peau peuvent apparaître. Cette réaction est
absolument sans danger et passagère.
- Une réaction cutanée semblable à un coup de soleil peut apparaître
momentanément sur la zone ashée. Si elle persiste plus de trois jours,
consultez votre médecin.
- L’association du rasage et de l’utilisation de Lumea peut assécher la
peau et provoquer des irritations. Cette réaction est sans danger et
disparaît en quelques jours. Vous pouvez rafraîchir la zone avec de la
glace ou un gant de toilette mouillé. Si la sécheresse persiste, vous
pouvez appliquer une lotion hydratante non parfumée sur la zone
ashée 24 heures après l’opération.
Effets secondaires rares :
- Brûlures, rougeur excessive et enure : ces réactions se produisent
très rarement. Elles sont provoquées par l’utilisation d’une intensité
lumineuse trop élevée pour votre couleur de peau. Si ces réactions
persistent plus de trois jours, consultez votre médecin. Attendez que
la peau soit entièrement guérie avant de recommencer la séance, et
utilisez une intensité lumineuse moins élevée.
- Altération de la pigmentation de la peau : ceci se produit très rarement.
L’altération de la pigmentation de la peau se manifeste par une plaque
plus foncée ou plus claire que la zone qui l’entoure. Elle est provoquée
par l’utilisation d’une intensité lumineuse trop élevée pour votre
couleur de peau. Si elle persiste plus de 2 semaines, consultez votre
médecin. Ne ashez pas les zones atteintes tant que l’altération de la
pigmentation n’a pas disparu et que votre peau n’a pas retrouvé sa
couleur normale.
- Infection et inammation cutanées : très rares, elles peuvent être
causées par l’utilisation de l’appareil sur des plaies ou des coupures
provoquées par le rasage, sur des plaies existantes ou sur des poils
incarnés.

FRANÇAIS48
- Douleur excessive : celle-ci peut apparaître pendant ou après la séance
si vous avez utilisé l’appareil sur une peau non rasée, à une intensité
lumineuse trop élevée pour votre couleur de peau, si vous ashez
plusieurs fois sur la même zone et si vous utilisez l’appareil sur des
plaies ouvertes, inammations, infections, tatouages, brûlures, etc. Pour
plus d’informations, reportez-vous au chapitre « Important », section
« Contre-indications ».
Après utilisation
- N’appliquez pas de produits cosmétiques parfumés sur les zones tout
juste ashées.
- N’utilisez pas de déodorant immédiatement après avoir ashé les
aisselles. Attendez que les rougeurs aient totalement disparu.
- Pour obtenir des informations sur l’exposition au soleil et le bronzage
articiel, reportez-vous au chapitre « Avant utilisation », section
« Conseils de bronzage ».
Nettoyage et entretien
Pour garantir des résultats optimaux et une longue durée de
fonctionnement, nettoyez l’appareil avant et après chaque utilisation et, si
nécessaire, pendant la séance. L’appareil perd son efcacité si vous ne le
nettoyez pas correctement.
Ne nettoyez jamais l’appareil ou ses composants sous le robinet ou au
lave-vaisselle.
N’utilisez jamais d’éponges à récurer, de produits abrasifs ou de
détergents agressifs tels que l’essence ou l’acétone pour nettoyer
l’appareil.
Ne rayez jamais le verre ltrant ou la surface métallique à l’intérieur des
accessoires.
Remarque : Veillez à ce que de la crasse ne bloque pas les interrupteurs de
contact sur l’anneau de sécurité.
Remarque : Arrêtez d’utiliser l’appareil lorsqu’il n’est plus possible de nettoyer
le verre ltrant ou les accessoires.
1 Éteignez l’appareil, débranchez-le et laissez-le refroidir.
Remarque : Le verre ltrant chauffe pendant l’utilisation. Assurez-vous qu’il a
refroidi avant de le nettoyer.
2 Pour retirer l’accessoire, placez vos doigts dans les renfoncements
situés en haut et en bas de l’appareil, puis tirez doucement.
L’accessoire devrait se retirer facilement.
3 À l’aide du tissu de nettoyage fourni avec l’appareil, humidié de
quelques gouttes d’eau, nettoyez les pièces suivantes :
- Le verre ltrant
- La surface externe des accessoires
- Le cadre métallique à l’intérieur des accessoires
- Le verre ltrant rouge à l’intérieur de l’accessoire de précision
Remarque : Si l’eau n’est pas assez efcace, nettoyez les pièces mentionnées
ci-dessus avec quelques gouttes d’alcool fort.

FRANÇAIS 49
Remarque : Un verre ltrant et/ou un accessoire sales peuvent ressembler
à cette image. N’oubliez pas de nettoyer l’appareil avant et après chaque
utilisation et, si nécessaire, pendant la séance, en suivant les instructions de
cette section.
Conseil : Si vous ne pouvez plus nettoyer les bords des accessoires à l’aide
du tissu de nettoyage fourni, utilisez un coton-tige. Veillez à débarrasser les
accessoires ou le verre ltrant de toute peluche ou bre.
4 Si nécessaire, nettoyez l’extérieur de l’appareil à l’aide du tissu de
nettoyage fourni avec l’appareil.
Rangement
1 Éteignez l’appareil, débranchez-le et laissez-le refroidir.
2 Nettoyez l’appareil avant de le ranger.
3 Placez l’appareil dans son coffret.
4 Rangez l’appareil dans un lieu sec, à une température comprise entre
0°C et 60°C.
Remplacement
Si vous devez remplacer une pièce ou tout simplement en acheter une
supplémentaire, contactez votre revendeur Philips ou rendez-vous sur
www.philips.com/support.
Si vous avez des difcultés pour vous procurer ces pièces, contactez le
Service Consommateurs Philips de votre pays.
Pièces de rechange
Les pièces de rechange suivantes sont disponibles :
- Accessoire corps
- Accessoire de précision
- Adaptateur secteur
- Boîtier

FRANÇAIS50
Environnement
- Lorsqu’il ne fonctionnera plus, ne jetez pas l’appareil avec les ordures
ménagères, mais déposez-le à un endroit assigné à cet effet, où
il pourra être recyclé. Vous contribuerez ainsi à la protection de
l’environnement.
- Les batteries rechargeables intégrées contiennent des substances qui
peuvent nuire à l’environnement. Veillez à toujours retirer les batteries
avant de mettre l’appareil au rebut ou de le déposer à un endroit
assigné à cet effet. Déposez les batteries usagées à un endroit assigné
à cet effet. Si vous n’arrivez pas à les retirer de l’appareil, vous pouvez
apporter ce dernier dans un Centre Service Agréé Philips qui prendra
toute l’opération en charge pour préserver l’environnement.
Retrait des batteries
Ne retirez les batteries que lorsqu’elles sont complètement déchargées.
1 Insérez un poinçon ou autre outil pointu dans le couvercle de
l’appareil pour le détacher.
2 Dévissez les deux vis situées en bas du manche à l’aide d’un
tournevis.
3 Retirez la partie inférieure de la poignée et coupez les deux ls
connectés à la partie inférieure de l’appareil.

FRANÇAIS 51
4 À l’aide d’une pince à bec long, tirez sur les connecteurs de la
batterie pour les détacher des bornes de la batterie.
5 Utilisez cette pince pour retirer les batteries rechargeables de
l’appareil.
6 Coupez les deux ls l’un après l’autre pour éviter tout accident dû à
une charge résiduelle éventuelle.
Garantie et service
Si vous rencontrez un problème ou si vous souhaitez obtenir des
informations ou faire réparer l’appareil, rendez-vous sur le site
Web de Philips à l’adresse www.philips.com ou contactez le
Service Consommateurs Philips de votre pays (vous trouverez le numéro
de téléphone correspondant sur le livret de garantie internationale).
S’il n’existe pas de Service Consommateurs Philips dans votre pays,
renseignez-vous auprès de votre revendeur Philips local.

FRANÇAIS52
Spécicités techniques
Modèle SC2002
Tension nominale 100-240 V
Fréquence nominale 50-60 Hz
Entrée nominale 7,5 W
Protection contre les électrocutions Classe II Q
Niveau de protection IP 30 (EN 60529)
Conditions de fonctionnement Température : +15 à +35°C
Taux d’humidité relative : 25 à 95 %
Conditions de stockage Température : 0 à +60°C
Taux d’humidité relative : 5 à 95 %
Spectre de l’accessoire > 570 nm
Spectre de l’accessoire de précision > 600 nm
Batterie lithium-ion 2 x 3,7 V ; 1 500 mAh
Dépannage
Cette rubrique présente les problèmes les plus courants que vous
pouvez rencontrer avec votre appareil. Si vous ne parvenez pas à
résoudre le problème à l’aide des informations ci-dessous, contactez le
Service Consommateurs Philips de votre pays (vous trouverez le numéro
de téléphone correspondant sur le livret de garantie internationale).

Problème Cause possible Solution
FRANÇAIS 53
L’appareil ne
fonctionne pas.
L’appareil s’éteint
sans prévenir.
L’adaptateur
secteur chauffe au
cours de la charge.
Le voyant de
charge ne s’allume
pas lorsque je
branche la petite
che sur la prise
de l’appareil.
L’appareil est
allumé, mais je
ne parviens pas à
augmenter ou à
diminuer l’intensité
lumineuse.
Le voyant « Prêtà-asher » ne
s’allume pas
lorsque je place
l’appareil sur ma
peau.
Les batteries
rechargeables sont
vides.
L’appareil est
défectueux.
Les batteries
rechargeables sont
vides.
Ce phénomène
est normal.
Vous n’avez
pas branché
l’adaptateur sur la
prise secteur.
La prise n’est pas
alimentée.
L’adaptateur
n’est pas branché
correctement sur
la prise secteur et/
ou la petite che
n’est pas insérée
correctement
dans la prise de
l’appareil.
L’appareil est
défectueux.
L’appareil doit être
réinitialisé.
L’accessoire équipé
de l’anneau de
sécurité n’est pas
correctement
placé sur la peau.
Rechargez l’appareil (voir le chapitre « Charge »).
Contactez le Service Consommateurs Philips de votre pays,
votre revendeur Philips ou un Centre Service Agréé Philips.
Rechargez l’appareil (voir le chapitre « Charge »).
Aucune action n’est requise.
Insérez la petite che dans la prise de l’appareil et branchez
l’adaptateur sur la prise secteur.
Branchez un autre appareil sur la prise secteur pour
vérier qu’elle est alimentée. Si la prise est alimentée
mais que l’appareil ne se charge toujours pas, contactez
le Service Consommateurs Philips de votre pays, votre
revendeur Philips ou un Centre Service Agréé Philips.
Assurez-vous que l’adaptateur est branché correctement
sur la prise secteur et/ou que la petite che est insérée
correctement dans la prise de l’appareil.
Contactez le Service Consommateurs Philips de votre pays,
votre revendeur Philips ou un Centre Service Agréé Philips.
Pour réinitialiser l’appareil, éteignez-le, puis rallumez-le. Si
vous ne parvenez toujours pas à régler l’intensité lumineuse,
contactez le Service Consommateurs Philips de votre pays,
votre revendeur Philips ou un Centre Service Agréé Philips.
Placez l’appareil perpendiculairement à la peau, de manière
à ce que tous les interrupteurs de contact touchent la peau,
puis vériez que le voyant « Prêt-à-asher » est allumé et
appuyez sur le bouton du ash.

FRANÇAIS54
Problème Cause possible Solution
Si le problème n’est pas résolu, placez l’appareil sur une
zone de votre corps où il est facile d’établir un bon
contact, par exemple sur votre avant-bras, puis vériez
que le voyant « Prêt-à-asher » est allumé. Si ce n’est pas
le cas alors que l’appareil touche votre peau, contactez
le Service Consommateurs Philips de votre pays, votre
revendeur Philips ou un Centre Service Agréé Philips.
Le voyant « Prêtà-asher » ne
s’allume pas
lorsque je place
un accessoire sur
ma peau, mais
le ventilateur
fonctionne.
Le voyant « Prêtà-asher » est
vert mais l’appareil
n’émet pas de
ash lorsque
j’appuie sur le
bouton du ash.
L’appareil devient
chaud en cours
d’utilisation.
L’appareil n’indique
pas l’intensité
lumineuse 1
lorsque je l’allume.
L’appareil produit
une odeur étrange.
L’anneau de
sécurité est sale.
La protection antisurchauffe a été
activée.
L’appareil doit être
réinitialisé.
Ce phénomène
est normal.
L’appareil doit être
réinitialisé.
L’accessoire et/ou
le verre ltrant est
sale.
Vous n’avez pas
correctement rasé
la zone à asher.
Nettoyez soigneusement l’anneau de sécurité.
Si vous ne parvenez pas à le faire, contactez le
Service Consommateurs Philips de votre pays, votre
revendeur Philips ou un Centre Service Agréé Philips pour
remplacer l’accessoire.
Lorsque la protection anti-surchauffe a été activée, le
ventilateur continue à fonctionner. N’éteignez pas l’appareil
et laissez-le refroidir pendant environ 15 minutes avant
de reprendre l’utilisation. Si le voyant « Prêt-à-asher » ne
s’allume pas lorsque vous placez l’appareil sur votre peau,
contactez le Service Consommateurs Philips de votre pays,
votre revendeur Philips ou un Centre Service Agréé Philips.
Pour réinitialiser l’appareil, éteignez-le, puis rallumez-le. Si
le voyant « Prêt-à-asher » est vert, mais que l’appareil
n’émet toujours pas de ash lorsque vous appuyez sur le
bouton du ash, contactez le Service Consommateurs Philips
de votre pays, votre revendeur Philips ou un
Centre Service Agréé Philips.
Aucune action n’est requise.
Pour réinitialiser l’appareil, éteignez-le, puis rallumez-le. Si
l’appareil n’indique toujours pas l’intensité lumineuse 1,
contactez votre Service Consommateurs Philips, votre
revendeur Philips ou un Centre Service Agréé Philips.
Nettoyez soigneusement l’accessoire. Si vous ne parvenez
pas à le faire, contactez le Service Consommateurs Philips
de votre pays, votre revendeur Philips ou un
Centre Service Agréé Philips pour remplacer l’accessoire.
Si la zone à asher contient des poils, ceux-ci peuvent brûler
au passage de l’appareil, ce qui produit une odeur étrange.
Rasez correctement la zone à asher avant d’utiliser l’appareil.
Si le rasage irrite votre peau, tondez les poils aussi court que
possible et utilisez une intensité qui vous convient.

Problème Cause possible Solution
FRANÇAIS 55
La peau est
plus sensible
que d’habitude
pendant la séance.
Je ressens
une douleur
importante
lorsque j’utilise
l’appareil.
Vous avez rangé
l’appareil dans un
lieu poussiéreux.
L’intensité
lumineuse que
vous utilisez est
trop élevée.
Vous n’avez pas
rasé les zones à
asher.
Le ltre UV du
verre ltrant est
cassé.
L’appareil est
défectueux.
Vous n’avez pas
rasé les zones à
asher.
Vous avez ashé
une zone pour
laquelle l’appareil
n’est pas conçu.
Vous avez utilisé
une intensité
lumineuse trop
élevée.
Le verre ltrant
ou le verre rouge
de l’accessoire est
cassé.
L’appareil ne
convient pas à
votre couleur de
peau.
L’odeur étrange se dissipera au bout de quelques ashs.
Vériez que vous avez sélectionné la bonne intensité
lumineuse. Si nécessaire, diminuez l’intensité.
Rasez les zones à asher avant d’utiliser l’appareil. Si le rasage
irrite votre peau, tondez les poils aussi court que possible et
utilisez une intensité qui vous convient.
Si le ltre UV du verre ltrant est cassé, arrêtez d’utiliser
l’appareil. Contactez le Service Consommateurs Philips
de votre pays, votre revendeur Philips ou un
Centre Service Agréé Philips.
Contactez le Service Consommateurs Philips de votre pays,
votre revendeur Philips ou un Centre Service Agréé Philips.
Rasez les zones à asher avant d’utiliser l’appareil. Si le rasage
irrite votre peau, tondez les poils aussi court que possible et
utilisez une intensité qui vous convient.
L’appareil ne doit pas être utilisé sur les petites lèvres, le vagin,
l’anus, les mamelons, les aréoles, les lèvres, à l’intérieur des
narines et des oreilles, ainsi que dans la région des yeux et
des sourcils. Les hommes ne doivent pas l’utiliser sur le visage
ou le scrotum.
Réduisez l’intensité lumineuse à un niveau que vous trouvez
confortable. Reportez-vous au chapitre « Avant utilisation »,
section « Réglage de l’intensité lumineuse ».
Si le verre ltrant ou le verre rouge de l’accessoire de
précision est cassé, n’utilisez plus cet accessoire. Faites-le
remplacer auprès de votre revendeur ou d’un Centre Service
Agréé Philips ou contactez le Service Consommateurs Philips.
N’utilisez pas l’appareil si votre peau est très foncée. Ne
l’utilisez pas non plus si vos poils sont blond clair, roux, gris ou
blancs.

FRANÇAIS56
Problème Cause possible Solution
Des rougeurs
apparaissent sur
les zones venant
d’être ashées.
La réaction
cutanée suite à la
séance dure plus
longtemps qu’en
temps normal.
L’épilation n’est
pas satisfaisante.
Il est normal
d’observer
de légères
rougeurs ; celles-ci
disparaissent
rapidement.
Vous avez utilisé
une intensité
lumineuse trop
élevée.
Vous avez utilisé
une intensité
lumineuse trop
basse.
Vous n’avez pas
ménagé des
chevauchements
sufsants lorsque
vous avez utilisé
l’appareil.
Vous n’utilisez pas
l’appareil aussi
souvent que nous
le recommandons.
L’appareil ne
convient pas à
votre couleur de
peau ou de poils.
Aucune action n’est requise.
Sélectionnez une intensité lumineuse moins élevée
la prochaine fois. Reportez-vous au chapitre « Avant
utilisation », section « Réglage de l’intensité lumineuse ».
Si la réaction cutanée persiste plus de 3 jours, contactez
votre médecin.
Sélectionnez une intensité lumineuse plus importante la
prochaine fois.
Pour épiler correctement les poils, vous devez passer
l’appareil de manière à ce que les zones ashées se
chevauchent. Reportez-vous au chapitre « Utilisation de
l’appareil », étape 11.
Pour réussir à épiler tous les poils et prévenir la réactivation
des racines, les séances doivent être répétées toutes les
deux semaines pendant les deux premiers mois. Pour une
peau durablement douce et parfaitement épilée, nous
vous recommandons de renouveler les séances toutes les
4 à 6 semaines. La durée entre chaque séance peut varier
selon la repousse des poils de chacun et également selon
les différentes parties du corps. Si vos poils ont repoussé
en abondance entre deux séances, réduisez simplement
l’intervalle entre les séances, en veillant toutefois à respecter
une fréquence maximale de deux semaines. En choisissant
une fréquence supérieure à celle recommandée, vous
augmentez le risque de réactions cutanées sans gagner en
efcacité.
N’utilisez pas l’appareil si vos poils sont blond clair, roux, gris
ou blancs. N’utilisez pas cet appareil non plus si votre peau
est très foncée.

Problème Cause possible Solution
FRANÇAIS 57
Les poils
commencent à
repousser sur
certains points des
zones ashées.
Vous n’avez pas
ménagé des
chevauchements
sufsants lorsque
vous avez utilisé
l’appareil.
Les poils
repoussent dans le
cadre de leur cycle
de vie normal.
Pour épiler correctement les poils, vous devez passer
l’appareil de manière à ce que les zones ashées se
chevauchent. Reportez-vous au chapitre « Utilisation de
l’appareil », étape 11.
La repousse fait partie du cycle de vie normal des poils.
Toutefois, les poils qui repoussent sont généralement plus
ns et doux.

58
РУССКИЙ
Содержание
Введение 59
Преимущества 59
Адаптированная для домашнего использования технология IPL 59
Предотвращение повторного роста волос для бесконечной
гладкости 60
Мягкое воздействие даже на самых чувствительных участках 60
Максимальная свобода и удобство благодаря работе от
аккумуляторов 60
Лампа фотоэпилятора не требует замены 60
Принцип работы технологии интенсивного импульсного
светового излучения 60
Рост волос 60
Принцип действия 61
Общее описание 61
Важно! 61
Опасно! 62
Предупреждение. 62
Меры предотвращения повреждений 62
Внимание! 63
Во избежание сокращения срока службы фотоэпилятора Philips
Lumea Precision необходимо соблюдать следующие правила. 63
Кто не может пользоваться фотоэпилятором Philips Lumea
Precision? 63
Противопоказания 63
Запрещается использовать прибор во время беременности или
кормления грудью. 63
Запрещается использовать прибор, если ваш тип кожи
и/или волос не соответствует требованиям для
использования прибора: 63
Запрещается пользоваться прибором при следующих
заболеваниях и состояниях: 64
Запрещается пользоваться прибором при приеме
следующих лекарственных препаратов: 64
Никогда не используйте прибор на следующих участках. 65
Запрещается использовать прибор на коже, обгоревшей
на солнце, на коже, которая недавно (в последние 48 часов)
подверглась воздействию солнечных лучей или воздействию
искусственного загара: 65
Электромагнитные поля (ЭМП) 65
Зарядка 65
Подготовка прибора к работе 66
Подготовка обрабатываемых участков 66
Выбор уровня интенсивности светового импульса 67
Рекомендованная интенсивность света (1–5) 68
Важно! 68
Советы по эпиляции при наличии загара 68
Использование прибора 69
Выбор насадки 69
Первое использование и тест на небольшом участке кожи 69
Последующие процедуры 71
Руководство по использованию прибора 72

РУССКИЙ 59
Среднее время воздействия 72
Области применения 73
Использование прибора для эпиляции ног 73
Использование прибора в зоне бикини 74
Использование прибора в области подмышек 74
Использование прибора для удаления волос на лице
(область над верхней губой, подбородок, виски) 74
Как достигнуть наилучшего результата 75
Поддерживающий уход 75
Возможные побочные эффекты и кожные реакции 75
После завершения работы 76
Очистка и уход 76
Хранение 77
Замена деталей 78
Заменяемые детали 78
Защита окружающей среды 78
Извлечение аккумулятора 78
Гарантия и обслуживание 80
Технические характеристики 80
Поиск и устранение неисправностей 80
Введение
Поздравляем с покупкой продукции Philips! Для получения полной
поддержки, оказываемой компанией Philips, зарегистрируйте прибор
на веб-сайте www.philips.com/lumea.
Удаление волос при помощи светового импульса — один из наиболее
эффективных методов избавления от нежелательных волос на
теле, обеспечивающий длительные результаты. Он превосходит
существующие методы удаления волос, используемые в домашних
условиях, благодаря значительному сокращению повторного роста
волос. Компания Philips в сотрудничестве с ведущими дерматологами
занималась исследованием этого метода более 10 лет. Теперь вы
можете использовать эту инновационную технологию в комфортных
домашних условиях в любое время и в любом месте.
Прибор был разработан для женщин, но он также может
использоваться мужчинами.
Philips Lumea Precision позволяет проводить эпиляцию на всем теле,
включая лицо (область над верхней губой, подбородок и виски) с
использованием двух специальных насадок.
Фотоэпилятор Philips Lumea Precision предназначен строго для
индивидуального использования.
Дополнительную информацию о фотоэпиляторе Philips Lumea
Precision см. на веб-сайте www.philips.com/lumea. Регулярно проверяйте
наличие обновлений на главной странице.
Преимущества
Данный прибор обладает следующими преимуществами.
Адаптированная для домашнего использования технология IPL
В фотоэпиляторе Philips Lumea Precision применяется технология
интенсивного светового импульса (Intense Pulsed Light, IPL), которая
используется в профессиональной косметологии для удаления волос
на протяжении последних пятнадцати лет. Благодаря фотоэпилятору

РУССКИЙ60
Philips Lumea Precision теперь вы сможете воспользоваться этой
инновационной технологией в комфортных домашних условиях.
Предотвращение повторного роста волос для бесконечной
гладкости
Этот метод на длительное время предотвращает повторный
рост волос, и ваша кожа надолго остается гладкой как шелк. Наши
исследования показали, что значительное снижение роста волос
наблюдается уже после двух сеансов, а оптимальных результатов
удается достичь после четырех-пяти применений прибора. С каждым
новым сеансом наблюдается заметное сокращение густоты волос.
Эффективность и длительность эффекта эпиляции индивидуальны.
Для получения дополнительной информации см. раздел “Как достичь
наилучшего результата” в главе “Использование прибора”.
Мягкое воздействие даже на самых чувствительных
участках
Фотоэпилятор Lumea Precision был разработан в тесном
сотрудничестве с ведущими дерматологами и обеспечивает
эффективное, но в то же время мягкое воздействие даже на самых
чувствительных участках тела и лица.
Максимальная свобода и удобство благодаря работе от
аккумуляторов
Поскольку прибор оснащен аккумуляторами, он является портативным
и может использоваться в любом месте.
Лампа фотоэпилятора не требует замены
Фотоэпилятор Philips Lumea Precision оснащен
высокопроизводительной лампой, не требующей замены. Лампа
рассчитана на 80 000 вспышек, что позволяет поддерживать
кожу гладкой в течение 5 лет* и экономить на приобретении
дорогостоящих ламп.
*При условии обычного применения одним пользователем в течение
рекомендованных периодов времени.
Принцип работы технологии интенсивного импульсного
светового излучения
Рост волос
Интенсивность роста волос индивидуальна, она зависит от возраста,
обмена веществ и других факторов. Однако в норме волосы проходят
три фазы роста.
1 Фаза роста (фаза анагена)
Активный рост волос от корня. В этой фазе наблюдается
максимальная концентрация меланина. Меланин отвечает за
пигментацию волос. Концентрация меланина также является
определяющим фактором эффективности этого метода. Только в фазе
анагена волосы чувствительны к световому воздействию.
2 Регрессивная фаза (фаза катагена)
Рост волос останавливается, перед выпадением волоса происходит
сокращение корня.
3 Фаза покоя (фаза телогена)
Волос отделяется от фолликула и выпадает. Фолликул остается в
состоянии покоя до тех пор, пока биологические часы не вернут его в
активное состояние, после чего начинается рост нового волоса.

РУССКИЙ 61
Принцип действия
Прибор удаляет волосы путем нагревания волоса и корня,
находящегося под кожей. Меланин, содержащийся в волосе и его
корне, поглощает световые импульсы. Чем темнее цвет волос, тем
больше поглощается света. Этот процесс стимулирует переход волоса
в фазу покоя.
Волос выпадает естественным образом, в дальнейший его рост
прекращается. Для выпадения волос может потребоваться одна
или две недели. Оптимальные результаты удаления волос не могут
быть достигнуты после однократного сеанса, поскольку волосы
чувствительны к световому воздействию только в фазе роста. Обычно
во время эпиляции волосы находятся в разных стадиях роста. Для
успешного удаления волос процедуру следует повторять раз в две
недели.
Встроенный оптический фильтр предотвращает попадание УФ-лучей
на кожу, обеспечивая безопасность проведения процедуры.
Общее описание (Рис. 2)
A Стеклянный УФ-фильтр
B Насадки
1 Насадка для тела (подходит для всех участков тела ниже шеи)
2 Прецизионная насадка (подходит для всех участков тела, включая
область над верхней губой, подбородок и виски)
C Металлическая рамка внутри насадки
D Система безопасности (кольцо безопасности с контактными
переключателями)
E Кнопка подачи светового импульса
F Индикаторы интенсивности (1–5)
G % — кнопка увеличения интенсивности
H ^ — кнопка уменьшения интенсивности
I Индикатор зарядки и индикатор низкого заряда аккумуляторов
J Кнопка включения/выключения
K Индикатор готовности к подаче импульса
L Разъем прибора
M Адаптер
N Малый штекер
O Вентиляционные отверстия
Также входят в комплект: футляр и ткань для очистки
Важно!
Перед использованием прибора внимательно ознакомьтесь с
руководством пользователя и сохраните его для дальнейшего
использования в качестве справочного материала.

РУССКИЙ62
Опасно!
- Вода и электричество — опасное сочетание! Не пользуйтесь
прибором в местах с повышенной влажностью (например, рядом с
включенным душем, наполненной ванной или бассейном).
- Избегайте попадания жидкости на прибор и адаптер.
- Во избежание поражения электрическим током не касайтесь
внутренних частей прибора, если он сломан.
- Запрещается вставлять в прибор посторонние предметы.
Предупреждение.
- Данный прибор не предназначен для использования лицами
(включая детей) с ограниченными возможностями сенсорной
системы или ограниченными умственными или физическими
способностями, кроме случаев, когда прибор используется под
контролем и руководством лиц, ответственных за их безопасность.
- Не позволяйте детям играть с прибором.
- Прибор не предназначен для детей младше 15 лет. Подростки от
15 до 18 лет должны использовать прибор с согласия и/или при
помощи родителей или лиц, ответственных за их безопасность.
Взрослые от 19 лет и старше могут свободно пользоваться
прибором.
- Заряжайте прибор только с помощью прилагаемого адаптера.
- Не используйте прибор или адаптер, если они повреждены.
- В конструкцию адаптера входит трансформатор. Запрещается
заменять адаптер или присоединять к нему другие штекеры: это
опасно.
- Если адаптер поврежден, заменяйте его только таким же
адаптером, чтобы обеспечить безопасную эксплуатацию прибора.
- Прекратите использование прибора, если стеклянный УФ-фильтр
сломан.
- Прекратите использование прецизионной насадки, если красное
стекло разбито.
Меры предотвращения повреждений
- Обеспечьте беспрепятственную циркуляцию воздуха через
вентиляционные отверстия.
- Не встряхивайте, не бросайте и не подвергайте прибор сильным
ударам.
- При перемещении прибора из очень холодного в теплое
помещение (или наоборот) подождите приблизительно 3 часа
перед началом использования прибора.
- Храните прибор в футляре, это поможет защитить его от пыли.
- Не оставляйте включенный прибор без присмотра. Всегда
выключайте прибор после использования.
- Не оставляйте прибор под воздействием прямых солнечных лучей
или УФ-лучей в течение нескольких часов.
- При срабатывании световых вспышек прибор можно подносить
только к коже. Несоблюдение данного условия может привести
к серьезному повреждению насадок и/или фильтра. Включайте

РУССКИЙ 63
кнопку подачи светового импульса только при полном контакте с
кожей.
Внимание!
- Чтобы избежать повреждения зрения, не подносите включенный
прибор близко к глазам и бровям.
- При использовании прибора выбирайте только те настройки
интенсивности, которые подходят для вашего типа кожи.
Использование настроек, интенсивность которых выше
рекомендованного уровня, повышает риск возникновения
аллергических кожных реакций и побочных явлений.
- Данный прибор с прилагаемыми двумя насадками предназначен
только для удаления нежелательных волос на теле на участках,
расположенных ниже скул. Запрещается использовать его для
других целей.
Во избежание сокращения срока службы фотоэпилятора
Philips Lumea Precision необходимо соблюдать следующие
правила.
- Температура среду при использовании прибора не должна быть
ниже 15 °C или выше 35 °C.
- Прибор оснащен встроенной системой защиты от перегрева. При
перегреве прибор перестает вырабатывать световые импульсы. Не
выключайте прибор, дайте ему остыть в течение 15 минут, а затем
возобновите процедуру.
- Для выполнения проверки или ремонта прибора обращайтесь
только в авторизованный сервисный центр Philips. Вследствие
неквалифицированного ремонта эксплуатация прибора может
стать чрезвычайно опасной.
- Запрещается использование прибора в случаях, перечисленных в
разделе “Противопоказания”.
Кто не может пользоваться фотоэпилятором Philips Lumea
Precision?
Фотоэпилятор Philips Lumea Precision подходит не для всех. Если хотя
бы одно из следующих положений относится к вам, вы не можете
использовать данный прибор!
Противопоказания
Запрещается использовать прибор во время беременности
или кормления грудью.
Запрещается использовать прибор, если ваш тип кожи и/или
волос не соответствует требованиям для использования
прибора:
- Если на обрабатываемых участках волосы светло-русые, седые,
пепельные или рыжие (натуральный цвет).
- Если ваша кожа относится к VI типу (вы редко или никогда не
сгораете на солнце и загораете до очень темного оттенка, ваша
кожа имеет темно-коричневый или более темный оттенок). В
этом случае при использовании прибора Philips Lumea Precision
довольно высок риск развития кожных реакций, таких как сильное
покраснение, ожоги и изменение цвета кожи.

РУССКИЙ64
Запрещается пользоваться прибором при следующих
заболеваниях и состояниях:
- При наличии кожных заболеваний, таких как рак кожи в активной
стадии; при наличии перенесенных раковых поражений кожи
или других локальных раковых поражений на обрабатываемых
участках.
- При наличии на обрабатываемых участках предраковых лезий или
множественных атипичных родинок.
- При наличии в анамнезе нарушений коллагенообразования,
включая формирование келоидов или нарушение процесса
ранозаживления.
- При наличии в анамнезе заболеваний сосудистой системы, таких
как варикозное расширение вен или сосудистая эктазия на
обрабатываемых участках.
- При чувствительности кожи к свету и при быстром возникновении
аллергических реакций.
- При наличии инфекционных заболеваний, экземы, ожогов,
воспаленных волосяных фолликулов, открытых ран, царапин,
герпеса, ранений, лезий или гематом на обрабатываемых участках.
- При наличии послеоперационных шрамов на обрабатываемых
участках.
- При наличии эпилептических заболеваний с чувствительностью к
мигающему свету.
- При наличии таких заболеваний, как диабет, туберкулезная
волчанка, порфирия или застойная сердечная недостаточность.
- При наличии каких-либо нарушений свертываемости крови.
- При наличии в анамнезе заболеваний, подавляющих иммунитет
(включая ВИЧ-инфекцию или СПИД).
Запрещается пользоваться прибором при приеме
следующих лекарственных препаратов:
- На участках кожи, которые обрабатываются или недавно были
обработаны препаратами, содержащими альфа-оксикислоты (AHA),
бета-оксикислоты (BHA), изотретиноин местного применения или
азелаовую кислоту.
- В случае приема изотретиноина (Accutane
течение последних шести месяцев. Лечение такими препаратами
может повысить склонность кожи к появлению повреждений, ран
и раздражения.
- В случае приема болеутоляющих средств, уменьшающих
чувствительность к теплу.
- При приеме фотосензибилизирующих медикаментов и
средств внимательно ознакомьтесь с инструкцией препарата
и не используйте прибор, если в инструкции указано, что
прием препарата может привести к фотоаллергической или
фототоксической реакции, а также если при приеме данного
препарата рекомендуется избегать солнца.
- При приеме антикоагуляционных препаратов, включая
интенсивное употребление аспирина, при котором недостаточно
соблюдения минимального периода вымывания (1 неделя) перед
каждой процедурой.
- При приеме иммуносупрессорных препаратов.
®
или Roaccutance®) в

РУССКИЙ 65
Никогда не используйте прибор на следующих участках.
- Вокруг глаз и рядом с бровями;
- На сосках, ареолах, в области малых половых губ, влагалища, ануса,
в ноздрях или ушах.
- Мужчины не должны использовать прибор в области мошонки и
на лице.
- Непосредственно на или возле искусственных имплантатов, таких
как силиконовые имплантаты, кардиостимуляторы, каналы для
подкожного впрыскивания (система для введения инсулина) или
пирсинг.
- На участках с родинками, веснушками, увеличенными венами,
пигментными пятнами, шрамами, кожными аномалиями без
предварительной консультации с врачом. Это может стать
причиной ожога или изменения пигментации, что может
затруднить диагностику кожных заболеваний (например, рака
кожи).
- На бородавках, татуировках или перманентном макияже. Это
может привести к ожогу или пигментации кожи.
- На участках нанесения дезодорантов длительного действия. Это
может привести к аллергическим кожным реакциям. См. главу
“Использование прибора”, раздел “Возможные побочные эффекты
и кожные реакции”.
Запрещается использовать прибор на коже, обгоревшей
на солнце, на коже, которая недавно (в последние
48 часов) подверглась воздействию солнечных лучей или
воздействию искусственного загара:
- На безопасность процедуры может повлиять наличие загара
любого типа. Это относится как к естественному солнечному
загару, так и к искусственно приобретенному (при помощи
лосьонов, специального оборудования и пр.). Если вы недавно
загорали или собираетесь загорать/наносить средства для загара,
ознакомьтесь с главой “Подготовка к использованию прибора”,
раздел “Советы по эпиляции при наличии загара”.
Примечание Это не полный список. Если вы не уверены в том, можно ли
вам использовать прибор, проконсультируйтесь с врачом.
Электромагнитные поля (ЭМП)
Данный прибор Philips соответствует стандартам по
электромагнитным полям (ЭМП). При правильном обращении
согласно инструкциям, приведенным в руководстве пользователя,
применение прибора безопасно в соответствии с современными
научными данными.
Зарядка
Перед первым использованием прибора или при полной разрядке
аккумуляторов его необходимо зарядить. Полная зарядка
аккумуляторов занимает примерно 1 час 40 минут.
Зарядите прибор, если во время использования индикатор зарядки
загорается оранжевым, что указывает на низкий заряд аккмулятора. В
этом случае оставшегося заряда аккумуляторов хватит как минимум на
30 вспышек.

РУССКИЙ66
Полностью заряженный аккумулятор обеспечивает не менее
320 вспышек при использовании 5 уровня интенсивности света.
Полностью заряжайте прибор каждые 3-4 месяца, даже если прибор
не используется в течение длительного времени.
Зарядите прибор следующим образом:
1 Выключите прибор.
2 Вставьте маленький штекер в прибор и подключите адаптер к
розетке электросети.
, Мигающий зеленым индикатор зарядки сигнализирует о том, что
прибор заряжается.
, При полной зарядке аккумуляторов индикатор зарядки ровно
горит зеленым.
Примечания.
- Во время зарядки адаптер и прибор нагреваются. Это нормально.
- Во время зарядки прибор использовать нельзя.
- Данный прибор оснащен системой защиты аккумуляторов от
перегрева и не заряжается, если температура в помещении
превышает 40 °C.
Запрещается покрывать прибор и адаптер во время зарядки.
3 После завершения зарядки извлеките адаптер из розетки
электросети и отключите маленький штекер от прибора.
Подготовка прибора к работе
Для достижения оптимальных результатов и максимальной
эффективности подготовьте участки, на которых вы намерены
использовать прибор, как описано ниже.
Подготовка обрабатываемых участков
1 При наличии волос выбрейте участки, подлежащие обработке.
Примечание Если во время последней процедуры эпиляции волосы были
удалены с корнем (например, при помощи эпилятора или воска), перед
тем как использовать прибор Philips Lumea Precision, подождите, пока
волосы отрастут. Не используйте вместо бритья кремы-депиляторы.
При обработке участков, где волосы не были сбриты
или были сбриты не полностью, возникают следующие
нежелательные явления.
- Со временем на стеклянном фильтре и насадке может скопиться
грязь и остатки волос. При загрязнении стеклянного фильтра
и насадки сокращается срок службы и эффективность работы
прибора. Кроме того, выгоревшие/черные точки на фильтре и
насадках, появившееся в результате загрязнения, могут вызвать
болезненные ощущения во время эпиляции и кожные реакции,
такие как покраснение и изменение цвета кожи.
- Волосы на коже могут сгорать, что вызывает неприятный запах.

РУССКИЙ 67
2 Очистите кожу и убедитесь, что все волосы сбриты, затем
насухо вытрите ее и удалите излишки жира и масла (которые
могут быть составной частью некоторых косметических средств,
таких как дезодорант, лосьон, духи и крем для/от загара).
3 Проверьте, не загрязнен ли прибор, особенно стеклянный фильтр
и насадка, волосами, пылью или волокнами. При обнаружении
загрязнения очистите прибор согласно инструкциям,
приведенным в главе “Очистка и уход”.
Примечания.
- Если после бритья на коже остаются ранки или повреждения,
вероятно, у вас чувствительная кожа, и процедура фотоэпиляции
иногда может вызывать неприятные ощущения.
- Как только волосы перестанут расти (обычно это происходит
после 4—5 процедур), вам больше не нужно бриться перед
использованием прибора.
Выбор уровня интенсивности светового импульса
Прибор Philips Lumea Precision разработан для домашнего
использования, и по болевым ощущениям его нельзя сравнить с
профессиональными приборами для фотоэпиляции. По сравнению
с профессиональными устройствами прибор Philips Lumea Precision
генерирует гораздо более щадящие световые импульсы, что делает
процедуру комфортной и эффективной.
Интенсивность светового импульса устанавливается в соответствии
с цветом кожи и волос на теле, а также в зависимости от
индивидуальных ощущений.
Таблица с рекомендуемыми настройками интенсивности светового
импульса, приведенная ниже, поможет выбрать подходящую
интенсивность светового воздействия.
1 Чтобы определить настройки интенсивности светового
импульса, наиболее подходящие для вашего цвета кожи и
волос на теле, а также удостовериться в том, что данный
метод эпиляции вам подходит, см. таблицу ниже (если данный
метод эпиляции вам не подходит, это обозначается в таблице
символом “x”).
2 Для каждой части тела и даже для каждого отдельного участка
может потребоваться определенная настройка интенсивности,
которую необходимо выбрать в соответствии с таблицей,
приведенной ниже. Данный способ эпиляции наиболее
эффективен при использовании настроек более высокой
интенсивности, однако при появлении дискомфорта или
болезненных ощущений интенсивность светового воздействия
необходимо снизить.
Люди с темной кожей в большей степени подвержены риску
возникновения кожного раздражения, поскольку их кожа поглощает
больше света. Поэтому, если у вас темная кожа, рекомендуем
выбирать настройки более низкой интенсивности.
Под воздействием светового импульса на коже может появляться
ощущение тепла или жара, однако процедура не должна быть
болезненной. Информацию о предотвращении кожных реакций см.

РУССКИЙ68
в главе “Использование прибора”, раздел “Возможные побочные
эффекты и кожные реакции”.
Рекомендованная интенсивность света (1–5)
В таблице ниже символ “x” означает, что прибор для вас не подходит.
Цвета и характеристики кожи:
Цвет волос на
теле:
темно-русые/светло-каштановые/
каштановые/темно-каштановые/
черные
белый/седой/
рыжий/светлый
блондин
Белый
(всегда
появляются
ожоги,
не загорает)
4/5 4/5 4/5 3/4 1/2/3 x
x x x x x x
Бежевый
(часто
появляются
ожоги,
слабо
загорает)
Важно!
Чтобы определить, подходит ли вам прибор Philips Lumea Precision,
см. раздел “Кто не может пользоваться фотоэпилятором Philips Lumea
Precision?”.
Если вы загорали на солнце или использовали средства для
искусственного загара, кожа может стать темнее, чем во время
предыдущих процедур. Чтобы выбрать настройки интенсивности,
подходящие для вашего цвета кожи, ознакомьтесь с таблицей выше.
Советы по эпиляции при наличии загара
Прием солнечных ванн до процедуры
- После приема солнечных ванн до использования прибора должно
пройти не менее 48 часов. Солнечные ванны могут вызвать
потемнение кожи (загар) и/или привести к ожогу (покраснение
кожи).
- По истечении 48 часов убедитесь, что на коже нет солнечных
ожогов. Прибор Philips Lumea Precision можно использовать
только после того, как ожоги полностью пройдут.
- После того как исчезнут следы солнечных ожогов, выполните
тест на участке кожи (см. главу “Использование прибора”, раздел
“Первое использование”), на котором будет проводиться
эпиляция, чтобы определить подходящий уровень интенсивности.
Светлокоричневый
(иногда
появляются ожоги,
хорошо
загорает)
Коричневый
(ожоги
появляются редко,
кожа
быстро и
хорошо загорает)
Темно-коричневый
(ожоги
появляются редко,
очень
хорошо
загорает)
Черно-коричневый и более
темный (кожа
редко/никогда
не сгорает и
имеет очень
темный оттенок)

РУССКИЙ 69
- Если кожа загорелая, выполните тест на небольшом участке (см.
главу “Использование прибора”, раздел “Первое использование”),
на котором будет проводиться эпиляция, чтобы определить
подходящий уровень интенсивности. Невыполнение такого теста
повышает риск развития кожных реакций после использования
фотоэпилятора Philips Lumea Precision.
Прием солнечных ванн после процедуры
- После проведения процедуры обработанные участки кожи можно
подвергать воздействию солнечного света не менее чем через
24 часа. Но даже по истечении 24 часов необходимо проверить,
не осталось ли на обработанных участках покраснений, перед тем
как подвергать их воздействию солнечного света.
- Во время пребывания на солнце закрывайте обработанные участки
кожи или используйте солнцезащитные средства с высоким
фактором защиты (SPF 30+) в течение 2 недель после процедуры.
- Если не применять защитные меры, воздействие солнечных лучей
на обработанные участки сразу после процедуры может повысить
риск возникновения побочных эффектов и кожных реакций. См.
главу “Использование прибора”, раздел “Возможные побочные
эффекты и кожные реакции”.
Загар с использование искусственного света
- Следуйте изложенным выше инструкциям в разделе “Прием
солнечных ванн до процедуры” и “Прием солнечных ванн после
процедуры”.
Использование кремов для искусственного загара
- Если вы наносили на кожу крема или лосьоны для искусственного
загара, перед использованием прибора Philips Lumea Precision
дождитесь полного исчезновения искусственного загара.
Примечание Дополнительную информацию о нежелательных кожных
реакциях см. в главе “Использование прибора”, раздел “Возможные
побочные эффекты и кожные реакции”.
Использование прибора
Для определения настроек интенсивности, оптимально подходящих
для вашего цвета кожи и волос, ознакомьтесь с таблицей в главе
“Подготовка к использованию прибора”, разделе “Выбор уровня
интенсивности светового импульса”. Используйте прибор в хорошо
освещенном помещении; достаточное количество света сокращает
видимую яркость вспышек. Перед использованием прибора побрейте
область эпиляции (см. главу “Подготовка к использованию прибора”,
раздел “Подготовка обрабатываемых участков”).
Если процедура становится нестерпимо болезненной в какой-либо
момент, снижайте интенсивность, пока процедура снова не станет
комфортной. Если вы заметили более сильную кожную реакцию, чем
легкое покраснение, немедленно прекратите процедуру и прочтите
раздел “Возможные побочные эффекты и кожные реакции” в этой
главе.

РУССКИЙ70
Выбор насадки
- Насадка для тела
Насадка для тела может использоваться для удаления нежелательных
волос на теле на участках ниже шеи (исключения см. в главе “Важная
информация”, “Противопоказания”). Площадь воздействия насадки для
тела составляет 3 см и идеально подходит для обработки больших
участков.
Не используйте насадку для тела для удаления волос на лице.
- Прецизионная насадка
Прецизионная насадка оснащена дополнительным световым фильтром
и может использоваться для удаления нежелательных волос на лице:
над верхней губой, на подбородке и висках. Она также подходит для
удаления волос на более чувствительных участках тела, например, в
области подмышек и зоны бикини или в труднодоступных местах.
Не используйте прибор в области вокруг глаз и рядом с бровями.
Первое использование и тест на небольшом участке кожи
1 Выберите насадку, подходящую для области, на которой будет
проводиться эпиляция.
2 Выберите участок, расположенный рядом с областью, на
которой будет проводиться эпиляция.
Примечание Прежде чем использовать прибор для удаления
волос над верхней губой, на подбородке или висках, для проведения
теста выберите участок кожи, на котором нет волос и родинок,
расположенный ниже уха.
3 Нажмите кнопку включения/выключения для включения
прибора.
, Прибор автоматически начинает работу, используя настройку
минимальной интенсивности.
4 Интенсивность светового импульса первой вспышки должна
быть наименьшей из рекомендованных для вашего типа кожи
(для получения рекомендаций, касающихся подачи светового
импульса, см. шаги 6—9 в разделе “Дальнейшее использование” в
этой главе).
5 Пока вы не почувствуете дискомфорт (пока не появятся
болезненные ощущения), повышайте интенсивность на один
уровень в границах значений интенсивности светового импульса,
рекомендованных для вашего типа кожи, и выполняйте по

РУССКИЙ 71
одной вспышке для каждой настройки. Выполнять более одной
вспышки на одном и том же участке нельзя.
6 После пробного использования подождите 24 часа, обратите
внимание на наличие кожных реакций. В случае появления
кожных реакций выберите максимальную интенсивность, при
которой кожные реакции отсутствуют.
Если вы впервые используете прибор, рекомендуется выполнить тест
на участке коже, на котором будет проводиться эпиляция, чтобы
проверить реакцию кожи на воздействие прибора и привыкнуть к
процедуре фотоэпиляции.
Последующие процедуры
1 Перед каждым использованием проводите очистку насадок,
стеклянного фильтра и металлической рамки внутри насадок
фотоэпилятора Philips Lumea Precision. Для получения более
подробной информации см. главу “Очистка и уход”.
2 Выберите насадку, подходящую для области, на которой будет
проводиться эпиляция.
3 Нажмите кнопку включения/выключения для включения
прибора.
Примечание В процессе использования прибор и насадка нагреваются
— это нормально.
4 Перед каждой процедурой тщательно подбирайте настройку
интенсивности светового импульса с учетом уровня
чувствительности кожи и ваших ощущений.
Существует множество причин, по которым в разное время
и в разных ситуациях кожа может по-разному реагировать на
воздействие прибора. Дополнительную информацию см. в разделе
“Возможные побочные эффекты и кожные реакции” в этой главе.
5 Для увеличения интенсивности используйте кнопку %. Для
уменьшения интенсивности используйте кнопку ^.
, После каждого нажатия кнопки начинает мигать
соответствующий индикатор интенсивности. Это занимает
несколько секунд.
6 Установите прибор перпендикулярно к поверхности кожи,
чтобы насадка и кольцо безопасности касались кожи.

РУССКИЙ72
7 Плотно прижмите кольцо безопасности к коже, слегка надавив
на него.
Примечание Кольцо безопасности оснащено контактными
переключателями, которые, вместе с кольцом, формируют систему
безопасности прибора. Кольцо безопасности предотвращает случайное
включение прибора без контакта с кожей.
, При контакте всех переключателей на кольце безопасности
с кожей индикатор готовности к подаче светового импульса,
расположенный на задней панели прибора, загорится зеленым
светом. Этот процесс может занять до 3,5 секунд.
Совет. Для упрощения процедуры растяните кожу на участке,
подлежащем обработке. При обработке участков с более мягкой
кожей для обеспечения полного контакта переключателей, возможно,
вам придется приложить больше усилий, надавливая на прибор.
8 Для генерации световой вспышки нажмите кнопку подачи
светового импульса.
Примечание Видимый свет, поступающий из прибора,
является отражением светового импульса на коже и безопасен для
глаз. Во время использования прибора нет необходимости надевать
защитные очки.
9 После срабатывания вспышки отпустите кнопку подачи
светового импульса.
10 Для генерации следующей вспышки повторите шаги 6—9.
Устройство готово к подаче следующей вспышки спустя
3,5 секунды.
Во время сеанса эпиляции не обрабатывайте один и тот же участок
несколько раз. Это не повышает эффективность работы прибора, а
лишь увеличивает риск возникновения кожных реакций.
11 Чтобы не оставить некоторые участки кожи необработанными,
всегда прикладывайте прибор так, чтобы его положение
частично совпадало с предыдущим местом обработки.
Действующий световой импульс поступает только из окна
выхода света. Убедитесь, что световые импульсы выполняются
рядом друг с другом.
12 Выключите прибор после окончания удаления волос.
13 Проверьте, не загрязнены ли стеклянный фильтр и насадка
остатками волос и пылью, всегда очищайте прибор после
использования. См. главу “Очистка и уход”.
Руководство по использованию прибора
Среднее время воздействия

РУССКИЙ 73
Участок Приблиз. время воздействия Рекомендованная насадка
Подмышки 1,5 минуты на обработку
Линия бикини 1,5 минуты на обработку
Зона бикини полностью 5 минут Насадка для тела/прецизионная
Одна голень 12 минут Насадка для тела
Одна нога полностью 20 минут Насадка для тела
Область над верхней
губой/подбородок/виски
каждой подмышки
каждой стороны
1 минута Насадка для точного подравнивания
Примечание Указанные выше средние значения времени воздействия
были получены в ходе исследований и тестирования прибора.
Оптимальное время воздействия является индивидуальным.
Примечание Полностью заряженный аккумулятор обеспечивает
срабатывание не менее 320 вспышек при использовании 5 уровня
интенсивности света. Время использования прибора зависит от
размера обрабатываемого участка и установленной настройки
интенсивности светового импульса.
Области применения
Прибор предназначен для удаления нежелательных волос в области
над верхней губой, на подбородке, висках, в области подмышек, на
руках, животе, в области бикини и на ногах.
Использование прибора для эпиляции ног
Выберите настройку интенсивности светового воздействия,
рекомендуемую для применения при эпиляции ног, в таблице,
приведенной в главе “Подготовка к использованию прибора”, разделе
“Выбор уровня интенсивности светового импульса”.
- Во время эпиляции ног прибор можно перемещать вверх, вниз или
в стороны, в зависимости от ваших предпочтений.
Примечание Участки, где кости расположены близко к коже (голень,
лодыжки) более чувствительны, чем другие участки тела. Слишком
сильное нажатие на насадку прибора на таких участках может
повысить риск кожных реакций, таких как раздражение и покраснение.
См. раздел “Возможные побочные эффекты и кожные реакции” в этой
главе. Прижимайте насадку к коже настолько сильно, насколько это
необходимо, чтобы загорелся индикатор готовности к подаче импульса,
но не более того.
Совет. При использовании прибора на коже могут оставаться следы.
С их помощью можно легко определить место повторного применения
прибора.
Во время использования прибора для полной эпиляции ног может
потребоваться подзарядка аккумулятора. Это нормально. Время
использования прибора зависит от размера обрабатываемого участка
и установленной настройки интенсивности светового импульса.
Насадка для тела/прецизионная
насадка
Насадка для тела/прецизионная
насадка
насадка

РУССКИЙ74
Совет. Многие во время процедуры смотрят телевизор или слушают
музыку. Благодаря этому процесс эпиляции становится более
приятным и расслабляющим.
Использование прибора в зоне бикини
Выберите настройку интенсивности светового воздействия,
рекомендуемую для применения в области бикини, в таблице,
приведенной в главе “Подготовка к использованию прибора”, в
разделе “Выбор уровня интенсивности светового импульса”.
Благодаря безопасному и мягкому воздействию, прибор Philips Lumea
Precision может использоваться для эпиляции всей области бикини
(например, для создания бразильской или голливудской стрижки). Для
обработки более темных и чувствительных участков зоны бикини
выберите настройки более низкой интенсивности. Не используйте
прибор в области малых половых губ, влагалища или ануса. При
обработке лобковой области мужчины не должны использовать
прибор в области мошонки.
Примечание Из гигиенических соображений всегда очищайте насадку
перед началом обработки другой области.
Использование прибора в области подмышек
Выберите настройку интенсивности светового воздействия,
рекомендуемую для применения в области подмышек, в таблице,
приведенной в главе “Подготовка к использованию прибора”, разделе
“Выбор уровня интенсивности светового импульса”.
Перед проведением эпиляции очистите кожу от остатков
дезодоранта, крема или другого продукта по уходу за кожей.
Совет. Для достижения оптимальных результатов во время эпиляции
в области подмышек встаньте напротив зеркала, чтобы получить
хороший обзор области эпиляции и индикатора готовности к подаче
импульса. Поднимите руку и положите ее на затылок, чтобы кожа в
области подмышек натянулась. Таким образом кольцо безопасности
будет находиться в более плотном контакте с кожей, что упростит
проведение процедуры.
Примечание Отраженный свет не оказывает негативного
воздействия на зрение. Однако если свет вызывает у вас чувство
дискомфорта, нажимая кнопку подачи светового импульса, закрывайте
глаза.
Использование прибора для удаления волос на лице
(область над верхней губой, подбородок, виски)
Выберите настройку интенсивности светового воздействия,
рекомендуемую для применения на лице, в таблице, приведенной в
главе “Подготовка к использованию прибора”, разделе “Выбор уровня
интенсивности светового импульса”.
Для удаления волос над верхней губой, на подбородке и висках
всегда используйте прецизионную насадку. Никогда не подносите
включенный прибор близко к глазам и бровям. При удалении волос
над верхней губой, на подбородке или висках не подвергайте лицо
воздействию прямых солнечных лучей в течение 24 часов после
процедуры. При нахождении на солнце наносите на кожу средство
с высоким фактором защиты (SPF 30+) в течение 2 недель после
процедуры.

РУССКИЙ 75
Совет. Для достижения оптимальных результатов во время
эпиляции области над верхней губой, на подбородке и висках встаньте
напротив зеркала, чтобы получить хороший обзор области эпиляции и
индикатора готовности к подаче импульса.
Совет. Из-за особенностей строения челюсти достижение полного
контакта кольца безопасности с кожей может быть затруднено. Для
улучшения площади контактной поверхности вставьте язык между
десной и верхней губой или надуйте щеки.
Совет. Отраженный свет не оказывает негативного воздействия на
зрение. Однако если свет вызывает у вас чувство дискомфорта, нажимая
кнопку подачи светового импульса, закрывайте глаза.
Как достигнуть наилучшего результата
- После первых сеансов волосы будут по-прежнему видны, так и
должно быть (см. главу “Введение”, раздел “Принцип действия”).
- Для успешного удаления волос и предотвращения повторной
активизации волосяных фолликулов в течение первых двух
месяцев процедуру следует повторять раз в две недели.
После этого кожа должна стать полностью гладкой. Для
поддержания достигнутого результата ознакомьтесь с главой
“Поддерживающий уход”.
Поддерживающий уход
- Для поддержания гладкости кожи рекомендуем повторять
процедуру раз в 4—6 недель. Промежуток между процедурами
может различаться в зависимости от индивидуальных
особенностей интенсивности роста волос, а также темпов роста
волос на разных участках тела. Если же количество отросших за
это время волос будет слишком велико, достаточно уменьшить
интервал между сеансами (однако он не должен быть меньше
двух недель). При более частом использовании прибора его
эффективность остается прежней, а риск кожных реакций
увеличивается.
Возможные побочные эффекты и кожные реакции
Частые кожные реакции:
- На коже может появиться небольшое покраснение и/или чувство
покалывания, зуда или легкого жжения. Такая реакция абсолютно
безопасна и быстро проходит.
- На короткое время на обработанном участке может возникнуть
кожная реакция, похожая на солнечный ожог. Если раздражение
не проходит через 3 дня, рекомендуем проконсультироваться с
врачом.
- Бритье и последующая фотоэпиляция могут вызвать сухость кожи
и зуд. Эти явления не опасны и проходят через несколько дней.
На обработанные области можно положить пакет со льдом или
влажную салфетку из махровой ткани. Если сухость не проходит,
по истечении 24 часов можно нанести на обработанные участки
увлажняющее средство без отдушек.

РУССКИЙ76
Редкие побочные эффекты.
- Ожоги, сильное покраснение и отек. Эти явления крайне редки и
являются результатом использования слишком высокой для вашего
цвета кожи интенсивности светового импульса. Если эти реакции
не пройдут через 3 дня, рекомендуем проконсультироваться
с врачом. Не выполняйте повторную процедуру, пока кожа
полностью не восстановится, а для последующих процедур
используйте более низкую интенсивность светового импульса.
- Изменение цвета кожи. Крайне редкое явление. Изменение
цвета кожи выглядит как появление более темных или более
светлых участков на поверхности кожи и является результатом
использования слишком высокой для вашего цвета кожи
интенсивности светового импульса. Если нормальный цвет кожи не
восстановится через 2 недели, рекомендуем обратиться к врачу.
Не применяйте прибор на таких участках, пока не восстановится
нормальный цвет кожи.
- Воспаление кожи и инфекционные заболевания. Эти явления
крайне редки и возникают вследствие использования прибора на
участках с повреждениями кожи после бритья, прочими ранами, а
также на участках с вросшими волосами.
- Сильная боль. Боль может возникнуть во время или после
эпиляции, если: прибор применялся на участках, на которых
предварительно не было проведено бритье; была выбрана
слишком высокая для вашего цвета кожи интенсивность
светового импульса; на один и тот же участок вспышка была
направлена более одного раза; прибор использовался на участках
с открытыми ранами, воспалением, инфекционными заболеваниями,
татуировками, ожогами и пр. Дополнительные сведения см. в главе
“Важная информация”, раздел “Противопоказания”.
После завершения работы
- Не наносите парфюмированные косметические вещества на
обработанные участки непосредственно после процедуры.
- Не используйте дезодорант после процедуры, пока покраснение
полностью не исчезнет.
- Информацию о воздействии солнечного света и средствах для
искусственного загара см. в главе “Подготовка к использованию
прибора”, раздел “Советы по эпиляции при наличии загара”.
Очистка и уход
Чтобы достичь оптимальных результатов и продлить срок службы
прибора, очищайте его каждый раз до и после использования, а
также во время использования, если необходимо. Если не очищать
прибор должным образом, эффективность его работы снижается.

РУССКИЙ 77
Запрещается промывать прибор или его детали под струей воды
или в посудомоечной машине.
Запрещается использовать для чистки прибора губки с абразивным
покрытием, абразивные чистящие средства или растворители типа
бензина или ацетона.
Защищайте от царапин стеклянный фильтр и металлическую рамку
внутри насадок.
Примечание Следите, чтобы контактные переключатели кольца
безопасности не засорились.
Примечание Прекратите использование прибора, если стеклянный
фильтр или насадки больше не поддаются очистке.
1 Выключите прибор, отсоедините его от сети и дайте ему остыть.
Примечание Стеклянный фильтр нагревается в процессе
использования. Дайте ему остыть перед очисткой.
2 Чтобы снять насадку, поставьте пальцы в углубления в верхней
и нижней части и осторожно потяните на себя. Насадка должна
легко отсоединиться.
3 Несколькими каплями воды смочите мягкую ткань, входящую в
комплект прибора, и очистите с ее помощью следующие части:
- стеклянный фильтр
- внешние поверхности насадок
- металлическую рамку внутри насадок
- красное стекло фильтра внутри прецизионной насадки
Примечание Если очистки водой недостаточно, смочите ткань
несколькими каплями высокопроцентного изопропилового спирта и
очистите перечисленные выше части.
Примечание Загрязненный стеклянный фильтр и/или насадка могут
выглядеть, как на этом изображении. Очищайте прибор каждый раз
до и после использования, а также во время использования (если это
необходимо) в соответствии с инструкциями, приведенными в этом
разделе.
Совет. Если насадки не удается очистить с помощью входящей в
комплект ткани для очистки, используйте ватную палочку. Убедитесь,
что на насадках или фильтре нет пыли и волокон.
4 При необходимости протрите внешнюю поверхность прибора
сухой мягкой тканью, входящей в комплект.
Хранение
1 Выключите прибор, отсоедините его от сети и дайте ему остыть.
2 Очистите прибор перед тем, как убрать его на хранение.
3 Поместите прибор в прилагаемый чехол для хранения.
4 Храните прибор в сухом месте при температуре от 0°C до 60°C.

РУССКИЙ78
Замена деталей
Если необходимо заменить старую или приобрести дополнительную
деталь, посетите торговую организацию Philips или зайдите на вебсайт www.philips.com/support.
Если при заказе запасных частей возникли проблемы, обратитесь в
местный центр поддержки потребителей Philips.
Заменяемые детали
В продаже имеются следующие детали:
- Насадка для тела
- Насадка для точного подравнивания
- Адаптер
- Футляр
Защита окружающей среды
- После окончания срока службы не выбрасывайте прибор вместе
с бытовыми отходами. Передайте его в специализированный
пункт для дальнейшей утилизации. Этим вы поможете защитить
окружающую среду.
- Аккумуляторы содержит вещества, загрязняющие окружающую
среду. После окончания срока службы прибора и передачи его
для утилизации, аккумуляторы необходимо извлечь. Аккумуляторы
следует утилизировать в специализированных пунктах. Если при
извлечении аккумуляторов возникли затруднения, можно передать
прибор в сервисный центр Philips, где аккумуляторы извлекут и
утилизируют безопасным для окружающей среды способом.
Извлечение аккумулятора
Аккумуляторы необходимо извлекать, когда они полностью
разряжены.
1 Вставьте шило или другой заостренный предмет в нижнюю
часть крышки и снимите нижнюю крышку.

РУССКИЙ 79
2 Отверните винты в нижней части ручки при помощи отвертки.
3 Снимите нижнюю часть ручки и отрежьте два провода,
соединяющие нижнюю часть с прибором.
4 С помощью пассатижей отсоедините разъемы от клемм
аккумуляторов.
5 Извлеките аккумуляторы из прибора при помощи пассатижей.
6 Перережьте оба провода одновременно, чтобы избежать
возможной поломки вследствие остаточного разряда.

РУССКИЙ80
Гарантия и обслуживание
Для получения дополнительной информации и при необходимости
сервисного обслуживания, а также в случае возникновения проблем
посетите веб-сайт Philips www.philips.com или обратитесь в центр
поддержки потребителей Philips в вашей стране (номер телефона
центра указан на гарантийном талоне). Если подобный центр в вашей
стране отсутствует, обратитесь в местную торговую организацию
Philips.
Технические характеристики
Модель SC2002
Номинальное напряжение 100–240 В
номинальная частота 50–60 Гц
Потребляемая мощность 7,5 Вт
Защита от поражения электрическим током Класс II Q
Степень защиты IP 30 (EN 60529)
Условия эксплуатации Температура: от +15° до +35°C
Относительная влажность: от 25 % до 95 %
Условия хранения Температура: от 0° до +60°C
Относительная влажность: от 5% до 95%
Спектральный диапазон воздействия насадки для
тела
Спектральный диапазон воздействия
прецизионной насадки
Литий-ионный аккумулятор 2 x 3,7 В 1500 мА/ч
>570 нм
>600 нм
Поиск и устранение неисправностей
Данная глава посвящена наиболее распространенным проблемам,
возникающим при использовании прибора. Если приведенная ниже
информация не помогла самостоятельно справиться с проблемой,
обратитесь в центр поддержки потребителей Philips в вашей стране
(номер телефона центра указан на гарантийном талоне).

Проблема Возможная причина Способы решения
РУССКИЙ 81
Прибор не работает. Аккумуляторы разряжены. Зарядите аккумуляторы прибора (см.
Прибор поврежден. Обратитесь в центр поддержки
Прибор внезапно
автоматически
выключается.
Адаптер нагревается в
процессе зарядки.
Индикатор зарядки не
включается после того,
как маленький штекер
вставлен в разъем
прибора.
Прибор был включен,
но мне не удается
изменить настройку
интенсивности света.
Аккумуляторы разряжены. Зарядите аккумуляторы прибора (см.
Это нормально. Не требуется никаких действий.
Адаптер не подключен к
розетке электросети.
Розетка электросети
неисправна.
Адаптер неправильно
вставлен в розетку
электросети и/или
маленький штекер
неправильно вставлен в
разъем прибора.
Прибор поврежден. Обратитесь в центр поддержки
Необходимо сбросить
настройки прибора.
главу “Зарядка”).
потребителей в вашей стране, в
торговую организацию Philips или в
сервисный центр Philips.
главу “Зарядка”).
Вставьте маленький штекер в разъем
прибора и подключите адаптер к
розетке электросети.
Для проверки исправности розетки
электросети подключите к ней другой
прибор. Если розетка исправна, но
прибор по-прежнему не работает,
обратитесь в центр поддержки
потребителей в вашей стране, в
торговую организацию Philips или в
сервисный центр Philips.
Убедитесь, что адаптер правильно
вставлен в розетку электросети и/или
маленький штекер правильно вставлен в
разъем прибора.
потребителей в вашей стране, в
торговую организацию Philips или в
сервисный центр Philips.
Для сброса настроек выключите и
снова включите прибор. Если и после
этого не удается изменить настройку
интенсивности света, обратитесь в
центр поддержки потребителей в вашей
стране, в торговую организацию Philips
или в сервисный центр Philips.

РУССКИЙ82
Проблема Возможная причина Способы решения
После того как прибор
помещен на кожу,
индикатор готовности
к подаче импульса не
загорается.
После того как насадка
прибора помещена
на кожу, индикатор
готовности к подаче
импульса не загорается,
а охлаждающий
вентилятор работает.
Индикатор готовности
к подаче импульса горит
зеленым, однако, прибор
не выполняет вспышку
при нажатии кнопки
светового импульса.
Во время использования
прибор нагревается.
Насадка с кольцом
безопасности неправильно
приложена к коже.
Кольцо безопасности
загрязнено.
Включена система защиты
от перегрева.
Необходимо сбросить
настройки прибора.
Это нормально. Не требуется никаких действий.
Поставьте прибор под углом 90 ° к
поверхности кожи, все переключатели
контактов должны касаться кожи.
Затем проверьте, горит ли индикатор
готовности к подаче импульса, и
нажмите кнопку подачи светового
импульса.
Если это не помогает, приложите
прибор к части тела, на которой прибор
легко соприкасается с кожей (например,
предплечье). Затем проверьте,
работает ли индикатор готовности к
подаче импульса. Если, после того как
прибор помещен на кожу, индикатор
не загорается, обратитесь в центр
поддержки потребителей в вашей
стране, в торговую организацию Philips
или в сервисный центр Philips.
Осторожно очистите кольцо
безопасности. Если не удается
тщательно очистить кольцо
безопасности, обратитесь в центр
поддержки потребителей в вашей
стране, в торговую организацию Philips
или в сервисный центр Philips для
замены насадки.
При включении системы защиты от
перегрева вентилятор продолжает
работать. Не выключайте прибор, дайте
ему охладиться около 15 минут, затем
возобновите сеанс. Если после того как
прибор помещен на кожу, индикатор
не загорается, обратитесь в центр
поддержки потребителей в вашей
стране, в торговую организацию Philips
или в сервисный центр Philips.
Для сброса настроек выключите и
снова включите прибор. Если после
этого индикатор готовности к подаче
импульса продолжает гореть зеленым,
а прибор не выполняет вспышку,
обратитесь в центр поддержки
потребителей в вашей стране, в
торговую организацию Philips или в
сервисный центр Philips.

Проблема Возможная причина Способы решения
РУССКИЙ 83
При включении
прибора не
загорается индикатор
интенсивности света 1.
При работе прибора
ощущается странный
запах.
Во время процедуры
кожа становится более
чувствительной, чем
обычно.
Необходимо сбросить
настройки прибора.
Насадка и/или стеклянный
фильтр загрязнены.
Подлежащий обработке
участок не выбрит как
полагается.
Прибор хранился в пыльном
помещении.
Установленная
интенсивность светового
импульса слишком высокая.
Подлежащие обработке
участки не выбриты.
Стеклянный УФ-фильтр
сломан.
Для сброса настроек выключите и
снова включите прибор. Если после
этого индикатор интенсивности света
1 не загорается, обратитесь в центр
поддержки потребителей в вашей
стране, в торговую организацию Philips
или в сервисный центр Philips.
Осторожно очистите насадку. Если не
удается тщательно очистить насадку,
обратитесь в центр поддержки
потребителей в вашей стране, в
торговую организацию Philips или в
сервисный центр Philips для замены
насадки.
Если на участке, подлежащем обработке,
имеются волосы, они могут сгорать во
время работы прибора. В результате
вы ощущаете странный запах. Для
упрощения процедуры выбрейте этот
участок перед использованием прибора.
Если бритье вызывает раздражение
кожи, с помощью триммера
подровняйте волосы как можно короче,
а затем установите подходящую
настройку.
После подачи нескольких световых
импульсов странный запах исчезнет.
Проверьте, правильно ли выбран
уровень интенсивности светового
импульса. При необходимости
установите более низкую интенсивность.
Перед использованием прибора всегда
выбривайте соответствующие участки.
Если бритье вызывает раздражение
кожи, с помощью триммера
подровняйте волосы как можно короче,
а затем установите подходящую
настройку.
Если стеклянный УФ-фильтр сломан,
прекратите использование прибора.
Обратитесь в центр поддержки
потребителей в вашей стране, в
торговую организацию Philips или в
сервисный центр Philips.

РУССКИЙ84
Проблема Возможная причина Способы решения
При использовании
прибора я испытываю
нестерпимую боль.
После процедуры
обработанные области
краснеют.
Кожная реакция
после процедуры
продолжается в течение
более длительного
времени, чем обычно.
Прибор поврежден. Обратитесь в центр поддержки
Подлежащие обработке
участки не выбриты.
Вы обрабатывали участок,
для которого прибор не
предназначен.
Вы установили слишком
высокую для вас
интенсивность светового
импульса.
Стеклянный фильтр или
красное стекло фильтра
насадки сломаны.
Прибор не подходит для
вашего цвета кожи.
Небольшое покраснение
— нормальная, безопасная
реакция, которая быстро
проходит.
Вы установили слишком
высокую для вас
интенсивность светового
импульса.
потребителей в вашей стране, в
торговую организацию Philips или в
сервисный центр Philips.
Перед использованием прибора всегда
выбривайте соответствующие участки.
Если бритье вызывает раздражение
кожи, с помощью триммера
подровняйте волосы как можно короче,
а затем установите подходящую
настройку.
Нельзя использовать прибор в области
малых половых губ, влагалища, ануса,
сосков, ареол, губ, в носу и ушах, рядом
с бровями и глазами. Не допускается
использование прибора мужчинами на
лице и в области мошонки.
Уменьшите интенсивность света
до комфортного уровня. См. главу
“Подготовка к использованию прибора”,
раздел “Выбор уровня интенсивности
света”.
В случае повреждения стеклянного
фильтра или красного стекла фильтра
прецизионной насадки, прекратите
использование прибора с этой насадкой.
Обратитесь в торговую организацию,
сервисный центр Philips или центр
поддержки потребителей Philips для
замены насадки.
Не используйте прибор, если у вас
слишком темная кожа. Также прибор
нельзя использовать, если волосы на
теле светло-русые, рыжие, пепельные
или седые.
Не требуется никаких действий.
В следующий раз используйте более
низкую интенсивность. См. главу
“Подготовка к использованию прибора”,
раздел “Выбор уровня интенсивности
светового импульса”.
Если кожная реакция продолжается
более 3 дней, обратитесь к врачу.

Проблема Возможная причина Способы решения
РУССКИЙ 85
Результаты эпиляции
неудовлетворительны.
В некоторых местах
на обработанных
участках рост волос
возобновляется.
Вы установили слишком
низкую для вас
интенсивность светового
импульса.
Во время процедуры вы
оставляли промежутки
между обработанными
участками.
Вы используете прибор
не так часто, как
рекомендовано.
Прибор не подходит для
вашего цвета кожи или
волос.
Во время процедуры вы
оставляли промежутки
между обработанными
участками.
Волосы начинают отрастать
снова, что является частью
естественного цикла роста
волос.
В следующий раз выберите более
высокую интенсивность светового
импульса.
Для достижения оптимальных
результатов при удалении волос
необходимо, чтобы обрабатываемые
участки частично налагались друг
на друга. См. главу “Использование
прибора”, шаг 11.
Для успешного удаления волос
и предотвращения повторной
активизации волосяных фолликулов в
течение первых двух месяцев процедуру
следует повторять раз в две недели.
Для поддержания гладкости кожи
рекомендуем повторять процедуру
раз в 4—6 недель. Промежуток между
процедурами может различаться
в зависимости от индивидуальных
особенностей интенсивности
роста волос, а также темпов роста
волос на разных участках тела. Если
же количество отросших за это
время волос будет слишком велико,
достаточно уменьшить интервал
между сеансами (однако он не должен
быть меньше двух недель). При более
частом использовании прибора его
эффективность остается прежней, а риск
кожных реакций увеличивается.
Не используйте прибор, если волосы на
теле светлые, рыжие, седые или белые.
Также не используйте прибор, если кожа
очень темная.
Для достижения оптимальных
результатов при удалении волос
необходимо, чтобы обрабатываемые
участки частично налагались друг
на друга. См. главу “Использование
прибора”, шаг 11.
Это нормальное явление. Повторное
отрастание волос — часть
естественного цикла роста волос. Тем
не менее, заново отросшие волосы
должны быть мягче и тоньше.

8687888990919293949596979899100


 Loading...