

Page 1

Register your product and get support at
www.philips.com/SatinLux
or call 00800-S-A-T-I-N-L-U-X (7-2-8-4-6-5-8-9)
SC2000
Page 2

2
Page 3
A
M
B
D
C
E
F
G
H
I
J
K
N
L
3
1
Page 4

4
Page 5

ENGLISH 6
DEUTSCH 22
ESPAÑOL 40
FRANÇAIS
ITALIANO 74
NEDERLANDS 92
PORTUGUÊS
57
110
SC2000
Page 6

6
1 2 3 41 2 3 4
ENGLISH
Introduction
Congratulations on your purchase and welcome to Philips! To fully benet
from the support that Philips offers, register your product at www.philips.
com/satinlux.
Hair removal with light is one of the most effective methods to get
rid of unwanted body hair with longer lasting results. It is completely
different from current home hair removal methods and Philips has been
investigating this method together with leading dermatologists for almost
10 years. You can now use this innovative technology comfortably in the
privacy of your own home, whenever you want.
This appliance is intended for removing women’s body hair on areas below
the neck:
underarms
bikini area
legs
-
The appliance is not intended for:
persons with a too light body hair colour (light blond, red, grey or
white body hair) or a very dark skin. See chapter ‘Preparing for use’,
section ‘Setting the light intensity’.
For more information about the SatinLux, see www.philips.com/satinlux.
How photo-epilation works
Hair growth
Depending on age, metabolism and other factors, everyone’s hair grows
differently, but hair normally grows in three phases:
1 Anagen phase (growing phase)
The hair grows actively from the root. In this phase the concentration
of melanin is highest. Melanin is responsible for the pigmentation of the
hair. The more melanin there is in the root, the darker the hair is. Melanin
concentration is also the determining factor for the efcacy of this method.
Only hairs in the anagen phase are susceptible to treatment with light.
2 Catagen phase (degradation phase)
The hair growth stops and the root shrinks before the hair sheds.
3 Telogen phase (resting phase)
The old hair separates from the root and the new hair slowly pushes out
the old hair. The root remains at rest until the biological clock tells it to
become active again and grow a new hair (4). Hairs on an area of skin are
usually in different stages of the cycle of hair growth.
Working principle
The appliance removes hair by heating up the hair and root beneath the
skin. The melanin in the hair and hair root absorbs the released light pulses.
The darker the colour of the hair, the more heat can be produced. This
process stimulates the hair to go into the resting phase.
The hair now sheds naturally and the hair growth is inhibited.
Optimal hair removal cannot be obtained with a single session, since only
hairs in the anagen phase are susceptible to treatment with light. During
a treatment, hairs on the treated area are usually in different stages of the
cycle of hair growth.
To treat all hairs successfully and to prevent the hair root from becoming
active again, the treatments have to be repeated once every two weeks.
Page 7

ENGLISH 7
An integrated optical lter makes sure no UV light reaches the skin and
therefore leaves it unharmed.
Benets
This appliance has the following advantages:
Professional IPL technology for home use
SatinLux uses a light-based technology called ‘Intense Pulsed Light’ (IPL). IPL
is also used in the professional beauty market for hair removal. SatinLux
now brings this innovative technology to the comfort of your home.
Effective hair regrowth prevention for everlasting smoothness
This method prevents hair from growing back for a long time and provides
a silky-smooth skin. Our studies have shown a signicant hair reduction
already after 2 treatments. Optimal results were generally achieved after
4 to 5 treatments. A reduction in hair density is visible from treatment to
treatment. How fast the effect becomes visible and how long the results
last varies from person to person. Repeat this treatment every two weeks
to achieve optimal results and to keep your skin smooth for ever.
Gentle treatment, even on sensitive body areas
SatinLux has been developed in close cooperation with leading
dermatologists for an effective and gentle treatment, even on the most
sensitive body areas.
Cordless operation for maximum freedom and exibility
Because the appliance runs on rechargeable batteries, it is portable and can
be used anywhere.
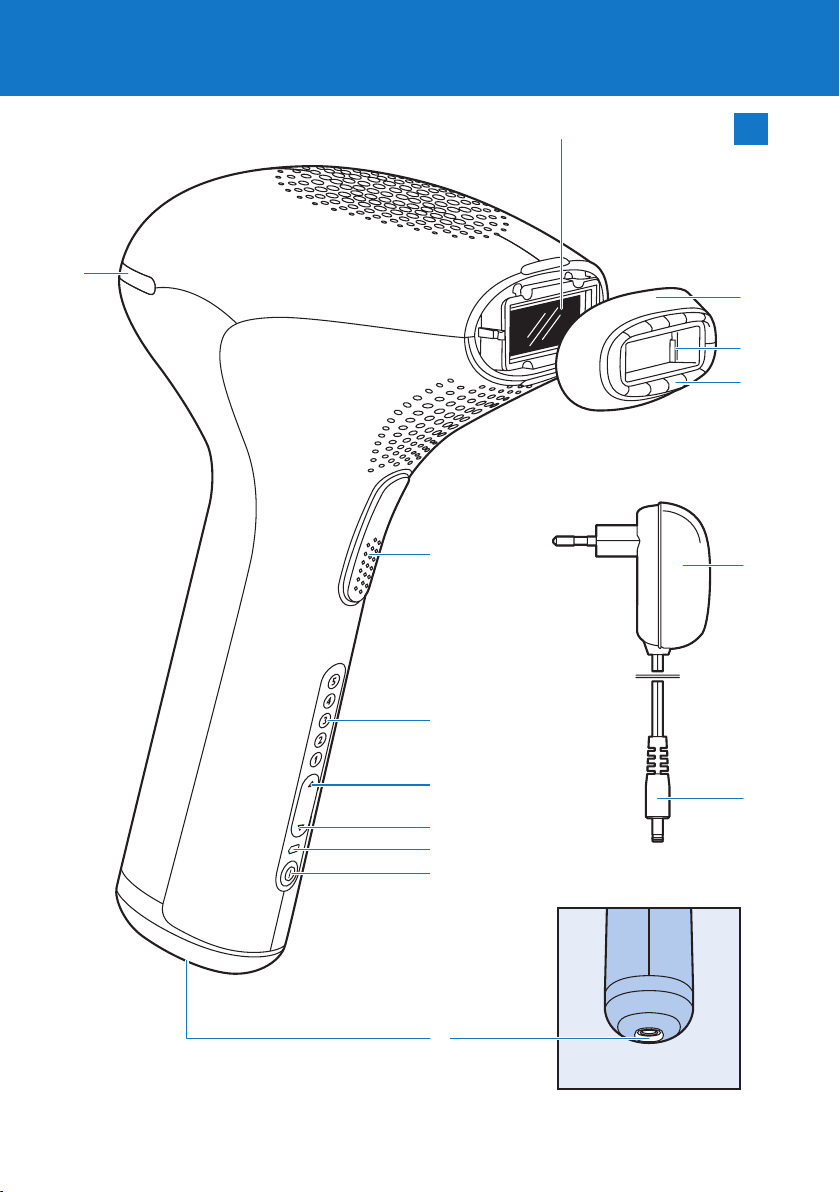
General description (Fig. 1)
A Light exit window with lter glass
B Removable window
C Metallic surface inside the removable window
D Safety system (safety ring with contact switches)
E Flash button
F Intensity lights (1- 5)
G % Intensity increase button
H ^ Intensity decrease button
I Charging light and battery low indication
J On/off button
K ’Ready to ash’ light
L Appliance socket
M Adapter
N Small plug
Also included: pouch and cleaning cloth
Important
Read this user manual carefully before you use the appliance and save it for
future reference.
Page 8

ENGLISH8
Danger
Water and electricity are a dangerous combination. Do not use
this appliance in wet surroundings (e.g. near a bath, a shower or a
swimming pool).
Keep the appliance and the adapter dry.
-
Warning
This appliance is not intended for use by persons (including children)
with reduced physical, sensory or mental capabilities, or lack of
experience and knowledge, unless they have been given supervision or
instruction concerning use of the appliance by a person responsible for
their safety.
Children should be supervised to ensure that they do not play with the
appliance.
Only use the appliance in combination with the adapter supplied.
Do not use the appliance if the adapter or the appliance itself is
damaged.
Do not use the appliance if the lter glass is broken.
If the adapter is damaged, always have it replaced with one of the
original type in order to avoid a hazard.
The adapter contains a transformer. Do not cut off the adapter to
replace it with another plug, as this causes a hazardous situation.
To prevent damage:
-
1 never cover the ventilation slots during use.
2 make sure nothing can obstruct the air ow through the ventilation
slots
3 never subject the appliance to heavy shocks and do not shake or drop
it.
If you take the appliance from a very cold environment to a very warm
environment, wait approximately 3 hours before you use it.
Never use or store the appliance in a dusty environment.
Never leave the appliance unattended when it is switched on. Always
switch off the appliance after use.
Do not expose the appliance to direct sunlight or UV light for a longer
time.
Caution
-
This appliance is only intended for removing women’s body hair. Do
not use it for any other purpose.
The appliance is only intended for removing human hair from areas
below the neck. Do not use it for any other body part.
This appliance is not designed for commercial or professional use.
If the appliance is used for commercial or professional purposes, if it
is used on other body parts than for which it is explicitly intended
or if it is used by persons explicitly excluded from use, the guarantee
becomes invalid and Philips refuses any liability for damage caused.
Page 9

ENGLISH 9
Your skin may become a little red and irritated after using the
appliance. This phenomenon is absolutely normal and quickly
disappears. If the irritation does not disappear within three days, we
advise you to consult a doctor.
Do not expose the appliance to temperatures lower than 15°C or
higher than 35°C during use.
The appliance is equipped with a built-in overheat protection. If the
-
appliance overheats, it does not ash. Do not switch off the appliance,
but let it cool down for approx. 15 minutes before you continue with
your treatment.
Always return the appliance to a service centre authorised by Philips
-
for examination or repair. Repair by unqualied people could cause an
extremely hazardous situation for the user.
Never use the appliance in any of the cases mentioned under
Contraindications.
Contraindications
Never use the appliance:
If you have a skin disease such as active skin cancer, if you have a history
of skin cancer or any other localised cancer in the areas to be treated,
if you have pre-cancerous lesions or multiple atypical moles in the areas
to be treated.
If you have epilepsy with ashlight sensitivity.
If you have a history of collagen disorder, including a history of keloid
scar formation or a history of poor wound healing.
If you have a history of vascular disorder, such as the presence of
varicose veins or vascular ectasia in the areas to be treated.
If your skin is sensitive to light and causes a rash or an allergic reaction.
If you are taking photosensitising agents or medications, check the
package insert of your medicine and never use the appliance if it is
stated that it can cause photo-allergic reactions, photo-toxic reactions
or if you have to avoid sun when taking this medicine.
If you have diabetes, lupus erythematodes, porphyria or congestive
heart disease.
On areas of your skin where you are currently being treated with or
have recently been treated with Alpha-Hydroxy Acids (AHAs), BetaHydroxy Acids (BHAs), topical isotretinoin and azelaic acid.
If you have taken oral isotretinoin Accutane® or Roaccutane® in the
last six months.This treatment can make skin more susceptible to tears,
wounds and irritations.
If you have any bleeding disorder or take anticoagulation medications,
including heavy use of aspirin, in a manner which does not allow for a
minimum 1-week washout period prior to each treatment.
If you have infections, eczema, burns, inammation follicles, open
lacerations, abrasions, surgeries, herpes simplex, wounds or lesions and
haematomas in the areas to be treated.
If you have a history of immunosuppressive disease (including HIV
infection or AIDS) or when you take immunosuppressive medications.
When you are on painkillers, which reduce the sensitivity to heat.
If you are pregnant or breastfeeding.
On moles, freckles, large veins, darker pigmented areas, scars, skin
anomalies without consulting your doctor. This can result in a burn and
Page 10

ENGLISH10
change of colour, which makes it potentially harder to identify skinrelated diseases (e.g. skin cancer).
On nipples and mucous areas.
After intensive sunbathing and/or on sunburnt skin or if you use suntan
accelerators.
On warts, tattoo or permanent make-up. This can result in a burn and
change of colour.
If you use long-lasting deodorants. This can result in skin reactions.
-
Over or near anything articial like silicon implants, Implanon
contraceptive implants, pacemakers, subcutaneous injection ports
(insulin dispenser) or piercings.
Electromagnetic elds (EMF)
This Philips appliance complies with all standards regarding electromagnetic
elds (EMF). If handled properly and according to the instructions in this
user manual, the appliance is safe to use based on scientic evidence
available today.
Charging
Fully charge the batteries before you use the appliance for the rst time
and when the batteries are empty. Fully charging the batteries takes up to
4 hours.
Charge the appliance when the charging light lights up orange during use.
When the charging light goes on, the remaining capacity is at least 30
ashes.
Fully charged batteries provide at least 160 ashes at light intensity 5, which
amounts to approx. 15 minutes of cordless operation time. The actual
number of ashes varies, depending on the selected light intensity (see
‘Efcacy at different light intensities’ in chapter ‘Preparing for use’).
Fully charge the appliance every 3 to 4 months, even if you do not use the
appliance for a longer time.
1 Switch off the appliance.
2 Insert the small plug into the appliance and put the adapter in the
wall socket.
The charging light ashes green to indicate that the appliance is
,
charging.
When the batteries are fully charged, the charging light lights
,
up green continuously.
Caution: Never cover the appliance and adapter during charging.
Note: During charging, the appliance cannot be used.
Note: The adapter feels warm during charging. This is normal.
3 After charging, remove the adapter from the wall socket and pull the
small plug out of the appliance.
Preparing for use
For optimal results and highest efcacy, prepare the areas on which you
intend to use the appliance in the manner described below.
Page 11

ENGLISH 11
1 Shave the areas you intend to treat as long as you still experience
hair regrowth.
Never remove the hairs by means of wax, epilation, tweezers or
depilation cream. These methods counteract photo-epilation because
they remove hairs by the root. In these cases, the light cannot be
successfully absorbed by the root and the hairs will grow back again.
Note: Shaving is necessary to ensure that the light energy is channelled
to the hair root in the most efcient way. Furthermore, visible hairs in the
treatment area can be burnt by the light and can thus cause an unpleasant
smell. In general this is harmless, but it may be a bit painful when you use the
appliance.
2 Clean your skin and make sure it is entirely dry and free from grease
and oil (e.g. present in cosmetic products like deodorants, lotions,
perfumes, tanning creams and sunscreens).
Note: If shaving causes wounds or lesions, the skin may be more sensitive
as a result. In that case, the light treatment may be more perceptible and
sometimes even uncomfortable.
Note: Once the hairs stop growing back - which usually happens after a few
treatments - you no longer have to shave before you use the appliance.
Tip: If shaving causes skin irritation, you can also use a trimmer to trim the
hair as short as possible. In that case, the light treatment may be more
perceptible and sometimes even slightly uncomfortable.
Setting the light intensity
You have to adjust the light intensity to your skin and body hair colour and
to a level you nd comfortable.
The table with recommended light intensities below helps you to establish
the right light intensity.
1 Consult the table below to determine which light intensities are
most suitable for your skin and body hair colour and to check if this
method is suitable for you at all (if it is not, this is indicated with x in
the table).
Note: Persons with darker skin run a higher risk of skin irritation because
their skin absorbs more light. Therefore lower intensities are recommended for
persons with darker skin.
2 For each body area you want to treat, select a suitable intensity in
the recommended range that is as high as possible but does not
cause any discomfort on the skin.
The light intensity you use can feel warm or hot on the skin, but should
never feel uncomfortable.
Note: Before every treatment, check if the appliance is set to the right intensity.
Page 12

ENGLISH12
Recommended light intensities (1-5)
Skin colour &
characteristics :
Body hair colour: white/
grey
red x x x x x x
light
blond
blond 4/5 4/5 4/5 3/4/5 1/2/3/4 x
dark
blond/
light
brown
brown 4/5 4/5 4/5 3/4/5 1/2/3/4 x
dark
brown
black 4/5 4/5 4/5 3/4/5 1/2/3/4 x
White
(always
sunburn,
no
tanning)
x x x x x x
x x x x x x
4/5 4/5 4/5 3/4/5 1/2/3/4 x
4/5 4/5 4/5 3/4/5 1/2/3/4 x
x means that the appliance is not suitable for use.
Note: The appliance is not suitable for persons with very dark to black skin
because of the higher risk of skin irritations.
Note: The appliance is not suitable for persons with light blond, red, grey and
white body hair because the low melanin concentration in the hair results in
very poor hair removal efcacy.
Note: At higher light intensities the method is not only more efcacious, but it is
also more perceptible.
Efcacy at different light intensities
Beige
(easy
sunburn,
minimal
tanning)
Light brown
(sometimes
sunburn,
good
tanning)
Mid
brown
(rarely
sunburn,
fast and
good
tanning)
Dark
brown
(rarely
sunburn,
very
good
tanning)
Black
(rarely
to never
sunburn,
very dark
tanning)
Light intensity Efcacy Number of ashes
5 ***** 160
4 **** 190
3 *** 250
2 ** 350
1 * 520
* indicates the level of efcacy
Page 13

ENGLISH 13
Note: This table shows the number of ashes the appliance can give at each
light intensity and the corresponding expected efcacy. Please use the intensity
appropriate for your skin colour and body hair colour.
Using the appliance
The light intensity you use can feel warm or hot on the skin, but should
never feel uncomfortable.
This appliance is only intended for removing women’s body hair on areas
below the neck: underarms, bikini area and legs.
Note: Shave the area you intend to treat before you use the appliance (see
chapter ‘Preparing for use’).
Tip: The best time for treatment is before you go to bed at night.This
diminishes any skin reaction that may occur overnight.
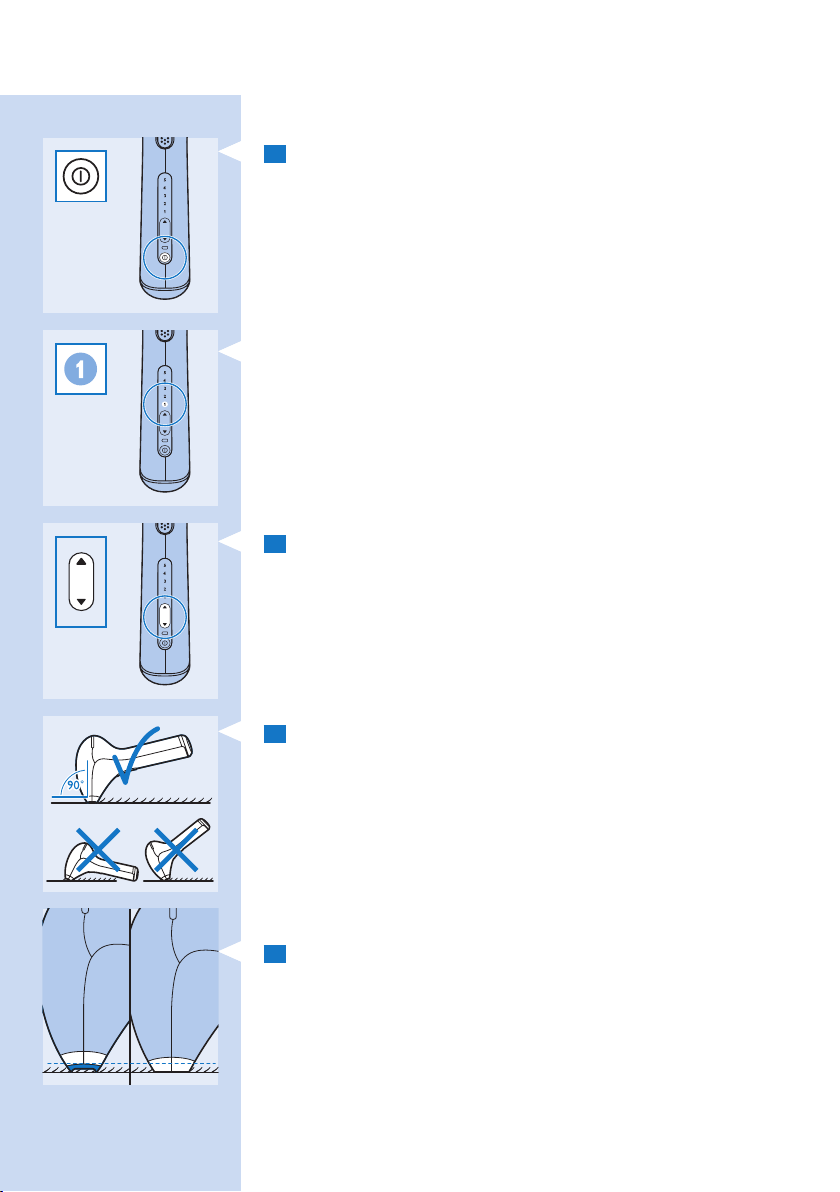
1 Press the on/off button to switch on the appliance.
Intensity light 1 goes on automatically to indicate that the appliance
,
is switched on at default intensity 1.
Note: You can switch off the appliance any time by pressing the on/off button
again.
Note: It is normal that the appliance becomes warm during use.
2 Press the % button to increase the intensity. To lower the intensity,
press the ^ button.
Every time you press the button, the corresponding intensity
,
light starts to ash. This takes a few seconds.
3 Place the appliance perpendicularly on the skin so that the
removable window and the safety ring are in contact with the skin.
Tip: When you use the appliance for the rst time, try it out, for instance on
your hip, to get accustomed to the light-based method. Start with the lowest
recommended intensity and increase it until you have reached the highest
recommended intensity. This test tells you how sensitive your skin is to light.
Check if your skin shows any reactions 20 minutes after the test. If it does, use
a lower recommended intensity for the areas to be treated.
Page 14

ENGLISH14
4 Press the safety ring fully onto the skin with slight pressure.
Note: The safety ring has contact switches that together are the safety system
of the appliance. This safety ring prevents unintentional ashing without skin
contact.
When all contact switches of the safety ring have been pushed
,
into the appliance, the ‘ready to ash’ light on the back of the
appliance goes on. This may take a few seconds. When the ‘ready to
ash’ light is on, the appliance is ready to release a ash.
Tip: For easier use, stretch the skin you want to treat. On areas with softer skin,
you may need to exert more pressure on the appliance to push in all contact
switches.
5 Press the ash button to release a ash. After the appliance has
ashed once, release the ash button.
6 For the next ash, repeat steps 3, 4 and 5. This can take a few
seconds.
Never ash the same area twice without lifting the appliance off the skin.
This prevents excessive heating and possible burning of the skin.
7 To avoid untreated areas, always make sure there is some overlap
with the previously treated area when you place the appliance on the
skin.The effective light only comes out of the light exit window. Make
sure the ashes are produced close to each other.
8 Switch off the appliance after you have nished the treatment.
Note: Avoid looking straight into the light coming out of the window when the
appliance is switched on.
Note: The visible light produced by the appliance is the reection of the ash
on the skin and is harmless to your eyes. It is not necessary to wear goggles
during use.
Guidelines for treatment
Recommended number of ashes and treatment time
Area Approx. number of ashes Approx. treatment time
Underarms 25 per underarm 3 minutes per underarm
Bikini line 25 per side 3 minutes per side
Entire bikini area 90 for entire area 10 minutes
One lower leg 160-190 15 minutes
Page 15

ENGLISH 15
Area Approx. number of ashes Approx. treatment time
One full leg 320-380 30 minutes
Note: Fully charged batteries offer at least 160 ashes at intensity 5, which
amounts to a cordless operating time of approx. 15 minutes.
How to achieve optimal results
Optimal results cannot be obtained with a single session, since only hairs
in the anagen phase are susceptible to treatment with light. During a
treatment, hairs on a treated area are usually in different stages of the cycle
of hair growth. To treat all hairs successfully and to prevent that the hair
root becomes active again, you have to repeat the treatment every 2
weeks. It is recommended to adhere to this frequency. Better results are
not expected if you increase or decrease the treatment frequency. Clinical
trials have shown that this is the optimal frequency of use.
After treatment
After treatment it may happen that:
Your skin shows slight redness and/or prickles, tingles or feels warm.
This reaction is harmless and disappears quickly.
A skin reaction similar to sunburn may occur on the treated area for a
short while.
Your skin may appear to be dry, as the combination of shaving and light
treatment may cause dry skin.
Some hairs grow back although you use the appliance frequently.
This happens because hairs are in different stages of the cycle of hair
growth during treatment. The hairs that grow back tend to be softer
and thinner.
It is recommended to
Consult your doctor if skin irritation does not disappear within three
days (see chapter ‘Impor tant’, section ‘Caution’).
Wait with the next treatment until skin irritation has disappeared
completely. Perhaps you have used an intensity that was too high for
you. Use a lower intensity the next time.
Do not take an intensive sunbath or suntan without proper protection
immediately after a treatment. If you want to go sunbathing after a
treatment, apply a sun blocker to the treated areas.
Avoid swimming in chlorinated water for 48 hours after treatment.The
chlorine in the water can cause itchiness.
Avoid applying any cosmetic substances to the treated areas
immediately after treatment.
:
Cleaning and maintenance
Never clean the appliance or any of its parts under the tap or in the
dishwasher.
Never use scouring pads, abrasive cleaning agents or aggressive liquids
such as petrol or acetone to clean the appliance.
Never scratch the lter glass or the metallic surface inside the
removable window.
Page 16
ENGLISH16
Note: Make sure that the contact switches of the safety ring do not get
jammed with dirt.
Note: Stop using the appliance when it is no longer possible to clean the lter
glass or the removable window.
To ensure optimal results and a long life for the appliance, clean the
appliance after each treatment.
1 Switch off the appliance, unplug it and let it cool down.
Note: The lter glass becomes hot during use. Make sure it has cooled down
before you clean it.
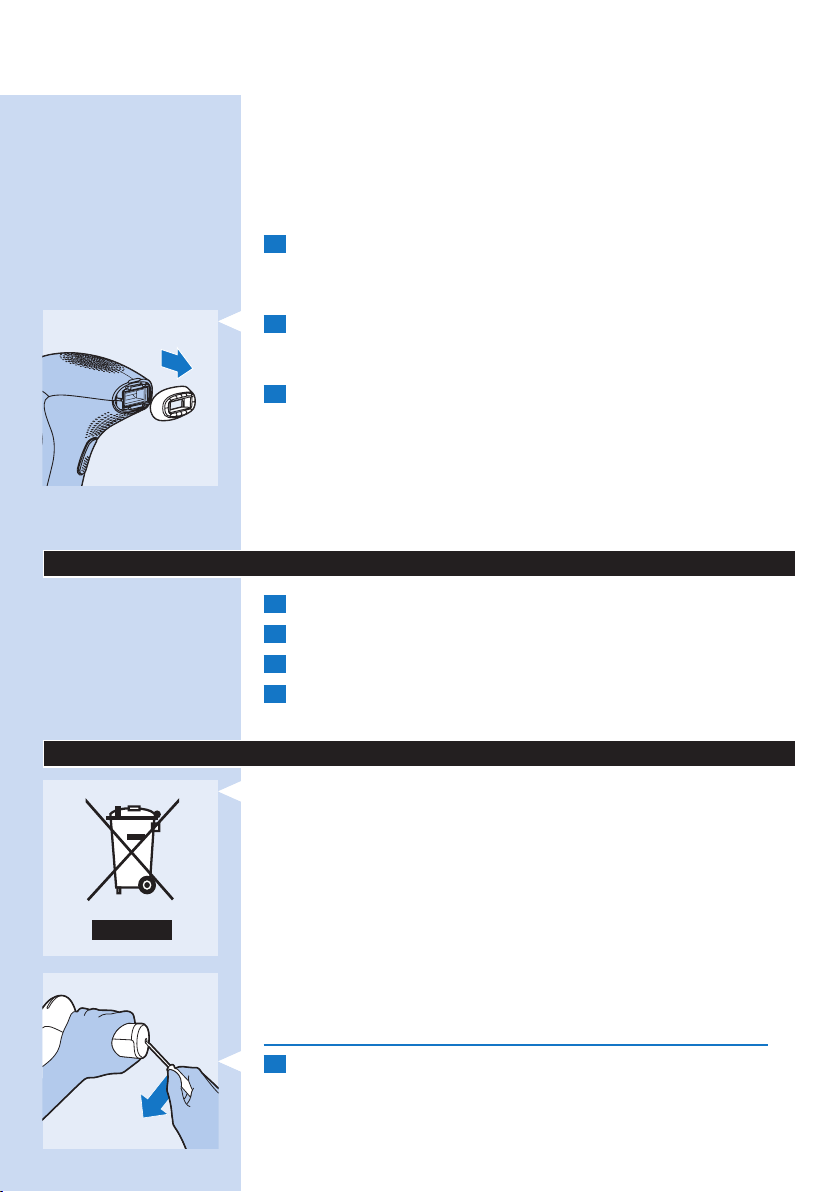
2 To remove the removable window, put your ngers in the recesses
on the housing of the appliance and pull the removable window off
the appliance.
3 Use the dry, soft cloth supplied with the appliance to clean the
following parts:
the surface of the lter glass
the outside surface of the removable window
the metallic frame inside the removable window
the housing of the appliance (if necessary)
-
Note: If necessary, wet the cloth with some drops of water.
Storage
1
Switch off the appliance, unplug it and let it cool down.
2 Clean the appliance before you store it.
3 Put the appliance in the pouch supplied.
4 Store the appliance in a dry place at a temperature between 0°C and
60°C.
Environment
Do not throw away the appliance with the normal household waste
-
at the end of its life, but hand it in at an ofcial collection point for
recycling. By doing this, you help to preserve the environment.
The built-in rechargeable batteries contain substances that may pollute
-
the environment. Always remove the batteries before you discard and
hand in the appliance at an ofcial collection point. Dispose of the
batteries at an ofcial collection point for batteries. If you have trouble
removing the batteries, you can also take the appliance to a Philips
service centre. The staff of this centre will remove the batteries for you
and will dispose of them in an environmentally safe way.
Removing the rechargeable batteries
Only remove the rechargeable batteries if they are completely empty.
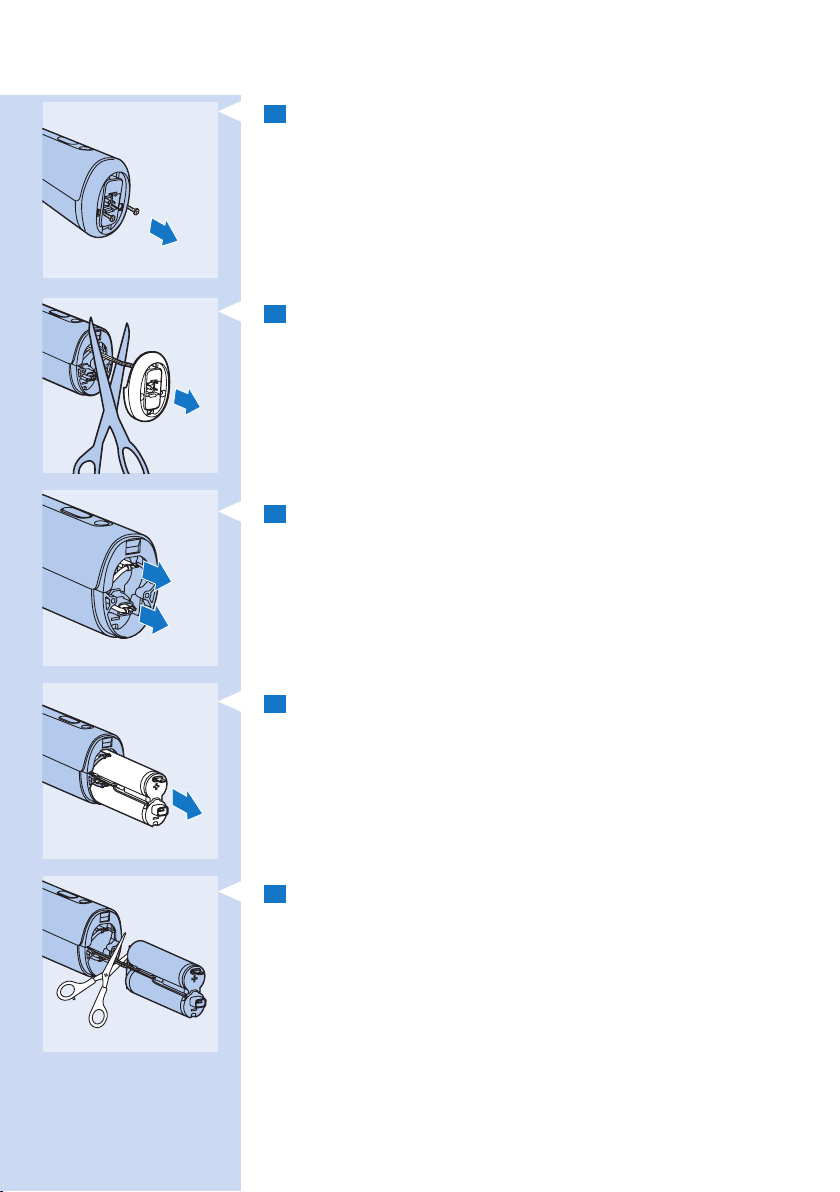
1 Insert an awl or another pointed tool into the appliance tool and pry
the bottom cap off the handle.
Page 17
ENGLISH 17
2 Undo the two screws.
3 Remove the bottom part of the handle and cut the two wires that
connect the bottom part to the appliance.
4 Pull the battery connectors off the battery terminals.
5 Shake the rechargeable batteries out of the appliance.
6 Cut the two wires that connect the rechargeable batteries to the
appliance.
Page 18

ENGLISH18
Guarantee and service
If you need service or information or if you have a problem, please visit
the Philips website at www.philips.com/satinlux or call 00800-SATINLUX
(72846589).
Replacement parts
The following replacement parts are available:
Removable window
-
Adapter
-
Pouch
-
Technical specications
Model SC2000
Rated voltage 100V-240V
Rated frequency 50Hz-60Hz
Rated input 7.5W
Protection against electric shock Class II Q
Protection rating IP 30 (EN 60529)
Operating conditions Temperature: +15° to +35°C
Relative humidity: 25% to 75%
Storage conditions Temperature: 0° to +60°C
Relative humidity: 5% to 95%
Intense pulsed light lamp Spectrum: >570nm
Lithium ion battery 2 x 3.7 Volt
1100 mAh
Troubleshooting
This chapter summarises the most common problems you could
encounter with the appliance. If you are unable to solve the problem with
the information below, contact the Consumer Care Centre in your country.
See the telephone number on the back of the user manual or visit www.
philips.com/satinlux for further information.
Problem Possible cause Solution
The appliance does not
work.
The appliance suddenly
switches off.
The rechargeable
batteries are empty.
The appliance is
broken.
The rechargeable
batteries are empty.
Charge the appliance (see chapter ‘Charging’).
Contact the Consumer Care Centre in your
country, your Philips dealer or a Philips service
centre.
Charge the appliance (see chapter ‘Charging’).
Page 19

Problem Possible cause Solution
ENGLISH 19
The adapter becomes
warm during charging.
The charging light does
not go on when I put
the small plug in the
appliance socket.
I have switched on the
appliance but I cannot
increase or decrease the
light intensity.
The ‘ready to ash’ light
does not go on when I
place the appliance on
the skin.
This is normal. No action required.
You have not put the
adapter in the wall
socket.
The adapter is not
inserted properly into
the wall socket and/or
the small plug is not
inserted properly into
the appliance socket.
The appliance is
broken.
The appliance has to
be reset.
You have not put the
removable window
with safety ring
properly on the skin.
The safety ring is dirty. Clean the safety ring carefully. If you are unable
Insert the small plug into the appliance socket and
put the adapter in the wall socket.
Connect another appliance to the wall socket to
check if the wall socket is live.
If the appliance still does not charge, contact the
Consumer Care Centre in your country, your
Philips dealer or a Philips service centre.
Make sure the adapter is inserted properly into
the wall socket and/or the small plug is inserted
properly into the appliance socket.
Contact the Consumer Care Centre in your
country, your Philips dealer or a Philips service
centre.
To reset the appliance, switch off the appliance
and then switch it on again. If you still cannot
adjust the light intensity, contact the Consumer
Care Centre in your country, your Philips dealer or
a Philips service centre.
Place the appliance perpendicularly onto the skin
in such a way that all contact switches touch the
skin. Then check if the ‘ready to ash’ light is on
and press the ash button.
If this does not work, place the appliance on a
part of your body where it is easy to establish full
skin contact, for example on your lower arm.Then
check if the ‘ready to ash’ light works. If the ‘ready
to ash’ light still does not go on when you place
the appliance on the skin, contact the Consumer
Care Centre in your country, your Philips dealer or
a Philips service centre.
to clean the safety ring properly, contact the
Consumer Care Centre in your country, your
Philips dealer or a Philips service centre to replace
the ash screen.
Page 20

ENGLISH20
Problem Possible cause Solution
The ‘ready to ash’ light
does not go on when
I place the removable
window on my skin, but
the cooling fan works.
The ‘ready to ash’
light is green but
the appliance does
not produce a ash
when I press the ash
button.
The appliance becomes
warm during use.
The appliance does not
show light intensity 1
when I switch it on.
The appliance produces
a strange smell.
The treatment is more
perceptible than usual.
The overheat
protection has been
activated.
The appliance needs to
be reset.
This is normal. No action required.
The appliance needs to
be reset.
The removable
window is dirty.
You have not shaved
the area to be treated
properly.
You used a too high
light intensity.
You did not shave the
areas to be treated.
The appliance is
defective.
You stored the
appliance in a dusty
environment.
The lter glass in the
light exit window is
broken.
When the overheat protection has been activated,
the fan still works. Do not switch off the appliance
and let it cool down for approx. 15 minutes before
you continue to use it. If the ‘ready to ash’ light
still does not go on when you place the appliance
on the skin, contact the Consumer Care Centre
in your country, your Philips dealer or a Philips
service centre.
To reset the appliance, switch off the appliance
and switch it on again. If the ‘ready to ash’ light
is green but the appliance still does not produce
a ash when you press the ash button, contact
the Consumer Care Centre in your country, your
Philips dealer or a Philips service centre.
To reset the appliance, switch it off and on again.
If the appliance still does not show light intensity
1, contact your Customer Care Centre, your
Philips dealer or a Philips Service Centre.
Clean the removable window carefully. If you
are unable to clean the removable window
properly, contact the Consumer Care Centre
in your country, your Philips dealer or a Philips
service centre to replace the removable window.
If there are hairs on the area to be treated, these
hairs may get burnt when you use the appliance.
As a result, you notice a strange smell. Shave the
area to be treated properly before you use the
appliance.
Check if you have selected the right light intensity.
If necessary, select a lower light intensity.
Always shave the areas to be treated before you
use the appliance.
Contact the Consumer Care Centre in your
country, your Philips dealer or a Philips service
centre.
The strange smell disappears after a few ashes.
If the lter glass in the light exit window is broken,
do not use the appliance anymore. Contact the
Consumer Care Centre in your country, your
Philips dealer or a Philips service centre.
Page 21

Problem Possible cause Solution
ENGLISH 21
I experience an
unacceptable pain level
when I use the appliance.
The treated areas
become red after the
treatment.
The skin reaction after
the treatment lasts longer.
The hair reduction
results are not
satisfactory.
Hair starts to grow again
on some spots of the
treated areas.
You did not shave the
areas to be treated
You treated an area for
which the appliance is
not intended.
You used a too
high light intensity.
The lter glass of the
light exit window is
broken.
The appliance is not
suitable for your hair or
skin colour.
Slight redness is
harmless and normal
and disappears quickly.
You used a too high
light intensity.
You used a too low
light intensity.
You did not let the
appliance give enough
ashes.
You did not make
enough overlaps when
you used the appliance.
You do not use the
appliance often enough.
The appliance is not
suitable for your hair or
skin colour.
You did not make
enough overlaps when
you used the appliance.
Hair starts to grow again
as part of the natural
cycle of hair growth.
Always shave the area to be treated before you
use the appliance.
Only use the appliance on the legs, underarms and
bikini area.
Reduce the light intensity to a level that is
comfortable for you. See chapter ‘Preparing for
use’, section ‘Setting the light intensity’.
If the lter glass of the light exit window is broken,
do not use the appliance any more. Contact the
Consumer Care Centre in your country, your
Philips dealer or a Philips service centre.
Do not use the appliance if your body hair is light
blond, red, grey or white. Do not use the appliance
either if you have very dark skin.
No action required.
Select a lower light intensity the next
time. See chapter ‘Preparing for use’, section
‘Setting the light intensity.
If the skin reaction lasts longer than 3 days, contact
your doctor.
Select a higher light intensity the next time.
Make sure you let the appliance give enough
ashes. See chapter ‘Preparing for use’, section
‘Setting the light intensity’.
To obtain proper hair-removal results, you have to
make overlaps when you use the appliance. See
chapter ‘Using the appliance’, step 7.
Use the appliance once every 2 weeks.
Do not use the appliance if your body hair is light
blond, red, grey or white. Do not use the appliance
either if you have very dark skin.
For proper hair removal results, you have to
make overlaps when you use the appliance. See
chapter ‘Using the appliance’.
It is part of the natural cycle of hair growth that
hair starts growing again. The hairs that come back,
however, tend to be softer and thinner.
Page 22

22
1 2 3 41 2 3 4
DEUTSCH
Einführung
Herzlichen Glückwunsch zu Ihrem Kauf und willkommen bei Philips! Um
den Support von Philips optimal nutzen zu können, registrieren Sie Ihr
Produkt bitte unter www.philips.com/satinlux.
Enthaarung mit Licht ist eine der wirksamsten Methoden für eine lang
anhaltende Beseitigung von unerwünschtem Körperhaar. Sie hat mit
gebräuchlichen Enthaarungsmethoden zur häuslichen Anwendung
absolut nichts gemein und ist das Ergebnis langjähriger Forschungs- und
Entwicklungsarbeit zwischen Philips und führenden Dermatologen. Jetzt
können Sie diese innovative Technologie jederzeit und ungestört zu Hause
nutzen.
Dieses Gerät ist für die Entfernung von weiblichem Körperhaar an
Hautpartien unterhalb des Halses vorgesehen:
Achselhöhlen
Bikinizone
Beine
-
Das Gerät eignet sich nicht für -
Personen mit besonders hellem Körperhaar (hellblond, rot, grau
oder weiß) oder sehr dunkler Haut. Siehe Kapitel “Für den Gebrauch
vorbereiten”, Abschnitt “Die Lichtintensität einstellen”.
Weitere Informationen zum SatinLux nden Sie unter www.philips.com/
satinlux.
So funktioniert die Photoepilation
Haarwuchs
Die Haare jedes Menschen wachsen je nach Alter, Stoffwechsel und
anderen Faktoren unterschiedlich, allerdings erfolgt der Haarwuchs im
Allgemeinen in drei Phasen:
1 Anagene Phase (Wachstumsphase)
Dies ist die aktive Wachstumsphase, in der das Haar über die Wurzel
genährt wird. In dieser Phase enthält es die höchste Konzentration an
Melanin. Melanin ist ein Pigment, das für die Färbung von Haut und Haaren
verantwortlich ist. Je mehr Melanin die Wurzel enthält, desto dunkler ist
das Haar. Die Melaninkonzentration ist darüber hinaus der entscheidende
Faktor für die Wirksamkeit dieser Epiliermethode. Nur die Haare in der
anagenen Phase können durch Lichtbehandlung entfernt werden.
2 Catagen-Phase (Abbauphase)
Das Haar wächst nicht mehr, und die Wurzel schrumpft, bevor das Haar
ausfällt.
3 Telogen-Phase (Ruhephase)
Das alte Haar löst sich von der Wurzel und wird langsam von dem neuen
Haar abgestoßen. Die Wurzel ruht, bis ihr die biologische Uhr mitteilt,
dass sie wieder aktiv werden und ein neues Haar wachsen lassen soll (4).
In einem bestimmten Hautbereich benden sich normalerweise Haare in
unterschiedlichen Wachstumsphasen.
Funktionsprinzip
Zum Entfernen von Haaren erhitzt das Gerät das Haar und die Wurzel
unter der Haut. Das Melanin im Haar und in der Haarwurzel absorbiert
die vom Gerät produzierten Lichtimpulse. Je dunkler das Haar, desto mehr
Wärme kann erzeugt werden. Dieser Vorgang regt das Haar an, in die
Ruhephase überzugehen.
Page 23

DEUTSCH 23
Das Haar fällt nun auf natürliche Weise aus, und der Haarwuchs wird
unterdrückt.
Eine optimale Haarentfernung kann nicht durch eine Behandlung
allein erzielt werden, da nur Haare in der anagenen Phase auf die
Lichtbehandlung reagieren und sich die Haare im behandelten
Körperbereich normalerweise in verschiedenen Wachstumsphasen
benden.
Um eine erfolgreiche Behandlung aller Körperhaare zu gewährleisten
und eine erneute Aktivierung der Haarwurzel zu verhindern, muss die
Behandlung in vierzehntägigem Abstand wiederholt werden.
Ein integrierter optischer Filter sorgt dafür, dass keine UV-Strahlen auf die
Haut gelangen. Sie nimmt daher keinen Schaden.
Vorteile
Das Gerät hat folgende Vorteile:
Professionelle IPL-Technologie für den Gebrauch zu Hause
SatinLux arbeitet mit einer lichtbasierten Technologie namens “Intense
Pulsed Light” (IPL), die in der Kosmetikbranche zur Haarentfernung
verwendet wird. Mit SatinLux können Sie diese innovative Technologie nun
zu Hause nutzen.
Wirksames Verhindern nachwachsender Haare für dauerhaft glatte Haut
Mit dieser Methode wird der Haarwuchs für lange Zeit verhindert - das
Resultat ist seidenglatte Haut. Unsere Studien zeigen eine deutliche
Haarabnahme bereits nach zwei Behandlungen. Optimale Ergebnisse
wurden generell nach vier bis fünf Behandlungen erreicht. Nach jeder
Behandlung ist eine weitere Abnahme der Haardichte erkennbar. Wie
schnell der Effekt sichtbar wird und wie lange er anhält, ist von Person zu
Person unterschiedlich. Wiederholen Sie die Behandlung in vierzehntägigem
Abstand, um ein perfektes Ergebnis und permanent glatte und
geschmeidige Haut zu erzielen.
Sanfte Behandlung, selbst an empndlichen Körperpartien
SatinLux wurde in enger Zusammenarbeit mit führenden Dermatologen
entwickelt. Das Resultat ist eine wirksame und sanfte Behandlung, die selbst
für die empndlichsten Körperpar tien geeignet ist.
Akkubetrieb für maximale Freiheit und Flexibilität
Da das Gerät Akkus verwendet, ist es tragbar und kann überall eingesetzt
werden.
Allgemeine Beschreibung (Abb. 1)
A Lichtaustrittsfenster mit Filterglas
B Abnehmbares Fenster
C Metalloberäche im abnehmbaren Fenster
D Sicherheitssystem (Sicherheitsring mit Kontaktschaltern)
E Blitztaste
F Lichtstärkeanzeigen (1 bis 5)
G % Taste zur Erhöhung der Lichtstärke
H ^ Taste zur Senkung der Lichtstärke
I Ladeanzeige und Akkustandsanzeige
J Ein-/Aus-Schalter
Page 24

DEUTSCH24
K Bereitschaftsanzeige
L Buchse für Gerätestecker
M Adapter
N Gerätestecker
Ebenfalls im Lieferumfang enthalten: Tasche und Reinigungstuch
Wichtig
Lesen Sie diese Bedienungsanleitung vor dem Gebrauch des Geräts
aufmerksam durch, und bewahren Sie sie für eine spätere Verwendung auf.
Gefahr
Wasser und Elektrizität sind eine gefährliche Kombination! Verwenden
-
Sie das Gerät nicht in einer feuchten Umgebung, z. B. in der Nähe einer
Badewanne, einer Dusche oder eines Schwimmbeckens.
Gerät und Adapter dürfen nicht nass werden.
-
Warnhinweis
Dieses Gerät ist für Benutzer (einschl. Kinder) mit eingeschränkten
physischen, sensorischen oder psychischen Fähigkeiten bzw. ohne
jegliche Erfahrung oder Vorwissen nur dann geeignet, wenn eine
angemessene Aufsicht oder ausführliche Anleitung zur Benutzung des
Geräts durch eine verantwortliche Person sichergestellt ist.
Achten Sie darauf, dass Kinder nicht mit dem Gerät spielen.
Benutzen Sie das Gerät nur mit dem mitgelieferten Adapter.
Benutzen Sie das Gerät nicht, wenn der Adapter oder das Gerät selbst
beschädigt oder defekt ist.
Verwenden Sie das Gerät nicht, wenn das Filterglas beschädigt ist.
Wenn der Adapter defekt oder beschädigt ist, darf er nur durch
-
ein Original-Ersatzteil ausgetauscht werden, um Gefährdungen zu
vermeiden.
Der Adapter enthält einen Transformator. Ersetzen Sie den Adapter
keinesfalls durch einen anderen Stecker, da dies möglicherweise den
Benutzer gefährden kann.
So vermeiden Sie Beschädigungen:
-
1 Blockieren Sie die Lüftungsschlitze nicht, wenn das Gerät in Gebrauch
ist.
2 Achten Sie darauf, dass ein ungehinderter Luftstrom durch die
Lüftungsschlitze möglich ist.
3 Setzen Sie das Gerät keinen schweren Stößen aus, schütteln Sie es
nicht, und lassen Sie es nicht fallen.
Wenn das Gerät extremen Temperaturunterschieden ausgesetzt war,
warten Sie etwa 3 Stunden, bevor Sie es benutzen.
Das Gerät darf nicht in einer staubigen Umgebung verwendet oder
aufbewahrt werden.
Lassen Sie das Gerät nicht unbeaufsichtigt, solange es eingeschaltet ist,
und schalten Sie es nach Gebrauch immer aus.
Page 25

DEUTSCH 25
Setzen Sie das Gerät nicht über einen längeren Zeitraum direktem
-
Sonnen- oder UV-Licht aus.
Achtung
Das Gerät ist ausschließlich zum Entfernen von weiblichem Körperhaar
-
vorgesehen. Verwenden Sie es nicht für andere Zwecke.
Das Gerät ist nur zum Entfernen von menschlichem Körperhaar
-
vorgesehen. Verwenden Sie es ausschließlich unterhalb des Halses.
Dieses Gerät ist nicht für kommerzielle und gewerbliche Zwecke
bestimmt.
Wird das Gerät für kommerzielle und gewerbliche Zwecke und an
anderen Körperpartien als denen, für die es bestimmt ist, eingesetzt,
oder wird es von Personen verwendet, denen von der Benutzung
ausdrücklich abgeraten wurde, erlischt die Garantie, und Philips
übernimmt keinerlei Haftung für daraus entstandene Schäden.
Nach der Verwendung des Geräts ist Ihre Haut möglicherweise etwas
gerötet und gereizt. Dies ist völlig normal, und die Symptome halten
nur kurze Zeit an. Sollte die Reizung nicht innerhalb von drei Tagen
abklingen, sollten Sie einen Arzt konsultieren.
Setzen Sie das Gerät während des Gebrauchs keinen Temperaturen
unter 15 °C oder über 35 °C aus.
Das Gerät ist mit einem integrierten Überhitzungsschutz ausgestattet.
Wenn es überhitzt ist, wird kein Blitzlicht erzeugt. Schalten Sie das
Gerät nicht ab, lassen Sie es aber ungefähr 15 Minuten abkühlen, bevor
sie es weiter benutzen.
Wenden Sie sich zur Prüfung oder zur Reparatur des Geräts immer
-
an ein Philips Service-Center. Unsachgemäß ausgeführte Reparaturen
gefährden den Benutzer.
Verwenden Sie das Gerät auf keinen Fall in den unter “Wichtige
Hinweise” aufgeführten Situationen.
Wichtige Hinweise
Benutzen Sie das Gerät keinesfalls in folgenden Situationen:
Wenn Sie unter einer Hauterkrankung wie z. B. Hautkrebs leiden
-
oder in der Vergangenheit an den zu behandelnden Hautpartien unter
Hautkrebs oder einer anderen Krebsart gelitten haben; das gleiche
gilt bei präkanzerösen Läsionen und einer Häufung von atypischen
Muttermalen.
Wenn Sie Epileptiker mit Blitzlichtempndlichkeit sind.
Wenn Sie unter Collagenstörungen leiden, einschließlich der Bildung
von Wulstnarben oder schlechter Wundheilung.
Wenn Sie unter einer Gefäßkrankheit leiden und die zu behandelnden
Körperpartien zum Beispiel Krampfadern oder Gefäßerweiterungen
aufweisen.
Wenn Ihre Haut lichtempndlich ist und auf Licht mit Ausschlag
reagiert oder eine allergischen Reaktion zeigt. Wenn Sie
fotosensibilisierende Medikamente einnehmen, prüfen Sie den
Beipackzettel, und verwenden Sie das Gerät auf keinen Fall, wenn
als Nebenwirkungen fotoallergische oder fototoxische Reaktionen
auftreten können und Ihre Haut während der Einnahmezeit nicht
direktem Sonnenlicht ausgesetzt werden darf.
Wenn Sie unter Diabetes, Lupus Erythematodes, Porphyrie oder
kongestiver Herzerkrankung leiden.
Page 26

DEUTSCH26
An Hautpartien, an denen Sie derzeit oder erst kürzlich mit
Alpha-Hydroxycarbonsäure (Alpha-Hydroxy Acids, AHAs), BetaHydroxycarbonsäure (Beta-Hydroxy Acids, BHAs), lokal angewendetem
Isotretinoin und Azelainsäure behandelt wurden.
Wenn Sie in den letzten sechs Monaten die Isotretinoin-haltigen
Medikamente Accutane® oder Roaccutane® in Tablettenform
einnehmen mussten. Eine Behandlung mit diesen Medikamenten kann
zur Folge haben, dass die Haut leichter aufplatzt und eher zu Wunden
und Reizungen neigt.
Wenn Sie unter einer Blutkrankheit leiden oder Medikamente zur
Blutverdünnung (einschließlich hoher Dosen von Aspirin) einnehmen
und die Behandlung ein Absetzen des Medikaments mindestens eine
Woche vor jeder Behandlung nicht zulässt.
Wenn Sie an den zu behandelnden Hautpartien Infektionen, Ekzeme,
-
Verbrennungen, entzündete Follikel, offene Wunden, Abschürfungen,
Herpes, Wunden oder Läsionen und Blutergüsse haben oder an den
betroffenen Körperzonen operiert wurden.
Wenn Sie unter einem Immundefekt (einschließlich HIV oder AIDS)
leiden oder immunsuppressive Medikamente einnehmen.
Wenn Sie Schmerzmittel einnehmen, die Sie weniger
-
wärmeempndlich machen.
Wenn Sie schwanger sind oder stillen.
-
An Körperpar tien mit Muttermalen, Sommersprossen, großen Venen,
dunkler pigmentierten Hautstellen, Narben, Hautanomalien, ohne zuvor
einen Arzt konsultiert zu haben. Dies kann zu Verbrennungen und
Hautverfärbung führen, wodurch die Diagnose von Hautkrankheiten
(z. B. Hautkrebs) erschwert werden kann.
An Brustwarzen und Schleimhäuten.
Nach intensivem Sonnenbaden und/oder bei Sonnenbrand oder bei
-
der Verwendung von Schnellbräunungsmitteln.
An Warzen, Tätowierungen oder permanentem Make-Up. Dies kann zu
-
Verbrennungen oder Hautverfärbung führen.
Wenn Sie ein dauerhaftes Deodorant verwenden. Dies kann
Hautreizungen zur Folge haben.
Über oder in der Nähe von künstlichen Silikonimplantaten, dem
schwangerschaftsverhütenden Implantat Implanon, Herzschrittmachern,
subkutanen Injektionsports (Insulinspender) oder Piercings.
Elektromagnetische Felder
Dieses Philips Gerät erfüllt sämtliche Normen bezüglich
elektromagnetischer Felder (EMF). Nach aktuellen wissenschaftlichen
Erkenntnissen ist das Gerät sicher im Gebrauch, sofern es ordnungsgemäß
und entsprechend den Anweisungen in dieser Bedienungsanleitung
gehandhabt wird.
Laden
Laden Sie die Akkus vor dem ersten Gebrauch und bei leerem Akku auf.
Wenn die Akkus ganz leer sind, dauert es ca. 4 Stunden, bis sie wieder voll
aufgeladen sind.
Laden Sie das Gerät auf, wenn die Ladeanzeige beim Gebrauch orange
leuchtet. Wenn die Ladeanzeige aueuchtet, verbleiben Ihnen noch
mindestens 30 Lichtimpulse.
Page 27

DEUTSCH 27
Vollständig aufgeladene Akkus bieten bei einer Lichtintensität von Stufe
5 mindestens 160 Lichtimpulse, was einer schnurlosen Betriebsdauer
von ca. 15 Minuten entspricht. Die tatsächliche Anzahl der Lichtimpulse
hängt von der ausgewählten Lichtintensität ab (siehe “Wirksamkeit
bei unterschiedlicher Lichtintensität” im Kapitel “Für den Gebrauch
vorbereiten”).
Laden Sie das Gerät alle 3 bis 4 Monate vollständig auf, auch wenn Sie es
längere Zeit nicht verwenden.
1 Schalten Sie das Gerät aus.
2 Führen Sie den Gerätestecker in das Gerät, und stecken Sie den
Adapter in eine Steckdose.
Die Ladeanzeige blinkt grün und zeigt an, dass das Gerät aufgeladen
,
wird.
Wenn die Akkus vollständig geladen sind, leuchtet die Ladeanzeige
,
ununterbrochen grün.
Achtung: Decken Sie das Gerät und den Adapter während des
Ladevorgangs nicht ab.
Hinweis: Das Gerät kann während des Ladevorgangs nicht verwendet werden.
Hinweis: Während des Ladevorgangs wird der Adapter warm. Dies ist normal.
3 Trennen Sie den Adapter nach dem Ladevorgang von der Steckdose
und den kleinen Gerätestecker vom Gerät.
Für den Gebrauch vorbereiten
Um ein perfektes Ergebnis und die höchste Wirksamkeit zu gewährleisten,
sollten Sie die Körperpartien, an denen das Gerät eingesetzt werden soll,
wie unten beschrieben vorbereiten.
1 Rasieren Sie die zu behandelnden Hautpartien, solange die Haare
nachwachsen.
Entfernen Sie die Haare auf keinen Fall mit Wachs, Epilierer, Pinzette
oder Enthaarungscreme. Diese Methoden stehen im Gegensatz zur
Photoepilation, da die Haare mit der Wurzel entfernt werden. In diesen
Fällen kann das Licht nicht von der Wurzel absorbiert werden, und die
Haare wachsen nach.
Hinweis: Das Rasieren ist notwendig, um sicherzustellen, dass die Lichtenergie
auf möglichst wirksame Weise zur Haarwurzel geleitet wird. Darüber hinaus
können sichtbare Haare an der behandelten Körperpartie vom Licht versengt
werden und dadurch einen unangenehmen Geruch verursachen. Das ist im
Allgemeinen zwar harmlos, kann aber während der Anwendung zu leichten
Schmerzen führen.
2 Reinigen Sie die Haut, und achten Sie darauf, dass sie vollkommen
trocken und fettfrei ist (Kosmetikprodukte wie Deos, Lotionen,
Parfum, Selbstbräuner und Sonnenschutzmittel sind meist ölhaltig).
Hinweis: Wenn Sie sich beim Rasieren verletzen, ist die Haut wesentlich
empndlicher. In diesem Fall spüren Sie die Lichtbehandlung wahrscheinlich
stärker, und in einigen Fällen kann sie sogar unangenehm sein.
Page 28

DEUTSCH28
Hinweis: Sobald keine Haare mehr nachwachsen (in der Regel nach einigen
Behandlungen), ist vor dem Gebrauch des Geräts kein Rasieren mehr
erforderlich.
Tipp: Wenn das Rasieren zu einer Hautreizung führt, können Sie die Haare
stattdessen auch mit einem Haarschneider so kurz wie möglich schneiden. In
diesem Fall spüren Sie die Lichtbehandlung unter Umständen stärker, und in
einigen Fällen kann sie auch etwas unangenehm sein.
Die Lichtintensität einstellen
Sie müssen die Lichtintensität entsprechend ihrer Haut- und Haarfarbe
anpassen und so einstellen, dass sie Ihnen angenehm ist.
Anhand der nachstehenden Tabelle mit Empfehlungen für die Lichtintensität
können Sie die richtige Einstellung nden.
1 Konsultieren Sie die Tabelle, um herauszunden, welche
Lichtintensität für Ihre Haut und Haarfarbe am besten geeignet ist,
und um zu prüfen, ob dies die richtige Enthaarungsmethode für Sie
ist (ist dies nicht der Fall, enthält die Tabelle an der entsprechenden
Stelle ein x).
Hinweis: Personen mit dunklerer Haut müssen eher mit Hautreizungen
rechnen, da ihre Haut mehr Licht absorbiert. Daher wird für sie eine niedrigere
Lichtintensität empfohlen.
2 Wählen Sie für jede zu behandelnde Körperpartie eine geeignete
Intensität im empfohlenen Bereich, die möglichst hoch ist, sich auf
der Haut aber nicht unangenehm anfühlt.
Die verwendete Lichtintensität kann sich auf der Haut warm oder heiß
anfühlen, sollte aber nie unangenehm sein.
Hinweis: Prüfen Sie vor jeder Verwendung des Geräts, ob die richtige Intensität
eingestellt ist.
Empfohlene Lichtstärken (1 bis 5)
Hautfarbe und
-eigenschaften:
Farbe der
Körperhaare:
Weiß
(immer
Sonnenbrand,
keine
Bräunung)
Weiß/
Grau
Rot x x x x x x
Hellblond x x x x x x
Blond 4/5 4/5 4/5 3/4/5 1/2/3/4 x
Dunkel-
blond/
Hellbraun
x x x x x x
4/5 4/5 4/5 3/4/5 1/2/3/4 x
Beige
(leichter
Sonnenbrand,
minimale
Bräunung)
Hellbraun
(manchmal Sonnenbrand,
gute Bräunung)
Mittelbraun
(selten Sonnenbrand,
schnelle
und gute
Bräunung)
Dunkelbraun
(selten
Sonnenbrand,
sehr gute
Bräunung)
Schwarz
(selten
bis nie
Sonnenbrand, sehr
dunkle
Bräunung)
Page 29

DEUTSCH 29
Hautfarbe und
-eigenschaften:
Braun 4/5 4/5 4/5 3/4/5 1/2/3/4 x
Dunkel-
braun
Schwarz 4/5 4/5 4/5 3/4/5 1/2/3/4 x
Lichtintensität Wirksamkeit Anzahl der Lichtimpulse
5 ***** 160
4 **** 190
3 *** 250
2 ** 350
1 * 520
Weiß
(immer
Sonnenbrand,
keine
Bräunung)
4/5 4/5 4/5 3/4/5 1/2/3/4 x
Beige
(leichter
Sonnenbrand,
minimale
Bräunung)
Das x bedeutet, dass das Gerät für die Verwendung nicht geeignet ist.
Hinweis: Das Gerät ist für Personen mit sehr dunkler oder schwarzer Haut
aufgrund des erhöhten Risikos von Hautirritationen nicht geeignet.
Hinweis: Das Gerät ist für Personen mit hellblonder, roter, grauer oder weißer
Körperbehaarung nicht geeignet, da der niedrige Melaninwert in den Haaren
zu einer sehr schlechten Haarentfernung führt.
Hinweis: Bei einer höheren Lichtintensität wird nicht nur eine bessere Wirkung
erzielt, das Resultat ist auch deutlicher sichtbar.
Wirksamkeit bei unterschiedlicher Lichtintensität
Hellbraun
(manchmal Sonnenbrand,
gute Bräunung)
Mittelbraun
(selten Sonnenbrand,
schnelle
und gute
Bräunung)
Dunkelbraun
(selten
Sonnenbrand,
sehr gute
Bräunung)
Schwarz
(selten
bis nie
Sonnenbrand, sehr
dunkle
Bräunung)
* gibt den Grad der Wirksamkeit an.
Hinweis: Diese Tabelle zeigt die Anzahl der Lichtimpulse, die das Gerät bei
der jeweiligen Lichtintensität generiert, sowie die zu erwartende Wirksamkeit.
Stellen Sie die Intensität entsprechend Ihrer Haut- und Haarfarbe ein.
Das Gerät benutzen
Die verwendete Lichtintensität kann sich auf der Haut warm oder heiß
anfühlen, sollte aber nie unangenehm sein.
Dieses Gerät ist nur für die Entfernung von weiblichem Körperhaar an
Hautpartien unterhalb des Halses vorgesehen: Achselhöhlen, Bikinizone
und Beine.
Hinweis: Rasieren Sie die zu behandelnde Körperpartie, bevor Sie das Gerät
benutzen (siehe Kapitel “Für den Gebrauch vorbereiten”).
Page 30
DEUTSCH30
Tipp: Die beste Zeit für eine Behandlung ist vor dem Zubettgehen, denn dann
können auftretende Hautreizungen über Nacht abklingen.
1 Drücken Sie den Ein-/Ausschalter, um das Gerät einzuschalten.
,
Die Intensitätsanzeige 1 leuchtet automatisch auf und gibt an, dass
das Gerät mit der Standardintensität 1 eingeschaltet wurde.
Hinweis: Sie können das Gerät jederzeit durch erneutes Drücken des Ein/Ausschalters abschalten.
Hinweis: Das Gerät wird bei Gebrauch warm.
2 Drücken Sie die Taste %, um die Intensität zu verstärken, bzw. die
Taste ^, um die Intensität zu verringern.
Bei jedem Drücken der Taste blinkt die entsprechende
,
Intensitätsanzeige auf. Dies dauert einige Sekunden.
3 Setzen Sie das Gerät senkrecht auf die Haut auf, sodass das
abnehmbare Fenster und der Sicherheitsring Kontakt zur Haut
haben.
Tipp: Beim erstmaligen Gebrauch sollten Sie das Gerät zunächst ausprobieren,
z. B. an der Hüfte, damit Sie sich mit der Licht-Methode vertraut machen
können. Beginnen Sie mit der niedrigsten empfohlenen Intensität, und erhöhen
Sie sie nach und nach, bis die höchste empfohlene Intensität erreicht ist. Mit
diesem Test können Sie feststellen, wie lichtempndlich Ihre Haut ist. Prüfen Sie,
ob Ihre Haut 20 Minuten nach dem Test eine Reaktion zeigt. Ist dies der Fall,
behandeln Sie die gewünschten Körperpartien mit einer niedrigeren Intensität.
4 Drücken Sie den Sicherheitsring unter leichtem Druck ganz gegen
die Haut.
Hinweis: Der Sicherheitsring verfügt über Kontaktschalter, die gemeinsam
das Sicherheitssystem des Geräts bilden. Dieser Sicherheitsring verhindert
unbeabsichtigte Lichtblitze, wenn kein Hautkontakt besteht.
Page 31

DEUTSCH 31
Wenn alle Kontaktschalter des Sicherheitsrings in das Gerät
,
gedrückt wurden, leuchtet die Anzeige für Blitzbereitschaft auf der
Geräterückseite auf. Dieser Vorgang kann einige Sekunden dauern.
Wenn die Anzeige für Blitzbereitschaft ununterbrochen aueuchtet,
ist das Gerät für den ersten Lichtimpuls bereit.
Tipp: Die Anwendung wird einfacher, wenn Sie die zu behandelnde Haut
straffen. An Stellen mit besonders weicher Haut müssen Sie eventuell mehr
Druck ausüben, damit alle Kontaktschalter eingedrückt werden.
5 Drücken Sie die Blitztaste, um einen Blitz auszulösen. Lassen Sie sie
nach dem ersten Blitz los.
6 Wiederholen Sie die Schritte 3, 4 und 5 für den nächsten Blitz.
Dieser Vorgang kann einige Sekunden dauern.
Lösen Sie über der gleichen Stelle niemals mehr als einen Blitz aus, ohne
das Gerät zuerst von der Haut abzuheben. So vermeiden Sie ein zu
starkes Aufheizen und mögliche Hautverbrennungen.
7 Um das Auslassen von Hautpartien zu vermeiden, empehlt es
sich, beim Positionieren des Geräts auf der Haut einen Teil der zuvor
behandelten Stelle nochmals zu behandeln. Das effektive Licht tritt
nur aus dem Lichtaustrittsfenster aus. Stellen Sie sicher, dass die
Lichtimpulse dicht neben einander erzeugt werden.
8 Schalten Sie das Gerät nach der Behandlung aus.
Hinweis: Blicken Sie nicht direkt in das bei eingeschaltetem Gerät aus dem
Fenster austretende Licht.
Hinweis: Das von dem Gerät erzeugte sichtbare Licht ist die Reexion des
Blitzlichts auf der Haut und für die Augen harmlos. Sie brauchen daher beim
Gebrauch des Geräts keine Schutzbrille zu tragen.
Hinweise zur Behandlung
Empfohlene Anzahl von Blitzen und Behandlungszeit
Bereich Ungefähre Anzahl von Blitzen Ungefähre Behandlungszeit
Achselhöhlen 25 pro Achselhöhle 3 Minuten pro Achselhöhle
Bikinizone 25 pro Seite 3 Minuten pro Seite
Gesamter Bikinibereich 90 für gesamten Bereich 10 Minuten
Ein Unterschenkel 160-190 15 Minuten
Ein Bein 320-380 30 Minuten
Hinweis: Vollständig geladene Akkus reichen für mindestens 160 Blitze der
Intensität 5, was einer Nutzungsdauer im Akkubetrieb von ca. 15 Minuten
entspricht.
Page 32

DEUTSCH32
Erzielen optimaler Ergebnisse
Perfekte Ergebnisse können nicht durch eine Behandlung allein erzielt
werden, da nur Haare in der anagenen Phase auf die Lichtbehandlung
reagieren und sich die Haare im behandelten Körperbereich normalerweise
in verschiedenen Wachstumsphasen benden. Um eine erfolgreiche
Behandlung aller Haare zu gewährleisten und eine erneute Aktivierung
der Haarwurzel zu verhindern, muss die Behandlung in vierzehntägigem
Abstand wiederholt werden. Es empehlt sich, dieses Intervall einzuhalten.
Eine höhere oder geringere Behandlungshäugkeit bringt keine besseren
Ergebnisse, und klinische Studien haben gezeigt, dass dies die optimale
Behandlungshäugkeit ist.
Nach der Behandlung
Nach der Behandlung kann Folgendes auftreten:
Die Haut ist leicht gerötet, kribbelt, juckt oder fühlt sich warm an. Diese
-
Erscheinungen sind harmlos und klingen schnell ab.
An der behandelten Hautpartie kann kurzzeitig eine einem
Sonnenbrand ähnelnde Hautreaktion auftreten.
Ihre Haut kann sich aufgrund des Rasierens und der Lichtbehandlung
trocken anfühlen.
Auch bei häuger Anwendung des Geräts wachsen einige Haare
wieder nach. Das kommt daher, dass sich die Haare während der
Behandlung in unterschiedlichen Wachstumsphasen benden. Die
nachwachsenden Haare sind jedoch weicher und feiner.
Nützliche Ratschläge
Hält die Hautreizung länger als drei Tage an, sollten Sie einen Arzt
aufsuchen (siehe Kapitel “Wichtige Hinweise”, Abschnitt “Achtung”).
Führen Sie die nächste Behandlung erst durch, wenn die Hautreizung
vollkommen abgeklungen ist. Möglicherweise war die Lichtintensität zu
hoch für Ihre Haut. Stellen Sie beim nächsten Mal eine niedrigere Stufe
ein.
Legen Sie sich unmittelbar nach der Behandlung nicht ohne
Sonnenschutz in die pralle Sonne oder auf die Sonnenbank. Wenn
Sie sich nach einer Behandlung sonnen möchten, cremen Sie alle
behandelten Körperpartien mit einem Sun-Blocker ein.
Schwimmen Sie in den ersten 48 Stunden nach der Behandlung nicht
-
in Chlorwasser, denn Chlor kann Juckreiz verursachen.
Benutzen Sie unmittelbar nach der Behandlung keine Kosmetika an den
behandelten Körperpartien.
:
Reinigung und Wartung
Reinigen Sie das Gerät oder Teile davon nie unter ießendem Wasser
oder im Geschirrspüler.
Benutzen Sie zum Reinigen des Geräts keine Scheuerschwämme und
-mittel oder aggressive Flüssigkeiten wie Benzin oder Azeton.
Vermeiden Sie Kratzer auf dem Filterglas und auf der Metalloberäche
im abnehmbaren Fenster.
Hinweis: Achten Sie darauf, dass die Kontaktschalter des Sicherheitsrings nicht
verschmutzen.
Hinweis: Stellen Sie die Verwendung des Geräts ein, wenn sich das Filterglas
Page 33

DEUTSCH 33
oder das abnehmbare Fenster nicht mehr reinigen lassen.
Für perfekte Ergebnisse und eine lange Lebensdauer des Geräts sollten Sie
dieses nach jedem Gebrauch reinigen.
1 Schalten Sie das Gerät aus, ziehen Sie den Stecker ab, und lassen Sie
es abkühlen.
Hinweis: Das Filterglas wird während des Gebrauchs heiß. Lassen Sie es
abkühlen, bevor Sie es reinigen.
2 Zum Herausnehmen des abnehmbaren Fensters stecken Sie Ihre
Finger in die Einbuchtung des Gerätegehäuses, und heben Sie das
abnehmbare Fenster ab.
3 Reinigen Sie mit dem mitgelieferten trockenen, weichen Tuch
folgende Teile:
die Oberäche des Filterglases
die Außenseite des abnehmbaren Fensters
den Metallrahmen im abnehmbaren Fenster
das Gerätegehäuse (falls nötig)
-
Hinweis: Befeuchten Sie das Tuch bei Bedarf mit etwas Wasser.
Aufbewahrung
1
Schalten Sie das Gerät aus, ziehen Sie den Stecker ab, und lassen Sie
es abkühlen.
2 Reinigen Sie das Gerät, bevor Sie es wegpacken.
3 Bewahren Sie das Gerät in der zugehörigen Tasche auf.
4 Bewahren Sie das Gerät an einem trockenen Ort bei Temperaturen
zwischen 0°C und 60°C auf.
Umweltschutz
Werfen Sie das Gerät am Ende der Lebensdauer nicht in den
-
normalen Hausmüll. Bringen Sie es zum Recycling zu einer ofziellen
Sammelstelle. Auf diese Weise helfen Sie, die Umwelt zu schonen.
Die integrierten Akkus enthalten Substanzen, die die Umwelt gefährden
können. Nehmen Sie die Akkus heraus, bevor Sie das Gerät an einer
ofziellen Recyclingstelle abgeben. Geben Sie gebrauchte Akkus bei
einer Batteriesammelstelle ab. Falls Sie beim Entfernen der Akkus
Probleme haben, können Sie das Gerät auch an ein Philips ServiceCenter geben. Dort werden die Akkus herausgenommen und
umweltgerecht entsorgt.
Die Akkus entfernen
Entnehmen Sie die Akkus erst, wenn sie ganz leer sind.
Page 34

DEUTSCH34
1 Führen Sie einen Dorn oder ein anderes spitzes Werkzeug in das
Gerät ein, und hebeln Sie die untere Abdeckung vom Griff ab.
2 Lösen Sie die beiden Schrauben.
3 Nehmen Sie den unteren Teil des Griffs ab, und schneiden Sie die
beiden Drähte, die mit dem unteren Teil des Geräts verbunden sind,
durch.
4 Trennen Sie die Akkus von den Anschlüssen.
5 Schütteln Sie die wiederauadbaren Akkus aus dem Gerät heraus.
Page 35

6 Schneiden Sie die beiden Drähte durch, die die wiederauadbaren
Akkus mit dem Gerät verbinden.
Garantie und Kundendienst
Benötigen Sie weitere Informationen oder treten Probleme auf, besuchen
Sie die Philips Website unter www.philips.com/satinlux, oder rufen Sie
00800-SATINLUX (72846589) an.
Ersatzteile
Die folgenden Ersatzteile sind erhältlich:
Abnehmbares Fenster
Adapter
Tasche
-
Technische Daten
Gerätetyp SC2000
Nennspannung 100 - 240 V
Nennfrequenz 50 - 60 Hz
Nenneingangsleistung 7,5 W
Schutz vor Stromschlägen Klasse II Q
Schutzklasse IP 30 (EN 60529)
Betrieb Temperatur: +15° bis +35°C
Relative Luftfeuchtigkeit: 25 % bis 75 %
Aufbewahrung Temperatur: 0° bis +60°C
Relative Luftfeuchtigkeit: 5 % bis 95 %
IPL-Lampe Spektrum: >570 nm
Lithium-Ionen-Akku 2 x 3,7 Volt
1.100 mAh
DEUTSCH 35
Fehlerbehebung
In diesem Kapitel sind die häugsten Probleme aufgeführt, die beim
Gebrauch Ihres Geräts auftreten können. Sollten Sie ein Problem mithilfe
der nachstehenden Informationen nicht beheben können, wenden Sie sich
bitte an das Philips Service-Center in Ihrem Land.
Weitere Informationen erhalten Sie unter der Telefonnummer am Ende der
Bedienungsanleitung oder bei www.philips.com/satinlux.
Page 36

DEUTSCH36
Problem Mögliche Ursache Lösung
Das Gerät funktioniert
nicht.
Das Gerät schaltet sich
plötzlich aus.
Der Adapter wird beim
Auaden warm.
Die Ladeanzeige leuchtet
nicht auf, wenn Sie den
Gerätestecker an das
Gerät anschließen.
Das Gerät ist eingeschaltet,
aber die Lichtintensität lässt
sich nicht erhöhen oder
reduzieren.
Die Anzeige für die
Blitzbereitschaft leuchtet
nicht auf, wenn das Gerät
auf der Haut positioniert
wird.
Die
wiederauadbaren
Akkus sind leer.
Das Gerät ist
beschädigt.
Die
wiederauadbaren
Akkus sind leer.
Das ist normal. Sie brauchen nichts zu unternehmen.
Sie haben den
Adapter nicht an
die Steckdose
angeschlossen.
Der Stecker wurde
nicht richtig an die
Steckdose und/oder
der Gerätestecker
nicht richtig an das
Gerät angeschlossen.
Das Gerät ist
beschädigt.
Das Gerät muss
zurückgesetzt
werden.
Das abnehmbare
Fenster und der
Sicherheitsring
haben keinen
richtigen Kontakt mit
der Haut.
Laden Sie das Gerät auf (siehe Kapitel “Laden”).
Wenden Sie sich an das Philips Service-Center in
Ihrem Land oder Ihren Philips Händler.
Laden Sie das Gerät auf (siehe Kapitel “Laden”).
Führen Sie den Gerätestecker in das Gerät, und
stecken Sie den Adapter in eine Steckdose.
Schließen Sie ein anderes Gerät an die Steckdose
an, um zu testen, ob die Steckdose funktioniert.
Kann das Gerät immer noch nicht aufgeladen
werden, wenden Sie sich an das Philips ServiceCenter in Ihrem Land oder Ihren Philips Händler.
Prüfen Sie, ob der Adapter richtig an die Steckdose
und/oder der Gerätestecker richtig an das Gerät
angeschlossen wurde.
Wenden Sie sich an das Philips Service-Center in
Ihrem Land oder Ihren Philips Händler.
Schalten Sie hierzu das Gerät aus und wieder ein.
Wenn Sie die Lichtintensität immer noch nicht
ändern können, wenden Sie sich an das Philips
Service-Center in Ihrem Land oder Ihren Philips
Händler.
Positionieren Sie das Gerät in einem rechten
Winkel so auf der Haut, dass alle Kontaktschalter
die Haut berühren. Prüfen Sie dann, ob die Anzeige
für Blitzbereitschaft aueuchtet, und drücken Sie
die Blitztaste.
Page 37

Problem Mögliche Ursache Lösung
Funktioniert dies nicht, positionieren Sie das Gerät
an einer Körperpartie, an der Sie problemlos vollen
Hautkontakt herstellen können, z. B. am Unterarm.
Prüfen Sie dann, ob die Anzeige für Blitzbereitschaft
funktioniert. Leuchtet sie immer noch nicht auf,
wenn das Gerät mit der Haut Kontakt hat, wenden
Sie sich an das Philips Service-Center in Ihrem
Land oder Ihren Philips Händler.
Die Anzeige für
Blitzbereitschaft leuchtet
nicht auf, wenn das
abnehmbare Fenster
mit der Haut in Kontakt
ist, aber der Ventilator
funktioniert.
Die Anzeige für
Blitzbereitschaft leuchtet
grün, doch das Gerät
erzeugt beim Betätigen
der Blitztaste keinen
Lichtimpuls.
Das Gerät wird während
des Gebrauchs warm.
Beim Einschalten des
Geräts leuchtet die Anzeige
für Lichtintensität 1 nicht
auf.
Bei dem Gerät tritt ein
ungewöhnlicher Geruch
auf.
Sie spüren die Behandlung
stärker als sonst.
Der Sicherheitsring
ist verschmutzt.
Der
Überhitzungsschutz
wurde aktiviert.
Das Gerät muss
zurückgesetzt
werden.
Das ist normal. Sie brauchen nichts zu unternehmen.
Das Gerät muss
zurückgesetzt
werden.
Das abnehmbare
Fenster ist
verschmutzt.
Sie haben die
zu behandelnde
Körperpartie nicht
gründlich rasiert.
Sie verwenden
eine zu hohe
Lichtintensität.
Reinigen Sie den Sicherheitsring vorsichtig. Ist
dies nicht möglich, wenden Sie sich an das Philips
Service-Center in Ihrem Land oder Ihren Philips
Händler, um das Lichtfenster zu ersetzen.
Wenn der Überhitzungsschutz aktiviert wurde,
funktioniert der Ventilator weiterhin. Schalten
Sie das Gerät nicht aus, und lassen Sie es ca.
15 Minuten abkühlen, bevor Sie es weiter benutzen.
Leuchtet die Anzeige für Blitzbereitschaft immer
noch nicht auf, wenn das Gerät mit der Haut
Kontakt hat, wenden Sie sich an das Philips ServiceCenter in Ihrem Land oder Ihren Philips Händler.
Schalten Sie hierzu das Gerät aus und wieder
ein. Wenn die Anzeige für Blitzbereitschaft grün
leuchtet, das Gerät beim Drücken der Blitztaste
aber immer noch keinen Lichtimpuls erzeugt,
wenden Sie sich an das Philips Service-Center in
Ihrem Land oder Ihren Philips Händler.
Schalten Sie hierzu das Gerät aus und wieder ein.
Leuchtet die Anzeige für Lichtintensität 1 immer
noch nicht auf, wenden Sie sich an das Philips
Service-Center in Ihrem Land oder Ihren Philips
Händler.
Reinigen Sie es vorsichtig. Ist dies nicht möglich,
wenden Sie sich an das Philips Service-Center
in Ihrem Land oder Ihren Philips Händler, um es
auszutauschen.
Wenn sich an der zu behandelnden Körperpartie
Haare benden, werden diese beim Verwenden
des Geräts möglicherweise versengt. Dabei
entsteht ein ungewöhnlicher Geruch. Rasieren Sie
die zu behandelnde Körperpartie, bevor Sie das
Gerät verwenden.
Prüfen Sie, ob die richtige Lichtintensität eingestellt
ist, und reduzieren Sie diese bei Bedarf.
DEUTSCH 37
Page 38

DEUTSCH38
Problem Mögliche Ursache Lösung
Beim Benutzen des Geräts
treten unzumutbare
Schmerzen auf.
Die behandelten
Körperzonen sind nach der
Behandlung gerötet.
Die Haut ist nach der
Behandlung längere Zeit
gereizt.
Sie haben die
zu behandelnde
Körperpartie nicht
rasiert.
Das Gerät ist defekt. Wenden Sie sich an das Philips Service-Center in
Sie haben das
Gerät in einer
staubigen Umgebung
aufbewahrt.
Das Filterglas im
Lichtaustrittsfenster
ist beschädigt.
Sie haben die
zu behandelnde
Körperpartie nicht
rasiert.
Sie haben eine
Körperpartie
behandelt, für die
das Gerät nicht
vorgesehen ist.
Sie verwenden
eine zu hohe
Lichtintensität.
Das Filterglas im
Lichtaustrittsfenster
ist beschädigt.
Das Gerät ist
für Ihre Haaroder Hautfarbe nicht
geeignet.
Eine leichte Rötung
ist harmlos und ganz
normal und klingt
schnell wieder ab.
Sie verwenden
eine zu hohe
Lichtintensität.
Rasieren Sie die zu behandelnde Körperpartie
jedes Mal, bevor Sie das Gerät benutzen.
Ihrem Land oder Ihren Philips Händler.
Der ungewöhnliche Geruch veriegt nach einigen
Lichtpulsen.
Verwenden Sie das Gerät in diesem Fall
nicht. Wenden Sie sich an das Philips ServiceCenter in Ihrem Land oder Ihren Philips Händler.
Rasieren Sie die zu behandelnde Körperpartie
jedes Mal, bevor Sie das Gerät benutzen.
Verwenden Sie das Gerät nur für Beine,
Achselhöhlen und Bikinizone.
Reduzieren Sie die Lichtintensität auf ein für
Sie komfortables Niveau. Siehe Kapitel “Für
den Gebrauch vorbereiten”, Abschnitt “Die
Lichtintensität einstellen”.
Verwenden Sie das Gerät in diesem Fall
nicht. Wenden Sie sich an das Philips ServiceCenter in Ihrem Land oder Ihren Philips Händler.
Benutzen Sie das Gerät nicht bei hellblondem,
rotem, grauem oder weißem Körperhaar oder bei
sehr dunkler Haut.
Sie brauchen nichts zu unternehmen.
Stellen Sie das nächste Mal eine niedrigere
Lichtintensität ein. Siehe Kapitel “Für den
Gebrauch vorbereiten”, Abschnitt “Die
Lichtintensität einstellen”.
Sollte die Hautreizung nicht innerhalb von drei
Tagen abklingen, suchen Sie einen Arzt auf.
Page 39

Problem Mögliche Ursache Lösung
DEUTSCH 39
Die Enthaarungsergebnisse
sind nicht zufrieden
stellend.
An einigen Stellen der
behandelten Körperpartien
wachsen Haare nach.
Sie verwenden
eine zu niedrige
Lichtintensität.
Sie haben
nicht genügend
Lichtimpulse
ausgelöst.
Sie haben beim
Benutzen des Geräts
keine ausreichend
große Hautpartie
erneut erfasst.
Sie benutzen das
Gerät zu selten.
Das Gerät ist für
Ihre Haar- oder
Hautfarbe nicht
geeignet.
Sie haben beim
Benutzen des Geräts
keine ausreichend
große Hautpartie
erneut erfasst.
Das Nachwachsen
gehört zum
natürlichen
Wachstumszyklus
der Haare.
Stellen Sie das nächste Mal eine höhere
Lichtintensität ein.
Stellen Sie sicher, dass das Gerät eine ausreichende
Anzahl an Lichtimpulsen ausgibt. Siehe Kapitel
“Für den Gebrauch vorbereiten”, Abschnitt “Die
Lichtintensität einstellen”.
Für ein gutes Enthaarungsresultat müssen Sie
gewisse Hautpartien erneut erfassen. Siehe
Schritt 7 im Kapitel “Das Gerät benutzen”.
Verwenden Sie das Gerät in vierzehntägigem
Abstand.
Benutzen Sie das Gerät nicht bei hellblondem,
rotem, grauem oder weißem Körperhaar oder bei
sehr dunkler Haut.
Für ein gutes Enthaarungsresultat müssen Sie
gewisse Hautpartien erneut behandeln. Siehe das
Kapitel “Das Gerät benutzen”.
Dies ist ganz normal. Allerdings sind die neuen
Haare in der Regel weicher und feiner.
Page 40

40
1 2 3 41 2 3 4
ESPAÑOL
Introducción
Enhorabuena por la compra de este producto y bienvenido a Philips. Para
sacar el mayor partido de la asistencia que Philips le ofrece, registre su
producto en www.philips.com/satinlux.
La eliminación del vello con luz es uno de los métodos más ecaces y de
resultados más duraderos.Es completamente distinto de las soluciones
caseras; durante casi 10 años Philips se ha dedicado a su investigación con
la ayuda de importantes dermatólogos. Ahoraya puede usar esta
innovadora tecnología cómodamente en casa y siempre que lo desee.
Este aparato está diseñado para eliminar el vello en las siguientes zonas del
cuerpo de la mujer:
axilas
línea del bikini
piernas
-
Su uso no está indicado para:
personas con un vello demasiado claro (rubio, pelirrojo, gris o blanco)
o con piel muy oscura. Consulte el capítulo ‘Preparación para su uso’,
sección ‘Ajuste de la intensidad de la luz’.
Para obtener más información sobre SatinLux, consulte www.philips.
com/satinlux.
Cómo funciona la fotodepilación
Crecimiento del vello
Según la edad, el metabolismo y otros factores, el vello de cada persona
crece de forma diferente, pero, por lo general, el crecimiento del vello se
produce en tres fases:
1 Fase anágena (fase de crecimiento)
El vello crece activamente desde la raíz. En esta fase, es cuando se da la
mayor concentración de melanina, responsable de la pigmentación. Cuanto
más se concentre en la raíz, más oscuro será el vello. La concentración de
este pigmento es además el factor determinante de la ecacia del método.
El tratamiento con luz sólo actúa ecazmente en los vellos en fase anágena.
2 Fase catágena (fase de degradación)
El crecimiento del vello se detiene y la raíz se reduce antes de que el vello
se caiga.
3 Fase telógena (fase de reposo)
El vello ya crecido se separa de la raíz y el nuevo va saliendo y empujando
poco a poco. La raíz permanece en reposo hasta que el reloj biológico
le informa de que es hora de activarse para dejar crecer vello nuevo (4).
Los vellos de una zona de la piel suelen estar en distintas fases del ciclo de
crecimiento.
Principio de funcionamiento
El aparato elimina el vello calentándolo desde la raíz. La melanina del vello
y la raíz absorbe los pulsos de luz emitidos. Cuanto más oscuro es el vello,
más calor puede generarse. Este proceso estimula el paso del vello a la fase
de reposo.
Se produce la caída natural del vello y se inhibe el crecimiento.
Una sola sesión no consigue una eliminación óptima, ya que el vello sólo
puede tratarse en la fase anágena y en la zona tratada habrá vello en
distintas fases del ciclo de crecimiento.
Page 41

ESPAÑOL 41
Para tratar todo el vello correctamente y evitar que la raíz vuelva a estar
activa, es necesario repetir el tratamiento cada dos semanas.
Un ltro óptico integrado evita que la luz UV llegue a la piel, por lo que no
produce daño alguno.
Ventajas
Este aparato tiene las siguientes ventajas:
Tecnología IPL profesional para uso en casa
SatinLux usa la tecnología “Luz pulsada intensa” (Intense Pulsed Light, IPL),
que también se aplica en los tratamientos de belleza profesionales para la
eliminación del vello, y de la que podrá beneciarse ahora en la comodidad
de casa.
Prevención ecaz del crecimiento del vello para una suavidad
duradera
Este método evita que el vello vuelva a crecer durante largo tiempo y
contribuye a la suavidad de la piel. Nuestros estudios han demostrado una
importante reducción del vello después de tan solo 2 tratamientos. Los
resultados óptimos se obtenían normalmente tras 4 ó 5 tratamientos. Se
aprecia una menor densidad del vello con cada tratamiento. La rapidez con
que se aprecian resultados visibles y la duración entre cada depilación varía
de una persona a otra. Repita este tratamiento cada dos semanas para
lograr resultados óptimos y mantener su piel siempre suave.
Tratamiento delicado, incluso en zonas sensibles
SatinLux se ha desarrollado en estrecha colaboración con importantes
dermatólogos para conseguir un tratamiento ecaz y delicado, incluso en
las zonas más sensibles del cuerpo.
Funcionamiento sin cables para una máxima libertad y
exibilidad
El aparato funciona con pilas recargables, por lo que lo podrá llevar a todas
partes y usarlo en cualquier lugar.
Descripción general (g. 2)
A Ventanilla de salida de luz con ltro de cristal
B Ventanilla extraíble
C Supercie metálica en el interior de la ventanilla extraíble
D Sistema de seguridad (anillo de seguridad con puntos de contacto)
E Botón de emisión de pulsos de luz
F Luces de intensidad (1- 5)
G % Botón de aumento de intensidad
H ^ Botón de disminución de intensidad
I Luz de carga e indicación de batería baja
J Botón de encendido/apagado
K Luz que indica “listo para emisión de pulsos”
L Toma del aparato
M Adaptador de corriente
N Clavija pequeña
También incluye: funda y paño de limpieza
Page 42

42
ESPAÑOL42
Importante
Antes de usar el aparato, lea atentamente este manual de usuario y
consérvelo por si necesitara consultarlo en el futuro.
Peligro
El agua y la electricidad forman una combinación peligrosa. No utilice
este aparato en ambientes húmedos (p. ej., cerca de un baño, una
ducha o una piscina).
Mantenga el aparato y el adaptador siempre secos.
-
Advertencia
Este aparato no debe ser usado por personas (adultos o niños) con su
capacidad física, psíquica o sensorial reducida, ni por quienes no tengan
los conocimientos y la experiencia necesarios, a menos que sean
supervisados o instruidos acerca del uso del aparato por una persona
responsable de su seguridad.
Asegúrese de que los niños no jueguen con este aparato.
-
Utilice el aparato sólo con el adaptador que se suministra.
No utilice el aparato si el adaptador o el propio aparato están dañados.
-
No utilice el aparato si el ltro de cristal está roto.
Si el adaptador está dañado, sustitúyalo siempre por otro del modelo
original para evitar situaciones de peligro.
El adaptador incorpora un transformador. No corte el adaptador
para sustituirlo por otra clavija, ya que podría provocar situaciones de
peligro.
Para evitar daños:
-
1 No cubra las ranuras de ventilación durante su uso.
2 Compruebe que nada impide el paso del aire por las ranuras de
ventilación.
3 Evite golpes fuertes en el aparato, no lo sacuda ni lo deje caer.
Si cambia el aparato de un entorno muy frío a otro muy cálido, espere
unas tres horas antes de usarlo.
Nunca use ni guarde el aparato en un entorno donde se acumule
polvo.
No deje nunca el aparato desatendido cuando esté enchufado a la
toma de corriente. Apáguelo siempre después de cada uso.
No exponga el aparato a la luz solar directa ni a la luz UV durante
largo tiempo.
Precaución
Este aparato está ideado para eliminar únicamente el vello corporal de
-
las mujeres. No lo utilice con otra nalidad.
El aparato no está indicado para el vello facial, utilícelo sólo en las
-
partes del cuerpo especicadas.
Este aparato no está diseñado para uso comercial ni profesional.
-
Page 43

Si el aparato se usa para nes comerciales o profesionales, se aplica
en otras partes del cuerpo contraindicadas expresamente o lo utiliza
alguien al que claramente se le ha excluido de su uso, la garantía se
invalida y Philips no se hace responsable ante daño alguno.
La piel podría enrojecerse ligeramente e irritarse tras usar el aparato.
-
Esta reacción es absolutamente normal y desaparece rápidamente. Si
la irritación no desaparece después de tres días, se aconseja consultar
con un médico.
No exponga el aparato a temperaturas inferiores a 15 °C o superiores
a 35 °C durante su uso.
El aparato está equipado con una protección contra el
sobrecalentamiento integrada. Si el aparato se sobrecalienta, no emite
pulsos de luz. No lo apague, deje que se enfríe durante unos 15
minutos antes de continuar con el tratamiento.
Para revisiones o reparaciones, lleve siempre el aparato a un centro
de servicio autorizado por Philips. Las reparaciones llevadas a
cabo por personal no cualicado pueden dar lugar a situaciones
extremadamente peligrosas para el usuario.
No use nunca el aparato en los supuestos mencionados en el apartado
Contraindicaciones.
Contraindicaciones
No use nunca el aparato:
Si sufre alguna enfermedad cutánea, como cáncer de piel, si
tiene antecedentes de cáncer de piel o cualquier otro tipo de
cáncer localizado en las zonas que se van a tratar, si tiene lesiones
precancerígenas o numerosos lunares atípicos en las zonas que se van
a tratar.
Si padece de epilepsia con sensibilidad a la luz parpadeante.
Si tiene antecedentes de desorden del colágeno, y es propenso a la
formación de queloides o sufre de mala cicatrización.
Si tiene antecedentes de desorden vascular, como presencia de venas
varicosas o ectasia vascular en las zonas que se van a tratar.
Si su piel es sensible a la luz y aparece una reacción alérgica o
erupción. Si toma medicación o componentes fotosensibles, consulte
el prospecto y no use nunca el aparato si se indica que puede causar
reacciones fotoalérgicas, fototóxicas o si tiene que evitar la luz solar
durante el tratamiento con esta medicación.
Si padece de diabetes, lupus eritematoso, porria o una enfermedad
cardiaca congestiva.
En zonas de la piel que se estén tratando o se hayan tratado
recientemente con ácidos alfa-hidróxidos (AHA), ácidos betahidróxidos (BHA), isotretinoína tópica y ácido azelaico.
Si ha tomado por vía oral isotretinoína en Accutane® o Roaccutane®
-
en los últimos seis meses. Este tratamiento puede ocasionar la
aparición de heridas e irritaciones.
Si sufre algún desorden sanguíneo o toma anticoagulantes, incluso el
uso sistemático de aspirinas, sin que pueda suspender la medicación
durante un mínimo de una semana antes de cada tratamiento.
Si tiene infecciones, eccemas, quemaduras, folículos inamados, heridas
abiertas, cicatrices de cirugía reciente, herpes simplex, heridas o
lesiones y hematomas en las zonas que se van a tratar.
43ESPAÑOL 43
Page 44

44
ESPAÑOL44
Si tiene antecedentes de enfermedad inmunodepresiva (incluida la
-
infección por VIH o SIDA) o si toma inmunosupresores.
Si toma analgésicos que reducen la sensibilidad al calor.
Si está embarazada o da el pecho.
-
En los lunares, pecas, venas varicosas, zonas de pigmentación más
oscura, cicatrices, anomalías cutáneas sin consultar antes con su doctor.
El tratamiento puede ocasionar quemaduras y cambios en el color, lo
que podría dicultar la identicación de enfermedades de la piel (por
ejemplo, el cáncer de piel).
En los pezones y las zonas mucosas.
Tras tomar el sol de forma prolongada o en quemaduras solares, o si
usa bronceadores.
En verrugas, tatuajes o maquillaje permanente. El tratamiento puede
ocasionar quemaduras y cambios en el color.
Si usa desodorantes de acción prolongada. El tratamiento puede
ocasionar reacciones en la piel.
Sobre o cerca de ningún implante articial de silicona, implantes
anticonceptivos Implanon, marcapasos, vías de inyección subcutáneas
(dosicadores de insulina) o piercings.
Campos electromagnéticos (CEM)
Este aparato Philips cumple todos los estándares sobre campos
electromagnéticos (CEM). Si se utiliza correctamente y de acuerdo con las
instrucciones de este manual, el aparato se puede usar de forma segura
según los conocimientos cientícos disponibles hoy en día.
Carga
Cargue completamente las pilas antes de usar el aparato por primera vez y
siempre que se agoten. El proceso de carga completa de las pilas se realiza
en 4 horas.
Cargue el aparato cuando la luz de carga se ilumine en naranja durante su
uso. Cuando la luz de carga se enciende, quedará capacidad para al menos
30 pulsos de luz.
Con las pilas totalmente cargadas, hay capacidad para unos 160 pulsos
con una intensidad de luz 5, es decir, casi 15 minutos de funcionamiento
autónomo. El número real de pulsos varía en función de la intensidad de
luz seleccionada (consulte “Ecacia con diferentes intensidades de luz” en el
capítulo “Preparación para su uso”).
Cargue por completo el aparato cada 3 ó 4 meses, incluso si no lo usa
durante largo tiempo.
1 Apague el aparato.
2 Inserte la clavija pequeña en el aparato y enchufe el adaptador a la
toma de corriente.
La luz de carga parpadea en verde para indicar que el aparato se
,
está cargando.
Cuando las pilas están completamente cargadas, el piloto de carga se
,
enciende en verde de forma continua.
Precaución: No cubra nunca el aparato ni el adaptador durante la carga.
Nota: Durante la carga, el aparato no puede utilizarse.
Page 45

45ESPAÑOL 45
Nota: El cargador se notará caliente al tacto durante la carga. Esto es normal.
3 Después de la carga, desenchufe el adaptador de la toma de
corriente y la clavija pequeña del aparato.
Preparación para su uso
Para unos resultados óptimos y una máxima ecacia, prepare las zonas que
va a tratar según lo descrito a continuación.
1 Afeite las zonas que va a tratar cuando el vello empiece a crecer.
No elimine nunca el vello con cera, depilación, pinzas ni cremas
depilatorias. Estos métodos contrarrestan los efectos de la
fotodepilación porque eliminan el vello desde la raíz, que no podrá
absorber correctamente la luz, de forma que el vello volverá a salir.
Nota: El afeitado es necesario para garantizar que la energía de la luz pasa
a la raíz del vello de la forma más ecaz. Además, los vellos visibles en la
zona de tratamiento se pueden quemar por la luz y producirse así un olor
desagradable. Por lo general, el afeitado no produce daños, pero puede sentir
un dolor leve al usar el aparato.
2 Limpie la piel y séquela bien, eliminando cualquier resto de grasa y
aceite (por ejemplo, de productos cosméticos como desodorantes,
lociones, perfumes, cremas bronceadoras o protectores solares).
Nota: Si al afeitarse se producen heridas o lesiones, la piel podría estar
más sensible. En tal caso, podría notar con más intensidad la aplicación del
tratamiento por luz y algunas veces podría resultarle hasta incómodo.
Nota: Cuando el vello no vuelva a crecer, generalmente tras algunas sesiones,
ya no tendrá que afeitarse antes de usar el aparato.
Consejo: Si la piel se irrita con el afeitado, puede usar una afeitadora para
cortar el vello lo más corto posible. En tal caso, podría notar con más
intensidad la aplicación del tratamiento por luz y algunas veces podría
resultarle algo incómodo.
Ajuste de la intensidad de la luz
Tiene que ajustar la intensidad de la luz al color de su vello y piel hasta un
nivel que le resulte tolerable.
La tabla con las intensidades de luz recomendadas le ayuda a ajustar la
intensidad adecuada a su caso.
1 Consulte la siguiente tabla para determinar qué intensidad de luz es
más apropiada para el color de su vello y piel, y comprobar si este
método es adecuado para usted (si no lo es, está indicado con una x
en la tabla).
Nota: Las personas con la piel más oscura tienen mayor riesgo de sufrir
irritaciones porque su piel absorbe más luz. Por tanto, en este caso se
recomiendan intensidades más bajas.
2 Para cada parte del cuerpo que desee tratar, seleccione una
intensidad adecuada en el intervalo recomendado, siempre tomando
el valor más alto pero sin causar molestias en la piel.
Page 46

46
ESPAÑOL46
Puede notar un efecto de más o menos calor en la piel por la intensidad
de la luz aplicada, pero nunca deberá sentir molestias.
Nota: Antes de cada tratamiento, compruebe si el aparato está ajustado con la
intensidad adecuada.
Intensidades de luz recomendadas (1-5)
Características y
color de
la piel:
Color del
vello:
Blanca
(siempre
se quema
al sol, no
se broncea)
blanco/
gris
pelirrojo x x x x x x
rubio
claro
rubio 4/5 4/5 4/5 3/4/5 1/2/3/4 x
rubio
oscuro/
castaño
claro
castaño 4/5 4/5 4/5 3/4/5 1/2/3/4 x
castaño
oscuro
negro 4/5 4/5 4/5 3/4/5 1/2/3/4 x
x x x x x x
x x x x x x
4/5 4/5 4/5 3/4/5 1/2/3/4 x
4/5 4/5 4/5 3/4/5 1/2/3/4 x
Beige (se
quema fácilmente
al sol, se
broncea
muy
poco)
x signica que el aparato no es adecuado para su uso.
Nota: El aparato no es adecuado para personas con piel muy oscura, ya que
hay un mayor riesgo de irritación de la piel.
Nota: El aparato no es adecuado para personas con vello corporal rubio claro,
pelirrojo, gris o blanco, ya que la baja concentración de melanina hace que la
eliminación del vello sea muy poco efectiva.
Nota: A intensidades de luz más altas, el método es más ecaz y su aplicación
también se nota más.
Ecacia con diferentes intensidades de luz
Morena clara (algunas
veces se
quema
al sol, se
broncea
bien)
Morena
media
(raramente
se quema
al sol, se
broncea
rápido y
bien)
Morena
oscura
(raramente
se quema
al sol, se
broncea
muy bien)
Negra
(raramente
o nunca se
quema al sol,
se broncea
con un
color muy
oscuro)
Intensidad de la luz Ecacia Número de pulsos de luz
5 ***** 160
4 **** 190
3 *** 250
Page 47

Intensidad de la luz Ecacia Número de pulsos de luz
2 ** 350
1 * 520
* indica el nivel de ecacia
Nota: Esta tabla muestra el número de pulsos que el aparato puede generar
con cada intensidad de luz y la ecacia esperada correspondiente. Use la
intensidad apropiada para el color de su piel y vello.
Uso del aparato
Puede notar un efecto de más o menos calor en la piel por la intensidad
de la luz aplicada, pero nunca deberá sentir molestias.
Este aparato sólo está diseñado para eliminar el vello corporal de las
mujeres, no el facial, en las siguientes zonas: axilas, línea del bikini y
piernas.
Nota: Afeite la zona que va a tratar antes de usar el aparato (consulte el
capítulo “Preparación para su uso”).
Consejo: El momento más indicado para el tratamiento es por la noche, antes
de ir a dormir, ya que así cualquier posible irritación desaparecerá durante la
noche.
1 Pulse el botón de encendido/apagado para encender el aparato.
47ESPAÑOL 47
Se enciende automáticamente la luz con intensidad 1
,
predeterminada.
Nota: Puede apagar el aparato en cualquier momento volviendo a pulsar el
botón de encendido/apagado.
Nota: Es normal que el aparato se caliente durante su uso.
2 Pulse el botón % para aumentar la intensidad. Para disminuirla, pulse
el botón ^.
Cada vez que pulse el botón, la luz de intensidad correspondiente
,
empieza a parpadear. Esto tarda unos segundos.
Page 48

48
ESPAÑOL48
3 Coloque el aparato en perpendicular sobre la piel, de forma que la
ventanilla extraíble y el anillo de seguridad estén en contacto con la
piel.
Consejo: Antes de usar el aparato por primera vez, pruébelo, por ejemplo,
en la cadera para acostumbrase al método de emisión de pulsos de luz.
Empiece con la intensidad más baja recomendada y vaya aumentando hasta
alcanzar el valor más alto recomendado dentro del intervalo. Con esta prueba
podrá conrmar si su piel es sensible a la luz. Compruebe si presenta alguna
reacción 20 minutos después de la prueba. Si es así, use un nivel de intensidad
más bajo en las zonas que se van a tratar.
4 Presione el anillo de seguridad ligeramente para que entre en
contacto con la piel.
Nota: El anillo de seguridad tiene puntos de contacto que forman parte del
sistema de seguridad del aparato. Este anillo evita que se produzcan pulsos de
luz accidentales cuando no se está tocando la piel.
Cuando todos los puntos de contacto se retraen en el interior del
,
aparato por la presión ejercida en el anillo de seguridad, se enciende
la luz de “listo para emisión de pulsos” de la parte posterior del
aparato. Con esta luz encendida, el aparato está listo para emitir un
pulso de luz.
Consejo: Para un uso más fácil, estire la piel que desea tratar. En las zonas
con piel más suave, quizá tenga que ejercer más presión en el aparato para
retraer todos los puntos de contacto.
5 Pulse el botón de emisión de pulsos de luz para generar un pulso.
Cuando el aparato haya emitido un pulso de luz, suelte el botón.
6 Para el siguiente pulso, repita los pasos 3, 4 y 5. Esto podría llevar
unos segundos.
No aplique un pulso de luz dos veces en la misma zona sin levantar antes
el aparato de la piel. De esta forma evitará un calentamiento excesivo y
posibles quemaduras.
7 Para que no quede ninguna zona sin tratar, asegúrese siempre de
abarcar parte de la zona anteriormente tratada cuando vuelva a
colocar el aparato en la piel. La luz ecaz sólo se emite desde la
ventanilla de salida de la luz. Asegúrese de que los pulsos de luz se
producen cercanos entre sí.
8 Apague el aparato cuando termine el tratamiento.
Nota: Evite mirar directamente a la luz procedente de la ventanilla cuando el
aparato esté encendido.
Nota: La luz visible producida por el aparato es reejo de la aplicación del
pulso en la piel y puede dañar la vista. No es necesario llevar gafas durante su
uso.
Page 49

Instrucciones para el tratamiento
Número de pulsos de luz recomendados y duración del tratamiento
Zona Número aprox. de pulsos Duración aprox. del tratamiento
Axilas 25 por axila 3 minutos por axila
Línea del bikini 25 por cada lado 3 minutos por lado
Zona completa del bikini 90 por toda la zona 10 minutos
Media pierna 160-190 15 minutos
Pierna completa 320-380 30 minutos
Nota: Las pilas totalmente cargadas tienen capacidad para 160 pulsos con
intensidad 5, es decir, un tiempo aproximado de funcionamiento sin cables de
15 minutos.
Cómo lograr resultados óptimos
Una sola sesión no garantiza resultados óptimos, ya que sólo los vellos
en la fase anágena son susceptibles al tratamiento con luz y en la zona
tratada habrá vellos en diferentes fases del ciclo de crecimiento. Para
un tratamiento ecaz de todos los vellos, que evite además que la raíz
vuelva a estar activa, se recomienda repetir el tratamiento cada 2 semanas.
No espere lograr mejores resultados aumentando o disminuyendo la
frecuencia del tratamiento. Pruebas clínicas han demostrado que esta es la
frecuencia de uso óptima.
Después del tratamiento
Después del tratamiento podría apreciar los siguientes signos:
La piel se enrojece ligeramente o siente picor, hormigueo o calor. Esta
reacción no es anómala y desaparece rápidamente.
Una reacción similar a una quemadura solar aparece en la zona tratada
durante un corto tiempo.
La piel podría quedar seca, ya que al afeitarse y tratarse con luz se
ocasiona sequedad.
Algunos vellos vuelven a salir a pesar de usar el aparato con frecuencia.
-
Esto ocurre porque los vellos están en distintas fases del ciclo de
crecimiento. Los vellos que vuelven a salir suelen ser más suaves y nos.
Se recomienda:
Consultar con su médico si la irritación de la piel no desaparece en
tres días (consulte el capítulo “Importante”, sección “Precaución”).
Esperar a que la irritación de la piel haya desaparecido por completo
para el próximo tratamiento. Quizá haya usado una intensidad
demasiado elevada. Pruebe con un nivel más bajo la próxima vez.
No tomar el sol de forma prolongada sin protección adecuada
inmediatamente después de un tratamiento. Si desea tomar el sol después
de usar el aparato, aplique una protección elevada en las zonas tratadas.
Evitar bañarse en aguas con cloro durante 48 horas después del
-
tratamiento. El cloro puede ocasionar picor.
No aplicar sustancias cosméticas en las zonas tratadas inmediatamente
después del tratamiento.
49ESPAÑOL 49
Page 50

50
ESPAÑOL50
Limpieza y mantenimiento
No limpie nunca el aparato ni ninguna de sus piezas directamente bajo el
grifo o en el lavavajillas.
No utilice estropajos, agentes abrasivos ni líquidos agresivos, como
gasolina o acetona, para limpiar el aparato.
No arañe el ltro de cristal ni la supercie metálica del interior de la
ventanilla extraíble.
Nota: Asegúrese de que los puntos de contacto del anillo de seguridad no se
atascan con suciedad acumulada.
Nota: Deje de usar el aparato cuando ya no pueda limpiar el ltro de cristal o
la ventanilla extraíble.
Para garantizar resultados óptimos y una mayor duración del aparato,
límpielo después de cada tratamiento.
1 Apague el aparato, desenchúfelo y deje que se enfríe.
Nota: El ltro de cristal se calienta durante el uso. Antes de limpiarlo,
compruebe que se ha enfriado.
2 Para quitar la ventanilla extraíble, ponga los dedos en los huecos de
la carcasa del aparato y tire hacia fuera de la ventanilla.
3 Use el paño seco suministrado con el aparato para limpiar las
siguientes piezas:
la supercie del ltro de cristal
-
la supercie exterior de la ventanilla extraíble
el marco metálico interior de la ventanilla extraíble
la carcasa del aparato (si es necesario)
-
Nota: Si es necesario, humedezca el paño con unas gotas de agua.
Almacenamiento
1
Apague el aparato, desenchúfelo y deje que se enfríe.
2 Limpie el aparato antes de guardarlo.
3 Guarde el aparato en la funda que se suministra.
4 Guarde el aparato en un lugar seco a una temperatura de entre 0 °C
y 60 °C.
Medio ambiente
Al nal de su vida útil, no tire el aparato junto con la basura normal del
-
hogar. Llévelo a un punto de recogida ocial para su reciclado. De esta
manera ayudará a conservar el medio ambiente.
Page 51

51ESPAÑOL 51
Las pilas recargables incorporadas contienen sustancias que pueden
-
contaminar el medio ambiente. Extraiga siempre las pilas antes de
deshacerse del aparato o de llevarlo a un punto de recogida ocial.
Deposite las pilas en un lugar de recogida ocial. Si no puede quitar
las pilas, puede llevar el aparato a un servicio de asistencia técnica de
Philips. El personal del ser vicio de asistencia técnica extraerá las pilas y
se deshará de ellas de forma no perjudicial para el medio ambiente
.
Cómo extraer las pilas recargables
Quite las pilas recargables sólo si están completamente descargadas.
1 Inserte un punzón o cualquier otra herramienta de punta en el
aparato y haga palanca para quitar la tapa inferior del mango.
2 Quite los dos tornillos.
3 Quite la parte inferior del mango y corte los dos cables que
conectan esta parte al aparato.
4 Saque los conectores de las pilas de los terminales.
Page 52

52
ESPAÑOL52
5 Saque las pilas recargables del aparato.
6 Corte los dos cables que conectan las pilas recargables al aparato.
Garantía y servicio
Si necesita información o si tiene algún problema, visite la página Web de
Philips en www.philips.com/satinlux o llame al número 00800-SATINLUX
(72846589).
Piezas de repuesto
Las siguientes piezas de repuesto están disponibles:
Ventanilla extraíble
-
Adaptador de corriente
-
Funda
-
Especicaciones técnicas
Modelo SC2000
Voltaje nominal 100 V-240 V
Frecuencia nominal 50 Hz-60 Hz
Potencia nominal de entrada 7,5 W
Protección contra descargas eléctricas Clase II Q
Grado de protección IP 30 (EN 60529)
Condiciones de funcionamiento Temperatura: de +15° a +35 °C
Humedad relativa: del 25% al 75%
Condiciones de almacenamiento Temperatura: de 0° a +60 °C
Humedad relativa: del 5% al 95%
Bombilla de luz pulsada intensa Espectro: >570 nm
Pila de iones de litio 2 x 3,7 voltios
Page 53

Modelo SC2000
1100 mAh
Guía de resolución de problemas
En este capítulo se resumen los problemas más frecuentes que pueden
surgir. Si no puede resolver el problema con la siguiente información,
póngase en contacto con el Servicio de Atención al Cliente de su país.
Consulte el número de teléfono en el reverso del manual de usuario o
visite www.philips.com/satinlux para obtener más información.
Problema Posible causa Solución
53ESPAÑOL 53
El aparato no funciona. Las pilas
recargables están
descargadas.
El aparato está
roto.
El aparato se
apaga repentinamente.
El adaptador se
calienta durante la
carga.
La luz de carga no
se enciende cuando
enchufo la clavija
pequeña en la toma
del aparato.
Las pilas
recargables están
descargadas.
Esto es normal. No es necesario corregir nada.
No ha conectado
el adaptador a la
toma de corriente.
El adaptador no
queda conectado
correctamente a la
toma de corriente
o la clavija pequeña
no se inserta
debidamente en la
toma del aparato.
El aparato está
roto.
Cargue el aparato (consulte el capítulo “Carga”).
Póngase en contacto con el Servicio de Atención al
Cliente de su país, con su distribuidor o un centro de
servicio Philips.
Cargue el aparato (consulte el capítulo “Carga”).
Inserte la clavija pequeña en la toma del aparato y
enchufe el adaptador a la toma de corriente.
Conecte otro aparato a la toma de corriente para
comprobar si recibe tensión.
Si el aparato sigue sin cargarse, póngase en contacto con
el Servicio de Atención al Cliente de Philips de su país,
con su distribuidor o un centro de servicio Philips.
Compruebe que el adaptador queda conectado
correctamente a la toma de corriente o que la clavija
pequeña se inserta debidamente en la toma del aparato.
Póngase en contacto con el Servicio de Atención al
Cliente de su país, con su distribuidor o un centro de
servicio Philips.
Page 54

54
ESPAÑOL54
Problema Posible causa Solución
He encendido el
aparato pero no
puedo aumentar ni
disminuir la intensidad
de la luz.
La luz de “listo para
emisión de pulso” no
se enciende cuando
pongo el aparato
sobre la piel.
La luz de “listo para
emisión de pulso” no
se enciende cuando
coloco la ventanilla
extraíble sobre la piel,
pero el ventilador
funciona.
La luz de “listo para
emisión de luz”
está verde pero el
aparato no emite
ningún pulso cuando
presiono el botón
correspondiente.
El aparato se calienta
durante su uso.
El aparato no muestra
la intensidad de luz 1
cuando lo enciendo.
Es necesario
reiniciar el aparato.
No ha colocado
correctamente
sobre la piel la
ventanilla extraíble
con el anillo de
seguridad.
El anillo de
seguridad está
sucio.
La protección
contra el
sobrecalentamiento
se ha activado.
Es necesario
reiniciar el aparato.
Esto es normal. No tiene que preocuparse de nada.
Es necesario
reiniciar el aparato.
Para reajustar el aparato, apáguelo y vuelva a encenderlo.
Si sigue sin poder ajustar la intensidad de la luz, póngase
en contacto con el Servicio de Atención al Cliente de
Philips de su país, con su distribuidor o un centro de
servicio Philips.
Coloque el aparato en perpendicular sobre la piel,
de forma que la ventanilla extraíble y el anillo de
seguridad estén en contacto con la piel. A continuación,
compruebe si la luz de “listo para emisión de pulso” se
enciende y pulse el botón de emisión de pulsos de luz.
Si esto no funciona, coloque el aparato en una parte del
cuerpo en la que toque fácilmente la piel, por ejemplo,
en el antebrazo. Compruebe ahora si la luz funciona.
Si sigue sin encenderse, póngase en contacto con el
Servicio de Atención al Cliente de Philips de su país, con
su distribuidor o un centro de servicio Philips.
Limpie el anillo de seguridad con cuidado. Si no lo puede
limpiar bien, póngase en contacto con el Servicio de
Atención al Cliente de Philips de su país, su distribuidor
o un centro de servicio Philips para obtener una nueva
pantalla.
Cuando la protección contra el sobrecalentamiento
se activa, el ventilador sigue funcionando. No apague
el aparato y deje que se enfríe unos 15 minutos antes
de continuar. Si la luz de “listo para emisión de pulso”
sigue sin encenderse al colocar el aparato sobre la piel,
póngase en contacto con el Servicio de Atención al
cliente de Philips de su país, con su distribuidor o un
centro de servicio Philips.
Para reiniciar el aparato, apáguelo y vuelva a encenderlo.
Si la luz de “listo para emisión de pulso” está verde pero
el aparato sigue sin emitir pulsos al presionar el botón,
póngase en contacto con el Servicio de Atención al
Cliente de Philips de su país, con su distribuidor o un
centro de servicio Philips.
Para reiniciar el aparato, apáguelo y vuelva a encenderlo.
Si el aparato sigue sin mostrar la luz de intensidad 1,
póngase en contacto con el Servicio de Atención al
Cliente de Philips de su país, con su distribuidor o un
centro de servicio Philips.
Page 55

Problema Posible causa Solución
55ESPAÑOL 55
Sale un olor extraño
del aparato.
Noto la aplicación más
de lo normal.
El tratamiento me
resulta demasiado
doloroso.
La ventanilla
extraíble está sucia.
No ha afeitado
la zona que
se va a tratar
correctamente.
Ha usado una
intensidad de luz
demasiado alta.
No ha afeitado las
zonas que se van a
tratar.
El aparato está
defectuoso.
Ha guardado el
aparato en un
lugar en el que se
acumula polvo.
El ltro de cristal
de la ventanilla de
salida de luz está
roto.
No ha afeitado las
zonas que se van a
tratar.
Ha tratado
una zona
contraindicada.
Ha usado una
intensidad de luz
demasiado alta.
El ltro de cristal
de la ventanilla de
salida de luz está
roto.
El aparato no es
apropiado para el
color de su piel o
vello.
Limpie la ventanilla extraíble con cuidado. Si no la puede
limpiar bien, póngase en contacto con el Servicio de
Atención al Cliente de Philips de su país, su distribuidor
o un centro de servicio Philips para obtener una nueva
ventanilla extraíble.
Si queda vello en la zona que va a tratar, estos vellos
podrían quemarse al usar el aparato. Por tanto, notará un
olor extraño. Afeite la zona a tratar correctamente antes
de usar el aparato.
Compruebe si ha seleccionado la intensidad de luz
correcta. Si es necesario, seleccione una intensidad
menor.
Afeite siempre las zonas que se van a tratar antes de
usar el aparato.
Póngase en contacto con el Servicio de Atención al
Cliente de su país, con su distribuidor o un centro de
servicio Philips.
El olor extraño desaparece tras emitir algunos pulsos de
luz.
Si el ltro de cristal de la ventanilla de salida de luz está
roto, deje de usar el aparato. Póngase en contacto con
el Servicio de Atención al Cliente de su país, con su
distribuidor o un centro de servicio Philips.
Afeite siempre las zonas que se van a tratar antes de
usar el aparato.
Use el aparato sólo en las piernas, axilas y línea del bikini.
Reduzca la intensidad de luz a un nivel que le resulte
tolerable. Consulte el capítulo “Preparación para su uso”,
sección “Ajuste de la intensidad de la luz”.
Si el ltro de cristal de la ventanilla de salida de luz está
roto, deje de usar el aparato. Póngase en contacto con
el Servicio de Atención al Cliente de su país, con su
distribuidor o un centro de servicio Philips.
No use el aparato si su vello es rubio claro, pelirrojo, gris
o blanco. Tampoco lo utilice si tiene una piel muy oscura.
Page 56

ESPAÑOL56
Problema Posible causa Solución
Las zonas tratadas
podrían enrojecerse
después del
tratamiento.
La reacción de la piel
tras el tratamiento
tarda más en
desaparecer.
Los resultados de
reducción del vello no
son satisfactorios.
El vello vuelve a crecer
en algunas partes de
las zonas tratadas.
Un ligero
enrojecimiento
es normal y
desaparece
rápidamente.
Ha usado una
intensidad de luz
demasiado alta.
Ha usado una
intensidad de luz
demasiado baja.
No ha aplicado
bastantes pulsos de
luz con el aparato.
No ha abarcado
bien la zona a
tratar cuando uso
el aparato.
No ha usado
el aparato con
demasiada
frecuencia.
El aparato no es
apropiado para el
color de su piel o
vello.
No ha abarcado
bien la zona a
tratar cuando uso
el aparato.
El vello vuelve a
aparecer como
parte de su
ciclo natural de
crecimiento.
No tiene que preocuparse de nada.
Seleccione una intensidad inferior la próxima
vez. Consulte el capítulo “Preparación para su uso”,
sección “Ajuste de la intensidad de la luz”.
Si la reacción de la piel dura más de 3 días, consulte con
su médico.
Seleccione una intensidad más alta la próxima vez.
Asegúrese de generar bastantes pulsos de luz con el
aparato. Consulte el capítulo “Preparación para su uso”,
sección “Ajuste de la intensidad de luz”.
Para que los resultados de erradicación del vello
sean óptimos, tiene que abarcar parte de las zonas
anteriormente tratadas al usar el aparato. Consulte el
apartado “Uso del aparato”, paso 7.
Use el aparato una vez cada dos semanas.
No use el aparato si su vello es rubio claro, pelirrojo, gris
o blanco. Tampoco lo utilice si tiene una piel muy oscura.
Para que los resultados de erradicación del vello
sean óptimos, tiene que abarcar parte de las zonas
anteriormente tratadas al usar el aparato. Consulte el
apartado “Uso del aparato”.
Como parte natural de su ciclo de crecimiento, el vello
volverá a aparecer. Sin embargo, este nuevo vello será
más suave y no.
Page 57

1 2 3 41 2 3 4
FRANÇAIS
57
Introduction
Félicitations pour votre achat et bienvenue dans l’univers Philips ! Pour
proter pleinement de l’assistance Philips, enregistrez votre produit sur le
site à l’adresse suivante : www.philips.com/satinlux.
L’épilation à la lumière est l’une des méthodes les plus efcaces pour
éliminer les poils durablement. Issue de près de 10 ans de collaboration
entre Philips et d’éminents dermatologues, elle se démarque complètement
des modes d’épilation domestiques actuellement sur le marché.Protez de
cette technologie novatrice chez vous, à votre rythme.
Cet appareil est conçu pour l’élimination des poils féminins des zones
situées en dessous du cou :
Aisselles
Maillot
-
Jambes
-
Cet appareil n’est pas adapté dans les cas suivants :
Personnes dont les poils sont trop clairs (blond clair, roux, gris ou
blancs) ou dont la peau est très foncée. Reportez-vous au chapitre
« Avant utilisation », section « Réglage de l’intensité lumineuse ».
Pour plus d’informations sur SatinLux, visitez le site www.philips.com/
satinlux.
Quel est le principe de fonctionnement de la photo-épilation ?
Cycle de vie du poil
La croissance du poil est différente selon les personnes, et dépend de l’âge,
du métabolisme et d’autres facteurs, mais se décompose toujours en trois
phases :
1 Phase anagène (phase de pousse)
Le poil pousse à la racine. C’est lors de cette phase que la concentration
de mélanine, le pigment responsable de la couleur du poil, est la plus
élevée. Plus la racine contient de mélanine, plus le poil est foncé. La
concentration en mélanine est également un facteur déterminant pour
l’efcacité de cette méthode. Seuls les poils en phase anagène sont
réceptifs au traitement à la lumière.
2 Phase catagène (phase de dégradation)
Le poil arrête de pousser, la racine se rétracte, puis le poil tombe.
3 Phase télogène (phase de repos)
Le poil mort se détache de la racine et un nouveau poil le déloge
lentement. La racine reste au repos jusqu’à ce que l’horloge biologique la
réactive et lui fasse produire un nouveau poil (4). Une même zone de peau
contient des poils aux différentes phases du cycle de vie.
Principe de fonctionnement
L’appareil élimine les poils en chauffant le poil et la racine sous la peau.
La mélanine contenue dans le poil et sa racine absorbe la lumière pulsée
émise. Plus le poil est foncé, plus la chaleur produite est élevée. Ce
processus force le poil à passer en phase de repos.
Le poil tombe alors naturellement, et sa pousse est inhibée.
Une épilation optimale nécessite plusieurs séances, car seuls les poils en
phase anagène sont réceptifs au traitement à la lumière, alors qu’une zone
donnée de la peau contient des poils à différentes phases du cycle de vie.
Pour réussir à traiter tous les poils et bloquer la réactivation des racines, les
traitements doivent être répétés toutes les deux semaines.
Page 58

58
FRANÇAIS58
Un ltre optique intégré protège votre peau des UV, qui est ainsi
parfaitement préservée.
Avantages
Cet appareil offre les avantages suivants :
La technologie professionnelle IPL chez vous
SatinLux utilise la technologie dite de « lumière pulsée intense » ou IPL,
jusque-là utilisée dans le secteur de l’esthétique professionnelle pour
les épilations dénitives. Avec SatinLux, bénéciez de cette technologie
innovante chez vous.
Prévention efcace de la repousse des poils pour une douceur
à l’inni
Cette méthode empêche le poil de repousser avant longtemps, pour
une peau douce comme de la soie. Nos études ont mis en évidence une
diminution considérable des poils après seulement 2 traitements. Les
résultats optimaux ont généralement été obtenus après 4 ou 5 traitements.
La pilosité diminue visiblement de traitement en traitement. La rapidité
d’apparition de cet effet et la longévité des résultats dépendent de
l’individu. Répétez ce traitement tous les quinze jours pour des résultats
optimaux et an de conserver une peau douce à l’inni.
Un traitement non agressif, même sur les zones sensibles du corps
Développé en étroite collaboration avec d’éminents dermatologues,
SatinLux est un traitement efcace et non agressif, même sur les zones du
corps les plus sensibles.
Fonctionnement sans l pour une liberté et une exibilité
maximales
L’appareil fonctionne avec une batterie : vous pouvez donc l’emporter
partout et l’utiliser où bon vous semble.
Description générale (g. 2)
A Fenêtre de diffusion de la lumière avec ltre en verre
B Fenêtre amovible
C Surface métallique derrière l’écran amovible
D Système de sécurité (anneau de sécurité avec interrupteurs de
contact)
E Bouton Flash
F Voyants d’intensité (1- 5)
G % Bouton d’augmentation de l’intensité
H ^ Bouton de diminution de l’intensité
I Voyant de charge et indication de batterie faible
J Bouton marche/arrêt
K Voyant « Prêt pour le ash »
L Prise de l’appareil
M Adaptateur
N Petite che
Également inclus : housse et chiffon
Page 59

Important
Lisez attentivement ce mode d’emploi avant d’utiliser l’appareil et
conservez-le pour un usage ultérieur.
Danger
-
L’eau et l’électricité ne font pas bon ménage ! Donc, n’utilisez jamais
l’appareil dans un environnement humide (par ex. près d’une baignoire,
d’une douche ou d’une piscine).
Évitez de mouiller l’appareil et l’adaptateur.
-
Avertissement :
Cet appareil n’est pas destiné à être utilisé par des personnes
(notamment des enfants) dont les capacités physiques, sensorielles
ou intellectuelles sont réduites, ou par des personnes manquant
d’expérience ou de connaissances, à moins que celles-ci ne soient sous
surveillance ou qu’elles n’aient reçu des instructions quant à l’utilisation
de l’appareil par une personne responsable de leur sécurité.
Veillez à ce que les enfants ne puissent pas jouer avec l’appareil.
-
Utilisez l’appareil uniquement avec l’adaptateur fourni.
N’utilisez pas l’appareil lorsque celui-ci ou l’adaptateur est endommagé.
-
N’utilisez pas l’appareil si le verre ltrant est cassé.
Si l’adaptateur est endommagé, remplacez-le toujours par un
adaptateur de même type pour éviter tout accident.
L’adaptateur contient un transformateur. N’essayez pas de remplacer la
-
che de l’adaptateur pour éviter tout accident.
Pour éviter tout endommagement :
-
1 Ne recouvrez jamais les fentes de ventilation en cours d’utilisation.
2 Veillez à ce que rien n’obstrue le ux d’air à travers les fentes de
ventilation.
3 Ne soumettez jamais l’appareil à des chocs violents, des secousses ou
des chutes.
Lorsque l’appareil passe d’un environnement très froid à un
environnement très chaud, attendez environ 3 heures avant de l’utiliser.
N’utilisez jamais et ne rangez jamais l’appareil dans un lieu poussiéreux.
Ne laissez jamais l’appareil branché sans surveillance. Éteignez
impérativement l’appareil après utilisation.
N’exposez pas l’appareil de manière prolongée aux rayons directs du
-
soleil ou à des rayons UV.
Attention
Cet appareil a été conçu uniquement pour éliminer les poils féminins.
-
Ne l’utilisez jamais à d’autres ns.
Cet appareil a été conçu uniquement pour éliminer les poils humains
des zones du corps situées en dessous du cou. Ne l’utilisez pas sur
d’autres zones du corps.
Cet appareil n’est pas destiné à un usage commercial ou professionnel.
-
59FRANÇAIS 59
Page 60

60
FRANÇAIS60
La garantie est invalidée et Philips refuse toute responsabilité
concernant les éventuels dégâts occasionnés en cas d’utilisation de
l’appareil à des ns commerciales ou professionnelles, ou s’il est
utilisé sur des zones du corps autres que celles pour lesquelles il
est explicitement conçu, ou par des personnes pour lesquelles une
utilisation est explicitement interdite.
De légères rougeurs ou irritations peuvent apparaître sur votre peau
suite à l’utilisation de l’appareil. Ce phénomène est parfaitement normal
et disparaît rapidement. Si l’irritation persiste au bout de trois jours, il
est recommandé de consulter un médecin.
Utilisez votre appareil à une température comprise entre 15 °C et
35 °C.
L’appareil est équipé d’une protection anti-surchauffe intégrée. Le ash
ne fonctionne pas en cas de surchauffe. N’éteignez pas l’appareil, mais
laissez-le refroidir pendant environ 15 minutes avant de reprendre le
traitement.
Conez toujours l’appareil à un Centre Service Agréé Philips pour
-
réparation ou vérication. Toute réparation par une personne non
qualiée peut s’avérer dangereuse pour l’utilisateur.
N’utilisez jamais l’appareil dans les conditions mentionnées dans la
section Contre-indications.
Contre-indications
N’utilisez jamais l’appareil dans les conditions suivantes :
Si vous souffrez d’une maladie de peau telle qu’un cancer cutané actif,
si vous avez des antécédents de cancer cutané, ou de tout autre cancer
localisé dans la zone à traiter, si la zone à traiter contient des lésions
pré-cancéreuses ou des grains de beauté atypiques.
Si vous souffrez d’épilepsie avec sensibilité aux ashs.
Si vous présentez des antécédents de maladie du collagène, y
compris des antécédents de formation de cicatrices chéloïdes ou de
cicatrisation difcile.
Si vous présentez des antécédents de troubles vasculaires, tels que
varices ou ectasie vasculaire dans les zones à traiter.
Si votre peau est sensible à la lumière, produisant des irritations ou
des réactions allergiques. Si vous prenez des médicaments ou produits
photosensibilisants, reportez-vous à leur notice, et n’utilisez en aucun
cas l’appareil si cette dernière indique des risques de réaction photoallergique ou photo-toxique, ou si elle précise qu’il faut éviter une
exposition au soleil.
Si vous souffrez de diabète, de lupus érythémateux, de porphyrie ou
d’une maladie cardiaque congestive.
Sur des zones de votre peau en cours de traitement ou récemment
traitées par acides alpha hydroxylés (AHA), acides bêta hydroxylés
(BHA), isotrétinoïne topique et acide azélaïque.
Si vous avez pris de l’Accutane® ou du Roaccutane® à l’isotrétinoïne
par voie orale au cours des six derniers mois. Ce traitement rend la
peau plus susceptible aux déchirures, plaies et irritations.
Si vous souffrez d’un trouble hémostatique ou que vous prenez des
médicaments anticoagulants, y compris de fortes doses d’aspirine, à un
rythme ne permettant pas d’aménager une période d’élimination d’une
semaine avant chaque traitement.
Page 61

61FRANÇAIS 61
Si vous souffrez d’infections, d’eczéma, de brûlures, de follicules
-
enammées, de lacérations ouvertes, d’abrasions, d’herpès simplex,
de plaies ou de lésions, d’hématomes, ou que vous avez subi une
intervention chirurgicale sur les zones à traiter.
Si vous avez des antécédents de maladie immunosuppressive
-
(dont une infection au VIH, ou SIDA) ou que vous prenez des
immunosuppresseurs.
Si vous prenez des analgésiques, qui réduisent la sensibilité à la chaleur.
Si vous êtes enceinte ou que vous allaitez.
Sur les grains de beauté, les taches de rousseur, les veines de taille
importante, les zones à la pigmentation plus foncée, les cicatrices et les
anomalies cutanées sans consultation préalable avec un médecin, en
raison d’un risque de brûlure ou de modication de la pigmentation,
qui rendrait difcile le dépistage d’éventuelles maladies de peau telles
que le cancer de la peau.
Sur les aréoles et les muqueuses.
Après d’importantes séances de bronzage et/ou sur des coups de
soleil, ou si vous utilisez des accélérateurs de bronzage.
Sur des verrues, un tatouage ou un maquillage permanent en raison du
-
risque de brûlure ou de modication de la pigmentation.
Si vous utilisez un déodorant longue durée en raison du risque de
réaction cutanée.
Au-dessus ou près de produits articiels tels que des implants
en silicone, des implants contraceptifs Implanon, des stimulateurs
cardiaques, des points d’entrée d’injection sous-cutanée (pompe à
insuline) ou des piercings.
Champs électromagnétiques (CEM)
Cet appareil Philips est conforme à toutes les normes relatives aux champs
électromagnétiques (CEM). Il répond aux règles de sécurité établies
sur la base des connaissances scientiques actuelles s’il est manipulé
correctement et conformément aux instructions de ce mode d’emploi.
Charge
Chargez entièrement les batteries avant d’utiliser l’appareil pour la
première fois et lorsque celles-ci sont épuisées. Une charge complète
prend jusqu’à 4 heures.
Chargez l’appareil lorsque le voyant de charge devient orange pendant
l’utilisation. La capacité de l’appareil à partir du moment où le voyant
s’allume est de 30 ashs.
Des batteries entièrement chargées permettent d’émettre au moins
160 ashs d’une intensité lumineuse de 5, ce qui correspond à un temps de
fonctionnement sans l d’environ 15 minutes. Le nombre de ashs dépend
de l’intensité lumineuse sélectionnée (voir « Efcacité en fonction des
différentes intensités lumineuses », au chapitre « Avant utilisation »).
Rechargez entièrement l’appareil tous les 3 à 4 mois, même en cas
d’inutilisation prolongée.
1 Éteignez l’appareil.
2 Insérez la petite che dans l’appareil et l’adaptateur dans la prise
secteur.
Page 62

62
FRANÇAIS62
Le voyant de charge clignote en vert pour indiquer que l’appareil se
,
charge.
Lorsque les batteries sont complètement chargées, le voyant de
,
charge cesse de clignoter et devient vert.
Attention : Ne recouvrez jamais l’appareil ou l’adaptateur lors de la
charge.
Remarque : L’appareil ne peut pas être utilisé en cours de charge.
Remarque : L’adaptateur chauffe en cours de charge. Ce phénomène est
normal.
3 Une fois la charge terminée, débranchez l’adaptateur de la prise
murale, puis retirez la petite che de l’appareil.
Avant utilisation
Pour une efcacité et des résultats optimaux, préparez les zones sur
lesquelles vous souhaitez utiliser l’appareil de la manière suivante :
1 Rasez les zones que vous souhaitez traiter tant que vous observez
une repousse des poils.
Ne vous épilez jamais à la cire, l’épilateur, la pince à épiler ou une crème
dépilatoire. Ces méthodes inhibent le fonctionnement de la photoépilation, car elles éliminent les poils à la racine. La lumière ne peut alors
plus être absorbée par la racine ; les poils repousseront donc.
Remarque : Le rasage est nécessaire pour que l’énergie lumineuse atteigne la
racine du poil aussi efcacement que possible. En outre, la lumière peut brûler
les poils visibles sur la zone de traitement, causant une odeur désagréable. Ce
phénomène est généralement sans danger, mais peut rendre l’utilisation de
l’appareil légèrement douloureuse.
2 Nettoyez votre peau et assurez-vous qu’elle est parfaitement sèche
et exempte de graisse ou d’huile (les produits cosmétiques tels que
les déodorants, laits, parfums, crèmes de bronzage et crèmes solaires
en contiennent).
Remarque : Si le rasage cause des coupures ou des lésions, il est possible
que la peau devienne plus sensible. Dans ce cas, le traitement peut être plus
perceptible, ou même parfois inconfortable.
Remarque : Une fois que les poils ne repoussent plus, ce qui est généralement
le cas après quelques traitements, vous n’avez plus besoin de vous raser avant
utilisation.
Conseil : Si le rasage irrite votre peau, vous pouvez utiliser une tondeuse
pour couper les poils aussi court que possible. Dans ce cas, le traitement
à la lumière pourrait être plus perceptible, ou même parfois légèrement
inconfortable.
Réglage de l’intensité lumineuse
Réglez l’intensité lumineuse en fonction de la couleur de votre peau et de
vos poils, tout en recherchant un niveau confortable.
Le tableau ci-dessous indique les intensités lumineuses recommandées an
de vous aider à trouver le niveau qui vous convient.
Page 63

1 Consultez le tableau ci-dessous pour déterminer les intensités
lumineuses les mieux adaptées à la couleur de votre peau et de vos
poils, et pour vérier que cette méthode d’épilation vous convient
(une croix gure dans le tableau lorsque ce n’est pas le cas).
Remarque : Le risque d’irritation cutanée est plus important pour les
personnes à peau foncée car leur peau absorbe plus de lumière. Les faibles
intensités sont alors recommandées.
2 Pour chaque zone du corps à traiter, sélectionnez une intensité
adaptée, comprise dans la fourchette recommandée, mais aussi
élevée que possible sans causer de sensation inconfortable au niveau
de la peau.
L’intensité lumineuse sélectionnée peut produire des sensations de
chaleur plus ou moins importante sur la peau, mais ne doit jamais être
inconfortable.
Remarque : Avant chaque traitement, vériez que l’appareil est réglé sur
l’intensité qui convient.
Intensités lumineuses recommandées (1-5)
63FRANÇAIS 63
Couleur et
caractéristiques
de la peau :
Couleur des
poils :
Blanc
(coups
de soleil
à chaque
exposition,
aucun
bronzage)
blanc/gris x x x x x x
roux x x x x x x
blond clair x x x x x x
blond 4/5 4/5 4/5 3/4/5 1/2/3/4 x
blond
foncé/
marron
clair
marron 4/5 4/5 4/5 3/4/5 1/2/3/4 x
marron
foncé
noir 4/5 4/5 4/5 3/4/5 1/2/3/4 x
4/5 4/5 4/5 3/4/5 1/2/3/4 x
4/5 4/5 4/5 3/4/5 1/2/3/4 x
Beige
(coups
de soleil
réguliers,
léger
bronzage)
Marron
clair
(quelques
coups
de
soleil,
bon
bronzage)
Marron
moyen
(rares coups
de soleil,
bronzage
bon et
rapide)
Marron
foncé
(rares
coups
de
soleil,
très
bon
bronzage)
Noir
(coups
de
soleil
rares
ou
inexistants,
bronzage très
foncé)
La croix signie qu’il n’est pas recommandé d’utiliser l’appareil.
Page 64

64
FRANÇAIS64
Remarque : L’appareil ne convient pas aux peaux très foncées à noires en
raison du risque plus important d’irritation cutanée.
Remarque : L’appareil ne convient pas aux personnes dont les poils sont blond
clair, roux, gris ou blancs. L’élimination de ces poils est beaucoup moins efcace
en raison de leur faible concentration en mélanine.
Remarque : Les intensités lumineuses plus élevées sont plus efcaces, mais
aussi plus perceptibles.
Efcacité en fonction des différentes intensités lumineuses
Intensité lumineuse Efcacité Nombre de ashs
5 ***** 160
4 **** 190
3 *** 250
2 ** 350
1 * 520
* indique le niveau d’efcacité
Remarque : Ce tableau indique le nombre de ashs que l’appareil produit à
chaque intensité lumineuse, ainsi que l’efcacité correspondante. Sélectionnez
l’intensité adaptée à votre couleur de peau et à la couleur de vos poils.
Utilisation de l’appareil
L’intensité lumineuse sélectionnée peut produire des sensations de
chaleur plus ou moins importante sur la peau, mais ne doit jamais être
inconfortable.
Cet appareil est uniquement conçu pour l’élimination des poils féminins
sur les zones situées en dessous du cou : aisselles, maillot et jambes.
Remarque : Rasez la zone à traiter avant d’utiliser l’appareil (voir le chapitre
« Avant utilisation »).
Conseil : Le mieux est de procéder au traitement le soir avant de vous coucher
pour minimiser d’éventuelles réactions cutanées pouvant se déclarer au cours
de la nuit.
1 Mettez l’appareil en marche en appuyant sur le bouton marche/arrêt.
,
Le voyant d’intensité 1 s’allume automatiquement pour indiquer que
l’appareil est allumé et réglé sur l’intensité par défaut 1.
Remarque : Vous pouvez éteindre l’appareil à tout moment en appuyant de
nouveau sur le bouton marche/arrêt.
Remarque : Il est normal que l’appareil chauffe au cours de l’utilisation.
Page 65

65FRANÇAIS 65
2 Appuyez sur le bouton % pour augmenter l’intensité, et sur le
bouton ^ pour la diminuer.
À chaque fois que vous appuyez sur le bouton, le voyant d’intensité
,
correspondant au niveau clignote au bout de quelques secondes.
3 Placez l’appareil perpendiculairement à la peau de sorte que la
fenêtre amovible et l’anneau de sécurité soient en contact avec la
peau.
Conseil : Lorsque vous utilisez l’appareil pour la première fois, réalisez un
essai, par exemple sur la hanche, pour vous habituer à la méthode d’épilation.
Commencez par l’intensité recommandée la plus basse, puis augmentez-la
jusqu’à ce que vous atteigniez le réglage le plus élevé recommandé. Cet essai
vous permet de déterminer la sensibilité de votre peau à la lumière. Vériez
que votre peau ne présente pas de réactions 20 minutes après l’essai. Si c’est
le cas, utilisez une intensité recommandée plus basse sur les zones à traiter.
4 L’anneau de sécurité doit exercer une légère pression sur la peau, de
manière à ce que le contact soit total.
Remarque : L’anneau de sécurité est équipé d’interrupteurs de contact servant
de système de sécurité de l’appareil. Il évite tout ash indésirable lorsque
l’appareil ne touche pas la peau.
Lorsque tous les interrupteurs de contact sur l’anneau de sécurité
,
sont enfoncés dans l’appareil, le voyant « Flash prêt » s’allume au dos
de l’appareil au bout de quelques secondes. Lorsque le voyant « Flash
prêt » est allumé, l’appareil est prêt à émettre un ash.
Conseil : Pour faciliter l’utilisation, étirez la peau à traiter. Il vous faudra peutêtre exercer une pression plus forte sur les zones moins fermes du corps pour
que tous les interrupteurs de contacts s’enfoncent.
5 Appuyez sur le bouton du ash pour émettre un ash. Une fois que
l’appareil a émis un ash, relâchez ce bouton.
6 Pour le ash suivant, réitérez les étapes 3, 4 et 5. Ce processus peut
prendre quelques secondes.
Ne ashez jamais la même zone deux fois de suite sans séparer l’appareil
de la peau. Ceci évite toute surchauffe ou une éventuelle brûlure.
Page 66

66
FRANÇAIS66
7 Pour vous assurer que toutes les zones sont traitées, veillez à ce
que les zones successives de traitement se chevauchent. La lumière
efcace est uniquement émise par l’écran de sortie de la lumière.
Assurez-vous que les ashs sont rapprochés.
8 À la n du traitement, mettez l’appareil hors tension.
Remarque : Évitez de regarder directement la lumière émise par l’écran
lorsque l’appareil est allumé.
Remarque : La lumière visible produite par l’appareil correspond au ash
reété par la peau, et ne représente aucun danger pour vos yeux. Il n’est pas
nécessaire de porter des lunettes de protection pendant l’utilisation.
Recommandations relatives au traitement
Nombre de ashs et durée du traitement recommandés
Zone Nombre approximatif de
ashs
Aisselles 25 par aisselle 3 minutes par aisselle
Maillot 25 par côté 3 minutes par côté
Zone pubienne 90 pour l’ensemble de la zone 10 minutes
Demi-jambe 160 - 190 15 minutes
Jambe entière 320 - 380 30 minutes
Remarque : Des batteries entièrement chargées permettent d’émettre au
moins 160 ashs d’une intensité de 5, ce qui correspond à un temps de
fonctionnement sans l d’environ 15 minutes.
Pour des résultats optimaux
Des résultats optimaux sont impossibles en une seule séance, car seuls
les poils en phase anagène sont réceptifs à un traitement à la lumière. Les
poils d’une zone traitée sont généralement tous à différents stades de leur
cycle de vie. Pour réussir à traiter tous les poils et à empêcher que les
racines ne redeviennent actives, vous devez répéter le traitement toutes les
2 semaines. Il est recommandé de respecter ce rythme. Vous n’obtiendrez
pas de meilleurs résultats en augmentant ou en diminuant la fréquence.
Des essais cliniques ont en effet démontré que cette fréquence d’utilisation
était optimale.
Après le traitement
Les phénomènes suivants peuvent se produire suite au
traitement :
Des rougeurs et/ou des fourmillements, des picotements ou une
sensation de chaleur sur la peau. Cette réaction est sans danger et
passagère.
Une réaction cutanée semblable à un coup de soleil peut apparaître
momentanément sur la zone traitée.
Votre peau peut sembler sèche. L’association du rasage et du
traitement à la lumière peut en effet assécher la peau.
Durée approximative du traitement
Page 67

Il est possible que des poils repoussent malgré une utilisation fréquente
de l’appareil. Ceci est dû au fait que les poils sont tous à un stade
différent de leur cycle de vie. Lorsqu’ils repoussent, les poils sont
généralement plus ns et doux.
Il est recommandé de
Consulter un médecin lorsque l’irritation cutanée ne disparaît pas sous
trois jours (voir la section « Attention » au chapitre « Important »).
Attendez que l’irritation ait totalement disparu avant de recommencer
le traitement. L’intensité utilisée était peut-être trop élevée pour vous.
Utilisez une intensité moins élevée la prochaine fois.
Ne restez pas longtemps au soleil et ne faites pas de séance de
bronzage intensive sans une protection adéquate juste après un
traitement. Si vous souhaitez prendre un bain de soleil après un
traitement, appliquez un écran total sur les zones traitées.
Évitez de nager dans de l’eau chlorée pendant 48 heures après le
traitement. Le chlore dans l’eau peut provoquer des démangeaisons.
Évitez d’appliquer des produits cosmétiques sur les zones venant d’être
traitées.
Nettoyage et entretien
Ne nettoyez jamais l’appareil ou ses composants sous le robinet ou au
lave-vaisselle.
N’utilisez jamais de tampons à récurer, de produits abrasifs ou de
détergents agressifs tels que de l’essence ou de l’acétone pour nettoyer
l’appareil.
Ne rayez jamais le verre ltrant ou la surface métallique derrière l’écran
amovible.
Remarque : Veillez à ce que de la crasse ne bloque pas les interrupteurs de
contact sur l’anneau de sécurité.
Remarque : Arrêtez d’utiliser l’appareil lorsqu’il n’est plus possible de nettoyer
le verre ltrant ou l’écran amovible.
Pour garantir des résultats optimaux et une longue durée de
fonctionnement, nettoyez l’appareil après chaque traitement.
1 Éteignez l’appareil, débranchez-le et laissez-le refroidir.
Remarque : Le verre ltrant chauffe pendant l’utilisation. Assurez-vous qu’il a
refroidi avant de le nettoyer.
2 Pour retirer l’écran amovible, placez vos doigts dans les
renfoncements de l’appareil, puis tirez sur l’écran pour le détacher
de l’appareil.
3 Nettoyez les pièces suivantes à l’aide du chiffon sec et doux fourni :
Surface du verre ltrant
Surface extérieure de l’écran amovible
Cadre métallique derrière l’écran amovible
Corps de l’appareil (si nécessaire)
-
Remarque : Si nécessaire, ajoutez quelques gouttes d’eau.
:
67FRANÇAIS 67
Page 68

68
FRANÇAIS68
Rangement
1
Éteignez l’appareil, débranchez-le et laissez-le refroidir.
2 Nettoyez l’appareil avant de le ranger.
3 Rangez l’appareil dans la housse fournie.
4 Rangez l’appareil dans un lieu sec, à une température comprise entre
0°C et 60°C.
Environnement
Lorsqu’il ne fonctionnera plus, ne jetez pas l’appareil avec les ordures
-
ménagères, mais déposez-le à un endroit assigné à cet effet, où
il pourra être recyclé. Vous contribuerez ainsi à la protection de
l’environnement.
Les batteries rechargeables intégrées contiennent des substances qui
-
peuvent nuire à l’environnement. Veillez à toujours retirer les batteries
avant de mettre l’appareil au rebut ou de le déposer à un endroit
assigné à cet effet. Déposez les batteries usagées à un endroit assigné
à cet effet. Si vous n’arrivez pas à les retirer de l’appareil, vous pouvez
apporter ce dernier dans un Centre Service Agréé Philips qui prendra
toute l’opération en charge pour préserver l’environnement.
Retrait des batteries
Ne retirez les batteries que lorsqu’elles sont complètement déchargées.
1 Insérez un poinçon ou autre outil pointu dans l’orice de l’appareil
pour détacher le couvercle sous la poignée.
2 Dévissez les deux vis.
3 Retirez la partie inférieure de la poignée et coupez les deux ls
connectés à la partie inférieure de l’appareil.
Page 69

4 Tirez sur les connecteurs de la batterie pour les détacher des
bornes de la batterie.
5 Faites sortir les batteries rechargeables de l’appareil.
6 Coupez les deux ls reliant les batteries rechargeables à l’appareil.
69FRANÇAIS 69
Garantie et service
Si vous rencontrez un problème ou si vous souhaitez obtenir des
informations ou faire réparer votre appareil, rendez-vous sur le site Web
de Philips à l’adresse www.philips.com/satinlux ou appelez le 00800-
SATINLUX (72846589).
Pièces de rechange
Les pièces de rechange suivantes sont disponibles :
Écran amovible
-
Adaptateur
-
Étui
-
Caractéristiques techniques
Modèle SC2000
Tension nominale 100-240 V
Fréquence nominale 50-60 Hz
Entrée nominale 7,5 W
Protection contre les électrocutions Classe II Q
Page 70

70
FRANÇAIS70
Modèle SC2000
Niveau de protection IP 30 (EN 60529)
Conditions de fonctionnement Température : +15 à +35°C
Taux d’humidité relative : 25 à 75 %
Conditions de stockage Température : 0 à +60°C
Taux d’humidité relative : 5 à 95 %
Lampe à lumière pulsée intense Spectre : > 570 nm
Batterie lithium-ion 2 x 3,7 Volts
1 100 mAh
Dépannage
Cette rubrique présente les problèmes les plus courants que vous
pouvez rencontrer avec votre appareil. Si vous ne parvenez pas à
résoudre le problème à l’aide des informations ci-dessous, contactez le
Service Consommateurs Philips de votre pays.
Reportez-vous au numéro de téléphone gurant à l’arrière de manuel
d’utilisation ou visitez le site www.philips.com/satinlux pour plus
d’informations.
Problème Cause possible Solution
L’appareil ne
fonctionne pas.
L’appareil s’éteint
sans prévenir.
L’adaptateur
chauffe au cours
de la charge.
Le voyant de
charge ne s’allume
pas lorsque je
branche la petite
che sur la prise
de l’appareil.
Les batteries
rechargeables sont
vides.
L’appareil est cassé. Contactez le Service Consommateurs Philips de votre pays,
Les batteries
rechargeables sont
vides.
Ce phénomène est
normal.
Vous n’avez pas
branché l’adaptateur
sur la prise secteur.
Rechargez l’appareil (voir le chapitre « Charge »).
votre revendeur Philips ou un Centre Service Agréé Philips.
Rechargez l’appareil (voir le chapitre « Charge »).
Aucune action n’est requise.
Insérez la petite che dans la prise de l’appareil et branchez
l’adaptateur sur la prise secteur.
Branchez un autre appareil sur la prise secteur pour vérier
qu’elle est alimentée.
Si l’appareil ne se charge toujours pas, contactez le
Service Consommateurs Philips de votre pays, votre
revendeur Philips ou un Centre Service Agréé Philips.
Page 71

Problème Cause possible Solution
71FRANÇAIS 71
L’appareil est
allumé, mais je
ne parviens pas à
augmenter ou à
diminuer l’intensité
lumineuse.
Le voyant « Flash
prêt » ne s’allume
pas lorsque je
place l’appareil sur
ma peau.
Le voyant « Flash
prêt » ne s’allume
pas lorsque je
place l’écran
amovible sur
ma peau, mais
le ventilateur
fonctionne.
Le voyant « Flash
prêt » est vert
mais l’appareil
n’émet pas de
ash lorsque
j’appuie sur le
bouton du ash.
L’adaptateur
n’est pas branché
correctement sur
la prise secteur
et/ou la petite che
n’est pas insérée
correctement dans la
prise de l’appareil.
L’appareil est cassé. Contactez le Service Consommateurs Philips de votre pays,
L’appareil doit être
réinitialisé.
L’écran amovible
équipé de l’anneau
de sécurité n’est pas
correctement placé
sur la peau.
L’anneau de sécurité
est sale.
La protection antisurchauffe a été
activée.
L’appareil doit être
réinitialisé.
Assurez-vous que l’adaptateur est branché correctement
sur la prise secteur et/ou que la petite che est insérée
correctement dans la prise de l’appareil.
votre revendeur Philips ou un Centre Service Agréé Philips.
Pour réinitialiser l’appareil, éteignez-le, puis rallumez-
le. Si vous ne parvenez toujours pas à régler l’intensité
lumineuse, contactez le Service Consommateurs Philips
de votre pays, votre revendeur Philips ou un
Centre Service Agréé Philips.
Placez l’appareil perpendiculairement à la peau, de manière
à ce que tous les interrupteurs de contact touchent la
peau, puis vériez que le voyant « Flash prêt » est allumé et
appuyez sur le bouton du ash.
Si le problème n’est pas résolu, placez l’appareil sur une
zone de votre corps où il est facile d’établir un bon
contact, par exemple sur votre avant-bras, puis vériez
que le voyant « Flash prêt » est allumé. Si ce n’est pas
le cas alors que l’appareil touche votre peau, contactez
le Service Consommateurs Philips de votre pays, votre
revendeur Philips ou un Centre Service Agréé Philips.
Nettoyez soigneusement l’anneau de sécurité.
Si vous ne parvenez pas à le faire, contactez le
Service Consommateurs Philips de votre pays, votre
revendeur Philips ou un Centre Service Agréé Philips pour
remplacer l’écran du ash.
Lorsque la protection anti-surchauffe a été activée, le
ventilateur continue à fonctionner. N’éteignez pas l’appareil
et laissez-le refroidir pendant environ 15 minutes avant de
reprendre l’utilisation. Si le voyant « Flash prêt » ne s’allume
pas lorsque vous placez l’appareil sur votre peau, contactez
le Service Consommateurs Philips de votre pays, votre
revendeur Philips ou un Centre Service Agréé Philips.
Pour réinitialiser l’appareil, éteignez-le, puis rallumez-le. Si
le voyant « Flash prêt » est vert, mais que l’appareil n’émet
toujours pas de ash lorsque vous appuyez sur le bouton
du ash, contactez le Service Consommateurs Philips
de votre pays, votre revendeur Philips ou un
Centre Service Agréé Philips.
Page 72

72
FRANÇAIS72
Problème Cause possible Solution
L’appareil devient
chaud en cours
d’utilisation.
L’appareil n’indique
pas l’intensité
lumineuse 1
lorsque je l’allume.
L’appareil produit
une odeur étrange.
Le traitement est
plus perceptible
que d’habitude.
Je ressens
une douleur
importante
lorsque j’utilise
l’appareil.
Ce phénomène est
normal.
L’appareil doit être
réinitialisé.
L’écran amovible est
sale.
Vous n’avez pas
correctement rasé la
zone à traiter.
Vous avez utilisé une
intensité lumineuse
trop élevée.
Vous n’avez pas rasé
les zones à traiter.
L’appareil est
défectueux.
Vous avez rangé
l’appareil dans un lieu
poussiéreux.
Le verre ltrant de
l’écran d’émission de
la lumière est cassé.
Vous n’avez pas rasé
les zones à traiter.
Vous avez traité une
zone pour laquelle
l’appareil n’est pas
conçu.
Vous avez utilisé une
intensité lumineuse
trop élevée.
Le verre ltrant de
l’écran d’émission de
la lumière est cassé.
Aucune action n’est requise.
Pour réinitialiser l’appareil, éteignez-le, puis rallumez-le. Si
l’appareil n’indique toujours pas l’intensité lumineuse 1,
contactez votre Service Consommateurs Philips, votre
revendeur Philips ou un Centre Service Agréé Philips.
Nettoyez soigneusement l’écran amovible. Si
vous ne parvenez pas à le faire, contactez le
Service Consommateurs Philips de votre pays, votre
revendeur Philips ou un Centre Service Agréé Philips pour
remplacer l’écran amovible.
Si la zone à traiter contient des poils, ceux-ci peuvent brûler au
passage de l’appareil, ce qui produit une odeur étrange. Rasez
correctement la zone à traiter avant d’utiliser l’appareil.
Vériez que vous avez sélectionné la bonne intensité
lumineuse. Si nécessaire, diminuez l’intensité.
Rasez impérativement les zones à traiter avant d’utiliser
l’appareil.
Contactez le Service Consommateurs Philips de votre pays,
votre revendeur Philips ou un Centre Service Agréé Philips.
L’odeur étrange se dissipera au bout de quelques ashs.
Si le verre ltrant de l’écran d’émission de la lumière
est cassé, arrêtez d’utiliser l’appareil. Contactez le
Service Consommateurs Philips de votre pays, votre
revendeur Philips ou un Centre Service Agréé Philips.
Rasez impérativement les zones à traiter avant d’utiliser
l’appareil.
Utilisez l’appareil uniquement sur les jambes, les aisselles et
le maillot.
Réduisez l’intensité lumineuse à un niveau que vous
trouvez confortable. Reportez-vous au chapitre « Avant
utilisation », section « Réglage de l’intensité lumineuse ».
Si le verre ltrant de l’écran d’émission de la lumière
est cassé, arrêtez d’utiliser l’appareil. Contactez le
Service Consommateurs Philips de votre pays, votre
revendeur Philips ou un Centre Service Agréé Philips.
Page 73

Problème Cause possible Solution
73FRANÇAIS 73
Des rougeurs
apparaissent sur
les zones venant
d’être traitées.
La réaction
cutanée suite au
traitement dure
plus longtemps.
La réduction de
pilosité n’est pas
satisfaisante.
Les poils
repoussent par
endroits sur les
zones traitées.
L’appareil ne
convient pas à votre
couleur de peau ou
de poils.
Il est normal
d’observer de
légères rougeurs ;
celles-ci disparaissent
rapidement.
Vous avez utilisé une
intensité lumineuse
trop élevée.
Vous avez utilisé une
intensité lumineuse
trop basse.
Vous n’avez pas laissé
l’appareil émettre
sufsamment de
ashs.
Vous n’avez pas
ménagé des
chevauchements
sufsants lorsque
vous avez utilisé
l’appareil.
Vous n’utilisez pas
l’appareil assez
souvent.
L’appareil ne
convient pas à votre
couleur de peau ou
de poils.
Vous n’avez pas
ménagé des
chevauchements
sufsants lorsque
vous avez utilisé
l’appareil.
Les poils repoussent
dans le cadre de leur
cycle de vie normal.
N’utilisez pas l’appareil si vos poils sont blond clair, roux,
gris ou blancs. N’utilisez pas cet appareil non plus si votre
peau est très foncée.
Aucune action n’est requise.
Sélectionnez une intensité lumineuse moins élevée
la prochaine fois. Reportez-vous au chapitre « Avant
utilisation », section « Réglage de l’intensité lumineuse ».
Si la réaction cutanée persiste plus de 3 jours, contactez
votre médecin.
Sélectionnez une intensité lumineuse plus importante la
prochaine fois.
Veillez à laisser l’appareil émettre sufsamment de ashs.
Reportez-vous au chapitre « Avant utilisation », section
« Réglage de l’intensité lumineuse ».
Pour éliminer correctement les poils, vous devez passer
l’appareil de manière à ce que les zones traitées se
chevauchent. Reportez-vous au chapitre « Utilisation de
l’appareil », étape 7.
Utilisez l’appareil toutes les 2 semaines.
N’utilisez pas l’appareil si vos poils sont blond clair, roux,
gris ou blancs. N’utilisez pas cet appareil non plus si votre
peau est très foncée.
Pour éliminer correctement les poils, vous devez passer
l’appareil de manière à ce que les zones traitées se
chevauchent. Reportez-vous au chapitre « Utilisation de
l’appareil ».
La repousse fait partie du cycle de vie normal des poils.
Toutefois, les poils qui repoussent sont généralement plus
ns et doux.
Page 74

74
1 2 3 4
ITALIANO
Introduzione
Congratulazioni per l’acquisto e benvenuti in Philips! Per trarre il massimo
vantaggio dall’assistenza Philips, registrate il vostro prodotto su www.philips.
com/satinlux.
La depilazione a luce è uno dei metodi più efcaci per la rimozione dei peli
superui e garantisce risultati che durano più a lungo.Questo metodo di
depilazione è diverso da quelli più diffusi; Philips è impegnata nella ricerca
in questo settore da quasi 10 anni, con il supporto dei migliori dermatologi.
Ora potete utilizzare questainnovativa tecnologia direttamente a casa, ogni
volta che volete.
Questo apparecchio è adatto per la rimozione dei peli nelle seguenti aree:
ascelle
area bikini
gambe
-
Questo apparecchio non è adatto per:
persone con una peluria troppo chiara (bionda, rossa, grigia o
bianca) o la pelle olivastra. Consultate il capitolo ‘Predisposizione
dell’apparecchio’, sezione ‘Impostazione del livello d’intensità luminosa’.
Per ulteriori informazioni su SatinLux, visitate il sito Web www.philips.
com/satinlux.
Come funziona la fotoepilazione
Crescita dei peli
I peli crescono in modo diverso in base all’età, al metabolismo e ad altri
fattori, ma generalmente il processo di crescita è composto da tre fasi:
1 Fase anagen (fase di crescita)
I peli si sviluppano dal bulbo. In questa fase la concentrazione di melanina
è altissima. La melanina è responsabile della pigmentazione dei peli. Se il
bulbo contiene un’alta concentrazione di melanina, il pelo sarà più scuro. La
concentrazione di melanina è anche il fattore determinante dell’efcacia di
questo metodo. Solo i peli nella fase anagen sono sensibili al trattamento
con la luce.
2 Fase catagen (fase di degradazione)
La crescita del pelo si interrompe, il bulbo si ritira e il pelo fuoriesce.
3 Fase telogen (fase di riposo)
Il vecchio pelo si separa dal bulbo e il nuovo pelo spinge leggermente il
vecchio verso l’esterno. Il bulbo rimane a riposo no a quando l’orologio
biologico lo informa che è il momento di attivarsi nuovamente e far
crescere un altro pelo (4). La stessa supercie cutanea ospita generalmente
peli in diverse fasi del ciclo di crescita.
Principio di funzionamento
L’apparecchio rimuove i peli riscaldando il pelo e il bulbo pilifero sotto la
cute. La melanina contenuta nel pelo e nel bulbo pilifero assorbe gli impulsi
luminosi emessi. Un pelo più scuro richiede una maggiore quantità di
calore. Questo processo stimola il pelo ad entrare nella fase di riposo.
Il pelo ora fuoriesce naturalmente e la crescita del pelo è inibita.
Non è possibile ottenere una depilazione ottimale con una sola sessione,
dal momento che sono sensibili al trattamento con la luce solo i peli nella
fase anagen. Durante un trattamento, i peli dell’area trattata si trovano
generalmente in diverse fasi del ciclo di crescita.
Page 75

ITALIANO 75
Per eliminare i peli con successo ed impedire che il bulbo pilifero si riattivi,
è opportuno ripetere i trattamenti una volta ogni due settimane.
Un ltro ottico integrato protegge la cute dalla luce UV.
Vantaggi
Questo apparecchio offre i seguenti vantaggi:
Tecnologia IPL professionale anche a casa
SatinLux utilizza una tecnologia basata sulla luce pulsata, denominata IPL
(Intense Pulsed Light). La tecnologia IPL viene utilizzata anche nel mercato
professionale della bellezza per la depilazione. Grazie a SatinLux, ora questa
tecnologia innovativa può essere utilizzata nel comfort della vostra casa.
Prevenzione efcace della ricrescita dei peli per una pelle
sempre vellutata
Questo metodo rallenta la ricrescita dei peli e rende la pelle liscia come
il velluto. Gli studi indicano una riduzione signicativa del pelo già dopo 2
trattamenti. Il risultato ottimale viene generalmente raggiunto dopo 4-5
trattamenti. Già da un trattamento all’altro potrete notare una riduzione
della peluria. La rapidità e la durata dei risultati variano da persona a
persona. Per risultati ottimali e per una pelle sempre liscia, ripetete questo
trattamento ogni due settimane.
Trattamento delicato, anche sulle aree del corpo più sensibili
SatinLux è stato sviluppato in stretta collaborazione con dermatologi
esperti, per garantire un trattamento efcace e delicato anche sulle aree
del corpo più sensibili.
Funzionamento senza lo per la massima libertà di movimento
e essibilità
Dal momento che l’apparecchio è alimentato da batterie ricaricabili, è
portatile e può essere utilizzato ovunque.
Descrizione generale (g. 1)
A Finestra di emissione luce con ltro in vetro
B Finestra rimovibile
C Supercie metallica all’interno della nestra rimovibile
D Sistema di sicurezza (anello di sicurezza con interruttori a contatto)
E Pulsante per l’emissione ash
F Intensità della luce (1 - 5)
G % Pulsante aumento intensità
H ^ Pulsante diminuzione intensità
I Spia ricarica e indicatore batteria scarica
J Pulsante on/off
K Spia di luce pronta
L Presa apparecchio
M Adattatore
N Spinotto
Inclusi inoltre: custodia e panno detergente
Importante
Prima di utilizzare l’apparecchio, leggete attentamente il presente manuale e
conservatelo per eventuali riferimenti futuri.
Page 76

ITALIANO76
Pericolo
L’acqua e l’elettricità rappresentano una combinazione pericolosa! Non
usate l’apparecchio in ambienti umidi (ad esempio vicino a una vasca
da bagno, doccia o piscina).
Non bagnate l’apparecchio e l’adattatore.
-
Avvertenza
L’apparecchio non è destinato a persone (inclusi bambini) con capacità
-
mentali, siche o sensoriali ridotte, fatti salvi i casi in cui tali persone
abbiano ricevuto assistenza o formazione per l’uso dell’apparecchio da
una persona responsabile della loro sicurezza.
Adottate le dovute precauzioni per evitare che i bambini giochino con
l’apparecchio.
Utilizzate l’apparecchio esclusivamente con l’adattatore in dotazione.
Non utilizzate l’apparecchio nel caso in cui l’adattatore o l’apparecchio
stesso fossero danneggiati.
Non utilizzare l’apparecchio se il ltro in vetro è danneggiato.
Nel caso in cui l’adattatore fosse danneggiato, dovrà essere sostituito
-
esclusivamente con un adattatore originale al ne di evitare situazioni
pericolose.
L’adattatore contiene un trasformatore. Non tagliate l’adattatore per
sostituirlo con un’altra spina onde evitare situazioni pericolose.
Per evitare danni:
-
1 non coprite le fessure per la ventilazione durante l’uso.
2 accertatevi che le fessure per la ventilazione non presentino ostruzioni
al usso dell’aria
3 non sottoponete l’apparecchio a urti violenti, forti scosse o cadute.
Se spostate l’apparecchio da un ambiente eccessivamente freddo a
un ambiente eccessivamente caldo, attendete circa 3 ore prima di
utilizzarlo.
Non utilizzate né conservate l’apparecchio in un ambiente polveroso.
Non lasciate l’apparecchio incustodito quando è acceso. Spegnete
sempre l’apparecchio dopo l’uso.
Non esponete l’apparecchio alla luce diretta del sole o alla luce UV per
un periodo di tempo prolungato.
Attenzione
Questo apparecchio è stato realizzato unicamente per la depilazione
femminile. Non utilizzatelo per altri scopi.
L’apparecchio è stato realizzato unicamente per la rimozione dei peli
dalle aree del corpo dal collo in giù. Non utilizzatelo per aree diverse
da quelle indicate.
Questo apparecchio non è progettato per l’uso commerciale o
professionale.
Se l’apparecchio viene utilizzato per scopi commerciali o professionali,
se viene utilizzato su aree del corpo diverse da quelle espressamente
Page 77

ITALIANO 77
specicate o se viene utilizzato da persone espressamente escluse
dall’uso, la garanzia diventa nulla e Philips declina ogni responsabilità per
i danni causati.
La cute potrebbe arrossarsi leggermente e risultare irritata dopo
l’uso dell’apparecchio. Questo fenomeno è assolutamente normale e
scompare rapidamente. Se l’irritazione non scompare entro tre giorni,
si consiglia di consultare un medico.
Durante l’utilizzo, non esponete l’apparecchio a temperature inferiori a
15°C o superiori a 35°C.
L’apparecchio è dotato di una protezione dal surriscaldamento
-
integrata. In caso di surriscaldamento, il ash non viene emesso. Non
spegnete l’apparecchio e lasciatelo raffreddare per circa 15 minuti
prima di continuare il trattamento.
Per qualunque controllo o riparazione, l’apparecchio dovrà essere
-
afdato a un centro d’assistenza autorizzato Philips. L’intervento di
manodopera non qualicata potrebbe compromettere la sicurezza
dell’utente.
Non utilizzate l’apparecchio nei casi riportati nella sezione
Controindicazioni.
Controindicazioni
Non utilizzate l’apparecchio:
In caso di malattie cutanee quali il cancro alla pelle, nel caso di
anamnesi di cancro alla pelle o di altre forme di cancro, nonché di
lesioni precancerose o di concentrazioni di nei atipici nelle aree da
sottoporre al trattamento.
In caso di reazioni epilettiche in presenza di ash.
In caso di anamnesi di malattie del collagene, incluse cicatrici cheloidee
o scarsa cicatrizzazione.
In caso di anamnesi di malattie vascolari, ad esempio la presenza
di vene varicose o ectasia vascolare nelle aree da sottoporre al
trattamento.
In caso di fotosensibilità cutanea con reazioni di rash cutaneo o
reazioni allergiche. Se assumete medicinali o agenti che provocano
fotosensibilità, controllate il foglietto illustrativo e, se sono evidenziate
reazioni di fotosensibilità e fototossicità o se si sconsiglia l’esposizione al
sole durante l’assunzione del prodotto, non utilizzate l’apparecchio.
In caso di diabete, lupus eritematoso, porria o insufcienza cardiaca
congestizia.
Nelle aree cutanee attualmente o recentemente sottoposte a
trattamento con acido glicolico (AHA), acido salicilico (BHA),
isotretinoine per uso topico e acido azelaico.
In caso di assunzione di isotretinoine Accutane® o Roaccutane® per
uso orale negli ultimi sei mesi. Questo trattamento può rendere la cute
più suscettibile a lacerazioni, ferite e irritazioni.
In caso di disordini emorragici o se assumete farmaci anticoagulanti,
inclusa l’assunzione massiccia di aspirina tale da non consentire un
periodo minimo di 1 settimana di washout prima di ogni trattamento.
In caso di infezioni, eczema, ustioni, inammazione follicolare, lacerazioni
aperte, abrasioni, cicatrici chirurgiche, herpes simplex, ferite o lesioni ed
ematomi nell’area da sottoporre al trattamento.
In caso di anamnesi di malattie immunosoppressive (inclusa l’infezione
-
da HIV o AIDS) o se assumete farmaci immunosoppressivi.
Page 78

ITALIANO78
Se assumete analgesici, in quanto riducono la sensibilità al calore.
In caso di gravidanze o allattamento in corso.
In caso di nei, lentiggini, vene evidenti, aree con pigmentazione più
scura, cicatrici, anomalie cutanee, consultate il medico, in quanto il
trattamento potrebbe provocare ustioni e una modica del colore,
rendendo potenzialmente più difcile l’identicazione di eventuali
malattie della pelle (ad esempio, cancro alla pelle).
Sui capezzoli e sulle mucose.
Dopo un’esposizione intensiva al sole e/o sulla pelle scottata dal sole o
se utilizzate acceleratori dell’abbronzatura.
Su verruche, tatuaggi o trucco permanente, in quanto il trattamento
-
potrebbe provocare ustioni e una modica del colore.
Se utilizzate deodoranti a lunga durata, in quanto il trattamento
potrebbe provocare reazioni cutanee.
In caso di protesi articiali, ad esempio in silicone, contraccettivi
Implanon, pace-maker, impianti sottocutanei (erogatori di insulina) o
piercing.
Campi elettromagnetici (EMF)
Questo apparecchio Philips è conforme a tutti gli standard relativi ai campi
elettromagnetici (EMF). Se utilizzato in modo appropriato seguendo le
istruzioni contenute nel presente manuale utente, l’apparecchio consente
un utilizzo sicuro come confermato dai risultati scientici attualmente
disponibili.
Come ricaricare l’apparecchio
Caricate completamente le batterie prima di utilizzare l’apparecchio per la
prima volta e quando queste risultano scariche. Una ricarica completa delle
batterie richiede no a 4 ore.
Caricate l’apparecchio quando la spia relativa al livello di ricarica diventa
arancione durante l’utilizzo. Quando tale spia si accende, l’apparecchio è in
grado di fornire almeno 30 ash.
Le batterie completamente cariche forniscono almeno 160 ash con
un’intensità luminosa pari a 5, che corrispondono a circa 15 minuti
di funzionamento senza lo. Il numero effettivo di ash varia in base
all’intensità luminosa selezionata (consultate ‘Efcacia con le diverse
intensità luminose’ nel capitolo ‘Predisposizione dell’apparecchio’).
Effettuate una ricarica completa ogni 3 - 4 mesi, anche se non utilizzate
l’apparecchio per un periodo di tempo prolungato.
1 Spegnete l’apparecchio.
2 Inserite lo spinotto nella presa dell’apparecchio e l’adattatore nella
presa di corrente.
Quando l’apparecchio è in carica, la spia di ricarica emette una luce
,
verde lampeggiante.
Quando le batterie sono completamente cariche, la spia di ricarica
,
emette una luce ssa verde.
Attenzione Non coprite l’apparecchio e l’adattatore durante la ricarica.
Nota Durante la ricarica, l’apparecchio non può essere utilizzato.
Nota il riscaldamento della supercie dell’adattatore durante la ricarica è un
fenomeno normale.
Page 79

ITALIANO 79
3 Dopo la ricarica, scollegate l’adattatore dalla presa e lo spinotto
dall’apparecchio.
Predisposizione dell’apparecchio
Per ottenere risultati ottimali e per la massima efcacia, preparate le
aree da sottoporre al trattamento nel modo descritto di seguito.
1 Rasate le aree desiderate n quando notate che i peli continuano a
ricrescere.
Non rimuovete i peli tramite ceretta, epilazione, pinzette o creme
depilatorie. Questi metodi contrastano la fotoepilazione in quanto
rimuovono i peli alla radice e in tal caso la luce non può essere assorbita
dal bulbo e i peli ricresceranno di nuovo.
Nota È necessario radere l’area da sottoporre al trattamento per garantire che
l’energia luminosa raggiunga il bulbo pilifero nel modo più efcace possibile.
Inoltre, i peli visibili nell’area da trattare possono essere bruciati dalla luce e
produrre un odore sgradevole. Generalmente si tratta di un fenomeno innocuo,
ma potrebbe essere leggermente doloroso durante l’utilizzo dell’apparecchio.
2 Pulite la cute e assicuratevi che sia totalmente asciutta e priva di
sostanze grasse e oleose (ad esempio, presenti nei prodotti cosmetici
quali deodoranti, lozioni, profumi, creme abbronzanti e schermi
solari).
Nota Se la rasatura provoca ferite o lesioni, la cute potrebbe essere più
sensibile. In tal caso, il trattamento di depilazione a luce pulsata potrebbe
essere più fastidioso e causare disagio.
Nota Quando il pelo smette di ricrescere - generalmente dopo alcuni
trattamenti - non è più necessario radere l’area prima di utilizzare
l’apparecchio.
Consiglio Se la rasatura provoca irritazioni cutanee, potete utilizzare una
forbicina per accorciare i peli il più possibile. In tal caso, il trattamento di
depilazione a luce potrebbe essere più fastidioso e causare disagio.
Impostazione dell’intensità luminosa
È necessario regolare l’intensità luminosa in base al colore della pelle e dei
peli, impostando il livello che ritenere più adatto.
Nella tabella riportata di seguito, sono riportate le intensità luminose
consigliate.
1 Consultate la tabella per stabilire l’intensità più adatta al colore della
propria pelle e dei peli e per vericare se questo metodo è adatto
per tutti i soggetti (in caso negativo, nella tabella è riportata una “x”).
Nota Le persone con una pelle più scura corrono maggiori rischi di irritazioni
cutanee in quanto la pelle assorbe una maggiore quantità di luce. In questo
caso, si consiglia di utilizzare intensità minori.
2 Per ogni area del corpo da depilare, selezionate l’intensità più adatta
tra quelle comprese nell’intervallo consigliato, in modo che sia
relativamente alta ma non tale da provocare dolore cutaneo.
L’intensità luminosa genera una sensazione di calore più o meno intenso
sulla cute, ma non dovrebbe provocare dolore.
Page 80

ITALIANO80
Nota Prima di ogni trattamento, vericate che l’apparecchio sia impostato sul
giusto livello di intensità.
Intensità luminose consigliate (1 - 5)
Colore
della
pelle e
caratteristiche:
Colore
dei peli:
Bianca
(si scotta
sempre al
sole e non si
abbronza)
bianco/
grigio
rosso x x x x x x
biondo
chiaro
biondo 4/5 4/5 4/5 3/4/5 1/2/3/4 x
biondo
chiaro/
marrone
chiaro
marrone 4/5 4/5 4/5 3/4/5 1/2/3/4 x
marrone
scuro
Nero 4/5 4/5 4/5 3/4/5 1/2/3/4 x
x x x x x x
x x x x x x
4/5 4/5 4/5 3/4/5 1/2/3/4 x
4/5 4/5 4/5 3/4/5 1/2/3/4 x
x signica che l’uso dell’apparecchio è sconsigliato.
Nota L’apparecchio non è adatto a persone con carnagione molto scura o nera
a causa del rischio più alto di irritazione alla pelle per questo tipo di soggetti.
Nota L’apparecchio non è adatto a persone con peli biondi, rossi, grigi o
bianchi perché la bassa concentrazione di melanina riduce l’efcacia della
rimozione dei peli.
Nota Selezionando intensità luminose più alte, il trattamento sarà più efcace
ma l’impatto percepito sarà più intenso.
Efcacia con le diverse intensità luminose
Beige (si
scotta
facilmente
al sole,
raggiunge
una scarsa
abbronzatura)
Dorata
(a volte
si scotta
al sole,
raggiunge una
buona
abbronzatura)
Marroncina
(si scotta
raramente
al sole,
raggiunge
una rapida
e buona
abbronzatura)
Marrone
scuro (si
scotta
raramente
al sole,
raggiunge
un’ottima
abbronzatura)
Scura (si
scotta raramente o
quasi mai,
raggiunge
un’abbronzatura
molto in
tensa)
-
Intensità luce Efcacia Numero di ash
5 ***** 160
4 **** 190
3 *** 250
2 ** 350
Page 81

ITALIANO 81
Intensità luce Efcacia Numero di ash
1 * 520
* indica il livello di efcacia
Nota La presente tabella riporta il numero di ash che possono essere emessi
dall’apparecchio con ogni intensità luminosa e la corrispondente efcacia
prevista. Utilizzate l’intensità appropriata al colore della pelle e dei peli.
Modalità d’uso dell’apparecchio
L’intensità luminosa genera una sensazione di calore più o meno intenso
sulla cute, ma non dovrebbe provocare dolore.
Questo apparecchio è adatto per la rimozione dei peli nelle seguenti
aree: ascelle, area bikini e gambe.
Nota Prima di utilizzare l’apparecchio, eseguite una rasatura dell’area
da sottoporre al trattamento (consultate il capitolo ‘Predisposizione
dell’apparecchio’).
Consiglio Eseguite il trattamento la sera, prima di coricarvi, per dare modo alla
pelle di riposare e ridurre la possibilità di comparsa di irritazioni cutanee.
1 Premete il pulsante on/off per accendere l’apparecchio.
L’intensità luminosa 1 si attiva automaticamente per indicare che
,
l’apparecchio è acceso e impostato sull’intensità predenita 1.
Nota Potete spegnere l’apparecchio in qualsiasi momento premendo
nuovamente il pulsante on/off.
Nota Durante l’utilizzo, un surriscaldamento dell’apparecchio è del tutto
normale.
2 Premete il pulsante % per aumentare l’intensità. Per diminuirla,
premete il pulsante ^.
Ad ogni pressione del pulsante, la spia dell’intensità corrispondente
,
inizia a lampeggiare nel giro di pochi secondi.
Page 82

ITALIANO82
3 Appoggiate l’apparecchio sulla cute perpendicolarmente, in modo
che la nestra rimovibile e l’anello di sicurezza siano a contatto con
la cute stessa.
Consiglio Quando utilizzate l’apparecchio per la prima volta, effettuate una
prova, ad esempio sulla zona pelvica, per abituarvi al metodo di depilazione
a luce pulsata. Iniziate con l’intensità minore consigliata e aumentatela no a
raggiungere l’intensità più alta consigliata. Tramite questa prova potrete capire
il grado di sensibilità della vostra cute alla luce. Controllate la presenza di
eventuali reazioni cutanee 20 minuti dopo la prova. In caso positivo, utilizzate
un livello di intensità minore consigliato per le aree da sottoporre al
trattamento.
4 Premete completamente l’anello di sicurezza sulla cute con una
leggera pressione.
Nota L’anello di sicurezza è dotato di interruttori a contatto che formano il
sistema di sicurezza dell’apparecchio e impediscono l’emissione del ash in
assenza di contatto con la cute.
,
Quando tutti gli interruttori a contatto dell’anello di
sicurezza vengono spinti all’interno dell’apparecchio, la spia di luce
pronta sul retro dello stesso si accende nel giro di pochi secondi.
Quando la spia è accesa, l’apparecchio è pronto per l’emissione del
ash.
Consiglio Per semplicare l’uso dell’apparecchio, tendete la cute nell’area
desiderata. Nelle aree in cui la cute è più morbida, potrebbe essere necessario
esercitare una maggiore pressione sull’apparecchio in modo da spingere
all’interno tutti gli interruttori a contatto.
5 Per emettere un ash, premete il relativo pulsante. Dopo il primo
ash, rilasciate il pulsante.
6 Per il ash successivo, ripetete i passaggi 3, 4 e 5. Questa operazione
potrebbe richiedere alcuni secondi.
Evitate che vengano emessi due ash sulla stessa area senza aver
sollevato l’apparecchio dalla cute, per impedire scottature o il
surriscaldamento della stessa.
7 Per evitare che alcune aree restino escluse dal trattamento, quando
appoggiate l’apparecchio sulla cute vericate sempre che vi sia una
sorta di sovrapposizione con l’area appena trattata. La luce viene
emessa solo dall’apposita nestra. Accertatevi che i ash prodotti
siano vicini l’uno all’altro.
8 Al termine del trattamento, spegnete l’apparecchio.
Nota Evitate di guardare in direzione della luce emessa dalla nestra mentre
l’apparecchio è acceso.
Nota La luce visibile prodotta dall’apparecchio è il riesso del ash sulla cute e
non danneggia gli occhi. Non è necessario indossare occhiali protettivi durante
l’utilizzo.
Page 83

ITALIANO 83
Indicazioni per il trattamento
Numero di ash e durata del trattamento consigliata
Area Numero approssimativo di
ash
Ascelle 25 per le ascelle 3 minuti per le ascelle
Area bikini 25 per lato 3 minuti per lato
Intera area bikini 90 per l’intera area 10 minuti
Un polpaccio 160-190 15 minuti
Una gamba intera 320-380 30 minuti
Nota Le batterie completamente cariche offrono almeno 160 ash
con un’intensità pari a 5, che corrisponde a una durata dell’apparecchio senza
li pari a circa 15 minuti.
Come ottenere risultati ottimali
Non è possibile ottenere risultati ottimali con una singola sessione, dal
momento che solo i peli nella fase anagen sono sensibili al trattamento
con la luce pulsata. I peli dell’area sottoposta al trattamento si trovano
generalmente in diverse fasi del ciclo di crescita. Per eliminare tutti i
peli con successo e per evitare che il bulbo pilifero si riattivi, ripetete
il trattamento ogni 2 settimane. È opportuno rispettare la frequenza
consigliata. L’aumento o la diminuzione della frequenza di trattamento non
comporta migliori risultati. Test clinici hanno dimostrato che la frequenza
ottimale è quella sopra citata.
Dopo il trattamento
Dopo il trattamento potrebbe vericarsi quanto segue:
La cute potrebbe risultare leggermente arrossata e/o si avverte una
sensazione di pizzicore o di calore. Questa reazione è innocua e
scompare rapidamente.
Sulla parte trattata potrebbe vericarsi per un breve istante una
reazione simile a una scottatura solare.
La cute potrebbe apparire secca, in quanto la combinazione di rasatura
e trattamento con luce pulsata potrebbe seccarla.
Alcuni peli potrebbero ricrescere nonostante l’apparecchio sia stato
utilizzato frequentemente. Ciò accade perché i peli si trovano in diverse
fasi del ciclo di crescita durante il trattamento. I peli che ricrescono
tendono a essere più morbidi e sottili.
Vi consigliamo di:
Rivolgervi a un medico se l’irritazione cutanea non scompare entro tre
giorni (consultate il capitolo ‘Importante’, sezione ‘Attenzione’).
Attendere che l’irritazione sia scomparsa completamente prima
di passare al trattamento successivo. È possibile che abbiate
utilizzato un’intensità troppo elevata per il vostro tipo di pelle. Per il
trattamento successivo, utilizzate un’intensità minore.
Evitare eccessive esposizioni al sole senza un’adeguata protezione
immediatamente dopo ogni trattamento. Se desiderate esporvi al sole
dopo un trattamento, applicate uno schermo totale sulle aree trattate.
Durata approssimativa del
trattamento
Page 84

ITALIANO84
Evitare di nuotare in acqua contenente cloro nelle 48 ore successive al
trattamento. Il cloro presente nell’acqua potrebbe causare prurito.
Evitare di applicare sostanze cosmetiche sulle aree trattate
immediatamente dopo il trattamento.
Pulizia e manutenzione
Non pulite mai l’apparecchio né le sue parti con acqua corrente o in
lavastoviglie.
Non usate prodotti o sostanze abrasive o detergenti aggressivi, come
benzina o acetone, per pulire l’apparecchio.
Non grafate il ltro in vetro o la supercie metallica all’interno della
nestra rimovibile.
Nota Vericate che gli interruttori a contatto dell’anello di sicurezza non
presentino depositi di polvere.
Nota Se non è più possibile pulire il ltro in vetro o la nestra rimovibile,
interrompete l’utilizzo dell’apparecchio.
Per garantire risultati ottimali e una maggiore durata dell’apparecchio,
effettuate la pulizia dello stesso dopo ogni trattamento.
1 Spegnete l’apparecchio, scollegatelo dalla presa e lasciatelo
raffreddare.
Nota Il ltro in vetro si surriscalda durante l’uso. Prima di pulirlo, lasciatelo
raffreddare.
2 Per rimuovere la nestra, inserite le dita nelle apposite rientranze
dell’alloggiamento dell’apparecchio e spingete la nestra rimovibile
verso l’esterno.
3 Utilizzate il panno morbido e asciutto fornito in dotazione con
l’apparecchio per pulire le seguenti parti:
la supercie del ltro in vetro
-
la supercie esterna della nestra rimovibile
-
la cornice metallica all’interno della nestra rimovibile
l’alloggiamento dell’apparecchio (se necessario)
-
Nota Se necessario, inumidite il panno con alcune gocce d’acqua.
Come riporre l’apparecchio
1
Spegnete l’apparecchio, scollegatelo dalla presa e lasciatelo
raffreddare.
2 Pulite l’apparecchio prima di riporlo.
3 Riponete l’apparecchio nell’apposita custodia.
4 Riponete l’apparecchio in un luogo asciutto ad una temperatura
compresa tra 0°C e 60°C.
Page 85

ITALIANO 85
Tutela dell’ambiente
Per contribuire alla tutela dell’ambiente, non gettate l’apparecchio tra i
-
riuti domestici quando non viene più utilizzato, ma consegnatelo a un
centro di raccolta ufciale.
Le batterie ricaricabili integrate contengono sostanze potenzialmente
nocive per l’ambiente. Rimuovete sempre le batterie prima di smaltire
l’apparecchio e consegnarlo a un centro di raccolta ufciale. Smaltite
le batterie in un apposito centro di raccolta. In caso di difcoltà nella
rimozione delle batterie, consegnate l’apparecchio a un centro di
assistenza Philips, che si occuperà della rimozione e del corretto
smaltimento dell’apparecchio.
Rimozione delle batterie ricaricabili
Prima di rimuovere le batterie, vericate che siano completamente
scariche.
1 Inserite un punteruolo o un altro oggetto appuntito nell’apparecchio
ed estraete il cappuccio inferiore dall’impugnatura.
2 Svitate le due viti.
3 Rimuovete la parte inferiore dell’impugnatura e tagliate i due li che
collegano la parte inferiore all’apparecchio.
4 Estraete i connettori della batteria dai relativi terminali.
Page 86

ITALIANO86
5 Estraete le batterie dall’apparecchio facendo.
6 Tagliate i due li che collegano le batterie ricaricabili all’apparecchio.
Garanzia e assistenza
Per ricevere ulteriori informazioni, richiedere assistenza o risolvere
eventuali problemi, visitate il sito Web Philips all’indirizzo
www.philips.com/satinlux o chiamate 00800-SATINLUX (72846589).
Parti di ricambio
Sono disponibili le seguenti parti di ricambio:
Finestra rimovibile
Adattatore
Custodia morbida
-
Speciche tecniche
Modello SC2000
Tensione nominale 100 V-240 V
Frequenza nominale 50 Hz-60 Hz
Alimentazione nominale 7,5 W
Protezione dalle scosse elettriche Classe II Q
Classicazione IP 30 (EN 60529)
Condizioni operative Temperatura: da +15° a +35°C
Umidità relativa: da 25% a 75%
Condizioni di conservazione Temperatura: da 0° a +60°C
Umidità relativa: da 5% a 95%
Lampada a luce pulsata Spettro: >570 nm
Batteria agli ioni di litio 2 x 3,7 Volt
Page 87

Modello SC2000
1100 mAh
Risoluzione dei guasti
In questo capitolo vengono riportati i problemi più ricorrenti legati all’uso
dell’apparecchio. Se non riuscite a risolvere i problemi con le informazioni
seguenti, contattate il Centro Assistenza Clienti Philips del vostro paese.
Per ulteriori informazioni, fate riferimento al numero di telefono riportato
sul retro del manuale utente o visitate il sito Web www.philips.com/satinlux.
Problema Possibile causa Soluzione
ITALIANO 87
L’apparecchio non
funziona.
L’apparecchio si spegne
improvvisamente.
L’adattatore si surriscalda
durante la ricarica.
La spia di ricarica non
si accende quando
inserisco lo spinotto nella
presa dell’apparecchio.
Le batterie
ricaricabili sono
scariche.
L’apparecchio è
danneggiato.
Le batterie
ricaricabili sono
scariche.
Si tratta di un
fenomeno del tutto
normale.
Non avete inserito
l’adattatore nella
presa di corrente.
L’adattatore
non è inserito
correttamente nella
presa di corrente
e/o lo spinotto
non è inserito
correttamente
nella presa
dell’apparecchio.
L’apparecchio è
danneggiato.
Caricate l’apparecchio (vedere il capitolo “Come
ricaricare l’apparecchio”).
Contattate il Centro Assistenza Clienti del vostro
paese, il rivenditore Philips o un centro autorizzato
Philips.
Caricate l’apparecchio (vedere il capitolo “Come
ricaricare l’apparecchio”).
Non è necessario intervenire in alcun modo.
Inserite lo spinotto nella presa dell’apparecchio e
l’adattatore nella presa di corrente.
Collegate un altro apparecchio alla presa di corrente
per vericare che quest’ultima sia funzionante.
Se l’apparecchio continua a non ricaricarsi, contattate
il Centro Assistenza Clienti Philips del vostro paese, il
rivenditore Philips o un centro autorizzato Philips.
Vericate che l’adattatore sia inserito correttamente
nella presa di corrente e/o lo spinotto sia inserito
correttamente nella presa dell’apparecchio.
Contattate il Centro Assistenza Clienti del vostro
paese, il rivenditore Philips o un centro autorizzato
Philips.
Page 88

ITALIANO88
Problema Possibile causa Soluzione
L’apparecchio è acceso
ma non riesco ad
aumentare o diminuire
l’intensità della luce.
La spia di luce pronta
non si accende quando
poso l’apparecchio sulla
cute.
La spia di luce pronta
non si accende quando
la nestra rimovibile
viene appoggiata sulla
cute, ma la ventola di
raffreddamento funziona.
La spia di luce pronta
è illuminata in verde
ma l’apparecchio
non produce un ash
alla pressione del relativo
pulsante.
Durante l’uso,
l’apparecchio si
surriscalda.
L’apparecchio
richiede una
reimpostazione.
Non avete spinto
correttamente sulla
cute la nestra
rimovibile fornita di
anello di sicurezza.
L’anello di sicurezza
è sporco.
La protezione dal
surriscaldamento è
stata attivata.
L’apparecchio
richiede una
reimpostazione.
Si tratta di un
fenomeno del tutto
normale.
Per effettuare la reimpostazione,
spegnete l’apparecchio e riaccendetelo. Se, dopo
questa operazione, non è possibile regolare l’intensità
della luce, contattate il Centro Assistenza Clienti
del vostro paese, il rivenditore Philips o un centro
autorizzato Philips.
Appoggiate l’apparecchio sulla cute
perpendicolarmente in modo che tutti gli interruttori
siano a contatto con la cute stessa. Quindi, vericate
che la spia di luce pronta sia accesa e premete il
pulsante per l’emissione del ash.
Se questa operazione non produce alcun risultato,
appoggiate l’apparecchio su una parte del corpo
dove il contatto tra lo stesso e la cute risulti più facile,
ad esempio il braccio. Quindi vericate che la spia di
luce pronta sia funzionante. Se la spia non si accende
quando appoggiate l’apparecchio sulla cute, contattate
il Centro Assistenza Clienti del vostro paese, il
rivenditore Philips o un centro autorizzato Philips.
Pulite con cautela l’anello di sicurezza. Se non è
possibile pulire correttamente l’anello di sicurezza,
contattate il Centro Assistenza Clienti del vostro
paese, il rivenditore Philips o un centro autorizzato
Philips per la sostituzione dello schermo del ash.
Quando la protezione dal surriscaldamento è attiva,
la ventola continua a funzionare. Non spegnete
l’apparecchio e lasciatelo raffreddare per circa 15
minuti prima di continuare a utilizzarlo. Se la spia
di luce pronta continua a non funzionare quando
appoggiate l’apparecchio sulla cute, contattate
il Centro Assistenza Clienti del vostro paese, il
rivenditore Philips o un centro autorizzato Philips.
Per effettuare la reimpostazione, spegnete
l’apparecchio e riaccendetelo. Se la spia di luce pronta
è verde ma l’apparecchio continua a non produrre
un ash quando premete il relativo pulsante di
emissione, contattate il Centro Assistenza Clienti
del vostro paese, il rivenditore Philips o un centro
autorizzato Philips.
Non è necessario intervenire in alcun modo.
Page 89

Problema Possibile causa Soluzione
ITALIANO 89
L’apparecchio non
mostra l’intensità
luminosa 1 quando lo
accendo.
Dall’apparecchio
fuoriesce uno strano
odore.
Il trattamento è più
fastidioso del solito.
Quando utilizzo
l’apparecchio, provo un
dolore intenso.
L’apparecchio
richiede una
reimpostazione.
La nestra
rimovibile è sporca.
Non avete praticato
una adeguata
rasatura dell’area
da sottoporre al
trattamento.
Avete utilizzato
un’intensità luminosa
troppo alta.
Non avete rasato le
aree da sottoporre
al trattamento.
L’apparecchio è
difettoso.
Avete riposto
l’apparecchio un
ambiente polveroso.
Il ltro in vetro
della nestra di
emissione della luce
è danneggiato.
Non avete
rasato le aree
da sottoporre al
trattamento
Avete sottoposto al
trattamento un’area
per la quale non
è previsto l’uso
dell’apparecchio.
Per effettuare la reimpostazione, spegnete
l’apparecchio e riaccendetelo. Se l’apparecchio
continua a non mostrare l’intensità luminosa
1, contattate il Centro Assistenza Clienti del vostro
paese, il rivenditore Philips o un centro autorizzato
Philips.
Pulite con cautela la nestra rimovibile. Se non è
possibile pulire correttamente la nestra rimovibile,
contattate il Centro Assistenza Clienti del vostro
paese, il rivenditore Philips o un centro autorizzato
Philips per la sostituzione della nestra.
Se sono presenti dei peli nell’area da
trattare, potrebbero bruciarsi durante l’uso
dell’apparecchio. Di conseguenza, produrranno
uno strano odore. Si consiglia di radere l’area da
sottoporre al trattamento prima di utilizzare
l’apparecchio.
Accertatevi di aver selezionato la giusta intensità. Se
necessario, selezionate un’intensità minore.
È opportuno radere sempre le aree da trattare prima
di utilizzare l’apparecchio.
Contattate il Centro Assistenza Clienti del vostro
paese, il rivenditore Philips o un centro autorizzato
Philips.
L’odore anomalo scompare dopo alcuni ash.
Se il ltro in vetro nella nestra di emissione
della luce è danneggiato, non utilizzate più
l’apparecchio. Contattate il Centro Assistenza Clienti
del vostro paese, il rivenditore Philips o un centro
autorizzato Philips.
È opportuno radere sempre l’area da trattare prima
di utilizzare l’apparecchio.
Utilizzate l’apparecchio solo sulle gambe, le ascelle e
l’area bikini.
Page 90

ITALIANO90
Problema Possibile causa Soluzione
Dopo il trattamento,
le aree depilate si
arrossano.
La reazione cutanea
dopo il trattamento dura
più del previsto.
I risultati del trattamento
non sono soddisfacenti.
Avete utilizzato
un’intensità
luminosa troppo
alta.
Il ltro in vetro
della nestra di
emissione della luce
è danneggiato.
L’apparecchio non
è adatto al vostro
colore della pelle o
dei peli.
Un leggero rossore
è innocuo e
normale e scompare
rapidamente.
Avete utilizzato
un’intensità luminosa
troppo alta.
Avete utilizzato
un’intensità luminosa
troppo bassa.
L’apparecchio
non ha prodotto
abbastanza ash.
Non avete praticato
abbastanza
sovrapposizioni
durante l’utilizzo
dell’apparecchio.
Non avete utilizzato
l’apparecchio con la
dovuta frequenza.
L’apparecchio non
è adatto al vostro
colore della pelle o
dei peli.
Diminuite l’intensità della luce impostando in
livello adatto al vostro tipo di pelle. Consultate il
capitolo ‘Predisposizione dell’apparecchio’, sezione
‘Impostazione dell’intensità luminosa’.
Se il ltro in vetro nella nestra di emissione della
luce è danneggiato, non utilizzate più l’apparecchio.
Contattate il Centro Assistenza Clienti del vostro
paese, il rivenditore Philips o un centro autorizzato
Philips.
Non utilizzate l’apparecchio se i peli sono di colore
biondo chiaro, rosso, grigio o bianco. Non utilizzate
l’apparecchio se avete una pelle olivastra.
Non è necessario intervenire in alcun modo.
Per il trattamento successivo, selezionate
un’intensità luminosa minore. Consultate il capitolo
‘Predisposizione dell’apparecchio’, sezione
‘Impostazione dell’intensità luminosa’.
Se la reazione cutanea dura più di 3 giorni, contattate
un medico.
Per il trattamento successivo, selezionate un’intensità
maggiore.
Accertatevi che l’apparecchio emetta abbastanza
ash. Consultate il capitolo ‘Predisposizione
dell’apparecchio’, sezione ‘Impostazione dell’intensità
luminosa’.
Per ottenere i risultati desiderati, è necessario
praticare delle sovrapposizioni durante il
trattamento. Consultate il capitolo ‘Modalità d’uso
dell’apparecchio’, passaggio 7.
Ripetete il trattamento ogni 2 settimane.
Non utilizzate l’apparecchio se i peli sono di colore
biondo chiaro, rosso, grigio o bianco. Non utilizzate
l’apparecchio se avete una pelle olivastra.
Page 91

Problema Possibile causa Soluzione
ITALIANO 91
I peli cominciano a
ricrescere su alcuni punti
delle aree trattate.
Non avete praticato
abbastanza
sovrapposizioni
durante l’utilizzo
dell’apparecchio.
I peli cominciano a
ricrescere seguendo
il ciclo di crescita
naturale.
Per ottenere i risultati desiderati, è necessario
praticare delle sovrapposizioni durante il
trattamento. Consultate il capitolo ‘Modalità d’uso
dell’apparecchio’.
È normale che i peli ricrescano. Tuttavia, i peli
ricresciuti tendono ad essere più morbidi e sottili.
Page 92

92
1 2 3 4
NEDERLANDS
Inleiding
Gefeliciteerd met uw aankoop en welkom bij Philips! Als u volledig wilt
proteren van de ondersteuning die Philips biedt, registreer uw product
dan op www.philips.com/satinlux.
Haar verwijderen met licht is een van de effectiefste methoden
om ongewenste lichaamsharen te verwijderen met een langduriger
resultaat. Deze methode verschilt volledig van de huidige methode
voor het verwijderen van lichaamsharen en Philips heeft gezamenlijk
met toonaangevende dermatologen bijna 10 jaar lang onderzoek naar
deze methode verricht. U kunt deze innovatieve technologie nu op
comfortabele wijze, op elk gewenst moment in de beslotenheid van uw
eigen woning gebruiken.
Dit apparaat is bedoeld voor het verwijderen van lichaamsharen onder de
halslijn bij vrouwen:
oksels
bikinilijn
benen
-
Het apparaat is niet bedoeld voor:
personen met te licht gekleurde lichaamsharen (lichtblonde, rode,
grijze of witte lichaamsharen) of een zeer donkere huid. Zie ‘De
lichtintensiteit instellen’ in hoofdstuk ‘Klaarmaken voor gebruik’.
Ga voor meer informatie over de SatinLux naar www.philips.com/satinlux.
De werking van foto-epilatie
Haargroei
Afhankelijk van leeftijd, stofwisseling en andere factoren, groeit haar bij
iedereen op een andere manier, maar het groeit doorgaans in drie fasen:
1 Anagene fase (groeifase)
Het haar groeit actief vanaf de wortel. In deze fase is de concentratie van
melanine het hoogst. Melanine is verantwoordelijk voor de pigmentatie
van het haar. Hoe hoger de concentratie van melanine in de wortel, des te
donkerder is de haarkleur. De concentratie melanine is ook de bepalende
factor voor de werkzaamheid van deze methode. Alleen haren in de
anagene fase zijn gevoelig voor de behandeling met licht.
2 Catagene fase (degradatiefase)
De haargroei stopt en de wortel slinkt voordat de haar uitvalt.
3 Telogene fase (rustfase)
De oude haar wordt gescheiden van de wortel en wordt langzaam naar
buiten geduwd door de nieuwe haar. De wortel blijft in rusttoestand totdat
de biologische klok aangeeft dat deze weer actief moet worden om een
nieuwe haar te produceren (4). Haren op een bepaald gebied bevinden
zich doorgaans in verschillende fasen van de haargroei.
Werkingsprincipe
Met het apparaat worden haren verwijderd door haren en haarwortels
onder de huid te verhitten. Het melanine in de haar en de bijbehorende
haarwortel absorberen de lichtpulsen. Bij een donkere haarkleur kan er
meer hitte worden geproduceerd. Dit proces zorgt ervoor dat de haar
eerder overgaat naar de rustfase.
De haren vallen nu op natuurlijke wijze uit en de haargroei wordt geremd.
In één sessie kan het haar niet op optimale wijze worden verwijderd omdat
alleen haren in de anagene fase gevoelig zijn voor behandeling met licht.
Page 93

NEDERLANDS 93
Tijdens de behandeling bevinden de haren op het behandelingsgebied zich
vaak in verschillende fasen van de haargroeicyclus.
Om alle haren op succesvolle wijze te behandelen en te voorkomen dat
de haarwortel weer actief wordt, moeten de behandelingen om de twee
weken worden herhaald.
Een geïntegreerd optisch lter zorgt ervoor dat er geen UV-licht op de
huid komt, zodat deze niet wordt beschadigd.
Voordelen
Dit apparaat biedt de volgende voordelen:
Professionele IPL-technologie voor thuis
De SatinLux maakt gebruik van een lichttechnologie met de naam
‘Intense Pulsed Light’ (IPL). IPL wordt ook in de professionele
schoonheidsverzorgingsmarkt gebruikt om haar te verwijderen. De
SatinLux maakt deze innovatieve technologie nu beschikbaar in uw
comfortabele thuisomgeving.
Effectieve preventie van terugkerende haargroei voor blijvende gladheid
Met deze methode wordt terugkerende haargroei langdurig voorkomen
en krijgt u een zijdezachte huid. Uit onze onderzoeken is gebleken dat
de hoeveelheid haar al na 2 behandelingen aanzienlijk afneemt. Een
optimaal resultaat werd meestal bereikt na 4 tot 5 behandelingen. Na elke
behandeling is een afname van de haardichtheid waarneembaar. Hoe snel
het effect zichtbaar wordt en hoe lang het resultaat aanhoudt, varieert
per persoon. Herhaal deze behandeling om de twee weken om optimale
resultaten te behalen en uw huid altijd glad te houden.
Zachte behandeling, ook op gevoelige delen van het lichaam
De SatinLux is in nauwe samenwerking met toonaangevende
dermatologen ontwikkeld om een effectieve en zachte behandeling te
bieden, ook op de gevoeligste delen van het lichaam.
Draadloze werking voor maximale vrijheid en exibiliteit
Omdat het apparaat op accu’s werkt, is het draagbaar en kan het overal
worden gebruikt.
Algemene beschrijving (g. 1)
A Lichtvenster met lterglas
B Verwijderbaar venster
C Metallic oppervlak binnen het verwijderbare venster
D Veiligheidssysteem (veiligheidsring met contactschakelaars)
E Flitsknop
F Intensiteitslampjes (1-5)
G % Knop voor verhogen van intensiteit
H ^ Knop voor verlagen van intensiteit
I Oplaadlampje met ‘bijna leeg’-indicatie
J Aan/uitknop
K ’Klaar om te itsen’-lampje
L Apparaataansluiting
M Adapter
N Kleine stekker
Ook bijgeleverd: etui en reinigingsdoek
Page 94

NEDERLANDS94
Belangrijk
Lees deze gebruiksaanwijzing zorgvuldig door voordat u het apparaat gaat
gebruiken. Bewaar de gebruiksaanwijzing om deze indien nodig te kunnen
raadplegen.
Gevaar
Water en elektriciteit vormen een gevaarlijke combinatie. Gebruik dit
apparaat daarom niet in een vochtige omgeving (bijv. in de buurt van
een bad, douche of zwembad).
Houd het apparaat en de adapter droog.
-
Waarschuwing
Dit apparaat is niet bedoeld voor gebruik door personen (waaronder
kinderen) met verminderde lichamelijke, zintuiglijke of geestelijke
vermogens, of die gebrek aan ervaring of kennis hebben, tenzij iemand
die verantwoordelijk is voor hun veiligheid toezicht op hen houdt of
hen heeft uitgelegd hoe het apparaat dient te worden gebruikt.
Houd toezicht op kinderen om te voorkomen dat ze met het apparaat
gaan spelen.
Gebruik het apparaat uitsluitend in combinatie met de bijgeleverde
adapter.
Gebruik het apparaat niet indien de adapter of het apparaat zelf
beschadigd is.
Gebruik het apparaat niet als het lterglas is beschadigd.
Indien de adapter beschadigd is, laat deze dan altijd vervangen door
een van het oorspronkelijke type om gevaar te voorkomen.
De adapter bevat een transformator. Knip de adapter niet af om deze
te vervangen door een andere stekker, aangezien dit een gevaarlijke
situatie oplevert.
Ga als volgt te werk om schade te voorkomen:
-
1 Bedek de ventilatieopeningen nooit tijdens het gebruik.
2 Zorg dat niets de luchtstroom via de ventilatieopeningen kan
belemmeren.
3 Stel het apparaat nooit bloot aan zware schokken, schud het niet en
laat het niet vallen.
Als u het apparaat van een zeer koude naar een zeer warme omgeving
verplaatst, moet u ongeveer 3 uur wachten voordat u het in gebruik
neemt.
Gebruik of bewaar het apparaat nooit in een stofge omgeving.
Laat het apparaat niet onbeheerd achter wanneer het ingeschakeld is.
Schakel het apparaat na gebruik altijd uit.
Stel het apparaat niet lange tijd bloot aan rechtstreeks zonlicht of UV-
licht.
Page 95

NEDERLANDS 95
Let op
Dit apparaat is uitsluitend bedoeld voor het verwijderen van
lichaamsharen bij vrouwen. Gebruik het niet voor andere doeleinden.
Dit apparaat is uitsluitend bedoeld voor het verwijderen van haar bij
mensen onder de halslijn. Gebruik het niet voor andere doeleinden.
Dit apparaat is niet bedoeld voor commercieel of professioneel
gebruik.
Als het apparaat voor commerciële of professionele doeleinden wordt
gebruikt, als het wordt gebruikt voor andere delen van het lichaam dan
waarvoor het uitdrukkelijk is bedoeld of als het door personen wordt
gebruikt die uitdrukkelijk worden uitgesloten van het gebruik, vervalt
de garantie en is Philips niet aansprakelijk voor eventuele schade die
wordt veroorzaakt.
Uw huid kan na het gebruik van het apparaat wat rood en geïrriteerd
zijn. Dit is een volstrekt normaal verschijnsel, dat snel verdwijnt.
Raadpleeg uw huisarts als de irritatie na drie dagen niet verdwenen is.
Stel het apparaat tijdens het gebruik niet bloot aan een temperatuur
lager dan 15°C of hoger dan 35°C.
Het apparaat is voorzien van een ingebouwde
-
oververhittingsbeveiliging. Als het apparaat oververhit is, itst het niet.
Schakel het apparaat niet uit maar laat het ongeveer 15 minuten
afkoelen voordat u doorgaat met de behandeling.
Breng het apparaat altijd naar een door Philips geautoriseerd
servicecentrum voor onderzoek of reparatie. Reparatie door een
onbevoegd persoon kan zeer gevaarlijke situaties opleveren voor de
gebruiker.
Gebruik het apparaat nooit als er situaties van toepassing zijn die
worden vermeld onder Contra-indicaties.
Contra-indicaties
Gebruik het apparaat nooit in de volgende situaties:
Als u een huidaandoening hebt zoals een actieve vorm van huidkanker,
als u in het verleden huidkanker of een andere vorm van kanker hebt
gehad in de gebieden die worden behandeld, als u precancereus letsel
of meerdere atypische moedervlekken hebt in de gebieden die worden
behandeld.
Als u lijdt aan epilepsie met overgevoeligheid voor lichtitsen.
Als u in het verleden bent behandeld voor een collageenaandoening,
bijvoorbeeld de vorming van een keloïdlitteken of slecht genezende
wonden.
Als u in het verleden bent behandeld voor een vasculaire aandoening,
bijvoorbeeld de aanwezigheid van spataderen of vasculaire ectasie in de
gebieden die worden behandeld.
Als uw huid gevoelig is voor licht en er uitslag ontstaat of een
allergische reactie optreedt. Als u middelen of medicijnen gebruikt
die de lichtgevoeligheid verhogen, lees dan de bijsluiter en gebruik
het apparaat niet als er staat dat het medicijn fotoallergische of
fototoxische reacties kan veroorzaken of dat u zonlicht moet vermijden
wanneer u het medicijn inneemt.
Als u lijdt aan diabetes, lupus erythematodes, porphyria of een
congestieve hartaandoening.
Page 96

NEDERLANDS96
Op gebieden van uw huid die momenteel worden behandeld of
onlangs zijn behandeld met AHA’s (Alpha-Hydroxy Acid), BHA’s (BetaHydroxy Acid), isotretinoïne en azelaïnezuur.
Als u tijdens de afgelopen zes maanden oraal isotretinoïne Accutane®
of Roaccutance® hebt ingenomen. Deze behandeling kan de
gevoeligheid van de huid voor scheuren, wonden en irritaties verhogen.
Als u lijdt aan een bloedingsstoornis of antistollingsmiddelen neemt
(bijvoorbeeld hoge doses aspirine), op zodanige wijze dat een
onthoudingsperiode van 1 week voorafgaand aan elke behandeling niet
mogelijk is.
Als u infecties, eczeem, brandwonden, ontstekingsblaasjes, open
wonden, schaafplekken, operatielittekens, herpes simplex, wonden of
laesies en hematomen hebt in de gebieden die worden behandeld.
Als u in het verleden bent behandeld voor immuniteitsaandoeningen
-
(waaronder HIV-infectie of AIDS) of als u immunosuppressieve
medicatie neemt.
Als u pijnremmers neemt die de gevoeligheid voor hitte verminderen.
Als u zwanger bent of borstvoeding geeft.
Op moedervlekken, sproeten, grote aderen, gebieden met donkerder
pigment, littekens, huidaandoeningen zonder uw huisarts te raadplegen.
Dit kan leiden tot verbrandingen en verandering van de huidskleur,
waardoor het mogelijk lastiger wordt huidgerelateerde ziekten te
ontdekken (bijv. huidkanker).
Op tepels en slijmvliesachtige delen.
Na intensief zonnen en/of op een verbrande huid of als u
snelbruiningsmiddelen gebruikt.
Op wratten, tatoeages of permanente make-up. Dit kan leiden tot
verbrandingen en verandering van de huidskleur.
Als u deodorant met een lange werkingsduur gebruikt. Dit kan leiden
tot huidreacties.
Op of bij kunstmatige delen zoals siliconenimplantaten, contraceptieve
implantaten van Implanon, pacemakers, onderhuidse injectieopeningen
(insulinepomp) of piercings.
Elektromagnetische velden (EMV)
Dit Philips-apparaat voldoet aan alle richtlijnen met betrekking tot
elektromagnetische velden (EMV). Mits het apparaat op de juiste wijze
en volgens de instructies in deze gebruiksaanwijzing wordt gebruikt, is het
veilig te gebruiken volgens het nu beschikbare wetenschappelijke bewijs.
Opladen
Laad de accu’s volledig op voordat u het apparaat voor de eerste keer
gebruikt en wanneer de accu’s leeg zijn. Het kost maximaal 4 uur om de
accu’s volledig op te laden.
Laad het apparaat volledig op wanneer het oplaadlampje oranje begint te
branden tijdens het gebruik. Wanneer het oplaadlampje oplicht, kan het
apparaat nog ten minste 30 keer itsen.
Met volledig opgeladen accu’s kunt u ten minste 160 keer itsen bij
lichtintensiteit 5, wat neerkomt op een draadloze gebruikstijd van ongeveer
15 minuten. Het werkelijke aantal itsen varieert afhankelijk van de gekozen
lichtintensiteit (zie ‘Werkzaamheid bij verschillende lichtintensiteiten’ in
hoofdstuk ‘Klaarmaken voor gebruik’).
Page 97

NEDERLANDS 97
Laad het apparaat om de 3 tot 4 maanden op, zelfs als u het apparaat
langere tijd niet gebruikt.
1 Schakel het apparaat uit.
2 Steek de kleine stekker in het apparaat en steek de adapter in het
stopcontact.
Het oplaadlampje knippert groen om aan te geven dat het apparaat
,
wordt opgeladen.
Als de accu’s volledig zijn opgeladen, brandt het oplaadlampje continu
,
groen.
Let op: Bedek het apparaat en de adapter nooit tijdens het opladen.
Opmerking: Tijdens het opladen kan het apparaat niet worden gebruikt.
Opmerking: Tijdens het opladen voelt de adapter warm aan. Dit is normaal.
3 Haal de adapter na het opladen uit het stopcontact en trek de kleine
stekker uit het apparaat.
Klaarmaken voor gebruik
Voor optimale resultaten en de hoogste werkzaamheid wordt het
aangeraden om de gebieden waarop u het apparaat wilt gebruiken, voor te
bereiden zoals hieronder wordt beschreven.
1 Scheer de gebieden die u wilt behandelen zolang het haar nog steeds
teruggroeit.
Verwijder het haar nooit met was, epilatie, een pincet of
ontharingscrème. Deze methoden zijn niet combineerbaar met fotoepilatie omdat het haar bij de wortel wordt verwijderd. In deze gevallen
kan het licht niet goed door de wortel worden geabsorbeerd, zodat het
haar teruggroeit.
Opmerking: Scheren is noodzakelijk om te zorgen dat de lichtenergie op de
efciëntste wijze naar de haarwortel wordt geleid. Bovendien kunnen zichtbare
haren in het behandelingsgebied worden verbrand door het licht en zo een
onaangename geur veroorzaken. Dit is in het algemeen onschadelijk maar kan
enige pijn veroorzaken wanneer u het apparaat gebruikt.
2 Maak uw huid schoon en zorg dat deze volledig droog en vrij
van vetten en oliën is (die bijvoorbeeld aanwezig kunnen zijn
in cosmetische producten zoals deodorant, lotion, parfum,
bruiningscrème en zonnebrandcrème).
Opmerking: Als u scheerwonden of huidbeschadigingen hebt, kan de huid
gevoeliger zijn. In dat geval kan de behandeling met licht beter voelbaar en
soms zelf onprettig zijn.
Opmerking: Wanneer het haar niet meer teruggroeit, wat doorgaans na enige
behandelingen het geval is, hoeft u zich niet meer te scheren voor het gebruik
van het apparaat.
Tip Als het scheren huidirritaties veroorzaakt, kunt u ook een trimmer
gebruiken om het haar zo kort mogelijk te trimmen. In dat geval kan de
lichthandeling beter voelbaar en soms zelf enigszins onprettig zijn.
Page 98

NEDERLANDS98
De lichtintensiteit instellen
U moet de lichtintensiteit op uw huidskleur en de kleur van uw
lichaamsharen instellen en een niveau kiezen dat u prettig vindt.
Aan de hand van onderstaande tabel met aanbevolen lichtintensiteiten
kunt u vaststellen wat de juiste lichtintensiteit voor u is.
1 Raadpleeg de volgende tabel om vast te stellen welke
lichtintensiteiten het geschiktst voor uw huidskleur en de kleur van
uw lichaamsharen zijn en om te controleren of deze methode op
zichzelf geschikt voor u is (als dat niet het geval is, staat er een x in
de tabel).
Opmerking: Mensen met een donkerdere huid hebben meer kans op
huidirritaties, omdat hun huid meer licht absorbeert. Daarom wordt er een
lagere lichtintensiteit aanbevolen voor mensen met een donkerdere huid.
2 Kies voor elk deel van de huid dat u wilt behandelen een geschikte
intensiteit in het aanbevolen bereik, die zo hoog mogelijk is maar niet
onaangenaam aanvoelt op de huid.
De lichtintensiteit die u gebruikt, kan warm of heet aanvoelen op de huid
maar mag nooit onprettig zijn.
Opmerking: Controleer vóór elke behandeling of het apparaat op de juiste
intensiteit is ingesteld.
Aanbevolen lichtintensiteit (1-5)
Huidskleur
& -kenmerken:
Kleur van
lichaamsharen:
Wit
(altijd
verbranden,
geen
bruining)
wit/grijs x x x x x x
rood x x x x x x
licht-
blond
blond 4/5 4/5 4/5 3/4/5 1/2/3/4 x
donker-
blond/
lichtbruin
bruin 4/5 4/5 4/5 3/4/5 1/2/3/4 x
donker-
bruin
zwart 4/5 4/5 4/5 3/4/5 1/2/3/4 x
x x x x x x
4/5 4/5 4/5 3/4/5 1/2/3/4 x
4/5 4/5 4/5 3/4/5 1/2/3/4 x
Beige
(eenvoudig
verbranden,
minimale
bruining)
x betekent dat het apparaat niet geschikt is.
Lichtbruin
(soms
verbranden,
goede
bruining)
Gemiddeld bruin
(zelden
verbranden, snelle
en goede
bruining)
Donkerbruin
(zelden
verbranden,
zeer goede
bruining)
Zwart
(zelden
tot nooit
verbranden, zeer
donkere
bruining)
Page 99

NEDERLANDS 99
Opmerking: Het apparaat is niet geschikt voor personen met een zeer donkere
tot zwarte huid vanwege het hogere risico op huidirritaties.
Opmerking: Het apparaat is niet geschikt voor personen met lichtblonde, rode,
grijze en witte lichaamsbeharing. Vanwege de lage melanineconcentratie in het
haar is deze methode niet effectief.
Opmerking: Bij een hogere lichtintensiteit neemt de werkzaamheid van de
methode niet alleen toe maar is deze ook beter voelbaar.
Werkzaamheid bij verschillende lichtintensiteiten
Lichtintensiteit Werkzaamheid Aantal itsen
5 ***** 160
4 **** 190
3 *** 250
2 ** 350
1 * 520
* geeft het niveau van de werkzaamheid aan
Opmerking: Deze tabel geeft aan hoeveel itsen het apparaat bij elke
lichtintensiteit kan geven en wat de bijbehorende verwachte werkzaamheid
is. Kies de intensiteit die geschikt is voor uw huidskleur en de kleur van uw
lichaamshaar.
Het apparaat gebruiken
De lichtintensiteit die u gebruikt, kan warm of heet aanvoelen op de huid
maar mag nooit onprettig zijn.
Dit apparaat is alleen bedoeld voor het verwijderen van lichaamsharen
onder de halslijn bij vrouwen: oksels, bikinilijn en benen
Opmerking: Scheer het gebied dat u wilt behandelen voordat u het apparaat
gebruikt (zie hoofdstuk ‘Klaarmaken voor gebruik’).
Tip Het beste moment voor de behandeling is ‘s avonds voordat u naar bed
gaat. Hiermee vermindert u huidreacties die ‘s nachts kunnen optreden.
1 Druk op de aan/uitknop om het apparaat in te schakelen.
Het intensiteitslampje 1 gaat automatisch branden om aan te geven
,
dat het apparaat is ingeschakeld op de standaardintensiteit 1.
Opmerking: U kunt het apparaat op elk gewenst moment uitschakelen door
opnieuw op de aan/uitknop te drukken.
Opmerking: Het is normaal dat het apparaat warm wordt tijdens het gebruik.
Page 100

NEDERLANDS100
2 Druk op de knop % om de intensiteit verhogen. Druk op de knop ^
om de intensiteit te verlagen.
Elke keer dat u op de knop drukt, begint het bijbehorende
,
intensiteitslampje te knipperen. Dit duurt enige seconden.
3 Plaats het apparaat loodrecht op de huid zodat het verwijderbare
venster en de veiligheidsring contact hebben met de huid.
Tip Wanneer u het apparaat voor de eerste keer gebruikt, kunt u het
bijvoorbeeld eerst uitproberen op uw heup om gewend te raken aan deze
op licht gebaseerde methode. Begin met de laagste aanbevolen intensiteit en
verhoog deze tot de hoogste aanbevolen intensiteit. Deze test zal aangeven
hoe gevoelig uw huid is voor licht. Controleer 20 minuten na de test of er
huidreacties zijn. Als dat het geval is, moet u een lagere aanbevolen intensiteit
kiezen voor de gebieden die u behandelt.
4 Druk de veiligheidsring met enige druk volledig op de huid.
Opmerking: De veiligheidsring beschikt over contactschakelaars die
gezamenlijk het veiligheidssysteem van het apparaat vormen. Deze
veiligheidsring voorkomt dat het apparaat onopzettelijk itst terwijl er geen
contact met de huid is.
Wanneer alle contactschakelaars van de veiligheidsring in het
,
apparaat zijn gedrukt, gaat het ‘klaar om te itsen’-lampje aan de
achterkant van het apparaat branden. Dit kan enige seconden duren.
Wanneer het ‘klaar om te itsen’-lampje brandt, is het apparaat klaar
om te itsen.
Tip Het apparaat is gemakkelijker in gebruik wanneer u de huid die u
wilt behandelen, strak trekt. Op gebieden met een zachtere huid moet
u mogelijk meer druk uitoefenen op het apparaat om te zorgen dat alle
contactschakelaars naar binnen worden gedrukt.
5 Druk op de itsknop om een its af te geven. Laat de itsknop los
nadat het apparaat eenmaal heeft geitst.
6 Herhaal stap 3, 4 en 5 voor de volgende its. Dit kan enige seconden
duren.
Flits nooit tweemaal op hetzelfde gebied zonder het apparaat van de
huid te halen. Op deze wijze voorkomt u dat uw huid te veel wordt
verhit of zelfs verbrandt.
 Loading...