

Philips SBCVL1400/85 User Manual

VL1400L6bk.p65 27/03/2002, 11:051

22
ENGLISH
Your Wireless TV Link
SBC VL1400
Your Philips Wireless TV Link
or analogue set-top boxes, DVDs, satellite receivers, VCRs etc.) or cable
programmes throughout your house without the need for extra wiring, running
cables or drilling holes. This means that you can enjoy the freedom of watching PayTV on your bedroom TV. You can also enjoy a film playing on your living-room
video recorder while others independently watch their favourite programmes on
the main TV.
Besides distributing video signals wirelessly, your Wireless TV Link also functions as a
switch box for your main TV. It is equipped with four SCART input connectors.
These allow you to connect up to four video devices at the same time, so cable
swapping or re-configuring your audio/video set-up is no longer necessary. In
addition, three of the SCART inputs can be linked to the four th one, which makes
copying your video content ver y simple.
The universal remote control allows you to control your Wireless TV Link, your
second TV and up to four video sources, regardless of brand. You don’t have to
carry around the other remote control units!
Your Wireless TV Link
convenience. To enable you to enjoy the best possible performance, four
transmission channels are provided so you can select the channel that provides
optimum viewing with the minimum of interference.
Pure wireless home conPure wireless home con
Pure wireless home con
Pure wireless home conPure wireless home con
allows you to distribute any kind of video signal (digital
is based on wireless RF technology that offers you in-home
vv
enience!enience!
v
enience!
vv
enience!enience!
Safety precautions
Please read this guide carefully and keep it for future reference.
•
Do not use this product in moist places or close to water.
•
Do not expose this product to extreme heat.
•
Do not open this product; in case of technical difficulties bring it to your Philips
retailer.
•
Do not cover this product.
•
Only connect the AC power adapters to a power supply of 220-240 VAC / 50Hz.
•
Only use the AC power adapters included or a type that complies with safety
standard EN60950 and that has the following specification: 12 Volt DC / 500mA.
•
Inadequately protected or sensitive electronic equipment may be affected by the
use of this product. This interference can lead to damage to either equipment.
Please check whether or not surrounding equipment can be affected by this
product before you start using it.
VL1400L6bk.p65 27/03/2002, 11:052
Keys and functions
ENGLISH
3
Product illustration
on inside flap:A1
Transmitter Unit
Power button
> switches the transmitter between stand-by and on.
Power light
2
> red in stand-by mode, green when power is on, flashes when receiving remote
control commands
LINK SOURCE button
3
> links SCART input 1,2,3 or SCART OUT to SCART in/output 4.
LINK SOURCE indication lights
4
> indicate which SCART input (1,2 or 3) is linked to SCART in/output 4. When
there is no light indication the SCART OUT is linked to SCART in/output 4.
VIEW SOURCE button
5
> selects which SCART input (1-4) is viewed on the transmitter SCART output
View source indication display
6
> indicates the SCART input number that is viewed on the transmitter output.
AUTO light
7
> indicates if automatic SCART switching is enabled (on) or disabled (off).
Infra-red remote control blaster lights
8
> transmit infra-red remote control signals from the receiver to the video source
devices below.
Channel selection switch
9
> switches the frequency of the transmission channel of the audio/video signal to
minimize interference.
SCART input (1-4) connectors
10
> connect SCART-enabled video source devices to these connectors
SCART output connector
11
> connect to the main TV
RCA sound output connector
12
> connect to an audio amplifier
DC power input
13
Remote control blaster cord connector
14
Remote control blaster cord
15
> four infra-red lights used instead of the infra-red remote control blaster lights for
a more precise control of the video sources.
SCART cable
16
Power adapter
17
Remote control antenna
18
VL1400L6bk.p65 27/03/2002, 11:053

4
ENGLISH
SUOMI
73
Product illustration
on inside flap:B19
Keys and functions
Receiver Unit
Power button
> switches the receiver between stand-by and on. When the receiver unit is turned
on or off the transmitter unit is automatically turned on or off as well.
Power light
20
> red in stand-by mode, green when power is on, flashes when receiving remote
control commands
Remote control signal receiver
21
> receives remote control commands which are sent to the transmitter unit to
control the video sources.
Input source up (+) / down (-) buttons
22
> selects one of the four video sources connected to the transmitter unit for
viewing on the second TV.
Transmission channel switch
23
> switches the frequency channel of the audio/video signal to minimize
interference.
SCART output connector
24
> connect to the second TV
DC power input
25
SCART cable
26
Power adapter
27
Remote control antenna
28
Yleistä
Tehonsyöttö:
Tehon kulutus:
Tuloliitäntöjen määrä:
Lähetinyksikkö
Mitat:
SCART-liitännät 1 ja 2
SCART 3 -liitäntä:
SCART 4 -liitäntä:
SCART-lähtöliitäntä:
Vastaanotinyksikkö
Mitat:
SCART-liitäntä:
Laitteen tukemat
kuvastandardit:
Käyttöetäisyys:
Äänen ja kuvan
siirto
Kantoaallon taajuus:
Kanavien määrä:
Modulointitapa:
Lähetysteho:
Tekniset tiedot
220 – 240 VAC / 50 Hz
7 W (sekä lähetin- että vastaanotinyksikkö)
4
270 (L) x 146 (S) x 61 (K) mm
Tulo: stereo audio / video: CVBS
Tulo: stereo audio / video: RGB ja CVBS
Tulo: stereo audio / video: RGB ja CVBS
Lähtö: stereo audio / video: CVBS, P50-yhteensopiva
Tulo: stereo audio / video: CVBS
Lähtö: stereo audio / video: RGB ja CVBS P50-yhteensopiva
61 (L) x 146 (S) x 150 (K) mm
Lähtö: stereo audio / video: CVBS
PAL / NTSC / SECAM
Enintään 100 m ulkona, 30 m sisällä
2,4 GHz
4 (tai vähemmän, paikallisten määräysten mukaan)
FM
< 10 mW
Important information
•
Each video source, the main TV and the second TV must have SCART
connectors.
•
Two SCART cables are supplied; you will require additional SCART cables for
the video sources you connect.
•
A video source can be any satellite receiver, Pay-TV decoder box (digital or
analogue), video recorder (VCR), DVD player, camcorder, game-console etc.
•
Before using the Universal Remote Control it must be set up to operate with
your other equipment. Refer to its instructions for use to discover the full
potential of this versatile unit.
•
In this guide we call the main TV (connected to the transmitter unit) TV1; we call
the second TV (connected to the receiver unit) TV2.
•
It may be helpful to have the instructions for use for the TVs and the video
sources at hand for reference.
VL1400L6bk.p65 27/03/2002, 11:054
Kauko-ohjaimen
signaali
Antennit:
Kantoaallon taajuus:
Modulointitapa:
Lähetysteho:
Infrapunasignaalin
kantama:
Kantoaallon taajuus:
Kauko-ohjaimen
laajennusjohto:
Kauko-ohjainantenni:
Sisäänrakennettu
433,92 MHz
AM
< 10 mW
Enintään 6 m
32 kHz – 57 kHz
On, 4 infrapunavaloa
Antennit kummankin yksikön takana
L
72
SUOMI
ENGLISH
5
Yleisiä ohjeita
Mikroaaltouunin käyttö saattaa vaikuttaa kuvan ja äänen laatuun. Myös muut
•
johdottomat järjestelmät (Bluetooth, johdottomat lähiverkot jne.) voivat
heikentää kuvan ja äänen laatua, ja toisaalta TV-linkki voi häiritä näitä järjestelmiä.
Johdoton TV-linkki on radiotaajuuksiin (RF) perustuva tuote. Siksi muut samalla
•
periaatteella toimivat laitteet, kuten matkapuhelimet, kannettavat radiot ja muut
radiotaajuuslaitteet voivat vaikuttaa sen suorituskykyyn.
Jos kummastakin televisiosta on valittu sama kuvalähde, molemmissa näkyy sama
•
ohjelma.
Johdottoman TV-linkin toiminta ei rajoitu yhteen huoneeseen tai edes yhteen
•
taloon. Voit käyttää sitä missä tahansa talon sisällä tai sen läheisyydessä. Tämän
takia kuka tahansa, joka asuu lähettimesi toimintasäteen alueella ja omistaa
johdottoman TV-linkin, joka on säädetty samalle kanavalle, voi katsella ohjelmaa,
jota sinun kuvalähteesi lähettää.
Kauko-ohjaimien komentojen sekaantumisvaaran vuoksi television käyttö
•
kuvalähteenä ei ole suositeltavaa.
Kaikki televisioihin sisäänrakennetut videonauhurit (TV-videonauhuriyhdistelmät)
•
eivät sovellu käytettäväksi lähetinyksikön kanssa (riippuu laitteen merkistä ja
tyypistä).
Kuvalähteitä voi käyttää kauko-ohjaimella vain siinä tapauksessa, että
•
infrapunasignaalin kantoaallon taajuus on välillä 32–57 kHz.
AUDIO
OUT
Aligned
Wireless TV
Link Transmitter
Channel
1 2 3 4
R
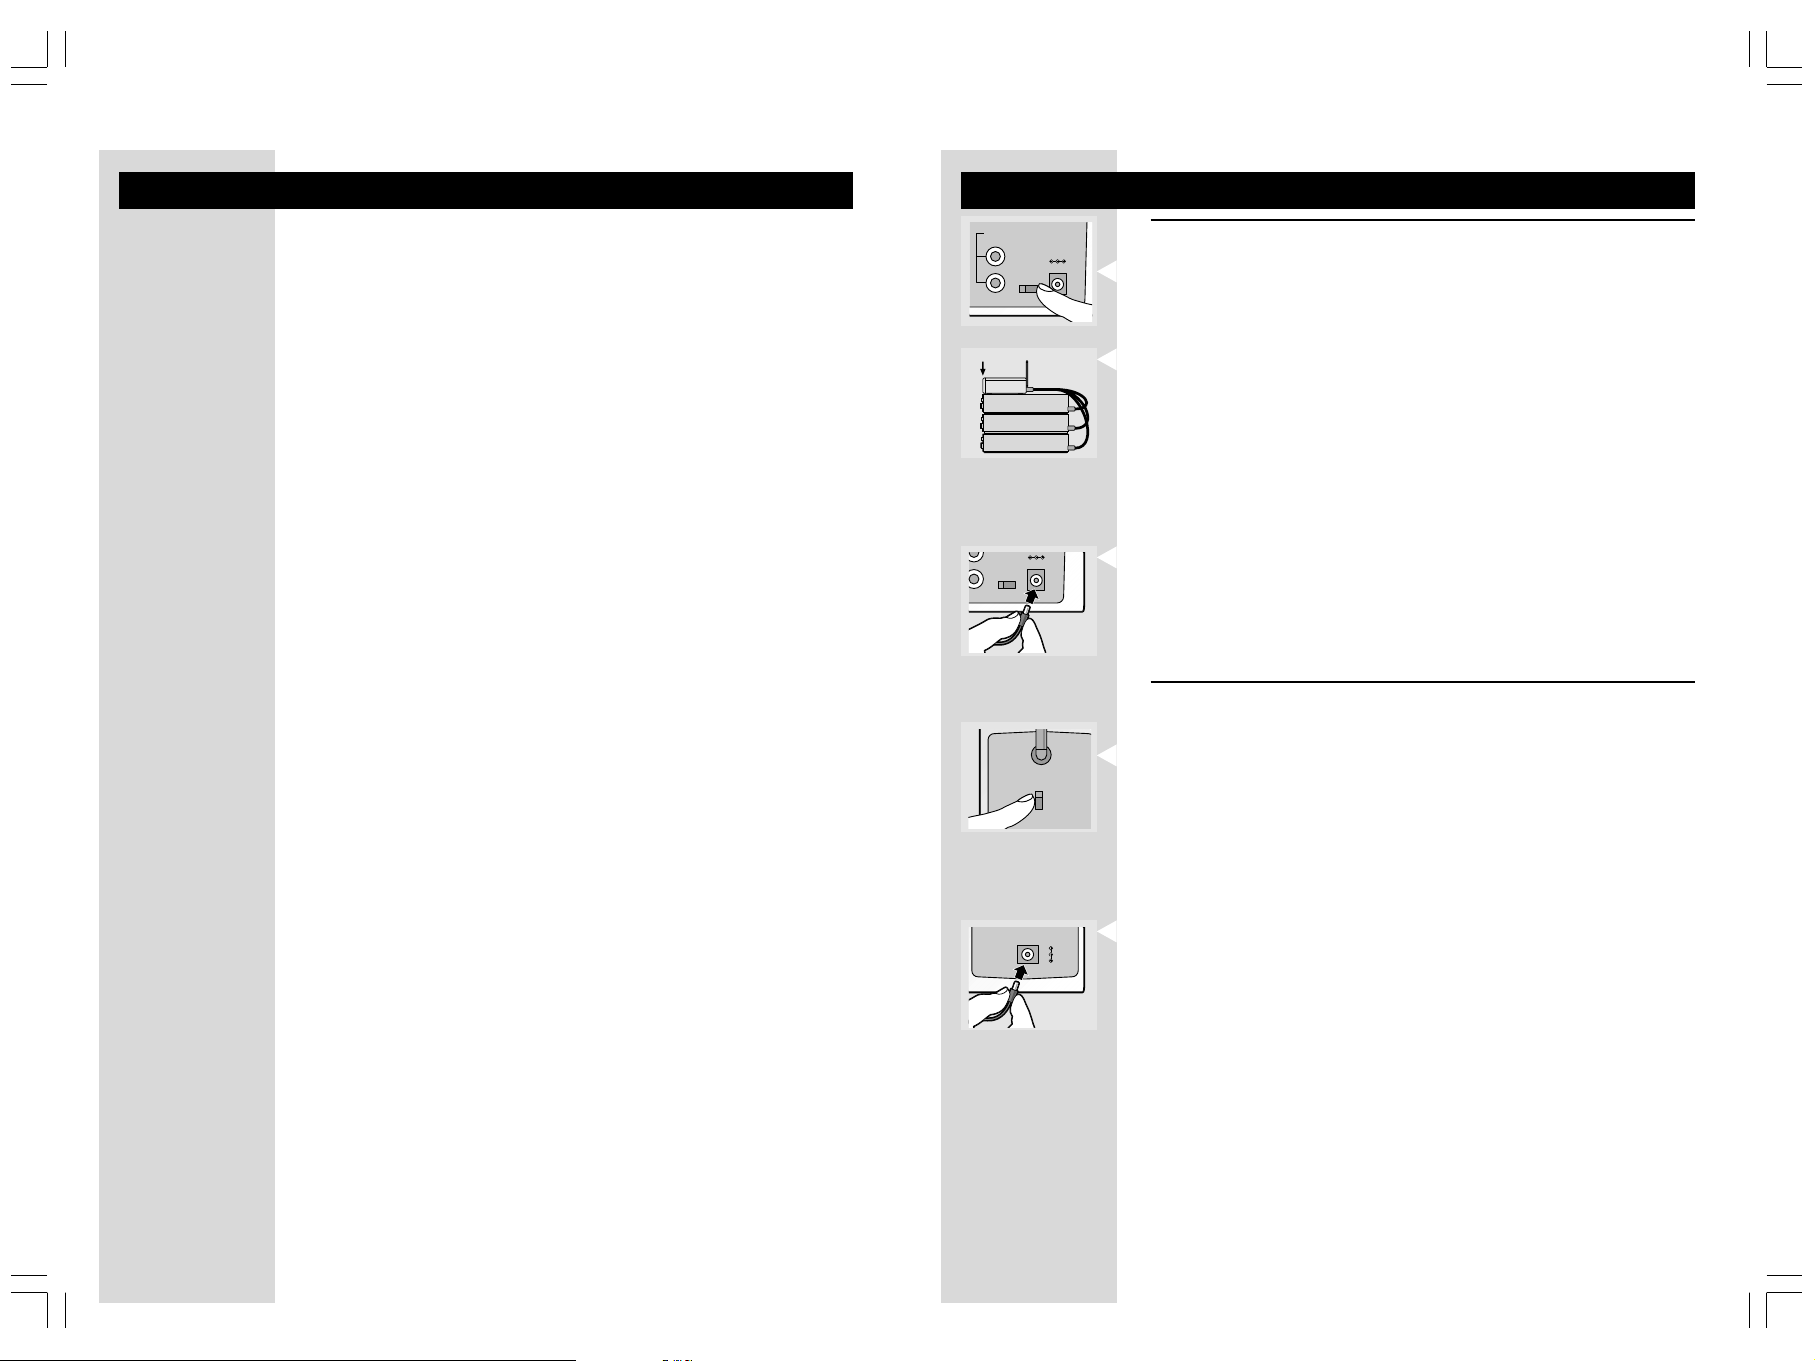
Getting your Wireless TV Link ready
Setting up the transmitter unit
L
DC 12V
Channel
1 2 3 4
R
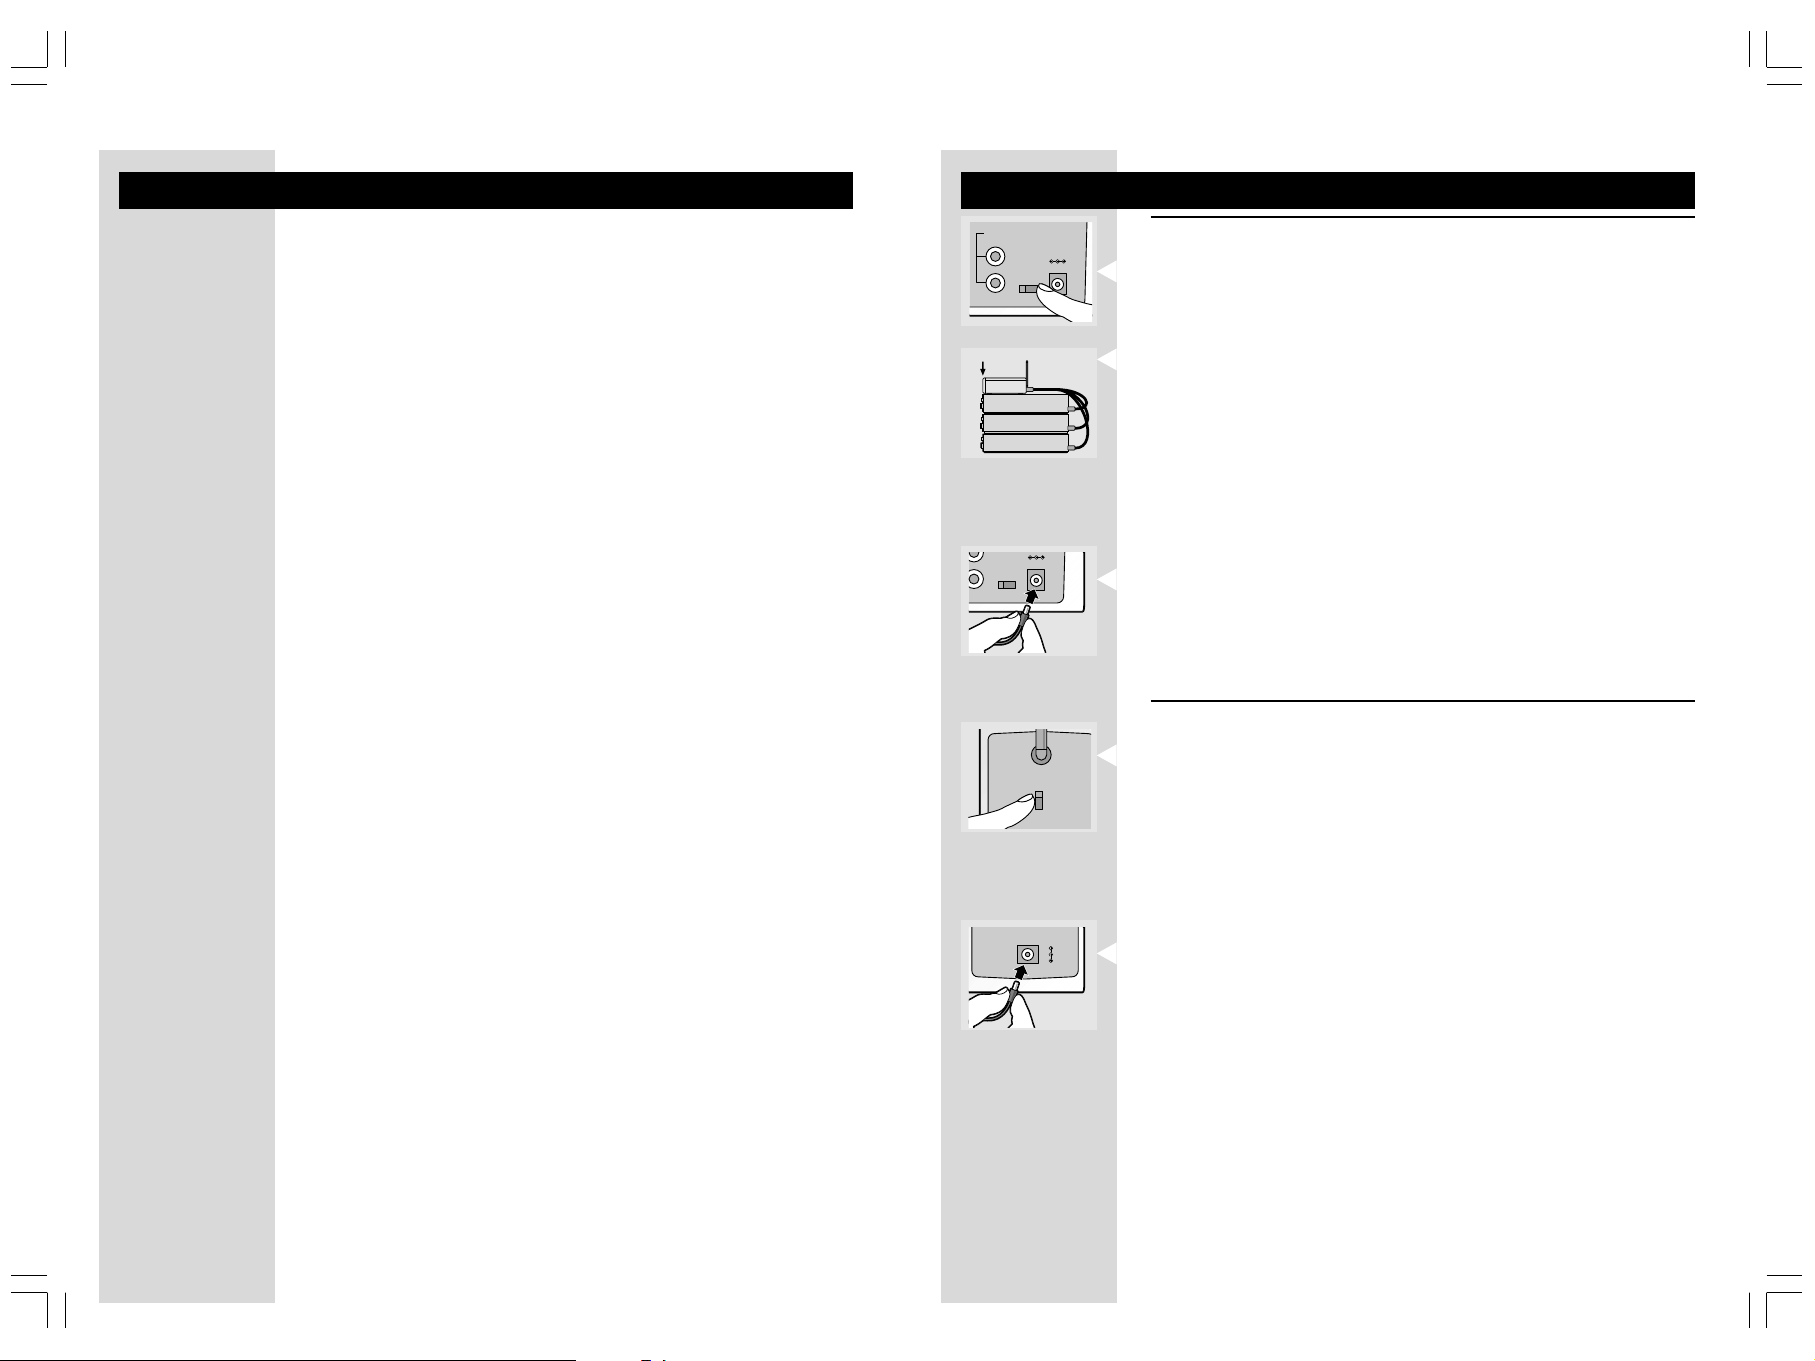
Set channel selection switch to channel 1.
1
> Always set transmitter and receiver units to the same channel.
Position transmitter unit on top of video sources with the front panels aligned
2
VCR
DVD
Set-top box
DC 12V
vertically.
> Never put video sources or metal plates on top of the transmitter unit.
Connect SCART cables from video sources to transmitter unit SCART inputs.
3
Connect SCART cable from transmitter unit output to TV1.
4
Connect power adapter to transmitter unit.
5
Plug power adapter into mains socket.
6
Setting up the receiver unit
1 2 3 4
Antenna
Channel
Set channel selection switch to channel 1.
1
> Always set transmitter and receiver units to the same channel.
Position the receiver unit close to TV2.
Lähetinyksikkö voi tukea modernien televisioiden ja kuvanauhureiden yhteistä
•
kanavienviritystä (tätä ominaisuutta kutsutaan myös nimillä Follow-TV, Easylink,
SmartLink, AV-Link, MEGALogic, TV-Link ja Q-Link.) Tämä toiminto vaatii täysin
2
> Ensure that the front of the receiver unit is positioned to receive remote control
commands.
nastoitettujen SCART-johtojen käyttöä.
Connect SCART cable from receiver unit to TV2.
3
Radioaaltoturvallisuus: Kun Philipsin johdoton TV-linkki on kytketty päälle, se
•
lähettää ja vastaanottaa radioaaltoja. Philipsin johdoton TV-linkki on siihen
DC 12V
Connect second power adapter to receiver unit.
4
soveltuvien standardien mukainen.
Plug second power adapter into mains socket.
5
Philipsin johdottoman TV-linkin toiminta-alue on avoimessa tilassa jopa 100
•
metriä. Seinät, katot ja muut isot esteet voivat rajoittaa toimintasäteen
rakennuksen sisällä noin 30 metriin.
VL1400L6bk.p65 27/03/2002, 11:055
66
N
66
ENGLISH 71
SUOMI
STANDBY
STANDBY
STANDBY
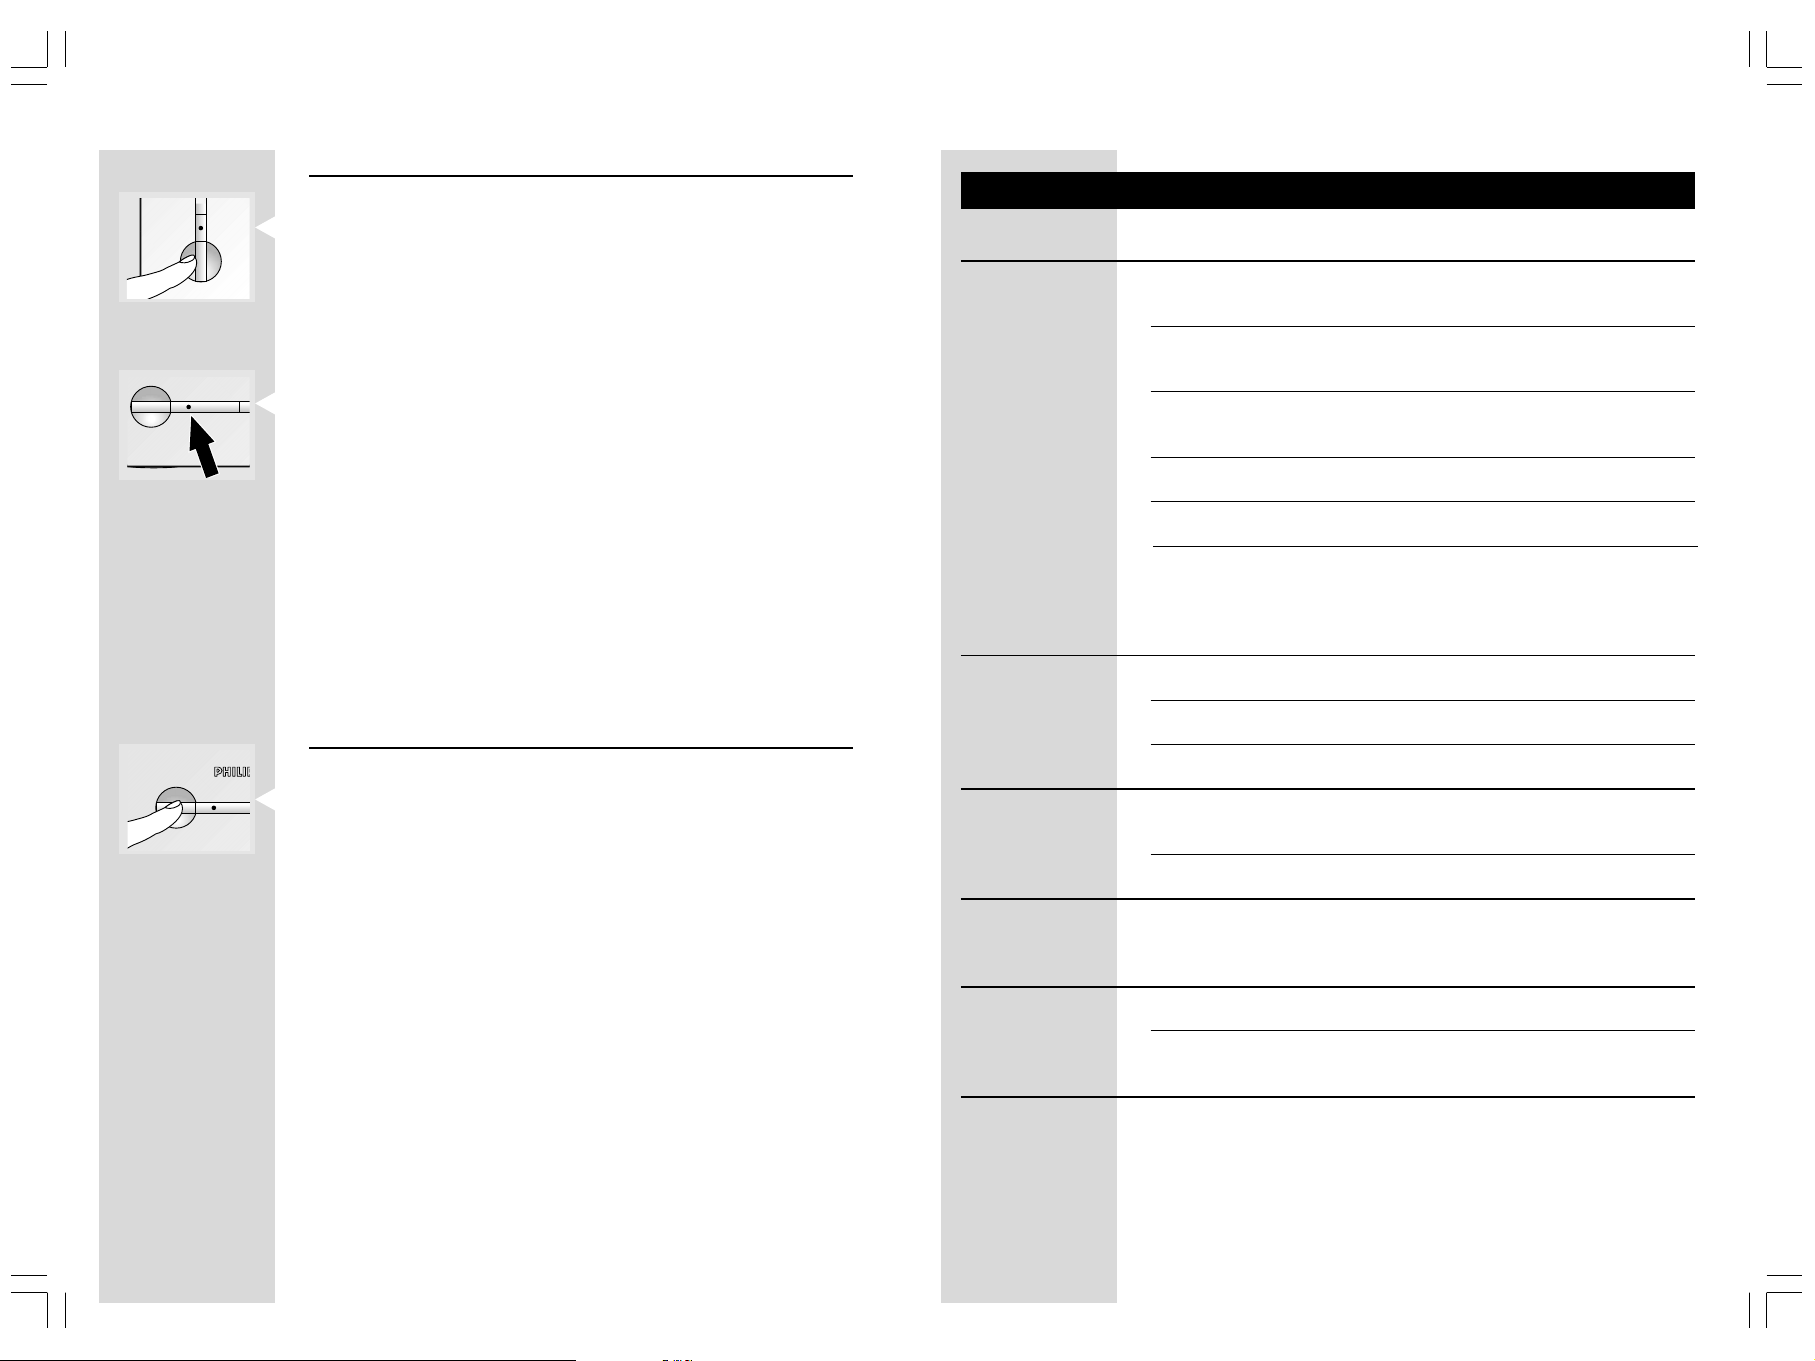
Checking the remote control operation
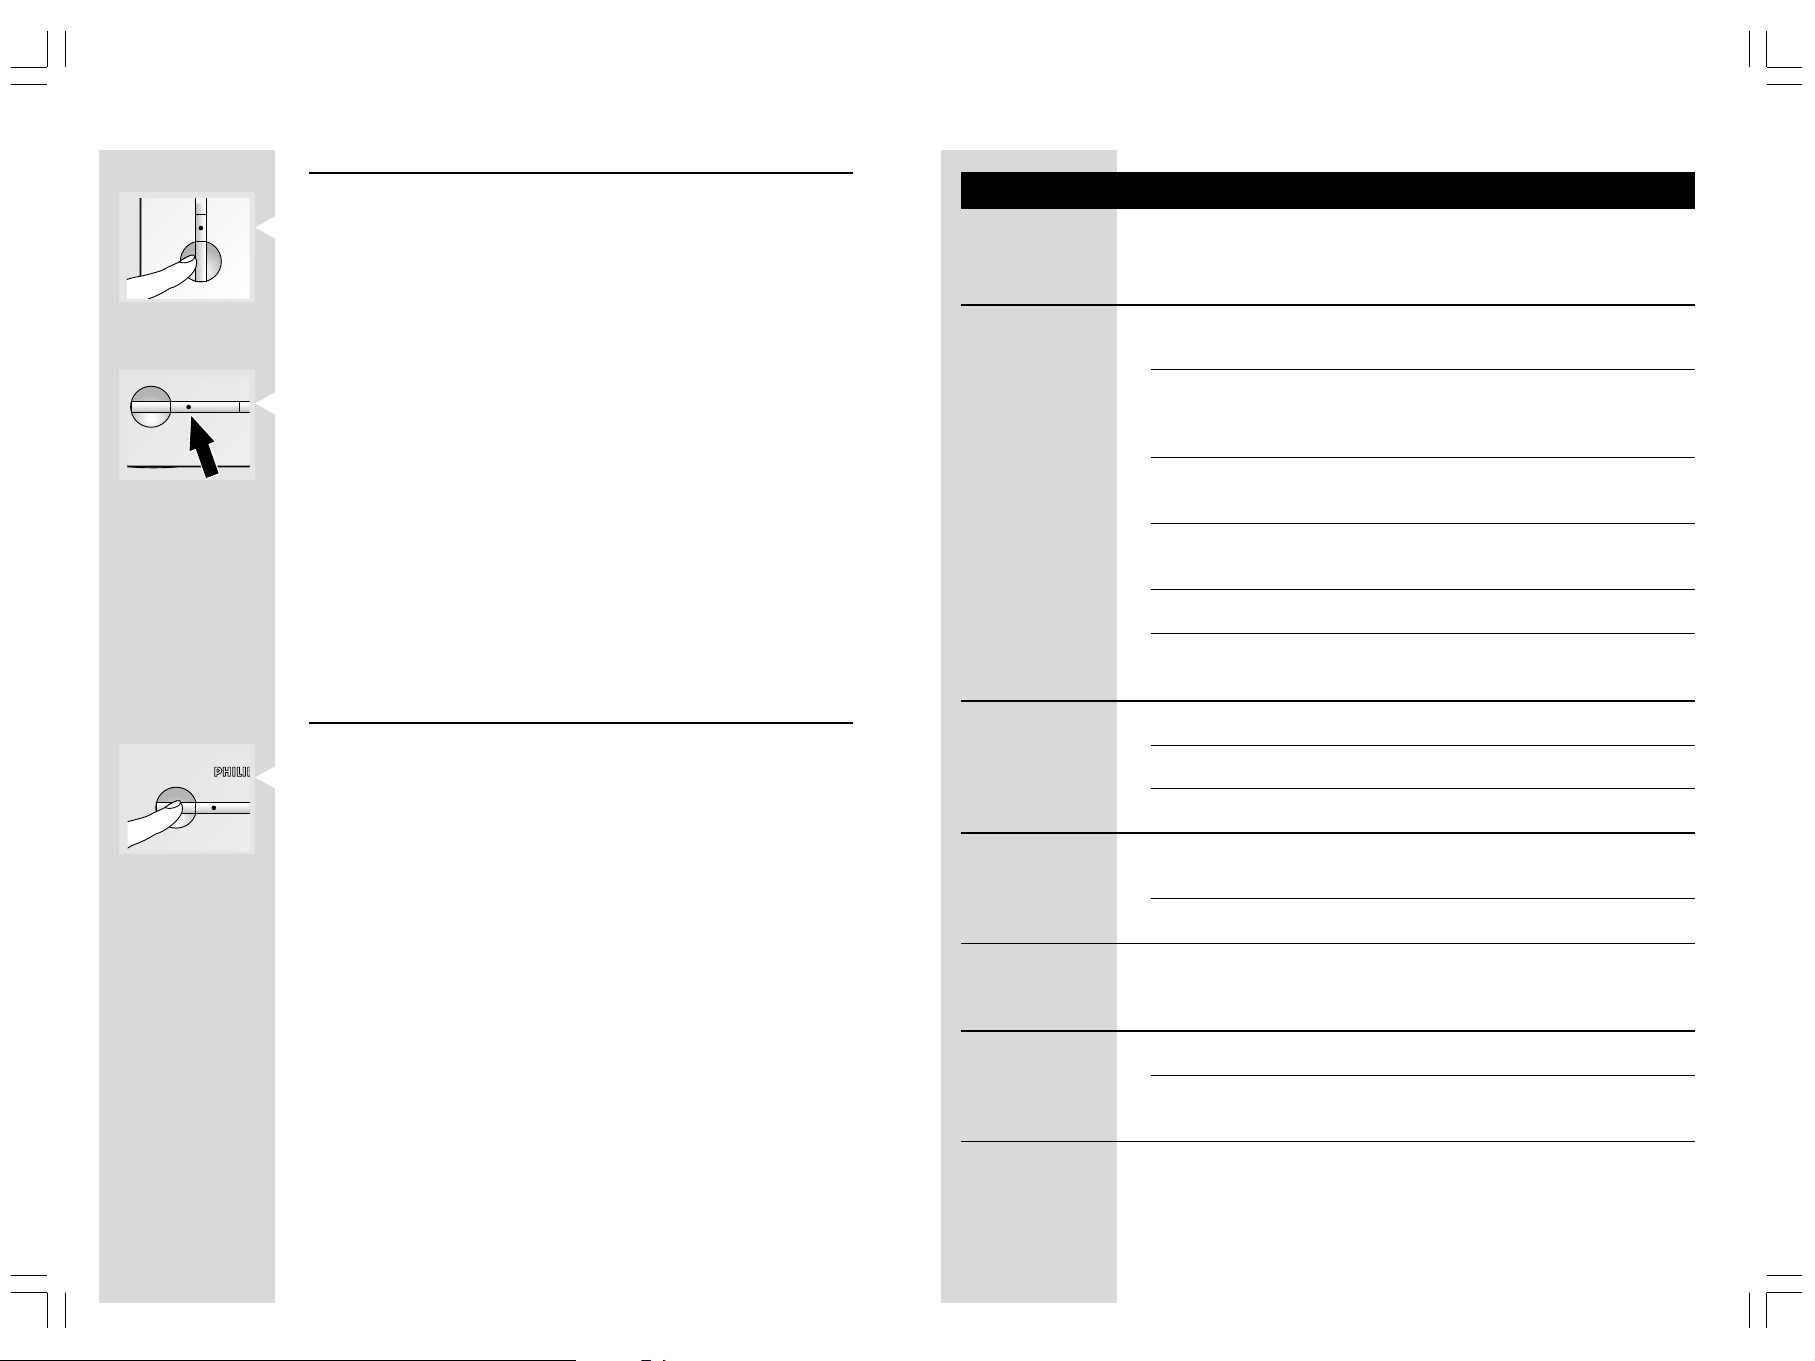
1
Switch on TV2 and the receiver unit.
> Make sure your transmitter is also turned on.
2
Point the video source’s remote control unit at the receiver unit and switch
between play and stop.
> The power light on the receiver unit flashes to show that it has received the
remote control command.
LI
3
Have a second person check that the power light on the transmitter unit flashes.
> This indicates that it is receiving the remote control signal from the receiver unit.
4
If the power light does not flash, reposition the remote control antenna at the
rear of either unit.
> The power light on the transmitter unit should now flash when a remote control
command is given at the receiver side.
5
If the video source does not respond to the remote command, try realigning the
front of the transmitter unit with the front of the video source until you get a
response.
6
If the video source still fails to respond install the remote control blaster cord
as described below.
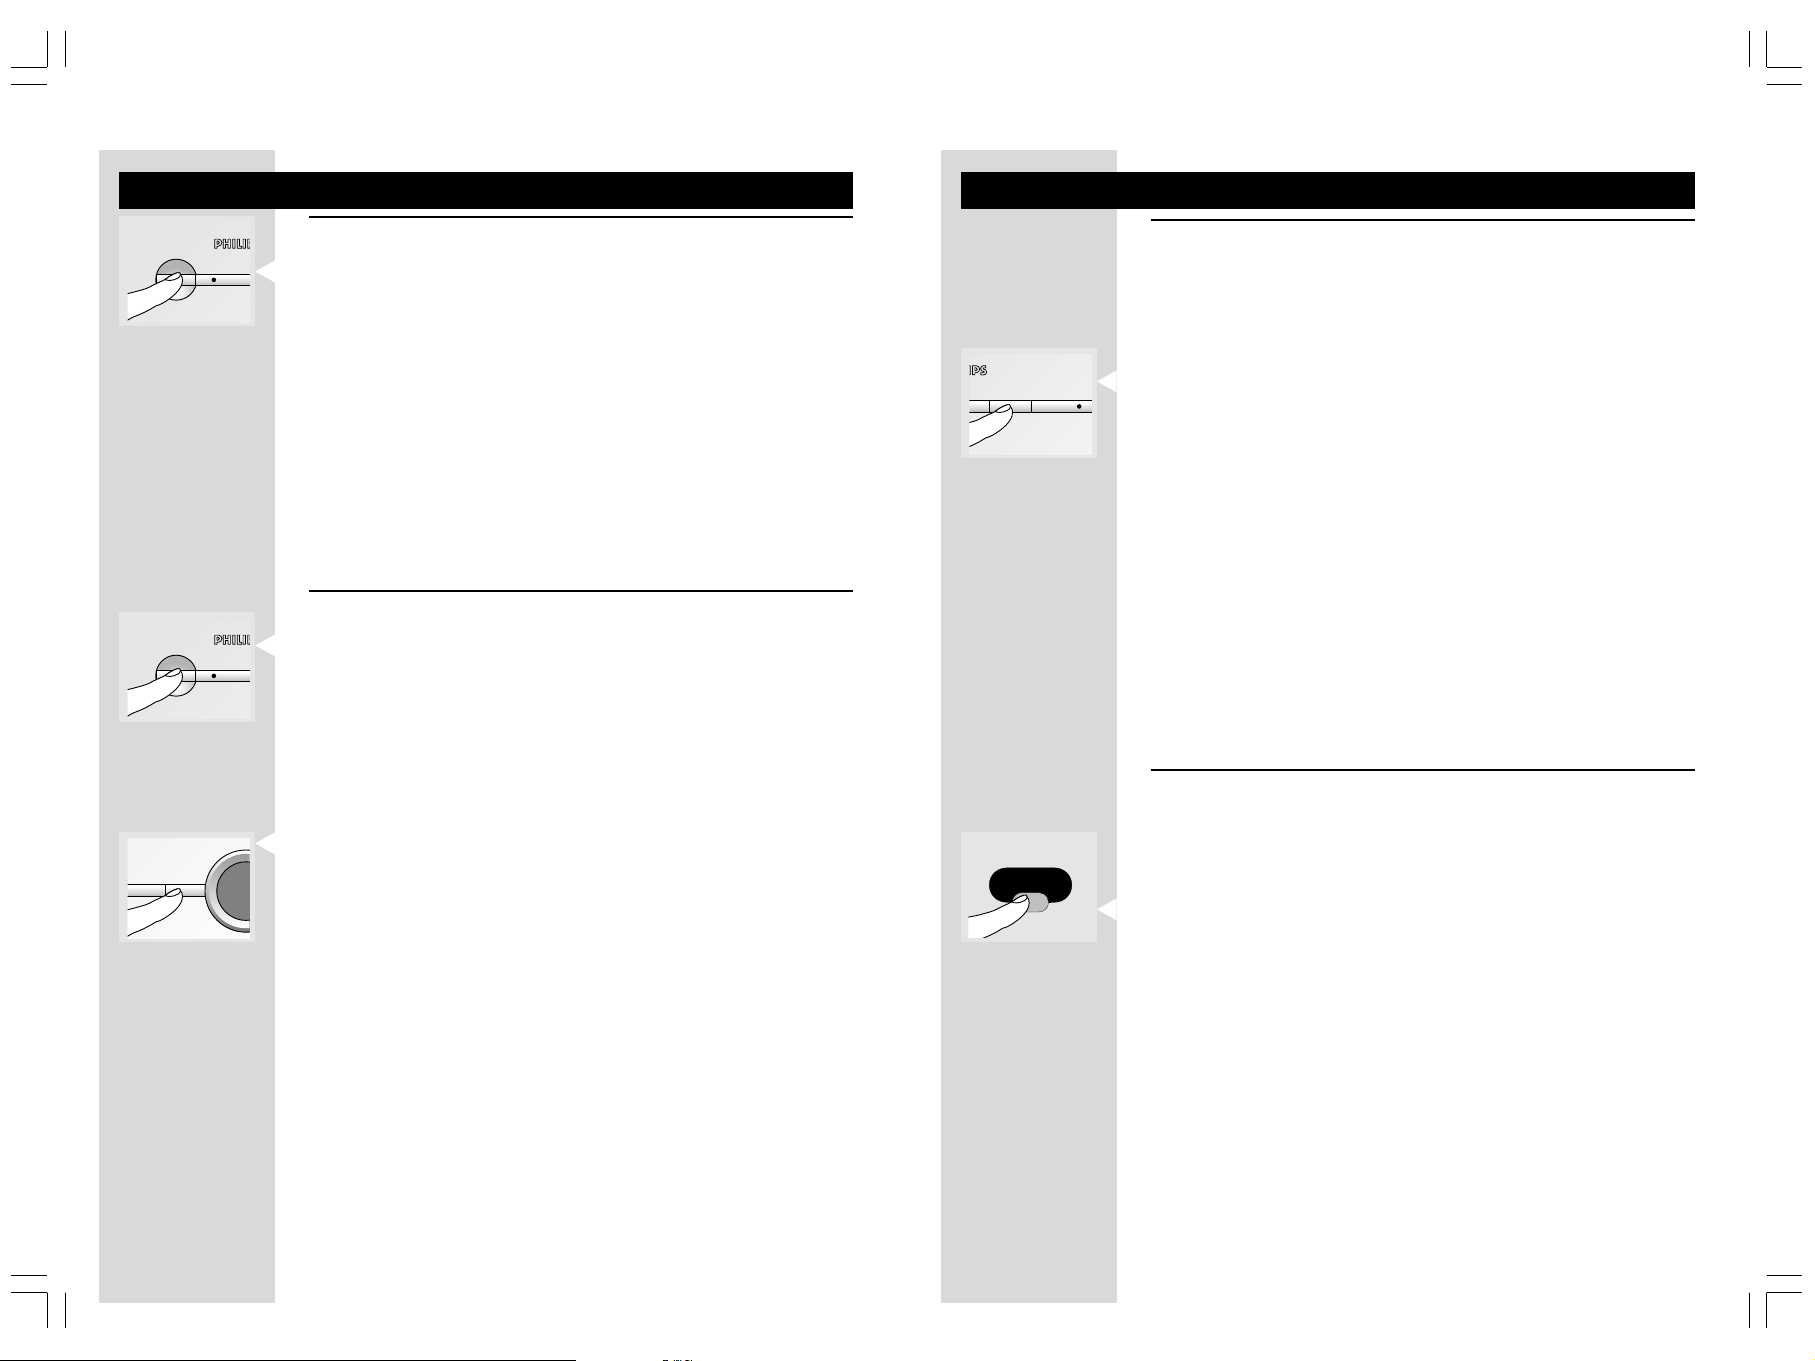
Installing the remote control blaster cord
1
Switch off the transmitter unit.
2
Plug the blaster cord into the IR socket at the back of the transmitter unit.
3
Switch on both transmitter and receiver units.
Kuvalähteiden ohjaus
kakkostelevisiosta
käsin ei onnistu.
Kauko-ohjainta
käytettäessä kuuluu
suriseva ääni.
Easylink-toiminto ei
toimi.
Ongelmatilanteet
Suuntaa kauko-ohjain suoraan vastaanotinyksikköä kohti ja varmista, ettei kaukoohjaimen ja yksikön välissä ole esteitä (merkkivalon B-19 täytyy välähtää).
Varmista, ettei lähistöllä ole mitään muita johdottomia laitteita (johdottomia
kuulokkeita, kaiuttimia, infrapunaohjaussignaaleja), jotka voivat aiheuttaa häiriöitä
kauko-ohjaimeen.
Kauko-ohjaimen ja vastaanotinyksikön välinen etäisyys saa olla enintään 6 metriä*.
Tarkasta, ettet yritä ohjata laitetta tätä kauempaa.
Varmista, että lähetinyksikkö ja vastaanotinyksikkö ovat vähintään 5 metrin päässä
toisistaan.
Varmista, että yrität ohjata kuvalähdettä sen omalla kauko-ohjaimella.
Aseta kauko-ohjaimen laajennusjohdon infrapunavalo toiseen kohtaan kuvalähteen
pinnalle tai 5–10 cm:n päähän laitteen eteen.
Siirtele vastaanotinyksikköä varovasti, kunnes suriseva ääni lakkaa.
Siirtele lähetinyksikköä varovasti, kunnes suriseva ääni lakkaa.
Joissakin televisioissa tätä ongelmaa ei voi poistaa.
Tarkasta, että sekä televisio että kuvanauhuri tukevat tätä ominaisuutta (katso
näiden laitteiden käyttöohjeita).
4
Ask another person to press and hold a key of the video source’s remote
control while pointing it at the receiver unit.
5
While the other person is doing this, slowly move an IR light (a black block)
along the front panel of the video source.
> Do not let the distance between the IR light and the front panel exceed 1 cm.
When the video source reacts to the command from the remote control, the
correct position has been found. (Alternatively, locate the IR sensor by referring to
the video source’s instructions for use.)
6
Remove the adhesive tape from the back of the IR light and stick it onto the IR
sensor window of the video source.
7
If necessary, repeat this procedure for the other video sources.
VL1400L6bk.p65 27/03/2002, 11:056
S-VHS-videosta tulee
vain mustavalkoinen
kuva.
DVD-soittimesta
tuleva kuva ei näy
ykkös- tai
kakkostelevisiossa.
Käytä Easylink-yhteensopivia tai täysin nastoitettuja SCART-johtoja.
Valitse S-VHS-kuvanauhurille CVBS-videolähtöformaatti, kun käytät SCART-lähtöä 1
tai 2 (katso kuvanauhurin käyttöohjetta).
Yhdistä DVD-soitin SCART-tuloon 3 tai 4 (molemmat tukevat RGB-formaattia).
Valitse DVD-soittimelle CVBS-videolähtöformaatti (katso DVD-soittimen
käyttöohjetta).
* Tähän vaikuttavat kauko-ohjaimen signaalin voimakkuus sekä paristojen kunto.

70
SUOMI
77
77ENGLISH
Ongelma
Kakkostelevisioon ei
tule kuvaa.
Kakkostelevision kuvan
tai äänen laatu on
huono.
Kuvanauhurin
kaapeliohjelma katoaa.
Ongelmatilanteet
Tarkasta ensimmäiseksi, että kaikki kaapelit ovat kunnolla paikoillaan.
Ratkaisu
Varmista, että molemmat yksiköt on kytketty päälle (merkkivalot A-2 ja B-20 ovat
vihreitä).
Valitse kakkostelevisiosta EXT- tai AV-kanava.
Käynnistä kuvalähde (sovitin: vir ta päälle; kuvanauhuri/DVD: paina PLAY-painiketta).
Valitse lähetinyksiköstä oikea kuvalähde.
Valitse vastaanotinyksiköstä ja lähetinyksiköstä sama taajuuskanava.
Jos kuvalähteenä on kuvanauhuri, varmista että käytät siitä oikeaa SCART-liitäntää
(Ext1 tai Ext2 – tarkasta kuvanauhurin käyttöohjeesta).
Liikuttele vastaanotinyksikköä varovasti, kunnes saat paremman kuvan ja äänen.
Liikuttele lähetinyksikköä varovasti, kunnes saat paremman kuvan ja äänen.
Valitse molemmista yksiköistä toinen taajuuskanava.
Pienennä lähetinyksikön ja vastaanotinyksikön välistä etäisyyttä (oltava alle 30 m).
Kytke kuvanauhurin automaattinen valmiustila pois päältä. (Katso kuvanauhurin
käyttöohjetta.)
STANDBY
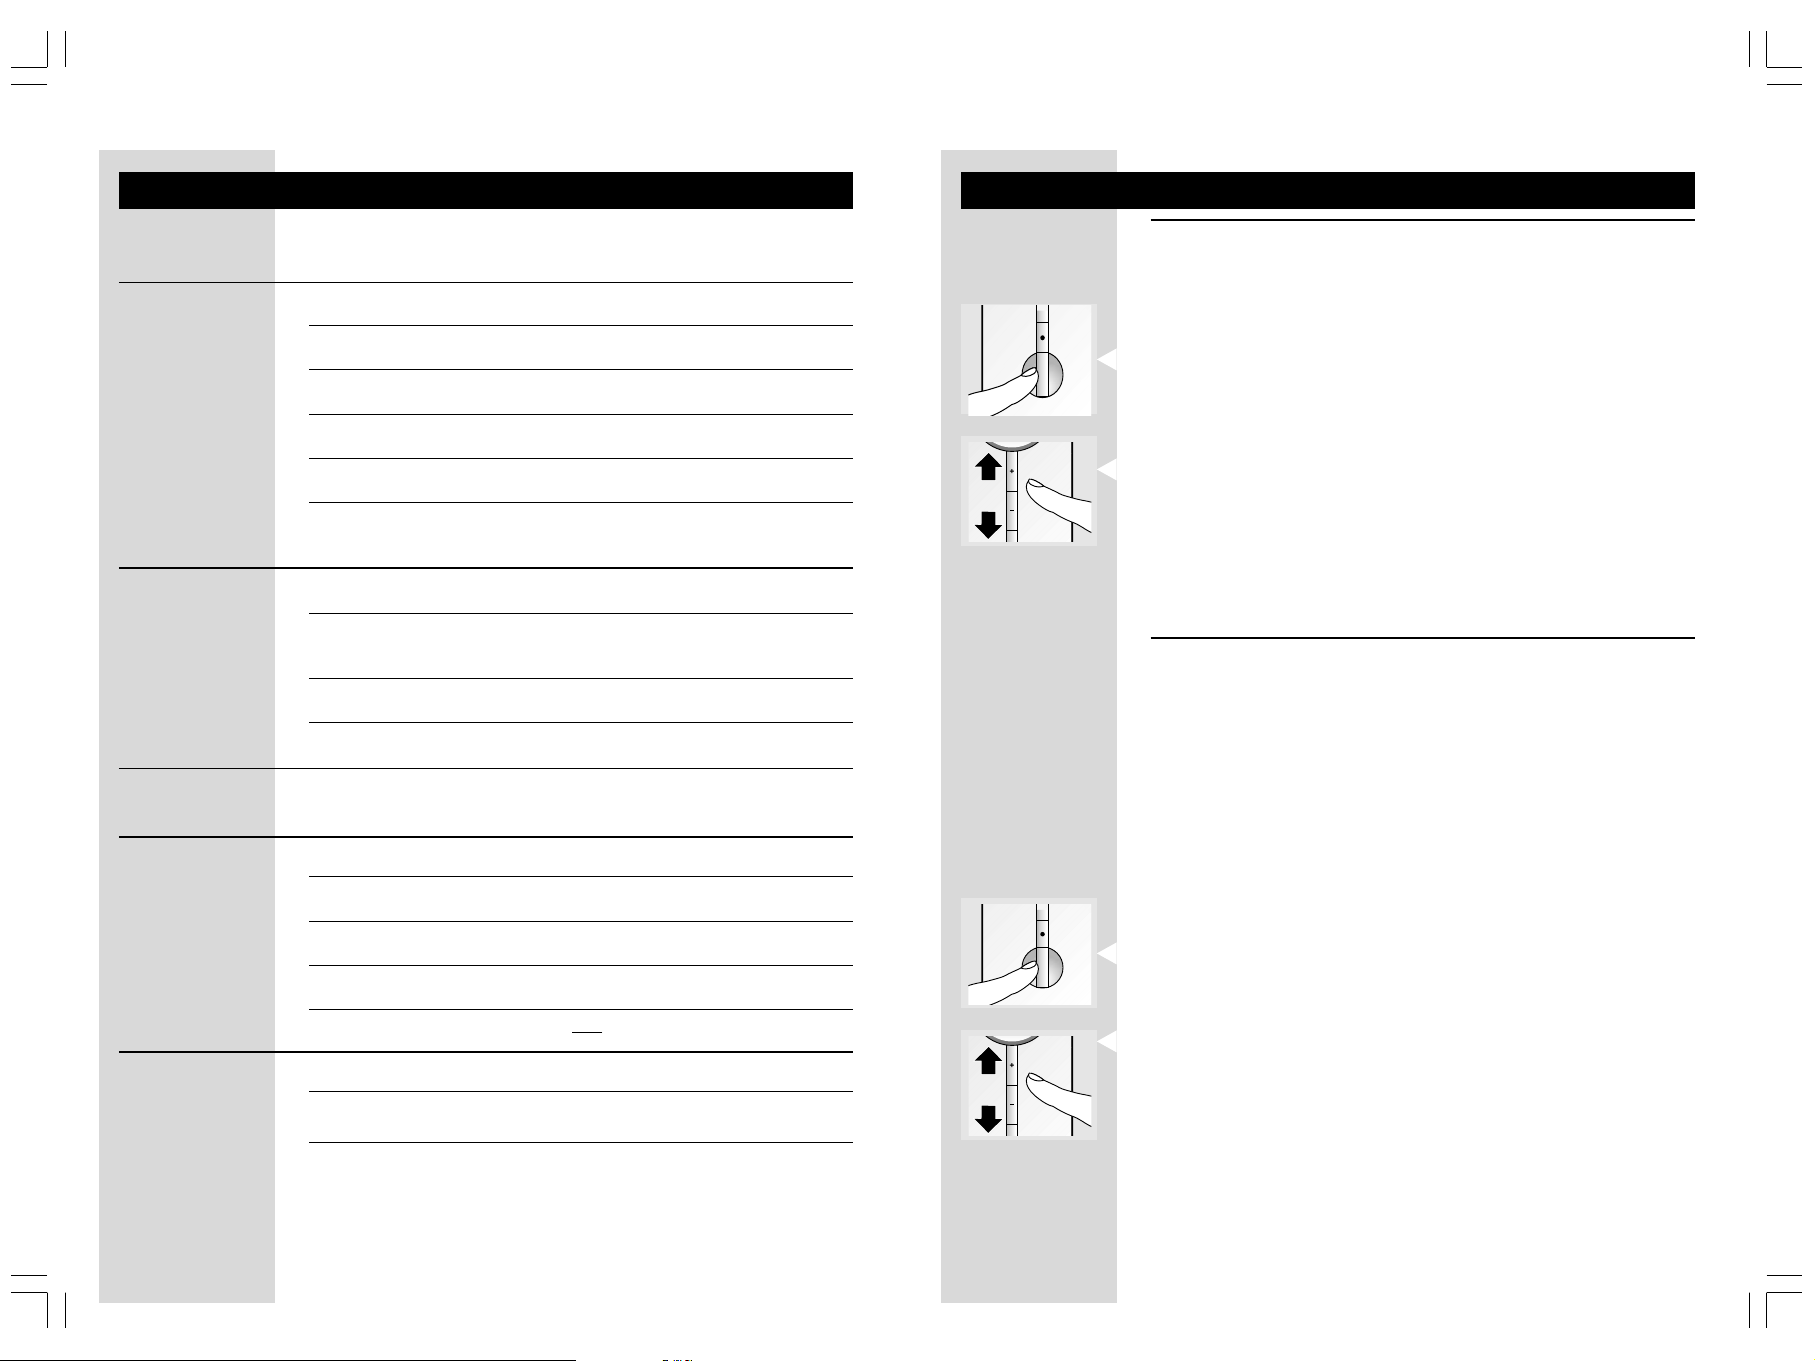
Using the wireless link with TV2
Watching and controlling video sources on TV2
1
Switch on TV2.
> It is not necessary to switch on TV1 to enjoy video programmes on TV2.
2
Press the power button to switch on the receiver unit (or use the universal
remote control unit*).
> When the receiver unit is turned on, the transmitter unit switches on
automatically and TV2 displays the signal on its SCART input.
3
Press the – or + buttons on the receiver unit to select the video source to be
displayed (or use the universal remote control unit*).
> The selection cycle is SCART input 1> 2 > 3 > 4
4
Aim the remote control at the receiver unit to control the video source.
> Use either video source’s remote control or, even better, the universal remote
control after selecting the correct mode*.
Watching cable programmes on TV2
1
Switch on the VCR (or DVD+RW).
> The VCR (or DVD+RW) must be connected to the cable TV network and to the
transmitter unit of the Wireless TV Link.
Some VCRs need to be switched to tuner mode to remain on (refer to their
instructions for use).
Simultaneously recording a cable programme on the VCR and wirelessly watching
cable programmes on TV2 is not possible.
Väärä kuva
kakkostelevisiossa.
Väärä kuva
ykköstelevisiossa.
VL1400L6bk.p65 27/03/2002, 11:057
Valitse kakkostelevisiosta EXT- tai AV-kanava.
Valitse vastaanotinyksiköstä toinen kuvalähde.
Käynnistä kuvalähde (sovitin: vir ta päälle; kuvanauhuri/DVD: paina PLAY-painiketta).
Vaihda lähetinyksikön SCART-liitännät keskenään.
Valitse molemmista yksiköistä toinen taajuuskanava.
Valitse ykköstelevisiosta oikea EXT- tai AV-kanava (katso television käyttöohjetta).
Valitse VIEW SOURCE -painikkeella (A-5) oikea kuvalähde.
Valitse oikea kanavanumero.
STANDBY
2
Switch on TV2.
> It is not necessary to switch on TV1 to enjoy cables programmes on TV2.
3
Press the power button to switch on the receiver unit (or use the universal
remote control unit*).
> When the receiver unit is turned on, the transmitter unit switches on
automatically and TV2 displays the signal on its SCART input.
4
Press the – or + buttons on the receiver unit to select the VCR (or DVD+RW)
as the video source (or use the universal remote control unit*).
5
Aim the remote control at the receiver unit and press a numbered (or up/down)
button to select the cable programme on the VCR (or DVD+RW).
> Use either video source’s remote control or, even better, the universal remote
control after selecting the correct mode*.
* Refer to the universal remote control’s instructions for use.
88
ENGLISH
SUOMI
6969
STANDBY
STANDBY
Using the wireless link with TV1
Selecting the video source automatically
Press power button to switch transmitter unit to stand-by.
1
> Power light is red; AUTO light is on (automatic switching is enabled).
Switch on TV1.
2
Switch on the video source.
3
> TV1 switches automatically to the corresponding external input and displays the
activated video source.
Operate the video source.
4
> If another video source is activated, TV1 displays that video source. The last
activated video source is displayed.
Selecting the video source manually
Press power button to switch transmitter unit on.
1
> Power light is green; AUTO light is off (automatic switching is disabled).
> Switching on the receiver unit automatically switches on the transmitter unit.
Switch on TV1.
2
Muiden toimintojen käyttö
Kuvalähteiden kytkeminen yhteen
Yhdistä kuvanauhuri (tai DVD+RW-tallennin) SCART-tuloon/-lähtöön 4.
1
> Käytä tähän aina täysin nastoitettua SCART-johtoa.
Yhdistä ainakin yksi kuvalähde SCART-tuloon 1, 2 tai 3.
2
Valitse LINK SOURCE -painikkeella SCART-tulo, josta haluat kopioida SCART-
3
1LINK SOURCE
lähtöön 4.
> Valitun SCART-tulon 1, 2 tai 3 merkkivalo syttyy.
Valitse kuvanauhurista (tai DVD+RW-tallentimesta) EXT- tai AV-tulo.
4
> Tarkasta, että olet valinnut oikean kuvalähteen.
Paina kuvanauhurin (tai DVD+RW-tallentimen) tallennuspainiketta.
5
Paina kuvalähteen PLAY-painiketta.
6
> Kuvalähde kopioituu nyt kuvanauhurille (tai DVD+RW-tallentimelle).
> Jos kopioit digitaaliselta tietovälineeltä (DVD-levyltä), vain audio- ja videosignaali
kopioituvat. Muut DVD-toiminnot (kielen valinta ym.) eivät kopioidu.
> Jos kopiointitoiminto on poistettu käytöstä, nauhalle (tai levylle) tallentuu
ykköstelevision ohjelma (jos televisio on päällä). Huomaa, että joissakin kuvalähteissä
on kopioinninestosuojaus.
Select the EXT or AV input of TV1 to which the transmitter unit is connected
3
(see TV instruction manual).
Press VIEW SOURCE button to select one of the four SCART inputs.
4
VIEW SOURCE
VL1400L6bk.p65 27/03/2002, 11:058
> The selection cycle is SCART input 1 > 2 > 3 > 4 > AUTO. The indication
display displays the number of the selected video source.
Switch on and operate the video source.
5
> When the transmitter is turned on, AUTO mode is automatically disabled and
the last viewed video source remains displayed. Automatic SCART switching
(automatic input selection) of TV1 is turned off when the transmitter unit is turned
on.
Yleiskauko-ohjaimen käyttö
Yleiskauko-ohjaimella voi ohjata vastaanotin- tai lähetinyksikköä ja lisäksi enintään
TV VCR
DVD
SAT
LINK
CBL
viittä muuta laitetta. Voit käyttää yhtä ja samaa kauko-ohjainta kaikkien laitteidesi
kauko-ohjaukseen niiden merkistä riippumatta.
Kun haluat kauko-ohjata vastaanotin- tai lähetinyksikköä, valitse toimintatilan
1
valitsimella LINK-tila.
> LINK-painikkeen alla oleva punainen merkkivalo syttyy. LINK-tilassa ei tarvitse tehdä
mitään asetuksia ja sitä voi käyttää heti.
Suuntaa yleiskauko-ohjain lähetinyksikköä kohti ja valitse ylä- ja alanuolinäppäimillä
2
tai numeronäppäimillä 1–4 SCART-tulo, jonka kuvasignaalia haluat katsoa
ykköstelevisiosta.
> Virtapainikkeella voit kytkeä lähettimen päälle ja pois päältä.
Suuntaa yleiskauko-ohjain vastaanotinyksikköä kohti ja valitse ylä- ja
3
alanuolinäppäimellä tai numeronäppäimillä 1–4 kuvalähde, jota haluat katsoa
kakkostelevisiosta.
> Virtapainikkeella voit kytkeä sekä lähettimen että vastaanottimen päälle ja pois
päältä.

6868
SUOMI
ENGLISH
99
STANDBY
STANDBY
Johdottoman linkin käyttö ykköstelevision (TV1) kanssa
Kuvalähteen automaattinen valinta
Kytke lähetinyksikkö valmiustilaan painamalla virtapainiketta.
1
> Virran merkkivalo palaa punaisena, merkkivalo AUTO palaa (automaattinen
kytkentä on käytössä).
Kytke ykköstelevisio (TV1) päälle.
2
Kytke kuvalähde päälle.
3
> Ykköstelevisio kytkeytyy automaattisesti vastaavalle ulkoiselle tulolle ja
kuvaruudussa näkyy toimintaan kytketystä kuvalähteestä tuleva kuva.
Ohjaa kuvalähdettä totuttuun tapaan.
4
> Jos kytket toisen kuvalähteen toimintaan, ykköstelevisio näyttää sen kuvaa.
Kuvaruudussa näkyy aina kuvalähde, joka on viimeksi kytketty toimintaan.
Kuvalähteen manuaalinen valinta
Kytke lähetinyksikkö päälle painamalla virtapainiketta.
1
> Virran merkkivalo palaa vihreänä, merkkivalo AUTO ei pala (automaattinen
kytkentä ei ole käytössä).
> Kun vastaanotinyksikkö kytketään päälle, lähetinyksikkö kytkeytyy automaattisesti
päälle.
Using additional features
Linking video sources
Connect a VCR (or DVD+RW) to SCART in/output 4
1
> Use a full-wired SCART cable only for this connection.
Connect at least one video source to SCART input 1, 2 or 3.
2
Press the LINK SOURCE button to select the SCART input to be copied to
3
1LINK SOURCE
SCART output 4.
> The selected SCART input 1, 2 or 3 lights up.
Select EXT or AV input of the VCR (or DVD+RW).
4
> Check that the correct video source is selected.
Press the record button on the VCR (or DVD+RW).
5
Press the play button on the video source
6
> The video source is now copied to the VCR (or DVD+RW).
> When copying from a digital medium (DVD), only the audio/video is copied.
Additional DVD features (language selection, etc.) are not copied.
When the Link function is disabled, the programme on TV1, if on, is recorded.
Please note that some video sources are copy-protected.
Kytke ykköstelevisio (TV1) päälle.
2
Valitse televisiosta EXT- tai AV-tulo, johon lähetinyksikkö on yhdistetty (katso
3
television käyttöohjetta).
VIEW SOURCE
VL1400L6bk.p65 27/03/2002, 11:059
Valitse VIEW SOURCE -painikkeella jokin neljästä SCART-tulosta.
4
> SCART-tuloja valittaessa ne vaihtuvat järjestyksessä 1 > 2 > 3 > 4 > AUTO.
Näytössä näkyy valitun kuvalähteen numero.
Kytke kuvalähde päälle ja ohjaa sitä totuttuun tapaan.
5
Kun lähetin kytketään päälle, AUTO-toiminto poistuu automaattisesti käytöstä ja
kuvaruutuun jää viimeksi katsottu kuvalähde. Ykköstelevision automaattinen SCARTkytkentä (automaattinen kuvasignaalin valinta) kytkeytyy automaattisesti pois käytöstä,
kun lähetinyksikkö kytketään pois päältä.
Using the Universal Remote Control
The Universal Remote Control is capable of controlling the receiver or transmitter
TV VCR
DVD
SAT
LINK
CBL
unit and up to five additional devices. With this single unit you can control all your
devices remotely, regardless of their brand.
Select the LINK mode with the mode selector to operate the receiver or
1
transmitter unit remotely.
> The red indicator under LINK lights up. The LINK mode does not require any
form of set-up and can be used straight away.
Point the universal remote control at the transmitter unit and press the channel
2
up/down or numerical keys 1 to 4 to select the SCART input for viewing on
TV1.
> Pressing the power button turns the transmitter on or off.
Point the universal remote control at the receiver unit and press the channel up/
3
down or numerical keys 1 to 4 to select the video source for viewing on TV2.
> Pressing the power button turns both the transmitter and the receiver on or off.
10
ENGLISH
SUOMI
6767
Problem
No picture on TV2.
Bad picture/ sound
quality on TV2.
Cable programme on
VCR disappears.
Wrong picture on
TV2.
Wrong picture on
TV1.
Problem solving
Solution
First, check all cables to ensure that they are connected correctly.
Ensure that both units are switched on (A-2 and B-20 are green).
Select the EXT or AV channel on TV2.
Activate the video source (set-top box: power on; VCR/DVD: playback).
Select the correct video source on the Receiver unit.
Select the same frequency channel on both the Receiver and Transmitter units.
If a VCR is the video source, ensure that the correct SCART connector of the VCR
is used (Ext1 or Ext2 - check VCRs user manual).
Move the receiver unit around gently until you get good picture and sound quality.
Move the transmitter unit around gently until you get good picture and sound
quality.
Change both units to another frequency channel.
Reduce the distance between the transmitter and receiver unit (<30m).
Disable the auto standby mode of the VCR. (Check VCR’s user manual).
Select the EXT or AV channel on TV2.
Select another video source on the receiver unit.
Activate the video source (set-top box: power on; VCR/DVD: playback).
Swap the SCART connectors on the transmitter unit.
Switch to another frequency channel on both units.
Select the correct EXT or AV channel on TV1 (see TV instruction manual).
Select the correct video source with the VIEW SOURCE button (A-5).
Select a regular programme number.
STANDBY
STANDBY
Johdottoman linkin käyttö kakkostelevision kanssa
Kuvalähteiden katselu ja ohjaus kakkostelevisiosta (TV2)
Kytke kakkostelevisio (TV2) päälle.
1
> Voit katsoa ohjelmia kakkostelevisiosta ilman että sinun tarvitsee kytkeä
ykköstelevisiota päälle.
Kytke vastaanotinyksikkö päälle painamalla virtapainiketta (tai käytä yleiskauko-
2
ohjainta*).
> Kun vastaanotinyksikkö kytketään päälle, lähetinyksikkö kytkeytyy automaattisesti
päälle ja kakkostelevisiossa näkyy sen SCART-tuloon tuleva signaali.
Valitse vastaanotinyksikön painikkeilla + ja – kuvalähde, jota haluat katsoa (tai käytä
3
yleiskauko-ohjainta*).
> SCART-tuloja valittaessa ne vaihtuvat järjestyksessä 1 > 2 > 3 > 4.
Voit ohjata kuvalähdettä suuntaamalla kauko-ohjaimen vastaanotinyksikköä kohti.
4
> Käytä joko kuvalähteen kauko-ohjainta tai vielä kätevämpää yleiskauko-ohjainta,
josta olet ensin valinnut oikean toimintatilan*.
Kaapelitelevisio-ohjelmien katselu kakkostelevisiosta
Kytke kuvanauhuri (tai DVD+RW-tallennin) päälle.
1
> Kuvanauhurin (tai DVD+RW-tallentimen) on oltava kytkettynä
kaapelitelevisioverkkoon ja johdottoman TV-linkin lähetinyksikköön.
> Tietyt kuvanauhurit on kytkettävä viritintilaan, jotta ne eivät sammu (katso
käyttöohjetta).
> Kaapeliohjelman tallentaminen kuvanauhurille ja kaapeliohjelmien johdoton katselu
kakkostelevisiosta samaan aikaan ei ole mahdollista.
Kytke kakkostelevisio (TV2) päälle.
2
> Voit katsoa kaapeliohjelmia kakkostelevisiosta ilman että sinun tarvitsee kytkeä
ykköstelevisiota päälle.
Kytke vastaanotinyksikkö päälle painamalla virtapainiketta (tai käytä yleiskauko-ohjainta*).
3
> Kun vastaanotinyksikkö kytketään päälle, lähetinyksikkö kytkeytyy automaattisesti
päälle ja kakkostelevisiossa näkyy sen SCART-tuloon tuleva signaali.
Valitse vastaanotinyksikön painikkeilla + ja – kuvalähteeksi kuvanauhuri (tai
4
DVD+RW-tallennin) (tai käytä yleiskauko-ohjainta*).
Suuntaa kauko-ohjain vastaanotinyksikköä kohti ja valitse kaapeliohjelman numero
5
kuvanauhurista (tai DVD+RW-tallentimesta) numeronäppäimillä (tai ylä- ja
alanuolinäppäimellä).
> Käytä joko kuvalähteen kauko-ohjainta tai vielä kätevämpää yleiskauko-ohjainta,
josta olet ensin valinnut oikean toimintatilan*.
VL1400L6bk.p65 27/03/2002, 11:0510
* Katso yleiskauko-ohjaimen käyttöohjetta.
6666
N
SUOMI
ENGLISH
11
STANDBY
STANDBY
STANDBY
Kauko-ohjaimen toiminnan tarkastus
Kytke kakkostelevisio (TV2) ja vastaanotinyksikkö päälle.
1
> Tarkasta että lähetinyksikkö on myös päällä.
No control of video
Suuntaa kuvalähteen kauko-ohjain vastaanotinyksikköä kohti ja paina vuorotellen
2
PLAY- ja STOP-painikkeita.
> Vastaanotinyksikön virran merkkivalo välähtää merkkinä siitä, että se on
vastaanottanut kauko-ohjaimen komennon.
LI
Pyydä toista henkilöä tarkastamaan, että lähetinyksikön virran merkkivalo välähtää.
3
> Tämä on merkkinä siitä, että lähetinyksikkö vastaanottaa kauko-ohjainsignaalin
vastaanotinyksiköltä.
Jos virran merkkivalo ei välähdä, suuntaa jommankumman yksikön takana oleva
4
kauko-ohjainantenni uudelleen.
> Lähetinyksikön virran merkkivalon tulisi nyt välähtää, kun kauko-ohjaimella
lähetetään komento vastaanotinyksikköön.
Jos kuvalähde ei reagoi kauko-ohjaimen komentoon, aseta lähetinyksikön
5
etupaneeli uudelleen kuvalähteen etupaneelin suuntaiseksi.
Jos kuvalähde ei vieläkään reagoi komentoon, asenna kauko-ohjaimen
6
laajennusjohto seuraavassa neuvotulla tavalla.
sources from TV2.
Buzzing sound when
using the remote
control .
Kauko-ohjaimen laajennusjohdon asennus
Kytke lähetinyksikkö pois päältä.
1
Yhdistä laajennusjohto lähetinyksikön takana olevaan infrapunaliitäntään.
2
Kytke lähetinyksikkö ja vastaanotinyksikkö päälle.
3
Pyydä toista henkilöä suuntaamaan kuvalähteen kauko-ohjain vastaanotinyksikköä
4
kohti ja pitämään samalla kauko-ohjaimen jotakin näppäintä painettuna.
Easylink feature
doesn’t work.
S-VHS video gives
black and white
pictures only.
Problem solving
SolutionProblem
Aim the remote control directly at the receiver unit and ensure that there are no
obstacles in between (B-19 must flash).
Ensure that there is no other wireless device (wireless headphones, speakers, RF
control signals) interfering with the remote control.
The maximum operating distance between the remote control and the receiver
unit is 6 metres*; be sure you are within this range.
Ensure that the transmitter and receiver unit are more than 5 metres apart.
Ensure that the remote control belonging to the video source is used to contro itl.
Reposition the remote control blaster cord light on the video source, or place the
light 5-10 cm in front of the video source.
Move the receiver unit around gently until the buzzing sound stops.
Move the transmitter unit around gently until the buzzing sound stops.
With some types of TV you will not be able to solve this problem.
Check that both your TV and VCR suppor t this feature (check TV and VCRs user
manuals).
Use Easylink compatible or fully wired SCART cables.
Select CVBS video output format for your S-VHS VCR when using SCART input 1
or 2 (check the VCRs user manual).
Toisen henkilön tehdessä näin siirrä IR-valoa (musta yksikkö) kuvalähteen
5
etupaneelin edessä.
> Pidä IR-valoa lähellä etupaneelia enintään 1 senttimetrin päässä siitä. Kun kuvalähde
reagoi kauko-ohjaimen komentoon, oikea kohta on löytynyt.
> Vaihtoehtoisesti voit etsiä infrapunailmaisimen sijainnin kuvalähteen käyttöohjeen
avulla.
Irrota infrapunavalon takana oleva teippi ja kiinnitä valo kuvalähteeseen
6
infrapunailmaisimen kohdalle.
Toista sama menettely tarvittaessa muilla kuvalähteillä.
7
VL1400L6bk.p65 27/03/2002, 11:0511
DVD player gives no
pictures on either TV1
or TV2.
Connect the DVD player to SCART input 3 or 4 (both support RGB).
Select CVBS video output format for your DVD player (check the DVD player’s
user manual).
* depends on remote control’s signal strength and battery condition.
12 ENGLISH
L
SUOMI
65
General notes
Picture and sound quality is influenced by the use of microwave ovens. Other
•
wireless systems (Bluetooth, wireless LANs, etc.) can also adversely influence
the quality of picture and sound, and vice versa.
The Wireless TV Link is a Radio Frequency (RF) based product. As such its
•
performance can suffer the same kinds of interference as GSMs, portable radios
and other RF-based products.
If the same video source is selected for both TVs, then you get the same
•
programme on each TV.
The Wireless TV link is not limited to just one room or house. You can use it
•
anywhere in or around the house. Consequently, anybody in the vicinity of your
house (up to the maximum operating range) who also owns a Wireless TV link
set to the same channel, can watch the same programmes that are playing on
your video source.
In order to prevent the mixing of remote control commands it is not advisable
•
to use a TV as a video source.
Some built-in VCRs (TV-VCR combination) cannot be used with the transmitter
•
unit (depends on brand and type).
Video sources cannot be controlled remotely if the carrier frequency of the IR
•
signal is outside the operation window of 32kHz to 57kHz.
The transmitter unit can support the channel downloading feature (also known
•
as ‘Follow-TV’, ‘Easylink’, ‘SmartLink’, ‘AV-Link’, ‘MEGALogic’, ‘TV-Link’ or ‘Q-Link’)
of high-end TVs and VCRs. Fully wired SCART cables that support this feature
must be used.
Radio wave safety: When switched on, the Philips Wireless TV Link transmits
•
and receives radio waves. The Philips Wireless TV Link complies with the
standards that are defined for it.
The Philips Wireless TV Link has an operating range of up to 100 metres in open
•
air. Walls, ceilings and other large objects may limit the useable operating range
to about 30 metres in the house.
AUDIO
OUT
Aligned
Wireless TV
Link Transmitter
Channel
1 2 3 4
R
Johdottoman linkin käyttöönotto
Lähetinyksikön käyttöönotto
L
DC 12V
Channel
1 2 3 4
R
Valitse kanavanvalitsimella kanava 1.
1
> Muista aina valita sama kanava sekä lähetinyksiköstä että vastaanotinyksiköstä.
Aseta lähetinyksikkö kuvalähteiden päälle niin, että etupaneelit ovat samassa
2
VCR
DVD
Set-top box
DC 12V
pystytasossa.
> Älä koskaan pane kuvalähteitä tai metallilevyjä lähetinyksikön päälle.
Yhdistä kuvalähteet SCART-johdoilla lähetinyksikön SCART-tuloihin.
3
Yhdistä lähetinyksikön lähtöliitäntä SCART-johdolla ykköstelevisioon (TV1).
4
Yhdistä verkkolaite lähetinyksikköön.
5
Yhdistä verkkolaitteen pistotulppa pistorasiaan.
6
Vastaanotinyksikön käyttöönotto
Valitse kanavanvalitsimella kanava 1.
1
> Muista aina valita sama kanava sekä lähetinyksiköstä että vastaanotinyksiköstä.
Sijoita vastaanotinyksikkö lähelle kakkostelevisiota (TV2).
2
> Tarkasta, että lähetinyksikön etupaneeli on sellaisessa asennossa, että yksikkö voi
vastaanottaa kauko-ohjaimen komennot.
Yhdistä vastaanotinyksikkö SCART-johdolla kakkostelevisioon.
3
Yhdistä verkkolaite vastaanotinyksikköön.
4
Yhdistä toisenkin verkkolaitteen pistotulppa pistorasiaan.
5
1 2 3 4
DC 12V
Antenna
Channel
VL1400L6bk.p65 27/03/2002, 11:0512
 Loading...