

Philips SBCSK305/10C, SBCSK305/10, SBCSK305/08C, SBCSK305/05C, SBCSK305/00C User Manual
...Page 1
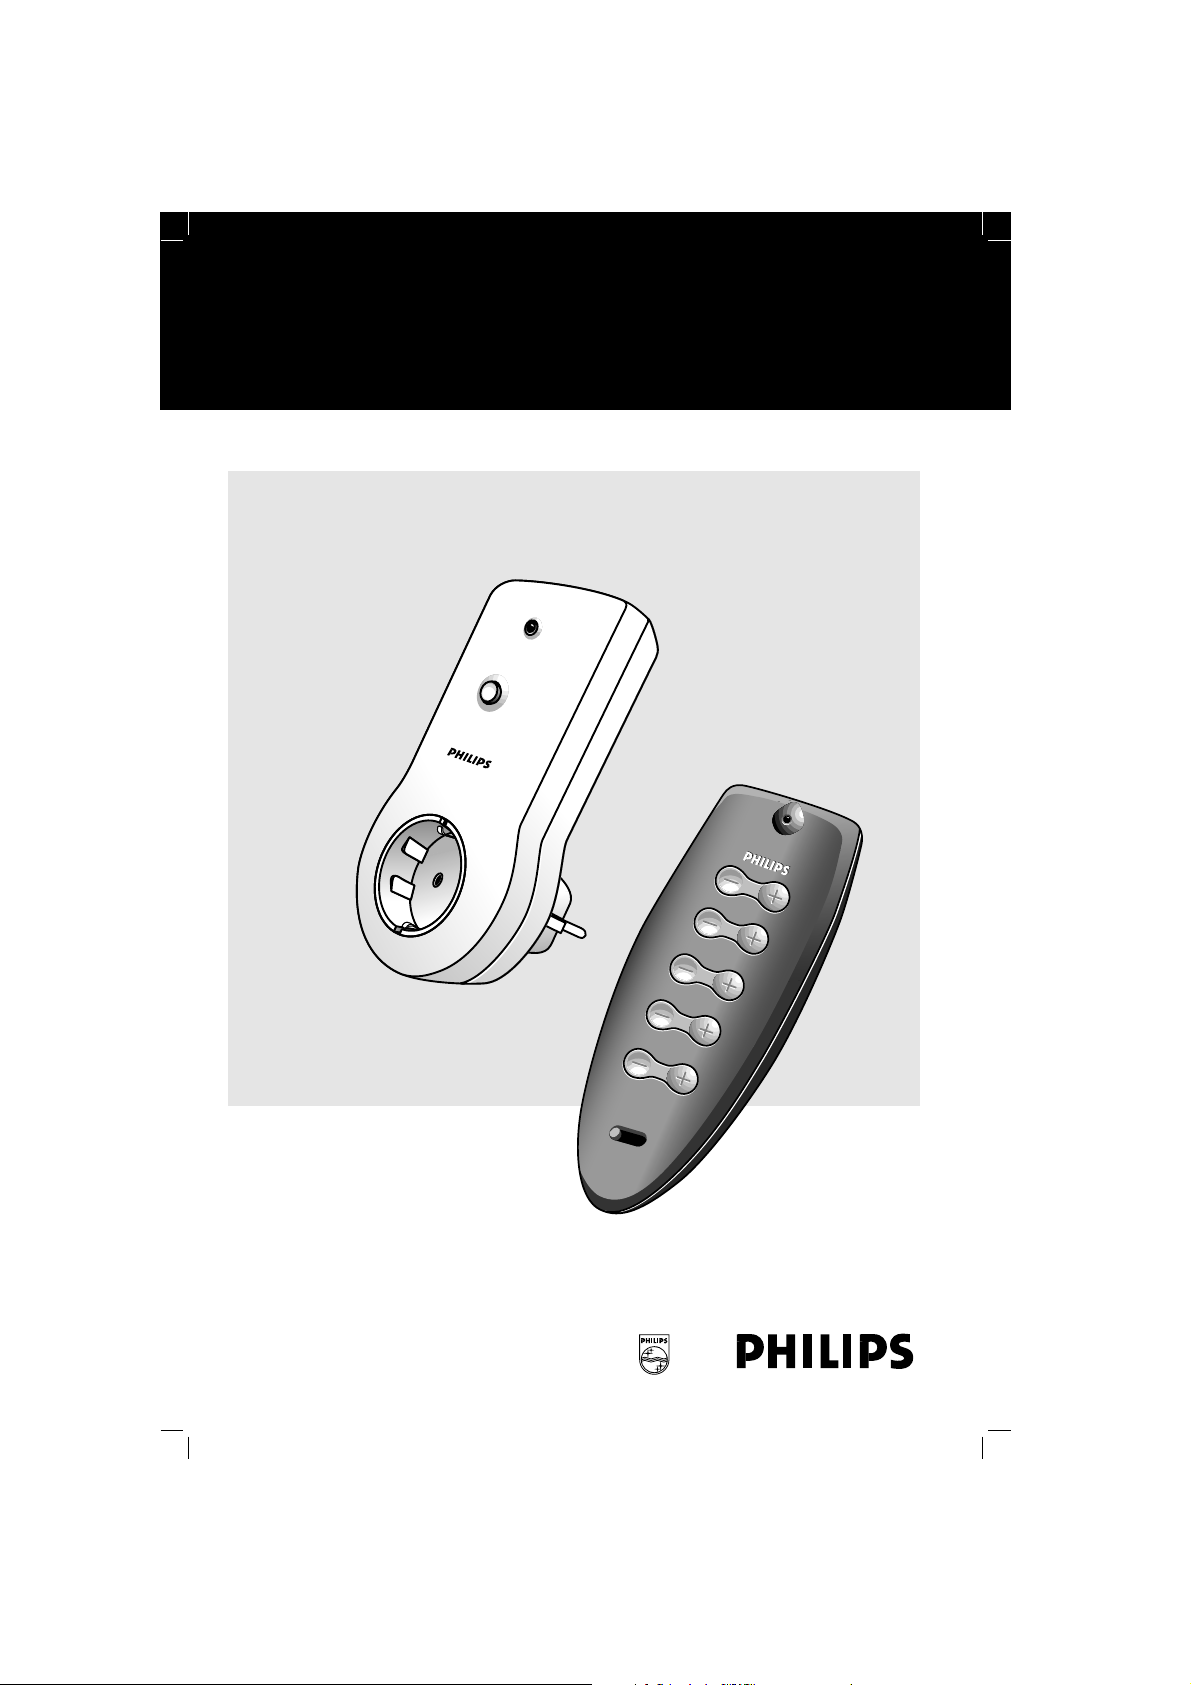
SBC SK 305
– Power Control System
SK305page 1
Instructions for use
Mode d’emploi
Instrucciones de manejo
Bedienungsanleitung
Gebruiksaanwijzing
Instruzioni per l’uso
Manual de utilização
Οδηγίεσ χρήσεωσ
Bruksanvisning
Instrukcja obs¬ugi
ON – OFF
1 • 5
2 • 6
3 • 7
4 • 8
1 • 4 5 • 8
ALL
1 • 5
2 • 6
3 • 7
4 • 8
1 • 4 5 • 8
ALL
Page 2
2
SK305 page 2
INDEX
Batterijen niet weggooien,
maar inleveren als KCA.
ñ
English
Français
Español
Deutsch
Nederland
s
English.....................................page 4
Illustrations ........................................................3
Français..................................page 6
Illustrations ........................................................3
Español................................página 8
Illustraciones......................................................3
Deutsch.........................................Seite 10
Illustrationen......................................................3
Nederlands...........................pagina 12
Illustraties ..........................................................3
Italiano
Italiano...............................pagina 14
Illustrazioni.........................................................3
Português
Έλληνικά
Svenska
Português........................página 16
Ilustrações .........................................................3
Έλληνικά ............................ σελίδα 18
ΑΠΕIΚΟΝIΣΕIΣ......................................................3
Svenska.........................................sida 20
Illustrationer.......................................................3
Polski
Polski...................................strona 22
Ilustracje.............................................................3
Page 3
3
SK305page 3
•
•
•
•
•
•
•
•
•
•
•
•
•
•
•
•
A
B
C
D
E
F
G
H
I
J
K
L
M
N
O
P
1
2
3
4
5
6
7
8
9
1
0
1
1
1
2
1
3
1
4
1
5
1
6
GROUP
HOUSE
UNIT
ON
OFF
HOUSE
HOUSE
•
•
•
•
•
•
•
•
•
•
•
•
•
•
•
•
A
B
C
D
E
F
G
H
I
J
K
L
M
N
O
P
12
4
3
HOUSE
HOUSE
B
A
C
D
P
E
O
F
N
G
M
H
L
I
K
J
ON – OFF
ON – OFF
1 • 5
1 • 5
2 • 6
2 • 6
3 • 7
3 • 7
4 • 8
4 • 8
ALL
ALL
1 • 4 5 • 8
1 • 4 5 • 8
Page 4
4
SBCSK305page 4
Congratulations on your purchase of the
Philips Power Control System (SBC SK305).
This system contains one remote control (SBC
SR315) and one power switch (SBC SP370).
With the Power Remote Control system you
can operate electrical appliances (e.g. lamps,
coffee-maker etc.) in and around your house
via the remote control without getting out of
your chair!
Before connecting an appliance to the Power
Control System, please read this document
carefully.
1. INTRODUCTION
English
QUICK REFERENCE
1.
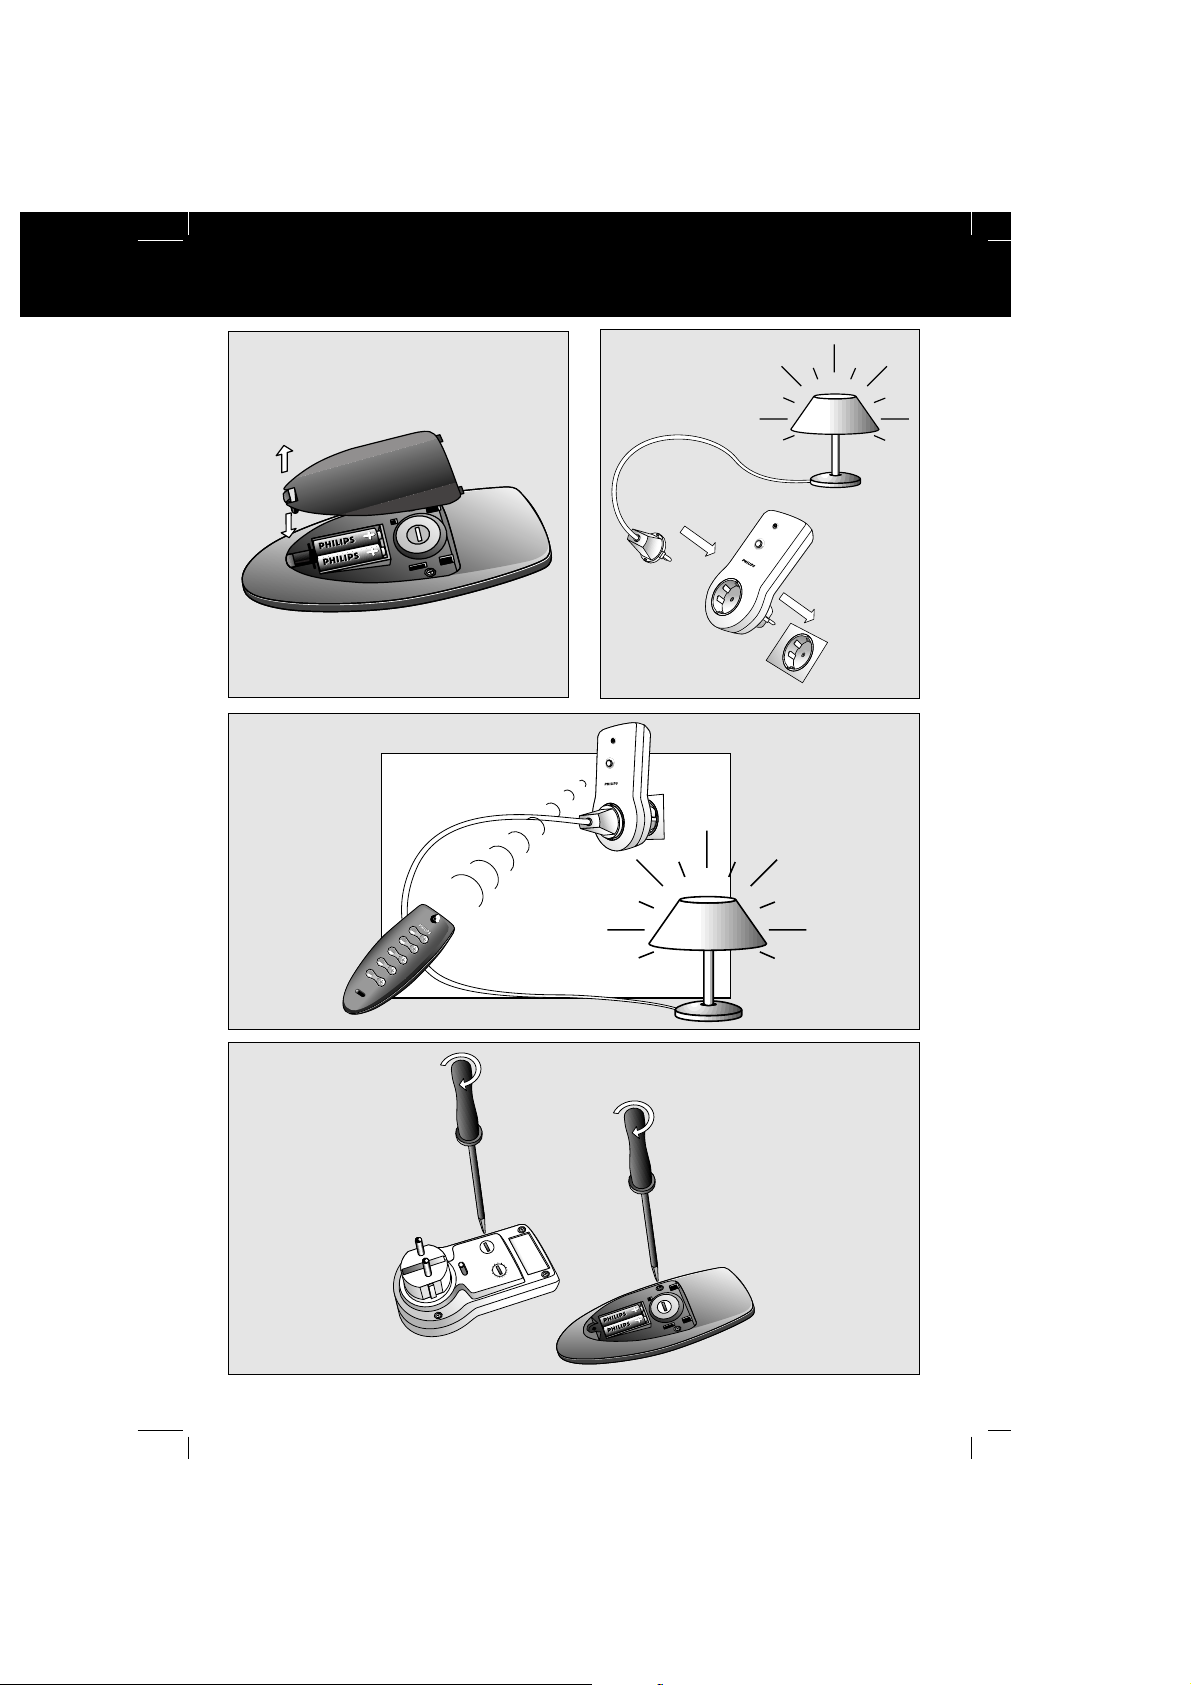
Install the enclosed batteries in the remote control
(fig. 1)
.
2.
Connect the Power switch to a mains power outlet
(fig. 2)
.
3.
Select the appliance, e.g. a lamp, you want to control and plug it into the
Power switch
(fig. 2)
.
• Check the power consumption of the selected appliance before
plugging it into the Power switch. The Power switch can control
appliances with a maximum power rating of 1000 Watts!
• If the selected appliance has its own ON/OFF switch, make sure they
are switched on.
4.
Use the remote control to operate the appliance
(fig. 3)
.
The Power switch operates with button 1 as its default setting.
If the right side (+) of the button is pressed, the selected appliance
switches on. If the left side (-) of the button is pressed, the selected
appliance switches off again.
3. INSTALLATION
2. QUICK REFERENCE
BATTERY INSTALLATION
Install the enclosed batteries in the remote
control as follows
(fig. 1)
:
• Unscrew the battery door at the rear the
remote control.
• Insert the batteries in the unit, checking
carefully that the battery polarities (+ and -)
match those inside the compartment.
Notes:
– Remove the batteries when the remote
control is not going to be used for a long
period of time.
– Batteries in the remote control should be
replaced once a year. If the transmission
range of the remote control reduces
drastically, batteries need to be replaced
immediately.
– Replace batteries only with original PHILIPS
8LR932 batteries.
Page 5
3. INSTALLATION
5
SBCSK305page 5
INSTALLATION
Your appliance must be connected to the
Power switch before you can control it with
the remote control
(fig. 2)
.
• Select the appliance (e.g. a lamp) you want
to control and plug it into the Power switch
(fig. 2)
.
• Please check the power consumption of the
selected appliance. The Power switch can
control appliances with a maximum power
rating of 1000 Watts!
• If the selected appliance has its own ON/OFF
switch, make sure it is switched on.
English
4. OPERATION
OPERATION
The connected appliance can now be operated
via the remote control
(fig. 3)
. The Power
switch is operated with button 1 by default.
• If the right side (+) of the button is pressed,
the appliance switches on. If the left side of
the button (-) is pressed, the appliance
switches off again.
The Power switch can also be operated with
the last button of the remote control. This
button is designed to operate more Power
switches at the same time.
• Set the GROUP toggle switch on the rear of
the Power switch to the right side (= ON).
– The switch will now respond when the 5th
button of the remote control is pressed. If
the right side (+) of the button is pressed,
the appliance switches on. If the left side of
the button (-) is pressed, the appliance
switches off again.
MANUAL OPERATION
The Power switch has a button for manual
operation. This means that your appliance can
still be operated without the remote control.
• Press the button in front of the Power
switch once.
– The Power switch switches on.
• Press button in front of the Power switch
once again.
– The Power switch switches off again.
CHANGING THE HOUSE CODE
The house code is meant to prevent
interference with the Power Control System of
your neighbour.
The Power Control System will only respond
to signals with the correct house code. To
change the house code
(fig. 4)
:
• Unscrew the battery door at the rear of the
remote control.
• Set the house code of the remote control by
turning the house code selection wheel (AP) with a screwdriver.
• Set the house code of the Power switch by
turning the house code selection wheel at
the rear of the switch (A-P) with a
screwdriver.
• Please note that the selected house-code
for the remote control and Power switch
should be the same! The house code’s
default setting is A.
CHANGING UNIT CODE
A unit code should be set on the Power
switch. The selected unit code corresponds to
the button which has to be pressed on the
remote control. If for example, unit-code 3 is
set, the Power switch is operated via the 3rd
button on the remote control. The unit code’s
default setting is 1. To change the unit code
(fig. 4)
:
• Set the unit code of the Power switch by
turning the unit code selection wheel at the
rear of the plug (1-16) with a screwdriver.
• The Power switch is operated by pressing
the correct button on the remote control.
• It is possible to activate more Power
switches at the same time by selecting the
same unit code.
Note: Although the unit code on the Power
switch can be set from 1 to 16, the
remote control can only operate Power
switches with unit code set from 1 to 8.
• To operate Power switches with unit code
1-4, the toggle switch on the remote control
should be set to the left (1-4).
– The first 4 buttons on the remote control
correspond with unit code 1 to 4
respectively.
– If the toggle switch on the remote control is
set to the right (5-8), the first 4 buttons
correspond with unit code 5 to 8
respectively.
Page 6
1. INTRODUCTION
Félicitations pour votre achat du système de
commande électrique Philips SBC SK305.
Ce système comprend une télécommande
SBC SR315 et un interrupteur Marche/Arrêt
SBC SP370.
Grâce à ce système de commande, vous
pouvez allumer/éteindre divers appareils
électriques de la maison (cafetière, lampes…),
sans quitter votre fauteuil! Lisez attentivement
ce document avant de raccorder un appareil à
ce système de commande.
6
Français
SBC SK305.. page 6
2. MISE EN ROUTE RAPIDE
MISE EN ROUTE RAPIDE
1.
Placez les piles fournies dans la télécommande
(fig. 1)
.
2.
Raccordez l'interrupteur Marche/Arrêt à une prise secteur
(fig. 2)
.
3.
Choisissez l'appareil, une lampe par exemple, que vous désirez contrôler
et raccordez-le à l'interrupteur M/A
(fig. 2)
.
• Vérifiez la consommation de l'appareil avant de le raccorder à
l'interrupteur M/A. Ces interrupteurs acceptent une puissance de
1000 W maximum !
• Si l'appareil choisi est doté de son propre interrupteur marche/arrêt,
assurez-vous que celui-ci soit en position marche.
4.
Vous pouvez allumer/éteindre l'appareil à l'aide de la télécommande
(fig. 3)
.
L'interrupteur répond par défaut au bouton 1.
Il suffit d'appuyer sur le côté droit du bouton (+) pour mettre l’appareil en
marche, et d'appuyer sur le côté gauche (-) pour l’éteindre.
3. INSTALLATION
INSTALLATION DES PILES
Pour placer les piles fournies dans la
télécommande
(fig. 1
):
• Dévissez le couvercle du compartiment
situé au dos de la télécommande.
• Placez les piles en respectant la polarité (+
et -) indiquée sur le fond du compartiment.
Remarques:
•
Enlevez les piles si la télécommande ne doit
pas être utilisée pendant une période de
temps prolongée.
•
Il est recommandé de changer les piles de la
télécommande une fois par an. Si la portée
de transmission de la télécommande est
devenue trop faible, changez les piles
immédiatement.
•
Remplacez les piles uniquement par des
piles Philips d'origine 8LR932.
INSTALLATION
L'appareil doit être raccordé à l'interrupteur si
vous voulez le contrôler à partir de la
télécommande
(fig. 2
).
• Choisissez l'appareil, une lampe par
exemple, que vous désirez contrôler et
raccordez-le à l'interrupteur
(fig. 2
).
• Vérifiez la consommation de l'appareil avant
de le raccorder à l'interrupteur M/A. Ces
interrupteurs acceptent une puissance de
1000 W maximum !
• Si l'appareil choisi est doté de son propre
interrupteur marche/arrêt, assurez-vous que
celui-ci soit en position marche.
Page 7

4. FONCTIONNEMENT
FONCTIONNEMENT
Vous pouvez maintenant allumer/éteindre
l'appareil à partir de la télécommande
(fig. 3)
.
L'interrupteur répond par défaut au bouton 1.
• Pour mettre l'appareil en marche, appuyez
sur le côté droit du bouton (+). Pour
l'éteindre, appuyez sur le côté gauche du
bouton (-).
Vous pouvez également contrôler l'interrupteur
avec le dernier bouton de la télécommande.
Ce bouton permet de commander
simultanément plusieurs interrupteurs.
• Placez le sélecteur GROUP situé au dos de
l'interrupteur M/A sur le côté droit
(ON/marche).
– Vous pouvez maintenant contrôler
l'interrupteur en appuyant sur le cinquième
bouton de la télécommande. Il suffit
d'appuyer sur le côté droit du bouton (+)
pour mettre tous les appareils en marche, et
d'appuyer sur le côté gauche (-) pour les
éteindre tous.
FONCTIONNEMENT MANUEL
L'interrupteur Marche/Arrêt est doté d'un
bouton de commande manuelle pour vous
permettre de contrôler les appareils même
sans l'aide de la télécommande.
• Appuyez une fois sur le bouton situé sur
l'avant de l'interrupteur M/A.
– L'interrupteur est activé (ON).
• Appuyez de nouveau sur le bouton situé sur
l'avant de l'interrupteur M/A.
– L'interrupteur est désactivé (OFF).
CHANGER LE CODE MAISON
Le code maison est destiné à éviter les
interférences avec le système de commande
électrique installé chez votre voisin.
Les systèmes de commande répondent
seulement aux signaux émis avec le code
maison approprié. Pour modifier ce code
maison
(fig. 4)
:
• Dévissez le couvercle du compartiment à
piles situé au dos de la télécommande.
• Pour définir le code maison de la
télécommande, tournez la molette du code
maison (A-P) au dos de la télécommande à
l'aide d'un tournevis.
• Pour définir le code maison de l’interrupteur,
tournez la molette du code maison (A-P) de
l’interrupteur à l'aide d'un tournevis.
• Notez que les codes maison sélectionnés
pour la télécommande et pour l’interrupteur
doivent être identiques. Le code par défaut
est A.
CHANGER LE CODE UNITE
Il est recommandé de définir un code unité
pour l'interrupteur Marche/Arrêt.
Le code unité sélectionné correspond au
bouton de la télécommande sur lequel vous
appuierez. Si, par exemple, le code unité est
3, vous pourrez commander l'interrupteur en
appuyant sur le troisième bouton de la
télécommande. Le code unité par défaut est 1.
Modifier le code unité
(fig. 4)
comme suit:
• Pour définir le code unité de l'interrupteur,
tournez la molette du code unité (UNIT) au
dos de la prise (1 - 16) à l'aide d'un
tournevis.
• Pour commander l'interrupteur, appuyez sur
le bouton approprié de la télécommande.
• Vous pouvez commander plusieurs
interrupteurs simultanément si vous
sélectionnez le même code unité pour tous.
Remarque: Même si le code unité de
l'interrupteur peut être compris
entre 1 et 16, la télécommande se
limite aux codes unité entre 1 et 8.
• Pour commander des interrupteurs
Marche/Arrêt avec des codes unité 1-4, le
sélecteur de la télécommande doit être
basculé vers la gauche (positions 1-4).
– Les 4 premiers boutons de la
télécommande correspondent aux codes
unité 1-4.
– Si le sélecteur de la télécommande est
basculé vers la droite (positions 5-8), les 4
premiers boutons correspondent aux codes
unité 5-8.
7
SBC SK305.. page 7
Français
Page 8
1. INTRODUCCIÓN
Felicitaciones por haber comprado el Sistema
de Control de Potencia Philips (SBC SK305).
Este sistema tiene 1 mando a distancia (SBC
SR315) y un Conmutador de Potencia (SBC
SP370).
Con el sistema de Mando a Distancia,
usted puede operar los aparatos eléctricos (por
ej. lámparas, cafetera, etc.) en su casa y sus
alrededores mediante el mando a distancia, ¡sin
tener que levantarse de su silla!
Antes de conectar los aparatos al Sistema de
Control de Potencia, por favor lea este
documento con cuidado.
8
Español
SK305.. page 8
2. REFERENCIA RÁPIDA
REFERENCIA RÁPIDA
1.
Instale las baterías suministradas en el mando a distancia
(fig. 1)
.
2.
Conecte el Conmutador de Potencia a una toma de corriente de la red
(fig. 2)
.
3.
Seleccione el aparato, por ejemplo una lámpara, que quiere controlar y enchúfelo en el
Conmutador de Potencia
(fig. 2)
.
• Verifique el consumo de potencia del aparato seleccionado antes de enchufarlo en el
Conmutador de Potencia. Este Conmutador de Potencia puede controlar aparatos con
una potencia nominal máxima de 1000 vatios.
• Si el aparato seleccionado tiene su propio conmutador, asegúrese de que esté
encendido.
4.
Use el mando a distancia para operar el aparato
(fig. 3)
.
El Conmutador de Potencia se opera con el botón 1 como su ajuste por defecto.
Si se pulsa la parte derecha de un botón (+) el aparato se enciende. Si se pulsa la parte
izquierda de un botón (-), el aparato se apaga.
3. INSTALACIÓN
INSTALACIÓN DE LAS BATERÍAS
Instale las baterías incluidas, en el mando a
distancia de la forma siguiente
(fig. 1)
.
• Destornille la tapa de baterías en la parte
trasera del mando a distancia.
• Inserte la baterías en la unidad, verificando
con cuidado que la polaridad de las baterías
(+ y -) es igual a la marcada dentro del
compartimiento.
Notas:
•
Quite las baterías cuando el mando a
distancia no se vaya a usar por un largo
tiempo.
•
Las baterías en el mando a distancia deben
reemplazarse una vez al año. Si el alcance
de transmisión del mando a distancia se
reduce drásticamente, las baterías deben
ser reemplazadas inmediatamente.
•
Reemplace las baterías solamente con las
originales PHILIPS 8LR932.
INSTALACIÓN
Su aparato tiene que ser conectado al
Conmutador de Potencia antes de que pueda
controlarlo con el mando a distancia
(fig. 2)
.
• Seleccione el aparato (por ej. una lámpara)
que quiere controlar y enchúfelo en el
Conmutador de Potencia
(fig. 2)
.
• Por favor verifique el consumo de potencia
del aparato seleccionado. El Conmutador de
Potencia puede controlar aparatos con una
potencia nominal máxima de 1000 vatios.
• Si el aparato seleccionado tiene su propio
conmutador, asegúrese de que esté
encendido.
Page 9

4. OPERACIÓN
OPERACIÓN
El aparato conectado ahora puede ser operado
mediante el mando a distancia
(fig. 3)
. El
Conmutador de Potencia es operado con el
botón 1 por defecto.
• Si se pulsa la parte derecha de un botón (+)
el aparato se enciende. Si se pulsa la parte
izquierda de un botón (-), el aparato se
apaga.
El Conmutador de Potencia puede ser operado
también con el último botón del mando a
distancia. Este botón está diseñado para
operar más Conmutadores de Potencia al
mismo tiempo.
• Ajuste el conmutador GROUP en la parte
trasera del Conmutador de Potencia al lado
derecha (ON - encendido).
– El conmutador ahora responderá cuando se
pulse el quinto botón del mando a distancia.
Si se pulsa el lado derecho del botón (+), el
aparato se enciende. Si se pulsa la parte
izquierda de un botón (-), el aparato se
apaga.
OPERACIÓN MANUAL
El Conmutador de Potencia tiene un botón
para operación manual. Este significa que su
aparato puede operarse tambíen sin el mando
a distancia.
• Pulse el botón en la parte delantera del
Conmutador de Potencia una vez.
– Se enciende el Conmutador de Potencia
• Pulse el botón en la parte delantera del
Conmutador de Potencia una vez más.
– Se apaga el Conmutador de Potencia.
CAMBIANDO EL CÓDIGO DE CASA
La idea del código de casa es la de prevenir
interferencia del Sistema de Control de su vecino.
Los Sistemas de Control de Potencia responderán
a las señales que tienen el código de casa
correcto. Para cambiar el código de casa
(fig. 4)
:
• Destornille la tapa en la parte trasera del
mando a distancia
• Ajuste el código de casa en el mando a
distancia, girando la rueda de selección de
códigos (A-P) con un destornillador.
• Ajuste el código de casa del Conmutador de
Potencia, girando la rueda de selección de
códigos (A-P) con un destornillador.
• Por favor nótese que el código de casa para
el mando a distancia y el del Conmutador de
Potencia deben ser iguales. El código de
casa, por defecto, es A.
CAMBIANDO EL CÓDIGO DE LA UNIDAD
Un código de unidad debe ser ajustado en el
Conmutador de Potencia.
El código de unidad seleccionado corresponde
al botón que tiene que pulsarse en el mando a
distancia. Si, por ejemplo, se ajusta el código
de unidad a 3, el Conmutador de Potencia se
opera con el tercer botón del mando a distancia.
El código de unidad, por defecto, es 1. Para
cambiar un código de unidad
(fig. 4)
:
• Ajuste el código de unidad del Conmutador
de Potencia girando la rueda de selección de
códigos de unidad (UNIT) en la parte trasera
del enchufe (1-16) con un destornillador.
• El Conmutador de Potencia se opera
pulsando el botón correcto en el mando a
distancia.
• Es posible activar más de un Conmutador de
Potencia a la vez, seleccionando el mismo
código.
Nota: Aunque el código de unidad en el
Conmutador de Potencia puede
ajustarse a un número entre 1 y 16, el
mando a distancia puede operar los
Conmutadores de Potencia solamente
con códigos entre 1 y 8.
• Para operar los Conmutadores de Potencia
con códigos entre 1 y 4, deje el conmutador
en el mando a distancia hacia la izquierda
(1-4).
– Los primeros 4 botones del mando a
distancia corresponden a los códigos 1 a 4
respectivamente.
– Si el conmutador de mando a distancia está
ajustado hacia la derecha (5-8), los primeros
botones corresponden a los códigos 5 a 8
respectivamente.
9
SK305.. page 9
Español
Page 10

1. EINFÜHRUNG
Herzlichen Glückwunsch zum Erwerb des
Philips Funk-steuerungssystems (SBC SK305).
Das System enthält eine Fernbedienung
(SBC SR315) und einen Funk-stecker
(SBC SP370).
Mit dem Funk-steuerungssystem können Sie
von Ihrem Sessel aus elektrische Geräte (z.B.
Lampen, Kaffeemaschine, etc.) in Ihrem und
um Ihr Haus mit der Fernbedienung ein- und
ausschalten!
Bevor Sie ein Gerät an das Funk-steuerungssystem anschließen, lesen Sie bitte dieses
Dokument genau durch.
10
SK305.. page 10
Deutsch
2. KURZÜBERSICHT
KURZÜBERSICHT
1.
Legen Sie die mitgelieferten Batterien in die Fernbedienung ein
(Abb. 1)
.
2.
Stecken Sie den Funk-stecker in eine Steckdose
(Abb. 2)
.
3.
Wählen Sie das Gerät aus, z.B. eine Lampe, das Sie schalten wollen, und
schließen Sie dieses an den Funk-stecker an
(Abb. 2)
.
• Prüfen Sie vor dem Anschließen des ausgewählten Geräts an den Funkstecker dessen Stromverbrauch. An den Funk-stecker darf nur ein Gerät mit
höchstens 1000 Watt angeschlossen werden.
• Besitzt das ausgewählte Gerät einen eigenen Ein-/Aus-Schalter, prüfen Sie, ob
das Gerät eingeschaltet ist.
4.
Schalten Sie das Gerät mit der Fernbedienung
(Abb. 3)
.
Der Funk-stecker wird mit der Taste 1 geschaltet (Standardeinstellung).
Wird die rechte Seite einer Taste (+) gedrückt, wird das Gerät eingeschaltet.
Wird die linke Seite einer Taste (-) gedrückt, wird das Gerät ausgeschaltet.
3. INSTALLATION
EINLEGEN DER BATTERIEN
Die mitgelieferten Batterien wie folgt in die
Fernbedienung einlegen
(Abb. 1)
:
• Entfernen Sie die Schraube im Deckel des
Batteriefachs der Fernbedienung.
• Legen Sie die Batterien ein. Achten Sie
dabei darauf, daß die Polaritäten der
Batterien mit denen im Batteriefach
übereinstimmen.
Anmerkungen:
– Wird die Fernbedienung für längere Zeit
nicht benutzt, nehmen Sie bitte die
Batterien aus der Fernbedienung.
– Die Batterien der Fernbedienung sollten
jedes Jahr ersetzt werden. Ist der
Übertragungsbereich der Fernbedienung
stark reduziert, müssen die Batterien sofort
ausgewechselt werden.
– Die Batterien nur durch Original PHILIPS
8LR932 Batterien ersetzen.
INSTALLATION
Ihr Gerät muß an den Funk-stecker
angeschlossen werden, bevor Sie es mit der
Fernbedienung schalten können
(Abb. 2)
.
• Wählen Sie das Gerät (z.B. eine Lampe) aus,
das Sie schalten wollen, und schließen Sie
es an den Funk-stecker an
(Abb. 2)
.
• Prüfen Sie vor dem Anschließen des
ausgewählten Geräts an den Funk-stecker
dessen Stromverbrauch. An den Funkstecker darf nur ein Gerät mit höchstens
1000 Watt angeschlossen werden.
• Besitzt das ausgewählte Gerät einen
eigenen Ein-/Aus-Schalter, prüfen Sie, ob
das Gerät eingeschaltet ist.
Page 11

4. BEDIENUNG
BEDIENUNG
Das angeschlossene Gerät kann jetzt mit der
Fernbedienung geschaltet werden
(Abb. 3)
.
Der Funk-stecker wird mit der Taste 1
geschaltet (Standardeinstellung).
• Wird die rechte Seite einer Taste (+)
gedrückt, wird das Gerät eingeschaltet. Wird
die linke Seite einer Taste (-) gedrückt, wird
das Gerät ausgeschaltet.
Der Funk-stecker kann auch mit der letzten
Taste der Fernbedienung geschaltet werden.
Mit dieser Taste können mehrere FunkStecker gleichzeitig geschaltet werden.
• Stellen Sie den GROUP Schalter auf der
Rückseite des Funk-steckers nach rechts (=
ON - ein).
– Der Funk-stecker reagiert jetzt, wenn die 5.
Taste der Fernbedienung gedrückt wird.
Wird die rechte Seite der Taste (+) gedrückt,
werden die Geräte eingeschaltet. Wird die
linke Seite der Taste (-) gedrückt, werden
die Geräte ausgeschaltet.
MANUELLES SCHALTEN
Der Funk-stecker besitzt eine Taste für
manuelles Schalten. Das heißt, Ihr Gerät kann
weiterhin auch ohne Fernbedienung ein- bzw.
ausgeschaltet werden.
• Drücken Sie die Taste auf der Vorderseite
des Funk-steckers einmal.
– Der Funk-stecker ist eingeschaltet.
• Drücken Sie die Taste auf der Vorderseite
des Funk-steckers erneut.
– Der Funk-stecker ist ausgeschaltet.
ÄNDERN DES HAUSCODE
Der Hauscode soll eine Interferenz mit dem
Funk-steuerungssystem Ihres Nachbarn
verhindern.
Die Leistungssteuersysteme reagieren nur auf
Signale mit dem korrekten Hauscode. Zum
ändern des Hauscode
(Abb. 4)
:
• Schrauben Sie den Deckel des Batteriefachs
auf der Rückseite der Fernbedienung ab.
• Drehen Sie zum Einstellen des Hauscodes
der Fernbedienung das Hauscode-Einstellrad
(A-P) mit einem Schraubenzieher.
• Drehen Sie zum Einstellen des Hauscodes
des Funk-steckers das Hauscode-Einstellrad
(HOUSE) auf der Rückseite des Funksteckers (A-P) mit einem Schraubenzieher.
• Bitte beachten Sie, daß der Hauscode für
die Fernbedienung und dem(n) Funkstecker(n) identisch sein muß! Die
Standardeinstellung für den Hauscode ist A.
ÄNDERN DES GERÄTECODE
An den Funk-steckern muß ein Gerätecode
eingestellt werden. Der ausgewählte
Gerätecode entspricht der Taste, die auf der
Fernbedienung gedrückt werden muß. Wird
zum Beispiel der Gerätecode 3 eingestellt,
wird der Funk-stecker mit der 3. Taste der
Fernbedienung geschaltet. Die
Standardeinstellungen der Gerätecode ist 1.
Zum ändern des Gerätecodes
(Abb. 4)
:
• Drehen Sie zum Einstellen des Gerätecodes
des Funk-steckers das GerätecodeEinstellrad (UNIT) auf der Rückseite des
Funk-steckers (1-16) mit einem
Schraubenzieher.
• Der Funk-stecker wird durch Drücken der
entsprechende Taste auf der Fernbedienung
geschaltet.
• Durch Einstellen des gleichen Gerätecodes
können mehrere Funk-stecker gleichzeitig
aktiviert werden.
Beachte: Der Gerätecode der Funk-stecker
kann zwar von 1 bis 16 eingestellt
werden, doch kann die
Fernbedienung nur Funk-stecker
mit einem Gerätecode von 1 bis 8
schalten.
• Zum Schalten der Funk-stecker mit dem
Gerätecode 1-4 müssen Sie den
Kippschalter auf der Fernbedienung nach
links stellen (1-4).
– Die ersten 4 Tasten der Fernbedienung
entsprechen den Gerätecodes 1 bis 4.
– Ist der Kippschalter an der Fernbedienung
nach rechts gestellt (5-8), entsprechen die
ersten 4 Tasten der Fernbedienung den
Gerätecodes 5 bis 8.
11
SK305.. page 11
Deutsch
Page 12

1. INLEIDING
Gefeliciteerd met de aanschaf van het Philipsschakelsysteem (SBC SK305).
Dit systeem bestaat uit één afstandsbediening
(SBC SR315) en één stekkerschakelaar
(SBC SP370).
Met de bijbehorende afstandsbediening kunt u
elk elektrisch apparaat (bijvoorbeeld lampen,
koffiezetapparaat enzovoort) in en om uw huis
met de afstandsbediening bedienen zonder dat
u hoeft op te staan! Leest u deze
gebruiksaanwijzing aandachtig voor u een
apparaat op het schakelsysteem aansluit.
12
SSK305.. page 12
Nederland
s
2. VERKORTE HANDLEIDING
1.
Plaats de bijgeleverde batterijen in de afstandsbediening
(fig. 1)
.
2.
Steek de stekkerschakelaar in een stopcontact
(fig. 2)
.
3.
Kies het apparaat, bijvoorbeeld een lamp, dat u op afstand wilt bedienen en steek
de stekker van dit apparaat in de stekkerschakelaar
(fig. 2)
.
• Ga het stroomverbruik na van het gekozen apparaat voor u de stekker in de
stekkerschakelaar steekt. De stekkerschakelaar kan gebruikt worden voor
apparaten met een vermogen van maximaal 1000 watt!
• Als het gekozen apparaat een eigen aan/uit-schakelaar heeft, zet die dan aan.
4.
Gebruik nu de afstandsbediening om het apparaat te bedienen
(fig. 3)
.
De stekkerschakelaar wordt standaard met toets 1 bediend.
Als u op de rechterkant (+) van de toets drukt, dan wordt het gekozen apparaat
ingeschakeld. Als u op de linkerkant (-) van de toets drukt, dan wordt het gekozen
apparaat weer uitgeschakeld.
PLAATSEN VAN DE BATTERIJEN
Plaats de bijgeleverde batterijen als volgt in de
afstandsbediening
(fig. 1)
.
• Schroef het batterijdeksel op de achterkant
van de afstandsbediening los.
• Plaats de batterijen in de afstandsbediening
en let erop dat de polariteit van de batterijen
(+ en -) klopt met de aanduidingen binnenin
het batterijvak.
Opmerkingen:
• Verwijder de batterijen als u de afstandsbediening gedurende langere tijd niet zult
gebruiken.
• De batterijen van de afstandsbediening
moeten eenmaal per jaar vervangen
worden. Als het zendbereik van de afstandsbediening beduidend minder wordt, vervang
de batterijen dan meteen.
• Gebruik bij vervanging alleen originele
Philips-batterijen, type 8LR932.
INSTALLATIE
Voor u uw apparaat met de afstandsbediening
kunt bedienen, moet het eerst aangesloten
worden op de stekkerschakelaar
(fig. 2)
.
• Kies het apparaat dat u wilt bedienen
(bijvoorbeeld een lamp) en steek de stekker
van dit apparaat in de stekkerschakelaar
(fig. 2)
.
• Ga het stroomverbruik na van het gekozen
apparaat voor u de stekker in de stekkerschakelaar steekt.
De stekkerschakelaar kan gebruikt worden
voor apparaten met een vermogen van
maximaal 1000 watt!
• Als het gekozen apparaat een eigen aan/-uitschakelaar heeft, zet deze dan aan.
3. INSTALLATIE
Page 13

4. BEDIENING
BEDIENING
Het aangesloten apparaat kan nu met de
afstandsbediening bediend worden
(fig. 3)
. De
stekkerschakelaar wordt standaard met toets 1
bediend
• Als u op de rechterkant (+) van de toets
drukt, dan wordt het gekozen apparaat
ingeschakeld. Als u op de linkerkant (-) van
de toets drukt, dan wordt het gekozen
apparaat weer uitgeschakeld.
De stekkerschakelaar kan ook met de laatste
toets op de afstandsbediening bediend
worden. Deze toets is bedoeld voor het
bedienen van meerdere stekkerschakelaars
tegelijkertijd.
• Schuif de GROUP-schakelaar op de achter-
kant van de stekkerschakelaar naar rechts
(= ON - aan).
– Het apparaat reageert nu als u op de 5de
toets van de afstandsbediening drukt. Als u
op de rechterkant (+) van de toets drukt, dan
wordt het apparaat ingeschakeld. Als u op
de linkerkant (-) van de toets drukt, dan
wordt het apparaat weer uitgeschakeld.
HANDMATIGE BEDIENING
De stekkerschakelaar heeft een knop voor
handmatige bediening. Op die manier kan uw
apparaat ook zonder de afstandsbediening nog
steeds bediend worden.
• Druk eenmaal op de knop op de voorkant
van de stekkerschakelaar.
– De stekkerschakelaar wordt ingeschakeld.
• Druk nog eenmaal op de knop op de
voorkant van de stekkerschakelaar.
– De stekkerschakelaar wordt weer
uitgeschakeld.
WIJZIGEN VAN DE HUISCODE
De huiscode is bedoeld om beïnvloeding door
het schakelsysteem van uw buren te
voorkomen.
De schakelsystemen reageren alleen op
signalen met de juiste huiscode. Om de
huiscode te wijzigen
(fig. 4)
:
• Schroef het batterijdeksel op de achterkant
van de afstandsbediening los.
• Stel de huiscode van de afstandsbediening
in door met een schroevendraaier het
huiscodeschijfje te draaien (A-P).
• Stel de huiscode van de stekkerschakelaar
in door met een schroevendraaier het
huiscodeschijfje (HOUSE) op de achterkant
van de schakelaar (A-P) te draaien.
• De gekozen huiscode voor de afstandsbediening en de stekkerschakelaar moet
hetzelfde zijn ! De huiscode is standaard
ingesteld op A.
WIJZIGEN VAN DE SCHAKELAARCODE
Op de stekkerschakelaar moet de code van die
schakelaar ingesteld worden. De gekozen
schakelaarcode komt overeen met de toets die
u moet indrukken op de afstandsbediening.
Als u bijvoorbeeld de schakelaar op code 3
instelt, dan wordt de schakelaar bediend met
de 3de toets op de afstandsbediening. De
code van de schakelaar is standaard ingesteld
op 1. Om de code van de schakelaar te
wijzigen
(fig. 4)
:
• Stel de schakelaarcode van de stekkerschakelaar in door met een schroevendraaier
het schakelaarcodeschijfje (UNIT) op de
achterkant van de stekkerschakelaar (1-16)
te draaien.
• U kunt de stekkerschakelaar bedienen door
op de bijbehorende toets op de afstandsbediening te drukken.
• Het is ook mogelijk meerdere stekkerschakelaars tegelijk te bedienen door ze
dezelfde schakelaarcode te geven.
Opmerking: De schakelaarcode op de
stekkerschakelaar kan van 1 tot
16 ingesteld worden, maar met
de afstandsbediening kunt u
alleen stekkerschakelaars met
een code van 1 tot 8 bedienen.
• Om stekkerschakelaars met een schakelaarcode van 1 tot 4 te bedienen moet u de
keuzeschakelaar op de afstandsbediening
naar links schuiven (1-4).
– De eerste 4 toetsen op de afstands-
bediening komen respectievelijk overeen
met schakelaarcodes 1 tot 4.
– Schuift u de keuzeschakelaar op de
afstandsbediening naar rechts (5-8) dan
komen de eerste 4 toetsen respectievelijk
overeen met schakelaarscodes 5 tot 8.
13
SSK305.. page 13
Nederland
s
Page 14

1. INTRODUZIONE
Ci congratuliamo con Lei per l'acquisto del
sistema di controllo dell'alimentazione Philips
(SBC SK305). Il sistema comprende un
telecomando (SBC SR315) e un interruttore di
accensione (SBC SP370).
Con il sistema di comando a distanza
dell'alimentazione è possibile mettere in
funzione dispositivi elettrici, (ad es.: lampade,
macchina per il caffè, ecc...), installati in casa o
nelle vicinanze, tramite un telecomando, senza
alzarsi dalla poltrona. Prima di collegare i
dispositivi al sistema di controllo, leggere con
attenzione il presente documento.
14
SK305 page 14
Italiano
2. GUIDA RAPIDA
GUIDA RAPIDA
1.
Installare nel telecomando le pile incluse nella confezione
(fig.1)
2.
Collegare l'interruttore di accensione a una presa di corrente
(fig.2)
.
3.
Selezionare il dispositivo (ad es.: una lampada) che si intende comandare a
distanza e collegarlo all'interruttore di accensione
(fig.2)
.
• Prima di collegare il dispositivo all'interruttore di accensione, controllarne il
consumo. Questo interruttore di accensione è in grado di controllare dispositivi
con una potenza massima nominale di 1000 Watt.
• Se il dispositivo prescelto dispone di interruttore di accensione proprio,
accertarsi che sia in posizione di 'acceso'.
4.
Utilizzare il telecomando per mettere in funzione il dispositivo
(fig.3)
L'interruttore di accensione è preimpostato per funzionare con il tasto 1.
Se viene premuto il lato destro del tasto (+), il dispositivo si accende. Se si preme
il lato sinistro (-) il dispositivo si spegne.
3. INSTALLAZIONE DELLE PILE
INSTALLAZIONE DELLE PILE
Installare le pile incluse nel telecomando come
indicato
(fig.1)
• Svitare lo sportello del vano batterie situato
sul retro del telecomando.
• Inserire le pile nell'apparecchio, facendo
attenzione che le polarità delle pile siano in
accordo con quelle dello scomparto che le
accoglie.
Note:
•
Quando si prevede che il telecomando
rimanga inattivo per lungo tempo, togliere le
pile.
• Le pile del telecomando vanno sostituite una
volta l'anno. Se il raggio di azione del
telecomando si riduce in modo drastico le
pile vanno immediatamente sostituite.
• Sostituire le pile solo con pile originali
PHILIPS SLR932.
INSTALLAZIONE
Per poterlo controllare con il telecomando, il
dispositivo va prima collegato all'interruttore di
accensione
(fig.2)
.
• Selezionare il dispositivo (ad es.: una
lampada) che si intende comandare a
distanza e collegarlo all'interruttore di
accensione
(fig.2)
.
• Controllare il consumo del dispositivo
prescelto. L'interruttore di accensione è in
grado di controllare dispositivi con una
potenza massima nominale di 1000 Watt.
• Se il dispositivo prescelto dispone di
interruttore di accensione proprio, accertarsi
che sia in posizione di 'acceso'.
Page 15

4. FUNZIONAMENTO
FUNZIONAMENTO
A questo punto il dispositivo collegato può
essere controllato tramite il telecomando
(fig 3)
. L'interruttore di accensione è
preimpostato per funzionare con il tasto 1
• Se viene premuto il lato destro del tasto (+),
il dispositivo si accende. Se si preme il lato
sinistro (-) il dispositivo si spegne.
L'interruttore di accensione può essere
attivato anche con l'ultimo tasto del
telecomando. Il tasto è progettato per attivare
più interruttori contemporaneamente.
• Impostare a destra (ON, acceso)
l'interruttore a levetta contrassegnato
GROUP e situato sulla parte posteriore
dell'interruttore di accensione.
– Ora l'interruttore si attiverà con la pressione
del 5° tasto del telecomando. Se viene
premuto il lato destro del tasto (+), il
dispositivo si accende. Se si preme il lato
sinistro (-) il dispositivo si spegne.
FUNZIONAMENTO MANUALE
L'interruttore di accensione ha un pulsante che
lo abilita al funzionamento manuale. Ciò
significa che il dispositivo può essere messo in
funzione senza il telecomando.
• Premere una volta il tasto sulla parte
anteriore dell'interruttore di accensione.
– L'interruttore di accensione si attiva.
• Premere nuovamente il tasto sulla parte
anteriore dell'interruttore di accensione.
– L'interruttore di accensione si disattiva.
MODIFICA DEL CODICE DOMESTICO
Il codice domestico ha il compito di evitare le
interferenze con eventuali sistemi di controllo
presenti nelle case vicine.
I sistemi di controllo rispondono solo a segnali
che contengano il codice domestico corretto.
Per modificare il codice domestico
(fig.4)
:
• Svitare lo sportello del vano batterie situato
sul retro del telecomando.
• Impostare il codice domestico del
telecomando facendo ruotare con un
cacciavite il selettore per codice domestico
(A-P).
• Impostare il codice domestico
dell'interruttore facendo ruotare con un
cacciavite il selettore per codice domestico
(A-P).
- Si tenga presente che il codice domestico
prescelto per il telecomando e l'interruttore
(i) di accensione devono coincidere. Il codice
domestico preimpostato è A.
MODIFICA DEL CODICE APPARECCHIO
Sull'interruttore di accensione va impostato un
codice apparecchio. Il codice apparecchio
prescelto corrisponde al tasto che va premuto
sul telecomando. Se ad esempio si imposta il
codice apparecchio 3, l'interruttore di
accensione è attivato con il 3° tasto del
telecomando.Il codice apparecchio
preimpostato è 1. Per modificare il codice
apparecchio
(fig.4)
:
• Impostare il codice apparecchio
dell'interruttore di accensione facendo
ruotare con un cacciavite il selettore
contrassegnato UNIT e situato sul retro
dell'interruttore (1-16).
- L'interruttore di accensione viene attivato
premendo il tasto corretto sul telecomando.
- È possibile attivare più interruttori di
accensione contemporaneamente
scegliendo lo stesso codice apparecchio.
Nota: Anche se il codice apparecchio
dell'interruttore di accensione può
essere impostato su una cifra compresa
tra 1 e 16, il telecomando può attivare
solo interruttori di accensione con codici
apparecchio da 1 a 8.
• Per attivare gli interruttori di accensione con
codici apparecchio da 1 a 4, l'interruttore a
levetta del telecomando va impostato a
sinistra (1-4).
– I primi 4 tasti del telecomando
corrispondono rispettivamente ai codici
apparecchio da 1 a 4.
– Se l'interruttore a levetta del telecomando è
impostato a destra (5-8), i primi 4 tasti
corrispondono rispettivamente ai codici
apparecchio da 5 a 8.
15
SK305 page 15
Italiano
Page 16

1. INTRODUÇÃO
Parabéns pela compra do Sistema de Controlo
Eléctrico Philips (SBC SK305).
Este sistema contém um controlo remoto
(SBC SR315) e um interruptor eléctrico
(SBC SP370).
Com o sistema de Controlo Remoto Eléctrico,
você pode comandar equipamentos eléctricos
(por ex. candeeiros, máquina de café, etc.)
dentro e à volta da sua casa sem ter de se
levantar da sua cadeira! Antes de ligar
equipamentos ao Sistema de Controlo
Eléctrico, por favor leia cuidadosamente este
documento.
16
SK 305 page 16
Português
2. REFERÊNCIA RÁPIDA
REFERÊNCIA RÁPIDA
1.
Instale as baterias incluídas com o controlo remoto
(fig. 1)
.
2.
Ligue o Interruptor eléctrico a uma tomada de rede eléctrica
(fig. 2)
.
3.
Seleccione o equipamento que você quer controlar, por ex. um candeeiro, e
ligue-o ao Interruptor eléctrico
(fig. 2)
.
• Verifique o consumo eléctrico do equipamento seleccionado antes de o ligar
ao Interruptor eléctrico. O Interruptor eléctrico pode controlar equipamentos
com um consumo eléctrico máximo de 1000 Watts!
• Se o equipamento seleccionado tiver o seu próprio interruptor de ligar/
desligar, certifique-se de que ele está ligado.
4.
Use o controlo remoto para controlar o equipamento
(fig. 3)
.
O Interruptor eléctrico é comandado com o botão 1 como configuração padrão.
Se for premido o lado direito de um botão (+), o equipamento é ligado. Se for
premido o lado esquerdo de um botão (-), o equipamento é desligado outra vez.
3. INSTALAÇÃO
INSTALAÇÃO DE BATERIAS
Instale as baterias incluídas com o controlo
remoto como segue
(fig. 1)
:
• Desaparafuse a tampa das baterias na parte
de trás do controlo remoto.
• Introduza as baterias na unidade, verificando
cuidadosamente se as polaridades das
baterias (+ e -) correspondem com as
assinaladas dentro do compartimento.
Notas:
• Retire as baterias quando o controlo remoto
não vá ser usado por um longo período de
tempo.
• As baterias do controlo remoto deverão ser
substituídas uma vez por ano. Se o alcance
de transmissão do controlo remoto se
reduzir drasticamente, as baterias
necessitam de uma substituição imediata.
• Apenas substitua as baterias por baterias
originais PHILIPS 8LR932.
INSTALAÇÃO
O seu equipamento tem de estar ligado ao
Interruptor eléctrico antes de você o poder
controlar com o controlo remoto
(fig. 2)
.
• Seleccione o equipamento que você quer
controlar, por ex. um candeeiro, e ligue-o ao
Interruptor eléctrico
(fig. 2)
.
• Por favor, verifique o consumo eléctrico do
equipamento seleccionado antes de o ligar
ao Interruptor eléctrico. O Interruptor
eléctrico pode controlar equipamentos com
um consumo eléctrico máximo de 1000
Watts!
• Se o equipamento seleccionado tiver o seu
próprio interruptor de ligar/ desligar,
certifique-se de que ele está ligado.
Page 17

4. OPERAÇÃO
OPERAÇÃO
O equipamento ligado pode agora ser
comandado através do controlo remoto
(fig. 3)
.
O Interruptor eléctrico é comandado por
defeito com o botão 1.
• Se for premido o lado direito de um botão
(+), o equipamento é ligado. Se for premido
o lado esquerdo de um botão (-), o
equipamento é desligado outra vez.
O Interruptor eléctrico também pode ser
comandado com o último botão do controlo
remoto. Este botão foi concebido para
comandar mais Interruptores eléctricos ao
mesmo tempo.
• Desloque o comutador GROUP, situado na
parte de trás do Interruptor eléctrico para o
lado direito (- ON - ligado).
– O interruptor responderá, agora, quando o 5º
botão do controlo remoto for premido. Se
for premido o lado direito do botão (+), o
equipamento é ligado. Se for premido o lado
esquerdo do botão (-), o equipamentos é
desligado outra vez.
OPERAÇÃO MANUAL
O Interruptor eléctrico tem um botão para
operação manual. Isto quer dizer que o seu
equipamenttambém pode ser comandado sem
o controlo remoto.
• Prima uma vez o botão na frente do
Interruptor eléctrico.
– O Interruptor eléctrico liga-se.
• Prima outra vez o botão na frente do
Interruptor eléctrico.
– O Interruptor eléctrico desliga-se novamente.
MUDANDO O CÓDIGO DE CASA
O código de casa destina-se a impedir
interferências com o Sistema de Controlo
Eléctrico do seu vizinho.
Os Sistemas de Controlo Eléctrico só
responderão a sinais com o código de casa
correcto. Para mudar o código de casa
(fig. 4)
:
• Desaparafuse a tampa do compartimento
das baterias na parte de trás do controlo
remoto.
• Seleccione o código de casa do controlo
remoto fazendo rodar a roda de selecção do
código de casa (A-P) com uma chave de
parafusos.
• Seleccione o código de casa do Interruptor
eléctrico fazendo rodar a roda de selecção
do código de casa (HOUSE) na parte de trás
do interruptor (A-P) com uma chave de
parafusos.
• Por favor note que o código de casa para
controlo remoto e Interruptor(es) eléctrico(s)
deve ser o mesmo! O valor de defeito do
código de casa é A.
MUDANDO O CÓDIGO DA UNIDADE
Deverá ser configurado um código de unidade
nos Interruptor eléctrico. O código de unidade
seleccionado corresponde ao botão que tem
de ser premido no controlo remoto. Se, por
exemplo, estiver escolhido o código de
unidade 3, o Interruptor eléctrico será
comandado através do 3º botão do controlo
remoto.O valor de defeito do código da
unidade é 1. Para mudar o código da unidade
(fig. 4)
:
• Escolha a unidade do Interruptor eléctrico
rodando a roda de selecção de código de
unidade (UNIT), na parte de trás da ficha (1-
16), com uma chave de parafusos.
• O Interruptor eléctrico é comandado
premindo-se o botão correcto no controlo
remoto.
• É possível activar mais Interruptores
eléctricos ao mesmo tempo seleccionando
o mesmo código de unidade.
Nota: Apesar de o código da unidade poder
ser configurado de 1 a 16, o controlo
remoto apenas pode comandar
Interruptores eléctricos com códigos de
1 a 8.
• Para comandar Interruptores eléctricos com
códigos de unidade de 1 a 4, o comutador
do controlo remoto deverá estar colocado
para a esquerda (1-4).
– Os primeiros 4 botões do controlo remoto
correspondem aos códigos de unidade de 1
a 4, respectivamente.
– Se o comutador do controlo remoto estiver
colocado para a direita (5-8), os primeiros 4
botões correspondem aos códigos de
unidade de 5 a 8, respectivamente.
17
SK 305 page 17
Português
Page 18

1. ΕIΣΑΓΩΓΗ
Συγχαρητήρια για την αγορά του Συστήµατοσ
Τροφοδοσίασ Iσχύοσ τησ Philips (SBC SK305).
Αυτ το σύστηµα περιέχει ένα τηλεχειριστήριο
(SBC SR315) και ένα βύσµα τροφοδοσίασ ισχύοσ
(SBC SP370). Με το τηλεχειριζµενο σύστηµα
τροφοδοσίασ ισχύοσ µπορείτε να ελέγχετε
ηλεκτρικέσ συσκευέσ (για παράδειγµα, φωτιστικά,
καφετιέρεσ κλπ.) µέσα και γύρω απ το σπίτι σασ,
µέσω του τηλεχειριστηρίου, χωρίσ να σηκώνεστε
απ τη πολυΘρνα σασ!
Σασ παρακαλούµε να διαβάσετε προσεκτικά αυτ
το εγχειρίδιο πριν συνδέστε τισ συσκευέσ στο
Σύστηµα Τροφοδοσίασ Iσχύοσ.
18
SBC SK305 page 18
Έλληνικά
2. ΣΥΝΤΟΜΗ ΠΕΡIΓΡΑΦΗ
ΣΥΝΤΟΜΗ ΠΕΡIΓΡΑΦΗ
1. ΤοποΘετήστε τισ εσώκλειστεσ µπαταρίεσ µέσα στο τηλεχειριστήριο (εικ. 1).
2. Συνδέστε το
βύσµα τροφοδοσίασ ισχύοσ σε µια πρίζα (εικ. 2).
3. Επιλέξτε τη συσκευή, για παράδειγµα ένα φωτιστικ, που Θέλετε να ελέγχετε, και
συνδέστε την στο βύσµα τροφοδοσίασ ισχύοσ (εικ. 2).
•
Ελέγξτε την κατανάλωση ρεύµατοσ τησ επιλεγµένησ συσκευήσ πριν τη συνδέσετε
στο βύσµα. Το βύσµα τροφοδοσίασ ισχύοσ µπορεί να ελέγχει συσκευέσ µε ισχύ χι
ανώτερη απ 1000 Watt!
•
Αν η επιλεγµένη συσκευή έχει τον δικ τησ διακπτη για το άναµµα / σβήσιµ τησ,
βεβαιωΘείτε τι αυτσ είναι ανοικτσ.
4. Χρησιµοποιήστε το τηλεχειριστήριο για να Θέσετε τη συσκευή σε λειτουργία (εικ. 3).
Το πλήκτρο 1 έχει προκαΘοριστεί για τον χειρισµ του βύσµατοσ τροφοδοσίασ ισχύοσ.
Αν πατήσετε τη δεξιά πλευρά του πλήκτρου (+), η συσκευή τίΘεται σε λειτουργία. Αν
πατήσετε την αριστερή πλευρά του πλήκτρου (-), η συσκευή τίΘεται πάλι εκτσ
λειτουργίασ.
3. ΕΓΚΑΤΑΣΤΑΣΗ
ΤΟΠΟΘΕΤΗΣΗ ΤΩΝ ΜΠΑΤΑΡIΩΝ
ΤοποΘετήστε τισ εσώκλειστεσ µπαταρίεσ µέσα στο
τηλεχειριστήριο, µε τον ακλουΘο τρπο (εικ. 1).
•
Ξεβιδώστε το καπάκι του χώρου µπαταριών στο
πίσω µέροσ του τηλεχειριστηρίου.
•
ΤοποΘετήστε τισ µπαταρίεσ στη µονάδα,
ελέγχοντασ προσεκτικά αν η πολικτητα των
µπαταριών (+ και -) ταιριάζει µε τισ ενδείξεισ
στο εσωτερικ του χώρου µπαταριών.
Σηµειώσεισ:
•
Αφαιρέστε τισ µπαταρίεσ ταν το
τηλεχειριστήριο δεν πρκειται να
χρησιµοποιηΘεί για µεγάλο χρονικ διάστηµα.
•
Οι µπαταρίεσ του τηλεχειριστηρίου Θα πρέπει
να αντικαΘίστανται µία φορά το χρνο. Αν η
εµβέλεια µετάδοσησ του τηλεχειριστηρίου
µειωΘεί σε µεγάλο βαΘµ, οι µπαταρίεσ Θα
πρέπει να αντικατασταΘούν αµέσωσ.
•
ΑντικαΘιστάτε τισ µπαταρίεσ µνο µε
αυΘεντικέσ µπαταρίεσ PHILIPS 8LR932.
ΕΓΚΑΤΑΣΤΑΣΗ
Η συσκευή σασ Θα πρέπει να έχει συνδεΘεί στο
βύσµα τροφοδοσίασ ισχύοσ για να µπορείτε να την
ελέγχετε µε το τηλεχειριστήριο (εικ. 2).
•
Επιλέξτε τη συσκευή (για παράδειγµα ένα
φωτιστικ) που Θέλετε να ελέγχετε, και
συνδέστε την στο βύσµα τροφοδοσίασ ισχύοσ
(εικ. 2).
•
Σασ παρακαλούµε να ελέγξετε την κατανάλωση
ρεύµατοσ τησ επιλεγµένησ συσκευήσ. Το βύσµα
τροφοδοσίασ ισχύοσ µπορεί να ελέγχει
συσκευέσ µε ισχύ χι ανώτερη απ 1000 Watt!
•
Αν η επιλεγµένη συσκευή έχει τον δικ τησ
διακπτη για το άναµµα / σβήσιµ τησ,
βεβαιωΘείτε τι αυτσ είναι ανοικτσ.
Page 19

4. ΛΕIΤΟΥΡΓIΑ
ΛΕIΤΟΥΡΓIΑ
Hι συνδεδεµένη συσκευή µπορεί τώρα να
ελέγχεται µε το τηλεχειριστήριο (εικ. 3). Το
πλήκτρο 1 έχει προκαΘοριστεί για τον χειρισµ
του βύσµατοσ τροφοδοσίασ ισχύοσ.
•
Αν πατήσετε τη δεξιά πλευρά του πλήκτρου (+),
η συσκευή τίΘεται σε λειτουργία. Αν πατήσετε
την αριστερή πλευρά του πλήκτρου (-), η
συσκευή τίΘεται πάλι εκτσ λειτουργίασ.
Μπορείτε επίσησ να ελέγχετε το βύσµα
τροφοδοσίασ ισχύοσ µε το τελευταίο πλήκτρο του
τηλεχειριστηρίου. Αυτ το πλήκτρο έχει
σχεδιαστεί για τον ταυτχρονο χειρισµ
περισστερων βυσµάτων ισχύοσ.
•
Βάλτε τον διακπτη ολίσΘησησ GROUP - στο
πίσω µέροσ των βυσµάτων τροφοδοσίασ ισχύοσ
- στην δεξιά Θέση (= ΟΝ - ανοικτσ).
– Το βύσµα τώρα Θα ανταποκρίνεται στο πάτηµα
του πέµπτου πλήκτρου του τηλεχειριστηρίου.
Αν πατήσετε τη δεξιά πλευρά του πλήκτρου (+),
η συσκευή Θα τεΘεί σε λειτουργία. Αν
πατήσετε την αριστερή πλευρά του πλήκτρου
(-), η συσκευή Θα τεΘεί πάλι εκτσ λειτουργίασ.
ΧΕIΡIΣΜΟΣ ΜΕ ΤΟ ΧΕΡI
Το βύσµα τροφοδοσίασ ισχύοσ διαΘέτει ένα
πλήκτρο για τον χειρισµ του µε το χέρι. Αυτ
σηµαίνει τι µπορείτε να ελέγχετε τη συσκευή
σασ και χωρίσ το τηλεχειριστήριο.
•
Πατήστε µία φορά το πλήκτρο στο εµπρσ
µέροσ του βύσµατοσ τροφοδοσίασ ισχύοσ.
– Το βύσµα τροφοδοσίασ ισχύοσ Θα τεΘεί σε
λειτουργία.
•
Πατήστε ακµη µία φορά το πλήκτρο στο
εµπρσ µέροσ του βύσµατοσ τροφοδοσίασ
ισχύοσ.
– Το βύσµα τροφοδοσίασ ισχύοσ Θα τεΘεί πάλι
εκτσ λειτουργίασ.
ΑΛΛΑΓΗ ΤΟΥ ΚΩ∆IΚΟΥ ΟIΚIΑΣ
Ο κωδικσ οικίασ έχει σχεδιαστεί για την αποφυγή
ενδεχοµένων παρεµβολών απ κάποιο γειτονικ
Σύστηµα Τροφοδοσίασ Iσχύοσ.
Τα Συστήµατα Τροφοδοσίασ Iσχύοσ
ανταποκρίνονται µνο σε σήµατα µε το σωστ
κωδικ οικίασ. Για να αλλάξετε τον κωδικ οικίασ
(εικ. 4):
• Ξ
εβιδώστε το καπάκι του χώρου µπαταριών στο
πίσω µέροσ του τηλεχειριστηρίου.
•
ΡυΘµίστε τον κωδικ οικίασ του
τηλεχειριστηρίου, γυρί οντασ τον τροχίσκο
επιλογήσ του κωδικού οικίασ (Α-Ρ) µε ένα
κατσαβ ίδι.
•
ΡυΘµίστε τον κωδικ οικίασ του βύσµατοσ
τροφοδοσίασ ισχύοσ, γυρίζοντασ τον τροχίσκο
επιλογήσ του κωδικού οικίασ στο πίσω µέροσ
του βύσµατοσ (Α-Ρ) µε ένα κατσαβίδι.
•
Εχετε υπψη σασ τι ο επιλεγµένοσ κωδικσ
οικίασ του τηλεχειριστηρίου και του βύσµατοσ /
των βυσµάτων τροφοδοσίασ ισχύοσ Θα πρέπει
να είναι ίδιοσ! Η προκαΘορισµένη ρύΘµιση του
κωδικού οικίασ είναι Α.
ΑΛΛΑΓΗ ΤΟΥ ΚΩ∆IΚΟΥ ΜΟΝΑ∆ΑΣ
Θα πρέπει να ρυΘµιστεί ένασ κωδικσ µονάδασ
στο βύσµα τροφοδοσίασ ισχύοσ. Ο επιλεγµένοσ
κωδικσ µονάδασ αντιστοιχεί στο πλήκτρο που Θα
πρέπει να πατηΘεί στο τηλεχειριστήριο. Αν, για
παράδειγµα, έχει ρυΘµιστεί ο κωδικσ µονάδασ 3,
µπορείτε να ενεργοποιείτε το αντίστοιχο βύσµα
τροφοδοσίασ ισχύοσ µέσω του τρίτου πλήκτρου
στο τηλεχειριστήριο.H προκαΘορισµένη ρύΘµιση
του κωδικού µονάδασ είναι 1. Για να αλλάξετε τον
κωδικ µονάδασ (εικ. 4):
•
ΡυΘµίστε τον κωδικ µονάδασ του βύσµατοσ
τροφοδοσίασ ισχύοσ γυρίζοντασ τον τροχίσκο
επιλογήσ του κωδικού µονάδασ (UNIT) στο πίσω
µέροσ του βύσµατοσ (1-16) µε ένα κατσαβίδι.
•
Το βύσµα τροφοδτησησ ισχύοσ ελέγχεται µε
το πάτηµα του σωστού πλήκτρου στο
τηλεχειριστήριο.
•
Μπορείτε να ενεργοποιείτε περισστερα
βύσµατα ισχύοσ ταυτοχρνωσ, επιλέγοντασ τον
ίδιο κωδικ µονάδασ.
Σηµείωση: Παρά το γεγονσ τι ο κωδικσ
µονάδασ στο βύσµα τροφοδοσίασ
ισχύοσ µπορεί να ρυΘµιστεί απ το 1
µέχρι το 16, το τηλεχειριστήριο είναι
σε Θέση να ενεργοποιεί µνο βύσµατα
τροφοδοσίασ ισχύοσ µε κωδικούσ
µονάδασ απ το 1 µέχρι το 8.
•
Για τον χειρισµ βυσµάτων τροφοδοσίασ ισχύοσ
µε κωδικούσ µονάδασ απ το 1 ωσ το 4, ο
διακπτησ ολίσΘησησ στο τηλεχειριστήριο Θα
πρέπει να ρυΘµιστεί στην αριστερή Θέση (1-4).
– Τα πρώτα 4 πλήκτρα του τηλεχειριστηρίου
αντιστοιχούν µε τουσ κωδικούσ µονάδασ 1 έωσ
4.
– Αν ο διακπτησ ολίσΘησησ του
τηλεχειριστηρίου ρυΘµιστεί στην δεξιά Θέση
(5-8), τα πρώτα 4 πλήκτρα αντιστοιχούν µε τουσ
κωδικούσ µονάδασ 5 έωσ 8.
19
SBC SK305 page 19
Έλληνικά
Page 20

1. INLEDNING
Grattis till inköpet av fjärrströmbrytarsystemet
SBC SK305. Detta system omfattar en
fjärrkontroll (SBC SR315) och en strömbrytare
(SBC SP370).
Med detta fjärrströmbrytarsystem
kan du styra elektriska apparater (t.ex.
kaffebryggare) eller lampor i och i närheten av
huset utan att ens behöva resa dig från stolen!
Läs denna bruksanvisning noga innan du
ansluter en apparat till fjärrströmbrytarsystemet.
20
SK305 page 20
Svenska
2. SNABBREFERENS
SNABBREFERENS
1.
Sätt i de medföljande batterierna i fjärrkontrollen
(fig. 1)
.
2.
Anslut strömbrytaren till nätuttaget
(fig. 2)
.
3.
Bestäm vilken apparat eller lampa du vill kunna fjärrstyra och anslut den
till strömbrytaren
(fig. 2)
.
• Kontrollera apparatens strömförbrukning innan du ansluter den till
strömbrytaren. Strömbrytaren kan styra apparater på högst 1000 Watt.
• Om apparaten har en egen strömbrytare, ska den vara på permanent.
4.
Använd fjärrkontrollen för att styra apparaten
(fig. 3)
.
I standardinställningen styrs strömbrytaren med knapp 1.
Apparaten kopplas på med ett tryck på höger sida av knappen (+), och
kopplas av med ett tryck på vänster sida (-).
ISÄTTNING AV BATTERIER
Så här sätts de medföljande batterierna in i
fjärrkontrollen
(fig. 1)
.
• Skruva loss batteriluckan på baksidan av
fjärrkontrollen.
• Sätt i batterierna i enheten och se till att de
kommer åt rätt håll, dvs att polariteterna (+
och -) stämmer.
OBS:
• Ta ut batterierna om fjärrkontrollen inte ska
användas på en längre tid.
• Batterierna i fjärrkontrollen ska bytas en
gång om året. Om fjärrkontrollens räckvidd
har försämrats påtagligt, ska batterierna
bytas omedelbart.
• Använd bara äkta PHILIPS-batterier 8LR932.
INSTALLATION
Apparaten måste vara ansluten till
strömbrytaren innan du kan styra den med
fjärrkontrollen
(fig. 2)
.
• Välj vilken apparat eller lampa du vill
fjärrstyra och anslut den till strömbrytaren
(fig. 2)
.
• Kontrollera apparatens strömförbrukning
innan du ansluter den till strömbrytaren.
Strömbrytarna kan styra apparater på högst
1000 Watt.
• Om apparaten har en egen strömbrytare,
ska den vara på permanent.
3. INSTALLATION
Page 21

4. ANVÄNDNING
ANVÄNDNING
Den anslutna apparaten kan nu styras med
fjärrkontrollen
(fig. 3)
. I standardinställningen
styrs strömbrytaren med knapp 1.
• Apparaten kopplas på med ett tryck på
höger sida av knappen (+), och kopplas av
med ett tryck på vänster sida (-).
Strömbrytaren kan också styras med den sista
knappen på fjärrkontrollen. Den knappen är
avsedd att styra fler än en strömbrytare
samtidigt.
• Ställ omkopplaren GROUP på baksidan av
strömbrytaren till höger (= ON - på).
– Strömbrytaren reagerar nu när den femte
knappen på fjärrkontrollen trycks ner.
Apparaten kopplas på med ett tryck på
höger sida av knappen (+), och kopplas av
med ett tryck på vänster sida (-).
MANUELL ANVÄNDNING
Strömbrytaren har en knapp för manuell
användning. Med den kan du bestämma om
du vill använda strömbrytaren utan
fjärrkontrollen.
• Tryck på knappen på framsidan av
strömbrytaren en gång.
– Då slår strömbrytaren på sig.
• Tryck på knappen på framsidan av
strömbrytaren en gång till.
– Då stänger strömbrytaren av sig igen.
BYTE AV HUSKOD
Huskoden är till för att förhindra att ditt
fjärrströmbrytarsystem kan påverka en
grannes.
Fjärrströmbrytarsystem reagerar bara på
signaler med rätt huskod. Så här byter du
huskoden
(fig. 4)
:
• Skruva loss batteriluckan på baksidan av
fjärrkontrollen.
• Ställ in huskoden på fjärrkontrollen genom
att vrida huskodsratten (A-P) med en
skruvmejsel.
• Ställ in huskoden på strömbrytaren genom
att vrida huskodsratten (HOUSE) på
baksidan av strömbrytaren (A-P) med en
skruvmejsel.
• Observera att du måste välja samma huskod
för fjärrkontrollen och strömbrytaren.
Standardinställningen för huskoden är A.
BYTE AV ENHETSKODEN
En enhetskod ska ställas in på strömbrytaren.
Den valda enhetskoden motsvarar vilken
knapp som ska tryckas ned på fjärrkontrollen.
Till exempel, om enhetskoden 3 är inställd för
en viss strömbrytare, styrs den strömbrytaren
av knapp nr. 3 på fjärrkontrollen.
Standardinställningen för enhetskoden är 1. Så
här ändrar du enhetskoden
(fig. 4)
:
• Ställ in enhetskoden på strömbrytaren
genom att vrida enhetskodsratten (UNIT) på
baksidan av strömbrytaren (1-16) med en
skruvmejsel.
• Du styr sedan strömbrytaren genom att
trycka på motsvarande knapp på
fjärrkontrollen.
• Du kan aktivera mer än en strömbrytare
samtidigt om du väljer samma enhetskod för
dem.
OBS: Det går att ställa in enhetskoden på
strömbrytaren till mellan 1 till 16, men
fjärrkontrollen kan bara styra en
strömbrytare med en enhetskod på
mellan 1 och 8.
• För styrning av en strömbrytare med
enhetskod 1-4, ska omkopplaren på
fjärrkontrollen vara ställd till vänster (1-4).
– De fyra första knapparna på fjärrkontrollen
motsvarar enhetskoderna 1 till 4.
– Om omkopplaren på fjärrkontrollen är ställd
till höger (5-8), motsvarar de fyra första
knapparna enhetskoderna 5 till 8.
21
SK305 page 21
Svenska
Page 22

1. WSTÊP
Gratulujemy zakupu systemu kontroli zasilania
Philips Power Control System (SBC SK305).
System niniejszy skada siê z pilota zdalnego
sterowania (SBC SR315) oraz z wŒcznika
zasilania (SBC SP370). Za pomocå zdalnie
sterowanego systemu kontroli zasilania mo¿na
korzystaæ z urzådzeñ elektrycznych (np. lamp,
ekspresów do kawy etc.) w domu i w jego
pobli¿u przy u¿yciu pilota nie wstajåc z krzes¬a!
Przed pod¬åczeniem urzådzenia do systemu
kontroli zasilania nale¿y uwa¿nie zapoznaæ siê z
niniejszå instrukcjå.
22
SK305 page 22
2. KRÓTKA INFORMACJA
3. INSTALACJA
KRÓTKA INFORMACJA
1.
W¬ó¿ za¬åczone baterie do pilota (rysunek 1).
2.
PodŒcz wŒcznik zasilania do sieci (rysunek 2).
3.
Wybierz urzådzenie z którego chcesz korzystaæ, np. lampê, i pod¬åcz do w¬åcznika
zasilania (rysunek 2).
•
SprawdŸ pobór mocy wybranej urzådzenia przed pod¬åczeniem go do w¬åcznika
zasilania. W¬åcznika zasilania mo¿na u¿ywaæ do kontroli urzådzeñ o
maksymalnej mocy 1000 wat!
•
Je¿eli wybrane urzådzenie posiada w¬asny w¬åcznik, nale¿y go w¬åczyæ.
4.
U¿ywaj pilota do kontroli urzådzenia (rysunek 3).
W¬åcznik zasilania uruchamiany jest za pomocå przycisku 1 jako ustawienie
standardowe.
Je¿eli prawa strona (+) przycisku jest wciœniêta, wybrane urzådzenie w¬åczy siê.
Je¿eli lewa strona (-) przycisku jest wciœniêta, wybrane urzådzenie ponownie siê
wyŒczy.
ZAK£ADANIE BATERII
Za¬åczone baterie w¬ó¿ do pilota w nastêpujåcy
sposób (rysunek 1):
• Odkrêciæ pokrywê baterii w tylnej czêœci
pilota.
• W¬ó¿ baterie, sprawdzajåc przy tym czy wska
niki biegunowoœci baterii (+ i -) zgadzajå siê
ze wska nikami na pilocie.
Uwaga:
• Usuñ baterie je¿eli nie zamierzasz u¿ywaæ
pilota przez d¬u¿szy okres czasu.
• Baterie w pilocie nale¿y wymieniaæ raz w
roku. Je¿eli zasiêg transmisji pilota
drastycznie siê zmniejszy, nale¿y natychmiast
wymieniæ baterie.
• U¿ywaj jedynie oryginalnych baterii PHILIPS
8LR932.
INSTALACJA
Urzådzenie mo¿na kontrolowaæ za pomocå
pilota po podŒczeniu go do wŒcznika zasilania
(rysunek 2).
• Wybierz urzådzenie (np. lampê), które chcesz
kontrolowaæ i pod¬åcz jej do w¬åcznika
zasilania (rysunek 2).
• SprawdŸ pobór mocy wybranej urzådzenia.
W¬åcznika zasilania mo¿na u¿ywaæ do
kontroli urzådzeñ o maksymalnej mocy 1000
wat!
• Je¿eli wybrane urzådzenie posiada w¬asny
w¬åcznik, nale¿y go w¬åczyæ.
Polski
Page 23

4. URUCHAMIANIE
URUCHAMIANIE
Podåczone urzådzenie mo¿na teraz uruchamiaæ
za pomocå pilota (rysunek 3)). W¬åcznik
zasilania uruchamiany jest za pomocå przycisku
1 jako ustawienie standardowe.
• Je¿eli prawa strona (+) przycisku jest
wciœniêta, wybrane urzådzenie w¬åczy siê.
Je¿eli lewa strona (-) przycisku jest
wciœniêta, wybrane urzådzenie ponownie siê
wyŒczy.
W¬åcznik zasilania mo¿na równie¿ uruchamiaæ
za pomocå ostatniego przycisku pilota. Przycisk
ten przeznaczony jest do uruchamiania wiêkszej
iloœci w¬åczników zasilania równoczeœnie.
• Przesuñ prze¬åcznik dwustabilny GROUP
znajdujåcy siê z tylnej strony w¬åcznika
zasilania w prawo (= ON)
– W¬åcznik bêdzie teraz reagowaæ przy
wciœniêciu piåtego przycisku pilota. Je¿eli
prawa strona (+) przycisku jest wciœniêta,
urzådzenie w¬åczy siê. Je¿eli lewa strona (-)
przycisku jest wciœniêta, urzådzenie
ponownie siê wy¬åczy.
URUCHAMIANIE RÊCZNE
WŒcznik zasilania posiada przycisk do
uruchamiania rêcznego. Oznacza to, ¿e
urzådzenia mogå byæ równie¿ uruchamiane bez
u¿ycia pilota.
•
Wciœnij raz przycisk znajdujåcy siê z przedniej
strony wŒcznika zasilania.
– W¬åcznik zasilania w¬åczy siê.
•
Wciœnij powtórnie przycisk znajdujåcy siê z
przedniej strony wŒcznika zasilania.
– W¬åcznik zasilania wy¬åczy siê.
ZMIANA KODU DOMOWEGO
Kod domowy s¬u¿y zapobieganiu zak¬óceñ z
systemem kontroli zasilania twojego såsiada.
System kontroli zasilania bêdzie jedynie
reagowaæ na sygna¬y o w¬aœciwym kodzie
domowym. Aby zmieniæ kod domowy (rysunek
4):
• Odkrêciæ pokrywê baterii w tylnej czêœci
pilota.
• Ustaw kod domowy pilota obracajåc
œrubokrêtem kó¬ko wyboru kodu domowego
(A-P).
• Ustaw kod domowy w¬åcznika zasilania
obracajåc œrubokrêtem kó¬ko wyboru kodu
domowego z tylnej strony wŒcznika (A-P).
• Zwróæ uwagê na to, ¿eby wybrany kod
domowy na pilocie zgadza¬ siê z kodem na
wŒczniku zasilania! Ustawienie
standardowe kodu domowego to A.
ZMIANA KODU JEDNOSTKOWEGO
Kod jednostkowy nale¿y ustawiæ na w¬åczniku
zasilania. Wybrany kod jednostkowy odpowiada
przyciskowi, który nale¿y przycisnåæ na pilocie.
Je¿eli, na przyk¬ad, kod jednostkowy 3 zosta¬
ustawiony, wŒcznik zasilania uruchamiany jest
za pomocå trzeciego przycisku na pilocie.
Ustawienie standardowe kodów jednostkowych
to 1, 2 i 3. Aby zmieniæ kod jednostkowy
(rysunek 4):
• Ustaw kod jednostkowy w¬åcznika zasilania
obracajåc œrubokrêtem kó¬ko wyboru kodu
jednostkowego z tylnej strony wtyczki (1-16).
• W¬åcznik zasilania uruchamiany jest za
pomocå w¬aœciwego przycisku na pilocie.
• Mo¿liwe jest aktywowanie wiêkszej iloœci
w¬åczników zasilania równoczeœnie
wybierajåc ten sam kod jednostkowy.
Uwaga:
Chocia¿ kod jednostkowy na w¬åczniku zasilania
mo¿e zostaæ ustawiony w pozycji 1 do 16, za
pomocå pilota mo¿na jedynie uruchamiaæ
wŒczniki zasilania o kodzie od 1 do 8.
• W celu uruchomienia w¬åczników zasilania o
kodzie jednostkowym 1-4, przeŒcznik
dwustabilny na pilocie powinien zostaæ
przesuniêty w lewo (1-4).
– Pierwsze 4 przyciski na pilocie odpowiadajå
kodom jednostkowym odpowiednio od 1 do 4
– Je¿eli prze¬åcznik dwustabilny na pilocie
przesuniêty jest w prawo (5-8), pierwsze 4
przyciski odpowiadajå kodom jednostkowym
odpowiednio od 5 do 8.
23
SK305page 23
Polski
Page 24

NOTES
24
SK305page 24
Page 25

SK305page 25
Page 26

SK305 page 26
TCText/RR/9731
year
jaar
Jahr
année
χρνοσ
warranty
garantie
Garantie
garantie
εγγύηση
år
año
ano
anno
rok
garanti
garantia
garantia
garanzia
gwarancja
Guarantee
certificate
Identieficatiekaart
Garantibeviset
Certificat de
garantie
Certificado de
garantia
Takuutodistus
Garantie
Certificato di
garanzia
Εγγύηση
Karta gwarancyjna
Type:
Serial nr.:
Date of purchase - Date d’achat - Kaufdatum - Koopdatum - Fecha de compra Data da compra - Data di acquisto - Købsdato - kjøpedato - inköpsdato - Ostopäivå -
Ηµεροµηνία αγοράσ -
data zakupu
_________________19_____
Dealer’s name, address and signature
Nom, adresse et signature du revendeur
Name, Anschrift und Unterschrift des Händlers
Naam, adres en handtekening v.d. handelaar
Nombre, dirección y firma del distribuidor
Nome, indirizzo e firma del fornitore
Nome, morada e assinatura da loja
Forhrhandlerens navn, adresse og underskrift
Återförsäljarens namn, adress och namnteckning
Myyjän nimi, osoite ja allekirjoitus,
Ονοµατεπώνυµο, διεύθυνση και υπογραφή
του εµπ. προµηθευτή
Nazwisko, adres i podpis sprzedawcy
 Loading...