

Page 1

ON – OFF
SBC SK 303
– Power Control System
SK303 page 1
Instructions for use
Mode d’emploi
Instrucciones de manejo
Bedienungsanleitung
Gebruiksaanwijzing
Instruzioni per l’uso
Manual de utilização
Οδηγίεσ χρήσεωσ
Bruksanvisning
Instrukcja obs¬ugi
Noors
Käyttöohje
Page 2
SK303 page 2
INDEX
Batterijen niet weggooien,
maar inleveren als KCA.
ñ
English
Français
Español
Deutsch
Nederland
s
English.....................................page 4
Illustrations ........................................................3
Français..................................page 6
Illustrations ........................................................3
Español................................página 8
Illustraciones......................................................3
Deutsch.........................................Seite 10
Illustrationen......................................................3
Nederlands...........................pagina 12
Illustraties ..........................................................3
Italiano
Italiano...............................pagina 14
Illustrazioni.........................................................3
Português
Έλληνικά
Svenska
Português........................página 16
Ilustrações .........................................................3
Έλληνικά ............................ σελίδα 18
ΑΠΕIΚΟΝIΣΕIΣ......................................................3
Svenska.........................................sida 20
Illustrationer.......................................................3
Polski
Polski...................................strona 22
Ilustracje.............................................................3
Norsk
Norsk.................................................side 24
Illustrationer.......................................................3
Suomi
Suomi...............................................sivu 26
Kuvat..................................................................3
Page 3
3
SK303 page 3
•
•
•
•
•
•
•
•
•
•
•
•
•
•
•
•
A
B
C
D
E
F
G
H
I
J
K
L
M
N
O
P
1
2
3
4
5
6
7
8
9
1
0
1
1
1
2
1
3
1
4
1
5
1
6
GROUP
HOUSE
UNIT
ON
OFF
ON
ON
I234
ON
I234
ON
12
4
3
Pin No.
1 2 3 4
House
B
C
D
E
F
G
H
I
J
K
L
M
N
O
P
A
0 0 0 0
1 0
0 0
0 0 1 0
1 0 1 0
0
0
1 1
1
0
1 1
0 0 0
1
1 0
0
1
0
1
0
0
1
1 0 0
0
1 1
0
1
1 1
0
0 1 1
1
1
1 1
1
0 1 0
1
1
1
0
1
ON = 1
ON • • OFF
ON
ON
ON – OFF
ON – OFF
Page 4
4
SK303 page 4
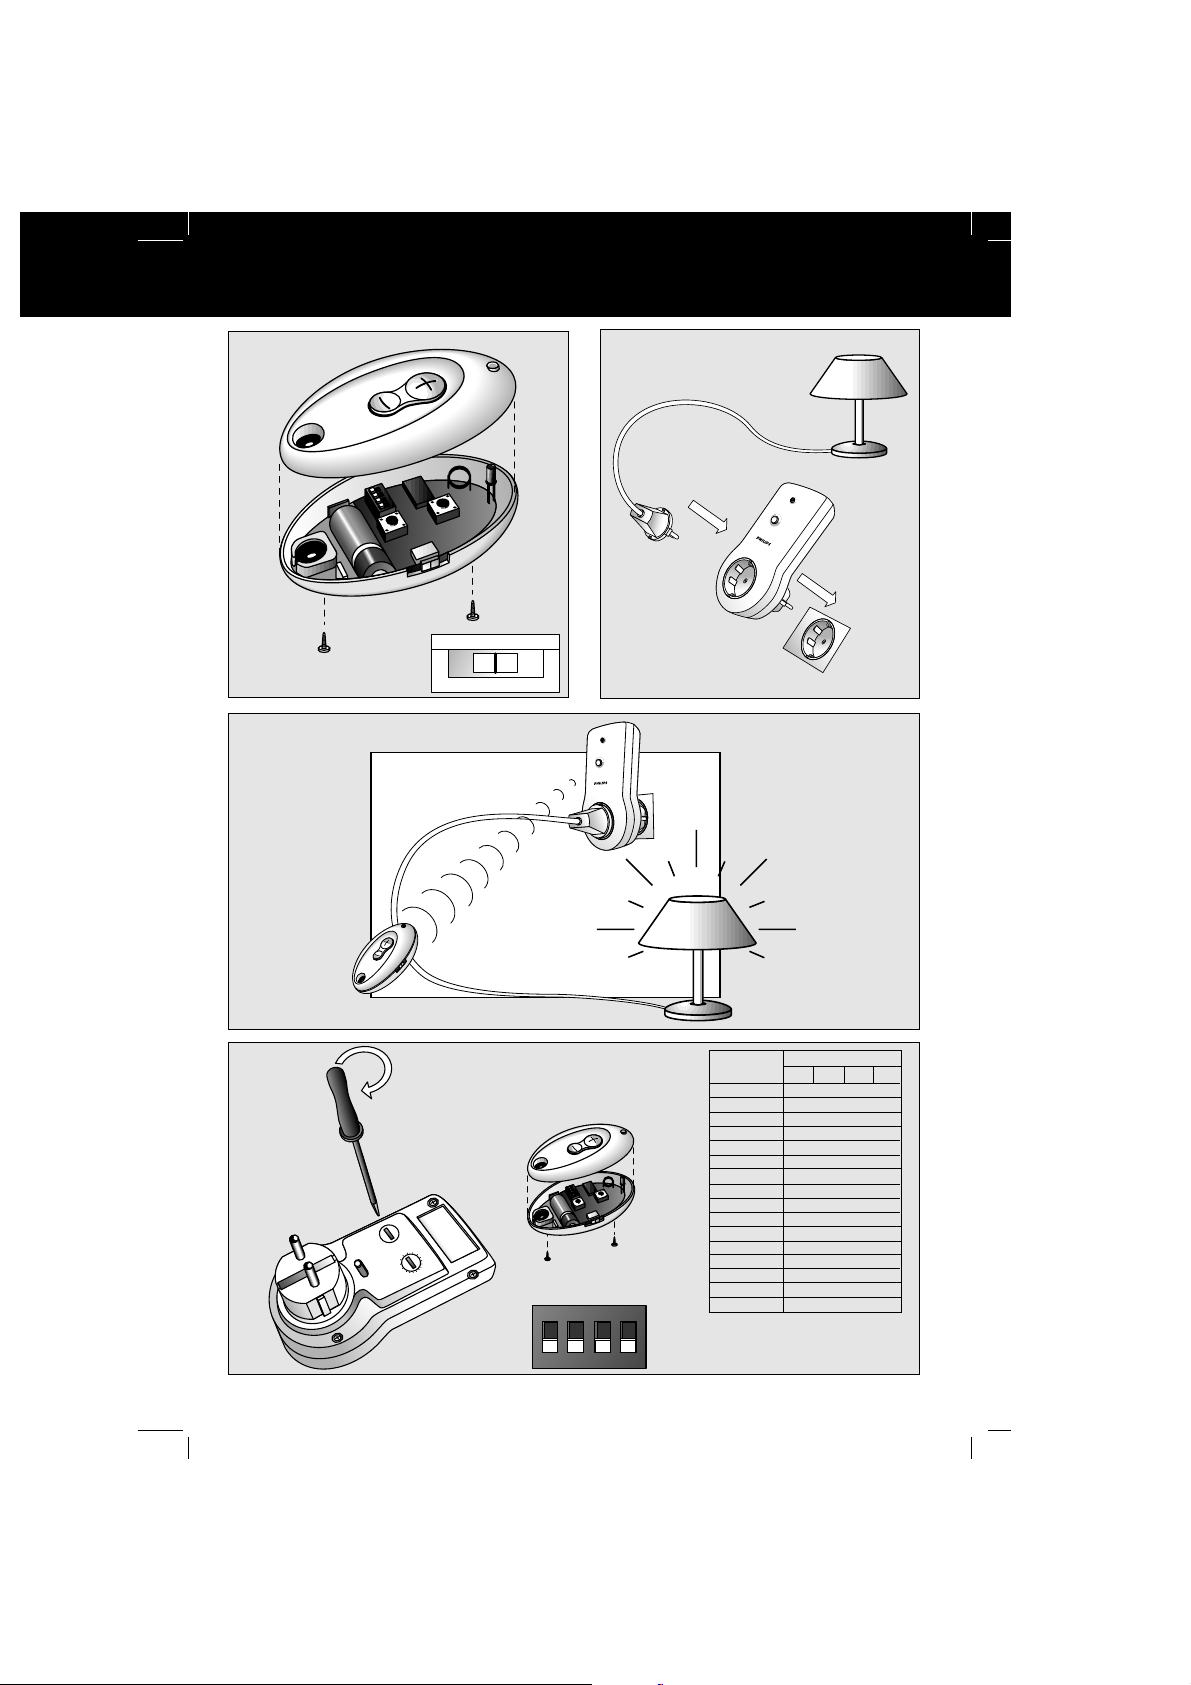
Congratulations on your purchase of the
Philips Power Control System (SBC SK303).
This system contains one key-ring remote
control (SBC SR312) and one Power switch
(SBC SP370). With the Power Control System
you can operate electrical appliances (e.g.
lamps, coffee-maker etc.) with a power rating
of up to 1000 Watts in and around your house
via the key-ring remote control.
You can also use the key-ring remote control
as a GROUP switch, allowing you to operate
several Power switches simultaneously (All
ON / All OFF).
Before connecting an appliance to the Power
Control System, please read this document
carefully.
1. INTRODUCTION
English
QUICK REFERENCE
1.
Connect the Power switch to a mains power outlet
(fig. 2)
.
2.
Select the appliance, e.g. a lamp, you want to control, ensuring that its
power rating does not exceed 1000 Watts, and plug it into the Power
switch
(fig. 2)
.
• If the selected appliance has its own ON/OFF switch, make sure it is
switched on.
3.
Use the key-ring remote control to operate the appliance
(fig. 3)
.
When the (+) of the remote control button is pressed, the selected
appliance switches on. When the (-) of the button is pressed, the
selected appliance switches off again.
The Power switch is set at unit code 1 by default.
3. INSTALLATION
2. QUICK REFERENCE
INSTALLATION
Your appliance must be connected to the
Power switch before you can control it with
the key-ring remote control
(fig. 2)
.
• Check that the mains voltage as indicated
on the Power switch corresponds to your
local mains voltage. If it does not, consult
your dealer or service organisation.
• Select the appliance (e.g. lamp) you want to
control, ensuring that its power rating does
not exceed 1000 Watts, and plug it into the
Power switch
(fig. 2)
.
• If the selected appliance has its own
ON/OFF switch, make sure it is switched
on.
Page 5

English
4. OPERATION
5
SK303 page 5
OPERATION
The connected appliance can now be operated
via the key-ring remote control
(fig.3)
.
• When the (+) of the button is pressed, the
appliance switches on. When the (-) of the
button is pressed, the appliance switches
off again.
– The Power switch is set to unit code 1 by
default.
With the key-ring remote control it is possible
to operate more Power switches at the same
time. When the GROUP switch on the key-ring
remote is in the ON position, it will switch on
and off every Power switch whose own
GROUP switch is in the ON position.
• Set the GROUP switch of the key-ring
remote control to the ON position.
• Set the GROUP switch on the rear of the
Power switch to the ON position.
– Every Power switch whose GROUP switch
is in the ON position will now respond to the
key-ring remote control. When the (+) of the
button is pressed, all appliances connected
to these Power switches will switch on.
When the (-) of the button is pressed, the
appliances switch off again.
MANUAL OPERATION
The Power switch has a button for manual
operation. This means that you can still switch
on and off your appliance without the key-ring
remote control.
• Press the button in front of the Power
switch once.
– The Power switch switches on.
• Press the button in front of the Power
switch once again.
– The Power switch switches off.
BATTERY REPLACEMENT
Install a battery in the key-ring remote control
as follows
(fig. 1)
:
• Unscrew the bottom cover of the key-ring
remote control and remove.
• Insert the battery in the unit, checking
carefully that the battery polarities (+ and -)
match those inside the compartment.
• Place to bottom cover over the key-ring
remote control, insert screws and tighten.
Notes:
•
Remove the battery when the key-ring
remote control is not going to be used for a
long period of time.
•
Replace the battery in the key-ring remote
control at least once a year. If you notice
that the transmission range of the key-ring
remote control reduces drastically, replace
the battery immediately.
•
Use only an original PHILIPS 8LR932
battery when replacing the remote control
battery.
CHANGING THE HOUSE CODE
The house code is designed to prevent
interference with the Power Control System of
your neighbour. It also enables you to use
more key-ring remote controls for different
applications in and around your house.
The Power Control System will only respond
to signals with the correct house code.
To change the house code
(fig. 4)
:
• Choose a house code (A,B, or C, etc.) from
table 1, and turn the house code selection
wheel at the rear of the Power switch to
this house code.
• Unscrew the bottom cover of the key-ring
remote control and remove.
• Set the dip-switches of the key-ring remote
control to correspond to the chosen house
code.
• Place to bottom cover over the key-ring
remote control, insert screws and tighten.
Note:
The key-ring remote control can NOT control
the Power switch when the unit code is
changed to a number other than 1. However, it
is possible to activate more Power switches at
the same time by selecting unit code 1 on
each Power switch.
Page 6
1. INTRODUCTION
Félicitations pour votre achat d'un système de
commande électrique Philips SBC SK303
comprenant une télécommande en porte-clés
SBC SR312 et un interrupteur Marche/Arrêt
SBC SP370. Avec cette télécommande, le
système vous permet d'allumer ou d'éteindre
des appareils électriques (lampes, cafetières,
etc.) d'une puissance nominale de 1000 watts,
dans toute la maison.
Cette télécommande en porte-clés peut
également vous servir d'interrupteur général
(GROUP) pour allumer ou éteindre plusieurs
interrupteurs simultanément (ALL ON/ALL
OFF).
Lisez attentivement ce document avant de
raccorder tout appareil à ce système de
commande.
6
Français
SK303 page 6
2. GUIDE DE REFERENCE RAPIDE
GUIDE DE DE REFERENCE RAPIDE
1.
Branchez l'interrupteur Marche/Arrêt sur une prise secteur
(fig. 2)
.
2.
Reliez l'appareil (lampe ou autre) que vous désirez télécommander à
l'interrupteur M/A et assurez-vous que la consommation électrique ne
dépasse pas 1000 watts
(fig. 2)
.
• Si l'appareil sélectionné est doté de son propre interrupteur
marche/arrêt, assurez-vous que celui-ci soit en position marche.
3.
Vous pouvez maintenant utiliser la télécommande en porte-clés pour
allumer/éteindre l'appareil
(fig. 3)
.
Pour mettre l'appareil en marche, appuyez sur la touche (+) de la
télécommande. Pour l'éteindre, appuyez sur la touche (-).
L'interrupteur M/A répond par défaut au code unité 1.
3. INSTALLATION
INSTALLATION
Votre appareil doit d'abord être relié à
l'interrupteur M/A avant que vous ne puissiez
le contrôler à l'aide de la télécommande
(fig. 2)
.
• Assurez-vous que la tension indiquée sur
l'interrupteur M/A correspond à la tension
locale. Dans le cas contraire, consultez votre
revendeur ou le service de réparation.
• Reliez l'appareil (lampe ou autre) que vous
désirez télécommander à l'interrupteur M/A
et assurez-vous que la consommation
électrique ne dépasse pas 1000 watts
(fig. 2)
.
• Si l'appareil sélectionné est doté de son
propre interrupteur marche/arrêt, assurezvous que celui-ci soit en position marche.
Page 7

4. FONCTIONNEMENT
FONCTIONNEMENT
Vous pouvez maintenant allumer/éteindre
l'appareil sélectionné par l'intermédiaire de la
télécommande en porte-clés
(fig. 3)
.
• Pour mettre l'appareil en marche, appuyez
sur la touche (+) de la télécommande. Pour
l'éteindre, appuyez sur la touche (-).
– L'interrupteur M/A répond par défaut au
code unité 1.
Cette télécommande en porte-clés vous
permet de contrôler plusieurs interrupteurs à la
fois. Si le sélecteur GROUP de la
télécommande en porte-clés est en position
ON (marche), vous pourrez allumer/éteindre
tout interrupteur dont le sélecteur GROUP est
également sur ON.
• Placez le sélecteur GROUP de la
télécommande en porte-clés sur ON.
• Placez le sélecteur GROUP situé au dos de
l'interrupteur M/A en position ON.
– Chaque interrupteur dont le sélecteur
GROUP est en position ON peut être
contrôlé par la télécommande en porte-clés.
Il suffit d'appuyer sur le côté (+) du bouton
pour mettre en marche tous les appareils
reliés à ces interrupteurs, et d'appuyer sur le
côté (-) pour les éteindre tous.
FONCTIONNEMENT MANUEL
Cet interrupteur est doté d'un bouton de
commande manuelle pour vous permettre
d'allumer ou d'éteindre les appareils même
sans l'aide de la télécommande.
• Appuyez une fois sur le bouton situé sur
l'avant de l'interrupteur M/A.
– L'interrupteur est activé (ON).
• Appuyez de nouveau sur le bouton situé sur
l'avant de l'interrupteur M/A.
– L'interrupteur est désactivé (OFF).
REMPLACER LA PILE
Pour placer la pile dans la télécommande en
porte-clés
(fig. 1)
:
• Dévissez et enlevez le couvercle inférieur de
la télécommande.
• Placez la pile en respectant la polarité (+ et -)
comme indiqué sur le fond du
compartiment.
• Refermez la télécommande en porte-clés en
replaçant le couvercle avec les vis.
Remarques:
•
Enlevez la pile si la télécommande ne doit
pas être utilisée pendant une période de
temps prolongée.
•
Il est recommandé de changer la pile de la
télécommande au moins une fois par an. Si
la portée de transmission de la
télécommande est devenue trop faible,
changez la pile immédiatement.
•
Remplacez la pile uniquement par une pile
Philips d'origine 8LR932.
CHANGER LE CODE MAISON
Le code maison est destiné à éviter les
interférences avec le système de commande
électrique installé chez votre voisin. Il vous
permet également d'utiliser plusieurs
télécommandes en porte-clés pour différentes
applications. Le système de commande
électrique répond seulement aux signaux émis
avec le code maison approprié.
Pour modifier ce code maison
(fig. 4)
:
• Choisissez un code maison (A, B ou C, etc. )
dans le tableau 1 et tournez la molette
située au dos de l'interrupteur pour
sélectionner le code choisi.
• Dévissez et enlevez le couvercle inférieur de
la télécommande en porte-clés.
• Placez les commutateurs de la
télécommande de façon à indiquer le code
choisi.
• Refermez la télécommande en replaçant le
couvercle avec les vis.
Remarque:
La télécommande ne peut pas contrôler un
interrupteur si le code unité sélectionné est
différent de 1. Toutefois, il est possible
d'activer simultanément plusieurs
interrupteurs en sélectionnant le code unité 1
sur chaque interrupteur.
7
SK303 page 7
Français
Page 8

1. INTRODUCCIÓN
Enhorabuena por su compra del sistema Philips
Power Control (SBC SK303).
Este sistema contiene un mando a distancia
llavero (SBC SR312) y un interruptor de control
(SBC SP370). Con el sistema Power Control Vd.
podrá hacer funcionar aparatos eléctricos (p. ej.
lámparas, cafetera, etc.) dentro de una gama de
potencia de hasta 1000 vatios dentro y
alrededor de su casa por medio del mando a
distancia llavero.
También puede utilizar el mando a distancia
llavero como interruptor de GRUPO,
permitiéndole activar simultáneamente varios
interruptores de corriente (todos encendidos /
todos apagados).
Antes de conectar un aparato al sistema Power
Control, por favor, lea detenidamente este
texto.
8
Español
SK303 page 8
2. REFERENCIA RÁPIDA
REFERENCIA RÁPIDA
1.
Conecte el interruptor de control a una toma de corriente de la red
(fig. 2)
.
2.
Seleccione el aparato, p. ej. una lámpara, que quiera Vd. controlar,
asegurándose de que no exceda de 1000 vatios de potencia, y enchúfelo
al interruptor de control
(fig. 2)
.
• Si el aparato seleccionado tiene su propio interruptor de on/off,
asegúrese de que está encendido (on).
3.
Utilice el mando a distancia llavero para hacer funcionar el aparato
(fig. 3)
.
Cuando se oprime el (+) del botón del mando a distancia, el aparato
seleccionado se enciende. Cuando se oprime el (-) del botón del mando a
distancia, el aparato seleccionado se vuelve a apagar.
El interruptor de control tiene asignado por defecto el código de unidad 1.
3. INSTALACIÓN
INSTALACIÓN
Debe Vd. conectar el aparato al interruptor de
control antes de poder controlarlo con el
mando a distancia llavero
(fig. 2)
.
• Compruebe que la tensión de red indicada
en el interruptor de control se corresponde
con su tensión de red local. Si no es así,
consulte a su proveedor u organización de
servicio.
• Seleccione el aparato (p. ej. una lámpara)
que quiere Vd. controlar, asegurándose de
que su potencia no exceda de 1000 vatios, y
enchúfelo al interruptor de control
(fig. 2)
.
• Si el aparato seleccionado tiene su propio
interruptor de on/off, asegúrese de que está
encendido (on).
Page 9

4. MANEJO
MANEJO
El aparato conectado puede ahora manejarse a
través del mando a distancia llavero
(fig. 3)
.
• Cuando se oprime el (+) del botón, el
aparato seleccionado se enciende. Cuando
se oprime el (-) del botón, el aparato
seleccionado se vuelve a apagar.
– El interruptor de control tiene asignado por
defecto el código de unidad 1.
Con el mando a distancia llavero es posible
manejar más interruptores de control al mismo
tiempo. Cuando el interruptor de GRUPO del
mando a distancia llavero esté en la posición
ON, encenderá y apagará todo interruptor de
control cuyo propio interruptor de GRUPO esté
asimismo en la posición ON.
• Coloque el interruptor de GRUPO del mando
a distancia llavero en la posición ON.
• Coloque el interruptor de GRUPO del
interruptor de control en la posición ON.
– Todo interruptor de control cuyo interruptor
de GRUPO esté ahora en la posición ON
responderá ahora al mando a distancia
llavero. Cuando presione el (+) del botón,
todos los aparatos conectados a estos
interruptores de control se encenderán.
Cuando presione el (-) del botón, los
aparatos se apagarán de nuevo.
MANEJO MANUAL
El interruptor de control tiene un botón para
manejo manual. Esto significa que Vd. puede
seguir encendiendo y apagando su aparato sin
el mando a distancia llavero.
• Presione el botón de la parte de delante del
interruptor de control.
– El interruptor de control se enciende.
• Presione otra vez el botón de la parte de
delante del interruptor de control.
– El interruptor de control se apaga.
RECAMBIO DE LA PILA
Instale la pila en el mando a distancia llavero
como sigue
(fig. 1)
:
• Destornille la cubierta inferior del mando a
distancia llavero y retírela.
• Introduzca la pila en la unidad, teniendo
cuidado de que las polaridades (+ y -) del
compartimento y de la pila concuerden.
• Vuelva a colocar la cubierta, inserte los
tornillos y apriételos.
Notas:
•
Retire la pila cuando no vaya a utilizar el
mando a distancia llavero durante un largo
periodo de tiempo.
•
Renueve la pila al menos una vez al año. Si
nota que el alcance de transmisión del
mando se reduce drásticamente, sustituya
la pila inmediatamente.
•
Utilice sólo pilas originales PHILIPS 8LR932
cuando sustituya la pila del mando.
CAMBIAR EL CÓDIGO DOMÉSTICO
El código doméstico está diseñado para
prevenir posibles interferencias con el sistema
Power Control de su vecino. También hace
posible que Vd. pueda utilizar más de un
mando a distancia llavero para distintos
aparatos dentro y alrededor de su casa.
El sistema Power Control sólo responderá a
señales emitidas con el código doméstico
correcto.
Para cambiar el código doméstico
(fig. 4)
:
• Escoja un código doméstico (A, B o C, etc.)
de la tabla 1 y gire la rueda de selección de
código doméstico en la parte trasera del
interruptor de control hasta ese código
doméstico.
• Destornille la cubierta inferior del mando a
distancia llavero y retírela.
• Ajuste los interruptores del mando a
distancia llavero para que se correspondan
con el código doméstico escogido.
• Vuelva a colocar la cubierta, inserte los
tornillos y apriételos.
Nota:
El mando a distancia llavero NO puede
controlar el interruptor de control si el código
de unidad se ha cambiado a un número que no
sea el 1. De cualquier modo, es posible activar
más interruptores de control al mismo tiempo
seleccionando el código de unidad 1 en cada
interruptor de control.
9
SK303 page 9
Español
Page 10
1. EINFÜHRUNG
Herzlichen Glückwunsch zum Erwerb des
Philips Leistungsregelsystems (SBC SK303).
Dieses System enthält eine
Schlüsselanhänger-Fernbedienung (SBC
SR312) und einen Steckerschalter (SBC
SP370). Mit dem Leistungsregelsystem
können Sie elektrische Geräte (z.B. Lampen,
Kaffeemaschine, etc.) mit einer Nennleistung
von bis zu 1000 Watt in und um Ihr Haus mit
der Schlüsselanhänger-Fernbedienung ein- und
ausschalten.
Sie können die SchlüsselanhängerFernbedienung auch als GRUPPENSCHALTER
benutzen, um mehrere Steckerschalter
gleichzeitig zu schalten (alle EIN / alle AUS).
Bevor Sie ein Gerät an das
Leistungsregelsystem anschließen, lesen Sie
bitte dieses Dokument genau durch.
10
SK303 page 10
Deutsch
2. KURZÜBERSICHT
KURZÜBERSICHT
1.
Stecken Sie den Steckerschalter in eine Steckdose
(Abb. 2)
.
2.
Wählen Sie das Gerät aus, z.B. eine Lampe, die Sie schalten wollen, und
vergewissern Sie sich, daß seine Nennleistung 1000 Watt nicht
überschreitet. Stecken Sie den Gerätestecker in den Steckerschalter ein
(Abb. 2)
.
• Besitzt das ausgewählte Gerät einen eigenen Ein-/Aus-Schalter, prüfen
Sie, ob es eingeschaltet ist.
3.
Schalten Sie das Gerät mit der Schlüsselanhänger-Fernbedienung
(Abb. 3)
.
Wird die rechte Seite der Taste (+) gedrückt, wird das ausgewählte Gerät
eingeschaltet. Wird die linke Seite der Taste (-) gedrückt, wird das Gerät
ausgeschaltet.
Der Steckerschalter ist standardmäßig auf einen Einheitscode 1
eingestellt.
3. INSTALLATION
INSTALLATION
Bevor Sie Ihr Gerät mit der SchlüsselanhängerFernbedienung schalten können, müssen Sie
es an den Steckerschalter anschließen
(Abb. 2)
.
• Prüfen Sie, ob die Netzspannungsangabe
des Steckerschalters mit Ihrer lokalen
Netzspannung übereinstimmt. Ist dies nicht
der Fall, wenden Sie sich an Ihren Händler
oder Ihre Kundendienstorganisation.
• Wählen Sie das Gerät (z.B. eine Lampe) aus,
das Sie schalten möchten, vergewissern Sie
sich, daß seine Nennleistung 1000 Watt
nicht überschreitet, und stecken Sie den
Gerätestecker in den Steckerschalter
(Abb. 2)
.
• Besitzt das ausgewählte Gerät einen
eigenen Ein-/Aus-Schalter, prüfen Sie, ob es
eingeschaltet ist.
Page 11

4. BEDIENUNG
BEDIENUNG
Das angeschlossene Gerät kann jetzt mit der
Schlüsselanhänger-Fernbedienung geschaltet
werden
(Abb. 3)
.
• Wird die rechte Seite der Taste (+) gedrückt,
wird das ausgewählte Gerät eingeschaltet.
Wird die linke Seite der Taste (-) gedrückt,
wird das Gerät ausgeschaltet.
– Der Steckerschalter ist standardmäßig auf
den Einheitscode 1 eingestellt.
Mit der Schlüsselanhänger-Fernbedienung
können Sie gleichzeitig mehrere
Steckerschalter betätigen. Ist der Schalter
GROUP der Schlüsselanhänger-Fernbedienung
auf ON (ein) gestellt, werden aller
Steckerschalter ein- bzw. ausgeschaltet, deren
eigener GROUP Schalter auf ON (ein) steht.
• Stellen Sie den GROUP Schalter der
Schlüsselanhänger-Fernbedienung auf ON
(ein).
• Stellen Sie den GROUP Schalter auf der
Rückseite des Steckerschalters auf ON (ein).
– Jeder Steckerschalter, dessen GROUP
Schalter auf ON (ein) steht, reagiert jetzt auf
die Schlüsselanhänger-Fernbedienung. Wird
die rechte Seite der Taste (+) gedrückt,
werden alle an diese Steckerschalter
angeschlossenen Geräte eingeschaltet.
Wird die linke Seite der Taste (-) gedrückt,
werden alle Geräte wieder ausgeschaltet.
MANUELLES SCHALTEN
Der Steckerschalter besitzen eine Taste für
manuelles Schalten. Das heißt, Ihr Gerät kann
weiterhin auch ohne die SchlüsselanhängerFernbedienung ein- bzw. ausgeschaltet
werden.
• Drücken Sie die Taste auf der Vorderseite
des Steckerschalters einmal.
– Der Steckerschalter ist eingeschaltet.
• Drücken Sie die Taste auf der Vorderseite
des Steckerschalters erneut.
– Der Steckerschalter ist ausgeschaltet.
EINLEGEN DER BATTERIEN
Eine Batterie wie folgt in die
Schlüsselanhänger-Fernbedienung einlegen
(Abb. 1)
:
• Lösen Sie die Schrauben im Deckel auf der
Unterseite der SchlüsselanhängerFernbedienung und entfernen Sie den
Deckel.
• Legen Sie die Batterie in die Fernbedienung
ein. Achten Sie dabei darauf, daß die
Polaritäten der Batterie (+ und -) mit denen
im Batteriefach übereinstimmen.
• Legen Sie den Deckel wieder in die
Schlüsselanhänger-Fernbedienung ein,
setzen Sie die Schrauben ein und ziehen Sie
diese fest.
Anmerkungen:
•
Wird die Schlüsselanhänger-Fernbedienung
für längere Zeit nicht benutzt, nehmen Sie
bitte die Batterie aus der Fernbedienung.
•
Die Batterie der SchlüsselanhängerFernbedienung sollte jedes Jahr ersetzt
werden. Bemerken Sie, daß der
Übertragungsbereich der
Schlüsselanhänger-Fernbedienung stark
reduziert ist, ersetzen Sie die Batterie sofort.
•
Die Batterie nur durch eine Original PHILIPS
8LR932 Batterie ersetzen.
ÄNDERN DES HAUSCODE
Der Hauscode soll eine Interferenz mit dem
Leistungsregelsystem Ihres Nachbarn
verhindern. Er gestattet es Ihnen außerdem
auch, mehrere SchlüsselanhängerFernbedienungen für verschiedene Geräte in
und um Ihr Haus zu benutzen. Das
Leistungsregelsystem reagiert nur auf Signale
mit dem korrekten Hauscode.
Zum Ändern des Hauscode
(Abb. 4)
:
• Wählen Sie aus Tabelle 1 einen Hauscode
aus (A, B oder C, etc.) und drehen Sie das
Hauscode-Einstellrad auf der Rückseite des
Steckerschalters auf diesen Hauscode.
• Schrauben Sie den Deckel des Batteriefachs
auf der Rückseite der SchlüsselanhängerFernbedienung ab.
• Stellen Sie die Dip-Schalter der
Schlüsselanhänger-Fernbedienung auf den
ausgewählten Hauscode ein.
• Legen Sie den Deckel wieder in die
Schlüsselanhänger-Fernbedienung ein,
setzen Sie die Schrauben ein und ziehen Sie
diese fest.
Beachte:
Die Schlüsselanhänger-Fernbedienung kann
die Steckerschalter NICHT schalten, wenn der
Einheitscode auf eine andere Zahl als 1
eingestellt ist. Sie können jedoch mehrere
Steckerschalter gleichzeitig aktivieren, wenn
Sie an jedem Steckerschalter den
Einheitscode 1 einstellen.
11
SK303 page 11
Deutsch
Page 12

1. INLEIDING
Gefeliciteerd met de aanschaf van het Philipsschakelsysteem (SBC SK303).
Dit systeem bestaat uit één
sleutelhangerafstandsbediening (SBC SR312)
en één stekkerschakelaar (SBC SP370). Met
het schakelsysteem kunt u elk elektrisch
apparaat (bijvoorbeeld lampen,
koffiezetapparaat enzovoort) met een
vermogen tot 1000 watt in en om uw huis met
de sleutelhangerafstandsbediening bedienen.
U kunt de sleutelhangerafstandsbediening ook
als GROUP-schakelaar gebruiken zodat u
meerdere stekkerschakelaar tegelijk kunt
bedienen (All ON/All OFF).
Leest u deze gebruiksaanwijzing aandachtig
voor u een apparaat op het schakelsysteem
aansluit.
12
SK303 page 12
Nederland
s
2. VERKORTE HANDLEIDING
VERKORTE HANDLEIDING
1.
Steek de stekkerschakelaar in een stopcontact
(fig. 2)
.
2.
Kies het apparaat, bijvoorbeeld een lamp, dat u op afstand wilt bedienen controleer eerst of het vermogen van het apparaat niet hoger is dan 1000
watt - en steek de stekker van dit apparaat in de stekkerschakelaar
(fig. 2)
.
• Als het gekozen apparaat een eigen aan/uit-schakelaar heeft, zet deze
dan aan.
3.
Gebruik nu de sleutelhangerafstandsbediening om het apparaat te
bedienen
(fig. 3)
.
Als u op de (+) op de toets op de afstandsbediening drukt, dan gaat het
gekozen apparaat aan. Als u op de (-) op de toets drukt, dan gaat het
gekozen apparaat weer uit.
De stekkerschakelaar is standaard op schakelaarcode 1 ingesteld.
INSTALLATIE
Voor u uw apparaat met de
sleutelhangerafstandsbediening kunt
bedienen, moeten deze eerst aangesloten
worden op de stekkerschakelaar
(fig. 2)
.
• Controleer of de netspanning zoals
aangegeven op de stekkerschakelaar
overeenkomt met de plaatselijke
netspanning. Is dit niet het geval, neem dan
contact op met uw leverancier of met de
serviceorganisatie.
• Kies het apparaat, bijvoorbeeld een lamp,
dat u op afstand wilt bedienen - controleer
eerst of het vermogen van het apparaat niet
hoger is dan 1000 watt - en steek de stekker
van dit apparaat in de stekkerschakelaar
(fig. 2)
.
• Als het gekozen apparaat een eigen aan/uitschakelaar heeft, zet deze dan aan.
3. INSTALLATIE
Page 13

4. BEDIENING
BEDIENING
Het aangesloten apparaat kan nu met de
sleutelhangerafstandsbediening bediend
worden
(fig. 3)
.
• Als u op de (+) op de toets drukt, dan gaat
het apparaat aan. Als u op de (-) op de toets
drukt, dan gaat het apparaat weer uit.
– De stekkerschakelaar is standaard op
schakelaarcode 1 ingesteld.
Met de sleutelhangerafstandsbediening kunt u
ook meerdere stekkerschakelaars tegelijk
bedienen. Als de GROUP-schakelaar van de
sleutelhangerafstandsbediening op ON staat
dan wordt elke stekkerschakelaar waarvan de
eigen GROUP-schakelaar ook op ON staat
tegelijk in- en uitgeschakeld.
• Zet de GROUP-schakelaar van de
sleutelhangerafstandsbediening op ON.
• Zet de GROUP-schakelaar op de achterkant
van de stekkerschakelaar op ON.
– Elke stekkerschakelaar waarvan de GROUP-
schakelaar op ON staat reageert nu op de
sleutelhangerafstandsbediening. Als u op de
(+) op de toets drukt, dan gaan alle
apparaten die aangesloten zijn op deze
stekkerschakelaars aan. Als u op de (-) op de
toets drukt, dan gaan alle apparaten weer
uit.
HANDMATIGE BEDIENING
De stekkerschakelaar heeft een knop voor
handmatige bediening. Op die manier kan uw
apparaat ook zonder de
sleutelhangerafstandsbediening nog steeds
bediend worden.
• Druk eenmaal op de knop op de voorkant
van de stekkerschakelaar.
– De stekkerschakelaar schakelt in.
• Druk nog eenmaal op de knop op de
voorkant van de stekkerschakelaar.
– De stekkerschakelaar schakelt weer uit.
VERVANGEN VAN DE BATTERIJ
Plaats de bijgeleverde batterij als volgt in de
sleutelhangerafstandsbediening
(fig. 1)
:
• Schroef het batterijdeksel aan de onderkant
van de afstandsbediening los en verwijder
het deksel.
• Plaats de batterij in de afstandsbediening en
let erop dat de polariteit van de batterij
(+ en -) klopt met de aanduidingen binnenin
het batterijvak.
• Plaats het batterijdeksel terug in de
afstandsbediening, zet de schroeven terug
en schroef ze vast.
Opmerkingen:
•
Verwijder de batterij als u de
sleutelhangerafstandsbediening gedurende
langere tijd niet zult gebruiken.
•
De batterij van de sleutelhangerafstandsbediening moet tenminste eenmaal
per jaar vervangen worden. Als het
zendbereik van de afstandsbediening
beduidend minder wordt, vervang de batterij
dan meteen.
•
Gebruik bij vervanging enkel een originele
Philips-batterij, type 8LR932.
WIJZIGEN VAN DE HUISCODE
De huiscode is bedoeld om beïnvloeding door
het schakelsysteem van uw buren te
voorkomen. De huiscode zorgt er ook voor dat
u meerdere sleutelhangerafstandsbedieningen
voor verschillende toepassingen in en om uw
huis kunt gebruiken. Het schakelsysteem
reageert enkel op signalen met de juiste
huiscode.
Om de huiscode te wijzigen
(fig. 4)
:
• Kies een huiscode (A, B of C enzovoort) uit
tabel 1 en stel het huiscodeschijfje op de
achterkant van de stekkerschakelaar in op
die huiscode.
• Schroef het batterijdeksel op de achterkant
van de afstandsbediening los en verwijder
het deksel.
• Stel de dipschakelaars van de
sleutelhangerafstandsbediening zodanig in
dat deze overeenkomen met de gekozen
huiscode.
• Plaats het batterijdeksel terug in de
afstandsbediening, zet de schroeven terug
en schroef ze vast.
Opmerking:
U kunt de stekkerschakelaar NIET bedienen
met de sleutelhangerafstandsbediening
wanneer de schakelaarcode op een ander
cijfer ingesteld is dan 1. U kunt echter wel
meerdere stekkerschakelaars tegelijkertijd
activeren door de schakelaarcode van elke
stekkerschakelaar op 1 in te stellen.
13
SK303 page 13
Nederland
s
Page 14

1. INTRODUZIONE
Congratulazioni per avere acquistato il Power
Control System Philips (SBC SK303). Questo
sistema comprende un telecomando a
portachiavi (SBC SR312) ed un Interruttore di
accensione (SBC SP370). Con il Power Control
System è possibile azionare gli apparecchi
elettrici (ad es. lampade, macchine per il caffè,
ecc.) mediante telecomando, con una tensione
nominale di esercizio massima di 1000 Watt,
sia all’interno della casa che al di fuori di essa.
Il telecomando può anche essere utilizzato
come interruttore GROUP (di GRUPPO), per
azionare più interruttori di accensione
contemporaneamente (Tutti ON / Tutti OFF).
Prima di collegare un apparecchio al Power
Control System, leggere attentamente la
documentazione fornita.
14
SK303 page 14
Italiano
2. GUIDA RAPIDA
GUIDA RAPIDA
1.
Collegare l’Interruttore di accensione alla relativa presa d’alimentazione
(fig. 2)
.
2.
Selezionare l’apparecchio, ad es. una lampada, che si desidera
comandare a distanza, controllando che la sua tensione nominale non
superi i 1000 Watt, quindi eseguire il collegamento con l’Interruttore di
accensione
(fig. 2)
.
• Se l’apparecchio è dotato di un proprio interruttore ON/OFF (di
accensione/spegnimento), verificare che questo sia acceso.
3.
Usare il telecomando a portachiavi per azionare l’apparecchio
(fig. 3)
.
Se si preme il tasto (+) del telecomando, l’apparecchio selezionato si
accende. Se si preme il tasto (-), l’apparecchio selezionato si spegne
nuovamente.
L’Interruttore di accensione è impostato di default su un codice unità 1.
3. INSTALLAZIONE DELLE PILE
INSTALLAZIONE
Collegare l’apparecchio all’Interruttore di
accensione, prima di comandarlo a distanza
con il telecomando a portachiavi
(fig. 2)
.
• Controllare che la tensione di rete indicata
sull’Interruttore di accensione corrisponda
alla tensione di alimentazione locale. Se ciò
non dovesse essere, consultare il rivenditore
o il Servizio assistenza clienti.
• Selezionare l’apparecchio (ad es. una
lampada) che si desidera comandare a
distanza, controllando che la sua tensione
nominale non superi i 1000 Watt, quindi
eseguire il collegamento con l’Interruttore di
accensione
(fig. 2)
.
• Se l’apparecchio selezionato è dotato di un
proprio interruttore ON/OFF (di
accensione/spegnimento), verificare che
questo sia acceso.
Page 15

4. FUNZIONAMENTO
FUNZIONAMENTO
L’apparecchio collegato può ora essere
azionato mediante il telecomando a portachiavi
(fig.3)
.
• Se si preme il pulsante (+), l’apparecchio si
accende. Se si preme il pulsante (-),
l’apparecchio si spegne nuovamente.
– L’interrutore di accensione è impostato di
default su un codice unità 1.
Usando il telecomando a portachiavi, si
possono azionare più Interruttori di accensione
contemporaneamente. Se il tasto GROUP
(Gruppo) del telecomando è in posizione ON,
esso accenderà e spegnerà ogni Interruttore di
accensione, il cui tasto GROUP sia in posizione
ON.
• Impostare il tasto GROUP del telecomando
sulla posizione ON.
• Impostare il tasto GROUP sulla parte
posteriore dell’Interruttore di accensione
sulla posizione ON.
– Ogni Interruttore di accensione, il cui tasto
GROUP sia in posizione ON risponderà al
telecomando a distanza. Quando si preme il
simbolo (+) del pulsante, tutti gli apparecchi
collegati a quegli Interruttori di accensione si
accendono. Quando si preme il simbolo (-)
del pulsante, tutti gli apparecchi si spengono
nuovamente.
FUNZIONAMENTO MANUALE
L’Interruttore di accensione è dotato di un
pulsante per l’azionamento manuale. Ciò
significa che gli apparecchi possono essere
accesi e spenti anche senza il telecomando a
portachiavi
• Premere una volta il pulsante opposto
all’Interruttore di accensione.
– L’Interruttore di accensione si accende.
• Premere nuovamente il pulsante opposto
all’Interruttore di accensione.
– L’Interruttore di accensione si spegne.
SOSTITUZIONE DELLA BATTERIA
Installare una batteria nel telecomando a
portachiavi nel modo seguente
(fig. 1)
:
• Svitare la base del telecomando a
portachiavi e rimuoverla.
• Inserire la batteria nell’unità, controllando
bene che i poli della batteria (+ e -)
coincidano con quelli indicati all’interno del
comparto.
• Riposizionare la base del telecomando a
portachiavi, inserire le viti e serrarle.
Note:
•
Rimuovere la batteria se non si deve
utilizzare il telecomando per un lungo
periodo di tempo.
•
Sostituire la batteria nel telecomando
almeno una volta all’anno. Sostituire la
batteria immediatamente, se si nota una
notevole riduzione della portata di
trasmissione del telecomando.
•
Usare solo una batteria originale PHILIPS
8LR932 come batteria di ricambio del
telecomando.
VARIAZIONE DEL CODICE DI CASA
Il codice di casa ha lo scopo di evitare
interferenze con il Power Control System del
vicino. Esso, inoltre, consente di utilizzare più
telecomandi a portachiavi per applicazioni
diverse, sia all’interno della casa che al di fuori
di essa. Il Power Control System risponde solo
ai segnali con il codice di casa corretto.
Per variare il codice di casa
(fig. 4)
:
• Selezionare un codice di casa (A,B, o C,
ecc.) dalla tabella 1, quindi ruotare il
selettore dei codici di casa, posteriormente
all’Interruttore di accensione, portandolo sul
codice selezionato.
• Svitare il fondo del telecomando a
portachiavi e rimuoverlo.
• Regolare i commutatori del telecomando a
portachiavi, in modo che corrispondano al
codice di casa selezionato.
• Riposizionare il fondo del telecomando,
inserire le viti e serrarle.
Nota:
Il telecomando a portachiavi NON può
controllare l’Interruttore di accensione, se il
codice unità viene sostituito con un numero
diverso da 1. È possibile, tuttavia, attivare più
Interruttori di accensione
contemporaneamente, selezionandone il
codice unità 1 su ogni Interruttore di
accensione.
15
SK303 page 15
Italiano
Page 16

1. INTRODUÇÃO
Os nossos parabéns pela sua aquisição do
Sistema de Controlo Eléctrico Philips (SBC
SK303). Este sistema contém um comando à
distância de porta-chaves (SBC SR312) e um
interruptor de corrente (SBC SP370). Com o
Sistema de Controlo Eléctrico, poderá fazer
funcionar electrodomésticos (por ex.
candeeiros, máquinas de café, etc.) com uma
potência nominal máxima de 1000 Watts,
dentro de casa ou na respectiva periferia,
utilizando o comando à distância de portachaves.
Pode também utilizar o comando à distância
de porta-chaves como um interruptor de
GRUPO, o que lhe permite fazer funcionar
vários interruptores de corrente ao mesmo
tempo (Ligar Todos / Desligar Todos).
Antes de ligar um electrodoméstico ao
Sistema de Controlo Eléctrico, queira por favor
ler com atenção este folheto.
16
SK 303 page 16
Português
2. REFERÊNCIA RÁPIDA
REFERÊNCIA RÁPIDA
1.
Ligue o interruptor de corrente a uma tomada da rede
(fig. 2)
.
2.
Seleccione o electrodoméstico que deseja comandar (por ex. um
candeeiro), certificando-se de que a respectiva potência nominal não
excede 1000 Watts, e ligue-o ao interruptor de corrente
(fig. 2)
.
• Se o electrodoméstico em causa possui o seu próprio interruptor para
ligar/desligar, certifique-se de que ele está ligado.
3.
Utilize o comando à distância de porta-chaves para comandar o
electrodoméstico
(fig. 3)
.
Quando o (+) do botão do comando à distância é pressionado, o
electrodoméstico seleccionado é ligado. Quando o (-) do botão do
comando à distância é pressionado, o electrodoméstico seleccionado é
desligado outra vez.
O interruptor de corrente está definido por defeito para o código de
unidade 1.
3. INSTALAÇÃO
INSTALAÇÃO
Para que possa ser comandado com o
comando à distância de porta-chaves, é
preciso que o electrodoméstico seja primeiro
ligado ao interruptor de corrente
(fig. 2)
.
• Certifique-se de que a voltagem indicada no
interruptor de corrente corresponde à
voltagem da rede local. Se não
corresponder, consulte o seu concessionário
ou a organização encarregada da
assistência.
• Seleccione o electrodoméstico que deseja
comandar (por ex. um candeeiro),
certificando-se de que a respectiva potência
nominal não excede 1000 Watts, e ligue-o
ao interruptor de corrente
(fig. 2)
.
• Se o electrodoméstico em causa possui o
seu próprio interruptor para ligar/desligar,
certifique-se de que ele está ligado.
Page 17

4. OPERAÇÃO
FUNCIONAMENTO
É agora possível fazer funcionar o
electrodoméstico ligado utilizando o comando à
distância de porta-chaves
(fig. 3)
.
• Quando o (+) do botão do comando à
distância é pressionado, o electrodoméstico
seleccionado é ligado. Quando o (-) do botão
do comando à distância é pressionado, o
electrodoméstico seleccionado é desligado
outra vez.
– O interruptor de corrente está definido por
defeito para o código de unidade 1.
Com o comando à distância de porta-chaves, é
possível comandar mais interruptores de
corrente ao mesmo tempo. Quando o
interruptor de GROUP (Grupo) do comando à
distância de porta-chaves se encontra na
posição de ON (Ligado), liga e desliga qualquer
interruptor de corrente que tenha o seu próprio
interruptor de GROUP (Grupo) na posição de
Ligado.
• Coloque o interruptor de GROUP (Grupo) do
comando à distância de porta-chaves na
posição de Ligado.
• Coloque o interruptor de GROUP (Grupo) que
se encontra na parte de trás do interruptor de
corrente na posição de Ligado.
– Todos os interruptores de corrente que
tenham o seu próprio interruptor de GROUP
(Grupo) na posição de Ligado passarão agora
a responder ao comando à distância de portachaves. Quando o (+) do botão é pressionado,
todos os aparelhos ligados a esses
interruptores de corrente são ligados. Quando
o (-) do botão é pressionado, os aparelhos
desligam-se outra vez.
FUNCIONAMENTO MANUAL
O interruptor de corrente tem um botão para
funcionamento manual. Isto significa que
continua a poder ligar e desligar os seus
electrodomésticos sem o comando à distância
de porta-chaves.
• Pressione uma vez o botão que se encontra
na frente do interruptor de corrente.
– O interruptor de corrente é ligado.
• Pressione uma vez mais o botão que se
encontra na frente do interruptor de corrente.
– O interruptor de corrente é desligado.
SUBSTITUIÇÃO DAS PILHAS
Coloque uma pilha no comando à distância de
porta-chaves da seguinte forma
(fig. 1)
:
• Desaparafuse a tampa inferior do comando à
distância de porta-chaves e tire a tampa.
• Introduza a pilha na unidade, certificando-se
cuidadosamente de que os pólos da pilha (+ e
-) ficam nas posições correspondentes
marcadas dentro do compartimento.
• Coloque a tampa inferior no comando,
coloque os parafusos e aperte-os.
Notas:
•
Tire a pilha do comando sempre que este não
vá ser utilizado por um período de tempo
longo.
•
Substitua a pilha do comando pelo menos
uma vez por ano. Se notar que o alcance de
transmissão do comando se reduziu
drasticamente, substitua imediatamente a
pilha.
•
Utilize apenas uma pilha original PHILIPS
8LR932 quando substituir a pilha do comando
à distância.
MUDAR O CÓDIGO DE CASA
O código de casa destina-se a evitar
interferência com o Sistema de Controlo
Eléctrico dos seus vizinhos. Permite-lhe
também usar mais comandos à distância de
porta-chaves para diferentes aplicações dentro
de casa e na respectiva periferia.
O Sistema de Controlo Eléctrico só responderá
aos sinais que tenham o código de casa
correcto. Para mudar o código da casa
(fig. 4)
:
• Escolha um dos códigos de casa (A, B, ou C,
etc.) da tabela 1 e faça rodar a roda de
selecção do código de casa que se encontra
na parte de trás do interruptor de corrente
para este código.
• Desaparafuse a tampa inferior do comando à
distância de porta-chaves e tire a tampa.
• Defina os interruptores DIP do comando à
distância de porta-chaves por forma a fazê-los
corresponder ao código de casa escolhido.
• Coloque a tampa inferior no comando à
distância, coloque os parafusos e aperte-os.
Nota:
O comando à distância de porta-chaves NÃO
pode comandar o interruptor de corrente
quando o código de unidade é alterado para um
número diferente de 1. É, no entanto, possível
activar mais interruptores de corrente ao
mesmo tempo seleccionando o código de
unidade 1 em cada um dos interruptores de
corrente.
17
SK 303 page 17
Português
Page 18

1. ΕIΣΑΓΩΓΗ
Κάνατε µια πολύ καλή επιλογή αγοράζοντασ αυτ το
Σύστηµα ελέγχου συσκευών τησ Philips (SBC
SK303). Το σύστηµα αυτ περιλαµβάνει ένα
τηλεχειριστήριο-µπρελκ (SBC SR312) και ένα
διακπτη λειτουργίασ (SBC SP370). Με το Σύστηµα
ελέγχου συσκευών µπορείτε να βάλετε σε
λειτουργία ηλεκτρικέσ συσκευέσ (π.χ. λάµπεσ,
καφετιέρα κλπ.) ισχύοσ µέχρι 1000 Watts, µέσα και
έξω απ το σπίτι σασ µε τη βοήθεια του
τηλεχειριστηρίου-µπρελκ.
Μπορείτε επίσησ να χρησιµοποιήσετε το
τηλεχειριστήριο-µπρελκ σαν Κεντρικ (GROUP)
διακπτη, για να βάζετε σε λειτουργία διάφορεσ
συσκευέσ ταυτχρονα (ALL ON / ALL OFF).
Πριν συνδέσετε µια συσκευή στο Σύστηµα ελέγχου
συσκευών, διαβάστε προσεχτικά αυτ το φυλλάδιο.
18
SK303 page 18
Έλληνικά
2. ΣΥΝΤΟΜΗ ΠΕΡIΓΡΑΦΗ
ΣΥΝΤΟΜΗ ΠΕΡIΓΡΑΦΗ
1.
Βάλτε το διακπτη Power στην πρίζα (εικ.2).
2.
Επιλέξτε τη συσκευή, π.χ. µια λάµπα, που θέλετε να λειτουργίσετε και η οποία
δεν ξεπερνά τα 1000 Watts, και συνδέστε τη µε το διακπτη Power (εικ.2).
•
Αν η επιλεγµένη συσκευή έχει τον δικ τησ ON/OFF διακπτη, βεβαιωθείτε
τι αυτσ βρίσκεται στη θέση ΟΝ.
3.
Χρησιµοποιήστε το τηλεχειριστήριο-µπρελκ για να βάλετε σε λειτουργία τη
συσκευή (εικ.3). Πιέζοντασ το σήµα (+) του πλήκτρου του τηλεχειριστηρίου, η
επιλεγµένη συσκευή ανάβει. Πιέζοντασ το σήµα (-), η συσκευή ξανασβύνει. Ο
διακπτησ Power έχει κωδικ 1.
3. ΕΓΚΑΤΑΣΤΑΣΗ
ΕΓΚΑΤΑΣΤΑΣΗ
Η συσκευή που επιλέξατε θα πρέπει είναι
συνδεδεµένη µε το διακπτη Power για να τη
βάλετε σε λειτουργία µε το τηλεχειριστήριοµπρελκ (εικ.2).
•
Ελέγξτε αν η παροχή ρεύµατοσ του διακπτη
Τάσεωσ ανταποκρίνεται στην παροχή ρεύµατοσ
τησ περιοχήσ σασ. Αν χι, συµβουλευτείτε τον
αντιπρσωπο αγοράσ ή σέρβισ.
•
Επιλέξτε τη συσκευή, π.χ. µια λάµπα, που θέλετε
να λειτουργίσετε και η οποία δεν ξεπερνά τα 1000
Watts, και συνδέστε τη µε το διακπτη Power
(εικ.2).
•
Αν η επιλεγµένη συσκευή έχει τον δικ τησ
ON/OFF διακπτη, βεβαιωθείτε τι αυτσ
βρίσκεται στη θέση ΟΝ.
Page 19

4. ΛΕIΤΟΥΡΓIΑ
ΛΕIΤΟΥΡΓIΑ
Η συνδεδεµένη συσκευή µπορεί τώρα να τεθεί σε
λειτουργία µε το τηλεχειριστήριο-µπρελκ (εικ.3).
•
Πιέζοντασ το σήµα (+) του πλήκτρου του
τηλεχειριστηρίου, η επιλεγµένη συσκευή ανάβει.
Πιέζοντασ το σήµα (-), η συσκευή ξανασβύνει.
–
Ο διακπτησ Power έχει κωδικ 1.
Με το τηλεχειριστήριο-µπρελκ µπορείτε να
χειριστείτε περισστερουσ διακπτεσ Power
ταυτχρονα. ταν ο διακπτησ GROUP του
τηλεχειριστηρίου βρίσκεται στη θέση ΟΝ, κάθε
διακπτησ Τάσεωσ του οποίου ο διακπτησ GROUP
βρίσκεται επίσησ στη θέση ΟΝ θα ανάψει.
•
Τοποθετείστε το διακπτη GROUP του
τηλεχειριστηρίου-µπρελκ στη θέση ΟΝ.
•
Τοποθετείστε το διακπτη GROUP, που βρίσκεται
στο πίσω µέροσ του διακπτη Τάσεωσ, στη θέση
ΟΝ.
–
Κάθε διακπτησ Τάσεωσ του οποίου ο διακπτησ
GROUP βρίσκεται στη θέση ΟΝ, θα
ανταποκρίνεται τώρα στο τηλεχειριστήριοµπρελκ. Πιέζοντασ το σήµα (+) του πλήκτρου,
λεσ οι συσκευέσ που είναι συνδεδεµένεσ σ’
αυτούσ τουσ διακπτεσ θα ανάψουν. Πιέζοντασ το
σήµα (-) του πλήκτρου, οι συσκευέσ ξανασβύνουν.
ΧΕΙΡΟΚΊΝΗΤΗ ΛΕIΤΟΥΡΓIΑ
Ο διακπτησ Τάσεωσ διαθέτει ένα πλήκτρο για
χειροκίνητη λειτουργία. Αυτ συµαίνει τι µπορείτε
να ανάψετε ή να σβύσετε τη συσκευή χωρίσ το
τηλεχειριστήριο-µπρελκ.
•
Πιέστε µια φορά το κουµπί που βρίσκεται
µπροστά απ το διακπτη λειτουργίασ.
–
Ο διακπτησ λειτουργίασ ανάβει.
•
Πιέστε ακµη µια φορά το κουµπί που βρίσκεται
µπροστά απ το διακπτη Τάσεωσ
–
Ο διακπτησ Τάσεωσ σβύνει.
ΤΟΠΟΘΕΤΗΣΗ ΜΠΑΤΑΡIΩΝ
Για να τοποθετείστε µια µπαταρία στο
τηλεχειριστήριο-µπρελκ (εικ. 2):
•
Ξεβιδώστε το κάτω κάλυµµα του
τηλεχειριστηρίου-µπρελκ και ανοίξτε το.
•
Τοποθετείστε τη µπαταρία, ελέγχοντασ αν οι
πλοι τησ (+ και -) ταιριάζουν µε αυτούσ στο
εσωτερικ τησ θήκησ.
•
Επανατοποθετείστε το κάτω κάλυµα στο
τηλεχειριστήριο-µπρελκ, βάλτε τισ βίδεσ και
ασφαλίστε.
Σηµειώσεισ:
•
Αποσύρετε τη µπαταρία ταν το τηλεχειριστήριοµπρελκ δεν πρκειται να χρησιµοποιηθεί για
αρκετ καιρ.
•
Αντικαταστείστε τη µπαταρία του
τηλεχειριστηρίου-µπρελκ τουλάχιστον µια φορά
το χρνο. Αν παρατηρήσετε σηµαντική µείωση
τησ ακτίνασ µετάδοσησ του τηλεχειριστηρίουµπρελκ, αντικαταστείστε τη µπαταρία αµέσωσ.
•
Χρησιµοποιείστε µνο µια αυθεντική µπαταρία
PHILIPS 8LR932 για την αντικατάσταση τησ
µπαταρίασ του τηλεχειριστηρίου.
ΑΛΛΑΓΗ ΤΟΥ ΑΤΟΜIΚΟΥ ΚΩ∆IΚΑ
Ο ατοµικσ κώδικασ έχει σχεδιαστεί ώστε να
αποφευχθεί η επίδραση µε το Σύστηµα ελέγχου
συσκευών του γείτονά σασ. Σασ επιτρέπει επίσησ να
χρησιµοποιήσετε περισστερα τηλεχειριστήριαµπρελκ για διάφορεσ συσκευέσ µέσα και γύρω απ
το σπίτι σασ.
Το Σύστηµα ελέγχου συσκευών θα ανταποκρίνεται
µνο στα σήµατα µε το σωστ ατοµικ κωδικ. Για
να αλλάξετε τον ατοµικ κωδικ (εικ. 4) :
•
Επιλέξτε ένα ατοµικ κωδικ (A, B ή C, κλπ.) απ
τον πίνακα 1, και γυρίστε τον επιλογέα ατοµικού
κωδικού στο πίσω µέροσ του διακπτη στον
συγκεκριµένο ατοµικ κωδικ.
•
Ξεβιδώστε το κάτω κάλυµµα του
τηλεχειριστηρίου-µπρελκ και ανοίξτε το.
•
Θέστε τουσ διακπτεσ του τηλεχειριστηρίουµπρελκ ώστε ενα ανταποκρίνονται στον
επιλεγµένο ατοµικ κωδικ.
•
Επανατοποθετείστε το κάτω κάλυµα στο
τηλεχειριστήριο-µπρελκ, βάλτε τισ βίδεσ και
ασφαλίστε.
Σηµείωση:
Το τηλεχειριστήριο-µπρελκ ∆ΕΝ µπορεί να θέσει
σε λειτουργία το διακπτη ταν ο κωδικσ µονάδασ
έχει µετατραπεί σε άλλο αριθµ εκτσ του 1.
Ωστσο, είναι δυνατν να ενεργοποιήσετε
περισστερουσ διακπτεσ Τάσεωσ ταυτχρονα εάν
επιλέξετε κωδικ µονάδασ 1 σε κάθε διακπτη
Τάσεωσ
19
SK303 page 19
Έλληνικά
Page 20

Tack för att du köpt ett Philips
fjärrströmbrytarsystem (SBC SK303). Detta
system har en fjärrkontroll i nyckelringsform
(SBC SR312) och en strömbrytare (SBC
SP370). Med fjärrströmbrytarsystemet kan du
styra elektriska apparater (t.ex. lampor,
kaffemaskiner etc.) med nominell märkström
upp till 1000 watt i och runt hemmet via
nyckelringskontrollen.
Du kan också använda nyckelringskontrollen
som en GRUPP-strömbrytare, vilket gör att du
kan styra flera strömbrytare samtidigt (Alla PÅ /
Alla AV).
Innan du ansluter en apparat till
fjärrströmbrytarsystemet, läs detta dokument
noga.
20
SK303. page 20
Svenska
SNABBREFERENS
1.
Anslut strömbrytaren till ett eluttag
(fig. 2)
.
2.
Välj apparaten, t.ex. en lampa, som du vill styra, kontrollera att dess
nominella märkström inte överstiger 1000 watt, och anslut den till
strömbrytaren
(fig. 2)
.
•Om den valda apparaten har sin egen PÅ/AV-strömbrytare, kontrollera
att den är påslagen.
3.
Använd nyckelringskontrollen för att styra apparaten
(fig. 3)
.
När (+) på knappen trycks in, slås de valda apparaterna på. När (-) på
knappen trycks in, stängs de valda apparaterna av.
Strömbrytaren är som standard inställd på enhetskod 1.
ISÄTTNING AV BATTERIER
Apparaten måste vara ansluten till
strömbrytaren innan du kan styra den med
nyckelringskontrollen
(fig. 2)
.
• Kontrollera att nätspänningen som anges på
strömbrytaren motsvarar den lokala
nätspänningen. Om den inte gör det bör du
kontakta återförsäljaren eller en
serviceorganisation.
• Välj apparaten (t.ex. en lampa) som du vill
styra, kontrollera att dess nominella
märkström inte överstiger 1000 watt, och
anslut den till strömbrytaren
(fig. 2)
.
• Om den valda apparaten har sin egen
PÅ/AV-strömbrytare, kontrollera att den är
påslagen.
2. SNABBREFERENS
3. INSTALLATION
1. INLEDNING
Page 21

4. ANVÄNDNING
ANVÄNDNING
Den anslutna apparaten kan nu styras via
nyckelringskontrollen
(fig. 3)
.
• När (+) på knappen trycks in, slås apparaten på.
När (-) på knappen trycks in, stängs apparaten
av.
– Strömbrytaren är som standard inställd på
enhetskod 1.
Med nyckelringskontrollen är det möjligt att styra
flera strömbrytare samtidigt. När GRUPPströmbrytaren på nyckelringskontrollen är i läget
PÅ, slår den på och av alla strömbrytare vars
GRUPP-strömbrytare är i läget PÅ.
• Ställ in GRUPP-strömbrytaren på
nyckelringskontrollen i läget PÅ.
• Ställ in GRUPP-strömbrytaren på baksidan av
strömbrytaren i läget PÅ.
– Varje strömbrytare vars GRUPP-strömbrytare är
i läget PÅ, reagerar nu på nyckelringskontrollen.
När (+) på knappen trycks in, slås alla apparater
som är anslutna till dessa strömbrytare på. När
(-) på knappen trycks in, stängs apparaterna av
igen.
MANUELL ANVÄNDNING
Strömbrytaren har en knapp för manuell drift. Det
betyder att du fortfarande kan slå av och på
apparaten utan nyckelringskontrollen.
• Tryck på knappen på strömbrytarens framsida.
– Strömbrytaren slås på.
• Tryck på knappen på strömbrytarens framsida
igen.
– Strömbrytaren stängs av.
BATTERIBYTE
Montera ett batteri i nyckelringskontrollen på
följande sätt
(fig. 1)
:
• Skruva loss undersidan på
nyckelringskontrollen och ta bort.
• Sätt in batteriet i enheten, kontrollera noga att
batteriets polaritet (+ och -) motsvarar det som
anges i batterifacket.
• Sätt tillbaks undersidan på
nyckelringskontrollen, för in skruvarna och dra
åt dem.
Anmärkningar:
• Ta ut batteriet om nyckelringskontrollen inte
kommer att användas på en längre tid.
• Byt ut batteriet i nyckelringskontrollen minst en
gång om året. Om du observerar att
nyckelringskontrollens sändningsområde
minskar avsevärt, ska batteriet bytas
omedelbart.
•
Använd enbart ett PHILIPS 8LR932
originalbatteri när du byter batteriet i
nyckelringskontrollen.
BYTA HUSKOD
Huskoden är utformad för att förhindra störningar
från din grannes fjärrströmbrytarsystem. Den gör
också att du kan använda fler nyckelringskontroller
för olika funktioner i och runtomkring hemmet.
Fjärrströmbrytarsystemet reagerar endast på
signaler med rätt huskod. För att byta huskod
(fig. 4)
:
• Välj en huskod (A, B, eller C, etc) i tabell 1, och
vrid huskodsväljaren på strömbrytarens baksida
till denna huskod.
• Skruva loss undersidan på
nyckelringskontrollen och ta bort.
• Ställ in byglarna på nyckelringskontrollen så att
de motsvarar den valda huskoden.
• Sätt tillbaks undersidan på
nyckelringskontrollen, för in skruvarna och dra
åt dem.
Anmärkning:
Nyckelringskontrollen kan INTE styra
strömbrytaren om enhetskoden ändras till ett
annat nummer än 1. Det går dock att aktivera flera
strömbrytare samtidigt genom att välja enhetskod
1 på varje strömbrytare.
21
SK303page 21
Svenska
Page 22

1. WSTÊP
Gratulujemy zakupu systemu kontroli zasilania
Philips Power Control System (SBC SK303).
System ten sk¬ada siê z pilota zdalnego
sterowania do zaczepienia na bryloku na klucze
(SBC SR312) oraz z jednego wyŒcznika
zasilania (SBC SP370). Za pomocå zdalnie
sterowanego systemu kontroli zasilania mo¿na
obs¬ugiwaæ urzådzenia elektryczne (np. lampy,
ekspresy do kawy itd.) o mocy do 1000 Wat w
domu i w jego pobli¿u przy u¿yciu pilota.
Mo¿na równie¿ u¿ywaæ pilota jako wy¬åcznika
GROUP, co pozwala na korzystanie z kilku
wy¬åczników zasilania równoczeœnie (ALL ON /
All OFF).
Przed pod¬åczeniem urzådzenia do systemu
kontroli zasilania nale¿y uwa¿nie zapoznaæ siê z
niniejszå instrukcjå.
22
Sk303 page 22
Polski
2. KRÓTKA INFORMACJA
3. INSTALACJA
1. PodŒcz wyŒcznik zasilania do sieci (rysunek 2).
2. Wybierz urzådzenie z którego chcesz korzystaæ, np. lampê, upewnij siê, ¿e
jego moc nie przekracza 1000 Wat i w¬ó¿ jego wtyczkê do wy¬åcznika
zasilania (rysunek 2).
• Je¿eli wybrane urzådzenie ma w¬asny wy¬åcznik mocy ON/OFF, upewnij
siê, ¿e jest on w¬åczony.
3. U¿ywaj pilota do ob¬sugi urzådzeñ (rysunek 3).
Je¿eli prawa strona (+) przycisku jest wciœniêta, wybrane urzådzenie
w¬åcza siê. Je¿eli lewa strona (-) przycisku jest wciœniêta, wybrane
urzådzenie ponownie siê w¬yåcza.
Kod wyŒcznika zasilania ustawiony jest standardowo w pozycji 1.
Urzådzenie mo¿na obs¬ugiwaæ za pomocå pilota
po podŒczeniu go do wyŒcznika zasilania
(rysunek 2).
• Upewnij siê, czy napiêcie sieciowe, jak
oznaczono na wyŒczniku zasilania
odpowiada miejscowemu napiêciu
sieciowemu. Je¿eli nie odpowiada,
skontaktuj siê ze sprzedawcå lub punktem
serwisowym.
• Wybierz urzådzenie z którego chcesz
korzystaæ, np. lampê, upewnij siê, ¿e jego
moc nie przekracza 1000 Wat i w¬ó¿ jego
wtyczkê do wy¬åcznika zasilania (rysunek 2).
• Je¿eli wybrane urzådzenie ma w¬asny
wy¬åcznik mocy ON/OFF, upewnij siê, ¿e jest
on wŒczony.
Page 23

4. OBS£UGA
OBS£UGA
Pod¬åczone urzådzenie mo¿e byæ teraz
obs¬ugiwane za pomocå pilota (rysunek 3).
• Je¿eli prawa strona (+) przycisku jest
wciœniêta, wybrane urzådzenie w¬åcza siê.
Je¿eli lewa strona (-) przycisku jest
wciœniêta, wybrane urzådzenie ponownie siê
wyŒcza.
РKod wyŒcznika zasilania ustawiony jest
standardowo w pozycji 1.
Za pomocå pilota mo¿liwe jest obsugiwanie
wiêkszej iloœci wy¬åczników zasilania
równoczeœnie. Je¿eli wy¬åcznik GROUP na
pilocie ustawiony jest w pozycji ON (wŒczony),
bêdzie on w¬åcza i wy¬åcza ka¿dy wy¬åcznik
zasilania, którego w¬asny wy¬åcznik GROUP
ustawiony jest w pozycji ON (wŒczony).
• Ustaw wy¬åcznik GROUP na pilocie w pozycji
ON (wŒczony).
• Ustaw wy¬åcznik GROUP na tylnej stronie
wyŒcznika zasilania w pozycji ON (wŒczony).
– Ka¿dy wyåcznik zasilania, którego wy¬åcznik
GROUP jest w pozycji ON (w¬åczony) bêdzie
teraz reagowaæ na pilot. Je¿eli prawa strona
(+) przycisku jest wciœniêta, wszystkie
urzådzenia pod¬åczone do wy¬åczników
zasilania w¬åczå siê. Je¿eli lewa strona (-)
przycisku jest wciœniêta, urzådzenia
ponownie siê wy¬åczå.
OBS£UGA RÊCZNA
Wy¬åcznik zasilania posiada przycisk do obs¬ugi
rêcznej. Oznacza to, ¿e urzådzenie mo¿e byæ
równie¿ w¬åczane i wy¬åczane bez u¿ycia pilota.
• Wciœnij raz przycisk znajdujåcy siê na
przedniej stronie wyŒcznika zasilania.
– Wy¬åcznik zasilania w¬åczy siê.
• Wciœnij powtórnie przycisk znajdujåcy siê na
przedniej stronie wyŒcznika zasilania.
– Wy¬åcznik zasilania wy¬åczy siê.
WYMIANA BATERII
W¬ó¿ baterie do pilota w nastêpujåcy sposób
(rysunek 1) :
• Odkrêæ œrubki przytrzymujåce dolne wieczko
pilota i zdejmij wieczko.
• W¬ó¿ baterie, sprawdzajåc przy tym czy
wskaŸniki biegunowoœci baterii (+ i -)
zgadzajå siê ze wskaŸnikami wewnåtrz
pojemnika.
• Umieœæ dolne wieczko na pilocie, w¬ó¿ œrubki
i przykrêæ je.
Uwaga:
• Wyciågnij baterie je¿eli nie zamierzasz
u¿ywaæ pilota przez d¬u¿szy okres czasu.
• Baterie w pilocie nale¿y wymieniaæ
przynajmniej raz w roku. Je¿eli zasiêg
transmisji pilota drastycznie siê zmiejszy,
nale¿y natychmiast wymieniæ baterie.
• U¿ywaj jedynie oryginalnych baterii PHILIPS
8LR932 przy wymianie baterii pilota.
ZMIANA KODU DOMOWEGO
Kod domowy s¬u¿y zapobieganiu zak¬óceñ z
systemem kontroli zasilania twojego såsiada.
Umo¿liwia on równie¿ korzystanie z wiêkszej
iloœci pilotów dla ró¿nych zastosowañ w domu i
w jego pobli¿u.
System kontroli zasilania bêdzie jedynie
reagowaæ na sygna¬y o prawid¬owym kodzie
domowym. Aby zmieniæ kod domowy
(rysunek 4) :
• Wybierz kod domowy (A, B, lub C itd.) z
tablicy 1 i obróæ kó¬ko wyboru kodu
domowego, znajdujåce siê na tylnej stronie
wyŒcznika zasilania na ten kod domowy.
• Odkrêæ œrubki zamykajåce dolne wieczko
pilota i zdejmij wieczko.
• Ustaw prze¬åczniki na pilocie tak, aby
odpowiaday one wybranemu kodowi
domowemu.
• Umieœæ dolne wieczko na pilocie, w¬ó¿ œrubki
i przykrêæ je.
Uwaga:
Pilota NIE mo¿na u¿ywaæ do obsugi wy¬åcznika
zasilania, je¿eli kod jednostkowy zosta¬
zmieniony na cyfrê innå ni¿ 1. Nie mniej jednak,
mo¿liwe jest uaktywnienie wiêkszej iloœci
wy¬åczników zasilania równoczeœnie,
wybierajåc kod jednostkowy 1 na ka¿dym
wyŒczniku zasilania.
23
Sk303 page 23
Polski
Page 24

1. INNLEDNING
Du er nå eier av et nytt Philips
strømkontrollsystem (Power Control System)
(SBC SK303). Systemet omfatter en nøkkelring
med fjernstyring (SBC SR312) og en
strømtilførselsbryter (SBC SP370). Ved å bruke
strømkontrollsystemet kan du betjene
elektriske husholdningsapparater (f.eks.
lamper, kaffetraktere osv.) med et
effektforbruk opp til 1000 Watt i huset via en
nøkkelring med fjernkontroll.
Du kan også bruke nøkkelringen med
fjernkontroll som GRUPPE-bryter for å gjøre
det mulig å betjene flere strømbrytere
samtidig ALL ON/ ALL OFF (Alle AV / Alle PÅ).
Før du kopler husholdningsapparater til
strømkontrollsystemet, les nøye gjennom
veiledningen nedenfor.
24
SK303 page 24
Norsk
2. HURTIGREFERANSE
3. INSTALLASJON
HURTIGREFERANSE
1.
Kople strømbryteren til uttaket på hovedstrømtilførselen
(fig. 2)
.
2.
Velg husholdningsapparatet som skal styres, f.eks. en lampe, men
forsikre deg om at den ikke overskrider 1000 Watt. Plugg den til
strømkontrollbryteren
(fig. 2)
.
– Hvis apparatet du velger har egen ON/OFF (AV/PÅ)-bryter, se etter at den
er slått på.
3.
Bruk nøkkelringen med fjernkontroll for å betjene husholdningsapparatet
(fig. 3)
.
Når + (pluss) på fjernkontrollen trykkes, vil husholdningsapparatet slå seg
på. Når - (minus) på fjernkontrollen trykkes, vil det valgte apparatet slå
seg av igjen.
Strømkontrollbryteren er innstilt på enhetskode 1 som standard.
INSTALLASJON
Husholdningsapparatet ditt må være tilkoplet
strømkontrollbryteren før du kan styre den
med fjernkontrollen på nøkkelringen
(fig. 2)
.
• Kontroller at spenning for hovedstrøm som
vises på strømkontrollbryteren
korresponderer med spenningen på
strømtilførselen på stedet. Hvis ikke, rådfør
deg med forhandleren eller
servicerepresentanten.
• Velg et husholdningsapparat (f.eks. lampe)
som du ønsker å styre, men forsikre deg om
at effektforbruket ikke overskrider 1000
Watt. Plugg det til strømkontrollbryteren
(fig. 2)
.
• Hvis apparatet som du velger har egen
AV/PÅ-bryter, pass på at den er slått på.
Page 25

4. BETJENING
BETJENING
Husholdningapparatet som er tilkoplet kan nå
betjenes via nøkkelringens fjernkontroll
(fig.3)
.
• Når + (pluss) på knappen trykkes, vil
husholdningsapparatet slå seg på. Når - på
knappen trykkes, vil apparatet slå seg av
igjen.
– Strømkontrollbryteren er innstilt på
enhetskoden 1 som standard.
Fjernkontrollen på nøkkelringen gjør det mulig
å styre flere strømkontrollbrytere samtidig. Når
GROUP (Gruppe)-bryteren på fjernkontrollen er
ON (På), vil den slå alle strømkontrollbrytere
for den gruppen av og på når GROUP
(Gruppe)-bryteren er ON (På).
• Sett GROUP (Gruppe)-bryter for nøkkelring
med fjernkontroll ON (På).
• Sett GROUP (Gruppe)-bryteren bak på
strømkontrollbryteren ON (På).
– GROUP (Gruppe)-bryteren som er ON (På)
for hver strømkontrollbryter, vil nå reagere
på nøkkelringen med fjenkontroll. Når +
(pluss) på fjernkontrollen trykkes, vil alle
husholdningsapparater som er koplet til
disse strømkontrollbryterne slå seg på. Når (minus) på fjernkontrollen trykkes, vil alle
husholdningsapparater som er koplet til
disse strømkontrollbryterne slå seg av igjen.
MANUELL BETJENING
Strømkontrollbryteren har en knapp for
manuell drift. Funksjonen gjør det fremdeles
mulig å slå husholdningsapparatet av og på
uten å bruke nøkkelringen med fjernkontroll.
• Trykk på knappen foran på
strømkontrollbryteren én gang.
– Strømkontrollbryteren slår seg på.
• Trykk på knappen foran på
strømkontrollbryteren én gang til.
– Strømkontrollbryteren slår seg av.
UTSKIFTING AV BATTERI
Sett batteriet i nøkkelringen med fjernkontroll
på følgende måte
(fig. 1)
:
• Skru av dekselet i bunnen på nøkkelringens
fjernkontroll og ta det ut.
• Sett batteriet inn i enheten. Vær nøye med
at batteripolene (+ og -) samsvarer med
kontaktene innvendig i fjernkontrollen.
• Plasser batteriet mot dekselet i bunnen over
nøkkelringens fjernkontroll, sett skruene på
plass og skru fast.
Anmerkninger:
•
Demonter batteriet når nøkkelringen med
fjernkontroll ikke skal brukes i lengre
perioder.
•
Skift batteriet i fjernkontrollen minst én gang
i året. Hvis du merker a rekkevidden på
overføringen av fjernkontrollen reduseres
drastisk, skal batteriet skiftes omgående.
•
Bruk kun et originalbatteri av typen PHILIPS
8LR932 ved utskifting.
FORANDRING AV HUSKODE
Huskoden er laget for å hindre forstyrrelse av
naboens strømkontrollsystem. Dette gjør det
også mulig for deg å bruke flere fjernkontroller
med forskjellige bruksområder inne i huset
ditt. Strømkontrollsystemet vil kun reagere på
signaler med korrekt huskode. Huskoden
forandres på følgende måte
(fig. 4)
:
• Velg en huskode (A,B eller C, osv.) fra tabell
1, og drei velgerskiven bak på
strømkontrollbryteren til huskoden.
• Skru løst dekselet i bunnen på nøkkelringens
fjernkontroll og ta det av.
• Innstill omskifterne på fjernkontrollen slik at
de korresponderer med valgt huskode.
• Plasser batteriet mot dekselet i bunnen over
nøkkelringens fjernkontroll, sett skruene på
plass og skru fast.
Merk:
Nøkkelring med fjernkontroll kan IKKE styre
strømkontrollbryteren når enhetskoden
forandres til et nummer som er forskjellig fra
1. Det er imidlertid mulig å aktivere flere
strømkontrollbrytere samtidig ved å velge
enhetskoden 1 på hver strømkontrollbryter.
25
SK303page 25
Norsk
Page 26

1. JOHDANTO
Onnittelemme sinua Philips Power Control
System -virransäätöjärjestelmän (SBC SK303)
hankinnasta. Tämä järjestelmä koostuu
kaukosäätimestä (SBC SR312) ja
virtakytkimesta (SBC SP370). Tämän
virransäätöjärjestelmän avulla voit
kaukosäätimellä käyttää kotonasi sekä sisällä
että pihalla erilaisia sähkölaitteita (esim.
lamppuja, kahvinkeittimiä yms.), joiden
nimellisteho on korkeintaan 1000 wattia.
Voit käyttää kaukosäädintä myös RYHMÄkytkimenä, jonka avulla voit ohjata useiden
virtakytkimien toimintaa samanaikaisesti (kaikki
PÄÄLLÄ / kaikki POIS PÄÄLTÄ).
Lue nämä ohjeet huolellisesti ennen kuin
kytket sähkölaitteen virransäätöjärjestelmään.
26
SK303page 26
Suomi
2. PIKAOPAS
3. ASENNUS
PIKAOPAS
1
.
Kytke virtakytkin verkkopistorasiaan
(kuva. 2)
.
2.
Valitse sähkölaite, esim. lamppu, jonka toimintaa haluat ohjata,
varmistaen samalla, että sen nimellisteho ei ylitä 1000 wattia, ja työnnä
sen pistotulppa virtakytkimeen
(kuva 2)
.
• Jos sähkölaite on varustettu omalla kytkimellä, varmista, että se on
kytketty päälle.
3.
Käytä kaukosäädintä sähkölaitteen toiminnan ohjaamiseen
(kuva 3)
.
Kun kaukosäätimen (+)-näppäintä painetaan, sähkölaite käynnistyy.
Kun (-)-näppäintä painetaan, sähkölaite lakkaa toimimasta.
Virtakytkimen oletusasetukseksi on säädetty yksikkökoodi 1.
ASENNUS
Sähkölaite on kytkettävä virtakytkimeen, ennen
kuin laitteen toimintaa voidaan ohjata
kaukosäätimellä
(kuva 2)
.
• Varmista, että virtakytkimeen merkitty
verkkojännite vastaa paikallista
verkkojännitettä. Jos näin ei ole, ota yhteyttä
myyjään.
• Valitse sähkölaite, (esim. lamppu), jonka
toimintaa haluat ohjata, varmistaen samalla,
että sen nimellisteho ei ylitä 1000 wattia, ja
työnnä sen pistotulppa virtakytkimeen
(kuva 2)
.
• Jos sähkölaite on varustettu omalla
kytkytkimellä, varmista, että se on kytketty
päälle.
Page 27

KÄYTTÖ
Järjestelmään kytkettyä laitetta voidaan nyt
käyttää kaukosäätimen avulla
(kuva 3)
.
• Kun kaukosäätimen (+)-näppäintä
painetaan, valittu sähkölaite kytkeytyy
toimintaan. Kun (-)-näppäintä painetaan,
valittu sähkölaite kytkeytyy pois
toiminnasta.
– Virtakytkimen oletusasetukseksi on
säädetty yksikkökoodi 1.
Kaukosäätimen avulla voidaan ohjata
useampaa virtakytkintä samanaikaisesti. Kun
kaukosäätimessä oleva GROUP-ryhmäkytkin
on kytkentäasennossa ON, se kytkee
toimintaan ja pois toiminnasta jokaisen
virtakytkimen, jonka oma GROUP-ryhmäkytkin
on kytkentäasennossa ON.
• Aseta kaukosäätimessä oleva GROUP-
ryhmäkytkin kytkentäasentoon ON.
• Aseta virtakytkimen takana sijaitseva
GROUP-ryhmäkytkin kytkentäasentoon ON .
– Jokainen virtakytkin, jonka GROUP-
ryhmäkytkin on kytkentäasennossa ON,
reagoi nyt kaukosäätimen toimintaan. Kun
(+)-näppäintä painetaan, kaikki näihin
virtakytkimiin kytketyt sähkölaitteet
kytkeytyvät toimintaan. Kun
(-)-näppäintä painetaan, sähkölaitteet
kytkeytyvät pois toiminnasta.
KÄSIKÄYTTÖ
Virtakytkimessä on käsikäyttönäppäin. Tästä
johtuen siihen kytketyt sähkölaitteet voidaan
kytkeä toimintaan ja pois toiminnasta myös
käsikäyttöisesti ilman kaukosäädintä.
• Paina virtakytkimen edessä olevaa näppäintä
kerran.
– Virtakytkin kytkeytyy toimintaan.
• Paina virtakytkimen edessä olevaa näppäintä
uudestaan.
– Virtakytkin kytkeytyy pois toiminnasta.
PARISTON UUSINTA
Asenna paristo kaukosäätimeen seuraavalla
tavalla
(kuva 1)
:
• Kierrä kaukosäätimen pohjakannen ruuvit
auki ja siirrä kansi pois.
• Työnnä paristo paikoilleen tarkastaen
samalla, että pariston (+)- ja (-)-napa
asettuvat oikein päin paristotilan sisään.
• Aseta pohjakansi takaisin kaukosäätimeen,
kierrä ruuvit paikoilleen ja kiristä.
Huomio:
•
Poista paristo kaukosäätimestä, kun säädintä
ei tulla käyttämään pitempään aikaan.
•
Vaihda kaukosäätimeen uusi paristo
vähintään kerran vuodessa. Vaihda paristo
heti, jos huomaat, että kaukosäätimen
vaikutusalue on pienentynyt huomattavasti.
•
Kun vaihdat kaukosäätimen pariston uuteen,
käytä aina vain alkuperäisiä PHILIPS 8LR932
-paristoja.
TALOKOODIN MUUTTAMINEN
Talokoodin tarkoituksena on estää
naapuritalojen virytkjärjestelmien häiriöt. Se
mahdollistaa lisäksi useampien kaukosäätimien
käytön eri tarkoituksiin kotonasi sekä sisällä
että ulkona. Virtakytkin reagoi ainoastaan
oikeaan talokoodiin liittyviin signaaleihin.
Talokoodi voidaan muuttaa seuraavalla tavalla
(kuva 4)
:
• Valitse talokoodi (A, B tai C, yms.) taulukosta
1 ja käännä virtakytkimen takana sijaitseva
talokoodin valintakiekko halutun talokoodin
kohdalle.
• Kierrä kaukosäätimen pohjakannen ruuvit
auki ja siirrä kansi pois.
• Säädä kaukosäätimen kaksiasentokytkimet
siten, että ne vastaavat valittua talokoodia.
• Aseta pohjakansi takaisin kaukosäätimeen,
kierrä ruuvit paikoilleen ja kiristä.
Huomio:
Kaukosäätimellä EI voida ohjata virtakytkimen
toimintaa, jos yksikkökoodi on muutettu
muuksi numeroksi kuin 1. Useampia
virtakytkimiä voidaan kuitenkin aktivoida
samanaikaisesti valitsemalla yksikkökoodiksi 1
jokaisen virtakatkaisimen osalta.
27
Suomi
SK303 page 27
4. KÄYTTÖ
Page 28

28
Suomi
Suomi
SK303 page 25
Page 29

English
SK305 page 29
TCText/RR/9731
year
jaar
Jahr
année
χρνοσ
warranty
garantie
Garantie
garantie
εγγύηση
år
año
ano
anno
rok
garanti
garantia
garantia
garanzia
gwarancja
Guarantee
certificate
Identieficatiekaart
Garantibeviset
Certificat de
garantie
Certificado de
garantia
Takuutodistus
Garantie
Certificato di
garanzia
Εγγύηση
Karta gwarancyjna
Type:
Serial nr.:
Date of purchase - Date d’achat - Kaufdatum - Koopdatum - Fecha de compra Data da compra - Data di acquisto - Købsdato - kjøpedato - inköpsdato - Ostopäivå -
Ηµεροµηνία αγοράσ -
data zakupu
_________________19_____
Dealer’s name, address and signature
Nom, adresse et signature du revendeur
Name, Anschrift und Unterschrift des Händlers
Naam, adres en handtekening v.d. handelaar
Nombre, dirección y firma del distribuidor
Nome, indirizzo e firma del fornitore
Nome, morada e assinatura da loja
Forhrhandlerens navn, adresse og underskrift
Återförsäljarens namn, adress och namnteckning
Myyjän nimi, osoite ja allekirjoitus,
Ονοµατεπώνυµο, διεύθυνση και υπογραφή
του εµπ. προµηθευτή
Nazwisko, adres i podpis sprzedawcy
Page 30

30
SBC366page 30
English
Page 31

31
SBC366page 31
English
Page 32

32
SBC366page 32
English
Page 33

33
SBC366page 33
English
Page 34

34
SBC366page 34
English
Page 35

35
SBC366page 35
English
Page 36

NOTES
36
SBC366page 36
English
 Loading...