

Page 1

Dial-up baby monitor
SC469
SBC
Instructions for use
English 4
Page 2

2
☎
Helpline www.p4c.philips.com
België & Luxemburg/
Belgien & Luxemburg/
Belgique & Luxembourg
(Belgium & Luxembourg)
070 222 303
Danmark (Denmark)
808 82814
Deutschland (Germany)
0180 535 6767
España (Spain)
902 113 384
France
0825 889789
(Greece)
0 0800 3122 1280
Ireland
0176 40292
Italia (Italy)
199 11 88 99
Nederland (Netherlands)
0900-8406
Norge (Norway)
22 748250
Österreich (Austria)
0810 001 203
Portugal
2 1416 3033
Schweiz/ Suisse/ Svizzera
(Switzerland)
0844 800 544
Suomi (Finland)
09 6158 0250
Sverige
08 5985 2250
UK (United Kingdom)
0870 900 9070
BE ✔ DK ✔ GR ✔ ES ✔ FR ✔
IRE ✔ IT ✔ LU ✔ NL ✔ AT ✔
PT ✔ FI ✔ SE ✔ UK ✔ NO✔
DE ✔ CH ✔
SBC SC469/00
Page 3
3
1
2
3
4
5
7
8
9
0
!
&
^
%
$
@
¡
)
(
6
*
#
SYSTEM CHECK
LEVEL
DC 9V
CHARGE
≤
£
≥
§
¤
ª
•
º
‹
⁄
™
∞
›
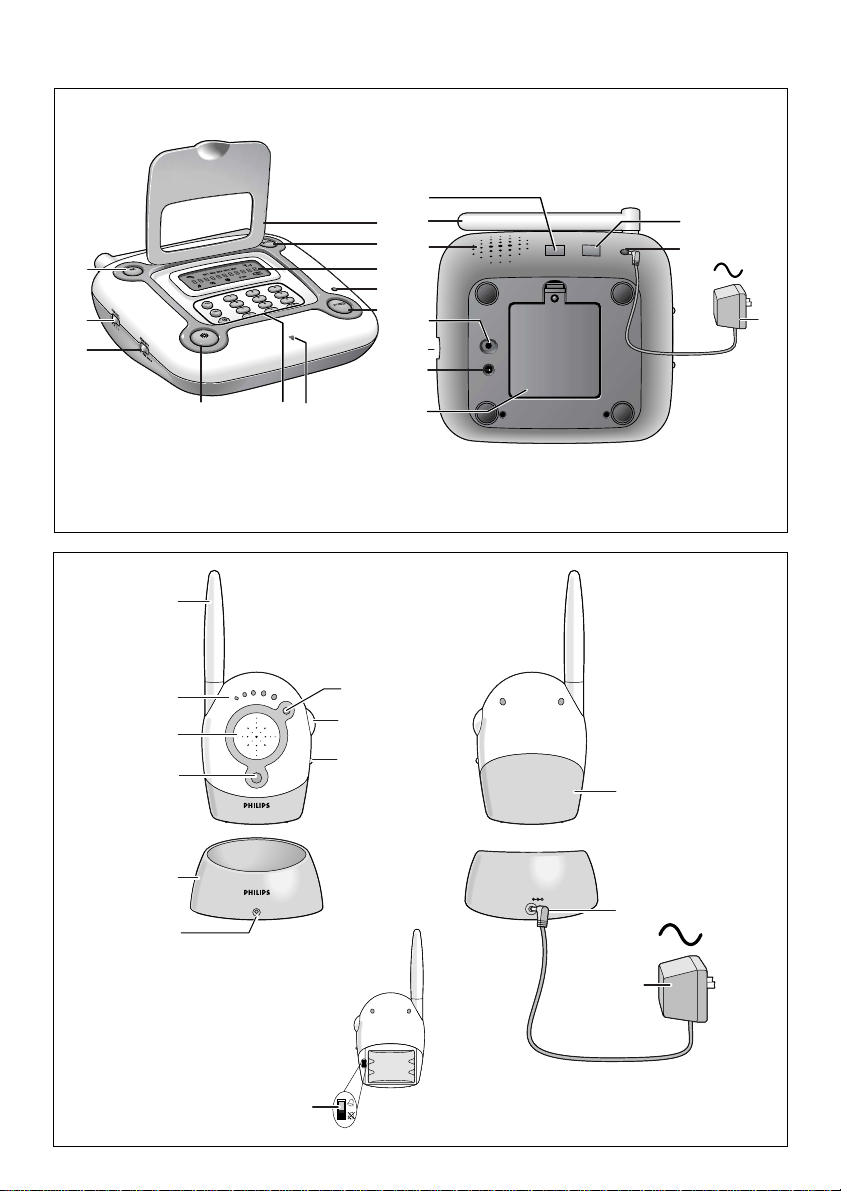
A) Baby Unit
B) Parent Unit
Page 4

ENGLISH4
Your dial-up baby monitor
SBC SC469
Philips is committed to producing caring, reliable products that new
mothers and father s really need. Products whose reliability and operating
quality bring reassurance .
Being both a regular wireless baby monitor and a dial-up unit in one, the
SBC SC469 gives you more freedom to move in and around the house and
garden while having the assurance that you can hear your baby wherever
your are.When the r ange of the regular baby monitor is out of range ,
simply extend it by connecting the baby monitor to your (mobile) phone.
It works both ways, the dialler calls you when your baby makes a sound and
you can dial in to the baby unit to listen or speak to your baby.
Important information
Please read this guide carefully before using the baby monitor, and keep it
for future reference. This baby monitor is intended as an aid. It is not a
substitute for responsible and proper adult supervision and should not be
used as such.
• Ensure the Baby Unit and adapter cable are always out of reach of the
baby, they should be at least one metre away.
•Never place the Baby Unit inside the baby ’s cot or playpen!
•Never cover the baby monitor (with a towel,blanket,etc.).
• Clean the baby monitor with a damp cloth.
•Never use the baby monitor near water.
• Radio equipment for wireless applications is not protected against
disturbance from other radio services.
• Ensure the room where the Baby Unit is to be placed has a telephone
connection with access to your telephone network.
• There is a risk of explosion if batteries are replaced by an incorrect type.
• Remove batteries if the unit is not used for a longer period of time.
• Clean batter y contacts regularly with an eraser.
Page 5

Contents
Help line 2
General 4
Impor tant information 4
Functional overview 5-6
Getting your baby monitor ready 7-10
Using your baby monitor as a regular baby monitor 10-11
Using your baby monitor in Dial-up mode 12-13
Advanced options (Dial-up mode only) 13-15
Troubleshooting 16-17
Technical specifications 18
Functional overview
A) Baby Unit
1M(emory) button
Selects a telephone number from the memory.
2 CHANNEL selection switch
Selects the required channel.
3 SENSITIVITY switch
Adjusts the microphone sensitivity of the Baby Unit.
4 button
Switches the night light on and off.
5Keypad
Programs telephone numbers, PIN code, timer and ‘sensitivity time’.
6 Microphone
7POWER button
Switches the unit on and off.
8Power light
Lights up green when the unit is switched on.
9 Display
Informs you on the present status of the unit:
- unit in Baby monitor mode;
- unit in Dial-up mode;
M1 - M5 - indicate phone numbers stored in the memory (1 to 5);
88- indicate phone numbers;
- unit not (properly) connected to the mains;
- unit not (properly) connected to the telephone network;
- indicates that a sensitivity time delay is programmed
(sensitivity time is 10 seconds as standard);
PIN - indicates that a non default PIN code is programmed;
- indicates battery status. Blinks when batteries are low and need
to be replaced.
10 MODE button
Selects the required operation mode: Dial-up mode or regular Baby
monitor mode.
ENGLISH 5
Product illustration on
inside flap:
Page 6

11 Lid
12 Batter y compar tment
13 RESET button
Resets all user settings to the default factory settings.
14 VOLUME control
Adjusts the volume.
15 Tone/Pulse selector
Selects between tone dialling and pulse dialling.Always use tone dialling
unless your telephone company only support pulse dialling.
16 Loudspeaker
17 Extractable antenna
18 PHONELINE OUT socket
Connects the unit to the telephone.
19 PHONELINE IN socket
Connects the unit to the telephone network.
20 DC 9V —<± socket
DC power supply socket for connection to the mains.
21 AC power adapter
B) Parent Unit (Only for Regular baby monitor use)
22 Charging light
Lights up red when the unit battery is being char ged.
23 Charging base
24 SYSTEM CHECK light
– Lights up green when the units have proper contact.
– Flashes red when the units are out of range or when connection is
not reliably anymore.
25 Loudspeaker
26 Sound level lights
Visually indicate baby's sounds.
27 Antenna
28 Power light
– Lights up green when the unit is switched on.
– Flashes red when batteries are almost empty.
29 VOLUME control and ON/OFF switch
Switches the unit on and controls the volume.
30 CHANNEL selection switch
Selects the required channel.
31 SYSTEM CHECK ALARM switch
Switches the System Check Alarm on and off.
The alarm beeps when the units are not in contact.
32 Batter y compar tment
33 DC 9V —<± socket
DC power supply socket for connection to the mains
34 AC power adapter
ENGLISH6
Page 7

Getting your baby monitor ready
Battery back-up
As soon as the batteries are inserted battery back-up will be activated. In
case of mains failure during mains operated use,the unit will give you a
call and automatically switch to battery operated use.The unit
automatically switches back to mains operated use when the mains
returns.
Inserting the batteries in the Baby Unit
1 Ensure the Baby Unit is disconnected from the mains.
2 Remove the battery compartment cover (12) using a screwdriver.
3 Insert four 1.5V,alkaline , LR6 batteries using the + and - configuration
inside the battery compartment. The batteries are not included.
Only use 1.5V LR6/AA non-rechargeable alkaline batteries.
4 Put the batter y compartment cover (12) back in place.
> The Baby Unit can now be used cordlessly in both regular baby monitor
mode and Dial-up mode. It operates for approximately 30 hours on
fresh batteries
> When the battery indicator on the display (9) is empty and blinking, the
battery power is low.You should install new batter ies.
Tips:
– Switch off the Baby night light to save battery power when the Baby Unit is
being batter y operated.
– Remove batteries if the unit is not used for a longer period of time.
– Remove empty batteries from the Baby Unit.
Installing the units for use in regular baby monitor
mode
1 Position the Baby Unit at least one metre away from your baby.
Never place the Baby Unit inside the baby’s cot or playpen.
2 Set the CHANNEL selection switches (2 and 30) to the same channel on
both units.
3 Connect the AC power adapter (21) to the DC 9V —<± socket (20)
of the Baby Unit and insert the mains plug into the mains supply.
4 Move away from the Baby Unit with the Parent Unit.
If units are positioned too close to each other, a high-pitched noise can be
heard.
ENGLISH 7
LINE OUT
L
I
N
E
IN
TONE/PULSE
+
+
+
RESET
+
+
+
+
+
+
+
+
+
LINE OUT
L
I
N
E
IN
+
+
TONE/PULSE
+
+
+
+
RESET
+
+
C
A
H
B
A
N
C
N
D
E
L
Page 8

5 Connect the second power adapter (34) to the DC 9V —<± socket
(33) of the Parent Unit’s charging base and inser t the mains plug into the
mains supply.
6 Place the Parent Unit inside its charging base (23).
> The red char ging light (22) lights up.
7 Leave the Parent Unit in the charging base for at least 14 hours to fully
charge the batteries.
When batteries are fully charged, the Parent Unit can be used cordlessly for
approximately 12 hours.
• Place the Parent Unit inside the charging base when the power light on
the Parent Unit flashes green (an indication that batteries are low).
> The units are now ready for use in regular baby monitor mode.
Replacing the Parent Unit’s battery pack
1 Open the Parent Unit’s battery compartment cover (32).
2 Disconnect the old batter y pack from the power plug and remove from
the battery compartment.
3 Carefully connect the new battery pack to the power plug and place
inside the battery compartment.
4 Close the batter y compartment cover (32). Remove the battery pack
from the Parent Unit if it is not used for long periods of time.
Note:Always replace the battery pack with one of the same type:
SBC EB4880, 4.8V, 800 mAh.
Batteries
Dispose of used batteries in an environmentally friendly manner.
Do not mix old and new batteries,or different types of batteries.
Remove Baby Unit batteries if the baby monitor is not to be used for
more than a few days.
Installing the Baby Unit for use in Dial-up mode
1 Position the Baby Unit at least one metre away from your baby.
Never place the Baby Unit inside the baby’s cot or playpen.
2 Connect the telephone cable to the Baby Unit PHONELINE IN socket (19).
ENGLISH8
DC 9V
LEVEL
SYSTEM CHECK
CHARGE
LINE OUT
L
I
N
E
I
N
Page 9

3 Connect the AC power adapter (21) to the DC 9V —<± socket (20)
of the Baby Unit and insert the mains plug into the mains supply.
4 Use the TONE/PULSE selector (15) to select tone dialling or pulse
dialling.
Always use tone dialling unless your telephone company only supports
pulse dialling. Please check with your telephone company when in doubt.
5 Press the POWER button (7).
> The display (9) lights up and the Power light (8) lights up green.
> After a few seconds ‘M1’star ts blinking on the display.
The Baby Unit is now in Quick install mode and you are asked to enter:
– A call-up phone number (M1).This is the number the Baby Unit is
going to call when sound is detected.
– A 4 digit PIN code (PIN).The PIN code has to be entered when
placing calls to the Baby Unit.
– A sensitivity time ( ). This is the time after which the Baby Unit
calls the call up number when sound is detected.
The default is 10 seconds.
6 Enter the call-up phone number,PIN code and sensitivity time using the
numeric keypad (5) and confirm each entry by pressing the OK button
on the keypad (5).
> The Baby Unit is now ready for use in Dial-up mode and returns to
regular baby monitor mode.
Notes:
– Optional conversion connectors are available at your telephone supplier,in
case your telephone cable does not fit.
– With the C(lear) button on the keypad (5) you can always clear the last
entered digit.
– If you do not wish to change the default sensitivity time ( ),
simply press the OK button on the keypad (5).
– If no button is pressed for 5 seconds the Baby Unit enters regular baby
monitor mode.
– To undo the installation, press the RESET button (13) for more than
5 seconds.
– For more detailed information on programming and on resetting the Baby
Unit, see ‘Advanced settings’.
ENGLISH 9
Page 10

Selecting your language
When placing calls to the Baby monitor you are asked to enter your PIN
code in one of the following languages:
1 English;
2 French;
3 German;
4 Spanish;
5 Dutch.
Select your language as follows:
1 Press the PRG (Program) button on the keypad (5).
2 Press the OK button on the keypad (5) followed by the number for your
language (1,2, 3,4 or 5).
> The selected number is shown on the display and the Baby Unit will
mention the selected language.
3 Press the OK button again to confirm your selection.
Using your baby monitor as a regular baby monitor
Listening to your baby
1 Press the POWER button (7) on the Baby Unit to switch it on.
> The display lights up and the Power light (8) lights up green.
> After a few seconds ‘M1’star ts blinking on the display.
The Baby Unit is now in Quick install mode.
2 Wait 5 seconds or press the OK button on the keypad (5) several times
to skip Quick install mode for there is no need to program the Baby Unit
(call-up phone number, PIN code and sensitivity time) in regular baby
monitor mode.
3 Use the MODE button (10) to select Baby monitor mode ( ).
4 Use the SENSITIVITY switch (3) to adjust the microphone sensitivity of
the Baby Unit to a level you prefer (using your own voice as a sound
reference).
5 Extract and move the Baby Unit antenna (17) for best reception.
6 Switch on the Parent Unit and adjust the volume to the level you prefer,
using the VOLUME ON/OFF control (29).
> The digital SYSTEM CHECK light (24) lights up continuously (green)
when the Parent and Baby Unit are in contact with each other.
ENGLISH10
O
N
V
O
L
U
ME
O
F
F
Page 11

Avoiding interference
• If there is interference or if sound reception is poor, switch both units to
another channel.
• Always ensure that the CHANNEL selection switches (2 and 30) on both
units are set to the same position.
Monitoring baby silently
• Adjust the volume on the Parent Unit to the lowest level using the
VOLUME ON/OFF control (29) (do not switch off).
>Now you will not hear your baby.Therefore you should continuously
check the sound level lights (26).The sound level lights will visually alert
you to baby’s sounds. The more noise your baby makes, the more lights
light up.
Checking that the units are in contact
• Check that the digital SYSTEM CHECK light (24) on the Parent Unit
lights up continuously (green) to confirm that the connection between
both units is reliable.
• If the light flashes (green), move the Parent Unit closer to the Baby Unit.
> The light flashes if the units are out of r ange for more than 30 seconds
or if there is interference.
Switching on the system check alarm
The system check alarm on the Parent Unit beeps when the units are not
in contact. The Parent Unit is delivered with the system check alarm in
the Off ( ) position. To switch on the alarm:
1 Open the Parent Unit’s battery compartment cover (32).
2 Set the SYSTEM CHECK ALARM switch (31) inside the compartment to
the ON position ( ).
3 Close the batter y compartment cover (32).
> The SYSTEM CHECK light (24) can still flash even if the system check
alarm is switched off.
Switching on the night light
• Press the button (4) to switch on the nightlight.
• Switch off the night light when operating the Baby Unit on batteries to
conserve power.
Operating range 200m in open air
The baby monitor has an operating range of up to 200 metres in ideal
open-air conditions. This means that the units will be in each other’s
range when there are no obstacles in between.Walls,ceilings,large
objects and even glass affect the operating range.The more obstacles
there are in between,the shor ter the operating range .
ENGLISH 11
C
A
H
B
A
N
C
N
D
E
L
Page 12

Using your baby monitor in Dial-up mode
Setting the Baby Unit to Dial-up mode
1 Ensure all connections have been properly made (see ‘Installing the Baby
Unit’) and that at least one call-up phone number has been stored in the
unit’s memory (see ‘Installing the Baby Unit for use in Dial-up mode).
2 Press the Power button (7) to switch on the Baby Unit.
> The power light (8) lights up green.
3 Use the MODE button (10) to select Dial-up mode ( ).
4 Use the M(emor y) button (1) to select the required call-up number
(‘M1’-’M5’).
> The call-up number has now been set.
When noise is detected during your absence, the Baby Unit will call this
number.
5 Use the SENSITIVITY switch (3) to adjust the microphone sensitivity of
the Baby Unit to the level you prefer (using your own voice as a sound
reference).
Note: If lights up the unit is not (properly) connected to the telephone
network. You can not select Dial-up mode, an aler t beep will sound and
the Baby Unit stays in regular baby monitor mode.
Answering the Dial-up monitor’s call
• Ensure the Baby Unit is switched on and set to Dial-up mode and that a
call-up phone number has been stored in the unit’s memor y (see
‘Installing the Baby Unit for use in Dial-up mode).
> When noise is detected after the sensitivity time has elapsed, the Baby
Unit calls the selected call-up number.
> After answer ing the phone , you can listen to your baby.After pressing
the # button on your telephone, you can talk back to your baby.
> After three minutes the Baby Unit will break off the connection.
> If you do not answer the phone the unit will hang up and then calls
back after 1 minute.
> If the unit detects noise again, it will repeat the above procedure.
• Press the * key on your telephone to end the call (for tone dialling mode
only).
ENGLISH12
Page 13

ENGLISH 13
Calling in to check on your baby
Note:We recommend using a tone dial telephone when calling in to the Baby
Unit. Calling in with a pulse dial telephone might not wor k proper ly or not
at all.
1 Ensure the Baby Unit is switched on and set to Dial up mode and that
you have your PINcode at hand.
2 Dial the number of the telephone line the Baby Unit is connected to.
> After three r ings, the Baby Unit is activated and will request your
PIN code.
3 Enter your PIN code using the numeric keys on your telephone.
>You can now listen to your baby.
• If you press the # button on your telephone you can also talk to your
baby.
4 Press the * key on your telephone to end the call (for tone dialling mode
only).
> The Baby Unit will automatically disconnect after 3 minutes.
Note: If you press the wrong PIN code three times in a row, the unit will hang up.
Advanced options (Dial-up mode only)
Storing telephone numbers
Up to five telephone numbers can be stored in the Baby Unit’s memory.
1 Press the PRG (Program) button on the keypad (5).
2 Press the M(emory) button (1).
> If ‘M1’lights up on the display,telephone numbers have already been
stored in the memory.If ‘M1’blinks on the display, the memory is still
empty.
3 Continue to press the M(emory) button (1) to find an empty memor y
location (or a required memory location).The icon blinks when the
location is empty.
4 Use the numeric keypad (5) to enter the required telephone number.
The number may consist of a maximum of 40 digits.
Confirm your entry by pressing the OK button on the keypad (5).
> The telephone number will be shown on the display (11 digits only).
> The number disappears from the display and the icon (e.g.‘M1’) remains
lit. The number has now been stored.
Page 14

ENGLISH14
5 If you wish to store another telephone number press the M(emory)
button (1) again to select a memory location and repeat steps 3 and 4.
Notes:
–With the C(lear) button on the keypad (5) you can always clear the last
entered digit.
– When no key is pressed for 5 seconds the Baby Unit leaves the
programming mode.
– In case your telephone networ k requires a shor t pause between number s
(e.g. for selecting an outside line), a pause can be stored by pressing the
button on the keypad (5). The display will next show a ‘P’.
Clearing telephone numbers
1 Press the PRG (Program) button on the keypad (5).
> ‘M1’ blinks on the display.
2 Press the M(emory) button (1).
> ‘M1’ lights up on the display together with the telephone number.
3 Press the ‘0’ button on the keypad (5).
4 Briefly press the C(lear) button on the keypad (5).
> The icon starts flashing and the number disappears from the display.
The number has now been cleared and the memory location is available
again.
5 Repeat steps 2, 3 and 4 to clear other telephone numbers.
Note: To clear all numbers,you can also reset the unit.
All user settings will be reset to the factory default.
See ‘Resetting the Baby Unit’for more information.
Storing your PIN code
When using the Baby monitor in Dial-up mode, use of the PIN code is
necessary.It prevents others from listening to your baby.The PIN code
has to be entered when placing calls to the Baby Unit
1 Press the PRG (Program) button on the keypad (5).
2 Press the PIN button on the keypad (5).
> ‘PIN’ and ‘– – – –’start flashing on the display.
3 Use the numeric keypad (5) to enter the required PIN code.The code
must consist of 4 digits.
4 If the code is correct, press the OK button on the keypad (5) to store
the code in the memory.
Page 15

ENGLISH 15
Notes:
–With the C(lear) button on the keypad (5) you can always clear the last
entered digit.
– If you wish to change the PIN code, just repeat the above procedure.
Setting the sensitivity time
When the Baby Unit detects sound for approximately 10 seconds,it will
dial the selected number. In case you want to delay calling out interval
you can enter another ‘sensitivity time’.
1 Press the PRG (Program) button on the keypad (5).
2 Press the button on the keypad (5).
>’ ’and ‘10’ star t flashing on the display.
3 Use the numeric keypad (5) to enter the required sensitivity time time
and confirm by pressing the OK button on the keypad (5).
Notes:
–With the C(lear) button on the keypad (5) you can clear the last entered
digit.
– Entering a time under 10 seconds or over 360 seconds will not be
accepted.
Resetting the Baby Unit
Resetting the Baby Unit is an easy way to delete all programmed phone
numbers,the PIN code and the sensitivity time simultaneously.Resetting
will also restart the quick start installation process.
• Keep the RESET button (13) pressed for about 5 seconds.
> First you will hear a shor t confir mation beep.
> When you hear a double beep, the reset procedure is complete.
All user settings (including selected language) are now reset to the
default factory settings.
Page 16

ENGLISH16
Troubleshooting
First check the points listed belowif an error occur s. If you are unable to
resolve the problem by following the solutions given below, contact the
helpline or consult your dealer. Under no circumstances should you try to
repair the set yourself as this will invalidate the warranty.
Problem Possible cause Solution
System check Units are out of range or there is Move units closer together to
light flashes red interference from another restore the link. Remove the other
and/or system FM source. FM source.
check alarm
sounds Baby Unit is not switched on. Press POWER button (7).
Power light does Parent Unit: unit is not turned on. Turn VOLUME ON/OFF control (29)
not light up downwards.
AC power adapter (34) Inser t AC power (34) adapter into the
not inser ted into the mains supply mains supply and/or into the unit’s
and/or into the charging base (33). char ging base (33).
Batteries are low. Recharge batteries.
Baby Unit: unit is not turned on. Press POWER button (7).
AC power adapter (21) Inser t AC power (21) adapter into the
not inser ted into the mains supply mains supply and/or into the unit’s
and/or into the unit (20). charging basre (20).
Batteries are exhausted. Replace batteries.
High pitched Units are too close together. Move Parent Unit away from Baby
noise Unit.T urn VOLUME ON/OFF
control (29) on Parent Unit upwards.
Parent Unit AC power adapter (34) Insert AC power (34) adapter into the
batteries do not not inser ted into the mains supply mains supply and/or into the unit
charge and/or into the charging base (33). the charging base (33).
Battery life is at an end. Replace battery pack.
No sound Volume on Parent Unit is set Turn VOLUME ON/OFF control (29)
too low. downwards.
Power light Batteries are low or empty. Parent Unit: - recharge battery pack.
flashing Baby Unit:- replace batteries or
connect to mains power.
Page 17

Problem Possible cause Solution
Interference or Mobile or cordless phones too Move phones away from the units.
poor reception close to the baby monitor.
Pick-up from Both systems are operating on Switch channels.
another baby the same frequency.
monitor
Baby Unit cannot Telephone line not present Check telephone line connection,
switch to Dial-up ( icon on display is on). ( must be off).
mode
Baby Unit does Dial-up mode not selected Use the MODEbutton (10) to select
not dial a ( icon on display is not on). Dial-up mode.
telephone
number Telephone line not present Check telephone line connection,
( icon on display is on). ( must be off).
‘Sensitivity time’ too long. Set shor ter ‘sensitivity time’.
No ‘call-up’ phone number(s) Store at least one ‘call-up’ phone
stored in the memory. number. See ‘Installing the Baby Unit
for use in ‘Dial-up mode’.
No ‘call-up’ phone number Select ‘call-up’ phone number.See
selected. Setting the Baby Unit to Dial-up mode.
Baby Unit does Wrong PIN code entered. Redial and enter correct PIN code.
not recognise
PIN code Your telephone is in pulse dial Set telephone to tone dial mode. See
mode. the instructions for use of your
telephone. Use a tone dial telephone
or a mobile telephone.
The telephone used is a pulse Use a tone dial telephone or a mobile
dial telephone. telephone.
No PIN code stored in the Store PIN code. See ‘Installing the
memory. Baby Unit for use in Dial-up mode’.
Baby Unit does The telephone used is a pulse Use a tone dial telephone .
not answer an dial telephone.
incoming call
Baby Unit Your telephone network does not Set TONE/PULSE selector (15) to
does not dial recognise dialling pulses. Tone or use a mobile telephone.
correct number
ENGLISH 17
Page 18

Helpline
If you have any queries about the SBC SC469, please contact our helpline
for assistance. You can find the number in the list on page 2. Before you call,
please check the instructions carefully; they can help you solve most
problems.The model number of the Dial-up baby monitor is SBC SC469.
Date of purchase: _____ /_____ /______ day /month /year
Technical specifications
Power supply: • Batter y pack; rechargeable NiMH for Parent Unit (included).
• Optional batteries 4 x 1.5 V;AA alkaline for Baby Unit (not included).
•AC power adapter 230V AC,50 Hz (two included):
- Output voltage 9 V DC, 200mA.
• Only use the AC power adapter included.
Operating range: • Up to 200 metres in ideal conditions (walls, floors,etc., can limit this
distance).
Operating
temperature: • 10°C to 40°C .
Digital Pilot tone: • Digitally monitored communication link (hidden signal helps reduce
interference and enables a communication link between both units to
ensure you only hear your baby’s sounds).
Transmission
frequencies: • SBC SC469/00:from 40.695 to 40.675 MHz
ENGLISH18
Page 19

ENGLISH 19
Page 20

Guarantuee certificate
Garantiebewijs
Certificado de garantia
Garantibevis
Certificat de garantie
Certificado de garantia
Garantibevis
Garantieschein
Certificato di garanzia
Garanticertifikat
Takuutodistus
year warranty
année garantie
Jahr Garantie
jaar garantie
año garantia
anno garanzia
år garanti
år garanti
år garanti
vuosi takuu
año garantia
11
0682
www.philips.com
This document is printed on chlorine free produced paper
Data subject to change without notice
Printed in China
Dealer’s name,address and signature
Nom,adresse et signature du revendeur
Name, Anschrift und Unterschrift des Händlers
Naam,adres en handtekening v.d.handelaar
Nombre,direccion y firma del distribudor
Nome, indirizzo e firma del fornitore
, .
Återförsäljarens namn,adress och signatur
Forhandlerens navn,adresse og unterskrift
Forhandlerens navn,adresse og unterskrift
Jälleenmyyjän nimi,osoite ja allekirjoitus
Nome, morada e assinature da loja
Date of purchase - Date de la vente - Verkaufsdatum - Aankoopdatum - Fecha de compra - Date d’acquisito -
Data da adquirição - G - Inköpsdatum - Anskaffelsesdato - Kjøpedato - Oatopäivä -
6 month guarantee on rechargeable batteries
6 mois de garantie sur les piles rechargeables
6 meses de garantía para las pilas recargables
6 Monate Garantie auf wiederaufladbare Batterien
6 maanden garantie op oplaadbare batterijen
Garanzia di 6 mesi sulle batterie ricaricabili
Pilhas recarregáveis com 6 meses de garantia
E 6
6 månaders garanti på laddningsbara batterier
6 måneders garanti på genopladelige batterier
6 måneders garanti på de oppladbare batteriene
Ladattavilla akuilla on 6 kuukauden takuu
Type: SBC SC469
Serial nr:_____________________________________________________________
 Loading...