

Page 1

Register your product
Universal Remote Control
and get support at
www.philips.com/welcome SBC RU 252/00H
EN User manual 3
DE Bedienungsanleitung 8
FR Mode d’emploi 13
IT Manuale d’uso 18
ES Instrucciones de
manejo 23
PL
Instrukcja obsługi
28
NL Gebruikershandleiding 33
GR
∂Á¯ÂÈÚ›‰ÈÔ ¯Ú‹Û˘
38
SV Bruksanvisning 44
PT
Manual do utilizador
49
DK Brugervejledning 54
FI Käyttöopas 59
NO Bruksanvisning 64
SRU252_V4_Transfer_RR:SRU252_V4_Transfer 26-03-10 20:05 Pagina 1
Page 2

1
2
3
4
5
6
7
8
9
0
%
$
#
@
!
2
SRU252_V4_Transfer_RR:SRU252_V4_Transfer 26-03-10 15:32 Pagina 2
Page 3

Installing the remote control
Contents
1. Introduction.....................................................................................3
2. Installing the remote control ..............................................3-6
Inserting the batteries..........................................................................................3
Testing the remote control ..........................................................................3-4
Setting the remote control ..........................................................................4-5
Automatically setting the remote control ...........................................5-6
3. Keys and functions ....................................................................6-7
4. Need help?........................................................................................7
Code list of all brands / equipment..............................69-81
Equipment list........................................................................................................82
Helpline.....................................................................................................................82
Information to the Consumer.....................................................................83
1. Introduction
Congratulations on your purchase of the Philips SBC RU 252
universal remote control. After installing the remote control you can
operate a maximum of 2 different appliances with it: TV and
VCR/DVD players/recorders.
You can find information about how to prepare this remote control
for use in the chapter ‘Installing the remote control’.
2. Installing the remote control
Inserting the batteries
1 Press the cover inwards and slide it
in the direction of the arrow.
2 Place two R03, UM4 or AAA type
batteries into the battery
compartment, as shown.
3 Slide the cover back and click it
firmly into place.
Testing the remote control
The remote control has been programmed to operate most Philips
appliances. Because the RU 252 may use different signals for each
make and even for different models of the same make, it is
advisable to test whether your appliance responds to the RU 252.
The example below (TV) instructs you how to do this. You can
repeat the same steps for other appliances (VCR/DVD
players/recorders) which you want to operate using the RU 252.
Example of TV:
1 Turn your TV on manually or use the original remote control.
Tune to channel 1.
EN
English
3
SRU252_V4_Transfer_RR:SRU252_V4_Transfer 26-03-10 15:32 Pagina 3
Page 4
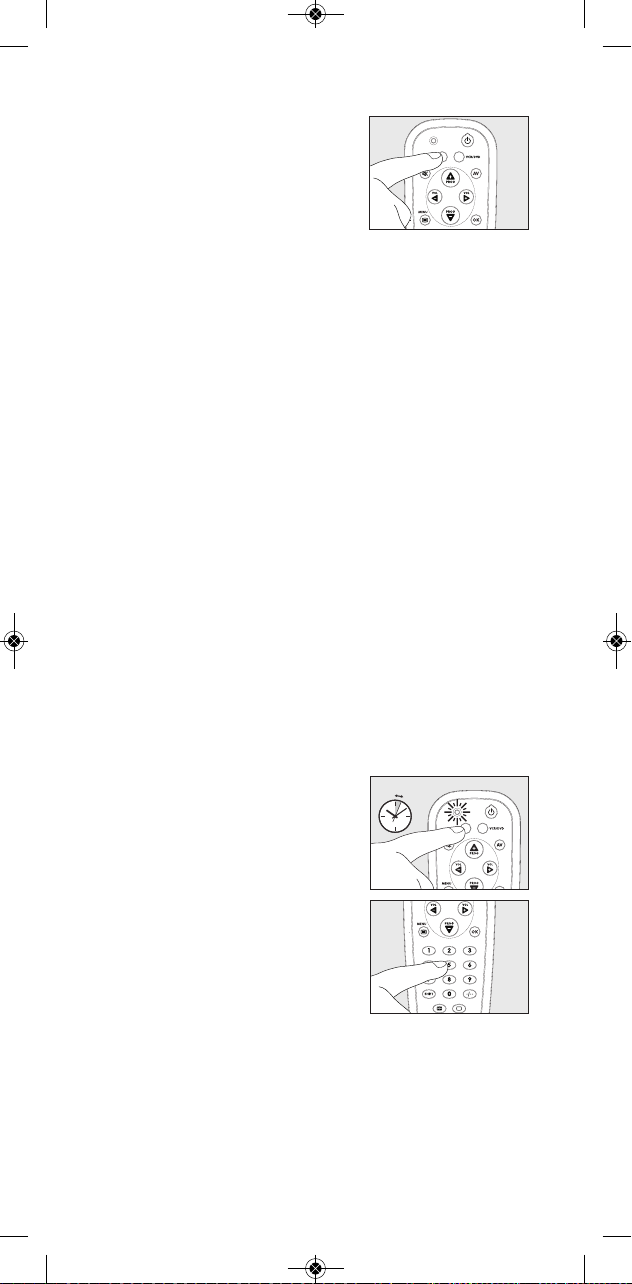
2 Press the RU 252’s TV key to select
TV.
3 Check whether all the keys are
working. For an overview of the
keys and their functions see ‘3. Keys
and functions’.
– If the TV responds as it should to all of the key commands the
RU 252 is ready for use.
• If the device does not respond at all or not to all of the
key commands, follow the instructions under ‘Setting
the remote control’.
Setting the remote control
This is only necessar y if your appliance does not respond to the
RU 252.
If that is the case, the RU 252 does not recognize the brand and/or
model of your appliance and you need to program the remote
control to do so.
The example below (TV) instructs you how to do this. You can
repeat the same steps for other appliances (VCR/DVD
players/recorders) which you want to operate using the RU 252.
Example of TV:
1 Turn on the TV manually or use the original remote control.
Tune in to channel 1.
2 Look up the brand of your TV in the code list at the back of
this manual. One or more four-figure codes are shown for
each brand.
Note the first code.
Be careful! There are separate tables for TV, VCR and DVD.
Make sure you use the codes from the correct table.
3 Keep the TV Key pressed for 3
seconds until the green indicator
light remains lit.
4 Then enter the code noted in step
2 using the digital keys.
– The green indicator light will now
flash twice.
If the light flashes once for an
extended period, the code has not
been entered properly or the wrong code has been entered.
Start again from step 2.
5 Point the RU 252 at the TV and check that it responds as it
should.
– If the TV responds to all of the key commands, the RU 252 is
ready for use. Do not forget to note your code.
3 sec.
EN4
SRU252_V4_Transfer_RR:SRU252_V4_Transfer 26-03-10 15:32 Pagina 4
Page 5

• If the device does not respond at all, or not to all of the
key commands, start again from step 2 and try the next
code from the list.
Automatically setting the remote control
If you cannot find the right code for your brand device, the remote
control can automatically search for the right code.
Example of TV:
1 Make sure the TV is switched on and select a channel using
the original remote control or the keys on the TV (for
example channel 1).
The RU 252 emits the ‘switch off TV’ signal for all models of
TV that are stored in the memor y.
• If the device is a DVD-player or video recorder,
insert a disk or tape and star t playback.
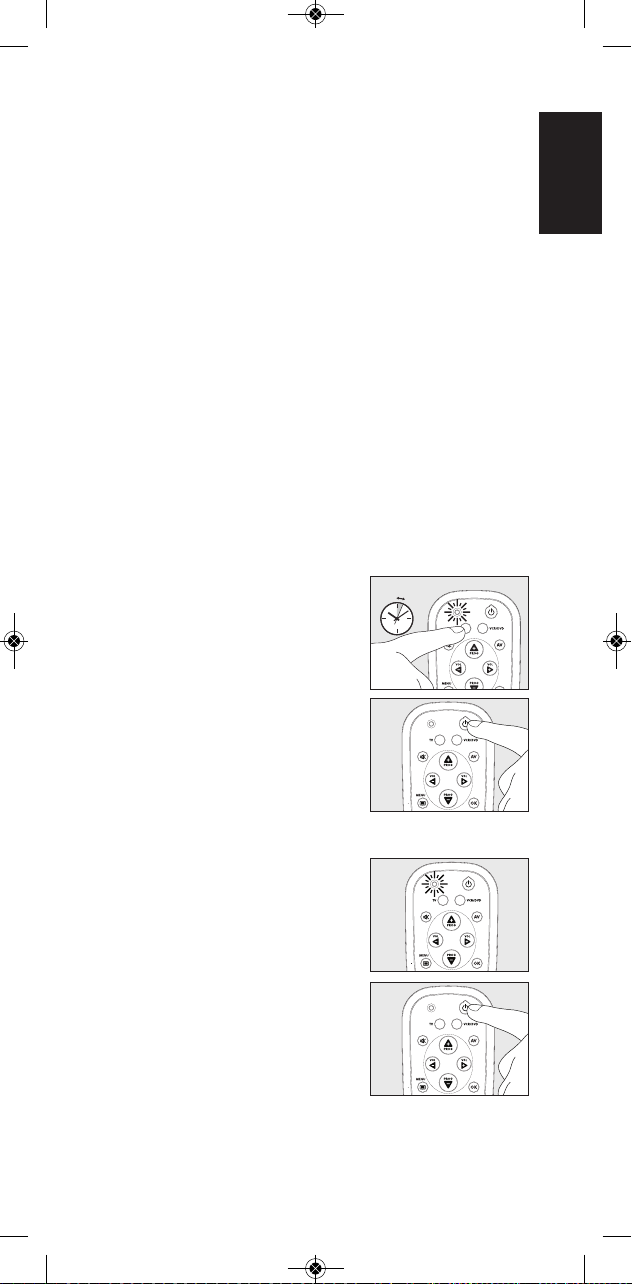
2 Then keep the TV Key pressed for
3 seconds until the green indicator
light remains lit.
3 Press the Standby key and keep it
pressed.
– The RU 252 now starts emitting all known ‘TV off’ signals, one
by one. Each time a code is sent, the
green indicator light flashes.
4 When your TV switches off
(stand-by mode), immediately release
the Standby key of the RU 252.
– The RU 252 has now found a code
that works on your TV.
5 Check if you can operate all functions
on your TV with the RU 252.
• If this is not the case, you can redo the automatic
setting. The RU 252 will then search for a code that
perhaps works better.
– After the RU 252 has run through all the known codes, the
search will stop automatically and the green light will stop
flashing.
– Automatic programming of a TV takes a maximum of 5
minutes. For VCR/DVD this time is 6 minutes.
3 sec.
EN
Installing the remote control
English
5
SRU252_V4_Transfer_RR:SRU252_V4_Transfer 26-03-10 15:32 Pagina 5
Page 6

EN6
3. Keys and functions
The illustration on page 3 gives an overview of all keys and their
functions.
1 y Standby . . . . . . . . . switches TV, VCR or DVD mode on or
off.
2 Indicator light . . . . . - lights up green when an IR signal is
being sent.
- flashes green when a code is being
entered and when automatically
setting the remote control.
3 TV - VCR/DVD. . . . . select the device you want to operate:
TV, VCR or DVD.
4 s (Mute) . . . . . . . . . . mutes the sound of the TV.
5 - PROG + . . . . . . . . . . selects a previous or following channel.
6 (Menu) . . . . . . . . - wide screen (TV).
- menu on/off (VCR/DVD).
7 Digital keys . . . . . . . . direct choice of channels and other
functions.
8 SHIFT . . . . . . . . . . . . . for extra functions. When pressed at
the same time as a second key, the
second key will get another function.
For example:
SHIFT + PROG+:. . 'menu up'
SHIFT + PROG-:. . 'menu down'
SHIFT + VOL+:. . . . 'menu right'
SHIFT + VOL-:. . . . 'menu left'
SHIFT + :. . . . . . ‘menu on/off ’
Try out other combinations with the Shift-key on your appliance in
order to find out which functions are available. Only functions
featured on the original remote control are available.
9 . . . . . . . . . . . . . . . . switches teletext on.
0 5. . . . . . . . . . . . . . . . . . - red teletext key
- rewind (VCR/DVD)
9 . . . . . . . . . . . . . . . . . . - green teletext key
- stop (VCR/DVD)
0 . . . . . . . . . . . . . . . . . . record (VCR/DVD)
;. . . . . . . . . . . . . . . . . . . - yellow teletext key
- pause (VCR/DVD)
6. . . . . . . . . . . . . . . . . . - blue teletext key
- wind (VCR/DVD)
2 . . . . . . . . . . . . . . . . . . - white teletext key
- play (VCR/DVD)
! . . . . . . . . . . . . . . . . switches teletext off.
@ -/-- . . . . . . . . . . . . . . . . . selects between one- and two-figure
channel numbers.
# OK . . . . . . . . . . . . . . . . confirms your selection.
$ - VOL + . . . . . . . . . . . . adjusts the TV volume.
% AV. . . . . . . . . . . . . . . . . switches between external inputs of
your equipment.
SRU252_V4_Transfer_RR:SRU252_V4_Transfer 26-03-10 15:32 Pagina 6
Page 7

EN
Need help?
English
7
Note! The VOL – /VOL + and s (Mute) keys give direct access to the
TV volume even if you are operating your VCR or DVD
equipment.
If the device does not respond at all, or not to all of the key
commands, follow the instructions under ‘Setting the remote
control’. It is possible that you must enter another code for
the device.
4. Need help?
We advise you to first read this user manual carefully. It is provided
to help you set up and use the remote control.
If, however, you require extra information or have additional
questions about setup, usage, spare parts, warranty, etc. of the
SBC RU 252 you can always contact us.
Before calling our helpline, first fill out the equipment list at the end
of this user manual. Make sure to have the list and the SBC RU 252
at hand when you call, so that our operators can help you
determine whether the SBC RU 252 is working properly.
You will find our contact details at the end of this user manual.
The model number of your Philips universal remote control is
SBC RU 252/00H.
Date of purchase: ......../ ......../ ........
(day/month/year)
SRU252_V4_Transfer_RR:SRU252_V4_Transfer 26-03-10 15:32 Pagina 7
Page 8

DE8
Inhaltsangabe
1. Einleitung...........................................................................................8
2. Inbetriebnahme der Fernbedienung..............................8-11
Einsetzen der Batterien .......................................................................................8
Prüfen der Fernbedienung ............................................................................8-9
Einstellen der Fernbedienung ...................................................................9-10
Automatisches Einstellen der Fernbedienung..............................10-11
3. Tasten und Funktionen.......................................................11-12
4. Benötigen Sie Hilfe?...................................................................12
Codeliste aller Marken / Geräte ....................................69-81
Equipment list........................................................................................................82
Helpline.....................................................................................................................82
Kundeninformationen .....................................................................................83
1. Einleitung
Herzlichen Glückwunsch zu Ihrer Entscheidung für diese universelle
Fernbedienung SBC RU 252 von Philips. Nach der Inbetriebnahme
der Fernbedienung können Sie maximal 2 verschiedene Geräte
hiermit bedienen:
TV und Videorecorder/DVD-Spieler/Recorder.
Nähere Informationen zur Inbetriebnahme dieser Fernbedienung
finden Sie in dem Kapitel ‘Inbetriebnahme der Fernbedienung’.
2. Inbetriebnahme der Fernbedienung
Einsetzen der Batterien
1 Drücken Sie die kleine Klappe
nach innen und schieben Sie sie in
Pfeilrichtung.
2
Setzen Sie zwei Batterien vom Typ R03,
UM4 oder AAA wie angegeben in das
Batteriefach ein.
3 Schieben Sie die Klappe wieder
zurück und lassen Sie sie einrasten.
Prüfen der Fernbedienung
Die Fernbedienung ist für die Steuerung der meisten Geräte von
Philips vorbereitet. Da die Signale der RU 252 bei jeder Marke und
sogar bei den einzelnen Modellnummern unterschiedlich sein
können, sollten Sie prüfen, ob Ihr Gerät auf die RU 252 reagiert.
In dem nachstehenden Beispiel (Fernsehgerät) wird beschrieben,
wie Sie hierfür am besten vorgehen. Sie können die Schritte für
andere Geräte (Videorecorder/DVD-Spieler/ Recorder), die Sie mit
der RU 252 bedienen möchten, wiederholen.
Beispiel Fernsehgerät:
1 Schalten Sie das Fernsehgerät von Hand ein oder benutzen Sie
hierfür die Original-Fernbedienung. Stimmen Sie das Gerät auf
Kanal 1 ab.
SRU252_V4_Transfer_RR:SRU252_V4_Transfer 26-03-10 15:32 Pagina 8
Page 9

2 Drücken Sie die TV-Taste der
RU 252, um das Fernsehgerät
auszuwählen.
3 Kontrollieren Sie die Funktion der
einzelnen Tasten. Eine Übersicht über
die Tasten und ihre Funktion finden
Sie in Kapitel ‘3. Tasten und Funktionen’.
– Reagiert das Fernsehgerät ordnungsgemäß auf alle
Tastenbefehle, so ist die Fernbedienung RU 252 einsatzbereit.
• Reagiert das Gerät überhaupt nicht oder nicht auf alle
Tastenbefehle, befolgen Sie bitte die Anweisungen im
Abschnitt ‘Einstellen der Fernbedienung’.
Einstellen der Fernbedienung
Dies ist nur erforderlich, wenn sich Ihr Gerät nicht oder nur
teilweise mit der Fernbedienung RU 252 steuern lässt. In diesem
Fall kennt die Fernbedienung die Marke und/oder das Modell Ihres
Gerätes nicht und müssen Sie diese der Fernbedienung bekannt
geben.
In dem nachstehenden Beispiel (Fernsehgerät) wird beschrieben,
wie Sie hierfür am besten vorgehen. Sie können die Schritte für
andere Geräte (Videorecorder/DVD-Spieler/ Recorder), die Sie mit
der RU 252 bedienen möchten, wiederholen.
Beispiel Fernsehgerät:
1 Schalten Sie das Fernsehgerät von Hand ein oder benutzen Sie
hierfür die Original-Fernbedienung. Stimmen Sie das Gerät auf
Kanal 1 ab.
2 Suchen Sie die Marke Ihres Fernsehgeräts in der Codeliste
hinten in dieser Gebrauchsanleitung heraus. Hinter der Marke
sind ein oder mehrere vierstellige Codes aufgeführt. Notieren
Sie sich den ersten Code.
Achtung! Es gibt gesonderte Tabellen für TV, Video und DVD.
Achten Sie darauf, dass Sie die Codes aus der richtigen Tabelle
übernehmen.
3 Halten Sie die Taste 'TV' 3 Sekunden
lang gedruckt, bis das grune
Lämpchen kontinuierlich leuchtet.
4 Geben Sie jetzt mit den
Zifferntasten den bei Schritt 2
notierten Code ein.
– Die grüne Anzeigelampe blinkt jetzt
zweimal. Blinkt die Lampe ein Mal
lang, wurde der Code nicht korrekt
eingegeben oder es wurde ein verkehr ter Code eingegeben.
Beginnen Sie noch einmal ab Schritt 2.
3 sec.
DE
Inbetriebnahme der Fernbedienung
Deutsch
9
SRU252_V4_Transfer_RR:SRU252_V4_Transfer 26-03-10 15:32 Pagina 9
Page 10

5 Richten Sie die Fernbedienung RU 252 auf das Fernsehgerät
und kontrollieren Sie, ob das Fernsehgerät ordnungsgemäß
reagiert.
– Reagiert das Fernsehgerät ordnungsgemäß auf alle
Tastenbefehle, so ist die Fernbedienung RU 252 einsatzbereit.
Vergessen Sie nicht, Ihren Code zu notieren.
• Reagiert das Gerät überhaupt nicht oder nicht auf alle
Tastenbefehle, beginnen Sie erneut ab Schritt 2 und
versuchen Sie es mit dem nächsten Code in der Liste.
Automatisches Einstellen der Fernbedienung
Wenn Sie den richtigen Code für Ihre Gerätemarke nicht finden
können,
können Sie die Fernbedienung auch nach dem richtigen Code
suchen lassen.
Beispiel Fernsehgerät:
1 Sorgen Sie dafür, dass das Fernsehgerät eingeschaltet ist, und
wählen Sie mit Hilfe der Original-Fernbedienung oder mit den
Tasten am Gerät einen Kanal (zum Beispiel Kanal 1). Die
Fernbedienung RU 252 wird nämlich das Signal ‘Fernsehgerät
ausschalten’ für alle TV-Modelle senden, die im Speicher
hinterlegt sind.
• Bei dem DVD-Spieler oder Videorecorder legen Sie eine Disk
bzw. Cassette ein und lassen Sie diese wiedergeben.
2 Halten Sie dann die Taste ‘TV’
anschließend 3 Sekunden lang
gedruckt, bis das grune Lämpchen
kontinuierlich leuchtet.
3 Drücken Sie die Bereitschafts-
taste, und halten Sie sie gedruckt.
–– Die RU 252 beginnt jetzt, alle bekannten ‘TV aus’-Signale
nacheinander zu übertragen.
Immer wenn ein Code gesendet
wird, blink die grüne Anzeigelampe
auf.
4 Wenn Ihr Fernsehgerät in den
Standby-Modus schaltet, lassen Sie die
Berteitschaftstaste auf der RU252 los.
– Die Fernbedienung RU 252 hat jetzt
einen Code gefunden, der für Ihr
Fernsehgerät funktioniert.
3 sec.
DE10
SRU252_V4_Transfer_RR:SRU252_V4_Transfer 26-03-10 15:32 Pagina 10
Page 11

DE
Tasten und Funktionen
Deutsch
11
5 Kontrollieren Sie, ob Sie alle Funktionen Ihres Fernsehgeräts mit
der RU 252 steuern können.
• Ist dies nicht der Fall, können Sie die automatische
Einstellung erneut durchführen. Die RU 252 wird dann
weiter nach einem Code suchen, der vielleicht besser
funktioniert.
– Wenn die RU 252 alle Codes gesendet hat, stoppt der
Suchvorgangautomatisch und die grüne Lampe blinkt nicht
mehr.
– Die automatische Programmierung eines Fernsehgeräts dauer t
maximal 5 Minuten. Für VCR/DVD werden maximal 6 Minuten
benötigt.
3. Tasten und Funktionen
Die Abbildung auf Seite 3 enthält eine Übersicht über alle Tasten
und ihre Funktionen.
1 y Standby.......................zum Ein- und Ausschalten von TV, VCR
oder DVD.
2 Anzeigelampe............- leuchtet grün auf, wenn ein IR-Signal
gesendet wird.
- blinkt grün, wenn ein Code eingegeben
wird und wenn die Fernbedienung
automatisch eingestellt wird.
3 TV - VCR/DVD..........zum Wählen des zu steuernden Gerätes:
TV, VCR oder DVD.
4 s (Mute).........................zum Stummschalten des Tons vom
Fernsehgerät.
5 - PROG +........................zum Wählen eines vorhergehenden oder
folgenden Kanals.
6 (Menu)....................- Breitbild (TV).
- Menu Ein/Aus (VCR/DVD).
7 Zifferntasten ...............direkte Kanalwahl und übrige Funktionen.
8 SHIFT ................................für zusätzliche Funktionen. Zusammen
mit einer zweiten Taste gedrückt, erhält
die zweite Taste eine andere Funktion.
Beispiel:
SHIFT + PROG+:....'Menü nach oben'
SHIFT + PROG-:.....'Menü nach unten'
SHIFT + VOL+:........'Menü nach rechts'
SHIFT + VOL-:..........'Menü nach links'
SHIFT + :...............'Menu Ein/Aus'
Probieren Sie andere Kombinationen mit der Shift-Taste an Ihrem
Gerät aus, um herauszufinden, welche Funktionen zur Verfügung
stehen. Es sind nur Funktionen zugänglich, die bei der ursprünglichen
Fernbedienung verfügbar waren.
SRU252_V4_Transfer_RR:SRU252_V4_Transfer 26-03-10 15:32 Pagina 11
Page 12

DE12
9 .........................................zum Einschalten von Videotext.
0 5............................................- rote Videotext-Taste
- Rücklauf (VCR/DVD)
9..............................................- grüne Videotext-Taste
- Stoppen (VCR/DVD)
0 .............................................Aufnahme (VCR/DVD)
;...............................................- gelbe Videotext-Taste
- Pause (VCR/DVD)
6............................................- blaue Videotext-Taste
- Vorlauf (VCR/DVD)
2..............................................- weiße Videotext-Taste
- Wiedergabe (VCR/DVD)
! .........................................zum Ausschalten von Videotext.
@ -/-- ..........................................zum Wählen zwischen ein- und
zweistelligen Kanalnummern.
# OK.........................................zum Bestätigen Ihrer Wahl.
$ - VOL +..............................zum Regeln der Lautstärke des
Fernsehgeräts.
% AV..........................................zum Umschalten zwischen den externen
Eingängen Ihres Geräts.
Hinweis! Mit den Tasten VOL – /VOL + und s (Stummschaltung)
kann die Lautstärke des Fernsehgerätes direkt eingestellt
werden, auch wenn Sie gerade Ihren Videorecorder, Ihr DVDoder Ihr SAT-Gerät benutzen.
Reagiert das Gerät überhaupt nicht oder nicht auf alle
Tastenbefehle, befolgen Sie bitte die Anweisungen im
Abschnitt ‘Einstellen der Fernbedienung’.
Eventuell müssen Sie einen anderen Code für das Gerät
eingeben.
4. Benötigen Sie Hilfe?
Lesen Sie zunächst diese Bedienungsanleitung aufmerksam. Sie dient
als zusätzliche Hilfe
für die Konfiguration und Verwendung der Fernbedienung.
Sollten Sie zusätzliche Informationen benötigen oder zusätzliche
Fragen zu Einrichtung, Verwendung, Ersatzteilen oder Garantie der
SBC RU 252 haben, können Sie sich jederzeit an uns wenden.
Füllen Sie bitte zuerst die Geräteliste am Ende dieser
Bedienungsanleitung aus, bevor Sie unsere Helpline anrufen. Halten
Sie diese Liste und die SBC RU 252 griffbereit, damit unsere
Mitarbeiter problemlos feststellen können, ob die SBC RU 252
ordnungsgemäß funktioniert.
Sie finden die entsprechenden Kontaktdaten am Ende dieser
Bedienungsanleitung.
Die Modellnummer Ihrer Philips Universal-Fernbedienung lautet
SBC RU 252/00H.
Kaufdatum: ......../ ......../ ........
(Tag/Monat/Jahr)
SRU252_V4_Transfer_RR:SRU252_V4_Transfer 26-03-10 15:32 Pagina 12
Page 13

FR
Installation de la télécommande
Français
13
Sommaire
1. Introduction.................................................................................13
2. Installation de la télécommande .................................13-16
Insertion des piles..............................................................................................13
Test de la télécommande ......................................................................13-14
Réglage de la télécommande..............................................................14-15
Réglage automatique de la télécommande.................................15-16
3. Touches et fonctions ..........................................................16-17
4. Besoin d'aide ?.............................................................................17
Nomenclature des marques/équipements..............69-81
Liste des équipements ....................................................................................82
Assistance téléphonique ................................................................................82
Informations pour le consommateur..............................................83-84
1. Introduction
Merci d’avoir acheté cette télécommande universelle Philips
SBC RU 252. Une fois installée, vous pouvez l’utiliser avec 2
appareils différents: téléviseur et magnétoscope ou
lecteur/enregistreur de DVD.
Pour plus de détails sur l’installation de cette télécommande,
reportez-vous à la section ‘Installation de la télécommande’.
2. Installation de la télécommande
Insertion des piles
1 Faites coulisser le couvercle
dans la direction indiquée par la
flèche.
2 Insérez deux piles de type R03, UM4
ou AAA dans le sens indiqué dans le
compartiment.
3 Refermez le couvercle.
Test de la télécommande
Cette télécommande est compatible avec la plupart des appareils
Philips. Sachant que les signaux de la RU 252 peuvent varier selon
les marques et même selon les modèles, il est conseillé de vous
assurer de son fonctionnement avec chacun de vos équipements.
L’exemple suivant (TV) montre comment procéder. Répétez cette
procédure pour les autres appareils (magnétoscopes et
lecteurs/enregistreurs de DVD) à utiliser avec la RU 252.
SRU252_V4_Transfer_RR:SRU252_V4_Transfer 26-03-10 15:32 Pagina 13
Page 14

Exemple - téléviseur:
1 Allumez le téléviseur manuellement ou à l’aide de la
télécommande d’origine. Activez le canal 1.
2 Appuyez sur la touche TV de
la RU 252 pour sélectionner le
téléviseur.
3 Assurez-vous que toutes les touches
fonctionnent. Pour connaître la
fonction des touches, reportez-vous à
la section ‘3. Touches et fonctions’.
– Si le téléviseur réagit à toutes les touches, la RU 252 est prête.
• Si le téléviseur ne réagit absolument pas ou pas à toutes
les commandes, reportez-vous aux instructions de la
section ‘Réglage de la télécommande’.
Réglage de la télécommande
Cette opération n’est nécessaire que si la RU 252 ne fonctionne
pas ou seulement partiellement avec votre appareil. La raison en est
que la RU 252 ne reconnaît pas la marque ni/ou le modèle ; dans
ce cas, vous devez la configurer en conséquence.
L’exemple suivant (TV) montre comment procéder. Répétez cette
procédure pour les autres appareils (magnétoscopes et
lecteurs/enregistreurs de DVD) à utiliser avec la RU 252.
Exemple - téléviseur:
1 Allumez le téléviseur manuellement ou à l’aide de la
télécommande d’origine. Activez le canal 1.
2 Recherchez la marque de votre téléviseur dans la
nomenclature qui accompagne le présent manuel. Un ou
plusieurs codes à quatre chiffres figurent à la suite de la
marque. Prenez note du premier.
Attention ! Les tableaux des téléviseurs, des magnétoscopes et des
lecteurs de DVD sont différents. Veillez à noter le code du tableau
correspondant.
3 Maintenez la touche TV enfoncée
pendant 3 secondesjusqu’à ce que le
voyant vert reste allumé.
4 Saisissez le code noté à l’étape 2
à l’aide des touches numériques .
– Le voyant vert doit maintenant
clignoter deux fois. Le témoin
lumineux vert de la fenêtre de
sélection clignote encore deux fois.
S’il ne clignote qu’une fois, c’est parce que le code saisi est
erroné ou que vous avez fait une faute de saisie.
Recommencez à partir de l’étape 2.
3 sec.
FR14
SRU252_V4_Transfer_RR:SRU252_V4_Transfer 26-03-10 15:32 Pagina 14
Page 15

5 Dirigez la RU 252 vers le téléviseur et assurez-vous qu’elle
fonctionne correctement.
– Si le téléviseur réagit à toutes les touches, la RU 252 est
configurée correctement. N’oubliez pas de prendre note de
votre code.
• Si l’appareil ne réagit absolument pas, ou si certaines
touches sont inopérantes, reprenez la procédure à partir
de l’étape 2 et essayez le code suivant dans la liste.
Réglage automatique de la télécommande
Si vous ne trouvez pas le code de la marque de votre matériel,
vous pouvez également laisser la télécommande le rechercher
automatiquement.
Exemple - téléviseur:
1 Allumez le téléviseur et sélectionnez un canal (par exemple, le
canal 1) à l’aide de la télécommande d’origine. La RU 252
renvoie le message ‘Éteindre le téléviseur’ pour tous les
modèles qui sont enregistrés dans sa mémoire.
• Insérez un disque ou une bande dans le lecteur ou le
magnétoscope et lancez la lecture .
2 Maintenez la touche TV enfoncée
pendant 3 secondes jusqu’à ce que
le voyant vert reste allumé.
3 Appuyez sur la touche Standby et
maintenez-la enfoncée.
– La RU 252 transmet alors successivement tous les signaux de
sortie TV connus.
Le voyant vert clignote à chaque
transmission d’un code.
4 Lorsque le téléviseur s’éteint
(mode de veille), relâchez
immédiatement la touche Standby de
la RU252
- La RU 252 a trouvé un code qui
fonctionne avec votre téléviseur.
3 sec.
FR
Installation de la télécommande
Français
15
SRU252_V4_Transfer_RR:SRU252_V4_Transfer 26-03-10 15:32 Pagina 15
Page 16

FR16
5 Vérifiez que vous pouvez utiliser toutes les fonctions de votre
téléviseur à l’aide de la RU 252.
• Si ce n’est pas le cas, vous pouvez relancer la
configuration automatique. La RU 252 recherche alors
un code susceptible de fonctionner.
– Une fois que la RU 252 a transmis tous les codes, la
recherche automatique s’arrête et le témoin lumineux vert
cesse de clignoter.
– La programmation automatique d’un téléviseur prend au
maximum 5 minutes. Pour un magnétoscope/lecteur de DVD,
elle prend 6 minutes.
3. Touches et fonctions
L’illustration de la page 3 présente toutes les touches et leur
fonction.
1 y Standby . . . . . . . . . mise sous tension et hors tension d’un
téléviseur, magnétoscope ou lecteur de
DVD.
2 Voyant. . . . . . . . . . . . . - s’allume en vert lors de l’envoi d’un
signal IR.
- clignote en vert lors de la saisie d’un
code et du réglage automatique de la
télécommande.
3 TV - VCR/DVD. . . . . choix de l’appareil: TV, VCR ou DVD.
4 s (Mute) . . . . . . . . . . coupe le son du téléviseur.
5 - PROG + . . . . . . . . . . choix d’un canal précédent ou suivant.
6 (Menu) . . . . . . . . - 16/9 (téléviseur).
Activation/désactivation du menu
(magnétoscope/DVD).
7 Touches
numériques. . . . . . . . sélection directe des canaux et autres
fonctions.
8 SHIFT . . . . . . . . . . . . . accès aux autres fonctions. Si vous
maintenez cette touche enfoncée en
appuyant sur une autre touche, cette
dernière remplit une autre fonction.
Exemple:
SHIFT + PROG+:. . 'menu précédent'
SHIFT + PROG-:. . 'menu suivant'
SHIFT + VOL+:. . . . 'menu de droite'
SHIFT + VOL-:. . . . 'menu de gauche'
SHIFT + . . . . . . ‘activation/désactivation du menu’
Essayez d’autres combinaisons avec la touche Shift pour déterminer
les fonctions disponibles avec votre matériel. Seules les fonctions
disponibles sur la télécommande d’origine sont accessibles.
SRU252_V4_Transfer_RR:SRU252_V4_Transfer 26-03-10 15:32 Pagina 16
Page 17

FR
Besoin d’aide?
Français
17
9 . . . . . . . . . . . . . . . . active la fonction télétexte.
0 5. . . . . . . . . . . . . . . . . . - touche télétexte rouge
- rembobinage (magnétoscope/DVD)
9 . . . . . . . . . . . . . . . . . . - touche télétexte verte
- arrêt (magnétoscope/DVD)
0 . . . . . . . . . . . . . . . . . . enregistrer (magnétoscope/DVD)
;. . . . . . . . . . . . . . . . . . . - touche télétexte jaune
- pause (magnétoscope/DVD)
6. . . . . . . . . . . . . . . . . . - touche télétexte bleue
- avance rapide (magnétoscope/DVD)
2 . . . . . . . . . . . . . . . . . . - touche télétexte blanc
- lecture (magnétoscope/DVD)
! . . . . . . . . . . . . . . . . désactive la fonction télétexte.
@ -/-- . . . . . . . . . . . . . . . . . choix entre un numéro de canal à un
ou deux chiffres.
# OK . . . . . . . . . . . . . . . . confirmation de votre choix.
$ - VOL + . . . . . . . . . . . . réglage du volume du téléviseur.
% AV. . . . . . . . . . . . . . . . . passage d’une entrée externe de votre
matériel à une autre.
Remarque ! Les touches VOL – /VOL + et s (muet) permettent de
régler le volume du téléviseur même si vous utilisez
simultanément votre magnétoscope, lecteur de DVD ou
décodeur satellite.
Si le téléviseur ne réagit absolument pas ou pas à toutes les
commandes, reportez-vous aux instructions de la section
‘Réglage de la télécommande’.
Il est peut-être nécessaire de spécifier un code différent.
4. Besoin d'aide ?
Il est conseillé de lire attentivement ce manuel d'utilisation au
préalable. Il a été conçu
pour vous aider à configurer et à utiliser la télécommande.
Cependant, si vous avez besoin d'informations supplémentaires ou
pour toute autre question relative à la configuration, à l'utilisation,
aux pièces de rechange, à la garantie, etc. de la télécommande
SBC RU 252, contactez-nous.
Avant d'appeler notre assistance téléphonique, veuillez compléter la
liste des équipements figurant à la fin de ce manuel. Lorsque vous
appelez, assurez-vous d'avoir cette liste ainsi que la télécommande
SBC RU 252 à portée de main de sorte que nos opérateurs
puissent vous aider à déterminer si elle fonctionne correctement.
Vous trouverez nos coordonnées à la fin de ce manuel.
La référence du modèle de votre télécommande universelle Philips
est : SBC RU 252/00H.
Date d'achat : ......../ ......../ ........
(jour/mois/année)
SRU252_V4_Transfer_RR:SRU252_V4_Transfer 26-03-10 15:32 Pagina 17
Page 18

IT18
Sommario
1. Introduzione.......... .....................................................................18
2. Installazione del telecomando........................................18-21
Inserimento delle batterie...............................................................................18
Collaudo del telecomando .....................................................................18-19
Configurazione del telecomando ........................................................19-20
Configurazione automatica del telecomando..............................20-21
3. Tasti e funzioni .......................................................................21-22
4. Bisogno di aiuto?..........................................................................22
Lista dei codici per tutte le marche / apparecchi .69-81
Elenco degli apparecchi ..................................................................................82
Assistenza ...............................................................................................................82
Informazioni per il consumatore.................................................................84
1. Introduzione
Congratulazioni per l’acquisto del telecomando universale Philips
SBC RU 252. Dopo aver messo a punto la configurazione del
telecomando potrete utilizzarlo per controllare fino a 2 apparecchi:
televisori (TV) e videoregistratori/DVD (VCR/DVD).
Nel capitolo ‘Installazione del telecomando’ troverete le
informazioni necessarie per preparare il telecomando all’uso.
2. Installazione del telecomando
Inserimento delle batterie
1 Premete sul coperchio e fatelo
scorrere nella direzione della freccia.
2 Inserite due batterie R03, UM4 od
AAA nel vano batterie, come
mostrato in figura.
3 Richiudete il coperchio (scatta in
posizione con un clic).
Collaudo del telecomando
Il telecomando è stato programmato per funzionare con la
maggioranza degli apparecchi Philips. Poiché l’RU 252 potrebbe
utilizzare segnali differenti per ciascuna marca e modello, è
opportuno verificare se l’apparecchio risponde ai comandi inviati
dall’RU 252.
L’esempio che segue (TV) descrive la procedura per il collaudo.
Potete ripetere questi passaggi per gli altri apparecchi
(videoregistratori, DVD) che intendete controllare con l’RU 252.
SRU252_V4_Transfer_RR:SRU252_V4_Transfer 26-03-10 15:32 Pagina 18
Page 19

Installaziione del telecomando
IT
Italiano
19
Procedura di esempio relativa ad un televisore:
1 Accendete il televisore direttamente o tramite il suo
telecomando originale. Sintonizzate il canale 1.
2 Premete il tasto TV dell' RU 252 per
selezionare TV.
3 Controllate se funzionano tutti i tasti.
Per una panoramica sui tasti e le
relative funzioni, consultate ‘3. Tasti e
funzioni’.
– Se il TV risponde correttamente a tutti i comandi abbinati ai
tasti, l’RU 252 è pronto per l’uso.
• Se l’apparecchio non risponde del tutto od ignora alcuni
comandi, passate alle istruzioni descritte in
‘Configurazione del telecomando’.
Configurazione del telecomando
Questa procedura va svolta solo se l’apparecchio non risponde ai
comandi inviati dall’RU 252. Se ciò accade significa che l’RU 252
non riconosce la marca e/o il modello dell’apparecchio ed è quindi
necessario programmare il telecomando in base alle specifiche
dell’apparecchio.
L’esempio che segue (TV) descrive la procedura di configurazione.
Potete ripetere questi passaggi per gli altri apparecchi
(videoregistratori, DVD) che intendete controllare con l’RU 252.
Procedura di esempio relativa ad un televisore:
1 Accendete il televisore direttamente o tramite il suo
telecomando originale. Sintonizzate il canale 1.
2 Individuate la marca del vostro TV nella lista dei codici inclusa
alla fine di questa guida. Per ciascuna marca sono elencati uno
o più codici a quattro cifre. Annotate il primo codice.
Prestate attenzione! Vi sono tabelle separate per le varie categorie
di apparecchi: TV, video e DVD. Prelevate i codici dalla tabella
corretta.
3 Tenere premuto il tasto TV per
3 secondi fino a quando la spia di
segnalazione verde rimane accesa.
4 A questo punto inserite il codice
annotato al punto 2, mediante i tasti
numerici.
– Ora la spia verde lampeggia due
volte. Se la spia lampeggia una volta
per un prolungato periodo di tempo,
il codice non è stato inserito correttamente, oppure si tratta di
un codice errato. Ripetete la procedura a par tire dal punto 2.
5 Puntate l’RU 252 in direzione del TV e verificate se
l’apparecchio risponde correttamente ai comandi inviati.
3 sec.
SRU252_V4_Transfer_RR:SRU252_V4_Transfer 26-03-10 15:32 Pagina 19
Page 20

IT20
– Se il TV risponde a tutti i comandi abbinati ai tasti, l’RU 252 è
pronto per l’uso. Non scordate di annotare il codice.
• Se l’apparecchio non risponde del tutto od ignora alcuni
comandi, ripetete la procedura a partire dal punto 2
inserendo il secondo codice elencato nella lista.
Configurazione automatica del telecomando
Se nessuno dei codici abbinati alla marca del vostro prodotto è
corretto, è possibile utilizzare la funzione di ricerca automatica del
codice corretto del telecomando.
Procedura di esempio relativa ad un televisore:
1 Assicuratevi che il TV sia acceso e selezionate un canale
mediante il suo telecomando originale, od i tasti del pannello
del televisore (ad esempio il canale 1). L’RU 252 procederà con
l’invio del segnale di ‘spegnimento TV’ di tutti i modelli di
televisore presenti nella sua memoria.
• Se l’apparecchio è un lettore DVD od un videoregistratore,
inserite un disco od un nastro ed avviate la riproduzione.
2 Quindi tenere premuto il tasto TV
per 3 secondi fino a quando la spia di
segnalazione verde rimane accesa.
3 Premete brevemente il tasto
Standby dell’RU 252.
– L’RU 252 inizia ad inviare tutti i segnali noti di ‘spegnimento TV’,
uno alla volta.
Ogni volta che viene inviato un
codice, la spia verde lampeggia.
4 Quando il televisore si spegne
(modalità standby), rilasciare
immediatamente il tasto Standby
dell'RU252
– L’RU 252 ha quindi trovato un codice
adatto al vostro TV.
5 Verificate se l’RU 252 è in grado di controllare tutte le funzioni
del televisore.
• In caso contrario, ripetete la procedura di configurazione
automatica. L’RU 252 ricercherà quindi un codice che
forse risulterà migliore del precedente.
3 sec.
SRU252_V4_Transfer_RR:SRU252_V4_Transfer 26-03-10 15:33 Pagina 20
Page 21

– Quando l’RU 252 ha inviato tutti i codici noti, la ricerca si
arresta automaticamente e la spia verde termina di
lampeggiare.
– La programmazione automatica di un TV richiede fino a 5
minuti. Per i VCR/DVD invece è di 6 minuti.
3. Tasti e funzioni
L’illustrazione a pagina 3 fornisce una panoramica di tutti i tasti e le
relative funzioni.
1 y Standby . . . . . . . . . attiva o disattiva la modalità TV, VCR o
DVD.
2 Spia . . . . . . . . . . . . . . . - si accende in verde all'invio di un
segnale IR.
- lampeggia in verde all'inserimento di
un codice e quando il telecomando
viene configurato automaticamente.
3 TV - VCR/DVD. . . . . seleziona l’apparecchio da controllare:
TV, VCR o DVD.
4 s (Mute) . . . . . . . . . . abbassa completamente il volume audio
del TV.
5 - PROG + . . . . . . . . . . seleziona il canale precedente o
successivo.
6 (Menu) . . . . . . . . - wide screen (TV).
- attiva/disattiva il menu (VCR/DVD).
7 Tasti numerici . . . . . selezione di retta dei canali e di altre
funzioni.
8 SHIFT . . . . . . . . . . . . . rende disponibili funzioni aggiuntive. Se
premuto simultaneamente ad un altro
tasto, il secondo tasto attiva la seconda
funzione associata.
Ad esempio:
SHIFT + PROG+:. . 'menu su'
SHIFT + PROG-:. . 'menu giù'
SHIFT + VOL+:. . . . 'menu a destra'
SHIFT + VOL-:. . . . 'menu a sinistra'
SHIFT + :. . . . . . 'attiva/disattiva il menu'
Provate altre combinazioni del tasto Shift con il vostro apparecchio
per verificare le funzioni disponibili. Sono disponibili sono le funzioni
presenti nel telecomando originale.
9 . . . . . . . . . . . . . . . . attiva il teletext.
0 5. . . . . . . . . . . . . . . . . . - tasto teletext rosso
- riavvolgimento (VCR/DVD)
9 . . . . . . . . . . . . . . . . . . - tasto teletext verde
- stop (VCR/DVD)
0 . . . . . . . . . . . . . . . . . . registra (VCR/DVD)
;. . . . . . . . . . . . . . . . . . . - tasto teletext giallo
- pausa (VCR/DVD)
6. . . . . . . . . . . . . . . . . . - tasto teletext blu
- avanti rapido (VCR/DVD)
2 . . . . . . . . . . . . . . . . . . - tasto teletext bianco
- indice (VCR/DVD)
Tasti e funzioni
IT
Italiano
21
SRU252_V4_Transfer_RR:SRU252_V4_Transfer 26-03-10 15:33 Pagina 21
Page 22

! . . . . . . . . . . . . . . . . disattiva il teletext.
@ -/-- . . . . . . . . . . . . . . . . . seleziona tra numeri di canale ad una e
due cifre.
# OK . . . . . . . . . . . . . . . . conferma la selezione.
$ - VOL + . . . . . . . . . . . . regola il volume del TV.
% AV. . . . . . . . . . . . . . . . . seleziona a rotazione tra gli ingressi
esterni dell’apparecchio.
Nota! I tasti VOL – /VOL + e s (Mute) controllano direttamente il
volume del televisore, anche se state controllando un
apparecchio VCR, DVD o SAT.
Se l’apparecchio non risponde del tutto od ignora alcuni
comandi, passate alle istruzioni descritte in ‘Configurazione
del telecomando’. Può essere necessario inserire un altro
codice per l’apparecchio.
4. Bisogno di aiuto?
Innanzitutto, leggere attentamente il manuale d'uso, fornito per
agevolare l'utente nella configurazione e nell'uso del telecomando.
Nel caso in cui siano comunque necessarie informazioni aggiuntive
o per ulteriori domande sulle impostazioni, l'utilizzo, le parti di
ricambio, la garanzia, ecc. che riguardano il telecomando
SBC RU 252, rivolgersi a Philips.
Prima di contattare l'assistenza, compilare l'elenco degli apparecchi
in fondo al manuale d'uso. Verificare di avere a por tata di mano
l'elenco e il telecomando SBC RU 252 quando si effettua la
chiamata, per poter verificare se il telecomando funziona
correttamente.
Le informazioni sui contatti sono riportate sul retro di questo
manuale.
Il numero del modello del telecomando universale Philips è
SBC RU 252/00H.
Data di acquisto: ......../ ......../ ........
(giorno/mese/anno)
IT22
SRU252_V4_Transfer_RR:SRU252_V4_Transfer 26-03-10 15:33 Pagina 22
Page 23

Contenido
1. Introducción...................................................................................23
2. Instalación del mando a distancia.................................23-26
Inserción de las pilas...........................................................................................23
Verificación del mando a distancia .....................................................23-24
Configuración del mando a distancia................................................24-25
Configuración automática del mando a distancia......................25-26
3. Teclas y funciones..................................................................26-27
4.
¿Necesita ayuda?..............................................................................27
Lista de códigos de todas las marcas o equipos ....69-81
Lista de equipo ..........................................................................................................82
Servicio de ayuda.....................................................................................................82
Información al consumidor.............................................................................84
1. Introducción
Enhorabuena por la adquisición del mando a distancia universal
Philips SBC RU 252. Una vez instalado el mando a distancia, podrá
utilizarlo para controlar hasta 2 dispositivos diferentes:
televisores (TV) y reproductoras de video/DVD (VCR/DVD).
Para obtener más información sobre la configuración de este
mando a distancia, consulte el capítulo ‘Instalación del mando a
distancia’.
2. Instalación del mando a distancia
Inserción de las pilas
1 Empuje la cubier ta hacia dentro
desplazándola en la dirección de la
flecha.
2 Inserte dos pilas de tipo R03, UM4 o
AAA en el compartimento de las
pilas, como se muestra en la
ilustración.
3 Vuelva a introducir la cubierta hasta que haga clic y esté bien
encajada.
Verificación del mando a distancia
El mando a distancia está programado para que funcione con la
mayoría de dispositivos Philips. Como el modelo RU 252 puede
utilizar diferentes señales para cada marca e incluso para modelos
diferentes de la misma marca, se recomienda que verifique si el
dispositivo responde al mando RU 252.
En el ejemplo siguiente (TV) se explica cómo realizar esta
verificación. Repita el mismo procedimiento para otros dispositivos
(grabadora/reproductoras de video/DVD) con los que desee
utilizar el mando a distancia RU 252.
23
Español
Instalación del mando a distancia
ES
SRU252_V4_Transfer_RR:SRU252_V4_Transfer 26-03-10 15:33 Pagina 23
Page 24

Ejemplo de TV:
1 Encienda el televisor manualmente o utilice el mando a
distancia original. Sintonice el canal 1.
2 Pulse botón TV de RU 252 para
seleccionar el televisor.
3 Compruebe que todas las teclas
funcionan.
Para obtener una descripción de las
teclas y sus funciones, consulte la
sección ‘3. Teclas y funciones’.
– Si el televisor responde correctamente a todos los comandos
de tecla, el mando a distancia RU 252 se puede utilizar.
• Si el dispositivo no responde a ninguno o sólo a algunos
comandos de tecla, siga las instrucciones de la sección
‘Configuración del mando a distancia’.
Configuración del mando a distancia
Este proceso sólo es necesario si el dispositivo no responde al
mando a distancia RU 252. Si es así, el mando RU 252 no reconoce
la marca y/o el modelo del dispositivo en cuestión y debe
programarlo para que lo reconozca.
En el ejemplo siguiente (TV) se explica cómo realizar esta
configuración. Repita el mismo procedimiento para otros
dispositivos (grabadora/ reproductoras de video/DVD) con los que
desee utilizar el mando a distancia RU 252.
Ejemplo de TV:
1 Encienda el televisor manualmente o utilice el mando a
distancia original. Sintonice el canal 1.
2 Busque la marca del televisor en la lista de códigos que se
encuentra al dorso de este manual. A cada marca le
corresponde uno o más códigos de cuatro cifras. Tome nota
del primer código.
Preste atención ya que hay tablas diferentes para TV, vídeo y DVD.
Asegúrese de utilizar los códigos de la tabla correcta.
3 Mantenga pulsado el botón TV
durante 3 segundos hasta que el
piloto verde permanezca iluminado.
4 A continuación, introduzca el
código anotado en el paso 2
mediante las teclas digitales. .
– El LED verde parpadeará dos veces.
La luz verde de la ventana del
selector parpadea dos veces.
Si parpadea una vez durante un período largo de tiempo, el
código no se ha introducido correctamente o se ha
introducido un código incorrecto. Vuelva a empezar desde el
paso 2.
3 sec.
ES24
SRU252_V4_Transfer_RR:SRU252_V4_Transfer 26-03-10 15:33 Pagina 24
Page 25
3 sec.
ES
Instalación del mando a distancia
Español
25
5 Apunte el mando a distancia RU 252 al televisor y verifique
que responde.
– Si el televisor responde a todos los comandos de teclas, el
mando a distancia RU 252 se puede utilizar. No olvide anotar
el código.
• Si el dispositivo no responde a ninguno o sólo a algunos
comandos de tecla, vuelva a empezar desde el paso 2 y
pruebe con el siguiente código de la lista.
Configuración automática del mando a
distancia
Si no encuentra el código adecuado para la marca de su dispositivo,
el mando a distancia puede buscarlo automáticamente.
Ejemplo de TV:
1 Asegúrese de que el televisor está encendido y seleccione un
canal con el mando a distancia original o las teclas del televisor
(por ejemplo, el canal 1).
El mando a distancia RU 252 emite la señal de ‘apagar TV’ para
todos los modelos de televisor almacenados en la memoria.
• Si el dispositivo es un reproductor de DVD o una grabadora
de vídeo, inserte un disco o una cinta e inicie la reproducción.
2 A continuación, mantenga pulsado
botón TV durante 3 segundos hasta
que el piloto verde permanezca
iluminado.
3 Pulse botón de modo ‘en espera’
y manténgalo pulsado.
– El mando a distancia RU 252 comienza a emitir todas las
señales conocidas de ‘apagar TV’, una por una.
Cada vez que se envía un código,
el LED verde parpadea.
4 Cuando el televisor se apague
(modo de espera), suelte
inmediatamente el botón de modo
de espera del RU252.
- El mando a distancia RU 252 ha
encontrado el código que funciona
con el televisor.
5 Compruebe que todas las funciones del televisor funcionan
con el mando a distancia RU 252.
3 sec.
SRU252_V4_Transfer_RR:SRU252_V4_Transfer 26-03-10 15:33 Pagina 25
Page 26

ES26
• Si no es así, repita el proceso de configuración
automática.
El mando a distancia RU 252 buscará un código que
funcione mejor.
– Una vez que el mando a distancia RU 252 ha verificado todos
los códigos conocidos, la búsqueda se detiene
automáticamente y la luz verde deja de parpadear.
– La programación automática de un TV lleva como máximo 5
minutos. En unvídeo/DVD lleva unos 6 minutos.
3. Teclas y funciones
La ilustración de la página 3 proporciona una descripción de todas
las teclas y sus funciones.
1 y Standby . . . . . . . . . activa o desactiva los modos TV, VCR y
DVD.
2 LED indicador . . . . . - se ilumina en verde cuando se envía
una señal infrarroja.
- parpadea en verde cuando se
introduce un código ydurante la
configuración automática del mando a
distancia.
3 TV - VCR/DVD. . . . . selecciona el dispositivo que desea
utilizar:
TV, VCR o DVD.
4 s (Mute) . . . . . . . . . . silencia el sonido del televisor.
5 - PROG + . . . . . . . . . . selecciona un canal anterior o siguiente.
6 (Menu) . . . . . . . . - pantalla panorámica (TV).
- menú activado/desactivado
(VCR/DVD).
7 Teclas digitales . . . . selección directa de canales y otras
funciones.
8 SHIFT . . . . . . . . . . . . . funciones adicionales. Si se pulsa al
mismo tiempo que otra tecla, la
segunda tecla adquiere otra función. Por
ejemplo:
SHIFT + PROG+:. . 'menú arriba'
SHIFT + PROG-:. . 'menú abajo'
SHIFT + VOL+:. . . . 'menú a la derecha'
SHIFT + VOL-:. . . . 'menú a la izquierda'
SHIFT + :. . . . . . 'menú activado/desactivado'
Pruebe otras combinaciones con la tecla Shift del dispositivo para
saber qué funciones están disponibles. Sólo estarán disponibles las
funciones del mando a distancia original.
SRU252_V4_Transfer_RR:SRU252_V4_Transfer 26-03-10 15:33 Pagina 26
Page 27

9 . . . . . . . . . . . . . . . . activa el teletexto.
0 5. . . . . . . . . . . . . . . . . . - tecla roja del teletexto
- rebobinar (VCR/DVD)
9 . . . . . . . . . . . . . . . . . . - tecla verde del teletexto
- detener (VCR/DVD)
0 . . . . . . . . . . . . . . . . . . grabar (VCR/DVD)
;. . . . . . . . . . . . . . . . . . . - tecla amarilla del teletexto
- pausa (VCR/DVD)
6. . . . . . . . . . . . . . . . . . - tecla azul del teletexto
- avance rápido (VCR/DVD)
2 . . . . . . . . . . . . . . . . . . - tecla blanca del teletexto
- índice (VCR/DVD)
! . . . . . . . . . . . . . . . . desactiva el teletexto.
@ -/-- . . . . . . . . . . . . . . . . . selecciona entre números de canales de
una y dos cifras.
# OK . . . . . . . . . . . . . . . . confirma la selección.
$ - VOL + . . . . . . . . . . . . ajusta el volumen del televisor.
% AV. . . . . . . . . . . . . . . . . selecciona alternativamente las entradas
externas del equipo.
Nota! Los botones VOL – /VOL + y s (Mute) controlan directamente
el volumen del televisor incluso cuando está utilizando el vídeo,
DVD o satélite.
Si el dispositivo no responde a ninguno o sólo a algunos
comandos de tecla, siga las instrucciones de la sección
‘Configuración del mando a distancia’. Es posible que tenga
que introducir otro código para el dispositivo.
4. ¿Necesita ayuda?
Le aconsejamos que primero lea este manual de usuario
atentamente. Éste se proporciona para ayudarle a configurar y
utilizar el mando a distancia.
Si necesita más información o tiene otras preguntas sobre la
configuración, uso, piezas de recambio, garantía, etc. del
SBC RU 252, póngase en contacto con nosotros.
Antes de llamar a nuestro servicio de ayuda, rellene la lista de
equipo incluida al final de este manual de usuario. Asegúrese de
tener la lista y el SBC RU 252 a mano cuando llame para que
nuestros operadores puedan ayudarle a determinar si el
SBC RU 252 funciona correctamente.
Encontrará nuestros datos de contacto en al final de este manual.
El número de modelo de su mando a distancia universal de Philips
es el SBC RU 252/00H.
Fecha de compra: ......../ ......../ ........
(día/mes/año)
ES
Español
27
¿Necesita ayuda?
SRU252_V4_Transfer_RR:SRU252_V4_Transfer 26-03-10 15:33 Pagina 27
Page 28

PL28
Spis treści
1. Wprowadzenie ...........................................................................28
2. Instalowanie pilota..............................................................28-31
Wkładanie baterii...............................................................................................28
Testowanie pilota.......................................................................................28-29
Konfigurowanie pilota ..............................................................................29-30
Automatyczne konfigurowanie pilota .............................................30-31
3. Klawisze i funkcje ................................................................31-32
4. Potrzebna pomoc? ....................................................................32
Lista kodów wszystkich producentów / sprzętu ..69-81
Lista urządzeń.......................................................................................................82
Infolinia.....................................................................................................................82
Informacje dla użytkownika..........................................................................85
1. Wprowadzenie
Gratulujemy zakupu pilota uniwersalnego Philips SBC RU 252. Po
zainstalowaniu pilota można go wykorzystać do sterowania najwyżej
2 różnymi urządzeniami: w obsłudze telewizorów (TV) i
magnetowidów/DVD.
Informacje dotyczące przygotowania pilota do użycia znajdują się
w rozdziale ‘Instalowanie pilota’.
2. Instalowanie pilota
Wkładanie baterii
1 Wciśnij pokrywę i przesuń ją w
kierunku wskazywanym przez strzałkę.
2 Włóż dwie baterie typu R03, UM4
lub AAA (tzw. małe paluszki) do
pojemnika na baterie, jak pokazano
na ilustracji.
3 Przesuń pokrywę z powrotem i
zatrzaśnij ją.
Testowanie pilota
Pilot został zaprogramowany do sterowania urządzeniami firmy
Philips. Ponieważ pilot RU 252 może używać różnych sygnałów dla
każdego urządzenia, a nawet dla różnych modeli tego samego
urządzenia, zalecane jest sprawdzenie, czy dane urządzenie reaguje
na sterowanie pilotem RU 252.
Poniższy przykład (telewizor) pokazuje, jak to zrobić. Te same
czynności można wykonać dla innych urządzeń
(magnetowidów/DVD), którymi chce się sterować za pomocą
pilota RU 252.
Przykład telewizora:
1 Włącz telewizor ręcznie lub korzystając z oryginalnego pilota.
Przełącz na kanał 1.
SRU252_V4_Transfer_RR:SRU252_V4_Transfer 26-03-10 15:33 Pagina 28
Page 29

2 Wybierz telewizor, wciskając na
pilocie RU 252 przycisk TV.
3 Sprawdź, czy działają wszystkie
klawisze. Informacje na temat
przeglądu klawiszy oraz ich funkcji
znajdują się w rozdziale ‘Klawisze
i funkcje’.
– Jeśli telewizor reaguje prawidłowo na wszystkie klawisze, pilot
RU 252 jest gotowy do użycia.
• Jeśli urządzenie nie reaguje na niektóre lub na wszystkie
klawisze, postępuj zgodnie z instrukcjami zawartymi w
części ‘Konfigurowanie pilota’.
Konfigurowanie pilota
Jest to konieczne tylko wtedy, gdy urządzenie nie reaguje na sygnały
z pilota RU 252. W takim przypadku pilot RU 252 nie rozpoznaje
producenta lub modelu urządzenia i należy zaprogramować pilota
tak, aby je rozpoznawał.
Poniższy przykład (telewizor) pokazuje, jak to zrobić. Te same
czynności można wykonać dla innych urządzeń
(magnetowidów/DVD), którymi chce się sterować za pomocą
pilota RU 252.
Przykład telewizora:
1 Włącz telewizor ręcznie lub korzystając z oryginalnego pilota.
Przełącz na kanał 1.
2 Wyszukaj producenta telewizora na liście kodów znajdującej się
na tylnej okładce niniejszej instrukcji. Dla każdego producenta
wymieniony jest jeden lub kilka kodów. Zanotuj pierwszy kod.
Zachowaj ostrożność! Dla telewizora, magnetowidu i DVD
dostępne są osobne tabele. Upewnij się, że szukasz kodu we
właściwej tabeli.
3 Naciśnij i przytrzymaj przycisk TV
przez 3 sekundy do momentu
zapalenia się zielonego wskaźnika.
4 Następnie za pomocą klawiszy
numerycznych wpisz kod zanotowany
w punkcie 2.
– Zielona lampka mignie dwa razy.
Jeśli lampka mignie tylko raz przez
dłuższy czas, będzie to oznaczać, że
kod nie został prawidłowo wprowadzony lub wprowadzono zły
kod. Rozpocznij ponownie od punktu 2.
5 Skieruj pilota RU 252 na telewizor i sprawdź, czy reaguje
właściwie.
– Jeśli telewizor reaguje na wszystkie klawisze, pilot RU 252 jest
gotowy do użycia. Nie zapomnij o zanotowaniu kodu.
Instalowanie pilota
3 sec.
PL
Polski
29
SRU252_V4_Transfer_RR:SRU252_V4_Transfer 26-03-10 15:33 Pagina 29
Page 30

• Jeśli urządzenie nie reaguje na niektóre lub na wszystkie
klawisze, rozpocznij ponownie od punktu 2iużyj
kolejnego kodu z listy.
Automatyczne konfigurowanie pilota
Jeśli nie można znaleźć odpowiedniego kodu dla danego urządzenia,
pilot może automatycznie wyszukać właściwy kod.
Przykład telewizora:
1 Sprawdź, czy telewizor jest włączony i wybierz kanał za
pomocą oryginalnego pilota lub przycisków na telewizorze (np.
kanał 1).
Pilot RU 252 emituje sygnał ‘wyłącz telewizor’ dla wszystkich
modeli telewizorów przechowywanych w pamięci.
• Jeśli urządzenie to odtwarzacz DVD lub magnetowid, włóż
dysk lub kasetę i rozpocznij odtwarzanie.
2 Następnie naciśnij i przytrzymaj
przycisk TV przez 3 sekundy do
momentu zapalenia się zielonego
wskaźnika.
3 Naciśnij ponownie, a następnie
przytrzymaj przycisk trybu gotowości.
– Pilot RU 252 zacznie teraz po kolei emitować wszystkie znane
sygnały ‘wyłącz telewizor’.
Po każdym wysłaniu kodu
miga zielona lampka.
4 W momencie wyłączenia się
telewizora (tryb gotowości)
niezwłocznie zwolnij przycisk trybu
gotowości na pilocie RU252
– Pilot RU 252 znalazł kod, który działa
z tym telewizorem.
5 Sprawdź, czy pilot RU 252 może sterować wszystkimi
funkcjami telewizora
• Jeśli tak nie jest, można powtórzyć automatyczne
ustawianie. Pilot RU 252 zacznie szukać kodu, który
prawdopodobnie działa lepiej.
3 sec.
PL30
SRU252_V4_Transfer_RR:SRU252_V4_Transfer 26-03-10 15:33 Pagina 30
Page 31

– Gdy pilot RU 252 sprawdzi wszystkie znane kody,
wyszukiwanie zatrzyma się automatycznie i zielona lampka
przestanie migać.
– Automatyczne programowanie telewizora trwa najwyżej 5
minut.
Dla magnetowidu/odtwarzacza DVD czas ten wynosi 6 minuty.
3. Klawisze i funkcje
Ilustracja na stronie 3 przedstawia wszystkie klawisze oraz ich
funkcje.
1 y Standby . . . . . . . . . (tryb oczekiwania) włącza i wyłącza tryb
TV, VCR lub DVD.
2 Lampka . . . . . . . . . . . - świeci na zielono podczas wysyłania
sygnału w podczerwieni.
- miga na zielono po wprowadzeniu
kodu i podczas automatycznej
konfiguracji pilota.
3 TV - VCR/DVD. . . . . służy do wybierania urządzenia, którym
chce się sterować: TV, VCR lub DVD.
4 s (Mute) . . . . . . . . . . wyłącza dźwięk w telewizorze.
5 - PROG + . . . . . . . . . . wybór poprzedniego lub następnego
kanału.
6 (Menu) . . . . . . . . - panoramiczny (TV).
- wł/wył menu (VCR/DVD).
7 Klawisze
numeryczne . . . . . . . bezpośredni wybór kanałów oraz innych
funkcji.
8 SHIFT . . . . . . . . . . . . . dodatkowe funkcje; w przypadku
naciśnięcia tego klawisza razem z innym
klawiszem, drugi klawisz będzie miał
inną funkcję; przykładowo:
SHIFT + PROG+:. . 'wyższa pozycja menu'
SHIFT + PROG-:. . 'niższa pozycja menu'
SHIFT + VOL+:. . . . 'pozycja menu w prawo'
SHIFT + VOL-:. . . . 'pozycja menu w lewo'
SHIFT + :. . . . . . 'wł/wył menu'
Wypróbuj na urządzeniu inne kombinacje z klawiszem Shift, aby
dowiedzieć się, które funkcje są dostępne w danym przypadku.
Dostępne są tylko te funkcje, które zawiera oryginalny pilot do
danego urządzenia.
9 . . . . . . . . . . . . . . . . włącza telegazety.
0 5. . . . . . . . . . . . . . . . . . - czerwony klawisz telegazety
- przewijanie w tył (VCR/DVD)
9 . . . . . . . . . . . . . . . . . . - zielony klawisz telegazety
- stop (VCR/DVD)
0 . . . . . . . . . . . . . . . . . . nagrywanie (VCR/DVD)
;. . . . . . . . . . . . . . . . . . . - żółty klawisz telegazety
- pauza (VCR/DVD)
6. . . . . . . . . . . . . . . . . . - niebieski klawisz telegazety
- przewijanie (VCR/DVD)
2 . . . . . . . . . . . . . . . . . . - biały klawisz telegazety
- odtwarzanie (VCR/DVD)
Klawisze i funkcje
PL
Polski
31
SRU252_V4_Transfer_RR:SRU252_V4_Transfer 26-03-10 15:33 Pagina 31
Page 32

PL32
! . . . . . . . . . . . . . . . . wyłącza telegazety.
@ -/-- . . . . . . . . . . . . . . . . . wybór pomiędzy wybieraniem kanałów
jedno- lub dwucyfrowych.
# OK . . . . . . . . . . . . . . . . potwierdzenie wyboru.
$ - VOL + . . . . . . . . . . . . zmienia głośność w telewizorze.
% AV. . . . . . . . . . . . . . . . . przełączenie pomiędzy zewnętrznymi
wejściami urządzenia.
Uwaga!
Przyciski VOL – /VOL + z s (Mute) umożliwiają
bezpośrednie sterowanie głośnością telewizora, nawet
podczas korzystania z magnetowidu, odtwarzacza DVD
lub odbiornika satelitarnego.
Jeśli urządzenie nie reaguje na niektóre lub na wszystkie
klawisze, postępuj zgodnie z instrukcjami zawartymi w części
‘Konfigurowanie pilota’. Możliwe, że będzie konieczne
wprowadzenie innego kodu dla urządzenia.
4. Potrzebna pomoc?
Zalecamy najpierw uważne przeczytanie niniejszej instrukcji. Pomaga
ona skonfigurować i korzystać z pilota zdalnego sterowania.
Aby uzyskać dodatkowe informacje lub odpowiedzi na pytania na
temat konfiguracji, korzystania, części zamiennych, gwarancji itp.
pilota SBC RU 252, skontaktuj się z nami.
Przed kontaktem z naszą infolinią należy wypełnić listę urządzeń
znajdującą się na końcu niniejszej instrukcji obsługi. Upewnij się, że
przed wykonaniem telefonu masz pod ręką zarówno pilota
SBC RU 252, jak i tę listę, co pomoże naszym operatorom w
określeniu, czy Twój pilot działa prawidłowo.
Szczegółowe dane kontaktowe można znaleźć na końcu niniejszej
instrukcji.
Numer modelu uniwersalnego pilota firmy Philips to
SBC RU 252 /00H.
Data zakupu: ......../ ......../ ........
(dzień/miesiąc/rok)
SRU252_V4_Transfer_RR:SRU252_V4_Transfer 26-03-10 15:33 Pagina 32
Page 33

Inhoudsopgave
1. Inleiding..........................................................................................33
2. Installeren van de afstandsbediening.........................33-36
Inzetten van de batterijen.............................................................................33
Testen van de afstandsbediening .......................................................33-34
Instellen van de afstandsbediening...........................................................34
Automatisch installen van de afstandsbediening ......................35-36
3. Toetsen en functies.............................................................36-37
4. Hulp nodig?...................................................................................37
Codelijst van alle merken / apparatuur....................69-81
Lijst met apparatuur .........................................................................................82
Hulplijn.....................................................................................................................82
Informatie voor de consument..................................................................85
1. Inleiding
Gefeliciteerd met de aanschaf van deze Philips SBC RU 252
universele afstandsbediening. Na het installeren van de
afstandsbediening kunt u er maximaal 2 verschillende apparaten
mee bedienen: een TV en een VCR of DVD-speler/recorder .
Informatie over het installeren van deze afstandsbediening vindt u in
het hoofdstuk ‘Installeren van de afstandsbediening’.
2. Installeren van de afstandsbediening
Inzetten van de batterijen
1 Duw het klepje in en schuif het
in de richting van de pijl.
2 Installeer twee batterijen van het type
R03, UM4 of AAA zoals aangegeven
in het batterijvak.
3 Schuif het klepje terug en klik het
vast.
Testen van de afstandsbediening
De afstandsbediening is voorbereid voor het bedienen van de
meeste Philips apparatuur. Omdat de signalen van de RU 252 per
merk en zelfs per modelnummer kunnen verschillen is het
verstandig te testen of uw apparatuur reageert op de RU 252.
In het onderstaande voorbeeld (tv) leest u hoe. De stappen kunt u
herhalen voor andere apparatuur (VCR/ DVD-spelers/recorders)
die u met de RU 252 wilt bedienen.
Voorbeeld tv:
1 Zet de tv handmatig aan of gebruik hier voor de originele
afstandsbediening. Stem af op kanaal 1.
Batterijen niet weggooien,
maar inleveren als KCA.
ñ
Installeren van de afstandsbediening
NL
Nederlands
33
SRU252_V4_Transfer_RR:SRU252_V4_Transfer 26-03-10 15:33 Pagina 33
Page 34

2 Druk op de TV-toets van de RU 252
om TV te kiezen.
3 Controleer of alle toetsen werken.
Voor een overzicht van de toetsen
en hun functies zie ‘3. Toetsen en
functies’.
– Reageert de tv naar behoren op álle toetscommando’s dan is
de RU 252 klaar voor gebruik.
• Reageert het apparaat helemaal niet of niet op álle
toetscommando’s, volg dan de instructies onder ‘Instellen
van de afstandsbediening’.
Instellen van de afstandsbediening
Dit is alleen nodig wanneer uw apparatuur niet of slechts
gedeeltelijk te bedienen is via de RU 252. In dit geval kent de
RU 252 merk en/of model van uw apparatuur niet en dient u dit
kenbaar te maken aan de RU 252.
In het onderstaande voorbeeld (tv) leest u hoe. De stappen kunt u
herhalen voor andere apparatuur (VCR/ DVD-spelers/recorders)
die u met de RU 252 wilt bedienen.
Voorbeeld tv:
1 Zet de tv handmatig aan of gebruik hier voor de originele
afstandsbediening. Stem af op kanaal 1.
2 Zoek het merk van uw tv op in de codelijst achterin deze
gebruiksaanwijzing. Achter het merk staan één of meerdere
viercijferige codes vermeld. Noteer de eerste code.
Let op! Er zijn aparte tabellen voor tv, video en dvd.
Zorg er voor dat u de codes uit de juiste tabel gebruikt.
3 Houd de TV-toets 3 seconden
ingedrukt totdat het groene
indicatielampje blijft branden.
4 Voer nu de bij stap 2 genoteerde
code in met de numerieke toetsen.
– De groene LED knippert nu twee
keer. Knippert het lampje één keer
lang dan is de code niet goed
ingevoerd of is een verkeerde code
ingevoerd. Begin opnieuw vanaf stap 2.
5 Richt de RU 252 op de tv en controleer of dit naar behoren
reageert.
– Reageert de tv naar behoren op álle toetscommando’s dan is
de RU 252 klaar voor gebruik. Vergeet niet uw code te
noteren.
• Reageert het apparaat helemaal niet of niet op álle
toetscommando’s, begin dan opnieuw vanaf stap 2 en
probeer de volgende code uit de lijst.
3 sec.
NL34
SRU252_V4_Transfer_RR:SRU252_V4_Transfer 26-03-10 15:33 Pagina 34
Page 35

Automatisch instellen van de
afstandsbediening
Wanneer u de juiste code voor uw merk apparatuur niet kunt
vinden, kunt u de afstandsbediening ook automatisch laten zoeken
naar de juiste code.
Voorbeeld tv:
1 Zorg dat de tv aan staat en selecteer met behulp van de
originele afstandsbediening of met de knoppen op het toestel
een kanaal (bijvoorbeeld kanaal 1). De RU 252 zal namelijk het
signaal
‘tv uitschakelen’ uitzenden voor alle tv modellen die in het
geheugen
zijn opgeslagen.
• Bij de dvd-speler of videorecorder: stop een schijfje of band in
het apparaat en laat deze afspelen.
2 Houd daarna de TV-toets
3 seconden ingedrukt totdat het
groene indicatielampje blijft branden.
3 Druk op de Standby-toets en houd
deze ingedrukt.
– De RU 252 begint nu alle bekende ‘tv uit’-signalen één voor
één te versturen.
Bij elke verzonden code licht de
groene LED even op.
4 Wanneer uw TV uitgeschakelt
(stand-bymodus), laat dan
onmiddellijk de Standby-toets van de
RU252 los.
– De RU 252 heeft nu een code
gevonden die werkt op uw tv.
5 Controleer of u alle functies van uw tv kunt bedienen met de
RU 252.
• Is dit niet het geval, dan kunt u de automatische
instelling opnieuw doen. De RU 252 gaat dan verder met
zoeken naar een code die misschien beter werkt.
Installeren van de afstandsbediening
3 sec.
NL
Nederlands
35
SRU252_V4_Transfer_RR:SRU252_V4_Transfer 26-03-10 15:33 Pagina 35
Page 36

– Wanneer de RU 252 alle codes heeft gestuurd, stopt het
zoeken automatisch en stopt het groene lampje met knipperen.
– Automatisch programmeren van een TV duurt maximaal 5
minuten. Voor een VCR/DVD duurt het 6 minuten.
3. Toetsen en functies
De afbeelding op pagina 3 geeft een overzicht van alle toetsen en
hun functies.
1 y Standby . . . . . . . . . in- en uitschakelen van tv, VCR of DVD.
2 Indicatie-LED. . . . . . - licht groen op tijdens het versturen
van een IR-signaal.
- knippert groen bij het invoeren van
een code en tijdens het automatisch
instellen van de afstandsbediening.
3 TV - VCR/DVD. . . . . kiezen van het apparaat dat u wilt
bedienen:
tv, VCR of DVD.
4 s (Mute) . . . . . . . . . . onderdrukken van het tv-geluid.
5 - PROG + . . . . . . . . . . kiezen van een voorgaand- of volgend
kanaal.
6 (Menu) . . . . . . . . - breedbeeld (TV).
- menu inschakelen/uitschakelen
(VCR/DVD).
7 Numerieke
toetsen . . . . . . . . . . . . directe kanaalkeuze en overige functies.
8 SHIFT . . . . . . . . . . . . . voor extra functies.
Ingedrukt samen met een tweede toets,
krijgt de tweede toets een andere
functie. Bijvoorbeeld:
SHIFT + PROG+:. . 'menu omhoog'
SHIFT + PROG-:. . 'menu omlaag'
SHIFT + VOL+:. . . . 'menu naar rechts'
SHIFT + VOL-:. . . . 'menu naar links'
SHIFT + :. . . . . . 'menu inschakelen/uitschakelen'
Probeer andere combinaties met de Shift-toets op uw apparatuur
uit om erachter te komen welke functies beschikbaar zijn. Alleen
functies die op de oorspronkelijke afstandsbediening beschikbaar
waren, zijn toegankelijk.
9 . . . . . . . . . . . . . . . . schakelt teletekst in.
0 5. . . . . . . . . . . . . . . . . . - rode teletekst-toets
- terugspoelen (VCR/DVD)
9 . . . . . . . . . . . . . . . . . . - groene teletekst-toets
- stoppen (VCR/DVD)
0 . . . . . . . . . . . . . . . . . . opnemen (VCR/DVD)
;. . . . . . . . . . . . . . . . . . . - gele teletekst-toets
- pauze (VCR/DVD)
6. . . . . . . . . . . . . . . . . . - blauwe teletekst-toets
- vooruitspoelen (VCR/DVD)
2 . . . . . . . . . . . . . . . . . . - witte teletekst-toets
- afspelen (VCR/DVD)
NL36
SRU252_V4_Transfer_RR:SRU252_V4_Transfer 26-03-10 15:33 Pagina 36
Page 37

Hulp nodig?
NL
Nederlands
37
! . . . . . . . . . . . . . . . . schakelt teletekst uit.
@ -/-- . . . . . . . . . . . . . . . . . kiezen tussen één- en tweecijferige
kanaalnummers.
# OK . . . . . . . . . . . . . . . . bevestigen van uw keuze.
$ - VOL + . . . . . . . . . . . . regelen van het tv-volume.
% AV. . . . . . . . . . . . . . . . . schakelen tussen externe ingangen van
uw apparatuur.
Opmerking! Met de toetsen VOL – /VOL + en s (Mute) kunt u het
volume van de TV direct aanpassen, zelfs tijdens het
bedienen van uw VCR, DVD of SAT-apparatuur.
Reageert het apparaat helemaal niet of niet op álle
toetscommando’s, volg dan de instructies onder ‘Instellen van
de afstandsbediening’. Het is mogelijk dat u een andere code
voor het apparaat moet ingeven.
4. Hulp nodig?
Wij adviseren u deze gebruikershandleiding eerst aandachtig door
te lezen. Deze wordt geleverd om u te helpen bij het instellen en
gebruiken van de afstandsbediening.
Als u extra informatie nodig hebt of als u meer vragen hebt over
het instellen, het gebruik, reserveonderdelen, garantie enz. van de
SBC RU 252, kunt u altijd contact met ons opnemen.
Vul eerst de apparatuurlijst in die u achter in deze
gebruikershandleiding vindt voordat u de hulplijn belt. Zorg ervoor
dat u de lijst en de SBC RU 252 bij de hand hebt wanneer u belt,
zodat onze medewerkers u kunnen helpen te bepalen of de
SBC RU 252 goed werkt.
U vindt onze contactgegevens achter in deze gebruikershandleiding.
Het modelnummer van uw universele afstandsbediening van Philips
is SBC RU 252/00H.
Aankoopdatum: ......../ ......../ ........
(dag/maand/jaar)
SRU252_V4_Transfer_RR:SRU252_V4_Transfer 26-03-10 15:33 Pagina 37
Page 38

GR38
¶ÂÚȯfiÌÂÓ·
1. ∂ÈÛ·ÁˆÁ‹........................................................................38
2. ∂БО·Щ¿ЫЩ·ЫЛ ЩФ˘ ЩЛПВ¯ВИЪИЫЩЛЪ›Ф˘ ........................38-41
∆ÔÔı¤ÙËÛË ÙˆÓ Ì·Ù·ÚÈÒÓ ..........................................................38
¢ФОИМ‹ ЩФ˘ ЩЛПВ¯ВИЪИЫЩЛЪ›Ф˘ ..................................................38-39
ƒ‡ıМИЫЛ ЩФ˘ ЩЛПВ¯ВИЪИЫЩЛЪ›Ф˘ ................................................39-40
∞˘ЩfiМ·ЩЛ Ъ‡ıМИЫЛ ЩФ˘ ЩЛПВ¯ВИЪИЫЩЛЪ›Ф˘ .............................40-41
3. ¶П‹ОЩЪ· О·И ПВИЩФ˘ЪБ›В˜ .........................................41-42
4. ÃÚÂÈ¿fÂÛÙÂ ‚Ô‹ıÂÈ·?.....................................................43
§›ÛÙ· Έ‰ÈÎÒÓ Ì fiϘ ÙȘ Ì¿ÚΘ/ÂÍÔÏÈÛÌfi........69-81
§›ЫЩ· ВНФПИЫМФ‡ .............................................................................82
°Ú·ÌÌ‹ ‚Ô‹ıÂÈ·˜ ..............................................................................82
........86
1. ∂ÈÛ·ÁˆÁ‹
™˘Б¯·ЪЛЩ‹ЪИ· БИ· ЩЛУ ·БФЪ¿ ЩФ˘ ЩЛПВ¯ВИЪИЫЩЛЪ›Ф˘ БВУИО‹˜
¯Ъ‹ЫЛ˜ SBC RU 252 ЩЛ˜ Philips. ∞КФ‡ ВБО·Щ·ЫЩ‹ЫВЩВ ЩФ
ЩЛПВ¯ВИЪИЫЩ‹ЪИФ МФЪВ›ЩВ У· ¯ВИЪ›˙ВЫЩВ МВ ·˘Щfi ¤ˆ˜ 2
‰И·КФЪВЩИО¤˜ Ы˘ЫОВ˘¤˜: БИ· ЩЛПВФЪ¿ЫВИ˜ TV О·И ‚›УЩВФ DVD ,
VCR/DVD.
¶ПЛЪФКФЪ›В˜ Ы¯ВЩИО¿ МВ ЩФ Т˜ У· ЪФВЩФИМ¿ЫВЩВ ЩФ ·ЪfiУ
ЩЛПВ¯ВИЪИЫЩ‹ЪИФ БИ· ¯Ъ‹ЫЛ МФЪВ›ЩВ У· ‚ЪВ›ЩВ ЫЩФ ОВК¿П·ИФ
‘∂БО·Щ¿ЫЩ·ЫЛ ЩФ˘ ЩЛПВ¯ВИЪИЫЩЛЪ›Ф˘’.
2. ∂БО·Щ¿ЫЩ·ЫЛ ЩФ˘ ЩЛПВ¯ВИЪИЫЩЛЪ›Ф˘
∆ÔÔı¤ÙËÛË ÙˆÓ Ì·Ù·ÚÈÒÓ
1 ¶È¤ÛÙ ÙÔ Î·¿ÎÈ ÚÔ˜ Ù·
̤۷ Î·È Û‡ÚÙ ÙÔ ÛÙËÓ Î·Ù‡ı˘ÓÛË
ÙÔ˘ ‚¤ÏÔ˘˜.
2 ∆ÔÔıÂÙ‹ÛÙ ‰‡Ô ̷ٷڛ˜ Ù‡Ô˘
R03 UM4 ‹ AAA ̤۷ ÛÙË ı‹ÎË
Ì·Ù·ÚÈÒÓ fiˆ˜ Ê·›ÓÂÙ·È ÛÙÔ
Û¯‹Ì·.
4 ™‡ÚÙ ÙÔ Î·¿ÎÈ ÚÔ˜ Ù· ›Ûˆ Î·È ÎÔ˘ÌÒÛÙ ÙÔ Î·Ï¿ ÛÙË
ı¤ÛË ÙÔ˘.
¢ФОИМ‹ ЩФ˘ ЩЛПВ¯ВИЪИЫЩЛЪ›Ф˘
∆Ф ЩЛПВ¯ВИЪИЫЩ‹ЪИФ ¤¯ВИ ЪФБЪ·ММ·ЩИЫЩВ› БИ· У· ПВИЩФ˘ЪБВ› МВ ЩИ˜
ВЪИЫЫfiЩВЪВ˜ Ы˘ЫОВ˘¤˜ Philips. ∂ВИ‰‹ ЩФ RU 252 МФЪВ› У·
¯ЪЛЫИ МФФИВ› ‰И·КФЪВЩИО¿ Ы‹М·Щ· БИ· О¿ıВ М¿ЪО· ·ОfiМ· О·И БИ·
‰И·КФ ЪВ ЩИО¿ МФУЩ¤П· ЩЛ˜ ›‰И·˜ М¿ЪО·˜ Ы˘УИЫЩ¿Щ·И У· ‰ФОИМ¿˙ВЩВ
·У Л Ы˘ЫОВ˘‹ Ы·˜ ПВИЩФ˘ЪБВ› МВ ЩФ RU 252 ∆Ф ·Ъ¿‰ВИБМ· Ф˘
·ÎÔÏÔ˘ ı› TV Û·˜ ‰›ÓÂÈ Ô‰ËÁ›Â˜ Û¯ÂÙÈο Ì ÙÔ Ò˜ Ú¤ÂÈ Ó· ÙÔ
οÓÂÙÂ. ªÔÚ›Ù ӷ ·ӷϿ‚ÂÙ ٷ ›‰È· ‚‹Ì·Ù· ÁÈ· ÙȘ ¿ÏϘ
Û˘Û΢¤˜ ‚›ÓÙÂÔ DVD Ô˘ ı¤ÏÂÙ ӷ ¯ÂÈÚ›˙ÂÛÙ Ì ÙÔ RU 252.
SRU252_V4_Transfer_RR:SRU252_V4_Transfer 26-03-10 15:33 Pagina 38
Page 39

¶·Ú¿‰ÂÈÁÌ· ÁÈ· ÙËÓ ÙËÏÂfiÚ·ÛË
1 ∞У¿„ЩВ ЩЛУ ЩЛПВfiЪ·ЫЛ ¯ВИЪФО›УЛЩ· ‹ ¯ЪЛЫИМФФИТУЩ·˜ ЩФ
‰ÈÎfi Ù˘ ÙËϯÂÈÚÈ ÛÙ‹ÚÈÔ ™˘ÓÙÔÓ›ÛÙ ÙËÓ ÛÙÔ Î·Ó¿ÏÈ 1.
2 ¶È¤ÛÙ ÙÔ Ï‹ÎÙÚÔ TV ÙÔ˘
RU 252 ÁÈ· Ó· ÂÈϤÍÙ ÙËÓ
ÙËÏÂfiÚ·ÛË.
3 ∂П¤БНЩВ ·У ПВИЩФ˘ЪБФ‡У fiП· Щ·
П‹ОЩЪ· °И· ЩЛ Ы˘УФЩИО‹
·ЪФ˘Ы›·ЫЛ ЩˆУ П‹ОЩЪˆУ О·И ЩˆУ
ПВИЩФ˘ЪБИТУ ЩФ˘˜ ·У·ЩЪ¤НЩВ ЫЩЛУ ·Ъ¿БЪ·КФ ‘3 ¶П‹ОЩЪ· О·И
ПВИЩФ˘ЪБ›В˜’
– ∞У Л ЩЛПВfiЪ·ЫЛ ПВИЩФ˘ЪБ‹ЫВИ fiˆ˜ Ъ¤ВИ ЫЩИ˜ ВУЩФП¤˜ fiПˆУ
ЩˆУ П‹ОЩЪˆУ ЩФ RU 252 В›У·И ¤ЩФИМФ БИ· ¯Ъ‹ЫЛ.
•
∞У Л Ы˘ЫОВ˘‹ ‰ВУ ПВИЩФ˘ЪБ‹ЫВИ О·ıfiПФ˘ ‹ ‰ВУ ПВИЩФ˘Ъ Б‹ЫВИ fiˆ˜ Ъ¤ВИ ЫЩИ˜ ВУЩФП¤˜ fiПˆУ ЩˆУ П‹ОЩЪˆУ
·ОФПФ˘ı‹ЫЩВ ЩИ˜ Ф‰ЛБ›В˜ ЩЛ˜ ·Ъ·БЪ¿КФ˘ ‘ƒ‡ıМИЫЛ ЩФ˘
ЩЛПВ¯ВИЪИЫЩЛ Ъ›Ф˘’.
ƒ‡ıМИЫЛ ЩФ˘ ЩЛПВ¯ВИЪИЫЩЛЪ›Ф˘
∫¿ÙÈ Ù¤ÙÔÈÔ Â›Ó·È ··Ú·›ÙËÙÔ ÌfiÓÔ ·Ó Ë Û˘Û΢‹ Û·˜ ‰ÂÓ
·Ô ÎÚ›ÓÂÙ·È ÛÙÔ RU 252. ™ÙËÓ ÂÚ›ÙˆÛË ·˘Ù‹ ÙÔ RU 252 ‰ÂÓ
·У· БУˆЪ›˙ВИ ЩЛ М¿ЪО· О·И‹ ЩФ МФУЩ¤ПФ ЩЛ˜ Ы˘ЫОВ˘‹˜ Ы·˜
¯ЪВИ¿˙ВЩ·И ВФМ¤Уˆ˜ У· ЪФБЪ·ММ·Щ›ЫВЩВ О·Щ¿ППЛП· ЩФ
ЩЛПВ¯ВИЪИЫЩ‹ЪИФ.
∆Ф ·Ъ¿‰ВИБМ· Ф˘ ·ОФПФ˘ıВ› TV Ы·˜ ‰›УВИ Ф‰ЛБ›В˜ Ы¯ВЩИО¿ МВ
ЩФ Т˜ Ъ¤ВИ У· ЩФ О¿УВЩВ. ªФЪВ›ЩВ У· В·У·П¿‚ВЩВ Щ· ›‰И·
‚‹М·Щ· БИ· ЩИ˜ ¿ППВ˜ Ы˘ЫОВ˘¤˜ ‚›УЩВФ DVD Ф˘ ı¤ПВЩВ У·
¯ВИЪ›˙ВЫЩВ МВ ЩФ RU 252.
¶·Ú¿‰ÂÈÁÌ· ÁÈ· ÙËÓ ÙËÏÂfiÚ·ÛË
1 ∞У¿„ЩВ ЩЛУ ЩЛПВfiЪ·ЫЛ ¯ВИЪФО›УЛЩ· ‹ ¯ЪЛЫИМФФИТУЩ·˜ ЩФ
‰ИОfi ЩЛ˜ ЩЛПВ¯ВИЪИЫЩ‹ЪИФ. ™˘УЩФУ›ЫЩВ ЩЛУ ЫЩФ О·У¿ПИ 1.
2 ∞Ó·˙ËÙ‹ÛÙ ÙË Ì¿Úη Ù˘ ÙËÏÂfiÚ·Û‹˜ Û·˜ ÛÙË Ï›ÛÙ· Έ‰ÈÎÒÓ
Ф˘ ˘¿Ъ¯ВИ ЫЩФ ФИЫıfiК˘ППФ ЩФ˘ ·ЪfiУЩФ˜ ВБ¯ВИЪИ‰›Ф˘.
™В О¿ıВ М¿ЪО· ·УЩИЫЩФИ¯Ф‡У ¤У·˜ ‹ ВЪИЫЫfiЩВЪФИ
ЩВЩЪ·„‹КИФИ Оˆ‰ИОФ›. ™ЛМВИТЫЩВ ЩФУ ЪТЩФ Оˆ‰ИОfi.
¶ЪФЫФ¯‹! А¿Ъ¯Ф˘У НВ¯ˆЪИЫЩФ› ›У·ОВ˜ БИ· ЩЛУ ЩЛПВfiЪ·ЫЛ
ЩФ ‚›УЩВФ О·И ЩФ DVD. µВ‚·ИˆıВ›ЩВ fiЩИ ¯ЪЛЫИМФФИВ›ЩВ ЩФ˘˜
Оˆ‰ИОФ‡˜ ЩФ˘ ЫˆЫЩФ‡ ›У·О·.
3 ∫Ú·Ù‹ÛÙ ·ÙË̤ÓÔ ÙÔ Ï‹ÎÙÚÔ ‘TV’
БИ· 3 ‰В˘ЩВЪfiПВЩ· М¤¯ЪИ Л Ъ¿ФИУЛ
Вv‰ВИОЩО‹ П˘xv›· v· ·Ъ·МВ›vВИ
·v·Ì̤vË.
∂ÏÏËÓÈο
∂БОaЩ¿ЫЩaЫЛ ЩФ˘ ЩЛПВ¯ВИЪИЫЩЛЪÔ˘
3 sec.
5 SEC.
GR
∂ППЛУИО¿
39
SRU252_V4_Transfer_RR:SRU252_V4_Transfer 26-03-10 15:33 Pagina 39
Page 40

4 ™ÙË Û˘Ó¤¯ÂÈ· ηٷ¯ˆÚ›ÛÙÂ
ЩФУ Оˆ‰ИОfi ЩФ˘ ‚‹М·ЩФ˜ 2
¯ЪЛЫИМФФИТУЩ·˜ Щ· „ЛКИ·О¿
П‹ОЩЪ·.
– ∏ ВУ‰ВИОЩИО‹ Ъ¿ЫИУЛ П˘¯У›· ı·
·У·‚ФЫ‚‹ЫВИ ЩТЪ· ‰‡Ф КФЪ¤˜.
∞У ЩФ П·М¿ОИ ·У¿„ВИ БИ· ·Ъ·ЩВЩ·М¤УФ ¯ЪФУИОfi ‰И¿ЫЩЛМ·
О·И МВЩ¿ Ы‚‹ЫВИ ЫЛМ·›УВИ fiЩИ Ф Оˆ‰ИОfi˜ ‰ВУ О·Щ·¯ˆЪ‹ıЛОВ
ЫˆЫЩ¿ ‹ fiЩИ О·Щ·¯ˆЪ‹ıЛОВ ВЫК·ПМ¤УФ˜ Оˆ‰ИОfi˜.
•ÂÎÈÓ‹ÛÙÂ Î·È ¿ÏÈ ·fi ÙÔ ‚‹Ì· 2.
5 ™ÙÚ¤„Ù ÙÔ RU 252 ÚÔ˜ ÙËÓ ÙËÏÂfiÚ·ÛË Î·È ÂϤÁÍÙ ·Ó ·˘Ù‹
ПВИЩФ˘ЪБВ› fiˆ˜ Ъ¤ВИ.
– ∞У Л ЩЛПВfiЪ·ЫЛ ПВИЩФ˘ЪБ‹ЫВИ fiˆ˜ Ъ¤ВИ ЫЩИ˜ ВУЩФП¤˜ fiПˆУ
ЩˆУ П‹ОЩЪˆУ ЩФ RU 252 В›У·И ¤ЩФИМФ БИ· ¯Ъ‹ЫЛ. ªЛУ
НВ¯¿ЫВЩВ У· ЫЛМВИТЫВЩВ ЩФУ Оˆ‰ИОfi Ы·˜.
•
∞У Л Ы˘ЫОВ˘‹ ‰ВУ ПВИЩФ˘ЪБ‹ЫВИ О·ıfiПФ˘ ‹ ‰ВУ ПВИЩФ˘ЪБ‹ЫВИ
fiˆ˜ Ъ¤ВИ ЫЩИ˜ ВУЩФП¤˜ fiПˆУ ЩˆУ П‹ОЩЪˆУ, НВОИУ‹ЫЩВ О·И
¿ПИ ·fi ЩФ ‚‹М· 2 О·И ‰ФОИМ¿ЫЩВ У· О·Щ·¯ˆЪ›ЫВЩВ ЩФУ
ВfiМВУФ Оˆ‰ИОfi ЩЛ˜ П›ЫЩ·˜
.
∞˘ЩfiМ·ЩЛ Ъ‡ıМИЫЛ ЩФ˘ ЩЛПВ¯ВИЪИЫЩЛЪ›Ф˘
∞У ‰ВУ МФЪВ›ЩВ У· ‚ЪВ›ЩВ ЩФ ЫˆЫЩfi Оˆ‰ИОfi ЩЛ˜ Ы˘ЫОВ˘‹˜ Ы·˜,
ЩФ ЩЛПВ¯ВИЪИЫЩ‹ЪИФ МФЪВ› У· ·У·˙ЛЩ‹ЫВИ ·˘ЩfiМ·Щ· ЩФ ЫˆЫЩfi
Оˆ‰ИОfi.
¶·Ú¿‰ÂÈÁÌ· ÁÈ· ÙËÓ ÙËÏÂfiÚ·ÛË:
1 µÂ‚·Èˆı›Ù fiÙÈ Ë ÙËÏÂfiÚ·ÛË Â›Ó·È ·Ó·Ì̤ÓË Î·È ÂÈϤÍÙÂ
О¿ФИФ О·У¿ПИ ¯ЪЛЫИМФФИТУЩ·˜ ЩФ ‰ИОfi ЩЛ˜ ЩЛПВ¯ВИЪИЫЩ‹ЪИФ ‹
Щ· ОФ˘МИ¿ ЩЛ˜ (ВИП¤НЩВ БИ· ·Ъ¿‰ВИБМ· ЩФ О·У¿ПИ 1).
∆Ф RU 252 ВО¤МВИ ЩФ Ы‹М· ‘·ВУВЪБФФ›ЛЫЛ˜ ЩЛ˜
ЩЛПВfiЪ·ЫЛ˜. БИ· fiП· Щ· МФУЩ¤П· ЩЛПВfiЪ·ЫЛ˜ Ф˘ В›У·И
·ÔıËÎÂ˘Ì¤Ó· ÛÙË ÌÓ‹ÌË.
• ∞Ó Ë Û˘Û΢‹ Â›Ó·È ¤Ó· DVD player ‹ ¤Ó· ‚›ÓÙÂÔ,
ЩФФıВЩ‹ЫЩВ ¤У· ‰›ЫОФ DVD ‹ МИ· ‚ИУЩВФО·Ы¤Щ· О·И ı¤ЫЩВ ЩЛ
Ы˘ЫОВ˘‹ ЫВ ПВИЩФ˘ЪБ›·.
2 ‘∂ÂÈÙ· ÎÚ·Ù‹ÛÙ ·ÙË̤ÓÔ ÙÔ
П‹ОЩЪФ ‘TV’ БИ· 3 ‰В˘ЩВЪfiПВЩ·
М¤¯ЪИ Л Ъ¿ФИУЛ Вv‰ВИОЩО‹ П˘xv›· v·
·Ъ·МВ›vВИ ·v·ММ¤vЛ.
3 ¶·Ù‹ÛÙÂ Í·v¿ ÙÔ Ï‹ÎÙÚÔ Standby
(Av·Ìo‹) Î·È ÎÚ·Ù‹ÛÙ Ùo ·ÙË̤ÓÔ.
3 sec.
5 SEC.
GR40
SRU252_V4_Transfer_RR:SRU252_V4_Transfer 26-03-10 15:33 Pagina 40
Page 41

∂ÏÏËÓÈο
¶П‹ОЩЪ· О·И ПВИЩФ˘ЪБ›В˜
GR
∂ППЛУИО¿
41
– ∆Ô RU 252 ·Ú¯›˙ÂÈ Ï¤ÔÓ Ó· ÂΤÌÂÈ ¤Ó· ÚÔ˜ ¤Ó· fiÏ· Ù·
БУˆЫЩ¿ Ы‹М·Щ· ‘·ВУВЪБФФ›ЛЫЛ˜ ЩЛ˜ ЩЛПВfiЪ·ЫЛ˜’.
∫¿ıВ КФЪ¿ Ф˘ ·ФЫЩ¤ППВЩ·И
Оˆ‰ИОfi˜, Л Ъ¿ЫИУЛ ВУ‰ВИОЩИО‹
П˘¯У›· ·У·‚ФЫ‚‹УВИ.
4 AÊÛÙ ÙÔ Ï‹ÎÙÚÔ ·v·Ìov‹˜ ÙÔ˘
RU 252 ·Ì¤Ûˆ˜ ÌfiÏȘ
·ÂvÂÚÁooÈËı› Ë ÙËÏÂfiÚ·Û‹ Û·˜
(ÏÂÈÙo˘ÚÁ›· ·v·Ìov‹˜).
– ∆Ô RU 252 ¤¯ÂÈ Ï¤ÔÓ ‚ÚÂÈ ¤Ó·Ó
Оˆ‰ИОfi Ф˘ ПВИЩФ˘ЪБВ› ЫЩЛУ
ЩЛПВfiЪ·Ы‹ Ы·˜.
5 ∂П¤БНЩВ ·У МФЪВ›ЩВ У· ВОЩВП¤ЫВЩВ fiПВ˜ ЩИ˜ ПВИЩФ˘ЪБ›В˜ ЩЛ˜
ÙËÏÂfiÚ·Û‹˜ Û·˜ Ì ÙÔ RU 252.
•
∞У ‰ВУ В›У·И ‰˘У·Щ‹ Л ВОЩ¤ПВЫЛ fiПˆУ ЩˆУ ПВИЩФ˘ЪБИТУ ЩЛ˜ МВ
ЩФ ЩЛПВ¯ВИЪИЫЩ‹ЪИФ, МФЪВ›ЩВ У· В·У·П¿‚ВЩВ ЩЛУ ·˘ЩfiМ·ЩЛ
Ъ‡ıМИЫЛ. ∆Ф RU 252 ı· „¿НВИ ЩfiЩВ О¿ФИФУ Оˆ‰ИОfi Ф˘
ПВИЩФ˘ЪБВ› ВУ‰В¯ФМ¤Уˆ˜ О·П‡ЩВЪ·.
– ∞КФ‡ ЩФ RU 252 Ы·ЪТЫВИ fiПФ˘˜ ЩФ˘˜ БУˆЫЩФ‡˜ Оˆ‰ИОФ‡˜, Л
·Ó·˙‹ÙËÛË ı· ÛÙ·Ì·Ù‹ÛÂÈ ·˘ÙfiÌ·Ù· Î·È ÙÔ Ú¿ÛÈÓÔ Ï·Ì¿ÎÈ
ı· ÛÙ·Ì·Ù‹ÛÂÈ Ó· ·Ó·‚ÔÛ‚‹ÓÂÈ.
– √ ·˘ÙfiÌ·ÙÔ˜ ÚÔÁÚ·ÌÌ·ÙÈÛÌfi˜ Ù˘ ÙËÏÂfiÚ·Û˘ ‰È·ÚΛ ¤ˆ˜
5 ÏÂÙ¿ ÙÔ ·ÓÒÙ·ÙÔ. °È· ÙÔ VCR/DVD‰È·ÚΛ 6 ÏÂÙ¿.
3.
¶П‹ОЩЪ· О·И ПВИЩФ˘ЪБ›В˜
™ÙË ÛÂÏ›‰· 3 ˘¿Ú¯ÂÈ Û˘ÓÔÙÈ΋ ÂÈÎfiÓ· fiÏˆÓ ÙˆÓ Ï‹ÎÙÚˆÓ.
1 y Standby . . . . . . . . . ВУВЪБФФИВ› ‹ ·ВУВЪБФФИВ› ЩЛ
ПВИЩФ˘ЪБ›· TV, VCR ‹ DVD.
2 ∂У‰ВИОЩИО‹ П˘¯У›· . . - Á›ÓÂÙ·È Ú¿ÛÈÓË fiÙ·Ó ·ÔÛÙ¤ÏÏÂÙ·È
Û‹Ì· ˘ÂÚ‡ıÚˆÓ ‘IR’.
- ·У·‚ФЫ‚‹УВИ МВ Ъ¿ЫИУФ ¯ЪТМ·
О·Щ¿ ЩЛУ О·Щ·¯ТЪИЫЛ ВУfi˜ Оˆ‰ИОФ‡
О·И О·Щ¿ ЩЛУ ·˘ЩfiМ·ЩЛ Ъ‡ıМИЫЛ ЩФ˘
ЩЛПВ¯ВИЪИЫЩЛЪ›Ф˘
3 TV - VCR/DVD. . . . . ÂÈϤÁÂÈ ÙË Û˘Û΢‹ Ô˘ ı¤ÏÂÙ ӷ
¯ВИЪИЫЩВ›ЩВ: TV, VCR ‹ DVD.
4 s (Mute) . . . . . . . . . . ‰È·ÎfiÙÂÈ ÙÔÓ ‹¯Ô ‘Û›Á·ÛË’.
5 - PROG + . . . . . . . . . . ВИП¤БВИ ЪФЛБФ‡МВУФ ‹ ВfiМВУФ
ηӿÏÈ.
6 (Menu) . . . . . . . . - ¢Ú›· oıfivË (TV).
- ÂvÂÚÁoo›ËÛË/·ÂvÂÚÁoo›ËÛË
ÌÂvo‡ (VCR/DVD).
7 æËÊȷο Ï‹ÎÙÚ· .
·Â˘ı›·˜ ÂÈÏÔÁ‹ ηӷÏÈÒÓ Î·È
ПВИЩФ˘ЪБИТУ
.
SRU252_V4_Transfer_RR:SRU252_V4_Transfer 26-03-10 15:33 Pagina 41
Page 42

GR42
8 SHIFT . . . . . . . . . . . . . БИ· ЪfiЫıВЩВ˜ ПВИЩФ˘ЪБ›В˜. ∞У ·ЩЛıВ›
Ù·˘Ùfi¯ÚÔÓ· Ì ¤Ó· ‰Â‡ÙÂÚÔ Ï‹ÎÙÚÔ,
ÙÔ ‰Â‡ÙÂÚÔ Ï‹ÎÙÚÔ ·ÔÎÙ¿:
SHIFT + PROG+:. . ‘ÌÂÓÔ‡ ¿Óˆ’
SHIFT + PROG-:. . ’ÌÂÓÔ‡ οو’
SHIFT + VOL+:. . . . ‘ÌÂÓÔ‡ ‰ÂÍÈ¿’
SHIFT + VOL-:. . . . . . ' '
SHIFT + :. . . . . . ‘ВУВЪБФo›ЛЫЛ/·ВУВЪБФФ›ЛЫЛ МВУФ‡’
∂И¯ВИЪ‹ЫЩВ ¿ППФ˘˜ Ы˘У‰˘·ЫМФ‡˜ МВ ЩФ П‹ОЩЪФ Shift ЩЛ˜
Ы˘ЫОВ˘‹˜ Ы·˜ ЪФОВИМ¤УФ˘ У· ‚ЪВ›ЩВ ФИВ˜ ПВИЩФ˘ЪБ›В˜ В›У·И
‰И·ı¤ЫИМВ˜. ªfiУФ ФИ ПВИЩФ˘ЪБ›В˜ Ф˘ В›У·И ВКИОЩ¤˜ МВ ЩФ БУ‹ЫИФ
ЩЛПВ¯ВИЪИЫЩ‹ЪИФ В›У·И ‰И·ı¤ЫИМВ˜.
9 . . . . . . . . . . . . . . . . ВУВЪБФФИВ› ЩФ teletext.
0 5. . . . . . . . . . . . . . . . . . - ОfiООИУФ П‹ОЩЪФ teletext
- ÁÚ‹ÁÔÚË ÌÂٷΛÓËÛË ›Ûˆ
(VCR/DVD)
9 . . . . . . . . . . . . . . . . . . - Ú¿ÛÈÓÔ Ï‹ÎÙÚÔ teletext
- ÛÙ·Ì¿ÙËÌ· (VCR/DVD)
0 . . . . . . . . . . . . . . . . . . ÂÁÁÚ·Ê‹ (VCR/DVD)
;. . . . . . . . . . . . . . . . . . . - О›ЩЪИУФ П‹ОЩЪФ teletext
- ·‡ÛË (VCR/DVD)
6. . . . . . . . . . . . . . . . . . - ÌÏÂ Ï‹ÎÙÚÔ teletext
- ÁÚ‹ÁÔÚË ÌÂٷΛÓËÛË ÂÌÚfi˜
(VCR/DVD)
2 . . . . . . . . . . . . . . . . . . - Ï¢Îfi Ï‹ÎÙÚÔ teletext
- ·Ó··Ú·ÁˆÁ‹ (VCR/DVD)
! . . . . . . . . . . . . . . . . ·ВУВЪБФФИВ› ЩФ teletext
@ -/-- . . . . . . . . . . . . . . . . . ÂÈϤÁÂÈ ÌÔÓÔ„‹ÊÈÔ ‹ ‰È„‹ÊÈÔ ·ÚÈıÌfi
ηӷÏÈÔ‡.
# OK . . . . . . . . . . . . . . . . ВИ‚В‚·ИТУВИ ЩЛУ ВИПФБ‹ Ы·˜.
$ - VOL + . . . . . . . . . . . . Ú˘ıÌ›˙ÂÈ ÙËÓ ¤ÓÙ·ÛË ‹¯Ô˘ Ù˘
ÙËÏÂfiÚ·Û˘.
% AV. . . . . . . . . . . . . . . . . ВУ·ПП¿ЫЫВЩ·И МВЩ·Н‡ ВНˆЩВЪИОТУ
ВИЫfi‰ˆУ ЩФ˘ ВНФПИЫМФ‡ Ы·˜.
™ËÌ›ˆÛË!
∆· Ï‹ÎÙÚ· VOL – / VOL + ηÈ
s
s
(Mute) ·Ъ¤¯Ф˘У
¿МВЫЛ ЪfiЫ‚·ЫЛ ЫЩЛУ ¤УЩ·ЫЛ ЩЛ˜ ЩЛПВfiЪ·ЫЛ˜ ОfiМ·
О·И ·У ПВИЩФ˘ЪБВ› Ф ВНФПИЫМfi˜ ‚›УЩВФ DVD ‹ SAT.
∞У Л Ы˘ЫОВ˘‹ ‰ВУ ПВИЩФ˘ЪБ‹ЫВИ О·ıfiПФ˘ ‹ ‰ВУ ПВИЩФ˘ЪБ‹ЫВИ fiˆ˜
Ъ¤ВИ ЫЩИ˜ ВУЩФП¤˜ fiПˆУ ЩˆУ П‹ОЩЪˆУ, ·ОФПФ˘ı‹ЫЩВ ЩИ˜ Ф‰ЛБ›В˜
ЩЛ˜ ·Ъ·БЪ¿КФ˘ ‘ƒ‡ıМИЫЛ ЩФ˘ ЩЛПВ¯ВИЪИЫЩЛЪ›Ф˘’. ∂›У·И Иı·УfiУ У·
Ъ¤ВИ У· О·Щ·¯ˆЪ›ЫВЩВ ¿ППФ Оˆ‰ИОfi БИ· ЩЛ Ы˘ЫОВ˘‹.
SRU252_V4_Transfer_RR:SRU252_V4_Transfer 26-03-10 15:33 Pagina 42
Page 43

∂ÏÏËÓÈο
ÃÚÂÈ¿fÂÛÙÂ ‚Ô‹ıÂÈ·?
GR
∂ППЛУИО¿
43
4. ÃÚÂÈ¿fÂÛÙÂ ‚Ô‹ıÂÈ·?
™·˜ Ы˘УИЫЩФ‡МВ ЪТЩ· У· ‰И·‚¿ЫВЩВ ЪФЫВОЩИО¿ ЩФ ·ЪfiУ
ВБ¯ВИЪ›‰ИФ ¯Ъ‹ЫЛ˜. ¶·Ъ¤¯ВЩ·И ¤ЩЫИ ТЫЩВ У· Ы·˜ ‚ФЛı‹ЫВИ У·
Ъ˘ıМ›ЫВЩВ О·И У· ¯ЪЛЫИМФФИ‹ЫВЩВ ЩФ ЩЛПВ¯ВИЪИЫЩ‹ЪИФ.
∂¿Ó, ˆÛÙfiÛÔ, ¯ÚÂÈ¿fВЫЩВ ЪfiЫıВЩВ˜ ПЛЪФКФЪ›В˜ ‹ ¤¯ВЩВ
ВИП¤ФУ ВЪˆЩ‹ЫВИ˜ Ы¯ВЩИО¿ МВ ЩЛ Ъ‡ıМИЫЛ, ЩЛ ¯Ъ‹ЫЛ, Щ·
·УЩ·ПП·ОЩИО¿, ЩЛУ ВББ‡ЛЫЛ, О.П. ЩФ˘ SCB RU 252, МФЪВ›ЩВ
¿УЩ· У· ВИОФИУˆУ‹ЫВЩВ М·f› Ì·˜.
¶ЪИУ О·П¤ЫВЩВ ЩЛ БЪ·ММ‹ ‚Ф‹ıВИ·˜, Ы˘МПЛЪТЫЩВ ЩЛ П›ЫЩ·
ВНФПИЫМФ‡ ЫЩФ Щ¤ПФ˜ ЩФ˘ ·ЪfiУЩФ˜ ВБ¯ВИЪИ‰›Ф˘ ¯Ъ‹ЫЛ˜. ¡·
¤¯ВЩВ ЩЛ П›ЫЩ· О·И ЩФ SCB RU 252 ОФУЩ¿ Ы·˜ fiЩ·У О·П¤ЫВЩВ БИ·
‚Ф‹ıВИ·, ¤ЩЫИ ТЫЩВ ЩФ ЪФЫˆИОfi М·˜ У· Ы·˜ ‚ФЛı‹ЫВИ У·
О·ıФЪ›ЫВЩВ В¿У ЩФ SCB RU 252 ПВИЩФ˘ЪБВ› О·УФУИО¿.
£· ‚ЪВ›ЩВ Щ· ЫЩФИ¯В›· ВИОФИУˆУ›·˜ ЫЩФ ›Ыˆ М¤ЪФ˜ ЩФ˘ ·ЪfiУЩФ˜
ВБ¯ВИЪИ‰›Ф˘ ¯Ъ‹ЫЛ˜.
√ ·ЪИıМfi˜ МФУЩ¤ПФ˘ ЩФ˘ ЩЛПВ¯ВИЪИЫЩЛЪ›Ф˘ БВУИО‹˜ ¯Ъ‹ЫЛ˜ ЩЛ˜
Philips Ф˘ ‰И·ı¤ЩВЩВ В›У·И SCB RU 252/00H.
∏МВЪФМЛУ›· ·БФЪ¿˜: ......../ ......../ ........
(Ë̤ڷ/Ì‹Ó·˜/¤ÙÔ˜)
SRU252_V4_Transfer_RR:SRU252_V4_Transfer 26-03-10 15:33 Pagina 43
Page 44

SV44
Innehåll
1. Introduktion.................................................................................44
2. Installera fjärrkontrollen..................................................44-46
Sätta i batterier ...................................................................................................44
Testa fjärrkontrollen ..................................................................................44-45
Tälla in fjärrkontrollen.....................................................................................45
Ställa in fjärrkontrollen automatiskt.........................................................46
3. Knappar och funktioner ...................................................47-48
4. Behöver du hjälp? ......................................................................48
Kodlista för alla märken / all utrustning...................69-81
Lista över utrustning .......................................................................................82
Kundtjänst...............................................................................................................82
Information till konsumenten ......................................................................86
1. Introduktion
Grattis till ditt köp av en Philips SBC RU 252 universalfjärrkontroll.
Efter installation av fjärrkontrollen kan du styra upp till 2 olika
apparater med den:
TV, videobandspelare och DVD-spelare/-inspelare.
Information om hur du gör för att förbereda fjärrkontrollen för
användning finns i kapitlet ‘Installera fjärrkontrollen’.
2. Installera fjärrkontrollen
Sätta i batterier
1 Tryck på luckan och skjut den i
pilens riktning .
2 Sätt i två batterier av typ R03, UM4
eller AAA i batterifacket, se bilden.
3 Sätt tillbaka luckan och låt den klicka
på plats.
Testa fjärrkontrollen
Fjärrkontrollen har programmerats att styra de flesta apparater från
Philips. Eftersom RU 252 kan använda olika signaler för olika
märken och till och med för olika modeller av samma märke,
rekommenderar vi att du testar att din utrustning reagerar på
fjärrkontrollens signaler. Exemplet nedan (TV) beskriver hur du går
till väga. Du kan upprepa samma steg för andra apparater
(videobandspelare/DVD-spelare/-inspelare) som du vill kunna styra
med RU 252.
Exempel, TV:
1 Slå på TV:n manuellt eller använd originalfjärrkontrollen. Välj
kanal 1.
SRU252_V4_Transfer_RR:SRU252_V4_Transfer 26-03-10 15:34 Pagina 44
Page 45

2 Tryck på TV-knappen på RU 252
för att välja TV.
3 Kontrollera att alla knappar fungerar.
En översikt över knapparna och
deras funktioner finns i kapitel 3
‘Knappar och funktioner’.
– Om TV:n reagerar som den ska på alla knapptryckningarna är
RU 252 klar att använda.
• Om apparaten inte reagerar alls eller inte reagerar på
alla knapptryckningarna, följer du anvisningarna under
‘Ställa in fjärrkontrollen’.
Ställa in fjärrkontrollen
Detta är bara nödvändigt om apparaten inte reagerar på signaler
från RU 252. Om så är fallet, känner RU 252 inte igen märket
och/eller modellen på apparaten och du måste därför programmera
fjärrkontrollen att göra det. Exemplet nedan (TV) beskriver hur du
går till väga. Du kan upprepa samma steg för andra apparater
(videobandspelare/DVD-spelare/-inspelare) som du vill kunna styra
med RU 252.
Exempel, TV:
1 Slå på TV:n manuellt eller använd originalfjärrkontrollen. Välj
kanal 1.
2 Leta reda på märket på TV:n i kodlistan på baksidan av den här
handboken. För varje märke finns det en eller flera fyrsiffriga
koder. Notera den första koden.
Observera! Det är olika tabeller för TV, video och DVD.
Se till att du använder koden från rätt tabell.
3 Håll TV-knappen intryckt i 3 sekunder
tills den gröna indikatorlampan lyser
med fast sken.
4 Knappa sedan in koden som du
noterade under steg 2.
– Den gröna lampan blinkar två gånger.
Om lampan blinkar en gång har du
inte matat in koden korrekt eller
matat in fel kod.
Börja om igen från steg 2.
5 Rikta RU 252 mot TV:n och kontrollera att den reagerar som
den ska.
– Om TV:n reagerar på alla knapptryckningarna är RU 252 klar
att använda. Glöm inte att notera koden.
• Om apparaten inte reagerar alls eller inte reagerar på
alla knapptryckningarna, börjar du om från steg 2 och
försöker med nästa kod i listan.
Installera fjärrkontrollen
3 sec.
5 SEC.
SV
Svenska
45
SRU252_V4_Transfer_RR:SRU252_V4_Transfer 26-03-10 15:34 Pagina 45
Page 46

Ställa in fjärrkontrollen automatiskt
Om du inte hittar rätt kod för det märke du använder, kan
fjärrkontrollen automatiskt söka reda på koden.
Exempel, TV:
1 Se till att TV:n är påslagen och välj en kanal med hjälp av
originalfjärrkontrollen eller knapparna på TV:n (till exempel
kanal 1).
RU 252 sänder signalen ‘stäng av TV:n’ för samtliga modeller av
TV-apparater som finns lagrade i dess minne.
• Om det gäller en DVD-spelare eller videobandspelare sätter
du i en skiva eller ett band och startar avspelningen.
2 Håll TV-knappen intryckt i
3 sekunder tills den gröna
indikatorlampan lyser med fast sken.
3 Tryck på standbyknappen igen
och håll den intryckt
– RU 252 börjar nu sända alla kända signaler för ‘TV av’, en efter
en.
Varje gång en kod sänds, blinkar den
gröna lampan.
4 När TV:n stängs av (vänteläge),
släpper du upp standbyknappen på
RU252 omedelbart.
– Nu har RU 252 hittat en kod som
fungerar på din TV.
5 Kontrollera att du kan använda alla funktionerna på TV:n med
RU 252.
• Om så inte är fallet kan du göra om den automatiska
inställningen. RU 252 söker då efter en kod som kanske
fungerar bättre.
– När RU 252 har gått igenom alla kända koder, stoppas
sökningen automatiskt och den gröna lampan slutar att blinka.
– Det tar högst 5 minuter att programmera en TV automatiskt.
För video/DVD är motsvarande tid 6 minuter.
3 sec.
5 SEC.
SV46
SRU252_V4_Transfer_RR:SRU252_V4_Transfer 26-03-10 15:34 Pagina 46
Page 47

3. Knappar och funktioner
Bilden på sidan 3 ger en översikt över alla knappar och deras
funktioner.
1 y Standby . . . . . . . . . stäng av och slå på lägena TV, VCR och
DVD.
2 Indikatorlampa . . . . - lyser grönt när IR-signal sänds.
- blinkar grönt när en kod knappas in
och vid automatisk inställning av
fjärrkontrollen.
3 TV - VCR/DVD. . . . . välj den apparat du vill styra: TV, VCR
eller DVD.
4 s (Mute) . . . . . . . . . . stäng av TV:ns ljud.
5 - PROG + . . . . . . . . . . ändra TV-volymen.
6 (Menu) . . . . . . . . - widescreen (TV).
- meny på/av (video/DVD).
7 Sifferknappar . . . . . . välj kanal och andra funktioner direkt.
8 SHIFT . . . . . . . . . . . . . för extrafunktioner. Om den trycks ned
samtidigt som en annan knapp, får den
andra knappen en annan funktion. Till
exempel:
SHIFT + PROG+:. . 'upp i menyn'
SHIFT + PROG-:. . 'ned i menyn'
SHIFT + VOL+:. . . . 'åt höger i menyn'
SHIFT + VOL-:. . . . 'åt vänster i menyn'
SHIFT + :. . . . . . 'meny på/av'
Prova andra kombinationer med knappen Shift för att se vilka
funktioner som är tillgängliga på apparaten. Endast funktioner som
kan styras med originalfjärrkontrollen är tillgängliga.
9 . . . . . . . . . . . . . . . . slår på text-TV.
0 5. . . . . . . . . . . . . . . . . . - röd text-TV-knapp
- snabbspola bakåt (VCR/DVD)
9 . . . . . . . . . . . . . . . . . . - grön text-TV-knapp
- stopp (VCR/DVD)
0 . . . . . . . . . . . . . . . . . . inspelning (VCR/DVD)
;. . . . . . . . . . . . . . . . . . . - gul text-TV-knapp
- paus (VCR/DVD)
6. . . . . . . . . . . . . . . . . . - blå text-TV-knapp
- snabbspola framåt (VCR/DVD)
2 . . . . . . . . . . . . . . . . . . - vit text-TV-knapp
- spela av (VCR/DVD)
! . . . . . . . . . . . . . . . . stänger av text-TV.
@ -/-- . . . . . . . . . . . . . . . . . växla mellan en- och tvåsiffriga
kanalnummer.
# OK . . . . . . . . . . . . . . . . bekräfta ditt val.
$ - VOL + . . . . . . . . . . . . ändra TV-volymen.
% AV. . . . . . . . . . . . . . . . . växla mellan externa källor i
utrustningen.
Obs! Knapparna VOL – /VOL + och s (Mute) ger direkt åtkomst till
TV:ns ljudvolym även när du styr videobandspelare, DVD-spelare
eller satellitmottagare.
Knappar och funktioner
SV
Svenska
47
SRU252_V4_Transfer_RR:SRU252_V4_Transfer 26-03-10 15:34 Pagina 47
Page 48

SV48
Om apparaten inte reagerar alls eller inte reagerar på alla
knapptryckningarna, följer du anvisningarna under ‘Ställa in
fjärrkontrollen’. Eventuellt måste du ange en annan kod för
apparaten.
4. Behöver du hjälp?
Vi rekommenderar att du först läser igenom den här
användarhandboken noggrant.
Den är ämnad att hjälpa dig ställa in och använda fjärrkontrollen.
Om du behöver extra information eller har frågor om inställning,
användning, reservdelar, garanti osv. för SBC RU 252 kan du alltid
kontakta oss.
Innan du ringer vår kundtjänst bör du först fylla i listan över
utrustning i slutet av den här användarhandboken. Ha listan och
SBC RU 252 nära till hands när du ringer så att våra medarbetare
SBC RU 252 fungerar som den ska.
Kontaktuppgifterna finns i slutet av den här användarhandboken.
Modellnumret för din universalfjärrkontroll från Philips är
SBC RU 252/00H.
Inköpsdatum: ......../ ......../ ........
(dag/månad/år)
SRU252_V4_Transfer_RR:SRU252_V4_Transfer 26-03-10 15:34 Pagina 48
Page 49

Instalar o telecomando
PT
Português
49
Índice
1. Introdução.....................................................................................49
2. Instalar o telecomando.....................................................49-51
Inserir as pilhas ....................................................................................................49
Testar o telecomando..............................................................................49-50
Programar o telecomando....................................................................50-51
Programar automaticamente o telecomando ...........................51-52
3. Teclas e funções....................................................................52-53
4. Precisa de ajuda?........................................................................53
Lista de códigos de todas as marcas / equipamento
......................................................................................................69-81
Lista de equipamento......................................................................................82
Linha de apoio.....................................................................................................82
Informações ao consumidor........................................................................87
1. Introdução
Parabéns por ter adquirido o telecomando universal SBC RU 252 da
Philips. Depois de instalar o telecomando, pode comandar um máximo
de 2 aparelhos diferentes: televisões (TV) e gravadores de vídeo/DVD
(VCR/DVD).
Pode obter informações sobre como preparar o telecomando no
capítulo ‘Instalar o telecomando’.
2. Instalar o telecomando
Inserir as pilhas
1 Carregue na tampa para dentro
e faça-a deslizar na direcção da seta.
2 Coloque duas pilhas R03, UM4 ou do
tipo AAA no compartimento das
pilhas, como indicado.
3 Faça deslizar a tampa para a posição
inicial até ouvir um estalido.
Testar o telecomando
O telecomando da Philips foi programado para comandar a maioria
dos aparelhos da Philips. Uma vez que o RU 252 pode utilizar sinais
diferentes para cada marca e mesmo para modelos diferentes da
mesma marca, é aconselhável que teste se o aparelho responde ao
RU 252.
O exemplo a seguir (televisor) fornece instruções sobre como
deve proceder. Repita os mesmos passos para outros aparelhos
(gravadores de vídeo/DVD) que pretenda utilizar com o RU 252.
SRU252_V4_Transfer_RR:SRU252_V4_Transfer 26-03-10 15:34 Pagina 49
Page 50

Exemplo do televisor:
1 Ligue o televisor manualmente ou utilize o telecomando de
origem. Sintonize para o canal 1.
2 Carregue na tecla TV do RU 252
para seleccionar o televisor.
3 Verifique se todas as teclas estão a
funcionar. Para obter uma visão geral
das teclas e respectivas funções,
consulte ‘3. Teclas e funções’.
– Se o televisor responder devidamente a todos os comandos
das teclas, o RU 252 está pronto a ser utilizado.
• Se o aparelho não responder a todos ou a nenhum
comando das teclas, siga as instruções da secção
‘Programar o telecomando’.
Programar o telecomando
Este procedimento só é necessário se o aparelho não responder
ao RU 252.
Se for o caso, o RU 252 não reconhece a marca e/ou modelo do
aparelho e é necessário programar o telecomando para o fazer.
O exemplo a seguir (televisor) fornece instruções sobre como
deve proceder. Repita os mesmos passos para outros aparelhos
(gravadores de vídeo/DVD) que pretenda utilizar com o RU 252.
Exemplo do televisor:
1 Ligue o televisor manualmente ou utilize o telecomando de
origem. Sintonize para o canal 1.
2 Procure a marca do seu televisor na lista de códigos no verso
deste manual. Cada marca tem um ou mais códigos com
quatro dígitos. Tome nota do primeiro código.
Tenha cuidado! Existem tabelas diferentes para televisores, vídeos
e DVDs. Certifique-se de que utiliza os códigos da tabela correcta.
3 Mantenha premida a tecla TV
durante 3 segundos até que o
indicador verde se mantenha aceso.
4 Em seguida, introduza o código que
anotou no passo 2 utilizando as
teclas digitais.
– O indicador luminoso verde pisca
duas vezes.
Se o indicador piscar uma vez
durante um período prolongado, significa que o código não foi
introduzido correctamente ou então introduziu o código
errado. Comece novamente a partir do passo 2.
5 Aponte o RU 252 para o televisor e verifique se responde
correctamente.
3 sec.
5 SEC.
PT50
SRU252_V4_Transfer_RR:SRU252_V4_Transfer 26-03-10 15:34 Pagina 50
Page 51

– Se o televisor responder a todos os comandos das teclas, o
RU 252 está pronto a ser utilizado. Não se esqueça de anotar
o código.
• Se o aparelho não responder a todos ou a alguns
comandos das teclas, comece novamente a partir do
passo 2 e experimente o código seguinte da lista.
Programar automaticamente o telecomando
Se não conseguir encontrar o código correcto do aparelho de
marca, o telecomando pode procurar automaticamente o código
correcto.
Exemplo do televisor:
1 Verifique se o televisor está ligado e seleccione um canal
utilizando o telecomando de origem ou os botões do
televisor (por exemplo, o canal 1). O RU 252 emite o sinal de
desactivação do televisor para todos os modelos de televisor
que estejam guardados na memória.
• Se o aparelho for um leitor de DVD ou um videogravador,
introduza um disco ou uma cassete e inicie a reprodução.
2 De seguida, mantenha a tecla TV
premida durante 3 segundos até
que o indicador verde se mantenha
aceso.
3 Prima e mantenha premida a tecla
em espera
– O RU 252 começa então a emitir todos os sinais de
desactivação de televisor conhecidos, um a um.
Sempre que um código é enviade,
o indicador luminoso verde pisca.
4 Quando o televisor se desligar,
liberte imediatamente a tecla em
espera do RU252.
– O RU 252 encontrou um código
que funciona com o seu televisor.
5 Verifique se consegue utilizar todas as funções do televisor
com o RU 252.
• Se não for o caso, pode voltar a efectuar a
programação automática. O RU 252 procura, nessa
ocasião, um código que talvez funcione melhor.
Instalar o telecomando
3 sec.
5 SEC.
PT
Português
51
SRU252_V4_Transfer_RR:SRU252_V4_Transfer 26-03-10 15:34 Pagina 51
Page 52

– Depois do RU 252 percorrer todos os códigos conhecidos, a
procura pára automaticamente e o indicador luminoso verde pára
de piscar.
– A programação automática de um televisor demora 5 minutos, no
máximo. Para o videogravador/DVD demora 6 minutos
3. Teclas e funções
A ilustração da página 3, fornece uma visão geral de todas as teclas e
respectivas funções.
1 y Standby . . . . . . . . . liga e desliga o modo TV, VCR ou DVD.
2 Indicador luminoso. - acende a verde quando é enviado um
sinal de infravermelhos.
- fica verde intermitente quando está a ser
introduzido um código e quando se
programa automaticamente o
telecomando.
3 TV - VCR/DVD. . . . . selecciona o aparelho que pretende utilizar :
TV, VCR ou DVD.
4 s (Mute) . . . . . . . . . . silencia o som do televisor.
5 - PROG + . . . . . . . . . . selecciona o canal anterior ou seguinte.
6 (Menu) . . . . . . . . - ecrã panorâmico (TV).
-activar/desactivar menu (VCR/DVD).
7 Teclas digitais. . . . . . selecção directa de canais e outras funções.
8 SHIFT . . . . . . . . . . . . . para funções extra. Se carregar ao mesmo
tempo com uma segunda tecla, esta
segunda tecla acede a outra função. Por
exemplo:
SHIFT + PROG+:. . 'menu acima'
SHIFT + PROG-:. . 'menu abaixo'
SHIFT + VOL+:. . . . 'menu direita'
SHIFT + VOL-:. . . . 'menu esquerda'
SHIFT + :. . . . . . 'activar/desactivar menu'
Experimente outras combinações com a tecla Shift no aparelho para
descobrir outras funções disponíveis. Apenas estão disponíveis as
funções do telecomando de origem.
9 . . . . . . . . . . . . . . . . activa o teletexto.
0 5. . . . . . . . . . . . . . . . . . - tecla vermelha do teletexto
- rebobinar ( Videogravador/DVD)
9 . . . . . . . . . . . . . . . . . . - tecla verde do teletexto
- parar ( Videogravador/DVD)
0 . . . . . . . . . . . . . . . . . . grava ( Videogravador/DVD)
;. . . . . . . . . . . . . . . . . . . - tecla amarela do teletexto
- pausa ( Videogravador/DVD)
6. . . . . . . . . . . . . . . . . . - tecla azul do teletexto
- bobinar ( Videogravador/DVD)
2 . . . . . . . . . . . . . . . . . . - tecla branca do teletexto
- reproduzir ( Videogravador/DVD)
! . . . . . . . . . . . . . . . . desactiva o teletexto.
@ -/-- . . . . . . . . . . . . . . . . . selecciona entre os números de canal com
um ou dois dígitos.
PT52
SRU252_V4_Transfer_RR:SRU252_V4_Transfer 26-03-10 15:34 Pagina 52
Page 53

Precisa de ajuda?
PT
Português
53
# OK . . . . . . . . . . . . . . . . confirma a selecção.
$ - VOL + . . . . . . . . . . . . regula o volume do televisor.
% AV. . . . . . . . . . . . . . . . . muda entre as entradas externas do
seu equipamento.
Nota! As teclas VOL – /VOL + e s (Mute) oferecem um acesso
directo ao volume do televisor, mesmo se estiver a utilizar o
equipamento de satélite, de DVD ou o videogravador.
Se o aparelho não responder a todos ou a nenhum comando
das teclas, siga as instruções da secção ‘Programar o
telecomando’. É possível que tenha de introduzir outro
código para o aparelho.
4. Precisa de ajuda?
Aconselhamo-lo a ler atentamente este manual primeiro. É
fornecido para o ajudar a configurar e utilizar o telecomando.
No entanto, se necessitar de informação extra ou tiver dúvidas
acerca da configuração, utilização, peças sobresselentes, garantia, etc.
do SBC RU 252, poderá contactar-nos.
Antes de contactar a nossa linha de atendimento, preencha
primeiro a lista de equipamento que se encontra no fim deste
manual do utilizador. Certifique-se de que tem a lista e o
SBC RU 252 à mão quando efectuar a chamada, de modo a que os
nossos operadores possam ajudá-lo a determinar se o SBC RU 252
está a funcionar correctamente.
Poderá encontrar os nossos detalhes de contacto no final deste
manual.
O número de modelo do telecomando universal Philips é
SBC RU 252/00H.
Data de compra: ......../ ......../ ........
(dia/mês/ano)
SRU252_V4_Transfer_RR:SRU252_V4_Transfer 26-03-10 15:34 Pagina 53
Page 54

DK54
Indholdsfortegnelse
1. Indledning......................................................................................54
2. Installering af fjernbetjeningen.....................................54-56
Isætning af batterier ..........................................................................................54
Test af fjernbetjeningen ...........................................................................54-55
Indstilling af fjernbetjeningen .......................................................................55
Automatisk installering af fjernbetjeningen .........................................56
3. Knapper og funktioner......................................................57-58
4. Har du brug for hjælp? ............................................................58
Kodeliste over alle mærker / udstyr ...........................69-81
Liste over udstyr.................................................................................................82
Telefonsuppor t ....................................................................................................82
Information til kunden ...................................................................................87
1. Indledning
Til lykke med erhvervelsen af Philips universal-fjernbetjeningen
SBC RU 252. Efter installering af fjernbetjeningen kan du betjene op
til 2 forskellige apparater med denne: TV og VCR/DVDafspillere/optagere.
Oplysninger om installering af denne fjernbetjening finder du i
afsnittet ‘Installering af fjernbetjeningen’.
2. Installering af fjernbetjeningen
Isætning af batterier
1 Tryk på dækslet og skub det i
pilens retning.
2 Sæt to batterier af type R03, UM4
eller AAA i som angivet i
batterirummet.
3 Skub dækslet tilbage til det klikker på
plads.
Test af fjernbetjeningen
Fjernbetjeningen er forberedt til betjening af det meste udstyr fra
Philips. Da signalerne fra RU 252’en kan være forskellige alt efter
mærke og selv pr. modelnummer, er det klogt at afprøve, om dit
udstyr svarer på RU 252’en.
I nedenstående eksempel (TV) er beskrevet, hvordan dette gøres.
Du kan gentage de enkelte trin for andet udstyr (VCR/DVDafspillere/ optagere), som du vil betjene med RU 252’en.
Eksempel med TV:
1 Tænd fjernsynet manuelt eller brug den originale
fjernbetjening til fjernsynet. Afstem på kanal 1.
SRU252_V4_Transfer_RR:SRU252_V4_Transfer 26-03-10 15:34 Pagina 54
Page 55

2 Tryk på tasten TV på RU 252’en for
at vælge tv.
3 Kontroller at alle knapper virker. For
en oversigt over knapperne og deres
funktioner, se afsnit ‘3. Knapper og
funktioner’.
– Hvis tv’et reagerer på alle knapper, er RU 252’en klar til brug.
• Hvis apparatet ikke reagerer eller ikke reagerer på
samtlige knapper, følg da anvisningerne i afsnittet
‘Indstilling af fjernbetjeningen’.
Indstilling af fjernbetjeningen
Fjernbetjeningen skal kun indstilles, hvis dit udstyr ikke eller kun
delvis kan betjenes via RU 252’en. I så tilfælde genkender
RU 252’en ikke mærket og/eller model af dit udstyr, og du skal
indstille fjernbetjeningen, så den genkender dit udstyr. I
nedenstående eksempel (TV) læser du, hvordan dette gøres. Du
kan gentage de enkelte trin for andet udstyr (VCR/DVD-afspillere/
optagere), som du vil betjene med RU 252’en.
Eksempel med TV:
1 Tænd fjernsynet manuelt eller brug den originale
fjernbetjening til fjernsynet. Afstem på kanal 1.
2 Slå mærket på dit tv op i kodelisten bagest i denne
brugsanvisning. Bag mærket står en eller flere 4-cifrede koder.
Noter den første kode ned.
OBS! Der er særskilte tabeller for TV, video og DVD.
Sørg for at bruge koderne fra den rigtige tabel.
3 Tryk på og hold TV-tasten inde i 3
sekunder, indtil den grønne indikator
lyser kontinuerligt.
4 Indtast nu den kode, du har noteret
i trin 2, ved at bruge de numeriske
knapper.
– Det grønne indikatorlys vil nu blinke
to gange.
Hvis LED’en viser et langt blink, er
koden ikke indtastet korrekt eller der er indtastet en ugyldig
kode.
Gå tilbage til trin 2 og gentag fremgangsmåden.
5 Peg med RU 252’en på tv’et og kontroller, om det svarer
korrekt.
– Hvis tv’et reagerer korrekt på alle knapper, er RU 252’en klar
til brug. Husk at notere den nye kode ned.
• Gå tilbage til trin 2 og prøv den næste kode fra
kodelisten, hvis apparatet slet ikke reagerer eller ikke
reagerer på alle knapper.
Installering af fjernbetjeningen
3 sec.
5 SEC.
DK
Dansk
55
SRU252_V4_Transfer_RR:SRU252_V4_Transfer 26-03-10 15:34 Pagina 55
Page 56

Automatisk indstilling af fjernbetjeningen
Hvis du ikke kan finde den rigtige kode til mærket på dit udstyr, kan
du få fjernbetjeningen til automatisk at søge den rigtige kode.
Eksempel med TV:
1 Sørg for at tv’et er slået til og vælg en kanal (f.eks. kanal 1) ved
at bruge den originale fjernbetjening eller ved brug af
knapperne på fjernsynet. RU 252’en vil nemlig sende signalet
‘Slå TV fra’ for alle tv-modeller, der er gemt i hukommelsen.
• For en DVD-afspiller eller videobåndoptager, indsæt en disk
eller et videobånd i apparatet og lad den afspille disken hhv.
videobåndet.
2 Hold derefter TV-tasten inde i 3
sekunder, indtil den grønne indikator
lyser kontinuerligt.
3 Tryk på Standby-tasten, og hold den
inde.
– RU 252’en begynder at sende alle kendte ‘Slå TV fra’-signaler en
ad gangen.
Det grønne indikatorlys blinker,
hver gang der sendes en kode.
4 Når dit TV slukker (skifter til
standbytilstand), skal du straks slippe
Standby-tasten på RU252.
– RU 252’en har nu fundet en kode,
der virker med dit tv.
5 Kontroller at du kan betjene alle tv’ets funktioner med RU
252’en.
• Hvis ikke, så kan du foretage den automatiske indstilling
på ny. RU 252’en fortsætter da med at søge en kode,
der måske virker bedre.
– Når RU 252’en har sendt alle koderne, stopper søgningen
automatisk og den grønne indikator-LED stopper at blinke.
– Den automatiske programmering af et fjernsyn tager højst 5
minutter. Den automatiske programmering af en
videobåndoptager /DVD-afspiller tager 6 minutter.
3 sec.
5 SEC.
DK56
SRU252_V4_Transfer_RR:SRU252_V4_Transfer 26-03-10 15:34 Pagina 56
Page 57

Knapper og funktioner
3. Knapper og funktioner
Afbildningen på side 3 giver en oversigt over alle knapper og deres
funktioner.
1 y Standby . . . . . . . . . slår TV-, VCR- eller DVD-tilstand til eller
fra.
2 Indikatorlys. . . . . . . . - lyser grønt, når der sendes et IR-signal.
- blinker grønt, når en kode indtastes og
når fjernbetjeningen indstilles
automatisk.
3 TV - VCR/DVD. . . . . vælger det apparat, du vil betjene:
TV, VCR eller DVD.
4 s (Mute) . . . . . . . . . . slår TV-lyden til eller fra.
5 - PROG + . . . . . . . . . . vælger forrige eller næste kanal.
6 (Menu) . . . . . . . . - widescreen (TV).
- menu til/fra (VCR/DVD).
7 Numeriske
knapper . . . . . . . . . . . til direkte kanalvalg og andre funktioner.
8 SHIFT . . . . . . . . . . . . . for at få adgang til yderligere funktioner.
Hvis SHIFT trykkes ned med en anden
funktionsknap, får den anden knap en
anden funktion. Eksempel:
SHIFT + PROG+:. . 'menu op'
SHIFT + PROG-:. . 'menu ned'
SHIFT + VOL+:. . . . 'menu højre'
SHIFT + VOL-:. . . . 'menu venstre'
SHIFT + :. . . . . . 'menu til/fra'
Prøv andre Shift-knap kombinationer på dit udstyr for at finde ud af,
hvilke funktioner der er tilgængelige. Kun funktioner, der var
tilgængelige på den oprindelige fjernbetjening til dit udstyr, er
tilgængelige.
9 . . . . . . . . . . . . . . . . slår tekst-tv til.
0 5. . . . . . . . . . . . . . . . . . - rød tekst-tv knap
- tilbagespoling (VCR/DVD)
9 . . . . . . . . . . . . . . . . . . - grøn tekst-tv knap
- stop (VCR/DVD)
0 . . . . . . . . . . . . . . . . . . optag (VCR/DVD)
;. . . . . . . . . . . . . . . . . . . - gul tekst-tv knap
- pause (VCR/DVD)
6. . . . . . . . . . . . . . . . . . - blå tekst-tv knap
- fremspoling (VCR/DVD)
2 . . . . . . . . . . . . . . . . . . - hvid tekst-tv knap
- afspil (VCR/DVD)
! . . . . . . . . . . . . . . . . slår tekst-tv fra.
@ -/-- . . . . . . . . . . . . . . . . . vælg mellem en- og tocifrede
kanalnumre.
# OK . . . . . . . . . . . . . . . . bekræfter dit valg.
$ - VOL + . . . . . . . . . . . . regulerer TV-apparatets lydstyrke.
% AV. . . . . . . . . . . . . . . . . skifter mellem eksterne udgange på dit
udstyr.
DK
Dansk
57
SRU252_V4_Transfer_RR:SRU252_V4_Transfer 26-03-10 15:34 Pagina 57
Page 58

DK58
Bemærk! Tasterne VOL – /VOL + og s (Mute) giver direkte adgang til
tv’ets lydstyrke, selvom du betjener dit VCR-, DVD- eller SATudstyr.
Hvis apparatet slet ikke reagerer eller ikke reagerer på
samtlige knapper, følg da anvisningerne i afsnittet ‘Indstilling
af fjernbetjeningen’. Du skal muligvis indtaste en anden kode
for udstyret.
4. Brug for hjælp?
Vi anbefaler, at du først læser denne vejledning grundigt. Den er
beregnet til at hjælpe med at konfigurere og betjene
fjernbetjeningen.
Du kan altid kontakte os, hvis du har brug for yderligere oplysninger
eller har flere spørgsmål om opsætning, anvendelse, reservedele,
garanti osv. for SBC RU 252.
Før du ringer til vores forbrugerlinje, skal du udfylde udstyrslisten
bagest i denne brugervejledning. Sørg for at have listen og
SBC RU 252 ved hånden, når du ringer op, så vores teknikere kan
hjælpe dig med at finde ud af, om SBC RU 252 fungerer korrekt.
Du kan finde kontaktoplysninger bagest i denne brugervejledning.
Modelnummeret på din Philips universalfjernbetjening er
SBC RU 252/00H.
Købsdato: ......../ ......../ ........
(dag/måned/år)
SRU252_V4_Transfer_RR:SRU252_V4_Transfer 26-03-10 15:34 Pagina 58
Page 59

Kauko-ohjaimen ottaminen käyttöön
FI
Suomi
59
Sisällys
1. Johdanto.........................................................................................59
2. Kauko-ohjaimen ottaminen käyttöön.......................59-62
Paristojen asettaminen....................................................................................59
Kauko-ohjaimen testaaminen...............................................................59-60
Kauko-ohjaimen asetusten määrittäminen ...................................60-61
Kauko-ohjaimen asetusten määrittäminen automaattisesti61-62
3. Painikkeet ja toiminnot ....................................................62-63
4. Tarvitsetko apua?.......................................................................63
Eri merkkien ja laitteiden koodiluettelo..................69-81
Laiteluettelo...........................................................................................................82
Tukipalvelu..............................................................................................................82
Tiedote kuluttajille.............................................................................................88
1. Johdanto
Onnittelumme siitä, että hankit Philips SBC RU 252 -yleiskaukoohjaimen. Kun olet määrittänyt kauko-ohjaimen asetukset, voit
ohjata sillä jopa 2 eri laitetta: televisiota ja videonauhuria tai DVDsoitinta/-tallenninta.
Lisätietoja kauko-ohjaimen valmistelemisesta käyttöä varten on
kohdassa Kauko-ohjaimen ottaminen käyttöön.
2. Kauko-ohjaimen ottaminen käyttöön
Paristojen asettaminen
1 Paina kantta sisäänpäin ja liu’uta
sitä nuolen suuntaan.
2 Aseta paristolokeroon kaksi R03-,
UM4- tai AAA-paristoa kuvassa
esitetyllä tavalla.
3 Liu’uta kansi takaisin paikalleen ja
napsauta se kiinni.
Kauko-ohjaimen testaaminen
Kauko-ohjain on ohjelmoitu niin, että sillä voidaan käyttää useimpia
Philips-laitteita. Koska RU 252-auko-ohjaimessa voidaan käyttää eri
signaaleja kutakin merkkiä - ja jopa saman valmistajan eri malleja varten, on suositeltavaa kokeilla, vastaako laite RU 252-kaukoohjaimella annettuihin komentoihin. Alla olevassa esimerkissä
kuvataan tämä television osalta. Voit toistaa samat vaiheet muissa
laitteissa (videonauhuri tai DVD-soitin/-tallennin), joita haluat ohjata
RU 252-kauko-ohjaimella.
SRU252_V4_Transfer_RR:SRU252_V4_Transfer 26-03-10 15:34 Pagina 59
Page 60

Esimerkki (TV):
1 Kytke televisio päälle joko sen omasta virtakytkimestä tai
käyttämällä sen omaa kauko-ohjainta.
Vaihda television kanavaksi 1.
2 Valitse televisio painamalla
RU 252-kauko-ohjaimen TVpainiketta.
3 Tarkista, toimivatko kaikki painikkeet.
Painikkeet ja niiden toiminnot on
kuvattu kohdassa 3. Painikkeet ja
toiminnot.
– Jos televisio reagoi oikein kaikkien painikkeiden käyttämiseen,
RU 252-kauko-ohjain on käyttövalmis.
• Jos laite ei reagoi minkään painikkeen tai joidenkin
painikkeiden painamiseen, noudata kohdassa
‘Kauko-ohjaimen asetusten määrittäminen’ olevia
ohjeita.
Kauko-ohjaimen asetusten määrittäminen
RU 252-kauko-ohjaimen asetukset tar vitsee määrittää vain silloin,
kun laite ei reagoi sillä annettuihin komentoihin. Tässä tapauksessa
RU 252 ei tunnista laitteen merkkiä tai mallia, ja se pitää ohjelmoida
laitetta varten.
Alla olevassa esimerkissä kuvataan tämä television osalta. Voit toistaa
samat vaiheet muissa laitteissa (videonauhuri tai DVD-soitin/tallennin), joita haluat ohjata RU 252-kauko-ohjaimella.
Esimerkki (TV):
1 Kytke televisio päälle joko sen omasta virtakytkimestä tai
käyttämällä sen omaa kauko-ohjainta. Vaihda television
kanavaksi 1.
2 Etsi television merkki tämän käyttöoppaan takakannessa
olevasta luettelosta. Luettelossa kullekin merkille on vähintään
yksi nelinumeroinen koodi. Merkitse ensimmäinen koodi
muistiin.
Ole huolellinen, sillä eri laitteita varten on omat taulukkonsa.
Varmista, että katsot koodin oikeasta taulukosta.
3 Paina TV-painiketta 3 sekunnin ajan,
kunnes vihreä merkkivalo jää
palamaan.
3 sec.
5 SEC.
FI60
SRU252_V4_Transfer_RR:SRU252_V4_Transfer 26-03-10 15:34 Pagina 60
Page 61

Kauko-ohjaimen ottaminen käyttöön
4 Anna sitten numeropainikkeilla
kohdassa 2 muistiin merkitsemäsi
koodi .
– Vihreä merkkivalo vilkkuu nyt kaksi
kertaa.
Jos valo vilkkuu vain kerran hitaasti,
koodi annettiin väärin tai kyseinen koodi ei kelpaa. Aloita
uudelleen vaiheesta 2.
5 Suuntaa RU 252-kauko-ohjain televisiota kohti ja tarkista sen
toiminta.
– Jos televisio reagoi oikein kaikkien painikkeiden käyttämiseen,
RU 252-kauko-ohjain on käyttövalmis. Muista merkitä oikea
koodi muistiin.
• Jos laite ei reagoi minkään painikkeen tai joidenkin
painikkeiden painamiseen, aloita uudelleen vaiheesta 2
käyttämällä luettelon seuraavaa koodia.
Kauko-ohjaimen asetusten määrittäminen
automaattisesti
Jos luettelosta ei löydy laitteen oikeaa koodia, kauko-ohjain voi
automaattisesti etsiä oikean koodin.
Esimerkki (TV):
1 Varmista, että televisio on kytketty päälle. Valitse sitten kanava
(esimerkiksi kanava 1) television omalla kauko-ohjaimella tai
sen etupaneelin painikkeilla. RU 252 lähettää television
virrankatkaisusignaalia kaikille sen muistiin tallennetuille
televisiomalleille.
• Jos laite on DVD-soitin tai videonauhuri, aseta levy tai kasetti
laitteeseen ja käynnistä toisto.
2 Paina sitten TV-painiketta 3 sekunnin
ajan, kunnes vihreä merkkivalo jää
palamaan.
3 Pidä valmiustilapainiketta alhaalla.
– RU 252-kauko-ohjain alkaa nyt lähettää yksitellen kaikkia
tuntemiansa television virrankatkaisusignaaleja.
Vihreä merkkivalo syttyy aina,
kun koodi lähetetään.
FI
Suomi
61
3 sec.
5 SEC.
SRU252_V4_Transfer_RR:SRU252_V4_Transfer 26-03-10 15:34 Pagina 61
Page 62

4 Kun TV:n virta katkeaa (valmiustila),
vapauta RU252:n valmiustilapainike
heti.
– RU 252-kauko-ohjain on nyt löytänyt
televisiotasi vastaavan koodin.
5 Tarkista, että television kaikkia toimintoja voi käyttää RU 252-
kauko-ohjaimella.
• Jos näin ei ole, suorita asetusten automaattinen
määrittäminen uudelleen. RU 252-kauko-ohjain voi tällä
kertaa löytää paremmin toimivan koodin.
– Kun RU 252-kauko-ohjain on käynyt läpi kaikki siihen tallennetut
koodit, haku lopetetaan automaattisesti ja vihreän merkkivalon
vilkkuminen loppuu.
– Kauko-ohjaimen automaattinen ohjelmointi televisiota varten
kestää enintään 8 minuuttia.
Videonauhuria tai DVD-laitetta var ten se kestää 4 minuuttia.
3. Painikkeet ja toiminnot
Sivulla 3 on yleiskatsaus kaikista painikkeista ja niiden toiminnoista.
1 y Standby . . . . . . . . . TV-, VCR (videonauhuri)- tai DVD-tilan
kytkeminen päälle tai pois päältä.
2 Merkkivalo . . . . . . . . - Palaa vihreänä infrapunasignaalin
lähettämisen aikana.
- Vilkkuu vihreänä koodin syöttämisen ja
kauko-ohjaimen asetusten
automaattisen määrittämisen aikana.
3 TV - VCR/DVD. . . . . Käytettävän laitteen valitseminen: TV,
VCR tai DVD.
4 s (Mute) . . . . . . . . . . Television äänen mykistäminen.
5 - PROG + . . . . . . . . . . Edellisen tai seuraavan kanavan
valitseminen.
6 (Menu) . . . . . . . . - Laajakuva (TV).
- Valikko käytössä/ei (VCR/DVD).
7 Numeropainikkeet . Kanavien ja muiden toimintojen
valitseminen suoraan.
8 SHIFT . . . . . . . . . . . . . Lisätoimintojen käyttäminen.
Painikkeiden toissijaisia toimintoja
voidaan käyttää pitämällä tätä painiketta
painettuna toimintopainikkeen
painamisen aikana. Esimerkki:
SHIFT + PROG+:. . Siir tyminen ylöspäin valikossa.
SHIFT + PROG-:. . Siirtyminen alaspäin valikossa.
SHIFT + VOL+:. . . . Siirtyminen oikealle valikossa.
SHIFT + VOL-:. . . . Siirtyminen vasemmalle valikossa.
SHIFT + :. . . . . . Valikko käytössä/ei.
FI62
SRU252_V4_Transfer_RR:SRU252_V4_Transfer 26-03-10 15:34 Pagina 62
Page 63

Tarvitsetko apua?
FI
Suomi
63
Pitämällä SHIFT-painiketta painettuna ja kokeilemalla muita
painikkeita voit selvittää, mitkä toiminnot ovat käytettävissä kussakin
laitteessa. Ainoastaan laitteen alkuperäisen kauko-ohjaimen
sisältämät toiminnot ovat käytettävissä.
9 . . . . . . . . . . . . . . . . Tekstitelevision kytkeminen päälle.
0 5. . . . . . . . . . . . . . . . . . - tekstitelevision punainen pikapainike
- taaksekelaus (VCR/DVD)
9 . . . . . . . . . . . . . . . . . . - tekstitelevision vihreä pikapainike
- pysäytys (VCR/DVD)
0 . . . . . . . . . . . . . . . . . . Tallennus (VCR/DVD)
;. . . . . . . . . . . . . . . . . . . - tekstitelevision keltainen pikapainike
- tauko (VCR/DVD)
6. . . . . . . . . . . . . . . . . . - tekstitelevision sininen pikapainike
- eteenkelaus (VCR/DVD)
2 . . . . . . . . . . . . . . . . . . - tekstitelevision valkoinen pikapainike
- toisto (VCR/DVD)
! . . . . . . . . . . . . . . . . Tekstitelevision kytkeminen pois päältä.
@ -/-- . . . . . . . . . . . . . . . . . Yksi- ja kaksinumeroisten
kanavanumeroiden valitseminen
käyttöön.
# OK . . . . . . . . . . . . . . . . Valinnan vahvistaminen.
$ - VOL + . . . . . . . . . . . . Television äänenvoimakkuuden
säätäminen.
% AV. . . . . . . . . . . . . . . . . Laitteen ulkoisten tuloliitäntöjen
vuorotteleminen.
Huomautus! Painikkeilla VOL – /VOL + ja s (Mute) voidaan säätää
suoraan television äänenvoimakkuutta myös silloin, kun
kauko-ohjaimella käytetään videonauhuria, DVD-soitinta
tai satelliittivastaanotinta.
Jos laite ei reagoi minkään painikkeen tai joidenkin
painikkeiden painamiseen, noudata kohdassa Kaukoohjaimen asetusten määrittäminen olevia ohjeita. Laitteelle
voi myös joutua määrittämään jonkin muun koodin.
4. Tarvitsetko apua?
Suosittelemme, että luet ensin käyttöoppaan huolellisesti. Siinä on
tietoja kaukosäätimen määrittämisestä ja käyttämisestä.
Jos kuitenkin tarvitset lisätietoja tai sinulla on kysymyksiä
SBC RU 252-kaukosäätimen asetusten määrittämisestä, varaosista,
takuusta jne., voit ottaa yhteyttä meihin.
Ennen kuin otat yhteyttä kuluttajapalveluumme, täytä tämän
käyttöoppaan lopussa oleva laiteluettelo. Varmista, että luettelo ja
SBC RU 252 ovat kätesi ulottuvilla, kun soitat, jotta tukihenkilömme
pystyvät helpommin selvittämään, toimiiko SBC RU 252 kunnolla.
Yhteystietomme ovat käyttöoppaan lopussa.
Tämän Philips-yleiskaukosäätimen mallinumero on
SBC RU 252/00H.
Ostopäivä: ......../ ......../ ........
(päivä/kuukausi/vuosi)
SRU252_V4_Transfer_RR:SRU252_V4_Transfer 26-03-10 15:34 Pagina 63
Page 64

NO64
Innhold
1. Innledning......................................................................................64
2. Installere fjernkontrollen.................................................64-66
Sette inn batteriene..........................................................................................64
Teste fjernkontrollen.................................................................................64-65
Stille inn fjernkontrollen ..........................................................................65-66
Stille inn fjernkontrollen automatisk........................................................66
3. Knapper og funksjoner......................................................67-68
4. Trenger du hjelp? .......................................................................68
Kodeliste over alle merker / alt utstyr......................69-81
Utstyrsliste..............................................................................................................82
Kundestøtte...........................................................................................................82
Informasjon til forbrukerne ..........................................................................88
1. Innledning
Gratulerer med valget av en Philips SBC RU 252 universal
fjernkontroll. Etter å ha installert fjernkontrollen, kan du betjene
opptil 2 forskjellige apparater med den: TV og video-/DVD-spillere/opptakere.
I kapittelet ‘Installere fjernkontrollen’ finner du opplysninger om
hvordan fjernkontrollen skal klargjøres for bruk.
2. Installere fjernkontrollen
Sette inn batteriene
1 Trykk dekselet innover og skyv
det i pilens retning.
2 Sett to batterier av type R03, UM4
eller AAA inn i batterirommet, som
vist.
3 Skyv dekselet tilbake og klikk det
godt på plass.
Teste fjernkontrollen
Fjernkontrollen er programmert for å betjene de fleste Philipsapparater. Siden RU 252 kan bruke forskjellige signaler for hvert
merke, og til og med for ulike modeller av samme merke, råder vi
deg til å teste om apparatet ditt reagerer på RU 252.
Eksempelet nedenfor (TV) forklarer deg hvordan dette gjøres. Du
kan gjenta de samme trinnene for andre apparater (video-/DVDspillere/-opptakere) som du ønsker å styre ved hjelp av RU 252kontrollen.
TV-eksempel:
1 Slå TV-apparatet på manuelt eller bruk den opprinnelige
fjernkontrollen.
Still inn på kanal 1.
SRU252_V4_Transfer_RR:SRU252_V4_Transfer 26-03-10 15:34 Pagina 64
Page 65

3 sec.
5 SEC.
NO
Installere fjernkontrollen
Norsk
65
2 Trykk TV-knappen på RU 252
for å velge TV.
3 Sjekk om alle knappene virker. Du
finner en oversikt over knappene og
deres funksjoner under ‘3. Knapper
og funksjoner’.
– Hvis TV-apparatet reagerer som det skal på alle
knappekommandoene, er RU 252 klar til bruk.
• Hvis apparatet ikke reagerer i det hele tatt, eller ikke
reagerer på alle knappekommandoene, følger du
anvisningene under ‘Stille inn fjernkontrollen’.
Stille inn fjernkontrollen
Dette er bare nødvendig hvis apparatet ditt ikke reagerer på RU
252. I så fall betyr det at RU 252 ikke gjenkjenner apparatets merke
og/eller modell, og da må du programmere fjernkontrollen til å
gjøre det.
Eksempelet nedenfor (TV) forklarer deg hvordan dette gjøres.
Du kan gjenta de samme trinnene for andre apparater (video/DVD-spillere/-opptakere) som du ønsker å styre ved hjelp av
RU 252-kontrollen.
TV-eksempel:
1 Slå TV-apparatet på manuelt eller bruk den opprinnelige
fjernkontrollen. Still inn på kanal 1.
2 Finn merket på TV-apparatet ditt i kodelisten bakerst i denne
håndboken. Den viser én eller flere firesifrete koder for hvert
merke. Notér deg den første koden.
OBS! Det er egne tabeller for TV, video og DVD.
Pass på at du bruker kodene fra den riktige tabellen.
3 Trykk på og hold inne knappen TV
i 3 sekunder til den grønne
indikatoren lyser kontinuerlig.
4 Bruk så tallknappene og tast
inn koden du noter te deg i trinn 2.
– Nå blinker det grønne indikatorlyset
to ganger.
Hvis lyset avgir ett langvarig blink, er
koden tastet inn feil eller du har
tastet feil kode. Begynn på nytt fra trinn 2.
5 Pek med RU 252-kontrollen mot TV-apparatet og sjekk at det
reagerer som det skal.
– Hvis TV-apparatet reagerer på alle knappekommandoene, er
RU 252 klar til bruk. Glem ikke å notere ned koden din.
SRU252_V4_Transfer_RR:SRU252_V4_Transfer 26-03-10 15:34 Pagina 65
Page 66

3 sec.
5 SEC.
NO66
• Hvis enheten ikke reagerer i det hele tatt, eller ikke
reagerer på alle knappekommandoene, begynn på nytt
fra trinn 2 og prøv neste kode på listen.
Stille inn fjernkontrollen automatisk
Hvis du ikke finner den riktige koden for apparatmerket ditt,
kan fjernkontrollen automatisk søke etter den riktige koden.
TV-eksempel:
1 Forsikre deg om at TV-apparatet er slått på, og velg en kanal
med den opprinnelige fjernkontrollen eller med knappene på
TV-apparatet
(for eksempel kanal 1). RU 252 avgir signalet ‘slå av TV’ for alle
TV-modeller som er lagret i minnet.
• Hvis apparatet er en DVD-spiller eller videoopptaker, sett inn
en plate eller et bånd og star t avspillingen.
2 Trykk deretter på og hold inne
knappen TV i 3 sekunder til den
grønne indikatoren lyser kontinuerlig.
3 Trykk på knappen Standby, og hold
den inne.
–Nå begynner RU 252 å avgi alle kjente ‘TV-av’-signaler, ett etter ett.
Hver gang det sendes en kode,
blinker det grønne indikatorlyset.
4 Slipp knappen Standby på RU 252
når TVen slås av (ventemodus).
– RU 252 har nå funnet en kode som
virker på ditt TV-apparat.
5 Sjekk om du kan betjene alle funksjonene på TVen din med
RU 252-kontrollen.
• Hvis du ikke kan det, kan du utføre den automatiske
innstillingen på nytt. RU 252 vil da søke etter en kode
som kanskje fungerer bedre.
– Etter at RU 252 har kjør t gjennom alle de kjente kodene,
stopper søket automatisk og det grønne lyset holder opp å
blinke.
– Automatisk programmering av et TV-apparat tar maksimum
8 minutter. For video/DVD tar dette 4 minutter.
SRU252_V4_Transfer_RR:SRU252_V4_Transfer 26-03-10 15:35 Pagina 66
Page 67

3. Knapper og funksjoner
Illustrasjonen på side 3 gir en oversikt over alle knapper og deres
funksjoner.
1 y Standby . . . . . . . . . slår TV-, VCR- eller DVD-modus på eller
av.
2 Indikatorlys. . . . . . . . - begynner å lyse grønt når det sendes
et IR-signal.
- blinker grønt når det legges inn en
kode og når fjernkontrollen blir stilt
inn automatisk.
3 TV - VCR/DVD. . . . . velger den enheten du ønsker å bruke:
TV, VCR eller DVD.
4 s (Mute) . . . . . . . . . . demper lyden på TV-apparatet.
5 - PROG + . . . . . . . . . . velger en tidligere eller påfølgende
kanal.
6 (Menu) . . . . . . . . - widescreen (TV).
- meny av/på (VCR/DVD).
7 Digital keys . . . . . . . . direkte valg av kanaler og andre
funksjoner.
8 SHIFT . . . . . . . . . . . . . for ekstra funksjoner. Når denne trykkes
samtidig med en annen knapp, får den
andre knappen en annen funksjon. For
eksempel:
SHIFT + PROG+:. . 'menu opp’
SHIFT + PROG-:. . 'menu ned'
SHIFT + VOL+:. . . . 'menu høyre'
SHIFT + VOL-:. . . . 'menu venstre'
SHIFT + :. . . . . . 'meny av/på'
Prøv ut andre kombinasjoner med Shift-knappen på apparatet ditt,
for å finne ut hvilke funksjoner som er tilgjengelige. Det er bare
funksjoner som finnes på den opprinnelige fjernkontrollen som er
tilgjengelige.
9 . . . . . . . . . . . . . . . . slår tekst-TV på.
0 5. . . . . . . . . . . . . . . . . . - rød Tekst-TV-knapp
- spol tilbake (VCR/DVD)
9 . . . . . . . . . . . . . . . . . . - grønn Tekst-TV-knapp
- stopp (VCR/DVD)
0 . . . . . . . . . . . . . . . . . . opptak (VCR/DVD)
;. . . . . . . . . . . . . . . . . . . - gul Tekst-TV-knapp
- pause (VCR/DVD)
6. . . . . . . . . . . . . . . . . . - blå Tekst-TV-knapp
- spol frem (VCR/DVD)
2 . . . . . . . . . . . . . . . . . . - hvit Tekst-TV-knapp
- spill av (VCR/DVD)
! . . . . . . . . . . . . . . . . slår tekst-TV av.
@ -/-- . . . . . . . . . . . . . . . . . velger mellom én- og tosifrete
kanalnumre.
# OK . . . . . . . . . . . . . . . . bekrefter valget.
$ - VOL + . . . . . . . . . . . . justerer TV-volumet.
% AV. . . . . . . . . . . . . . . . . veksler mellom eksterne innganger på
utstyret ditt.
NO
Knapper og funksjoner
Norsk
67
SRU252_V4_Transfer_RR:SRU252_V4_Transfer 26-03-10 15:35 Pagina 67
Page 68

Merk! Knappene VOL – /VOL + og s (Mute) gir direkte tilgang til
TV-volumet selv om det er video-, DVD- eller SAT-utstyret som er
i bruk.
Hvis enheten ikke reagerer i det hele tatt, eller ikke reagerer
på alle knappekommandoene, følger du anvisningene under
‘Stille inn fjernkontrollen’. Det er mulig at du må legge inn
en annen kode for enheten.
4. Trenger du hjelp?
Vi anbefaler at du først leser denne bruksanvisningen nøye. Den er
laget for å hjelpe deg med å konfigurere og bruke fjernkontrollen.
Hvis du trenger mer informasjon eller har andre spørsmål om
konfigurering, bruk, reservedeler, garanti, osv. for SBC RU 252, kan
du alltid ta kontakt med oss.
Før du ringer kundestøtten, må du fylle ut utstyrslisten som du
finner bakerst i denne bruksanvisningen. Sørg for at du har listen og
SBC RU 252 for hånden når du ringer, slik at våre operatører kan
hjelpe deg med å finne ut om SBC RU 252 fungerer slik den skal.
Du finner kontaktinformasjon bakerst i denne bruksanvisningen.
Modellnummeret på den universelle Philips-fjernkontrollen er
SBC RU 252/00H.
Kjøpsdato: ......../ ......../ ........
(dag/måned/år)
NO68
SRU252_V4_Transfer_RR:SRU252_V4_Transfer 26-03-10 15:35 Pagina 68
Page 69

TV
TV
TV
TV
TV
TV
SETUP CODES FOR TV
A
A.R. Systems..................................0029
Acme.................................................0006
Acura ...................................0007, 0028
ADC ..................................................0005
Admiral..................0004, 0005, 0010
.................................................0011, 0091
Adyson..................0006, 0023, 0024
Agashi..................................0023, 0024
Agazi ..................................................0005
AGB....................................................0027
Aiko...........0006, 0007, 0023, 0024
.................................................0028, 0029
Aim.....................................................0029
Aiwa .....................................0057, 0087
Akai...........0007, 0008, 0016, 0019,
.......0021, 0022, 0023, 0024, 0027,
......................0028, 0029, 0031, 0094
Akiba.........0008, 0029, 0031, 0032
Akira...................................................0116
Akito..................................................0012
Akura ........0005, 0008, 0028, 0029
.................................................0031, 0032
Alaron ...............................................0023
Alba ...........0006, 0007, 0008, 0014
........0022, 0023, 0026, 0028, 0029
.................................................0031, 0061
Alcyon...............................................0030
Allorgan..............................0013, 0024
Allstar...................................0016, 0029
America Action ...........................0096
Amplivision..........0006, 0024, 0026
..............................................................0033
Amstrad ..0005, 0007, 0008, 0015
......................0027, 0028, 0029, 0031
Amtron.............................................0093
Anam ...................................0007, 0096
Anam National ............................0093
Anglo....................................0007, 0028
Anitech..................0005, 0007, 0028
.................................................0029, 0030
Ansonic....0007, 0009, 0026, 0028
.................................................0029, 0034
AOC.....................................0092, 0094
Apex..................................................0106
Arc en Ciel.....................................0020
Arcam..................................0023, 0024
Arcam Delta..................................0006
Aristona ................0016, 0022, 0029
Arthur Martin...............................0033
ASA.......................................0004, 0011
Asberg ...................0016, 0029, 0030
Astra ..................................................0007
Asuka........0005, 0006, 0008, 0023
...................................0024, 0031, 0032
Atlantic..................0006, 0016, 0022
.................................................0023, 0029
Atori.....................................0007, 0028
Auchan .............................................0033
Audio Blast.....................................0118
Audiosonic.............0006,0007,0008
.....................0016, 0020, 0022, 0024,
....................................0026,0029, 0031
AudioTon .............0006, 0024, 0026
Audiovox...........................0093, 0096
Ausind...............................................0030
Autovox................0004, 0005, 0006
.................................................0024, 0030
Awa.......................................0023, 0024
Ayomi................................................0018
B
Baird .....................................0020, 0024
Bang & Olufsen ...........................0004
Basic Line..........0007, 0008, 00016,
........0024, 0028, 0029, 0031, 0032
Bastide.................................0006, 0024
Baur.........................0021, 0022, 0029
Bazin...................................................0024
Beko........................0026, 0029, 0053
Belcor................................................0092
Bell & Howell................................0091
Beon........................0016, 0022, 0029
Best.....................................................0026
Bestar .....................0016, 0026, 0029
Binatone.............................0006, 0024
Blacktron..........................................0032
Blackway..........................................0032
Blue Sky...0008, 0029, 0031, 0032
Blue Star.............................0017, 0032
Boots......................0006, 0012, 0024
BPL...........................0017, 0029, 0032
Bradford .............................0093, 0096
Brandt..................................0020, 0040
Brinkmann.......................................0029
Brionvega...004, 0016, 0022, 0029
Britannia................0006, 0023, 0024
Brockwood.....................................0092
Broksonic.........................................0096
Bruns..................................................0004
BSR........................................0013, 0018
BTC.......................................0008, 0031
Bush...........0007, 0008, 0010, 0012
........0014, 0016, 0017, 0018, 0020
........0022, 0024, 0028, 0029, 0031
...................................0032, 0047, 0087
C
Candle.................................0092, 0094
Capsonic..........................................0005
Carena..............................................0029
Carnivale..........................................0094
Carrefour ........................................0014
Cascade.................0007, 0028, 0029
Cathay....................0016, 0022, 0029
CCE....................................................0024
Centurion ............0016, 0022, 0029
TV
Codelist
69
SRU252_V4_Transfer_RR:SRU252_V4_Transfer 26-03-10 15:35 Pagina 69
Page 70

TV
TV
TV
TV
TV
TV
Century............................................0004
CGE ........................0018, 0026, 0030
Cimline..................0007, 0028, 0031
Citizen....................0092, 0093, 0094
City........................................0007, 0028
Clarion..............................................0096
Clarivox............................................0022
Clatronic .0005, 0006, 0007, 0008
........0015, 0016, 0024, 0026, 0028
......................0029, 0030, 0031, 0034
CMS ...................................................0023
CMS Hightec.................................0024
Colortyme......................................0092
Concerto ........................................0092
Concorde..........................0007, 0028
Condor....0006, 0016, 0023, 0026
......................0028, 0029, 0032, 0034
Contec.....0006, 0007, 0014, 0015
...................................0023, 0028, 0096
Contec/Cony................................0093
Continental Edison ....................0020
Cosmel................................0007, 0028
Craig.....................................0093, 0096
Crosley..................0004, 0018, 0030
Crown......0007, 0016, 0022, 0026
........0028, 0029, 0030, 0093, 0096
CS Electronics ...0006, 0008, 0023
..............................................................0031
CTC Clatronic..............................0009
Curtis Mathes .................0092, 0094
CXC.....................................0093, 0096
Cybertron .........................0008, 0031
D
Daewoo..0006, 0007, 0016, 0023
......................0024, 0028, 0029, 0031
........0045, 0083, 0086, 0092, 0107
Dainichi .................0008, 0023, 0031
Dansai....................0005, 0016, 0022
...................................0023, 0024, 0029
Dantax.................................0022, 0026
Dawa.................................................0029
Daytron.................0007, 0028, 0092
De Graaf .........................................0010
Decca........0006, 0012, 0015, 0016
......................0022, 0024, 0027, 0029
Desmet .................0016, 0022, 0029
Diamant ...........................................0029
Diamond..........................................0023
Dixi.............0007, 0016, 0022, 0024
.................................................0028, 0029
DTS.......................................0007, 0028
Dual.........................0006, 0018, 0020
.................................................0024, 0029
Dual-Tec ...............0006, 0007, 0018
Dumont................0004, 0006, 0009
...................................0024, 0034, 0092
Durabrand ........................0095, 0096
Dux.....................................................0022
Dynatron..............0016, 0022, 0029
E
Elbe..........................0024, 0026, 0027
.................................................0029, 0031
Elbe-Sharp ......................................0027
Elcit..........................0004, 0027, 0034
Electa.................................................0017
ELECTRO TECH ........................0007
Electrograph ..................................0097
Electrohome..................................0092
Elektra ...............................................0032
Elin ...........................0006, 0016, 0022
...................................0023, 0028, 0029
Elite............0008, 0016, 0029, 0031
Elman......................0009, 0018, 0034
Elta...........................0007, 0023, 0028
Emerson..0004, 0021, 0026, 0029
........0092, 0093, 0095, 0096, 0107
Emperor...........................................0032
Envision...............................0092, 0094
Epson.................................................0132
Erres........................0016, 0022, 0029
ESC.....................................................0024
Etron..................................................0007
Eurofeel............................................0024
Euro-Feel.........................................0005
Euroline............................................0022
Euroman..0023, 0024, 0026, 0032
Euromann ...........0005, 0006, 0016,
..............................................................0029
Europhon............0006, 0009, 0012,
.......0016, 0018, 0023, 0024, 0027,
.................................................0029, 0034
Expert ...............................................0033
Exquisit .............................................0029
F
Fenner .................................0007, 0028
Ferguson ............................0022, 0046
Fidelity......0006, 0010, 0023, 0029
Filsai....................................................0024
Finlandia ...........................................0010
Finlux.........0004, 0006, 0009, 0016
......................0018, 0022, 0024, 0027
...................................0029, 0030, 0034
FIRST LINE.........0006, 0007, 0013,
..............................................................0016
Firstline ..................0023, 0024, 0028
.................................................0029, 0034
Fisher......................0004, 0006, 0014
...................................0018, 0024, 0026
Flint..........................0016, 0029, 0031
FNR....................................................0034
Formenti .0004, 0006, 0018, 0019
...................................0022, 0023, 0030
Formenti-Phoenix ......................0023
Fortress ............................................0004
Fraba ....................................0026, 0029
Friac....................................................0026
TV70
SRU252_V4_Transfer_RR:SRU252_V4_Transfer 26-03-10 15:35 Pagina 70
Page 71

TV
TV
TV
TV
TV
TV
Frontech ...............0005, 0007, 0010
...................................0011, 0024, 0028
Fujitsu...................................0024, 0034
Fujitsu General.............................0024
Funai..........0005, 0013, 0093, 0096
Futuretech.........................0093, 0096
G
Galaxi...................................0029, 0034
Galaxis ...................0026, 0029, 0034
Gateway.............................0097, 0098
GBC........................0007, 0014, 0018
.................................................0028, 0031
GE..........................................0092, 0095
Geant Casino................................0033
GEC...........0006, 0011, 0016, 0021
......................0022, 0024, 0027, 0029
Geloso......0007, 0010, 0018, 0028
General Technic .............0007, 0028
Genexxa...............0008, 0011, 0016
.................................................0029, 0031
Giant..................................................0024
Gibralter.............................0092, 0094
GoldHand.......................................0023
Goldline............................................0029
GoldStar..0006, 0007, 0010, 0016
......................0018, 0022, 0023, 0024
......................0025, 0026, 0028, 0029
...................................0092, 0094, 0095
Goodmans..........0005, 0007, 0014,
.......0016, 0022, 0024, 0025, 0027,
...................................0028, 0029, 0087
Gorenje............................................0026
GPM .....................................0008, 0031
Graetz..................................0011, 0021
Granada...0006, 0010, 0014, 0016
......................0019, 0022, 0024, 0027
...................................0029, 0030, 0033
Grandin.................0007, 0008, 0017
.................................................0022, 0032
Gronic...............................................0024
Grundig ...0026, 0029, 0030, 0042
Grunpy .........................0093, 0096
H
Halifax ......0005, 0006, 0023, 0024
Hallmark.............................0092, 0095
Hampton..............0006, 0023, 0024
Hanseatic.............0006, 0007, 0013,
.......0014, 0016, 0018, 0021, 0022,
........0024, 0026, 0028, 0029, 0032
Hantarex.0007, 0027, 0028, 0029
Hantor ..............................................0029
Harvard ..............................0093, 0096
Harwood ...........................0028, 0029
HCM.........0005, 0006, 0007, 0017
........0024, 0028, 0029, 0031, 0032
Hema...................................0024, 0028
Hifivox...............................................0020
Higashi ..............................................0023
HiLine................................................0029
Hinari ........0007, 0008, 0014, 0016
......................0022, 0028, 0029, 0031
Hisawa...................0008, 0017, 0031
.................................................0032, 0033
Hitachi......0006, 0010, 0011, 0014
........0018, 0019, 0020, 0021, 0024
......................0027, 0029, 0092, 0103
Hornyphon.....................................0016
Hornyphone..................................0029
Hoshai .................................0008, 0031
Huanyu................................0006, 0023
Hygashi..................0006, 0023, 0024
Hyper.....................0006, 0007, 0018
...................................0023, 0024, 0028
Hypson..................0005, 0006, 0016
...................................0017, 0022, 0024
...................................0029, 0032, 0033
I
Iberia..................................................0029
ICE ...........................0005, 0006, 0007
......................0008, 0016, 0023, 0024
...................................0028, 0029, 0031
ICeS ......................................0023, 0031
IMA.....................................................0093
Imperial .................0011, 0016, 0018
...................................0026, 0029, 0030
Indiana....................0016, 0022, 0029
Ingelen...............................................0011
Ingersol ...............................0007, 0028
Inno Hit ...0006, 0007, 0008, 0016
......................0022, 0024, 0025, 0027
......................0028, 0029, 0030, 0031
Innovation..........................0005, 0007
Insignia...............................................0115
Interactive .......................................0026
Interbuy...............................0007, 0028
Interfunk..0004, 0011, 0016, 0020
......................0021, 0022, 0026, 0029
International...................................0023
Intervision ...........0005, 0006, 0009,
.......0024, 0026, 0029, 0031, 0032,
..............................................................0034
Irradio ....................0007, 0008, 0016
...................................0022, 0025, 0028
...................................0029, 0030, 0031
Isukai..........0008, 0029, 0031, 0032
ITC...........................0006, 0018, 0024
ITS ..............0008, 0016, 0017, 0023
...................................0029, 0031, 0032
ITT..............0007, 0011, 0019, 0021
ITV ...........................0007, 0022, 0029
J
JC Penney........................................0092
Jensen................................................0092
JVC...........................0014, 0016, 0031
.................................................0059, 0113
TV
Codelist
71
SRU252_V4_Transfer_RR:SRU252_V4_Transfer 26-03-10 15:35 Pagina 71
Page 72

TV
TV
TV
TV
TV
TV
K
Kaisui.......................0006, 0007, 0008
......................0017, 0023, 0024, 0028
...................................0029, 0031, 0032
Kamosonic......................................0006
Kamp....................................0006, 0023
Kapsch...............................................0011
Karcher..................0006, 0007, 0022
......................0026, 0029, 0032, 0034
Kawasho.............................0023, 0092
KEC.....................................................0096
Kendo.....................0009, 0010, 0026
.................................................0029, 0034
Kennedy...........................................0018
Kenwood...........................0092, 0094
KIC......................................................0024
Kingsley ...............................0006, 0023
Kloss Novabeam.........................0093
Kneissel ...............................0026, 0029
Kolster.................................0016, 0029
Konka...................................0008, 0031
Korpel ....................0016, 0022, 0029
Korting ................................0004, 0026
Kosmos.............................................0029
Koyoda..............................................0007
KTV..........................0006, 0024, 0093
.................................................0094, 0096
Kyoto....................................0023, 0024
L
Lasat...................................................0026
Lenco...................................0007, 0028
Lenoir.....................0006, 0007, 0028
Leyco......................0005, 0013, 0016
.................................................0022, 0029
LG...............0006, 0007, 0010, 0016
......................0018, 0022, 0023, 0024
......................0025, 0026, 0028, 0029
......................0049, 0088, 0095, 0133
LG/GoldStar..................................0060
Liesenk..............................................0022
Liesenkotter...................................0029
Life.........................................0005, 0007
Lifetec.....................0005, 0007, 0028
.................................................0029, 0031
Lloyds................................................0028
Loewe....................0026, 0027, 0029
.................................................0043, 0143
Loewe Opta.......0004, 0016, 0022
Logik.....................................0015, 0091
Luma.......................0010, 0021, 0022
.................................................0028, 0029
Lumatron..............0010, 0016, 0021
...................................0022, 0024, 0029
Lux May ...........................................0016
Luxman.............................................0092
Luxor......................0006, 0010, 0021
.................................................0024, 0025
LXI.......................................................0095
M
M Electronic .......0006, 0007, 0011
...................................0016, 0020, 0022
Magnadyne..........0004, 0009, 0018
...................................0022, 0027, 0034
Magnafon..............0006, 0009, 0023
...................................0027, 0030, 0034
Magnavox.............0092, 0094, 0108
Magnum..............................0005, 0007
Majestic.............................................0091
Mandor.............................................0005
Manesth ................0005, 0006, 0016
...................................0022, 0024, 0029
Marantz.................0016, 0022, 0029
.................................................0092, 0094
Marelli................................................0004
Mark........................0016, 0022, 0023
...................................0024, 0028, 0029
Masuda .............................................0024
Matsui........0006, 0007 0010, 0012
........0013, 0014, 0015, 0016, 0022
......................0024, 0027, 0028, 0029
Maxent..............................................0097
Mediator...............0016, 0022, 0029
Medion..................0005, 0007, 0029
Megatron.........................................0095
M-Electronic......0023, 0024, 0028,
..............................................................0029
Melvox..............................................0033
Memorex............0007, 0028, 0091,
..............................................................0095
Memphis.............................0007, 0028
Mercury ..............................0028, 0029
Metz......................................0004, 0065
MGA.......................0092, 0094, 0095
Micromaxx........................0005, 0007
Microstar............................0005, 0007
Minerva...............................0027, 0030
Minoka.................................0016, 0029
Mitsubishi ............0004, 0014, 0015,
........0016, 0029, 0056, 0092, 0095
Mivar .........0006, 0023, 0024, 0025
...................................0026, 0027, 0030
Montgomery Ward...................0091
Motion..............................................0030
MTC..........0023, 0026, 0092, 0094
Multi System..................................0022
Multistandard ................................0034
Multitech.0006, 0007, 0009, 0010
......................0014, 0018, 0022, 0023
......................0024, 0026, 0028, 0029
...................................0034, 0093, 0096
Murphy..................0006, 0019, 0023
N
NAD ....................................0021, 0095
Naonis...............................................0010
NEC...........0014, 0024, 0092, 0094
TV72
SRU252_V4_Transfer_RR:SRU252_V4_Transfer 26-03-10 15:35 Pagina 72
Page 73

TV
TV
TV
TV
TV
TV
Neckermann ......0004, 0006, 0010
........0016, 0022, 0024, 0026, 0029
NEI...........................0016, 0022, 0029
Net-TV.............................................0097
Neufunk..............................0028, 0029
New Tech............0007, 0016, 0028,
..............................................................0029
New World......................0008, 0031
NewTech .........................................0024
Nicamagic..........................0006, 0023
Nikkai........0005, 0006, 0008, 0016
......................0022, 0023, 0024, 0028
.................................................0029, 0031
Nikko ...................................0094, 0095
Nobliko.................0006, 0009, 0023
.................................................0030, 0034
Nogamatic......................................0020
Nokia......................0011, 0019, 0021
Nordic...............................................0024
Nordmende.....................0004, 0011
.................................................0016, 0020
Nordvision......................................0022
Novatronic.....................................0029
O
Oceanic.................0011, 0021, 0033
Okano .................................0026, 0029
ONCEAS........................................0006
Onwa.....................0031, 0093, 0096
Opera................................................0029
Orbit.....................................0016, 0029
Orion........0007, 0013, 0015, 0016
......................0022, 0027, 0028, 0029
...................................0034, 0052, 0087
Orline ..................................0029, 0031
Orsowe............................................0027
Osaki.......................0005, 0006, 0008
...................................0024, 0029, 0031
Osio ...................................................0025
Oso.......................................0008, 0031
Osume..............................................0031
Otto Versand .....0006, 0014, 0016
......................0017, 0018, 0020, 0021
......................0022, 0024, 0027, 0029
P
Pael........................................0006, 0023
Palladium.0006, 0024, 0026, 0029
Palsonic.............................................0024
Panama..................0005, 0006, 0007
......................0023, 0024, 0028, 0029
Panasonic..............0011, 0021, 0027
......................0029, 0039, 0072, 0102
Panavision........................................0029
Pathe Cinema....0006, 0018, 0023
.................................................0026, 0033
Pathe Marconi..............................0020
Pausa....................................0007, 0028
Penney.................................0094, 0095
Perdio...................................0023, 0029
Perfekt...............................................0029
Philco......................0004, 0018, 0026
......................0029, 0030, 0092, 0094
Philharmonic....................0006, 0024
Philips........0000, 0001, 0002, 0003
........0004, 0006, 0016, 0018, 0021
........0022, 0029, 0037, 0041, 0066
......................0081, 0085, 0092, 0105
Philips Magnavox...........0105, 0108
Phoenix.................0004, 0016, 0022
...................................0023, 0026, 0029
Phonola.................0004, 0016, 0022
.................................................0023, 0029
Pilot.......................................0092, 0094
Pioneer..................0011, 0016, 0020
......................0022, 0026, 0029, 0092
Plantron...0005, 0016, 0028, 0029
Playsonic ..........................................0024
Poppy...................................0007, 0028
Portland ...........................................0092
Prandoni-Prince ............0010, 0021,
.................................................0027, 0030
Precision.............................0006, 0024
Prima ......................0007, 0011, 0028
Profex.....................0007, 0021, 0028
Profi-Tronic.........0016, 0029, 0034
Proline.................................0016, 0029
Prosonic................0006, 0022, 0023
...................................0024, 0026, 0029
Protech....0005, 0006, 0007, 0009
......................0016, 0018, 0022, 0024
Proton .................................0092, 0095
Provision.............................0022, 0029
Pulsar.................................................0092
Pye..............0016, 0022, 0029, 0054
Pymi......................................0007, 0028
Q
Quandra Vision............................0033
Quelle.......0005, 0006, 0013, 0015
.......0016, 0018, 0021, 0022, 0024,
.................................................0025, 0029
Questa..............................................0014
R
Radialva...............................0029, 0031
Radio Shack/Realistic...0092, 0093
Radiola .....0016, 0022, 0024, 0029
Radiomarelli........0004, 0027, 0029
RadioShack.........0029, 0094, 0095,
..............................................................0096
Radiotone...........0016, 0026, 0028,
..............................................................0029
Rank ...................................................0014
RCA......................................0092, 0100
Realistic..................0094, 0095, 0096
Recor.................................................0029
Rediffusion......................................0021
Redstar .............................................0029
Reflex ................................................0029
TV
Codelist
73
SRU252_V4_Transfer_RR:SRU252_V4_Transfer 26-03-10 15:35 Pagina 73
Page 74

TV
TV
TV
TV
TV
TV
Revox........0016, 0022, 0026, 0029
Rex ..........................0005, 0010, 0011
RFT........................................0004, 0026
Rhapsody.........................................0023
R-Line.....................0016, 0022, 0029
Roadstar..0005, 0007, 0008, 0028
...................................0031, 0063, 0087
Robotron.........................................0004
Rowa....................................0023, 0024
Royal Lux ........................................0026
RTF .....................................................0004
Runco................................................0094
S
Saba.........................0004, 0011, 0020
...................................0021, 0027, 0040
Saisho........0005, 0006, 0007, 0015
...................................0024, 0027, 0028
Salora .....................0010, 0011, 0018
...................................0021, 0025, 0027
Sambers ..0009, 0027, 0030, 0034
Sampo....................0092, 0094, 0097
Samsung..0005, 0006, 0007, 0015
........0016, 0022, 0023, 0024, 0025
........0026, 0028, 0029, 0090, 0092
......................0094, 0095, 0111, 0064
Sandra....................0006, 0023, 0024
Sansui........0016, 0029, 0109, 0121
Sanyo .......0006, 0014, 0015, 0018,
.......0023, 0024, 0026, 0028, 0050,
..............................................................0092
SBR........................................0022, 0029
SCHAUB LORENTZ
.................................................0011, 0021
Schneider ............0006, 0008, 0016,
0018, .......0020, 0022, 0024, 0029,
.................................................0031, 0055
Scotch ...............................................0095
Scott..........0092, 0093, 0095, 0096
Sears.....................................0092, 0095
SEG...........0005, 0006, 0009, 0014,
.......0018, 0022, 0023, 0024, 0028,
..............................................................0029
SEI.............................0027, 0029, 0034
SEI-Sinudyne.......0004, 0009, 0011
.................................................0013, 0027
Seleco.......0010, 0011, 0014, 0018
Sencora...............................0007, 0028
Sentra ..................................0028, 0031
Serino................................................0023
Sharp........0014, 0027, 0044, 0092,
..............................................................0101
Shinco................................................0122
Shogun..............................................0092
Shorai ................................................0013
Siarem ......0004, 0009, 0018, 0027
.................................................0029, 0034
Sierra....................................0016, 0029
Siesta..................................................0026
Signature..........................................0091
Silva.....................................................0023
Silver...................................................0014
Singer.......0004, 0009, 0018, 0033,
..............................................................0034
Sinudyne..0004, 0009, 0013, 0018
......................0022, 0027, 0029, 0034
Skantic...............................................0011
Solavox.............................................0011
Sonitron..............................0024, 0026
Sonoko.....0005, 0006, 0007, 0016
........0022, 0024, 0028, 0029, 0032
Sonolor...............................0011, 0033
Sontec ......0016, 0022, 0026, 0029
Sony...........0007, 0014, 0015, 0034
......................0035, 0036, 0089, 0104
Sound & Vision..............0008, 0009,
.................................................0031, 0034
Soundesign.........0092, 0093, 0095,
..............................................................0096
Soundwave..........0016, 0022, 0029
SSS...........................0092, 0093, 0096
Standard..0006, 0007, 0008, 0016
......................0024, 0028, 0029, 0031
Star Lite ..............................0028, 0029
Starlight ............................................0022
Starlite .................................0093, 0096
Stenway.................0017, 0031, 0032
Stern.....................................0010, 0011
Strato...................................0028, 0029
Stylandia...........................................0024
Sunkai.....................0007, 0013, 0031
Sunstar.................................0028, 0029
Sunwood 0007, 0016, 0028, 0029
Superla.....0006, 0023, 0024, 0027
SuperTech ............0023, 0028, 0029
Supra....................................0007, 0028
Susumu.............................................0008
Sutron..................................0007, 0028
Sydney ...................0006, 0023, 0024
Sylvania..................0092, 0094, 0114
Symphonic...........0093, 0096, 0112
Sysline................................................0022
Sytong ...............................................0023
T
Tandberg..........................................0013
Tandy.........0006, 0008, 0011, 0019
.................................................0024, 0031
Tashiko ....0006, 0010, 0014, 0023,
..............................................................0024
Tatung .......0006, 0012, 0016, 0022
........0024, 0027, 0029, 0087, 0098
TCL.....................................................0123
TCM.....................................0005, 0007
Teac.......................................0024, 0029
Tec............................0006, 0007, 0018
...................................0019, 0024, 0028
Technics ..............................0011, 0021
TV74
SRU252_V4_Transfer_RR:SRU252_V4_Transfer 26-03-10 15:35 Pagina 74
Page 75

TV
TV
TV
TV
TV
TV
Techwood .......................................0092
TEDELEX........................................0024
Teknika .....0091, 0092, 0093, 0096
Teleavia .............................................0020
Telecor...................0024, 0029, 0031
Telefunken ..........0016, 0020, 0029,
..............................................................0062
Telegazi................................0029, 0031
Telemeister .....................................0029
Telesonic ..........................................0029
Telestar .............................................0029
Teletech ...0007, 0022, 0028, 0029
Teleton ................................0006, 0024
Televideon ......................................0023
Televiso.............................................0033
Tensai ........0007, 0008, 0013, 0016
......................0024, 0028, 0029, 0031
Tesmet ..............................................0016
Tevion ..................................0005, 0007
Texet .........0006, 0023, 0024, 0028
Thomson..............0006, 0016, 0020
...................................0029, 0038, 0040
Thorn .....................0021, 0022, 0029
TMK......................................0092, 0095
Tokai........................0016, 0024, 0029
Tokyo ...................................0006, 0023
Tomashi...............................0017, 0032
Toshiba.....0014, 0024, 0034, 0058
......................0071, 0084, 0087, 0110
Towada ....0011, 0018, 0024, 0034
Trakton .............................................0024
Trans Continens ............0024, 0029
Transtec............................................0023
Trident.................................0024, 0027
Tristar.................................................0031
Triumph..............................0027, 0029
U
Uher.........0011, 0016, 0026, 0029,
..............................................................0030
Ultravox...0004, 0006, 0009, 0018
......................0019, 0023, 0029, 0034
Unic Line .........................................0029
United...............................................0022
Universum..........0005, 0016, 0018,
.......0022, 0024, 0025, 0026, 0029,
..............................................................0030
Univox...............................................0029
V
Vector Research..........................0094
Vestel........0010, 0011, 0016, 0018
...................................0022, 0024, 0029
Vexa...........0007, 0022, 0028, 0029
Victor...................................0014, 0016
VIDEOLOGIC..............................0023
Videologique......0006, 0008, 0023
.................................................0024, 0031
VideoSystem....................0016, 0029
Videotechnic....................0023, 0024
Vidtech................................0092, 0095
Viewsonic........................................0097
Visiola...................................0006, 0023
Vision......................0016, 0024, 0029
Vistar..................................................0019
Vizio ...................................................0098
Vortec....................0016, 0022, 0029
Voxson...................0004, 0010, 0011
...................................0016, 0029, 0030
W
Waltham.0006, 0019, 0024, 0029
Wards.......0091, 0092, 0094, 0095
Watson....0016, 0022, 0029, 0031
Watt Radio.........0006, 0009, 0018
.................................................0023, 0034
Wega......................0004, 0014, 0029
Wegavox.........................................0028
Weltblick..............0016, 0022, 0024,
..............................................................0029
Weston.............................................0018
White Westinghouse ..0006, 0009
......................0022, 0023, 0029, 0107
Windstar..........................................0032
X
Xrypton ...........................................0029
Y
Yamaha...............................0092, 0094
Yamishi.....0024, 0029, 0031, 0032
Yokan .................................................0029
Yoko..........0005, 0006, 0007, 0008,
.......0016, 0022, 0023, 0024, 0026,
...................................0028, 0029, 0031
Yorx.......................................0008, 0031
Z
Zanussi................................0010, 0024
Zenith.......0091, 0092, 0095, 0099
TV
Codelist
75
SRU252_V4_Transfer_RR:SRU252_V4_Transfer 26-03-10 15:35 Pagina 75
Page 76

TV
VCR
TV
VCR
TV
VCR
SETUP CODES FOR FLAT
TV
A
Amoi..................................................0117
B
Bush....................................................0075
C
Chimei ..............................................0119
D
Daewoo...........................................0076
Dell .....................................................0142
Denver..............................................0074
G
Goodmans......................................0077
H
Hitachi...............................................0070
J
JVC ........................................0079, 0130
L
LG ............................0068, 0082, 0140
M
Magnavox........................................0141
Matsui................................................0080
N
Nachus..............................................0120
Norcent ...........................................0138
O
Olevia................................................0129
P
Palladine...........................................0124
Panasonic...........................0072, 0128
Philips...................................0066, 0137
Polaroid............................................0136
R
RCA ...................................................0051
S
Samsung .............................0067, 0127
Sharp....................................0073, 0125
Sony......................................0069, 0126
Syntax................................................0129
T
Toshiba..............................................0135
V
Viewsonic ..........................0078, 0131
W
Westinghouse...............................0139
Z
Zenith................................................0134
SETUP CODES FOR VCR
A
ABS.....................................................5050
Adelsound ......................................5011
Adyson .............................................5015
Aiwa ..........5001, 5002, 5003, 5010
......................5013, 5014, 5029, 5049
Akai .........................5002, 5012, 5014
Akiba ....................................5009, 5015
Akura ........5002, 5009, 5014, 5015
Alba ...........5003, 5004, 5005, 5009
......................5010, 5012, 5015, 5016
Alienware........................................5050
Ambassador.....................5005, 5012
Amstrad ..5001, 5010, 5015, 5016
Anitech................................5009, 5015
Ansonic ............................................5011
ASA.........................5006, 5007, 5013
Asuka ........5001, 5006, 5007, 5009
...................................5010, 5013, 5015
Audiosonic .....................................5016
AudioTon ........................................5012
B
Baird........................5001, 5002, 5004
...................................5010, 5014, 5016
Basic Line ............5003, 5004, 5005,
......................5009, 5012, 5015, 5016
Baur ....................................................5007
Bestar........5004, 5005, 5012, 5016
Black Panther Line........5004, 5016
Blaupunkt...........................5007, 5008
Blue Sky............................................5013
Bondstec...............5005, 5012, 5015
Brandt..................................5014, 5030
Broksonic.........................................5059
Bush...........5003, 5004, 5009, 5010
......................5015, 5016, 5039, 5044
C
Casio..................................................5010
Cathay...............................................5016
Catron.................................5005, 5012
CGE...........5001, 5002, 5010, 5014
Cimline ..................5003, 5009, 5015
Clatronic...............5005, 5012, 5015
Condor....5004, 5005, 5012, 5016
Crown....................5004, 5005, 5009
...................................5012, 5015, 5016
Cyperpower..................................5050
D
Daewoo..5004, 5005, 5012, 5016
......................5027, 5033, 5036, 5043
Dansai ....................5009, 5015, 5016
Dantax..............................................5003
Daytron ..............................5004, 5016
De Graaf .........................................5007
Decca.......5001, 5002, 5007, 5010,
..............................................................5014
VCR76
SRU252_V4_Transfer_RR:SRU252_V4_Transfer 26-03-10 15:40 Pagina 76
Page 77

VCR
VCR
VCR
VCR
VCR
VCR
VCR
Codelist
77
Dell.....................................................5050
Denko...............................................5015
Diamant ...........................................5013
Dual..........5002, 5007, 5010, 5014,
..............................................................5016
Dumont.............5001, 5007, 5010
E
Elbe.....................................................5016
Elcatech............................................5015
Elsay....................................................5015
Elta...........................5009, 5015, 5016
Emerson...........................................5015
ESC..........................5004, 5012, 5016
Etzuko..................................5009, 5015
Europhon ........................................5012
F
Ferguson...............5002, 5010, 5014
Fidelity....................5001, 5010, 5015
Finlandia..............................5007, 5010
Finlux.........5001, 5002, 5007, 5010
FIRST LINE..........5003, 5006, 5009
Firstline................................5013, 5015
Fisher .................................................5012
Flint.....................................................5003
Formenti/Phoenix.......................5007
Frontech.............................5005, 5012
Fujitsu...................................5001, 5010
Funai........................5001, 5010, 5055
G
Galaxy..................................5001, 5010
Gateway...........................................5050
GBC........................5005, 5009, 5012
GEC....................................................5007
Geloso ..............................................5009
General...............................5005, 5012
General Technic .............5003, 5008
GoldHand..........................5009, 5015
GoldStar..5001, 5006, 5010, 5013
Goodmans..........5001, 5004, 5005,
.......5006, 5009, 5010, 5012, 5013,
...................................5015, 5016, 5048
Graetz..................................5002, 5014
Granada................5007, 5010, 5013
Grandin....5001, 5004, 5005, 5006
.......5009, 5010, 5012, 5013, 5015,
..............................................................5016
Grundig...............................5007, 5009
H
Hanseatic.............5006, 5007, 5013,
..............................................................5016
Hantor ..............................................5012
Harwood.........................................5015
HCM ....................................5009, 5015
Hewlett Packard .........................5050
Hinari......................5003, 5009, 5011
...................................5014, 5015, 5016
Hisawa ..............................................5003
Hitachi......5001, 5002, 5007, 5010
........5011, 5014, 5023, 5040, 5060
Howard Computers.................5050
HP .......................................................5050
Hush...................................................5050
Hypson ....5003, 5009, 5015, 5016
I
iBUYPOWER.........................5050
Impego................................5005, 5012
Imperial...............................5001, 5010
Ingersol.............................................5011
Inno Hit ...5004, 5005, 5007, 5009
...................................5012, 5015, 5016
Innovation..........................5003, 5008
Insignia...............................................5056
Interbuy.................5006, 5013, 5015
Interfunk...........................................5007
Intervision ...........5001, 5010, 5013,
..............................................................5016
Irradio.......5006, 5009, 5013, 5015
ITT.........................................5002, 5014
ITV...5004, 5006, 5012, 5013, 016
J
JVC...........................5002, 5014, 5022
K
Kaisui ....................................5009, 5015
Karcher.............................................5007
Kendo......5003, 5004, 5005, 5013,
..............................................................5015
Kenwood...........................5002, 5014
Korpel..................................5009, 5015
Kyoto.................................................5015
L
Lenco.................................................5004
Leyco....................................5009, 5015
LG...............5001, 5006, 5010, 5013
......................5025, 5037, 5045, 5056
Lifetec..................................5003, 5008
Linksys...............................................5050
Loewe...............................................5008
Loewe Opta......5006, 5007, 5011,
..............................................................5013
Logik........................5009, 5011, 5015
Lumatron...........................5004, 5016
Luxor.................................................5015
M
M Electronic ..................................5001
Magnavox........................................5054
Manesth..............................5009, 5015
Marantz ............................................5007
Mark...................................................5016
Matsui......5003, 5006, 5010, 5011,
..............................................................5013
Media Center PC .......................5050
Mediator..........................................5007
Medion................................5003, 5008
M-Electronic.....................5010, 5013
SRU252_V4_Transfer_RR:SRU252_V4_Transfer 26-03-10 15:35 Pagina 77
Page 78

VCR
VCR
VCR
VCR
VCR
VCR
Memorex............5001, 5006, 5010,
..............................................................5013
Memphis.............................5009, 5015
Metz...................................................5008
Micromaxx........................5003, 5008
Microsoft .........................................5050
Microstar............................5003, 5008
Migros..................................5001, 5010
Mind...................................................5050
Mitsubishi...........................5001, 5007
Multitech.5001, 5005, 5007, 5009
...................................5010, 5012, 5015
Murphy................................5001, 5010
N
National ...........................................5008
NEC......................................5002, 5014
Neckermann ......5002, 5007, 5014
NEI......................................................5007
Nesco.....................5009, 5010, 5015
Nikkai........5005, 5012, 5015, 5016
Niveus Media................................5050
Nokia......................5002, 5014, 5016
Nordmende.....................5002, 5014
Northgate.......................................5050
O
Oceanic...5001, 5002, 5010, 5014
Okano....................5003, 5015, 5016
Orion.......5003, 5011, 5031, 5041,
..............................................................5048
Orson ..................................5001, 5010
Osaki.......................5001, 5006, 5009
...................................5010, 5013, 5015
Otto Versand ................................5007
P
Palladium.5002, 5006, 5009, 5011
...................................5013, 5014, 5015
Panasonic..............5008, 5019, 5052
Pathe Cinema...............................5011
Pathe Marconi.................5002, 5014
Perdio...................................5001, 5010
Philco.................................................5015
Philips .....................5000, 5007, 5021
...................................5032, 5042, 5054
Philips Magnavox.........................5054
Phonola............................................5007
Pioneer................................5007, 5061
Portland...5004, 5005, 5012, 5016
Prinz......................................5001, 5010
Profex................................................5009
Proline.................................5001, 5010
Prosonic................5003, 5010, 5016
Pye.........................................5007, 5021
Q
Quelle..................................5001, 5007
R
Radialva...............................5013, 5015
Radiola..............................................5007
RCA ...................................................5051
Rex........................................5002, 5014
RFT.............5005, 5007, 5012, 5015
Ricavision.........................................5050
Roadstar..5004, 5006, 5009, 5013
...................................5015, 5016, 5048
Royal..................................................5015
S
Saba ......................................5002, 5014
Saisho.....................5003, 5009, 5011
Samsung................5017, 5035, 5047
Samurai..................5005, 5014, 5015
Sansui.................................................5002
Sanwa................................................5011
Sanyo.................................................5028
Saville.................................................5016
SBR .....................................................5007
Schaub Lorenz................5001, 5002
.................................................5010, 5014
Schneider ............5001, 5003, 5004,
........5005, 5006, 5007, 5009, 5010
...................................5013, 5015, 5016
SEG..........................5009, 5015, 5016
SEI-Sinudyne ....................5007, 5011
Seleco.......5002, 5012, 5013, 5014
Sentra.....................5005, 5012, 5015
Sentron...............................5009, 5015
Sharp....................................5018, 5057
Shintom ..............................5009, 5015
Shivaki..................................5006, 5013
Shorai ................................................5011
Siemens ..............................5006, 5013
Silva.......................................5006, 5013
Silver...................................................5016
Sinudyne.............................5007, 5011
Solavox.............................................5005
Solovox.............................................5012
Sonneclair........................................5015
Sonoko................................5004, 5016
Sontec .................................5006, 5013
Sony..........5020, 5034, 5046, 5050,
..............................................................5053
Soundwave.....................................5013
Stack...................................................5050
Standard.............................5004, 5016
Starlite...............................................5013
Stern ..................................................5016
Sunkai................................................5003
Sunstar.................................5001, 5010
Suntronic............................5001, 5010
Sunwood............................5009, 5015
Supra..................................................5013
Symphonic...........5010, 5015, 5055
Systemax .........................................5050
T
Tagar Systems...............................5050
Taisho ...................................5003, 5011
Tandberg..........................................5016
Tashiko ...................5001, 5010, 5013
VCR78
SRU252_V4_Transfer_RR:SRU252_V4_Transfer 26-03-10 15:35 Pagina 78
Page 79

VCR
VCR
VCR
DVD
VCR
DVD
DVD
Codelist
79
Tatung.....................5001, 5002, 5007
...................................5010, 5014, 5048
TCM.....................................5003, 5008
Teac .........................5010, 5014, 5016
Tec ..............5005, 5012, 5015, 5016
Technics............................................5008
Teleavia................................5002, 5014
Telefunken .........................5002, 5014
Teletech ..............................5015, 5016
Tenosal ................................5009, 5015
Tensai ........5001, 5006, 5009, 5010
...................................5011, 5013, 5015
Tevion ..................................5003, 5008
Thomson..............5002, 5014, 5024
Thorn .....................5002, 5013, 5014
Tokai .........5006, 5009, 5013, 5014,
..............................................................5015
Tonsai.................................................5009
Toshiba.....5002, 5007, 5014, 5026
......................5038, 5044, 5050, 5058
Touch.................................................5050
Towada................................5009, 5015
Towika .................................5009, 5015
TVA.......................................5005, 5012
U
Uher .....................................5006, 5013
Ultravox...........................................5016
United Quick Star ........5004, 5016
Universum...........5001, 5006, 5007
.................................................5010, 5013
V
Videon.................................5003, 5008
Viewsonic........................................5050
Voodoo............................................5050
W
Weltblick..........................................5006
Wetblick...........................................5013
White Westinghouse................5055
Y
Yamishi................................5009, 5015
Yokan....................................5009, 5015
Yoko ........................5005, 5006, 5009
...................................5012, 5013, 5015
Z
Zenith................................................5056
ZT Group.......................................5050
SETUP CODES FOR TV
VCR
A
Aiwa .....................................0087, 5049
B
Bush......................................0087, 5044
D
Daewoo.............................0086, 5043
G
Goodmans........................0087, 5048
L
LG..........................................0088, 5045
O
Orion...................................0087, 5048
P
Philips...................................0085, 5042
R
Roadstar.............................0087, 5048
S
Samsung .............................0090, 5047
Sony......................................0089, 5046
T
Tatung ..................................0087, 5048
Toshiba ................................0087, 5044
SETUP CODES FOR DVD
A
Aiko....................................................1097
Aiwa...................................................1055
Akai.......................................1005, 1093
Akira...................................................1060
Akura.................................................1017
Alba....................................................1045
Alco....................................................1081
Apex..................................................1087
Apex Digital...................................1085
Audiovox.........................................1081
B
Best Buy...........................................1016
Blaupunkt ........................................1085
Brandt ....................1011, 1038, 1050
Bush...........1015, 1024, 1045, 1071
C
California Audio Labs...............1078
Cambridge Audio.......................1013
CAT....................................................1020
Celestial............................................1026
Centrex............................................1018
Centrum..........................................1020
CGV...................................................1013
CineVision.......................................1023
Classic................................................1007
Clatronic..........................................1015
Coby..................................................1082
C-Tech ..............................................1104
CyberHome.......1031, 1046, 1086
D
Daewoo................1047, 1069, 1075
Dalton...............................................1027
Dansai ...............................................1103
Daytek...............................................1033
DEC ...................................................1015
Denon....................1064, 1078, 1091
Denver................................1015, 1017
SRU252_V4_Transfer_RR:SRU252_V4_Transfer 26-03-10 15:35 Pagina 79
Page 80

DVD
DVD
DVD
DVD
DVD
DVD
Denzel...............................................1012
Desay...................................1021, 1095
Diamond............................1013, 1104
Digitor...............................................1025
DK Digital .......................................1051
Dmtech............................................1002
Dual....................................................1012
DVX...................................................1104
E
Easy Home.....................................1016
Eclipse ...............................................1013
Elta ......................................................1052
Enzer ....................................1012, 1053
F
Finlux .................................................1013
G
GE..........................................1083, 1085
Gericom...........................................1057
Global Solutions..........................1104
Global Sphere ..............................1104
GoldStar...........................................1041
Goodmans..........1015, 1018, 1024,
..............................................................1059
Gradiente........................................1078
Graetz...............................................1012
Greenhill..........................................1085
Grundig.................1018, 1054, 1084
H
H&B......................................1015, 1022
Haaz......................................1013, 1104
Harman/Kardon...........................1099
HiMAX.............................................1016
Hitachi......1012, 1016, 1042, 1072
Humax..............................................1061
I
ICHIBAN.........................................1101
Initial...................................................1085
Innovation.......................................1006
Integra...............................................1079
J
Jamo...................................................1019
JBL .......................................................1098
JVC ........................................1011, 1043
K
Kawasaki...........................................1081
Kenwood...........................1078, 1102
Kingavon...........................................1015
Kiss.........................................1012, 1022
KLH.......................................1081, 1085
Koda...................................................1015
Koss....................................................1080
KXD...................................................1016
L
Lawson .............................................1104
Lecson...............................................1103
Lenco.................................................1015
LG ............................1037, 1041, 1074
Life.......................................................1006
Lifetec................................................1006
Limit ...................................................1104
Loewe...............................................1058
LogicLab...........................................1104
Luxor.................................................1018
M
Magnavox.............1011, 1015, 1084
Marantz.................1063, 1084, 1092
Matsui................................................1050
Medion................................1006, 1024
Metz...................................................1004
MiCO ................................................1013
Micromaxx .....................................1006
Micromedia....................................1011
Microsoft .........................................1083
Microstar .........................................1006
Mintek...............................................1085
Mirror................................................1024
Mitsubishi.........................................1003
Mizuda.................................1015, 1016
Monyka.............................................1012
Mustek.................................1007, 1029
Mx Onda.........................................1013
N
NAD..................................................1009
Naiko.................................................1018
Nakamichi.......................................1010
Nesa...................................................1085
Neufunk...........................................1012
Norcent ...........................................1082
O
Onkyo..................................1011, 1079
Optim................................................1103
Orava.................................................1015
Orion...................................1071, 1077
Oritron................................1006, 1080
P
P&B.....................................................1015
Pacific.................................................1104
Panasonic..............1039, 1078, 1089
Philips........1000, 1001, 1011, 1028
......................1063, 1066, 1073, 1084
Pioneer................................1004, 1034
Polk Audio......................................1084
Proline...............................................1018
Proscan.............................................1083
Provision..........................................1015
Q
Qwestar...........................................1080
R
Raite...................................................1012
RCA ..........1081, 1083, 1085, 1090
RedStar.............................................1017
Reoc...................................................1104
Revoy.................................................1022
Roadstar.............................1015, 1062
Rowa..................................................1018
Rownsonic......................................1020
80 DVD
SRU252_V4_Transfer_RR:SRU252_V4_Transfer 26-03-10 15:35 Pagina 80
Page 81

DVD
DVD
DVD
DVD
DVD
DVD
S
Saba ......................................1038, 1050
Sabaki ................................................1104
Sampo...............................................1008
Samsung..1036, 1042, 1068, 1078
Sansui...................................1013, 1104
Sanyo.................................................1048
ScanMagic .......................................1029
Schneider...........................1002, 1006
Scientific Labs................................1104
Scott.....................................1027, 1044
SEG..........................1012, 1040, 1104
Sharp....................................1009, 1049
Shinco................................................1014
Sigmatek...........................................1016
Silva.....................................................1017
Singer...................................1013, 1104
Skymaster.............1007, 1100, 1104
Skyworth .........................................1017
SM Electronic................................1104
Sony...........1032, 1035, 1067, 1088
Soundmaster.................................1104
Soundmax.......................................1104
Standard...........................................1104
Star Cluster....................................1104
Starmedia........................................1015
Sungale .............................................1094
Supervision.....................................1104
Synn....................................................1104
T
TCM...................................................1006
Teac............1004, 1065, 1081, 1104
Tec.......................................................1017
Technics ..............................1039, 1078
Telefunken.......................................1020
Tevion.....................1006, 1027, 1104
Thomson ...........................1038, 1076
Tokai .....................................1012, 1017
Toshiba.....1011, 1030, 1070, 1077
Trutech .............................................1096
TruVision .........................................1016
V
Venturer...........................................1081
W
Wharfedale.......................1013, 1104
X
Xbox..................................................1083
Xlogic ................................................1104
Y
Yakumo.............................................1018
Yamada.............................................1018
Yamaha..................1056, 1078, 1084
Yamakawa.......................................1012
Yukai...................................................1029
Z
Zenith................................................1011
SETUP CODES FOR
DVD-R
A
Apex..................................................2015
B
Broksonic.........................................2026
D
Daewoo...........................................2013
G
Gateway...........................................2014
Go Video.........................................2014
H
Hitachi...............................................2027
I
Insignia...............................................2025
J
JVC.............2006, 2031, 2032, 2033
L
LG..........................................2007, 2022
Liteon ................................................2019
Lite-On.............................................2014
P
Panasonic..............2005, 2016, 2010
Philips........2000, 2001, 2004, 2017
Pioneer.............................................2028
S
Samsung .............................2003, 2011
Sansui.................................................2029
Sensory Science..........................2014
Sharp..................................................2023
Sony...........2002, 2018, 2034, 2035
Sylvania.............................................2020
T
Toshiba ................................2024, 2012
Y
Yamaha.............................................2021
Yukai...................................................2008
Z
Zenith................................................2030
SETUP CODES FOR
COMBO TV DVD
D
Daewoo.............................0083, 1075
L
LG..........................................0082, 1074
P
Philips...................................0081, 1073
T
Thomson ...........................0040, 1076
Toshiba ................................0084, 1077
81
Codelist
DVD
SRU252_V4_Transfer_RR:SRU252_V4_Transfer 26-03-10 15:35 Pagina 81
Page 82

Equipment list
TV
Brand
Model number
Code
VCR
Brand
Model number
Code
DVD
Brand
Model number
Code
3 Helpline
Country Phone number Tariff
Australia 1 800 812 261 pstn
Östereich 0810000206 € 0.07
België / Belgique 078250851 € 0.06
Česká republika 800 142100 free
Danmark 3525 8758 pstn
Suomi 09 2294 8258 pstn
France 0821 611658 € 0.09
Deutschland 0900 1101212 € 0.10
∂ÏÏ¿‰· 0 0800 3122 1219 free
Magyarország 0680018544 pstn
Ireland 01 601 1158 pstn
Italia 840320041 € 0.08
Lëtzebuerg 40 6661 5645 pstn
Nederland 0900 0400 063 € 0.10
Norge 2270 8258 pstn
Polska 0223491505 pstn
Portugal 2 1359 1441 pstn
Slovensko 0800004551 free
España 902 889 343 € 0.10
Sverige 08 750 5196 pstn
Schweiz / Suisse / Svizzera 044 212 0045 pstn
United Kingdom 0207 949 0069 pstn
United States of America /
Canada 1 800 233 8413 free
82
SRU252_V4_Transfer_RR:SRU252_V4_Transfer 26-03-10 15:41 Pagina 82
Page 83

83
EN
I
nformation to the Consumer
Disposal of your old product
Your product is designed and manufactured with high quality
materials and components, which can be recycled and reused.
When this crossed-out wheeled bin symbol
is attached to a product it means the product is
covered by the European Directive 2002/96/EC.
Please inform yourself about the local separate
collection system for electrical and electronic products.
Please act according to your local rules and do not dispose of your
old products with your normal household waste. The correct
disposal of your old product will help prevent potential negative
consequences for the environment and human health.
Battery information
Your product operates on batteries covered by the European
Directive 2006/66/EC, which cannot be disposed with normal
household waste. Please inform yourself about the local rules on
separate collection of batteries because the correct disposal will help
prevent negative consequences for the environmental and human
health.
DE Kundeninformationen
Entsorgung Ihres alten Geräts
Ihr Gerät wurde unter Verwendung hochwertiger Materialien und
Komponenten entwickelt und hergestellt, die recycelt und wieder
verwendet werden können.
Befindet sich dieses Symbol (durchgestrichene
Abfalltonne auf Rädern) auf dem Gerät, bedeutet dies,
dass für dieses Gerät die Europäischen Richtlinie
2002/96/EG gilt.
Informieren Sie sich über die geltenden Bestimmungen
zur getrennten Sammlung von Elektro- und Elektronik-Altgeräten in
Ihrem Land.
Richten Sie sich bitte nach den geltenden Bestimmungen in Ihrem
Land, und entsorgen Sie Altgeräte nicht über Ihren Haushaltsabfall.
Durch die korrekte Entsorgung Ihrer Altgeräte werden Umwelt und
Menschen vor möglichen negativen Folgen geschützt.
Informationen zu Batterien
Für Ihr Produkt werden Batterien verwendet, für die die Europäische
Richtlinie 2006/66/EG gilt und die nicht mit dem normalen Hausmüll
entsorgt werden können. Informieren Sie sich über die geltenden
Bestimmungen Ihres Landes zur separaten Sammlung von Batterien.
Die korrekte Entsorgung hilft negative Auswirkungen auf Umwelt und
Gesundheit zu vermeiden.
FR Informations pour le consommateur
Mise au rebut des produits en fin de vie
Ce produit a été conçu et fabriqué avec des matériaux et composants
recyclables de haute qualité.
Le symbole d'une poubelle barrée apposé
sur un produit signifie que ce dernier répond aux
exigences de la directive européenne 2002/96/EC.
SRU252_V4_Transfer_RR:SRU252_V4_Transfer 26-03-10 15:35 Pagina 83
Page 84

Informez-vous auprès des instances locales sur le système de collecte
des produits électriques et électroniques en fin de vie.
Conformez-vous à la législation en vigueur et ne jetez pas vos
produits avec les déchets ménagers. Seule une mise au rebut
adéquate des produits peut empêcher la contamination de
l'environnement et ses effets nocifs sur la santé.
Informations sur les piles
Votre produit fonctionne avec des piles conformes à la directive
européenne 2006/66/EC qui ne doivent pas être mises au rebut avec
les déchets ménagers.
Informez-vous auprès des instances locales sur le système de collecte
des piles car la mise au rebut citoyenne permet de protéger
l'environnement et la santé.
IT Informazioni per il consumatore
Smaltimento di vecchi prodotti
Il prodotto è stato progettato e assemblato con materiali e
componenti di alta qualità che possono essere riciclati e riutilizzati.
Se su un prodotto si trova il simbolo di un bidone
con ruote, ricoperto da una X, vuol dire che il prodotto
soddisfa i requisiti della Direttiva comunitaria 2002/96/CE.
Informarsi sulle modalità di raccolta, dei prodotti elettrici
ed elettronici, in vigore nella zona in cui si desidera
disfarsi del prodotto.
Attenersi alle normative locali per lo smaltimento dei rifiuti e non
gettare i vecchi prodotti nei normali rifiuti domestici. Uno smaltimento
adeguato dei prodotti aiuta a prevenire l'inquinamento ambientale e
possibili danni alla salute.
Informazioni sulla batteria
Il prodotto funziona con batterie che rientrano nella direttiva europea
2006/66/EC e che non possono essere smaltite con i normali rifiuti
domestici. Informarsi circa le normative locali sullo smaltimento
separato delle batterie che contribuisce a ridurre gli effetti negativi
sull'ambiente
e sulla salute.
ES Información al consumidor
Desecho del producto antiguo
El producto se ha diseñado y fabricado con materiales y componentes
de alta calidad, que se pueden reciclar y volver a utilizar.
Cuando este símbolo de contenedor de ruedas
tachado se muestra en un producto indica que éste
cumple la directiva europea 2002/96/EC.
Obtenga información sobre la recogida selectiva local de
productos eléctricos y electrónicos.
Cumpla con la normativa local y no deseche los productos antiguos
con los desechos domésticos. El desecho correcto del producto
antiguo ayudará a evitar consecuencias negativas para el
medioambiente y la salud humana.
Información sobre la batería
El producto funciona con pilas contempladas por la directiva europea
2006/66/EC, que no se deben tirar con la basura normal del hogar.
Infórmese de la legislación local sobre la recogida selectiva de pilas, ya
que esto ayuda a evitar consecuencias negativas para el medio
ambiente y la salud humana.
84
SRU252_V4_Transfer_RR:SRU252_V4_Transfer 26-03-10 15:35 Pagina 84
Page 85

P
L Informacje dla użytkownika
Usuwanie zużytych produktów
Niniejszy produkt został zaprojektowany i wykonany w oparciu o
wysokiej jakości materiały i podzespoły, które poddane recyklingowi
mogą być ponownie użyte.
Jeśli na produkcie znajduje się symbol przekreślonego
przekreślonego pojemnika na śmieci na kółkach, podlega
on postanowieniom dyrektywy 2002/96/WE.
Należy zapoznać się lokalnymi zasadami zbiórki i
segregacji sprzętu elektrycznego i elektronicznego.
Należy przestrzegać lokalnych przepisów i nie wyrzucać zużytych
produktów elektronicznych wraz z normalnymi odpadami
gospodarstwa domowego.
Prawidłowe składowanie zużytych produktów pomaga ograniczyć ich
szkodliwy wpływ na środowisko naturalne i zdrowie ludzi.
Informacje na temat baterii
Produkt jest zasilany bateriami objętymi dyrektywą Unii Europejskiej
2006/66/WE, których nie wolno wyrzucać wraz ze zwykłymi
odpadami komunalnymi.
Zalecamy zapoznanie się z lokalnymi przepisami dotyczącymi
selektywnej zbiórki baterii, ponieważ ich odpowiednia utylizacja
przyczynia się do zapobiegania negatywnym skutkom dla środowiska i
zdrowia ludzkiego.
NL Informatie voor de consument
Verwijdering van uw oude product
Uw product is vervaardigd van kwalitatief hoogwaardige materialen
en onderdelen, welke gerecycled en opnieuw gebruikt kunnen
worden.
Als u op uw product een doorstreepte
afvalcontainer op wieltjes ziet, betekent dit dat het
product valt onder de EU-richtlijn 2002/96/EC.
Win inlichtingen in over de manier waarop elektrische
en elektronische producten in uw regio gescheiden
worden ingezameld.
Neem bij de verwijdering van oude producten de lokale wetgeving in
acht en plaats deze producten niet bij het gewone huishoudelijke
afval. Als u oude producten correct verwijdert voorkomt u negatieve
gevolgen voor het milieu en de volksgezondheid.
Informatie over de batterij
Uw apparaat gebruikt batterijen die onder de Europese richtlijn
2006/66/EC vallen.
Deze batterijen kunnen niet met het normale huisvuil worden
afgevoerd. Informeer naar de plaatselijke regelgeving over het apart
inzamelen van batterijen. Door juiste inzameling worden negatieve
effecten op het milieu en de menselijke gezondheid voorkomen.
85
SRU252_V4_Transfer_RR:SRU252_V4_Transfer 26-03-10 15:35 Pagina 85
Page 86

86
G
R a aa
∞fiÚÚÈwËaÏÈÔ ÚÔ˚fiÓÙÔ˜
a ¯ ¯da a aaa wË‹
Ëa a a‹aa a aa
a a aa¯ËË.
a a Ë dË
daa d d, a
aa a Ë OdËa 2002/96/.
aaa a Ë ¯
Ëa ¯‹ ‹ Ë a
Ë .
aaa a a Ë ‹ a a a Ë
a a a a a a a a a
aaa. ‹ d awË a a
a Ë a‹ aË
a Ë aË a
.
∆Ф ЪФ˚fiУ Ы·˜ ПВИЩФ˘ЪБВ› МВ М·Щ·Ъ›В˜ Ф˘ О·П‡ЩФУЩ·И ·fi ЩЛУ
∂˘Ъˆ·˚О‹ √‰ЛБ›· 2006/66/∂∫, О·И ‰ВУ МФЪВ› У· ·ФЪЪ›ЩВЩ·И МВ
Щ· Ы˘У‹ıЛ ФИОИ·О¿ ·ФЪЪ›ММ·Щ·.
¶ПЛЪФКФЪ›В˜ М·Щ·ЪИТУ
∂УЛМВЪˆıВ›ЩВ Ы¯ВЩИО¿ МВ ЩЛУ ИЫ¯‡Ф˘Ы· ЩФИО‹ УФМФıВЫ›· БИ· ЩЛ
¯ˆЪИЫЩ‹ Ы˘ППФБ‹ ЩˆУ М·Щ·ЪИТУ ВВИ‰‹ Л ЫˆЫЩ‹ М¤ıФ‰Ф˜ ·fiЪЪИ’Л˜
ЩˆУ ·ПИТУ Ы·˜ ЪФ˚fiУЩˆУ ı· Ы˘М‚¿ПВИ ЫЩЛУ ·ФК˘Б‹ ·ЪУЛЩИОТУ
ВИЩТЫВˆУ ЫЩФ ВЪИ‚¿ППФУ О·И ЩЛУ ·УıЪТИУЛ ˘БВ›·.
SV Information till konsumenten
Kassering av din gamla produkt
Produkten är utvecklad och tillverkad av högkvalitativa material och
komponenter som kan både återvinnas och återanvändas.
När den här symbolen med en överkryssad
papperskorg visas på produkten innebär det att
produkten omfattas av det europeiska direktivet
2002/96/EG.
Ta reda på var du kan hitta närmaste återvinningsstation
för elektriska och elektroniska produkter.
Följ de lokala reglerna och släng inte dina gamla produkter i det
vanliga ushållsavfallet. Genom att kassera dina gamla produkter på
rätt sätt kan du bidra till att minska eventuella negativa effekter på
miljö och hälsa.
Batteriinformation
Din produkt drivs av batterier som omfattas av European Directive
2006/66/EG och inte kan kasseras som vanligt hushållsavfall. Ta reda
på vilka lokala regler som gäller angående separat insamling av
batterier, eftersom korrekt kassering bidrar till att förhindra negativa
konsekvenser för miljön och för människors hälsa.
SRU252_V4_Transfer_RR:SRU252_V4_Transfer 26-03-10 15:35 Pagina 86
Page 87

87
P
T Informações ao consumidor
Eliminação do seu antigo produto
O seu produto foi desenhado e fabricado com matérias-primas e
componentes de alta qualidade, que podem ser reciclados e
reutilizados.
Quando este símbolo, com um latão traçado, está
afixado a um produto significa que o produto é
abrangido pela Directiva Europeia 2002/96/EC.
Informe-se acerca do sistema de recolha selectiva local
para produtos eléctricos e electrónicos.
Aja de acordo com os regulamentos locais e não descarte os seus
antigos produtos com o lixo doméstico comum. A correcta eliminação
do seu antigo produto ajuda a evitar potenciais consequências
negativas para o meio ambiente e para a saúde pública.
Informação relativa à bateria
O seu produto funciona com pilha abrangidas pela Directiva Europeia
2006/66/EC, que não podem ser eliminadas com com os resíduos
domésticos comuns. Informe-se acerca dos regulamentos locais sobre
a recolha separada de pilhas uma vez que a eliminação correcta ajuda
a evitar consequências negativas no meio ambiente e na saúde
humana.
DK Information til kunden
Bortskaffelse af dit gamle produkt
Dit produkt er konstrueret med og produceret af materialer og
komponenter af høj kvalitet, som kan genbruges.
Når dette markerede affaldsbøttesymbol er placeret
på et produkt betyder det, at produktet er omfattet af
det europæiske direktiv 2002/96/EC.
Hold dig orienteret om systemet for særskilt indsamling
af elektriske og elektroniske produkter i dit lokalområde.
Overhold gældende regler, og bortskaf ikke dine gamle produkter
sammen med dit almindelige husholdningsaffald. Korrekt bortskaffelse
af dine gamle produkter er med til at skåne miljøet og vores.
Batterioplysninger
Dit produkt kører på batterier, som falder ind under EU-direktiv
2006/66/EC, og ikke må bor tskaffes sammen med almindeligt
husholdningsaffald.
Undersøg venligst de lokale indsamlingsregler for batterier. Ved
korrekt bortskaffelse af batterierne undgås negative konsekvenser for
miljø og mennesker.
SRU252_V4_Transfer_RR:SRU252_V4_Transfer 26-03-10 15:35 Pagina 87
Page 88

F
I
Tiedote kuluttajille
Vanhan tuotteen hävittäminen
Tuotteesi on suunniteltu ja valmistettu laadukkaista materiaaleista ja
komponenteista, jotka voidaan kierrättää ja käyttää uudelleen.
Tuotteeseen kiinnitetty yliviivatun roskakorin kuva
tarkoittaa, että tuote kuuluu Euroopan parlamentin ja
neuvoston direktiivin 2002/96/EC soveltamisalaan.
Ota selvää sähkölaitteille ja elektronisille laitteille
tarkoitetusta kierrätysjärjestelmästä alueellasi.
Noudata paikallisia sääntöjä äläkä hävitä vanhoja tuotteita tavallisen
talousjätteen mukana. Vanhojen tuotteiden hävittäminen oikealla
tavalla auttaa vähentämään ympäristölle ja ihmisille mahdollisesti
koituvia haittavaikutuksia.
Akun tiedot
Laite toimii paristoilla, jotka ovat Euroopan parlamentin ja neuvoston
direktiivin 2006/66/EY vaatimusten mukaiset, eikä niitä voi hävittää
tavallisen talousjätteen mukana. Tutustu paikallisiin paristojen keräystä
koskeviin ohjeisiin, koska paristojen hävittäminen oikealla tavalla auttaa
vähentämään ympäristölle ja ihmisille mahdollisesti koituvia
haittavaikutuksia.
NO Informasjon til forbrukerne
Avhending av gamle produkter
Produktet er utformet og produsert i materialer og komponenter av
høy kvalitet, som kan resirkuleres og brukes på nytt.
Når denne søppelbøtten med kryss på følger med et
produkt, betyr det at produktet dekkes av det
europeiske direktivet 2002/96/EU.
Finn ut hvor du kan levere inn elektriske og elektroniske
produkter til gjenvinning i ditt lokalmiljø.
Overhold lokale regler, og ikke kast gamle produkter sammen med
husholdningsavfallet.
Riktig avhending av de gamle produktene dine vil hjelpe til med å
forhindre potensielle negative konsekvenser for miljøet og
menneskers helse.
Batteriinformasjon
Produktet bruker batterier som er i samsvar med det europeiske
direktivet 2006/66/EF, og de kan ikke avhendes sammen med vanlig
husholdningsavfall.
Gjør deg kjent med de lokale retningslinjene for separat innsamling
av batterier, da riktig avhending vil hjelpe med å forhindre miljø- og
helseskader.
88
SRU252_V4_Transfer_RR:SRU252_V4_Transfer 26-03-10 15:35 Pagina 88
Page 89

Notes
SRU252_V4_Transfer_RR:SRU252_V4_Transfer 26-03-10 15:35 Pagina 89
Page 90

Notes
SRU252_V4_Transfer_RR:SRU252_V4_Transfer 26-03-10 15:35 Pagina 90
Page 91

© 2010 Koninklijke Philips Electronics N.V.
All rights reserved. Reproduction in whole or in part is
prohibited without the prior written consent of the copyright
owner. The information presented in this document does not
form part of any quotation or contract, is believed to be accurate
and reliable and may be changed without notice. No liability will
be accepted by the publisher for any consequence of its use.
Publication there of does not convey nor imply any license under
patent- or other industrial or intellectual property rights.
Document order number: 3139 235 5253 2
March 2010
www.philips.com
RTP/RR/1210
SRU252_V4_Transfer_RR:SRU252_V4_Transfer 26-03-10 15:35 Pagina 92
 Loading...