

Page 1

Instructions for use
English 4
Mode d'emploi
Français 14
Instrucciones de manejo
Español 24
Bedienungsanleitung
Deutsch 34
Gebruiksaanwijzing
Nederlands 44
Instruzioni per l'uso
Italiano 54
Manual de utilização
Português 64
Bruksanvisning
Svenska 74
Vejledning
Dansk 84
Bruksanvisning
Norge 94
Käyttöohje
Suomi 104
114
Wireless PC-TV Link LM1000
SBC_LM1000.qxd 18-02-2004 15:33 Pagina 1
Page 2
3
LM1100 TVLINK TRANSMITTER
LM1100 TVLINK TRANSMITTER
1 2 3 4
1 2 3 4
AV SOURCE INPUT
R–AUDIO–L
CHANNEL
IR
VIDEO DC 9V
ON/OFF
AV SOURCE INPUT
R–AUDIO–L
CHANNEL
IR
VIDEO DC 9V
ON/OFF
467 5
3
8
1 2
LM1100 TVLINK RECEIVER
LM1100 TVLINK RECEIVER
1 2 3 4
1 2 3 4
TV OUTPUT
R–AUDIO–L
CHANNEL
VIDEO DC 9V
ON/OFF
TV OUTPUT
R–AUDIO–L
CHANNEL
VIDEO DC 9V
ON/OFF
1416 15
13
17
11
12
A) TRANSMITTER
B) RECEIVER
9
10
RLTV
18
20
19
SBC_LM1000.qxd 18-02-2004 15:33 Pagina 2
Page 3
2
☎
Helpline
België & Luxemburg/
Belgien & Luxemburg/
Belgique & Luxembourg
070 222303
Danmark
808 82814
Deutschland
0180 53 56 767
España
902 11 33 84
France
08 25 88 97 89
00800 3122 1280
Ireland
01 7640292
Italia
800 820026
Nederland
0900 8406
Norge
2274 8250
Österreich
0810 001203
Portugal
021 416 3063
Schweiz/ Suisse/ Svizzera
0844 800 544
Suomi
09 615 80 250
Sverige
08 598 522 50
UK (United Kingdom)
0870 900 90 70
BE ✔ DK ✔ GR ✔ ES ✘ FR ✔
IRE ✘ IT ✔ LU ✔ NL ✔ AT ✔
PT ✔ FI ✔ SE ✔ UK ✘ NO✔
DE ✔ CH ✔
SBC LM 1000/00
R&TTE Directive 1999/5/EC
BE ✘ DK ✘ GR ✘ ES ✘ FR ✘
IRE ✔ IT ✘ LU ✘ NL ✘ AT ✘
PT ✘ FI ✘ SE ✘ UK ✔ NO✘
DE ✘ CH ✘
SBC LM 1000/05
R&TTE Directive 1999/5/EC
BE ✘ DK ✘ GR ✘ ES ✔ FR ✘
IRE ✘ IT ✘ LU ✘ NL ✘ AT ✘
PT ✘ FI ✘ SE ✘ UK ✘ NO✘
DE ✘ CH ✘
SBC LM 1000/16
R&TTE Directive 1999/5/EC
SBC_LM1000.qxd 18-02-2004 15:33 Pagina 3
Page 4

ENGLISH
Wireless PC-TV Link
SBC LM1000
Congratulations! The Philips Wireless PC-TV Link SBC LM1000 you have
just purchased is manufactured to the highest standards and will give you
years of trouble-free use.
To enable you to enjoy the best possible performance, the Philips Wireless
PC-TV Link has a channel selector switch, which enables you to select the
channel that provides optimum viewing. Pure wireless home convenience!
Note:The Wireless PC-TV Link does NOT give you control over PC and/ or audio/
video content you are playing.You need to manually start/ stop playing
videos or audio songs on your PC via the connected mouse or keyboard.
Contents
Helpline .............................................................................................2
Illustrations........................................................................................3
Introduction.......................................................................................4
1. Important information................................................................5
Safety precautions......................................................................................................................5
Packaging contents.....................................................................................................................5
2. Functional overview .................................................................6-7
A) Transmitter unit....................................................................................................................6
B) Receiver unit ..........................................................................................................................7
3. Installation...............................................................................8-10
Setting up the transmitter unit ...........................................................................................8
Connecting the receiver unit to the TV........................................................................9
Channel selection.......................................................................................................................9
Optional connection to audio equipment ...........................................................9-10
4. Operation ...................................................................................10
5. Problem solving ....................................................................11-12
6. General notes.............................................................................12
7. Technical specifications .............................................................13
4
SBC_LM1000.qxd 18-02-2004 15:33 Pagina 4
Page 5
1. Important information
• Please read the following instructions carefully, and retain this booklet for
future reference.
• Requirements:
– TV with SCART or RCA connector(s).
– Video requirements: PC with properly installed video card, supporting
TV-out.The TV-Out connector should be an RCA connector.
– Audio requirements: PC with properly installed sound card with
3.5 mm jack.
Safety precautions
• Do not use this product in damp places or close to water.
• Do not expose this product to extreme heat.
• Do not open this product. In the event of technical difficulties take it to
your Philips retailer.
• Do not cover this product.
• Only connect the AC power adapters to a power supply of
220-240 V AC/ 50Hz.
• Only use the AC power adapters included or a type that complies with
safety standard EN60950 and that has the following specification:
9 V DC/ 300 mA.
• Inadequately protected or sensitive electronic equipment may be affected
by the use of this product.This interference may lead to damage to either
equipment. Please check whether or not surrounding equipment may be
affected by this product before you start using it.
Packaging contents
Please check that the following items are packed in the
Wireless PC-TV Link box.
They are provided to help you set up and use your Wireless PC-TV Link.
•Transmitter unit
• Receiver unit
•Two AC power adapters
•RCA+ 3.5 mm jack to RCA audio/video cable
(yellow/red/white to yellow/black)
•RCA to RCA audio cable (red/white)
•RCA to RCA video cable (yellow)
•RCA to SCART adapter (not for U.S.A. version)
• Audio splitter (3.5 mm jack)
• Remote control blaster cord, used only in combination with an infra red
PC remote control (not suplied in this package).
Please store this cable for future use
• Instructions For Use
ENGLISH 5
SBC_LM1000.qxd 18-02-2004 15:33 Pagina 5
Page 6

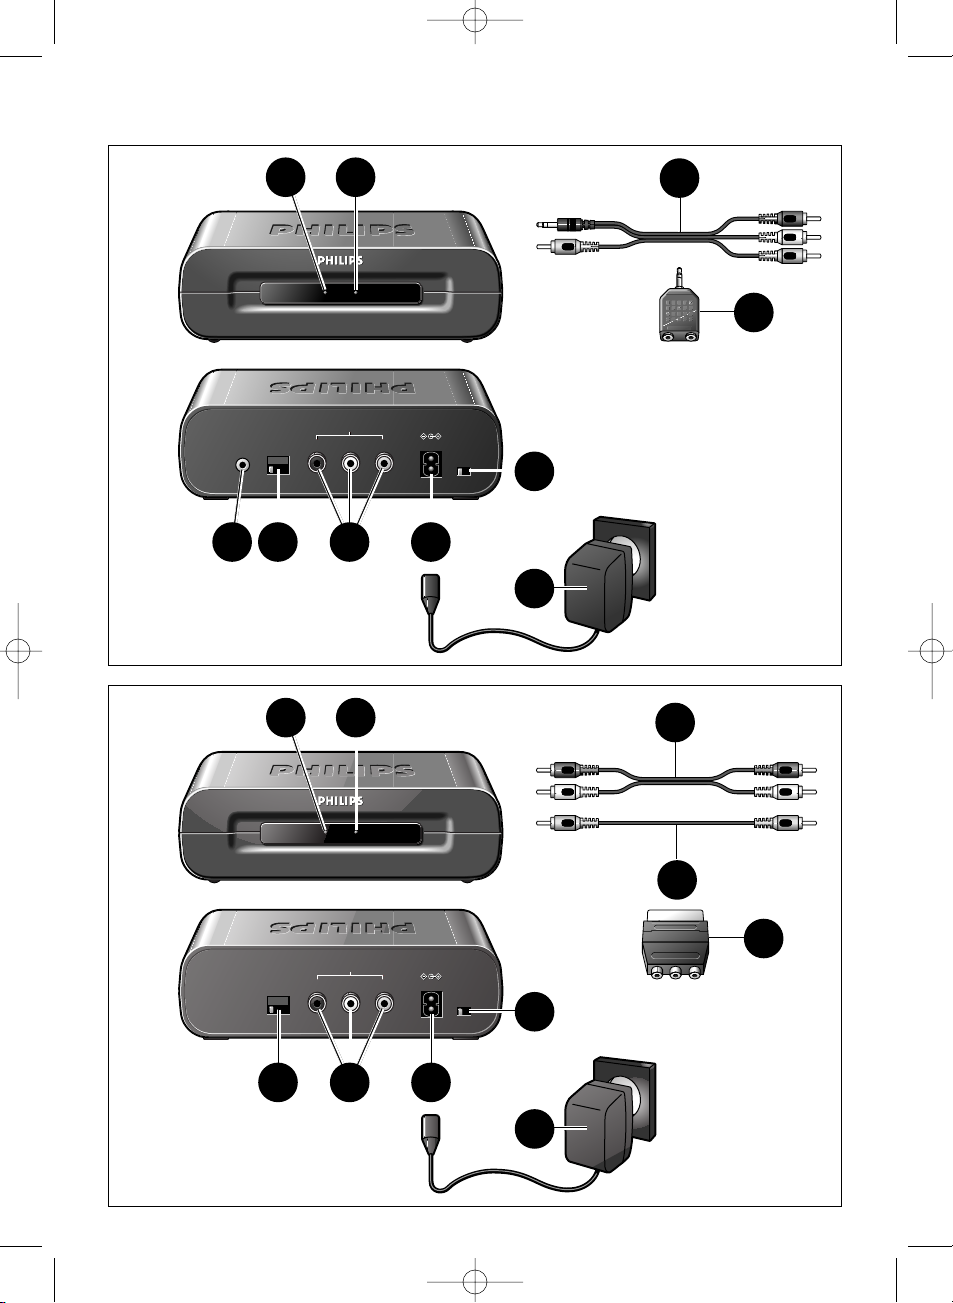
2. Functional overview
A) Transmitter unit
1Power light
Lights green when power is switched on.
2 Remote control receiver light
Indication light for (future) use,
together with a PC with PC remote control functionality.
3 ON/OFF switch
Switches the transmitter unit on and off.
4 DC 9V —<±
DC power supply socket for connection to the mains.
5AV SOURCE INPUT connectors
For connecting the transmitter to the PC via the TV-Out output of your
video card and the 3.5 mm stereo jack of your sound card (Audio Out).
VIDEO (yellow) - video input connector
R-AUDIO-L - left (L) and right (R) audio input connectors
(R-red / L-white)
6 CHANNEL switch
Selects the desired frequency channel of the audio/video signal.The
number of channels you can select may vary from country to country.
7IR
Optional connector for (future) use,
together with a PC with PC remote control functionality.
8AC power adapter
9 RCA+ 3.5 mm jack to RCA audio/video cable
(yellow/red/white to yellow/black)
For connecting the PC to the transmitter via the
AV SOURCE INPUT connectors.
10 Audio splitter (3.5 mm jack)
For connecting the transmitter to the PC
in case PC speakers are connected to the PC sound card.
ENGLISH6
SBC_LM1000.qxd 18-02-2004 15:33 Pagina 6
Page 7

B)Receiver unit
11 Power light
Lights green when power is switched on.
12 Remote control receiver light
Indication light for (future) use,
together with a PC with PC remote control functionality.
13 ON/OFF switch
Switches the receiver unit on and off.
14 DC 9V —<±
DC power supply socket for connection to the mains.
15 TV OUTPUT connectors
For connection the transmitter to an RCA or SCART enabled TV or
stereo set.
VIDEO (yellow) - video output connector.
R-AUDIO-L - left (L) and right (R) audio output connectors
(R-red / L-white).
16 CHANNEL switch
Selects the desired frequency channel of the audio/video signal.
The number of channels you can select may vary per country.
17 AC Power adapter
18 RCA to RCA audio cable (red/white)
For connecting the receiver to audio inputs of the TV or audio
equipment.
19 RCA to RCA video cable (yellow)
For connecting the receiver to the video inputs of the TV via the TV
OUTPUT connectors.
20 RCA to SCART adapter (not for U.S.A. version)
For connecting the receiver to the audio/video inputs of the TV in case
the TV is equipped with a SCART connector.
ENGLISH 7
SBC_LM1000.qxd 18-02-2004 15:33 Pagina 7
Page 8
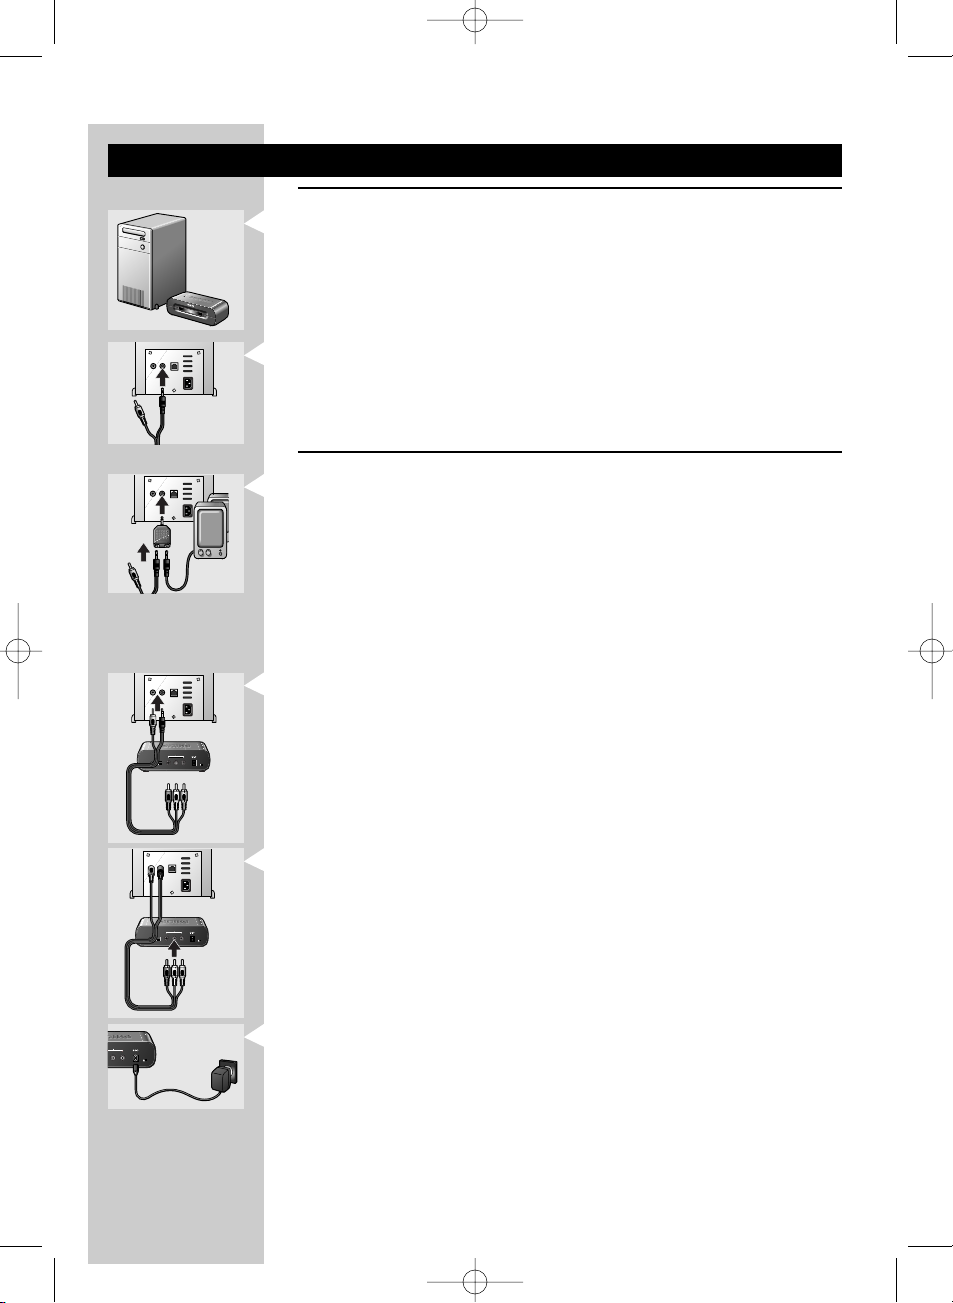
3. Installation
Setting up the transmitter unit
1 Position the transmitter unit near of the PC.
Never place other devices on top of the transmitter unit.
2 Check the Instructions For Use of the PC sound card for the exact
location of the audio output.
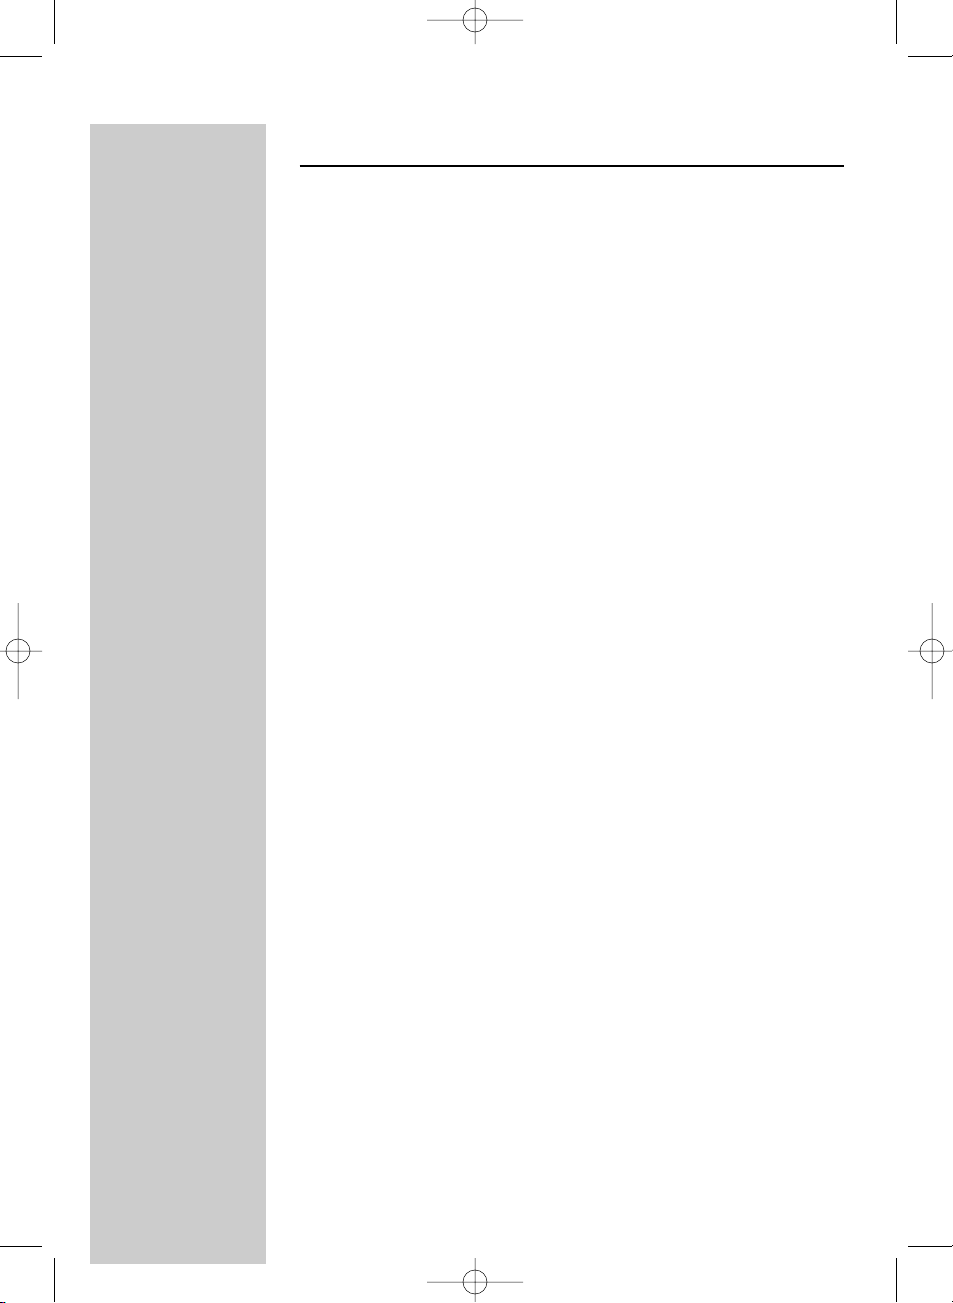
3 Connect the 3.5 mm jack plug (black) of the audio/video cable (9)
supplied to the audio output of the PC.
Please note that the rear of your PC may differ from the example in the
illustration.
In case you have PC speakers connected to the PC
3a Remove the PC speaker plug from the audio output of the PC and
connect it to the Audio splitter (10) supplied.
3b Connect the 3.5 mm jack plug (black) of the audio/video cable (9)
supplied to the Audio splitter (10).
3c Connect the Audio splitter (10) to the audio output of the PC.
4 Connect the video plug (yellow) of the audio/video cable (9) supplied to
the TV-Out output of the PC.
Read the Instructions For Use of the PC or video card on how to activate
the TV-Out function. In case you are not able to activate the TV-out of your
video card, contact the helpdesk of the PC or videocard manufacturer
5 Connect the audio/video plugs at the other end of the audio/ video cable
(9) supplied to the AV SOURCE INPUT connectors (5) on the
transmitter unit.
Make sure to insert the yellow plug into the yellow video input and the
white and red audio plugs into the left (L) and right (R) audio inputs.
6 Connect the AC power adapter (8) to a mains socket and to the DC 9V
—<± supply socket (4) of the transmitter unit.
O
U
O
U
ENGLISH8
SBC_LM1000.qxd 18-02-2004 15:34 Pagina 8
L
L
M
M
1
1
1
1
0
0
0
0
T
T
V
V
L
L
IN
IN
K
K
T
T
R
R
A
A
N
N
S
S
M
M
IT
I
T
T
T
E
E
R
R
AUDIO
INPUTTVINPUT
AUDIO
INPUTTVINPUT
URCE INPUT
URCE INPUT
DIO–L VIDEO DC 9V
DIO–L VIDEO DC 9V
AUDIO
INPUTTVINPUT
AV SOURCE INPUT
AV SOURCE INPUT
VIDEO DC 9V
R–AUDIO–L
R–AUDIO–L
VIDEO DC 9V
CHANNEL
CHANNEL
IR
IR
ON/OFF
ON/OFF
1 2 3 4
1 2 3 4
AUDIO
INPUTTVINPUT
AV SOURCE INPUT
AV SOURCE INPUT
R–AUDIO–L
VIDEO DC 9V
R–AUDIO–L
VIDEO DC 9V
CHANNEL
CHANNEL
IR
IR
ON/OFF
ON/OFF
1 2 3 4
1 2 3 4
ON/OFF
ON/OFF
Page 9

Connecting the receiver unit to the TV
1 Position the receiver unit close to the TV.
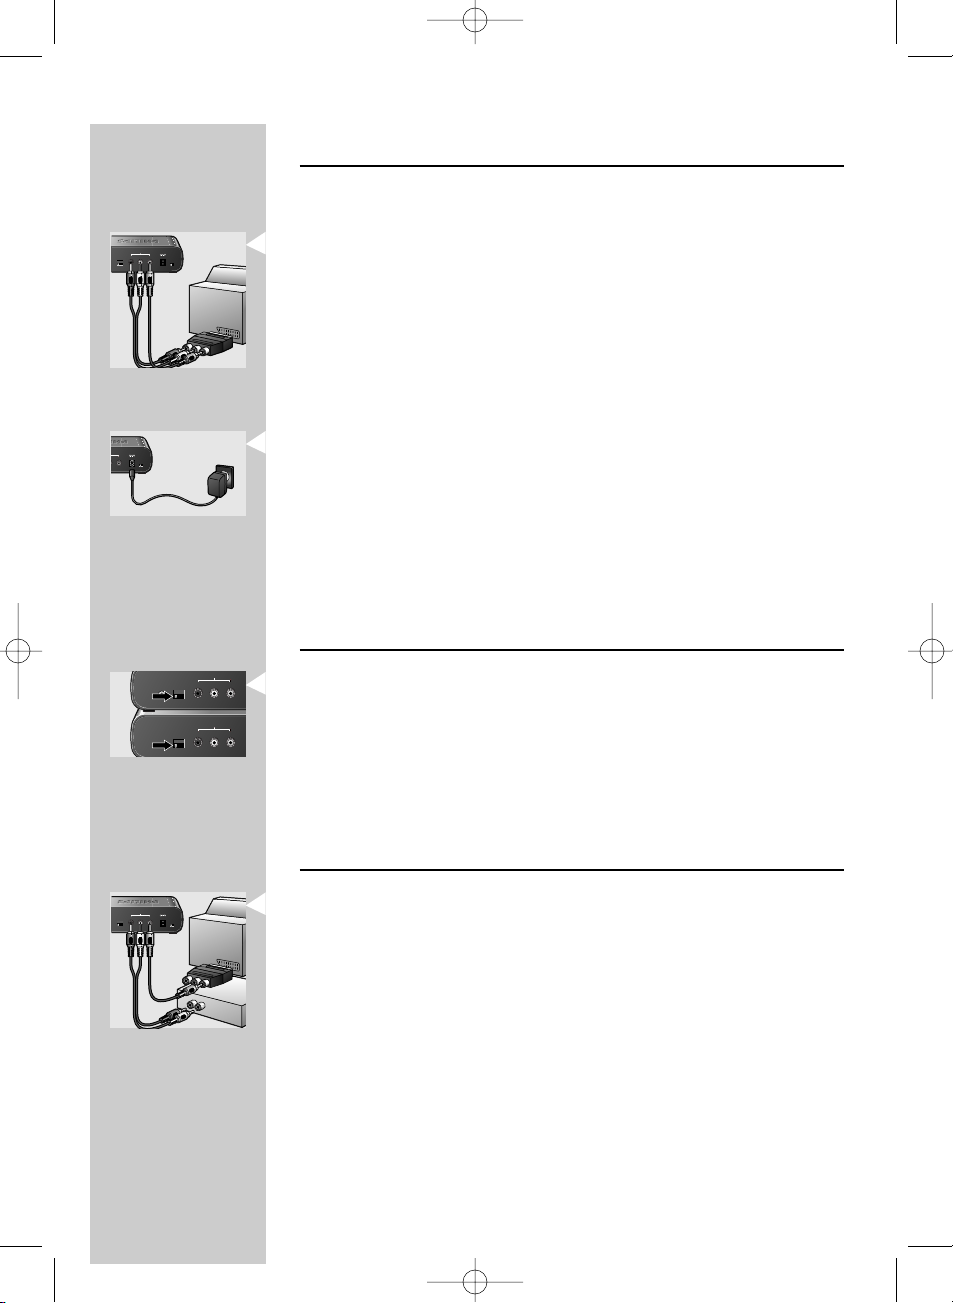
2 Connect the RCA to SCART adapter (20) supplied to the
SCART connector of the TV.
3 Connect the video cable (19) and audio cable (18) supplied to both the
adapter and the TV OUTPUT connectors (15) of the receiver.
Make sure to insert the yellow plugs into the yellow video in- and outputs
and the red and white plugs into the red and white audio in- and outputs.
4 Connect the AC power adapter (17) to a mains socket and to the
DC 9V —<± supply socket (14) of the receiver unit.
Note: In case your TV is equipped with RCA connectors you can directly connect
the TV OUTPUT connectors (13) of the receiver to the corresponding RCA
connectors of the TV. Make sure to insert the yellow, white and red plugs
into the yellow, white and red inputs on both receiver and TV.
Channel selection
• Set the CHANNEL switches (6 and 16) on both units to channel 1.
• If interference occurs (e.g. degraded image) set both switches to another
channel.
> Both units are now ready for use.
Note: Both units must always be set to the same channel.
Optional connection to audio equipment
1 Connect one end of the video cable (19) supplied to the video input
(yellow) of the SCART adapter (or directly to the yellow video input of
the TV) and the other end to the VIDEO output (15) of the receiver.
2 Connect the audio cable (18) supplied to the AUX input of the audio
equipment and the R-AUDIO-L outputs (15) of the receiver.
Make sure to insert the white and red plugs into the left (L) and right (R)
inputs.
Read the Instructions For Use of the audio equipment for the correct input.
R
L
TV
T
T
R
L
TV
ENGLISH 9
SBC_LM1000.qxd 18-02-2004 15:34 Pagina 9
TV OUTPUT
TV OUTPUT
R–AUDIO–L
VIDEO DC 9V
R–AUDIO–L
VIDEO DC 9V
CHANNEL
CHANNEL
ON/OFF
ON/OFF
1 2 3 4
1 2 3 4
PUT
PUT
VIDEO DC 9V
VIDEO DC 9V
ON/OFF
ON/OFF
CHANNEL
CHANNEL
IR
IR
1 2 3 4
1 2 3 4
CHANNEL
CHANNEL
1 2 3 4
1 2 3 4
R
L
TV
AV SOURCE INPUT
AV SOURCE INPUT
R–AUDIO–L
R–AUDIO–L
TV OUTPUT
TV OUTPUT
R–AUDIO–L
R–AUDIO–L
VIDEO
VIDEO
VIDEO
VIDEO
TV OUTPUT
TV OUTPUT
R–AUDIO–L
VIDEO DC 9V
R–AUDIO–L
VIDEO DC 9V
CHANNEL
CHANNEL
ON/OFF
ON/OFF
1 2 3 4
1 2 3 4
R
L
TV
Page 10

3 Connect the AC power adapter (17) to a mains socket and to the
DC 9V —<± supply socket (14) of the receiver unit.
> Audio information from the PC will now be heard via the audio
equipment.
4 Play an audio file on the PC to check if the audio signal is available on the
audio output.
4. Operation
1 Turn on the PC and select an audio or video file you want to play.
2 Start playback of the selected file. Refer to the Instructions For Use of
your Windows operating system on how to select and play audio/video
files.
3 Make sure you see the movie playing on your PC monitor or hear the
music on the PC speakers, if connected.
4 Activate the TV-Out function of your PC video card and
make sure you have video signal available on the TV-Out output.
Refer to the Instructions For Use of your video card for details.
5 Turn on the TV.
6 Select the external input (EXT or AV) on your TV.
Read the Instructions For Use of your TV.
7 Set the ON/OFF switch on both transmitter (3) and receiver (13) to ON.
> You can now watch the video source on your TV.
Notes:
– The Wireless PC-TV Link does NOT give you control over PC and/or
audio/video content you are playing.You need to manually start/stop playing
videos or audio songs on your PC via the connected mouse or keyboard.
– You should see the video you are playing on the PC on the TV screen, if not
please check if you performed all steps correctly and make sure you have a
video signal on the TV-out of your PC. If you have a TV-signal on the TV-out of
your PC but no reception on the Reciever, refer to the troubleshooting section
of this manual.
T
T
ENGLISH10
SBC_LM1000.qxd 18-02-2004 15:34 Pagina 10
PUT
PUT
VIDEO DC 9V
VIDEO DC 9V
ON/OFF
ON/OFF
AV SOURCE INPUT
AV SOURCE INPUT
R–AUDIO–L VIDEO DC 9V
R–AUDIO–L VIDEO DC 9V
TV OUTPUT
TV OUTPUT
R–AUDIO–L VIDEO DC 9V
R–AUDIO–L VIDEO DC 9V
ON/OFF
ON/OFF
ON/OFF
ON/OFF
Page 11
5. Problem solving
If a fault occurs, first check the points listed below. If you are unable to
remedy a problem by following these hints, contact the helpline
(see ‘Need help?’) or consult your dealer.
Never try to open the set yourself as this will void the guarantee.
First, check all cables to ensure that they are connected correctly.
Problem Solution
No picture on TV •Turn on the PC and star t playing a video file. Make sure the TV-Out output
of the video card is activated and a video signal is present.
Refer to the Instructions For Use of the video card on how to activate the
TV-Out output of the video card.
• In case you have a portable TV you can check if a TV-out signal is present
on your video card by transferring the TV to the PC and connect the
TV-out directly to the TV.
• Make sure both units are turned on
(both green power lights (1 and 11) are lit).
• Select the correct EXT or AV channel on TV.
Refer to the Instructions For Use of the TV.
• Select the same channel on the receiver and transmitter units,
using CHANNEL switches 6 and 16.
Bad picture/ •Move the receiver unit around on the surface it is positioned on,
sound quality centimetre by centimetre until you get good picture and sound quality.
on TV • Carr y out the same procedure for the transmitter unit.
• Change both units to another frequency channel, using CHANNEL switches
6 and 16.
Make sure that both units use the same frequency channel.
• Reduce the distance between the transmitter and receiver units
(less than 30 metres).
ENGLISH 11
SBC_LM1000.qxd 18-02-2004 15:34 Pagina 11
Page 12
Wrong picture on • Select the correct EXT or AV channel.
on TV Refer to the Instructions For Use of the TV.
• It is possible that a signal from another Wireless Link is being picked up.
Switch to another channel on both units, using CHANNEL switches 6 and
16 to receive your own signal.
Make sure that the same channel is selected on both units!
Buzzing sound • The buzzing sound could be caused by functionality implemented for future
when using a use. Move the transmitter unit around, centimetre by centimetre, until
remote control the buzzing sound disappears. In some cases you will not be able to
overcome this problem.
•Move the transmitter unit around, centimetre by centimetre, until the
buzzing sound disappears.
In some cases you will not be able to overcome this problem.
TV gives black & • Make sure your TV-out signal is in CVBS or Composite format.
white pictures Refer to Instructions for use of your video card for details.
6. General notes
• Picture and sound quality is influenced by the use of microwave ovens.
Other wireless systems (Bluetooth, wireless LANs, etc.) can also
adversely influence the quality of picture and sound, and vice versa.
• The Wireless PC-TV Link is a Radio Frequency (RF) based product.
As such its performance can suffer the same kinds of interference as
GSMs, portable radios and other RF-based products.
• The Wireless PC-TV Link is not limited to just one room or house.
You can use it anywhere in or around the house. Consequently, anybody
in the vicinity of your house (up to the maximum operating range)
who also owns a Wireless Link set to the same channel, can watch the
same programmes that are playing on your video source.
• PC cannot be controlled remotely if the carrier frequency of the
IR signal is outside the operation window of 32kHz to 40kHz.
This infra red functionality is part of future functionality.
• Radio wave safety:When switched on, the Philips Wireless PC-TV Link
transmits and receives radio waves.The Philips Wireless PC-TV Link
complies with the standards that are defined for it.
• The Philips Wireless PC-TV Link has an operating range of up to
100 metres in open air. Walls, ceilings and other large objects may limit
the useable operating range up to 30 metres in the house.
ENGLISH12
SBC_LM1000.qxd 18-02-2004 15:34 Pagina 12
Page 13

7.Technical specifications
General Video standards supported PAL / NTSC / SECAM
Power supply 220 - 240V AC / 50Hz
Operating consumption: 3 W (both transmitter and receiver unit)
Transmitter unit Audio input: Stereo audio (white/red RCA connectors)
Video input: CVBS (yellow RCA connector)
Dimensions 14.3 cm (W) x 9.3 cm (D) x 4 cm (H)
Receiver unit Output (audio/video) Stereo audio (white/red RCA connectors)
CVBS (yellow RCA connector)
Operating range Up to 100 metres in open air;
up to 30 metres indoors
Dimensions 14.3 cm (W) x 9.3 cm (D) x 4 cm (H)
Audio / Video Carrier frequency: 2.4 GHz
transmission Number of channels: four (may differ, depending on local
regulations)
Type of modulation: FM
Tr ansmission power: <10mW
Antennas: Built-in
Remote control Carrier frequency: 433.92 MHz
transmission Type of modulation: AM
Tr ansmission power: <10 mW
Range of IR reception: Up to 5 metres
Carrier frequency range 32 kHz – 40 kHz
Remote control blaster cord: Yes, one infrared light
Need Help?
In case you have any questions about the LM1000, please contact our
helpline for assistance! You can find the number in the list on page 2.
Before you call, please read this manual carefully.
You will be able to solve most of your problems.
The model number of the Wireless PC-TV Link is LM1000.
Date of purchase: _____ /_____ /_____
day /month /year
ENGLISH 13
SBC_LM1000.qxd 18-02-2004 15:34 Pagina 13
Page 14
FRANÇAIS
Liaison PC - téléviseur sans fil
SBC LM1000
Félicitations! La borne PC-TV sans fil Philips SBC LM1000 que vous venez
d’acheter est conforme aux normes les plus exigeantes et vous donnera des
années de satisfaction.
Pour en tirer le meilleur parti, la borne PCTV sans fil Philips est dotée d’un
bouton de sélection du canal, offrant un confort d’utilisation optimal.
Le meilleur du sans fil à la maison !
Remarque: La borne PCTV sans fil ne permet PAS de commander le PC ni le
contenu audio/vidéo en cours de lecture.
Vous devez lancer ou arrêter la lecture de vidéos ou de titres audio
sur votre PC à l’aide de la souris ou du clavier.
Sommaire
Assistance .........................................................................................2
Illustrations........................................................................................3
Introduction.....................................................................................14
1. Important ...................................................................................15
Consignes de sécurité...........................................................................................................15
Contenu de l’emballage.......................................................................................................15
2. Présentation des fonctionnalités ........................................16-17
A) Émetteur................................................................................................................................16
B) Récepteur..............................................................................................................................17
3. Installation.............................................................................18-20
Configuration de l’émetteur..............................................................................................18
Raccordement du récepteur au téléviseur...............................................................19
Sélection de canal....................................................................................................................19
Raccordement optionnel à un équipement audio........................................19-20
4. Utilisation ...................................................................................20
5. Résolution des problèmes ...................................................21-22
6. Remarques d’ordre général......................................................22
7. Caractéristiques techniques .....................................................23
14
SBC_LM1000.qxd 18-02-2004 15:34 Pagina 14
Page 15
1. Important
• Lisez attentivement les instructions ci-après et conservez ce livret pour
référence.
• Configuration requise: Téléviseur avec connecteur(s) SCART ou RCA.
- Configuration vidéo requise : PC avec carte vidéo prenant en charge la sortie
TV. Le connecteur de sortie TV doit être de type RCA.
- Configuration audio requise : PC avec carte son et prise jack de 3,5 mm.
Précautions de sécurité
• N’utilisez pas ce produit dans des lieux humides ou à proximité de l’eau.
• N’exposez pas ce produit à une chaleur extrême.
• N’ouvrez pas le boîtier de ce produit.
En cas de problème technique, portez-le à votre détaillant Philips.
• Ne couvrez pas le boîtier de ce produit.
• Branchez l’adaptateur secteur uniquement à une prise d’alimentation
220-240 V ~/50 Hz.
• Utilisez exclusivement les adaptateurs fournis ou des adaptateurs
conformes à la norme de sécurité EN60950 répondant à la spécification
suivante: 9 V CC/300 mA.
• Un appareil électronique mal protégé ou sensible risque d’être perturbé
par l’utilisation de ce produit. Ces interférences risquent d’endommager
l’un ou l’autre.Vérifiez qu’aucun équipement situé à proximité risque
d’être perturbé par ce produit avant de l’utiliser.
Contenu de l’emballage
Vérifiez que l’emballage de la borne PCTV sans fil contient les éléments
suivants. Ils doivent vous permettre de configurer et d’utiliser votre
borne PCTV sans fil.
• Émetteur
• Récepteur
• Deux adaptateurs CA
• Prise jack RCA+ 3,5 mm pour câble audio/vidéo RCA
(jaune/rouge/blanc vers jaune/noir)
• Câble audio RCA-RCA (rouge/blanc)
• Câble vidéo RCA-RCA (jaune)
• Adaptateur RCA-SCART (sauf version U.S.)
• Répartiteur automatique (jack 3,5 mm)
• Rallonge de télécommande, utilisé exclusivement en combinaison avec
une télécommande PC infrarouge (non fournie).
Rangez ce câble soigneusement pour l’utiliser ultérieurement
• Instructions d’utilisation
FRANÇAIS 15
SBC_LM1000.qxd 18-02-2004 15:34 Pagina 15
Page 16

FRANÇAIS16
2. Présentation des fonctionnalités
A) Émetteur
1Voyant d’alimentation
S’allume en vert à la mise sous tension.
2Voyant du récepteur de télécommande
Voyant d’utilisation (future) avec un PC avec télécommande.
3 Commutateur marche/arrêt
Met l’émetteur sous tension et hors tension.
49 V CC —<±
Prise d’alimentation en courant continu pour raccordement au secteur.
5 Connecteurs d’entrée source audio/vidéo
Raccordement de l’émetteur au PC via la sortie TV de la carte vidéo et
la prise jack 3,5 mm de votre carte son (sortie audio).
VIDEO (jaune) - connecteur d’entrée vidéo
R-AUDIO-L - connecteurs d’entrée audio de gauche (L) et
de droite (R) (R - rouge/L - blanc)
6 Commutateur de canaux
Permet de sélectionner le canal de fréquence souhaité pour le signal
audio/vidéo. Le nombre de canaux disponibles peut varier d’un pays à
l’autre.
7IR
Connecteur optionnel pour utilisation (future) avec un PC avec
télécommande.
8 Adaptateur d’alimentation secteur
9 Prise jack RCA+ 3,5 mm pour câble audio/vidéo RCA
(jaune/rouge/blanc vers jaune/noir)
Raccordement du PC à l’émetteur via les connecteurs
AV SOURCE INPUT (entrée source audio/vidéo).
10 Répartiteur automatique (jack 3,5 mm)
Raccordement de l’émetteur au PC si les haut-parleurs de celui-ci sont
connectés à la carte son.
SBC_LM1000.qxd 18-02-2004 15:34 Pagina 16
Page 17
FRANÇAIS 17
B)Récepteur
11 Voyant d’alimentation
S’allume en vert à la mise sous tension.
12 Voyant du récepteur de télécommande
Voyant d’utilisation (future) avec un PC avec télécommande.
13 Commutateur marche/arrêt
Met le récepteur sous tension et hors tension.
14 9 V CC —<±
Prise d’alimentation en courant continu pour raccordement au secteur.
15 Connecteurs TV OUTPUT (sortie TV)
Raccordement de l’émetteur à la prise RCA ou SCART d’un téléviseur
ou d’une chaîne stéréo.
VIDEO (jaune) - connecteur de sortie vidéo.
R-AUDIO-L - Connecteurs de sortie audio de gauche (L) et
de droite (R) (R - rouge / L - blanc).
16 Commutateur de canaux
Permet de sélectionner le canal de fréquence souhaité pour le signal
audio/vidéo. Le nombre de canaux disponibles peut varier selon les pays.
17 Adaptateur d’alimentation secteur
18 Câble audio RCA-RCA (rouge/blanc)
Permet de raccorder le récepteur aux entrées audio du téléviseur ou du
système audio.
19 Câble vidéo RCA-RCA (jaune)
Permet de raccorder le récepteur aux entrées vidéo du téléviseur via les
connecteurs TV OUTPUT (sortie TV).
20 Adaptateur RCA-SCART (sauf version U.S.)
Permet de raccorder le récepteur aux entrées audio/vidéo du téléviseur
si celui-ci est doté d’un connecteur SCART.
SBC_LM1000.qxd 18-02-2004 15:34 Pagina 17
Page 18

3. Installation
Configuration de l’émetteur
1 Placez l’émetteur à proximité du PC.
Ne placez jamais d’autre périphérique sur l’émetteur.
2 Consultez le guide d’utilisation de la carte son du PC pour trouver
l’emplacement exact de la sortie audio.
3 Branchez la prise jack 3,5 mm 3,5 mm (noire) du câble audio/vidéo (9) à la
sortie audio du PC.
Notez que l’arrière de votre PC peut se présenter différemment de celui qui est
illustré ici.
Si des haut-parleurs sont connectés au PC
3a Débranchez la prise de la sortie audio du PC et branchez-la au
répartiteur audio (10) fourni.
3b Branchez la prise jack 3,5 mm (noire) du câble audio/vidéo (9) fourni au
répartiteur audio (10).
3c Branchez le répartiteur audio (10) à la sortie audio du PC.
4 Branchez la prise vidéo (jaune) du câble audio/vidéo (9) fourni à la sortie
TV du PC.
Lisez les instructions d’utilisation du PC ou de la carte vidéo pour savoir
comment activer la sortie TV. Si vous ne parvenez pas à activer la sortie TV
de votre carte vidéo, contactez l’assistance clientèle du constructeur du PC
ou du fabricant de la carte.
5 Branchez les connecteurs audio/vidéo à l’autre extrémité du câble
audio/vidéo (9) fourni aux connecteurs AV SOURCE INPUT
(entrée source audio/vidéo - (5)) de l’émetteur.
Assurez-vous de brancher la prise jaune à l’entrée vidéo jaune et les prises
audio blanche et rouge aux entrées audio de gauche (L) et de droite (R).
6 Branchez l’adaptateur secteur (8) à une prise secteur et au connecteur
d’alimentation 9 V CC (4) —<± de l’émetteur.
O
U
O
U
FRANÇAIS18
SBC_LM1000.qxd 18-02-2004 15:34 Pagina 18
L
L
M
M
1
1
1
1
0
0
0
0
T
T
V
V
L
L
IN
IN
K
K
T
T
R
R
A
A
N
N
S
S
M
M
IT
I
T
T
T
E
E
R
R
AUDIO
INPUTTVINPUT
AUDIO
INPUTTVINPUT
URCE INPUT
URCE INPUT
DIO–L VIDEO DC 9V
DIO–L VIDEO DC 9V
AUDIO
INPUTTVINPUT
AV SOURCE INPUT
AV SOURCE INPUT
VIDEO DC 9V
R–AUDIO–L
R–AUDIO–L
VIDEO DC 9V
CHANNEL
CHANNEL
IR
IR
ON/OFF
ON/OFF
1 2 3 4
1 2 3 4
AUDIO
INPUTTVINPUT
AV SOURCE INPUT
AV SOURCE INPUT
R–AUDIO–L
VIDEO DC 9V
R–AUDIO–L
VIDEO DC 9V
CHANNEL
CHANNEL
IR
IR
ON/OFF
ON/OFF
1 2 3 4
1 2 3 4
ON/OFF
ON/OFF
Page 19
Raccordement du récepteur au téléviseur
1 Placez le récepteur à proximité du téléviseur.
2 Branchez l’adaptateur RCA-SCART (20) fourni au connecteur SCART du
téléviseur.
3 Branchez le câble vidéo (19) et le câble audio (18) aux connecteurs de
l’adaptateur et TV OUTPUT (sortie TV - (15)) du récepteur.
Veillez à brancher les prises jaunes à l’entrée et à la sortie vidéo, de couleur
jaune, et les prises rouge et blanche aux connecteurs d’entrée et de sortie
audio rouge et blanc.
4 Branchez l’adaptateur secteur (17) à une prise secteur et au connecteur
d’alimentation 9 V CC (14) —<± du récepteur.
Remarque : Si votre téléviseur est équipé de connecteurs RCA, vous pouvez
raccorder les connecteurs TV OUTPUT (sortie TV - (13)) du
récepteur directement aux connecteurs RCA correspondants du
téléviseur.Assurez-vous de faire correspondre les prises jaune,
blanche et rouge avec les entrées jaune, blanche et rouge du
récepteur et du téléviseur.
Sélection de canal
• Positionnez les commutateurs CHANNEL (canal) (6 et 16) des deux
unités sur le canal 1.
• En cas d’interférence (par ex., de dégradation de l’image), positionnez les
deux commutateurs sur un autre canal.
>Les deux unités sont prêtes.
Remarque: Les deux unités doivent toujours être réglées sur le même canal.
Connexion optionnelle à un équipement audio
1 Branchez une extrémité du câble vidéo (19) à l’entrée vidéo (jaune) de
l’adaptateur SCART (ou directement à l’entrée vidéo jaune du téléviseur)
et l’autre extrémité à la sortie vidéo (15) du récepteur.
2 Branchez le câble audio (18) à l’entrée AUX de l’équipement audio et aux
sorties RAUDIOL (15) du récepteur.
Assurez-vous d’insérer les prises blanche et rouge dans les entrées de
gauche (L) et de droite (R), respectivement. Consultez les instructions
d’utilisation de votre équipement audio pour connaître l’entrée correcte.
R
L
TV
T
T
R
L
TV
FRANÇAIS 19
SBC_LM1000.qxd 18-02-2004 15:34 Pagina 19
TV OUTPUT
TV OUTPUT
R–AUDIO–L
VIDEO DC 9V
R–AUDIO–L
VIDEO DC 9V
CHANNEL
CHANNEL
ON/OFF
ON/OFF
1 2 3 4
1 2 3 4
PUT
PUT
VIDEO DC 9V
VIDEO DC 9V
ON/OFF
ON/OFF
CHANNEL
CHANNEL
IR
IR
1 2 3 4
1 2 3 4
CHANNEL
CHANNEL
1 2 3 4
1 2 3 4
R
L
TV
AV SOURCE INPUT
AV SOURCE INPUT
R–AUDIO–L
VIDEO
VIDEO
R–AUDIO–L
VIDEO
VIDEO
R–AUDIO–L
R–AUDIO–L
TV OUTPUT
TV OUTPUT
TV OUTPUT
TV OUTPUT
R–AUDIO–L
VIDEO DC 9V
R–AUDIO–L
VIDEO DC 9V
CHANNEL
CHANNEL
ON/OFF
ON/OFF
1 2 3 4
1 2 3 4
R
L
TV
Page 20

3 Branchez l’adaptateur secteur (17) à une prise secteur et au connecteur
d’alimentation 9 V CC (14) —<± du récepteur.
> Vous devez maintenant pouvoir écouter les fichiers audio de votre PC
sur votre équipement audio.
4 Lancez la lecture d’un fichier audio sur le PC pour vous assurer que le
signal audio est disponible sur la sortie audio.
4. Utilisation
1 Allumez le PC et sélectionnez un fichier audio ou vidéo.
2 Lancez la lecture du fichier sélectionné. Reportez-vous aux instructions
d’utilisation de votre système d’exploitation Windows concernant la
sélection et la lecture des fichiers audio/vidéo.
3 Vérifiez que vous pouvez effectivement regarder le film sur l’écran de
votre PC ou entendre la musique sur les haut-parleurs du PC.
4 Activez la sortie TV de votre carte vidéo et assurez-vous que le signal
vidéo est disponible sur la sortie TV.
Pour plus de détails sur votre carte vidéo, reportez-vous aux instructions
d’utilisation.
5 Allumez le téléviseur.
6 Sélectionnez l’entrée externe (EXT ou AV) de votre téléviseur.
Le cas échéant, consultez les instructions d’utilisation de votre téléviseur.
7 Placez le commutateur ON/OFF de l’émetteur (3) et du récepteur (13)
sur ON.
> Vous pouvez maintenant regarder les images provenant de la source
vidéo sur votre téléviseur.
Remarques:
- La borne PCTV sans fil ne permet PAS de commander le PC ni de contrôler le
contenu audio/vidéo en cours de lecture.
Pour ce faire, vous devez lancer ou arrêter manuellement la lecture des vidéos
ou des titres audio sur votre PC à l’aide de la souris ou du clavier.
- La vidéo en cours de lecture sur le PC doit s’afficher sur le téléviseur;
sinon, vérifiez que vous avez suivi toutes les étapes correctement et
que le signal vidéo est présent sur la sortie TV de votre PC.
Si le signal TV est bien présent sur la sortie TV du PC, mais qu’il est absent au
niveau du récepteur, reportez-vous à la section Dépannage de ce manuel.
T
T
FRANÇAIS20
SBC_LM1000.qxd 18-02-2004 15:34 Pagina 20
PUT
PUT
VIDEO DC 9V
VIDEO DC 9V
ON/OFF
ON/OFF
AV SOURCE INPUT
AV SOURCE INPUT
R–AUDIO–L VIDEO DC 9V
R–AUDIO–L VIDEO DC 9V
TV OUTPUT
TV OUTPUT
R–AUDIO–L VIDEO DC 9V
R–AUDIO–L VIDEO DC 9V
ON/OFF
ON/OFF
ON/OFF
ON/OFF
Page 21

5. Résolution des problèmes
En cas de panne, vérifiez d’abord les points ci-dessous. Si vous ne parvenez
pas à résoudre un problème après avoir suivi ces conseils, contactez le
service d’assistance (voir «Besoin d’aide?») ou votre revendeur.
Ne tentez jamais d’ouvrir la borne vous-même: cela annulerait la garantie.
Vérifiez d’abord que tous les câbles sont branchés correctement.
Problème Solution
Pas d’image sur • Allumez le PC et lancez la lecture d’un fichier vidéo.Assurez-vous que la
le téléviseur sortie TV de la carte vidéo est activée et qu’un signal vidéo est présent.
Pour savoir comment activer la sortie TV de la car te vidéo, reportez-vous
aux instructions d’utilisation.
• Si vous avez un téléviseur portable, vous pouvez vérifier la présence d’un
signal de sortie TV sur votre carte vidéo en transférant l’affichage des
images du téléviseur sur le PC et en raccordant la sortie TV directement au
téléviseur.
• Vérifiez que l’émetteur et le récepteur sont tous deux allumés
(voyants d’alimentation verts - 1 et 11 - allumés).
• Sélectionnez le canal EXT ou AV correct sur le téléviseur.
Reportez-vous aux instructions d’utilisation du téléviseur.
• Sélectionnez le même canal sur le récepteur que sur l’émetteur à l’aide des
commutateurs CHANNEL 6 et 16.
Image de mauvaise • Faites pivoter le récepteur. centimètre par centimètre jusqu’à ce que
qualité/qualité l’image et le son soient corrects.
du sonsur le • Suivez la même procédure pour l’émetteur.
téléviseur • Sélectionnez un autre canal sur l’émetteur et le récepteur à l’aide des
commutateurs CHANNEL 6 et 16.
Assurez-vous que tous deux utilisent le même canal de fréquence.
• Rapprochez l’émetteur du récepteur
(distance maximale: 30 mètres).
FRANÇAIS 21
SBC_LM1000.qxd 18-02-2004 15:34 Pagina 21
Page 22

Image incorrecte • Sélectionnez le canal EXT ou AV correct.
sur sur le Reportez-vous aux instructions d’utilisation du téléviseur.
téléviseur • Il est possible que le signal d’une autre liaison sans fil soit intercepté.
Passez sur un autre canal à la fois sur l’émetteur et sur le récepteur à l’aide
des commutateurs CHANNEL 6 et 16 pour recevoir le signal de votre
propre émetteur.
Vérifiez que vous avez sélectionné le même canal sur les deux unités!
Sonnerie • Le retentissement de la sonnerie peut être dû à l’activation d’une
lors de l’utilisation fonctionnalité encore indisponible.
d’une utilisation. Faites tourner l’émetteur sur lui-même,
télécommande centimètre par centimètre, jusqu’à ce que la sonnerie s’arrête.
Dans certains cas, il n’est pas possible de résoudre ce problème.
• Faites tourner l’émetteur sur lui-même, centimètre par centimètre,
jusqu’à ce que la sonnerie s’arrête.
Dans certains cas, il n’est pas possible de résoudre ce problème.
L’image du • Assurez-vous que le signal de la sortie TV est au format CVBS ou Composite.
téléviseur est en Pour plus de détails sur votre carte vidéo,
noir et blanc reportez-vous aux instructions d’utilisation.
6. Remarques d’ordre général
•L’utilisation d’un four à micro-ondes risque d’entraîner la dégradation de
la qualité des images et du son.
D’autres systèmes sans fil (Bluetooth, réseaux locaux sans fil, etc.)
risquent également de provoquer la dégradation des images et du son;
inversement, la borne PC-TV risque d’affecter leurs performances.
• La borne PCTV sans fil est un produit à radiofréquence (RF).
De ce fait, il risque de subir les mêmes interférences que les téléphones
GSM, les radios portables et tous autres produits RF.
•L’utilisation de la borne PCTV sans fil n’est pas confinée à une seule
pièce ou à une seule maison.Vous pouvez l’utiliser n’importe où dans la
maison ou à l’extérieur.Ainsi, quiconque se trouve à proximité de votre
maison (dans le rayon de réception) et qui possède également une
borne sans fil réglée sur le même canal peut regarder les programmes
provenant de votre source vidéo.
• Le PC ne peut pas être télécommandé si la fréquence du signal IR n’est
pas comprise dans la plage de 32 kHz à 40 kHz.
Cette fonctionnalité infrarouge n’est pas encore disponible.
• Ondes radio et sécurité: Lorsqu’elle est mise sous tension, la borne
PCTV sans fil Philips émet et reçoit des ondes radio.
Elle est conforme aux normes y afférent.
• La borne PCTV sans fil Philips a une portée atteignant
100 mètres en espace ouvert. À l’intérieur, les murs, les plafonds et
autres objets volumineux peuvent limiter la portée à 30 mètres.
FRANÇAIS22
SBC_LM1000.qxd 18-02-2004 15:34 Pagina 22
Page 23

7. Caractéristiques techniques
Généralités Normes vidéo: PAL/NTSC/SECAM
Alimentation: 220-240 V ~ / 50 Hz
Consommation: 3 W (émetteur et récepteur)
Émetteur Entrée audio: Audio stéréo (connecteurs RCA blanc/rouge)
Entrée vidéo: CVBS (connecteur RCA jaune)
Dimensions: 14,3 cm (L) x 9,3 cm (P) x 4 cm (H)
Récepteur Sortie (audio/vidéo): Audio stéréo (connecteurs RCA
blanc/rouge)
CVBS (connecteur RCA jaune)
Por tée: Jusqu’à 100 mètres en espace dégagé;
jusqu’à 30 mètres en intérieur
Dimensions: 14,3 cm (L) x 9,3 cm (P) x 4 cm (H)
Audio/vidéo Fréquence du signal: 2,4 GHz
transmission Nombre de canaux: quatre (peut varier selon la réglementation
locale)
Type de modulation: FM
Puissance de transmission: <10 mW
Antennes: intégrées
Télécommande Fréquence du signal: 433,92 MHz
transmission Type de modulation: AM
Puissance de transmission: <10 mW
Distance de réception IR: Jusqu’à 5 mètres
Plage de fréquences du signal: 32 kHz-40 kHz
Rallonge de télécommande: Oui, un voyant infrarouge
Besoin d’aide ?
Pour toute question concernant la LM1000, contactez notre service
d’assistance téléphonique.Vous trouverez le numéro dans la liste de la page 2.
Avant d’appeler, lisez ce manuel attentivement.
Dans la plupart des cas, vous y trouverez la solution à votre problème.
La référence de la borne PCTV sans fil est LM1000.
Date d’achat : _____ /_____ /_____
jour /mois /année
FRANÇAIS 23
SBC_LM1000.qxd 18-02-2004 15:34 Pagina 23
Page 24

ESPAÑOL
Wireless PC-TV Link
SBC LM1000
¡Enhorabuena! El Philips Wireless PC-TV Link SBC LM1000 que ha
adquirido está fabricado de acuerdo con los más altos estándares,
lo que le garantiza un funcionamiento sin problemas durante años.
Para que pueda disfrutar de un óptimo rendimiento,
el Philips Wireless PC-TV Link dispone de un interruptor selector de
canales que le permitirá seleccionar el canal con la mejor visualización.
¡Lo mejor en redes domésticas inalámbricas!
Nota: El Wireless PC-TV Link NO le proporciona control sobre el contenido de
audio, vídeo y/o PC que esté reproduciendo. Deberá iniciar o detener
manualmente la reproducción de vídeos o canciones en el PC mediante el
teclado o el ratón conectados.
Contenido
Línea de ayuda ..................................................................................2
IIustraciones ......................................................................................3
Introducción ....................................................................................24
1. Información importante ...........................................................25
Precauciones de seguridad.................................................................................................25
Contenido del embalaje......................................................................................................25
2. Visión general del funcionamiento .....................................26-27
A) Unidad transmisora.........................................................................................................26
B) Unidad receptora .............................................................................................................27
3. Instalación .............................................................................28-30
Configuración de la unidad transmisora ....................................................................28
Conexión de la unidad receptora al televisor........................................................29
Selección de canales ..............................................................................................................29
Conexiones opcionales del equipo de audio..................................................29-30
4. Funcionamiento .........................................................................30
5. Resolución de problemas.....................................................31-32
6. Notas generales .........................................................................32
7. Especificaciones técnicas ..........................................................33
24
SBC_LM1000.qxd 18-02-2004 15:34 Pagina 24
Page 25

1. Información importante
• Lea atentamente las siguientes instrucciones y conserve el presente
manual para futuras consultas.
• Requisitos: - TV con conector(es) SCART o RCA.
- Requisitos de vídeo: PC con tarjeta de vídeo correctamente instalada y
compatible con salida de televisión. El conector de salida de televisión
debe ser un conector RCA.
- Requisitos de audio: PC con tarjeta de sonido correctamente instalada con
clavija de 3,5 mm.
Precauciones de seguridad
• No utilice este producto en zonas húmedas o cerca del agua.
• No exponga este producto a un calor excesivo.
• No abra este producto. En caso de dificultades técnicas, llévelo a su
distribuidor Philips.
• No cubra este producto.
• Conecte los adaptadores CA únicamente a una fuente de alimentación de
220-240 VCA / 50 Hz.
• Utilice sólo los adaptadores CA proporcionados o un tipo que cumpla
con el estándar de seguridad EN60950 y que disponga de la siguiente
especificación: 9 VCC / 300 mA.
• Los equipos electrónicos protegidos inadecuadamente o sensibles pueden
verse afectados por la utilización de este producto. Esta interferencia
puede producir daños en dichos equipos. Compruebe si los equipos
circundantes pueden verse afectados por este producto antes de
comenzar a utilizarlo.
Contenido del embalaje
Compruebe que la caja del Wireless PC-TV Link contiene los siguientes
elementos, que le facilitarán la configuración y
el uso del Wireless PC-TV Link.
• Unidad transmisora
• Unidad receptora
• Dos adaptadores CA
•RCA y clavija de 3,5 mm a cable de audio/vídeo RCA
(amarillo/rojo/blanco a amarillo/negro)
• Cable de audio RCA a RCA (rojo/blanco)
• Cable de vídeo RCA a RCA (amarillo)
• Adaptador RCA a SCART (excepto versión para EE.UU.)
• Distribuidor de audio (clavija de 3,5 mm)
• Cordón para extensión del mando a distancia, utilizado sólo en
combinación con un mando a distancia de PC por infrarrojos
(no suministrado en este embalaje).
Guarde este cordón para utilizarlo posteriormente.
• Instrucciones de uso
ESPAÑOL 25
SBC_LM1000.qxd 18-02-2004 15:34 Pagina 25
Page 26

ESPAÑOL26
2.Visión general del funcionamiento
A) Unidad transmisora
1 Luz de alimentación
Se enciende en verde cuando se activa la alimentación.
2 Luz del receptor del mando a distancia
Luz de indicación de uso (futuro) en PC con funcionalidad de mando a
distancia.
3 Interruptor ON/OFF
Activa y desactiva la unidad transmisora.
4 DC 9V —<±
Enchufe de alimentación CC para conexión a la red eléctrica
5 Conectores AV SOURCE INPUT
Permiten conectar el transmisor al PC mediante la salida de televisión
de la tarjeta de vídeo y la clavija estéreo de 3,5 mm de la tarjeta de
sonido (salida de audio).
VIDEO (amarillo) - conector de entrada de vídeo
R-AUDIO-L - conectores de entrada de audio izquierdo (L) y
derecho (R) (R-rojo / L-blanco)
6 Interruptor CHANNEL
Selecciona el canal de frecuencia deseado de la señal de audio/vídeo.
El número de canales que se pueden seleccionar puede variar de
un país a otro.
7IR
Conector opcional de uso (futuro) en PC con
funcionalidad de mando a distancia.
8 Adaptador CA
9 RCA y clavija de 3,5 mm a cable de audio/vídeo RCA
(amarillo/rojo/blanco a amarillo/negro)
Permite conectar el PC al transmisor mediante los conectores
AV SOURCE INPUT.
10 Distribuidor de audio (clavija de 3,5 mm)
Permite conectar el transmisor al PC si se han conectado altavoces de
PC a la tarjeta de sonido del PC.
SBC_LM1000.qxd 18-02-2004 15:34 Pagina 26
Page 27

ESPAÑOL 27
B)Unidad receptora
11 Luz de alimentación
Se enciende en verde cuando se activa la alimentación.
12 Luz del receptor del mando a distancia
Luz de indicación de uso (futuro) en PC con funcionalidad de mando a
distancia.
13 Interruptor ON/OFF
Activa y desactiva la unidad receptora.
14 CC 9 V —<±
Enchufe de alimentación CC para conexión a la red eléctrica
15 Conectores TV OUTPUT
Permiten conectar el transmisor a un equipo estéreo o a un televisor
activado para RCA o SCART.
VIDEO (amarillo) - conector de salida de vídeo.
R-AUDIO-L - conectores de salida de audio izquierdo (L) y
derecho (R) (R-rojo/ L-blanco).
16 Interruptor CHANNEL
Selecciona el canal de frecuencia deseado de la señal de audio/vídeo.
El número de canales que se pueden seleccionar puede variar de un
país a otro.
17 Adaptador CA
18 Cable de audio RCA a RCA (rojo/blanco)
Permite conectar el receptor a las entradas de audio del televisor o el
equipo de audio.
19 Cable de vídeo RCA a RCA (amarillo)
Permite conectar el receptor a las entradas de vídeo del televisor
mediante los conectores TV OUTPUT.
20 Adaptador RCA a SCART (excepto versión para EE.UU.)
Permite conectar el receptor a las entradas de audio/vídeo del televisor
si éste viene equipado de un conector SCART.
SBC_LM1000.qxd 18-02-2004 15:34 Pagina 27
Page 28

3. Instalación
Configuración de la unidad transmisora
1 Coloque la unidad transmisora cerca del PC.
Nunca coloque otros dispositivos encima de la unidad transmisora.
2 Consulte las instrucciones de uso de la tarjeta de sonido del PC para
obtener información sobre la ubicación exacta de la salida de audio.
3 Conecte la clavija de 3,5 mm (negra) del cable de audio/vídeo (9)
suministrado a la salida de audio del PC.
Recuerde que la parte posterior de su PC puede ser distinta a la del ejemplo
que aparece en la ilustración.
Si dispone de altavoces de PC conectados al PC
3a Retire la clavija de altavoz del PC de la salida de audio del mismo y
conéctela al distribuidor de audio (10) suministrado.
3b Conecte la clavija de 3,5 mm (negra) del cable de audio/vídeo (9)
suministrado al distribuidor de audio (10).
3c Conecte el distribuidor de audio (10) a la salida de audio del PC.
4 Conecte la clavija de vídeo (amarilla) del cable de audio/vídeo (9)
suministrado a la salida de televisión del PC.
Lea las instrucciones de uso del PC o de la tarjeta de vídeo sobre cómo
activar la función de salida de televisión. Si no puede activar la salida de
televisión de la tarjeta de vídeo, póngase en contacto con el servicio de
atención al cliente del fabricante de la tarjeta de vídeo o del PC.
5 Conecte las clavijas de audio/vídeo del otro extremo del cable de
audio/vídeo (9) suministrado a los conectores AV SOURCE INPUT (5) de
la unidad transmisora.
Asegúrese de insertar la clavija amarilla en la entrada de vídeo del mismo
color y las clavijas de audio blanca y roja en las entradas de audio izquierda
(L) y derecha (R).
6 Conecte el adaptador CA (8) a la red eléctrica y al enchufe de
alimentación CC de 9 V —<± (4) de la unidad transmisora.
O
U
O
U
ESPAÑOL28
SBC_LM1000.qxd 18-02-2004 15:34 Pagina 28
L
L
M
M
1
1
1
1
0
0
0
0
T
T
V
V
L
L
IN
IN
K
K
T
T
R
R
A
A
N
N
S
S
M
M
IT
I
T
T
T
E
E
R
R
AUDIO
INPUTTVINPUT
AUDIO
INPUTTVINPUT
URCE INPUT
URCE INPUT
DIO–L VIDEO DC 9V
DIO–L VIDEO DC 9V
AUDIO
INPUTTVINPUT
AV SOURCE INPUT
AV SOURCE INPUT
VIDEO DC 9V
R–AUDIO–L
R–AUDIO–L
VIDEO DC 9V
CHANNEL
CHANNEL
IR
IR
ON/OFF
ON/OFF
1 2 3 4
1 2 3 4
AUDIO
INPUTTVINPUT
AV SOURCE INPUT
AV SOURCE INPUT
R–AUDIO–L
VIDEO DC 9V
R–AUDIO–L
VIDEO DC 9V
CHANNEL
CHANNEL
IR
IR
ON/OFF
ON/OFF
1 2 3 4
1 2 3 4
ON/OFF
ON/OFF
Page 29

Conexión de la unidad receptora al televisor
1 Coloque la unidad receptora cerca del televisor.
2 Conecte el adaptador RCA a SCART (20) suministrado al conector
SCART del televisor.
3 Conecte el cable de vídeo (19) y el cable de audio (18) suministrado al
adaptador y a los conectores TV OUTPUT (15) del receptor.
Asegúrese de insertar las clavijas amarillas en las salidas y entradas de vídeo
amarillas, y las clavijas blancas y rojas en las salidas y entradas de audio
blancas y rojas.
4 Conecte el adaptador CA (17) a la red eléctrica y al enchufe de
alimentación CC de 9 V —<± (14) de la unidad receptora.
Nota: En el caso de que el televisor esté equipado con conectores RCA, podrá
conectar directamente los conectores TV OUTPUT (13) del receptor a los
conectores RCA correspondientes del televisor.Asegúrese de insertar las
clavijas amarillas, blancas y rojas en las entradas amarillas, blancas y rojas
del receptor y del televisor.
Selección de canales
• Establezca los interruptores CHANNEL (6 y 16) de ambas unidades en el
canal 1.
• En caso de interferencias (por ejemplo, una imagen degradada),
establezca ambos interruptores en otro canal.
> Ambas unidades están listas para usar.
Nota:Asegúrese de que ambas unidades tienen siempre establecido
el mismo canal.
Conexiones opcionales del equipo de audio
1 Conecte un extremo del cable de vídeo (19) suministrado a la entrada de
vídeo (amarilla) del adaptador SCART (o directamente a la entrada de
vídeo amarilla del televisor) y el otro extremo a la salida VIDEO (15) del
receptor.
2 Conecte el cable de audio (18) suministrado a la entrada AUX del equipo
de audio y a las salidas R-AUDIO-L (15) del receptor.
Asegúrese de insertar las clavijas blanca y roja en las entradas izquierda (L)
y derecha (R). Lea las instrucciones de uso del equipo de audio para
obtener información sobre la entrada adecuada.
R
L
TV
T
T
R
L
TV
ESPAÑOL 29
SBC_LM1000.qxd 18-02-2004 15:34 Pagina 29
TV OUTPUT
TV OUTPUT
R–AUDIO–L
VIDEO DC 9V
R–AUDIO–L
VIDEO DC 9V
CHANNEL
CHANNEL
ON/OFF
ON/OFF
1 2 3 4
1 2 3 4
PUT
PUT
VIDEO DC 9V
VIDEO DC 9V
ON/OFF
ON/OFF
CHANNEL
CHANNEL
IR
IR
1 2 3 4
1 2 3 4
CHANNEL
CHANNEL
1 2 3 4
1 2 3 4
R
L
TV
AV SOURCE INPUT
AV SOURCE INPUT
R–AUDIO–L
R–AUDIO–L
TV OUTPUT
TV OUTPUT
R–AUDIO–L
R–AUDIO–L
VIDEO
VIDEO
VIDEO
VIDEO
TV OUTPUT
TV OUTPUT
R–AUDIO–L
VIDEO DC 9V
R–AUDIO–L
VIDEO DC 9V
CHANNEL
CHANNEL
ON/OFF
ON/OFF
1 2 3 4
1 2 3 4
R
L
TV
Page 30

3 Conecte el adaptador CA (17) a la red eléctrica y al enchufe de
alimentación CC de 9 V —<± (14) de la unidad receptora.
> Ahora podrá oír la información de audio del PC mediante el equipo de
audio.
4 Reproduzca un archivo de audio en el PC para comprobar si la señal de
audio está disponible en la salida de audio.
4. Funcionamiento
1 Encienda el PC y seleccione el archivo de audio o vídeo que desea
reproducir.
2 Inicie la reproducción del archivo seleccionado. Consulte las instrucciones
de uso del sistema operativo Windows para obtener información sobre
cómo seleccionar y reproducir archivos de audio/vídeo.
3 Asegúrese de que ve la película reproducida en el monitor del PC o de
que escucha la música por los altavoces del PC, si están conectados.
4 Active la función de salida de televisión de la tarjeta de vídeo del PC y
asegúrese de que la señal de vídeo está disponible en la salida de
televisión.
Consulte las instrucciones de uso de la tarjeta de vídeo para obtener
información detallada.
5 Encienda el televisor.
6 Seleccione la entrada externa (EXT o AV) del televisor.
Lea las instrucciones de uso del televisor.
7 Establezca el interruptor ON/OFF del transmisor (3) y del receptor (13)
en ON.
> Ahora podrá ver la fuente de vídeo en el televisor.
Notas:
- El Wireless PC-TV Link NO le proporciona control sobre el contenido de audio,
vídeo y/o PC que está reproduciendo.
Deberá iniciar o detener manualmente la reproducción de vídeos o canciones
en el PC mediante el teclado o el ratón conectados.
- El vídeo que se está reproduciendo se debe ver en el PC o en la pantalla del
televisor. En caso contrario, compruebe si se han realizado todos los pasos
correctamente y asegúrese de que dispone de una señal de vídeo en la salida
de televisión del PC.
Si dispone de dicha señal pero el receptor no muestra ninguna recepción,
consulte la sección de solución de problemas de este manual.
T
T
ESPAÑOL30
SBC_LM1000.qxd 18-02-2004 15:34 Pagina 30
PUT
PUT
VIDEO DC 9V
VIDEO DC 9V
ON/OFF
ON/OFF
AV SOURCE INPUT
AV SOURCE INPUT
R–AUDIO–L VIDEO DC 9V
R–AUDIO–L VIDEO DC 9V
TV OUTPUT
TV OUTPUT
R–AUDIO–L VIDEO DC 9V
R–AUDIO–L VIDEO DC 9V
ON/OFF
ON/OFF
ON/OFF
ON/OFF
Page 31

5. Resolución de problemas
Si surge algún problema, compruebe en primer lugar los puntos detallados a
continuación. Si no puede solucionar un problema siguiendo estos consejos,
póngase en contacto con la línea de ayuda (véase ‘Ayuda’) o consulte a su
distribuidor. Nunca intente abrir el aparato usted mismo, ya que esto
anularía la garantía.
En primer lugar, compruebe que todos los cables están correctamente
conectados.
Problema Solución
No hay imagen en • Encienda el PC e inicie la reproducción de un archivo de vídeo.
el televisor Asegúrese de que la salida de televisión de la tarjeta de vídeo está activada
y de que hay una señal de vídeo.
Consulte las instrucciones de uso de la tarjeta de vídeo para obtener
información sobre cómo activar la salida de televisión de la tarjeta de vídeo.
• Si dispone de un televisor portátil, puede comprobar si hay una señal de
salida de televisión en la tarjeta de vídeo. Para ello, transfiera el televisor al
PC y conecte la salida de televisión al televisor.
• Asegúrese de que ambas unidades están encendidas
(las dos luces de alimentación verde (1 y 11) están encendidas).
• Seleccione el canal EXT o AV correcto del televisor.
Lea las instrucciones de uso del televisor.
• Seleccione el mismo canal en las unidades transmisora y receptora
mediante los interruptores CHANNEL 6 y 16.
Mala calidad de • Desplace la unidad receptora por la superficie en la que se encuentra,
imagen/sonido centímetro a centímetro hasta que obtenga una buena calidad de imagen
en el televisor y sonido.
• Realice el mismo procedimiento con la unidad transmisora.
• Cambie el canal de frecuencia de ambas unidades mediante los
interruptores CHANNEL 6 y 16.
Asegúrese de que ambas unidades utilizan el mismo canal de frecuencia.
• Disminuya la distancia entre las unidades receptora y transmisora
(menos de 30 metros).
ESPAÑOL 31
SBC_LM1000.qxd 18-02-2004 15:34 Pagina 31
Page 32

Imagen errónea • Seleccione el canal EXT o AV correcto.
en el televisor Lea las instrucciones de uso del televisor.
• Puede que se esté recibiendo la señal de otro Wireless Link.
Establezca otro canal en ambas unidades mediante los interruptores
CHANNEL 6 y 16 para recibir la señal de su dispositivo.
Asegúrese de que selecciona el mismo canal para ambas unidades.
Se emite un • El zumbido puede estar causado por una funcionalidad implementada
zumbido al para un uso futuro. Desplace la unidad transmisora,
utilizar un centímetro a centímetro, hasta que el zumbido desaparezca.
mando a distancia En algunos casos no podrá solucionar este problema.
• Desplace la unidad transmisora, centímetro a centímetro, hasta que el
zumbido desaparezca. En algunos casos no podrá solucionar este problema.
La imagen del • Asegúrese de que la señal de salida de televisión está establecida en
televisor aparece formato CVBS o Compuesto.Consulte las instrucciones de uso de la tarjeta
en blanco y negro de vídeo para obtener información detallada.
6. Notas generales
• La calidad de imagen y sonido se ve afectada por el uso de hornos
microondas. Otros sistemas inalámbricos (Bluetooth, redes LAN
inalámbricas, etc.) también pueden afectar a la calidad de imagen y
sonido, y viceversa.
• El Wireless PC-TV Link es un producto basado en radiofrecuencia (RF).
Como tal, su rendimiento se puede ver afectado por las mismas
interferencias que otros productos basados en RF, como GSM, radios
portátiles, etc.
• El Wireless PC-TV Link no se limita a una habitación o vivienda.
Podrá utilizarlo allí donde desee, dentro y fuera de la vivienda.
Por lo tanto, cualquiera de sus vecinos (dentro del rango de
funcionamiento máximo) que también posea un Wireless Link
establecido en el mismo canal puede ver los mismos programas que se
estén reproduciendo en su fuente de vídeo.
• El PC no se puede controlar de forma remota si la frecuencia de la
portadora de la señal infrarroja se encuentra fuera del rango de
funcionamiento de 32 kHz a 40 kHz.
Esta funcionalidad infrarroja forma par te de una funcionalidad futura.
• Seguridad de ondas de radio: Cuando está encendido, el Philips Wireless
PC-TV Link transmite y recibe ondas de radio. El Philips Wireless PC-TV
Link cumple con los estándares definidos para dicho uso.
• El Philips Wireless PC-TV Link tiene un rango de funcionamiento
máximo de 100 metros al aire libre. Las paredes, los techos y otros
objetos grandes pueden limitar el rango de funcionamiento de uso hasta
un máximo de 30 metros en el interior de la vivienda.
ESPAÑOL32
SBC_LM1000.qxd 18-02-2004 15:34 Pagina 32
Page 33

7. Especificaciones técnicas
General Compatibilidad con
estándares de vídeo: PAL / NTSC / SECAM
Fuente de alimentación: 220 - 240 VCA / 50 Hz
Consumo operativo: 3 W (unidad receptora y unidad transmisora)
Unidad Entrada de audio: Audio estéreo (conectores RCA blanco/rojo)
transmisora Entrada de vídeo: CVBS (conector RCA amarillo)
Dimensiones: 14,3 cm (An.) x 9,3 cm (P.) x 4 cm (Al.)
Unidad receptora Salida (audio/vídeo): Audio estéreo (conectores RCA blanco/rojo)
CVBS (conector RCA amarillo)
Rango de funcionamiento: Hasta 100 metros al aire libre;
hasta 30 metros en interiores
Dimensiones: 14,3 cm (An.) x 9,3 cm (P.) x 4 cm (Al.)
Transmisión de Frecuencia de la por tadora: 2,4 GHz
audio/vídeo Número de canales: Cuatro
(puede variar según las normativas locales)
Tipo de modulación: FM
Tr ansmisión: <10 mW
Antenas: Integradas
Transmisión del Frecuencia de la portadora: 433,92 MHz
mando a Tipo de modulación: AM
distancia Tr ansmisión: <10 mW
Rango de recepción
de infrarrojos: Hasta 5 metros
Rango de frecuencia
de la portadora: 32 kHz - 40 kHz
Cordón para extensión del
mando a distancia: Sí, una luz infrarroja
Ayuda
Si tiene alguna pregunta sobre el LM1000, póngase en contacto con nuestra
línea de ayuda para obtener asistencia.
Consulte el número de teléfono en la lista de la página 2.
Antes de llamar, lea atentamente este manual, donde encontrará solución a
la mayoría de los problemas.
El número de modelo del Wireless PC-TV Link es LM1000.
Fecha de adquisición:_____ /_____ /_____
día /mes /año
ESPAÑOL 33
SBC_LM1000.qxd 18-02-2004 15:34 Pagina 33
Page 34

DEUTSCH
Wireless PC-TV Link
SBC LM1000
Herzlichen Glückwunsch! Sie haben sich für das Philips Wireless PC-TV Link
SBC LM1000 entschieden. Dieses Link wurde mit größter Sorgfalt
hergestellt und wird Ihnen jahrelang zuverlässige Dienste leisten.
Damit Sie in den Genuss der bestmöglichen Leistung kommen können,
verfügt das Philips Wireless PC-TV Link über einen Kanalwähler, mit dem Sie
den Kanal wählen können, der eine optimale Darstellung bietet.
Ungetrübter schnurloser Heimkomfort!
Hinweis: Das Wireless PC-TV Link dient NICHT zur Steuerung des PCs und/oder
des Audio/Video-Contents, den Sie wiedergeben. Die Wiedergabe von
Videos oder Audiotiteln auf Ihrem PC muss über die angeschlossene
Maus oder Tastatur manuell gestartet/gestoppt werden.
Inhalt
Helpline .............................................................................................2
Abbildungen.......................................................................................3
Einleitung .........................................................................................34
1. Wichtige Informationen ...........................................................35
Sicherheitsmaßnahmen.........................................................................................................35
Lieferumfang ...............................................................................................................................35
2. Funktionsübersicht...............................................................36-37
A) Sendeeinheit........................................................................................................................36
B) Empfangseinheit.................................................................................................................37
3. Installation.............................................................................38-40
Einrichten der Sendeeinheit ..............................................................................................38
Anschließen der Empfangseinheit an das Fernsehgerät ....................................39
Kanalwahl......................................................................................................................................39
Optionale Verbindung mit Audiogeräten............................................................39-40
4. Bedienung ...................................................................................40
5. Fehlerbehebung ....................................................................41-42
6. Allgemeine Hinweise.................................................................42
7. Technische Daten.......................................................................43
34
SBC_LM1000.qxd 18-02-2004 15:34 Pagina 34
Page 35

1.Wichtige Informationen
• Bitte lesen Sie sich die nachstehenden Anweisungen sorgfältig durch und
heben Sie diese Anleitung auf, damit Sie auch später bei Bedarf darin
nachschauen können.
• Anforderungen: - Fernsehgerät mit SCART- oder RCA-Anschluss.
- Video-Anforderungen: PC mit ordnungsgemäß installierter Videokarte mit
TV-Ausgang. Bei dem TV-Ausgangsanschluss sollte es sich um einen RCAKonnektor handeln.
- Audio-Anforderungen: PC mit ordnungsgemäß installierter Soundkar te mit
3,5-mm-Klinkenstecker.
Sicherheitsmaßnahmen
• Benutzen Sie dieses Produkt nicht an feuchten Orten oder in der Nähe von
Wasser.
• Setzen Sie dieses Produkt nicht übermäßiger Wärme aus.
• Öffnen Sie dieses Produkt nicht. Bringen Sie es im Fall von technischen
Schwierigkeiten zu Ihrem Philips Fachhändler.
• Decken Sie dieses Produkt nicht ab.
•Verbinden Sie die Netzadapter ausschließlich mit einer Steckdose, die eine
Netzspannung von 220-240 V AC mit einer Netzfrequenz von 50 Hz liefert.
• Benutzen Sie nur die mitgelieferten Netzadapter oder einen Adaptertyp,
der der Sicherheitsnorm EN 60950 entspricht und über die folgenden
Spezifikationen verfügt: 9 V DC/ 300 mA.
• Die Funktion von nicht ausreichend geschützten oder empfindlichen
elektronischen Geräten kann durch die Verwendung dieses Produkts
beeinträchtigt werden.
Diese Störung kann Schäden an beiden Geräten zur Folge haben.
Bitte prüfen Sie, ob in der Nähe befindliche Geräte durch dieses Produkt
beeinträchtigt werden können, bevor Sie das Produkt in Betrieb nehmen.
Lieferumfang
Bitte kontrollieren Sie, ob die nachstehend genannten Teile mit dem
Wireless PC-TV Link mitgeliefert wurden. Sie sind vorgesehen,um Ihnen
bei der Einrichtung und Benutzung des Wireless PC-TV Link zu helfen.
• Sendeeinheit
• Empfangseinheit
•Zwei Netzadapter
•RCA+ 3,5-mm-Klinkenstecker auf RCA Audio/Video-Kabel (gelb/rot/weiß
auf gelb/schwarz)
•RCA auf RCA-Audiokabel (rot/weiß)
•RCA auf RCA-Videokabel (gelb)
•RCA/ SCART-Adapter (nicht bei der Ausführung für die USA)
• Audio-Splitter (3,5-mm-Klinkenstecker)
•Fernbedienungsverlängerungskabel, nur in Verbindung mit einer InfrarotPC-Fernbedienung (diese ist nicht im Lieferumfang enthalten).
Bitte bewahren Sie dieses Kabel für zukünftige Zwecke auf.
• Bedienungsanleitung
DEUTSCH 35
SBC_LM1000.qxd 18-02-2004 15:34 Pagina 35
Page 36

DEUTSCH36
2. Funktionsübersicht
A) Sendeeinheit
1 Einschaltanzeige
Leuchtet grün, wenn das Gerät eingeschaltet ist.
2 Lampe für Fernbedienungsempfänger
Anzeigelampe für (zukünftige) Verwendung, zusammen mit einem PC mit
PC-Fernbedienungsfunktion.
3 ON/OFF-Schalter
Zum Ein- und Ausschalten der Sendeeinheit.
4 DC 9 V —<±
Gleichstromversorgungsbuchse zur Verbindung mit der Netzspannung
(über Netzadapter)
5AV SOURCE INPUT Anschlüsse
Zum Verbinden der Sendeeinheit mit dem PC über den
TV-Out-Ausgang der Videokar te und den 3,5-mm-Stereo-Klinkenstecker
der Soundkarte (Audio-Ausgang).
VIDEO (gelb) - Video-Eingangsanschluss
R-AUDIO-L - linker (L) und rechter (R) Audio-Eingangsanschluss
(R-rot / L-weiß)
6 CHANNEL-Schalter
Zum Wählen des gewünschten Frequenzkanals des Audio/Video-Signals.
Die Anzahl der wählbaren Kanäle kann von Land zu Land unterschiedlich
sein.
7IR
Optionaler Anschluss für (zukünftige) Verwendung, zusammen mit einem
PC mit PC-Fernbedienungsfunktion.
8 Netzadapter
9 RCA+ 3,5-mm-Klinkenstecker auf RCA Audio/Video-Kabel
(gelb/rot/weiß auf gelb/schwarz)
Zum Verbinden des PCs mit der Sendeeinheit über die
AV SOURCE INPUT Anschlüsse.
10 Audio-Splitter (3,5-mm-Klinkenstecker)
Zum Verbinden der Sendeeinheit mit dem PC, falls PC-Lautsprecher an
die PC-Soundkarte angeschlossen sind.
SBC_LM1000.qxd 18-02-2004 15:34 Pagina 36
Page 37

DEUTSCH 37
B)Empfangseinheit
11 Einschaltanzeige
Leuchtet grün, wenn das Gerät eingeschaltet ist.
12 Lampe für Fernbedienungsempfänger
Anzeigelampe für (zukünftige) Verwendung, zusammen mit einem PC mit
PC-Fernbedienungsfunktion.
13 ON/OFF-Schalter
Zum Ein- und Ausschalten der Empfangseinheit.
14 DC 9 V —<±
Gleichstromversorgungsbuchse zur Verbindung mit der Netzspannung
(über Netzadapter)
15 TV OUTPUT Anschlüsse
Zum Verbinden des Senders mit einem Fernsehgerät oder einer
Stereoanlage mit RCA- oder SCART-Anschluss .
VIDEO (gelb) - Video-Ausgangsanschluss.
R-AUDIO-L - linker (L) und rechter (R) Audio-Ausgangsanschluss
(R-rot / L-weiß).
16 CHANNEL-Schalter
Zum Wählen des gewünschten Frequenzkanals des Audio/Video-Signals.
Die Anzahl der wählbaren Kanäle kann von Land zu Land unterschiedlich
sein.
17 Netzadapter
18 RCA auf RCA-Audiokabel (rot/weiß)
Zum Verbinden der Empfangseinheit mit den Audio-Eingängen des
Fernseh- oder Audiogeräts.
19 RCA auf RCA-Videokabel (gelb)
Zum Verbinden der Empfangseinheit mit den Video-Eingängen des
Fernsehgeräts über die TV OUTPUT Anschlüsse.
20 RCA/ SCART-Adapter (nicht bei der Ausführung für die USA)
Zum Verbinden der Empfangseinheit mit den Audio/Video-Eingängen des
Fernsehgeräts, falls das Fernsehgerät mit einem SCART-Anschluss
ausgestattet ist.
SBC_LM1000.qxd 18-02-2004 15:34 Pagina 37
Page 38

3. Installation
Einrichten der Sendeeinheit
1 Stellen Sie die Sendeeinheit in die Nähe des PCs.
Stellen Sie niemals andere Geräte auf die Sendeeinheit.
2 Sehen Sie in der Bedienungsanleitung für die PC-Soundkarte nach, wo der
Audio-Ausgang angeordnet ist.
3 Verbinden Sie den 3,5-mm-Klinkenstecker (schwarz) des mitgelieferten
Audio/Video-Kabels (9) mit dem Audio-Ausgang des PCs.
Bitte beachten Sie, dass sich die Rückseite Ihres PCs von dem in der Abbildung
dargestellten Beispiel unterscheiden kann.
Wenn PC-Lautsprecher mit dem PC verbunden sind
3a Ziehen Sie den PC-Lautsprecherstecker aus dem Audio-Ausgang des PCs
heraus und verbinden Sie ihn mit dem mitgelieferten Audio-Splitter (10) .
3b Verbinden Sie den 3,5-mm-Klinkenstecker (schwarz) des mitgelieferten
Audio/Video-Kabels (9) mit dem Audio-Splitter (10).
3c Verbinden Sie den Audio-Splitter (10) mit dem Audio-Ausgang des PCs.
4 Verbinden Sie den Videostecker (gelb) des mitgelieferten
Audio/Video-Kabels (9) mit dem TV-Out-Ausgang des PCs.
Lesen Sie in der Bedienungsanleitung für den PC oder die Videokarte nach,
wie man die TV-Out-Funktion aktiviert. Wenn Sie nicht in der Lage sind, den
TV-Out-Ausgang Ihrer Videokar te zu aktivieren, wenden Sie sich an das
Helpdesk des PC- oder Videokar ten-Herstellers.
5 Verbinden Sie die Audio/Video-Stecker am anderen Ende des
mitgelieferten Audio/Video-Kabels (9) mit den AV SOURCE INPUT
Anschlüssen (5) an der Sendeeinheit.
Achten Sie darauf, dass der gelbe Stecker mit dem gelben Video-Eingang
verbunden wird und der weiße und rote Audiostecker mit dem linken (L)
bzw. dem rechten (R) Audio-Eingang.
6 Verbinden Sie den Netzadapter (8) mit einer Netzsteckdose und der
DC 9V —<± Versorgungsbuchse (4) der Sendeeinheit.
O
U
O
U
DEUTSCH38
SBC_LM1000.qxd 18-02-2004 15:34 Pagina 38
L
L
M
M
1
1
1
1
0
0
0
0
T
T
V
V
L
L
IN
IN
K
K
T
T
R
R
A
A
N
N
S
S
M
M
IT
I
T
T
T
E
E
R
R
AUDIO
INPUTTVINPUT
AUDIO
INPUTTVINPUT
URCE INPUT
URCE INPUT
DIO–L VIDEO DC 9V
DIO–L VIDEO DC 9V
AUDIO
INPUTTVINPUT
AV SOURCE INPUT
AV SOURCE INPUT
VIDEO DC 9V
R–AUDIO–L
R–AUDIO–L
VIDEO DC 9V
CHANNEL
CHANNEL
IR
IR
ON/OFF
ON/OFF
1 2 3 4
1 2 3 4
AUDIO
INPUTTVINPUT
AV SOURCE INPUT
AV SOURCE INPUT
R–AUDIO–L
VIDEO DC 9V
R–AUDIO–L
VIDEO DC 9V
CHANNEL
CHANNEL
IR
IR
ON/OFF
ON/OFF
1 2 3 4
1 2 3 4
ON/OFF
ON/OFF
Page 39

Anschließen der Empfangseinheit an das
Fernsehgerät
1 Stellen Sie die Empfangseinheit in die Nähe des Fernsehgeräts.
2 Verbinden Sie den mitgelieferten RCA/ SCART-Adapter (20) mit dem
SCART-Anschluss des Fernsehgeräts.
3 Verbinden Sie das mitgelieferte Videokabel (19) und das mitgelieferte
Audiokabel (18) sowohl mit dem Adapter als auch mit den TV OUTPUT
Anschlüssen (15) der Empfangseinheit.
Achten Sie darauf, die gelben Stecker mit den gelben Video-Ein- und
Ausgängen zu verbinden und den roten und den weißen Stecker mit dem
roten bzw. dem weißen Audio-Eingang bzw. -Ausgang.
4 Verbinden Sie den Netzadapter (17) mit einer Netzsteckdose und der
DC 9V —<± Versorgungsbuchse (14) der Empfangseinheit.
Hinweis: Falls das Fernsehgerät mit RCA-Anschlüssen ausgestattet ist, können Sie
die TV OUTPUT Anschlüsse (13) der Empfangseinheit direkt mit den
entsprechenden RCA-Anschlüssen des Fernsehgeräts verbinden.
Achten Sie darauf, den gelben, weißen und roten Stecker mit dem
gelben, weißen bzw. roten Eingang der Empfangseinheit und des
Fernsehgeräts zu verbinden.
Kanalwahl
• Stellen Sie die CHANNEL-Schalter (6 und 16) an beiden Einheiten auf
Kanal 1.
• Wenn Störungen auftreten (z.B.Verschlechterung des Bildes),
stellen Sie beide Schalter auf einen anderen Kanal.
> Beide Einheiten sind jetzt einsatzbereit.
Hinweis: Beide Einheiten müssen immer auf den gleichen Kanal eingestellt sein.
Optionale Verbindung mit Audiogeräten
1 Verbinden Sie das eine Ende des mitgelieferten Videokabels (19) mit dem
Video-Eingang (gelb) des SCART-Adapters (oder direkt mit dem gelben
Video-Eingang des Fernsehgeräts) und das andere Ende mit dem
VIDEO-Ausgang (15) der Empfangseinheit.
2 Verbinden Sie das mitgelieferte Audiokabel (18) mit dem AUX-Eingang
des Audiogeräts und den R-AUDIO-L Ausgängen (15) der
Empfangseinheit.
Achten Sie darauf, den weißen und den roten Stecker mit dem linken (L)
bzw. dem rechten (R) Eingang zu verbinden.Welches der korrekte Eingang
ist, können Sie in der Bedienungsanleitung für das Audiogerät nachlesen.
R
L
TV
T
T
R
L
TV
DEUTSCH 39
SBC_LM1000.qxd 18-02-2004 15:34 Pagina 39
TV OUTPUT
TV OUTPUT
R–AUDIO–L
VIDEO DC 9V
R–AUDIO–L
VIDEO DC 9V
CHANNEL
CHANNEL
ON/OFF
ON/OFF
1 2 3 4
1 2 3 4
PUT
PUT
VIDEO DC 9V
VIDEO DC 9V
ON/OFF
ON/OFF
R
L
TV
AV SOURCE INPUT
AV SOURCE INPUT
R–AUDIO–L
VIDEO
VIDEO
R–AUDIO–L
CHANNEL
CHANNEL
IR
IR
1 2 3 4
1 2 3 4
TV OUTPUT
TV OUTPUT
R–AUDIO–L
VIDEO
R–AUDIO–L
VIDEO
CHANNEL
CHANNEL
1 2 3 4
1 2 3 4
TV OUTPUT
TV OUTPUT
R–AUDIO–L
VIDEO DC 9V
R–AUDIO–L
VIDEO DC 9V
CHANNEL
CHANNEL
ON/OFF
ON/OFF
1 2 3 4
1 2 3 4
R
L
TV
Page 40

3 Verbinden Sie den Netzadapter (17) mit einer Netzsteckdose und der
DC 9V —<± Versorgungsbuchse (14) der Empfangseinheit.
> Jetzt sind die Audio-Informationen vom PC über das Audiogerät zu
hören.
4 Spielen Sie eine Audio-Datei auf dem PC ab,um zu prüfen, ob das
Audiosignal am Audio-Ausgang zur Verfügung steht.
4. Bedienung
1 Schalten Sie den PC ein und wählen Sie eine Audio- oder Video-Datei, die
Sie wiedergeben möchten.
2 Starten Sie die Wiedergabe der gewählten Datei.
Wie man Audio/Video-Dateien auswählt und wiedergibt, können Sie in
der Bedienungsanleitung Ihres Windows Betriebssystems nachlesen.
3 Vergewissern Sie sich,dass Sie den auf Ihrem PC-Monitor abgespielten
Film sehen oder die Musik von den PC-Lautsprechern hören, falls diese
angeschlossen sind.
4 Aktivieren Sie die TV-Out-Funktion Ihrer PC-Videokarte und
vergewissern Sie sich, dass das Videosignal am TV-Out-Ausgang zur
Verfügung steht.
Einzelheiten hierzu finden Sie in der Bedienungsanleitung für Ihre Videokarte.
5 Schalten Sie das Fernsehgerät ein.
6 Wählen Sie den externen Eingang (EXT oder AV) an Ihrem Fernsehgerät.
Lesen Sie die diesbezüglichen Informationen in der Bedienungsanleitung
Ihres Fernsehgeräts nach.
7 Stellen Sie den ON/OFF-Schalter an der Sendeeinheit (3) und an der
Empfangseinheit (13) auf ON.
> Jetzt können Sie das Signal von Ihrer Videoquelle auf dem Fernsehgerät
sehen.
Hinweise:
- Das Wireless PC-TV Link dient NICHT zur Steuerung des PCs und/oder des
Audio/Video-Contents, den Sie wiedergeben.
Die Wiedergabe von Videos oder Audiotiteln auf Ihrem PC muss über die
angeschlossene Maus oder Tastatur manuell gestartet/gestoppt werden.
- Sie müssten die Videoinformationen, die Sie mit dem PC wiedergeben, auf dem
Fernsehbildschirm sehen. Ist dies nicht der Fall, kontrollieren Sie bitte, ob Sie alle
Schritte korrekt durchgeführt haben, und vergewissern Sie sich, dass ein
Videosignal am TV-Out-Ausgang des PCs zur Verfügung steht. Wenn ein
TV-Signal am TV-Out-Ausgang des PCs zur Verfügung steht, Sie aber keinen
Empfang an der Empfangseinheit haben, sehen Sie bitte im Abschnitt
“Fehlerbehebung” dieses Handbuchs nach.
T
T
DEUTSCH40
SBC_LM1000.qxd 18-02-2004 15:34 Pagina 40
PUT
PUT
VIDEO DC 9V
VIDEO DC 9V
ON/OFF
ON/OFF
AV SOURCE INPUT
AV SOURCE INPUT
R–AUDIO–L VIDEO DC 9V
R–AUDIO–L VIDEO DC 9V
TV OUTPUT
TV OUTPUT
R–AUDIO–L VIDEO DC 9V
R–AUDIO–L VIDEO DC 9V
ON/OFF
ON/OFF
ON/OFF
ON/OFF
Page 41

5. Fehlerbehebung
Prüfen Sie im Falle einer Fehlfunktion zunächst die in der nachstehenden
Liste aufgeführten Punkte. Wenn ein Problem trotz Abhilfemaßnahmen nicht
behoben werden kann, wenden Sie sich an die Helpline
(siehe ‘Benötigen Sie Hilfe?’) oder an Ihren Fachhändler.
Ver suchen Sie niemals, das Gerät selbst zu öffnen,
weil hierdurch Ihr Garantieanspruch erlischt.
Kontrollieren Sie zuerst alle Kabel, um sicherzustellen, dass sie korrekt
angeschlossen sind.
Problem Abhilfe
Kein Bild auf dem • Schalten Sie den PC ein und starten Sie die Wiedergabe einer Video-Datei.
Fernsehgerät Ver gewissern Sie sich, dass der TV-Out-Ausgang der Videokarte aktiviert ist
und dass ein Videosignal vorhanden ist. Wie man den TV-Out-Ausgang der
Videokarte aktiviert, können Sie in der Bedienungsanleitung der Videokarte
nachlesen.
•Wenn Sie ein tragbares Fernsehgerät besitzen, können Sie prüfen,
ob ein TV-Out-Signal am Ausgang der Videokar te vorhanden ist,
indem Sie das Fernsehgerät zum PC bringen und den TV-Out-Ausgang
direkt mit dem Fernsehgerät verbinden.
•Vergewissern Sie sich, dass beide Einheiten eingeschaltet sind
(beide grünen Anzeigelampen (1 und 11) leuchten).
• Wählen Sie den korrekten EXT- oder AV-Kanal am Fernsehgerät.
Lesen Sie die diesbezüglichen Informationen in der Bedienungsanleitung des
Fernsehgeräts nach.
• Wählen Sie an der Empfangs- und an der Sendeeinheit mit den
CHANNEL-Schaltern 6 und 16 den gleichen Kanal.
Schlechte •Verschieben Sie die Empfangseinheit auf der Stellfläche
Bildqualität / Zentimeter für Zentimeter, bis eine zufriedenstellende Bild- und Tonqualität
Tonqualität erreicht ist.
am Fernsehgerät • Führen Sie die gleiche Prozedur für die Sendeeinheit durch.
• Stellen Sie beide Einheiten mit Hilfe der CHANNEL-Schalter 6 und 16 auf
einen anderen Frequenzkanal.Vergewissern Sie sich, dass beide Einheiten
den gleichen Frequenzkanal nutzen.
•Verkleinern Sie den Abstand zwischen der Sende- und der Empfangseinheit
(weniger als 30 Meter).
DEUTSCH 41
SBC_LM1000.qxd 18-02-2004 15:34 Pagina 41
Page 42

Falsches Bild auf • Wählen Sie den korrekten EXT- oder AV-Kanal.
dem Fernsehgerät Näheres hierzu finden Sie in der Bedienungsanleitung des Fernsehgeräts.
• Es ist möglich, dass ein Signal von einem anderen Wireless Link aufgefangen
wird. Schalten Sie beide Einheiten mit Hilfe der CHANNEL-Schalter 6 und 16
auf einen anderen Kanal, damit Sie Ihr eigenes Signal empfangen.Vergewissern
Sie sich, dass beide Einheiten auf den gleichen Kanal eingestellt sind!
Summton • Der Summton könnte durch eine Funktion verursacht werden,
bei Verwendung die für zukünftige Zwecke implementiert wurde.
einer Ver schieben Sie die Sendeeinheit Zentimeter um Zentimeter,
Fernbedienung bis der Summton verschwindet.
In manchen Fällen werden Sie dieses Problem nicht beheben können.
•Verschieben Sie die Sendeeinheit Zentimeter um Zentimeter, bis der
Summton verschwindet.
In manchen Fällen werden Sie dieses Problem nicht beheben können.
Fernsehgerät zeigt •Vergewissern Sie sich, dass das TV-Out-Signal im FBAS- oder Composite-
Schwarzweiß- Format vorliegt.
Bilder Einzelheiten hierzu finden Sie in der Bedienungsanleitung für Ihre Videokarte.
6.Allgemeine Hinweise
• Die Bild- und Tonqualität wird durch den Betrieb von Mikrowellengeräten
beeinflusst. Auch andere schnurlose Systeme (Bluetooth,Wireless LANs,
usw.) können die Ton- und Bildqualität beeinträchtigen, ebenso wie dies
umgekehrt der Fall sein kann.
• Das Wireless PC-TV Link ist ein Produkt, dessen Funktion auf der
Hochfrequenztechnik beruht. Als solches kann seine Leistung durch die
gleiche Art von Störeinflüssen beeinträchtigt werden wie die Leistung wie
Mobiltelefonen (GSMs), portablen Radios und anderen HF-Produkten.
• Das Einsatzgebiet des Wireless PC-TV Link beschränkt sich nicht auf nur
einen Raum oder ein Haus. Sie können es überall im Haus und um das
Haus herum einsetzen. Daher kann sich jeder, der sich in der Nähe Ihres
Hauses aufhält (bis zur maximalen Reichweite) und ebenfalls über ein
Wireless Link verfügt, das auf den gleichen Kanal eingestellt ist, die
Programme ansehen, die mit Ihrer Videosignalquelle wiedergegeben
werden.
• Der PC kann nicht ferngesteuer t werden, wenn die Trägerfrequenz des
IR-Signals außerhalb des Betriebsfensters von 32 kHz bis 40 kHz liegt.
Diese Infrarot-Funktion ist Teil einer zukünftigen Funktionalität.
• Sicherheitshinweis in Bezug auf Radiowellen:
Wenn das Philips Wireless PC-TV Link eingeschaltet ist,sendet und
empfängt es Radiowellen. Das Philips Wireless PC-TV Link erfüllt die
Anforderungen der Normen, die diesbezüglich verfasst wurden.
• Das Philips Wireless PC-TV Link hat eine Reichweite von bis zu 100 Metern
durch die Luft.Wände, Decken und andere große Objekte können die
nutzbare Reichweite im Haus auf bis zu 30 Meter beschränken.
DEUTSCH42
SBC_LM1000.qxd 18-02-2004 15:34 Pagina 42
Page 43

7.Technische Daten
Allgemeines Unterstützte Videonormen: PAL / NTSC / SECAM
Stromversorgung: 220 - 240 V AC / 50 Hz
Leistungsaufnahme: 3 W (Sende- und Empfangseinheit)
Sendeeinheit Audio-Eingang: Stereo Audio (weißer/roter RCA-Anschluss)
Video-Eingang: FBAS (gelber RCA-Anschluss)
Abmessungen: 14,3 cm (B) x 9,3 cm (T) x 4 cm (H)
Empfangseinheit Ausgang (Audio/Video): Stereo Audio (weißer/roter RCA-Anschluss)
FBAS (gelber RCA-Anschluss)
Reichweite: Bis zu 100 Metern durch die Luft;
bis zu 30 Metern in Räumen
Abmessungen: 14,3 cm (B) x 9,3 cm (T) x 4 cm (H)
Audio / Video Trägerfrequenz: 2,4 GHz
Übertragung Anzahl der Kanäle: vier (kann je nach lokalen Richtlinien
unterschiedlich sein)
Art der Modulation: FM
Sendeleistung: <10 mW
Antennen: eingebaut
Fernbedienung Trägerfrequenz: 433,92 MHz
Übertragung Art der Modulation: AM
Sendeleistung: <10 mW
Reichweite des IR-Empfangs: Bis zu 5 Meter
Trägerfrequenzbereich: 32 kHz - 40 kHz
Fernbedienungsverlängerungskabel: Ja, eine Infrarot-Lampe
Benötigen Sie Hilfe?
Falls Sie Fragen zum LM1000 haben sollten, wenden Sie sich bitte an unsere
Helpline! Sie finden die Telefonnummer in der Liste auf Seite 2.
Lesen Sie sich dieses Handbuch bitte sorgfältig durch, bevor Sie anrufen.
Oft können Sie Ihre Probleme selbst lösen.
Die Modellnummer des Wireless PC-TV Link lautet LM1000.
Kaufdatum: _____ /_____ /_____
Ta g /Monat /Jahr
DEUTSCH 43
SBC_LM1000.qxd 18-02-2004 15:34 Pagina 43
Page 44

NEDERLANDS
Wireless PC-TV Link
SBC LM1000
Gefeliciteerd! Met de Philips Wireless PC-TV Link SBC LM1000 hebt u een
product gekocht dat aan de strengste technische normen voldoet,
zodat u het jaren zonder problemen kunt gebruiken.
De Philips Wireless PC-TV Link heeft een kanaalkeuzeschakelaar waarmee u
het zendkanaal kunt kiezen dat het hoogste prestatieniveau en de beste
beeldkwaliteit oplevert. Puur wireless gemak in en rond het huis!
Opmerking: Met de Wireless PC-TV Link kunt u NIET uw PC bedienen of het
afgespeelde geluid of beeld aanpassen.
Het starten en stoppen van video of muziek die u via uw PC
afspeelt doet u dus via de muis of het toetsenbord.
Inhoud
Helpdesk ...........................................................................................2
Afbeeldingen......................................................................................3
Inleiding............................................................................................44
1. Belangrijke informatie...............................................................45
Veiligheidsmaatregelen..........................................................................................................45
Inhoud verpakking ...................................................................................................................45
2. Functieoverzicht...................................................................46-47
A) Zender....................................................................................................................................46
B) Ontvanger.............................................................................................................................47
3. Aansluiten..............................................................................48-50
Zender aansluiten....................................................................................................................48
Ontvanger op de TV aansluiten ......................................................................................49
Kanaal instellen..........................................................................................................................49
Optionele verbinding met stereo-installatie.....................................................49-50
4. Bediening ....................................................................................50
5. Problemen oplossen.............................................................51-52
6. Algemene opmerkingen............................................................52
7. Technische specificaties.............................................................53
44
SBC_LM1000.qxd 18-02-2004 15:34 Pagina 44
Page 45

1. Belangrijke informatie
• Lees het volgende aandachtig door en bewaar deze handleiding om er
later iets in te kunnen opzoeken.
•U hebt nodig: - TV met SCART- of cinchaansluiting(en).
- Voor video: PC met een correct geïnstalleerde videokaart die een
TV-uitgang heeft. De TV-Out-connector moet een cinch-aansluiting zijn.
- Voor audio: PC met een correct geïnstalleerde geluidskaart die
een aansluiting van 3,5 mm heeft.
Veiligheidsmaatregelen
• Gebruik dit product nooit in vochtige ruimten of dicht bij water.
• Stel dit product niet bloot aan extreme hitte.
• Open de behuizing van het product niet.
Breng het product bij technische problemen naar uw Philips-leverancier.
• Dek het product niet af.
• Sluit de netadapter alleen aan op een netspanning van 220-240 V AC, 50 Hz.
• Gebruik alleen de bijgeleverde netadapters of een type met het
veiligheidskeurmerk EN60950 en de volgende specificatie:
9 V DC / 300 mA.
•Onvoldoende afgeschermde of gevoelige elektronische apparatuur kan
door het gebruik van dit product worden gestoord.
Deze storingen kunnen schade aan andere apparatuur toebrengen.
Controleer of apparatuur in de omgeving door dit product wordt
beïnvloed voordat u het in gebruik neemt.
Inhoud verpakking
Controleer of de verpakking van de Wireless PC-TV Link de volgende
onderdelen bevat.Al deze onderdelen zijn bestemd voor het correct
aansluiten en gebruiken van uw Wireless PC-TV Link.
• Zender
• Ontvanger
•Twee netadapters
• Audio/videokabel met cinch + 3,5 mm mini-jack naar cinch
(geel/rood/wit naar geel/zwart)
• Audiokabel met aan beide uiteinden cinchpluggen (rood/wit)
• Videokabel met aan beide uiteinden een cinchplug (geel)
• Cinch-SCART-adapter (niet in de VS)
• Audiosplitter (3,5 mm mini-jack)
• Uitbreidingssnoer voor bedienen op afstand, alleen nodig voor infrarode
afstandsbediening voor de PC (niet geleverd).
Bewaar dit snoertje voor latere toepassingen.
• Gebruiksaanwijzing
NEDERLANDS 45
SBC_LM1000.qxd 18-02-2004 15:34 Pagina 45
Page 46

NEDERLANDS46
2. Functieoverzicht
A) Zender
1Voedingslampje
Licht groen op als het apparaat is ingeschakeld.
2 Lampje voor ontvanger voor afstandsbediening
Indicatielampje voor (toekomstig) gebruik,
bij toepassing van een PC met afstandsbediening.
3 Aan/uit-schakelaar
Schakelt de zender in of uit.
4 DC 9V —<±
Aansluiting voor voedingsspanning (DC) vanaf de netadapter
5AV SOURCE INPUT-connectors
Voor aansluiting van de zender op de TV-uitgang van de videokaart in
uw PC en op de 3,5 mm stereo Audio-uitgang van uw geluidskaart.
VIDEO (geel) - video-ingang
R-AUDIO-L - audio-ingangen, links (L) en rechts (R)
(R=rood / L=wit)
6 Kanaalkeuzeschakelaar
Met deze schakelaar kiest u de gewenste frequentie van het audio/
videosignaal. Het aantal beschikbare kanalen kan per land verschillen.
7IR
Optionele connector voor (toekomstig) gebruik bij
een PC met afstandsbediening.
8 Netadapter
9 Audio/videokabel met cinch + 3,5 mm mini-jack
naar cinch (geel/rood/wit naar geel/zwart)
Voor aansluiting van de PC op de zender via de connectors
AV SOURCE INPUT.
10 Audiosplitter (3,5 mm mini-jack)
Voor aansluiting van de zender op de PC als u op de geluidskaart van
de PC luidsprekers hebt aangesloten.
SBC_LM1000.qxd 18-02-2004 15:34 Pagina 46
Page 47

NEDERLANDS 47
B)Ontvanger
11 Voedingslampje
Licht groen op als het apparaat is ingeschakeld.
12 Lampje voor ontvanger voor afstandsbediening
Indicatielampje voor (toekomstig) gebruik bij een PC met
afstandsbediening.
13 Aan/uit-schakelaar
Schakelt de ontvanger in of uit.
14 DC 9V —<±
Aansluiting voor voedingsspanning (DC) vanaf de netadapter
15 TV OUTPUT-connectors
Voor aansluiting van de zender op een TV of geluidsinstallatie met
cinch- of SCART-aansluiting.
VIDEO (geel) - video-uitgang.
R-AUDIO-L - audio-uitgangen links (L) en rechts (R) (R=rood/L=wit).
16 Kanaalkeuzeschakelaar
Met deze schakelaar kiest u de gewenste frequentie van het
audio/videosignaal.
Het aantal beschikbare kanalen kan per land verschillen.
17 Netadapter
18 Audiokabel met aan beide uiteinden cinchpluggen (rood/wit)
Voor aansluiting van de ontvanger op de audio-ingang van uw TV of
geluidsinstallatie.
19 Videokabel met aan beide uiteinden cinchplug (geel)
Voor verbinding tussen de TV OUTPUT van de ontvanger en
de video-ingang van uw TV.
20 Cinch-SCART-adapter (niet in de VS)
Voor aansluiting van de ontvanger op de audio/video-ingangen van
uw TV als die een SCART-connector heeft.
SBC_LM1000.qxd 18-02-2004 15:34 Pagina 47
Page 48

3.Aansluiten
Zender aansluiten
1 Zet de zender dicht bij de PC.
Plaats nooit andere apparatuur boven op de zendereenheid.
2 Kijk in de handleiding bij de geluidskaart van uw PC waar de
audio-uitgang van die kaart zich bevindt.
3 Sluit het plugje van 3,5 mm (zwart) van de bijgeleverde
audio/video-kabel (9) aan op de audio-uitgang van uw PC.
De achterzijde van uw PC kan uiteraard afwijken van het voorbeeld in de
afbeelding.
Als u luidsprekers op uw PC hebt aangesloten
3a Tr ek het plugje van de luidsprekerkabel uit de audio-uitgang van de PC en
sluit het aan op bijgeleverde audiosplitter (10) .
3b Sluit de mini-jackplug van 3,5 mm (zwart) van de bijgeleverde
audio/video-kabel (9) aan op de audiosplitter (10).
3c Sluit de audiosplitter (10) aan op de audio-uitgang van uw PC.
4 Sluit de videoplug (geel) van de bijgeleverde audio/video-kabel (9) aan op
de TV-uitgang van uw PC.
Kijk in de handleiding van uw PC of videokaart voor informatie over het
activeren van de TV-uitgang. Kunt u de TV-uitgang niet activeren, neem dan
contact op met de leverancier van de PC of de videokaart.
5 Steek de audio/video-plugjes aan het andere uiteinde van de bijgeleverde
audio/video-kabel (9) in de AV SOURCE INPUT-connectors (5) op de
zender.
Steek de gele plug in de gele video-ingang, de witte plug in de witte
audio-ingang (L, links) en de rode plug in de rode audio-ingang (R, rechts).
6 Verbind de AC-netadapter (8) met de aansluiting DC 9V —<± voor
voedingsspanning (4) op de zender en daarna met een stopcontact.
O
U
O
U
NEDERLANDS48
SBC_LM1000.qxd 18-02-2004 15:34 Pagina 48
L
L
M
M
1
1
1
1
0
0
0
0
T
T
V
V
L
L
IN
IN
K
K
T
T
R
R
A
A
N
N
S
S
M
M
IT
I
T
T
T
E
E
R
R
AUDIO
INPUTTVINPUT
AUDIO
INPUTTVINPUT
URCE INPUT
URCE INPUT
DIO–L VIDEO DC 9V
DIO–L VIDEO DC 9V
AUDIO
INPUTTVINPUT
AV SOURCE INPUT
AV SOURCE INPUT
VIDEO DC 9V
R–AUDIO–L
R–AUDIO–L
VIDEO DC 9V
CHANNEL
CHANNEL
IR
IR
ON/OFF
ON/OFF
1 2 3 4
1 2 3 4
AUDIO
INPUTTVINPUT
AV SOURCE INPUT
AV SOURCE INPUT
R–AUDIO–L
VIDEO DC 9V
R–AUDIO–L
VIDEO DC 9V
CHANNEL
CHANNEL
IR
IR
ON/OFF
ON/OFF
1 2 3 4
1 2 3 4
ON/OFF
ON/OFF
Page 49

Ontvanger op de TV aansluiten
1 Zet de ontvanger dicht bij de TV.
2 Sluit de bijgeleverde RCA-SCART-adapter (20) aan op de
SCART-connector van uw TV.
3 Sluit de bijgeleverde videokabel (19) en audiokabel (18) aan op de adapter
en op de TV OUTPUT-connectors (15) van de ontvanger.
Controleer of u de gele pluggen in de gele video-ingang en video-uitgang
hebt gestoken en de rode en witte cinchpluggen in de rode en witte audioingang en audio-uitgang.
4 Verbind de AC-netadapter (17) met de aansluiting DC 9V —<± voor
voedingsspanning (14) op de ontvanger en daarna met een stopcontact.
Opmerking: Hebt u een TV met cinch-aansluitingen, dan kunt u de
TV OUTPUT-aansluitingen (13) van de ontvanger rechtstreeks met
die cinch-aansluitingen verbinden.
Zorg dat u zowel op de ontvanger als op de TV de gele, witte en
rode pluggen in de connectors met dezelfde kleuren steekt.
Kanaal instellen
• Zet de CHANNEL-schakelaar (6 en 16) van beide eenheden op kanaal 1.
• Als er storing optreedt (b.v. slecht beeld), kies dan een ander kanaal en
stel dat op beide eenheden in.
> Beide eenheden zijn nu gebruiksklaar.
Opmerking: Zorg dat op beide eenheden altijd hetzelfde kanaal is ingesteld.
Optionele verbinding met stereo-installatie
1 Sluit een uiteinde van de bijgeleverde videokabel (19) aan op de
video-ingang (geel) van de SCART-adapter (of direct op de gele
video-ingang van uw TV) en het andere uiteinde op de VIDEO-uitgang (15)
van de ontvanger.
2 Sluit de bijgeleverde audiokabel (18) aan op de AUX-ingang van de
stereo-installatie en op de R-AUDIO-L-uitgangen (15) van de ontvanger.
Controleer of u de witte en de rode pluggen in de witte (L, links) en rode
(R, rechts) ingang hebt gestoken. Kijk indien nodig in de handleiding bij de
stereo-installatie voor de juiste aansluitingen.
R
L
TV
T
T
R
L
TV
NEDERLANDS 49
SBC_LM1000.qxd 18-02-2004 15:34 Pagina 49
TV OUTPUT
TV OUTPUT
R–AUDIO–L
VIDEO DC 9V
R–AUDIO–L
VIDEO DC 9V
CHANNEL
CHANNEL
ON/OFF
ON/OFF
1 2 3 4
1 2 3 4
PUT
PUT
VIDEO DC 9V
VIDEO DC 9V
ON/OFF
ON/OFF
CHANNEL
CHANNEL
IR
IR
1 2 3 4
1 2 3 4
CHANNEL
CHANNEL
1 2 3 4
1 2 3 4
R
L
TV
AV SOURCE INPUT
AV SOURCE INPUT
R–AUDIO–L
VIDEO
VIDEO
R–AUDIO–L
VIDEO
VIDEO
R–AUDIO–L
R–AUDIO–L
TV OUTPUT
TV OUTPUT
TV OUTPUT
TV OUTPUT
R–AUDIO–L
VIDEO DC 9V
R–AUDIO–L
VIDEO DC 9V
CHANNEL
CHANNEL
ON/OFF
ON/OFF
1 2 3 4
1 2 3 4
R
L
TV
Page 50

3 Verbind de AC-netadapter (17) met de aansluiting
DC 9V —<± voor voedingsspanning (14) op de ontvanger en daarna
met een stopcontact.
> U kunt nu geluid vanaf de PC via uw stereo-installatie beluisteren.
4 Speel een geluidsbestand op de PC af en controleer of het geluid via de
audio-uitgang hoorbaar wordt.
4. Bediening
1 Schakel de PC in en kies een audio- of videobestand dat u wilt afspelen.
2 Start het afspelen van het gekozen bestand.
Kijk in uw Windows-handleiding voor meer informatie over het kiezen en
afspelen van audio/video-bestanden.
3 Controleer of de beelden op uw PC-monitor verschijnen.
Als u luidsprekers op de PC hebt aangesloten, controleer dan of die de
muziek weergeven.
4 Activeer de functie TV-Out van de videokaart in uw PC en controleer of
via die uitgang een videosignaal wordt weergegeven.
Kijk in de handleiding van uw videokaart voor meer informatie over de
TV-uitgang.
5 Zet uw TV aan.
6 Kies op de TV de externe ingang (EXT of AV).
Kijk in de handleiding van uw TV voor meer informatie.
7 Zet de ON/OFF-schakelaar van de zender (3) en van de ontvanger (13)
in de stand ON.
> Nu kunt u de video op uw TV bekijken.
Opmerkingen:
- Met de Wireless PC-TV Link kunt u NIET uw PC bedienen of het afgespeelde
geluid of beeld aanpassen. Het starten en stoppen van video of muziek die u
via uw PC afspeelt doet u dus via de muis of het toetsenbord.
- U moet de video die op de PC wordt afgespeeld nu op uw TV kunnen
bekijken. Is dit niet zo, controleer dan of u alle stappen correct hebt uitgevoerd
en of op de TV-uitgang van de videokaart een videosignaal beschikbaar is.Als
op de TV-uitgang van de PC een videosignaal beschikbaar is, maar niet op de
ontvanger, kijk dan in het onderdeel ‘Problemen oplossen’ in deze handleiding.
T
T
NEDERLANDS50
SBC_LM1000.qxd 18-02-2004 15:34 Pagina 50
PUT
PUT
VIDEO DC 9V
VIDEO DC 9V
ON/OFF
ON/OFF
AV SOURCE INPUT
AV SOURCE INPUT
R–AUDIO–L VIDEO DC 9V
R–AUDIO–L VIDEO DC 9V
TV OUTPUT
TV OUTPUT
R–AUDIO–L VIDEO DC 9V
R–AUDIO–L VIDEO DC 9V
ON/OFF
ON/OFF
ON/OFF
ON/OFF
Page 51

5. Problemen oplossen
Probeer een fout altijd eerst met de volgende suggesties op te lossen.
Lukt dat niet, neem dan contact op met de helpdesk (zie ‘Hulp nodig?’) of
met uw leverancier. Probeer nooit zelf het product te openen, want dan
vervalt uw recht op garantie.
Controleer eerst of alle kabelverbindingen correct zijn aangesloten.
Probleem Oplossing
Geen beeld op TV • Schakel de PC in en start het afspelen van een videobestand.
Controleer of de functie TV-Out van de videokaart is geactiveerd en of op
de TV-uitgang een videosignaal beschikbaar is.
Kijk in de handleiding van uw videokaart hoe u de functie TV-Out activeert.
• Als u een draagbare TV hebt, dan kunt u controleren of op de TV-uitgang
van de videokaart in uw PC een videosignaal aanwezig is door die TV
rechtstreeks op die TV-uitgang aan te sluiten.
• Zorg dat de PC en de TV zijn ingeschakeld
(groene lampjes 1 en 11 moeten oplichten).
• Kies op de TV de juiste externe ingang (EXT of AV).
Kijk in de handleiding van uw TV voor meer informatie.
• Stel op de ontvanger en op de zender hetzelfde kanaal in met behulp van
de CHANNEL-schakelaar (6 en 16).
Slecht beeld/ • Laat de ontvanger staan waar hij nu staat, maar verdraai de stand van de
slecht geluid ontvanger. Doe dit in stapjes van een paar centimeter en kijk of de
op TV beeld- en geluidskwaliteit verbetert.
• Herhaal het verdraaien van de stand bij de zender.
• Kies met de CHANNEL-schakelaar op de zender (6) en op de ontvanger
(16) een ander kanaal. Kies op beide eenheden hetzelfde kanaal.
• Zet de zender en de ontvanger dichter bij elkaar
(afstand van minder dan 30 meter).
NEDERLANDS 51
SBC_LM1000.qxd 18-02-2004 15:34 Pagina 51
Page 52

Slecht beeld • Stel op de TV de correcte EXT- of AV-ingang in.
op TV Kijk in de handleiding van uw TV.
• Het kan zijn dat een signaal van een andere Wireless Link wordt
opgevangen. Kies met de CHANNEL-schakelaar op de zender (6) en op de
ontvanger (16) een ander kanaal om het signaal van uw eigen Wireless Link
te ontvangen. Stel op beide eenheden hetzelfde kanaal in!
Bromgeluid • De brom zou te wijten kunnen zijn aan functies die ingebouwd zijn voor
bij gebruik van een toekomstige uitbreiding.Verdraai de stand van de ontvanger
afstandsbediening centimeter voor centimeter, tot de brom verdwijnt.
U kunt dit probleem niet in alle gevallen oplossen.
•Verdraai de stand van de zender centimeter voor centimeter, tot het
bromgeluid verdwijnt. U kunt dit probleem niet in alle gevallen oplossen.
TV geeft zwart/ • Controleer of het videosignaal op de TV-uitgang van het type CVBS of
wit beeld samengesteld (composite) is.
Kijk in de handleiding van uw videokaart voor meer informatie.
6.Algemene opmerkingen
• De beeld- en geluidskwaliteit worden beïnvloed als in de directe omgeving
een magnetron wordt gebruikt. Ook andere wireless-systemen
(Bluetooth, wireless-LAN enz.) kunnen de beeld- en geluidskwaliteit
verstoren en omgekeerd ook door de Wireless Link worden gestoord.
• De Wireless PC-TV Link maakt gebruik van radiofrequenties (RF).
Daarom kunnen dezelfde storingen optreden als bij het gebruiken van
GSM’s, mobiele zenders en andere RF-producten.
• Het bereik van een Wireless PC-TV Link blijft niet beperkt tot een
kamer of een woning. U kunt dit product overal in en om het huis
gebruiken. Daarom kan iedereen die in de nabije omgeving (binnen het
maximale zendbereik van uw Wireless PC-TV Link) een zelfde product
op hetzelfde kanaal instelt het beeld bekijken dat u afspeelt.
•U kunt de PC niet via een afstandsbediening bedienen als de draaggolf
van het IR-signaal buiten het bereik 32 kHz tot 40 kHz ligt.
Deze infraroodfunctie is bedoeld voor toekomstige toepassingen.
• Uitgestraalde radiogolven: Een ingeschakelde Philips Wireless PC-TV Link
verzendt en ontvangt radiogolven. De Philips Wireless PC-TV Link
voldoet aan de daarvoor geldende veiligheidsnormen.
• In een omgeving zonder obstakels heeft de Philips Wireless PC-TV Link
een bereik van maximaal 100 meter. Muren, plafonds en andere grote
objecten kunnen het praktische bereik binnenshuis tot 30 meter
beperken.
NEDERLANDS52
SBC_LM1000.qxd 18-02-2004 15:34 Pagina 52
Page 53

7.Technische specificaties
Algemeen Videonormen: PAL / NTSC / SECAM
Voeding: 220 - 240 V AC / 50 Hz
Energieverbruik: 3 W (zowel zender als ontvanger)
Zender Audio-ingang: Stereo (witte/rode cinch-aansluitingen)
Video-ingang: CVBS (gele cinch-aansluiting)
Afmetingen: 14,3 x 9,3 x 4 cm (b x d x h)
Ontvanger Uitgang (audio/video) Stereo (witte/rode cinch-aansluitingen)
CVBS (gele cinch-aansluiting)
Bereik: Tot 100 meter in open veld;
tot 30 meter binnenshuis
Afmetingen: 14,3 x 9,3 x 4 cm (b x d x h)
Audio / Video Draaggolffrequentie: 2,4 GHz
verzenden Aantal kanalen: vier (kan vanwege plaatselijke
voorschriften afwijken)
Modulatietype: FM
Zendvermogen: <10 mW
Antennes: Ingebouwd
Afstandsbediening Draaggolffrequentie: 433,92 MHz
zender Modulatietype: AM
Zendvermogen: <10 mW
Bereik IR-ontvanger: 5 meter
Frequentiebereik draaggolf: 32 kHz - 40 kHz
Uitbreidingssnoer voor
bedienen op afstand: Ja, een infraroodlampje
Hulp nodig?
Mocht u vragen over de LM1000 hebben, vraag dan om raad bij de
helpdesk! U vindt het telefoonnummer op pagina 2.
Lees eerst deze handleiding zorgvuldig voordat u contact opneemt.
U kunt de meeste problemen namelijk zelf oplossen.
Uw Wireless PC-TV Link heeft de productaanduiding LM1000.
Aankoopdatum: _____ /_____ /_____
dag /maand /jaar
NEDERLANDS 53
SBC_LM1000.qxd 18-02-2004 15:34 Pagina 53
Page 54

ITALIANO
Wireless PC-TV Link
SBC LM1000
Congratulazioni! Il prodotto SBC LM1000 Philips per la connessione
wireless PC-TV appena acquistato è stato prodotto secondo i più elevati
standard per assicurare un funzionamento affidabile nel tempo.
Per godere al massimo le sue prestazioni Philips Wireless PC-TV Link è
provvisto di un selettore di canale, che consente di selezionare il canale che
offre la migliore visualizzazione possibile. Convenienza home wireless pura!
Nota:Wireless PC-TV Link NON consente il controllo del PC e/o sul contenuto
audio/video in riproduzione. E’ quindi necessario avviare/arrestare
manualmente i video od i brani musicali sul PC tramite la tastiera od il
mouse.
Sommario
Helpline .............................................................................................2
Illustrazioni ........................................................................................3
Introduzione ....................................................................................54
1. Importanti informazioni ...........................................................55
Precauzioni per la sicurezza...............................................................................................55
Contenuto della confezione..............................................................................................55
2. Descrizione funzionale.........................................................56-57
A) Unità trasmettitore..........................................................................................................56
B) Unità ricevitore..................................................................................................................57
3. Installazione ..........................................................................58-60
Configurare l’unità trasmettitore ....................................................................................58
Collegare l’unità ricevitore al TV.....................................................................................59
Selezione dei canali.................................................................................................................59
Connessione opzionale ad un apparecchio audio........................................59-60
4. Funzionamento ..........................................................................60
5. Risoluzione di problemi .......................................................61-62
6. Note generali .............................................................................62
7. Specifiche tecniche ....................................................................63
54
SBC_LM1000.qxd 18-02-2004 15:34 Pagina 54
Page 55

1. Importanti informazioni
• Leggete attentamente le seguenti istruzioni, e conservate questa guida per
il futuro.
• Requisiti: - TV con connettore/i SCART od RCA.
- Requisiti video: PC con scheda video correttamente installata, in grado di
supportare TV-out. Il connettore TV-Out deve essere di tipo RCA.
- Requisiti audio: PC con scheda audio correttamente installata, provvista di
jack da 3,5 mm.
Precauzioni per la sicurezza
• Non utilizzate questo prodotto in luoghi umidi o in prossimità di acqua.
• Non esponete questo prodotto ad eccessivo calore.
• Non aprite il prodotto. In caso di problemi di natura tecnica,rivolgetevi
ad un rivenditore Philips.
• Non coprite il prodotto.
• Collegate esclusivamente gli adattatori CA a reti elettriche
220-240 V CA/ 50 Hz.
• Utilizzate esclusivamente gli adattatori CA in dotazione o un modello
conforme allo standard di sicurezza EN60950 ed alle seguenti specifiche:
9 V CC/ 300 mA.
•L’uso di questo prodotto può causare interferenze ad apparecchi
elettronici non adeguatamente protetti.Tali interferenze possono
comportare danni ad entrambi gli apparecchi. Prima di utilizzare questo
prodotto verificate se nelle vicinanze vi siano apparecchi che potrebbero
venire disturbati.
Contenuto della confezione
Verificate che la confezione di Wireless PC-TV Link contenga i seguenti
articoli. Si tratta di componenti utili per configurare ed utilizzare Wireless
PC-TV Link.
• Unità trasmettitore
• Unità ricevitore
• Due adattatori CA
•Cavo audio/video RCA + jack da 3,5 mm - RCA
(giallo/rosso/bianco - giallo/nero)
•Cavo audio RCA - RCA (rosso/bianco)
•Cavo video RCA - RCA (giallo)
• Adattatore RCA - SCART (non per la versione U.S.A.)
• Sdoppiatore audio (jack da 3,5 mm)
•Prolunga per il telecomando, utilizzata solo in combinazione con un
telecomando per PC ad infrarossi (non fornito in questa confezione).
Conservate questo cavo per impieghi futuri.
• Istruzioni per l’uso
ITALIANO 55
SBC_LM1000.qxd 18-02-2004 15:34 Pagina 55
Page 56

ITALIANO56
2. Descrizione funzionale
A) Unità trasmettitore
1 Spia alimentazione
Si illumina in verde quando l’unità è alimentata.
2 Spia ricevitore telecomando
Spia destinata all’utilizzo (futuro) dell’unità in combinazione con un PC
con supporto per un telecomando per PC.
3 Interruttore ON/OFF
Accende o spegne l’unità trasmettitore.
4 DC 9V —<±
Presa alimentazione CC per la connessione elettrica
5 Connettori AV SOURCE INPUT
Per la connessione del trasmettitore al PC tramite l’uscita TV-Out della
scheda video ed il jack stereo da 3,5 mm della scheda audio
(Uscita audio).
VIDEO (giallo) - connettore ingresso video
R-AUDIO-L - connettori ingresso audio sinistro (L) e destro (R)
(R-rosso / L-bianco)
6 Selettore CHANNEL
Seleziona il canale di frequenza desiderato per il segnale audio/video. Il
numero di canali selezionabili varia da Paese a Paese.
7IR
Connettore opzionale per l’utilizzo (futuro) dell’unità in combinazione
con un PC con supporto per telecomando per PC.
8 Adattatore CA
9Cavo audio/video RCA + jack da 3,5 mm - RCA
(giallo/rosso/bianco - giallo/nero)
Per la connessione del PC al trasmettitore tramite i
connettori AV SOURCE INPUT.
10 Sdoppiatore audio (jack da 3,5 mm)
Per la connessione del trasmettitore al PC quando le casse del PC sono
collegate alla scheda audio.
SBC_LM1000.qxd 18-02-2004 15:34 Pagina 56
Page 57

ITALIANO 57
B)Unità ricevitore
11 Spia alimentazione
Si illumina in verde quando l’unità è alimentata.
12 Spia ricevitore telecomando
Spia destinata all’utilizzo (futuro) dell’unità in combinazione con un PC
con supporto per telecomando per PC.
13 Interruttore ON/OFF
Accende o spegne l’unità ricevitore.
14 DC 9V —<±
Presa alimentazione CC per la connessione elettrica
15 Connettori TV OUTPUT
Per collegare il trasmettitore ad un TV o stereo provvisto di connessioni
RCA o SCART.
VIDEO (giallo) - connettore di uscita video.
R-AUDIO-L - connettori di uscita audio sinistro (L) e destro (R)
(R-rosso / L-bianco).
16 Selettore CHANNEL
Seleziona il canale di frequenza desiderato per il segnale audio/video.
Il numero di canali selezionabili può variare da Paese a Paese.
17 Adattatore CA
18 Cavo audio RCA - RCA (rosso/bianco)
Per la connessione del ricevitore agli ingressi audio del TV o di
apparecchi audio.
19 Cavo video RCA - RCA (giallo)
Per la connessione del ricevitore agli ingressi video del TV tramite i
connettori TV OUTPUT.
20 Adattatore RCA - SCART (non per la versione U.S.A.)
Per la connessione del ricevitore agli ingressi audio/video del TV,
qualora sia provvisto di connettore SCART.
SBC_LM1000.qxd 18-02-2004 15:34 Pagina 57
Page 58

3. Installazione
Configurare l’unità trasmettitore
1 Collocare l’unità trasmettitore vicino al PC.
Non poggiare altri dispositivi sopra all’unità trasmettitore.
2 Consultare le Istruzioni per l’uso della scheda audio del PC per
individuare l’esatta posizione dell’uscita audio.
3 Collegate il jack da 3,5 mm (nero) del cavo audio/video (9) in dotazione
all’uscita audio del PC.
Tenete presente che il pannello posteriore del vostro PC potrebbe differire
dall’illustrazione.
Se al PC sono collegate delle casse
3a Rimuovete lo spinotto delle casse dall’uscita audio del PC e collegatelo
allo sdoppiatore audio (10) in dotazione.
3b Collegate il jack da 3,5 mm (nero) del cavo audio/video (9) in dotazione
allo sdoppiatore audio (10).
3c Collegate lo sdoppiatore audio (10) all’uscita audio del PC.
4 Collegate lo spinotto video (giallo) del cavo audio/video (9) in dotazione
all’uscita TV-Out del PC.
Leggete le Istruzioni per l’uso del PC o della scheda video per verificare
come attivare la funzione TV-Out.
Se non riuscite ad attivare la TV-out della scheda video, contattate l’helpdesk
del produttore del PC o della scheda video
5 Collegate gli spinotti audio/video all’altra estremità del cavo audio/video
(9) in dotazione ai connettori AV SOURCE INPUT (5) dell’unità
trasmettitore.
Assicuratevi di collegare lo spinotto giallo all’ingresso video gialle e gli
spinotti bianco e rosso agli ingressi audio sinistro (L) e destro (R).
6 Collegate l’adattatore CA (8) alla presa elettrica ed al connettore
DC 9V —<± (4) dell’unità trasmettitore.
O
U
O
U
ITALIANO58
SBC_LM1000.qxd 18-02-2004 15:34 Pagina 58
L
L
M
M
1
1
1
1
0
0
0
0
T
T
V
V
L
L
IN
IN
K
K
T
T
R
R
A
A
N
N
S
S
M
M
IT
I
T
T
T
E
E
R
R
AUDIO
INPUTTVINPUT
AUDIO
INPUTTVINPUT
URCE INPUT
URCE INPUT
DIO–L VIDEO DC 9V
DIO–L VIDEO DC 9V
AUDIO
INPUTTVINPUT
AV SOURCE INPUT
AV SOURCE INPUT
VIDEO DC 9V
R–AUDIO–L
R–AUDIO–L
VIDEO DC 9V
CHANNEL
CHANNEL
IR
IR
ON/OFF
ON/OFF
1 2 3 4
1 2 3 4
AUDIO
INPUTTVINPUT
AV SOURCE INPUT
AV SOURCE INPUT
R–AUDIO–L
VIDEO DC 9V
R–AUDIO–L
VIDEO DC 9V
CHANNEL
CHANNEL
IR
IR
ON/OFF
ON/OFF
1 2 3 4
1 2 3 4
ON/OFF
ON/OFF
Page 59

Collegare l’unità ricevitore al TV
1 Collocate l’unità ricevitore vicino al TV.
2 Collegate l’adattatore RCA-SCART (20) in dotazione al connettore
SCART del TV.
3 Collegate il cavo video (19) ed il cavo audio (18) in dotazione
all’adattatore ed ai connettori TV OUTPUT (15) del ricevitore.
Assicuratevi di collegare gli spinotti gialli alle uscite ed ingressi video gialli e
gli spinotti rossi e bianchi alle uscite ed ingressi audio rosse e bianche.
4 Collegate l’adattatore CA (17) alla presa elettrica ed al connettore
DC 9V —<± (14) dell’unità ricevitore.
Nota: Se il TV è provvisto di connettori RCA, è possibile collegare direttamente i
connettori TV OUTPUT (13) del ricevitore ai corrispondenti connettori RCA
del TV.Assicuratevi di collegare gli spinotti giallo, bianco e rosso agli ingressi
giallo, bianco e rosso del ricevitore e del TV.
Selezione dei canali
• Impostate i selettori CHANNEL (6 e 16) sul canale 1 in entrambe le
unità.
• In caso di interferenze (p.e. immagine di cattiva qualità), impostate
entrambi i selettori su un altro canale.
> Entrambe le unità sono pronte per l’uso.
Nota: Le due unità devono essere impostate sullo stesso canale.
Connessione opzionale ad un apparecchio audio
1 Collegate un’estremità del cavo video (19) in dotazione all’ingresso video
(giallo) dell’adattatore SCART (oppure direttamente all’ingresso video
giallo del TV) e l’altra estremità all’uscita VIDEO (15) del ricevitore.
2 Collegate il cavo audio (18) in dotazione all’ingresso AUX
dell’apparecchio audio ed alle uscite R-AUDIO-L (15) del ricevitore.
Assicuratevi di collegare gli spinotti bianco e rosso agli ingressi sinistro (L) e
destro (R). Leggete le Istruzioni per l’uso dell’apparecchio audio per
verificare la posizione dell’ingresso corretto.
R
L
TV
T
T
R
L
TV
ITALIANO 59
SBC_LM1000.qxd 18-02-2004 15:34 Pagina 59
TV OUTPUT
TV OUTPUT
R–AUDIO–L
VIDEO DC 9V
R–AUDIO–L
VIDEO DC 9V
CHANNEL
CHANNEL
ON/OFF
ON/OFF
1 2 3 4
1 2 3 4
PUT
PUT
VIDEO DC 9V
VIDEO DC 9V
ON/OFF
ON/OFF
CHANNEL
CHANNEL
IR
IR
1 2 3 4
1 2 3 4
CHANNEL
CHANNEL
1 2 3 4
1 2 3 4
R
L
TV
AV SOURCE INPUT
AV SOURCE INPUT
R–AUDIO–L
R–AUDIO–L
TV OUTPUT
TV OUTPUT
R–AUDIO–L
R–AUDIO–L
VIDEO
VIDEO
VIDEO
VIDEO
TV OUTPUT
TV OUTPUT
R–AUDIO–L
VIDEO DC 9V
R–AUDIO–L
VIDEO DC 9V
CHANNEL
CHANNEL
ON/OFF
ON/OFF
1 2 3 4
1 2 3 4
R
L
TV
Page 60

3 Collegate l’adattatore CA (17) alla presa elettrica ed al connettore
DC 9V —<± (14) dell’unità ricevitore.
> Le informazioni audio provenienti dal PC vengono ora diffuse mediante
l’apparecchio audio.
4 Riproducete un file sul PC per verificare la presenza del segnale audio
sull’uscita audio.
4. Funzionamento
1 Accendete il PC e selezionate un file audio o video da riprodurre.
2 Avviate la riproduzione del file selezionato. Fate riferimento alle Istruzioni
per l’uso del sistema operativo Windows per verificare come selezionare
e riprodurre file audio/video.
3 Controllate se sul monitor del PC viene visualizzato il filmato in
riproduzione o le casse del PC emettono il sonoro, se collegate.
4 Attivate la funzione TV-Out della scheda video del PC e controllate se
sull’uscita TV-Out è disponibile il segnale video.
Per i dettagli, consultate le Istruzioni per l’uso della scheda video.
5 Accendete il TV.
6 Selezionate l’ingresso esterno (EXT od AV) sul TV.
Leggete le Istruzioni per l’uso del vostro televisore.
7 Impostate l’interruttore ON/OFF del trasmettitore (3) e del ricevitore
(13) su ON.
> Ora potete guardare la sorgente video sul TV.
Note:
- Wireless PC-TV Link NON consente il controllo del PC e/o sul contenuto
audio/video in riproduzione. E’ quindi necessario avviare/arrestare
manualmente i video od i brani musicali sul PC tramite la tastiera od il mouse.
- Il video in riproduzione sul PC dovrebbe essere visualizzato sullo schermo del
televisore; in caso negativo, verificate se avete svolto correttamente tutti i
passaggi ed assicuratevi della presenza di un segnale video sulla TV-out del PC.
Se sulla TV-out del PC è presente un segnale TV, ma al ricevitore non arriva
alcun segnale, consultate la sezione Risoluzione di problemi di questa guida.
T
T
ITALIANO60
SBC_LM1000.qxd 18-02-2004 15:34 Pagina 60
PUT
PUT
VIDEO DC 9V
VIDEO DC 9V
ON/OFF
ON/OFF
AV SOURCE INPUT
AV SOURCE INPUT
R–AUDIO–L VIDEO DC 9V
R–AUDIO–L VIDEO DC 9V
TV OUTPUT
TV OUTPUT
R–AUDIO–L VIDEO DC 9V
R–AUDIO–L VIDEO DC 9V
ON/OFF
ON/OFF
ON/OFF
ON/OFF
Page 61

5. Risoluzione di problemi
In caso di problemi, controllate prima i seguenti punti. Se non riuscite a
risolvere il problema seguendo queste indicazioni, contattate la helpline
(vedi ‘Problemi?’) o contattate il vostro rivenditore.
Non tentate mai di aprire personalmente l’apparecchio, altrimenti la garanzia
verrà annullata.
Come prima azione, controllate tutti i cavi per verificare che siano collegati
correttamente.
Problema Soluzione
Nessuna • Accendete il PC ed avviate la riproduzione di un file video.
immagine sul TV Verificate che l’uscita TV-Out della scheda video sia attivata e che sia
presente un segnale video. Leggete le Istruzioni per l’uso della scheda video
per verificare come attivare la funzione TV-Out.
• Se state utilizzando un televisore portatile, potete verificare la presenza di
un segnale TV-out sulla scheda video avvicinando il TV al PC e collegando la
TV-out direttamente al televisore.
• Assicuratevi che entrambi le unità sia accese
(entrambi le spie di alimentazione (1 ed 11) devono essere illuminate).
• Selezionate il canale corretto, EXT o AV, sul TV.
Fate riferimento alle Istruzioni per l’uso del vostro televisore.
• Selezionate lo stesso canale sulle unità ricevitore e trasmettitore, mediante i
selettori CHANNEL 6 e 16.
Immagine di • Cambiate posizione all’unità ricevitore sulla superficie sulla quale è collocata,
cattiva qualità/ un centimetro alla volta fino ad ottenere immagini ed audio di buona qualità.
audio di cattiva •Svolgete la stessa procedura per l’unità trasmettitore.
qualità sul TV • Cambiate canale su entrambe le unità, mediante i selettori CHANNEL 6 e 16.
Assicuratevi che entrambe le unità siano impostate sullo stesso canale di
frequenza.
• Riducete la distanza tra le unità trasmettitore e ricevitore (entro 30 metri).
ITALIANO 61
SBC_LM1000.qxd 18-02-2004 15:34 Pagina 61
Page 62

Immagine errata • Selezionate il canale EXT o AV appropriato.
sul sul TV Fate riferimento alle Istruzioni per l’uso del TV.
•E’possibile che si stia ricevendo un segnale proveniente da un altro
Wireless Link. Cambiate canale su entrambe le unità, mediante i selettori
CHANNEL 6 e 16 per ricevere il segnale corretto.
Assicuratevi di impostare lo stesso canale su entrambe le unità!
Ronzio •L’emissione di ronzio potrebbe essere causata da funzionalità implementate
utilizzando un per utilizzi futuri. Spostate il trasmettitore, un centimetro alla volta, finché
telecomando il ronzio scompare. In alcuni casi non sarà possibile risolvere questo problema.
• Spostate il trasmettitore, un centimetro alla volta, finché il ronzio scompare.
In alcuni casi non sarà possibile risolvere questo problema.
Il TV genera • Assicuratevi che il segnale TV-out sia in formato CVBS o Composito.
immaginiin bianco Per i dettagli, consultate le Istruzioni per l’uso della scheda video.
e nero
6. Note generali
• La qualità del sonoro e delle immagini è influenzata dall’uso di forni a
microonde. Altri sistemi wireless (Bluetooth, LAN wireless, ecc.) possono
inoltre influenzare negativamente la qualità delle immagini e del sonoro,
e viceversa.
• Wireless PC-TV Link è un prodotto basato su radio frequenza (RF).
Per tanto le sue prestazioni possono essere influenzate dagli degli stessi
tipi di interferenze alle quali sono sensibili i prodotti GSM, radio portatili
ed altri prodotti basati su RF.
• Wireless PC-TV Link non è limitato all’utilizzo in una stanza o
nell’abitazione. Potete utilizzarlo ovunque dentro o fuori casa.
Conseguentemente, chiunque nelle vicinanze della vostra abitazione
(entro il raggio operativo massimo) possegga un Wireless Link impostato
sullo stesso canale, sarà in grado di guardare gli stessi programmi che
state riproducendo dalla vostra sorgente video.
• Il PC non può essere controllato in remoto se la frequenza portante del
segnale IR è fuori dall’intervallo compreso tra 32 kHz a 40 kHz.
Questa funzionalità infrarossi è compresa nelle funzionalità future.
• Sicurezza delle onde radio: Quando Philips Wireless PC-TV Link è
acceso, trasmette e riceve onde radio. Philips Wireless PC-TV Link è
conforme con gli standard definiti per questa tipologia di prodotti.
• Philips Wireless PC-TV Link ha un raggio operativo massimo di
100 metri in campo aperto. Pareti, soffitti ed oggetti di grandi dimensioni
possono ridurre il campo operativo fino a 30 metri in interni.
ITALIANO62
SBC_LM1000.qxd 18-02-2004 15:34 Pagina 62
Page 63

7. Specifiche tecniche
Generale Standard video supportati: PAL / NTSC / SECAM
Alimentazione: 220 - 240 V CA / 50 Hz
Consumo: 3 W (entrambe le unità trasmettitore e
ricevitore)
Unità Ingresso audio: Audio stereo
trasmettitore (connettori RCA bianco/rosso)
Ingresso video: CVBS (connettore RCA giallo)
Dimensioni: 14,3 cm (L) x 9,3 cm (P) x 4 cm (A)
Unità ricevitore Uscita (audio/video): Audio stereo
(connettori RCA bianco/rosso)
CVBS (connettore RCA giallo)
Raggio operativo: Fino a 100 metri in campo aperto;
fino a 30 metri in interni
Dimensioni: 14,3 cm (L) x 9,3 cm (P) x 4 cm (A)
Trasmissione Frequenza portante: 2,4 GHz
audio/video Numero canali: quattro (potrebbe variare in base
alle normative locali)
Tipo di modulazione: FM
Potenza in trasmissione: <10mW
Antenne: Integrate
Trasmissione Frequenza portante: 433,92 MHz
controllo remoto Tipo di modulazione: AM
Potenza in trasmissione: <10 mW
Raggio ricezione IR: Fino a 5 metri
Intervallo frequenze portante: 32 kHz 40 kHz
Prolunga per il telecomando: Si, una spia infrarossi
Problemi?
Per eventuali domande su LM1000, contattate la nostra helpline per
richiedere assistenza! I numeri sono ripor tati a pagina 2.
Prima di richiedere assistenza, leggete attentamente questo manuale.
Ciò vi consentirà di risolvere la maggioranza dei problemi.
Il numero del modello di Wireless PC-TV Link is LM1000.
Data di acquisto: _____ /_____ /_____
giorno /mese /anno
ITALIANO 63
SBC_LM1000.qxd 18-02-2004 15:34 Pagina 63
 Loading...