

Page 1
Register your product and get support at
www.philips.com/welcome
HP6521
who suffer from diabetes mellitus, haemophilia or
ENGLISH
2 3 4
5
8
11
1
14 15 16
17
6
9 10
12
7
13
Introduction
Congratulations on your purchase and welcome to
Philips! To fully benet from the support that Philips
offers, register your product at www.philips.com/
welcome.
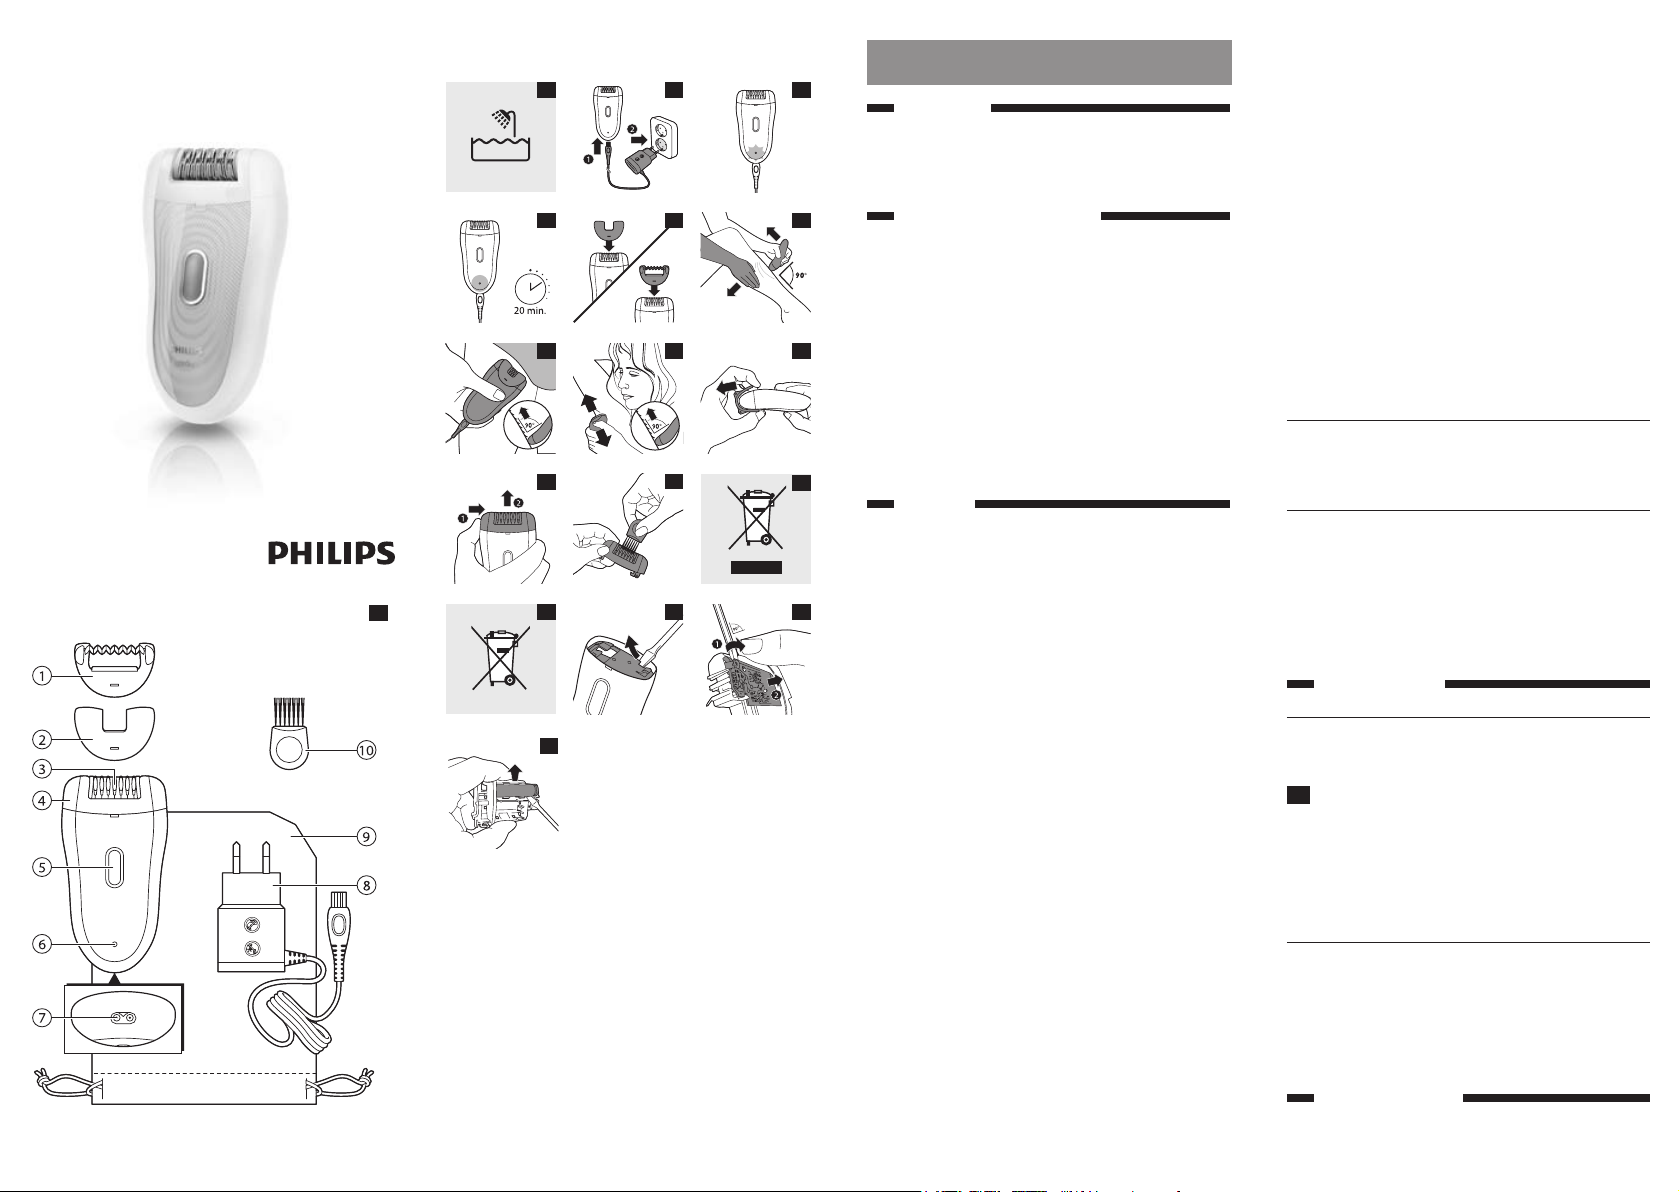
General description (Fig. 1)
1 Double wavy massage attachment
2 Sensitive area cap
3 Epilating discs
4 Epilating head
5 On/off button
- press once for speed II
- press twice for speed I
- press three times to switch off
6 Charging light (white) with battery-low indication
(red)
7 Socket for small plug
8 Adapter
9 Storage pouch
10 Cleaning brush
Important
Read this user manual carefully before you use the
appliance and save it for future reference.
Danger
- Keep the adapter dry.
Warning
- If the adapter is damaged, always have it replaced
with one of the original type in order to avoid a
hazard.
- This appliance is not intended for use by persons
(including children) with reduced physical, sensory
or mental capabilities, or lack of experience and
knowledge, unless they have been given supervision
or instruction concerning use of the appliance by a
person responsible for their safety.
- Children should be supervised to ensure that they
do not play with the appliance.
- Do not cut off the adapter to replace it with another
plug, as this causes a hazardous situation.
- Do not insert metal-containing material into the
socket for the appliance plug to avoid short circuiting.
Caution
- This appliance is only intended for removing
women’s body hair on areas below the neck. Do not
use it for any other purpose.
- Fully charge the appliance every 3 to 4 months, even
if you do not use the appliance for a longer time.
- To prevent damage and injuries, keep operating
appliance (with or without attachment) away
from scalp hair, eyebrows, eyelashes, clothes, threads,
cords, brushes etc.
- Do not use the appliance on irritated skin or skin
with varicose veins, rashes, spots, moles (with hairs)
or wounds without consulting your doctor rst.
People with a reduced immune response or people
immunodeciency should also consult their doctor
rst.
- Your skin may become a little red and irritated
the rst few times you use the epilator. This
phenomenon is absolutely normal and quickly
disappears. As you use the appliance more
often, your skin gets used to epilation, skin
irritation decreases and regrowth becomes thinner
and softer. If the irritation has not disappeared within
three days, we advise you to consult a doctor.
- Do not use the epilating head or attachments if they
are damaged or broken, as this may cause injury.
- Do not clean the appliance with water that is hotter
than shower temperature (max. 40°C).
- Charge, use and store the appliance at a temperature
between 10°C and 30°C.
- Do not use bath or shower oils when you epilate
under wet conditions, as this may cause serious skin
irritation.
Compliance with standards
This Philips appliance complies with all standards
regarding
electromagnetic elds (EMF).
General
- This symbol means that this appliance is suitable for
use in a bath or shower and for cleaning under a
running tap (Fig. 2).
- For safety reasons, this appliance can only be
operated cordlessly.
- The adapter is equipped with an automatic voltage
selector and is suitable for mains voltages ranging
from 100 to 240 volts.
Preparing for use
Charging
Charging the epilator takes approximately 1 hour. When
the epilator is fully charged, it has a cordless operating
time of up to 30 minutes.
1 Switch off the appliance before you charge it. Then
connect it to a wall socket (Fig. 3).
, The charging light ashes white to indicate that the
appliance is charging (Fig. 4).
, When the battery is fully charged, the charging light
lights up white continuously for 20 minutes and
then goes out (Fig. 5).
Battery low or empty
- When the battery is almost empty, the charging light
starts to ash red. When this happens, the battery
still contains enough energy for a few minutes of
epilating.
- When the battery is completely empty, the charging
light lights up red continuously. To charge the epilator,
see section ‘Charging’ above.
Using the appliance
Clean the epilating head and charge the appliance fully
before you use the appliance for the rst time.
Page 2

Note: You cannot use the appliance while it is connected to
the mains.
Epilating tips
- Wet: If you are new to epilation, we advise you to
start epilating on wet skin, as water relaxes the skin
and makes epilation less painful and more gentle. The
appliance is waterproof and can be safely used in the
shower or bathtub.
Tip: If you want you can use your common shower
gel or foam.
- Dry: If you epilate dry, epilation is easier just after
taking a bath or shower.
- Dry: Make sure your skin is clean and free from
grease. Do not apply any cream to your skin before
you start to epilate.
- General: We advise you to epilate before you go
to bed at night, as skin irritation usually disappears
overnight.
- General: Epilation is easier and more comfortable
when the hairs have a length of 3-4 mm. If the hairs
are longer, we recommend that you shave rst and
epilate the shorter regrowing hairs after 1 or 2
weeks.
Epilating
Note: If you are new to epilation, start epilating with the
double wavy massage attachment to minimise the pulling
sensation of epilation. This attachment is only intended for
epilating the legs.
Note: To epilate the underarms or bikini line, use the sensitive
area cap that reduces the number of active epilating discs.
1 Put the attachment on the epilating head (Fig. 6).
2 Press the on/off button once to switch on the
appliance.
, The appliance starts to operate at speed II, which is
the most efcient speed for epilating.
Note: If you want to use speed I, press the on/off button
a second time. Speed I is suitable for areas with little hair
growth, for hard-to-reach areas and for areas where bones
are located directly beneath the skin, such as knees and
ankles.
3 Stretch the skin with your free hand to make the
hairs stand upright. Place the epilating head at an
angle of 90° onto the skin with the on/off button
pointing in the direction in which you are going to
move the appliance (Fig. 7).
- Epilate your bikini line as shown in the gure (Fig. 8).
- Epilate your underarms as shown in the gure (Fig. 9).
4 Move the appliance slowly over the skin against the
direction of the hair growth while pressing it lightly.
5 Remove the attachment by pulling it off the
appliance (Fig. 10).
Tip: When epilating the underarms, use a small amount of
your common shower gel for better gliding.
Tip: To relax the skin, we advise you to apply a moisturising
cream immediately or a few hours after epilation. For the
underarms, use a gentle deodorant without alcohol.
Overheat protection
This function helps to prevent overheating of the
appliance.
Note: To avoid overheating of the epilator, do not press
the appliance too hard onto your skin. The epilator works
best when you move it over your skin without exerting any
pressure.
If the overheat protection is activated, the appliance
switches off automatically and the charging light ashes
red for 30 seconds.
To reset the overheat protection, let the appliance cool
down and then switch it on again.
Note: If the charging light starts to ash red again, the
appliance has not yet cooled down completely.
Overload protection
If you press the epilating head too hard onto your skin or
when the rotating discs of the epilating head get blocked
(for instance because a piece of clothing has got stuck
between the epilating discs), the appliance switches off
and the charging light ashes red for 5 seconds.
Turn the epilating discs with your thumb until you can
remove whatever is blocking the epilating discs.
Cleaning and maintenance
Never use scouring pads, abrasive cleaning agents or
aggressive liquids such as petrol or acetone to clean the
appliance.
Always keep the adapter dry. Never rinse it under the
tap or immerse it in water.
- If necessary, clean the adapter with the cleaning
brush or a dry cloth.
- After each wet use, clean the appliance thoroughly
with water to ensure optimum performance.
Cleaning the appliance
1 Switch off the appliance.
2 Remove the attachment from the epilating head.
3 Push the epilating head to the right (1) and remove
it from the appliance (2) (Fig. 11).
Note: Never try to detach the epilating discs from the
epilating head.
4 Remove loose hairs with the cleaning
brush (Fig. 12).
5 Rinse all parts under the tap, shake off excess
water and let them dry.
Note: Make sure all parts are completely dry before you
reassemble the appliance.
Storage
Store the appliance, the attachments and the adapter in
the storage pouch.
Ordering accessories
To purchase accessories for this appliance, please visit
our online shop at www.shop.philips.com/service.
If the online shop is not available in your country, go to
your Philips dealer or a Philips service centre. If you have
any difculties obtaining accessories for your appliance,
please contact the Philips Consumer Care Centre in your
country.
Environment
- Do not throw away the appliance with the normal
household waste at the end of its life, but hand it in
at an ofcial collection point for recycling. By doing
this, you help to preserve the environment (Fig. 13).
- The built-in rechargeable battery contains substances
that may pollute the environment. Always remove
the battery before you discard and hand in the
appliance at an ofcial collection point. Dispose
of the battery at an ofcial collection point for
batteries. If you have trouble removing the battery,
you can also take the appliance to a Philips service
centre (Fig. 14).
Removing the rechargeable battery
1 Disconnect the appliance from the adapter. Let the
appliance operate until the battery is
completely empty.
2 Remove the epilating head and open the appliance
with a screwdriver (Fig. 15).
3 Insert the screwdriver into the small slot in
the printed circuit board (1). Turn around the
screwdriver until the connection between the
printed board and battery breaks off (2) (Fig. 16).
4 Pry the rechargeable battery out of the appliance
with the screwdriver (Fig. 17).
Caution: Be careful, the battery strips are sharp.
Do not attempt to replace the rechargeable battery.
Do not connect the appliance to the mains again after
you have removed the rechargeable battery.
Guarantee and service
Guarantee
- Philips Consumer Lifestyle guarantees its products
for a period of two years after the date of
purchase. If any defect due to faulty materials and
workmanship occurs within this two-year guarantee
period, Philips Consumer Lifestyle will repair or
replace the product at its expense.
- Philips Consumer Lifestyle will only pay for repair
or replacement if convincing proof is provided, for
instance by means of a receipt, that the day on which
service is claimed is within the guarantee period.
- The guarantee does not cover products and/or
product parts that are subject to wear, that can be
considered as consumable parts by their nature or
that are made of glass.
- The guarantee is not valid if a defect is due to
damage caused by incorrect use, poor maintenance
(e.g. parts blocked by scale) or if alterations or
repairs have been carried out by persons not
authorised by Philips Consumer Lifestyle.
- For the appliance to be used correctly, the user
should strictly adhere to all instructions included in
this user manual and should abstain from any actions
or uses that are described as undesired or which are
warned against in this user manual.
- For some products, the guarantee may be subject
to certain restrictions, for instance as a result of the
type of material used.
- These guarantee restrictions do not affect your
statutory rights.
Service
Service during and after the guarantee period can be
obtained in all countries where the product is ofcially
distributed by Philips. In countries where the product
is not distributed by Philips, service is provided by the
national Philips organisation. In this case there may be
some delay if the required spare parts are not readily
available.
If you need service or information or if you have a
problem, please visit the Philips website at
www.philips.com/support or contact the Philips
Consumer Care Centre in your country. You nd its
contact details below. If there is no Consumer Care
Centre in your country, go to your local Philips dealer or
contact an authorised Philips service centre. Addresses
and phone numbers of these service centres can be
found in the separate repair-shop leaet.
Contact details Philips Consumer Care
Centre
- 0800 701 0203 (Demais localidades)
- (11) 2121 0203 (Grande Sao Paulo)
Troubleshooting
This chapter summarises the most common problems
you could encounter with the appliance. If you are unable
to solve the problem with the information below, contact
the Consumer Care Centre in your country.
Page 3

Problem Possible cause Solution
The epilator
does not
work.
During use,
the epilator
becomes hot
and suddenly
stops
operating.
Then the
charging light
ashes red for
30 seconds.
The socket
used to
charge the
epilator does
not work.
The
rechargeable
battery is
empty.
The overheat
protection
has been
activated.
Make sure the
socket you use to
charge the epilator
is live. The charging
light goes on to
indicate that the
epilator is charging.
If you connect the
epilator to a socket
in a bathroom
cabinet, you may
need to switch
on the light in the
bathroom to make
sure the socket is
live.
When the charging
light lights up red
continuously, the
battery is empty
and you need to
charge the epilator
for approx. 1 hour.
Note: before rst
use, you have to
charge the epilator
fully.
The epilator is
equipped with
integrated overheat
protection, which
prevents the epilator
from becoming
too hot. If the
overheat protection
is activated, the
appliance switches
off automatically.
Then the charging
light ashes red
for 30 seconds. To
reset the overheat
protection, let the
appliance cool down
and then switch it
on again. To avoid
overheating of the
epilator, do not
press the epilator
too hard onto your
skin.
Problem Possible cause Solution
During use,
the epilator
suddenly stops
operating.
Then the
charging light
ashes red for
5 seconds
The overload
protection
has been
activated.
If you press the
epilating head too
hard onto your
skin or when the
rotating discs of
the epilating head
get blocked (for
instance because a
piece of clothing has
got stuck between
the epilating discs),
the epilator switches
off automatically.
Then the charging
light ashes red for
5 seconds. Turn the
epilating discs with
your thumb until
you can remove
whatever is blocking
the epilating discs.
Then switch on the
epilator again.
ESPAÑOL
Introducción
Enhorabuena por la compra de este producto y
bienvenido a Philips. Para sacar el mayor partido de la
asistencia que Philips le ofrece, registre su producto en
www.philips.com/welcome.
Descripción general (fig. 1)
1 Accesorio de masaje con doble onda
2 Adaptador para zonas sensibles
3 Discos depiladores
4 Cabezal depilador
5 Botón de encendido/apagado
- pulse una vez para la velocidad II
- pulse dos veces para la velocidad I
- pulse tres veces para apagar
6 Piloto de carga (blanco) con indicación de batería
baja (rojo)
7 Toma para clavija pequeña
8 Adaptador de corriente
9 Funda de viaje
10 Cepillo de limpieza
Importante
Antes de usar el aparato, lea atentamente este manual
de usuario y consérvelo por si necesitara consultarlo en
el futuro.
Peligro
- Mantenga el adaptador seco.
Advertencia
- Si el adaptador está dañado, sustitúyalo siempre por
otro del modelo original para evitar situaciones de
peligro.
- Este aparato no debe ser usado por personas
(adultos o niños) con su capacidad física, psíquica
o sensorial reducida, ni por quienes no tengan los
conocimientos y la experiencia necesarios, a menos
que sean supervisados o instruidos acerca del uso
del aparato por una persona responsable de su
seguridad.
- Asegúrese de que los niños no jueguen con este
aparato.
- No corte el adaptador para sustituirlo por otra
clavija, ya que podría provocar situaciones de peligro.
- No inserte ningún objeto metálico en la toma de la
clavija del aparato para evitar que se produzca un
cortocircuito.
Precaución
- Este aparato está ideado para eliminar únicamente el
vello de las zonas por debajo de la línea del cuello de
las mujeres. No lo utilice con otra nalidad.
- Cargue por completo el aparato cada 3 ó 4 meses,
incluso si no lo usa durante largo tiempo.
- Cuando el aparato esté en funcionamiento (con
o sin accesorios), manténgalos alejados del pelo
de la cabeza, las pestañas y las cejas, así como de
ropas, hilos, cables, cepillos, etc., con el n de evitar
accidentes y deterioros.
- No utilice el aparato sobre piel irritada o con
venas varicosas, erupciones, manchas, lunares (con
pelos) o heridas sin consultar antes a su médico. Las
personas con una reducida respuesta inmunológica
o personas que padezcan diabetes mellitus, hemolia
o inmunodeciencia, también deben consultar antes
a su médico.
- Las primeras veces que utilice la depiladora la
piel puede enrojecerse e irritarse un poco. Este
fenómeno es normal y desaparecerá pronto.
A medida que vaya utilizando el aparato más
a menudo, la piel se irá a acostumbrando a la
depilación, la irritación disminuirá y el vello que
salga de nuevo será cada vez más no y suave. Si
la irritación no desaparece al cabo de tres días, le
recomendamos que consulte a su médico.
- No utilice el cabezal depilador ni los accesorios si
están dañados o rotos, ya que podrían ocasionarle
lesiones.
- No limpie el aparato con agua a una temperatura
superior a la de la ducha (máximo 40 °C).
- Cargue, utilice y guarde el aparato a una temperatura
entre 10 °C y 30 °C.
- No utilice aceites de baño o ducha cuando se depile
en húmedo, ya que esto puede causar irritaciones de
piel graves.
Cumplimiento de normas
Este aparato Philips cumple todos los estándares sobre
campos electromagnéticos (CEM).
General
- Este símbolo signica que este aparato es adecuado
para su uso en una bañera o ducha y se puede
limpiar bajo el grifo (g. 2).
- Por motivos de seguridad, este aparato sólo funciona
sin cable.
- El adaptador está equipado con un selector
automático de voltaje y es apto para voltajes de red
entre 100 y 240 voltios.
Preparación para su uso
Carga
La depiladora tarda aproximadamente 1 hora en
cargarse. Cuando la depiladora está completamente
cargada, tiene un tiempo de funcionamiento sin cable de
hasta
30 minutos.
1 Apague el aparato antes de cargarlo. A
continuación, conéctelo a una toma de
corriente (g. 3).
, La luz de carga parpadea en blanco para indicar que
el aparato se está cargando (g. 4).
, Cuando la pila está completamente cargada, el
piloto de carga permanece encendido en blanco
durante 20 minutos y, después, se apaga (g. 5).
Batería baja o vacía
- Cuando la batería esté casi descargada, el piloto de
carga comenzará a parpadear en rojo. Cuando esto
sucede, la batería contiene aún carga suciente para
unos minutos de depilación.
- Cuando la batería esté completamente vacía, el
piloto de carga se ilumina en rojo continuamente.
Para cargar la depiladora, consulte la sección “Carga”
que aparece con anterioridad.
Uso del aparato
Limpie el cabezal depilador y cargue el aparato
completamente antes de utilizarlo por primera vez.
Nota: No puede utilizar el aparato mientras está conectado
a la red eléctrica.
Consejos para la depilación
- En húmedo: Si es la primera vez que se depila, le
aconsejamos comenzar la depilación con la piel
húmeda, ya que el agua relaja la piel y hace que la
depilación sea menos dolorosa y más agradable. El
aparato es resistente al agua
y se puede utilizar de manera segura en la bañera o
la ducha.
Consejo: Si lo desea, puede utilizar gel de ducha o
espuma normal.
- En seco: Si se depila en seco, resulta más fácil justo
después de bañarse o ducharse.
- En seco: Asegúrese de que la piel esté limpia y libre
de grasa. No utilice crema para la piel antes de
comenzar a depilarse.
- General: Le aconsejamos que se depile por la noche
antes de acostarse, ya que así cualquier posible
irritación desaparecerá durante la noche.
- General: La depilación es más sencilla y cómoda
cuando el vello tiene una longitud de 3-4 mm. Si la
longitud es superior, recomendamos que lo afeite
primero y depile el vello más corto cuando está
volviendo a crecer después de 1 ó 2 semanas.
Page 4

Depilar
Nota: Si es la primera vez que se depila, comience a
depilarse con el accesorio de masaje con doble onda para
reducir la sensación de tirón de la depilación. Este accesorio
sólo se puede utilizar para depilar las piernas.
Nota: Para depilar las axilas o la línea del bikini, utilice el
adaptador para zonas sensibles que reduce el número de
discos depiladores activos.
1 Coloque el accesorio en el cabezal
depilador (g. 6).
2 Pulse el botón de encendido/apagado una vez para
encender el aparato.
, El aparato comienza a funcionar a la velocidad II,
que es la velocidad más ecaz para la depilación.
Nota: Si desea utilizar la velocidad I, pulse el botón de
encendido/apagado por segunda vez. La velocidad I es
adecuada para zonas con poco vello, de difícil acceso y
donde el hueso está justo debajo de la piel, como las rodillas
y los tobillos.
3 Para hacer que el vello se levante, estire la piel con
su mano libre. Coloque el cabezal depilador sobre
la piel formando un ángulo de 90° con el botón de
encendido/apagado orientado hacia la dirección en
la que va a mover el aparato (g. 7).
- Depile la línea del bikini como se muestra en el
dibujo (g. 8).
- Depile las axilas como se muestra en el
dibujo (g. 9).
4 Mueva el aparato despacio sobre la piel, en sentido
contrario al crecimiento del vello y presionando
ligeramente.
5 Tire del accesorio para sacarlo del aparato (g. 10).
Consejo: Al depilar las axilas, utilice una pequeña cantidad
de gel de baño para un mejor deslizamiento.
Consejo: Para relajar la piel, le aconsejamos que aplique
crema hidratante inmediatamente o unas horas después de
la depilación. Para las axilas, utilice un desodorante suave
sin alcohol.
Protección contra el sobrecalentamiento
Esta función ayuda a evitar que el aparato se
sobrecaliente.
Nota: Para evitar el sobrecalentamiento de la depiladora, no
presione demasiado el aparato contra la piel. La depiladora
funciona mejor si se mueve sobre la piel sin ejercer presión.
Si se activa la protección contra el sobrecalentamiento, el
aparato se apaga automáticamente y el piloto de carga
parpadea en rojo durante 30 segundos.
Para restablecer la protección contra el
sobrecalentamiento, deje que el aparato se enfríe y, a
continuación, vuelva a encenderlo.
Nota: Si el piloto de carga comienza a parpadear en rojo
otra vez, el aparato aún no se ha enfriado completamente.
Protección contra sobrecarga
Si presiona el cabezal depilador con demasiada fuerza
contra la piel o si los discos giratorios del cabezal
depilador se bloquean (por ejemplo, porque se ha
atascado un trozo de ropa entre los discos depiladores),
el aparato se apaga y el piloto de carga parpadea en rojo
durante 5 segundos.
Gire los discos depiladores con el pulgar hasta que pueda
retirar lo que bloquea
los discos.
Limpieza y mantenimiento
No utilice estropajos, agentes abrasivos ni líquidos
agresivos, como gasolina o acetona, para limpiar el aparato.
Mantenga siempre el adaptador seco. Nunca lo enjuague
bajo del grifo ni lo sumerja en agua.
- Si es necesario, limpie el adaptador con el cepillo de
limpieza o con un paño seco.
- Después del uso en húmedo, limpie el aparato
completamente con agua para garantizar un
rendimiento óptimo.
Limpieza del aparato
1 Apague el aparato.
2 Quite el accesorio del cabezal depilador.
3 Empuje el cabezal depilador hacia la derecha (1) y
quítelo del aparato (2) (g. 11).
Nota: No intente nunca sacar los discos depiladores del
cabezal depilador.
4 Elimine los pelos sueltos con el cepillo (g. 12).
5 Enjuague todas las piezas bajo el grifo, sacúdalas
para eliminar el exceso de agua y deje que se sequen.
Nota: Antes de empezar a montar el aparato, asegúrese de
que todas las piezas estén completamente secas.
Almacenamiento
Guarde el aparato, los accesorios y el adaptador en la
funda.
Solicitud de accesorios
Si desea adquirir accesorios para este aparato, visite
nuestra tienda en línea en
www.shop.philips.com/service. Si la tienda en línea
no está disponible en su país, diríjase a su distribuidor
Philips o a un centro de servicio Philips. Si tiene cualquier
dicultad para obtener accesorios para su aparato,
póngase en contacto con el Servicio de Atención al
Cliente de Philips en su país.
Medio ambiente
- Al nal de su vida útil, no tire el aparato junto con
la basura normal del hogar. Llévelo a un punto de
recogida ocial para su reciclado. De esta manera
ayudará a conservar el medio ambiente (g. 13).
- La batería recargable incorporada contiene sustancias
que pueden contaminar el medio ambiente. Extraiga
siempre la batería antes de deshacerse del aparato o
de llevarlo a un punto de recogida ocial. Deposite la
batería en un punto de recogida ocial. Si no puede
quitarla, puede llevar el aparato a un servicio de
asistencia técnica de Philips (g. 14).
Cómo extraer la batería recargable
1 Desconecte el aparato del adaptador. Deje que
el aparato funcione hasta que la batería esté
completamente agotada.
2 Retire el cabezal depilador y abra el aparato con un
destornillador (g. 15).
3 Introduzca el destornillador en la pequeña ranura
del circuito impreso (1). Gire el destornillador
hasta que la conexión entre el circuito impreso y la
batería se rompa (2) (g. 16).
4 Separe la batería recargable del aparato con el
destornillador (g. 17).
Precaución: Tenga cuidado con las tiras de la batería ya
que están aladas.
No intente sustituir la batería recargable.
No vuelva a conectar el aparato a la red una vez que
haya quitado la batería recargable.
Garantía y servicio
Garantía
- Philips Consumer Lifestyle garantiza sus productos
durante un período de 2 años a partir de la fecha de
compra. Si durante el período de garantía de 2 años
apareciera algún defecto en el producto debido
a la fabricación o materiales defectuosos, Philips
Consumer Lifestyle se hará cargo de la reparación o
sustitución del producto.
- Philips Consumer Lifestyle sólo se hará cargo de la
reparación o sustitución en caso de que se presente
una prueba convincente, por ejemplo el recibo de
compra, que demuestre que el día en que se reclama
el servicio está dentro del período de garantía.
- La garantía no cubre aquellos productos y/o piezas
de los productos que estén sujetos a desgaste, que
se puedan considerar piezas consumibles por su
naturaleza o que sean de cristal.
- La garantía no es válida si el defecto es debido a
daños causados por un uso incorrecto del aparato
o su mal mantenimiento (p.ej. piezas bloqueadas
debido a la cal), o si ha sido reparado o modicado
por personal no autorizado por Philips Consumer
Lifestyle.
- Para hacer un buen uso del aparato, el usuario
deberá seguir estrictamente todas las instrucciones
que se indican en este manual de usuario y
abstenerse de cualquier acción o uso descritos como
no deseables o contra los que se prevenga en este
manual de usuario.
- La garantía de ciertos productos está sujeta a
restricciones, por ejemplo, dependiendo del tipo de
material utilizado.
- Estas restricciones de la garantía no afectan a los
derechos que le corresponden por ley.
Servicio
Puede obtener servicio durante y después del periodo
de garantía en todos los países donde se distribuyan
ocialmente productos de Philips. En aquellos países
donde el producto no lo distribuya Philips, la organización
nacional de Philips será quien preste servicio. En este
caso, se podrían producir retrasos si las piezas que se
piden no están disponibles en el acto.
Si necesita asistencia o información o si tiene un
problema, visite el sitio Web de Philips en
www.philips.com/support o póngase en contacto
con el Servicio de Atención al Cliente de Philips en su
país. Encontrará los datos de contacto más abajo. Si
no hay Servicio de Atención al Cliente de Philips en su
país, diríjase a su distribuidor local de Philips o póngase
en contacto con el servicio de asistencia técnica de
Philips. Las direcciones y los números de teléfono de
los servicios de asistencia se encuentran en el folleto de
establecimientos de reparación independiente.
Datos de contacto del Servicio de Atención al
Cliente de Philips.
Argentina
Help Desk Philips Argentina
0800-888-7532 (número gratuito)
(011)-4564 2047
www.philips.com.ar
Chile
600 7445477
www.philips.cl
México
01 800 504 6200
www.philips.com.mx
Colombia
01 800 700 7445
www.philips.com.co
Panamá
800 8300
www.centralamerica.philips.com
Paraguay
Help Desk Philips Paraguay
009-800 541 0004 (número gratuito)
www.philips.com.ar
Perú
0800-00100
www.philips.com.pe
Uruguay
Help Desk Philips Uruguay
0004-054 176 (número gratuito)
www.philips.com.ar
Venezuela
0800 100 4888
www.philips.com.ve
Page 5

Guía de resolución de problemas
En este capítulo se resumen los problemas más
frecuentes que pueden surgir. Si no puede resolver
el problema con la siguiente información, póngase en
contacto con el Servicio de Atención al Cliente de su
país.
Problema Posible causa Solución
La depiladora
no funciona.
La toma
utilizada para
cargar la
depiladora no
funciona.
La batería
recargable está
descargada.
Asegúrese de
que la toma de
corriente que
utiliza para cargar
la depiladora está
activa. El piloto de
carga se enciende
para indicar que
la depiladora se
está cargando. Si
ha enchufado la
depiladora en un
cuarto de baño,
puede que necesite
encender la luz del
baño para activar el
enchufe.
Si el indicador de
carga permanece
encendido en
rojo, la batería
está descargada
y será necesario
cargar la depiladora
durante 1 hora
aproximadamente.
Debe cargar
la depiladora
completamente
antes de utilizarla
por primera vez.
Problema Posible causa Solución
Durante
su uso, la
depiladora
se calienta y
de repente
deja de
funcionar. A
continuación,
el piloto
de carga
parpadea en
rojo durante
30 segundos.
Durante
su uso, la
depiladora
de repente
deja de
funcionar. A
continuación,
el piloto
de carga
parpadea en
rojo durante
5 segundos
La protección
contra el
sobrecalentamiento se ha
activado.
La protección
contra la
sobrecarga se
ha activado.
La depiladora
está equipada con
protección contra el
sobrecalentamiento
integrada que evita
que se caliente
demasiado. Si la
protección contra el
sobrecalentamiento
está activada, el
aparato se apaga
automáticamente.
A continuación,
el piloto de
carga parpadea
en rojo durante
30 segundos. Para
restablecer la
protección contra el
sobrecalentamiento,
deje que el
aparato se enfríe
y, a continuación,
vuelva a encenderlo.
Para evitar que
la depiladora se
sobrecaliente, no
la presione con
demasiada fuerza
sobre la piel.
Si presiona el
cabezal depilador
con demasiada
fuerza contra la
piel o si los discos
giratorios del
cabezal depilador
se bloquean (por
ejemplo, porque
se ha atascado
un trozo de ropa
entre los discos
depiladores), la
depiladora se apaga
automáticamente.
A continuación,
el piloto de carga
parpadea en rojo
durante 5 segundos.
Gire los discos
depiladores con el
pulgar hasta que
pueda retirar lo que
bloquea los discos.
A continuación,
vuelva a encender la
depiladora.
PORTUGUÊS DO BRASIL
Introdução
Parabéns pela sua compra e bem-vindo à Philips! Para
aproveitar ao
máximo o suporte oferecido pela Philips, registre o
produto em
www.welcome.philips.com/br_pt/.
Descrição geral (fig. 1)
1 Massageador giratório duplo
2 Capa redutora para áreas sensíveis
3 Discos de depilação
4 Cabeça depiladora
5 Botão liga/desliga
- Pressione uma vez para acionar a velocidade 2
- Pressione duas vezes para acionar a velocidade 1
- Pressione três vezes para desligar
6 Luz indicadora de carregamento (branca) com
indicação de bateria fraca (vermelha)
7 Encaixe para o plugue pequeno
8 Adaptador
9 Estojo de transporte
10 Escova de limpeza
Importante
Leia atentamente este manual do usuário antes de usar o
aparelho e guarde-o para consultas futuras.
Perigo
- Mantenha o adaptador seco.
Aviso
- Se o adaptador estiver danicado, ele deverá ser
trocado (por um modelo original) para evitar
situações de risco.
- Este aparelho não deve ser usado por pessoas
(inclusive crianças) com capacidades físicas, mentais
ou sensoriais reduzidas ou pouca experiência e
conhecimento, a menos que sejam supervisionadas
ou instruídas sobre o uso do aparelho por uma
pessoa responsável por sua segurança.
- Crianças devem ser supervisionadas para que não
brinquem com o aparelho.
- Não retire o adaptador da tomada para trocá-lo por
outro plugue, pois isso pode ser perigoso.
- Não insira material contendo metal na entrada do
plugue do aparelho para evitar curto-circuito.
Atenção
- Este aparelho destina-se apenas à remoção de pelos
do corpo feminino, nas áreas abaixo do pescoço.
Não use-o para outros propósitos.
- Carregue totalmente o aparelho de 3 a 4 meses,
mesmo que você que sem usá-lo por um longo
tempo.
- Para evitar danos e ferimentos, use o aparelho (com
ou sem acessórios) a uma certa distância do couro
cabeludo, sobrancelhas, cílios, roupas, tecidos, cordas,
escovas etc.
- Não use o aparelho em peles irritadas ou com
varizes, arranhões, espinhas, pelos encravados,
verrugas (com pelos) ou feridas sem consultar
um médico. Pessoas com baixa imunidade ou que
sofrem de diabetes mielitus, doença de Raynaud ou
imunodeciência devem consultar um médico antes
de usar o aparelho.
- Sua pele pode car um pouco vermelha e irritada
nas primeiras vezes em que usar o depilador. Isso é
absolutamente normal e desaparece rapidamente.
Quando começar a usar o aparelho com mais
frequência, sua pele se acostumará à depilação, a
irritação desaparecerá e os pelos carão mais nos e
macios. Se a irritação não desaparecer em três dias,
recomendamos consultar um médico.
- Não use a cabeça depiladora nem os acessórios
se estiverem danicados ou quebrados, pois isso
poderá causar ferimentos.
- Não limpe o aparelho com água a uma temperatura
superior à do chuveiro (40° C no máximo).
- Carregue, use e guarde o aparelho a uma
temperatura entre 10 °C e 30 °C.
- Não use óleos de banho ao se depilar com água,
pois isso pode causar graves irritações na pele.
Conformidade com padrões
Este aparelho Philips está em conformidade com todos
os padrões relativos a campos eletromagnéticos (EMF).
Geral
- Este símbolo signica que o aparelho é à prova
d’água (g. 2).
- Por motivos de segurança, este aparelho só pode ser
usado sem o.
- O adaptador possui um seletor automático de
tensão e é adequado para tensões de 100 a 240
volts.
Preparação para o uso
Carregamento
O carregamento do depilador demora cerca de uma
hora. Depois de completamente carregado, o tempo de
funcionamento sem o do aparelho é de até 30 minutos.
1 Sempre desligue o aparelho antes de carregá-
lo (g. 3).
, A luz indicadora de carregamento piscará na cor
branca para indicar que o aparelho está sendo
carregado (g. 4).
, Quando a bateria está totalmente carregada, a luz
piloto de recarga ca acesa permanentemente na
cor branca por 20 minutos e se apaga (g. 5).
Bateria fraca ou descarregada
- Se a bateria estiver quase descarregada, a luz
vermelha indicadora de carregamento piscará. Caso
isso aconteça, signica que a bateria ainda possui
carga o suciente para alguns minutos de depilação.
- Se a bateria estiver totalmente descarregada, a luz
vermelha indicadora de carregamento acenderá.
Para carregar o depilador, consulte a seção
“Carregamento” acima.
Utilização do aparelho
Limpe a cabeça depiladora e carregue completamente o
aparelho antes de usá-lo pela primeira vez.
Page 6

Nota: Você não pode usar o aparelho enquanto ele estiver
conectado à rede elétrica.
Dicas de depilação
- Com a pele molhada: se for a primeira vez que
você se depilará, recomendamos começar com a
pele molhada, pois a água relaxa a pele e torna a
depilação mais suave e menos dolorosa. O aparelho
é à prova d’água e pode ser usado com segurança na
banheira ou no chuveiro.
Dica: Você também pode usar gel ou espuma de banho.
- Com a pele seca: para facilitar a depilação, tome
um banho e seque bem a pele antes de começar a
depilar.
- Dicas para uso com a pele seca: verique se sua pele
está limpa e sem oleosidade. Não aplique cremes
sobre a pele antes de iniciar a depilação.
- Dicas gerais: recomenda-se depilar antes de dormir,
pois as irritações na pele geralmente desaparecem
durante a noite.
- Dicas gerais: a depilação ca muito mais fácil e
confortável quando os pelos tem de 3 a 4 mm de
comprimento. Se eles forem maiores do que isso,
depile-os primeiro e, após uma ou duas semanas,
depile os pelos menores.
Depilação
Nota: Ao depilar pela primeira vez, use o massageador
giratório duplo a m de minimizar a sensação de
desconforto. Este acessório só pode ser usado na depilação
das pernas.
Nota: Ao depilar as axilas ou a linha do biquíni, use a capa
redutora para áreas sensíveis, que reduz o número de discos
de depilação ativos.
1 Coloque o acessório na cabeça depiladora (g. 6).
2 Pressione o botão liga/desliga para ligar o
barbeador.
, O aparelho começa funcionando na velocidade 2,
que é a mais eciente
para depilação.
Nota: Para usar a velocidade 1, pressione rapidamente o
botão liga/desliga. A velocidade 1 é ideal para áreas com
poucos pelos, difíceis de alcançar e próximas dos ossos,
como joelhos e tornozelos.
3 Estique a pele com a mão que está livre para
facilitar a depilação. Coloque a cabeça depiladora
em um ângulo de 90º sobre a pele, com o botão
liga/desliga voltado para o sentido de deslocamento
do aparelho (g. 7).
- Depile as áreas íntimas como mostra a gura (g. 8).
- Depile as axilas como mostra a gura (g. 9).
4 Passe o aparelho lentamente sobre a pele, na
direção contrária ao crescimento dos pelos,
fazendo uma leve pressão.
5 Retire o acessório puxando-o do aparelho (g. 10).
Dica: Ao depilar as axilas, use um pouco de gel de banho
para facilitar o deslize.
Dica: Para suavizar a pele, aplique um creme hidratante
durante ou algumas horas após a depilação. Use um
desodorante suave e sem álcool nas axilas.
Proteção contra superaquecimento
Este recurso ajuda a evitar o superaquecimento do
aparelho.
Nota: Para evitar o superaquecimento do depilador, não
pressione muito o aparelho sobre a pele. O depilador
funciona melhor quando você o move sobre a pele sem
pressioná-lo.
Se a proteção contra superaquecimento for ativada, o
aparelho desligará automaticamente e a luz indicadora de
carregamento piscará na cor vermelha por 30 segundos.
Para reativar a proteção contra superaquecimento, deixe
o aparelho esfriar e ligue-o novamente.
Nota: Caso a luz indicadora de carregamento pisque na cor
vermelha novamente, signica que o aparelho não esfriou
por completo.
Proteção contra sobrecarga
Se você exercer muita pressão sobre a pele ao passar
a cabeça depiladora ou quando os discos giratórios da
cabeça depiladora estiverem obstruídos (por exemplo,
quando um pedaço de tecido ca preso entre os discos),
o aparelho desligará e a luz indicadora de carregamento
piscará em vermelho por cinco segundos.
Gire os discos de depilação com o dedo até que você
possa remover o que estiver os obstruindo.
Limpeza e manutenção
Nunca use palhas de aço, agentes de limpeza abrasivos
ou líquidos agressivos, como querosene ou acetona,
para limpar o aparelho.
Mantenha o adaptador seco. Nunca o lave em água
corrente nem o
mergulhe na água.
- Se necessário, limpe o adaptador com a escova de
limpeza ou um pano seco.
-
Após o uso com a pele molhada, limpe todo o
aparelho com água para garantir o desempenho ideal.
Limpeza do aparelho
1 Desligue o aparelho.
2 Retire o acessório da cabeça depiladora.
3 Pressione a cabeça depiladora para a direita (1) e a
retire do aparelho (2) (g. 11).
Nota: Nunca tente desencaixar os discos de depilação da
cabeça depiladora.
4 Remova pelos soltos com a escova de
limpeza (g. 12).
5 Lave todas as peças em água corrente, agite-as para
retirar o excesso de água e deixe-as secar.
Nota: Verique se todas as peças estão completamente
secas antes de encaixá-las novamente no aparelho.
Armazenamento
Guarde o aparelho, os acessórios e o adaptador no
estojo para transpor te.
Encomenda de acessórios
Para adquirir acessórios para este aparelho, acesse a
nossa loja on-line: www.shop.philips.com/service.
Caso a loja on-line não esteja disponível para seu país, vá
até um revendedor ou uma Central de Atendimento ao
Cliente Philips. Caso você tenha diculdade em adquirir
acessórios para o seu aparelho, entre em contato com a
Central de Atendimento ao Cliente Philips do seu país.
Meio ambiente
-
Não descarte o aparelho no lixo doméstico no nal
de sua vida útil. Leve-o até um posto de coleta ocial
para que ele possa ser reciclado. Dessa forma, você
estará ajudando a preservar o meio ambiente (g. 13).
- A bateria integrada contém substâncias que podem
poluir o meio ambiente. Sempre remova a bateria
do aparelho antes de descartá-lo e levá-lo a um
posto de coleta de baterias. Descarte as baterias em
um posto ocial de coleta de baterias. Se você tiver
diculdade em removê-la, também poderá levar o
aparelho a uma assistência técnica Philips (g. 14).
Remoção da bateria recarregável
1 Desconecte o aparelho do adaptador. Deixe o
produto funcionando até a bateria descarregar
totalmente.
2 Remova a cabeça depiladora e abra o aparelho com
uma chave de fenda (g. 15).
3 Insira a chave de fenda no pequeno orifício na placa
de circuito impresso (1). Gire a chave de fenda até
separar a placa de circuito impresso da bateria
(2) (g. 16)
4 Retire a bateria recarregável do aparelho com a
chave de fenda (g. 17).
Cuidado: tenha cuidado, pois os os de metal da bateria
são aados.
Não tente recolocar a bateria recarregável.
Não reconecte o aparelho ao sistema elétrico após
remover a bateria recarregável.
Garantia e assistência técnica
Garantia
- A Philips Consumer Lifestyle oferece produtos
com garantia válida por dois anos a partir da data
da compra. A Philips Consumer Lifestyle reparará
e trocará os produtos que apresentarem defeito
dentro desses dois anos de garantia.
- A Philips Consumer Lifestyle só pagará pelo
reparo ou substituição se for apresentada prova
convincente, por exemplo, um recibo, indicando que
no dia em que a manutenção foi solicitada, o serviço
estava dentro da garantia.
- A garantia não cobre produtos e/ou peças que estão
sujeitas a desgaste, que são itens de consumo ou que
são feitas de vidro.
- A garantia não cobre defeitos causados por mau
uso, manutenção inapropriada (por exemplo, peças
obstruídas por sujeiras) ou modicações/reparos
realizados por pessoas não autorizadas pela Philips
Consumer Lifestyle.
- Para usar o aparelho corretamente, o usuário deve
seguir todas as instruções inclusas no manual do
usuário e evitar uso e ações não recomendadas.
- Dependendo do produto, a garantia pode estar
sujeita a restrições (por exemplo, decorrentes do
tipo de material usado).
- Essas restrições da garantia não interferem em seus
direitos estatutários.
Serviço
A assistência durante ou após o período de garantia
pode ser obtida em todos os países onde o produto
é ocialmente distribuído pela Philips. No caso de
países onde o produto não é distribuído pela Philips,
a assistência é oferecida pela organização nacional da
Philips. Nesse caso, poderá haver atraso se as peças
avulsas solicitadas não estiverem prontamente disponíveis.
Caso você precise de assistência técnica, informações ou
tenha algum problema, acesse o site da Philips:
www.philips.com/support ou entre em contato
com a Central de Atendimento ao Cliente Philips do
seu país (veja as informações de contato abaixo). Caso
não exista uma Central de Atendimento ao Cliente no
seu país, dirija-se a um representante local da Philips ou
entre em contato com uma assistência técnica autorizada
da Philips. Os endereços e números de telefone das
assistências técnicas autorizadas encontram-se no folheto
de assistência técnica à parte.
Informações de contato da Central de
Atendimento ao Cliente Philips
- 0800 701 0203 (Demais localidades)
- (11) 2121 0203 (Grande São Paulo)
Solução de problemas
Este capítulo resume os problemas mais comuns
que você pode encontrar ao usar o aparelho. Se não
conseguir resolver o problema com as informações
abaixo, entre em contato com a Assistência Técnica
Autorizada Philips mais próxima.
Page 7

Problema Possível causa Solução
O depilador
não funciona.
A tomada usada
para carregar o
depilador não
funciona.
A bateria
recarregável
está
descarregada.
Verique se a
tomada usada
para carregar o
adaptador está
alimentada. A luz
indicadora de
carregamento
acenderá para
indicar que o
aparelho está
sendo carregado.
Ao conectar
o depilador a
um armário de
banheiro, talvez
seja necessário
acender a luz
do banheiro
para vericar se
a tomada está
alimentada.
Quando a luz
indicadora de
carregamento
acende na cor
vermelha, signica
que a bateria está
vazia e devem ser
carregadas por
aproximadamente
uma hora. Nota:
você deve carregar
completamente
o depilador antes
de usá-lo pela
primeira vez.
Problema Possível causa Solução
Durante
o uso, o
depilador
esquenta
e para de
funcionar.
E a luz
indicadora de
carregamento
começa a
piscar na cor
vermelha
durante 30
segundos.
Durante uso,
o depilador
para de
funcionar de
repente. Em
seguida, a luz
indicadora de
carregamento
pisca na cor
vermelha
durante cinco
segundos.
A proteção
contra
superaque
cimento foi
ativada.
A proteção
contra
superaquecimento foi
ativada.
O depilador
possui proteção
integrada contra
superaquecimento,
evitando que o
aparelho que
muito quente. Se
a proteção contra
superaquecimento
for ativada, o
aparelho desligará
automaticamente.
A luz indicadora
de carregamento
piscará durante
30 segundos.
Para reajustar a
proteção contra
superaquecimento,
deixe o aparelho
esfriar e ligue
novamente.
Para evitar o
superaquecimento
do depilador, não
passe o depilador
com muita força
sobre a pele.
Se você pressionar
a cabeça
depiladora com
muita força sobre
a sua pele ou
quando os discos
rotativos da cabeça
depiladora carem
bloqueados (por
exemplo, porque
um pedaço da
roupa car preso
entre os discos
de depilação), o
depilador desligará
automaticamente.
Em seguida, a luz
indicadora de
carregamento
piscará na cor
vermelha por
cinco segundos.
Vire os discos de
depilação com o
seu polegar até
remover o que os
estão bloqueando.
Ligue o depilador
novamente.
 Loading...