

Page 1
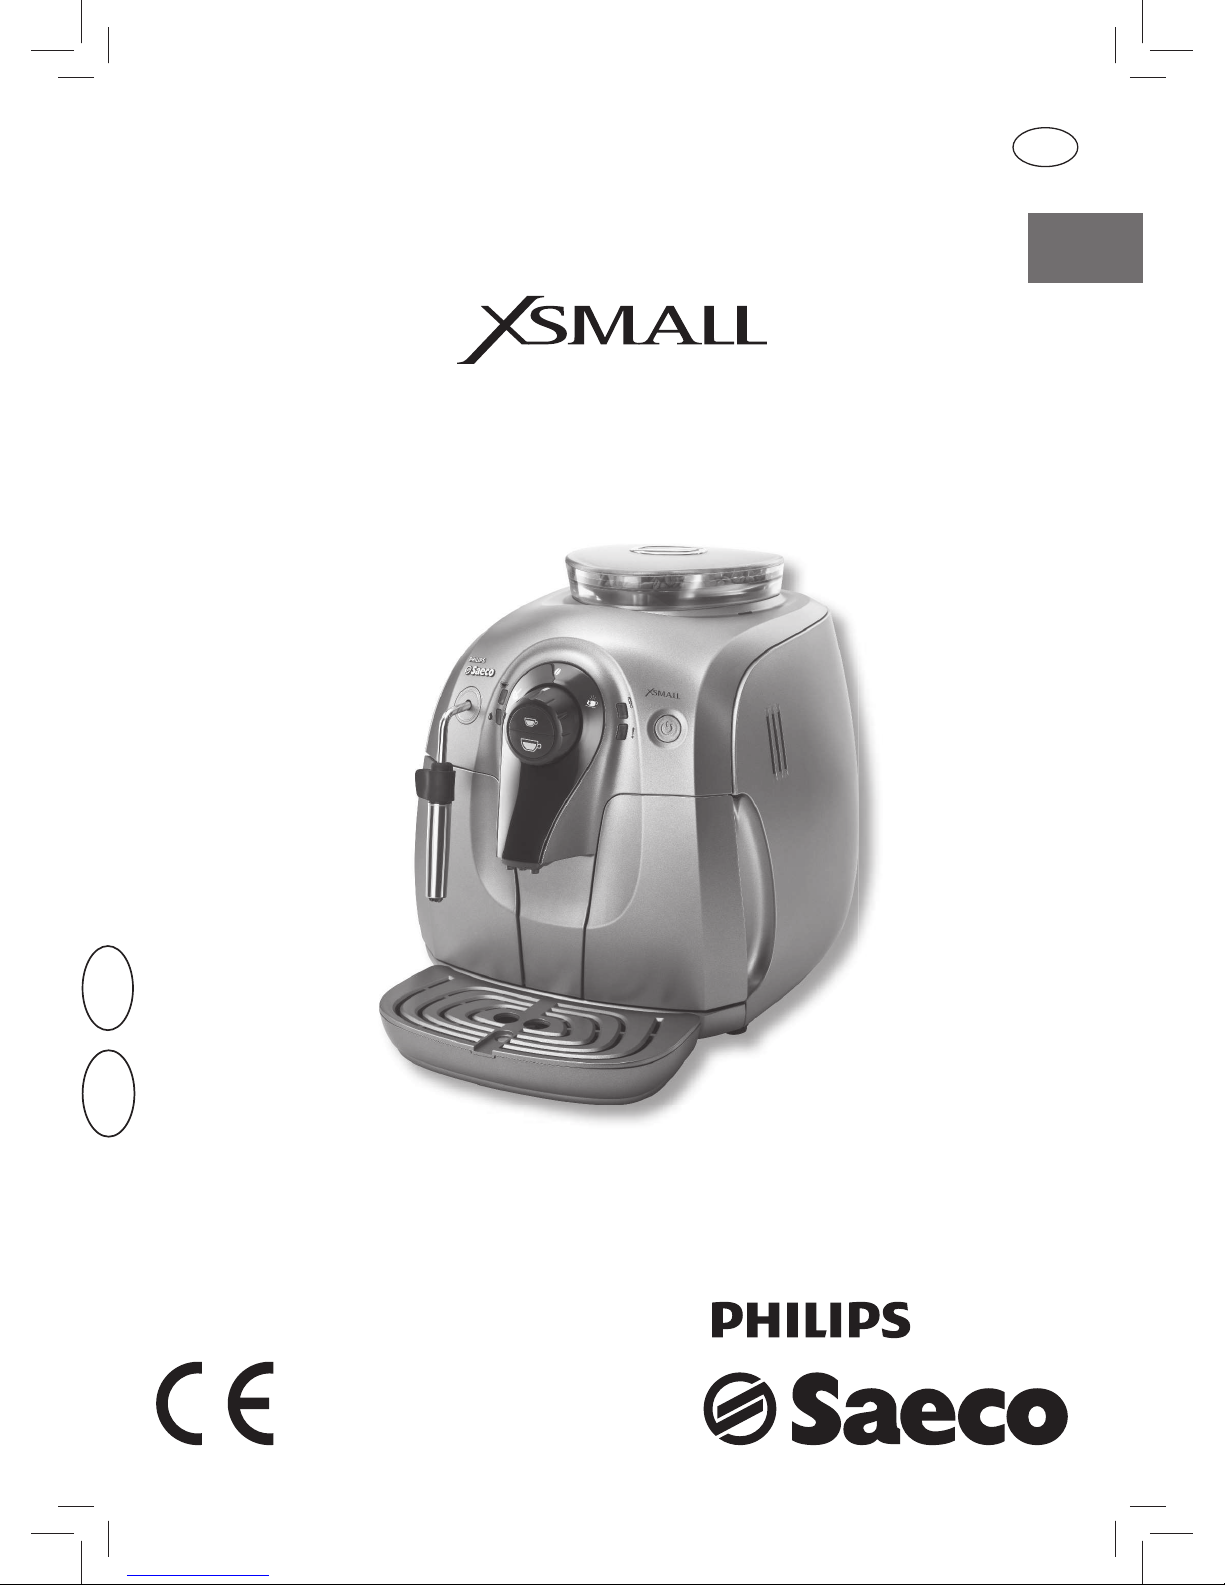
USER MANUAL
PLEASE READ THIS USER MANUAL CAREFULLY BEFORE USING THE MACHINE.
Register your product and get support at
www.philips.com/welcome
English
Type HD8743 / HD8745 / HD8747
EN
02
02
Page 2

IMPORTANT SAFEGUARDS
When using electrical appliances, basic safety precautions should always be
followed, including the following:
1. Read all instructions.
2. Do not touch hot surfaces. Use handles or knobs.
3. To protect against fire, electric shock and injury to persons do not immerse
cord, plugs, or appliance in water or other liquid.
4. Close supervision is necessary when the appliance is used by or near
children.
5. Unplug from outlet when not in use and before cleaning. Allow to cool
before putting on or taking off parts, and before cleaning the appliance.
6. Do not operate any appliance with a damaged cord or plug or after the
appliance malfunctions, or has been damaged in any manner. Return
appliance to the nearest authorized service facility for examination, repair
or adjustment.
7. The use of accessory attachments not recommended by the appliance
manufacturer may result in fire, electric shock or injury to persons.
8. Do not use outdoors.
9. Do not let cord hang over edge of table or counter, or touch hot surfaces.
10. Do not place on or near a hot gas or electric burner, or in a heated oven.
11. Always attach plug to appliance first, then plug cord into wall outlet. To
disconnect, turn any control to “off”, then remove plug from wall outlet.
12. Do not use appliance for other than intended use.
13. Save these instructions.
SAVE THESE INSTRUCTIONS
Page 3

CAUTION
This appliance is for household use only. Any servicing, other than cleaning
and user maintenance, should be performed by an authorized service center.
Do not immerse machine in water. To reduce the risk of fire or electric shock,
do not disassemble the machine. There are no parts inside the machine
serviceable by the user. Repair should be done by authorized service personnel
only.
1. Check voltage to be sure that the voltage indicated on the nameplate
corresponds with your voltage.
2. Never use warm or hot water to fill the water tank. Use cold water only.
3. Keep your hands and the cord away from hot parts of the appliance during
operation.
4. Never clean with scrubbing powders or harsh cleaners. Simply use a soft
cloth dampened with water.
5. For optimal taste of your coffee, use purified or bottled water. Periodic
descaling is still recommended every 2-3 months.
6. Do not use caramelized or flavored coffee beans.
INSTRUCTIONS FOR THE POWER
SUPPLY CORD
A. A short power-supply cord (or detachable power-supply cord) is to be
provided to reduce risks resulting from becoming entangled in or tripping
over a longer cord.
B. Longer detachable power-supply cords or extension cords are available
and may used if care is exercised in their use.
C. If a long detachable power-supply cord or extension cord is used,
1. The marked electrical rating of the detachable power-supply cord or
extension cord should be at least as great as the electrical rating of the
appliance
2. If the appliance is of the grounded type, the extension cord should be a
grounding-type 3-wire cord, and
3. The longer cord should be arranged so that it will not drape over the
counter top or table top where it can be pulled on by children or tripped
over.
Page 4
2
ENGLISH
Congratulations on your purchase of a Saeco Xsmall full
automatic espresso machine!
To fully bene t from the support that Philips Saeco o ers,
please register your product at www.philips.com/welcome.
This user manual applies to HD8743, HD8745 and HD8747.
The machine is suitable for preparing espresso co ees using
whole co ee beans. It can also dispense steam and hot water. In this user manual you will nd all the information you
need to install, use, clean and descale your machine.
Page 5

ENGLISH
3
CONTENTS
IMPORTANT..................................................................................................... 4
Safety instructions .......................................................................................................................... 4
Warning .......................................................................................................................................... 4
Caution ........................................................................................................................................... 5
Compliance with standards ............................................................................................................ 5
INSTALLATION ................................................................................................. 6
Product overview ............................................................................................................................ 6
General description ......................................................................................................................... 7
PREPARING FOR USE ........................................................................................ 8
Machine Packaging ......................................................................................................................... 8
Preparing for use ............................................................................................................................. 8
USING THE MACHINE FOR THE FIRST TIME ........................................................10
Circuit priming .............................................................................................................................. 10
Automatic rinse/self-cleaning cycle .............................................................................................. 11
Manual rinse cycle......................................................................................................................... 12
HOW TO INSTALL THE “INTENZA+” WATER FILTER OPTIONAL ...........................14
ADJUSTMENTS ................................................................................................15
Saeco Adapting System .................................................................................................................15
How to adjust the Ceramic Co ee Grinder ..................................................................................... 15
Adjusting the Co ee Length ......................................................................................................... 16
ESPRESSO AND COFFEE BREWING ....................................................................18
DISPENSING STEAM/CAPPUCCINO BREWING ....................................................19
Dispensing Steam ......................................................................................................................... 19
Frothing milk to prepare a cappuccino .......................................................................................... 20
Steam/Co ee Switchover .............................................................................................................. 21
DISPENSING HOT WATER .................................................................................22
CLEANING AND MAINTENANCE ........................................................................23
Cleaning ........................................................................................................................................ 23
Daily cleaning of the machine ....................................................................................................... 23
Daily cleaning of water tank .......................................................................................................... 24
Daily cleaning of hot water/steam wand (Pannarello, if supplied) ................................................ 24
Weekly cleaning of hot water/steam wand (Pannarello, if supplied) ............................................ 25
BREW GROUP CLEANING .................................................................................26
Brew Group Weekly Cleaning ........................................................................................................ 26
Brew Group Lubrication ................................................................................................................ 28
DESCALING .....................................................................................................29
MEANING OF THE LIGHT SIGNALS .....................................................................34
Control panel display ..................................................................................................................... 34
TROUBLE SHOOTING .......................................................................................36
ENVIRONMENT ...............................................................................................37
Energy saving ................................................................................................................................ 37
Disposal ........................................................................................................................................ 37
TECHNICAL SPECIFICATION ..............................................................................38
GUARANTEE AND SERVICE ...............................................................................38
Guarantee .....................................................................................................................................38
Service .......................................................................................................................................... 38
ORDERING MAINTENANCE PRODUCTS ..............................................................39
Page 6
4
ENGLISH
IMPORTANT
Safety instructions
This machine is equipped with safety features. Nevertheless read the safety
instructions carefully and only use the machine as described in these
instructions to avoid accidental injury or damage.
Keep this user manual for future reference.
The term WARNING and this sign warn against possible severe injuries,
danger to life and/or damage to the machine.
The term CAUTION and this sign warn against slight injuries and/or damage to the machine.
Warning
• Connect the machine to a wall socket which is properly wired. Its main
voltage should comply with the technical data of the appliance.
• Do not let the mains cord hang over the edge of a table or counter, or
touch hot surfaces.
• Never immerse the machine, mains plug or mains cord in water (danger of electrical shock).
• Never direct the hot water jet towards body parts (danger of burning).
• Do not touch hot surfaces. Use handles and knobs.
• Remove the mains plug from the wall socket.
- If a disturbance occurs.
- If the machine will not be used for a long time.
- Before cleaning the machine.
Pull on the plug, not on the mains cord. Do not touch the mains
plug with wet hands.
• Do not use the machine if the mains plug, the mains cord or the machine itself is damaged.
• Do not make any modi cations to the machine or its mains cord. Only
have repairs carried out by a service centre authorized by Philips to
avoid a hazard.
• This machine is not intended for use by persons (including children)
with reduced physical, sensory or mental capabilities, or lack of experience and knowledge, unless they have been given supervision or
instruction concerning use of the machine by a person responsible for
their safety.
• Children should be supervised to ensure that they do not play with the
machine.
• Never insert ngers or other objects into the ceramic co ee grinder.
Page 7

ENGLISH
5
Caution
• The machine is for household use only. It is not intended for use in environments such as sta kitchens of shops, o ces, farms or other work
environments.
• Always put the machine on a at and stable surface.
• Do not place the machine on a hot plate, directly next to a hot oven,
heater or similar source of heat.
• Only put co ee beans into the co ee bean hopper. If ground co ee,
instant co ee or any other substance is put in, it may damage the
machine.
• Allow the machine to cool before putting on or taking o parts, and
before cleaning the machine.
• Never use warm or hot water to ll the water tank. Use cold water only.
• Never clean with scrubbing powders or harsh cleaners. Simply use a
soft cloth dampened with water.
• Descale your machine regularly. The machine indicates when descaling is needed. Not doing this will make your appliance stop working
properly. In this case repair is not covered under your warranty!
• Do not keep the machine at temperature below 0 degree Celsius or 32
degrees Fahrenheit. Residue water in the heating system may freeze
and cause damage.
• Do not leave water in the water tank when the machine is not used
over a longer period of time. The water can become contaminated. Use
fresh water every time you use the machine.
Compliance with standards
The machine complies with art.13 of the Italian Legislative Decree dated 25
July 2005, no. 151 “Implementation of the directives 2005/95/EC, 2002/96/
EC and 2003/108/EC on the restriction of the use pf certain hazardous substances in electrical and electronic equipment, as well as waste disposal”.
This product complies with eu directive 2002/96/EC.
Page 8
6
INSTALLATION
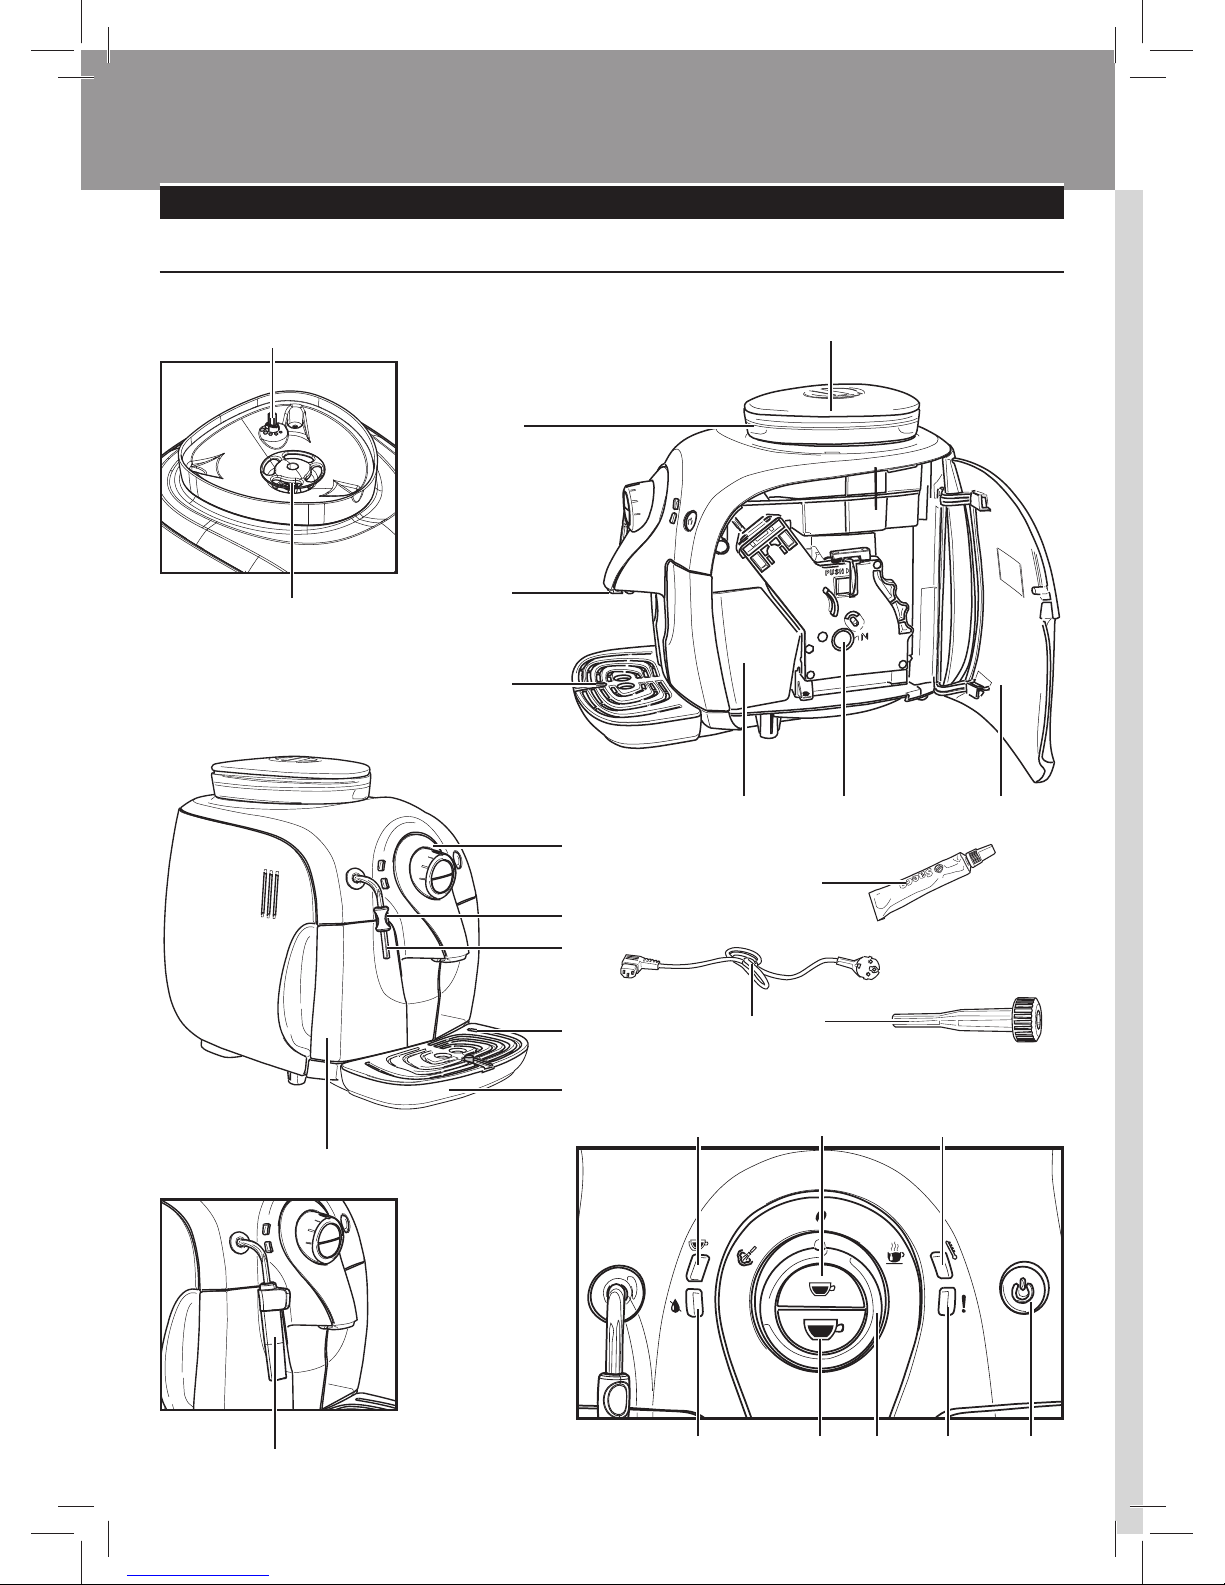
Product overview
1
26
21
18 19 20
22 23 24 25
13
17
14
5
27
6 7
2
3
4
16
15
8
9
10
11
12
Page 9

ENGLISH
7
General description
1. Co ee bean hopper lid
2. Co ee bean hopper
3. Dispensing spout
4. Full drip tray indicator
5. Co ee ground drawer
6. Brew group
7. Service door
8. Control panel
9. Protective handle
10. Hot water/steam wand
11. Grill
12. Drip tray
13. Water tank
14. Power cord
15. Brew group lubricant
16. Grinder adjustment key
17. Pannarello (optional - only available for certain models)
18. Double co ee light and brewed co ee length setting
19. Espresso button
20. Temperature light
21. Water tank level light
22. Co ee button
23. Control dial
24. Warning light
25. ON/OFF button
26. Grinder adjustment knob
27. Ceramic co ee grinder
Page 10
8
ENGLISH
PREPARING FOR USE
Machine Packaging
The original packaging has been designed and constructed to protect the
machine during transport. We recommend keeping the packaging material
for possible future transport.
Preparing for use
1
Remove the co ee bean hopper lid and the drip tray with grill from the
packaging.
2
Remove the machine from the packaging.
3
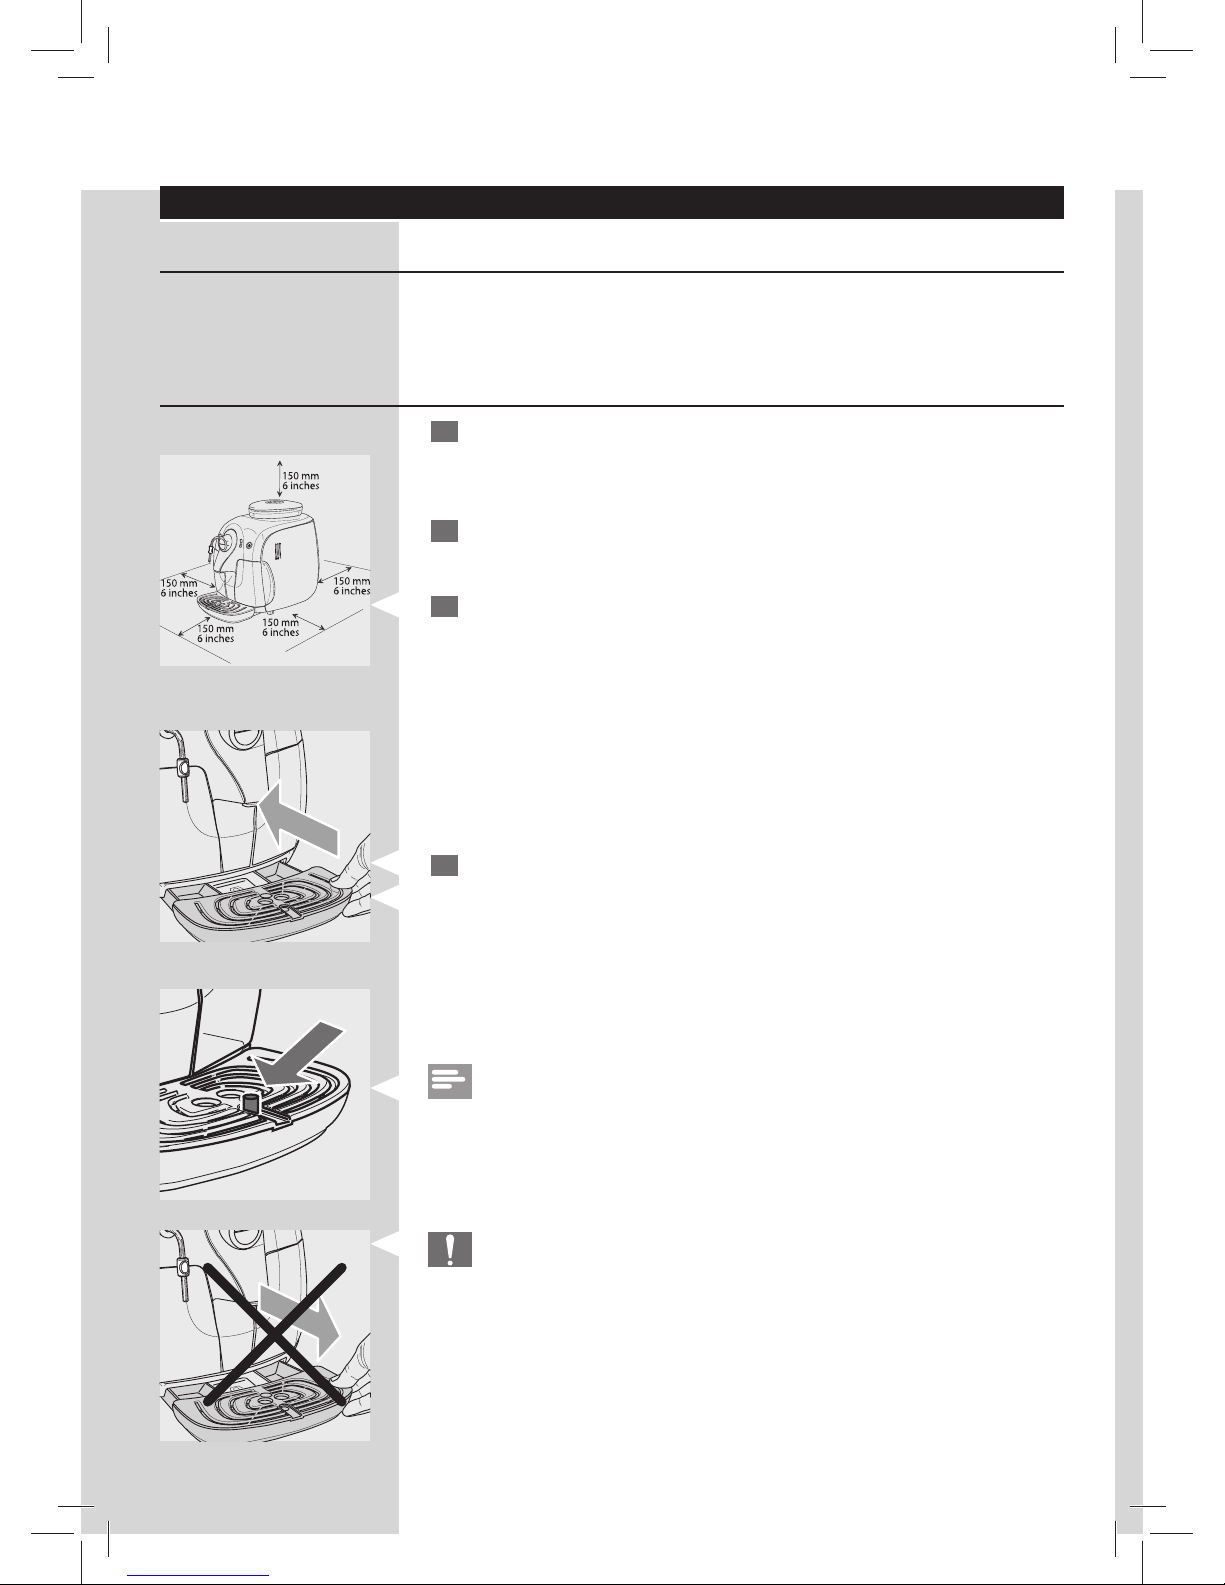
For best use, it is recommended to:
• Choose a safe, level surface, where there will be no danger of overturning it or being injured.
• Choose a location that is su ciently well-lit, clean and near an easily reachable socket.
• Allow for a minimum distance from the sides of the machine as
shown in the illustration.
4
Attach the drip tray with grill to the machine. Make sure it is fully
inserted.
Note:
The drip tray collects the water that comes out of the dispensing spout
during each rinse/self-cleaning cycle as well as co ee that might be spilled
during beverage preparation. Empty and clean the drip tray daily and each
time the full drip tray indicator is raised.
Caution:
NEVER remove the drip tray when the machine has just been turned
on. Wait a couple of minutes, since the machine will carry out a rinse/
self-cleaning cycle.
Page 11
ENGLISH
9
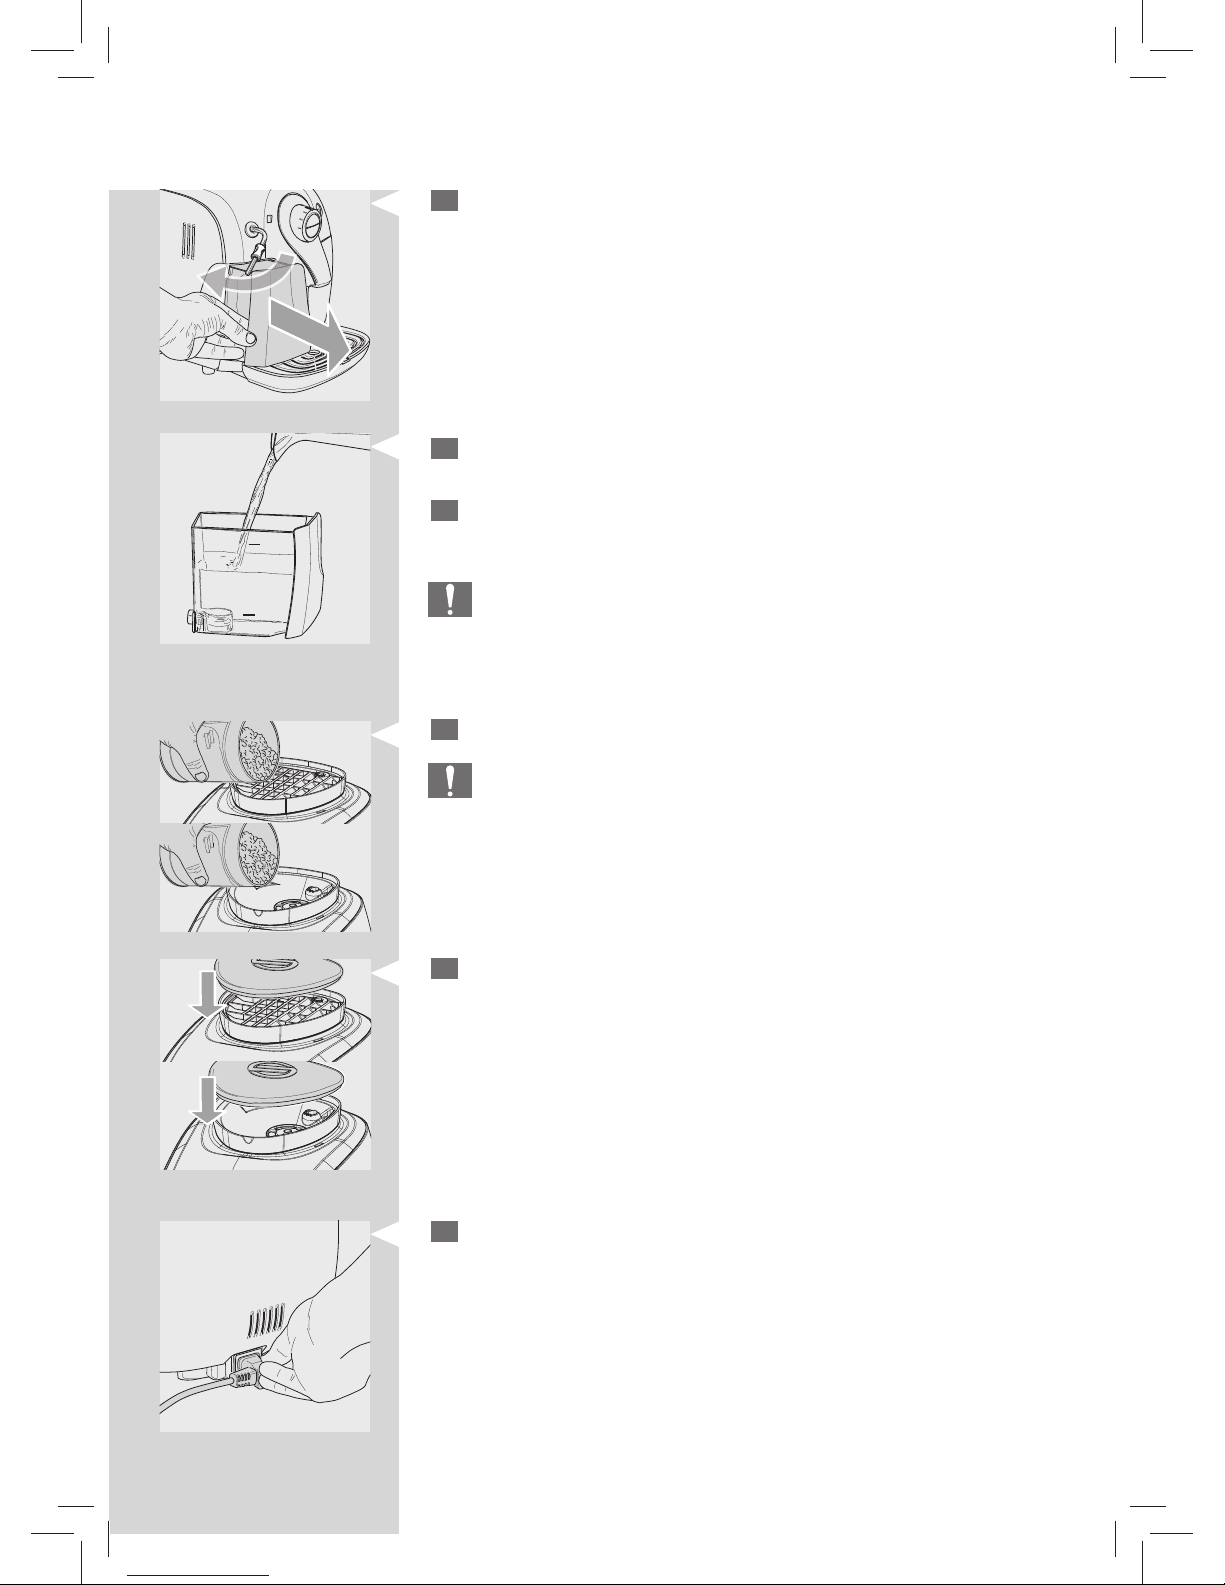
5
Remove the water tank.
MAX
MIN
6
Rinse the water tank under fresh water.
7
Fill the water tank with fresh water up to the MAX level and reinsert it
into the machine. Make sure it is fully inserted.
Caution:
Never ll the water tank with warm, hot, sparkling water or any other
liquid, as this may cause damage to the water tank and the machine.
8
Slowly pour the co ee beans into the co ee bean hopper.
Caution:
Only co ee beans must be put into the co ee bean hopper. Ground
co ee, instant co ee, caramelized co ee or any other object may
damage the machine.
9
Put the lid on the co ee bean hopper.
10
Insert the plug into the socket located on the back of the machine.
Page 12
10
ENGLISH
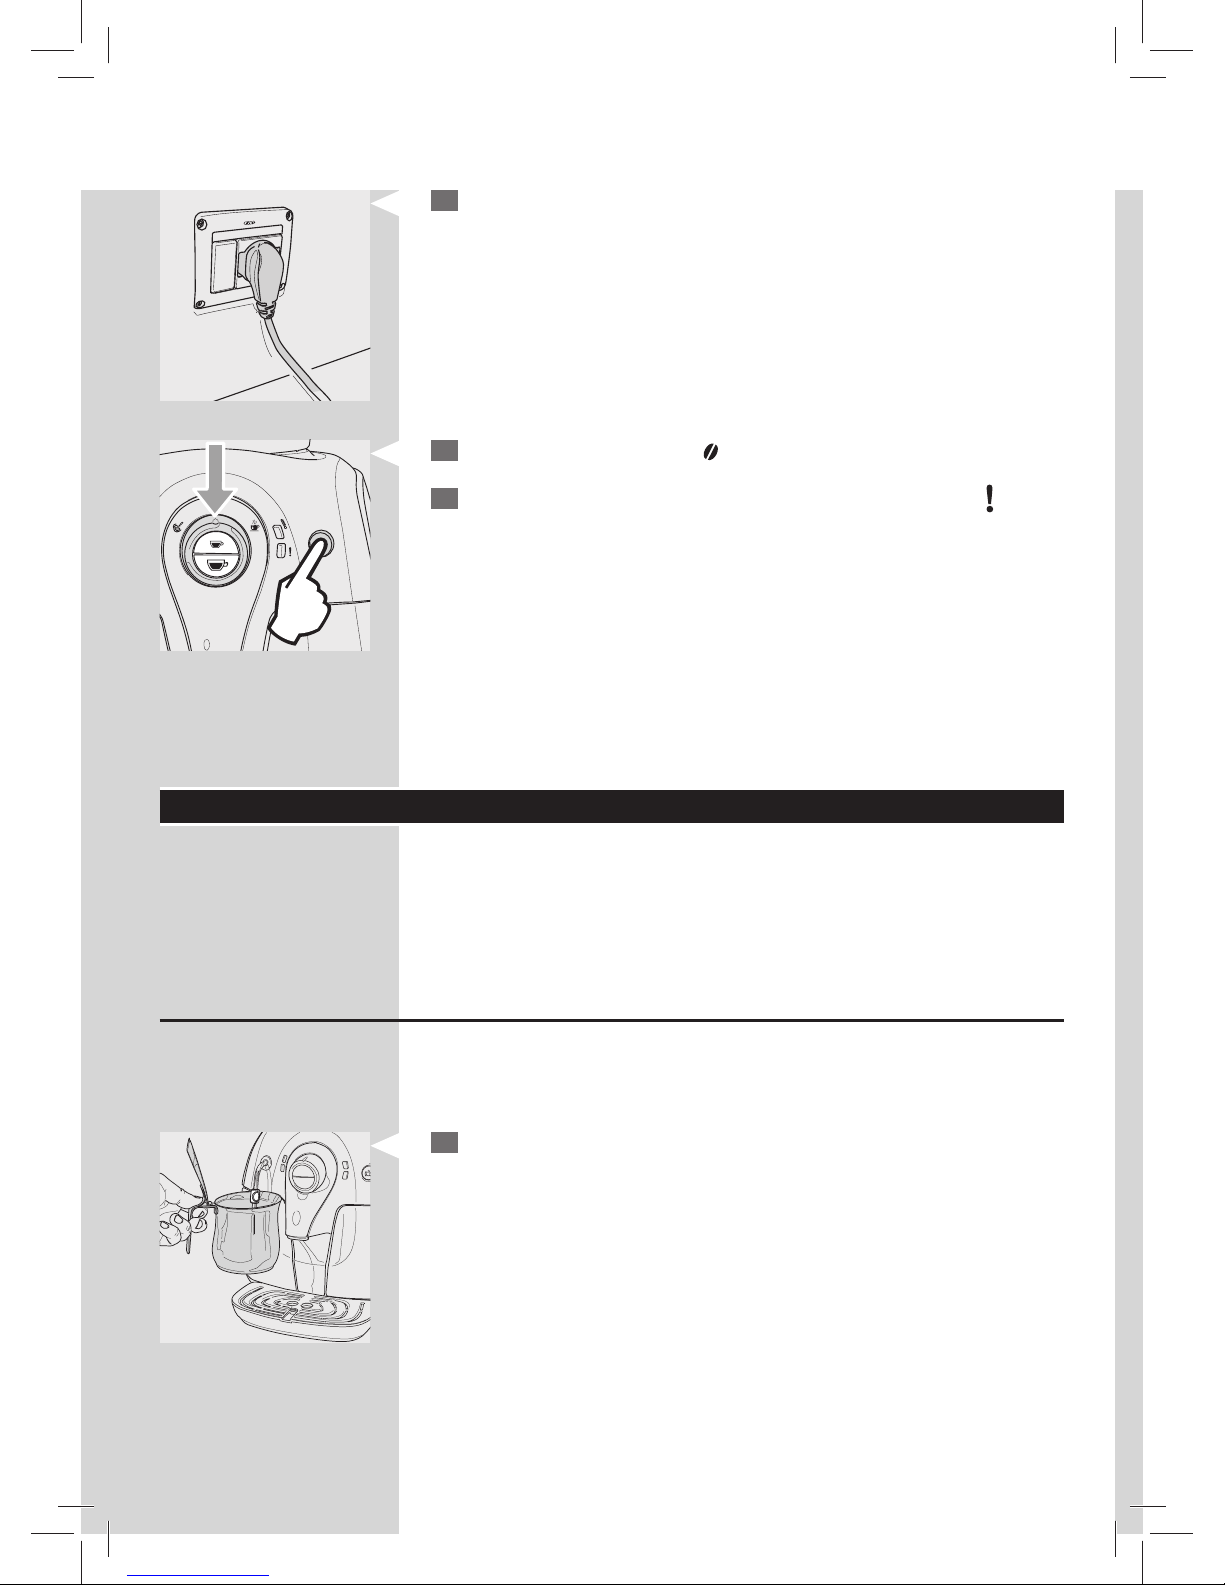
11
Insert the plug of the other end of the power cord into a wall socket
with suitable power voltage.
12
Make sure control dial is on “ ” position.
13
Simply press the ON/OFF button to turn the machine on; the “ “ light
will begin to ash quickly indicating that the circuit has to be primed.
USING THE MACHINE FOR THE FIRST TIME
When using the machine for the rst time, the following activities need to
happen:
1) You need to prime the circuit.
2) The machine will perform an automatic rinse/self-cleaning cycle.
3) You need to initiate a manual rinse cycle.
Circuit priming
During this process fresh water ows through the internal circuit of the
machine and the machine warms up. This takes a few minutes.
1
Place a container under the hot water/steam wand or Pannarello (if
supplied).
Page 13
ENGLISH
11
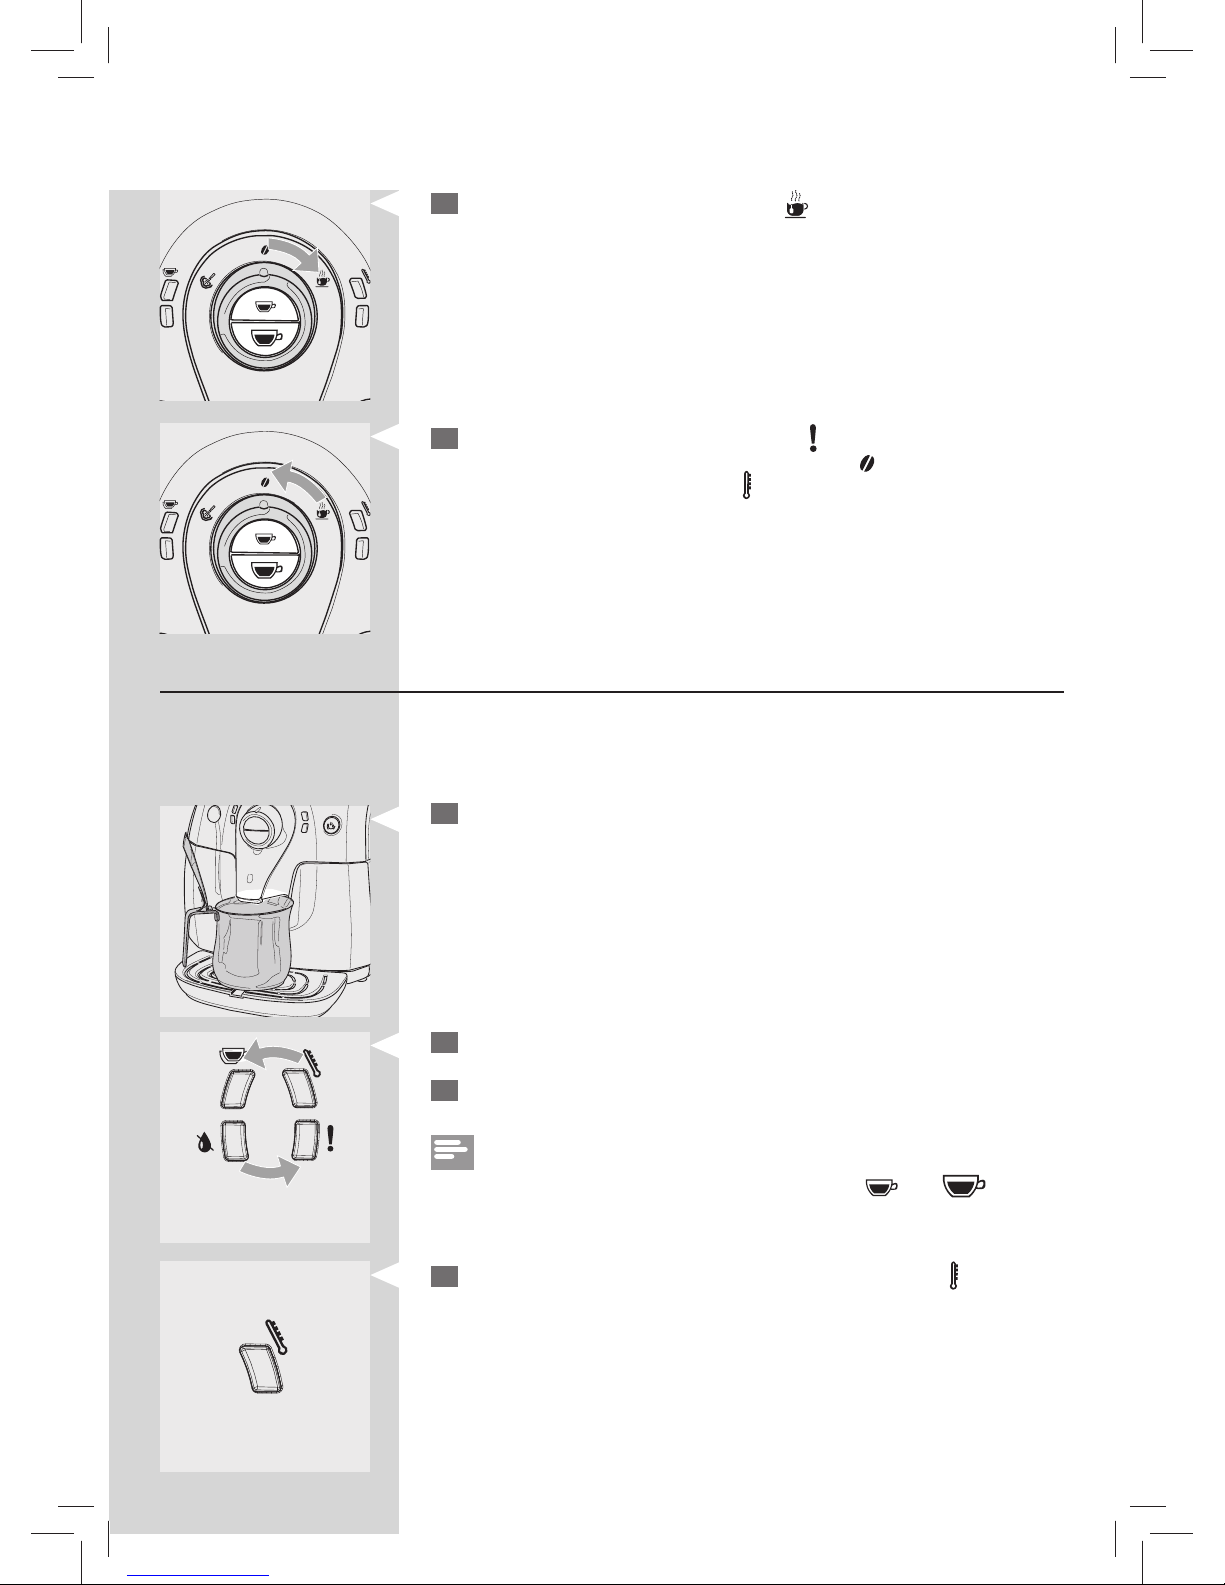
2
Turn the control dial clockwise to the “ ” position and wait few sec-
onds.
3
When water steadily comes out and the “ “ light ashes slowly, rotate
the control dial counter-clockwise back to the “
” position. The ma-
chine is in warm-up mode (light “
“ ashes slowly).
Automatic rinse/self-cleaning cycle
When warm-up is complete, the machine automatically performs rinse/
self- cleaning cycle of the internal circuit with fresh water. This takes less
than a minute.
1
Place a container under the dispensing spout to catch the small
amount of water which will be dispensed.
+
Blinking
2
The indicator lights ash counter clock wise.
3
Wait for the cycle to nish automatically.
Note:
You can stop dispensing as well, by pressing either “
“ or “ “ button.
4
When the above steps are complete, check that the light “ “ shines
steadily.
Steady on
Page 14
12
ENGLISH
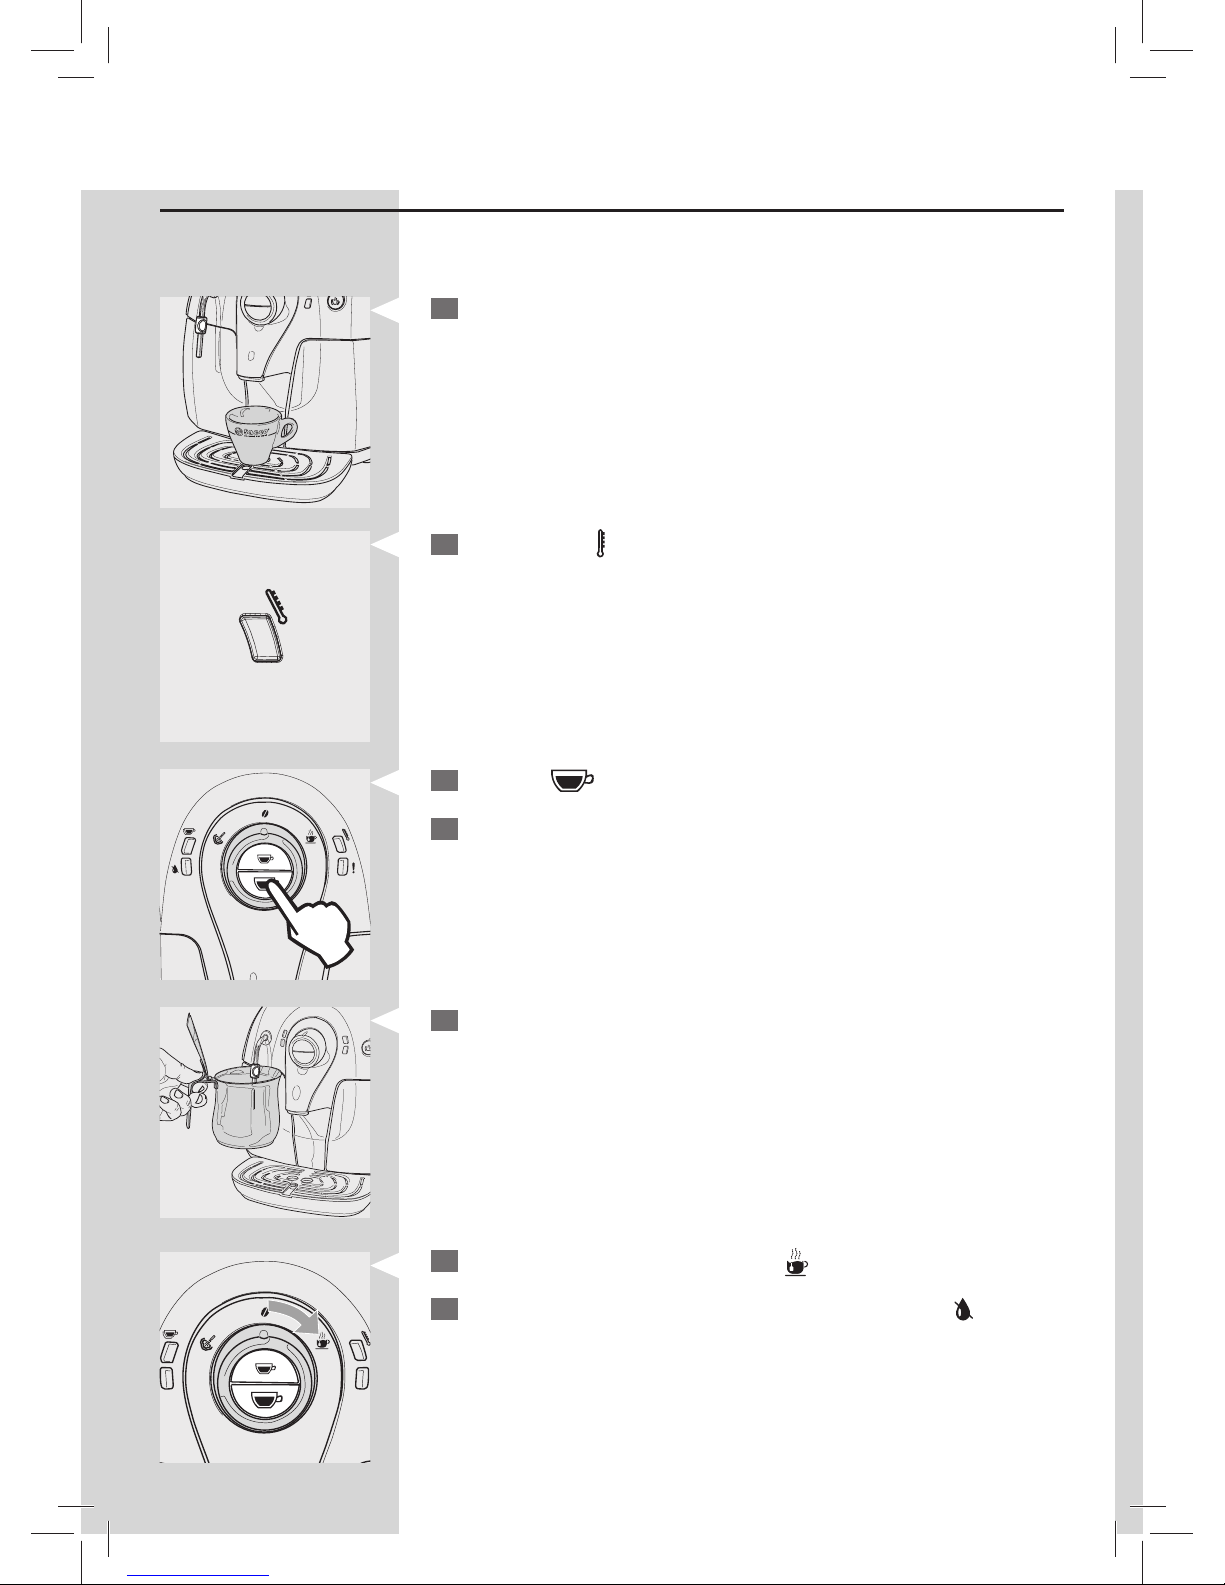
Manual rinse cycle
During this process you brew a co ee and fresh water ows through the
steam/hot water circuit. This takes a few minutes.
1
Place a cup under the dispensing spout
Steady on
2
Check that the “ “ light shines steadily.
3
Press the “ “ button. The machine starts brewing co ee.
4
Wait until brewing is complete and empty the cup.
5
Place a large container (1,2 lt) under the hot water/steam wand (Pan-
narello, if supplied).
6
Turn the control dial clockwise to the “ ” position.
7
Dispense water until the no water signal is displayed. The “ ” light
shines steadily.
Page 15
ENGLISH
13
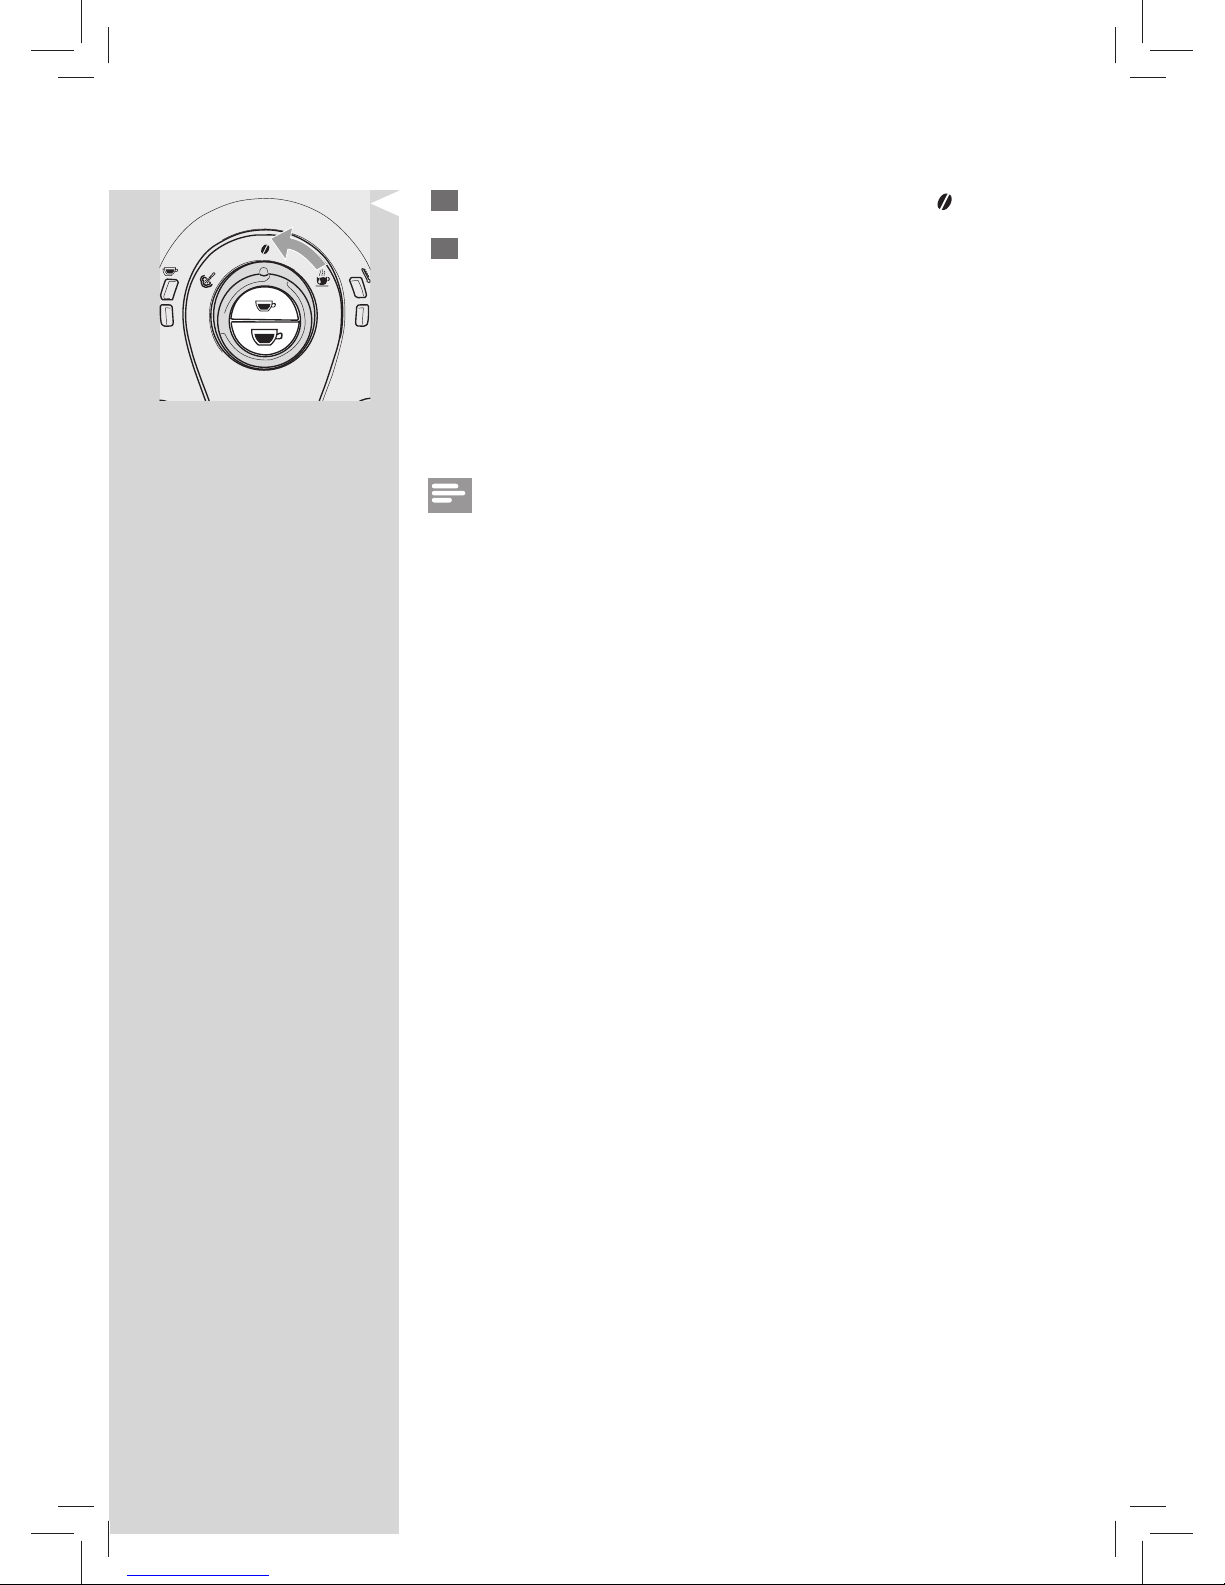
8
Now turn the control dial counterclockwise back to the “ ” position.
9
At the end, ll the water tank again. Then the machine is ready for
brewing products.
Notes:
When you haven’t used the machine for 2 or more weeks, the machine
will automatically perform an automatic rinse/self-cleaning cycle after you
have switched on the machine. There after you need to initiate the manual
rinse cycle including brewing a co ee as described above.
The automatic rinse/self-cleaning cycle is also initiated automatically when
starting up the machine (with a cold boiler) or when the machine is preparing to go in stand-by mode, after you have pressed the ON/OFF button
(after a co ee has been brewed).
Page 16
14
ENGLISH
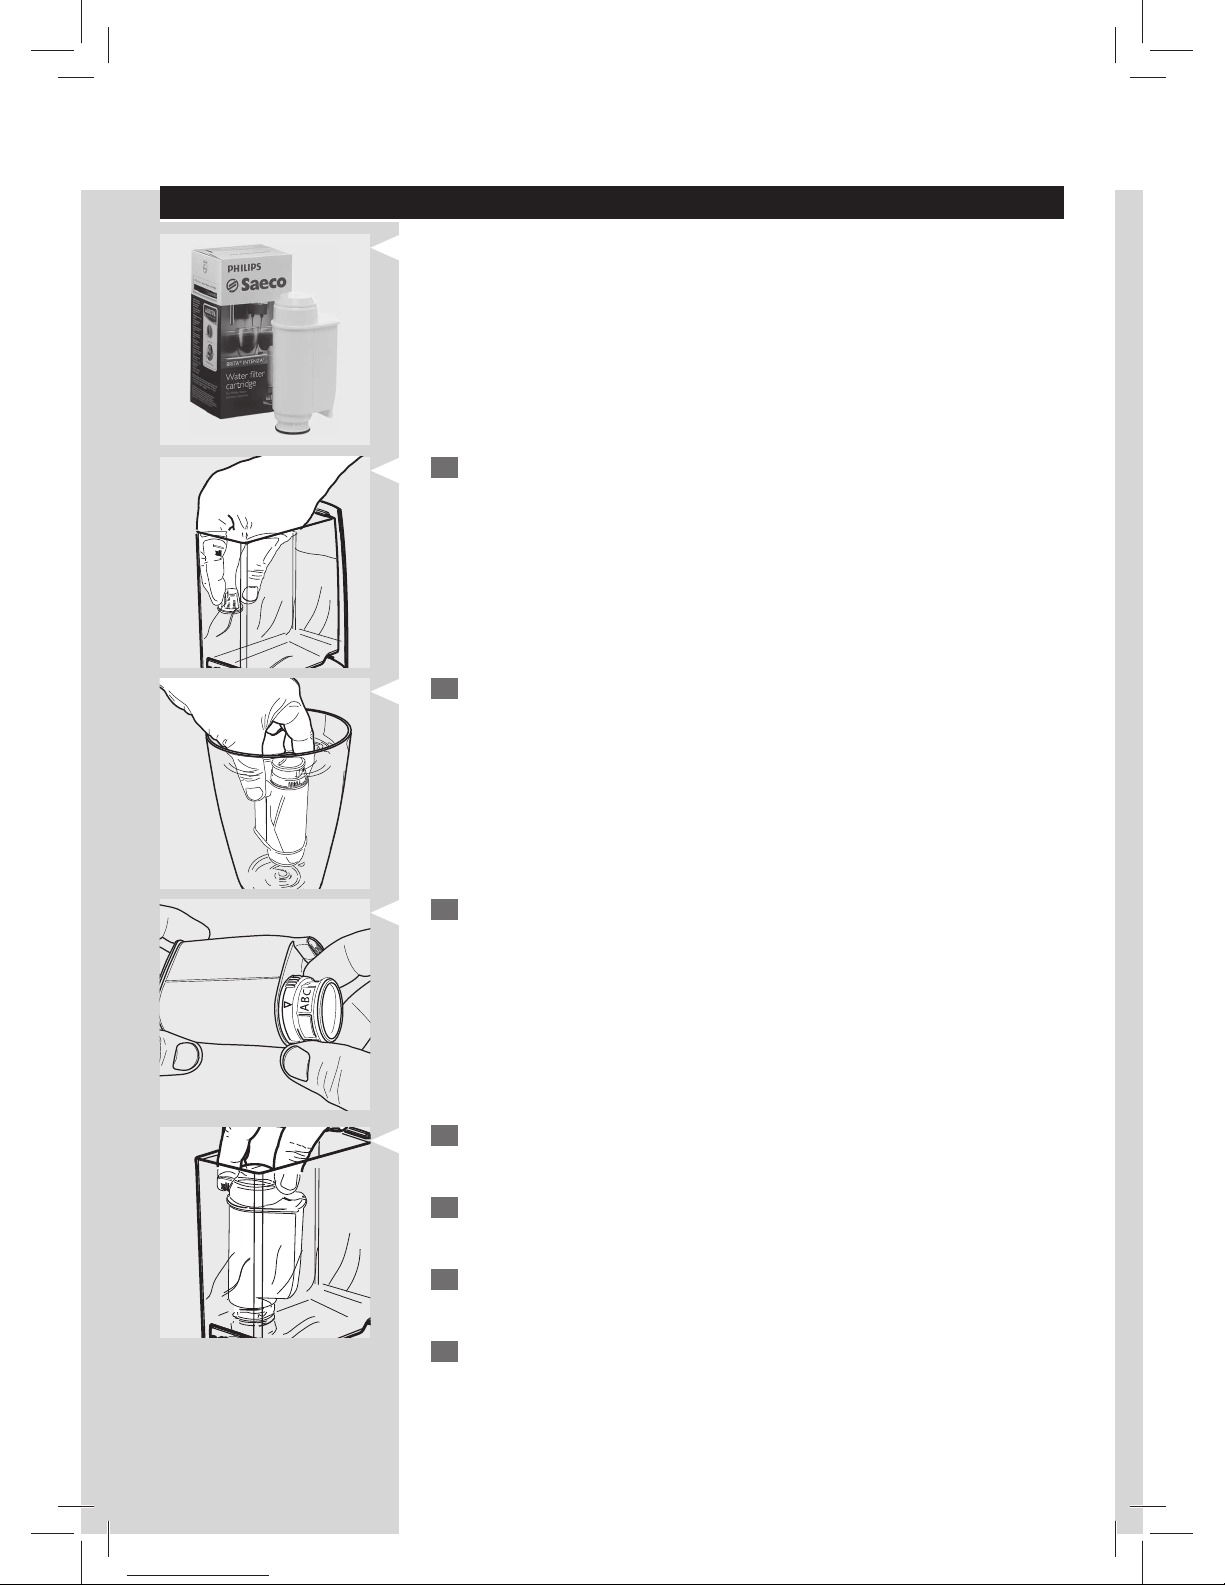
3
Set the lter according to the measurements performed to set the wa-
ter hardness. Use the water hardness test strip provided with the lter.
Set the “Intenza Aroma System” as speci ed on the lter package.
A = Soft water
B = Hard water (standard)
C = Very hard water
4
Put the lter into the empty water tank. Press it until it cannot move
further down.
5
Fill the water tank with fresh water and reinsert it into the machine.
Write down the date of the next water lter replacement (+ 2 months).
6
To activate the water lter, dispense the entire water tank by using the
hot water function (see section “Hot Water Dispensing”).
7
Fill the water tank again.
The machine is now ready.
1
Remove the small white lter from the water tank and store it in a dry
place.
2
Remove the “INTENZA+” water lter from its packaging, immerse it
vertically (with the opening positioned upwards) in cold water and
delicately press the sides so as to let the air bubbles out.
HOW TO INSTALL THE “INTENZA+” WATER FILTER OPTIONAL
You can purchase separately the Intenza+ water lter. Please refer to the
accessory page in this usermanual for further details.
Water is a crucial part of every espresso-so it’s most important to always
have it professionally ltered. Using the “INTENZA+” water lter will prevent
mineral deposits from building up and improve your water quality.
Page 17
ENGLISH
15
ADJUSTMENTS
The machine allows for certain adjustments so that you can brew the best
tasting co ee possible.
Saeco Adapting System
Co ee is a natural product and its characteristics may change according to
its origin, blend and roast. The machine is equipped with a self-adjusting
system that allows the use of all types of co ee beans available on the
market (not for caramelized beans).
The machine automatically adjusts itself after brewing several cups of
co ee to optimize the extraction of the co ee to the compactness of the
ground co ee.
How to adjust the Ceramic Co ee Grinder
Ceramic co ee grinders always guarantee accurate grinding for every coffee blend and prevent the beans from overheating.
This provides for full aroma preservation, delivering the truly Italian taste in
every cup.
Warning:
The ceramic co ee grinder contains moving parts that may be dangerous. Therefore, do not insert ngers and/ or other objects. Only adjust
the ceramic co ee grinder using the grinder adjustment key. Turn
o the machine by pressing the ON/OFF button and remove the plug
from the socket before carrying out any type of operation inside the
co ee bean hopper.
You can adjust the ceramic grinders to set the co ee grinding to your
personal taste.
Warning:
The grinder adjustment knob, inside the co ee bean hopper, must be
turned only when the ceramic co ee grinder is working.
This adjustment can be carried out by pressing and turning the grinder
adjustment knob inside the co ee bean hopper, using the grinder adjustment key provided with the machine.
1
Press and turn the grinder adjustment knob one notch at a time. You
will taste the di erence after brewing 2-3 cups of espresso.
Page 18
16
ENGLISH
2
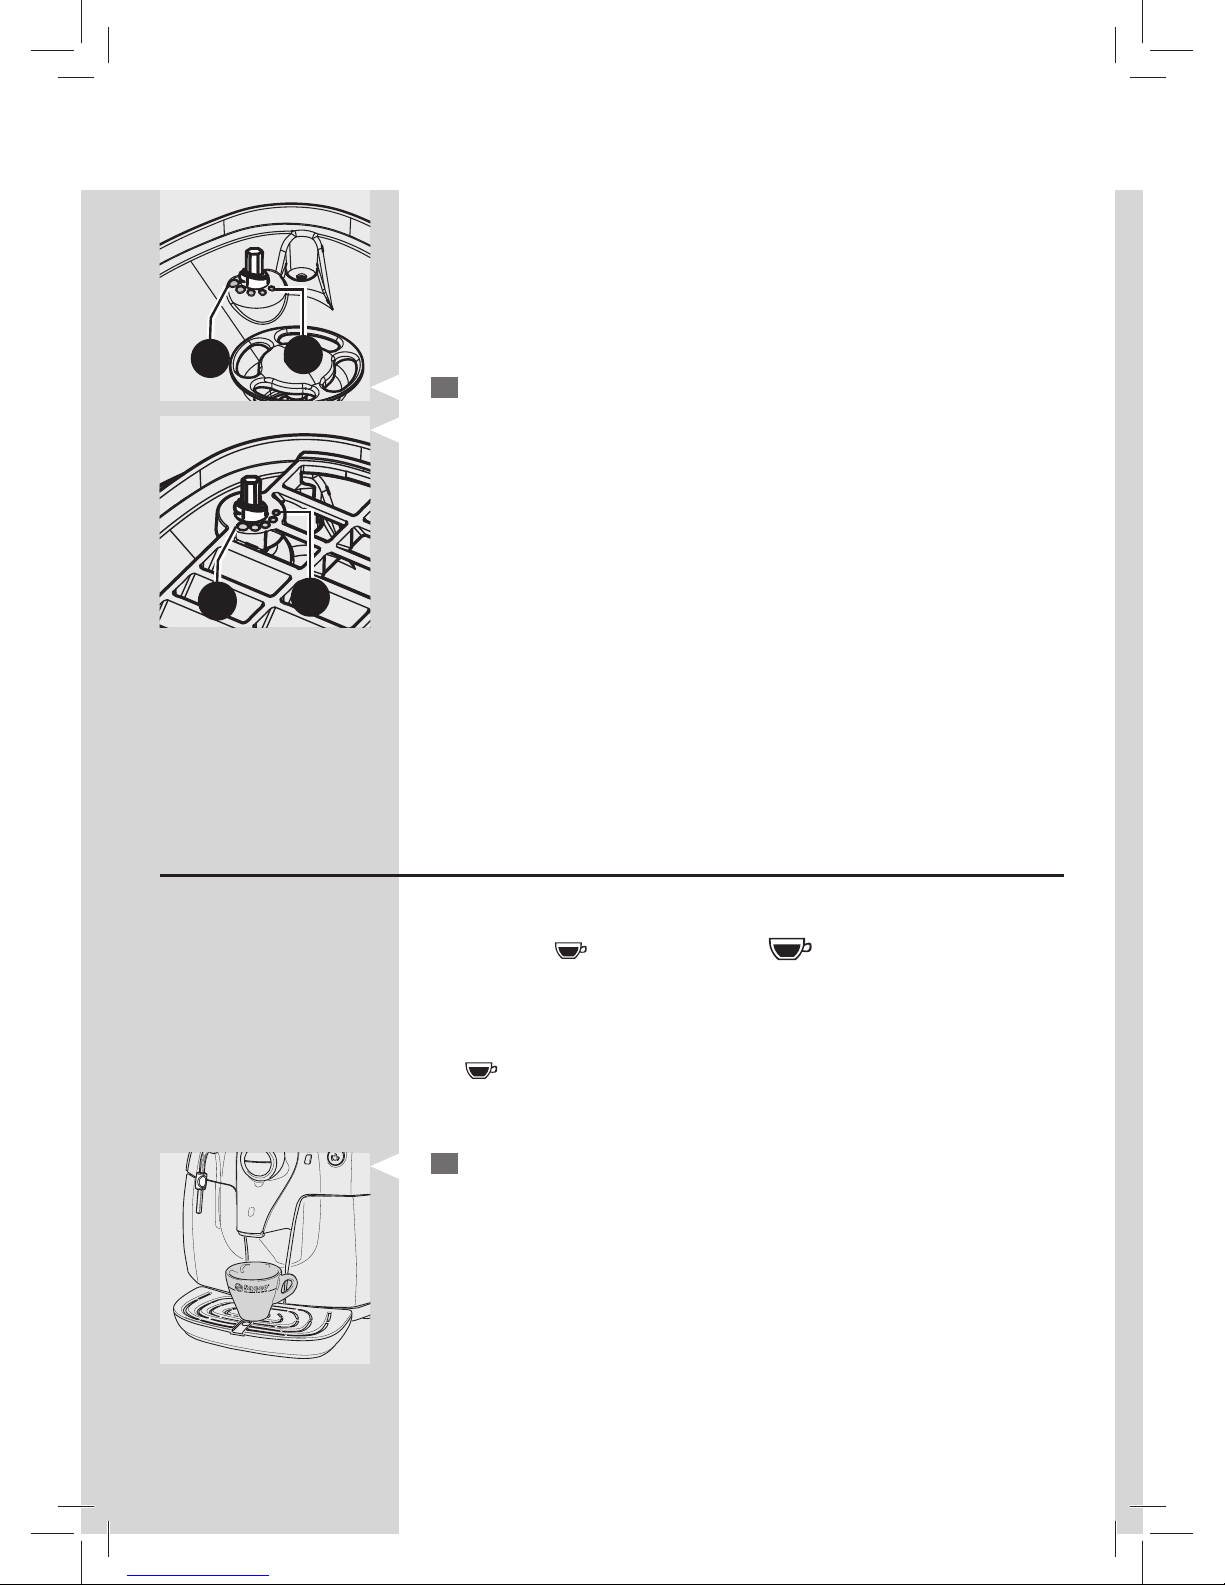
The reference marks inside the co ee bean hopper indicate the grind
setting. There are 5 di erent grind settings to choose from varying
from:
1 - Course grind: Lighter taste, for dark roasted co ee blends
to
2 - Fine grind: Bolder taste, for light roasted co ee blends
1
1
2
2
When you adjust the ceramic co ee grinder to a ner setting, your co ee
will taste stronger. For a milder co ee taste, adjust the ceramic co ee
grinder to a coarser setting.
Adjusting the Co ee Length
The machine allows you to adjust the amount of brewed espresso according to your taste and the size of your cups.
Each time the “
” espresso button or “ ” co ee button are pressed
and released, the machine brews a pre-set amount of co ee. Each button
may be individually programmed for a speci c brew setting.
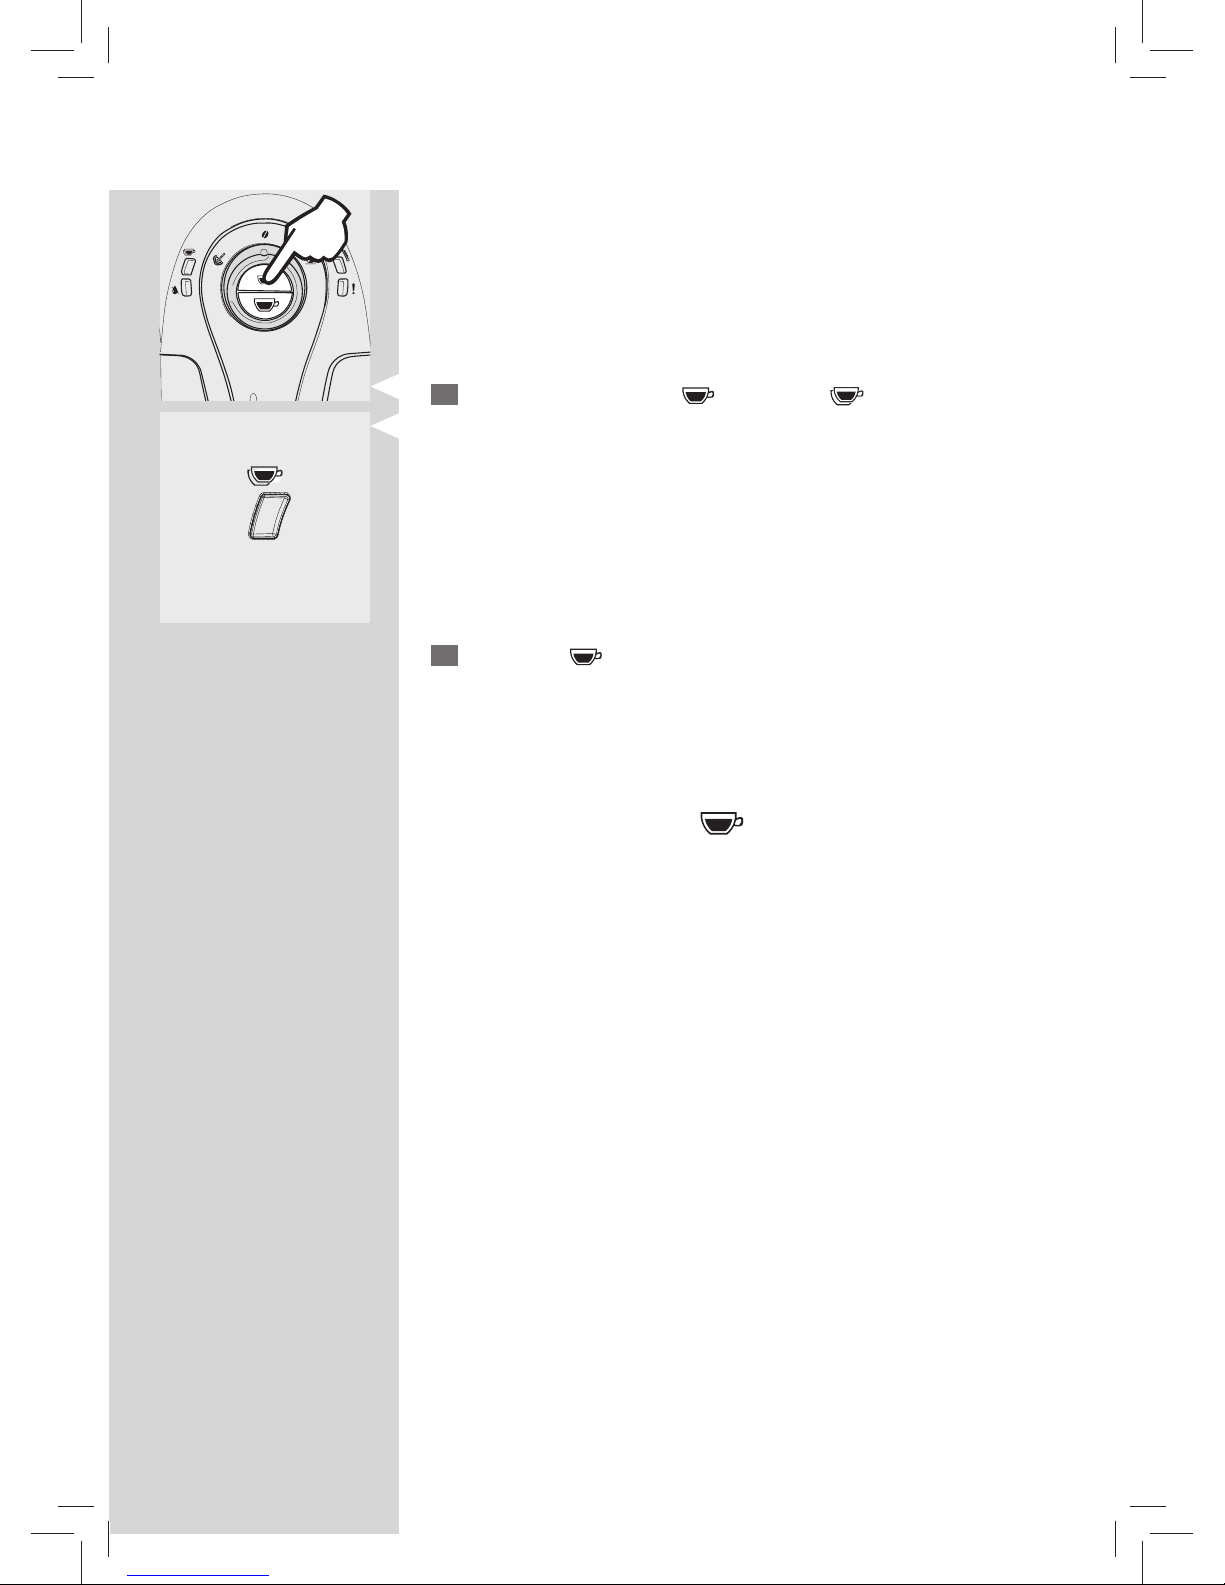
The following procedure describes the programming of the espresso button“
”.
1
Place a cup under the dispensing spout.
Page 19
ENGLISH
17
2
Press and hold down the “ ” button; the “ ” light ashes during
this phase.
Flashing
3
Release the “ ” button when the amount of co ee in the cup reaches
the desired level.
At this point the button is programmed; each time it is pressed and
released, the machine will brew the same amount of espresso that was just
programmed.
Same procedure applies to the “
” co ee button.
Page 20
18
ENGLISH
ESPRESSO AND COFFEE BREWING
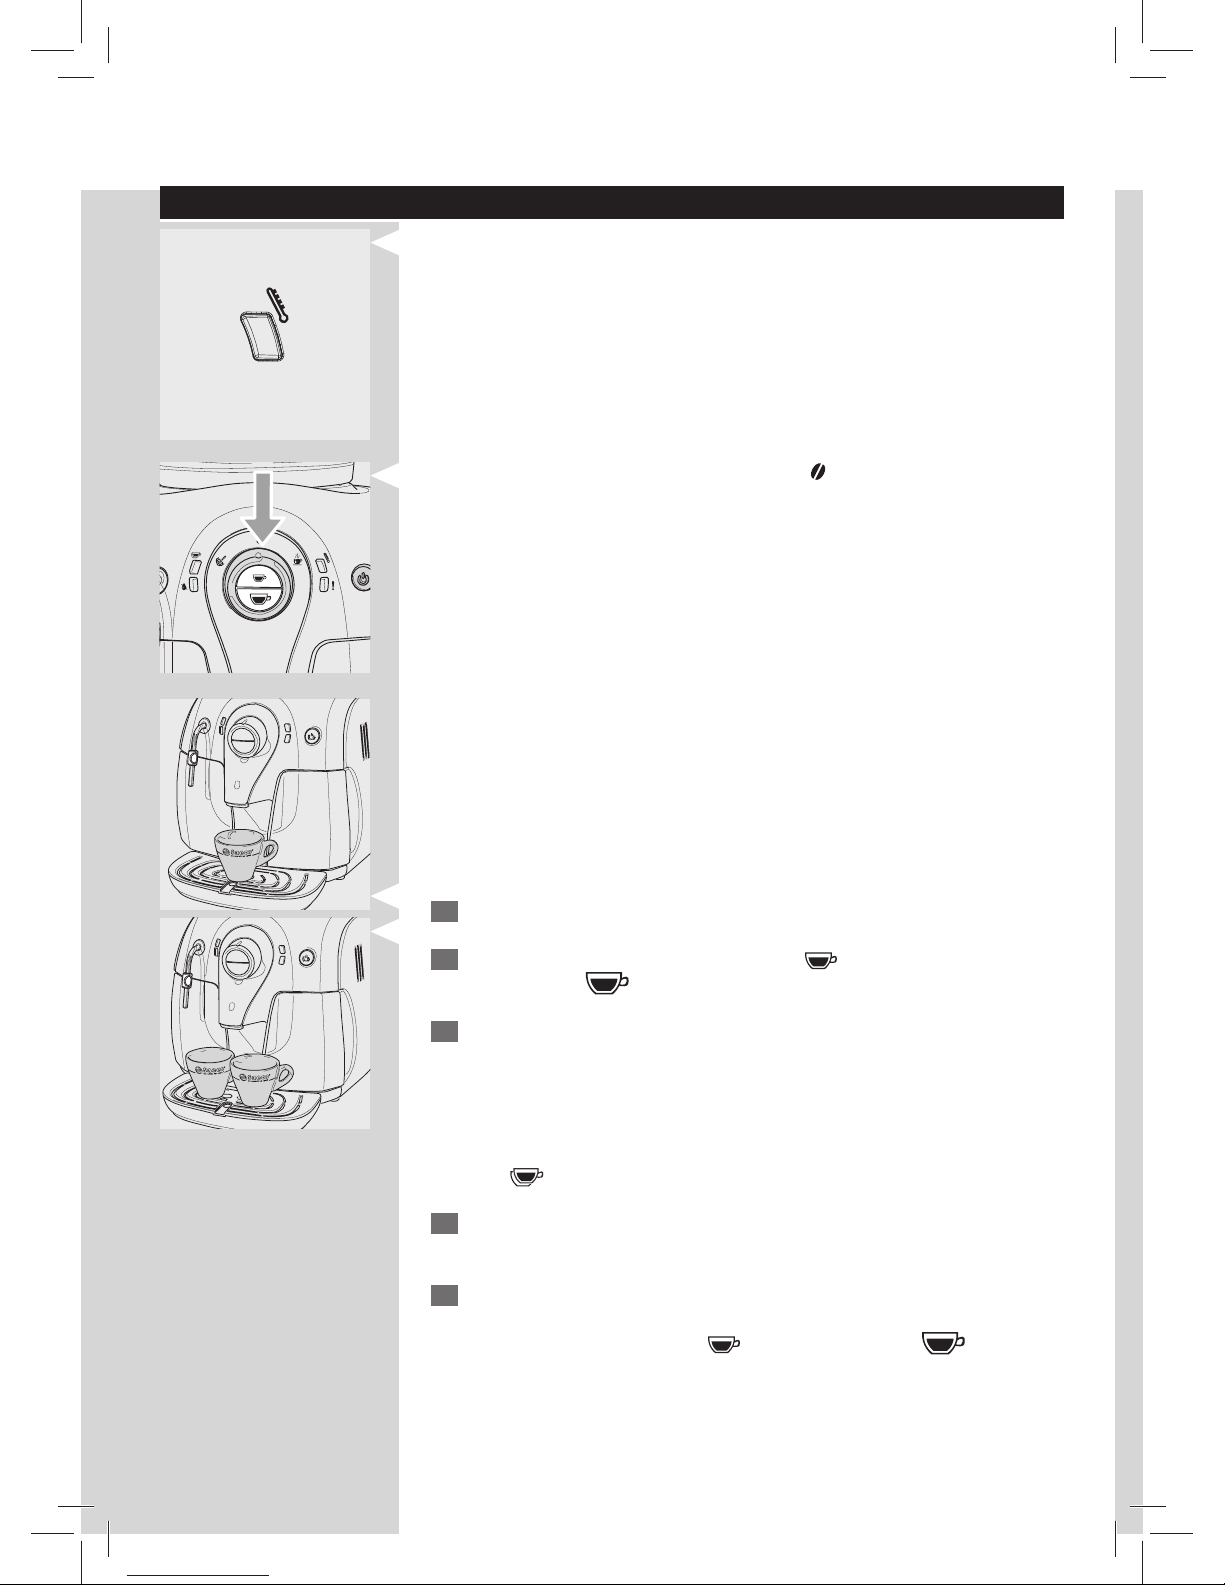
Before brewing co ee, make sure that the green temperature
light shines steadily and that the water tank and the co ee bean hopper
are full.
Steady on
Leave the control dial on the co ee position “ ” during the dispensing
phase.
1
Place 1 or 2 cups under the dispensing spout.
2
To brew espresso, press and release the “ ” espresso button for an
espresso; the “
” co ee button for a co ee.
3
To dispense 1 cup of espresso, press the button once. To dispense 2
cups of espresso, press the button twice consecutively.
In this operating mode, the machine automatically grinds and doses the
correct amount of co ee. Brewing two espressos requires two grinding
and brewing cycles, automatically carried out by the machine; during this
time the “
” light is shining steadily.
4
After the pre-brewing cycle, co ee begins to dispense out of the dis-
pensing spout.
5
Co ee brewing stops automatically when the pre-programmed level is
reached; however, it is possible to interrupt co ee brewing by pressing
the button initially pressed (“
” espresso button or “ ” co ee
button).
Page 21
ENGLISH
19
DISPENSING STEAM/CAPPUCCINO BREWING
Steam may be used to froth milk for a cappuccino.
Warning:
Danger of scalding! Dispensing may be preceded by small jets of hot
water. The hot water/steam wand may reach high temperatures: Never
touch it with bare hands. Use the appropriate protective handle only.
Dispensing Steam
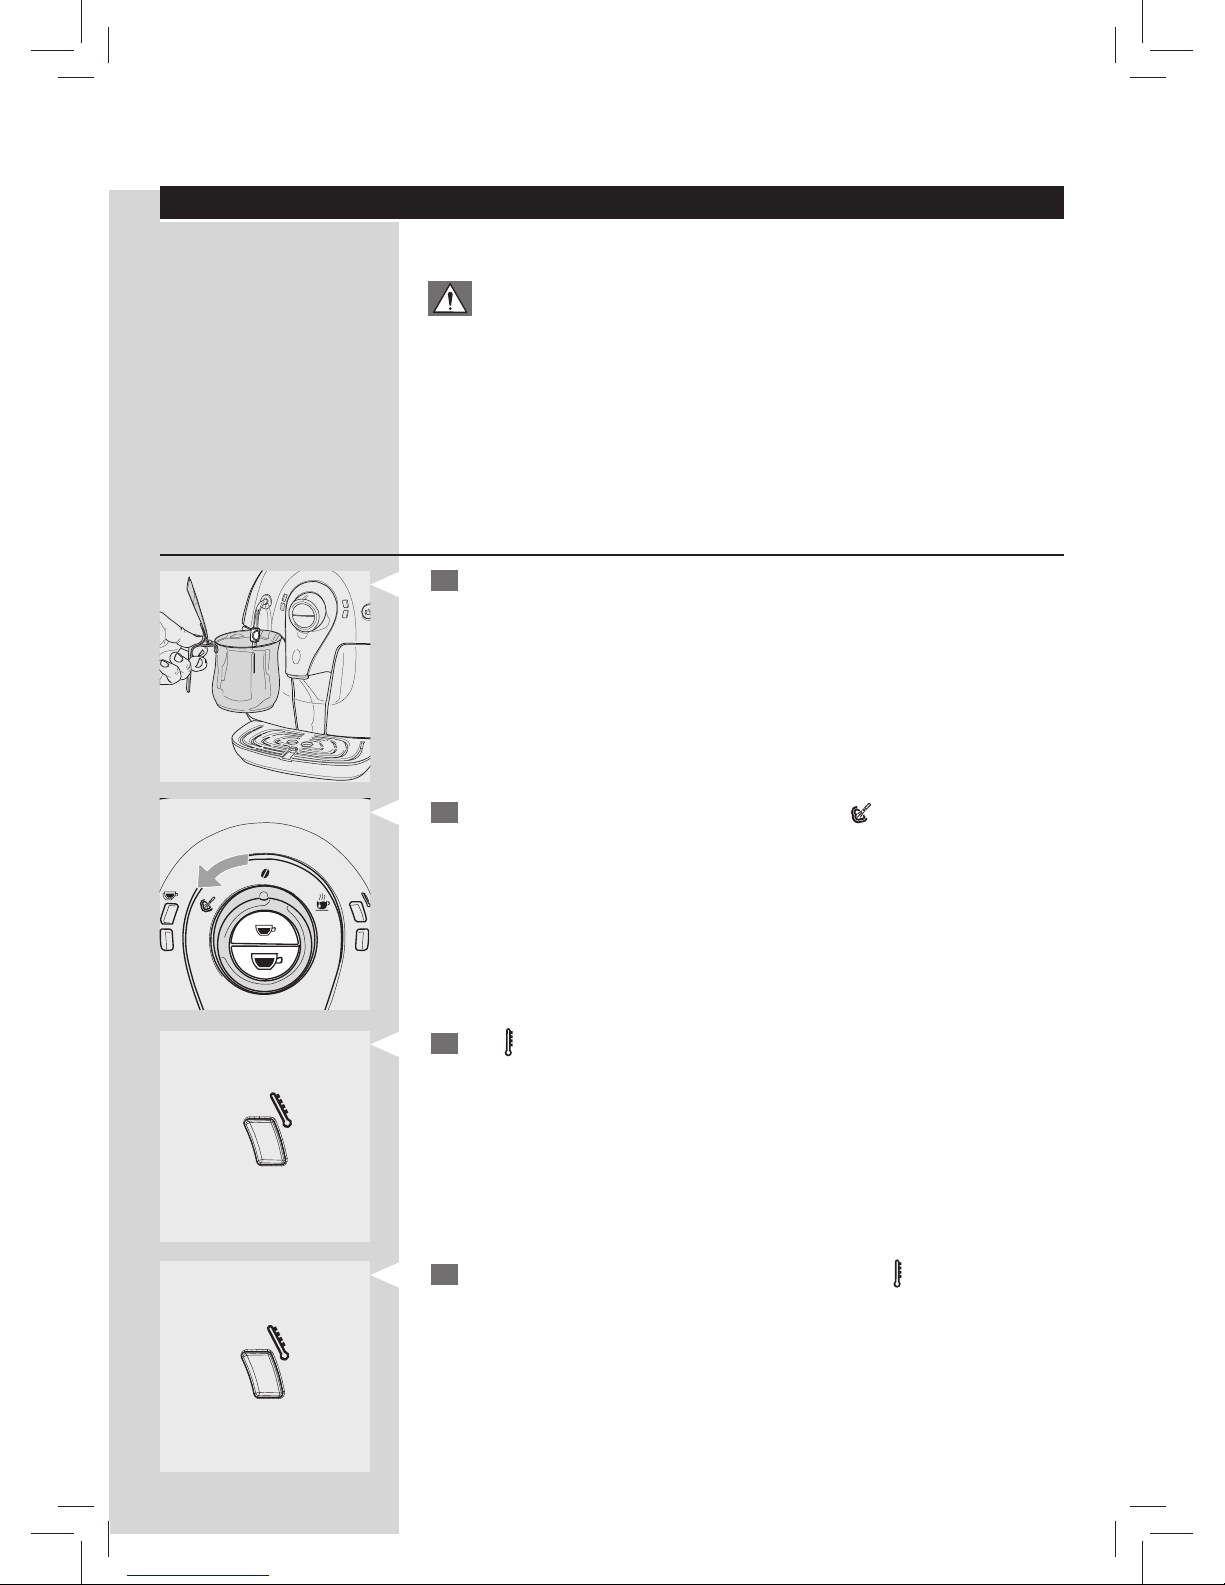
1
Place a container under the hot water/steam wand (Pannarello, if sup-
plied).
2
Turn the control dial counterclockwise to the “ ” position.
Steady on
Flashing
3
The “ ” light ashes during the preheating time required by the ma-
chine.
4
Steam dispensing will begin when the green light “ ” shines steadily.
Page 22
20
ENGLISH
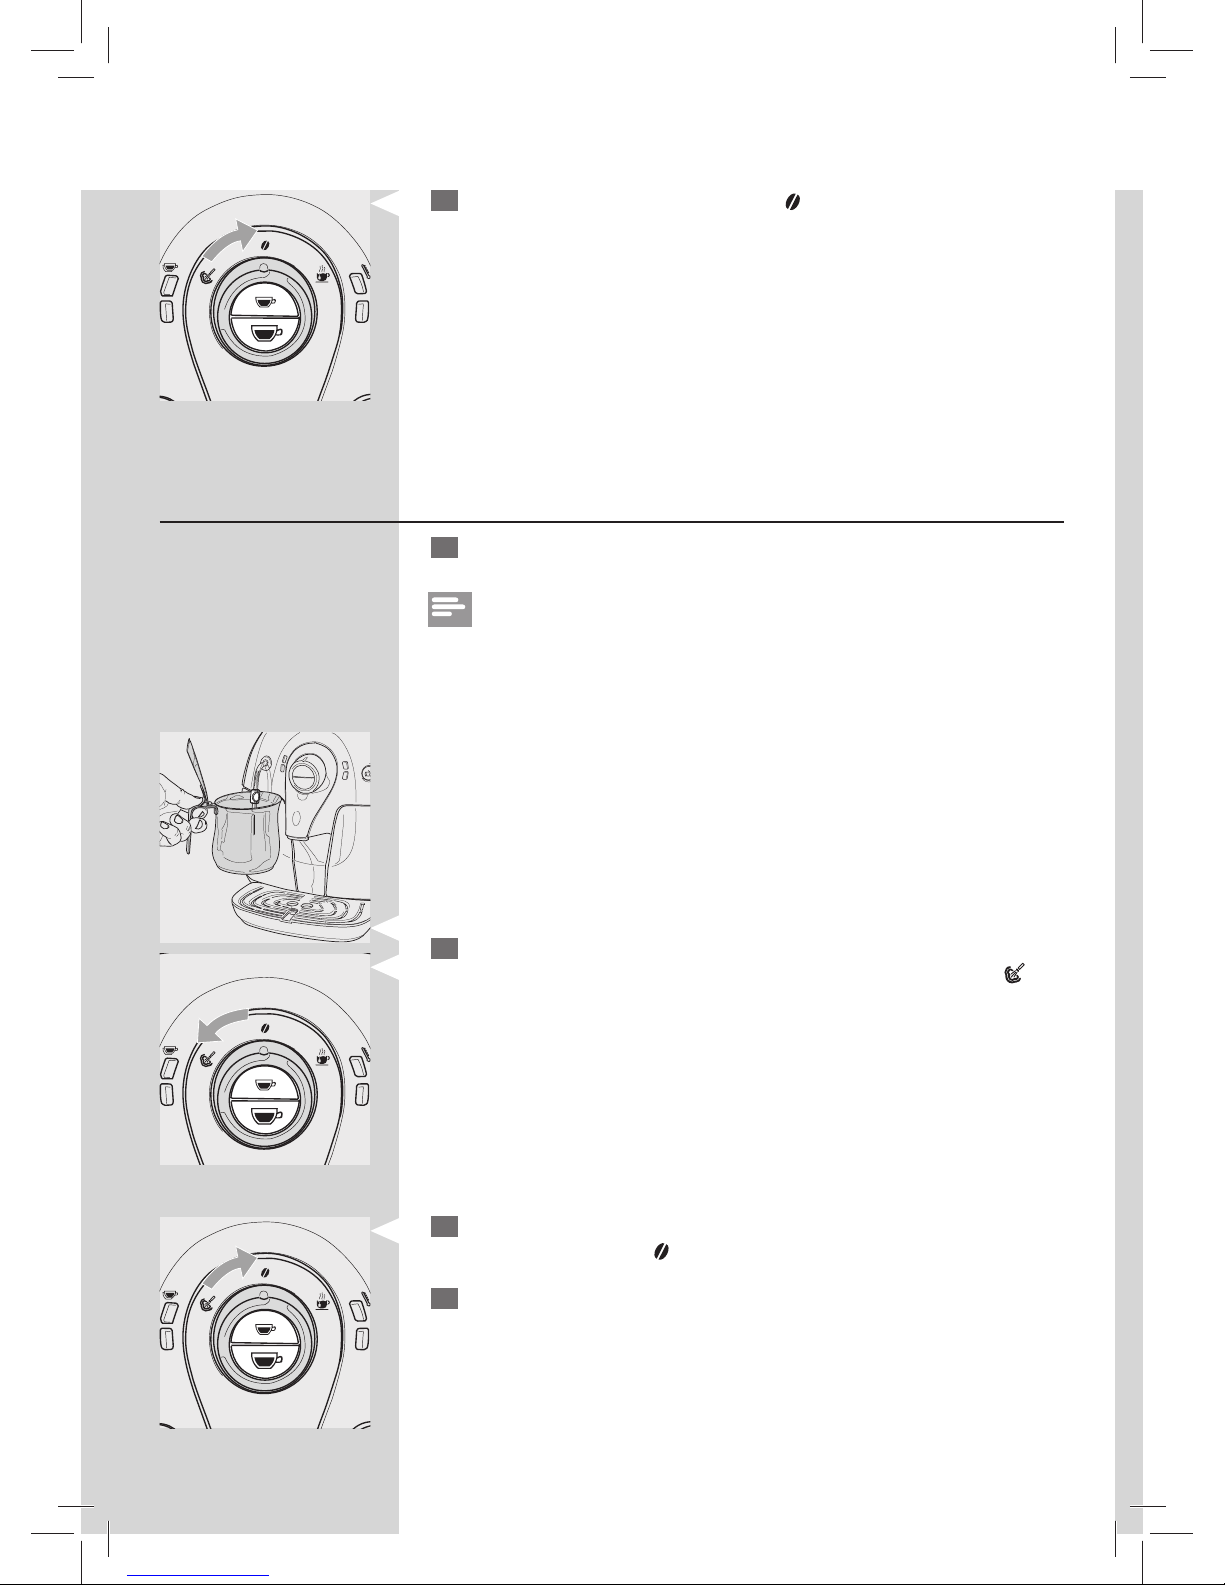
5
Turn the control dial clockwise to the “ ” position to stop dispensing
steam.
Frothing milk to prepare a cappuccino
1
Fill 1/3 of a carafe with cold milk.
Note:
Use cold (~5°C / 41°F) milk with a protein content of at least 3% to ensure
optimum results when preparing a cappuccino. You can use whole milk or
low-fat milk depending on your personal taste.
2
Immerse the hot water/steam wand (Pannarello, if supplied) in the milk
to be heated and turn the control dial counter-clockwise to the “
”
position. Froth the milk by gently swirling the container and moving it
up and down.
3
When the milk froth has the desired consistency, turn the control dial
clockwise back to the “
” position to stop dispensing steam.
4
The same procedure can be used to heat other beverages.
Page 23
ENGLISH
21
Caution:
After using the steam to froth the milk, clean the hot water/steam
wand (or Pannarello, if supplied) by dispensing a small amount of hot
water into a container. For detailed cleaning instructions please see
the “Cleaning and Maintenance” section.
If you want to brew an espresso after having dispensed steam, you rst
need to bring the machine back to the co ee brewing temperature. For
this follow the steps described below:
Steam/Co ee Switchover
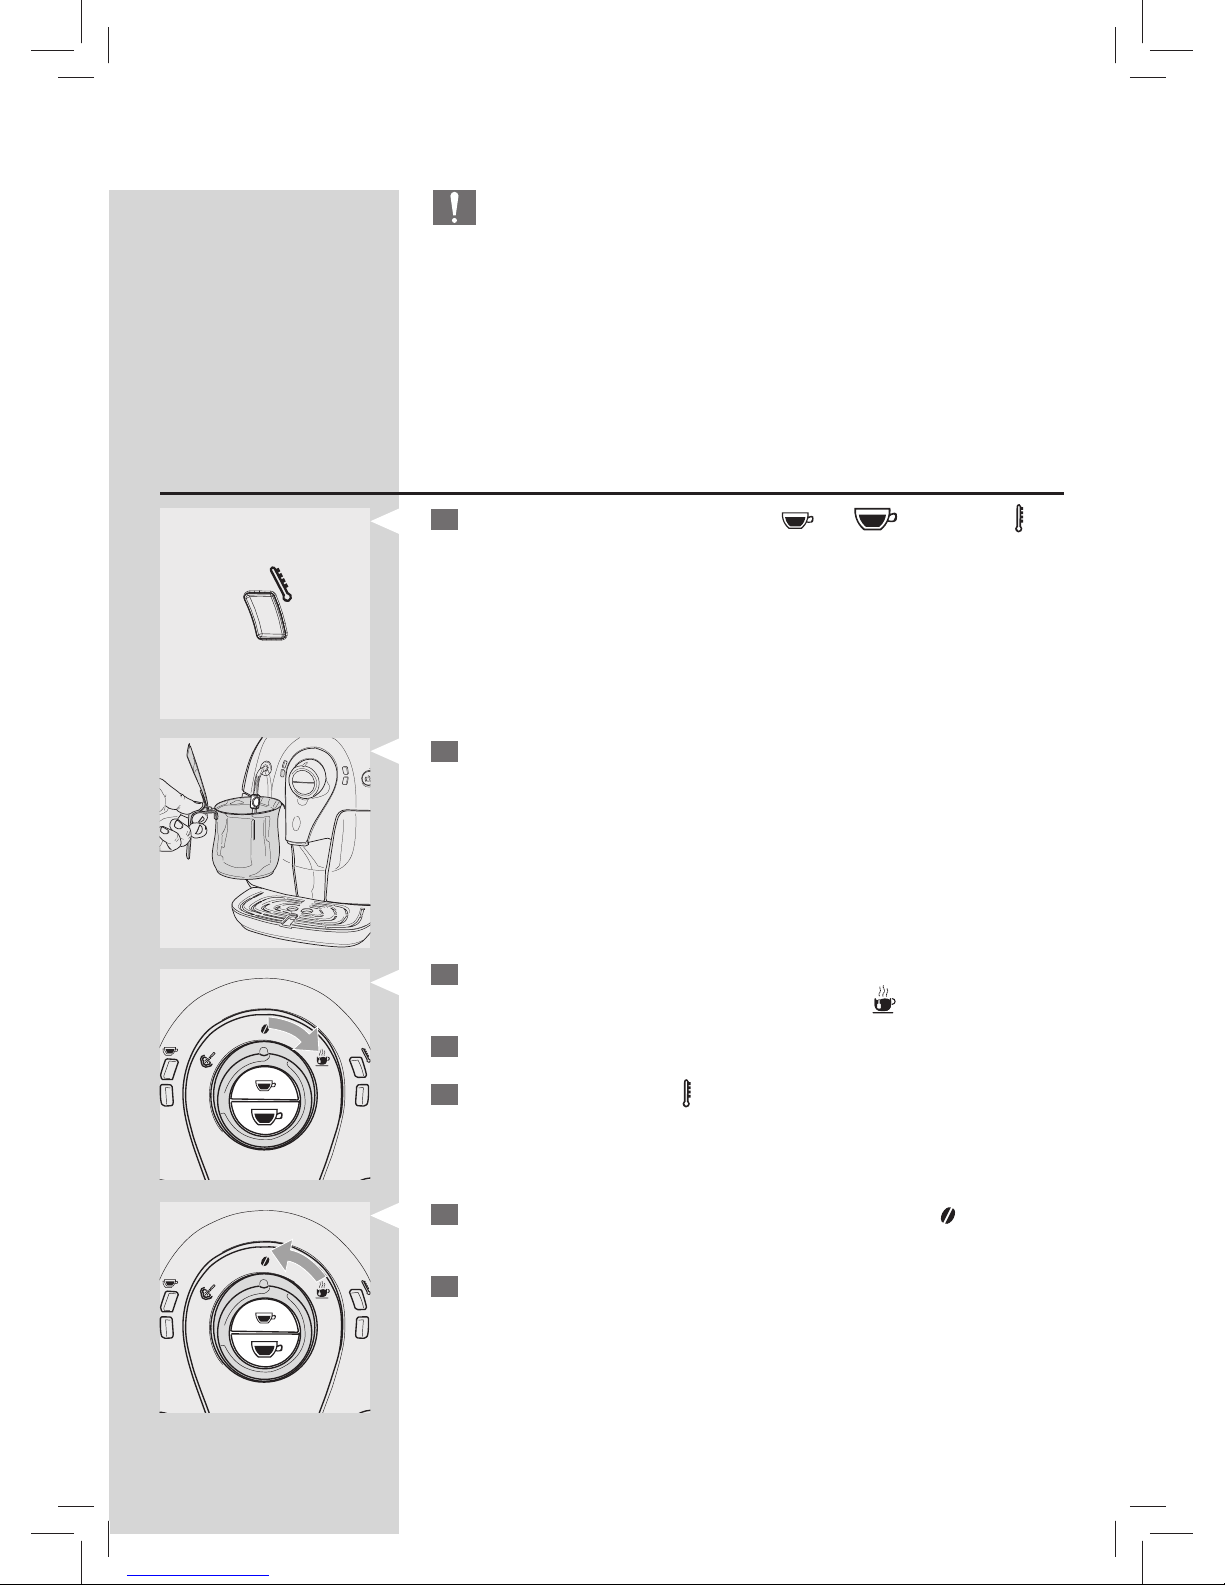
1
After dispensing steam and pressing “ ” or “ ” button, the “ ”
light ashes fast to show that the machine is overheated and cannot
brew co ee.
Flashing fast
2
To brew co ee, rst drain a small amount of water.
3
Place a container under the hot water/steam wand (Pannarello, if sup-
plied) and turn the control dial clockwise to the “
” position.
4
Hot water will be dispensed.
5
Wait for the temperature “ ” light shines steadily.
6
Then turn the control dial counterclockwise back to the “ ” position to
stop dispensing.
7
Now follow the procedure described in the “Brewing espresso” section
to brew co ee.
Page 24
22
ENGLISH
DISPENSING HOT WATER
Warning:
Danger of scalding! Dispensing may be preceded by small jets of hot
water. The hot water/steam wand may reach high temperatures: Never
touch it with bare hands. Use the appropriate protective handle only.
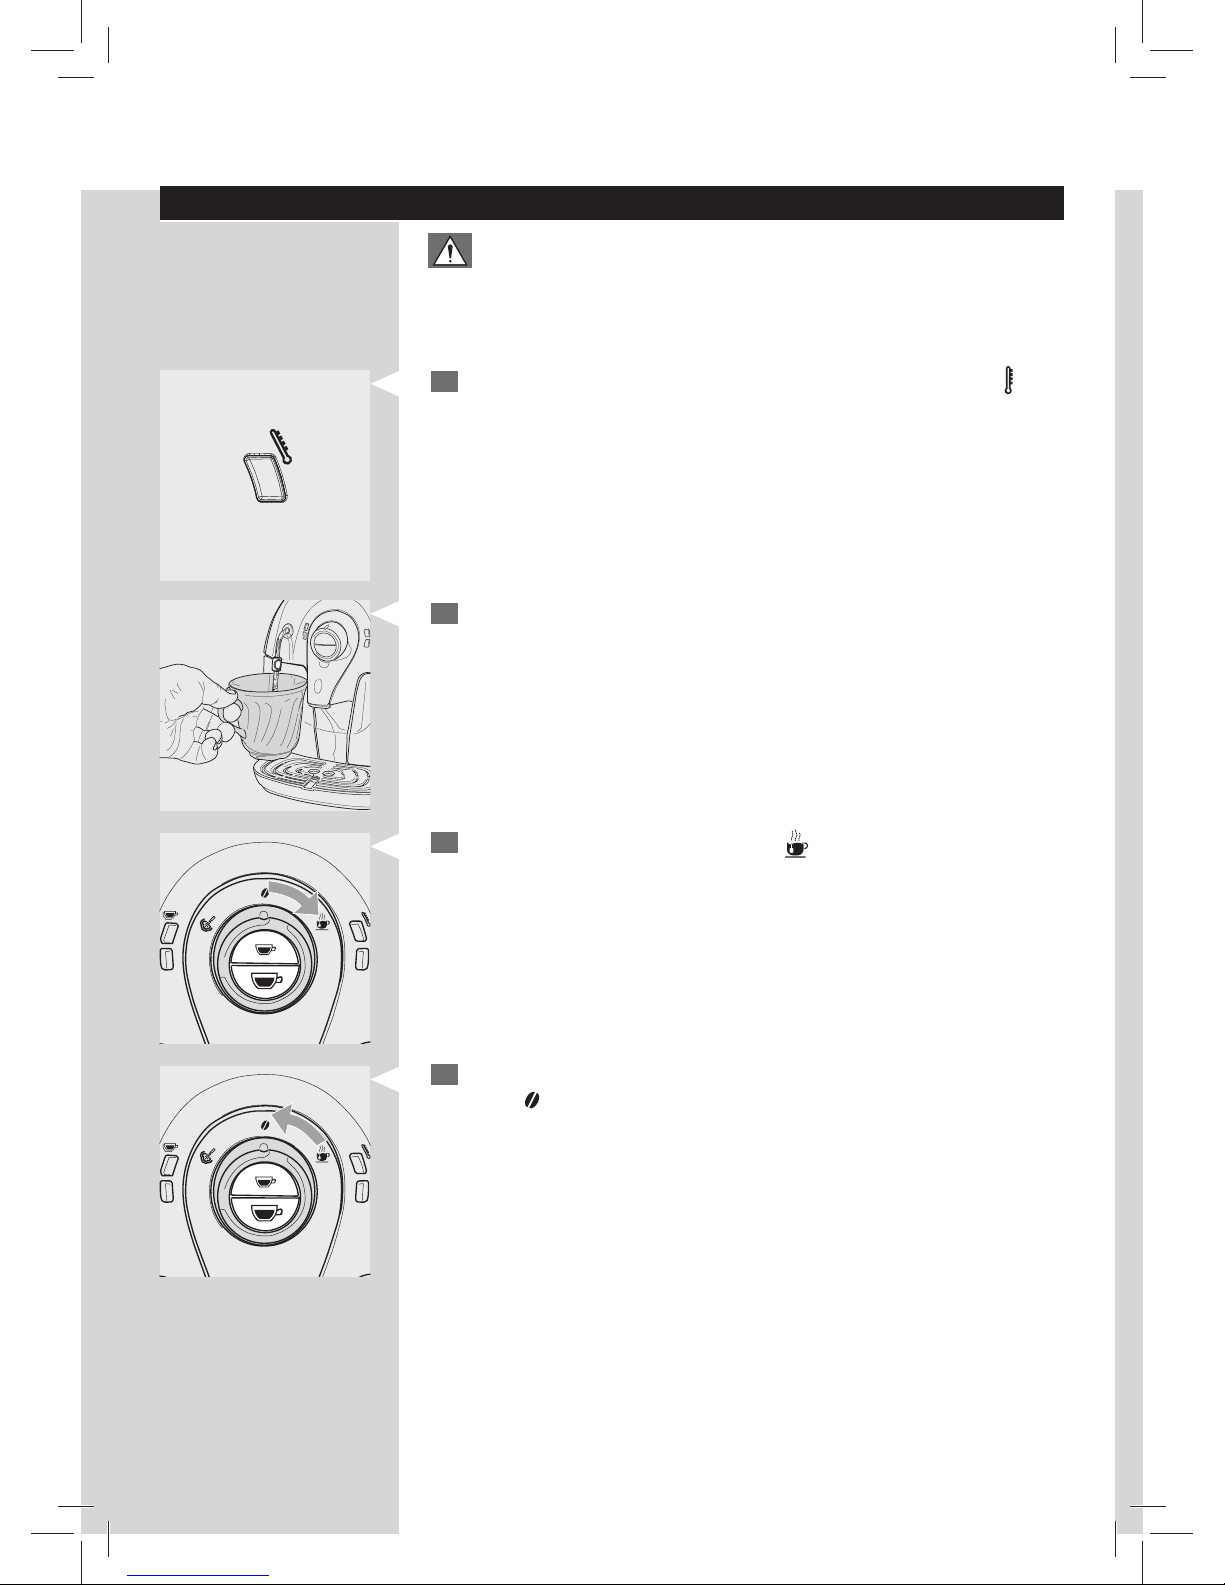
1
Before dispensing hot water, check that the green temperature “ ” light
shines steadily. If the light ashes slowly, wait for the machine to heat
up.
Steady on
2
Place a cup under the hot water/steam wand (Pannarello, if supplied);
3
Turn the control dial clockwise to the “ ” position. Hot water will be
dispensed.
4
To stop hot water dispensing, turn control dial counter-clockwise back
to the
“ ”
position.
Page 25
ENGLISH
23
CLEANING AND MAINTENANCE
Cleaning
Caution:
Timely cleaning and maintenance of your machine is very important
as it prolongs the life of your machine. Your machine gets exposed to
moist, co ee and limescale continuously!
In this chapter it is described in detail which activities you need to
perform at which frequency. Not doing this will ultimately make
your machine stop working properly. This repair is NOT covered by
your warranty!
Note:
• Use a soft, dampened cloth to clean the machine.
• Do not wash any of its parts in the dishwasher.
• Do not use alcohol, solvents, and/or abrasive objects to clean the machine.
• Do not dry the machine and/or its components using a microware
and/or standard oven.
Daily cleaning of the machine
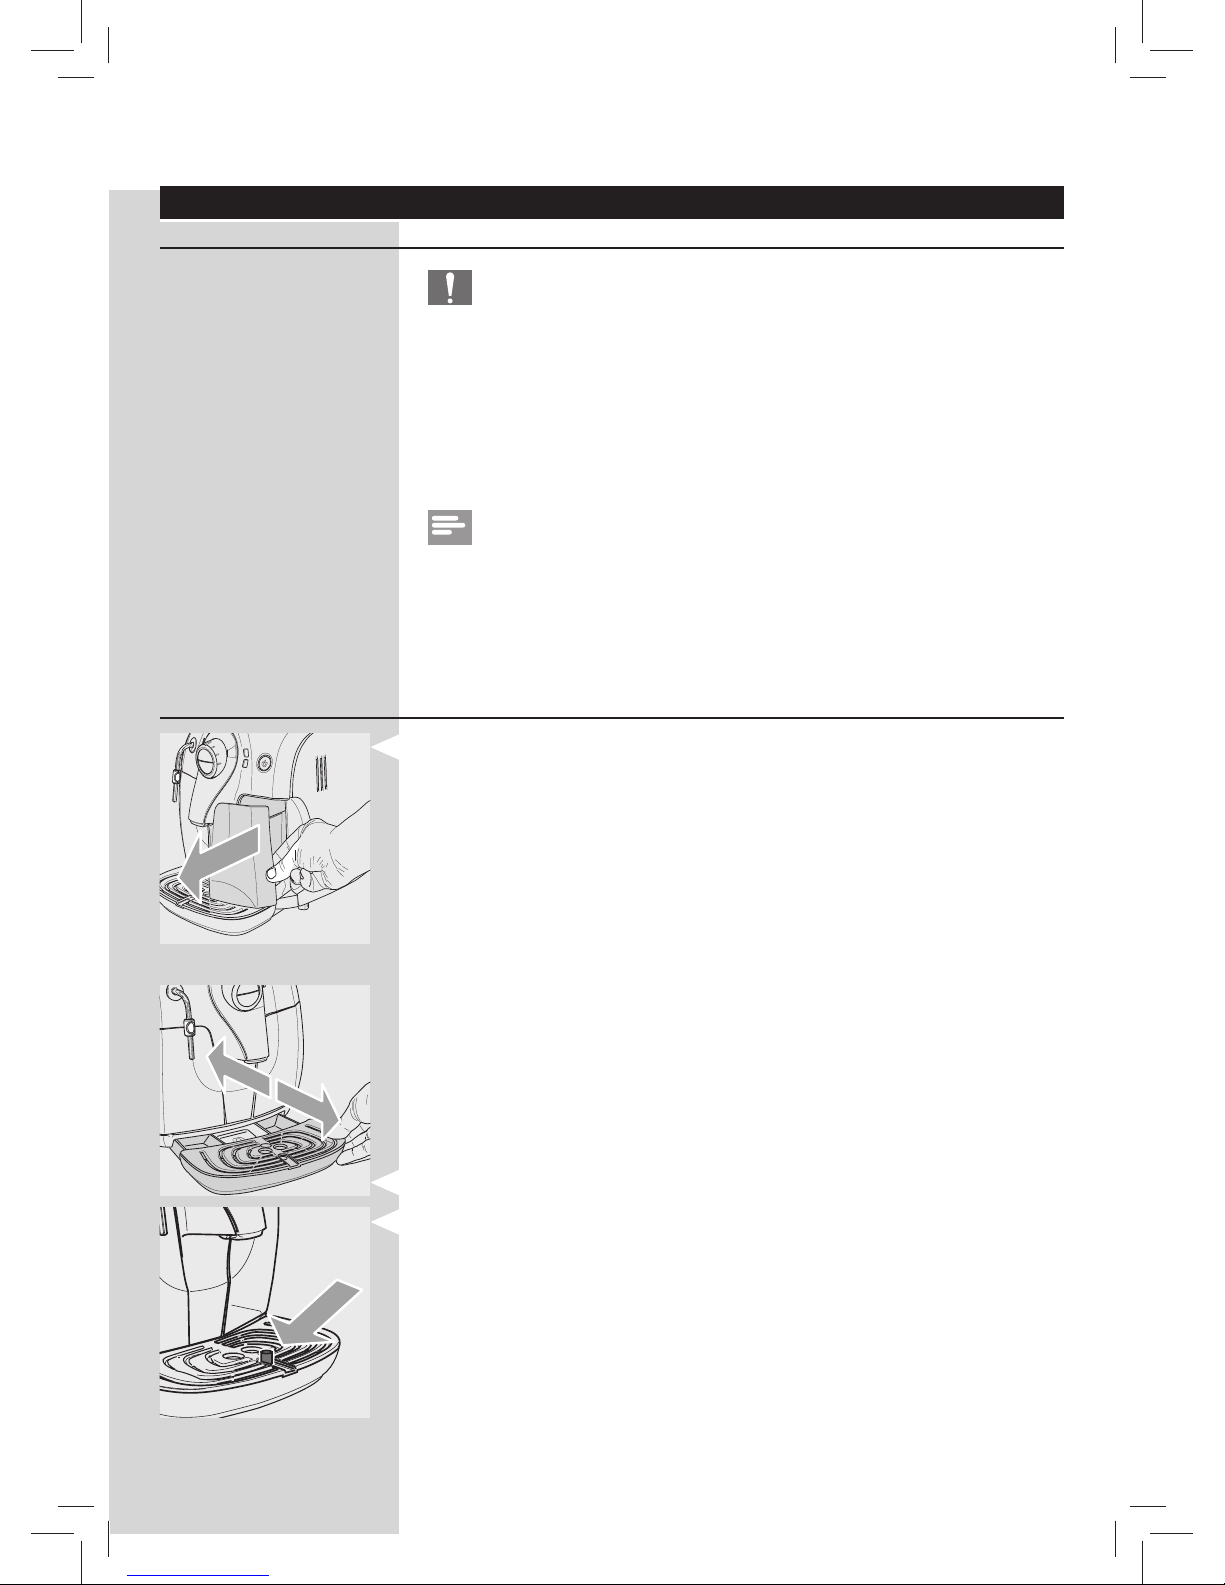
• Empty and clean the co ee ground drawer daily with the machine
turned on.
Other maintenance operations can only be carried out when the machine
is turned o and unplugged.
• Empty and clean the drip tray. Perform this operation also when the
full drip tray indicator is raised.
Page 26
24
ENGLISH
Daily cleaning of water tank
1
Remove the small white lter or the Intenza+ water lter (if installed)
from the water tank and wash it with fresh water.
2
Put the small white lter back or the Intenza+ water lter (if installed)
in its housing by gently pressing and turning it at the same time.
3
Fill the water tank with fresh water.
Daily cleaning of hot water/steam wand (Pannarello, if supplied)
The hot water/steam wand (Pannarello, if supplied) needs to be cleaned
each time after frothing milk.
Note:
Some models of the machine are supplied with a Pannarello and some
are not. Please follow the cleaning steps, depending on the model of your
machine.
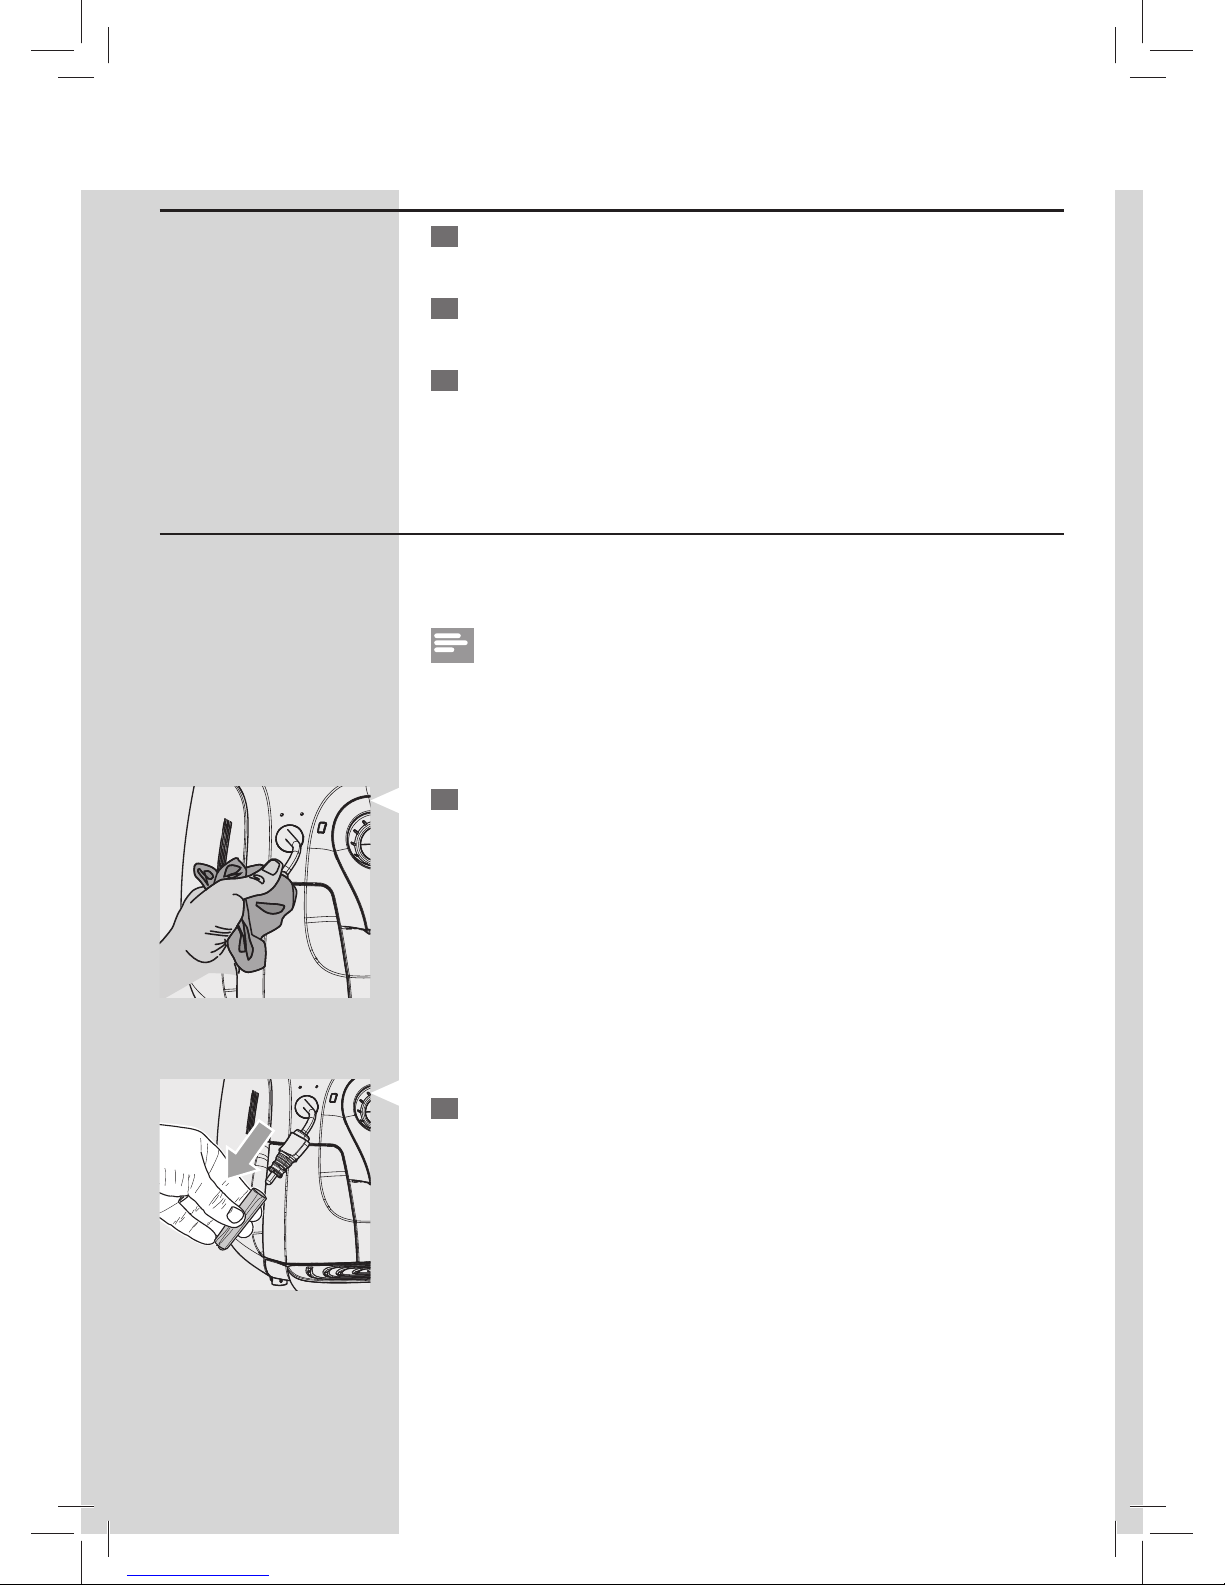
For machine without Pannarello:
1
Clean the hot water/steam wand with a wet cloth to remove milk
residues.
For machine with Pannarello:
1
Remove the external part of the Pannarello and wash it with fresh
water.
Page 27
ENGLISH
25
Weekly cleaning of hot water/steam wand (Pannarello, if supplied)
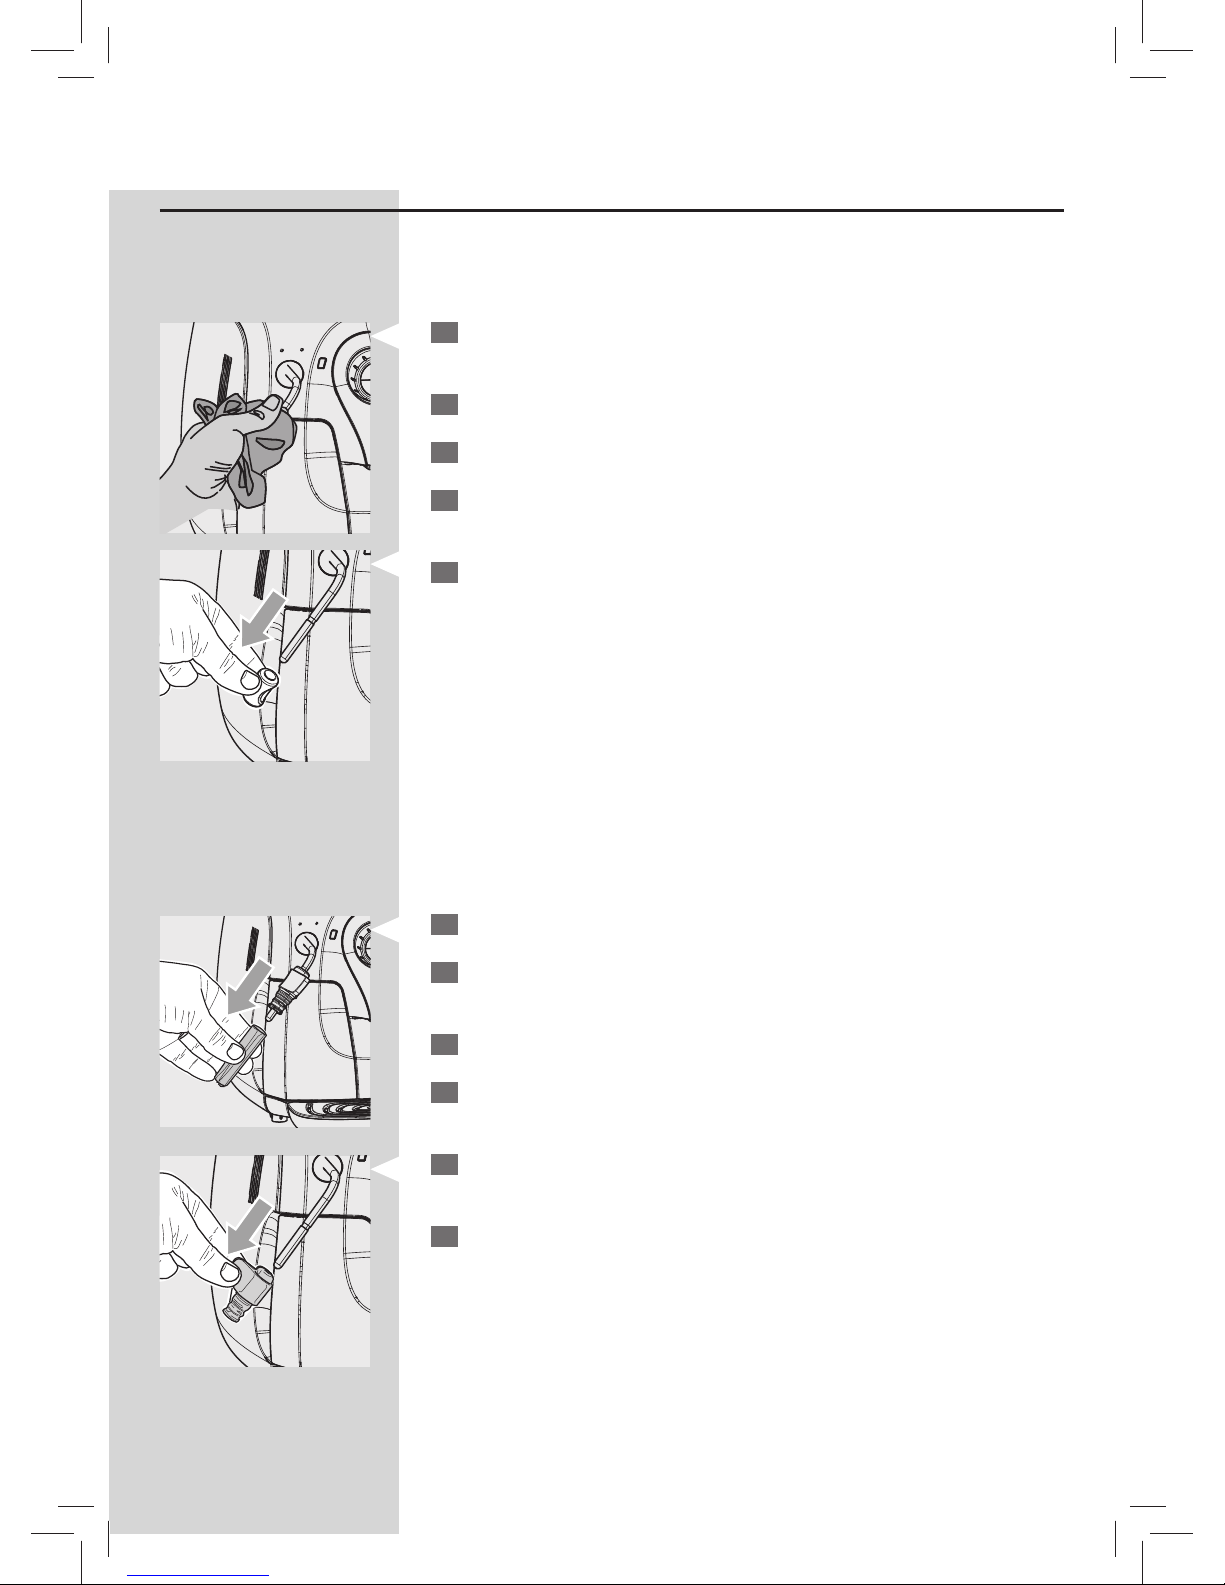
Once a week you need to perform the following operations:
For machine without Pannarello:
1
Clean the hot water/steam wand with a wet cloth to remove milk
residues.
2
Remove the protective handle from the hot water/steam wand.
3
Wash the protective handle with fresh water and dry it with a cloth.
4
Thoroughly clean the hot water steam wand with a wet cloth and dry it
with a cloth.
5
Put the protective handle back onto the hot water/steam wand.
For machine with Pannarello:
1
Remove the external part of the Pannarello (if supplied).
2
Remove the upper part of the Pannarello from the hot water/steam-
wand.
3
Wash the upper part of the Pannarello with fresh water.
4
Clean the hot water/steam wand with a wet cloth to remove milk
residues.
5
Put the upper part back into the hot water/steam wand (make sure it is
completely inserted).
6
Reassemble the external part of the Pannarello.
Page 28
26
ENGLISH
BREW GROUP CLEANING
Brew Group Weekly Cleaning
The brew group should be cleaned every time the co ee bean hopper is
lled or at least once a week.
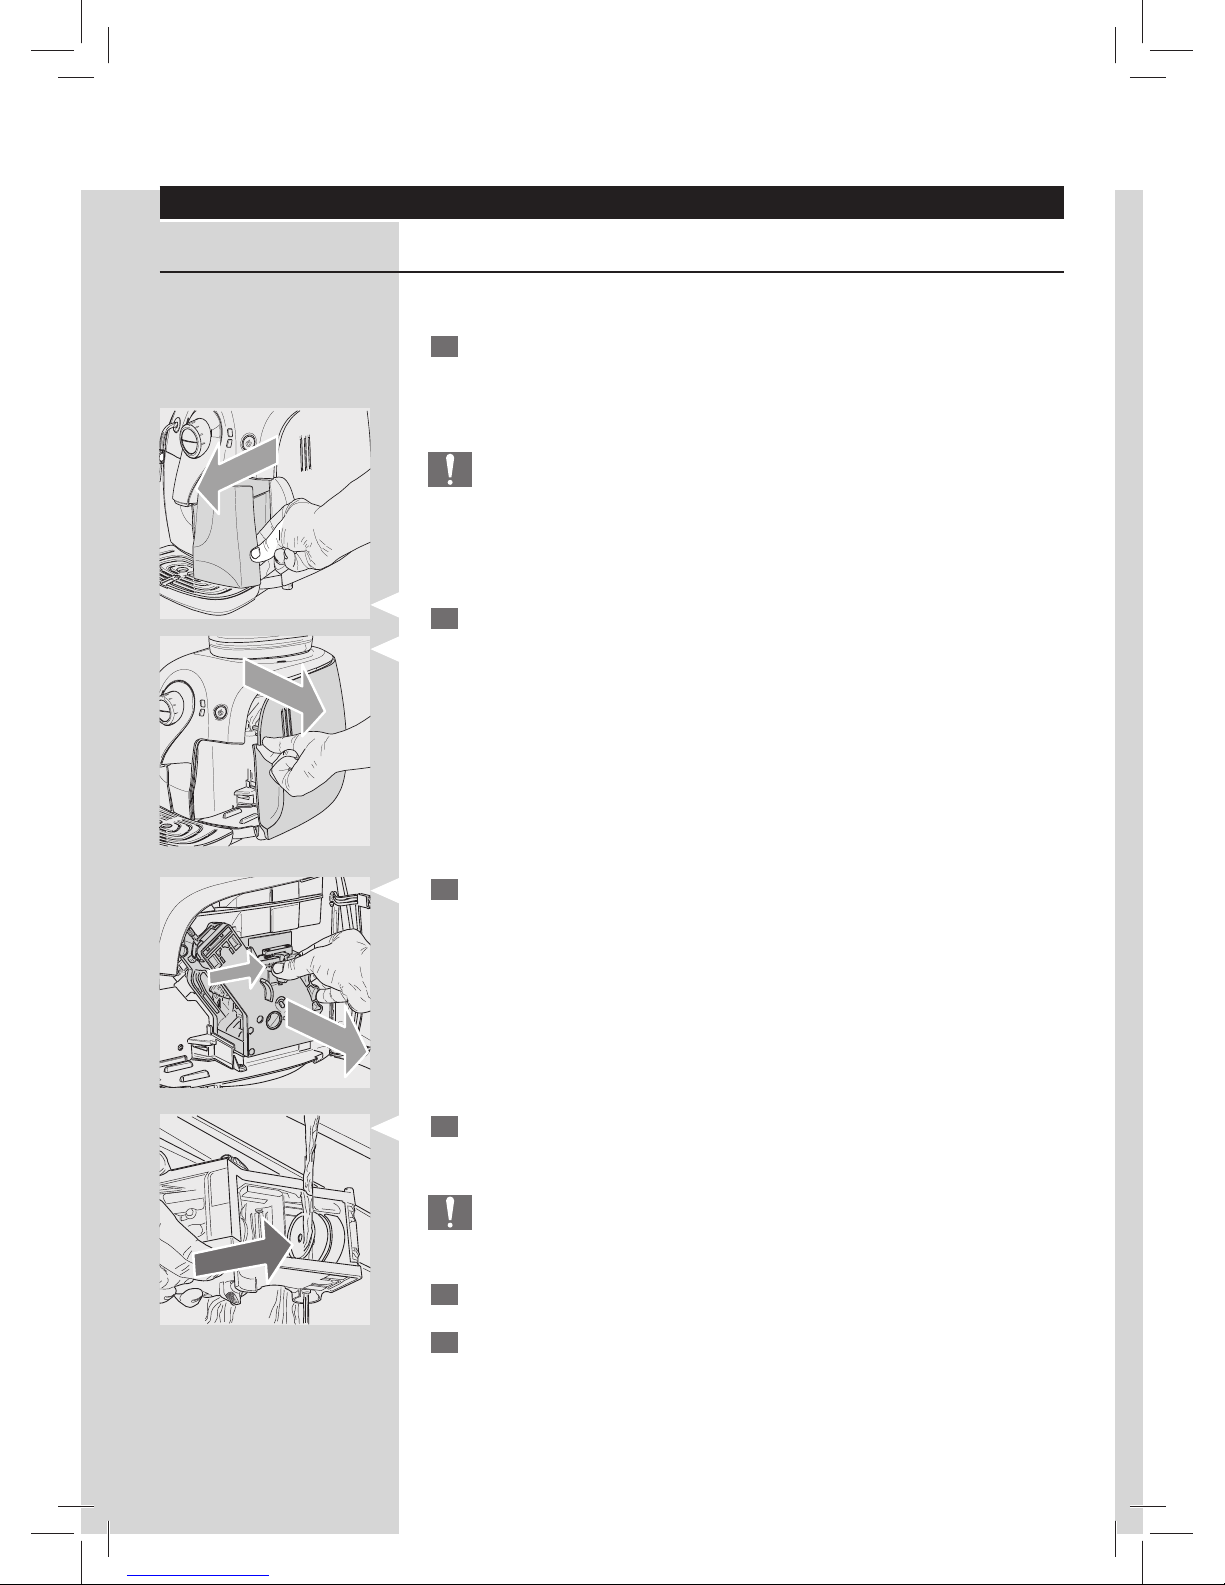
1
Turn o the machine by pressing the ON/OFF button and remove the
plug from the socket.
2
Remove the co ee ground drawer. Open the service door.
3
To remove the brew group, press the «PUSH» button and pull it by the
handle.
4
Thoroughly wash the brew group with fresh, lukewarm water and care-
fully clean the upper lter.
Caution:
Do not use detergent/ soap to clean the brew group.
5
Let the brew group air-dry thoroughly.
6
Thoroughly clean the inside of the machine using a soft, dampened
cloth.
Caution:
Wait the automatic rinse/self-cleaning cycle of the machine to be
nished, before you remove the plug from the socket.
Page 29
ENGLISH
27
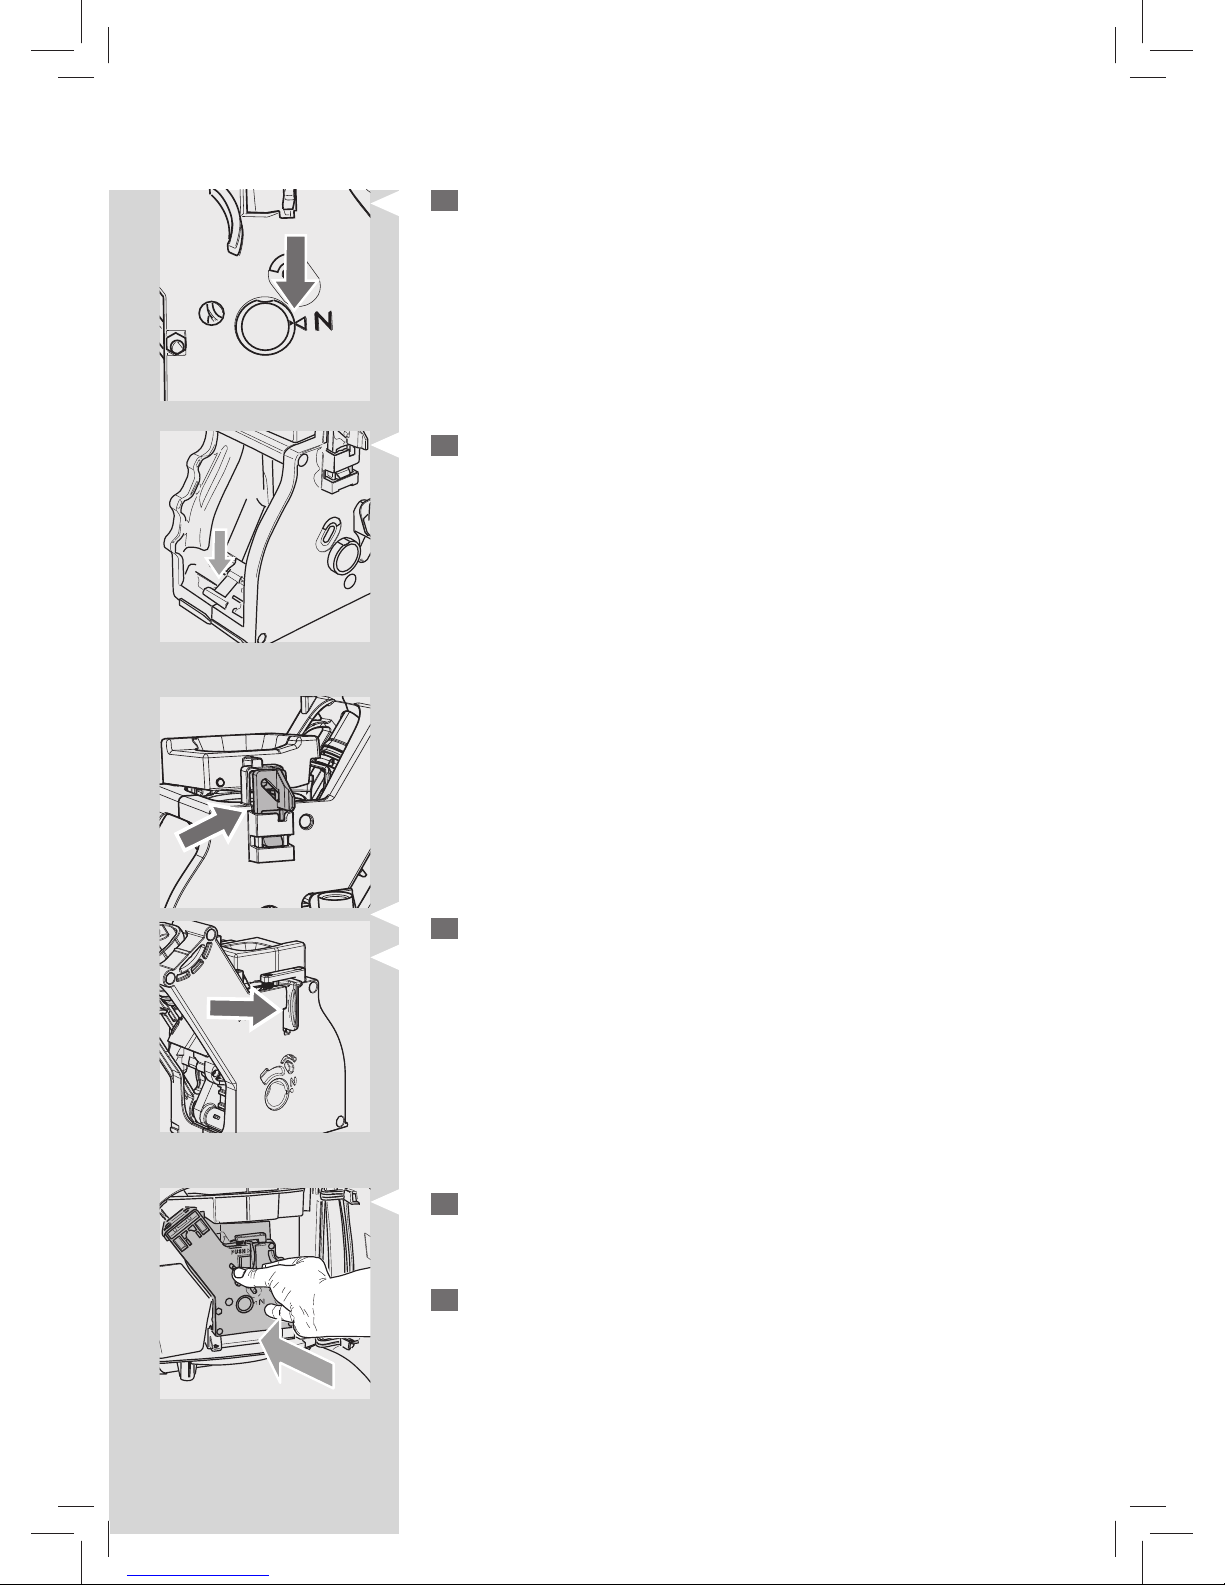
7
Make sure the brew group is in the rest position; the two reference
signs must match. If they do no match, proceed as described in step
(8).
8
Gently pull down the lever until it is in contact with the brew group
base and the two reference signs on the side of the brew group do
match
9
Make sure the hook to lock the brew group is in the correct position
by rmly pressing the “PUSH” button until you hear a click. Check if the
hook is at the top end position. If it is not, please try again.
10
Insert the brew group in its seat again until it locks into place WITHOUT
pressing the “PUSH” button.
11
Insert the co ee ground drawer. Close the service door.
Page 30
28
ENGLISH
Brew Group Lubrication
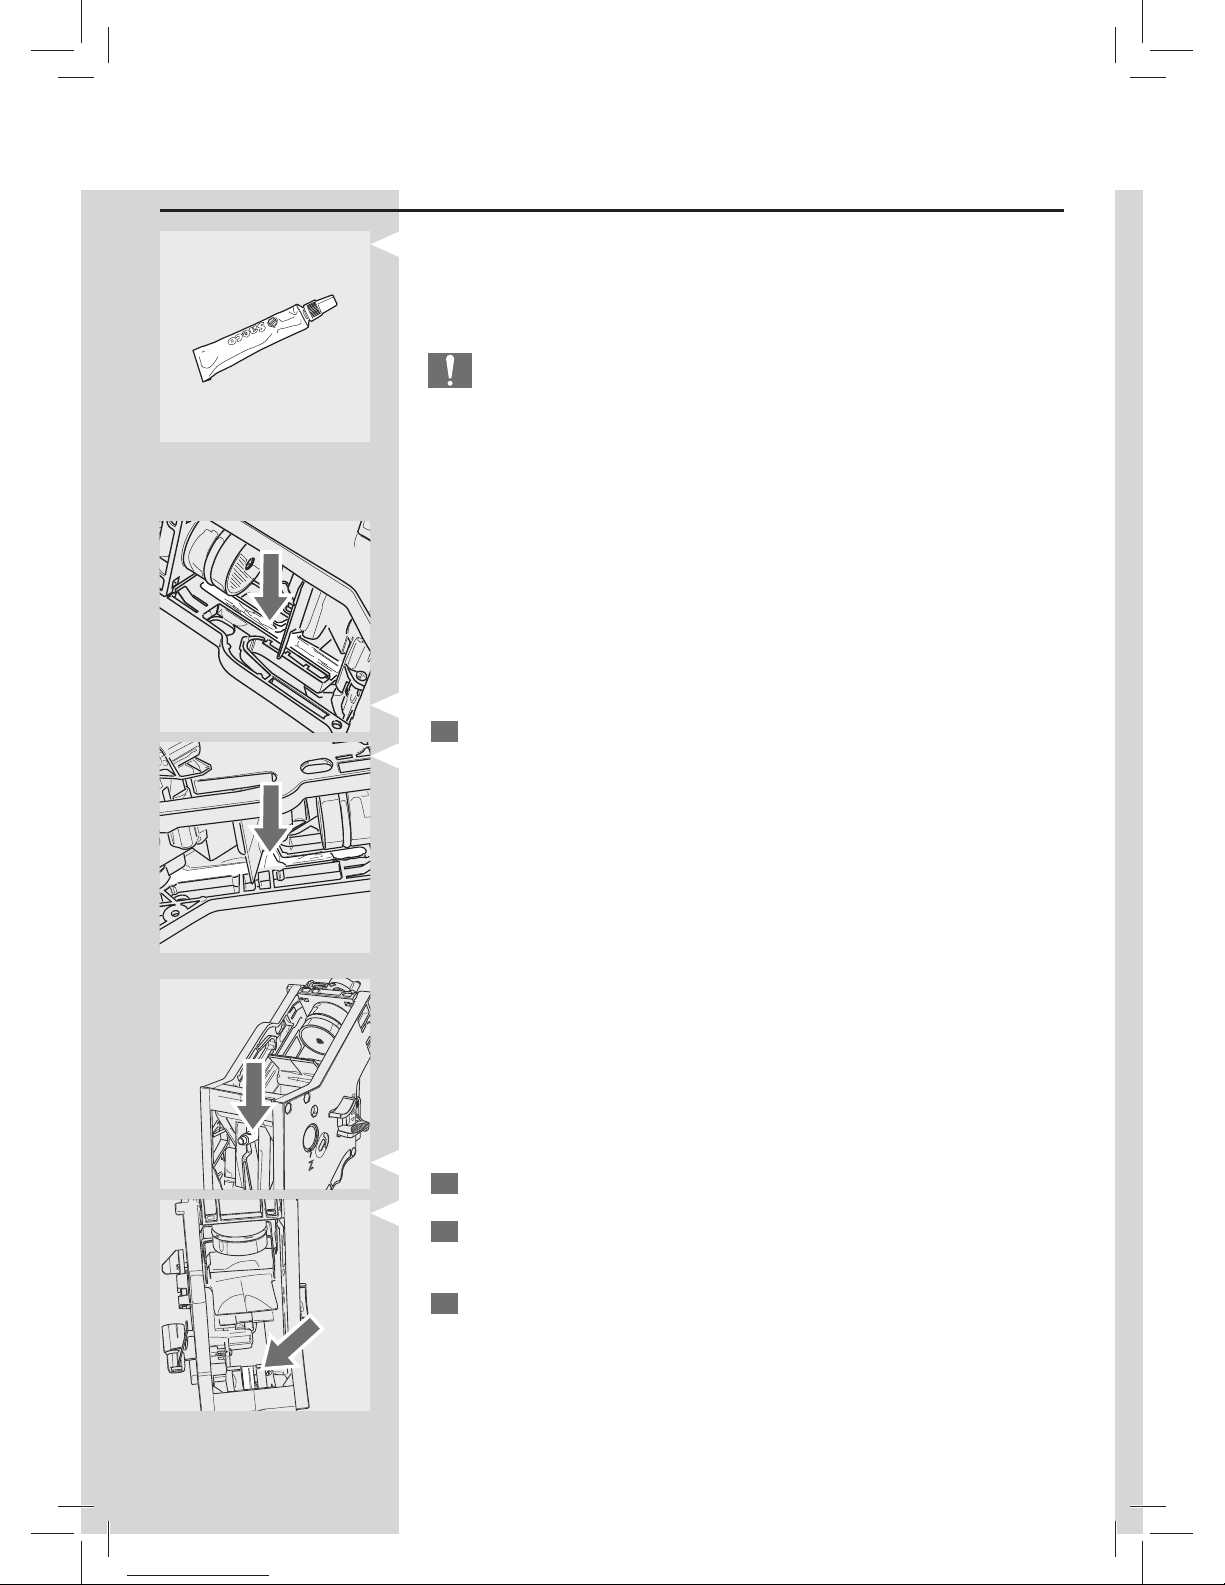
Lubricate the brew group after approximately 500 cups of co ee or once a
month. The grease to lubricate the brew group (HD5061) may be purchased at the Philips online shop at www.shop.philips.com/service, your
local dealer or at authorised service centres.
Caution:
Before lubricating the brew group, clean it under fresh water and let it
dry, as described in the “Brew Group Weekly Cleaning” section.
1
Apply the grease evenly on both side guides and the shaft.
2
Lubricate the shaft too.
3
Insert the brew group in its seat until it locks into place. (see “Brew
Group Weekly Cleaning” section).
4
Insert the co ee ground drawer and close the service door.
Page 31
ENGLISH
29
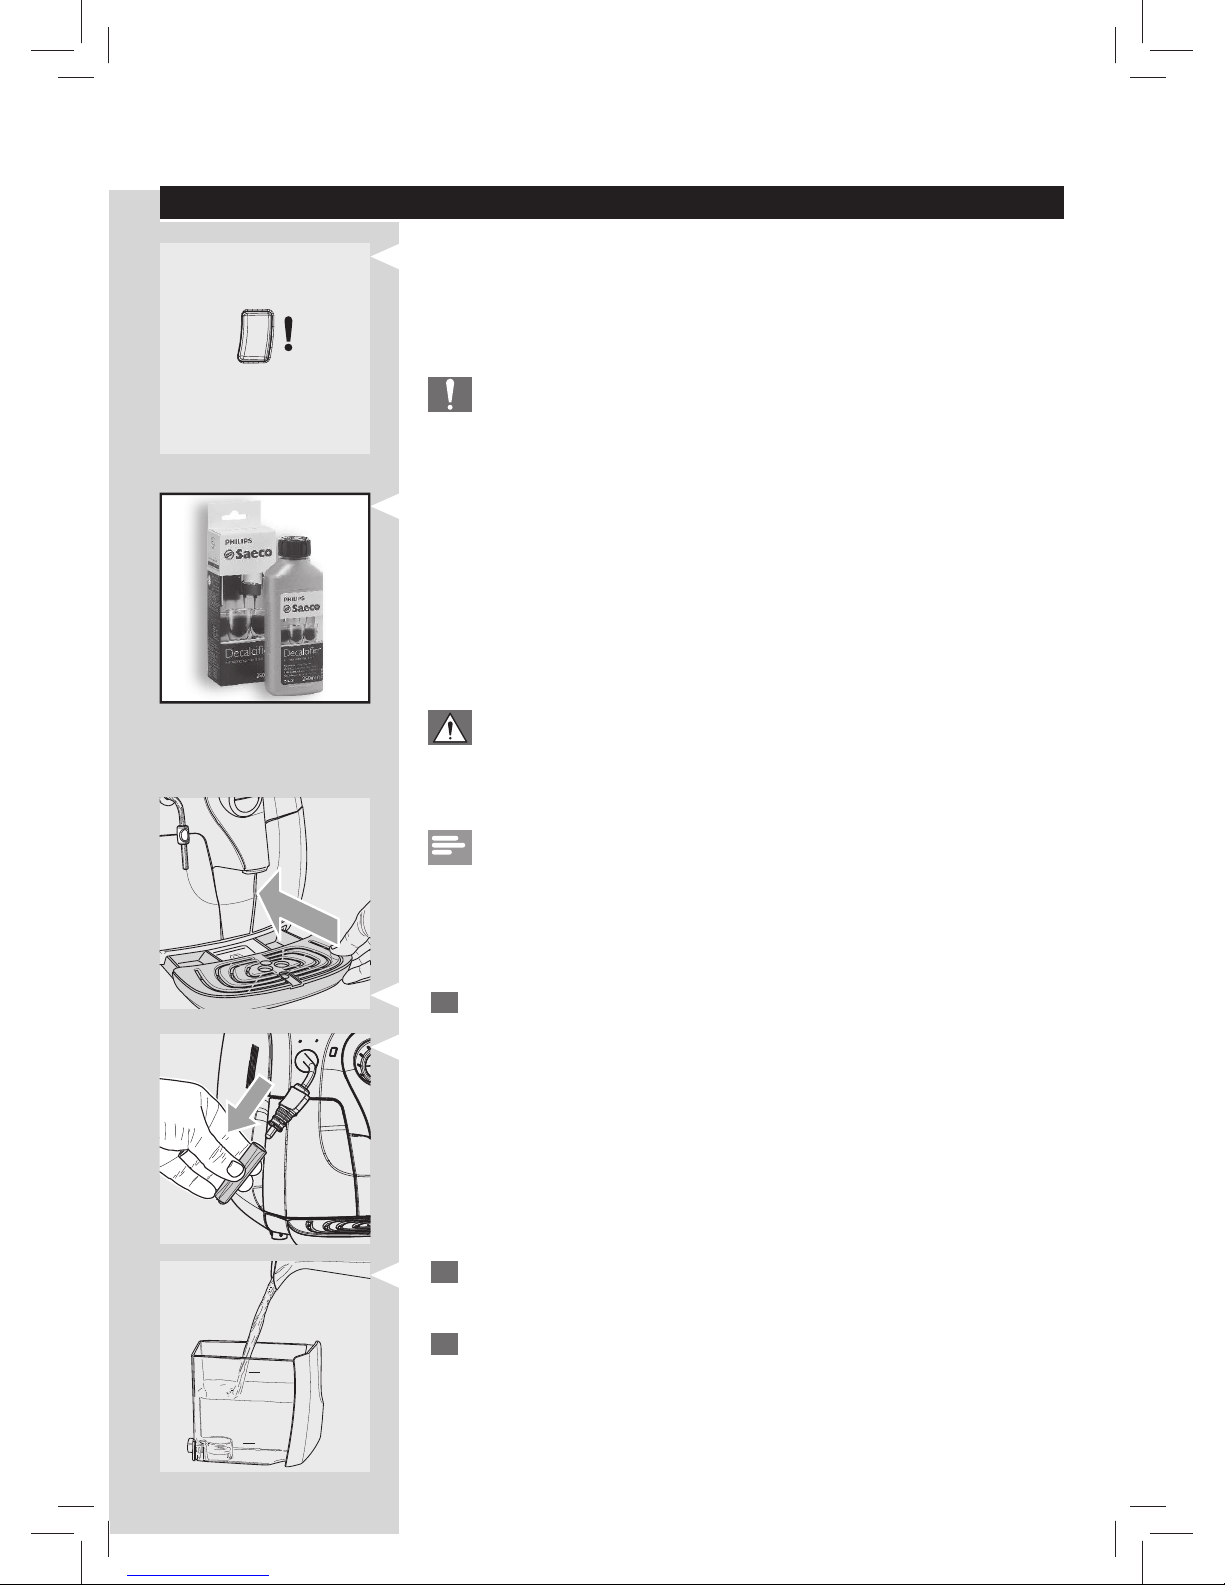
DESCALING
The descaling process takes approx. 30 minutes.
Limescale builds up inside the machine during use. It needs to be removed
regularly as it may clog the water and co ee circuit of your machine. The
machine indicates when descaling is needed. If the light is blinking very
quickly, you need to descale.
Caution:
Not doing this will ultimately make your machine stop working properly, and in this case repair is NOT covered by your warranty.
Use the Saeco decalci er only. Its formula has been designed to ensure
better machine performance. The Saeco decalci er (CA6700) may be purchased at the Philips online shop at www.shop.philips.com/service, your
local dealer or at authorised service centres.
2
Remove the water tank and pour the entire content of the Saeco decal-
ci er. Then ll the tank with fresh water up to the MAX level.
3
Place the water tank back into the machine.
Warning:
Never drink the decalci er or any products dispensed until the cycle
has been carried out to the end. Never use vinegar as a decalci er.
Note:
During the descaling cycle do not switch o the machine or turn it into the
stand-by mode. Once you start the descling cycle, you cannot exit until the
cycle nishes.
To execute the descaling cycle please follow the steps described below:
1
Before descaling:
- Empty the drip tray;
- Remove the Pannarello (if supplied) from the hot water/steam
wand;
- Remove the “Intenza+” water lter from the water tank if it was
installed.
MAX
MIN
Flashing very quickly
Page 32
30
ENGLISH
4
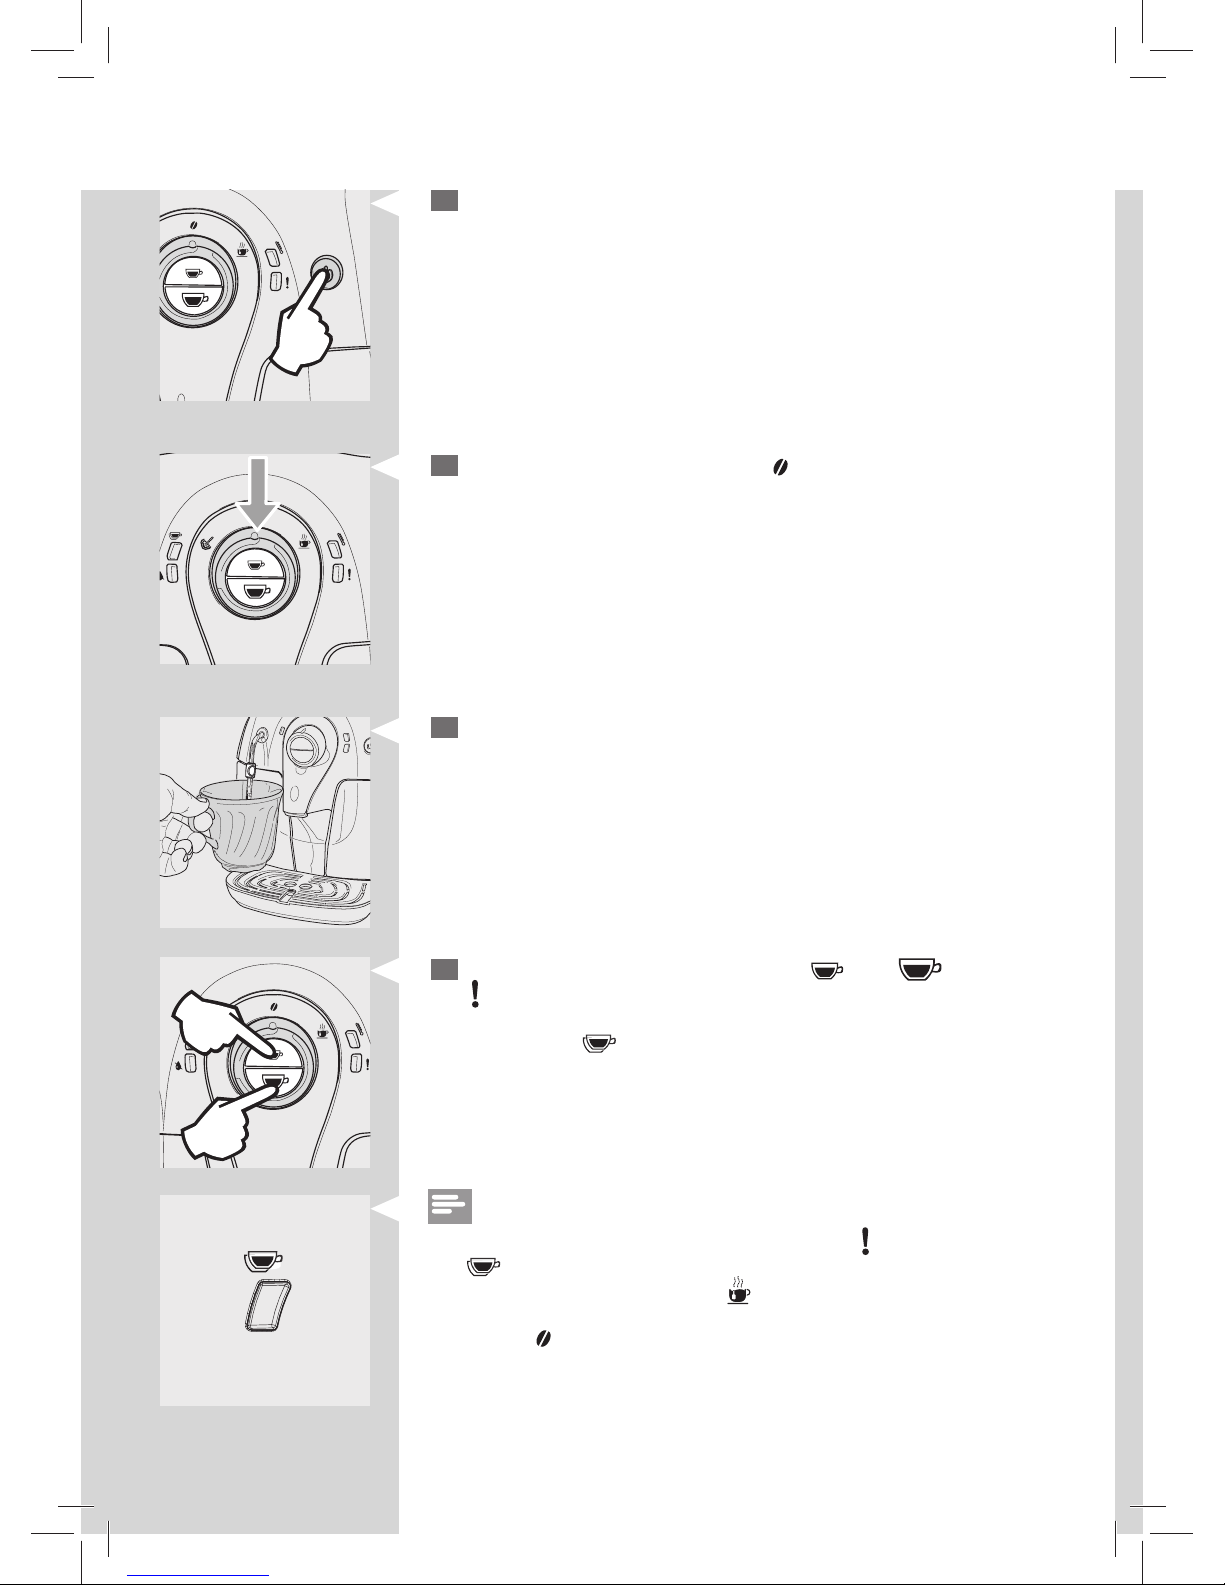
Turn the machine o by pressing the ON/OFF button.
5
Check that the control dial is on the “ ” position
6
Place a container of 1,2lt under the steam/hot water wand.
7
Press at the same time for 3 seconds the “ ” and “ ”buttons. The
“
“ light starts ashing very fast. The machine starts dispensing directly
into the drip tray.
After this the “
” light turns on.
Steady on
Note:
It may happen that, upon cycle start up, when the “
” light blinks fast also
the “
” light is solid on at the same time. This means that the circuit must
be primed. Turn the control dial to “
”. The machine dispenses a small
quantity of water through the hot water/steam wand. Bring the control
dial back to “
”. The light blinks slowly. Now the descaling cycle can be
continued.
Page 33
ENGLISH
31
8
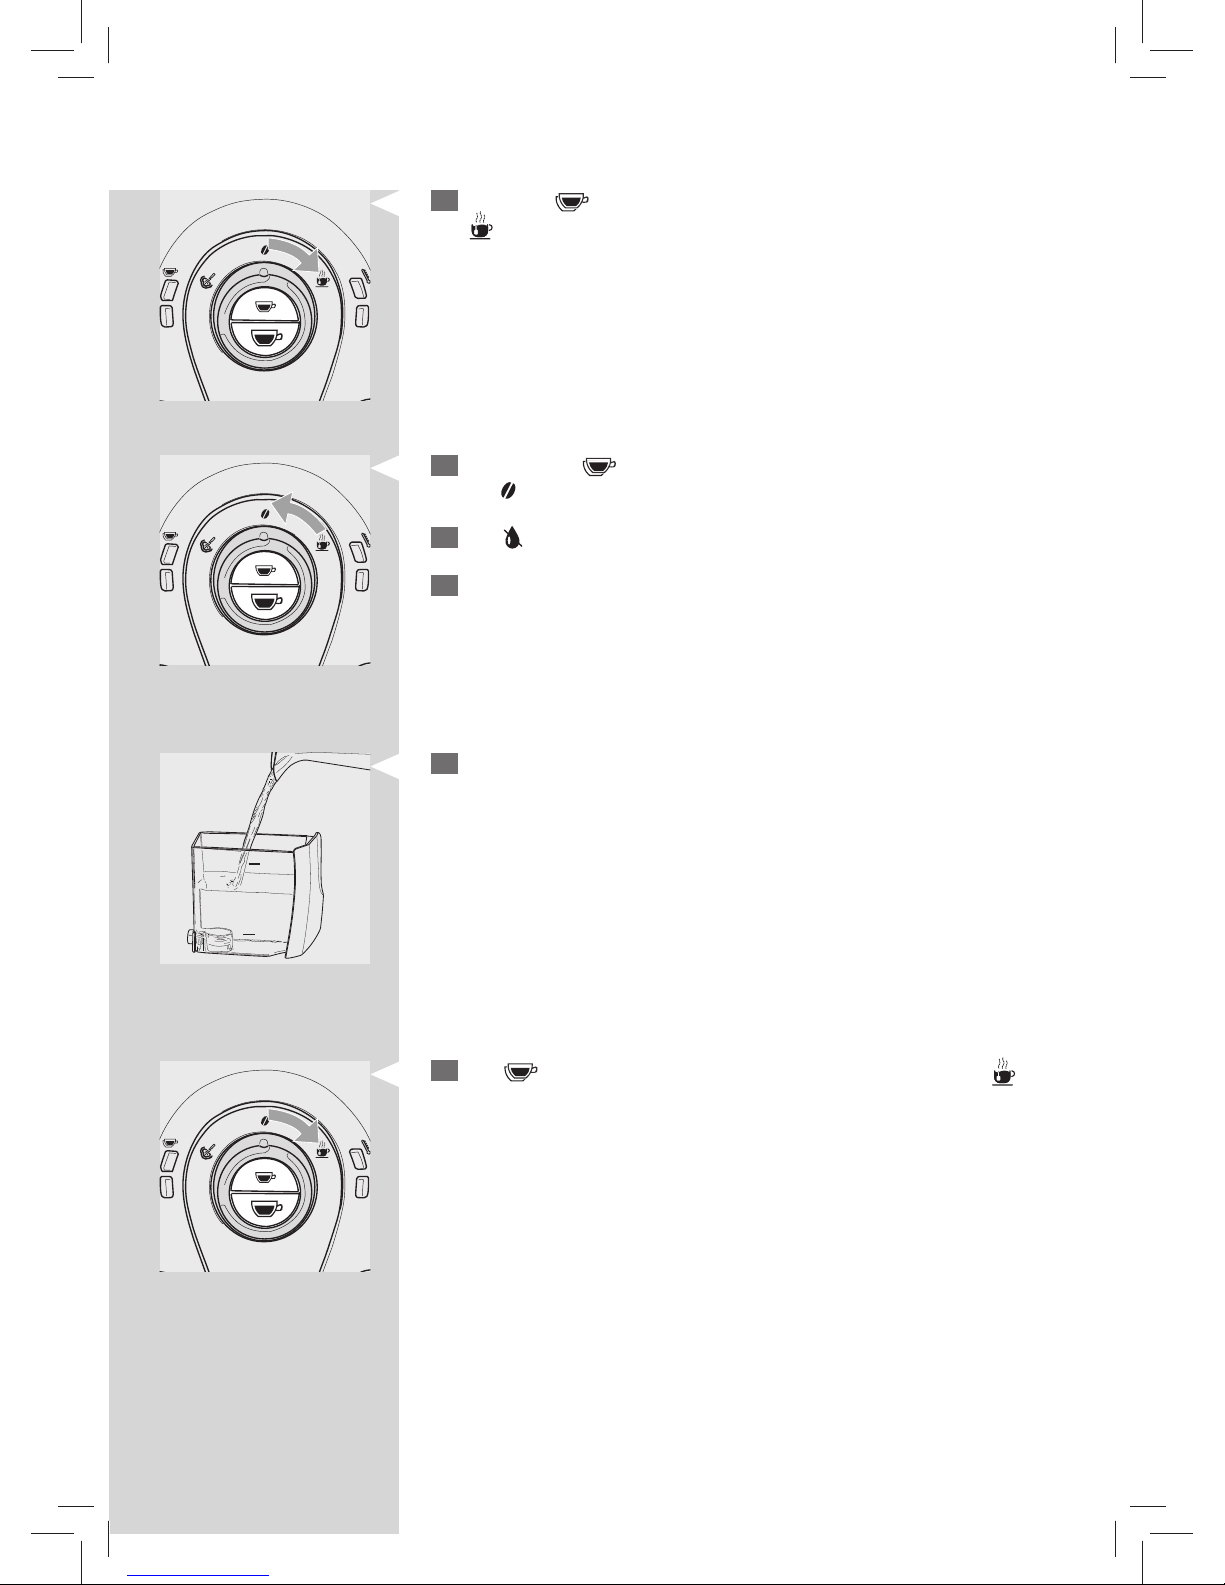
When the “ ” light turns on, turn the control dial clockwise up to the
“
” position.
The machine starts dispensing through the steam/hot water wand
until the water tank is empty.
9
After this the “ ” light starts ashing slowly. Turn the control dial to
the “
” position
10
The “ ” light turns on to indicate that the water tank is empty.
11
Empty the container and place it back under the steam/hot water
wand.
Empty the drip tray and place it back into its seat.
MAX
MIN
12
Remove the water tank, rinse it and ll it up to the MAX level with fresh
water. Place it back into the machine.
13
The “ ” light turns on. Turn the control dial clockwise to the “ ”
position for priming the internal circuits.
Page 34
32
ENGLISH
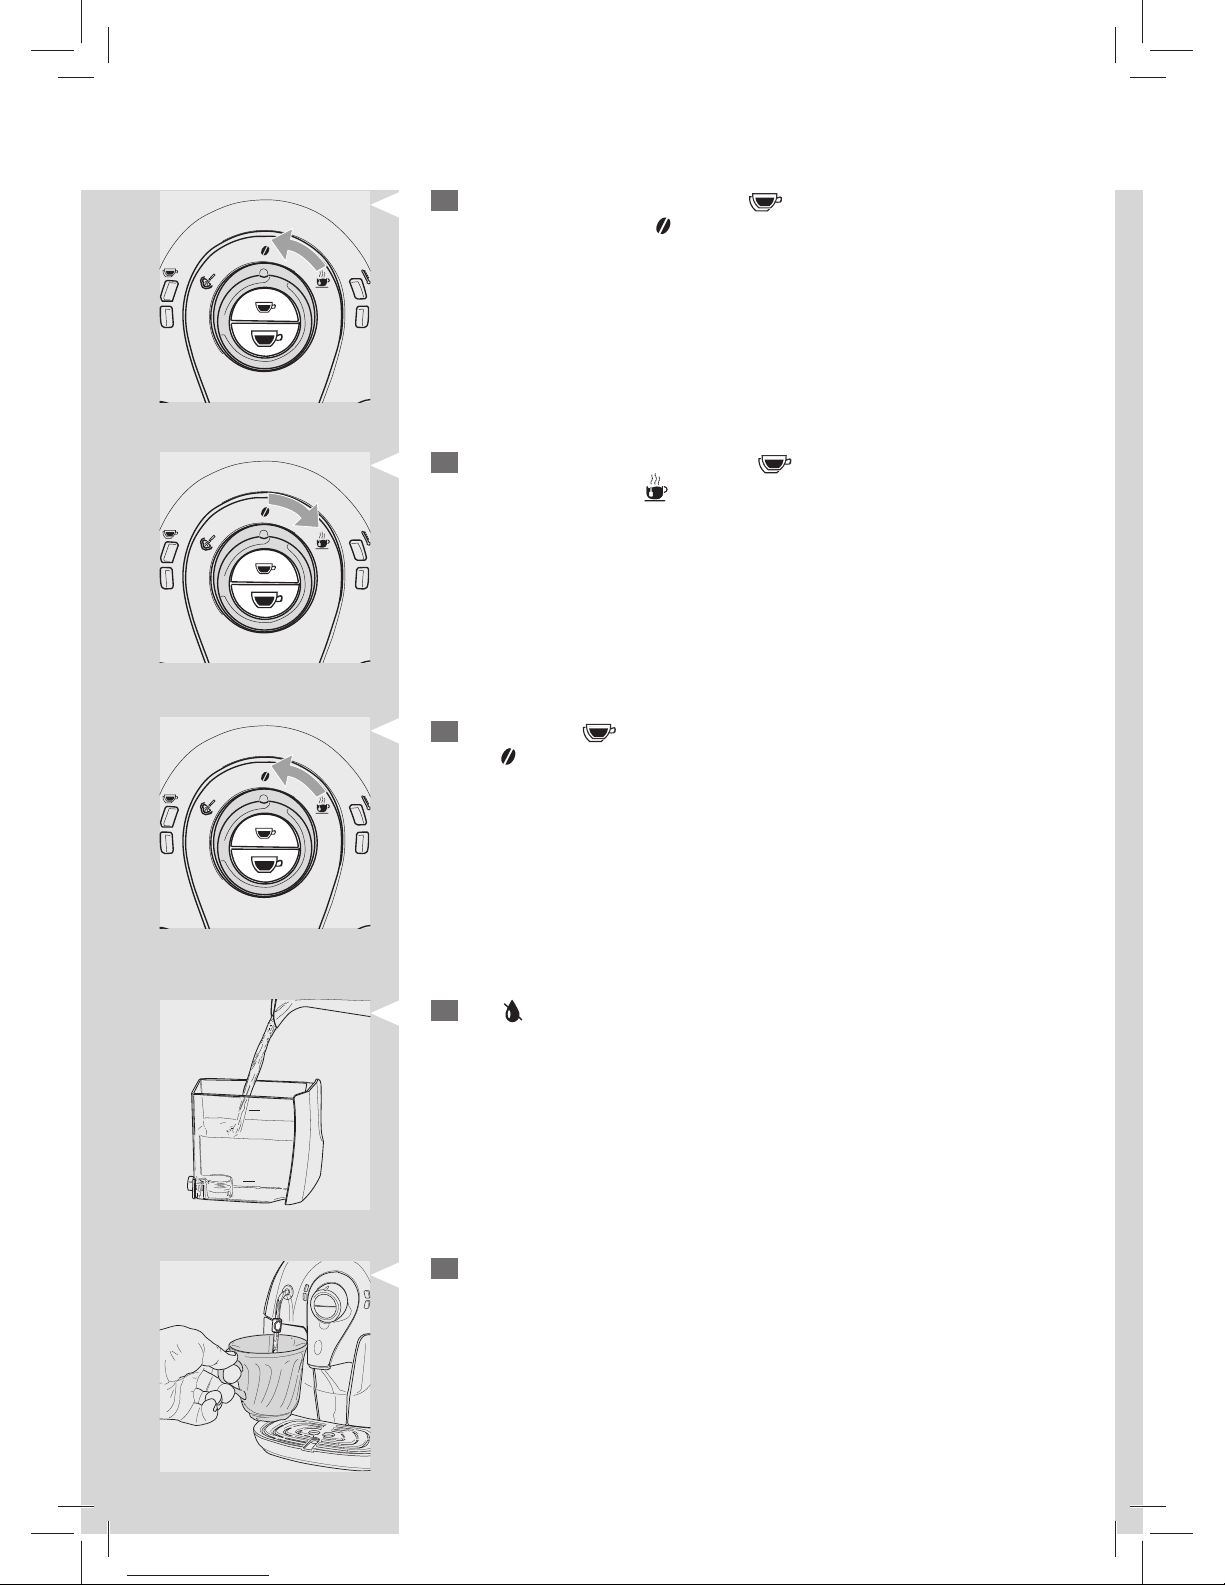
14
When the primining nishes, the “ ” led starts ashing slowly. Turn
the control dial to the “
” position.
The machine dispenses water directly into the drip tray.
15
When the dispensing nishes, the “ ” led turns on. Turn the control
dial clockwise to the “
” position.
The machine starts rinsing through the hot water/steam wand until
the water tank is empty.
MAX
MIN
16
After this the “ ” light starts ashing slowly. Turn the control dial to
the “
” position
17
The “ ” light turns on to indicate that the water tank is empty. Rinse
and ll it up to the MAX level with fresh water.
18
Empty the container and place it back under the steam/hot water
wand.
Empty the drip tray and place it back into its seat.
Page 35
ENGLISH
33
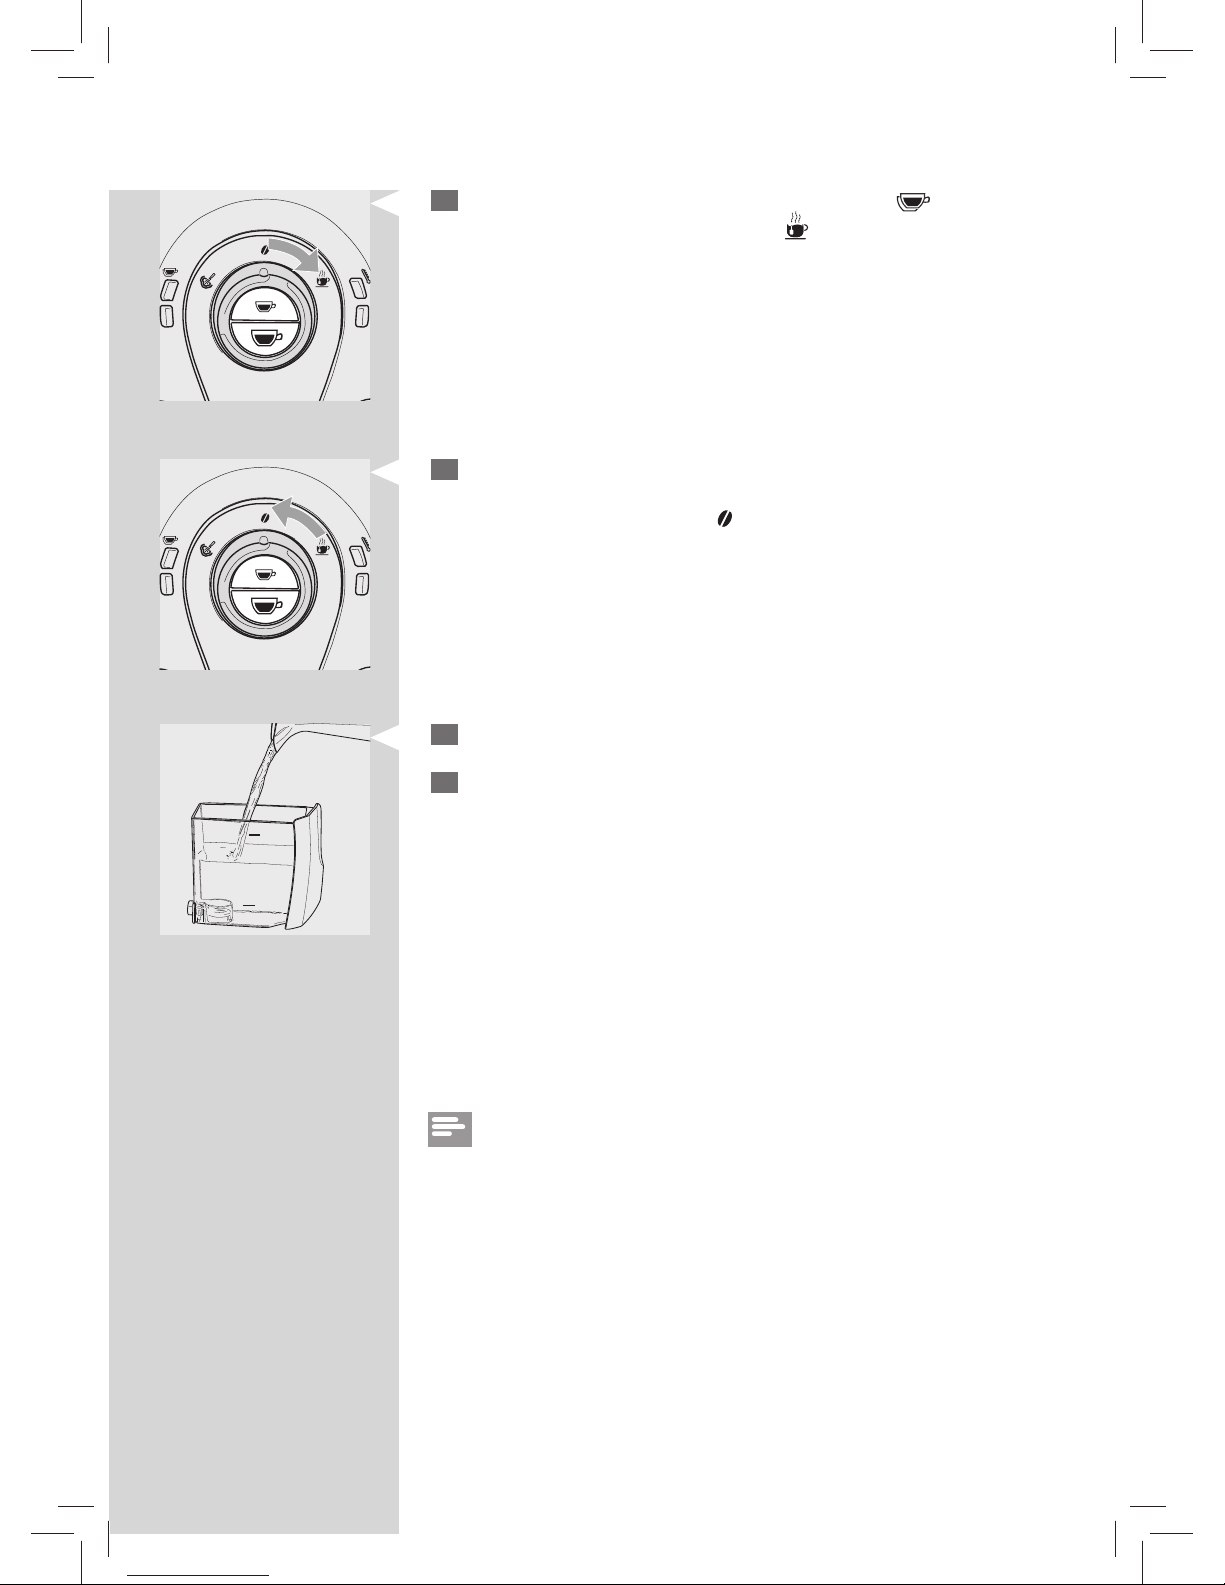
19
When the water tank is back into the machine, the “ ” light turns on.
Turn the control dial clockwise to the “
” position. The machine starts
the rinsing until the water tank is empty.
21
Rinse the drip tray and reinstall the Pannarello (if supplied).
22
Remove the water tank, rinse it and ll it up to the MAX level with fresh
water. Place it back into the machine.
To brew products, turn on the machine.
MAX
MIN
Note:
If the machine is turned o during the descaling cycle, next time the machine is turned on, the cycle needs to be restarted from the beginning.
20
When the rinse cycle is complete the machine turns o . The descaling
procedure is complete.
Bring the control dial back to “
”.
Page 36
34
ENGLISH
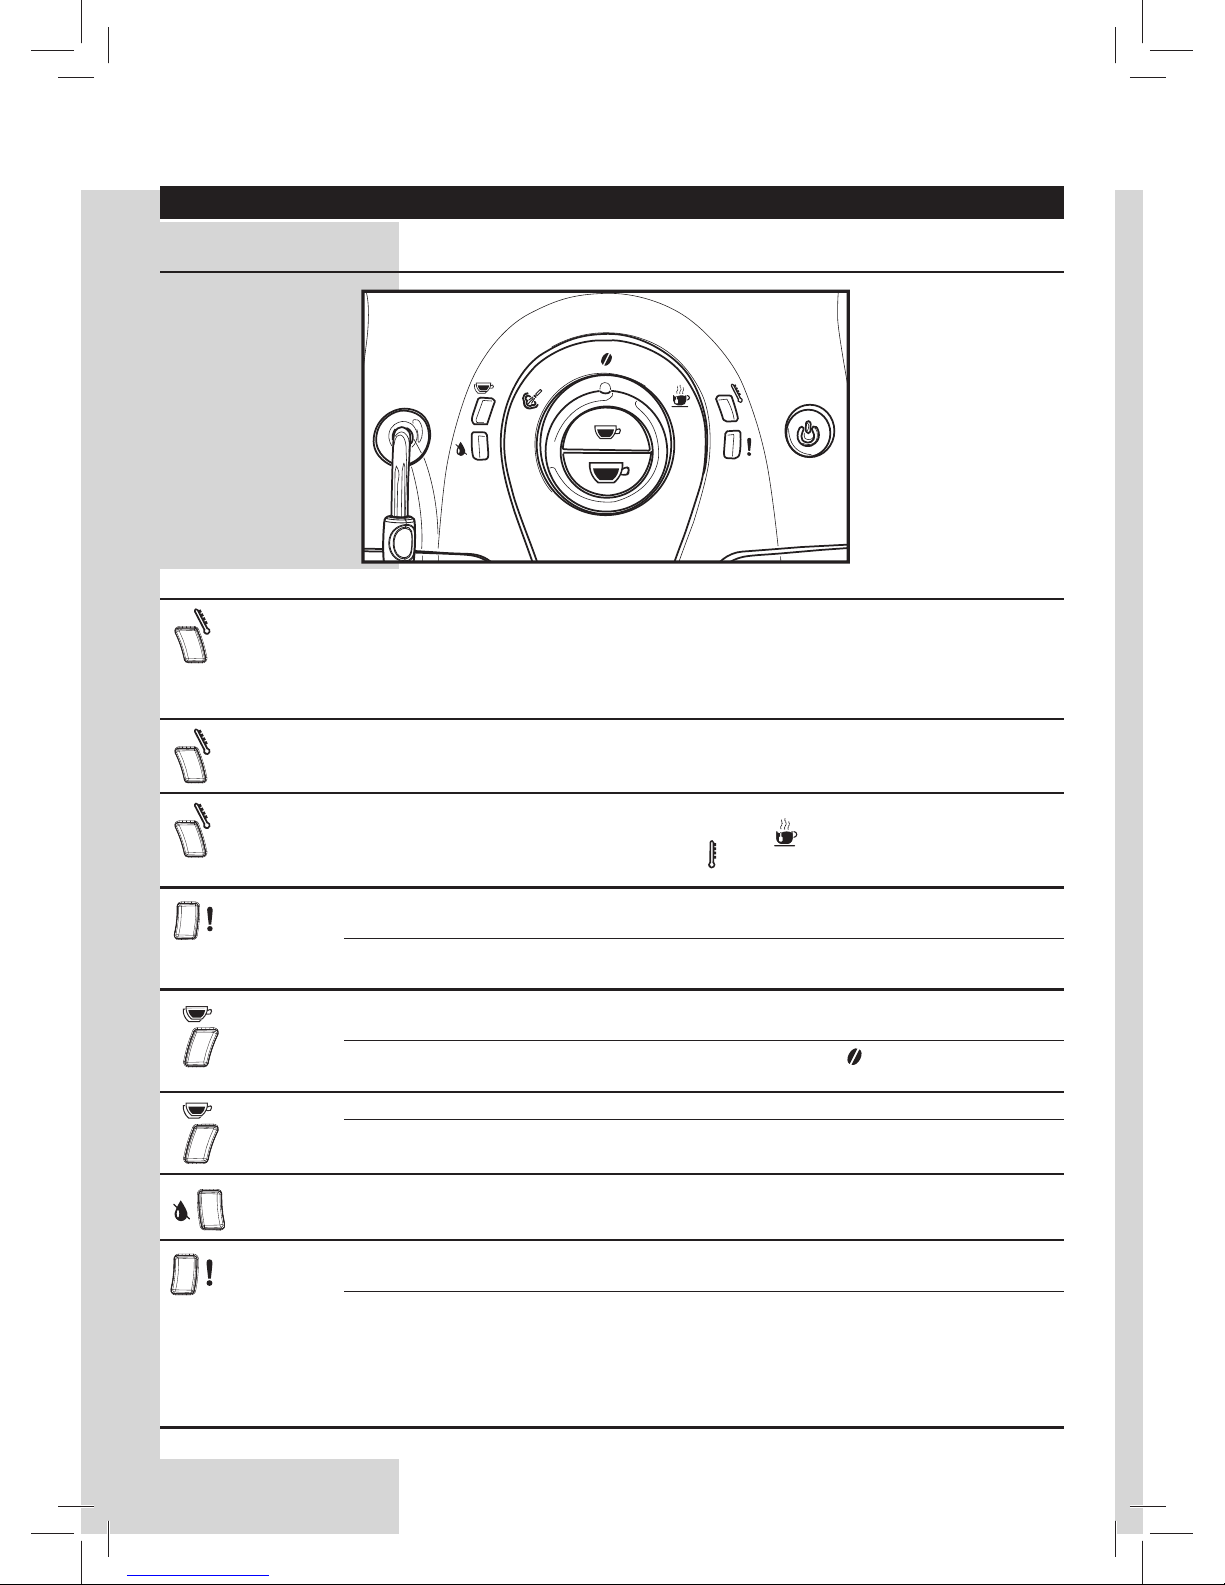
MEANING OF THE LIGHT SIGNALS
Control panel display
Light Signals Causes Solutions
Steady on
The machine has reached the right temperature and
is now ready:
- For co ee brewing;
- For hot water dispensing;
- For steam dispensing
Slowly ashing
The machine is warming up to brew espresso and
dispense hot water or steam.
Quickly ashing
Machine is overheating. Co ee may not be brewed. The water must be drained into a container by turning the control dial
clockwise to the
“
” position until the green ready temperature
light “
” shines steadily. After that, stop dispensing water.
Flashing very
quickly
The machine needs to be descaled. Start the descaling cycle.
The machine is in the descaling cycle. If you don’t descale regularly, the machine will stop workin g
properly. This is not covered by warranty.
Slowly ashing
Indicates that the machine is programming the
amount of co ee to brew .
During the descaling phase the control dial is not in
the correct position.
Bring the control dial back to “
”.
Steady on
The machine is brewing a double co ee.
The light is steady on at the beginning of the descaling
cycle.
Prime the circuit and continue the descaling cycle.
Steady on
Low water level. Fill the water tank with fresh water. After re lling the water tank,
the indicator light turns o .
Steady on
The co ee bean hopper is empty. Fill the coffe e bean hopper with coffe e beans an d star t t he
procedure again.
The co ee ground drawer is full. With the machine turned on, empty the co ee ground drawer. The
co ee ground drawer must be emptied after every 8 co ee cycles. If
the co ee ground drawer is emptied with the machine turned o , or
when the indicator light is not illuminated, the count of co ee cycles
is not reset. For this reason, the indicator light to empty the co ee
ground drawer may illuminate even when it is not full.
Page 37
ENGLISH
35
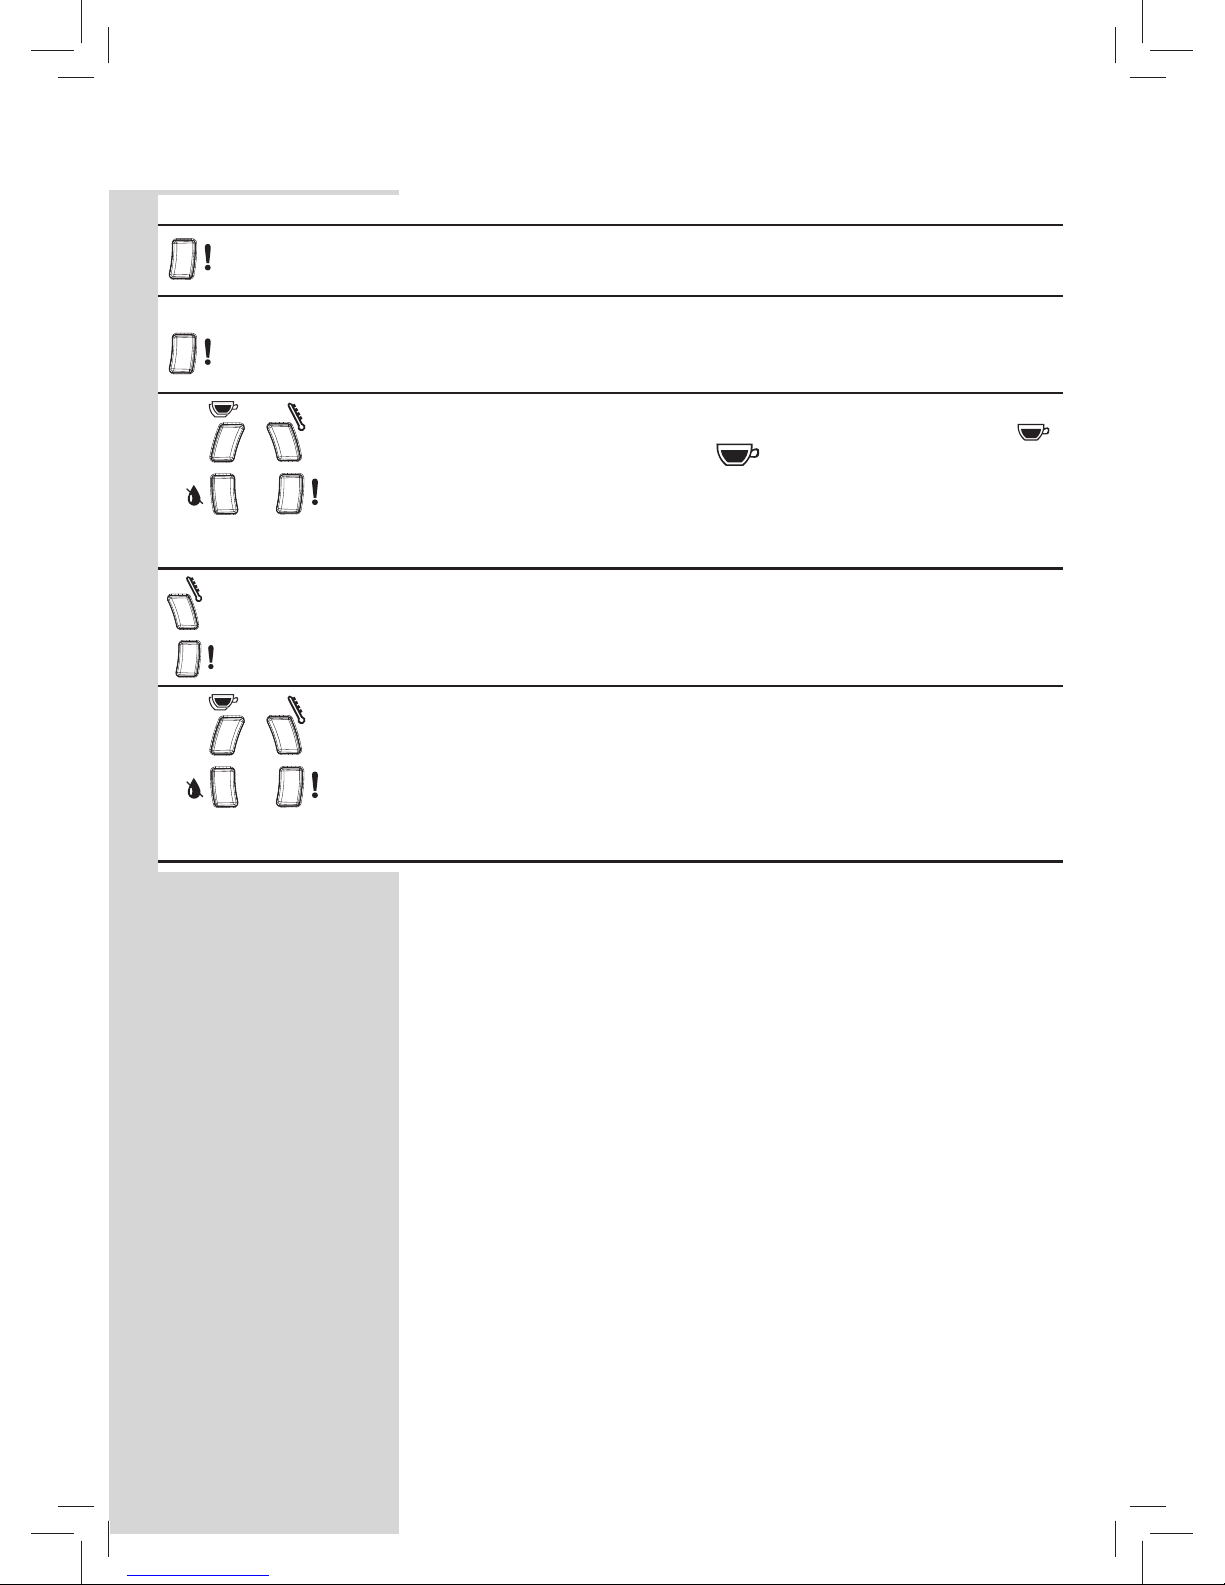
Light Signals Causes Solutions
Quickly ashing
The water circuit is empty. Fill the water tank with fresh water and prime the water circuit as
described in Section “Using the Machine for the First Time”.
Slowly ashing
Brew group is not inserted. Coffee ground drawer is
not inserted.
Service door is open.
Control dial is not in correct position.
Make sure that all components have been correctly inserted and
closed. The blinking red light will now turn o .
+
Flashing in counter-
clockwise direction (cyclical)
The machine is performing the rinse/self-cleaning
cycle.
The machine ends the rinse/self-cleaning cycle automatically.
You can interrupt the rinse/self-cleaning cycle by pressing
“ ”
either “ ” buttons
Flashing
alternately
A fault has occurred in the brew group. Try again to brew another espresso.
+
Flashing
simultaneously
A fault has occurred in the machine and hot water,
steam or espresso cannot be dispensed.
Turn the machine o . After 30-seconds, turn it back on.
Try this 2 or 3 times.
If the machine does NOT start, contact the Philips Saeco hotline.
Page 38
36
ENGLISH
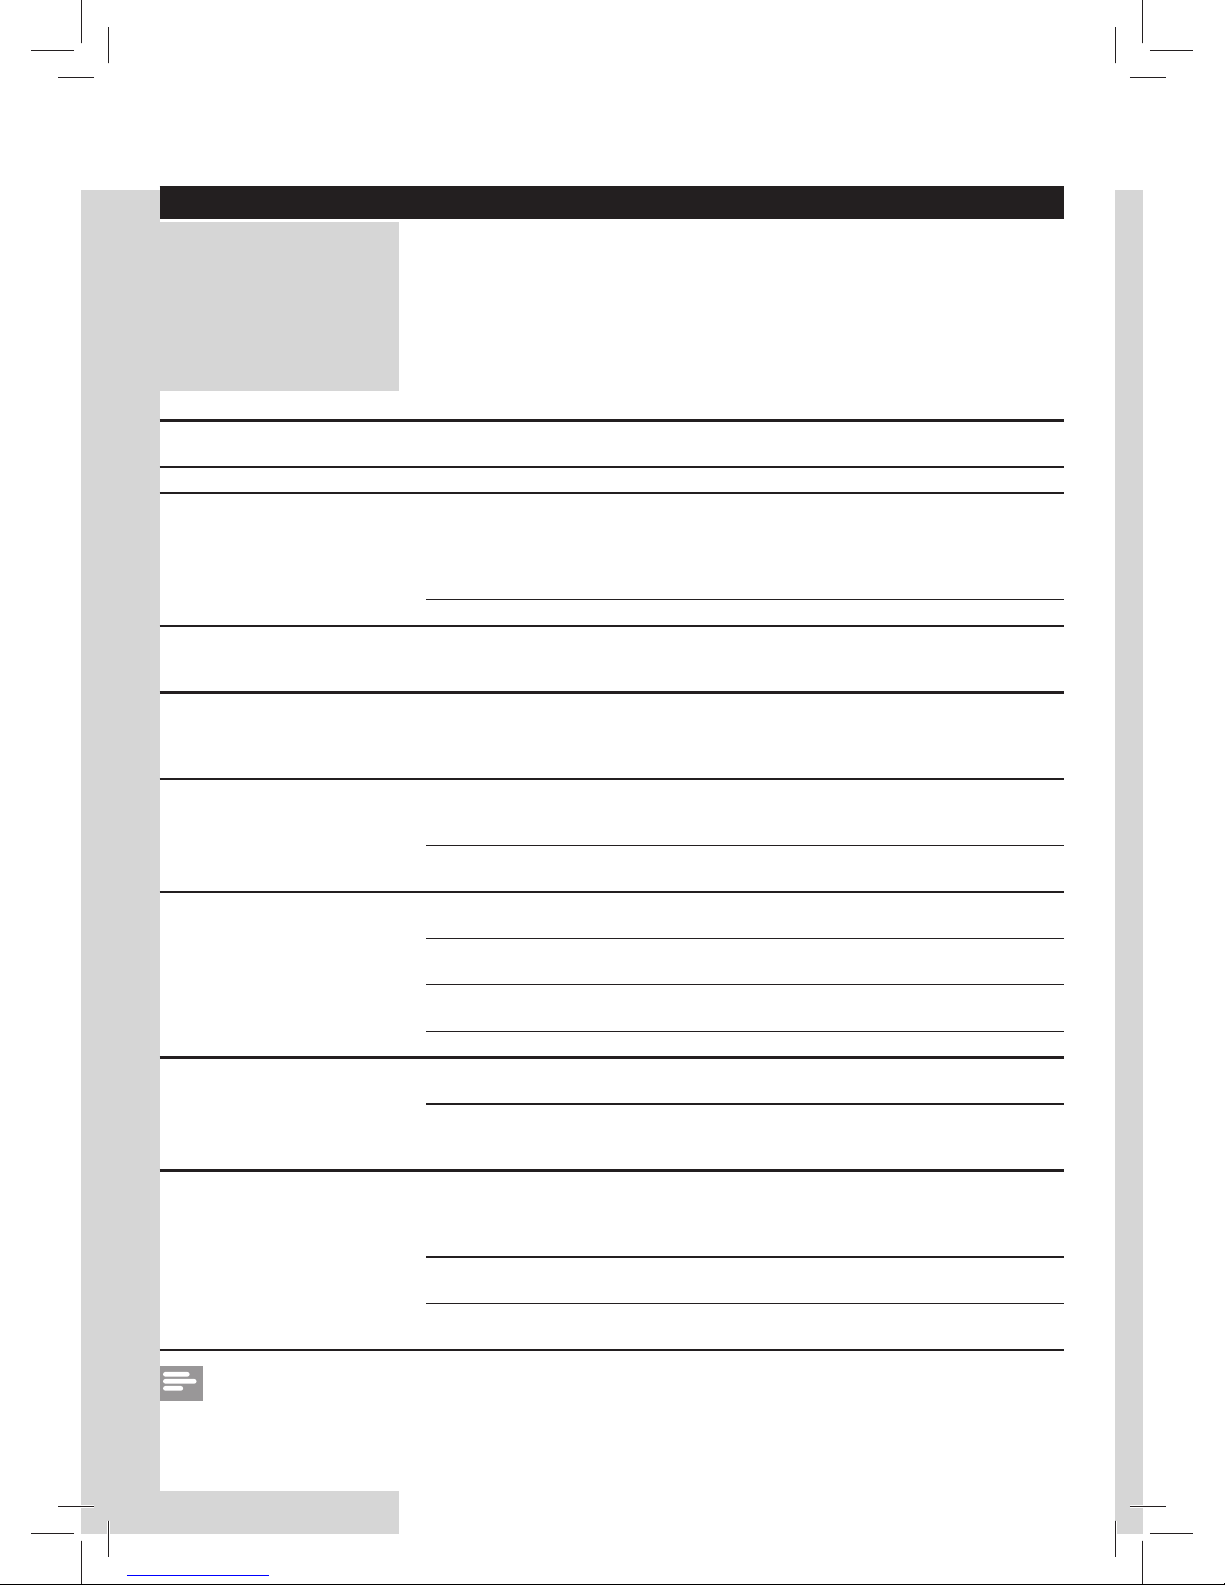
TROUBLE SHOOTING
This chapter summarizes the most common problems you could encounter with your machine. If you are unable to solve the problem with the
information below, visit www.philips.com/support for a list of frequently
asked questions or contact the Philips Saeco hotline in your country. You
nd its contact details in the warranty booklet bypacked separately or on
www.philips.com/support.
Problem Possible Cause Solution
The machine does not turn on. The machine is not connected to the
power source.
Connect the machine to the power source.
The co ee is not hot enough. The cups are cold. Preheat the cups with hot water.
Hot water or steam is not dispensed.
The hole of the hot water/steam wand
is clogged.
Clean the hole of the hot water/steam wand
using a pin.
Make sure that the machine is turned o
and has cooled before performing this
operation.
Pannarello is dirty (if supplied). Clean the Pannarello.
The espresso is not creamy
enough.
The co ee blend is unsuitable, the co ee
is not freshly roasted or the grind is too
coarse.
Change co ee blend or adjust the ceramic
co ee grinder as explained in section
“How to adjust the ceramic co ee grinder”.
The machine takes a long time to
warm up or the amount of water
dispensed from the hot water/
steam wand is too small
The machine’s water circuit is obstructed
by limescale build-up.
Descale the machine.
The brew group cannot be
removed.
The brew group is out of place. Turn the machine on. Close the service door.
The brew group automatically returns to the
correct position.
The co ee ground drawer is inserted. Remove the co ee ground drawer rst, then
the brew group.
The machine grinds the co ee
beans but no co ee comes out.
The brew group is dirty. Clean the brew group (section “Brew Group
Cleaning”).
The water circuit is not primed. Prime the water circuit (section “Using the
Machine for the First Time”).
Rare event that occurs when the machine is automatically adjusting the dose.
Brew a few espressos as described in section
“Saeco Adapting System”.
The dispensing spout is dirty. Clean the dispensing spout.
The co ee is too weak. Rare event that occurs when the machi-
ne is automatically adjusting the dose.
Brew a few espressos as described in section
“Saeco Adapting System”.
The ceramic co ee grinder is set to a
coarse grind.
Adjust the ceramic co ee grinder to a ner
setting (see section “How to adjust the
ceramic co ee grinder”)
Co ee is brewed slowly. The co ee grind is too ne. Change co ee blend or adjust the grind as
explained in section
“How to adjust the ceramic co ee grinder”.
The water circuit is not primed. Prime the water circuit (section “Using the
Machine for the First Time”).
The brew group is dirty. Clean the brew group (section “Brew Group
Cleaning”).
Note:
These problems can be considered normal if the co ee blend has been changed or if the machine has just been
installed. In this case wait until the machine performs a self-adjusting operation as described in section “Saeco
Adapting System”.
Page 39
ENGLISH
37
ENVIRONMENT
Energy saving
Stand-by
The machine is designed for energy saving- proven by the Class A energy
label.
After 60 minutes of inactivity, the machine turns o automatically.
Disposal
Do not throw away the machine with the normal household waste at the
end of its life, but hand it in at an o cial collection point for recycling. By
doing this, you help to preserve the environment.
The packing materials can be recycled.
- Machine: unplug the machine and cut the power cord.
- Deliver the appliance and power cord to a service center or public
waste disposal facility.
This product complies with eu directive 2002/96/EC.
The symbol on the product or on its packaging indicates that this product
may not be treated as household waste.
Instead it shall be handed over to the applicable collection point for the
recycling of electrical and electronic equipment.
By ensuring this product is disposed of correctly, you will help prevent
potential negative consequences for the environment
and human health, which could otherwise be caused by inappropriate
waste handling of this product. For more detailed information about recycling of this product, please contact your local city o ce, your household
waste disposal service or the shop where you purchased the product.
Page 40
38
ENGLISH
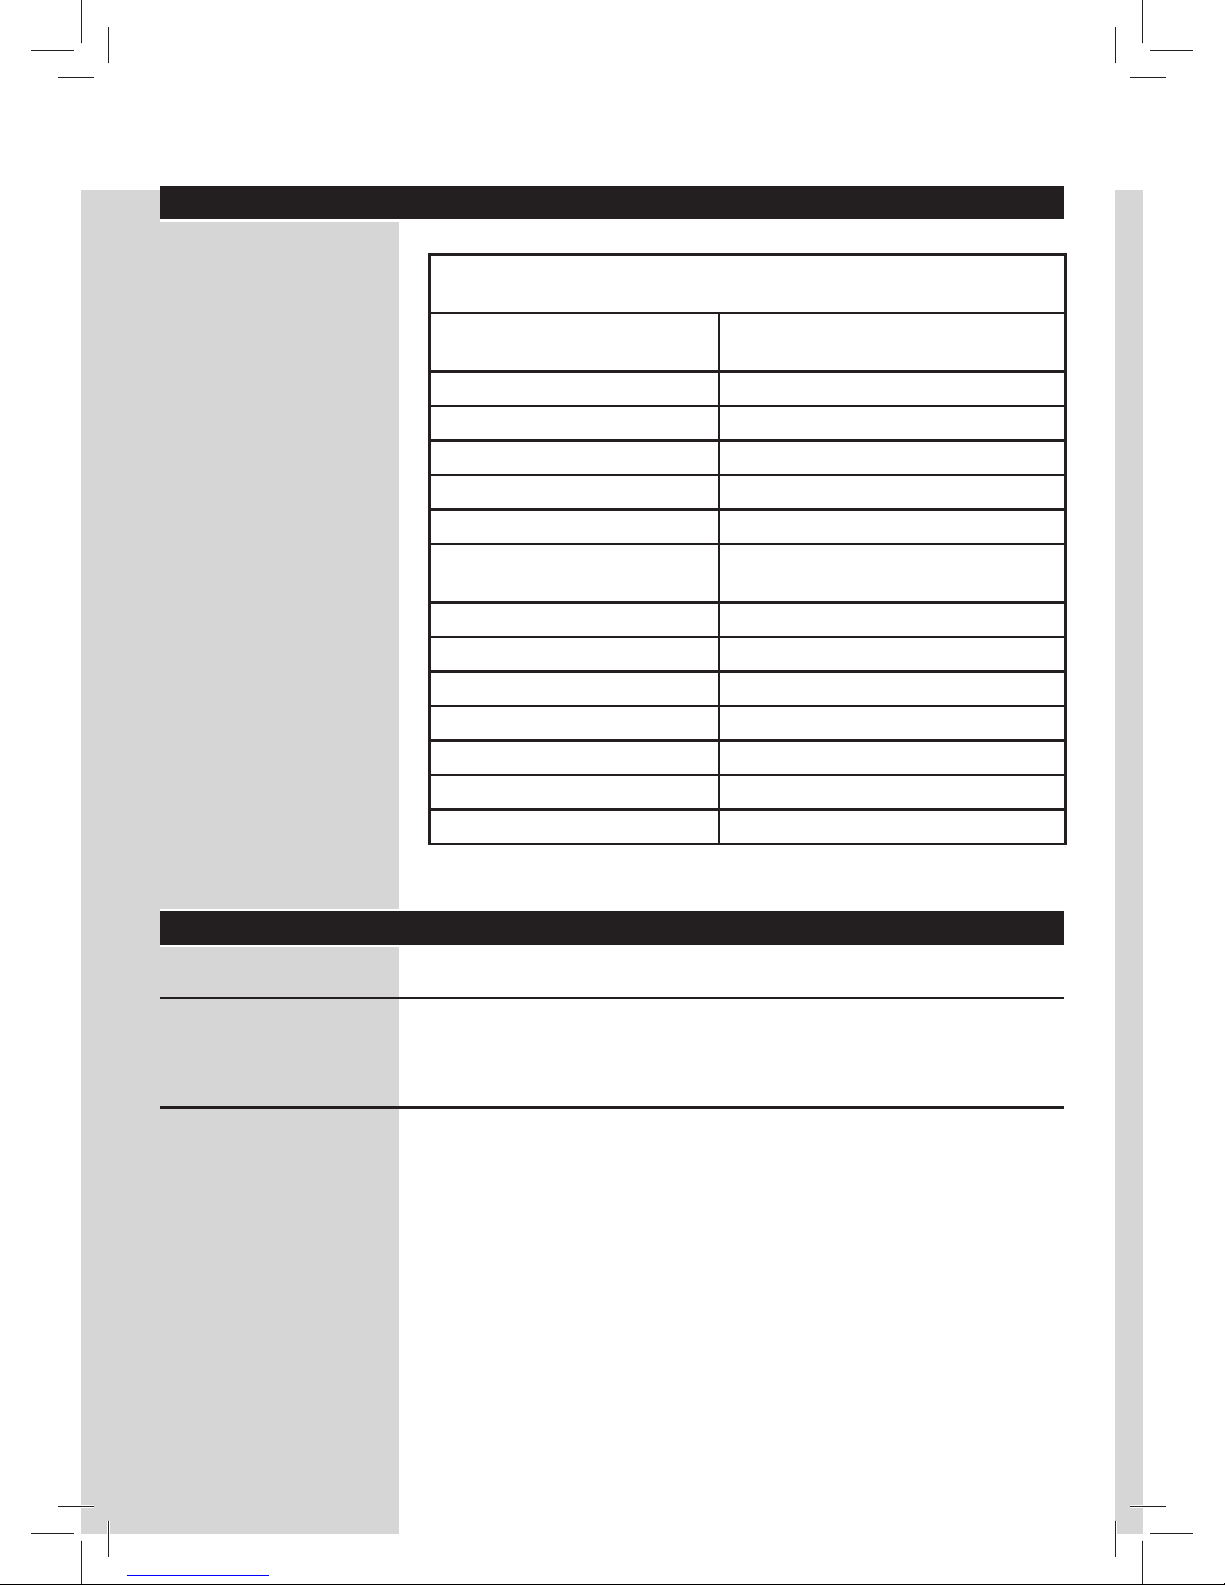
TECHNICAL SPECIFICATION
The manufacturer reserves the right to make changes to the technical
speci cations of the product
Nominal Voltage - Power Rating
- Power Supply
See label on the inside of the service
door
Housing material ABS - Thermoplastic
Size (w x h x d) 295 x 325 x 420 mm - 11.5” x 13” x 16.5”
Weight 6.9 kg - 15 lbs
Power Cord Length 1.2 m - 47”
Control Panel Front
Pannarello (only available for
certain models)
Special for cappuccinos
Size of cup 95 mm
Water Tank 1.0 litres – 33 oz. / Removable
Co ee Bean Hopper Capacity 170 g / 6.5 oz.
Co ee ground Drawer Capacity 8
Pump pressure 15 bar
Boiler Stainless steel
Safety mechanisms Thermal fuse
GUARANTEE AND SERVICE
Guarantee
For detailed information on your warranty and related conditions, please
read the warranty booklet bypacked separately.
Service
We want to ensure that you remain satis ed with your machine. If not done
already, please register your product on www.philips.com/welcome so
that we can stay in contact with you and send you cleaning and descaling
reminders.
If you need service or support, please visit the Philips website at www.
philips.com/support or contact the Philips Saeco hotline in your country.
You nd its phone number in the worldwide booklet by packed separately
or on www.philips.com/support.
Page 41
ENGLISH
39
ORDERING MAINTENANCE PRODUCTS
For cleaning and descaling, use saeco maintenance products only.
You can purchase accessories for this machine, at the philips online shop at
www.Shop.Philips.Com/service, your local dealer or at authorised service
centres.
If you have any di culties obtaining accessories for your machine, please
contact the philips saeco hotline in your country.
You nd its contact details in the worldwide booklet bypacked separately
or on www.Philips.Com/support.
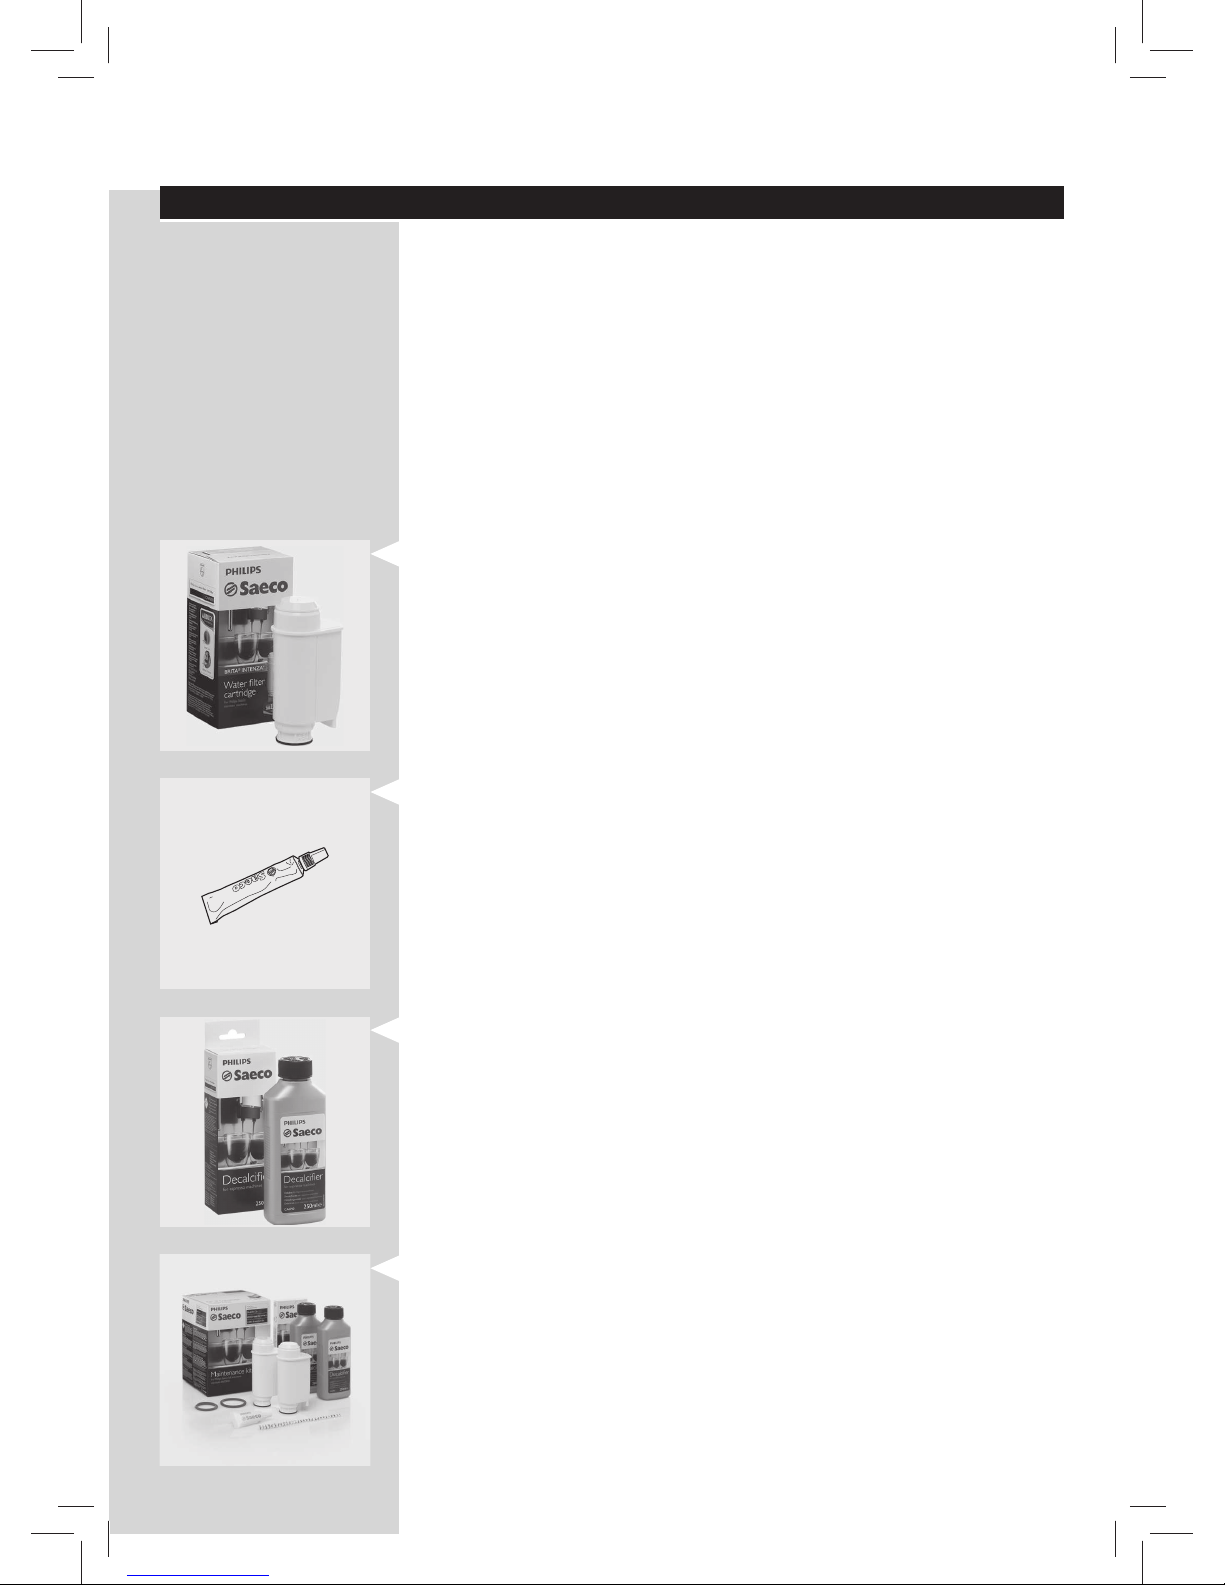
Overview of maintenance products
INTENZA+ WATER FILTER CA6702
LUBRICATION HD5061
DECALCIFIER CA6700
MAINTENANCE KIT CA 6706
Page 42
Page 43
Page 44
Rev.00 del 15-07-12
www.philips.com/saeco
The manufacturer reserves the right to make changes without prior notice.
EN
02
02
 Loading...