

Philips Saeco Syntia HD8833, Saeco Syntia SUP 037R Operating Instructions Manual
Type HD8833
SUP 037R
OPERATING INSTRUCTIONS
READ THESE OPERATING INSTRUCTIONS CAREFULLY BEFORE USING THE MACHINE.
Register your product and get support at
www.philips.com/welcome
English
02
EN
02

• 2 •
IMPORTANT SAFEGUARDS
When using electrical appliances, basic safety precautions should always be
followed, including the following:
1. Read all instructions.
2. Do not touch hot surfaces. Use handles or knobs.
3. To protect against fire, electric shock and injury to persons do not immerse
cord, plugs, or appliance in water or other liquid.
4. Close supervision is necessary when the appliance is used by or near
children.
5. Unplug from outlet when not in use and before cleaning. Allow to cool
before putting on or taking off parts, and before cleaning the appliance.
6. Do not operate any appliance with a damaged cord or plug or after the
appliance malfunctions, or has been damaged in any manner. Return
appliance to the nearest authorized service facility for examination, repair
or adjustment.
7. The use of accessory attachments not recommended by the appliance
manufacturer may result in fire, electric shock or injury to persons.
8. Do not use outdoors.
9. Do not let cord hang over edge of table or counter, or touch hot surfaces.
10. Do not place on or near a hot gas or electric burner, or in a heated oven.
11. Always attach plug to appliance first, then plug cord into wall outlet. To
disconnect, turn any control to “off”, then remove plug from wall outlet.
12. Do not use appliance for other than intended use.
13. Save these instructions.
SAVE THESE INSTRUCTIONS

• 3 •
CAUTION
This appliance is for household use only. Any servicing, other than cleaning and
user maintenance, should be performed by an authorized service center. Do not
immerse machine in water. To reduce the risk of fire or electric shock, do not
disassemble the machine. There are no parts inside the machine serviceable by
the user. Repair should be done by authorized service personnel only.
1. Check voltage to be sure that the voltage indicated on the nameplate
corresponds with your voltage.
2. Never use warm or hot water to fill the water tank. Use cold water only.
3. Keep your hands and the cord away from hot parts of the appliance during
operation.
4. Never clean with scrubbing powders or harsh cleaners. Simply use a soft
cloth dampened with water.
5. For optimal taste of your coffee, use purified or bottled water. Periodic
descaling is still recommended every 2-3 months.
6. Do not use caramelized or flavored coffee beans.
INSTRUCTIONS FOR THE POWER
SUPPLY CORD
A. A short power-supply cord (or detachable power-supply cord) is to be
provided to reduce risks resulting from becoming entangled in or tripping
over a longer cord.
B. Longer detachable power-supply cords or extension cords are available
and may used if care is exercised in their use.
C. If a long detachable power-supply cord or extension cord is used,
1. The marked electrical rating of the detachable power-supply cord or
extension cord should be at least as great as the electrical rating of the
appliance
2. If the appliance is of the grounded type, the extension cord should be a
grounding-type 3-wire cord, and
3. The longer cord should be arranged so that it will not drape over the
counter top or table top where it can be pulled on by children or tripped
over.
• 4 •
GENERAL INFORMATION
The co ee machine is suitable for preparing espresso co ee using either co ee beans or ground
co ee and is equipped with a device to dispense steam and hot water. The structure of the machine has been designed for domestic use only and is not suitable for continuous professionaltype operation.
Keep these operating instructions in a safe place and make them available to anyone
who may use the co ee machine.
For further information or in case of problems that are not included or not completely explained
in these instructions, please contact an authorized service center.
Warning. No liability is held for damage caused by:
• Incorrect use not in accordance with the intended purposes;
• Repairs not carried out by authorized service centers;
• Tampering with the power cord;
• Tampering with any parts of the machine;
• Storage or use of the machine at a temperature outside the operating temperature
range (+15°C / +45°C);
• The use of non-original spare parts and accessories.
In these cases, the warranty shall be deemed null and void.
SAFETY REGULATIONS
Never allow water to come into contact with any of the electrical parts of the
machine: Danger of short circuit! Steam and hot water may cause scalding!
Do not direct the steam/hot water wand towards body parts. Carefully handle the
steam/hot water wand by its grip: Danger of scalding!
Intended Use
The co ee machine is intended for domestic use only. Do not make any technical changes or use
the machine for unauthorized purposes since this would create serious hazards! The appliance is
not to be used by persons (including children) with reduced physical, mental or sensory abilities
or with limited experience and/or expertise, unless they are supervised by a person responsible
for their safety, or they are instructed by this person on how to properly use the machine.
Power Supply - Power Cord
Only connect the co ee machine to a suitable socket.
The voltage must correspond to that indicated on the machine label located on the inside of
service door.
Never use the co ee machine if the power cord is defective or damaged.
If damaged, the power cord must be replaced by the manufacturer or an authorized service
center. Do not pass the power cord around corners, over sharp edges or over hot objects and
keep it away from oil. Do not use the power cord to carry or pull the co ee machine.
Do not pull out the plug by the power cord or touch it with wet hands. Do not let the power cord
hang freely from tables or shelves.
For the Safety of Others
Keep children under control to prevent them from playing with the product. Children are not
aware of the risks related to electric household appliances. Do not leave the machine packaging
materials within the reach of children.
• 5 •
Danger of Burns
Never direct the steam/hot water wand towards yourself or others: Danger of scalding! Al-
ways use the handles or knobs provided.
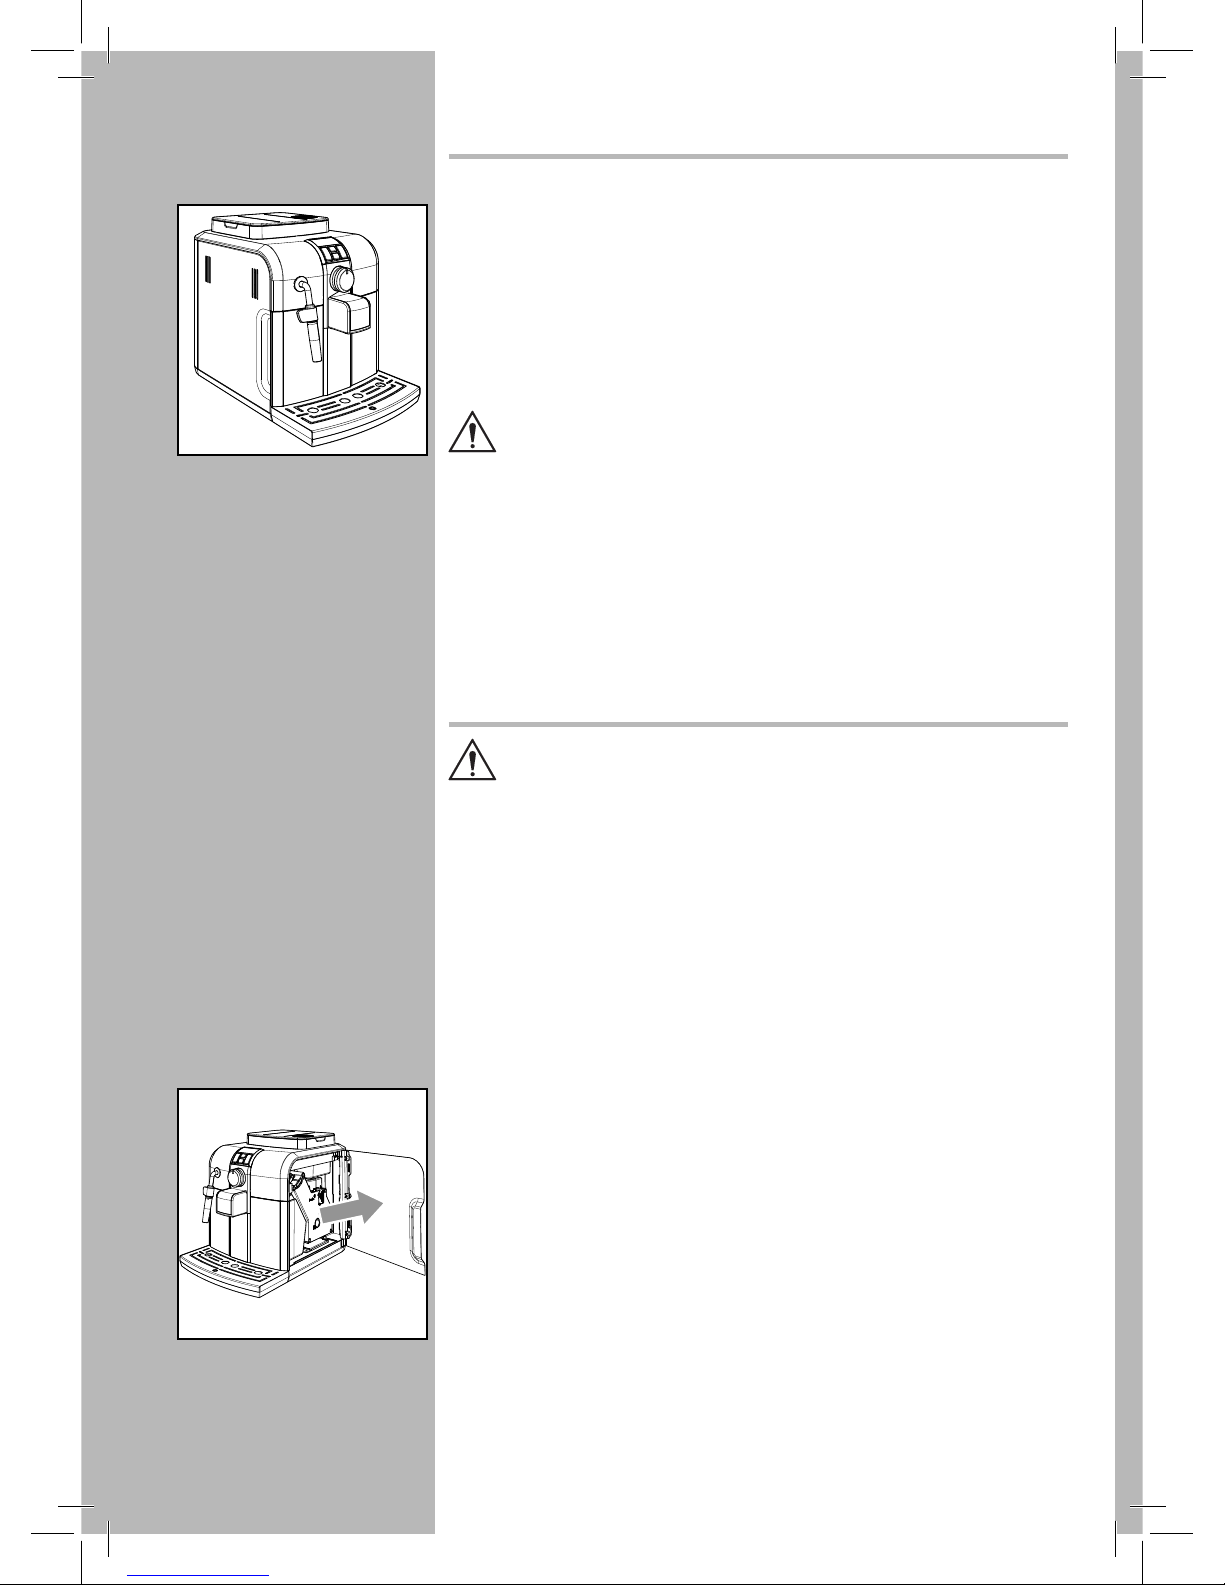
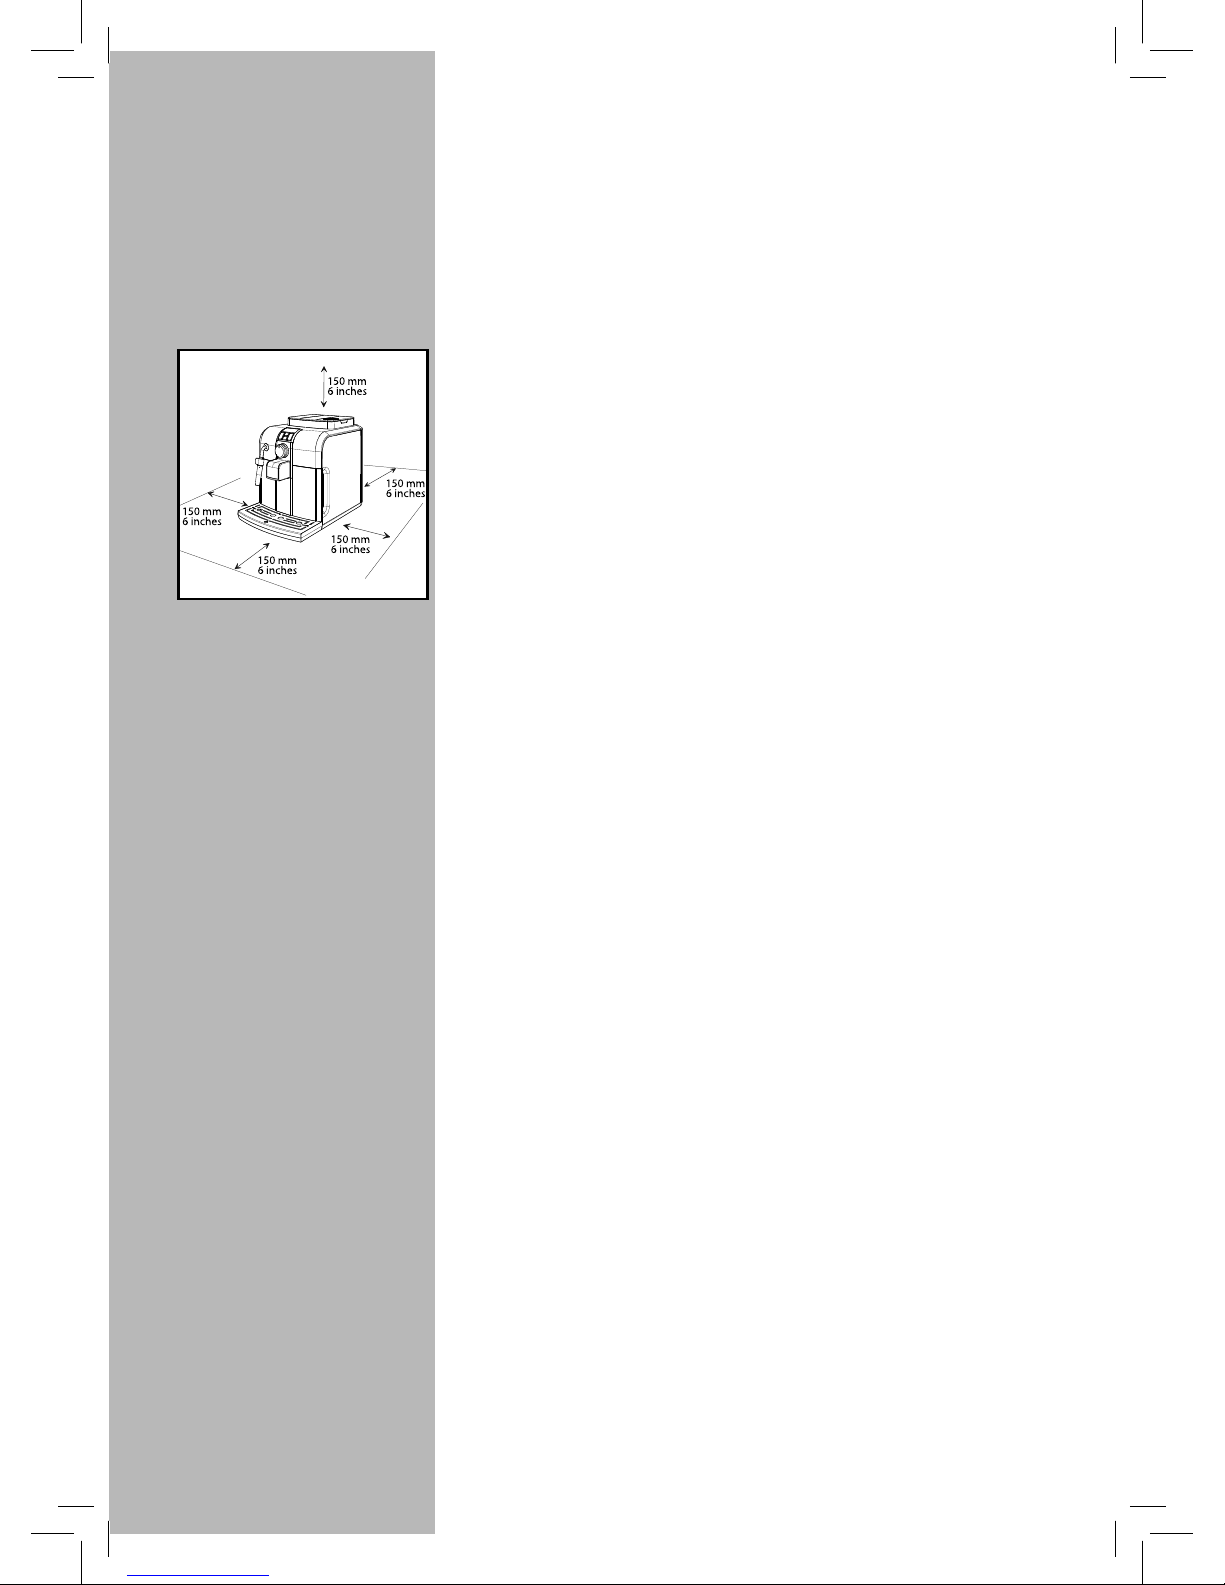
Machine Location - Suitable Location for Operation and Maintenance
For best use, it is recommended to:
• Choose a safe, level surface, where there will be no danger of overturning it or being inju-
red.
• Choose a location that is su ciently well-lit, clean and near an easily reachable socket.
• Provide for a minimum distance from the sides of the machine as shown in the illustration.
• During machine turning on/o , it is recommended to place an empty glass under the ddi-
spensing spout.
Do not keep the machine at a temperature below 0°C (32°F).
Frost may damage the machine.
Do not use the co ee machine outdoors.
In order to prevent its housing from melting or being damaged, do not place the machine on
very hot surfaces and close to open ames.
Storing the Machine - Cleaning
Before cleaning the machine, turn it o by pressing the “STANDBY”, button, and then switch
the power button to “0”. Remove the plug from the socket.
Wait for the machine to cool down.
Never immerse the machine in water!
It is strictly forbidden to tamper with the internal parts of the machine.
Water left in the tank for several days should not be consumed. Wash the tank and ll it with
fresh drinking water.
If the machine will not be used for a long time, dispense water from the steam wand, and
carefully clean the Pannarello (if supplied), then turn it o and unplug it.
Store it in a dry place, out of the reach of children.
Keep it protected from dust and dirt.
Servicing / Maintenance
In case of failure, problems or a suspected fault resulting from the falling of the machine, immediately remove the plug from the socket.
Never attempt to operate a faulty machine.
Servicing and repairs may only be carried out by authorized service centers.
All liability for damages resulting from work not carried out by professionals is declined.
Fire Safety Precautions
In case of re, use carbon dioxide (CO2) extinguishers. Do not use water or dry powder extinguishers.
• 6 •
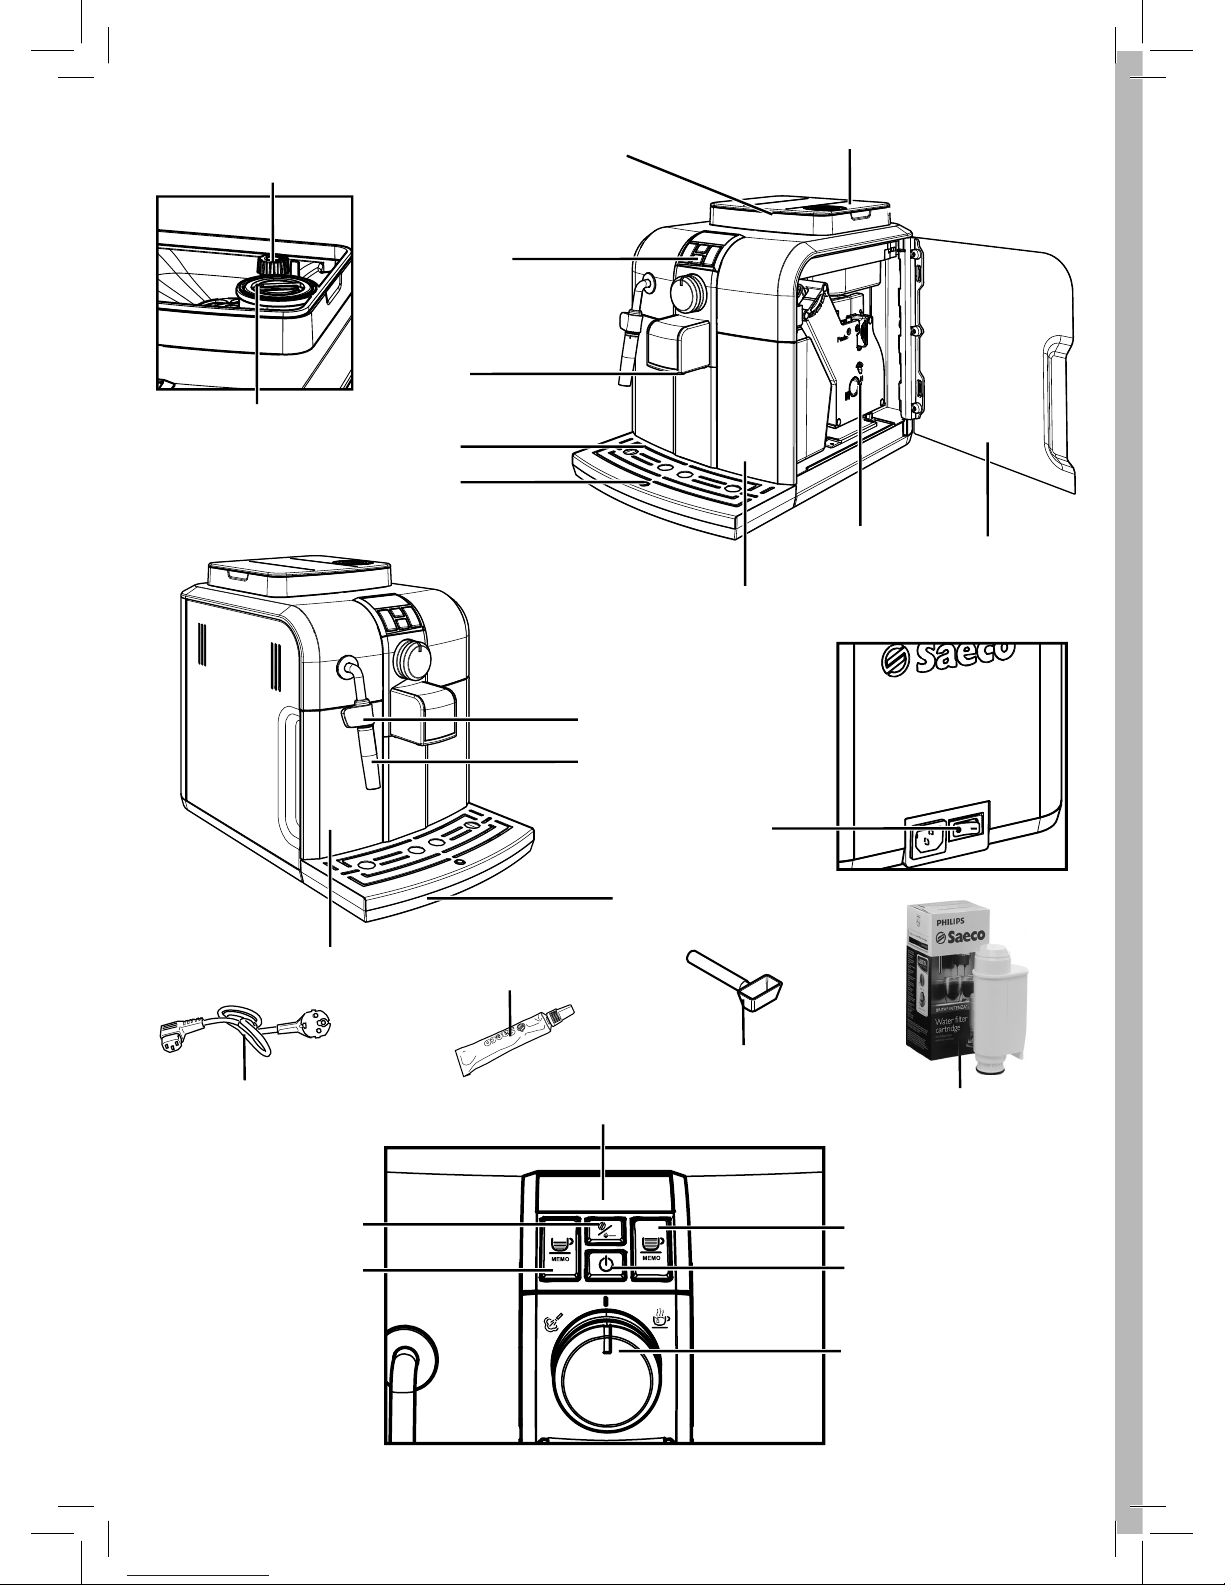
Co ee bean hopper cover
Power cord
Pre-ground co ee scoop
Grease for the brew group
LED display
“Aroma” - Pre-ground co ee
selector switch
Espresso co ee light button
Long co ee light button
Hot water/steam selector dial
“STAND-BY” light button
Brew group
Co ee grounds drawer
Service door
Grinder adjustment
knob
Pre-ground co ee
compartment
Co ee bean hopper
Dispensing spout
Cup holder grill
ON-OFF power button
Full drip tray indicator
Drip tray
Water tank
Hot water/steam wand
Wand protective gripper
Control panel
Intenza Water Filter
(Optional)
• 7 •
INSTALLATION
For your safety and the safety of
others, carefully follow the instructions provided in the “Safety Regulations” section.
Machine Packaging
The original packaging has been designed
and constructed to protect the machine
during transport. We recommend keeping
the packaging material for possible future
transport.
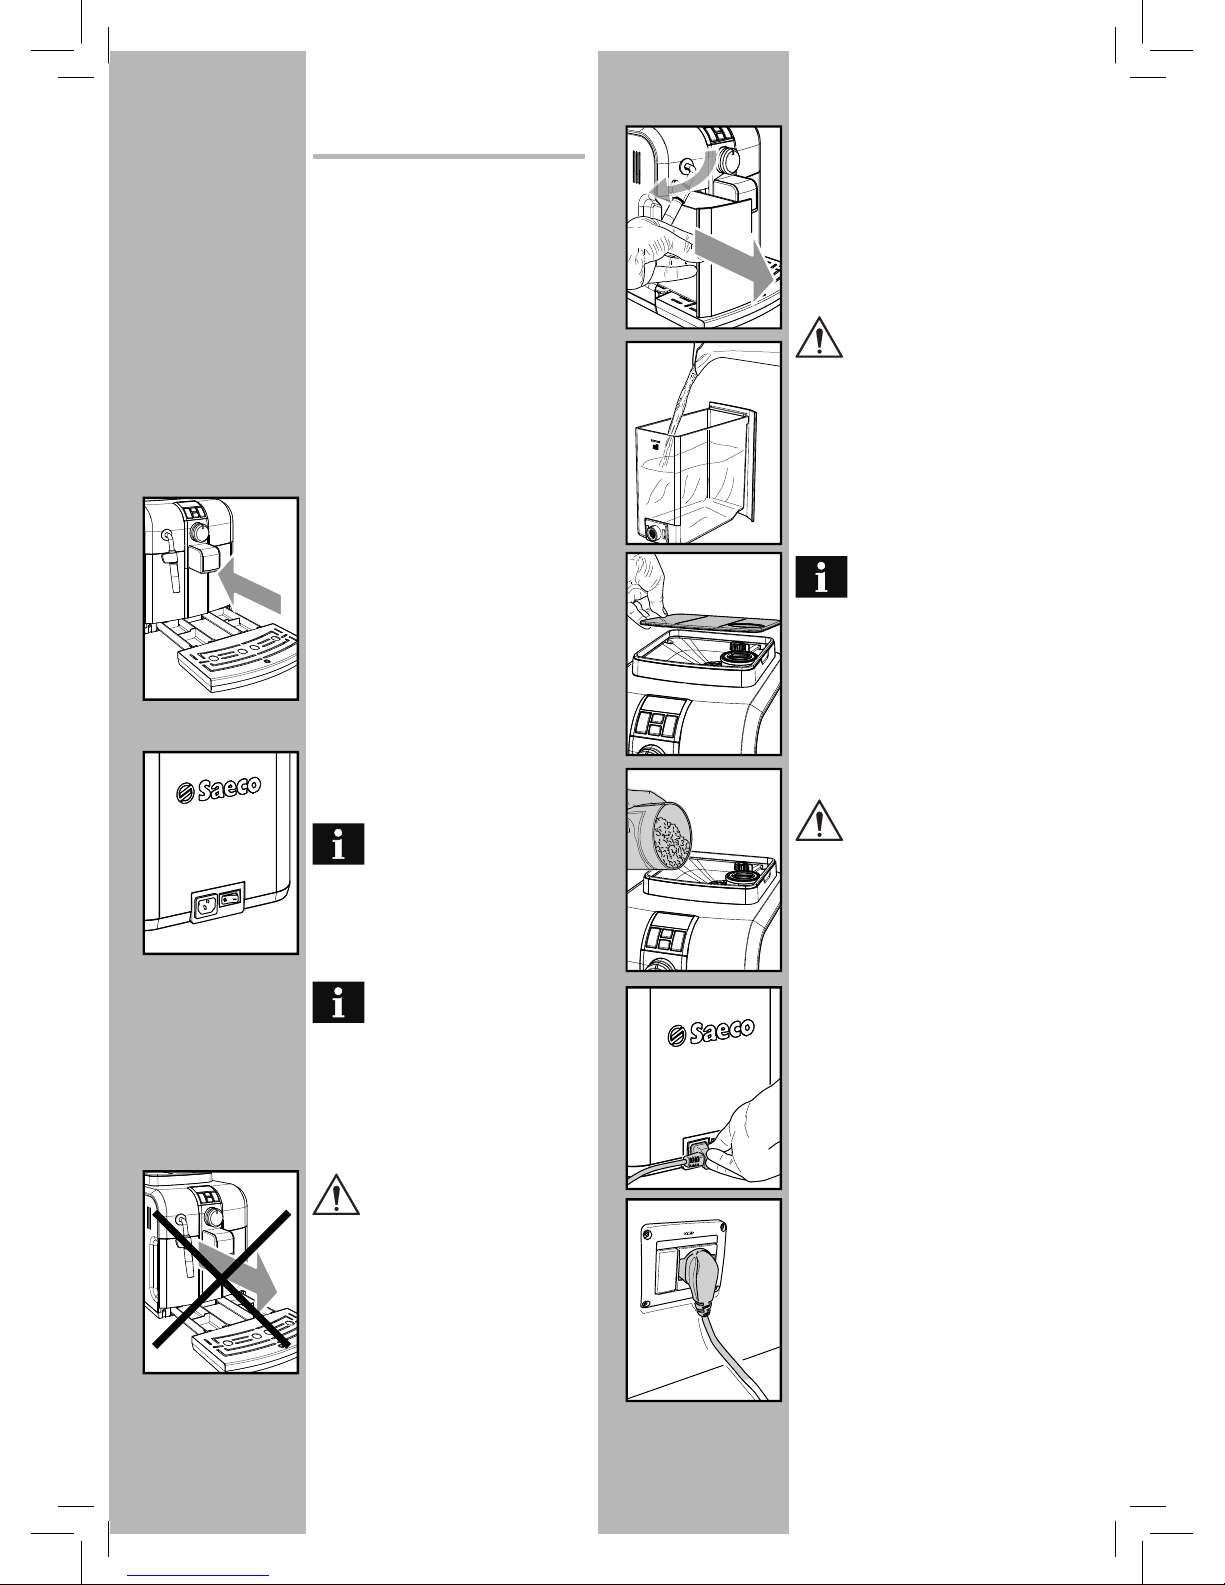
Preliminary Operations
• Remove the co ee bean hopper cover
and the drip tray with grill from the
packaging.
• Remove the co ee machine from the
packaging and position it in a place
that meets the requirements described
in the safety regulations.
• Place the drip tray with grill into its
appropriate seat on the machine. Make
sure it is fully inserted to its limit stop.
• Insert the co ee bean hopper cover.
Note: Insert the plug in the
machine and in the wall socket only when indicated and check
that the power button is switched
to “0”.
Important note: Carefully
read the explanatory descriptions of all the warnings the machine
displays to the user via the lights on
the control panel display (see section
“Display Warnings”).
NEVER remove the drip tray
when the machine is turned
on. Wait a couple of minutes after
turning on/o , as the machine will
be carrying out a rinse/self-cleaning
cycle (see section “Rinse/Self-cleaning Cycle”).
• Remove the water tank from its seat.
• Rinse and ll it with fresh water making sure that it is not lled exceeding
the MAX level indicated in the water
tank. Put the water tank back in its
seat.
Fill the tank only with fresh,
non-sparkling water. Hot water or any other liquid may damage
the tank and/or the machine. Do not
turn on the machine when the tank
is empty: Make sure there is enough
water in the tank.
• Remove the co ee bean hopper cover.
Note: The hopper may be
provided with different safety features according to the regulations of the country of use of the
machine.
• Slowly pour the co ee beans into the
hopper.
Only co ee beans must be put
into the co ee bean hopper.
Ground coffee, instant coffee or
any other object may damage the
machine.
• Replace the co ee bean hopper cover.
• Insert the plug into the socket on the
back of the machine.
• Insert the plug of the other end of the
cable into a wall socket with suitable
power voltage.
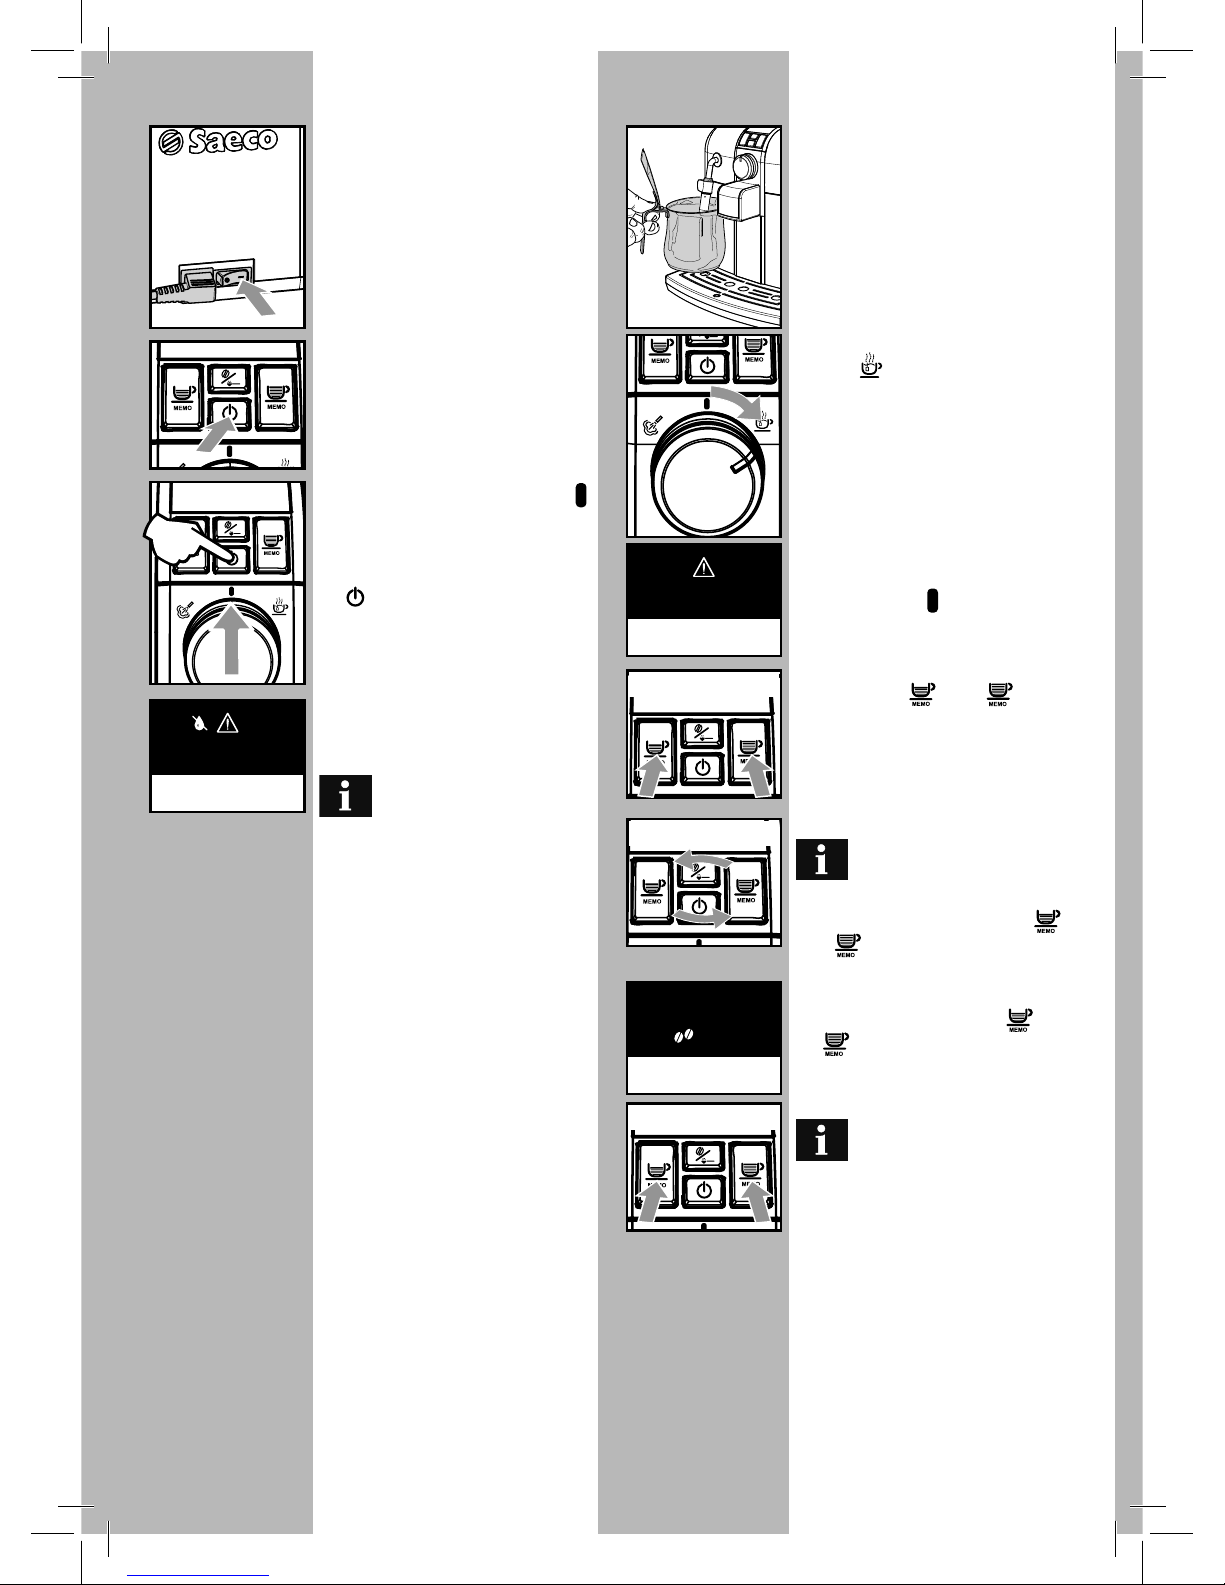
• 8 •• 8 •
• Switch the power button to “I” to turn
the machine on.
Circuit Priming
• To prime the water circuit, place a
container under the steam wand
(Pannarello, if supplied).
• Make sure the selector dial is in the “ ”
position; if this is not the case, set it to
that position.
• To turn the machine on simply press the
“
STAND-BY” button.
• The blinking icons (shown to the side)
warn that the circuit must be primed.
Note: Before starting the
machine for the first time,
and after long periods of inactivity,
prime the water circuit.
• The “STAND-BY” button blinks.
Blinking
Blinking
Steady on
• Turn the selector dial clockwise to set it
to the“
” position. The machine starts
the automatic priming of the circuit by
letting out a preset quantity of water
through the Pannarello.
Once the circuit has been primed, the
icon shown in the figure will start
blinking on the display.
Turn the selection knob back to its
central position “
”.
• The buttons “
” and “ ” on the
control panel blink slowly together
to show that the machine is warming
up.
When warm-up is complete,
the machine performs a rinse
cycle of the internal circuits.
During this phase the buttons “
”
and “
” blink alternately.
• When the operations described above
are completed, the buttons “
” and
“
” are steady on and the aroma icon
on the display turns on.
The displayed aroma is the
factory setting when the
machine is switched on for the rst
time, or it is the same as the aroma
that was selected for the last brewed
co ee.
The machine is then ready to brew
beverages.
• To brew coffee, dispense hot water or
steam, and properly use the machine, carefully follow the instructions provided.
Blinking
Steady on
Blinking
• 9 •
Steady on
Steady on
Steady on
Using the machine for the
first time or after a long
period of inactivity.
These simple operations will make it possible to always brew excellent co ee.
1 Place a large container under the
dispensing spout.
2 Before starting the procedure, check
that the following icon is displayed and
that the buttons “
” and “ ” on
the control panel are steady on.
3 Select the pre-ground co ee function
by pressing the “
“ button one or
more times.
Do not add the pre-ground
co ee to the compartment.
The icon will appear on the display.
4 Press the button to brew a long cof-
fee.
5 Wait until brewing is completed and
empty the container.
6 Repeat the operations from step 1 to
step 5 for 3 times; then continue with
step 7.
7 Place a container under the steam wand
(Pannarello, if supplied).
8 Turn the selector dial clockwise to set it
to the “
” position.
9 Dispense water until the no water si-
gnal is displayed, then turn the selector dial counter-clockwise to set it to
the “
” position.
10 At the end, fill the water tank again.
Then the products can be brewed as
described in the following sections.
Rinse/Self-cleaning Cycle
This cycle allow rinsing the co ee circuits
with fresh water.
The cycle is carried out:
• At machine start (with cold boiler)
• After priming the water circuit (with
cold boiler)
• During the Stand-by preparation phase
(if a co ee product has been brewed)
• During the phase of activating the
stand-by mode after pressing the
“STAND-BY” button (if a co ee product
has been brewed).
A small amount of water will be dispensed, which will rinse and heat all the machine components; in this phase the buttons “
” and “ ” blink alternately.
Wait for the cycle to nish automatically.
You can stop dispensing by pressing
either of the two brew buttons.
Blinking
 Loading...