

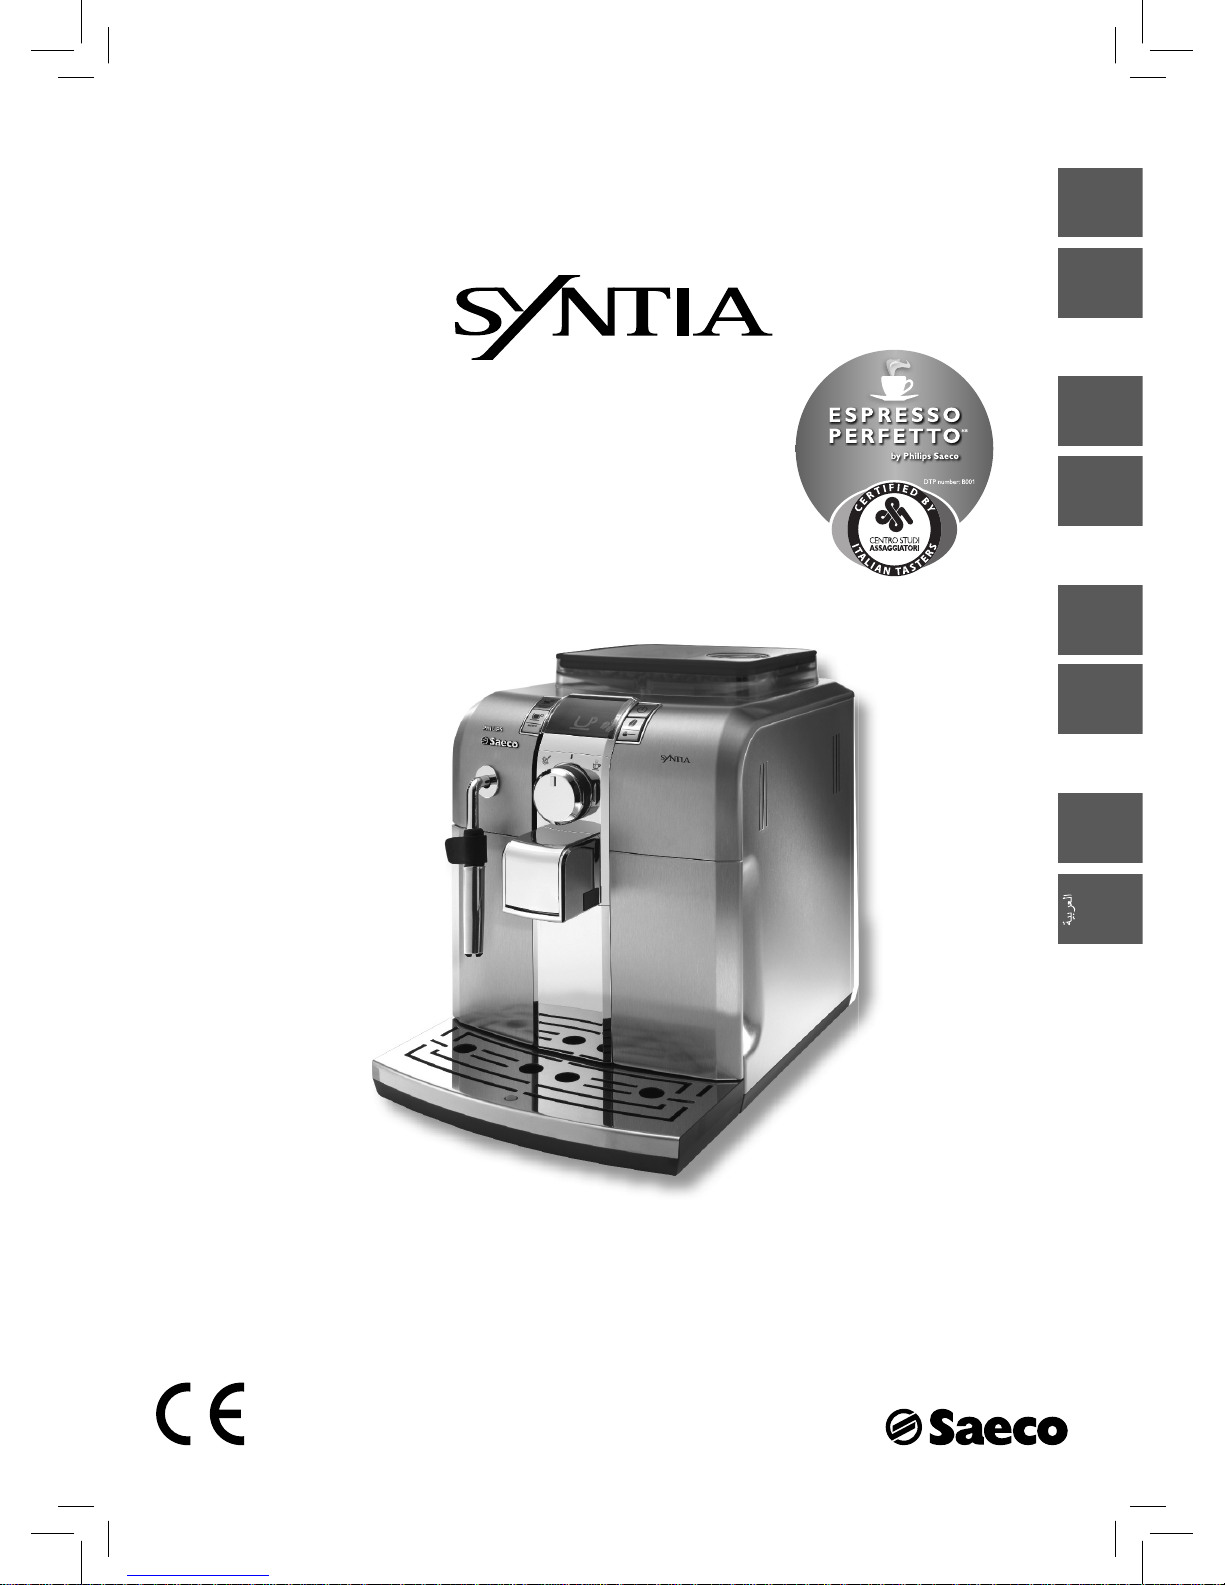
Philips Saeco Syntia HD8836, Saeco Syntia HD8837 Instructions Manual
Register your product and get support at
www.philips.com/welcome
INSTRUCTIONS
READ THESE INSTRUCTIONS CAREFULLY BEFORE USING THE MACHINE.
CHECK ON WWW.PHILIPS.COM/SUPPORT TO DOWNLOAD THE LATEST USER MANUAL
Type HD8836 / HD8837
EnglishEspañolDeutschFrançais
中文
中文
한국어
한국어
繁體中文
繁體中文

ES
¡Bienvenido al mundo Philips Saeco! Regístrese en la página WWW.PHILIPS.COM/WELCOME para recibir consejos y actualizaciones
relativos al mantenimiento. En este manual encontrará las instrucciones resumidas para el correcto funcionamiento de la máquina. En
el embalaje de la máquina se incluye un CD con el manual completo en el idioma deseado. Introduzca el CD en el reproductor de su PC; se le
guiará hasta el documento deseado. También puede visitar la página www.philips.com/support para buscar (utilice el código indi-
cado en la primera página) y descargar la última versión del manual de uso.
DE
Herzlich Willkommen in der Welt von Philips Saeco! Registrieren Sie sich auf der Internetseite WWW.PHILIPS.COM/WELCOME und
erhalten Sie Hinweise und Aktualisierungen zur Wartung. In diesem Heft werden die Hinweise für den korrekten Betrieb der Maschine
in Kurzform dargestellt. In der Verpackung der Maschine be ndet sich eine CD, die das gesamte Handbuch in der gewünschten Sprache enthält.
Legen Sie die CD in das Lesegerät Ihres PC ein und Sie werden zum gewünschten Dokument geführt. Darüber hinaus können Sie die neue-
ste Version des Bedienungshandbuchs auf der Internetseite www.philips.com/support herunterladen. Nehmen Sie dabei auf
die Modellnummer Bezug, die auf der ersten Seite angegeben wird.
EN
Welcome to Philips Saeco! Register on WWW.PHILIPS.COM/WELCOME and you will receive tips and updates on how to take care of
your machine. This booklet contains quick instructions on how to operate your machine properly. The machine package includes a CD
with the entire manual in your language. Put the CD in your PC’s CD drive and you will be guided to the desired document. You may also go to
www.philips.com/support to download the latest version of the user manual (refer to the type number listed on the cover
page).
FR
Bienvenue dans le monde Philips Saeco ! Enregistrez-vous sur le site WWW.PHILIPS.COM/WELCOME et retrouvez les conseils et les
mises à jour concernant l’entretien de votre appareil. Ce mode d’emploi fournit de brèves instructions pour le bon fonctionnement de la
machine. L’emballage de la machine contient un CD avec le manuel complet dans la langue souhaitée. Insérez le CD dans le lecteur de votre PC
et laissez-vous guider vers le document souhaité. De plus, vous pouvez télécharger la dernière version du manuel d’utilisateur de-
puis le site www.philips.com/support (reportez-vous au numéro de modèle indiqué à la première page).
EN
Congratulations on choosing perfect espresso!
This home barista is your gateway to a world of professionally prepared Italian coffee specialties.
Treat your senses to perfect espresso by Philips Saeco – certifi ed by Italian Tasters – Centro Studi Assaggiatori, Italy’s #1
center for sensory analysis. Get more info on the certifi cation and learn about your new machine’s specifi c settings at
www.philips.com/saeco
DE
Herzlichen Glückwunsch, dass Sie sich für den perfekten Espresso
entschieden haben!
Dieser "Barista" für Zuhause öffnet Ihnen die Türen für professionell zubereiteten, italienischen Genuss.Verwöhnen Sie
Ihre Sinne mit einem perfekten Espresso von Philips Saeco, ausgezeichnet vom italienischen Studienzentrum Verkoster
(Centro Studi Assaggiatori - Italian Tasters), dem führenden Institut für sensorische Analysen in Italien. Weitere Informationen zur Zertifi zierung und zur besonderen Einstellung Ihrer neuen Maschine fi nden Sie unter
www.philips.com/saeco.
ES
¡Felicidades
por haber elegido el café exprés perfecto!
Esta máquina de café se convertirá en su barman personal, su puerta de acceso a un mundo de auténticas especialidades
italianas de café preparadas de forma profesional.
Regale a sus sentidos todo el placer del café exprés
Philips Saeco, certifi cado
por el Centro de Estudios de Catadores (Centro Studi Assaggiatori - Italian Tasters), el instituto de análisis sensorial n°
1 en Italia. Para más información sobre la certifi cación del producto y sobre las confi guraciones específi cas de su nueva
máquina, consulte la página
www.philips.com/saeco
FR
Félicitations pour avoir choisi le café expresso parfait !
Cette machine à café sera votre barman personnel, votre porte d'accès à un monde d'authentiques cafés italiens,
préparés de manière professionnelle. Préparez vos sens à goûter aux plaisirs des cafés expresso Philips Saeco certifi és
par le Centre d'Études des Dégustateurs (Centro Studi Assaggiatori - Italian Tasters), l'institut d'analyse sensorielle
numéro 1 en Italie. Pour plus d'informations sur la certifi cation du produit et sur les réglages spécifi ques de votre
nouvelle machine, consultez le site www.philips.com/saeco
EnglishEspañolDeutschFrançais

EN CONTENT PAGE 6
SAFETY INSTRUCTIONS ........................................................................................................................................................................................6
FIRST INSTALLATION............................................................................................................................................................................................8
MANUAL RINSE CYCLE.......................................................................................................................................................................................... 9
FIRST ESPRESSO ................................................................................................................................................................................................10
MY FAVORITE ESPRESSO .................................................................................................................................................................................... 10
ADJUSTING THE CERAMIC COFFEE GRINDER ....................................................................................................................................................... 11
FROTHING MILK ................................................................................................................................................................................................ 11
HOT WATER........................................................................................................................................................................................................ 12
DESCALING ........................................................................................................................................................................................................ 12
BREW GROUP CLEANING .................................................................................................................................................................................... 15
STEAM WAND/PANNARELLO CLEANING .............................................................................................................................................................. 16
WARNING SIGNALS YELLOW COLOUR ............................................................................................................................................................... 16
WARNING SIGNALS RED COLOUR ..................................................................................................................................................................... 17
MAINTENANCE PRODUCTS. ................................................................................................................................................................................ 58
ES ÍNDICE PÁG. 7
NORMAS DE SEGURIDAD ...................................................................................................................................................................................... 7
PRIMERA INSTALACIÓN .......................................................................................................................................................................................8
CICLO DE ENJUAGUE MANUAL .............................................................................................................................................................................. 9
PRIMER CAFÉ EXPRÉS ........................................................................................................................................................................................10
MI CAFÉ EXPRÉS IDEAL ....................................................................................................................................................................................... 10
REGULACIÓN DEL MOLINILLO DE CAFÉ DE CERÁMICA .......................................................................................................................................... 11
CÓMO MONTAR LECHE ....................................................................................................................................................................................... 11
AGUA CALIENTE .................................................................................................................................................................................................12
DESCALCIFICACIÓN ............................................................................................................................................................................................12
LIMPIEZA DEL GRUPO DE CAFÉ ........................................................................................................................................................................... 15
LIMPIEZA DEL TUBO DE VAPOR/PANNARELLO .................................................................................................................................................... 16
SEÑALES DE AVISO AMARILLO ......................................................................................................................................................................... 16
SEÑALES DE ALARMA ROJO .............................................................................................................................................................................. 17
PRODUCTOS PARA EL MANTENIMIENTO .............................................................................................................................................................58

FR TABLE DES MATIÈRES PAG.19
PRESCRIPTIONS DE SÉCURITÉ ............................................................................................................................................................................19
PREMIÈRE INSTALLATION .................................................................................................................................................................................. 20
CYCLE DE RINÇAGE MANUEL ............................................................................................................................................................................... 21
PREMIER CAFÉ EXPRESSO ..................................................................................................................................................................................22
MON CAFÉ EXPRESSO IDÉAL ............................................................................................................................................................................... 22
RÉGLAGE DU MOULIN À CAFÉ EN CÉRAMIQUE ..................................................................................................................................................... 23
COMMENT ÉMULSIONNER LE LAIT ...................................................................................................................................................................... 23
EAU CHAUDE ...................................................................................................................................................................................................... 24
DÉTART RAGE ..................................................................................................................................................................................................... 24
NETTOYAGE DU GROUPE DE DISTRIBUTION ........................................................................................................................................................ 27
NETTOYAGE BUSE DE VAPEUR/PANNARELLO ...................................................................................................................................................... 28
SIGNAUX D'AVERTISSEMENT JAUNE ................................................................................................................................................................. 28
SIGNAUX D'ALARME ROUGE ............................................................................................................................................................................. 29
PRODUITS POUR L'ENTRETIEN ............................................................................................................................................................................ 58
DE INHALT S. 18
SICHERHEITSHINWEISE .....................................................................................................................................................................................18
ERSTE INSTALLATION ......................................................................................................................................................................................... 20
MANUELLER SPÜLZYKLUS.................................................................................................................................................................................. 21
ERSTER ESPRESSO ............................................................................................................................................................................................. 22
MEIN LIEBLINGSESPRESSO ............................................................................................................................................................................... 22
EINSTELLUNG KERAMIKMAHLWERK .................................................................................................................................................................. 23
MILCH AUFSCHÄUMEN ....................................................................................................................................................................................... 23
HEISSWASSER ................................................................................................................................................................................................... 24
ENTKALKUNG .................................................................................................................................................................................................... 24
REINIGUNG DER BRÜHGRUPPE .......................................................................................................................................................................... 27
REINIGUNG DAMPFDÜSE/PANNARELLO ............................................................................................................................................................. 28
HINWEISSIGNALE GELB ................................................................................................................................................................................... 28
ALARMSIGNALE ROT ....................................................................................................................................................................................... 29
PRODUKTE FÜR DIE WARTUNG ......................................................................................................................................................................... 58
EnglishEspañolDeutschFrançais
6
Safety instructions
Normas de seguridad
www.philips.com/support
EN - Safety instructions
This machine is equipped with safety features. Nevertheless read the safety
instructions carefully and only use the machine as described in these instructions to avoid accidental injury or damage.
Keep this user manual for future reference.
Warnings
• Connect the machine to a wall socket which is properly wired. Its main
voltage should comply with the technical data of the appliance.
• Do not let the mains cord hang over the edge of a table or counter, or
touch hot surfaces.
• Never immerse the machine, mains plug or mains cord in water (danger of electrical shock).
• Never direct the hot water jet towards body parts (danger of burning).
• Do not touch hot surfaces. Use handles and knobs.
• Remove the mains plug from the wall socket.
- If a disturbance occurs.
- If the machine will not be used for a long time.
- Before cleaning the machine.
Pull on the plug, not on the mains cord. Do not touch the mains plug
with wet hands.
• Do not use the machine if the mains plug, the mains cord or the machine itself is damaged.
• Do not make any modi cations to the machine or its mains cord. Only
have repairs carried out by a service centre authorized by Philips to
avoid a hazard.
• This machine is not intended for use by persons (including children)
with reduced physical, sensory or mental capabilities, or lack of experience and knowledge, unless they have been given supervision or
instruction concerning use of the machine by a person responsible for
their safety.
• Children should be supervised to ensure that they do not play with the
machine.
• Never insert ngers or other objects into the ceramic co ee grinder.
Cautions
• The machine is for household use only. It is not intended for use in
environments such as sta kitchens of shops, o ces, farms or other
work environments.
• Always put the machine on a at and stable surface.
• Do not place the machine on a hot plate, directly next to a hot oven,
heater or similar source of heat.
• Only put co ee beans into the co ee bean hopper. If ground co ee,
instant co ee or any other substance is put in, it may damage the machine.
• Allow the machine to cool before putting on or taking o parts, and
before cleaning the machine.
• Never use warm or hot water to ll the water tank. Use cold water
only.
• Never clean with scrubbing powders or harsh cleaners. Simply use a
soft cloth dampened with water.
• Descale your machine regularly. The machine indicates when descaling is needed. Not doing this will make your appliance stop working
properly. In this case repair is not covered under your warranty!
• Do not keep the machine at temperature below 0 degrees Celsius
or 32 degrees Fahrenheit. Residue water in the heating system may
freeze and cause damage.
• Do not leave water in the water tank when the machine is not used
over a longer period of time. The water can become contaminated.
Use fresh water every time you use the machine.
Disposal
- The packing materials can be recycled.
- Appliance: Unplug the appliance and cut the power cord.
- Deliver the appliance and power cord to a service center or public
waste disposal facility.
In compliance with art.13 of the Italian Legislative Decree dated 25 July
2005, no. 151 “Implementation of the directives 2005/95/EC, 2002/96/EC
and 2003/108/EC on the restriction of the use pf certain hazardous substances in electrical and electronic equipment, as well as waste disposal”.
This product complies with eu directive 2002/96/EC.
The symbol
on the product or on its packaging indicates that this
product may not be treated as household waste. Instead it shall be handed
over to the applicable collection point for the recycling of electrical and
electronic equipment.
By ensuring this product is disposed of correctly, you will help prevent
potential negative consequences for the environment and human health,
which could otherwise be caused by inappropriate waste handling of this
product. For more detailed information about recycling of this product,
please contact your local city o ce, your household waste disposal service
or the shop where you purchased the product.
7
Safety instructions
Normas de seguridad
www.philips.com/support
EnglishEspañol
ES - Normas de seguridad
La máquina está provista de dispositivos de seguridad. No obstante, es
necesario leer atentamente las instrucciones de seguridad que aquí se
describen para evitar daños accidentales a personas o cosas.
Conservar este manual para posibles referencias en el futuro.
Atención
• Conectar la máquina a una toma de pared adecuada, cuya tensión
principal se corresponda con la indicada en los datos técnicos del
aparato.
• Evitar que el cable de alimentación cuelgue de la mesa o la barra o
que toque super cies calientes.
• No sumergir la máquina, la toma de corriente o el cable de alimentación en agua: ¡peligro de choque eléctrico!
• No dirigir nunca el chorro de agua caliente hacia partes del cuerpo:
¡riesgo de quemaduras!
• No tocar las super cies calientes. Usar los asideros y mandos correspondientes.
• Desconectar el enchufe de la toma:
- si se producen anomalías;
- si la máquina no va a utilizarse durante un largo período;
- antes de proceder a la limpieza de la máquina.
Tirar del enchufe y no del cable de alimentación. No tocar el enchufe
con las manos mojadas.
• No utilizar la máquina si el enchufe, el cable de alimentación o la
propia máquina están dañados.
• No alterar ni modi car de ninguna forma la máquina o el cable de
alimentación. Para evitar riesgos, todas las reparaciones deberán
ser efectuadas por un centro de asistencia técnica autorizado por
Philips.
• Esta máquina no está destinada a ser utilizada por personas (niños
incluidos) con capacidades físicas, mentales o sensoriales reducidas
o que no dispongan de una su ciente experiencia y/o competencias, a menos que la utilicen bajo la supervisión de una persona
responsable de su seguridad o que sean instruidas por dicho responsable en cómo usarla.
• Vigilar a los niños para asegurarse de que no jueguen con el aparato.
• No introducir nunca los dedos u otros objetos en el molinillo de café
de cerámica.
Advertencias
• La máquina está exclusivamente destinada al uso doméstico y no
está indicada para ser utilizada en sitios como comedores o cocinas
de tiendas, o cinas, haciendas u otros lugares de trabajo.
• Colocar siempre la máquina sobre una super cie plana y estable.
• No colocar la máquina sobre super cies calientes o cerca de hornos
calientes, calefactores o fuentes de calor similares.
• Introducir siempre en el contenedor sólo café en grano. La máquina
podría resultar dañada si se introdujese en el contenedor de café en
grano cualquier otro producto, como café molido o soluble.
• Dejar enfriar la máquina antes de introducir o extraer cualquiera de
sus componentes y antes de proceder a su limpieza.
• No introducir nunca en el depósito agua caliente o hirviendo. Utilizar sólo agua fría.
• No utilizar para la limpieza polvos abrasivos o detergentes agresivos. Es su ciente con utilizar un paño suave humedecido con agua.
• Efectuar la descalci cación de la máquina regularmente. Cuando
sea necesario proceder a la descalci cación, la máquina lo indicará.
El aparato dejará de funcionar correctamente en caso de no llevar a
cabo dicha operación. ¡La reparación no estará cubierta por la garantía!
• No someter la máquina a temperaturas inferiores a 0°C o 32°F. El
agua residual del interior del sistema de calentamiento podría congelarse y dañar la máquina.
• No dejar agua en el depósito si la máquina no va a utilizarse durante un largo período. El agua podría sufrir contaminaciones. Utilizar
agua fresca cada vez que se utilice la máquina.
Eliminación
- Los materiales de embalaje pueden reciclarse.
- Aparato: desconectar la máquina de la toma de corriente y cortar el
cable de alimentación.
- Entregar el aparato y el cable de alimentación a un centro de asistencia o a un organismo público de eliminación de desechos.
De conformidad con el art. 13 del Decreto Legislativo italiano del 25 de
julio de 2005, n.° 151 “Aplicación de las Directivas 2005/95/CE, 2002/96/
CE y 2003/108/CE relativas a la reducción del uso de sustancias peligrosas
en aparatos eléctricos y electrónicos y a la eliminación de sus residuos”.
Este producto cumple con la directiva europea 2002/96/CE.
El símbolo
estampado en el producto o en su embalaje indica
que el producto no puede ser tratado como desecho doméstico sino que
debe entregarse al centro de recogida competente para que sus componentes eléctricos y electrónicos puedan ser reciclados.
Al proceder a la correcta eliminación del producto estará contribuyendo
a proteger al medio ambiente y a las personas de posibles consecuencias
negativas que podrían derivar de una gestión incorrecta del producto en
su fase nal de vida. Para más información sobre el reciclaje del producto,
póngase en contacto con la o cina local competente, con su servicio de
eliminación de desechos domésticos o bien con la tienda donde adquirió
el producto.
8
Instructions
Instrucciones
www.philips.com/support
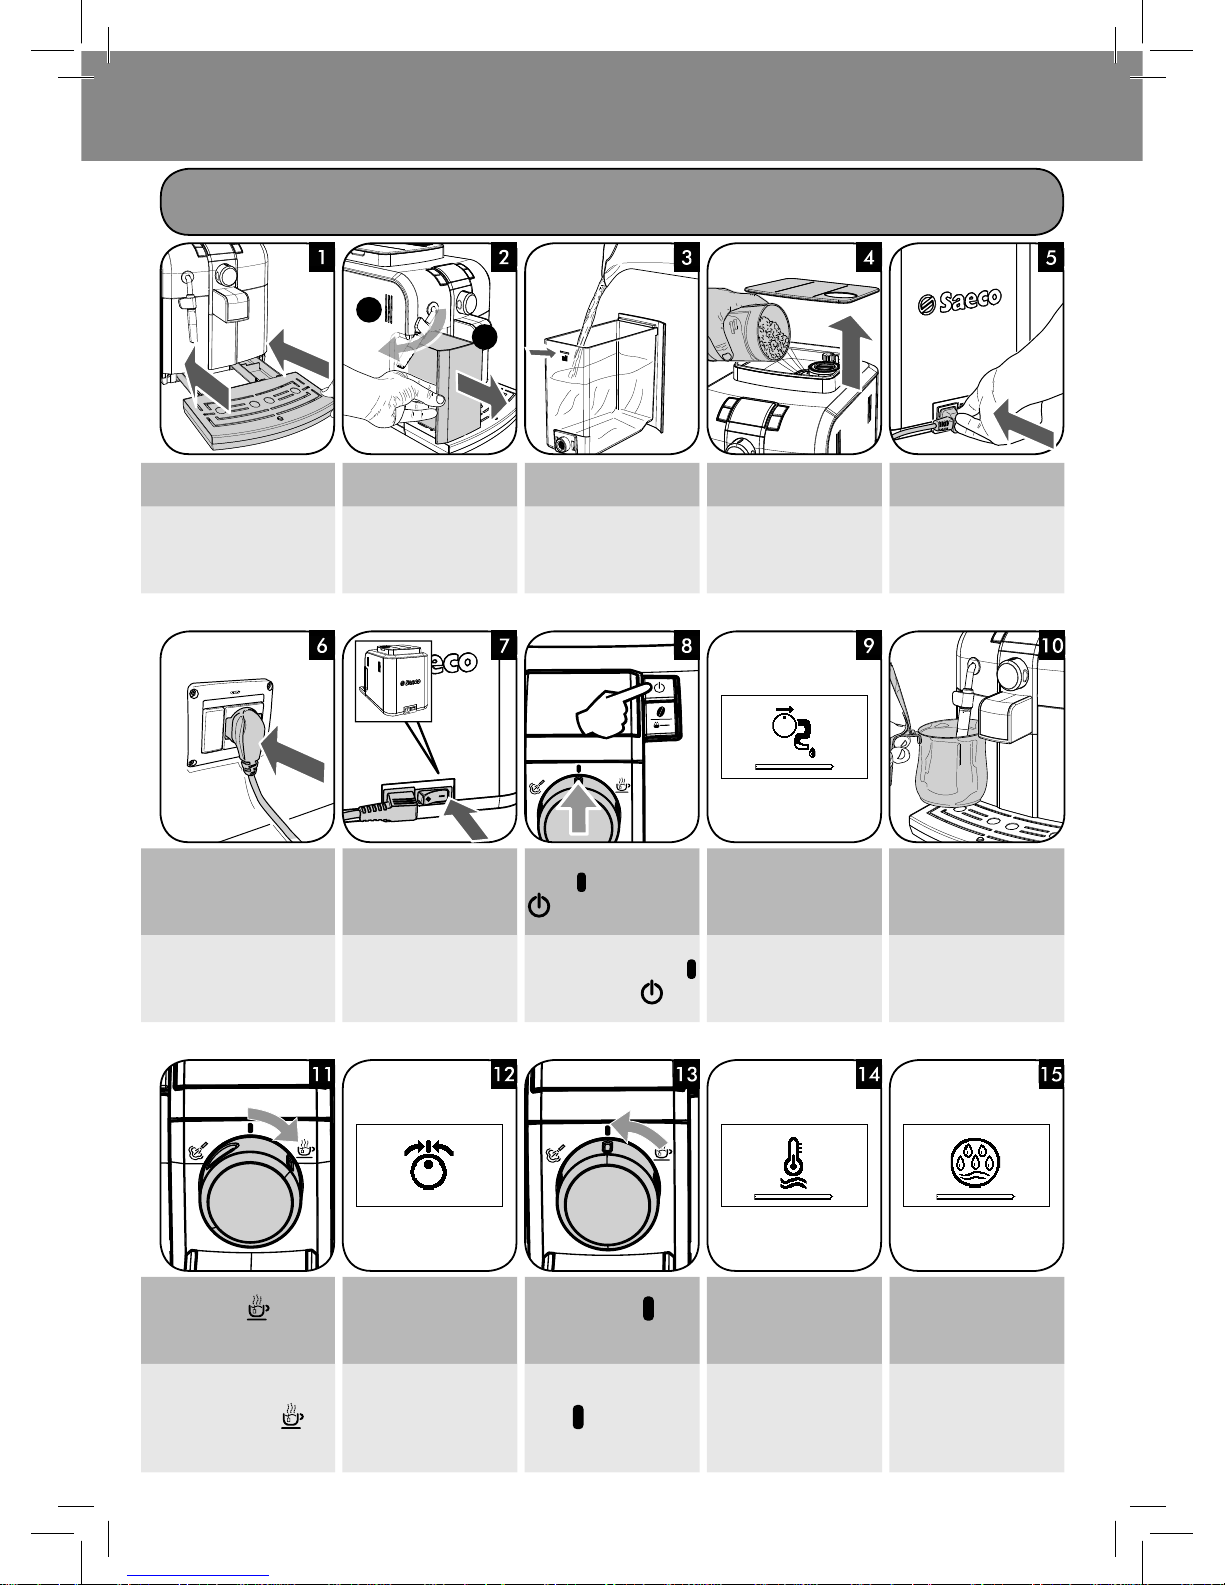
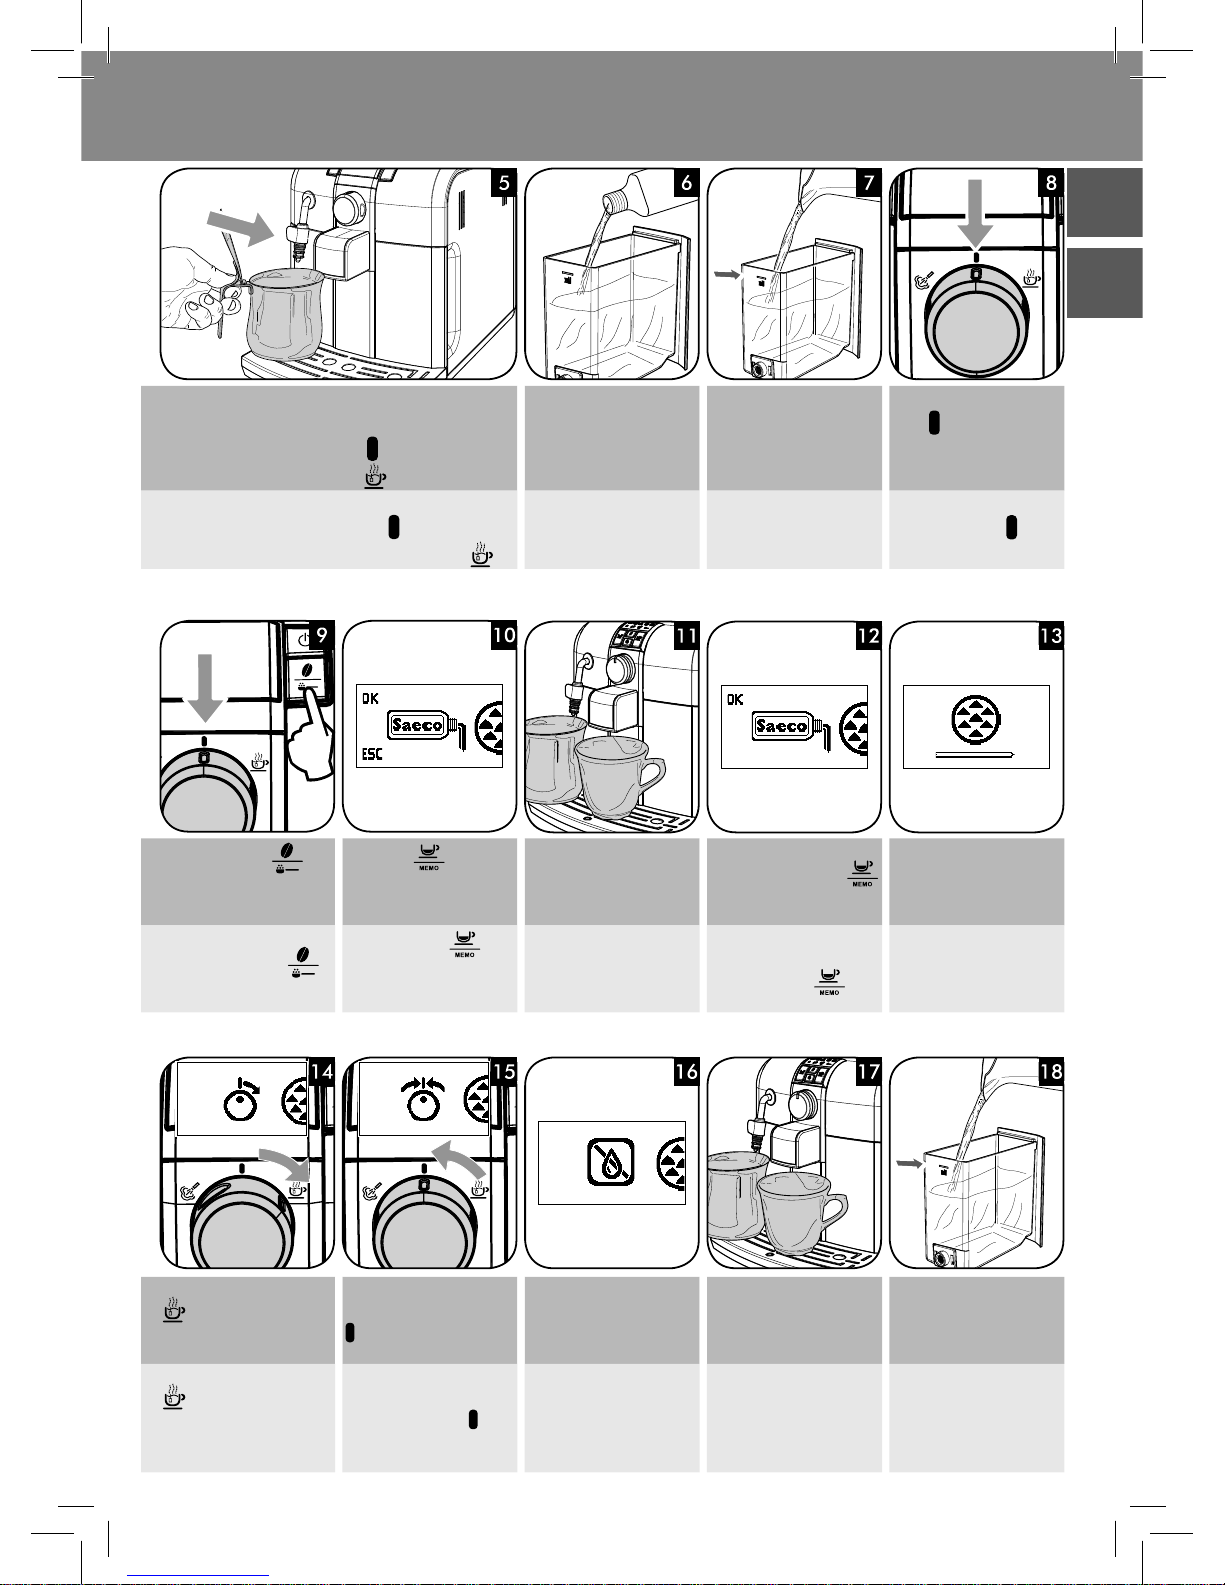
EN
Insert the drip tray with grill
into the machine.
Remove the water tank. Rinse the water tank and re-
ll it with fresh water.
Fill the co ee bean hopper. Insert the plug into the rear
socket of the machine.
ES
Introducir la bandeja de goteo junto con la rejilla en la
máquina.
Extraer el depósito de agua. Enjuagar el depósito y lle-
narlo con agua fresca.
Llenar el contenedor de café
en grano.
Introducir la clavija en la
toma de corriente ubicada
en la parte trasera de la
máquina.
EN
Insert the plug on the other
end of the power cord into a
wall socket.
Switch the power button
to "I".
Make sure the selector dial
is in the
position. Press the
button to turn on the
machine.
The display indicates that
the circuit must be primed.
Place a container under the
Pannarello.
ES
Conectar el enchufe del extremo opuesto del cable de
alimentación a una toma de
corriente de pared.
Poner el interruptor en “I”. Asegurarse de que el se-
lector esté en la posición
. Pulsar el botón para
encender la máquina.
La pantalla indica que es
necesario proceder a la carga del circuito.
Colocar un recipiente bajo el
Pannarello.
EN
Turn the selector dial clockwise to the
position.
The machine starts the automatic priming.
Once the circuit has been
primed, the display shows
this icon.
Turn the selector dial back to
its central position (
).
The display indicates that
the machine is warming up.
The machine performs a circuit rinse cycle.
ES
Girar el selector en el sentido de las agujas del reloj
hasta la posición
. La
máquina procede a la carga
automática.
Una vez concluido el proceso de carga, aparece este
símbolo en la pantalla.
Volver a poner el mando
de selección en la posición
central
.
La pantalla indica el calentamiento de la máquina.
La máquina realiza un enjuague de los circuitos.
FIRST INSTALLATION
PRIMERA INSTALACIÓN
1
2
H2O
MAX
9
www.philips.com/support
Instructions
Instrucciones
EnglishEspañol
EN
After completing the operations, the display will show this
icon. The machine is ready to brew beverages.
ES
Una vez terminadas las operaciones, aparece este símbolo
en la pantalla. La máquina ya está lista para el suministro
de productos.
H2O
MAX
EN
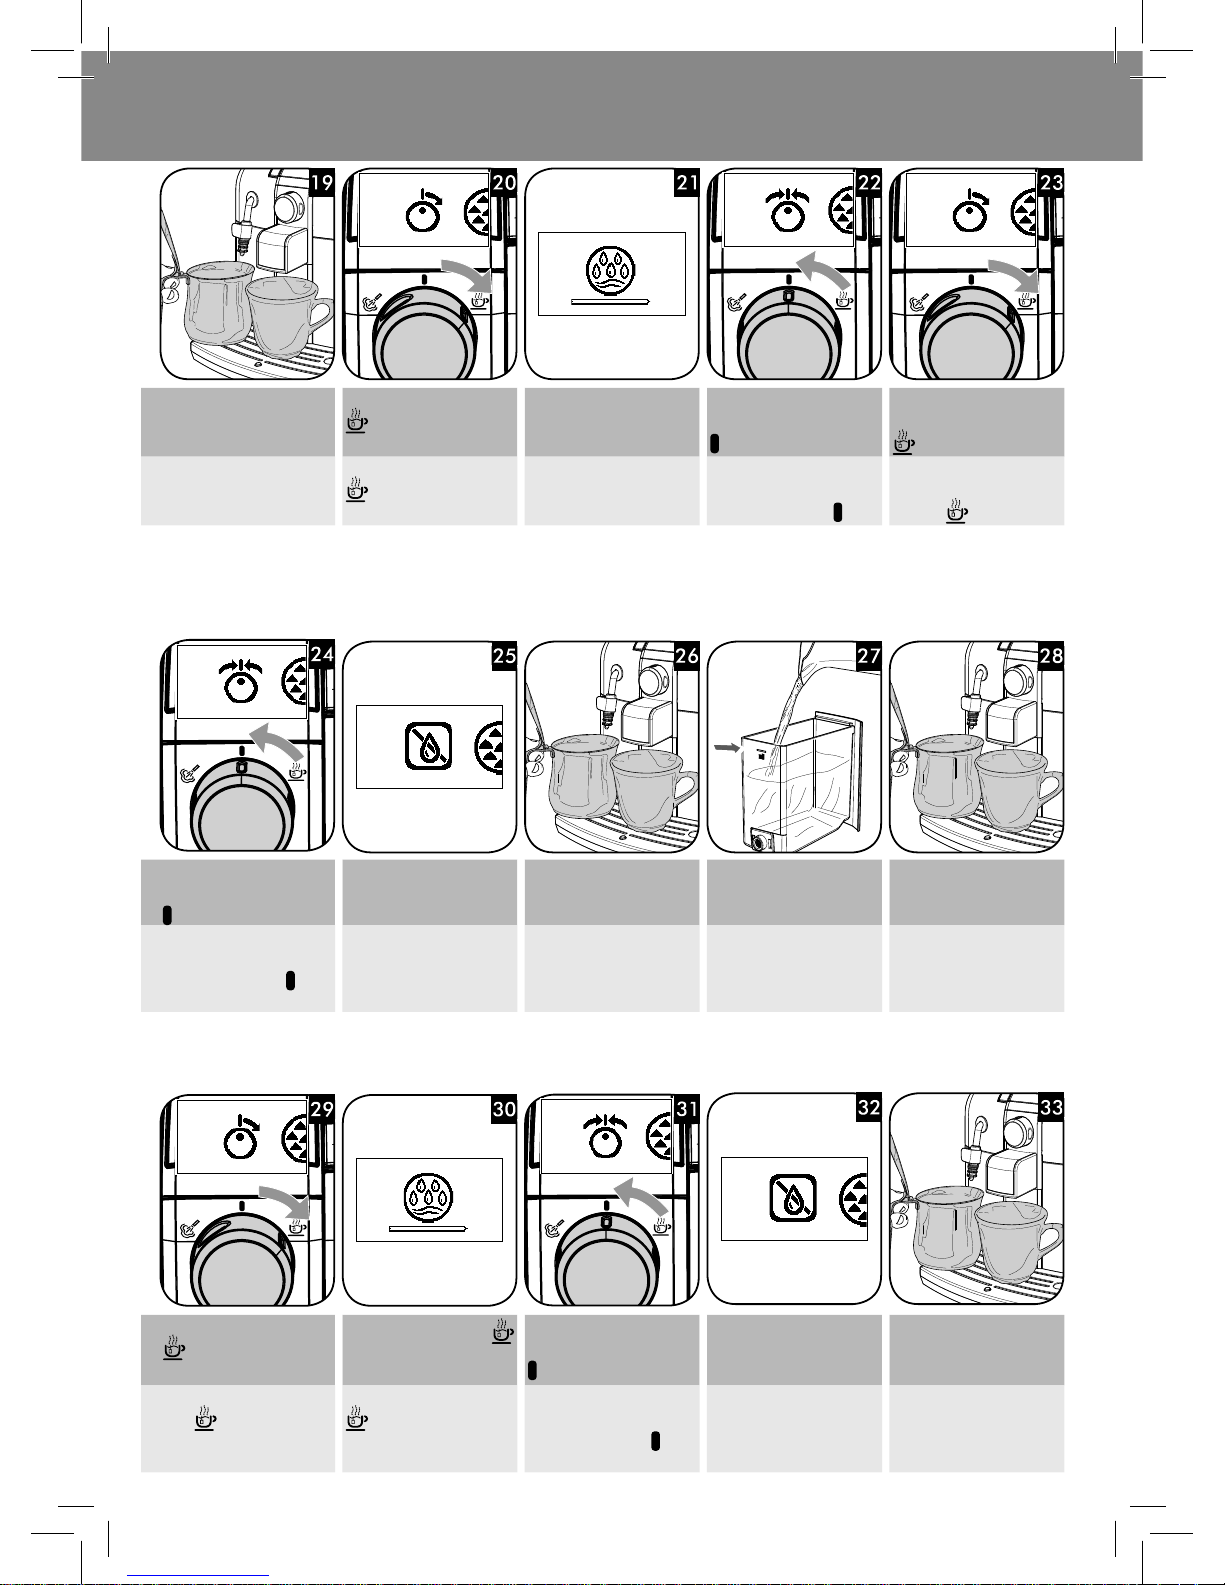
Place a container under the
Pannarello.
Turn the selector dial clockwise to the
position.
Dispense water until the no
water icon is displayed.
Turn the selector dial back to
its central position ( ).
At the end, ll the water tank
again up to the MAX level.
ES
Colocar un recipiente bajo el
Pannarello.
Girar el selector en el sentido de las agujas del reloj
hasta la posición
.
Suministrar agua hasta que
se muestre el aviso de falta
de agua.
Volver a poner el mando
de selección en la posición
central .
A continuación, volver a
llenar el depósito de agua
hasta el nivel MAX.
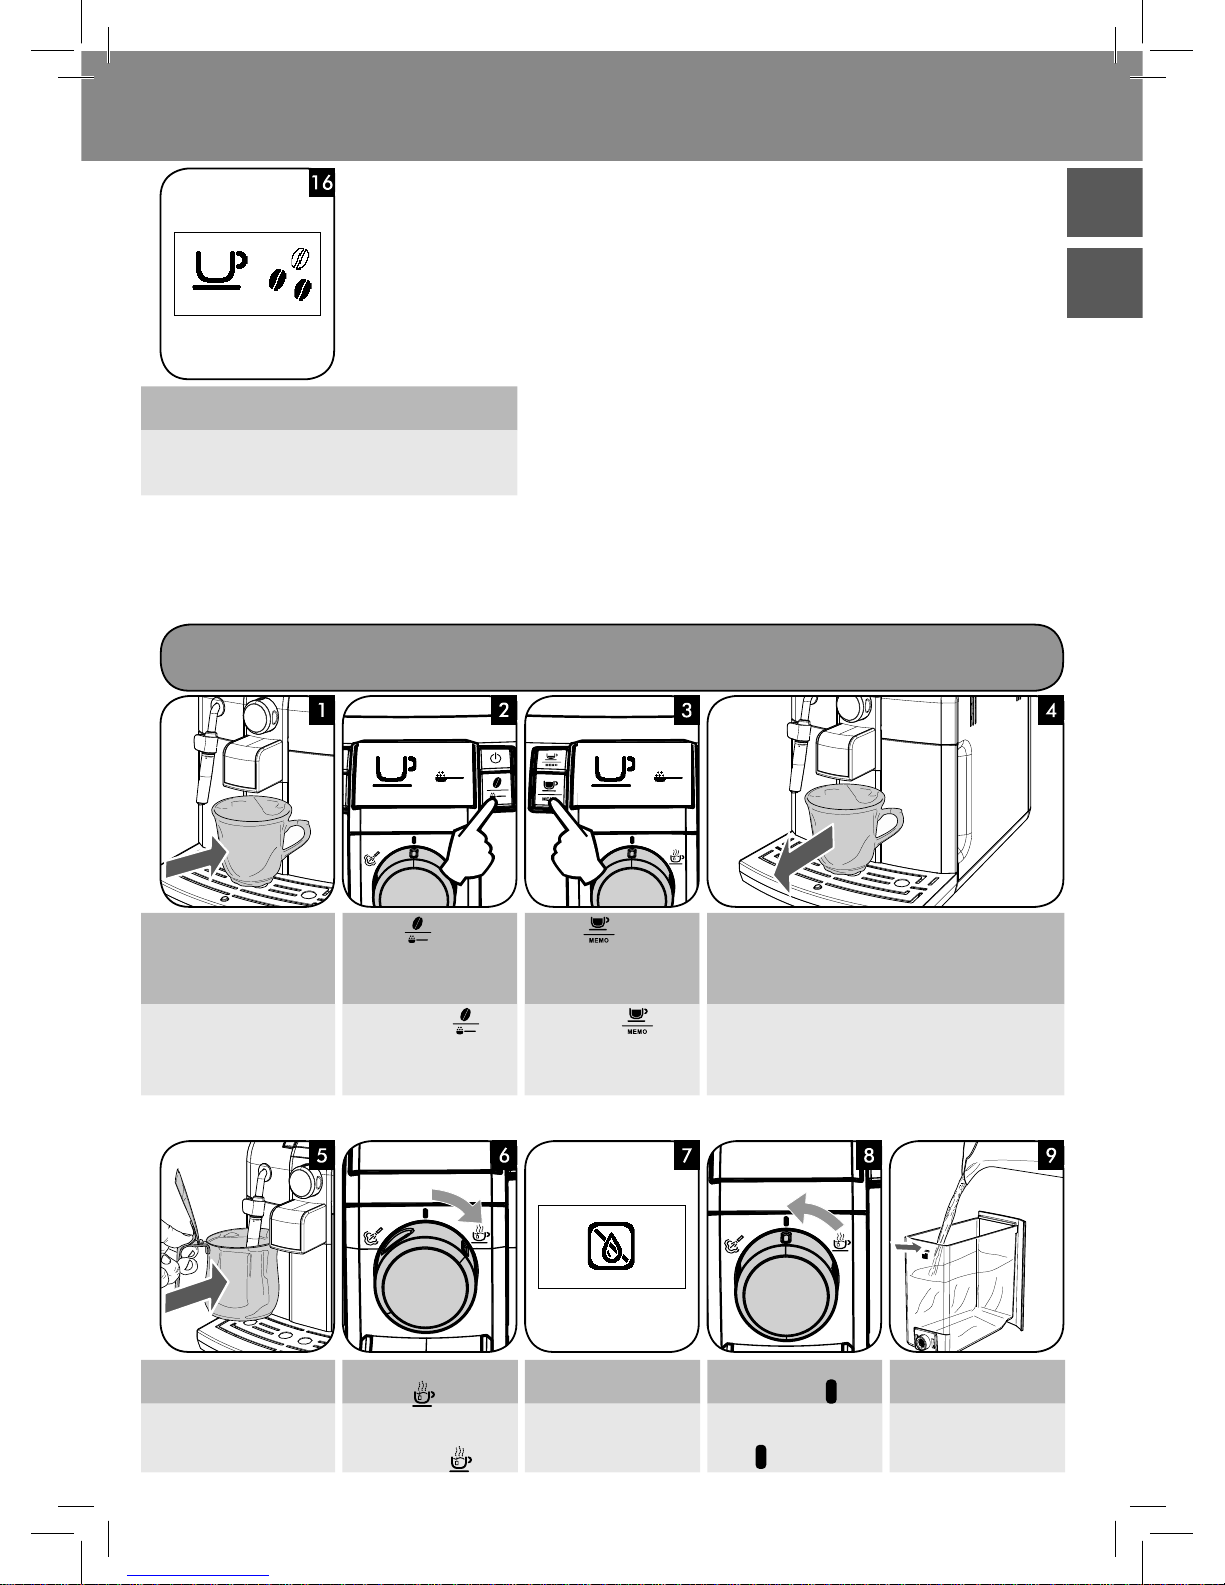
EN
Place a container under the
dispensing spout.
Press the
button to select the pre-ground co ee
function. Do NOT add preground co ee.
Press the
button.
The machine starts dispensing water.
When the dispensing is complete, empty the container.
Repeat the operations from step 1 to step 4 twice, then continue with step 5.
ES
Colocar un recipiente bajo la
salida de café.
Pulsar el botón
para
seleccionar la función de
café premolido. NO añadir
café premolido.
Pulsar el botón
.
La máquina comienza a suministrar agua.
Una vez nalizado el suministro, vaciar el recipiente.
Repetir dos veces las operaciones del punto 1 al 4; a continuación, pasar al punto 5.
MANUAL RINSE CYCLE
CICLO DE ENJUAGUE MANUAL
10
Instructions
Instrucciones
www.philips.com/support
FIRST ESPRESSO
PRIMER CAFÉ EXPRÉS
EN
Adjust the dispensing spout.
Press the
button to
brew an espresso, or...
... press the button to
brew a co ee.
At the end of the process, remove the cup.
ES
Ajustar la salida de café.
Pulsar el botón
para
suministrar un café exprés
o...
... pulsar el botón para
suministrar un café.
Una vez terminado el proceso, retirar la taza.
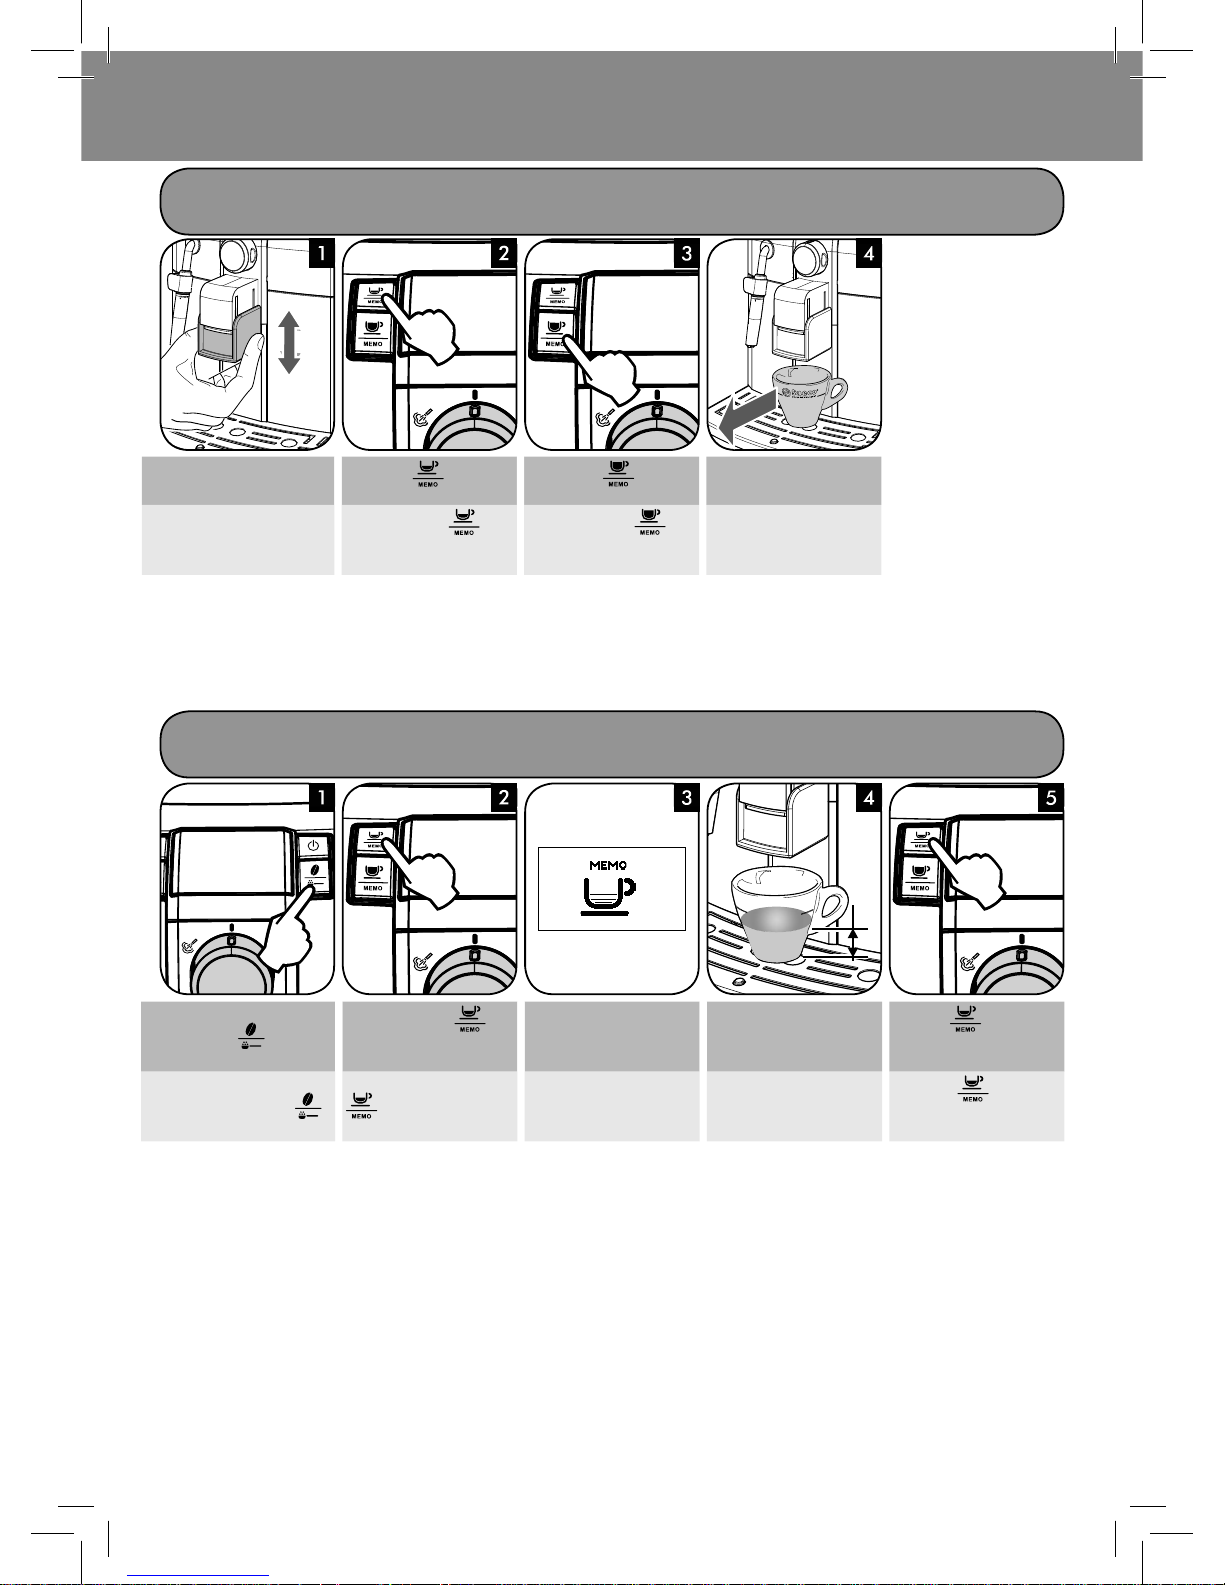
MY FAVORITE ESPRESSO
MI CAFÉ EXPRÉS IDEAL
EN
Select the desired aroma by
pressing the
button.
Press and hold the
but-
ton for more than 5 seconds.
The machine is in the programming mode.
Wait until the desired quantity is reached...
... press to stop the
process.
Stored!
ES
Seleccionar el aroma deseado pulsando el botón
.
Mantener pulsado el botón
durante más de 5 se-
gundos.
La máquina está en fase de
programación.
Esperar a que se alcance la
cantidad deseada...
... pulsar
para interrumpir el proceso.
¡Memorizado!
OK
11
www.philips.com/support
Instructions
Instrucciones
EnglishEspañol
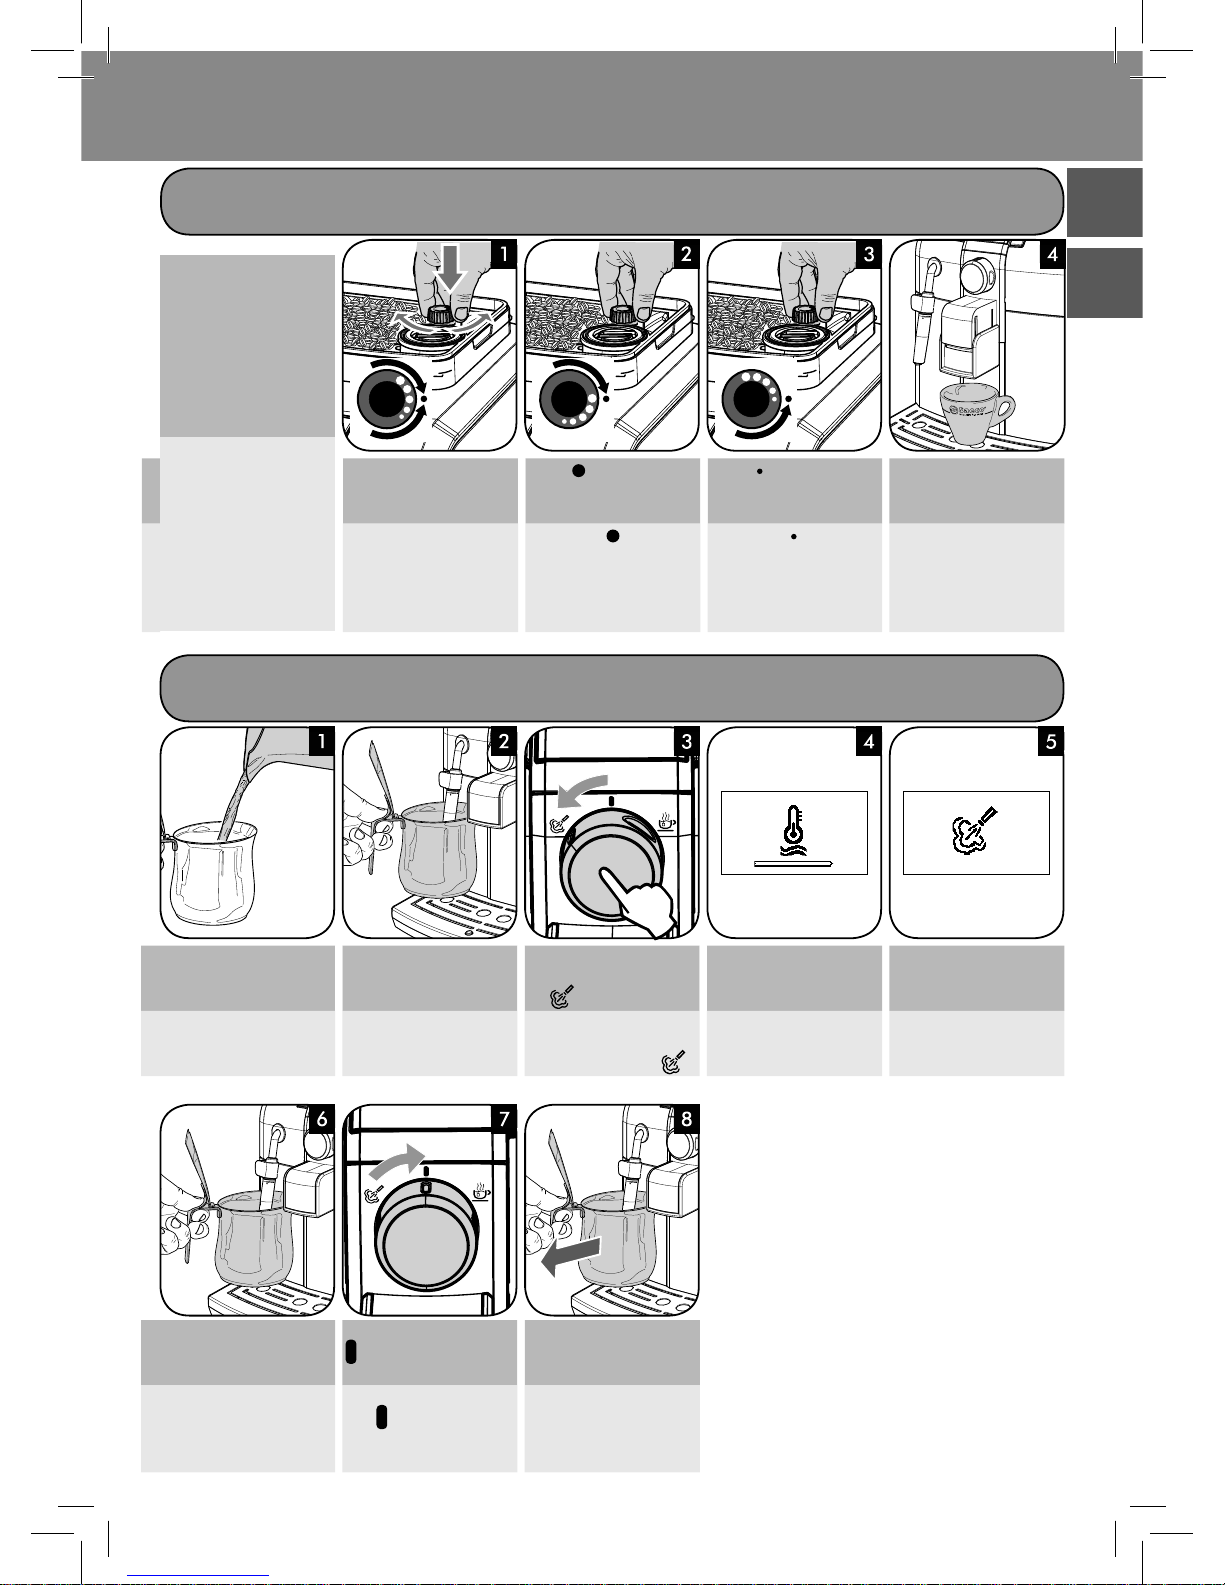
ADJUSTING THE CERAMIC COFFEE GRINDER
REGULACIÓN DEL MOLINILLO DE CAFÉ DE CERÁMICA
EN
Press and turn the grinder
adjustment knob one notch
at a time.
Select ( ). Lighter taste, for
dark roasted co ee blends.
Select ( ). Bolder taste, for
light roasted co ee blends.
Brew 2-3 products to taste the
di erence. If co ee is watery,
change the grinder setting.
ES
Presionar y girar el mando
de regulación del grado de
molido un paso cada vez.
Seleccionar ( ). Sabor más
ligero, para mezclas con torrefacción oscura.
Seleccionar ( ). Sabor más
fuerte, para mezclas con
torrefacción clara.
Suministrar 2-3 productos
para probar la diferencia. Si
el café está acuoso, modi car
la con guración del molinillo
de café.
The grinder adjustment
knob inside the co ee
bean hopper MUST be
turned only when the
ceramic co ee grinder is
working.
El mando de regulación
del grado de molido, ubicado en el interior del
contenedor de café en
grano, DEBE girarse sólo
con el molinillo de café
de cerámica en funcionamiento.
FROTHING MILK
CÓMO MONTAR LECHE
EN
Fill 1/3 of a container with
cold milk.
Immerse the Pannarello in
the milk.
Turn the selector dial counter-clockwise and set it to
the
position.
The display indicates that
the machine is warming up.
When the following icon
is displayed, the machine
starts dispensing steam.
ES
Llenar 1/3 de un recipiente
con leche fría.
Sumergir el Pannarello en
la leche.
Girar el selector en el sentido contrario a las agujas del
reloj hasta la posición
.
La pantalla indica el calentamiento de la máquina.
El suministro dará inicio
cuando en la pantalla se
muestre este símbolo.
EN
Froth the milk by gently
swirling the container and
moving it up and down.
Turn the selector dial to the
position to stop dispens-
ing steam.
Remove the container.
ES
Montar la leche realizando
ligeros movimientos circulares arriba y abajo con el
recipiente.
Girar el selector a la posición
para detener el su-
ministro de vapor.
Retirar el recipiente.

12
Instructions
Instrucciones
www.philips.com/support
HOT WATER
AGUA CALIENTE
EN
Place a container under the
Pannarello.
Turn the selector dial clockwise to the
position.
Dispense the desired quantity of water.
Then, turn the selector dial
and set it back to the position to stop dispensing.
Remove the container.
ES
Colocar un recipiente bajo el
Pannarello.
Girar el selector en el sentido de las agujas del reloj
hasta la posición
.
Suministrar la cantidad de
agua deseada.
Para interrumpir el suministro, girar el selector a la
posición .
Retirar el recipiente.
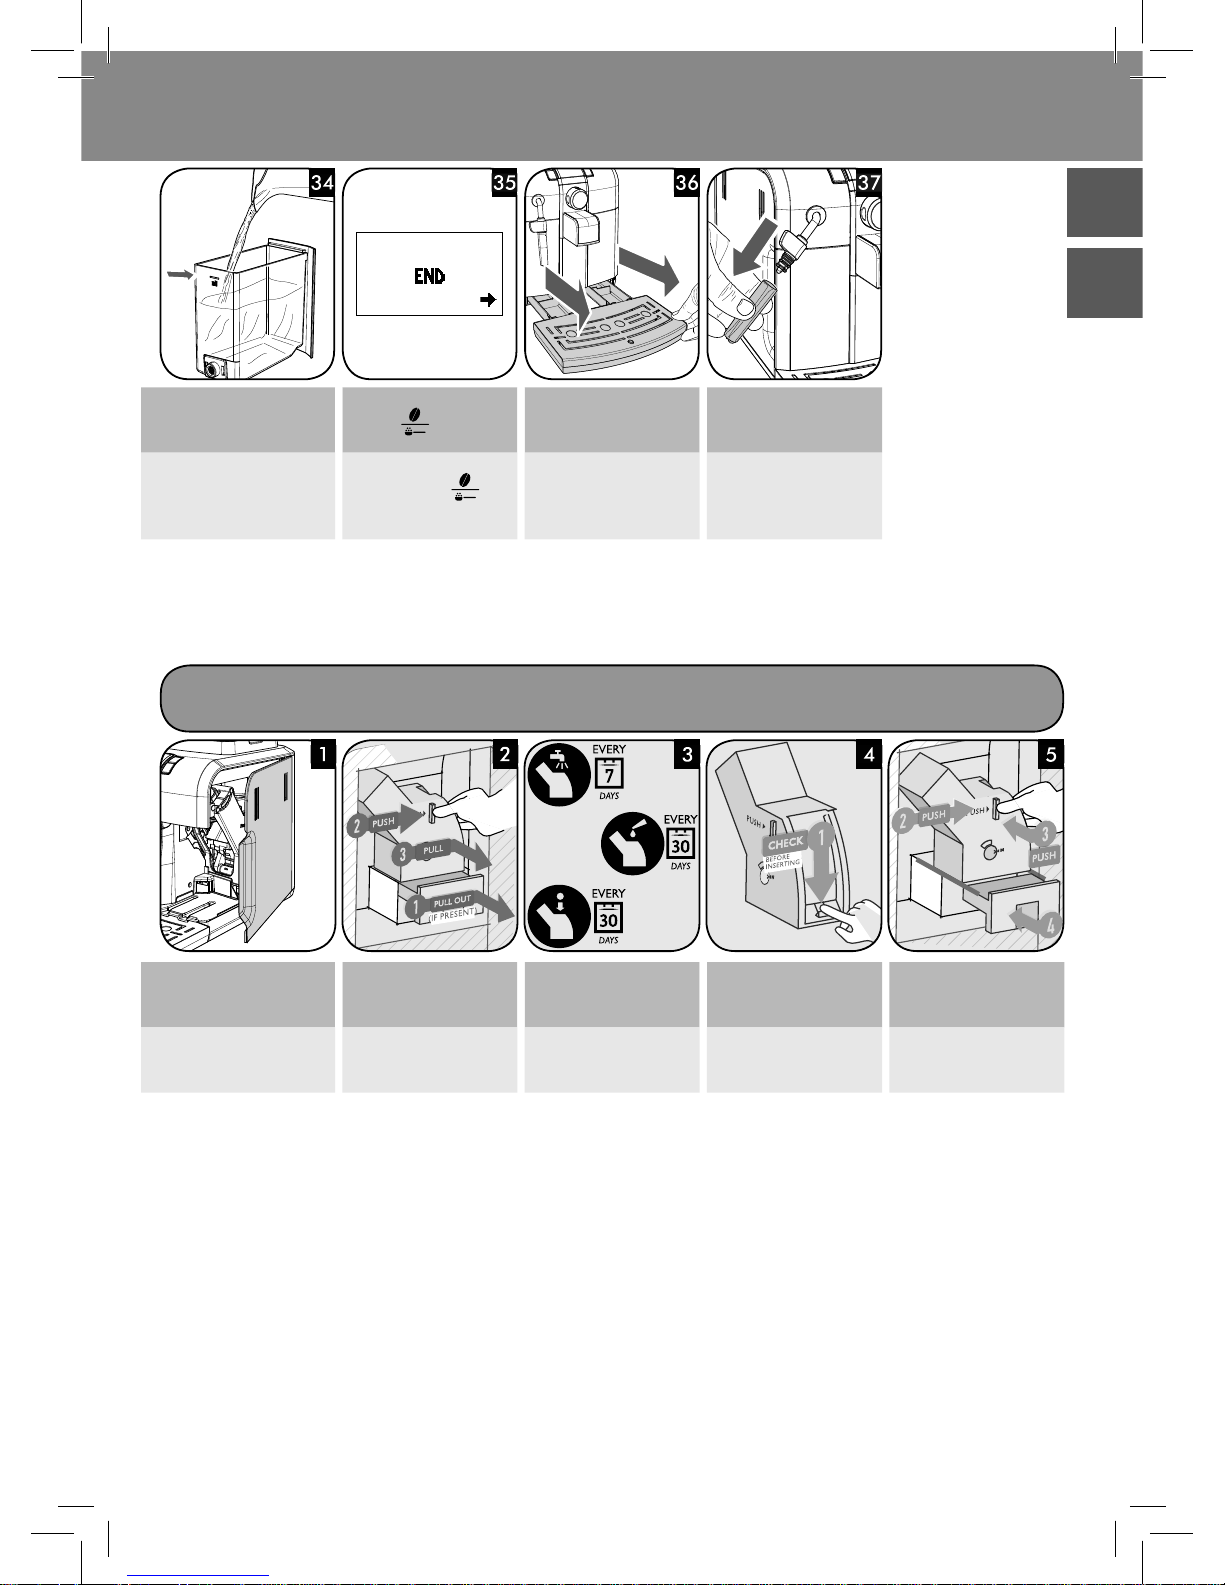
DESCALING - 35 min.
DESCALCIFICACIÓN - 35 min
EN
When the icon is displayed, descaling is needed.
Not doing this will make your appliance stop working properly. In this case the repair is not covered under your warranty.
ES
El símbolo visualizado indica que es necesario proceder a la descalci cación.
Si dicha operación no se lleva a cabo, la máquina dejará de funcionar correctamente. En tal caso, la reparación no
estará cubierta por la garantía.
EN
Empty the drip tray. Remove
the INTENZA+ lter (if installed).
Remove the Pannarello from
the steam/hot water wand.
Temporarily stop the dispensing process in order to
empty the containers.
If the descaling solution and/or water spills out of the dispensing spout:
PAUSE: turn the selector dial to the
position;
START: turn the selector dial to the
position.
ES
Vaciar la bandeja de goteo.
Extraer el ltro INTENZA+
(en su caso).
Quitar el Pannarello del
tubo de vapor/agua caliente.
Se puede interrumpir momentáneamente el suministro para poder vaciar los
recipientes.
Si la solución y/o el agua sale por la salida de café:
PAUSA: llevar el selector a la posición
;
PUESTA EN MARCHA: llevar el selector a la posición
.
13
www.philips.com/support
Instructions
Instrucciones
EnglishEspañol
EN
If the descaling solution and/or water spills out of the steam
wand:
PAUSE: turn the selector dial to the
position;
START: turn the selector dial to the
position.
Pour the descaling solution. Then ll the water tank with
fresh water up to the MAX
level.
Make sure the selector dial is
in the
position
.
ES
Si la solución y/o el agua sale por el tubo de vapor:
PAUSA: llevar el selector a la posición
;
PUESTA EN MARCHA: llevar el selector a la posición
.
Verter la solución descalci c a n t e .
Rellenar el depósito con
agua fresca hasta el nivel
MAX.
Comprobar que el selector
esté en la posición
.
EN
Press and hold the button for 5 seconds.
Press the
button to
con rm the activation of the
descaling cycle.
Place an empty container
under the steam wand and
another one under the dispensing spout.
After adding the descaling
solution, press the
button to con rm.
The machine starts dispensing directly from the dispensing spout.
ES
Mantener pulsado durante
5 segundos el botón
.
Pulsar el botón
para
con rmar la activación del
ciclo de descalci cación.
Colocar un recipiente vacío
bajo el tubo de vapor y otro
bajo la salida de café.
Sólo tras haber añadido el
producto descalci cante,
pulsar el botón
para
con rmar.
La máquina inicia el suministro directamente a través
de la salida de café.
H2O
MAX
EN
Turn the selector dial to the
position to start dispensing the descaling solution from the steam wand.
When this icon is displayed,
turn the selector dial back to
position.
The icon indicates that the
tank must be rinsed and
lled.
Empty the used containers. Rinse the water tank and ll
it with fresh water up to the
MAX level.
ES
Girar el selector a la posición
para dar inicio al suministro del producto descalci cante a través del tubo
de vapor.
Cuando aparezca este símbolo, volver a poner el selector en la posición
.
Este símbolo indica que se
debe enjuagar y llenar el
depósito.
Vaciar los recipientes utilizados.
Enjuagar el depósito y llenarlo con agua fresca hasta
el nivel MAX.
H2O
MAX
14
Instructions
Instrucciones
www.philips.com/support
EN
When this icon is displayed,
turn the selector dial back to
position.
The icon indicates that the
tank must be rinsed and
lled.
Empty the containers used to
collect the liquid dispensed
by the machine.
Rinse the water tank and ll
it with fresh water up to the
MAX level.
After inserting the tank, insert the containers into the
machine.
ES
Cuando aparezca este símbolo, volver a poner el selector en la posición
.
Este símbolo indica que se
debe enjuagar y llenar el
depósito.
Vaciar los recipientes utilizados para recoger el
líquido expulsado por la
máquina.
Enjuagar el depósito y llenarlo con agua fresca hasta
el nivel MAX.
Tras haber introducir el depósito, colocar los recipientes en la máquina.
EN
Turn the selector dial to the
position to start dispensing.
Turn the selector dial to
to start the second rinse cycle.
When this icon is displayed,
turn the selector dial back to
position.
The icon indicates that the
tank must be rinsed and
lled.
Empty the containers used to
collect the liquid dispensed
by the machine.
ES
Girar el selector a la posición
para dar inicio al
suministro.
Girar el selector a la posición
para dar inicio al 2° en-
juague.
Cuando aparezca este símbolo, volver a poner el selector en la posición
.
Este símbolo indica que se
debe enjuagar y llenar el
depósito.
Vaciar los recipientes utilizados para recoger el
líquido expulsado por la
máquina.
H2O
MAX
EN
After inserting the tank, insert the containers into the
machine.
Turn the selector dial to the
position to start dis-
pensing.
The machine performs a fast
rinse cycle.
When this icon is displayed,
turn the selector dial back to
position.
When this icon is displayed,
turn the selector dial to the
position.
ES
Tras haber introducir el depósito, colocar los recipientes en la máquina.
Girar el selector a la posición
para dar inicio al sumi-
nistro.
La máquina realiza un ciclo
de enjuague rápido.
Cuando aparezca este símbolo, volver a poner el selector en la posición
.
Cuando aparezca este símbolo, girar el selector a la
posición .
15
www.philips.com/support
Instructions
Instrucciones
EnglishEspañol
BREW GROUP CLEANING
LIMPIEZA DEL GRUPO DE CAFÉ
EN
Remove the co ee grounds
drawer and open the service
door.
Remove the co ee residues
drawer and then the brew
group.
Carry out maintenance to the
brew group.
Check the alignment. Push and then insert the
brew group and the co ee
grounds drawer.
ES
Sacar el cajón de recogida
de posos y abrir la puerta de
servicio.
Sacar el cajón de recogida
de café y el grupo de café.
Realizar el mantenimiento
del grupo de café.
Comprobar la alineación. Presionar e introducir el
grupo de café y el cajón de
recogida de posos.
EN
Rinse the water tank and ll
it with fresh water up to the
MAX level.
Insert the water tank.
Press the
button to quit
the descaling cycle.
Empty the drip tray. Insert the Pannarello into the
steam/hot water wand.
ES
Enjuagar el depósito y llenarlo con agua fresca hasta
el nivel MAX.
Introducir el depósito.
Pulsar el botón
para
salir del ciclo de descalci cación.
Vaciar la bandeja de goteo. Introducir el Pannarello en
el tubo de vapor/agua caliente.
H2O
MAX
16
Instructions
Instrucciones
www.philips.com/support
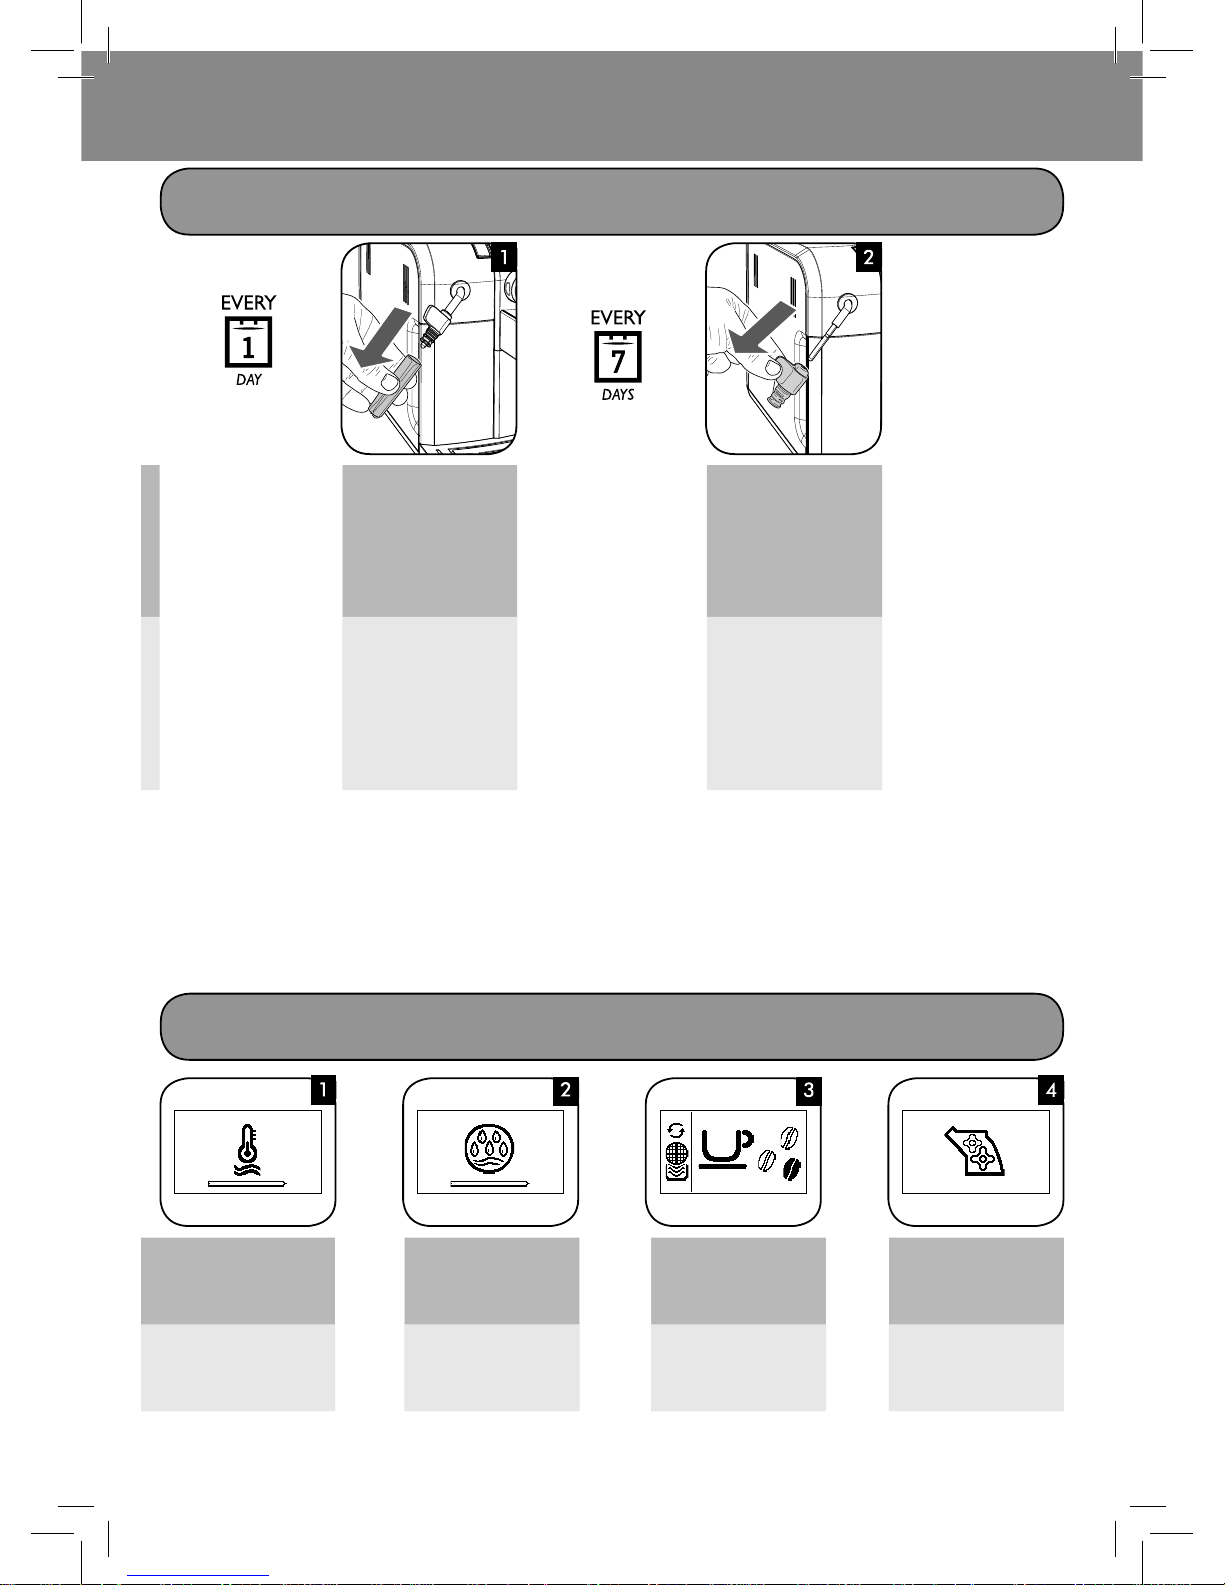
STEAM WAND/PANNARELLO CLEANING
LIMPIEZA DEL TUBO DE VAPOR/PANNARELLO
EN
Daily
Remove the external part of
the Pannarello and wash it
with fresh water.
Weekly
Remove the upper part of the
Pannarello from the steam/
hot water wand. Wash it with
fresh water. Clean the steam/
hot water wand with a wet
cloth. Reassemble all the parts
of the Pannarello.
ES
Diaria
Quitar la pieza externa del
Pannarello y lavarla con
agua fresca.
Semanal
Extraer la pieza superior del
Pannarello del tubo de vapor/agua caliente. Lavarla
con agua fresca. Limpiar el
tubo de vapor/agua caliente
con un paño húmedo. Volver
a montar todos los componentes del Pannarello.
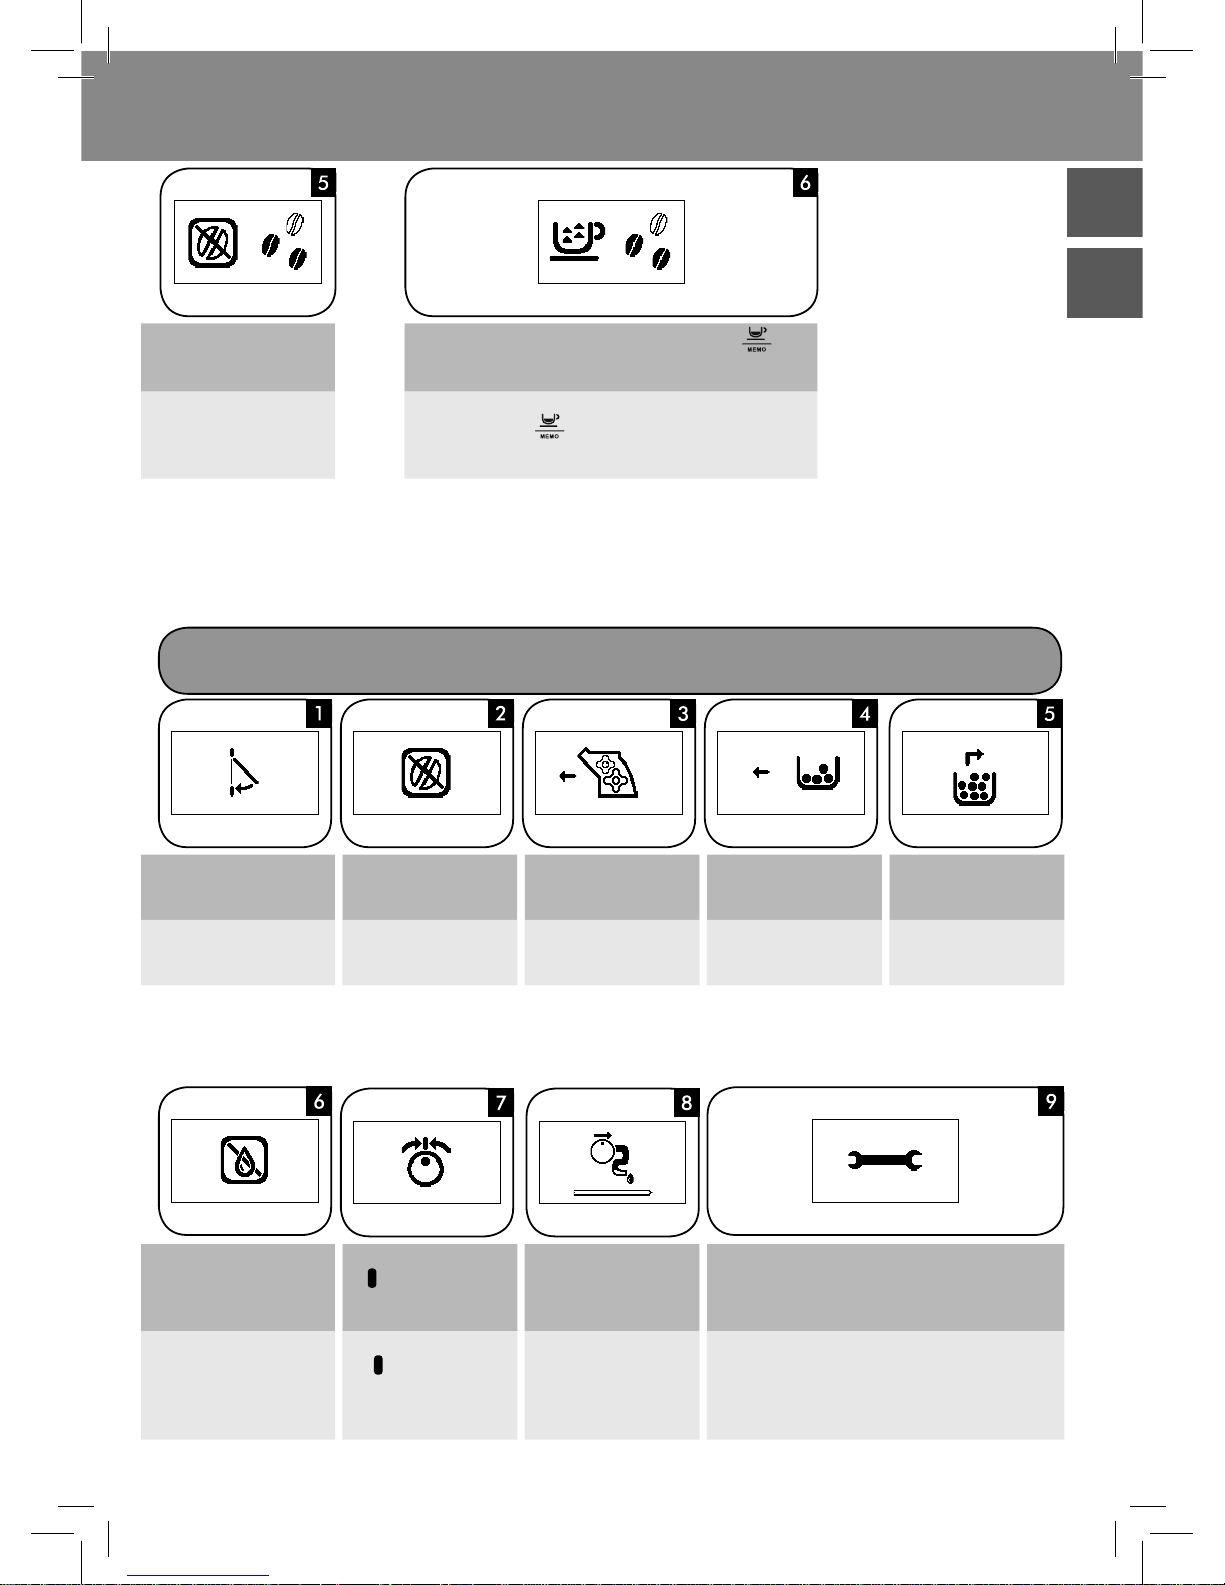
WARNING SIGNALS YELLOW COLOUR
SEÑALES DE AVISO AMARILLO
EN
The machine is warming up
to brew co ee and dispense
hot water and steam.
The machine is performing
the rinse cycle. Wait until
the machine stops the operation.
The machine needs the
“INTENZA+” lter to be replaced.
The brew group is being reset
due to machine reset.
ES
Máquina en fase de calentamiento para el suministro de café, agua caliente y
vapor.
La máquina está realizando
el ciclo de enjuague. Esperar
a que la máquina termine la
operación.
La máquina indica que es
necesario sustituir el ltro
“INTENZA+”.
Grupo de café en fase de
restablecimiento tras reset
de la máquina.
17
www.philips.com/support
Instructions
Instrucciones
EnglishEspañol
EN
Re ll the co ee bean hopper and restart the brewing
cycle.
When this icon is displayed, descaling is needed. Press the
button
to enter the descaling menu and refer to the relevant chapter.
ES
Llenar el contenedor de café
en grano y reiniciar el ciclo
de suministro.
Si se muestra este símbolo, es necesario proceder a la descalci cación. Pulsar el botón
para acceder al menú de descalci cación
y consultar el capítulo correspondiente.
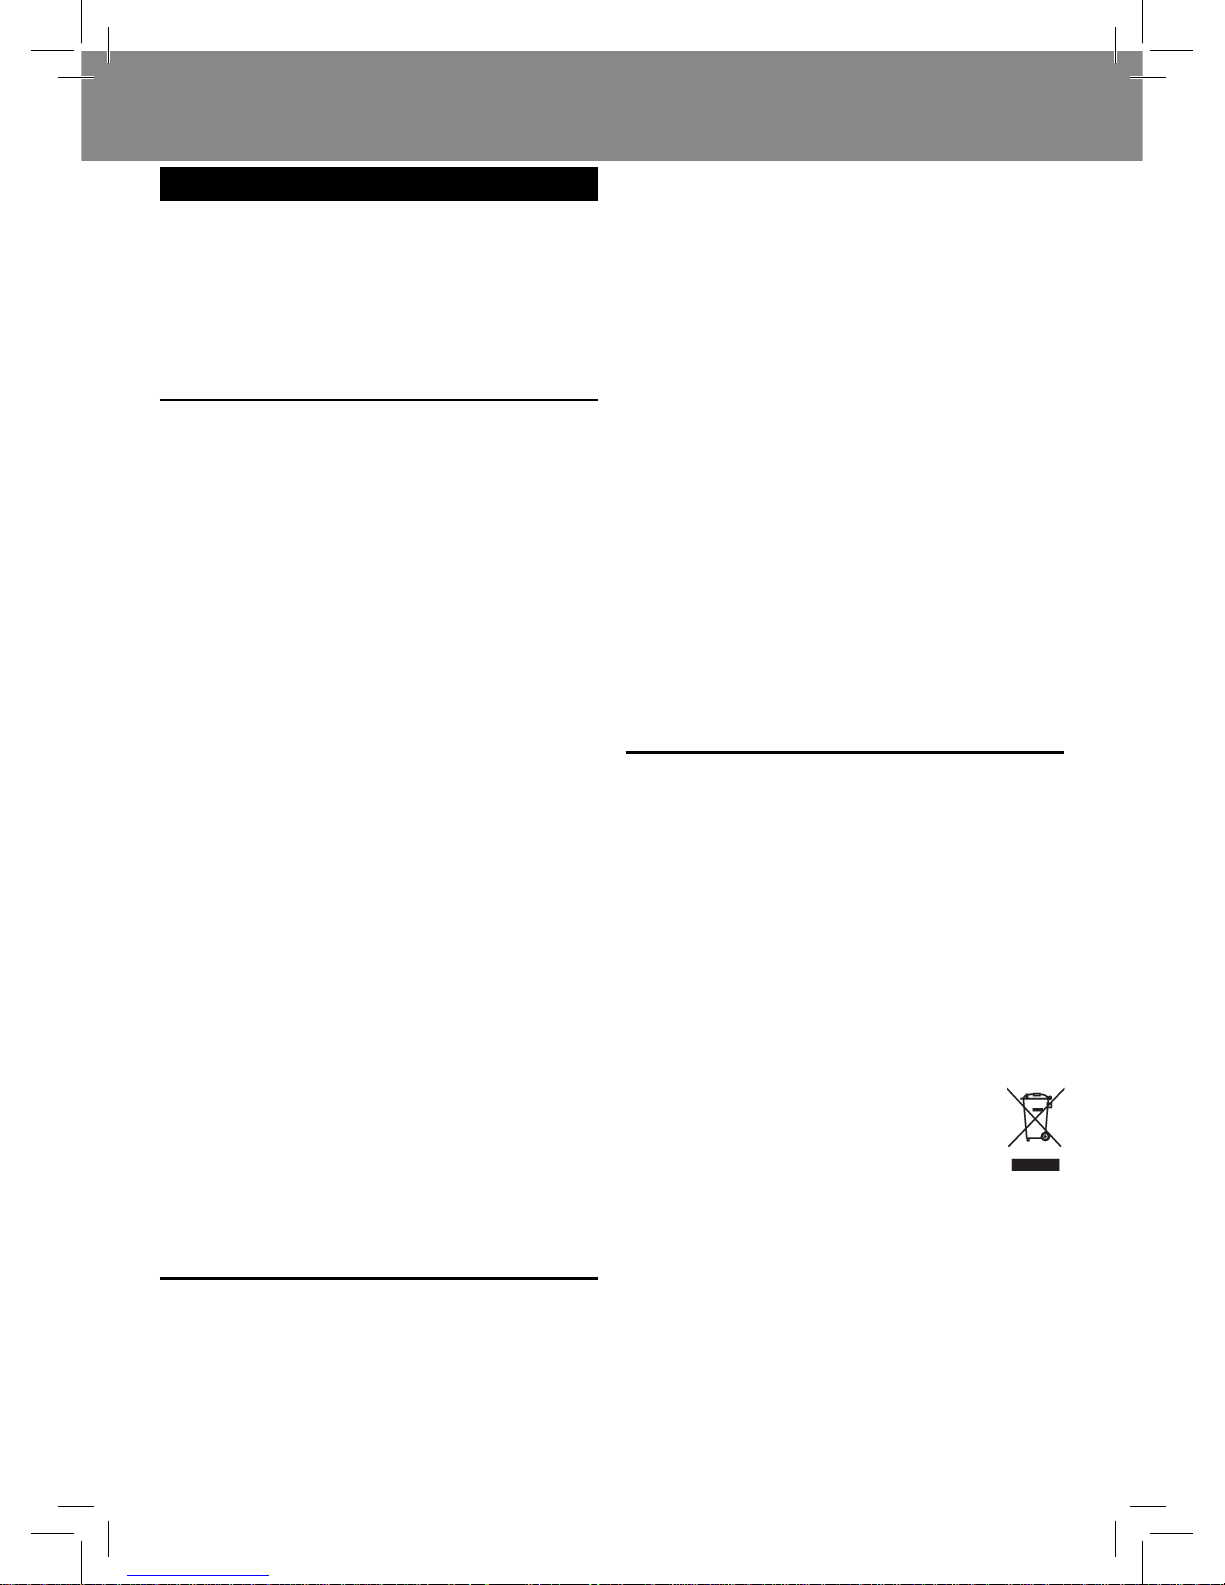
WARNING SIGNALS RED COLOUR
SEÑALES DE ALARMA ROJO
EN
Close the service door. Fill the co ee bean hopper
with co ee beans.
The brew group must be inserted into the machine.
Insert the co ee grounds
drawer.
Empty the co ee grounds
drawer and the co ee residues drawer.
ES
Cerrar la puerta de servicio. Llenar el contenedor de café
con café en grano.
El grupo de café debe estar
introducido en la máquina.
Introducir el cajón de recogida de posos.
Vaciar el cajón de recogida
de posos y el cajón de recogida de café.
EN
Fill the water tank. Turn the selector dial back to
the
position.
Problems with the water
circuit.
Turn o the machine. After 30 seconds, turn it back on. Repeat the procedure 2 or 3 times.
If the machine does not start, contact the Philips SAECO hotline (contact details in the warranty booklet).
ES
Llenar el depósito de agua. Llevar el selector a la posi-
ción
.
Problemas en el circuito
hídrico.
Apagar la máquina. Volver a encenderla tras 30 segundos.
Repetir el procedimiento 2 o 3 veces.
Si la máquina no se enciende, contactar con la línea de
atención al cliente de SAECO (números de contacto en el
libro de garantía).
18
Sicherheitshinweise
Prescriptions de sécurité
www.philips.com/support
DE - Sicherheitshinweise
Die Maschine ist mit Sicherheitsvorrichtungen ausgestattet. Dennoch sollten die in der vorliegenden Bedienungsanleitung beschriebenen Sicherheitshinweise aufmerksam gelesen werden, um eventuell Personen- und
Sachschäden zu vermeiden.
Dieses Handbuch sollte für eventuelle spätere Konsultationen aufbewahrt
werden.
Achtung
• D ie Maschine an einer geeigneten Wandsteckdose anschließen, deren
Hauptspannung den technischen Daten des Geräts entspricht.
• Ein Herabhängen des Netzkabels vom Tisch oder der Theke oder die
Au age desselben auf heißen Flächen sollte vermieden werden.
• Die Maschine, die Steckdose oder das Netzkabel dürfen keinesfalls in
Wasser getaucht werden: Gefahr von Stromschlägen!
• Den Heißwasserstrahl keinesfalls auf Körperteile richten: Verbrühungsgefahr!
• Heiße Ober ächen sollten nicht berührt werden. Die Gri e und Kurbeln benutzen.
• Den Stecker von der Steckdose abziehen:
- wenn Störungen auftreten;
- wenn die Maschine für einen längeren Zeitraum nicht benutzt
wird;
- bevor die Maschine gereinigt wird.
Am Stecker, und nicht am Netzkabel ziehen. Den Stecker nicht mit
nassen Händen berühren.
• Die Maschine nicht benutzen, wenn der Stecker, das Netzkabel oder
die Maschine selbst beschädigt sind.
• Die Maschine oder das Netzkabel dürfen keinesfalls verändert werden. Alle Reparaturen müssen durch ein von Philips autorisiertes Kundendienstzentrum ausgeführt werden, um jede Gefahr zu vermeiden.
• Die Maschine ist nicht dazu bestimmt, von Personen (einschließlich
Kindern) mit eingeschränkten körperlichen oder geistigen Fähigkeiten oder einer Beeinträchtigung der Sinnesorgane und/oder von
Personen ohne ausreichende Erfahrung oder Kompetenz verwendet
zu werden, es sei denn, sie werden von einer Person überwacht, die
für ihre Sicherheit verantwortlich ist oder sie werden im Gebrauch der
Maschine geschult.
• Kinder müssen beaufsichtigt werden, um sicherzustellen, dass diese
nicht mit dem Gerät spielen.
• Keinesfalls die Finger oder andere Gegenstände in das Keramikmahlwerk einführen.
Hinweise
• Die Maschine ist ausschließlich für die Verwendung im Haushalt
bestimmt und eignet sich nicht für den Einsatz in Umgebungen wie
Kantinen oder Küchenbereichen von Geschäften, Büros, Bauernhöfen
oder anderen Arbeitsbereichen.
• Die Maschine stets auf einer achen und stabilen Fläche aufstellen.
• Die Maschine nicht auf heißen Flächen, in der Nähe von heißen Öfen,
Heizgeräten oder ähnlichen Wärmequellen abstellen.
• In den Behälter dürfen ausschließlich Ka eebohnen eingefüllt werden. Pulverka ee, Instantka ee oder andere Gegenstände können
Schäden an der Maschine verursachen, wenn sie in den Ka eebohnenbehälter eingefüllt werden.
• Bevor Teile eingebaut oder herausgenommen werden, und bevor die
Reinigung vorgenommen wird, sollte abgewartet werden, bis die Maschine abkühlt.
• Keinesfalls heißes oder kochendes Wasser in den Tank füllen. Ausschließlich kaltes Wasser verwenden.
• Für die Reinigung sollten keine Scheuerpulver oder aggressive Reinigungsmittel verwendet werden. Für die Reinigung des Geräts ist ein
weiches, leicht mit Wasser getränktes Tuch ausreichend.
• Die Maschine sollte regelmäßig entkalkt werden. Die Maschine zeigt
an, wann die Entkalkung erforderlich ist. Wird dieser Vorgang nicht
ausgeführt, so treten Betriebsstörungen auf Ihrem Gerät auf. In diesem Fall wird die Reparatur nicht durch die Garantie gedeckt!
• Die Maschine darf keinen Temperaturen unter 0°C oder 32°F ausgesetzt werden. Das im Heizsystem verbliebene Restwasser könnte gefrieren und die Maschine beschädigen.
• Wird die Maschine für einen längeren Zeitraum nicht benutzt, so darf
kein Wasser im Wassertank gelassen werden. Das Wasser könnte verunreinigt werden. Bei jeder Verwendung der Maschine ist frisches
Wasser zu benutzen.
Entsorgung
- Die Verpackungsmaterialien können recycelt werden.
- Gerät: Den Stecker von der Steckdose abziehen und das Stromkabel zerschneiden.
- Das Gerät und das Netzkabel bei einem Kundendienstzentrum
oder einer ö entlichen Einrichtung für die Abfallentsorgung abgeben.
Gemäß Art. 13 der italienischen Gesetzesverordnung Nr. 151 vom 25. Juli
2005 “Umsetzung der Richtlinien 2005/95/EG, 2002/96/EG und 2003/108/
EG, hinsichtlich der Verringerung des Einsatzes von Gefahrensto en in elektrischen und elektronischen Geräten sowie zur Abfallentsorgung”.
Dieses Produkt entspricht den Vorgaben der Europäischen Richtlinie
2002/96/EG.
Das auf dem Produkt oder auf seiner Verpackung abgebildete Symbol
weist darauf hin, dass das Produkt nicht als normaler Hausmüll behandelt werden darf, sondern an einer zuständigen Sammelstelle abgegeben werden muss,
damit die elektrischen und elektronischen Bestandteile recycelt werden können.
Durch Ihren Beitrag zur korrekten Entsorgung dieses Produkts schützen Sie
die Umwelt und die Gesundheit Ihrer Mitmenschen vor negativen Folgen,
die durch eine falsche Entsorgung des Produktes am Ende seines Betriebslebens entstehen können. Weitere Informationen zum Recycling des Produktes erhalten Sie von Ihrer zuständigen Gemeinde, der Müllabfuhr oder dem
Geschäft, in dem Sie das Produkt gekauft haben.
 Loading...