

Philips Saeco Royal HD8838 Service Manual

All parts of this document are the property of Saeco International Group.
All rights reserved. This document and all the information herein is provided without liability deriving from any
errors or omissions. Furthermore, no part may be reproduced, used or collected with the exception of that
authorised in writing or in accordance with a contractual agreement.
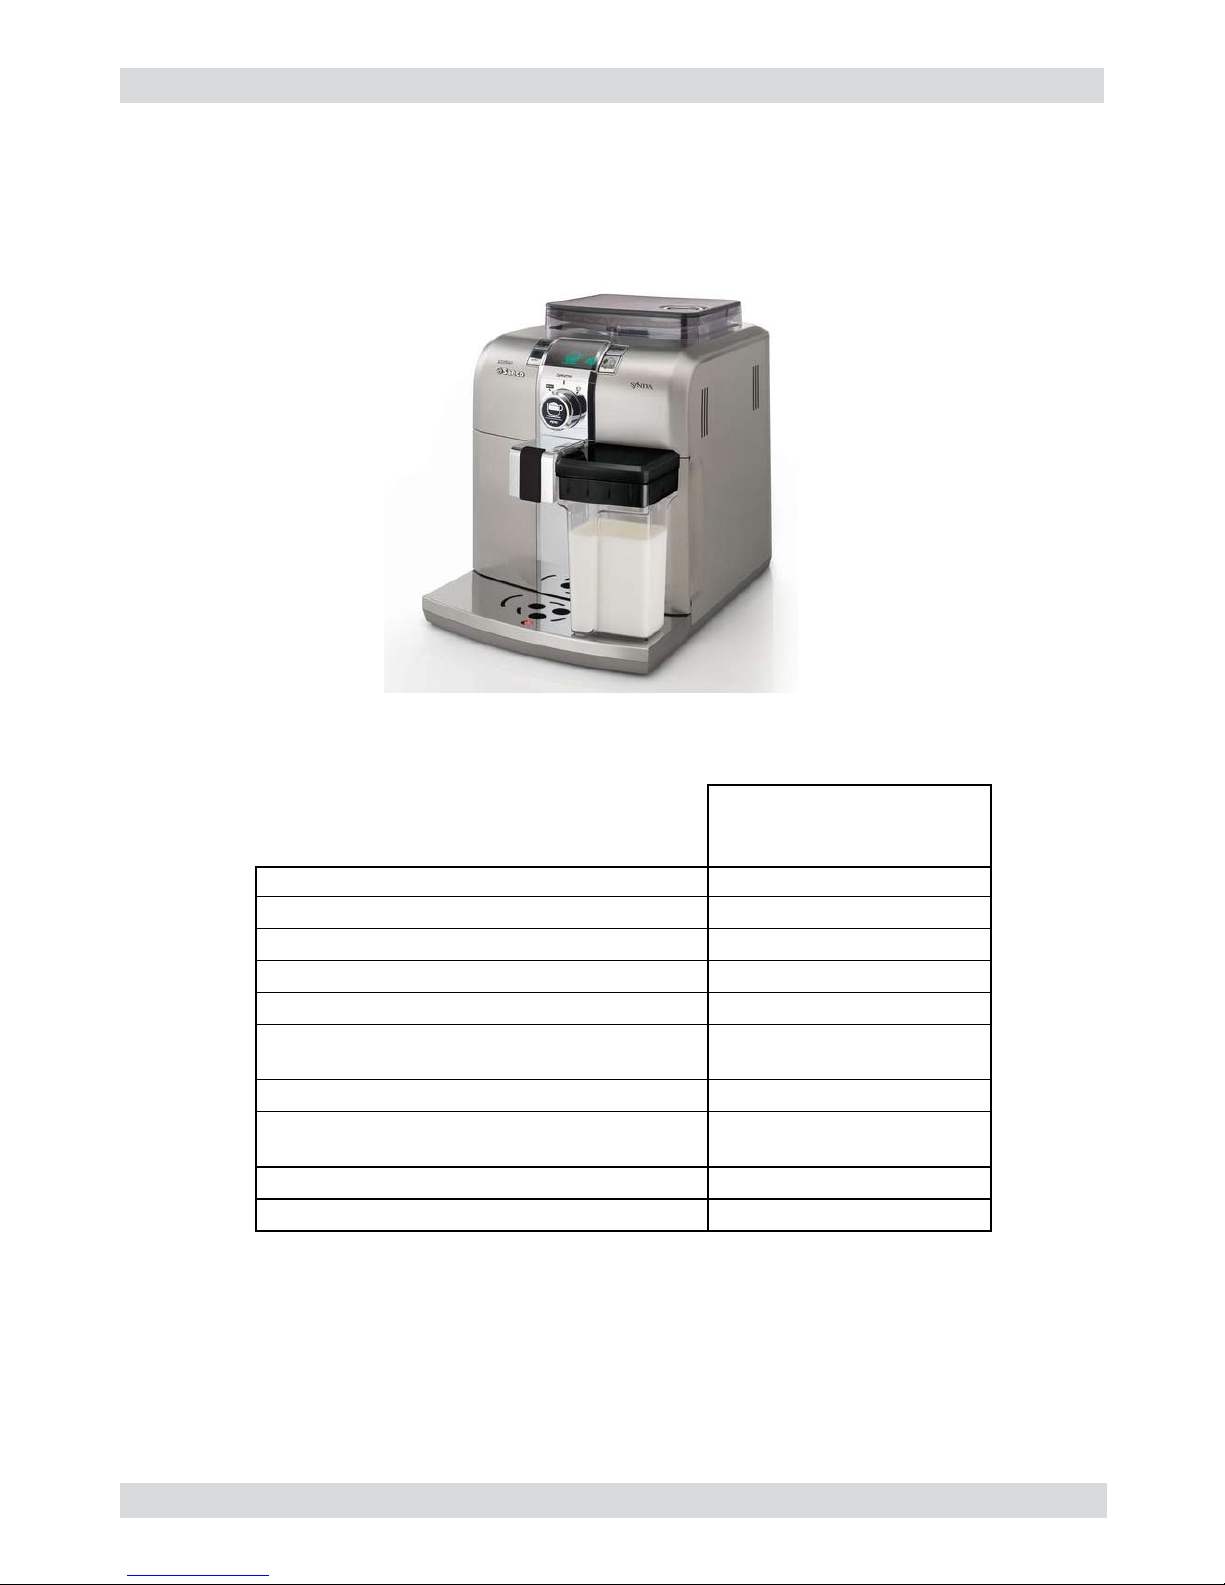
Coffee Machine
HD8838
Syntia cappuccino
Contents Page
1. Introduction
1.1. Documentation required 1
1.2. Tools and equipment required 1
1.3. Material 1
1.4. Safety warnings 1
1.5. Syntia Cappuccino Range 2
1.6.1. External appliance parts 3
1.6.2. Internal appliance parts 4
2. Technical specications
2.1. Technical specications 1
2.2. Appliance parameters and performance 2
3. User instructions
3.1. Customer and programming menu 1
3.2. Operation, cleaning and maintenance 5
4. Operating logic
4.1. Water circuit 1
4.2. Frother valve assembly 2
4.3. Stopcock 2
4.4. Coffee cycle 3
4.5. Single microswitch 4
4.6 Temperature sensor 4
4.7. Coffee grinder 5
4.8. No-bean detection, dose adjustment, blocked coffee
grinder
5
Contents Page
4.9. Auto-learning dose (SAS) 6
4.10. Water level detection (water tank) 7
4.11. Water level detection (drip tray) 7
4.12. Descaling request 8
4.13. Anti-scale lter 8
5. Troubleshooting
5.1. Test mode 1
5.2. Error messages 6
6. Standard inspections
6.1. Repair schedule 1
6.2. Service schedule 1
6.3. Final inspection 2
7. Disassembly
7.1. Outer elements 1
7.2. Coffee dispenser 2
7.3. Coffee grinder adjustment 3
7.4. Keyboard card and control knob 4
7.5. Power/CPU Board 4
7.6. Gearmotor 5
7.7. Boiler 6
7.8. Stopcock 6
7.9. Pump and ow meter 7
7.10. Solenoid valves 7
2010-November-rev.00
Service Manual
Service
Published by Saeco International Group Subject to modication EN 4219 400 00008
© Copyright

Saeco International Group SYNTIA CAPPUCCINO
Contents Page
7.11. Coffee grinder 8
7.12. Adjusting/removing and installing the grinder blades 8
7.13. Installing and removing Oetiker clamps 9
8. Notes
9. Water circuit diagram
10. Electrical diagram
Saeco International Group
SYNTIA CAPPUCCINO
SYNTIA CAPPUCCINO 01 INTRODUCTION
Saeco International Group Page / 04
1.1. Documentation required
The following documentation is required for repairs:
Instruction booklet of the specic model•
Technical documentation of the specic model (diagrams, exploded drawings)•
1.2. Tools and equipment required
Besides standard equipment, the following tools are required:
Qty. Description Notes
1 Screwdriver Torx T 8 - T 10 - T 20
1 Pliers for Oetiker clamps
1 AC - DC - Vdc tester
1 Digital thermometer Full scale > 150°C
1 SSC (Saeco Service Center) Programmer
(for programming and diagnosis mode)
1.3. Material
Description Notes
Thermal grease Thermal resistance > 200°C
Descaler Saeco descaler
Degreaser Personal choice
Silicone grease Safe to use with food
1.4. Safety warnings
It is recommended to consult the technical manual of the appliance before implementing any
operation.
Comply with all applicable standards relating to the repair of household appliances.
Always disconnect the power plug from the mains before beginning repairs on the appliance.
Simply turning off the main switch is not sufciently safe to prevent electrical discharges.
This household appliance is rated as insulation class I.
On completion of the repairs, insulation and dielectric rigidity tests must be performed.
01
SYNTIA CAPPUCCINO 01 INTRODUCTION
Saeco International Group Page / 04
1.5. Syntia Cappuccino Range
DO PSA
SYNTIA CAPPUCCINO
SS
Display interface X
With brushed stainless steel parts X
With parts made of ABS
Milk carafe X
Automatic dosing (SAS) X
Quantity of dispensed coffee saved in
memory
X
Auto-rinse X
Automatic shutdown
(after 60' inactivity)
X
Compartment for ground coffee X
Automatic descaling cycle X
02

SYNTIA CAPPUCCINO 01 INTRODUCTION
Saeco International Group Page / 04
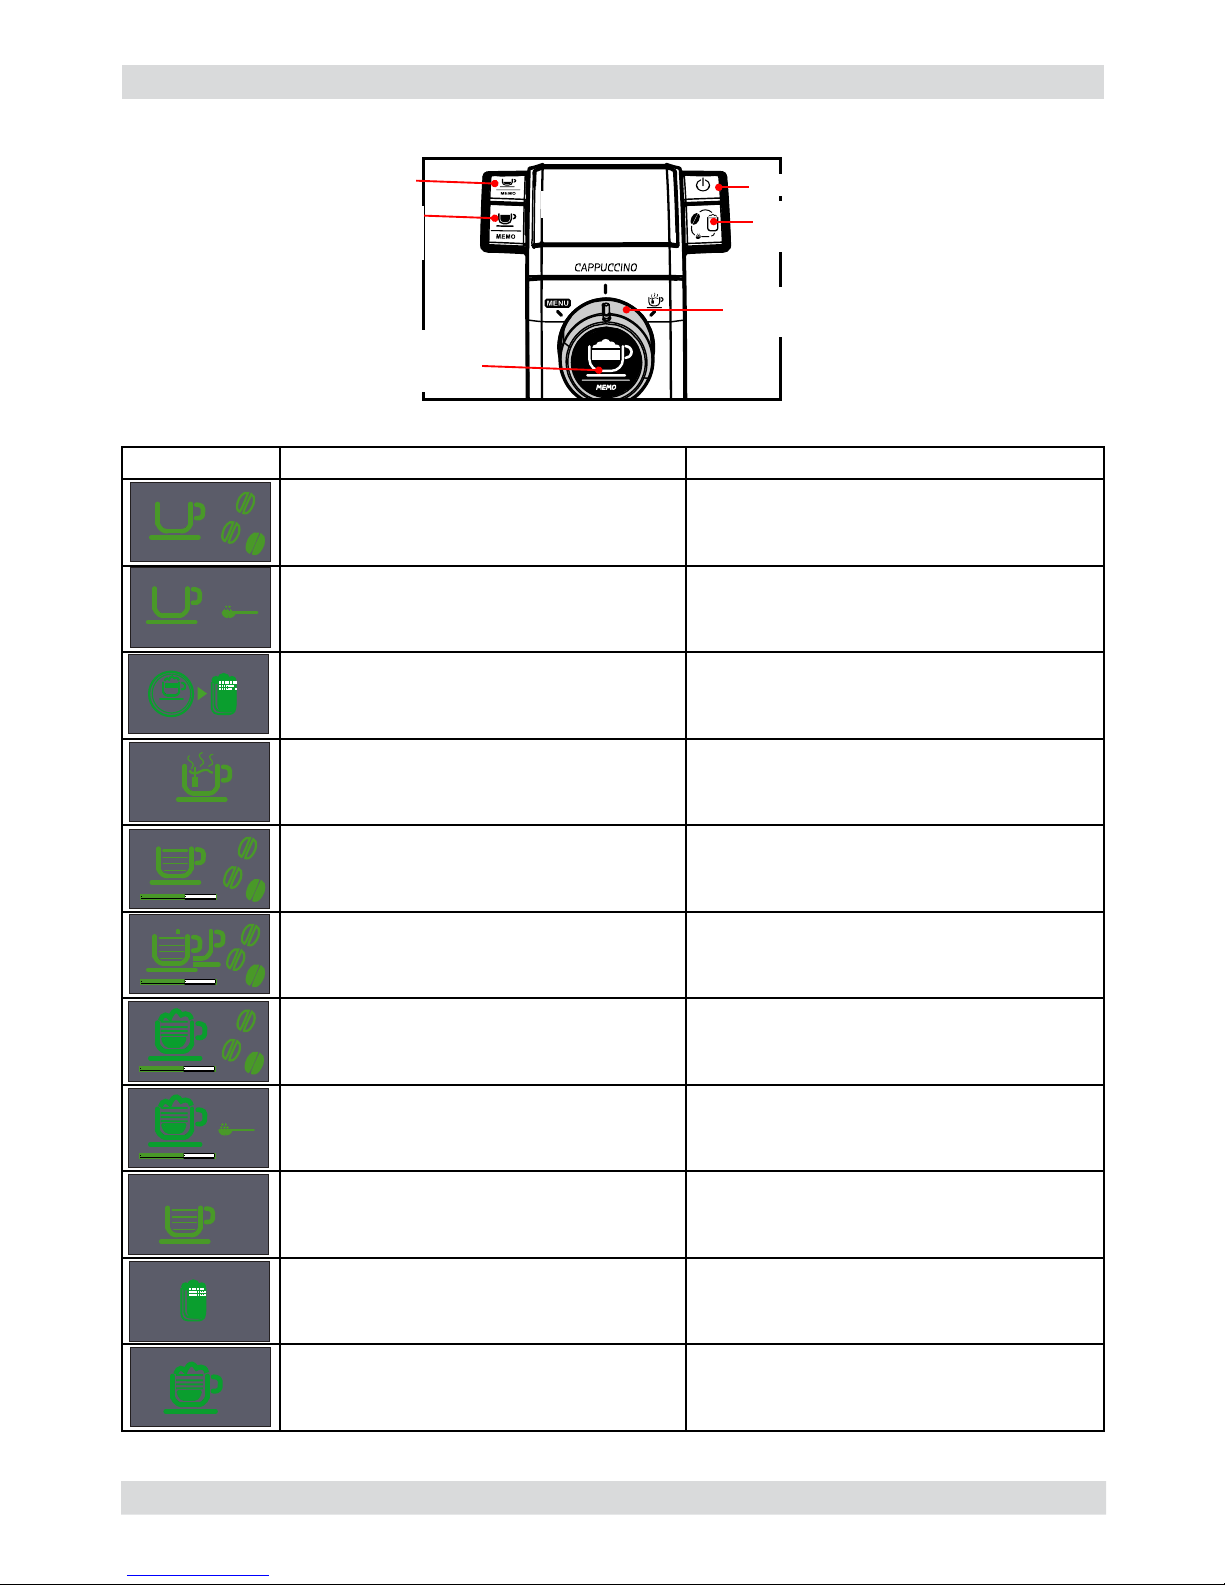
1.6.1. External appliance parts
03
Control
panel
Water tank
Power cord
Coffee bean
container with lid
Compartment for
pre-ground coffee
Service
hatch
Connection for
milk container
milk container
Grind level
adjustment
Brewing unit
Dreg
drawer
Drip
tray+grille
Full tank
oat
Pre-ground coffee “avour”/
hot milk selector
Coffee/hot water selector
PROGRAMMING MENU
Expresso lungo dispensing
button
Cappuccino/milk
dispensing button
Expresso dispensing button
ON/OFF button
LCD display
Main switch

SYNTIA CAPPUCCINO 01 INTRODUCTION
Saeco International Group Page / 04
1.6.2. Internal appliance parts
04
Ground coffee
conveyor
Solenoid Valve
EV1
Solenoid Valve
EV2
Power Board
Pump
Flow meter
Water level
capacitive sensor
Door lock
microswitch
Boiler
Coffee grinder
Saeco International Group
SYNTIA CAPPUCCINO
SYNTIA CAPPUCCINO 02 TECHNICAL SPECIFICATIONS
Saeco International Group Page / 03
2.1. Technicalspecications
Power supply and output: 240 V~ 50 Hz 1400 W - 230 V~ 50/60 Hz 1400 W -
120 V~ 60 Hz 1500 W - 100 V~ 50/60 Hz 1300 W
Temperature control: Variable resistor sensor (NTC)
transmits the value to the control board
Safety system: 2 manual reset or one-shot thermostats (175°C)
Coffee heat exchanger output:
Stainless steel
(230/120 V~) 1300 W – (100 V~) 1100 W
to dispense coffee, hot water and steam
Gearmotor: 33VC 2 rotation directions; 24VC power supply
Pump:
Ulka with reciprocating piston and 120°C cutout 48 W, 230V,
50 Hz, Type EP5 approx. 13-15 bar 120V, 60Hz 100V, 50/60 Hz
Overpressure valve: Opening at approx. 16-18 bar
Water lter: In tank
Coffee grinder: Direct current motor with at ceramic grinder blades
Automatic dosage Dose adjustment controlled by the electronic system
Consumption: During the heating phase - approx. 5.6 A
Consumption in Stand-by < 1 W
Dimensions: W x H x D in mm: 256x315x415
Weight: 9 kg
Water tank capacity: 1.2 l.
Coffee container capacity 260 g coffee beans
Dreg drawer capacity 8
Heat exchanger capacity: Approx. 10 cc
Water circuit lling time: Approx. 15 sec Max. on rst lling cycle
Heating time: Approx. 45 sec.
Dispensing temperature: Approx. 84°± 4°
Grinding time: approx. 8-10 sec.
01
SYNTIA CAPPUCCINO 02 TECHNICAL SPECIFICATIONS
Saeco International Group Page / 03
2.2. Appliance parameters and performance
02
Descaling frequency
Hardness Water hardness Withoutanti-scalelter Withanti-scalelter
1 Soft (up to 7°dH) 240 litres (480,000 pulses) 480 litres (960,000 pulses)
2 Medium (7° - 14°dH) 120 litres (240,000 pulses) 240 litres (480,000 pulses)
3 Hard (15° - 21°dH) 60 litres (120,000 pulses) 120 litres (240,000 pulses)
4 Very hard (over 21°dH) 30 litres (60,000 pulses) 60 litres (120,000 pulses)
The default water hardness level is 3. Each litre of water corresponds to approximately 2,000
pulses.
PRODUCT
QUANTITY
Minimum
quantity
(Puls.)
Default
quantity
(Puls.)
Maximum
quantity
(Puls.)
Set
by the
user
Set by the
Production/Service Dept
Expresso
70 165 600 Yes No
Average coffee
No No No No No
Expresso lungo
70 440 600 Yes No
Pre-ground
Yes
Hot water
Continues until the water is used up (capacitive sensor)
Steam
Continues until the water is used up (capacitive sensor)
RINSE Initial rinse Final rinse
When performed
When the appliance is switched
on and the boiler temperature is
≤ 50°C
When the machine is switched
off electronically, manually or
automatically after 60', if at least
one coffee has been dispensed
before being switched off
No. of Pulses
180 80
Stop option
Yes, by pressing any button Yes, by pressing any button
Can be disabled by the user
No No
Can be disabled by the
Production/Service Dept
No No
No. of pulses adjustable by
the user
No No
No. of pulses adjustable by
the Production/Service Dept
No No
Pulse range
(Min - Max)
No No
WATER HARDNESS ADJUSTABLE
SYNTIA CAPPUCCINO 02 TECHNICAL SPECIFICATIONS
Saeco International Group Page / 03
STAND-BY Description and values
Input time (min - max) 15 minutes - 180 minutes
Input time (default) 60 minutes
Input time set by user Yes
Input time set by
the Production/Service Dept
Yes
Boiler temperature during Stand-by Boiler OFF
03
DREG DRAWER Description and values
Time-out for dreg drawer 5 sec.
Alarm to empty dreg drawer block after
(double expresso as the last dispensed product)
8 lots of dregs
(9 lots of dregs)
Warning to empty dreg drawer No
Reset dreg counter Each time the dreg drawer is removed for at
least 5 seconds, even if the "empty dreg drawer"
alarm is not triggered
WATER TANK Description
Level sensor Yes
Water reserve (pulses) 200
Water reserve modiable by
the Production/Service Dept
No
"Fill tank" alarm Yes
"No tray" alarm No
Water mains No
Saeco International Group
SYNTIA CAPPUCCINO
SYNTIA CAPPUCCINO 03 USER INSTRUCTIONS
Saeco International Group Page / 05
Indications Causes Solutions
The appliance has reached the temperature
- to dispense coffee beans
- to dispense hot water
Dispense the product
The appliance has reached the temperature
- to dispense ground coffee
(pre-ground)
Dispense the product
The appliance is ready to dispense hot milk Dispense the product
The appliance is dispensing hot water Dispense hot water
The appliance is dispensing a coffee
Wait for the dispensing process to end (press
the button again to stop dispensing)
The appliance is dispensing two coffees
Wait for the dispensing process to end (press
the button again to stop dispensing)
The appliance is dispensing a cappuccino with
coffee beans.
Stop the dispensing process as desired
The appliance is dispensing a cappuccino with
ground coffee.
Stop the dispensing process as desired
The appliance is programming the amount of
coffee to be dispensed.
Stop the dispensing process as desired
The appliance is programming the amount of
hot milk to be dispensed.
Stop the dispensing process as desired
The appliance is programming the amount of
cappuccino to be dispensed.
Stop the dispensing process as desired
01
3.1. Customer and programming menu
Appliance ready mode indications (GREEN)
Pre-ground coffee “avour”/
hot milk selector
LCD display
Coffee/hot water selector
PROGRAMMING MENU
Expresso lungo dispensing
button
Cappuccino/milk
dispensing button
Expresso dispensing button
ON/OFF button
MEMO
M
E
M
O
M
E
M
O
M
E
M
O
SYNTIA CAPPUCCINO 03 USER INSTRUCTIONS
Saeco International Group Page / 05
02
Alarm indications (RED)
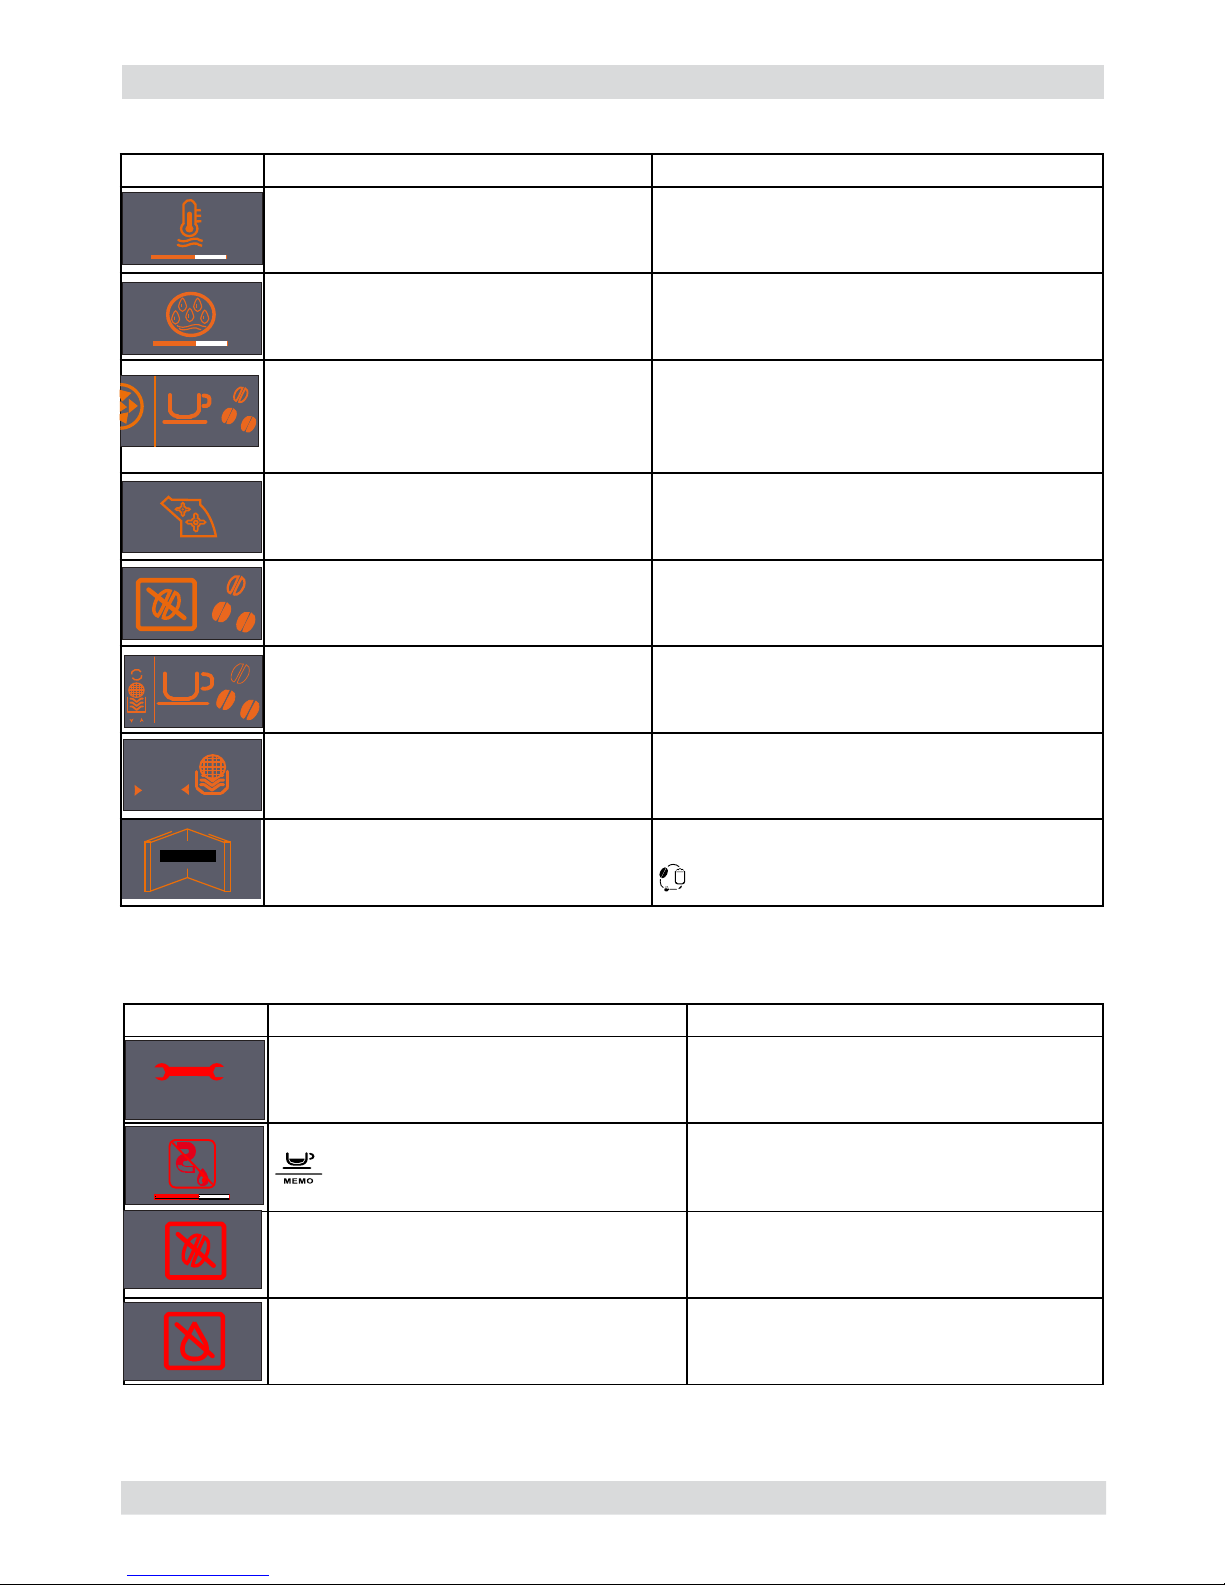
Indications Causes Solutions
Switch the appliance off and back on after 30
seconds. Repeat this twice or three times
If the appliance does not go on, contact the
Service Centre.
Problems with the water circuit. Press the
button to start the manual loading
cycle of the water circuit
Wait for the circuit to ll up
No coffee beans inside the container.
Restart the cycle after having lled the
coffee container
No water Fill the water tank
1
Warning indications (ORANGE)
Indications Causes Solutions
Appliance is in heating mode to
dispense coffee, hot water or steam
Wait for the heating process to end
(see the progress bar)
The appliance is in rinsing mode
wait for the appliance to complete the
operation
Wait for the operation to be completed
The machine requires a
descaling cycle
Perform a descaling cycle
Press the aroma/pre-ground coffee
button for 5 seconds to access the
descaling cycle
The brewing unit is in restart mode
for the appliance to be reset Wait for the restart to be complete
Fill the coffee bean container and
restart the dispensing cycle Fill the coffee bean container
The appliance requires the Intenza
lter to be replaced
Replace the lter. This message is
displayed if the function is activated
via the programme
The alarm is only disabled if “RESET” is
performed via the programme
The appliance requires the milk
system to be cleaned
After having washed the milk unit, press the
button to cancel the message
MENU
ESC
OK
+
ON
OFF
RESET
-
OK
CLEAN
START

SYNTIA CAPPUCCINO 03 USER INSTRUCTIONS
Saeco International Group Page / 05
03
30
30
30
Indications Causes Solutions
Service hatch open: Close it
If the service hatch is opened while a product is being dispensed, the appliance
stops dispensing and starts a 30 sec countdown before cancelling the dispensing
process. The countdown can be interrupted by closing the service hatch and the
dispensing process continues where it stopped from.
Bring the hot water/steam stopcock knob to the correct position.
If the knob is turned (opened) while a product is being dispensed, the appliance
stops dispensing and starts a 30 sec countdown before cancelling the dispensing
process. The countdown can be interrupted by closing the knob and the dispensing
process continues where it stopped from.
No brewing unit
If the brewing unit is removed while a product is being dispensed, the appliance
stops dispensing and starts a 30 sec countdown before cancelling the dispensing
process. The countdown can be interrupted by reinserting the brewing unit and
closing the door - the dispensing process continues where it stopped from.
Empty the dreg drawer and the drip tray
To reset the dreg counter, wait for the
dreg value inside the icon on the display
to disappear (5 seconds)
Insert the dreg drawer
When the dreg counter is reset, the icon
is displayed with no dreg value
Indications Causes Solutions
Descaling CYCLE
(press the Aroma/pre-ground coffee button for 5 seconds)
1) Initial screen to enter the
descaling cycle.
Press "esc" to exit
5) Rinse cycle of the descaling
cycle during the pause mode
2) Descaling cycle being
performed
6) Descaling cycle ended.
Press the
button to exit the
cycle
3) Descaling cycle in Pause mode
7) Fill the tank with fresh
water
4) Rinse cycle of the descaling
cycle being performed
START
STOP
Saeco
ESC
OK
END
STOP
START
SYNTIA CAPPUCCINO 03 USER INSTRUCTIONS
Saeco International Group Page / 05
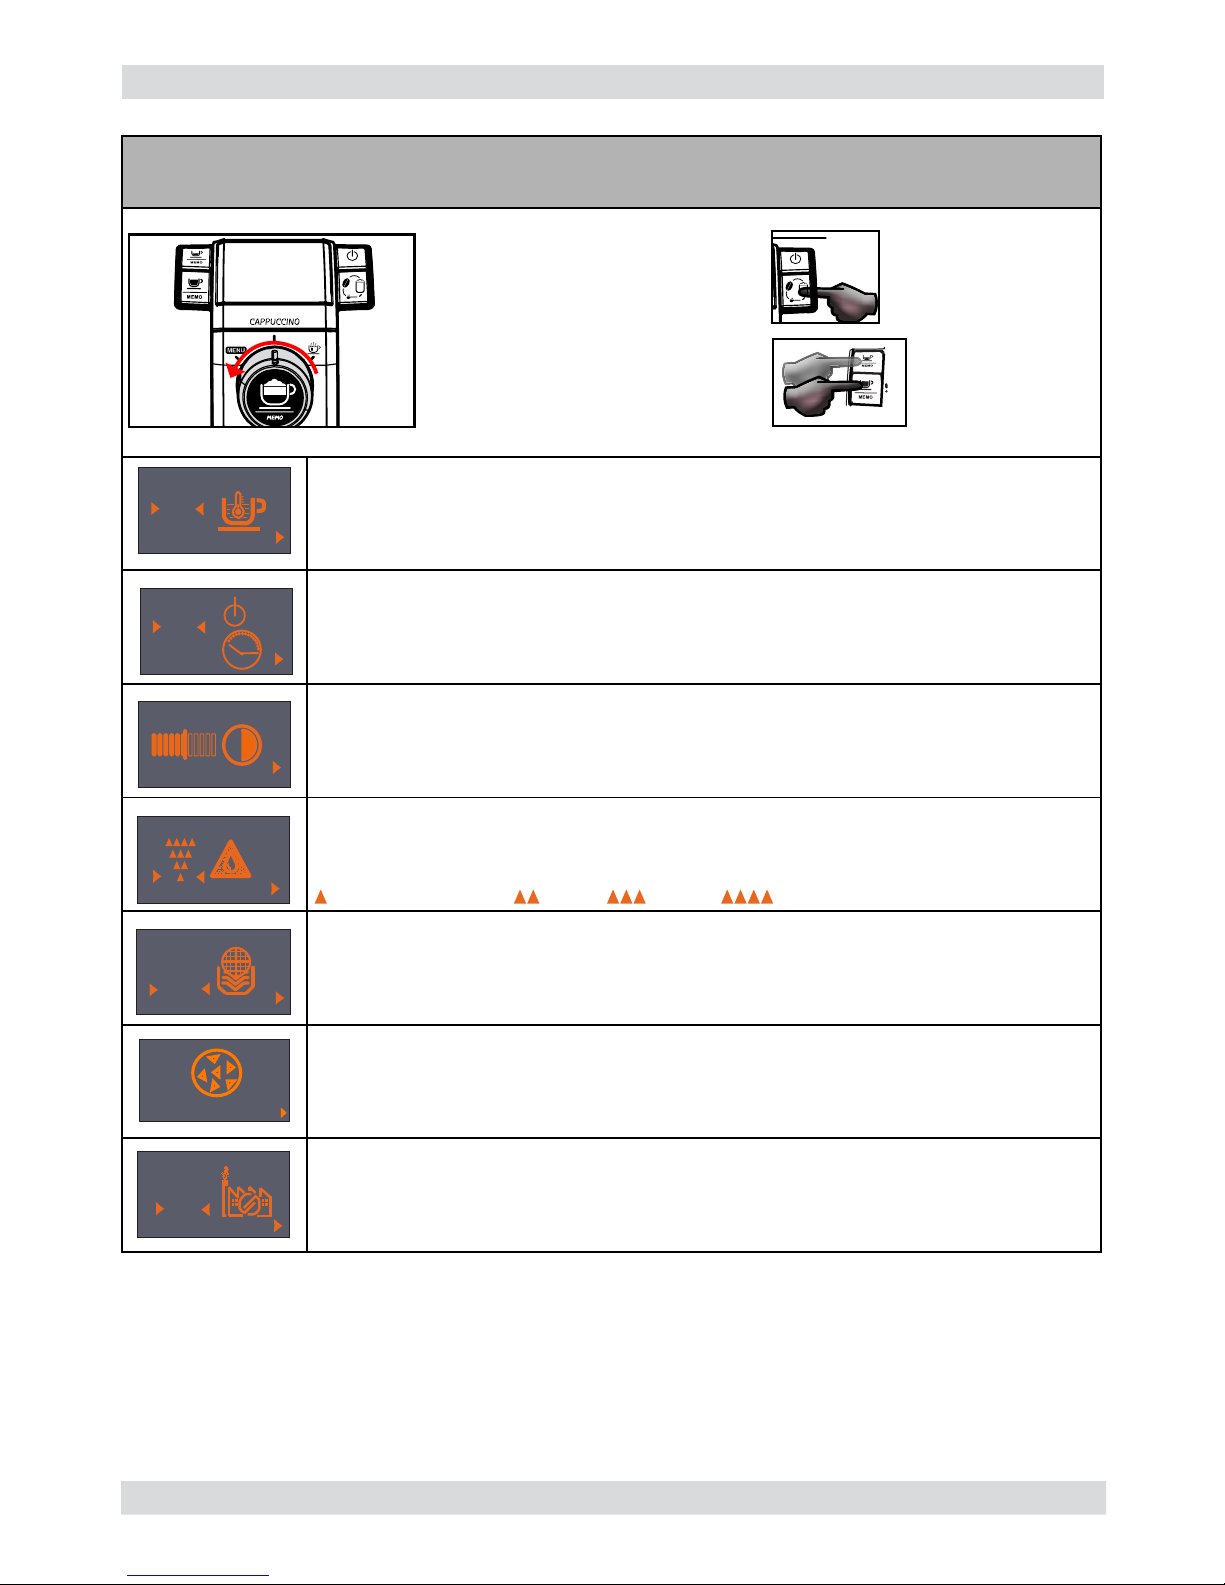
MENU
(controls and programmes)
Coffee temperature:
This function adjusts the dispensing temperature of the coffee.
Timer (Stand-by):
This function adjusts the interval to switch to Stand-by after the last product is
dispensed.
Contrast:
This function adjusts the contrast of the display for the messages to be read
better.
Water hardness:
This function adjusts the water hardness for better management of appliance
maintenance.
= very soft water =soft =hard =very hard
"INTENZA"waterlter
This function lets the user manage the "INTENZA" water lter.
Descaling cycle
This function lets the user manage the appliance descaling cycle.
Default settings
This function restores the default settings.
ESC
-
+
MAX
MED
MIN
ESC
-
+
180’
60’
30’
15’
ESC
-
+
ESC
-
+
ESC
-
+
ON
OFF
RESET
ESC
-
+
YES
NO
START
Turn the selector anti-clockwise
until "MENU" is reached in order
to access the programming
menu in appliance ready mode
Press to scroll the
MENU
Press
edit
04
 Loading...