

Page 1
ISTRUZIONI PER L'USO
OPERATING INSTRUCTIONS
MODE D’EMPLOI
BEDIENUNGSANLEITUNG
INSTRUÇÕES PARA O USO
INSTRUCCIONES PARA EL USO
GEBRUIKSAANWIJZING
INSTRUKCJE OBSŁUGI
ItalianoEnglishDeutschFrançaisEspañolPortugalNederlandsPolski
LEGGERE ATTENTAMENTE QUESTE ISTRUZIONI D'USO PRIMA DI UTILIZZARE LA MACCHINA.
READ THESE OPERATING INSTRUCTIONS CAREFULLY BEFORE USING THE MACHINE.
DIESE BEDIENUNGSANLEITUNG IST VOR DEM ERSTEN GEBRAUCH DER MASCHINE AUFMERKSAM ZU LESEN.
LÉANSE ATENTAMENTE LAS SIGUIENTES INSTRUCCIONES DE USO ANTES DE UTILIZAR LA MÁQUINA.
PRZECZYTAĆ UWAŻNIE NINIEJSZE INSTRUKCJE OBSŁUGI PRZED UŻYTKOWANIEM URZĄDZENIA.
LIRE ATTENTIVEMENT CES INSTRUCTIONS AVANT D’UTILISER LA MACHINE.
LER ATENTAMENTE ESTAS INSTRUÇÕES PARA O USO ANTES DE USAR A MÁQUINA.
LEES DEZE INSTRUCTIES AANDACHTIG DOOR VOORDAT U HET APPARAAT IN GEBRUIK NEEMT.
Page 2

5 6 7 8
3 41 2
11
13
10
• 2 •
9
17
15
16
18
12
16 in
40 cm
20 cm
8 in
20 cm
8 in
Fig.A - Abb.A - Af b.A - Rys.A
20 cm
20 cm
8 in
8 in
Fig.B - Abb.B
Afb.B - Rys.B
14
Page 3

Fig.1 - Abb.1 - Afb.1 - Rys.1 Fig.2 - Abb.2 - Af b.2 - Rys.2 Fig.3 - Abb.3 - Af b.3 - Rys.3
Fig.4 - Abb.4 - Afb.4 - Rys.4 Fig.5 - Abb.5 - Afb.5 - Rys.5 Fig.6 - Abb.6 - Afb.6 - Ry s.6
Fig.7 - Abb.7 - Afb.7 - Rys.7 Fig.8 - Abb.8 - Afb.8 - R ys.8 Fig.9 - Abb.9 - Afb.9 - Ry s.9
Fig.11 - Abb.11 - Afb.11 - Rys.11 Fig.12 - Abb.12 - Afb.12 - Rys.12Fig.10 - Abb.10 - Afb.10 - Rys.10
• 3 •
Page 4

Fig.13 - Abb.13 - Afb.13 - Rys.13 Fig.14 - Abb.14 - Afb.14 - Rys.14 Fig.15 - Abb.15 - Afb.15 - Rys.15
Fig.16 - Abb.16 - Afb.16 - Rys.16 Fig.17 - Abb.17 - Afb.17 - Rys.17 Fig.18 - Abb.18 - Afb.18 - Rys.18
Fig.19 - Abb.19 - Afb.19 - Rys.19 Fig.20 - Abb.20 - Afb.20 - Rys.20 Fig.21 - Abb.21 - Afb.21 - Rys.21
Fig.22 - Abb.22 - Af b.22 - Rys.22 Fig. 23 - Abb.23 - Afb.23 - Rys.23 Fig.24 - Abb.24 - Afb.24 - Rys.24
• 4 •
Page 5
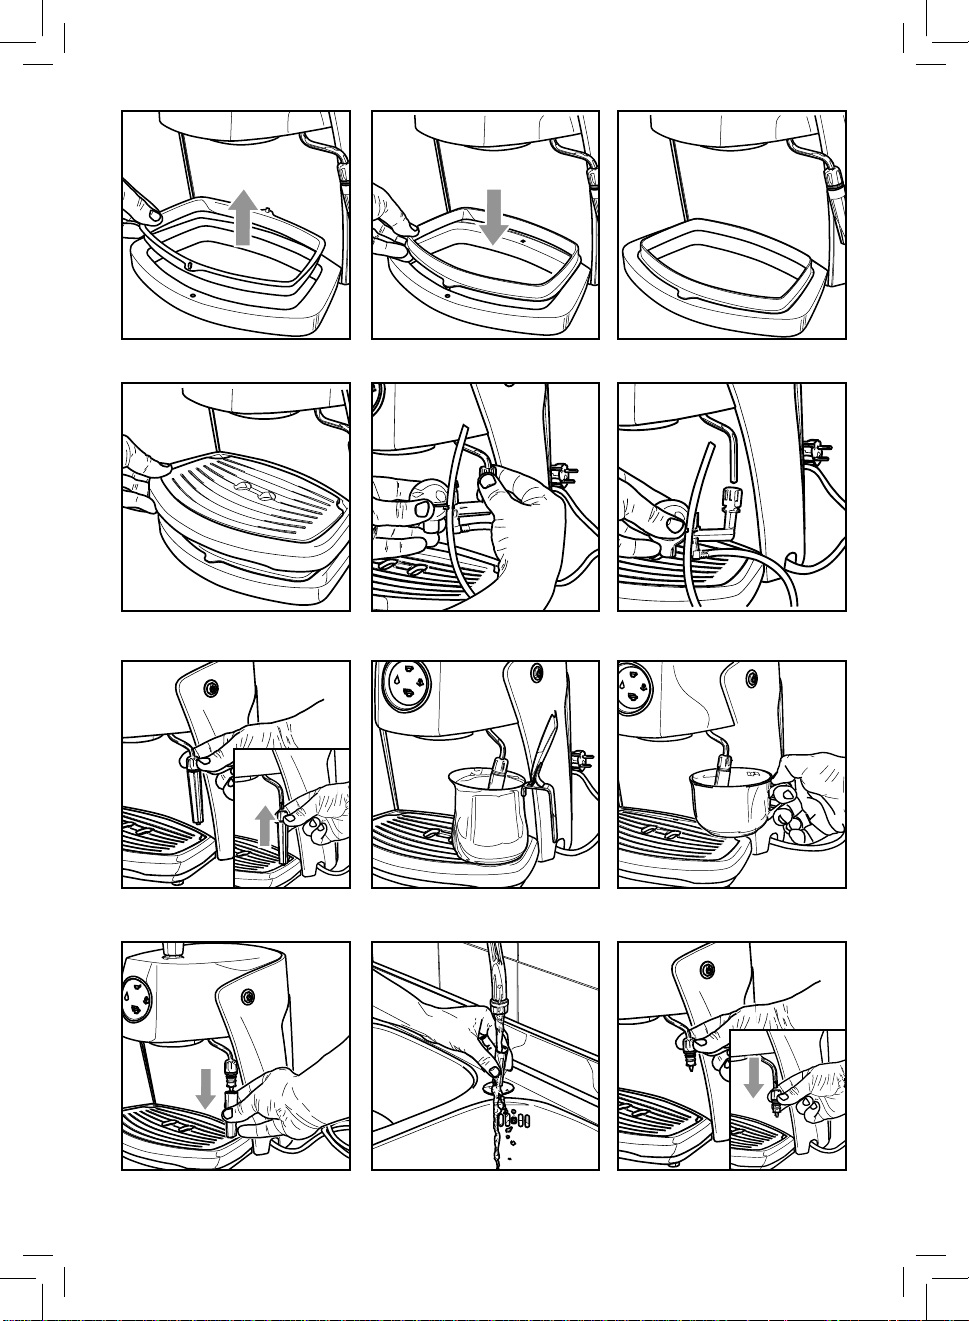
Fig.25 - Abb.25 - Af b.25 - Rys.25 Fig.26 - Abb.26 - Afb.26 - Rys.26 Fig.27 - Abb.27 - Afb.27 - Rys.27
Fig.28 - Abb.28 - Af b.28 - Rys.28 Fig.29 - Abb.29 - Af b.29 - Rys.29 Fig.30 - Abb.30 - Afb.30 - Rys.30
Fig.31 - Abb.31 - Afb.31 - Rys.31 Fig.32 - Abb.32 - Afb.32 - Rys.32 Fig.33 - Abb.33 - Afb.33 - Rys.33
Fig.34 - Abb.34 - Af b.34 - Rys.34 Fig.35 - Abb.35 - Afb.35 - Rys.35 Fig.36 - Abb.36 - Afb.36 - Rys.36
• 5 •
Page 6
1 GENERALITÀ
La macchina per ca è è indicata per la preparazione di 1 o 2
tazze di ca è espresso ed è dotata di un cappuccinatore orientabile per l’erogazio ne del vapore e dell’acqua calda. I co man di
sulla parte frontale del l’ap pa rec chio sono contrassegnati con
simboli di facile in ter pre ta zio ne.
La macchina è st ata progettata per u so domestico e non è indicata per un funzionamento continuo di tipo professionale.
Attenzione. Non si assumono re spon sa bi li tà per
eventuali danni in caso di:
• Impiego errato e non con for me agli scopi pr evisti;
• Riparazioni non ese gui te presso centri d’assistenza
autorizzati;
• Manomissione del cavo d'alimentazione;
• Manomissione di qual si a si com po nen te della macchina;
• Impie go di pezzi di ri cam bio e a ccessori non or iginali;
• Mancata decalci cazione e stoccaggio in locali al di
sotto di 0°C.
In questi casi viene a decader e la garanzia.
1.1 Per facilitare la lettura
Il triangolo d’avvertimento indica
tutte le istruzioni importanti per
la sicurezza del l’uten te. Attenersi
scrupo losamente a tali in dicazioni per evi tare ferimenti gra vi!
Il riferimen to ad illustrazioni, par ti dell’apparecchio o elementi
di co man do, ecc. è in di ca to da numeri o lettere; in questo caso
si rimanda all’illus trazione.
2 DATI TECNICI
Il costruttore si riser va il diritto di modi care le caratteristiche
tecniche del prodotto.
Tensione nominale - Potenza nominale - Alimentazione
Vedi targhetta posta sull’apparecchio
Materiale corpo
Plastica
Dimensioni (l x a x p) (mm)
270 x 350 x 300
Peso
4 kg
Lunghezza cavo
1,2 m
Pannello di comando
Sulla parte frontale
Porta ltro
Pressurizzato
Pannarello
Speciale per cappuccini
Serbatoio acqua
1,5 litri - Estraibile
Pressione pomp a
15 ba r
Caldaia
Inox
Dispositivi di sicurezza
Ter mof us ibi le
3 NORME DI SICUREZZA
Questo simbolo evidenzia le in for ma zio ni da
tenere in maggiore con si de ra zio ne, per un mi-
gliore uti liz zo della mac chi na.
Le illustrazioni corrispondenti al te sto si trovano nelle
prime pagine del manuale. Consultare queste pagine
du ran te la lettura delle istru zio ni per l’uso.
1.2 Impiego di queste istruzioni per l’uso
Conservare queste istruzioni per l’uso in un luogo sicuro e allegarle alla mac chi na per ca è qualora un’altra persona dovesse
utilizzarla.
Per ulteriori informazioni o nel caso di problemi, rivolgetevi ai
centri assistenza autorizzati.
• 6 •
Mai mettere a contatto del l’ac qua le parti sotto corrente: pe ri co lo di cortocircuito! Il vapore sur ri scal da to
e l’acqua calda possono pro vo ca re scottature! Mai dirigere il getto di va po re o dell’acqua calda ver so parti
del corpo, toccare con pre cau zio ne il beccuccio vapore /
ac qua calda: pe ri co lo di scottature!
Destinazione d’uso
La macchina per ca è è prevista esclu si va men te per l’impiego
do me sti co. È vietato apportare modi che tec ni che e ogni impiego illeci to, a causa dei rischi che essi co m por ta no! L’apparecchio non è destinato ad essere utilizzato da persone (compresi
i bambini) con ridotte capacità siche, mentali o sensoriali o
con esperienza e/o competenze insu cienti, a meno che non
siano sotto la supervisione di una persona responsabile della
loro sicurezza o non vengano da essa istruite sull’uso dell’apparecchio.
Page 7

Alimentazione di corrente
Collegare la macchina per ca è soltanto ad una presa di corrente adeguata. La tensione deve corrispondere a quella indicata sulla targhetta dell’apparecchio.
Cavo d’alimentazione
Mai usare la macchi na per ca è se il cavo d’alimentazio ne è di fet to so. Se il cavo d’alimentazione è danneggiato, deve essere
cambiato dal produttore o dal suo servizio assistenza clienti.
Non far passare il cavo d’ali men ta zio ne per angoli e su spigoli
vivi, sopra oggetti molto caldi e pro teg ger lo dall’olio.
Non portare o tirare la macchina per ca è tenendola per il
cavo. Non estr arre la spina tirandola per il cavo op pure toccarla
con le mani bagnate.
Evitare che il cavo d’ali men ta zio ne cada liberamente da tavoli
o sca ali.
Protezione d’altre persone
Tenere i bambini sotto supervisione, per evitare che giochino
con l’apparecchio.
I bambini non si rendono conto del per icolo connesso agli elettrodomestici. Non lasciare alla portata dei bam bi ni i ma te ria li
utilizzati per im bal la re la mac chi na.
Pericolo d’ustioni
Evitare di dirigere contro se stessi e/o altri il getto di vapore
sur ri scal da to e/o d’acqua calda. Usare sempre le apposite maniglie o ma no po le.
Non disinserire (to glie re) mai il por ta ltro p ressurizzato duran te l’erogazione del ca è. Durante la fase di riscaldamento dal
grup po erogazione ca è pos so no us cire gocce d’acqua calda.
Ubicazione
Sistemare la macchi na per ca è in un po sto sicuro, dove ne ssuno può rovesciar la o venirne ferito.
Acqua calda o vapore sur ri scal da to po treb be ro fuoriuscire: pe-
ricolo di scottature!
Non tenere la macchina a tem peratura inferiore a 0°C; c'è il pe ricolo che il gelo possa danneggiare la macchina.
Non usare la macchina per ca è al l’aper to.
Non posare la macchina su su per ci mol to calde e nelle vicinanze di amme libere per evitare che la carcassa fonda o co mun que si danneggi.
Pulizia
Prima di pulire la macchina, è in di spensa bi le disinserire la
macchina con il tasto ON/OFF tasti e poi staccare la spina dalla
presa di corrente. Inoltre, aspet tare che la macchina si ra red di. Mai immergere la mac chi na nel l’ac qua!
È severamente vietato cercare d’in ter ve ni re all’interno della
macchina.
Non utilizzare, per scopi alimentari, l’acqua rimasta nel serbatoio per alcuni giorni, lavare il serbatoio e riempirlo con acqua
fresca potabile.
Spazio per l’uso e la ma nu ten zio ne
Per il corretto e buon funzionamento della macchina per ca è
si consiglia quanto segue:
• Scegliere un piano d’appoggio ben li vel la to;
• Scegliere un ambiente su cien te men te illuminato, igienico
e con presa di cor ren te facilmente accessibile;
• Prevedere una distanza minima dal le pa re ti della macchina
come indicato in gu ra (Fig.A).
Custodia della macchina
Quando la macchina rimane inutilizzata per un pe ri o do prolungato, disinserire la mac chi na e staccare la spina dalla pre sa.
Custodirla in luogo asciutto e non ac ces si bi le ai bam bi ni. Proteggerla dalla polvere e dallo sporco.
Riparazioni / Manutenzione
Nel caso di guasti, difetti o sospetto di di fet to dopo una caduta, stac ca re subito la spin a dalla presa. Mai mettere in fu nzione
una macchina di fet to sa. Soltanto i Centri di Assistenza Au to riz za ti possono e ettuare in ter ven ti e riparazioni. Nel caso di
interventi non eseguiti a regola d’arte, si declina ogni re spon sa bi li tà per eventuali danni.
Antincendio
In caso di incendio utilizzare estin to ri ad anidride carbonica
(CO
). Non utilizz are acqua o estintori a polvere.
2
Legenda componenti macchina (Pag.2)
1 Pannello comandi
2 Interruttore ON/OFF
3 Serbatoio acqua
4 Pomello acqua calda / vapore
5 Vasca recupero acqua + griglia
6 Gruppo erogatore c a è
7 Cappuccinatore
8 Cavo alimentazione
9 Misurino per ca è macinato
10 Porta ltro pressurizzato
11 Filtro per ca è macinato
(unico per l'erogazione di 1 o 2 ca è)
12 Pannarello
13 Adattatore per ltro ca è in cialde
14 Filtro per ca è in cialde
15 Tasto luminoso erogazione c a è singolo
16 Tasto luminoso erogazione ca è doppio
17 Tasto luminoso erogazione acqua calda
18 Tasto luminoso erogazione vapore
Italiano
• 7 •
Page 8

4 INSTALLAZIONE
Per la propria sicurezza e quella di ter zi at te ner si scrupolosamente alle “Nor me di si cu rez za” riportate nel
cap. 3.
4.1 Imballaggio
L’imballaggio originale è stato progettato e realizzato per
proteggere la macchina durante la spedizione. Si consiglia di
conservarlo per un eventuale traspor to futuro.
4.2 Avvertenze d'installazione
Prima di inst allare la macchina, attenersi alle seguenti prescrizioni di sicurez za:
• sistemare la macchina in un luogo si cu ro;
• accertarsi che i bambini non ab bia no la possibilità di giocare
con la mac chi na;
• evitare che la macchina venga col lo ca ta su super ci molto
calde o vicino a am me libere.
La macchina per ca è è ora pronta per es se re collegata alla
rete elettrica.
Nota: si consiglia di lavare i componenti prima
del loro primo utilizzo e/o dopo un periodo
d'inutilizzo.
4.3 Collegamento della macchina
La corrente elettrica può es se re pe ri co lo sa! Di
c o n s e g u e n z a , a t t e n e r s i s e m p r e s c r u p o l o s a m e n te all e nor me di si cu rez za. No n usare mai cavi di fet to si!
I cavi e le spi ne difettosi de vo no es se re so sti tu i ti im me dia ta men te da Centri di Assistenza Autorizzati.
La tensione dell’apparecchio è stata impostata in fabbrica. Veri care che la tensione della rete corrisponda alle indicazioni
riportate sulla targhetta d’identi cazione posta sul fondo
dell’apparecchio.
• Veri care che l’interruttore ON/OFF (2) non sia premuto pri-
ma di collegare la macchina alla rete elettrica.
• Inserire la spina in una presa di corrente a parete di tensione
adeguata.
4.4 Ser ba to io ac qua
• (Fig.1) - Estrarre il serbatoio del l’ac qua (3).
• (Fig.2) - Sciacquarlo e riempirlo con ac qua fre sca potabile
evitando di immetterne una quantità eccessiva.
• (Fig.1) - Reinserire il serbatoio nella sua sede; assicurarsi
che sia correttamente posizionato.
Immettere nel ser ba to io sem pre e sol tan to ac-
qua fre sca po ta bi le non gas sa ta. Ac qua cal da
non ché al tri liquidi possono dan neg gia re il ser ba to io.
Non mettere in fun zio ne la mac chi na sen za acqua: ac cer tar si che ve ne sia a su c i e n z a a l l ’ i n t e r n o d e l s e r batoio.
4.5 Caricamento del circuito
All'inizio, dopo aver erogato vapore o dopo aver terminato
l'acqua nel serbatoio, il circuito della macchina deve essere
ricaricato; la macchina indica la necessità d'eseguire questa
operazione facendo lampeggiare contemporaneamente i 4
tasti del pannello comandi .
• (Fig.3) - Premere l’interruttore ON/OFF (2); i 4 tasti lampeg-
giano;
• (Fig.4) - Inserire un contenitore sotto al cappuccinatore.
• (Fig.5) - Aprire il pomello (4) “ac qua cal da/va po re” ruotan-
dolo in sen so antiorario.
• (Fig.6) - Premere il tasto acqua calda (17).
• Attendere che la macchina termini l'erogazione dell'acqua.
• Chiudere il pomello (4) “ac qua calda/vapore” ruotandolo in
sen so orario. Rimuovere il contenitore.
Alla ne del primo caricamento del circuito la
macchina si porta nello stato di riscaldamento
e non è possi bile fare ca è/acqua/vapore sino a quando
i due led 15 e 16 non sono accesi ssi.
Nota: se l'operazione non viene completata i 4
tasti continueranno a lampeggiare e non si potrà utilizzare la macchina.
4.6 Primo utilizzo o dopo un periodo di
inutilizzo
Questa semplice operazione vi assicura un'erogazione ottimale
e deve essere eseguita:
- al primo avvio;
- quando la macchina rimane inutilizzata per lungo tempo
(per più di 2 settimane).
L’acqua erogata deve essere vuotata in un ap-
posito scarico e non può essere utilizzata per
l’alimentazione. Se il contenitore si riempie, durante il
ciclo, fermare l’erogazione e vuotarlo prima di riprendere l’operazione.
1 (Fig.2) - Risciacquare il serbatoio e riempirlo con acqua fre-
sca potabile.
• 8 •
Page 9
2 (Fig.4-6) - Sistemare un contenitore sot to al cappuccinato-
re. Aprire il rubinetto (4) ruotandolo in senso antiorario e
premere il tasto acqua calda “
3 Erogare tutto il contenuto del serbatoio dell’acqua dal cap-
puccinatore; per terminare l’erogazione premere nuovamente il tasto acqua calda “
ruotandolo in senso orario.
4 (Fig.2) - Riempire il serbatoio con acqua fresca potabile.
5 (Fig.11-12) - Inserire dal basso il porta ltro nel gruppo
erogazione (6) e ruotarlo da sinistra verso destra no al suo
bloccaggio.
6 (Fig.13) - Inserire un contenitore adeguato sotto al porta l-
tro.
7 Premere il tasto “
grammata.
8 Vuotare il contenitore posto sotto al porta ltro e ripetere
le operazioni riportate al punto (7) no allo svuota-
mento dell’acqua presente nel serbatoio.
9 Riempire nuovamente il serbatoio ed attendere che i led
dei tasti “
10 (Fig.16) - Rimuovere il porta ltro dal gruppo ruotandolo da
destra verso sinistra e sciacquarlo con acqua fresca potabile.
Dopo la macchina è pronta per l’utilizzo.
La macchina ora è pronta per l’erogazione del ca è e del va po re; si rimanda ai ca pi to li relativi per i dettagli di funzionamento.
” e ” ” si accendano in modo sso.
”.
” e chiudere il rubinetto (4)
” ed erogare la quantità di acqua pro-
4.7 Regolazione vasca recupero acqua
La vasca di recupero acqua può essere regolata per adattarsi
alle dimensioni delle tazzine o delle tazze utilizzate.
Per regolare l'altezza della vasca di recupero acqua procedere
come segue:
• (Fig.24) - Sollevare la vasca di recupero acqua e s lare la
griglia.
• (Fig.25) - S lare il supporto posto sotto alla vasca.
• (Fig.26 - 27) - Ruotare il supporto e posizionarlo nella mac-
china da ca è.
• (Fig.28) - Sistemare la vasca di recupero acqua sopra al sup-
porto e riposizionare la griglia.
5 EROGAZIONE DEL CAFFÈ
Attenzione! Durante l’erogazione del ca è è
vie ta to disinserire il porta ltro pressurizzato
ruotandolo ma nual men te in sen so ora rio. Pe ri co lo
d’ustio ni.
• Durante questa operazione, i tasti (15 - 16) possono accen-
dersi e spegnersi; tale funzionamento deve essere considerato normale e non un’anomalia.
• Assicurarsi, prima dell’uso, che il po mel lo (4) acqua calda/
va po re sia chiuso e che il ser ba to io acqua della macchina
con ten ga una quantità d'acqua su ciente.
• (Fig.3) - Premere l’interruttore ON/OFF (2).
• Attendere che i tasti (15 - 16) si accendano in modo sso,
ora la macchina è pronta per l’erogazione del ca è.
5.1 Con caff è macinato
• (Fig.8) - Inserire il ltro (11) nel porta ltro pressurizzato
(10); al primo utilizzo il ltro è già inserito.
• (Fig.11) - Inserire dal basso il porta ltro nel gruppo eroga-
zione (6).
• (Fig.12) - Ruotare il porta ltro da si ni stra verso destra no
al suo bloccaggio. Lasciare la presa dal ma ni co del porta ltro pressurizzato, il manico ruota leg ger men te verso sinistra.
Questo movimento garantisce il perfetto funzionamento del
porta ltro.
• (Fig.14) - Preriscaldare il porta ltro pressurizzato premen-
do il tasto (16). L’acqua co min ce rà ad usci re dal porta ltro
pressurizzato (que sta operazione si rende ne ces sa ria solo
per il primo ca è).
• L'erogazione dell'acqua terminerà automaticamente.
• (Fig.16) - Togliere il porta ltro dalla macchina ruotando-
lo da destra verso sinistra e vuotare l’acqua residua. Con lo
speciale ltro (11) di cui è dotata la mac chi na, non occorre
cambiare l tro per ottenere uno o due ca è.
• (Fig.9A) - Versare 1-1,5 misurini per il ca è singolo o 2 mi-
surini rasi per il ca è doppio; pulire il bor do del porta ltro
dai re si dui di ca è.
• (Fig.11) - Inserire dal basso il porta ltro (10) nel gruppo
erogazione (6)
• (Fig.12) - Ruotare il porta ltro da si ni stra verso destra no
al suo bloccaggio.
• (Fig.13) - Prelevare 1 o 2 tazzine preriscaldate e posizio-
narle sotto al porta ltro pressurizzato; veri care che siano
correttamente si ste ma te sotto ai fori di uscita ca è.
• (Fig.14) - Premere:
- il tasto (15) per ottenere 1 ca è o;
- il tasto (16) per ottenere 2 ca è.
• Rag giun ta la quantità di ca è programmata, la macchina
Italiano
• 9 •
Page 10
termina automaticamente l'erogazione; prelevare le tazzine
con il ca è (Fig.15).
• (Fig.16) - Al termine dell’erogazione at ten de re qual che
secondo, estrar re il porta ltro pressurizzato e vuotarlo dai
fondi residui.
• Rag giun ta la quantità di ca è programmata, la macchina
termina automaticamente l'erogazione; prelevare le tazzine
con il ca è (Fig.15).
• (Fig.16) - Al termine dell’erogazione attendere qualche
secondo, estrarre il porta ltro e smaltire la cialda utilizzata.
Nota: nel porta ltro rimane una piccola quantità d i acqua; que sto è norma le ed è dovuto alle
caratteristiche del porta ltro.
Nota importante: Il ltro (11) deve essere mantenuto pulito per garantire un perfetto risulta-
to. Lavare giornalmente a ne utilizzo.
5.2 Con caff è in cialde
• (Fig.10) - Togliere, utilizzando un cucchiaino da ca è, il
ltro per ca è macinato (11) dal porta ltro pressurizzato
(10).
• (Fig.7A) - Inserire, nel porta ltro pressurizzato (10), l'adat-
tatore per cialde (13), con la parte bombata rivolta verso il
basso.
• (Fig.7B) - Dopo, inserire il ltro per cialde (14) nel porta l-
tro pressurizzato (10).
• (Fig.11) - Inserire dal basso il porta ltro pressurizzato nel
gruppo erogazione (6).
• (Fig.12) - Ruotare il porta ltro da si ni stra verso destra no
al suo bloccaggio. Lasciare la presa dal ma ni co del porta ltro pressurizzato . Un si ste ma automatico riporta ora leg ger men te il manico verso sinistra.
Questo movimento garantisce il perfetto funzionamento del
porta ltro pressurizzato.
• (Fig.14) - Preriscaldare il porta ltro pressurizzato premen-
do il tasto (16). L’acqua co min ce rà ad usci re dal porta ltro
pressurizzato (que sta operazione si rende ne ces sa ria solo
per il primo ca è).
• L'erogazione dell'acqua terminerà automaticamente.
• (Fig.16) - Togliere il porta ltro pressurizzato dalla mac-
china ruotandolo da destra verso sinistra e vuotare l’acqua
residua.
• (Fig.9B) - Inserire la cialda nel porta ltro; assicurarsi che la
carta della cialda non fuoriesca dal porta ltro.
• (Fig.11) - Inserire dal basso il porta ltro pressurizzato nel
gruppo erogazione (6).
• (Fig.12) - Ruotare il porta ltro da si ni stra verso destra no
al suo bloccaggio.
• Prelevare 1 tazzina preriscaldata e posizionarla sotto al
porta ltro; veri care che sia correttamente sistemata sotto
ai fori d'uscita ca è.
• (Fig.14) - Premere il tasto (15) per ottenere 1 ca è.
Nota i mport ante: Il ltro (14) e l'adat tatore (13)
devono essere mantenuti puliti per garantire
un perfetto risultato. Lavare giornalmente a ne utilizzo.
5.3 Programmazione quantità caff è
In questa macchina è possibile pre ssare le quantità di ca è
erogato, quando viene premuto il tas to (15) o il tasto (16).
La programmazione della quantità di ca è è
possibile solo per il tasto (15) (min 25cc e max
180c c).
Premendo il tasto (16) la macchina eroga una quantità
doppia di quanto programmato con il tasto (15).
•
Per iniziare la programmazione, inserire il ca è nel porta ltro come indicato nel par.5.1 o 5.2.
• Posizionare una tazzina sotto l'erogatore ca è (10).
• (Fig.14) - Premere e mantenere premuto il tasto ca è (15).
Dopo 3 secondi, la macchina comincerà ad erogare ca è.
• Quando nella tazzina è presente la quantità di ca è deside-
rata, rilasciare il tasto (15).
La programmazione è terminata e, d'ora in poi, la macchina
erogherà:
• la medesima quantità selezionata ad ogni pressione e rila-
scio del tasto (15);
• il doppio della quantità selezionata ad ogni pressione e rila-
scio del tasto (16).
6 SCELTA DEL TIPO DI CAF FÈ CON SI GLI
In linea di massima si possono uti liz za re tutti i tipi di ca è esistenti in commercio. Tuttavia, il ca è è un prodotto na tu ra le
ed il suo gusto cambia in funzione del l’ori gi ne e della mi sce la;
è preferibile quindi pro var ne vari tipi, al ne di trovare quello
che meglio si addice ai gusti personali.
Per migliori risult ati si consiglia co mun que di utilizzare miscele
espres sa men te pre pa ra te per macchine espresso. Il ca è dovrebbe sempre fuo riu sci re re golar men te dal porta ltro pressurizzato senza goc cio la re.
La velocità di fuoriuscita del ca è può es se re modi cata cambiando leggermente la dose del ca è nel ltro e/o utilizzando
ca è con un grado di macinatura di erente.
• 10 •
Page 11

Per un miglior risul tato in tazza e per facili tà di pulizia e preparazione, Saeco consiglia l'utilizzo di ca è in cialde monodose
contrassegnate dal marchio ESE.
PRIMA DI ESEGUIRE QUALSIASI OPERA ZIONE RELA-
TIVA ALL’EROGAZIONE DEL VAPORE O DELL’ACQUA
CALDA VERIFICARE CHE IL CAPPUCCINATORE SIA ORIENTATO SOPRA LA VASC A RECUPERO ACQUA.
• (Fig.18) - Inserire un contenitore sotto al cappuccinatore.
• (Fig.5) - Aprire il po mel lo (4) per qual che istante, in modo
da far uscire l’ac qua residua dal cappuccinatore; in breve
tem po co min ce rà ad uscire solo vapore.
• Chiudere il pomello (4) e togliere il contenitore.
Per garantire un miglior risultato utilizzare
latte freddo.
• (Fig.20) - Immergere il tubo d'aspirazione del cappuccina-
tore nel contenitore latte.
• Posizionare la tazza sotto al cappuccinatore.
• (Fig.5) - Aprire il pomello (4) ruotandolo in senso antiora-
rio.
Italiano
7 AC QUA CALDA
Pericolo di scottature! All’inizio dell’erogazione
posso no ve ri car si brevi spruzzi di acqua calda.
Il tubo d’erogazione può rag giun ge re temperature elevate: evitare di toc car lo di ret ta men te con le mani.
• (Fig.3) - Premere l’interruttore ON/OFF (2).
• Attendere che i tasti (15 - 16) si accendano in modo sso.
• (Fig.18) - Sistemare un contenitore o un bic chie re da tè sot-
to al cappuccinatore.
• (Fig.5) - Aprire il po mel lo (4).
• (Fig.6) - Premere il tasto (17).
• Quando è stata prelevata la quan ti tà de si de ra ta di ac qua
cal da, premere nuovamente il tasto (17).
• (Fig.5) - Chiudere il po mel lo (4)
• Prelevare il contenitore con l'acqua calda.
Premendo i tasti (15) o (16) la macchina eroga
una quantità dosata di acqua calda; la quantità
è uguale a quella programmata nel par. 5.3.
8 VA PO RE / CAPPUCCINO
Pericolo di scottature! All’inizio dell’erogazione
pos so no ve ri car si brevi spruzzi di acqua calda.
Il tubo d’erogazione può rag giun ge re temperature elevate: evitare di toc car lo di ret ta men te con le mani.
• (Fig.3) - Premere l’interruttore ON/OFF (2).
• Attendere che i tasti (15 - 16) si accendano in modo sso.
• (Fig.19) - Premere il tasto (18).
• Attendere che il tasto (18) si accenda in modo sso; a questo
punto la mac chi na è pron ta per l’erogazione del va po re.
Si consigl ia un'erogazione mas sima di 60 secondi.
• (Fig.21) - Agire sul perno per regolare il volume della schiu-
ma; sollevarlo delicatamente per aumentare la schiuma.
• Al termine, chiudere il pomello (4); prelevare la tazza con il
latte montato.
Dopo aver preparato il cappuccino, immergere il tubo d'aspirazione in un contenitore contenente acqua pulita ed erogare
vapore. Quando esce acqua chiara, il cappuccinatore è pulito.
Pulire esternamente il tubo d'aspirazione con un panno umido.
Settimanalmente il cappuccinatore deve essere
smontato e lavato comp letamente.
• (Fig.19) - Premere nuovamente il tasto (18).
• Procedere con il caricamento del cir cui to descritto nel par.4.5
per rendere ope ra ti va la macchina.
Nota: la macc hina è operativa qua ndo i tasti (15
e 16) sono accesi in modo sso.
Nota bene: se non si riesce ad erogare un cap-
puccino come descritto, si deve ricaricare il
circuito come descritto nel par. 4.5 e successivamente
ripetere le operazioni.
Lo stesso sistema può essere uti lizza to per il
r i s c a l d a m e n t o d i a l t r e b e v a n d e .
• 11 •
Page 12

9 PANNARELLO
Il pannarello può essere utilizzato in alternativa al cappuccinatore per l'erogazione di acqua calda o l'erogazione di vapore.
Per installare il pannarello si deve rimuovere il cappuccinatore
(Fig.29-30):
- svitare la ghiera senza s larla;
- togliere il raccordo del cappuccinatore dal tubo vapore.
Installare il pannarello (Fig.31):
- Inserire completamente il pannarello nel tubo vapore;
- Avvitare bene la ghiera.
(Fig.32; Fig.33) - Per erogare acqua calda o vapore si deve
preparare la macchina come descritto nei paragra 7 e 8 ed
utilizzare il pannarello per la preparazione.
(Fig.34; Fig.35) - Dopo l'utilizzo, a macchina fredda, s lare la
parte inferiore del pannarello e lavarla con acqua tiepida.
(Fig.36) - Set timanalmente smontare anche la par te superore
e lavarla con acqua tiepida.
10 PULIZIA
La manutenzione e la pulizia possono essere e ettuate soltanto, quando la macchina è fredda e scollegata dalla rete
elettrica.
• Non immergere la mac chi na nel l’ac qua e non inserire i com po nen ti nella la va sto vi glie.
• Non utilizzare alcool etilico, solventi e/o agenti chimici aggressivi.
• Si consiglia di pulire quo ti dia na men te il serbatoio del l’ac qua e di riempirlo con acqua fresca.
• (Fig.20) - Dopo aver riscaldato il lat te erogare anche una
piccola quantità di acqua calda.
Pericolo! quando la parte terminale del cappuccinatore è smontata, non di deve mai erogare
vapore.
• (Fig.22 - 23) - Settimanalmente si deve pulire il cappuccinatore.
Per eseguire questa operazione, si deve:
- rimuovere la parte terminale del cappuccinatore;
- separare la parte superiore ed inferiore del cappuccinatore;
- lavare tutti i componenti del cappuccinatore con acqua tiepida;
- lavare il tubo d'aspirazione con un panno umido e rimuovere eventuali residui di latte;
- assemblare il cappuccinatore;
- riposizionare la parte terminale del cappuccinatore nel
raccordo che è rimasto sulla macchina (assicurarsi che sia
completamente inserito).
• (Fig.24) - Giornalmente vuotare e lavare la vasca raccogli
gocce.
• Per la pulizia dell’apparecchio utilizzare un panno morbido
inumidito d'acqua.
• (Fig.17) - Per la pulizia del porta ltro pressurizzato pro ce de re come segue:
- (Fig.10) - estrarre il ltro, lavarlo con cura con acqua cal-
da.
- estrarre l'adattatore (se presente), lavarlo con cura con acqua calda.
- lavare l’interno del porta ltro pressurizzato.
• Non asciugare la macchina e/o i suoi componenti utilizzando un forno a microonde e/o un forno convenzionale.
Nota: non lavare il porta ltro pressurizzato
nella lavastoviglie.
11 DE CAL CI FI CA ZIO NE
La formazione di calcare avviene con l’uso dell’apparecchio;
la decalci cazione è necessaria ogni 1-2 mesi di utilizzo della
macchina e/o quando si osserva una riduzione della portata
dell’acqua. Usare esclusivamente il prodotto decalci cante
Saeco.
Quanto indicato nel manuale di uso e manu-
tenzione ha priorità rispetto alle indicazioni
riportate su accessori e/o materiali d’uso venduti separatamente, laddove sussista un con itto.
Usare il prodotto decalci cante Saeco (Fig.B).
E' stato formulato speci catamente per mantenere al meglio la performance e la funzionalità della
macchin a per tutta la sua v ita, nonchè per ev itare, se correttamente usato, ogni alterazione del prodotto erogato. prima d’iniziare il ciclo di decalci cazione assicurarsi
che: SIA STATO RIMOSSO IL FILTRO ACQUA se utiliz zato.
Non bere la soluzione decalci cante e i prodotti erogati no al completamento del ciclo. Non
utilizzare in nessun caso l’aceto come decalc i cante.
1 (Fig.11-12) - Inserire dal basso il porta ltro nel gruppo
erogazione (6) e ruotarlo da sinistra verso destra no al suo
bloccaggio.
2 (Fig.1) - Rimuovere e svuotare il serbatoio dell’acqua.
• 12 •
Page 13
3 (Fig.2) - Versare METÀ del contenuto della bottiglia di
decalci cante concentrato Saeco nel serbatoio dell’acqua
dell’apparecchio e riempire con acqua fresca potabile no
al livello MAX.
4 (Fig.3) - Accendere la macchina premendo l’interruttore
ON/OFF (2).
(Fig.4) - Prelevare (come descritto nel capitolo 7 del ma-
nuale), dal tubo vapore/acqua calda, 2 tazze (circa 150 ml.
ciascuna) di acqua; dopodichè spegnere la macchina tramite l’interruttore ON/OFF (2).
5 Lasciare agire il decalci cante circa 15-20 minuti con la
macchina spenta.
6 Accendere la macchina premendo l’interruttore ON/OFF (2).
(Fig.4) - Prelevare (come descritto nel capitolo 7 del ma-
nuale) dal tubo vapore/acqua calda 2 tazze (circa 150 ml
ciascuna) di acqua. Successivamente spegnere la macchina
tramite l’interruttore ON/OFF (2) e lasciarla spenta per 3 minuti.
7 Ripetere le operazioni descritte al punto 6 no al completo
svuotamento del serbatoio dell’acqua.
8 (Fig.2) - Risciacquare il serbatoio con acqua fresca potabile
e riempirlo completamente.
9 Inserire un contenitore sotto al porta ltro.
10 (Fig.6) - Accendere la macchina premendo l’interruttore ON/
OFF (2)
; attendere che i tasti (15 - 16) si accendano in modo
sso.
Premere il tasto “ ” ed erogare la quantità di acqua
programmata.
11 Vuotare il contenitore posto sotto al porta ltro e ripetere
le operazioni riportate al punto (10) no allo svuota-
mento dell’acqua presente nel serbatoio.
12 (Fig.2) - Riempire nuovamente il serbatoio con acqua fre-
sca.
(Fig.4) - Posizionare un contenitore capiente sotto al
tubo vapore/acqua calda. Aprire il rubinetto di erogazione dell’acqua (4) ruotandolo in senso antiorario. Premere
il tasto acqua calda “
serbatoio tramite il tubo vapore/acqua calda.
13 Dopo aver nito il prelievo di acqua, per fermare l’erogazione
premere nuovamente il tasto acqua calda “
rubinetto erogazione acqua (4) ruotando in senso orario.
14 Ripetere un’altra volta le operazioni dal punto (8) per un
totale di 4 serbatoi.
15 (Fig.16) - Rimuovere il porta ltro dal gruppo ruotandolo da
destra verso sinistra e sciacquarlo con acqua fresca potabile.
” e prelevare l’intero contenuto del
”. Chiudere il
La soluzione decalci cante deve essere smalti-
ta secondo quanto previsto dal costruttore e/o
dalle norme vigenti nel Paese d’utilizzo.
12 SMALTIMENTO
INFORMAZIONE AGLI UTENTI: ai sensi dell’art. 13 del Decreto
Legislativo 25 luglio 2005, n. 151"Attuazione delle Direttive
2002/95/CE, 2002/96/CE e 2003/108/CE, relative alla riduzione
dell'uso di sostanze pericolose nelle apparecchiature elettriche
ed elettroniche, nonché allo smaltimento dei ri uti"
Il simbolo
parecchiatura o sulla sua confezione indica che il prodot to alla
n e della propria vita utile deve e ssere raccolto separata mente
dagli altri ri uti.
L’utente dovrà, pertanto, conferire l’apparecchiatura giunta a
ne vita agli idonei centri di raccolta di erenziata dei ri uti
elettronici ed elettrotecnici, oppure riconsegnarla al rivenditore al momento dell ’acquisto di una n uova apparecchiatura di
tipo equivalente, in ragione di uno a uno.
L’adeguata racco lta di erenziata per l’avvio successi vo dell’apparecchiatura dismessa al riciclaggio, al trattamento e allo
smaltimento ambientalmente compatibile contribuisce ad
evitare possibili e etti negativi sull’ambiente e sulla salute e
favorisce il rei mpiego e/o riciclo dei materiali di c ui è composta
l’apparecchiatura.
Lo smaltimento abusivo del prodotto da parte dell’utente
comporta l’applicazione delle sanzioni amministrative previste dalla normativa vigente.
del cassonet to barrato riportato sull’ap-
Italiano
Il ciclo di decalci cazione è cosi concluso.
(Fig.2) - Riempire nuovamente il serbatoio con acqua fresca.
Se necessario e ettuare il caricamento del circuito come descritto nel par. 4.5 del manuale.
• 13 •
Page 14

Guasto Cause possibili Rimedio
La macchina non si ac cen de. Macchina non collegata alla rete elettri-
La pompa è molto r u mo ro sa. Manca acqua nel ser ba to io Rabboccare con acqua.(par.4.4).
Tutti i tasti lamp eggiano Il circuito dell'acqua deve essere caricato.
Il ca è é troppo freddo.
Non si forma la schiu ma del lat te.
Non si riesce a preparare un cappuccino.
Il ca è sgorga troppo ve lo ce men te, non si forma la crema.
Il ca è non sgorga o sgor ga solo
a gocce.
Il ca è sgorga dai bordi.
ca.
Porta ltro non inserito per il preriscaldamento (cap. 5).
Tazzine fredde. Preriscadare le tazzine con acqua calda.
Latte non adatto: latte in polvere, latte
magro.
Cappuccinatore sporco. Pulire il cappuccinatore come descr itto nel Cap.9.
Non è più presente vapore nella caldaia.
Troppo poco ca è nel porta ltro. Aggiungere il ca è (cap. 5).
Macinatura trop po grossa. Usare una miscela diversa (cap.6).
Ca è vecchio o non adatto. Usare una mi sce la diversa (cap.6).
Cialda vecchia o non adat ta. Cambiare la cialda utilizzata.
Manca un componente nel port a ltro.
Mancanza di acqua. Rabboccare con acqua (par.4.4).
Macinatura trop po ne. Usare una miscela diversa (cap.6).
Ca è premuto nel porta ltro. Smuovere il ca è macinato.
Troppo ca è nel porta ltro. Ridurre la quantità di ca è nel porta ltro.
Pomello (4) aperto. Chiudere il pomello (4).
Macchina calci cata. Decalci care la macchina (cap.10).
Filtro nel porta ltro otturato. Pulire il ltro (cap.9).
Cialda non adatta. cambiare il tipo di cialda.
Porta ltro inserito male nel grup po ero-
gazione ca è.
Bordo superiore del porta ltro sporco. Pulire il bordo del por ta ltro.
Guarnizione della caldaia spor ca o usu-
rata.
Cialda inserita in modo errato.
Troppo ca è nel porta ltro.
Collegare la macchina alla rete elet trica.
Eseguire il caricamento del circuito come descritto nel par. 4.5.
Preriscaldare il porta ltro.
Utilizzare latte intero.
Ricaricare il circuito (par. 4.5) e ripetere le operazioni desc ritte nel Cap.8.
Veri care che tutti i componenti siano presenti e
correttamente montati.
Inserire correttamente il porta ltro (cap.5).
Pulire la guar ni zio ne.
Inserire correttamente la cialda facendo in modo
che non esca dal p orta ltro.
Ridurre la quantità di ca è uti liz zan do il misurino.
Per i guasti non con tem p la ti dalla suddetta ta bel la o in c aso che i rimedi sug ge ri ti non li ri sol va no, rivolgersi ad un
centro assistenza.
• 14 •
Page 15

1 GENERAL INFORMATION
The co ee machine is ideal for brewing 1 or 2 cups of espresso
co ee and it is provided wi th a swivel cappuccinator e for steam
ejection and hot water dispensing. The controls on the front
side of the machine are labelled with easy-to-read symbols.
The machine has been designed for household use only. It is
not suitable for professional, continuous use.
Warning. No lia bility is held f or damages caused
by:
• Improper and inconsistent use of the machine.
• Rep airs carr ied out by anyone oth er than author ized
service centres.
• Tampering with the power cord.
• Tampering with any component of the machine.
• Use of non-o riginal spare par ts and accessories.
• Failed d escaling and s torage at tempera tures below
0°C.
In such cases, the warranty is not valid.
1.1 To Facilitate interpretation
The warning triangle indicates the
instructions that are important for
user's safety. Please follow these
instructions carefully to avoid serious injury!
lllustrations, parts of the machine and control elements are
referred to by numbers or letters; in this case please refer to
the illustration.
2 TECHNICAL SPECIFICATIONS
The manufac turer reser ves the right to make technic al changes
to the product.
Nominal Voltage - Power rating - Power supply
See label on the appliance
Housing material
Plastic
Size (w x h x d) (mm)
270 x 350 x 300
Weight
4 kg
Cord length
1.2 m
Control panel
Front side
Porta lter
Pressurized type
Pannarello
Special for cappuccinos
Water Tank
1.5 litres - Removable t ype
Pump pressure
15 ba r
Boiler
Stainless steel
Safety devices
Thermal fuse
English
This symbol emphasizes particularly important
information to take into greater account for a
better use of the machine.
The illus trations corr esponding to th e text can be fou nd
on the rst pages of the manual. Please refer to these
pages while reading the operating instructions.
1.2 How to Use These Operating
Instructions
Keep these operating instructions in a safe place and make
them available to anyone who may use the co ee machine.
For further information or in case of problems, please refer to
any authorized service centre.
• 15 •
Page 16

3 SAFETY REGULATIONS
Do not put live parts in contact with water: danger of
short circuit! Overheated steam and hot water may
cause sc alding! Do not dire ct the steam or hot wate r jet
towards bo dy parts. Handle t he steam/hot water s pout
with care: danger of scalding!
Intended Use
The co ee machine is intended for domestic use only. Do not
make any technical changes or use the machine for unlawful
purposes sin ce this would create seriou s hazards! The appliance
is not for use by persons (included children) with reduced
physical, mental or sensory abilities or with scarce experience
and/or competences, unless they are supervised by a person
responsible for their safety or they are instructed by him/her
to use the machine.
Power Supply
Connect the co ee machine only to a suitable socket. The
voltage must correspond to the value shown on the machine’s
label.
Power Cord
Do not use the co ee machine if the power cord is defective.
If damaged, the power cord must be replaced by the
manufacturer or its customer service centre. Do not run the
cord around sharp corners and edges as well as on hot objects
and keep it away from oil.
Do not use the power cord to carry or pull the co ee machine.
Do not unplug the machine by pulling the power cord or touch
the plug with wet hands.
Do not let the power cord hang freely f rom tables or shelves.
Protecting Other People
Prevent children from p laying with the machine.
Children are not aware of the risks stemming from household
appliances. Do not leave the co ee machine packaging within
the reach of children.
Danger of Burns
Do not direct the jet of overheated steam and/or hot water
towards yourself or other people. Always use the special
handles or knobs.
Do not disconnect (remove) the pressurized porta lter during
co ee brewing. Hot water drops may spill out of the co ee
brew unit during the warming up.
Location
Place the co ee machine in a safe place, where nobody may
overturn i t or be injured by it.
Hot water or overheated steam may spill out of the machine:
danger of scalding!
Do not keep the machine at a temperature below 0°C; frost
may damage the machine.
Do not use the co ee machine outdoors.
Do not place the machine on very hot surfaces and close to
open ames in order to prevent its housing from melting or
being damaged.
Cleaning
Bef ore clea ning the machin e, discon nect i t by pres sing the ON/
OFF button, t hen pull out the plug from t he socket. Wait for the
machine to cool down. Do not immers e the machine in water!
It is strictly forbidden to tamper with the internal parts of the
machine.
Water left in the t ank for several days should not be con sumed.
Wash the tank and ll it with fresh drinking water.
Space for Operation and Maintenance
To ensure that the co ee machine works properly and
e ciently, read the following inst ructions.
• Choose an even surface.
• Choose an adequately lit and clean location with a socket
within easy reach.
• Allow for a minimum distance from the sides of the machine
as shown in Fig. A.
Storing the Machine
If the machine is to remain unused for a long time, turn it o
and unplug it from the socket. Keep it in a dry place out of
children’s reach. Shelter it from dust and dirt.
Repairing / Maintenance
In case of failure, faults or a suspected fault after dropping,
remove the plug from the socket immediately. Do not operate
a faulty ma chine. Servicing and r epairing should be car ried out
by authorized service centres only. All liability for damages
caused by works not carried out in a professional manner is
declined.
Fire Safety
In case of re, use carbon dioxide (CO2) extinguishers. Do not
use water or dry powder extinguishers.
• 16 •
Page 17

Key to machine components (Page 2)
1 Control panel
2 ON/OFF button
3 Water Tank
4 Hot water/steam knob
5 Drip tray & grill
6 Co ee brew unit
7 Cappuccinatore
8 Power cord
9 Ground co ee measuring scoop
10 Pressurized porta lter
11 Ground co ee lter
(single piece for 1 or 2 co ee(s))
12 Pannarello
13 Pod lter adapter
14 Co ee pod lter
15 Single co ee brew button
16 Double co ee brew button
17 Hot water button
18 Steam button
4.3 Machine Connection
Electric power can be dangerous! It is therefore
essentia l to follow the s afety reg ulations c arefully.
Do not use faulty cords! Faulty cords and plugs must be
immediately replaced by authorized service centres.
Appliance voltag e has been pre-set by the manu facturer. Make
sure that the power voltage matches the indications on the
identi cation plate on the bottom of the appliance.
• Make sure that the ON/OFF button (2) is not pressed before
connecting the machine to the power supply.
• Fit the plug into a wall socket with suitable power voltage.
4.4 Water Tank
• (Fig.1) - Remove the water tank (3).
• (Fig.2) - Rinse the water tank and ll it with fresh drinking
water taking care not to over ll it.
• (Fig.1) - Reinsert the water tank into its seat and make sure
that it has been placed correctly.
English
4 INSTALLATION
For your and other people safety, follow the "Safety
Regulatio ns" in section 3 carefully.
4.1 Packaging
The original packaging has been designed to protect the
machine during transport. We recommend keeping the
packaging for future transport.
4.2 Installation Instructions
Before installing the machine, read the following safety
instructions carefully.
• Put the machine in a safe place.
• Make sure children cannot play with the machine.
• Do not place the machine on hot surfaces or near open
ames.
The co ee machine is now ready to be connec ted to the power
supply.
Note: it is recommended to wash the
components before using them for the rst
time and/or after they have not been used for a cer tain
period of time.
Use only fresh, non-sparkling drinking water
to ll the tank. Hot water, as well as any other
liquid, may damage the tank. Do not turn on the
machine with empty water tank: make sure there is
enough water in the tank.
4.5 Circuit Priming
At the beginning, after dispensing steam or when the water
tank is empty, the machine’s water circuit must be primed. In
this case, the 4 buttons of the control panel will blink at the
same time.
• (Fig.3) - Press the ON/OFF button (2). The 4 buttons will
ash.
• (Fig.4) - Place a container under the cappuccinatore.
• (Fig.5) - Open the "hot water/steam" knob (4) by turning it
anticlockwise.
• (Fig.6) - Press the hot water button (17).
• Wait for water dispensing to stop.
• Close the "hot water/steam" knob (4) by turning it clockwise.
Remove the container.
When the rst priming ends, the warming up
start s. Before bre wing co ee, water and s team,
please wait for lights 15 and 16 to be permanently on.
Note: if primi ng is not completed, the 4 b uttons
will keep on ashing. The machine cannot be
used.
• 17 •
Page 18
4.6 Using the machine for the fi rst time
or after a period of inactivity
This simple operation ensures an optimum brewing and must
be performed:
- At rst start-up;
- When the machine remains inactive for a long time (more
than 2 weeks).
Dispensed water must be emptied into an
adequate drain. It is not suitable for food use. If
the contai ner lls up, stop dispen sing water during the
cycle and empty it before resuming the operation.
1 (Fig.2) - Rinse the tank and ll it again with fresh drinking
water.
2 (Fig.4-6) - Place a container under the Cappuccinatore.
Open the knob (4) by turning it counter-clockwise and press
the hot water button “
3 Dispense the whole water tank content from the
Cappuccinatore. To end the operation, press the hot water
button "
clockwise.
4 (Fig.2) - Fill the water tank with fresh drinking water.
5 (Fig.11-12) - Insert the porta lter into the brew unit from
the bottom (6) and turn it from left to right until it locks into
place.
6 (Fig.13) - Place a suitable container under the porta lter.
7 Press the "
quantity of water.
8 Empty the container placed under the porta lter and
repeat the operations described in step (7) until the
water tank is completely empty.
9 Fill the tank again and wait until the lights of buttons
"
10 (Fig.16) - Remove the porta lter from the unit by turning it
from right to left and rinse it with fresh drinking water. The
machine is now ready to be used.
The machine is now ready to brew co ee and dispense steam.
Please see related sections f or operating details.
" again and close the knob (4) by turning it
" and ” ” turn on and remain steady on.
”.
" button to dispense the programmed
4.7 Drip Tray Adjustment
The drip tray can be adjusted according to the cup size.
To adjust the drip tray height, do as follows.
• (Fig.24) - Lift the drip tray and remove the grill.
• (Fig.25) - Remove the support under the drip tray.
• (Fig.26 - 27) - Rotate the support and place it in the co ee
machine.
• (Fig.28) - Put the drip tray on the support and replace the
grill.
5 COFFEE BREWING
Warning! During the co ee brewing, do not
remove the pressurized porta lter by manually
turning it clock wise. Danger of burns.
• During this operation, the buttons (15 - 16) may ash on
and o ; this is to be considered as standard and not a faulty
operating mode.
• Before using the machine, make sure that the hot water/
steam knob (4) is closed and that there is enough water in
the tank.
• (Fig.3) - Press the ON/OFF button (2).
• Wait for the buttons (15 - 16) to be permanently on. The
machine is now ready for co ee brewing.
5.1 Using ground coff ee
• (Fig.8) - Insert the lter (11) in the pressurized porta lter
(10); the lter is already inserted before using the machine
for the rst time.
• (Fig.11) - Insert the porta lter into the brew unit from the
bottom (6).
• (Fig.12) - Turn the porta lter from left to right until it
locks into place. Release the porta lter grip. The handle
will slightly turn to the left. This movement guarantees
porta lter performance.
• (Fig.14) - Preheat the pressurized porta lter by pressing
the button (16). Water will spill out of the pressurized
porta lter (this has to be done only for the rst co ee).
• Water dispensing will stop automatically.
• (Fig.16) - Remove the porta lter from the machine by
turning it to the left and pour out any water left. As the
machine is tted with the special lter (11), there is no need
to change the lter to make one or two co ees.
• (Fig.9A) - Add 1-1.5 measuring scoop for single co ee and
2 measuring scoops for double co ee. Remove any co ee
residues from the rim of the lter.
• (Fig.11) - Insert the porta lter (10) into the brew unit from
the bottom (6).
• (Fig.12) - Turn the porta lter from left to right until it locks
into place.
• (Fig.13) - Ta ke 1 or 2 preheated cups and place them under
the pressurized porta lter. Make sure that they are correctly
placed under the co ee brewing nozzles.
• 18 •
Page 19
• (Fig.14) - Press:
- button (15) to brew 1 co ee, or
- button (16) to brew 2 co ees.
• When the programmed quantity of co ee has been
obtained, brewing will stop automatically. Remove the
co ee cups (Fig.15).
• (Fig.16) - Wait a few seconds after brewing, then remove
the pressurized porta lter and empty the remaining co ee
grounds.
Note: If a small quantity of water remains in
the porta lter, this is absolutely normal and is
due to the por ta lter features.
Important note: The lter (11) should be kept
clean to guarantee perfect results. Clean daily
after use.
5.2 Using Coff ee Pods
• (Fig.10) - Use a co ee spoon to remove the lter for ground
co ee (11) from the pressurized porta lter (10).
• (Fig.7A) - Insert the co ee pod adapter (13) - with the
convex part facing down - into the pressurized porta lter
(10).
• (Fig.7B) - Then, insert the pod lter (14) into the pressurized
porta lter (10).
• (Fig.11) - Insert the pressurized porta lter into the brew
unit (6) from the bottom.
• (Fig.12) - Turn the porta lter from left to right until it locks
into place. Release the grip from the pressurized porta lter.
The handle is automatically slightly turned leftwards.
This movement guarantees porta lter performance.
• (Fig.14) - Preheat the pressurized porta lter by pressing
the button (16). Water will spill out of the pressurized
porta lter (this has to be done only for the rst co ee).
• Water dispensing will stop automatically.
• (Fig.16) - Remove the pressurized porta lter from the
machine by turning it to the left and pour out any water
left.
• (Fig.9B) - Insert the pod into the porta lter and make sure
the paper of the pod does not overhang the porta lter.
• (Fig.11) - Insert the pressurized porta lter into the brew
unit (6) from the bottom.
• (Fig.12) - Turn the porta lter from left to right until it locks
into place.
• Take one preheated cup and place it under the porta lter.
Check that it is correctly placed under the co ee brewing
nozzles.
• (Fig.14) - Press the button (15) for 1 co ee.
• When the programmed quantity of co ee has been
obtained, brewing will stop automatically. Remove the
co ee cups (Fig.15).
• (Fig.16) - Wait a few seconds after brewing, then remove
the porta lter and dispose of the used pod.
English
Important note: The lter (14) and the adapter
(13) should be kept clean to guarantee perfect
results. Clean daily after use.
5.3 Programming the Quantity of Coff ee
It is possible to preset the quantity of co ee to be brewed by
pressing the buttons (15) or (16).
The quantity of co ee can only be programmed
for the but ton (15) (min. 25cc, max. 180cc).
By pressing the button (16), you will have twice the
quantit y programmed by the button (15).
• To start programming, insert co ee into the porta lter as
shown in Sections 5.1 and 5.2.
• Place a cup under the brew unit (10).
• (Fig. 14) - Press the co ee brew button (15) for a few seconds.
After 3 seconds, the machine will start brewing co ee.
• When the desired quantity of co ee is in the cup, release the
button (15).
Programming is complete. From now on the machine will
brew:
• The same quantity as the one previously selected by pressing
and releasing the button (15).
• Twice the quantity as the one previously selected by pressing
and releasing the button (16).
• 19 •
Page 20
6 TIPS FOR CHOOSING COFFEE
As a general ru le any type of co ee available on the market can
be used. However, co ee is a natural product and its avour
changes accord ing to its origin and blend; it is t herefore a good
idea to try di erent types of co ee in order to nd the most
suited to your personal taste.
For best results, we recommend using blends which are
expressly indicated for espresso co ee machines. Co ee
should always be dispensed by the pressurized porta lter
without dripping. The speed of co ee dispensing can be
modi ed by s lightly changin g the amo unt of co ee in th e lter
and/or by using a di erent co ee grind. Saeco recommends
using single-dose co ee pods marked ESE for a tasty co ee
and easier cleaning and preparing.
BEFORE USING THE HOT WATER/STEAM JET, MAKE
SURE THAT THE CAPPUCCINATORE IS POSITIONED
OVER THE DRIP TRAY.
7 HOT WATER
Danger of s calding! When b rewing star ts, spurts
of hot water may come out. The spout can reach
high temperatures: do not touch it with bare hands.
• (Fig.3) - Press the ON/OFF button (2).
• Wait for the buttons (15 - 16) to be permanently on.
• (Fig.18) - Place a container or a teacup under the
cappuccinatore.
• (Fig.5) - Open the knob (4).
• (Fig.6) - Press the button (17)
• When the required amount of hot water has been dispensed,
press the button (17) again.
• (Fig.5) - Close the knob (4).
• Remove the container with hot water.
By pressi ng the buttons (15) or (16), the machine
will brew th e same quantity of ho t water as the
one programmed in Section 5.3.
8 STEAM / CAPPUCCINO
Danger of scalding! When brewing begins,
spurts of hot water may come out. The spout
can reach high temperatures: do not touch it with bare
hands.
• (Fig.3) - Press the ON/OFF button (2).
• Wait for the buttons (15 - 16) to be permanently on.
• (Fig.19) - Press the button (18).
• Wait for the button (18) to be permanently on. The machine
is now ready for steam ejection.
• (Fig.18) - Place a container under the cappuccinatore.
• (Fig.5) - Open the knob (4) for a few seconds, so that
remaining water ows out of the cappuccinatore. In a short
time only steam will come out.
• Close the knob (4) and remove the container.
Use cold milk to get a better result.
• (Fig.20) - Immerse the cappuccinatore suction pipe in the
milk container.
• Place the cup under the cappuccinatore.
• (Fig.5) - Open the knob (4) by turning it anticlockwise.
A maximum steam ejection of 60 seconds is
recommended.
• (Fig.21) - Adjust the froth quantity by using the pin. Lift it
gently to get a greater quantity of froth.
• When brewing ends, close the knob (4) and remove the cup
with the frothed milk.
After preparing the cappuccino, immerse the suction pipe
into a container with fresh clean water and eject steam. The
cappuccinatore is clean when clean water is dispensed. Clean
the suction pipe externally with a damp cloth.
The cappuccinatore must be removed and
completely washed once a week.
• (Fig.19) - Press the button (18) again.
• Prime the circuit as described in section 4.5 to make the
machine ready for use.
Note: the machine is ready when the buttons
(15 and 16) are permanently on.
• 20 •
Note: if it is not po ssible to dis pense a cap puccino
as described, prime the circuit as explained in
Section 4.5, then repeat the pr ocedure.
Page 21
The same procedure can be used to heat other
beverages.
9 PANNARELLO
Pannarello can be used for dispensing hot water and ejecting
steam instead of the cappuccinatore.
Remove the cappuccinatore before installing the Pannarello
(Fig.29-30):
- Loosen the ring nut without taking it o .
- Remove the cappuccinatore coupling from the steam
spout.
Install the Pannarello (Fig.31):
- Insert the Pannarello completely into the steam spout.
- Tighten the ring nut securely.
(Fig.32 - Fig.33) - Prepare the machine by using the
Pannarello as described in Sections 7 and 8 to dispense hot
water or steam.
- Wash all the cappuccinatore parts with lukewarm water.
- Wash the suction pipe with a damp cloth and remove any
milk residue.
- Assemble the cappuccinatore.
- Place the end part of the cappuccinatore in the coupling on
the machine (make sure it is completely inserted).
• (Fig.24) - Empty and clean the drip tray daily.
• Use a damp and soft cloth to clean the appliance.
• (Fig.17) - Perform the following operations to clean the
pressurized porta lter:
- (Fig.10) - Remove the lter, wash it thoroughly with hot
water.
- Remove the adapter (if tted), and wash it thoroughly
with hot water.
- Wash the internal part of the pressurized porta lter.
• Do not dry the machine and/or its components in a
microwave and/or in a conventional oven.
Note: do not wash th e pressurized por ta lter in
the dishwasher.
English
(Fig.34 - Fig.35) - After usi ng the machine, when it has cooled
down, remove the lower part of the Pannarello and wash it
with lukewarm water.
(Fig.36) - Once a week, remove the upper part as well and
wash it with lukewarm water.
10 CLEANING
Maintenance and cleaning must be performed only when the
machine has cooled d own and has been disconnecte d from the
power supply.
• Do not immerse the machine in water nor place any of its
parts in a dishwasher.
• Do not use spirit, solvents and/or aggressive chemical
agents.
• We recommend cleaning the water tank and lling it up
with fresh water daily.
• (Fig.20) - After heating milk, brew a small quantity of hot
water as well.
Danger! If the end part of the cappuccinatore
has been removed, do not eject steam.
• (Fig.22 - 23) - Clean the cappuccinatore weekly.
In order to do this, please:
- Remove the cappuccinatore end part.
- Separate the cappuccinatore upper and lower parts.
11 DESCALING
Limescale b uilds up with the use of the app liance; the machine
needs desc aling every 1-2 months and/or whe never a reductio n
in water ow is noticed. Use the S aeco descaling solution only.
In c a se o f co n ic t , p ri o r it y m u st b e g i v en t o w h a t
is indicated in the operation and maintenance
manual over the instructions provided on separately
sold accessories and materials.
Use the Saeco descaling solution (Fig.B). Its
formula has been designed to ensure better
machine performance and operation for its whole
operatin g life. If correct ly used, it also avoids al terations
in the brewed produc t. Before starting a descaling cycle
make sure that: THE WATER FILTER (if used) HAS BEEN
REMOVED.
Never drink the descaling solution or any
products dispensed until the cycle has been
carrie d out to the end. Never use vin egar as a descaling
solution.
1 (Fig.11-12) - Insert the porta lter into the brew unit from
the bottom (6) and turn it from left to right until it locks into
place.
2 (Fig.1) - Remove and empty the water tank.
3 (Fig.2) - Pour HALF the content of the Saeco concentrated
• 21 •
Page 22

descaling solution into the water tank, then ll the tank
with fresh drinking water up to the MAX level.
4 (Fig.3) - Switch on the machine by pressing the ON/OFF
button (2).
(Fig.4) - Fill up (as described in Section 7 of the manual)
two cups of water (about 150 ml each) from the steam / hot
water wand and turn o the machine by pressing the ON/
OFF button (2).
5 Leave the descaling solution to descale for approx.15-20
minutes with the machine turned o .
6 Switch on the machine by pressing the ON/OFF button (2).
(Fig.4) - Fill up (as described in Section 7 of the manual)
two cups of water (about 150 ml each) from the steam / hot
water wand. Then turn o the machine by means of the ON/
OFF button (2) and leave it o for 3 minutes.
7 Repeat the operations as described in step 6 until the water
tank is completely empty.
8 (Fig.2) - Rinse the water tank with fresh drinking water and
ll it completely.
9 Place a container under the porta lter.
10 (Fig.6) - Switch on the machine by pressing the ON/OFF
button (2). Wait for the buttons (15 - 16) to be permanently
on. Press the
quantity of water.
11 Empty the container placed under the por ta lter and repeat
the operations described in step (10) until the water tank is
completely empty.
12 (Fig.2) - Fill the tank again with fresh water.
(Fig.4) - Place a large enough container under the steam
/ hot water wand. Open the water dispensing knob (4) by
turning it counter-clockwise. Press the hot water button
“
of the steam / hot water wand.
13 After dispensing water, press the hot water button “
again to stop the dispensing. Close the water dispensing
knob (4) by turning it clockwise.
14 Repeat the operations from point (8) once again for a total
of 4 tanks.
15 (Fig.16) - Remove the porta lter from the unit by turning it
from right to left and rinse it with fresh drinking water.
“ ”
button to dispense the programmed
” and dispense the whole content of the tank by means
12 DISPOSAL
• Put unused appliances out of service.
• Disconnect the plug from the socket and cut the electrical
cord.
• At the end of its life, take the appliance to a suitable waste
collection site.
This produc t complies with EU Directive 2002/96/EC.
The symbol
indicates that this product may not be treated as household
waste. Instead it shall be handed over to the applicable
collection point for the recycling of electrical and electronic
equipment.
By ensuring this product is disposed of correctly, you will help
prevent potential negative consequences for the environment
and human health, which could otherwise be caused by
inappropriate waste handling of this product. For more
detailed information about recycling of this product, please
contact your local city o ce, your household waste disposal
service or the shop where you purchased the product.
”
on the product or on its packaging
The descaling cycle is now complete.
(Fig.2) - Fill the tank again with fresh water. If necessary,
prime the circuit as described in Section 4.5 of the manual.
The descaling solution must be disposed of
according to the manufacturer’s instructions
and/or regu lations in force in the countr y of use.
• 22 •
Page 23

Fault Possible cause Solution
The machine does not turn on. Machine not connected to the power supply. Connect the machine to the power supply.
The pump is very noisy. Water tank empty. Re ll with water (Section 4.4).
All buttons are ashing. Water circuit needs priming.
The co ee is too cold.
The porta lter is not inserted for preheating
(Sec tion 5).
Cold cups. Preheat the cups with hot water.
Prime the circuit as described in Section
4.5.
Preheat the porta lter.
English
Milk does not froth.
It is not possible to prepare a
cappuccino.
The co ee is dispensed too fast,
no foam builds up.
Co ee is not dispensed or
dispensed only in drips.
Not suitable milk: powdered milk, low-fat milk. Use whole milk.
The cappuccinatore is dirty.
No steam in the boiler.
Too little co ee in the porta lter. Add co ee (Section 5).
Co ee ground is too coar se. Use a di erent blend (Sec tion 6).
Co ee is old or not suitable. Use a di erent blend (Section 6).
Old or not suitable pod. Change the pod.
One component missing in the por ta lter.
No water. Re ll with water. (Section 4.4).
The grind is too ne. Use a di erent blend (Section 6).
Co ee pressed in the porta lter. Shake the ground co ee.
Too much co ee in the porta lter.
Knob (4) is open.
Traces of limestone. Descale the machine (section 10).
The lter in the porta lter is clogged. Clean the lter (Section 9).
Not suitable pod. Change type of pod.
The porta lter is incorrectly inserted into the
brew unit.
The upper edge of the por ta lter is dirty. Clean the rim of the port a lter.
Clean the cappuccinatore as described in
Section 9.
Prime the circuit (section 4.5) and repeat
the procedure described in Section 8.
Make sure that all components are
present and that they have been installed
properly.
Reduce the quantity of co ee in the
porta lter.
Close the knob (4).
Insert the p orta lter correctly (Section 5).
Co ee drips from the edges.
Please contact an authorized service centre for any faults not covered in the above table or when the suggested
solutions do not solve the problem.
The gasket of the boiler is dirt y or worn. Clean the gasket.
Pod wrongly inserte d.
Too much co ee in the porta lter.
Insert the pod correctly. Make sure it does
not come out of the porta lter.
Reduce the quantity of co ee using the
measuring scoop.
• 23 •
Page 24
1 ALLGEMEINES
Die Ka eemaschine eignet sich für die Zubereitung von 1 oder
2 Tassen Espresso un d ist mit einem drehbaren Cap puccinatore
für die Dampf- und die Heißwasserausgabe ausgestattet. Die
Bedienelemente auf der Vorderseite des Geräts sind mit einfach verständlichen Symbolen gekennzeichnet.
Die Maschine wurde für den Einsatz im Haushalt entwickelt
und eignet sich daher nicht für den Dauerbetrieb im gewerblichen Einsatz.
Achtung. In fo lgenden Fällen wird für eventuelle Schäden keine Haf tung übernommen:
• Falsche und n icht den vorgesehenen Verwend ungszwecken entsprechende Ver wendung;
• Reparaturen, die nicht in autorisierten Kundendienststellen durchgeführt wurden;
• Veränderungen am Netzkabel;
• Veränderungen an beliebigen Bestandteilen der
Vorr ichtu ng;
• Verwen dung von anderen a ls originalen Er satz- und
Zubehörteilen;
• Fehlende Entkalkung und Lagerung in Räumen bei
Temperaturen unter 0°C.
In diesen Fällen erlischt die Gar antie.
1.1 Hinweise zur einfacheren Lektüre
Das Warndreieck weist auf alle
wichtigen Anweisungen für die Si-
cherheit des Benutzers hin. Diese
Hinweise sind strikt zu beachten, um schwere Verletzungen zu vermeiden!
2 TECHNISCHE DATEN
Der Hersteller behält sich das Recht vor, technische Änderungen am Produk t vorzunehmen.
Nennspannung - Nennleistung - Stromversorgung
Siehe Typenschild auf dem Gerät
Material des Gerätekörper s
Kunsts to
Abmessungen (L x H x T) (mm)
270 x 350 x 300
Gewicht
4 kg
Kabellänge
1,2 m
Bedienfeld
Auf der Vorderseite
Filterhalter
druckverdichtet
Pannarello
Spezialzubehör für Cappuccinos
Wasse rtank
1,5 Liter - herausnehmbar
Pumpendruck
15 ba r
Durchlauferhitzer
Rostfreier Edelstahl
Sicherheitsvorrichtungen
Thermosicherung
3 SICHERHEITSVORSCHRIFTEN
Der Bezug auf Abbildungen, Teile des Geräts oder Bedienelemente usw. erfolgt über Zahlen oder Buchstaben. In diesem
Falle wird auf die Abbildung verwiesen.
Mit diesem Symbol werden Informationen gekennzeichnet, auf die besonders geachtet wer-
den muss, um den Betrieb der Vorrichtung zu optimiere n.
Die dem Text entsprechenden Abbildungen be nden
sich auf der ersten Seite des Handbuchs. Diese Seiten
sind beim Lesen der vorliegenden Bedienungsanleitung zu berücksichtigen.
1.2
Gebrauch dieser Bedienungsanleitung
Bewahren Sie diese Bedienungsanleitung an einem sicheren
Ort auf und legen Sie sie der Maschine immer bei, wenn diese
von anderen Per sonen benutzt wird.
Für weitere Informationen oder bei Problemen wenden Sie
sich bitte an die autorisierten Kundendienst stellen.
• 24 •
Die unter Strom stehen den Teile dürfen ke inesfalls mit
Wasser in Berührung kommen: Kurzschlussgefahr! Der
heiße Dampf und das heiße Wasser können Verbrennungen verursachen! Den Dampf- oder Heißwasserstrahl keinesfalls auf Körperteile richten. Die Düse für
die Dampf-/Heißwasserausgabe vorsichtig berühren:
Verbrennungsgefahr!
Sachgemäßer Gebrauch
Die Ka eemaschine ist ausschließlich für den Betrieb in Haushalten vorgesehen. Technische Änderungen und unsachgemäßer Gebrauch sind wegen der damit verbundenen Risiken
verboten! Die Ma schine ist nicht dazu bes timmt, von Personen
(einschließlich Kindern) mit eingeschränkten körperlichen oder
geistigen Fähigkeiten oder einer Beeinträchtigung der Sinnesorgane bzw. von Personen ohne ausreichender Erfahrung oder
Kompetenz ver wendet zu werden, es sei denn, sie werden von
Page 25

einer Person überwacht, die für ihre Sicherheit verantwortlich
sind oder sie werden im Gebrauch der Masc hine geschult.
Stromversorgung
Die Ka eemaschine darf ausschließlich an eine geeignete
Steckdose angeschlossen werden. Die Spannung muss mit
derjenigen übereinstimmen, die auf dem Typenschild des Geräts angegeben ist.
Netzkabel
Die Ka eemaschine darf keinesfalls mit defektem Netzkabel
betrieben werden. Bei Schäden am Netzkabel muss dieses
vom Hersteller oder von dessen Kundendienst ausgetauscht
werden. Das Versorgungskabel darf nicht in Ecken, über scharfe Kanten oder auf sehr heißen Gegenständen verlegt werden.
Es sollte vor Öl geschützt werden. Die Ka eemaschine darf
nicht am Kabel getragen oder gezogen werden. Der Stecker
darf nicht durch Ziehen am Kabel herausgezogen werden. Er
sollte nicht mit nassen Händen berührt werden.
Der freie Fall des Netzkabels von Tischen oder Regalen sollte
vermieden werden.
Schutz anderer Personen
Kinder beaufsichtigen, damit sie nicht mit dem Gerät spielen.
Kinder können die Gefahrensituationen, die durch Haushaltsgeräte entstehen können, nicht abschätzen. Die für die Verpackung der Maschine benutzten Materialien sollten nicht in
Reichweite von Kindern aufbewahrt werden.
Verbrennungsgefahr
Den Heißwasser- oder Dampfstrahl keinesfalls auf sich selbst
oder auf andere Personen richten. Stets die entsprechenden
Gri e benutzen.
Der Druck lterhalter darf kein esfalls während der Ausga be des
Ka ees herausgenommen (abgenommen) werden. Während
der Aufheizphase der Brühgruppe besteht die Möglichkeit des
Austrit ts von Tropfen heißen Wassers.
Standort
Die Ka eemaschine sollte an einem sicheren Ort aufgestellt
werden, an dem nicht die Gefahr des Umkippens oder der Verletzung von Personen besteht.
Es besteht die Möglichkeit des Austritts von heißem Wasser
oder Dampf: Verbrennungsgefahr!
Die Maschine sollte Temperaturen von unter 0°C nicht ausgesetzt werden. Es besteht die Gefahr, dass die Maschine durch
gefrierendes Wasser beschädigt wird.
Die Ka eemaschine darf nicht im Freien betrieben werden.
Die Maschine nicht auf heißen Flächen oder in der Nähe von
o enem Feuer aufstellen, da das Gehäuse schmelzen oder auf
andere Art beschädigt werden könnte.
Reinigung
Bevor die Maschine gereinigt wird, muss die Maschine mit
der Taste EIN/AUS ausgeschaltet und dann der Stecker von der
Steckdose abgenommen werden. Darüber hinaus abwarten,
bis die Maschine abgekühlt ist. Die Maschine keinesfalls in
Wasse r tauchen !
Der Versuch von Eingr i en im Inneren der Maschine ist s trengstens verboten.
Wasser, das einige Tage lang im Wassertank verblieben ist, darf
nicht für Leb ensmittelzwe cke genutzt od er getrunken werden.
Den Tank reinigen und mit f rischem Trinkwasser füllen.
Raumbedarf für den Betrieb und die Wartung
Für einen korrekten und einwandfreien Betrieb der Ka eemaschine sollten folgende Empfehlungen berücksichtigt werden:
• Eine ebene Abstell äche rather auswählen.
• Der Raum sollte ausreichend beleuchtet und hygienisch unbedenklich sein und die Steckdose muss leicht zugänglich
sein.
• Gemäß den Angaben in der Abbildung (Abb. A) einen Mindestabstand von den Maschinenwänden berücksichtigen.
Aufbewahrung der Maschine
Wird die Maschi ne für längere Zeit nicht benut zt, so ist sie auszuschalten un d der Stecker ist aus der Steckdose z u ziehen. Die
Maschine an einem trockenen und für Kinder unzugänglichen
Ort auf bewahren. Vor Staub und Schmutz schützen.
Reparaturen/Wartungsarbeiten
Die Maschine bei Störungen, Defekten oder dem Verdacht auf
Defekte nach einem Sturz nicht verwenden und unverzüglich
den Netzstecker ziehen. Eine defekte Maschine keinesfalls in
Betrieb setzen. Eingri e und Reparaturen dürfen ausschließlich von autorisierten Kundendienststellen vorgenommen
werden. Im Falle von nicht fachgerecht ausgeführten Eingriffen wird jede Haf tung für eventuelle Schäden abgelehnt.
Brandschutz
Im Fall eines Brandes einen Kohlensto dioxid-Löscher (CO2)
verwenden. Keinesfalls sind Wasser- oder Pulverlöscher einzusetzen.
Deutsch
• 25 •
Page 26
Legende der Maschinenbestandteile (S. 2)
1 Bedienfeld
2 Schalter EIN/AUS
3 Wassertank
4 Drehknopf Heißwasser/Dampf
5 Wasserau angschale + Gitter
6 Ka eebrühgruppe
7 Cappuccinatore
8 Netzkabel
9 Messlö el für gemahlenen Ka ee
10 Druck lterhalter
11 Filter für gemahlenen Ka ee
(ein Filter für die Aus gabe von 1 oder 2 Tassen Ka ee)
12 Pannarello
13 Filteradapter für Ka eepads
14 Filter für Ka eepads
15 Leuchttaste Ausgabe Einzelka ee
16 Leuchttaste Ausgabe doppelter Ka ee
17 Leuchttaste Heißwasserausgabe
18 Leuchttaste Dampfausgabe
4 AUFSTELLUNG
Für Ihre eigene Sicherheit und die der anderen müssen
die “Sicherheit svorschrif ten” im Kap. 3 strik t eingehalten werden.
4.1 Verpackung
Die Original-Verpackung wurde für den Schutz der Maschine
während des Versands entwickelt und hergestellt. Es wird
empfohlen, die se Verpackung für eventuelle z ukünftige Transporte aufzubewahren.
4.2 Installationshinweise
Bevor die Maschine installiert wird, müssen die folgenden Sicherheitsvorschriften beachtet werden:
• Die Maschine an einem sicheren Ort aufstellen;
• Sicherstellen, dass Kinder nicht mit der Maschine spielen
können;
• Die Maschine nicht auf heißen Flächen oder in der Nähe von
o enem Feuer aufstellen.
Nun kann die Ka eemaschin e an das Stromnetz angesch lossen
werden.
Hinweis: Es wird empfohlen, die Bestandteile
vor dem ersten Gebrauch bzw. nach einer län-
geren Nichtbenutzung zu waschen.
4.3 Anschluss der Maschine
Elektrischer Strom kann gefährlich sein! Aus
diesem Gr unde müssen d ie Sicherheit svorschr iften stets st rikt beachtet wer den. Defekte Kab el dürfen
keinesfalls benutzt werden! Beschädigte oder defekte
Kabel und Stecker müssen umgehend von einer autorisierten Kundendienststelle ersetzt werden.
Die Spannung des Geräts wurde werkseitig eingestellt. Überprüfen, ob die Netzspannung den auf dem Typenschild auf der
Unterseite der Mas chine aufgeführten Angaben entspricht.
• Sicherstellen, dass der Schalter EIN/AUS (2) nicht vor dem
Anschluss der Maschine an das Stromnetz gedrückt wurde.
• Den Stecker in eine Wandsteckdose mit geeigneter Span-
nung einstecken.
4.4 Wassertank
• (Abb. 1) - Den Wassertank (3) herausnehmen.
• (Abb. 2) - Den Tank ausspülen und mit frischem Trinkwasser
au üllen. Dabei sollte nicht zuviel Wasser eingefüllt werden.
• (Abb. 1) - Den Tank wieder in seine Aufnahme einsetzen.
Sicherstellen, dass er korrekt positioniert wurde.
In den Tank stets ausschließlich frisches Trink-
wasser ohne Kohlensäure einfüllen. Heißes
Wasser oder andere Flüssigkeiten können den Tank beschädigen. Die Maschine darf ohne Wasser keinesfalls
in Betrieb gesetzt werden: Sicherstellen, dass im Tank
eine ausreichende Menge Wasser vorhanden ist.
4.5 Entlüften
Am Anfang, nach der Dampfausgabe und nach vollständiger
Entnahme des Wassers muss das System der Maschine neu
entlüftet werden. Die Maschine weist auf die Notwendigkeit
der Ausführung dieses Vorgangs hin, indem die 4 Tasten des
Bedienfeldes gleichzeitig blinken.
• (Abb. 3) - Den Schalter EIN/AUS (2) drücken. Die 4 Tasten
blinken.
• (Abb. 4) - Einen Behälter unter den Cappuccinatore stellen.
• (Abb. 5) - Den Drehknopf (4) “Heißwasser/Dampf” ö nen,
indem er indem er gegen den Uhrzeigersinn gedreht wird.
• (Abb. 6) - Die Taste Heißwasser (17) drücken.
• Warten, bis die Maschine die Wasserausgabe beendet.
• Den Drehknopf (4) “Heißwasser/Dampf” schließen, indem
er im Uhrzeigersinn gedreht wird. Den Behälter entfernen.
• 26 •
Page 27

Nachdem der erste Au üllvorgang des Systems
abgeschlossen ist, beginnt die Maschine mit
dem Aufheizen und es kann weder Ka ee, Wasser noch
Dampf ausgegeben werden, solange die beiden LED 15
und 16 nicht dauerhaft au euchten.
Hinweis: wird der Vorgang nicht korrekt abge-
schlossen, so blinken die 4 Tasten weiter und
die Maschine kann nicht betrieben werden.
4.6 Erste Inbetriebnahme oder Benut-
zung nach längerer Nichtbenutzung
Dieser einfache Vorgang gewährleistet eine optimale Ausgabe
und muss ausgef ührt werden:
- bei der ersten Inbetriebnahme;
- nach einem längeren Zeitraum der Nichtbenutzung der Ma-
schine (länger als 2 Wochen).
Das ausgegebene Wasser muss über einen
entsprechenden Ab uss entsorgt werden, und
darf nicht für Lebensmit telzwecke verwendet werden.
Sollte der Behälter während des Zyklus voll werden,
muss die Ausgabe gestoppt und der Behälter geleert
werden, bevor der Vorgang fortgesetzt wird.
1 (Abb.2) - Den Tank ausspülen und mit frischem Trinkwasser
füllen.
2 (Abb.4-6) - Einen Behälter unter den Cappuccinatore stel-
len. Den Regler (4) ö nen, indem er im Gegenuhr zeigersinn
gedreht wird, und dann die Heißwassertaste “
3 Den gesamten Inhalt des Wassertanks über den Cappuc-
cinatore ab ießen lassen. Um die Ausgabe zu beenden,
erneut die Heißwassertaste “
(4) schließen, indem er im Uhrzeigersinn gedreht wird.
4 (Abb.2) - Den Tank mit frischem Trinkwasser füllen.
5 (Abb.11-12) - Den Filterhalter von unten in die Brühgruppe
(6) einsetzen und von links nach rechts drehen, bis er einrastet.
6 (Abb.13) - Einen geeigneten Behälter unter den Filterhalter
stellen.
7 Die Taste "
menge ausgeben.
8 Den Behälter leeren, der unter dem Filterhalter steht und
die unter Punkt (7) aufgeführten Vorgänge bis zur
Entleerung des im Tank vorhandenen Wassers ausführen.
9 Den Tank erneut füllen und abwarten, bis die LED der Ta-
sten “
" drücken und die programmierte Wasser-
” und ” ” dauerhaft au euchten.
” drücken und den Regler
” drücken.
10 (Abb.16) - Den Filterhalter durch Drehung von rechts nach
links aus der Brühgruppe herausnehmen und mit frischem
Trinkwasser ausspülen. Danach ist die Maschine betriebsbereit.
Die Maschine ist nun für die Ausgabe von Ka ee und Dampf
bereit. Für die Einzelheiten zum Betrieb wird auf die entsprechenden Kapitel verwiesen.
4.7 Einstellung Wasserauff angschale
Die Wasserau angschale kann eingestellt werden, um sie an
die Abmessungen der verwendeten Tassen anzupassen.
Für die Höheneinstellung der Wasserau angschale ist wie
folgt vorzugehen:
• (Abb.24) - Die Wasserau angschale anheben und den Rost
herausnehmen.
• (Abb.25) - Die Halterung unter der Schale herausziehen.
• (Abb.26 - 27) - Die Halterung drehen und in der Ka eema-
schine positionieren.
• (Abb.28) - Die Wasserau angschale auf die Halterung le-
gen und den Rost au egen.
Deutsch
• 27 •
Page 28

5 KAFFEEAUSGABE
Achtung! Die Herausnahme des Druck lterhal-
ters durch Drehung im Uhrzeigersinn von Hand
während der Ausgabe des Ka ees ist verboten. Verbrennungsgefahr.
• Während dieses Vorgangs können sich die Tasten (15 - 16)
ein- und ausschalten. Dieser Betrieb ist völlig normal und
nicht als Störung zu betrachten.
• Vor dem Gebrauch sicherstellen, dass der Drehknopf (4)
“Heißwasser/Dampf" geschlossen ist und der Wassertank
der Maschine eine ausreichende Menge Wasser enthält.
• (Abb. 3) - Den Schalter EIN/AUS (2) drücken.
• Warten, bis die Tasten (15 - 16) dauerhaft au euchten. Nun
ist die Maschine für die Ka eeausgabe bereit.
• Nachdem die programmierte Ka eemenge ausgegeben
wurde, beendet die Maschine automatisch die Ausgabe. Die
Tassen mit dem Ka ee entnehmen (Abb.15).
• (Abb.16) - Zum Abschluss der Ausgabe einige Sekunden
abwarten, dann den Druck lterhalter herausnehmen und
den Ka eesatz entfernen.
Hinweis: im Filterhalter verbleibt eine geringe
Menge Wasser. Dies ist normal und auf die Ei-
genschaften des Filterhalters zurückzu führen.
Wichtiger Hinweis: Der Filter (11) muss stets
sauber gehalten werden, um ein optimales
Ergebnis zu gewährleisten. Täglich nach Gebrauch reinigen.
5.1 Betrieb mit gemahlenem Kaff ee
• (Abb.8) - Den Filter (11) in den Druck lterhalter (10) einsetzen.
Bei der ersten Benutzung ist der Filter bereits eingesetzt.
• (Abb.11) - Den Filterhalter von unten in die Brühgruppe (6)
einsetzen.
• (Abb.12) - Den Filterhalter von links nach rechts drehen, bis
er blockiert. Den Gri des Druck lterhalters loslassen; der
Gri dreht sich leicht nach links. Diese Bewegung gewährleistet die korrekte Funktion des Filterhalters.
• (Abb.14) - Den Druck lterhalter vorheizen, indem die Taste
(16) gedrückt wird. Das Wasser beginnt, aus dem Druck lterhalter auszuströmen (dieser Vorgang ist lediglich für den
ersten Ka ee erforderlich).
• Die Wasserausgabe wird automatisch abgeschaltet.
• (Abb.16) - Den Filterhalter durch Drehung von rechts nach
links aus der Maschine herausnehmen und das Restwasser
ausschütten. Mit dem speziellen Filter (11), mit dem die
Maschine ausgestattet ist, muss der Filter für die Zubereitung von einer oder zwei Tassen Ka ee nicht gewechselt
werden.
• (Abb.9A) - 1 oder 1,5 Messlö el für einen einzelnen Ka ee
oder 2 gestrichene Messlö el für den doppelten Ka ee in
den Filter geben. Den Ka eesatz vom Rand des Filterhalters
entfernen.
• (Abb.11) - Den Filterhalter (10) von unten in die Brühgrup-
pe (6) einsetzen.
• (Abb.12) - Den Filterhalter von links nach rechts drehen, bis
er blockiert.
• (Abb.13) - 1 oder 2 vorgewärmte Tassen unter den Druck-
lterhalter stellen. Überprüfen, ob diese korrekt unter den
Ka eeausgabeö nungen stehen.
• (Abb.14) - Druck von:
- Taste (15) für 1 Tasse Ka ee oder
- Taste (16) für 2 Tassen Ka ee.
• 28 •
5.2 Betrieb mit Kaff eepads
• (Abb.10) - Unter Verwendung eines Ka eelö els den Filter
für gemahlenen Ka ee (11) aus dem Druck lterhalter (10)
herausnehmen.
• (Abb.7A) - Den Adapter für Ka eepads (13) mit der ge-
wölbten Seite nach unten in den Druck lterhalter (10) einsetzen.
• (Abb.7B) - Danach den Filter für Ka eepads (14) in den
Druck lterhalter (10) einsetzen.
• (Abb.11) - Den Druck lterhalter von unten in die Brüh-
gruppe (6) einsetzen.
• (Abb.12) - Den Filterhalter von links nach rechts drehen, bis
er blockiert. Den Gri des Druck lterhalters loslassen. Ein
automatisches System versetzt den Gri nun wieder leicht
nach links.
Diese Bewegung gewährleistet die korrekte Funktion des
Druck lterhalters.
• (Abb.14) - Den Druck lterhalter vorheizen, indem die Taste
(16) gedrückt wird. Das Wasser beginnt, aus dem Druck lterhalter auszuströmen (dieser Vorgang ist lediglich für den
ersten Ka ee erforderlich).
• Die Wasserausgabe wird automatisch abgeschaltet.
• (Abb.16) - Den Druck lterhalter durch Drehung von rechts
nach links aus der Maschine herausnehmen und das Restwasser ausschütten.
• (Abb.9B) - Den Ka eepad in den Filterhalter einlegen. Si-
cherstellen, dass das Papier des Ka eepads nicht über den
Filterhalter übersteht.
• (Abb.11) - Den Druck lterhalter von unten in die Brüh-
gruppe (6) einsetzen.
• (Abb.12) - Den Filterhalter von links nach rechts drehen, bis
er blockiert.
• 1 vorgewärmte Tasse entnehmen und unter den Filter-
Page 29

halter stellen. Überprüfen, ob diese korrekt unter den Kaffeeausgabeö nungen steht.
• (Abb.14) - Die Taste (15) drücken, um 1 Tasse Ka ee zuzu-
bereiten.
• Nachdem die programmierte Ka eemenge ausgegeben
wurde, beendet die Maschine automatisch die Ausgabe. Die
Tassen mit dem Ka ee entnehmen (Abb.15).
• (Abb.16) - Zum Abschluss der Ausgabe einige Sekunden
abwarten, dann den Filterhalter herausnehmen und den
verbrauchten Ka eepad entfernen.
Wichtiger Hinweis: De r Filter (14) und der Adap-
ter (13) müssen stets sauber gehalten werden,
um ein optimales Ergebnis zu gewährleisten. Täglich
nach Gebrauch reinigen.
5.3 Programmierung der Kaff eemenge
Auf dieser Ma schine kann die Ka eemenge voreinge stellt werden, die ausgegeben wird, wenn die Taste (15) gedrückt wird.
Die Programmierung der Ka eemenge ist le-
diglich für die Taste (15) möglich (min. 25 cm
und max. 180 cm).
Durch Druck der Taste (16) gibt die Maschine hinsichtlich der Programmierung der Taste (15) die doppelte
Menge aus.
• Um die Programmierung zu beginnen, wird der Ka ee in den
Filterhalter gefüllt, wie im Abschn. 5.1 oder 5.2 beschrieben.
• Eine Tasse unter den Ka eeauslauf (10) stellen.
• (Abb. 14) - Die Taste für die Ka eeausgabe (15) drücken und
gedrückt halten. Nach einem Zeitraum von 3 Sekunden beginnt die Maschine mit der Ka eeausgabe.
• Sobald die gewünschte Menge Ka ee in die Tasse ausgege-
ben wurde, die Taste (15) loslassen.
6 AUSWAHL DER KAFFEESORTE EMPFEH
LUNGEN
Im Allgemeinen können alle handelsüblichen Ka eesorten
verwendet werden. Dennoch handelt es sich bei Ka ee um ein
Naturprodukt und sein Geschmack ist je nach Ursprungsland
und Mischung unterschiedlich. Aus diesem Grunde sollten
verschiedene Sorten probiert werden, um die Mischung zu
ermitteln, die den persönlichen Vorlieben am besten gerecht
wird. Für optima le Ergebnisse empfehlen wir, nur ausdr ücklich
für die Zubereitung in Espressomaschinen zusammengestellte
Mischungen zu verwenden. Der Ka ee sollte stets gleichmäßig
aus dem Druck lterhalter austreten und dabei keine Tropfen
bilden. Die Geschwindigkeit des Austritts des Ka ees kann
geändert werden, indem der Umfang der Ka eeportion im
Filter leicht variiert und/oder ein Ka ee mit einem anderen
Mahlgrad verwendet wird. Um ein optimales Ergebnis in der
Tasse zu gewährleisten und um die Reinigung und die Zubereitung zu erleichtern, emp ehlt Saeco die Verwendung von
Einzelportionen-Ka eepads mit dem Markenzeichen ESE.
BEVOR DAMPF ODER HEISSES WASSER AUSGEGE-
BEN WIRD, MUSS ÜBERPRÜFT WERDEN, OB DER
CAPPUCCINATORE AUF DIE AUFFANGSCHALE GERICHTET
IST.
Deutsch
Die Programmierung ist nun abgeschlossen. Von nun an gibt
die Maschine folgende Mengen aus:
• die gleiche angewählte Ka eemenge bei jedem Druck und
Loslassen der Taste (15);
• die doppelte Menge der angewählten Ka eemenge bei jedem Druck und Loslassen der Taste (16).
• 29 •
Page 30

7 HEISSWASSER
Verbrennungsgefahr! Zu Beginn der Ausgabe
kann es zu Heißwasserspritzern kommen. Das
Ausgaberohr kann hohe Temperaturen erreichen: direkte Berührung vermeiden.
• (Abb. 3) - Den Schalter EIN/AUS (2) drücken.
• Warten, bis die Tasten (15 - 16) dauerhaft au euchten.
• (Abb. 18) - Einen Behälter oder ein Teeglas unter den Cap-
puccinatore stellen.
• (Abb. 5) - Den Drehknopf (4) ö nen.
• (Abb. 6) - Die Taste (17) drücken.
• Nach der Entnahme der gewünschten Menge heißen Was-
sers erneut die Taste (17) drücken.
• (Abb. 5) - Den Drehknopf (4) schließen.
• Den Behälter mit dem heißen Wasser entnehmen.
Bei Druck der Tasten (15) oder (16) gibt die Ma-
schine eine dosierte Menge heißes Wasser aus.
Die Menge entspricht der in Abschn. 5.3 programmierten Menge.
Es wird empfohlen, die Ausgabe auf maximal
60 Sekunden zu beschränken.
• (Abb. 21) - Am Bolzen drehen, um das Schaumvolumen
einzustellen. Den Bolzen leicht nach oben drücken, um die
Schaummenge zu erhöhen.
• Abschließend den Drehknopf (4) schließen; die Tasse mit
der aufgeschäumten Milch entnehmen.
Nach der Zubereitung eines Cappuccinos wird der Ansaugschlauch in einen Behälter mit sauberem Wasser eingesteckt
und Dampf ausgeben. Wenn sauberes Wasser austritt, ist der
Cappuccinatore sauber. Den Ansaugschlauch außen mit einem
feuchten Tuch reinigen.
Der Cappuccinatore sollte einmal wöchentlich
auseinander gebaut und vollständig gereinigt
werden.
• (Abb. 19) - Die Taste (18) erneut drücken.
• Die Vorgehensweise für die Ladung des Systems, die im
Abschn. 4.5 beschrieben wird, ausführen, um die Maschine
betriebsbereit zu machen.
8 DAMPF / CAPPUCCINO
Verbrennungsgefahr! Zu Beginn der Ausgabe
kann es zu Heißwasserspritzern kommen. Das
Ausgaberohr kann hohe Temperaturen erreichen: direkte Berührung vermeiden.
• (Abb. 3) - Den Schalter EIN/AUS (2) drücken.
• Warten, bis die Tasten (15 - 16) dauerhaft au euchten.
• (Abb. 19) - Die Taste (18) drücken.
• Warten, bis die Taste (18) dauerhaft au euchtet; nun ist die
Maschine für die Dampfausgabe bereit.
• (Abb. 18) - Einen Behälter unter den Cappuccinatore stel-
len.
• (Abb. 5) - Den Drehknopf (4) kurz ö nen, um das Rest-
wasser aus dem Cappuccinatore aus ießen zu lassen; nach
kurzer Zeit strömt nur mehr Dampf aus.
• Den Drehknopf (4) wieder schließen und den Behälter ent-
fernen.
Für ein gutes Ergebnis kalte Milch verwenden
• (Abb. 20) - Den Ansaugschlauch des Cappuccinatore in den
Milchbehälter eintauchen.
• Eine Tasse unter den Cappuccinatore stellen.
• (Abb. 5) - Den Drehknopf (4) ö nen, indem er indem er
gegen den Uhrzeigersinn gedreht wird.
Hinweis: die Maschine ist betriebsbereit, wenn
die Tasten (15 und 16) dauerhaft au euchten.
Hinweis: wenn es nicht gelingt, den Cappuc-
cino wie beschrieben zuzubereiten, muss das
System, wie im Abschnitt 4.5. beschrieben, gefüllt und
der Vorgang wiederholt werden.
Auf diese lbe Weise können auch an dere Flüssig-
keiten erhitzt werden.
9 PANNARELLO
Als Alternative zum Cappuccinatore kann für die Ausgabe von
heißem Wasser oder Dampf der Pannarello verwendet werden.
Für die Montage des Pannarello muss der Cappuccinatore abgenommen werden (Abb. 29-30):
- Die Nutmutter abschrauben, ohne sie abzunehmen;
- Den Anschlussstutzen des Cappuccinatore von der Dampfdüse abnehmen.
Montage des Pannarello (Abb. 31):
- Den Pannarello vollständig auf die Dampfdüse aufstecken;
- Die Nutmutter gut anziehen.
(Abb. 32; Abb. 33) - Für die Ausgabe von heiß em Wasser oder
• 30 •
Page 31

Dampf muss die Maschine gemäß der Beschreibungen in den
Abschnitten 7 und 8 vorbereitet werden. Für die Ausgabe ist
der Pannarello zu benutzen.
(Abb. 34; Abb. 35) - Nach der Verwendung ist bei kalter Maschine der untere Teil des Pannarello herauszuziehen und mit
lauwarmem Wasser zu reinigen.
(Abb. 36) - Einmal pro Woche sollte auch der obere Teil abgenommen und mit lauwarmem Wasser gereinigt werden.
10 REINIGUNG
Die Wartung und die Reinigung dürfen nur dann durchgeführt
werden, wenn die Maschine vom Stromnetz getrennt wurde
und abgekühlt ist.
• Die Maschine darf nicht in Wasser getaucht werden. Teile
der Maschine dürfen nicht in der Spülmaschine gereinigt
werden.
• Für die Reinigung sollten kein Äthylalkohol, Lösungsmittel
und/oder chemisch aggressive Produkte verwendet werden.
• Es wird empfohlen, den Wassertank täglich zu reinigen und
mit frischem Trinkwasser zu füllen.
• (Abb. 20) - Nachdem die Milch erwärmt wurde, sollte auch
eine geringe Menge an heißem Wasser ausgegeben werden.
Gefahr ! Wenn das Endstück des Cappuccinatore
ausgebaut ist, darf keinesfalls Dampf ausgege-
ben werden.
• (Abb. 22 - 23) - Der Cappuccinatore sollte wöchentlich gereinigt werden.
Dazu wie folgt vorgehen:
- das Endstück des Cappuccinatore abnehmen;
- den oberen Teil und den unteren Teil des Cappuccinatore
voneinander trennen;
- alle Teile des Cappuccinatore mit lauwarmen Wasser reinigen;
- den Ansaugschlauch mit einem feuchten Tuch reinigen und
eventuelle Milchreste entfernen;
- den Cappuccinatore wieder zusammenbauen;
- das Endstück des Cappuccinatore wieder auf dem Anschlussstutzen montieren, der auf der Maschine verblieben
ist (sicherstellen, dass dieses vollständig eingesetzt wurde).
• (Abb. 24) - Die Au angschale täglich entleeren und reini-
gen.
• Für die Reinigung des Geräts ein weiches, leicht mit Wasser
befeuchtetes Tuch verwenden.
• (Abb.17) - Für die Reinigung des Druck lterhalters ist wie
folgt vorzugehen:
- (Abb.10) - den Filter herausnehmen und sorgfältig mit
warmem Wasser reinigen.
- den Adapter (sofern vorhanden) herausnehmen und sorgfältig mit warmem Wasser reinigen.
- den Innenbereich des Druck lterhalters reinigen.
• Die Vorrichtung und deren Bestandteile nicht unter Verwendung eines Mikrowellen- oder herkömmlichen Backofens
trocknen.
Deutsch
Hinweis: Der Druck lterhalter darf nicht in der
Spülmaschine gereinigt werden.
11 ENTK ALKUNG
Beim Gebrauch der Maschine bildet sich Kalk. Die Entkalkung
ist nach jeweils 1-2 Betriebsmonaten der Maschine und/oder
dann erforderlich, wenn eine Reduzierung der Wasserdurchlaufmenge festgestellt wird. Es sollte ausschließlich den
Saeco-Entkalker verwendet werden.
Die Angaben im Bedienungs- und Wartungs-
handbuch haben gegenüber den Angaben auf
separat verkauftem Zubehör und/oder Verbrauchsmaterial Vorrang, soweit sich daraus Kon ikte ergeben.
Den Saeco-Entkalker verwenden (Abb. B). Dieser
wurde eigens dafür entwickelt, um die Leistungen und den Betrieb der Maschine für deren gesamtes
Betriebsleben optimal zu erhalten, und, soweit er korrekt verwendet wird, Beeinträchtigungen des ausgegebenen Produktes zu vermeiden. Bevor der Entkalkungszyklus gestartet wird, ist folgendes sicherzustellen: DER
WASSERFILTER (wenn verwendet) WURDE ENTFERNT.
Die Entkalkerlösung und die bis zum Abschluss
des Zyklus ausgegebenen Produkte dürfen keinesfalls getrunken werden. Keinesfalls darf Essig als
Entkalker verwendet werden.
1 (Abb.11-12) - Den Filterhalter von unten in die Brühgruppe
(6) einsetzen und von links nach rechts drehen, bis er einrastet.
2 (Abb.1) - Den Wassertank abnehmen und leeren.
3 (Abb.2) - Die HÄLFTE des Inhalts der Flasche mit konzen-
triertem Saeco-Entkalker in den Wassertank des Geräts
einfüllen und den Tank mit frischem Trinkwasser bis zum
Füllstand MAX au üllen.
4 (Abb.3) - Die Maschine durch Druck des Schalters ON/OFF
(2) einschalten.
(Abb.4) - Über die Heißwasser-/Dampfdüse 2 Tassen mit
jeweils ca. 150 ml Wasser entnehmen (wie im Kapitel 7
• 31 •
Page 32

des Handbuchs beschrieben). Dann die Maschine über den
Schalter ON/OFF (2) ausschalten.
5 Den Entkalker für ca. 15-20 Minuten bei ausgeschalteter
Maschine einwirken lassen.
6 Die Maschine durch Druck des Schalters ON/OFF (2) ein-
schalten.
(Abb.4) - Über die Heißwasser-/Dampfdüse 2 Tassen mit
jeweils ca. 150 ml Wasser entnehmen (wie im Kapitel 7 des
Handbuchs beschrieben). Nachfolgend die Maschine über
den Schalter ON/OFF (2) ausschalten und für einen Zeitraum
von 3 Minuten ausgeschaltet lassen.
7 Die unter Punkt 6 beschriebenen Vorgänge bis zur vollstän-
digen Leerung des Wassertanks wiederholen.
8 (Abb.2) - Den Tank mit frischem Trinkwasser ausspülen und
vollständig au üllen.
9 Einen Behälter unter den Filterhalter stellen.
10 (Abb.6) - Die Maschine durch Druck des Schalters ON/OFF (2)
einschalten. Warten, bis die Tasten (15 - 16) dauerhaft aufleuchten. Die Taste “
Wassermenge ausgeben.
11 Den Behälter leeren, der unter dem Filterhalter steht und
die unter Punkt (10) aufgeführten Vorgänge bis zur
Entleerung des im Tank vorhandenen Wassers ausführen.
12 (Abb.2) - Den Tank erneut mit frischem Wasser füllen.
(Abb.4) - Einen Behälter mit ausreichendem Fassungs-
vermögen unter die Heißwasser-/Dampfdüse stellen.
Den Regler für die Wasserausgabe (4) ö nen, indem er im
Gegenuhrzeigersinn gedreht wird. Die Heißwassertaste “
” drücken und den gesamten Inhalt des Tanks über die
Heißwasser-/Dampfdüse ab ießen lassen.
13 Nach Beendigung der Wasserentnahme wird die Heißwas-
sertaste “
Den Regler für die Wasserausgabe (4) schließen, indem er
im Uhrzeigersinn gedreht wird.
14 Die Vorgänge ab Punkt (8) erneut für insgesamt 4 Tankfül-
lungen wiederholen.
15 (Abb.16) - Den Filterhalter durch Drehung von rechts nach
links aus der Brühgruppe herausnehmen und mit frischem
Trinkwasser ausspülen.
” erneut gedrückt, um die Ausgabe zu beenden.
” drücken und die programmierte
12 ENTSORGUNG
Dieses Produkt entspricht der EU-Richtlinie 2002/96/EG
Das Symbol
kung weist darauf hin, dass das Produkt nicht als normaler
Hausmüll zu behandeln ist, sondern an einem Sammelpunkt
für das Recycling von elek trischen und elektronischen Geräten
abgegeben werden muss.
Durch Ihren Beitrag zum korrekten Entsorgen dieses Produkts
schützen Sie die Umwelt und die Gesundheit Ihrer Mitmenschen.
Umwelt und Gesundheit werden durch falsches Entsorgen
gefährdet.
Weitere Informationen über das Recycling dieses Produkts
erhalten Sie von Ihrer Gemeinde, der Müllabfuhr oder dem
Geschäft, in dem Sie das Produk t gekauft haben.
auf dem Produkt oder seiner Verpak-
Der Entkalkungszyklus ist nun abgeschlossen.
(Abb.2) - Den Tank erneut mit frischem Wasser füllen. Soweit
erforderlich, das System entlüften, wie im Abschn. 4.5 des
Handbuchs beschrieben.
Die Entsorgung der Entkalkerlösung muss gemäß den Vorgaben des Herstellers und/oder
den im Benut zerland geltenden Vorschriften erfolgen.
• 32 •
Page 33

Störung Mögliche Ursachen Abhilfe
Die Maschine schaltet sich nicht
ein.
Die Pumpe ist sehr laut. Wasser im Tank fehlt. Füllen Sie Wasser nach (Abschn. 4.4).
Alle Tasten blinken. Das Wassersystem muss gefüllt werden.
Der Ka ee ist zu kalt.
Es bildet sich kein Schaum auf
der Milch.
Die Zubereitu ng des Cappuccinos
gelingt nicht.
Der Ka ee sprudelt zu schnell
heraus, es bildet sich keine Crema.
Der Ka ee läuft nicht oder nur
tropfenweise heraus.
Der Ka ee läuft über die Ränder.
Die Maschine ist nicht an das Stromnetz
angeschlossen.
Filterhalter zum Vorwärmen nicht eingesetz t (Kap. 5).
Tassen kalt. Wärmen Sie die Tassen mit heißem Wasser vor.
Milch nicht geeignet: Milchpulver, Ma-
germilch.
Der Cappuccinatore ist verschmutzt.
Es ist kein Dampf mehr im Durchlauferhitzer.
Zu wenig Ka ee im Filterhalter. Mehr Ka ee einfüllen (Kap. 5).
Der Mahlgrad is t zu grob.
Der Ka ee ist alt oder nicht geeignet.
Altes oder ungeeignetes Ka eepad. Wechseln Sie das verwendete Ka eepad.
Im Filterhalter fehlt ein Bestandteil.
Wasser fehlt. Füllen Sie Wasser nach (Abschn. 4.4).
Der Mahlgrad is t zu fein.
Ka e e im Filterhalter zu fest angedrückt. Lockern Sie den gemahlenen Ka ee.
Zu viel Ka ee im Filterhalter. Reduzieren Sie die Ka eemenge im Filterhalter.
Drehknopf (4) o en.
Maschine verkalkt. Entkalken Sie die Maschine (Kap. 10).
Filter im Filterhalter verstopft. Reinigen Sie den Filter (Kap. 9).
Ka e epad nicht geeignet. Wechseln Sie die Ka eepadsorte.
Der Filterhalter wurde nicht korrekt in die
Brühgruppe eingesetzt.
Oberer Rand des Filterhalters verschmutzt.
Die Dichtung des Kessels ist verschmutzt
oder abgenutzt.
Ka eepad falsch eingelegt.
Zu viel Ka ee im Filterhalter.
Schließen Sie die Maschine an das Stromnetz an.
Das System füllen, wie im Abschn. 4.5 beschrieben.
Wärmen Sie den Filter halter vor.
Verwenden Sie Vollmilch.
Reinigen Sie den Cappuccinatore wie im Kap. 9
beschrieben.
Füllen Sie den Kreisl auf (Abschn. 4.5) und wiederholen Sie die im Kap. 8 beschriebenen Schritte.
Verwenden Sie eine andere Ka eemischung
(Kap. 6)
Verwenden Sie eine andere Ka eemischung
(Kap. 6)
Überprüfen, ob alle Bestandteile vorhanden sind
und korrek t montiert wurden.
Verwenden Sie eine andere Ka eemischung
(Kap. 6)
Schließen Sie den Verschlussknopf (4).
Setzen Sie den Filterhalter korrekt ein (Kap. 5).
Reinigen Sie den Rand des Filterhalter s.
Reinigen Sie die Dic htung.
Legen Sie das Ka eepad richtig ein und achten
Sie darauf, dass er nicht über den Filterhalter
hinausragt.
Reduzieren Sie die Ka eemenge mit einem Messlö el.
Deutsch
Bei Störun gen, die nicht in der o ben aufgefüh rten Tabelle behan delt werden oder i n Fällen, in denen die em pfohlenen Vorgehensweisen das Problem nicht beheben, wen den Sie sich bitte an eine Kundendienststelle.
• 33 •
Page 34

1 GÉNÉRALITÉS
Cette machine à café est appropriée pour la préparation d’une
ou de deux tasses de café expresso. Elle est équipée d’un cappuccinatore orientable pour la distribution de la vapeur et de
l’eau chaude. Les commandes sur la façade de l’appareil sont
marquées par des symboles faciles à comprendre.
Cette machin e a été conçue pour un usage dome stique et n’est
pas indiquée pour un fonctionnement continu de type professionnel.
Attention. La société décline toute responsabilité pour les éventuels dommages se produisant
en cas de :
• Usage impropre non conforme aux utilisations prévues ;
• Répara tions non e ec tuées auprès de s centres d'assistance agréés ;
• Altération du câble d'alimentation ;
• Altération de n’importe quel composant de la machine ;
• Utilisation de pièces de rechange et d’accessoires
non d’origine ;
• Défaut de détartrage et stockage au-dessous de
0°C.
Dans tous ces c as, la garantie cesse d ’exister.
1.1 Pour faciliter la lecture
Le triangle d’avertissement indique
toutes les instructions à retenir
pour la sécurité de l’utilisateur. Respecter attentivement ces indications a n d’éviter de
graves blessures !
2 DONNÉES TECHNIQUES
Le construc teur se réserve le dro it d'apporter des modi cations
aux caractéristiques techniques du produit.
Tension nominale - Puissance nominale - Alimentation
Voir plaquette placée sur l'appareil
Matériau du châssis
Plastique
Dimensions (l x h x p) (mm)
270 x 350 x 300
Poids
4 kg
Longueur du câble
1,2 m
Bandeau de commande
En façade
Porte- ltre
Pressurisé
Pannarello
Spécial pour les cappuccinos
Réservoir à eau
1,5 litres - Amovible
Pression de la pompe
15 ba rs
Chaudière
Acier inoxydable
Dispositif s de sécurité
Coupe-circuit thermique
3 CONSIGNES DE SÉCURITÉ
Les images, les parties de l’appareil, les élément s de commande, etc. sont marqués par des lettres ou des chi res. Dans ce
cas, consulter les images.
Ce symbole met en évidence les informations
importantes pour une meilleure utilisation de
la machine.
Les images c orrespondant au te xte se trouvent da ns les
premières pages du manuel. Consulter ces pages pendant la lec ture du mode d’emploi.
1.2 Utilisation de ce mode d’emploi
Garder ce mode d’emploi dans un endroit sûr. Le joindre à la
machine à café pour tout éventuel changement d'utilis ateur.
Pour plus d’informations ou en cas de problèmes, s’adresser
aux centres d’assistance agréés.
• 34 •
Ne jamais mettre les p arties sous tension au contac t de
l’eau : danger de court-circuit ! La vapeur surchau ée
et l’eau chaude peuvent provoquer des brûlures ! Ne
jamais diriger le jet de vapeur ou d’eau chaude vers
des parties du corps, toucher la buse de vapeur/d’eau
chaude en faisant tr ès attention : danger de brûlures !
Utilisation prévue
Cette machine à café est destinée uniquement à un usage
domestique. Toute modi cation technique de la machine
et toute utilisation impropre sont interdites car elles engendrent des risques ! L’appareil ne doit pas être utilisé par des
personnes (y compris les enfants) ayant de faibles capacités
physiques, mentales ou sensorielles, sans expérience et/ou
aux compétences insu sante s, à moins qu'elles ne soient sous
Page 35

la supervision d’une personne responsable de leur sécurité ou
formées par cette personne en ce qui concerne l’utilisation de
l’appareil.
Alimentation secteur
La machine à café ne peut être branchée que sur une prise de
courant appropriée. La tension doit correspondre à celle indiquée sur la plaquet te de l’appareil.
Câble d’alimentation
Ne jamais utiliser la machine à café si le câble d’alimentation
est défe ctueux. Si le câble d ’aliment ation est abîmé, il doit ê tre
remplacé par le constructeur ou par son service d’assistance
aux clients. Ne pas faire passer le câble d’alimentation sur des
arêtes ou des objets très chauds et le protéger contre l’huile.
Ne pas transporter ou tirer la machine à café par le câble. Ne
pas extraire la che en la tirant par le câble. Ne pas la toucher
avec les mains mouillées.
Éviter que le câble d’alimentation ne pende librement des tables ou des ét agères.
Protection des autres personnes
Garder les enfants sous supervision, a n d’éviter qu’ils ne
jouent avec l’appareil.
Les enfants ne se rendent pas compte des risques liés aux appareils électroménagers. Les matériaux utilisés pour l'emballage de la machine doivent être gardés hors de la portée des
enfants.
Danger de brûlures
Ne pas diriger le je t d’eau chaude ou de vapeur surchau ée vers
soi et/ou vers d ’autre s personnes. Utiliser to ujours les poignées
ou les boutons prévus à cet e et.
Ne ja mais ôte r le por te- ltre pressu risé p endant l a distr ibuti on
du café. Pendant le chau age, des gouttes d’eau chaude peuvent sortir du groupe de distribution du café.
Emplacement
Ranger la machine à café dans un endroit sûr pour éviter tout
risque de renversement ou de blessures.
Risque de fuite d’eau chaude ou de vapeur surchau ée : dan-
ger de brûlures !
Ne pas garder la machine à une température inférieure à 0°C :
le gel pourr ait endommager la machine.
Ne pas utiliser la machine à café en plein air.
Ne pas poser la machine sur des surfaces trop chaudes ou à
proximité d'une amme nue : Le châssis pourrait fondre ou
s'abîmer.
Nettoyage
Avant de nettoyer la machine, il faut déconnecter la machine
avec le bouton ON/OFF et retirer la che de la prise de courant.
Attendre quelques instants pour que la machine se refroidisse.
Ne jamais plonger la machine dans l’eau !
Il est stric tement interdit d’essayer d’inter venir à l’intérieur de
la machine.
Ne pas utilise r l’eau qui es t restée pendant plusieur s jours dans
le réservoir pour un usage alimentaire ; laver le réservoir et le
remplir d’eau fraîche potable.
Espace pour le mode d’emploi et l’entretien
Pour un fonctionnement correct et e cace de la machine à
café, il est cons eillé de :
• Choisir une surface d’appui plane et nivelée ;
• Choisir un endroit assez bien éclairé, propre et pourvu d’une
prise de courant facilement accessible ;
• Prévoir une distance minimum des parois de la machine,
conformément à la gure (Fig.A).
Rangement de la machine
Si la machine reste inutilisée pendant longtemps, la mettre
hors tension et ôter la che de la prise. La ranger dans un lieu
se c et ho rs d e la po rté e des enfa nts . La p roté ger c ontr e la p oussière et les saletés.
Réparations / Entretien
En cas de pannes, de dommages ou de défauts présumés à la
suite d’une chute, débrancher immédiatement la che de la
prise. Ne jamais mettre en marche une machine défectueuse.
Seuls les centres d'assistance agréés peuvent e ectuer des intervention s et des réparations. Nous déclinons toute responsabilité en cas de dommages pour tou te opération non e ectuée
dans les règles de l ’art.
En cas d’incendie
En cas d’incendie, utiliser des e xtincteurs à anhydride carbonique (CO
). N’utiliser ni d’eau ni d’extinc teurs à poudre.
2
Français
• 35 •
Page 36

Légende des composants de la machine (Page 2)
1 Bandeau de commande
2 Interrupteur ON/OFF
3 Réservoir à eau
4 Bouton eau chaude/vapeur
5 Bac récupération d'eau + grille
6 Groupe de distribution de café
7 Cappuccinatore
8 Câble d'alimentation
9 Mesure à café moulu
10 Porte- ltre pressurisé
11 Filtre à café moulu
(pour la distribution de 1 ou 2 cafés)
12 Pannarello
13 Adaptateur du ltre à doset tes de café
14 Filtre à dosette s de café
15 Touche lumineuse de distr ibution d’un seul café
16 Touche lumineuse de distribution d’un café double
17 Touche lumineuse de distribution d’eau chaude
18 Touche lumineuse de distribution de la vapeur
4 MISE EN PLACE
Pour votre sécurité et celle des tiers, s’en tenir scrupuleusement aux « Consignes de sécurité » indiquées au
chapitre 3.
4.1 Emballage
L’emballage or iginal a été conçu et réalisé pour p rotéger la machine lors de son expédition. Il est conseillé de le garder pour
d’éventuels transpor ts à venir.
4.2 Avertissements de mise en place
Avant d’installer la machine, s’en tenir aux consignes de sécurité suivantes :
• placer la machine dans un endroit sûr ;
• s’assurer que les enfants n’aient pas la possibilité de jouer
avec la machine ;
• éviter de placer la machine sur des surfaces très chaudes ou
à proximité de ammes nues.
La machine à café est prête pour être branchée sur le réseau
électrique.
Remarque : i l est recommandé de l aver les composants avant la toute première utilisation et/
ou après des périodes d’inac tivité.
4.3 Raccordement de la machine
Le courant électrique peut être dangereux !
Par conséquent, il est impératif de respecter
les consignes de sécurité. Ne jamais utiliser des câbles
défec tueux ! Les câbles e t les ches défec tueux doivent
être immé diatement remplac és par des centres d'ass istance agréés.
La tension de l’appareil a été prévue à l’usine. Véri er si la tension du réseau correspond aux indications gurant sur la plaquette d'identi c ation qui se trouve au fond de l’appareil.
• Avant de brancher la machine sur le réseau électrique, s’as-
surer que l’interrupteur ON/OFF (2) n’a pas été appuyé.
• Brancher la che sur une prise de courant au mur ayant une
tension appropriée.
4.4 Réservoir à eau
• (Fig.1) - Retirer le réservoir à eau (3).
• (Fig.2) - Le rincer et le remplir d’eau fraîche potable ; éviter
d’en verser une quantité excessive.
• (Fig.1) - Réintroduire le réservoir dans son logement en
s'assurant qu’il est correctement positionné.
Remplir le réservoir uniquement avec de l'eau
fraîche potable non pétillante. L'eau chaude ou
tout autre liquide peuvent endommager le réservoir.
Ne pas mettre la machine en service, s’il n’y a pas d’eau
: s’assurer que le réser voir est su samment plein.
4.5 Amorçage du circuit
Au début, après avoir distribué de la vapeur ou épuisé l'eau
contenue dans le réservoir, le circuit de la machine doit être
réamorcé. La nécessité de cette opération est signalée par le
clignotement simultané des 4 touches sur le bandeau de commande.
• (Fig.3) - Appuyer sur l'interrupteur ON/OFF (2). Les 4 bou-
tons clignotent ;
• (Fig.4) - Placer un récipient sous le cappuccinatore.
• (Fig.5) - Ouvrir le bouton (4) « eau chaude/vapeur » en le
tournant dans le sens inverse des aiguilles d’une montre.
• (Fig.6) - Appuyer sur la touche eau chaude (17).
• Attendre que la machine termine la distribution de l’eau.
• Fermer le bouton (4) « eau chaude/vapeur » en le tournant
dans le sens des aiguilles d'une montre. Enlever le récipient.
• 36 •
Page 37

Après le premier amorçage du circuit, la ma-
chine se met en phase de chau age. Il n’est pas
possible de distribuer café/eau/vapeur jusqu’à ce que
les deux voyants D.E.L. 15 et 16 ne s’allument de manière xe.
tenant, la machine est prête à l'emploi.
La machine es t prête à distribuer d u café et de la vapeur. Quant
aux mécanisme s de son fonctionnement , consulter les sections
correspondantes.
Remarque : si l’opération n’est pas complète,
les 4 touches continueront à clignoter et on ne
pourra pas utiliser la machine.
4.6 Première utilisation ou après une pé-
riode d'inactivité
Cet te si mple o péra tion v ous ga rant it une dist ribut ion o ptima le
et est à e ectuer :
- lors du premier démarrage ;
- lorsque la machine reste inactive pendant une longue pé-
riode (pendant plus de 2 semaines).
L'eau distribuée doit être vidée dans une vi-
dange spéciale e t ne peut pas être utilisée pour
l’alimentation. Si le récipient se remplit, pendant le
cycle, a rrêter la distri bution et le vider avant de recom mencer l'opération.
1 (Fig.2) - Rincer le réservoir et le remplir d'eau fraîche pota-
ble.
2 (Fig.4-6) - Placer un récipient sous le Cappuccinatore.
Ouvrir le robinet (4) en le tournant dans le sens inverse des
aiguilles d'une montre et appuyer sur la touche de l'eau
chaude “
”.
3 Distribuer tout le contenu du réservoir à eau depuis le Cap-
puccinatore ; pour terminer la distribution, appuyer à nouveau sur la touche de l'eau chaude “
(4) en le tournant dans le sens des aiguilles d'une montre.
4 (Fig.2) - Remplir le réservoir avec de l'eau fraîche potable.
5 (Fig.11-12) - Introduire le porte- ltre par le bas dans le
groupe de distribution (6) et le tourner de gauche à droite
jusqu'à ce qu'il se bloque.
6 (Fig.13) - Placer un récipient approprié sous le porte- ltre.
7 Appuyer sur la touche “
programmée.
8 Vider le récipient se trouvant sous le porte- ltre et répéter
les opérations dont au point (7) jusqu'à vider toute l'eau
dans le réservoir.
9 Remplir à nouveau le réservoir et attendre jusqu’à ce que les
DEL des touches “
10 (Fig.16) - Enlever le porte- ltre du groupe en le tournant
de droite à gauche et le rincer à l'eau fraîche potable. Main-
” et ” ” s'allument xes.
” et fermer le robinet
” et distribuer la quantité d'eau
4.7 Réglage bac de récupération de l’eau
Le bac de récupération de l’eau peut être réglé pour s'adapter
aux dimensions de s tasses et de petites tasses utilisées.
Pour régler l’hauteur du bac de récupération de l’eau procéder
comme suit :
• (Fig.24) - Soulever le bac de récupération de l’eau et retirer
la grille.
• (Fig.25) - Retirer le support positionné sous le bac.
• (Fig.26 - 27) - Tourner le support et le positionner dans la
machine à café.
• (Fig.28) - Positionner le bac de récupération de l’eau sur le
support et replacer la grille.
Français
• 37 •
Page 38

5 DISTRIBUTION DU CAFÉ
Attentio n ! Pendant la dist ribution du ca fé, il est
interdit de démonter le porte- ltre pressurisé,
en le tournant manuellement dans le sens des aiguilles
d'une montr e. Danger de brûlures.
• Pendant cette opération, les touches (15-16) peuvent s’al-
lumer et s’éteindre. Ce fonctionnement doit être considéré
comme normal et ne constitue pas une anomalie.
• Avant d’utiliser la machine, véri er que le bouton « eau
chaude/vapeur » (4) est fermé et que le réservoir à eau de la
machine contient une quantité d’eau su sante.
• (Fig.3) - Appuyer sur l'interrupteur ON/OFF (2).
• Attendre jusqu’à ce que les touches (15-16) s'allument. La
machine est prête pour la distribution du café.
5.1 Avec du café moulu
• (Fig.8) - Insérer le ltre (11) dans le porte- ltre pressurisé
(10) ; lors de la première utilisation le ltre est déjà inséré.
• (Fig.11) - Introduire le porte- ltre par le bas dans le groupe
de distribution (6).
• (Fig.12) - Tourner le porte- ltre de gauche à droite jusqu’à
ce qu’il se bloque. Laisser la poignée du porte- ltre pressurisé ; la poignée tourne légèrement vers la gauche. Ce mouvement garantit le parfait fonctionnement du porte- ltre.
• (Fig.14) - Préchau er le porte- ltre pressurisé en appuyant
sur la touche (16). L’eau commencera à sortir du porte- ltre
pressurisé (cette opération n’est nécessaire que pour le premier café).
• La distribution de l’eau s’achève automatiquement.
• (Fig.16) - Enlever le porte- ltre de la machine en le tour-
nant de droite à gauche et vider l’eau résiduelle. Grâce au
ltre spécial (11) dont la machine est pourvue, il n’est pas
nécessaire de changer de ltre pour obtenir une ou deux
doses de café.
• (Fig.9A) - Verser 1-1,5 mesures pour un café individuel ou
2 mesures pour un café double. Nettoyer le bord du porte ltre pour éliminer tout résidu de café.
• (Fig.11) - Introduire le porte- ltre (10) par le bas dans le
groupe de distribution (6).
• (Fig.12) - Tourner le porte- ltre de gauche à droite jusqu’à
ce qu’il se bloque.
• (Fig.13) - Mettre 1 ou 2 tasses préchau ées sous le
porte- ltre pressurisé et véri er qu’elles sont correctement
placées sous les buses de distribution du café.
• (Fig.14) - Appuyer sur :
- la touche (15) pour obtenir 1 café ou ;
- la touche (16) pour obtenir 2 cafés.
• Après avoir distribué la quantité de café programmée, la
machine achève automatiquement la distribution ; retirer
les tasses avec le café (Fig.15).
• (Fig.16) - Une fois la distribution terminée, attendre quelques secondes avant d'enlever le porte- ltre pressurisé et
d’évacuer le marc du café.
Remarque : dans le porte- ltre il reste une petite quantité d’eau ; cela est normal et n'est dû
qu’aux caractéristiques du porte- ltre.
Re mar qu e im po rt ant e : a n de g ar ant ir d e b ons
résultats le ltre (11) doit être toujours propre.
Laver le ltre tous les jours après son utilisation.
5.2 Avec des dosettes de café
• (Fig.10) - À l'aide d'une cuiller à café, enlever le ltre à café
moulu (11) du porte- ltre pressurisé (10).
• (Fig.7A) - Insérer l'adaptateur pour dosettes (13) dans le
porte- ltre pressurisé (10), la partie bombée tournée vers
le bas.
• (Fig.7B) - Ensuite, introduire le ltre pour dosettes (14)
dans le porte- ltre pressurisé (10).
• (Fig.11) - Introduire le porte- ltre pressurisé par le bas
dans le groupe de distribution (6).
• (Fig.12) - Tourner le porte- ltre de gauche à droite jusqu’à
ce qu’il se bloque. Laisser la poignée du porte- ltre pressurisé. Grâce à un système automatique, la poignée se déplace
légèrement vers la gauche.
Ce mouvement garantit le parfait fonctionnement du por-
te- ltre pressurisé.
• (Fig.14) - Préchau er le porte- ltre pressurisé en appuyant
sur la touche (16). L’eau commencera à sortir du porte- ltre
pressurisé (cette opération n’est nécessaire que pour le premier café).
• La distribution de l’eau s’achève automatiquement.
• (Fig.16) - Enlever le porte- ltre pressurisé de la machine en
le tournant de droite à gauche et vider l’eau résiduelle.
• (Fig.9B) - Introduire la dosette dans le porte- ltre et s’assurer que le papier de la dosette ne sort pas du porte- ltre.
• (Fig.11) - Introduire le porte- ltre pressurisé par le bas
dans le groupe de distribution (6).
• (Fig.12) - Tourner le porte- ltre de gauche à droite jusqu’à
ce qu’il se bloque.
• Mettre 1 tasse préchau ée sous le porte- ltre et véri er
qu’elle est correctement placée sous les buses de distribution du café.
• (Fig.14) - Appuyer sur la touche (15) pour obtenir 1 café.
• 38 •
Page 39

• Après avoir distribué la quantité de café programmée, la
machine achève automatiquement la distribution ; retirer
les tasses avec le café (Fig.15).
• (Fig.16) - Une fois la distribution terminée, attendre quelques secondes avant d'enlever le porte- ltre et la dosette
utilisée.
Remarque importante : a n de garantir de
bons résultats le ltre (14) et l'adaptateur (13)
doivent être toujours propres. Laver le ltre et l'adaptateur tous les jours après leur utilisation.
5.3 Programmation de la quantité de
café
La machine o re la possibilité d’établir la quantité de café distribué en appuyant sur la touche (15) ou (16).
La programmation de la quantité de café n'est
possible qu’en appuyant sur la touche (15) (min
25 ml et max 180 ml)
En appuya nt sur la touche (16) la machine dis tribue une
quantité double par rapport à celle établie pour la touche (15).
• Pour commencer la programmation, mettre le café dans le
porte- ltre comme indiqué aux sections 5.1 ou 5.2.
• Positionner une tasse sous le distributeur de café (10).
• (Fig.14) - Appuyer sur la touche café (15) sans la relâcher.
Au bout de 3 secondes, la machine commence la distribution de café.
• Lorsque la quantité souhaitée est atteinte, relâcher la tou-
che (15).
6 CHOIX DU TYPE DE CAFÉ CONSEILS
Généralement, tous les types de café disponibles dans le commerce peuvent être utilisés. Toutefois, le café est un produit
naturel et son goût change en fonc tion de l’origine et des mélanges réalisés. Il est donc conseillé d’essayer plusieurs types
de café, a n de trouver celui qui s’adapte le mieux à vos goû ts.
Pour des résult ats optimaux, il est quan d même conseillé d’utiliser des mélanges préparés spécialement pour les machines
à expresso. Le café est toujours censé sortir régulièrement du
porte- ltre pressurisé sans qu'il s'égoutte. La vitesse de distribution du café peut être modi ée, en changeant légèrement
la dose de café dans le ltre et/ou en utilisant une mouture
di érente.
Pour obtenir un meilleur résultat et faciliter le nettoyage et la
préparation, Saeco vous conseille d’utiliser des dosettes unidose marquées ESE.
AVANT TOUTE OPÉRATION DE DISTRIBUTION DE
VAPEUR OU D’EAU CHAUDE, VÉRIFIER QUE LE CAPPUCCINATORE EST CORRECTEMENT ORIENTÉE VERS LE BAC
DE RÉCUPÉRATION D’EAU.
Français
La programmation est terminée. Dès maintenant la machine
distribue :
• la même quantité sélectionnée à chaque fois qu’on appuie
ou relâche la touche (15) ;
• la même quantité sélectionnée à chaque fois qu’on appuie
ou relâche la touche (16).
• 39 •
Page 40

7 EAU CHAUDE
Danger de br ûlures ! Au début d e la distributi on,
il peut y avoir des éclaboussures d'eau chaude.
Le tuyau de dis tribution peut at teindre des températ ures élevées : éviter tout contact direct avec les mains.
• (Fig.3) - Appuyer sur l'interrupteur ON/OFF (2).
• Attendre que les touches (15 - 16) s'allument de manière
x e .
• (Fig.18) - Placer un récipient ou un verre à thé sous le cap-
puccinatore.
• (Fig.5) - Ouvrir le bouton (4).
• (Fig.6) - Appuyer sur la touche (17).
• Après avoir prélevé la quantité d'eau chaude désirée, ap-
puyer à nouveau sur la touche (17).
• (Fig.5) - Fermer le bouton (4).
• Retirer le récipient contenant l’eau chaude.
En appuyant sur les touches (15) ou (16) la
machine distribue une quantité dosée d’eau
chaude ; cette quantité est égale à celle indiquée à la
section 5.3.
inverse des aiguilles d’une montre.
Il est conseillé une distribution de 60 secondes
maximum.
• (Fig.21) - Régler la densité de la crème au moyen du pi-
vot ; le soulever doucement pour augmenter la quantité de
crème.
• Une fois ce procédé terminé, fermer le bouton (4) et prendre
la tasse avec le lait émulsionné.
Après avoir préparé le cappuccino, mettre le tuyau d’aspiration dans un récipient avec de l’eau propre et distribuer de la
vapeur. Si de l'eau chaude sort, le cappuccinatore est propre.
Nettoyer la partie ex térieure du tuyau d’aspiration moyennant
un chi on humide.
Le cappuccinatore doit être démonté et lavé
complètement une fois pour semaine.
• (Fig.19) - Appuyer à nouveau sur la touche (18).
• Pour mettre la machine en service, amorcer le circuit conformément à la section 4.5.
8 VAPEUR / CAPPUCCINO
Danger de br ûlures ! Au début d e la distributi on,
il peut y avoir des éclaboussures d'eau chaude.
Le tuyau de dis tribution peut at teindre des températ ures élevées : éviter tout contact direct avec les mains.
• (Fig.3) - Appuyer sur l'interrupteur ON/OFF (2).
• Attendre que les touches (15 - 16) s'allument de manière
x e .
• (Fig.19) - Appuyer sur la touche (18).
• Attendre jusqu’à ce que la touche (18) s'allume de manière
xe. La machine est prête pour la distribution de la vapeur.
• (Fig.18) - Placer un récipient sous le cappuccinatore.
• (Fig.5) - Ouvrir le bouton (4) pour quelques instants pour
faire écouler l’eau résiduelle du cappuccinatore ; la vapeur
commence à sortir au bout de quelques secondes.
• Fermer le bouton (4) et retirer le récipient.
Pour obtenir de meilleurs résultats, utiliser du
lait froid.
• (Fig.20) - Plonger le tuyau d'aspiration du cappuccinatore
dans le réservoir à lait.
• Mettre la tasse sous le cappuccinatore.
• (Fig.5) - Ouvrir le bouton (4) en le tournant dans le sens
Remarque : la machina est prête lorsque les
touches (15) et (16) sont allumés de manière
x e .
Remarque : s’il n’est pas possible de distribuer
un cappuccino comme indiqué, il faut réamorcer le circuit selon ce qui est prévu à la section 4.5 et
répéter par la suite toutes les opérations.
Procéder de la même façon pour réchau er
d'autres boissons.
9 PANNARELLO
Le Pannarello peut être utilisé à la place du cappuccinatore
pour la distribution d’eau chaude ou la distribution de la vapeur.
Pour monter le Pannarello, il faut enlever le cappuccinatore
(Fig 29-30) :
- desserrer la bague sans l’enlever ;
- enlever le raccord du cappuccinatore de la buse de vapeur.
Monter le Pannarello (Fig.31) :
- Introduire complètement le Pannarello dans la buse de
vapeur ;
- Visser la bague.
• 40 •
Page 41

(Fig.32 ; Fig.33) - Pour la distribution d’eau chaude ou de vapeur il faut préparer la machine comme indiqué aux sec tions 7
et 8 et utiliser le Pannarello pour la préparation.
- laver la partie intérieure du porte- ltre pressurisé.
• Ne pas laisser sécher la machine et/ou ses composants dans
un four à micro-ondes et/ou un four traditionnel.
(Fig.34 ; Fig. 35) - Après chaqu e utilisation, quand la machine
est froide, démonter la partie inférieure du Pannarello et la
laver à l’eau tiède.
(Fig.36) - Une fois p ar semaine, démonter aussi la part ie supérieure et la laver à l’eau tiède.
10 NETTOYAGE
L’entretien et le nettoyage ne peuvent être e ectués que si la
machine est f roide et débranchée du réseau électrique.
• Ne pas plonger la machine dans l’eau. Ne pas laver ses composants au lave-vaisselle.
• Ne pas utiliser d’alcool éthylique, de solvants ni d’agents
chimiques agressifs.
• Il est recommandé de nettoyer quotidiennement le réservoir à eau et de le remplir avec de l'eau fraîche.
• (Fig. 20) - Après avoir réchau é le lait, distribuer aussi une
petite quantité d’eau chaude.
Danger ! lorsque l’extrémité du cappuccinatore
est démontée, il est interdit de distribuer de la
vapeur.
• (Fig.22 - 23) - Il est nécessaire de nettoyer le cappuccinatore une fois par semaine.
Pour ce faire il faut :
- extraire l’extrémité du cappuccinatore ;
- séparer la partie supérieure et inférieure du cappuccinatore;
- laver tous le composants du cappuccinatore à l’eau tiède ;
- laver le tuyau d'aspiration avec un chi on humide et enlever tout éventuel résidu de lait ;
- assembler le cappuccinatore ;
- remettre l'extrémité du cappuccinatore dans le raccord
qu'on a gardé monté sur la machine (s'assurer qu'il est
complètement inséré).
• (Fig.24) - Vider et laver tous les jours le bac d'égoutte-
ment.
• Pour le nettoyage de l’appareil, utiliser un chi on doux et
légèrement imbibé d’eau.
• (Fig.17) - Pour nettoyer le porte- ltre pressurisé, procéder
comme suit :
- (Fig.10) - enlever le ltre et le laver soigneusement à l’eau
chaude.
- enlever l’adaptateur (s’il est présent) et le laver soigneusement à l’eau chaude.
Rem arq ue : le por te- lt re pr ess uris é ne d oit p as
être lavé au lave-vaisselle
11 DÉTARTRAGE
La formation d e calcaire est liée à l’emploi de l’appareil. Le c ycle
de détartrage est nécessaire tous les 1 ou 2 mois d’utilisation
de la machine et/ou en cas de réduction de la quantité d'eau
débitée. Utiliser uniquement le produit détartrant Saeco.
S’il y a du con it, le contenu du mode d’emploi
et d’entretien est prioritaire par rapport aux
indications gurant sur les accessoires et/ou sur les
matériaux d ’usage vendus séparément.
Utiliser le produit détartrant Saeco (Fig.B). Ce
produit a été spécialement conçu pour assurer,
si utilisé correctement, la meilleure performance et
fonctionnalité de l'appareil pendant toute sa vie opérationnelle et pour éviter toute altération du produit
distribué. Avant de commencer le cycle de détartrage,
véri er : QUE LE FILTRE À EAU, si utilisé, A ÉTÉ ENLEVÉ.
Ne pas boire la solution détartrante et les pro-
duits distribués jusqu'à la conclusion du cycle.
Ne jamais utiliser de vinaigre pour détartrer la machine.
1 (Fig.11-12) - Introduire le porte- ltre par le bas dans le
groupe de distribution (6) et le tourner de gauche à droite
jusqu'à ce qu'il se bloque.
2 (Fig.1) - Enlever et vider le réservoir à eau.
3 (Fig.2) - Verser LA MOITIÉ du contenu de la bouteille de
détartrant concentré Saeco dans le réservoir à eau de l'appareil et le remplir avec de l’eau fraîche potable jusqu'au
niveau MAX indiqué.
4 (Fig.3) - Mettre en marche la machine, en appuyant sur
l'interrupteur ON/OFF (2).
(Fig.4) - Prendre (comme il est décrit à la section 7 du mode
d'emploi) de la buse de vapeur/eau chaude, 2 tasses d'eau
(à peu près 150 ml chacune) ; arrêter ensuite la machine en
appuyant sur l'interrupteur ON/OFF (2).
5 La machine arrêtée, attendre 15 à 20 minutes pour que le
détartrant ait son e et.
6 Mettre en marche la machine, en appuyant sur l'interrup-
teur ON/OFF (2).
(Fig.4) - Prendre (comme il est décrit à la section 7 du mode
d'emploi) de la buse de vapeur/eau chaude, 2 tasses d'eau
Français
• 41 •
Page 42

(à peu près 150 ml chacune). Arrêter ensuite la machine en
appuyant sur l'interrupteur ON/OFF (2) et la garder ainsi
pendant 3 minutes.
7 Répéter les opérations décrites au point 6 jusqu'à vider
complètement le réservoir à eau.
8 (Fig.2) - Rincer le réservoir avec de l’eau fraîche potable et
le remplir complètement.
9 Placer un récipient sous le porte- ltre.
10 (Fig.6) - Mettre en marche la machine, en appuyant sur l'in-
terrupteur ON/OFF (2) ; attendre jusqu'à ce que les touches
(15 - 16) s'allument xes. Appuyer sur la touche “
distribuer la quantité d'eau programmée.
11 Vider le récipient se trouvant sous le porte- ltre et répéter
les opérations dont au point (10) jusqu'à vider toute
l'eau dans le réservoir.
12 (Fig.2) - Remplir à nouveau le réservoir avec de l'eau fraî-
che.
(Fig.4) - Placer un grand récipient sous la buse de vapeur/
eau chaude. Ouvrir le robinet de distribution de l'eau (4) en
le tournant dans le sens inverse des aiguilles d'une montre.
Appuyer sur la touche de l'eau chaude “
le contenu du réservoir par la buse de vapeur/eau chaude.
13 Une fois l'eau prélevée, pour arrêter la distribution appuyer
à nouveau sur la touche de l'eau chaude “
binet de distribution de l'eau (4) en le tournant dans le sens
des aiguilles d'une montre.
14 Répéter encore une fois les opérations du point (8) pour un
total de 4 réservoirs.
15 (Fig.16) - Enlever le porte- ltre du groupe en le tournant
de droite à gauche et le rincer à l'eau fraîche potable.
” et prélever tout
”. Fermer le ro-
” et
12 ÉLIMINATION
L’ appareil est en conçu et fabriqué pour faciliter sa valorisation, son recyclage ou sa réutilisation conformément à la directive eu ropéenne 2002/96/CEE relative aux appa reils électriques et électroniques usagés (waste electrical and electronic
equipment - WEEE).
Le logo
ce produit ne peut pas être éliminé avec les déchets ménager s
non triés.
Lorsque vous aur ez décidé de vous en sépare r dé nitivement , il
convient de faire p rocéder à la collecte sélec tive de cet appareil
en v ous conf orm ant a u mo de de rep ris e mis en pl ace d ans v otr e
commune (collecte ponctuelle des encombrants, déchèterie),
ou en faisant appel au service de reprise proposé p ar votre distributeur, ou bien, en le con ant à des organis ations caritatives
et des associations à but non lucratif.
En vous assurant que ce pr oduit est éliminé correc tement, vous
favorisez la prévention des conséquences négatives pour l’environnement et la santé humaine.
ci-contre apposé sur l’appareil indique que
Le cycle de dét artrage est ainsi terminé.
(Fig.2) - Remplir à nouveau le réservoir avec de l'eau fraîche.
Le cas échéant, r éamorcer le circuit comme il es t décrit à la section 4.5 du mode d'emploi.
La solution détartrante doit être éliminée
conformément à ce qui est prévu par le producteur et/ou par les normes en vigueur dans le Pays où la
machine est utilis ée.
• 42 •
Page 43

Panne Causes possibles Remède
La machine ne se met pas en
marche
La pompe est très bruyante Manque d’eau dans le réservoir. Remplir d’eau (sec .4.4).
Toutes les touches clignotent. réamorcer le circuit de l’eau.
Le café est trop froid.
La crème de lait ne se forme pas.
Il n’est pas possible de préparer
de cappuccinos
Le café coule trop rapidement, la
crème ne se forme pas
Le café ne coule pas o u il coule en
gouttes.
Le café coule des bords.
La machine n’est pas branchée sur le réseau électrique.
Le p orte - ltre n ’est p as ins éré po ur le p réchau age (chap. 5).
Les tasses sont froides Préchau er les tasses avec de l’eau chaude
Lait inapproprié : lait en poudre, lait mai-
gre.
Le Cappuccinatore es t sale.
Il n’y a plus de vapeur dans la chaudière.
Pas assez de café dans le porte- ltre. Ajouter du café (chap. 5).
Mouture trop grossière. Changer de mélange (chap.6).
Café pas frais ou inapproprié. Changer de mélange (chap.6).
La doset te n’est pas fr aîche ou adéquate. Changer de doset te.
Un composant dans le porte- ltre fait
défaut.
Eau insu sante. Remplir d’eau (sect.4.4).
Mouture trop ne. Changer de mélange (chap.6).
Café pressé dans le porte- ltre. Remuer le café moulu.
Trop de café dans le porte- ltre. Réduire la quantité de café dans le porte- ltre.
Bouton (4) ouvert. Fermer le bouton (4).
Machine entartrée. Détar trer la machine (chap.10)
Le ltre contenu dans le porte- ltre est
bouché.
La dosette n’est pas adéquate Changer de dosette.
Porte- ltre mal inséré dans le groupe de
distribu tion du café.
Bord supérieur du porte- ltre encrassé. Nettoyer le bord du porte- ltre.
Garniture de la chaudière encrassée ou
usée.
Dosette introduite de manière incorrecte.
Trop de café dans le porte- ltre. Réduire la quantité de café à l’aide de la mesure.
Brancher la machine sur le réseau électrique.
Réamorcer le circuit comme décrit à la section
4.5.
Préchau er le porte- ltre.
Utiliser du lait entier.
Nettoyer le cappuccinatore comme il a été décrit
au Chap.9.
Réamorcer le circuit (sec t. 4.5) et répéter les opérations décrites au Chap. 8.
Véri er si tous les composants sont présents et
montés correctement.
Nettoyer le ltre (chap.9)
Insérer correctement le porte- ltre (chap.5).
Nettoyer la garniture.
Introduire correctement la dosette de manière à
ce qu’elle ne sorte pas du p orte- ltre.
Français
Pour toute panne non détaillée dans le tableau ci-dessus ou en cas de solutions insu santes à résoudre le problème, s'adr esser à un centre d'assistance agréé.
• 43 •
Page 44

1 INFORMACIÓN DE CARÁCTER GENERAL
La máquina de c afé prepara 1 o 2 tazas d e café exprés y dispon e
de un cappuccinatore orientable para el suministro del vapor y
del agua caliente. Los mandos situados en la parte delantera
del aparato llevan iconos de fácil interpretación.
La máquina ha sido diseñada para us o doméstico y no se aconseja un funcionamiento continuo de tipo profesional.
¡Atención! Se declina toda responsabilidad por
posibles daños en caso de:
• Uso indebido y no conforme a las instrucciones de
uso;
• Re parac ione s real izad as en ce ntro s de as isten cia no
autorizados;
• Alteración del cable de alimentación;
• Alteración de cualquier piez a de la máquina;
• Utilizac ión de repuestos y accesorios no originales;
• Descalci cación de la máquina no realizada y alma-
cenamiento en locales con temperatura por debajo
de 0°C.
En dichos c asos la garantía pierde su validez.
1.1 Para facilitar la lectura
El triángulo de advertencia señala
todas las instrucciones importan-
tes para la seguridad del usuario.
¡Observar atentamente dichas indicaciones para evitar
heridas g raves!
2 DATOS TÉCNICOS
El fabrican te se reserva el derec ho de modi c ar las caracterís ticas técnic as del producto.
Tensión nominal - Potencia nominal - Alimentación
Véase placa en el aparato
Estruc tura exterior
Plástico
Dimensiones (l x a x p) (mm)
270 x 350 x 300
Peso
4 kg
Longitud cable
1,2 m
Panel de mandos
En la parte delantera
Porta ltro
Presurizado
Pannarello
Especial para capuchinos
Depósito de agua
1,5 litros - Extraíble
Presión bomb a
15 ba r
Caldera
Acero inoxidable
Dispositivos de seguridad
Ter mof us ibl e
La referencia a guras, partes del aparato o elementos del panel de mandos, etc . está indicada con números o l etras; en este
caso, hacer referencia a las guras.
Este símbolo señala la información más importante para asegurar un mejor uso de la máqui-
na.
Las guras que remiten al texto se encuentran en las
primeras páginas del manual. Consultar estas páginas
durante la lectura de las instrucciones de uso.
1.2 Cómo utili zar estas instrucciones para
el uso
Guardar este manual de instrucciones de uso en un lugar seguro y adjuntarlas a la máquina de café en caso de que otra
persona vaya a utilizar la máquina.
Para información más detallada o en caso de algún problema,
dirigirse a centros de asistenc ia autorizados.
• 44 •
3 NORMAS DE SEGURIDAD
No dejar nunca que las partes bajo tensión entren en
contacto con el agua: ¡Peligro de cortocircuito! ¡El vapor sobrecalentado y el agua caliente pueden causar
quemaduras! No dirigir nunca el chorro de vapor o del
agua caliente hacia partes del cuerpo; manipular con
cuidado la boquilla de salida de vapor / agua caliente:
¡Riesgo de quemaduras!
Uso previsto
Esta máquina de café ha sido diseñada sólo para uso doméstico. ¡Se prohíbe toda modi cación técnica y uso ilícito por
los riesgos que éstos conllevan! El aparato no está diseñado
para que lo usen personas (incluidos los niños) con reducidas
capacidades físicas, mentales o sensoriales o con experiencia
y/o competencias insu cientes, a no ser que lo utilicen bajo la
Page 45

supervisión de una persona responsable de su seguridad o que
ésta les enseñe a usarlo.
Alimentación de corriente eléctrica
Conectar la máquina de café sólo a una toma de corriente
adecuada. La tensión debe corresponder al valor indicado en
la placa del apar ato.
Cable de alimentación
Nunca usar la máquina de café si el cable de alimentación es
defectuoso. Si el cable de alimentación está dañado, solicitar
al fabricante o al servicio de asistencia clientes la sustitución
del mismo. Procurar que el cable de alimentación no pase por
esquinas o can tos agudos ni por encima de objeto s muy calientes. Proteger lo del aceite.
No llevar ni tirar de la máquina agarrándola por el cable. No
desenchufar la máquina tirando del cable ni tocar el enchufe
con las manos mojadas.
Procurar que el cable de alimentación no cuelgue libremente
de mesas o estanterías.
Protección de otras personas
Mantener fuera del alcance de los niños para evitar que jueguen con el aparato.
Los niños no se dan cuenta de los peligros relacionados con el
uso indebido de un electrodoméstico. No dejar al alcance de los
niños los materiales usados par a embalar la máquina.
Peligro de quemaduras
No dirigir contra sí mismo ni contra los demás el chorro de vapor sobrec alentado o de agua caliente. Usa r siempre las empuñaduras o los mandos.
Nunca quitar el porta ltro presurizado durante el suministro
del café. Durante la fase de calentamiento del grupo de café
pueden salir unas gotas de agua c aliente.
Colocación
Colocar la máquina de café en un lugar seguro, donde nadie
pueda volcarla o quedar herido.
Agua caliente o vapor sobrecalentado podrían salir de los tubos: ¡Riesgo de quemaduras!
No colocar la máquina en un lugar con temperatura inferior a
0°C; las bajas temperaturas pueden dañar la máquina.
No usar la máquina de café en lugares abiertos.
No apoyar la máquina sobre super cies muy calientes ni cerca
de llamas abiertas a n de evitar que su carrocería se derrita o
que de cualquier manera se dañe.
Limpieza
Antes de limpiar la máquina, es necesario desactivarla pulsando el botón ON/OFF y, a continuació n, desconectarla de la tom a
de corriente. Esperar hasta que la máquina se enfríe. ¡Nunca
sumergir la máquina en el agua!
Se prohíbe terminantemente tratar de intervenir en la estruc-
tura interna de la máquina.
No usar el agua que ha quedado en el depósito durante unos
días para uso alimentario. Volver a llenar el depósito con agua
potable fresca.
Espacio para el uso y el mantenimiento
Para un funcionamiento correcto de la máquina de café se recomienda lo siguiente:
• Elegir una super cie de apoyo bien nivelada;
• Elegir un ambiente su cientemente iluminado e higiénico.
La toma de corriente debe ser de fácil acceso;
• Calcular una distancia mínima de la máquina con respecto a
la pared como muestra la gura (Fig.A).
Conservación de la máquina
En caso de que no se v aya a usar la máquina durante largos pe riodos de tiempo, deberá apagarse y desconectarse de la toma
de corriente. Guardar la máquina en un lugar seco y al que no
puedan acceder los niños. Proteger la máquina del polvo y de
la suciedad.
Reparaciones / Mantenimiento
En caso de averías, desperfectos o sospecha de desperfectos
tras una caída, se recomienda desconectar en seguida la máquina de la toma de corri ente. Nunca poner en funcionami ento
una máquina que presente desperfectos. Sólo los centros de
asistencia autorizados pueden realizar reparaciones a la máquina. En caso de reparaciones realizadas de forma incorrecta,
se declina toda responsabilidad por posibles daños.
Antiincendio
En caso de incendio usar extintores de anhídrido carbónico
(CO
). No usar agua ni ex tintores de polvo.
2
Español
• 45 •
Page 46

Componentes de la máquina (Pág.2)
1 Panel de mandos
2 Interruptor ON/OFF
3 Depósito de agua
4 Mando de agua caliente / vapor
5 Bandeja de goteo + rejilla
6 Grupo de café
7 Cappuccinatore
8 Cable de alimentación
9 Cuchara dosi cadora para café molido
10 Porta ltro presurizado
11 Filtro para café molido
(único para el suministro de 1 ó 2 cafés)
12 Pannarello
13 Adaptador de ltro para pastillas de caf é
14 Filtro para pastillas de café
15 Botón luminoso de suministro de café individual
16 Botón luminoso de suministro de café doble
17 Botón luminoso de suministro de agua caliente
18 Botón luminoso de suministro de vapor
4 INSTALACIÓN
Para su seguridad y la seguridad de terceras personas
observar atentamente las “Normas de seguridad” descritas en el cap. 3.
4.1 Embalaje
El emb alaje or iginal h a sido dis eñado y re alizad o para pr oteger
la máquina durante el transporte. Se aconseja guardarlo para
transportes futuros.
4.2 Advertencia para la instalación
Antes de instalar la máquina, respetar las siguientes normas
de seguridad:
• colocar la máquina en un lugar seguro;
• asegurarse de que los niños no tengan la posibilidad de jugar con la máquina;
• no apoyar la máquina sobre super cies muy calientes ni
cerca de llamas abiertas.
Ahora se puede conectar la máquina de café a la red eléctrica.
Nota: se aconseja lavar los componentes antes
de utiliz arlos por primer a vez y/o despué s de un
largo período de inutilización.
4.3 Conexión de la máquina
¡La corriente eléctrica puede ser peligrosa! Por
tanto, observar siempre atentamente las normas de seguridad. ¡Nunca usar cables defectuosos! Los
cables y l os enchufes defe ctuosos deben s er sustituidos
en seguida en los centros de asistencia autorizados.
La tensión del aparato ha sido determinada en fábrica. Comprobar que la tensión de red corresponda a los valores indicados en la placa de identi cación situada en la parte de abajo
del aparato.
• Antes de conectar la máquina a la red eléctrica, comprobar
que el interruptor ON/OFF (2) no esté en la posición de encendido.
• Conectar el enchufe a una toma de corriente de pared de
tensión adecuada.
4.4 Depósito de agua
• (Fig.1) - Extraer el depósito de agua (3).
• (Fig.2) - Aclarar y llenar con agua potable fresca evitando
llenar hasta el tope.
• (Fig.1) - Introducir de nuevo el depósito en su alojamiento;
comprobar que esté correctamente colocado.
Introducir en el depósito siempre y sólo agua
potable fresca sin gas. El agua caliente y otros
líquidos pueden estropear el depósito. No poner en
funcionamiento la máquina sin agua: asegurarse de
que haya su ciente agua en el depósito.
4.5 Carga del circuito
Al principio, después de suministrar vapor o terminar el agua
en el depósito, se debe recargar el circuito de la máquina; la
máquina indica la necesidad de realizar esta operación mediante el parpadeo simultáneo de los 4 botones del panel de
mandos.
• (Fig.3) - Pulsar el interruptor ON/OFF (2); los 4 botones par-
padean.
• (Fig.4) - Colocar un recipiente debajo del cappuccinatore.
• (Fig.5) - Abrir el mando (4) “agua caliente/vapor” girándolo
en el sentido contrario a las agujas del reloj.
• (Fig.6) - Pulsar el botón agua caliente (17).
• Esperar hasta que la máquina termine el suministro de
agua.
• 46 •
Page 47

• Cerrar el mando (4) “agua caliente/vapor” girándolo en el
sentido de las agujas del reloj. Retirar el recipiente.
Al terminar la primera carga del circuito, la
máquina empieza a calentarse. No se puede
suminis trar café, agua o vap or hasta que los dos p ilotos
luminosos 15 y 16 permanezcan encendidos.
Nota: si la operación no se completa los 4 bo-
tones seguirán parpadeando y la máquina no
podrá utilizarse.
4.6 Primer uso o después de un período
de inactividad
Esta simple o peración asegura un sumini stro óptimo y debe ser
realizada:
- en la primera puesta en marcha;
- cuando la máquina permanece un largo período sin usarse
(más de 2 semanas).
Se debe vaciar el agua suministrada en un des-
agüe apropiado y no se la puede utilizar para la
alimentación. Si durante el ciclo el recipiente se llena,
detener el suministro y vaciarlo antes de reiniciar la
operación.
1 (Fig.2) - Enjuagar el depósito y llenarlo con agua potable
fresca.
2 (Fig.4-6) - Colocar un recipiente debajo del Cappuccinatore.
Abrir el mando (4) girándolo en el sentido contrario a las
agujas del reloj y pulsar el botón agua caliente “
3 Suministrar todo el contenido del depósito de agua a través
del Cappuccinatore; para terminar el suministro, pulsar nuevamente el botón agua caliente “
girándolo en el sentido de las agujas del reloj.
4 (Fig.2) - Llenar el depósito con agua potable fresca.
5 (Fig.11-12) - Fijar el porta ltro en el grupo de café (6) in-
troduciéndolo desde abajo del grupo y girarlo de izquierda a
derecha hasta que se bloquee.
6 (Fig.13) - Colocar un recipiente adecuado debajo del porta-
ltro.
7 Pulsar el botón “
programada.
8 Vaciar el recipiente colocado debajo del porta ltro y repetir
las operaciones descritas en el punto (7) hasta que el
depósito quede vacío.
” y suministrar la cantidad de agua
” y cerrar el mando (4)
”.
9 Llenar nuevamente el depósito y esperar a que los pilotos
luminosos de los botones “
jos.
10 (Fig.16) - Retirar el porta ltro del grupo girándolo de
derecha a izquierda y enjuagarlo con agua potable fresca.
Después, la máquina está lista para el uso.
Ahora la máquina está lista para el suministro de café y vapor;
para los detalles de funcionamiento consultar los capítulos correspondientes.
” e ” ” se enciendan
4.7 Ajuste de la bandeja de goteo
La bandeja de gote o se puede ajustar para adapt arla al tamaño
de las tazas utilizadas.
Para ajustar la altura de la bandeja de goteo, proceder de la
siguiente manera:
• (Fig.24) - Levantar la bandeja de goteo y retirar la rejilla.
• (Fig.25) - Extraer el soporte ubicado debajo de la bandeja.
• (Fig.26 - 27) - Girar el soporte y colocarlo en la máquina de
café.
• (Fig.28) - Colocar la bandeja de goteo sobre el soporte y
volver a colocar la rejilla.
Español
• 47 •
Page 48

5 SUMINISTRO DE CAFÉ
¡Atención! Nunca quitar el porta ltro presuriza-
do girándolo manualmente en el sentido de las
agujas del reloj durante el suministro del café. Riesgo
de quemaduras.
na termina automáticamente el suministro; retirar las tazas
con el café (Fig.15).
• (Fig.16) - Finalizado el suministro esperar unos segundos,
luego extraer el porta ltro presurizado y vaciarlo de los posos.
• Durante esta operación, los botones (15 - 16) se pueden
encender y apagar; dicho funcionamiento debe ser considerado normal y no una anomalía.
• Asegurarse, antes de usar la máquina, de que el mando (4)
“agua caliente/vapor” esté cerrado y que haya su ciente
agua en el depósito.
• (Fig.3) - Pulsar el interruptor ON/OFF (2).
• Esperar a que los botones (15 - 16) permanezcan encendi-
dos; a continuación, la máquina está lista para el suministro
de café.
5.1 Con café molido
• (Fig.8) - Introducir el ltro (11) en el porta ltro presurizado
(10); al utilizarlo la primera vez, el ltro ya está introducido.
• (Fig.11) - Fijar el porta ltro en el grupo de café (6) introdu-
ciéndolo debajo del grupo.
• (Fig.12) - Girar el porta ltro de izquierda a derecha hasta
que se bloquee. Soltar el mango del porta ltro presurizado,
el mango gira levemente hacia la izquierda. Este movimiento garantiza el perfecto funcionamiento del porta ltro.
• (Fig.14) - Precalentar el porta ltro presurizado pulsando el
botón (16). El agua empezará a salir del porta ltro presurizado (esta operación es necesaria sólo para el primer café).
• El suministro de agua terminará automáticamente.
• (Fig.16) - Retirar el porta ltro de la máquina girándolo de
derecha a izquierda y vaciar el agua restante. Gracias al especial ltro (11) de la máquina, no es necesario cambiar de
ltro para obtener uno o dos cafés.
• (Fig.9A) - Añadir 1 -1,5 medidas para un café individual
ó 2 medidas rasas para un café doble; limpiar el borde del
porta ltro de los restos de café.
• (Fig.11) - Fijar el porta ltro (10) en el grupo de café (6)
introduciéndolo debajo del grupo.
• (Fig.12) - Girar el porta ltro de izquierda a derecha hasta
que se bloquee.
• (Fig.13) - Retirar 1 ó 2 tazas precalentadas y colocarlas
debajo del porta ltro presurizado; asegurarse de que las tazas
estén debajo de los ori cios de suministro de café.
• (Fig.14) - Pulsar:
- el botón (15) para obtener 1 café;
- el botón (16) para obtener 2 cafés.
• Una vez obtenida la cantidad de café programada, la máqui-
Nota: en el porta ltro queda una pequeña cantidad de agua; esto es normal y se debe a las
características del porta ltro.
Not a impo rtan te: El ltr o (11) debe m anten erse
limpio para poder garantizar un resultado per-
fecto. Lavar diariamente tras el uso.
5.2 Con pastillas de café
• (Fig.10) - Quitar, utilizando una cucharita de café, el ltro
para café molido (11) del porta ltro presurizado (10).
• (Fig.7A) - Introducir, en el porta ltro presurizado (10), el
adaptador para pastillas de café (13), con la parte convexa
orientada hacia abajo.
• (Fig.7B) - A continuación, introducir el ltro para pastillas
de café (14) en el porta ltro presurizado (10).
• (Fig.11) - Fijar el porta ltro presurizado en el grupo de café
(6) introduciéndolo debajo del grupo.
• (Fig.12) - Girar el porta ltro de izquierda a derecha hasta
que se bloquee. Soltar el mango del porta ltro presurizado.
A continuación, un sistema automático mueve el mango
levemente hacia la izquierda.
Este movimiento garantiza el perfecto funcionamiento del
porta ltro presurizado.
• (Fig.14) - Precalentar el porta ltro presurizado pulsando el
botón (16). El agua empezará a salir del porta ltro presurizado (esta operación es necesaria sólo para el primer café).
• El suministro de agua terminará automáticamente.
• (Fig.16) - Retirar el porta ltro presurizado de la máquina
girándolo de derecha a izquierda y vaciar el agua restante.
• (Fig.9B) - Introducir la pastilla de café en el porta ltro; ase-
gurarse de que el papel de la pastilla de café no salga del
porta ltro.
• (Fig.11) - Fijar el porta ltro presurizado en el grupo de café
(6) introduciéndolo debajo del grupo.
• (Fig.12) - Girar el porta ltro de izquierda a derecha hasta
que se bloquee.
• Retirar 1 taza precalentada y colocarla debajo del porta-
ltro; asegurarse de que la taza esté debajo de los ori cios
de suministro de café.
• (Fig.14) - Pulsar el botón (15) para obtener 1 café.
• 48 •
Page 49

• Una vez obtenida la cantidad de café programada, la máqui-
na termina automáticamente el suministro; retirar las tazas
con el café (Fig.15).
• (Fig.16) - Finalizado el suministro esperar unos segundos,
luego extraer el porta ltro y tirar la pastilla de café usada.
Nota importante: el ltro (14) y el adaptador
(13) deben mantenerse limpios para poder garantizar un resultado perfecto. Lavar diariamente tras
el uso.
5.3 Programación de la cantidad de café
En es ta máq uina se p uede pr ogram ar la can tidad d e café s uministrado al pulsar el botón (15) o el botón (16).
La programación de la cantidad de café está
disponible sólo para el botón (15) ( 25cc mín. y
180cc máx.).
Pulsando el botón (16) la máquina suministra el doble
de la cantidad programada con el botón (15).
• Para iniciar la programación, introducir el café en el porta ltro
como se indica en el apartado 5.1 ó 5.2.
• Colocar una taza debajo de la salida de café (10).
• (Fig.14) - Pulsar y mantener pulsado el botón café (15). Al
cabo de 3 segundos, la máquina empezará a suministrar
café.
• Una vez obtenida la cantidad de café deseada, soltar el botón
(15).
6 SELECCIÓN DEL TIPO DE CAFÉ CONSE
JOS
En general es posible utilizar cualquier tipo de café que se encuentra en vent a. Sin embargo, el café es un produc to natural y
su sabor camb ia en función del origen y de la mezc la; por tanto
es aconsejable probar varios tipos hasta encontrar el café que
nos agrada más.
De todas formas, para obtener mejores resultados se aconseja
utilizar mezclas preparadas especialmente para las máquinas
de café exprés. La salida del café del porta ltro presurizado
deberá ser siempre regular y sin goteo.
Es posible modi car la velocidad de salida del café cambiando
levemente la c antidad de café del ltro y/o usando un café que
tenga un grado de molido diferente.
Para asegurar un excelente resultado en taza y facilitar la limpieza y la preparación, Saeco recomienda usar pastillas de c afé
monodosis marcadas ESE.
ANTES DE REALIZAR CUALQUIER OPERACIÓN DE
SUMINISTRO DE VAPOR O DE AGUA CALIENTE,
COMPROBAR QUE EL CAPPUCCINATORE ESTÉ ORIENTADO
HACIA LA BANDEJA DE GOTEO.
Español
La programación ha terminado y a partir de ahora la máquina
suministrará:
• la misma cantidad de café seleccionada cada vez que se pulse y se suelte el botón (15);
• el doble de la cantidad de café seleccionada cada vez que se
pulse y se suelte el botón (16);
• 49 •
Page 50

7 AGUA CALIENTE
¡Riesgo de quemaduras! Al empezar el suminis-
tro se pueden producir pequeñas salpicaduras
de agua caliente. El tubo de suministro puede alcanzar
temperaturas elevadas: no tocarlo directamente con
las manos.
• (Fig.3) - Pulsar el interruptor ON/OFF (2).
• Esperar a que los botones (15 - 16) permanezcan encendi-
dos.
• (Fig.18) - Colocar un recipiente o una taza de té debajo del
cappuccinatore.
• (Fig.5) - Abrir el mando (4).
• (Fig.6) - Pulsar el botón (17)
• Una vez obtenida la cantidad de agua caliente deseada, pul-
sar de nuevo el botón (17).
• (Fig.5) - Cerrar el mando (4)
• Retirar el recipiente con el agua caliente.
Pulsando los botones (15) o (16) la máquina su-
ministra una cantidad de agua caliente dosi cada; dic ha cantidad es igu al a la que se ha progra mado
en el apartado 5.3.
re en el contenedor de la leche.
• Coloque la taza debajo del cappuccinatore.
• (Fig.5) - Abrir el mando (4) girándolo en el sentido contra-
rio a las agujas del reloj.
Se recomienda un suministro máximo de 60
segundos.
• (Fig.21) - Regular el tornillo para modi car el volumen de
la crema; levantarlo suavemente para aumentar la crema.
• Al nal, cerrar el mando (4) y retirar la taza con la leche
montada.
Tras preparar el capuchino, sumergir el tubo de aspiración en
un recipiente con agua limpia y suministrar vapor. Cuando salga agua clara, el capp uccinatore estará limpio. Limpiar la p arte
exterior del tubo de aspiración con un paño húmedo.
Desmontar y lavar completamente el cappuccinatore una vez a la semana.
• (Fig.19) - Pulsar de nuevo el botón (18).
• Proceder con la operación de carga del circuito como se indica en el apartado 4.5 para que la máquina sea operativa.
8 VAPOR / CAPUCHINO
¡Riesgo de quemaduras! Al empezar el suminis-
tro se pueden producir pequeñas salpicaduras
de agua caliente. El tubo de suministro puede alcanzar
temperaturas elevadas: no tocarlo directamente con
las manos.
• (Fig.3) - Pulsar el interruptor ON/OFF (2).
• Esperar a que los botones (15 - 16) permanezcan encendi-
dos.
• (Fig.19) - Pulsar el botón (18).
• Esperar a que el botón (18) permanezca encendido; a conti-
nuación, la máquina está lista para el suministro de vapor.
• (Fig.18) - Colocar un recipiente debajo del cappuccinatore.
• (Fig.5) - Abrir el mando (4) durante algunos segundos para
que salga el agua que ha quedado en el cappuccinatore; en
poco tiempo, empezará a salir sólo vapor.
• Cerrar el mando (4) y retirar el recipiente.
Para garantizar un mejor resultado usar leche
fría
• (Fig.20) - Sumergir el tubo de aspiración del cappuccinato-
• 50 •
Nota: la máquina es operativa cuando los botones (15 y 16) per manecen encendidos.
Nota: si no se consigue preparar un capuchino
como se describe, se debe recargar el circuito
como se indica en el apartado 4.5 y luego repetir las
operaciones.
El mismo sistema puede ser utilizado para el
calentamiento de otras bebidas.
Page 51

9 PANNARELLO
El pannarello se puede utilizar como alternativa al cappuccinatore para el suminis tro de agua caliente o vapor.
Para instalar el pannarello será necesario desmontar el cappuccinatore (Fig.29-30):
- a ojar la abrazadera sin retirarla;
- quitar el racor del cappuccinatore del tubo de vapor.
Instalar el pannarello (Fig.31):
- Introducir completamente el pannarello en el tubo de vapor;
- Apretar bien la abrazadera.
(Fig.32; Fig.33) - Para suministrar agua caliente o vapor se
debe preparar la máquina como se describe en los apartados
7 y 8; utilizar el pannarello para la preparación.
(Fig.34; Fig.35) - Tras el uso, con la máquina fría, extraer la
parte inferior del pannarello y lavarla con agua tibia.
eventuales residuos de leche;
- ensamblar el cappuccinatore;
- volver a montar la parte terminal del cappuccinatore en el
racor que está en la máquina (asegurarse de que se haya
introducido completamente).
• (Fig.24) - Vaciar y lavar la bandeja de goteo diariamente.
• Limpiar la máquina usando un paño suave humedecido con
agua.
• (Fig.17) - Para limpiar el porta ltro presurizado proceder
de la siguiente manera:
- (Fig.10) - extraer el ltro y lavarlo bien con agua caliente.
- extraer el adaptador (si está instalado) y lavarlo bien con
agua caliente.
- lavar el interior del porta ltro presurizado.
• No secar la máquina ni sus componentes usando un horno
de microondas o un horno convencional.
Nota: no lavar el porta ltro presurizado en el
lavavajillas.
Español
(Fig.36) - Una vez a la semana desmontar también la parte
superior y lavarla con agua tibia.
10 LIMPIEZA
El mantenimiento y la limpieza pueden ser realizados sólo
cuando la máquina está fría y desconectada de la red eléctrica.
• No sumergir la máquina en el agua ni introducir sus componentes en el lavavajillas.
• No use alcohol etílico, disolventes y/o productos químicos
agresivos.
• Es aconsejable limpiar el depósito de agua diariamente y
llenarlo con agua fresca.
• (Fig.20) - Tras calentar la leche, suministrar también una
pequeña cantidad de agua caliente.
¡Peligro! Cuando la parte terminal del cappuccinatore está desmontada, nunca suministrar
vapor.
• (Fig.22 - 23) - Una vez a la semana se debe limpiar el cappuccinatore.
Para realizar esta operación se debe:
- retirar la parte terminal del cappuccinatore;
- separar la parte superior del cappuccinatore de la parte
inferior;
- lavar todos los componentes del cappuccinatore con agua
tibia;
- lavar el tubo de aspiración con un paño húmedo y quitar los
11 DESCALCIFICACIÓN
La formaci ón de cal se produce con el uso d el aparato; el ciclo de
descalci cación debe efectuarse regularmente cada 1-2 meses
y/o cuando se observa una reducción del caudal de agua. Utilizar exclusivamente el producto descalci cante Saeco.
En caso de con icto, las instrucc iones presentes
en el manual de uso y mantenimiento tienen
priori dad respecto a las i ndicaciones re lativas a accesorios o materiales de uso vendidos por separado.
Utilizar el producto descalci cante Saeco (Fig.
B). Ha sido formulado especí camente para
mantener al máximo el rendimiento y la funcionalidad
de la máquina para toda su vida operativa, y también
para evitar, si utilizado correctamente, alteraciones de
los productos suministrados. Antes de iniciar el ciclo de
descalci cación asegurarse de que: SE HAYA EXTRAÍDO EL
FILTRO DE AGUA, si utilizado.
No beber la solución descalci cante y los pro-
ductos suministrados hasta completar el ciclo.
No utilizar bajo ningún concepto vinagre como producto descalci cante.
1 (Fig.11-12) - Fijar el porta ltro en el grupo de café (6) in-
troduciéndolo desde abajo del grupo y girarlo de izquierda a
derecha hasta que se bloquee.
2 (Fig.1) - Retirar y vaciar el depósito de agua.
• 51 •
Page 52

3 (Fig.2) - Verter la MITAD del contenido de la botella de lí-
quido descalci cante concentrado Saeco en el depósito de
agua del aparato y llenarlo con agua potab le fresca hasta el
nivel MÁX.
4 (Fig.3) - Encender la máquina pulsando el interruptor ON/
OFF (2).
(Fig.4) - Suministrar (como se describe en el capítulo 7 del
manual), a través tubo de vapor/agua caliente, 2 tazas de
agua (aproximadamente 150 ml para cada una). Luego,
apagar la máquina mediante el interruptor ON/OFF (2).
5 Dejar que el producto descalci cante actúe durante 15-20
minutos con la máquina apagada.
6 Encender la máquina pulsando el interruptor ON/OFF (2).
(Fig.4) - Suministrar (como se describe en el capítulo 7 del
manual), a través del tubo de vapor/agua caliente, 2 tazas
de agua (aproximadamente 150 ml para cada una). A continuación, apagar la máquina mediante el interruptor ON/
OFF (2) y dejarla apagada durante 3 minutos.
7 Repetir las operaciones descritas en el punto 6 hasta que el
depósito de agua quede completamente vacío.
8 (Fig.2) - Enjuagar el depósito con agua potable fresca y lle-
narlo completamente.
9 Colocar un recipiente debajo del porta ltro.
10 (Fig.6) - Encender la máquina pulsando el interruptor ON/
OFF (2); esperar a que los botones (15 - 16) se enciendan
jos. Pulsar el botón
agua programada.
11 Vaciar el recipiente colocado debajo del porta ltro y repetir
las operaciones descritas en el punto (10) hasta que el
depósito quede vacío.
12 (Fig.2) - Volver a llenar el depósito con agua fresca.
(Fig.4) - Colocar un recipiente grande debajo del tubo
de vapor/agua caliente. Abrir el mando de suministro de
agua (4) girándolo en el sentido contrario a las agujas del
reloj. Pulsar el botón agua caliente “
el contenido del depósito a través del tubo de vapor/agua
caliente.
13 Una vez que el agua se haya agotado, para detener el sumi-
nistro, pulsar nuevamente el botón agua caliente “
el mando de suministro de agua (4) girándolo en el sentido
de las agujas del reloj.
14 Repetir otra vez las operaciones desde el punto (8) por un
total de 4 depósitos.
15 (Fig.16) - Retirar el porta ltro del grupo girándolo de dere-
cha a izquierda y enjuagarlo con agua potable fresca.
“ ”
y suministrar la cantidad de
” y suministrar todo
”. Cerrar
La soluc ión descalc i c ante que se utilic e se debe
eliminar según lo previsto por el fabricante y/o
por las normas vigentes en el país donde se usa.
12 ELIMINACIÓN DEL APARATO
Este producto cumple con la Directiva EU 2002/96/EC.
El simbolo
que este producto no se puede tratar como desperdicios normales del hogar.
Este producto se debe entregar al punto de recolección de
equipos eléctricos y electrónicos para reciclaje.
Al asegurarse de que este producto se deseche correctamente,
usted ayudará a evitar posibles consecuencias negativas para
el ambiente y la salud pública, lo cual podria acurrir si este
producto no se manipula de forma adecuada. Para abtener
información más detallada sobre el reciclaje de este producto,
póngase en contac to con la administración de su c iudad, con su
servicio de desechos del hogar o con la tienda donde compró
el producto.
en el producto o en su empaque indica
De esta manera concluye el ciclo de descalci cación.
(Fig.2) - Volver a llenar el depósito con agua fresca. Si fuera
necesario, cargar el circuito como se describe en el apar. 4.5
del manual.
• 52 •
Page 53

Avería Posibles causas Solución
La máquina no se enciende Máquina no conect ada a la red eléctrica. Conectar la máquina a la red eléctrica.
La bomba es muy ruidosa. Falta agua en el depósito. Llenar con agua (apartado 4.4).
Todos los botones parpadean. Se debe cargar el circuito de agua.
El café sale frío.
No se forma la crema de la leche.
No es posible preparar el capuchino.
El café sale muy rápido y no se
forma la crema.
El café no sale o bien sale en
gotas.
El café sale fuera de los bordes
del port a ltro.
No se ha introducido el porta ltro para el
precalentamiento (cap. 5).
Tazas frías. Precalentar las tazas con agua caliente.
Leche no adecuada: leche en polvo, leche
desnatada.
Cappuccinatore sucio.
No hay más vapor en la caldera.
Hay muy poco café en el porta ltro. Añadir café (cap. 5).
Molido demasiado gr ueso. Usar una mezcla diferente (cap.6).
Café viejo o no adecuado. Usar una mezcla diferente (cap.6).
Pastilla de café vieja o inadecuada. Cambiar la pastilla de café usada.
Falta un componente en el porta ltro.
Falta agua. Llenar con agua (apartado 4.4).
Molido demasiado no. Usar una mezcla diferente (cap.6).
Café comprimido en el porta ltro. Mover el café molido.
Hay demasiado café en el porta ltr o. Reducir la cantidad de c afé en el porta ltro.
Mando (4) abierto. Cer rar el mando (4).
Máquina calci cada. Descalci car la máquina (cap.10).
Filtro del porta ltro obstruido. Limpiar el ltro (cap.9).
Pastilla de café inadecuada. Cambiar el tipo de pastilla de café.
Porta ltro colocado de forma incorrecta
en el grupo de café.
Borde superior del port a ltro sucio. Limpiar el borde del por ta ltro.
Junta de la caldera sucia o desgastada. Limpiar la junta.
Pastilla de café colocada de forma incorrecta.
Hay demasiado café en el porta ltro.
Carg ar el circ uito como se descr ibe en el a partad o
4.5.
Precalentar el porta ltro.
Utilizar leche entera.
Limpiar el cappuccinatore como se describe en el
Cap.9.
Cargar el circuito (apartado 4.5) y repetir las operaciones descritas en el Cap. 8.
Comprobar que todos los componentes estén
presentes e instalados cor rectamente.
Colocar el por ta ltro de forma correc ta (cap.5).
Colocar la pastilla de café correctamente de manera que no salga del porta ltro.
Reducir la cantidad de café utilizando la cuchara
dosi cadora.
Español
Para las averías no mencionadas en la tabla o en caso de que las soluciones indicadas no funcionen, contactar con
un centro de asistencia.
• 53 •
Page 54

1 GENERALIDADES
A máquina de café é indicada para a preparação de 1 ou 2 chávenas de café expresso e é equipada com um cappuccinatore
orientável para a distribuição de vapor e água quente. Os comandos na parte frontal do aparelho são marcados com símbolos de fácil interpretação.
A máquina foi pro jectada para um uso d oméstico e não está in dicada para um funcionamento contínuo de tipo pro ssional.
Atenção. Não assumimos qualquer responsabilidade por eventuais danos em caso de:
• Utili zação errada e nã o conforme as rec omendações
deste manual;
• Consertos não realizados em centros de assistência
autorizados;
• Alteração do cabo de alimentação;
• Alteração de qualquer componente da máquina;
• Utilização de peças sobressalentes e acessórios não
originais;
• Falta de des calci caçã o e armazenagem em lu gares
com temperatura abaixo de 0°C.
Estes casos invalidarão a garantia.
1.1 Para facilitar a leitura
O triângulo de advertência indica
todas as instruções importantes
para a segurança do utilizador. Siga
escrupulosamente estas indicações para evitar ferimentos graves!
A referência a ilustrações, partes do aparelho ou elementos de
comando, etc. é indicada com números ou letras; neste caso
consulte a ilustração.
2 DADOS TÉCNICOS
O fabricante reserva-se o direito de alterar as características
técnicas do produto.
Tensão nominal - Potência nominal - Alimentação
Veja plaqueta posicionada no aparelho
Material do corpo
Plástico
Dimensões (c x a x p) (mm)
270 x 350 x 300
Peso
4 kg
Comprimento do cabo
1,2 m
Painel de comando
Na parte frontal
Porta- ltro
Pressurizado
Pannarello
Especial para cappuccinos
Reservatório de água
1,5 litros - Extraível
Pressão da bomba
15 ba r
Caldeira
Aço Inox
Dispositivos de segurança
Ter mof us íve l
3 NORMAS DE SEGURANÇA
Este símbolo evidencia as informações a ter em
conta, para uma melhor utilização da máqui-
na.
As ilustrações correspondentes ao texto encontram-se
nas primeiras páginas do manual. Consulte estas páginas durante a leitura d as instruções de uso.
1.2 Utilização destas instruções de uso
Guarde estas instruções de uso em lugar seguro e anexe-as
à máquina de café se por acaso uma outra pessoa precisar
utilizá-la.
Para mais informações ou no caso de problemas contacte os
centros de assistência autorizados.
• 54 •
Nunca ponha em contacto com água as partes sob tensão: perigo de curto-circuito! O vapor sobreaquecido e
a água quente podem provocar queimaduras! Nunca
dirija o jacto de vapor ou a água quente para as partes
do corpo, toque com cuidado no tubo de vapor/água
quente: perigo de queimaduras!
Destino de uso
A máquina de café está prevista exclusivamente para a utilização doméstica. É proibido realizar alterações técnicas e qualquer utiliza ção ilícita, por causa do s riscos que podem comportar! O aparelho não deve ser utilizado por pessoas (inclusive
as crianças) com capacidades físicas, mentais ou sensoriais
reduzidas ou com experiência e/ou competências insu cien-
Page 55

tes, a não ser que não es tejam sob a supervisão de uma pessoa
responsável pela segurança deles ou não sejam ensinadas por
ela sobre o uso do aparelho.
Alimentação de corrente
Ligue a máquina de café só numa tomada de corrente ad equada. A tensão deve corresponder àquela indicada na plaqueta
do aparelho.
Cabo de alimentação
Nunca utilize a máquina de café se o cabo de alimentação estiver dani cado. Se o cabo de alimentação estiver dani cado,
deverá ser substituído pelo fabricante ou pelo seu serviço de
assistência ao s clientes. Não faça passa r o cabo de alimentação
por ângulos e cantos vivos, acima de objectos muito quentes e
proteja-o contra o óleo.
Não carregue ou puxe a máquina de café segurando-a pelo
cabo. Não tire a cha puxando-a pelo cabo ou toque nela com
as mãos molhadas.
Não deixe pender o cabo de alimentação de mesas ou estantes.
Protecção de outras pessoas
Mantenha as crianças sob a supervisão, para evitar que brinquem com o aparelho.
As crianças não têm a noção do perigo ligado ao uso dos electrodomésticos. Não deixe ao alcance das crianças os materiais
utilizados para embalar a máquina.
Perigo de queimaduras
Não vire na sua direcção, nem na direcção de outros o jacto de
vapor sobreaquecido e/ou água quente. Utilize sempre as pegas ou os botões apropriados.
Nunca tire o por ta- lt ro pressurizado duran te a distribuição do
café. Durante a f ase de aquecimento pode m sair gotas de água
quente do grupo de distribuição do café.
Colocação
Coloque a máquina de café num lugar seguro, onde ninguém
possa virá-la ou ferir-se por causa da própria máquina.
Água quente ou vapor sobreaquecido podem sair: perigo de
queimaduras!
Não deixe a máquina a uma temperatura inferior a 0°C; o gelo
poderia dani car a máquina.
Não use a máquina de café em lugar aber to.
Não coloque a máquina em cima de super fícies muito quentes,
ou perto de chamas, para evitar eventuais danos na máquina.
Limpeza
Antes de limpar a máqu ina, é indispensável desligar a máq uina
com a tecla ON/OFF e depois desligar da tomada de corrente.
Além disso aguarde que a máquina arrefeça. Nunca mergulhe
a máquina na água!
É severamente proibido realizar intervenções no interior da
máquina.
Não utilize para ns alimentares a água que restou no re servatório por alguns dias, lave o reservatório e encha-o com água
fresca potável.
Utilização e manutenção
Para um correcto e bom funcionamento da máquina de café
aconselha-se a:
• Escolher uma superfície de apoio bem nivelada;
• Escolher um ambiente su cientemente iluminado, higiénico e com uma tomada de corrente facilmente acessível;
• Providenciar uma distância mínima das paredes da máquina como indicado na gura (Fig.A).
Conservação da máquina
Quando a máquina car inutilizada por um período prolongado, desligue a máquina e tire a cha da tomada. Guarde-a em
lugar seco e fora do alcance das crianças. Proteja-a contra o pó
e a sujeira.
Reparação / Manutenção
No caso de avarias, defeitos ou suspeito de defeito após uma
queda, desligue logo a cha da tomada. Nunca ponha a funcionar uma máquina defeituosa. Só os Centros de Assistência
Autorizados p oderão realizar interve nções e consertos. No cas o
de int ervenç ões não r ealizad as corre ctame nte, decl ina-se t oda
e qualquer responsabilidade por danos eventuais.
Anti-incêndio
No caso de incêndio utilize extintores de dióxido de carbono
(CO
). Não utilize água ou ex tintores de pó.
2
Portugal
• 55 •
Page 56

Legenda componentes da máquina (Pag.2)
1 Painel de comando
2 Interruptor ON/OFF
3 Reservatório de água
4 Botão água quente / vapor
5 Reservatório de recuperação da água + grelha
6 Grupo de distribuição de café
7 Cappuccinatore
8 Cabo de alimentação
9 Medidor para café moído
10 Porta- ltro pressurizado
11 Filtro para c afé moído
(único para a distribuição de 1 ou 2 c afés)
12 Pannarello
13 Adaptador para ltro café em pastilhas
14 Filtro para café em pastilhas
15 Tecla luminosa de distribuição de café único
16 Tecla luminosa de distribuição de café duplo
17 Tecla luminosa de distribuição de água quente
18 Tecla luminosa de distribuição de vapor
4 INSTALAÇÃO
Para a sua segurança e a de terceiros, siga escrupulosamente as “Normas de segurança” indic adas no cap. 3.
4.1 Embalagem
A embalagem original foi projectada e realizada para proteger
a máquina durante a expedição. Aconselha-se a conservá-la
para um eventual f uturo transporte.
4.2 Advertências de instalação
Antes de instalar a máquina, siga as seguintes indicações de
segurança:
• coloque a máquina num lugar seguro;
• certi que-se de que as crianças não têm a possibilidade de
brincar com a máquina;
• não coloque a máquina acima de superfícies muito quentes
ou perto de chamas vivas.
A máquina de café agora está pronta para ser ligada à rede
eléctrica.
Obs.: aconselha-se a lavar os componentes antes da sua primeira utilização e/ou depois de
um período de inutilização.
4.3 Ligar a máquina
A corrente eléctrica pode ser perigosa! Por con-
seguinte, siga sempre escrupulosamente as
normas de segurança. Nunca utilize cabos defeituosos!
Os cabos e as chas defeituos as devem ser substituídas
imediatamente pelos Centros de Assistência Autorizados.
A tensão do aparelho foi ajustada na fábrica. Certi que-se de
que a tensão de rede corresponde às indicações indicadas na
plaqueta de identi cação posicionada no fundo do aparelho.
• Certi que-se de que o interruptor geral ON/OFF (2) não está
pressionado antes de ligar a máquina à rede eléctrica.
• Introduza a cha numa tomada de parede de tensão ade-
quada.
4.4 Reservatório de água
• (Fig.1) - Retire o reservatório de água (3).
• (Fig.2) - Enxagúe-o e encha-o com água fresca potável evi-
tando introduzir uma quantidade excessiva.
• (Fig.1) - Reintroduza o reservatório na sua sede; certi que-
se de que está posicionado correctamente.
Introduza no reservatório sempre e só água
fresca potável sem gás. Água quente e também
outros lí quidos podem dan i car o reser vatório. Não ponha a funcionar a máquina sem água: certi que-se de
que há água su ciente dentr o do reservatório.
4.5 Carregamento do circuito
No início, depois de ter distribuído vapor ou após a nalização da água no reservatório, o circuito da máquina deve ser
recarregado; a máquina indica a necessidade de realizar esta
op eraç ão f azen do p isc ar ao mesm o te mpo, a s 4 te cla s do p ain el
de comando.
• (Fig.3) - Pressione o interruptor ON/OFF (2); as 4 teclas pis-
cam;
• (Fig.4) - Introduza um recipiente debaixo do cappuccinato-
re.
• (Fig.5) - Abra o botão (4) “água quente/vapor” rodando-o
no sentido anti-horário.
• (Fig.6) - Pressione a tecla água quente (17).
• Aguarde a máquina terminar a distribuição de água.
• Feche o botão (4) “água quente/vapor” rodando-o no senti-
do horário. Remova o recipiente.
• 56 •
Page 57

Depois de acabado o primei ro carregamento do
circuito, a máquina entra no estado de aquecimento e não será possível distribuir café/água/vapor
até quando os dois indicadores LED 15 e 16 não se tornarem acesos e xos.
Obs.: se a operação não for completada, as 4
teclas continuarão a piscar e não será possível
utilizar a máquina.
4.6 Primeira utilização ou após um perío-
do de inutilização
Esta simples operação assegura-lhe uma óptima distribuição
e deve ser realizada:
- na primeira utilização;
- quando a máquina permanecer inutilizada por um longo
período de tempo (por mais de 2 semanas).
A água distribuída deve ser esvaziada em uma
apropriada descarga e não pode ser utilizada
para a alimentação. Se o recipiente se enche, durante
o ciclo, par e a distribuição e e svazie-o antes de re começar a operação.
1 (Fig.2) - Enxagúe o reservatório e encha-o com água fresca
potável.
2 (Fig.4-6) - Introduza um recipiente debaixo do Cappuccina-
tore. Abra a torneira (4) virando-a no sentido contrário ao
dos ponteiros do relógio e pressione a tecla de água quente
“
”.
3 Distribua todo o conteúdo do reservatório de água do Ca-
ppuccinatore; para nalizar a distribuição pressione novamente a tecla de água quente “
virando-a no sentido dos ponteiros do relógio.
4 (Fig.2) - Encha o reservatório com água fresca potável.
5 (Fig.11-12) - Introduza o porta- ltro abaixo do grupo de
distribuição (6), virando-o da esquerda à direita até se bloquear.
6 (Fig.13) - Introduza um recipiente adequado abaixo do
porta- ltro.
7 Pressione a tecla “
programada.
8 Esvazie o recipiente posicionado debaixo do porta- ltro e
repita as operações indicadas no ponto (7) até o esva-
ziamento da água presente no reservatório.
9 Encha novamente o reservatório e espere que os indicadores
luminosos das teclas “
x o .
” e distribua a quantidade de água
” e feche a torneira (4)
” e ” ” se acendam de modo
10 (Fig.16) - Remova o porta- ltro do grupo virando-o da
direita à esquerda e enxagúe-o com água fresca potável.
Depois disso a máquina está pronta para utilizar.
Agora a máquina está pronta para a distribuição de café e vapor; consulte os capítulos que dizem respeito aos detalhes de
funcionamento.
4.7 Ajustar o reservatório de recuperação
de água
É possível ajustar o reservatório de recuperação de água para
adaptá-lo às dimensões das chávenas pequenas ou das chávenas utilizadas.
Para ajustar a altura do reservatório de recuperação de água
proceda da seguinte forma:
• (Fig.24) - Levante o reservatório de recuperação de água e
retire a grelha.
• (Fig.25) - Retire o suporte posicionado debaixo do reserva-
tório.
• (Fig.26 - 27) - Rode o suporte e posicione-o na máquina de
café.
• (Fig.28) - Coloque o reservatório de recuperação de água
acima do suporte e volte a posicionar a grelha.
Portugal
• 57 •
Page 58

5 DISTRIBUIÇÃO DO CAFÉ
Atenção! Du rante a distribu ição do café é proi bi-
do desligar o porta- ltro pressurizado rodandoo manualmente no sentido horário. Perigo de queimaduras.
• Depois de alcançada a quantidade de café programada, a
máquina terminará automaticamente a distribuição; retire
as chávenas pequenas com o café (Fig.15).
• (Fig.16) - No m da distribuição aguarde uns segundos,
retire o porta- ltro pressurizado e deite fora as borras.
• Durante esta operação as tecla (15 - 16) poderão acender-se
e apagar-se; este funcionamento deve ser considerado normal e não uma anomalia.
• Antes do uso, certi que-se de que o botão (4) água quente/
vapor está fechado e que o reservatório de água da máquina
contém uma quantidade su ciente de água.
• (Fig.3) - Pressione o interruptor ON/OFF (2).
• Aguarde as teclas (15 - 16) se acenderem de modo xo, agora a máquina está pronta para distribuir café.
5.1 Com café moído
• (Fig.8) - Introduza o ltro (11) no porta- ltro pressurizado
(10); na primeira utilização o ltro já se encontra introduzido.
• (Fig.11) - Introduza o porta- ltro debaixo do grupo de dis-
tribuição (6).
• (Fig.12) - Rode o porta- ltro da esquerda para a direita até
car bloqueado. Solte a pega do porta- ltro pressurizado, a
própria pega rodará ligeiramente para a esquerda. Este movimento garante o perfeito funcionamento do porta- ltro.
• (Fig.14) - Pré-aqueça o porta- ltro pressurizado pressionando a tecla (16). A água começará a sair do porta- ltro
pressurizado (esta operação é necessária apenas para o primeiro café).
• A distribuição de água terminará automaticamente.
• (Fig.16) - Retire o porta- ltro da máquina rodando-o da
direita para a esquerda e deite fora a água restante. Graças
ao ltro especial (11) fornecido com à máquina, não precisa
trocar o ltro para obter um ou dois cafés.
• (Fig.9A) - Deite 1-1,5 medidores para um único café ou 2
medidores cheios até à borda para o café duplo; limpe as
borras da borda do porta- ltro.
• (Fig.11) - Introduza o porta- ltro (10) debaixo do grupo de
distribuição (6).
• (Fig.12) - Rode o porta- ltro da esquerda para a direita até
car bloqueado.
• (Fig.13) - Pegue 1 ou 2 chávenas pequenas pré-aque-
cidas e coloque-as debaixo do porta- ltro pressurizado;
certi que-se de que estão colocadas correctamente debaixo
dos furos de saída do café.
• (Fig.14) - Pressione:
- a tecla (15) para obter 1 café ou;
- a tecla (16) para obter 2 cafés.
Obs.: no porta- ltro ca uma pequena quantidade de água; isto é normal e deve-se às carac-
terísticas do porta- ltro.
Obs. importante: O ltro (11) deve estar sempre limpo para garantir um resultado perfeito.
Lave diariamente após a utilização.
5.2 Com café em pastilhas
• (Fig.10) - Tire, utilizando uma colher (chá), o ltro para café
moído (11) do porta- ltro pressurizado (10).
• (Fig.7A) - Introduza no porta- ltro pressurizado (10), o
adaptador para as pastilhas (13), com a parte convexa para
baixo.
• (Fig.7B) - Depois, introduza o ltro para pastilhas (14) no
porta- ltro pressurizado (10).
• (Fig.11) - Introduza o porta- ltro pressurizado debaixo do
grupo de distribuição(6).
• (Fig.12) - Rode o porta- ltro da esquerda para a direita até
car bloqueado. Solte a pega do porta- ltro pressurizado.
Um sistema automático agora recolocará ligeiramente a
pega para esquerda.
Este movimento garante o perfeito funcionamento do
porta- ltro pressurizado.
• (Fig.14) - Pré-aqueça o porta- ltro pressurizado pressio-
nando a tecla (16). A água começará a sair do porta- ltro
pressurizado (esta operação é necessária apenas para o primeiro café).
• A distribuição de água terminará automaticamente.
• (Fig.16) - Retire o porta- ltro pressurizado da máquina
rodando-o da direita para a esquerda e deite fora a água
restante.
• (Fig.9B) - Introduza a pastilha no porta- ltro; certi que-se
de que o papel da pastilha não sai do porta- ltro.
• (Fig.11) - Introduza o porta- ltro pressurizado debaixo do
grupo de distribuição (6).
• (Fig.12) - Rode o porta- ltro da esquerda para a direita até
car bloqueado.
• Pegue 1 chávena pequena pré-aquecida e coloque-a
debaixo do porta- ltro; certi que-se de que está colocada
correctamente debaixo dos furos de saída do café.
• 58 •
Page 59

• (Fig.14) - Pressione a tecla (15) para obter 1 café.
• Depois de alcançada a quantidade de café programada, a
máquina terminará automaticamente a distribuição; retire
as chávenas pequenas com o café (Fig.15).
• (Fig.16) - No m da distribuição aguarde uns segundos,
retire o porta- ltro e deite fora a pastilha utilizada.
Obs. importante: O ltro (14) e o adaptador (13)
devem estar sempre limpos para garantir um
resultado perfeito. Lave diariamente após a utilização.
5.3 Programar a quantidade de café
Com esta máqui na é possível programar a s quantidades de café
a distribuir quando for pressionada a tecla (15) ou a tecla (16).
A programação da quantidade de café é possí-
vel apenas para a tecla (15) (mín. 25cc e máx.
180cc). Ao pressionar a tecla (16) a máquina distribui
uma quantidade dupla a respeito do programado com
a tecla (15).
• Para começar a programação, introduza o café no porta- ltro
como indicado no par.5.1 ou 5.2.
• Posicione uma chávena pequena debaixo do grupo de distri-
buição de café (10).
• (Fig.14) - Pressione e mantenha pressionada a tecla café
(15). Depois de 3 segundos, a máquina começará a distribuir
café.
• Quando estiver presente a quantidade de café desejada na
chávena, solte a tecla (15).
6 ESCOLHA DO TIPO DE CAFÉ SUGESTÕES
Em linhas gerais é possível utilizar todos os tipos de café
existentes à venda. Todavia, o café é um produto natural e o
seu gosto muda conforme a origem e a mistura; é preferível
portanto experimentar vários tipos de café, para encontrar o
que satisfaz da melhor maneira os gostos pessoais. Para um
resultado melhor, aconselha-se a utilizar misturas preparadas
expressamente para máquinas de café expresso. O café deveria sair sempr e regularmente do porta- ltro pressuriz ado, sem
gotejar.
A velocidade de saída do café pode ser modi cada mudando
leveme nte a dose de c afé no ltro e/ou uti lizando um c afé com
um grau de moagem diferente.
Para obter um resultado melhor na chávena e para facilitar a
limpeza e a preparação, a Saeco aconselha a utilizar café em
pastilhas monodose marcadas ESE.
Portugal
ANTES DE REALIZAR QUALQUER OPERAÇÃO RE-
LATIVA À DISTRIBUIÇÃO DO VAPOR OU DA ÁGUA
QUENTE, CERTIFIQUE-SE DE QUE O CAPPUCCINATORE ESTÁ
ORIENTADO ACIMA DA BANDEJA DE LIMPEZA.
A programação terminou e, de agora em diante, a máquina
distribuirá:
• a mesma quantidade seleccionada cada vez que pressionar
e soltar a tecla (15);
• o dobro da quantidade seleccionada cada vez que pressionar e soltar a tecla (16).
• 59 •
Page 60

7 ÁGUA QUENTE
Perigo de queimaduras! Durante o início da
distribuição podem-se veri car breves salpicos
de água quente. O tubo de distribuição pode alcançar
temperaturas elevadas: não toque nele directamente
com as mãos.
• Posicionar a chávena debaixo do cappuccinatore.
• (Fig.5) - Abra o botão (4) rodando-o no sentido anti-horá-
rio.
Aconselha-se uma distribuição máxima de 60
segundos.
• (Fig.3) - Pressione o interruptor ON/OFF (2).
• Aguarde as teclas (15 - 16) se acenderem de modo xo.
• (Fig.18) - Coloque um recipiente ou um copo (chá) debaixo
do cappuccinatore.
• (Fig.5) - Abra o botão (4).
• (Fig.6) - Pressione a tecla (17)
• Depois de distribuída a quantidade desejada de água quen-
te, pressione novamente a tecla (17).
• (Fig.5) - Feche o botão (4)
• Retire o recipiente com a água quente.
Ao pressionar as teclas (15) ou (16) a máquina
distribui uma quantidade doseada de água
quente; a quantidade corresponde à programada no
par. 5.3.
8 VAPOR / CAPPUCCINO
Perigo de queimaduras! Durante o início da
distribuição podem-se veri car breves salpicos
de água quente. O tubo de distribuição pode alcançar
temperaturas elevadas: não toque nele directamente
com as mãos.
• (Fig.3) - Pressione o interruptor ON/OFF (2).
• Aguarde as teclas (15 - 16) se acenderem de modo xo.
• (Fig.19) - Pressione a tecla (18).
• Aguarde a tecla (18) se acender de modo xo; neste ponto a
máquina está pronta para distribuir o vapor.
• (Fig.18) - Introduza um recipiente debaixo do cappuccina-
tore.
• (Fig.5) - Abra o botão (4) durante alguns segundos, de
modo a fazer sair a água residual do cappuccinatore; em
breve tempo começará a sair apenas o vapor.
• Feche o botão (4) e retire o recipiente.
Para garantir um resultado melhor utilize leite
frio
• (Fig.20) - Mergulhe o tubo de aspiração do cappuccinatore
no recipiente de leite.
• (Fig.21) - Ajuste o volume da espuma através do pino;
levante-o delicadamente para aumentar a espuma.
• No m, feche o botão (4); retire a chávena com o leite batido.
Depois de preparado o cap puccino, mergulhe o tubo de aspiração num recipiente com água limpa e distribua vapor. Quando
sair água clara, o cappuccinatore estará limpo. Limpe ex ternamente o tubo de aspiração com um pano húmido.
O cappuccinatore deve ser desmontado e lavado completamente a c ada semana.
• (Fig.19) - Pressione de novo a tecla (18).
• Proceda com o carregamento do circuito descrito no par.4.5
para tornar operativa a máquina.
Obs.: a máquina é operativa quando as teclas
(15 e 16) estive rem acesas de modo xo.
Note bem: se não conseguir distribuir um ca-
ppuccino como descrito anteriormente, será
preciso recarregar o circuito como descrito no par. 4.5
e sucessivamente repetir as operações.
É possível utilizar o mesmo sistema para aque-
cer outras bebidas.
9 PANNARELLO
O pannarello pode ser utilizado em lugar do cappuccinatore
para distr ibuir água quente ou vapor.
Para instalar o pannarello é preciso remover o cappuccinatore
(Fig.29-30):
- desaparafuse a virola sem retirá-la;
- tire a junção do cappuccinatore do tubo de vapor.
Instale o pannarello (Fig.31):
- Introduza completamente o pannarello no tubo de vapor;
- Aparafuse bem a virola.
• 60 •
Page 61

(Fig.32; Fig.33) - Para distribuir água quente ou vapor é preciso aprontar a máquina como descrito nos parágrafos 7 e 8 e
utilizar o pannarello para a preparação.
(Fig.34; Fig.35) - Depois da utilização, com a máquina fria,
retire a par te inferior do pannarello e lave-a com água morna.
• Não seque a máquina e/ou seus componentes utilizando
um forno microondas e/ou um forno convencional.
Obs.: o porta- ltro pressurizado não pode ser
lavado na máquina de lavar louça.
(Fig.36) - Desmonte semanalmente também a parte superior
e lave-a com água morna.
10 LIMPEZA
A manutenção e a limpeza podem ser realizadas só quando a
máquina estiver fria e desligada da rede eléc trica.
• Não mergulhe a máquina na água e não introduza os componentes na máquina de lavar louça.
• Não utilize álcool etílico, solventes e/ou agentes químicos
agressivos.
• Aconselha-se a limpar diariamente o reservatório de água e
a enchê-lo com água fresca.
• (Fig.20) - Depois de aquecido o leite distribua também
uma pequena quantidade de água quente.
Perigo! Nunca distribua vapor com a parte terminal do cappuccinatore desmontada.
• (Fig.22 - 23) - É preciso limpar semanalmente o cappuccinatore.
Para realizar esta operação, será preciso:
- remover a parte terminal do cappuccinatore;
- separar a parte superior e a inferior do cappuccinatore;
- lavar todos os componentes do cappuccinatore com água
morna;
- lavar o tubo de aspiração com um pano húmido e remover
eventuais resíduos de leite;
- remontar o cappuccinatore;
- reposicionar a parte terminal do cappuccinatore na junção
que cou na máquina (certi que-se de que está introduzida completamente).
• (Fig.24) - Esvazie e lave diariamente a bandeja de limpeza.
• Para a limpeza do aparelho utilize um pano macio humedecido com água.
• (Fig.17) - Para a limpeza do porta- ltro pressurizado proceda da seguinte forma:
- (Fig.10) - retire o ltro, lave-o cuidadosamente com água
quente.
- retire o adaptador (quando presente), lave-o cuidadosamente com água quente.
- lave o interior do porta- ltro pressurizado.
11 DESCALCIFICAÇÃO
A formação de calcário acontece com o uso do aparelho; é preciso realiza r a descalci c ação a cada 1-2 meses de utilização da
máquina e/ou quando houver uma redução da capacidade da
água. Utilize exclusivamente o produto descalci cante Saeco.
O indicad o no manual de uso e manutenç ão tem
prioridade com relação às indicações descritas
nos acessórios e/ou materiais de uso vendidos separadamente, on de exista um prob lema.
Utilize o produto descalci cante Saeco (Fig. B).
Foi concebido especi camente para manter da
melhor forma o desempenho e a funcionalidade da máquina durante toda a sua vida útil, assim como para evitar, se for utilizado correctamente, qualquer alteração
do produto distribuído. Antes de iniciar o ciclo de desc alci cação assegure-se que: O FILTRO DA ÁGUA TENHA SIDO
REMOVIDO, se utiliza do.
Não beba a solução descalci cante e os produ-
tos distribuídos até a conclusão do ciclo. Nunca
utilize, baixo nenhuma circunstância, o vinagre como
descalci cante.
1 (Fig.11-12) - Introduza o porta- ltro abaixo do grupo de
distribuição (6), virando-o da esquerda à direita até se bloquear.
2 (Fig. 1) - Remova e esvazie o reservatório de água.
3 (Fig. 2) - Deite METADE do conteúdo da garrafa de des-
calci cante concentrado Saeco no reservatório de água do
aparelho e encha-o com água fresca potável até alcançar o
nível MÁX.
4 (Fig.3) - Ligue a máquina pressionando o interruptor ON/
OFF (2).
(Fig.4) - Retire (como descrito no capítulo 7 do manual),
pelo tubo de vapor/água quente, 2 chávenas (aproximadamente 150 ml cada uma) de água; depois disso desligue a
máquina pelo interruptor ON/OFF (2).
5 Deixe o descalci cante actuar por aproximadamente 15-20
minutos com a máquina desligada.
6 Ligue a máquina pressionando o interruptor ON/OFF (2).
(Fig.4) - Retire (como descrito no capítulo 7 do manual)
pelo tubo de vapor/água quente, 2 chávenas (aproximadamente 150 ml cada uma) de água. De seguida, desligue
Portugal
• 61 •
Page 62

a máquina pelo interruptor ON/OFF (2) e deixe-a desligada
durante 3 minutos.
7 Repita as operações descritas no ponto 6 até o completo
esvaziamento do reservatório de água.
8 (Fig. 2) - Enxagúe o reservatório com água fresca potável e
encha-o completamente.
9 Introduza um recipiente abaixo do porta- ltro.
10 (Fig.6) - Ligue a máquina pressionando o interruptor ON/
OFF (2); aguarde que as teclas (15 - 16) se acendam de
modo xo. Pressione a tecla
de de água programada.
11 Esvazie o recipiente posicionado debaixo do porta- ltro e
repita as operações indicadas no ponto (10) até o es-
vaziamento da água presente no reservatório.
12 (Fig.2) - Encha novamente o reservatório com água fresca.
(Fig.4) - Posicione um recipiente grande abaixo do tubo
de vapor/água quente. Abra a torneira de distribuição de
água (4) virando-a no sentido contrário ao dos ponteiros do
relógio. Pressione a tecla de água quente “
o conteúdo do reservatório mediante o tubo de v apor/água
quente.
13 Depois de nalizar a retirada de água, para interromper a
distribuição pressione novamente a tecla de água quente
“
”. Feche a torneira de distribuição de água (4) virando-a
no sentido dos ponteiros do relógio.
14 Repita mais uma vez as operações do ponto (8) num total
de 4 reservatórios de água.
15 (Fig.16) - Remova o porta- ltro do grupo virando-o da di-
reita à esquerda e enxagúe-o com água fresca potável.
“ ”
e distribua a quantida-
” e retire todo
12 DESMANTELAMENTO
Este produto está conforme a direc tiva EU 2002/96/EC.
O simbolo
lagem indica que este produto não se pode tratar como lixo
doméstico normal.
Este produto deve ser entregue num ponto de recolha de
equipamentos eléctricos e electrónicos para reciclagem. Ao
assegurar-se que este produto é eliminado correctamente, estará a ajudar a evitar possiveis consequências negativas para o
ambiente e saúde pública que resultariam se este produto não
fosse manipulado de forma adquada. Para obter informações
mais detalhadas sobre a reciclagem deste produto, por favor
contacte o gabinete da câmara municipal da sua cidade ou a
loja onde comprou o produto.
impresso no produto ou na sua emba-
O ciclo de desc alci cação está concluído.
(Fig.2) - Encha novamente o reservatório com água fresca.
Se for necessário realize o carregamento do circuito conforme
descrito no par. 4.5 do manual.
A solução descalci cante deverá ser eliminada
de acordo com o previsto pelo fabricante e/ou
pelas nor mas vigentes no país de utilização.
• 62 •
Page 63

Avaria Causas possíveis Solução
A máquina não se liga. Máquina não ligada à rede eléctrica. Ligue a máquina à rede eléctrica.
A bomba é muito ruidosa. Falta a água no reservatório. Reabasteça com água (par.4.4).
Todas as teclas piscam. O circuito de água deve ser carregado.
Porta- ltro não introduzido para o pré-
O café sai mui to frio.
Não é possível obter a espuma
do leite.
Não é possível preparar um cappuccino.
O café sai muito rápido, não é
possível obter creme.
O café não sai ou sai só às pingas.
aquecimento (cap. 5).
Chávenas frias. Pré-aqueç a as chávenas com água quente.
Leite inapropriado: leite em pó, leite ma-
gro.
Cappuccinatore sujo. Limpe o cappuccinatore como descrito no Cap.9.
Não há mais vapor na caldeira.
Pouco café no porta - ltro. Adicione café (cap. 5).
Moagem demasiado grossa. Utilize uma mistura diferente (cap.6).
Café velho ou inapropriado. Utilize uma mistura diferente (cap.6).
Pastilha velha ou inapropriada. Troque a pastilha utilizada.
Falta um componente no porta- ltro.
Falta de água. Reabasteça com água (par.4.4).
Moagem demasiado na. Utilize uma mistura diferente (cap.6).
Café comprimido no por ta- ltro. Mexa o caf é moído.
Demasiado café no porta- ltro. Diminua a quantidade de café no por ta- ltro.
Botão (4) aberto. Feche o botão (4).
Máquina calci cada. Descalci que a máquina (cap.10).
Filtro entupido no porta- ltro. Limpe o ltro (cap.9).
Pastilha inapropriada. Mude o tipo de pastilha.
Porta- ltro introduzido não correctamen-
te no grupo de dis tribuição do café.
Borda superior do porta- ltro suja. Limp e a borda do porta- ltro.
Realize o carregamento do circuito como descrito
no par. 4.5.
Pré-aqueç a o porta- lt ro.
Mude o tipo de leite
Recarregue o circuito (par. 4.5) e repita as operações descr itas no Cap.8.
Certi que-se de que todos os com ponentes estão
presentes e montados correctamente.
Introduza cor rectamente o porta - ltro (cap.5).
Portugal
O café sai das borras.
Para as avarias não incluídas na tabela acima indicada ou problemas não resolvidos, contacte um centro de assistência.
Junta da caldeira suja ou desgastada. Limpe a junta.
Pastilha introduzida de modo errado.
Demasiado café no porta- ltro.
Introduza correctamente a pastilha de modo a
não sair do porta- ltro.
Diminua a quantidade de café utilizando o medidor.
• 63 •
Page 64

1 ALGEMEEN
De ko emachine is geschikt voor het zetten van 1 of 2 kopjes
espresso en is voorzien van een zwenkbare cappuccinatore
voor de afgifte van stoom en heet water. De symbolen op de
bedieningsknoppen aan de voorkant van het apparaat zijn gemakkelijk te begrijpen.
De machine is ont worpen voor huishoudelijk gebruik en is niet
geschikt voor continu professioneel gebruik.
Let op. In de volgende gevallen wordt geen
aansprakelijkheid voor eventuele schade aan-
vaard:
• Verkeerd gebruik dat niet in overeenstemming is
met de beoogde doelen;
• Reparaties die niet zijn uitgevoerd door erkende
servicecentra;
• Onklaar gemaakte voedingskabel;
• Onklaar gemaakte componenten van de machine;
• Gebruik van niet-originele vervangingsonderdelen
en accessoires;
• Wanneer het apparaat niet is ont kalkt en bij opsla g
in ruimten me t temperaturen onder de 0°C.
In deze gevallen vervalt de garantie.
1.1 Voor een gemakkelijke raadpleging
De waarschuwingsdriehoek geeft
alle belangrijke instructies aan die
van belang zijn voor de veiligheid
van de gebruiker. Houd u strikt aan deze aanwijzingen
om ernstig letsel te voorkomen!
2 TECHNISCHE GEGEVENS
De constructeur behoudt zich het recht voor om de technische
eigenschappen van het product te wijzigen.
Nominale spanning - Nominaal vermogen - Voeding
Zie plaatje op het apparaat
Materiaal behuizing
Plastic
Afmetingen (l x h x d) (mm)
270 x 350 x 300
Gewicht
4 kg
Kabellengte
1,2 m
Bedieningspaneel
Op de voorkant
Filterhouder
Onder druk
Pannarello
Speciaal voor cappuccino's
Waterreserv oir
1,5 liter - Uitneembaar
Pompdruk
15 ba r
Waterketel
Inox
Veiligheidsinrichtingen
Thermozekering
3 VEILIGHEIDSNORMEN
Verwijzingen naar illustraties, delen van het apparaat of bedieningselementen, enz. bestaan uit cijfers of letters; in dit
geval wordt ver wezen naar de illustratie.
Dit symbool geeft informatie aan waarmee
men in het bijzonder rekening moet houden
voor een beter gebruik van de machine.
De illustraties die met de tekst overeenstemmen, bevinden zich op de eerste pagina's van de handleiding.
Raadpleeg deze pagina’s tijdens het lezen van de gebruiksaanwijzing.
1.2 Gebruik van deze gebruiksaanwijzing
Bew aar de ze gebr uiks aanwi jzing o p een v eilige plaat s en ho ud
hem bij de ko emachine in geval van gebruik door anderen.
Neem voor nadere informatie of bij problemen contact op met
één van de erkende servicecentra.
• 64 •
Breng de onder stroom staande delen nooit in contact
met water: kortsluitingsgevaar! De oververhitte stoom
en het hete water kunnen brandwonden veroorzaken!
Richt de hete stoom- of waterstraal nooit op lichaamsdelen. Wees voorzichtig bij het aanraken van het
stoom-/heetwaterpijpje: gevaar voor brandwonden!
Gebruiksbestemming
De ko emachine is uitsluitend bestemd voor huishoudelijk
gebruik. Het aanbrengen van technische wijzigingen en elk
ongeoorloofd gebruik is verb oden, in verband met de risico's
die dit met zich meebrengt! Het apparaat is nie t bestemd om
gebruikt te worden door personen (inclusief kinderen) met
verminderde fysieke, mentale of gevoelige capaciteiten of met
Page 65

onvoldoende er varing en/of bekwaamheid, tenzij ze o nder het
toezicht staan van een persoon die verantwoordelijk is voor
hun veiligheid en van wie ze instructies verkrijgen aangaande
het gebruik van het apparaat.
Stroomvoeding
Sluit de ko emachine alleen aan op een geschik t stopcontact.
De spanning moet overeenstemmen met de spanning die op
het plaatje van het apparaat staat vermeld.
Voed ingskabe l
Gebruik de ko emachine nooit als de voedingskabel defect
is. Indien de voedingskabel beschadigd is, moet deze door de
fabrikant of door zijn klantenservice vervangen worden. Laat
de voedingskabel niet over hoeken en scherpe randen of hete
voorwerp en lopen, en bescherm deze tegen olie.
Draag de ko emachine niet aan de kabel en trek er niet aan.
Haal de stekker niet uit het stopcontact door aan de kabel te
trekken en raak de ze niet met natte handen aan.
Voorkom dat de voedingskabel los van tafels of planken afhangt.
Bescherming van andere personen
Houd kinderen onder toezicht om te vermijden dat ze met het
apparaat spelen.
Kinderen realiseren zich de gevaren die aan elektrische apparaten verbonden zijn niet. Laat het verpakkingsmateriaal van
de machine niet binnen bereik van kinderen.
Verb randings gevaar!
Richt de oververhitte stoomstraal en/of heetwaterstraal nooit
op uzelf of op anderen. Gebruik altijd de handgrepen of knoppen.
Verwijder de onder druk staande lterhouder nooit terwijl de
ko e uit het apparaat stroomt. Tijdens het opwarmen kan
warm water uit de centrale ko e-unit druppelen.
Plaatsing
Zet de ko e machine op een veilige plek waar n iemand het zou
kunnen omstoten of zich eraan zou kunnen verwonden.
Er kan heet water of oververhitte stoom uitkomen: gevaar
voor brandwonden!
Bewaar de machine niet bij een temperatuur van minder dan
0°C; het apparaat kan door bevr iezing worden beschadigd.
Gebruik de ko emachine niet buiten.
Zet de machine nie t op erg warme opper vlakken en in de buurt
van open vuur om te voorkomen dat de behuizing smelt of anderszins beschadigd raakt.
Reiniging
Alvorens het apparaat te reinigen, moet het apparaat worden
uitgeschakeld met de ON/OFF toets en vervolgens moet de
stekker uit het stopcontact worden gehaald. Wacht dan tot
de machine is afgekoeld. Dompel het apparaat nooit onder in
water!
Pogingen tot reparaties aan de binnenkant van de machine
zijn ten strengste verboden.
Gebruik het water dat enkele dagen in het waterreservoir
heeft gestaan niet voor voedingsdoeleinden, was en vul het
reservoir met vers drinkwater.
Ruimte voor gebruik en onderhoud
Voor een correcte en goede werking van de ko emachine
wordt het volgende aanbevolen:
• Kies een vlakke ondergrond;
• Kies een voldoende verlichte, hygiënische omgeving met
een gemakkelijk toegankelijk stopcontact;
• Zorg er voor dat het apparaat op een minimumaf stand van
de wanden staat, zoals op de afbeelding is aangegeven
(Afb. A).
Opslag van de machine
Schakel de machine uit en haal de stekker uit het stopcontact,
wanneer de machine langere tijd niet wordt gebruikt. Bewaar
de machine in een droge ruimte en buiten het bereik van kinderen. Bescherm de machine tegen stof en vuil.
Reparaties / Onderhoud
Haal de stekker meteen uit het stopcontact bij storingen, defecten of vermoedelijke defecten na een val. Zet de machine
nooit in werking als deze defect is. Alleen de erkende servicecentra mogen werkzaamheden en reparaties uitvoeren. Bij
ondeskundig uitgevoerde werk zaamheden wordt iedere vorm
van aansprakelijkheid van de hand gewezen.
Brandbestrijding
Gebruik in geval van brand koolzuurblussers (CO2). Gebruik
geen water of poederblussers.
Nederlands
• 65 •
Page 66

Legenda machineonderdelen (Pag.2)
1 Bedieningspaneel
2 Schakelaar ON/OFF
3 Waterreservoir
4 Draaiknop voor heet water/stoom
5 Wateropvangbakje + rooster
6 Centrale ko e-unit
7 Cappuccinatore
8 Voedingskabel
9 Maatlepel voor gemalen ko e
10 Onder druk staande lterhouder
11 Filter voor gemalen ko e
(dezelfde voor de afgifte van 1 of 2 kopjes ko e)
12 Pannarello
13 Adapter voor lter voor ko epads
14 Filter voor ko epads
15 Verlichte toets voor de afgif te van één ko e
16 Verlichte toets voor de af gifte van dubbele ko e
17 Verlichte toets voor de afgif te van warm water
18 Verlichte toets voor de afgifte van s toom
4 INSTALLATIE
Houd u voor uw eigen veiligheid en die van anderen
strikt aan de "Veilig heidsvoorschriften" in hst. 3.
4.1 Verpakking
De oorspronkelijke verpakking is ontworpen en vervaardigd
om de machine tijdens het transport te beschermen. Het is
raadzaam om de verpakking te bewaren voor eventueel transport in de toekomst.
4.2 Waarschuwingen voor de installatie
Houd u aan de volgende veiligheidsvoorschriften, voordat u
het apparaat installeert:
• zet het apparaat op een veilige plek;
• verzeker u ervan dat kinderen niet met het apparaat kunnen spelen;
• zet het apparaat niet op erg warme oppervlakken of in de
buurt van open vuur.
De ko emachine mag nu op het elektriciteitsnet worden aangesloten.
Opgelet: wij raden aan om de onderdelen te
wassen voor de eerste ingebruikname en/of na
een periode dat deze niet zijn gebruik t.
4.3 Aansluiting van de machine
Elektrische stroom kan gevaarlijk zijn! Houd
u daarom altijd strikt aan de veiligheidsvoorschrif ten. Gebruik nooit de fecte kabels! Defecte kabel s
en stekkers moeten onmiddellijk door erkende servicecentra worden vervangen.
De spanning van het apparaat is in de fabriek ingesteld. Controleer of de netspanning overeenstemt met de aanwijzingen
op het typeplaatje op de achterkant van het apparaat.
• Controleer of de schakelaar ON/OFF (2) niet is ingedrukt,
voordat u het apparaat op het elektriciteitsnet aansluit.
• Steek de stekker in een wandstopcontact met de juiste
spanning.
4.4 Waterreservoir
• (Afb.1) - Verwijder het waterreservoir (3).
• (Afb. 2) - Spoel het reservoir en vul het met vers drinkwa-
ter zonder het te vol te maken.
• (Afb.1) - Plaats het reser voir terug op zijn plek; verzeker u
ervan dat deze juist geplaatst is.
Vul het reservoir altijd en alleen met vers dr ink-
water zonder koolzuur. Warm water of andere
vloeisto en kunnen he t reservoir besc hadigen. Zet het
apparaat nooit aan zonder dat er water in zit: controleer of er voldoende water in het reservoir zit.
4.5 Vullen van het circuit
Aan het begin, na stoom te hebben verstrekt of nadat het
water op is in het reservoir, dient het circuit van de machine
gevuld te worden; de machine geeft de noodzaak om deze
handeling uit te voeren aan door gelijktijdig de 4 toetsen van
het bedieningspaneel te laten knipperen.
• (Afb. 3) - Druk op de schakelaar ON/OFF (2); de 4 toetsen
gaan knipperen;
• (Afb.4) - Plaats een bak onder de c appuccinatore.
• (Afb. 5) - Draai de “heetwater-/stoomknop” (4) linksom
open.
• (Afb.6) - Druk op de toets voor warm water (17).
• Wacht tot de machine de afgif te van het water beëindigt.
• Dr aai de “heetwater-/stoomknop” (4) rechtsom dic ht. Haal
de bak weg.
• 66 •
Page 67

Zodra het circuit voor de eerste keer gevuld is,
zal de machine in de verwarmingsstand gaan
en is het niet meer mogelijk om ko e/water/stoom af
te geven totdat de twee leds 15 en 16 continu blijven
branden.
Opgelet: indien de procedure niet beëindigd
wordt, zul len de 4 toetsen blij ven knipperen en
kan men de machine niet gebruiken.
10 (Afb.16) - Verwijder de lterhouder uit de centrale unit
door deze van rechts naar links te draaien en spoel het
met vers drinkwater. Hierna is de machine gereed voor
gebruik.
Het apparaat is nu gereed voor de afgifte van ko e en stoom;
zie de desbetre ende hoofdstukken voor meer informatie over
de werking.
4.6 Ingebruikname of gebruik na een pe-
riode van stilstand
Deze eenvoudig e handeling verzekert va n een optimale afgif te
en dient uitgevoerd te worden:
- bij de ingebruikname;
- wanneer de machine gedurende een lange tijd niet wordt
gebruikt (voor meer dan 2 weken).
Het water dat verstrekt wordt, dient geleegd
te worden in de daarvoor bestemde afvoer en
mag niet gebruikt worden voor consumptie. Indien het
reservoir vol raakt tijdens de cyclus, dient de afgifte
gestopt te worden en het reservoir geleegd alvorens
de handeling te voltooien.
1 (Afb.2) - Spoel het reservoir en vul het met vers drinkwa-
ter.
2 (Afb.4-6) - Plaats een bak onder de Cappuccinatore. Draai
de kraan (4) linksom open en druk op de toets voor heet
water “
”.
3 Verstrek de gehele inhoud van het waterreservoir door de
Cappuccinatore; om de afgifte te stoppen, druk opnieuw
op de toets voor he et water “
door deze rechtsom te draaien.
4 (Afb.2) - Vul het reservoir met vers drinkwater.
5 (Afb.11-12) - Plaats de lterhouder van onderen in de cen-
trale unit (6) en draai deze van link s naar rechts totdat deze
geblokkeerd is.
6 (Afb.13) - Plaat s een passend kopje onder de lterhouder.
7 Druk op de toets “
hoeveelheid water.
8 Leeg het kannetje dat onder de lterhouder staat en her-
haal de handelingen beschreven bij (7) totdat al het
water in het reservoir op is.
9 Vul het re servoir opnieuw en wac ht tot de leds van de toet-
” en ” ” continu blijven branden.
sen “
” en draai de kraan (4) dicht
” en verstrek de geprogrammeerde
4.7 Afstelling wateropvangbakje
Het wateropvangbakje kan worden afgesteld om deze aan te
passen aan de afmetingen van de gebruikte ko ekopjes of
bekers.
Om de hoogte van het wateropvangbakje af te stellen, ga als
volgt te werk:
• (Afb. 24) - Til het wateropvangbakje op en haal he t rooster
eruit.
• (Afb.25) - Haal de steun die zich onder het bakje bevindt
eruit.
• (Afb.26 - 27) - Draai de steun en plaats deze in de ko e-
machine.
• (Afb. 28) - Zet het wateropvangbakje teru g op de steun en
plaats het rooster terug.
Nederlands
• 67 •
Page 68

5 KOFFIEAFGIFTE
Let op! Tijdens de ko eafgifte mag de onder
druk staande lterhouder niet worden verwijderd door hem met de hand rechtsom te draaien. Verbrandingsgevaar.
• Tijdens deze handeling kunnen de toetsen (15 - 16) aan en
uit gaan; dit is normaal en geen storing.
• Controleer voor gebruik of de heetwater-/stoomknop (4)
dicht gedraaid is e n of het waterreservoir va n het apparaat
voldoende water bevat.
• (Afb. 3) - Druk op de schakelaar ON/OFF (2).
• Wacht tot de de toetsen (15 - 16) continu blijven branden,
nu is de machine klaar voor de ko eafgifte.
5.1 Met gemalen koffi e
• (Afb.8) - Plaats de lter (11) in de onder druk staande
lterhouder (10); bij het eerste gebruik is de lter al geplaatst.
• (Afb.11) - Breng de lterhoud er van onderen in de centrale
unit (6) aan.
• (Afb.12) - Draai de lterhouder van links naar rechts tot-
dat hij is geblokkeerd. Laat het handvat van de onder druk
staande lterhouder los, het handvat draait lichtjes naar
links. Deze beweging garandeert een perfecte werking
van de lterhouder.
• (Afb.14) - Verwarm de onder druk staande lterhouder
voor door op de toets (16) te drukken. Het water zal uit
de onder druk staande lterhouder beginnen te stromen
(deze handeling is alleen noodzakelijk voor het eerste
kopje ko e).
• De afgif te van water eindigt automatisch.
• (Afb.16) - Haal de lterhouder uit het apparaat door hem
van rechts naar lin ks te draaien en gooi het rest water weg.
Met de speciale lter (11) waarmee de machine is uitgerust, hoeft het lter niet te worden verwisseld om één of
twee kopjes ko e te verkrijgen.
• (Afb.9A) - Doe 1-1,5 maatlepels voor één enkele ko e of
2 afgestreken maatlepels voor dubbele ko e erin; ontdoe
de rand van de lterhouder van de ko eresten.
• (Afb.11) - Breng de lterhouder (10) van onderen in de
centrale unit (6) aan.
• (Afb.12) - Draai de lterhoude r van links naar rechts totdat
hij is geblokkeerd.
• (Afb.13) - Neem 1 of 2 voorverwarmde kopjes en zet
ze onder de onder druk staande lterhouder; controleer
of ze correct onder de gaten zijn geplaatst waar de ko e
uitstroomt.
• (Afb.14) - Druk op:
- de toets (15) om 1 ko e te verkrijgen of;
- de toets (16) om 2 ko e te verkrijgen.
• Als de geprogrammeerde hoeveelheid ko e bereikt is, zal
de machine automatisch de afgifte beëindigen; neem de
kopjes ko e weg (Afb.15).
• (Afb.16) - Wacht enkele seconden na het beëindigen van
de afgifte, neem de onder druk staande lterhouder weg
en gooi het ko edik weg.
Opmerking: in de lterhouder blijft er een
kleine hoeveelheid water over; dit is normaal
en is te wijten aan de eigenschappen van de lterhouder zelf.
Belangrijke Opmerking: De lter (11) dient
schoon gehouden te worden om een perfect
resultaat te garanderen. Dagelijks wassen na het gebruik.
5.2 Met koffi epads
• (Afb.10) - Haal de lter voor gemalen ko e (11) uit de on-
der druk staande lterhouder (10) door gebruik te maken
van een ko elepeltje.
• (Afb.7A) - Plaats de houder voor ko epads (13) in de on-
der druk staande lterhouder (10) met de bolle kant naar
beneden.
• (Afb.7B) - Plaats vervolgens het lter voor ko epads (14)
in de onder druk s taande lterhouder (10).
• (Afb.11) - Breng de onder druk staande lterhouder van
onderen in de centrale unit (6) aan.
• (Afb.12) - Draai de lterhouder van links naar rechts tot-
dat hij is geblokkeerd. Laat het handvat van de onder druk
staande lterhouder los. Een automatisch systeem brengt
het handvat nu iets naar links terug.
Deze beweging garandeert een perfecte werking van de
onder druk st aande lterhouder.
• (Afb.14) - Verwarm de onder druk staande lterhouder
voor door op de toets (16) te drukken. Het water zal uit
de onder druk staande lterhouder beginnen te stromen
(deze handeling is alleen noodzakelijk voor het eerste
kopje ko e).
• De afgif te van water eindigt automatisch.
• (Afb.16) - Haal de onder druk staande lterhouder uit het
apparaat door hem v an rechts naar links te draaien en go oi
het restwater weg.
• (Afb.9B) - Plaats de ko epad in de lterhouder; contro-
leer of het papier van de ko epad niet uit de lterhouder
steekt.
• 68 •
Page 69

• (Afb.11) - Breng de onder druk staande lterhouder van
onderen in de centrale unit (6) aan.
• (Afb.12) - Draai de lterhouder van links naar rechts tot-
dat hij is geblokkeerd.
• Neem 1 voorverwarmd kopje en zet het onder de l-
terhouder; controleer of het correct onder de gaten is geplaatst waar de ko e uitstroomt.
• (Afb.14) - Druk op de toets (15) om 1 ko e te verkrijgen.
• Als de geprogrammeerde hoeveelheid ko e bereikt is, zal
de machine automatisch de afgifte beëindigen; neem de
kopjes ko e weg (Afb.15).
• (Afb.16) - Wacht na de afgifte enkele seconden, neem de
lterhouder weg en gooi de gebruikte ko epad weg.
Bel angr ijke Opme rki ng: De lte r (14) en d e hou -
der voor ko epads (13) dienen schoon gehouden te worden o m een perfect r esultaat te garand eren.
Dagelijks wassen na het gebruik.
5.3 Programmering hoeveelheid koffi e
In deze machine is het mogelijk de hoeveelheid afgegeven
ko e van te voren in te stellen wanneer de toets (15) of (16)
ingedrukt wordt.
De progra mmering van de hoeveelh eid ko e is
alleen mogelijk voor de toets (15) (min 25cc en
max 180cc).
Door op de toets (16) te drukken zal de machine een
dubbele hoeveelheid afgegeven van wat geprogrammeerd is voo r de toets (15).
6 KEUZE VAN DE KOFFIE ADVIEZEN
In princi pe kunnen alle in de han del verkrijgbar e ko esoorten
worden gebruikt. Ko e is echter een natuurlijk product en de
smaak ervan verandert naar gelang de herkomst en de melange; het verdient dus de voorkeur om verschillende soorten
te proberen om het type ko e te vinden dat het meest naar
uw smaak is.
Toch wordt er voor een beter resultaat aangeraden om melanges te gebruiken die speciaal gemaakt zijn voor espressomachines. De ko e zou altijd normaal uit de onder druk staande
lterhouder moeten lopen zonder te druppelen.
De uitloop snelheid van de ko e kan wo rden gewijzigd door de
ko edosis in het lter iets te veranderen en/of door ko e met
een andere maal jnheid te gebruiken.
Saeco raadt het gebruik van per stuk verpakte ESE ko epads
aan om een beter resultaat in het kopje te krijgen en om de
reiniging en de bereiding te vergemakkelijken.
Nederlands
CONTROLEER OF DE CAPPUCCINATORE OP HET WATEROPVANGBAKJE IS GERICHT, VOORDAT U STOOM
OF HEET WATER UIT HET APPARAAT LAAT KOMEN.
• Om de programmering te beginnen, plaats de ko e in de
lterhouder zoals aangegeven in par.5.1 of 5.2.
• Plaats een kopje onder de ko euitloop (10).
• (Afb. 14) - Hou d de ko etoets (15) ingedrukt. Na 3 secon-
den zal de machine beginnen ko e af te geven.
• Laat de to ets (15) los wanne er het kopje de gewenste hoe-
veelheid ko e bevat.
De programmering is beëindigd en vanaf nu zal de machine
het volgende afgeven:
• de geprogrammeerde hoeveelheid bij elke druk op de
toets (15);
• de dubbele geprogrammeerde hoeveelheid bij elke druk
op de toets (16);
• 69 •
Page 70

7 WARM WATER
Gevaar voor brandwonden! Aan het begin van
de afgifte kan wat heet water vrijkomen. Het
uitlooppijpje kan hoge temperaturen bereiken: voorkom direc te aanraking met uw handen.
• (Afb. 3) - Druk op de schakelaar ON/OFF (2).
• Wacht tot de de toetsen (15 - 16) continu blijven branden.
• (Afb.18) - Zet een bak of een theeglas onder de cappuc-
cinatore.
• (Afb. 5) - Draai de knop (4) open.
• (Afb.6) - Druk op de toets (17).
• Wanneer d e gewenste hoeveelheid warm w ater verkregen
is, druk opnieuw op de toets (17).
• (Afb. 5) - Draai de knop (4) dicht.
• Neem de bak met warm water weg.
Een afgifte van maximaal 60 seconden wordt
aangeraden.
• (Afb. 21) - Stel het volume van de schuim in door middel
van de pin; til deze voorzichtig op om de schuim te vermeerderen.
• Draai na b eëindiging de knop (4) dicht; neem de be ker met
de opgeschuimde melk weg.
Nadat de cappuccino bereid is, dompel het aanzuigbuisje in
een bak met schoon water en laat stoom eruit lopen. Wanneer
er helder water uitkomt, is de cappuccinatore schoon. Reinig
het aanzuigbuisje aan de buitenkant met een vochtige doek.
De cappuccinatore dient wekelijks te worden
gedemonteerd en geheel afgewassen te wor-
den.
Door op de toets (15) of (16) te drukken, zal de
machine een gedoseerde hoeveelheid water
afgeven; de hoeveelheid is gelijk aan wat geprogrammeerd is in par. 5.3.
8 STOOM / CAPPUCCINO
Gevaar voor brandwonden! Aan het begin van
de afgifte kan wat heet water vrijkomen. Het
uitlooppijpje kan hoge temperaturen bereiken: voorkom direc te aanraking met uw handen.
• (Afb. 3) - Druk op de schakelaar ON/OFF (2).
• Wacht tot de de toetsen (15 - 16) continu blijven branden.
• (Afb.19) - Druk op de toets (18).
• Wacht tot de toets (18) continu blijft branden; op dit mo-
ment is de machine klaar voor de stoomafgif te.
• (Afb.18) - Plaats een bak onder de cappuccinatore.
• (Afb. 5) - Draai de knop (4) even open, zodat het restwater
uit de cappuccinatore kan lopen; na korte tijd komt er alleen stoom uit.
• Draai de knop (4) dicht en neem de bak weg.
Gebruik koude melk om een beter resultaat te
verkrijgen
• (Afb. 20) - Dompel het aanzuigbuisje van de cappuccina-
tore in de melkkan.
• Zet het kopje onder de cappuccinatore.
• (Afb. 5) - Draai de knop (4) linksom open.
• (Afb.19) - Druk opnieuw op de to ets (18).
• Vul het circuit zoals in par. 4.5 is beschreven om de machine operatief te maken.
Opgelet: de machine is operatief wanneer de
toetsen (15 en 16) continue branden.
Nota bene: indien het niet lukt om een cappuc-
cino te bereiden zoals beschreven, dient men
het circ uit weer te laden zoals be schreven in par. 4.5 en
vervolgens de handelingen te herhalen.
Hetzelfde systeem kan worden toegepast voor
de verwar ming van andere dranken.
9 PANNARELLO
De pannarello kan gebruikt worden als alternatief voor de cappuccinatore voor de afgifte van warm water of de afgifte van
stoom.
Om de pannarello te installeren, dient men de cappuccinatore
te verwijderen (Afb.29-30):
- draai de ring los zonder deze weg te nemen;
- verwijder de aansluiting van de cappuccinatore van het
stoompijpje.
Installeer de pannarello (Afb.31):
- Steek de pannarello geheel in het stoompijpje;
- Draai de ring goed vast.
(Afb.32; Af b.33) - Om warm water of stoom af te geve n, dient
men de machine vo or te bereiden zoals beschreven in de para-
• 70 •
Page 71

grafen 7 en 8 en de pannarello te ge bruiken voor de bereiding.
(Afb.34; Afb.35) - Haal na gebruik, met de machine afgekoeld, het onderste gedeelte van de pannarello weg en was
deze af met lauw water.
(Afb.36) - Demonteer weekelijks ook het bovenste gedeelte
en was deze af met lauw water.
der.
• Droo g de machine en/of zijn componenten niet in de mag netron en/of in een traditionele oven.
Opgelet: de onder druk staande lterhouder
mag niet in de vaatwasmachine afgewassen
worden.
10 REINIGING
Het onderhoud en de reiniging mogen alleen worden uitgevoerd wanneer de machine koud is en van het elek triciteitsnet
afgekoppeld is.
• Dompel de machine niet onder in water en was de onderdelen niet in de vaat wasmachine.
• Gebruik geen ethylalcohol, oplosmiddelen en/of agressieve chemische s to en.
• Wij raden u aan om het waterreservoir dagelijks te reinigen en met vers water te vullen.
• (Afb. 20) - Laat na het verwarmen van de melk een kleine
hoeveelheid warm water stromen.
Gevaar! Wanneer het uiteinde van de cappuccinatore gedemonteerd is, mag men nooit stoom
afgeven.
• (Afb.22 .23) - De cappuccinatore dient wekelijks gerei-
nigd te worden.
Om deze handeling uit te voeren, ga als volgt te werk:
- verwijder het uiteinde van de cappuccinatore;
- scheid het bovenste gedeelte van de cappuccinatore van
het onderste gedeelte.
- was alle onderdelen van de cappuccinatore af met lauw
water;
- was het aanzuigbuisje met een vochtige doek en verwijder eventuele melk resten;
- zet de cappuccinatore in elkaar;
- Plaats het uiteinde van de cappuccinatore op de aansluiting die op de machine gebleven is (verzeker u ervan dat
deze er geheel ingestoken is).
• (Afb. 24) - Maak het lekbakje dagelijks leeg en was het af.
• Gebruik voor de reiniging van het apparaat een zachte
doek die met water is bevochtigd.
• (Afb.17) - Ga als volgt te werk om de onder druk staande
lterhouder schoon te maken:
- (Afb.10) - verwijder de lter, was deze zorgvuldig met
warm water af.
- verwijder de adapter (indien aanwezig), was deze zorgvuldig met warm water.
- was de binnenkant van de onder druk staande lterhou-
11 ONTKALKING
Tijdens het gebruik van het apparaat wordt kalk gevormd; de
machine moet om de 1-2 maanden ontkalkt worden en/of als
er minder water uit de machine stroomt. Gebruik uitsluitend
het ontkalkingsproduc t van Saeco.
In het geval er een verschil bestaat, heeft het-
geen aangegeven is in de handleiding voor gebruik en onderhoud prioriteit op de aanwijzingen die
zijn vermeld op de accessoires en/of gebruiksmaterialen die apart zijn ve rkocht.
Gebruik het ontkalkingsproduct van Saeco
(Afb.B). Dit is speciaal ontwikkeld om de performance en de functionering van de machine het best
te bewaren gedurende de gehele levensduur ervan,
evenals voor het voorkomen, indien juist gebruikt,
van iedere aantasting van het verstrekte product.
Zorg vóór het uitvoeren van de ontkalkingscyclus ervoor dat: HET WATERFILTER VERWIJDERD IS, indien deze
wordt gebruikt.
Drink niet de ontkalkingsoplossing en de ver-
strekte producten totdat de cyclus geheel beeindigd is. Gebruik in geen geval azijn als ontkalkingsmiddel.
1 (Afb.11-12) - Plaats de lterhouder van onderen in de cen-
trale unit (6) en draai deze van link s naar rechts totdat deze
geblokkeerd is.
2 (Afb.1) - Haal het waterreser voir eruit en leeg het.
3 (Afb.2) - Giet de HELFT van de inhoud van de es met ge-
concentreerd ontkalkingsmiddel van Saeco in het waterreservoir van het apparaat en vul het met vers drinkwater
tot het MAX niveau.
4 (Afb.3) - Schakel de machine in door op de schakelaar ON/
OFF (2) te drukken.
(Afb.4) - Neem (zoals beschreven in hoofdstuk 7 van de
handleiding) 2 kopje s water (circa 150 ml per kopje) uit het
stoom/heet waterpijpje; schakel vervolgens de machine
uit met de schakelaar ON/OFF (2).
5 Laat het ontkalkingsmiddel voor circa 15-20 minuten in-
werken terwijl de machine uitgeschakeld is.
Nederlands
• 71 •
Page 72

6 Schakel de machine in door op de s chakelaar ON/OFF (2) te
drukken.
(Afb.4) - Neem (zoals beschreven in hoofdstuk 7 van de
handleiding) 2 kopje s water (circa 150 ml per kopje) uit het
stoom/heet waterpijpje. Schakel vervolgens de machine
uit met de schakelaar ON/OFF (2) en laat deze gedurende
3 minuten uit.
7 Herhaal de handelingen beschreven bij punt 6 totdat het
waterreservoir geheel leeg is.
8 (Afb.2) - Spoel het reservoir met vers drinkwater en vul
het weer opnieu w.
9 Plaats e en kannetje onder de lterhouder.
10 (Afb.6) - Schakel de machine in door op de schakelaar ON/
OFF (2) te drukken; wacht tot de toetsen (15 - 16) continu
blijven branden. Druk op de toets “
geprogrammeerde hoeveelheid water.
11 Leeg het kannetje dat onder de lterhouder staat en her-
haal de handelingen beschreven bij (10) totdat al het
water in het reservoir op is.
12 (Afb.2) - Vul het reser voir opnieuw met vers water.
(Afb.4) - Plaats een ruim kannetje onder het stoom/heet
waterpijpje. Draai de kraan voor de afgifte van water (4)
open door deze linksom te draaien. Druk op de toets voor
heet water “
voir door het stoom/heet waterpijpje.
13 Wanneer men klaar is met de afgifte van het water, stop
de afgifte door opnieuw op de toets voor heet water “
te drukken. Draai de kraan voor de afgifte van water (4)
rechtsom dicht.
14 Herhaal opnieuw de handelingen vanaf punt (8) voor een
totaal van 4 reser voirs.
15 (Afb.16) - Verwijder de lterhouder uit de centrale unit
door deze van rec hts naar links te draaien en spoel het m et
vers drinkwater.
” en schenk de gehele inhoud van het reser-
” en verstrek de
12 AFDANKING
Dit produc t voldoet aan de EU-richtlijn 2002/9 6/EG.
Het symbo ol
erop dat dit product niet als huishoudafval mag worden behandeld.
Het moet echter naar een plaats worden gebracht waar elektrische en elektronische apparatuur worden gerecycled.
Als u ervoor zorgt dat dit produc t op de correcte manier wordt
verwijderd, voorkomt u mogelijk voor het milieu negatieve
gevolgen die zich zouden kunnen voordoen in geval van verkeerde afvalbehandeling. Voor meer details in verband met
het recyclen van dit product, neemt u het best contact op met
de gemeentelijke ins tanties, het bedrijf of d e dienst belast met
de verwijdering van huishoudafval of de winkel waar u het
product hebt gekocht.
”
op het product of op verpakking wijst
De ontkalkingscyclus is nu voltooid.
(Afb.2) - Vul het reservoir opnieuw met ver s water. Vul indien
nodig het circuit volgens de aanwijzingen beschreven in de
par. 4.5 van de handleiding.
De ontkalkingsoplossing moet afgedankt wor-
den volgens de instructies van de constructeur
en/of de geld ende normen van he t land waar het wordt
gebruikt.
• 72 •
Page 73

Storing Mogelijke oorzaken Oplossing
De machine kan niet worden ingeschakeld.
De pomp maakt veel lawaai. Geen water in het reservoir. Voeg water toe (par.4.4).
Alle toetsen knipperen. het watercircuit dient gevuld te worden.
De ko e is te koud.
Er komt geen schuim.Het lukt
niet om een cappuccino te bereiden.
De ko e loopt te snel over, er
wordt geen schuim gevormd.
De ko e komt niet of slechts
druppelsgewijs eruit.
De ko e komt langs de rand
naar buiten.
Machine niet aangesloten op het elektriciteitsnet.
Filterhouder niet geplaatst voor voorverwarming (hst. 5).
Koude kopjes. Warm de kopjes voor me t warm water.
Melk is niet geschikt: poedermelk, magere
melk.
Cappuccinatore is vuil.
Er is geen stoom meer in de waterketel.
Te weinig ko e in de lterhouder. Voeg ko e toe (hst. 5).
Te grove maling. Gebruik een andere melange (hst. 6).
Ko e oud of niet geschikt. Gebruik een andere melange (hs t. 6).
Ko ep ad oud of niet geschikt. Vervang de gebruikte ko epad.
Er mist een onderdeel in de lterhouder.
Geen water. Voeg water toe (par.4.4).
Te jne maling. Gebruik een andere melange (hst. 6).
Ko e aangedrukt in de lter houder. Maak de gemalen ko e los.
Te veel ko e in lterhouder. Doe minder ko e in de lterhouder.
Knop (4) open. Draai de knop (4) dicht.
Kalkaanslag in de machine. Ontkalk de machine (hst.10).
Filter in lterhouder verstopt. Maak de lter schoon (hst.9).
Ko ep ad niet geschikt. gebruik een ander type ko epad.
Filterhouder slecht in de centrale ko e-unit
aangebracht.
Bovenrand van lterhouder vuil. Maak de rand van de lterhouder scho on.
Pakking van de waterketel vuil of ver sleten. Maak de afdichting schoon.
Ko epad onjuist aangebracht.
Te veel ko e in lterhouder.
Sluit de machine op het elektriciteitsnet
aan.
het circuit vullen volgens de aanwijzingen
in par. 4.5.
Verwarm de lterhouder voor.
Gebruik volle melk.
Reinig de cappuccinatore zoals beschreven
in Hst.9.
Laad het circuit opnieuw (par. 4.5) en herhaal de handelingen beschreven in Hst. 8.
Controleer of alle onderdelen aanwezig
zijn en juist gemonteerd.
Breng de lterhouder correct aan (hst.5).
Breng de ko epad juist aan en zorg ervoor
dat deze niet uit de lterhouder steekt.
Doe minder ko e in de lterhouder. Gebruik de maatlepel.
Nederlands
Voor storingen die niet in bovenstaande tabel te vinden zijn of als de geadviseerde oplossingen geen e ect hebben, dient u contact op te nemen met een servicecentrum.
• 73 •
Page 74

1 INFORMACJE OGÓLNE
Ekspres do kaw y jest przeznaczony do prz ygotowywania 1 lub
2 liżanek kawy espresso, i jest on wyposażony w nastawny
cappuccinatore do przygotow ywania pary i gorącej wod y. Sterowania umieszczone na przedniej części urządzenia są oznaczone symbolami o prostej interpretacji.
Urządzenie zo stało zaprojek towane do użytku dom owego i nie
nadaje się do intensywnego wykorzystywania profesjonalnego.
Uwaga. Producent nie ponosi odpowiedzialności za ewentualne szkod y spowodowane przez:
• Użytkowanie błędne i niezgodne z przewidzianym
celem;
• Naprawy nie wykonane w autoryzowanych cen-
trach serwisowych;
• Przerobienie kabla zasilającego;
• Przerobienie jakiejkolwiek części urządzenia;
• Używanie nieoryginalnych części zamiennych i ak-
cesoriów;
• Brak wykonania odwapnienia i przechowywanie w
pomieszc zeniach o temperaturze niższej niż 0°C.
W każdym powyższym wypadku gwarancja traci swoją
ważność.
1.1 Ułatwienie odczytu
Trójkąt ostrzegawczy wskazuje
wszystkie ważne instrukcje odno-
szące się do bezpieczeństwa użytkown ika. Zas tosować si ę do nich s krupul atnie, by z apobiec ciężkim obrażeniom!
W przypadku potrzeby dodatkowych informacji lub w przypadku pojawienia się problemów, należy zwrócić się do autoryzowanych centrów serwisow ych.
2 DANE TECHNICZNE
Producent zastrzega sobie prawo do wprowadzenia zmian we
właściwościach technicznych produktu.
Napięcie nominalne - Moc nominalna - Zasilanie
Patrz tablic zka umieszczona na urz ądzeniu
Materiał korpusu
Twor zywo s ztu czne
Wymiary (l x h x d) (mm)
270 x 350 x 300
Waga
4 kg
Długość kabla
1,2 m
Panel sterownic zy
Na przedniej c zęści
Uchwyt ltra
Specjalny
Przystawka Pannarello
Specjalne urządzenie do cappuccino
Pojemnik wody
1,5 litry - Wyjmowany
Ciśnienie pompy
15 ba rów
Bojler
Inox
Zabezpieczenia
Bezpiec znik termiczny
Odniesienia do ilustracji, części urządzenia lub elementów
sterowania, itd. są oznaczone numerami lub literami; w tym
przypadku zaleca się obejrzenie ilustracji.
Ten symbol ma na celu zwrócenie szczególnej
uwagi na informacje, które pozwalają na jak
najlepsze stosowanie urządzenia.
Ilustracje odpowiadające tekstowi znajdują się na
pierwszych stronach podręcznika. Pozostawić otwartą
tę stronę podczas zapoznawania się z instrukcją obsługi.
1.2 Zastosowanie niniejszej instrukcji
przy użytku
Zachować poniższą instrukcję obsługi w bezpiecznym miejscu
i dołączyć ją każdorazowo do urządzenia, gdy będzie go używała inna osoba.
• 74 •
3 NORMY BEZPIECZEŃSTWA
Nigdy nie pozwalać, aby woda weszła w kontakt z częściami znajdującymi się pod napięciem: niebezpieczeństwo poparzeń! Rozgrzana para i gorąca woda mogą
spowodować opar zenia! Nie kierować nigdy s trumienia
pary lu b gorącej wody w kier unku części c iała, dotyka ć z
ost rożn ości ą końc ówki rurk i wy lotu p ary/g orąc ej wod y:
niebezpieczeństwo poparzeń!
Przeznaczenie użytkowe
Ekspres do kawy jest przeznaczony wyłącznie do użytku domowego. Jest wzbronione przeprowadzanie jakichkolwiek
Page 75

przeróbek lub zmian oraz niewłaściwe użytkowanie, z powodu zagrożeń, jakie może to spowodować! Urządzenie nie jest
przeznaczone do użytkowania przez osoby (włącznie z dziećmi) o ograniczonych możliwościach zycznych, umysłowych
oraz o ograniczonych zdolnościach zmysłowych, lub w przypadku niewystarczającego doświadczenia lub odpowiedniego
przygotowania; może się to odbywać jedynie pod nadzorem
osoby odpowiedzialnej za bezpieczeństwo wyżej wymienionych osób oraz po uprzednim ich pouczeniu, co do sposobu
użytkowania urządzenia.
Zasilanie elektryczne
Podłączyć urządzenie jedynie do odpowiedniego gniazdka
ele ktry czneg o. Napi ęcie mu si odp owiada ć napię ciu pod anemu
na tabliczce umieszczonej na urządzeniu.
Kabel zasilania
Nie używać nigdy ekspresu do kawy, jeśli kabel zasilania jest
wadliwy. Gdy kabel zasilający jest uszkodzony, musi być wymieniony przez producenta lub przez upoważniony serwis
obsługi klientów. Nie przeprowadzać kabla zasilającego przez
kąty lub ost re krawędzie, nad gorąc ymi przedmiotami i chr onić
go od oleju.
Nie przesuwać i nie ciągnąć ekspresu do kawy, trz ymając go za
kabel. Nie wyciągać wtyczki z gniazdka, ciągnąc za kabel i nie
dotykać jej mokry mi rękami.
Unikać swobodnego zwisania kabla zasilającego ze stołów czy
półek.
Ochrona osób
Nie pozostawiać dzieci bez opieki, aby uniknąć by bawiły się
urządzeniem.
Dzieci nie zdają sob ie sprawy z zagrożeń powodowanych przez
sprzęt domowego użytku. Nie zostawiać materiałów użytych
do opakowania urządzenia w zasięgu dzieci.
Niebezpieczeństwo poparzeń
Unikać kierowania strumienia i/lub wody we własnym kierunku lub w kierunku innych osób. Uży wać zawsze przeznaczone go do tego celu uchw yty lub pokrętła.
Nie wyjmować (w yciągać) nigdy uchwy tu ltra pod ciśnie niem
podczas parzenia kawy. Podczas fazy rozgrzewania bloku zaparzającego kawę mogą wyp łynąć krople gorącej wody.
Usytuowanie
Umieścić ekspres do kawy w bezpiecznym miejscu, gdzie nikt
nie będzie mógł go przewrócić czy zostać zraniony przez jego
części.
Możliwość wydostania się gorącej wody i pary: niebezpie-
czeństwo poparzeń!
Nie trzy mać urządzenia w temperatur ze niższej niż 0°C; istnieje niebezpieczeństwo uszkodzenia ur ządzenia przez lód.
Nie używać ekspresu do kawy na świeżym powietrzu.
Nie umieszczać urządzenia w pobliżu bardzo rozgrzanych
powierzchni, obudowa mogłaby się stopić lub zostać uszkodzona.
Czyszczenie
Pr ze d c zy sz cz en ie m ur z ądz en ia, na le ży je w y łą cz yć pr zy po mo cy prz ycisku ON/OFF i wyciągnąć nastę pnie wtyczkę z gniazdk a
elektrycznego. Ponadto odczekać, aż urządzenie się ochłodzi.
Nie zanurzać nigdy urządzenia w wodzie!
Jest surowo wzbronione przeprowadzanie interwencji wewnątrz urządzenia.
Nie używać do celów spożywczych wody pozostałej w pojemniku przez k ilka dni, umyć pojemnik i napeł nić go świeżą, pitną
wodą.
Miejsce przeznaczone do użytku i konserwacji
Dla uzyskania poprawnego funkcjonowania ekspresu do kawy,
zaleca się pr zestrzeganie następując ych warunków:
• Wybrać dobrze wypoziomowaną powierzchnię;
• Wybrać pomieszczenie wystarczająco oświetlone, higieniczne, z łatwo dostępnym kontaktem elektrycznym;
• Umieścić urządzenie w odpowiedniej odległości od ścian
zgodnie ze wskazówkami na rysunku (Rys. A).
Ochrona urządzenia
Jeżeli urządzenie nie jest używane przez dłuższy okres czasu,
należy je wy łączyć i wyjąć wtyczkę z gniazdka. Przechowywać
urządzenie w suc hym i niedostępnym dla dzieci miejs cu. Chronić urządzenie przed kurzem i brudem.
Reparacje/Konserwacja
W przypadku awarii, usterek lub podejrzenia o usterkach w
wyniku upadku, natychmiast wyjąć w tyczkę z gniazdka. Nigdy
nie włącz ać wadliwego urz ądzenia. Tylko Autoryzowa ne Centra
Serwisowe mogą dokonywać interwencji i napraw. Producent
nie ponosi odpowiedzialności za ewentualne szkody spowodowane przez nieodpowiednio przeprowadzone interwencje.
Postępowanie w przypadku pożaru
W przypadku pożaru, używać do gaszenia gaśnicy z dwutlenkiem węgla (CO
). Nie używać wody ani gaśnic proszkow ych.
2
Polski
• 75 •
Page 76

Legenda dotycząca komponentów urządzenia (Str.2)
1 Panel sterujący
2 Wyłącznik ON/OFF
3 Pojemnik wody
4 Pokrętło gorącej wody / par y
5 Taca ociekowa + kratka
6 Blok zaparz ający kawę
7 Cappuccinatore
8 Kabel zasilania
9 Miarka do kawy mielonej
10 Uchwyt ltra
11 Filtr do kawy mielonej
(jedyny do parzenia 1 lub 2 kaw)
12 Przystawka Pannarello
13 Adaptator do ltra do kawy w saszetkach
14 Filtr do kawy w saszetkach
15 Przycisk podświetlany parzenia jednej kawy
16 Przycisk podświetlany parzenia dwóch kaw
17 Przycisk podświetlany nalewania gorącej wody
18 Przycisk podświetlany wytwarzania par y
4 INSTALACJA
Dla własnego bezpieczeństwa oraz bezpieczeństwa
innych osób zastosować się skrupulatnie do „Norm bezpieczeństwa” opisanych w rozdz. 3.
4.1 Opakowanie
Oryginalne opakowanie zost ało zaprojektowane i w yprodukowane w celu ochrony urządzenia podczas transportu. Zaleca
się jego zachowanie do ewentualnej potrzeby transportu w
przyszłości.
4.2 Pouczenia dotyczące instalacji
Przed instalacją urządzenia zastosować się do następujących
zaleceń dotyczących bezpiec zeństwa:
• umieścić urządzenie w bezpiecznym miejscu;
• upewnić się czy dzieci nie mają możliwości bawienia się
urządzeniem;
• unikać umieszczenia urządzenia na gorących powierzchniach lub w pobliżu otwartego płomienia.
Ekspres do kawy jest gotowy do podłączenia do sieci elektryc znej.
4.3 Podłączenie urządzenia
Prąd elektryczny może być niebezpieczny! Z
tego powodu zawsze stosować się skrupulatnie
do norm bezpieczeństwa. Nie używać nigdy wadliwych
kabli! Wadliwe kable i w tyczki muszą być bezzwłocznie
wymienione przez Autor yzowane Centra Serwisowe.
Napięcie urządzenia zostało ustawione fabrycznie. Sprawdzić
czy napięcie sieci odpowiada wskazaniom umieszczonym na
tabliczce identy kacyjnej znajdującej się w dolnej części urządzenia.
• Przed podłączeniem urządzenia do sieci elektrycznej spraw-
dzić czy wyłącznik ON/OFF (2) nie jest wciśnięty.
• Włożyć wtyczkę do ściennego gniazdka elektrycznego o od-
powiednim napięciu.
4.4 Pojemnik wody
• (Rys.1) - Wyjąć zbiornik wody (3).
• (Rys.2) - Wypłukać pojemnik i napełnić go świeżą pitną
wodą, unikając nalania zbyt dużej ilości wody.
• (Rys.1) - Umieścić ponownie zbiornik w jego gnieździe;
upewnić się, że został on umieszczony poprawnie.
Wlewać do pojemnika zawsze i jedynie świeżą
wodę pitną nie gazowaną. Gorąca woda lub
inne pł yny mogą uszkodz ić pojemnik. Nie w łączać urządzenia bez wody: upewnienić się czy w pojemniku jest
wystarczająca ilość wody.
4.5 Napełnianie obwodu
Na początku, po wyt worzeniu pary i wyczerpaniu wody w pojemniku, obwód urządzenia musi zostać napełniony; urządzenie wskazuje na konieczność wykonania tej operacji poprzez
równoczesne miganie 4 prz ycisków na panelu sterującym.
• (Rys.3) - Wcisnąć wyłącznik ON/OFF (2); 4 przyciski migają;
• (Rys.4) - Ustawić pojemnik pod cappuccinatore.
• (Rys.5) - Otworzyć pokrętło (4) „gorąca woda/para” w kie-
runku przeciwnym do kierunku ruchu wskazówek zegara.
• (Rys.6) - Nacisnąć przycisk gorącej wody (17).
• Odczekać aż urządzenie zakończy nalewanie wody.
• Zamknąć pokrętło (4) „gorąca woda/para” obracając je w
kierunku zgodnym z kierunkiem ruchu wskazówek zegara.
Wyjąć pojemnik.
Uwaga: zaleca się umycie komponentów przed
ich pierwszym użyciem i/lub po okresie, w któ-
rym nie by ły używane.
• 76 •
Page 77

Po zakończeniu pierwszego napełniania obwo-
du, urządzenie ustawia się w stan podgrzewania i nie można zaparzyć kawę/nalać wodę/ wytworzyć
parę do czasu, kiedy dwie lampki kontrolne 15 i 16 nie
zapalą się na stałe.
Uwaga: jeżeli operacja nie zostanie zakończo-
na, 4 przyciski będą nadal migać i nie będzie
możliwe korzystanie z urządzenia.
4.6 Pierwsze użycie lub użycie po okresie
nieużywania
Ta prosta czynność zagwarantuje Państwu optymalne parzenie; powinna być wykonana:
- przy pierwszym uruchomieniu;
- kiedy urządzenie nie było używane przez długi okres czasu
(dłużej niż 2 tygodnie).
Nalaną wodę należy wylać do zlewu i nie wol-
no jej stosować do celów spożywczych. Jeżeli
pojemnik napełni się podczas cyklu, należy zatrzymać
nalewanie i opróżnić go przed kontynuowaniem czynności.
1 (Rys.2) - Wypłukać pojemnik i napełnić go świeżą pitną
wodą.
2 (Rys.4-6) - Ustawić pojemnik pod Cappuccinatore. Otwo-
rzyć pokrętło (4), obracając je w kierunku przeciwnym do
kierunku ruchu wskazówek zegara i nacisnąć przycisk gorącej wody “
3 Nalać całą zawartość pojemnika na wodę z Cappuccinato-
re; aby zakończyć nalewanie, nacisnąć ponownie przycisk
gorącej wody “
kierunku zgodnym z ruchem wskazówek zegara.
4 (Rys.2) - Napełnić pojemnik świeżą wodą pitną.
5 (Rys.11-12) - Od dołu włożyć uchwyt ltra do bloku zapa-
rzającego (6) i przekręcić go od lewej do prawej strony, aż do
momentu zablokowania.
6 (Rys.13) - Ustawić pojemnik pod uchwytem ltra.
7 Wcisnąć przycisk “
wody.
8 Opróżnić pojemnik umieszczony pod uchwytem ltru i po-
wtórzyć operacje opisane w punkcie (7) aż do całkowi-
tego opróżnienia pojemnika na wodę.
9 Napełnić ponownie pojemnik i zaczekać, aż diody led przy-
cisków “
rywany m.
”.
” i zamknąć pokrętło (4), przekręcając je w
” i nalać zaprogramowaną ilość
” i ” ” zaczną się świecić światłem nieprze-
10 (Rys.16) - Wyjąć uchwyt ltra z bloku, przekręcając go od
prawej do lewej strony i opłukać go świeżą pitną wodą. Następnie urządzenie jest gotowe do użytku.
Urządzenia jest teraz gotowe do parzenia kawy i wytwarzania
pary; szc zegóły dotyc zące funkcjonowania są opi sane w odpowiednich rozdziałach.
4.7 Regulacja tacy ociekowej
Położenie ta cy ociekowej może być regulow ane w celu dopasowania jej do rozmiarów s tosowanych kubków lub liżanek.
W celu wyregulowania wysokości położenia tacy ociekowej
postępować w następujący sposób:
• (Rys.24) - Podnieść zbiornik ściekowy wody i wyjąć kratkę.
• (Rys.25) - Wyjąć wspornik umieszczony pod tacą ocieko-
wą.
• (Rys.26 - 27) - Przekręcić wspornik i umieścić go w ekspre-
sie do kawy.
• (Rys.28) - Umieścić tacę ociekową na wsporniku i włożyć
kratkę.
Polski
• 77 •
Page 78

5 PARZENIE KAWY
Uwaga! Podczas parzenia kawy jest wzbronio-
ne wyjmowanie uchwytu ltra pod ciśnieniem
obraca jąc go ręcznie w kie runku zgodnym z k ierunkiem
ruchu wskazówek zegara. Niebezpieczeństwo poparzeń.
• Podczas tej operacji, przyciski (15 - 16) mogą się zapalać i
gasnąć, takie funkcjonowanie jest to normalne i nie może
być uważane za anomalię.
• Upewnić się przed użyciem, czy pokrętło (4) gorąca woda/
para jest zamknięte i czy pojemnik wody urządzenia zawiera wystarczającą ilość wody.
• (Rys.3) - Nacisnąć wyłącznik ON/OFF (2).
• Odczekać aż przyciski (15 - 16) zapalą się stałym światłem,
teraz urządzenie jest gotowe do parzenia kawy.
• (Rys.14) - Nacisnąć:
- przycisk (15), aby otrzymać 1 kawę lub;
- przycisk (16), aby otrzymać 2 kawy.
• Po osiągnięciu zaprogramowanej ilości kaw, urządzenie zakończy parzenie w sposób automatyczny; zabrać liżanki z
kawą (Rys.15).
• (Rys.16) - Po zakończeniu parzenia odczekać jeszcze kilka
sekund, wyciągnąć uchwyt ltra pod ciśnieniem i opróżnić
go z pozostałych fusów.
Uwaga: w uchwycie ltra pozostanie niewielka
ilość wody; to jest normalne zjawisko związane
z właściwościami uchwytu ltra.
Ważna informacja: Filtr (11) należy utrzymy wać
w czystości, aby zapewnić doskonały rezultat.
Myć codziennie po zakończeniu używania.
5.1 Z kawą mieloną
• (Rys.8) - Włożyć ltr (11) do uchwytu ltra pod ciśnieniem
(10); przy pierwszym użyciu ltr jest już włożony.
• (Rys.11) - Włożyć od dołu uchwyt ltra do bloku zapar zają-
cego (6).
• (Rys.12) - Obracać uchwyt ltra od lewej do prawej strony,
aż do momentu zablokowania. Wypuścić rączkę uchwytu ltra pod ciśnieniem, rączka obraca się lekko w lewym
kierunku. Ten ruch gwarantuje poprawne funkcjonowanie
uchwytu ltra.
• (Rys.14) - Nagrzać wstępnie uchwyt ltra pod ciśnie-
niem przyciskając przycisk (16). Woda zacznie wypływać z
uchwytu ltra pod ciśnieniem (przedmiotowa czynność jest
konieczna wyłącznie w przypadku pierwszej kawy).
• Nalewanie gorącej wody zakończy się automatycznie.
• (Rys.16) - Wyjąć uchwyt ltra z urządzenia obracając go od
prawej do lewej strony i wylać pozostałą wodę. Przy użyciu
specjalnego ltra (11), w któr y jest wyposażone urządzenie,
nie trzeba zmieniać ltra by otrzymać jedną lub dwie kawy.
• (Rys.9A) - Wsypać 1-1,5 płaskiej miarki kawy mielonej,
aby otrzymać jedną lub 2 płaskie miarki kawy mielonej, aby
otrzymać dwie kawy; oczyścić brzeg uchwytu ltra z resztek
kawy.
• (Rys.11) - Włożyć od dołu uchwyt ltra (10) do bloku zapa-
rzającego (6).
• (Rys.12) - Obracać uchwyt ltra od lewej do prawej strony,
aż do momentu zablokowania.
• (Rys.13) - Wziąć 1 lub 2 liżanki wstępnie ogrzane i
ustawić je pod uchwytem ltra pod ciśnieniem; sprawdzić
czy są poprawnie umieszczone pod otworami wylotu kawy.
5.2 Przy użyciu kawy w saszetkach
• (Rys.10) - Używając łyżeczki do kawy wyjąć z uchwytu ltra pod ciśnieniem (10) ltr do kawy mielonej (11).
• (Rys.7A) - Włożyć do uchwytu ltra pod ciśnieniem (10)
adaptator do saszetek (13), z częścią wypukłą do dołu.
• (Rys.7B) - Następnie, włożyć ltr do saszetek (14) do
uchwytu ltra pod ciśnieniem (10).
• (Rys.11) - Włożyć od dołu uchwyt ltra do zespołu zaparzającego (6).
• (Rys.12) - Obracać uchwyt ltra od lewej do prawej strony,
aż do momentu zablokowania. Wypuścić rączkę uchwytu
ltra pod ciśnieniem. System automatyczny obróci teraz
rączkę lekko w lewym kierunku.
Ten ruch gwarantuje poprawne funkcjonowanie uchwytu
ltra pod ciśnieniem.
• (Rys.14) - Nagrzać wstępnie uchwyt ltra pod ciśnieniem przyciskając przycisk (16). Woda zacznie wypływać z
uchwytu ltra pod ciśnieniem (przedmiotowa czynność jest
konieczna wyłącznie w przypadku pierwszej kawy).
• Nalewanie gorącej wody zakończy się automatycznie.
• (Rys.16) - Wyjąć uchwyt ltra pod ciśnieniem z urządzenia
obracając go od prawej do lewej strony i wylać pozostałą
wodę.
• (Rys.9B) - Włożyć saszetkę do uchwytu do ltra; upewnić
się czy papier saszetki nie wystaje z uchwytu ltra.
• (Rys.11) - Włożyć od dołu uchwyt ltra do zespołu zaparzającego (6).
• (Rys.12) - Obracać uchwyt ltra od lewej do prawej strony,
aż do momentu zablokowania.
• Wziąć 1 liżankę wstępnie ogrzaną i ustawić ją pod
• 78 •
Page 79

uchwytem ltra, sprawdzić czy jest poprawnie umieszczona
pod otworami wylotu kawy.
• (Rys.14) - Nacisnąć przycisk kawy (15) w celu zaparzenia 1
kawy.
• Po osiągnięciu zaprogramowanej ilości kaw, urządzenie zakończy parzenie w sposób automatyczny; zabrać liżanki z
kawą (Rys.15).
• (Rys.16) - Po zakończeniu parzenia odczekać jeszcze kilka
sekund, wyciągnąć uchwyt ltra i usunąć zużytą saszetkę.
Ważna informacja: Filtr (14) i adaptator (13)
należy utrzymywać w czystości, aby zapewnić
doskonały rezultat. Myć codziennie po zakończeniu
używania.
5.3 Programowanie ilości kawy
W tym urządzeniu można wstępnie ustawić ilość kawy parzonej po naciśnięciu przycisku (15) lub przycisku (16).
Programowanie ilości kawy jest możliwe wy-
łącznie przy pomocy przycisku (15) (min. 25cc i
maks. 180cc).
Naciskając przycisk (16) urządzenie zaparzy podwójną
ilość kawy w stosunku do tej zaprogramowanej przy
pomocy przyc isku (15).
• Aby rozpocząć programowanie, umieścić kawę w uchwycie
ltra zgodnie ze wskazówkami w paragrafach 5.1 lub 5.2.
• Umieścić liżankę pod wylewką uchwytu ltra (10).
• (Rys.14) - Przycisnąć i przytrzymać wciśnięty przycisk
kawy (15). Po 3 sekundach, urządzenie rozpocznie parzenie
kawy.
• Kiedy w liżance pojawi się wybrana ilość kawy, należy
uwolnić przycisk (15).
6 WYBÓR TYPU KAWY PORADY
W zasadzie możliwe jest stosowanie każdego typu kawy
ziarnistej dostępnej w sprzedaży. Pomimo wszystko, kawa
to produkt naturalny i może zmieniać smak w zależności od
pochodzenia i rodzaju mieszanki; z tego powodu zaleca się
spróbowanie róż nych jej typów, aby znaleźć ten gatunek, k tóry
najlepiej odpowiada osobistym upodobaniom. W celu otrzymania jak najlepszych rezultatów, w każdym wypadku zaleca
się stosowanie mieszanek przygotowanych wyłącznie dla ekspresów do kaw y. Kawa powinna wypł ywać w sposób regular ny
z uchwytu ltra pod ciśnieniem bez kapania. Szybkość wypływania kawy może być zm ody kowana przez niewielk ą zmianę
dawki kawy w ltrze i/lub przez zastosowanie kawy o innym
stopniu zmielenia. W celu zapewnienia lepszego wyniku w liżance i ułat wienia czynności c zyszczenia i prz ygotowywania,
Saeco zaleca stosować kawę w saszetkach jednorazowych ze
znakiem ESE na opakowaniu.
PRZED WYKONANIEM JAKICHKOLWIEK CZYNNOŚCI
ZWIĄZANYCH Z WYTWARZANIA PARY LUB GORĄCEJ WODY SPRAWDZIĆ CZY CAPPUCCINATORE JEST ZWRÓCONY W TACY OCIEKOWEJ.
Polski
Programowanie zostało zakończone, od teraz, urządzenie będzie parzyć:
• taką samą ilość jak ta wybrana przy każdym naciśnięciu i
uwolnieniu przycisku (15).
• podwójną ilość w stosunku do tej wybranej przy każdym
naciśnięciu i uwolnieniu przycisku (16).
• 79 •
Page 80

7 GORĄCA WODA
Niebezpieczeństwo poparzeń! Na początku pa-
rzenia mogą wystąpić krótkie wytryski gorącej
wody. Rurka doprowadzająca może osiągnąć wysokie
temperatury: unikać jej dotykania bezpośrednio rękami.
• (Rys.3) - Nacisnąć wyłącznik ON/OFF (2).
• Odczekać aż przyciski (15 - 16) zapalą się stałym światłem.
• (Rys.18) - Ustawić pojemnik lub szklankę pod cappuccina-
tore.
• (Rys.5) - Otworzyć pokrętło (4).
• (Rys.6) - Nacisnąć przycisk (17).
• Kiedy zostanie pobrana wymagana ilość gorącej wody,
przycisnąć ponownie przycisk (17).
• (Rys.5) - Zamknąć pokrętło (4)
• Zabrać pojemnik z gorącą wodą.
Przyciskając przyciski (15) lub (16) urządzenie
nalewa odpowiednią ilość gorącej wody; ilość
jest taka jak ta zaprogramowana w par. 5.3.
Zalecamy spienianie mleka maksymalnie przez
60 sekund.
• (Rys.21) - Używać szpilki cappuccinatore , aby wyregu-
lować ilość pianki; podnosząc ją delikatnie, aby zwiększyć
ilość pianki.
• Po zakończeniu zamknąć pokrętło (4); zabrać liżankę ze
spienionym mlekiem.
Po przygotowaniu cappuccino, zanurzyć rurkę zasysającą w
pojemniku z czystą wodą i wytworzyć parę. Kiedy pojawi się
czysta woda, cappuccinatore jest czysty. Oczyścić z zewnątrz
rurkę zasysającą wilgotną ściereczką.
Co tydzień cappuccinatore musi być rozmontowany i całkowicie umy ty.
• (Rys.19) - Nacisnąć ponownie przycisk (18).
• Przystąpić do napełnienia obwodu, tak jak to opisano w par.
4.5, by urządzenie stało się operatywne.
Uwaga: urządzenie jest operatywne, gdy przyciski (15 i 16), zapalą się stałym światłem.
8 PARA/CAPPUCCINO
Niebezpieczeństwo poparzeń! Na początku pa-
rzenia mogą wystąpić krótkie wytryski gorącej
wody. Rurka doprowadzająca może osiągnąć wysokie
temperatury: unikać jej dotykania bezpośrednio rękami.
• (Rys.3) - Nacisnąć wyłącznik ON/OFF (2).
• Odczekać aż przyciski (15 - 16) zapalą się stałym światłem.
• (Rys.19) - Nacisnąć przycisk (18).
• Zaczekać aż zapali się w sposób stały przycisk (18); teraz
urządzenie jest gotowe do wytwarzania pary.
• (Rys.18) - Ustawić pojemnik pod cappuccinatore.
• (Rys.5) - Otworzyć pokrętło (4) na moment, tak by umożli-
wić wypłynięcie resztek wody z cappuccinatore; w krótkim
czasie zacznie wydobywać się tylko para.
• Zamknąć pokrętło (4) i zabrać pojemnik.
Stosować zimne mleko by zapewnić jak lepsze
rezultaty
• (Rys.20) - Zanurzyć rurkę zasysającą cappuccinatore w po-
jemniku mleka.
• (Rys.5) - Otworzyć pokrętło (4) przekręcając je w kierunku
przeciwnym do kierunku ruchu wskazówek zegara.
Nota bene: jeśli nie udaje się zaparzyć cappuc-
cino według wskazówek, należy ponownie napełnić obwód jak to opisano w par. 4.5 oraz następnie
powtórzyć kolejne c zynności.
Ten sam system może być stosowany do ogrze-
wania innych napojów.
9 PRZYSTAWKA PANNARELLO
Przystawka pannarello może być stosowana jako alternatywa
dla cappuccinatore do nalewania gorącej wody i wytwarzania
pary.
W celu zainstalowania przystawki pannarello należy usunąć
cappuccinatore (Rys.29-30):
- odkręcić tulejkę bez jej zdjęcia;
- usunąć złączkę cappuccinatore z rurki wylotu pary.
Zainstalować przystawkę pannarello (Rys.31):
- Włożyć całkowicie przystawkę pannarello do rurki wylotu
pary;
- Dokręcić dobrze tulejkę.
(Rys.32; Rys.33) - W celu nalania gorącej wody lub wytwo-
• 80 •
Page 81

rzenia pary należy przygotować urządzenie zgodnie z opisem
w paragrafach 7 i 8, i zastosować przystawkę pannarelo do
przygotowania.
- umyć wnętrze uchwytu ltra pod ciśnieniem.
• Nie suszyć urządzenia lub jego części w piecyku mikrofalowym lub tradycyjnym piecu.
(Rys.34; Rys.35) - Po zastosowaniu, z zimnego urządzenia,
wyjąć część dolną przystawki pannarello i umyć ją ciepłą
wodą.
(Rys. 36) - Co tydzień rozmontować c zęść górną i umyć ją przy
pomocy ciepłej wody.
10 CZYSZCZENIE
Konserwacja i czyszczenie mogą być wykonywane wyłącznie,
kiedy urządzenie jest ochłodzone i odłączone od sieci elektrycznej.
• Nie zanurzać urządzenia w wodzie i nie wkładać jego części
do zmywarki do naczyń.
• Nie stosować alkoholu etylowego, rozpuszczalników i/lub
agresywnych środków chemicznych.
• Zaleca się codzienne czyszczenie zbiornika na wodę i napełnianie go świeżą wodą.
• (Rys.20) - Po uprzednim podgrzaniu mleka nalać również
niewielką ilość gorącej wody.
Niebezpieczeństwo! kiedy część końcowa cappuccinatore jest rozmontowana, nie należy ni-
gdy wy twarzać pary.
• (Rys.22 - 23) - Raz w tygodniu należy wyczyścić cappuccinatore.
Aby wykonać tą czynność trzeba:
- usunąć część końcową cappuccinatore;
- oddzielić część górną cappuccinatore od jego części dolnej.
- umyć wszystkie komponenty cappuccinatore przy pomocy
ciepłej wody;
- umyć rurkę zasysającą wilgotną ściereczką i usunąć ewentualne pozostałości mleka;
- zamontować cappuccinatore;
- umieścić część końcową cappuccinatore w złączce, która
pozostała na urządzeniu (upewnić się, że została w pełni
dociśnięta).
• (Rys.24) - Codziennie opróżniać i myć tacę ociekową.
• Do czyszczenia urządzenia stosować miękką ściereczkę nawilżoną w wodzie.
• (Rys.17) - By przeprowadzić czyszczenie uchwytu ltra pod
ciśnieniem, wykonać kolejno następujące czynności:
- (Rys.10) - wyciągnąć ltr, umyć go dokładnie ciepłą
wodą.
- wyciągnąć adaptator (jeżeli obecny), umyć go dokładnie
ciepłą wodą.
Uwaga: uchwyt ltra pod ciśnieniem nie może
być myty w zmywarce do naczyń.
11 ODWAPNIENIE
Tworzenie się kamienia następuje przy użytkowaniu urządzenia; odwapnianie konieczne jest co 1-2 miesiące użytkowania
urządzenia i/lub, kiedy zauważone zostanie zmniejszenie
przepływu wody. Stosować wyłącznie środek odwapniający
Saeco.
W razie ewentualnej sprzeczności treść instruk-
cji obsł ugi i konserwacji ma pier wszeństwo nad
treścią instrukcji akcesoriów i/lub materiałów eksploatacyjnych sprzedawanych osobno.
Stosować środek odwapniający Saeco (rys.B).
Został on opracowany specjalnie w celu utrzymania jak najlepszej wydajności i funkcjonalności
urządzenia przez cały okres jego żywotności, jak również, aby uniknąć sytuacji, w k tórych, jeśli jest ono prawidłowo używane, dochodziłoby do zmian parzonego
produktu. Przed rozpoczęciem cyklu odwapniania
upewnić s ię, czy: ZOSTAŁ USUNIĘTY FILTR WODY, jeśli jest
używany.
Nie pić roztworu odwapniającego ani nalewanych produktów aż do zakończenia cyklu. Nie
używać w żadnym wypadku octu jako odwapniac za.
1 (Rys.11-12) - Od dołu włożyć uchwyt ltra do bloku zapa-
rzającego (6) i przekręcić go od lewej do prawej strony, aż do
momentu zablokowania.
2 (Rys.1) - Wyjąć i opróżnić pojemnik na wodę.
3 (Rys.2) - Wlać POŁOWĘ zawartości butelki skoncentrowa-
nego odwapniacza Saeco do pojemnika na wodę znajdującego się w urządzeniu i napełnić go świeżą pitną wodą aż do
poziomu MAX.
4 (Rys.3) - Włączyć urządzenie przez naciśnięcie wyłącznika
ON/OFF (2).
(Rys.4) - Nalać (zgodnie z opisem w rozdziale 7 instruk-
cji) z rurki wylotu pary/gorącej wody 2 filiżanki (około 150
ml każda) wody, po czym wyłączyć urządzenie za pomocą wyłącznika ON/OFF (2).
5 Pozwolić na działanie odwapniacza przez około 15-20 mi-
nut przy wyłączonym urządzeniu.
Polski
• 81 •
Page 82

6 Włączyć urządzenie przez naciśnięcie wyłącznika ON/
OFF (2).
(Rys.4) - Nalać (zgodnie z opisem w rozdziale 7 instrukcji)
z rurki wylotu pary/gorącej wody 2 liżanki (około 150 ml
każda) wody. Następnie wyłączyć urządzenie przez naciśnięcie wyłącznika ON/OFF (2) i pozostawić je wyłączone
przez 3 minuty.
7 Powtarzać operacje opisane w punkcie 6 aż do całkowitego
opróżnienia pojemnika na wodę.
8 (Rys.2) - Wypłukać pojemnik świeżą pitną wodą i napełnić
go całkowicie.
9 Ustawić pojemnik pod uchwytem ltra.
10 (Rys.6) - Włączyć urządzenie przez naciśnięcie wyłącznika
ON/OFF (2); poczekać, aż przyciski (15 - 16) zaświecą się
światłem stałym. Wcisnąć przycisk “
mowaną ilość wody.
11 Opróżnić pojemnik umieszczony pod uchwytem ltru i po -
wtórzyć operacje opisane w punkcie (10) aż do całkowitego opróżnienia pojemnika na wodę.
12 (Rys.2) - Napełnić ponownie pojemnik świeżą wodą.
(Rys.4) - Ustawić spory pojemnik pod rurkę wylotu pary/
gorącej wody. Otworzyć pokrętło nalewania wody (4),
przekręcając je w kierunku przeciwnym do ruchu wskazówek zegara. Wcisnąć przycisk gorącej wody “
całą zawartość pojemnika poprzez rurkę wylotu pary/gorącej wody.
13 Po zakończeniu przelewania wody, aby zatrzymać nalewa-
nie, należy wcisnąć ponownie przycisk gorącej wody“
Zamknąć pokrętło nalewania wody (4), obracając je zgodnie
z kierunkiem ruchu wskazówek zegara.
14 Powtórzyć jeszcze raz operacje opisane od punktu (8) dla 4
kolejnych pojemników.
15 (Rys.16) - Wyjąć uchwyt ltra z bloku, przekręcając go od
prawej do lewej strony i opłukać go świeżą pitną wodą.
W ten sposób cykl odwapniania został zakończony.
” i nalać zaprogra-
” i przelać
12 POZBYWANIE SIĘ URZĄDZENIA
INSTRUKCJE USUWANIA ZUŻYTEGO SPRZĘTU: Ten produkt odpowiada wymogom dyrektywy nr 2002/96/WE Parlamentu
Europejskiego i Rady.
• Symbol
niu wskazuje na to, że zużyty sprzęt nie może być traktowany jako ogólny odpad domowy, a że należy go zanieść
do punktów zbiórki selektywnej sprzętu elektrycznego i
elektronicznego, zorganizowanych przez administrację publiczną.
• Sprzęt ten może być również oddany dystrybutorowi w
momencie zakupu nowego równorzędnego sprzętu. Użytkownik jest odpowiedzialny za oddanie zużytego sprzętu do
odpowiednich punktów zbiórki; w przeciwnym przypadku
podlega on sankcjom przewidzianym przez obowiązujące
przepisy w dziedzinie odpadów.
• Poprawna selektywna zbiórka poprzez przeznaczenie zu-
żytego sprzętu na recykling, przetworzenie oraz usuwanie
przyjazne dla środowiska przyczynia się do zmniejszenia
ewentualnych negatywnych skutków na środowisko i ludzkie zdrowie oraz sprzyja odzyskowi materiałów, z których
składa się produkt.
”.
• O otrzymanie szczególniejszych informacji dotyczących
możliwych systemów zbiórki należy się zwrócić do lokalnych podmiotów zajmujących się usługami usuwania
odpadów lub do dystrybutora, u którego został zakupiony
produkt. Producent i/lub importer wypełniają obowiązki
związane z recyklingiem, przetworzeniem oraz przyjaznym
dla środowiska usuwaniem odpadów zarówno indywidualnie jak i biorąc udział w zbiorowych systemach.
umieszczony na sprzęcie lub opakowa-
(Rys.2) - Napełnić ponownie pojemnik świeżą wodą. Jeśli to
konieczne, przeprowadzić napełnianie obwodu zgodnie z opisem w par. 4.5 instrukcji obsługi.
Roztwór odwapniający musi być zutylizowany
w sposób przewidziany przez producenta i/lub
według norm obowiązującyc h w kraju używania.
• 82 •
Page 83

Usterka Możliwe przyczyny Możliwe rozwiązanie
Urządzenie nie włącza się.
Pompa jest bardzo hałaśliwa. Brakuje wody w pojemniku. Uzupełnić wodę. (par. 4.4).
Migają wszystkie prz yciski. należy nape łnić obwód wody.
Kawa jest zbyt zimna.
Brak pianki na mleku.
Nie można przygotować cappuccino.
Kawa wypływa zbyt szybko, nie
wyt warza się pianka.
Kawa nie płynie lub płynie tylko
kroplami.
Kawa wypływa po brzegach
uchwytu.
Urządzenie nie jest podłączone do sieci
elektrycznej.
Uchwyt ltra nie włożony do wstępnego
ogrzania (rozdz. 5).
Filiżanki zimne. Ogrzać liżanki gorącą wodą.
Nieodpowie dnie mleko: mleko w proszku,
mleko chude.
Brudny cappuccinatore.
Brak pary w bojlerze.
Zbyt mało kawy w uchw ycie ltra. Dodać kawę (rozdz. 5).
Mielenie zby t grube. Zastosować inny ty p mieszanki (rozdz.6).
Kawa stara lub nieodpowiednia. Zastosować inny t yp mieszanki (rozdz.6).
Saszetka s tara lub nieodpowiednia. Wymienić używaną saszetkę.
Brak komponentu w uchwycie ltra.
Brakuje wody. Uzupełnić wodę. (par. 4.4).
Mielenie zbyt drobne. Zastosować inny typ mieszanki (rozdz.6).
Kawa zbyt dociśnięta w uchw ycie ltra. Wzruszyć mieloną kawę.
Zbyt dużo kaw y w uchwycie ltra. Zmniejszyć ilość kawy w uchwycie ltra.
Pokrętło(4) otwarte. Zamknąć pokrętło (4).
Urządzenie zawapnione. Odwapnić urządzenie (rozdz.10).
Filtr zatkany wew nątrz uchwytu. Oczyścić ltr (rozdz.9).
Nieodpowiednia saszetka. zmienić typ używanej saszetki.
Uchwyt ltra nieprawidłowo włożony do
bloku zaparzającego.
Górna krawędź uchwytu ltra jest brudna.
Uszczelka bloku zaparzającego zanieczyszczona lub zużyta.
Saszetka nieprawidłowo włożona.
Zbyt dużo kaw y w uchwycie ltra. Zmniejszyć ilość kawy s tosując miarkę.
Podłącz yć urządzenie do sieci elek trycznej.
Przeprowadzić napełnianie obwodu zgodnie z
opisem w par. 4.5.
Ogrzać ws tępnie uchwyt ltra.
Zastosować p ełne mleko.
Oczyścić cappuccinatore jak to opisano w
Rozdz.9.
Napełnić ponownie obwód (par. 4.5) i powtórzyć
czynności opisane w Rozdz. 8.
Sprawdzić cz y wszystkie kom ponenty są obecne i
czy zos tały zamocowane poprawnie.
Włożyć poprawnie uchwy t ltra (rozdz.5.)
Oczyścić krawęd ź uchwytu ltra.
Oczyścić uszczelkę.
Włożyć popr awnie saszetkę tak by nie w ystawała
z uchwytu lt ra.
Polski
W przypadku problemów, które nie zostały omówione w powyższej tabeli, lub, gdy podane porady ich nie rozwiązują, zwrócić się do centrum serw isowego.
• 83 •
Page 84

DICHIARAZIONE DI CONFORMITA’ CE
ANNO 09
EC 2006/95, EC 2004/108.
EC DECLARATION OF CONFORMIT Y
YEAR 09
EC 2006/95, EC 2004/108.
Noi :
Saeco International Group
Via Torretta , 240
40041 GAGGIO MONTANO (BO)
dichiar iamo sotto la nostra responsabilità che il prodotto :
MACCHINA PER CAFFE' SINGOLA
TIPO : SIN 026XH
al quale si riferisce questa dichiarazione è conforme
alle seguenti norme :
• Sicurezza di elettrodomestici e apparecchi elettrici - Requisiti generali.
EN 60335-1 (2002) + A1(2004) + A2(2006) + A11(2004) +
A12 (2006) + A13(2008)
• Sicurezza di elettrodomestici e apparecchi elettrici - Parte
2-15 -Requisiti speci ci per apparecchi per riscaldare liquidi
EN 60 335-2-15 (2002) + A1(2005) +A2(2008)
• Sicurezza apparecchi per uso domestico e similare. Campi
elettromagnetici. Metodi per la valutazione e le misure
EN 62233 (2008)
• Limiti e metodi di misurazione dei disturbi radio caratteristici di apparecchi con motore elettrico e termici per uso
domestico e simili scopi, strumenti elettrici e simili apparecchiature elettriche - EN 55014-1 (2006).
• Compatibilità elettromagnetica (EMC)
Parte 3^ Limiti - Sezione 2 : Limiti per le emissioni di cor-
rente armonica (corrente in ingresso dell’apparecchiatura ≤
16A per fase) - EN 61000-3-2 (2006).
• Compatibilità elettromagnetica (EMC)
Parte 3^ Limiti - Sezione 3 : Limitazione delle uttuazioni
e dei picchi di tensione nei sistemi di alimentazione a bassa
tensione per apparecchiature con corrente nominale ≤ 16A.
EN 61000-3-3 (1995) + corr.(1997) + A1(2001) + A2 (2005).
• Requisiti di immunità per elettrodomestici, strumenti e apparecchi similari.
EN 55014-2 (1997) + A1 (2001)
secondo le disposizioni delle direttive :
EC 2006/95 , EC 2004/108.
Norma per famiglia di prodotti
We :
Saeco International Group
Via Torretta , 240
40041 GAGGIO MONTANO (BO)
declare under our responsibilit y that the product :
COFFEE MAKER
TYpe : SIN 026XH
to which this declaration relates is in conformity with the
followin g standards or othe r normative docume nts :
• Safety of household and electrical appliances - General requirements
EN 60335-1(2002 ) + A1(2004) + A2(2006) + A11(2004) +
A12(2006)+ A13(2008).
• Safety of household and electrical appliances - Part 2-15
Particular requirements for appliances for heating liquids
EN 60335-2-15(2002) + A1(2005) +A2(2008)
• Household and similar elec trical appliances - Electromagnetic elds - methods for evaluation and measurement
EN 62233 (2008)
• Electromagnetic compatibility (EMC) - Requirements for
household appliances , electric tools and similar apparatus
- Part 1 - Emission EN 55014-1 (2006).
• Electromagnetic compatibility (EMC)
Part. 3^ Limits - Section 2 : Limits for harmonic current
emissions (equipment input current ≤ 16A for phase) EN 61000-3-2 (2006).
• Electromagnetic compatibility (EMC)
Part 3^ : Limits - Section 3 : Limitation of voltage changes ,
voltage uctuations and icker in public low - voltage supply systems , for equipment with rated current ≤ 16 A for
phase and not subject to conditional connection
EN 61000-3-3 (1995) + corr.(1997) + A1 (2001) + A2 (2005).
• Electromagnetic compatibility - Requirements for household
appliances , electric tools and similar apparatus - Part 2.
Immunity - Product family standard EN 55014-2 (1997) +
A1 (2001)
following the provisions of the Directives :
EC 2006/95 , EC 2004/108.
Gaggio Montano 28/04/2009
• 84 •
Gaggio Montano 2009 - 04 - 28
R&D
Ing. Andrea Castellani
Page 85

EG KONFORMITÄTSERKLÄRUNG
JAHR 09
2006/95/EG, 2004/108/EG.
DÉCLARATION CE DE CONFORMITÉ
AN 09
2006/95/CE , 2004/108/CE.
Wir:
Saeco International Group
Via Torretta , 240
40041 GAGGIO MONTANO (BO)
erklären unter eigener Verantwortung, dass das Produkt:
EINZEL KAFFEEMAS CHINE
TYP : SIN 026XH
auf das sich diese Erklärung bezieht, folgenden Normen entspricht:
• Sicherheit elektrischer Geräte für den Hausgebrauch und
ähnliche Zwecke - Allgemeine Anforderungen
EN 60335-1 (2002) + A1(2004) + A2(2006) + A11(2004) +
A12 (2006) +A13 (2008)
• Sicherheit ele ktrischer Geräte für den Hausgebrauch und
ähnliche Zwecke - Teil 2-15
Besondere Anforderungen für Geräte zur Flüssigkeitserhit-
zung - EN 60 335-2-15 (2002) + A1(2005) +A2(2008)
• Sicherheit Geräte für den Hausgebrauch und ähnliche Zwekke Elektromagnetische Felder Verfahren für die Bewertung
und die Messungen - EN 62233 (2008)
• Grenzwerte und Messverfahren für Funkstörungen von Geräten mit elektromotorischem Antrieb und Elektrowärmegeräten für den Hausgebrauch und ähnliche Zwecke, Elektrowerkzeugen und ähnlichen Elektrogeräten - EN 55014-1 (2006).
• Elektromagnetische Verträglichkeit (EMV)
Teil 3 Grenzwerte - Hauptabschnitt 2: Grenzwerte für Ober-
schwingungsströme (Geräte-Eingangsstrom ≤ 16 A je Leiter) - EN 61000-3-2 (2006).
• Elektromagnetische Verträglichkeit (EMV)
Teil 3 Grenzwerte - Hauptabschnitt 3: Grenzwerte für Span-
nungsschwankungen und Flicker in Niederspannungsnetzen für Geräte mit einem Eingangsstrom ≤ 16 A.
EN 61000-3-3 (1995) + Korr.(1997) + A1(2001) + A2 (2005).
• Störfestigkeit von Haushaltsgeräten, Elektrowerkzeugen
und ähnlichen Geräten.
Produktfamiliennorm EN 55014-2 (1997) + A1 (2001).
gemäß den Bestimmungen der Richtlinien :
2006/95/EG, 2004/108/EG.
Gaggio Montano 28/04/2009
Nous :
Saeco International Group
Via Torretta , 240
40041 GAGGIO MONTANO (BO)
déclarons sous notre responsabilité que le produit :
MACHINE À CAFÉ
TYPE : SIN 026XH
auquel se réfère cette déclaration est conforme aux
normes suivantes :
• Sécurité des appareils électrodomestiques et analogues Prescriptions générales
EN 60335-1 (2002) + A1(2004) + A2(2006) + A11(2004) +
A12 (2006) +A13 (2008)
• Sécurité des appareils électrodomestiques et analogues - Partie 2-15 - Règles particulières pour les appareils de chau age
des liquides - EN 60 335-2-15 (2002) + A1(2005) +A2(2008)
• Appareils électrodomestiques et analogues. Champs électro-magnétiques - Méthodes d’évaluation et de mesure
EN 62233 (2008)
• Limites et méthodes de mesure des perturbations radioélectriques produites par les appareils électrodomestiques
ou analogues comportant des moteurs ou des dispositifs
thermiques, par les outils électriques et par les appareils
électriques analogues - EN 55014-1 (2006).
• Compatibilité électromagnétique (EMC)
Partie 3, Limites - Section 2 : Limites pour les émissions de
courant harmonique (courant appelé par les appareils ≤ 16
A par phase) - EN 61000-3-2 (2006).
• Compatibilité électromagnétique (EMC)
Partie 3, Limites - Section 3 : Limitation des variations, des uc-
tuations de tension et du papillotement dans les réseaux publics d’alimentation basse tension ayant un courant assigné ≤
16A par phase et non soumis à un raccordement conditionnel.
EN 61000-3-3 (1995) + corr.(1997) + A1(2001) + A2 (2005).
• Exigences pour les appareils électrodomestiques, outillages
électriques et appareils analogues.
Norme de famille de produits EN 55014-2 (1997) + A1 (2001)
Selon les dispositions des directives :
2006/95/CE , 2004/108/CE.
Gaggio Montano 28/04/2009
R&D
Ing. Andrea Castellani
• 85 •
Page 86

DECLARACIÓN DE CONFORMIDAD CE
AÑO 09
2006/95/CE , 2004/108/CE.
DECLARAÇÃO DE CONFORMIDADE CE
ANO 09
2006/95/CE , 2004/108/CE.
Nosotros, la empresa :
Saeco International Group
Via Torretta , 240
40041 GAGGIO MONTANO (BO)
declaramos bajo nuestra responsabilidad que el producto:
MÁQUINA DE CAFÉ
TIPO : SIN 026XH
al cual se re ere esta declaración, cumple con las siguientes normas :
• Seguridad de electrodomésticos y aparatos eléctricos - Requisitos generales
EN 60335-1 (2002) + A1 (2004) + A2 (2006) + A11 (2004)
+ A12 (2006) +A13 (2008)
• Seguridad de electrodomésticos y aparatos eléctricos -Parte 2-15
Requisitos especí cos para aparatos para calentar líquidos
EN 60335-2-15 (2002) + A1 (2005) +A2(2008)
• Seguridad de aparatos para uso doméstico y análogos. Campos electromagnéticos
Métodos de evaluación y medición - EN 62233 (2008)
• Límites y métodos de medición de las interferencias de radio características de aparatos con motor eléctrico y dispositivos térmicos para uso doméstico y objetivos análogos,
instrumentos eléctricos y equipos eléctricos análogos - EN
55014-1 (2006).
• Compatibilidad electromagnética (EMC)
Parte 3a Límites - Sección 2: Límites para las emisiones de
corriente armónica (equipos con corriente de entrada ≤16A
por fase) - EN 61000-3-2 (2006).
• Compatibilidad electromagnética (EMC)
Parte 3a Límites - Sección 3: Limitación de las uctuaciones
y de los picos de tensión en los sistemas de alimentación de
baja tensión para equipos con corriente nominal ≤ 16A.
EN 61000-3-3 (1995) + corr. (1997) + A1 (2001) + A2 (2005).
• Requisitos de inmunidad para electrodomésticos, instrumentos y equipos análogos.
Norma para familia de productos EN 55014-2 (1997) + A1
(2001)
de conformidad con las disposiciones de las directivas:
2006/95/CE , 2004/108/CE.
Gaggio Montano 28/04/2009
Nós :
Saeco International Group
Via Torretta , 240
40041 GAGGIO MONTANO (BO)
declaramos sob noss a inteira responsabilidade que o produto:
MÁQUINA DE CAFÉ
TIPO : SIN 026XH
a que se refere esta declaração está conforme com as
seguintes normas :
• Segurança de aparelhos electrodomésticos e análogos - Requisitos gerais - EN 60335-1 (2002) + A1(2004) + A2(2006)
+ A11(2004) + A12 (2006) + A13(2008)
• Segurança de aparelhos electrodomésticos e análogos Parte 2-15 - Requisitos especí cos para equipamentos de
aquecimento de líquidos -
EN 60 335-2-15 (2002) + A1(2005) +A2(2008)
• Segurança de aparelhos domésticos e análogos. Campos
electromagnéticos - Métodos de avaliação e medição
EN 62233 (2008)
• Limites e métodos de medição das interferências rádio características de aparelhos com motor eléctrico e térmicos
para uso doméstico e utilizações análogas, instrumentos
eléctricos e aparelhagens eléctricas análogas -
EN 55014-1 (2006).
• Compatibilidade electromagnética (CEM)
Parte 3 Limites - Secção 2 : Limites para emissões de corren-
te harmónica (corrente de entrada do equipamento até ≤
16A por fase) - EN 61000-3-2 (2006).
• Compatibilidade electromagnética (CEM)
Parte 3 Limites - Secção 3 : Limitação das utuações e
dos picos de tensão nos sistemas de alimentação de baixa
tensão para equipamentos de corrente nominal até ≤ 16A.
EN 61000-3-3 (1995) + corr.(1997) + A1 (2001) + A2 (2005).
• Requisitos de imunidade para electrodomésticos, instrumentos e aparelhos análogos.
Norma da família de produtos EN 55014-2 (1997) + A1 (2001)
segundo as disposições das directivas:
2006/95/CE , 2004/108/CE.
Gaggio Montano 28/04/2009
R&D
Ing. Andrea Castellani
• 86 •
Page 87

EG-VERKLARING VAN OVEREENSTEMMING
JAAR 09
2006/95/EG, 2004/108/EG.
Wij :
Saeco International Group
Via Torretta , 240
40041 GAGGIO MONTANO (BO)
verklaren onder eigen verant woordelijkheid dat het product:
DEKLARACJA ZGODNOCI WE
ROK 09
2006/95/ WE, 2004/108/ WE.
My:
Saeco International Group
Via Torretta , 240
40041 GAGGIO MONTANO (BO)
niniejszym deklarujemy, ponosząc za to pełną odpowiedzialność, że produkt:
ENKELVOUDIGE KOFFIEMACHINE
Type : SIN 026XH
waarnaar deze verklaring verwijst, voldoet aan de volgende normen:
• Huishoudelijke en soortgelijke elektrische toestellen – Veiligheid – Algemene eisen - EN 60335-1 (2002) + A1(2004)
+ A2(2006) + A11(2004) + A12 (2006) +A13 (2008)
• Huishoudelijke en soortgelijke elektrische toestellen - Deel
2-15 - Bijzondere eisen voor toestellen voor verwarming
van vloeisto en -
EN 60 335-2-15 (2002) + A1(2005) +A2(2008)
• Huishoudelijke en soortgelijke toestellen. Elektromagnetische velden - Methoden voor de evaluatie en meting
EN 62233 (2008)
• Grenswaarden en meetmethoden van radiostoringskenmerken van elektrisch en thermisch aangedreven motoren voor
huishoudelijk gebruik en soortgelijke doeleinden, elektrisch
gereedschap en soortgelijke apparaten - EN 55014-1 (2006).
• Elektromagnetische compatibiliteit (EMC)
Deel 3-2: Limietwaarden - Limietwaarden voor de emissie
van harmonische stromen (ingangsstroom van de toestellen ≤ 16A per fase) - EN 61000-3-2 (2006).
• Elektromagnetische compatibiliteit (EMC)
Deel 3-3: Limietwaarden - Limietwaarden voor spannings-
wisselingen, spanningsschommelingen en ikkering in
openbare laagspanningsnetten voor apparatuur met een
ingangsstroom ≤ 16 A.
EN 61000-3-3 (1995) + corr.(1997) + A1(2001) + A2 (2005).
• Immuniteitseisen voor huishoudelijke toestellen, elektrisch
gereedschap en soortgelijke apparaten.
Productgroepnorm EN 55014-2 (1997) + A1 (2001)
EKSPRES DO KAW Y POJEDYNCZY
TYP : SIN 026XH
do któr ego odnosi się ta de klaracja jes t zgodny z wymaganiami zawart ymi w następującyc h normatywach:
• Zasady bezpieczeństwa dla sprzętu domowego i elektrycznego – Wymagania ogólne - EN 60335-1 (2002) + A1(2004)
+ A2(2006) + A11(2004) + A12 (2006) + A13(2008)
• Zasady bezpieczeństwa dla sprzętu domowego i elektrycznego - Część 2-15 - Wymagania szczególne dla urządzeń
służących do ogrzewania płynów -
EN 60 335-2-15 (2002) + A1(2005) +A2(2008)
• Zasady bezpieczeństwa dla urządzeń do użytku domowego
i podobnego. Pola elektromagnetyczne
Metody oceny i pomiarów - EN 62233 (2008)
• Wartości dopuszczalne i metody pomiarów zakłóceń radioelektrycznych, charakterystycznych dla urządzeń z silnikiem
elektrycznym i termicznych do użytku domowego lub do
podobnych celów, przyrządy elektryczne i podobny sprzęt
elektryczny - EN 55014-1 (2006)
• Kompatybilność elektromagnetyczna (EMC)
Część 3^ Wartości dopuszczalne – Rozdział 2 : Wartości
dopuszczalne dla emisji prądu harmonicznego (prąd na
wejściu urządzenia ≤ 16A na fazę) – EN 61000-3-2 (2006).
• Kompatybilność elektromagnetyczna (EMC)
Część 3^ Wartości dopuszczalne – Rozdział 3 : Dopuszczal-
ne zmiany i wahania napięcia w systemach zasilania niskim
napięciem dla urządzeń o prądzie nominalnym ≤ 16A.
EN 61000-3-3 (1995) + popr.(1997) + A1 (2001) + A2 (2005).
• Wymagania dotyczące odporności sprzętu domowego,
przyrządów i podobnej aparatury.
Norma dla grupy produktów EN 55014-2 (1997) + A1 (2001)
volgens de voorschriften van de richtlijnen:
2006/95/EG, 2004/108/EG.
Gaggio Montano 28/04/2009
zgodnie z rozporządzeniami zawartymi w dyrektywach: 2006/95/WE, 2004/108/WE.
Gaggio Montano 28/04/2009
R&D
Ing. Andrea Castellani
• 87 •
Page 88

Type Sin026XH
Saeco International Group S.p.A. Via Torretta, 240 - 40041 Gaggio Montano
Bologna - Italy - Tel. +39 0534.771.111 - Fax. +39 0534.31025
http://www.saeco.com
Cod. 15002122 Rev.00 15-10-10
 Loading...