

Page 1
Quick Instruction Guide
Type HD8768
READ THIS GUIDE CAREFULLY BEFORE USING THE MACHINE.
CHECK ON WWW.PHILIPS.COM/SUPPORT TO DOWNLOAD THE LATEST USER MANUAL
EnglishItalianoDeutschFrançaisEspañolPortuguês
Register your product and get support at
www.philips.com/welcome
Page 2
Welcome to Philips Saeco! Register on WWW.PHILIPS.COM/WELCOME and you will receive tips
EN
and updates on how to take care of your machine. This booklet contains quick instructions on how
to operate your machine properly. The machine package includes a CD with the entire manual in your language. Put the CD in your PC’s CD drive and you will be guided to the desired document. You may also go
to www.philips.com/support to download the latest version of the user manual (refer to the
type number listed on the cover page).
Benvenuto nel mondo Philips Saeco! Registratevi sul sito WWW.PHILIPS.COM/WELCOME per ri-
IT
cevere consigli e aggiornamenti sulla manutenzione. In questo libretto sono riportate le istruzioni
in breve per il corretto funzionamento della macchina. Nell’imballo della macchina potete trovare un CD
contenente il manuale completo nella lingua desiderata. Inserire il CD nel lettore del computer per accedere al documento desiderato. Consultate il sito www.philips.com/support per scaricare l’ultima ver-
sione del manuale d’uso (fare riferimento al numero di modello indicato sulla copertina).
Herzlich Willkommen in der Welt von Philips Saeco! Registrieren Sie sich auf der Internetseite
DE
WWW.PHILIPS.COM/WELCOME und erhalten Sie Hinweise und Aktualisierungen zur Wartung. In
diesem Heft werden die Hinweise für den korrekten Betrieb des Geräts in Kurzform dargestellt. In der Verpackung des Geräts be ndet sich eine CD, die das gesamte Handbuch in der gewünschten Sprache enthält.
Die CD in das Laufwerk im Computer einlegen und das gewünschte Dokument ö nen. Auf der Webseite
www.philips.com/support kann die aktuellste Version des Bedienungshandbuchs heruntergeladen werden (dabei ist auf die auf dem Deckblatt angegebene Modellnummer Bezug zu
nehmen).
Page 3

Bienvenue dans le monde Philips Saeco! Enregistrez-vous sur le site WWW.PHILIPS.COM/WEL-
FR
COME et retrouvez les conseils et les mises à jour concernant l'entretien de votre appareil. Ce mode
d'emploi fournit de brèves instructions pour le bon fonctionnement de la machine. Dans l'emballage de la
machine vous trouverez un CD avec le manuel complet dans la langue souhaitée. Insérer le CD dans le
lecteur de l'ordinateur pour accéder au document désiré. Consulter le site www.philips.com/support
pour télécharger la dernière version du manuel d'utilisation (se référer au numéro du modèle
indiqué sur la couverture).
¡Bienvenido al mundo Philips Saeco! Regístrese en la página WWW.PHILIPS.COM/WELCOME
ES
para recibir consejos y actualizaciones sobre el mantenimiento. En este manual encontrará las instrucciones resumidas para el correcto funcionamiento de la máquina. En el embalaje de la máquina se incluye un CD con el manual completo en el idioma deseado. Introduzca el CD en el reproductor del ordenador
para acceder al documento deseado. Consulte la página www.philips.com/support para descargar
la última versión del manual de uso (haga referencia al número de modelo indicado en la portada).
EnglishItalianoDeutschFrançaisEspañolPortuguês EnglishItalianoDeutschFrançaisEspañolPortuguês
Bem-vindo ao mundo Philips Saeco! Registe-se no site WWW.PHILIPS.COM/WELCOME para rece-
PT
ber conselhos e actualizações relativas à manutenção. Neste livreto estão indicadas, de forma reduzida, as instruções para o funcionamento correcto da máquina. Na embalagem da máquina poderá encontrar um CD que contém o manual completo no idioma desejado. Introduza o CD no leitor do computador
para aceder ao documento desejado. Consulte o site www.philips.com/support para descarregar a
última versão do manual de utilização (consulte o número do modelo indicado na capa).
Page 4

EN - CONTENT - PAG.6
SAFETY INSTRUCTIONS ........................................................................................................................................................................................6
FIRST INSTALLATION.......................................................................................................................................................................................... 10
MANUAL RINSE CYCLE........................................................................................................................................................................................ 11
FIRST ESPRESSO / COFFEE .................................................................................................................................................................................. 12
MY FAVORITE ESPRESSO .................................................................................................................................................................................... 12
CHANGING COFFEE BEANS ................................................................................................................................................................................. 13
ADJUSTING THE CERAMIC COFFEE GRINDER .......................................................................................................................................................15
MILK FROTHING ................................................................................................................................................................................................ 16
HOT WATER........................................................................................................................................................................................................ 17
DESCALING ........................................................................................................................................................................................................ 18
BREW GROUP CLEANING .................................................................................................................................................................................... 20
AUTOMATIC MILK FROTHER CLEANING ...............................................................................................................................................................21
CLEANING OF THE COFFEE BEAN HOPPER, THE TRAY AND THE COMPARTMENT ....................................................................................................24
WARNING SIGNALS YELLOW COLOUR ...............................................................................................................................................................25
WARNING SIGNALS RED COLOUR .....................................................................................................................................................................26
MAINTENANCE PRODUCTS .................................................................................................................................................................................27
IT - INDICE - PAG.8
NORME DI SICUREZZA .......................................................................................................................................................................................... 8
PRIMA INSTALLAZIONE ...................................................................................................................................................................................... 10
CICLO DI RISCIACQUO MANUALE .........................................................................................................................................................................11
PRIMO ESPRESSO / CAFFÈ ..................................................................................................................................................................................12
IL MIO ESPRESSO IDEALE ...................................................................................................................................................................................12
SOSTITUZIONE CAFFÈ IN GRANI .......................................................................................................................................................................... 13
REGOLAZIONE MACINACAFFÈ IN CERAMICA ....................................................................................................................................................... 15
COME EMULSIONARE IL LATTE............................................................................................................................................................................ 16
ACQUA C ALDA ....................................................................................................................................................................................................17
DECALCIFICAZIONE ............................................................................................................................................................................................18
PULIZIA DEL GRUPPO CAFFÈ ..............................................................................................................................................................................20
PULIZIA MONTALATTE AUTOMATICO .................................................................................................................................................................. 21
PULIZIA DEL CONTENITORE CAFFÈ IN GRANI, DEL VASSOIO E DEL VANO CAFFÈ ....................................................................................................24
SEGNALI DI AVVISO GIALLO ............................................................................................................................................................................. 25
SEGNALI DI ALLARME ROSSO ...........................................................................................................................................................................26
PRODOTTI PER LA MANUTENZIONE ....................................................................................................................................................................27
DE - INHALT - S. 28
SICHERHEITSHINWEISE .....................................................................................................................................................................................28
ERSTE INBETRIEBNAHME .................................................................................................................................................................................. 32
MANUELLER SPÜLZYKLUS..................................................................................................................................................................................33
ERSTER ESPRESSO / KAFFEE ...............................................................................................................................................................................34
MEIN LIEBLINGSESPRESSO ............................................................................................................................................................................... 34
WECHSEL DER KAFFEEBOHNEN ..........................................................................................................................................................................35
EINSTELLUNG KERAMIKMAHLWERK .................................................................................................................................................................. 37
AUFSCHÄUMEN VON MILCH ...............................................................................................................................................................................38
HEISSWASSER ................................................................................................................................................................................................... 39
ENTKALKEN ....................................................................................................................................................................................................... 40
REINIGUNG DER BRÜHGRUPPE .......................................................................................................................................................................... 42
REINIGUNG DES AUTOMATISCHEN MILCHAUFSCHÄUMERS .................................................................................................................................43
REINIGUNG DES KAFFEEBOHNENBEHÄLTERS, DER SCHALE UND DES KAFFEEFACHS ............................................................................................46
HINWEISSIGNALE GELB ................................................................................................................................................................................... 47
ALARMSIGNALE ROT ....................................................................................................................................................................................... 48
PFLEGEPRODUKTE............................................................................................................................................................................................ 49
Page 5

FR - TABLE DES MATIÈRES- PAG.30
CONSIGNES DE SÉCURITÉ ...................................................................................................................................................................................30
PREMIÈRE INSTALLATION ..................................................................................................................................................................................32
CYCLE DE RINÇAGE MANUEL ............................................................................................................................................................................... 33
PREMIER CAFÉ EXPRESSO / CAFÉ ........................................................................................................................................................................34
MON CAFÉ EXPRESSO IDÉAL ............................................................................................................................................................................... 34
REMPLACEMENT CAFÉ EN GRAINS ...................................................................................................................................................................... 35
RÉGLAGE DU MOULIN À CAFÉ EN CÉRAMIQUE .....................................................................................................................................................37
COMMENT ÉMULSIONNER LE LAIT ...................................................................................................................................................................... 38
EAU CHAU DE ......................................................................................................................................................................................................39
DÉTARTR AGE ..................................................................................................................................................................................................... 40
NETTOYAGE DU GROUPE DE DISTRIBUTION ........................................................................................................................................................42
NETTOYAGE DU MOUSSEUR À LAIT AUTOMATIQUE .............................................................................................................................................. 43
NETTOYAGE DU RÉSERVOIR À CAFÉ EN GRAINS, DU PLATEAU ET DU LOGEMENT À CAFÉ ....................................................................................... 46
SIGNAUX D'AVERTISSEMENT JAUNE ................................................................................................................................................................. 47
SIGNAUX D'ALARME ROUGE .............................................................................................................................................................................48
PRODUITS POUR L'ENTRETIEN ............................................................................................................................................................................ 49
ES - ÍNDICE - PÁG. 50
NORMAS DE SEGURIDAD ....................................................................................................................................................................................50
PRIMERA INSTALACIÓN .....................................................................................................................................................................................54
CICLO DE ENJUAGUE MANUAL ............................................................................................................................................................................ 55
PRIMER CAFÉ EXPRÉS / CAFÉ ..............................................................................................................................................................................56
MI CAFÉ EXPRÉS IDEAL ....................................................................................................................................................................................... 56
SUSTITUCIÓN DEL CAFÉ EN GRANO .....................................................................................................................................................................57
REGULACIÓN DEL MOLINILLO DE CAFÉ DE CERÁMICA .......................................................................................................................................... 59
CÓMO ESPUMAR LECHE ...................................................................................................................................................................................... 60
AGUA CALIENTE .................................................................................................................................................................................................61
DESCALCIFICACIÓN ............................................................................................................................................................................................62
LIMPIEZA DEL GRUPO DE CAFÉ ...........................................................................................................................................................................64
LIMPIEZA DEL MONTADOR DE LECHE AUTOMÁTICO .............................................................................................................................................65
LIMPIEZA DEL CONTENEDOR DE CAFÉ EN GRANO, DE LA CUBETA Y DEL COMPARTIMENTO DE CAFÉ ...................................................................... 68
SEÑALES DE AVISO AMARILLO ......................................................................................................................................................................... 69
SEÑALES DE ALARMA ROJO .............................................................................................................................................................................. 70
PRODUCTOS PARA EL MANTENIMIENTO .............................................................................................................................................................71
EnglishItalianoDeutschFrançaisEspañolPortuguês
PT - ÍNDICE - PÁG.52
INDICAÇÕES PARA A SEGURANÇA .......................................................................................................................................................................52
PRIMEIRA INSTALAÇÃO ...................................................................................................................................................................................... 54
CICLO DE ENXAGÚE MANUAL ..............................................................................................................................................................................55
PRIMEIRO EXPRESSO / CAFÉ ............................................................................................................................................................................... 56
O MEU EXPRESSO IDEAL ..................................................................................................................................................................................... 56
SUBSTITUIÇÃO DE CAFÉ EM GRÃOS ..................................................................................................................................................................... 57
AJUSTE DO MOINHO DE CAFÉ DE CERÂMICA ........................................................................................................................................................ 59
COMO BATER O LEITE ......................................................................................................................................................................................... 60
ÁGUA QUENTE .................................................................................................................................................................................................... 61
DESCALCIFICAÇÃO ............................................................................................................................................................................................. 62
LIMPEZA DO GRUPO CAFÉ ..................................................................................................................................................................................64
LIMPEZA DO BATEDOR DE LEITE AUTOMÁTICO ....................................................................................................................................................65
LIMPEZA DO RECIPIENTE DE CAFÉ EM GRÃOS, DA BANDEJA E DO COMPARTIMENTO DE CAFÉ ............................................................................... 68
SINAIS DE AVISO AMARELO ..............................................................................................................................................................................69
SINAIS DE ALARME VERMELHO ........................................................................................................................................................................70
PRODUTOS PARA A MANUTENÇÃO...................................................................................................................................................................... 71
Page 6

Safety instructions
6
Norme di sicurezza
www.philips.com/support
EN SAFETY INSTRUCTIONS
This machine is equipped with safety features.
Nevertheless read the safety instructions carefully and only use the machine as described in
these instructions to avoid accidental injury or
damage.
Keep this user manual for future reference.
Warnings
• Connect the machine to a wall socket which
is properly wired. Its main voltage should
comply with the technical data of the appliance.
• Do not let the mains cord hang over the
edge of a table or counter, or touch hot surfaces.
• Never immerse the machine, mains plug
or mains cord in water (danger of electrical
shock).
• Never direct the hot water jet towards body
parts (danger of burning).
• Do not touch hot surfaces. Use handles and
knobs.
• Remove the mains plug from the wall socket:
- If a malfunction occurs.
- If the machine will not be used for a long
time.
- Before cleaning the machine.
Pull on the plug, not on the mains cord. Do
not touch the mains plug with wet hands.
• Do not use the machine if the mains plug,
the mains cord or the machine itself is damaged.
• Do not make any modi cations to the machine or its mains cord. Only have repairs
carried out by a service centre authorized by
Philips to avoid a hazard.
• This machine is not intended for use by
persons (including children) with reduced
physical, sensory or mental capabilities, or
lack of experience and knowledge, unless
they have been given supervision or instruction concerning use of the machine by a person responsible for their safety.
• Children should be supervised to ensure
that they do not play with the machine.
• Never insert ngers or other objects into the
ceramic co ee grinder.
Cautions
• The machine is for household use only. It is
not intended for use in environments such
as sta kitchens of shops, o ces, farms or
other work environments.
• Always put the machine on a at and stable
surface.
• Do not place the machine on a hot plate, directly next to a hot oven, heater or similar
source of heat.
• Only put co ee beans into the co ee bean
hopper. If ground co ee, instant co ee or
any other substance is put in, it may damage the machine.
• Allow the machine to cool before putting on
or taking o parts, and before cleaning the
machine.
• Never use warm or hot water to ll the water tank. Use cold water only.
• Never clean with scrubbing powders or
harsh cleaners. Simply use a soft cloth
dampened with water.
• Descale your machine regularly. The machine indicates when descaling is needed.
Not doing this will make your appliance
Page 7

www.philips.com/support
Safety instructions
Norme di sicurezza
7
stop working properly. In this case repair is
not covered under your warranty!
• Do not keep the machine at temperature
below 0 degrees Celsius or 32 degrees Fahrenheit. Residue water in the heating system
may freeze and cause damage.
• Do not leave water in the water tank when
the machine is not used over a longer period
of time. The water can become contaminated. Use fresh water every time you use the
machine.
Disposal
- The packing materials can be recycled.
- Appliance: unplug the appliance and cut the
power cord.
- Deliver the appliance and power cord to a
service center or public waste disposal facility.
In compliance with art.13 of the Italian Legislative Decree dated 25 July 2005, no. 151 “Implementation of the directives 2005/95/EC,
2002/96/EC and 2003/108/EC on the restriction
of the use of certain hazardous substances in
electrical and electronic equipment, as well as
waste disposal”.
This product complies with EU directive
2002/96/EC.
By ensuring this product is disposed of correctly, you will help prevent potential negative
consequences for the environment and human
health, which could otherwise be caused by
inappropriate waste handling of this product.
For more detailed information about recycling
of this product, please contact your local city
o ce, your household waste disposal service or
the shop where you purchased the product.
EnglishItaliano
The symbol
on the product or on its packaging indicates that this product may not be
treated as household waste. Instead it shall be
handed over to the applicable collection point
for the recycling of electrical and electronic
equipment.
Page 8

Safety instructions
8
Norme di sicurezza
www.philips.com/support
IT NORME DI SICUREZZA
La macchina è dotata di dispositivi di sicurezza.
È tuttavia necessario leggere attentamente le
indicazioni per la sicurezza descritte nelle presenti istruzioni d'uso in modo da evitare danni
accidentali a persone o cose.
Conservare questo manuale per eventuali riferimenti futuri.
Attenzione
• Collegare la macchina a una presa a muro
adeguata, la cui tensione principale corrisponda ai dati tecnici dell'apparecchio.
• Evitare che il cavo di alimentazione penda
dal tavolo o dal piano di lavoro o che tocchi
super ci calde.
• Non immergere la macchina, la presa di
corrente o il cavo di alimentazione in acqua:
pericolo di shock elettrico!
• Non dirigere mai il getto di acqua calda verso parti del corpo: pericolo di ustioni!
• Non toccare super ci calde. Utilizzare i manici e le manopole.
• Rimuovere la spina dalla presa:
- se si veri cano dei malfunzionamenti;
- se la macchina rimarrà inutilizzata per
lungo tempo;
- prima di procedere alla pulizia della
macchina.
Tirare dalla spina e non dal cavo di alimen-
tazione. Non toccare la spina con le mani
bagnate.
• Non utilizzare la macchina se la spina, il cavo
di alimentazione o la macchina stessa risultano danneggiati.
• Non alterare né modi care in alcun modo la
macchina o il cavo di alimentazione. Tutte
le riparazioni devono essere eseguite da un
centro assistenza autorizzato da Philips per
evitare qualsiasi pericolo.
• La macchina non è destinata all'uso da parte
di persone (compresi i bambini) con ridotte
capacità siche, mentali o sensoriali o con
esperienza e/o competenze insu cienti, a
meno che non siano sotto la supervisione
di una persona responsabile della loro sicurezza o non vengano da essa istruite all’uso
dell’apparecchio.
• I bambini devono essere sorvegliati per assicurarsi che non giochino con l'apparecchio.
• Non inserire mai le dita o altri oggetti nel
macinaca è in ceramica.
Avvertenze
• La macchina è prevista per il solo uso domestico. e non è indicata per l'utilizzo in ambienti quali mense o zone cucina di negozi,
u ci, fattorie o altri ambienti lavorativi.
• Posizionare sempre la macchina su una super cie piana e stabile.
• Non posizionare la macchina su super ci
calde, in prossimità di forni caldi, riscaldatori o analoghe sorgenti di calore.
• Nel contenitore ca è in grani inserire sempre e soltanto ca è in grani. Ca è in polvere,
solubile, nonché altri oggetti, se inseriti nel
contenitore ca è in grani, possono danneggiare la macchina.
• Lasciare ra reddare la macchina prima di
inserire o rimuovere qualsiasi componente e
prima di procedere alla sua pulizia.
• Non riempire il serbatoio con acqua calda o
bollente. Utilizzare solo acqua fredda.
• Per la pulizia, non utilizzare polveri abrasive o detergenti aggressivi. È su ciente un
Page 9

www.philips.com/support
Safety instructions
Norme di sicurezza
9
panno morbido inumidito con acqua.
• E ettuare la decalci cazione della macchina
regolarmente. Sarà la macchina a segnalare
quando è necessario procedere alla decalci cazione. Se questa operazione non viene
eseguita, l'apparecchio smetterà di funzionare correttamente. In questo caso la riparazione non è coperta da garanzia!
• Non tenere la macchina a temperature inferiori a 0°C o 32°F. L'acqua residua all'interno
del sistema di riscaldamento può congelare
e danneggiare la macchina.
• Non lasciare acqua nel serbatoio se la macchina non verrà utilizzata per un lungo periodo. L'acqua potrebbe subire delle contaminazioni. Ogni volta che si usa la macchina,
utilizzare acqua fresca.
Smaltimento
- I materiali d'imballaggio possono essere riciclati.
- Apparecchio: staccare la spina dalla presa e
tagliare il cavo di alimentazione.
- Consegnare l'apparecchio e il cavo di alimentazione a un centro assistenza o a una
struttura pubblica per lo smaltimento dei
ri uti.
Il simbolo
riportato sul prodotto o sulla
confezione indica che il prodotto non può essere
trattato come ri uto domestico, ma deve essere
consegnato al centro di raccolta competente per
poterne riciclare i componenti elettrici ed elettronici.
Provvedendo al corretto smaltimento del prodotto, contribuite a salvaguardare l'ambiente
e le persone da possibili conseguenze negative
che potrebbero derivare da una gestione non
corretta del prodotto nella sua fase nale di vita.
Per maggiori informazioni sulle modalità di riciclo del prodotto vi preghiamo di contattare l'uf cio locale di competenza, il vostro servizio di
smaltimento ri uti domestici oppure il negozio
presso il quale avete acquistato il prodotto.
EnglishItaliano
Ai sensi dell’art. 13 del Decreto Legislativo 25
luglio 2005, n. 151 "Attuazione delle Direttive
2005/95/CE, 2002/96/CE e 2003/108/CE, relative alla riduzione dell’uso di sostanze pericolose
nelle apparecchiature elettriche ed elettroniche, nonché allo smaltimento dei ri uti".
Questo prodotto è conforme alla Direttiva europea 2002/96/CE.
Page 10

Instructions
10
Istruzioni
www.philips.com/support
FIRST INSTALLATION
PRIMA INSTALLAZIONE
1
MAX
Insert the drip tray with grill
into the machine. Make sure
EN
it is fully inserted.
Inserire la vasca raccogligocce con griglia nella
IT
macchina. Veri care che sia
inserita completamente.
Push gently on the edge of
the water tank door to release the handgrip.
Premere delicatamente sul
lato dello sportello del serbatoio dell'acqua per far
uscire l'impugnatura.
Remove the co ee bean hopper lid. Slowly pour the co ee
beans into the co ee bean hopper.
EN
Togliere il coperchio dal contenitore ca è in grani. Versarvi
lentamente il ca è in grani.
IT
Remove the water tank by
pulling the handgrip.
Estrarre il serbatoio dell'acqua tirando l'impugnatura.
Insert the plug into the socket located on the back of the
machine.
Inserire la spina nella presa
di corrente posta sul retro
della macchina.
Rinse and ll the water tank
with fresh water up to the
MAX level and slide it back
into the machine.
Riempire il serbatoio dell'acqua no al livello MAX con
acqua fresca e reinserirlo
nella macchina.
Insert the plug on the other
end of the power cord into a
wall socket .
Inserire la spina all’estremità opposta del cavo di
alimentazione in una presa
di corrente a muro.
Always carry the full water tank as shown in the
picture.
Quando è pieno, il serbatoio dell'acqua deve
essere trasportato come
mostrato in gura.
Switch the power button
to “I”.
Portare l’interruttore su “I”.
Press the button to turn on the machine.
EN
Premere il tasto per accendere la macchina.
IT
Place a container under the
steam wand.
Posizionare un contenitore
sotto il tubo vapore.
Press the
Premere il tasto
circuito.
button to start priming the circuit.
per avviare il ciclo di caricamento del
Page 11

www.philips.com/support
Instructions
Istruzioni
11
EnglishItaliano
When the process is completed the machine starts
EN
warming up.
Al termine del processo la
macchina inizia la fase di
IT
riscaldamento.
Place a container under the
co ee dispensing spout.
EN
Posizionare un contenitore
sotto l'erogatore del ca è.
IT
When the warm-up is complete place a container under
the dispensing spout.
Al termine del riscaldamento posizionare un contenitore sotto l'erogatore.
The machine performs an
automatic rinsing cycle.
La macchina esegue un ciclo
di risciacquo automatico.
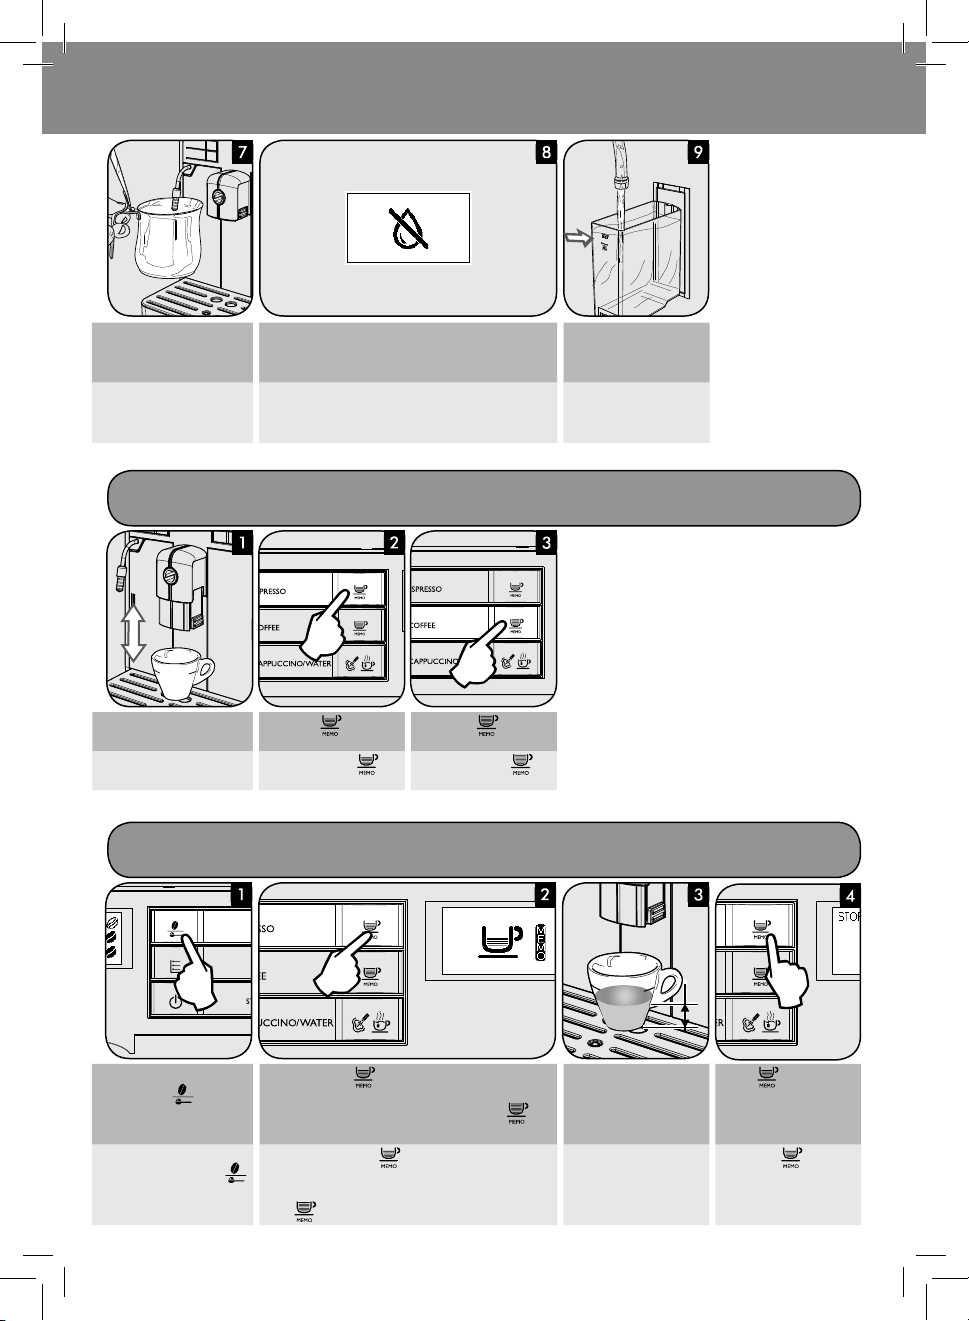
MANUAL RINSE CYCLE
CICLO DI RISCIACQUO MANUALE
2
Press the
fee. Press the
Premere il tasto
ca è pre-macinato. Premere il tasto
button to select the pre-ground co ee function. Do NOT add pre-ground cof-
button. The machine starts dispensing water.
per selezionare la funzione ca è pre-macinato. NON aggiungere
The machine is ready for the
manual rinse cycle.
La macchina è pronta per il
ciclo di risciacquo manuale.
1
. La macchina inizia ad erogare acqua.
When the dispensing has
nished, empty the container.
Al termine dell'erogazione,
vuotare il contenitore.
1
3
Repeat step 1 to step 3 twice,
then continue with step 5.
EN
Ripetere le operazioni dal
punto 1 al punto 3 per due
IT
volte, quindi passare al
punto 5.
Place a container under the
steam wand.
Posizionare un contenitore
sotto il tubo vapore.
Press the
Press the
Premere il tasto
Premere il tasto MENU
button. The machine shows this display.
MENU button to start dispensing hot water.
2
1
. La macchina visualizza il simbolo in alto.
per avviare l’erogazione di acqua calda.
Page 12
Instructions
12
Istruzioni
www.philips.com/support
MAX
Once the water has been
dispensed, remove and
EN
empty the container.
Dopo aver erogato l'acqua,
rimuovere e svuotare il
IT
contenitore.
Adjust the dispensing spout.
EN
Regolare l’erogatore.
IT
Repeat step 5 to 7 until the water tank is empty and the no
water icon appears.
Ripetere la procedura dal punto 5 al punto 7 no a quando
il serbatoio dell'acqua è vuoto ed appare il simbolo mancanza acqua.
FIRST ESPRESSO / COFFEE
PRIMO ESPRESSO / CAFFÈ
Press the
brew espresso or...
button to
Premere il tasto
erogare un espresso o...
...press the
brew co ee.
per
...premere il tasto per
erogare un ca è.
button to
MY FAVORITE ESPRESSO
IL MIO ESPRESSO IDEALE
At the end, ll the water tank
again up to the MAX level.
Al termine, riempire nuovamente il serbatoio dell'acqua no al livello MAX.
Select the desired aroma by
pressing the
EN
Selezionare l'aroma desiderato premendo il tasto
IT
button.
Press and hold the
yed. The machine is programming.
Note: To program co ee, press and hold the
ton until the MEMO icon is displayed.
Tenere premuto il tasto
.
lo MEMO. La macchina è in fase di programmazione.
Nota: Per programmare il ca è, tenere premuto il
tasto
button until the MEMO icon is displa-
no a quando appare il simbo-
no a quando appare il simbolo MEMO.
Wait until the desired
amount of co ee has been
dispensed.
but-
Attendere no al raggiungimento della quantità di
ca è desiderata.
OK
... press
Stored!
... premere
rompere il processo.
Memorizzato!
to stop.
per inter-
Page 13

www.philips.com/support
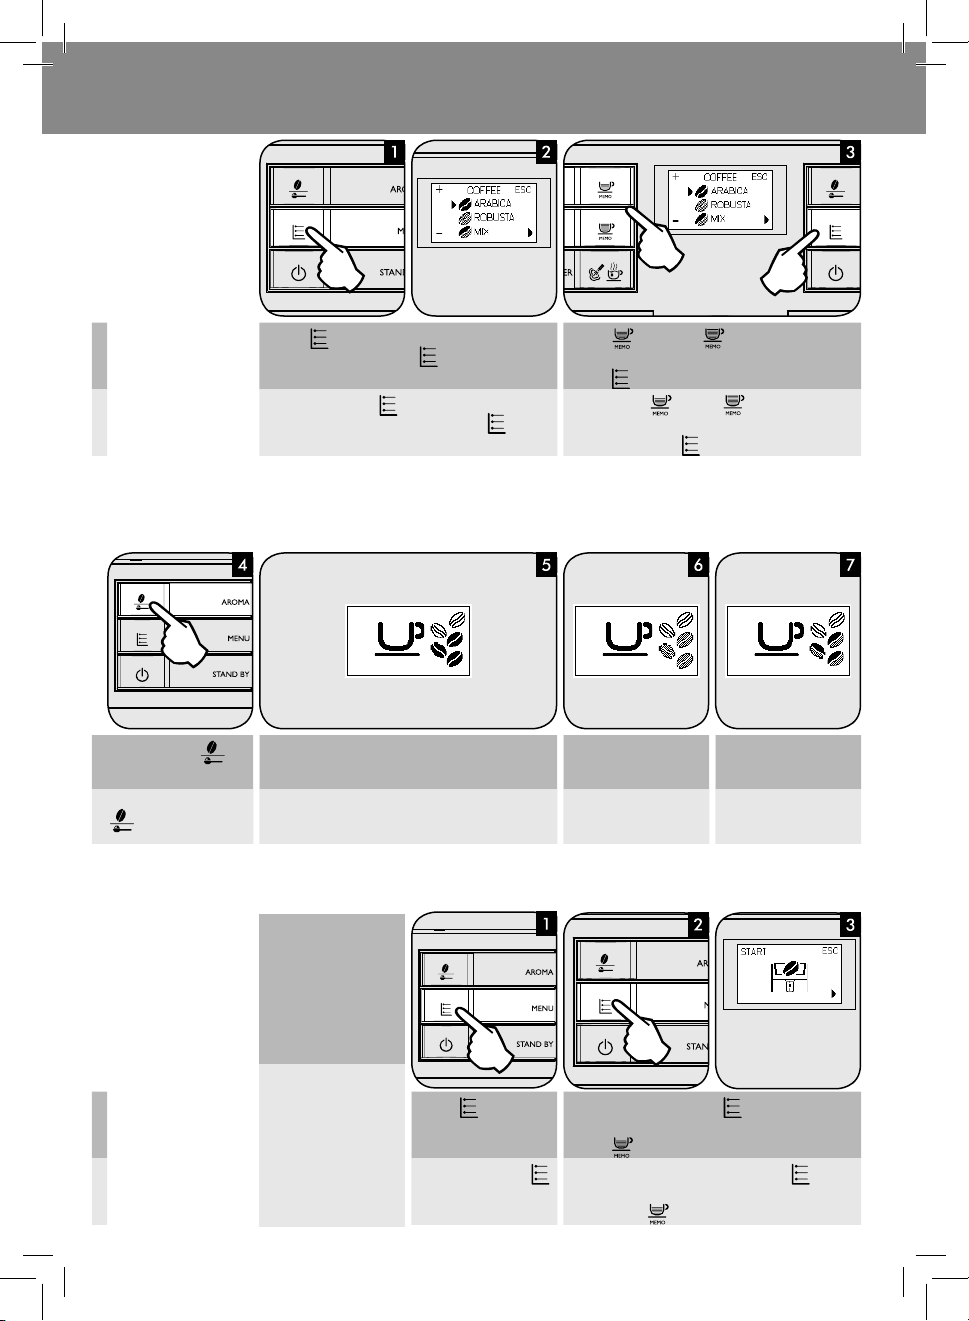
SOSTITUZIONE CAFFÈ IN GRANI
CHANGING COFFEE BEANS
Instructions
Istruzioni
13
EnglishItaliano
Removing the cof-
EN
fee bean hopper
Estrazione con-
IT
tenitore ca è in
grani
Inserting the cof-
EN
fee bean hopper
Inserimento
IT
contenitore ca è
in grani
Switch the selector to the position.
It may happen that the selector can not be switched
as it is blocked by co ee beans. In this case move the
selector back and forth until the beans are released.
Posizionare il selettore in posizione .
È possibile che il selettore non possa essere posizionato, perché bloccato da qualche chicco di ca è. In
questo caso muovere il selettore avanti ed indietro
no a rimuovere il chicco di ca è bloccato.
Switch the selector to the
position.
Posizionare il selettore in
posizione
.
Remove any beans from the
co ee bean hopper compartment.
Rimuovere i chicchi di ca è
dal vano contenitore ca è.
Lift the sides of the co ee bean hopper with both hands.
Sollevare il contenitore ca è in grani impugnandolo ai lati
con entrambe le mani.
Insert the co ee bean hopper into the compartment.
Inserire il contenitore ca è
in grani nel vano.
Switch the selector to the
position.
When you change coffee blend and switch to
deca einated co ee,
still some ca eine traces
might be present even after having run the emptying cycle.
Posizionare il selettore in
posizione
Cambiando il tipo di caffè in grani e passando a
un ca è deca einato è
possibile che siano ancora presenti tracce di caffeina anche dopo il ciclo
di svuotamento.
.
Page 14
Instructions
14
Istruzioni
www.philips.com/support
Co ee bean
EN
selection
Selezione del
IT
ca è in grani
To exit, press the but-
EN
ton.
Per uscire, premere il tasto
IT
.
Press the MENU button.
Scroll the pages by pressing the
icon shown above is displayed.
Premere il tasto MENU .
Scorrere le opzioni premendo il tasto MENU
sualizzare il simbolo in alto.
The display shows the type of co ee beans chosen when the
machine is ready for brewing.
For “ARABICA” co ee beans;
Il display mostra il tipo di ca è in grani scelto quando la
macchina è pronta per l'erogazione.
Per ca è in grani di tipo "ARABICA";
MENU button until the
no a vi-
Press the
co ee beans in the co ee bean hopper.
Press the
Premere il tasto
di chicchi di ca è presente nel contenitore ca è in grani.
Premere il tasto MENU
for “ROBUSTA” co ee beans; for a “MIX” of co ee beans.
per ca è in grani di tipo
"ROBUSTA";
button or the button to select the type of
MENU button to con rm the setting.
o il tasto per selezionare il tipo
per confermare l'impostazione.
per ca è in grani di tipo
"MISTO".
Co ee emptying
EN
cycle
Ciclo di svuota-
IT
mento ca è
When you change co ee
beans we recommend to
empty the co ee duct and
grinder. In this way you
will taste the full aroma
of the new co ee beans.
Quando si procede a
cambiare il tipo di ca è
in grani, consigliamo di
vuotare il condotto caffè ed il macinaca è. In
questo modo sarà possibile gustare appieno
l’aroma del nuovo ca è
in grani.
Press the MENU button. Scroll the pages by pressing the MENU button until the
icon shown above is displayed.
Press the
Premere il tasto MENU . Scorrere le opzioni premendo il tasto MENU no a vi-
sualizzare il simbolo in alto.
Premere il tasto
button.
.
Page 15

www.philips.com/support
The machine performs two
grinding cycles without
EN
brewing co ee.
La macchina e ettua due
cicli di macinatura senza
IT
erogare ca è.
When the grinding cycles
have been nished, the icon
shown above is displayed.
Terminati i cicli di macinatura, la macchina visualizza il
simbolo in alto.
ADJUSTING THE CERAMIC COFFEE GRINDER
REGOLAZIONE MACINACAFFÈ IN CERAMICA
Do not turn the grinder
more than 1 notch at the
time to prevent damage.
If you have not emptied the co ee duct and grinder, you
need to brew at least two co ees before you can taste the
new co ee beans.
When you change co ee blend and switch to decaffeinated co ee, still some ca eine traces might be
present even after having run the emptying cycle.
Se il condotto ca è ed il macinaca è non sono stati vuotati, sarà necessario erogare almeno due ca è prima di poter
gustare appieno il nuovo tipo di ca è in grani.
Cambiando il tipo di ca è in grani e passando a un
ca è deca einato è possibile che siano ancora presenti tracce di ca eina anche dopo il ciclo di svuotamento.
Instructions
Istruzioni
15
EnglishItaliano
Per evitare danni alla
macchina, non ruotare
il macinaca è per più di
EN
uno scatto alla volta.
IT
Remove the co ee bean
hopper.
Estrarre il contenitore ca è
in grani.
Press and turn the grinder
adjustment knob one notch
at a time.
Premere e ruotare di uno
scatto alla volta la manopola di regolazione della
macinatura.
1
Select ( ) for coarse grind
- lighter taste. Select (
ne grind - bolder taste.
Selezionare (
natura grossa - gusto più
leggero. Selezionare (
macinatura ne - gusto più
forte.
2
) for
) per maci-
) per
Brew 2-3 co ees to taste the
di erence. If co ee is watery,
change the grinder setting.
Erogare 2-3 ca è per gustare la di erenza. Se il ca è è
acquoso, modi care le impostazioni del macinaca è.
Page 16
Instructions
16
Istruzioni
Danger of scalding! Dispensing may be preceded
by small jets of hot water.
Use the appropriate protective handle only.
Pericolo di scottature!
All’inizio dell’erogazione
possono veri carsi brevi
spruzzi di acqua calda.
EN
Utilizzare solo la speci ca impugnatura protettiva.
IT
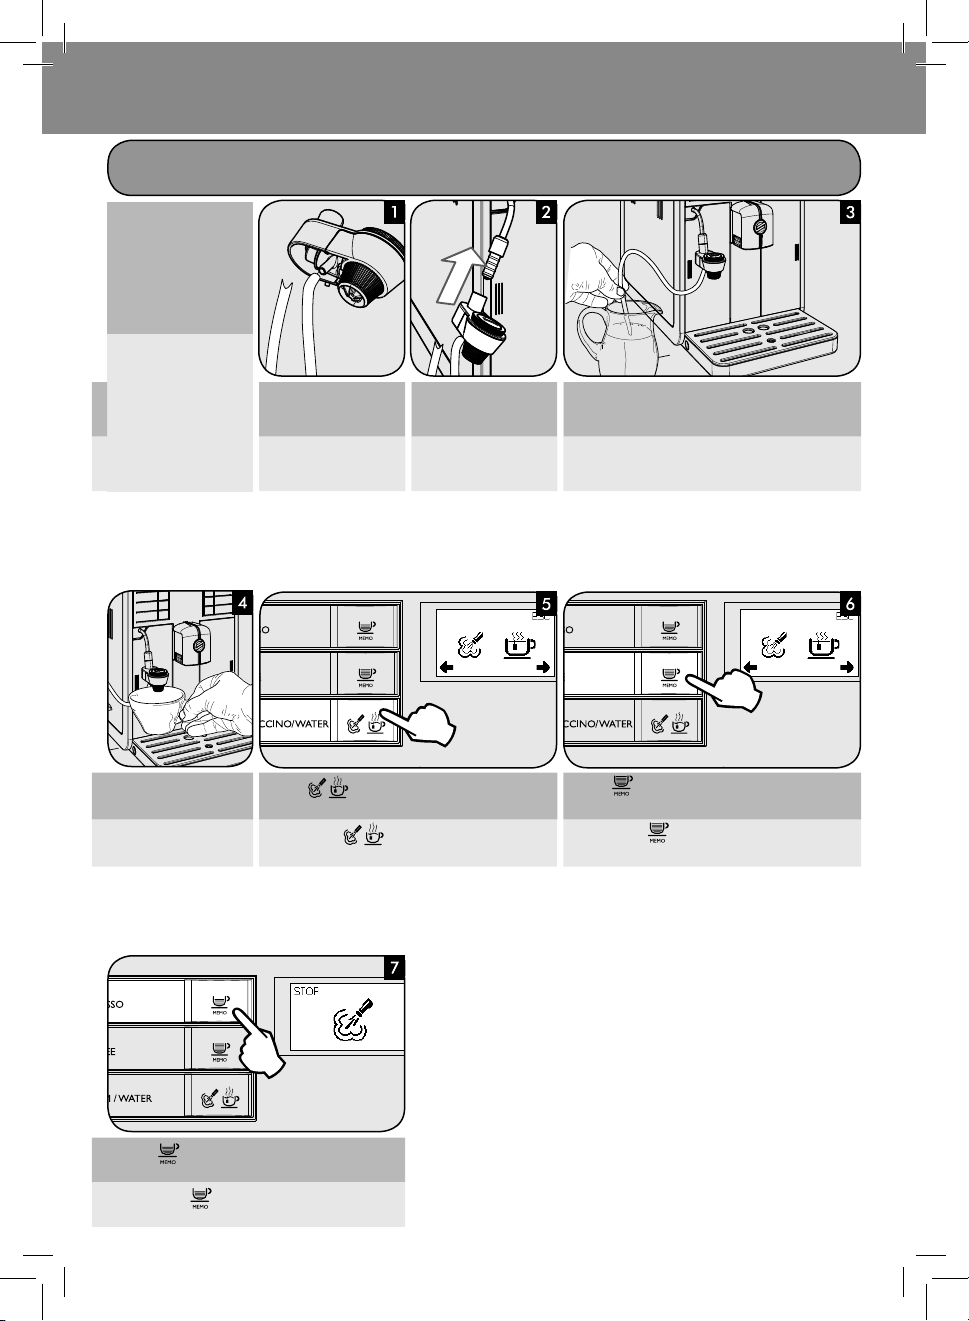
COME EMULSIONARE IL LATTE
Insert the suction tube into
the Automatic Milk Frother.
Inserire il tubo di aspirazione nel Montalatte Automatico.
MILK FROTHING
Insert the Automatic Milk
Frother in the steam wand
seat.
Inserire il Montalatte Automatico nella sede del tubo
vapore.
Insert the suction tube in the milk container.
Inserire il tubo di aspirazione nel contenitore del latte.
www.philips.com/support
Place a cup under the Automatic Milk Frother.
EN
Posizionare una tazza sotto
IT
il Montalatte Automatico.
Press the button to stop when the desired quantity of
EN
milk has been dispensed.
Premere il tasto per interrompere il processo quando è
IT
stata erogata la quantità di latte desiderata.
Press the
Premere il tasto
in alto.
button. The machine shows this display.
. La macchina visualizza il simbolo
Press the
Premere il tasto
button to start frothing the milk.
per iniziare ad emulsionare il latte.
Page 17
www.philips.com/support
Danger of scalding! Dispensing may be preceded
by small jets of hot water.
Use the appropriate protective handle only.
Pericolo di scottature!
All’inizio dell’erogazione
possono veri carsi brevi
EN
spruzzi di acqua calda.
Utilizzare solo la speci ca impugnatura protettiva.
IT
Remove the Automatic Milk
Frother from the steam
wand. Place a container underneath.
S lare il Montalatte Automatico dal tubo vapore.
Posizionarvi sotto un contenitore.
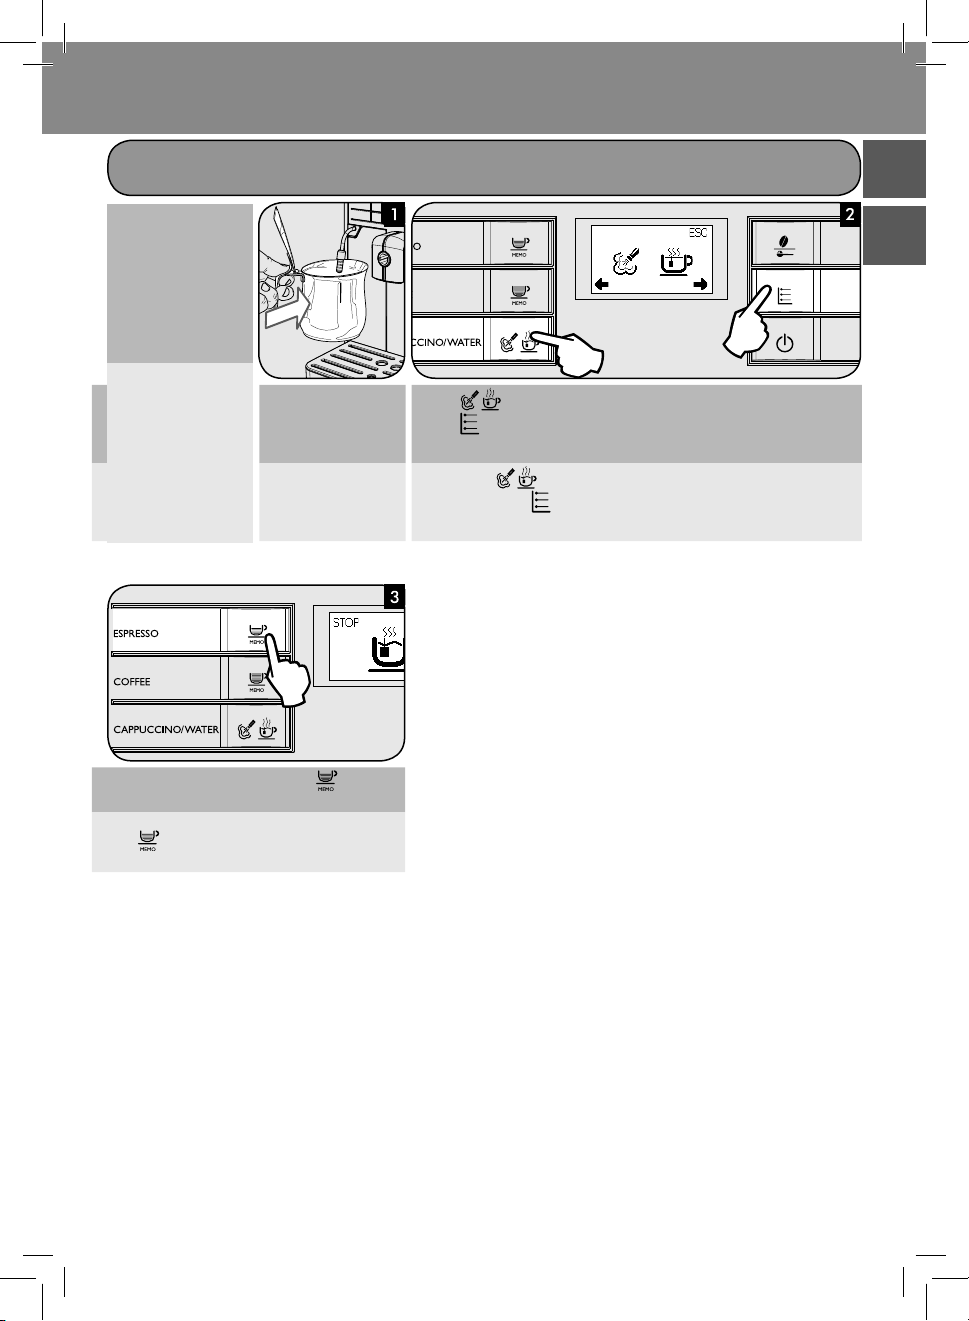
HOT WATER
ACQUA CALDA
Press the
Press the
Premere il tasto
Premere il tasto MENU
button. The machine shows this display.
MENU button to start dispensing hot water.
Instructions
1
. La macchina visualizza il simbolo in alto.
per avviare l’erogazione di acqua calda.
Istruzioni
17
EnglishItaliano
2
To stop the hot water dispensing press the button.
EN
Remove the container.
Per interrompere l’erogazione di acqua calda premere il
tasto
.
IT
Rimuovere il contenitore.
Page 18

Instructions
18
Istruzioni
www.philips.com/support
DESCALING - 35 min.
DECALCIFICAZIONE - 35 min.
When the “CALC CLEAN” symbol is displayed, you need to descale the machine.
Not doing this will ultimately make your machine stop working properly. In this case repair is not covered
EN
under your warranty.
Quando viene visualizzato il simbolo “CALC CLEAN” è necessario procedere alla decalci cazione.
Se questa operazione non viene eseguita, l’apparecchio smetterà di funzionare correttamente. In que-
IT
stocaso la riparazione non è coperta da garanzia.
The descaling cycle (A) and the rinse cycle (B) may be paused by pressing the button. To resume the cycle, press the
button again. This allows the container to be emptied or the machine to be left unattended for a short time.
EN
Il ciclo di decalci cazione (A) ed il ciclo di risciacquo (B) possono essere messi in pausa premendo il tasto . Per
proseguire con il ciclo, premere nuovamente il tasto
IT
per un breve periodo.
. Questo consente di vuotare il contenitore o di assentarsi
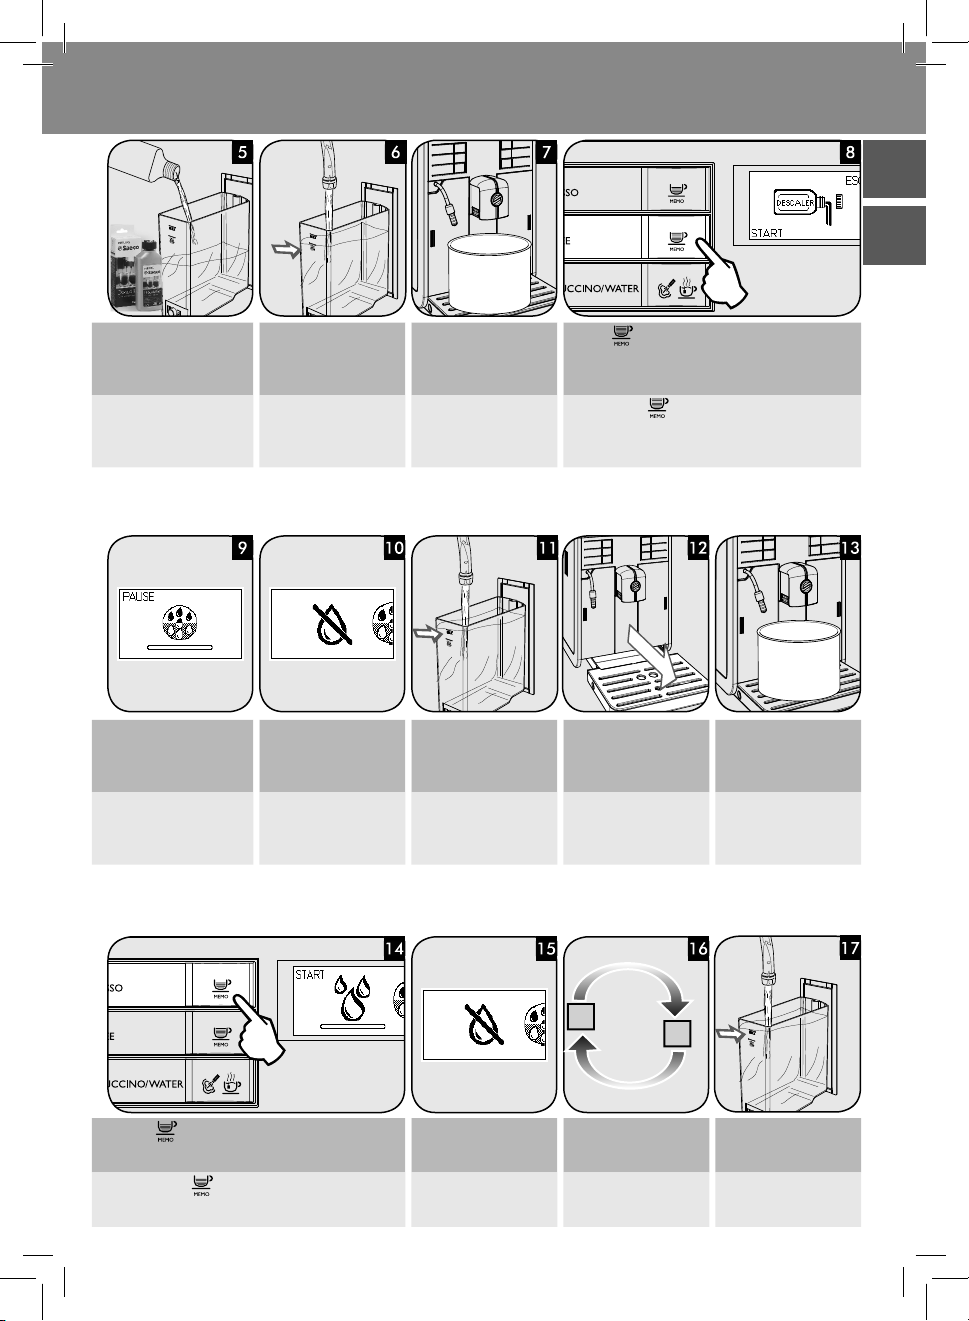
Empty the drip tray. Remove the Automatic Milk Frother
from the hot water/steam wand. Re-
EN
move the “INTENZA+” water lter from
the water tank if it was installed and
replace it with the small white original
one.
Vuotare la vasca raccogligocce.
IT
S lare il Montalatte Automatico dal
tubo vapore/acqua calda. Estrarre il
ltro acqua “INTENZA+” (se presente)
dal serbatoio dell'acqua e sostituirlo
con il ltrino bianco originale.
Press the
Premere il tasto
button.
The machine enters the program.
.
La macchina avvia il programma.
Page 19
www.philips.com/support
Instructions
Istruzioni
19
Pour the entire descaling
solution.
EN
Versare tutta la soluzione
decalci cante.
IT
The descaling solution will
be dispensed at intervals
EN
(this takes about 25min).
La soluzione decalci cante sarà erogata a intervalli
IT
regolari (durata: circa 25
min).
CALC
CLEAN
Fill the water tank with fresh
water up to the calc clean
level and place it back into
the machine.
Riempire il serbatoio
dell'acqua con acqua fresca
no al livello calc clean e
reinserirlo nella macchina.
When this icon is displayed,
the water tank is empty.
Quando viene visualizzato
questo simbolo, il serbatoio
dell'acqua è vuoto.
Place a large container (1,5 l)
under both the steam/hot
water wand and the dispensing spout.
Posizionare un contenitore
capiente (1,5l) sotto il tubo
vapore/acqua calda e sotto
l'erogatore.
MAX
Rinse the water tank and ll
it up to the MAX level with
fresh water. Place it back
into the machine.
Risciacquare il serbatoio e
riempirlo con acqua fresca
no al livello MAX. Reinserirlo nella macchina.
Press the button to start the descaling cycle.
Premere il tasto per av viare il ciclo di decalci cazione.
Empty the drip tray and
place it back.
Vuotare la vasca raccogligocce e reinserirla in posi-
Empty the container and
place it back.
Vuotare il contenitore e
reinserirlo in posizione.
zione.
EnglishItaliano
Press the button to start the rinsing cycle.
EN
Premere il tasto per avviare il ciclo di risciacquo.
IT
When this icon is displayed,
the water tank is empty.
Quando viene visualizzato
questo simbolo, il serbatoio
dell'acqua è vuoto.
11
15
Repeat steps 11 to 15. Then
continue with step 17.
Ripetere le operazioni dal
punto 11 al punto 15, quindi passare al punto 17.
MAX
Rinse the water tank and ll
it up to the MAX level with
fresh water.
Risciacquare il serbatoio e
riempirlo con acqua fresca
no al livello MAX.
Page 20

Instructions
20
Istruzioni
www.philips.com/support
When the amount of water needed for the rinse cycle has
been completely dispensed, the icon shown above is dis-
EN
played. Press the
MENU button to quit the descaling
cycle.
Quando l’acqua richiesta per il ciclo risciacquo è stata
completamente erogata, la macchina visualizza il simbolo
IT
in alto. Premere il tasto MENU
per uscire dal ciclo di
decalci cazione.
Remove the small white water lter and place back the “INTENZA+” water lter into the water tank if it was installed.
EN
Put back the Automatic Milk Frother.
Rimuovere il ltrino bianco e riposizionare il ltro acqua
“INTENZA+” (se presente) nel serbatoio dell'acqua. Rein-
IT
serire il Montalatte Automatico.
BREW GROUP CLEANING
PULIZIA DEL GRUPPO CAFFÈ
Press the
button to
prime the circuit.
Premere il tasto
per ca-
ricare il circuito.
Wash the brew group. for further guidance, see the “Brew
Group Cleaning” chapter.
Pulire il gruppo ca è. Per
ulteriori indicazioni, vedere
il capitolo “Pulizia del gruppo ca è”.
Once the rinse cycle has been completed, empty the drip tray
and place it back.
Al termine del ciclo di risciacquo vuotare la vasca raccogligocce e riposizionarla.
Note: The circuit needs to
be cleaned with a preset
amount of water.
If you had not lled up
the water tank to MAX
level, the machine might
require three or more
tanks for rinsing.
Nota: Il circuito deve
essere pulito con una
The machine is ready to brew
co ee.
quantità di acqua preimpostata. Se il serbatoio
dell’acqua non viene
La macchina è pronta per
l’erogazione di ca è.
riempito no al livello
MAX, la macchina, per il
risciacquo, può richiedere il riempimento del serbatoio per tre o più volte.
Turn o the machine and unplug the power cord. Remove the
co ee ground drawer and open the service door.
EN
Spegnere la macchina e scollegare il cavo di alimentazione.
Rimuovere il cassetto raccoglifondi ed aprire lo sportello di
IT
servizio.
Remove and clean the co ee
residues drawer.
Estrarre il cassetto raccogli
ca è e pulirlo.
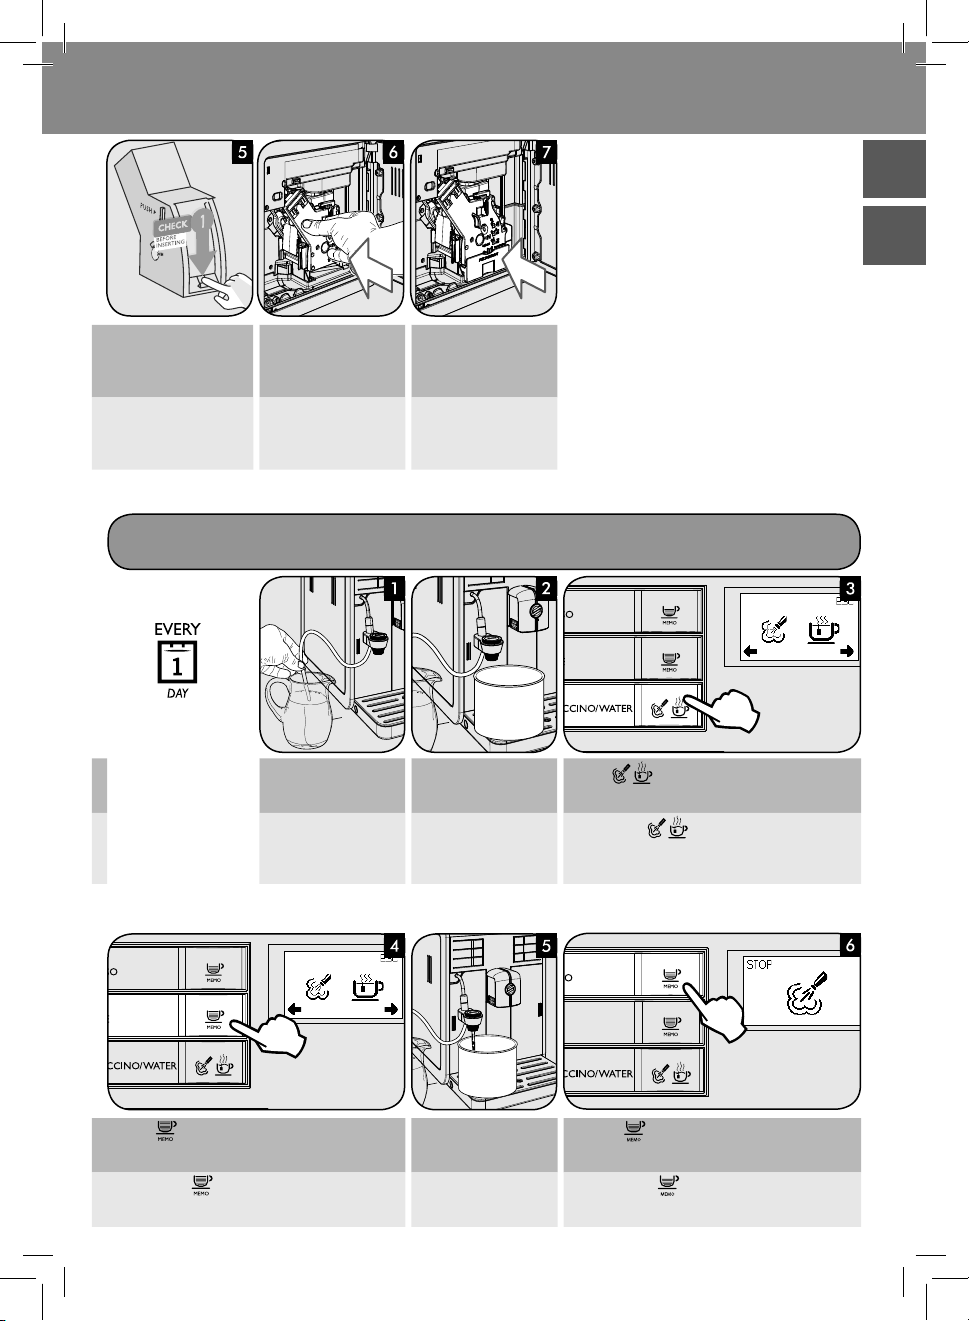
To remove the brew group,
press the «PUSH» button and
pull it by the handle.
Per estrarre il gruppo ca è
premere il tasto «PUSH» tirando la maniglia.
Carry out maintenance to the
brew group.
Eseguire la manutenzione
del gruppo ca è.
Page 21
www.philips.com/support
Instructions
Istruzioni
21
EnglishItaliano
Pull down the lever for proper alignment.
EN
Abbassare la leva per un
corretto allineamento.
IT
Daily
EN
IT
Quotidiana
Insert the brew group in its
seat again until it locks into
Insert the co ee residues
drawer.
place without pressing the
“PUSH” button.
Introdurre di nuovo in sede
il gruppo ca è no ad ag-
Inserire il cassetto raccogli
ca è.
ganciarlo senza premere il
tasto “PUSH”.
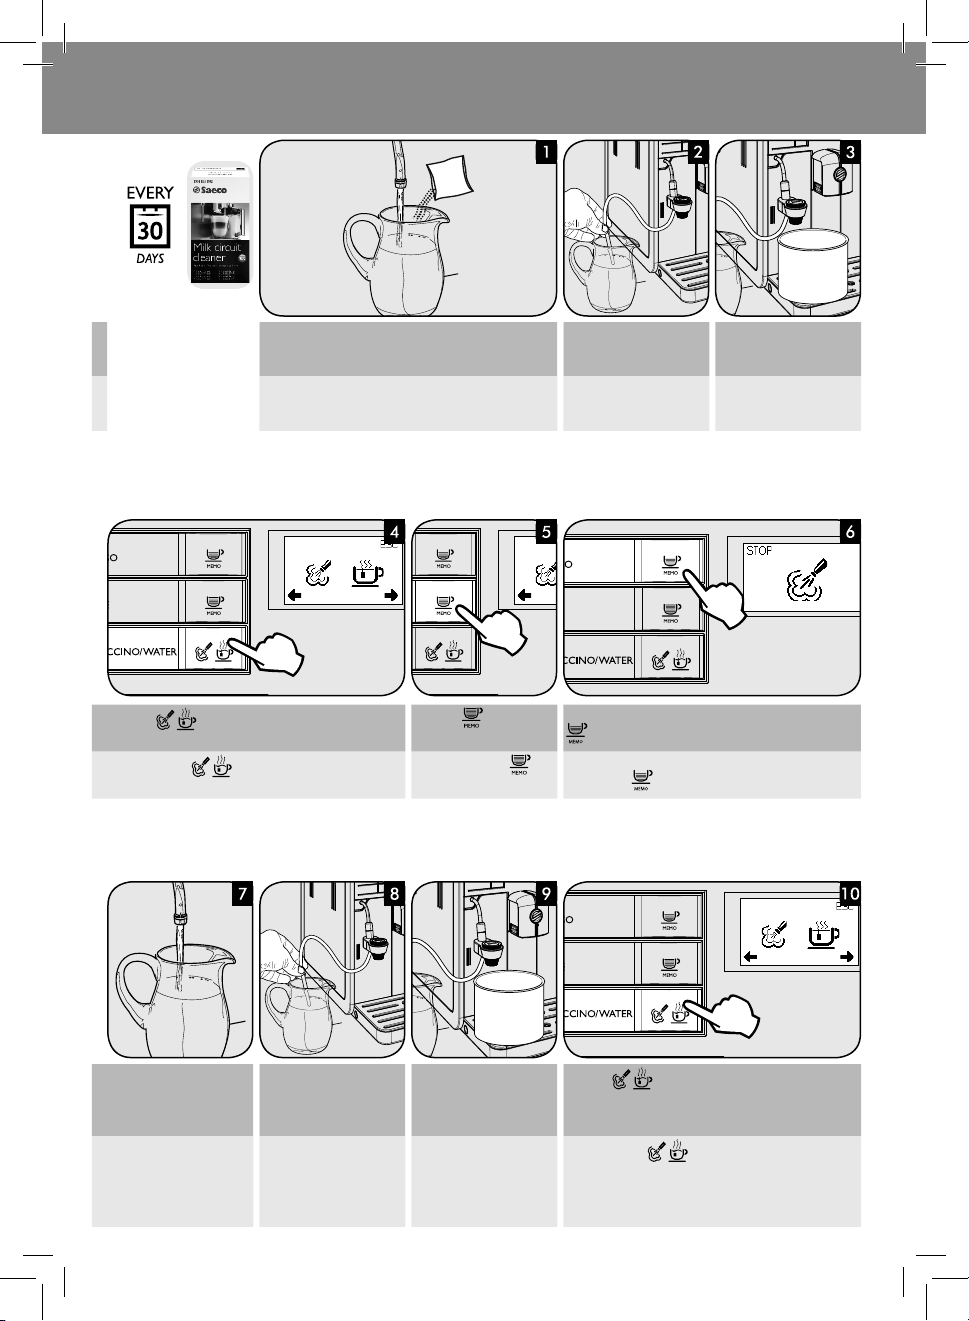
AUTOMATIC MILK FROTHER CLEANING
PULIZIA MONTALATTE AUTOMATICO
Insert the suction tube in a
container lled with fresh
water.
Inserire il tubo di aspirazione in un contenitore pieno
di acqua fresca.
Place an empty container
under the Automatic Milk
Frother.
Posizionare un contenitore
vuoto sotto il Montalatte
Automatico.
Press the
Premere il tasto
in alto.
button. The machine shows this display.
. La macchina visualizza il simbolo
Press the button to start dispensing steam.
EN
Premere il tasto per av viare l’erogazione di vapore.
IT
When clear water is dis-
pensed from the Automatic
Milk Frother.....
Quando l'acqua in uscita
dal Montalatte Automatico
risulta pulita...
... press the button to stop dispensing.
...premere il tasto per interrompere l'erogazione.
Page 22
Instructions
22
Istruzioni
www.philips.com/support
Pour the “Saeco Milk Circuit Cleaner” into a container. Add ½
EN
Monthly
l of lukewarm water and let it dissolve completely.
Versare il "prodotto per la pulizia del circuito latte Saeco"
IT
Mensile
Press the button. The machine shows this display.
EN
Premere il tasto . La macchina visualizza il simbolo
IT
in alto.
in un contenitore. Aggiungere ½l di acqua tiepida e attendere che il prodotto si sciolga completamente.
Press the
button to dis-
pense steam.
Premere il tasto
erogare vapore.
Insert the suction tube in the
container.
Place an empty container
under the Automatic Milk
Frother.
Inserire il tubo di aspirazione nel contenitore.
Posizionare un contenitore
vuoto sotto il Montalatte
Automatico.
When the solution has been completely dispensed, press the
button to stop dispensing.
Quando la soluzione è stata completamente erogata, pre-
per
mere il tasto
per interrompere l'erogazione.
Rinse the container thoroughly and ll it with ½ l of
EN
fresh water to be used for the
rinsing cycle.
Risciacquare a fondo il contenitore e riempirlo con ½l
di acqua fresca che sarà
IT
utilizzata per il ciclo di risciacquo.
Insert the suction tube in the
container.
Inserire il tubo di aspirazione nel contenitore.
Empty the container and
place it back under the Auto-
matic Milk Frother.
Vuotare il contenitore e ri-
posizionarlo sotto il Monta-
latte Automatico.
Press the
Premere il tasto
in alto.
button. The machine shows this display.
. La macchina visualizza il simbolo
Page 23

www.philips.com/support
Instructions
Istruzioni
23
EnglishItaliano
Press the button to dis-
EN
pense steam.
Premere il tasto per
IT
erogare vapore.
Remove the rubber grip from the steam wand.
EN
Caution: the steam wand may be hot if used recently.
When the water has been completely dispensed, press the
button to stop dispensing.
Quando l'acqua è stata completamente erogata, premere il
tasto
per interrompere l'erogazione.
Rimuovere la protezione in gomma dal tubo vapore.
Attenzione: il tubo vapore potrebbe essere caldo se
IT
usato di recente.
Remove the Automatic Milk Frother from the machine.
Estrarre il Montalatte Automatico dalla macchina.
Remove the suction tube. Press the sides and pull out the Automatic Milk Frother.
Rimuovere il tubo di aspi-
Estrarre il Montalatte Automatico, premendolo ai lati.
razione.
Remove the rubber cover. Wash all the components
EN
with lukewarm water.
You can also clean these
parts in the dishwasher.
Rimuovere il coperchio in
gomma.
IT
Lavare tutti i componenti
con acqua tiepida.
È anche possibile lavare
i componenti in lavastoviglie.
Attach the lid by pressing in
the middle, and ensure that
it is rmly in place.
Montare il coperchio pre-
mendo nella parte centra-
le; assicurarsi che sia ben
installato.
Reassemble the Automatic Milk Frother making sure it is correctly inserted.
Rimontare il Montalatte Automatico assicurandosi che sia
inserito correttamente.
Page 24

Instructions
24
Istruzioni
www.philips.com/support
Install the suction tube. Reinsert the rubber grip on the steam wand. Insert the Automatic Milk Frother until it locks in place on the
EN
Installare il tubo di aspirazione.
IT
Reinserire la protezione in gomma sul tubo vapore. Inserire il Montalatte Automatico sulla protezione in gom-
rubber grip.
Do not insert the rubber grip beyond the highlighted
seat. If this has occurred the Automatic Milk Frother
does not operate correctly as no milk is sucked.
ma no allo scatto in posizione.
Non inserire la protezione in gomma oltre la sede
evidenziata. In questo caso, il Montalatte Automatico non funziona correttamente perché non è in
grado di aspirare il latte.
CLEANING OF THE COFFEE BEAN HOPPER, THE TRAY
AND THE COMPARTMENT
PULIZIA DEL CONTENITORE CAFFÈ IN GRANI, DEL VASSOIO
E DEL VANO CAFFÈ
Weekly
EN
IT
Settimanale
Clean the co ee bean hopper,
the tray and the co ee bean
hopper compartment once a
week with a cloth to remove
any co ee residuals or dust.
Pulire il contenitore ca è
in grani, il vassoio ed il
vano ca è una volta alla
settimana con un panno per
rimuovere i residui di ca è e
la polvere.
To remove the tray push the hooks on the bot-
tom of the co ee bean hopper. This is shown
in the picture above.
Per rimuovere il vassoio premere sui ganci
posti sul fondo del contenitore ca è in grani,
come mostrato nella gura in alto.
After cleaning put the tray back into the coffee bean hopper.
Dopo la pulizia, reinserire il vassoio nel
contenitore ca è in grani.
Page 25

www.philips.com/support
WARNING SIGNALS YELLOW COLOUR
SEGNALI DI AVVISO GIALLO
Instructions
Istruzioni
25
EnglishItaliano
The machine is warming up
to brew beverages or dis-
EN
pense hot water.
Macchina in fase di riscaldamento per l’erogazione di
IT
bevande o acqua calda.
Re ll the co ee bean hopper
with co ee beans and restart
EN
the brewing cycle.
Riempire il contenitore ca è
in grani e riavviare il ciclo di
IT
erogazione.
The machine is performing
the rinse cycle. Wait until this
You need to replace the “INTENZA+” lter.
The brew group is being reset
due to machine reset.
has been completed.
La macchina sta eseguendo
un ciclo di risciacquo. Attendere no al termine.
È necessario sostituire il ltro acqua “INTENZA+”.
Gruppo ca è in fase di ripristino in seguito a reset
macchina.
Prime the circuit. You need to descale the machine. See descaling chapter for further
guidance.
Caricare il circuito. È necessario eseguire la decalci cazione della macchina. Vedere il
capitolo dedicato alla decalci cazione per ulteriori indicazioni.
Page 26

Instructions
Exx
26
Istruzioni
www.philips.com/support
WARNING SIGNALS RED COLOUR
SEGNALI DI ALLARME ROSSO
Close the service door. Re ll the co ee bean hopper. The brew group must be in-
EN
Chiudere lo sportello di servizio.
IT
Riempire nuovamente il
contenitore ca è in grani.
Fill the water tank. Fully insert the co ee ground
drawer.
EN
Riempire il serbatoio dell’acqua.
IT
Inserire completamente il
cassetto raccoglifondi.
serted into the machine.
Il gruppo ca è deve essere
inserito nella macchina.
Insert the co ee bean hop-
per.
Inserire il contenitore ca è
in grani.
Insert the co ee grounds
drawer.
Empty the co ee grounds
drawer and the co ee residues drawer.
Inserire il cassetto raccoglifondi.
Svuotare il cassetto raccoglifondi ed il cassetto raccogli ca è.
Turn o the machine. After 30 seconds, turn it on again. Repeat the procedure 2 or 3 times.
If the machine does not start, contact the SAECO hotline
(phone numbers in the warranty booklet) and quote the error code you see on the display.
Spegnere la macchina. Riaccenderla dopo 30 secondi. Ripetere la procedura 2 o 3 volte.
Se la macchina non si avvia, contattare la hotline SAECO
del proprio Paese (numeri nel libretto della garanzia) e comunicare il codice di errore indicato sul display.
Page 27

go to www.shop.philips.com
Maintenance products
Prodotti per la manutenzione
Maintenance products
Prodotti per la manutenzione
27
INTENZA+ water lter
EN
product number: CA6702
Filtro acqua INTENZA+
numero prodotto: CA6702
IT
Decalci er
product number: CA6700
EN
Soluzione decalci cante
numero prodotto: CA6700
IT
Milk circuit cleaner
EN
product number: CA6705
Prodotto per la pulizia del
circuito latte
IT
numero prodotto: CA6705
Grease
product number: HD5061
EN
Grasso
numero prodotto: HD5061
IT
Co ee oil remover
EN
product number: CA6704
Pastiglie sgrassanti
numero prodotto: CA6704
IT
Visit philips onlineshop to check
availability and purchasing op-
EN
portunities in your country.
Visita il negozio online Philips
per veri care la disponibilità e le
IT
opportunità di acquisto nel tuo
Paese.
Page 28

Sicherheitshinweise
28
Consignes de sécurité
www.philips.com/support
DE SICHERHEITSHINWEISE
Das Gerät ist mit Sicherheitsvorrichtungen ausgestattet. Dennoch sollten Sie die beschriebenen Sicherheitshinweise in dieser Bedienungsanleitung aufmerksam lesen, um eventuelle
Personen- und Sachschäden zu vermeiden.
Bewahren Sie diese Bedienungsleitung für eine
spätere Verwendung auf.
Achtung
• Schließen Sie das Gerät an einer geeigneten
Wandsteckdose an, deren Hauptspannung
den technischen Daten des Geräts entspricht.
• Das Netzkabel nicht lose vom Tisch oder
der Arbeits äche herab hängen lassen und
nicht auf heißen Ober ächen au egen.
• Das Gerät, der Stecker und das Netzkabel
dürfen nicht in Wasser getaucht werden:
Gefahr von Stromschlag!
• Den Heißwasserstrahl keinesfalls auf Körperteile richten: Verbrennungsgefahr!
• Berühren Sie keine heißen Ober ächen.
Benutzen Sie die vorgesehenen Gri e und
Drehknöpfe.
• Den Stecker von der Steckdose abziehen:
- wenn Betriebsstörungen auftreten;
- wenn das Gerät für einen längeren Zeitraum nicht benutzt wird;
- bevor das Gerät gereinigt wird.
Am Stecker, und nicht am Netzkabel ziehen.
Den Stecker nicht mit nassen Händen berühren.
• Verwenden Sie das Gerät nicht, wenn der
Netzstecker, das Netzkabel oder das Gerät
selbst defekt oder beschädigt sind.
• Das Gerät oder das Netzkabel dürfen keinesfalls modi ziert werden. Alle Reparaturen
müssen durch ein von Philips autorisiertes
Kundendienstzentrum ausgeführt werden,
um jede Gefahr zu vermeiden.
• Dieses Gerät kann nur von Kinder und Personen mit körperlichen, sensorischen oder
mentalen Einschränkungen sowie mangelnder Erfahrung und Wissen verwendet
werden, sofern sie zuvor entsprechend von
einer für ihre Sicherheit verantwortliche
Person in der Verwendung des Geräts unterwiesen wurden.
• Achten Sie darauf, dass Kinder nicht mit
dem Gerät spielen.
• Führen Sie keinesfalls die Finger oder andere Gegenstände in das Keramikmahlwerk
ein.
Hinweise
• Dieses Gerät ist nur für den Gebrauch im
privaten Haushalt bestimmt. Es ist z.B. nicht
für die Verwendung in Personalküchen von
Geschäften, Büros, landwirtschaftlichen
Betrieben oder anderen Arbeitsbereichen
vorgesehen.
• Stellen Sie das Gerät auf eine waagerechte,
ebene und stabile Fläche.
• Stellen Sie das Gerät nicht auf heiße Flächen, in der Nähe von heißen Öfen, Heizgeräten oder ähnlichen Wärmequellen ab.
• In den Ka eebohnenbehälter dürfen ausschließlich Ka eebohnen eingefüllt werden. Wenn Pulver- oder Instantka ee oder
andere Gegenstände in den Ka eebohnenbehälter eingefüllt werden, können Schäden am Gerät verursacht werden.
• Bevor Teile eingebaut oder herausgenom-
Page 29

www.philips.com/support
Sicherheitshinweise
Consignes de sécurité
29
men werden, und bevor die Reinigung
vorgenommen wird, sollte abgewartet werden, bis das Gerät abkühlt.
• Keinesfalls heißes oder kochendes Wasser in
den Tank füllen. Verwenden Sie ausschließlich kaltes Wasser.
• Für die Reinigung sollten keine Scheuerpulver oder aggressive Reinigungsmittel
verwendet werden. Für die Reinigung des
Geräts ist ein weiches, feuchtes Tuch ausreichend.
• Das Gerät muss regelmäßig entkalkt werden. Das Gerät zeigt an, wann das Entkalken erforderlich ist. Diese Vorgänge nicht
auszuführen, führt dazu, dass das Gerät
nicht mehr störungsfrei funktioniert. Eine
entsprechende Reparatur ist nicht durch die
Garantie gedeckt!
• Das Gerät darf keinen Temperaturen unter
0°C oder 32°F ausgesetzt werden. Das im
Heizsystem verbliebene Restwasser kann
gefrieren und das Gerät beschädigen.
• Entleeren Sie den Wassertank, wenn das
Gerät für einen längeren Zeitraum nicht
verwendet wird. Das Wasser könnte verunreinigt werden. Bei jeder Verwendung des
Geräts ist frisches Wasser zu benutzen.
Entsorgung
Gemäß Art. 13 der italienischen Gesetzesverordnung Nr. 151 vom 25. Juli 2005 “Umsetzung
der Richtlinien 2005/95/EG, 2002/96/EG und
2003/108/EG, hinsichtlich der Verringerung des
Einsatzes von Gefahrensto en in elektrischen
und elektronischen Geräten sowie zur Abfallentsorgung”.
Dieses Produkt entspricht den Vorgaben der Europäischen Richtlinie 2002/96/EG.
Das auf dem Produkt oder auf der Verpackung
abgebildete Symbol
weist darauf hin,
dass das Produkt nicht als normaler Hausmüll
behandelt werden darf, sondern an einer zuständigen Sammelstelle abgegeben werden
muss, damit die elektrischen und elektronischen Bestandteile recycelt werden können.
Durch Ihren Beitrag zur korrekten Entsorgung
dieses Produkts schützen Sie die Umwelt und
die Gesundheit Ihrer Mitmenschen vor negativen Folgen, die durch eine falsche Entsorgung
des Produktes am Ende seines Betriebslebens
entstehen können. Weitere Informationen zum
Recycling des Produktes erhalten Sie von Ihrer
zuständigen Gemeinde, der Müllabfuhr oder
dem Geschäft, in dem Sie das Produkt gekauft
haben.
DeutschFrançais
- Die Verpackungsmaterialien können recycelt werden.
- Gerät: Den Stecker von der Steckdose abziehen und das Netzkabel zerschneiden.
- Das Gerät und das Netzkabel bei einem Kundendienstzentrum oder einer ö entlichen
Einrichtung für die Abfallentsorgung abgeben.
Page 30

Sicherheitshinweise
30
Consignes de sécurité
www.philips.com/support
FR CONSIGNES DE SÉCURITÉ
La machine est dotée de dispositifs de sécurité.
Il est toutefois nécessaire de lire attentivement
les prescriptions de sécurité contenues dans le
présent mode d'emploi a n d'éviter des dommages accidentels aux personnes ou aux choses.
Conserver ce manuel pour toute référence à
venir.
Attention
• Brancher la machine à une prise murale appropriée, dont la tension principale correspond aux données techniques de l'appareil.
• Le câble d'alimentation ne doit pas pendre
de la table ou du plan de travail et ne
doit pas être en contact avec des surfaces
chaudes.
• Ne pas plonger la machine, la prise de courant ou le câble d'alimentation dans l'eau:
danger de choc électrique!
• Ne jamais diriger le jet d’eau chaude vers des
parties du corps: danger de brûlures!
• Ne pas toucher aux surfaces chaudes. Utiliser les poignées et les boutons.
• Débrancher la che de la prise murale:
- en cas de dysfonctionnements;
- si la machine reste inactive pendant une
longue période;
- avant de procéder au nettoyage de la
machine.
Tirer la che et non le câble d'alimentation.
Ne pas toucher à la che avec les mains
mouillées.
• Ne pas utiliser la machine si la che, le câble
d'alimentation ou la machine sont endommagés.
• Ne pas altérer ni modi er d'aucune façon la
machine ou le câble d'alimentation. Toutes
les réparations doivent être e ectuées par
un centre d’assistance agréé par Philips pour
éviter tout danger.
• La machine ne doit pas être utilisée par des
personnes (y compris les enfants) ayant
de faibles capacités physiques, mentales
ou sensorielles, sans expérience et/ou aux
compétences insu santes, à moins qu'elles
ne soient sous la supervision d'une personne responsable de leur sécurité ou formées par cette personne en ce qui concerne
l’utilisation de l’appareil.
• Il faut s'assurer que les enfants n'aient jamais la possibilité de jouer avec cet appareil.
• Ne jamais insérer les doigts ou d'autres objets dans le moulin à café en céramique.
Avertissements
• Cette machine est destinée uniquement à
un usage domestique, et n'est pas indiquée
pour une utilisation dans des cantines ou
dans les espaces cuisine de magasins, bureaux, fermes ou d'autres environnements
de travail.
• Toujours poser la machine sur une surface
plane et stable.
• Ne pas placer la machine sur des surfaces
chaudes, proches de fours chauds, de réchau eurs ou d'autres sources de chaleur
similaires.
• Ne verser que du café en grains dans le réservoir à café en grains. Le café en poudre,
soluble ou autres objets, si insérés dans le
réservoir à café en grains, peuvent endommager la machine.
• Laisser refroidir la machine avant d’insérer
ou de retirer des pièces ou avant de procéder
Page 31

www.philips.com/support
Sicherheitshinweise
Consignes de sécurité
31
à son nettoyage.
• Ne pas remplir le réservoir avec de l'eau
chaude ou bouillante. Utiliser uniquement
de l’eau froide.
• Pour le nettoyage ne pas utiliser de produits
abrasifs ou des détergents agressifs. Un chiffon doux et imbibé d’eau est su sant.
• E ectuer régulièrement le détartrage de
la machine. La machine signalera quand il
sera nécessaire de procéder au détartrage.
Si cette opération n'est pas e ectuée, l'appareil cesse de fonctionner correctement. En
pareil cas, la réparation n'est pas couverte
par la garantie!
• Éviter de garder la machine à des températures inférieures à 0°C ou 32°F. L'eau résiduelle à l'intérieur du système de chau age
pourrait geler et endommager la machine.
• Ne pas laisser d'eau dans le réservoir si la
machine n’est pas utilisée pendant une
longue période. L'eau pourrait être contaminée. Utiliser de l'eau fraîche à chaque utilisation de la machine.
Élimination
équipements électriques et électroniques et à
l’élimination des déchets».
Ce produit est conforme à la Directive européenne 2002/96/CE.
Le symbole
sur le produit ou sur l'emballage indique que le produit ne peut pas être
traité comme un déchet ménager, mais doit
être livré à la décharge spécialisée compétente
pour recycler les composants électriques et
électroniques.
En assurant la correcte élimination du produit,
vous contribuez à sauvegarder l'environnement
et les personnes de possibles conséquences
négatives qui pourraient dériver d'une gestion
non correcte du produit dans la phase nale de
son cycle de vie. Pour plus d'informations sur
les modalités de recyclage du produit, prière
de contacter le bureau local compétent, votre
service d'élimination des déchets ménagers ou
le magasin auprès duquel vous avez acheté le
produit.
DeutschFrançais
- Les matériaux d'emballage peuvent être
recyclés.
- Appareil: ôter la che de la prise de courant
et couper le câble d'alimentation.
- Livrer l'appareil et le câble d'alimentation
à un centre d’assistance ou à une structure
publique d'élimination des déchets.
Aux termes de l’art.13 du Décret Législatif Italien n° 151 du 25 juillet 2005, « Application
des Directives 2005/95/CE, 2002/96/CE et
2003/108/CE, relatives à la limitation de l’utilisation des substances dangereuses dans les
Page 32

Hinweise
32
Instructions
www.philips.com/support
ERSTE INBETRIEBNAHME
PREMIÈRE INSTALLATION
1
MAX
Die Abtropfschale mit Rost
in das Gerät einsetzen. Über-
DE
prüfen, ob diese komplett
Leicht auf die Seite der Tür
des Wassertanks drücken,
um den Gri zu lösen.
eingesetzt wurde.
Insérer dans la machine le
bac d'égouttement avec sa
grille. Véri er qu'il est com-
FR
plètement inséré.
Appuyer délicatement sur
le côté de la porte du réservoir à eau pour faire sortir la
poignée.
Den Deckel vom Ka eebohnenbehälter abnehmen. Die Kaffeebohnen langsam einfüllen.
DE
Enlever le couvercle du réservoir à café en grains. Y verser
lentement le café en grains.
FR
Den Wassertank durch Ziehen am Gri entnehmen.
Retirer le réservoir à eau en
tirant sur la poignée.
Den Stecker in die Steckdose
auf der Rückseite des Geräts
einstecken.
Brancher la che sur la prise
de courant placée au dos de
l'appareil.
Den Wassertank mit frischem Wasser bis zum Füllstand MAX füllen und wieder
in das Gerät einsetzen.
Remplir le réservoir à
eau avec de l’eau fraîche
jusqu'au niveau MAX et réintroduire ensuite le réservoir dans la machine.
Den Stecker des anderen Endes des Netzkabels in eine
Wandsteckdose mit geeigneter Spannung einstecken.
Brancher la che à l'extrémité opposée du câble d'alimentation sur une prise de
courant murale.
Ist der Wassertank voll,
muss er transportiert
werden, wie in der Abbildung gezeigt.
Une fois rempli, le réservoir à eau doit être
transporté comme le
montre la gure.
Den Schalter auf “I” stellen.
Mettre l'interrupteur sur
«I».
Die Taste drücken, um das Gerät einzuschalten.
DE
Appuyer sur la touche pour allumer la machine.
FR
Einen Behälter unter die
Dampfdüse stellen.
Placer un récipient sous la
buse de vapeur.
Die Taste
drücken, um die Entlüftung des Systems zu
starten.
Appuyer sur la touche
çage du circuit.
pour démarrer le cycle d’amor-
Page 33

www.philips.com/support
Hinweise
Instructions
33
Nach Beendigung des Vorgangs beginnt das Gerät die
DE
Aufheizphase.
À la n du processus la machine démarre la phase de
FR
réchau age.
Einen Behälter unter den
Ka eeauslauf stellen.
DE
Placer un récipient sous
la buse de distribution du
FR
café.
Nach Abschluss der Aufheizphase einen Behälter unter
den Auslauf stellen.
À la n du réchau age placer un récipient sous la buse
de distribution.
Das Gerät führt einen automatischen Spülzyklus aus.
La machine e ectue un
cycle de rinçage automatique.
MANUELLER SPÜLZYKLUS
CYCLE DE RINÇAGE MANUEL
2
Die Taste
mahlenen Ka ee einfüllen. Die Taste
Appuyer sur la touche
café prémoulu. Appuyer sur la touche
drücken, um die Funktion Vorgemahlener Ka ee anzuwählen. KEINEN vorge-
pour sélectionner la fonction café prémoulu. NE PAS ajouter de
Das Gerät ist für den manuellen Spülzyklus bereit.
La machine est prête pour
le cycle de rinçage manuel.
1
drücken. Das Gerät beginnt Wasser auszugeben.
. La machine commence à distribuer de l'eau.
DeutschFrançais
Nach der Ausgabe den Behälter leeren.
À la n de la distribution,
vider le récipient.
1
3
Die Vorgänge von Punkt 1
bis Punkt 3 insgesamt zwei
DE
Mal wiederholen. Danach zu
Punkt 5 übergehen.
Répéter deux fois les opérations du point 1 au point 3,
FR
passer ensuite au point 5.
Einen Behälter unter die
Dampfdüse stellen.
Placer un récipient sous la
buse de vapeur.
Die Taste
Die Taste MENÜ
Appuyer sur la touche
Appuyer sur la touche MENU
drücken. Das Gerät zeigt das obige Display an.
drücken, um die Heißwasserausgabe zu starten.
2
1
. La machine a che le symbole ci-dessus.
pour démarrer la distribution d'eau chaude.
Page 34

Hinweise
34
Instructions
www.philips.com/support
MAX
Nach der Wasserausgabe
den Behälter entfernen und
DE
leeren.
Après avoir distribué l'eau,
enlever et vider le récipient.
FR
Den Auslauf einstellen.
DE
Régler la buse de distribution.
FR
Den Vorgang ab Punkt 5 bis Punkt 7 wiederholen, bis der
Wassertank leer ist und das Symbol Wasser fehlt angezeigt
wird.
Répéter la procédure du point 5 au point 7 jusqu'à vider
le réservoir à eau et que s'a che le symbole de manque
d'eau.
ERSTER ESPRESSO / KAFFEE
PREMIER CAFÉ EXPRESSO / CAFÉ
Die Taste für einen Espresso oder ...
Appuyer sur la touche
pour distribuer un café expresso ou...
... die Taste für einen
Ka ee drücken.
...appuyer sur la touche
pour distribuer un café.
MEIN LIEBLINGSESPRESSO
MON CAFÉ EXPRESSO IDÉAL
Anschließend den Wassertank erneut bis zum Füllstand MAX füllen.
À la n de cette opération,
remplir à nouveau le réservoir
à eau jusqu'au niveau MAX.
Durch Druck der Taste
das gewünschte Aroma anwählen.
DE
Sélectionner l'arôme souhaité en appuyant sur la
FR
touche
.
Die Taste
zeigt wird. Das Gerät be ndet sich im Programmiermodus.
Hinweis: Um den Ka ee zu programmieren, die Taste
wird.
Garder enfoncée la touche
bole MEMO. La machine est en phase de programmation.
Remarque: Pour programmer le café, garder enfoncée
la touche
gedrückt halten, bis das Symbol MEMO ange-
gedrückt halten, bis das Symbol MEMO angezeigt
jusqu'à l'a chage du sym-
jusqu'à l'a chage du symbole MEMO.
OK
Abwarten, bis die gewünschte Menge an Ka ee
erreicht ist.
Attendre que la quantité
de café souhaitée ait été
atteinte.
... die Taste
den Vorgang abzubrechen.
Gespeichert!
...appuyer sur
terrompre le processus.
Mémorisé!
drücken, um
pour in-
Page 35

www.philips.com/support
WECHSEL DER KAFFEEBOHNEN
REMPLACEMENT CAFÉ EN GRAINS
Hinweise
Instructions
35
DeutschFrançais
Entnahme des
Ka eebohnenbe-
DE
hälters
Enlèvement du
réservoir à café en
FR
grains
Einsetzen des
Ka eebohnenbe-
DE
hälters
Introduction du
réservoir à café en
FR
grains
Den Wahlschalter in Position stellen.
Eventuell kann der Wahlschalter nicht eingestellt
werden, da er durch Ka eebohnen blockiert wird. In
diesem Falle den Wahlschalter vor und zurück bewegen, bis die blockierte Ka eebohne entfernt wird.
Positionner le sélecteur en position .
Il est possible que le sélecteur ne puisse pas être positionné si celui-ci est bloqué par un grain de café.
Dans ce cas de gure, bouger le sélecteur en avant
et arrière jusqu'à enlever le grain de café bloqué.
Den Wahlschalter in Position
stellen.
Positionner le sélecteur en
position
.
Die Ka eebohnen aus dem
Fach des Ka eebehälters
entfernen.
Enlever les grains de café
du logement du réservoir
à café.
Den Ka eebohnenbehälter anheben, indem er mit beiden
Händen auf beiden Seiten angefasst wird.
Soulever le réservoir à café en grains en le saisissant sur les
côtés avec les deux mains.
Den Ka eebohnenbehälter
in das Fach einsetzen.
Introduire le réservoir à café
en grains dans le logement.
Den Wahlschalter in Positi-
stellen.
on
Bei einem Wechsel des
Ka eebohnentyps und bei
der Umstellung auf koffeinfreien Ka ee besteht
die Möglichkeit, dass auch
nach einem Entleerungszyklus noch Ko einspuren
vorhanden sind.
Positionner le sélecteur en
.
position
En changeant de type de
café en grains et en passant à un café décaféiné,
il est possible que des
traces de caféine soient
encore présentes après
le cycle de vidange.
Page 36

Hinweise
36
Instructions
www.philips.com/support
Anwahl der Kaf-
DE
feebohnen
Sélection du café
FR
en grains
Um die Funktion zu verlassen, die Taste
DE
Pour quitter, appuyer sur la
touche
FR
Entleerungszyklus
DE
Cycle de vidange
FR
drücken.
.
Ka ee
du café
Die Taste MENÜ so oft drücken, bis das obige Symbol
angezeigt wird.
Appuyer sur la touche MENU .
Faire dé ler les options en appuyant sur la touche MENU
jusqu'à l'a chage du symbole ci-dessus.
Das Display zeigt die angewählte Sorte der Ka eebohnen
an, wenn das Gerät für die Ausgabe bereit ist.
Für Ka eebohnen der Sorte "ARABICA".
L'écran a che le type de café en grains choisi une fois que
la machine est prête à distribuer.
Pour le café en grains de type «ARABICA» ;
Beim Wechsel der Ka eebohnensorte wird empfohlen, die Ka eezufuhf
und das Mahlwerk zu entleeren. Auf diese Weise
kann sich das volle Aroma
der neuen Ka eebohnen
entfalten.
Quand on procède au
changement de type
de café en grains, il est
conseillé de vider la
conduite du café et le
moulin à café. De cette
manière, il sera possible
de déguster pleinement
l’arôme du nouveau café
en grains.
Die Taste MENÜ drü-
cken.
Appuyer sur la touche
.
MENU
Die Taste oder die Taste drücken, um die im Kaffeebohnenbehälter vorhandene Ka eebohnensorte anzuwählen.
Die Taste MENÜ
tigen.
Appuyer sur la touche
tionner le type de grains de café présent dans le réservoir
à café en grains.
Appuyer sur la touche MENU
glage.
für Ka eebohnen der Sorte
"ROBUSTA".
pour le café en grains de
type «ROBUSTA» ;
Die Taste MENÜ so oft drücken, bis das obige Symbol
angezeigt wird.
Die Taste
Faire dé ler les options en appuyant sur la touche MENU
jusqu'à l'a chage du symbole ci-dessus.
Appuyer sur la touche
drücken, um die Einstellung zu bestä-
ou la touche pour sélec-
pour con rmer le ré-
für Ka eebohnen der Sorte
"MISCHUNG".
pour le café en grains de
type «MIXTE».
drücken.
.
Page 37

www.philips.com/support
Das Gerät führt zwei Mahlzyklen aus, ohne Ka ee aus-
DE
zugeben.
La machine e ectue deux
cycles de mouture sans dis-
FR
tribuer de café.
Nach Abschluss der Mahlzyklen zeigt das Gerät das oben
abgebildete Symbol an.
Une fois terminés les cycles
de mouture, la machine af che le symbole ci-dessus.
EINSTELLUNG KERAMIKMAHLWERK
RÉGLAGE DU MOULIN À CAFÉ EN CÉRAMIQUE
Um Schäden am Gerät zu
vermeiden, den Drehknopf
für die Mahlgradeinstellung jeweils nur um maximal einen Grad verstellen.
Wurden die Ka eezufuhr und das Mahlwerk nicht entleert,
so müssen mindestens zwei Tassen Ka ee ausgegeben werden, bevor das volle Aroma der neuen Ka eebohnensorte
genossen werden kann.
Bei einem Wechsel des Ka eebohnentyps und bei
der Umstellung auf ko einfreien Ka ee besteht die
Möglichkeit, dass auch nach einem Entleerungszyklus
noch Ko einspuren vorhanden sind.
Si la conduite de café et le moulin à café n’ont pas été vidés,
il sera nécessaire de distribuer au moins deux cafés avant
de pouvoir goûter pleinement le nouveau type de café en
grains.
En changeant de type de café en grains et en passant à un café décaféiné, il est possible que des
traces de caféine soient encore présentes après le
cycle de vidange.
1
2
Hinweise
Instructions
37
DeutschFrançais
Ne pas tourner le moulin
à café de plus d’un cran à
la fois a n d’éviter d’endommager la machine.
DE
FR
Den Ka eebohnenbehälter
entnehmen.
Extraire le réservoir à café
en grains.
Den Drehknopf für die
Mahlgradeinstellung jeweils
nur um maximal einen Grad
verstellen.
Appuyer sur le bouton de
réglage de la mouture et le
tourner d'un cran à la fois.
Die Markierung (
groben Mahlgrad - leichteres Aroma auswählen. Die
Markierung (
Mahlgrad - stärkeres Aroma
auswählen.
Sélectionner ( ) pour une
mouture grosse - goût plus
léger. Sélectionner (
une mouture ne - goût
plus fort.
) für
) für feinen
) pour
2-3 Tassen Ka ee ausgeben,
um den Unterschied wahrzunehmen. Ist der Ka ee wässrig, die Einstellungen des
Mahlwerks ändern.
Distribuer 2-3 cafés pour
savourer la di érence. Si le
café est aqueux, modi er les
réglages du moulin à café.
Page 38

Hinweise
38
Instructions
Verbrennungsgefahr!
Beim Start können heiße
Wasserspritzer austreten.
Ausschließlich den speziellen Schutzgri benutzen.
Danger de brûlures! Il
peut y avoir quelques
éclaboussures d’eau
chaude au début de la
distribution.
DE
Utiliser uniquement la
poignée de protection
spéci que.
FR
AUFSCHÄUMEN VON MILCH
COMMENT ÉMULSIONNER LE LAIT
Den Ansaugschlauch in den
automatischen Milchaufschäumer stecken.
Insérer le tuyau d'aspiration dans le Mousseur à lait
Automatique.
Den automatischen Milchaufschäumer in die Aufnahme der Dampfdüse einstecken.
Insérer le Mousseur à lait
Automatique dans le logement de la buse de vapeur.
www.philips.com/support
Den Ansaugschlauch in den Milchbehälter stecken.
Mettre le tuyau d’aspiration dans le réservoir à lait.
Einen Tasse unter den automatischen Milchaufschäu-
DE
mer stellen.
Positionner une tasse sous
le Mousseur à lait Automa-
FR
tique.
Die Taste drücken, um die Ausgabe abzubrechen, nach-
DE
dem die gewünschte Milchmenge ausgegeben wurde.
Appuyer sur la touche pour interrompre le processus
FR
quand la quantité désirée de lait à été distribuée.
Die Taste
drücken. Das Gerät zeigt das obige Sym-
bol an.
Appuyer sur la touche
bole ci-dessus.
. La machine a che le sym-
Die Taste
drücken, um die Milch aufzuschäumen.
Appuyer sur la touche
ner le lait.
pour commencer à émulsion-
Page 39

www.philips.com/support
Verbrennungsgefahr!
Beim Start können heiße
Wasserspritzer austreten.
Ausschließlich den speziellen Schutzgri benutzen.
Danger de brûlures! Il
peut y avoir quelques
éclaboussures d’eau
chaude au début de la
distribution.
DE
Utiliser uniquement la
poignée de protection
spéci que.
FR
Den automatischen Milchaufschäumer von der
Dampfdüse abziehen. Einen
Behälter darunter stellen.
Enlever le Mousseur à lait
Automatique de la buse de
vapeur. Placer un récipient
en dessous.
HEISSWASSER
EAU CHAUDE
Die Taste
Die Taste MENÜ
Appuyer sur la touche
Appuyer sur la touche MENU
drücken. Das Gerät zeigt das obige Display an.
drücken, um die Heißwasserausgabe zu starten.
Hinweise
Instructions
2
1
. La machine a che le symbole ci-dessus.
pour démarrer la distribution d'eau chaude.
39
DeutschFrançais
Um die Ausgabe von heißem Wasser abzubrechen, die Taste
drücken.
DE
Den Behälter entfernen.
Pour interrompre la distribution d’eau chaude, appuyer sur
la touche
FR
Enlever le récipient.
.
Page 40

Hinweise
40
Instructions
www.philips.com/support
ENTKALKEN - 35 Min.
DÉTARTRAGE - 35 min.
Wird das Symbol “CALC CLEAN” angezeigt, so muss das Entkalken vorgenommen werden.
Diese Vorgänge nicht auszuführen, führt dazu, dass das Gerät nicht mehr störungsfrei funktioniert. Eine
DE
entsprechende Reparatur ist nicht durch die Garantie gedeckt.
Quand le symbole «CALC CLEAN» s'a che, il est nécessaire de procéder au détartrage.
Si cette opération n'est pas e ectuée, l'appareil cesse de fonctionner correctement. En pareil cas, la
FR
réparation n'est pas couverte par la garantie.
Der Entkalkungszyklus (A) und der Spülzyklus (B) können durch Druck der Taste unterbrochen werden. Um den
Zyklus fortzusetzen, erneut die Taste
DE
Zeitraum unbeaufsichtigt gelassen werden.
Le cycle de détartrage (A) et le cycle de rinçage (B) peuvent être interrompus en appuyant sur la touche . Pour
reprendre le cycle, appuyer à nouveau sur la touche
FR
une courte période.
drücken. Dadurch kann der Behälter entleert oder das Gerät für einen kurzen
. Cela permet de vider le récipient ou de s'absenter pendant
Die Abtropfschale leeren. Den automatischen Milchaufschäumer
von der Dampf-/Heißwasserdüse ab-
DE
ziehen. Den Wasser lter “INTENZA+”
(soweit vorhanden) aus dem Wassertank herausziehen und durch den kleinen weißen Original-Filter ersetzen.
Vider le bac d’égouttement. Enlever le Mousseur à lait Auto-
matique de la buse de vapeur/eau
FR
chaude. Retirer le ltre à eau «INTENZA+» (si présent) du réservoir à eau
et le remplacer avec le petit ltre blanc
d'origine.
Die Taste
drücken.
Appuyer sur la touche
Das Gerät startet das Programm.
.
La machine démarre le programme.
Page 41

www.philips.com/support
CALC
CLEAN
Hinweise
Instructions
41
Das gesamte Entkalkungsmittel einfüllen.
DE
Verser toute la solution
détartrante.
FR
Das Entkalkungsmittel wird
in regelmäßigen Intervallen
DE
ausgegeben (Dauer: ca. 25
Min.).
La solution détartrante
sera distribuée à intervalles
FR
réguliers (durée: environ 25
min).
Den Wassertank bis zum
Füllstand Calc Clean mit frischem Wasser füllen und
wieder in das Gerät einsetzen.
Remplir le réservoir à
eau avec de l’eau fraîche
jusqu’au niveau calc clean
puis le réinsérer dans la
machine.
Wird dieses Symbol angezeigt, so ist der Wassertank
leer.
Lorsque ce symbole s'af che, le réservoir à eau est
vide.
Einen großen Behälter (1,5l)
unter die Dampf-/Heißwasserdüse und unter den Auslauf stellen.
Placer un récipient su samment grand (1,5 l) sous la
buse de vapeur/eau chaude
et sous la buse de distribution.
MAX
Den Tank ausspülen und bis
zum Füllstand MAX mit frischem Wasser füllen. Wieder
ins Gerät einsetzen.
Rincer le réservoir et le
remplir avec de l’eau fraîche
jusqu’au niveau MAX. Le
réinsérer dans la machine.
Die Taste drücken, um den Zyklus des Entkalkens zu
starten.
Appuyer sur la touche pour démarrer le cycle de détartrage.
Die Abtropfschale leeren und
wieder einsetzen.
Vider le bac d'égouttement
et le replacer dans sa posi-
Den Behälter leeren und wieder einsetzen.
Vider le récipient et le replacer dans sa position.
tion.
DeutschFrançais
Die Taste drücken, um den Spülzyklus zu starten.
DE
Appuyer sur la touche pour démarrer le cycle de rinçage.
FR
Wird dieses Symbol angezeigt, so ist der Wassertank
leer.
Lorsque ce symbole s'af che, le réservoir à eau est
vide.
11
15
Die Vorgänge von Punkt 11
bis Punkt 15 wiederholen.
Danach zu Punkt 17 übergehen.
Répéter les opérations du
point 11 au point 15, passer
ensuite au point 17.
MAX
Den Tank ausspülen und bis
zum Füllstand MAX mit frischem Wasser füllen.
Rincer le réservoir et le
remplir avec de l’eau fraîche
jusqu’au niveau MAX.
Page 42

Hinweise
42
Instructions
www.philips.com/support
Wurde das für die Spülung erforderliche Wasser vollständig
ausgegeben, zeigt das Gerät das obige Symbol an. Die Taste
DE
MENÜ
drücken, um den Entkalkungszyklus zu verlassen.
Lorsque l'eau nécessaire pour le rinçage a été totalement
distribuée, la machine a che le symbole ci-dessus. Appuyer
FR
sur la touche MENU
pour quitter le cycle de détartrage.
Den kleinen weißen Filter entfernen, den Wasser lter “INTENZA+” (soweit vorhanden) wieder im Wassertank in-
DE
stallieren. Den automatischen Milchaufschäumer wieder
einsetzen.
Enlever le petit ltre blanc et replacer le ltre à eau «INTENZA+» (si présent) dans le réservoir à eau. Réinsérer le
Mousseur à lait Automatique.
FR
REINIGUNG DER BRÜHGRUPPE
NETTOYAGE DU GROUPE DE DISTRIBUTION
Die Taste
drücken, um
das System zu entlüften.
Appuyer sur la touche
pour amorcer le circuit.
Die Brühgruppe reinigen. Für
weitere Anweisungen siehe
Kapitel “Reinigung der Brühgruppe”.
Nettoyer le groupe de distribution. Pour plus d'informations, consulter la section
« Nettoyage du groupe de
distribution».
Am Ende des Spülzyklus die Abtropfschale leeren und wieder
einsetzen.
À la n du cycle de rinçage, vider le bac d'égouttement et
le remettre à sa place.
Hinweis: Das System
muss mit einer voreingestellten Wassermenge
gereinigt werden.
Wird der Tank nicht bis
zum Füllstand MAX gefüllt, besteht die Möglichkeit, dass das Gerät die
Ausführung von drei oder
mehr Zyklen fordert.
Das Gerät ist bereit für die
Ausgabe von Ka ee.
Remarque: le circuit doit
être nettoyé avec une
quantité d’eau préréglée.
Si le réservoir à eau n’est
La machine est prête à distribuer du café.
pas rempli jusqu’au niveau
MAX, la machine peut demander le remplissage du
réservoir trois fois ou plus
pour le rinçage.
Das Gerät ausschalten und das Netzkabel herausziehen. Den
Ka eesatzbehälter entfernen und die Servicetür ö nen.
DE
Éteindre la machine et débrancher le câble d'alimentation.
Enlever le tiroir à marc et ouvrir la porte de service.
FR
Den Ka eeau angbehälter
herausnehmen und reinigen.
Retirer le tiroir à café et le
nettoyer.
Die Taste «PUSH» drücken
und am Handgri ziehen,
um die Brühgruppe herauszunehmen.
Pour enlever le groupe de
distribution appuyer sur la
touche « PUSH » en tirant
sur la poignée.
Die Wartung der Brühgruppe
ausführen.
Procéder à l'entretien du
groupe de distribution.
Page 43

www.philips.com/support
Hinweise
Instructions
43
Den Hebel auf die untere Position senken.
DE
Baisser le levier pour un alignement correct.
FR
REINIGUNG DES AUTOMATISCHEN MILCHAUFSCHÄUMERS
Täglich
DE
Quotidien
FR
Die Brühgruppe wieder in
die Aufnahme einsetzen, bis
Den Ka eeau angbehälter
einsetzen.
sie einrastet. Dabei nicht die
Taste “PUSH” drücken.
Introduire à nouveau le
Insérer le tiroir à café.
groupe de distribution
dans son logement jusqu’à
ce qu’il soit bien enclenché
sans appuyer sur la touche
«PUSH».
NETTOYAGE MOUSSEUR À LAIT AUTOMATIQUE
Den Ansaugschlauch in einen Behälter mit frischem
Wasser stecken.
Insérer le tuyau d’aspiration dans un récipient plein
d’eau fraîche.
Einen leeren Behälter unter
den automatischen Mil-
chaufschäumer stellen.
Placer un récipient vide sous
le Mousseur à lait Automa-
tique.
Die Taste
drücken. Das Gerät zeigt das obige Display
an.
Appuyer sur la touche
bole ci-dessus.
. La machine a che le sym-
DeutschFrançais
Die Taste drücken, um die Dampfausgabe zu starten.
DE
Appuyer sur la touche pour démarrer la distribution
de vapeur.
FR
Ist das aus dem automati-
schen Milchaufschäumer aus-
tretende Wasser sauber ...
Lorsque l'eau qui sort du
Mousseur à lait Automa-
tique est propre...
... die Taste drücken, um die Ausgabe abzubrechen.
...appuyer sur la touche pour interrompre la distribution.
Page 44

Hinweise
44
Instructions
www.philips.com/support
Den Saeco Milchsystem-Reiniger in einen Behälter schütten.
Monatlich
DE
½ Liter lauwarmes Wasser hinzugeben und abwarten, bis
sich das Produkt vollständig au öst.
Verser le«produit pour le nettoyage du circuit lait Saeco»
Mensuel
FR
Die Taste drücken. Das Gerät zeigt das obige Display
DE
an.
Appuyer sur la touche . La machine a che le sym-
FR
bole ci-dessus.
dans un récipient. Ajouter ½l d'eau tiède, puis attendre
que le produit soit entièrement dissout.
Die Taste
drücken, um
Dampf auszugeben.
Appuyer sur la touche
pour distribuer de la vapeur.
Den Ansaugschlauch in den
Behälter stecken.
Einen leeren Behälter unter
den automatischen Milchaufschäumer stellen.
Mettre le tuyau d'aspiration
dans le récipient.
Placer un récipient vide sous
le Mousseur à lait Automatique.
Nach der vollständigen Ausgabe der Lösung die Taste
drücken, um die Ausgabe zu beenden.
Lorsque la solution a été distribuée complètement, appuyer sur la touche
pour interrompre la distribution.
Den Behälter gründlich ausspülen und mit ½ Liter fri-
DE
schem Wasser füllen, das für
den Spülzyklus benutzt wird.
Bien rincer le récipient et
le remplir avec ½ l d'eau
fraîche qui sera ensuite
FR
utilisée pour le cycle de
rinçage.
Den Ansaugschlauch in den
Behälter stecken.
Mettre le tuyau d'aspiration
dans le récipient.
Den Behälter leeren und
erneut unter den automa-
tischen Milchaufschäumer
stellen.
Vider le récipient et le repla-
cer sous le Mousseur à lait
Automatique.
Die Taste
drücken. Das Gerät zeigt das obige Display
an.
Appuyer sur la touche
bole ci-dessus.
. La machine a che le sym-
Page 45

www.philips.com/support
Hinweise
Instructions
45
Die Taste drücken, um
DE
Dampf auszugeben.
Appuyer sur la touche
FR
pour distribuer de la vapeur.
Nach der vollständigen Ausgabe des Wassers die Taste
drücken, um die Ausgabe zu beenden.
Lorsque l'eau a été distribuée complètement, appuyer sur
la touche
pour interrompre la distribution.
Den Gummischutz von der Dampfdüse abnehmen.
Achtung: Die Dampfdüse ist eventuell heiß, wenn sie
DE
erst kürzlich benutzt wurde.
Enlever le protecteur en caoutchouc de la buse de vapeur.
Attention: La buse de vapeur pourrait être chaude
FR
si elle a été récemment utilisée.
Den Ansaugschlauch ab-
nehmen.
Enlever le tuyau d'aspira-
tion.
Den automatischen Milchaufschäumer aus dem Gerät herausnehmen.
Extraire le Mousseur à lait Automatique de la machine.
Den automatischen Milchaufschäumer an den Seiten drücken und ziehen.
Extraire le Mousseur à lait Automatique, en le tenant sur
les côtés.
DeutschFrançais
Die Gummiabdeckung abnehmen.
DE
Enlever le couvercle en
caoutchouc.
FR
Alle Teile mit lauwarmem
Wasser reinigen.
Die Teile können auch in
der Spülmaschine gereinigt werden.
Laver tous les composants à
l’eau tiède.
Il est également possible de laver les composants au lave-vaisselle.
Den Deckel wieder montie-
ren. Um diesen korrekt auf-
zusetzen, sicherstellen,
dass in der Mitte gedrückt
wurde.
Monter le couvercle en
appuyant sur la partie cen-
trale; s'assurer qu'il est bien
installé.
Den automatischen Milchaufschäumer erneut montieren
und sicherstellen, dass er korrekt eingesetzt wurde.
Remonter le Mousseur à lait Automatique en s'assurant
qu'il est correctement inséré.
Page 46

Hinweise
46
Instructions
www.philips.com/support
Den Ansaugschlauch anbringen.
DE
Installer le tuyau d'aspiration.
FR
REINIGUNG DES KAFFEEBOHNENBEHÄLTERS, DER SCHALE
NETTOYAGE DU RÉSERVOIR À CAFÉ EN GRAINS, DU PLATEAU
Den Gummischutz wieder auf der Dampfdüse anbringen. Den automatischen Milchaufschäumer in den Gummischutz
Réinsérer le protecteur en caoutchouc sur la buse de vapeur.
einstecken, bis er einrastet.
Den Gummischutz nicht über die markierte Aufnahme
hinausschieben. Im diesem Falle besteht die Möglichkeit, dass der automatische Milchaufschäumer nicht
korrekt funktioniert, da keine Milch angesaugt werden kann.
Insérer le Mousseur à lait Automatique sur le protecteur en
caoutchouc jusqu’à l'enclenchement.
Ne pas insérer le protecteur en caoutchouc au-delà
du logement indiqué. Dans ce cas, le Mousseur à
lait Automatique ne fonctionne pas correctement
parce-qu'il n'est pas en mesure d'aspirer le lait.
UND DES KAFFEEFACHS
ET DU LOGEMENT À CAFÉ
Wöchentlich
DE
Hebdomadaire
FR
Den Ka eebohnenbehälter,
die Schale und das Ka eefach
einmal wöchentlich mit
einem Tuch reinigen, um
Ka eerückstände und Staub
zu entfernen.
Nettoyer le réservoir à café
en grains, le plateau et le
logement à café une fois
par semaine avec un chi on
pour enlever le marc de café
et la poussière.
Für die Herausnahme der Schale wird auf die
Haken am Boden des Ka eebohnenbehälters
gedrückt, wie in der Abbildung oben gezeigt.
Pour enlever le plateau appuyer sur les cro-
chets situés sur le fond du réservoir à café en
grains, comme le montre la gure ci-dessus.
Nach der Reinigung die Schale wieder in
den Ka eebohnenbehälter einsetzen.
Après le nettoyage, réinsérer le plateau
dans le réservoir à café en grains.
Page 47

www.philips.com/support
SIGNAUX D’AVERTISSEMENT JAUNE
HINWEISSIGNALE GELB
Hinweise
Instructions
47
Gerät in Aufheizphase für die
Ausgabe von Getränken oder
DE
heißem Wasser.
Machine en phase de réchau age pour la distribu-
FR
tion de boissons ou d’eau
chaude.
Den Ka eebohnenbehälter
füllen und den Zyklus erneut
DE
starten.
Remplir le réservoir à café
en grains et redémarrer le
FR
cycle de distribution.
Das Gerät führt einen Spülzyklus aus. Warten bis den
Zyklus beendet ist.
La machine est en train d’effectuer un cycle de rinçage.
Attendre jusqu'à la n.
Der Wasser lter “INTENZA+” muss ausgetauscht
werden.
Il est nécessaire de remplacer le ltre à eau «INTENZA+».
Brühgruppe in der Rückstellungsphase nach einem Zurücksetzen des Geräts.
Groupe de distribution en
phase de rétablissement
suite à la remise à zéro de la
machine.
Das System entlüften. Das Gerät muss entkalkt werden. Für weitere Anweisungen siehe ent-
sprechendes Kapitel für das Entkalken.
Amorcer le circuit. Il faut e ectuer le détartrage de la machine. Consulter la section
dédiée au détartrage pour plus d'informations.
DeutschFrançais
Page 48

Hinweise
Exx
48
Instructions
www.philips.com/support
ALARMSIGNALE ROT
SIGNAUX D’ALARME ROUGE
Die Servicetür schließen. Den Ka eebohnenbehälter
DE
erneut au üllen.
Fermer la porte de service. Remplir à nouveau le réser-
FR
voir à café en grains.
Den Wassertank füllen. Den Ka eesatzbehälter voll-
ständig einsetzen.
DE
Remplir le réservoir à eau. Insérer complètement le
tiroir à marc.
FR
Die Brühgruppe muss in das
Gerät eingesetzt werden.
Le groupe de distribution
doit être inséré dans la
machine.
Den Ka eebohnenbehälter
einsetzen.
Insérer le réservoir à café en
grains.
Den Ka eesatzbehälter einsetzen.
Den Ka eesatzbehälter und
den Ka eeau angbehälter
leeren.
Insérer le tiroir à marc. Vider le tiroir à marc et le
tiroir à café.
Das Gerät ausschalten. Nach 30 Sekunden erneut einschalten. Den Vorgang 2 oder 3 Mal wiederholen.
Kann das Gerät nicht gestartet werden, so ist die Hotline
SAECO im jeweiligen Land zu kontaktieren (die Kontaktnummern sind im Garantieheft angeführt), und der auf dem Display angezeigte Fehlercode anzugeben.
Éteindre la machine. La rallumer après 30 secondes. Répéter la procédure 2 ou 3 fois.
Si la machine ne démarre pas, contacter le centre d’assistance SAECO de votre Pays (numéros de contact indiqués
dans la notice de la garantie) et communiquer le code
d'erreurs indiqué sur l'a cheur.
Page 49

go to www.shop.philips.com
Produits pour l’entretien
P ege-Produkte
P ege-Produkte
Produits pour l’entretien
49
Wasser lter INTENZA+
Produktnummer: CA6702
DE
Filtre à eau INTENZA+
numéro produit: CA6702
FR
Entkalker
Produktnummer: CA6700
DE
Solution détartrante
numéro produit: CA6700
FR
Produkt für die Reinigung des
Milchsystems
DE
Produktnummer: CA6705
Produit pour le nettoyage du circuit lait
FR
numéro produit: CA6705
Fett
Produktnummer: HD5061
DE
Graisse
numéro produit: HD5061
FR
Ka eefettlöser-Tabletten
Produktnummer: CA6704
DE
Tablettes de dégraissage
numéro produit: CA6704
FR
Besuchen Sie den Online-Shop
Philips für die Verfügbarkeit und
DE
die Kaufmöglichkeiten in Ihrem
Land.
Visitez le magasin en ligne Philips pour véri er la disponibilité
FR
et les opportunités d'achat dans
votre Pays.
Page 50

Normas de seguridad
50
Indicações para a segurança
www.philips.com/support
ES NORMAS DE SEGURIDAD
La máquina está dotada de dispositivos de seguridad. No obstante, es necesario leer atentamente las instrucciones de seguridad que aquí
se describen para evitar daños accidentales a
personas o cosas.
Conservar este manual para posibles referencias
en el futuro.
Atención
• Conectar la máquina a una toma de pared
adecuada, cuya tensión principal se corresponda con la indicada en los datos técnicos
del aparato.
• Evitar que el cable de alimentación cuelgue
de la mesa o la super cie de trabajo o que
toque super cies calientes.
• No sumergir la máquina, la toma de corriente o el cable de alimentación en agua: ¡peligro de choque eléctrico!
• No dirigir nunca el chorro de agua caliente
hacia partes del cuerpo: ¡riesgo de quemaduras!
• No tocar las super cies calientes. Usar los
asideros y mandos.
• Desconectar el enchufe de la toma:
- si se produce un mal funcionamiento;
- si la máquina no va a utilizarse durante
un largo período;
- antes de proceder a la limpieza de la máquina.
Tirar del enchufe y no del cable de alimen-
tación. No tocar el enchufe con las manos
mojadas.
• No utilizar la máquina si el enchufe, el cable
de alimentación o la propia máquina han
sufrido daños.
• No alterar ni modi car de ninguna forma la
máquina o el cable de alimentación. Para
evitar riesgos, todas las reparaciones deberán ser efectuadas por un centro de asistencia técnica autorizado por Philips.
• Esta máquina no debe ser utilizada por personas (niños incluidos) con capacidades físicas, mentales o sensoriales reducidas o que
no dispongan de una su ciente experiencia
y/o competencias, a menos que la utilicen
bajo la supervisión de una persona responsable de su seguridad o que sean instruidas
por dicho responsable en cómo usarla.
• Vigilar a los niños para asegurarse de que no
jueguen con el aparato.
• No introducir nunca los dedos u otros objetos en el molinillo de café de cerámica.
Advertencias
• La máquina está exclusivamente destinada
al uso doméstico y no está indicada para ser
utilizada en sitios como comedores o cocinas de tiendas, o cinas, haciendas u otros
lugares de trabajo.
• Colocar siempre la máquina sobre una super cie plana y estable.
• No colocar la máquina sobre super cies calientes ni cerca de hornos calientes, calefactores o fuentes de calor similares.
• Introducir exclusivamente café en grano en
el contenedor de café en grano. La máquina
podría resultar dañada si se introdujese en
el contenedor de café en grano cualquier
otro producto, como café molido o soluble.
• Dejar enfriar la máquina antes de introducir
o extraer cualquiera de sus componentes y
antes de proceder a su limpieza.
• No llenar el depósito con agua caliente o
Page 51

www.philips.com/support
Normas de seguridad
Indicações para a segurança
51
hirviendo. Utilizar sólo agua fría.
• No utilizar para la limpieza polvos abrasivos o detergentes agresivos. Es su ciente
con utilizar un paño suave humedecido con
agua.
• Efectuar la descalci cación de la máquina con regularidad. Cuando sea necesario
proceder a la descalci cación, la máquina
lo señalará. Si dicha operación no se lleva
a cabo, la máquina dejará de funcionar correctamente. ¡En tal caso, la reparación no
estará cubierta por la garantía!
• No someter la máquina a temperaturas inferiores a 0 °C o 32 °F. El agua residual del
interior del sistema de calentamiento puede
congelarse y dañar la máquina.
• No dejar agua en el depósito si la máquina
no va a utilizarse durante un largo período.
El agua podría sufrir contaminaciones. Utilizar agua fresca cada vez que se utilice la
máquina.
Eliminación
sus residuos".
Este producto cumple con la directiva europea
2002/96/CE.
El símbolo
estampado en el producto o
en el embalaje indica que el producto no puede
ser tratado como desecho doméstico sino que
debe entregarse al centro de recogida competente para que sus componentes eléctricos y
electrónicos puedan ser reciclados.
Al proceder a la correcta eliminación del producto estará contribuyendo a proteger al medio
ambiente y a las personas de posibles consecuencias negativas que podrían derivar de una
gestión incorrecta del producto en su fase nal
de vida. Para más información sobre el reciclaje
del producto, póngase en contacto con la o cina
local competente, con su servicio de eliminación
de desechos domésticos o bien con la tienda
donde adquirió el producto.
EspañolPortuguês
- Los materiales de embalaje pueden reciclarse.
- Aparato: desconectar el enchufe de la toma
de corriente y cortar el cable de alimentación.
- Entregar el aparato y el cable de alimentación a un centro de asistencia o a un organismo público de eliminación de desechos.
De conformidad con el art. 13 del Decreto Legislativo italiano del 25 de julio de 2005, n.°
151 "Aplicación de las Directivas 2005/95/CE,
2002/96/CE y 2003/108/CE relativas a la reducción del uso de sustancias peligrosas en aparatos eléctricos y electrónicos y a la eliminación de
Page 52

Normas de seguridad
52
Indicações para a segurança
www.philips.com/support
PT INDICAÇÕES PARA A SEGURANÇA
A máquina está dotada de dispositivos de segurança. Contudo, é necessário que leia atentamente as indicações para a segurança descritas
nas presentes instruções de utilização, de modo
a evitar danos acidentais a pessoas ou coisas.
Guarde este manual para eventuais consultas
futuras.
Atenção
• Ligue a máquina a uma tomada de parede
adequada, cuja tensão principal corresponda aos dados técnicos do aparelho.
• Evite que o cabo de alimentação penda da
mesa ou da superfície de trabalho, ou ainda
que toque superfícies quentes.
• Não mergulhe a máquina, a cha de corrente ou o cabo de alimentação em água: risco
de choque eléctrico!
• Nunca dirija o jacto de água quente para as
partes do corpo: perigo de queimaduras!
• Não toque em superfícies quentes. Utilize as
pegas e os botões.
• Retire a cha da tomada:
- se forem veri cados problemas no funcionamento;
- se a máquina permanecer inutilizada
por um longo período de tempo;
- antes de realizar a limpeza da máquina.
Puxe pela cha, não pelo cabo de alimenta-
ção. Não toque na cha com as mãos molhadas.
• Não utilize a máquina se a cha, o cabo de
alimentação ou a própria máquina estiverem dani cados.
• Não altere nem modi que de modo algum
o cabo de alimentação. Todas as reparações
devem ser realizadas por um centro de assistência autorizado pela Philips, para evitar
qualquer perigo.
• A máquina não se destina a ser utilizada por
pessoas (incluindo crianças) com reduzidas
capacidades físicas, mentais ou sensoriais
ou com experiência e/ou competências
insu cientes, a não ser que estejam sob a
supervisão de uma pessoa responsável pela
sua segurança ou que sejam ensinadas instruídas por essa mesma pessoa a utilizar o
aparelho.
• As crianças devem ser supervisionadas para
assegurar-se que não estejam a brincar com
o aparelho.
• Nunca introduza os dedos ou outros objectos no moinho de café de cerâmica.
Advertências
• A máquina destina-se apenas à utilização
doméstica e não está indicada para uso em
ambientes como cafés ou cozinhas de lojas,
escritórios, fábricas ou outros ambientes de
trabalho.
• Posicione sempre a máquina sobre uma superfície plana e estável.
• Não posicione a máquina sobre superfícies
quentes, nas proximidades de fornos aquecidos, aquecedores ou fontes de calor semelhantes.
• No recipiente de café em grãos, introduza
sempre e apenas café em grãos. Café em pó,
solúvel, bem como outros objectos, se forem
inseridos no recipiente de café em grãos,
podem dani car a máquina.
• Deixe a máquina arrefecer antes de introduzir ou remover peças e antes de realizar a
sua limpeza.
Page 53

www.philips.com/support
Normas de seguridad
Indicações para a segurança
53
• Não encha o reservatório com água quente
ou a ferver. Utilize apenas água fria.
• Não utilize pós abrasivos ou detergentes
agressivos para a limpeza. É su ciente um
pano macio humedecido com água.
• Efectue a descalci cação da máquina regularmente. A própria máquina assinala
quando houver necessidade de se realizar
a descalci cação. Se esta operação não for
realizada, o aparelho deixará de funcionar
correctamente. Neste caso, a reparação não
está coberta pela garantia!
• Não mantenha a máquina em temperaturas inferiores a 0°C ou 32°F. A água restante
dentro do sistema de aquecimento poderia
congelar e dani car a máquina.
• Não deixe água no reservatório se a máquina não for utilizada por um longo período. A
água poderia sofrer contaminações. Sempre
que utilizar a máquina, use água fresca.
rectiva europeia 2002/96/CE.
O símbolo
apresentado no produto ou na
embalagem indica que o produto não pode ser
tratado como lixo doméstico; deve ser entregue num centro de recolha para reciclagem dos
componentes eléctricos e electrónicos.
A eliminação adequada do produto contribui
para proteger o meio-ambiente e as pessoas
das possíveis consequências negativas que
poderiam advir de uma gestão incorrecta do
produto na sua fase nal de vida útil. Para mais
informações sobre os modos de reciclagem do
produto pedimos-lhe que contacte o escritório
local responsável, o seu serviço de eliminação
dos resíduos domésticos ou a loja na qual adquiriu o produto.
EspañolPortuguês
Eliminação
- Os materiais da embalagem podem ser reciclados.
- Aparelho: desligue a cha da tomada e retire o cabo de alimentação.
- Entregue o aparelho e o cabo de alimentação a um centro de assistência ou a uma
entidade pública para a eliminação dos resíduos.
Nos termos do art. n.º 13 do Decreto Legislativo
italiano de 25 de Julho de 2005, n.º 151 "Aplicação das Directivas 2005/95/CE, 2002/96/CE e
2003/108/CE, respeitantes a redução do uso de
substâncias perigosas nas aparelhagens eléctricas e electrónicas, além da eliminação dos lixos”.
Este produto está em conformidade com a Di-
Page 54

Instrucciones
54
Instruções
www.philips.com/support
PRIMERA INSTALACIÓN
PRIMEIRA INSTALAÇÃO
1
MAX
Introducir la bandeja de goteo junto con la rejilla en la
máquina. Comprobar que
ES
quede completamente in-
Presionar delicadamente en
el lateral de la puerta del
depósito de agua para hacer
que salga la empuñadura.
troducida.
Introduza a bandeja de limpeza com grelha na máquina. Veri car que esteja com-
PT
pletamente inserida.
Pressione delicadamente no
lado da portinhola do reservatório de água para provocar a saída da pega.
Quitar la tapa del contenedor de café en grano. Verter en él
lentamente el café en grano.
ES
Retire a tampa do recipiente de café em grãos. Verta lentamente o café em grãos.
PT
Extraer el depósito de agua
tirando de la empuñadura.
Extraia o reservatório de
água retirando a pega.
Introducir la clavija en la
toma de corriente ubicada
en la parte trasera de la máquina.
Introduza a cha na tomada
de corrente posicionada na
parte traseira da máquina.
Llenar el depósito de agua
con agua fresca hasta el nivel MAX y volver a introducirlo en la máquina.
Encha o reservatório da
água até ao nível MÁX com
água fresca e reintroduza-o
na máquina.
Conectar el enchufe del extremo opuesto del cable de
alimentación a una toma de
corriente de pared.
Introduza a cha da extremidade oposta do cabo de
alimentação numa tomada
de corrente de parede.
Cuando esté lleno, el
depósito de agua debe
transportarse tal como se
muestra en la gura.
Quando estiver cheio,
o reservatório de água
deve ser transportado
conforme apresentado
na gura.
Poner el interruptor en “I”.
Coloque o interruptor na
posição "I".
Pulsar el botón para encender la máquina.
ES
Pressione a tecla para ligar a máquina.
PT
Colocar un recipiente bajo el
tubo de vapor.
Coloque um recipiente debaixo do tubo de vapor.
Pulsar el botón
del circuito.
Pressione a tecla
do circuito.
para poner en marcha el ciclo de carga
para iniciar o ciclo de carregamento
Page 55

www.philips.com/support
Instrucciones
Instruções
55
Una vez terminado el proceso, la máquina da inicio a la
ES
fase de calentamiento.
No nal do processo, a máquina inicia a fase de aque-
PT
cimento.
Colocar un recipiente bajo la
salida de café.
ES
Coloque um recipiente debaixo do distribuidor de
PT
café.
Tras el calentamiento, colocar un recipiente bajo la salida de café.
No nal do aquecimento,
coloque um recipiente debaixo do distribuidor.
CICLO DE ENJUAGUE MANUAL
CICLO DE ENXAGÚE MANUAL
2
Pulsar el botón
Pulsar el botón
Pressione a tecla
pré-moído. Pressione a tecla
para seleccionar la función de café premolido. NO añadir café premolido.
. La máquina comenzará a suministrar agua.
para seleccionar a função de café pré-moído. NÃO adicione café
La máquina realiza un ciclo
de enjuague automático.
A máquina efectua o ciclo
de enxagúe automático.
. A máquina inicia a distribuir água.
La máquina está lista para
el ciclo de enjuague manual.
A máquina está pronta para
o ciclo de enxagúe manual.
EspañolPortuguês
1
Una vez nalizado el suministro, vaciar el recipiente.
No nal da distribuição, esvazie o recipiente.
1
3
Repetir dos veces las operaciones del punto 1 al 3; a
ES
continuación, pasar al punto 5.
Repita as operações do
ponto 1 ao ponto 3 durante
PT
duas vezes consecutivas e
depois passe ao ponto 5.
Colocar un recipiente bajo el
tubo de vapor.
Coloque um recipiente debaixo do tubo de vapor.
Pulsar el botón
Pulsar el botón MENU
Pressione a tecla
Pressione a tecla MENU
2
1
. La máquina mostrará el símbolo de aquí arriba.
para dar inicio al suministro de agua caliente.
. A máquina apresenta o símbolo na parte superior.
para iniciar a distribuição de água quente.
Page 56

Instrucciones
56
Instruções
www.philips.com/support
MAX
Tras haber suministrado
el agua, retirar y vaciar el
ES
recipiente.
Depois de distribuir a
água, remova e esvazie o
PT
recipiente.
Ajustar la salida de café.
ES
Ajuste o distribuidor.
PT
Repetir el procedimiento del punto 5 al punto 7 hasta que el
depósito de agua esté vacío y aparezca el símbolo de falta
de agua.
Repita o procedimento do ponto 5 ao ponto 7 até que o
reservatório de água esteja vazio e apareça o símbolo de
falta de água.
PRIMER CAFÉ EXPRÉS / CAFÉ
PRIMEIRO EXPRESSO / CAFÉ
Pulsar el botón
ministrar un café exprés o...
Pressione a tecla
distribuir um expresso ou...
para su-
... pulsar el botón para
suministrar un café.
para
...pressione a tecla
para distribuir um café.
MI CAFÉ EXPRÉS IDEAL
O MEU EXPRESSO IDEAL
A continuación, volver a llenar el depósito de agua hasta el nivel MAX.
No nal, encha novamente
o reservatório da água até
ao nível MÁX.
Seleccionar el aroma deseado pulsando el botón
ES
Seleccione o aroma desejado ao pressionar a tecla
PT
.
Mantener pulsado el botón
.
bolo MEMO. La máquina está en fase de programación.
Nota: para programar el café, mantener pulsado el
botón
hasta que aparezca el símbolo MEMO.
Mantenha pressionada a tecla
MEMO. A máquina está na fase de programação.
Obs.: Para programar o café, mantenha pressionada
a tecla
até aparecer o símbolo MEMO.
hasta que aparezca el sím-
até aparecer o símbolo
OK
Esperar a que se alcance la
cantidad de café deseada.
Aguarde até ao alcance da
quantidade de café desejada.
... pulsar
pir el proceso.
¡Memorizado!
... pressione
romper o processo.
Memorizado!
para interrum-
para inter-
Page 57

www.philips.com/support
SUSTITUCIÓN DEL CAFÉ EN GRANO
SUBSTITUIÇÃO DE CAFÉ EM GRÃOS
Instrucciones
Instruções
57
Extracción del
contenedor de
ES
café en grano
Extracção do
recipiente de café
PT
em grãos
Introducción del
contenedor de
ES
café en grano
Introdução do
recipiente de café
PT
em grãos
Poner el selector en la posición .
Es posible que el selector esté bloqueado por algún
grano de café y que, debido a ello, no pueda ser desplazado. En tal caso, mover el selector adelante y
atrás hasta retirar el grano de café bloqueado.
Posicione o selector na posição .
É possível que o selector não possa ser posicionado,
por estar bloqueado por algum grão de café. Neste
caso, mova o selector para a frente e para trás até
remover o grão de café bloqueado.
Poner el selector en la posición
.
Posicione o selector na posição
.
Retirar los granos de café del
compartimento del contenedor de café.
Remova os grãos de café
do compartimento do recipiente de café.
Extraer el contenedor de café en grano sosteniéndolo por los
lados con ambas manos.
Levante o recipiente de café em grãos pegando no mesmo
dos lados com ambas as mãos.
Introducir el contenedor de
café en grano en el compartimento.
Introduza o recipiente de
café em grãos no compartimento.
Poner el selector en la posición .
Al cambiar de tipo de café
en grano y pasar a un café
descafeinado, es posible
que aún existan restos
de cafeína incluso tras el
ciclo de vaciado.
Posicione o selector na posição
.
Ao mudar o tipo de café
em grãos e passar para
um café descafeinado é
possível que continuem
a existir vestígios de cafeína, mesmo após o ciclo de esvaziamento.
EspañolPortuguês
Page 58

Instrucciones
58
Instruções
www.philips.com/support
Selección del café
ES
en grano
Selecção do café
PT
em grãos
Para salir, pulsar el botón
ES
.
Para sair, pressione a tecla
.
PT
Pulsar el botón MENU .
Pasar las opciones pulsando el botón MENU
se visualice el símbolo de aquí arriba.
Pressione a tecla MENU .
Percorra as opções pressionando a tecla MENU
sualizar o símbolo na parte superior.
La pantalla muestra el tipo de café en grano seleccionado
cuando la máquina está lista para el suministro.
Para café en grano de tipo “ARÁBICA”;
O visor apresenta o tipo de café em grãos seleccionado
quando a máquina estiver pronta para a distribuição.
Para café em grãos do tipo "ARÁBICA";
hasta que
até vi-
Pulsar el botón
de granos de café presente en el contenedor de café en grano.
Pulsar el botón MENU
Pressione a tecla
de grãos de café presente no recipiente de café em grãos.
Pressione a tecla MENU
ção.
para café en grano de tipo
“ROBUSTA”;
para café em grãos do tipo
"ROBUSTA";
o el botón para seleccionar el tipo
para con rmar la con guración.
ou a tecla para seleccionar o tipo
para con rmar a programa-
para café en grano de tipo
“MIXTO”.
para café em grãos do tipo
"MISTO".
Ciclo de vaciado
ES
del café
Ciclo de esvazia-
PT
mento de café
Al cambiar de tipo de café
en grano, aconsejamos
vaciar el conducto de café
y el molinillo de café. Esto
permite degustar plenamente el aroma del nuevo
café en grano.
Quando proceder à mudança do tipo de café
em grãos, é recomendável esvaziar a conduta
de café e o moinho de
café. Desta forma, será
possível saborear todo o
aroma do novo café em
grãos.
Pulsar el botón MENU . Pasar las opciones pulsando el botón MENU hasta que
Pressione a tecla MENU
.
se muestre el símbolo de aquí arriba.
Pulsar el botón
Percorra as opções pressionando a tecla MENU
sualizar o símbolo na parte superior.
Pressione a tecla
.
até vi-
.
Page 59

www.philips.com/support
La máquina efectúa dos ciclos de molido sin suminis-
ES
trar café.
A máquina efectua dois
ciclos de moagem sem dis-
PT
tribuir café.
Una vez concluidos los ciclos de molido, la máquina
mostrará el símbolo de aquí
arriba.
Terminados os ciclos de
moagem, a máquina visualiza o símbolo na parte
superior.
REGULACIÓN DEL MOLINILLO DE CAFÉ DE CERÁMICA
AJUSTE DO MOINHO DE CAFÉ DE CERÂMICA
Para evitar dañar la máquina, no girar el molinillo de café más de un paso
cada vez.
Instrucciones
En caso de no vaciar el conducto de café y el molinillo de café,
será necesario suministrar al menos dos cafés antes de poder
degustar plenamente el nuevo tipo de café en grano.
Al cambiar de tipo de café en grano y pasar a un café
descafeinado, es posible que aún existan restos de cafeína incluso tras el ciclo de vaciado.
Se a conduta de café e o moinho de café não tiverem sido
esvaziados, será necessário distribuir, pelo menos, dois cafés antes de poder saborear na totalidade o novo tipo de
café em grãos.
Ao mudar o tipo de café em grãos e passar para um
café descafeinado é possível que continuem a existir vestígios de cafeína, mesmo após o ciclo de esvaziamento.
Instruções
59
EspañolPortuguês
Para evitar danos na máquina, não rode o moi-
ES
nho de café mais de uma
volta de cada vez.
PT
Extraer el contenedor de café
en grano.
Extraia o recipiente de café
em grãos.
Presionar y girar el mando de
regulación del grado de molido un paso cada vez.
Pressione e gire o botão de
ajuste de moagem com um
disparo de cada vez.
1
Seleccionar ( ) para un
molido grueso - sabor más
suave. Seleccionar (
un molido no - sabor más
fuerte.
Seleccione ( ) para moagem grossa - gosto mais
suave. Seleccione (
moagem na - gosto mais
forte.
2
) para
) para
Suministrar 2-3 cafés para
probar la diferencia. Si el
café está acuoso, modi car
la con guración del molinillo
de café.
Distribua 2-3 cafés para saborear a diferença. Se o café
estiver aquoso, modi que
as programações do moinho
de café.
Page 60

Instrucciones
60
Instruções
¡Riesgo de quemaduras!
Al principio del suministro se pueden producir
pequeñas salpicaduras
de agua caliente.
Utilizar sólo la empuñadura de protección especí ca.
Perigo de queimaduras!
No início da distribuição podem veri car-se
ES
breves salpicos de água
quente.
Utilize apenas a especí -
PT
ca pega protectora.
CÓMO ESPUMAR LECHE
COMO BATER O LEITE
Acoplar el tubo de aspiración
al Montador de leche Automático.
Introduza o tubo de aspiração no Batedor de leite automático.
Introducir el Montador de
leche Automático en el alojamiento del tubo de vapor.
Introduza o Batedor de leite
automático na sede do tubo
de vapor.
www.philips.com/support
Introducir el tubo de aspiración en el recipiente de leche.
Introduza o tubo de aspiração no recipiente de leite.
Colocar una taza bajo el
Montador de leche Auto-
ES
mático.
Coloque uma chávena debaixo do Batedor de leite
PT
automático.
Pulsar el botón para interrumpir el proceso una vez su-
ES
ministrada la cantidad de leche deseada.
Pressione a tecla para interromper o processo quando
PT
distribuir a quantidade de leite desejada.
Pulsar el botón
aquí arriba.
Pressione a tecla
na parte superior.
. La máquina mostrará el símbolo de
. A máquina apresenta o símbolo
Pulsar el botón
Pressione a tecla
para comenzar a espumar la leche.
para iniciar a bater o leite.
Page 61

www.philips.com/support
¡Riesgo de quemaduras!
Al principio del suministro se pueden producir
pequeñas salpicaduras
de agua caliente.
Utilizar sólo la empuñadura de protección especí ca.
Perigo de queimaduras!
No início da distribuição podem veri car-se
ES
breves salpicos de água
quente.
Utilize apenas a especí ca pega protectora.
PT
Sacar el Montador de leche
Automático del tubo de vapor. Colocar debajo un recipiente.
Retire o Batedor de leite automático do tubo de vapor.
Posicione debaixo de um
recipiente.
AGUA CALIENTE
ÁGUA QUENTE
Pulsar el botón
Pulsar el botón MENU
Pressione a tecla
Pressione a tecla MENU
. La máquina mostrará el símbolo de aquí arriba.
para dar inicio al suministro de agua caliente.
. A máquina apresenta o símbolo na parte superior.
para iniciar a distribuição de água quente.
Instrucciones
61
Instruções
2
1
EspañolPortuguês
Para interrumpir el suministro de agua caliente, pulsar el
botón
.
ES
Retirar el recipiente.
Para interromper a distribuição de água quente pressione
a tecla
PT
.
Remova o recipiente.
Page 62

Instrucciones
62
Instruções
www.philips.com/support
DESCALCIFICACIÓN - 35 min
DESCALCIFICAÇÃO - 35 min.
El símbolo “CALC CLEAN” visualizado indica que es necesario proceder a la descalci cación.
Si dicha operación no se lleva a cabo, la máquina dejará de funcionar correctamente. En tal caso, la repara-
ES
ción no estará cubierta por la garantía.
Quando visualizar o símbolo “CALC CLEAN”, é necessário proceder à descalci cação.
Se esta operação não for realizada, o aparelho deixará de funcionar correctamente. Neste caso, a repa-
PT
ração não está coberta pela garantia.
El ciclo de descalci cación (A) y el ciclo de enjuague (B) pueden ponerse en pausa pulsando el botón . Para reanudar
el ciclo, pulsar de nuevo el botón
ES
O ciclo de descalci cação (A) e o ciclo de enxagúe (B) podem ser colocados em pausa pressionando a tecla . Para
prosseguir com o ciclo, pressione novamente a tecla
PT
breve período de tempo.
. Esto permite vaciar el recipiente o ausentarse por un breve momento.
. Isso permite esvaziar o recipiente ou ausentar-se por um
Vaciar la bandeja de goteo. Sacar el Montador de leche Automático
del tubo de vapor/agua caliente. Ex-
ES
traer el ltro de agua “INTENZA+” (en
su caso) del depósito de agua y sustituirlo por el ltro blanco original.
Esvazie a bandeja de limpeza.
PT
Retire o Batedor de leite automático
do tubo de vapor/água quente. Extraia o ltro de água "INTENZA+" (se
presente) do reservatório da água e
substitua-o pelo pequeno ltro branco original.
Pulsar el botón
Pressione a tecla
.
.
La máquina da inicio al programa.
A máquina inicia o programa.
Page 63

www.philips.com/support
CALC
CLEAN
Instrucciones
Instruções
63
Verter toda la solución descalci cante.
ES
Verta toda a solução descalci cante.
PT
La solución descalci cante
será suministrada a interva-
ES
los regulares (duración: 25
min aprox.).
A solução descalci cante
será distribuída em inter-
PT
valos regulares (duração:
cerca de 25 min).
Rellenar el depósito de agua
con agua fresca hasta el nivel
CALC CLEAN e introducirlo en
la máquina.
Encha o reservatório de
água com água fresca até
ao nível calc clean e volte a
introduzi-lo na máquina.
Este símbolo indica que el
depósito de agua está vacío.
Quando se visualiza este
símbolo, o reservatório de
água está vazio.
Colocar un recipiente grande
(1,5l) bajo el tubo de vapor/
agua caliente y bajo la salida
de café.
Posicione um recipiente com
capacidade su ciente (1,5l)
debaixo do tubo de vapor/
água quente e debaixo do
distribuidor.
MAX
Enjuagar el depósito y llenarlo con agua fresca hasta
el nivel MAX. Volver a introducirlo en la máquina.
Enxagúe o reservatório e
encha-o com água fresca
até ao nível MÁX. Reintroduza-o na máquina.
Pulsar el botón para dar inicio al ciclo de descalci cación.
Pressione a tecla para iniciar o ciclo de descalci cação.
Vaciar la bandeja de goteo y
volver a colocarla en su sitio.
Esvazie a bandeja de limpeza e volte a introduzi-la na
devida posição.
Vaciar el recipiente y volver a
colocarlo.
Esvazie o recipiente e volte a introduzi-lo na devida
posição.
EspañolPortuguês
Pulsar el botón para poner en marcha el ciclo de enjuague.
ES
Pressione a tecla para iniciar o ciclo de enxagúe.
PT
Este símbolo indica que el
depósito de agua está vacío.
Quando se visualiza este
símbolo, o reservatório de
água está vazio.
11
15
Repetir las operaciones del
punto 11 al punto 15; a continuación, pasar al punto 17.
Repita as operações do ponto 11 ao ponto 15 e depois
passe ao ponto 17.
MAX
Enjuagar el depósito y llenarlo con agua fresca hasta
el nivel MAX.
Enxagúe o reservatório e
encha-o com água fresca
até ao nível MÁX.
Page 64

Instrucciones
64
Instruções
www.philips.com/support
Una vez suministrada toda el agua requerida para el ciclo de
enjuague, la máquina mostrará el símbolo de aquí arriba.
ES
Pulsar el botón MENU
para salir del ciclo de descalci -
cación.
Quando a água necessária para o ciclo de enxagúe for completamente distribuída, a máquina visualiza o símbolo na
PT
parte superior. Pressione a tecla MENU
para sair do ci-
clo de descalci cação.
Quitar el ltro blanco y volver a colocar el ltro de agua “INTENZA+” (en su caso) en el depósito de agua. Volver a intro-
ES
ducir el Montador de leche Automático.
Retire o pequeno ltro branco e reposicione o ltro de água
"INTENZA+" (se presente) no reservatório da água. Volte a
PT
introduzir o Batedor de leite automático.
LIMPIEZA DEL GRUPO DE CAFÉ
LIMPEZA DO GRUPO CAFÉ
Pulsar el botón
para
cargar del circuito.
Pressione a tecla
para
carregar o circuito.
Limpiar el grupo de café.
Para más indicaciones, ver el
capítulo “Limpieza del grupo
de café”.
Limpe o grupo café. Para obter mais indicações, consulte
o capítulo "Limpeza do grupo café".
Una vez concluido el ciclo de enjuague, vaciar la bandeja de
goteo y volver a colocarla en su sitio.
No nal do ciclo de enxagúe, esvazie a bandeja de limpeza
e volte a posicioná-la.
Nota: el circuito debe lavarse con una cantidad de
agua precon gurada.
En caso de no llenar el
depósito de agua hasta
el nivel MAX, la máquina
puede requerir, para el
enjuague, que se llene el
depósito tres o más veces.
Obs.: O circuito deve ser
La máquina está lista para el
suministro de café.
limpo com uma quantidade de água prede nida.
Se o reservatório de água
não for enchido até ao ní-
A máquina está pronta para
a distribuição de café.
vel MÁX, para o enxagúe,
a máquina pode exigir o
enchimento do reservatório três ou mais vezes.
Apagar la máquina y desconectar el cable de alimentación.
Sacar el cajón de recogida de posos y abrir la puerta de ser-
ES
vicio.
Desligue a máquina e desengate o cabo de alimentação.
Remova a gaveta de recolha das borras e abra a portinhola
PT
de serviço.
Extraer el cajón de recogida
de café y limpiarlo.
Extraia a gaveta de recolha
de café e limpe-a.
Para extraer el grupo de café,
presionar el pulsador “PUSH”
y tirar al mismo tiempo de la
empuñadura.
Para extrair o grupo café,
pressione a tecla «PUSH» e
puxe pela pega.
Realizar el mantenimiento
del grupo de café.
Realize a manutenção do
grupo café.
Page 65

www.philips.com/support
Instrucciones
Instruções
65
Bajar la palanca para una
correcta alineación.
ES
Baixe a alavanca para um
alinhamento correcto.
PT
Diaria
ES
Diária
PT
Volver a introducir el grupo
de café en su alojamiento
Introducir el cajón de recogi-
da de café.
hasta que quede enganchado sin presionar el pulsador
“PUSH”.
Introduza de novo na sede
o grupo café até obter o en-
Introduza a gaveta de reco-
lha de café.
caixe sem pressionar a tecla
"PUSH".
LIMPIEZA DEL MONTADOR DE LECHE AUTOMÁTICO
LIMPEZA DO BATEDOR DE LEITE AUTOMÁTICO
Introducir el tubo de aspiración en un recipiente lleno de
agua fresca.
Introduza o tubo de aspiração num recipiente cheio de
água fresca.
Colocar un recipiente vacío
bajo el Montador de leche
Automático.
Coloque um recipiente vazio
debaixo do Batedor de leite
automático.
Pulsar el botón
aquí arriba.
Pressione a tecla
na parte superior.
. La máquina mostrará el símbolo de
. A máquina apresenta o símbolo
EspañolPortuguês
Pulsar el botón para dar inicio al suministro de vapor.
ES
Pressione a tecla para iniciar a distribuição de vapor.
PT
Cuando salga agua limpia
por el Montador de leche Au-
tomático...
Quando a água que sai do
Batedor de leite automático
estiver limpa...
... pulsar el botón para interrumpir el suministro.
...pressione a tecla para interromper a distribuição.
Page 66

Instrucciones
66
Instruções
www.philips.com/support
Verter el “producto para la limpieza del circuito de la leche
ES
Mensual
Saeco” en un recipiente. Añadir ½l de agua templada y esperar a que el producto se disuelva por completo.
Verta o "produto para a limpeza do circuito de leite Saeco"
Mensal
PT
Pulsar el botón . La máquina mostrará el símbolo de
ES
aquí arriba.
Pressione a tecla . A máquina apresenta o símbolo
PT
na parte superior.
num recipiente. Adicione ½ l de água morna e aguarde que
o produto se derreta completamente.
Pulsar el botón
ministrar vapor.
Pressione a tecla
distribuir vapor.
Introducir el tubo de aspiración en el recipiente.
Colocar un recipiente vacío
bajo el Montador de leche
Automático.
Introduza o tubo de aspiração no recipiente.
Coloque um recipiente vazio
debaixo do Batedor de leite
automático.
Una vez que se haya suministrado toda la solución, pulsar el
para su-
botón
para detener el suministro.
Quando a solução for completamente distribuída, pressio-
para
ne a tecla
para interromper a distribuição.
Enjuagar bien el recipiente y
llenarlo con ½l de agua fres-
ES
ca, que será utilizada para el
ciclo de enjuague.
Enxagúe bem o recipiente
e encha-o com ½ l de água
PT
fresca que será utilizada
para o ciclo de enxagúe.
Introducir el tubo de aspiración en el recipiente.
Introduza o tubo de aspiração no recipiente.
Vaciar el recipiente y volver
a colocarlo bajo el Montador
de leche Automático.
Esvazie o recipiente e volte
a colocá-lo debaixo do Ba-
tedor de leite automático.
Pulsar el botón
aquí arriba.
Pressione a tecla
na parte superior.
. La máquina mostrará el símbolo de
. A máquina apresenta o símbolo
Page 67

www.philips.com/support
Instrucciones
Instruções
67
Pulsar el botón para su-
ES
ministrar vapor.
Pressione a tecla para
PT
distribuir vapor.
Una vez que se haya suministrado toda el agua, pulsar el botón
para detener el suministro.
Quando a água for completamente distribuída, pressione a
tecla
para interromper a distribuição.
Quitar la protección de goma del tubo de vapor.
Atención: el tubo de vapor podría estar caliente si se
ES
ha usado recientemente.
Remova a protecção de borracha do tubo de vapor.
Atenção: o tubo poderá estar quente, se tiver sido
PT
utilizado recentemente.
Extraer el Montador de leche Automático de la máquina.
Retire o Batedor de leite automático da máquina.
Quitar el tubo de aspiración. Extraer el Montador de leche Automático presionando en
los lados.
Remova o tubo de aspira-
ção.
Retire o Batedor de leite automático, pressionando nos
lados.
EspañolPortuguês
Quitar la tapa de goma. Lavar todos los componentes
con agua tibia.
ES
También es posible lavar
los componentes en el lavavajillas.
Remova a tampa de borracha.
PT
Lave todos os componentes
com água morna.
É igualmente possível
lavar os componentes na
máquina de lavar loiça.
Poner la tapa presionando
en la parte central, asegu-
rándose de que quede bien
colocada.
Monte a tampa ao pressio-
nar na parte central; certi-
que-se de que está bem
instalada.
Volver a montar el Montador de leche Automático comprobando que quede correctamente introducido.
Volte a montar o Batedor de leite automático, certi cando-
-se de que esteja correctamente inserido.
Page 68

Instrucciones
68
Instruções
www.philips.com/support
Acoplar el tubo de aspiración.
ES
Instale o tubo de aspiração. Reintroduza protecção de borracha no tubo de vapor. Introduza o Batedor de leite automático na protecção de
PT
Introducir la protección de goma en el tubo de vapor. Introducir el Montador de leche Automático sobre la protec-
ción de goma hasta que quede encajado.
No introducir la protección de goma más allá de la ranura indicada. En ese caso, el Montador de leche Automático no funcionará correctamente ya que no será
capaz de aspirar la leche.
borracha até ao engate na devida posição.
Não introduza a protecção de borracha noutro local
que não seja a sede evidenciada. Dessa forma, o
Batedor de leite automático não funciona correctamente pois não é capaz de aspirar o leite.
LIMPIEZA DEL CONTENEDOR DE CAFÉ EN GRANO, DE LA CUBETA
Y DEL COMPARTIMENTO DE CAFÉ
LIMPEZA DO RECIPIENTE DE CAFÉ EM GRÃOS, DA BANDEJA
E DO COMPARTIMENTO DE CAFÉ
ES
PT
Semanal
Semanal
Limpiar el contenedor de
café en grano, la cubeta y el
compartimento de café una
vez a la semana con un paño,
eliminando los residuos de
café y el polvo.
Limpe o recipiente de café
em grãos, a bandeja e o
compartimento de café
uma vez por semana com
um pano para remover os
resíduos de café e o pó.
Para extraer la cubeta, presionar los ganchos
situados en el fondo del contenedor de café
en grano, tal como se muestra en la gura
de arriba.
Para remover a bandeja pressione nos gan-
chos localizados no fundo do recipiente de
café em grãos, conforme apresentado na
gura na parte superior.
Tras la limpieza, volver a introducir la cubeta en el contenedor de café en grano.
Após a limpeza, volte a introduzir a bandeja no recipiente de café em grãos.
Page 69

www.philips.com/support
SEÑALES DE AVISO AMARILLO
SINAIS DE AVISO AMARELO
Instrucciones
Instruções
69
Máquina en fase de calentamiento para el suministro de
ES
bebidas o agua caliente.
Máquina em fase de aquecimento para a distribuição
PT
de bebidas ou água quente.
Llenar el contenedor de café
en grano y reiniciar el ciclo de
ES
suministro.
Encha o recipiente de café
em grãos e reinicie o ciclo
PT
de distribuição.
La máquina está realizando
un ciclo de enjuague. Esperar
a que termine.
A máquina está a realizar um ciclo de enxagúe.
Aguarde até ao nal.
Es necesario sustituir el ltro
de agua “INTENZA+”.
É necessário substituir o
ltro de água "INTENZA+".
Grupo de café en fase de restablecimiento tras reset de la
máquina.
O grupo café está em fase
de restabelecimento após
um reset da máquina.
Cargar el circuito. Es necesario realizar la descalci cación de la máquina. Ver el capítulo
relativo a la descalci cación para más indicaciones.
Carregue o circuito. É necessário efectuar a descalci cação da máquina. Consulte o capí-
tulo dedicado à descalci cação para obter mais indicações.
EspañolPortuguês
Page 70

Instrucciones
Exx
70
Instruções
www.philips.com/support
SEÑALES DE ALARMA ROJO
SINAIS DE ALARME VERMELHO
Cerrar la puerta de servicio. Volver a llenar el contenedor
ES
Feche a portinhola de serviço.
PT
de café en grano.
Encha novamente o recipiente de café em grãos.
Llenar el depósito de agua. Introducir completamente el
cajón de recogida de posos.
ES
Encha o reservatório de água.
Introduza completamente a gaveta de recolha das
PT
borras.
El grupo de café debe estar
introducido en la máquina.
O grupo café deve ser intro-
duzido na máquina.
Introducir el contenedor de
café en grano.
Introduza o recipiente de
café em grãos.
Introducir el cajón de recogida de posos.
Vaciar el cajón de recogida
de posos y el cajón de recogida de café.
Introduza a gaveta de recolha das borras.
Esvazie a gaveta de recolha
das borras e a gaveta de recolha de café.
Apagar la máquina. Volver a encenderla tras 30 segundos.
Repetir el procedimiento 2 o 3 veces.
Si la máquina no se pone en marcha, contactar con la línea
de asistencia al cliente de SAECO del país (números en el libro de garantía) y comunicar el código de error indicado en
la pantalla.
Desligue a máquina. Volte a ligá-la após 30 segundos. Repita o procedimento 2 ou 3 vezes.
Se a máquina não ligar, contacte a hotline (linha directa)
da SAECO do respectivo país (números no livreto da garantia) e indique o código de erro apresentado no visor.
Page 71

go to www.shop.philips.com
Productos para el mantenimiento
Produtos para a manutenção
Productos para el mantenimiento
Produtos para a manutenção
71
Filtro de agua INTENZA+
número de producto: CA6702
ES
Filtro de água INTENZA+
número do produto: CA6702
PT
Solución descalci cante
número de producto: CA6700
ES
Solução descalci cante
número do produto: CA6700
PT
Producto para la limpieza del circuito de la leche
ES
número de producto: CA6705
Produto para a limpeza do circuito de leite
PT
número do produto: CA6705
Grasa
número de producto: HD5061
ES
Graxa
número do produto: HD5061
PT
Pastillas desengrasantes
número de producto: CA6704
ES
Pastilhas desengordurantes
número do produto: CA6704
PT
Visite la tienda en línea de Philips
para comprobar la disponibili-
ES
dad y las ofertas de compra en
su país.
Visite a loja online Philips para
veri car a disponibilidade e as
PT
oportunidades de compra no seu
país.
EspañolPortuguês
Page 72

Il produttore si riserva il diritto d`apportare qualsiasi modifica senza preavviso.
The manufacturer reserves the right to change the features of the product without prior notice.
Der Hersteller behält sich das Recht vor, Änderungen am Produkt ohne Vorankündigung vorzunehmen.
Le producteur se réserve le droit d‘apporter des modifi cations au produit sans aucun préavis.
El fabricante se reserva el derecho a realizar modifi caciones en el producto sin previo aviso.
O fabricante reserva-se o direito de efectuar modifi cações ao produto sem aviso prévio.
Rev.00 del 15-05-13
 Loading...