

Page 1
Saeco
Intelia
HD8752
Product dimensions and information
• Product dimensions (L x D x H): 256 x 440 x 340 mm
• Coffee bean capacity: 300 gr
• Waste container capacity: 10 servings
• Water tank capacity: 1.5 l
• Maximum cup height: 130 mm
• Product weight: 8.9 kg
• Water pressure in pump: 15 bar
• Supported coffee types: Ground coffee
and Whole coffee beans
• Automatic Milk Frother
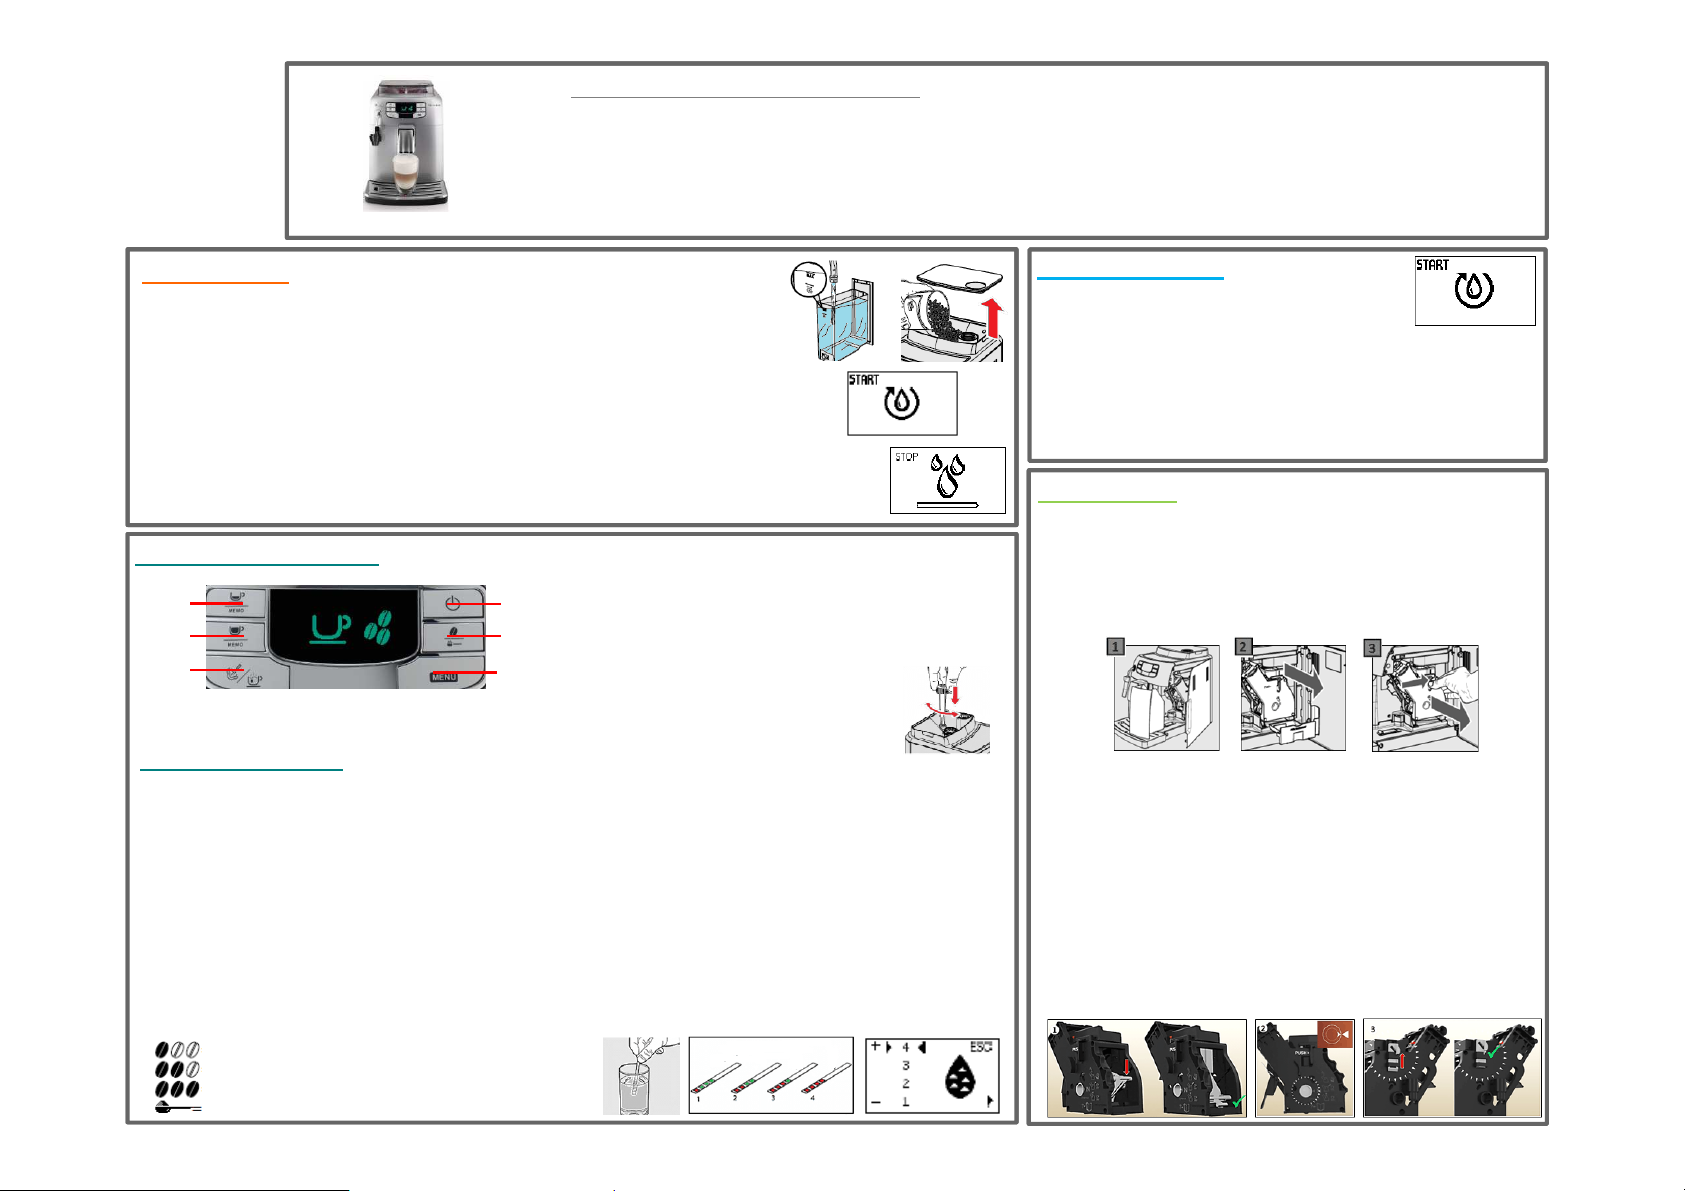
First time use: Machine needs to be installed and primed.
1. Insert the drip tray.
2. Rinse and fill the water tank with fresh water up to the MAX level.
3. Pour coffee beans into the coffee bean hopper.
4. Insert the plug at the back. Switch the power button to “I”.
5. To turn on the machine, press the “ON/OFF ” button on the front.
6. The display will indicate you have to prime the circuit.
7. Place a container under the steam wand/Classic Milk Frother.
8. Press the Espresso button to start the priming. After this he machine starts heating
up and performs an automatic rinse cycle trough the coffee dispensing spout.
9. Perform a manual rinse by dispensing some hot water and brew a pre-ground
coffee without adding coffee.
Buttons and symbols:
Espresso
button
Coffee
button
Steam/
Hot water
button
ON/OFF
button
Aroma/ preground coffee
button
Menu
• Grind settings:
The grinder can be set with the grinder
adjustment key. There are 5 settings.
Adjust while the machine is grinding.
1. Coarse grind: lighter taste, for dark roasted
coffee blends
2. Fine grind: bolder taste, for
light roasted coffee blends.
Machine Settings:
• Memo setting, cup volume.
Espresso and Coffee button can be adjusted
and set to your preference.
1. Place a cup under the dispensing spout.
2. Press and hold the espresso/coffee button until the
“MEMO” icon is displayed. Then release the button.
3. Press the espresso button when the desired amount
is reached. Also when adjusting the coffee button.
Aroma Setting:
3 strength choices are possible by pressing
the “Aroma" button
= mild aroma
= medium aroma
= strong aroma
= pre-ground coffee
Confidential
• Water hardness setting:
The water hardness can be measured with
the supplied tester strip.
1. Immerse the strip 1 sec. in water.
2. Check how many squares have changed to
red and consult the table.
3. The numbers on the strip correspond to the
water hardness adjustment settings.
4. To set the hardness on the machine; Press the
Menu button scroll with the aroma
button until the hardness setting appears and
select the number.
Divison, MMMM dd, yyyy, Reference
Prime the circuit:
To get air out of the internal circuit the
system needs to be primed.
Prime the system when the machine indicates this, it will
show this symbol in the display. Press the Espresso button
to start the priming.
You can also manually prime the circuit at any time by
simply dispensing some hot water.
Brew group:
How to remove:
1. Remove the coffee grounds drawer and open the service
door.
2. Remove and clean the coffee residues drawer.
3. To remove the brew group, press the PUSH button and
pull it out by its handle.
How to insert, set in rest position:
Important! If the brew group does not stand in the rest
position, it cannot be reinserted.
How to set the brew group in the rest position:
1. The lever must be in contact with the brew group base.
Push it down.
2. The two arrow heads on the side of the brew group will
now match.
3. The locking hook on the side of the brew group needs to
be in uppermost position. Push it upwards until you hear a
soft click.
Page 2

Cleaning and Maintenance:
• Empty/clean internal and external drip tray:
Empty the drip tray each time the ‘drip tray full’
indicator pops up through the drip tray cover.
• Cleaning Automatic Milk Frother
Daily; Rinse it for hygiene and to ensure perfect milk froth.
Weekly: Detach all parts and clean thoroughly.
Monthly: Clean the Automatic Milk Frother with the Saeco Milk
Circuit Cleaner CA6705.
• Empty Coffee ground container.
Always empty the container when the message ‘empty coffee
ground container’ is displayed. Always perform the activity when the
machine is switched ON.
• Descaling
Descale the machine when the calc clean symbol appears.
Only use the Philips/Saeco decalcifier CA6700.
It takes approx. 35 min. Finish the complete descale process till
the end without interruption.
The complete process consists of 3 cycles; One descaling cycle with the
specific decalcifier and two rinsing cycles with fresh water.
Attach Automatic Milk Frother:
First attach the suction tube and then insert it
onto the steam wand.
If you cannot insert it, rotate the chrome cover.
Detach the Automatic Milk Frother:
Brita/Intenza+ Filter installation/replacement:
Every time when installing or replacing a filter, this
.
new filter must be activated in the machine menu.
Activate new filter: Press the Menu button scroll by
pressing the Aroma button until Water Filter ON/OFF is
displayed Select ON and confirm with the Aroma button
Press the ON/OFF button to exit the menu.
Replace new filter: Press the Menu button scroll by
pressing the Aroma button until Water Filter ON/OFF/RESET is
displayed Select RESET and confirm with the Aroma
button Press the ON/OFF button to exit the menu.
Confidential
Compact description descaling process
Start descaling:
1. Remove the Automatic Milk Frother.
2. Press the Menu button and select CACL CLEAN.
Descaling cycle:
3. Empty the water tank, remove the filter if placed, and pour the entire bottle of Saeco
4. Empty the drip tray and coffee ground container.
5. Place a bowl underneath the steam/hot water wand and the dispensing spout.
6. Press the Espresso button to start the descaling cycle.
7. The machine will start dispensing the descaling solution at intervals. The bar on the
8. When the mixture of descaling solution and water has been used up, the Water tank
Rinsing Cycle:
9. Rinse and fill the water tank with fresh water up to the MAX level and place it back.
10. Empty the drip tray and place it back.
11. Place back the bowl underneath the steam/hot water wand and the dispensing spout.
12. Press the Espresso button to start the rinsing cycle. The display shows the progress.
13. When the Water tank empty symbol appears, refill the water tank with fresh water to
14. Press the Espresso button to start the second rinsing cycle.
15. When the descaling process is finished, the display shows END.
16. If the END symbol does not appear, the water tank has not been filled up to the MAX.
Divison, MMMM dd, yyyy, Reference
• Brew group cleaning.
Support movies available within the FAQ’s; how to lubricate/clean.
Clean the brew group weekly. Take it out and wash it with fresh,
lukewarm water. Clean monthly with the coffee oil remover
tablet CA6704.
Lubricate the brew group once a month or if needed after
cleaning. Use Saeco grease HD5061.
• Cleaning the coffee duct outlet (coffee funnel):
Clean the coffee duct outlet every time you clean
the brew group. Take out the brew group and clean
the coffee duct outlet with a spoon handle.
descaler in it. Top up with fresh water till the MAX level.
display shows the progress.
empty symbol appears on the display.
the MAX level. Place it back.
repeat steps 13 -15 again until END appears.
Page 3
Trouble shoot:
Error message (E01/E03/E04/E05/E14)
E01: Take out the brew group and unblock/clean the coffee duct outlet (coffee funnel). Clean and re-grease the brew group before placing it back.
E03/E04: Clean and re-grease the brew group. Make sure the brew group is in rest position before placing it back.
E05: 1). Try to prime the machine by dispensing some hot water. 2.) The steam wand is clogged with dirt, clean it with a pin. 3). When using an extra water filter, remove this filter
from the water tank and turn the machine OFF and back ON. 4). Take out and place back the water tank a few times.
E14: Switch OFF the machine and let it cool down for one hour.
Alarm message “Change filter” does not disappear, but the filter has been changed: The new filter has to be confirmed in the machine menu; Press the Menu button scroll
by pressing the Aroma button until Water Filter ON/OFF/RESET is displayed Select RESET and confirm with the Aroma button Press the ON/OFF button to exit.
Alarm message “Empty coffee ground container” does not disappear, but the container has been emptied: 1). Always empty the container when the machine is switched ON
and when the Empty coffee ground container symbol appears. Otherwise the machine does not register it is emptied. 2). Do not place the ground container back too fast.
Wait until the Insert coffee ground container symbol appears.
There is water under the machine (machine is leaking): This can have different causes; 1). The drip tray is too full and overflowed during brewing or the descaling process.
Always check the ’drip tray full’ indicator before brewing a coffee and empty the drip tray before you start descaling. 2). Check if the water tank is leaking. 3). The brew group
or the drains may be blocked, clean the brew group and the inside of the machine.
Cannot insert/remove the brew group:
Cannot insert: 1). Make sure the brew group is set in the rest position before placing it back. 2.) If still not possible to insert; place back the drip tray including coffee ground
container, close service door, switch ON and back OFF the machine. Try again to insert the brew group.
Cannot remove: 1). Check if the machine is still in the descaling process, if yes then first finish the descaling. If not, place back the drip tray including coffee ground container,
close service door, switch ON and back OFF the machine. Try again to remove the brew group.
The drip tray fills up quite fast: It is normal for the drip tray to fill up quickly and does not directly concern a defect. During use, the internal circuits are rinsed with water that
automatically ends up in the drip tray. Empty the drip tray frequently and when the ‘drip tray full’ indicator pops up through the drip tray cover.
The machine is not grinding the beans: 1). Clean the coffee duct outlet and brew group. 2). The grinder can be blocked. Take out all beans, place the suction tube of a
vacuum cleaner on top of the grinder to vacuum all loose particles. 3). Change the grind setting to a courser setting.
The coffee pucks are wet, and/or there is water in the coffee ground container: The consistency of the coffee pucks is related to the settings of the machine, and does not
directly point to a machine defect. Expect watery coffee pucks or some extra water in the coffee ground container: 1). During first time use as auto-dosing system is still
adapting. 2). After switching to a different blend of coffee beans or adjusting the grind settings, just brew some extra cups. 3). After changing machine settings as; grind setting,
coffee volume and aroma setting. As a coarse grind setting, higher coffee volume or a lighter aroma setting will lead to a waterier coffee puck.
The coffee/milk temperature is not hot enough: Adjust the coffee temperature in the Menu settings, options are MAX/ MED/MIN. Press the Menu button scroll to temp. setting
and select MAX. 1). Pre-heat the cups and use thin walled cups . 2). Adding cold milk or warm frothed milk, in both cases the temperature will decrease to some extent.
No coffee or only some drops of coffee are being dispensed (not first time use)/ The coffee is getting watery: This can have different causes; 1). The grinder is blocked; clean
the coffee bean container and coffee duct outlet. 2). Polluted/not well greased brew group; clean the brew group and make sure it is well greased. 3). Grind setting is set too
fine; change the grinder to a course setting. 4). Extra water filter not well placed (optional); Remove the extra water filter and try to make a coffee. If this works replace the
filter. 5). Air in the internal circuit; prime the circuit by dispensing some hot water. 6). Lime scale is causing a blockage; if the machine has not yet been descaled, descale the
machine.
There is coffee powder under the brew group/in the interior: Because of the fineness of the ground coffee powder, some coffee powder residues in the interior and under the
brew group are normal. If there is a lot of coffee powder, the piston of the brew group is not well greased, clean and grease the brew group.
Why doesn't the Automatic Milk Frother froth the milk?: 1). Make sure the suction tube is well attached and the Automatic Milk Frother is well attached to the machine. 2). Clean
the Automatic Milk Frother thoroughly, detach and clean it with warm water. 3). Clean the Automatic Milk Frother with the Saeco Milk Circuit Cleaner CA6705.
Confidential
Divison, MMMM dd, yyyy, Reference
 Loading...