

Page 1
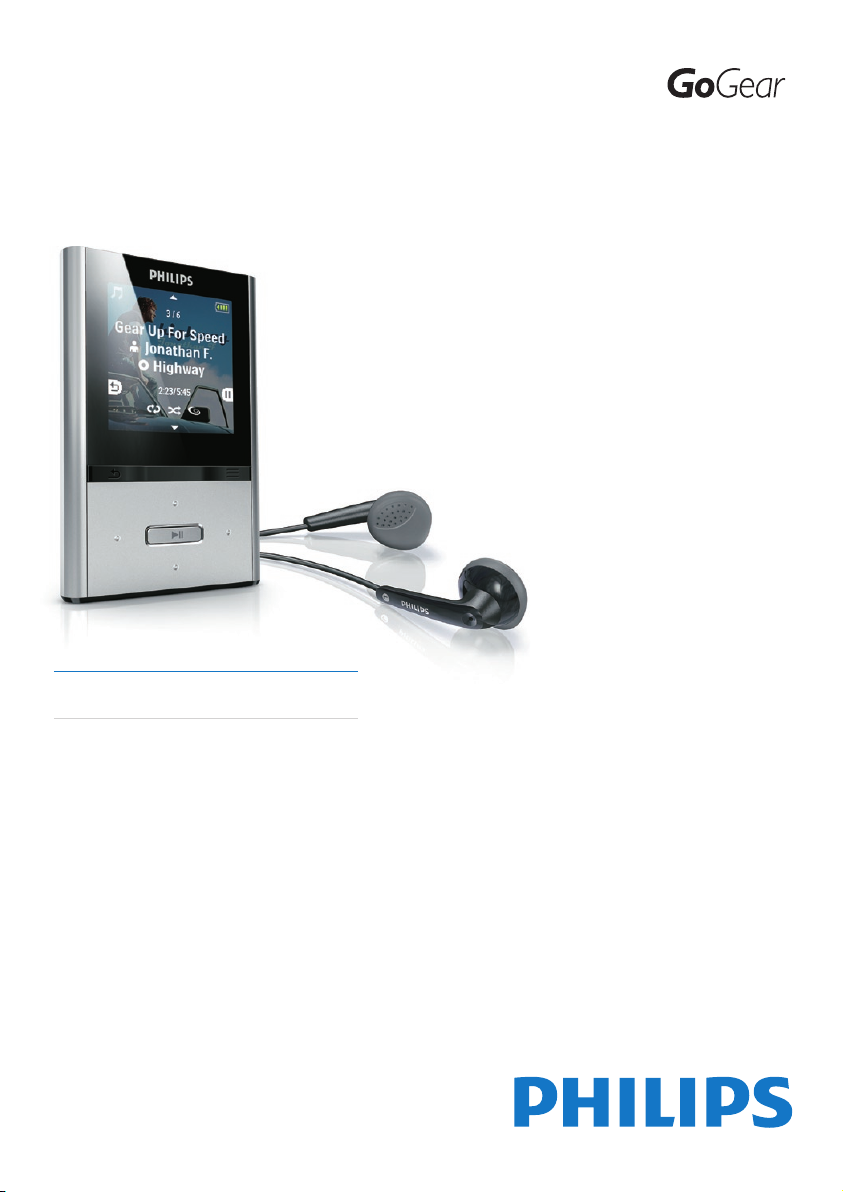
Register your product and get support at
www.philips.com/welcome
SA2VBE04
SA2VBE08
SA2VBE16
SA2VBE32
EN User manual
Page 2

Contents
1 Important safety information 2
General maintenance 2
Recycling the product 5
2 Your new VIBE 6
What’s in the box 6
3 Getting started 7
Overview of the controls and
connections 7
Limit the volume 7
Overview of the main menu 8
Connect and charge 8
Software loaded on the VIBE 9
Files loaded on the VIBE 9
4 Update VIBE 10
Manually verify / update the rmware 10
5 Turn VIBE on and off 11
Automatic shut-down 11
Lock the keys 11
6 Philips Songbird 12
Build a media library 12
Browse your media library 13
Organize and manage your Songbird
library 13
Playlists 15
Change the look of the Songbird
library 15
Format VIBE (erase all music and data) 16
Repair VIBE (restore factory settings) 16
7 Music 17
Listen to music 17
Navigate inside a music track 17
Play music from a ltered selection 17
Find your music 17
8 Video 19
Play videos 19
Navigate inside a video 19
Delete the currently playing video 19
Delete one or more videos 19
9 Pictures 20
Add pictures to VIBE 20
View pictures 20
Start a slideshow 20
Delete the currently displayed picture 20
Delete one or more pictures 20
10 Radio 21
Listen to FM radio 21
Manually tune a radio station 21
Auto-tune radio station presets 21
Play a preset radio station 21
Listen to recordings 22
Upload your recordings to a computer 22
11 Recordings 23
Record from FM radio (Available with
some versions only!) 23
Record audio/voices 23
Delete the currently playing video 24
Delete one or more recordings 24
12 UsetheVIBEtocarrydatales 25
13 Settings 26
14 Technical data 28
System requirements 28
15 Glossary 29
Need help?
Please visit
www.philips.com/welcome
where you can access a full set of supporting
materials such as the user manual, the latest
software updates, and answers to frequently
asked questions.
English
EN
1
Page 3

1 Important safety
Hearing Safety
information
General maintenance
The translation of this document is for
reference only.
In the event of any inconsistency between the
English version and the translated version, the
English version shall prevail.
Caution
To avoid damage or malfunction: •
Do not expose the product to excessive heat •
caused by heating equipment or direct sunlight.
Do not drop the product or allow objects to •
fall on your player.
Do not allow the product to be submerged •
in water. Do not expose headphone socket
or battery compartment to water, as water
entering the set may cause major damage.
Active mobile phones in the vicinit y may cause •
inter ference.
Back up your les. Ensure that you retain the •
original les you have downloaded to your
device. Philips is not responsible for any loss of
data if the product becomes damaged or not
readable / legible.
Manage (transfer, delete, etc.) your music les •
only with the supplied music software to avoid
problems.
Do not use any cleaning agents containing •
alcohol, ammonia, benzene, or abrasives as
these may harm the product .
About operating and storage temperatures
Operate in a place where temperature is •
always between 0 and 35ºC (32 to 95ºF)
Store in a place where temperature is •
always between -20 and 45ºC (-4 to
113ºF ).
Battery life may be shortened in low •
temperature conditions.
Replacement parts/accessories:
Visit www.philips.com/suppor t to order
replacement parts/accessories.
Listen at a moderate volume:
Using headphones at a high volume can impair
your hearing. This product can produce sounds
in decibel ranges that may cause hearing loss for
a normal person, even for exposure less than
a minute. The higher decibel ranges are offered
for those that may have already experienced
some hearing loss.
Sound can be deceiving. Over time your hearing
‘comfort level’ adapts to higher volumes of
sound. So after prolonged listening, what sounds
‘normal’ can actually be loud and harmful to
your hearing. To guard against this, set your
volume to a safe level before your hearing
adapts and leave it there.
To establish a safe volume level:
Set your volume control at a low setting.
Slowly increase the sound until you can hear it
comfortably and clearly, without distortion.
Listen for reasonable periods of time:
Prolonged exposure to sound, even at normally
‘safe’ levels, can also cause hearing loss.
Be sure to use your equipment reasonably and
take appropriate breaks.
Be sure to observe the following guidelines
when using your headphones.
Listen at reasonable volumes for reasonable
periods of time.
Be careful not to adjust the volume as your
hearing adapts.
Do not turn up the volume so high that you
can’t hear what’s around you.
You should use caution or temporarily
discontinue use in potentially hazardous
situations.
Do not use headphones while operating a
motorized vehicle, cycling, skateboarding, etc.; it
may create a trafc hazard and is illegal in many
areas.
2
EN
Page 4
Modications
Modications not authorized by the
manufacturer may void user’s authority to
operate the product.
Copyright information
All other brands and product names are
trademarks of their respective companies or
organizations.
Unauthorized duplication of any recordings
whether downloaded from the Internet or
made from audio CDs is a violation of copyright
laws and international treaties.
The making of unauthorized copies of copyprotected material, including computer
programs, les, broadcasts and sound
recordings, may be an infringement of
copyrights and constitute a criminal offense.
This equipment should not be used for such
purposes.
The Windows Media and the Windows logo are
registered trademarks of Microsoft Corporation
in the United States and/or other countries.
Be responsible! Respect copyrights.
Philips respects the intellectual property of
others, and we ask our users to do the same.
Multimedia content on the internet may have
been created and/or distributed without the
original copyright owner’s authorization.
Copying or distributing unauthorized content
may violate copyright laws in various countries
including yours.
Compliance with copyright laws remains your
responsibility.
The recording and transfer to the portable
player of video streams downloaded to your
computer is intended only for use with public
domain or properly licensed content. You
may only use such content for your private,
non-commercial use and shall respect eventual
copyright instructions provided by the copyright
owner of the work. Such instruction may
state that no further copies shall be made.
Video streams may include copy protection
technology that prohibits further copying. For
such situations the recording function will not
work and you will be notied with a message.
Data logging
Philips is committed to improving the quality
of your product and enhancing the Philips user
experience. To understand the usage prole of
this device, this device logs some info / data to
the non-volatile memory region of the device.
These data are used to identify and detect
any failures or problems you as a user may
experience while using the device. The data
stored, for example, will be the duration of
playback in music mode, duration of playback
in turner mode, how many times battery low
was encountered, etc. The data stored do not
reveal the content or media used on the device
or the source of downloads. The data stored on
the device are retrieved and used ONLY if the
user returns the device to the Philips service
center and ONLY to simplify error detection
and prevention. The data stored shall be made
available to user on user’s rst request.
Monkey’s Audio decoder
a The Monkey’s Audio SDK and source
code can be freely used to add
APE format playback, encoding, or
tagging support to any product, free
or commercial. Use of the code for
proprietary effor ts that don’t suppor t
the ofcial APE format require written
consent of the author.
b Monkey’s Audio source can be included
in GPL and open-source software,
although Monkey’s Audio itself will
not be subjected to external licensing
requirements or other viral source
restrictions.
c Code changes and improvements must
be contributed back to the Monkey’s
Audio project free from restrictions or
English
EN
3
Page 5

royalties, unless exempted by express
written consent of the author.
d Any source code, ideas, or libraries used
must be plainly acknowledged in the
software using the code.
e Although the software has been tested
thoroughly, the author is in no way
responsible for damages due to bugs or
misuse.
If you do not completely agree with all of the
previous stipulations, you must cease using this
source code and remove it from your storage
device.
FLAC decoder
Copyright (C) 2000,2001,2002,2003,2004,2005,
2006,2007,2008,2009 Josh Coalson
Redistribution and use in source and
binary forms, with or without modication,
are permitted provided that the following
conditions are met:
Redistributions of source code must •
retain the above copyright notice, this list
of conditions and the following disclaimer.
Redistributions in binary form must •
reproduce the above copyright notice,
this list of conditions and the following
disclaimer in the documentation and/
or other materials provided with the
distribution.
Neither the name of the Xiph.org •
Foundation nor the names of its
contributors may be used to endorse
or promote products derived from this
software without specic prior written
permission.
THIS SOFTWARE IS PROVIDED BY
THE COPYRIGHT HOLDERS AND
CONTRIBUTORS “AS IS” AND ANY EXPRESS
OR IMPLIED WARRANTIES, INCLUDING,
BUT NOT LIMITED TO, THE IMPLIED
WARRANTIES OF MERCHANTABILITY AND
FITNESS FOR A PARTICULAR PURPOSE
ARE DISCLAIMED. IN NO EVENT SHALL
THE FOUNDATION OR CONTRIBUTORS
BE LIABLE FOR ANY DIRECT, INDIRECT,
INCIDENTAL, SPECIAL, EXEMPLARY, OR
CONSEQUENTIAL DAMAGES (INCLUDING,
BUT NOT LIMITED TO, PROCUREMENT OF
SUBSTITUTE GOODS OR SERVICES; LOSS
OF USE, DATA, OR PROFITS; OR BUSINESS
INTERRUPTION) HOWEVER CAUSED
AND ON ANY THEORY OF LIABILITY,
WHETHER IN CONTRACT, STRICT LIABILITY,
OR TORT (INCLUDING NEGLIGENCE OR
OTHERWISE) ARISING IN ANY WAY OUT
OF THE USE OF THIS SOFTWARE, EVEN IF
ADVISED OF THE POSSIBILITY OF SUCH
DAMAGE.
XPAT XML Parser
Copyright (c) 1998, 1999, 2000 Thai Open
Source Software Center Ltd
Permission is hereby granted, free of charge, to
any person obtaining a copy of this software
and associated documentation les (the
“Software”), to deal in the Software without
restriction, including without limitation the rights
to use, copy, modify, merge, publish, distribute,
sub-license, and/or sell copies of the Software,
and to permit persons to whom the Software
is furnished to do so, subject to the following
conditions:
The above copyright notice and this permission
notice shall be included in all copies or
substantial portions of the Software.
THE SOFTWARE IS PROVIDED “AS IS”,
WITHOUT WARRANTY OF ANY KIND,
EXPRESS OR IMPLIED, INCLUDING BUT
NOT LIMITED TO THE WARRANTIES
OF MERCHANTABILITY, FITNESS FOR
A PARTICULAR PURPOSE AND NONINFRINGEMENT. IN NO EVENT SHALL THE
AUTHORS OR COPYRIGHT HOLDERS
BE LIABLE FOR ANY CLAIM, DAMAGES
OR OTHER LIABILITY, WHETHER IN AN
ACTION OF CONTRACT, TORT OR
OTHERWISE, ARISING FROM, OUT OF OR
IN CONNECTION WITH THE SOFTWARE
OR THE USE OR OTHER DEALINGS IN THE
SOFTWARE.
4
EN
Page 6
Recycling the product
Your product is designed and manufactured
with high quality materials and components,
which can be recycled and reused.
When you see the crossed-out wheel bin
symbol attached to a product, it means the
product is covered by the European Directive
2002/96/EC:
Never dispose of your product with other
household waste. Please inform yourself about
the local rules on the separate collection of
electrical and electronic products. The correct
disposal of your old product helps prevent
potentially negative consequences on the
environment and human health.
Warning
For products with “non-exchangeable” built-in •
batteries: The removal of (or the attempt to
remove) the battery invalidates the warranty.
This procedure is only to be per formed at the
end of the product’s life.
Your product contains a built-in rechargeable
battery covered by the European Directive
2006/66/EC, which cannot be disposed of with
normal household waste.
English
Please inform yourself about the local rules on
separate collection of batteries. The correct
disposal of batteries helps prevent potentially
negative consequences on the environment and
human health.
Notice for the European Union
This product complies with the radio
interference requirements of the European
Union.
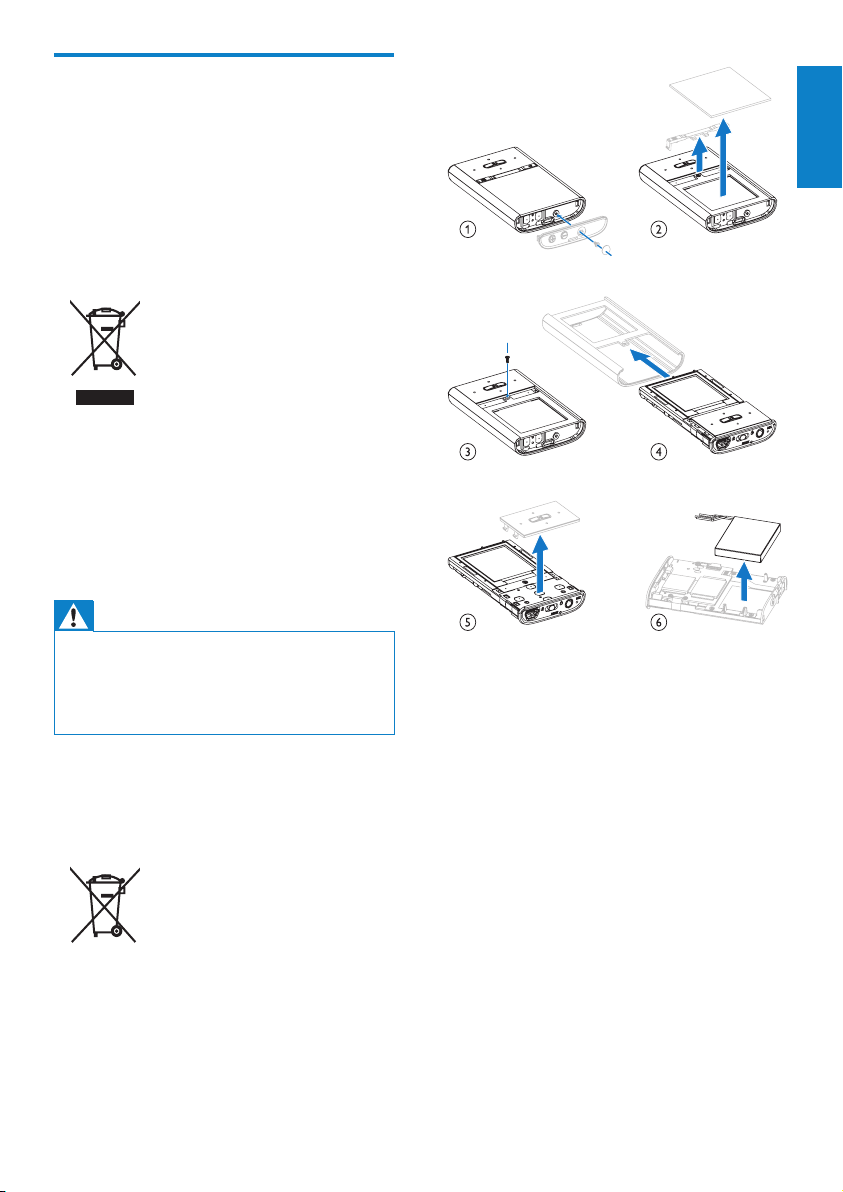
To safeguard the functionality and safety of
your product, take your product to an ofcial
collection point or service center where a
professional can remove or replace the battery
as shown:
EN
5
Page 7
2 Your new VIBE
Philips GoGear audio player
Quick start guide
VIBE allows you to
play music•
watch videos•
listen to FM radio•
make recordings•
What’s in the box
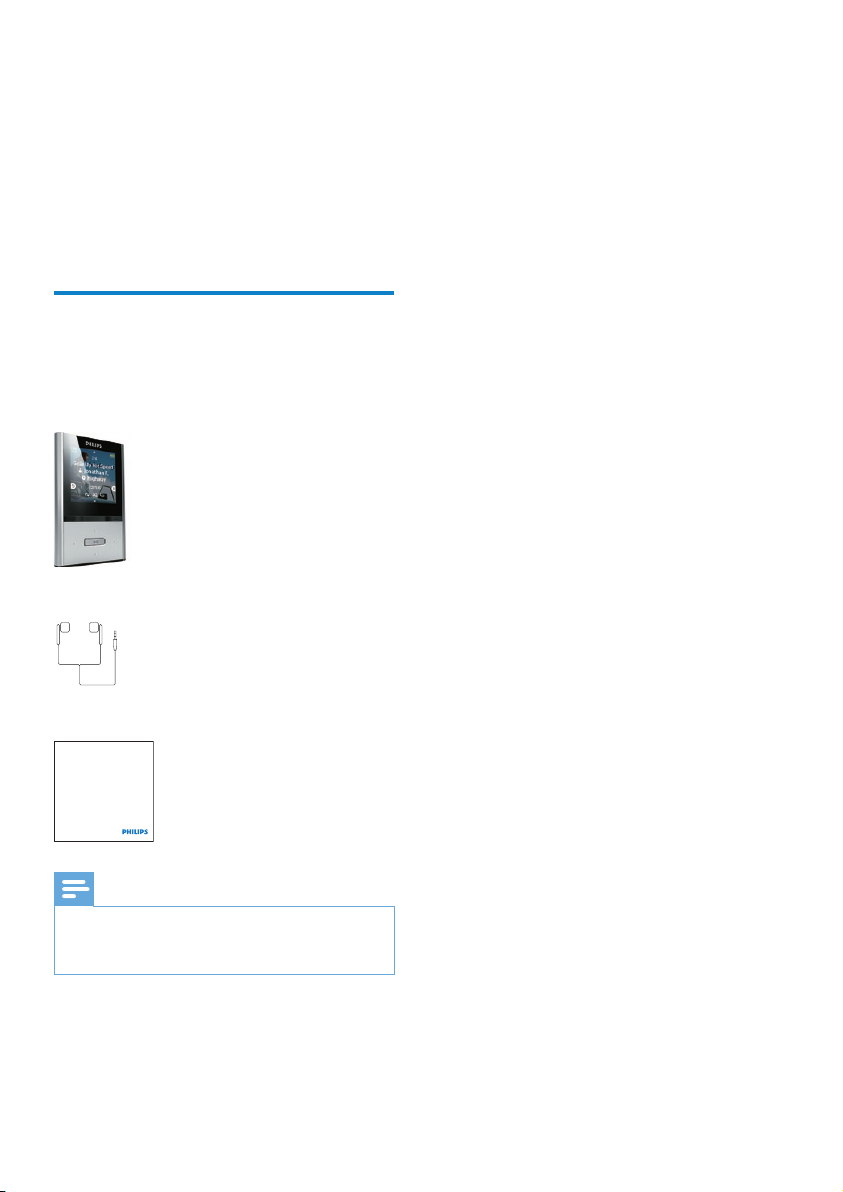
Check that you have received the following
items:
Player
Earphones
Quick start guide
6
Note
The images ser ve as reference only. Philips •
reserves the right to change color/design
without notice.
EN
Page 8

3 Getting started
Overview of the controls and connections
a
b
c
d
e
MIC microphone
f
display
/ press: increase/decrease the
volume
press and hold: increase/
decrease the volume quickly
show options menu
/ press and hold: skip to next/
previous quickly
in play screen, press and hold to
scan through current track
press: play/pause/conrm
g
RESET press: reset VIBE
h
i
j
k
l
Limit the volume
Listening to loud sounds for longer than a •
moment can be harmful to the listener.
You can set the volume level of VIBE to limit the
maximum volume output.
1 From the main menu, select
[Settings]>[Sound settings] > [Volume
limit].
2 Press the volume controls / to adjust
the level.
3 Press to conrm.
To enable maximum volume again:
1 Select [Settings] > [Sound settings]
>[Volume limit].
2 Set the volume limit to maximum.
3 Press to conrm.
headphone jack
slide and hold: turn VIBE on/off
slide: lock/unlock all buttons
/ in list, press: scroll up/down
in list, press and hold: scroll up/
down quickly
USB connector plug
press: back one level
press and hold: return to root
menu
Caution
When you set a volume limit, VIBE can »
no longer exceed the set volume, even
if you press the button to increase the
volume .
English
EN
7
Page 9
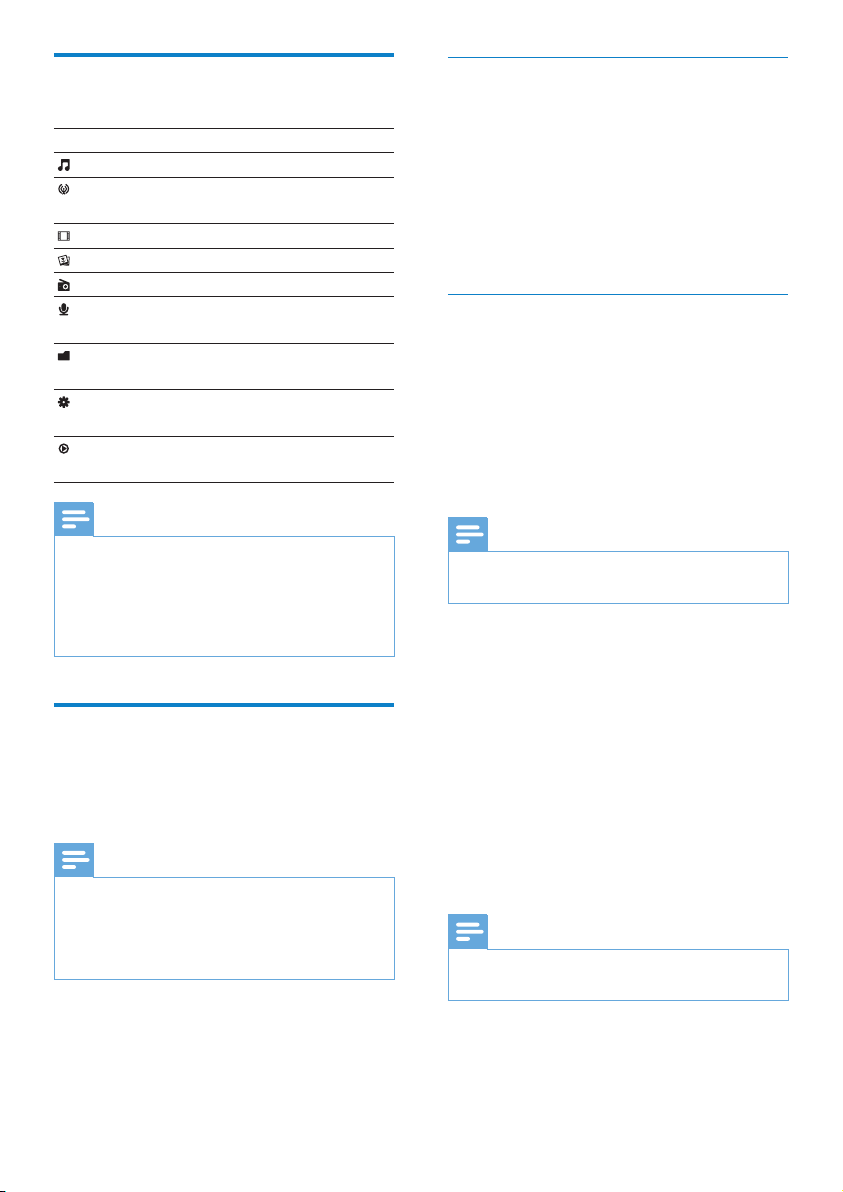
Overview of the main menu
Menu Mode To
Music play digital audio tracks
Rhapsody*
channels
Video play videos
Pictures view pictures
FM radio listen to FM radio
Recordings create or listen to
Folder
view
Settings customize the settings
Now
playing
Note
* Rhapsody channels becomes part of the •
main menu after you connect VIBE to a
computer that has the Rhapsody software
installed. Rhapsody channels services require
an active Rhapsody account and is available in
some regions only.
listen to your Rhapsody*
channels
recordings
view les in folders
of VIBE
show the current play
screen
Connect and charge
VIBE has a built-in battery that can be charged
through the USB port of a computer (USB
cable included).
Note
When you connect VIBE to a computer, you •
are br iey prompted to select:
• [Charge & transfer] or [Charge & play].
VIBE automatically applies • [Charge & transfer],
if no new selection is made.
Connect VIBE to a computer
1 Connect the USB plug of the supplied
USB cable to a spare USB port on your
compu ter.
2 Connect the small USB plug of the USB
cable to the small USB jack on VIBE.
3 Turn on your computer.
VIBE charges. »
InstallPhilipsSongbirdfortherst
time
When you connect VIBE to the PC for the
rst time, a pop-up window appears:
1 Select Install Philips Songbird.
2 Follow the on-screen instructions to
complete the installation.
Note
The ins tallation requires you to agree to the •
license terms.
If the pop-up window is not displayed
automatically:
1 Select My Computer (Windows XP /
Windows 2000) / Computer (Windows
Vista / Windows 7).
2 Right click on the Philips GoGear VIBE
icon.
3 Select Install Philips Songbird
(Setup.exe).
4 Follow the on-screen instructions to
complete the installation.
Note
The ins tallation requires you to agree to the •
license terms.
8
EN
Page 10
Install the Philips Songbird software
again(aftertherstinstallation)
Important!
The Philips Songbird software installer is
preloaded to VIBE.
To free memor y capacity for your media
content on VIBE, the installer le is
automatically deleted during the rst
installation process.
If you want to install the software any time
after the rst installation, follow these
instructions:
1 Connect VIBE to the computer.
2 Ensure that the computer is connected
to the Internet, and then open Windows
Exp lore r.
3 In Windows Explorer, right click on VIBE,
and then select the option to install
Philips Songbird.
The computer downloads the installer »
le from the Internet.
4 Follow the on-screen instructions to
complete the installation.
Battery level indication
The display indicates the approximate levels of
the battery status as follows:
100% 75% 50% 25% 0%
A ashing battery screen indicates that »
the battery is low. The player saves
all settings and switches off within 60
seconds.
Note
Rechargeable batteries have a limited number •
of charge cycles. Batter y life and number of
charge cycles vary by use and settings.
The charging animation stops and the •
icon is displayed when the charging process is
completed.
Tip
You can conser ve battery power and increase •
the play time of VIBE if you go to > [Display
Settings] > [Screen off timer] and ensure that
the shortest timer setting is selected.
English
Software loaded on the VIBE
VIBE comes with the following software:
• Philips Songbird (helps you update the
rmware of VIBE and transfer your media
les).
Files loaded on the VIBE
The following les are loaded on VIBE:
User Manual•
Frequently Asked Questions•
EN
9
Page 11
4 Update VIBE
VIBE is controlled by an internal program called
rmware. Newer versions of the rmware may
have been released after you have purchased
VIBE.
The software program called Philips Songbird
can use your computer to check for rmware
updates that are available on the Internet.
Install Philips Songbird on your computer
(see chapter Install software) and follow the
instructions to update (see chapter Manually
verify/updatethermware).
Note
Your music les are not affected by a r mware •
update.
Manually verify / update the
rmware
1 Ensure that your computer is connected
to the Internet.
2 Connect VIBE to the computer (see
section Connect and charge for
instructions).
3 On your computer, click Start >
Programs > Philips > Philips Songbird to
launch the Philips Songbird application.
4 Select Tools > Updates
» Philips Songbird checks for updates
and installs new rmware from the
Internet, if available.
5 Follow the on-screen instructions to
update the rmware of VIBE.
6 Wait until the update is completed, then
disconnect VIBE from the computer.
VIBE restarts after the rmware is »
updated and is ready for use again.
10
EN
Page 12

5 Turn VIBE on
and off
1 To toggle between modes on and off,
slide and hold for approximately 2
seconds.
Automatic shut-down
VIBE has an automatic shut-down feature that
can save battery power.
After 10 minutes in idle mode (no music plays,
no button is pressed), VIBE turns off.
1 Slide and hold for approximately 2
seconds to turn VIBE on again.
Lock the keys
VIBE has a lock switch to prevent accidental
operation.
1 To lock the buttons when you play, move
the slider to position .
All buttons except the volume keys are »
locked and the display shows a lock
icon.
2 To unlock the buttons again, move the
slider to the center position.
English
EN
11
Page 13
6 Philips Songbird
VIBE comes with the Philips Songbird software.
The Philips Songbird software helps you to:
purchase new media (music and videos) •
online
create a media librar y•
manage your media library•
play music and videos•
sync your media with the VIBE•
When Philips Songbird is launched for the
rst time, choose from the following options
to import media les into the Songbird media
library:
Impor t an existing iTunes library.•
Scan for media les in specic directories. •
(You can select to watch a folder, so that
the les that are added or deleted there
are automatically added or deleted in the
Songbird media library.)
Importmedialesfromadirectory
The following steps show how you can import
media (music and video) les that are stored
elsewhere on your computer or computer
network:
1 On the computer, launch the Songbird
program.
2 On the Songbird toolbar, click File, then
select Import Media....
3 Select your media (music and video) les,
then click OK.
The media les that you added are »
listed in the media library.
Tip
If you select a folder that contains music or •
video les, the software scans the folder and
adds all the music or video les it contains to
the media libr ary (duplicate titles are ignored).
Import media from iTunes
Build a media library
Use one or more of the following options to
build a media library with Songbird:
Rip a CD
By default, the Philips Songbird software
installs the following add-ons that are needed
to rip a CD:
CD Rip Suppor t•
Gracenote Metadata Lookup Provider•
Set up the CD rip options
1 On the computer, launch the Songbird
program.
2 Select Tools > Options....
3 Select the CD Rip tab, and then choose
your CD rip options.
4 Click on OK to conrm.
12
EN
1 On the computer, launch the Songbird
program.
2 Select Tools > Options....
3 On the Songbird toolbar, select the
Media Importer tab, then iTunes Import/
Export.
4 Verify your library location and options.
5 Select Import Library.
The software imports the iTunes »
library into Songbird.
Page 14
Export media to iTunes
Browse your media library
1 On the computer, launch the Songbird
program.
2 Select Tools > Options....
3 On the Songbird toolbar, select the
Media Importer tab, then iTunes Import/
Export.
4 Verify your library location and options.
5 Select Export Library.
The software exports the library from »
Songbird to iTunes.
Get content from online sources
You can purchase content from online sources
such as the following:
7-digital•
Check the specications of your VIBE to see
what services are available to you.
Import recordings from VIBE
1 On the computer, launch the Songbird
program.
2 On the Songbird toolbar, click File, then
select Import Media....
3 Select your recordings on VIBE, then click
OK.
The selected recordings are listed in »
the media library.
Tip
If you select a folder that contains recordings, •
the sof tware scans the folder and adds all the
recordings it contains to the library (duplicate
titles are ignored).
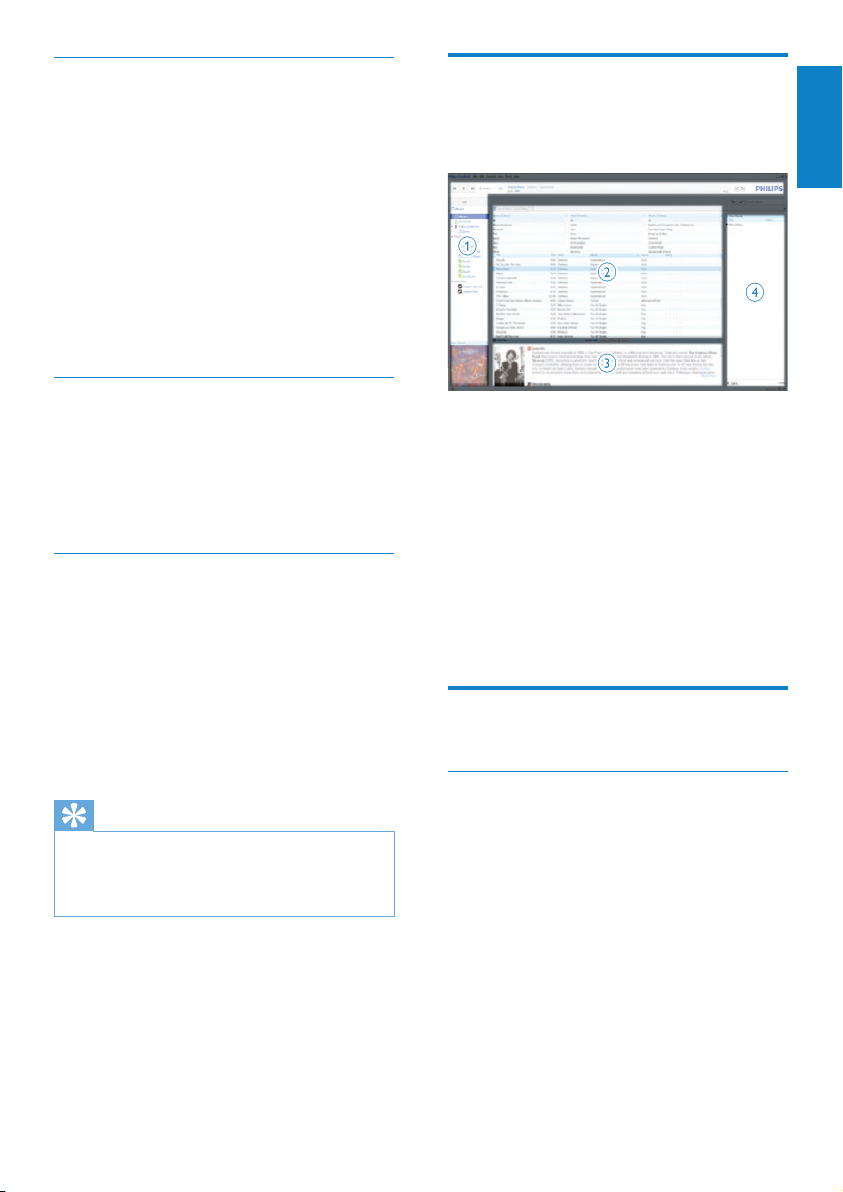
The Songbird media library is structured as
follows:
a Player Pane (this is where the VIBE is
displayed)
b Library Pane (this is where you nd the
contents of your library)
c Service Pane (this is where you nd
additional information about contents,
such as playlists)
d Information Pane (this is were you nd
information about the selected options)
Organize and manage your Songbird library
Let Songbird manage your media
1 On the computer, launch the Songbird
program.
2 Select Tools > Options….
3 On the Songbird toolbar, select the
Manage Files tab.
4 Check Allow Songbird to manage my
les.
5 Set the options on how you want to
organize your media.
English
EN
13
Page 15
RemovemedialesfromtheSongbird
media library
1 In the Songbird library, right click on a
media le, then select Remove.
2 In the prompt window, click Remove to
conrm that you want to remove the le.
The selected le is removed from »
the library and from all playlists. (By
default, the le is only “removed”, not
“deleted”. The media le still exists in
its original location on the computer or
computer network.)
Tip
To select multiple les on the computer (PC), •
press and hold Ctrl.
To select multiple consecutive les, press and •
hold Shift.
Delete media
This is how to delete media les in Windows
Explorer:
1 With VIBE connected to the computer,
open Windows explorer.
2 Locate the media folder in VIBE.
3 Delete the media le in the same way as
you would from any other location on the
compu ter.
4 Select the folder that you want Songbird
to watch for changes.
The selected folder is watched and »
Songbird matches the library content
to the content of the folder.
Fetch album artwork
Choose from these options to fetch the
artwork for your albums:
1 On the computer, launch the Songbird
program.
On the Songbird toolbar, select • Tools >
Get Album Artwork.
If no titles are selected, Songbird »
fetches the artwork for all titles in the
library.
Right-Click on selected titles.•
Songbird fetches the artwork for all »
selected titles.
Let Songbird watch a folder
You can let Songbird
monitor the contents of a folder, and•
add or remove the media from your •
library to match the folder contents.
1 On the computer, launch the Songbird
program.
2 Select Tools > Options....
3 On the Songbird toolbar, select the
Media Importer tab, and then Watch
Folders.
14
EN
Page 16

Playlists
By default, the Philips Songbird software installs
the following add-ons that are needed to rip a
CD:
CD Rip Suppor t•
Gracenote Metadata Lookup Provider•
Create a playlist
1 On the computer, launch the Songbird
program.
2 Choose from these options to create a
new playlist:
On the Songbird toolbar, select • File
> New Playlist.
Right-click on the left hand sidebar, •
and then choose New Playlist .
Click the • + symbol at the bottom of
the left hand side Ser vice Pane.
A new playlist appears in the Service »
Pane.
3 Enter a name for the new playlist.
Add titles to a playlist
1 On the computer, launch the Songbird
program.
2 Select one or more titles.
3 Choose from these options to add the
selected titles to a playlist:
Drag and drop the selected titles to •
the playlist in the Service Pane.
Right-click on the selection, and then •
select Add to Playlist > The_name_
of_your_playlist.
All selected titles are added to the »
playlist.
Remove titles from a playlist
1 On the computer, launch the Songbird
program.
2 Select a playlist.
3 Right-click on the title that you want to
remove, and then Remove.
The selected title is removed from the »
playlist.
Change the look of the Songbird library
You can change the design and color scheme
of the Songbird library. We call this “changing
feathers”. New feathers are installed and
managed like add-ons.
Find new feathers
1 On the computer, launch the Songbird
program.
2 On the Songbird toolbar, select View >
Feathers > Get More Feathers….
The software searches for new »
feathers.
3 Follow the on-line instructions to install
the new feathers.
English
EN
15
Page 17
Format VIBE (erase all music and data)
Philips Songbird has a Format feature that you
can use to format VIBE and erase all your les
from the internal memory.
Caution
The following procedure erases all your les •
that are stored on VIBE.
1 Install Philips Songbird on your computer
(see chapter Install software), and then
launch the program.
2 In the Philips Songbird player pane, click
on VIBE.
3 In the library pane, click on the tab called
Tools.
4 In the tools pane, click on Format device.
5 Follow the on-screen instructions to
complete the repair procedure.
Repair VIBE (restore factory settings)
Philips Songbird has a repair feature that you
can use to restore VIBE to the factory settings.
Before you proceed, back up your les that are
stored on VIBE if possible.
Caution
The following procedure erases all your les •
that are stored on VIBE, and res tores the
factory settings.
1 Install Philips Songbird on your computer
(see chapter Install software), and then
launch the program.
2 In the Philips Songbird menu bar (at the
top), click on the Tools pull-down menu
and then select Repair My VIBE.
3 Follow the on-screen instructions to
complete the repair procedure.
16
EN
Page 18
7 Music
Find your music
Listen to music
1 From the main menu, select to enter
the music mode.
2 Navigate the sub-menus to select the
music track.
3 Press to toggle between play and
pause.
Press • to see more music options.
Press • to go back one level.
Press and hold • to return to the
main menu.
Navigate inside a music track
1 While you listen to a music track, press
/ to quickly navigate forward /
backwards inside the track.
Press • to view more music options.
Playmusicfromaltered
selection
1 While you listen to music, press and
then select [Play mode] > [Play music
from…].
2 Select the selection lter (example:
selection lter[… this album] plays only
music from the currently playing album).
VIBE plays only music from the ltered »
selection.
From the main menu, select to enter music
mode.
VIBE offers the following menu options:
[All songs]
Alphabetically listed tracks•
[Artists]
Alphabetically listed ar tists•
Alphabetically listed albums•
Tracks listed in album order•
[Albums]
Alphanumerically listed albums•
Tracks listed in album order•
[Album art]
Alphanumerically listed album art•
[Playlists]
• [Playlist-on-the-go]
Tracks listed in playlist order•
[Audiobooks]*
Books listed in alphanumerical order•
Note
* You can purchase audiobooks at online •
stores such as audible.com.
VIBE handles the audiobooks like music les. •
Delete the currently playing music
track
This is how to delete the currently playing
music track:
1 While you listen to the music track, press
.
2 Select the option to delete the music
track.
3 Select [ Ye s] to conrm the deletion.
English
EN
17
Page 19
Delete one or more music tracks
Use the Philips Songbird software to sync
your media les.
Alternatively, you can delete music in
Windows Explorer:
1 Connect VIBE to the computer.
2 In Windows Explorer, locate the music
folder in VIBE.
3 Delete the music as you normally would
on the computer.
Note
Alternatively, you can select • from the main
menu and nd your les in folder view.
18
EN
Page 20
8 Video
Delete one or more videos
Play videos
1 From the main menu, select to enter
the video mode.
2 Navigate the sub-menus to select the
video.
3 Press to toggle between play and
pause.
Press • to see more video options.
Press • to go back one level.
Press and hold • to return to the
main menu.
Navigate inside a video
1 While you watch a video, press /
to quickly navigate forward / backwards
inside the video.
Press • to view more video options.
Delete the currently playing video
Use the Philips Songbird software to sync your
media les. Alternatively, you can delete music
in Windows Explorer:
1 Connect VIBE to the computer.
2 In Windows Explorer, locate the video
folder in VIBE.
3 Delete the video as you normally would
on the computer.
Note
Alternatively, you can select • from the main
menu and nd your les in folder view.
English
This is how to delete the currently playing
video:
1 While you watch the video, press .
2 Select the option to delete the video.
3 Select [ Ye s] to conrm the deletion.
EN
19
Page 21
9 Pictures
Delete the currently displayed picture
Add pictures to VIBE
1 Connect VIBE to the computer.
2 In Windows Explorer, create folders in
VIBE.
3 Use drag and drop actions to sor t your
pictures into the folders.
View pictures
1 From the main menu, select to enter
the picture mode.
2 Navigate the sub-menus to select the
picture.
3 Press to view the picture in full-screen
mode.
4 Press / to rotate the picture.
Press • to see more picture options.
Press • to go back one level.
Press and hold • to return to the
main menu.
This is how to delete the currently displayed
picture:
1 While you view the picture in full-screen
mode, press .
2 Select the option to delete the picture.
3 Select [ Ye s] to conrm the deletion.
Delete one or more pictures
Use a computer to delete pictures in Windows
Explorer:
1 Connect VIBE to the computer.
2 In Windows Explorer, locate the picture
folder in VIBE.
3 Delete the pictures as you normally
would on the computer.
Note
Alternatively, you can select • from the main
menu and nd your les in folder view.
Start a slideshow
1 While you view a video in full-screen
mode, press to start a slideshow.
Press • to view more slideshow options.
20
EN
Page 22
10 Radio
Play a preset radio station
Listen to FM radio
1 From the main menu, select to enter
radio mode.
The earphones cable acts as FM »
antenna.
Tip
Radio play stops when you switch to another •
mode or when you turn off VIBE.
Manually tune a radio station
While in mode, you can manually tune to a
radio station:
1 To search for the next stronger signal,
press and hold / .
2 To ne tune the frequency, briey press
/ .
Auto-tune radio station presets
1 While in mode, select preset.
2 Press or to change to another
preset.
3 To search for the next stronger signal,
press and hold or for 2 seconds.
To return to the main menu, press •
and hold for 2 seconds.
Note
To play preset r adio s tations, you rst have to •
store radio stations under presets.
English
The auto-tune feature of VIBE helps you nd
radio stations and save them under the preset
numbers.
1 While in mode with the earphones
connected, select a preset.
2 Press and then select [Auto tune].
If prompted, select • [ Yes] to conrm.
The radio automatically tunes radio »
stations and saves the frequencies to
presets. There are 20 presets available.
To stop auto tuning, press • .
To return to the main menu, press •
and hold for 2 seconds.
EN
21
Page 23
Listen to recordings
Listen to FM radio* recordings:
1 From the main menu select .
2 Press and then select [Recordings
library] > [FM radio].
3 Select a recording.
4 Press to play your recording.
Note
* FM radio recording feature is available with •
some versions only. Refer to the on-screen
menu of VIBE to nd out which features are
available to you.
Listen to voice/audio recordings:
1 From the main menu, select .
2 Press and then select [Recordings
Library] > [Voice].
3 Select a recording.
4 Press to play your recording.
Upload your recordings to a computer
Use the Philips Songbird software to sync your
media les. Alternatively, you can transfer
recordings in Windows Explorer:
1 Connect VIBE to the computer.
2 In Windows Explorer, open VIBE.
3 Select the folder Recordings > Voice or
FM radio*.
4 Copy and paste the recordings to any
location on the computer.
Note
* FM radio recording feature is available with •
some versions only. Refer to the on-screen
menu of VIBE to nd out which features are
available to you.
22
EN
Page 24
11 Recordings
Record audio/voices
Record from FM radio (Available with some versions only!)
1 From the main menu, select .
2 Press and then select [Start FM radio
recording].
Press• to toggle between pause and
record.
3 Press to stop.
4 Press to save the recording or press
to cancel.
Recordings are saved on the player. »
(Filename format: FMRECXXX.MP3,
where XXX is the recording number
that is generated automatically.)
Tip
You can nd your recordings under •
[Recordings Library] > [FM Radio].
This is how you can record audio/voices with
the built-in microphone (see section Overview
for location of built-in microphone):
1 From the main menu, select > [Start
voice recording].
Press • to toggle between pause
and record.
2 Press to stop.
3 Press to save the recording or press
to cancel.
Recordings are saved on the player. »
(Filename format: VOICEXXX.MP3,
where XXX is the recording number
that is generated automatically.)
Tip
You can nd your recordings under •
[Recordings Library] > [ Voice].
English
EN
23
Page 25
Delete the currently playing video
This is how to delete the currently playing
recording:
1 While you listen to a recording, press .
2 Select the option to delete the recording.
3 Select [ Ye s] to conrm the deletion.
Delete one or more recordings
This is how to delete recordings in Windows
Explorer:
1 Connect VIBE to the computer.
2 In Windows Explorer, locate the folder
Recordings > Voice or FM radio*.
3 Delete the recordings as you normally
would on the computer.
Note
* FM radio recording feature is available with •
some versions only. Refer to the on-screen
menu of VIBE to nd out which features are
available to you.
24
EN
Page 26
12 Use the VIBE to
carry data files
This is how you use VIBE to store and carr y
data les:
1 Connect VIBE to the computer (for
instructions see section Connect and
charge).
2 On the computer in Windows
Explorer,copy the data les and paste
them to VIBE.
Tip
Use the computer to transfer your data les •
back to the computer, or delete your data les
from VIBE.
English
EN
25
Page 27
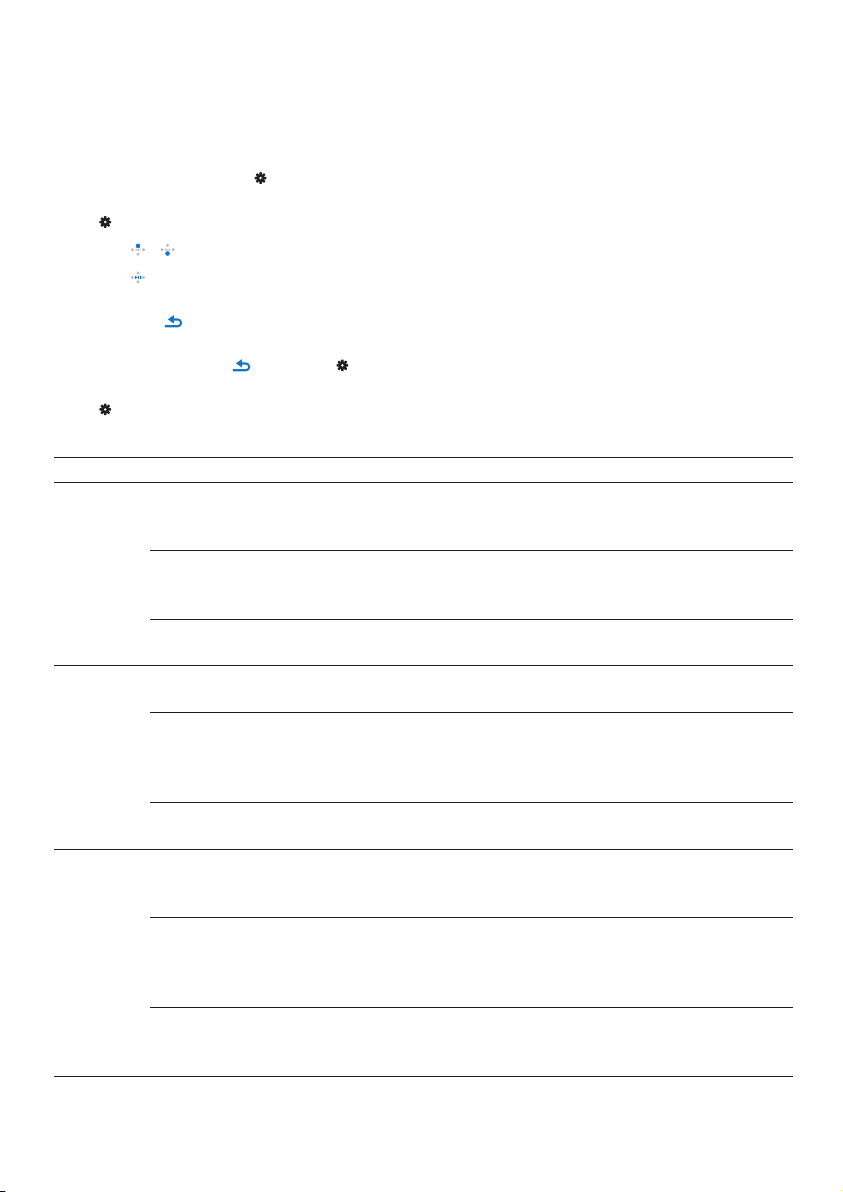
13 Settings
This is how you customize VIBE:
From the main menu, select to enter settings
mode.
In the menu, navigate as follows:
1 Press / to select an option.
2 Press to conrm a selection and go to
the nex t level (when available).
Press • to return to the previous
level.
Press and hold • to exit the
menu.
In the menu, the following options are
available:
Settings Options menu Sub-options menu
Play mode Play music from... All songs•
...this album•
...this artist•
Repeat Repeat off (default)•
Repeat 1•
Repeat all•
Shufe Shufe off (default)•
Shufe all•
Sound
settings
Display
settings
FullSound Off (default)•
On*•
Equalizer Off (default) •
Rock•
Funk•
Hip hop•
Volume limit Off (default)•
Set•
Theme Black (default)•
Blue•
Red•
Screen off timer 15 sec. (default)•
30 sec.•
45 sec.•
Always on•
Sleep timer Time left: [x] minutes•
Off (default)•
Set•
Jazz•
Classical•
Techno•
Custom•
26
EN
Page 28
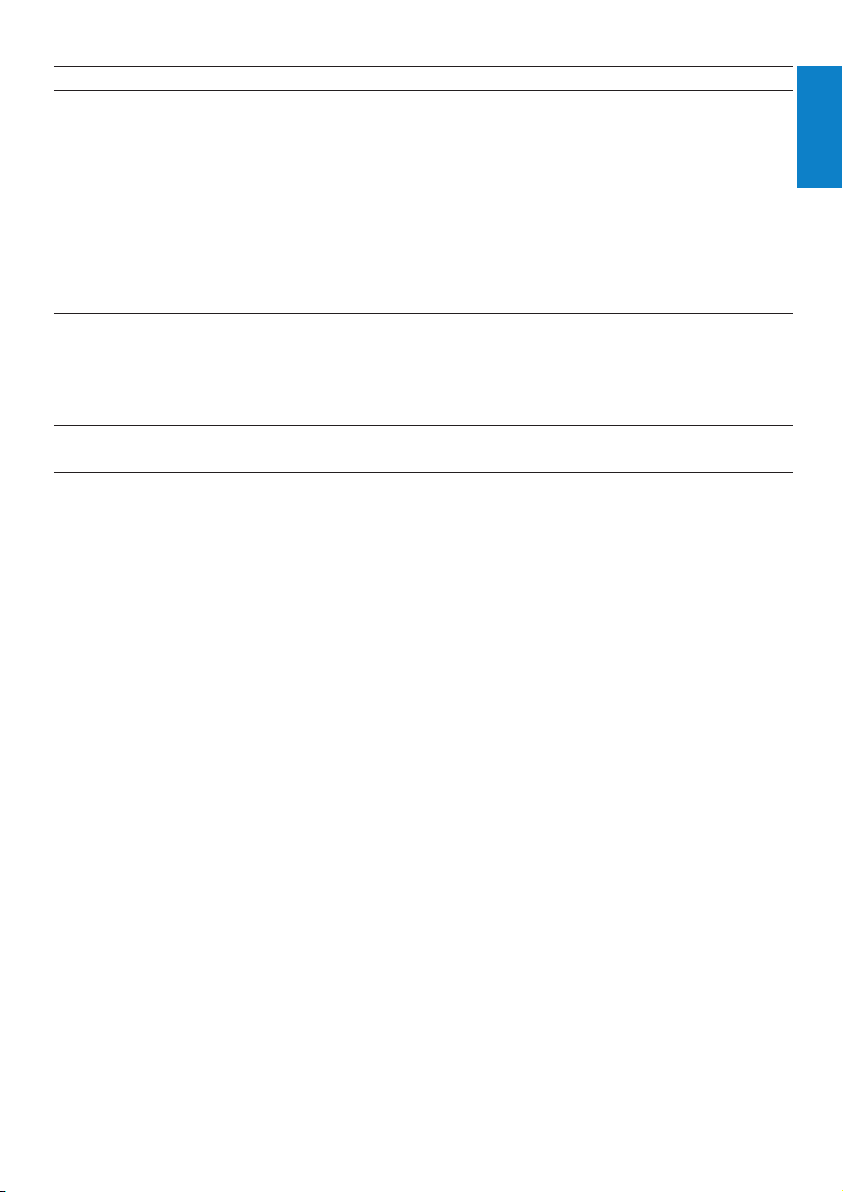
Settings Options menu Sub-options menu
Language Czech•
Greek•
English (default)•
Danish•
German•
Spanish•
French•
Hungarian•
Dutch•
Italian•
Norwegian•
Polish•
Portuguese•
Portuguese (Brazilian)•
Russian•
Slovak•
Finnish•
Swedish•
Information Capacity
Free space
Firmware version
Model
Support site
Factory
settings
Restore factory settings?
(Files are not affected.)
Yes•
No•
*Equalizer deactivates when FullSound is selected.
Turkish•
Simplied Chinese•
Traditional Chinese•
Japanese•
Korean•
Thai (some versions only)•
Arabic (some versions •
only)
Hebrew (some versions •
only)
English
EN
27
Page 29
14 Technical data
Power
Power supply: 250 mAh Li-ion polymer
internal rechargeable batter y
Play time¹
- music: 24 hours
- video: 4 hours
Software
Philips Songbird: to update rmware and
transfer³ music
Connectivity
Headphone 3.5 mm
USB 2.0 High speed
Sound
Channel separation: 45 dB
Frequency Response: 80 - 18,000 Hz
Output power: 2 x 2.4 mW
Signal to noise ratio: > 84 dB
Audio playback
Supported formats:
MP3:
MP3 bit rates: 8 - 320 kps and VBR
MP3 sample rates: 8, 11.025, 16, 22.050, 32,
44.1, 48 kHz
WMA:
WMA bit rates: 5 - 320 kbps
WMA sample rates: 8, 11.025, 16, 22.050, 32,
44.1, 48 kHz
WAV
FLAC
APE
Video playback
Supported formats:
MJPEG (in .mp4)
MP4
Picture display
Supported formats:
JPEG
BMP
Storage media
Built-in memory capacity²:
SA2VBE04 4GB NAND Flash
SA2VBE08 8GB NAND Flash
SA2VBE16 16GB NAND Flash
Display
Color LCD 128 x 128 pixels
Note
¹ Rechargeable batteries have a limited number •
of charge cycles. Batter y life and number of
charge cycles vary by use and settings.
² 1GB = 1 billion bytes; available storage •
capacity is less. Full memory capacity may
not be available as some memor y is reserved
for the player. Storage capacity is based on 4
minutes per song and 128 kbps MP3 encoding.
³ Transfer speed depends on operating system •
and sof tware conguration.
System requirements
Windows® XP (SP2 or above) / Vista / 7•
Pentium III 800 MHz processor or higher•
512 MB RAM•
500 MB hard disk space•
Internet connection•
Windows® Internet Explorer 6.0 or later•
CD-ROM drive•
USB por t•
28
ENEN
Page 30

15 Glossary
B
Bit rate
Bit rate is the number of bits that are
conveyed or processed per unit of time. The
bit rate is usually measured in some multiple
of bits per second (kilobits per second: kbps).
The term bit rate is a synonym for data
transfer rate (or simply data rate).
C
Compression
In audio terms, this is a process of temporarily
or permanently reducing audio data for more
efcient storage or transmission. A temporary
reduction in le size is called ‘non-lossy’
compression, and no information is lost. A
permanent reduction in le size (such as with
MP3 les) is called ‘lossy’ compression, and
involves discarding unnecessary information
which is irretrievably lost.
D
Decibel (dB)
A unit of measure used to express relative
difference in power or intensity of sound.
Frequency Response
Is the range of frequencies that a speaker
reproduces, lowest frequency to the highest.
While the optimal normal is 20-20,000 Hz
(Her tz), the range of human hearing for
individuals is often much more restricted.
A good full-range speaker system however,
reproduces as much of this range as possible
to cover all variations. Individual drivers are
limited to reproduce only that part of the
spectrum for which they were made, so their
response is limited, but still a necessary point
to consider when designing a complete sound
system.
FullSound
FullSound™ is an innovative technology
designed by Philips. FullSound™ faithfully
restores sonic details to compressed
music, enhancing it to provide a full sound
experience without any distortion.
L
LCD (Liquid Crystal Display)
Probably the most common way to show
visual information on non-computer
electronic equipment.
Lossless compression
A system for reducing the number of data bits
(density) in a musical signal without corrupting
the original.
English
F
FM (Frequency Modulation)
In radio broadcasting: a method of modulation
in which the frequency of the carrier voltage
is varied with the frequency of the modulation
voltage.
M
MP3
A le format with a sound data compression
system. MP3 is the abbreviation of Motion
Picture Exper ts Group 1 (or MPEG-1) Audio
Layer 3. With the MP3 format, one CD-R or
CD-RW can contain about 10 times more
data than a regular CD.
EN
29
Page 31

MSC [Mass Storage Class]
The USB mass storage device class (or
USB MSC or UMS) is a set of computing
communications protocols that provide an
inter face to storage devices. Devices that
support this standard are referred to as MSC
(Mass Storage Class) devices.
MTP [Media Transfer Protocol]
Media Transfer Protocol supports the transfer
of music and video les to por table audio and
video players.
R
Rip (ripping)
Using a software program that “grabs” digital
audio from a compact disc and transfers it to a
computer hard drive. The integrity of the data
is preserved, because the signal does not pass
through the computer sound card, and need
not be converted to an analog format. The
digital-to-digital transfer creates a WAV le
that can then be converted into an MP3 le.
S
SuperScroll
SuperScroll™ is a navigation feature of the
double-action search keys of the product.
SuperScroll™ allows easy speed control when
scrolling through large libraries to swiftly nd
items within large libraries. Longer press of the
button results in faster scroll speed.
30
EN
Page 32

© 2010 Koninklijke Philips Electronics N.V.
All rights reserved.
SA2VBE_02_UM_V1.2
wk10081
 Loading...