

Page 1

9000 series
S95XX / S93XX
9000 series
S95X 3X
Page 2
Page 3
2
3
4
5
6
7
8
9
10
11
13
12
14
15
22
23
24
25
26
17
16
18
19
20 21
1
Page 4

empty page before TOC
Page 5

English 6
Čeština 37
Eesti 68
Hrvatski 99
Latviešu 130
Lietuviškai 160
Magyar 191
Polski 223
Română 256
Slovenščina 290
Slovensky 320
Български 351
Українська 385
Page 6

English
6
Introduction
Congratulations on your purchase and welcome to
Philips! To fully benefit from the support that
Philips offers, register your product at
www.philips.com/welcome.
Please read this user manual, as it contains
information about the features of this shaver as
well as some tips to make shaving easier and more
enjoyable.
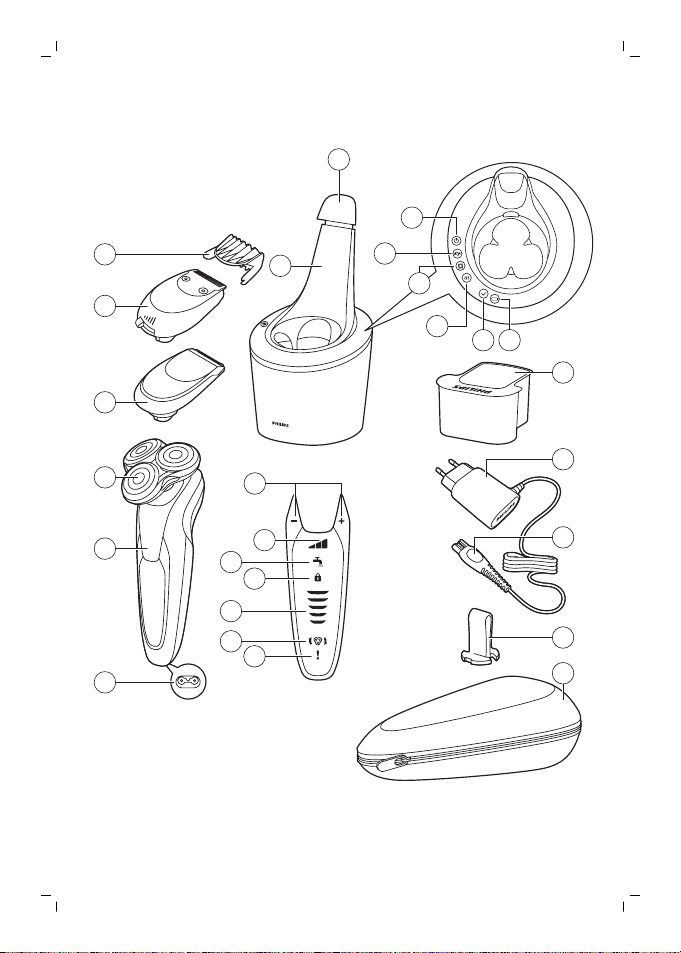
General description (Fig. 1)
1 Comb for beard styler attachment
2 Click-on beard styler attachment
3 Click-on trimmer attachment
4 Click-on shaving unit
5 On/off button
6 Socket for small plug
7 Exclamation mark
8 Replacement reminder
9 Battery charge indicator
10 Travel lock symbol
11 Cleaning reminder
12 Personal comfort settings bar
13 + and - buttons for personal comfort settings
14 SmartClean system
15 Cap of SmartClean system
16 On/off button
17 Replacement symbol
18 Cleaning symbol
19 Drying symbol
20 Ready symbol
21 Charge symbol
22 Cleaning cartridge for SmartClean system
23 Supply unit
24 Small plug
25 Retaining ring holder
26 Pouch
English
Page 7
The accessories supplied may vary for different
products. The box shows the accessories that have
been supplied with your appliance.
Important safety information
Read this important information carefully before
you use the appliance and its accessories and
save it for future reference. The accessories
supplied may vary for different products.
Danger
- Keep the supply unit dry.
Warning
- To charge the battery, only use
the detachable supply unit
(type HQ8505) provided with
the appliance.
- The supply unit contains a
transformer. Do not cut off the
supply unit to replace it with
another plug, as this causes a
hazardous situation.
English
7
Page 8

8
English
- This appliance can be used by
children aged from 8 years and
above and persons with
reduced physical, sensory or
mental capabilities or lack of
experience and knowledge if
they have been given
supervision or instruction
concerning use of the
appliance in a safe way and
understand the hazards
involved. Children shall not play
with the appliance. Cleaning
and user maintenance shall not
be made by children without
supervision.
- Always unplug the shaver
before you clean it under the
tap.
- Always check the appliance
before you use it. Do not use
the appliance if it is damaged,
as this may cause injury. Always
replace a damaged part with
one of the original type.
Page 9
Caution
English
- Do not open the appliance to
replace the rechargeable
battery.
- Never immerse the cleaning
system or the charging stand in
water and do not rinse it under
the tap.
- Never use water hotter than
80°C to rinse the shaver.
- Only use this appliance for its
intended purpose as shown in
the user manual.
- For hygienic reasons, the
appliance should only be used
by one person.
- Never use compressed air,
scouring pads, abrasive
cleaning agents or aggressive
liquids such as petrol or
acetone to clean the appliance.
9
Page 10

10
English
- If your shaver comes with a
cleaning system, always use
the original Philips cleaning
fluid (cartridge or bottle,
depending on the type of
cleaning system).
- Always place the cleaning
system on a stable, level and
horizontal surface to prevent
leakage.
- If your cleaning system uses a
cleaning cartridge, always make
sure the cartridge compartment
is closed before you use the
cleaning system to clean or
charge the shaver.
- When the cleaning system is
ready for use, do not move it to
prevent leakage of cleaning
fluid.
Page 11
- Water may drip from the socket
at the bottom of the shaver
when you rinse it. This is normal
and not dangerous because all
electronics are enclosed in a
sealed power unit inside the
shaver.
- Do not use the supply unit in or
near wall sockets that contain
an electric air freshener to
prevent irreparable damage to
the supply unit.
Electromagnetic fields (EMF)
- This Philips appliance complies with all
applicable standards and regulations regarding
exposure to electromagnetic fields.
General
- This shaver is waterproof. It is suitable for use in
the bath or shower and for cleaning under the
tap. For safety reasons, the shaver can
therefore only be used without cord.
- The appliance is suitable for mains voltages
ranging from 100 to 240 volts.
- The supply unit transforms 100-240 volts to a
safe low voltage of less than 24 volts.
- Максималды шу деңгейі: Lc = 69 дБ(A)
English
11
Page 12
English
12
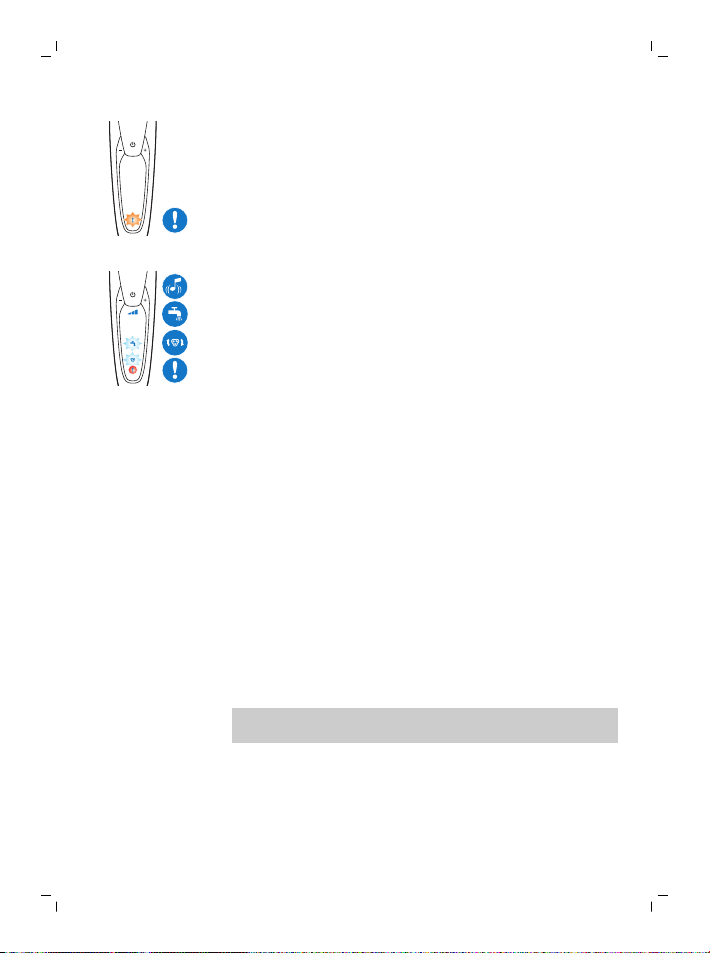
The display
Note: Before you use the shaver for the first time,
remove the protective foil from the display.
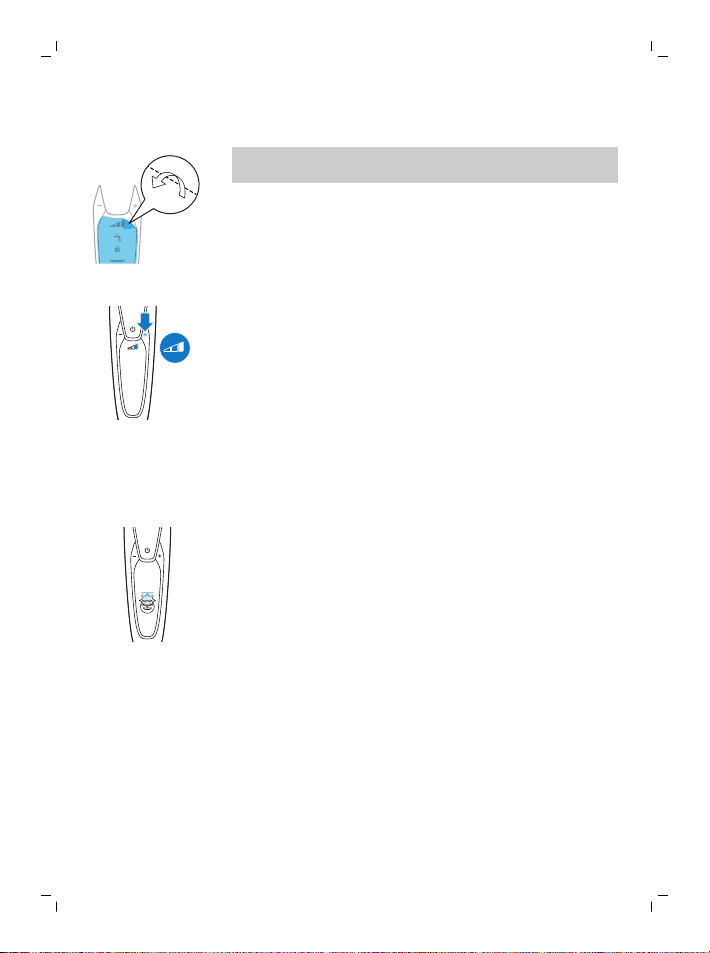
Personal comfort settings
The appliance has a feature that allows you to
personalise your settings. You can choose
between three settings depending on your
personal shaving needs: comfort, dynamic or
efficiency. When you press the - or + button, the
segment of the personal comfort settings bar that
lights up shows the currently selected setting. You
can press the + or - button to select a different
setting.
Charging
Quick charge: When you connect the shaver to the
wall socket, the lights of the battery charge
indicator light up one after another repeatedly.
When the shaver contains enough energy for one
shave, the bottom light of the battery charge
indicator starts to flash slowly.
While the shaver continues to charge, first the
bottom light of the battery charge indicator flashes
and then lights up continuously. Then the second
light flashes and lights up continuously, and so on
until the shaver is fully charged.
Page 13
Battery fully charged
When the battery is fully charged, all lights of the
battery charge indicator light up white
continuously.
Note: This appliance can only be used without
cord. When you press the on/off button during or
after charging, you hear a sound to indicate that
the shaver is still connected to the wall socket.
Note: When the battery is full, the display switches
off automatically after 30 minutes.
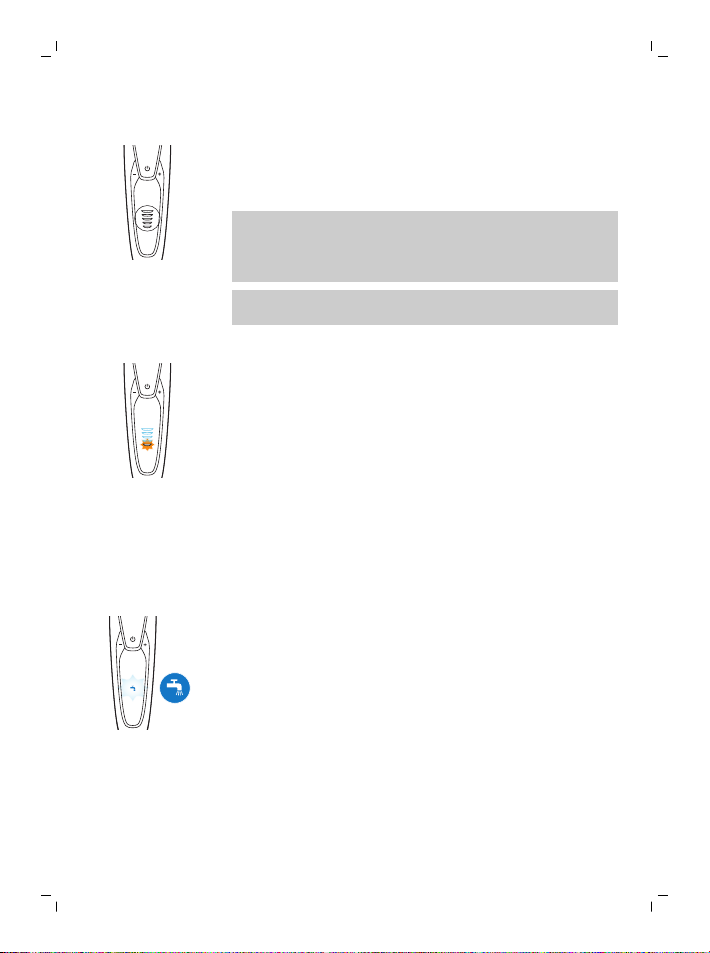
Battery low
When the battery is almost empty, the bottom light
of the battery charge indicator flashes orange and
you hear a sound.
Remaining battery charge
The remaining battery charge is shown by the
lights of the battery charge indicator that light up
continuously.
Cleaning reminder
Clean the shaver after every shave for optimal
performance. When you switch off the appliance,
the cleaning reminder flashes to remind you to
clean the appliance.
English
13
Travel lock
You can lock the appliance when you are going to
travel. The travel lock prevents the appliance from
being switched on by accident.
Activating the travel lock
Page 14
English
14
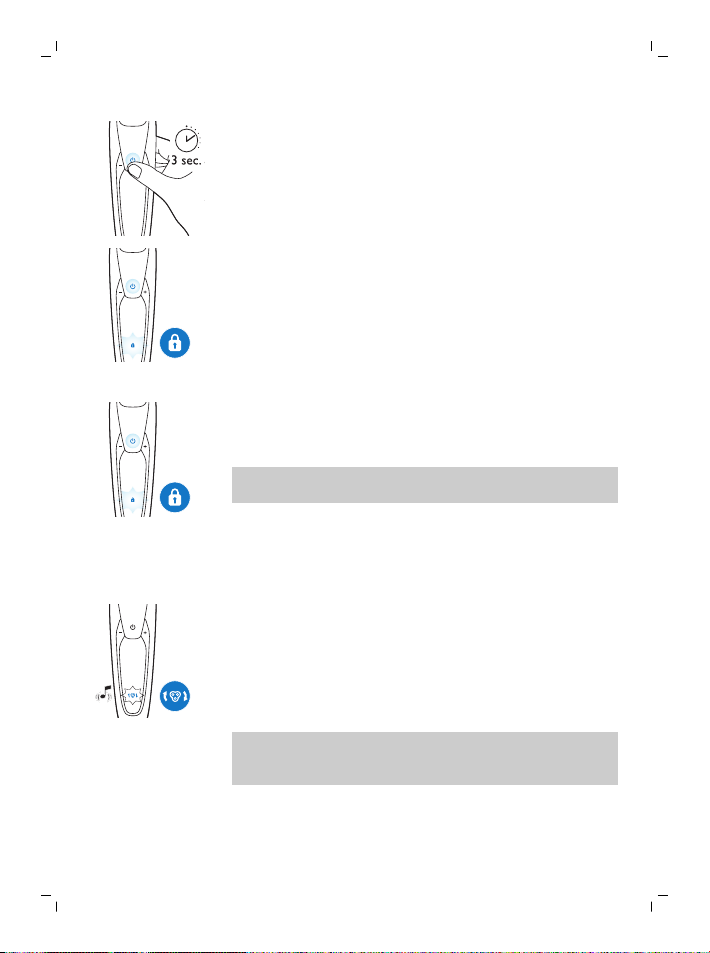
1 Press the on/off button for 3 seconds to enter
the travel lock mode.
While you activate the travel lock, the travel
lock symbol lights up white continuously. When
the travel lock is activated, the appliance
produces a sound and the travel lock symbol
flashes.
Deactivating the travel lock
1 Press the on/off button for 3 seconds.
The travel lock symbol flashes and then lights
up continuously. The appliance is now ready for
use again.
Note: You can also deactivate the travel lock by
connecting the appliance to the wall socket.
Replacement reminder
For maximum shaving performance, we advise you
to replace the shaving heads every two years.
The appliance is equipped with a replacement
reminder which reminds you to replace the
shaving heads. The shaving unit symbol lights up
white continuously, the arrows flash white and the
appliance beeps to indicate that you have to
replace the shaving heads.
Note: After replacing the shaving heads, you need
to reset the replacement reminder by pressing the
on/off button for 7 seconds.
Exclamation mark
Overheating
Page 15
If the appliance overheats during charging, the
exclamation mark flashes orange. When this
happens, the shaver switches off automatically.
Charging continues once the temperature of the
appliance has decreased to the normal level.
Blocked shaving heads
If the shaving heads are blocked, the exclamation
mark lights up orange continuously. The
replacement reminder and the cleaning reminder
flash white alternately and you hear a sound. In
this case, the motor cannot run because the
shaving heads are soiled or damaged.
If the shaving heads are soiled, you have to clean
them. If the shaving heads are damaged, you have
to replace them.
Charging
Charge the shaver before you use it for the first
time and when the display indicates that the
battery is almost empty. The battery charge is
indicated by the lights of the battery charge
indicator on the display.
When you connect the shaver to the wall socket,
you hear a sound.
Charging takes approx. 1 hour. A fully charged
shaver has a shaving time of up to 50 minutes.
Note: You cannot use the appliance while it is
charging.
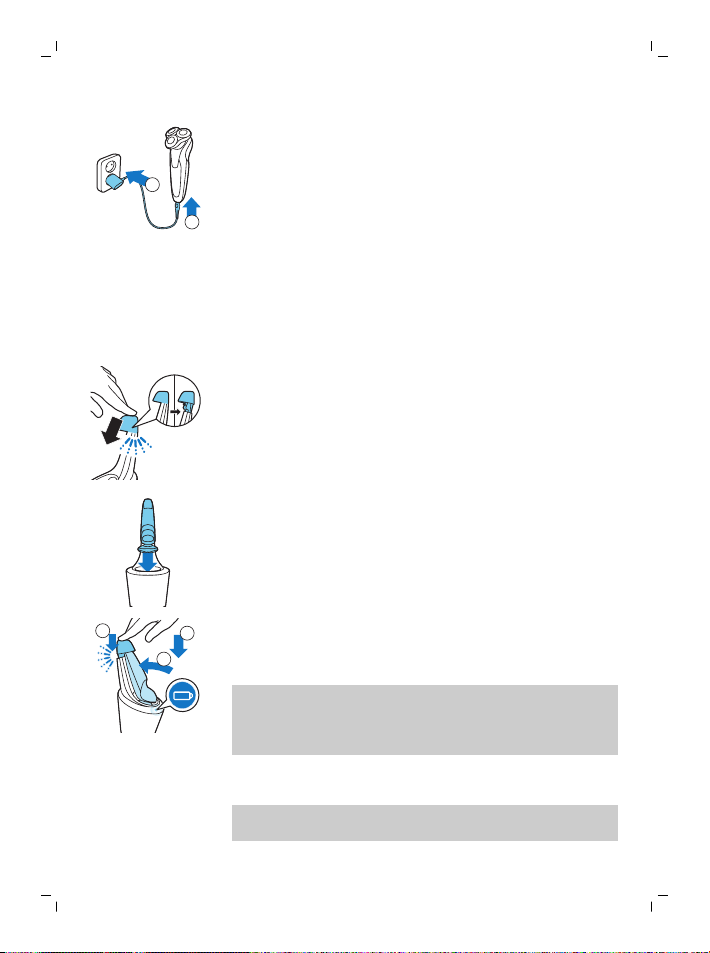
Charging with the supply unit
1 Make sure the appliance is switched off.
English
15
Page 16
1
2
1
2
3
English
16
2 Put the supply unit in the wall socket and put
the small plug in the appliance.
3 After charging, remove the supply unit from the
wall socket and pull the small plug out of the
appliance.
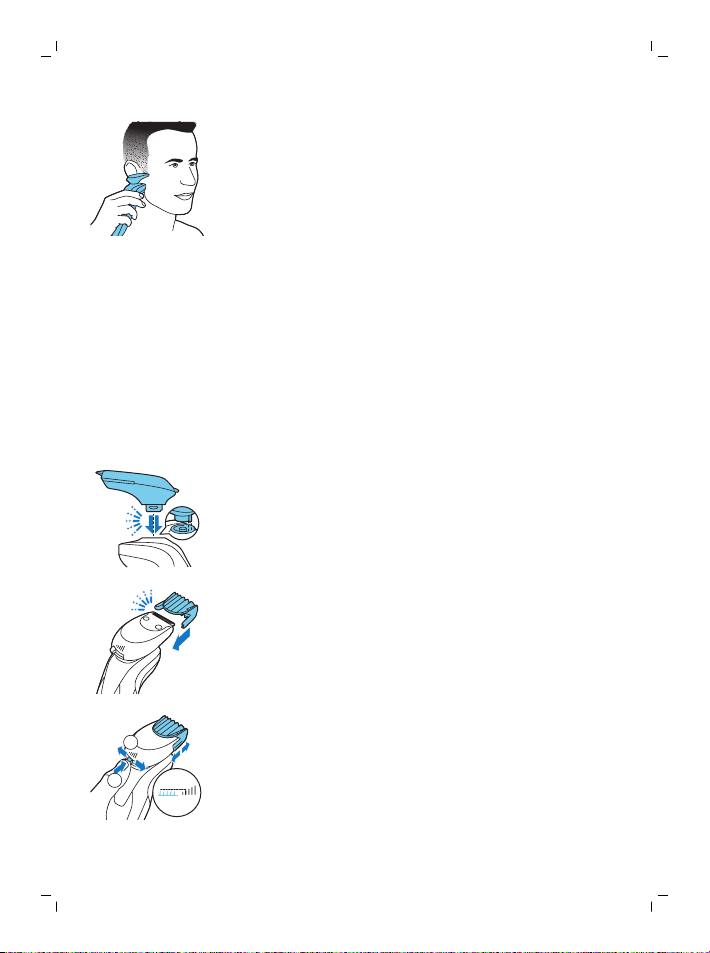
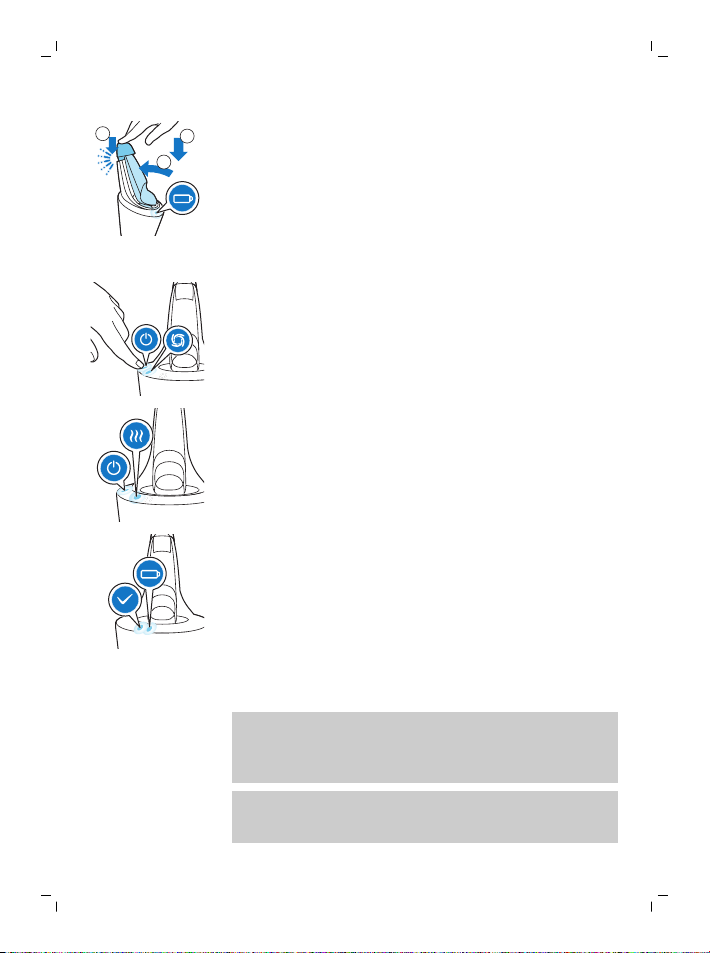
Charging in the SmartClean system (specific types only)
1 Put the small plug in the back of the
SmartClean system.
2 Put the supply unit in the wall socket.
3 Press the top cap to be able to place the shaver
in the holder ('click').
4 Hold the shaver upside down above the holder.
Make sure the front of the shaver points
towards the SmartClean system.
5 Place the shaver in the holder (1), tilt the shaver
backwards (2) and press down the top cap to
connect the shaver (‘click’) (3).
Note: The battery symbol starts to flash to indicate
that the appliance is charging. When the battery is
fully charged, the battery symbol lights up
continuously.
Using the appliance
Note: This appliance can only be used without
cord.
Page 17

Switching the appliance on and off
- To switch on the appliance, press the on/off
button once.
The display lights up for a few seconds.
- To switch off the appliance, press the on/off
button once.
The display lights up for a few seconds and
shows the remaining battery charge.
Shaving
Skin adaptation period
Your first shaves may not bring you the result you
expect and your skin may even become slightly
irritated. This is normal. Your skin and beard need
time to adapt to any new shaving system. To allow
your skin to adapt to this new appliance, we advise
you to shave regularly (at least 3 times a week)
and exclusively with this appliance for a period of
3 weeks.
Shaving tips
- Select your personal comfort settings (see ‘The
display’).
- To ensure the best result, we advise you to pretrim your beard if you have not shaved for 3
days or longer.
Dry shaving
1 Switch on the appliance.
The display lights up for a few seconds.
2 Move the shaving heads over your skin in
circular movements to catch all hairs growing in
different directions. Exert gentle pressure for a
close comfortable shave.
Note: Circular movements provide better
shaving results than straight movements.
English
17
Page 18
18
English
3 Clean the appliance after use (see 'Cleaning
and maintenance').
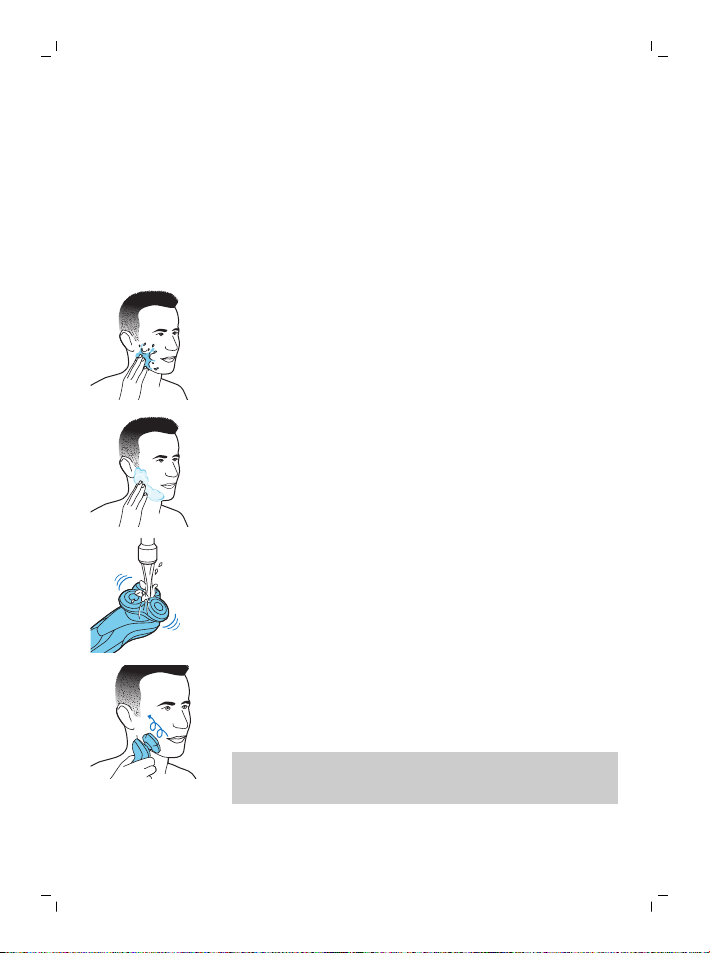
Wet shaving
You can also use this appliance on a wet face with
shaving foam or shaving gel.
To shave with shaving foam or shaving gel, follow
the steps below:
1 Apply some water to your skin.
2 Apply shaving foam or shaving gel to your skin.
3 Rinse the shaving unit under the tap to ensure
that the shaving unit glides smoothly over your
skin.
4 Switch on the appliance.
5 Move the shaving heads over your skin in
circular movements to catch all hairs growing in
different directions. Exert gentle pressure for a
close comfortable shave.
Note: Rinse the shaving unit regularly to ensure
that it continues to glide smoothly over your
skin.
6 Dry your face.
Page 19
7 Clean the appliance after use (see 'Cleaning
and maintenance').
Note: Make sure you rinse all foam or shaving
gel off the appliance.
Using the click-on attachments
Note: The accessories supplied may vary for
different products. The box shows the accessories
that have been supplied with your appliance.
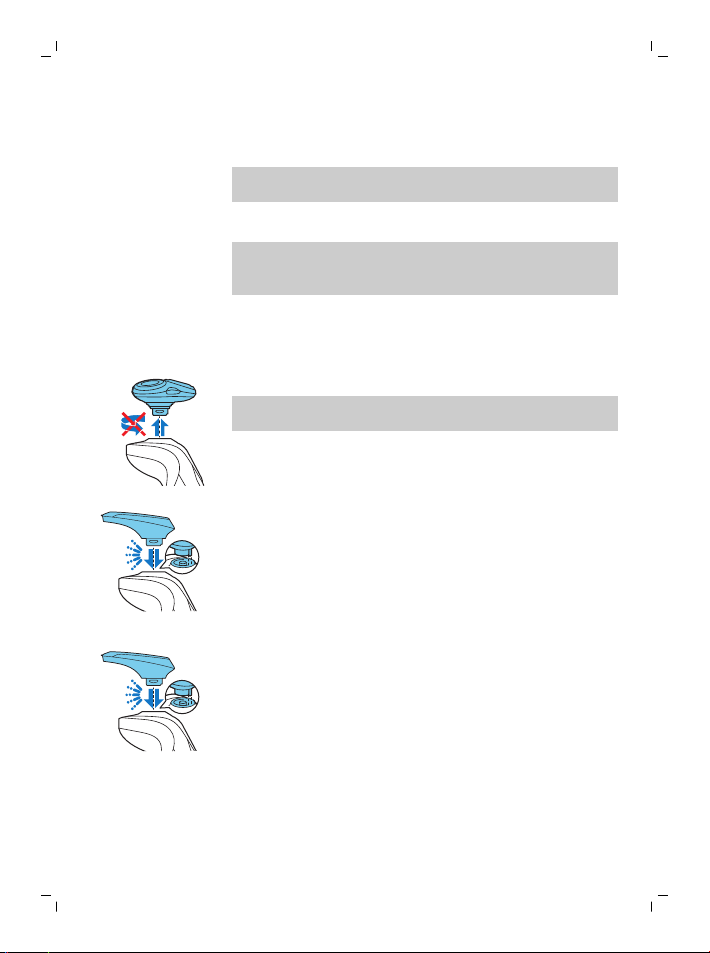
Removing or attaching the click-on attachments
1 Make sure the appliance is switched off.
2 Pull the attachment straight off the appliance.
Note: Do not twist the attachment while you
pull it off the appliance.
3 Insert the lug of the attachment into the slot in
the top of the appliance. Then press down the
attachment to attach it to the appliance (‘click’).
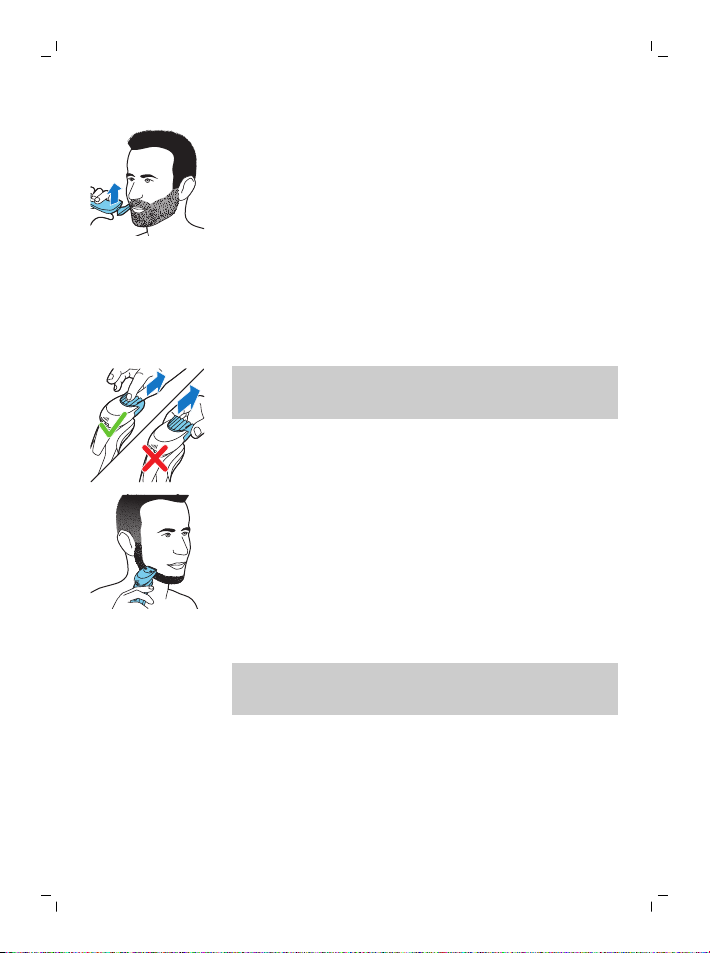
Using the trimmer attachment
You can use the trimmer attachment to groom
your sideburns and moustache.
1 Attach the attachment to the appliance (‘click’).
2 Switch on the appliance.
The display lights up for a few seconds.
English
19
Page 20
2
1
20
English
3 Hold the trimmer attachment perpendicular to
the skin and move the appliance downwards
while you exert gentle pressure.
4 Clean the attachment after use (see 'Cleaning
and maintenance').
Using the beard styler attachment with comb
You can use the beard styler attachment with the
comb attached to style your beard at one fixed
setting, but also at different length settings. You
can also use it to pre-trim any long hairs before
shaving for a more comfortable shave.
The length settings on the beard styler attachment
correspond to the remaining hair length after
cutting and range from 1 to 5mm.
1 Attach the attachment to the appliance ('click').
2 Slide the comb straight into the guiding grooves
on both sides of the beard styler attachment
(‘click’).
3 Press the length selector and then push it to the
left or right to select the desired hair length
setting.
4 Switch on the appliance.
Page 21
5 Move the appliance upwards while you exert
gentle pressure. Make sure the front of the
comb is in full contact with the skin.
6 Clean the attachment after use (see 'Cleaning
and maintenance').
Using the beard styler attachment without comb
You can use the beard styler attachment without
the comb to contour your beard, moustache,
sideburns or neckline to a length of 0.5mm.
1 Pull the comb off the beard styler attachment.
Note: Grab the comb in the center to pull it off
the beard styler attachment. Do not pull at the
sides of the comb.
2 Switch on the appliance.
3 Hold the beard styler attachment perpendicular
to the skin and move the appliance downwards
while you exert gentle pressure.
4 Clean the attachment after use (see 'Cleaning
and maintenance').
Cleaning and maintenance
Note: The accessories supplied may vary for
different products. The box shows the accessories
that have been supplied with your appliance.
English
21
Page 22
2
1
English
22
Cleaning the shaver in the SmartClean system
SmartClean system Plus has two phases: the
rinsing phase and the drying phase.
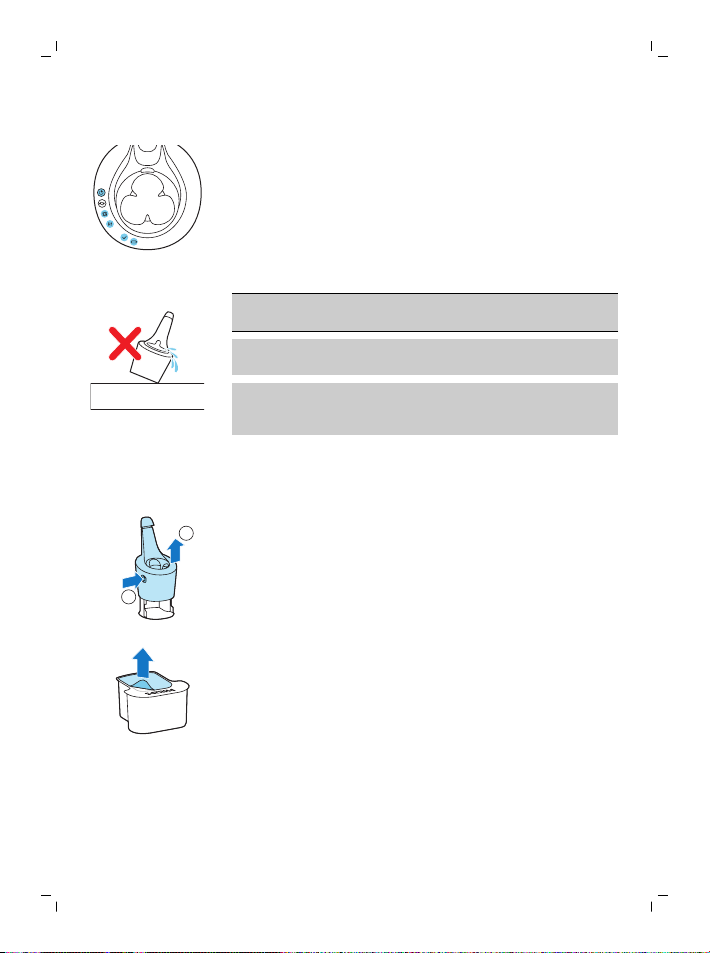
Preparing the SmartClean system for use
Caution: Do not tilt the SmartClean system to
prevent leakage.
Note: Hold the SmartClean system while you
prepare it for use.
Note: If you clean the shaver in the SmartClean
system once a week, the SmartClean cartridge
lasts approximately three months.
1 Put the small plug in the back of the
SmartClean system.
2 Put the supply unit in the wall socket.
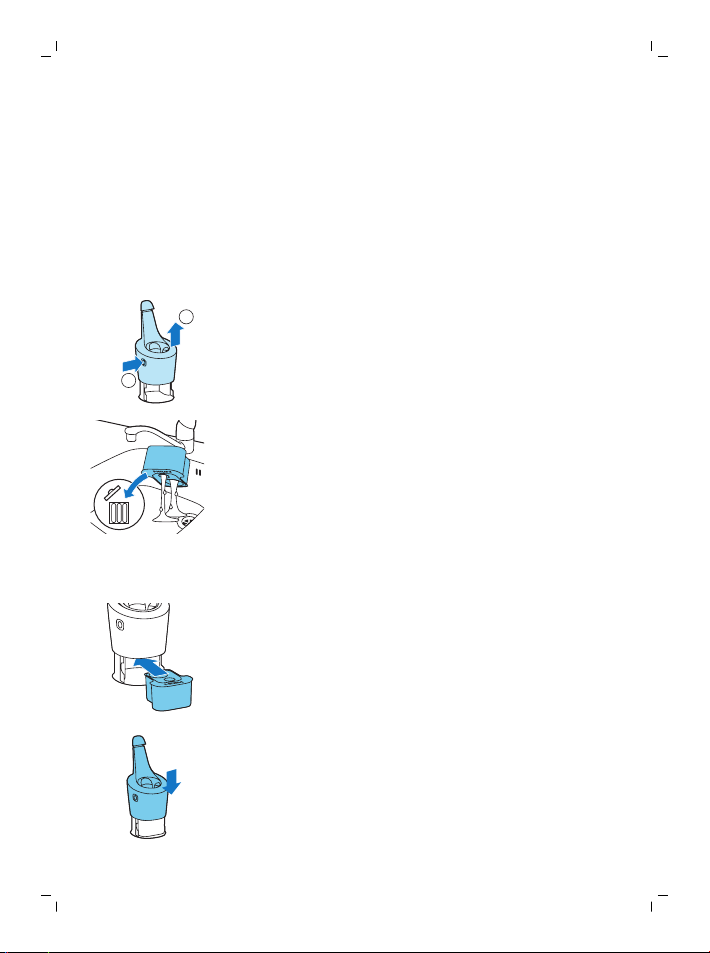
3 Press the button on the side of the SmartClean
system (1) and lift the top part of the
SmartClean system (2).
4 Pull the seal off the cleaning cartridge.
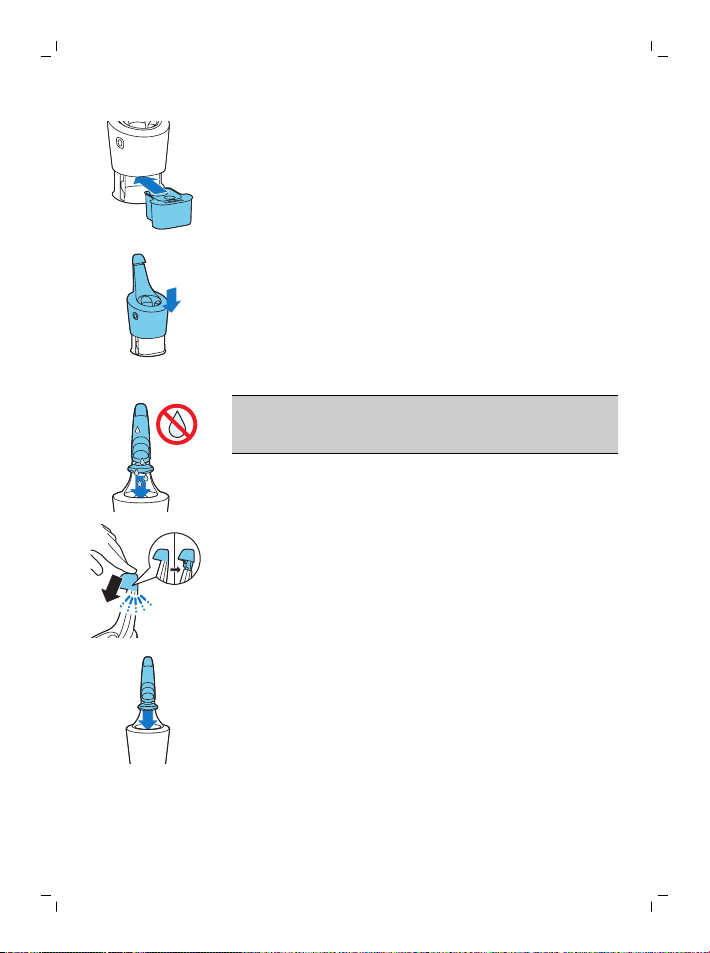
Page 23
English
5 Place the cleaning cartridge in the SmartClean
system.
6 Push the top part of the SmartClean system
back down (‘click’).
23
Using the SmartClean system
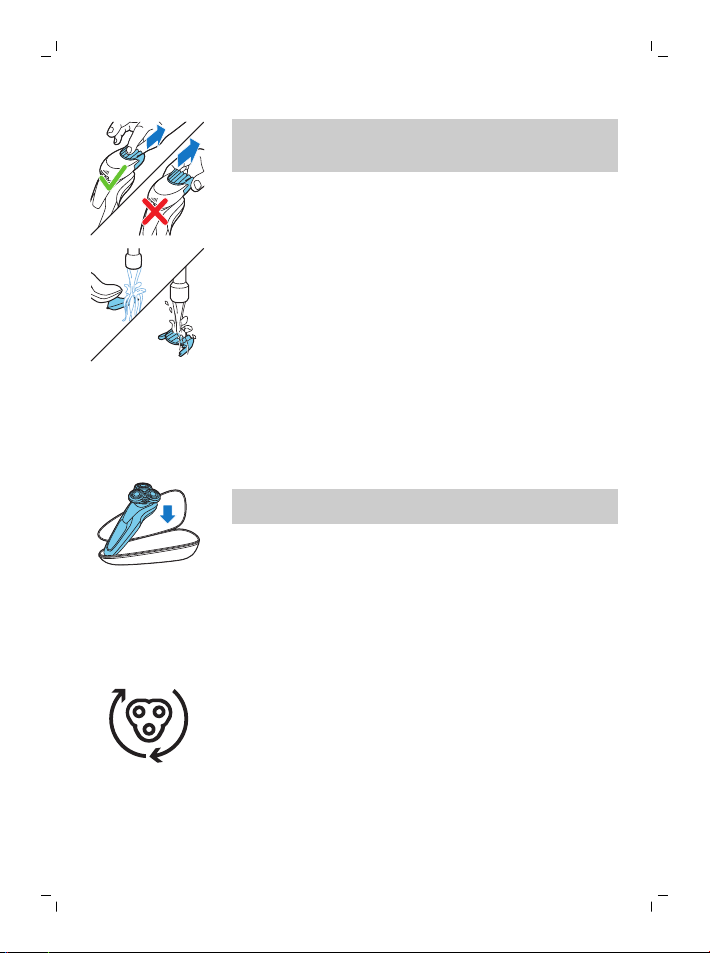
Caution: Always shake excess water off the
shaver before you place it in the SmartClean
system.
1 Press the top cap to be able to place the shaver
in the holder ('click').
2 Hold the shaver upside down above the holder.
Make sure the front of the shaver points
towards the SmartClean system.
Page 24
1
2
3
English
24
3 Place the shaver in the holder (1), tilt the shaver
backwards (2) and press down the top cap to
connect the shaver ('click') (3).
The battery symbol starts to flash, which
indicates that the shaver is charging.
4 Press the on/off button on the SmartClean
system to start the cleaning program.
During the rinsing phase, the rinsing symbol
flashes. When the rinsing phase is done (after
approx. 10 minutes), the rinsing symbol lights up
continuously.
After the rinsing phase, the drying phase starts
automatically. During this phase, the drying
symbol flashes. When the drying phase is done
(after approx. 4 hours), the drying symbol lights up
continuously.
When the cleaning program is done, the ready
symbol lights up continuously.
30 minutes after the cleaning program and
charging are done, the SmartClean system
switches off automatically.
The battery symbol lights up continuously to
indicate that the shaver is fully charged. Charging
takes approx. 1 hour.
Note: If you press the on/off button of the
SmartClean system during the cleaning program,
the program aborts. In this case, the rinsing or
drying symbol goes out.
Note: If you remove the supply unit from the wall
socket during the cleaning program, the program
aborts.
Page 25
2
1
English
Replacing the cartridge of the SmartClean system
Replace the cleaning cartridge when the
replacement symbol flashes orange or when you
are no longer satisfied with the cleaning result. If
you clean the shaver in the SmartClean system
once a week, the SmartClean cartridge lasts
approximately three months.
1 Press the button on the side of the SmartClean
system (1) and lift the top part of the
SmartClean system (2).
2 Remove the cleaning cartridge from the
SmartClean system and pour out any remaining
cleaning fluid.
You can simply pour the cleaning fluid down
the sink.
3 Throw away the empty cleaning cartridge.
4 Unpack the new cleaning cartridge and pull off
the seal.
5 Place the cleaning cartridge in the SmartClean
system.
25
6 Push the top part of the SmartClean system
back down (‘click’).
Page 26
English
26
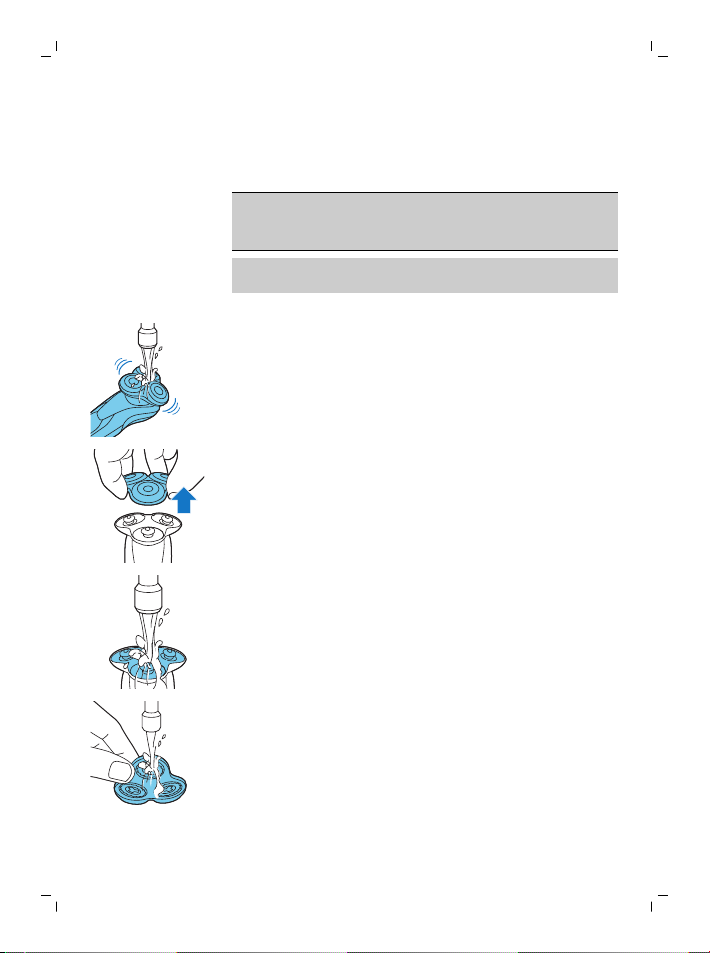
Cleaning the shaver under the tap
Clean the shaver after every shave for optimal
performance.
Caution: Be careful with hot water. Always check
if the water is not too hot, to prevent burning
your hands.
Note: Never dry the shaving unit with a towel or
tissue, as this may damage the shaving heads.
1 Switch on the appliance.
2 Rinse the shaving unit under a warm tap.
3 Switch off the appliance. Pull the shaving head
holder off the bottom part of the shaving unit.
4 Rinse the hair chamber under the tap.
5 Rinse the shaving head holder under a warm
tap.
6 Carefully shake off excess water and let the
shaving head holder dry.
Page 27
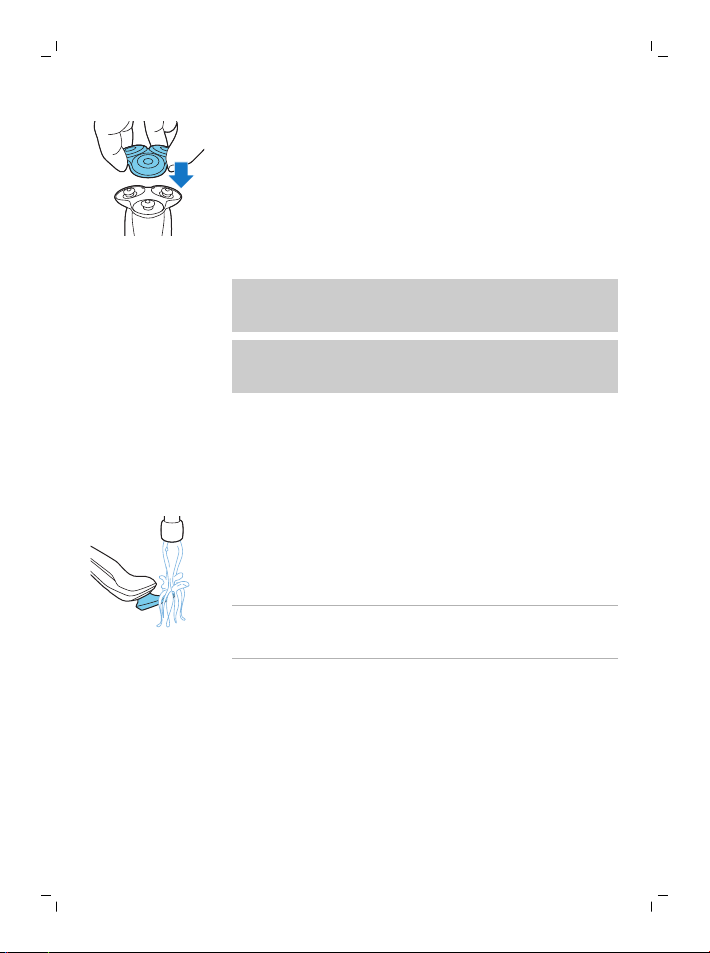
7 Attach the shaving head holder to the bottom
part of the shaving unit (‘click’).
Cleaning the click-on attachments
Never dry trimmer or beard styler attachments with
a towel or tissue, as this may damage the trimming
teeth.
The accessories supplied may vary for different
products. The box shows the accessories that have
been supplied with your appliance.
Cleaning the trimmer attachment
Clean the trimmer attachment every time you have
used it.
1 Switch on the appliance with the trimmer
attachment attached.
2 Rinse the attachment under a warm tap.
3 After cleaning, switch off the appliance.
4 Carefully shake off excess water and let the
attachment dry.
Tip: For optimal performance, lubricate the teeth
of the attachment with a drop of sewing machine
oil regularly.
Cleaning the beard styler attachment
Clean the beard styler attachment every time you
have used it.
1 Pull the comb off the beard styler attachment.
English
27
Page 28
2yrs
English
28
Note: Grab the comb in the centre to pull it off
the beard styler attachment. Do not pull at the
sides of the comb.
2 Switch on the appliance.
3 Rinse the beard styler attachment and the
comb separately under a warm tap.
4 After cleaning, switch off the appliance.
5 Carefully shake off excess water and let the
beard styler attachment and comb dry.
6 For optimal performance, lubricate the teeth of
the attachment with a drop of sewing machine
oil regularly.
Storage
1 Store the appliance in the pouch supplied.
Note: Make sure the appliance is dry before you
store it in the pouch.
Replacement
Replacing the shaving heads
For maximum shaving performance, we advise you
to replace the shaving heads every two years.
Replace damaged shaving heads immediately.
Always replace the shaving heads with original
Philips shaving heads (see 'Ordering accessories').
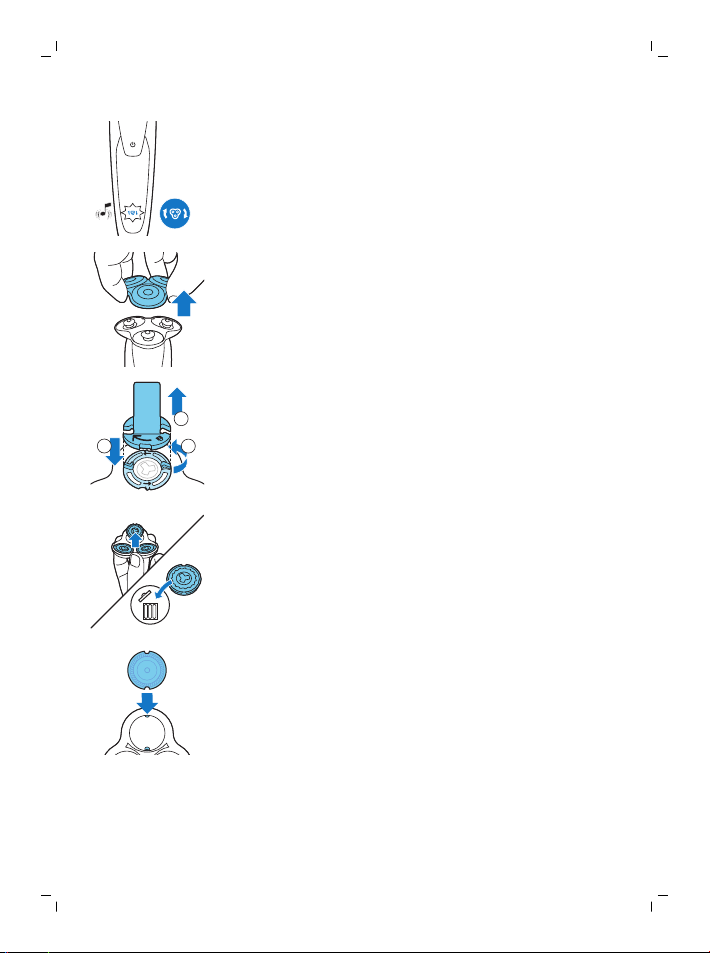
Replacement reminder
Page 29
1
3
2
English
The replacement reminder indicates that the
shaving heads need to be replaced.The shaving
unit symbol lights up continuously, the arrows
flash white and you hear a beep when you switch
off the shaver.
1 Switch off the appliance.
2 Pull the shaving head holder off the bottom
part of the shaving unit.
3 Place the retaining ring holder on the retaining
ring (1), turn it anticlockwise (2) and lift it off the
shaving head (3).
Remove the retaining ring from the retaining
ring holder and repeat this process for the other
retaining rings.
4 Remove the shaving heads from the shaving
head holder.
Throw away the used shaving heads
immediately to avoid mixing them with the new
shaving heads.
5 Place the shaving heads in the shaving head
holder.
Note: Make sure the notches on both sides of
the shaving heads fit exactly onto the
projections in the shaving head holder.
29
Page 30
3
1
2
2
1
English
30
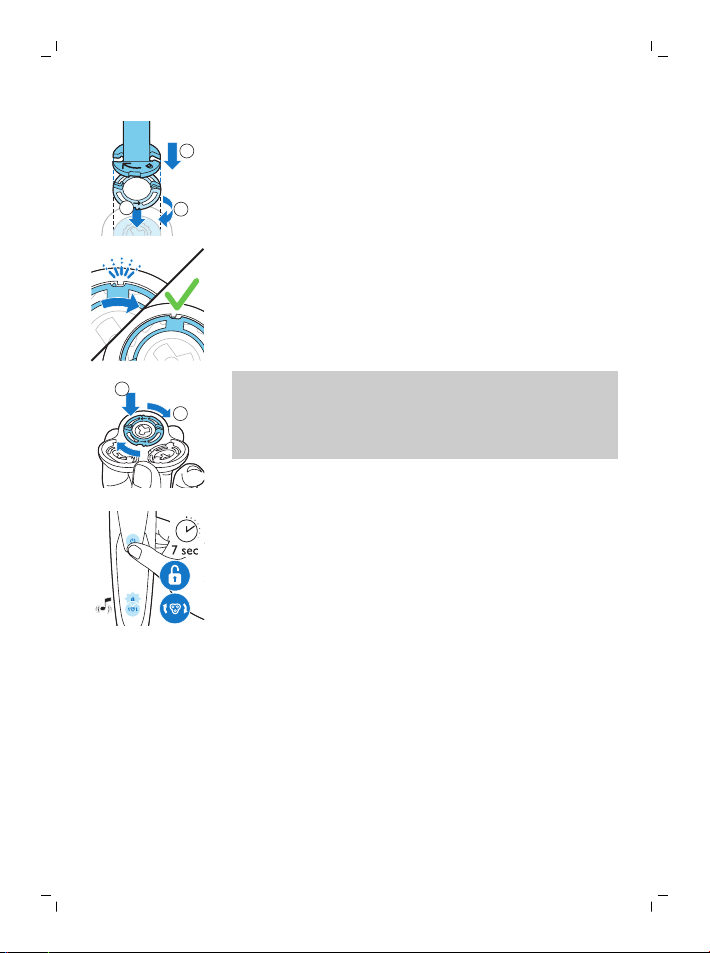
6 Place the retaining ring holder on the retaining
ring (1), place it on the shaving head (2) and turn
it clockwise (3) to reattach the retaining ring.
Repeat this process for the other retaining rings.
-
Each retaining ring has two recesses that fit
exactly into the projections of the shaving
head holder. Turn the ring clockwise until
your hear a click to indicate that the ring is
fixed.
Note: Hold the shaving head holder in your
hand when you reinsert the shaving heads and
reattach the retaining rings. Do not place the
shaving head holder on a surface when you do
this, as this may cause damage.
7 Attach the shaving head holder to the bottom
part of the shaving unit (‘click’).
8 To reset the replacement reminder, press and
hold the on/off button for approx. 7 seconds.
Wait until you hear two beeps.
Ordering accessories
To buy accessories or spare parts, visit
www.shop.philips.com/service or go to your
Philips dealer. You can also contact the Philips
Consumer Care Centre in your country (see the
worldwide guarantee leaflet for contact details).
The following accessories and spare parts are
available:
- SH90 Philips shaving heads
- HQ110 Philips shaving head cleaning spray
Page 31

- RQ111 Philips beard styler attachment
- RQ585 Philips cleansing brush attachment
- RQ560/RQ563 Philips cleansing brush heads
- JC301/JC302/JC303/JC304/JC305 cleaning
cartridge
- HQ8505 supply unit
Note: The availability of the accessories may differ
by country.
Recycling
- This symbol means that this product shall not
be disposed of with normal household waste
(2012/19/EU).
- This symbol means that this product contains a
built-in rechargeable battery which shall not be
disposed of with normal household waste
(2006/66/EC). We strongly advise you to take
your product to an official collection point or a
Philips service centre to have a professional
remove the rechargeable battery.
- Follow your country’s rules for the separate
collection of electrical and electronic products
and rechargeable batteries. Correct disposal
helps prevent negative consequences for the
environment and human health.
Removing the rechargeable shaver battery
Only remove the rechargeable battery
when you discard the shaver. Before you
remove the battery, make sure that the
shaver is disconnected from the wall socket
and that the battery is completely empty.
English
31
Page 32

English
32
Take any necessary safety precautions
when you handle tools to open the shaver
and when you dispose of the rechargeable
battery.
Be careful, the battery strips are sharp.
1 Insert the screwdriver into the slot between the
front and back panel in the bottom of the
appliance. Remove the back panel.
2 Remove the front panel.
3 Unscrew the two screws at the top of the inner
panel and remove the inner panel.
4 Remove the rechargeable battery with a
screwdriver.
Warranty and support
If you need information or support, please visit
www.philips.com/support or read the
international warranty leaflet.
Warranty restrictions
The shaving heads (cutters and guards) are not
covered by the terms of the international warranty
because they are subject to wear.
Troubleshooting
This chapter summarizes the most common
problems you could encounter with the appliance.
If you are unable to solve the problem with the
information below, visit www.philips.com/support for
a list of frequently asked questions or contact the
Consumer Care Center in your country.
Page 33

Shaver
Problem Possible cause Solution
English
33
The appliance
does not work
when I press the
on/off button.
The rechargeable
The travel lock is
The appli
ance does not
shave as well as
it used to.
Hairs or dirt obstruct
The appliance is still
attached to the wall
socket. For safety
reasons, the
appliance can only
be used without
cord.
battery is empty.
activated.
The shaving unit is
soiled or damaged
to such an extent
that the motor
cannot run.
The shaving heads
are damaged or
worn.
the shaving heads.
Unplug the appliance and
press the on/off button to
switch on the appliance.
Recharge the battery (see
'Charging').
Press the on/off button for
3 seconds to deactivate the
travel lock.
Clean the shaving heads
thoroughly or replace
them. Also see 'Hairs or dirt
obstruct the shaving heads'
for a detailed description of
how to clean the shaving
heads thoroughly.
Replace the shaving heads
(see 'Replacement').
Clean the shaving heads in
the regular way (see
'Cleaning and
maintenance') or clean
them thoroughly.
Page 34

English
34
Problem Possible cause Solution
To clean the shaving heads
I replaced the
shaving heads,
but the display
still shows the
replacement
reminder.
A shaving unit
symbol has
suddenly
appeared on the
display.
An exclamation
mark has
suddenly
appeared on the
display while the
appliance is
charging.
You have not reset
the appliance.
This symbol
reminds you to
replace the shaving
heads.
The appliance is
overheated.
thoroughly, remove the
shaving heads from the
shaving head holder one
by one (see
'Replacement'). Then
separate the cutter from its
guard and rinse each
matching set under the tap.
After rinsing, place the
cutter back into its
corresponding guard.
Finally, put the shaving
heads back into the
shaving head holder (see
'Replacement').
Reset the appliance by
pressing the on/off button
for approx. 7 seconds (see
'Replacing the shaving
heads').
Replace the shaving heads
(see 'Replacement').
Disconnect the appliance
from the wall socket for
approx. 10 minutes.
Page 35

Problem Possible cause Solution
English
35
An exclamation
mark, the
replacement
reminder and
the cleaning
reminder have
suddenly
appeared on the
display.
The shaving heads
Water is leaking
from the bottom
of the appliance.
The shaving heads
are damaged.
are soiled.
During cleaning,
water may collect
between the inner
body and the outer
shell of the
appliance.
Replace the shaving heads
(see 'Replacement').
Clean the shaving heads
(see 'Cleaning and
maintenance'). Also see
'Hairs or dirt obstruct the
shaving heads' for a
detailed description of how
to clean the shaving heads
thoroughly.
This is normal and not
dangerous because all
electronics are enclosed in
a sealed power unit inside
the appliance.
SmartClean system
Problem Possible cause Solution
The SmartClean
system does not
work when I
press the on/off
button.
The SmartClean
system is not
connected to the
wall socket.
The cleaning
cartridge is empty.
The replacement
symbol flashes to
indicate that you
have to replace the
cleaning cartridge.
Put the small plug in the
SmartClean system and put
the supply unit in the wall
socket.
Place a new cleaning
cartridge in the SmartClean
system (see 'Replacing the
cartridge of the SmartClean
system').
Page 36

English
36
Problem Possible cause Solution
The shaver is not
entirely clean
after I clean it in
the SmartClean
system.
The shaver is not
fully charged
after I charge it
in the
SmartClean
system.
You have not
placed the shaver in
the SmartClean
system properly, so
there is no electrical
connection
between the
SmartClean system
and the shaver.
The cleaning
cartridge needs to
be replaced.
You have used
another cleaning
fluid than the
original Philips
cleaning cartridge.
The drain of the
cleaning cartridge is
blocked.
You have not
placed the shaver in
the SmartClean
system properly, so
there is no electrical
connection
between the
SmartClean system
and the shaver.
Press down the top cap
(‘click’) to ensure a proper
connection between the
shaver and the SmartClean
system.
Replace the cleaning
cartridge (see 'Replacing
the cartridge of the
SmartClean system').
Only use the original
Philips cleaning cartridge.
Remove the cartridge from
the SmartClean system and
push the hairs down the
drain with a toothpick.
Press down the top cap
(‘click’) to ensure a proper
connection between the
shaver and the SmartClean
system.
Page 37

Úvod
Společnost Philips Vám gratuluje ke koupi a vítá
Vás! Chcete-li využívat všech výhod podpory
nabízené společností Philips, zaregistrujte svůj
výrobek na stránkách www.philips.com/welcome.
Přečtěte si tuto uživatelskou příručku. Naleznete
v ní informace o funkcích tohoto holicího strojku
i několik tipů, díky nimž bude holení snazší a
radostnější.
Všeobecný popis (obr. 1)
1 Hřeben nástavce na zastřihování vousů
2 Nasazovací nástavec na zastřihování vousů
3 Nasazovací zastřihovací nástavec
4 Nasazovací holicí jednotka
5 Vypínač
6 Zásuvka pro malou zástrčku
7 Vykřičník
8 Připomenutí výměny
9 Kontrolka nabíjení baterie
10 Symbol cestovního zámku
11 Připomenutí čištění
12 Panel nastavení osobního pohodlí
13 Tlačítka + a - pro nastavení osobního pohodlí
14 Systém SmartClean
15 Kryt systému SmartClean
16 Vypínač
17 Symbol výměny
18 Symbol čištění
19 Symbol sušení
20 Symbol připravenosti
21 Symbol nabíjení
22 Čisticí kazeta systému SmartClean
23 Napájecí jednotka
24 Malá zástrčka
25 Držák zajišťovacího kroužku
26 Pouzdro
Čeština
37
Čeština
Page 38

Čeština
38
Dodané příslušenství se může pro různé výrobky
lišit. Příslušenství, které je součástí výrobku, je
zobrazeno na krabičce produktu.
Důležité bezpečnostní informace
Před použitím přístroje a jeho příslušenství si
pečlivě přečtěte tuto příručku s důležitými
informacemi a uschovejte ji pro budoucí použití.
Dodané příslušenství se může pro různé výrobky
lišit.
Nebezpečí
- Zdroj udržujte v suchu.
Varování
- K nabíjení baterie používejte
pouze odpojitelnou napájecí
jednotku (typ HQ8505)
dodávanou s tímto přístrojem.
- Zdroj obsahuje transformátor. U
zdroje nikdy neodřezávejte a
nenahrazujte zástrčku. Mohlo
by tak dojít k nebezpečné
situaci.
Page 39

Čeština
- Tento holicí strojek mohou
používat děti od 8 let věku.
Osoby s omezenými fyzickými,
smyslovými nebo duševními
schopnostmi nebo
nedostatkem zkušeností
a znalostí jej mohou používat,
pokud jsou pod dohledem
nebo byly poučeny
o bezpečném používání
holicího strojku a pokud chápou
související rizika. Děti si
s holicím strojkem nesmí hrát.
Děti nesmí provádět bez
dozoru čištění a uživatelskou
údržbu.
- Holicí strojek před čištěním pod
tekoucí vodou vždy odpojte od
sítě.
- Před použitím přístroj vždy
zkontrolujte. Přístroj
nepoužívejte, je-li poškozený,
aby nedošlo ke zranění.
Poškozenou součástku
vyměňujte vždy za původní typ.
39
Page 40

Čeština
40
Upozornění
- Neotvírejte přístroj, ani se
nepokoušejte vyměnit
akumulátor.
- Čisticí systém ani nabíjecí stojan
neponořujte do vody, ani je
neoplachujte pod tekoucí
vodou.
- Pro oplachování holicího
strojku nikdy nepoužívejte vodu
teplejší než 80 °C.
- Přístroj používejte pouze
k účelu, ke kterému je určen, jak
je vyobrazeno v uživatelské
příručce.
- Z hygienických důvodů by měla
přístroj používat pouze jedna
osoba.
- K čištění přístroje nikdy
nepoužívejte stlačený vzduch,
kovové žínky, abrazivní ani
agresivní čisticí prostředky, jako
je například benzín nebo
aceton.
Page 41

Čeština
- Pokud je holicí strojek vybaven
čisticím systémem, vždy
používejte originální čisticí
kapalinu Philips (kazetu nebo
lahvičku v závislosti na typu
čisticího systému).
- Čisticí systém pokládejte vždy
na stabilní vodorovný povrch,
aby nedocházelo k úniku
kapaliny.
- Pokud čisticí systém používá
čisticí kazetu, před jeho
použitím pro čištění nebo nabití
holicího strojku se vždy ujistěte,
že je přihrádka pro kazetu
uzavřena.
- Když je čisticí systém připraven
k použití, nepohybujte s ním,
aby nedocházelo k úniku čisticí
kapaliny.
41
Page 42

Čeština
42
- Po opláchnutí holicího strojku
může ze zásuvky v jeho spodní
části vytékat voda. Je to
normální a nepředstavuje to
žádné nebezpečí, protože
veškerá elektronika je uzavřena
v izolované napájecí jednotce
uvnitř holicího strojku.
- Nepoužívejte zdroj v zásuvce,
ve které je zapojen elektrický
osvěžovač vzduchu, ani v její
blízkosti. Předejdete tak
nenapravitelnému poškození
zdroje.
Elektromagnetická pole (EMP)
- Tento přístroj Philips odpovídá všem platným
normám a předpisům týkajícím se vystavení
účinkům elektromagnetických polí.
Obecné informace
- Tento holicí strojek je voděodolný. Je vhodný
pro použití ve vaně nebo sprše a pro čištění pod
tekoucí vodou. Holicí strojek lze proto
z bezpečnostních důvodů používat pouze bez
napájecího kabelu.
- Přístroj lze připojit do sítě o napětí v rozmezí
100 až 240 V.
- Zdroj transformuje 100 V až 240 V na bezpečné
nízké napětí nižší než 24 V.
- Maximální hladina hluku: Lc = 69 dB(A)
Page 43

Displej
Poznámka: Před prvním použitím holicího strojku
sejměte z displeje ochrannou fólii.
Nastavení osobního pohodlí
Přístroj je vybaven funkcí, která umožňuje
přizpůsobení nastavení. Podle svých požadavků
na holení si můžete vybrat ze tří nastavení:
pohodlné, dynamické nebo efektivní. Když
stisknete tlačítko - nebo +, segment panelu
nastavení osobního pohodlí, který se rozsvítí,
označuje aktuálně zvolené nastavení. Stisknutím
tlačítka + nebo - vyberete jiné nastavení.
Nabíjení
Rychlé nabíjení: Po zapojení holicího strojku do
elektrické zásuvky se začnou postupně opakovaně
rozsvěcovat kontrolky nabíjení baterie. Když je
holicí strojek dostatečně nabitý na jedno holení,
začne spodní kontrolka nabíjení baterie pomalu
blikat.
Při pokračování v nabíjení poté bude spodní
kontrolka stavu nabíjení blikat a později se trvale
rozsvítí. Potom začne blikat a následně se trvale
rozsvítí druhá kontrolka. Tak to pokračuje, dokud
není přístroj zcela nabitý.
Čeština
43
Page 44

Čeština
44
Baterie je plně nabitá
Když je baterie plně nabitá, budou všechny
kontrolky nabití svítit trvalým světlem.
Poznámka: Tento přístroj lze používat pouze bez
kabelu. Když stisknete vypínač během nabíjení
nebo po nabíjení, zazní zvuk signalizující, že holicí
strojek je stále zapojen do síťové zásuvky.
Poznámka: Když se baterie plně nabije, displej se
po 30 minutách automaticky vypne.
Vybitá baterie
Když je baterie téměř vybitá, spodní kontrolka
nabíjení baterie začne blikat oranžově a uslyšíte
zvukový signál.
Zbývající úroveň nabití baterie
Zbývající úroveň nabití baterie zobrazují kontrolky
nabití baterie, které trvale svítí.
Připomenutí čištění
Po každém holení holicí strojek čistěte, aby byl
zajištěn jeho optimální výkon. Když přístroj
vypnete, začne blikat symbol připomínající
potřebu vyčištění přístroje.
Cestovní zámek
Před cestováním lze přístroj uzamknout. Cestovní
zámek zabraňuje nechtěnému zapnutí přístroje.
Aktivace cestovního zámku
Page 45

1 Režim cestovního zámku aktivujete podržením
vypínače po dobu tří sekund.
Při aktivaci cestovního zámku se trvalým bílým
světlem rozsvítí symbol cestovního zámku. Při
aktivaci cestovního zámku začne přístroj
vydávat zvuk a symbol cestovního zámku začne
blikat.
Deaktivace cestovního zámku
1 Podržte vypínač po dobu 3 sekund.
Symbol cestovního zámku začne blikat a poté
se trvale rozsvítí. Nyní je přístroj znovu připraven
k použití.
Poznámka: Cestovní zámek se deaktivuje i tím, že
přístroj připojíte do elektrické zásuvky.
Připomenutí výměny
V zájmu zajištění maximálního holicího výkonu
doporučujeme holicí hlavy měnit každé dva roky.
Přístroj je vybaven funkcí připomenutí výměny,
která upozorňuje na potřebu výměny holicích hlav.
Symbol holicí jednotky se rozsvítí nepřerušovaným
bílým světlem, šipky budou bíle blikat a zazní
pípnutí jako signál, že máte vyměnit holicí hlavy.
Poznámka: Po výměně holicích hlav je třeba funkci
připomenutí výměny resetovat podržením tlačítka
vypínače po dobu sedmi sekund.
Vykřičník
Přehřívání
Čeština
45
Page 46

Čeština
46
Pokud se přístroj během nabíjení přehřeje, začne
vykřičník blikat oranžově. Když k tomu dojde, holicí
strojek se automaticky vypne. Nabíjení bude
pokračovat, jakmile se přístroj ochladí na normální
teplotu.
Blokované holicí hlavy
Pokud jsou holicí hlavy ucpané, rozsvítí se
oranžový vykřičník a bude trvale svítit.Připomenutí
výměny a připomenutí čištění budou střídavě
blikat bílou barvou a zazní zvuk. V takovém
případě se motor nespustí, protože holicí hlavy
jsou znečištěné nebo poškozené.
Pokud jsou holicí hlavy znečištěné, je nutné je
vyčistit.. Pokud jsou holicí hlavy poškozené, je
nutné je vyměnit.
Nabíjení
Holicí stroje nabijte před prvním použitím a
v případě, že displej ukazuje, že je baterie téměř
vybitá. Úroveň nabití baterie udávají světélka
kontrolky nabíjení baterie na displeji.
Po zapojení holicího strojku do elektrické zásuvky
se ozve zvukový signál.
Nabíjení trvá přibližně 1 hodinu. Plně nabitý holicí
strojek vystačí až na 50 minut holení.
Poznámka: Během nabíjení nelze holicí strojek
používat.
Nabíjení pomocí napájecí jednotky
1 Ujistěte se, že je přístroj vypnutý.
Page 47

1
2
1
2
3
Čeština
2 Zapojte napájecí jednotku do elektrické zásuvky
a malou zástrčku zasuňte do přístroje.
3 Po nabití vytáhněte napájecí jednotku z
elektrické zásuvky a malý konektor vytáhněte z
přístroje.
Nabíjení v systému SmartClean (pouze některé typy)
1 Zasuňte malou zástrčku do zadní části systému
SmartClean.
2 Napájecí jednotku připojte do elektrické
zásuvky.
3 Stisknutím horního krytu umožníte vložení
holicího strojku do držáku (ozve se zaklapnutí).
4 Obraťte strojek vzhůru nohama nad držák.
Ujistěte se, že přední strana strojku směřuje
k systému SmartClean.
5 Vložte strojek do držáku (1), nakloňte strojek
směrem vzad (2) a stisknutím horního krytu
holicí strojek připojte (ozve se zaklapnutí) (3).
Poznámka: Začne blikat symbol baterie, což
znamená, že se přístroj nabíjí. Když je baterie plně
nabitá, bude symbol baterie trvale svítit.
47
Používání přístroje
Poznámka: Tento přístroj lze používat pouze bez
kabelu.
Page 48

Čeština
48
Zapínání a vypínaní přístroje
- Zastřihovač zapněte jedním stisknutím
vypínače.
Displej se na několik sekund rozsvítí.
- Zastřihovač vypněte opětovným stisknutím
vypínače.
Displej se na několik sekund rozsvítí a zobrazí
zbývající kapacitu baterie.
Holení
Čas pro přizpůsobení pleti
Prvních několik holení nemusí přinést požadované
výsledky a vaše pleť může být dokonce lehce
podrážděná. To je normální. Vaše pleť a vousy
potřebují určitou dobu, aby si zvykly na nový holicí
systém. Doporučujeme vám holit se pouze tímto
strojkem, a to pravidelně (nejméně třikrát týdně)
po dobu tří týdnů, aby si pokožka na nový přístroj
zvykla.
Tipy pro holení
- Zvolte si nastavení osobního pohodlí (viz
„Displej“).
- Pokud jste se tři dny nebo déle neholili,
doporučujeme vám, v zájmu co nejlepšího
výsledku, vousy před holením zkrátit.
Holení za sucha
1 Zapněte přístroj.
Displej se na několik sekund rozsvítí.
2 Krouživými pohyby pohybujte holicími hlavami
po pokožce.
Poznámka: Krouživé pohyby zajistí lepší
výsledek holení než přímé pohyby.
Page 49

Čeština
3 Po každém použití (viz 'Čištění a údržba')
přístroj vyčistěte.
Mokré holení
Tento přístroj lze použít i na mokrou tvář s pěnou
nebo gelem na holení.
Při holení pěnou nebo gelem na holení postupujte
takto:
1 Zvlhčete pokožku trochou vody.
2 Naneste na pokožku pěnu nebo gel na holení.
3 Propláchněte holicí jednotku pod tekoucí
vodou. Zajistíte, že bude hladce klouzat po kůži.
4 Zapněte přístroj.
49
5 Krouživými pohyby pohybujte holicími hlavami
po pokožce.
Poznámka: Holicí jednotku pravidelně
proplachujte pod tekoucí vodou. Zajistíte, že
bude stále hladce klouzat po kůži.
6 Osušte si tvář.
7 Po každém použití (viz 'Čištění a údržba')
přístroj vyčistěte.
Page 50

Čeština
50
Poznámka: Nezapomeňte z přístroje
opláchnout veškerou pěnu nebo gel.
Použití nasazovacích nástavců
Poznámka: Dodané příslušenství se může pro
různé výrobky lišit. Příslušenství, které je součástí
výrobku, je zobrazeno na krabičce produktu.
Vyjmutí a připevnění nasazovacích nástavců
1 Ujistěte se, že je přístroj vypnutý.
2 Přímo sejměte holicí nástavec z přístroje.
Poznámka: Při snímání z přístroje nástavec
neohýbejte.
3 Nasaďte výstupek nástavce do zářezu v horní
části holicího strojku. Poté nástavec zatlačením
nasaďte na přístroj (ozve se zaklapnutí).
Použití zastřihovacího nástavce
Zastřihovací nástavec lze použít k úpravě kotlet
a kníru.
1 Nasaďte nástavec na přístroj (ozve se
zaklapnutí).
2 Zapněte přístroj.
Displej se na několik sekund rozsvítí.
3 Podržte zastřihovací nástavec kolmo ke kůži a s
jemným přítlakem pohybujte přístrojem
směrem dolů.
4 Po každém použití nástavec vyčistěte (viz
'Čištění a údržba').
Page 51

2
1
Čeština
Použití nástavce na zastřihování vousů s hřebenem
Nástavec na zastřihování vousů můžete použít
spolu s hřebenovým nástavcem k úpravě vousů
s jedním pevným nastavením délky, ale také
s různými nastaveními délky. Můžete jej také
použít k předběžnému zastřižení delších vousů
před holením, což vám usnadní následné holení.
Nastavení délky vousů na nástavci na zastřihování
vousů odpovídá zbývající délce vousů po holení
a pohybuje se v rozmezí 1 až 5 mm.
1 Nasaďte nástavec na přístroj (ozve se
zaklapnutí).
2 Nasuňte hřeben do vodicích drážek po obou
stranách nástavce na zastřihování vousů (ozve
se zaklapnutí).
3 Stiskněte volič délky a poté jeho posunutím
doleva nebo doprava vyberte požadovanou
délku vousů.
4 Zapněte přístroj.
51
5 Pohybujte přístrojem s jemným přítlakem
směrem nahoru. Dbejte na to, aby byla celá
přední část hřebenu v kontaktu s pokožkou.
6 Po každém použití nástavec vyčistěte (viz
'Čištění a údržba').
Page 52

Čeština
52
Použití nástavce na zastřihování vousů bez hřebenu
Nástavec na zastřihování vousů bez hřebenu
můžete použít k zarovnání linie vousů, kníru, kotlet
nebo linie krku na délku 0,5 mm.
1 Z nástavce na zastřihování vousů sejměte
hřeben.
Poznámka: Chcete-li hřeben sejmout
z nástavce na zastřihování vousů, uchopte jej
uprostřed. Netahejte za strany hřebenu.
2 Zapněte přístroj.
3 Podržte nástavec na zastřihování vousů kolmo
ke kůži a s jemným přítlakem posouvejte
přístrojem směrem dolů.
4 Po každém použití nástavec vyčistěte (viz
'Čištění a údržba').
Čištění a údržba
Poznámka: Dodané příslušenství se může pro
různé výrobky lišit. Příslušenství, které je součástí
výrobku, je zobrazeno na krabičce produktu.
Čištění holicího strojku v systému SmartClean
Systém SmartClean Plus má dvě fáze:
vyplachovací fázi a fázi sušení.
Page 53

2
1
Čeština
53
Příprava systému SmartClean k použití
Upozornění: Systém SmartClean nenaklánějte,
aby se zabránilo vytečení.
Poznámka: Při přípravě k použití systém
SmartClean přidržujte.
Poznámka: Pokud budete holicí strojek čistit
jednou týdně v systému SmartClean, čisticí kazeta
SmartClean se opotřebuje přibližně za tři měsíce.
1 Zasuňte malou zástrčku do zadní části systému
SmartClean.
2 Napájecí jednotku připojte do elektrické
zásuvky.
3 Stiskněte tlačítko na straně systému SmartClean
(1) a horní část systému SmartClean zvedněte
(2).
4 Z čisticí kazety stáhněte uzávěr.
5 Čisticí kazetu vložte do systému SmartClean.
Page 54

1
2
3
54
Čeština
6 Horní část systému SmartClean zatlačte zpět
směrem dolů (ozve se zaklapnutí).
Použití systému SmartClean
Upozornění: Před vložením holicího strojku do
systému SmartClean musíte vždy vytřást
přebytečnou vodu.
1 Stisknutím horního krytu umožníte vložení
holicího strojku do držáku (ozve se zaklapnutí).
2 Obraťte strojek vzhůru nohama nad držák.
Ujistěte se, že přední strana strojku směřuje
k systému SmartClean.
3 Vložte strojek do držáku (1), nakloňte strojek
směrem vzad (2) a stisknutím horního krytu
holicí strojek připojte (ozve se zaklapnutí) (3).
Začne blikat symbol baterie, což znamená, že
se holicí strojek nabíjí.
4 Stisknutím vypínače na systému SmartClean
spusťte program čištění.
Page 55

Čeština
Během vyplachovací fáze symbol vyplachování
bliká. Jakmile je vyplachovací fáze dokončena
(přibližně po 10 minutách), symbol vyplachování
se rozsvítí nepřerušovaným světlem.
Po vyplachovací fázi je automaticky zahájena fáze
sušení. Během této fáze bude symbol sušení
blikat. Jakmile je fáze sušení dokončena (přibližně
po 4 hodinách, symbol sušení se rozsvítí
nepřerušovaným světlem.
Po dokončení programu čištění se trvale rozsvítí
symbol připravenosti.
30 minut po dokončení čisticího programu
a nabíjení se systém SmartClean automaticky
vypne.
Symbol baterie se trvale rozsvítí, což znamená, že
je holicí strojek plně nabitý. Nabíjení trvá přibližně
1 hodinu.
Poznámka: Pokud během programu čištění
stisknete vypínač systému SmartClean, program se
zruší. V takovém případě symbol vyplachování
nebo sušení zhasne.
Poznámka: Pokud v průběhu programu čištění
vyjmete napájecí jednotku z elektrické zásuvky,
program se zruší.
Výměna kazety systému SmartClean
Čisticí kazetu vyměňte, když symbol výměny bliká
oranžově a nebo když již nejste spokojeni
s výsledkem čištění. Pokud budete holicí strojek
čistit jednou týdně v systému SmartClean, čisticí
kazeta SmartClean se opotřebuje přibližně za
tři měsíce.
55
Page 56

2
1
56
Čeština
1 Stiskněte tlačítko na straně systému SmartClean
(1) a horní část systému SmartClean zvedněte
(2).
2 Vyjměte ze systému SmartClean čisticí kazetu a
vylijte z ní veškerou zbývající čisticí tekutinu.
Čisticí kapalinu můžete jednoduše vylít do
výlevky.
3 Prázdnou čisticí kazetu vyhoďte.
4 Rozbalte novou čisticí kazetu a stáhněte z ní
těsnicí kryt.
5 Čisticí kazetu vložte do systému SmartClean.
6 Horní část systému SmartClean zatlačte zpět
směrem dolů (ozve se zaklapnutí).
Čištění holicího strojku tekoucí vodou
Po každém holení holicí strojek čistěte, aby byl
zajištěn jeho optimální výkon.
Upozornění: Při použití horké vody buďte opatrní.
Vždy zkontrolujte, zda není voda příliš horká,
abyste si neopařili ruce.
Poznámka: Holicí jednotku nikdy nesušte ručníkem
nebo jinou tkaninou, vyvarujete se tak poškození
holicích hlav.
Page 57

Čeština
1 Zapněte přístroj.
2 Holicí jednotku opláchněte pod tekoucí teplou
vodou.
3 Přístroj vypněte. Vysuňte držák holicích hlav ze
spodní části holicí jednotky.
4 Vypláchněte komoru na odstřižené vousy
tekoucí vodou.
5 Vypláchněte držák holicích hlav pod teplou
tekoucí vodou.
6 Zbylou vodu důkladně vytřepejte a nechte
držák holicích hlav vyschnout.
7 Zasuňte držák holicích hlav do spodní části
holicí jednotky (ozve se zaklapnutí).
57
Čištění nasazovacích nástavců
Zastřihovací nástavec ani nástavce na zastřihování
vousů nikdy nesušte ručníkem nebo jinou
Page 58

58
Čeština
tkaninou, vyvarujete se tak poškození stříhacích
zubů.
Dodané příslušenství se může pro různé výrobky
lišit. Příslušenství, které je součástí výrobku, je
zobrazeno na krabičce produktu.
Čištění zastřihovacího nástavce
Zastřihovací nástavec po každém použití vyčistěte.
1 Zapněte přístroj s připojeným zastřihovacím
nástavcem.
2 Nástavec opláchněte pod tekoucí teplou
vodou.
3 Po čištění přístroj vypněte.
4 Zbylou vodu důkladně vytřepejte a nechte
nástavec vyschnout.
Tip: Aby byl zajištěn optimální výkon, pravidelně
kápněte na zuby nástavce kapku oleje na šicí
stroje.
Čištění nástavce na zastřihování vousů
Nástavec na zastřihování vousů čistěte po každém
použití.
1 Z nástavce na zastřihování vousů sejměte
hřeben.
Poznámka: Chcete-li hřeben sejmout
z nástavce na zastřihování vousů, uchopte jej
uprostřed. Netahejte za strany hřebenu.
2 Zapněte přístroj.
3 Opláchněte nástavec na zastřihování vousů
a hřeben každý zvlášť pod tekoucí teplou
vodou.
4 Po čištění přístroj vypněte.
Page 59

5 Opatrně vytřepejte přebytečnou vodu a nechte
2yrs
nástavec na zastřihování vousů a hřeben
vyschnout.
6 Aby byl zajištěn optimální výkon, pravidelně
kápněte na zuby nástavce kapku oleje na šicí
stroje.
Skladování
1 Přístroj uchovávejte v dodaném pouzdru.
Poznámka: Před uložením přístroje do pouzdra
se ujistěte, že je zcela suchý.
Výměna
Výměna holicích hlav
V zájmu zajištění maximálního holicího výkonu
doporučujeme holicí hlavy měnit každé dva roky.
Poškozené holicí hlavy ihned vyměňte. Holicí
hlavy nahrazujte vždy výhradně originálními
holicími hlavami (viz 'Objednávání příslušenství')
Philips.
Připomenutí výměny
Funkce připomenutí výměny informuje o nutnosti
výměny holicích hlav.Symbol holicí jednotky se
trvale rozsvítí, šipky začnou bíle blikat a při vypnutí
holicího strojku uslyšíte pípnutí.
1 Přístroj vypněte.
Čeština
59
Page 60

1
3
2
3
1
2
60
Čeština
2 Vysuňte držák holicích hlav ze spodní části
holicí jednotky.
3 Držák zajišťovacího kroužku umístěte na
zajišťovací kroužek (1), otočte proti směru
hodinových ručiček (2) a stáhněte z holicí hlavy
(3).
Sejměte držák zajišťovacího kroužku ze
zajišťovacího kroužku a opakujte tento postup
pro ostatní zajišťovací kroužky.
4 Sejměte holicí hlavy z držáku holicích hlav.
Použité holicí hlavy hned vyhoďte, aby nedošlo
k záměně s novými holicími hlavami.
5 Holicí hlavy vložte do držáku holicí hlavy.
Poznámka: Zkontrolujte, že drážky na obou
stranách holicí hlavy přesně zapadají na
výstupky držáku holicí hlavy.
6 Umístěte držák zajišťovacího kroužku na
zajišťovací kroužek (1), umístěte na holicí hlavu
(2) a otočením ve směru hodinových ručiček (3)
opět upevněte zajišťovací kroužek. Opakujte
postup pro ostatní zajišťovací kroužky.
Page 61

2
1
Čeština
-
Na každém zajišťovacím kroužku jsou dva
otvory, které přesně zapadají do výstupků
držáku holicích hlav. Otáčejte kroužkem po
směru hodinových ručiček, až dokud se
neozve zacvaknutí na znamení, že je kroužek
upevněn.
Poznámka: Při opětovném vložení holicí hlavy
do držáku a opětovném připevnění
zajišťovacích kroužků držte držák holicích hlav
v dlani. Nikam jej nepokládejte, mohlo by dojít
k poškození holicí hlavy.
7 Zasuňte držák holicích hlav do spodní části
holicí jednotky (ozve se zaklapnutí).
8 Pokud chcete funkci připomenutí výměny
resetovat, stiskněte vypínač a přibližně sedm
sekund jej podržte. Počkejte, dokud neuslyšíte
dvě pípnutí.
61
Objednávání příslušenství
Chcete-li koupit příslušenství nebo náhradní díly,
navštivte adresu www.shop.philips.com/service
nebo se obraťte na prodejce výrobků Philips.
Můžete se také obrátit na středisko péče
o zákazníky společnosti Philips ve své zemi
(kontaktní údaje naleznete na letáčku
s celosvětovou zárukou).
Objednat lze následující příslušenství a náhradní
díly:
- holicí hlavy Philips SH90
- čisticí sprej na holicí hlavy Philips HQ110
- nástavec na zastřihování vousů RQ111 Philips
- Nástavec čisticího kartáčku RQ585 Philips
- hlavice čisticího kartáčku RQ560/RQ563 Philips
Page 62

Čeština
62
- čisticí
kazeta JC301/JC302/JC303/JC304/JC305
- napájecí jednotka HQ8505
Poznámka: Dostupnost příslušenství se může lišit
podle země.
Recyklace
- Tento symbol znamená, že výrobek nelze
likvidovat s běžným komunálním odpadem
(2012/19/EU).
- Symbol na výrobku znamená, že tento výrobek
obsahuje vestavěné dobíjecí baterie, které
nemohou být likvidovány společně s běžným
domácím odpadem (2006/66/ES). Důrazně
doporučujeme, abyste výrobek zanesli do
oficiálního sběrného místa nebo servisního
střediska Philips a nechali vyjmutí nabíjecí
baterie na odbornících.
- Dodržujte předpisy vaší země týkající se sběru
tříděného odpadu elektrických a elektronických
výrobků a také akumulátorů. Správnou likvidací
pomůžete zabránit negativním dopadům na
životní prostředí a lidské zdraví.
Vyjmutí nabíjecího akumulátoru holicího strojku
Až budete holicí strojek likvidovat, vyjměte
z něj nabíjecí baterii. Před vyjmutím baterie
ověřte, zda je holicí strojek odpojený od
elektrické zásuvky a zda je tato baterie
zcela vybitá.
Při manipulaci s nástroji potřebnými
k otevření holicího strojku a při likvidaci
Page 63

nabíjecí baterie dbejte všech nezbytných
bezpečnostních zásad.
Pozor, pásky od baterie jsou ostré.
1 Vložte šroubovák do drážky mezi předním a
zadním panelem ve spodní části přístroje.
Sejměte zadní panel.
2 Sejměte přední panel.
3 Uvolněte dva šroubky na horní části vnitřního
panelu a sejměte vnitřní panel.
4 Vyjměte nabíjecí baterii pomocí šroubováku.
Záruka a podpora
Více informací nebo podporu naleznete na adrese
www.philips.com/support nebo na samostatném
záručním listu s celosvětovou platností.
Omezení záruky
Na holicí hlavy (planžety a kryty) se nevztahují
podmínky mezinárodní záruky, neboť podléhají
opotřebení.
Řešení problémů
V této kapitole jsou shrnuty nejběžnější problémy,
se kterými se můžete u zastřihovače setkat. Pokud
se vám nepodaří problém vyřešit podle
následujících informací, navštivte web
www.philips.com/support, kde jsou uvedeny
odpovědi na nejčastější dotazy, nebo kontaktujte
středisko zákaznické péče ve své zemi.
Čeština
63
Page 64

Čeština
64
Holicí strojek
Problém Možná příčina Řešení
Strojek po
stisknutí tlačítka
vypínače
nefunguje.
Nabíjecí baterie je
Cestovní zámek je
Strojek neho
lí tak dobře jako
dříve.
Holicí hlavy jsou
Přístroj je stále
připojen k elektrické
zásuvce. Přístroj lze
z bezpečnostních
důvodů používat
pouze bez
napájecího kabelu.
vybitá.
zapnutý.
Holicí jednotka je
znečištěná nebo
poškozená do té
míry, že motor nelze
spustit.
Jsou poškozené
nebo opotřebované
holicí hlavy.
ucpány vousy nebo
nečistotami.
Odpojte přístroj od sítě a
zapněte ho stisknutím
vypínače.
Nabijte baterii (viz
'Nabíjení').
Cestovní zámek
deaktivujete podržením
vypínače po dobu
tří sekund.
Holicí hlavy důkladně
vyčistěte nebo je vyměňte.
Podrobný popis toho, jak
správně vyčistit holicí hlavy,
naleznete v části „Holicí
hlavy ucpané vousy nebo
nečistotami“.
Vyměňte holicí hlavy (viz
'Výměna').
Vyčistěte holicí hlavy
standardním způsobem (viz
'Čištění a údržba') nebo je
důkladně vyčistěte.
Page 65

Problém Možná příčina Řešení
Čeština
65
Chcete-li důkladně vyčistit
Vyměnil jsem
holicí hlavy, ale
displej stále
zobrazuje
připomenutí
výměny.
Na displeji se
náhle objevil
symbol holicí
jednotky.
Při nabíjení
přístroje se na
displeji náhle
objevil symbol
vykřičníku.
Na displeji se
náhle objevil
vykřičník,
připomenutí vý
měny a
připomenutí
čištění.
Neresetovali jste
přístroj.
Tento symbol
upozorňuje na
nutnost výměny
holicích hlav.
Přístroj je přehřátý. Odpojte přístroj na
Holicí hlavy jsou
poškozené.
holicí hlavy, vyjměte je
postupně z držáku holicích
hlav (viz 'Výměna'). Poté
oddělte nožový věnec od
holicí korunky a opláchněte
jednotlivé páry pod tekoucí
vodou. Po opláchnutí
vložte nožový věnec zpět
do odpovídající holicí
korunky. Poté vložte holicí
hlavy zpět do držáku
holicích hlav (viz 'Výměna').
Resetujte přístroj
podržením tlačítka
vypínače po dobu přibližně
sedmi sekund (viz 'Výměna
holicích hlav').
Vyměňte holicí hlavy (viz
'Výměna').
přibližně 10 minut z
elektrické zásuvky.
Vyměňte holicí hlavy (viz
'Výměna').
Page 66

Čeština
66
Problém Možná příčina Řešení
Holicí hlavy jsou
Ze spodní části
přístroje
prosakuje voda.
znečištěné.
Během čištění se
může mezi vnitřním
tělem a vnějším
obalem přístroje
nahromadit voda.
Vyčistěte holicí hlavy (viz
'Čištění a údržba').
Podrobný popis toho, jak
správně vyčistit holicí hlavy,
naleznete v části „Holicí
hlavy ucpané vousy nebo
nečistotami“.
Je to normální a
nepředstavuje to žádné
nebezpečí, protože veškerá
elektronika je uzavřena
v izolované napájecí
jednotce uvnitř přístroje.
Systém SmartClean
Problém Možná příčina Řešení
Systém
SmartClean se
po stisknutí
vypínače
nezapne.
Holicí strojek
není po vyčištění
v systému
SmartClean
dokonale čistý.
Systém SmartClean
není zapojený do
elektrické zásuvky.
Čisticí kazeta je
prázdná. Bliká
symbol výměny,
který upozorňuje, že
je třeba vyměnit
čisticí kazetu.
Holicí strojek není
správně vložen do
systému
SmartClean a
nedošlo tak
k elektrickému
propojení mezi
holicím strojkem a
systémem
SmartClean.
Zasuňte malou zástrčku do
systému SmartClean a
zasuňte napájecí jednotku
do elektrické zásuvky.
Vložte novou čisticí kazetu
do systému SmartClean
(viz 'Výměna kazety
systému SmartClean').
Stlačte horní kryt směrem
dolů (ozve se zaklapnutí) a
zajistěte tak řádné spojení
mezi holicím strojkem a
systémem SmartClean.
Page 67

Problém Možná příčina Řešení
Čeština
67
Holicí strojek
není po nabíjení
v systému
SmartClean plně
nabitý.
Je třeba vyměnit
čisticí kazetu.
Použili jste jinou
čisticí kapalinu než
originální čisticí
kazetu Philips.
Je ucpán odtok
čisticí kazety.
Holicí strojek není
správně vložen do
systému
SmartClean a
nedošlo tak
k elektrickému
propojení mezi
holicím strojkem a
systémem
SmartClean.
Vyměňte čisticí kazetu (viz
'Výměna kazety systému
SmartClean').
Používejte pouze originální
čisticí kazetu Philips.
Ze systému SmartClean
vyjměte čisticí kazetu a
protlačte párátkem
chloupky do odtoku.
Stlačte horní kryt směrem
dolů (ozve se zaklapnutí) a
zajistěte tak řádné spojení
mezi holicím strojkem a
systémem SmartClean.
Page 68

Eesti
68
Sissejuhatus
Õnnitleme ostu puhul ja tervitame Philipsi poolt!
Philipsi pakutava tootetoe eeliste täielikuks
kasutamiseks registreerige oma toode veebisaidil
www.philips.com/welcome.
Palun lugege see pardli omadusi tutvustav
kasutusjuhend läbi. Sellest leiate ka nõuandeid
raseerimise kergemaks ja nauditavamaks
muutmise kohta.
Üldine kirjeldus (joon. 1)
1 Kamm habemepiirli tarviku jaoks
2 Kinniklõpsatav habemepiirli tarvik
3 Kinniklõpsatav piirli tarvik
4 Kinniklõpsatav pardlipea
5 Toitenupp
6 Väikese pistiku pesa
7 Hüüumärk
8 Asendamise meeldetuletus
9 Aku laetuse näidik
10 Reisiluku sümbol
11 Puhastamise meeldetuletus
12 Isiklike mugavussätete riba
13 + ja - nupud isiklike mugavussätete jaoks
14 SmartClean süsteem
15 SmartClean süsteemi kate
16 Toitenupp
17 Asendamise sümbol
18 Puhastamissümbol
19 Kuivatamissümbol
20 Valmisoleku sümbol
21 Laadimise sümbol
22 SmartClean süsteemi puhastuskassett
23 Toiteplokk
24 Väike pistik
25 Lukustusrõnga hoidja
26 Kott
Eesti
Page 69

Toote juurde kuuluvad tarvikud võivad olenevalt
tootest erineda. Karbil on näidatud tarvikud, mis
teie seadmega kaasas käivad.
Tähtis ohutusteave
Enne seadme ja selle tarvikute kasutamist lugege
antud oluline teave hoolikalt läbi ja hoidke see
edaspidiseks alles. Kaasaskäivad tarvikud võivad
vastavalt tootele erineda.
Oht
- Hoidke toiteplokk kuivana.
Hoiatus
- Kasutage aku laadimiseks ainult
äravõetavat toiteplokki (tüüp
HQ8505), mis on seadmega
kaasas.
- Toiteplokis on trafo. Ärge
lõigake toiteplokki ära, et
asendada seda mõne teise
pistikuga, kuna see
põhjustab ohtliku olukorra.
Eesti
69
Page 70

70
Eesti
- Seda seadet võivad kasutada
lapsed alates 8. eluaastast ning
füüsiliste puuete ja
vaimuhäiretega isikud või
isikud, kellel puuduvad
kogemused ja teadmised, kui
neid valvatakse või neile on
antud juhendid seadme ohutu
kasutamise kohta ja nad
mõistavad sellega seotud ohte.
Lapsed ei tohi seadmega
mängida. Ärge laske lastel
seadet järelevalveta puhastada
ja hooldada.
- Võtke alati pistik pistikupesast
välja enne pardli kraani all
pesemist.
- Kontrollige alati enne seadme
kasutamist selle korrasolekut.
Vigastuste vältimiseks ärge
kasutage seadet, kui see on
kahjustatud. Vahetage alati
kahjustatud osa
originaalvaruosa vastu välja.
Page 71

Ettevaatust
Eesti
- Ärge avage seadet, et laetavaid
akusid ise välja vahetada.
- Ärge kastke puhastussüsteemi
või laadimisalust vette ega
loputage neid voolava vee all.
- Ärge kunagi kasutage pardli
loputamiseks 80 °C-st
kuumemat vett.
- Kasutage seda seadet üksnes
selleks ettenähtud otstarbel
kasutusjuhendi kohaselt.
- Hügieenilistel põhjustel peaks
seadet ainult üks isik kasutama.
- Ärge kunagi kasutage seadme
puhastamiseks suruõhku,
küürimiskäsna, abrasiivseid
puhastusvahendeid ega ka
sööbivaid vedelikke nagu
bensiin või atsetoon.
71
Page 72

72
Eesti
- Kui pardel on varustatud
puhastussüsteemiga, kasutage
alati originaalset Philipsi
puhastusvedelikku (kassett või
pudel, sõltuvalt
puhastussüsteemi tüübist).
- Pange puhastussüsteem
lekkimise ärahoidmiseks alati
kindlale, tasasele ja
horisontaalsele pinnale.
- Kui teie süsteem kasutab
puhastuskassetti, veenduge
alati enne puhastussüsteemi
kasutamist või pardli laadimist,
et kasseti kamber on suletud.
- Ärge kasutusvalmis
puhastussüsteemi pesuvahendi
lekkimise ärahoidmiseks teise
kohta paigutage.
Page 73

- Loputamise ajal tilgub seadme
põhjal olevast pesast vett välja.
See on normaalne ega ole
ohtlik, sest kogu elektroonika
on pardli sees olevas
hermeetiliselt suletud
toiteallikas.
- Toiteploki pöördumatu
kahjustamise vältimiseks ärge
kasutage seda sellises
pistikupesas või sellise
pistikupesa lähedal, mis
sisaldab elektrilist
õhuvärskendit.
Elektromagnetväljad (EMF)
- See Philips seade vastab kõikidele
elektromagnetiliste väljadega kokkupuudet
käsitlevatele kohaldatavatele standarditele ja
õigusnormidele.
Üldteave
- See pardel on veekindel. Sobib kasutamiseks
vannis või duši all ning puhastamiseks kraani all.
Ohutuse tagamiseks saab pardlit vaid juhtmeta
kasutada.
- Seadet sobib kasutada toitepingel 100-240
volti.
- Toiteplokk muundab 100–240 voldise pinge
trafo abil ohutuks 24-voldiseks pingeks.
- Maksimaalne müratase: Lc = 69 dB(A).
Eesti
73
Page 74

Eesti
74
Ekraan
Märkus. Enne pardli esmakasutamist eemaldage
ekraanilt kaitsekile.
Isiklikud mugavussätted
Seadmel on funktsioon, mis võimaldab teil
seadistusi isikupäraseks muuta. Saate valida kolme
erineva sätte vahel sõltuvalt teie isiklikest
raseerimisvajadustest: mugav, dünaamiline või
tõhus. Kui vajutate - või + nuppe, süttib teie isiklike
mugavussätete riba, mis näitab hetkel valitud sätet.
Erinevate sätete valimiseks võite vajutada + või nuppu.
Laadimine
Kiirlaadimine: Pardli seinakontakti ühendades
süttivad aku laetuse näidiku märgutuled korduvalt
üksteise järel põlema. Kui pardlil on piisavalt
laengut üheks raseerimiseks, hakkab alumine aku
laetuse näidiku märgutuli aeglaselt vilkuma.
Samal ajal kui pardel laeb, hakkab kõigepealt aku
laetuse näidiku alumine märgutuli vilkuma ning siis
jääb see püsivalt põlema. Seejärel vilgub järgmine
tuli ning jääb püsivalt põlema ning nii kuniks seade
on täielikult laetud.
Page 75

Aku on täis laetud
Kui aku on täis laetud, jäävad kõik aku laetuse
näidiku märgutuled püsivalt valgelt põlema.
Märkus. Seda seadet saab kasutada ainult
juhtmevabalt. Kui vajutate laadimise ajal või pärast
seda sisse/välja-nuppu, kuulete heli, mis näitab, et
pardel on endiselt toitepesaga ühendatud.
Märkus. Kui aku on täis, lülitub ekraan 30 minuti
pärast automaatselt välja.
Aku on tühi
Kui aku on peaaegu tühi, vilgub aku laetuse
näidiku alumine märgutuli oranžilt ja kuulete
helisignaali.
Aku laetuse tase
Aku laetust näitavad aku laetuse näidiku
märgutuled, mis jäävad püsivalt põlema.
Puhastamise meeldetuletus
Optimaalse jõudluse tagamiseks puhastage pardlit
pärast igat raseerimist. Seadme väljalülitamisel
vilgub puhastamise meeldetuletus, mis tuletab
teile seadme puhastamist meelde.
Eesti
75
Reisilukk
Reisile minekul saab seadme lukku panna.
Reisilukk hoiab ära seadme juhusliku
sisselülitamise.
Reisiluku aktiveerimine
Page 76

Eesti
76
1 Reisilukurežiimi sisenemiseks vajutage 3
sekundi jooksul toitenuppu.
Reisiluku aktiveerimisel süttib reisiluku sümbol
pidevalt valgelt põlema. Kui reisilukk
aktiveeritakse, kostab seadmest helisignaal ning
reisiluku sümbol vilgub.
Reisiluku funktsiooni väljalülitamine
1 Vajutage kolme sekundi jooksul toitenuppu.
Reisiluku sümbol hakkab vilkuma ja jääb
seejärel püsivalt põlema. Seadet võib nüüd
uuesti kasutada.
Märkus. Reisiluku saate välja lülitada ka seadme
seinakontakti ühendamisel.
Asendamise meeldetuletus
Maksimaalse raseerimisjõudluse saavutamiseks
soovitame lõikepäid vahetada iga kahe aasta
tagant.
Seade on varustatud asendamise
meeldetuletusega, mis tuletab teile
raseerimispeade väljavahetamist meelde. Pardli
väljalülitamisel jääb pardlipea sümbol püsivalt
valgelt põlema, nooled valgelt vilkuma ja
seadmest kostuvad piiksud, ms tähendab, et peate
pardlipea välja vahetama.
Märkus. Pärast raseerimispeade väljavahetamist
peate asendamise meeldetuletuse lähtestama,
vajutades toitenuppu 7 sekundi jooksul.
Hüüumärk
Ülekuumenemine
Page 77

Kui seade kuumeneb laadimise ajal üle, hakkab
hüüumärk oranžilt vilkuma. Kui see juhtub, lülitub
pardel automaatselt välja. Laadimine jätkub, kui
seade on saavutanud taas tavalise temperatuuri.
Blokeeritud raseerimispead
Kui raseerimispead on blokeeritud, jääb hüüumärgi
sümbol pidevalt oranžilt põlema. Asendamise
meeldetuletus ja puhastamise meeldetuletus
vilguvad vaheldumisi valgelt ja kuulete heli. Sellisel
juhul on pardlipea määrdunud või kahjustunud, et
mootor ei hakka tööle.
Kui raseerimispea on määrdunud, peate seda
puhastama. Kui raseerimispea on kahjustunud,
peate selle välja vahetama.
Laadimine
Laadige pardlit enne esmakasutust ja siis, kui
ekraan näitab, et aku on peaaegu tühi. Aku laetuse
taset näitavad ekraanile kuvatud aku laetuse
näidiku märgutuled.
Pardli seinakontakti ühendades kuulete
helisignaali.
Laadimine kestab umbes üks tund. Täislaetud aku
võimaldab ajada habet ilma toitejuhtmeta kuni 50
minutit.
Märkus. Seadet ei saa laadimise ajal kasutada.
Toiteplokiga laadimine
1 Veenduge, et seade on välja lülitatud.
Eesti
77
Page 78

1
2
1
2
3
Eesti
78
2 Sisestage toiteplokk seinakontakti ja väike pistik
seadmesse.
3 Eemaldage toiteplokk pärast laadimist
seinakontaktist ja tõmmake väike pistik
seadmest välja.
Laadimine SmartClean süsteemis (ainult teatud mudelitel)
1 Sisestage väike pistik SmartClean süsteemi
tagaküljele.
2 Ühendage toiteplokk seinakontakti.
3 Vajutage ülemisele kattele, et saaksite pardli
hoidjasse asetada (klõpsatus!).
4 Hoidke pardlit hoidja kohal põhjaga ülespidi.
Veenduge, et pardli eesosa oleks suunatud
SmartClean süsteemi poole.
5 Pange pardel hoidjasse (1), kallutage pardlit
tahapoole (2) ja vajutage pardli ühendamiseks
alla ülemine kate (klõpsatus!) (3).
Märkus. Aku sümbol hakkab vilkuma märkimaks,
et seade laeb. Kui aku on täis laetud, jääb aku
sümbol pidevalt valgelt põlema.
Seadme kasutamine
Märkus. Seda seadet saab kasutada ainult
juhtmevabalt.
Page 79

Seadme sisse- ja väljalülitamine
- Seadme sisselülitamiseks vajutage üks kord
on/off nuppu.
Ekraan valgustub mõneks sekundiks.
- Seadme väljalülitamiseks vajutage üks kord
toitenuppu.
Ekraan läheb mõneks sekundiks heledaks ja
näitab aku laetuse taset.
Raseerimine
Naha kohanemise periood
Teie esimesed habemeajamised ei pruugi teile
soovitud tulemust anda ning võivad teie nahka
kergelt ärritada. See on normaalne. Teie nahk
vajab ükskõik millise uue raseerimissüsteemiga
harjumiseks aega. Lubamaks oma nahal uue
seadmega harjuda, soovitame raseerida
regulaarselt (vähemalt 3 korda nädalas) ja ainult
selle seadmega 3 nädala vältel.
Raseerimisnäpunäited
- Valige oma isiklikud mugavussätted (vt ptk
„Ekraan”).
- Parima tulemuse saavutamiseks soovitame teil
oma habet eelnevalt piirata, kui te pole
raseerinud 3 päeva jooksul või pikemalt.
Kuivalt habemeajamine
1 Lülitage seade sisse.
Ekraan valgustub mõneks sekundiks.
2 Liigutage lõikepäid ringikujuliste liigutustega
mööda nahka.
Märkus. Ringikujulised liigutused annavad
paremad raseerimistulemused kui sirged
liigutused.
Eesti
79
Page 80

80
Eesti
3 Puhastage seadet pärast kasutamist (vaadake
'Puhastamine ja hooldus').
Märjalt raseerimine
Seda seadet saate kasutada ka märjal näol,
raseerides raseerimisvahu või -geeliga.
Raseerimisvahu või -geeliga raseerimisel järgige
alltoodud samme.
1 Tehke nahk märjaks.
2 Määrige nahale raseerimisvahtu või -geeli.
3 Loputage pardlipead kraani all, et kindlustada
pardlipea sujuv libisemine nahal.
4 Lülitage seade sisse.
5 Liigutage lõikepäid ringikujuliste liigutustega
mööda nahka.
Märkus. Loputage pardlipead regulaarselt
kraanivee all, et see libiseks sujuvalt üle teie
naha.
6 Kuivatage oma nägu.
7 Puhastage seadet pärast kasutamist (vaadake
'Puhastamine ja hooldus').
Page 81

Märkus. Veenduge, et olete kogu vahu või geeli
seadmelt maha loputanud.
Kinniklõpsatavate tarvikute kasutamine
Märkus. Toote juurde kuuluvad tarvikud võivad
olenevalt tootest erineda. Karbil on näidatud
tarvikud, mis teie seadmega kaasas käivad.
Kinniklõpsatavate tarvikute kinnitamine ja eemaldamine
1 Veenduge, et seade on välja lülitatud.
2 Tõmmake tarvik seadme küljest ära.
Märkus. Ärge keerake tarvikut, kui te seda
seadme küljest lahti tõmbate.
3 Lükake tarviku eend seadme ülemises osas
olevasse süvendisse. Seejärel vajutage
tarvikule, et see seadme külge kinnitada
(klõpsatus!).
Piirli kasutamine
Piirlit võite kasutada põskhabeme ja vuntside
hooldamiseks.
1 Kinnitage tarvik seadme külge (klõpsatus!).
2 Lülitage seade sisse.
Ekraan valgustub mõneks sekundiks.
Eesti
81
3 Hoidke piirlit nahaga risti ning liigutage seadet
õrnalt surudes allapoole.
4 Puhastage tarvik pärast kasutamist (vaadake
'Puhastamine ja hooldus').
Page 82

2
1
82
Eesti
Habemepiirli kasutamine koos kammiga
Habemepiirli tarvikut saab habeme piiramiseks
kasutada ka koos seadme külge kinnitatud
kammiga kas kindlaksmääratud seadistusega või
erinevate pikkusseadetega. Saate seda kasutada
pikkade karvade eelpiiramiseks enne
habemeajamist, et saada mugavam
habemeajamise kogemus.
Habemepiirli tarviku pikkusseade vastab karvade
pikkusele pärast lõikust ning jääb vahemikku 1 kuni
5 mm.
1 Kinnitage tarvik seadme külge (klõpsatus!).
2 Lükake kamm habemepiirli tarviku kummalgi
küljel olevatesse juhtsoontesse, (klõpsatus!).
3 Vajutage pikkuse selektorit ja lükake seda
soovitud karvapikkuse seade valimiseks
vasakule või paremale.
4 Lülitage seade sisse.
5 Liigutage seadet õrnalt surudes ülespoole.
Veenduge, et kammi eesmine osa oleks vastu
nahka.
6 Puhastage tarvik pärast kasutamist (vaadake
'Puhastamine ja hooldus').
Page 83

Habemepiirli kasutamine ilma kammita
Võite kasutada habemepiirli tarvikut ilma kammita
oma habeme, vuntside, põskhabeme või kuklaosa
piiramiseks kuni pikkuseni 0,5 mm.
1 Tõmmake kamm habemepiirli tarviku küljest
lahti.
Märkus. Haarake kammi keskosast, et see
habemepiirli tarviku küljest eemaldada. Ärge
tõmmake kammi selle külgedest.
2 Lülitage seade sisse.
3 Hoidke habemepiirlit nahaga risti ning liigutage
seadet õrnalt surudes allapoole.
4 Puhastage tarvik pärast kasutamist (vaadake
'Puhastamine ja hooldus').
Puhastamine ja hooldus
Märkus. Toote juurde kuuluvad tarvikud võivad
olenevalt tootest erineda. Karbil on näidatud
tarvikud, mis teie seadmega kaasas käivad.
Pardli puhastamine SmartCleani süsteemis
SmartCleani süsteemil Plus on kaks etappi:
loputamise ja kuivatamise etapp.
Eesti
83
Page 84

2
1
84
Eesti
SmartClean süsteemi kasutamiseks ettevalmistamine
Ettevaatust! Lekkimise ärahoidmiseks ärge
kallutage SmartClean süsteemi.
Märkus. Hoidke SmartClean süsteemi kasutamiseks
ettevalmistamisel sellest kinni.
Märkus. Kui puhastate pardlit SmartClean
süsteemis kord nädalas, kestab SmartClean kassett
umbes kolm kuud.
1 Sisestage väike pistik SmartClean süsteemi
tagaküljele.
2 Ühendage toiteplokk seinakontakti.
3 Vajutage SmartClean süsteemi küljel olevat
nuppu (1) ja tõstke SmartClean süsteemi
ülemine osa üles (2).
4 Tõmmake kile puhastuskasseti küljest ära.
5 Pange puhastuskassett SmartClean süsteemi.
Page 85

1
2
3
Eesti
6 Suruge SmartClean süsteemi ülemist osa tagasi
allapoole (klõpsatus!).
SmartCleani süsteemi kasutamine
Ettevaatust! Enne pardli SmartClean süsteemi
panemist kontrollige alati, kas raputasite sellest
üleliigse vee välja .
1 Vajutage ülemisele kattele, et saaksite pardli
hoidjasse asetada (klõpsatus!).
2 Hoidke pardlit hoidja kohal põhjaga ülespidi.
Veenduge, et pardli eesosa oleks suunatud
SmartClean süsteemi poole.
3 Pange pardel hoidjasse (1), kallutage pardlit
tahapoole (2) ja vajutage pardli ühendamiseks
alla ülemine kate (klõpsatus!) (3).
Aku sümbol hakkab vilkuma pardli laadimise
tähistamiseks.
4 Puhastusprogrammi käivitamiseks vajutage
SmartClean süsteemi toitenuppu.
85
Page 86

86
Eesti
Loputamise ajal vilgub loputamise sümbol. Kui
loputus on lõppenud (ca 10 minuti pärast), hakkab
loputuse sümbol pidevalt põlema.
Kuivatus algab pärast loputust automaatselt. Selle
etapi ajal vilgub kuivatamise sümbol. Kui kuivatus
on lõppenud (ca 4 minuti pärast), hakkab
kuivatuse sümbol pidevalt põlema.
Kui puhastusprogramm on lõppenud, jääb
valmisoleku sümbol püsivalt põlema.
30 minutit pärast puhastusprogrammi ja laadimise
lõppu lülitub SmartCleani süsteem automaatselt
välja.
Aku sümbol jääb püsivalt põlema, näidates, et
pardel on täis laetud. Laadimine kestab umbes üks
tund.
Märkus. Kui vajutate SmartClean süsteemi
toitenuppu puhastusprogrammi ajal, siis programm
katkestatakse. Sel juhul lakkab loputamise või
kuivatamise sümbol põlemast.
Märkus. Kui eemaldate puhastusprogrammi
toimimise ajal toiteploki seinakontaktist, katkeb
programm.
SmartClean süsteemi kasseti väljavahetamine
Vahetage puhastuskassett välja, kui asendamise
sümbol vilgub oranžilt või te ei ole enam
puhastamise tulemusega rahul. Kui puhastate
pardlit SmartClean süsteemis kord nädalas, kestab
SmartClean kassett umbes kolm kuud.
Page 87

2
1
Eesti
1 Vajutage SmartClean süsteemi küljel olevat
nuppu (1) ja tõstke SmartClean süsteemi
ülemine osa üles (2).
2 Eemaldage puhastuskassett SmartClean
süsteemist ja valage allesjäänud
puhastusvedelik puhastuskassetist välja.
Puhastusvedeliku võite lihtsalt valamust alla
valada.
3 Visake tühi puhastuskassett minema.
4 Võtke uus puhastuskassett pakendist välja ja
tõmmake kile kasseti küljest ära.
5 Pange puhastuskassett SmartClean süsteemi.
6 Suruge SmartClean süsteemi ülemist osa tagasi
allapoole (klõpsatus!).
87
Pardli puhastamine kraani all
Optimaalse jõudluse tagamiseks puhastage pardlit
pärast igat raseerimist.
Ettevaatust! Olge kuuma veega ettevaatlik.
Kontrollige alati, et vesi ei oleks liiga tuline, sest
muidu võite käsi põletada.
Page 88

88
Eesti
Märkus. Ärge kunagi kuivatage pardlipead käteräti
või salvrätikuga, sest nii võite raseerimispäid
rikkuda.
1 Lülitage seade sisse.
2 Loputage pardlipead sooja kraanivee all.
3 Lülitage seade välja. Tõmmake raseerimispea
hoidja pardlipea alumise osa küljest ära.
4 Loputage karvakambrit kraani all.
5 Loputage raseerimispea hoidjat sooja kraanivee
all.
6 Raputage liigne vesi hoolikalt maha ja laske
raseerimispea hoidjal kuivada.
7 Pange raseerimispea hoidja pardlipea alumise
osa külge (klõpsatus!).
Page 89

Kinniklõpsatavate tarvikute puhastamine
Ärge kunagi kuivatage piirlit ega habemepiirlit
käteräti või salvrätikuga, sest nii võite piirlihambad
rikkuda.
Toote juurde kuuluvad tarvikud võivad olenevalt
tootest erineda. Karbil on näidatud tarvikud, mis
teie seadmega kaasas käivad.
Piirli puhastamine
Puhastage piirlit pärast iga kasutuskorda.
1 Lülitage külgepandud piirliga seade sisse.
2 Loputage tarvikut sooja kraanivee all.
3 Lülitage pardel pärast puhastamist välja.
4 Raputage liigne vesi ettevaatlikult ära ja laske
kinnitusel kuivada.
Nõuanne. Optimaalse jõudluse tagamiseks
määrige tarviku hambaid regulaarselt tilga
õmblusmasinaõliga.
Habemepiirli tarviku puhastamine
Puhastage habemepiirli tarvikut pärast iga
kasutuskorda.
1 Tõmmake kamm habemepiirli tarviku küljest
lahti.
Märkus. Haarake kammi keskosast, et see
habemepiirli tarviku küljest eemaldada. Ärge
tõmmake kammi selle külgedest.
2 Lülitage seade sisse.
Eesti
89
3 Loputage habemepiirli tarvikut ja kammi eraldi
sooja kraanivee all.
4 Lülitage pardel pärast puhastamist välja.
5 Raputage liigne vesi ettevaatlikult maha ning
laske habemepiirli tarvikul ja kammil kuivada.
Page 90

2yrs
Eesti
90
6 Optimaalse jõudluse tagamiseks määrige
tarviku hambaid regulaarselt tilga
õmblusmasinaõliga.
Hoiustamine
1 Hoidke seadet kaasasolevas vutlaris.
Märkus. Enne kui hoiustate seadet kotis,
veenduge, et see oleks kuiv.
Osade vahetamine
Raseerimispeade vahetamine
Maksimaalse raseerimisjõudluse saavutamiseks
soovitame lõikepäid vahetada iga kahe aasta
tagant. Kahjustatud raseerimispead tuleb
viivitamata välja vahetada. Asendage
raseerimispead alati originaalsete Philipsi
raseerimispeadega (vaadake 'Tarvikute tellimine').
Asendamise meeldetuletus
Asendamise meeldetuletus annab märku, et
raseerimispead vajavad väljavahetamist.Pardli
väljalülitamisel jääb pardlipea sümbol püsivalt
põlema, nooled valgelt vilkuma ja te kuulete piiksu.
1 Lülitage seade välja.
2 Tõmmake raseerimispea hoidja pardlipea
alumise osa küljest ära.
Page 91

1
3
2
3
1
2
Eesti
3 Pange lukustusrõnga hoidja lukustusrõnga
külge (1), keerake seda vastupäeva (2) ja tõstke
see raseerimispea küljest ära (3).
Eemaldage lukustusrõngas lukustusrõnga
hoidja küljest ja korrake seda toimingut teiste
lukustusrõngastega.
4 Eemaldage raseerimispead raseerimispea
hoidja küljest.
Vältimaks vanade raseerimispeade segamini
ajamist uutega, visake need kohe minema.
5 Pange raseerimispead raseerimispea hoidjasse.
Märkus. Veenduge, et lõikepeade mõlemal
küljel olevad sooned sobituksid täpselt lõikepea
hoidja eenditega.
6 Pange lukustusrõnga hoidja lukustusrõnga
külge (1), asetage see raseerimispea külge (2) ja
keerake see lukustusrõnga tagasipanekuks
päripäeva kinni (3). Korrake seda toimingut
teiste lukustusrõngastega.
-
Igal lukustusrõngal on kaks soont, mis
sobivad täpselt raseerimispea hoidja
eenditega. Keerake rõngast päripäeva kuni
kuulete klõpsatust, mis viitab, et rõngas on
fikseeritud.
91
Page 92

2
1
Eesti
92
Märkus. Hoidke raseerimispea hoidjat
raseerimispeade tagasipanekul ja lukustusrõnga
tagasipanekul käes. Ärge asetage raseerimispea
hoidjat selle tegevuse käigus muule pinnale,
sest see võib seda kahjustada.
7 Pange raseerimispea hoidja pardlipea alumise
osa külge (klõpsatus!).
8 Asendamise meeldetuletuse lähtestamiseks
hoidke toitenuppu u 7 sekundit all. Vajutage,
kuni kuulete kahte piiksu.
Tarvikute tellimine
Seadme jaoks tarvikute või varuosade ostmiseks
minge veebilehele www.shop.philips.com/service
või külastage Philipsi edasimüüjat. Samuti võite
pöörduda oma riigi Philipsi klienditoe keskusesse
(vt kontaktandmeid ülemaailmse garantii lehelt).
Saadaval on järgmised tarvikud ja asendusosad:
- SH90 Philipsi raseerimispead
- HQ110 Philipsi raseerimispeade pihustusaine
- RQ111 Philipsi habemepiirli tarvik
- RQ585 Philipsi puhastushari
- RQ560/RQ563 Philips puhastusharja pead
- JC301/JC302/JC303/JC304/JC305 puhastusk
assett
- HQ8505 toiteplokk
Märkus. Tarvikute saadavus võib riigiti erineda.
Page 93

Ringlussevõtt
- See sümbol tähendab, et seda toodet ei tohi
visata tavaliste olmejäätmete hulka
(2012/19/EL).
- See sümbol tähendab, et käesolev toode
sisaldab sisseehitatud akupatareid, mida ei tohi
visata tavaliste olmejäätmete hulka
(2006/66/EÜ). Me soovitame teil oma toode
viia Philipsi ametlikku kogumispunkti või
hoolduskeskusesse, et akupatarei
professionaalil eemaldada lasta.
- Järgige oma riigi elektriliste ja elektrooniliste
toodete ning akupatareide lahuskogumist
reguleerivaid eeskirju. Õigel viisil kasutusest
kõrvaldamine aitab ära hoida kahjulikke
tagajärgi keskkonnale ja inimeste tervisele.
Akupatarei eemaldamine
Eemaldage akupatarei seadmest vaid siis,
kui pardli kasutusest kõrvaldate. Enne aku
eemaldamist kontrollige, et pardli pistik
oleks seinakontaktist välja võetud ja et aku
oleks täiesti tühi.
Rakendage kõiki vajalikke ohutusmeetmeid,
kui käsitsete pardli avamisel tööriistu ja kui
kõrvaldate laetava aku kasutusest.
Ettevaatust, aku klemmiribade ääred on teravad.
1 Pange kruvikeeraja ots seadme põhjas olevasse
esi- ja tagapaneeli vahelisse pessa. Eemaldage
tagumine paneel.
2 Eemaldage esipaneel.
Eesti
93
Page 94

Eesti
94
3 Keerake kaks sisemise paneeli ülaosas olevat
kruvi lahti ja eemaldage sisemine paneel.
4 Eemaldage kruvikeeraja abil aku.
Garantii ja tugi
Kui vajate teavet või abi, külastage veebilehte
www.philips.com/support või lugege eraldiolevat
rahvusvahelist garantiilehte.
Garantiipiirangud
Raseerimispeade (nii lõiketerade kui ka
juhtvõrede) asendamine pole rahvusvaheliste
garantiitingimustega reguleeritud, sest need on
kuluvad osad.
Veaotsing
Selles peatükis võetakse kokku kõige levinumad
probleemid, mis teil seadmega tekkida võivad. Kui
te ei suuda alljärgneva teabe abil ise probleemi
lahendada, külastage veebilehte
www.philips.com/support, kus on loetelu korduma
kippuvatest küsimustest, või võtke ühendust oma
riigi klienditeeninduskeskusega.
Pardel
Probleem Võimalik põhjus Lahendus
Seade ei tööta,
kui ma vajutan
toitenuppu.
Laetav aku on tühi. Laadige aku (vaadake
Seade on ikka veel
seinakontakti
ühendatud.
Ohutuse tagamiseks
saab seadet vaid
juhtmeta kasutada.
Ühendage seade
vooluvõrgust lahti ning
vajutage selle
sisselülitamiseks
toitenuppu.
'Laadimine').
Page 95

Probleem Võimalik põhjus Lahendus
Eesti
95
Reisilukk on
Seade ei raseeri
enam nii hästi
nagu varem.
Karvad või mustus
Raseerimispeade
aktiveeritud.
Pardlipea on sellisel
määral määrdunud
või kahjustunud, et
mootor ei hakka
tööle.
Raseerimispead on
kahjustatud või
kulunud.
on raseerimispead
ummistanud.
Reisiluku väljalülitamiseks
vajutage 3 sekundi jooksul
toitenuppu.
Puhastage raseerimispead
põhjalikult või asendage
need. Selleks, kuidas
raseerimispäid põhjalikult
puhastada, vaadake ka osa
„Karvad või mustus on
raseerimispead
ummistanud”.
Vahetage raseerimispead
(vaadake 'Osade
vahetamine').
Puhastage raseerimispead
nii nagu tavaliselt (vaadake
'Puhastamine ja hooldus')
või siis puhastage need
põhjalikult.
põhjalikuks puhastamiseks
eemaldage need ükshaaval
(vaadake 'Osade
vahetamine') raseerimispea
hoidjast. Seejärel
eemaldage lõiketera
juhtvõrest ning puhastage
mõlemaid osi kraani all.
Pärast loputamist pange
lõiketera tagasi vastava
võre külge. Viimasena
pange raseerimispead
tagasi raseerimispea hoidja
(vaadake 'Osade
vahetamine') külge.
Page 96

Eesti
96
Probleem Võimalik põhjus Lahendus
Vahetasin
raseerimispead
välja, kuid
ekraanil
kuvatakse
endiselt
asendamise
meeldetuletust.
Ootamatult
ilmus ekraanile
pardlipea
sümbol.
Seadme
laadimise ajal
ilmus ekraanile
ootamatult
hüüumärk.
Ootamatult
ilmusid ekraanile
hüüumärk,
asendamise
meeldetuletus ja
puhastamise
meeldetuletus.
Raseerimispead on
Vesi lekib
seadme põhjast.
Te pole seadet
lähtestanud.
See sümbol tuletab
meelde, et
raseerimispead
vajavad
väljavahetamist.
Seade on
ülekuumenenud.
Raseerimispead on
kahjustatud.
määrdunud.
Puhastamise ajal
võib koguneda vesi
seadme sisekorpuse
ja väliskesta vahele.
Lähtestage seade,
vajutades toitenuppu u 7
sekundi (vaadake
'Raseerimispeade
vahetamine') jooksul.
Vahetage raseerimispead
(vaadake 'Osade
vahetamine').
Ühendage seade
seinakontaktist u 10
minutiks lahti.
Vahetage raseerimispead
(vaadake 'Osade
vahetamine').
Puhastage raseerimispead
(vaadake 'Puhastamine ja
hooldus'). Selleks, kuidas
raseerimispäid põhjalikult
puhastada, vaadake ka osa
„Karvad või mustus on
raseerimispead
ummistanud”.
See on normaalne ega ole
ohtlik, sest kogu
elektroonika on seadme
sees olevas hermeetiliselt
suletud toiteallikas.
Page 97

SmartClean süsteem
Probleem Võimalik põhjus Lahendus
Eesti
97
Kui vajutan
toitenuppu, ei
hakka
SmartClean
süsteem tööle.
Pardel pole
pärast
SmartClean
süsteemiga
puhastamist
täiesti puhas.
SmartClean
süsteem pole
seinakontaktiga
ühendatud.
Puhastuskassett on
tühi. Asendamise
sümbol hakkab
vilkuma, andes
märku, et
puhastuskassett
tuleb välja
vahetada.
Te ei asetanud
pardlit korralikult
SmartClean
süsteemi, seega
puudub SmartClean
süsteemi ja pardli
vahel
elektriühendus.
Puhastuskassett
tuleb välja
vahetada.
Te ei kasuta
originaalset Philipsi
puhastuskassetti.
Puhastuskasseti
äravooluava on
ummistunud.
Sisestage väike pistik
SmartClean süsteemi ning
toiteplokk seinakontakti.
Pange uus puhastuskassett
SmartClean süsteemi
(vaadake 'SmartClean
süsteemi kasseti
väljavahetamine').
Suruge ülemist katet
allapoole (klõpsatus!), et
tagada õige ühendus pardli
ja SmartClean süsteemi
vahel.
Vahetage puhastuskassett
välja (vaadake 'SmartClean
süsteemi kasseti
väljavahetamine').
Kasutage ainult
originaalseid Philipsi
puhastuskassette.
Eemaldage kassett
SmartClean süsteemist
ning lükake karvad
hambaorki kasutades
äravoolu.
Page 98

Eesti
98
Probleem Võimalik põhjus Lahendus
Pärast laadimist
SmartClean
süsteemis pole
pardel täielikult
laetud.
Te ei asetanud
pardlit korralikult
SmartClean
süsteemi, seega
puudub SmartClean
süsteemi ja pardli
vahel
elektriühendus.
Suruge ülemist katet
allapoole (klõpsatus!), et
tagada õige ühendus pardli
ja SmartClean süsteemi
vahel.
Page 99

Uvod
Čestitamo na kupnji i dobro došli u Philips! Kako
biste potpuno iskoristili podršku koju nudi tvrtka
Philips, registrirajte svoj proizvod na
www.philips.com/welcome.
Molimo, pročitajte ovaj korisnički priručnik jer
sadrži informacije o mogućnostima ovog aparata
za brijanje kao i neke savjete koji će brijanje učiniti
lakšim i ugodnijim.
Opći opis (sl. 1)
1 Češalj nastavka za oblikovanje brade
2 Nastavak za oblikovanje brade koji se lako
3 Nastavak za podrezivanje koji se lako
4 Jedinica za brijanje koja se lako pričvršćuje
5 Gumb za uključivanje/isključivanje
6 Utičnica za mali utikač
7 Znak uskličnika
8 Podsjetnik za zamjenu
9 Indikator punjenja baterije
10 Simbol putnog zaključavanja
11 Podsjetnik za čišćenje
12 Traka s osobnim postavkama za udobnost
13 Gumbi + i - za osobne postavke udobnosti
14 Sustav SmartClean
15 Poklopac sustava SmartClean
16 Gumb za uključivanje/isključivanje
17 Simbol zamjene
18 Simbol za čišćenje
19 Simbol za sušenje
20 Simbol spremnosti
21 Simbol punjenja
22 Spremnik za čišćenje za sustav SmartClean
23 Jedinica za napajanje
24 Mali utikač
pričvršćuje
pričvršćuje
Hrvatski
99
Hrvatski
Page 100

Hrvatski
100
25 Držač prstena za pričvršćivanje
26 Torbica
Isporučeni dodaci mogu se razlikovati za različite
proizvode. Kutija prikazuje dodatke koji su
dostavljeni s aparatom.
Važne sigurnosne informacije
Pažljivo pročitajte te važne informacije prije nego li
se budete koristili uređajem i njegovim dodacima
te ih pohranite za buduću upotrebu. Isporučeni
dodaci mogu se razlikovati za različite proizvode.
Opasnost
- Održavajte jedinicu za
napajanje suhom.
Upozorenje
- Kako biste napunili bateriju,
koristite se isključivo odvojivom
jedinicom za opskrbu (tip
HQ8505) isporučenom s
aparatom.
 Loading...