

Page 1
9000 series
S91XX / S90X X
Page 2
Page 3

15
14
1
2
3
4
5
6
16
18 19
17
7
8
9
10
11
12
13
20
21
22
23
24
25
Page 4

empty page before TOC
Page 5

English 6
Deutsch 38
Français 73
Italiano 108
Page 6

English
6
Contents
Introduction 7
Important safety information 7
Danger 8
Warning 8
Caution 10
Electromagnetic fields (EMF) 12
General 12
General description (Fig.1) 12
The display 13
Charging 14
Battery fully charged 14
Battery low 14
Remaining battery charge 14
Cleaning reminder 15
Travel lock 15
Replacement reminder 16
Exclamation mark 16
Charging 16
Charging with the supply unit 17
Charging in the SmartClean system (S9111/31, S9161/31
only)
Using the appliance 18
Switching the appliance on and off 18
Shaving 18
Using the click-on attachments 20
Cleaning and maintenance 22
Cleaning the shaver in the SmartClean system
(S9161/31, S9111/31 only)
Preparing the SmartClean system for use 23
Using the SmartClean system 24
Replacing the cartridge of the SmartClean system 26
Cleaning the shaver under the tap 27
23
17
English
Page 7

English
Cleaning the click-on attachments 28
Storage 29
Replacement 29
Replacing the shaving heads 29
Ordering accessories 31
Recycling 32
Removing the rechargeable shaver battery 32
Guarantee and support 33
Guarantee restrictions 33
Troubleshooting 33
Shaver 34
SmartClean system 36
Introduction
Congratulations on your purchase and welcome to
Philips! To fully benefit from the support that
Philips offers, register your product at
www.philips.com/welcome.
Please read this user manual, as it contains
information about the features of this shaver as
well as some tips to make shaving easier and more
enjoyable.
Important safety information
Read this important information carefully before
you use the appliance and its accessories and
save it for future reference. The accessories
supplied may vary for different products.
7
Page 8
English
8
Danger
Warning
- Keep the supply unit dry.
- To charge the battery, only use
the detachable supply unit
(type HQ8505) provided with
the appliance.
- The supply unit contains a
transformer. Do not cut off the
supply unit to replace it with
another plug, as this causes a
hazardous situation.
Page 9

English
- This appliance can be used by
children aged from 8 years and
above and persons with
reduced physical, sensory or
mental capabilities or lack of
experience and knowledge if
they have been given
supervision or instruction
concerning use of the
appliance in a safe way and
understand the hazards
involved. Children shall not play
with the appliance. Cleaning
and user maintenance shall not
be made by children without
supervision.
- Always unplug the shaver
before you clean it under the
tap.
- Always check the appliance
before you use it. Do not use
the appliance if it is damaged,
as this may cause injury. Always
replace a damaged part with
one of the original type.
9
Page 10
English
10
Caution
- Do not open the appliance to
replace the rechargeable
battery.
- Never immerse the cleaning
system or the charging stand in
water and do not rinse it under
the tap.
- Never use water hotter than
80°C to rinse the shaver.
- Only use this appliance for its
intended purpose as shown in
the user manual.
- For hygienic reasons, the
appliance should only be used
by one person.
- Never use compressed air,
scouring pads, abrasive
cleaning agents or aggressive
liquids such as petrol or
acetone to clean the appliance.
Page 11

English
- If your shaver comes with a
cleaning system, always use
the original Philips cleaning
fluid (cartridge or bottle,
depending on the type of
cleaning system).
- Always place the cleaning
system on a stable, level and
horizontal surface to prevent
leakage.
- If your cleaning system uses a
cleaning cartridge, always make
sure the cartridge compartment
is closed before you use the
cleaning system to clean or
charge the shaver.
- When the cleaning system is
ready for use, do not move it to
prevent leakage of cleaning
fluid.
11
Page 12
English
12
- Water may drip from the socket
at the bottom of the shaver
when you rinse it. This is normal
and not dangerous because all
electronics are enclosed in a
sealed power unit inside the
shaver.
- Do not use the supply unit in or
near wall sockets that contain
an electric air freshener to
prevent irreparable damage to
the supply unit.
Electromagnetic fields (EMF)
- This Philips appliance complies with all
applicable standards and regulations regarding
exposure to electromagnetic fields.
General
- This shaver is waterproof. It is suitable for use in
the bath or shower and for cleaning under the
tap. For safety reasons, the shaver can
therefore only be used without cord.
- The appliance is suitable for mains voltages
ranging from 100 to 240 volts.
- The supply unit transforms 100-240 volts to a
safe low voltage of less than 24 volts.
General description (Fig.1)
1 Comb for beard styler attachment (S9161/31,
S9111/41, S9111/31 only)
2 Click-on beard styler attachment (S9161/31,
S9111/41, S9111/31 only)
Page 13

The display
English
3 Click-on trimmer attachment (S9041/12,
S9031/12 only)
4 Click-on shaving unit
5 On/off button
6 Socket for small plug
7 Exclamation mark
8 Replacement reminder
9 Battery charge indicator
10 Travel lock symbol
11 Cleaning reminder
12 SmartClean system (S9161/31, S9111/31 only)
13 Cap of SmartClean system
14 On/off button
15 Replacement symbol
16 Cleaning symbol
17 Drying symbol
18 Ready symbol
19 Charge symbol
20 Cleaning cartridge for SmartClean system
21 Supply unit
22 Small plug
23 Retaining ring holder
24 Pouch
The accessories supplied may vary for different
products. The box shows the accessories that have
been supplied with your appliance.
Note: Before you use the shaver for the first time,
remove the protective foil from the display.
13
Page 14
English
14
Charging
Quick charge: When you connect the shaver to the
wall socket, the lights of the battery charge
indicator light up one after another repeatedly.
When the shaver contains enough energy for one
shave, the bottom light of the battery charge
indicator starts to flash slowly.
While the shaver continues to charge, first the
bottom light of the battery charge indicator flashes
and then lights up continuously. Then the second
light flashes and lights up continuously, and so on
until the shaver is fully charged (see 'Battery fully
charged').
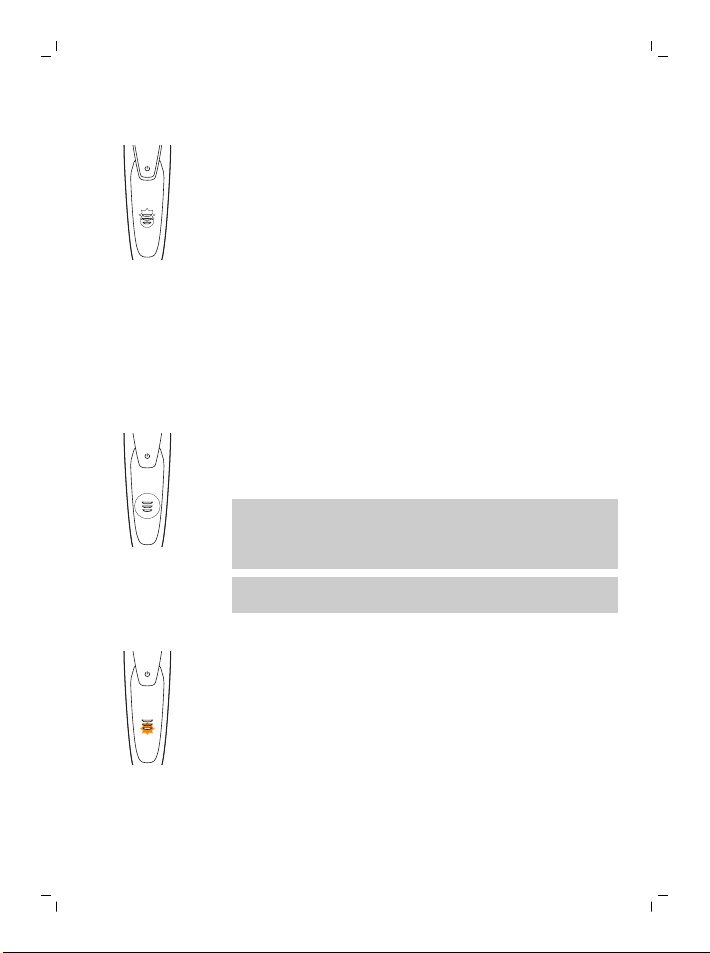
Battery fully charged
When the battery is fully charged, all lights of the
battery charge indicator light up white
continuously.
Note: This appliance can only be used without
cord. When you press the on/off button during or
after charging, you hear a sound to indicate that
the shaver is still connected to the wall socket.
Note: When the battery is full, the display switches
off automatically after 30 minutes.
Battery low
When the battery is almost empty, the bottom light
of the battery charge indicator flashes orange and
you hear a sound.
Remaining battery charge
The remaining battery charge is shown by the
lights of the battery charge indicator that light up
continuously.
Page 15
Cleaning reminder
Clean the shaver after every shave for optimal
performance. When you switch off the appliance,
the cleaning reminder flashes to remind you to
clean the appliance.
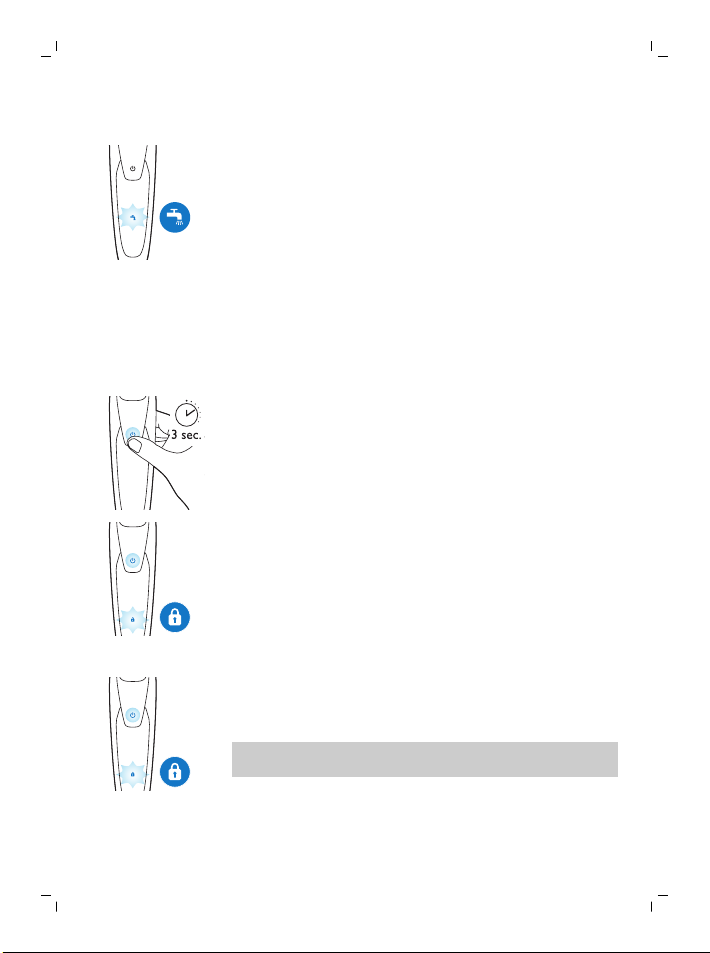
Travel lock
You can lock the appliance when you are going to
travel. The travel lock prevents the appliance from
being switched on by accident.
Activating the travel lock
1 Press the on/off button for 3 seconds to enter
Deactivating the travel lock
1 Press the on/off button for 3 seconds.
Note: You can also deactivate the travel lock by
connecting the appliance to the wall socket.
English
the travel lock mode.
While you activate the travel lock, the travel
lock symbol lights up white continuously. When
the travel lock is activated, the appliance
produces a sound and the travel lock symbol
flashes.
The travel lock symbol flashes and then lights
up continuously. The appliance is now ready for
use again.
15
Page 16
English
16
Replacement reminder
For maximum shaving performance, we advise you
to replace the shaving heads every two years.
The appliance is equipped with a replacement
reminder which reminds you to replace the
shaving heads. The shaving unit symbol lights up
white continuously, the arrows flash white and the
appliance beeps to indicate that you have to
replace the shaving heads.
Note: After replacing the shaving heads, you need
to reset the replacement reminder by pressing the
on/off button for 7 seconds.
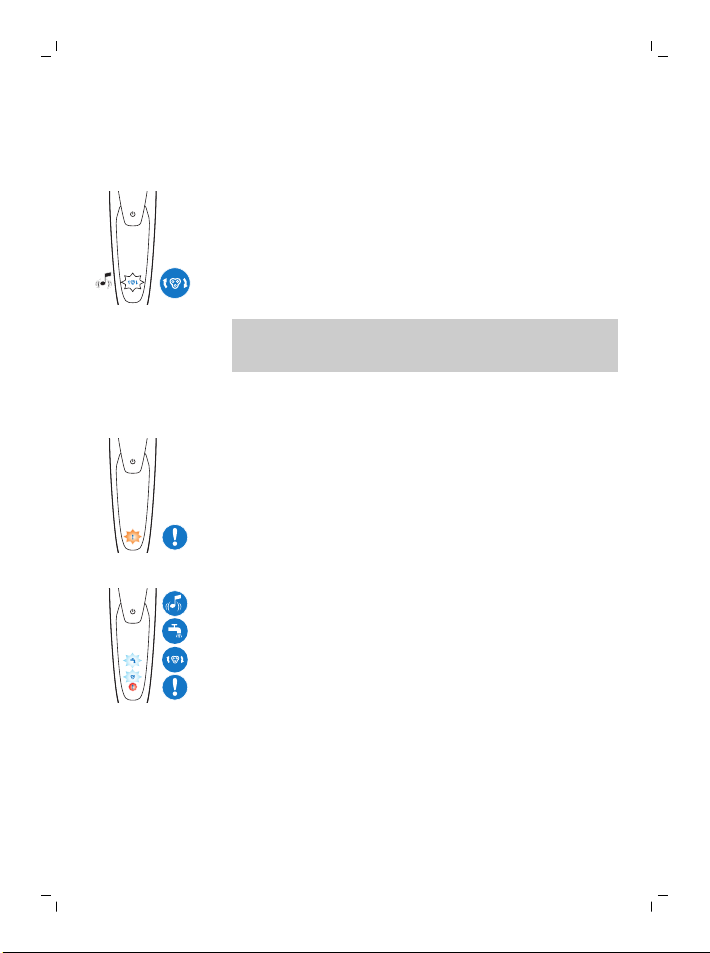
Exclamation mark
Overheating
If the appliance overheats during charging, the
exclamation mark flashes orange. When this
happens, the shaver switches off automatically.
Charging continues once the temperature of the
appliance has decreased to the normal level.
Blocked shaving heads
If the shaving heads are blocked, the exclamation
mark lights up orange continuously. The
replacement reminder and the cleaning reminder
flash white alternately and you hear a sound. In
this case, the motor cannot run because the
shaving heads are soiled or damaged.
If the shaving heads are soiled, you have to clean
them. If the shaving heads are damaged, you have
to replace them.
Charging
Charge the shaver before you use it for the first
time and when the display indicates that the
Page 17
1
2
English
battery is almost empty. The battery charge is
indicated by the lights of the battery charge
indicator on the display.
When you connect the shaver to the wall socket,
you hear a sound.
Charging takes approx. 1 hour. A fully charged
shaver has a shaving time of up to 50 minutes.
Note: You cannot use the appliance while it is
charging.
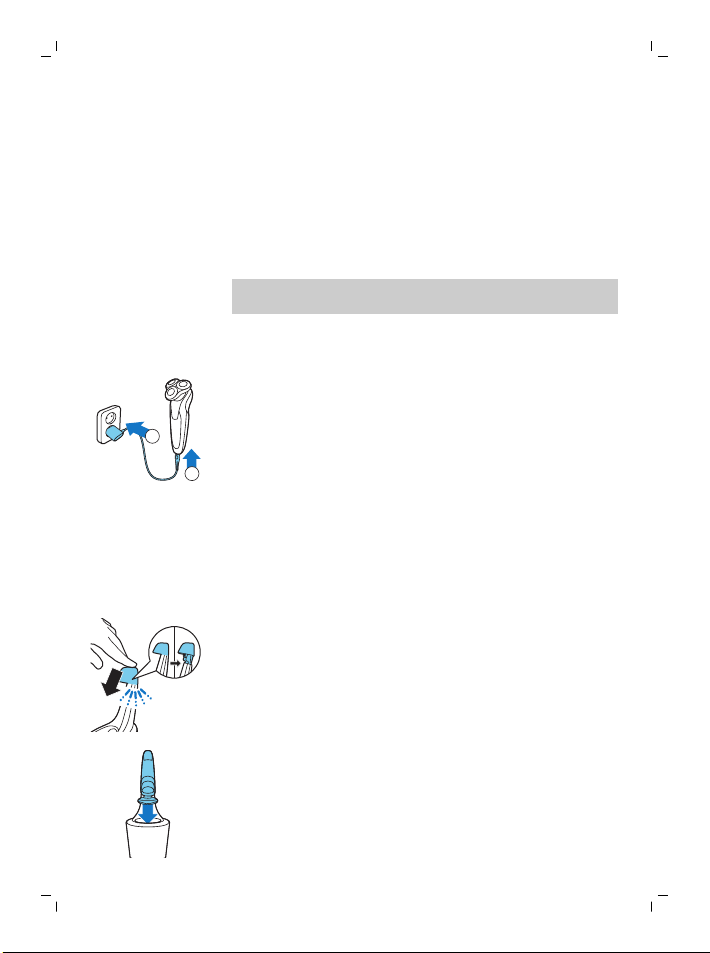
Charging with the supply unit
1 Make sure the appliance is switched off.
2 Put the supply unit in the wall socket and put
the small plug in the appliance.
3 After charging, remove the supply unit from the
wall socket and pull the small plug out of the
appliance.
Charging in the SmartClean system (S9111/31, S9161/31 only)
1 Put the small plug in the back of the
SmartClean system.
2 Put the supply unit in the wall socket.
3 Press the top cap to be able to place the shaver
in the holder ('click').
17
4 Hold the shaver upside down above the holder.
Make sure the front of the shaver points
towards the SmartClean system.
Page 18
1
2
3
English
18
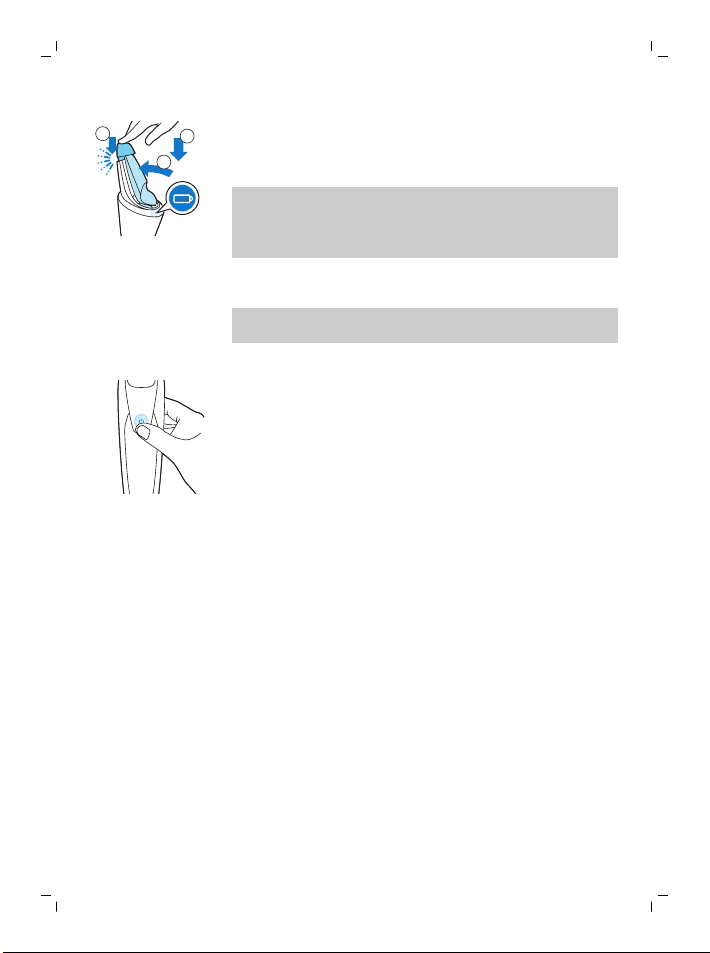
5 Place the shaver in the holder (1), tilt the shaver
backwards (2) and press down the top cap to
connect the shaver (‘click’) (3).
Note: The battery symbol starts to flash to indicate
that the appliance is charging. When the battery is
fully charged, the battery symbol lights up
continuously.
Using the appliance
Note: This appliance can only be used without
cord.
Switching the appliance on and off
- To switch on the appliance, press the on/off
button once.
The display lights up for a few seconds.
- To switch off the appliance, press the on/off
button once.
The display lights up for a few seconds and
shows the remaining battery charge.
Shaving
Skin adaptation period
Your first shaves may not bring you the result you
expect and your skin may even become slightly
irritated. This is normal. Your skin and beard need
time to adapt to any new shaving system. To allow
your skin to adapt to this new appliance, we advise
you to shave regularly (at least 3 times a week)
and exclusively with this appliance for a period of
3 weeks.
Shaving tips
- To ensure the best result, we advise you to pretrim your beard if you have not shaved for 3
days or longer.
Page 19
English
- Move the shaving heads over your skin in
circular movements.
Dry shaving
1 Switch on the appliance.
The display lights up for a few seconds.
2 Move the shaving heads over your skin in
circular movements.
Note: Circular movements provide better
shaving results than straight movements.
3 Clean the appliance after use (see 'Cleaning
and maintenance').
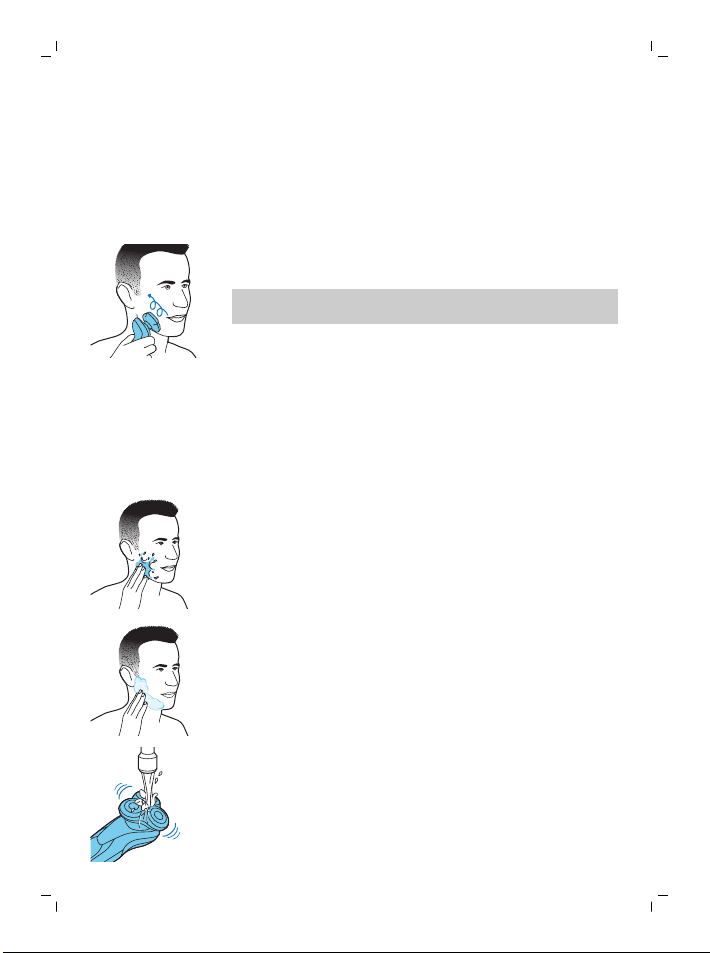
Wet shaving
You can also use this appliance on a wet face with
shaving foam or shaving gel.
To shave with shaving foam or shaving gel, follow
the steps below:
1 Apply some water to your skin.
2 Apply shaving foam or shaving gel to your skin.
19
3 Rinse the shaving unit under the tap to ensure
that the shaving unit glides smoothly over your
skin.
4 Switch on the appliance.
Page 20
English
20
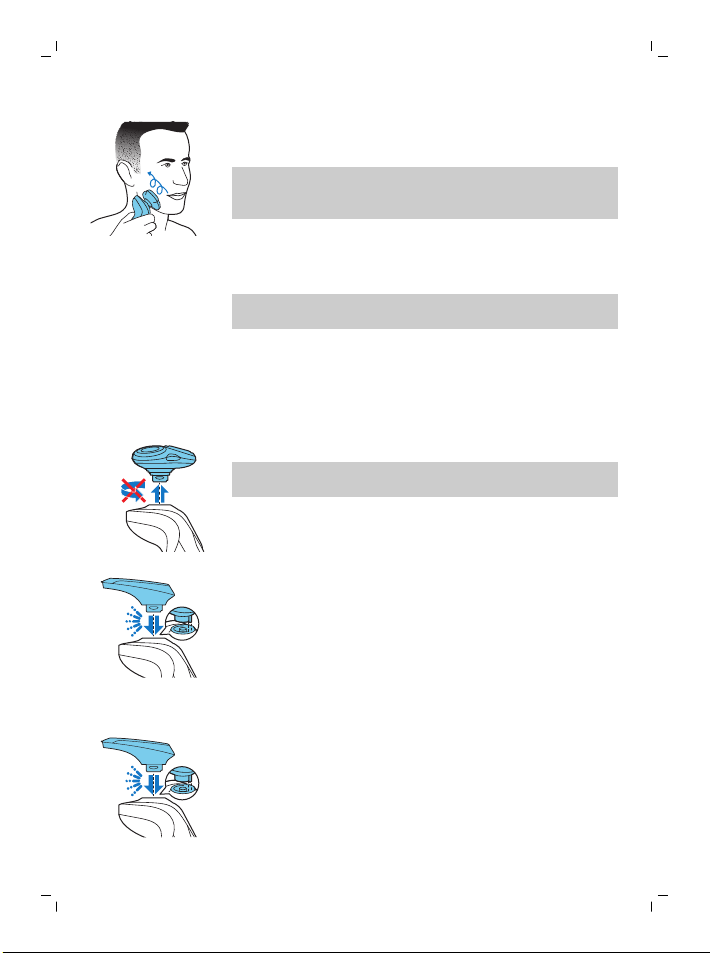
5 Move the shaving heads over your skin in
circular movements.
Note: Rinse the shaving unit regularly to ensure
that it continues to glide smoothly over your
skin.
6 Dry your face.
7 Clean the appliance after use (see 'Cleaning
and maintenance').
Note: Make sure you rinse all foam or shaving
gel off the appliance.
Using the click-on attachments
Removing or attaching the click-on attachments
1 Make sure the appliance is switched off.
2 Pull the attachment straight off the appliance.
Note: Do not twist the attachment while you
pull it off the appliance.
3 Insert the lug of the attachment into the slot in
the top of the appliance. Then press down the
attachment to attach it to the appliance (‘click’).
Using the trimmer attachment (S9041/12, S9031/12 only)
You can use the trimmer attachment to groom
your sideburns and moustache.
1 Attach the attachment to the appliance (‘click’).
2 Switch on the appliance.
The display lights up for a few seconds.
Page 21

2
1
English
3 Hold the trimmer attachment perpendicular to
the skin and move the appliance downwards
while you exert gentle pressure.
4 Clean the attachment after use (see 'Cleaning
and maintenance').
Using the beard styler attachment with comb (S9161/31, S9111/41, S9111/31 only)
You can use the beard styler attachment with the
comb attached to style your beard at one fixed
setting, but also at different length settings. You
can also use it to pre-trim any long hairs before
shaving for a more comfortable shave.
The length settings on the beard styler attachment
correspond to the remaining hair length after
cutting and range from 1 to 5mm.
1 Attach the attachment to the appliance ('click').
2 Slide the comb straight into the guiding grooves
on both sides of the beard styler attachment
(‘click’).
21
3 Press the length selector and then push it to the
left or right to select the desired hair length
setting.
Page 22

22
English
4 Switch on the appliance.
5 Move the appliance upwards while you exert
gentle pressure. Make sure the front of the
comb is in full contact with the skin.
6 Clean the attachment after use (see 'Cleaning
and maintenance').
Using the beard styler attachment without comb
You can use the beard styler attachment without
the comb to contour your beard, moustache,
sideburns or neckline to a length of 0.5mm.
1 Pull the comb off the beard styler attachment.
Note: Grab the comb in the center to pull it off
the beard styler attachment. Do not pull at the
sides of the comb.
2 Switch on the appliance.
3 Hold the beard styler attachment perpendicular
to the skin and move the appliance downwards
while you exert gentle pressure.
4 Clean the attachment after use (see 'Cleaning
and maintenance').
Cleaning and maintenance
The accessories supplied may vary for different
products. The box shows the accessories that have
been supplied with your appliance.
Page 23
2
1
English
Cleaning the shaver in the SmartClean system (S9161/31, S9111/31 only)
SmartClean system Plus has two phases: the
rinsing phase and the drying phase.
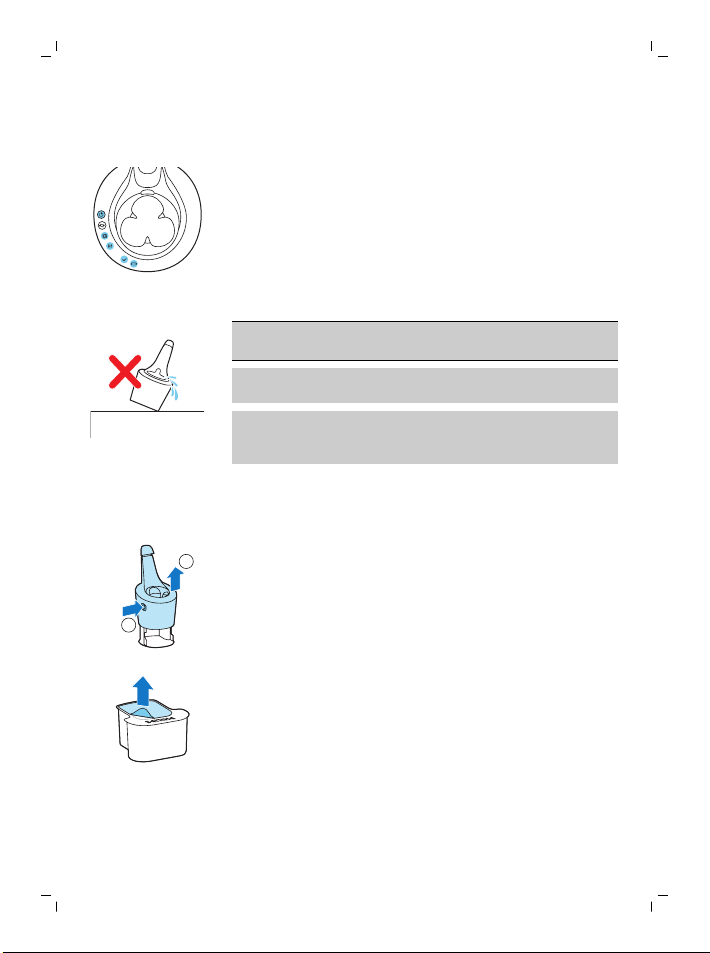
Preparing the SmartClean system for use
Caution: Do not tilt the SmartClean system to
prevent leakage.
Note: Hold the SmartClean system while you
prepare it for use.
Note: If you clean the shaver in the SmartClean
system once a week, the SmartClean cartridge
lasts approximately three months.
1 Put the small plug in the back of the
SmartClean system.
2 Put the supply unit in the wall socket.
3 Press the button on the side of the SmartClean
system (1) and lift the top part of the
SmartClean system (2).
23
4 Pull the seal off the cleaning cartridge.
Page 24
English
24
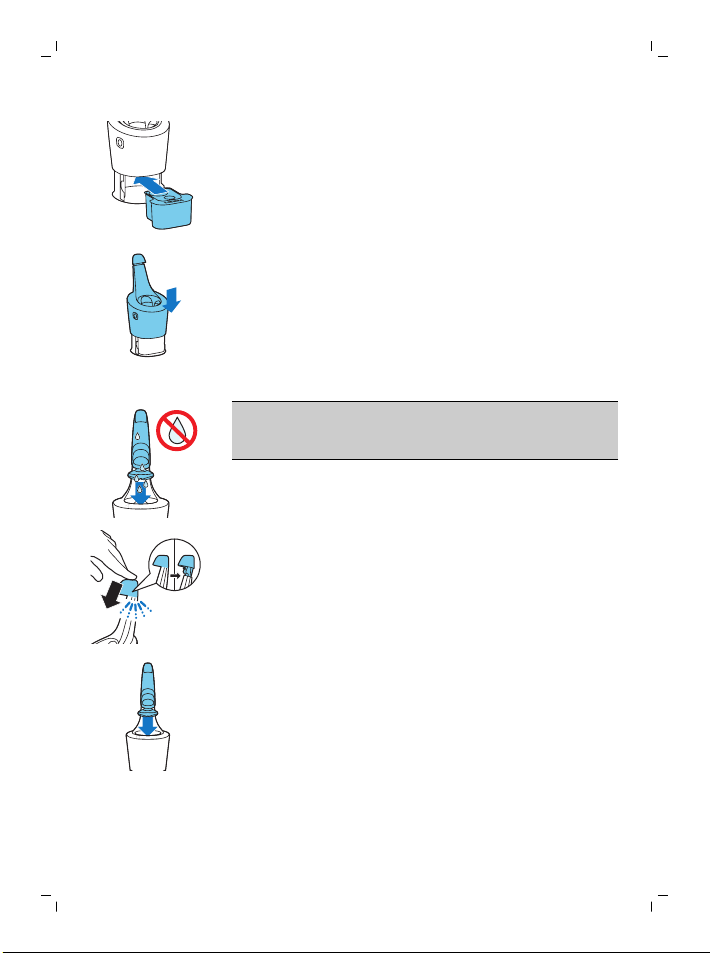
5 Place the cleaning cartridge in the SmartClean
system.
6 Push the top part of the SmartClean system
back down (‘click’).
Using the SmartClean system
Caution: Always shake excess water off the
shaver before you place it in the SmartClean
system.
1 Press the top cap to be able to place the shaver
in the holder ('click').
2 Hold the shaver upside down above the holder.
Make sure the front of the shaver points
towards the SmartClean system.
Page 25
1
2
3
English
25
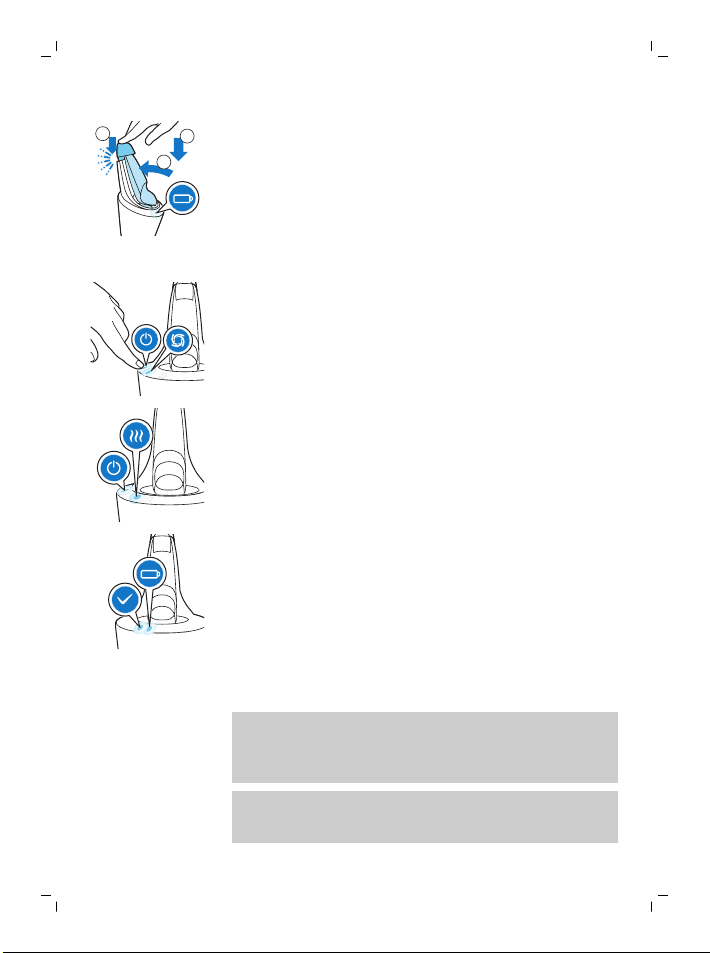
3 Place the shaver in the holder (1), tilt the shaver
backwards (2) and press down the top cap to
connect the shaver ('click') (3).
The battery symbol starts to flash, which
indicates that the shaver is charging.
4 Press the on/off button on the SmartClean
system to start the cleaning program.
During the rinsing phase, the rinsing symbol
flashes. When the rinsing phase is done (after
approx. 10 minutes), the rinsing symbol lights up
continuously.
After the rinsing phase, the drying phase starts
automatically. During this phase, the drying
symbol flashes. When the drying phase is done
(after approx. 4 hours), the drying symbol lights up
continuously.
When the cleaning program is done, the ready
symbol lights up continuously.
30 minutes after the cleaning program and
charging are done, the SmartClean system
switches off automatically.
The battery symbol lights up continuously to
indicate that the shaver is fully charged. Charging
takes approx. 1 hour.
Note: If you press the on/off button of the
SmartClean system during the cleaning program,
the program aborts. In this case, the rinsing or
drying symbol goes out.
Note: If you remove the supply unit from the wall
socket during the cleaning program, the program
aborts.
Page 26
2
1
English
26
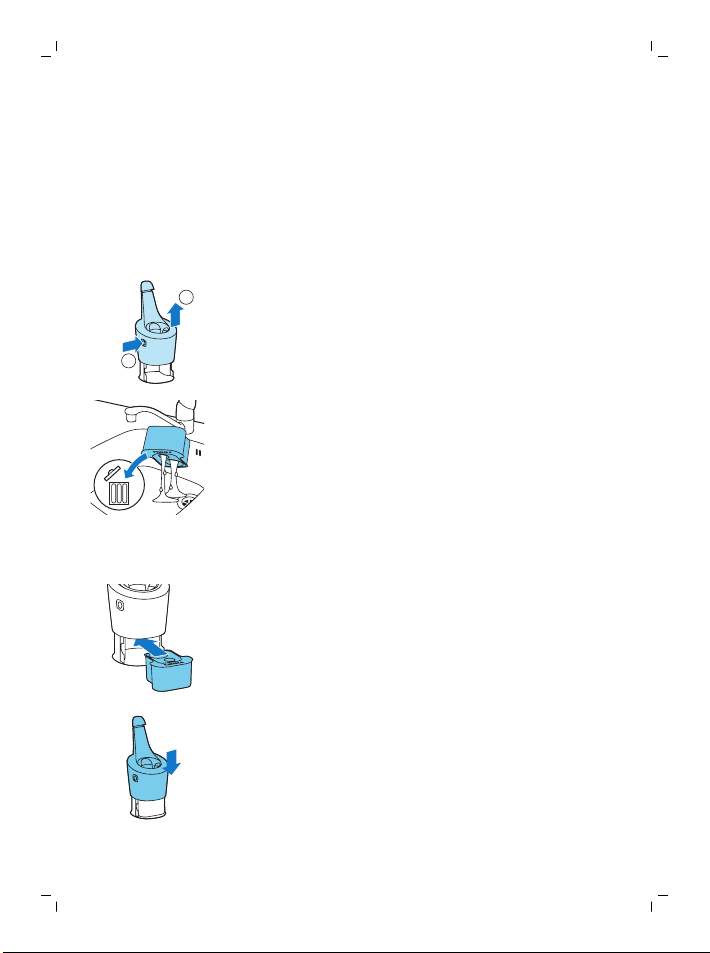
Replacing the cartridge of the SmartClean system
Replace the cleaning cartridge when the
replacement symbol flashes orange or when you
are no longer satisfied with the cleaning result. If
you clean the shaver in the SmartClean system
once a week, the SmartClean cartridge lasts
approximately three months.
1 Press the button on the side of the SmartClean
system (1) and lift the top part of the
SmartClean system (2).
2 Remove the cleaning cartridge from the
SmartClean system and pour out any remaining
cleaning fluid.
You can simply pour the cleaning fluid down
the sink.
3 Throw away the empty cleaning cartridge.
4 Unpack the new cleaning cartridge and pull off
the seal.
5 Place the cleaning cartridge in the SmartClean
system.
6 Push the top part of the SmartClean system
back down (‘click’).
Page 27
Cleaning the shaver under the tap
Clean the shaver after every shave for optimal
performance.
Caution: Be careful with hot water. Always check
if the water is not too hot, to prevent burning
your hands.
Never dry the shaving unit with a towel or tissue,
as this may damage the shaving heads.
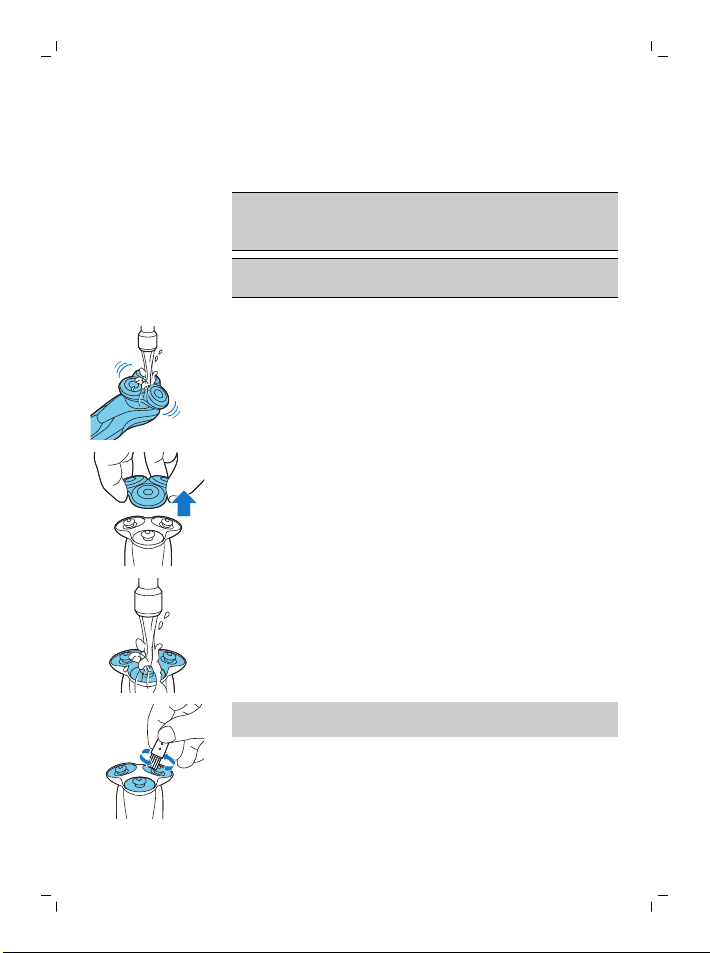
1 Switch on the shaver.
2 Rinse the shaving unit under a warm tap.
3 Switch off the shaver. Pull the shaving head
holder off the bottom part of the shaving unit.
4 Rinse the hair chamber under the tap.
English
27
Note: You can also clean the hair chamber with
the cleaning brush.
Page 28
English
28
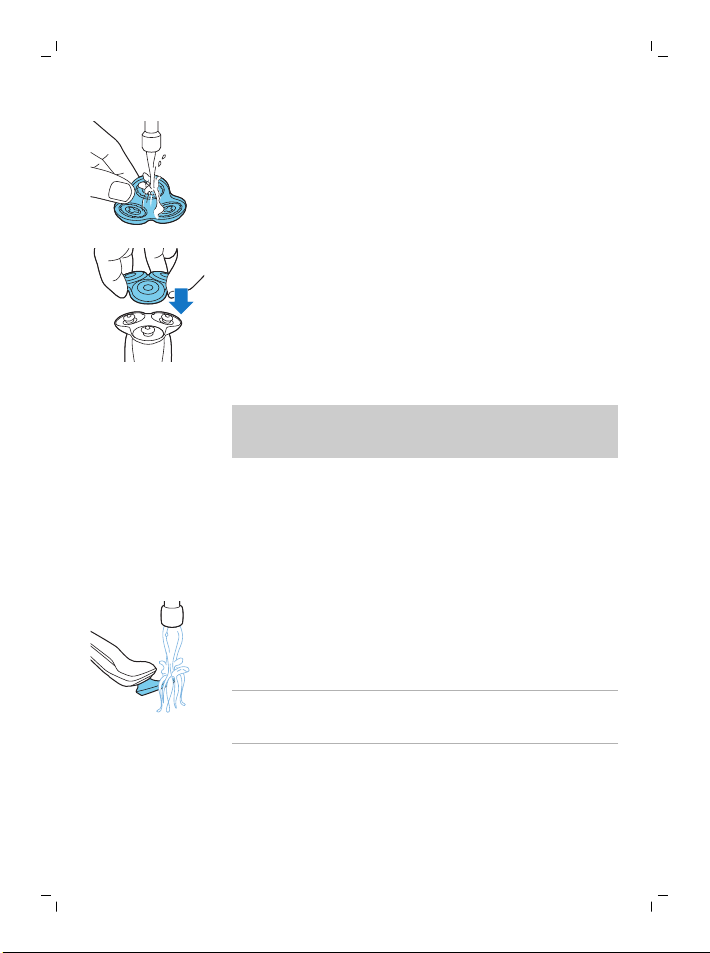
5 Rinse the shaving head holder under a warm
tap.
6 Carefully shake off excess water and let the
shaving head holder dry.
7 Attach the shaving head holder to the bottom
part of the shaving unit (‘click’).
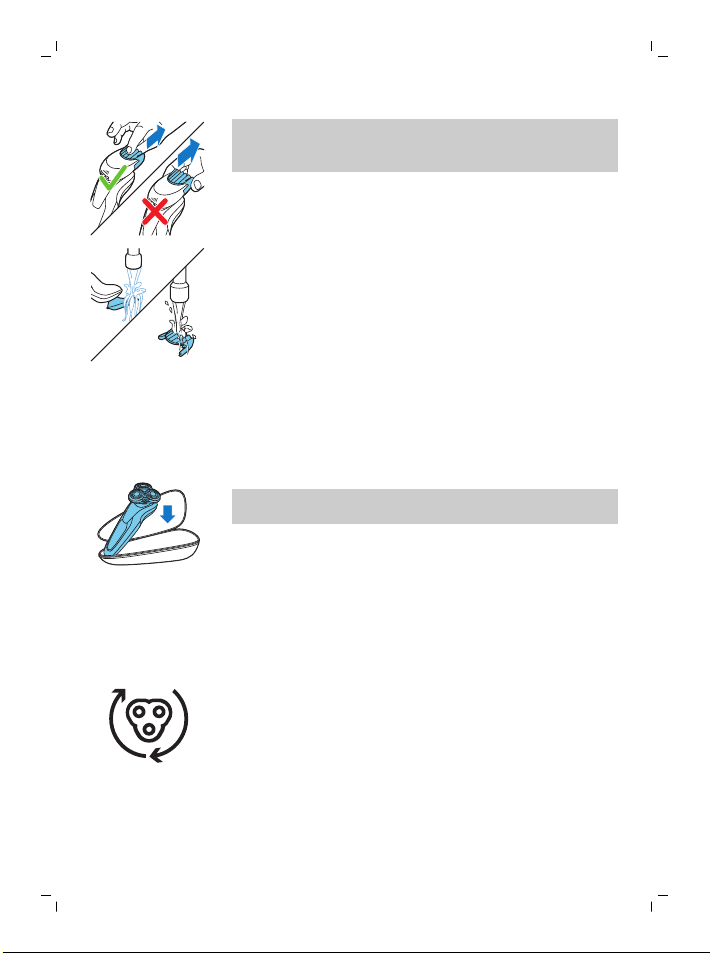
Cleaning the click-on attachments
Note: Never dry the trimmer or beard styler
attachments with a towel or tissue, as this may
damage the trimming teeth.
Cleaning the trimmer attachment (S9041/12, S9031/12 only)
Clean the trimmer attachment every time you have
used it.
1 Switch on the appliance with the trimmer
attachment attached.
2 Rinse the attachment under a warm tap.
3 After cleaning, switch off the appliance.
4 Carefully shake off excess water and let the
attachment dry.
Tip: For optimal performance, lubricate the teeth
of the attachment with a drop of sewing machine
oil regularly.
Cleaning the beard styler attachment (S9161/31, S9111/41, S9111/31 only)
Clean the beard styler attachment every time you
have used it.
1 Pull the comb off the beard styler attachment.
Page 29
Note: Grab the comb in the centre to pull it off
2yrs
the beard styler attachment. Do not pull at the
sides of the comb.
2 Switch on the appliance.
3 Rinse the beard styler attachment and the
comb separately under a warm tap.
4 After cleaning, switch off the appliance.
5 Carefully shake off excess water and let the
beard styler attachment and comb dry.
6 For optimal performance, lubricate the teeth of
the attachment with a drop of sewing machine
oil regularly.
Storage
1 Store the shaver in the pouch supplied.
Note: Make sure the appliance is dry before you
store it in the pouch.
Replacement
Replacing the shaving heads
For maximum shaving performance, we advise you
to replace the shaving heads every two years.
Replace damaged shaving heads immediately.
Always replace the shaving heads with original
Philips shaving heads (see 'Ordering accessories').
Replacement reminder
English
29
Page 30
1
3
2
30
English
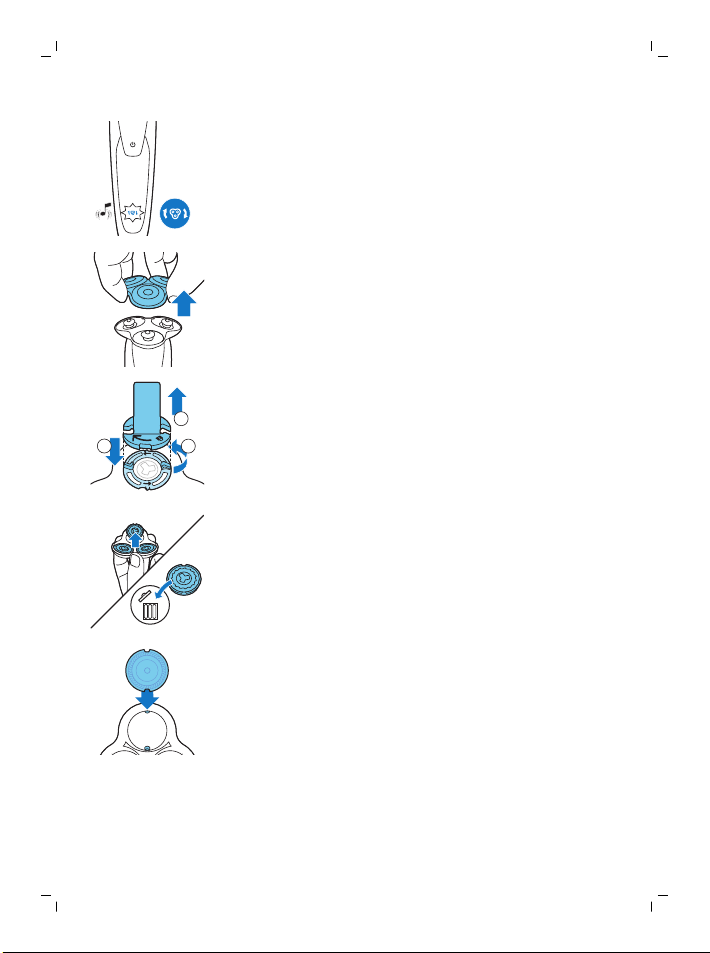
The replacement reminder indicates that the
shaving heads need to be replaced.The shaving
unit symbol lights up continuously, the arrows
flash white and you hear a beep when you switch
off the shaver.
1 Switch off the appliance.
2 Pull the shaving head holder off the bottom
part of the shaving unit.
3 Place the retaining ring holder on the retaining
ring (1), turn it anticlockwise (2) and lift it off the
shaving head (3).
Remove the retaining ring from the retaining
ring holder and repeat this process for the other
retaining rings.
4 Remove the shaving heads from the shaving
head holder.
Throw away the used shaving heads
immediately to avoid mixing them with the new
shaving heads.
5 Place the shaving heads in the shaving head
holder.
Note: Make sure the notches on both sides of
the shaving heads fit exactly onto the
projections in the shaving head holder.
Page 31

3
1
2
2
1
English
31
6 Place the retaining ring holder on the retaining
ring (1), place it on the shaving head (2) and turn
it clockwise (3) to reattach the retaining ring.
Repeat this process for the other retaining rings.
-
Each retaining ring has two recesses that fit
exactly into the projections of the shaving
head holder. Turn the ring clockwise until
your hear a click to indicate that the ring is
fixed.
Note: Hold the shaving head holder in your
hand when you reinsert the shaving heads and
reattach the retaining rings. Do not place the
shaving head holder on a surface when you do
this, as this may cause damage.
7 Attach the shaving head holder to the bottom
part of the shaving unit (‘click’).
8 To reset the replacement reminder, press and
hold the on/off button for approx. 7 seconds.
Wait until you hear two beeps.
Ordering accessories
To buy accessories or spare parts, visit
www.shop.philips.com/service or go to your
Philips dealer. You can also contact the Philips
Consumer Care Centre in your country (see the
worldwide guarantee leaflet for contact details).
The following accessories and spare parts are
available:
- SH90 Philips shaving heads
- HQ110 Philips shaving head cleaning spray
Page 32

English
32
- RQ111 Philips beard styler attachment
- RQ585 Philips cleansing brush attachment
- RQ560/RQ563 Philips cleansing brush heads
- JC301/JC302/JC303/JC304/JC305 cleaning
cartridge
- HQ8505 supply unit
Note: The availability of the accessories may differ
by country.
Recycling
- This symbol means that this product shall not
be disposed of with normal household waste
(2012/19/EU).
- This symbol means that this product contains a
built-in rechargeable battery which shall not be
disposed of with normal household waste
(2006/66/EC). We strongly advise you to take
your product to an official collection point or a
Philips service centre to have a professional
remove the rechargeable battery.
- Follow your country’s rules for the separate
collection of electrical and electronic products
and rechargeable batteries. Correct disposal
helps prevent negative consequences for the
environment and human health.
Removing the rechargeable shaver battery
Only remove the rechargeable battery
when you discard the shaver. Before you
remove the battery, make sure that the
shaver is disconnected from the wall socket
and that the battery is completely empty.
Page 33

Take any necessary safety precautions
when you handle tools to open the shaver
and when you dispose of the rechargeable
battery.
Be careful, the battery strips are sharp.
1 Insert the screwdriver into the slot between the
front and back panel in the bottom of the
appliance. Remove the back panel.
2 Remove the front panel.
3 Unscrew the two screws at the top of the inner
panel and remove the inner panel.
4 Remove the rechargeable battery with a
screwdriver.
Guarantee and support
If you need information or support, please visit
www.philips.com/support or read the separate
worldwide guarantee leaflet.
Guarantee restrictions
The shaving heads (cutters and guards) are not
covered by the terms of the international
guarantee because they are subject to wear.
Troubleshooting
This chapter summarizes the most common
problems you could encounter with the appliance.
If you are unable to solve the problem with the
information below, visit www.philips.com/support for
a list of frequently asked questions or contact the
Consumer Care Center in your country.
English
33
Page 34

English
34
Shaver
Problem Possible cause Solution
The appliance
does not work
when I press the
on/off button.
The rechargeable
The travel lock is
The appli
ance does not
shave as well as
it used to.
Hairs or dirt obstruct
The appliance is still
attached to the wall
socket. For safety
reasons, the
appliance can only
be used without
cord.
battery is empty.
activated.
The shaving unit is
soiled or damaged
to such an extent
that the motor
cannot run.
The shaving heads
are damaged or
worn.
the shaving heads.
Unplug the appliance and
press the on/off button to
switch on the appliance.
Recharge the battery (see
'Charging').
Press the on/off button for
3 seconds to deactivate the
travel lock.
Clean the shaving heads
thoroughly or replace
them. Also see 'Hairs or dirt
obstruct the shaving heads'
for a detailed description of
how to clean the shaving
heads thoroughly.
Replace the shaving heads
(see 'Replacement').
Clean the shaving heads in
the regular way (see
'Cleaning and
maintenance') or clean
them thoroughly.
Page 35

Problem Possible cause Solution
English
35
To clean the shaving heads
I replaced the
shaving heads,
but the display
still shows the
replacement
reminder.
A shaving unit
symbol has
suddenly
appeared on the
display.
An exclamation
mark has
suddenly
appeared on the
display while the
appliance is
charging.
You have not reset
the appliance.
This symbol
reminds you to
replace the shaving
heads.
The appliance is
overheated.
thoroughly, remove the
shaving heads from the
shaving head holder one
by one (see
'Replacement'). Then
separate the cutter from its
guard and rinse each
matching set under the tap.
After rinsing, place the
cutter back into its
corresponding guard.
Finally, put the shaving
heads back into the
shaving head holder (see
'Replacement').
Reset the appliance by
pressing the on/off button
for approx. 7 seconds (see
'Replacing the shaving
heads').
Replace the shaving heads
(see 'Replacement').
Disconnect the appliance
from the wall socket for
approx. 10 minutes.
Page 36

English
36
Problem Possible cause Solution
An exclamation
mark, the
replacement
reminder and
the cleaning
reminder have
suddenly
appeared on the
display.
The shaving heads
Water is leaking
from the bottom
of the appliance.
The shaving heads
are damaged.
are soiled.
During cleaning,
water may collect
between the inner
body and the outer
shell of the
appliance.
Replace the shaving heads
(see 'Replacement').
Clean the shaving heads
(see 'Cleaning and
maintenance'). Also see
'Hairs or dirt obstruct the
shaving heads' for a
detailed description of how
to clean the shaving heads
thoroughly.
This is normal and not
dangerous because all
electronics are enclosed in
a sealed power unit inside
the appliance.
SmartClean system
Problem Possible cause Solution
The SmartClean
system does not
work when I
press the on/off
button.
The SmartClean
system is not
connected to the
wall socket.
Put the small plug in the
SmartClean system and put
the supply unit in the wall
socket.
Page 37

Problem Possible cause Solution
English
37
The shaver is not
entirely clean
after I clean it in
the SmartClean
system.
The cleaning
The cleaning
You have used
The drain of the
The shaver is not
fully charged
after I charge it
in the
SmartClean
system.
You have not
placed the shaver in
the SmartClean
system properly, so
there is no electrical
connection
between the
SmartClean system
and the shaver.
cartridge needs to
be replaced.
cartridge is empty.
The replacement
symbol flashes to
indicate that you
have to replace the
cleaning cartridge.
another cleaning
fluid than the
original Philips
cleaning cartridge.
cleaning cartridge is
blocked.
You have not
placed the shaver in
the SmartClean
system properly, so
there is no electrical
connection
between the
SmartClean system
and the shaver.
Press down the top cap
(‘click’) to ensure a proper
connection between the
shaver and the SmartClean
system.
Replace the cleaning
cartridge (see 'Replacing
the cartridge of the
SmartClean system').
Place a new cleaning
cartridge in the SmartClean
system (see 'Replacing the
cartridge of the SmartClean
system').
Only use the original
Philips cleaning cartridge.
Remove the cartridge from
the SmartClean system and
push the hairs down the
drain with a toothpick.
Press down the top cap
(‘click’) to ensure a proper
connection between the
shaver and the SmartClean
system.
Page 38

Deutsch
38
Inhalt
Einführung 39
Wichtige Sicherheitsinformationen 39
Gefahr 40
Warnung 40
Achtung 42
Elektromagnetische Felder 45
Allgemeines 45
Allgemeine Beschreibung (Abb. 1) 45
Das Display 46
Laden 46
Akku voll aufgeladen 47
Batterie schwach 47
Verbleibende Akkuladung 47
Reinigungsanzeige 48
Reisesicherung 48
Ersatzanzeige 49
Ausrufezeichen 49
Laden 50
Mit der Stromversorgungseinheit aufladen 50
Aufladen im SmartClean-System (nur S9111/31,
S9161/31)
Das Gerät benutzen 51
Das Gerät ein- und ausschalten 51
Rasieren 52
Die Aufsätze verwenden 53
Reinigung und Wartung 56
Den Rasierer im SmartClean-System reinigen (nur
S9161/31, S9111/31)
Das SmartClean-System für den Gebrauch vorbereiten 56
Das SmartClean-System verwenden 57
Die Kartusche des SmartClean-Systems ersetzen 59
Den Rasierer unter fließendem Wasser reinigen 60
50
56
Deutsch
Page 39

Deutsch
Die Aufsätze reinigen 62
Aufbewahrung 63
Ersatz 63
Die Scherköpfe auswechseln 63
Bestellen von Zubehör 65
Recycling 66
Den Akku aus dem Rasierer entfernen 66
Garantie und Support 67
Garantieeinschränkungen 67
Fehlerbehebung 67
Rasierer 68
SmartClean-System 70
39
Einführung
Herzlichen Glückwunsch zu Ihrem Kauf und
willkommen bei Philips! Um die Unterstützung von
Philips optimal nutzen zu können, sollten Sie Ihr
Produkt unter www.philips.com/welcome
registrieren.
Lesen Sie diese Bedienungsanleitung sorgfältig
durch, da sie nützliche Informationen zu den
Funktionen dieses Rasierers sowie Tipps für eine
einfache und angenehme Rasur enthält.
Wichtige Sicherheitsinformationen
Lesen Sie diese wichtigen Informationen vor dem
Gebrauch des Geräts und des Zubehörs
aufmerksam durch, und bewahren Sie sie für eine
spätere Verwendung auf. Das mitgelieferte
Zubehör kann für verschiedene Produkte variieren.
Page 40

Deutsch
40
Gefahr
Warnung
- Halten Sie das Netzteil trocken.
- Verwenden Sie nur das im
Lieferumfang des Geräts
enthaltene abnehmbare
Netzteil (Typ HQ8505), um den
Akku aufzuladen.
- Das Netzteil enthält einen
Transformator. Schneiden Sie
das Netzteil keinesfalls auf, um
einen anderen Stecker
anzubringen, weil dies eine
gefährliche Situation
verursachen könnte.
Page 41

Deutsch
- Dieses Gerät kann von Kindern
ab 8 Jahren und Personen mit
verringerten physischen,
sensorischen oder psychischen
Fähigkeiten oder Mangel an
Erfahrung und Kenntnis
verwendet werden, wenn sie
bei der Verwendung
beaufsichtigt werden oder
Anleitung zum sicheren
Gebrauch des Geräts erhalten
und die Gefahren verstanden
haben. Kinder dürfen nicht mit
dem Gerät spielen. Die
Reinigung und Pflege des
Geräts darf von Kindern nicht
ohne Aufsicht durchgeführt
werden.
- Ziehen Sie stets das Netzteil
aus der Steckdose, bevor Sie
den Rasierer unter fließendem
Wasser reinigen.
41
Page 42

Deutsch
42
Achtung
- Überprüfen Sie das Gerät vor
jedem Gebrauch. Um
Verletzungen zu vermeiden,
benutzen Sie das Gerät nicht,
wenn es beschädigt ist.
Ersetzen Sie ein beschädigtes
Teil nur durch Originalteile.
- Öffnen Sie das Gerät nicht, um
den Akku zu ersetzen.
- Tauchen Sie das
Reinigungssystem und die
Ladestation niemals in Wasser.
Spülen Sie sie auch nicht unter
fließendem Wasser ab.
- Das Wasser zur Reinigung des
Rasierers darf nicht heißer als
80°C sein.
- Verwenden Sie dieses Gerät nur
für den vorgesehenen Zweck
wie in der Bedienungsanleitung
angegeben.
- Aus hygienischen Gründen
sollte das Gerät nur von einer
Person verwendet werden.
Page 43

Deutsch
- Benutzen Sie zum Reinigen des
Geräts keine Druckluft,
Scheuerschwämme und -mittel
oder aggressive Flüssigkeiten
wie Benzin oder Azeton.
- Wenn Ihr Rasierer über ein
Reinigungssystem verfügt,
verwenden Sie immer die
original Philips
Reinigungsflüssigkeit
(Kartusche oder Flasche, je
nach Art des
Reinigungssystems).
- Stellen Sie das
Reinigungssystem stets auf
eine stabile, ebene und
waagerechte Unterlage, um
Auslaufen von Flüssigkeit zu
vermeiden.
43
Page 44

44
Deutsch
- Wenn Ihr System eine
Reinigungskartusche
verwendet, stellen Sie immer
sicher, dass das Kartuschenfach
geschlossen ist, bevor Sie das
Reinigungssystem zum
Reinigen oder Laden des
Rasierers verwenden.
- Wenn das Reinigungssystem
betriebsbereit ist, darf es nicht
bewegt werden, damit keine
Reinigungsflüssigkeit ausläuft.
- Beim Abspülen tropft
möglicherweise Wasser aus der
Buchse unten am Rasierer. Das
ist normal und völlig
ungefährlich, da die gesamte
Elektronik im Inneren des
Geräts versiegelt ist.
Page 45

- Verwenden Sie das Netzteil
nicht in oder in der Nähe von
Wandsteckdosen, die einen
elektrischen Lufterfrischer
enthalten, um irreparable
Schäden am Netzteil zu
vermeiden.
Elektromagnetische Felder
- Dieses Philips-Gerät erfüllt alle einschlägigen
Normen und Vorschriften zur Exposition
gegenüber elektromagnetischen Feldern.
Allgemeines
- Dieser Rasierer ist wasserdicht. Es ist für die
Verwendung im Bad oder unter der Dusche
geeignet ist und kann mit Leitungswasser
gereinigt werden. Aus Sicherheitsgründen darf
dieser Rasierer daher nur kabellos verwendet
werden.
- Er ist für Stromspannungen zwischen 100 und
240 Volt konzipiert.
- Das Netzteil wandelt Netzspannungen von 100
bis 240 Volt in eine sichere Betriebsspannung
von unter 24 Volt um.
Deutsch
45
Allgemeine Beschreibung (Abb. 1)
1 Kamm für Bart-Styler-Aufsatz (nur S9161/31,
S9111/41, S9111/31)
2 Aufsteckbarer Bart-Styler (nur S9161/31,
S9111/41, S9111/31)
3 Aufsteckbarer Trimmer (nur S9041/12, S9031/12)
4 Aufsteckbare Schereinheit
5 Ein-/Ausschalter
6 Buchse für Gerätestecker
Page 46

Deutsch
46
Das Display
7 Ausrufezeichen
8 Ersatzanzeige
9 Akkuladestandsanzeige
10 Reisesicherungssymbol
11 Reinigungsanzeige
12 SmartClean-System (nur S9161/31, S9111/31)
13 Kappe des SmartClean-Systems
14 Ein-/Ausschalter
15 Ersatzsymbol
16 Reinigungssymbol
17 Trocknungssymbol
18 Bereitschaftssymbol
19 Ladesymbol
20 Reinigungskartusche für SmartClean-System
21 Stromversorgungseinheit
22 Gerätestecker
23 Sicherungsringhalter
24 Tasche
Das mitgelieferte Zubehör kann für verschiedene
Produkte variieren. Die Verpackung zeigt das
Zubehör, das mit Ihrem Gerät mitgeliefert wurde.
Hinweis: Entfernen Sie vor dem ersten Gebrauch
des Rasierers die Schutzfolie vom Display.
Laden
Schnellaufladung: Wenn Sie den Rasierer an die
Steckdose anschließen, leuchten die
Akkuladestandanzeigen hintereinander wiederholt
auf. Wenn der Rasierer nur noch genügend Energie
für eine Rasur hat, blinkt die untere
Akkuladestandanzeige langsam.
Page 47

Während der Rasierer auflädt, blinkt die untere
Akkuladestandanzeige zuerst und leuchtet dann
dauerhaft. Dann blinkt die zweite Anzeige und
leuchtet dann dauerhaft. Das wiederholt sich, bis
der Rasierer vollständig aufgeladen ist (siehe 'Akku
voll aufgeladen').
Akku voll aufgeladen
Wenn der Akku vollständig aufgeladen ist,
leuchten alle Anzeigen der Akkuladestandanzeige
dauerhaft weiß.
Hinweis: Dieses Gerät kann nur ohne Kabel
verwendet werden. Wenn Sie den Ein/Ausschalter während des Ladens oder danach
drücken, hören Sie einen Signalton, der anzeigt,
dass der Rasierer noch an die Steckdose
angeschlossen ist.
Hinweis: Wenn der Akku voll ist, schaltet sich das
Display nach 30 Minuten automatisch aus.
Batterie schwach
Wenn der Akku fast leer ist, blinkt die untere
Anzeige der Akkuladestandanzeige orangefarben
und Sie hören einen Signalton.
Deutsch
47
Verbleibende Akkuladung
Die verbleibende Akkuladung wird durch die
kontinuierlich aufleuchtende
Akkuladestandanzeige angezeigt.
Page 48

Deutsch
48
Reinigungsanzeige
Für eine optimale Leistung empfehlen wir, den
Rasierer nach jedem Gebrauch zu reinigen. Wenn
Sie das Gerät ausschalten, leuchtet die
Reinigungsanzeige auf, um Sie daran zu erinnern,
das Gerät zu reinigen.
Reisesicherung
Sie können das Gerät sichern, bevor Sie auf Reisen
gehen. Die Reisesperre verhindert, dass das Gerät
versehentlich eingeschaltet wird.
Die Reisesicherung aktivieren
1 Halten Sie den Ein-/Ausschalter 3 Sekunden
lang gedrückt, um die Reisesicherung zu
aktivieren.
Während Sie die Reisesicherung aktivieren,
leuchtet das Reisesicherungssymbol dauerhaft
weiß. Wenn die Reisesicherung aktiviert ist, gibt
der Rasierer einen Signalton aus, und das
Reisesicherungssymbol blinkt.
Die Reisesicherung deaktivieren
1 Halten Sie den Ein-/Ausschalter 3 Sekunden
lang gedrückt.
Das Reisesicherungssymbol blinkt und leuchtet
dann dauerhaft. Das Gerät ist nun wieder
einsatzbereit.
Hinweis: Sie können die Reisesicherung auch
deaktivieren, indem Sie das Gerät an einer
Steckdose anschließen.
Page 49

Ersatzanzeige
Ausrufezeichen
Deutsch
Für eine optimale Rasierleistung empfehlen wir,
die Scherköpfe alle zwei Jahre auszuwechseln.
Das Gerät ist mit einer Ersatzanzeige ausgestattet,
die Sie daran erinnert, die Scherköpfe zu ersetzen.
Das Schereinheitssymbol leuchtet durchgehend
weiß, die Pfeile blinken weiß und es ertönt ein
Signalton, um anzuzeigen, dass die Scherköpfe
ersetzt werden müssen.
Hinweis: Nachdem Sie die Scherköpfe
ausgetauscht haben, müssen Sie die
Erinnerungsfunktion zurücksetzen, indem Sie den
Ein-/Ausschalter 7 Sekunden lang gedrückt halten.
Überhitzen
Wenn das Gerät während des Aufladens überhitzt,
blinkt das Ausrufezeichen orange. Falls dies
passiert, schaltet sich der Rasierer automatisch
aus. Das Aufladen wird fortgesetzt, sobald das
Gerät wieder eine normale Temperatur erreicht
hat.
Blockierte Scherköpfe
Wenn die Scherköpfe blockiert sind, leuchtet das
Ausrufezeichen dauerhaft orangefarben auf. Die
Ersatzanzeige und die Reinigungsanzeige blinken
abwechselnd weiß und Sie hören einen Signalton.
Dies bedeutet, dass der Motor nicht mehr laufen
kann, da die Scherköpfe verschmutzt oder
beschädigt sind.
Falls die Scherköpfe verschmutzt sind, müssen Sie
sie reinigen. Falls die Scherköpfe beschädigt sind,
müssen Sie sie ersetzen.
49
Page 50

1
2
Deutsch
50
Laden
Laden Sie den Rasierer vor dem ersten Gebrauch
auf und wenn das Display anzeigt, dass der Akku
fast leer ist. Die Akkuladung wird durch die
Akkuladestandanzeigen in Prozent auf dem
Display angezeigt.
Wenn Sie den Rasierer an die Steckdose
anschließen, hören Sie einen Signalton.
Der Ladevorgang dauert ca. 1 Stunde. Mit einem
vollständig geladenen Rasierer können Sie sich bis
zu 50 Minuten lang rasieren.
Hinweis: Sie können das Gerät nicht verwenden,
während es aufgeladen wird.
Mit der Stromversorgungseinheit aufladen
1 Vergewissern Sie sich, dass das Gerät
ausgeschaltet ist.
2 Stecken Sie die Stromversorgungseinheit in eine
Steckdose, und stecken Sie den kleinen Stecker
in das Gerät.
3 Nach dem Ladevorgang trennen Sie die
Stromversorgungseinheit von der Steckdose
und ziehen Sie den kleinen Stecker vom Gerät
ab.
Aufladen im SmartClean-System (nur S9111/31, S9161/31)
1 Stecken Sie den kleinen Stecker in die
Rückseite des SmartClean-Systems.
2 Stecken Sie das Stromversorgungsgerät in die
Steckdose.
Page 51

1
2
3
Deutsch
3 Drücken Sie auf die obere Kappe, um den
Rasierer in die Halterung einsetzen zu können
(Sie hören ein "Klicken")).
4 Halten Sie den Rasierer kopfüber über der
Halterung. Überprüfen Sie, dass die Vorderseite
des Rasierers auf das SmartClean-System
gerichtet ist.
5 Stellen Sie den Rasierer in die Halterung, (1)
kippen Sie den Rasierer nach hinten, (2) und
drücken Sie die obere Kappe nach unten, um
den Rasierer zu verbinden (Sie hören ein
"Klicken") (3).
Hinweis: Das Akkusymbol blinkt und zeigt somit
an, dass das Gerät aufgeladen wird. Ist der Akku
vollständig geladen, leuchtet das Akkusymbol
dauerhaft.
51
Das Gerät benutzen
Hinweis: Dieses Gerät kann nur ohne Kabel
verwendet werden.
Das Gerät ein- und ausschalten
- Um das Gerät einzuschalten, drücken Sie
einmal den Ein-/Ausschalter.
Das Display leuchtet für einige Sekunden auf.
- Um das Gerät auszuschalten, drücken Sie
einmal den Ein-/Ausschalter.
Das Display leuchtet einige Sekunden lang auf
und zeigt die verbleibende Akkukapazität an.
Page 52

Deutsch
52
Rasieren
Anpassungszeit der Haut
Ihre ersten Rasuren bringen möglicherweise nicht
das erwartete Ergebnis, und Ihre Haut kann sogar
leicht gereizt werden. Das ist normal. Ihre Haut und
Ihr Bart müssen sich erst an ein neues Schersystem
gewöhnen. Damit sich Ihre Haut an den neuen
Rasierer gewöhnen kann, empfehlen wir Ihnen,
sich 3 Wochen lang regelmäßig (mindestens 3 Mal
pro Woche) mit diesem Rasierer zu rasieren.
Tipps zum Rasieren
- Wenn Sie sich länger als 3 Tage nicht rasiert
haben, empfehlen wir Ihnen, Ihren Bart
vorzuschneiden, um ein optimales Ergebnis zu
erzielen.
- Führen Sie den Rasierer mit kreisenden
Bewegungen über die Haut.
Trockenrasur
1 Schalten Sie das Gerät ein.
Das Display leuchtet für einige Sekunden auf.
2 Führen Sie den Rasierer mit kreisenden
Bewegungen über die Haut.
Hinweis: Kreisförmige Bewegungen bieten
bessere Rasurergebnisse als gerade
Bewegungen.
3 Reinigen Sie das Gerät nach dem Gebrauch
(siehe 'Reinigung und Wartung').
Nassrasur
Sie können dieses Gerät auch auf einem
angefeuchteten Gesicht mit Rasierschaum oder gel verwenden.
So rasieren Sie sich mit Rasierschaum oder -gel:
Page 53

1 Feuchten Sie Ihre Haut an.
2 Tragen Sie Rasierschaum oder -gel auf die Haut
auf.
3 Spülen Sie die Schereinheit unter fließendem
Wasser ab, damit sie besonders sanft über die
Haut gleitet.
4 Schalten Sie das Gerät ein.
5 Führen Sie den Rasierer mit kreisenden
Bewegungen über die Haut.
Hinweis: Spülen Sie die Schereinheit regelmäßig
ab, um sicherzustellen, dass sie weiterhin sanft
über die Haut gleitet.
6 Trocknen Sie Ihr Gesicht.
7 Reinigen Sie das Gerät nach dem Gebrauch
(siehe 'Reinigung und Wartung').
Hinweis: Spülen Sie alle Schaum- oder Gelreste
vom Gerät ab.
Die Aufsätze verwenden
Die aufsteckbaren Aufsätze entfernen oder anbringen
1 Vergewissern Sie sich, dass das Gerät
ausgeschaltet ist.
Deutsch
53
Page 54

54
Deutsch
2 Ziehen Sie den Aufsatz gerade vom Gerät ab.
Hinweis: Drehen Sie den Aufsatz nicht, wenn
Sie ihn vom Gerät abziehen.
3 Stecken Sie die Führung des Aufsatzes in den
Schlitz oben auf dem Gerät. Drücken Sie den
Aufsatz dann nach unten, sodass er hörbar auf
dem Gerät einrastet.
Den Trimmeraufsatz verwenden (nur S9041/12, S9031/12)
Der Trimmeraufsatz eignet sich zum Trimmen von
Koteletten und Schnurrbart.
1 Bringen Sie den Aufsatz am Gerät an, sodass er
hörbar einrastet.
2 Schalten Sie das Gerät ein.
Das Display leuchtet für einige Sekunden auf.
3 Halten Sie den Trimmer-Aufsatz senkrecht zur
Haut, und bewegen Sie das Gerät unter
leichtem Druck abwärts.
4 Reinigen Sie den Aufsatz nach jedem Gebrauch
(siehe 'Reinigung und Wartung').
Den Bart-Styler-Aufsatz mit Kamm verwenden (nur S9161/31, S9111/41, S9111/31)
Sie können den Bart-Styler-Aufsatz mit Kamm
verwenden, um Ihren Bart mit einer festen
Einstellung oder mit verschiedenen
Längeneinstellungen zu stylen. Sie können ihn
auch zum Schneiden langer Haare vor der Rasur
für eine angenehmere Rasur verwenden.
Page 55

2
1
Deutsch
55
Die Längeneinstellungen des Bart-StylerAufsatzes entsprechen der verbleibenden
Haarlänge nach dem Schneiden und reichen von 1
bis 5 mm.
1 Bringen Sie den Aufsatz am Gerät an, sodass er
hörbar einrastet.
2 Schieben Sie den Kammaufsatz in die Rillen an
beiden Seiten des Bart-Styler-Aufsatzes, bis er
hörbar einrastet.
3 Drücken Sie den Schnittlängenregler, und
schieben Sie ihn nach links oder rechts, um die
gewünschte Schnittlängeneinstellung
auszuwählen.
4 Schalten Sie das Gerät ein.
5 Bewegen Sie das Gerät unter leichtem Druck
aufwärts. Achten Sie darauf, dass die
Vorderseite des Kamms stets in vollem Kontakt
mit der Haut bleibt.
6 Reinigen Sie den Aufsatz nach jedem Gebrauch
(siehe 'Reinigung und Wartung').
Den Bart-Styler-Aufsatz ohne Kamm verwenden
Sie können den Bart-Styler-Aufsatz ohne Kamm
verwenden, um die Konturen an Bart, Schnurrbart,
Koteletten oder Nackenpartie auf eine Länge von
0,5 mm zu schneiden.
Page 56

Deutsch
56
1 Ziehen Sie den Kammaufsatz vom Bart-Styler-
Aufsatz ab.
Hinweis: Halten Sie den Kammaufsatz in der
Mitte, um ihn vom Bart-Styler-Aufsatz zu
ziehen. Ziehen Sie nicht an den Seiten des
Kammaufsatzes.
2 Schalten Sie das Gerät ein.
3 Halten Sie den Bart-Styler-Aufsatz senkrecht
zur Haut, und bewegen Sie das Gerät unter
leichtem Druck abwärts.
4 Reinigen Sie den Aufsatz nach jedem Gebrauch
(siehe 'Reinigung und Wartung').
Reinigung und Wartung
Das mitgelieferte Zubehör kann für verschiedene
Produkte variieren. Die Verpackung zeigt das
Zubehör, das mit Ihrem Gerät mitgeliefert wurde.
Den Rasierer im SmartClean-System reinigen (nur S9161/31, S9111/31)
SmartClean-System Plus hat zwei Phasen: die
Spülphase und die Trockenphase.
Das SmartClean-System für den Gebrauch vorbereiten
Achtung: Das SmartClean-System nicht kippen,
um ein Auslaufen zu vermeiden.
Hinweis: Halten Sie das SmartClean-System fest,
während Sie es für den Gebrauch vorbereiten.
Hinweis: Wenn Sie den Rasierer im SmartCleanSystem einmal pro Woche reinigen, hält die
SmartClean-Kartusche ca. drei Monate.
Page 57

2
1
Deutsch
1 Stecken Sie den kleinen Stecker in die
Rückseite des SmartClean-Systems.
2 Stecken Sie das Stromversorgungsgerät in die
Steckdose.
3 Drücken Sie die Taste auf der Seite des
SmartClean-Systems, (1) und heben Sie den
oberen Teil des SmartClean-Systems (2)an.
4 Ziehen Sie das Siegel von der
Reinigungskartusche.
5 Platzieren Sie die Reinigungskartusche in das
SmartClean-System.
6 Drücken Sie den oberen Teil des SmartClean-
Systems wieder nach unten (Sie hören ein
"Klicken").
57
Das SmartClean-System verwenden
Achtung: Vergewissern Sie sich, dass
überschüssiges Wasser vor dem Einsetzen in das
SmartClean-System immer abgeschüttelt wird.
Page 58

1
2
3
58
Deutsch
1 Drücken Sie auf die obere Kappe, um den
Rasierer in die Halterung einsetzen zu können
(Sie hören ein "Klicken")).
2 Halten Sie den Rasierer kopfüber über der
Halterung. Überprüfen Sie, dass die Vorderseite
des Rasierers auf das SmartClean-System
gerichtet ist.
3 Stellen Sie den Rasierer in die Halterung, (1)
kippen Sie den Rasierer nach hinten, (2) und
drücken Sie die obere Kappe nach unten, um
den Rasierer zu verbinden (Sie hören ein
"Klicken") (3).
Das Akkusymbol blinkt und zeigt somit an, dass
der Rasierer aufgeladen wird.
4 Drücken Sie den Ein-/Ausschalter am
SmartClean-System, um das
Reinigungsprogramm zu starten.
Während der Durchspülphase blinkt das
Durchspülsymbol. Wenn die Durchspülphase
abgeschlossen ist (nach ca. 10 Minuten), leuchtet
das Durchspülsymbol dauerhaft.
Nach der Durchspülphase beginnt automatisch die
Trocknungsphase. Während dieser Phase blinkt
das Trocknungssymbol. Wenn die
Trocknungsphase abgeschlossen ist (nach ca.
4 Stunden), leuchtet das Trocknungssymbol
dauerhaft.
Page 59

2
1
Deutsch
Wenn das Reinigungsprogramm abgeschlossen ist,
leuchtet das Bereitschaftssymbol dauerhaft.
30 Minuten nach Beendigung des
Reinigungsprogramms und des Aufladens schaltet
sich das SmartClean-System automatisch aus.
Das Akkusymbol leuchtet dauerhaft, um
anzuzeigen, dass der Rasierer vollständig
aufgeladen ist. Der Ladevorgang dauert ca.
1 Stunde.
Hinweis: Wenn Sie während des
Reinigungsprogramms des SmartClean-Systems
den Ein-/Ausschalter betätigen, wird das
Programm abgebrochen. In diesem Fall hört das
Durchspül- oder Trocknungssymbol auf zu blinken.
Hinweis: Wenn Sie den Adapter während des
Reinigungsprogramms vom Netzstrom entfernen,
wird das Programm abgebrochen.
Die Kartusche des SmartClean-Systems ersetzen
Ersetzen Sie die Reinigungskartusche, wenn das
Ersatzsymbol orangefarben blinkt oder wenn Sie
mit dem Reinigungsergebnis nicht mehr zufrieden
sind. Wenn Sie den Rasierer im SmartCleanSystem einmal pro Woche reinigen, hält die
SmartClean-Kartusche ca. drei Monate.
1 Drücken Sie die Taste auf der Seite des
SmartClean-Systems, (1) und heben Sie den
oberen Teil des SmartClean-Systems (2)an.
59
Page 60

Deutsch
60
2 Entfernen Sie die leere Reinigungskartusche
aus dem SmartClean-System, und gießen Sie
verbleibende Rückstände der Reinigungslösung
aus der Reinigungskartusche.
Sie können die Reinigungsflüssigkeit einfach
über dem Spülbecken ausgießen.
3 Entsorgen Sie die leere Reinigungskartusche.
4 Nehmen Sie die neue Reinigungskartusche aus
der Verpackung, und ziehen Sie das Siegel von
der Kartusche.
5 Platzieren Sie die Reinigungskartusche in das
SmartClean-System.
6 Drücken Sie den oberen Teil des SmartClean-
Systems wieder nach unten (Sie hören ein
"Klicken").
Den Rasierer unter fließendem Wasser reinigen
Für eine optimale Leistung empfehlen wir, den
Rasierer nach jedem Gebrauch zu reinigen.
Achtung: Gehen Sie vorsichtig mit heißem Wasser
um. Achten Sie darauf, dass das Wasser nicht zu
heiß ist, damit Sie sich nicht die Hände
verbrühen.
Trocknen Sie die Schereinheit niemals mit einem
Tuch ab, um Beschädigungen der Scherköpfe zu
vermeiden.
1 Schalten Sie den Rasierer ein.
Page 61

Deutsch
2 Spülen Sie die Schereinheit unter warmem
fließendem Wasser ab.
3 Schalten Sie den Rasierer aus. Ziehen Sie den
Scherkopfhalter vom unteren Teil der
Schereinheit ab.
4 Spülen Sie die Haarauffangkammer unter
fließendem Wasser aus.
Hinweis: Sie können die Haarauffangkammer
mit der beiliegenden Reinigungsbürste säubern.
5 Spülen Sie den Scherkopfhalter mit warmem
Leitungswasser ab.
6 Schütteln Sie überschüssiges Wasser sorgfältig
ab, und lassen Sie den Scherkopfhalter
trocknen.
61
Page 62

Deutsch
62
7 Befestigen Sie den Scherkopfhalter am unteren
Teil der Schereinheit, bis er hörbar einrastet.
Die Aufsätze reinigen
Hinweis: Trocknen Sie die Trimmer- oder BartStyler-Aufsätze niemals mit einem Handtuch oder
Tuch ab, da dies die Schneideelemente
beschädigen kann.
Den Trimmeraufsatz reinigen (nur S9041/12, S9031/12)
Reinigen Sie den Trimmeraufsatz nach jedem
Gebrauch.
1 Schalten Sie das Gerät mit dem befestigten
Trimmeraufsatz ein.
2 Spülen Sie den Aufsatz unter warmem
Leitungswasser.
3 Schalten Sie das Gerät nach der Reinigung aus.
4 Schütteln Sie überschüssiges Wasser sorgfältig
ab, und lassen Sie den Aufsatz trocknen.
Tipp: Um eine optimale Leistung zu gewährleisten,
ölen Sie die Zinken des Aufsatzes regelmäßig mit
einem Tropfen Nähmaschinenöl.
Den Bart-Styler-Aufsatz verwenden (nur S9161/31, S9111/41, S9111/31)
Reinigen Sie den Bart-Styler-Aufsatz nach jedem
Gebrauch.
1 Ziehen Sie den Kammaufsatz vom Bart-Styler-
Aufsatz ab.
Page 63

2 Schalten Sie das Gerät ein.
2yrs
3 Spülen Sie den Bart-Styler-Aufsatz und den
4 Schalten Sie das Gerät nach der Reinigung aus.
5 Schütteln Sie überschüssiges Wasser sorgfältig
6 Um eine optimale Leistung zu gewährleisten,
Aufbewahrung
1 Bewahren Sie den Rasierer in der im
Ersatz
Die Scherköpfe auswechseln
Für eine optimale Rasierleistung empfehlen wir,
die Scherköpfe alle zwei Jahre auszuwechseln.
Ersetzen Sie beschädigte Scherköpfe sofort.
Tauschen Sie die Scherköpfe immer gegen
Original-Scherköpfe (siehe 'Bestellen von
Zubehör') von Philips aus.
Ersatzanzeige
Deutsch
Hinweis: Halten Sie den Kammaufsatz in der
Mitte, um ihn vom Bart-Styler-Aufsatz zu
ziehen. Ziehen Sie nicht an den Seiten des
Kammaufsatzes.
Kammaufsatz getrennt einige Zeit unter
fließendem, warmem Wasser ab.
ab, und lassen Sie den Bart-Styler-Aufsatz und
Kamm trocknen.
ölen Sie die Zinken des Aufsatzes regelmäßig
mit einem Tropfen Nähmaschinenöl.
Lieferumfang enthaltenen Tasche auf.
Hinweis: Achten Sie darauf, dass das Gerät
trocken ist, bevor Sie es in der Tasche
aufbewahren.
63
Page 64

1
3
2
64
Deutsch
Die Ersatzanzeige zeigt an, dass die Scherköpfe
ausgetauscht werden müssen.Das
Schereinheitssymbol leuchtet kontinuierlich, die
Pfeile blinken weiß, und Sie hören einen Signalton,
wenn Sie den Rasierer ausschalten.
1 Schalten Sie das Gerät aus.
2 Ziehen Sie den Scherkopfhalter vom unteren
Teil der Schereinheit ab.
3 Setzen Sie den Sicherungsringhalter auf den
Sicherungsring, (1) drehen Sie ihn gegen den
Uhrzeigersinn, (2) und heben Sie den Scherkopf
an (3).
Entfernen Sie den Sicherungsring aus dem
Sicherungsringhalter, und wiederholen Sie
dieses Vorgehen für die anderen
Sicherungsringe.
4 Entfernen Sie die Scherköpfe vom
Scherkopfhalter.
Werfen Sie die gebrauchten Scherköpfe
umgehend weg, damit sie nicht mit den neuen
Scherköpfen verwechselt werden.
5 Setzen Sie die Scherköpfe in den
Scherkopfhalter ein.
Hinweis: Achten Sie darauf, dass die Führungen
auf beiden Seiten der Scherköpfe genau auf die
Vorsprünge am Scherkopfhalter passen.
Page 65

3
1
2
2
1
Deutsch
6 Setzen Sie den Sicherungsringhalter auf den
Sicherungsring, (1), dann beides auf den
Scherkopf, (2) und drehen Sie alles im
Uhrzeigersinn, (3) um den Sicherungsring zu
befestigen. Wiederholen Sie diese
Vorgehensweise für die anderen
Sicherungsringe.
-
Jeder Haltering verfügt über zwei
Aussparungen, die exakt in die Vorsprünge
des Scherkopfhalters passen. Drehen Sie
den Ring im Uhrzeigersinn, bis er hörbar
einrastet und fest sitzt.
Hinweis: Halten Sie den Scherkopfhalter in der
Hand, wenn Sie die Scherköpfe und
Sicherungsringe wieder anbringen. Legen Sie
den Scherkopfhalter dabei nicht auf einer
Unterlage ab, da dies Schäden verursachen
kann.
7 Befestigen Sie den Scherkopfhalter am unteren
Teil der Schereinheit, bis er hörbar einrastet.
8 Um die Erinnerungsfunktion zurückzusetzen,
halten Sie den Ein-/Ausschalter ungefähr 7
Sekunden lang gedrückt. Warten Sie, bis Sie
zwei Signaltöne hören.
65
Bestellen von Zubehör
Um Zubehör oder Ersatzteile zu kaufen, gehen Sie
auf www.shop.philips.com/service, oder suchen
Sie Ihren Philips Händler auf. Sie können sich auch
an ein Philips Service-Center in Ihrem Land
wenden. Die Kontaktdaten finden Sie in der
internationalen Garantieschrift.
Page 66

Deutsch
66
Die folgenden Zubehör- und Ersatzteile sind
erhältlich:
- SH90 Philips Scherköpfe
- HQ110 Philips Reinigungsspray für Scherköpfe
- RQ111 Philips Bart-Styler-Aufsatz
- RQ585 Philips Reinigungsbürstenaufsatz
- RQ560/RQ563 Philips Reinigungsbürstenköpfe
- JC301/JC302/JC303/JC304/JC305 Reini
gungskartusche
- HQ8505 Stromversorgungseinheit
Hinweis: Die Verfügbarkeit von Zubehör kann je
nach Land unterschiedlich sein.
Recycling
- Dieses Symbol bedeutet, dass das Produkt
nicht mit dem normalen Hausmüll entsorgt
werden kann (2012/19/EU).
- Dieses Symbol bedeutet, dass das Produkt
einen Akku enthält, der nicht mit dem normalen
Hausmüll entsorgt werden darf (2006/66/EG).
Wir empfehlen dringend, das Produkt bei einer
offiziellen Sammelstelle oder einem Philips
Service-Center abzugeben, um den Akku
fachgerecht ausbauen zu lassen.
- Beachten Sie die örtlichen Vorschriften zur
getrennten Entsorgung von elektrischen und
elektronischen Produkten, Akkus und Batterien.
Die ordnungsgemäße Entsorgung dient dem
Schutz von Umwelt und Gesundheit.
Den Akku aus dem Rasierer entfernen
Bauen Sie den wiederaufladbaren Akku nur
zur Entsorgung des Rasierers aus. Bevor Sie
den Akku entfernen, stellen Sie sicher, dass
der Rasierer nicht an einer Steckdose
eingesteckt ist und dass der Akku
vollständig entleert ist.
Page 67

Treffen Sie angemessene
Sicherheitsvorkehrungen, wenn Sie den
Rasierer mithilfe von Werkzeug öffnen und
wenn Sie den wiederaufladbaren Akku
entsorgen.
Vorsicht: Die Schienen am Akku sind scharf!
1 Führen Sie den Schraubendreher in den Schlitz
zwischen der Vorder- und der Rückseite unten
am Gerät ein. Entfernen Sie die hintere
Abdeckung.
2 Entfernen Sie die Vorderseite.
3 Lösen Sie die beiden Schrauben oben auf der
inneren Abdeckung, und entfernen Sie die
innere Abdeckung.
4 Lösen Sie den Akku mit einem
Schraubendreher.
Garantie und Support
Wenn Sie Hilfe oder Informationen benötigen,
besuchen Sie bitte www.philips.com/support,
oder lesen Sie die internationale Garantieschrift.
Garantieeinschränkungen
Die Scherköpfe (Schermesser und Scherkörbe)
unterliegen nicht den Bedingungen der
internationalen Garantie, da sie einem normalen
Verschleiß ausgesetzt sind.
Deutsch
67
Fehlerbehebung
In diesem Kapitel sind die häufigsten Probleme
aufgeführt, die beim Gebrauch des Geräts
auftreten können. Sollten Sie ein Problem mithilfe
der nachstehenden Informationen nicht beheben
können, besuchen Sie unsere Website unter
www.philips.com/support, und schauen Sie in der
Page 68

Deutsch
68
Liste „Häufig gestellte Fragen“ nach, oder wenden
Sie sich an das Philips Service-Center in Ihrem
Land.
Rasierer
Problem Mögliche
Ursache
Die Lösung
Das Gerät
funktioniert
nicht, wenn ich
den Ein/Ausschalter
drücke.
Der Akku ist leer. Laden Sie den Akku auf
Die Reisesicherung
Das Gerät rasiert
nicht mehr so
gut wie bisher.
Haare oder
Das Gerät ist noch
an die Steckdose
angeschlossen. Aus
Sicherheitsgründen
kann dieses Gerät
nur kabellos
verwendet werden.
ist aktiviert.
Das Scherkopfteil ist
so stark verschmutzt
oder beschädigt,
dass der Motor
nicht mehr laufen
kann.
Die Scherköpfe sind
beschädigt oder
abgenutzt.
Schmutz blockieren
die Scherköpfe.
Ziehen Sie den Netzstecker
des Geräts aus der
Steckdose und drücken Sie
den Ein-/Ausschalter, um
das Gerät einzuschalten.
(siehe 'Laden').
Halten Sie den Ein/Ausschalter drei Sekunden
lang gedrückt, um die
Reisesicherung zu
deaktivieren.
Reinigen Sie die
Scherköpfe gründlich oder
ersetzen Sie sie. Siehe auch
'Haare oder Schmutz
blockieren die Scherköpfe',
wo Sie eine detaillierte
Beschreibung zum
gründlichen Reinigen der
Scherköpfe finden.
Tauschen Sie die
Scherköpfe aus (siehe
'Ersatz').
Reinigen Sie die
Scherköpfe wie üblich
(siehe 'Reinigung und
Wartung') oder reinigen Sie
sie gründlich.
Page 69

Deutsch
69
Problem Mögliche
Die Lösung
Ursache
Um die Scherköpfe
Ich habe die
Scherköpfe
ausgetauscht,
aber die Anzeige
zeigt weiterhin
die
Ersatzanzeige.
Ein
Schereinheiten
symbol wird
plötzlich auf
dem Display
angezeigt.
Ein
Ausrufezeichen
wird plötzlich auf
dem Display
beim Aufladen
des Geräts
angezeigt.
Sie haben das Gerät
nicht zurückgesetzt.
Dieses Symbol
erinnert Sie daran,
die Scherköpfe
auszuwechseln.
Das Gerät ist
überhitzt.
gründlich zu reinigen,
entfernen Sie die einzelnen
Scherköpfe nacheinander
(siehe 'Ersatz') vom
Scherkopfhalter. Dann
trennen Sie das
Schermesser von seinem
Scherkorb und spülen
beide Teile unter
fließendem Wasser. Nach
dem Spülen, setzen Sie das
Schermesser wieder in
seinen dazugehörigen
Korb. Anschließend setzen
Sie die Scherköpfe wieder
in den Scherkopfhalter
(siehe 'Ersatz') ein.
Setzen Sie das Gerät durch
Drücken des Ein/Ausschalters für 7
Sekunden (siehe 'Die
Scherköpfe auswechseln')
zurück.
Tauschen Sie die
Scherköpfe aus (siehe
'Ersatz').
Ziehen Sie das Gerät für ca.
10 Minuten von der
Steckdose ab.
Page 70

70
Deutsch
Problem Mögliche
Ursache
Ein
Ausrufezeichen,
die
Ersatzanzei
ge und die
Reinigungsan
zeige werden
plötzlich auf
dem Display
angezeigt.
Die Scherköpfe sind
Wasser tritt aus
der Unterseite
des Gerätes aus.
Die Scherköpfe sind
beschädigt.
verschmutzt.
Während der
Reinigung kann sich
Wasser zwischen
dem inneren und
dem äußeren
Gehäuse des
Gerätes
ansammeln.
SmartClean-System
Problem Mögliche
Ursache
Die Lösung
Tauschen Sie die
Scherköpfe aus (siehe
'Ersatz').
Reinigen Sie den Scherkopf
(siehe 'Reinigung und
Wartung'). Siehe auch
'Haare oder Schmutz
blockieren die Scherköpfe',
wo Sie eine detaillierte
Beschreibung zum
gründlichen Reinigen der
Scherköpfe finden.
Das ist normal und völlig
ungefährlich, da die
gesamte Elektronik im
Inneren des Geräts
versiegelt ist.
Die Lösung
Das SmartCleanSystem
funktioniert
nicht, wenn ich
den Ein/Ausschalter
drücke.
Das SmartCleanSystem ist nicht an
die Steckdose
angeschlossen.
Stecken Sie den kleinen
Stecker in das SmartCleanSystem, und schließen Sie
das Netzteil an die
Steckdose an.
Page 71

Deutsch
71
Problem Mögliche
Ursache
Der Rasierer ist
nach der
Reinigung im
SmartCleanSystem nicht
richtig sauber.
Die
Die
Sie haben eine
Der Abfluss der
Sie haben den
Rasierer nicht richtig
in das SmartCleanSystem eingesetzt,
sodass keine
elektrische
Verbindung
zwischen dem
SmartClean-System
und dem Rasierer
besteht.
Reinigungskartu
sche muss ersetzt
werden.
Reinigungskartu
sche ist leer. Das
Ersatzsymbol blinkt,
um anzuzeigen,
dass Sie die
Reinigungskartu
sche ersetzen
müssen.
andere
Reinigungskartu
sche als die Philips
OriginalReinigungskartu
sche verwendet.
Reinigungskartu
sche ist verstopft.
Die Lösung
Drücken Sie die obere
Kappe nach unten (Sie
hören ein "Klicken"), um
eine ordnungsgemäße
Verbindung zwischen dem
Rasierer und dem
SmartClean-System zu
gewährleisten.
Ersetzen Sie die
Reinigungskartusche (siehe
'Die Kartusche des
SmartClean-Systems
ersetzen').
Platzieren Sie die neue
Reinigungskartusche im
SmartClean-System (siehe
'Die Kartusche des
SmartClean-Systems
ersetzen').
Verwenden Sie nur die
Original
Reinigungskartusche von
Philips.
Entfernen Sie die
Kartusche aus dem
SmartClean-System, und
drücken Sie die Haare mit
einem Zahnstocher in den
Abfluss.
Page 72

72
Deutsch
Problem Mögliche
Ursache
Der Rasierer ist
nicht vollständig
aufgeladen,
nachdem ich ihn
im SmartCleanSystem geladen
habe.
Sie haben den
Rasierer nicht richtig
in das SmartCleanSystem eingesetzt,
sodass keine
elektrische
Verbindung
zwischen dem
SmartClean-System
und dem Rasierer
besteht.
Die Lösung
Drücken Sie die obere
Kappe nach unten (Sie
hören ein "Klicken"), um
eine ordnungsgemäße
Verbindung zwischen dem
Rasierer und dem
SmartClean-System zu
gewährleisten.
Page 73

Français
73
Table des matières
Introduction 74
Informations de sécurité importantes 74
Danger 75
Avertissement 75
Attention 77
Champs électromagnétiques (CEM) 79
Informations d'ordre général 80
Description générale (Fig. 1) 80
L’afficheur 81
Charge 81
Batterie entièrement chargée 82
Piles faibles 82
Niveau de charge restant de la batterie 82
Alarme de nettoyage 82
Système de verrouillage pour voyage 82
Rappel de remplacement 83
Point d'exclamation 84
Charge 84
Charge avec le bloc d'alimentation 85
Charge dans le système SmartClean (S9111/31,
S9161/31 uniquement)
Utilisation de l'appareil 86
Mise en marche et arrêt de l'appareil 86
Se raser 86
Utilisation des accessoires amovibles 88
Nettoyage et entretien 91
Nettoyage du rasoir dans le système SmartClean
(S9161/31, S9111/31 uniquement)
Préparation du système SmartClean pour utilisation 91
Utilisation du système SmartClean 92
Remplacement de la cartouche du système
SmartClean
85
91
94
Français
Page 74

Français
74
Nettoyage du rasoir à l'eau 95
Nettoyage des accessoires amovibles 97
Rangement 98
Remplacement 98
Remplacement des têtes de rasage 98
Commande d'accessoires 100
Recyclage 101
Retrait de la batterie 102
Garantie et assistance 102
Limites de la garantie 102
Dépannage 103
Rasoir 103
Système SmartClean 106
Introduction
Félicitations pour votre achat et bienvenue dans
l'univers Philips ! Pour profiter pleinement de
l'assistance offerte par Philips, enregistrez votre
produit à l'adresse suivante :
www.philips.com/welcome.
Veuillez lire ce mode d'emploi, qui contient des
informations sur les fonctionnalités de ce
rasoir, ainsi que des conseils pour un rasage plus
facile et plus agréable.
Informations de sécurité importantes
Lisez attentivement ces informations importantes
avant d'utiliser l'appareil et ses accessoires et
conservez-les pour un usage ultérieur. Les
accessoires fournis peuvent varier selon les
différents produits.
Page 75

Danger
- Gardez le bloc d’alimentation
Avertissement
- Pour charger la batterie,
- Le bloc d’alimentation contient
Français
au sec.
veuillez uniquement utiliser le
bloc d’alimentation amovible
(type HQ8505) fourni avec
l'appareil.
un transformateur. N’essayez
pas de remplacer le bloc
d’alimentation par une autre
fiche afin d’éviter tout accident.
75
Page 76

76
Français
- Cet appareil peut être utilisé par
des enfants âgés de 8 ans ou
plus, des personnes dont les
capacités physiques,
sensorielles ou intellectuelles
sont réduites ou des personnes
manquant d'expérience et de
connaissances, à condition que
ces enfants ou personnes
soient sous surveillance ou
qu'ils aient reçu des instructions
quant à l'utilisation sécurisée
de l'appareil et qu'ils aient pris
connaissance des dangers
encourus. Les enfants ne
doivent pas jouer avec
l'appareil. Le nettoyage et
l'entretien ne doivent pas être
effectués par des enfants sans
surveillance.
- Débranchez toujours le rasoir
avant de le nettoyer sous le
robinet.
Page 77

Attention
Français
- Vérifiez toujours l'appareil
avant utilisation. Afin d'éviter
tout accident, n'utilisez pas
l'appareil s'il est endommagé.
Remplacez toujours une pièce
endommagée par une pièce du
même type.
- N'ouvrez pas l'appareil pour
remplacer la pile rechargeable.
- Ne plongez jamais le système
de nettoyage ni la base de
recharge dans l'eau et ne les
rincez pas sous l'eau.
- N'utilisez jamais une eau dont
la température est supérieure à
80 °C pour rincer le rasoir.
- N'utilisez pas cet appareil à
d'autres fins que celles pour
lesquelles il a été conçu (voir le
mode d'emploi).
- Pour des raisons d'hygiène,
l'appareil doit être utilisé par
une seule personne.
77
Page 78

78
Français
- N'utilisez jamais d'air comprimé,
de tampons à récurer, de
produits abrasifs ou de
détergents agressifs tels que de
l'essence ou de l'acétone pour
nettoyer l'appareil.
- Si votre rasoir est équipé d'un
système de nettoyage, utilisez
toujours le liquide de nettoyage
Philips d'origine (cartouche ou
flacon, en fonction du type de
système de nettoyage).
- Placez toujours le système de
nettoyage sur une surface
stable et horizontale pour éviter
toute fuite de liquide.
- Si votre système de nettoyage
utilise une cartouche de
nettoyage, assurez-vous
toujours que le compartiment
de la cartouche est fermé avant
d'utiliser le système de
nettoyage pour nettoyer ou
charger le rasoir.
Page 79

- Lorsque le système de
nettoyage est prêt à l'emploi,
ne le bougez pas pour éviter
toute fuite.
- Lorsque vous rincez l'appareil,
de l'eau peut s'écouler par la
prise inférieure. Ce phénomène
est normal et ne présente pas
de danger, car toutes les pièces
électroniques à l'intérieur du
rasoir sont protégées.
- N’utilisez pas le bloc
d’alimentation dans ou à
proximité de prises murales qui
contiennent un assainisseur
d’air électrique, afin d’éviter
que le bloc d’alimentation ne
subisse des dommages
irréversibles.
Champs électromagnétiques (CEM)
- Cet Philips appareil est conforme à toutes les
normes et à tous les règlements applicables
relatifs à l'exposition aux champs
électromagnétiques.
Français
79
Page 80

Français
80
Informations d'ordre général
- Ce rasoir est étanche. Il peut être utilisé dans la
baignoire et sous la douche, et peut être
nettoyé sous l'eau du robinet. Pour des raisons
de sécurité, le rasoir est uniquement conçu
pour une utilisation sans fil.
- L'appareil est conçu pour une tension secteur
comprise entre 100 V et 240 V.
- Le bloc d’alimentation transforme la tension de
100-240 V en une tension de sécurité de moins
de 24 V.
Description générale (Fig. 1)
1 Sabot de l'accessoire pour la barbe (S9161/31,
S9111/41, S9111/31 uniquement)
2 Accessoire pour la barbe amovible (S9161/31,
S9111/41, S9111/31 uniquement)
3 Accessoire de tonte amovible (S9041/12,
S9031/12 uniquement)
4 Unité de rasage amovible
5 Bouton marche/arrêt
6 Prise pour petite fiche
7 Point d'exclamation
8 Rappel de remplacement
9 Témoin de charge de la batterie
10 Symbole de verrouillage
11 Alarme de nettoyage
12 Système SmartClean (S9161/31, S9111/31
uniquement)
13 Capuchon du système SmartClean
14 Bouton marche/arrêt
15 Symbole de remplacement
16 Symbole de nettoyage
17 Symbole de séchage
18 Symbole « Prêt à l'emploi »
19 Symbole de charge
20 Cartouche de nettoyage du système
SmartClean
Page 81

L’afficheur
Charge
Français
21 Bloc d’alimentation
22 Petite fiche
23 Support d'anneau de fixation
24 Étui
Les accessoires fournis peuvent varier selon les
différents produits. Les accessoires qui ont été
fournis avec votre appareil sont indiqués sur
l’emballage.
Remarque : Avant d'utiliser le rasoir pour la
première fois, retirez le film de protection de
l'afficheur.
Charge rapide : Lorsque vous branchez l'appareil à
la prise secteur, les voyants du témoin de charge
de la batterie s’allument l'un après l'autre de
manière répétée. Lorsque le rasoir est
suffisamment chargé pour une séance de rasage,
le voyant inférieur du témoin de charge de la
batterie se met à clignoter lentement.
Pendant que le rasoir reste en charge, d'abord le
voyant inférieur du témoin de charge de la batterie
clignote, puis s'allume en continu. Ensuite, le
second voyant clignote, puis reste allumé, et ainsi
de suite jusqu'à ce que le rasoir soit complètement
chargé (voir 'Batterie entièrement chargée').
81
Page 82

Français
82
Batterie entièrement chargée
Lorsque la batterie est entièrement chargée, tous
les voyants de charge de celle-ci s'allument en
blanc de manière continue.
Remarque : Cet appareil est uniquement prévu
pour une utilisation sans fil. Lorsque vous appuyez
sur le bouton marche/arrêt pendant ou après la
charge, un signal sonore indique que le rasoir est
encore branché à la prise secteur.
Remarque : Lorsque la pile est entièrement
chargée, l'afficheur s'éteint automatiquement au
bout de 30 minutes.
Piles faibles
Lorsque la batterie est presque vide, le voyant
inférieur du témoin de charge de la batterie
clignote en orange et vous entendez un son.
Niveau de charge restant de la batterie
Le niveau de charge de la batterie restant est
indiqué par les voyants du témoin de charge de la
batterie qui s'allument de manière continue.
Alarme de nettoyage
Pour garantir des capacités optimales, nettoyez le
rasoir après chaque utilisation. Lorsque vous
éteignez l'appareil, l'alarme de nettoyage clignote
pour vous rappeler de nettoyer l'appareil.
Système de verrouillage pour voyage
Vous pouvez verrouiller l'appareil si vous partez en
voyage. Le verrouillage empêche l'appareil de se
mettre en marche accidentellement.
Page 83

Activation du verrouillage
1 Appuyez sur le bouton marche/arrêt pendant
3 secondes pour activer le mode de verrouillage
en voyage.
Lorsque vous activez le verrouillage, le symbole
de verrouillage blanc s'allume de manière
continue. Une fois le système de verrouillage
activé, l'appareil émet un son et le symbole du
système de verrouillage clignote.
Désactivation du verrouillage
1 Maintenez enfoncé le bouton marche/arrêt
pendant 3 secondes.
Le symbole du système de verrouillage
clignote, puis s'allume de manière continue.
L'appareil est à présent prêt à l'emploi.
Remarque : Vous pouvez aussi désactiver le
système de verrouillage en branchant l'appareil
sur la prise secteur.
Rappel de remplacement
Pour garantir des performances de rasage
optimales, nous vous recommandons de
remplacer les têtes de rasoir tous les deux ans.
Pour vous rappeler de remplacer les têtes de
rasage, l'appareil est doté d'une fonction de rappel
de remplacement. Le symbole de l'unité de rasage
s'allume en blanc de manière continue, les flèches
clignotent en blanc et l'appareil émet un signal
sonore pour indiquer que les têtes de rasage
doivent être remplacées.
Remarque : Après avoir remplacé les têtes de
rasage, vous devez réinitialiser le rappel de
Français
83
Page 84

Français
84
remplacement en appuyant sur le bouton
marche/arrêt pendant 7 secondes.
Point d'exclamation
Surchauffe
Si l'appareil surchauffe pendant la charge, le point
d'exclamation se met à clignoter en orange.
Lorsque cela se produit, le rasoir s'éteint
automatiquement. La charge continue une fois
que la température de l'appareil est revenue à la
normale.
Têtes de rasage bloquées
Si les têtes de rasoir sont bloquées, le point
d'exclamation s'allume en orange de manière
continue. Ce rappel de remplacement et l'alarme
de nettoyage clignotent en blanc en alternance et
vous entendez un son. Dans ce cas, le moteur ne
peut pas fonctionner parce que les têtes de rasage
sont sales ou endommagées.
Si les têtes de rasoir sont sales, vous devez les
nettoyer. Si les têtes de rasoir sont endommagées,
vous devez les remplacer.
Charge
Mettez le rasoir en charge avant de l'utiliser pour la
première fois et lorsque l'afficheur indique que la
pile est presque déchargée. Le niveau de charge
de la batterie est indiqué par les voyants du
témoin de charge de la batterie sur l'afficheur.
Lorsque vous branchez le rasoir à la prise secteur,
vous entendez un son.
La charge dure environ 1 heure. Un rasoir
complètement chargé offre une autonomie de
rasage de 50 minutes environ.
Page 85

1
2
1
2
3
Français
Remarque : Vous ne pouvez pas utiliser l'appareil
lorsqu'il est en charge.
Charge avec le bloc d'alimentation
1 Assurez-vous que l'appareil est éteint.
2 Branchez le bloc d'alimentation sur la prise
secteur et insérez la petite fiche dans l'appareil.
3 Une fois la charge terminée, débranchez le bloc
d'alimentation de la prise secteur, puis retirez la
petite fiche de l'appareil.
Charge dans le système SmartClean (S9111/31, S9161/31 uniquement)
1 Branchez la petite fiche au dos du système
SmartClean.
2 Branchez le bloc d'alimentation sur la prise
secteur.
3 Appuyez sur le capuchon supérieur pour
pouvoir placer le rasoir sur le support (clic).
4 Tenez le rasoir à l'envers au-dessus du support.
Assurez-vous que l'avant du rasoir est orienté
vers le système SmartClean.
85
5 Placez le rasoir dans le support (1), penchez le
rasoir en arrière (2) et appuyez sur le capuchon
supérieur pour connecter le rasoir (clic) (3).
Remarque : Le symbole de la batterie se met à
clignoter pour indiquer que l'appareil est en
charge. Lorsque la batterie est entièrement
Page 86

Français
86
chargée, le symbole de batterie s'allume de
manière continue.
Utilisation de l'appareil
Remarque : Cet appareil est uniquement prévu
pour une utilisation sans fil.
Mise en marche et arrêt de l'appareil
- Pour allumer l'appareil, appuyez une fois sur le
bouton marche/arrêt.
L'afficheur s'allume pendant quelques
secondes.
- Pour éteindre l'appareil, appuyez sur le bouton
marche/arrêt.
L'afficheur s'allume pendant quelques
secondes, puis affiche le niveau de charge de la
batterie.
Se raser
Période d'adaptation de la peau
Il est possible que vos premières séances de
rasage n'apportent pas les résultats escomptés et
que votre peau soit même légèrement irritée. Ce
phénomène est normal. Votre peau et votre barbe
ont besoin de temps pour s'adapter au nouveau
système de rasage. Pour habituer votre peau à ce
nouvel appareil, nous vous conseillons de vous
raser régulièrement (au moins 3 fois par semaine)
et exclusivement avec ce rasoir pendant
3 semaines.
Conseils de rasage
- Pour garantir le meilleur résultat possible, nous
vous conseillons un prérasage si votre barde est
longue de 3 jours ou plus.
Page 87

Français
- Faites glisser les têtes de rasoir sur votre peau
en effectuant des mouvements circulaires.
87
Rasage électrique
1 Allumez l'appareil.
L'afficheur s'allume pendant quelques
secondes.
2 Faites glisser les têtes de rasoir sur votre peau
en effectuant des mouvements circulaires.
Remarque : Les mouvements circulaires
procurent de meilleurs résultats de rasage que
les mouvements rectilignes.
3 Nettoyez l'appareil après utilisation (voir
'Nettoyage et entretien').
Rasage sur peau humide
Vous pouvez également utiliser cet appareil sur un
visage humide avec de la mousse à raser ou du gel
de rasage.
Pour vous raser avec de la mousse à raser ou du
gel de rasage suivez les étapes ci-dessous :
1 Mouillez votre peau.
2 Appliquez de la mousse à raser ou du gel de
rasage sur votre peau.
Page 88

Français
88
3 Rincez la tête de rasoir sous le robinet afin que
le rasoir puisse continuer à glisser en douceur
sur votre peau.
4 Allumez l'appareil.
5 Faites glisser les têtes de rasoir sur votre peau
en effectuant des mouvements circulaires.
Remarque : Rincez le rasoir sous le robinet
régulièrement afin qu'il puisse continuer à
glisser en douceur sur votre peau.
6 Séchez votre visage.
7 Nettoyez l'appareil après utilisation (voir
'Nettoyage et entretien').
Remarque : Rincez le rasoir pour éliminer
complètement la mousse.
Utilisation des accessoires amovibles
Retrait ou fixation des accessoires amovibles
1 Assurez-vous que l'appareil est éteint.
2 Détachez l'accessoire de l'appareil.
Remarque : Ne tournez pas l'accessoire
pendant que vous le retirez de l'appareil.
3 Insérez la languette de l'accessoire dans la
fente située sur la partie supérieure de
l'appareil. Fixez ensuite l'accessoire sur
l'appareil en le faisant glisser vers le bas (vous
devez entendre un clic).
Page 89

Français
Utilisation de la tondeuse (S9041/12, S9031/12 uniquement)
Vous pouvez utiliser la tondeuse pour tailler vos
favoris et votre moustache.
1 Fixez l'accessoire à l'appareil (vous devez
entendre un clic).
2 Allumez l'appareil.
L'afficheur s'allume pendant quelques
secondes.
3 Maintenez l'accessoire tondeuse en position
perpendiculaire à la peau et déplacez l'appareil
vers le bas en exerçant une légère pression.
4 Nettoyez l'accessoire après chaque utilisation
(voir 'Nettoyage et entretien').
Utilisation de l'accessoire barbe avec sabot (S9161/31, S9111/41, S9111/31 uniquement)
Vous pouvez utiliser l'accessoire pour la barbe
avec le sabot pour tailler votre barbe selon un
réglage défini, mais également à différentes
hauteurs de coupe. Vous pouvez également
l'utiliser pour pré-tailler les poils longs avant de
vous raser, pour un rasage plus agréable.
Les réglages de la hauteur de coupe sur
l'accessoire pour la barbe correspondent à la
hauteur restante de votre barbe après la coupe. Ils
vont de 1 mm à 5 mm.
1 Fixez l'accessoire à l'appareil (vous devez
entendre un clic).
89
Page 90

2
1
90
Français
2 Faites glisser le sabot dans les rainures situées
des deux côtés de l'accessoire de barbe,
jusqu'à entendre un clic.
3 Appuyez sur le sélecteur de hauteur de coupe,
puis poussez-le vers la gauche ou la droite pour
sélectionner le réglage de la hauteur de coupe
souhaitée.
4 Allumez l'appareil.
5 Déplacez l'appareil vers le haut en exerçant une
légère pression. Veillez à ce que l'avant du
sabot soit entièrement en contact avec la peau.
6 Nettoyez l'accessoire après chaque utilisation
(voir 'Nettoyage et entretien').
Utilisation de l'accessoire barbe sans sabot
Vous pouvez utiliser l'accessoire pour la barbe
sans sabot pour tailler les contours de votre barbe,
de votre moustache, de vos favoris ou de votre
nuque à une hauteur de 0,5 mm.
1 Retirez le sabot de l'accessoire barbe.
Remarque : Saisissez le sabot en son centre
pour le retirer de l'accessoire pour la barbe. Ne
tirez pas sur les côtés du sabot.
2 Allumez l'appareil.
Page 91

Français
3 Maintenez l'accessoire pour la barbe en
position perpendiculaire à la peau et déplacez
l'appareil vers le bas en exerçant une légère
pression.
4 Nettoyez l'accessoire après chaque utilisation
(voir 'Nettoyage et entretien').
Nettoyage et entretien
Les accessoires fournis peuvent varier selon les
différents produits. Les accessoires qui ont été
fournis avec votre appareil sont indiqués sur
l’emballage.
Nettoyage du rasoir dans le système SmartClean (S9161/31, S9111/31 uniquement)
Le système SmartClean Plus comporte deux
phases : la phase de rinçage et la phase de
séchage.
Préparation du système SmartClean pour utilisation
Attention : N'inclinez pas le système SmartClean
pour éviter les fuites.
Remarque : Tenez le système SmartClean tandis
que vous le préparez pour utilisation.
Remarque : Si vous nettoyez le rasoir dans le
système SmartClean une fois par semaine, la
cartouche SmartClean dure environ trois mois.
1 Branchez la petite fiche au dos du système
SmartClean.
2 Branchez le bloc d'alimentation sur la prise
secteur.
91
Page 92

2
1
Français
92
3 Appuyez sur le bouton latéral du système
SmartClean (1) et soulevez le haut du système
SmartClean (2).
4 Enlevez la protection hermétique de la
cartouche de nettoyage.
5 Placez la cartouche de nettoyage dans le
système SmartClean.
6 Remettez en place le haut du système
SmartClean en appuyant dessus (clic).
Utilisation du système SmartClean
Attention : Veillez toujours à évacuer l'excès
d'eau du rasoir avant de l'installer dans le
système SmartClean.
Page 93

1
2
3
Français
1 Appuyez sur le capuchon supérieur pour
pouvoir placer le rasoir sur le support (clic).
2 Tenez le rasoir à l'envers au-dessus du support.
Assurez-vous que l'avant du rasoir est orienté
vers le système SmartClean.
3 Placez le rasoir dans le support (1), penchez le
rasoir en arrière (2) et appuyez sur le capuchon
supérieur pour connecter le rasoir (clic) (3).
Le symbole de la batterie commence à
clignoter, ce qui indique que le rasoir est en
cours de charge.
4 Appuyez sur le bouton marche/arrêt du
système de nettoyage SmartClean pour
démarrer le programme de nettoyage.
Pendant la phase de rinçage, le symbole de
rinçage clignote. Lorsque la phase de rinçage est
terminée (après 10 minutes environ), le symbole
de rinçage s'allume de manière continue.
93
Après la phase de rinçage, la phase de séchage
commence automatiquement. Pendant cette
phase, le symbole de séchage clignote. Lorsque la
phase de séchage est terminée (après 4 heures
environ), le symbole de séchage reste allumé.
Page 94

2
1
Français
94
Au terme du programme de nettoyage, le symbole
« Prêt à l'emploi » s'allume en continu.
30 minutes après la fin du programme de
nettoyage et de la charge, le système SmartClean
s'éteint automatiquement.
Le symbole de la batterie s'allume également en
continu pour indiquer que le rasoir est
complètement chargé. La charge dure environ
1 heure.
Remarque : Si vous appuyez sur le bouton
Marche/Arrêt du système SmartClean pendant le
programme de nettoyage, le programme s'annule.
Dans ce cas, le symbole de rinçage ou de séchage
s'éteint.
Remarque : Si vous retirez le bloc d'alimentation
de la prise secteur pendant le programme de
nettoyage, le programme s'annule.
Remplacement de la cartouche du système SmartClean
Remplacez la cartouche de nettoyage lorsque le
symbole de remplacement clignote en orange ou
lorsque vous n'êtes plus satisfait du résultat. Si
vous nettoyez le rasoir dans le système
SmartClean une fois par semaine, la cartouche
SmartClean dure environ trois mois.
1 Appuyez sur le bouton latéral du système
SmartClean (1) et soulevez le haut du système
SmartClean (2).
Page 95

2 Videz le liquide de nettoyage qui reste encore
dans la cartouche de nettoyage du système
SmartClean avant de la jeter.
Vous pouvez simplement verser le liquide de
nettoyage dans le lavabo.
3 Jetez la cartouche vide de nettoyage.
4 Déballez la nouvelle cartouche de nettoyage,
puis retirez la protection hermétique.
5 Placez la cartouche de nettoyage dans le
système SmartClean.
6 Remettez en place le haut du système
SmartClean en appuyant dessus (clic).
Nettoyage du rasoir à l'eau
Pour garantir des capacités optimales, nettoyez le
rasoir après chaque utilisation.
Attention : Attention avec l'eau chaude. Veillez à
ce que l'eau ne soit pas trop chaude afin de ne
pas vous brûler.
Ne séchez jamais l'unité de rasage à l'aide d'une
serviette au risque d'endommager les têtes de
rasoir.
1 Allumez le rasoir.
Français
95
Page 96

96
Français
2 Rincez la tête de rasoir sous le robinet d'eau
chaude.
3 Éteignez le rasoir. Retirez le support de la tête
de rasoir de la partie inférieure de la tête de
rasoir.
4 Rincez le collecteur de poils sous le robinet.
Remarque : Vous pouvez également nettoyer le
collecteur de poils avec la brosse de nettoyage
fournie.
5 Rincez rapidement le support de la tête de
rasoir, sous l'eau chaude.
6 Secouez la tête de rasoir pour éliminer l'excès
d'eau et laissez-la sécher.
Page 97

7 Mettez le support de la tête de rasoir dans la
partie inférieure de la tête de rasoir (vous devez
entendre un clic).
Nettoyage des accessoires amovibles
Remarque : Ne séchez jamais l'accessoire de tonte
ou l'accessoire barbe à l'aide d'une serviette ou
d'un mouchoir, car vous risqueriez d'endommager
les dents de tonte.
Nettoyage de la tondeuse (S9041/12, S9031/12 uniquement)
Nettoyez la tondeuse après chaque utilisation.
1 Après installation de la tondeuse sur le rasoir,
allumez l'appareil.
2 Rincez l'accessoire sous le robinet d'eau
chaude.
3 Après le nettoyage, éteignez l'appareil.
4 Retirez l'excès d'eau en secouant l'accessoire,
puis laissez-le sécher.
Conseil : Pour garantir des capacités optimales,
appliquez régulièrement une goutte d'huile pour
machine à coudre sur les dents de l'accessoire.
Nettoyage de l'accessoire barbe (S9161/31, S9111/41, S9111/31 uniquement)
Nettoyez l'accessoire pour la barbe après chaque
utilisation.
1 Retirez le sabot de l'accessoire barbe.
Français
97
Page 98

2yrs
Français
98
Remarque : Saisissez le sabot en son centre
pour le retirer de l'accessoire pour la barbe. Ne
tirez pas sur les côtés du sabot.
2 Allumez l'appareil.
3 Rincez l'accessoire de barbe et le sabot
séparément sous l'eau chaude.
4 Après le nettoyage, éteignez l'appareil.
5 Égouttez soigneusement l'excédent d'eau, puis
laissez sécher l'accessoire pour la barbe et le
sabot.
6 Pour garantir des capacités optimales,
appliquez régulièrement une goutte d'huile
pour machine à coudre sur les dents de
l'accessoire.
Rangement
1 Rangez le rasoir dans la housse fournie.
Remarque : Assurez-vous que l'appareil est sec
avant de le ranger dans l'étui.
Remplacement
Remplacement des têtes de rasage
Pour garantir des performances de rasage
optimales, nous vous recommandons de
remplacer les têtes de rasoir tous les deux ans.
Remplacez immédiatement les têtes de rasage
endommagées. Remplacez toujours les têtes de
rasage par des têtes de rasage Philips d'origine
(voir 'Commande d'accessoires').
Page 99

1
3
2
Français
Rappel de remplacement
Le rappel de remplacement indique que les têtes
de rasoir doivent être remplacées.Le symbole des
têtes de rasoir s'allume en continu, les flèches
clignotent en blanc et vous entendez un signal
sonore lorsque vous éteignez le rasoir.
1 Éteignez l'appareil.
2 Retirez le support de la tête de rasoir de la
partie inférieure de la tête de rasoir.
3 Placez le support de l'anneau de fixation sur
l'anneau (1), faites-le pivoter dans le sens
inverse des aiguilles d'une montre (2), puis
enlevez la tête de rasoir (3).
Retirez l'anneau de fixation de son support,
puis répétez cette opération pour chacun des
anneaux de fixation.
4 Retirez les têtes de rasoir du support de tête de
rasoir.
Jetez immédiatement les têtes de rasage usées
pour éviter de les mélanger avec les nouvelles
têtes de rasage.
99
5 Placez les têtes de rasoir dans le support de
tête de rasoir.
Remarque : Assurez-vous que les languettes
sur les deux côtés des têtes de rasage
s'insèrent correctement dans les projections du
support de la tête de rasage.
Page 100

3
1
2
2
1
100
Français
6 Placez le support de l'anneau de fixation sur
l'anneau (1), puis sur la tête de rasoir (2). Faitesle ensuite pivoter dans le sens des aiguilles
d'une montre (3) pour fixer à nouveau l'anneau
de fixation. Répétez cette opération pour les
autres anneaux de fixation.
-
Chaque anneau de fixation est pourvu de
deux encoches qui s'encastrent dans celles
du support de la tête de rasoir. Faites
tourner l'anneau dans le sens des aiguilles
d'une montre jusqu'à ce que vous entendiez
un clic indiquant que l'anneau est fixé.
Remarque : Tenez le support de la tête de
rasoir dans la main lorsque vous réinsérez les
têtes de rasoir et replacez les anneaux de
fixation. Ne placez pas le support de la tête de
rasage sur une surface lors de cette opération,
car vous risqueriez de l'endommager.
7 Mettez le support de la tête de rasoir dans la
partie inférieure de la tête de rasoir (vous devez
entendre un clic).
8 Pour réinitialiser le rappel de remplacement,
maintenez le bouton marche/arrêt enfoncé
pendant environ 7 secondes. Attendez jusqu'à
ce que vous entendiez deux signaux sonores.
Commande d'accessoires
Pour acheter des accessoires ou des pièces de
rechange, consultez le site Web
www.shop.philips.com/service ou rendez-vous
chez votre revendeur Philips. Vous pouvez
également communiquer avec le Service
Consommateurs Philips de votre pays (consultez
 Loading...