

Page 1
S8950
Rechargeable Cordless
Tripleheader Shaver
Always here to help you
Register your product and get support at
www.norelco.com/register
Question?
Contact
Philips
Norelco
Question?
Contact
Philips
Norelco
Page 2

2
Page 3
S8950
ENGLISH 4
ESPAÑOL 30
Congratulations on your purchase and
welcome to Philips Norelco!
To fully benefit from the support that Philips
Norelco offers, register your product at
www.norelco.com/register
¡Bienvenido a Philips Norelco y felicitaciones
por su compra!
Para utilizar los servicios de asistencia técnica
de Philips Norelco, registre su producto en
www.norelco.com/register
Page 4

IMPORTANT SAFETY
INSTRUCTIONS
When using an electric appliance, basic precautions should always
be followed, including the following:
Read all instructions before using this appliance.
DANGER
To reduce the risk of electric shock:
1. Do not reach for a corded shaver that has fallen into water.
Unplug immediately.
2. Power plug is not for immersion or for use in shower.
3. Do not use an extension cord with this appliance.
4. Always unplug this shaver from the electrical outlet immediately
after use, except when shaver is (re)charging.
5. Unplug and remove power supply cord from shaver before
cleaning.
6. The batteries used in this device may present a fire or chemical
burn hazard if mistreated. Do not disassemble, heat above
100ºC (212ºF) or incinerate.
WARNING
To reduce the risk of burns, fire, electric shock, or injury
to persons:
1. Close supervision is necessary when this shaver is used by, on,
or near children or invalids.
2. Use this shaver for its intended household use as described
in this manual. Do not use attachments not recommended by
Philips Electronics North America Corporation.
3. Never operate this shaver if it has a damaged cord or charging
plug, if it is not working properly, if it has been dropped
or damaged, or dropped into water while plugged in. For
assistance call 1-800-243-3050.
ENGLISH
4
Page 5

4. Keep the shaver, cord and charging plug away from heated
surfaces.
5. Never drop or insert any object into any opening.
6. Do not use the adapter in or near a power outlet that contains
an electric air freshener to prevent damage to the adapter.
7. Do not charge or plug in shaver outdoors or operate where
aerosol (spray) products are being used or where oxygen is
being administered.
8. Do not use this shaver with a damaged or broken comb, as
facial injury may occur.
9. Always attach plug to shaver first, then plug into outlet. Be
certain plug is inserted firmly into
shaver
up to mark indicated
on plug. To disconnect, remove charging plug from outlet.
10. Never put the shaver in direct sunlight or store at a
temperature above 140°F (60ºC).
11. Keep the cord dry at all times. Do not handle with wet hands.
12. To prevent possible damage to the cord, do not wrap cord
around the shaver.
13. Do not attempt to open the appliance to replace the battery.
14. Only use the power plug supplied with the shaver.
SAVE THESE
INSTRUCTIONS
IMPORTANT: The power plug contains a transformer. Do not
cut off the power plug to replace it with another plug, as this will
cause a hazardous condition.
ENGLISH
5
Page 6

6
ENGLISH
45 - DAY MONEY-BACK GUARANTEE
To enjoy the closest and most comfortable shave from your new Philips Norelco
Men’s Shaver, the shaver should be used exclusively for 3 weeks. This allows your
hair and skin enough time to adapt to the Philips Norelco Shaving System. If, after
that period of time, you are not fully satisfied with your Philips Norelco Men’s
Shaver, send the product back along with dated sales receipt and we’ll refund
you the full purchase price. The shaver must be shipped prepaid by insured
mail, insurance prepaid, have the original sales receipt, indicating purchase price, the date of purchase, and the money-back guarantee return
authorization form enclosed. We cannot be responsible for lost mail.
The shaver must be postmarked no later than 45 days from the date of purchase.
Philips Norelco reserves the right to verify the purchase price of the shaver and
limit refunds not to exceed suggested retail price.
To obtain money-back guarantee return authorization form,
call 1-800-243-3050 for assistance. Delivery of refund check will
occur 6–8 weeks AFTER receipt of returned product.
Page 7

7
Table of Contents
Features ........................................................ 8-9
LED Display .............................................10-11
Before First Use .....................................11-12
Charging ...................................................12-13
Recharging .....................................................13
Quick Charge ...............................................13
Put It To The Test & Shaving Tips ........13-14
How to Shave
With An Electric Shaver ....................... 14-16
Using the SmartClick Styler ................ 16-19
Travel Lock ..............................................19-20
Cleaning .................................................... 20-23
Replacing the Shaving Heads ...............23-25
Storage ............................................................25
Assistance ......................................................26
Disposal .......................................................... 27
Accessories ...................................................28
Warranty ........................................................ 29
Spanish ............................................................ 30
ENGLISH
Page 8
8
ENGLISH
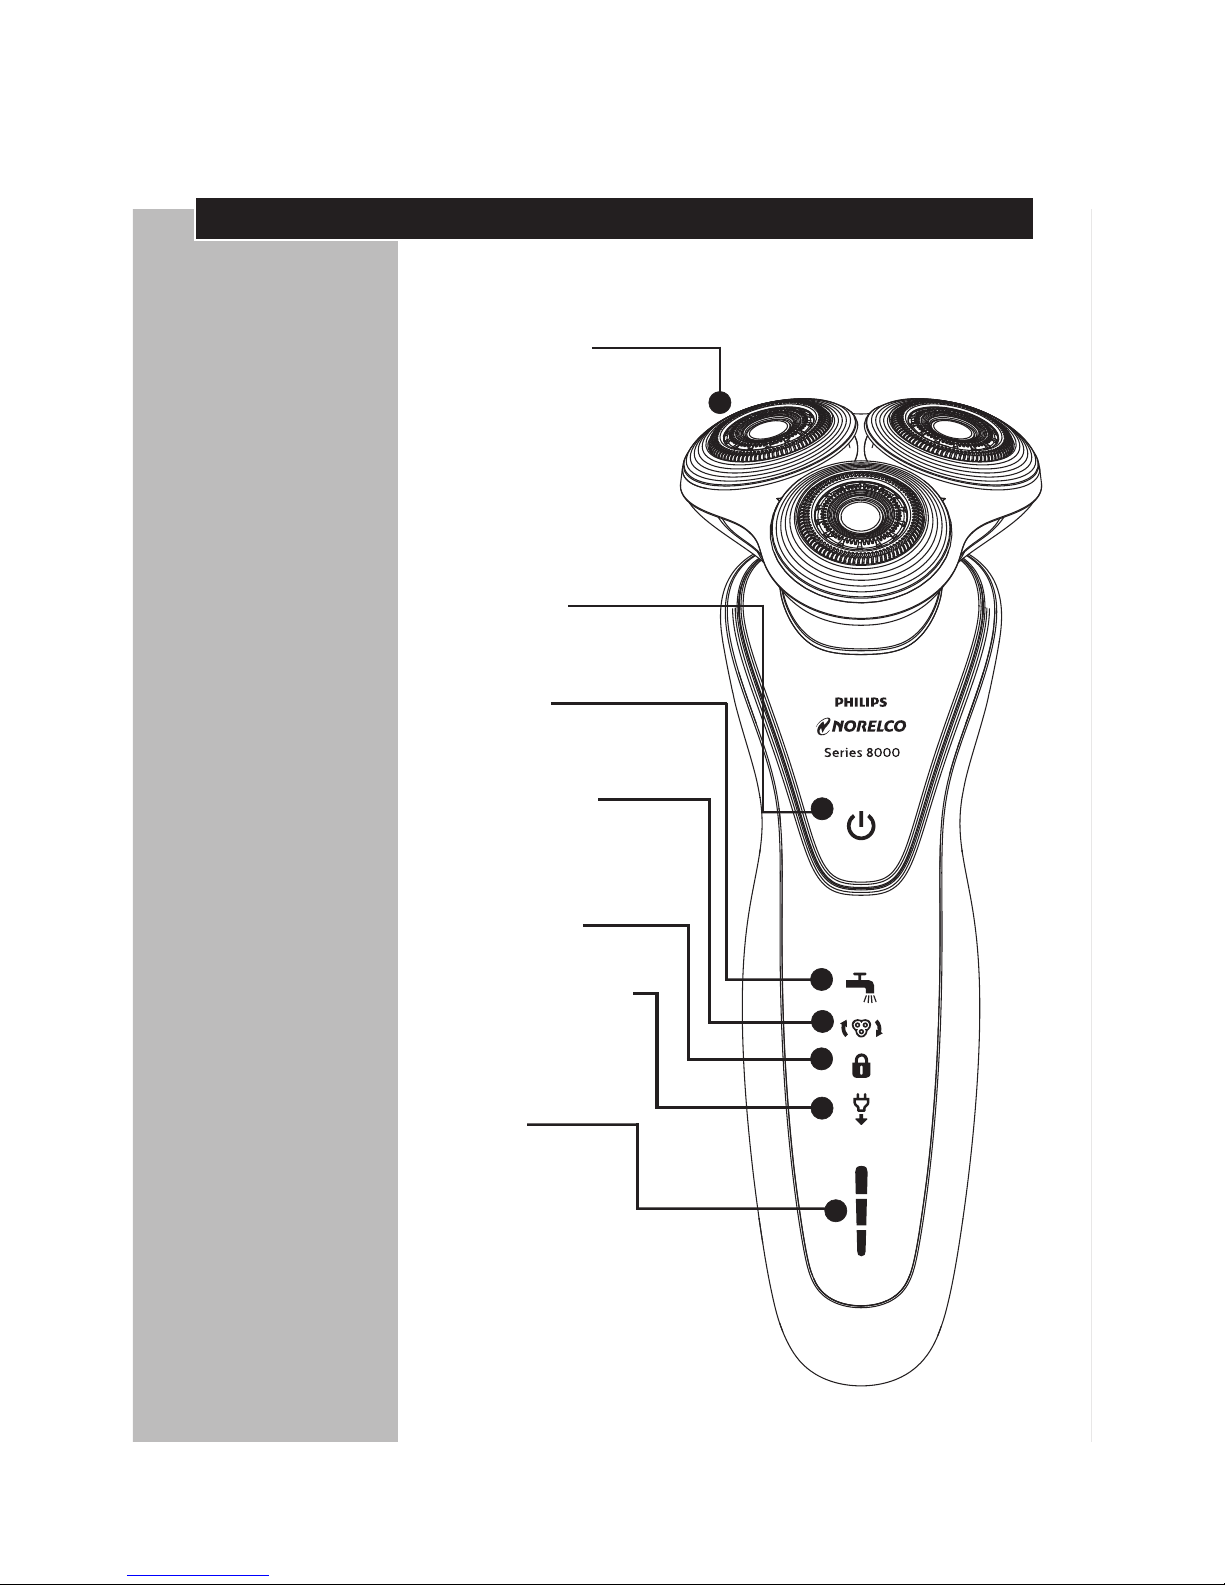
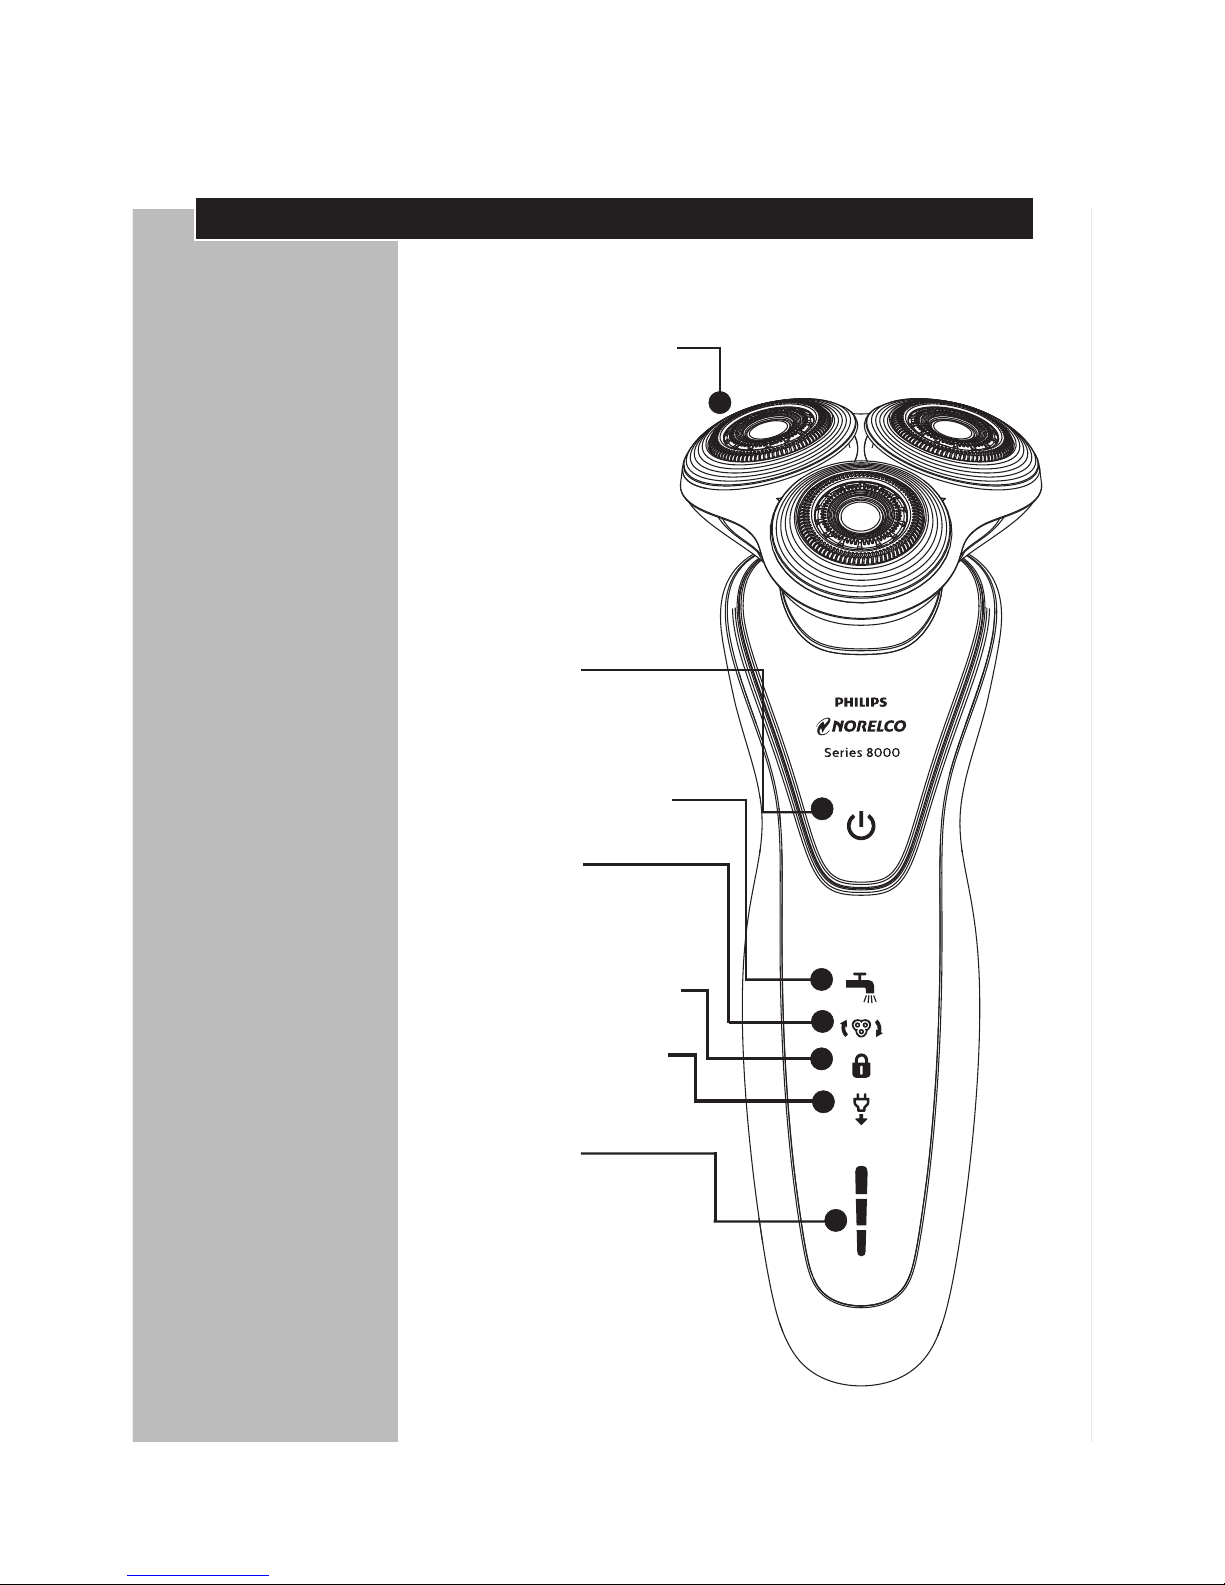
Features
Contour Detect Technology
Shaving Unit
• Hair Chamber
captures shaven
hair
Super Lift and
Cut Action
Electronic
On/Off Button
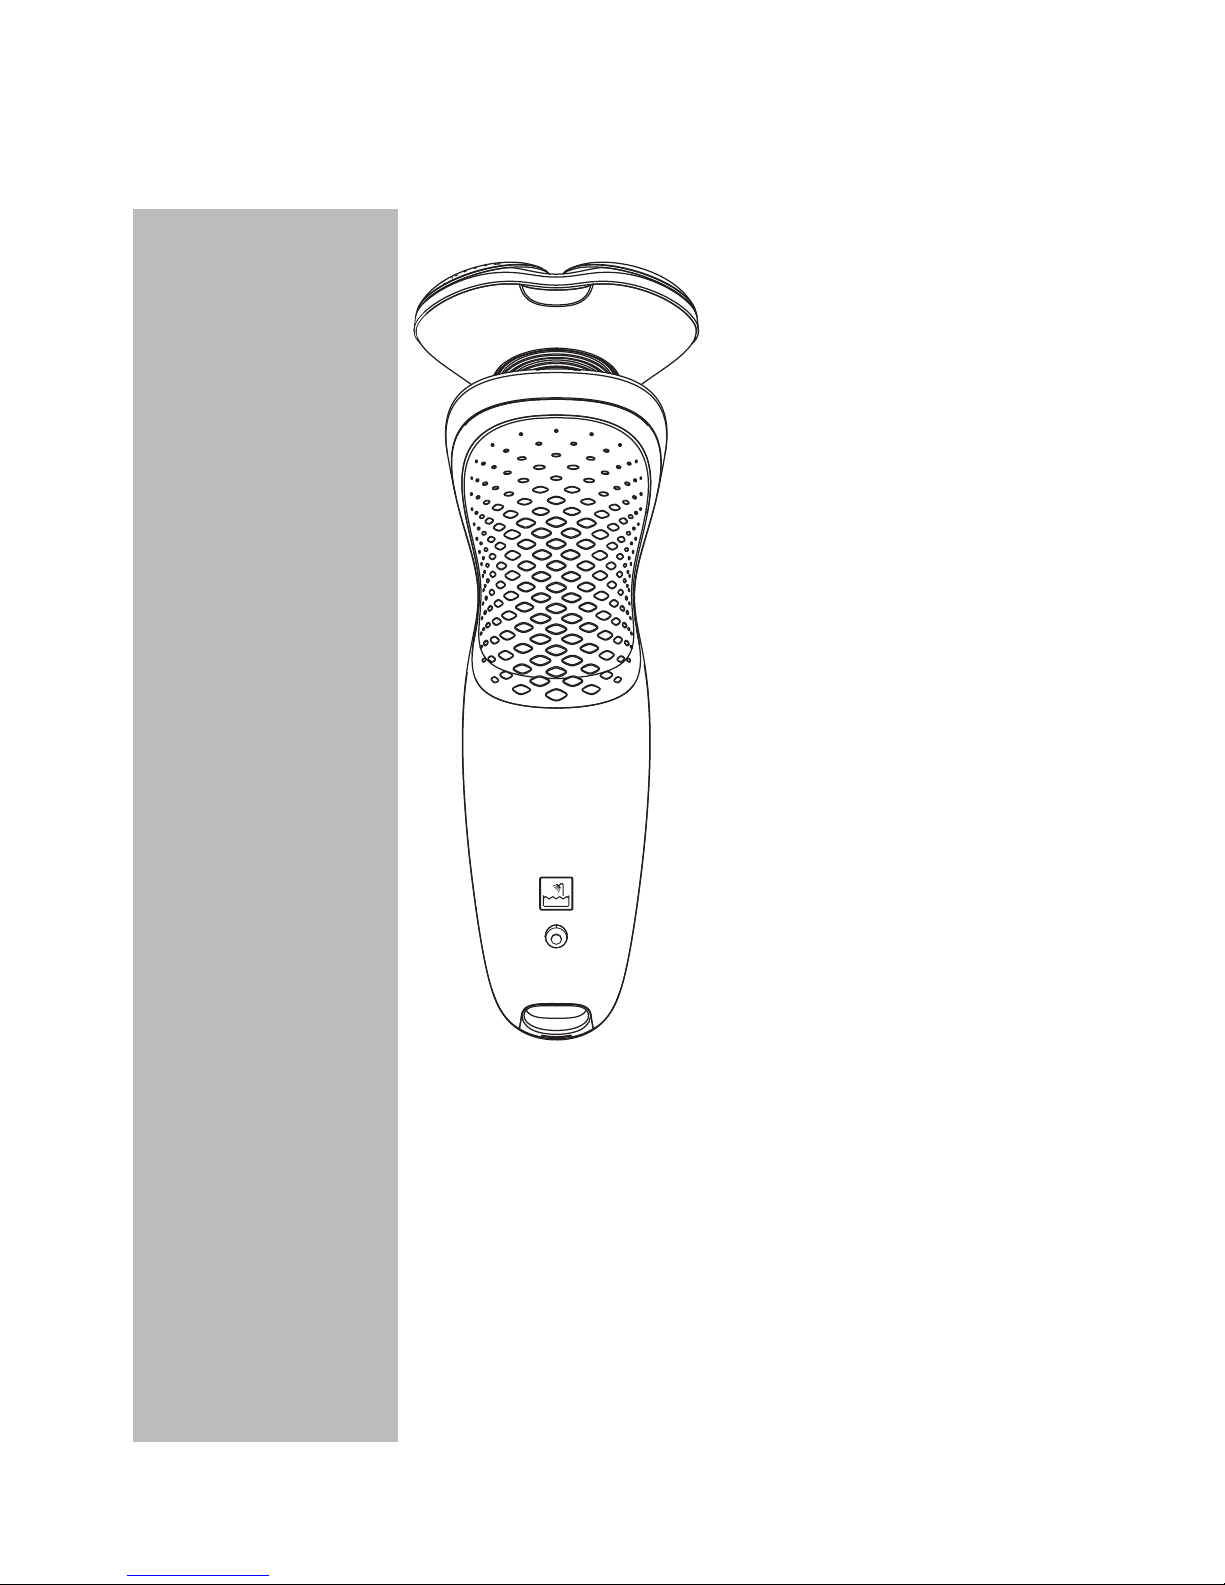
Cleaning
Indicator
Replacement
Shaving Heads
Indicator
Travel Lock
‘Unplug for use’
Indicator
Battery
Display
• Battery
Charge,
Full & Low
Indicators
Page 9
9
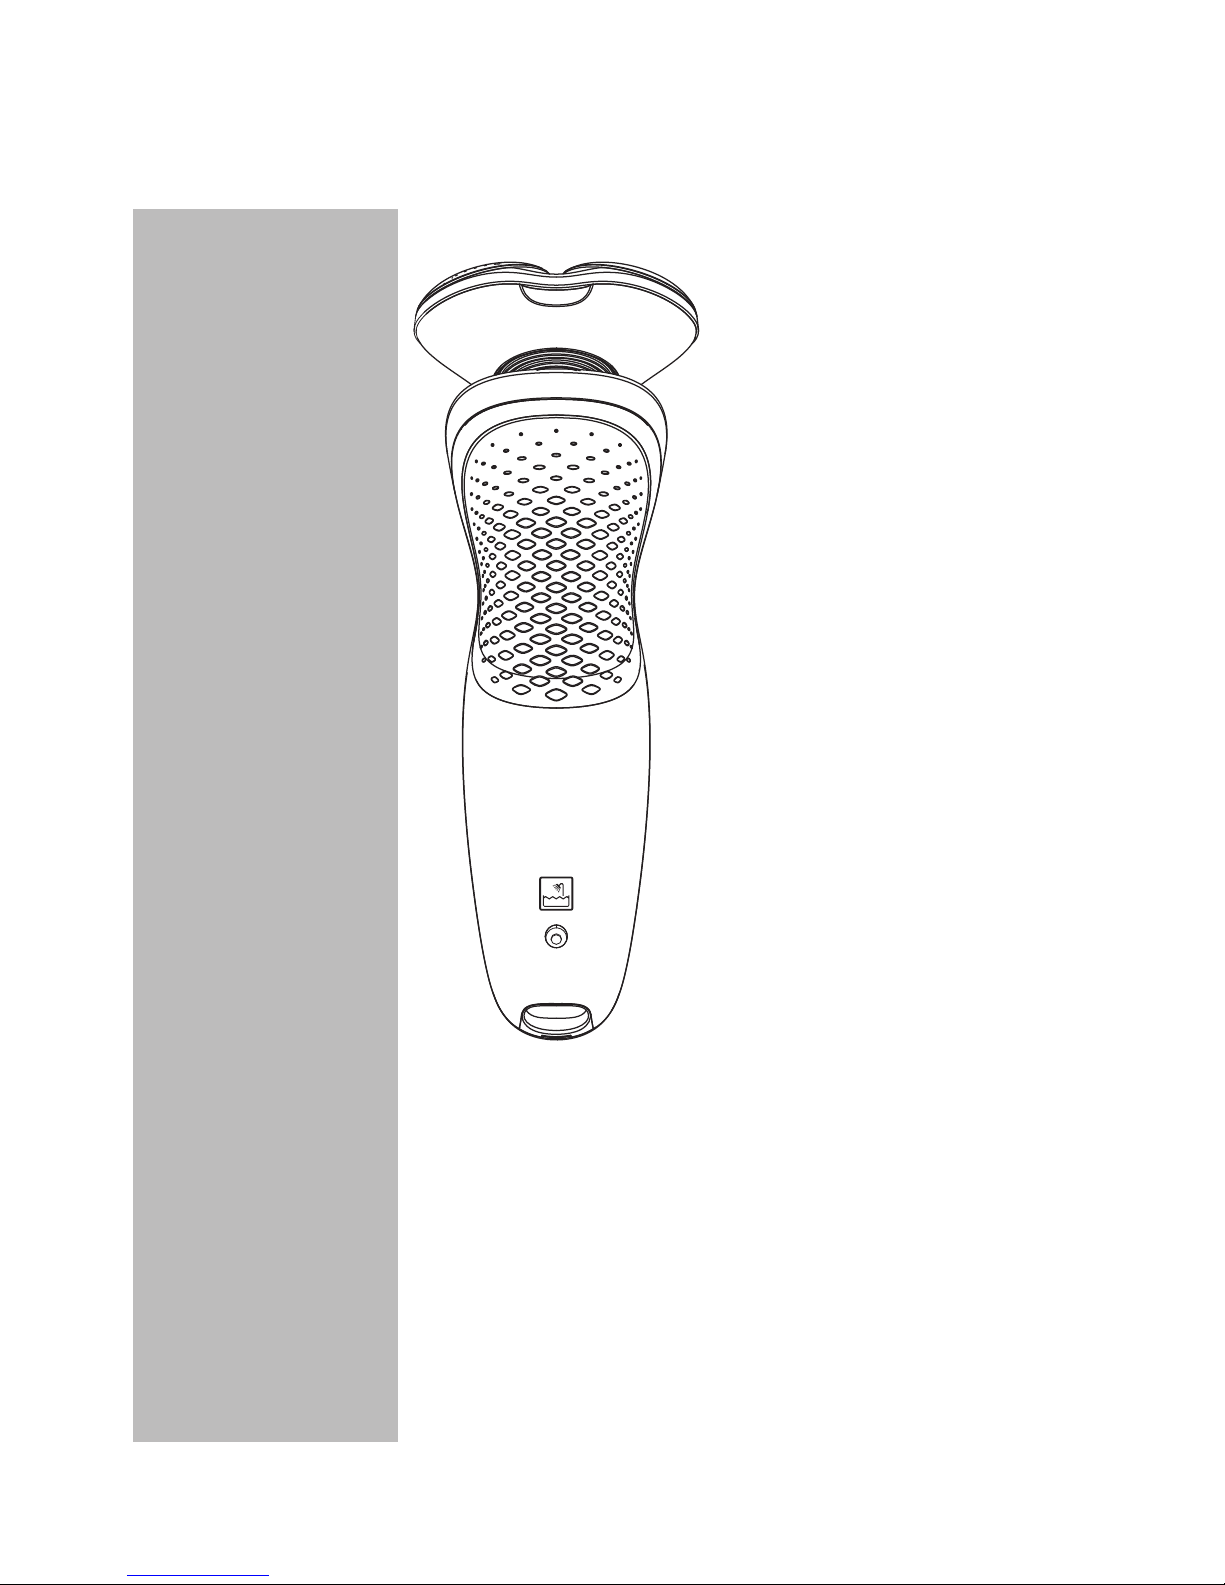
SmartClick
Beard Styler
Automatic Worldwide
Voltage 100V to 240V AC
Travel Case
Retaining Ring Holder
Rechargeable 1-hour full
charge for up to 50 min.
of cordless shaving time
Quick Charge - For
one shave
Cordless - To shave
without a cord
Full 2-Year Warranty
45-Day Money-Back
Guarantee
ENGLISH
Page 10

10
ENGLISH
LED Display
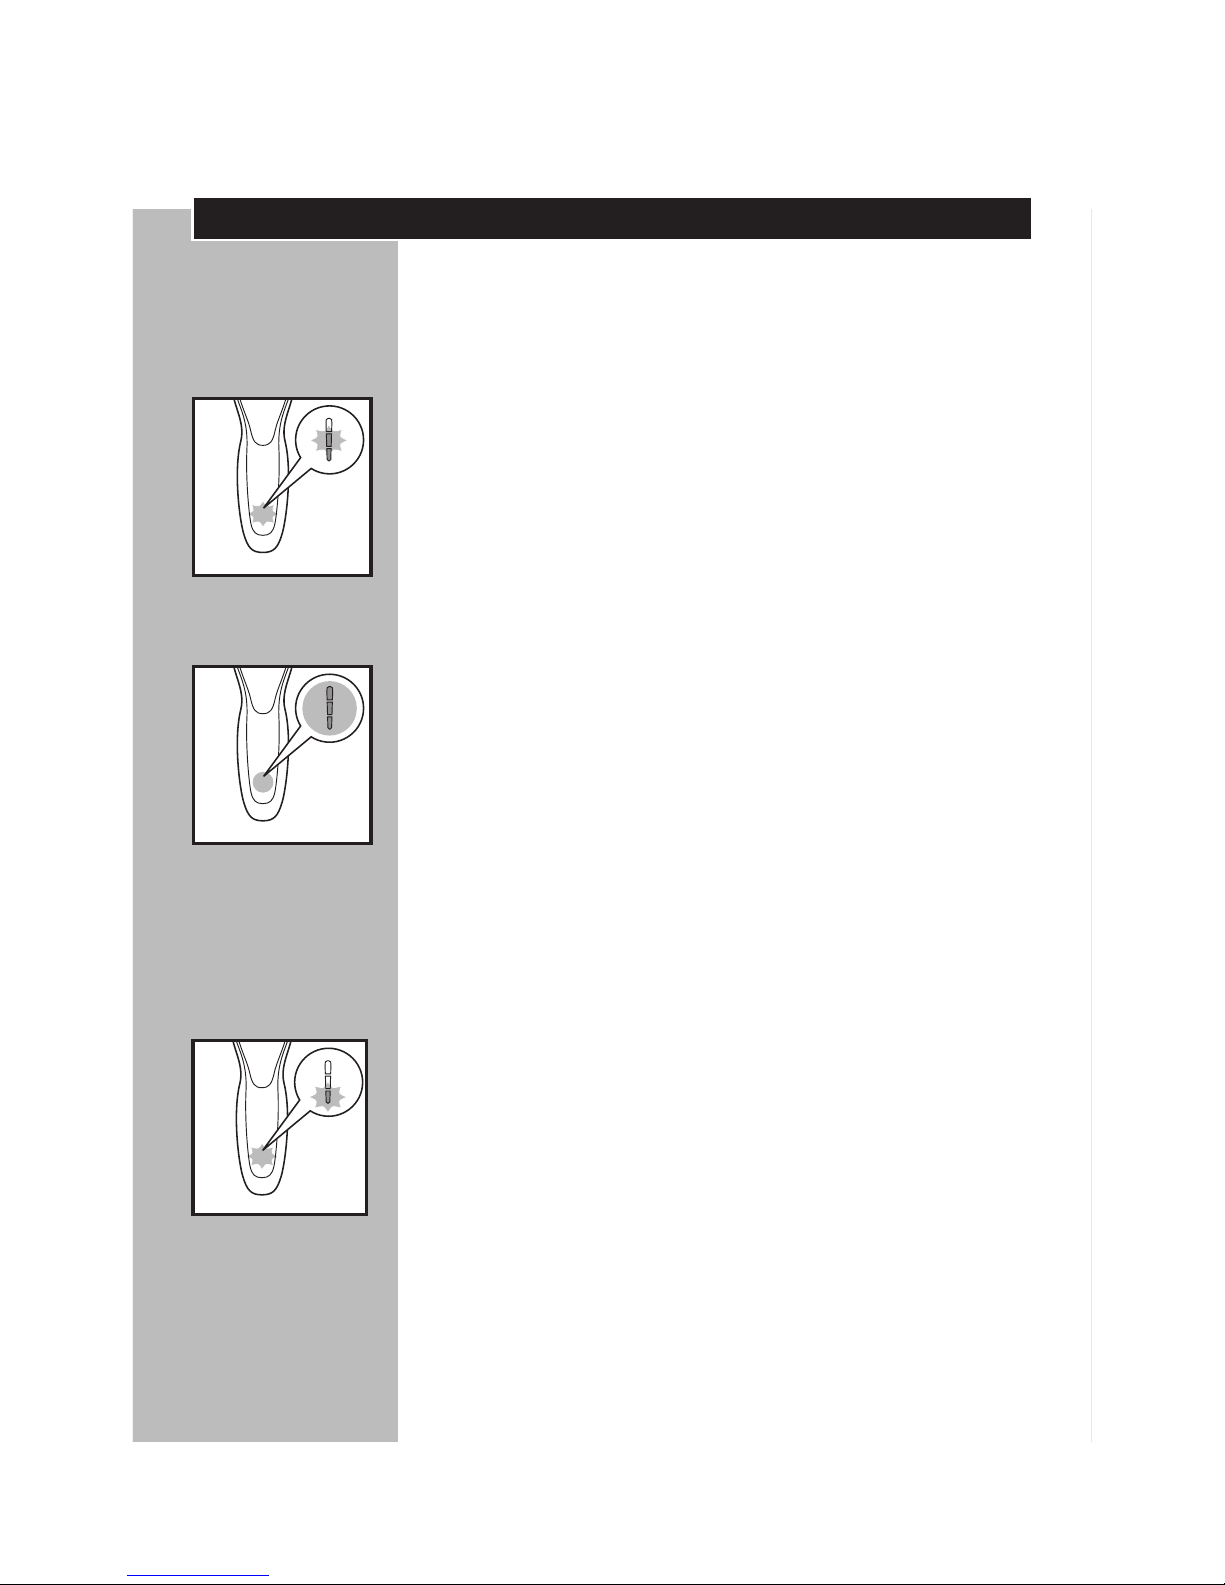
◗ The display provides the following
information:
◗ Charging Indicator
C
- Quick charge: When the shaver does NOT
contain enough energy for one shave, the
charging light will blink quickly.
- If the shaver does contain enough energy for one
shave, the charging light will blink slowly.
◗ Full Charge Indicator
C
- When the battery has been fully charged,
the charging light lights up continuously.
After approximately 30 minutes the display
automatically switches off again.
- If the on/off button is pressed during or after
charging, the 'unplug for use' symbol will blink
indicating the shaver is still connected to the
outlet.
◗ Low Battery Indicator
C
- When the battery is almost empty (5 or less
shaving minutes left), the charging light
blinks orange.
C
◗ 'Unplug For Use' Indicator
The 'unplug for use' symbol will blink to remind
you the shaver is connected to the outlet.
Page 11
11
ENGLISH
C
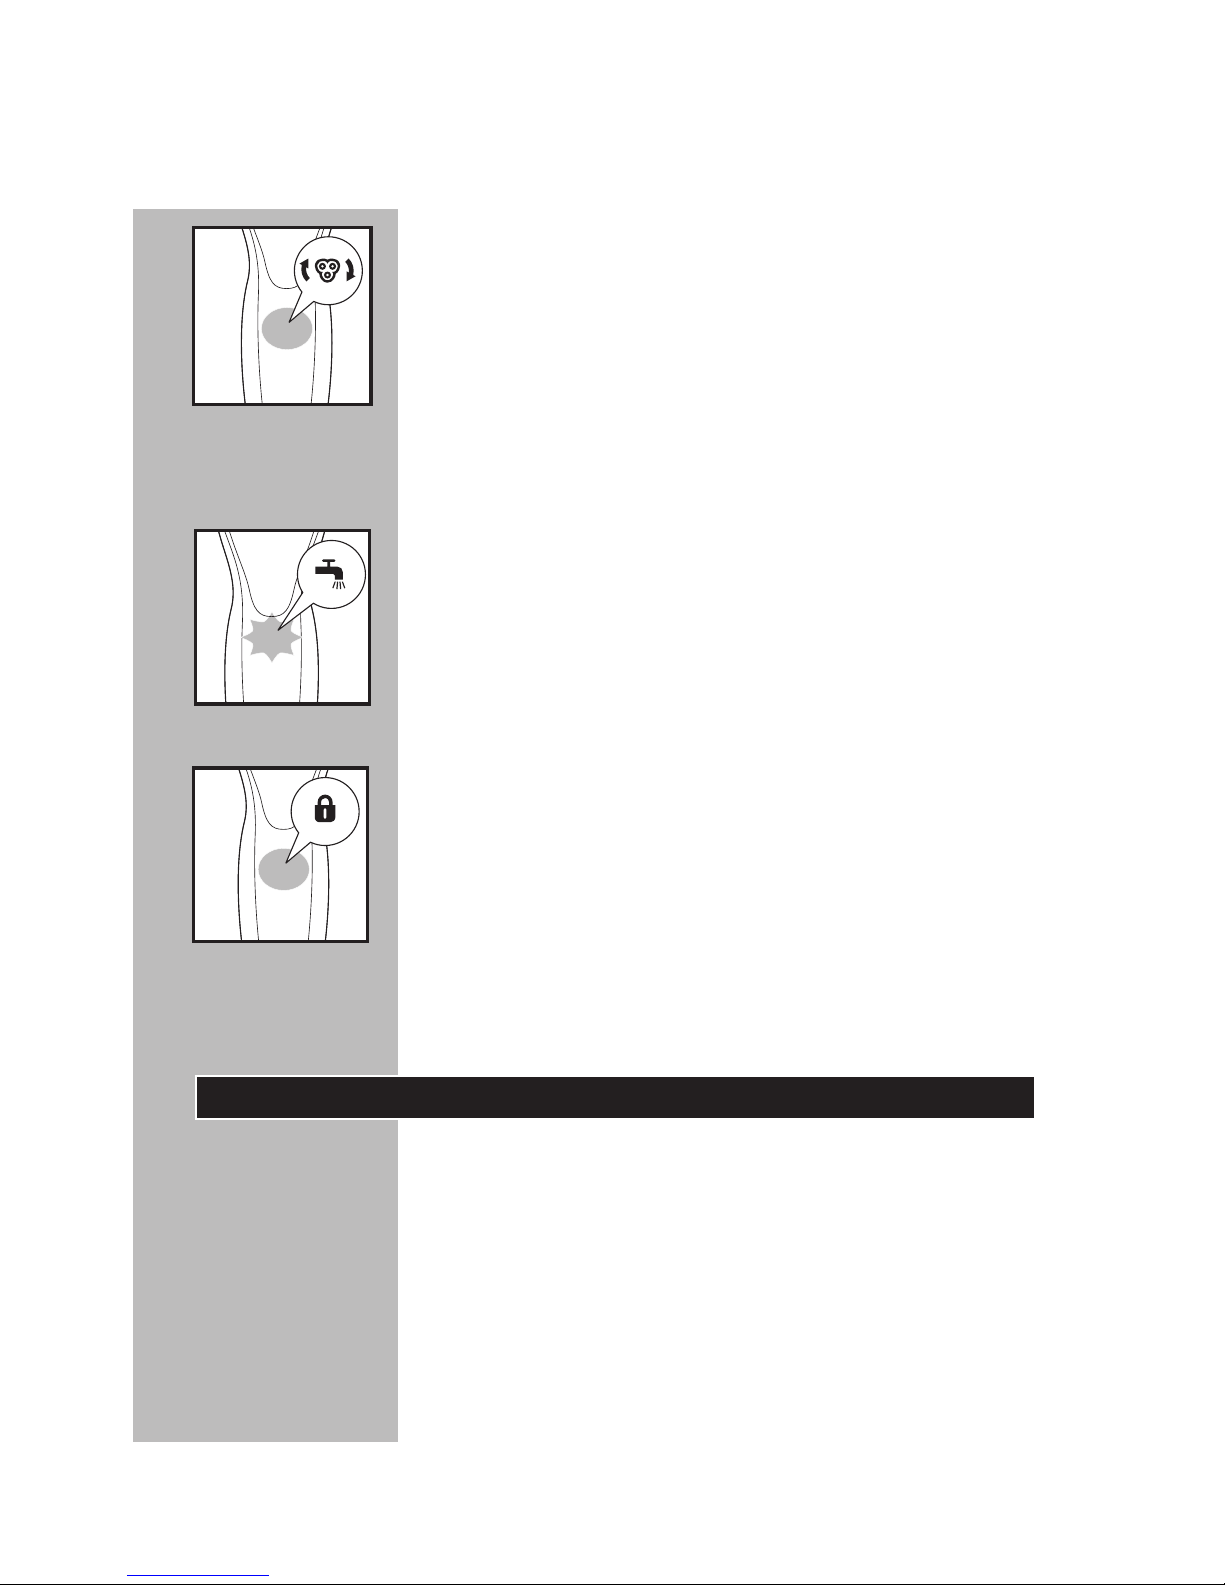
◗ Replacement Shaving Heads Indicator
Every year, depending on your shaving behavior,
the replacement shaving heads indicator lights up
white continuously. See 'Replacing the Shaving
Heads' section for instructions to reset the
shaver. This reminds you that with new shaving
heads you will guarantee yourself optimal shaving
performance.
C
◗ Cleaning Indicator
For optimal shaving performance, we
recommend cleaning the shaver after EACH use.
The blinking faucet will remind you the
shaving unit needs to be cleaned. This happens
after each shave.
C
◗ Travel Lock
The shaver is equipped with a travel lock function.
You can use the travel lock function when you are
going to store the shaver for a longer period or if
you are going to take the shaver with you when
traveling. See ‘Travel Lock’ section for instructions
on how to use this function.
Before First Use
◗ Charge the shaver before you start using it
(see ‘Charging’). Make sure the shaver is
switched off before you start charging it.
Page 12

12
ENGLISH
Important
◗ Only use the power cord provided to charge
the shaver.
◗ The power plug transforms 100-240V AC to
less than 24V DC.
Charging
◗ Charging, recharging or storing at
temperatures below 40°F (4,5°C) or higher
than 95°F (35°C) adversely affects lifetime of
batteries.
◗ Charging or recharging requires one full hour.
◗ A fully charged shaver has a shaving time of up
to 50 minutes.
◗ You may recharge when the display indicates
the battery is almost empty.
◗ This shaver will not operate corded directly
from the electrical outlet.
◗ Do not charge the shaver in a pouch or travel
case.
C
1 Connect cord directly to shaver (1) and
connect the power plug into any 100V to
240V AC outlet (2). Use only the power
cord provided.
◗ An adaptor plug may be necessary for power
cord usage in some foreign countries. Use
an attachment plug adaptor of the proper
configuration for the power outlet.
1
2
Page 13
13
ENGLISH
The power cord will automatically convert to
work on 100V to 240V AC systems.
2 The display on the shaver will indicate
shaver is charging.
3 Charging requires one full hour. A fully
charged shaver has a cordless shaving time
of up to 50 minutes.
Recharging
1 Recharging requires one full hour.
Recharge when the display indicates the
battery is almost empty.
Quick Charge
When batteries are empty, recharging the shaver
for 5 minutes gives enough energy for one
cordless shave.
Put It To The Test & Shaving Tips
◗ 21 Day Trial and Conversion Process. It is a fact
that your skin and beard need time to adjust to
a new shaving system.
◗ Use your new shaver exclusively for 3 weeks to
fully enjoy the closeness of a Philips Norelco
shave.
Page 14
14
ENGLISH
◗ At first you may not get as close a shave as you
expect, or your face may even become slightly
irritated. This is normal since your beard and
skin will need time to adjust. Invest 3 weeks
and you’ll soon experience the full joy of your
new shaver.
◗ Stick with it! If you alternate shaving methods
during the adjustment period, it may make it
more difficult to adapt to the Philips Norelco
shaving system.
◗ If you are still not convinced after 21 days,
Philips Norelco will refund you the full
purchase price as long as the request is
received within 45 days of purchase.
How To Shave With An Electric
Shaver
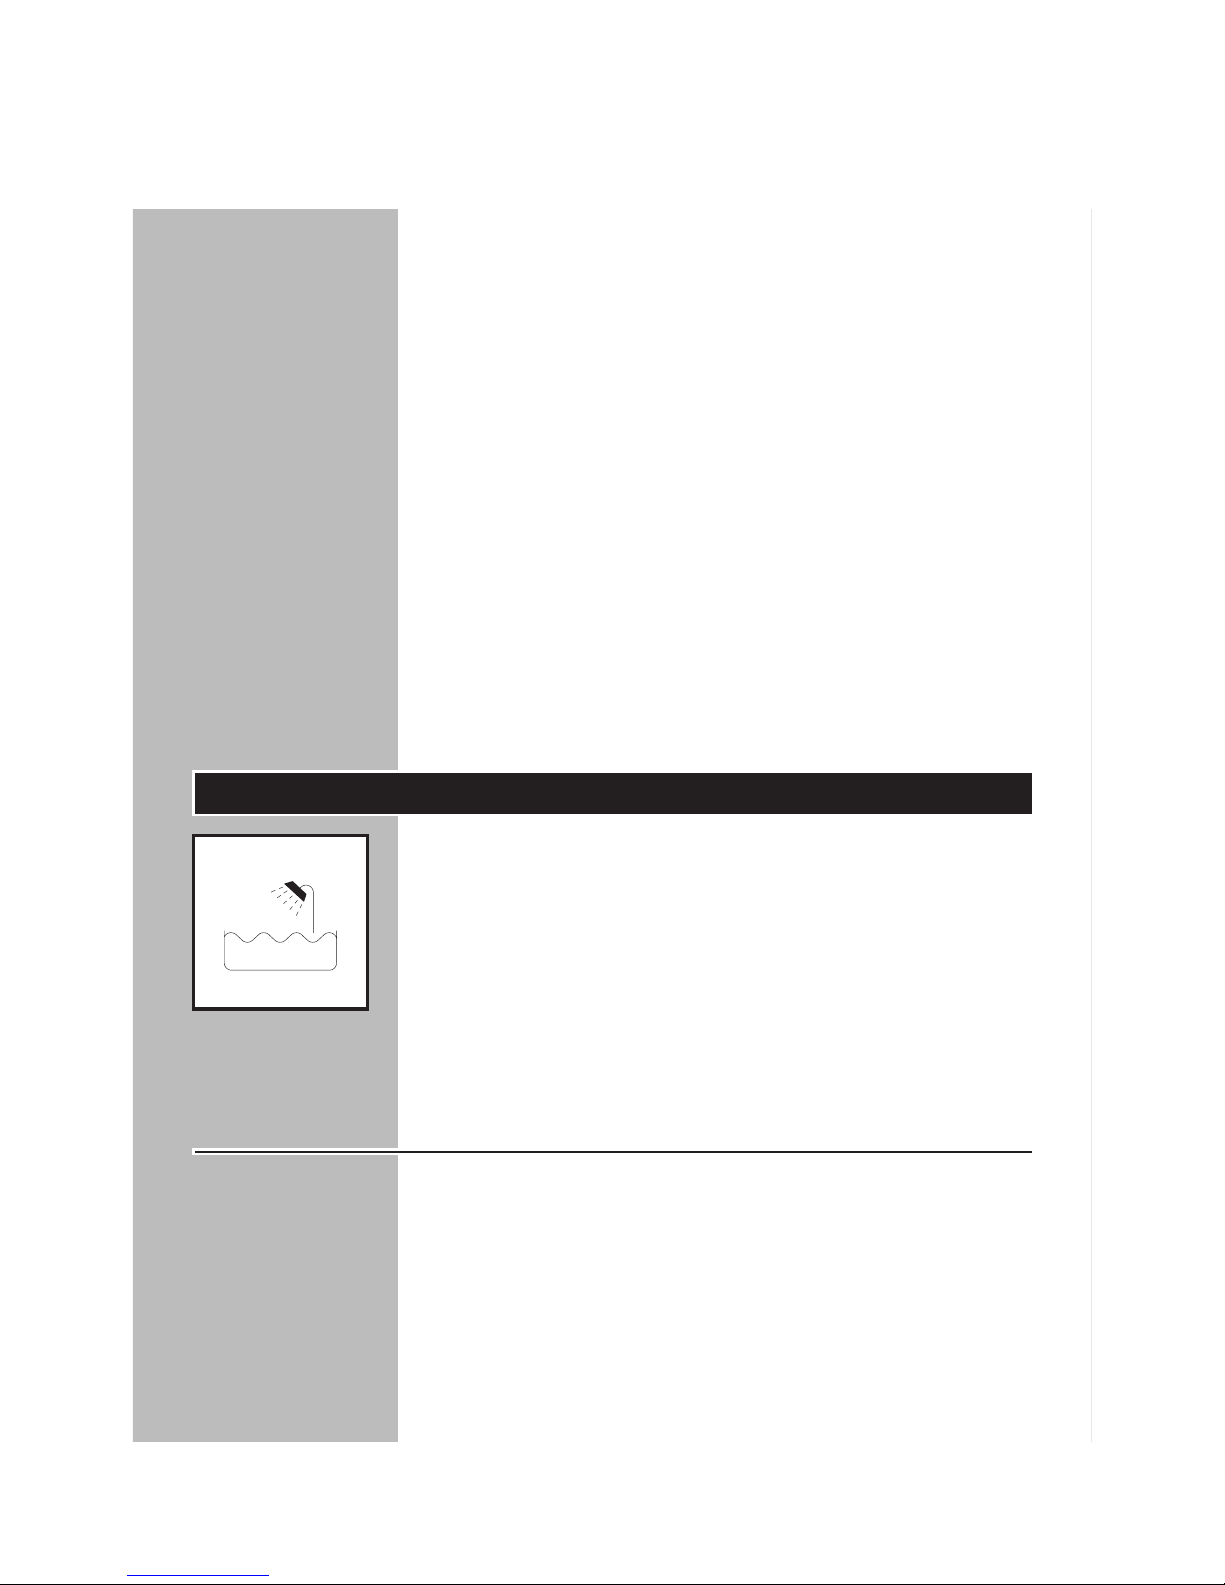
C◗ This symbol on the shaver indicates that the
shaver can be used in the bath or shower.
◗ For hygienic reasons, the shaver should only
be used by one person.
◗ Use this shaver for its intended household use
as described in this manual.
Shaving
◗ For best results on skin comfort, pre-trim
your beard if you have not shaved for 3 days
or longer.
Page 15
15
ENGLISH
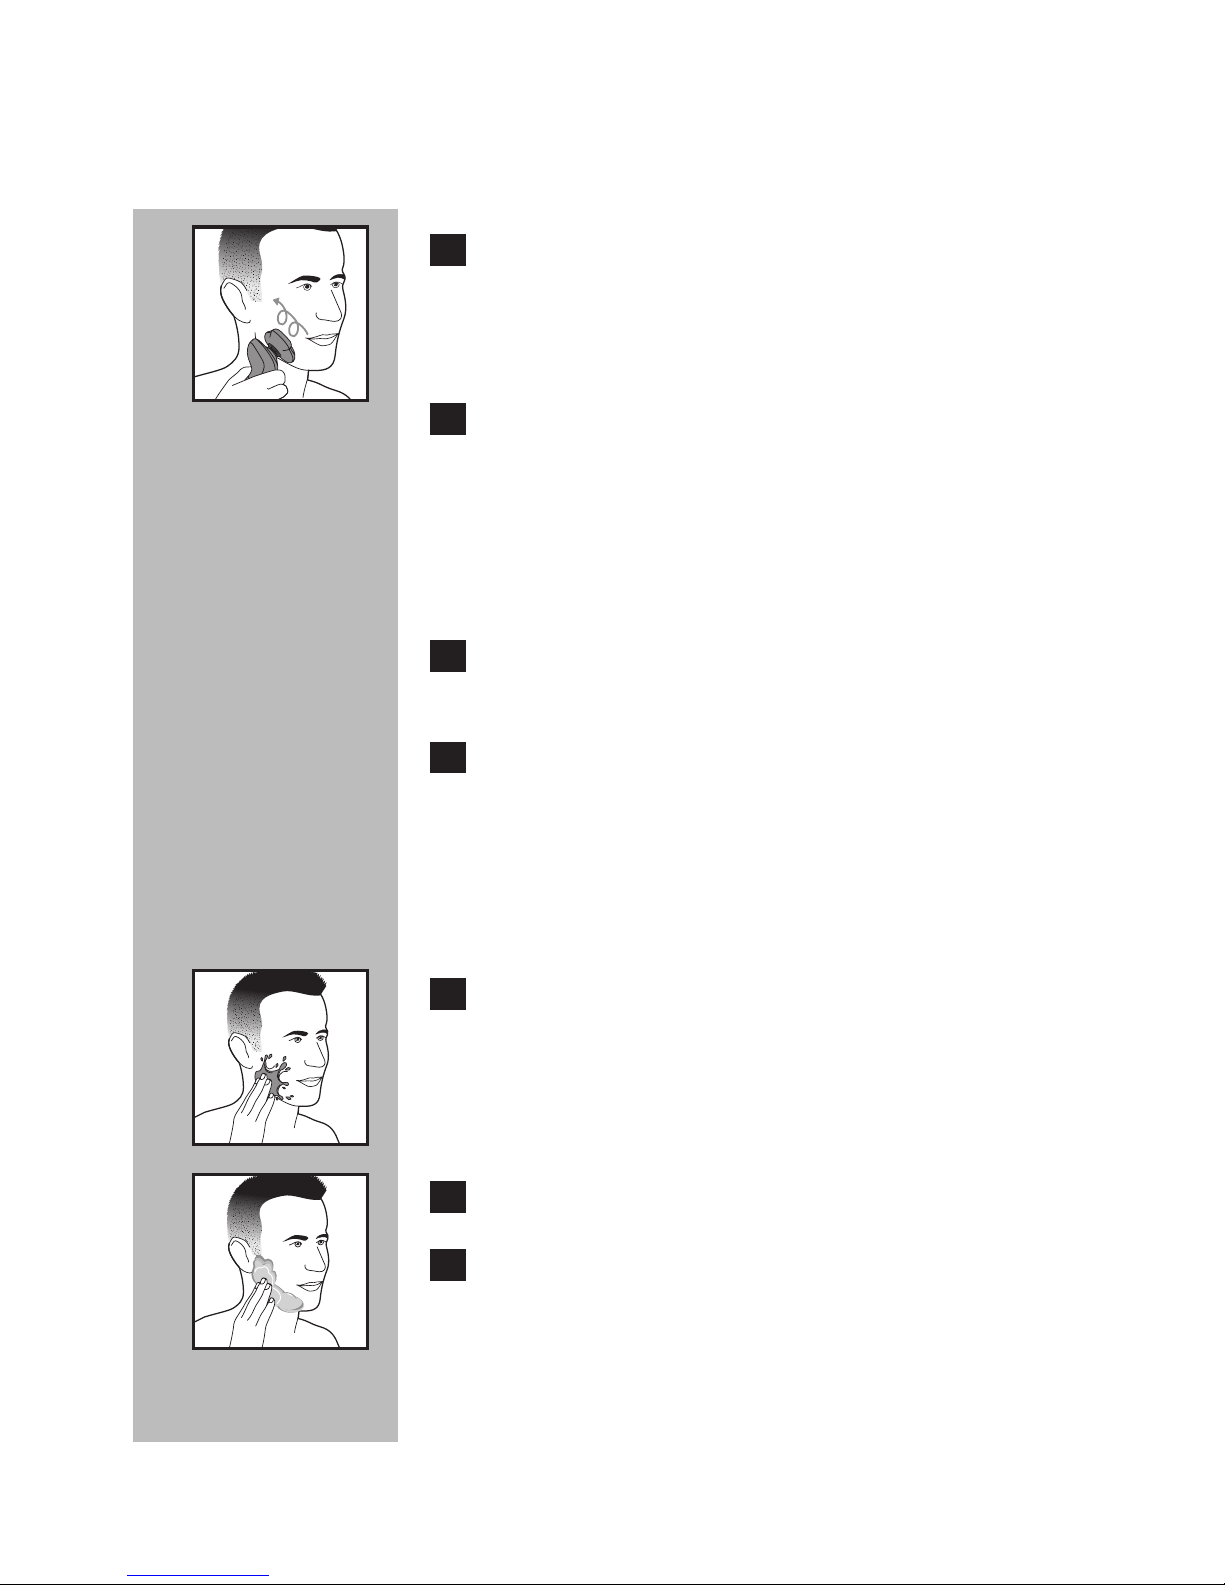
C 1 Turn shaver ON by pressing the on/off
button once. Shave against the direction
of beard growth using only circular
movements.
2 Stretch your skin with your free hand so
blades can lift and cut whiskers. Gently
press shaver to skin so the floating heads
can follow the contours of your face.
DO NOT press too hard. Too much
pressure can pinch the skin into the combs.
3 Turn shaver OFF by pressing the on/off
button once.
4 Clean the shaver after each use (see
chapter ‘Cleaning’).
Wet Shaving
You can also use the shaver on a wet face with
shaving foam or gel.
C 1 Apply some water to your skin.
C 2 Apply shaving foam or gel to your skin.
3 Rinse the shaving unit under the tap
to ensure that the shaving unit glides
smoothly over your skin.
Page 16
16
ENGLISH
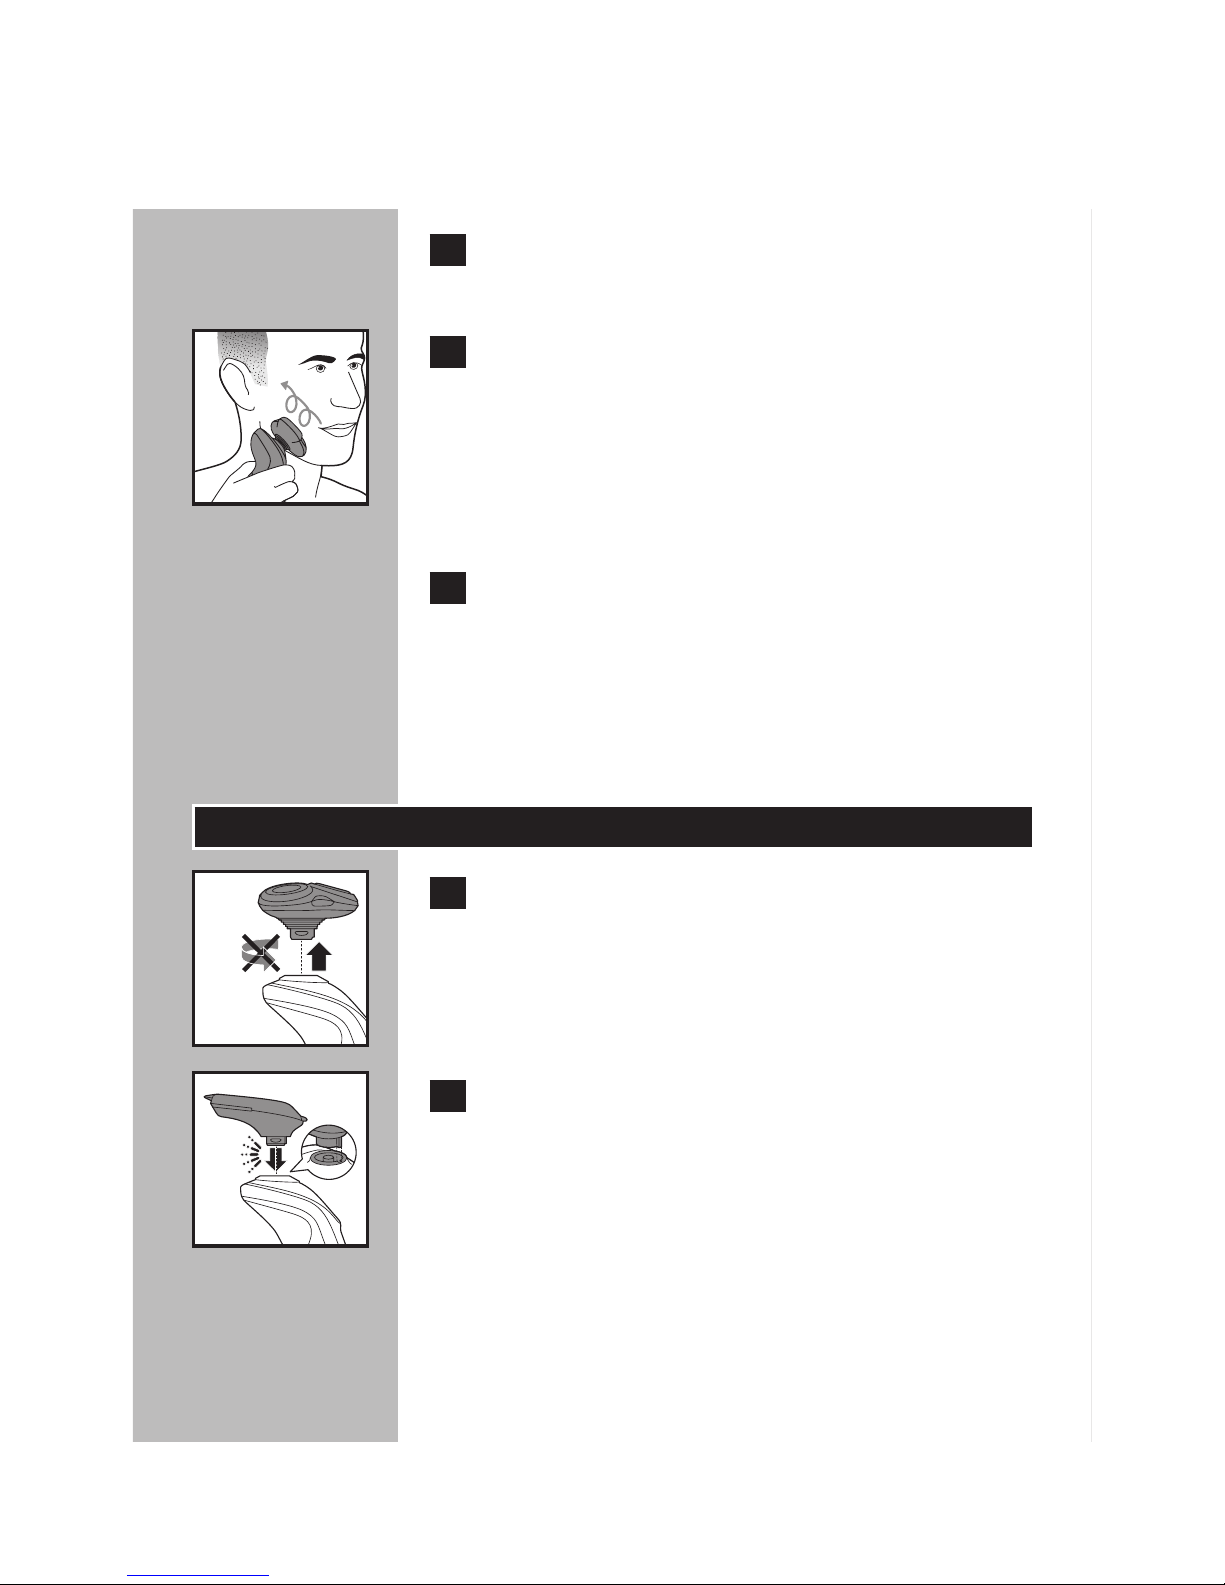
4 Press the on/off button once to switch on
the shaver.
C 5 Move the shaving heads in circular
movements over your skin.
NOTE: Rinse the shaver under the tap regularly
to ensure that it continues to glide smoothly over
your skin.
6 Dry your face and thoroughly clean
the shaver after each use (see chapter
‘Cleaning’).
NOTE: Make sure you rinse all foam or gel off the
shaver.
Using the SmartClick Styler
C
1 Pull the shaving unit straight off the shaver.
NOTE: Do not turn the shaving unit while you
pull it off the shaver.
C
2 Insert the raised notch of the SmartClick
styler into the slot in the top of the shaver.
Press the styler down to attach it to the
shaver. You will hear a ‘click’.
Page 17
17
ENGLISH
Styling with Comb Attachment
◗ Use the SmartClick styler with the comb
attached to trim your beard and moustache.
◗ To prevent trimming your beard and
moustache too short, make sure your hair is
dr y.
◗ Always comb beard and/or moustache with a
fine comb before using the styler.
◗ The hair length settings on the styler
correspond to the remaining hair length after
trimming. There are 5 settings from 3/64 in. –
3/16 in. (1-5mm).
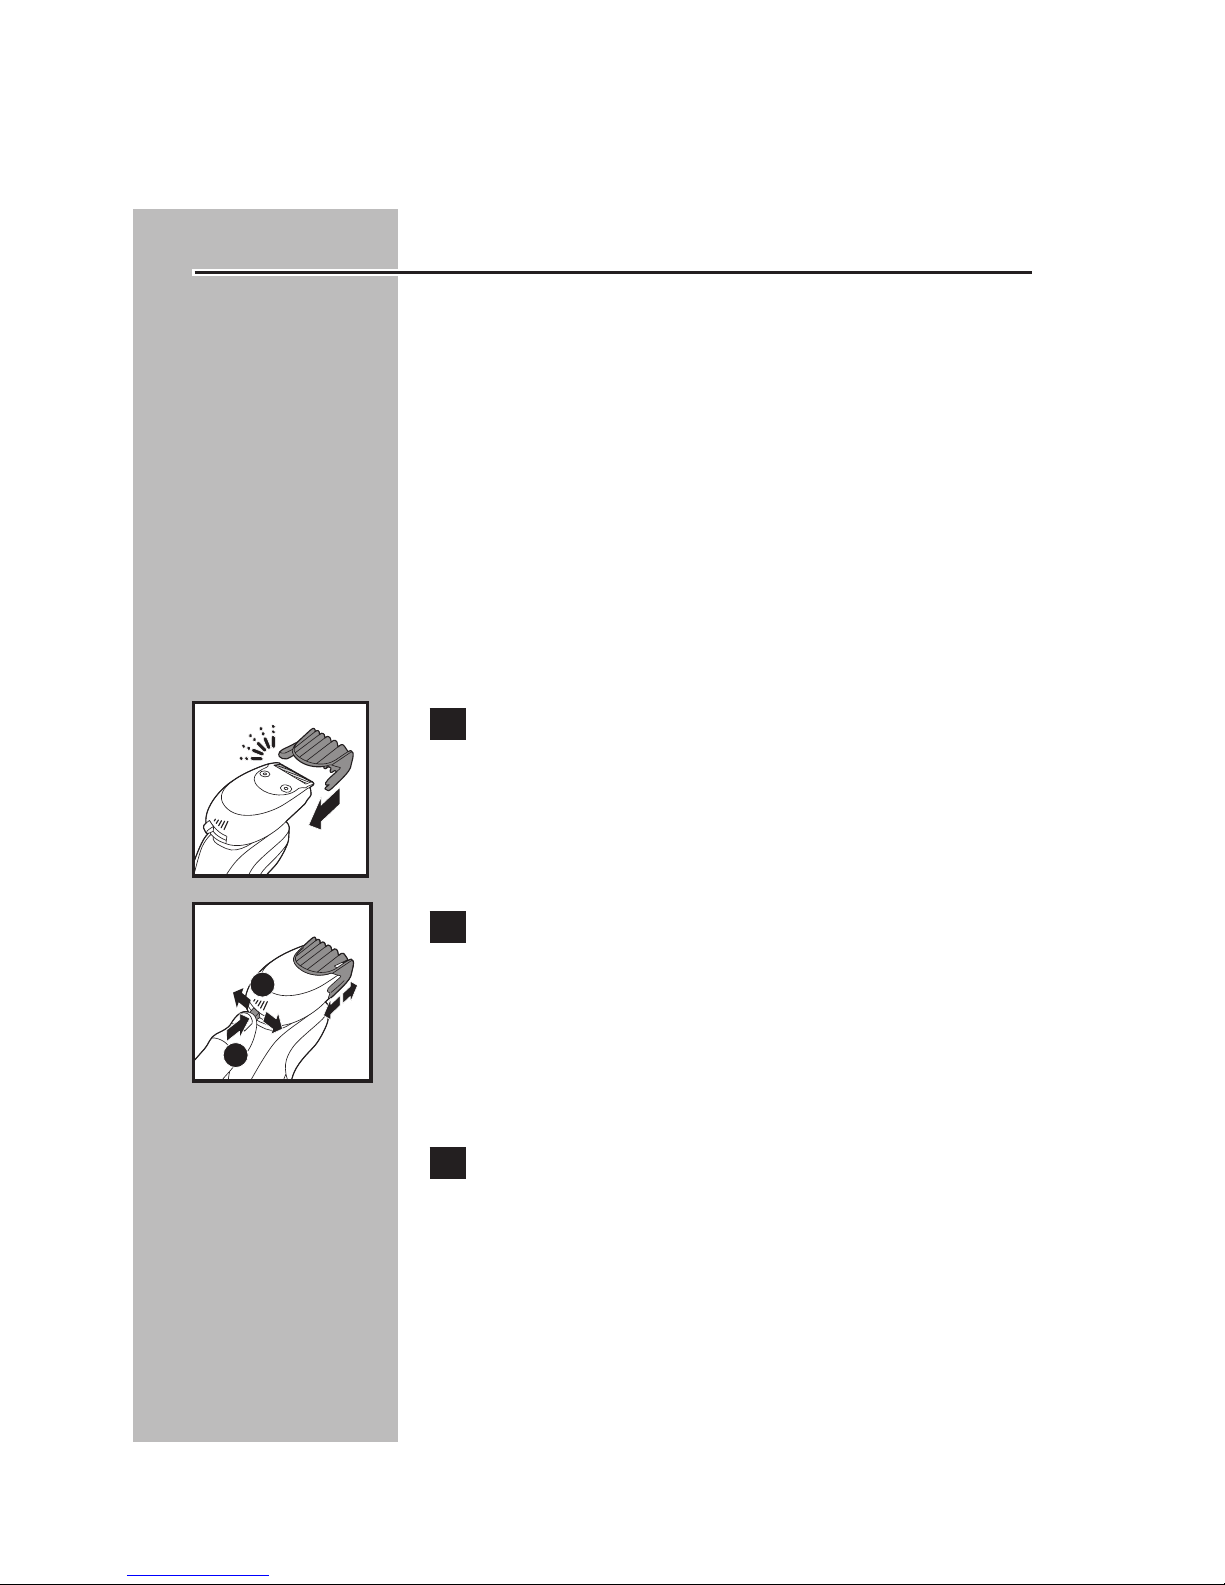
C 1 Slide the comb straight into the guiding
grooves on both sides of the SmartClick
styler. You will hear a ‘click’.
C 2 Press the length selector and push to the
left or right to select the desired hair
length setting.
To prevent accidentally trimming hairs too short,
start with the maximum setting of 3/16 in.
(5mm).
3 Turn shaver ON.
The shaver display shows the remaining battery
capacity.
2
1
Page 18
ENGLISH
C 4 Move the styler upward with gentle
pressure making sure the front of the
comb is in full contact with the skin.
NOTE: If cut hairs accumulate in the comb, turn
the shaver off, remove comb and blow and/or
shake hair out of the comb.
Styling without Comb Attachment
◗ Use the SmartClick styler without the comb
to contour your beard, moustache, sideburns
or neckline.
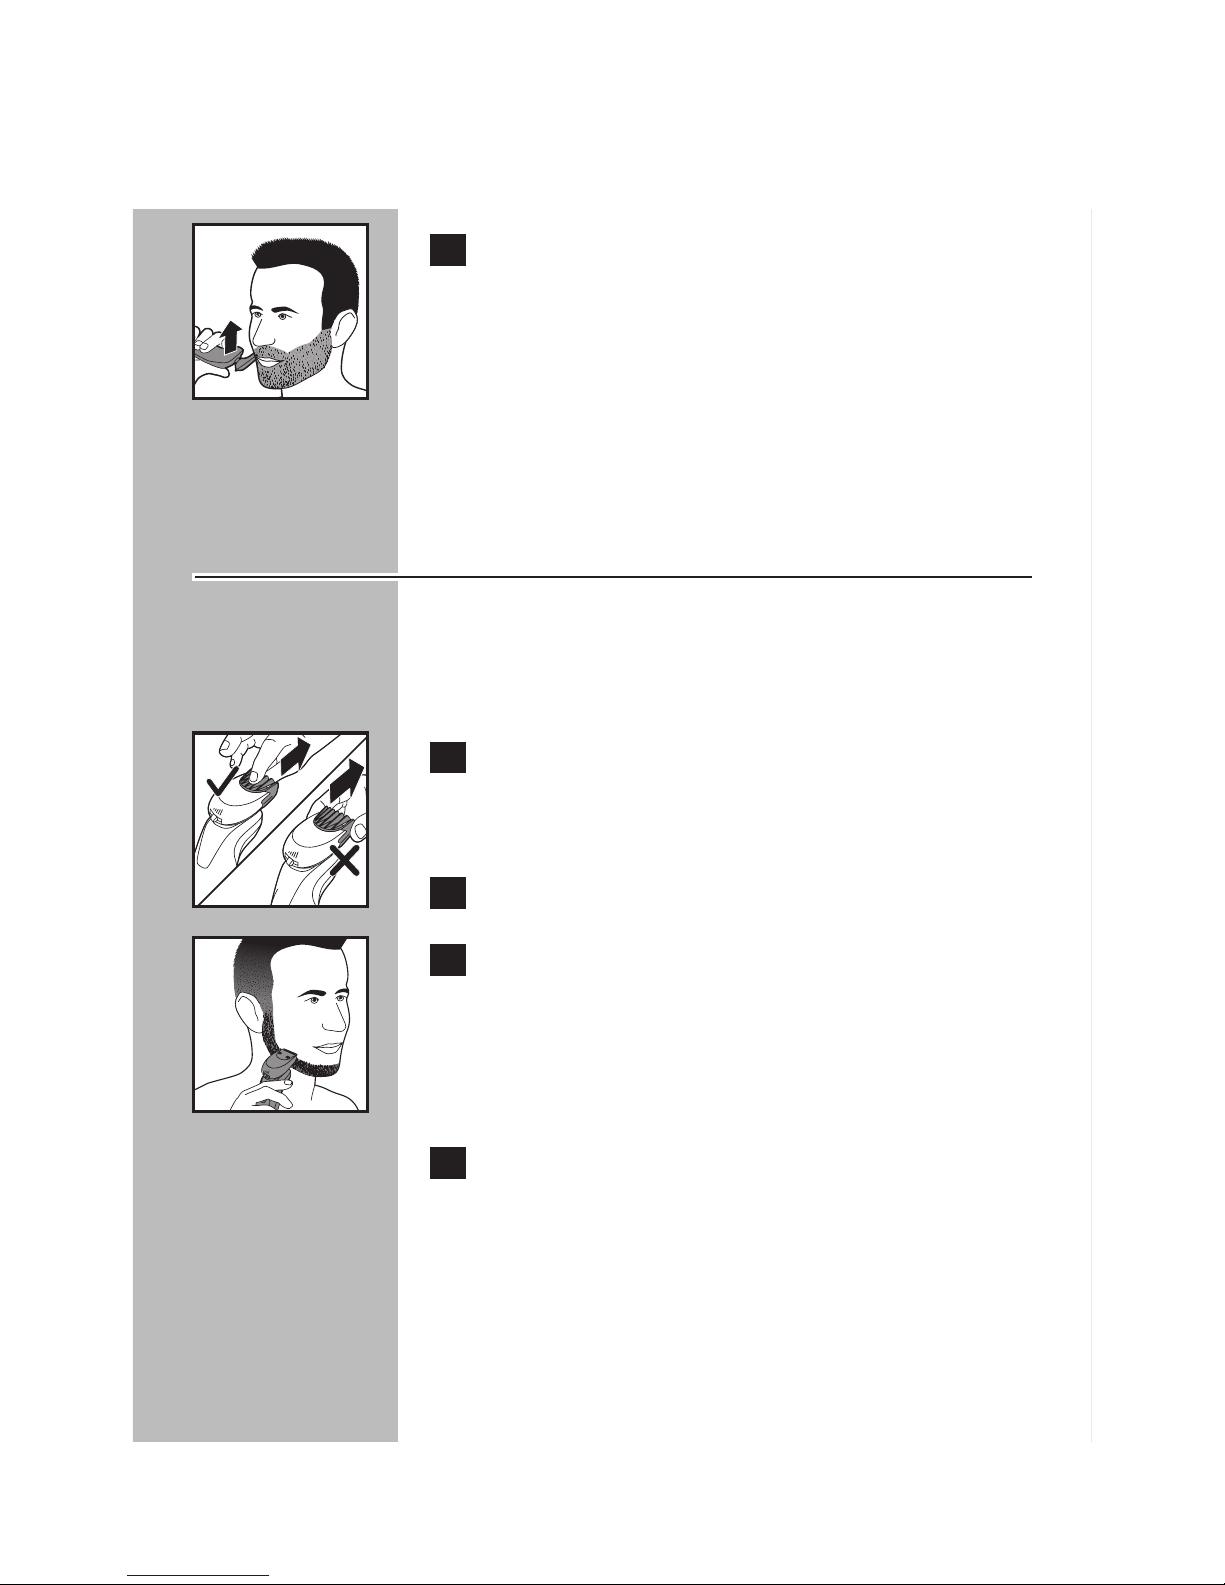
C 1 Pull the comb off the SmartClick styler.
Make sure to grab the comb in the center. Do not
pull at the sides of the comb.
2 Turn shaver ON.
C 3 Contour your beard, moustache,
sideburns or neckline by moving the styler
downward with gentle pressure.
Be careful, the styler cuts hairs very close to the
skin, at a length of 1/32 in (0.5 mm).
4 Turn shaver OFF when finished.
The shaver display shows the remaining battery
capacity.
18
Page 19
ENGLISH
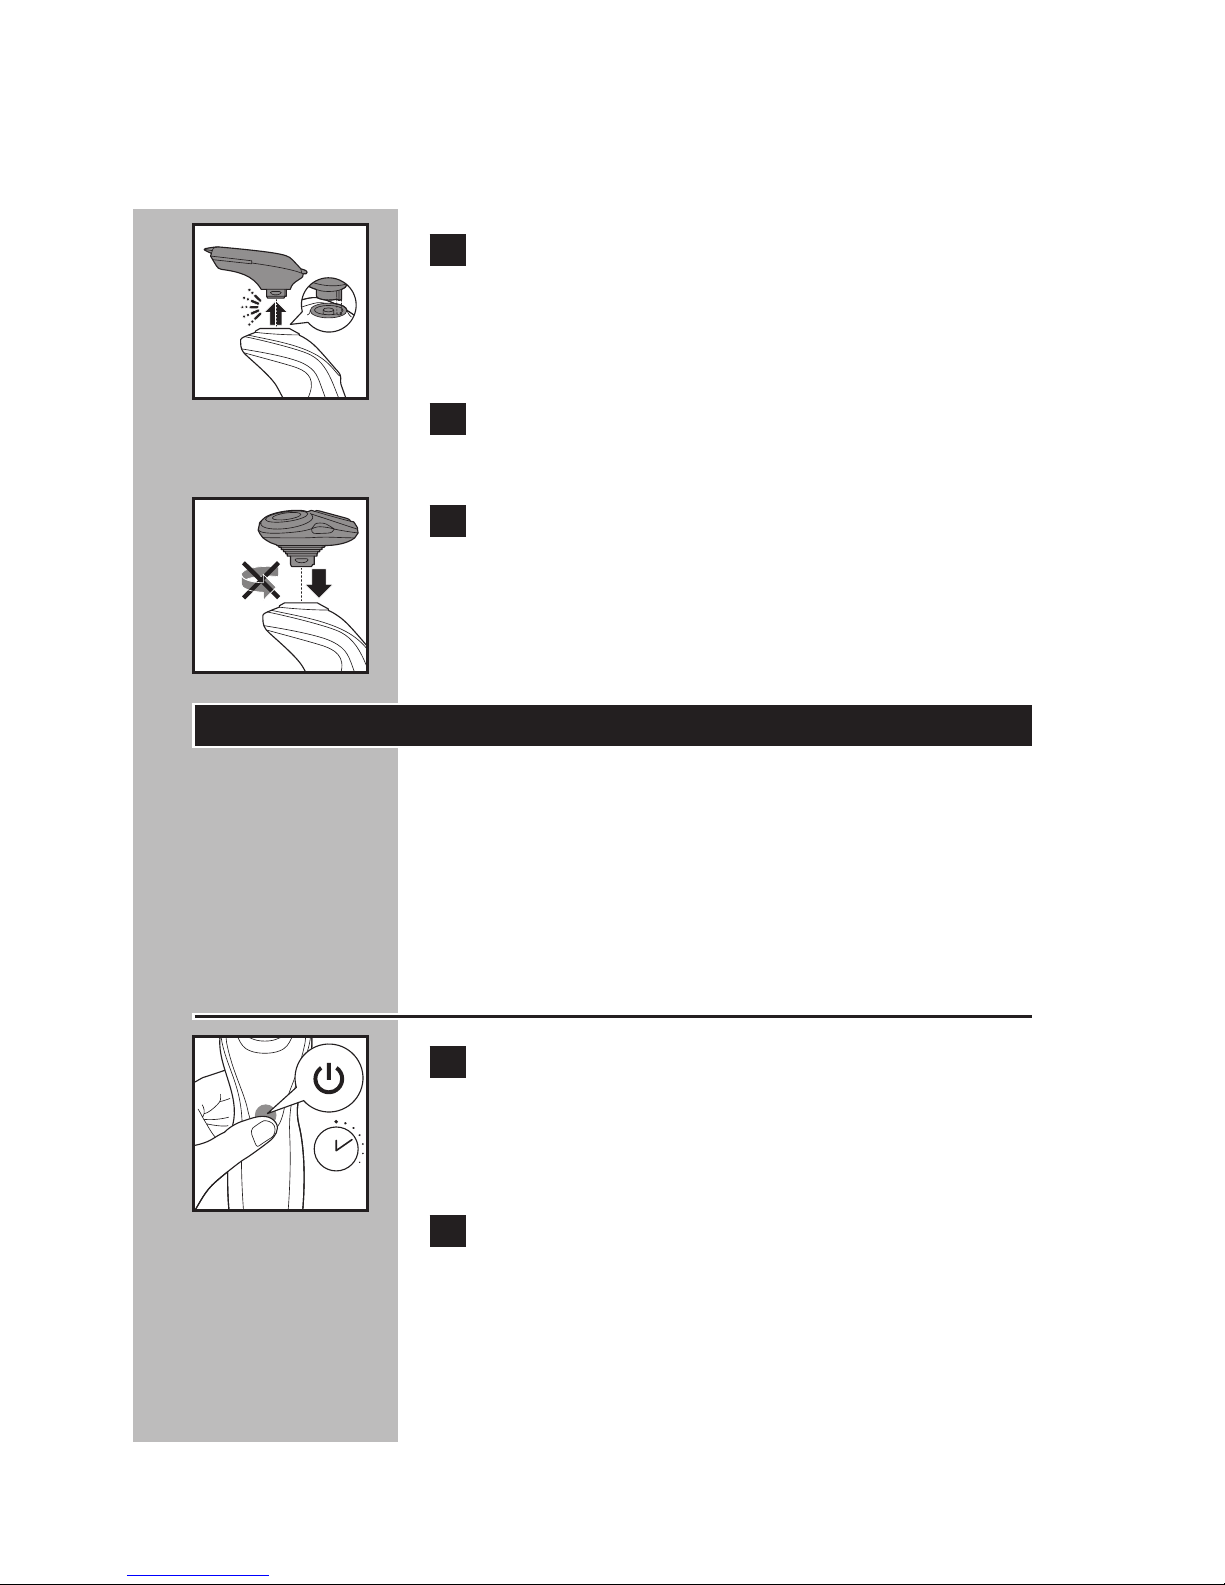
C 5 Pull the SmartClick styler straight off the
shaver.
NOTE: Do not turn or twist the styler while you
pull it off the shaver.
6 Thoroughly clean the styler and comb (see
‘Cleaning’).
C 7 Insert the raised notch of the shaving unit
into the slot in the top of the shaver. Press
the shaving unit down to attach it to the
shaver. You will hear a ‘click’.
Travel Lock
If you are going to store the shaver for a longer
time period or if traveling, it is possible to lock the
shaver. The travel lock prevents the shaver from
being switched on by accident.
Activating the travel lock
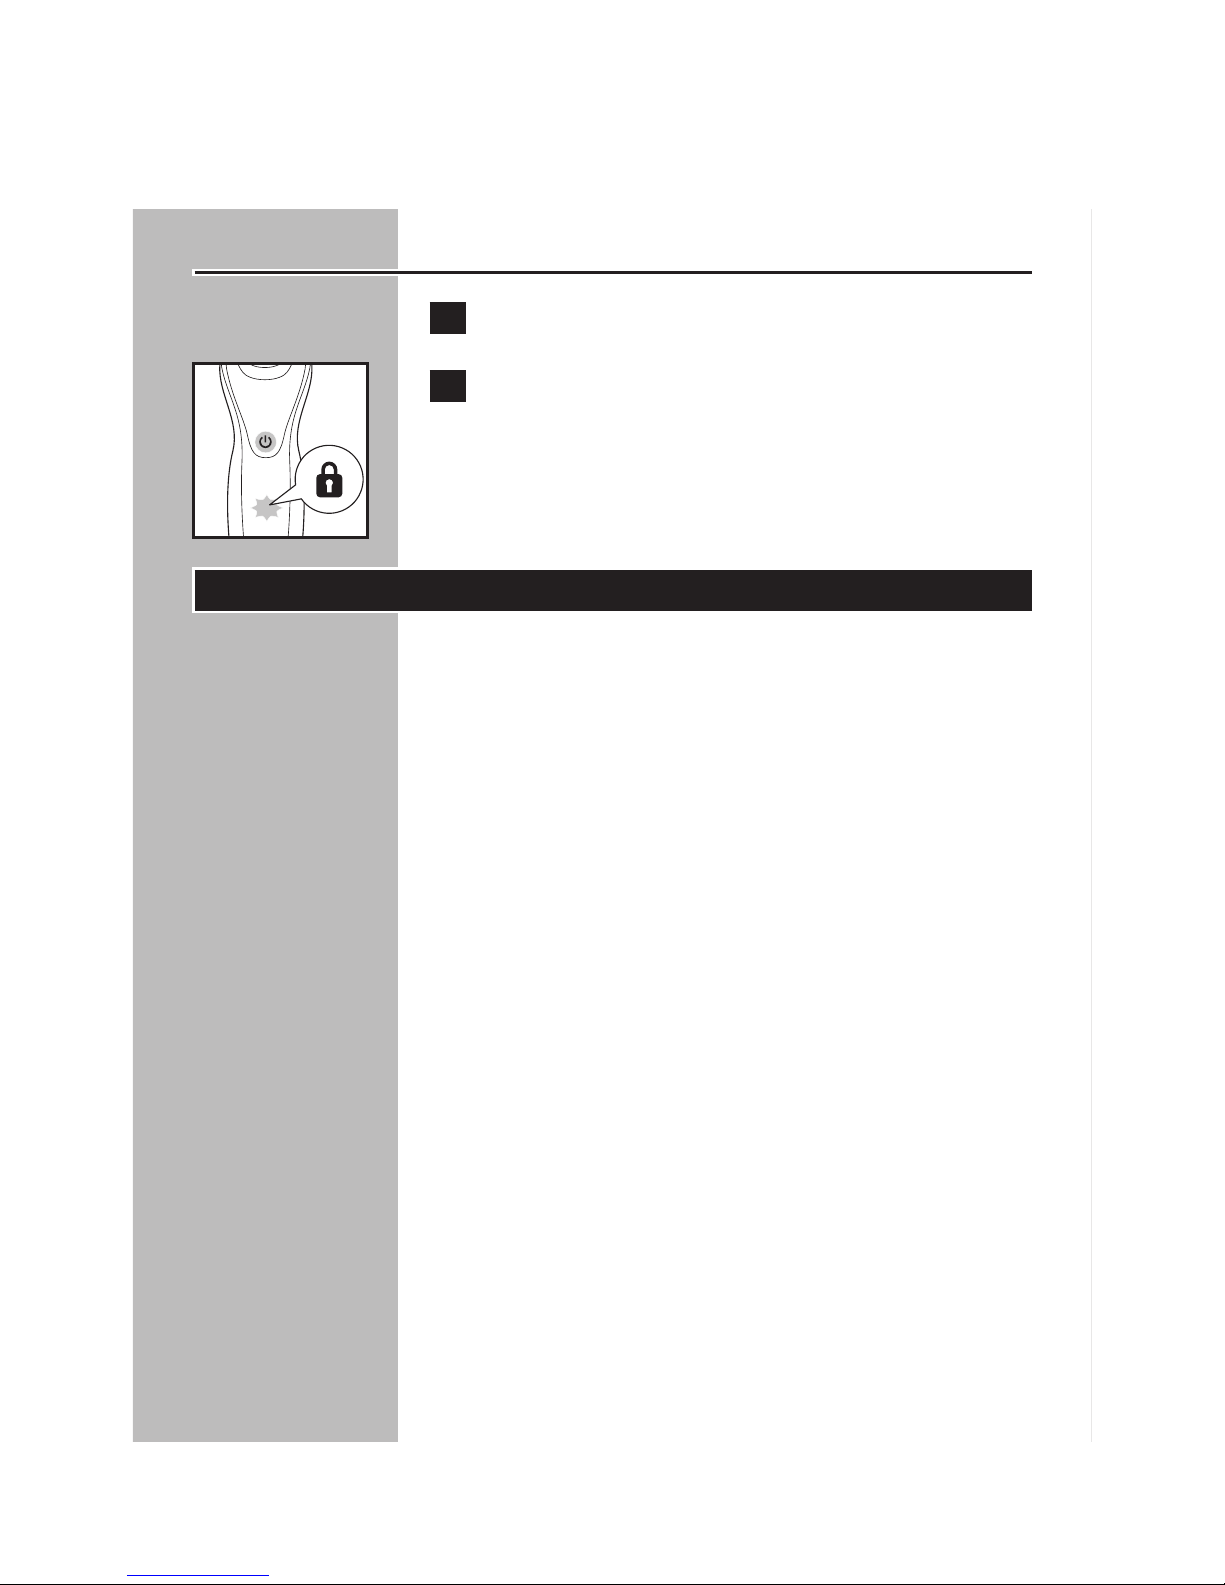
C
1 Press the ON/OFF button for 3 seconds.
◗ The travel lock symbol lights up white
continuously and the lock symbol blinks.
2 The travel lock has now been activated.
19
3 sec.
Page 20
ENGLISH
Deactivating the travel lock
1 Press the ON/OFF button for 3 seconds.
C 2 The lock symbol blinks and then lights up
continuously. The shaver is now ready for
use.
Cleaning
◗ Always clean your shaver after each use.
◗ Regular cleaning guarantees better shaving
results.
◗ Never clean, remove or replace shaving unit
while motor is on.
◗ Do not apply pressure to shaving head combs.
Do not touch shaving heads with hard objects
as this may dent or damage precision-made
slotted combs.
◗ Do not use shaver if shaving head combs are
damaged or broken. Facial injury may occur.
◗ Do not use abrasives, scourers or aggressive
liquids such as gasoline or acetone to clean
the shaver.
◗ Never dry the shaving unit with a towel or
tissue as this may damage the shaving heads.
20
Page 21
ENGLISH
Cleaning the Shaving Unit
The shaving heads may be quickly cleaned after
each use by rinsing with hot water. Water from
the tap should be on a hot setting, BUT BE
CAREFUL TO TEST WATER FIRST SO AS NOT
TO BURN OR SCALD HANDS.
◗ Regular cleaning guarantees better shaving
results.
◗ While rinsing shaving heads, water may drip
out of the base of shaver. This is a normal
occurrence.
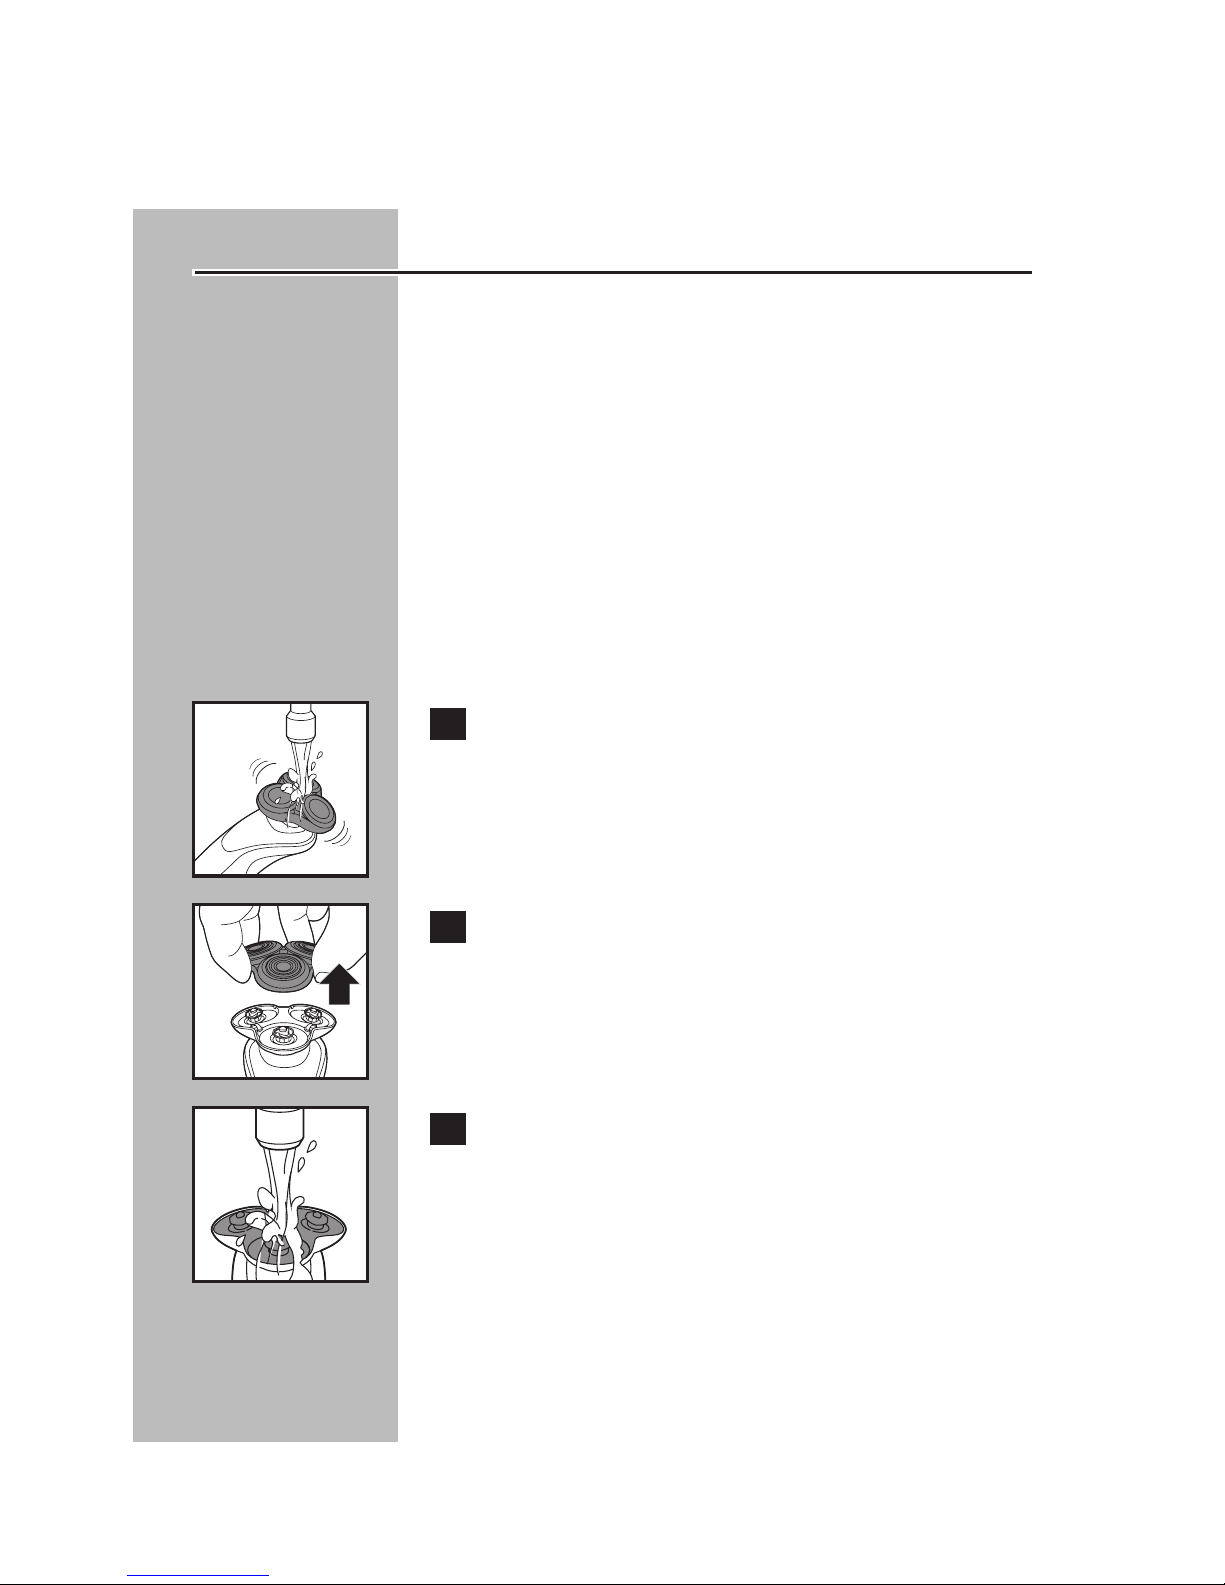
C 1 For best results rinse the shaving unit by
running under hot water for a few minutes.
C
2 Pull the top portion of the shaving unit
straight off the shaver.
C
3 Rinse the hair chamber under the tap.
21
Page 22
ENGLISH
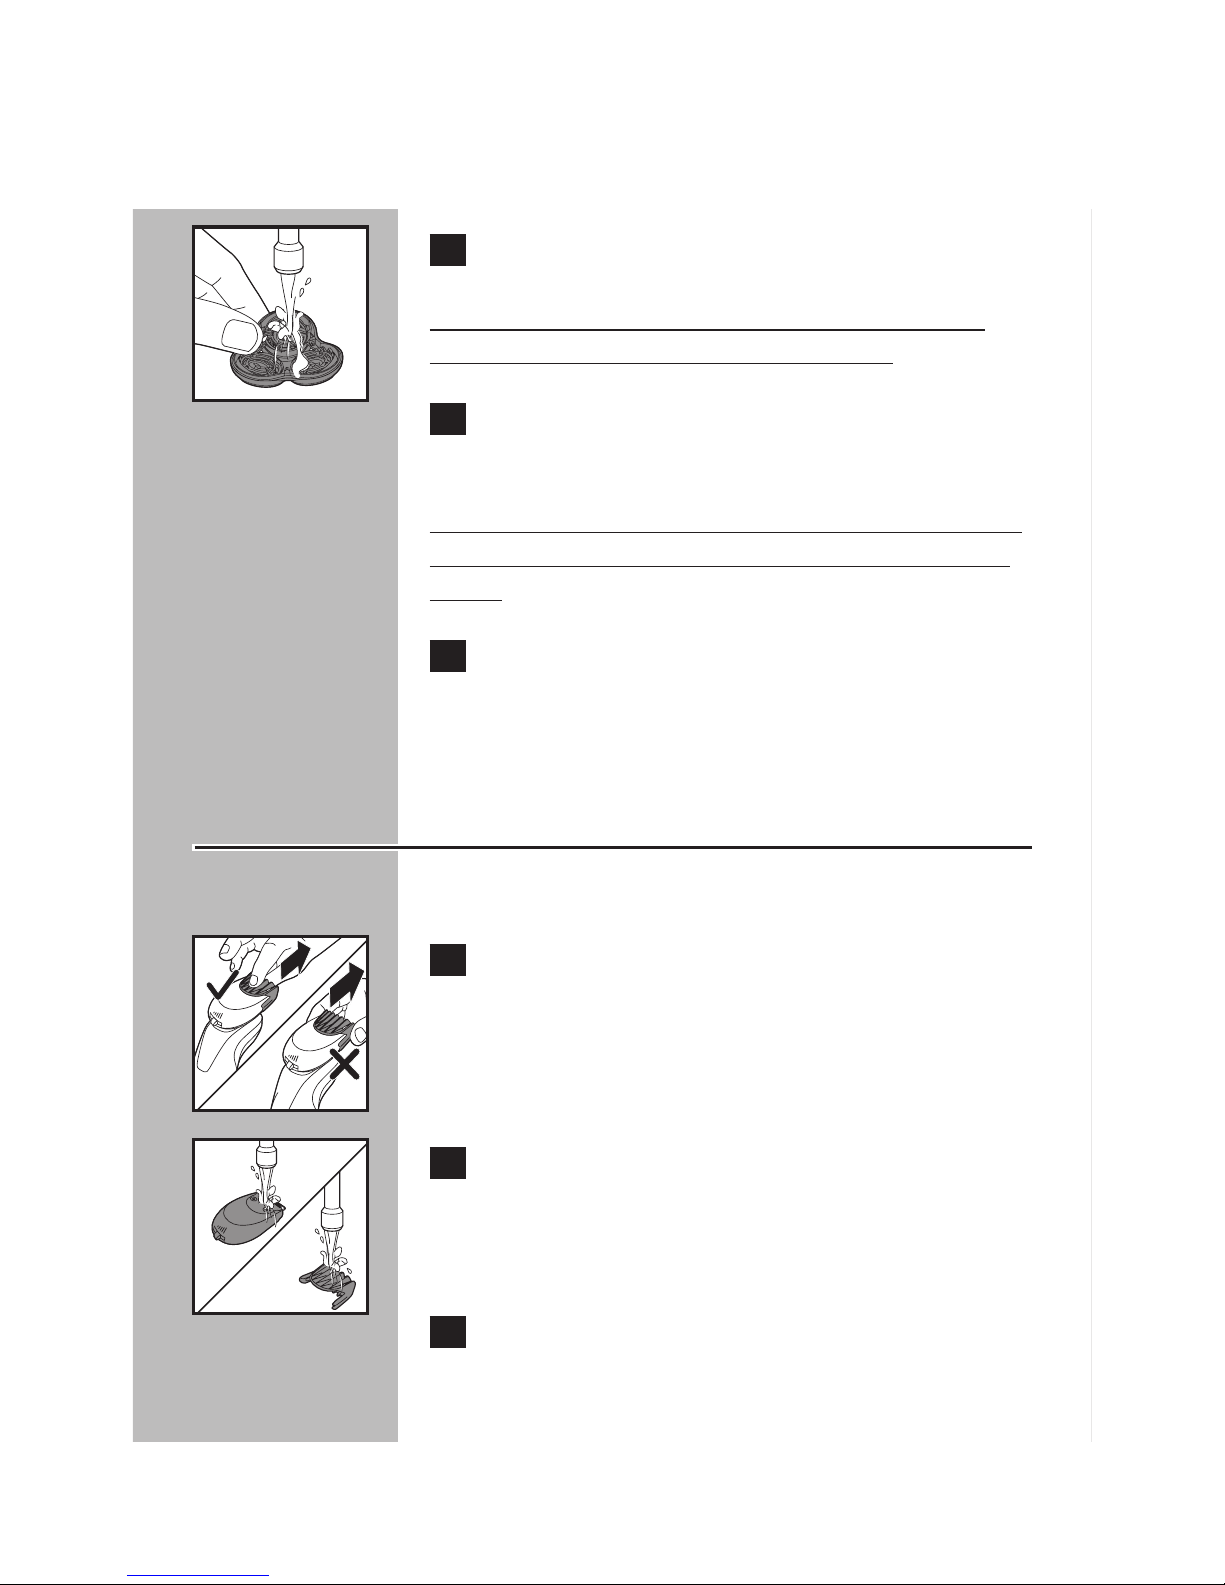
C
4 Rinse the shaving unit under hot tap water.
BE CAREFUL TO TEST WATER FIRST SO AS
NOT TO BURN OR SCALD HANDS.
5 Carefully shake off excess water and let
the shaving unit air dry completely.
NOTE: Do not wipe or dry the shaving unit with
a towel or tissue. This could damage the shaving
heads.
6 Press the top portion of the shaving unit
down to attach it to the shaver head
holder. You will hear a ‘click’.
Cleaning the Beard Styler
Clean the beard styler after each use.
C 1 Pull the comb off the beard styler.
Make sure to grab the comb in the center. Do not
pull at the sides of the comb.
C 2 Rinse the beard styler and comb under
hot water. BUT BE CAREFUL TO TEST
WATER FIRST SO AS NOT TO BURN OR
SCALD HANDS.
3 Shake off excess water and allow beard
styler and comb to air dry thoroughly.
22
Page 23
ENGLISH
Tip: For optimal performance, lubricate the beard
styler teeth with one drop of mineral
oil every 6 months.
Replacing the Shaving Heads
◗ Replace the shaving heads once a year for
optimal shaving results.
◗ Replace damaged or worn shaving heads with
model SH90 Philips Norelco shaving heads
only.
Replacement Shaving Heads
Indication
C ◗ The shaving heads symbol lights up
continuously when the shaver is turned off to
remind you to replace your shaving heads to
obtain optimal shaving results.
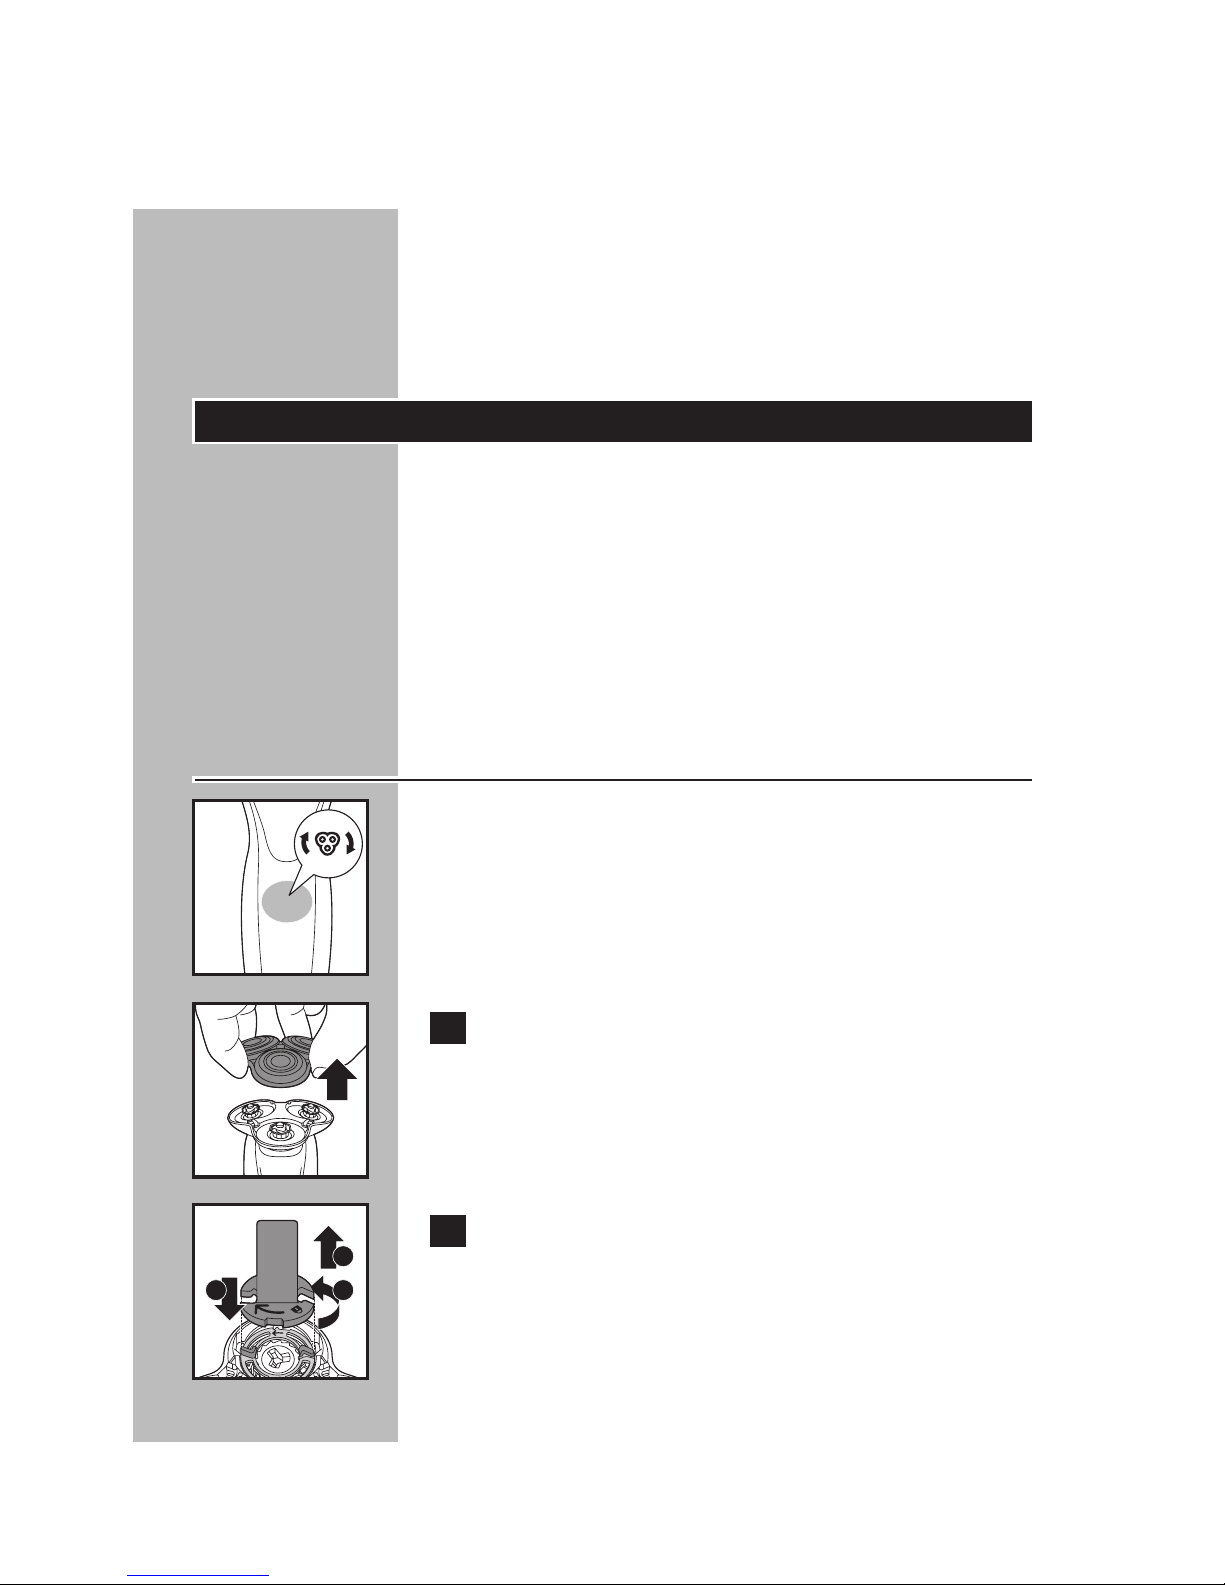
C 1 Pull the top portion of the shaving unit
straight off the shaver.
C 2 Place the retaining ring holder on the
retaining ring (1), turn counterclockwise
(2) and lift it off the shaving head (3).
23
1 2
3
Page 24
ENGLISH
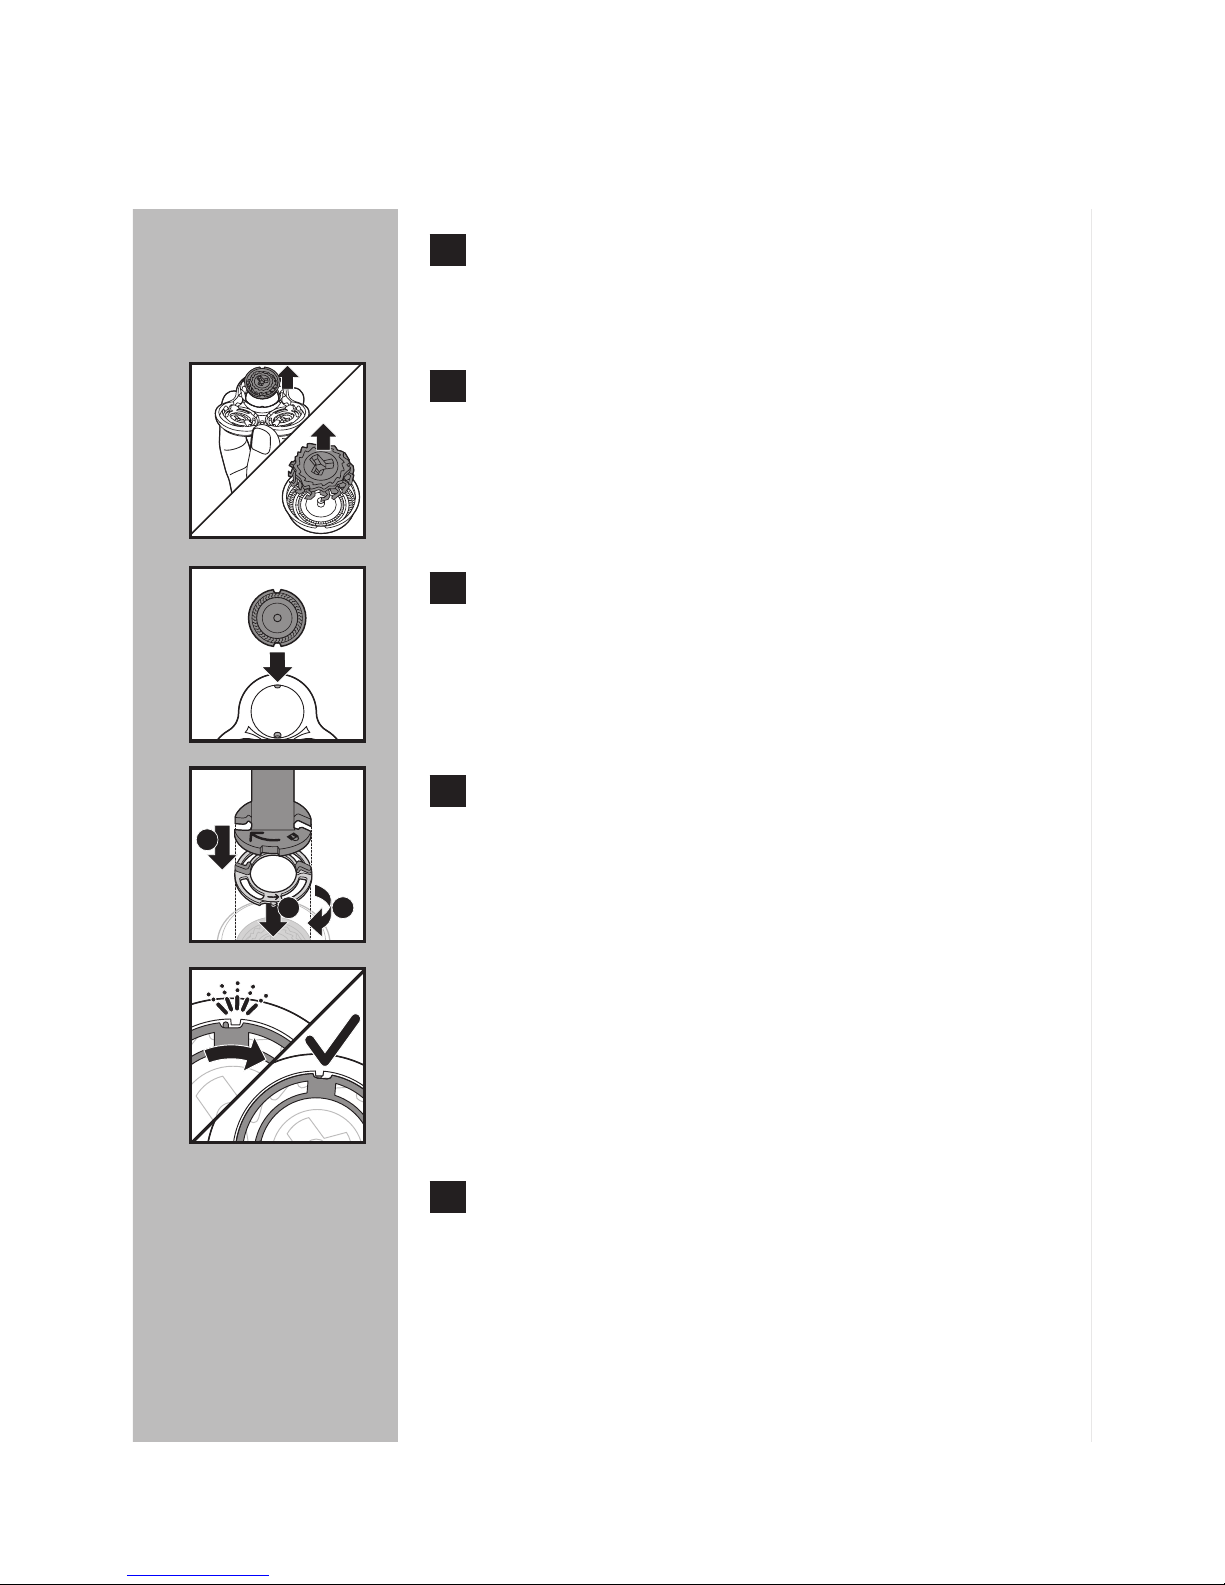
3 Remove the retaining ring from the
retaining ring holder and repeat the
process for the other retaining rings.
C 4 Remove the shaving heads from the
shaving head holder and discard.
DO NOT discard the retaining ring.
C 5 Place new shaving heads in the holder.
Make sure the notches on both sides of the
shaving heads fit exactly onto the projections in
the shaving head holder.
C 6 Place the retaining ring holder on the
retaining ring (1), place it on the shaving
head (2) and turn clockwise (3) to reattach
the retaining ring.
C NOTE: Each retaining ring has two recesses that
fit exactly into the projections of the shaving
head holder. Turn the ring clockwise until you
hear a click to indicate the ring is fixed into
place.
7 Repeat this process for the other retaining
rings.
24
1
3
2
Page 25
ENGLISH
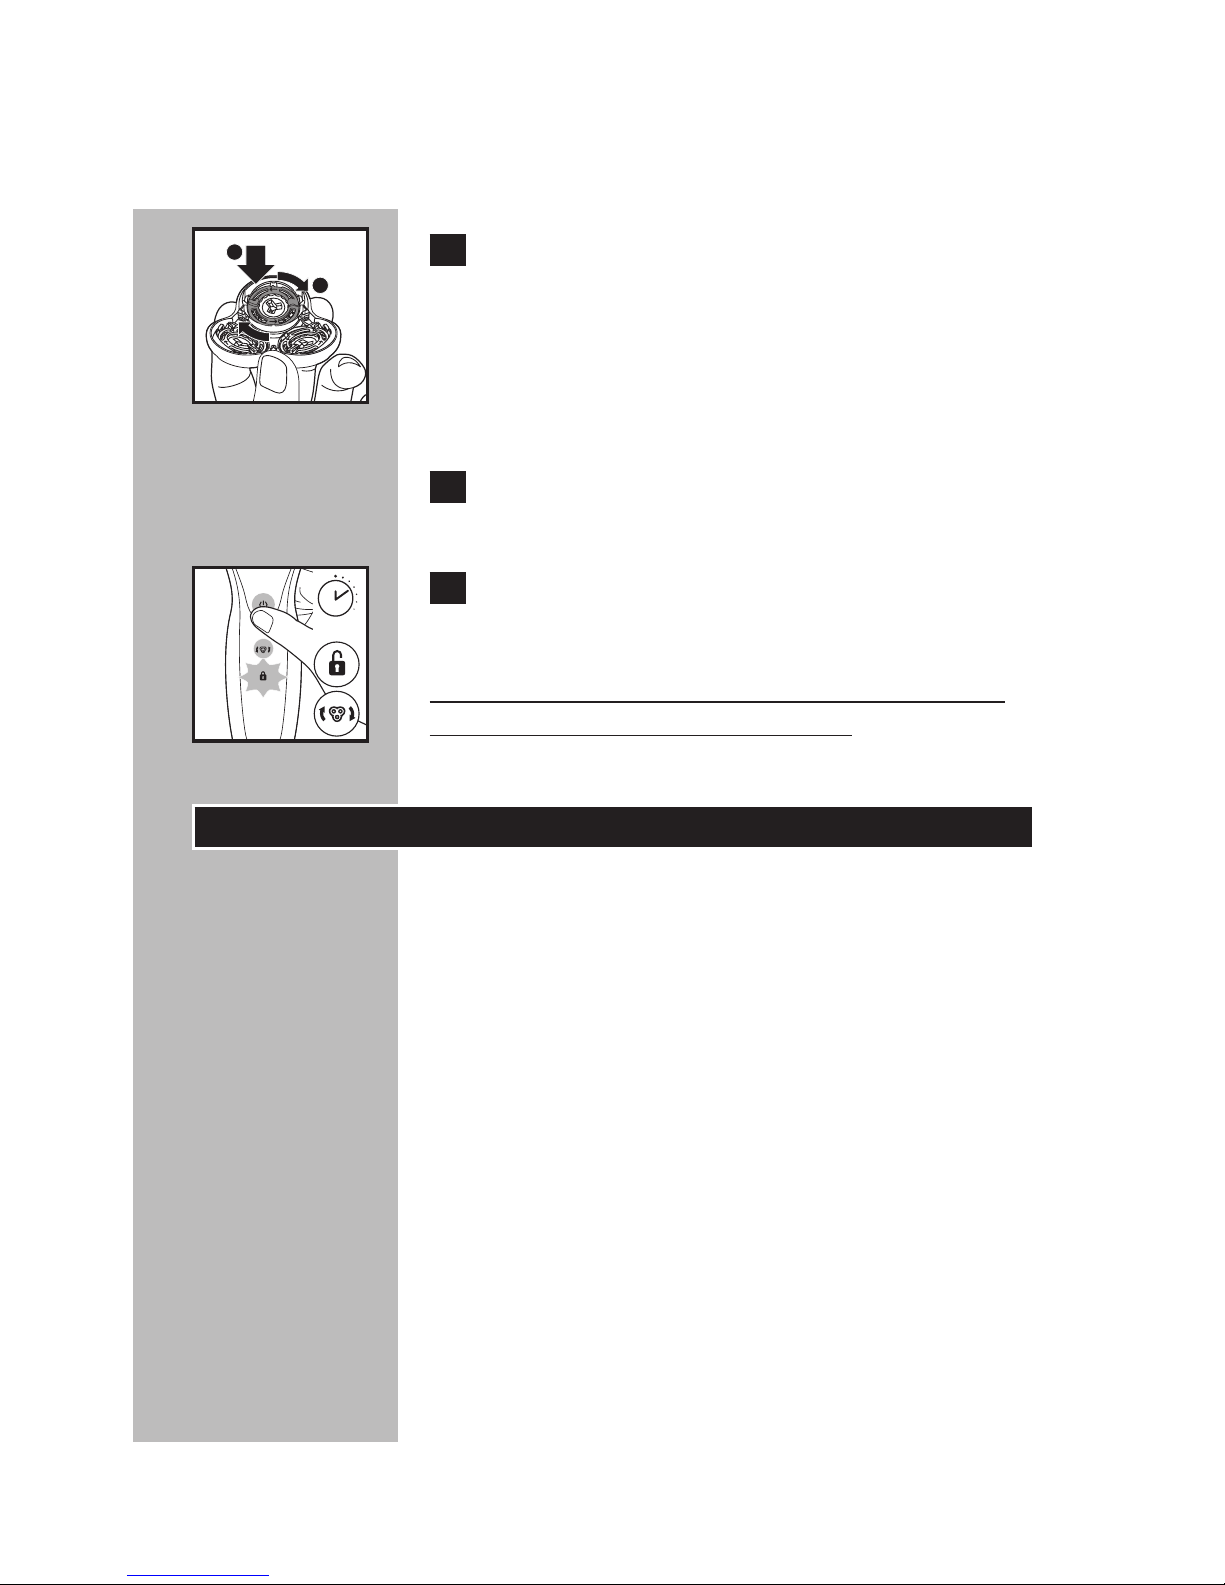
C 8 Hold the shaving head holder in your hand
and place the retaining ring on the shaving
head holder (1). Turn clockwise (2) to
reattach the retaining ring.
Do not place the shaving head holder on a
surface, as damage may occur.
9 Attach the shaving head holder to the
bottom part of the shaving unit (click).
C 10 To reset the shaver, press and hold the On/
Off button for approximately 7 seconds.
This shaver has no other user-serviceable parts.
For assistance, call 1-800-243-3050.
Storage
◗ The shaver can be placed in the travel case for
safe storage.
◗ Be sure shaver is turned off. Remove cord
from outlet before storing in a safe, dry
location where it will not be crushed, banged,
or subject to damage.
◗ Do not wrap power cord around shaver when
storing.
◗ Store cord in a safe location where it will not
be cut or damaged.
◗ Do not place or store shaver where it can fall
or be pulled into a tub or sink, water or other
liquid while plugged in.
25
7 sec.
1
2
Page 26

ENGLISH
Assistance
◗ For assistance, visit our website:
www.philips.com/support or
call toll free 1-800-243-3050
◗ Online information is available 24 hours a day,
7 days a week.
26
Page 27
ENGLISH
Disposal
C
◗ This Philips Norelco shaver contains a
rechargeable lithium-ion battery
which must be disposed of properly.
◗ Contact your local town or city officials
for battery disposal information or call
1-800-822-8837 or visit www.call2recycle.org
for battery drop-off locations.
◗ Your product is designed and manufactured
with high quality materials and components,
which can be recycled and reused. For
recycling information, please contact your
local waste management facilities or visit
www.recycle.philips.com.
◗ For assistance, visit our website,
www.philips.com/support or call toll free:
1-800-243-3050.
27
Page 28
28
Accessories
C
◗ Replacement Shaving Heads
Model SH90 - For maximum shaver
performance, replace your Philips Norelco
shaving heads once a year.
◗ SmartClick Cleansing Brush
Model RQ585 - Philips Norelco SmartClick
Cleansing Brush
◗ Philips Norelco Shaver Accessories may be
purchased at a store near you, or on our
website www.philips.com/store
ENGLISH
Page 29
FULL TWO YEAR WARRANTY
Philips Electronics North America Corporation warrants each new Philips Norelco Product,
Model S8950 (except cutters and combs) against defects in materials or workmanship for a
period of two years from the date of purchase, and agrees to repair or replace any defective
product without charge.
IMPORTANT: This warranty does not cover damage resulting from accident, misuse or abuse,
lack of reasonable care, the affixing of any attachment not provided with the product or loss of
parts or subjecting the product to any but the specified voltage.*
NO RESPONSIBILITY IS ASSUMED FOR ANY SPECIAL, INCIDENTAL OR
CONSEQUENTIAL DAMAGES.
In order to obtain warranty service, simply go to www.philips.com/norelco or call 1-800-2433050 for assistance. It is suggested that for your protection you return shipments of product
by insured mail, insurance prepaid. Damage occurring during shipment is not covered by this
warranty.
NOTE: No other warranty, written or oral, is authorized by Philips Electronics North America
Corporation.
This warranty gives you specific legal rights, and you may also have other rights which vary from
state to state. Some states do not allow the exclusion or limitation of incidental or consequential damages, so the above exclusion and limitations may not apply to you.
* Read enclosed instructions carefully.
Manufactured for:
Philips Consumer Lifestyle
A division of Philips Electronics North America Corporation
P.O.Box 10313, Stamford, CT 06904
This symbol on the product’s nameplate means it is
listed by Underwriters’ Laboratories, Inc.
Norelco, Tripleheader, Lift and Cut, and are registered trademarks of Philips Electronics
North America Corporation.
PHILIPS is a registered trademark of Koninklijke Philips N.V.
© 2016 Philips Electronics North America Corporation. All Rights Reserved.
29
ENGLISH
Page 30

ESPAÑOL
30
ESPAÑOL
30
INSTRUCCIONES
IMPORTANTES DE
SEGURIDAD
Cuando utilice un artefacto eléctrico, tome las precauciones
básicas.
Lea las instrucciones antes de utilizar este producto.
PELIGRO
Para reducir el riesgo de descarga eléctrica:
1. No intente sujetar una afeitadora enchufada que se haya
caído al agua. Desenchúfela inmediatamente.
2. El conector no deben sumergirse ni usarse en la ducha.
3. No utilice el artefacto con un cable de extensión.
4. Siempre desenchufe esta afeitadora del tomacorriente
inmediatamente después del uso, excepto cuando esté
recargando la afeitadora.
5. Desenchufe y retire el cable de alimentación de la afeitadora
antes de realizar la limpieza.
6. Las baterías que este dispositivo utiliza pueden generar
incendios o provocar quemaduras químicas si no se
manipulan correctamente. No las desarme y no las exponga
a temperaturas superiores a 100ºC (212ºF) ni las queme.
Page 31

ESPAÑOL
31
ESPAÑOL
31
ADVERTENCIA
Para reducir el riesgo de quemaduras, incendios, descargas
eléctricas y lesiones:
1. Es necesaria una estricta supervisión cuando la afeitadora sea
utilizada en niños o personas con discapacidad, en ellos o cerca
de ellos.
2. Utilice esta afeitadora para el uso doméstico al cual está
destinada según se describe en este manual. No use accesorios
no recomendados por Philips Electronics North America
Corporation.
3. Nunca use esta afeitadora si el cable o el conector de carga
están dañados, si no funciona correctamente, si se cayó o está
dañada o si se sumergió en agua mientras estaba conectada.
Para solicitar asistencia, comuníquese al 1-800-243-3050.
4. Mantenga la afeitadora, el cable y el enchufe de carga lejos de
superficies calientes.
5. No deje caer ni introduzca ningún objeto en las aberturas.
6. No utilice el adaptador en o cerca de una toma de corriente
électrica que contiene un ambientador para evitar daños en el
adaptador.
7. No cargue ni enchufe la afeitadora al aire libre ni la utilice en
lugares donde se usen aerosoles (sprays) o se administre
oxígeno.
8. No utilice esta afeitadora con un peine deteriorado o roto, ya
que podría ocasionar lesiones en la cara.
9. Siempre enchufe el conector a la afeitadora en primer lugar y
luego al tomacorriente. Asegúrese de que el enchufe esté
firmemente conectado a la base de carga, hasta la marca
indicada en éste. Para desconectar, retire el enchufe de carga
del tomacorriente.
10. Nunca exponga la afeitadora a la luz solar directa ni los guarde
en lugares con temperaturas superiores a los 60ºC (140ºF).
11. Mantenga el cable secos en todo momento. No los maneje con
manos mojadas.
12. Para evitar daños en el cable de alimentación, no lo enrolle
alrededor de la afeitadora.
Page 32

ESPAÑOL
32
GARANTÍA DE DEVOLUCIÓN DEL IMPORTE
DE 45 DÍAS
Use su nueva afeitadora Philips Norelco para hombres como método exclusivo
de afeitado durante tres semanas para disfrutar de un afeitado cómodo y al ras.
Esto permite que su pelo y su piel se acostumbren al sistema de afeitado Philips
Norelco. Si después de este período de prueba no está satisfecho con los resultados de su afeitadora Philips Norelco, puede devolver el producto con el recibo
de compra que contenga la fecha de adquisición y le reembolsaremos el precio de
compra íntegramente. La afeitadora se debe enviar prepagada por medio
de correo certificado con el recibo de compra original que indique la
fecha de compra, el importe abonado y el formulario de autorización
de reembolso garantizado del dinero. No nos responsabilizamos por la
pérdida de la correspondencia. La fecha de envío debe estar dentro de los 45
días posteriores a la compra. Philips Norelco se reserva el derecho de verificar el
precio de compra de la afeitadora y limitar el reembolso al precio de venta al por
menor sugerido.
Para obtener un formulario de autorización de reembolso garantizado
del dinero, llame al número 1-800-243-3050 para obtener asistencia. La
entrega del cheche de reembolso sucederá de 6 a 8 semanas DESPUÉS
de recibir el producto devuelto.
13. No intente abrir el artefacto para cambiar la batería.
14. Utilice únicamente el conector de alimentación suministrados
con la afeitadora.
CONSERVE ESTAS
INSTRUCCIONES
IMPORTANTE: el conector de alimentación contiene un
transformador. Para evitar situaciones de riesgo, no lo sustituya por
otro.
Page 33

ESPAÑOL
33
Tabla de contenido Tabla de contenido
Características ........................................ 34-35
Pantalla LED ............................................36-37
Antes del primer uso .................................. 38
Carga ......................................................... 38-39
Recarga ........................................................... 39
Carga rápida .................................................. 40
Prueba y consejos de afeitado .................. 40
Cómo usar una afeitadora
eléctrica ....................................................41-42
Uso del moldeador SmartClick .........43-45
Sistema de Bloqueo ............................... 45-46
Limpieza ....................................................46-49
Reemplazo de los cabezales
de afeitado ...............................................50-52
Almacenamiento ..........................................53
Asistencia ....................................................... 53
Eliminación .....................................................54
Accesorios ..................................................... 55
Garantía ............................... Cubierta trasera
Page 34
ESPAÑOL
34
Características
Tecnología de detección de contornos
Unidad de afeitado
• Cámara de
recolección
de vello recoge
el pelo afeitado
Functionamiento
del sistema Super
Lift & Cut
Electrónico
Botón de
encendido/apagado
Limpieza Indicador
Reemplazo
Cabezales de
afeitado Indicador
Sistema de bloqueo
'Desenchufar para
utilizar' Indicador
Pantalla de
la batería
• Carga de batería,
Indicadores
Cargado y Bajo
Page 35
ESPAÑOL
35
Modelador de Barba
SmartClick
Voltaje universal
automático entre
100 y 240 V CA
Funda de viaje
Soporte de anillo de
retención
Se recarga en 1 hora. La
carga completa proporciona
hasta 50 minutos de tiempo
de afeitado sin cable
Carga rápida -
Para un afeitado
Sin cables -
Para afeitarse sin cables
Garantía total por 2 años
Garantía de devolución del
importe de 45 días
Page 36
ESPAÑOL
36
Pantalla LED
◗ La pantalla proporciona la siguiente
información:
◗ Indicador de carga
C
-Carga rápida: cuando la afeitadora no contiene
suficiente energía para un afeitado, la luz de
carga parpadeará rápidamente.
- Si la afeitadora contiene suficiente energía para
un afeitado, la luz de carga parpadeará
lentamente.
◗ Indicador de carga completa
C
- Cuando la batería se haya cargado
completamente, la luz de carga permanecerán
encendidas. Después de unos 30 minutos, la
pantalla se volverá a apagar automáticamente.
-Si se pulsa el botón de encendido/apagado
durante o después de la carga, el símbolo
"desenchufar para utilizar" parpadeará para
indicar que la afeitadora aún está conectada
a la toma de corriente.
◗ Indicador de batería baja
C
- Cuando la batería está por agotarse (solo
quedan 5 minutos de afeitado o menos), la luz
de carga parpadea en color naranja.
Page 37
ESPAÑOL
37
C
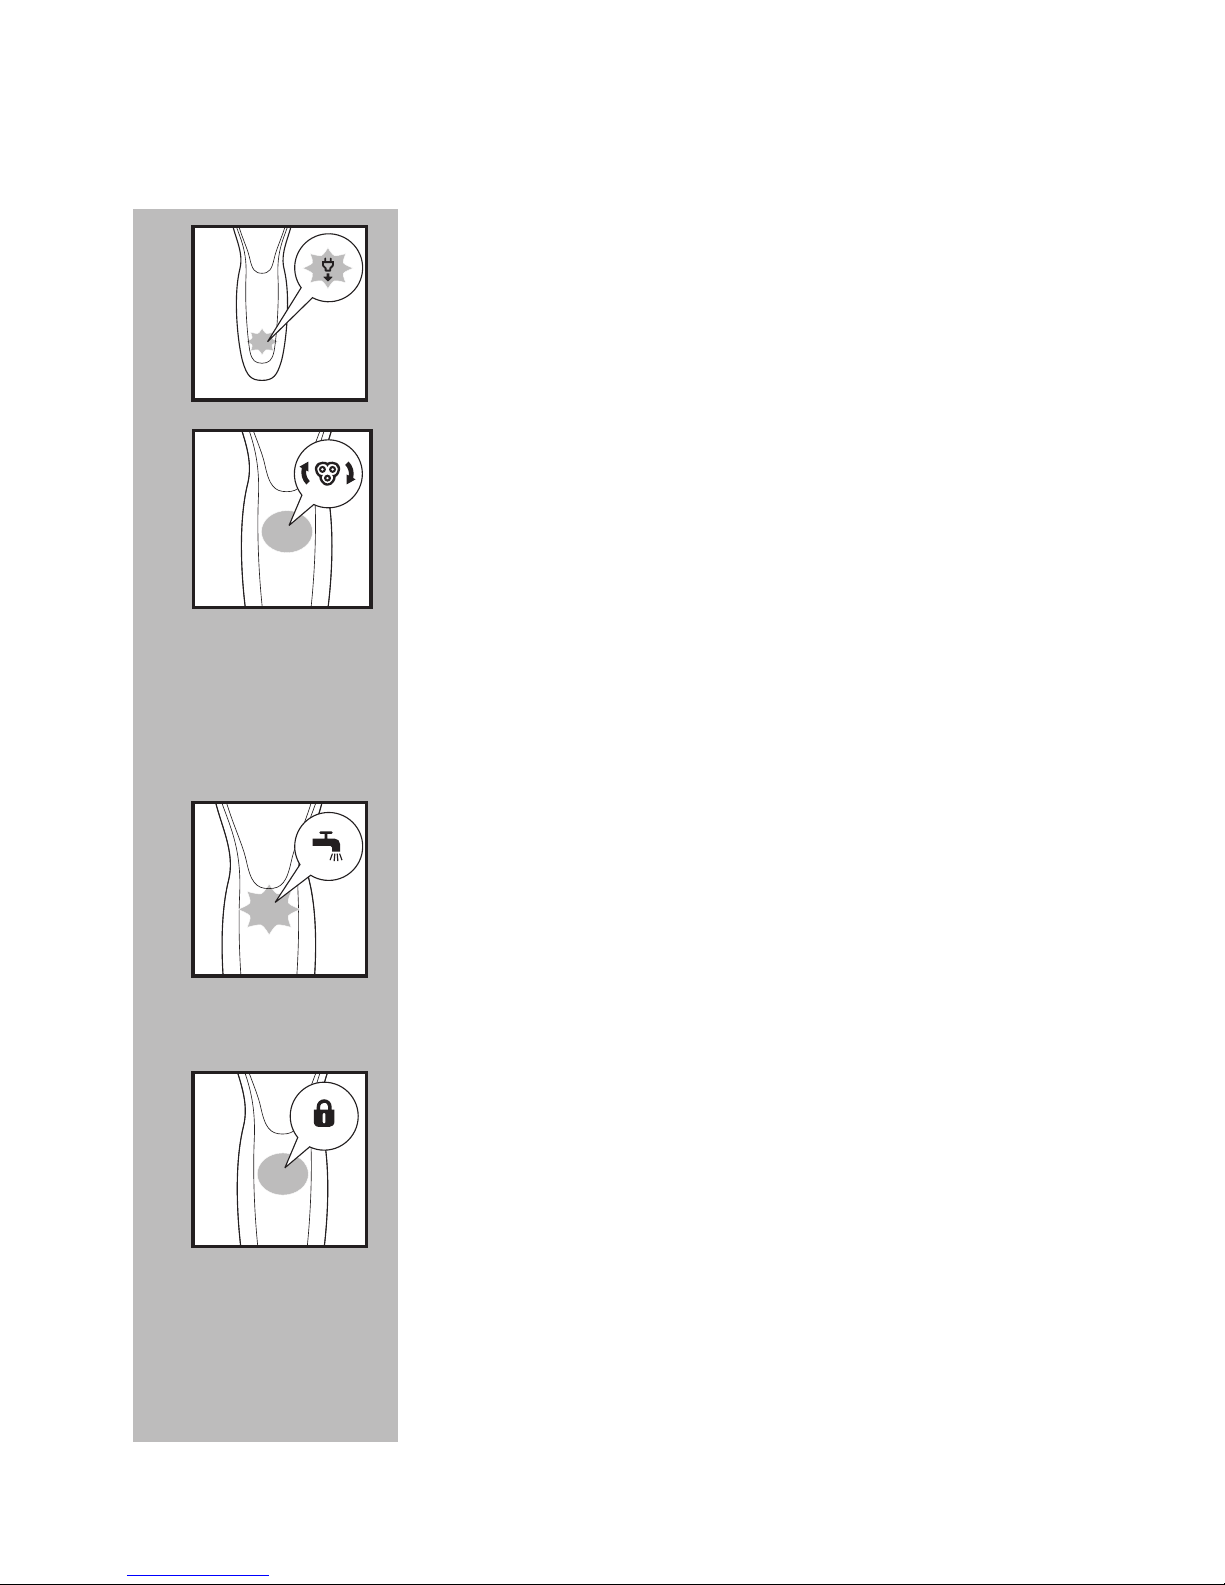
◗ Indicador "Desenchufar para utilizar"
El símbolo "desenchufar para utilizar" parpadeará
para recordarle que la afeitadora aún está
conectada a la toma de corriente.
C
◗ Indicador de reemplazo los cabezales de
afeitado
Cada año, según la manera en que se afeite,
el indicador de reemplazo de los cabezales de
afeitado se ilumina constantemente de color
blanco. Consulte la sección "Reemplazo de los
cabezales de afeitado" para obtener instrucciones
sobre cómo restablecer la afeitadora. Esto le
recuerda que con nuevos cabezales de afeitado se
garantiza un óptimo rendimiento de afeitado.
C
◗ Indicador de limpieza
Para conseguir un rendimiento óptimo de
afeitado, recomendamos limpiar la afeitadora
después de CADA uso.
El grifo parpadeante le recordará que la unidad
de afeitado debe limpiarse. Esto ocurre después
de cada afeitado.
C
◗ Bloqueo para viajes
La afeitadora está equipada con una función de
sistema de bloqueo. Puede utilizar el sistema
de bloqueo cuando pretenda almacenar la
afeitadora durante un largo periodo de tiempo o
si pretende llevar la afeitadora durante un viaje.
Consulte la sección "Sistema de bloqueo" para
obtener instrucciones sobre cómo utilizar esta
función.
Page 38

ESPAÑOL
38
ESPAÑOL
38
Antes del primer uso
◗ Cargue la afeitadora antes de comenzar a
usarla (consulte la sección "Carga"). Asegúrese
de que la afeitadora esté apagada antes de
comenzar a cargarla.
Importante
◗ Utilice solo el cable de alimentación o el
sistema SmartClean suministrados para cargar
la afeitadora.
◗ El adaptador del conector transforma CA de
100-240 V a menos de 24 V de CC.
Carga
◗ La carga, recarga o el almacenamiento del
producto a temperaturas inferiores a los
40°F (4,5°C) o superiores a los 95°F (35°C)
reduce la vida útil de las baterías.
◗ La carga o recarga requiere una hora
completa.
◗ Una afeitadora completamente cargada otorga
un tiempo de afeitado de hasta 50 minutos.
◗ Puede recargar la afeitadora cuando la pantalla
indique que la batería está casi vacía.
◗ Esta afeitadora no funciona si está enchufada
directamente a la toma de corriente eléctrica.
◗ No cargue la afeitadora dentro de la funda o
funda de viaje.
Page 39
ESPAÑOL
39
ESPAÑOL
39
C
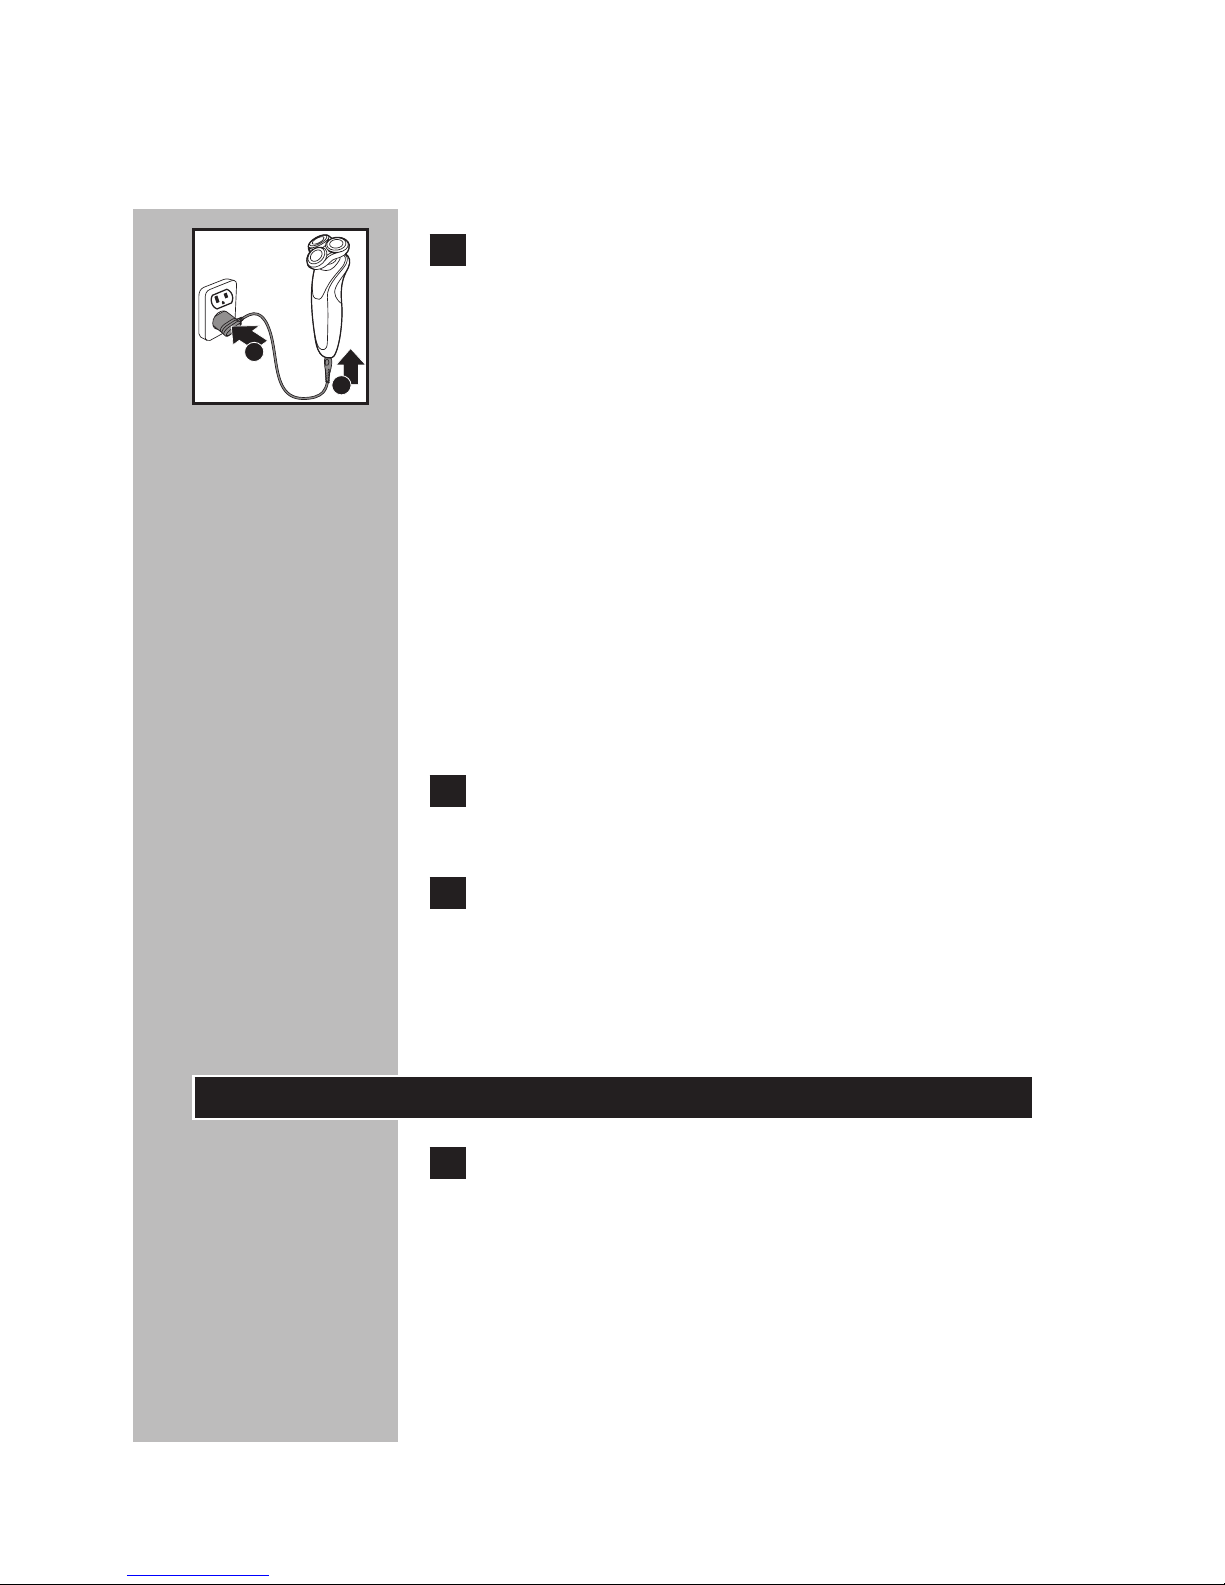
1 Conecte el cable directamente a la
afeitadora (1) y enchufe el conector de
alimentación a cualquier toma de corriente
(2) de entre 100 V a 240 V de CA. Utilice
únicamente el cable de alimentación
suministrado.
◗ En algunos países podría ser necesario el uso
de un adaptador para el cable de alimentación.
Utilice un adaptador apropiado para el tipo de
toma de corriente.
El cable de alimentación transformará
automáticamente la corriente para funcionar con
sistemas de 100 a 240 V de CA.
2 La pantalla de la afeitadora indicará que se
está cargando.
3 La carga requiere una hora completa. Una
afeitadora completamente cargada ofrece
un tiempo de afeitado sin cable de hasta
50 minutos.
Recarga
1 La recarga requiere una hora completa.
Puede realizar la recargar cuando la
pantalla indique que la batería está casi
vacía.
1
2
Page 40

ESPAÑOL
40
Carga rápida
Cuando las baterías estén vacías, al cargar la
afeitadora durante 5 minutos tendrá suficiente
energía para un afeitado sin cable.
Prueba y consejos de afeitado
◗ Proceso de prueba y adaptación de 21 días. Es
un hecho que la piel y la barba tardan algún
tiempo en acostumbrarse al nuevo sistema de
afeitado.
◗ Utilice su nueva afeitadora Philips
Norelco durante 3 semanas para disfrutar
completamente de un afeitado al ras.
◗ Es posible que al principio no obtenga el
afeitado al ras que desea e incluso su piel
puede irritarse levemente. Esto es normal, ya
que la barba y la piel necesitan tiempo para
acostumbrarse. Pruebe este producto durante
3 semanas y pronto disfrutará al máximo de
su nueva afeitadora.
◗ Sea perseverante. Si alterna entre métodos
de afeitado durante el período de adaptación,
será más difícil acostumbrarse al sistema de
afeitado de Philips Norelco.
◗ Si después de 21 días todavía no está
satisfecho con los resultados, Philips Norelco
le reembolsará el precio total de la compra,
siempre que la solicitud de reembolso se
reciba dentro de los 45 días posteriores a la
compra.
ESPAÑOL
40
Page 41
ESPAÑOL
41
ESPAÑOL
41
Cómo usar una afeitadora eléctrica
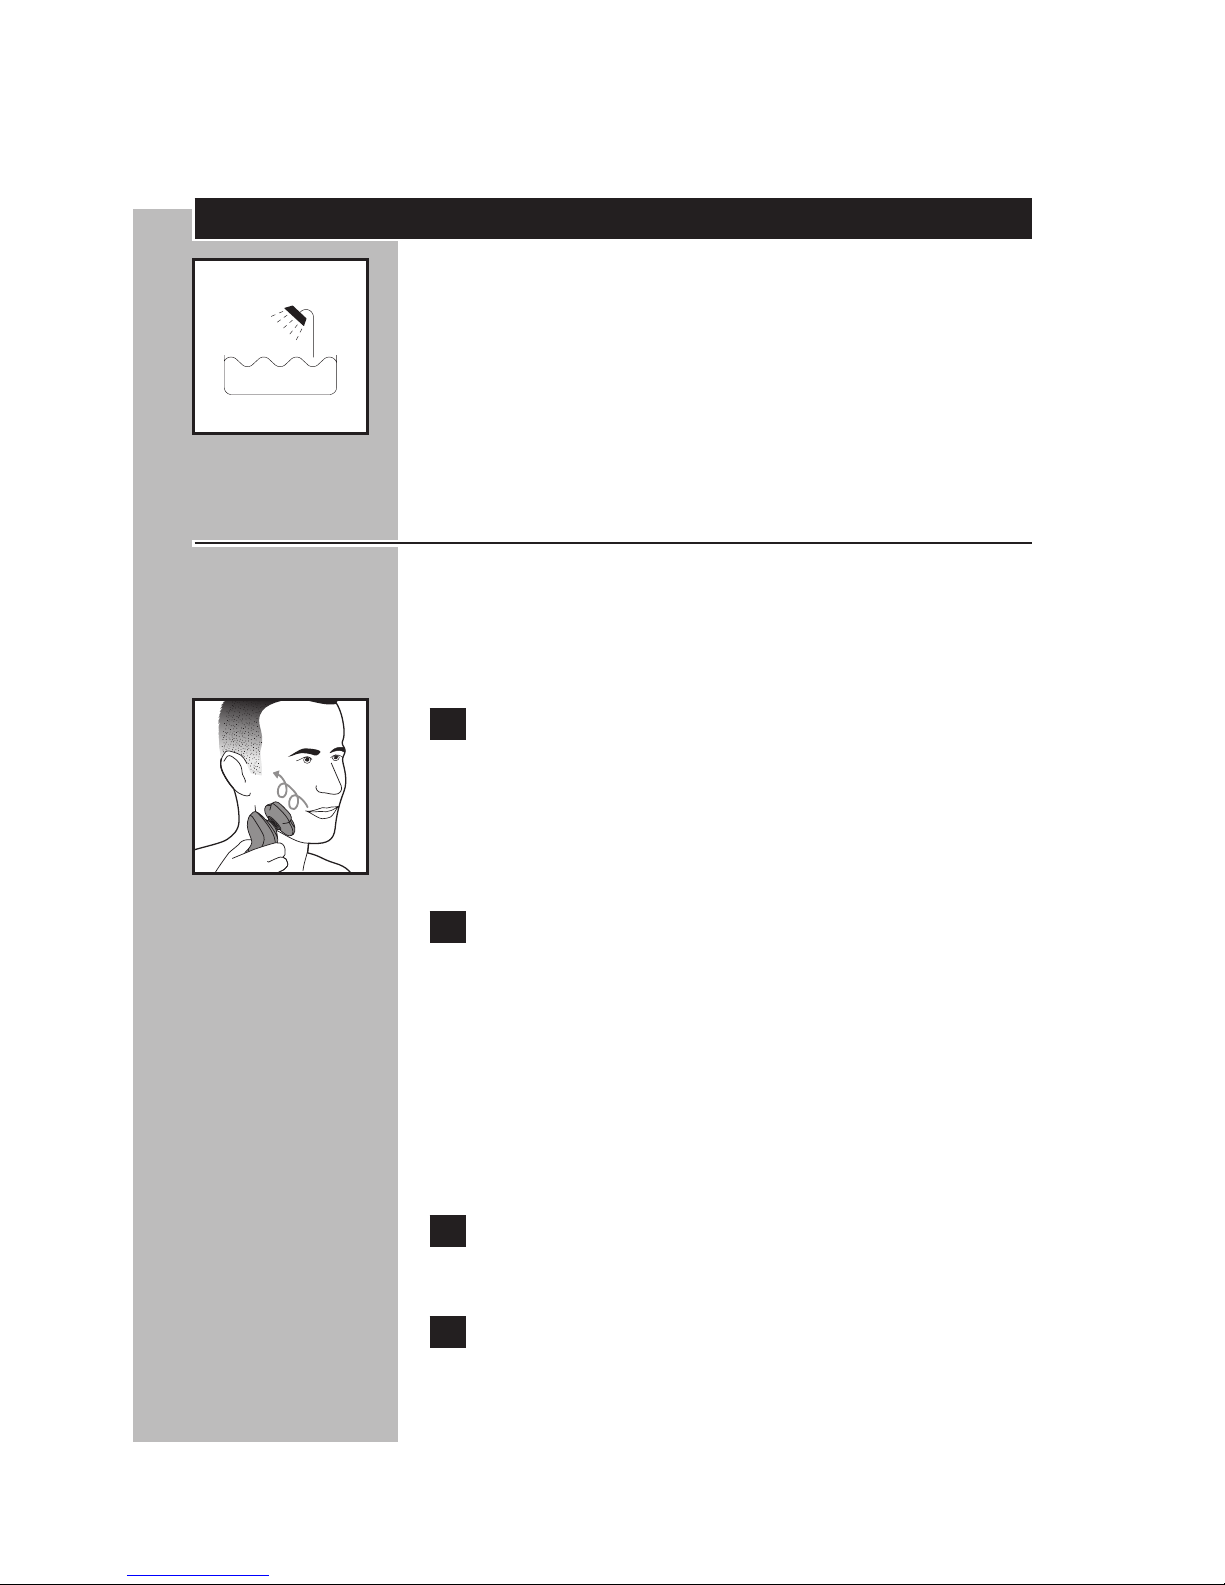
C◗ Este símbolo indica que la afeitadora puede
utilizarse en el baño o en la ducha.
◗ Por razones de higiene, la afeitadora sólo debe
ser utilizado por una sola persona.
◗ Utilice esta afeitadora para el uso doméstico
que se describe en este manual.
Afeitado
◗ Para obtener los mejores resultados en la piel
confort, recorte su barba si no se ha afeitado
durante 3 días o más.
C 1 Pulse el botón de encendido/apagado una
vez para encender la afeitadora. Aféitese
en el sentido contrario al crecimiento
del pelo, únicamente con movimientos
circulares.
2 Estire su piel con la mano libre para que
las cuchillas puedan levantar y cortar la
barba. Presione suavemente la afeitadora
contra la piel para que los cabezales
flotantes puedan seguir los contornos de
su rostro. NO presione demasiado, ya que
la presión excesiva puede causar que los
peines pellizquen la piel.
3 Pulse una vez el botón de encendido/
apagado para apagar la afeitadora.
4 Limpie la afeitadora después de cada uso
(consulte el capítulo "Limpieza").
Page 42
ESPAÑOL
42
Afeitado húmedo
También puede utilizar la afeitadora sobre el
rostro húmedo con espuma o gel de afeitar.
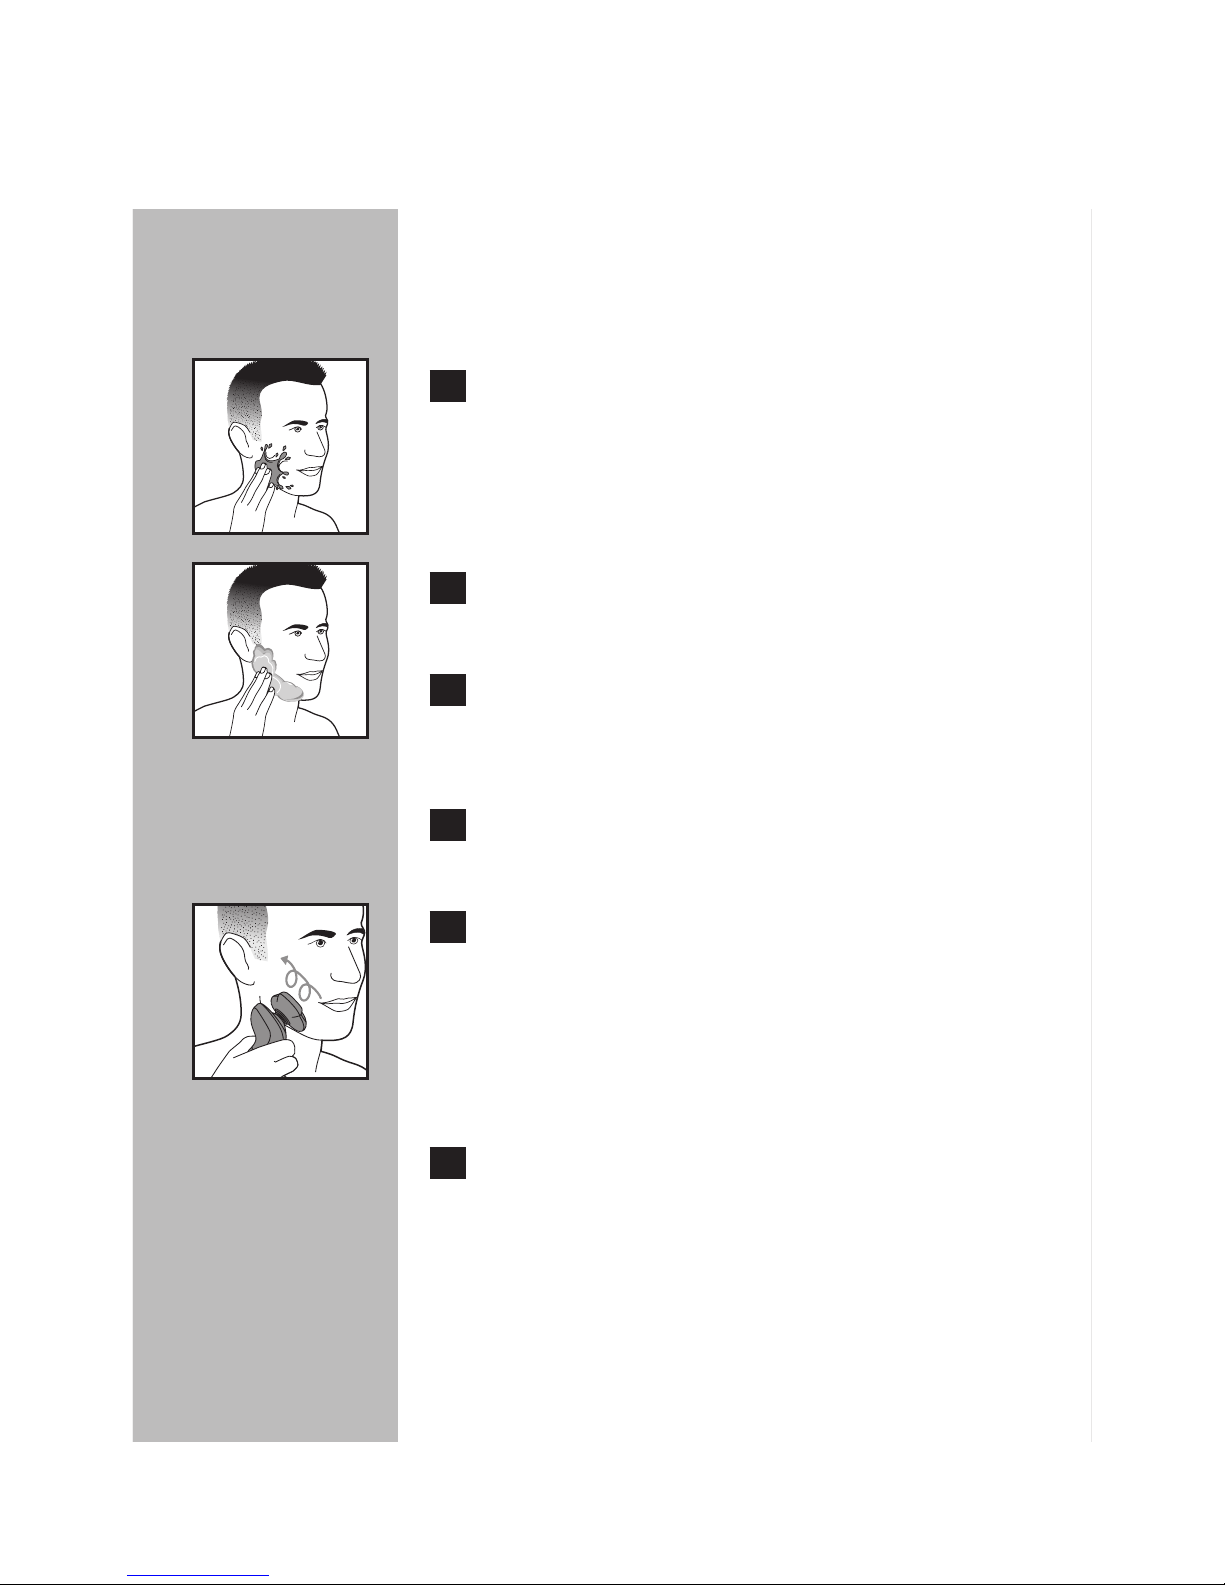
C 1 Humedezca la piel.
C 2 Aplique espuma o gel de afeitar sobre la
piel.
3 Enjuague la unidad de afeitado con el
agua del grifo para garantizar que se oiga
deslizando suavemente sobre la piel.
4 Pulse el botón de encendido/apagado una
vez para encender la afeitadora.
C 5 Mueva los cabezales de afeitado sobre la
piel con movimientos circulares.
NOTA: enjuague regularmente la afeitadora
con el agua del grifo para garantizar que se siga
deslizando suavemente sobre la piel.
6 Séquese la cara y limpie cuidadosamente la
afeitadora después de cada uso (consulte
el capítulo "Limpieza").
NOTA: asegúrese de eliminar todos los restos de
espuma o gel de afeitar de la afeitadora cuando la
enjuague.
Page 43
ESPAÑOL
43
Uso del modelador SmartClick
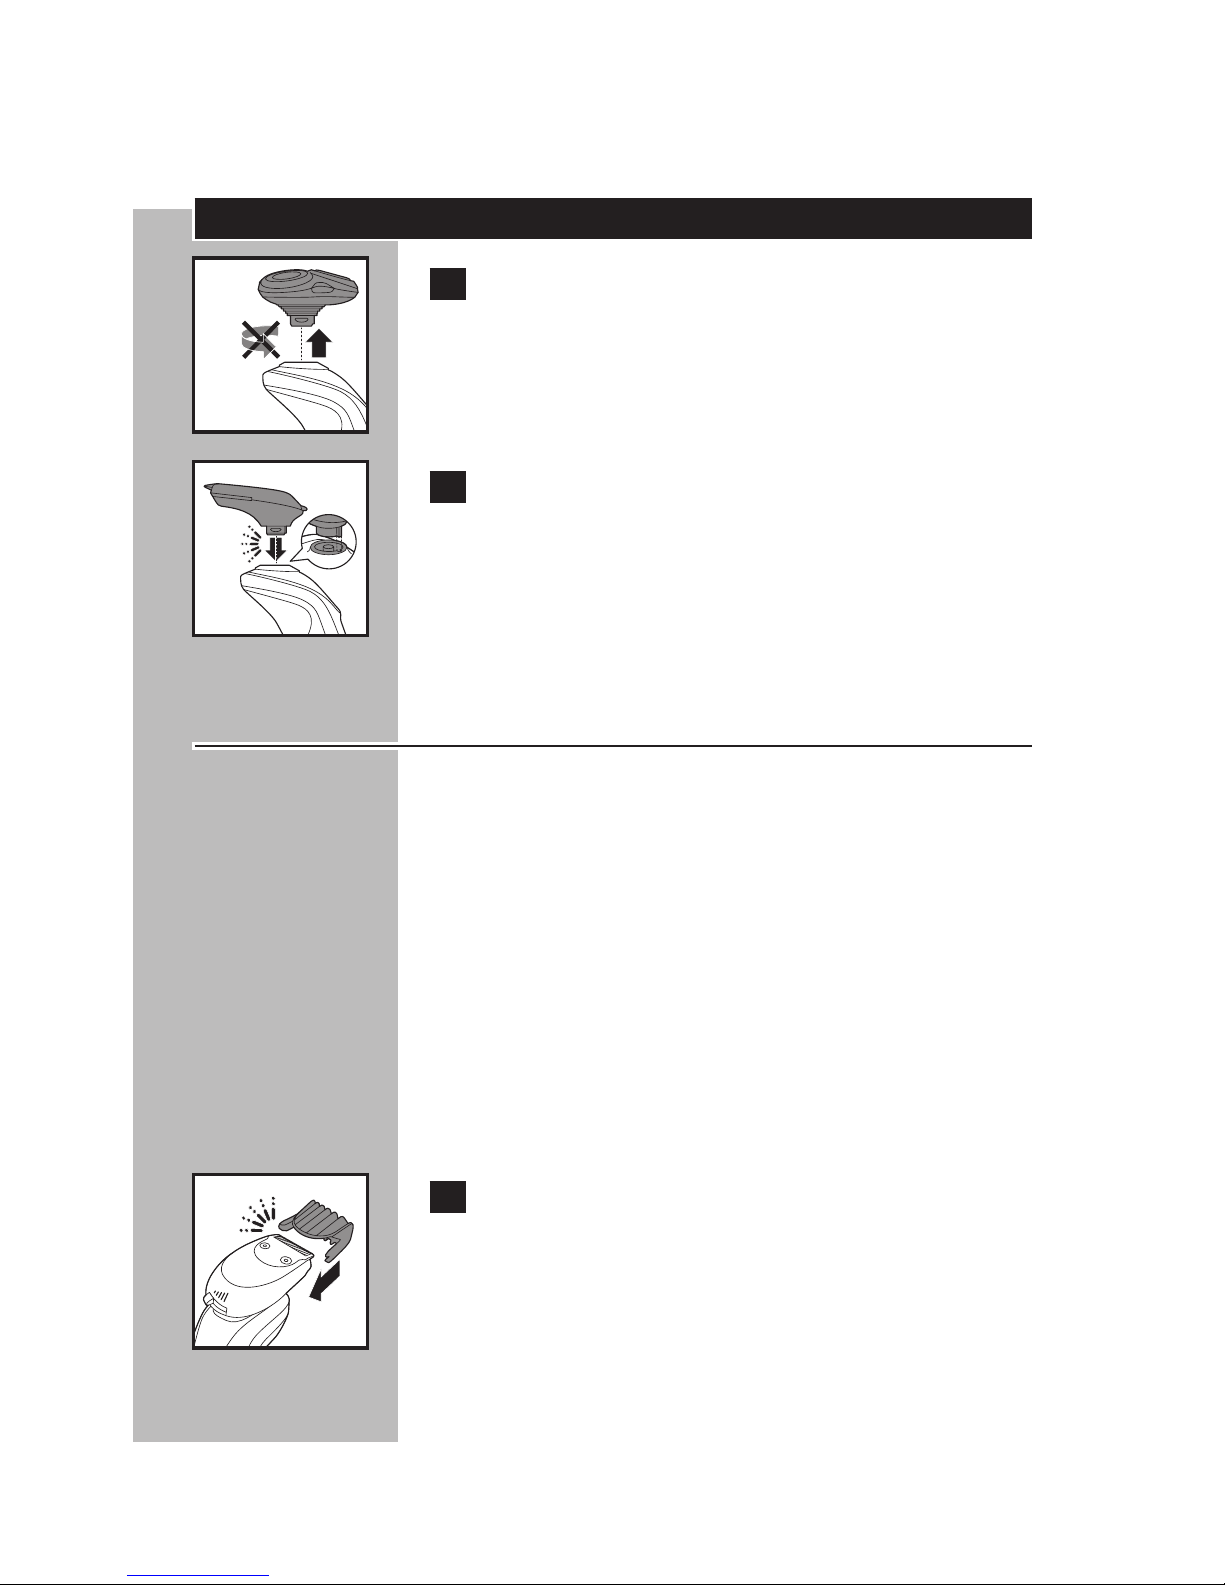
C
1 Extraiga la unidad de afeitado de la
afeitadora.
NOTA: no gire la unidad de afeitado mientras la
extrae de la afeitadora.
C
2 Inserte la muesca levantada del modelador
SmartClick en la ranura de la parte superior
de la afeitadora. Presione el modelador hacia
abajo para fijarlo a la afeitadora. Se oirá un
"clic".
Moldeado con el peine accesorio
◗ Utilice el modelador SmartClick con el peine
accesorio para recortar la barba y el bigote.
◗ Para evitar recortar demasiado la barba y
el bigote, asegúrese de tener el pelo seco.
◗ Antes de comenzar a recortar, peine siempre
la barba o el bigote con un peine fino.
◗ Las posiciones de longitud del pelo en el
modelador corresponden a la longitud del
pelo restante después del recorte. Hay 5
posiciones que van desde 3/64 pulgadas a 3/16
pulgadas (1 a 5 mm).
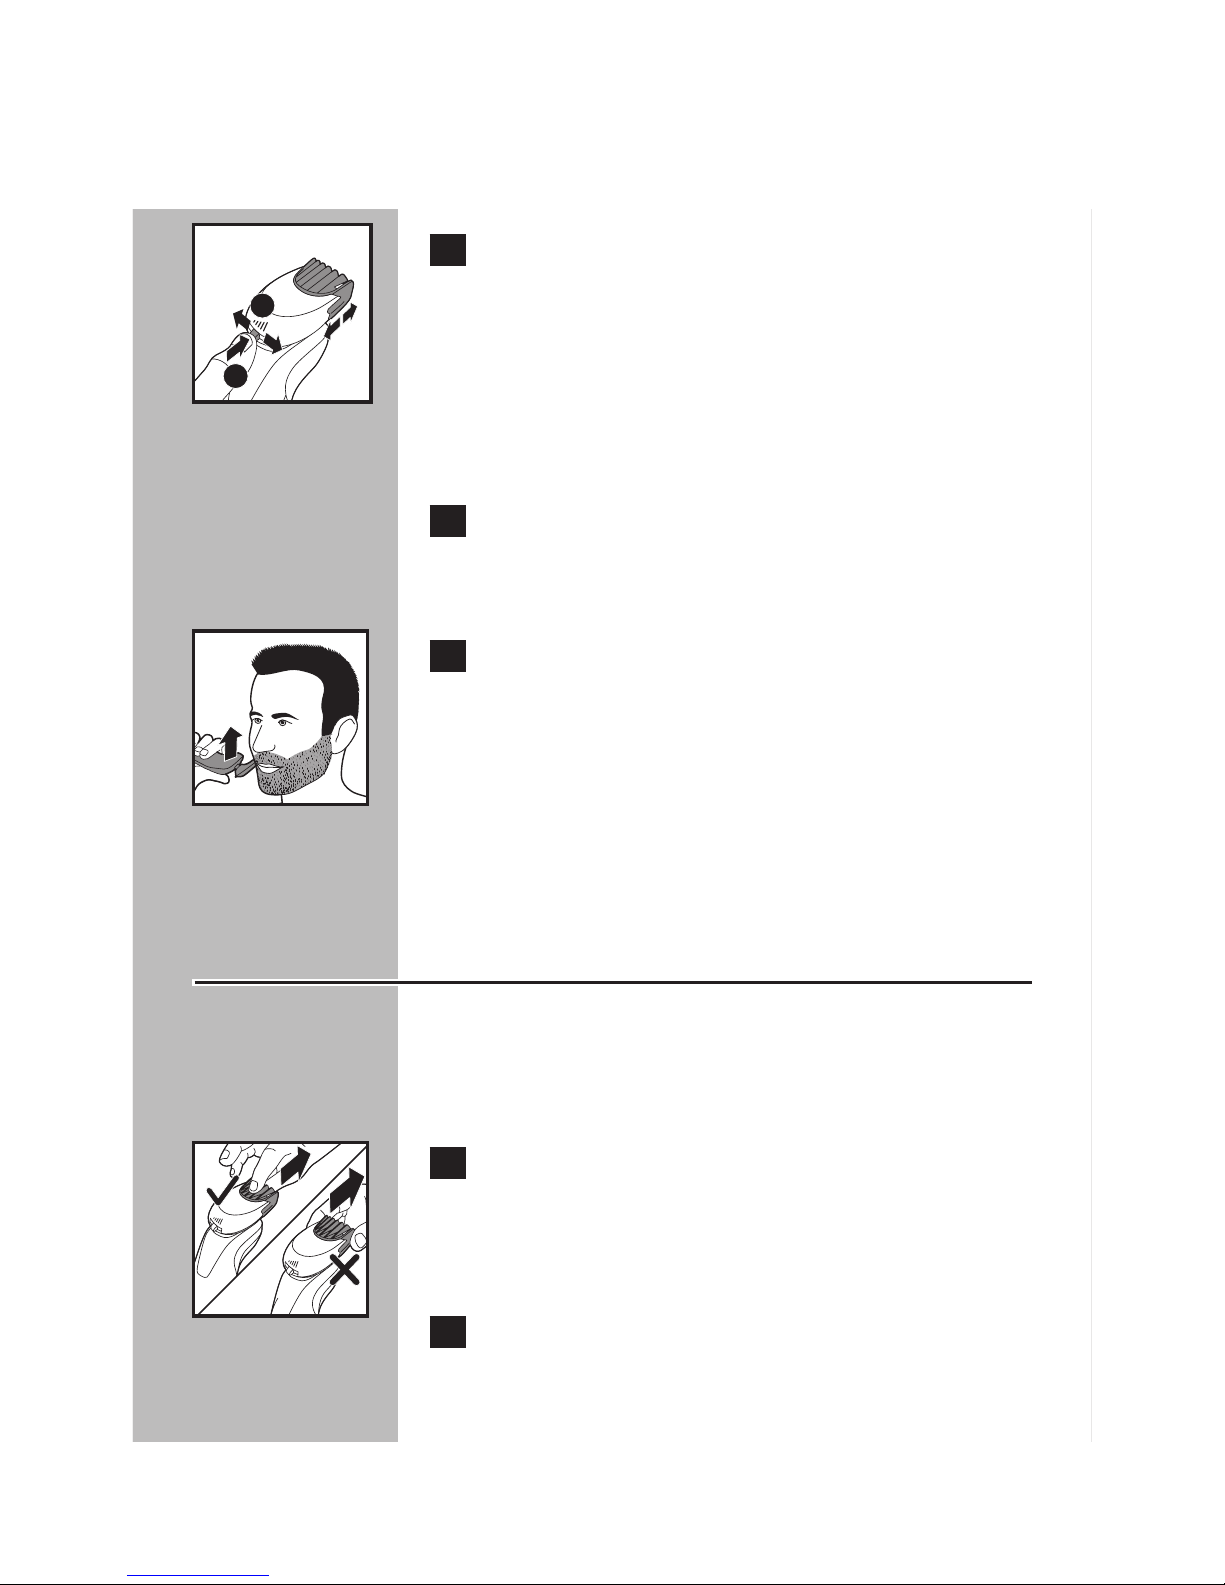
C 1 Deslice el peine en posición recta en
las ranuras guía en ambos lados del
modelador SmartClick. Oirá un "clic".
Page 44
ESPAÑOL
44
C 2 Presione el selector de longitud y
empújelo hacia la izquierda o hacia la
derecha para seleccionar la posición de
longitud deseada del pelo. "Limpieza").
Para evitar recortar demasiado el pelo por
accidente, comience con la posición máxima de
3/16 pulgadas (5 mm).
3 Encienda la afeitadora.
La pantalla de la afeitadora muestra la capacidad
restante de la batería.
C 4 Mueva el modelador hacia arriba
ejerciendo una presión suave y asegúrese
de que la parte delantera del peine entre
en contacto total con la piel.
NOTA: Si se acumula vello en el peine, apague
la afeitadora, extraiga el peine y sople o
sacuda el vello para eliminarlo del peine.
Moldeado sin el peine accesorio
◗ Utilice el modelador SmartClick sin el peine
para dar contorno a su barba, bigote, patillas o
mentón.
C 1 Tire del peine para sacarlo del modelador
SmartClick.
Asegúrese de tomar el peine por el centro. No
tire desde los lados del peine.
2 Encienda la afeitadora.
2
1
Page 45
ESPAÑOL
4545
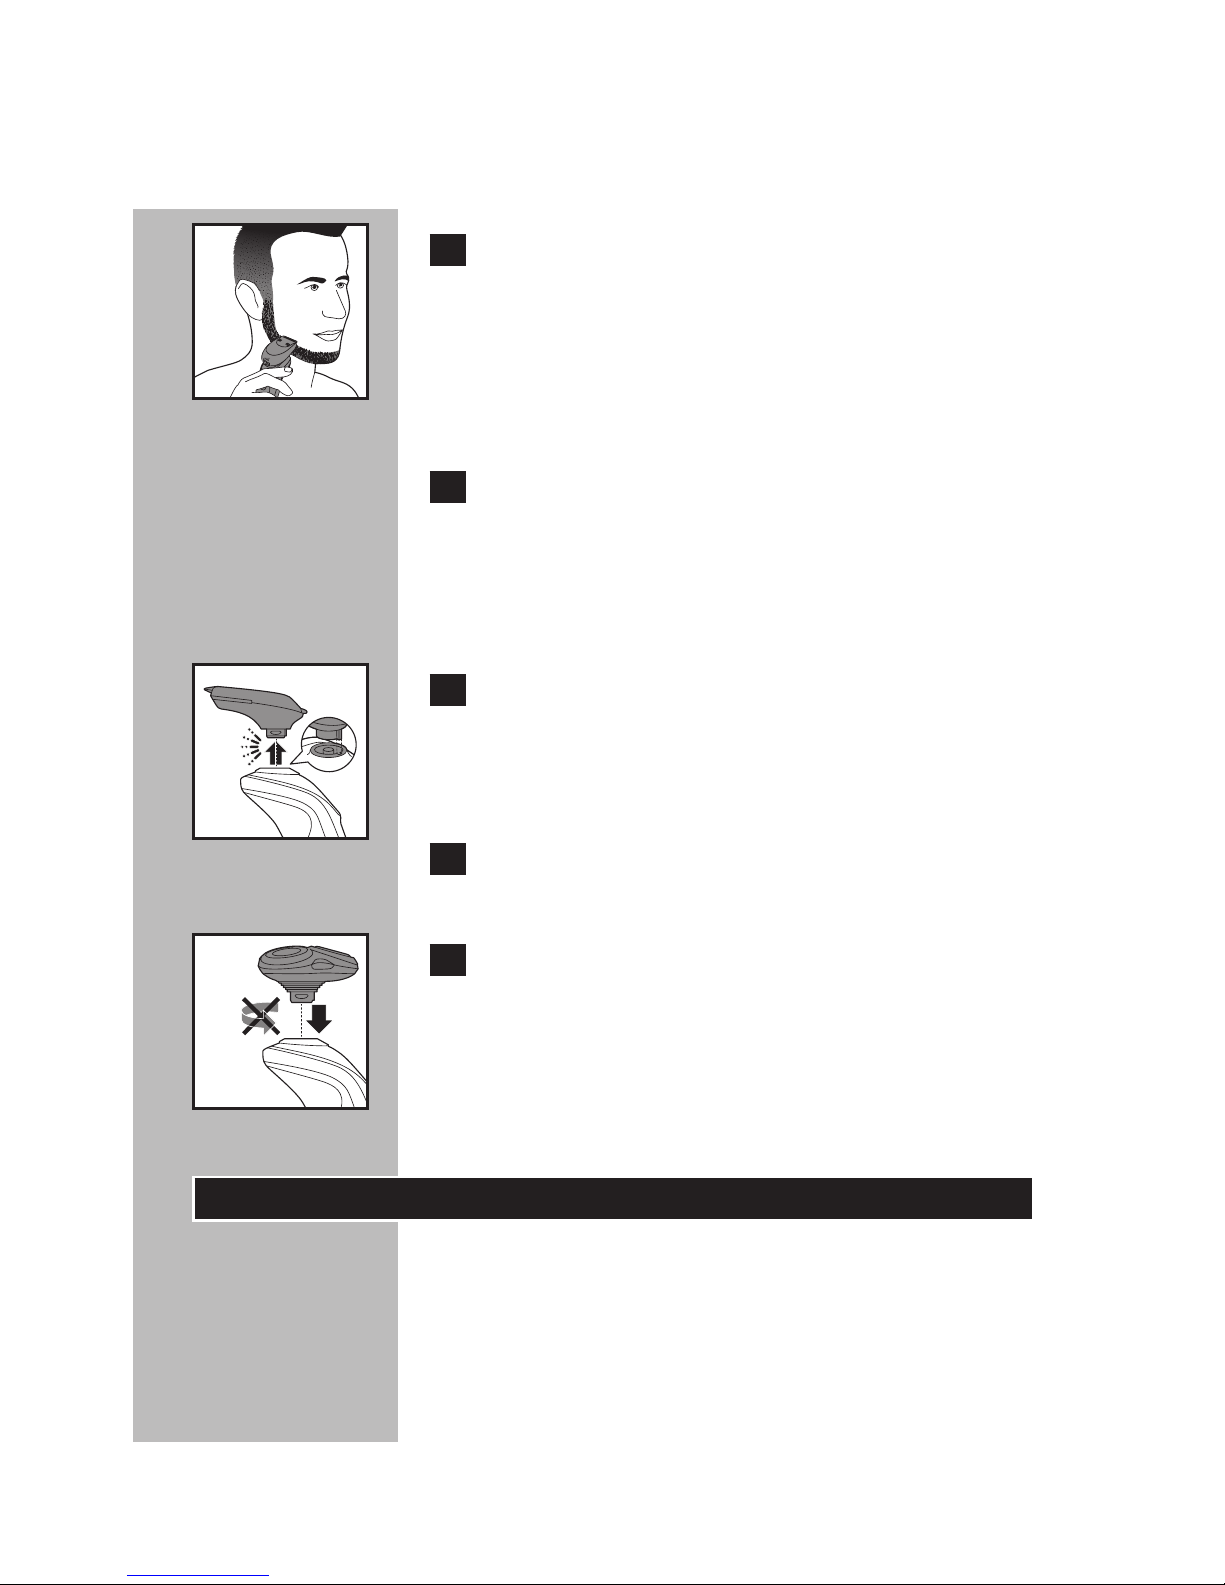
C 3 Dele contorno a la barba, bigote, patillas
o mentón moviendo el modelador hacia
abajo, ejerciendo una presión suave.
Sea cuidadoso, el modelador corta el vello muy
cerca de la piel, a una longitud de 1/32 pulgadas
(0,5 mm).
4 Apague la afeitadora cuando haya
terminado.
La pantalla se ilumina durante unos segundos y
a continuación muestra la carga disponible en la
batería.
C 5 Extraiga el modelador SmartClick de la
afeitadora.
NOTA: No gire ni tuerza el modelador mientras
lo extrae de la afeitadora.
6 Limpie cuidadosamente el modelador y el
peine (consulte "Limpieza").
C 7 Inserte la muesca levantada de la unidad de
afeitado en la ranura de la parte superior
de la afeitadora. Presione la unidad de
afeitado hacia abajo para fijarla a la
afeitadora. Se oirá un "clic".
Sistema de bloqueo
Puede bloquear la afeitadora si va a almacenarla
durante un largo periodo de tiempo o si va
a viajar. El sistema de bloqueo evita que la
afeitadora se encienda accidentalmente.
Page 46
ESPAÑOL
46
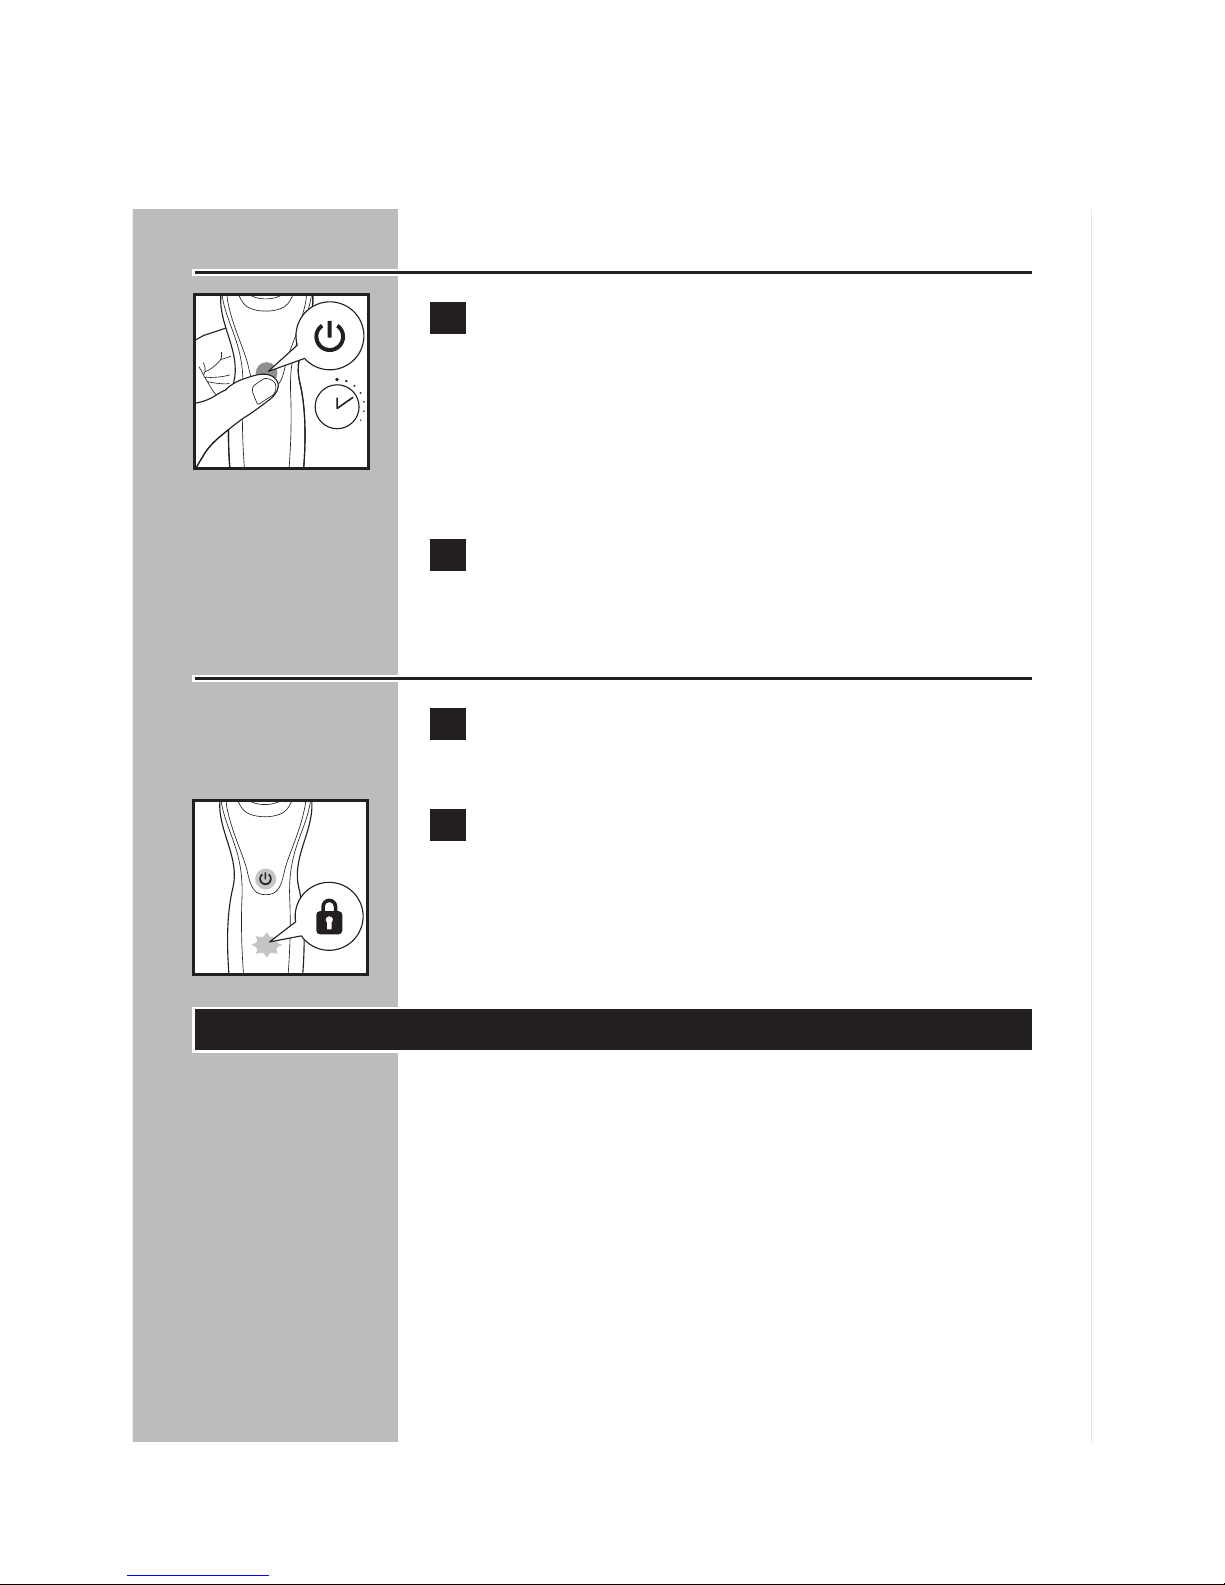
Activación del sistema de bloqueo
C
1 Pulse el botón de encendido/apagado
durante 3 segundos.
◗ El símbolo del sistema de bloqueo se ilumina
constantemente de color blanco y parpadea
el símbolo de bloqueo.
2 Se ha activado el sistema de bloqueo.
Desactivación del sistema de bloqueo
1 Pulse el botón de encendido/apagado
durante 3 segundos.
C 2 El símbolo de bloqueo parpadea y, a
continuación, se ilumina constantemente.
La afeitadora ahora está lista para usarse.
Limpieza
◗ Limpie siempre la afeitadora después de cada
uso.
◗ La limpieza frecuente asegura mejores
resultados en el afeitado.
◗ Nunca limpieza, retire ni reemplace la unidad
de afeitado con el motor en funcionamiento.
3 sec.
Page 47

ESPAÑOL
47
◗ No aplique presión a los peines del cabezal de
afeitado. No toque los cabezales de afeitado
con objetos duros, debido a que podría
deformar o dañar los peines que cuentan con
ranuras de precisión.
◗ No utilice la afeitadora si los peines del
cabezal de afeitado están dañados o rotos, ya
que podrían ocasionarle lesiones en el rostro.
◗ No utilice agentes abrasivos ni líquidos
agresivos como la gasolina o la acetona para
limpiar la afeitadora.
◗ Nunca seque la unidad de afeitado con una
toalla o un paño ya que esto podría dañar los
cabezales de afeitado.
Limpieza de la unidad de afeitado
Los cabezales de afeitado pueden limpiarse
rápidamente después de cada uso si se enjuagan
con agua caliente. El agua del grifo debe estar
caliente, pero PRIMERO COMPRUEBE LA
TEMPERATURA DEL AGUA PARA EVITAR
QUEMADURAS EN LAS MANOS.
◗ La limpieza frecuente asegura mejores
resultados en el afeitado.
◗ Al enjuagar los cabezales de afeitado, es
posible que salga agua por la base de la
afeitadora. Esto es normal.
Page 48
ESPAÑOL
48
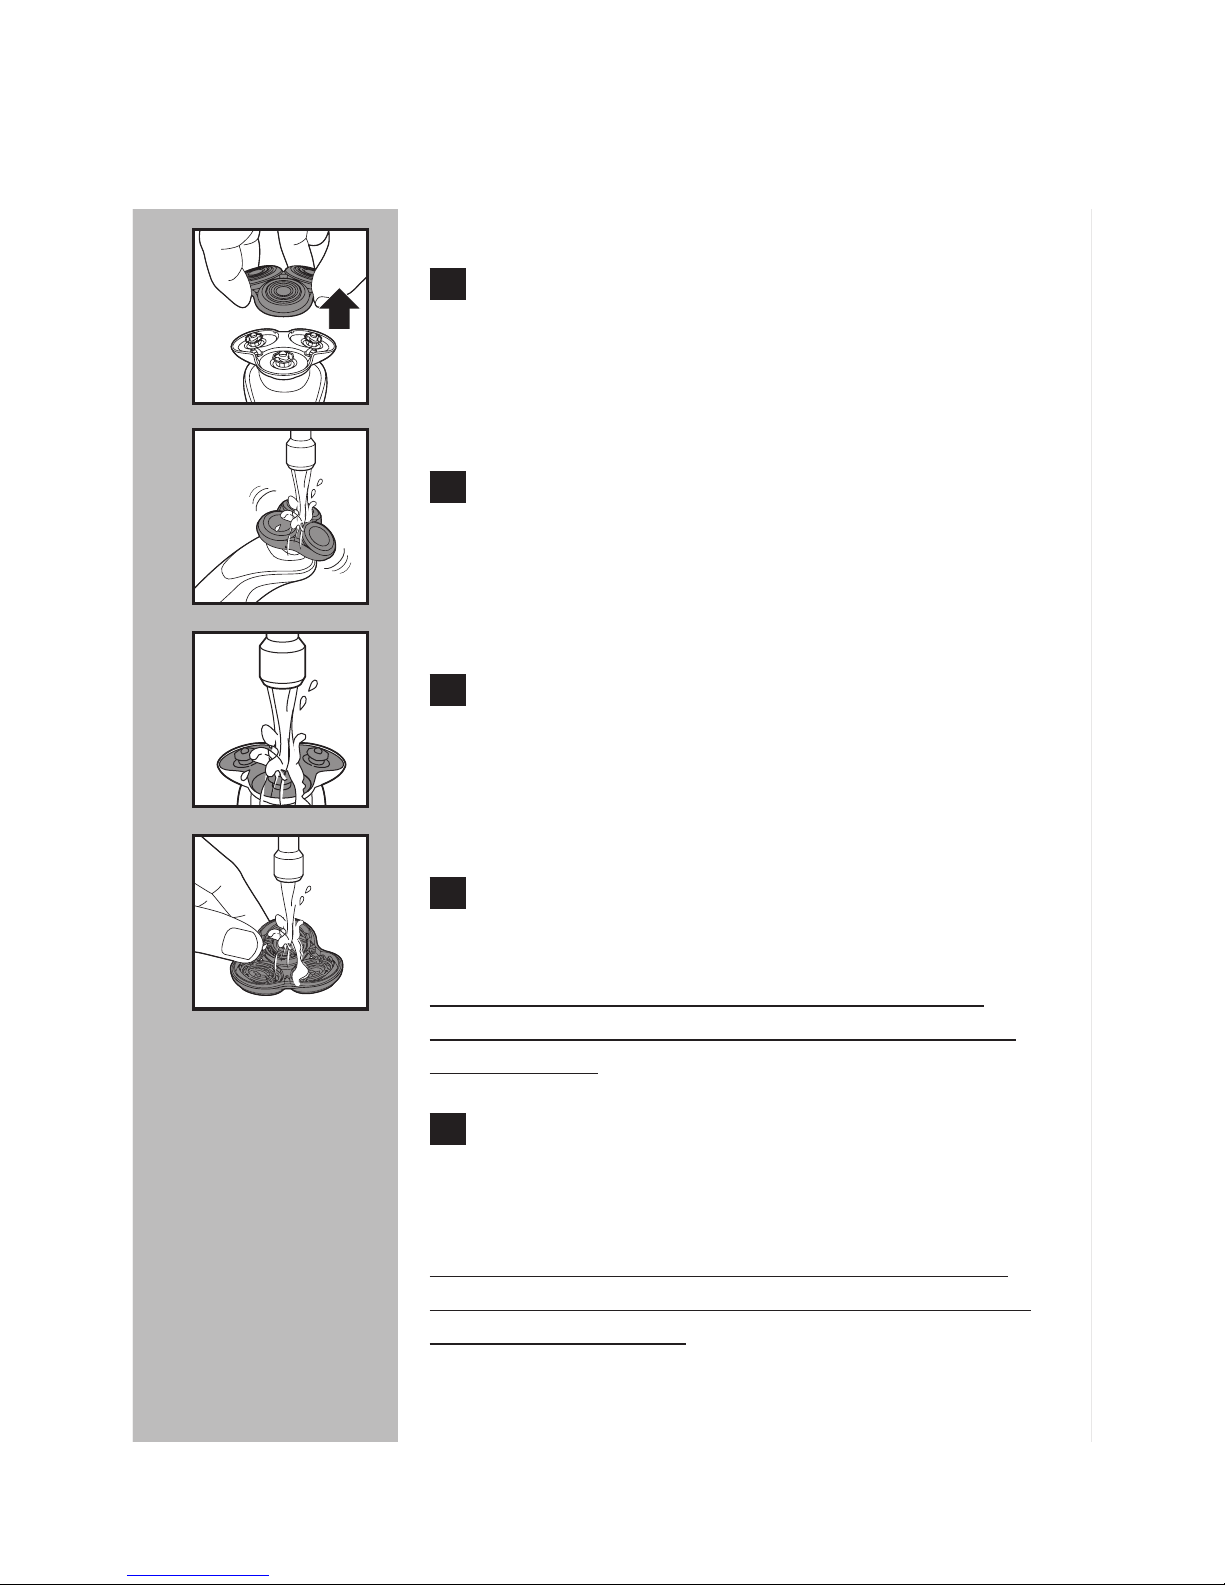
C 1 Para obtener mejores resultados, enjuague
la unidad de afeitado bajo el agua caliente
durante algunos minutos.
C
2 Extraiga la parte superior de la unidad de
afeitado de la afeitadora.
C
3 Enjuague la cámara de recolección de pelo
con agua del grifo.
C
4 Enjuague la unidad de afeitado con agua
caliente del grifo.
PRIMERO COMPRUEBE LA TEMPERATURA
DEL AGUA PARA EVITAR QUEMADURAS EN
LAS MANOS.
5 Elimine cuidadosamente el exceso de agua
y deje que la unidad de afeitado se seque
completamente al aire.
NOTA: no seque ni limpie la unidad de afeitado
con una toalla o un paño, ya que podría dañar los
cabezales de afeitado.
Page 49
ESPAÑOL
49
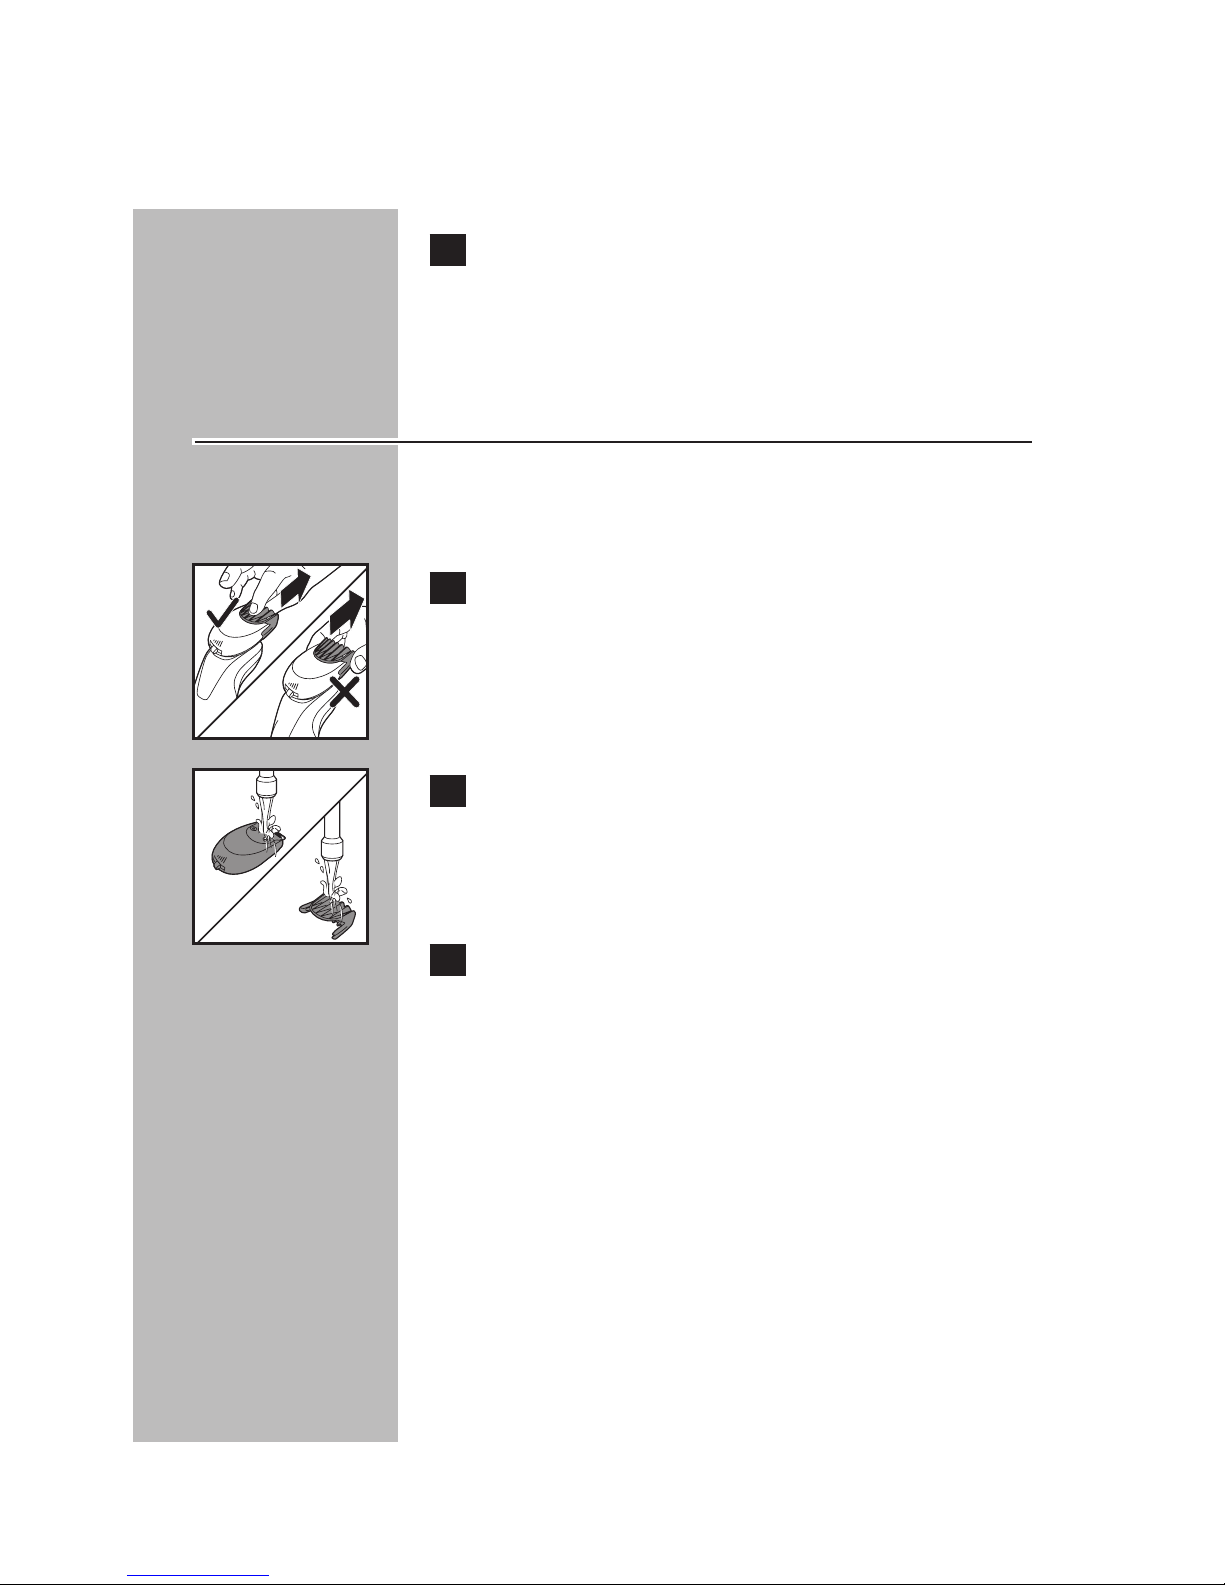
6 Presione hacia abajo la parte superior de
la unidad de afeitado para fijarla al soporte
del cabezal de afeitado. Se oirá un "clic".
Limpieza del modelador de barba
Limpie el modelador de barba después de cada
uso.
C 1 Tire del peine para sacarlo del modelador
de barba.
Asegúrese de tomar el peine por el centro. No
tire desde los lados del peine.
C 2 Enjuague el modelador de barba y el peine
con agua caliente. PRIMERO COMPRUEBE
LA TEMPERATURA DEL AGUA PARA
EVITAR QUEMADURAS EN LAS MANOS.
3 Elimine el exceso de agua y deje que el
modelador de barba y el peine se sequen
completamente al aire.
Sugerencia: Para obtener un rendimiento óptimo,
lubrique cada 6 meses los dientes del modelador
de barba con una gota de aceite mineral.
Page 50
ESPAÑOL
50
Reemplazo de los cabezales de afeitado
◗ Reemplace los cabezales de afeitado una vez
al año para obtener resultados óptimos de
afeitado.
◗ Reemplace los cabezales de afeitado dañados
o desgastados solo con los cabezales para la
afeitadora Philips Norelco modelo SH90.
Indicación de reemplazo del conjunto
del cabezal de afeitado
C ◗ El símbolo de la unidad de afeitado se ilumina
constantemente cuando la afeitadora está
apagada para recordarle que debe sustituir la
unidad de afeitado para obtener los resultados
óptimos de afeitado.
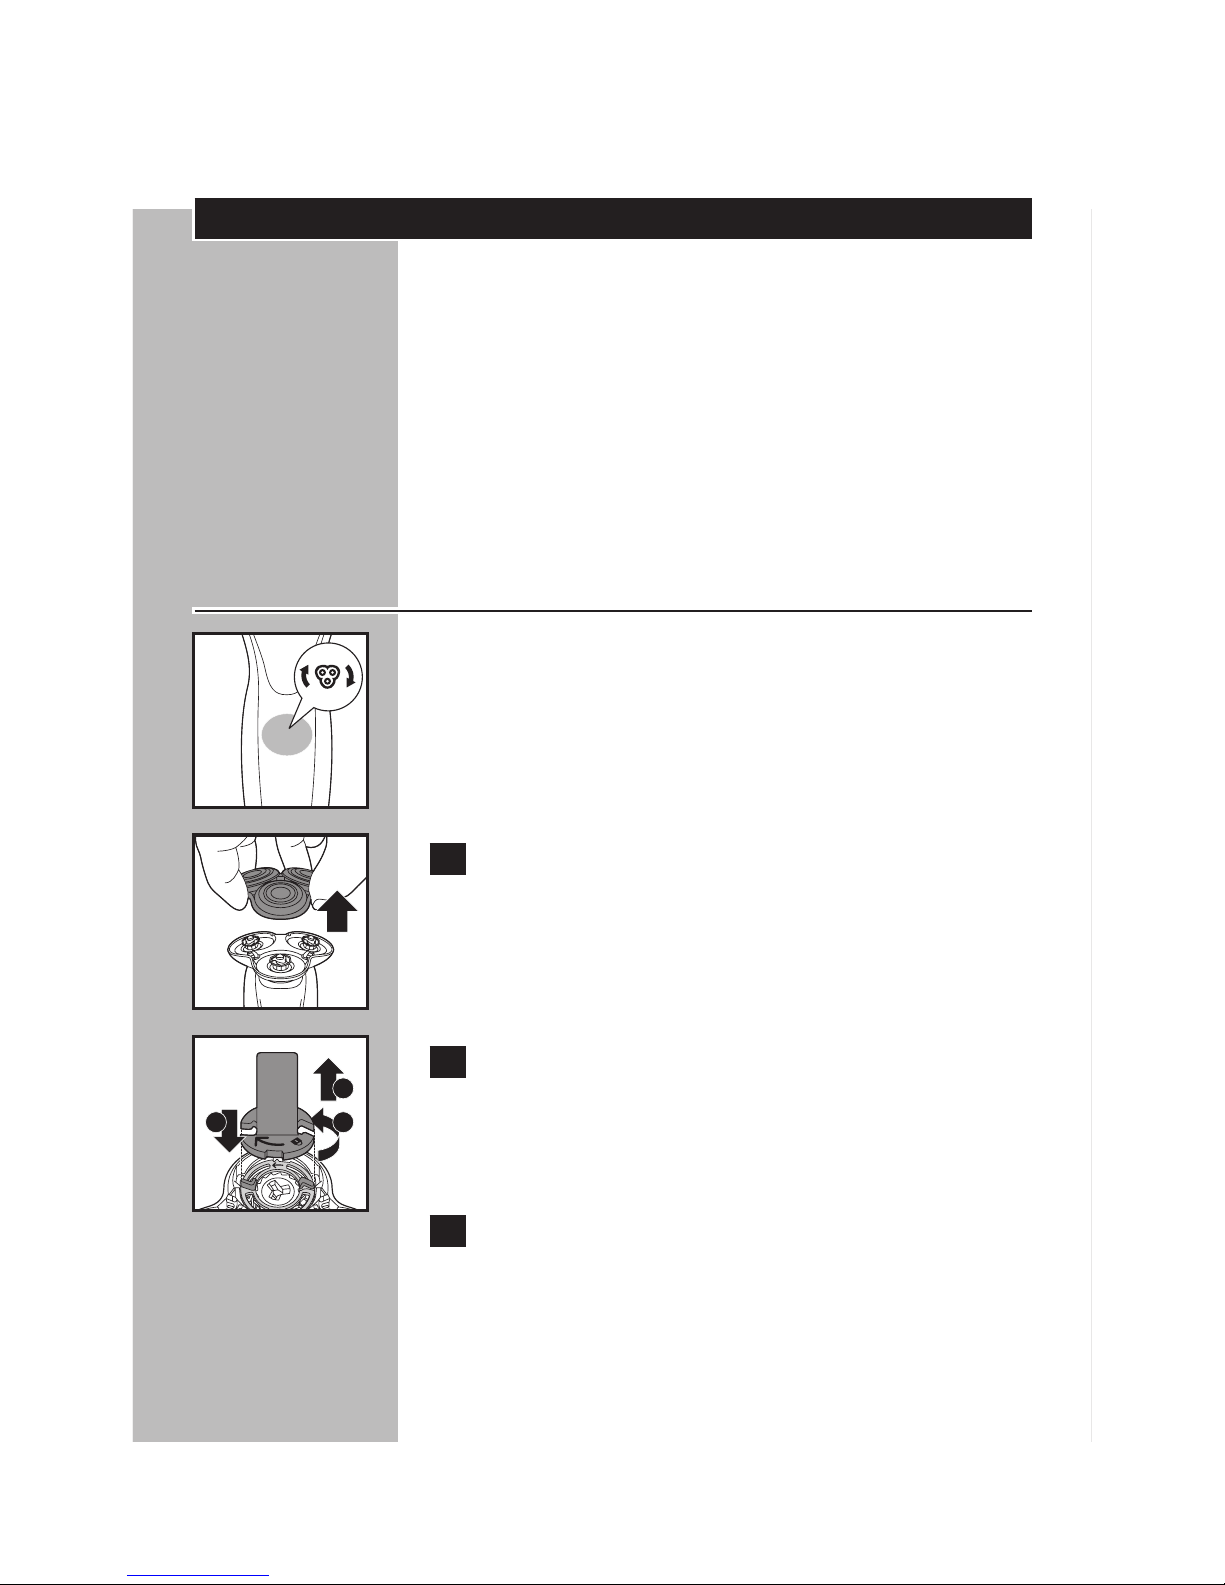
C 1 Extraiga la parte superior de la unidad de
afeitado de la afeitadora.
C 2 Coloque el soporte del anillo de retención
en el anillo de retención (1), gírelo a la
izquierda (2) y levántelo del cabezal de
afeitado (3).
3 Quite el anillo de retención del soporte
del anillo de retención y repita el proceso
con los otros anillos de retención.
1 2
3
Page 51
ESPAÑOL
51
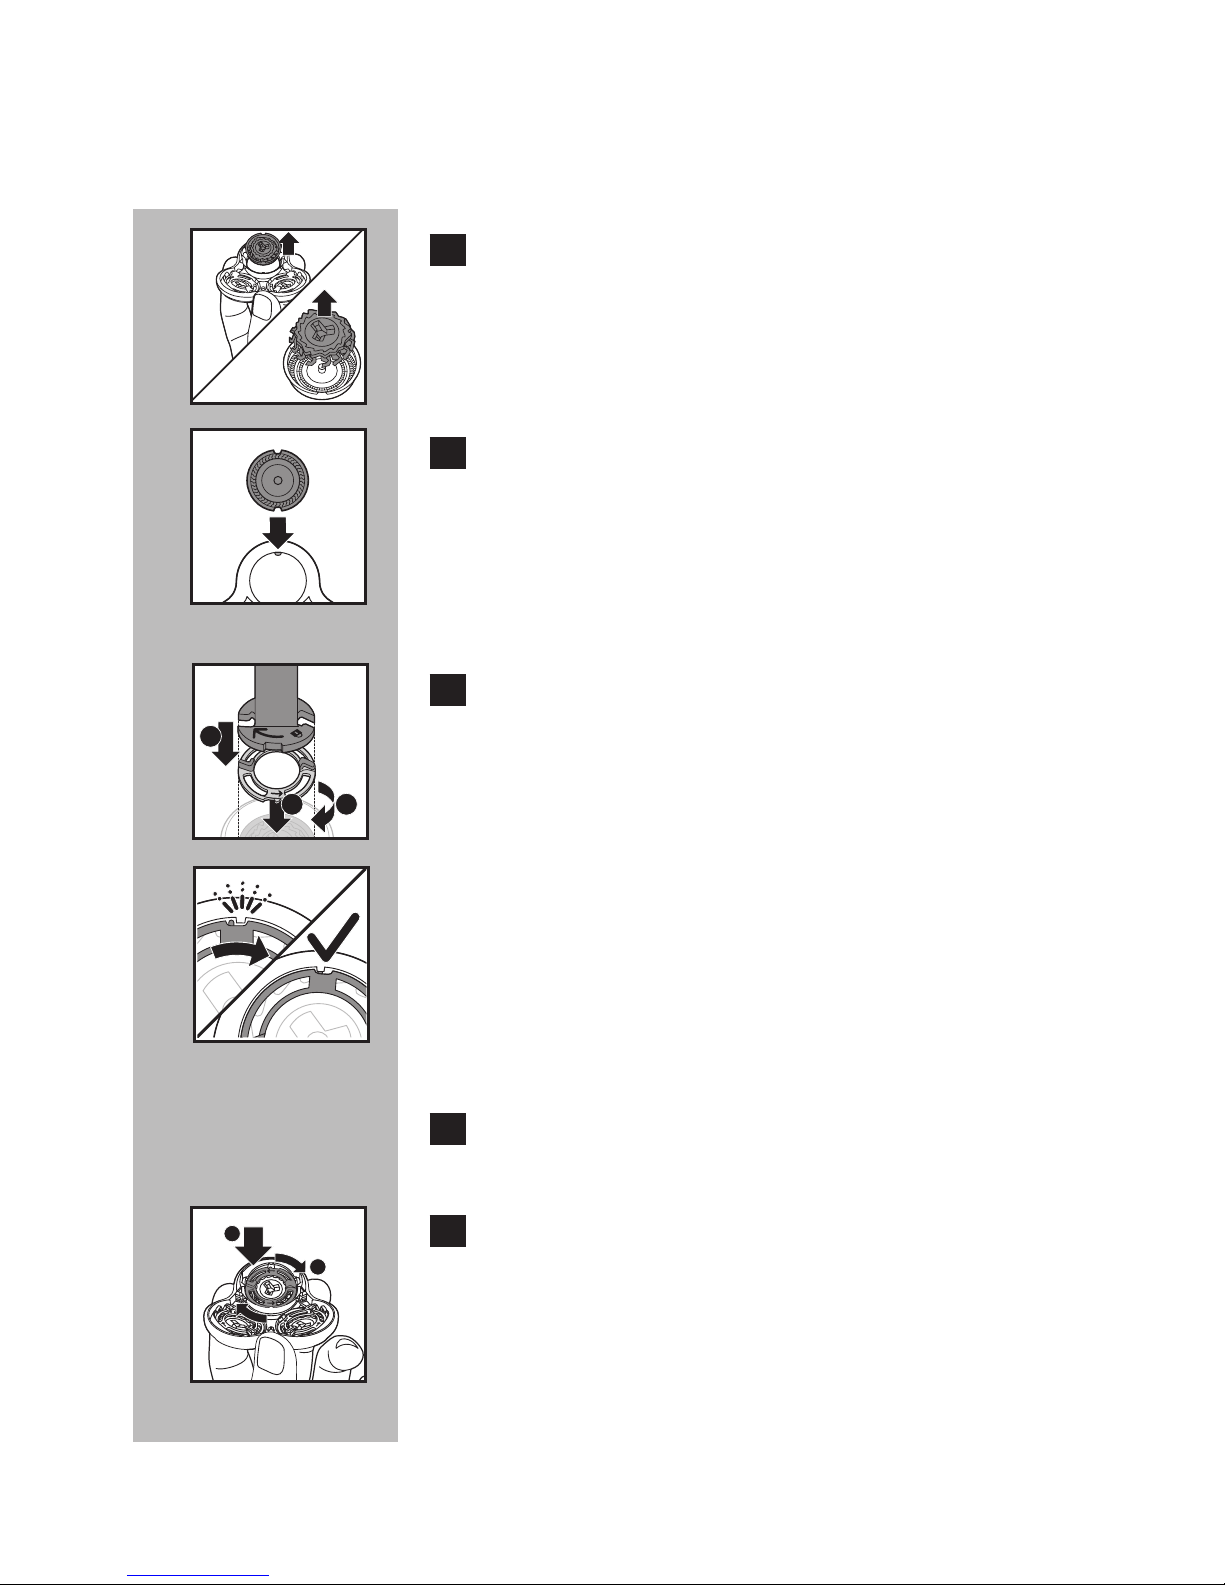
C 4 Quite los cabezales de afeitado del
soporte del cabezal de afeitado y
deséchelos.
No deseche el anillo de retención.
C 5 Coloque los nuevos cabezales de afeitado
en el soporte.
Asegúrese de que las muescas en ambos lados
de los cabezales de afeitado encajen exactamente
en las proyecciones en el soporte del cabezal de
afeitado.
C 6 Coloque el soporte del anillo de retención
en el anillo de retención (1), colóquelo en
el cabezal de afeitado (2) y gírelo hacia la
derecha (3) para volver a colocar el anillo
de retención.
C NOTA: Cada anillo de retención tiene dos
hendiduras que encajan exactamente en las
proyecciones del soporte del cabezal de
afeitado. Gire el anillo en el sentido de las
agujas del reloj hasta que oiga un 'clic' para
indicar el anillo es fijo.
7 Repita este proceso con los otros anillos
de retención.
C 8 Sujetar el soporte del cabezal de afeitado
en la mano y coloque el anillo de retención
en el soporte del cabezal de afeitado (1).
Gírelo hacia la derecha (2) para volver a
colocar en anillo de retención.
1
3
2
1
2
Page 52
ESPAÑOL
52
No coloque el soporte de cabezal de afeitado
sobre una superficie, ya que esto puede causar
daños.
9 Fije el soporte del cabezal de afeitado en
la parte inferior de la unidad de afeitado
(clic).
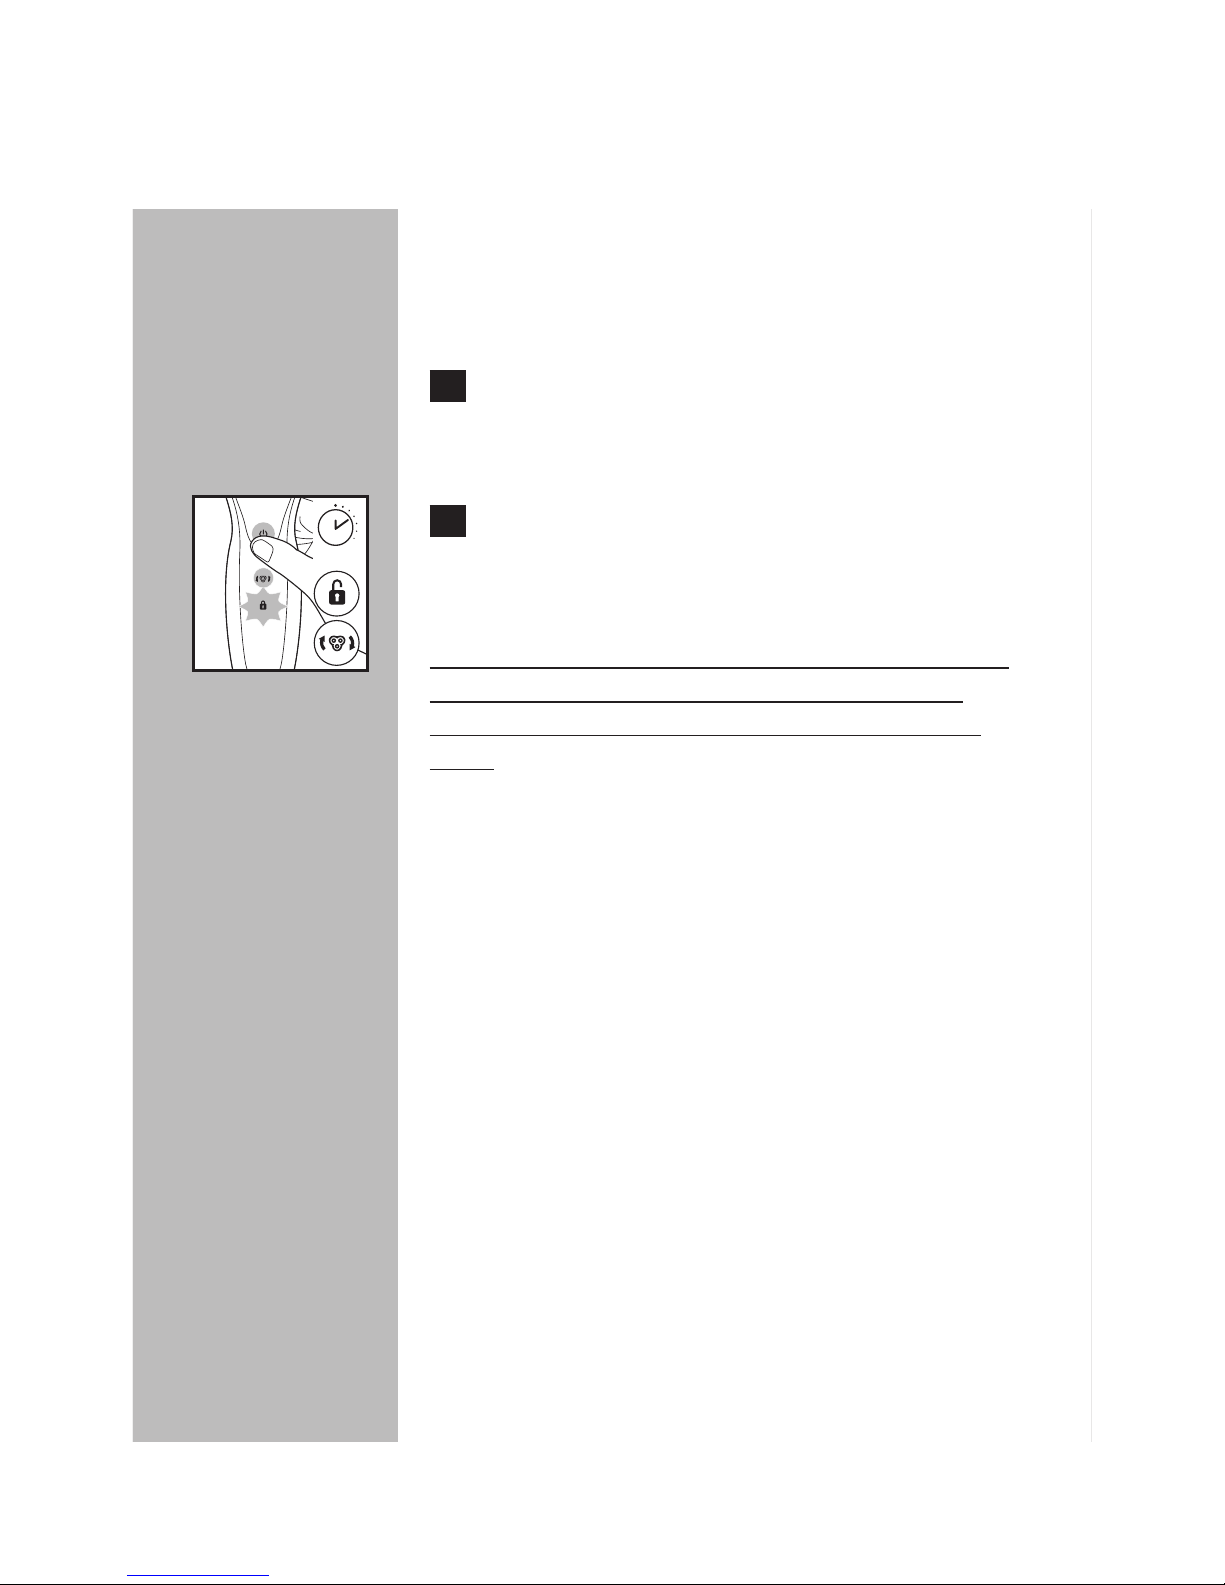
C 10 Para restablecer la afeitadora, mantenga
pulsado el botón de encendido/apagado
por aproximadamente 7 segundos.
Esta afeitadora no contienen ninguna otra pieza
que pueda ser reparada por el usuario. Para
solicitar asistencia, comuníquese al 1-800-243-
3050.
7 sec.
Page 53

ESPAÑOL
53
Almacenamiento
◗ La afeitadora puede colocarse en la funda de
viaje para un almacenamiento seguro.
◗ Asegúrese de que la afeitadora esté apagada.
Desenchufe el cable de la toma de corriente
antes de guardarla en un lugar seguro y seco,
donde no se aplaste, golpee ni pueda sufrir
daños.
◗ No enrolle el cable de alimentación alrededor
de la afeitadora cuando la guarde.
◗ Guarde el cable en un lugar seguro donde no
sufra cortes ni daños.
◗ No coloque ni guarde la afeitadora en un
lugar donde pueda caerse en la bañera, en el
lavabo, en el agua o en otro tipo de líquido
mientras está enchufado.
Asistencia
◗ Para obtener asistencia, visite nuestro sitio
Web:
www.philips.com/support o
llame al número gratuito
1-800-243-3050
◗ La información en línea está disponible las 24
horas, los 7 días de la semana.
Page 54
ESPAÑOL
54
Eliminación
C
◗ Esta afeitadora Philips Norelco contiene una
batería recargable de iones de litio que debe
desecharse de manera adecuada.
◗ Para obtener información sobre la forma de
desechar las baterías, comuníquese con las
autoridades locales, llame al número
1-800-822-8837 o visite el sitio web
www.call2recycle.org
◗ Su producto ha sido diseñado y fabricado con
materiales y componentes de alta calidad,
que pueden ser reciclados y reutilizados. Para
obtener información sobre reciclaje, contacte
las facilidades de gestión de residuos locales o
visite a www.recycle.philips.com.
◗ Para obtener asistencia, visite nuestro
sitio Web www.philips.com/support o
comuníquese al número gratuito:
1-800-243-3050.
Page 55
ESPAÑOL
55
Accesorios
C
◗ Reemplazo de los cabezales de afeitado
Modelo SH90 - para obtener el máximo
rendimiento de afeitado, reemplace los
cabezales de la afeitadora Philips Norelco una
vez al año.
◗ Cabezal de cepillado SmartClick
Modelo RQ585 - cabezal de cepillado
SmartClick de Philips Norelco
◗ Puede adquirir los accesorios para la
afeitadora Philips Norelco en el local más
cercano a su domicilio o a través de nuestro
sitio web: www.philips.com/store
Page 56
GARANTÍA TOTAL POR DOS AÑOS
Philips Electronics North America Corporation garantiza cada nuevo producto Philips Norelco, modelo
S8950 (excepto cuchillas y peines) contra defectos de materiales o de fabricación durante un período de
dos años desde la fecha de compra, y se compromete a reparar o sustituir sin cargo cualquier producto
defectuoso.
IMPORTANTE: esta garantía no cubre los daños provocados por accidentes, uso inapropiado o maltrato,
falta de mantenimiento razonable, uso de accesorios no suministrados con el producto, pérdida de piezas o
uso del artefacto con un voltaje distinto del especificado.*
TAMPOCO ASUME LA RESPONSABILIDAD POR DAÑOS ESPECIALES, INCIDENTALES
O EMERGENTES.
Para disfrutar del servicio de garantía, simplemente visite www.philips.com/norelco o llame al 1-800-2433050 para obtener asistencia. Por su seguridad, recomendamos realizar la devolución de productos por
correo certificado y prepago. La garantía no cubre los daños producidos durante el envío.
NOTA : Philips Electronics North America Corporation no autoriza ninguna otra garantía escrita o verbal.
Esta garantía otorga al usuario derechos específicos, sin perjuicio de otros derechos de los que disponga
en virtud de la legislación del estado. Algunos estados no permiten la exclusión o limitación de los daños
incidentales o emergentes, por lo que la exclusión y limitaciones anteriores no se aplicarán en estos casos.
*Lea atentamente las instrucciones que se adjuntan.
Fabricado para:
Philips Consumer Lifestyle
Una división de Philips Electronics North America Corporation
P.O. Box 10313, Stamford, CT 06904
Este símbolo colocado en la placa de especificaciones del producto significa que está registrado
por Underwriters Laboratories, Inc.
Norelco y Tripleheader son marcas comerciales registradas de Philips Electronics
North America Corporation.
PHILIPS es una marca registrada de Koninklijke Philips N.V.
© 2016 Philips Electronics North America Corporation. Todos los derechos reservados.
4222 002 5952 2
 Loading...