

Page 1
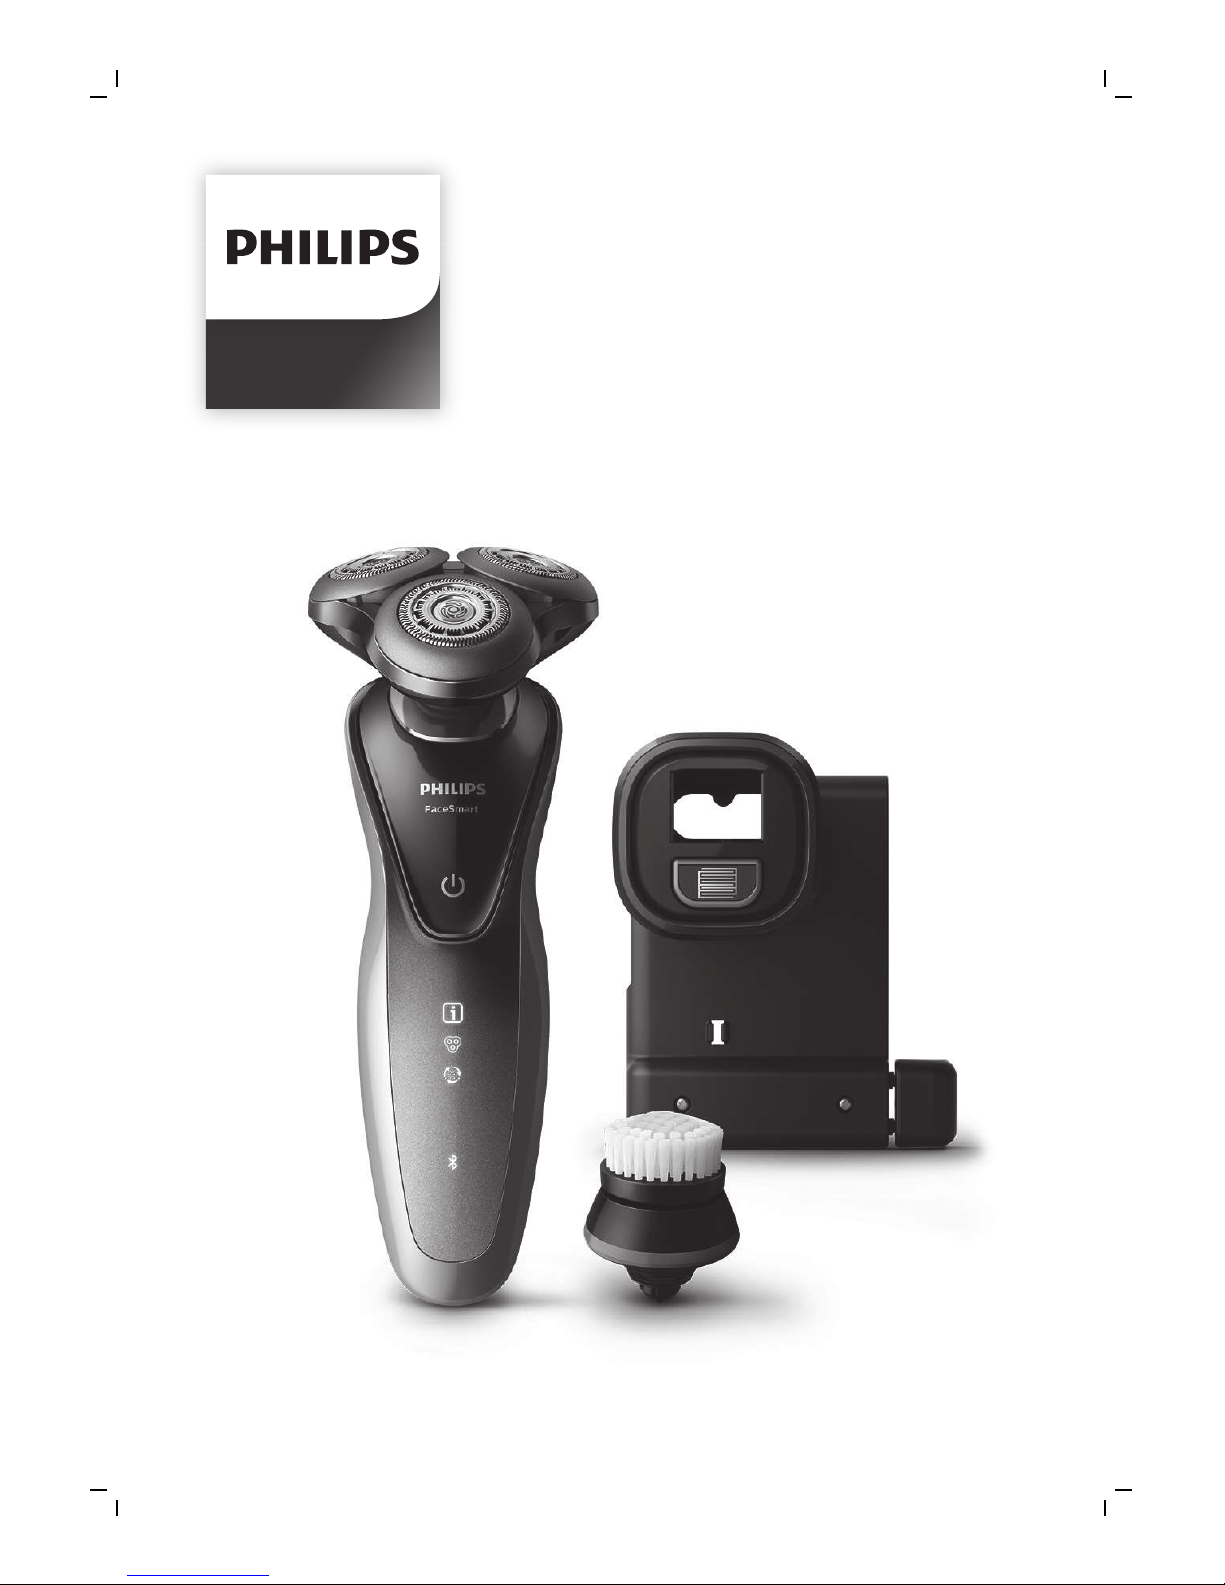
S7980
Page 2

Page 3
1
2
3
8
9
10
13
15
14
11
12
4
5
6
7
16
17
18
Page 4

empty page before TOC
Page 5

English 6
简体中文
35
Page 6

English
Introduction
Congratulations on your purchase and welcome to
Philips! To fully benefit from the support that
Philips offers, register your product at
www.philips.com/welcome or via the SkinAnalyst
app.
Introducing Philips’ first ever complete shaving and
skincare system. Assess and measure the
condition of your skin, personalize your FaceSmart
shaving and cleansing settings, and best of all,
receive daily skincare advice tailored to you.
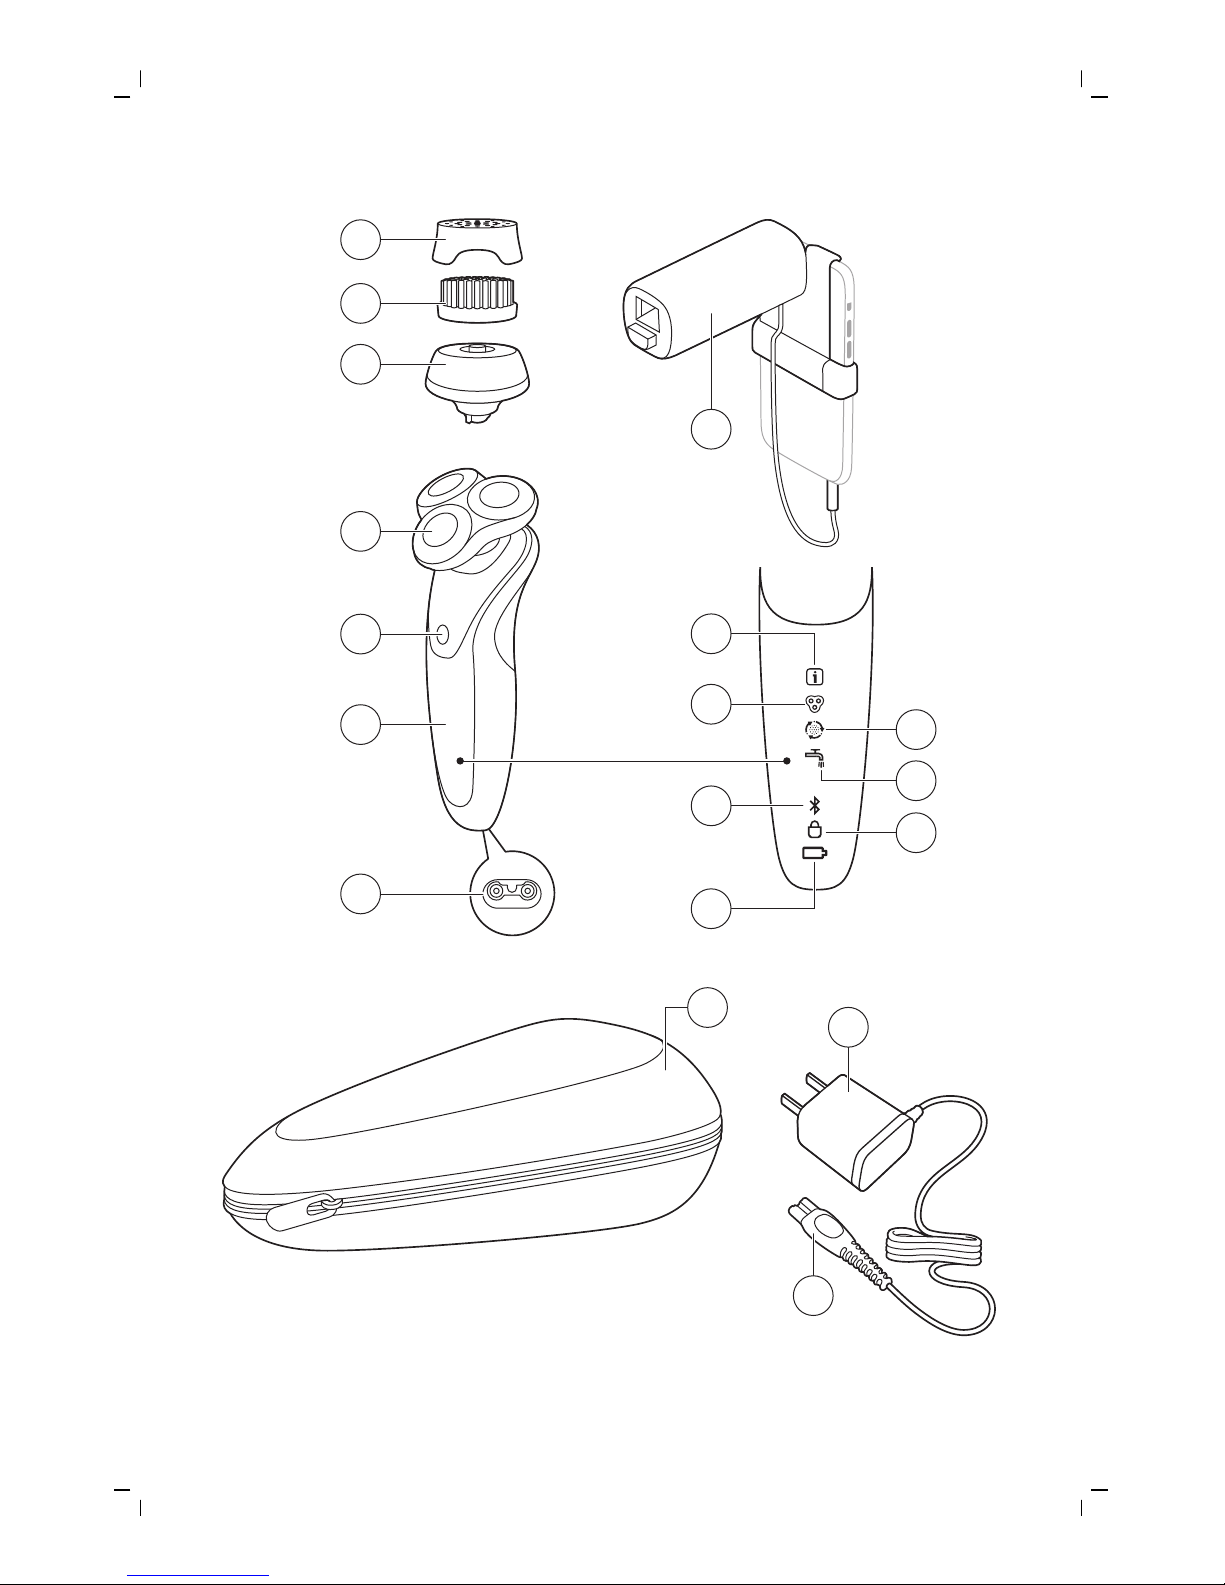
General description (Fig. 1)
1 Protection cap for cleansing brush
2 Cleansing brush
3 Cleansing brush base
4 Shaving unit
5 On/off button
6 Handle
7 Socket for small plug
8 SkinAnalyst sensor
9 Notification symbol
10 Shaving unit detector
11 Cleansing brush detector
12 Cleaning reminder
13 Bluetooth® symbol
14 Travel lock symbol
15 Battery charge indicator
16 Pouch
17 Supply unit (adapter)
18 Small plug
Consult the quick start guide and app for
instructions on how to connect the
SkinAnalyst sensor with the app and on how
to use the app to get personalized skincare
advice.
6
English
Page 7

Read this important information carefully before
you use the shaver, the Skinanalyst sensor and
save it for future reference. The accessories
supplied may vary for different products.
Danger
- Keep the supply unit dry.
Warning
- To charge the battery, only use the detachable
supply unit (type HQ8505) provided with the
shaver.
- The supply unit contains a transformer. Do not
cut off the supply unit to replace it with another
plug, as this causes a hazardous situation.
- The shaver and SkinAnalyst sensor can be used
by children aged from 8 years and above and
persons with reduced physical, sensory or
mental capabilities or lack of experience and
knowledge if they have been given supervision
or instruction concerning use of both
appliances in a safe way and understand the
hazards involved. Children shall not play with
the shaver. Cleaning and user maintenance
shall not be made by children without
supervision.
- Always unplug the shaver before you clean it
under the tap.
- Always check the shaver and SkinAnalyst
sensor before you use it. Do not use it if it is
damaged, as this may cause injury. Always
replace a damaged part with one of the original
type.
7
English
Page 8
- Do not open the shaver to replace the
rechargeable battery.
Caution
- Never use water hotter than 80°C to rinse the
shaver.
- Never rinse the SkinAnalyst sensor under the
tap.
- Only use the shaver and the SkinAnalyst sensor
for its intended purpose as shown in the user
manual.
- For hygienic reasons, the shaver should only be
used by one person.
- Never use compressed air, scouring pads,
abrasive cleaning agents or aggressive liquids
such as petrol or acetone to clean the shaver.
- Water may drip from the socket at the bottom
of the shaver when you rinse it. This is normal
and not dangerous because all electronics are
enclosed in a sealed power unit inside the
shaver.
- Do not use the supply unit in or near wall
sockets that contain an electric air freshener to
prevent irreparable damage to the supply unit.
- Keep your iPhone away from water and moist
environments.
- The shortwave radio frequency signals of a
Bluetooth shaver may impair the operation of
other electronic and medical devices.
8
English
Page 9

- Do not use the shaver in medical facilities,
aircraft, refuelling points, close to automatic
doors, automatic fire alarms or other
automatically controlled devices.
- Switch off Bluetooth where it is prohibited.
- Keep this shaver at least 20 cm from
pacemakers and other medical devices. Radio
waves may impair the operation of pacemakers
and other medical devices.
Electromagnetic fields (EMF)
- This Philips shaver complies with all shaver
standards and regulations regarding exposure
to electromagnetic fields.
General
- This shaver is waterproof. It is suitable for use in
the bath or shower and for cleaning under the
tap. For safety reasons, the shaver can
therefore only be used without cord.
- The shaver is suitable for mains voltages
ranging from 100 to 240 volts.
- The supply unit transforms 100-240 volts to a
safe low voltage of less than 24 volts.
- The frequency band in which the shaver
operates is 2.4 GHz.
- The maximum radio frequency power radiated
in the frequency band in which the shaver
operates is <10dBm.
9
English
Page 10
The display
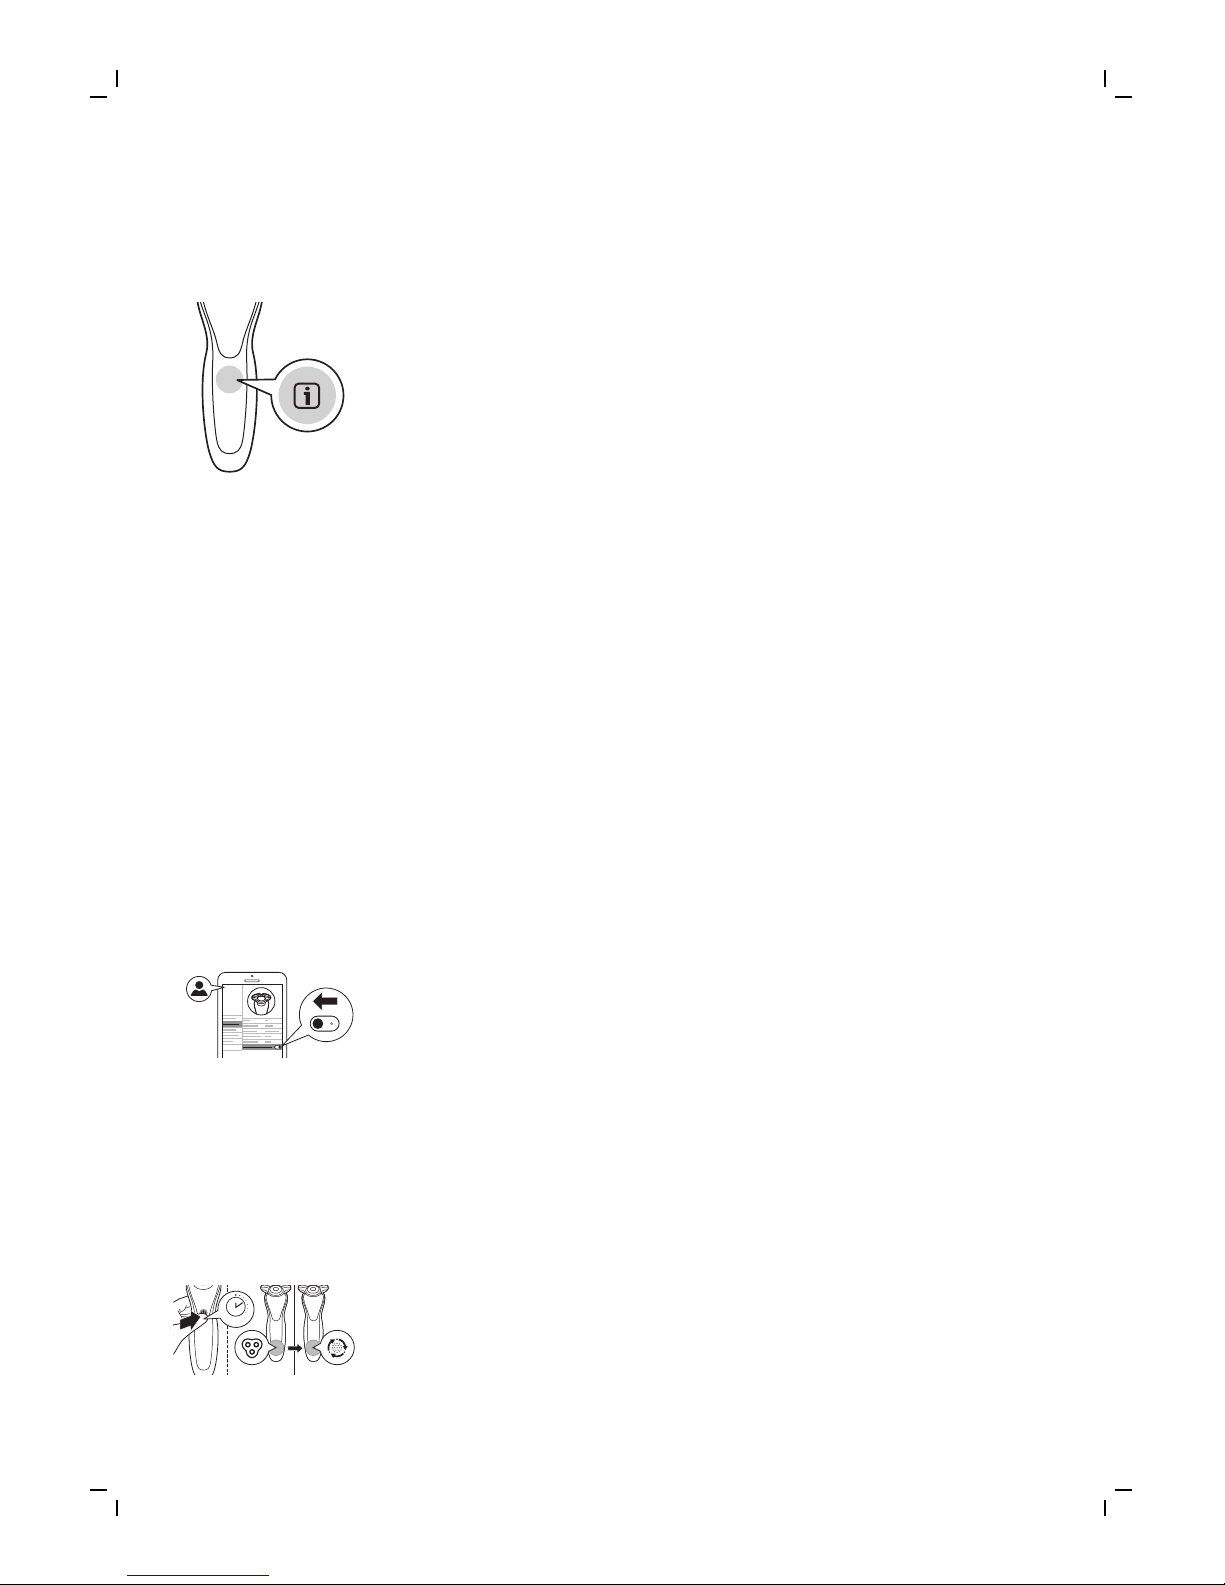
'Notification' symbol
The shaver is equipped with a notification symbol.
This symbol lights up when important advice is
available in the app. Go to the app to obtain this
advice. It reminds you to unplug the shaver before
you switch it on and to clean it for optimal
performance. It also reminds you to replace the
shaving heads every two years or the cleansing
brush every three months.
Attachment detection feature
When you have paired your iPhone with the
shaver, the attachment detection feature is
activated. Every time you switch on the shaver, this
feature automatically recognizes the attachment
(shaving unit/cleansing brush) that is attached to
the shaver handle and adapts the settings
accordingly. Unpairing of your iPhone and the
shaver deactivates this feature.
Manually select attachment
Make sure your shaver is connected to your
iPhone. The SkinAnalyst app also offers the
possibility to (de)activate the Attachment
detection feature. You can do this by going to My
profile, My shaver and switching off the Auto
attachment detection. You can then manually
select the brush attachment, by switching on the
shaver and press and hold the on/off button for
one second.
1 sec.
10
English
Page 11

Shaving unit detector
The shaving unit detector lights up to indicate that
the shaving unit has been attached to the handle.
Cleansing brush detector
The cleansing brush detector lights up to indicate
that the cleansing brush has been detected.
Cleaning reminder
When you switch off the shaver, the cleaning
reminder flashes to remind you to clean the
shaver. Clean the shaver and the attachments after
each use for optimal performance.
Bluetooth®
The shaver is equipped with Bluetooth 4.0 to
connect your shaver to the app on your iPhone.
Bluetooth is automatically activated when you
switch on the shaver for the first time. You can only
deactivate it by switching on the travel lock.
Travel lock
You can lock the shaver when you are going to
travel. The travel lock prevents the shaver from
being switched on by accident. The travel lock also
deactivates Bluetooth.
11
English
Page 12
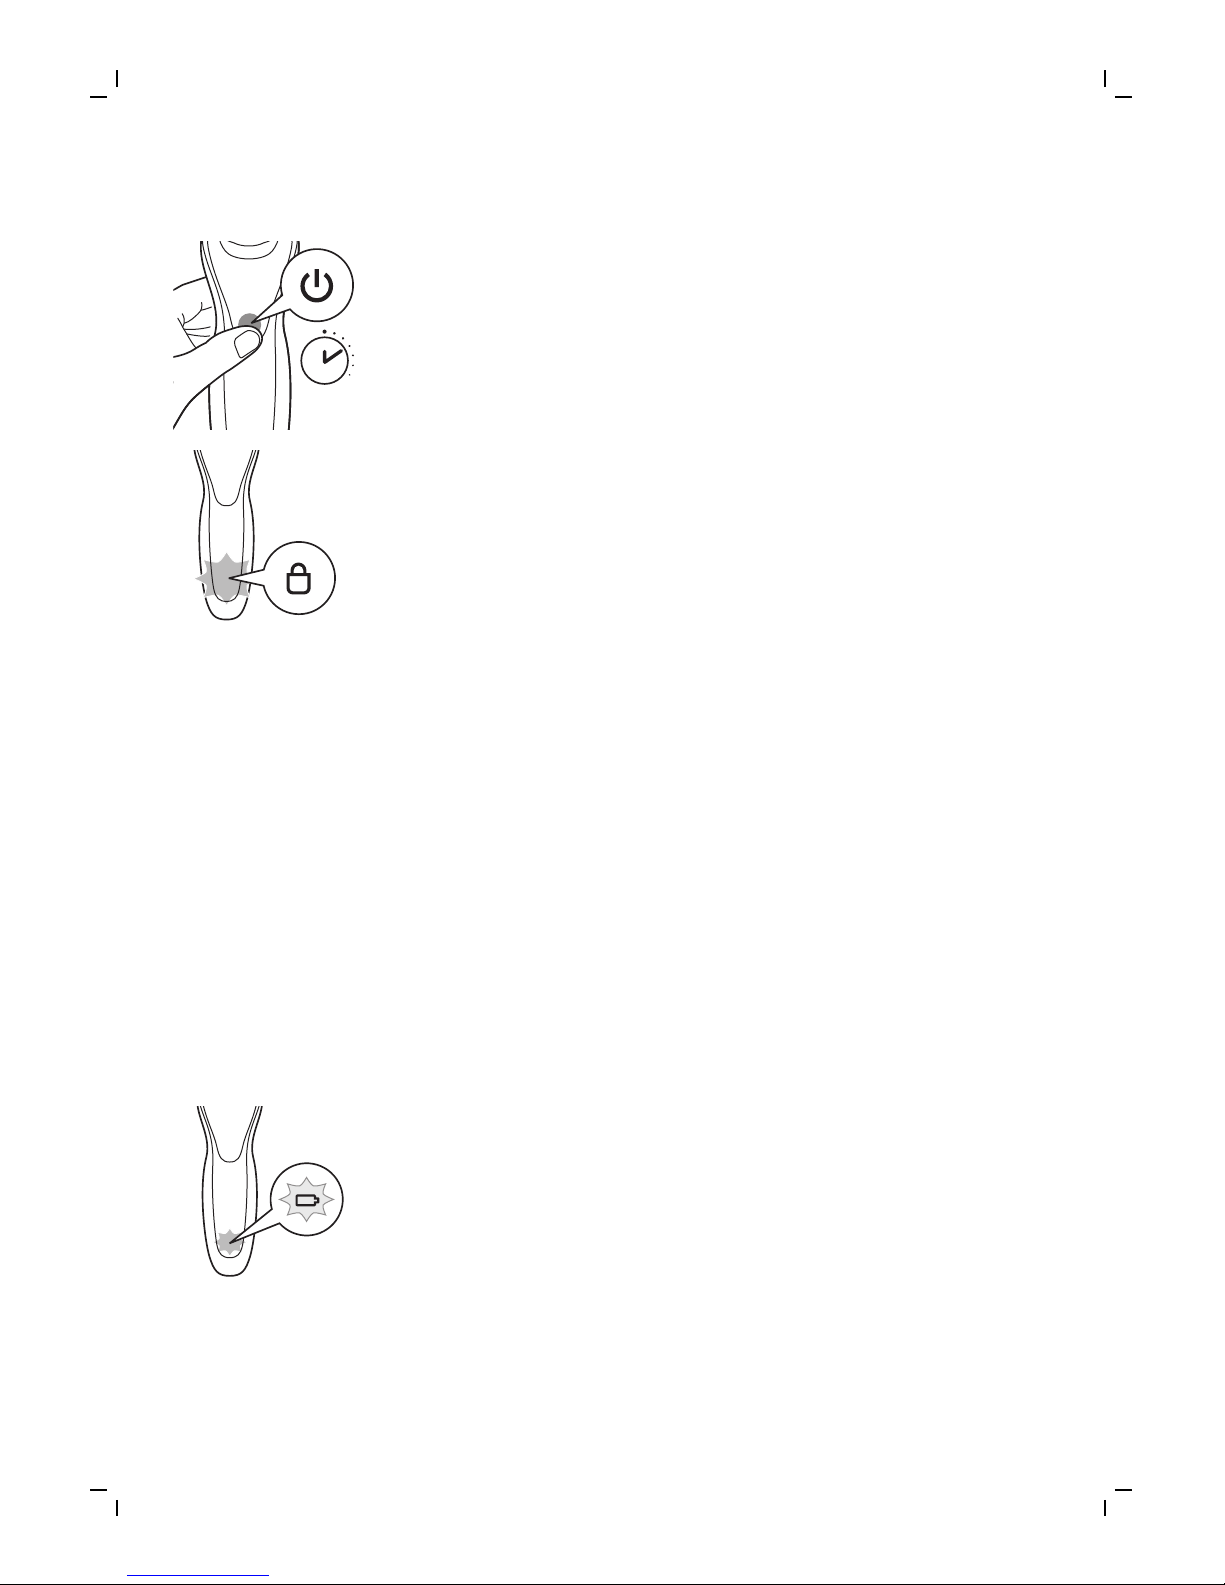
Activating the travel lock
3 sec.
1 Press the on/off button for 3 seconds to enter
the travel lock mode.
While you activate the travel lock, the travel lock
symbol flashes. When the travel lock is activated,
the travel lock symbol lights up continuously.
Deactivating the travel lock
1 Press the on/off button for 3 seconds.
The travel lock symbol flashes and then goes out.
The shaver is now ready for use and Bluetooth is
activated again.
Charging
Battery charge indicator
Charging takes approx. 1 hour.
Quick charge: When the battery is empty and you
connect the shaver to the wall socket, the battery
charge indicator flashes quickly. When the shaver
contains enough energy for one shaving or
cleansing session, the battery charge indicator
starts flashing slowly..
While the shaver continues to charge, the battery
charge indicator flashes slowly until the battery is
fully charged.
12
English
Page 13
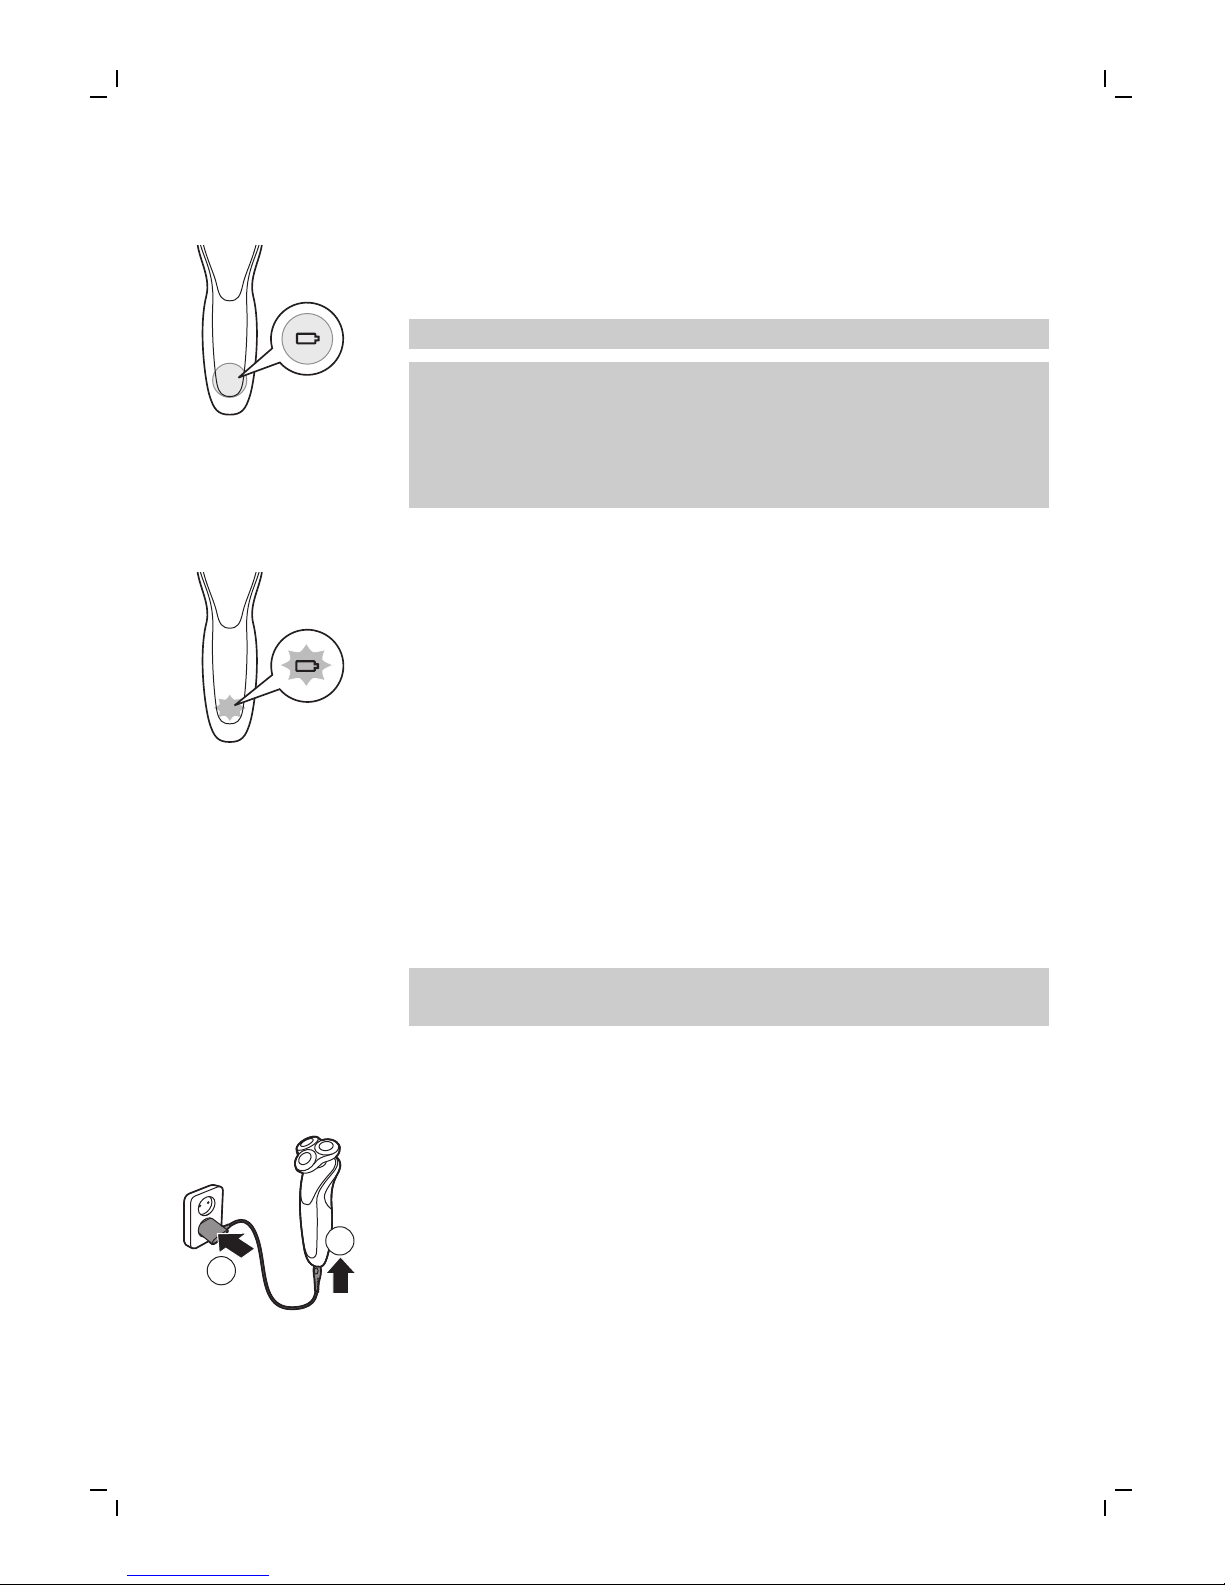
Battery fully charged
When the battery is fully charged, the battery
charge indicator lights up blue continuously.
Note: The shaver can only be used without cord.
Note: When the battery is full, the display switches
off automatically after 30 minutes. If you press the
on/off button during charging, the notification
symbol lights up blue to remind you that you have
to disconnect the shaver from the wall socket.
Battery low
When the battery is almost empty, the battery
charge indicator flashes orange.
When the battery is completely empty, the battery
charge indicator flashes orange quickly.
Charging
Charging takes approx. 1 hour.
Charge the shaver before first use and when the
display indicates that the battery is almost empty.
Note: You can charge the shaver after every use.
This will not harm the battery.
Charging with the supply unit
1 Make sure the shaver is switched off.
1
2
2 Insert the small plug into the shaver and put the
supply unit in the wall socket.
3 After charging, remove the supply unit from the
wall socket and pull the small plug out of the
shaver.
13
English
Page 14
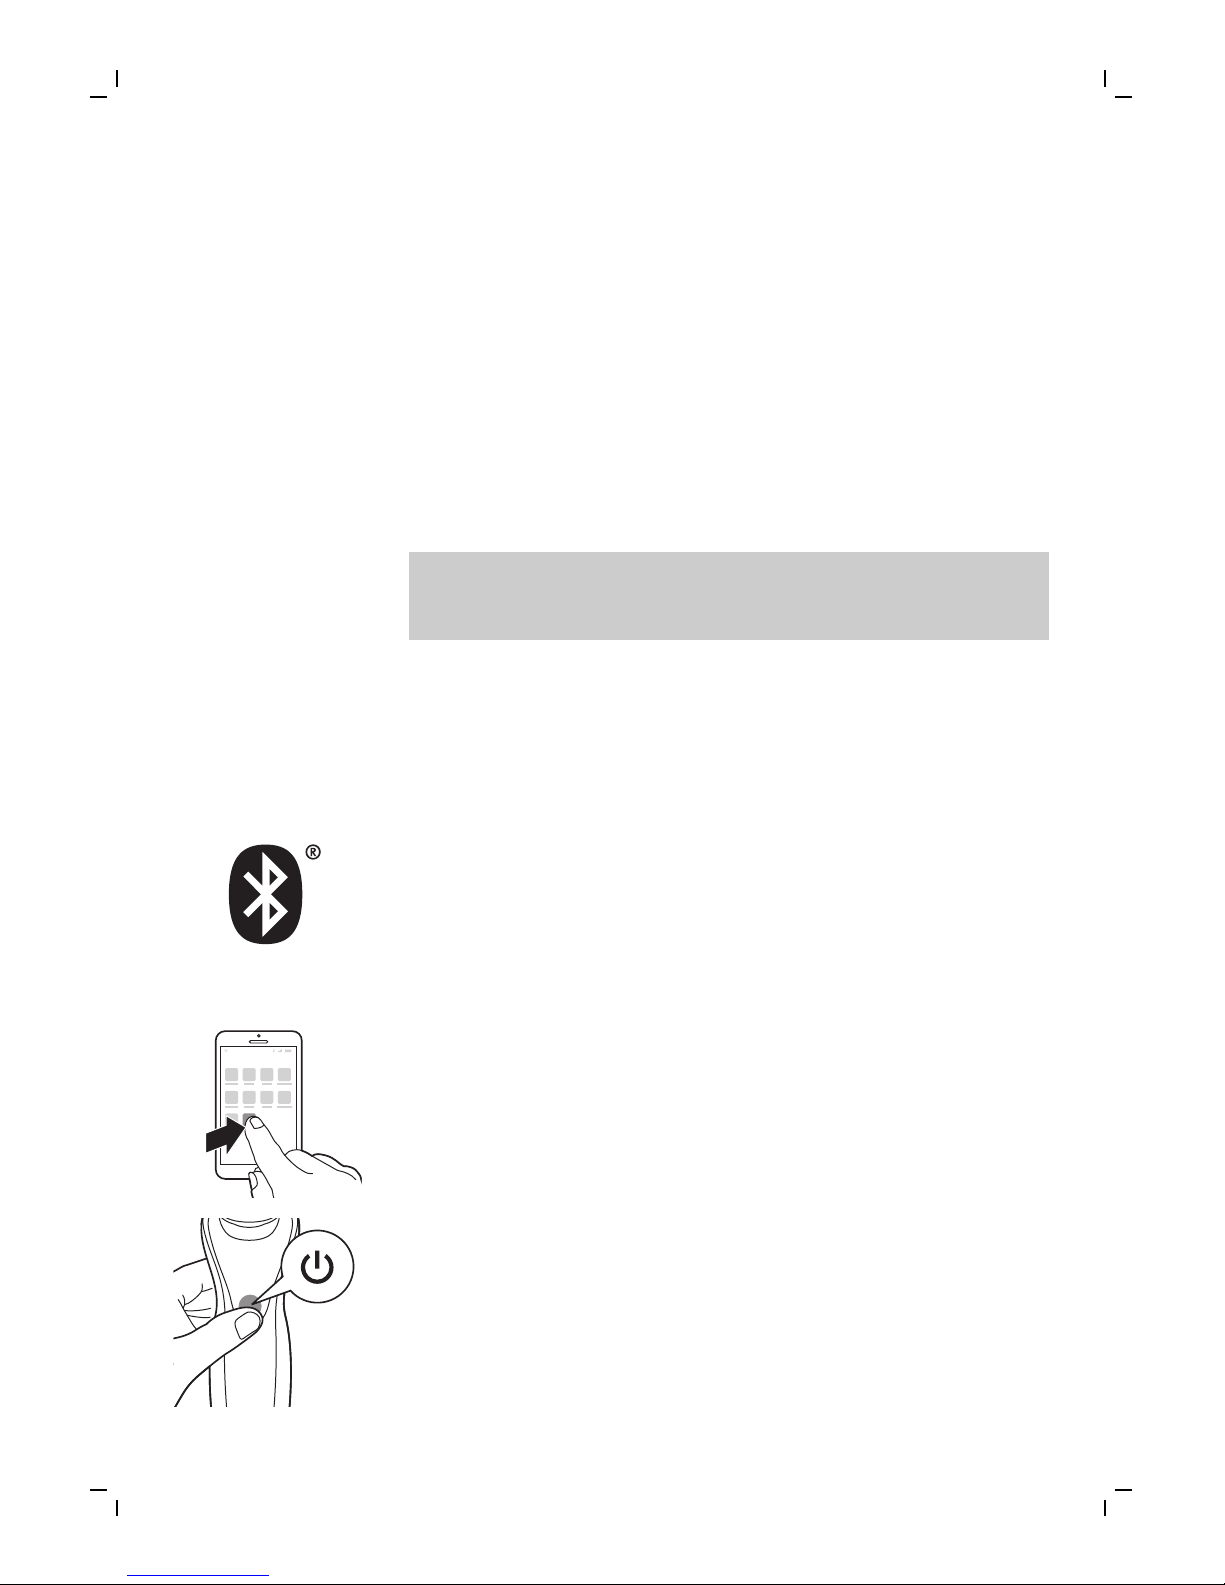
Preparing for use
Pairing the shaver and your iPhone
For this shaver a special app is available. You can
download the SkinAnalyst app from the App store.
By using the app, your skincare and shaving
routine will be personalized. The app gives you
expert advice based on your skin, shaving method,
local weather conditions, etc. to support your daily
skincare and shaving routine.
Note: The app is available for iPhone 6, iPhone 6
Plus, iPhone 6S and iPhone 6S Plus equipped with
iOS9 or higher.
To create a secure and safe connection, first the
shaver and your iPhone need to be paired once.
1 Download the SkinAnalyst app from the App
store.
2 Make sure Bluetooth on your iPhone is
switched on.
S7920
3 Open the app on your iPhone.
4 Follow the instructions in the app. After you
have filled in the skin assessment, the app asks
you to pair your iPhone with the shaver.
5 Switch on the shaver. Bluetooth is activated
automatically.
14
English
Page 15

6 In the app, the pop-up message 'press pair'
appears. When your iPhone and the shaver
have been paired successfully, the Bluetooth
symbol flashes briefly and then goes out. If this
does not happen, please see 'Troubleshooting'.
7 Once the shaver and the app have been paired,
the shaver automatically selects the right
personal settings depending on the attachment
you have clicked on. During shaving or
cleansing, you can open the app to see the
settings you are using and the duration of the
shaving or cleansing session.
Note: When you use the shaver, keep your
iPhone and shaver within transmission range
(no more than 5 meters from each other, in the
same room).
Using the shaver
Using the SkinAnalyst sensor
1 Open the app before measuring your skin.
1
2
2 If you have an iPhone case, first remove the
case from your iPhone.
3 Pull the clamp of the SkinAnalyst sensor
outwards and gently place your iPhone into the
holder with its camera pointing towards the
opening on the inside of the holder. Be careful
when you attach or remove the SkinAnalyst
sensor to prevent scratches on your iPhone.
Note: The SkinAnalyst sensor can only be used
on iPhone 6, iPhone 6 Plus, iPhone 6S and
iPhone 6S Plus equipped with iOS9 or higher.
15
English
Page 16
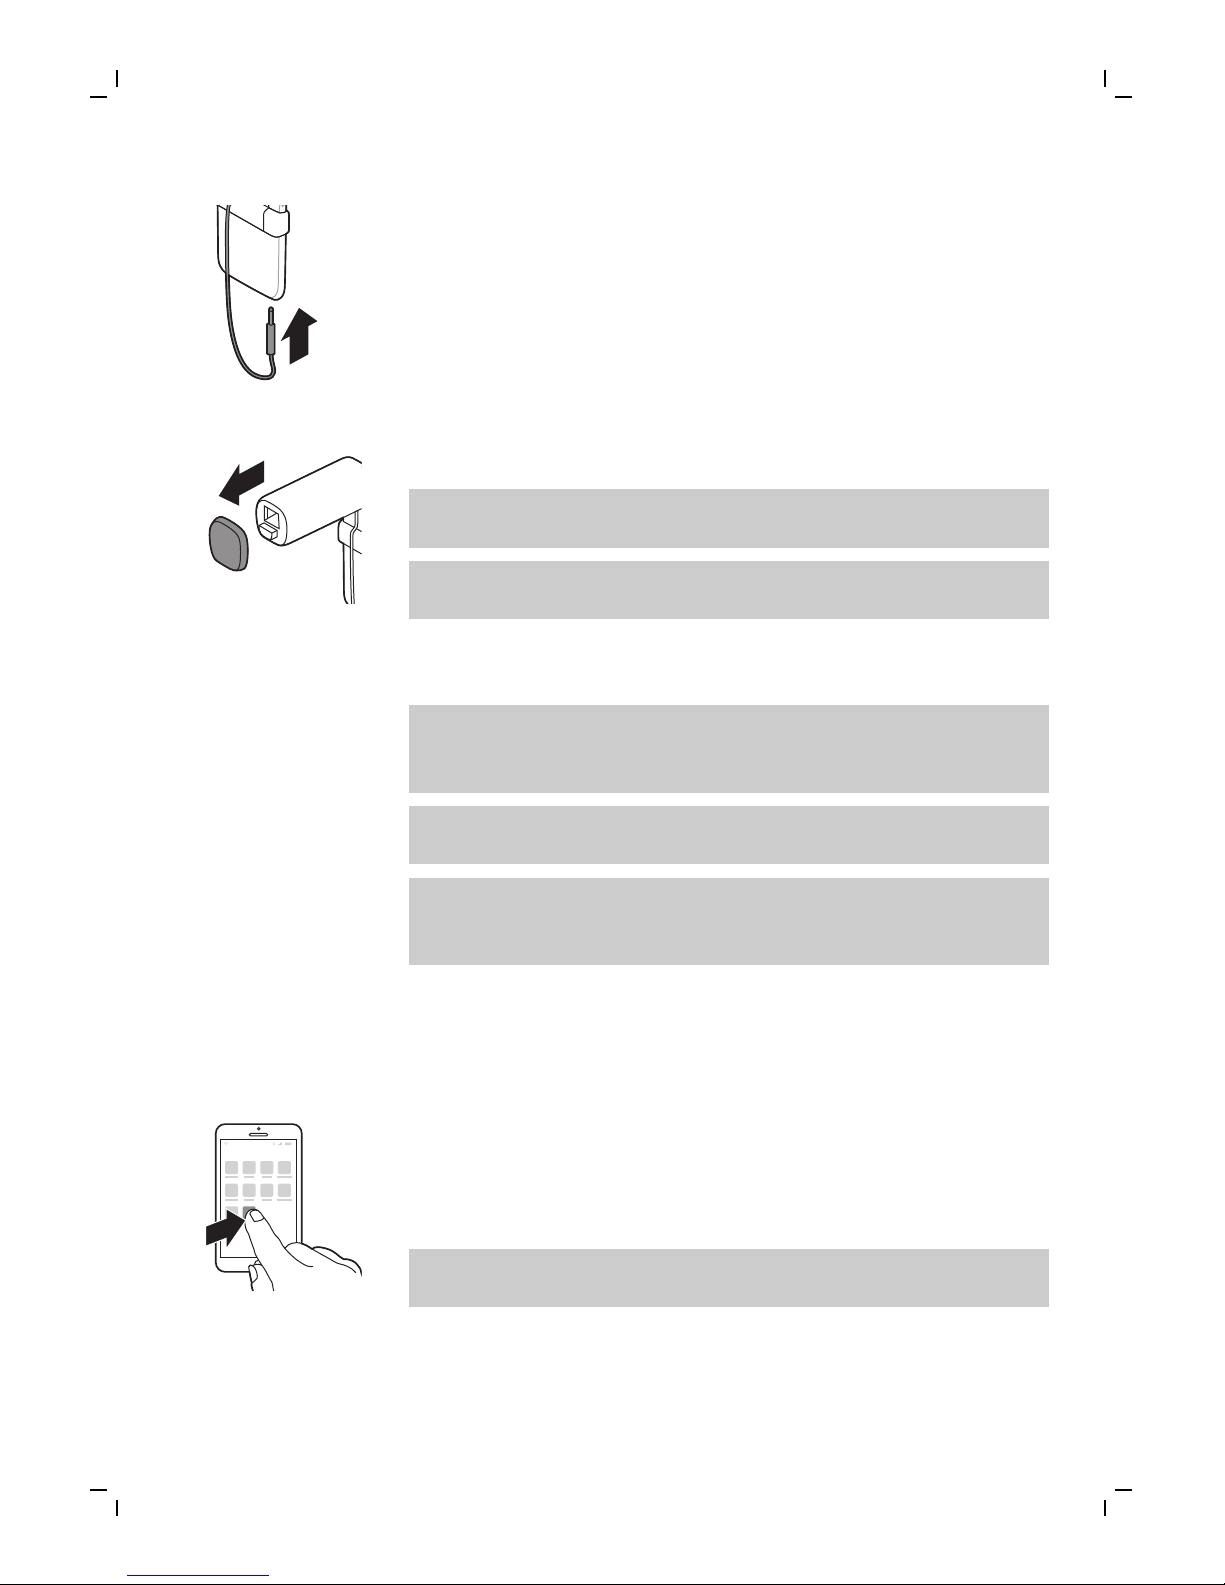
4 Insert the jack plug of the SkinAnalyst sensor
into your iPhone.
5 Remove the protection cap from the
SkinAnalyst sensor.
Note: Above instructions are also shown in the
app.
The SkinAnalyst sensor only works if you
remove the case of your iPhone.
6 Follow the instructions in the app to measure
your skin.
Note: Keep the SkinAnalyst sensor placed on
the skin during measurement to avoid flashing
into your eyes.
-Do not look into the sensor before and after
skin measurement.
-When you take a picture of the skin, please
position the sensor flat onto your skin so to
ensure it can take a clear picture of your skin.
Connecting with the shaver
1 Make sure Bluetooth on your iPhone is
switched on.
S7920
2 Open the app on your iPhone.
3 When paired, the shaver and the app connect
automatically. You can now start with your daily
skincare routine.
Note: Make sure you have a good internet
connection to fully benefit from the app.
4 Synchronize the shaving and cleansing data on
the shaver and the app (see 'Synchronizing your
shaves and cleansing treatments').
16
English
Page 17
5 Keep your iPhone and shaver close to each
other in order to stay connected.
Caution: Do not use your iPhone in moist
surroundings. Moisture and water can damage
your iPhone.
Switching the shaver on and off
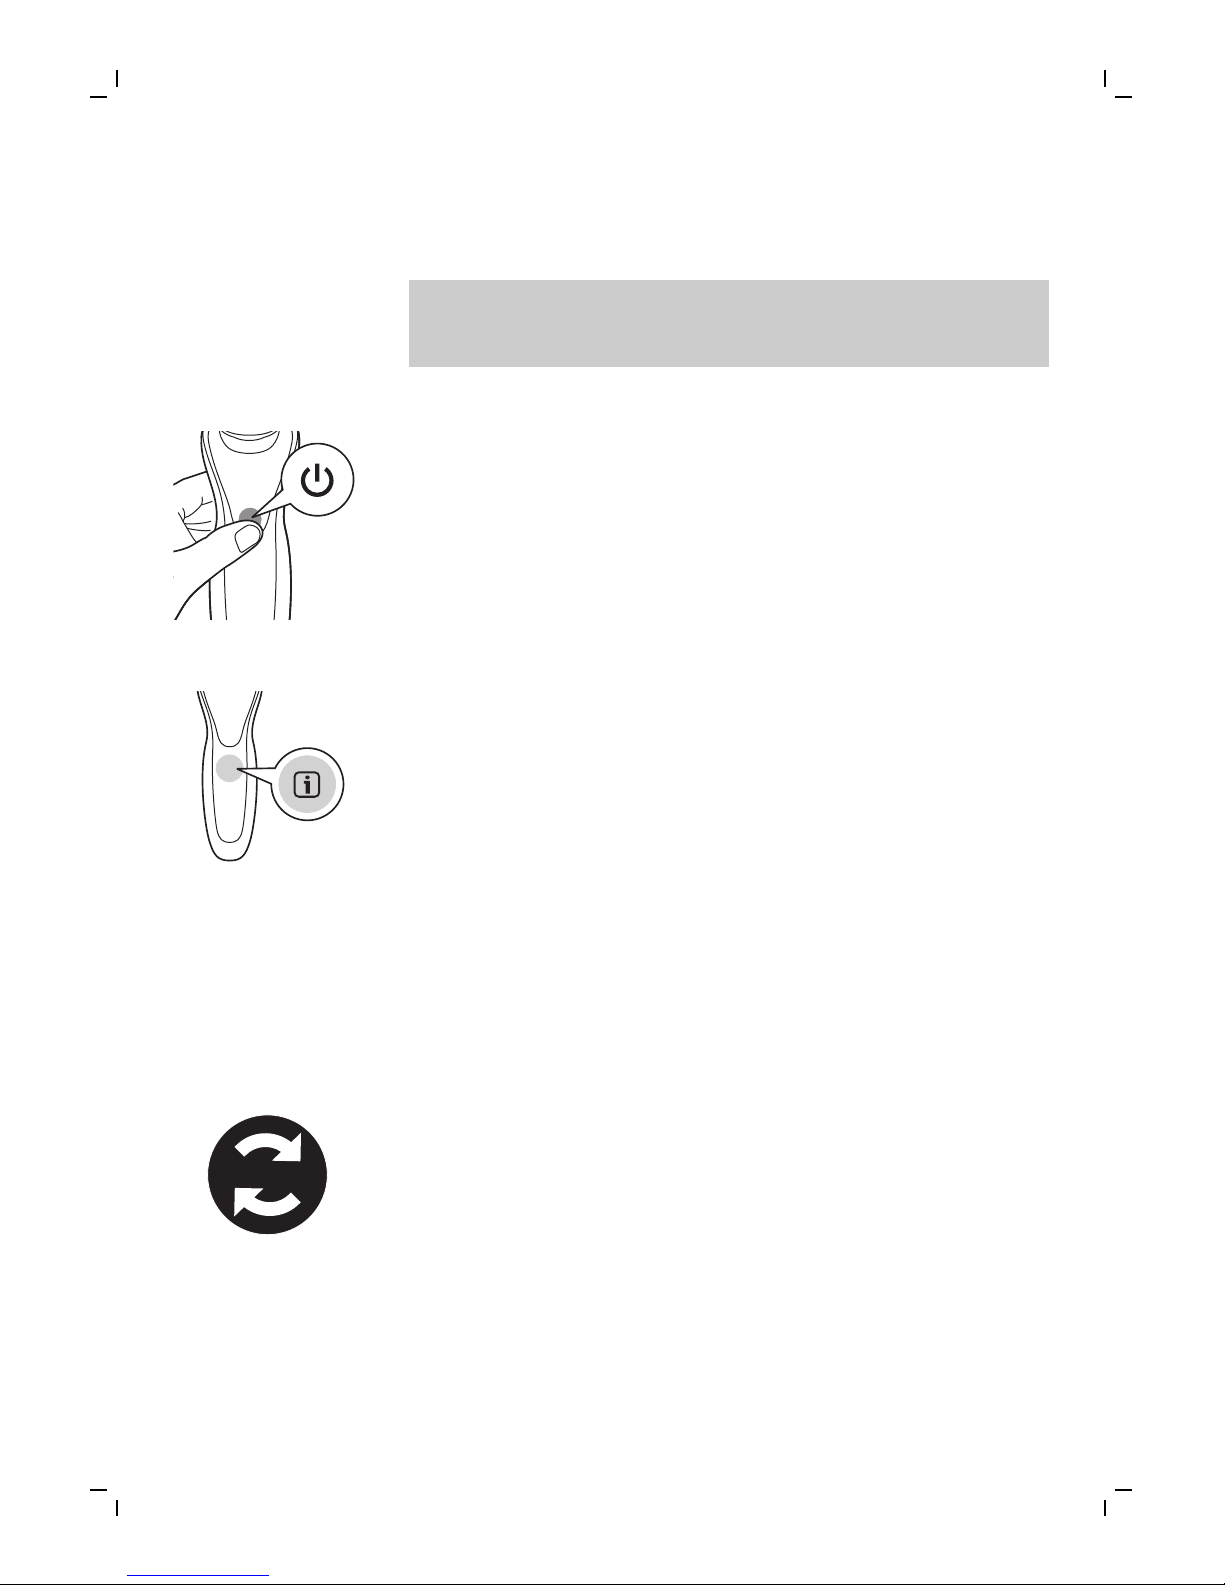
1 To switch on the shaver, press the on/off
button once.
2 To switch off the shaver, press the on/off
button once.
Synchronizing your shaves and cleansing treatments
In order to benefit optimally from the treatments,
you have to synchronize your treatments regularly.
The shaver can store up to 15 shaves and/or
cleansing treatments, so make sure you
synchronize the shaver at least once after every 15
treatments. As an extra reminder, the notification
symbol flashes every 9 treatments, without a
connection between the shaver and the app, to
tell you to connect with the app.
1 Open the app and make sure you are close to
the shaver.
2 The app connects with the shaver automatically
and synchronizes your last shaves or cleansing
treatments.
17
English
Page 18

Using the attachments
Note: Attach the cleansing brush on the cleansing
brush base first, before you place it on the shaver.
Removing or attaching the attachments
1 Make sure the shaver is switched off.
2 Pull the attachment straight off the shaver.
Note: Do not twist the attachment while you
pull it off the shaver.
3 Insert the lug of the attachment into the slot in
the top of the shaver. Then press down the
attachment to attach it to the shaver (‘click’).
Using the cleansing brush
Use the rotating cleansing brush with your daily
cleansing cream. The cleansing brush removes oil
and dirt, contributing to a healthy and oil-free skin.
We advise you to use it no more than twice a day.
It is recommended not to use the cleansing brush
directly after shaving to prevent skin irritation. For
better shaving results, use the cleansing brush
before shaving.
Caution: Do not use the shaver on damaged or
irritated skin or on wounds.
1 Attach the cleansing brush to the shaver ('click').
18
English
Page 19

2 Moisten the cleansing brush with water.
Note: Do not use the shaver with a dry
cleansing brush, as this can irritate the skin.
3 Moisten your face with water and apply a
cleanser to your face.
4 Place the cleansing brush on your cheek.
5 Switch on the shaver.
20 sec.
6 Gently move the cleansing brush across your
skin from the nose towards the ear. Do not
push the cleansing brush too hard onto the skin
to make sure the treatment remains
comfortable.
Note: Do not cleanse the sensitive area around
your eyes.
20 sec.
7 After approx. 15-20 seconds (depending on the
selected setting), the shaver pulsates twice to
indicate that you have to move the shaver to
your other cheek. Start cleansing this part of
your face. After approx. 15-20 seconds, move
the shaver to your other cheek and start
cleansing this part of your face.
20 sec.
8 After approx. 15-20 seconds, the shaver
pulsates twice to indicate that you have to
move the shaver to your forehead. Start
cleansing this part of your face. Gently move
the brush head from left to right. The shaver
stops automatically after it has completed the
program for the entire face.
19
English
Page 20

Note: We advise you to not overdo the
cleansing and to not cleanse any zone longer
than 15-20 seconds.
9 After the treatment, rinse and dry your
face.Your face is now ready for the next step of
your daily skincare routine.
10 Clean the cleansing brush after use.
Cleansing brush settings
The app has a feature that allows you to
personalize you cleansing settings. Go the Usage
Tracker and change the cleansing brush settings.
You can adjust the settings and choose between
four settings depending on your personal
cleansing needs: sensitive, dry, normal or oily.
Using the shaving unit
Note: This shaver can only be used without cord.
Skin adaptation period
Your first shaves may not bring you the result you
expect and your skin may even become slightly
irritated. This is normal. Your skin and beard need
time to adapt to any new shaving system. We
advise you to follow the advice provided by the
app and shave regularly (at least 3 times a week)
with this shaver for a period of 4 weeks to allow
your skin to adapt to the new shaver.
Dry shaving
1 Switch on the shaver.
2 Move the shaving heads over your skin in
circular movements to catch all hairs growing in
different directions. Make sure each shaving
head is fully in contact with the skin. Exert
gentle pressure for a close, comfortable shave.
20
English
Page 21
Note: Do not press too hard, this can cause skin
irritation.
3 Clean the shaver after use.
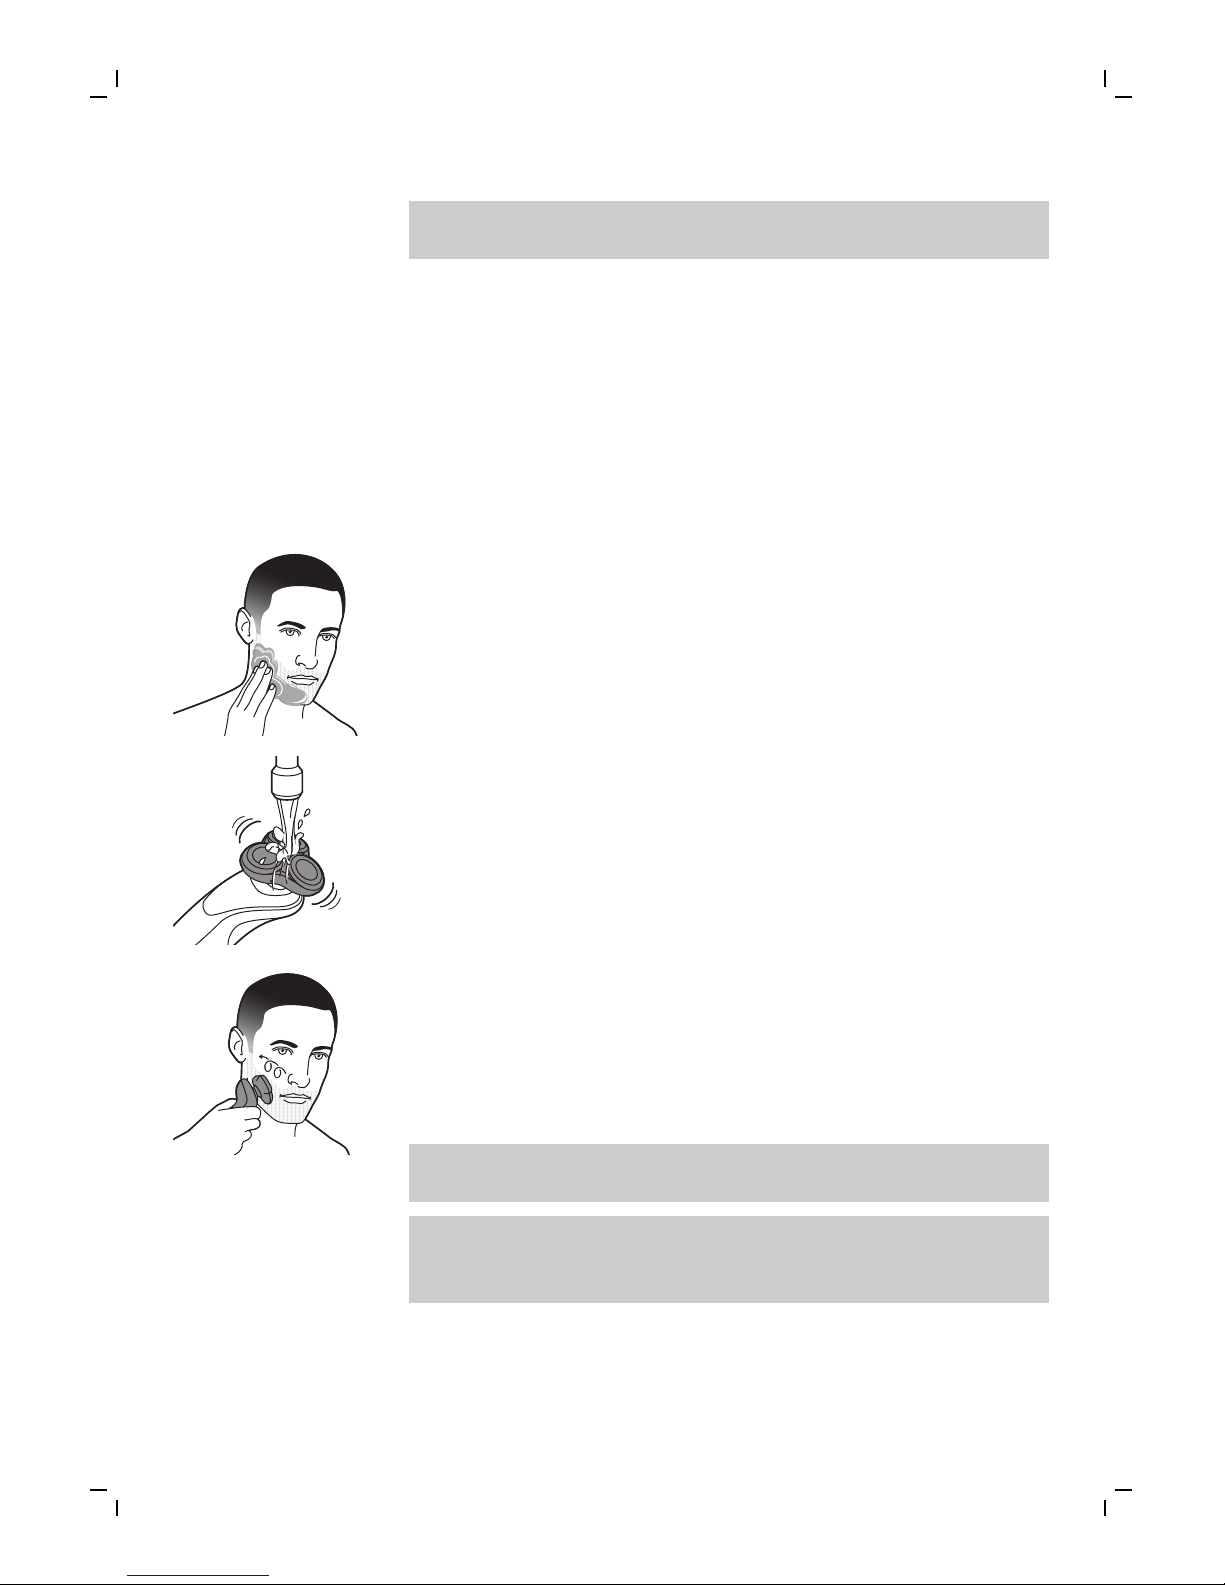
Wet shaving
You can also use this shaver on a wet face with
shaving foam or shaving gel.
To shave with shaving foam or shaving gel, follow
the steps below:
1 Apply some water to your skin.
2 Apply shaving foam or shaving gel to your skin.
3 Rinse the shaving unit under the tap to ensure
that the shaving unit glides smoothly over your
skin.
4 Switch on the shaver.
5 Move the shaving heads over your skin in
circular movements to catch all hairs growing in
different directions. Make sure each shaving
head is fully in contact with the skin. Exert
gentle pressure for a close, comfortable shave.
Note: Do not press too hard, this can cause skin
irritation.
Note: Rinse the shaving unit regularly to ensure
that it continues to glide smoothly over your
skin.
6 Dry your face.
7 Clean the shaver after use.
21
English
Page 22

Note: Make sure you rinse all foam or shaving
gel off the shaver.
Shave settings
The app has a feature that allows you to
personalize your shave settings. Go to the Usage
Tracker and change the shaving settings. You can
adjust the settings and choose between three
settings depending on your personal shaving
needs: extra sensitive (xs), sensitive (s) and normal
(n).
Unpairing your shaver and iPhone
Pairing allows a connection between 1 shaver and 1
iPhone. To remove this connection (e.g. when you
have a new iPhone 6, 6 Plus, 6S or 6S Plus
equipped with iOS9 or higher), follow the steps
below:
1 Remove pairing from the app: open the app ->
Go to the menu in the app -> Select 'App
settings' and press 'Remove pairing from app'.
2 Unpair the shaver: press and hold the on/off
button on the handle for approx. 10 seconds to
remove the bond between shaver and app.
Note: The unpairing of the shaver is successful
when the Bluetooth and notification symbol
flash simultaneously (approx. 4 seconds).
3 Unpair your iPhone: choose Settings -> General
-> Bluetooth -> Select the device by pressing (i)
-> and press 'forget devices'.
Cleaning and maintenance
If the shaver and the app are paired, the cleaning
reminder on the shaver lights up after each shave
as an extra reminder to tell you to clean the
shaver.
22
English
Page 23
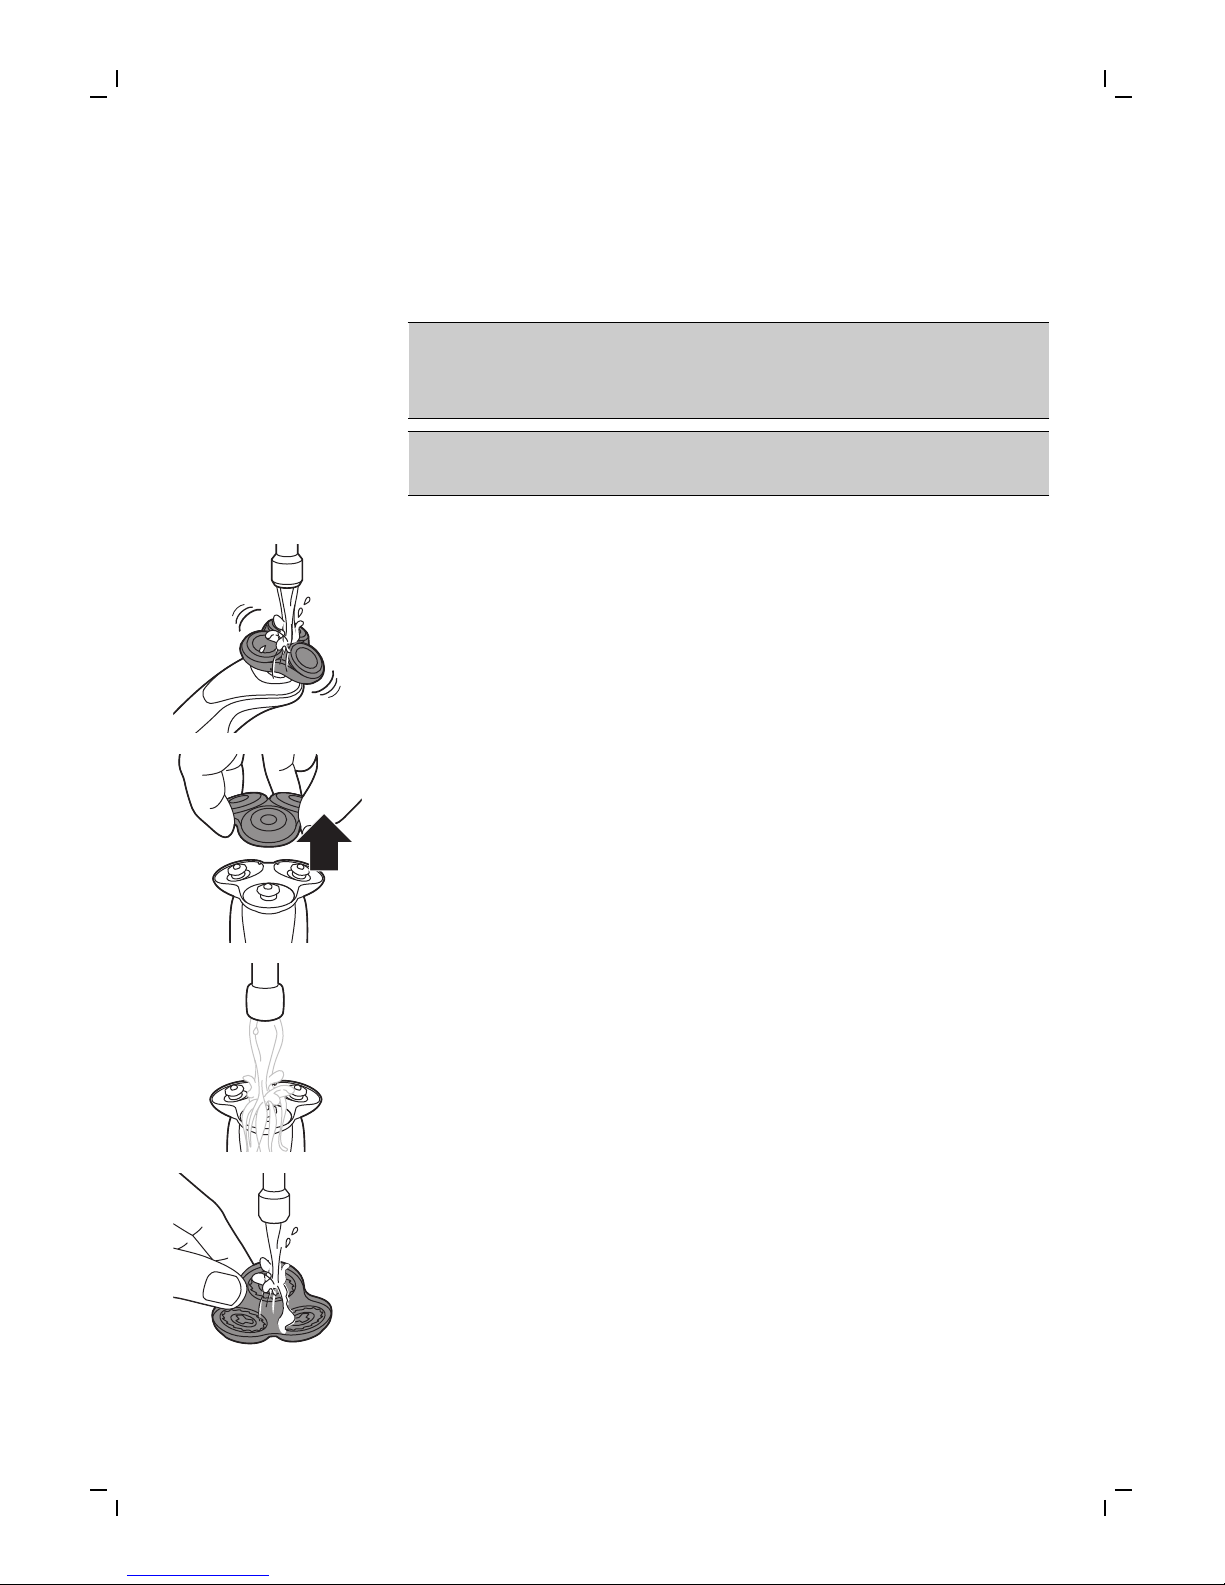
Cleaning the shaving unit under the tap
Clean the shaving unit after every shave for
optimal performance.
Be careful with hot water. Always check if the
water is not too hot, to prevent burning your
hands.
Never dry the shaving unit with a towel or tissue,
as this may damage the shaving heads.
1 Switch on the shaver.
2 Rinse the shaving unit under a warm tap.
3 Switch off the shaver. Pull the shaving head
holder off the bottom part of the shaving unit.
4 Rinse the hair chamber under the tap.
5 Rinse the shaving head holder under a warm
tap.
6 Carefully shake off excess water and let the
shaving head holder air-dry completely.
23
English
Page 24
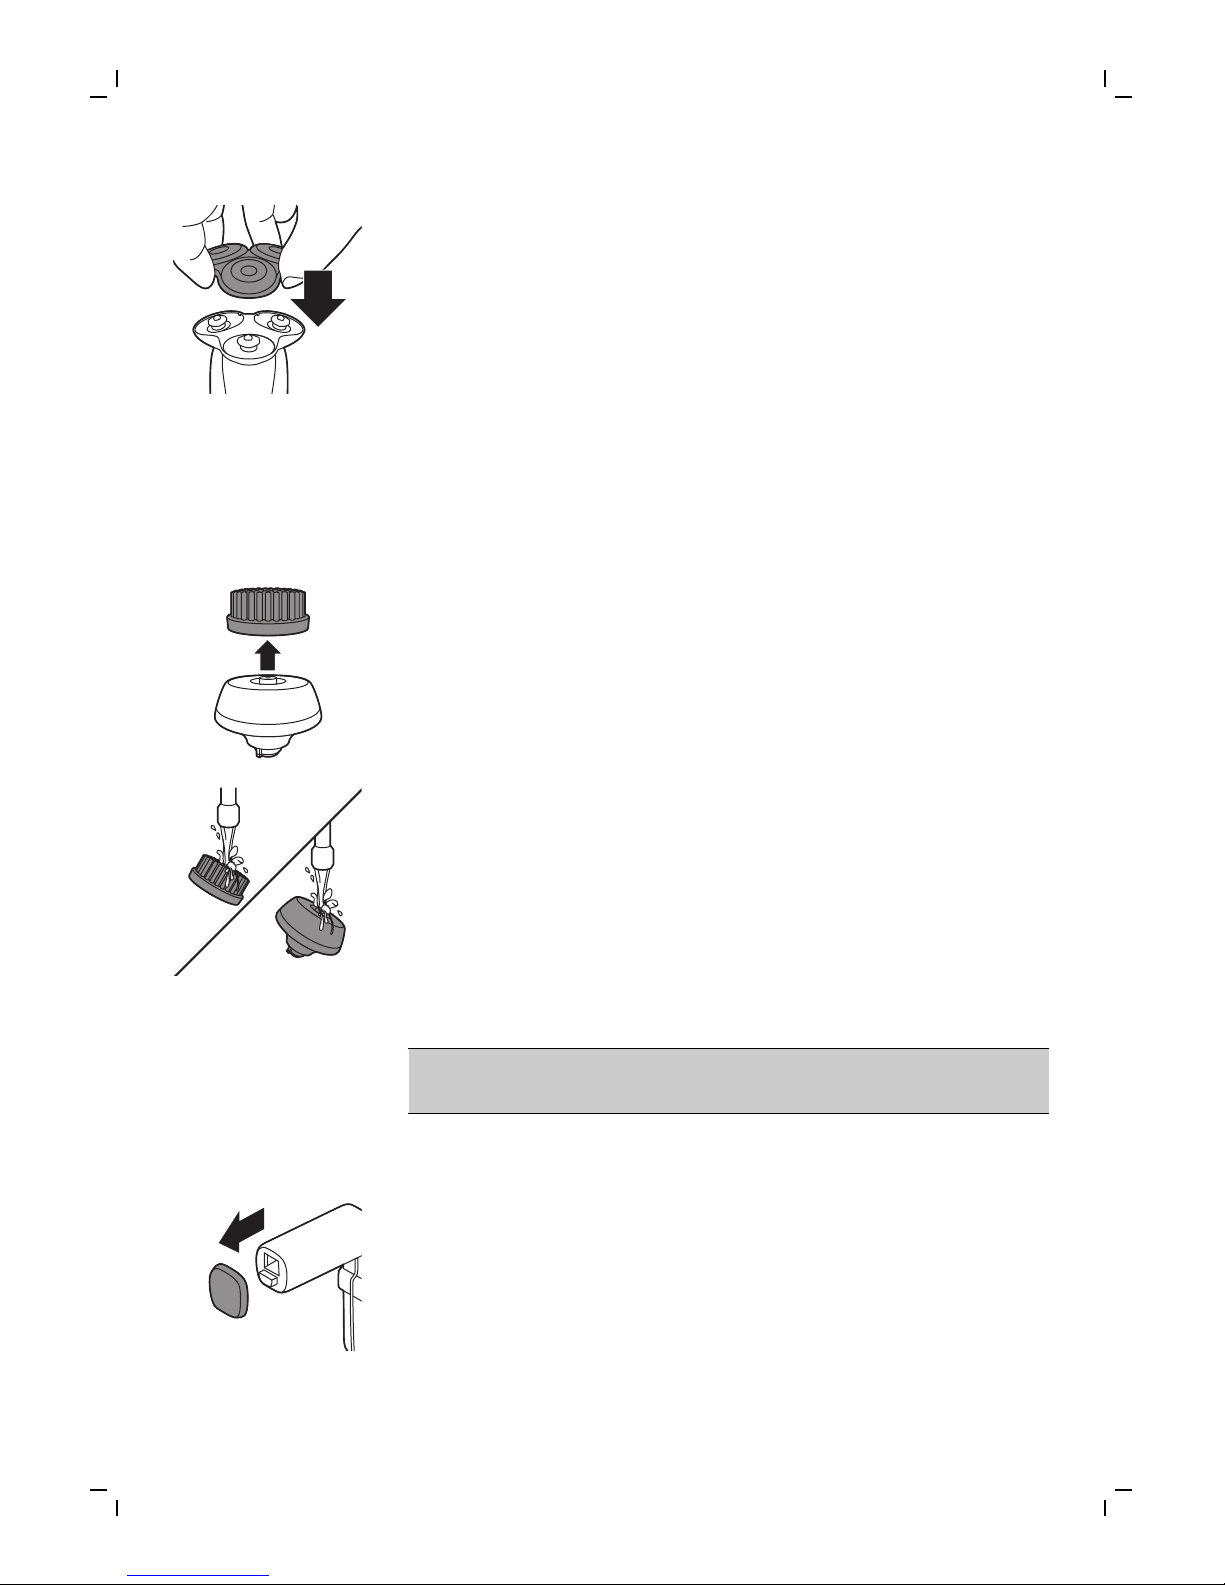
7 Attach the shaving head holder to the bottom
part of the shaving unit (‘click’).
Cleaning the cleansing brush
Clean the cleansing brush every time you have
used it.
1 Switch off the shaver.
2 Detach the brush head from the attachment
holder.
3 Clean the parts thoroughly with warm water
and soap.
4 Dry the cleansing brush with a towel.
Cleaning the SkinAnalyst sensor
Caution: Never clean the SkinAnalyst sensor
under the tap, as this may cause damage.
1 Remove the jack plug of the SkinAnalyst sensor.
2 Detach your iPhone from the SkinAnalyst
sensor.
24
English
Page 25
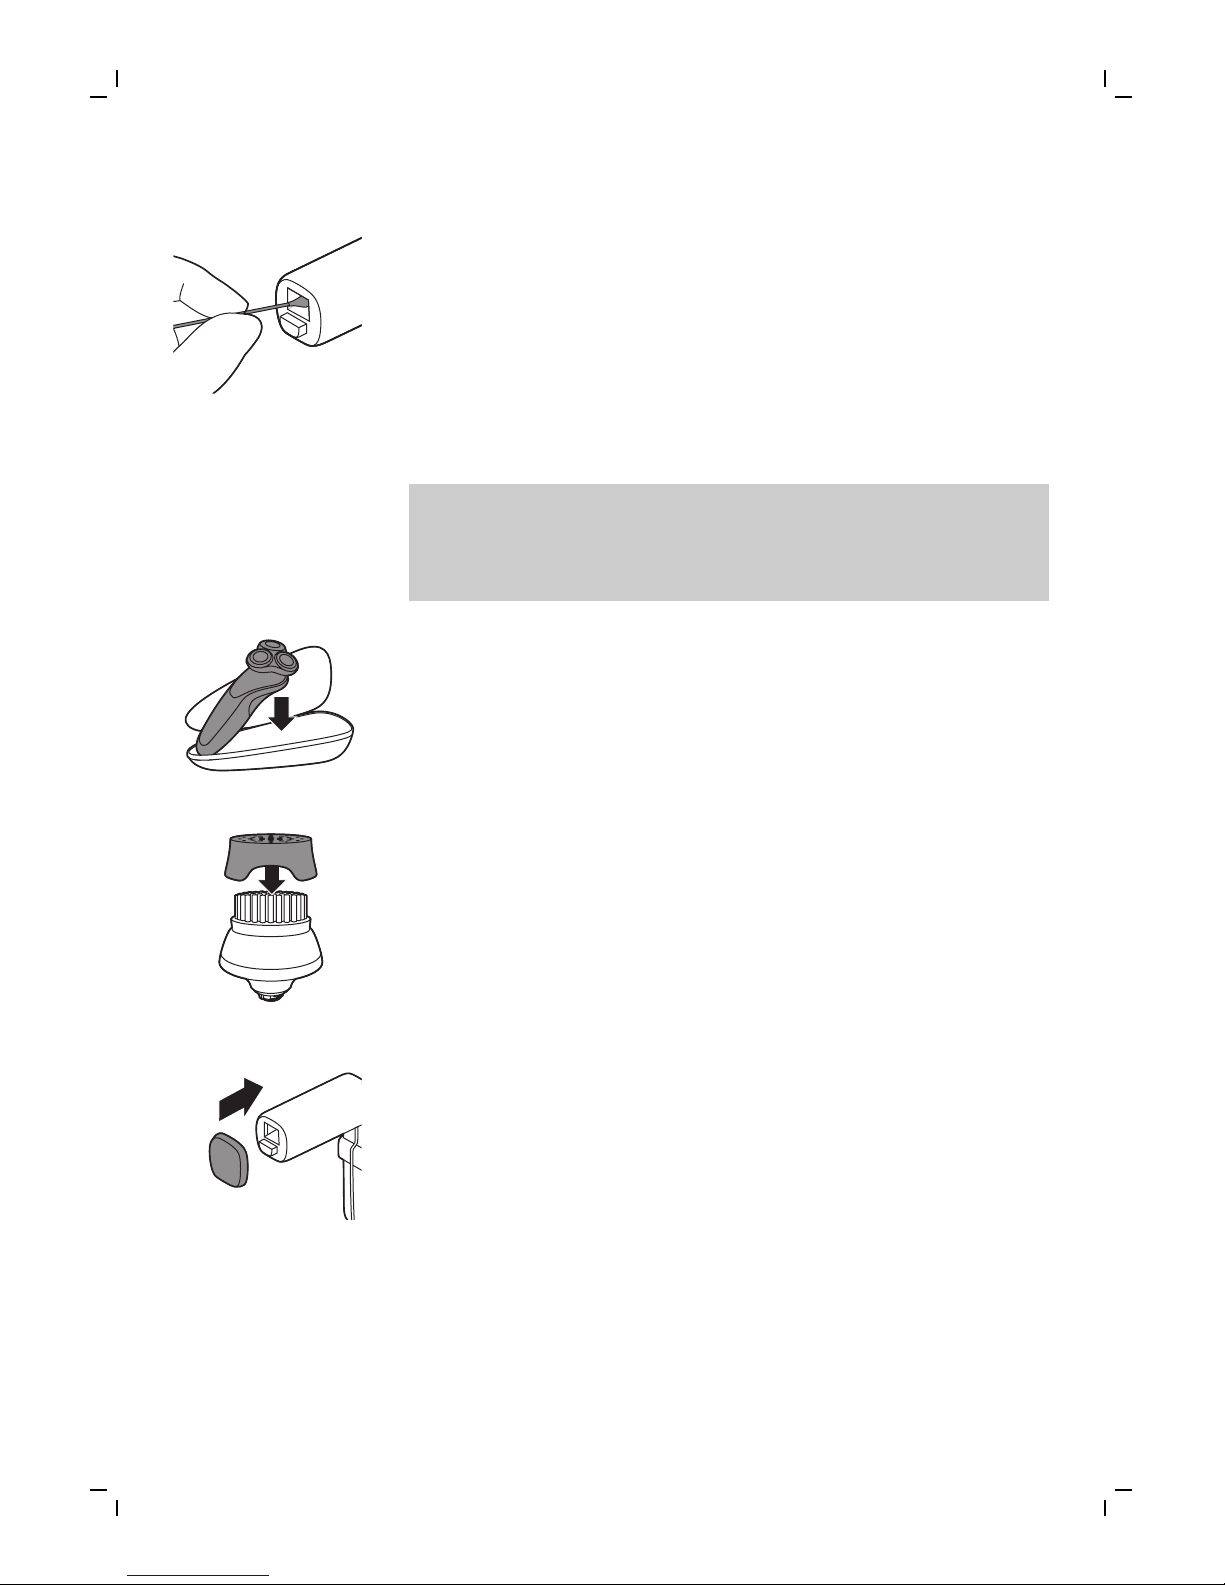
3 Gently clean the two mirror plates inside the
SkinAnalyst sensor with a cotton swab which
has been dipped in alcohol.
4 Dry the mirror plates with a clean cotton swab.
Storage
Note: We advise you to let the shaver and its
attachments dry before you put the protection
caps on the cleansing brush and SkinAnalyst
sensor and store the shaver in the pouch.
- Store the shaver in the pouch supplied.
- Put the protection cap on the cleansing brush
to protect it from dirt accumulation.
- Put the protection cap on the SkinAnalyst
sensor to protect it from dirt accumulation.
25
English
Page 26

Replacement
Replacing the shaving heads
2yrs
As an extra reminder, the notification symbol also
lights up when the shaving heads should be
replaced. This advice is also available in the app.
For maximum shaving performance, we advise you
to replace the shaving heads every two years.
Replace damaged shaving heads immediately.
Always replace the shaving heads with original
Philips shaving heads (see 'Ordering accessories').
1 Switch off the shaver.
2 Pull the shaving head holder off the bottom
part of the shaving unit.
2
1
3 Turn the retaining rings anticlockwise and
remove them. Place them aside in a safe place.
4 Remove the shaving heads from the shaving
head holder.
Discard the used shaving heads immediately to
avoid mixing them with the new shaving heads.
26
English
Page 27

5 Place the new shaving heads in the shaving
head holder.
Note: Make sure the notches on both sides of
the shaving heads fit exactly onto the
projections in the shaving head holder.
2
1
6 Place the retaining rings back onto the shaving
heads and turn them clockwise to reattach the
retaining ring.
- Each retaining ring has two recesses that fit
exactly into the projections of the shaving head
holder. Turn the ring clockwise until your hear a
click to indicate that the ring is fixed.
1
Note: Hold the shaving head holder in your
hand when you reinsert the shaving heads and
reattach the retaining rings. Do not place the
shaving head holder on a surface, as this may
cause damage to the shaving heads.
7 Attach the shaving head holder to the bottom
part of the shaving unit (‘click’).
8 To reset the replacement reminder, press and
hold the on/off button for approx. 7 seconds.
Replacing the cleansing brush
The brush head should be replaced every 3
months or earlier if the brush hairs are deformed
or damaged. As an extra reminder, the notification
symbol also lights up when the brush head should
be replaced. This advice is also available in the
app.
27
English
Page 28

Ordering accessories
To buy accessories or spare parts, visit
www.shop.philips.com/service or go to your
Philips dealer. You can also contact the Philips
Consumer Care Center in your country (see the
international warranty leaflet for contact details).
The following accessories and spare parts are
available:
- SH70 Philips shaving heads
- HQ110 Philips shaving head cleaning spray
- RQ560/RQ563 Philips cleansing brush
- HQ8505 supply unit
Note: The availability of the accessories may differ
by country.
Recycling
- Do not throw away the product with the normal
household waste at the end of its life, but hand
it in at an official collection point for recycling.
By doing this, you help to preserve the
environment.
- This product contains a built-in rechargeable
battery which shall not be disposed of with
normal household waste. Please take your
product to an official collection point or a
Philips service center to have a professional
remove the rechargeable battery.
- Follow your country’s rules for the separate
collection of electrical and electronic products
and rechargeable batteries. Correct disposal
helps prevent negative consequences for the
environment and human health.
Removing the rechargeable battery
Only remove the rechargeable battery when
you discard the shaver. Before you remove
28
English
Page 29

the battery, make sure that the shaver is
disconnected from the mains and that the
battery is completely empty.
Take any necessary safety precautions
when you handle tools to open the shaver.
Be careful, the battery strips are sharp.
1 Remove the screw in the back panel with a
screwdriver. Then remove the back panel.
2 Bend the hooks aside and remove the power
unit.
3 Break the snap hooks and remove the front
panel of the power unit.
4 Take out the battery holder and cut the battery
tags with a pair of cutting pliers.
29
English
Page 30

Warranty and support
If you need information or support, please visit
www.philips.com/support or read the
international warranty leaflet.
Troubleshooting
This chapter summarizes the most common
problems you could encounter with the shaver,
SkinAnalyst sensor and its accessories. If you are
unable to solve the problem with the information
below, visit www.philips.com/support for a list of
frequently asked questions or contact the
Consumer Care Center in your country.
Problem Possible cause Solution
I cannot connect the
shaver to the app.
You have not
downloaded the app.
Download the
SkinAnalyst app.
The app is available
for iPhone 6, iPhone
6 Plus, iPhone 6S
and iPhone 6S Plus
equipped with iOS9
or higher.
Your shaver is not
switched on.
Make sure the shaver
is switched on.
You have not opened
the app.
Make sure you open
the app.
your iPhone cannot
find the shaver.
The shaver is
available for iPhone
6, iPhone 6 Plus,
iPhone 6S and
iPhone 6S Plus
equipped with iOS9
or higher.
30
English
Page 31

Problem Possible cause Solution
Bluetooth is not
switched on.
Make sure Bluetooth
is enabled on the
shaver and your
iPhone.
The shaver is not
charged.
Make sure the shaver
is charged.
I want to use the
shaver without the
app.
You can also use the
shaver without the
app. However, only
when you use the
app together with
the shaver, the app is
able to provide tips
and advice based on
your usage. With the
app you can set your
shave settings. The
app also reminds you
when you need to
replace the shaving
heads, to clean the
shaver, etc.
I cannot change the
shave
settings/cleansing
brush settings on the
shaver.
Make sure there is a
good connection
between the shaver
and your iPhone.
You can select the
attachment (shaving
unit/cleansing brush)
on the shaver. In the
app, you can change
the settings per
attachment (shaving
unit:
normal/sensi
tive/extra sensitive,
cleansing brush: dry
skin/normal skin/oily
skin/sensitive skin).
31
English
Page 32

Problem Possible cause Solution
The shaver does not
shave as well as it
used to.
The shaving heads
are damaged or worn.
Replace the shaving
heads (see
'Replacing the
shaving heads').
Hairs or dirt obstruct
the shaving heads.
Clean the shaving
heads in the regular
way or clean them
thoroughly.
To clean the shaving
heads thoroughly,
remove the shaving
heads from the
shaving head holder
one by one (see
'Replacing the
shaving heads'). Then
separate the cutter
from its guard and
rinse each matching
set under the tap.
After rinsing, place
the cutter back into
its corresponding
guard. Finally, put the
shaving heads back
into the shaving head
holder (see
'Replacing the
shaving heads').
The cleansing brush
does not clean as
well as it used to.
The cleansing brush
is damaged or worn.
Replace the
cleansing brush (see
'Replacing the
cleansing brush').
32
English
Page 33

Problem Possible cause Solution
The shaver doesn't
detect the right
attachment.
The attachment is
heavily polluted or
damaged.
Try to clean the
attachment (see
'Cleaning and
maintenance'); if the
issue persists, switch
off the detection
feature from the app
and select the
attachment manually
by pressing the
on/off button for one
second while the
shaver is switched
on.
The shaver does not
work when I press
the on/off button.
The shaver is still
attached to the wall
socket. For safety
reasons, the shaver
can only be used
without cord.
Unplug the shaver
and press the on/off
button to switch on
the shaver.
The rechargeable
battery is empty.
Recharge the battery.
The travel lock is
activated.
Press the on/off
button for 3 seconds
to deactivate the
travel lock.
The shaving unit is
soiled or damaged to
such an extent that
the motor cannot run.
Clean the shaving
heads thoroughly or
replace them. Also
see 'Hairs or dirt
obstruct the shaving
heads' for a detailed
description of how to
clean the shaving
heads thoroughly.
The shaver switches
off when I select a
different brush
program.
You cannot change
the brush program
during cleansing.
Switch off the shaver
before you select a
different brush
program.
33
English
Page 34

Problem Possible cause Solution
I get an error in the
app during skin
measurement.
You did not place the
SkinAnalyst sensor
flat on your skin.
Place the SkinAnalyst
sensor flat on your
skin.
You did not insert the
plug of the
SkinAnalyst sensor
into your phone
properly.
Remove the plug of
the SkinAnalyst
sensor from your
phone and insert the
plug into your phone
again.
Your phone did not
recognize the
SkinAnalyst sensor.
Make sure that:
-
the cover/case of
your iPhone is
detached.
-
the camera lens
of your iPhone is
clean
-
the SkinAnalyst
sensor is
correctly
attached to your
iPhone
Your phone did not
recognize the
SkinAnalyst sensor.
Make sure that your
volume limit settings
are reset to default
settings (go to
Settings > Music >
Volume limit > slide
to the max).
Water is leaking from
the bottom of the
shaver.
During cleaning,
water may collect
between the inner
body and the outer
shell of the shaver.
This is normal and
not dangerous
because all
electronics are
enclosed in a sealed
power unit inside the
shaver.
34
English
Page 35

简体中文
说明
感谢您的惠顾,欢迎光临飞利浦! 为了让您能充分享
受飞利浦提供的支持,请在 www.philips.com/welcome
上或通过 SkinAnalyst 应用程序注册您的产品。
荣幸地向您推荐飞利浦首款智能剃须护肤套装, 它将
根据您的皮肤状况,智能定制适合您肤质的剃须护肤方
案,自动完成须刀及洁面刷的设置,调整为适合您皮肤
的剃须和清洁模式,并提供您相关护肤建议。
基本说明(图 1)
1 洁面刷保护盖
2 洁面刷
3 洁面刷基座
4 剃毛刀头部件
5 开/关按钮
6 手柄
7 小插头插座
8 SkinAnalyst 皮肤检测仪
9 通知符号
10 剃须刀头部件探测器
11 洁面刷探测器
12 清洗提示
13 蓝牙® 符号
14 旅行锁符号
15 电池充电指示灯
16 存储袋
17 电源部件(适配器)
18 充电插头
请参考快速入门指南和应用程序,了解如何将
SkinAnalyst 皮肤检测仪与应用程序关联,以及
如何使用应用程序获取个性化护肤建议的说明。
使用剃须刀和 SkinAnalyst 皮肤检测仪之前,请仔细阅
读本重要信息,并妥善保管以供日后参考。 随附的附
件可能因产品而异。
35
简体中文
Page 36
危险
- 保持电源部件干燥。
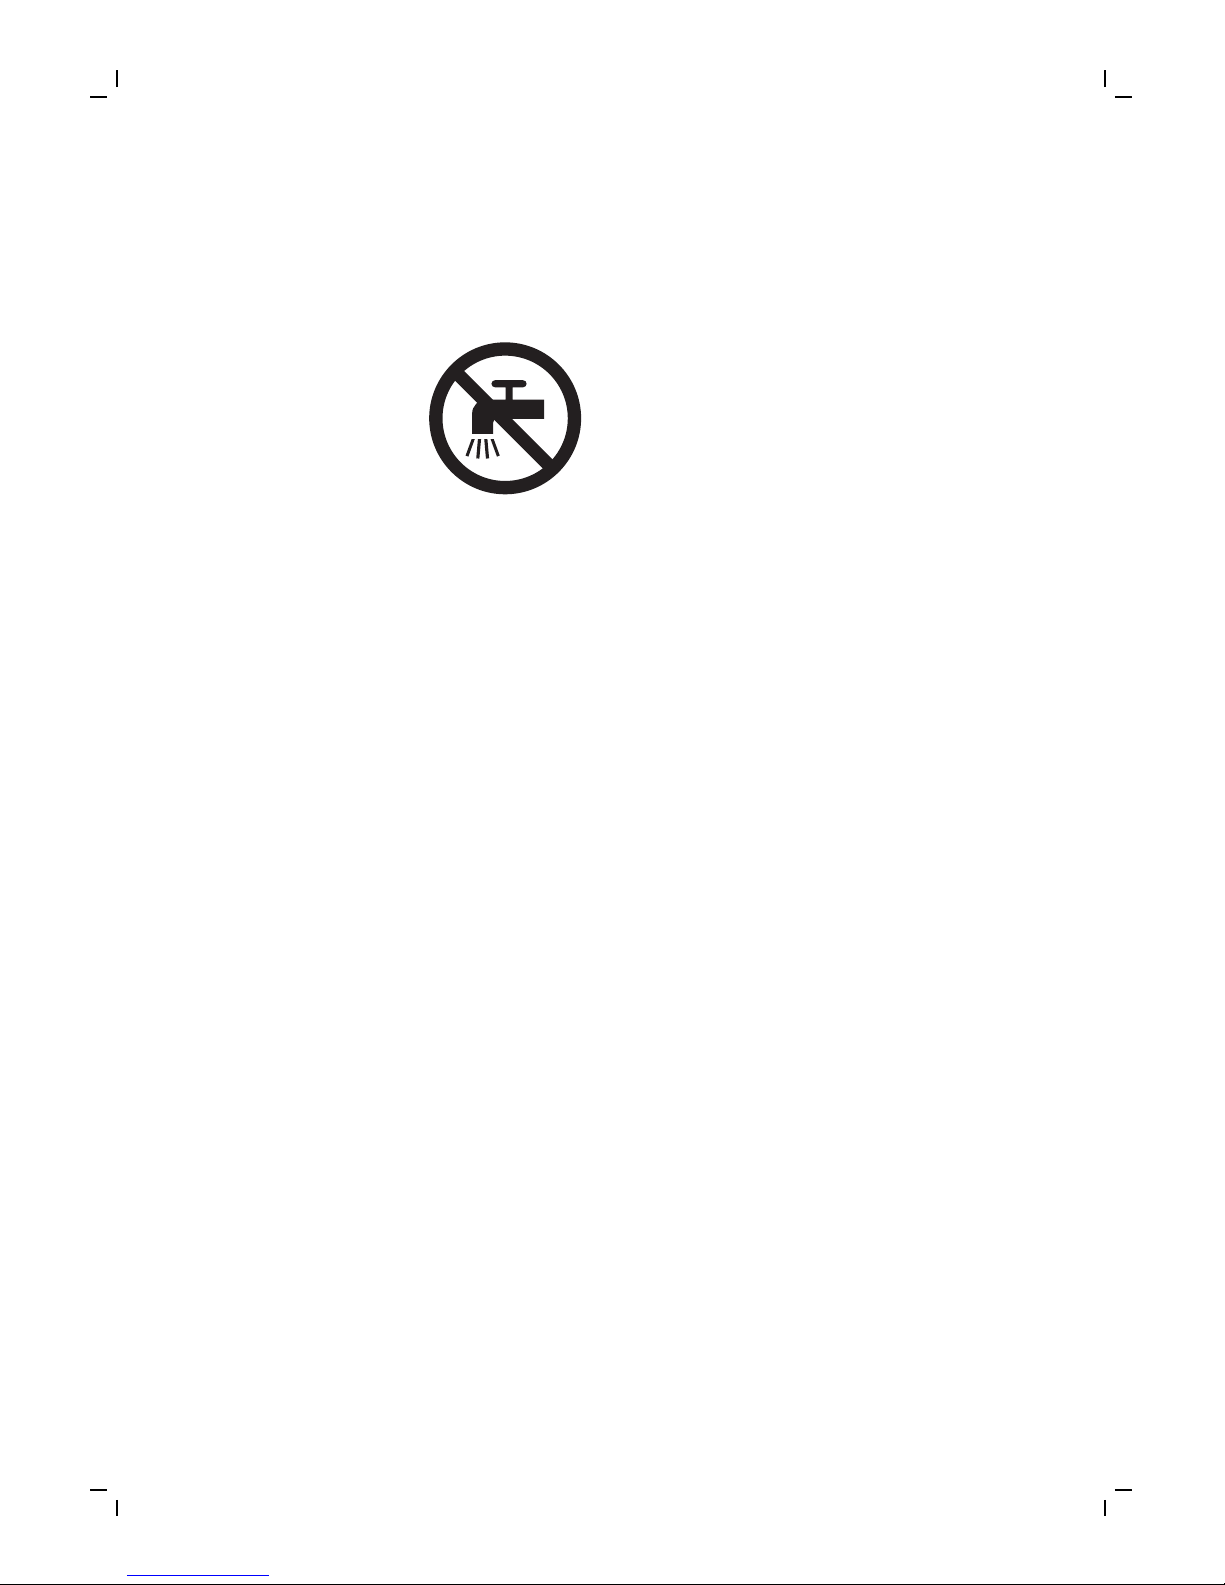
- 警告符号注释: 禁止在打开的水龙头下进行清洗。
警告
- 要给电池充电,请仅使用该剃须刀随附的可拆卸电
源部件(类型 HQ8505)。
- 电源部件中包含一个变压器。 请勿自行更换电源部
件的插头,否则将导致严重后果。
- 本剃须刀和 SkinAnalyst 皮肤检测仪可以由 8 岁及
以上年龄的儿童以及肢体不健全、感官或精神上有
障碍或缺乏相关经验和知识的人士使用,但前提是
有人对他们使用这些产品进行监督或指导,以确保
他们安全使用,并且让他们明白相关的危害。 切勿
让儿童玩弄剃须刀。 不要让儿童在无人监督的情况
下对本产品进行清洁和保养。
- 在自来水龙头下清洗剃须刀之前,务必拔掉其电源
插头。
- 使用前,请务必检查剃须刀和 SkinAnalyst 皮肤检
测仪。 请勿使用损坏的设备,否则可能造成人身伤
害。 请务必用原装型号更换损坏的部件。
- 切勿拆开剃须刀更换充电电池。
警告
- 切勿使用温度高于 80°C 的热水冲洗剃须刀。
- 切勿在水龙头下冲洗 SkinAnalyst 皮肤检测仪。
- 警告符号注释: 禁止在打开的水龙头下进行清洗。
36
简体中文
Page 37

- 除了用户手册所述的预期用途之外,不要将本剃须
刀和 SkinAnalyst 皮肤检测仪用于任何其它用途。
- 出于卫生考虑,请勿共用剃须刀。
- 切勿使用压缩气体、钢丝绒、研磨性清洁剂或汽
油、丙酮等腐蚀性液体来清洁剃须刀。
- 冲洗剃须刀时,水可能从产品底部的插口漏出。 这
是正常现象,而且没有危险,因为所有电子元件都
封闭在剃须刀内部的密封电源部件中。
- 请勿在包含电动空气清新器的墙壁插座上或其周围
使用电源部件,以免电源部件受到不可修复的损
坏。
- 您的 iPhone 应远离水和潮湿的环境。
- 蓝牙剃须刀的短波射频信号可能会影响其他电子和
医疗设备的工作。
- 请勿在医疗机构、飞机舱、加油站,以及靠近自动
门、自动火灾报警器或其他自动控制设备的场所使
用本剃须刀。
- 请在禁止蓝牙的场所关闭蓝牙。
- 请将本剃须刀与心脏起搏器及其他医疗设备之间保
持至少 20 厘米的距离。 无线电波可能会影响心脏
起搏器及其他医疗设备的工作。
电磁场 (EMF)
- 这款飞利浦剃须刀符合所有有关暴露于电磁场的剃
须刀标准和法规。
概述
- 该剃须刀具有防水性能。 适合在沐浴或淋浴时使
用,也可以放在水龙头下清洗。 出于安全原因,该
剃须刀在使用时不能连接电线。
37
简体中文
Page 38
- 符号注释:适合于在洗澡或淋浴时使用。 允许在盛
水的浴缸、淋浴、洗脸盆或其他器皿附近使用本器
具。
- 本剃须刀适合在 100 - 240 伏的电源电压下工作。
- 该电源部件可将 100-240 伏的电压转换为 24 伏以
下的安全低电压。
- 本剃须刀的工作频带为 2.4 GHz。
- 本剃须刀工作频带内发送的最大射频功率为
<10dBm。
显示屏
“通知”符号
本剃须刀上有通知符号。 当应用程序中提供重要建议
时,此符号会亮起。 请转到应用程序以查看此建议。
它会提醒您在打开本剃须刀电源之前拔掉剃须刀插头,
并对其进行清洁以获得出色性能。 另外,它还会提醒
您每两年更换一次剃须刀头,或每三个月更换一次洁面
刷。
附件检测功能
在 iPhone 与本剃须刀配对后,附件检测功能将被激
活。 每次打开本剃须刀电源时,此功能都会自动识别
安装到本剃须刀手柄上的附件(剃须刀头部件/洁面
刷),并相应地调整设置。 如果解除 iPhone 和本剃须
刀的配对,则将禁用此功能。
手动选择附件
确保您的剃须刀已连接到 iPhone。 您还可以通过
SkinAnalyst 应用程序激活或禁用附件检测功能。 您可
以前往“我的个人资料”,然后进入“我的剃须刀”并
关闭自动附件检测功能。 然后,您可以通过开启剃须
刀并按住开关按钮一秒钟,手动选择洁面刷附件。
1 sec.
38
简体中文
Page 39

剃须刀头部件探测器
剃须刀头部件探测器会亮起,表示剃须刀头部件已安装
到手柄上。
洁面刷探测器
洁面刷探测器会亮起,表示已检测到洁面刷。
清洗提示
关闭剃须刀时,清洗提示符号闪烁,提醒您需要清洁剃
须刀。 为获得出色性能,请在每次使用后都清洁本剃
须刀和附件。
蓝牙®
本剃须刀配备了蓝牙 4.0,可用于将该剃须刀连接到
iPhone 上的应用程序。 首次启动剃须刀时,即可自动
激活蓝牙。 只能通过启动旅行锁来解除蓝牙。
旅行锁
您可以在携带剃须刀旅行之前将其锁住。 旅行锁可防
止剃须刀被意外打开。 旅行锁还会禁用蓝牙。
启用旅行锁
39
简体中文
Page 40
3 sec.
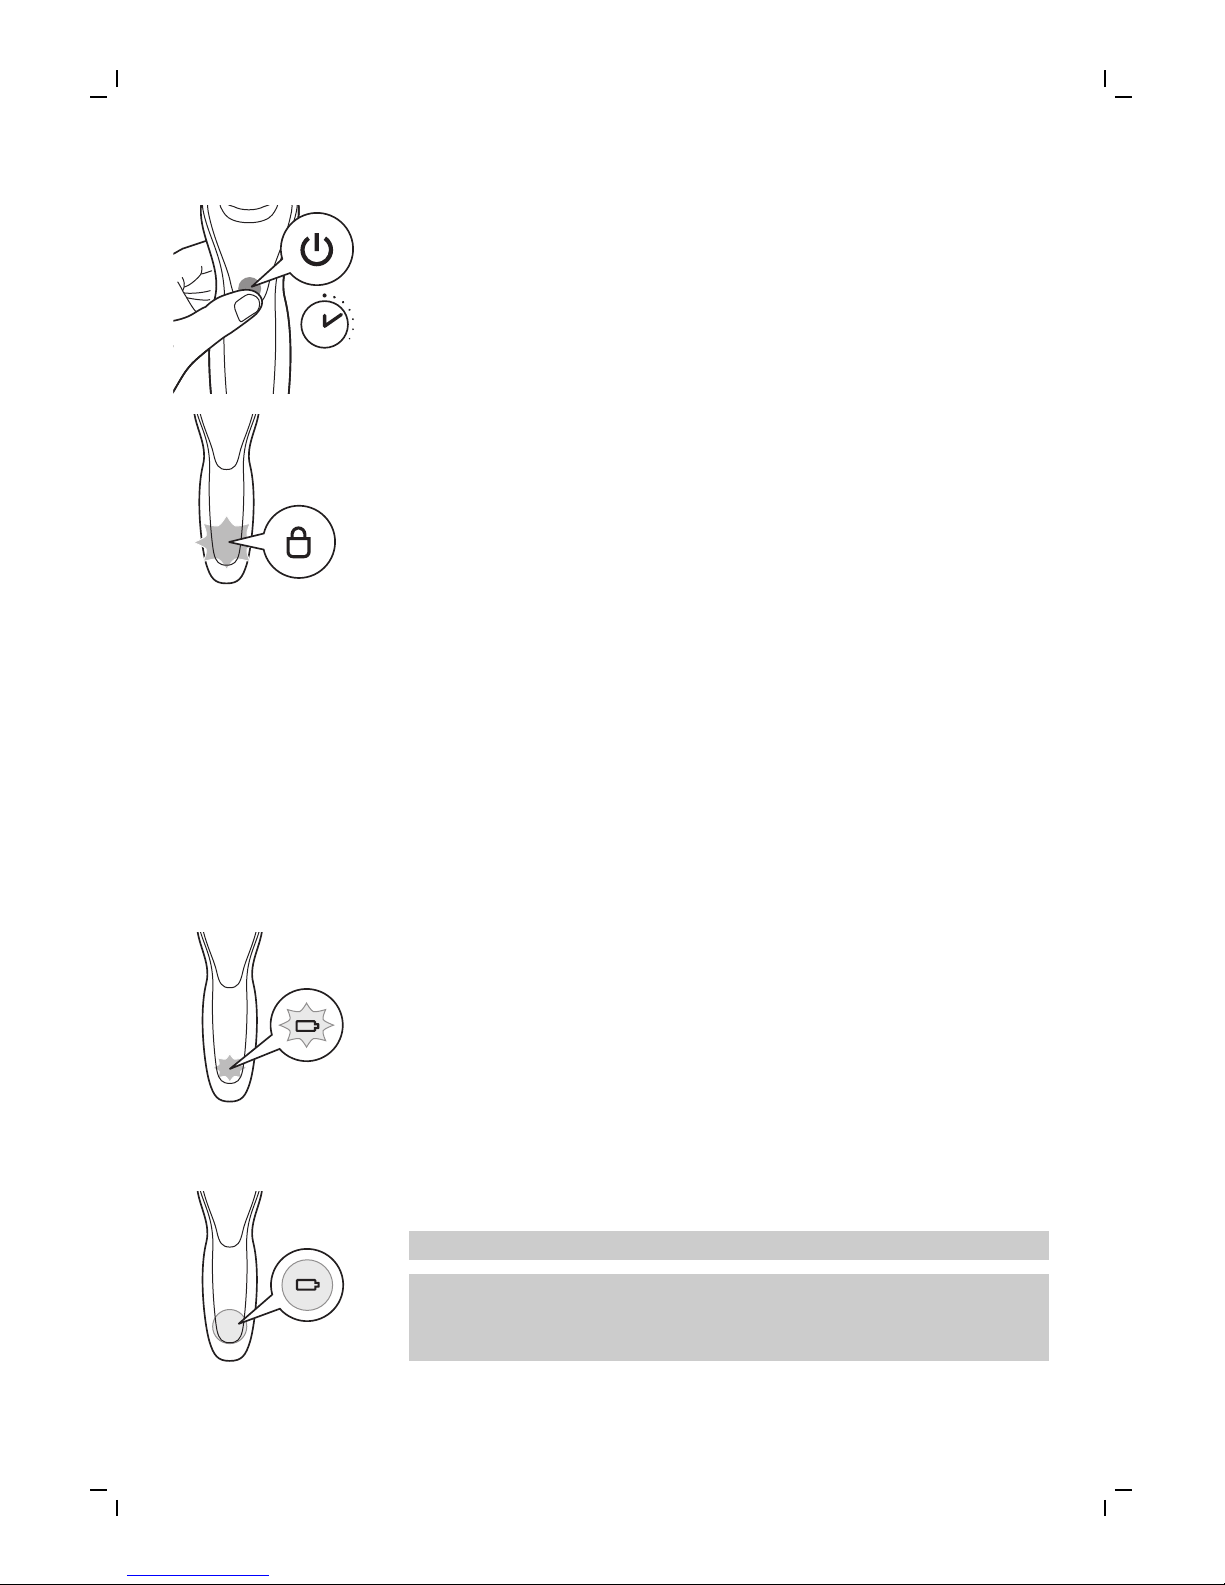
1 按住开/关按钮 3 秒钟以进入旅行锁模式。
启用旅行锁过程中,旅行锁符号会闪烁。 启用旅行锁
后,旅行锁符号将持续亮起。
解除旅行锁
1 按开/关按钮 3 秒钟。
旅行锁符号闪烁,然后熄灭。 本剃须刀现在可供使
用,蓝牙被重新激活。
充电
电池充电指示灯
充电约需 1 小时。
快速充电: 电池电量耗尽后,当您将本剃须刀连接到
电源插座时,电池充电指示灯会快速闪烁。 本剃须刀
包含的电量足够完成一轮剃须或清洁时,电池充电指示
灯开始缓慢闪烁。
如果本剃须刀继续充电,电池充电指示灯会缓慢闪烁,
直至电池充满电。
电池已完全充满
电池充满电后,电池充电指示灯将呈蓝色持续亮起。
注意: 本剃须刀只能在不接电源的情况下使用。
注意: 电池充满电后,显示屏会在 30 分钟后自动关
闭。如果在充电期间按开/关按钮,则通知符号会呈蓝
色亮起,提醒您需要断开本剃须刀与电源插座的连接。
40
简体中文
Page 41
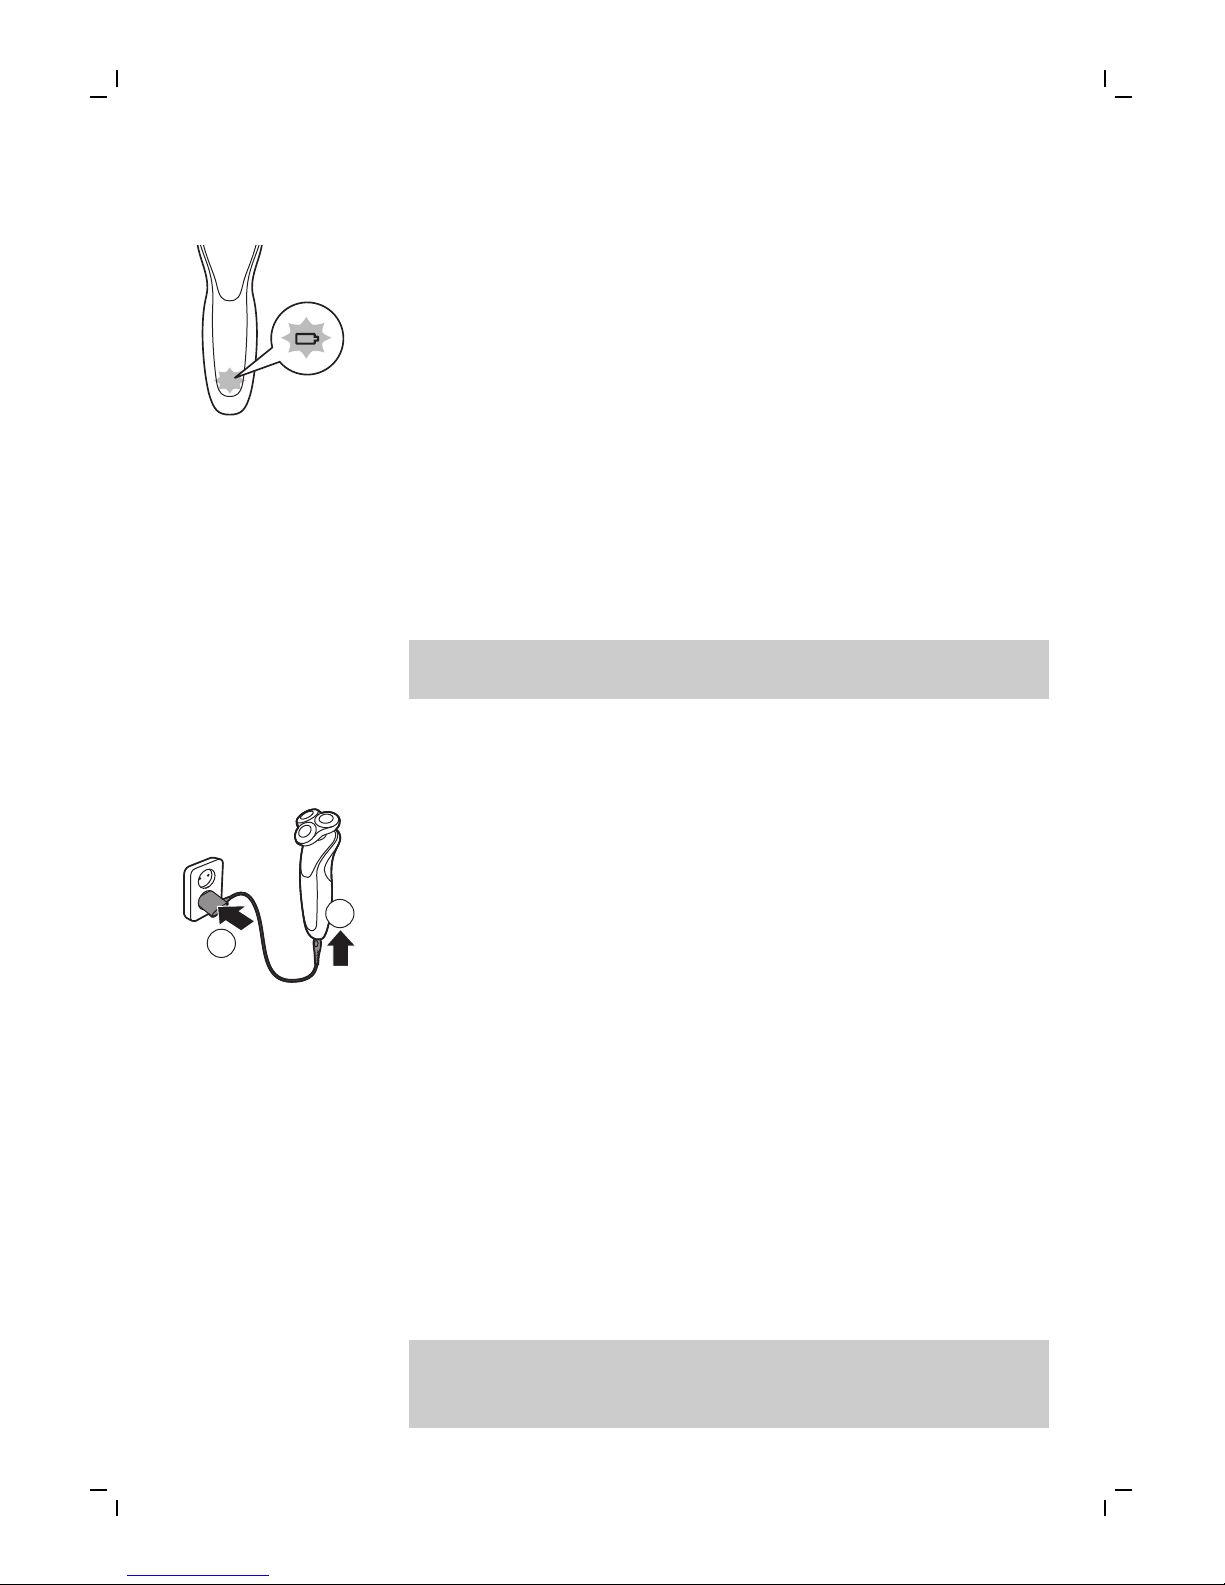
电池电量不足
当电池的电量几乎耗尽时,电池充电指示灯会呈橙色闪
烁。
当电池的电量完全耗尽时,电池充电指示灯会呈橙色快
速闪烁。
充电
充电约需 1 小时。
第一次使用本剃须刀之前,以及当显示屏指示电池电量
快要耗尽时,请先为本剃须刀充电。
注意: 您可以在每次使用后立即为本剃须刀充电。 这
样做将对电池有益无害。
使用电源部件充电
1 确保剃须刀已关闭。
1
2
2 将小插头插入剃须刀,然后将电源部件插入壁式插
座。
3 充电之后,从壁式插座上拔下电源部件,并从剃须
刀上拔下小插头。
使用准备
将本剃须刀和 iPhone 进行配对
我们为此剃须刀提供了一个特殊的应用程序。 您可以
从 App Store 下载 SkinAnalyst 应用程序。 通过使用该
应用程序,可以对护肤和剃须程序进行个性化设置。
根据您的皮肤、剃须方法和当地的气候条件等,应用程
序会为您提供专业的建议,以支持您的日常护肤和剃须
程序。
注意: 该应用程序适用于安装有 iOS9 或更高版本的
iPhone 6、iPhone 6 Plus、iPhone 6S 和 iPhone 6S
Plus。
41
简体中文
Page 42
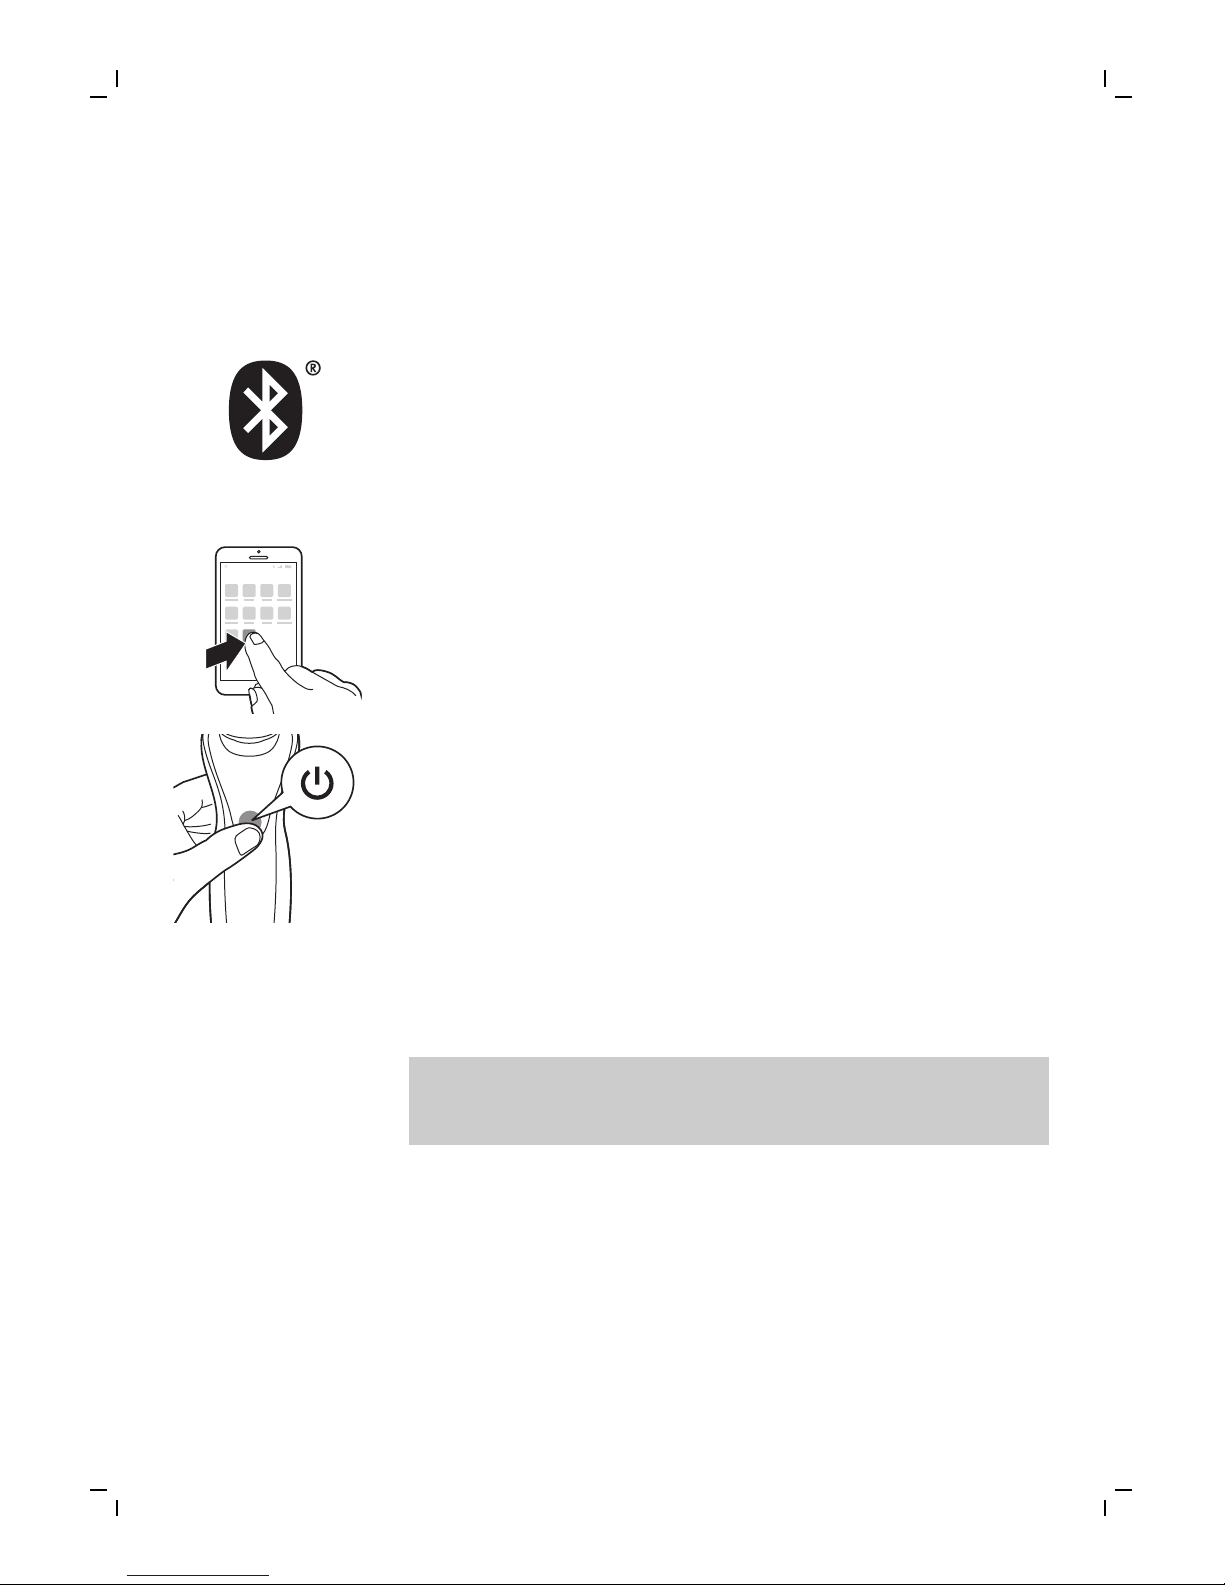
要创建安全可靠的连接,首先需要将本剃须刀和
iPhone 配对一次。
1 从 App Store 下载 SkinAnalyst 应用程序。
2 确保 iPhone 上的蓝牙已打开。
S7920
3 打开 iPhone 上的应用程序。
4 按照应用程序中的说明操作。 在填写完皮肤评估
后,应用程序会要求您将 iPhone 和本剃须刀进行配
对。
5 打开剃须刀。 蓝牙将被自动激活。
6 在应用程序中,将出现弹出消息:按“ 配对。在
iPhone 和本剃须刀成功配对后,蓝牙符号将短暂闪
烁,然后熄灭。 如果蓝牙未被激活,请参阅“故障
处理方法”。
7 在本剃须刀与应用程序进行配对后,该剃须刀将自
动选择合适的个人设置,具体视卡入的附件而定。
在剃须或洁面期间,您可以打开应用程序,查看当
前使用的设置,以及剃须或洁面的时长。
注意: 使用本剃须刀时,确保 iPhone 和剃须刀在
传输范围内(在同一个房间内,彼此之间的距离不
超过 5 米)。
使用剃须刀
使用 SkinAnalyst 皮肤检测仪
1 测量皮肤前要打开应用程序。
42
简体中文
Page 43
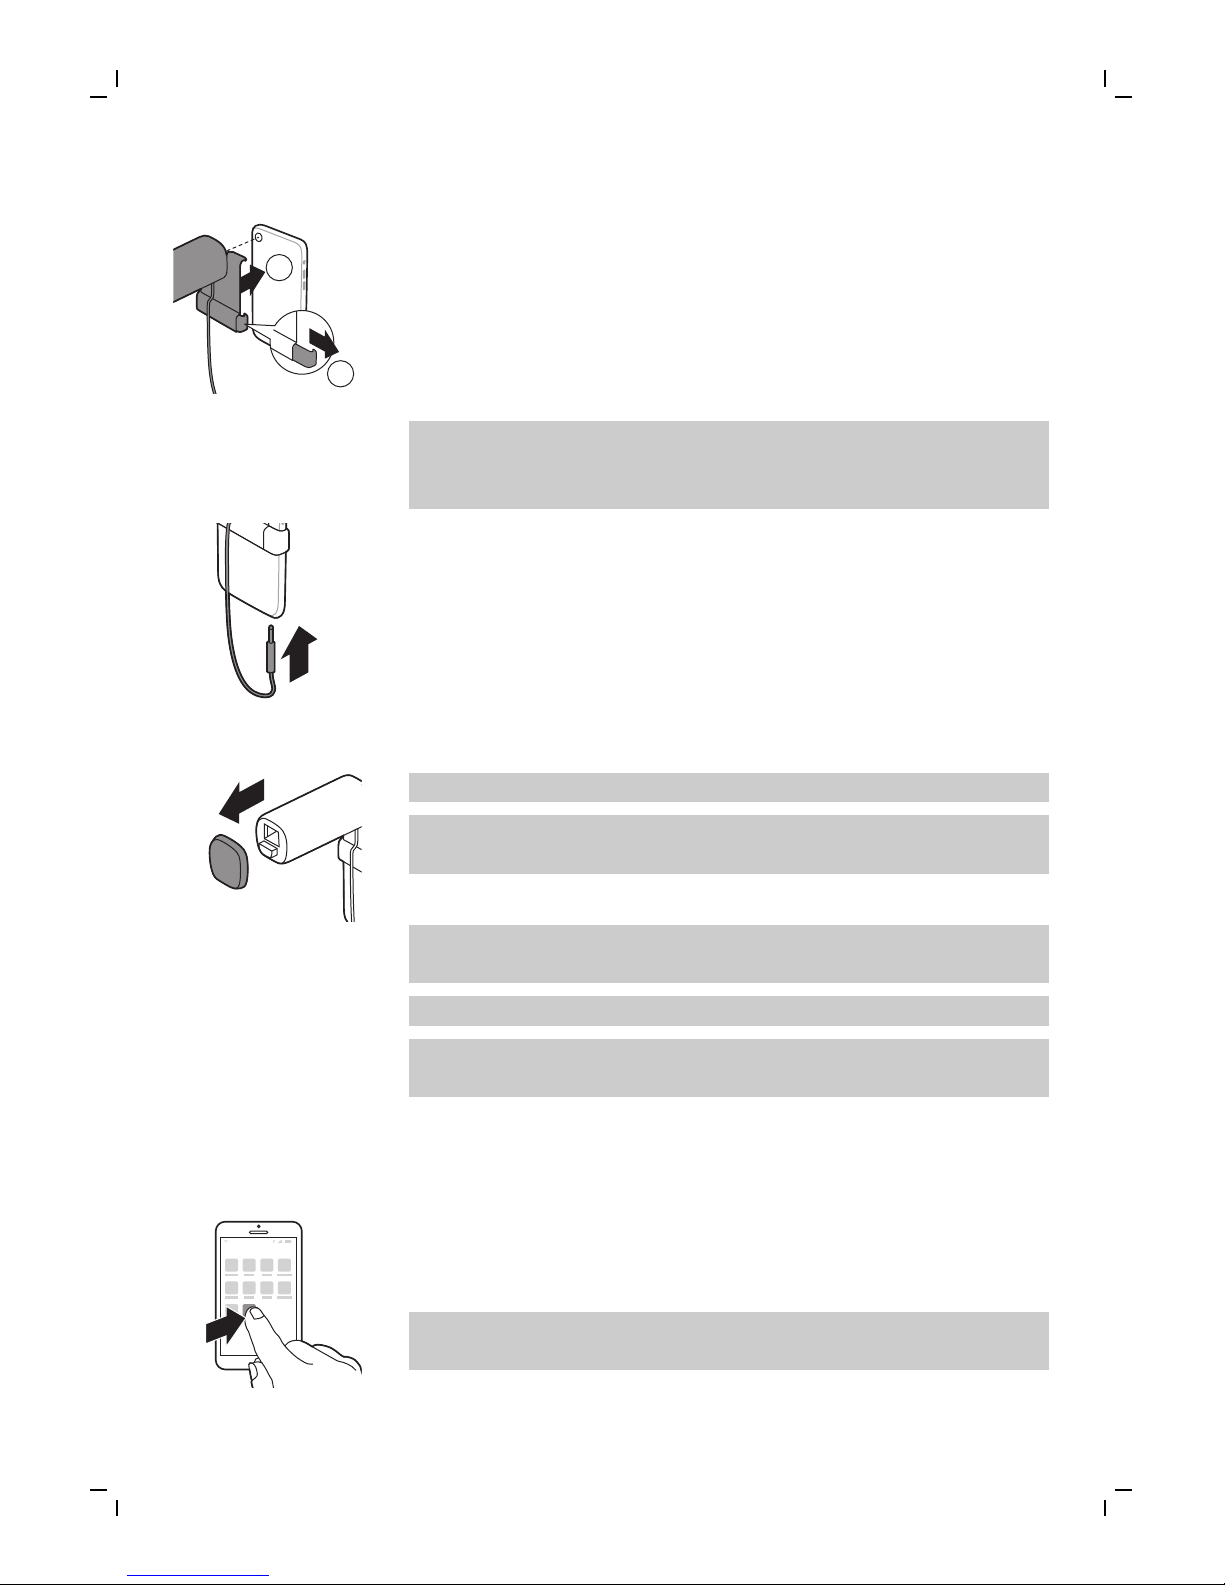
1
2
2 如果您使用了 iPhone 手机壳,请先从 iPhone 上卸
下手机壳。
3 向外拉 SkinAnalyst 皮肤检测仪的定位夹,并将摄
像头朝向支架内的开口,将iPhone 小心卡入到支架
中。 请小心在手机上放置或者取下SkinAnalyst皮肤
检测仪来避免给您的iPhone留下划痕。
注意: SkinAnalyst 皮肤检测仪只能用于安装有
iOS9 或更高版本的 iPhone 6、iPhone 6 Plus、
iPhone 6S 和 iPhone 6S Plus。
4 将 SkinAnalyst 皮肤检测仪的插头插入 iPhone 中。
5 从 SkinAnalyst 皮肤检测仪上卸下保护盖。
注意: 上述说明也会显示在应用程序中。
仅当卸下 iPhone 的手机壳时,SkinAnalyst 皮肤检
测仪才工作。
6 按照应用程序中的说明测量皮肤。
注意: 测量期间,始终将 SkinAnalyst 皮肤检测仪
置于皮肤上,以免闪入您的眼睛。
-在皮肤测量前后,请勿直视该皮肤检测仪。
-在拍摄皮肤照片时,请将该皮肤检测仪平放在皮肤
上,以便确保可以拍摄到清晰的皮肤照片。
与剃须刀建立连接
1 确保 iPhone 上的蓝牙已打开。
S7920
2 打开 iPhone 上的应用程序。
3 成功配对后,剃须刀和应用程序将自动连接。 现
在,您便可以开始执行日常护肤程序了。
注意: 要想充分利用应用程序功能,应确保网络连
接良好。
4 同步本剃须刀和应用程序 (请参见 '同步剃须和洁面
护理数据')上的剃须和洁面数据。
43
简体中文
Page 44
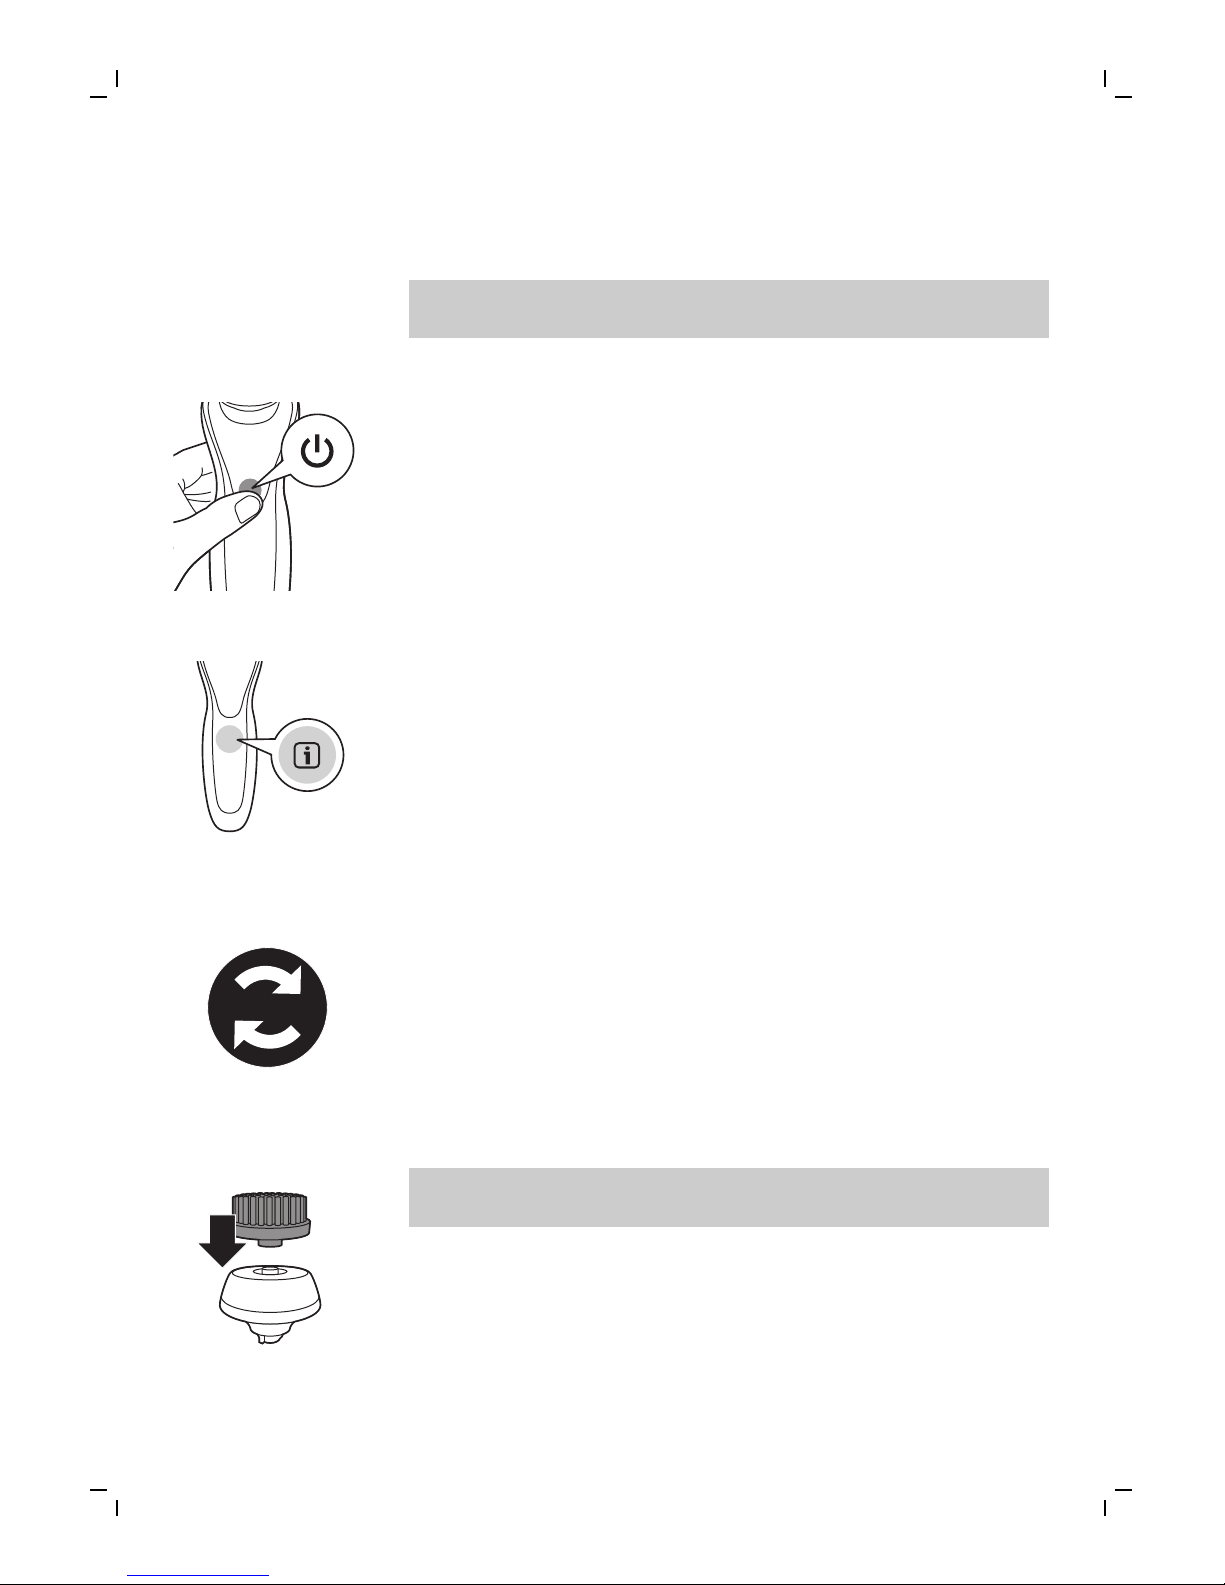
5 将您的 iPhone 和本剃须刀彼此贴近,以便保持连
接。
警告: 请勿在潮湿的环境中使用 iPhone。 湿气和
水气可能会损坏您的 iPhone。
打开或关闭剃须刀
1 要打开剃须刀,请按一下开/关按钮。
2 要关闭剃须刀,请按一下开/关按钮。
同步剃须和洁面护理数据
为了从护理中获得最大受益,您需要定期同步护理数
据。 本剃须刀最多可以存储 15 次剃须和/或洁面护理
数据,因此,请确保每进行 15 次护理后至少同步一次
本剃须刀。 作为额外的提醒,如果本剃须刀未连接应
用程序,则每进行 9 次护理后,通知符号会闪烁一
次,告知您要连接应用程序。
1 打开应用程序,确保您贴近本剃须刀。
2 应用程序会自动与本剃须刀相连,并同步您的最新
剃须或洁面护理数据。
使用附件
注意: 请先将洁面刷安装到洁面刷基座上,然后再安
装到本剃须刀上。
拆卸或安装附件
1 确保剃须刀已关闭。
44
简体中文
Page 45

2 将附件竖直抽出剃须刀。
注意: 将附件从剃须刀上抽出时,不要旋转。
3 将附件的凸缘插入本剃须刀顶部的槽内。 然后,按
下附件将其安装到本剃须刀上(可听到“咔哒”一
声)。
使用洁面刷
将旋转洁面刷与日常洁面产品一起使用。 洁面刷可去
除油脂和污垢,焕发健康无油脂的肌肤。 建议每天使
用本产品不超过 2 次。 建议不要在剃须后直接使用洁
面刷,以免皮肤过敏。 为获得更佳的剃须效果,请在
剃须前使用洁面刷。
警告: 请不要在受伤或发炎的皮肤或伤口上使用本剃
须刀。
1 将洁面刷安装到本剃须刀上(听到“咔哒”一
声)。
2 用水湿润洁面刷。
注意: 切勿在洁面刷干燥的情况下使用本剃须刀,
否则可能会刺激皮肤。
3 用水润湿面部,并将洁面乳涂抹到脸上。
4 将洁面刷置于面颊上。
5 打开剃须刀。
45
简体中文
Page 46
20 sec.
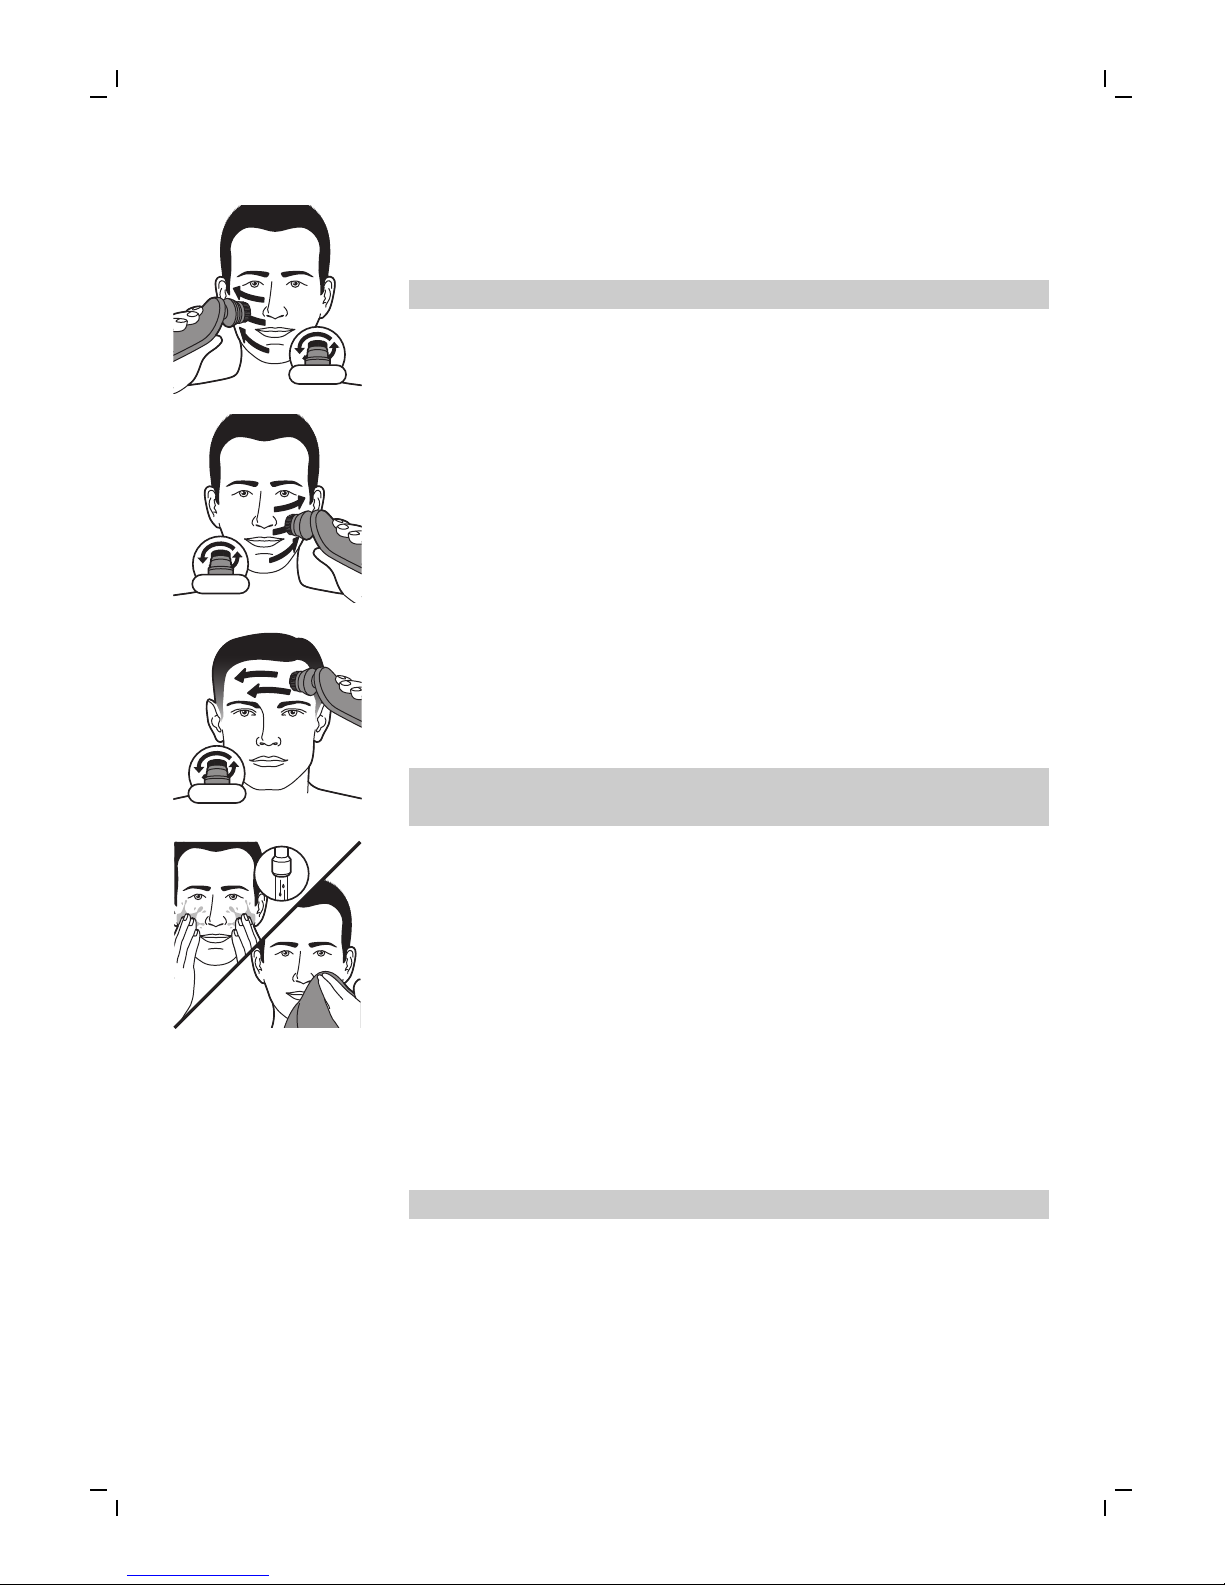
6 在鼻子至耳朵的皮肤上轻轻地移动洁面刷。 请勿太
过用力地将洁面刷压在皮肤上,应确保护理舒适。
注意: 切勿清洁眼部周围的敏感区域。
20 sec.
7 大约 15-20 秒钟后(取决于选定设置),本剃须刀
将震动两下,表示您需要将本剃须刀移至另一侧面
颊。 开始清洁这部分面部皮肤。 大约 15-20 秒钟
后,将本剃须刀移至另一侧面颊,开始清洁这部分
面部皮肤。
20 sec.
8 大约 15-20 秒钟后,本剃须刀将震动两下,表示您
需要将本剃须刀移至前额。 开始清洁这部分面部皮
肤。 轻轻将刷头从左向右移动。 剃须刀会在完成整
个面部程序后自动停止。
注意: 建议您不要过度清洁,任何部位的清洁时间
不要超过 15-20 秒钟。
9 护理后,洗脸并擦干。现在您可以进行日常面部护
肤的下一步了。
10 使用后,请清洁洁面刷。
洁面刷设置
应用程序还可个性化定制清洁设置。 转至“使用跟踪
器”并更改洁面刷设置。 您可以根据个人的洁面需要
调整设置,并从四种设置中进行选择: 敏感、干燥、
正常或油性。
使用剃须刀头部件
注意: 本剃须刀只能在不接电源的情况下使用。
皮肤适应期
前几次剃须可能不会带给您预期效果,并且您的皮肤可
能会受到轻度刺激。 这是正常的。 您的皮肤和胡须需
要时间适应任何新的剃须系统。我们建议您按照应用程
序提供的建议操作,并在 4 周的时间内定期(至少每
46
简体中文
Page 47
周 3 次)使用本产品剃须,以便让您的皮肤适应新的
剃须刀。
干用剃须
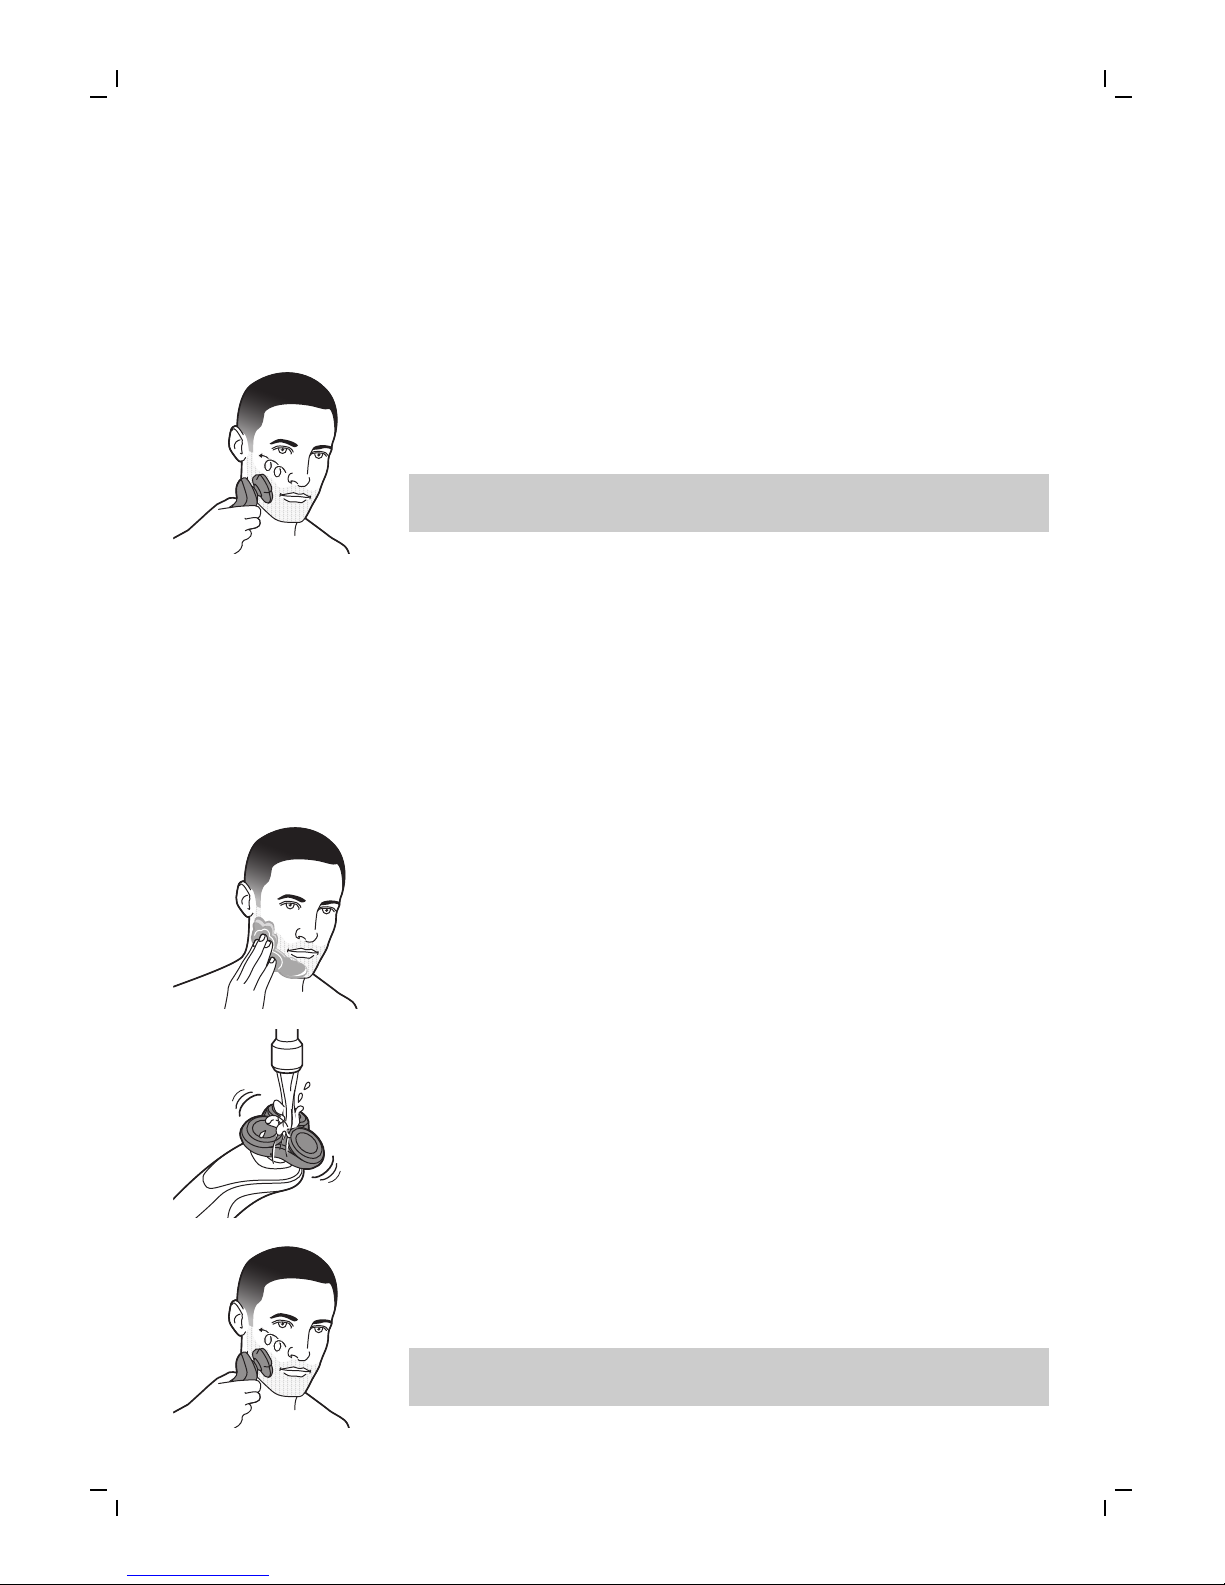
1 打开剃须刀。
2 让剃须刀头在您的皮肤上作迂回运动,以刮剃向不
同方向生长的所有须发。 轻轻按压,以获取舒适贴
面的剃须感受。
注意: 不要用力按压剃须刀,这样做可能会导致皮
肤疼痛。
3 使用后应立即清洁剃须刀。
湿剃
您也可以先用剃须泡沫或剃须啫喱将脸弄湿,然后再用
此剃须刀进行剃须。
要用剃须泡沫或剃须啫喱剃须,请按照下面的步骤执行
操作:
1 用水润湿皮肤。
2 在皮肤上涂抹剃须泡沫或剃须啫喱。
3 在水龙头下冲洗一下剃须刀头部件,确保剃须刀头
部件可以在您的皮肤上顺畅滑动。
4 打开剃须刀。
5 让剃须刀头在您的皮肤上作迂回运动,以刮剃向不
同方向生长的所有须发。 轻轻按压,以获取舒适贴
面的剃须感受。
注意: 不要用力按压剃须刀,这样做可能会导致皮
肤受刺激。
47
简体中文
Page 48

注意: 定期冲洗剃须刀头部件,确保其能够继续在
您的皮肤上顺畅滑动。
6 擦干面部。
7 使用后应立即清洁剃须刀。
注意: 确保冲洗干净剃须刀上的泡沫或剃须啫喱。
剃须设置
应用程序还可个性化定制剃须设置。 转至“使用跟踪
器”并更改剃须设置。 您可以根据个人的剃须需要调
整设置,并从三种设置中进行选择: 超敏感、敏感 和
正常。
解除剃须刀和 iPhone 的配对
配对实现了 1 个剃须刀和 1 部 iPhone 之间的连接。
要删除此连接(例如,如果您使用安装有 iOS9 或更高
版本操作系统的新 iPhone 6、iPhone 6 Plus、iPhone
6S 或 iPhone 6S Plus),请按照以下步骤操作:
1 从应用程序中删除配对: 打开应用程序 -> 转到应
用程序中的菜单 -> 选择 “应用程序设置” 并按“
从应用程序中删除配对”。
2 解除剃须刀配对: 按住手柄上的开/关按钮约 10 秒
钟,以解除剃须刀与应用程序之间的联系。
注意: 如果蓝牙和通知符号同时闪烁(约 4 秒
钟),则表示成功解除了本剃须刀的配对。
3 解除 iPhone 的配对: 选择“设置”->“通用”-
>“蓝牙”-> 按 (i) 选择设备 -> 按“忘记设备”。
清洁和保养
如果本剃须刀和应用程序已配对,则作为额外的提醒,
在每次剃须后,本剃须刀上的洁面提示会亮起,告知您
清洁剃须刀。
在水龙头下冲洗剃须刀头部件
每次剃须后清洁剃须刀头部件,以获得出色的性能。
48
简体中文
Page 49
使用热水要当心。 切记先检查水温是否太高,以防烫
手。
不要用毛巾或纸巾擦拭剃须刀头部件,因为这样可能会
损坏剃须刀头。
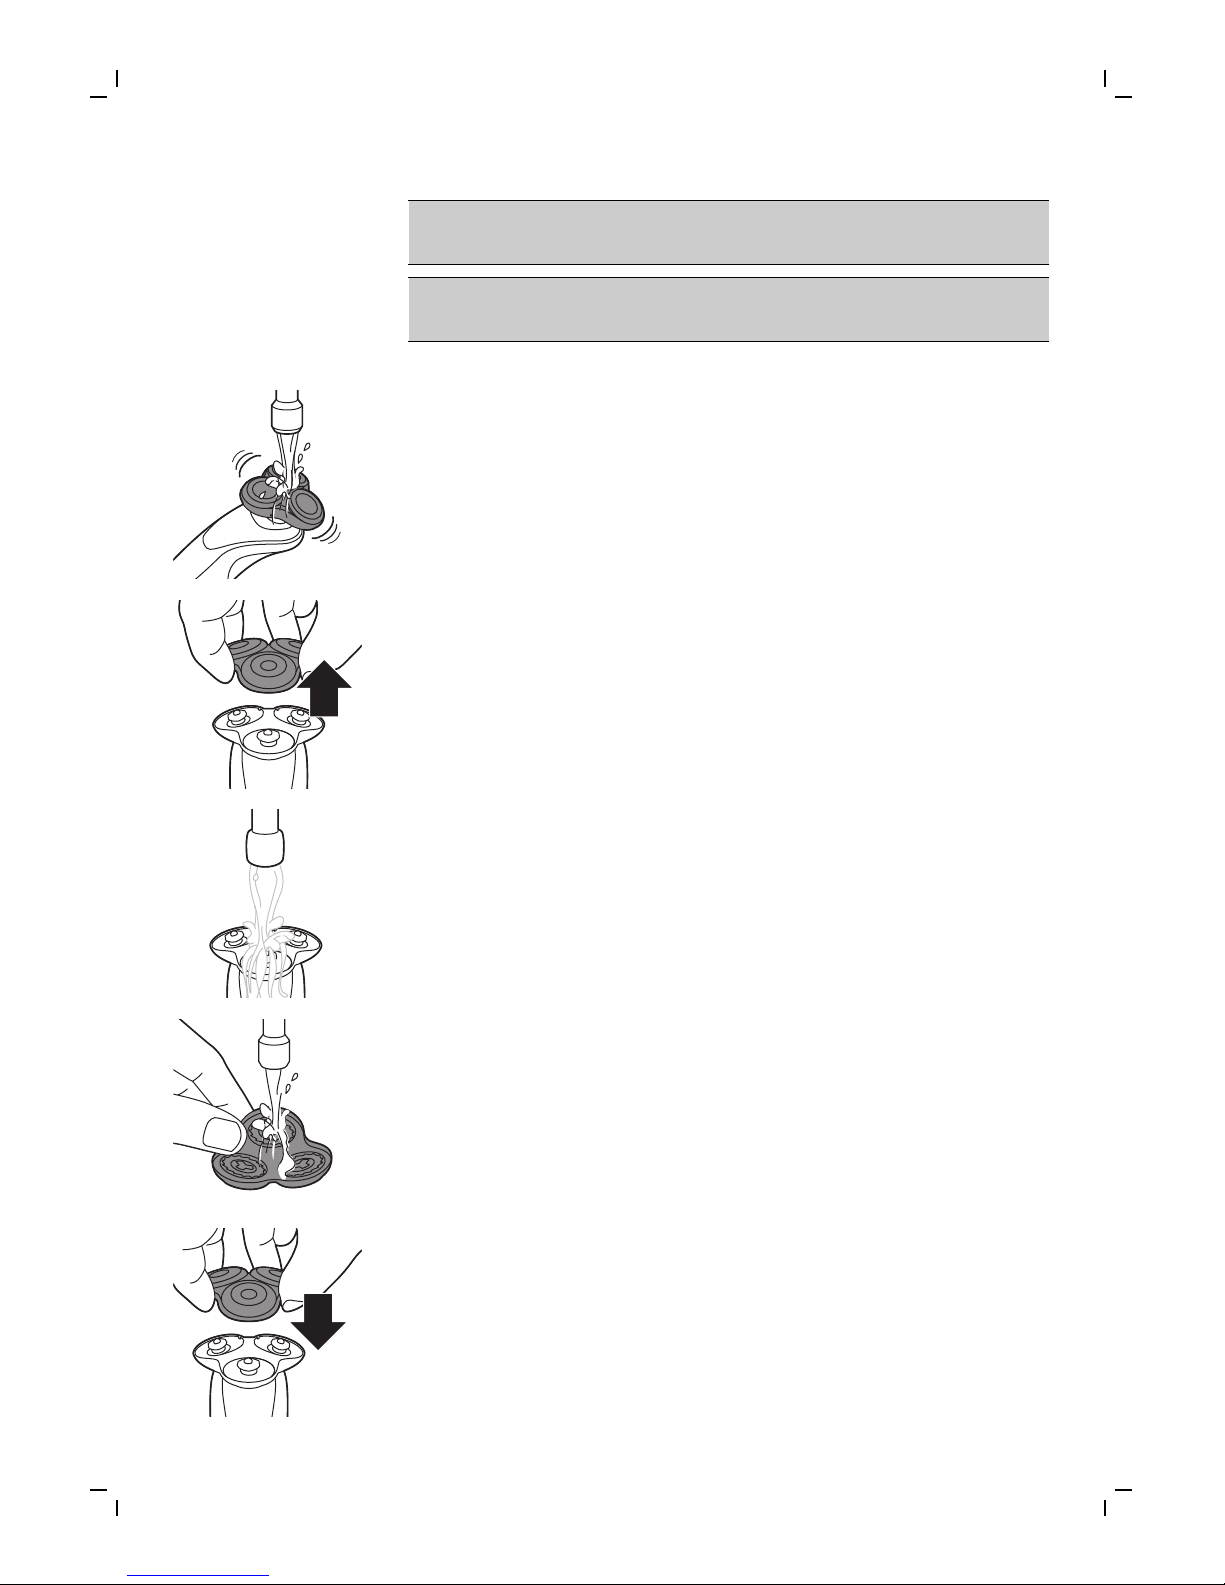
1 打开剃须刀。
2 用温水冲洗剃须刀头部件。
3 关闭剃须刀。 将剃须刀头支架从剃须刀头部件的底
部抽离。
4 在水龙头下冲洗胡茬储藏室。
5 用温水冲洗剃须刀头支架。
6 小心地甩掉多余水分并彻底晾干剃须刀头支架。
7 将剃须刀头支架安装到剃须刀头部件的底部(可听
到“咔哒”一声)。
49
简体中文
Page 50
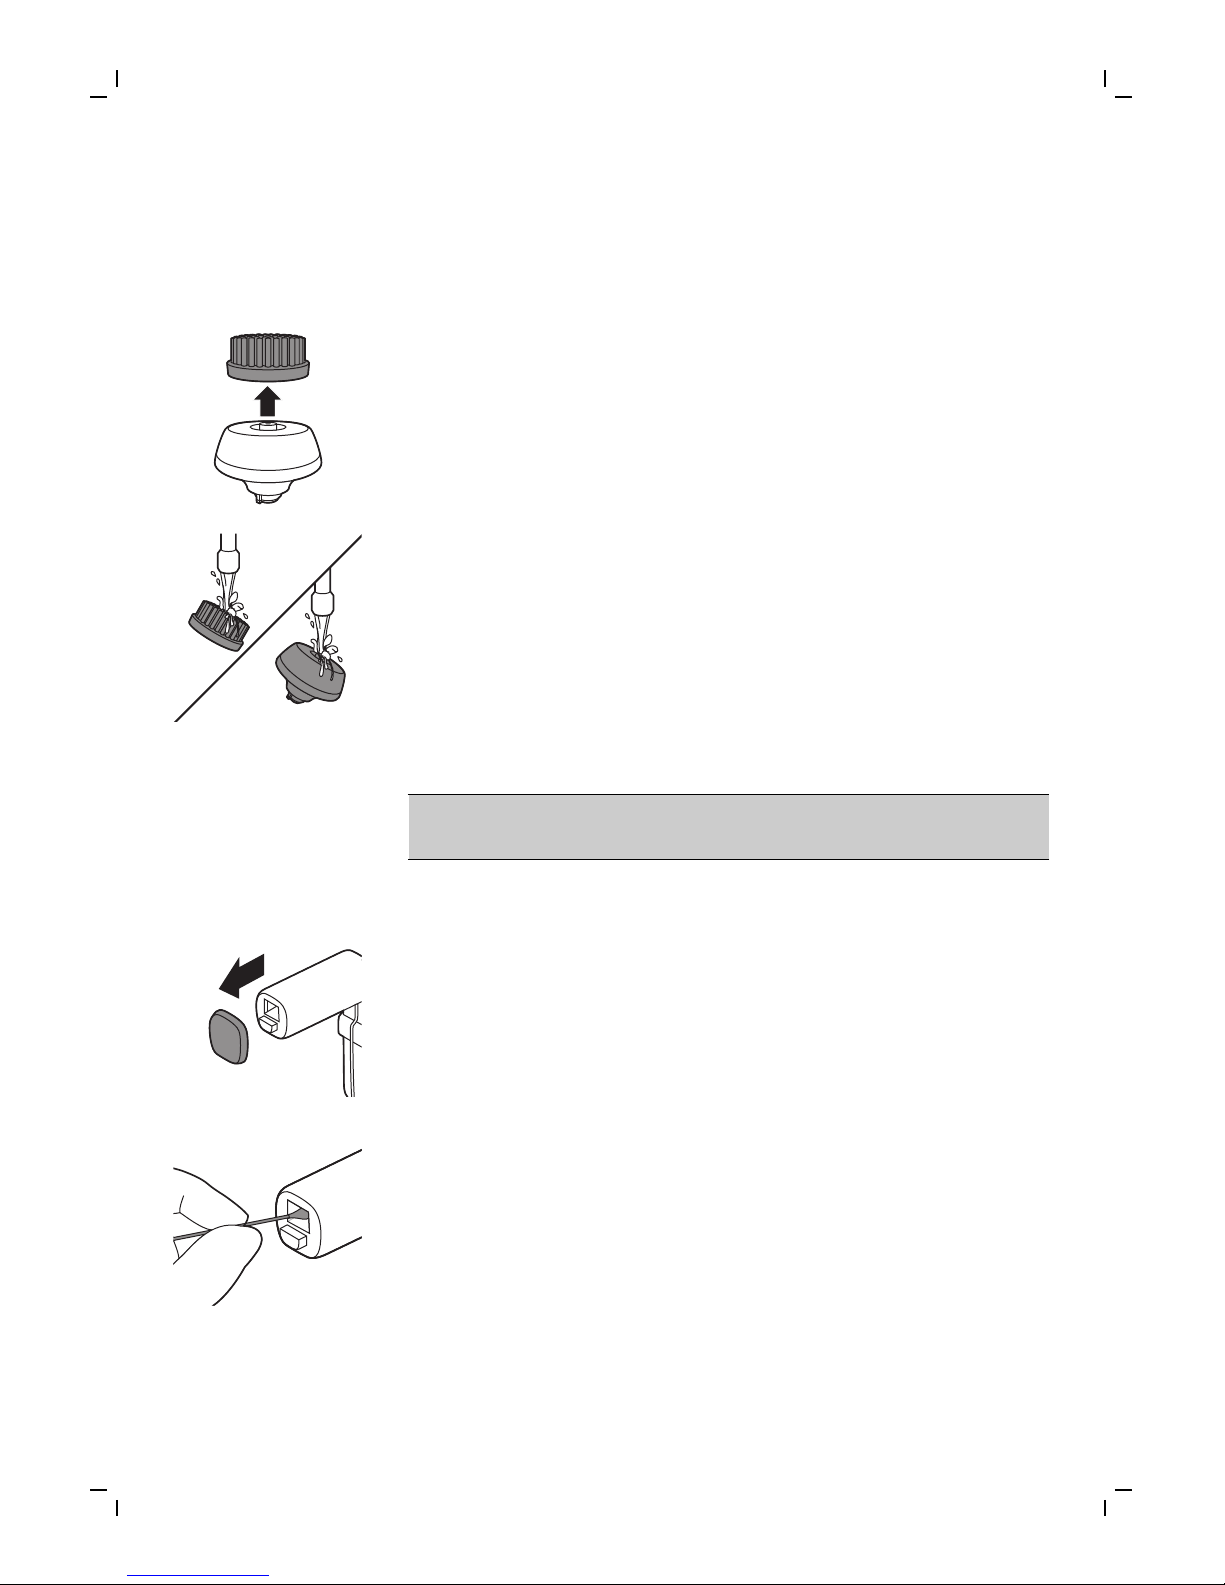
清洗洁面刷
每次使用后都要清洗洁面刷。
1 关闭剃须刀。
2 从附件基座上卸下刷头。
3 用温水和肥皂彻底清洗部件。
4 用毛巾擦干洁面刷。
清洁 SkinAnalyst 皮肤检测仪
警告: 切勿在水龙头下清洗 SkinAnalyst 皮肤检测仪,
否则可能会造成损坏。
1 拔下 SkinAnalyst 皮肤检测仪的插头。
2 从 SkinAnalyst 皮肤检测仪上卸下 iPhone。
3 使用蘸过酒精的棉签,轻轻地清洁 SkinAnalyst 皮
肤检测仪中的两个镜面。
4 使用干净的棉签擦干这两个镜面。
50
简体中文
Page 51
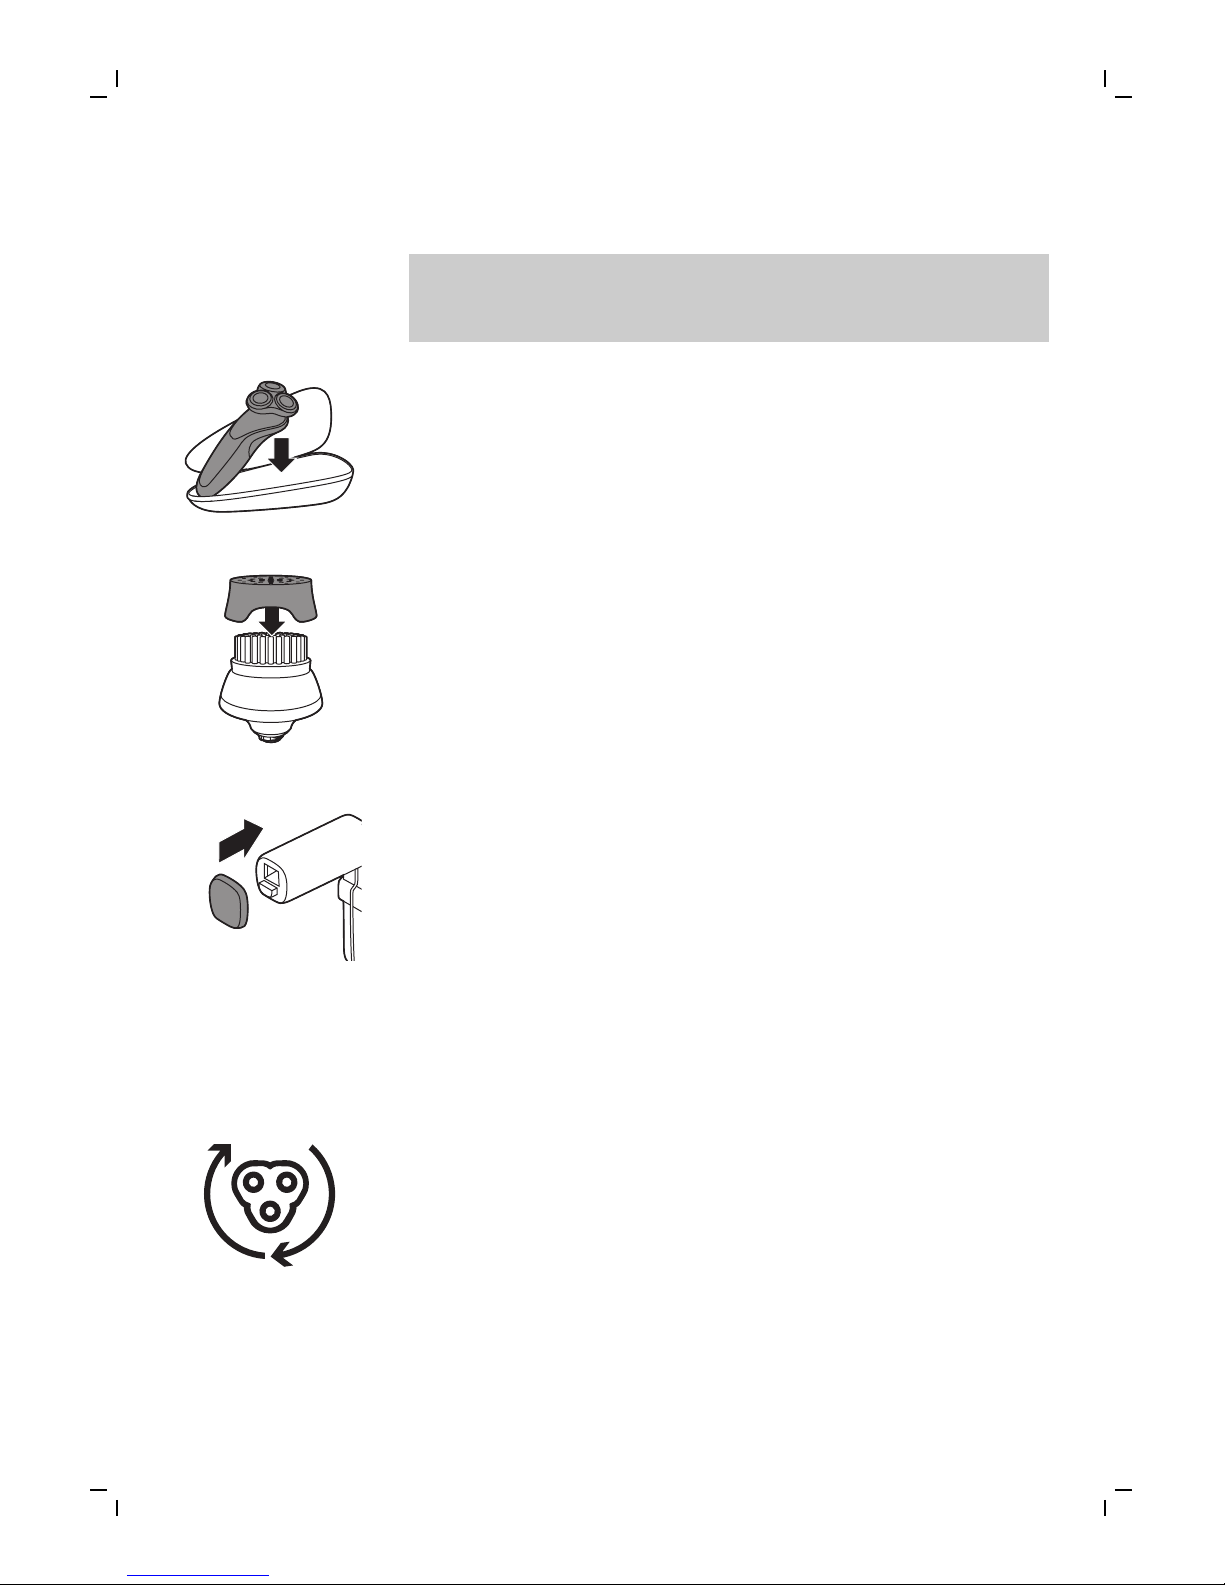
存放
注意: 我们建议您在晾干本剃须刀及其附件后,再将
保护盖放在洁面刷和 SkinAnalyst 皮肤检测仪上,将剃
须刀存放在收纳袋中。
- 将剃须刀存放在随附的软袋中。
- 将保护盖放在洁面刷上,以防产品积聚灰尘。
- 将保护盖放在 SkinAnalyst 皮肤检测仪上,以防产
品积聚灰尘。
更换
更换剃须刀头
2yrs
在应当更换剃须刀头时,通知符号也会亮起,以作为额
外的提示。应用程序中也提供此建议。
为获得更好剃须效果,建议每两年更换一次剃须刀头。
立即更换损坏的剃须刀头。 务必使用原装飞利浦剃须
刀头 (请参见 '订购配件')进行更换。
1 关闭剃须刀。
51
简体中文
Page 52
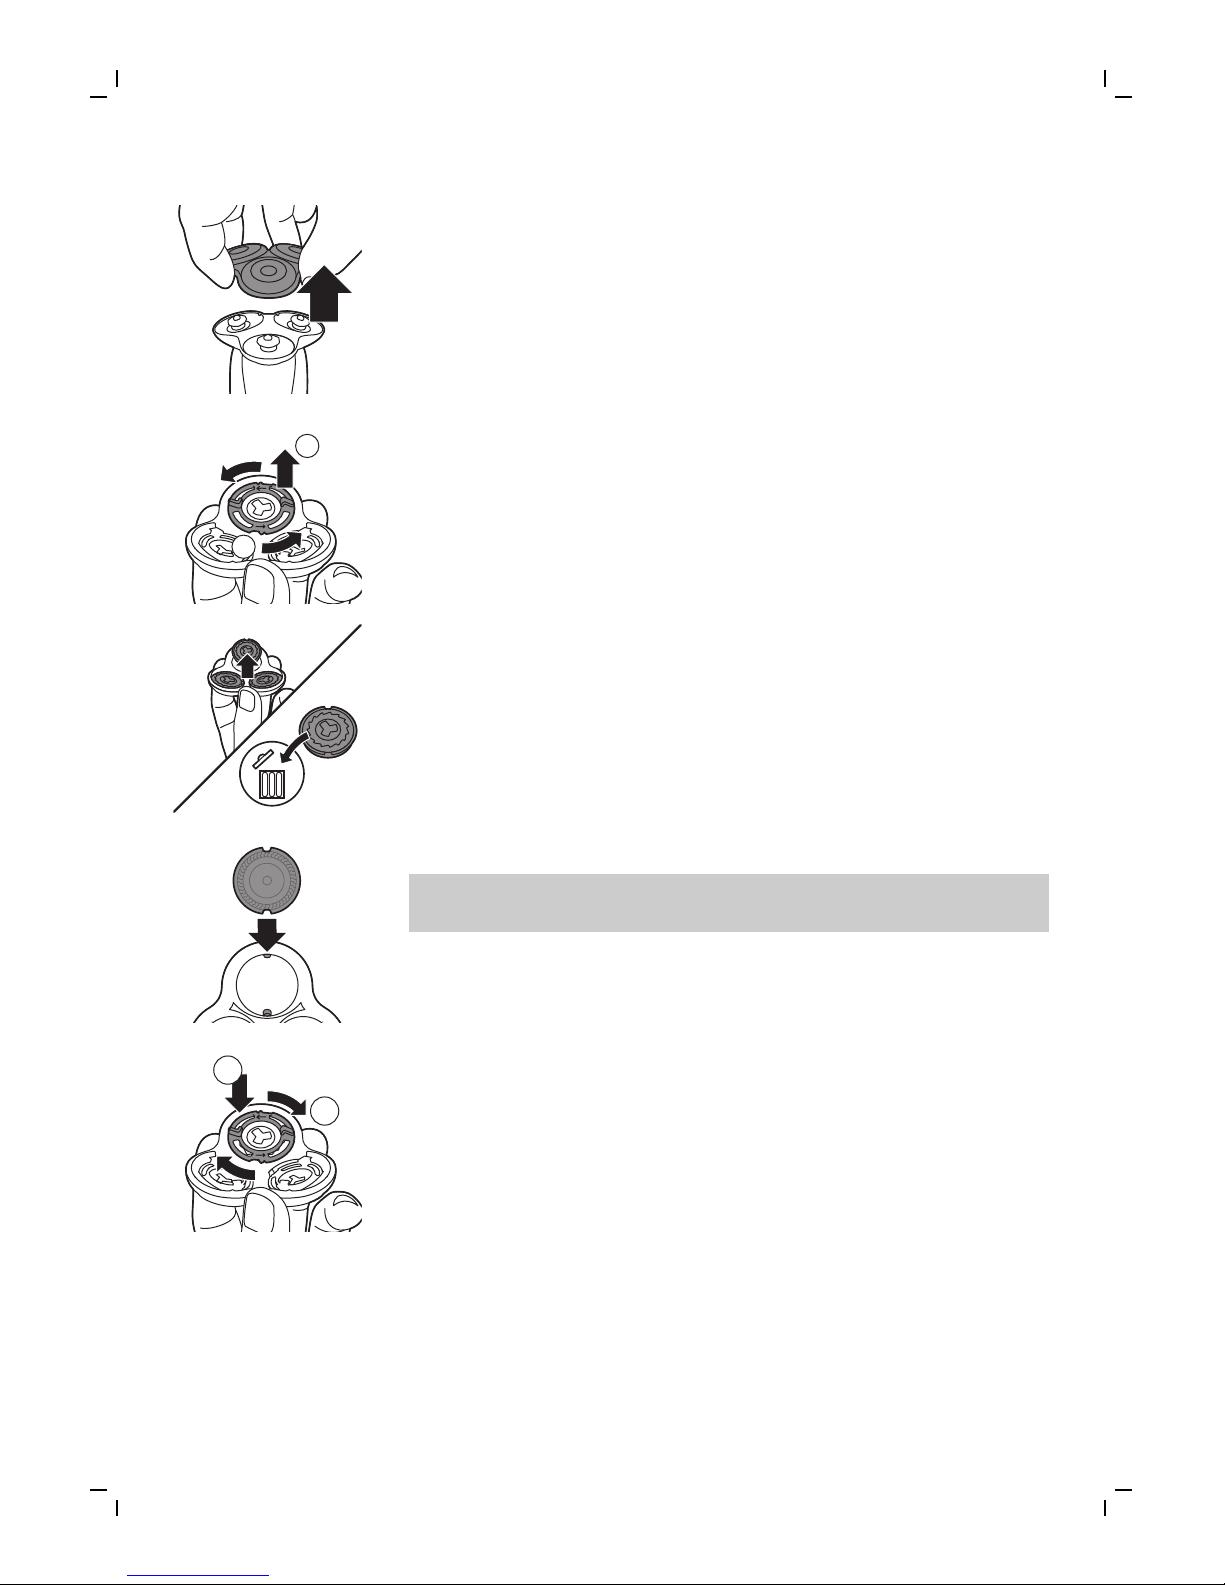
2 将剃须刀头支架从剃须刀头部件的底部抽离。
2
1
3 逆时针旋转固定环并将其取下。将其存放在安全的
地方。
4 从剃须刀头支架上卸下剃须刀头。
立即丢弃用过的剃须刀头,以免与新的剃须刀头混
淆。
5 将新的剃须刀头装到剃须刀头支架中。
注意: 确保剃须刀头两侧的槽口正好卡入剃须刀头
支架上的凸起部位。
2
1
6 将固定环放回剃须刀头上,然后顺时针旋转以重新
安装固定环。
52
简体中文
Page 53
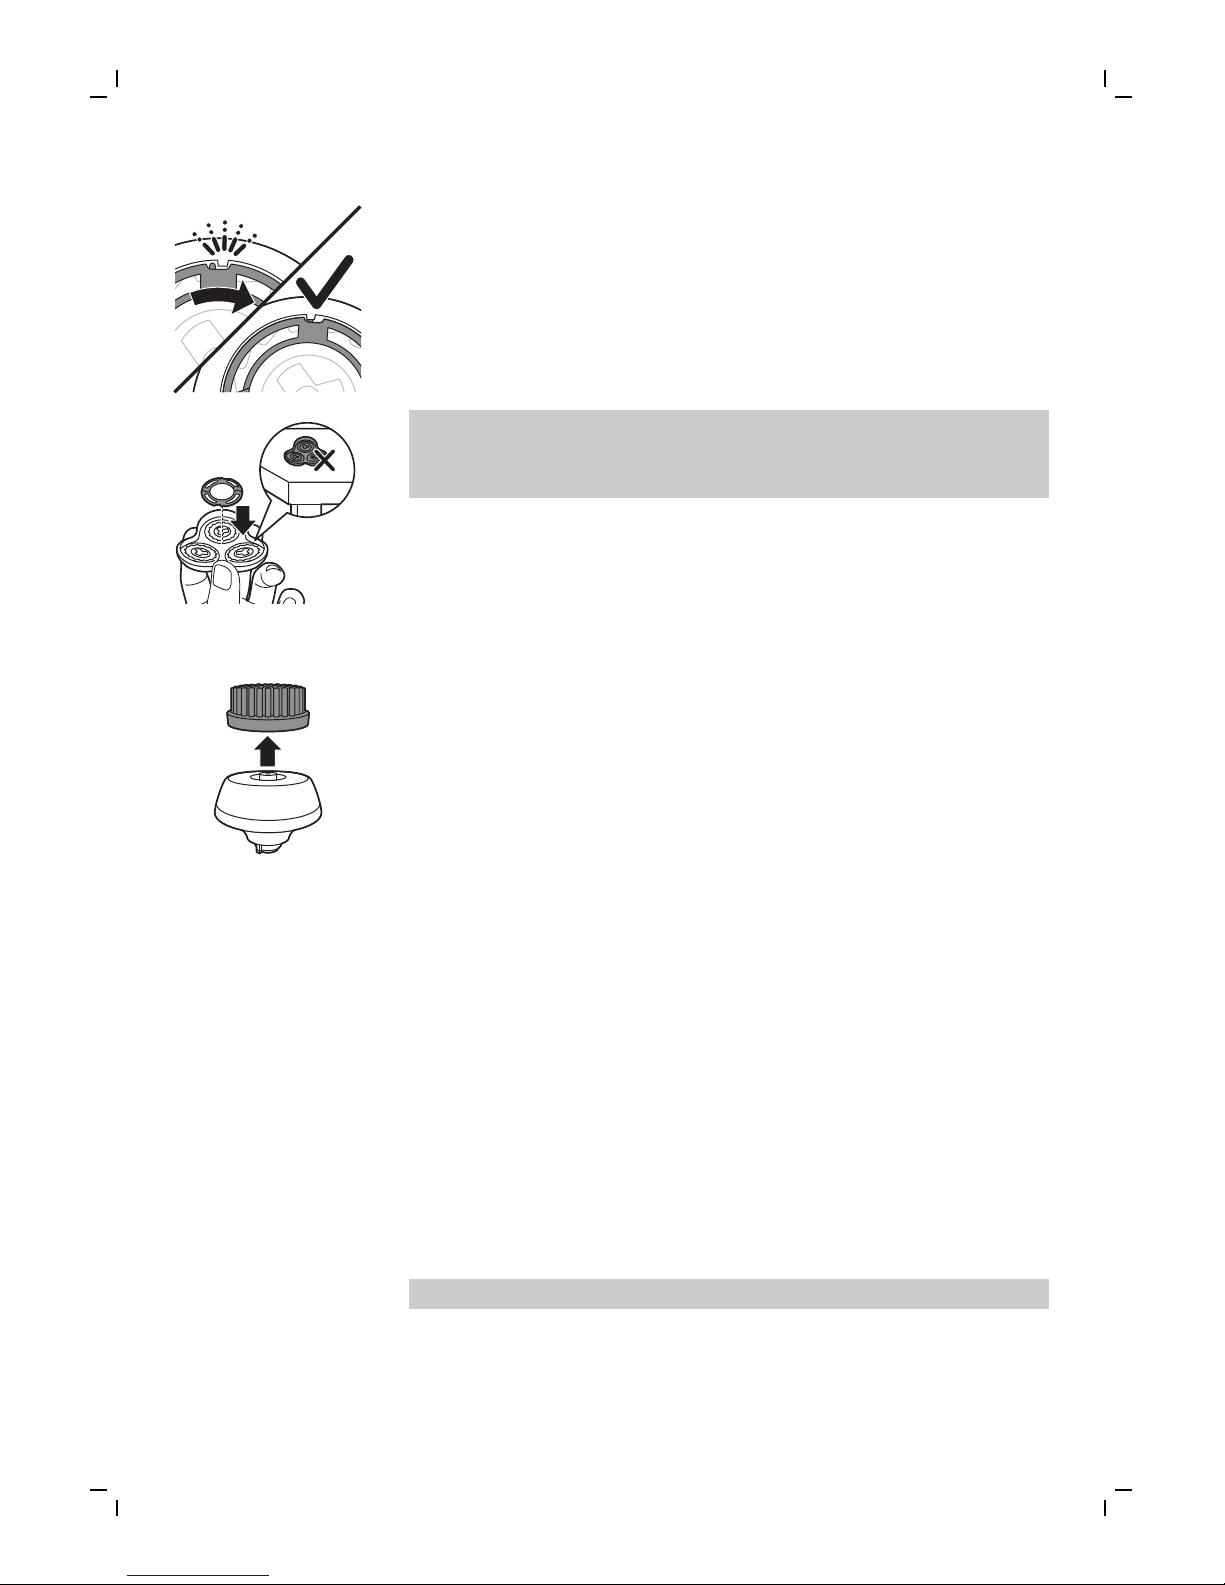
- 每个固定环均具有两个凹槽,正好能够装入剃须刀
头支架的凸缘上。 顺时针旋转固定环,直至听
到“咔哒”一声,表明固定环已就位。
1
注意: 当您重新插入剃须刀头并重新安装固定环
时,请将剃须刀头支架握在手中。 切勿将剃须刀头
支架放在平面上,否则可能会损坏剃须刀头。
7 将剃须刀头支架安装到剃须刀头部件的底部(可听
到“咔哒”一声)。
8 要重置更换提醒,请按住开/关按钮约 7 秒钟。
更换洁面刷
每 3 个月应更换一次刷头,或当刷毛在更短时间内出
现变形或损坏时更换。 在应当更换刷头时,通知符号
也会亮起,以作为额外的提示。应用程序中也提供此建
议。
订购配件
要购买附件或备件,请访问
www.shop.philips.com/service 或联系您的飞利浦经销
商。 您还可以联系所在国家/地区的飞利浦客户服务中
心(请参阅全球保修卡了解详细联系信息)。
可选配以下附件和备件:
- SH70 飞利浦剃须刀头
- HQ110 飞利浦剃须刀头清洁喷雾剂
- RQ560/RQ563 飞利浦洁面刷
- HQ8505 电源部件
注意: 配件可用性可能因国家/地区而异。
53
简体中文
Page 54

回收
- 弃置本产品时,请不要将其与一般生活垃圾放在一
起,应将其交给政府指定的回收中心。 这样做将有
利于环保。
- 此产品包含内置充电电池;请勿将充电电池与一般
生活垃圾一起弃置。 请您将产品送到官方收集中心
或飞利浦服务中心,请专业人士移除充电电池。
- 遵循您的国家/地区有关分类回收电子电气产品和充
电电池的规定。 正确弃置产品有助于避免对环境和
人类健康造成不良后果。
мȞġĈҴˀΙĀǩ؆Ӎߒʔ
ˌɫǩ؆
ĈҴˀΙ
(Pb)
᰽
(Hg)
⬡
(Cd)
ԣᲱ
(Cr (VI) )
Ġ⅑ԓ᧠
(PBB)
Ġ⅑ȕ᧠⓭
(PBDE)
PCB’s
מŪǗɢذ
X O O O O O
Electrical
contact pins
ǗˈǦ
X O O O O O
Power plug
Ǘ۷Ǽ
X O O O O O
ǕȪϜ֪֙SJ/T 11364Āܪǭৠ뺯
OȪФ˽ĈҴˀΙć˽ˌɫǨĈߴΙࠒնġĀߒʔߴćGB/T 26572ܪǭĀՄʔđŘĪ뺯
XȪФ˽ĈҴˀΙψɺć˽ˌɫĀԚĂߴΙࠒնġĀߒʔɸŜGB/T 26572ܪǭĀՄʔđ뺯
- 该表格中所显示的“有害物质”在产品正常使用情
况下不会对人身和环境产生任何伤害。
- 该表格中所显示的“有害物质”及其存在的部件向
消费者和回收处理从业者提供相关物质的存在信
息,有助于产品废弃时的妥善处理。
拆下充电电池
在废弃器具前,必须将电池从器具中取出。 卸下
电池之前,请确保剃须刀与电源断开连接并且电
池电量已耗尽。
当您使用工具打开剃须刀时,请采取必要的安全
保护措施。
注意,电池带非常锋利。
54
简体中文
Page 55

1 使用螺丝刀取出后面板中的螺钉。 拆除后面板。
2 将钩子向外掰,取出电源部件。
3 脱开安全钩,取下电源部件的前面板。
4 用一把钢丝钳剪下电池带。
保修和支持
如需信息或支持,请访问 www.philips.com/support 或
阅读国际保修卡。
故障处理方法
本章归纳了使用本剃须刀、SkinAnalyst 皮肤检测仪及
其附件时最常见的一些问题。 如果您无法根据以下信
息解决问题,请访问 www.philips.com/support 查阅常
见问题列表,或联系您所在国家/地区的客户服务中
心。
55
简体中文
Page 56

问题 可能的原因 解决方法
无法将本剃须刀连接到
应用程序。
应用程序尚未下载。 下载 SkinAnalyst 应用
程序。
该应用程序适用于安装
有 iOS9 或更高版本的
iPhone 6、iPhone 6
Plus、iPhone 6S 和
iPhone 6S Plus。
未打开剃须刀电源。 确保剃须刀已开启。
尚未打开应用程序。 确保打开应用程序。
iPhone 找不到本剃须
刀。
本剃须刀适用于安装有
iOS9 或更高版本操作
系统的 iPhone 6、
iPhone 6 Plus、iPhone
6S 和 iPhone 6S
Plus。
蓝牙未打开。 确保本剃须刀和
iPhone 上的蓝牙已启
用。
剃须刀未充电。 确保本剃须刀已充电。
我想在没有应用程序的
情况下使用本剃须刀。
即使没有应用程序,您
也可以使用本剃须刀。
但是,仅当应用程序与
本剃须刀结合使用时,
应用程序才能根据您的
使用情况提供提示和建
议。 您可以通过应用
程序设置剃须设置。
应用程序还会在需要更
换剃须刀头和清洁剃须
刀等时候提醒您
56
简体中文
Page 57

问题 可能的原因 解决方法
我无法更改本剃须刀上
的剃须设置/洁面刷设
置。
确保本剃须刀和
iPhone 之间的连接良
好。
您可以在剃须刀上选择
附件(剃须刀头部
件/洁面刷)。 您可以
在应用程序中根据附件
更改设置(剃须刀头部
件: 正常/敏感/超敏
感,洁面刷: 干性皮
肤/一般皮肤/油性皮
肤/敏感皮肤)。
剃须刀的剃须效果没有
以前好。
剃须刀头已损坏或磨
损。
更换剃须刀头 (请参见
'更换剃须刀头')。
毛发或污垢堵塞了剃须
刀头。
对剃须刀头进行常规或
彻底清洁。
要彻底清洁剃须刀头,
请将剃须刀头从剃须刀
头支架上逐一 (请参见
'更换剃须刀头')卸下。
然后,分离刀片和网
罩,并在水龙头下冲洗
每个刀片和网罩套装。
冲洗后,将刀片放回对
应的网罩中。 最后,
将剃须刀头装回到剃须
刀头支架 (请参见 '更换
剃须刀头')中。
洁面刷的清洁效果没有
以前好。
洁面刷已损坏或磨损。 更换洁面刷 (请参见 '更
换洁面刷')。
剃须刀检测不到正确的
附件。
附件受到严重污染或损
坏。
尝试清洁附件 (请参见
'清洁和保养');如果问
题依然存在,请通过应
用程序关闭检测功能,
并手动选择该附件,方
法是在打开本剃须刀电
源时,按下开/关按钮
一秒钟。
57
简体中文
Page 58

问题 可能的原因 解决方法
按下开/关钮时,剃须
刀不工作。
本剃须刀仍然连接着电
源插座。 出于安全原
因,该剃须刀在使用时
不能连接电源线。
拔掉剃须刀插头,然后
按开/关按钮打开剃须
刀。
充电电池的电量已耗
尽。
给电池充电。
旅行锁已被激活。 按住开/关按钮 3 秒钟
以解除旅行锁。
剃须刀头部件被污染或
损坏,导致马达无法运
行。
彻底清洁剃须刀头或将
其更换。 有关如何彻
底清洗剃须刀头的详细
说明,另请参阅“毛发
或污垢堵塞了剃须刀
头”。
剃须刀会在我选择不同
的刷头程序时关闭电
源。
在洁面期间,不能更改
刷头程序。
在选择不同的刷头程序
前,请关闭剃须刀电
源。
在皮肤测量期间,应用
程序出现错误。
未将 SkinAnalyst 传感
器平放在皮肤上。
将 SkinAnalyst 传感器
平放在皮肤上。
未将 SkinAnalyst 传感
器的插头正确地插入手
机。
从手机上拔下
SkinAnalyst 传感器的
插头,然后将插头重新
插入手机。
手机无法识别
SkinAnalyst 皮肤检测
仪。
确保满足以下条件:
-
已卸下iPhone机
套/壳。
-
iPhone 的摄像镜头
洁净
-
已将 SkinAnalyst
皮肤检测仪正确地
连接到 iPhone
58
简体中文
Page 59
问题 可能的原因 解决方法
手机无法识别
SkinAnalyst 皮肤检测
仪。
确保音量限制设置已重
置为默认设置(转
至“设置”>“音
乐”>“音量限
制”>“滑动到最
大”)。
水从剃须刀底部漏出。 在清洁过程中,水可能
聚集在剃须刀的机身内
部与外壳之间。
这是正常现象,而且没
有危险,因为所有电子
元件都封闭在剃须刀内
部的密封电源部件中。
产品 :飞利浦电动剃须刀
型号 :S7980
额定电压 :220V~
额定频率 :50Hz
额定输入功率 :9 W
产地 :荷兰
生产日期 :请见产品本体
CMIIT ID :2017DP0589
SRRC申请单位 :飞利浦(中国)投资有限公司
制造商:飞利浦电子香港有限公司
香港新界沙田香港科学园科技道东五号
经销单位:飞利浦(中国)投资有限公司
上海市静安区灵石路718号A1幢
全国顾客服务热线: 4008 800 008
本产品根据国标 GB4706.1-2005, GB4706.9-2008
,信部无【2002】353号制造
保留备用
发行日期: 13/02/2017
59
简体中文
Page 60

Page 61

Page 62

Page 63

Empty page before back cover
Page 64

© 2018 Koninklijke Philips N.V.
All rights reserved
保留所有权利
4222.002.5991.4 (16/2/2018)
> 75% 循环再造纸
>75% recycled paper
>75% papier recyclé
 Loading...