

Page 1

series S5000
Page 2

1
Page 3

ENGLISH 4
БЪЛГАРСКИ 39
ČEŠTINA 78
EESTI 113
HRVATSKI 147
MAGYAR 183
ҚАЗАҚША 218
LIETUVIŠKAI 255
LATVIEŠU 291
МАКЕДОНСКИ 326
POLSKI 365
ROMÂNĂ 402
РУССКИЙ 437
SLOVENSKY 475
SLOVENŠČINA 511
SHQIP 545
SRPSKI 581
УКРАЇНСЬКА 616
S5000 series
Page 4

4
ENGLISH
Introduction
Congratulations on your purchase and welcome to
Philips! To fully benet from the support that Philips
offers, register your product at
www.philips.com/welcome.
General description (Fig. 1)
1 Protection cap for cleansing brush attachment
(specic types only)
2 Click-on cleansing brush attachment
(specic types only)
3 Comb for beard styler attachment
(specic types only)
4
Click-on beard styler attachment (specic types only)
5 Click-on trimmer attachment (specic types only)
6 Protection cap for shaving unit (specic types only)
7 Click-on shaving unit
8 On/off button
9 Turbo button (specic types only)
10 Handle
11 Socket for small plug
12 Battery charge indicator with 1 light
13 Battery charge indicator with 3 lights
14 Unplug for use symbol
15 Travel lock symbol
16 Replacement reminder
17 Cleaning reminder
18 Cleaning cartridge for SmartClean system
19 SmartClean system (specic types only)
20 Cap of SmartClean system
21 On/off button
22 Battery symbol
23 Cleaning symbol
24 Replacement symbol
25 Ready symbol
Page 5

ENGLISH 5
26 Adapter
27 Small plug
28 Pouch (specic types only)
Note: The accessories supplied may vary for different
products. The box shows the accessories that have been
supplied with your appliance.
Important safety information
Read this important information carefully before you
use the appliance and its accessories and save it for
future reference. The accessories supplied may vary
for different products.
Danger
- Keep the adapter dry.
Warning
- The adapter contains a transformer. Do not cut
off the adapter to replace it with another plug, as
this causes a hazardous situation.
- This appliance can be used by children aged from
8 years and above and persons with reduced
physical, sensory or mental capabilities or lack
of experience and knowledge if they have been
given supervision or instruction concerning use
of the appliance in a safe way and understand the
hazards involved. Children shall not play with
the appliance. Cleaning and user maintenance
shall not be made by children without supervision.
- Always unplug the shaver before you clean it
under the tap.
- Always check the appliance before you use it.
Do not use the appliance if it is damaged, as this
may cause injury. Always replace a damaged part
with one of the original type.
Page 6

ENGLISH6
Caution
- Never immerse the cleaning system or the
charging stand in water and do not rinse it
under the tap.
- Never use water hotter than 80°C to rinse
the shaver.
- Only use this appliance for its intended purpose
as shown in the user manual.
- For hygienic reasons, the appliance should only
be used by one person.
- Do not use the adapter in or near wall sockets
that contain or have contained an electric air
freshener to prevent irreparable damage to the
adapter.
- Never use compressed air, scouring pads, abrasive
cleaning agents or aggressive liquids such as petrol
or acetone to clean the appliance.
- If your shaver comes with a cleaning system,
always use the original Philips cleaning uid
(cartridge or bottle, depending on the type of
cleaning system).
- Always place the cleaning system on a stable,
level and horizontal surface to prevent leakage.
- If your cleaning system uses a cleaning cartridge,
always make sure that the cartridge compar tment
is closed before you use the cleaning system to
clean or charge the shaver.
- When the cleaning system is ready for use, do not
move it to prevent leakage of cleaning uid.
- Water may drip from the socket at the bottom
of the shaver when you rinse it. This is normal
and not dangerous because all electronics are
enclosed in a sealed power unit inside the shaver.
Page 7

ENGLISH 7
Electromagnetic elds (EMF)
- This Philips appliance complies with all applicable
standards and regulations regarding exposure
to electromagnetic elds.
General
- This shaver is waterproof. It is suitable for use in
the bath or shower and for cleaning under the tap.
For safety reasons, the shaver can therefore only
be used without cord.
- The appliance is suitable for mains voltages ranging
from 100 to 240 volts.
- The adapter transforms 100-240 volts to a safe
low voltage of less than 24 volts.
- Maximum noise level: Lc = 69dB(A)
The display
Charging
Battery charge indicator with 3 lights
- Charging takes approx. 1 hour
- Quick charge: When the appliance is connected
to the mains, the lights of the battery charge
indicator light up one after the other continuously.
When the appliance contains enough energy for
one shave, the bottom light of the battery charge
indicator ashes slowly.
- If you leave the appliance connected to the mains,
the charging process continues. To indicate that
the appliance is charging, rst the bottom light
ashes and then lights up continuously. Then the
second light ashes and then lights up continuously,
and so on until the appliance is
fully charged.
Page 8

ENGLISH8
Battery charge indicator with 1 light
- Charging takes approx. 1 hour.
- Quick charge: When the appliance does not
contain enough energy for one shave, the battery
charge indicator ashes quickly. When the
battery charge indicator starts ashing slowly, the
appliance contains enough energy for one shave .
- If you leave the appliance connected to the mains,
the charging process continues. To indicate that
the appliance is charging, the battery charge
indicator ashes slowly.
Battery fully charged
Note: This appliance can only be used without cord.
Note: When the battery is full, the display switches
off automatically after 30 minutes. If you press the
on/off button during charging, the ‘unplug for use’
symbol ashes white to remind you that you have
to disconnect the appliance from the mains.
When the battery is fully charged, all lights of the
battery charge indicator light up continuously.
- Battery charge indicator with 3 lights
- Battery charge indicator with 1 light
Page 9

ENGLISH 9
Battery low
When the battery is almost empty, the battery
charge indicator ashes orange.
- Battery charge indicator with 3 lights
- Battery charge indicator with 1 light
Remaining battery capacity
Battery charge indicator with 3 lights
- The remaining battery capacity is indicated by the
lights of the battery charge indicator that light up
continuously.
‘Unplug for use’ reminder
- The appliance is equipped with an ‘unplug for use’
reminder. The ‘unplug for use’ symbol starts to
ash to remind you that you have to disconnect
the appliance from the adapter before you can
switch it on.
Page 10
3 sec.
ENGLISH10
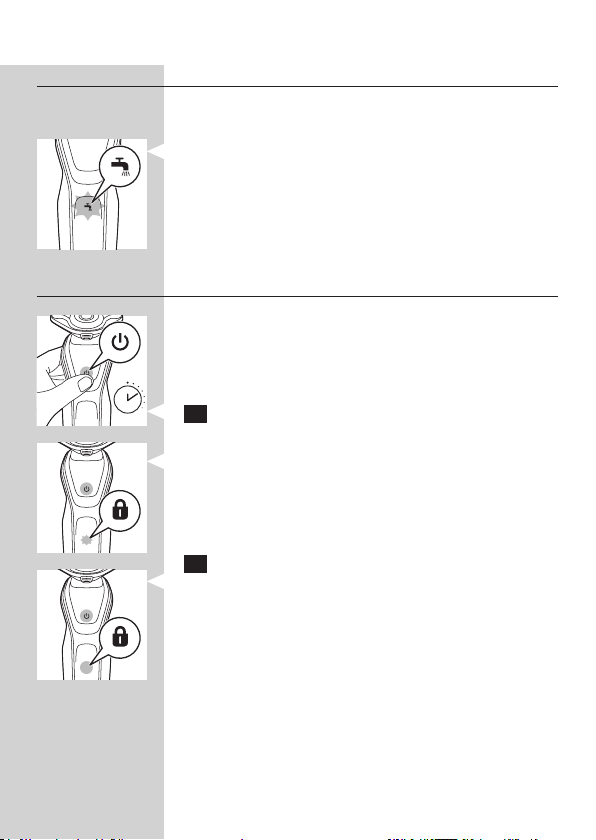
Cleaning reminder
For optimal shaving performance, we advise you to
clean the shaver after every use.
- When you switch off the shaver, the cleaning
reminder ashes to remind you to clean the
shaver.
Travel lock
You can lock the shaver when you are going to
travel. The travel lock prevents the shaver from being
switched on by accident.
Activating the travel lock
1 Press the on/off button for 3 seconds to enter
the travel lock mode.
- While you activate the travel lock, the travel lock
symbol lights up continuously. When the travel
lock is activated, the travel lock symbol ashes.
Deactivating the travel lock
1 Press the on/off button for 3 seconds.
- The travel lock symbol ashes and then lights up
continuously.
The shaver is now ready for use again.
Page 11

ENGLISH 11
Replacing shaving heads
For maximum shaving performance, we advise you
to replace the shaving heads every two years.
- The appliance is equipped with a replacement
reminder which reminds you to replace the
shaving heads. The replacement reminder lights up
continuously.
Note: After replacing the shaving heads, you need to
reset the replacement reminder by pressing the on/off
button for 7 seconds.
Turbo setting (specic types only)
The appliance is equipped with a Turbo or Turbo+
setting. This setting is intended for quicker and more
intense shaving and makes hard-to-reach areas easier
to shave.
Activating the Turbo setting
1 To activate the Turbo setting, press the Turbo
button once.
Deactivating the Turbo setting
1 To deactivate the Turbo setting, simply press
the Turbo button once again.
Charging
Charging takes approx. 1 hour.
Note: This appliance can only be used without cord.
Charge the shaver before you use it for the rst
time and when the display indicates that the battery
is almost empty.
Page 12

ENGLISH12
Charging with the adapter
1 Insert the small plug into the appliance
and put the adapter in the wall socket.
Charging in the SmartClean system
(specic types only)
1 Put the small plug in the SmartClean system.
2 Put the adapter in the wall socket.
3 Press down the top cap to be able to place the
shaver in the holder (‘click’).
4 Hold the shaver upside down above the holder.
Make sure the front of the shaver points
towards the SmartClean system.
5 Place the shaver in the holder, tilt the shaver
backwards and press down the top cap to
connect the shaver (‘click’).
- The battery symbol ashes slowly to indicate the
shaver is charging.
Page 13
ENGLISH 13
Using the shaver
Switching the appliance on and off
1 To switch on the appliance, press the on/off
button once.
2 To switch off the appliance, press the on/off
button once.
- Battery charge indicator with 3 lights: The display
lights up for a few seconds to show the remaining
battery status.
Shaving
Skin adaptation period
Your rst shaves may not bring you the result you
expect and your skin may even become slightly
irritated. This is normal. Your skin and beard need
time to adapt to any new shaving system.
We advise you to shave regularly (at least 3 times
a week) with this shaver for a period of 3 weeks to
allow your skin to adapt to the new shaver.
Note: This appliance can only be used without a cord.
1 Switch on the appliance.
2 Move the shaving heads over your skin in
circular movements.
Note: Do not make straight movements.
3 Clean the shaver after use (see chapter
‘Cleaning and maintenance’).
Wet shaving
You can also use this shaver in the shower or
on a wet face with shaving foam or shaving gel.
Page 14

ENGLISH14
To shave with shaving foam or shaving gel, follow the
steps below:
1 Apply some water to your skin.
2 Apply shaving foam or shaving gel to your skin.
3 Rinse the shaving unit under the tap to ensure
that the shaving unit glides smoothly over
your skin.
4 Switch on the shaver.
5 Move the shaving heads over your skin in
circular movements.
Note: Rinse the shaver under the tap regularly to ensure
that it continues to glide smoothly over your skin.
6 Dry your face and thoroughly clean the
shaver after use (see chapter ‘Cleaning
and maintenance’).
Note: Make sure you rinse all foam or shaving gel
off the shaver.
Page 15

ENGLISH 15
Turbo setting (specic types only)
The appliance is equipped with a Turbo or Turbo+
setting for easy shaving of hard-to reach areas.
1 Switch on the shaver.
2 Press the Turbo button once to switch on
the Turbo setting if you want to shave
hard-to-reach areas more quickly.
3 Move the shaving heads over your skin in
circular movements.
Note: Do not make straight movements.
4 To deactivate the Turbo setting simply press
the Turbo button once.
Using the click-on attachments
Note: The accessories supplied may vary for different
products. The box shows the accessories that have been
supplied with your appliance.
Removing or attaching the click-on
attachments
1 Make sure the appliance is switched off.
2 Pull the attachment straight off the appliance.
Note: Do not twist the attachment while you pull it off
the appliance.
3 Insert the lug of the attachment into the slot in
the top of the appliance. Then press down the
attachment to attach it to the appliance (‘click’).
Page 16

ENGLISH16
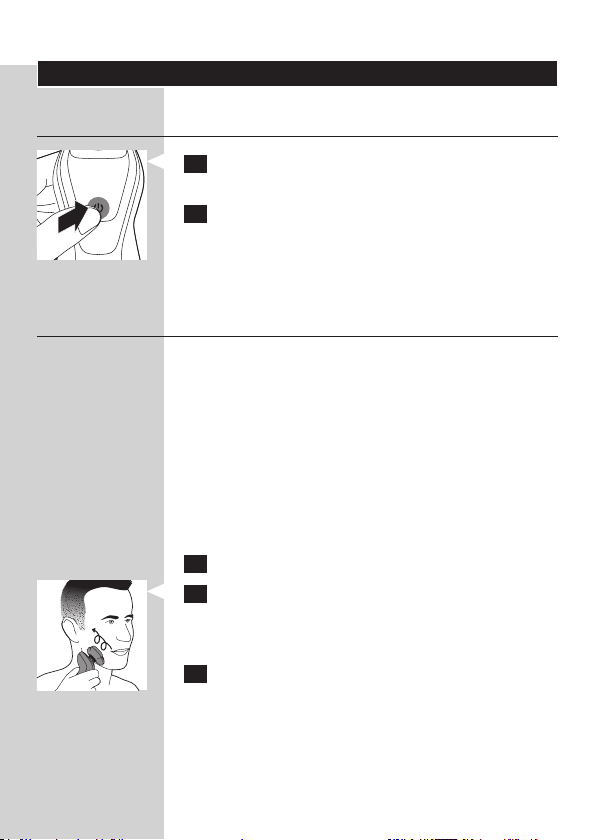
Using the trimmer attachment
You can use the trimmer attachment to groom
your sideburns and moustache.
1 Make sure the appliance is switched off.
2 Insert the lug of the attachment into the slot
in the top of the shaver. Then press down
the trimmer attachment to attach it to the
appliance (‘click’).
3 Switch on the appliance.
4 You can now start trimming.
5 Clean the attachment after use (see chapter
‘Cleaning and maintenance’).
Using the beard styler attachment
1 Make sure the appliance is switched off.
2 Insert the lug of the attachment into the slot in
the top of the appliance. Then press down the
attachment to attach it to the appliance (‘click’).
Using the beard styler attachment with comb
You can use the beard styler attachment with the
comb attached to style your beard at one xed
setting, but also at different length settings. You can
use it also to pre-trim any long hairs before shaving
to have a more comfortable shave.
The hair length settings on the beard styler
attachment correspond to the remaining hair length
after cutting and range from 1 to 5mm.
1 Slide the comb straight into the guiding grooves
on both sides of the attachment (‘click’).
Page 17

ENGLISH 17
2 Press the length selector and then push it
2
1
to the left or right to select the desired hair
length setting.
3 Switch on the appliance.
4 You can now start styling your beard by
moving the attachment upwards with
gentle pressure making sure the front of
the comb is in full contact with the skin.
5 Clean the attachment after use (see chapter
‘Cleaning and maintenance’).
Using the beard styler attachment without
comb
You can use the beard styler attachment without the
comb to contour your beard, moustache, sideburns
or neckline to a length of 0.5mm.
1 Pull the comb off the attachment.
Note: Grab the comb in the centre to pull it off the
attachment. Do not pull at the sides of the comb.
2 Switch on the appliance.
3 You can now start contouring your beard,
moustache, sideburns or neckline by moving
the styler downwards with gentle pressure
while holding it perpendicular to the skin.
4 Clean the attachment after use (see chapter
‘Cleaning and maintenance’).
Page 18

ENGLISH18
Using the cleansing brush attachment
Use the rotating cleansing brush attachment
with your daily cleansing cream. The cleansing
brush attachment removes oil and dirt, contributing
to a healthy and oil-free skin.
1 Insert the lug of the attachment into the
slot in the top of the appliance. Then press
down the attachment to attach it to the
appliance (‘click’).
2 Moisten the attachment with water.
Do not use the appliance with a dry
brush head, as this can irritate the skin.
Tip: Use the attachment before shaving for easier
shaving and a more hygienic shaving result.
3 Moisten your face with water and apply
a cleanser to your face.
4 Place the attachment on your right cheek.
5 Switch on the appliance.
6 Gently move the attachment across your skin
from the nose towards the ear. Do not push
the attachment too hard onto the skin to make
20 sec.
sure the treatment remains comfortable.
20 sec.
7 After approx. 20 seconds you can move
the attachment to your left cheek and start
cleansing this part of your face.
Page 19

20 sec.
ENGLISH 19
Caution: Do not clean the sensitive area around
your eyes.
8 After approx. 20 seconds you can move
the attachment to your forehead and start
cleansing this part of your face. Gently move
the attachment from left to right.
Note: We advise you to not overdo the cleansing
and to not cleanse any zone longer than 20 seconds.
9 After the treatment, rinse and dry your face.
Your face is now ready for the next step of
your daily skincare routine.
10 Clean the attachment after use
(see chapter ‘Cleaning and maintenance’).
Cleaning and maintenance
Note: The accessories supplied may vary for different
products. The box shows the accessories that have been
supplied with your appliance.
Cleaning the shaver in the SmartClean
system (specic types only)
Do not tilt the SmartClean system to prevent
leakage.
Note: Hold the SmartClean system while you prepare
it for use.
Note: If you clean the shaver in the SmartClean
system once a week, the SmartClean cartridge will last
approximately three months.
Page 20

ENGLISH20
Preparing the SmartClean system for use
1 Put the small plug in the back of the
SmartClean system.
2 Put the adapter in the wall socket.
3 Press the button on the side of the SmartClean
2
1
system and lift the top part of the SmartClean
system.
4 Pull the seal off the cleaning cartridge.
5 Place the cleaning cartridge in the
SmartClean system.
6 Push the top part of the SmartClean system
back down (‘click’).
Using the SmartClean system
Always make sure to shake excess water off the
shaver before you place it in the SmartClean system.
Page 21

ENGLISH 21
1 Press down the top cap to be able to place
the shaver in the holder (‘click’).
2 Hold the shaver upside down above the holder.
Make sure the front of the shaver points
towards the SmartClean system.
3 Place the shaver in the holder, tilt the shaver
backwards and press down the top cap to
connect the shaver (‘click’).
- The battery symbol ashes slowly to indicate
that the shaver is charging.
4 Press the on/off button on the SmartClean
system to start the cleaning program.
- During the cleaning program (which takes
approx. 10 minutes), the cleaning symbol ashes.
- When the cleaning program has been completed,
the ready symbol lights up continuously.
- The battery symbol lights up continuously to
indicate that the shaver is fully charged. This takes
approx. 1 hour.
Note: If you press the on/off button of the SmartClean
system during the cleaning program, the program aborts.
In this case, the cleaning symbol stops ashing.
Page 22

ENGLISH22
Note: If you remove the adapter from the wall socket
during the cleaning program, the program aborts.
Note: 30 minutes after the charging phase has been
completed, the SmartClean system switches off
automatically.
5 To let the shaver dry, you can leave it in the
SmartClean system until your next shave.
You can also remove the shaver from the
SmartClean system, shake off excess water,
open the shaving unit and let the shaver air dry.
Replacing the cartridge of the SmartClean
System
If you clean the shaver in the SmartClean system
once a week, the SmartClean cartridge will last
approximately three months.
Replace the cleaning cartridge when the
replacement symbol ashes orange or when you are
no longer satised with the cleaning result. If used
once a week, the SmartClean cartridge will last for
approximately three months
2
1
1 Press the button on the side of the SmartClean
system and lift the top part of the SmartClean
system.
2 Take the empty cleaning cartridge from the
SmartClean system and pour any remaining
cleaning uid out of the cleaning cartridge.
You can simply pour the cleaning uid down the sink.
3 Throw away the empty cleaning cartridge.
4 Unpack the new cleaning cartridge and pull
the seal off the cartridge.
Page 23
ENGLISH 23
5 Place the new cleaning cartridge in the
SmartClean system.
6 Push the top part of the SmartClean system
back down (‘click’).
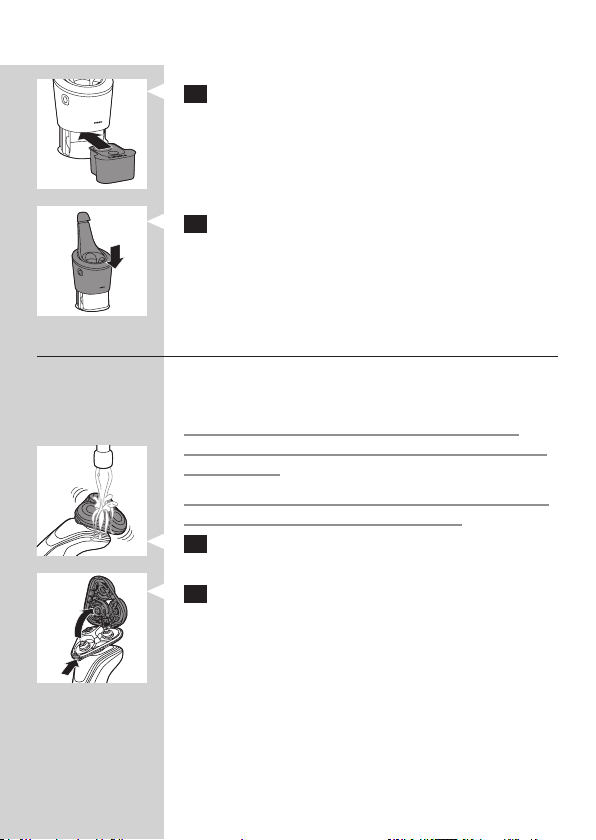
Cleaning the shaver under the tap
Clean the shaver after every shave for optimal
shaving performance.
Be careful with hot water. Always check if the
water is not too hot, to prevent your hands from
getting burnt.
Never dry the shaving unit with a towel or tissue,
as this may damage the shaving heads.
1 Rinse the shaving unit under a warm tap for
some time.
2 Press the release button and open the
shaving unit.
Page 24

ENGLISH24
3 Rinse the shaving head holder under
a warm tap for 30 seconds.
4 Carefully shake off excess water and let
the shaving head holder dry.
5 Close the shaving head holder (‘click’).
Thorough cleaning method
Make sure the appliance is switched off.
1 Press the release button and open the
shaving unit.
2 Pull the shaving head holder off the bottom
part of the shaving unit.
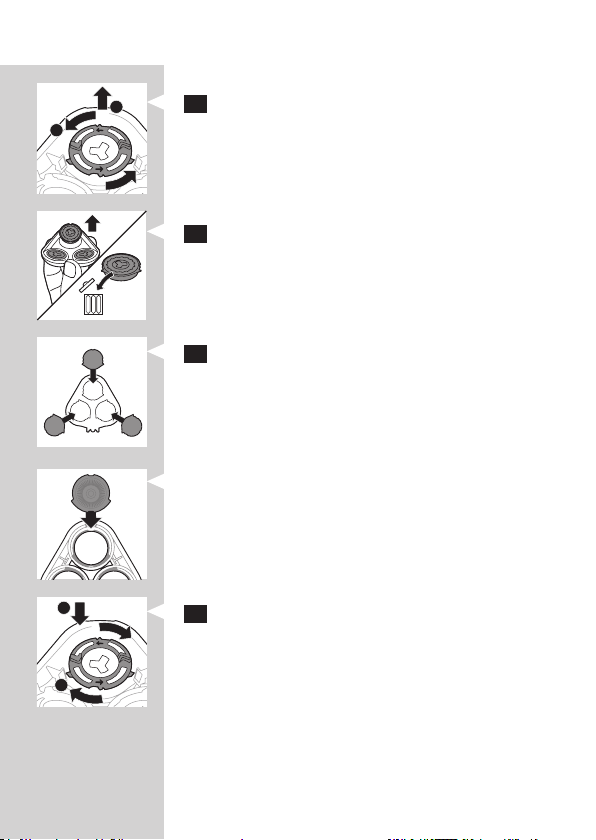
2
1
3 Turn the retaining rings anticlockwise and
remove them.
4 Remove the shaving heads from the shaving
head holder. Each shaving head consists of
a cutter and guard.
Note: Do not clean more than one cutter and guard at a
time, since they are all matching sets. If you accidentally
put a cutter in the wrong shaving guard, it may take several
weeks before optimal shaving performance is restored.
Page 25

ENGLISH 25
5 Clean the cutter and guard under the tap.
6 After cleaning, place the cutter back into
the guard.
7 Put the shaving heads back into the shaving
head holder.
Note: Make sure the projections of the shaving heads
t exactly into the recesses of the shaving-head holder.
1
8 Place the retaining rings back onto the shaving
head holder and turn them clockwise.
2
- Each retaining ring has two recesses and two
projections that t exactly in the projections and
recesses of the shaving head holder.
Page 26

ENGLISH26
- Turn the ring clockwise until your hear ‘click’ and
the ring is xed.
Note: Hold the shaving head holder in your hand
when you reinsert the shaving heads and reattach the
retaining rings. Do not place the shaving head holder
on a surface when you do this, as this may cause
damage.
9 Reinsert the hinge of the shaving head holder
into the slot of the shaving unit. Close the
shaving head holder (‘click’).
Cleaning the click-on attachments
Never dry the trimmer or beard styler
attachments with a towel or tissue, as this may
damage the trimming teeth.
Cleaning the trimmer attachment
Clean the trimmer attachment every time you have
used it.
1 Switch on the appliance with the trimmer
attachment attached.
2 Rinse the trimmer attachment under a hot tap
for some time.
3 After cleaning, switch off the appliance.
Page 27

ENGLISH 27
4 Carefully shake off excess water and let the
trimmer attachment dry.
Tip: For optimal trimmer performance, lubricate the
trimmer teeth with a drop of sewing machine oil every
six months.
Cleaning the beard styler attachment
Clean the beard styler attachment every time you
have used it.
1 Pull the comb off the beard styler attachment.
Note: Grab the comb in the centre to pull it off the
attachment. Do not pull at the sides of the comb.
2 Switch on the appliance.
3 Rinse the beard styler attachment and the
comb separately under a hot tap for some
time.
4 After cleaning, switch off the appliance.
5 Carefully shake off excess water and let the
beard styler attachment and comb dry.
Tip: For optimal trimmer performance, lubricate the
trimmer teeth with a drop of sewing machine oil every
six months.
Cleaning the cleansing brush attachment
Clean the cleansing brush attachment every time
you have used it.
1 Make sure the appliance is switched off.
2 Detach the brush head from the brush base.
Page 28

ENGLISH28
3 Clean both parts thoroughly with warm
water and mild soap.
4 Dry the cleansing brush attachment
with a towel.
Storage
Note: The accessories supplied may vary for different
products. The box shows the accessories that have been
supplied with your appliance.
Note: We advise you to let the appliance and its
attachments dry before you put the protection caps
on the attachments and store the shaver in the pouch.
- Put the protection cap on the shaving unit to
protect it from dirt accumulation.
- Store the shaver in the pouch supplied.
- Put the protection cap on the cleansing brush
attachment to protect it from dirt accumulation.
Page 29

ENGLISH 29
Replacement
Replacing the cleansing brush head
- The cleansing brush head attachment should be
replaced every 3 months or earlier if the laments
are deformed or damaged.
Replacing the shaving heads
For maximum shaving performance, we advise
you to replace the shaving heads every two years.
Replacement reminder
The shaving unit symbol will light up to indicate
that the shaving heads need to be replaced. Replace
damaged shaving heads immediately. Only replace
the shaving heads with original Philips shaving heads
as specied in chapter ‘Ordering accessories’.
1 The shaving unit symbol lights up continuously
when you switch off the shaver to indicate
that the shaving heads need to be replaced.
2 Press the release button and open the
shaving unit.
3 Pull the shaving head holder off the bottom
part of the shaving unit.
Page 30
ENGLISH30
2
1
4 Turn the retaining rings anticlockwise and
remove them.
5 Remove the shavings heads from the shaving
head holder and throw them away.
6 Place new shaving heads in the holder.
Note: Make sure the projections of the shaving heads
t exactly into the recesses of the shaving head holder.
1
7 Place the retaining rings back onto the shaving
heads and turn them clockwise.
2
Page 31

ENGLISH 31
- Each retaining ring has two recesses and two
projections that t exactly in the projections and
recesses of the shaving head holder.
- Turn the ring clockwise until your hear ‘click’ and
the ring is xed.
Note: Hold te shaving head holder in your hand when
you reinsert the shaving heads and reattach the
retaining rings. Do not place the shaving head holder
on a surface when you do this, as this may cause
damage.
8 Reinsert the hinge of the shaving head holder
into the slot of the shaving unit. Close the
shaving head holder (‘click’).
7 sec.
9 To reset the replacement reminder, press and
hold the on/off button for approx. 7 seconds.
Page 32

ENGLISH32
Ordering accessories
To buy accessories or spare parts, visit
www.shop.philips.com/service or go
to your Philips dealer. You can also contact
the Philips Consumer Care Centre in your
country (see the worldwide guarantee leaet
for contact details).
The following parts are available:
- HQ8505 adapter
- SH50 Philips shaving heads
- HQ110 Philips Shaving Head Cleaning Spray
- RQ111 Philips beard styler attachment
- RQ585 Philips cleansing brush attachment
- RQ560, RQ563 Philips cleansing brush heads
- JC301, JC302, JC303, JC304, JC305 cleaning
cartridge
Note: Availability of the accessories may differ
per country.
Shaving heads
- We advise you to replace your shaving heads
every two years. Always replace the shaving heads
with original SH50 Philips shaving heads.
Recycling
- This symbol means that this product shall not
be disposed of with normal household waste
(2012/19/EU).
Page 33

ENGLISH 33
- This symbol means that this product contains
a built-in rechargeable battery which shall not
be disposed of with normal household waste
(2006/66/EC). We strongly advise you to take
your product to an ofcial collection point or
a Philips service centre to have a professional
remove the rechargeable battery.
- Follow your country’s rules for the separate
collection of electrical and electronic products
and rechargeable batteries. Correct disposal
helps prevent negative consequences for the
environment and human health.
Removing the rechargeable shaver battery
Only remove the rechargeable battery when you
discard the shaver. Make sure the battery
is completely empty when you remove it.
Be careful, the battery strips are sharp.
1 Remove the screw in the back panel with
a screwdriver. Then remove the back panel.
2 Bend the hooks aside and remove the
power unit.
Page 34

ENGLISH34
3 Break the snap hooks and remove the
front panel of the power unit.
4 Take out the battery holder and cut the
battery tags with a pair of cutting pliers.
Guarantee and support
If you need information or support, please visit
www.philips.com/support or read the separate
worldwide guarantee leaet.
Guarantee restrictions
The shaving heads (cutters and guards) are not
covered by the terms of the international guarantee
because they are subject to wear.
Troubleshooting
This chapter summarises the most common
problems you could encounter with the
appliance. If you are unable to solve the
problem with the information below, visit
www.philips.com/support for a list of
frequently asked questions or contact the
Consumer Care Centre in your country.
Page 35

Problem Possible cause Solution
ENGLISH 35
The shaver does
not shave as well
as it used to.
The shaver does
not work when
I press the
on/off button.
The shaving heads
are damaged or
worn.
Hairs or dirt
obstruct the shaving
heads.
The shaver is still
attached to the
mains. For safety
reasons, the shaver
can only be used
without cord.
The rechargeable
battery is empty.
The travel lock
is activated.
The shaving unit is
soiled or damaged
to such an extent
that the motor
cannot run.
Replace the shaving heads
(see chapter ‘Replacement’).
Clean the shaving heads by
following the steps of the
thorough cleaning method
(see chapter ‘Cleaning and
maintenance’).
Disconnect the shaver from
the mains and press the on/
off button to switch on the
shaver (see section ‘Unplug
for use reminder’).
Recharge the battery (see
chapter ‘Charging’).
Press the on/off button for
3 seconds to deactivate the
travel lock.
Clean the shaving heads or
replace them (see chapters
‘Cleaning and maintenance’
and ‘Replacement’).
Page 36

ENGLISH36
Problem Possible cause Solution
The shaver is
not entirely
clean after I
clean it in the
SmartClean
system.
Water is leaking
from the
bottom of the
shaver.
You have not
placed the shaver in
the SmartClean
system properly, so
there is no electrical
connection between
the SmartClean
system and the
shaver.
The cleaning
cartridge is empty.
The replacement
symbol ashes to
indicate you have to
replace the cleaning
cartridge.
You have used
another cleaning
uid than the
original Philips
cleaning cartridge.
During cleaning,
water may collect
between the inner
body and the outer
shell of the shaver.
Press down the top cap
(‘click’) to ensure a proper
connection between the
shaver and the SmartClean
system.
Place a new cleaning
cartridge in the SmartClean
system (see chapter ‘Cleaning
and maintenance’).
Only use the original
Philips cleaning cartridges.
This is normal and not
dangerous because all
electronics are enclosed in a
sealed power unit inside the
shaver.
Page 37

Problem Possible cause Solution
ENGLISH 37
The SmartClean
system does not
work when I
press the on/off
button.
The shaver
is not fully
charged after I
charge it in the
SmartClean
system.
I replaced
the shaving
heads, but the
replacement
reminder
symbol is still
showing.
A shaving
head symbol
had suddenly
appeared on the
display.
The nose
trimmer
attachment pulls
at the hairs.
The SmartClean
system is not
connected to the
mains.
You have not placed
the shaver in the
SmartClean system
properly.
You have not reset
the shaver.
This symbol is
a replacement
reminder.
You move the
appliance too fast.
Put the small plug in
SmartClean system and
put the adapter in the wall
socket.
Make sure you press the
shaver in the SmartClean
system until it locks into
place and press down the
top cap.
Reset the shaver by pressing
the on/off button for approx.
7 seconds (see chapter
‘Replacement’).
Replace the shaving heads
(see chapter ‘Replacement’).
Do not move the appliance
too fast.
Page 38

ENGLISH38
Problem Possible cause Solution
The nose
trimmer
attachment does
not work.
The cutting element
of the attachment
is very dirty, for
instance because
some nasal mucus
has dried inside the
cutting element.
Clean the cutting element
by rinsing it under the tap
with hot water. Switch on
the appliance and rinse the
cutting element once more
to remove any remaining
hairs.
If rinsing the nose trimmer
under the tap does not
unblock the cutting element,
then immerse it in a glass
with warm water for a few
minutes. Then switch on the
appliance and rinse it under
the tap.
Page 39

БЪЛГАРСКИ 39
Въведение
Поздравления за вашата покупка и добре дошли
във Philips! За да се възползвате изцяло от
предлаганата от Philips поддръжка, регистрирайте
продукта си на адрес www.philips.bg/welcome.
Общо описание (фиг. 1)
1 Предпазна капачка за приставката с четка за
почистване (само за определени модели)
2 Приставка с четка за почистване, която се
поставя с щракване (само за определени
модели)
3 Гребен за приставка за оформяне на брада
(само за определени модели)
4 Приставка за оформяне на брада, която се
поставя с щракване (само за определени
модели)
5 Приставка за подстригване, която се поставя
с щракване (само за определени модели)
6 Предпазна капачка за бръснещ блок
(само за определени модели)
7 Бръснещ блок с щракване
8 Бутон за вкл./изкл.
9 Бутон “Турбо” (само за определени модели)
10 Дръжка
11 Гнездо за малък жак
12 Индикатор за зареждане на батерията
с 1 светлина
13 Индикатор за зареждане на батерията
с 3 светлини
14 Символ за изключване от контакта при
употреба
15 Символ за заключване при пътуване
16 Напомняне за смяна
17 Напомняне за почистване
Page 40

БЪЛГАРСКИ40
18 Почистваща касета за системата SmartClean
19 Система SmartClean (само за определени
модели)
20 Капачка на системата SmartClean
21 Бутон за вкл./изкл.
22 Символ на батерия
23 Символ на почистване
24 Символ за смяна
25 Символ за готовност
26 Адаптер
27 Малък жак
28 Калъф (само за определени модели)
Забележка: Включените в комплекта
принадлежности може да се различават
за различните продукти. Кутията показва
аксесоарите, които са били доставени с вашия уред.
Важна информация за безопасност
Прочетете тази важна информация внимателно,
преди да използвате уреда и неговите аксесоари,
и я запазете за справка в бъдеще. Включените в
комплекта принадлежности може да са различни
за различните продукти.
Опасност
- Пазете адаптера сух.
Предупреждение
- В адаптера има трансформатор. Не отрязвайте
адаптера, за да го замените с друг щепсел, тъй
като това крие опасности.
- Този уред може да се използва от деца на
възраст над 8 години и от хора с намалени
физически възприятия или умствени
недостатъци или без опит и познания, ако
са инструктирани за безопасна употреба на
Page 41

БЪЛГАРСКИ 41
уреда и са под наблюдение с цел гарантиране
на безопасна употреба и ако са им разяснени
евентуалните опасности. Не позволявайте на
деца да си играят с уреда. Не позволявайте на
деца да извършват почистване или поддръжка
на уреда без надзор.
- Винаги изключвайте щепсела от контакта,
преди да измиете самобръсначката с течаща
вода.
- Винаги проверявайте уреда, преди да го
използвате. Не използвайте уреда, ако е
повреден, тъй като това може да доведе до
нараняване. Винаги подменяйте повредените
части с оригинални.
Внимание
- Никога не потапяйте системата за почистване
или зарядната поставка във вода и не ги мийте
на течаща вода.
- Никога не изплаквайте самобръсначката с вода,
по-гореща от 80°C.
- Този уред трябва да се използва само за
целите, за които е предназначен, както е
показано в ръководството за потребителя.
- Поради хигиенни съображения уредът трябва
да се използва само от едно лице.
- Не използвайте адаптера във или в близост до
контакт, в който има или е имало електрически
ароматизатор за въздух, за да предотвратите
непоправими щети.
- Никога не почиствайте уреда с въздух
под налягане, абразивни гъби, абразивни
почистващи препарати или агресивни течности,
като бензин или ацетон.
- Ако в комплекта на вашата самобръсначка
е включена система за почистване, винаги
използвайте оригинална течност за почистване
Page 42

БЪЛГАРСКИ42
на Philips (касета или бутилка, в зависимост от
типа система за почистване).
- Винаги поставяйте системата за почистване
върху стабилна, равна и хоризонтална
повърхност, за да предотвратите разливане.
- Ако вашата система за почистване използва
касета за почистване, винаги проверявайте
дали отделението за касети е затворено, преди
да пристъпите към използване на системата за
почистване или към зареждане
на самобръсначката.
- Когато системата за почистване е готова за
употреба, не я местете, за да предотвратите
разливане на течността за почистване.
- От гнездото отдолу на самобръсначката
може да тече вода, когато я изплаквате.
Това е нормално и не е опасно, тъй като
цялата електроника е затворена в капсулован
захранващ блок вътре в самобръсначката.
Електромагнитни излъчвания (EMF)
- Този уред на Philips е в съответствие с
нормативната уредба и всички действащи
стандарти, свързани с излагането на
електромагнитни излъчвания.
Общи
- Тази самобръсначка е водоустойчива. Тя е
подходяща за използване във ваната или под
душа, както и за почистване на течаща вода. От
съображения за безопасност самобръсначката
може да се използва само без кабел.
- Този уред е подходящ за напрежение на
мрежата от 100 до 240 волта.
- Адаптерът преобразува 100-240 волта в
безопасно ниско напрежение под 24 волта.
- Максимално ниво на шума: Lc = 69 dB(A)
Page 43

БЪЛГАРСКИ 43
Дисплеят
Зареждане
Индикатор за зареждане на батерията
с 3 светлини
- Зареждането отнема около 1 час
- Бързо зареждане: когато уредът е свързан
към мрежата, светлините на индикатора за
зареждане на батерията светват една след
друга непрекъснато. Когато уредът съдържа
достатъчно заряд за едно бръснене, долният
индикатор за зареждане на батерията мига
бавно.
- Ако оставите уреда свързан към мрежата,
процесът на зареждане продължава. За да
покаже, че уредът се зарежда, първо долният
светлинен индикатор мига и след това свети
постоянно. След това вторият индикатор мига
и започва да свети непрекъснато и т.н., докато
самобръсначката се зареди напълно.
Индикатор за зареждане на батерията
с 1 светлина
- Зареждането отнема около 1 час.
- Бързо зареждане: когато уредът не съдържа
достатъчно заряд за едно бръснене,
индикаторът за зареждане на батерията мига
бързо. Когато индикаторът за зареждане
на батерията започне да мига бавно, уредът
съдържа достатъчно заряд за едно бръснене.
- Ако оставите уреда свързан към мрежата,
процесът на зареждане продължава. За да
покаже, че уредът се зарежда, индикаторът за
зареждане на батерията мига бавно.
Page 44

БЪЛГАРСКИ44
Напълно заредена батерия
Забележка: Този уред може да се използва
само без кабел.
Забележка: Когато батерията е заредена,
дисплеят се изключва автоматично след
30 минути. Ако натиснете бутона за вкл./изкл.
по време на зареждане, символът за изключване
от контакта при употреба мига в бяло, за да
ви напомни, че трябва да изключите уреда от
мрежата.
Когато батерията е напълно заредена,
всички индикатори за зареждане на
батерията светят постоянно.
- Индикатор за зареждане на батерията
с 3 светлини
- Индикатор за зареждане на батерията
с 1 светлина
Изтощена батерия
Когато батерията е почти изтощена,
индикаторът за зареждане на батерията
мига в оранжево.
- Индикатор за зареждане на батерията
с 3 светлини
Page 45

БЪЛГАРСКИ 45
- Индикатор за зареждане на батерията
с 1 светлина
Оставащ заряд на батерията
Индикатор за зареждане на батерията
с 3 светлини
- Оставащият в батерията заряд се обозначава
чрез светлините на индикатора за зареждане
на батерията, които светят непрекъснато.
Напомняне за изключване от контакта
при употреба
- Уредът е снабден с напомняне за изключване
от контакта при употреба. Съответният символ
започва да мига, за да ви напомни, че трябва да
изключите уреда от адаптера, за да можете да
го включите.
Напомняне за почистване
За най-добри резултати при бръснене ви
препоръчваме да почиствате самобръсначката
след всяка употреба.
- Когато изключите самобръсначката,
напомнянето за почистване започва да
премигва, за да ви напомни да почистите
самобръсначката.
Page 46

3 sec.
БЪЛГАРСКИ46
Заключване при пътуване
Можете да заключите самобръсначката, когато
ви предстои да пътувате. Заключването при
пътуване предпазва самобръсначката от случайно
включване.
Задействане на заключването при
пътуване
1 Задръжте бутона вкл./изкл. натиснат
за 3 секунди, за да влезете в режим на
заключване при пътуване.
- Докато активирате заключването при пътуване,
символът за заключване при пътуване свети
непрекъснато. Когато заключването при
пътуване е активирано, символът за заключване
при пътуване мига.
Освобождаване на заключването
при пътуване
1 Задръжте бутона вкл./изкл. натиснат
за 3 секунди.
- Символът за заключване при пътуване
премигва, след което започва да свети
непрекъснато.
Сега самобръсначката е отново готова
за използване.
Смяна на бръснещи глави
За най-добри резултати при бръснене
препоръчваме да подменяте бръснещите
глави на всеки две години.
Page 47

БЪЛГАРСКИ 47
- Уредът е оборудван с напомняне за подмяна,
което ви напомня да подменяте бръснещите
глави. Напомнянето за подмяна свети
непрекъснато.
Забележка: След смяна на бръснещите глави
трябва да нулирате напомнянето за подмяна
чрез натискане на бутона за включване/
изключване в продължение на 7 секунди.
Настройка “Турбо”
(само за определени модели)
Уредът е оборудван с настройка “Турбо” или
“Турбо+”. Тази настройка е предназначена
за по-бързо и по-интензивно бръснене и прави
бръсненето на трудни за достигане места
по-лесно.
Активиране на настройката “Турбо”
1 За да активирате настройката “Турбо”,
натиснете бутона “Турбо” веднъж.
Деактивиране на настройката “Турбо”
1 За да деактивирате настройката “Турбо”,
просто натиснете бутона “Турбо” отново.
Зареждане
Зареждането отнема около 1 час.
Забележка: Този уред може да се използва
само без кабел.
Заредете самобръсначката, преди да я
използвате за първи път, и когато на дисплея
се покаже, че батерията е почти изтощена.
Page 48

БЪЛГАРСКИ48
Зареждане с адаптера
1 Включете малкия щекер в уреда и включете
адаптера в контакта.
Зареждане в системата SmartClean
(само за определени модели)
1 Включете малкия щепсел в системата
SmartClean.
2 Включете адаптера в контакта.
3 Натиснете горния капак надолу, за да може
да поставите самобръсначката в държача
(с щракване).
4 Дръжте самобръсначката с горната част
надолу над държача. Уверете се, че предната
част на самобръсначката сочи към системата
SmartClean.
5 Поставете самобръсначката в държача,
наклонете самобръсначката назад и
натиснете надолу горния капак, за да
свържете самобръсначката (с щракване).
- Символът на батерията мига бавно, за да
покаже, че уредът се зарежда.
Page 49

БЪЛГАРСКИ 49
Използване на самобръсначката
Включване и изключване на уреда
1 За да включите уреда, натиснете еднократно
бутона за вкл./изкл.
2 За да изключите уреда, натиснете
еднократно бутона за вкл./изкл.
- Индикатор за зареждане на батерията
с 3 светлини: дисплеят светва за няколко
секунди, за да покаже състоянието на
батерията.
Бръснене
Период за адаптиране
Първите бръснения може да не дадат резултатите,
които очаквате, и дори може кожата ви леко да се
раздразни. Това е нормално. Кожата и брадата ви се
нуждаят от известно време, за да свикнат с новата
система за бръснене.
Съветваме ви да се бръснете редовно
(най-малко 3 пъти в седмицата) със самобръсначката
в продължение на 3 седмици, за да може кожата ви
да се приспособи към новата самобръсначка.
Забележка: Този уред може да се използва само
без кабел.
1 Включете уреда.
2 Движете бръснещите глави по кожата
си с кръгови движения.
Забележка: Не правете праволинейни движения.
3 Почиствайте самобръсначката след употреба
(вижте раздел “Почистванеи поддръжка”).
Page 50

БЪЛГАРСКИ50
Мокро бръснене
Можете да използвате тази самобръсначка
под душа и върху мокро лице с пяна или гел
за бръснене.
Ако искате да използвате пяна или гел
за бръснене, изпълнете следните стъпки:
1 Намокрете кожата с малко вода.
2 Нанесете пяна или гел за бръснене.
3 Изплакнете бръснещия блок с течаща вода,
за да сте сигурни, че ще се плъзга гладко
по кожата ви.
4 Включете самобръсначката.
5 Движете бръснещите глави по кожата
си с кръгови движения.
Забележка: Редовно изплаквайте бръснещия блок
с течаща вода, за да сте сигурни, че ще продължи
да се плъзга гладко по кожата ви.
6 Подсушете лицето си и почистете основно
самобръсначката след употреба (вж. главата
“Почистване и поддръжка”).
Забележка: Уверете се, че сте изплакнали
от самобръсначката всичката пяна или
гел за бръснене.
Page 51

БЪЛГАРСКИ 51
Настройка “Турбо”
(само за определени модели)
Уредът е оборудван с настройка “Турбо”
или “Турбо+” за лесно бръснене на трудни
за достигане места.
1 Включете самобръсначката.
2 Натиснете бутона “Турбо” веднъж, за да
включите настройката “Турбо”, ако искате
да избръснете труднодостъпните области
по-бързо.
3 Движете бръснещите глави по кожата
си с кръгови движения.
Забележка: Не правете праволинейни движения.
4 За да деактивирате настройката “Турбо”,
просто натиснете веднъж бутона “Турбо”.
Използване на приставките с щракване
Забележка: Включените в комплекта
принадлежности може да се различават
за различните продукти. Кутията показва
аксесоарите, които са били доставени с вашия
уред.
Сваляне и поставяне на приставките
с щракване
1 Уверете се, че уредът е изключен.
2 Свалете приставката, като я издърпате
от уреда по права линия.
Забележка: Не завъртайте приставката, докато
я сваляте от уреда.
Page 52

БЪЛГАРСКИ52
3 Вмъкнете издатината на приставката
в жлеба върху горната част на уреда.
След това натиснете приставката
надолу, за да я закрепите към уреда
(с щракване).
Използване на приставката за
подстригване
Можете да ползвате приставката за
подстригване, за да оформите бакенбардите
и мустаците си.
1 Уверете се, че уредът е изключен.
2 Вмъкнете издатината на приставката в жлеба
върху горната част на самобръсначката. След
това натиснете приставката за подстригване
надолу, за да я закрепите към уреда (с
щракване).
3 Включете уреда.
4 Сега можете да започнете подстригването.
5 Почиствайте приставката след употреба
(вижте раздел “Почистване и поддръжка”).
Използване на приставката за оформяне
на брада
1 Уверете се, че уредът е изключен.
2 Вмъкнете издатината на приставката в
жлеба върху горната част на уреда. След
това натиснете приставката надолу, за да я
закрепите към уреда (с щракване).
Page 53

БЪЛГАРСКИ 53
Използване на приставката за оформяне
на брада с гребен
Можете да използвате приставката за оформяне
на брада с гребен, за да стилизирате брадата
си с една фиксирана настройка, но също и
при различни настройки за дължина. Можете
да я използвате също и за предварително
подстригване на дълги косми преди бръснене
за по-удобно бръснене.
Настройките за дължина на космите на
приставката за оформяне на брада отговарят
на дължината на космите след отрязване и са
от 1 до 5 мм.
1 Плъзнете гребена точно в направляващите
жлебове от двете страни на приставката
(до щракване).
2
Натиснете селектора за дължина, след което го
2
1
преместете наляво или надясно, за да изберете
желаната настройка за дължина на косъма.
3 Включете уреда.
4 Сега можете да започнете да оформяте
брадата си чрез преместване на
приставката нагоре с леко притискане,
като се уверите, че предната част на
гребена е в пълен контакт с кожата.
5 Почиствайте приставката след употреба
(вижте раздел “Почистване и поддръжка”).
Използване на приставката за оформяне
на брада без гребен
Можете да използвате приставката за оформяне на
брада без гребен за оформяне на контура на брада,
мустаци, бакенбарди или линията на врата с дължина
от 0,5 мм.
Page 54

БЪЛГАРСКИ54
1 Издърпайте гребена от приставката.
Забележка: Хванете гребена по средата, за да
го издърпате от приставката. Не дърпайте
гребена отстрани.
2 Включете уреда.
3 Сега можете да започнете оформянето
на контура на брада, мустаци, бакенбарди
или линията на врата чрез преместване на
машинката надолу с леко притискане, докато
я държите перпендикулярно на кожата.
4 Почиствайте приставката след употреба
(вижте раздел “Почистване и поддръжка”).
Използване на приставка с четка за
почистване
Използвайте въртящата се приставка с четка за
почистване с дневния си крем за почистване.
Приставката с четка за почистване премахва
мазнини и замърсявания, допринасяйки за
здравословното състояние на кожата без
омазняване.
1 Вмъкнете издатината на приставката в
жлеба върху горната част на уреда. След
това натиснете приставката надолу, за да я
закрепите към уреда (с щракване).
2 Навлажнете приставката с вода. Не
използвайте уреда със суха глава на четката,
тъй като това може да раздразни кожата.
Съвет: Използвайте приставката преди бръснене
за по-лесно бръснене и по-хигиенични резултати.
Page 55

20 sec.
20 sec.
20 sec.
БЪЛГАРСКИ 55
3 Овлажнете лицето си с вода и приложете
почистващо средство върху лицето.
4 Поставете приставката на дясната си буза.
5 Включете уреда.
6 Бавно движете приставката по кожата си от
носа към ухото. Не натискайте приставката
твърде силно към кожата, за да запазите
комфорта при третиране.
7 След около 20 секунди можете да преместите
приставката към лявата си буза и да започнете
почистването на тази част от лицето си.
Внимание: Не почиствайте чувствителна зона
около очите си.
8 След около 20 секунди можете да
преместите приставката към челото си и
да започнете почистване на тази част от
лицето ви. Бавно движете приставката
отляво надясно.
Забележка: Съветваме ви да не прекалявате с
почистването и да не почиствате която и да е
зона повече от 20 секунди.
9 След третирането изплакнете и подсушете
лицето си. Лицето ви вече е готово за
следващата стъпка от ежедневните ви
грижи за кожата.
10 Почиствайте приставката след употреба
(вижте раздел “Почистване и поддръжка”).
Page 56

БЪЛГАРСКИ56
Почистване и поддръжка
Забележка: Включените в комплекта
принадлежности може да се различават
за различните продукти. Кутията показва
аксесоарите, които са били доставени с вашия уред.
Почистване на самобръсначката
със системата SmartClean
(само за определени модели)
Не накланяйте системата SmartClean,
за да избегнете изтичане.
Забележка: Дръжте системата SmartClean,
докато я подготвяте за употреба.
Забележка: Ако почиствате самобръсначката
в системата SmartClean веднъж седмично,
касетата SmartClean ще издържи приблизително
три месеца.
Подготовка на системата SmartClean
за употреба
1 Поставете малкия щепсел в задната част
2
1
на системата SmartClean.
2 Включете адаптера в контакта.
3 Натиснете бутона отстрани на системата
SmartClean и повдигнете горната част на
системата SmartClean.
4 Извадете уплътнението от почистващата
касета.
Page 57

БЪЛГАРСКИ 57
5 Поставете почистващата касета в системата
SmartClean.
6 Натиснете отново горната част на системата
SmartClean надолу (с щракване).
Използване на системата SmartClean
Винаги изтръсквайте излишната вода от
самобръсначката, преди да я поставите в
системата SmartClean.
1 Натиснете горния капак надолу, за да може
да поставите самобръсначката в държача
(с щракване).
2 Дръжте самобръсначката с горната част
надолу над държача. Уверете се, че предната
част на самобръсначката сочи към системата
SmartClean.
Page 58

БЪЛГАРСКИ58
3 Поставете самобръсначката в държача,
наклонете самобръсначката назад и
натиснете надолу горния капак, за да
свържете самобръсначката (с щракване).
- Символът на батерията мига бавно, за да
покаже, че самобръсначката се зарежда.
4 Натиснете бутона за включване/изключване
на системата SmartClean, за да стартирате
програмата за почистване.
- По време на програмата за почистване
(която отнема около 10 минути) символът
за почистване мига.
- Когато програмата за почистване завърши,
символът за готовност започва да свети
постоянно.
- Символът на батерия свети постоянно,
за да покаже, че самобръсначката е заредена
напълно. Това отнема около 1 час.
Забележка: Ако натиснете бутона за включване/
изключване на системата SmartClean по
време на изпълнението на програмата за
почистване, програмата прекъсва. В този случай
символът за почистване спира да премигва.
Забележка: Ако извадите адаптера от контакта
по време на изпълнението на програмата за
почистване, програмата прекъсва.
Забележка: 30 минути след завършване на
фазата за зареждане системата SmartClean
се изключва автоматично.
Page 59

БЪЛГАРСКИ 59
5 За да може самобръсначката да изсъхне,
можете да я оставите в системата
SmartClean до следващото си бръснене.
Можете също така да извадите
самобръсначката от системата SmartClean,
да изтръскате излишната вода, да
отворите бръснещия блок и да оставите
самобръсначката да изсъхне на въздуха.
Смяна на касетата на системата
SmartClean
Ако почиствате самобръсначката в системата
SmartClean веднъж седмично, касетата
SmartClean ще издържи приблизително три
месеца.
Сменете почистващата касета, когато символът
за подмяна мига в оранжево или когато
резултатите от почистването вече не ви
задоволяват. Ако се използва веднъж седмично,
касетата SmartClean ще издържи около три
месеца
1 Натиснете бутона отстрани на системата
2
1
SmartClean и повдигнете горната част на
системата SmartClean.
2 Извадете празната почистваща касета от
системата SmartClean и излейте оставащата
почистваща течност от почистващата касета.
Можете просто да излеете почистващата
течност в мивката.
Page 60

БЪЛГАРСКИ60
3 Изхвърлете празната почистваща касета.
4 Разопаковайте новата почистваща касета
и издърпайте уплътнението на касетата.
5 Поставете новата почистваща касета
в системата SmartClean.
6 Натиснете отново горната част на системата
SmartClean надолу (с щракване).
Почистване на самобръсначката
с течаща вода
За най-добри резултати при бръснене
почиствайте самобръсначката след всяка
употреба.
Внимавайте с горещата вода. Винаги
проверявайте дали водата не е прекалено
гореща, за да предпазите ръцете си от изгаряне.
Никога не подсушавайте бръснещия блок с
кърпа за баня или хартиени салфетки, защото
това може да повреди бръснещите глави.
1 Изплакнете бръснещия блок с топла
течаща вода.
Page 61

БЪЛГАРСКИ 61
2 Натиснете бутона за освобождаване
и отворете бръснещия блок.
3 Изплакнете държача на бръснещата глава
под топла течаща вода за 30 секунди.
4 Внимателно изтръскайте водата и оставете
държача на бръснещата глава да изсъхне.
5 Затворете държача на бръснещата глава
(с щракване).
Метод за цялостно почистване
Уверете се, че уредът е изключен.
1 Натиснете бутона за освобождаване
и отворете бръснещия блок.
2 Издърпайте държача на бръснещата глава
от долната част на бръснещия блок.
2
1
3 Завъртете задържащите пръстени обратно
на часовниковата стрелка и ги свалете.
Page 62

БЪЛГАРСКИ62
4 Свалете бръснещите глави от държача на
бръснещите глави. Всяка бръснеща глава
се състои от ножче и предпазител.
Забележка: Не почиствайте повече от едно
ножче и един предпазител едновременно, тъй
като те са в комплект. Ако случайно объркате
ножчетата и предпазителите, може да са
необходими няколко седмици за възстановяване
на оптималната работа при бръснене.
5 Изплакнете ножовете и предпазителите
с течаща вода.
6 След почистване поставете ножа отново
в предпазителя.
7 Поставете бръснещите глави обратно
в държача.
Забележка: Уверете се, че издатините на
бръснещите глави пасват точно в жлебовете на
държача на бръснещите глави.
Page 63

БЪЛГАРСКИ 63
1
8 Поставете задържащите пръстени обратно
върху държача на бръснещите глави и ги
завъртете по часовниковата стрелка.
2
- Всеки придържащ пръстен има две
вдлъбнатини и две издатини, които пасват
точно в издатините и вдлъбнатините на
държача.
- Завъртете пръстена по часовниковата стрелка,
докато се чуе щракване и пръстенът се
фиксира.
Забележка: Дръжте държача на бръснещата
глава в ръката си, когато поставяте отново
бръснещите глави и поставяте задържащите
пръстени. Не поставяйте държача на бръснещата
глава върху повърхност, когато правите това, тъй
като това може да причини повреда.
9 Поставете отново пантата на държача на
бръснещите глави в слота на бръснещия
блок. Затворете държача (с щракване).
Page 64

БЪЛГАРСКИ64
Почистване на приставките с щракване
Никога не подсушавайте приставките за
подстригване или за оформяне на брада с
хавлиена кърпа или хартиени салфетки, защото
това може да повреди зъбците.
Почистване на приставката за
подстригване
Почиствайте приставката за подстригване
след всяка употреба.
1 Включете уреда със сглобената към него
приставка за подстригване.
2 Изплакнете приставката за подстригване
с гореща течаща вода за известно време.
3 След почистването изключете уреда.
4 Внимателно изтръскайте излишната вода
и оставете приставката за подстригване
да изсъхне.
Съвет: С оглед на оптимален режим на работа
смазвайте зъбците на приставката за
подстригване с капка фино машинно масло
(за шевни машини) на всеки шест месеца.
Почистване на приставката за оформяне
на брада
Почиствайте приставката за оформяне на брада
след всяка употреба.
1 Издърпайте гребена от приставката за
оформяне на брада.
Забележка: Хванете гребена по средата, за да
го издърпате от приставката. Не дърпайте
гребена отстрани.
Page 65

БЪЛГАРСКИ 65
2 Включете уреда.
3 Изплакнете приставката за оформяне на
брада и гребена, поотделно, с гореща
течаща вода за известно време.
4 След почистването изключете уреда.
5 Внимателно изтръскайте излишната вода и
оставете приставката за оформяне на брада
и гребена да изсъхнат.
Съвет: С оглед на оптимален режим на работа
смазвайте зъбците на приставката за
подстригване с капка фино машинно масло
(за шевни машини) на всеки шест месеца.
Почистване на приставката с четка за
почистване
Почиствайте приставката с четка за почистване
след всяка употреба.
1 Уверете се, че уредът е изключен.
2 Откачете главата на четката от основата.
3 Почистете двете части внимателно с топла
вода и мек сапун.
4 Подсушете приставката с четка за
прочистване с кърпа.
Page 66

БЪЛГАРСКИ66
Съхранение
Забележка: Включените в комплекта
принадлежности може да се различават
за различните продукти. Кутията показва
аксесоарите, които са били доставени с вашия уред.
Забележка: Съветваме ви да оставите уреда
и приставките му да изсъхнат, преди да
поставяте предпазните капачки на приставките
и да прибирате самобръсначката в чантичката.
- Поставете предпазната капачка върху
бръснещия блок, за да го предпазите
от натрупване на мръсотия.
- Съхранявайте самобръсначката
в приложената торбичка.
- Поставете предпазната капачка върху
приставката с четка за почистване, за да
я предпазите от натрупване на мръсотия.
Резервни части
Смяна на главата на почистващата четка
- Главата на приставката с четка за почистване
трябва да се сменя на всеки 3 месеца или
по-рано, ако нишките са деформирани или
повредени.
Page 67

БЪЛГАРСКИ 67
Смяна на бръснещите глави
За да постигнете оптимална работа на уреда
при бръснене, препоръчваме ви да подменяте
бръснещите глави на всеки две години.
Напомняне за смяна
Символът на бръснещ блок ще светне, за да
покаже, че трябва да се сменят бръснещите глави.
Заменяйте повредените бръснещи глави веднага.
Заменяйте бръснещите глави само с оригинални
бръснещи глави на Philips, както е посочено в
глава “Поръчване на принадлежности”.
1 Символът на бръснещ блок свети
постоянно, когато изключите
самобръсначката, за да покаже, че трябва
да се сменят бръснещите глави.
2 Натиснете бутона за освобождаване
и отворете бръснещия блок.
3 Издърпайте държача на бръснещата глава
от долната част на бръснещия блок.
2
1
4 Завъртете задържащите пръстени обратно
на часовниковата стрелка и ги свалете.
Page 68

БЪЛГАРСКИ68
5 Свалете бръснещите глави от държача
на бръснещите глави и ги изхвърлете.
6 Поставете нови бръснещи глави в държача.
Забележка: Уверете се, че издатините на
бръснещите глави пасват точно в жлебовете
на държача на бръснещите глави.
1
7 Поставете задържащите пръстени обратно
върху бръснещите глави и ги завъртете по
часовниковата стрелка.
2
- Всеки придържащ пръстен има две
вдлъбнатини и две издатини, които пасват
точно в издатините и вдлъбнатините на
държача.
Page 69

БЪЛГАРСКИ 69
- Завъртете пръстена по часовниковата стрелка,
докато се чуе щракване и пръстенът се фиксира.
Забележка: Дръжте държача на бръснещите глави
в ръката си, когато слагате отново бръснещите
глави и поставяте задържащите пръстени. Не
поставяйте държача на бръснещите глави върху
повърхност, когато правите това, тъй като това
може да причини повреда.
8 Поставете отново пантата на държача на
бръснещите глави в слота на бръснещия
блок. Затворете държача (с щракване).
7 sec.
9 За да нулирате напомнянето за подмяна,
натиснете бутона за вкл./изкл. за около
7 секунди.
Page 70

БЪЛГАРСКИ70
Поръчване на аксесоари
За да закупите аксесоари или резервни части,
посетете www.shop.philips.com/service
или търговец на уреди Philips. Можете също
да се свържете с Центъра за обслужване
на потребители на Philips във вашата
страна (потърсете данните за контакт в
международната гаранционна карта).
Предлагат се следните части:
- Адаптер HQ8505
- SH50 Philips бръснещи глави
- HQ110 Philips спрей за почистване на
бръснещи глави
- Приставка за оформяне на брада RQ111 Philips
- Четка за почистване RQ585 Philips
- Глави на четката за почистване RQ560,
RQ563 Philips
- Почистваща касета JC301, JC302, JC303,
JC304, JC305
Забележка: Наличието на аксесоари може
да се различава според държавата.
Бръснещи глави
- Съветваме ви да подменяте бръснещите
глави на всеки две години. Винаги подменяйте
бръснещите глави с оригинални SH50 от Philips.
Page 71

БЪЛГАРСКИ 71
Рециклиране
- Този символ означава, че продуктът не може
да се изхвърля заедно с обикновените битови
отпадъци (2012/19/ЕС).
- Този символ означава, че продуктът
съдържа вградена акумулаторна батерия,
която не може да се изхвърля заедно с
обикновените битови отпадъци (2006/66/ЕО).
Настоятелно ви препоръчваме да занесете
продукта в официален пункт за събиране
или сервизен център на Philips, така че
акумулаторната батерия да бъде премахната
от професионалист.
- Следвайте местните правила за разделно
събиране на електрически и електронни
продукти и акумулаторни батерии. Правилното
изхвърляне помага за предотвратяването на
негативни последствия за околната среда и
човешкото здраве.
Изваждане на акумулаторната батерия
на самобръсначката
Изваждайте акумулаторната батерия само
когато ще изхвърляте самобръсначката.
Трябва да сте сигурни, че батерията е напълно
изтощена, когато я изваждате.
Page 72

БЪЛГАРСКИ72
Внимавайте, планките на батерията са остри.
1 Свалете винта на гърба с помощта на
отвертка. След това свалете задния панел.
2 Огънете встрани скобите и извадете
захранващия блок.
3 Счупете кукичките и свалете предния панел
на захранващия блок.
4 Извадете държача на батерията и срежете
клемите на батерията с клещи резачки.
Гаранция и поддръжка
Ако се нуждаете от информация или поддръжка,
посетете www.philips.bg/support или
прочетете листовката за международна гаранция.
Ограничения на гаранцията
Условията на международната гаранция не важат
за бръснещите глави (ножчета и предпазители),
тъй като те подлежат на амортизация.
Page 73

БЪЛГАРСКИ 73
Отстраняване на неизправности
В тази глава са обобщени най-често срещаните
проблеми, които може да срещнете при използване
на уреда. Ако не можете да разрешите проблема с
помощта на информацията по-долу, вижте списъка
с често задавани въпроси на адрес
www.philips.com/support или се свържете с
Центъра за обслужване на потребители във вашата
страна.
Проблем Възможна
Самобръсначката
не бръсне толкова
добре, колкото
преди.
Самобръсначката
не работи, когато
натисна бутона за
вкл./изкл.
причина
Бръснещите глави
са повредени или
износени.
Косми или
замърсявания
блокират
бръснещите глави.
Самобръсначката
все още е свързана
към електрическата
мрежа. Поради
съображения
за безопасност
самобръсначката
може да се
използва само без
кабел.
Решение
Сменете бръснещите
глави (вижте раздел
“Подмяна”).
Почистете бръснещите
глави, като следвате
стъпките на метода за
цялостно почистване
(вж. главата “Почистване
и поддръжка”).
Извадете щепсела на
самобръсначката от
контакта и натиснете
бутона за вкл./изкл.,
за да включите
самобръсначката (вж.
раздел “Напомняне
за изключване
от контакта при
употреба”).
Page 74

БЪЛГАРСКИ74
Проблем Възможна
Самобръсначката
не е напълно
почистена, след
като я почистя
в системата
SmartClean.
причина
Акумулаторната
батерия е
изтощена.
Заключването
при пътуване е
включено.
Бръснещият блок
е замърсен или
повреден до
такава степен, че
моторът не може
да работи.
Не сте поставили
правилно
самобръсначката
в системата
SmartClean и
поради това няма
електрическа
връзка между
системата
SmartClean и
самобръсначката.
Решение
Заредете батерията
(вижте глава
“Зареждане”).
Натиснете и задръжте
бутона за вкл./
изкл. за 3 секунди,
за да изключите
заключването при
пътуване.
Почистете бръснещите
глави или ги сменете
(вж. глави “Почистване
и поддръжка” и
“Замяна”).
Натиснете надолу
горния капак (с
щракване), за да се
осигури правилна
връзка между
самобръсначката и
системата SmartClean.
Page 75

БЪЛГАРСКИ 75
Проблем Възможна
От долната част на
самобръсначката
изтича вода.
Системата
SmartClean не се
включва, когато
натисна бутона
за включване/
изключване.
причина
Тази почистваща
касета е празна.
Символът за
смяна премигва,
за да покаже,
че трябва да
подмените
почистващата
касета.
Използвали сте
друга почистваща
касета вместо
оригиналната на
Philips.
По време на
почистване може
да се събира вода
между вътрешния
корпус и външната
обвивка на
самобръсначката.
Системата
SmartClean не
е включена към
захранването.
Решение
Поставете нова
почистваща касета в
системата SmartClean
(вижте раздела
“Почистване и
поддръжка”).
Използвайте само
оригинални касети за
почистване Philips.
Това е нормално и
не е опасно, тъй като
цялата електроника е
затворена в капсулован
захранващ блок вътре в
самобръсначката.
Поставете малкия
щепсел в системата
SmartClean и включете
адаптера в контакта.
Page 76

БЪЛГАРСКИ76
Проблем Възможна
Самобръсначката не
е напълно заредена
след зареждане
в системата
SmartClean.
Подмених
бръснещите глави,
но символът на
напомнянето за
подмяна все още се
показва.
Символ за бръснеща
глава внезапно се
появява на дисплея.
Приставката за
подстригване на нос
скубе космите.
причина
Не сте поставили
правилно
самобръсначката
в системата
SmartClean.
Не сте нулирали
самобръсначката.
Този символ е
напомняне за
смяна.
Движите уреда
прекалено бързо.
Решение
Уверете се, че
сте натиснали
самобръсначката в
системата SmartClean,
докато се захване
на мястото си, и
натиснете надолу
горния капак.
Нулирайте
самобръсначката
чрез натискане на
бутона за включване/
изключване за около 7
секунди (вижте раздел
“Подмяна”).
Сменете бръснещите
глави (вижте раздел
“Подмяна”).
Не движете уреда
прекалено бързо.
Page 77

БЪЛГАРСКИ 77
Проблем Възможна
Приставката за
подстригване на нос
не работи.
причина
Подстригващият
елемент на
приставката е
много замърсен,
например защото
назалната слуз е
изсъхнала отвътре
на подстригващия
елемент.
Решение
Почистете
подстригващия
елемент, като го
изплакнете с течаща
гореща вода. Включете
уреда и изплакнете
подстригващия
елемент още веднъж,
за да премахнете
всички останали косми.
Ако изплакването
на машинката за
подстригване на нос
под течаща вода не
отблокира режещия
елемент, потопете я в
чаша с топла вода за
няколко минути. След
това включете уреда и
го изплакнете с течаща
вода.
Page 78

78
ČEŠTINA
Úvod
Blahopřejeme vám k nákupu a vítáme vás
ve společnosti Philips. Abyste mohli plně využít
podpory, kterou Philips poskytuje, zaregistrujte svůj
výrobek na adrese www.philips.com/welcome.
Všeobecný popis (Obr. 1)
1 Ochranný kryt pro nástavec čisticího kartáčku
(pouze některé typy)
2 Nasazovací nástavec čisticího kartáčku
(pouze některé typy)
3 Hřeben pro nástavec na zastřihování vousů
(pouze některé typy)
4 Nasazovací nástavec na zastřihování vousů
(pouze některé typy)
5 Nasazovací zastřihovací nástavec
(pouze některé typy)
6 Ochranný kryt pro holicí jednotku
(pouze některé typy)
7 Nasazovací holicí jednotka
8 Vypínač
9 Tlačítko Turbo (pouze některé typy)
10 Rukojeť
11 Zásuvka pro malou zástrčku
12 Indikátor nabití baterie s 1 kontrolkou
13 Indikátor nabití baterie se 3 kontrolkami
14 Symbol odpojení
15 Symbol cestovního zámku
16 Připomenutí výměny
17 Připomenutí čištění
18 Čisticí kazeta pro systém SmartClean
19 Systém SmartClean (pouze některé typy)
20 Kryt systému SmartClean
21 Vypínač
22 Symbol baterie
Page 79

ČEŠTINA 79
23 Symbol čištění
24 Symbol výměny
25 Symbol připravenosti
26 Adaptér
27 Malá zástrčka
28 Pouzdro (pouze některé typy)
Poznámka: Dodané příslušenství se může pro různé
výrobky lišit. Příslušenství, které je součástí výrobku,
je zobrazeno na krabičce produktu.
Důležité bezpečnostní informace
Před použitím přístroje si pečlivě přečtěte tuto
příručku s důležitými informacemi a uschovejte ji
pro budoucí použití. Dodané příslušenství se může
u různých výrobků lišit.
Nebezpečí
- Adaptér udržujte v suchu.
Varování
- Adaptér obsahuje transformátor. Proto tento
adaptér nikdy nenahrazujte jinou zástrčkou,
protože by mohla vzniknout nebezpečná situace.
- Děti od 8 let a osoby s omezenými fyzickými,
senzorickými nebo mentálními schopnostmi
nebo nedostatečnou zkušeností či znalostí
mohou přístroj používat jedině v případě,
že jsou pod dohledem nebo byly poučeny
o bezpečném používání přístroje a rozumí všem
rizikům spojeným s používáním přístroje. Čištění
a uživatelskou údržbu nesmí provádět děti bez
dozoru.
- Holicí strojek před čištěním pod tekoucí vodou
vždy odpojte od sítě.
- Přístroj před použitím zkontrolujte. Nepoužívejte
jej, pokud je poškozený. Mohlo by dojít ke zranění.
Poškozené části vždy vyměňte za původní typ.
Page 80

ČEŠTINA80
Upozornění
- Čisticí systém ani nabíjecí stojan neponořujte
do vody, ani je neoplachujte pod tekoucí vodou.
- Pro oplachování holicího strojku nikdy
nepoužívejte vodu teplejší než 80 °C.
- Přístroj používejte pouze k účelu, ke kterému je
určen, jak je vyobrazeno v uživatelské příručce.
- Z hygienických důvodů by měla přístroj používat
pouze jedna osoba.
- Nepoužívejte adaptér v zásuvkách, ve kterých je
nebo byl umístěn elektrický osvěžovač vzduchu,
nebo v jejich blízkosti, abyste předešli nevratným
škodám.
- K čištění přístroje nikdy nepoužívejte stlačený
vzduch, kovové žínky, abrazivní ani agresivní čisticí
prostředky, jako je například benzín nebo aceton.
- Pokud je holicí strojek vybaven čisticím systémem,
vždy používejte originální čisticí kapalinu Philips
(kazetu nebo lahvičku v závislosti na typu čisticího
systému).
- Čisticí systém pokládejte vždy na stabilní
vodorovný povrch, aby nedocházelo k úniku
kapaliny.
- Pokud čisticí systém používá čisticí kazetu, před
jeho použitím pro čištění nebo nabití holicího
strojku se vždy ujistěte, že je přihrádka pro kazetu
uzavřena.
- Když je čisticí systém připraven k použití,
nepohybujte s ním, aby nedocházelo k úniku čisticí
kapaliny.
- Ze zásuvky ve spodní části holicího strojku
může po opláchnutí vytékat voda. To je normální
a nehrozí žádné nebezpečí, protože veškeré
elektronické díly holicího strojku jsou uzavřeny
ve vodotěsné napájecí jednotce uvnitř strojku.
Page 81

ČEŠTINA 81
Elektromagnetická pole (EMP)
- Tento přístroj Philips odpovídá všem
platným normám a předpisům týkajícím se
elektromagnetických polí.
Obecné informace
- Tento holicí strojek je vodotěsný. Je vhodný pro
použití při koupeli nebo ve sprše a můžete jej
omývat pod tekoucí vodou. Z důvodu bezpečnosti
můžete holicí strojek používat pouze bez kabelu.
- Přístroj lze připojit do sítě o napětí v rozmezí
100 až 240 V.
- Adaptér transformuje 100 V až 240 V na bezpečné
nízké napětí nižší než 24 V.
- Maximální hladina hluku: Lc = 69 dB (A)
Displej
Nabíjení
Indikátor nabití baterie se 3 kontrolkami
- Nabíjení trvá přibližně 1 hodinu.
- Rychlé nabíjení: Když přístroj připojíte k napájení,
kontrolky indikátoru nabití baterie se postupně
rozsvítí. Jakmile přístroj obsahuje dostatek energie
na jedno oholení, spodní kontrolka indikátoru
nabití baterie začne pomalu blikat.
- Pokud necháte přístroj připojený k napájení,
proces nabíjení bude pokračovat. Nabíjení přístroje
indikuje nejprve pomalé blikání spodní kontrolky,
ta se posléze trvale rozsvítí. To se opakuje u druhé
a dalších kontrolek, dokud přístroj není plně nabitý.
Page 82

ČEŠTINA82
Indikátor nabití baterie s 1 kontrolkou
- Nabíjení trvá přibližně 1 hodinu.
- Rychlé nabíjení: Když přístroj neobsahuje dostatek
energie na jedno oholení, indikátor nabití baterie
začne rychle blikat. Pokud indikátor nabití baterie
bliká pomalu, přístroj obsahuje dostatek energie na
jedno oholení.
- Pokud necháte přístroj připojený k napájení,
proces nabíjení bude pokračovat. Nabíjení
přístroje indikuje pomalé blikání indikátoru nabití
baterie.
Baterie je plně nabitá
Poznámka: Tento přístroj lze používat pouze bez
kabelu.
Poznámka: Když se baterie plně nabije, displej se po
30 minutách automaticky vypne. Pokud během nabíjení
stisknete vypínač, symbol odpojení bude blikat bíle
na znamení, že nejdříve je třeba odpojit přístroj od
napájení.
Když je baterie plně nabitá, všechny kontrolky
indikátoru nabití baterie trvale svítí.
- Indikátor nabití baterie se 3 kontrolkami
- Indikátor nabití baterie s 1 kontrolkou
Page 83

ČEŠTINA 83
Vybitá baterie
Když je baterie téměř vybitá, indikátor nabíjení
baterie začne blikat oranžově.
- Indikátor nabití baterie se 3 kontrolkami
- Indikátor nabití baterie s 1 kontrolkou
Zbývající kapacita baterie
Indikátor nabití baterie se 3 kontrolkami
- Zbývající kapacitu baterie zobrazují kontrolky
indikátoru nabití baterie, které nepřerušovaně svítí.
Připomenutí odpojení
- Přístroj disponuje funkcí připomenutí odpojení.
Symbol odpojení začne blikat na znamení, že
přístroj je třeba před zapnutím nejprve odpojit od
adaptéru.
Page 84

3 sec.
ČEŠTINA84
Připomenutí čištění
Aby byl zajištěn optimální výkon při holení,
doporučujeme po každém použití holicí strojek
vyčistit.
- Když holicí strojek vypnete, začne blikat symbol
připomenutí vyčištění holicího strojku.
Cestovní zámek
Před cestováním lze holicí strojek uzamknout.
Cestovní zámek zabraňuje náhodnému zapnutí
holicího strojku.
Aktivace cestovního zámku
1 Režim cestovního zámku aktivujete podržením
vypínače po dobu 3 sekund.
- Při aktivaci cestovního zámku se rozsvítí symbol
cestovního zámku. Když je cestovní zámek aktivní,
symbol cestovního zámku bliká.
Deaktivace cestovního zámku
1 Podržte vypínač po dobu 3 sekund.
- Symbol cestovního zámku bliká a poté se
nepřerušovaně rozsvítí.
Nyní je holicí strojek opět připraven k použití.
Page 85

ČEŠTINA 85
Výměna holicích hlav
Aby byl zajištěn maximální holicí výkon,
doporučujeme holicí hlavy vyměnit každé dva roky.
- Přístroj disponuje funkcí připomenutí výměny,
která upozorňuje na potřebu výměny holicích hlav.
Symbol připomenutí výměny se trvale rozsvítí.
Poznámka: Po výměně holicích hlav je třeba na
7 sekund stisknout vypínač a resetovat tak připomenutí
výměny.
Nastavení Turbo (pouze některé typy)
Přístroj disponuje nastavením Turbo nebo Turbo+.
Toto nastavení je určeno pro rychlejší a intenzivnější
holení a usnadňuje holení těžko dostupných míst.
Aktivace nastavení Turbo
1 Chcete-li aktivovat nastavení Turbo, stiskněte
jednou tlačítko Turbo.
Deaktivace nastavení Turbo
1 Chcete-li deaktivovat nastavení Turbo, stačí
stisknout znovu tlačítko Turbo.
Nabíjení
Nabíjení trvá přibližně 1 hodinu.
Poznámka: Tento přístroj lze používat pouze
bez kabelu.
Holicí strojek nabijte před prvním použitím
a v případě, že displej ukazuje, že baterie je
téměř vybitá.
Page 86

ČEŠTINA86
Nabíjení pomocí adaptéru
1 Zasuňte malou zástrčku do přístroje a adaptér
do zásuvky ve zdi.
Nabíjení v systému SmartClean
(pouze některé typy)
1 Zasuňte malou zástrčku do systému
SmartClean.
2 Zasuňte adaptér do zásuvky.
3 Před vložením holicího strojku do držáku
zatlačte na horní kryt (ozve se cvaknutí).
4 Obraťte strojek vzhůru nohama nad držák.
Ujistěte se, že přední strana strojku směřuje
k systému SmartClean.
5 Vložte strojek do držáku, nakloňte strojek
směrem vzad a zatlačením na horní kryt holicí
strojek připojte (ozve se cvaknutí).
- Symbol baterie pomalu bliká na znamení, že holicí
strojek se nabíjí.
Page 87

ČEŠTINA 87
Používání holicího strojku
Zapnutí a vypnutí přístroje
1 Chcete-li přístroj zapnout, stiskněte jednou
vypínač.
2 Chcete-li přístroj vypnout, stiskněte jednou
vypínač.
- Indikátor nabití baterie se 3 kontrolkami:
Displej se na několik sekund rozsvítí a zobrazí
zbývající kapacitu baterie.
Holení
Čas pro přizpůsobení pleti
Prvních několik holení nemusí přinést požadované
výsledky a vaše pleť může být dokonce lehce
podrážděná. To je normální. Vaše pleť a vousy
potřebují čas, aby se přizpůsobily jakémukoli novému
holicímu systému.
Doporučujeme vám holit tímto strojkem se
pravidelně (nejméně třikrát týdně) po dobu 3 týdnů,
aby si pokožka na nový holicí strojek zvykla.
Poznámka: Tento přístroj lze používat pouze bez
kabelu.
1 Zapněte přístroj.
2 Krouživými pohyby pohybujte holicími hlavami
po pokožce.
Poznámka: Nedělejte přímé pohyby.
3 Po použití holicí strojek vyčistěte
(viz kapitola „Čištění a údržba“).
Page 88

ČEŠTINA88
Mokré holení
Tento holicí strojek můžete také použít ve sprše
nebo na mokrou tvář s pěnou či gelem na holení.
Při holení pěnou nebo gelem na holení postupujte
takto:
1 Naneste na pokožku trochu vody.
2 Naneste na pokožku pěnu nebo gel na holení.
3 Propláchněte holicí jednotku pod tekoucí
vodou. Zajistíte, že bude hladce klouzat po kůži.
4 Zapněte holicí strojek.
5 Krouživými pohyby pohybujte holicími hlavami
po pokožce.
Poznámka: Holicí jednotku pravidelně proplachujte pod
tekoucí vodou. Zajistíte, že bude stále hladce klouzat
po kůži.
6 Po každém použití holicí strojek důkladně
vyčistěte a osušte si tvář (viz kapitola „Čištění
a údržba“).
Poznámka: Nezapomeňte z holicího strojku opláchnout
veškerou pěnu nebo gel.
Page 89

ČEŠTINA 89
Nastavení Turbo (pouze některé typy)
Přístroj disponuje nastavením Turbo nebo Turbo+
pro pohodlné holení těžko dostupných míst.
1 Zapněte holicí strojek.
2 Chcete-li holit těžko dostupná místa rychleji,
stisknutím tlačítka Turbo můžete zapnout
nastavení Turbo.
3 Krouživými pohyby pohybujte holicími hlavami
po pokožce.
Poznámka: Nedělejte přímé pohyby.
4 Chcete-li deaktivovat nastavení Turbo, stiskněte
tlačítko Turbo.
Použití nasazovacích nástavců
Poznámka: Dodané příslušenství se může pro různé
výrobky lišit. Příslušenství, které je součástí výrobku, je
zobrazeno na krabičce produktu.
Sejmutí nebo připevnění nasazovacích
nástavců
1 Ujistěte se, že je přístroj vypnutý.
2 Sejměte nástavec z přístroje.
Poznámka: Při snímání z přístroje nástavec neohýbejte.
3 Vložte výstupek nástavce do zářezu v horní
části přístroje. Poté zatlačením na nástavec
připojte nástavec k přístroji (ozve se cvaknutí).
Page 90

ČEŠTINA90
Použití zastřihovacího nástavce
Zastřihovací nástavec lze použít k úpravě kotlet
a kníru.
1 Ujistěte se, že je přístroj vypnutý.
2 Vložte výstupek nástavce do zářezu v horní
části holicího strojku. Poté zatlačením na
zastřihovací nástavec připojte nástavec
k přístroji (ozve se cvaknutí).
3 Zapněte přístroj.
4 Nyní můžete začít se zastřihováním.
5 Po použití nástavec vyčistěte
(viz kapitola „Čištění a údržba“).
Používání nástavce na zastřihování vousů
1 Ujistěte se, že je přístroj vypnutý.
2 Vložte výstupek nástavce do zářezu v horní
části přístroje. Poté zatlačením na nástavec
připojte nástavec k přístroji (ozve se cvaknutí).
Použití nástavce na zastřihování vousů
s hřebenem
Nástavec na zastřihování vousů s hřebenem můžete
použít k úpravě vousů s jedním pevným nastavením
délky, ale také s různými nastaveními délky. Chceteli dosáhnout příjemnějšího holení, použijte jej na
zastřižení dlouhých vousů před samotným holením.
Nastavení délky vousů na nástavci odpovídá délkám
vousů po zastřižení v rozmezí 1 až 5 mm.
1 Nasuňte hřeben do vodicích drážek po obou
stranách nástavce (ozve se cvaknutí).
Page 91

ČEŠTINA 91
2 Stiskněte volič délky a poté jeho posunutím
2
1
doleva nebo doprava vyberte požadované
nastavení délky vousů.
3 Zapněte přístroj.
4 Nyní můžete začít upravovat vousy jemný
pohybem nástavce směrem nahoru.
Dbejte na to, aby přední část hřebenu
byla v kontaktu s pokožkou.
5 Po použití nástavec vyčistěte
(viz kapitola „Čištění a údržba“).
Použití nástavce na zastřihování vousů
bez hřebenu
Nástavec na zastřihování vousů bez hřebenu můžete
použít k zarovnání linie bradky, kníru, kotlet nebo
vousů na krku na délku 0,5 mm.
1 Sejměte hřeben z nástavce.
Poznámka: Uchopte hřeben uprostřed a sejměte jej
z nástavce. Netahejte za strany hřebenu.
2 Zapněte přístroj.
3 Nyní můžete začít upravovat linii bradky, kníru,
kotlet nebo vousů na krku jemný pohybem
nástavce směrem dolů. Při úpravě směřujte
nástavcem kolmo na pokožku.
4 Po použití nástavec vyčistěte (viz kapitola
„Čištění a údržba“).
Použití nástavce čisticího kartáčku
Nástavec s rotačním čisticím kartáčkem používejte
spolu s holicím přípravkem. Nástavec čisticího kartáčku
odstraňuje mastnotu a špínu a přispívá tak k udržování
zdravé a nemastné pokožky.
Page 92

20 sec.
ČEŠTINA92
1 Vložte výstupek nástavce do zářezu v horní
části přístroje. Poté zatlačením na nástavec
připojte nástavec k přístroji (ozve se cvaknutí).
2 Nástavec navlhčete vodou. Pokud tak neučiníte,
mohlo by dojít k podráždění pokožky.
Tip: Chcete-li dosáhnout pohodlnějšího a hygieničtějšího
oholení, použijte před holením nástavec.
3 Navlhčete si obličej vodou a aplikujte na něj
čisticí přípravek.
4 Přiložte nástavec na pravou tvář.
5 Zapněte přístroj.
6 Jemně pohybujte nástavcem po pokožce
směrem od nosu k uchu. Netlačte příliš silně
pokožku, aby bylo čištění pohodlné.
20 sec.
7 Přibližně po 20 sekundách můžete přesunout
nástavec na levou tvář a začít s čištěním levé
části obličeje.
Upozornění: Nečistěte citlivé části obličeje
kolem očí.
Page 93

20 sec.
ČEŠTINA 93
8 Přibližně po 20 sekundách můžete přesunout
nástavec na čelo a začít s čištěním této části
obličeje. Jemně posouvejte nástavcem zleva
doprava.
Poznámka: Doporučujeme nečistit pleť příliš a žádnou
zónu neošetřovat po dobu delší než 20 sekund.
9 Po čištění si opláchněte a osušte obličej.
Obličej je nyní připravený na další fázi
každodenní péče o pokožku.
10 Po použití nástavec vyčistěte
(viz kapitola „Čištění a údržba“).
Čištění a údržba
Poznámka: Dodané příslušenství se může pro různé
výrobky lišit. Příslušenství, které je součástí výrobku,
je zobrazeno na krabičce produktu.
Čištění holicího strojku v systému
SmartClean (pouze některé typy)
Systém SmartClean nenaklánějte, aby nedošlo
k vytečení.
Poznámka: Když systém SmartClean připravujete
k použití, držte jej.
Poznámka: Pokud čistíte holicí strojek v systému
SmartClean jednou týdně, kazeta SmartClean vydrží
přibližně tři měsíce.
Page 94

ČEŠTINA94
Příprava systému SmartClean k použití
1 Zasuňte malou zástrčku do zadní části
systému SmartClean.
2 Zasuňte adaptér do zásuvky.
3 Stiskněte tlačítko na straně systému
2
1
SmartClean a zvedněte horní část systému
SmartClean.
4 Stáhněte uzávěr z čisticí kazety.
5 Vložte čisticí kazetu do systému SmartClean.
6 Zatlačte horní část systému SmartClean
zpět směrem dolů (ozve se cvaknutí).
Použití systému SmartClean
Před vložením holicího strojku do systému
SmartClean musíte vždy vytřást přebytečnou vodu.
Page 95

ČEŠTINA 95
1 Před vložením holicího strojku do držáku
zatlačte na horní kryt (ozve se cvaknutí).
2 Obraťte strojek vzhůru nohama nad držák.
Ujistěte se, že přední strana strojku směřuje
k systému SmartClean.
3 Vložte strojek do držáku, nakloňte strojek
směrem vzad a zatlačením na horní kryt holicí
strojek připojte (ozve se cvaknutí).
- Symbol baterie pomalu bliká na znamení,
že se holicí strojek nabíjí.
4 Stisknutím vypínače na systému SmartClean
spusťte program čištění.
- Během čisticího programu, který trvá přibližně
10 minut, symbol čištění bliká.
- Po dokončení programu čištění se nepřerušovaně
rozsvítí symbol připravenosti.
- Symbol baterie se rozsvítí na znamení, že holicí
strojek je plně nabitý. Tento proces trvá přibližně
1 hodinu.
Poznámka: Pokud během programu čištění stisknete
vypínač systému SmartClean, program se zruší.
V takovém případě přestane symbol čištění blikat.
Page 96

ČEŠTINA96
Poznámka: Pokud v průběhu programu čištění vyjmete
adaptér ze zásuvky ve zdi, program se zruší.
Poznámka: Systém SmartClean se automaticky vypne
30 minut po dokončení fáze nabíjení.
5 Do dalšího holení nechte holicí strojek
v systému SmartClean, aby oschnul. Nebo
můžete holicí strojek vyjmout ze systému
SmartClean, vytřepat z něj přebytečnou vodu,
otevřít holicí jednotku a nechat jej oschnout.
Výměna kazety systému SmartClean
Pokud čistíte holicí strojek v systému SmartClean
jednou týdně, kazeta SmartClean vydrží přibližně
tři měsíce.
Čisticí kazetu vyměňte, pokud symbol výměny bliká
oranžově nebo pokud nejste spokojeni s výsledky.
2
1
Kazeta SmartClean vydrží přibližně tři měsíce,
když ji používáte jednou týdně.
1 Stiskněte tlačítko na straně systému
SmartClean a zvedněte horní část systému
SmartClean.
2 Vyjměte ze systému SmartClean prázdnou
čisticí kazetu a vylijte z ní veškerou zbývající
čisticí tekutinu.
Čisticí kapalinu lze jednoduše vylít do výlevky.
3 Prázdnou čisticí kazetu vyhoďte.
4 Rozbalte novou čisticí kazetu a stáhněte
z ní těsnění.
5 Vložte novou čisticí kazetu do systému
SmartClean.
Page 97

ČEŠTINA 97
6 Zatlačte horní část systému SmartClean
zpět směrem dolů (ozve se cvaknutí).
Čištění holicího strojku tekoucí vodou
Čistěte holicí strojek po každém holení,
aby byl zajištěn optimální výkon holení.
Při použití horké vody buďte opatrní. Vždy
zkontrolujte, zda není voda příliš horká, abyste
si neopařili ruce.
Holicí jednotku nikdy nesušte ručníkem nebo jinou
tkaninou, vyvarujete se tak poškození holicích hlav.
1 Holicí jednotku propláchněte po přiměřenou
dobu tekoucí teplou vodou.
2 Stiskněte uvolňovací tlačítko a otevřete holicí
jednotku.
3 Držák holicí hlavy vyplachujte pod teplou
tekoucí vodou po dobu 30 sekund.
4 Zbylou vodu důkladně vytřepejte a nechte
držák holicí hlavy vyschnout.
5 Uzavřete držák holicí hlavy (ozve se cvaknutí).
Page 98

ČEŠTINA98
Postup pro důkladné čištění
Ujistěte se, že je přístroj vypnutý.
1 Stiskněte uvolňovací tlačítko a otevřete holicí
jednotku.
2 Držák holicí hlavice vysuňte ze spodní části
holicí jednotky.
2
1
3 Otočte zajišťovacími kroužky proti směru
hodinových ručiček a vyjměte je.
4 Sejměte holicí hlavy z držáku holicích hlav.
Každá holicí hlava se skládá ze stříhací jednotky
a krytu.
Poznámka: Nečistěte současně více než jednu střihací
jednotku a kryt, protože všechny tvoří kompatibilní
sady. Pokud střihací jednotku omylem vložíte do
špatného krytu pro holení, může trvat několik týdnů,
než se obnoví optimální výkon holení.
5 Stříhací jednotku a kryt opláchněte pod
tekoucí vodou.
Page 99

ČEŠTINA 99
6 Po očištění vložte stříhací jednotku zpět
do krytu.
7 Vložte holicí hlavy zpět do držáku holicí hlavy.
Poznámka: Zkontrolujte, zda výstupky holicích hlav
zapadly přesně do zářezů držáku holicí hlavy.
1
8 Do držáku holicí hlavy umístěte zpět zajišťovací
kroužky a otočte jimi ve směru hodinových
ručiček.
2
- Každý zajišťovací kroužek má dva zářezy a dva
výstupky, které přesně odpovídají zářezům
a výstupkům na držáku holicí hlavy.
Page 100

ČEŠTINA100
- Otáčejte kroužkem, dokud neslyšíte cvaknutí
a kroužek nebude zajištěn.
Poznámka: Při opětovném vložení holicí hlavy do
držáku a opětovném připevnění zajišťovacích
kroužků držte držák holicí hlavy v dlani a nikam jej
nepokládejte, mohlo by dojít k poškození holicí hlavy.
9 Znovu vložte závěs držáku holicí hlavy do
zářezu holicí jednotky. Uzavřete držák holicí
hlavy (ozve se cvaknutí).
Čištění nasazovacích nástavců
Nástavec zastřihovače nebo nástavec na
zastřihování vousů nikdy nesušte ručníkem nebo
jinou tkaninou, mohlo by dojít k poškození zubů
zastřihovače.
Čištění zastřihovacího nástavce
Zastřihovací nástavec po každém použití vyčistěte.
1 Zapněte přístroj s připojeným zastřihovacím
nástavcem.
 Loading...