

PHILIPS S3520 User Manual [nl]
S3540, S3530, SS3520, S3510, S3130, S3120, S3110

1
7
8
9
2
3
4
5
6
11
10

empty page before TOC

English 6
Dansk 24
Deutsch 40
Español 61
Français 79
Italiano 100
Nederlands 121
Norsk 140
Português 156
Suomi 173
Svenska 189
Türkçe 205
Ελληνικα
221

English
6
Introduction
Congratulations on your purchase and welcome to
Philips! To fully benefit from the support that
Philips offers, register your product at
www.philips.com/welcome.
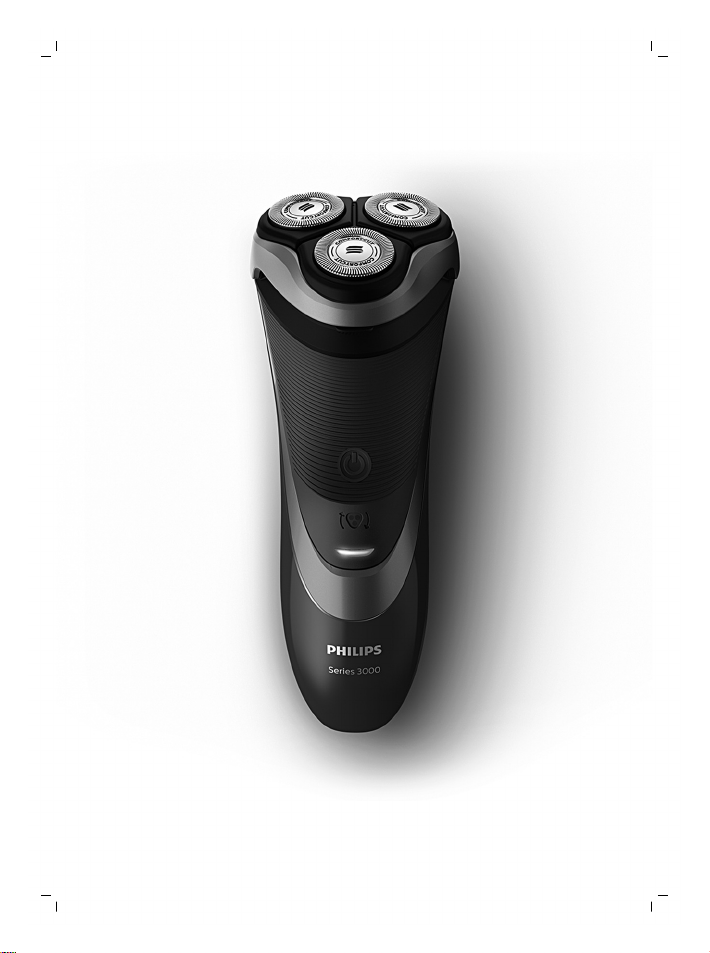
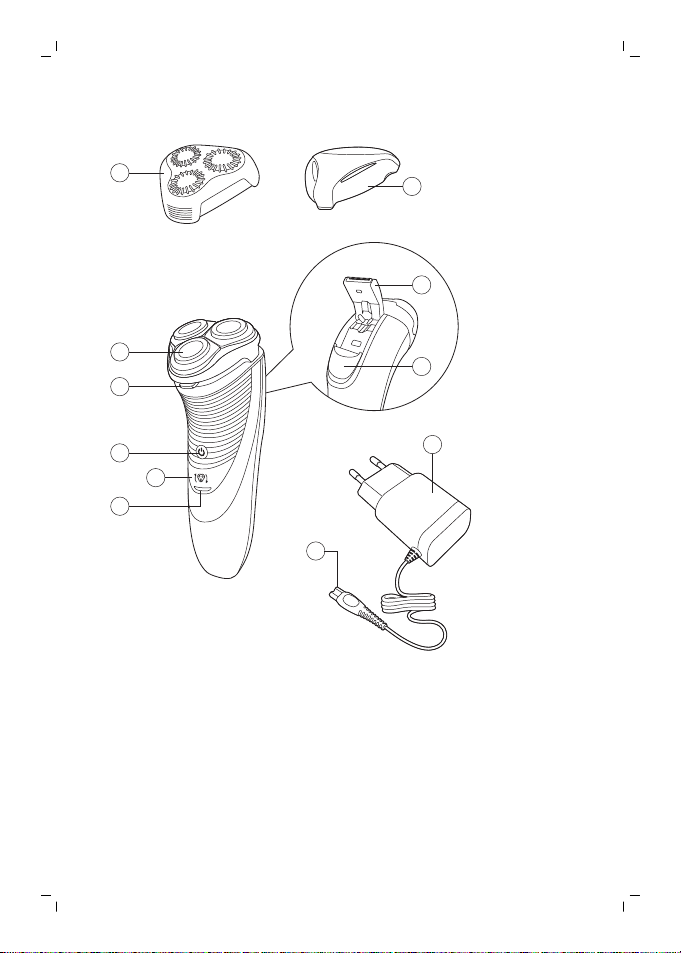
General description (Fig. 1)
1 Click-on stubble cap (S3520, S3510 only)
2 Shaving unit
3 Shaving unit release button
4 On/off button
5 Shaving head symbol
6 Charging light
7 Protection cap
8 Trimmer (S3540, S3530, S3520, S3510 only)
9 Trimmer release slidez (S3540, S3530, S3520,
S3510 only)
10 Supply unit (adapter, type HQ8505)
11 Small plug
Important safety information
Read this important information carefully before
you use the appliance and its accessories and save
it for future reference. The accessories supplied
may vary for different products.
Danger
- Keep the supply unit dry.
English

English
Warning
- To charge the battery, only use the
detachable supply unit (type HQ8505)
provided with the appliance.
- The supply unit contains a transformer. Do
not cut off the supply unit to replace it with
another plug, as this causes a hazardous
situation.
- This appliance can be used by children aged
from 8 years and above and persons with
reduced physical, sensory or mental
capabilities or lack of experience and
knowledge if they have been given
supervision or instruction concerning use of
the appliance in a safe way and understand
the hazards involved. Children shall not play
with the appliance. Cleaning and user
maintenance shall not be made by children
without supervision.
- Always unplug the shaver before you clean
it under the tap.
- Always check the appliance before you use
it. Do not use the appliance if it is damaged,
as this may cause injury. Always replace a
damaged part with one of the original type.
7

English
8
- Do not open the appliance to replace the
rechargeable battery.
Caution
- Never immerse the cleaning
system or the charging stand in
water and do not rinse it under
the tap.
- Never immerse the shaver in
water. Do not use the shaver in
the bath or in the shower.
- Never use water hotter than
60°C to rinse the shaver.
- Only use this appliance for its
intended purpose as shown in
the user manual.
- For hygienic reasons, the
appliance should only be used
by one person.
- Never use compressed air,
scouring pads, abrasive
cleaning agents or aggressive
liquids such as petrol or
acetone to clean the appliance.

English
- If your shaver comes with a
cleaning system, always use the
original Philips cleaning fluid
(cartridge or bottle, depending
on the type of cleaning system).
- Always place the cleaning
system on a stable, level and
horizontal surface to prevent
leakage.
- If your cleaning system uses a
cleaning cartridge, always make
sure the cartridge compartment
is closed before you use the
cleaning system to clean or
charge the shaver.
- When the cleaning system is
ready for use, do not move it to
prevent leakage of cleaning
fluid.
9

English
10
- Water may drip from the socket
at the bottom of the shaver
when you rinse it. This is normal
and not dangerous because all
electronics are enclosed in a
sealed power unit inside the
shaver.
- Do not use the supply unit in or
near wall sockets that contain
an electric air freshener to
prevent irreparable damage to
the supply unit.
Electromagnetic fields (EMF)
This Philips appliance complies with all applicable
standards and regulations regarding exposure to
electromagnetic fields.
General
Charging
- This shaver can be safely cleaned under the
tap.
- The supply unit is suitable for mains voltages
ranging from 100 to 240 volts.
- The supply unit transforms 100-240 volts to a
safe low voltage of less than 24 volts.
It takes approx. 1 hour (S3540, S3530, S3520,
S3510) or 8 hours (S3130, S3120, S3110) to fully
charge the appliance. When you charge the
appliance for the first time or after a long period of
1
2
disuse, let it charge until the charging light lights up
continuously. A fully charged appliance provides
up to 50 minutes (S3540, S3530, S3520, S3510) or
45 minutes (S3130, S3120, S3110) of shaving time.
The shaving time may be less than 50 or 45
minutes as a result of your shaving behavior, your
cleaning habits or your beard type.
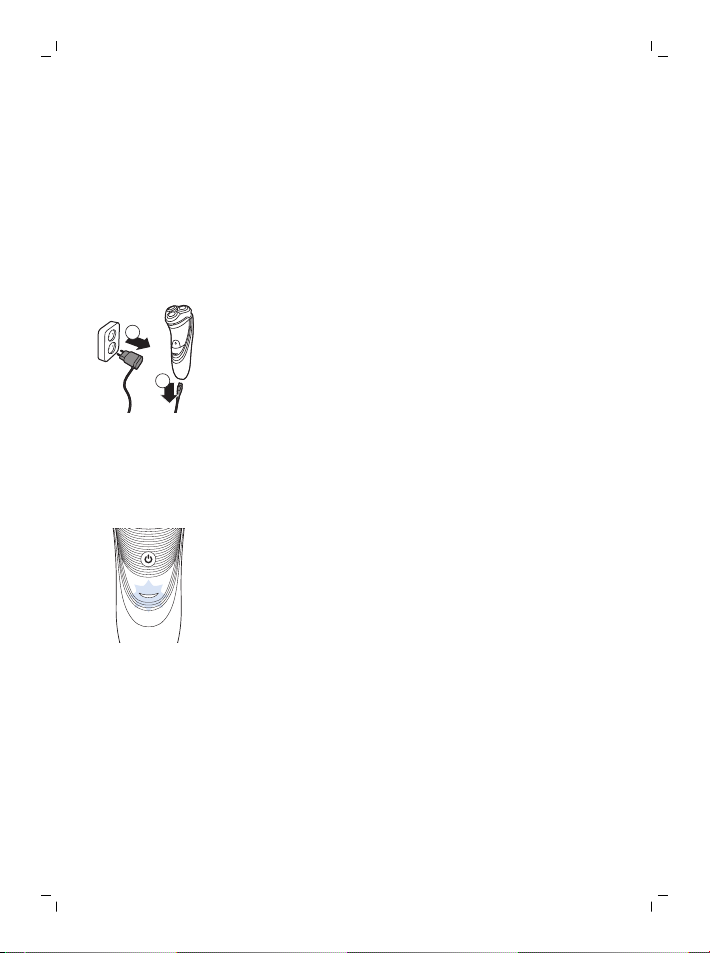
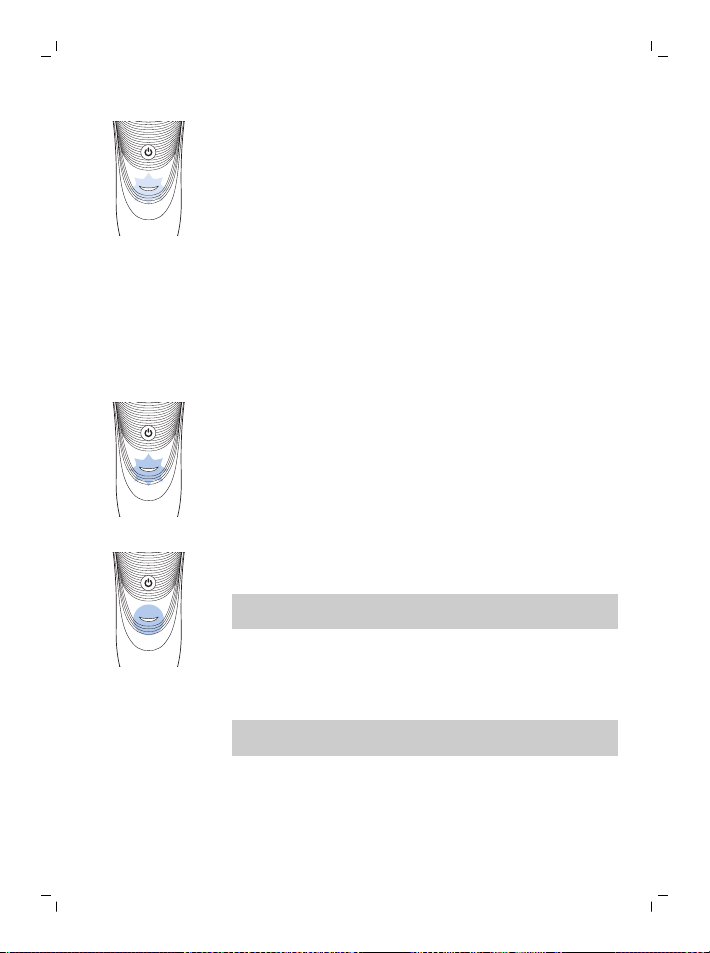
Charging with the adapter
1 Put the small plug in the appliance.
2 Put the supply unit in the wall socket.
- The charging light shows the charging status of
the appliance (see section ‘Charge indications’
in this chapter).
3 After charging, remove the supply unit from the
wall socket and pull the small plug out of the
appliance.
Charge indications
Battery low
- When the battery is almost empty (when there
are only 5 or fewer shaving minutes left), the
charging light starts to flash orange.
- When you switch off the appliance, the charging
light continues to flash orange for a few
seconds.
Quick charging
When you start charging the empty battery, the
charging light alternately flashes orange and green.
After approx. 3 minutes the charging light starts
flashing green only. The appliance now contains
enough energy for a 5-minute shave.
English
11

English
12
Charging
- When the appliance is charging, the charging
light flashes green.
Battery fully charged
- When the battery is fully charged, the charging
light lights up green continuously.
Note: After approx. 30 minutes, the charging light
goes out to save energy.
Using the appliance
Note: This appliance can be used without cord or
when it is connected to the wall socket.
Shaving tips and tricks
- Make circular movements during use. Circular
movements provide better shaving results than
straight movements.
- Your skin may need 2 or 3 weeks to get
accustomed to the Philips shaving system.
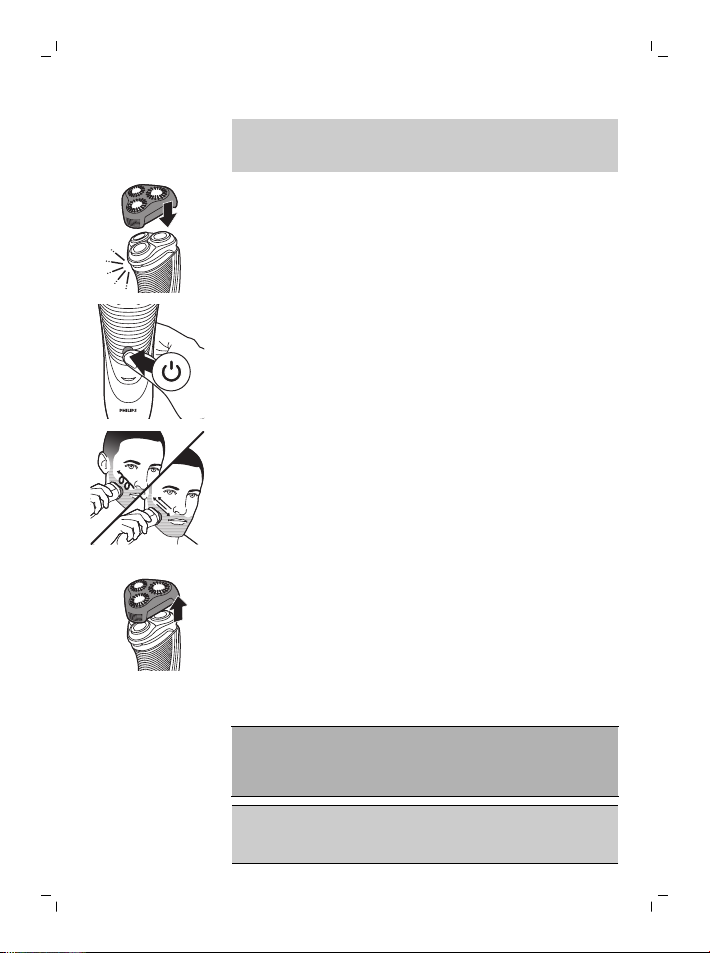
Switching the appliance on and off
1 To switch on the appliance, press the on/off
button once.
2 To switch off the appliance, press the on/off
button once.
Shaving
1 Switch on the appliance.
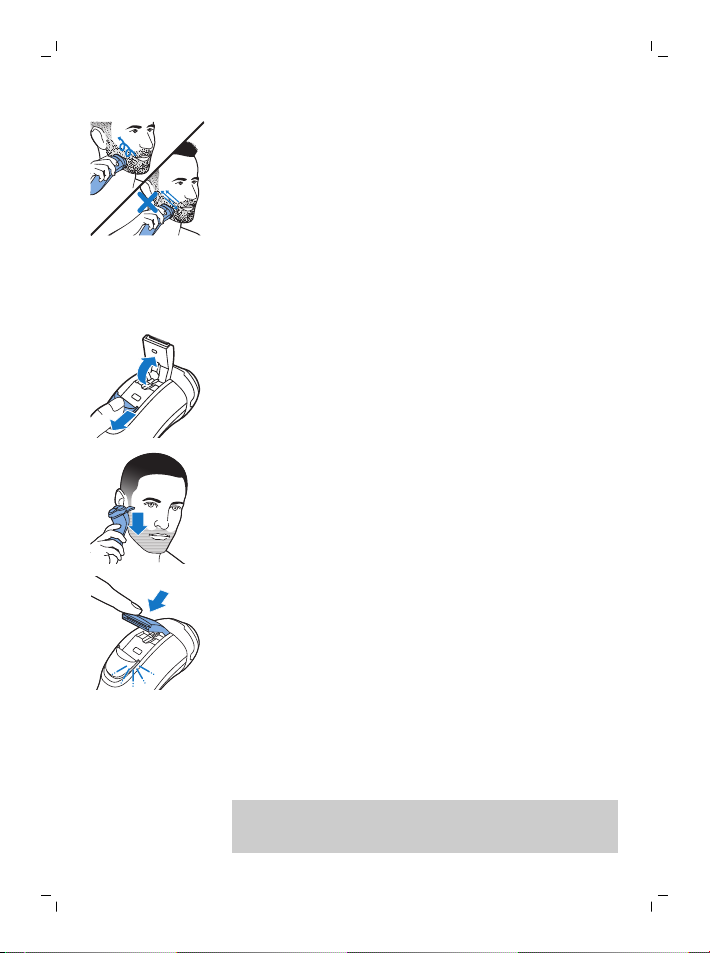
2 Move the shaving heads over your skin in
circular movements.
3 After shaving, switch off the appliance.
4 Clean the appliance (see chapter ‘Cleaning and
maintenance’).
Trimming (S3540, S3530, S3520, S3510 only)
You can use the trimmer to groom your sideburns
and moustache.
1 Push the trimmer release slide downwards to
open the trimmer.
2 Switch on the appliance.
- You can now start trimming.
3 After trimming, switch off the appliance.
4 Clean the trimmer (see chapter ‘Cleaning and
maintenance’).
5 Close the trimmer (‘click’).
English
13
Trimming with click-on stubble cap (S3520, S3510 only)
You can use the click-on stubble cap to trim your
beard to a length of a 3 day beard or to maintain a
1mm stubble look.
- For best trimming results with the click-on
stubble cap, hair and skin should be dry.
- The maximum beard length for using the click-on
14
English
stubble cap is a 7 day beard.
- The click-on stubble cap is for trimming above
the neck line only.
1 Place the click-on stubble cap on the
appliance.
2 To switch on the appliance, press the on/off
button once.
3 Gently press the appliance to your skin. Make
both straight and circular movements to
achieve the best result.
4 To switch off the appliance, press the on/off
button once.
5 Pull off the stubble cap from the appliance.
6 Clean the appliance and the click-on stubble
cap after each use.
Cleaning and maintenance
Danger: Remove the detachable cord
from the handheld part before cleaning
this part in water.
Caution: Never use compressed air, scouring
pads, abrasive cleaning agents or aggressive
liquids such as petrol or acetone to clean the
appliance.
- Clean the appliance after every shave for
optimal shaving performance.
- Regular cleaning guarantees better shaving
performance.
- Be careful with hot water. Always check if the
water is not too hot, to prevent your hands from
getting burnt.
Note: Water may leak from the socket at the
bottom of the appliance when you rinse it. This is
normal and not dangerous because all electronics
are enclosed in a sealed power unit inside the
shaver.
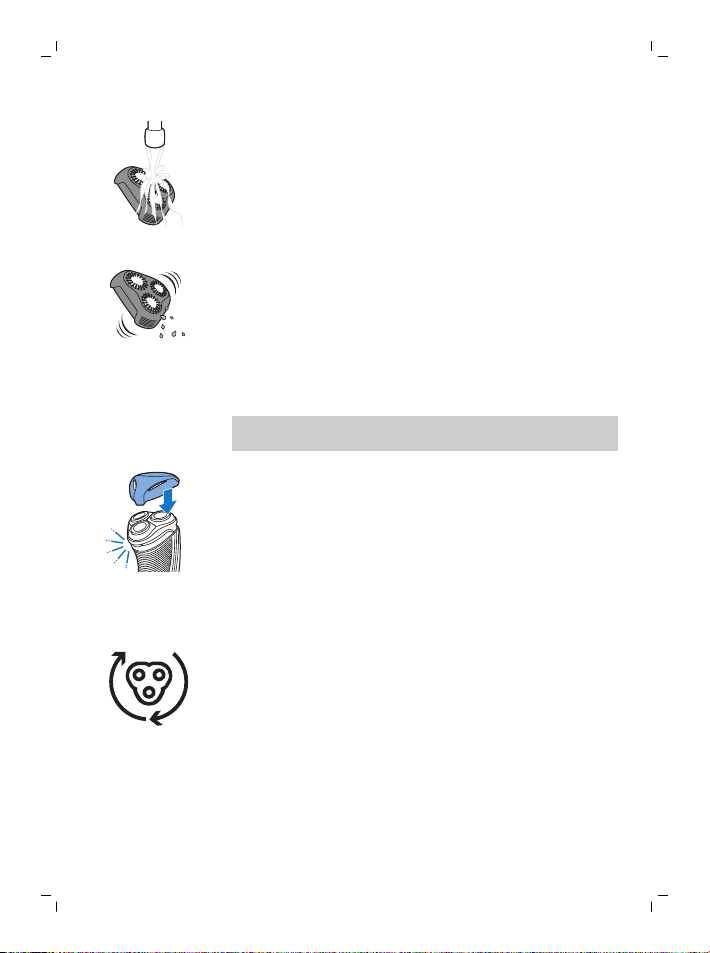
Cleaning the shaving unit under the tap
1 Switch off the appliance and make sure it is
disconnected from the wall socket.
2 Press the release button to open the shaving
unit. Rinse the inside of the shaving unit and
the hair chamber under a hot tap for 30
seconds.
- Rinse the outside of the shaving unit.
3 Close the shaving unit and shake off excess
water.
Caution: Be careful not to hit the shaving unit
against anything while you shake off excess
water.
Caution: Never dry the shaving unit and the hair
chamber with a towel or tissue, as this may
damage the shaving unit.
4 Open the shaving unit again and leave it open
to let the appliance dry completely.
English
15
2
1
English
16
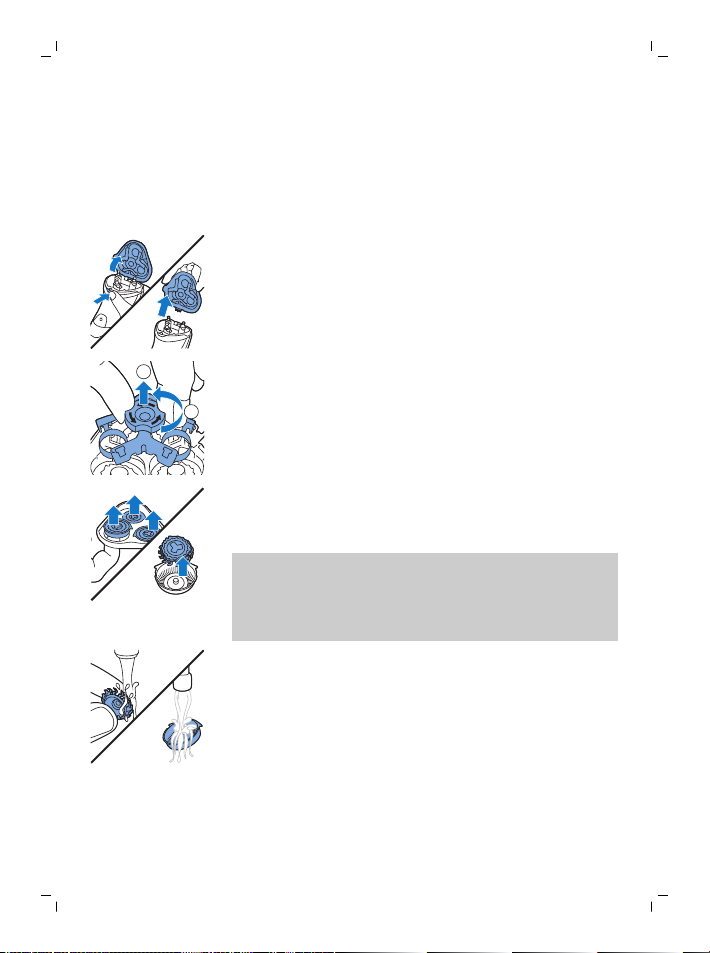
Thorough cleaning
Clean the shaving heads thoroughly once a month
for optimal performance.
1 Switch off the appliance and make sure it is
2 Press the release button to open the shaving
3 Turn the lock anticlockwise and remove the
4 Remove and clean one shaving head at a time.
- Remove the cutter from the shaving guard and
disconnected from the wall socket.
unit. Pull the shaving unit off the appliance.
retaining frame.
Each shaving head consists of a cutter and a
guard.
Note: Do not clean more than one cutter and
guard at a time, since they are all matching sets.
If you accidentally mix up the cutters and
guards, it may take several weeks before
optimal shaving performance is restored.
clean both parts under the tap.

1
2
English
5 Put the cutter back into the guard.
6 Put the shaving heads back into the shaving
unit.
Note: Make sure that the projections of the
shaving heads fit exactly into the recesses of
the shaving head holder.
7 Put the retaining frame back into the shaving
unit and turn the lock clockwise.
8 Insert the lug of the shaving unit into the slot in
the top of the appliance. Then close the shaving
unit ('click').
Note: If the shaving unit does not close
smoothly, check if you have inserted the
shaving heads properly and if the retaining
frame is locked.
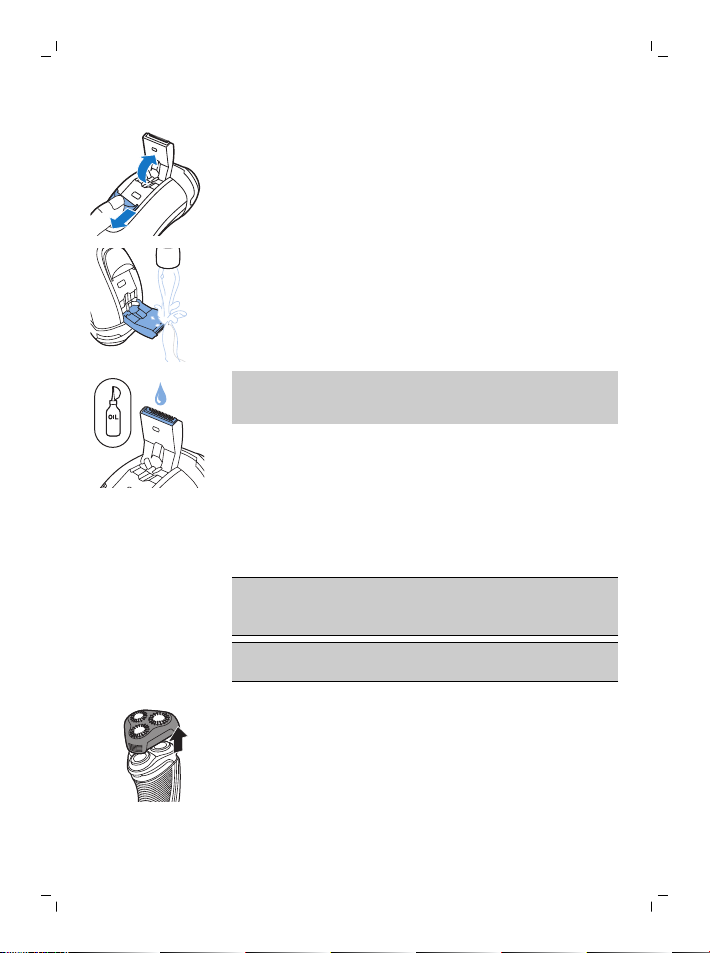
Cleaning the trimmer under the tap (S3520, S3510 only)
Clean the trimmer every time you have used it.
1 Switch off the appliance and make sure it is
disconnected from the wall socket.
17
English
18
2 Push the trimmer release slide downwards to
open the trimmer.
3 Switch on the appliance and clean the trimmer
under the tap.
4 Switch off the appliance and leave the trimmer
open to let it dry.
5 Close the trimmer (‘click’).
Tip: For optimal trimming performance, lubricate
the trimmer teeth with a drop of sewing machine
oil every six months.
Cleaning the click-on stubble cap (S3520, S3510 only)
Clean the click-on stubble cap after every trim for
optimal performance.
Be careful with hot water. Always check if the
water is not too hot, to prevent burning your
hands.
Never dry the stubble cap with a towel or tissue,
as this may damage the stubble cap.
1 Remove the stubble cap from the appliance.
2yrs
Storage
Replacement
English
2 Rinse the stubble cap under a warm tap.
3 Carefully shake off excess water and let the
stubble cap air dry.
Note: We advise you to let the appliance dry
before you put the protection cap on it.
Put the protection cap on the appliance to prevent
damage.
For maximum shaving performance, we advise you
to replace the shaving heads every two years.
Replace damaged shaving heads immediately.
Always replace the shaving heads with original
Philips shaving heads' (see 'Ordering accessories').
Replacement reminder
The shaving unit symbol will light up to indicate
that the shaving heads need to be replaced.
19

2
1
1
2
20
English
1 The shaving unit symbol lights up orange
continuously.
2 Switch off the appliance and make sure it is
disconnected from the wall socket.
3 Press the release button to open the shaving
unit. Pull the shaving unit off the appliance.
4 Turn the lock anticlockwise and remove the
retaining frame.
5 Remove the shaving heads from the shaving
unit and throw them away.
6 Place new shaving heads in the shaving unit.
Note: Make sure that the projections of the
shaving heads fit exactly into the recesses of
the shaving head holder.
7 Put the retaining frame back into the shaving
unit and turn the lock clockwise.

5 sec.
8 Insert the lug of the shaving unit into the slot in
the top of the appliance. Then close the shaving
unit ('click').
Note: If the shaving unit does not close
smoothly, check if you have inserted the
shaving heads properly and if the retaining
frame is locked.
9 Press and hold the on/off button for 5 seconds
to reset the replacement reminder on the
shaver. The orange light goes out.
Ordering accessories
To buy accessories or spare parts, visit
www.shop.philips.com/service or go to your
Philips dealer. You can also contact the Philips
Consumer Care Center in your country (see the
international warranty leaflet for contact details).
The following accessories and spare parts are
available:
- SH30 Philips Shaving Heads.
- HQ110 Philips shaving head cleaning spray
Recycling
- This symbol means that this product shall not
be disposed of with normal household waste
(2012/19/EU).
English
21

English
22
- This symbol means that this product contains a
built-in rechargeable battery which shall not be
disposed of with normal household waste
(2006/66/EC). Please take your product to an
official collection point or a Philips service
center to have a professional remove the
rechargeable battery.
- Follow your country’s rules for the separate
collection of electrical and electronic products
and rechargeable batteries. Correct disposal
helps prevent negative consequences for the
environment and human health.
Warranty and support
If you need information or support, please visit
www.philips.com/support or read the
international warranty leaflet.
Guarantee restrictions
The shaving heads (cutters and guards) are not
covered by the terms of the international
guarantee because they are subject to wear.
Troubleshooting
This chapter summarizes the most common
problems you could encounter with the appliance.
If you are unable to solve the problem with the
information below, visit www.philips.com/support
for a list of frequently asked questions or contact
the Consumer Care Center in your country.
Problem Possible cause Solution
The appliance
does not shave as
well as it used to.
The shaving heads
are damaged or
worn.
Replace the shaving heads
(see chapter
'Replacement').

Problem Possible cause Solution
The appliance
does not work
when I press the
on/off button.
Long hairs obstruct
the shaving heads.
You have not
inserted the
shaving heads
properly.
The rechargeable
battery is empty.
The temperature of
the appliance is too
high. In this case,
the appliance does
not work.
Clean the shaving heads
one by one (see chapter
'Cleaning and
maintenance').
Make sure that the
projections of the shaving
heads fit exactly into the
recesses (see chapter
'Cleaning and
maintenance').
Recharge the battery (see
chapter 'Charging'.
As soon as the
temperature of the
appliance has dropped
sufficiently, you can switch
on the appliance again.
English
23

Dansk
24
Introduktion
Tillykke med dit køb, og velkommen til Philips! For
at få fuldt udbytte af den support, Philips tilbyder,
skal du registrere dit produkt på
www.philips.com/welcome.
Generel beskrivelse (fig. 1)
1 Stubbekappe til at klikke på (kun S3520, S3510)
2 Skærenhed
3 Knap til at frigøre skærenhed
4 On/off-knap
5 Shaverhovedsymbol
6 Opladeindikator med lys
7 Beskyttelseshætte
8 Trimmer (kun S3540, S3530, S3520, S3510)
9 Udløser til trimmerz (kun S3540, S3530, S3520,
S3510)
10 Strømforsyningsenhed (adapter, HQ8505 type)
11 Lille stik
Vigtige sikkerhedsoplysninger
Læs disse vigtige oplysninger omhyggeligt
igennem, inden apparatet og tilbehøret tages i
brug, og gem dem til eventuel senere brug. Det
medfølgende tilbehør kan variere for forskellige
produkter.
Fare
- Hold forsyningsenheden tør.
Dansk

Advarsel
Dansk
- Apparatet er en konstruktion i Klasse III.
- Brug kun den aftagelige forsyningsenhed (type
HQ8505), der fulgte med apparatet, til at
oplade batteriet.
- Strømforsyningsenheden indeholder en
transformator. Klip ikke
strømforsyningsenheden af og udskift den med
et andet stik, da dette vil føre til farlige
situationer.
- Dette apparat må bruges af børn fra 8 år og
opefter og personer med reducerede fysiske,
sensoriske eller mentale evner eller manglende
erfaring og viden, hvis de er blevet instrueret i
sikker brug af apparatet og forstår de
medfølgende risici. Lad ikke børn lege med
apparatet. Rengøring og vedligeholdelse må
ikke foretages af børn uden opsyn.
- Tag altid stikket ud af shaveren, inden den
skylles under vandhanen.
- Kontroller altid apparatet, indendu anvender
det. Anvend ikke apparatet, hvis det er
beskadiget, da dette kan forårsage
personskade. Udskift altid en beskadiget del
med en tilsvarende original type.
- Apparatet må ikke åbnes i forbindelse med
udskiftning af det genopladelige batteri.
25
Forsigtig
- Kom aldrig rengøringssystemet eller
opladeenheden ned i vand, og undgå at skylle
dem under hanen.
- Kom aldrig shaveren ned i vand. Brug ikke
shaveren i badet eller under bruseren.
- Rens aldrig shaveren med vand, der er varmere
end 60 °C.

26
Dansk
- Brug kun apparatet til det tilsigtede formål som
vist i brugervejledningen.
- Af hygiejniske grunde bør apparatet kun
anvendes af en og samme person.
- Brug aldrig trykluft, skuresvampe eller skrappe
rengøringsmidler, som f.eks. benzin, acetone
eller lignende, til rengøring af apparatet.
- Hvis din shaver leveres med et
rengøringssystem, skal du altid bruge den
originale Philips rensevæske (i rensepatron eller
flaske, afhængigt af typen af rengøringssystem).
- Placer altid rengøringssystemet på et stabilt,
plant og vandret underlag for at undgå lækage.
- Hvis dit rengøringssystem anvender en
rensepatron, skal du altid sørge for, at rummet
til rensepatronen er lukket, før du bruger
rengøringssystemet til at rengøre eller oplade
shaveren.
- For at undgå udsivende rensevæske må
rengøringssystemet ikke flyttes, mens det er klar
til brug.
- Der kan dryppe lidt vand ud gennem stikket i
bunden af shaveren, når du skyller den. Dette er
helt normalt og ganske ufarligt, da al
elektronikken er indkapslet i en forseglet
motorenhed inde i shaveren.
- Brug ikke strømforsyningsenheden i eller i
nærheden af stikkontakter, som indeholder en
elektrisk luftfrisker, for at forhindre uoprettelig
beskadigelse af strømforsyningsenheden.
Elektromagnetiske felter (EMF)
Dette Philips-apparat overholder alle branchens
gældende standarder og regler angående
eksponering for elektromagnetiske felter.

1
2
Generelt
- Denne shaver kan skylles under rindende vand
uden risiko.
- Forsyningsenheden er egnet til netspændinger
fra 100 til 240 volt.
- Strømforsyningsenheden omformer 100-240
Volt til en lav sikkerhedsspænding under 24
Volt.
- Maks. støjniveau: Lc = 69dB(A)
Opladning
En fuld opladning af apparatet tager ca. 1 time
(S3540, S3530, S3520, S3510) eller 8 timer (S3130,
S3120, S3110). Når shaveren oplades for første gang
eller efter en længere pause, skal den oplade,
indtil opladeindikatoren lyser konstant. Et fuldt
opladet apparat giver en brugstid på op til 50
minutter (S3540, S3530, S3520, S3510) eller 45
minutter (S3130, S3120, S3110). Barberingstiden er
muligvis kortere end 50 eller 45 minutter som følge
af dine barberingsvaner, dine rensevaner eller din
skægtype.
Opladning med adapter
1 Sæt det lille stik i apparatet.
2 Slut adapteren til stikkontakten.
- Opladeindikatoren viser opladningsstatus for
shaveren (se afsnittet "Opladningsindikatorer" i
dette kapitel).
3 Efter opladning skal du tage forsyningsenheden
ud af stikkontakten og tage det lille stik ud af
apparatet.
Opladningsindikatorer
Lavt batteriniveau
Dansk
27
28
Dansk
- Når batteriet næsten er afladet (når der kun er 5
minutter eller færre tilbage til barbering), lyser
opladeindikatoren orange.
- Når du slukker for shaveren, fortsætter
opladeindikatorenmed at blinke orange i nogle
sekunder.
Lynopladning
Når du starter opladningen af det tomme batteri,
blinker opladeindikatoren skiftevis orange og
grønt. Efter ca. 3 minutter blinker
opladeindikatoren kun grønt. Shaveren har nu nok
strøm til 5 minutters barbering.
Opladning
- Når apparatet oplades, blinker
opladeindikatoren grønt.
Batteri fuldt opladet
- Når batteriet er fuldt opladet,
lyseropladeindikatoren konstant grønt.
Bemærk: Efter ca. 30 minutter slukker
opladeindikatoren for at spare på energien.
Sådan bruges apparatet
Bemærk: Shaveren kan bruges uden ledning, eller
når den er tilsluttet en stikkontakt.
Barberingstips og tricks
- Lav cirkulære bevægelser under brug. Cirkulære
bevægelser giver bedre barberingsresultater
end lige bevægelser.

- Vær opmærksom på, at der kan gå 2-3 uger, før
din hud helt har vænnet sig til Philips'
barberingssystem.
Sådan tændes og slukkes apparatet
1 Apparatet tændes ved at trykke én gang på
tænd/sluk-knappen.
2 Apparatet slukkes ved at trykke én gang på
on/off-knappen.
Barbering
1 Tænd for apparatet.
2 Bevæg skærhovederne hen over huden i
cirkulære bevægelser.
3 Efter trimning skal apparatet slukkes.
4 Rengør apparatet (se afsnittet "Rengøring og
vedligeholdelse").
Trimning (kun S3540, S3530, S3520, S3510)
Trimmeren kan bruges til at style bakkenbarter og
moustache.
1 Skub skyderen til frigørelse af trimmeren nedad
for at åbne trimmeren.
2 Tænd for apparatet.
Dansk
29
- Trimningen kan nu påbegyndes.
3 Efter trimning skal apparatet slukkes.
4 Rengør trimmeren (se afsnittet "Rengøring og
vedligeholdelse").

Dansk
30
5 Luk trimmeren ("klik").
Trimning med stubbekappe, der kan klikkes på (kun S3520, S3510)
Du kan bruge stubbekamme, der kan klikkes på, til
at trimme skægget til en længde på 3 dages
stubbe eller stubbe på 1 mm.
- Stubbekappen, der kan klikkes på, giver det
bedste trimningsresultat på tør hud og tørt hår..
- Den maksimale skæglængde, som stubbekappen
kan bruges på, er 7 dages skæg.
- Stubbekappen er kun beregnet til trimning fra
halsen og opefter..
1 Sæt stubbekappen på apparatet.
2 Apparatet tændes ved at trykke én gang på
tænd/sluk-knappen.
3 Tryk apparatet let mod huden. Foretag både
lige strøg og cirkelbevægelser for at få det
bedste resultat.
4 Apparatet slukkes ved at trykke én gang på
on/off-knappen.
 Loading...