

Page 1
S3520, S3510, S3120, S3110
Page 2
Page 3
S3520
S3510
1
9
2
3
4
5
10
8
7
6
Page 4

empty page before TOC
Page 5

English 6
Bahasa Indonesia 21
Bahasa Melayu 35
Tiếng Việt 50
ภาษาไทย
简体中文
繁體中文
한국의
ﺔﻴﺑﺮﻌﻟﺍ
یسرﺍف
64
77
90
102
115
128
תירבע 142
Page 6
English
6
Introduction
Congratulations on your purchase and welcome to
Philips! To fully benefit from the support that
Philips offers, register your product at
www.philips.com/welcome.
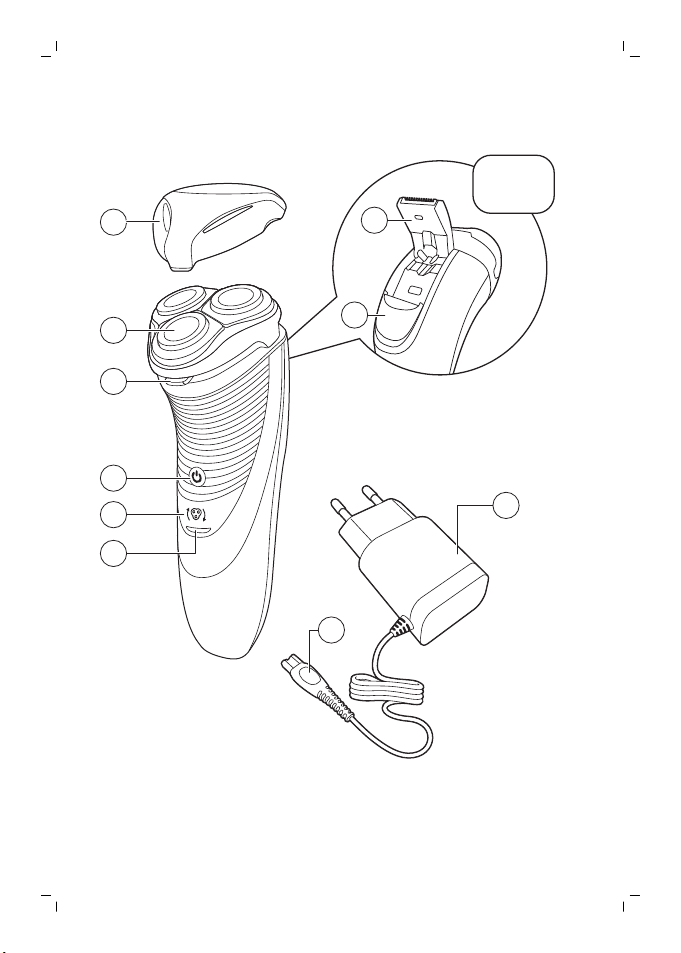
General description (Fig. 1)
1 Protection cap
2 Shaving unit
3 Shaving unit release button
4 On/off button
5 Shaving head symbol
6 Charging light
7 Trimmer (S3520, S3510 only)
8 Trimmer release slide (S3520, S3510 only)
9 Supply unit (adapter, type HQ8505)
10 Small plug
Important safety information
Read this important information carefully before
you use the appliance and its accessories and
save it for future reference. The accessories
supplied may vary for different products.
Danger
- Keep the supply unit dry.
English
Page 7

Warning
English
- To charge the battery, only use
the detachable supply unit
(type HQ8505) provided with
the appliance.
- The supply unit contains a
transformer. Do not cut off the
supply unit to replace it with
another plug, as this causes a
hazardous situation.
- This appliance can be used by
children aged from 8 years and
above and persons with
reduced physical, sensory or
mental capabilities or lack of
experience and knowledge if
they have been given
supervision or instruction
concerning use of the
appliance in a safe way and
understand the hazards
involved. Children shall not play
with the appliance. Cleaning
and user maintenance shall not
be made by children without
supervision.
7
Page 8
English
8
Caution
- Always unplug the shaver
before you clean it under the
tap.
- Always check the appliance
before you use it. Do not use
the appliance if it is damaged,
as this may cause injury. Always
replace a damaged part with
one of the original type.
- Do not open the appliance to
replace the rechargeable
battery.
- Never immerse the cleaning
system or the charging stand in
water and do not rinse it under
the tap.
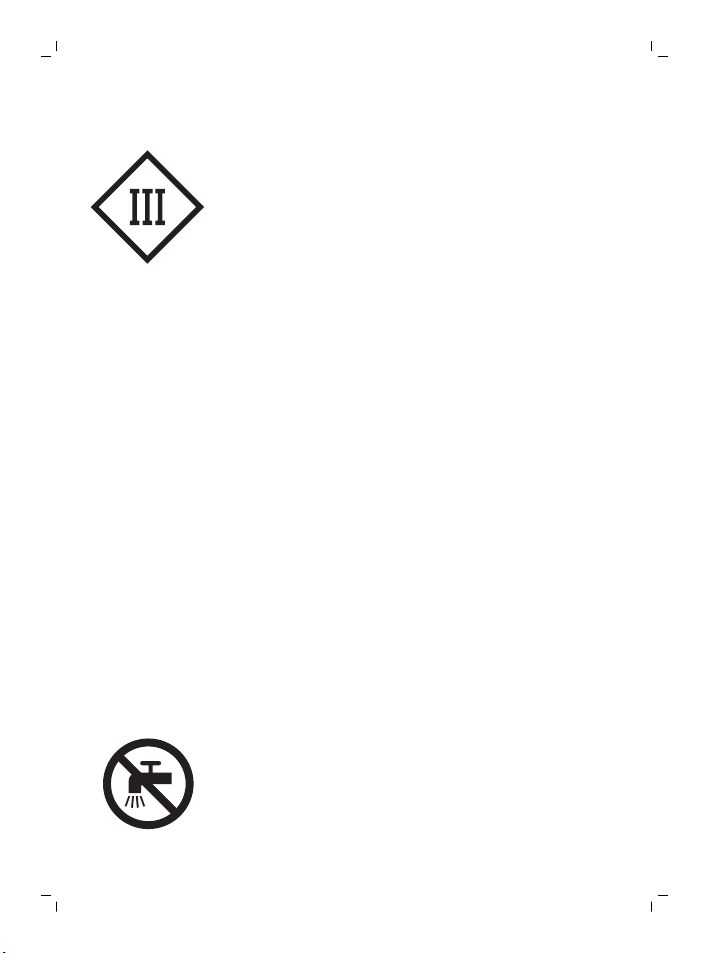
- Never immerse the shaver in
water. Do not use the shaver in
the bath or in the shower.
- Never use water hotter than
80°C to rinse the shaver.
- Only use this appliance for its
intended purpose as shown in
the user manual.
Page 9

English
- For hygienic reasons, the
appliance should only be used
by one person.
- Never use compressed air,
scouring pads, abrasive
cleaning agents or aggressive
liquids such as petrol or
acetone to clean the appliance.
- If your shaver comes with a
cleaning system, always use
the original Philips cleaning
fluid (cartridge or bottle,
depending on the type of
cleaning system).
- Always place the cleaning
system on a stable, level and
horizontal surface to prevent
leakage.
- If your cleaning system uses a
cleaning cartridge, always make
sure the cartridge compartment
is closed before you use the
cleaning system to clean or
charge the shaver.
9
Page 10

English
10
- When the cleaning system is
ready for use, do not move it to
prevent leakage of cleaning
fluid.
- Water may drip from the socket
at the bottom of the shaver
when you rinse it. This is normal
and not dangerous because all
electronics are enclosed in a
sealed power unit inside the
shaver.
- Do not use the supply unit in or
near wall sockets that contain
an electric air freshener to
prevent irreparable damage to
the supply unit.
Electromagnetic fields (EMF)
- This Philips appliance complies with all
applicable standards and regulations regarding
exposure to electromagnetic fields.
General
- This shaver can be safely cleaned under the
tap.
- The appliance is suitable for mains voltages
ranging from 100 to 240 volts.
- The supply unit transforms 100-240 volts to a
safe low voltage of less than 24 volts.
Page 11

Charging
2
1
Charging with the adapter
Charge indications
English
It takes approx. 1 hour (S3520, S3510) or 8 hours
(S3120, S3110) to fully charge the appliance. When
you charge the appliance for the first time or after
a long period of disuse, let it charge until the
charging light lights up continuously. A fully
charged appliance provides up to 50 minutes
(S3520, S3510) or 45 minutes (S3120, S3110) of
shaving time. The shaving time may be less than
50 or 45 minutes as a result of your shaving
behavior, your cleaning habits or your beard type.
1 Put the small plug in the appliance.
2 Put the adapter in the wall socket.
- The charging light shows the charging status of
the appliance (see section ‘Charge indications’
in this chapter).
3 After charging, remove the adapter from the
wall socket and pull the small plug out of the
appliance.
Battery low
- When the battery is almost empty (when there
are only 5 or fewer shaving minutes left), the
charging light starts to flash orange.
- When you switch off the appliance, the
charging light continues to flash orange for a
few seconds.
Quick charging
When you start charging the empty battery, the
charging light alternately flashes orange and
green. After approx. 3 minutes the charging light
starts flashing green only. The appliance now
contains enough energy for a 5-minute shave.
11
Page 12
English
12
Charging
- When the appliance is charging, the charging
light flashes green.
Battery fully charged
- When the battery is fully charged, the charging
light lights up green continuously.
Note: After approx. 30 minutes, the charging light
goes out to save energy.
Using the appliance
Note: This appliance can be used without cord or
when it is connected to the wall socket.
Shaving tips and tricks
- Make circular movements during use. Circular
movements provide better shaving results than
straight movements.
- Your skin may need 2 or 3 weeks to get
accustomed to the Philips shaving system.
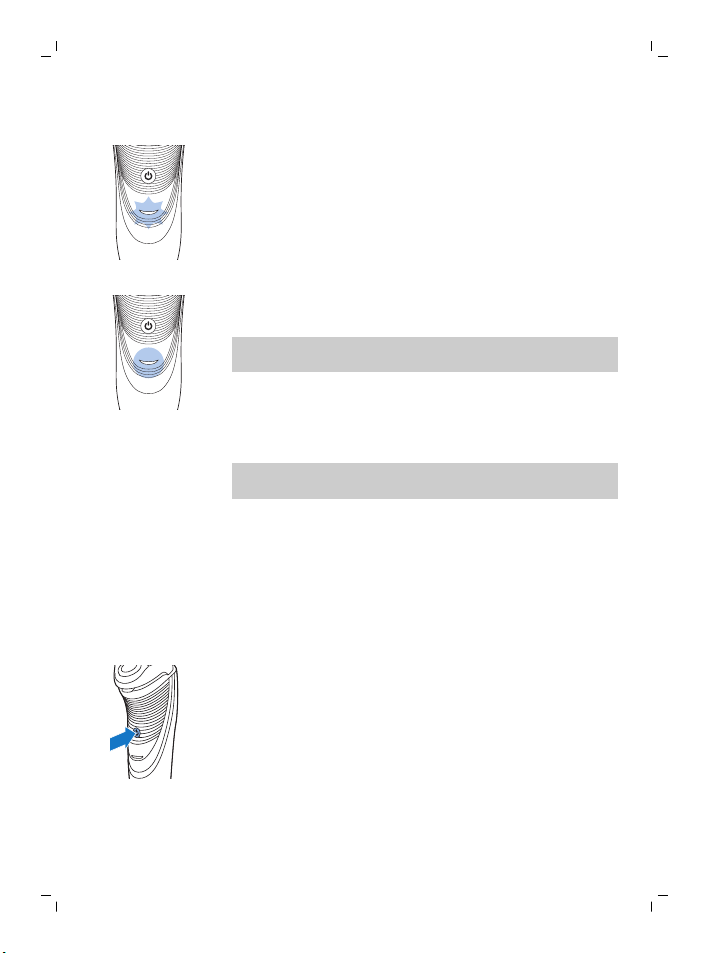
Switching the appliance on and off
1 To switch on the appliance, press the on/off
button once.
2 To switch off the appliance, press the on/off
button once.
Shaving
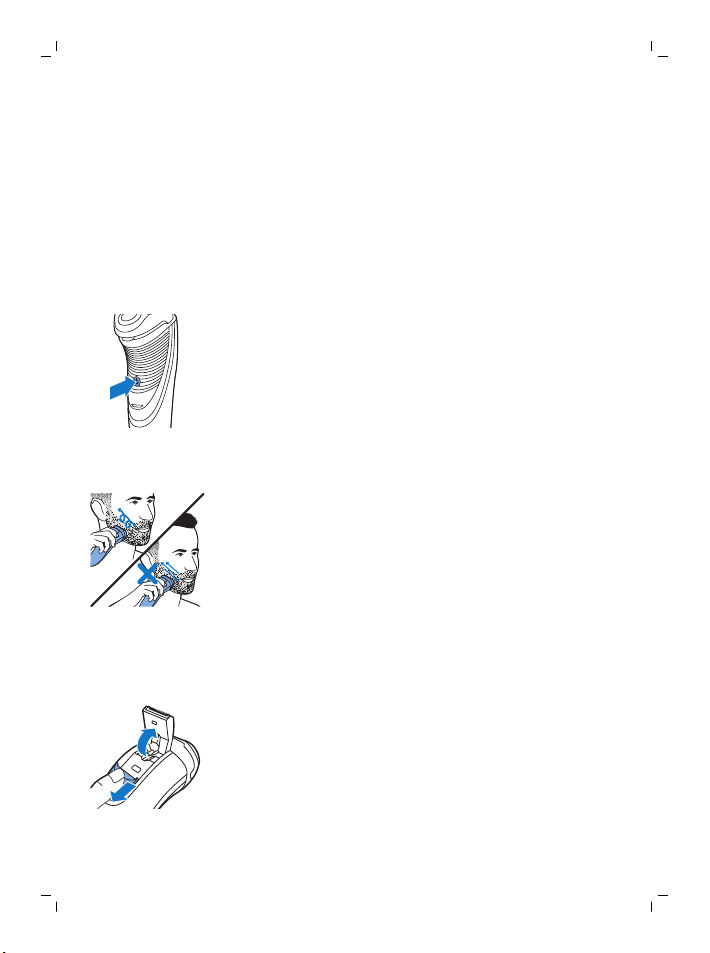
1 Switch on the appliance.
Page 13
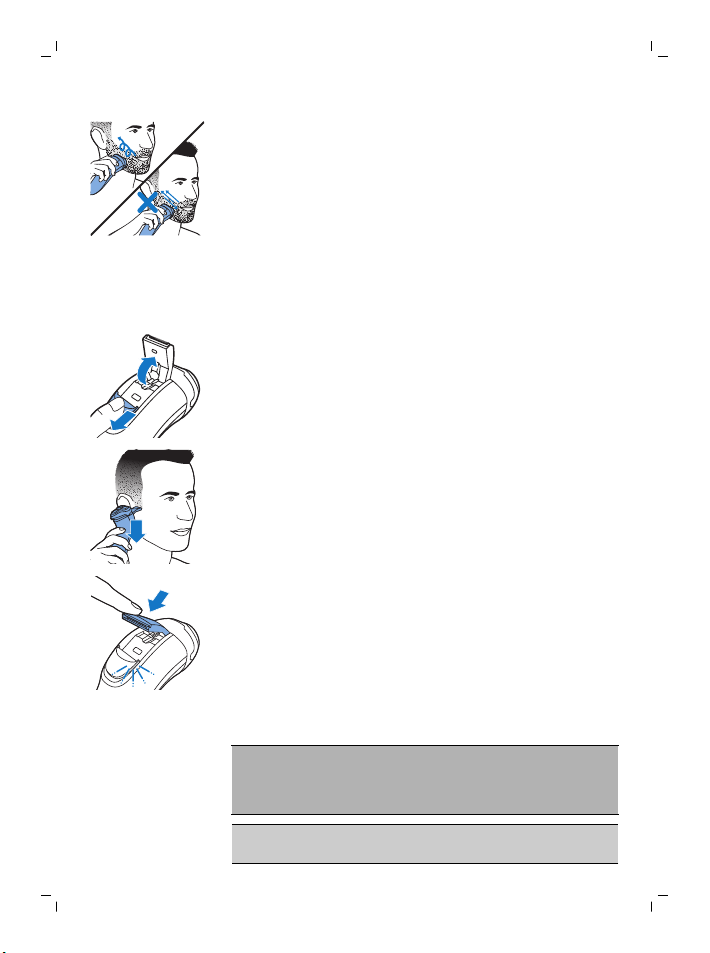
2 Move the shaving heads in circular movements
over your skin.
3 After shaving, switch off the appliance.
4 Clean the appliance (see chapter ‘Cleaning and
maintenance’).
Trimming (S3520, S3510 only)
You can use the trimmer to groom your sideburns
and moustache.
1 Push the trimmer slide downwards to open the
trimmer.
2 Switch on the appliance.
- You can now start trimming.
3 After trimming, switch off the appliance.
4 Clean the trimmer (see chapter ‘Cleaning and
maintenance’).
5 Close the trimmer (‘click’).
English
13
Cleaning and maintenance
Danger: Remove the detachable cord
from the handheld part before cleaning
this part in water.
Caution: Never use compressed air, scouring
pads, abrasive cleaning agents or aggressive
Page 14
English
14
liquids such as petrol or acetone to clean the
appliance.
- Clean the appliance after every shave for
optimal shaving performance.
- Regular cleaning guarantees better shaving
performance.
- Be careful with hot water. Always check if the
water is not too hot, to prevent your hands from
getting burnt.
Note: Water may leak from the socket at the
bottom of the appliance when you rinse it. This is
normal and not dangerous because all electronics
are enclosed in a sealed power unit inside the
shaver.
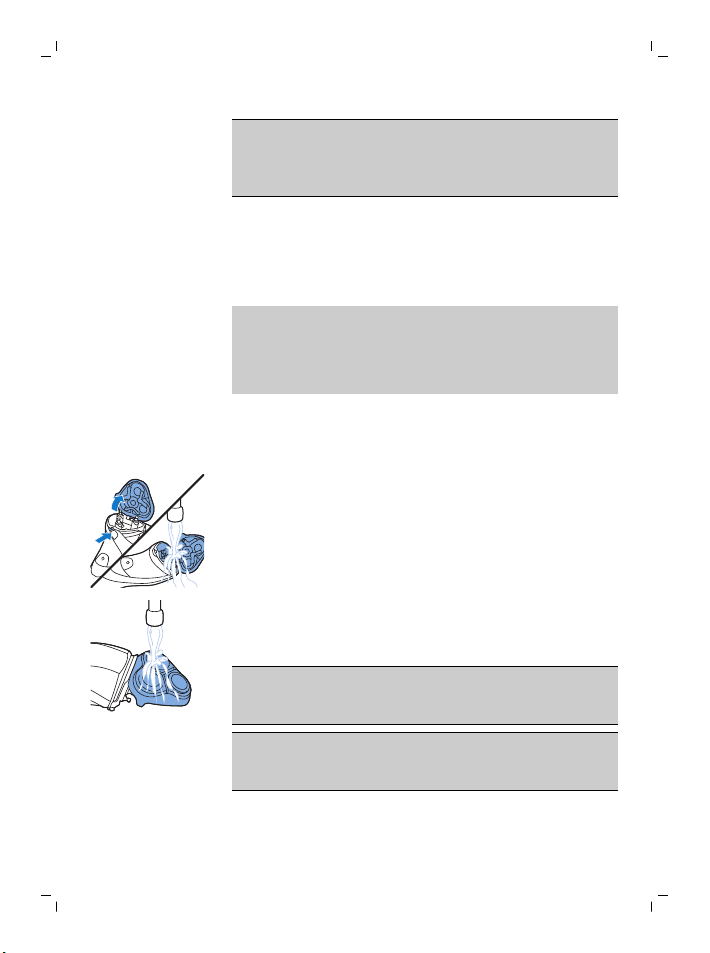
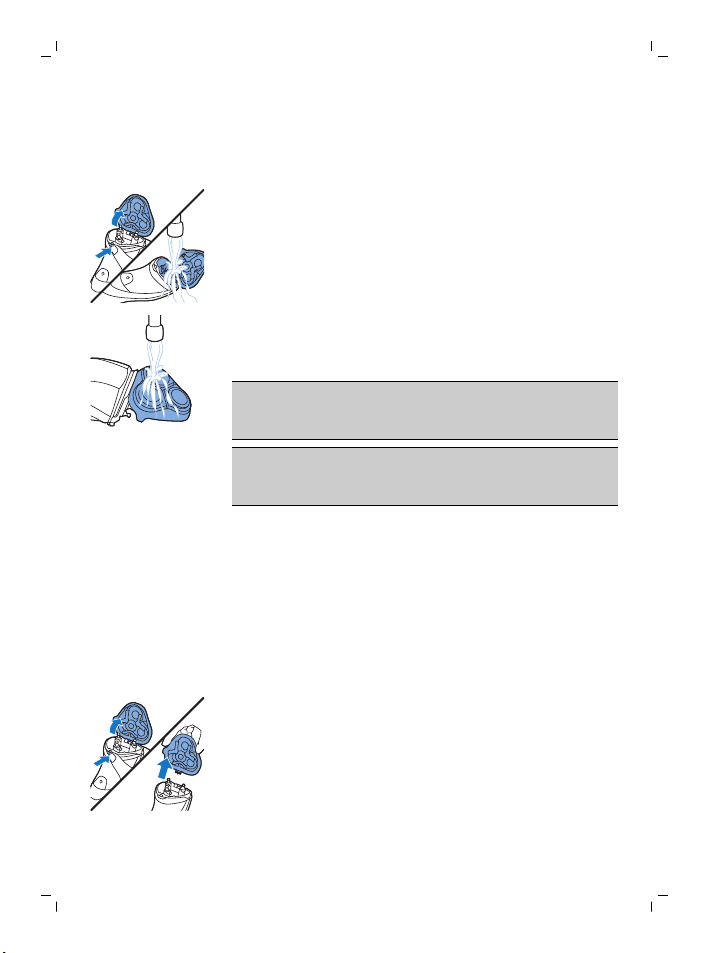
Cleaning the shaving unit under the tap
1 Switch off the appliance and make sure it is
disconnected from the wall socket.
2 Press the release button to open the shaving
unit. Rinse the inside of the shaving unit and the
hair chamber under a hot tap for 30 seconds.
- Rinse the outside of the shaving unit.
3 Close the shaving unit and shake off excess
water.
Caution: Be careful not to hit the shaving unit
against anything while you shake off excess
water.
Caution: Never dry the shaving unit and the hair
chamber with a towel or tissue, as this may
damage the shaving unit.
4 Open the shaving unit again and leave it open
to let the appliance dry completely.
Page 15

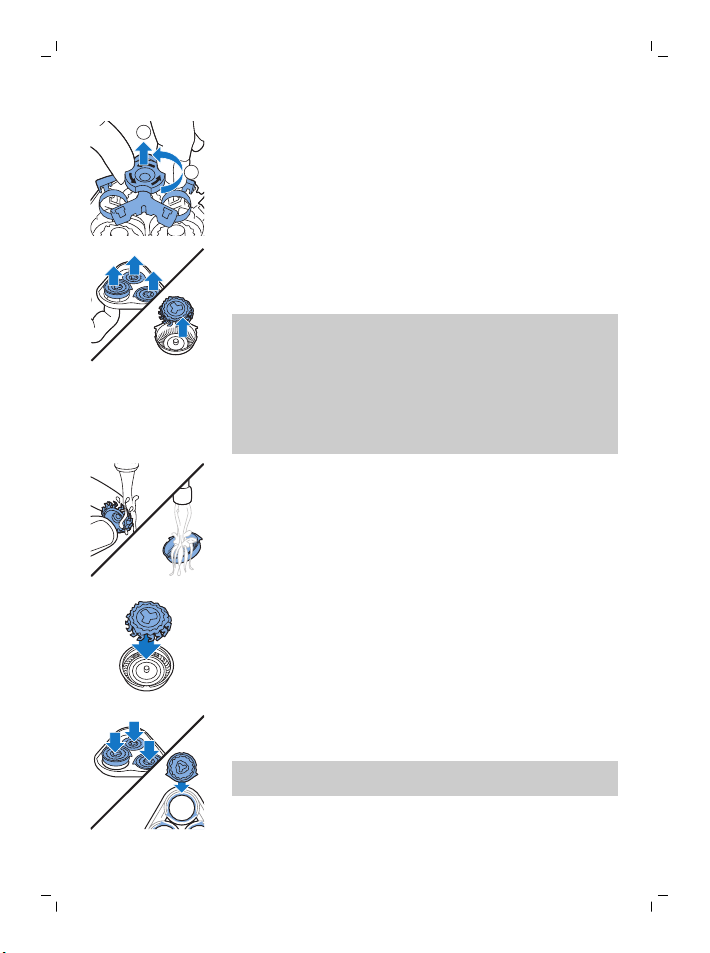
Thorough cleaning
2
1
Clean the shaving heads thoroughly once a month
for optimal performance.
1 Switch off the appliance and make sure it is
2 Press the release button to open the shaving
3 Turn the lock anticlockwise and remove the
4 Remove and clean one shaving head at a time.
- Remove the cutter from the shaving guard and
English
15
disconnected from the wall socket.
unit. Pull the shaving unit off the appliance.
retaining frame.
Each shaving head consists of a cutter and a
guard.
Note: Do not clean more than one cutter and
guard at a time, since they are all matching sets.
If you accidentally mix up the cutters and
guards, it may take several weeks before
optimal shaving performance is restored.
clean both parts under the tap.
Page 16

1
2
English
16
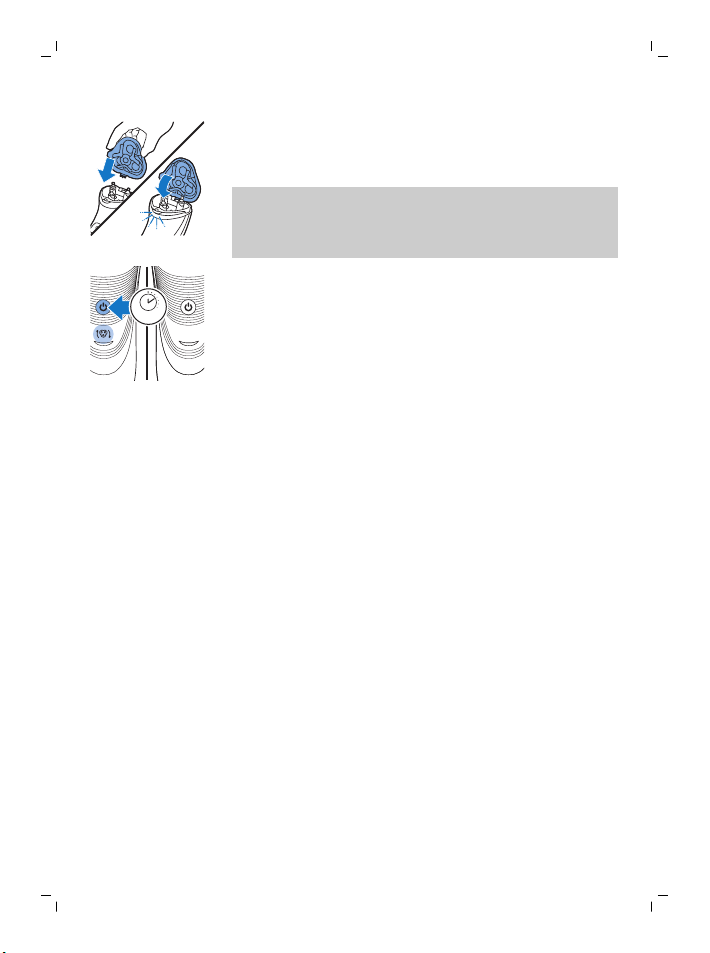
5 Put the cutter back into the guard.
6 Put the shaving heads back into the shaving
unit.
Note: Make sure that the projections of the
shaving heads fit exactly into the recesses of
the shaving head holder.
7 Put the retaining frame back into the shaving
unit and turn the lock clockwise.
8 Insert the lug of the shaving unit into the slot in
the top of the appliance. Then close the shaving
unit ('click').
Note: If the shaving unit does not close
smoothly, check if you have inserted the
shaving heads properly and if the retaining
frame is locked.
Cleaning the trimmer under the tap (S3520, S3510 only)
Clean the trimmer every time you have used it.
1 Switch off the appliance and make sure it is
disconnected from the wall socket.
Page 17
Storage
2yrs
English
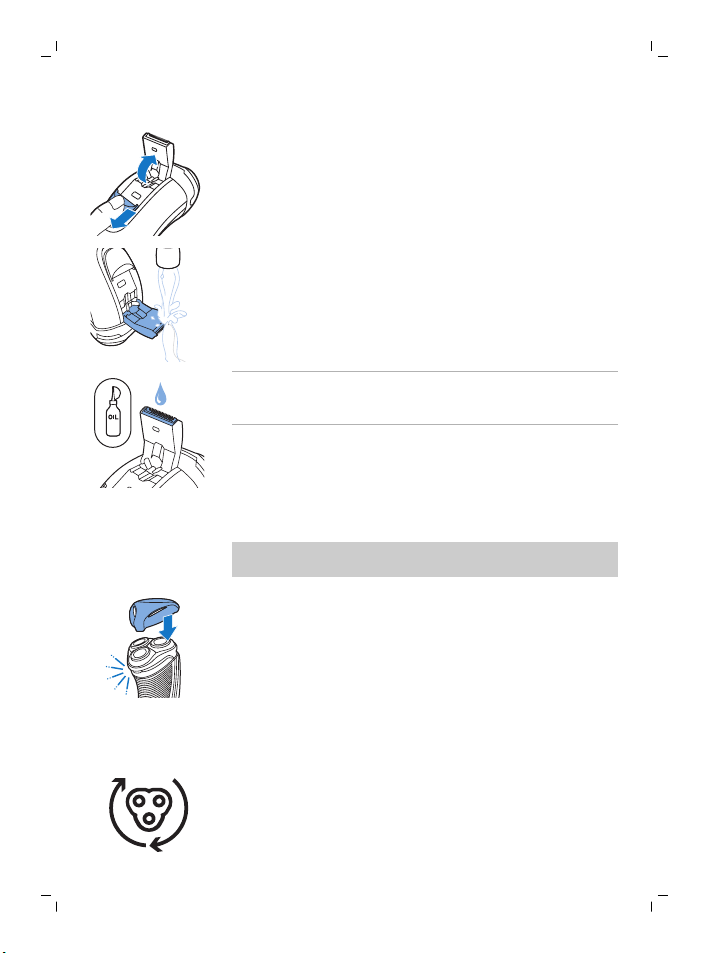
2 Push the trimmer slide downwards to open the
trimmer.
3 Switch on the appliance and clean the trimmer
under the tap.
4 Switch off the appliance and leave the trimmer
open to let it dry.
5 Close the trimmer (‘click’).
Tip: For optimal trimming performance, lubricate
the trimmer teeth with a drop of sewing machine
oil every six months.
Note: We advise you to let the appliance dry
before you put the protection cap on it.
Put the protection cap on the appliance to prevent
damage.
17
Replacement
For maximum shaving performance, we advise you
to replace the shaving heads every two years.
Replace damaged shaving heads immediately.
Always replace the shaving heads with original
Philips shaving heads' (see 'Ordering accessories').
Page 18

2
1
1
2
18
English
Replacement reminder
The shaving unit symbol will light up to indicate
that the shaving heads need to be replaced.
1 The shaving unit symbol lights up orange
continuously.
2 Switch off the appliance and make sure it is
disconnected from the wall socket.
3 Press the release button to open the shaving
unit. Pull the shaving unit off the appliance.
4 Turn the lock anticlockwise and remove the
retaining frame.
5 Remove the shaving heads from the shaving
unit and throw them away.
6 Place new shaving heads in the shaving unit.
Note: Make sure that the projections of the
shaving heads fit exactly into the recesses of
the shaving head holder.
7 Put the retaining frame back into the shaving
unit and turn the lock clockwise.
Page 19
8 Insert the lug of the shaving unit into the slot in
5 sec.
the top of the appliance. Then close the shaving
unit ('click').
Note: If the shaving unit does not close
smoothly, check if you have inserted the
shaving heads properly and if the retaining
frame is locked.
9 Press and hold the on/off button for 5 seconds
to reset the replacement reminder on the
shaver. The orange light goes out.
Ordering accessories
To buy accessories or spare parts, visit
www.shop.philips.com/service or go to your
Philips dealer. You can also contact the Philips
Consumer Care Center in your country (see the
worldwide guarantee leaflet for contact details).
The following accessories and spare parts are
available:
- SH30 Philips Shaving Heads.
- HQ110 Philips shaving head cleaning spray
Recycling
- Do not throw away the product with the normal
household waste at the end of its life, but hand
it in at an official collection point for recycling.
By doing this, you help to preserve the
environment.
English
19
Guarantee and support
If you need information or support, please visit
www.philips.com/support or read the separate
worldwide guarantee leaflet.
Page 20

English
20
Guarantee restrictions
The shaving heads (cutters and guards) are not
covered by the terms of the international
guarantee because they are subject to wear.
Troubleshooting
This chapter summarizes the most common
problems you could encounter with the appliance.
If you are unable to solve the problem with the
information below, visit www.philips.com/support for
a list of frequently asked questions or contact the
Consumer Care Center in your country.
Problem Possible cause Solution
The appliance
does not shave as
well as it used to.
The appliance
does not work
when I press the
on/off button.
The shaving heads
are damaged or
worn.
Long hairs obstruct
the shaving heads.
You have not
inserted the
shaving heads
properly.
The rechargeable
battery is empty.
The temperature of
the appliance is too
high. In this case,
the appliance does
not work.
Replace the shaving heads
(see chapter
'Replacement').
Clean the shaving heads
one by one (see chapter
'Cleaning and
maintenance').
Make sure that the
projections of the shaving
heads fit exactly into the
recesses (see chapter
'Cleaning and
maintenance').
Recharge the battery (see
chapter 'Charging'.
As soon as the
temperature of the
appliance has dropped
sufficiently, you can switch
on the appliance again.
Page 21

Bahasa Indonesia
Pendahuluan
Selamat atas pembelian Anda dan selamat datang
di Philips! Untuk memanfaatkan sepenuhnya
dukungan yang ditawarkan Philips, daftarkan
produk Anda di www.philips.com/welcome.
Keterangan umum (Gbr. 1)
1 Tutup pelindung
2 Unit pencukur
3 Tombol pelepas unit cukur
4 Tombol on/off
5 Simbol alat cukur
6 Lampu pengisian daya
7 Pemangkas (hanya S3520, S3510)
8 Geseran pelepas pemangkas (hanya S3520,
S3510)
9 Unit pemasok (adaptor, jenis HQ8505)
10 Steker kecil
Informasi keselamatan penting
Baca informasi penting ini dengan saksama
sebelum menggunakan alat dan aksesorinya,
simpanlah untuk referensi di kemudian hari.
Aksesori yang disertakan dapat berbeda-beda,
tergantung pada produk.
Bahaya
- Usahakan unit catu daya tetap kering.
21
Bahasa Indonesia
Page 22
Bahasa Indonesia
22
Peringatan
- Alat ini termasuk alat Kelas III.
- Untuk mengisi daya baterai, hanya gunakan
unit catu daya yang dapat dilepas (tipe
HQ8505) yang disertakan dengan alat ini.
- Unit catu daya terdiri atas transformator.
Jangan memotong unit catu daya dan
menggantinya dengan steker lain, karena hal ini
menimbulkan situasi berbahaya.
- Alat ini dapat digunakan oleh anak-anak
minimal berusia 8 tahun ke atas dan orang
dengan cacat fisik, indera atau kecakapan
mental yang kurang atau kurang pengalaman
dan pengetahuan jika mereka diberi
pengawasan atau petunjuk mengenai cara
penggunaan alat yang aman dan mengerti
bahayanya. Anak-anak dilarang memainkan
alat ini. Anak-anak tidak boleh membersihkan
dan memelihara alat ini tanpa pengawasan.
- Selalu cabut steker dari alat cukur sebelum
membersihkannya di bawah keran.
- Selalu periksa alat sebelum Anda
menggunakannya. Jangan gunakan alat jika
telah rusak, karena dapat menyebabkan
cedera. Selalu ganti komponen yang rusak
dengan yang asli.
- Jangan membuka alat untuk mengganti baterai
isi-ulang.
Perhatian
- Jangan sekali-kali merendam sistem pembersih
atau dudukan pengisi daya di dalam air atau
membilasnya di bawah keran.
- Jangan sekali-kali merendam alat cukur di
dalam air. Jangan gunakan alat cukur di bak
mandi atau di bawah shower.
Page 23

Bahasa Indonesia
- Jangan gunakan air dengan suhu di atas 80 °C
untuk membilas alat cukur.
- Hanya gunakan alat ini untuk keperluan yang
dimaksud di petunjuk pengguna.
- Untuk alasan higienis, alat sebaiknya hanya
digunakan oleh satu orang saja.
- Jangan sekali-kali menggunakan udara
bertekanan, sabut gosok, bahan pembersih
abrasif atau cairan agresif seperti bensin atau
aseton untuk membersihkan alat.
- Jika alat cukur Anda dilengkapi dengan sistem
pembersih, selalu gunakan cairan pembersih
Philips asli (kartrid atau botol, tergantung tipe
sistem pembersihnya).
- Selalu letakkan sistem pembersih pada
permukaan datar yang stabil dan rata untuk
mencegah kebocoran.
- Jika sistem pembersih Anda menggunakan
kartrid pembersih, selalu pastikan bahwa
wadah kartrid tersebut tertutup sebelum Anda
menggunakan sistem pembersih atau mengisi
daya alat cukur.
- Saat sistem pembersih siap digunakan, jangan
pindahkan alat agar tidak terjadi kebocoran
cairan pembersih.
- Air mungkin menetes keluar dari soket di bagian
bawah alat cukur saat Anda membilasnya. Hal
ini normal dan tidak berbahaya karena semua
perangkat elektronik terlindungi dalam unit
daya tertutup di dalam alat cukur.
- Jangan menggunakan unit catu daya di atau di
dekat stopkontak yang tersambung dengan
penyegar udara elektrik untuk mencegah
kerusakan permanen pada unit catu daya.
23
Page 24

2
1
Bahasa Indonesia
24
Medan elektromagnet (EMF)
- Alat Philips ini mematuhi semua standar dan
peraturan yang berlaku terkait paparan
terhadap medan elektromagnet.
Umum
- Alat cukur ini aman dibersihkan di bawah keran.
- Alat ini cocok untuk tegangan listrik berkisaran
100 hingga 240 volt.
- Unit catu daya mengubah tegangan 100-240
volt ke tegangan rendah yang aman kurang dari
24 volt.
Pengisian daya
Diperlukan waktu kurang-lebih 1 jam (S3520,
S3510) atau 8 jam (S3120, S3110) untuk mengisi
daya alat hingga penuh. Ketika mengisi daya alat
untuk pertama kalinya atau setelah lama tidak
digunakan, biarkan alat mengisi daya sampai
lampu pengisian daya menyala terus. Alat yang
terisi daya penuh dapat memberikan waktu
pencukuran hingga 50 menit (S3520, S3510) atau
45 menit (S3120, S3110). Waktu pencukuran
mungkin kurang dari 50 atau 45 menit akibat cara
pencukuran, kebiasaan pembersihan, atau jenis
jenggot.
Mengisi daya dengan adaptor
1 Pasang steker kecil ke alat.
2 Tancapkan adaptor ke stopkontak dinding.
- Lampu pengisian daya menunjukkan status alat
sedang diisi daya (lihat bagian 'Indikator daya'
di bab ini).
3 Setelah pengisian daya selesai, cabut adaptor
dari stopkontak dinding dan lepaskan steker
kecil dari alat.
Page 25

Indikator daya
Bahasa Indonesia
25
Baterai tinggal sedikit
- Bila baterai hampir habis (hanya bisa digunakan
untuk pencukuran selama 5 menit atau kurang),
lampu pengisian daya akan mulai berkedip
jingga.
- Ketika Anda mematikan alat, lampu pengisian
daya berkedip jingga terus-menerus selama
beberapa detik.
Pengisian cepat
Apabila Anda mulai mengisi daya baterai yang
kosong, lampu pengisian daya berkedip jingga dan
hijau secara bergantian. Setelah sekitar 3 menit,
lampu pengisian daya mulai berkedip hijau saja.
Kini alat sudah cukup terisi daya untuk pencukuran
selama 5 menit.
Pengisian daya
- Saat alat diisi daya, lampu pengisian daya
berkedip hijau.
Baterai terisi penuh
- Setelah baterai terisi penuh, lampu pengisian
daya akan terus menyala hijau.
Catatan: Setelah sekitar 30 menit, lampu pengisian
daya akan padam untuk menghemat energi.
Menggunakan alat
Catatan: Alat ini dapat digunakan tanpa kabel atau
ketika tersambung ke stopkontak.
Page 26
Bahasa Indonesia
26
Tip dan trik pencukuran
- Lakukan gerakan melingkar selama
penggunaan. Gerakan melingkar memberikan
hasil pencukuran yang lebih baik daripada
gerakan lurus.
- Kulit Anda mungkin memerlukan 2 atau 3
minggu agar terbiasa dengan sistem
pencukuran Philips.
Menghidupkan dan mematikan alat
1 Untuk menghidupkan alat, tekan tombol daya
satu kali.
2 Untuk mematikan alat, tekan tombol on/off satu
kali.
Mencukur
1 Hidupkan alat tersebut.
2 Gerakkan kepala cukur pada kulit Anda dalam
gerak melingkar.
3 Setelah selesai mencukur, matikan alat.
4 Bersihkan alat (lihat bab ‘Pembersihan dan
perawatan’).
Pemangkasan (hanya S3520, S3510)
Anda dapat menggunakan pemangkas untuk
merapikan cambang dan kumis.
1 Sorong penggeser ke bawah untuk membuka
pemangkas.
2 Hidupkan alat tersebut.
Page 27

- Sekarang Anda dapat mulai memangkas.
3 Setelah selesai memangkas, matikan alat.
4 Bersihkan pemangkas (lihat bab 'Pembersihan
dan perawatan’).
5 Tutup unit pemangkas (hingga berbunyi 'klik').
Pembersihan dan perawatan
Bahaya: Lepaskan kabel lepas-pasang
dari bagian pegangan sebelum
membersihkan bagian ini dalam air.
Perhatian: Jangan sekali-kali menggunakan
udara bertekanan, sabut gosok, bahan pembersih
abrasif atau cairan agresif seperti bensin atau
aseton untuk membersihkan alat.
- Bersihkan alat setelah setiap kali selesai
mencukur untuk memperoleh kinerja
pencukuran yang optimal.
- Membersihkan secara teratur akan menjamin
hasil pencukuran yang lebih baik.
- Berhati-hatilah saat menggunakan air panas.
Selalu pastikan air tidak terlalu panas untuk
mencegah luka bakar pada tangan Anda.
Catatan: Air mungkin merembes dari soket di
bagian bawah alat saat Anda membilasnya. Hal ini
normal dan tidak berbahaya karena semua
perangkat elektronik terlindungi dalam unit daya
tertutup di dalam alat cukur.
Bahasa Indonesia
27
Page 28
Bahasa Indonesia
28
Membersihkan unit cukur di bawah keran
1 Matikan alat dan pastikan kabel alat sudah
dicabut dari stopkontak.
2 Tekan tombol pelepas untuk membuka unit
pencukur. Bersihkan bagian dalam unit cukur
dan wadah rambut di bawah keran air panas
selama 30 detik.
- Bilas bagian luar unit cukur.
3 Tutup unit cukur dan kibaskan untuk
membuang air yang tertinggal.
Perhatian: Berhati-hatilah agar unit cukur tidak
terbentur dengan apa pun saat Anda
mengibaskan sisa air.
Perhatian: Jangan keringkan unit cukur dan
wadah rambut dengan handuk atau kertas tisu,
karena bisa merusak unit cukur.
4 Buka lagi unit pencukur dan biarkan terbuka
agar kering sama sekali.
Pembersihan saksama
Bersihkan kepala cukur secara menyeluruh
sebulan sekali untuk memperoleh kinerja yang
optimal.
1 Matikan alat dan pastikan kabel alat sudah
dicabut dari stopkontak.
2 Tekan tombol pelepas untuk membuka unit
pencukur. Tarik unit pencukur dari alat ke arah
luar hingga terlepas.
Page 29
2
1
Bahasa Indonesia
3 Putar berlawanan arah putaran jarum jam dan
lepaskan bingkai penahan.
4 Lepas dan bersihkan kepala cukur satu persatu.
Setiap kepala cukur terdiri atas satu mata pisau
dan satu pelindungnya.
Catatan: Jangan membersihkan lebih dari satu
mata pisau dan pelindungnya secara
bersamaan, bersihkan satu persatu karena
semuanya adalah komponen berpasangan. Jika
Anda tidak sengaja salah memasangkan mata
pisau dan pelindungnya, diperlukan beberapa
minggu untuk kembali mendapatkan kinerja
pencukuran yang optimal.
- Lepaskan mata pisau dari pelindungnya dan
bersihkan kedua bagian tersebut di bawah
pancuran air keran.
5 Masukkan kembali mata pisau ke dalam
pelindungnya.
29
6 Kembalikan kepala cukur ke dalam unit
pencukur.
Catatan: Pastikan bahwa kepala pencukur tepat
masuk ke dalam wadahnya.
Page 30

1
2
Bahasa Indonesia
30
7 Pasang kembali bingkai penahan pada unit
pencukur dan putar searah putaran jarum jam.
8 Masukkan tonjolan pengunci pada unit
pencukur ke dalam lubang pada bagian atas
alat. Lalu tutup unit pencukur (hingga berbunyi
'klik').
Catatan: Jika unit pencukur tidak menutup
rapat, periksa apakah Anda sudah memasukkan
kepala cukur dengan tepat dan apakah bingkai
penahan terkunci.
Membersihkan pemangkas di bawah keran (hanya S3520, S3510)
Bersihkan pemangkas setiap kali Anda selesai
menggunakannya.
1 Matikan alat dan pastikan kabel alat sudah
dicabut dari stopkontak.
2 Sorong penggeser ke bawah untuk membuka
pemangkas.
3 Hidupkan alat dan bersihkan pemangkas di
bawah keran.
4 Matikan alat dan biarkan pemangkas dalam
keadaan terbuka hingga kering.
5 Tutup unit pemangkas (hingga berbunyi 'klik').
Page 31

Tip: Untuk memperoleh kinerja pemangkasan yang
2yrs
optimal, lumasi gigi pemangkas dengan setetes
minyak mesin jahit setiap enam bulan.
Penyimpanan
Catatan: Sebaiknya tunggu hingga alat kering
sebelum memasang tutup pelindungnya.
Pasang tutup pelindung pada alat untuk
mencegah kerusakan.
Penggantian
Untuk memperoleh kinerja pencukuran maksimal,
sebaiknya Anda mengganti kepala cukur setiap
dua tahun. Segera ganti kepala cukur yang rusak.
Selalu ganti kepala cukur dengan kepala (lihat
'Memesan aksesori') cukur Philips yang asli.
Pengingat penggantian
Simbol unit pencukur akan menyala untuk
menandakan bahwa kepala cukur harus diganti.
1 Simbol unit pencukur akan menyala jingga
2 Matikan alat dan pastikan kabel alat sudah
secara terus menerus.
dicabut dari stopkontak.
Bahasa Indonesia
31
Page 32

2
1
1
2
Bahasa Indonesia
32
3 Tekan tombol pelepas untuk membuka unit
pencukur. Tarik unit pencukur dari alat ke arah
luar hingga terlepas.
4 Putar berlawanan arah putaran jarum jam dan
lepaskan bingkai penahan.
5 Lepas kepala cukur dari unit pencukur
kemudian buanglah.
6 Pasang kepala cukur yang baru pada unit
pencukur.
Catatan: Pastikan bahwa kepala pencukur tepat
masuk ke dalam wadahnya.
7 Pasang kembali bingkai penahan pada unit
pencukur dan putar searah putaran jarum jam.
8 Masukkan tonjolan pengunci pada unit
pencukur ke dalam lubang pada bagian atas
alat. Lalu tutup unit pencukur (hingga berbunyi
'klik').
Catatan: Jika unit pencukur tidak menutup
rapat, periksa apakah Anda sudah memasukkan
kepala cukur dengan tepat dan apakah bingkai
penahan terkunci.
Page 33

5 sec.
9 Tekan dan tahan tombol on/off selama 5 detik
untuk mengatur ulang pengingat penggantian
pada pencukur. Lampu oranye akan padam.
Memesan aksesori
Untuk membeli aksesori atau suku cadang, buka
www.shop.philips.com/service atau kunjungi
dealer Philips terdekat. Anda juga dapat
menghubungi Pusat Layanan Konsumen Philips di
negara Anda (lihat informasi dalam brosur garansi
di seluruh dunia untuk perincian kontak).
Aksesori dan komponen berikut tersedia:
- SH30 Philips Shaving Heads [kepala pencukur]
- HQ110 semprotan pembersih kepala cukur
Philips
Mendaur ulang
- Jangan membuang produk bersama limbah
rumah tangga biasa jika sudah tidak bisa
dipakai lagi, tetapi serahkan ke tempat
pengumpulan barang bekas yang resmi untuk
didaur ulang. Dengan melakukan ini, Anda turut
membantu melestarikan lingkungan.
Bahasa Indonesia
33
Garansi dan dukungan
Jika Anda memerlukan informasi atau dukungan,
silakan kunjungi www.philips.com/support atau
baca pamflet garansi internasional terpisah.
Batasan garansi
Kepala cukur (unit pemotong dan pelindung) tidak
tercakup oleh ketentuan garansi internasional
karena dapat aus akibat pemakaian.
Page 34

Bahasa Indonesia
34
Mengatasi masalah
Bab ini merangkum masalah yang paling umum
terjadi pada alat Anda. Jika Anda tidak dapat
menyelesaikan masalah dengan informasi di
bawah, kunjungi www.philips.com/support untuk
daftar pertanyaan umum atau hubungi Pusat
Layanan Konsumen di negara Anda.
Masalah Kemungkinan
penyebab
Solusi
Alat tidak
mencukur sebaik
biasanya.
Alat tidak mau
hidup sewaktu
saya menekan
tombol on/off.
Kepala cukur rusak
atau aus.
Rambut yang
panjang
menghalangi
mencukur kepala
cukur.
Anda belum
memasang kepala
pencukur dengan
benar.
Baterai isi ulangnya
habis.
Suhu alat terlalu
panas. Dalam
kasus ini, alat tidak
akan dapat
berfungsi.
Ganti kepala pencukur
(lihat bab 'Penggantian').
Bersihkan kepala cukur
satu per satu (lihat bab
'Membersihkan dan
pemeliharaan').
Pastikan bahwa tonjolan
kepala cukur tepat masuk
ke dalam wadahnya (lihat
bab 'Membersihkan dan
Pemeliharaan').
Isi ulang daya baterai (lihat
bab 'Pengisian daya'.
Setelah suhu alat turun
dan kembali normal, Anda
dapat menghidupkannya
lagi.
Page 35

Pengenalan
Tahniah atas pembelian anda dan selamat
menggunakan Philips! Untuk memanfaatkan
sepenuhnya sokongan yang ditawarkan oleh
Philips, daftar produk anda di
www.philips.com/welcome.
Gambaran umum (Raj. 1)
1 Tukup pelindung
2 Unit pencukur
3 Butang pelepas unit pencukur
4 Butang on/off
5 Simbol kepala pencukur
6 Lampu pengecasan
7 Perapi (S3520, S3510 sahaja)
8 Gelangsar pelepas perapi (S3520, S3510 sahaja)
9 Unit bekalan (penyesuai, jenis HQ8505)
10 Palam kecil
Maklumat keselamatan penting
Baca maklumat penting ini dengan teliti sebelum
anda menggunakan perkakas dan aksesorinya dan
simpan untuk rujukan pada masa hadapan.
Aksesori yang dibekalkan mungkin berbeza-beza
untuk berlainan produk.
Bahaya
- Pastikan unit bekalan sentiasa kering.
Bahasa Melayu
35
Bahasa Melayu
Page 36

Bahasa Melayu
36
Amaran
- Perkakas ini ialah binaan Kelas III.
- Untuk mengecas bateri, hanya gunakan unit
bekalan boleh ditanggalkan (jenis HQ8505)
yang disediakan dengan perkakas.
- Unit bekalan mengandungi pengubah. Jangan
putuskan unit bekalan untuk menggantikannya
dengan palam lain, kerana ini menyebabkan
situasi berbahaya.
- Perkakas ini boleh digunakan oleh kanak-kanak
berumur 8 tahun dan ke atas dan orang yang
kurang keupayaan fizikal, deria atau mental
atau kurang pengalaman dan pengetahuan jika
mereka diberi pengawasan dan arahan
berkaitan penggunaan perkakas secara selamat
dan memahami bahaya yang mungkin berlaku.
Kanak-kanak tidak sepatutnya bermain dengan
perkakas ini. Pembersihan dan
penyelenggaraan oleh pengguna tidak harus
dilakukan oleh kanak-kanak tanpa
pengawasan.
- Setiap kali anda hendak membersihkan
pencukur di bawah paip, pastikan plagnya telah
ditanggalkan.
- Pastikan anda memeriksa perkakas setiap kali
sebelum anda menggunakannya. Jangan
gunakan perkakas jika rosak, kerana ini boleh
menyebabkan kecederaan. Bahagian yang
rosak hendaklah digantikan dengan jenis yang
asli sahaja.
- Jangan buka perkakas tersebut untuk
menggantikan bateri boleh cas semula.
Page 37

Awas
Bahasa Melayu
- Jangan sekali-kali rendam sistem pembersih ini
atau dirian pengecasan dalam air dan jangan
bilasnya di bawah paip.
- Jangan sekali-kali tenggelamkan pencukur di
dalam air. Jangan gunakan pencukur di dalam
tab mandi atau di bawah pancuran.
- Jangan sekali-kali gunakan air yang lebih panas
daripada 80°C untuk membilas pencukur
tersebut.
- Hanya gunakan perkakas ini untuk tujuan
dimaksudkan seperti ditunjukkan dalam manual
pengguna.
- Atas sebab-sebab kebersihan, perkakas ini
hendaklah hanya digunakan oleh seorang
sahaja.
- Jangan sekali-kali gunakan udara termampat,
pad penyental, agen pembersih yang melelas
atau cecair yang agresif seperti alkohol atau
aseton untuk membersihkan perkakas.
- Jika pencukur anda disertakan dengan sistem
pembersih, sentiasa gunakan cecair pembersih
asli Philips (kartrij atau botol, bergantung pada
jenis sistem pembersih).
- Letakkan sistem pembersih pada permukaan
yang stabil, rata dan mendatar sahaja untuk
mengelakkan kebocoran.
- Jika sistem pembersih anda menggunakan
kartrij pembersih, sentiasa pastikan petak kartrij
tertutup sebelum anda menggunakan sistem
pembersih untuk membersihkan atau
mengecas pencukur.
- Apabila sistem pembersih siap untuk
digunakan, jangan alihkannya bagi
mengelakkan cecair pembersih daripada bocor.
37
Page 38

Bahasa Melayu
38
- Air mungkin menitis dari soket di bawah
pencukur apabila anda membilasnya. Ini adalah
biasa dan tidak berbahaya kerana semua alat
elektronik dilindungi dalam unit kuasa yang
kedap dalam pencukur.
- Jangan gunakan unit bekalan di atau
berdekatan dengan soket dinding yang
mengandungi penyegar udara elektrik untuk
mencegah kerosakan yang tidak boleh dibaiki
kepada unit bekalan.
Medan elektromagnet (EMF)
- Perkakas Philips ini mematuhi semua piawaian
dan peraturan yang berkaitan dengan
pendedahan kepada medan elektromagnet.
Am
- Pencukur ini boleh dibersihkan dengan selamat
di bawah paip air.
- Perkakas ini sesuai untuk voltan sesalur kuasa
antara 100 hingga 240 volt.
- Unit bekalan mengubah 100-240 volt kepada
voltan rendah dan selamat tidak melebihi 24
volt.
Pengecasan
Perkakas memerlukan lebih kurang 1 jam (S3520,
S3510) atau 8 jam (S3120, S3110) untuk dicas
sepenuhnya. Apabila anda mengecas
perkakas pada kali pertama atau selepas sekian
lama tidak menggunakannya, biarkan ia dicas
sehingga lampu pengecasan menyala berterusan.
Perkakas yang telah dicas sepenuhnya
menyediakan sehingga 50 minit (S3520, S3510)
atau 45 minit (S3120, S3110) masa mencukur. Masa
mencukur mungkin kurang daripada 50 atau 45
Page 39

minit, bergantung pada cara anda bercukur,
2
1
membersihkan diri atau jenis janggut anda.
Mengecas dengan penyesuai
1 Letakkan palam kecil di dalam perkakas.
2 Letakkan penyesuai dalam soket dinding.
- Lampu pengecasan menunjukkan status
pengecasan perkakas (lihat bahagian ‘Penunjuk
cas’ dalam bab ini).
3 Selepas mengecas, tanggalkan penyesuai dari
soket dinding dan cabut plag kecil keluar dari
perkakas.
Arahan cas
Bateri lemah
- Apabila bateri hampir habis (apabila hanya
terdapat baki 5 minit atau kurang), lampu
pengecasan mula berkelip warna jingga.
- Apabila anda mematikan perkakas, lampu
pengecasan terus berkelip
jingga selama beberapa saat.
Pengecasan pantas
Apabila anda mula mengecas bateri kosong,
lampu pengecasan berkelip warna jingga dan hijau
secara berselang-seli. Selepas lebih kurang 3 minit,
lampu pengecasan mula berkelip hijau sahaja.
Perkakas kini mengandungi tenaga yang
mencukupi bagi pencukuran selama 5 minit.
Pengecasan
- Apabila perkakas sedang dicas, lampu
pengecasan akan berkelip hijau.
Bahasa Melayu
39
Page 40

Bahasa Melayu
40
Bateri telah dicas sepenuhnya
- Apabila bateri telah dicas sepenuhnya, lampu
pengecasan akan menyala hijau berterusan.
Catatan: Selepas lebih kurang 30 minit, lampu
pengecasan akan padam untuk menjimatkan
tenaga.
Menggunakan perkakas
Catatan: Perkakas ini boleh digunakan tanpa kord
atau apabila disambungkan ke soket dinding.
Petua dan teknik mencukur
- Buat pergerakan bulatan semasa
menggunakannya. Gerakan bulatan memberi
hasil pencukuran yang lebih baik daripada
gerakan lurus.
- Kulit anda mungkin memerlukan 2 atau 3
minggu sebelum biasa dengan sistem
pencukuran Philips.
Menghidupkan atau mematikan perkakas
1 Untuk menghidupkan perkakas, tekan butang
on/off sekali.
2 Untuk mematikan perkakas, tekan butang
hidup/mati sekali.
Pencukuran
1 Hidupkan perkakas.
2 Gerakkan kepala pencukur dalam gerakan
membulat melalui kulit anda.
3 Selepas mencukur, matikan perkakas.
4 Bersihkan perkakas (lihat bab ‘Pembersihan
dan penyenggaraan’).
Page 41

Bahasa Melayu
Merapi (S3520, S3510 sahaja)
Anda boleh menggunakan perapi untuk
merapikan jambang dan misai anda.
1 Tolakkan gelangsar perapi ke bawah untuk
membuka perapi.
2 Hidupkan perkakas.
- Anda kini boleh memulakan perapian.
3 Selepas merapi, matikan perkakas.
4 Bersihkan perapi (lihat bab ‘Pembersihan dan
penyenggaraan’).
5 Tutupkan perapi (‘klik’).
Pembersihan dan penyelenggaraan
Bahaya: Tanggalkan kord boleh tanggal
dari bahagian kendalian tangan sebelum
membersihkan bahagian ini di dalam air.
Awas: Jangan sekali-kali gunakan udara
termampat, pad penyental, agen pembersih yang
melelas atau cecair yang agresif seperti alkohol
atau aseton untuk membersihkan perkakas.
- Bersihkan perkakas selepas setiap pencukuran
untuk prestasi mencukur yang optimum.
- Pembersihan secara tetap menjamin prestasi
pencukuran yang lebih baik.
41
Page 42

Bahasa Melayu
42
- Berhati-hati dengan air panas. Sentiasa periksa
sama ada air tidak begitu panas, untuk
mencegah tangan anda daripada luka terbakar.
Catatan: Air boleh bocor dari soket di bawah
perkakas apabila anda membilasnya. Ini adalah
biasa dan tidak berbahaya kerana semua
elektronik dilindungi dalam unit kuasa yang kedap
dalam pencukur.
Membersihkan unit pencukur di bawah paip air
1 Matikan perkakas dan pastikan ia dicabut dari
soket dinding.
2 Tekan butang pelepas untuk membuka unit
pencukur. Bilas bahagian dalam unit pencukur
dan ruang rambut di bawah paip air panas
selama 30 saat.
- Bilas bahagian luar unit pencukur.
3 Tutup unit pencukur dan keluarkan air lebihan
dengan menggoncangkannya.
Awas: Berhati-hati agar tidak menghentak unit
pencukur pada sebarang benda semasa anda
menggoncang keluar air berlebihan.
Awas: Jangan sekali-kali keringkan unit
pencukur dan ruang rambut dengan tuala atau
tisu, kerana ini boleh merosakkan unit pencukur.
4 Buka unit pencukur sekali lagi dan biarkan ia
terbuka supaya perkakas kering sepenuhnya.
Pembersihan menyeluruh
Bersihkan kepala pencukur dengan rapi sekali
sebulan untuk prestasi yang optimum.
1 Matikan perkakas dan pastikan ia dicabut dari
soket dinding.
Page 43

2
1
Bahasa Melayu
2 Tekan butang pelepas untuk membuka unit
pencukur. Tarik unit pencukur daripada
perkakas.
3 Pusingkan kunci mengikut arah lawan jam dan
tanggalkan rangka penahan.
4 Keluarkan dan bersihkan satu kepala pencukur
pada satu-satu masa. Setiap kepala pencukur
terdiri daripada pemotong dan adangan.
Catatan: Jangan bersihkan lebih daripada satu
pemotong dan adangan pada satu-satu masa
kerana semua set itu sepadan. Jika anda
tercampur pemotong dan adangan secara tidak
sengaja, ia mungkin mengambil masa beberapa
minggu sebelum mutu pencukuran terbaik
dapat dicapai semula.
- Alihkan pemotong daripada adangan pencukur
dan bersih kedua-dua bahagian di bawah paip
air.
43
5 Letakkan pemotong semula ke dalam adangan.
Page 44

1
2
Bahasa Melayu
44
6 Letakkan kembali kepala pencukur ke dalam
unit pencukur.
Catatan: Pastikan bahawa bahagian unjuran
kepala pencukur muat dengan tepat di dalam
ruang ceruknya.
7 Letakkan semula rangka penahan ke dalam unit
pencukur dan pusingkan pengunci mengikut
arah jam.
8 Masukkan cuping unit pencukur ke dalam ruang
di bahagian atas perkakas. Kemudian tutup unit
pencukur ('klik').
Catatan: Jika unit pencukur tidak ditutup
dengan lancar, periksa sama ada anda telah
meletakkan kepala pencukur dengan betul dan
sama ada rangka penahan telah dikunci.
Membersihkan perapi di bawah paip air (S3520, S3510 sahaja)
Bersihkan perapi setiap kali selepas
menggunakannya.
1 Matikan perkakas dan pastikan ia dicabut dari
soket dinding.
2 Tolakkan gelangsar perapi ke bawah untuk
membuka perapi.
Page 45

Penyimpanan
2yrs
Penggantian
Bahasa Melayu
3 Hidupkan perkakas dan bersihkan perapi di
bawah paip air.
4 Matikan perkakas dan biarkan perapi terbuka
untuk mengeringkannya.
5 Tutupkan perapi (‘klik’).
Petua: Untuk prestasi perapian yang optimum,
lincirkan gigi perapi dengan setitis minyak mesin
jahit setiap enam bulan.
Catatan: Kami menasihatkan anda untuk
membiarkan perkakas kering sebelum anda
memasang penutup perlindungan.
Pasangkan kembali penutup perlindungan pada
perkakas untuk mengelakkan kerosakan.
Untuk prestasi pencukuran yang maksimum, kami
menasihatkan agar anda menggantikan kepala
pencukur setiap dua tahun. Gantikan kepala
pencukur yang rosak dengan segera. Sentiasa
gantikan kepala pencukur dengan kepada
pencukur asli Philips' (lihat 'Memesan aksesori').
Peringatan penggantian
Simbol unit pencukur akan menyala untuk
menandakan bahawa kepala pencukur perlu
digantikan.
45
Page 46

2
1
1
2
Bahasa Melayu
46
1 Simbol unit pencukur menyalakan warna jingga
secara berterusan.
2 Matikan perkakas dan pastikan ia dicabut dari
soket dinding.
3 Tekan butang pelepas untuk membuka unit
pencukur. Tarik unit pencukur daripada
perkakas.
4 Pusingkan kunci mengikut arah lawan jam dan
tanggalkan rangka penahan.
5 Keluarkan kepala pencukur dari unit pencukur
dan buangkannya.
6 Letakkan kepala pencukur yang baru ke dalam
unit pencukur.
Catatan: Pastikan bahawa bahagian unjuran
kepala pencukur muat dengan tepat di dalam
ruang ceruknya.
7 Letakkan semula rangka penahan ke dalam unit
pencukur dan pusingkan pengunci mengikut
arah jam.
Page 47

8 Masukkan cuping unit pencukur ke dalam ruang
5 sec.
di bahagian atas perkakas. Kemudian tutup unit
pencukur ('klik').
Catatan: Jika unit pencukur tidak ditutup
dengan lancar, periksa sama ada anda telah
meletakkan kepala pencukur dengan betul dan
sama ada rangka penahan telah dikunci.
9 Tekan dan pegang butang hidup/mati selama 5
saat untuk menetapkan semula peringatan
penggantian pada pencukur. Lampu jingga
padam.
Memesan aksesori
Untuk membeli aksesori atau alat ganti, lawati
www.shop.philips.com/service atau pergi ke
penjual Philips anda. Anda boleh juga
menghubungi Pusat Layanan Pengguna Philips di
negara anda (lihat risalah jaminan seluruh dunia
untuk mendapatkan butiran hubungan).
Aksesori dan alat ganti yang berikut boleh
didapati:
- Kepala Pencukur Philips SH30.
- HQ110 Philips semburan pembersih kepala
pencukur
Bahasa Melayu
47
Kitar semula
- Jangan buang produk bersama sampah rumah
biasa di akhir hayatnya, sebaliknya bawanya ke
pusat pungutan rasmi untuk dikitar semula.
Dengan berbuat demikian, anda membantu
untuk memelihara persekitaran.
Page 48

Bahasa Melayu
48
Jaminan dan sokongan
Jika anda memerlukan maklumat atau sokongan,
sila lawati www.philips.com/support atau baca
risalah jaminan sedunia yang berasingan.
Pengehadan jaminan
Kepala pencukur (pemotong dan adangan) tidak
diliputi oleh terma jaminan antarabangsa kerana ia
terdedah kepada kelusuhan.
Penyelesai Masalah
Bab ini meringkaskan masalah paling lazim yang
anda mungkin hadapi dengan alat ini. Jika anda
tidak dapat menyelesaikan masalah dengan
maklumat di bawah, lawati www.philips.com/support
untuk mendapatkan senarai soalan lazim atau
hubungi Pusat Penjagaan Pengguna di negara
anda.
Masalah Punca yang
berkemungkinan
Penyelesaian
Perkakas ini tidak
mencukur sebaik
seperti sebelum
ini.
Kepala pencukur
rosak atau lusuh.
Rambut yang
panjang
menghalang kepala
pencukur.
Anda belum lagi
memasukkan
kepala pencukur
dengan betul.
Gantikan kepala pencukur
(Lihat bab 'Penggantian').
Bersihkan kepala pencukur
satu demi satu (lihat bab
'Pembersihan dan
penyelenggaraan').
Pastikan bahawa bahagian
unjuran kepala pencukur
muat dengan tepat di
dalam ruang ceruknya
(lihat bab 'Pembersihan
dan penyelenggaraan').
Page 49

Bahasa Melayu
49
Masalah Punca yang
berkemungkinan
Perkakas tidak
berfungsi apabila
saya menekan
butang
hidup/mati.
Bateri boleh cas
semula telah habis.
Suhu perkakas
terlalu tinggi.
Dalam keadaan
demikian, perkakas
tidak berfungsi.
Penyelesaian
Cas semula bateri (lihat
bab 'Mengecas'.
Sebaik sahaja suhu
perkakas turun dengan
secukupnya, anda boleh
menghidupkan semula
perkakas.
Page 50

Tiếng Việt
50
Giơi thiêu
Chúc mừng bạn đa mua hang và chào mừng bạn
đến với Philips! Để có được lợi ích đầy đủ từ sự hỗ
trợ do Philips cung cấp, hãy đăng ký sản phẩm tại
www.philips.com/welcome.
Mô ta tông quat (Hinh 1)
1 Nắp bảo vệ
2 Bô phân cao
3 Nút tháo bộ phận cạo
4 Nut bât/tăt
5 Biểu tượng đầu cạo
6 Đèn sạc
7 Đầu tỉa (chỉ có ở kiểu S3520, S3510)
8 Thanh trượt đầu tỉa (chỉ có ở kiểu S3520, S3510)
9 Bộ nguồn (bộ điều hợp, loại HQ8505)
10 Phích cắm nhỏ
Thông tin quan trọng về an toàn
Đọc kỹ thông tin quan trọng này trước khi sử dụng
thiết bị cùng phụ kiện và cất giữ để tiện tham khảo
sau này. Phụ kiện đi kèm có thể khác nhau cho
những sản phẩm khác nhau.
Nguy hiểm
- Giữ bộ nguồn khô ráo.
Tiếng Việt
Page 51

Canh bao
Chú ý
Tiếng Việt
- Thiết bị có kết cấu Cấp III.
- Để sạc pin, chỉ sử dụng bộ nguồn có thể tháo rời
(kiểu HQ8505) đi kèm với thiết bị.
- Bộ nguồn chứa một biến áp. Không tháo bo bộ
nguồn nay đê thay băng phích cắm khác, vi làm
như vậy se gây ra tinh huông nguy hiêm.
- Trẻ em từ 8 tuổi trở lên và những người bị suy
giảm năng lực về thể chất, giác quan hoặc tâm
thần, hoặc thiếu kiến thức và kinh nghiệm có thể
sử dụng thiết bị này nếu họ được giám sát hoặc
hướng dẫn sử dụng thiết bị theo cách an toàn và
hiểu được các mối nguy hiểm liên quan. Không
để trẻ em chơi đùa với thiết bị. Không nên để trẻ
em thực hiện vệ sinh và bảo dưỡng khi không có
sự giám sát.
- Luôn rut phich căm điên ra khoi may trươc khi
rưa may dươi voi nươc.
- Luôn kiểm tra thiết bị trước khi sử dụng. Không
sử dụng nếu thiết bị này bị hư hỏng, vì như vậy
có thể gây ra chấn thương. Luôn thay thế bộ
phận bị hỏng với bộ phận cùng loại và đúng tiêu
chuẩn.
- Không mở thiết bị để thay pin sạc.
- Không nhúng hệ thống làm sạch hoặc đế sạc
vào nước và không rửa dưới vòi nước.
- Không nhung máy cạo râu vào trong nươc.
Không sử dụng máy cạo râu trong bồn tắm hoặc
dưới vòi tắm.
- Không sử dụng nước nóng quá 80°C để rửa máy
cạo râu.
- Chỉ sử dụng thiết bị này cho mục đích sử dụng
đã định như mô tả trong hướng dẫn sử dụng.
- Để đảm bảo vệ sinh, thiết bị chỉ nên được sử
dụng bởi một người.
51
Page 52

Tiếng Việt
52
- Không sử dụng khí nén, miếng tẩy rửa, chất tẩy
rửa có tính ăn mòn hoặc những chất lỏng mạnh
như xăng hay axeton để lau chùi thiết bị.
- Nếu máy cạo râu của bạn đi kèm với một hệ
thống làm sạch, hãy luôn dùng dung dịch làm
sạch Philips chính hãng (hộp hoặc bình, tùy
thuộc vào loại hệ thống làm sạch).
- Luôn đặt hệ thống làm sạch trên một mặt phẳng
cân bằng, chắc chắn và nằm ngang để tránh rò
rỉ.
- Nếu hệ thống làm sạch của bạn dùng mô-đun
làm sạch, hãy đảm bảo ngăn chứa mô-đun đã
đóng trước khi bạn sử dụng hệ thống làm sạch
để vệ sinh hoặc sạc máy cạo râu.
- Khi hệ thống làm sạch đã sẵn sàng cho việc làm
sạch, không di chuyển máy để tránh rò rỉ dung
dịch làm sạch.
- Nươc co thê rỉ ra tư đui căm phia dươi may khi
ban rưa may. Điêu nay la binh thương va không
nguy hiêm bơi vi tât ca cac bô phân điên tư đêu
đươc đong kin trong lơp vo bao vê bên trong
may.
- Không sử dụng bộ nguồn trong hoặc gần ổ cắm
tường có cắm máy xịt thơm phòng để tránh thiệt
hại không thể khắc phục được cho bộ nguồn.
Điện từ trường (EMF)
- Thiết bị Philips này tuân thủ tất cả các tiêu
chuẩn và quy định hiện hành liên quan đến
mức phơi nhiễm điện từ trường.
Page 53

Tổng quát
2
1
- Máy cạo râu này co thê rưa an toàn dươi voi
nươc.
- Máy này thích hợp để sử dụng với điện áp từ
100 đến 240 vôn.
- Bộ nguồn biên điện ap tư 100-240 vôn xuông
mưc điên ap thâp an toan dươi 24 vôn.
Cách sạc pin
Mất khoảng 1 tiếng (S3520, S3510) hoặc 8 tiếng
(S3120, S3110) để sạc đầy thiết bị. Khi bạn sạc thiết
bị lần đầu hoặc sau một thời gian dài không sử
dụng, hãy sạc máy cho đến khi đèn báo sạc sáng
liên tục. Thiết bị đươc sac đây cung cấp thời gian
cạo lên tới 50 phút (S3520, S3510) hoặc 45 phút
S3120, S3110). Thời gian cạo râu có thể ít hơn 50
hoặc 45 phút do cách cạo râu, thói quen vệ sinh
hoặc kiểu râu của bạn.
Sạc bằng bộ điều hợp
1 Cắm phích cắm nhỏ vào thiết bị.
2 Căm bộ điều hợp vao ô căm.
- Đèn báo sạc pin cho biết trạng thái sạc pin của
thiết bị (xem phần 'Chỉ báo sạc' trong chương
này).
3 Sau khi sạc, tháo bộ điêu hơp ra khỏi ổ cắm và
rút phích cắm nhỏ ra khỏi thiết bị.
Chỉ báo sạc
Pin yếu
- Khi pin gần hết (khi chỉ còn không quá 5 phút
cạo râu), đèn báo sạc sẽ bắt đầu nhấp nháy
màu da cam.
- Khi tắt thiết bị, đèn báo sạc tiếp tục nhấp nháy
màu cam thêm một vài giây.
Tiếng Việt
53
Page 54

Tiếng Việt
54
Sạc nhanh
Khi bắt đầu sạc pin đã hết điện, đèn báo sạc pin
nhấp nháy luân phiên giữa màu cam và màu xanh.
Sau khoảng 3 phút, đèn báo sạc pin bắt đầu chỉ
nhấp nháy màu xanh. Thiết bị hiện giờ đã chứa đủ
năng lượng để cạo trong 5 phút.
Cách sạc pin
- Khi thiết bị đang sạc, đèn sạc nhấp nháy màu
xanh lá cây.
Pin đa đươc sac đây
- Khi pin được sạc đầy, đèn sạc sẽ sáng liên tục
màu xanh lá cây.
Lưu ý: Sau khoảng 30 phút đèn báo sạc pin sẽ tắt
để tiết kiệm năng lượng.
Sư dung thiết bị
Lưu ý: Thiết bị có thể được sử dụng không dây
hoặc khi được cắm vào ổ điện.
Mẹo và bí quyết cạo râu
- Di chuyển xoay vòng trong khi sử dụng. Di
chuyên xoay vòng mang lại kết quả cạo tốt hơn
so với di chuyển theo chiều thẳng đứng.
- Da cua ban có thể cân 2 hoặc 3 tuân đê lam
quen vơi may cạo râu Philips.
Page 55

Bật và tắt thiết bị
1 Để bật thiết bị, nhấn nút on/off (bật/tắt) một
lần.
2 Để tắt thiết bị, nhấn nút on/off (bật/tắt) lần nữa.
Cao râu
1 Bật thiết bị.
2 Di chuyển đầu cạo xoay vòng trên da.
3 Hãy tắt thiết bị sau khi cạo xong.
4 Làm sach thiết bị (xem chương 'Vệ sinh và bảo
dưỡng').
Cắt tỉa (chỉ có ở kiểu S3520, S3510)
Bạn có thể sử dụng đầu tỉa để cắt tỉa tóc mai và ria.
1 Đẩy đầu tỉa trượt xuống để mở đầu tỉa.
2 Bật thiết bị.
- Bây giờ bạn có thể bắt đầu tỉa.
3 Hãy tắt thiết bị sau khi tỉa xong.
4 Chui rưa đầu tỉa (xem chương 'Vệ sinh và bảo
dưỡng').
Tiếng Việt
55
Page 56

Tiếng Việt
56
5 Đong đầu tỉa (nghe tiêng 'click').
Vệ sinh và bảo dưỡng
Nguy hiểm: Tháo dây điện có thể tháo rời
ra khỏi bộ phận cầm tay trước khi rửa bộ
phận này trong nước.
Chú ý: Không sử dụng khí nén, miếng tẩy rửa, chất
tẩy rửa có tính ăn mòn hoặc những chất lỏng
mạnh như xăng hay axeton để lau chùi thiết bị.
- Làm sạch thiết bị sau mỗi lần cạo râu để có hiệu
suất tối ưu.
- Làm sạch may thương xuyên se đam bảo may
hoat đông tôt hơn.
- Nên thận trọng với nước nóng. Luôn kiêm tra
xem nươc co qua nong không đê tranh lam
bong tay ban.
Lưu ý: Nươc co thê rỉ ra tư đui căm phia dươi thiết
bị khi ban rưa may. Điêu nay la binh thương va
không nguy hiêm bơi vi tât ca cac bô phân điên tư
đêu đươc đong kin trong lơp vo bao vê bên trong
may.
Làm sạch bộ phận cạo dưới vòi nước
1 Tắt thiết bị và đảm bảo thiết bị đã được rút ra
khỏi ổ cắm điện.
2 Bâm nut đê mơ bô phân cao ra. Rửa bên trong
bô phân cao va khoang chứa râu tóc dưới vòi
nước nóng trong 30 giây.
Page 57

- Rưa phân ngoai cua bô phân cao.
2
1
3 Đong bô phân cao lai va ru sach nươc đong bên
Chú ý: Cẩn thận không để bộ phận cạo chạm vào
bất kỳ vật gì trong khi rũ sạch nước đọng bên
trong máy.
Chú ý: Không dung khăn bông hay khăn giây đê
lau khô bô phân cao và khoang chứa râu tóc vi
chung co thê lam hư bộ phận cạo.
4 Mơ bô phân cao lân nưa va vân giư ơ vi tri nay
Làm sạch toàn bộ
Làm sạch hoàn toàn các đầu cạo mỗi tháng một
lần để có hiệu suất tối ưu.
1 Tắt thiết bị và đảm bảo thiết bị đã được rút ra
2 Bâm nut đê mơ bô phân cao ra. Tháo bô phân
3 Xoay bô phân khoa theo ngươc chiêu kim đông
trong may.
cho đên khi may khô hăn.
khỏi ổ cắm điện.
cao ra khỏi thiết bị.
hô va thao khung giư ra.
Tiếng Việt
57
4 Thao va lau chui từng đâu dao cao một. Mỗi đầu
cạo có một bộ phận cắt và một bộ phận bảo vệ.
Lưu ý: Không chui rưa nhiêu lươi dao cao va
năp bao vê cung môt luc vi chung hơp thanh
tưng bô. Nêu vô tinh găn nhâm lươi dao cao va
năp bao vê, thi phai mất vai tuân sau may mơi
hoat đông tôt trơ lai.
Page 58

1
2
Tiếng Việt
58
- Tháo lưỡi cạo ra khỏi nắp bảo vệ và vệ sinh cả
hai bộ phận dưới vòi nước.
5 Đặt lưỡi cạo vào bộ phận bảo vệ.
6 Lắp các đầu cạo trở lại bộ phận cạo.
Lưu ý: Phai đam bao la cac đâu cao vưa sat vao
khung trông.
7 Đăt khung giư trơ lai bô phân cao, ân va xoay
khóa theo chiêu kim đông hô.
8 Lắp vấu của bộ phận cạo vào khe ở phần trên
cùng của thiết bị. Sau đó đong bô phân cao
(nghe tiêng 'click').
Lưu ý: Nếu bộ phận cạo không khớp sát với
nhau, hãy kiểm tra xem bạn đã lắp các đầu cạo
đúng vị trí chưa và khung giữ có được khóa
không.
Rửa đầu tỉa dưới vòi nước (chỉ có ở kiểu S3520, S3510)
Lam sạch đầu tỉa sau môi lân sư dung.
1 Tắt thiết bị và đảm bảo thiết bị đã được rút ra
khỏi ổ cắm điện.
Page 59

Bảo quản
2yrs
Tiếng Việt
2 Đẩy đầu tỉa trượt xuống để mở đầu tỉa.
3 Bật thiết bị và rửa sạch đầu tỉa dưới vòi nước.
4 Tắt thiết bị và để mở đầu tỉa cho khô ráo hẳn.
5 Đong đầu tỉa (nghe tiêng 'click').
Meo: Để có hiệu suất cắt tỉa tối ưu, hãy bôi trơn
răng đầu tỉa băng môt giot dâu may may cư sau
thang môt lân.
Lưu ý: Chúng tôi khuyên bạn nên để thiết bị khô
hẳn trước khi lắp nắp bảo vệ vào thiết bị.
Lắp nắp bảo vệ vào thiết bị đê tranh lam hong
may.
59
Thay thế phu kiên
Để có hiệu suất cao tối đa, chúng tôi khuyên bạn
nên thay đầu cao hai năm một lần. Thay ngay
những đầu cạo bị hư hỏng. Luôn thay đâu
cao băng đâu' (xem 'Đăt mua phu kiên') cao
Philips chính hãng.
Page 60

2
1
1
2
60
Tiếng Việt
Bộ phận nhắc thay thế
Biểu tượng bộ phận cạo sẽ sáng để báo rằng cần
phải thay đầu cạo.
1 Biểu tượng bộ phận cạo sẽ sáng liên tục màu
cam.
2 Tắt thiết bị và đảm bảo thiết bị đã được rút ra
khỏi ổ cắm điện.
3 Bâm nut đê mơ bô phân cao ra. Tháo bô phân
cao ra khỏi thiết bị.
4 Xoay bô phân khoa theo ngươc chiêu kim đông
hô va thao khung giư ra.
5 Tháo các đầu cạo ra khỏi bộ phận cạo và vứt bỏ
chúng.
6 Đặt đầu cạo mới vào bộ phận cạo.
Lưu ý: Phai đam bao la cac đâu cao vưa sat vao
khung trông.
7 Đăt khung giư trơ lai bô phân cao, ân va xoay
khóa theo chiêu kim đông hô.
Page 61

8 Lắp vấu của bộ phận cạo vào khe ở phần trên
5 sec.
cùng của thiết bị. Sau đó đong bô phân cao
(nghe tiêng 'click').
Lưu ý: Nếu bộ phận cạo không khớp sát với
nhau, hãy kiểm tra xem bạn đã lắp các đầu cạo
đúng vị trí chưa và khung giữ có được khóa
không.
9 Nhấn và giữ nút on/off (bật/tắt) trong khoảng 5
giây để thiết lập lại nhắc nhở thay thế trên máy
cạo râu. Đèn màu cam tắt.
Đăt mua phu kiên
Để mua đồ phụ tùng hoặc các linh kiện, truy cập
www.shop.philips.com/service hoặc tới đại lý
Philips của bạn. Bạn cũng có thể liên hệ với Trung
tâm Chăm sóc Người tiêu dùng của Philips ở quốc
gia của bạn (xem tờ quảng cáo bảo hành toàn cầu
để biết thêm chi tiết liên hệ).
Cac phu kiện và phụ tùng sau đây hiên đang co
săn:
- Đâu Cao Philips SH30.
- Bình xịt để rửa đầu dao cạo Philips HQ110
Tiếng Việt
61
Tái chế
- Không vứt sản phẩm cùng chung với rác thải gia
đình thông thường khi ngừng sử dụng nó mà
hãy đem thiết bị đến điểm thu gom chính thức
để tái chế. Làm như vậy sẽ giúp bảo vệ môi
trường.
Page 62

Tiếng Việt
62
Bảo hành và hỗ trợ
Nếu bạn cần thông tin hoặc hỗ trợ, vui lòng truy
cập www.philips.com/support hoặc đọc tờ bảo
hành toàn cầu riêng biệt,
Các giới hạn về bảo hành
Các đầu cạo (lưỡi cạo và bảo vệ) không được bảo
hành theo các điều khoản bảo hành quốc tế vì
chúng có thể bị mài mòn.
Cach khăc phuc sư cô
Chương nay tom tăt cac sư cô thường gặp phai
nhất vơi thiết bị này. Nếu bạn không thể giải quyết
vấn đề với những thông tin sau, hãy truy cập
www.philips.com/support để xem một danh sách các
câu hỏi thường gặp hoặc liên hệ Trung tâm Chăm
sóc Người tiêu dùng tại quốc gia của bạn.
Sự cố Nguyên nhân co
thê
Giai phap
Thiết bị không
cạo tốt như trước
đây.
Thiết bị không
hoạt động khi
nhấn bật/tắt.
Cac đâu cao đa bi
hư hong hay bi
mon.
Râu dài làm tắc các
đầu cạo.
Bạn chưa lắp đầu
cạo đúng cách.
Pin sạc hết điện. Sac pin lai (xem chương
Thay đầu cạo (xem chương
'Thay thế phụ kiện').
Lần lượt rửa từng đâu cao
(xem chương 'Vệ sinh và
bảo dưỡng').
Đảm bảo rằng phần nhô
lên của đầu cạo vừa khít
vào khung đỡ (xem
chương 'Vệ sinh và bảo
dưỡng').
'Cach sac pin').
Page 63

Tiếng Việt
63
Sự cố Nguyên nhân co
thê
Nhiệt độ của thiết bị
quá cao. Trong
trường hợp này,
thiết bị không hoạt
động.
Giai phap
Ngay sau khi nhiệt độ của
thiết bị hạ xuống ở mức đủ
thấp, bạn có thể bật lại
thiết bị.
Page 64

ภาษาไทย
64
ข้อมูลเบื้องต้น
ขอแสดงความยินดีกับผลิตภัณฑ์ใหม่และต้อนรับเข้าสู่โลกของฟิลิปส์!
เพื่อให้คุณได้รับประโยชน์อย่างเต็มที่จากบริการที่ Philips มอบให้
โปรดลงทะเบียนผลิตภัณฑ์ของคุณที่ www.philips.com/welcome
คุณสมบัติทั่วไป (รูปที่ 1)
1 ฝาครอบป้องกัน
2 ชุดหัวโกน
3 ปุ่มปลดชุดหัวโกน
4 ปุ่มเปิด/ปิด
5 สัญลักษณ์หัวโกน
6 ไฟแสดงการชาร์จ
7 ที่กันจอน (รุ่น S3520, S3510 เท่านั้น)
8 ตัวเลื่อนปลดล็อคที่กันจอน (รุ่น S3520, S3510 เท่านั้น)
9 ชุดอุปกรณ์ (ประเภทอะแดปเตอร์ HQ8505)
10 ปลั๊กขนาดเล็ก
ข้อมูลความปลอดภัยที่สำคัญ
โปรดอ่านข้อมูลที่สำคัญอย่างละเอียดก่อนใช้งานเครื่องรวมทั้งอุปกร
ณ์เสริมและเก็บคู่มือไว้เพื่อใช้อ้างอิงต่อไป
อุปกรณ์เสริมที่ให้มาอาจแตกต่างกันไปตามผลิตภัณฑ์
อันตราย
เก็บชุดอุปกรณ์ไว้ในที่แห้ง
ภาษาไทย
Page 65

คำเตือน
ข้อแนะนำ
ภาษาไทย
เครื่องนี้มีโครงสร้างแบบสามชั้น (Class III)
ใน การชาร์จแบตเตอรี่ ให้ใช้แต่ชุดอุปกรณ์ที่สามารถถอดออกได้
(ประเภท HQ8505) ที่มาพร้อมกับเครื่อง
ชุดอุปกรณ์นี้ประกอบด้วยตัวแปลงไฟ
อย่าตัดชุดอุปกรณ์แล้วเปลี่ยนหัวปลั๊กใหม่
เพราะจะก่อให้เกิดอันตรายร้ายแรงขึ้น
เครื่องนี้สามารถใช้โดยเด็กอายุ 8 ปีขึ้นไป
รวมถึงบุคคลที่มีสภาพร่างกายไม่สมบูรณ์
ประสาทสัมผัสไม่สมบูรณ์ หรือสภาพจิตใจไม่ปกติ
หรือขาดประสบการณ์และความรู้ความเข้าใจ
โดยจะต้องอยู่ในการควบคุมดูแลหรือได้รับคำแนะนำในการใช้ง
านที่ปลอดภัยและเข้าใจถึงอันตรายที่เกี่ยวข้องในการใช้งาน
ห้ามให้เด็กเล่นเครื่องนี้
ไม่ควรให้เด็กทำความสะอาดและดูแลรักษา
โดยไม่มีการควบคุมดูแล
ถอดปลั๊กเครื่องโกนหนวดทุกครั้งก่อนทำความสะอาดด้วยก๊อกน้ำ
ตรวจสอบเครื่องก่อนการใช้งานเสมอ ห้ามใช้งานเครื่อง
หากชำรุดเสียหาย เพราะอาจทำให้บาดเจ็บได้
ให้เปลี่ยนชิ้นส่วนที่ชำรุดด้วยชิ้นส่วนของแท้เท่านั้น
อย่าเปิดเครื่องเพื่อเปลี่ยนแบตเตอรี่ที่ชาร์จใหม่ได้
ห้ามแช่ระบบทำความสะอาดหรือแท่นชาร์จในน้ำ และห้าม
ล้างด้วยก๊อกน้ำ
ไม่ควรนำเครื่องโกนหนวดจุ่มลงในน้ำ
ห้ามใช้เครื่องโกนหนวดในอ่างน้ำหรือขณะอาบน้ำด้วยฝักบัว
ห้ามล้างเครื่องโกนหนวดด้วยน้ำที่ร้อนกว่า 80°C
ใช้อุปกรณ์เครื่องนี้ตามจุดประสงค์ของอุปกรณ์ตามที่แสดงไว้ใน
คู่มือผู้ใช้เท่านั้น
เพื่อสุขลักษณะที่ถูกต้อง
ควรใช้อุปกรณ์เครื่องนี้โดยบุคคลเดียวเท่านั้น
ห้ามใช้ระบบอากาศอัด แผ่นใยขัด สารทำความสะอาดที่มีผงขัด
หรือของเหลวที่เป็นอันตราย เช่น
น้ำมันเบนซินหรืออะซิโตนในการทำความสะอาดอุปกรณ์
65
Page 66

ภาษาไทย
66
หากเครื่องโกนหนวดของคุณมีระบบทำความสะอาด
ให้ใช้น้ำยาทำความสะอาดของ Philips (แบบกล่องหรือขวด
ขึ้นอยู่กับประเภทของระบบทำความสะอาด) เสมอ
วางระบบทำความสะอาดบนพื้นผิวแนวนอนเรียบเสมอกันอยู่เส
มอเพื่อป้องกันการรั่ว
หากระบบทำความสะอาดของคุณใช้กล่องทำความสะอาด
ให้ตรวจสอบว่าช่องกล่องปิดอยู่เสมอก่อนที่คุณจะใช้ระบบทำคว
ามสะอาดเพื่อทำความสะอาดหรือชาร์จเครื่องโกนหนวด
เมื่อระบบทำความสะอาดพร้อมใช้แล้ว
อย่าขยับเขยื้อนเพื่อป้องกันไม่ให้น้ำยาทำความสะอาดรั่วออกมา
น้ำอาจหยดออกจากเต้ารับที่ด้านล่างของเครื่องโกนหนวดเมื่อคุ
ณล้างเครื่อง
นี่เป็นเรื่องปกติและไม่เป็นอันตรายเนื่องจากส่วนอิเล็กทรอนิกส์
ทั้งหมดจะถูกห่อหุ้มไว้ในหน่วยกำลังไฟที่ซีลไว้ภายในเครื่องโก
นหนวด
ห้ามใช้ชุดอุปกรณ์บริเวณใกล้เคียงเต้ารับบนผนังที่มีเครื่องปรับอ
ากาศไฟฟ้าเพื่อหลีกเลี่ยงความเสียหายที่ร้ายแรงกับชุดอุปกรณ์
สนามแม่เหล็กไฟฟ้า (EMF)
อุปกรณ์ Philips
เครื่องนี้สอดคล้องกับมาตรฐานและกฎข้อบังคับที่เกี่ยวข้องทั้งหม
ดเกี่ยวกับการสัมผัสกับสนามแม่เหล็กไฟฟ้า
ทั่วไป
สามารถล้างเครื่องโกนหนวดใต้ก๊อกน้ำได้อย่างปลอดภัย
อุปกรณ์เครื่องนี้เหมาะสำหรับแรงดันไฟฟ้าตั้งแต่ 100 ถึง 240
โวลต์
ชุดอุปกรณ์สามารถแปลงแรงดันไฟฟ้าขนาด 100240
โวลต์เป็นแรงดันไฟต่ำกว่า 24 โวลต์ที่มีความปลอดภัยได้
การชาร์จ
ใช้เวลาประมาณ 1 ชม. (รุ่น S3520, S3510) หรือ 8 ชม. (รุ่น
S3120, S3110) ในการชาร์จแบตเตอรี่ให้เต็ม
เมื่อคุณชาร์จเครื่องเป็นครั้งแรกหรือหลังจากที่ไม่ได้ใช้งานเป็นเวลา
นาน
ปล่อยให้เครื่องชาร์จไฟจนกว่าไฟแสดงการชาร์จจะติดสว่างต่อเนื่อง
เมื่อชาร์จไฟเต็มแล้ว สามารถใช้เครื่องเพื่อโกนหนวดได้นานสูงสุด
Page 67

50 นาที (รุ่น S3520, S3510) หรือ 45 นาที (รุ่น S3120, S3110)
2
1
เวลาที่ต้องใช้ในการโกนอาจน้อยกว่า 50 หรือ 45 นาที
ทั้งนี้ขึ้นอยู่กับลักษณะการโกน อุปนิสัยในการทำความสะอาด
และลักษณะของหนวดของคุณ
การชาร์จด้วยอะแดปเตอร์
1 เสียบปลั๊กเล็กเข้ากับเครื่อง
2 เสียบอะแดปเตอร์เข้ากับเต้ารับบนผนัง
ไฟแสดงการชาร์จจะแสดงสถานะการชาร์จของเครื่อง (ดูหัวข้อ
'สัญลักษณ์แสดงการชาร์จไฟ' ในบทนี้)
3 หลังจากชาร์จไฟ ให้ถอดอะแดปเตอร์ออกจากเต้ารับบนผนัง
และถอดปลั๊กขนาดเล็กออกจากเครื่อง
สัญญาณไฟแสดงการชาร์จ
แบตเตอรี่เหลือน้อย
เมื่อแบตเตอรี่ใกล้หมด (เมื่อโกนหนวดได้อีกเพียง 5
นาทีหรือน้อยกว่า) ไฟแสดงการชาร์จจะเริ่มกะพริบเป็นสีส้ม
เมื่อปิดเครื่อง
ไฟแสดงการชาร์จจะกะพริบเป็นสีส้มต่อเนื่องประมาณสองสาม
วินาที
ชาร์จไฟอย่างรวดเร็ว
เมื่อคุณเริ่มชาร์จแบตเตอรี่ที่ไม่มีกระแสไฟ
ไฟแสดงการชาร์จจะกะพริบเป็นสีส้มสลับสีเขียว หลังจากประมาณ
3 นาที สัญญาณไฟแสดงการชาร์จจะกะพริบเป็นสีเขียวเท่านั้น
ตอนนี้เครื่องจะมีพลังงานเพียงพอสำหรับการโกนประมาณ 5 นาที
การชาร์จ
เมื่อเครื่องกำลังชาร์จไฟ ไฟแสดงการชาร์จเริ่มกะพริบเป็นสีเขียว
ภาษาไทย
67
Page 68

ภาษาไทย
68
แบตเตอรี่ชาร์จไฟเต็มแล้ว
เมื่อชาร์จแบตเตอรี่เต็มแล้ว
สัญญาณไฟจะสว่างเป็นสีเขียวต่อเนื่อง
หมายเหตุ: หลังจากประมาณ 30 นาที
สัญญาณไฟแสดงการชาร์จจะดับลงเพื่อเป็นการประหยัดพลังงาน
การใช้งาน
หมายเหตุ:
สามารถใช้เครื่องนี้ได้ทั้งในแบบไร้สายหรือเสียบปลั๊กไฟเข้ากับเต้ารั
บบนผนัง
เคล็ดลับและเทคนิคในการโกน
ให้โกนแบบวนไปมาระหว่างใช้
การเคลื่อนที่แบบวนไปมาให้ผลลัพธ์ในการโกนที่ดีกว่าการเคลื่อ
นที่เป็นแนวตรง
อาจต้องใช้เวลาประมาณ 2 หรือ 3
สัปดาห์เพื่อให้ผิวของคุณปรับสภาพให้เหมาะสมกับเครื่องโกนห
นวด Philips
การปิดและเปิดเครื่อง
1 หากต้องการเปิดสวิตช์เครื่อง ให้กดปุ่มเปิด/ปิดเครื่อง หนึ่งครั้ง
2 กดปุ่มเปิด/ปิดหนึ่งครั้งเพื่อปิดเครื่อง
การโกน
1 เปิดสวิตช์เครื่อง
2 เคลื่อนหัวโกนวนไปมาบนผิว
3 หลังจากการเล็ม ให้ปิดสวิตช์เครื่อง
4 การทำความสะอาดเครื่อง (ดูได้จากบท
'การทำความสะอาดและการบำรุงรักษา')
Page 69

การเล็ม (เฉพาะรุ่น S3520, S3510 เท่านั้น)
คุณสามารถใช้ที่กันจอนเพื่อตกแต่งจอนและหนวดของคุณ
1 เลื่อนปุ่มเลื่อนที่กันจอนลงเพื่อเปิดที่กันจอน
2 เปิดสวิตช์เครื่อง
จากนั้นคุณสามารถเริ่มเล็มได้ทันที
3 หลังจากการเล็ม ให้ปิดสวิตช์เครื่อง
4 การทำความสะอาดที่กันจอน (ดูได้จากบท
'การทำความสะอาดและการบำรุงรักษา')
5 ปิดที่กันจอน (เสียงดัง 'คลิก')
การทำความสะอาดและบำรุงรักษา
อันตราย: ถอดสายไฟที่สามารถถอดได้
ออกจากส่วนด้ามจับก่อนการทำความสะอาดส่วนนี้
ในน้ำ
ข้อควรระวัง: ห้ามใช้อากาศอัด แผ่นใยขัด
สารที่มีฤทธิ์กัดกร่อน หรือของเหลวที่มีฤทธิ์รุนแรง เช่น น้ำมัน
หรืออะซีโทน ทำความสะอาดเครื่องเป็นอันขาด
ทำความสะอาดเครื่องทุกครั้งหลังใช้งานเพื่อประสิทธิภาพการโก
นหนวดที่ดี
ควรทำความสะอาดเป็นประจำ
เพื่อการใช้งานที่มีประสิทธิภาพดีขึ้น
ระวังน้ำร้อน ตรวจสอบว่าน้ำไม่ร้อนเกินไปอยู่เสมอ
เพื่อป้องกันไม่ให้มือพุพอง
ภาษาไทย
69
Page 70

ภาษาไทย
70
หมายเหตุ: เมื่อล้างทำความสะอาดเครื่อง
อาจมีน้ำซึมออกมาจากด้านล่างของตัวเครื่อง
ซึ่งเป็นเรื่องปกติและไม่ก่อให้เกิดอันตรายใดๆ
เนื่องจากวงจรไฟฟ้าภายใน
เครื่องโกนหนวดเป็นระบบปิดและมีผนึกอยู่
การทำความสะอาดชุดหัวโกนโดยเปิดน้ำไหลผ่าน
1 ปิดสวิตช์เครื่องและถอดปลั๊กไฟออกจากเต้ารับบนผนัง
2 กดปุ่มปลดล็อคเพื่อเปิดชุดหัวโกนทำความสะอาดภายในชุดหัวโ
กนและช่องเก็บเศษหนวดด้วยน้ำอุ่นจากก๊อกน้ำเป็นเวลา 30
วินาที
ล้างภายนอกของชุดหัวโกน
3 ปิดชุดหัวโกนแล้วสะบัดน้ำออก
ข้อควรระวัง:
ระมัดระวังอย่าให้ชุดหัวโกนกระแทกกับสิ่งใดก็ตามขณะที่คุ
ณสะบัดน้ำออก
ข้อควรระวัง:
ห้ามเช็ดชุดหัวโกนและช่องเก็บเศษหนวดด้วยผ้าขนหนูหรือ
ทิชชู่ เพราะอาจทำให้ชุดหัวโกนเสียหาย
4 เปิดชุดหัวโกนออกอีกครั้ง แล้วปล่อยทิ้งไว้จนแห้งสนิท
การทำความสะอาด
ทำความสะอาดชุดหัวโกนอย่างทั่วถึงเดือนละครั้งเพื่อประสิทธิภาพก
ารโกนหนวดที่ดี
1 ปิดสวิตช์เครื่องและถอดปลั๊กไฟออกจากเต้ารับบนผนัง
2 กดปุ่มปลดล็อคเพื่อเปิดชุดหัวโกน ดึงชุดหัวโกนออกจากเครื่อง
Page 71

2
1
ภาษาไทย
3 หมุนล็อคไปในทิศทางทวนเข็มนาฬิกา แล้วถอดโครงยึดออก
4 ถอดหัวโกนออกและล้างทำความสะอาดทีละหัว
หัวโกนแต่ละหัวประกอบด้วยใบมีดและฝาครอบ
หมายเหตุ:
ห้ามทำความสะอาดใบมีดและฝาครอบมากกว่าหนึ่งชุดในเวลาเ
ดียวกัน เพราะแต่ละชุดจัดเตรียมมาให้เข้าชุดกันทั้งหมด
ในกรณีที่เกิดการสับเปลี่ยนใบมีดลงในฝาครอบที่ไม่เข้าชุดโดยบั
งเอิญ อาจต้องใช้เวลาหลายสัปดาห์
เพื่อให้เครื่องโกนหนวดปรับสภาพการทำงานให้เข้ากับชุดใบมีด
นั้นๆ
ถอดใบมีดออกจากฝาครอบแล้วทำความสะอาดทั้งสองส่วนโดยเ
ปิดน้ำไหลผ่าน
5 ใส่ใบมีดกลับเข้าไปในฝาครอบ
71
6 ประกอบหัวโกนเข้ากับชุดหัวโกนตามเดิม
หมายเหตุ:
ตรวจสอบส่วนที่ยื่นออกมาของหัวโกนว่าประกอบเข้ากับส่วนยึด
พอดีหรือไม่
Page 72

1
2
ภาษาไทย
72
7 ประกอบโครงยึดกลับเข้าไปในชุดหัวโกนแล้วหมุนตามเข็มนาฬิ
กาจนล็อคเข้าที่
8 เสียบสลักของชุดหัวโกนเข้าไปในช่องที่ด้านบนสุดของเครื่อง
จากนั้น ปิดชุดหัวโกนลง (เสียงดัง 'คลิก')
หมายเหตุ: หากชุดหัวโกนปิดไม่สนิท
ให้ตรวจดูว่าคุณวางตำแหน่งชุดหัวโกนถูกต้องแล้วหรือไม่
และโครงยึดล็อคแน่นดีหรือไม่
การทำความสะอาดที่กันจอนโดยเปิดน้ำไหลผ่าน (เฉพาะรุ่น
S3520, S3510 เท่านั้น)
ทำความสะอาดที่กันจอนทุกครั้งหลังใช้งาน
1 ปิดสวิตช์เครื่องและถอดปลั๊กไฟออกจากเต้ารับบนผนัง
2 เลื่อนปุ่มเลื่อนที่กันจอนลงเพื่อเปิดที่กันจอน
3 เปิดสวิตช์เครื่องและล้างที่กันจอนโดยเปิดน้ำไหลผ่าน
4 ปิดสวิตช์เครื่องและเปิดที่กันจอนทิ้งไว้ให้แห้ง
5 ปิดที่กันจอน (เสียงดัง 'คลิก')
เคล็ดลับ: ทุกๆ หกเดือน
ควรหยดน้ำมันจักรเพื่อหล่อลื่นซี่ฟันของที่กันจอน
เพื่อให้เล็มได้อย่างมีประสิทธิภาพ
Page 73

การจัดเก็บ
2yrs
2
1
หมายเหตุ: ขอแนะนำให้คุณปล่อยให้เครื่องแห้งสนิท
ก่อนใส่ฝาครอบป้องกันเข้ากับเครื่อง
ปิดฝาครอบลงบนเครื่องเพื่อป้องกันการชำรุดเสียหาย
การเปลี่ยนอะไหล่
เพื่อให้การโกนเป็นไปอย่างมีประสิทธิภาพสูงสุด
เราขอแนะนำให้คุณเปลี่ยนชุดหัวโกนทุกสองปี
เปลี่ยนหัวโกนที่ชำรุดเสียหายทันที เปลี่ยนหัวโกนด้วยหัวโกนแท้ของ
Philips เท่านั้น' (ดู 'การสั่งซื้ออุปกรณ์เสริม')
การแจ้งเตือนการเปลี่ยน
สัญลักษณ์ชุดเครื่องโกนจะสว่างขึ้นเพื่อแสดงว่าต้องเปลี่ยนหัวโกน
1 ไฟสัญลักษณ์ชุดหัวโกนสีส้มติดสว่างต่อเนื่อง
2 ปิดสวิตช์เครื่องและถอดปลั๊กไฟออกจากเต้ารับบนผนัง
3 กดปุ่มปลดล็อคเพื่อเปิดชุดหัวโกน ดึงชุดหัวโกนออกจากเครื่อง
ภาษาไทย
73
4 หมุนล็อคไปในทิศทางทวนเข็มนาฬิกา แล้วถอดโครงยึดออก
Page 74

1
2
5 sec.
ภาษาไทย
74
การสั่งซื้ออุปกรณ์เสริม
5 ถอดหัวโกนออกจากชุดหัวโกนและทิ้งทันที
6 วางหัวโกนใหม่เข้ากับชุดหัวโกน
หมายเหตุ:
ตรวจสอบส่วนที่ยื่นออกมาของหัวโกนว่าประกอบเข้ากับส่วนยึด
พอดีหรือไม่
7 ประกอบโครงยึดกลับเข้าไปในชุดหัวโกนแล้วหมุนตามเข็มนาฬิ
กาจนล็อคเข้าที่
8 เสียบสลักของชุดหัวโกนเข้าไปในช่องที่ด้านบนสุดของเครื่อง
จากนั้น ปิดชุดหัวโกนลง (เสียงดัง 'คลิก')
หมายเหตุ: หากชุดหัวโกนปิดไม่สนิท
ให้ตรวจดูว่าคุณวางตำแหน่งชุดหัวโกนถูกต้องแล้วหรือไม่
และโครงยึดล็อคแน่นดีหรือไม่
9 กดปุ่ม เปิด/ปิด ค้างไว้ประมาณ 5
วินาทีเพื่อรีเซ็ตการแจ้งเตือนการเปลี่ยนหัวโกนบนเครื่องโกนหน
วด ไฟสีส้มจะดับลง
หากต้องการซื้ออุปกรณ์เสริมหรืออะไหล่ โปรดไปที่
www.shop.philips.com/service หรือติดต่อตัวแทนจำหน่าย
Philips และคุณยังสามารถติดต่อศูนย์บริการลูกค้า Philips
ในประเทศของคุณได้อีกด้วย
(ดูที่รายละเอียดการติดต่อจากเอกสารแผ่นพับเกี่ยวกับการรับประกัน
ทั่วโลก)
อุปกรณ์เสริมและอะไหล่ที่วางจำหน่ายแล้ว:
ชุดหัวโกนฟิลิปส์รุ่น SH30
สเปรย์ทำความสะอาดหัวโกนของฟิลิปส์รุ่น HQ110
Page 75

การรีไซเคิล
ห้ามทิ้งผลิตภัณฑ์รวมกับขยะในครัวเรือนทั่วไป
เมื่อเครื่องหมดอายุการใช้งานแล้ว
ควรทิ้งลงในถังขยะสำหรับนำกลับไปใช้ใหม่ได้ (รีไซเคิล)
โดยจะเป็นการช่วยรักษาสภาวะสิ่งแวดล้อมที่ดี
การรับประกันและการสนับสนุน
หากคุณต้องการข้อมูลหรือการสนับสนุน โปรดไปที่
www.philips.com/support
หรืออ่านใบรับประกันทั่วโลกของแต่ละประเทศ
ข้อจำกัดในการรับประกัน
หัวโกน (ใบมีดและฝาครอบ) ไม่อยู่ในเงื่อนไขการรับประกันทั่วโลก
เนื่องจากเป็นสินค้าที่ต้องสึกหรอตามปกติเนื่องจากการใช้งาน
การแก้ปัญหา
บทนี้ได้รวบรวมปัญหาทั่วไปเกี่ยวกับเครื่องซึ่งคุณอาจพบได้
หากยังไม่สามารถแก้ไขปัญหาตามข้อมูลด้านล่างได้
โปรดดูรายการคำถามที่พบบ่อยที่ www.philips.com/support
หรือติดต่อศูนย์บริการลูกค้าในประเทศของคุณ
ปัญหา สาเหตุที่เป็นไปได้ การแก้ปัญหา
ภาษาไทย
75
เครื่องโกนขนได้ไม่ดีเท่
าเดิม
เครื่องไม่ทำงาน
เมื่อกดปุ่มเปิด/ปิด
หัวโกนชำรุดหรือสึก เปลี่ยนหัวโกนใหม่ (ดูได้จากบท
มีเศษหนวดที่มีความยาวอุ
ดตันหัวโกน
คุณยังไม่ได้ใส่หัวโกนให้เ
ข้าที่
แบตเตอรี่แบบชาร์จใหม่ไ
ด้ไม่มีไฟ
'การเปลี่ยนหัวโกน')
ทำความสะอาดหัวโกนทีละส่วน
(ดูได้จากบท
'การทำความสะอาดและการบำรุงรั
กษา')
ตรวจสอบให้แน่ใจว่าได้ประกอบส่ว
นที่ยื่นออกมาของหัวโกน
เข้ากับตัวยึดแล้ว (ดูได้จากบท
'การทำความสะอาดและการบำรุงรั
กษา')
ชาร์จไฟแบตเตอรี่ (ดูได้จากบท
'การชาร์จไฟ')
Page 76

ภาษาไทย
76
ปัญหา สาเหตุที่เป็นไปได้ การแก้ปัญหา
อุณหภูมิของเครื่องสูงเกิน
ไป ในกรณีนี้
เครื่องจะไม่ทำงาน
เมื่ออุณหภูมิของเครื่องลดลงจนถึงร
ะดับปกติแล้ว
คุณสามารถเปิดใช้งานอีกครั้งได้ทัน
ที
Page 77

说明
感谢您的惠顾,欢迎光临飞利浦! 为了让您能充分享
受飞利浦提供的支持,请在 www.philips.com/welcome
上注册您的产品。
基本说明(图 1)
1 保护盖
2 剃毛刀头部件
3 剃须刀头部件释放按钮
4 开/关按钮
5 剃须刀头符号
6 充电指示灯
7 修剪器(仅限于 S3520、S3510)
8 修剪器释放滑块(仅限于 S3520、S3510)
9 电源部件(适配器,类型 HQ8505)
10 小插头
重要安全信息
使用本产品及其附件之前,请仔细阅读本重要信息,并
妥善保管以供日后参考。 随附的附件可能因产品而
异。
危险
- 保持电源部件干燥。
简体中文
77
简体中文
Page 78

78
警告
简体中文
- 本产品为 III 级构造。
- 要给电池充电,请仅使用产品随附
的可拆卸电源部件(类型
HQ8505)。
- 电源部件中包含一个变压器。 请
勿自行更换电源部件的插头,否则
将导致严重后果。
- 本产品适合由 8 岁或以上年龄的
儿童以及肢体不健全、感觉或精神
上有障碍或缺乏相关经验和知识的
人士使用,但前提是有人对他们使
用本产品进行监督或指导,以确保
他们安全使用,并且让他们明白相
关的危害。 切勿让儿童玩弄本产
品。 不要让儿童在无人监督的情
况下对本产品进行清洁和保养。
- 在自来水龙头下清洗剃须刀之前,
务必拔掉其电源插头。
- 使用前,请务必检查产品。 请勿
使用损坏的产品,否则可能对人体
造成伤害。 请务必用原装型号更
换损坏的部件。
- 切勿拆开本产品更换充电电池。
Page 79

警告
简体中文
- 切勿将清洁系统或充电座浸入水中
,也不要在水龙头下冲洗。
- 切勿将剃须刀浸入水中。 切勿在
洗澡或淋浴时使用剃须刀。
- 切勿使用温度高于 80°C 的热水冲
洗剃须刀。
- 只能将本产品用于用户手册中所示
的原定用途。
- 出于卫生的目的,本产品只能供一
个人使用。
- 切勿使用压缩气体、钢丝绒、研磨
性清洁剂或腐蚀性液体(例如汽油
或丙酮)来清洁产品。
- 如果剃须刀随附清洁系统,应始终
使用原装飞利浦清洁液(滤芯或瓶
,取决于清洁系统类型)。
- 清洁系统必须放在稳定、平坦的水
平表面上,以防漏液。
- 如果清洁系统采用清洁滤芯,在使
用清洁系统进行清洁或为剃须刀充
电之前,应始终确保滤芯仓已关闭
。
- 清洁系统准备就绪时,切勿移动,
以免清洁液漏出。
79
Page 80

简体中文
80
电磁场 (EMF)
概述
充电
- 冲洗剃须刀时,水可能从产品底部
的插口漏出。 这是正常的,而且
没有危险,因为所有电子元件都封
闭在剃须刀内部的密封电源部件中
。
- 请勿在包含电动空气清新器的墙壁
插座上或其周围使用电源部件,以
免电源部件受到不可修复的损坏。
- 本 Philips 产品符合所有有关暴露于电磁场的适用标
准和法规。
- 这款剃须刀可放心在水龙头下清洗。
- 本产品适合在 100 - 240 伏的电源电压下工作。
- 该电源部件可将 100-240 伏的电压转换为 24 伏以
下的安全低电压。
产品充满电大约需要 1 小时(S3520、S3510)或 8 小
时(S3120、S3110)。 如果是首次为产品充电,或长
时间未使用后充电,应对其连续充电,直到充电指示灯
持续亮起。 充满电的产品可提供多达 50 分钟
(S3520、S3510)或 45 分钟(S3120、S3110)的剃
须时间。 剃须时间可能会因剃须行为、清洁习惯或胡
须类型的差异而少于 50 或 45 分钟。
Page 81

使用适配器充电
2
1
充电指示
简体中文
1 将小插头插入产品。
2 将电源适配器插入电源插座。
- 充电指示灯显示产品的充电状态(请参阅本章
中“充电指示”一节)
3 充电之后,从电源插座上拔下适配器,并从产品上
拔下小插头。
81
电池电量不足
- 当电池电量快要耗尽时(仅剩 5 分钟或更少的剃须
时间),充电指示灯将开始呈橙色闪烁。
- 关闭产品时,充电指示灯将持续呈橙色闪烁几秒
钟。
快速充电
开始为电量耗尽的电池充电时,充电指示灯将呈橙色和
绿色交替闪烁。 大约 3 分钟之后,充电指示灯将开始
仅呈绿色闪烁。 产品现在包含的电量足以完成 5 分钟
剃须。
充电
- 产品充电期间,充电指示灯将呈蓝绿色闪烁。
电池已完全充满
- 电池充满电时,充电指示灯将持续亮起绿灯。
注意: 大约 30 分钟后,充电指示灯熄灭以节省能源。
Page 82

简体中文
82
使用本产品
注意: 本产品既可以在不接电源的情况下使用,也可
连接电源插座使用。
剃须提示和技巧
- 请在使用时作迂回运动。 迂回运动比直线运动的剃
须效果更好。
- 您的皮肤可能需要 2 到 3 周才能适应飞利浦剃须系
统。
打开或关闭产品
1 要打开本产品,请按一下开/关按钮。
2 要关闭产品,请按一下开/关按钮。
剃须
1 启动产品。
2 将剃须刀头在您的皮肤上作迂回运动。
3 剃须后,请关闭本产品。
4 清洁产品(请参阅“清洁和保养”一章)。
修剪(仅限 S3520、S3510)
您可使用修剪器修剪鬓角和须髭。
1 向下推修剪器的滑动开关可打开修剪器。
2 启动产品。
Page 83

- 现在可以开始修剪了。
3 修剪后,请关闭产品。
4 清洁修剪器(请参阅“清洁和保养”一章)。
5 关闭修剪器(可听到“咔哒”一声)。
清洁和保养
危险: 将手持部分与电源线分开后,才能在水
中清洗手持部分。
警告: 切勿使用压缩气体、钢丝绒、研磨性清洁剂或
腐蚀性液体(例如汽油或丙酮)清洁本产品。
- 每次剃须后清洁本产品,以获得最佳的剃须效果。
- 为保证更好的剃须效果,剃须刀必须定期清洗。
- 使用热水要当心。 切记先检查水温是否太高,以防
烫手。
注意: 冲洗产品时,水可能从产品底部的插口漏出。
这是正常的,而且没有危险,因为所有电子元件都封闭
在剃须刀内部的密封电源部件中。
在水龙头下冲洗剃须刀头部件
1 关闭产品并确保已与电源插座断开连接。
2 按下释放按钮,打开剃须刀头部件。用热自来水冲
洗剃须刀头部件和胡茬储藏室的内部 30 秒。
简体中文
83
Page 84

2
1
简体中文
84
彻底清洁
- 冲洗剃须刀头部件外侧。
3 关闭剃须刀头部件并甩掉多余的水份。
警告: 甩掉多余的水份时,小心不要使剃须刀头部件
敲到任何东西。
警告: 不要用毛巾或纸巾来擦干剃须刀头部件和胡茬
储藏室,因为这样可能会损坏剃须刀头部件。
4 再次打开剃须刀头部件,使它保持打开状态,让产
品完全晾干。
每个月彻底清洁一次剃须刀头,以获得最佳效果。
1 关闭产品并确保已与电源插座断开连接。
2 按下释放按钮,打开剃须刀头部件。将剃须刀头部
件拉出产品。
3 逆时针方向转动锁装置并卸下固定架。
4 一次取下并清洁一个剃须刀头。 每个剃须刀头包含
一组刀片和网罩。
注意: 不要同时清洁多组刀片和网罩,因为它们都
是相互匹配的。 如果不小心将剃须刀头的刀片和网
罩弄混,则需要数周时间才能恢复产品的最佳剃须
效果。
Page 85

1
2
简体中文
- 从网罩取下刀片并在水龙头下清洁这两个部件。
5 将刀片重新装回至网罩。
6 将剃须刀头重新放入剃须刀头部件。
注意: 确保剃须刀头凸起部位正好插入凹陷部位。
7 将固定架放回剃须刀头部件内,并沿顺时针方向转
动锁装置。
8 将剃须刀头部件的凸缘插入产品顶部的槽内。 然后
关闭剃须刀头部件(可听到“咔哒”一声)。
注意: 如果剃须刀头部件关闭不畅,请检查剃须刀
头插入是否正确,固定架是否被锁住。
85
在水龙头下冲洗修剪器(仅限 S3520、S3510)
每次使用后都要清洁修剪器。
1 关闭产品并确保已与电源插座断开连接。
Page 86

2yrs
86
存放
简体中文
2 向下推修剪器的滑动开关可打开修剪器。
3 启动产品,并在水龙头下清洁修剪器。
4 关闭产品并打开修剪器,以使其干燥。
5 关闭修剪器(可听到“咔哒”一声)。
提示: 为获得最佳修剪效果,请每隔六个月用一滴缝
纫机油润滑修剪器齿。
注意: 建议您先将产品晾干,然后再装上保护盖。
请将保护盖装在产品上,以防发生损坏。
更换
为获得最佳剃须效果,建议每两年更换一次剃须刀头。
立即更换损坏的剃须刀头。 务必使用原装飞利浦剃须
刀头 (请参见 '订购配件')进行更换。
更换提醒
剃须刀头部件符号会亮起,表示需要更换剃须刀头。
Page 87

2
1
1
2
简体中文
1 剃须刀头部件符号会呈橙色持续亮起。
2 关闭产品并确保已与电源插座断开连接。
3 按下释放按钮,打开剃须刀头部件。将剃须刀头部
件拉出产品。
4 逆时针方向转动锁装置并卸下固定架。
5 将剃须刀头从剃须刀头部件上卸下并丢弃。
6 将新的剃须刀头放在剃须刀头部件中。
注意: 确保剃须刀头凸起部位正好插入凹陷部位。
7 将固定架放回剃须刀头部件内,并沿顺时针方向转
动锁装置。
87
Page 88

5 sec.
简体中文
88
订购配件
回收
8 将剃须刀头部件的凸缘插入产品顶部的槽内。 然后
关闭剃须刀头部件(可听到“咔哒”一声)。
注意: 如果剃须刀头部件关闭不畅,请检查剃须刀
头插入是否正确,固定架是否被锁住。
9 按住开/关按钮 5 秒钟可重置剃须刀更换提醒。 橙色
指示灯会熄灭。
要购买附件或备件,请访问
www.shop.philips.com/service 或联系您的飞利浦经销
商。 您还可以联系所在国家/地区的飞利浦客户服务中
心(请参阅全球保修卡了解详细联系信息)。
可选配以下附件和备件:
- SH30 飞利浦剃须刀头。
- HQ110 飞利浦剃须刀头清洁喷雾剂
- 弃置本产品时,请不要将其与一般生活垃圾放在一
起,应将其交给政府指定的回收中心。 这样做将有
利于环保。
保修和支持
保修条款
如果您需要信息或支持,请访问
www.philips.com/support 或阅读单独的全球保修卡。
由于剃须刀头(刀片和网罩)属于易磨损物品,因此不
在国际保修条款的涵盖范围之列。
Page 89

故障种类和处理方法
本章归纳了使用本产品时最常见的一些问题。如果您无
法根据以下信息解决问题,请访问
www.philips.com/support 查阅常见问题列表,或联系
您所在国家/地区的客户服务中心。
问题 可能的原因 解决方法
简体中文
89
产品的剃须效果没
有以前好。
按下开/关钮时,产
品不工作。
剃须刀头已损坏或磨损。更换剃须刀头(见“更
过长的胡须堵塞了剃
须刀头。
您没有正确插入剃须
刀头。
充电电池的电量已耗尽。给电池充电(请参阅“充
产品的温度过高。 此
时,产品无法工作。
换”一章)。
逐一清洁剃须刀头(参
阅“清洁和保养”一章)。
确保剃须刀头凸起部位正好
插入凹陷部位(见“清洁和
保养”一章)。
电”一章)。
一旦产品降到足够低的温
度,便可重新打开产品。
Page 90

繁體中文
90
簡介
感謝您購買本產品。歡迎來到飛利浦的世界! 為充分
享受飛利浦為您提供的好處,請至下列位址註冊產
品:www.philips.com/welcome。
一般說明 (圖 1)
1 保護蓋
2 除毛刀頭組
3 電鬍刀組釋放按鈕
4 開關按鈕
5 電鬍刀刀頭符號
6 充電指示燈
7 鬢角刀 (僅限 S3520、S3510)
8 鬢角刀釋放滑鈕 (僅限 S3520、S3510)
9 電源供應裝置 (電源轉換器,型號 HQ8505)
10 小插頭
重要安全資訊
使用本產品與其配件前,請先仔細閱讀此重要資訊,並
保留說明以供日後參考。 提供的配件可能隨產品而
異。
危險
- 電源供應裝置請保持乾燥。
繁體中文
Page 91

警示
警告
繁體中文
- 本產品為第 III 級 構造。
- 如需為電池充電,僅可使用裝置隨附的可拆式電源
供應裝置 (型號:HQ8505)。
- 電源供應裝置內含一個變壓器。 請勿切斷電源供應
裝置而以其他的插頭取代,否則會造成危險。
- 本產品可供 8 歲以上兒童、身體官能或心智能力退
化者,或是經驗與使用知識缺乏者使用,但需有人
從旁監督或指示如何安全使用本產品,且使用者需
了解使用本產品的潛在危險。 請勿讓小孩把玩本產
品。 若無人監督,請勿讓兒童進行清潔和使用者維
護。
- 在水龍頭下沖洗電鬍刀之前,請先拔掉電鬍刀的插
頭。
- 使用前請務必檢查本產品。 若產品受損請勿使用,
以免受傷。 零件如有受損,請務必以原型號更換
之。
- 請勿拆開本產品更換充電式電池。
- 切勿將清潔系統或充電座浸入水中,或直接在水龍
頭下沖洗。
- 請勿將電鬍刀浸泡在水中。 請勿在泡澡或淋浴時使
用電鬍刀。
- 切勿使用超過 80°C 的熱水沖洗電鬍刀。
- 本產品儘限用於本使用手冊所述之相關用途。
- 為保衛生起見,請勿多人共用本產品。
- 絕對不可使用壓縮空氣、鋼絲絨、磨蝕性的清潔劑
或侵蝕性的液體 (例如汽油或丙酮) 清潔本產品。
- 如果您的電鬍刀配備清潔系統,請務必使用飛利浦
原廠清潔液 (補充匣或補充瓶,依清潔系統的類型而
定)。
- 請務必將清潔系統放置在穩固、平整的水平面上,
以防滲漏。
91
Page 92

繁體中文
92
電磁波 (EMF)
一般
充電
- 如果您的清潔系統使用的是補充匣,在使用清潔系
統清潔電鬍刀或為電鬍刀充電之前,請務必確定補
充匣室已關閉。
- 當清潔系統準備就緒可供使用時,應避免移動它,
以防清潔液漏出。
- 在您沖洗時,電鬍刀底部的插孔可能會滴水。 此為
正常現象,並不會造成危險,因為所有的電子零件
都密封於電鬍刀內的電力裝置中。
- 請勿在插入電子空氣清淨機的牆壁插座內或附近使
用電源供應裝置,以免電源供應裝置發生無法修復
的損壞。
- 本Philips產品符合所有電磁場暴露的相關適用標準
和法規。
- 此電鬍刀可在水龍頭下安全地清洗。
- 本產品適用於 100 到 240 伏特的插座電壓。
- 電源供應裝置可以將 100-240 伏特的電壓轉換為低
於 24 伏特的安全低電壓。
S3520、S3510 充飽電約需要 1 小時;S3120、S3110
充飽電約需要 8 小時。 首次為產品充電,或長期未使
用後,請充電直到充電指示燈持續亮起為止。 充飽電
的產品可持續刮鬍 50 分鐘 (S3520、S3510) 或 45 分
鐘 (S3120、S3110)。 視您的刮鬍行為、清潔習慣或鬍
子類型而定,刮鬍時間可能少於 50 或 45 分鐘。
Page 93

使用電源轉換器充電
2
1
1 將小插頭插上產品。
2 將電源轉換器插入插座。
- 充電指示燈會顯示產品的充電狀態 (請參閱本單元的
3 充電完畢請將電源轉換器拔離電源插座,並將小插
充電指示
電量不足
- 電池電力即將用盡 (可使用時間只剩 5 分鐘以內)
- 關閉產品電源時,充電指示燈會持續閃爍橘光數
快速充電
開始為電力用盡的電池充電時,充電指示燈會交替閃爍
橘光與綠光。 約 3 分鐘後,充電指示燈僅會閃爍綠
光。 此時電鬍刀已經有足夠電力,可供您進行一次 5
分鐘的刮鬍。
充電
- 產品充電時,充電指示燈會閃爍綠光。
「充電指示」一節)。
頭從產品上拔除。
時,充電指示燈便會開始閃爍橘光。
秒。
繁體中文
93
電池充滿電
- 當電池充飽電力後,充電指示燈會持續亮綠燈。
注意: 大約 30 分鐘後,充電指示燈會熄滅以節省能
源。
Page 94

繁體中文
94
使用本產品
注意: 本產品可以無線方式使用或插在牆壁上的電源
插座上使用。
刮鬍秘訣與技巧
- 刮鬍時請以畫圓的方式移動。 畫圓移動的刮鬍效果
優於直線移動。
- 您的皮膚可能需要 2 到 3 週的時間才能完全適應飛
利浦電鬍刀系統。
開啟及關閉本產品
1 若要開啟本產品電源,請按一下開關按鈕。
2 若要關閉本產品電源,請按一下開關按鈕。
刮鬍
1 開啟產品電源。
2 請以畫圓的方式在皮膚上移動電鬍刀刀頭。
3 刮鬍後,關閉產品電源。
4 清潔本產品 (請參閱「清潔與維護」單元)。
修剪 (僅限 S3520、S3510)
您可以使用鬢角刀修整鬢角與鬍髭。
1 將鬢角刀開關往下推即可開啟鬢角刀。
2 開啟產品電源。
Page 95

- 這時即可開始修整。
3 修剪之後,關閉產品電源。
4 清潔鬢角刀 (請參閱「清潔與維護」單元)。
5 關閉鬢角刀 (會聽見「喀噠」一聲)。
清潔與維護
危險: 請先取下握把零件的可拆式電源線,再
於水中清洗此零件。
注意事項: 絕對不可使用壓縮空氣、鋼絲絨、磨蝕性
的清潔劑或侵蝕性的液體 (例如汽油或丙酮) 清潔本產
品。
- 為達到最佳刮鬍性能,請於每回刮鬍之後清潔本產
品。
- 定期清潔以維持較佳的刮鬍效果。
- 使用熱水時請小心。 隨時檢查熱水是否太燙,以避
免手部燙傷。
注意: 沖洗時,產品底部的插孔可能會滴水。 此為正
常現象,並不會造成危險,因為所有的電子零件都密封
於電鬍刀內的供電裝置中。
在水龍頭下清潔電鬍刀組
1 關閉本產品電源,並確定從插座拔出電源線。
繁體中文
95
Page 96

2
1
繁體中文
96
徹底清潔
2 按下釋放鈕,打開電鬍刀組。在水龍頭下以熱水沖
洗電鬍刀組內部與鬍渣室 30 秒。
- 沖洗電鬍刀組的外側。
3 蓋上電鬍刀組,並將多餘的水甩乾。
注意事項: 甩乾多餘的水份時,請小心別讓電鬍刀組
撞到任何東西。
注意事項: 請勿使用毛巾或紙巾擦乾電鬍刀組和鬍渣
室,因為此舉可能損壞電鬍刀組。
4 再一次打開電鬍刀組並保持開啟,讓電鬍刀完全晾
乾。
為達到最佳性能,請每月徹底清潔電鬍刀刀頭一次。
1 關閉本產品電源,並確定從插座拔出電源線。
2 按下釋放鈕,打開電鬍刀組。 將電鬍刀組從產品抽
出。
3 以逆時針方向轉動鎖扣,並移除固定架。
Page 97

1
2
繁體中文
4 一次取下並清洗一個刀頭。 每個電鬍刀刀頭都是由
刀具和刀網組成。
注意: 刀具及刀網是成對組合,請勿一次清潔超過
一組。 如果您不小心將刀具及刀網混在一起,可能
要花幾週的時間才能恢復最理想的刮鬍效果。
- 從電鬍刀刀網上取下刀具,並將這兩個零件置於水
龍頭下沖洗。
5 將刀片放回刀網中。
6 將電鬍刀刀頭裝回電鬍刀組。
注意: 確定電鬍刀刀頭的凸出部分準確地安裝於凹
處。
7 將固定架裝回電鬍刀組,並順時針轉動鎖扣。
97
Page 98

繁體中文
98
8 將電鬍刀組的突耳插入本產品頂端的凹槽。 然後蓋
上電鬍刀組 (會聽見「喀噠」一聲)。
注意: 若電鬍刀組無法順利關上,請檢查是否已妥
善插入電鬍刀刀頭,並將固定架確實鎖好。
將鬢角刀放在水龍頭下沖洗 (僅限 S3520、S3510)
每次使用鬢角刀後,請進行清潔。
1 關閉本產品電源,並確定從插座拔出電源線。
2 將鬢角刀開關往下推即可開啟鬢角刀。
3 開啟產品電源,將鬢角刀放在水龍頭下沖洗。
4 關閉產品電源,讓鬢角刀維持開啟,好讓鬢角刀完
全乾燥。
5 關閉鬢角刀 (會聽見「喀噠」一聲)。
提示: 為使鬢角刀發揮最佳性能,請每六個月以一滴
縫紉機油來潤滑鬢角刀的刀齒。
存放
注意: 我們建議您先將產品晾乾,再蓋上保護蓋。
Page 99

更換
2yrs
2
1
繁體中文
蓋上本產品上的保護蓋以避免損壞。
為達到最佳刮鬍性能,我們建議您每兩年更換一次電鬍
刀刀頭。 刀頭若受損,請立即更換。 更換電鬍刀刀頭
時,請務必使用原廠飛利浦電鬍刀刀頭 (見 '訂購配件
')。
更換提醒
電鬍刀組符號會亮起,表示電鬍刀刀頭需要更換。
1 電鬍刀組符號會持續亮起橘光。
2 關閉本產品電源,並確定從插座拔出電源線。
3 按下釋放鈕,打開電鬍刀組。 將電鬍刀組從產品抽
出。
99
4 以逆時針方向轉動鎖扣,並移除固定架。
Page 100

1
2
5 sec.
繁體中文
100
訂購配件
5 從電鬍刀組上取下電鬍刀刀頭並丟棄。
6 將新的電鬍刀刀頭放入電鬍刀組。
注意: 確定電鬍刀刀頭的凸出部分準確地安裝於凹
處。
7 將固定架裝回電鬍刀組,並順時針轉動鎖扣。
8 將電鬍刀組的突耳插入本產品頂端的凹槽。 然後蓋
上電鬍刀組 (會聽見「喀噠」一聲)。
注意: 若電鬍刀組無法順利關上,請檢查是否已妥
善插入電鬍刀刀頭,並將固定架確實鎖好。
9 請按住開關按鈕 5 秒,以重設更換提醒。 橘色指示
燈就會熄滅。
若要購買配件或備用零件,請造訪
www.shop.philips.com/service,或洽詢您的飛利浦經
銷商。 您也可以聯絡您所在國家/地區的飛利浦客戶服
務中心 (詳細聯絡資料請參閱全球保證書)。
備有下列配件及備用零件可供另外選購:
- SH30 飛利浦電鬍刀刀頭。
- HQ110 飛利浦電鬍刀刀頭噴霧清潔劑
 Loading...