

Page 1
S3540, S3530, SS3520, S3510, S3130, S3120, S3110
Page 2
Page 3
1
7
8
9
2
3
4
5
6
11
10
Page 4

empty page before TOC
Page 5

English 6
Dansk 24
Deutsch 40
Español 61
Français 79
Italiano 100
Nederlands 121
Norsk 140
Português 156
Suomi 173
Svenska 189
Türkçe 205
Ελληνικα
221
Page 6

English
6
Introduction
Congratulations on your purchase and welcome to
Philips! To fully benefit from the support that
Philips offers, register your product at
www.philips.com/welcome.
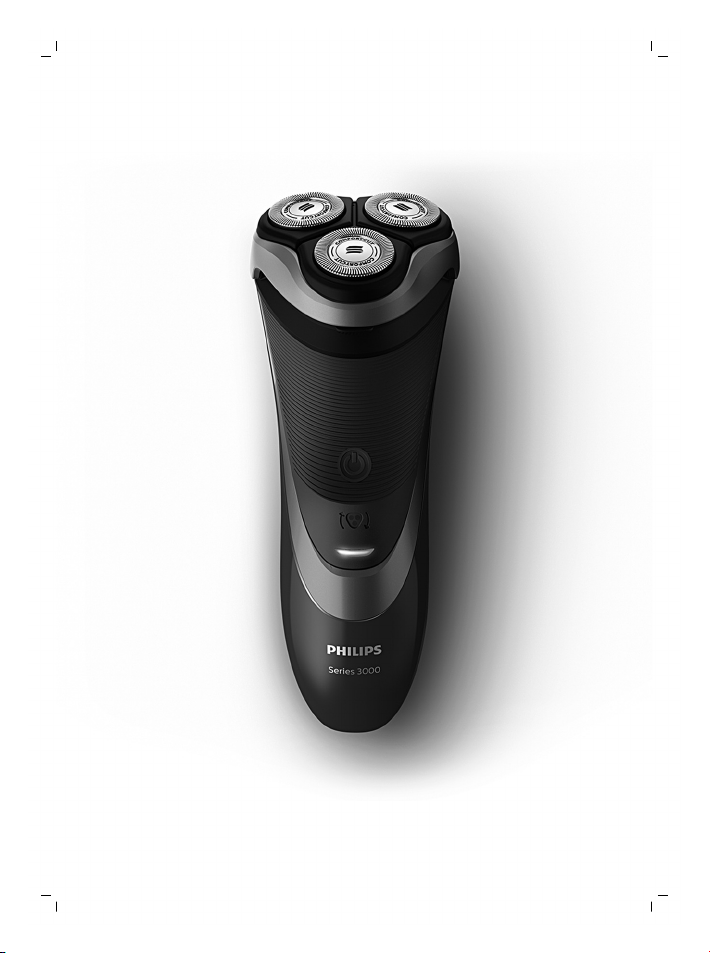
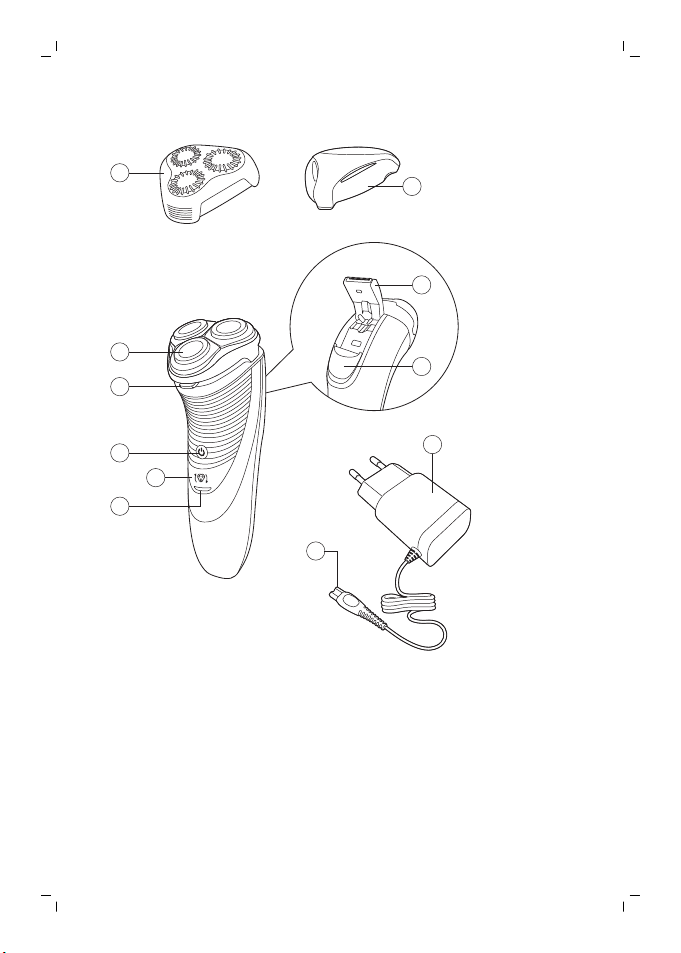
General description (Fig. 1)
1 Click-on stubble cap (S3520, S3510 only)
2 Shaving unit
3 Shaving unit release button
4 On/off button
5 Shaving head symbol
6 Charging light
7 Protection cap
8 Trimmer (S3540, S3530, S3520, S3510 only)
9 Trimmer release slidez (S3540, S3530, S3520,
S3510 only)
10 Supply unit (adapter, type HQ8505)
11 Small plug
Important safety information
Read this important information carefully before
you use the appliance and its accessories and save
it for future reference. The accessories supplied
may vary for different products.
Danger
- Keep the supply unit dry.
English
Page 7

English
Warning
- To charge the battery, only use the
detachable supply unit (type HQ8505)
provided with the appliance.
- The supply unit contains a transformer. Do
not cut off the supply unit to replace it with
another plug, as this causes a hazardous
situation.
- This appliance can be used by children aged
from 8 years and above and persons with
reduced physical, sensory or mental
capabilities or lack of experience and
knowledge if they have been given
supervision or instruction concerning use of
the appliance in a safe way and understand
the hazards involved. Children shall not play
with the appliance. Cleaning and user
maintenance shall not be made by children
without supervision.
- Always unplug the shaver before you clean
it under the tap.
- Always check the appliance before you use
it. Do not use the appliance if it is damaged,
as this may cause injury. Always replace a
damaged part with one of the original type.
7
Page 8
English
8
- Do not open the appliance to replace the
rechargeable battery.
Caution
- Never immerse the cleaning
system or the charging stand in
water and do not rinse it under
the tap.
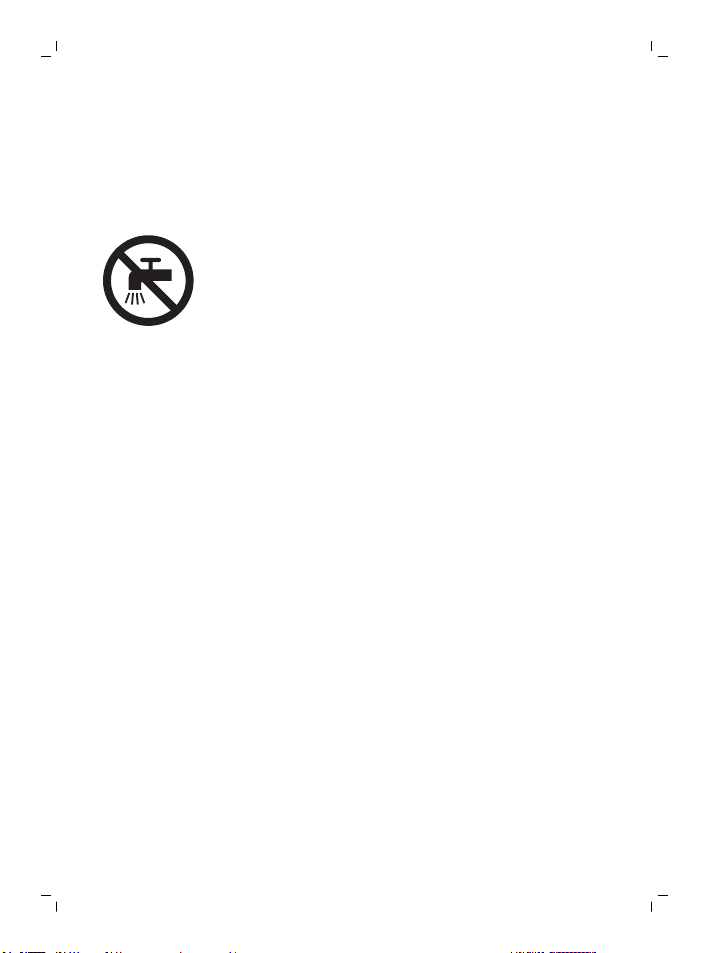
- Never immerse the shaver in
water. Do not use the shaver in
the bath or in the shower.
- Never use water hotter than
60°C to rinse the shaver.
- Only use this appliance for its
intended purpose as shown in
the user manual.
- For hygienic reasons, the
appliance should only be used
by one person.
- Never use compressed air,
scouring pads, abrasive
cleaning agents or aggressive
liquids such as petrol or
acetone to clean the appliance.
Page 9

English
- If your shaver comes with a
cleaning system, always use the
original Philips cleaning fluid
(cartridge or bottle, depending
on the type of cleaning system).
- Always place the cleaning
system on a stable, level and
horizontal surface to prevent
leakage.
- If your cleaning system uses a
cleaning cartridge, always make
sure the cartridge compartment
is closed before you use the
cleaning system to clean or
charge the shaver.
- When the cleaning system is
ready for use, do not move it to
prevent leakage of cleaning
fluid.
9
Page 10
English
10
- Water may drip from the socket
at the bottom of the shaver
when you rinse it. This is normal
and not dangerous because all
electronics are enclosed in a
sealed power unit inside the
shaver.
- Do not use the supply unit in or
near wall sockets that contain
an electric air freshener to
prevent irreparable damage to
the supply unit.
Electromagnetic fields (EMF)
This Philips appliance complies with all applicable
standards and regulations regarding exposure to
electromagnetic fields.
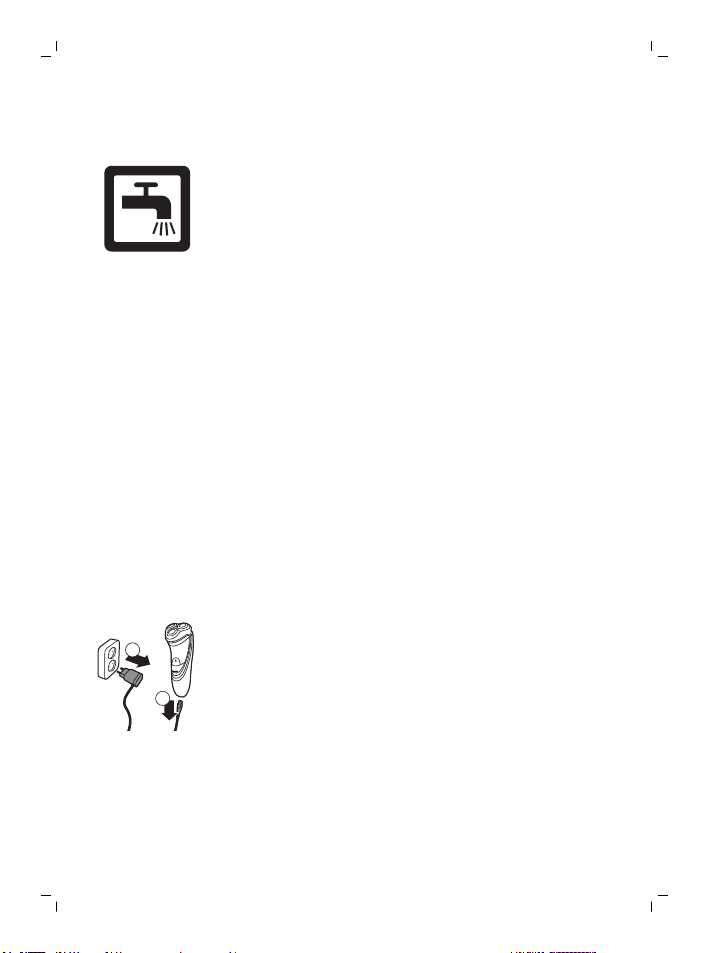
General
- This shaver can be safely cleaned under the
tap.
- The supply unit is suitable for mains voltages
ranging from 100 to 240 volts.
- The supply unit transforms 100-240 volts to a
safe low voltage of less than 24 volts.
Charging
It takes approx. 1 hour (S3540, S3530, S3520,
S3510) or 8 hours (S3130, S3120, S3110) to fully
charge the appliance. When you charge the
appliance for the first time or after a long period of
Page 11
disuse, let it charge until the charging light lights up
1
2
continuously. A fully charged appliance provides
up to 50 minutes (S3540, S3530, S3520, S3510) or
45 minutes (S3130, S3120, S3110) of shaving time.
The shaving time may be less than 50 or 45
minutes as a result of your shaving behavior, your
cleaning habits or your beard type.
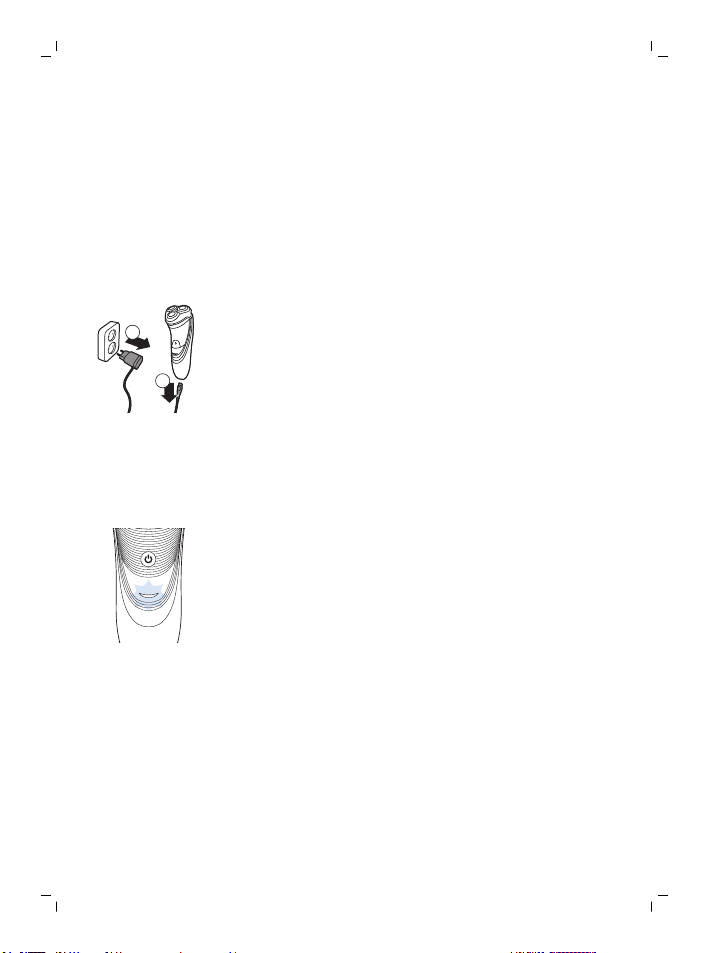
Charging with the adapter
1 Put the small plug in the appliance.
2 Put the supply unit in the wall socket.
- The charging light shows the charging status of
the appliance (see section ‘Charge indications’
in this chapter).
3 After charging, remove the supply unit from the
wall socket and pull the small plug out of the
appliance.
Charge indications
Battery low
- When the battery is almost empty (when there
are only 5 or fewer shaving minutes left), the
charging light starts to flash orange.
- When you switch off the appliance, the charging
light continues to flash orange for a few
seconds.
Quick charging
When you start charging the empty battery, the
charging light alternately flashes orange and green.
After approx. 3 minutes the charging light starts
flashing green only. The appliance now contains
enough energy for a 5-minute shave.
English
11
Page 12
English
12
Charging
- When the appliance is charging, the charging
light flashes green.
Battery fully charged
- When the battery is fully charged, the charging
light lights up green continuously.
Note: After approx. 30 minutes, the charging light
goes out to save energy.
Using the appliance
Note: This appliance can be used without cord or
when it is connected to the wall socket.
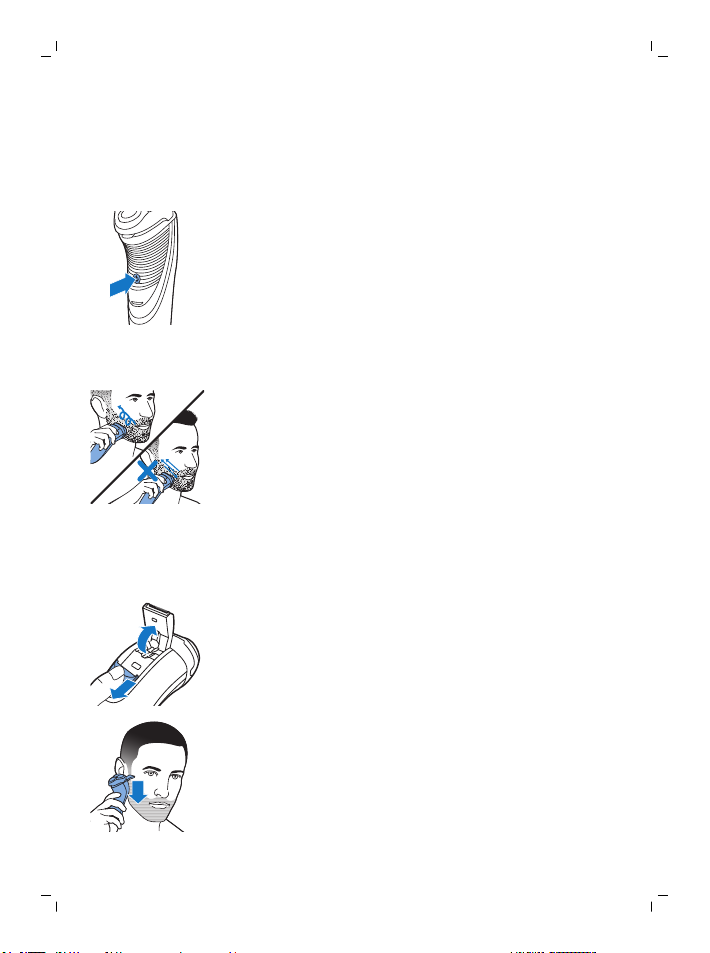
Shaving tips and tricks
- Make circular movements during use. Circular
movements provide better shaving results than
straight movements.
- Your skin may need 2 or 3 weeks to get
accustomed to the Philips shaving system.
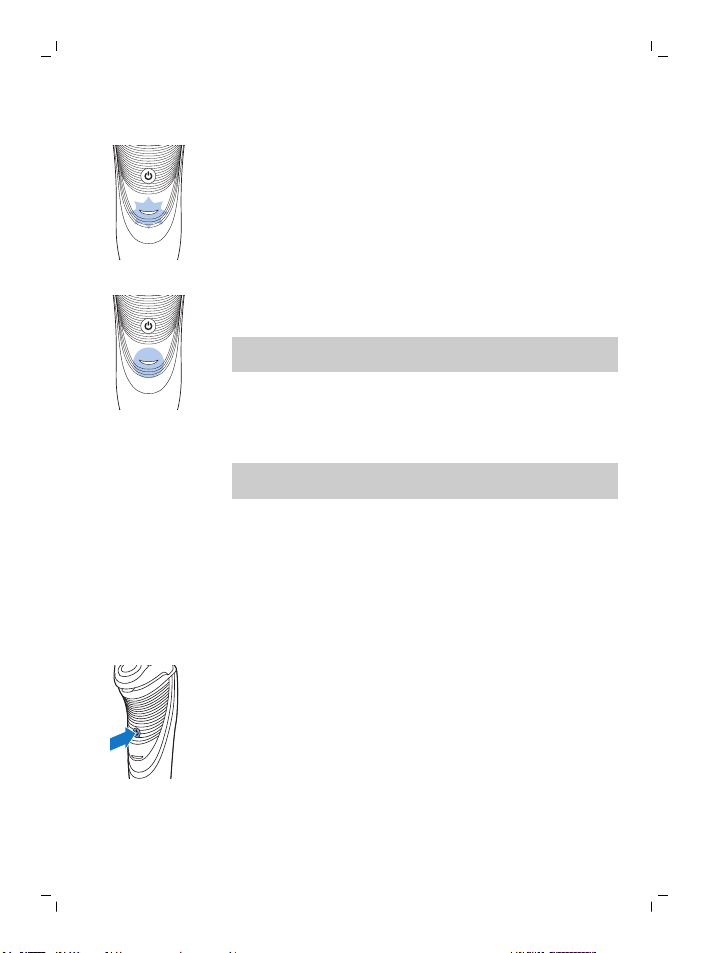
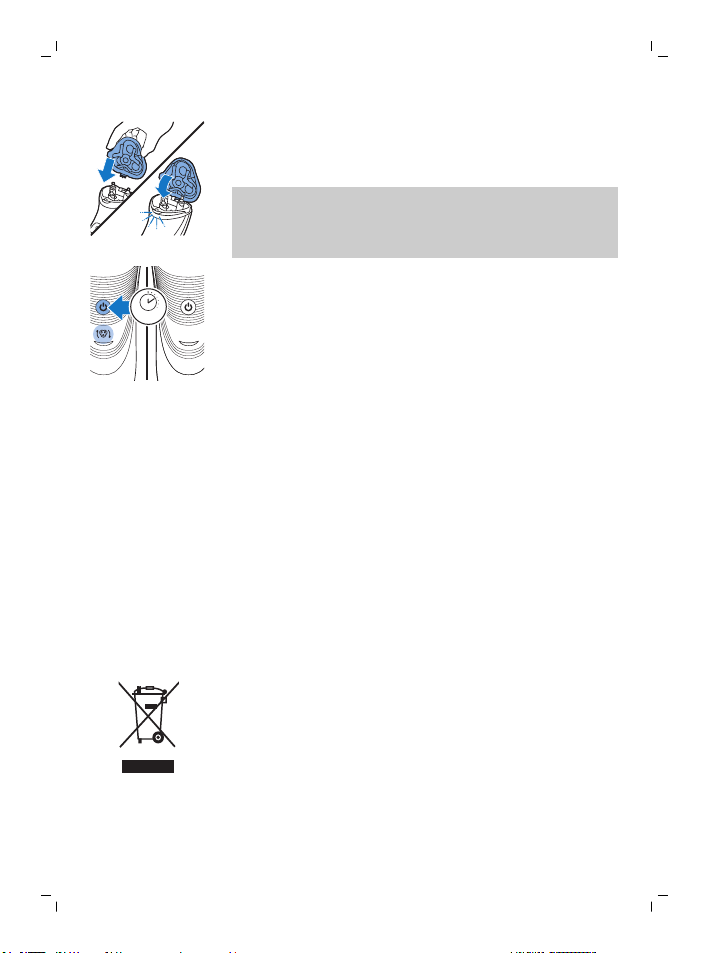
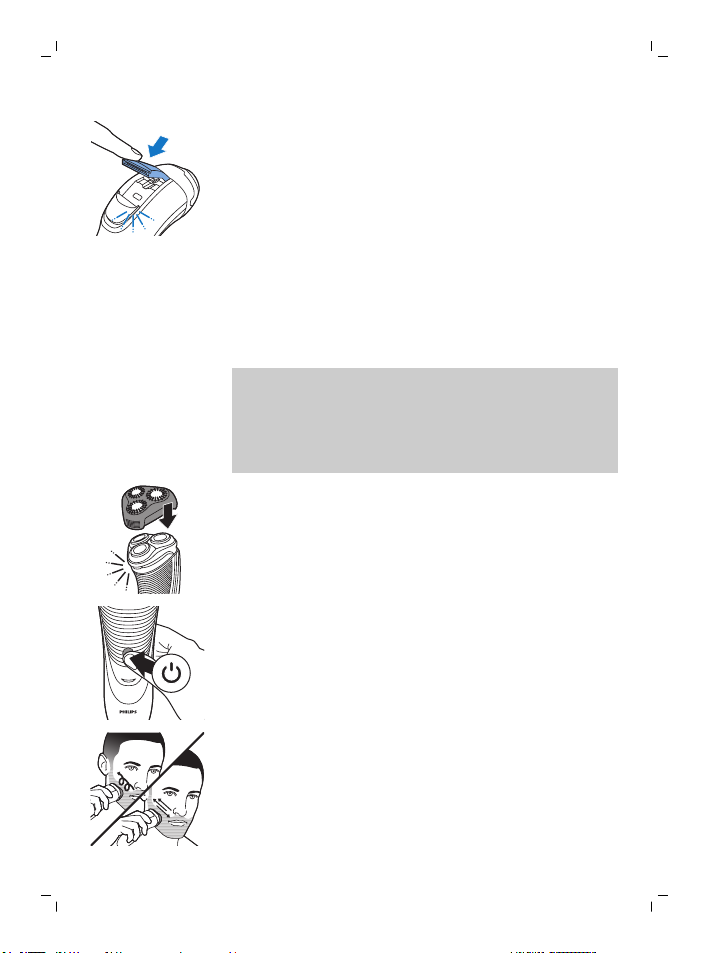
Switching the appliance on and off
1 To switch on the appliance, press the on/off
button once.
2 To switch off the appliance, press the on/off
button once.
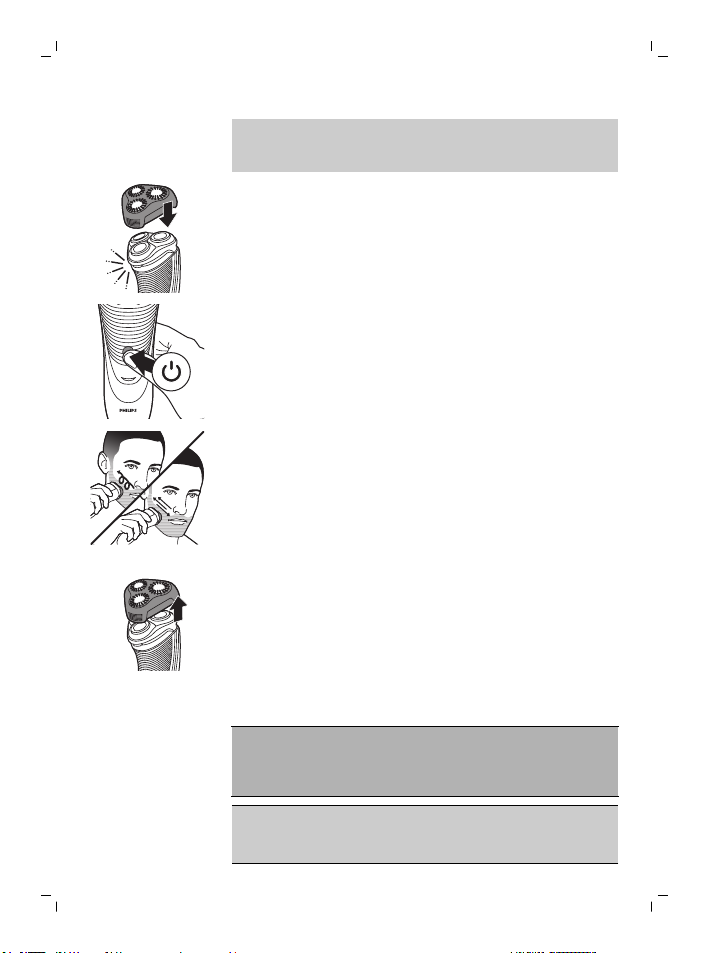
Shaving
1 Switch on the appliance.
Page 13

2 Move the shaving heads over your skin in
circular movements.
3 After shaving, switch off the appliance.
4 Clean the appliance (see chapter ‘Cleaning and
maintenance’).
Trimming (S3540, S3530, S3520, S3510 only)
You can use the trimmer to groom your sideburns
and moustache.
1 Push the trimmer release slide downwards to
open the trimmer.
2 Switch on the appliance.
- You can now start trimming.
3 After trimming, switch off the appliance.
4 Clean the trimmer (see chapter ‘Cleaning and
maintenance’).
5 Close the trimmer (‘click’).
English
13
Trimming with click-on stubble cap (S3520, S3510 only)
You can use the click-on stubble cap to trim your
beard to a length of a 3 day beard or to maintain a
1mm stubble look.
- For best trimming results with the click-on
stubble cap, hair and skin should be dry.
- The maximum beard length for using the click-on
Page 14
14
English
stubble cap is a 7 day beard.
- The click-on stubble cap is for trimming above
the neck line only.
1 Place the click-on stubble cap on the
appliance.
2 To switch on the appliance, press the on/off
button once.
3 Gently press the appliance to your skin. Make
both straight and circular movements to
achieve the best result.
4 To switch off the appliance, press the on/off
button once.
5 Pull off the stubble cap from the appliance.
6 Clean the appliance and the click-on stubble
cap after each use.
Cleaning and maintenance
Danger: Remove the detachable cord
from the handheld part before cleaning
this part in water.
Caution: Never use compressed air, scouring
pads, abrasive cleaning agents or aggressive
Page 15
liquids such as petrol or acetone to clean the
appliance.
- Clean the appliance after every shave for
optimal shaving performance.
- Regular cleaning guarantees better shaving
performance.
- Be careful with hot water. Always check if the
water is not too hot, to prevent your hands from
getting burnt.
Note: Water may leak from the socket at the
bottom of the appliance when you rinse it. This is
normal and not dangerous because all electronics
are enclosed in a sealed power unit inside the
shaver.
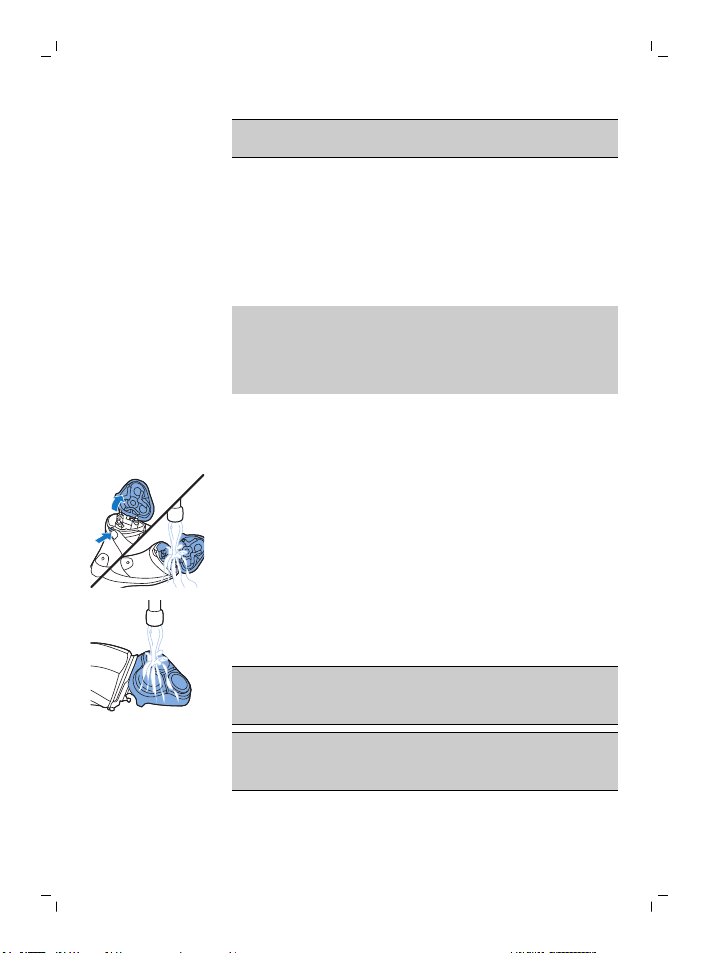
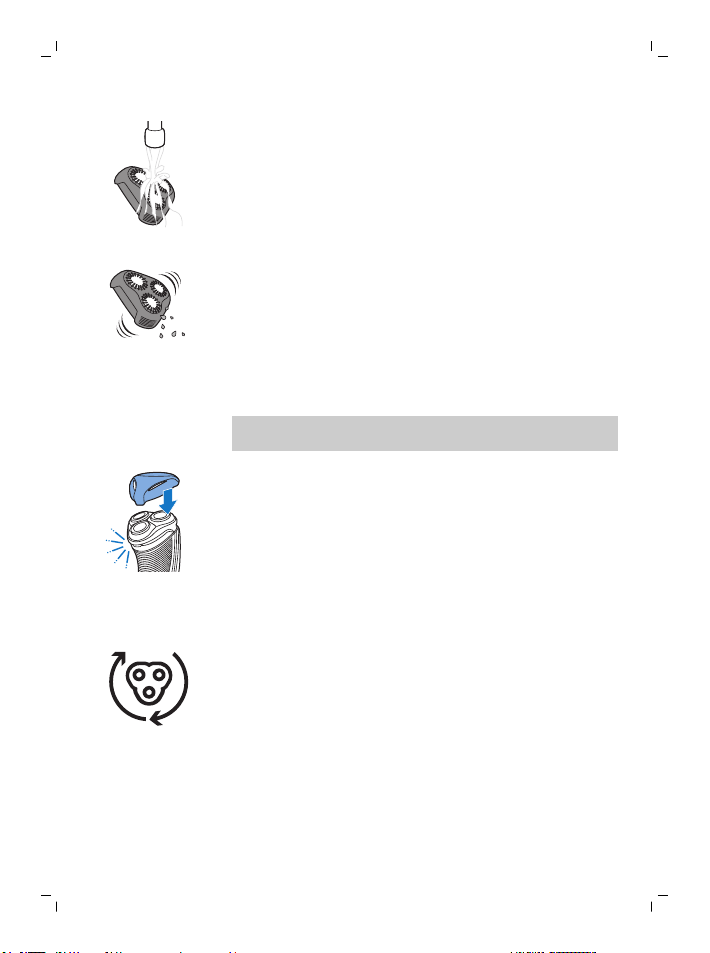
Cleaning the shaving unit under the tap
1 Switch off the appliance and make sure it is
disconnected from the wall socket.
2 Press the release button to open the shaving
unit. Rinse the inside of the shaving unit and
the hair chamber under a hot tap for 30
seconds.
- Rinse the outside of the shaving unit.
3 Close the shaving unit and shake off excess
water.
Caution: Be careful not to hit the shaving unit
against anything while you shake off excess
water.
Caution: Never dry the shaving unit and the hair
chamber with a towel or tissue, as this may
damage the shaving unit.
4 Open the shaving unit again and leave it open
to let the appliance dry completely.
English
15
Page 16
2
1
English
16
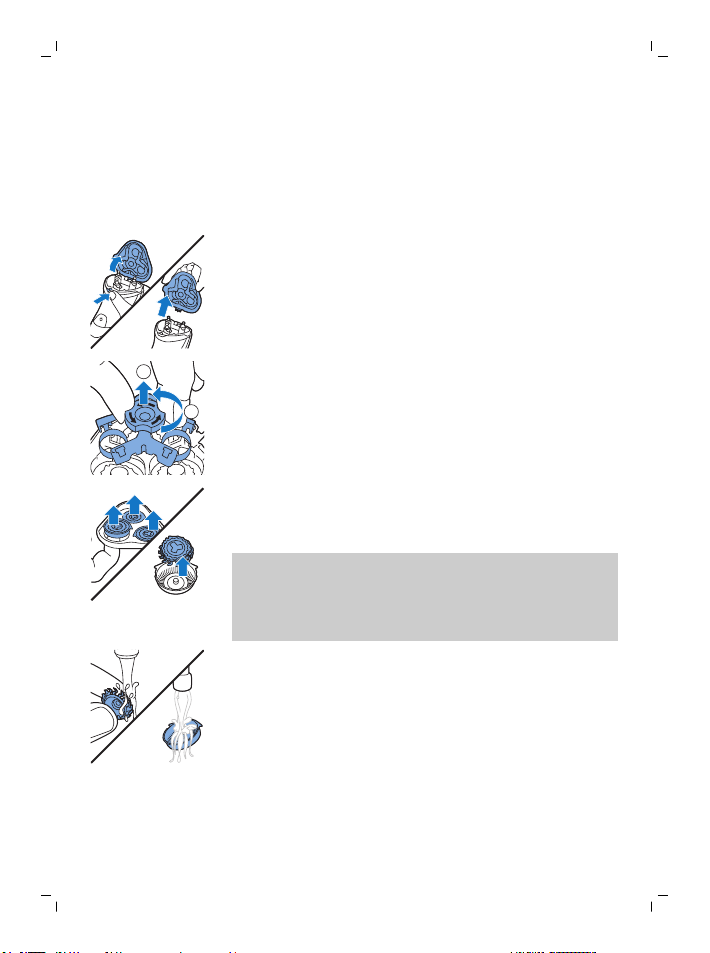
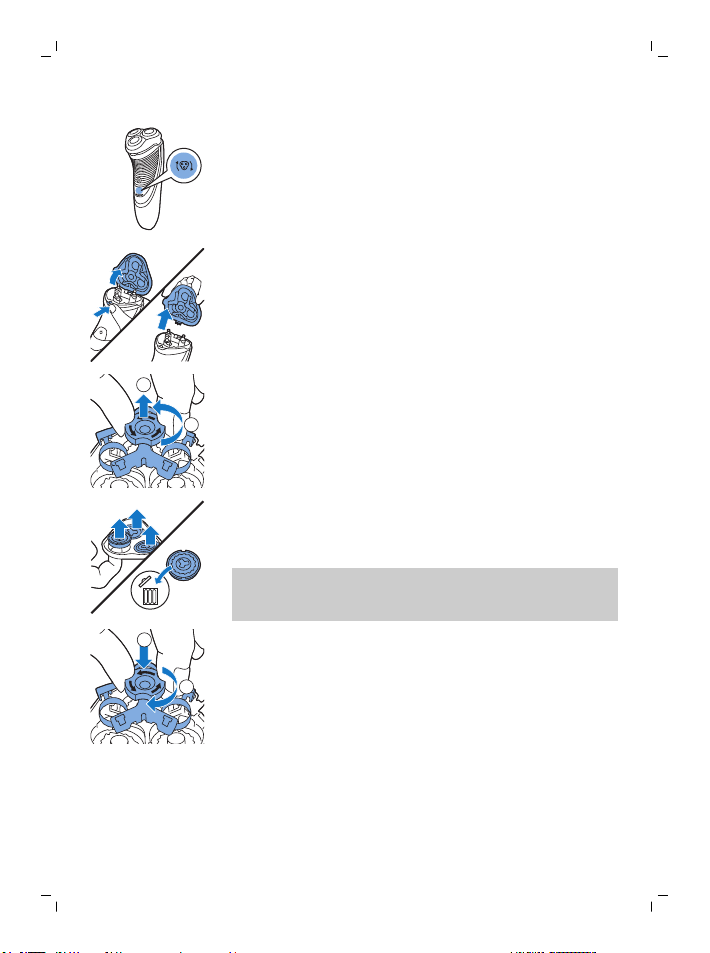
Thorough cleaning
Clean the shaving heads thoroughly once a month
for optimal performance.
1 Switch off the appliance and make sure it is
2 Press the release button to open the shaving
3 Turn the lock anticlockwise and remove the
4 Remove and clean one shaving head at a time.
- Remove the cutter from the shaving guard and
disconnected from the wall socket.
unit. Pull the shaving unit off the appliance.
retaining frame.
Each shaving head consists of a cutter and a
guard.
Note: Do not clean more than one cutter and
guard at a time, since they are all matching sets.
If you accidentally mix up the cutters and
guards, it may take several weeks before
optimal shaving performance is restored.
clean both parts under the tap.
Page 17
1
2
English
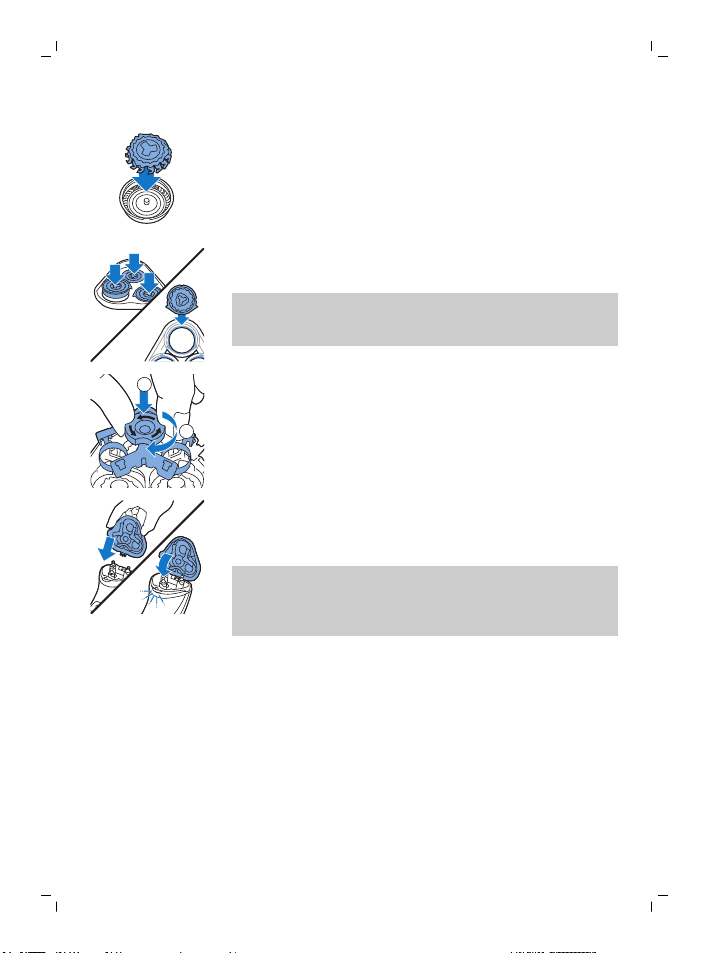
5 Put the cutter back into the guard.
6 Put the shaving heads back into the shaving
unit.
Note: Make sure that the projections of the
shaving heads fit exactly into the recesses of
the shaving head holder.
7 Put the retaining frame back into the shaving
unit and turn the lock clockwise.
8 Insert the lug of the shaving unit into the slot in
the top of the appliance. Then close the shaving
unit ('click').
Note: If the shaving unit does not close
smoothly, check if you have inserted the
shaving heads properly and if the retaining
frame is locked.
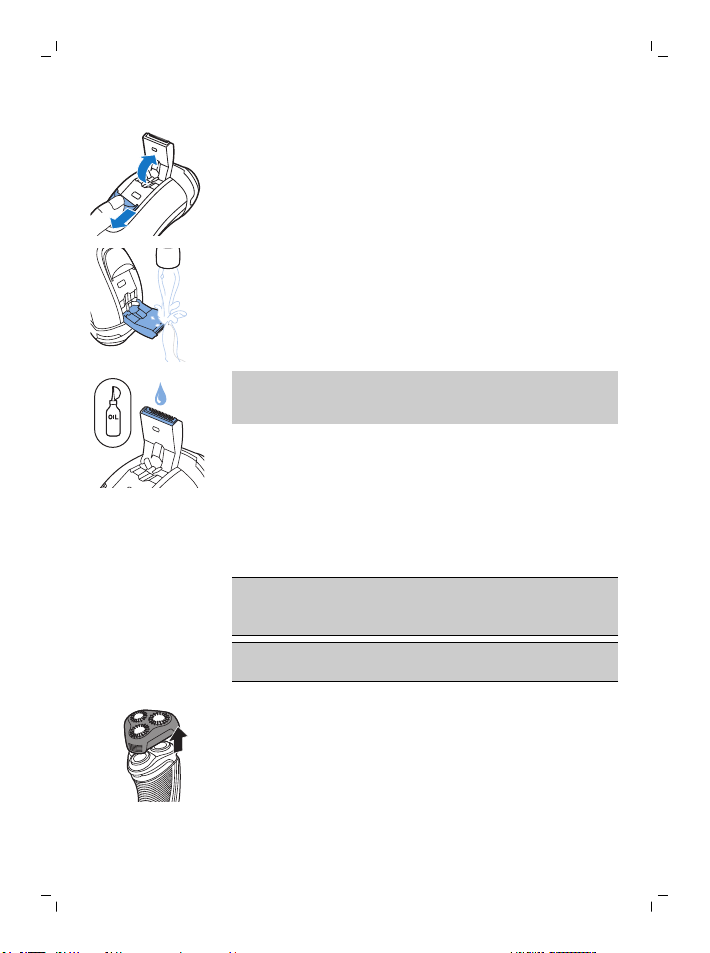
Cleaning the trimmer under the tap (S3520, S3510 only)
Clean the trimmer every time you have used it.
1 Switch off the appliance and make sure it is
disconnected from the wall socket.
17
Page 18
English
18
2 Push the trimmer release slide downwards to
open the trimmer.
3 Switch on the appliance and clean the trimmer
under the tap.
4 Switch off the appliance and leave the trimmer
open to let it dry.
5 Close the trimmer (‘click’).
Tip: For optimal trimming performance, lubricate
the trimmer teeth with a drop of sewing machine
oil every six months.
Cleaning the click-on stubble cap (S3520, S3510 only)
Clean the click-on stubble cap after every trim for
optimal performance.
Be careful with hot water. Always check if the
water is not too hot, to prevent burning your
hands.
Never dry the stubble cap with a towel or tissue,
as this may damage the stubble cap.
1 Remove the stubble cap from the appliance.
Page 19
Storage
2yrs
Replacement
English
2 Rinse the stubble cap under a warm tap.
3 Carefully shake off excess water and let the
stubble cap air dry.
Note: We advise you to let the appliance dry
before you put the protection cap on it.
Put the protection cap on the appliance to prevent
damage.
For maximum shaving performance, we advise you
to replace the shaving heads every two years.
Replace damaged shaving heads immediately.
Always replace the shaving heads with original
Philips shaving heads' (see 'Ordering accessories').
Replacement reminder
The shaving unit symbol will light up to indicate
that the shaving heads need to be replaced.
19
Page 20
2
1
1
2
20
English
1 The shaving unit symbol lights up orange
continuously.
2 Switch off the appliance and make sure it is
disconnected from the wall socket.
3 Press the release button to open the shaving
unit. Pull the shaving unit off the appliance.
4 Turn the lock anticlockwise and remove the
retaining frame.
5 Remove the shaving heads from the shaving
unit and throw them away.
6 Place new shaving heads in the shaving unit.
Note: Make sure that the projections of the
shaving heads fit exactly into the recesses of
the shaving head holder.
7 Put the retaining frame back into the shaving
unit and turn the lock clockwise.
Page 21
8 Insert the lug of the shaving unit into the slot in
5 sec.
the top of the appliance. Then close the shaving
unit ('click').
Note: If the shaving unit does not close
smoothly, check if you have inserted the
shaving heads properly and if the retaining
frame is locked.
9 Press and hold the on/off button for 5 seconds
to reset the replacement reminder on the
shaver. The orange light goes out.
Ordering accessories
To buy accessories or spare parts, visit
www.shop.philips.com/service or go to your
Philips dealer. You can also contact the Philips
Consumer Care Center in your country (see the
international warranty leaflet for contact details).
The following accessories and spare parts are
available:
- SH30 Philips Shaving Heads.
- HQ110 Philips shaving head cleaning spray
Recycling
- This symbol means that this product shall not
be disposed of with normal household waste
(2012/19/EU).
English
21
Page 22
English
22
- This symbol means that this product contains a
built-in rechargeable battery which shall not be
disposed of with normal household waste
(2006/66/EC). Please take your product to an
official collection point or a Philips service
center to have a professional remove the
rechargeable battery.
- Follow your country’s rules for the separate
collection of electrical and electronic products
and rechargeable batteries. Correct disposal
helps prevent negative consequences for the
environment and human health.
Warranty and support
If you need information or support, please visit
www.philips.com/support or read the
international warranty leaflet.
Guarantee restrictions
The shaving heads (cutters and guards) are not
covered by the terms of the international
guarantee because they are subject to wear.
Troubleshooting
This chapter summarizes the most common
problems you could encounter with the appliance.
If you are unable to solve the problem with the
information below, visit www.philips.com/support
for a list of frequently asked questions or contact
the Consumer Care Center in your country.
Problem Possible cause Solution
The appliance
does not shave as
well as it used to.
The shaving heads
are damaged or
worn.
Replace the shaving heads
(see chapter
'Replacement').
Page 23

Problem Possible cause Solution
English
23
The appliance
does not work
when I press the
on/off button.
Long hairs obstruct
the shaving heads.
You have not
inserted the
shaving heads
properly.
The rechargeable
battery is empty.
The temperature of
the appliance is too
high. In this case,
the appliance does
not work.
Clean the shaving heads
one by one (see chapter
'Cleaning and
maintenance').
Make sure that the
projections of the shaving
heads fit exactly into the
recesses (see chapter
'Cleaning and
maintenance').
Recharge the battery (see
chapter 'Charging'.
As soon as the
temperature of the
appliance has dropped
sufficiently, you can switch
on the appliance again.
Page 24

Dansk
24
Introduktion
Tillykke med dit køb, og velkommen til Philips! For
at få fuldt udbytte af den support, Philips tilbyder,
skal du registrere dit produkt på
www.philips.com/welcome.
Generel beskrivelse (fig. 1)
1 Stubbekappe til at klikke på (kun S3520, S3510)
2 Skærenhed
3 Knap til at frigøre skærenhed
4 On/off-knap
5 Shaverhovedsymbol
6 Opladeindikator med lys
7 Beskyttelseshætte
8 Trimmer (kun S3540, S3530, S3520, S3510)
9 Udløser til trimmerz (kun S3540, S3530, S3520,
S3510)
10 Strømforsyningsenhed (adapter, HQ8505 type)
11 Lille stik
Vigtige sikkerhedsoplysninger
Læs disse vigtige oplysninger omhyggeligt
igennem, inden apparatet og tilbehøret tages i
brug, og gem dem til eventuel senere brug. Det
medfølgende tilbehør kan variere for forskellige
produkter.
Fare
- Hold forsyningsenheden tør.
Dansk
Page 25
Advarsel
Dansk
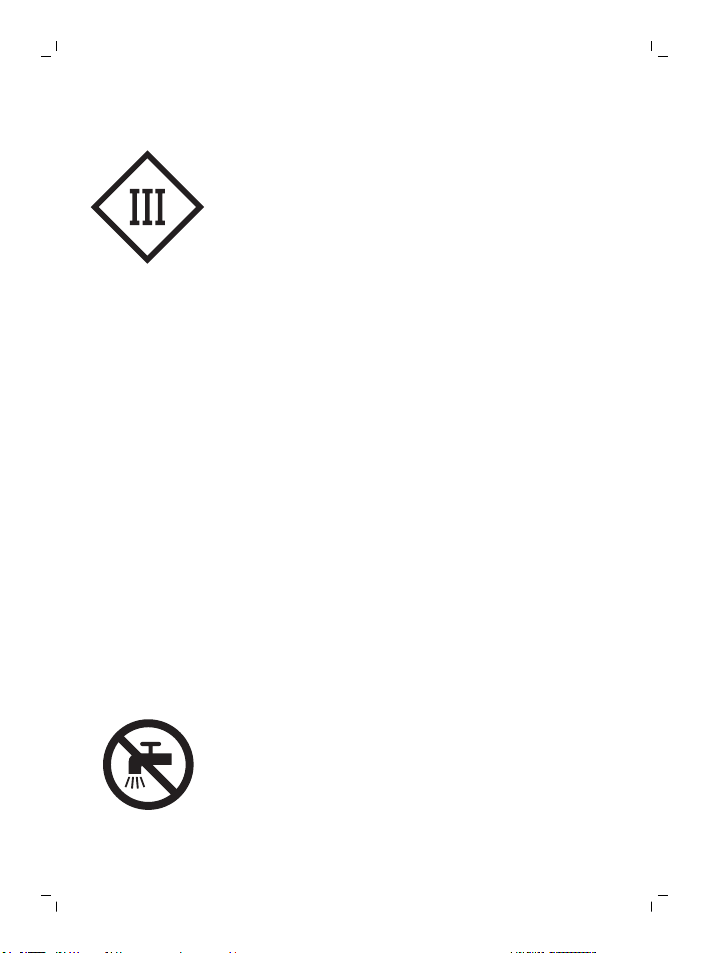
- Apparatet er en konstruktion i Klasse III.
- Brug kun den aftagelige forsyningsenhed (type
HQ8505), der fulgte med apparatet, til at
oplade batteriet.
- Strømforsyningsenheden indeholder en
transformator. Klip ikke
strømforsyningsenheden af og udskift den med
et andet stik, da dette vil føre til farlige
situationer.
- Dette apparat må bruges af børn fra 8 år og
opefter og personer med reducerede fysiske,
sensoriske eller mentale evner eller manglende
erfaring og viden, hvis de er blevet instrueret i
sikker brug af apparatet og forstår de
medfølgende risici. Lad ikke børn lege med
apparatet. Rengøring og vedligeholdelse må
ikke foretages af børn uden opsyn.
- Tag altid stikket ud af shaveren, inden den
skylles under vandhanen.
- Kontroller altid apparatet, indendu anvender
det. Anvend ikke apparatet, hvis det er
beskadiget, da dette kan forårsage
personskade. Udskift altid en beskadiget del
med en tilsvarende original type.
- Apparatet må ikke åbnes i forbindelse med
udskiftning af det genopladelige batteri.
25
Forsigtig
- Kom aldrig rengøringssystemet eller
opladeenheden ned i vand, og undgå at skylle
dem under hanen.
- Kom aldrig shaveren ned i vand. Brug ikke
shaveren i badet eller under bruseren.
- Rens aldrig shaveren med vand, der er varmere
end 60 °C.
Page 26

26
Dansk
- Brug kun apparatet til det tilsigtede formål som
vist i brugervejledningen.
- Af hygiejniske grunde bør apparatet kun
anvendes af en og samme person.
- Brug aldrig trykluft, skuresvampe eller skrappe
rengøringsmidler, som f.eks. benzin, acetone
eller lignende, til rengøring af apparatet.
- Hvis din shaver leveres med et
rengøringssystem, skal du altid bruge den
originale Philips rensevæske (i rensepatron eller
flaske, afhængigt af typen af rengøringssystem).
- Placer altid rengøringssystemet på et stabilt,
plant og vandret underlag for at undgå lækage.
- Hvis dit rengøringssystem anvender en
rensepatron, skal du altid sørge for, at rummet
til rensepatronen er lukket, før du bruger
rengøringssystemet til at rengøre eller oplade
shaveren.
- For at undgå udsivende rensevæske må
rengøringssystemet ikke flyttes, mens det er klar
til brug.
- Der kan dryppe lidt vand ud gennem stikket i
bunden af shaveren, når du skyller den. Dette er
helt normalt og ganske ufarligt, da al
elektronikken er indkapslet i en forseglet
motorenhed inde i shaveren.
- Brug ikke strømforsyningsenheden i eller i
nærheden af stikkontakter, som indeholder en
elektrisk luftfrisker, for at forhindre uoprettelig
beskadigelse af strømforsyningsenheden.
Elektromagnetiske felter (EMF)
Dette Philips-apparat overholder alle branchens
gældende standarder og regler angående
eksponering for elektromagnetiske felter.
Page 27
Generelt
1
2
- Denne shaver kan skylles under rindende vand
uden risiko.
- Forsyningsenheden er egnet til netspændinger
fra 100 til 240 volt.
- Strømforsyningsenheden omformer 100-240
Volt til en lav sikkerhedsspænding under 24
Volt.
- Maks. støjniveau: Lc = 69dB(A)
Opladning
En fuld opladning af apparatet tager ca. 1 time
(S3540, S3530, S3520, S3510) eller 8 timer (S3130,
S3120, S3110). Når shaveren oplades for første gang
eller efter en længere pause, skal den oplade,
indtil opladeindikatoren lyser konstant. Et fuldt
opladet apparat giver en brugstid på op til 50
minutter (S3540, S3530, S3520, S3510) eller 45
minutter (S3130, S3120, S3110). Barberingstiden er
muligvis kortere end 50 eller 45 minutter som følge
af dine barberingsvaner, dine rensevaner eller din
skægtype.
Opladning med adapter
1 Sæt det lille stik i apparatet.
2 Slut adapteren til stikkontakten.
- Opladeindikatoren viser opladningsstatus for
shaveren (se afsnittet "Opladningsindikatorer" i
dette kapitel).
3 Efter opladning skal du tage forsyningsenheden
ud af stikkontakten og tage det lille stik ud af
apparatet.
Opladningsindikatorer
Lavt batteriniveau
Dansk
27
Page 28
28
Dansk
- Når batteriet næsten er afladet (når der kun er 5
minutter eller færre tilbage til barbering), lyser
opladeindikatoren orange.
- Når du slukker for shaveren, fortsætter
opladeindikatorenmed at blinke orange i nogle
sekunder.
Lynopladning
Når du starter opladningen af det tomme batteri,
blinker opladeindikatoren skiftevis orange og
grønt. Efter ca. 3 minutter blinker
opladeindikatoren kun grønt. Shaveren har nu nok
strøm til 5 minutters barbering.
Opladning
- Når apparatet oplades, blinker
opladeindikatoren grønt.
Batteri fuldt opladet
- Når batteriet er fuldt opladet,
lyseropladeindikatoren konstant grønt.
Bemærk: Efter ca. 30 minutter slukker
opladeindikatoren for at spare på energien.
Sådan bruges apparatet
Bemærk: Shaveren kan bruges uden ledning, eller
når den er tilsluttet en stikkontakt.
Barberingstips og tricks
- Lav cirkulære bevægelser under brug. Cirkulære
bevægelser giver bedre barberingsresultater
end lige bevægelser.
Page 29
- Vær opmærksom på, at der kan gå 2-3 uger, før
din hud helt har vænnet sig til Philips'
barberingssystem.
Sådan tændes og slukkes apparatet
1 Apparatet tændes ved at trykke én gang på
tænd/sluk-knappen.
2 Apparatet slukkes ved at trykke én gang på
on/off-knappen.
Barbering
1 Tænd for apparatet.
2 Bevæg skærhovederne hen over huden i
cirkulære bevægelser.
3 Efter trimning skal apparatet slukkes.
4 Rengør apparatet (se afsnittet "Rengøring og
vedligeholdelse").
Trimning (kun S3540, S3530, S3520, S3510)
Trimmeren kan bruges til at style bakkenbarter og
moustache.
1 Skub skyderen til frigørelse af trimmeren nedad
for at åbne trimmeren.
2 Tænd for apparatet.
Dansk
29
- Trimningen kan nu påbegyndes.
3 Efter trimning skal apparatet slukkes.
4 Rengør trimmeren (se afsnittet "Rengøring og
vedligeholdelse").
Page 30
Dansk
30
5 Luk trimmeren ("klik").
Trimning med stubbekappe, der kan klikkes på (kun S3520, S3510)
Du kan bruge stubbekamme, der kan klikkes på, til
at trimme skægget til en længde på 3 dages
stubbe eller stubbe på 1 mm.
- Stubbekappen, der kan klikkes på, giver det
bedste trimningsresultat på tør hud og tørt hår..
- Den maksimale skæglængde, som stubbekappen
kan bruges på, er 7 dages skæg.
- Stubbekappen er kun beregnet til trimning fra
halsen og opefter..
1 Sæt stubbekappen på apparatet.
2 Apparatet tændes ved at trykke én gang på
tænd/sluk-knappen.
3 Tryk apparatet let mod huden. Foretag både
lige strøg og cirkelbevægelser for at få det
bedste resultat.
4 Apparatet slukkes ved at trykke én gang på
on/off-knappen.
Page 31

Dansk
5 Træk stubbekappen af apparatet.
6 Rengør apparatet og stubbekappen efter hver
brug.
Rengøring og vedligeholdelse
Fare: Tag den aftagelige netledning ud af
den håndholdte del, inden denne del
rengøres i vand.
Forsigtig: Brug aldrig trykluft, skuresvampe eller
skrappe rengøringsmidler, som f.eks. benzin,
acetone eller lignende, til rengøring af apparatet.
- Rengør apparatet efter hver barbering for at
bevare den optimale barberingsevne.
- Regelmæssig rengøring sikrer det bedste
barberingsresultat.
- Vær forsigtig med varmt vand. Kontroller altid,
at vandet ikke er for varmt, så du ikke skolder
dine hænder.
Bemærk: Der kan dryppe lidt vand ud gennem
stikket i bunden af shaveren, når du skyller den.
Dette er helt normalt og ganske ufarligt, da al
elektronikken er indkapslet i en forseglet
motorenhed inde i shaveren.
Rengøring af skærhovedet under rindende vand
1 Sluk for apparatet, og sørg for, at det er taget ud
af stikkontakten.
2 Tryk på udløserknappen, og luk skærhovedet
op. Skyl skærenhedens indersideog
skægkammeret under den varme hane i 30
sekunder.
31
Page 32

2
1
Dansk
32
- Skyl skærhovedets yderside.
3 Luk skærhovedet, og ryst overskydende vand
Forsigtig: Pas på, at skærhovedet ikke støder
mod andre ting, når du ryster overskydende vand
væk.
Forsigtig: Skærhovedet og skægkammeret må
ikke tørres med et håndklæde eller køkkenrulle,
da dette kan beskadige skærhovedet.
4 Luk skærhovedet op igen - og lad det være
Grundig rengøring
Rengør skærhovederne grundigt en gang om
måneden for at bevare den optimale funktion.
1 Sluk for apparatet, og sørg for, at det er taget ud
2 Tryk på udløserknappen, og luk skærhovedet
3 Drej låsen venstre om, og tag samlerammen af.
væk.
åbent - til shaveren er helt tør.
af stikkontakten.
op. Træk skærhovedetaf apparatet.
4 Skærehovederne skal tages af og rengøres ét
ad gangen. Hvert skærehoved består af en kniv
og en kappe.
Bemærk: Rens kun ét skær ad gangen, da knive
og lamelkapper er slebet parvis. Kommer man
ved en fejltagelse til at blande knive og
Page 33

1
2
Dansk
lamelkapper, kan det tage flere uger, før
shaveren igen barberer optimalt.
- Fjern skæret fra skærkappen, og rengør begge
dele under vandhanen.
5 Sætskærenheden tilbage i lamelkappen.
6 Sæt skærene tilbage i skærhovedet.
Bemærk: Sørg for, at skærhovedernes tapper
passer præcist ind i fordybningerne på
skærholderen.
7 Sæt samlerammen tilbage i skærhovedet, og
drej låsen i urets retning.
33
8 Placer tappen på skærhovedet i rillerne øverst
på apparatet. Luk derefter skærenheden med
et klik.
Bemærk: Hvis skærhovedet ikke lukker uden
modstand, skal du kontrollere, at du har
placeret skærene korrekt, og at samlerammen
er låst.
Page 34

Dansk
34
Rengøring af trimmeren under vandhanen (kun S3520, S3510)
Rens trimmeren, hver gang den har været brugt.
1 Sluk for apparatet, og sørg for, at det er taget ud
af stikkontakten.
2 Skub skyderen til frigørelse af trimmeren nedad
for at åbne trimmeren.
3 Tænd for apparatet, og rengør trimmeren under
vandhanen.
4 Sluk for apparatet, og lad trimmeren være åben,
så den kan tørre.
5 Luk trimmeren med et klik.
Tip: Smør trimmerens tænder med en dråbe
symaskineolie hver 6. måned for at bevareoptimal
trimmerfunktion.
Rengøring af stubbekappe, der kan klikkes på (kun S3520, S3510)
Rengør stubbekappen efter hver trimning for at
sikre den optimale ydeevne.
Forsigtig: Vær forsigtig med varmt vand.
Kontrollér altid, at vandet ikke er for varmt, så du
ikke skolder dine hænder.
Stubbekappen må aldrig tørres med et
håndklæde eller køkkenrulle, da det kan
beskadige den.
Page 35

Opbevaring
2yrs
Dansk
1 Tag stubbekappen af apparatet.
2 Skyl stubbekappen under den varme hane.
3 Ryst forsigtigtoverskydende vand af, og lad
stubbekappen lufttørre helt.
Bemærk: Vi anbefaler, at du lader apparatet tørre,
før du sætter beskyttelseshætten på.
Sæt beskyttelseskappen på apparatet, så den ikke
beskadiges.
35
Udskiftning
For at bevare optimal barberingsevne anbefales
det at udskifte skærene hvert andet år. Udskift
beskadigede skærhoveder med det samme.
Udskift altid skærhovederne med originale Philipsskærhoveder (se 'Bestilling af tilbehør').
Page 36

2
1
1
2
36
Dansk
Påmindelse om udskiftning
Skærenhedssymbolet lyser for at indikere, at
skærhovederne trænger til at udskiftes.
1 Skærenhedssymbolet lyser konstant orange.
2 Sluk for apparatet, og sørg for, at det er taget ud
af stikkontakten.
3 Tryk på udløserknappen, og luk skærhovedet
op. Træk skærhovedetaf apparatet.
4 Drej låsen venstre om, og tag samlerammen af.
5 Fjern skærhovederne fra skærenheden, og smid
dem væk.
6 Sæt de nye skærhoveder i skærenheden.
Bemærk: Sørg for, at skærhovedernes tapper
passer præcist ind i fordybningerne på
skærholderen.
7 Sæt samlerammen tilbage i skærhovedet, og
drej låsen i urets retning.
Page 37

8 Placer tappen på skærhovedet i rillerne øverst
5 sec.
på apparatet. Luk derefter skærenheden med
et klik.
Bemærk: Hvis skærhovedet ikke lukker uden
modstand, skal du kontrollere, at du har
placeret skærene korrekt, og at samlerammen
er låst.
9 Tryk på on/off-knappen, og hold den inde i 5
sekunder for at nulstille
udskiftningspåmindelsen på shaveren. Den
orange indikator slukker.
Bestilling af tilbehør
Du kan købe tilbehør og reservedele på
www.shop.philips.com/service eller hos din
Philips-forhandler. Du kan også kontakte det
lokale Philips-kundecenter (du kan finde
kontaktoplysninger i folderen "World-Wide
Guarantee").
Der findes følgende tilbehør og reservedele:
- SH30 Philips-skær.
- HQ110 Philips Shaving Head Cleaning Spray
(rengøringsspray til skær).
Dansk
37
Genanvendelse
- Dette symbol betyder, at dette produkt ikke må
bortskaffes sammen med almindeligt
husholdningsaffald (2012/19/EU).
Page 38

Dansk
38
- Dette symbol betyder, at produktet indeholder
et indbygget genopladeligt batteri, som ikke må
bortskaffes sammen med almindeligt
husholdningsaffald (2006/66/EF). Aflever
produktet på et officielt indsamlingssted eller
hos en Philips-forhandler, hvor du kan få en
fagmand til at tage det genopladelige batteri
ud.
- Følg den nationale lovgivning om særskilt
indsamling af elektriske og elektroniske
produkter og genopladelige batterier. Korrekt
bortskaffelse er med til at forhindre negativ
påvirkning af miljøet og menneskers helbred.
Reklamationsret og support
Hvis du har brug for hjælp eller support, bedes du
besøge www.philips.com/support eller læse i
folderen om international garanti.
Gældende forbehold i reklamationsretten
Skærene (knive og lamelkapper) er ikke omfattet af
den internationale garanti, da de udsættes for
slitage.
Fejlfinding
Dette afsnit opsummerer de mest almindelige
problemer, der kan forekomme ved brug af
enheden. Har du brug for yderligere hjælp og
vejledning, så besøg www.philips.com/support for
at få en liste med ofte stillede spørgsmål, eller
kontakt dit lokale Philips Kundecenter.
Page 39

Problem Mulig årsag Løsning
Dansk
39
Apparatet
barberer ikke lige
så godt, som det
gjorde til at
begynde med.
Apparatetvirkeri
kke, når jeg
trykker på
tænd/slukknappen.
Skærene er
beskadigede eller
slidte.
Der sidder lange
hår i vejen for
skærene.
Du har ikke sat
skærene korrekt i.
Det genopladelige
batteri er afladet.
Apparatets
temperatur er for
høj. I dette tilfælde
vil apparatet ikke
fungere.
Udskift skærene (se
kapitlet "Udskiftning").
Rengør skærene et ad
gangen (se afsnittet
"Rengøring og
vedligeholdelse").
Sørg for, at de små tapper
passer præcist ned i
fordybningerne (se kapitlet
"Rengøring og
vedligeholdelse").
Genoplad batteriet (se
afsnittet "Opladning").
Så snart apparatets
temperatur er faldet
tilstrækkeligt, kan
apparatet tændes igen.
Page 40

Deutsch
40
Einführung
Herzlichen Glückwunsch zu Ihrem Kauf und
willkommen bei Philips! Um die Unterstützung von
Philips optimal nutzen zu können, sollten Sie Ihr
Produkt unter www.philips.com/welcome
registrieren.
Allgemeine Beschreibung (Abb. 1)
1 Aufsteckbarer Dreitagebart-Aufsatz (nur S3520,
S3510)
2 Schereinheit
3 Entriegelungstaste der Schereinheit
4 Ein-/Ausschalter
5 Scherkopfsymbol
6 Ladeanzeige
7 Schutzkappe
8 Langhaarschneider (nur S3540, S3530, S3520,
S3510)
9 Entriegelungsschieber für Langhaarschneiderz
(nur S3540, S3530, S3520, S3510)
10 Netzteil (Adapter, Typ HQ8505)
11 Gerätestecker
Wichtige Sicherheitsinformationen
Lesen Sie diese wichtigen Informationen vor dem
Gebrauch des Geräts und des Zubehörs
aufmerksam durch, und bewahren Sie sie für eine
spätere Verwendung auf. Das mitgelieferte
Zubehör kann für verschiedene Produkte variieren.
Deutsch
Page 41

Gefahr
Warnung
Deutsch
- Halten Sie das Netzteil trocken.
- Bei diesem Gerät handelt es
sich um eine BauklasseIII.
- Verwenden Sie nur das im
Lieferumfang des Geräts
enthaltene abnehmbare
Netzteil (Typ HQ8505), um den
Akku aufzuladen.
- Das Netzteil enthält einen
Transformator. Schneiden Sie
das Netzteil keinesfalls auf, um
einen anderen Stecker
anzubringen, weil dies eine
gefährliche Situation
verursachen könnte.
41
Page 42

42
Deutsch
- Dieses Gerät kann von Kindern
ab 8Jahren und Personen mit
verringerten physischen,
sensorischen oder psychischen
Fähigkeiten oder Mangel an
Erfahrung und Kenntnis
verwendet werden, wenn sie
bei der Verwendung
beaufsichtigt werden oder
Anleitung zum sicheren
Gebrauch des Geräts erhalten
und die Gefahren verstanden
haben. Kinder dürfen nicht mit
dem Gerät spielen. Die
Reinigung und Pflege des
Geräts darf von Kindern nicht
ohne Aufsicht durchgeführt
werden.
- Ziehen Sie stets das Netzteil
aus der Steckdose, bevor Sie
den Rasierer unter fließendem
Wasser reinigen.
Page 43

Achtung
Deutsch
- Überprüfen Sie das Gerät vor
jedem Gebrauch. Um
Verletzungen zu vermeiden,
benutzen Sie das Gerät nicht,
wenn es beschädigt ist.
Ersetzen Sie ein beschädigtes
Teil nur durch Originalteile.
- Öffnen Sie das Gerät nicht, um
den Akku zu ersetzen.
- Tauchen Sie das
Reinigungssystem und die
Ladestation niemals in Wasser.
Spülen Sie sie auch nicht unter
fließendem Wasser ab.
- Tauchen Sie den Rasierer
niemals in Wasser. Benutzen
Sie den Rasierer nicht in der
Badewanne oder Dusche.
- Das Wasser zur Reinigung des
Rasierers darf nicht heißer als
60°C sein.
43
Page 44

44
Deutsch
- Verwenden Sie dieses Gerät nur
für den vorgesehenen Zweck
wie in der Bedienungsanleitung
angegeben.
- Aus hygienischen Gründen
sollte das Gerät nur von einer
Person verwendet werden.
- Benutzen Sie zum Reinigen des
Geräts keine Druckluft,
Scheuerschwämme und -mittel
oder aggressive Flüssigkeiten
wie Benzin oder Azeton.
- Wenn Ihr Rasierer über ein
Reinigungssystem verfügt,
verwenden Sie immer die
original Philips
Reinigungsflüssigkeit
(Kartusche oder Flasche, je
nach Art des
Reinigungssystems).
Page 45

Deutsch
- Stellen Sie das
Reinigungssystem stets auf
eine stabile, ebene und
waagerechte Unterlage, um
Auslaufen von Flüssigkeit zu
vermeiden.
- Wenn Ihr System eine
Reinigungskartusche
verwendet, stellen Sie immer
sicher, dass das Kartuschenfach
geschlossen ist, bevor Sie das
Reinigungssystem zum
Reinigen oder Laden des
Rasierers verwenden.
- Wenn das Reinigungssystem
betriebsbereit ist, darf es nicht
bewegt werden, damit keine
Reinigungsflüssigkeit ausläuft.
- Beim Abspülen tropft
möglicherweise Wasser aus der
Buchse unten am Rasierer. Das
ist normal und völlig
ungefährlich, da die gesamte
Elektronik im Inneren des
Geräts versiegelt ist.
45
Page 46

Deutsch
46
- Verwenden Sie das Netzteil
nicht in oder in der Nähe von
Wandsteckdosen, die einen
elektrischen Lufterfrischer
enthalten, um irreparable
Schäden am Netzteil zu
vermeiden.
Elektromagnetische Felder
Dieses Philips-Gerät erfüllt alle einschlägigen
Normen und Vorschriften zur Exposition
gegenüber elektromagnetischen Feldern.
Allgemeines
- Dieser Rasierer kann ohne Bedenken unter
fließendem Wasser gereinigt werden.
- Der Netzteil ist für Netzspannungen von 100 bis
240 Volt geeignet.
- Das Netzteil wandelt Netzspannungen von 100
bis 240 Volt in eine sichere Betriebsspannung
von unter 24 Volt um.
Aufladen
Nach ca. 1Stunde (S3540, S3530, S3520, S3510)
oder 8Stunden (S3130, S3120, S3110) ist das Gerät
vollständig aufgeladen. Lassen Sie das Gerät beim
erstmaligen Laden oder nach längerer
Gebrauchspause so lange in der Ladestation, bis
die Ladeanzeige dauerhaft leuchtet. Wenn das
Gerät vollständig aufgeladen ist, kann damit bis zu
50Minuten (S3540, S3530, S3520, S3510) bzw.
45Minuten (S3130, S3120, S3110) lang rasiert
werden. Je nach Rasierverhalten oder Barttyp
Page 47

reicht die Rasierzeit unter Umständen für weniger
1
2
als 50 oder 45Rasierminuten.
Mit dem Ladegerät aufladen
1 Stecken Sie den Gerätestecker in das Gerät.
2 Stecken Sie den Adapter in die Steckdose.
- Die Ladeanzeige zeigt den Ladestatus des
Geräts (siehe Abschnitt „Ladeanzeigen“ in
diesem Kapitel).
3 Nach dem Ladevorgang trennen Sie die
Stromversorgungseinheit von der Steckdose
und ziehen Sie den kleinen Stecker vom Gerät
ab.
Ladeanzeigen
Batterie schwach
- Ist der Akku fast leer (es verbleiben nur noch
maximal 5Minuten Rasierzeit), beginnt die
Ladeanzeige orange zu blinken.
- Wenn Sie das Gerät ausschalten, blinkt die
Ladeanzeige einige Sekunden lang weiter
orange.
Schnelles Aufladen
Wenn Sie den leeren Akku aufladen, blinkt die
Ladeanzeige abwechselnd orange und grün. Nach
etwa 3Minuten blinkt die Ladeanzeige nur noch
grün. Das Gerät weist nun eine ausreichende
Ladung für eine 5-Minuten-Rasur auf.
Laden
- Beim Aufladen des Geräts blinkt die
Ladeanzeige grün.
Deutsch
47
Page 48

Deutsch
48
Akku voll aufgeladen
- Wenn der Akku vollständig aufgeladen ist,
leuchtet die Ladeanzeige ununterbrochen grün.
Hinweis: Nach etwa 30Minuten erlischt die
Ladeanzeige, um Energie zu sparen.
Das Gerät benutzen
Hinweis: Dieses Gerät kann sowohl kabellos als
auch dann verwendet werden, wenn es an eine
Steckdose angeschlossen ist.
Tipps und Tricks zum Rasieren
- Führen Sie während der Verwendung kreisende
Bewegungen aus. Kreisförmige Bewegungen
bieten bessere Rasurergebnisse als gerade
Bewegungen.
- Es kann 2 bis 3Wochen dauern, bis sich Ihre
Haut an das Philips Schersystem gewöhnt hat.
Das Gerät ein- und ausschalten
1 Um das Gerät einzuschalten, drücken Sie
einmal den Ein-/Ausschalter.
2 Um das Gerät auszuschalten, drücken Sie
einmal den Ein-/Ausschalter.
Rasieren
1 Schalten Sie das Gerät ein.
2 Führen Sie den Rasierer mit kreisenden
Bewegungen über die Haut.
3 E_Schalten Sie das Gerät nach der Reinigung
aus.
4 Reinigen Sie das Gerät (siehe „Reinigung und
Pflege“).
Page 49

Deutsch
Trimmen (nur S3540, S3530, S3520, S3510)
Der Langhaarschneider eignet sich zum Trimmen
von Koteletten und Schnurrbart.
1 Schieben Sie den Entriegelungsschalter nach
unten, um den Langhaarschneider zu öffnen.
2 Schalten Sie das Gerät ein.
- Nun können Sie mit dem Schneiden beginnen.
3 Schalten Sie das Gerät nach dem Trimmen aus.
4 Reinigen Sie den Langhaarschneider (siehe
„Reinigung und Pflege“).
5 Schließen Sie den Langhaarschneider (er rastet
hörbar ein).
Trimmen mit dem Dreitagebart-Aufsatz (nur S3520, S3510)
Der aufsteckbare Dreitagebart-Aufsatz ermöglicht
das Trimmen der Barthaare für einen 3-Tage-Look
oder einen Stoppel-Look mit 1mm Länge.
- Für optimale Schneidergebnisse mit dem
aufsteckbaren Dreitagebart-Aufsatz sollten sowohl
Haare als auch Haut trocken sein.
- Der aufsteckbare Dreitagebart-Aufsatz kann bis
zu einer Bartlänge von sieben Tagen verwendet
werden.
- Der aufsteckbare Dreitagebart-Aufsatz eignet
sich nur zum Trimmen oberhalb der Halslinie.
49
Page 50

Deutsch
50
1 Setzen Sie den aufsteckbaren Dreitagebart-
Aufsatz auf das Gerät.
2 Um das Gerät einzuschalten, drücken Sie
einmal den Ein-/Ausschalter.
3 Drücken Sie das Gerät sanft auf die Haut. Die
besten Ergebnisse erzielen Sie, wenn Sie das
Gerät sowohl gerade als auch kreisförmig
bewegen.
4 Um das Gerät auszuschalten, drücken Sie
einmal den Ein-/Ausschalter.
5 Ziehen Sie den Dreitagebart-Aufsatz vom Gerät
ab.
6 Reinigen Sie das Gerät und den aufsteckbaren
Dreitagebart-Aufsatz nach jeder Verwendung.
Reinigung und Wartung
Gefahr: Entfernen Sie das abnehmbare
Kabel vor der Reinigung mit Wasser vom
Handstück.
Achtung: Benutzen Sie zum Reinigen des Geräts
keine Druckluft, Scheuerschwämme und -mittel
oder aggressive Flüssigkeiten wie Benzin oder
Azeton.
Page 51

Deutsch
- Für eine optimale Rasierleistung empfehlen wir,
das Gerät nach jedem Gebrauch zu reinigen.
- Regelmäßiges Reinigen des Geräts sorgt für
bessere Rasierergebnisse.
- Gehen Sie vorsichtig mit heißem Wasser um.
Achten Sie darauf, dass das Wasser nicht zu
heiß ist und Sie sich nicht die Hände verbrühen.
Hinweis: Beim Abspülen tropft möglicherweise
Wasser aus der Buchse unten am Gerät. Das ist
normal und völlig ungefährlich, da die gesamte
Elektronik im Inneren des Geräts versiegelt ist.
Die Schereinheit unter fließendem Wasser reinigen
1 Schalten Sie das Gerät aus und achten Sie
darauf, dass es nicht ans Stromnetz
angeschlossen ist.
2 Drücken Sie die Entriegelungstaste, und öffnen
Sie die Schereinheit. Spülen Sie das Innere der
Schereinheit sowie die Haarauffangkammer für
30Sekunden mit heißem Leitungswasser aus.
- Spülen Sie die Schereinheit von außen ab.
3 Schließen Sie die Schereinheit, und schütteln
Sie überschüssiges Wasser ab.
Achtung: Achten Sie beim Abschütteln von
überschüssigem Wasser darauf, die Schereinheit
nicht gegen irgendetwas zu stoßen.
Achtung: Trocknen Sie Schereinheit und
Haarauffangkammer keinesfalls mit einem
Handtuch oder Papiertuch, da dies die
Schereinheit beschädigen könnte.
4 Öffnen Sie die Schereinheit wieder, und lassen
Sie sie offen, bis das Gerät völlig trocken ist.
51
Page 52

2
1
Deutsch
52
Gründliche Reinigung
Für eine optimale Leistung empfehlen wir, die
Scherköpfe einmal pro Monat gründlich zu
reinigen.
1 Schalten Sie das Gerät aus und achten Sie
darauf, dass es nicht ans Stromnetz
angeschlossen ist.
2 Drücken Sie die Entriegelungstaste, und öffnen
Sie die Schereinheit. Ziehen Sie die Schereinheit
vom Gerät ab.
3 Drehen Sie die Verriegelung gegen den
Uhrzeigersinn, und entnehmen Sie den
Scherkopfhalter.
4 Entfernen Sie die Scherköpfe jeweils einzeln.
Jeder Scherkopf besteht aus einem
Schermesser und einem Scherkorb.
Hinweis: Reinigen Sie nicht mehr als ein
Schermesser und einen Scherkorb auf einmal,
da sie alle aufeinander abgestimmt sind.
Werden Schermesser und Scherkörbe
versehentlich miteinander vertauscht, kann es
mehrere Wochen dauern, bis wieder die
optimale Rasierleistung erreicht wird.
- Entnehmen Sie das Schermesser aus dem
Scherkorb und reinigen Sie beide Teile unter
dem Wasserstrahl.
Page 53

1
2
Deutsch
5 Setzen Sie das Schermesser wieder in den
Scherkorb ein.
6 Setzen Sie die Scherköpfe wieder in die
Schereinheit ein.
Hinweis: Achten Sie darauf, dass die
Vorsprünge an den Scherköpfen genau in die
Aussparungen des Scherkopfhalters passen.
7 Setzen Sie den Scherkopfhalter wieder in die
Schereinheit, und drehen Sie die Verriegelung
im Uhrzeigersinn fest.
8 Stecken Sie die Führung der Schereinheit in den
Schlitz oben am Gerät. Schließen Sie dann die
Schereinheit, bis sie hörbar einrastet.
Hinweis: Wenn sich die Schereinheit nicht
einfach schließen lässt, überprüfen Sie, ob Sie
die Scherköpfe ordnungsgemäß eingesetzt
haben und der Scherkopfhalter fest sitzt.
Den Trimmer unter fließendem Wasser reinigen (nur S3520, S3510)
Reinigen Sie den Langhaarschneider nach jedem
Gebrauch.
1 Schalten Sie das Gerät aus und achten Sie
darauf, dass es nicht ans Stromnetz
angeschlossen ist.
53
Page 54

Deutsch
54
2 Schieben Sie den Entriegelungsschalter nach
unten, um den Langhaarschneider zu öffnen.
3 Schalten Sie das Gerät ein und spülen Sie den
Langhaarschneider unter dem Wasserhahn mit
warmem Wasser ab.
4 Schalten Sie das Gerät aus und lassen Sie den
Langhaarschneider offen, damit er trocknen
kann.
5 Schließen Sie den Langhaarschneider (er rastet
hörbar ein).
Tipp: Ölen Sie die Zinken des Langhaarschneiders
alle sechs Monate mit einem Tropfen
Nähmaschinenöl.
Reinigen des Aufsatzes für Drei-Tage-Bart (nur S3520, S3510)
Reinigen Sie den aufsteckbaren DreitagebartAufsatz nach jedem Trimmen, um eine optimale
Leistung zu gewährleisten.
Achtung: Gehen Sie vorsichtig mit heißem Wasser
um. Achten Sie darauf, dass das Wasser nicht zu
heiß ist, damit Sie sich nicht die Hände verbrühen.
Trocknen Sie den aufsteckbaren DreitagebartAufsatz niemals mit einem Hand- oder
Papiertuch ab, da dies den Dreitagebart-Aufsatz
beschädigen kann.
Page 55

Lagerräume
Deutsch
1 Nehmen Sie den aufsteckbaren Dreitagebart-
Aufsatz vom Gerät ab.
2 Spülen Sie den aufsteckbaren Dreitagebart-
Aufsatz unter warmem fließendem Wasser ab.
3 Schütteln Sie überschüssiges Wasser sorgfältig
ab, und lassen Sie den aufsteckbaren
Dreitagebart-Aufsatz an der Luft trocknen.
Hinweis: Wir empfehlen Ihnen, das Gerät
vollständig trocknen zu lassen, bevor Sie die
Schutzkappe aufsetzen.
Setzen Sie die Schutzkappe auf das Gerät, um
Beschädigungen zu vermeiden.
55
Page 56

2yrs
2
1
Deutsch
56
Austausch
Für eine optimale Rasierleistung empfehlen wir,
die Scherköpfe alle zwei Jahre auszuwechseln.
Ersetzen Sie beschädigte Scherköpfe sofort.
Tauschen Sie die Scherköpfe immer gegen
Original-Scherköpfe (siehe 'Bestellen von
Zubehör') von Philips aus.
Ersatzanzeige
Das Schereinheitssymbol leuchtet auf, um
anzuzeigen, dass die Scherköpfe ausgetauscht
werden müssen.
1 Das Schereinheitssymbol leuchtet dauerhaft
orange.
2 Schalten Sie das Gerät aus und achten Sie
darauf, dass es nicht ans Stromnetz
angeschlossen ist.
3 Drücken Sie die Entriegelungstaste, und öffnen
Sie die Schereinheit. Ziehen Sie die Schereinheit
vom Gerät ab.
4 Drehen Sie die Verriegelung gegen den
Uhrzeigersinn, und entnehmen Sie den
Scherkopfhalter.
5 Entfernen Sie die Scherköpfe nacheinander von
der Schereinheit und entsorgen Sie sie.
6 Setzen Sie neue Scherköpfe in die Schereinheit.
Hinweis: Achten Sie darauf, dass die
Vorsprünge an den Scherköpfen genau in die
Aussparungen des Scherkopfhalters passen.
Page 57

1
2
7 Setzen Sie den Scherkopfhalter wieder in die
5 sec.
Schereinheit, und drehen Sie die Verriegelung
im Uhrzeigersinn fest.
8 Stecken Sie die Führung der Schereinheit in den
Schlitz oben am Gerät. Schließen Sie dann die
Schereinheit, bis sie hörbar einrastet.
Hinweis: Wenn sich die Schereinheit nicht
einfach schließen lässt, überprüfen Sie, ob Sie
die Scherköpfe ordnungsgemäß eingesetzt
haben und der Scherkopfhalter fest sitzt.
9 Halten Sie den Ein-/Ausschalter ungefähr
5Sekunden lang gedrückt, um die
Erinnerungsfunktion am Rasierer
zurückzusetzen. Das orangefarbene Licht
erlischt.
Bestellen von Zubehör
Um Zubehör oder Ersatzteile zu kaufen, besuchen
Sie www.shop.philips.com/service, oder suchen
Sie Ihren Philips Händler auf. Sie können sich auch
an das Philips Consumer Care Center in Ihrem
Land wenden. Die Kontaktdaten finden Sie in der
internationalen Garantieschrift.
Die folgenden Zubehör- und Ersatzteile sind
erhältlich:
- SH30 Philips Scherköpfe.
- HQ110 Philips Reinigungsspray für Scherköpfe
Deutsch
57
Page 58

Deutsch
58
Recycling
- Dieses Symbol bedeutet, dass das Produkt
nicht mit dem normalen Hausmüll entsorgt
werden kann (2012/19/EU).
- Dieses Symbol bedeutet, dass das Produkt
einen Akku enthält, der nicht mit dem normalen
Hausmüll entsorgt werden darf (2006/66/EG).
Bitte geben Sie das Produkt bei einer offiziellen
Sammelstelle oder einem Philips ServiceCenter ab, um den Akku fachgerecht ausbauen
zu lassen.
1 Altgeräte/Altakkus/Batterien können kostenlos
an geeigneten Rücknahmestellen abgegeben
werden.
2 Diese werden dort fachgerecht gesammelt oder
zur Wiederverwendung vorbereitet.
Altgeräte/Altakkus/Batterien können
Schadstoffe enthalten, die der Umwelt und der
menschlichen Gesundheit schaden können.
Enthaltene Rohstoffe können durch ihre
Wiederverwertung einen Beitrag zum
Umweltschutz leisten.
3 Die Löschung personenbezogener Daten auf
den zu entsorgenden Altgeräten muss vom
Endnutzer eigenverantwortlich vorgenommen
werden.
Page 59

4 Hinweise für Verbraucher in Deutschland: Die in
Punkt 1 genannte Rückgabe ist gesetzlich
vorgeschrieben. Altgeräte mit Altbatterien
und/oder Altakkus, die nicht vom Altgerät
umschlossen sind, sind vor der Abgabe an einer
Rücknahmestelle von diesen zu trennen. Dies
gilt nicht, falls die Altgeräte für eine
Wiederverwendung noch geeignet (d.h.
funktionstüchtig) sind und von den anderen
Altgeräten getrennt werden. Sammel- und
Rücknahmestellen in DE:
https://www.stiftung-ear.de/; für Batterien
auch Rückgabe im Handel möglich.
Garantie und Support
Für Unterstützung und weitere Informationen
besuchen Sie die Philips Website unter
www.philips.com/support, oder lesen Sie die
internationale Garantieschrift.
Garantieeinschränkungen
Die Scherköpfe (Schermesser und Scherkörbe)
unterliegen nicht den Bedingungen der
internationalen Garantie, da sie einem normalen
Verschleiß ausgesetzt sind.
Deutsch
59
Fehlerbehebung
In diesem Kapitel sind die häufigsten Probleme
aufgeführt, die beim Gebrauch des Geräts
auftreten können. Sollten Sie ein Problem mithilfe
der nachstehenden Informationen nicht beheben
können, besuchen Sie unsere Website unter
www.philips.com/support, und schauen Sie in der
Liste „Häufig gestellte Fragen“ nach, oder wenden
Page 60

Deutsch
60
Sie sich an das Philips Service-Center in Ihrem
Land.
Problem Mögliche
Ursache
Die Lösung
Das Gerät rasiert
nicht mehr so gut
wie bisher.
Das Gerät
funktioniert nicht,
wenn ich den Ein/Ausschalter
drücke.
Die Scherköpfe
sind beschädigt
oder abgenutzt.
Lange Haare
blockieren die
Scherköpfe.
Sie haben die
Scherköpfe nicht
ordnungsgemäß
eingelegt.
Der Akku ist leer. Laden Sie den Akku auf
Die Temperatur
des Geräts ist zu
hoch. In diesem
Fall funktioniert
das Gerät nicht.
Wechseln Sie die
Scherköpfe aus (siehe
Kapitel „Ersatz”).
Reinigen Sie die
Scherköpfe nacheinander
(siehe Kapitel "Reinigung
und Wartung").
Die Vorsprünge an den
Scherköpfen müssen
genau in die Aussparungen
der Schereinheit passen
(siehe Kapitel "Reinigung
und Wartung").
(siehe Kapitel „Laden”).
Nach entsprechender
Abkühlung können Sie das
Gerät wieder einschalten.
Page 61

Español
Introducción
Enhorabuena por la adquisición de este producto,
y bienvenido a Philips Para sacar el mayor partido
a la asistencia que Philips le ofrece, registre el
producto en www.philips.com/welcome.
Descripción general (fig. 1)
1 Adaptador para barba incipiente de fácil
montaje (solo modelos S3520 y S3510)
2 Unidad de afeitado
3 Botón de liberación de la unidad de afeitado
4 Botón de encendido/apagado
5 Símbolo del cabezal de afeitado
6 Piloto de carga
7 Tapa protectora
8 Recortador (solo modelos S3540, S3530, S3520
y S3510)
9 Botón de liberación del recortadorz (solo
modelos S3540, S3530, S3520 y S3510)
10 Unidad de alimentación (adaptador, tipo
HQ8505)
11 Clavija pequeña
Información de seguridad importante
Antes de utilizar el aparato y sus accesorios, lea
atentamente esta información importante y
consérvela por si necesitara consultarla en un
futuro. Los accesorios suministrados pueden variar
según los diferentes productos.
61
Español
Page 62

Español
62
Peligro
Advertencia
- Mantenga seca la fuente de
alimentación.
- Este aparato es una estructura de Clase III.
- Para cargar la batería, utilice únicamente la
unidad extraíble (tipo HQ8505) suministrada
con el aparato.
- La fuente de alimentación contiene un
transformador. No corte la fuente de
alimentación para sustituirla por otra clavija, ya
que podría provocar situaciones de peligro.
- Este aparato puede ser usado por niños a partir
de ocho años y por personas con su capacidad
física, psíquica o sensorial reducida y por
quienes no tengan los conocimientos y la
experiencia necesarios, si han sido
supervisados o instruidos acerca del uso del
aparato de forma segura y siempre que sepan
los riesgos que conlleva su uso. No permita que
los niños jueguen con el aparato. Los niños no
deben limpiar el aparato ni realizar tareas de
mantenimiento sin supervisión.
- Desenchufe siempre la afeitadora antes de
limpiarla bajo el grifo.
- Compruebe siempre el aparato antes de
utilizarlo. No utilice el aparato si está dañado,
ya que podría ocasionar lesiones. Sustituya las
piezas dañadas por repuestos originales.
- No abra el aparato para cambiar la batería
recargable.
Page 63

Precaución
Español
- No sumerja nunca el sistema de limpieza ni el
soporte de carga en agua ni los enjuague bajo
el grifo.
- No sumerja nunca la afeitadora en agua. No
utilice la afeitadora en la bañera o en la ducha.
- No utilice nunca agua a una temperatura
superior a 80°C para enjuagar la afeitadora.
- Utilice este aparato solo para el uso al que está
destinado como se indica en el manual de
usuario.
- Por razones de higiene, el aparato debería ser
usado únicamente por una persona.
- No utilice nunca aire comprimido, estropajos,
agentes de limpieza abrasivos ni líquidos
agresivos, como gasolina o acetona, para
limpiar el aparato.
- Si la afeitadora está equipada con un sistema
de limpieza, utilice siempre el líquido limpiador
original de Philips (cartucho o botella,
dependiendo del tipo de sistema de limpieza).
- Coloque siempre el sistema de limpieza sobre
una superficie horizontal, plana y estable para
evitar que el líquido se derrame.
- Si el sistema de limpieza utiliza un cartucho de
limpieza, asegúrese siempre de que el
compartimento del cartucho está cerrado antes
de utilizar el sistema de limpieza para limpiar o
cargar la afeitadora.
- Cuando el sistema de limpieza esté listo parar
usar, no lo mueva para evitar que el líquido
limpiador se derrame.
63
Page 64

Español
64
- Cuando enjuague la afeitadora es posible que
salga agua por el orificio de su parte inferior.
Esto es normal y no es peligroso, ya que todos
los sistemas electrónicos están dentro de la
unidad motora hermética en el interior de la
afeitadora.
- No utilice la fuente de alimentación cerca o en
tomas de corriente en las que esté o haya
estado enchufado un ambientador eléctrico
para evitar daños irreparables.
Campos electromagnéticos (CEM)
Este Philips cumple los estándares y las
normativas aplicables sobre exposición a campos
electromagnéticos.
General
- Esta afeitadora se puede limpiar bajo el grifo de
forma segura.
- La unidad de alimentación es adecuada para
voltajes de red de 100 a 240voltios.
- La fuente de alimentación transforma la
corriente de 100 - 240voltios en un bajo voltaje
de seguridad inferior a 24voltios.
Carga
Este aparato tarda aproximadamente 1 hora
(S3540, S3530, S3520 y S3510) u 8 horas (S3130,
S3120 y S3110) en cargarse por completo. Cuando
lo cargue por primera vez, o después de un largo
periodo sin usarlo, cárguelo hasta que el piloto de
carga se ilumine de manera continua. El aparato
ofrece una autonomía de afeitado de hasta
50minutos (S3540, S3530, S3520 y S3510) o
45minutos (S3130, S3120 y S3110) cuando está
completamente cargado. El tiempo de afeitado
Page 65

puede ser menor a 50 o 45minutos; dependerá de
1
2
la forma de afeitarse, de sus hábitos de limpieza o
del tipo de barba.
Carga con el adaptador
1 Enchufe la clavija pequeña al aparato.
2 Enchufe el adaptador a la toma de corriente.
- El piloto de carga muestra el estado de carga
del aparato (consulte la sección ‘Indicaciones
de carga’ en este capítulo).
3 Después de la carga, desenchufe la unidad de
alimentación de la toma de corriente y la clavija
pequeña del aparato.
Indicaciones de carga
Batería baja
- Cuando la batería está casi descargada
(cuando quedan 5minutos o menos de
afeitado), el piloto de carga comienza a
parpadear en naranja.
- Al apagar la afeitadora, el piloto de carga sigue
parpadeando en naranja durante unos
segundos.
Carga rápida
Al empezar a cargar una batería que estaba
agotada, el piloto de carga parpadea
alternativamente en naranja y verde. Tras unos
tres minutos aproximadamente, el piloto de carga
empezará a parpadear solamente con luz verde.
En ese momento indica que el aparato contiene
suficiente energía para un afeitado de cinco
minutos.
Español
65
Page 66

Español
66
Carga
- Cuando el aparato se está cargando, el piloto
de carga parpadea en verde.
Batería completamente cargada
- Cuando la batería está completamente
cargada, el piloto de carga permanece
encendido en verde.
Nota: El piloto de carga se apaga después de unos
30minutos para ahorrar energía.
Uso del aparato
Nota: Este aparato se puede utilizar sin cable o
mientras está conectado a una toma de corriente.
Consejos y trucos de afeitado
- Aféitese realizando movimientos circulares. Los
movimientos circulares proporcionan mejores
resultados de afeitado que los movimientos
rectos.
- Puede que su piel necesite de 2 a 3 semanas
para acostumbrarse al sistema de afeitado
Philips.
Encendido y apagado del aparato
1 Para encender el aparato, pulse el botón de
encendido/apagado una vez.
2 Para apagar el aparato, pulse el botón de
encendido/apagado una vez.
Page 67

Afeitado
1 Encienda el aparato.
2 Desplace los cabezales de afeitado sobre la
piel, haciendo movimientos circulares.
3 Después del afeitado, apague el aparato.
4 Limpie el aparato (consulte el capítulo
‘Limpieza y mantenimiento’).
Recorte (solo modelos S3520 y S3510)
Puede utilizar el recortador para recortar las
patillas y el bigote.
1 Deslice el botón de liberación del recortador
hacia abajo para abrirlo.
2 Encienda el aparato.
- Ya puede comenzar a utilizar el recortador.
3 Después de recortar, apague el aparato.
4 Limpie el recortador (consulte el capítulo
'Limpieza y mantenimiento').
5 Cierre el recortador ('clic').
Español
67
Recorte con el adaptador para barba incipiente de fácil montaje (solo modelos S3520 y S3510)
El adaptador para barba incipiente de fácil
montaje se puede utilizar para recortar la barba a
Page 68

68
Español
una longitud de 3 días o mantener una longitud de
1 mm con aspecto de barba incipiente.
- Para obtener resultados óptimos con el
adaptador para barba incipiente de fácil montaje,
el pelo y la piel deben estar secos..
- Para utilizar el adaptador para barba incipiente
de fácil montaje es preciso que la barba tenga una
longitud máxima de 7 días.
- El adaptador para barba incipiente de fácil
montaje solo sirve para recortar por encima de la
línea del cuello..
1 Coloque el adaptador para barba incipiente de
fácil montaje en el aparato.
2 Para encender el aparato, pulse el botón de
encendido/apagado una vez.
3 Presione suavemente el aparato sobre la piel.
Haga movimientos rectos y circulares para
conseguir los mejores resultados.
4 Para apagar el aparato, pulse el botón de
encendido/apagado una vez.
5 Tire del adaptador para barba incipiente para
sacarlo del aparato.
6 Limpie el aparato y el adaptador para barba
incipiente de fácil montaje después de cada
uso.
Page 69

Español
Limpieza y mantenimiento
Peligro: Quite el cable desmontable de la
pieza de mano antes de lavarla con agua.
Precaución: No utilice nunca aire comprimido,
estropajos, agentes de limpieza abrasivos ni
líquidos agresivos, como gasolina o acetona, para
limpiar el aparato.
- Para conseguir un rendimiento de afeitado
óptimo, limpie el aparato después de cada uso.
- Una limpieza frecuente garantiza mejores
resultados en el afeitado.
- Tenga cuidado con el agua caliente.
Compruebe siempre que el agua no esté
demasiado caliente para evitar quemarse las
manos.
Nota: Cuando enjuague el aparato, es posible que
salga agua por el orificio de su parte inferior. Esto
es normal y no es peligroso, ya que todos los
sistemas electrónicos están dentro de la unidad
motora hermética, en el interior de la afeitadora.
Limpieza de la unidad de afeitado bajo el grifo
1 Apague el aparato y asegúrese de que lo ha
desenchufado de la toma de corriente.
2 Pulse el botón de liberación para abrir la
unidad de afeitado. Enjuague bajo el grifo de
agua caliente durante 30segundos la cámara
de recogida del pelo y el interior de la unidad
de afeitado.
69
- Enjuague el exterior de la unidad de afeitado.
3 Cierre la unidad de afeitado y sacúdala para
eliminar el exceso de agua.
Page 70

2
1
Español
70
Precaución: Tenga cuidado de no golpear la
unidad de afeitado contra algo mientras la
sacude para eliminar el exceso de agua.
Precaución: No seque nunca la unidad de
afeitado ni la cámara de recogida del pelo con
una toalla o un paño, ya que esto podría dañar la
unidad de afeitado.
4 Vuelva a abrir la unidad de afeitado y déjela
Limpieza a fondo
Limpie los cabezales de afeitado cuidadosamente
una vez al mes para conseguir un rendimiento de
afeitado óptimo.
1 Apague el aparato y asegúrese de que lo ha
2 Pulse el botón de liberación para abrir la
3 Gire el cierre de seguridad en sentido contrario
abierta para que se seque completamente.
desenchufado de la toma de corriente.
unidad de afeitado. Extraiga la unidad de
afeitado del aparato.
al de las agujas del reloj y saque el marco de
retención.
4 Retire y limpie los cabezales de afeitado de uno
en uno. Cada cabezal de afeitado consta de
una cuchilla y su protector.
Nota: No limpie más de una cuchilla y su
protector al mismo tiempo, ya que forman
conjuntos entre sí. Si los mezcla
accidentalmente, es posible que pasen varias
Page 71

1
2
Español
semanas hasta que vuelva a conseguir un
rendimiento de afeitado óptimo.
- Extraiga la cuchilla del protector y enjuague
ambas piezas bajo el grifo.
5 Vuelva a poner la cuchilla en el protector.
6 Vuelva a colocar los cabezales en la unidad de
afeitado.
Nota: Asegúrese de que los salientes de los
cabezales de afeitado encajan exactamente en
las ranuras del soporte del cabezal de afeitado.
7 Coloque de nuevo el marco de retención en la
unidad de afeitado y gire el cierre de seguridad
en el sentido de las agujas del reloj.
71
8 Inserte el saliente de la unidad de afeitado en
la ranura de la parte superior del aparato. A
continuación, cierre la unidad de afeitado ('clic').
Nota: Si la unidad de afeitado no se cierra
fácilmente, compruebe que ha introducido
correctamente los cabezales de afeitado y que
el marco de retención tiene puesto el cierre de
seguridad.
Page 72

Español
72
Limpieza del recortador bajo el grifo (solamente para S3520 y S3510)
Limpie el recortador cada vez que lo utilice.
1 Apague el aparato y asegúrese de que lo ha
desenchufado de la toma de corriente.
2 Deslice el botón de liberación del recortador
hacia abajo para abrirlo.
3 Encienda el aparato con el recortador colocado
y lávelo bajo el grifo.
4 Apague el aparato y deje el recortador abierto
para que se seque.
5 Cierre el recortador ('clic').
Consejo: Para conseguir unos resultados óptimos,
lubrique los dientes del recortador con una gota
de aceite de máquina de coser cada seis meses.
Limpieza del adaptador para barba incipiente de fácil montaje (solo modelos S3520 y S3510)
Para garantizar un resultado óptimo, limpie el
adaptador para barba incipiente de fácil montaje
cada vez que recorte la barba.
Precaución: Tenga cuidado con el agua caliente.
Compruebe siempre que el agua no esté
demasiado caliente para evitar quemarse las
manos.
Nunca seque el adaptador para barba incipiente
con una toalla o servilleta, ya que podría dañarlo.
Page 73

1 Quite el adaptador para barba incipiente del
aparato.
2 Enjuague el adaptador para barba incipiente
con agua tibia.
3 Sacuda el exceso de agua con cuidado y deje
que el adaptador para barba incipiente se
seque al aire.
Almacenamiento
Nota: Le recomendamos que espere a que el
aparato se seque antes de ponerle la tapa
protectora.
Para evitar deterioros, coloque la tapa protectora
en el aparato.
Español
73
Page 74

2yrs
2
1
Español
74
Sustitución
Para un rendimiento de afeitado óptimo, le
aconsejamos que sustituya los cabezales de
afeitado cada dos años. Sustituya los cabezales de
afeitado dañados inmediatamente. Sustituya los
cabezales de afeitado siempre por cabezales
(consulte 'Solicitud de accesorios') de afeitado
Philips originales.
Recordatorio de sustitución
El símbolo de la unidad de afeitado se iluminará
para indicar que es necesario sustituir los
cabezales de afeitado.
1 El símbolo de la unidad de afeitado se ilumina
en naranja de forma continua.
2 Apague el aparato y asegúrese de que lo ha
desenchufado de la toma de corriente.
3 Pulse el botón de liberación para abrir la
unidad de afeitado. Extraiga la unidad de
afeitado del aparato.
4 Gire el cierre de seguridad en sentido contrario
al de las agujas del reloj y saque el marco de
retención.
Page 75

1
2
5 sec.
Español
5 Retire los cabezales de afeitado de la unidad
de afeitado y deséchelos.
6 Coloque los nuevos cabezales de afeitado en la
unidad de afeitado.
Nota: Asegúrese de que los salientes de los
cabezales de afeitado encajan exactamente en
las ranuras del soporte del cabezal de afeitado.
7 Coloque de nuevo el marco de retención en la
unidad de afeitado y gire el cierre de seguridad
en el sentido de las agujas del reloj.
8 Inserte el saliente de la unidad de afeitado en
la ranura de la parte superior del aparato. A
continuación, cierre la unidad de afeitado ('clic').
Nota: Si la unidad de afeitado no se cierra
fácilmente, compruebe que ha introducido
correctamente los cabezales de afeitado y que
el marco de retención tiene puesto el cierre de
seguridad.
9 Para restablecer el recordatorio de sustitución,
mantenga pulsado el botón de
encendido/apagado durante cincosegundos
aproximadamente. El piloto naranja se apagará.
75
Solicitud de accesorios
Para comprar accesorios o piezas de repuesto,
visite www.shop.philips.com/service o acuda a su
distribuidor de Philips. También puede ponerse en
contacto con el Servicio de Atención al Cliente de
Philips en su país (consulte los datos de contacto
en el folleto de la garantía mundial).
Page 76

Español
76
Reciclaje
Los siguientes accesorios y piezas de repuesto
están disponibles:
- Cabezales de afeitado Philips SH30.
- Spray limpiador para cabezales de afeitado
Philips HQ110
- Este símbolo significa que este producto no
debe desecharse con la basura normal del
hogar (2012/19/UE).
- Este símbolo significa que este producto
contiene una batería recargable integrada, que
no debe desecharse con los residuos
domésticos normales (2006/66/EC). Lleve el
producto a un punto de recogida oficial o a un
centro de asistencia de Philips para que un
profesional extraiga la batería recargable.
- Siga la normativa de su país para la recogida
selectiva de productos eléctricos y electrónicos
y de baterías recargables. El desechado
correcto ayuda a evitar consecuencias
negativas para el medio ambiente y la salud
humana.
Garantía y asistencia
Si necesita asistencia o información, visite
www.philips.com/support o lea el folleto de
garantía internacional.
Restricciones de la garantía
Los cabezales de afeitado (cuchillas y protectores)
no están cubiertos por las condiciones de la
Page 77

garantía internacional debido a que están sujetos
a desgaste.
Resolución de problemas
En este capítulo se resumen los problemas más
comunes que pueden surgir al usar el aparato. Si
no puede resolver el problema con la siguiente
información, visite www.philips.com/support para
consultar una lista de preguntas frecuentes o
comuníquese con el servicio de atención al cliente
en su país.
Problema Posible causa Solución
Español
77
El aparato no
afeita tan bien
como antes.
El aparato no
funciona cuando
pulso el botón de
encendido/apaga
do.
Los cabezales de
afeitado están
gastados o
deteriorados.
Hay pelos largos
que obstruyen los
cabezales de
afeitado.
No ha introducido
los cabezales de
afeitado
correctamente.
La batería
recargable está
descargada.
Sustituya los cabezales de
afeitado. Consulte el
capítulo 'Sustitución'.
Limpie los cabezales de
afeitado uno a uno
(consulte el capítulo
'Limpieza y
mantenimiento').
Asegúrese de que los
salientes de los cabezales
de afeitado encajan
exactamente en las
ranuras (consulte el
capítulo 'Limpieza y
mantenimiento').
Recargue la batería
(consulte el capítulo
‘Carga‘).
Page 78

Español
78
Problema Posible causa Solución
La temperatura del
aparato es
demasiado alta. En
este caso, el
aparato no
funciona.
En cuanto la temperatura
del aparato descienda lo
suficiente, puede volver a
encenderlo.
Page 79

Français
Introduction
Félicitations pour votre achat et bienvenue dans
l'univers Philips! Pour profiter pleinement de
l'assistance offerte par Philips, enregistrez votre
produit à l'adresse suivante:
www.philips.com/welcome.
Description générale (fig. 1)
1 Capuchon à clipser pour barbe de troisjours
(S3520, S3510 uniquement)
2 Unité de rasage
3 Bouton de déverrouillage de la tête de rasoir
4 Bouton marche/arrêt
5 Symbole de tête de rasoir
6 Voyant de charge
7 Capuchon de protection
8 Tondeuse (S3540, S3530, S3520, S3510
uniquement)
9 Bouton de déverrouillage de la tondeusez
(S3540, S3530, S3520, S3510 uniquement)
10 Bloc d’alimentation électrique (adaptateur, type
HQ8505)
11 Petite fiche
Informations de sécurité importantes
Lisez attentivement ces informations importantes
avant d'utiliser l'appareil et ses accessoires et
conservez-les pour un usage ultérieur. Les
accessoires fournis peuvent varier selon les
différents produits.
79
Français
Page 80

Français
80
Danger
- Gardez le bloc d’alimentation
Avertissement
- L'appareil est une construction
- Pour charger la batterie,
- Le bloc d’alimentation contient
au sec.
de classeIII.
veuillez uniquement utiliser le
bloc d’alimentation amovible
(type HQ8505) fourni avec
l'appareil.
un transformateur. N’essayez
pas de remplacer le bloc
d’alimentation par une autre
fiche afin d’éviter tout accident.
Page 81

Français
- Cet appareil peut être utilisé
par des enfants âgés de 8ans
ou plus, des personnes dont les
capacités physiques,
sensorielles ou intellectuelles
sont réduites ou des personnes
manquant d'expérience et de
connaissances, à condition que
ces enfants ou personnes
soient sous surveillance ou
qu'ils aient reçu des instructions
quant à l'utilisation sécurisée
de l'appareil et qu'ils aient pris
connaissance des dangers
encourus. Les enfants ne
doivent pas jouer avec
l'appareil. Le nettoyage et
l'entretien ne doivent pas être
effectués par des enfants sans
surveillance.
- Débranchez toujours le rasoir
avant de le nettoyer sous le
robinet.
81
Page 82

Français
82
Attention
- Vérifiez toujours l'appareil
avant utilisation. Afin d'éviter
tout accident, n'utilisez pas
l'appareil s'il est endommagé.
Remplacez toujours une pièce
endommagée par une pièce du
même type.
- N'ouvrez pas l'appareil pour
remplacer la pile rechargeable.
- Ne plongez jamais le système
de nettoyage ni la base de
recharge dans l'eau et ne les
rincez pas sous l'eau.
- Ne plongez jamais le rasoir
dans l'eau. N'utilisez jamais le
rasoir dans le bain ni sous la
douche.
- N'utilisez jamais une eau dont
la température est supérieure à
80°C pour rincer le rasoir.
- N'utilisez pas cet appareil à
d'autres fins que celles pour
lesquelles il a été conçu (voir le
mode d'emploi).
Page 83

Français
- Pour des raisons d'hygiène,
l'appareil doit être utilisé par
une seule personne.
- N'utilisez jamais d'air comprimé,
de tampons à récurer, de
produits abrasifs ou de
détergents agressifs tels que de
l'essence ou de l'acétone pour
nettoyer l'appareil.
- Si votre rasoir est équipé d'un
système de nettoyage, utilisez
toujours le liquide de nettoyage
Philips d'origine (cartouche ou
flacon, en fonction du type de
système de nettoyage).
- Placez toujours le système de
nettoyage sur une surface
stable et horizontale pour éviter
toute fuite de liquide.
83
Page 84

84
Français
- Si votre système de nettoyage
utilise une cartouche de
nettoyage, assurez-vous
toujours que le compartiment
de la cartouche est fermé avant
d'utiliser le système de
nettoyage pour nettoyer ou
charger le rasoir.
- Lorsque le système de
nettoyage est prêt à l'emploi,
ne le bougez pas pour éviter
toute fuite.
- Lorsque vous rincez l'appareil,
de l'eau peut s'écouler par la
prise inférieure. Ce phénomène
est normal et ne présente pas
de danger, car toutes les pièces
électroniques à l'intérieur du
rasoir sont protégées.
Page 85

- N’utilisez pas le bloc
d’alimentation dans ou à
proximité de prises murales qui
contiennent un assainisseur
d’air électrique, afin d’éviter que
le bloc d’alimentation ne
subisse des dommages
irréversibles.
Champs électromagnétiques (CEM)
Cet appareil Philips est conforme à toutes les
normes et à tous les règlements applicables
relatifs à l'exposition aux champs
électromagnétiques.
Informations d'ordre général
- Ce rasoir peut être nettoyé à l'eau en toute
sécurité.
- Le bloc d'alimentation est conçu pour une
tension secteur comprise entre 100V et 240V.
- Le bloc d’alimentation transforme la tension de
100-240V en une tension de sécurité de moins
de 24V.
Français
85
Charge
La charge complète de l'appareil dure environ
1heure (S3540, S3530, S3520, S3510) ou 8heures
(S3130, S3120, S3110). Lorsque vous chargez
l'appareil pour la première fois ou s'il n'a pas été
utilisé pendant une longue période, chargez-le
jusqu'à ce que le voyant de charge s'allume de
manière continue. Un appareil complètement
Page 86

1
2
Français
86
chargé permet un maximum de 50minutes
(S3540, S3530, S3520, S3510) ou de 45minutes
(S3130, S3120, S3110) de temps de rasage. Le temps
de rasage peut être inférieur à 50 ou 45minutes
selon vos habitudes de rasage et de nettoyage ou
votre type de barbe.
Charge avec l'adaptateur
1 Insérez la petite fiche dans l'appareil.
2 Branchez l'adaptateur sur la prise secteur.
- Le voyant de charge indique l'état de charge de
l'appareil (voir la section «Indications de
charge» de ce chapitre).
3 Une fois la charge terminée, débranchez le bloc
d'alimentation de la prise secteur, puis retirez la
petite fiche de l'appareil.
Indications de charge
Batterie faible
- Lorsque la batterie est presque vide (5minutes
ou moins de rasage restantes), le voyant de
charge se met à clignoter en orange.
- Lorsque vous éteignez l'appareil, le voyant de
charge continue à clignoter en orange pendant
quelques secondes.
Charge rapide
Lorsque vous commencez à charger la batterie
vide, le voyant de charge clignote alternativement
en orange et vert. Après environ 3minutes, le
voyant de charge commence à clignoter en vert
uniquement. L'appareil est désormais
suffisamment chargé pour de 5minutes de rasage.
Page 87

Charge
- Lorsque l'appareil est en charge, le voyant de
charge clignote en vert.
Batterie entièrement chargée
- Une fois la batterie entièrement chargée, le
voyant de charge devient vert et cesse de
clignoter.
Remarque: Après environ 30minutes, le voyant de
charge s'éteint pour économiser de l'énergie.
Utilisation de l'appareil
Remarque: Cet appareil peut être utilisé sans
cordon ou bien connecté à la prise murale.
Conseils et astuces de rasage
- Effectuez des mouvements circulaires durant
l'utilisation. Les mouvements circulaires
procurent de meilleurs résultats de rasage que
les mouvements rectilignes.
- Votre peau pourrait avoir besoin de 2 ou
3semaines pour s'habituer au système de
rasage Philips.
Mise en marche et arrêt de l'appareil
1 Pour allumer l'appareil, appuyez une fois sur le
bouton marche/arrêt.
2 Pour éteindre l'appareil, appuyez sur le bouton
marche/arrêt.
Français
87
Page 88

Français
88
Rasage
1 Allumez l'appareil.
2 Faites glisser les têtes de rasoir sur votre peau
en effectuant des mouvements circulaires.
3 Après le rasage, éteignez l'appareil.
4 Nettoyez l'appareil (voir le chapitre «Nettoyage
et entretien»).
Tondeuse (S3540, S3530, S3520, S3510 uniquement)
Vous pouvez utiliser la tondeuse pour tailler les
favoris et la moustache.
1 Dégagez la tondeuse en faisant glisser le
bouton coulissant vers le bas.
2 Allumez l’appareil.
- Vous pouvez commencer à vous tailler les
favoris et la moustache.
3 Après utilisation, éteignez l'appareil.
4 Nettoyez la tondeuse (voir le chapitre
«Nettoyage et entretien»).
5 Fermez la tondeuse («clic»).
Coupe avec le capuchon à clipser pour barbe de
troisjours (S3520, S3510 uniquement)
Vous pouvez utiliser le capuchon à clipser pour
couper votre barbe à la longueur d'une barbe de
3jours ou pour obtenir une barbe de 1mm.
Page 89

Français
- Pour des résultats de coupe optimaux avec le
capuchon à clipser, les poils et la peau doivent
être secs..
- La longueur de barbe maximale pour utiliser le
capuchon à clipser est une barbe de 7jours.
- Le capuchon à clipser pour barbe de troisjours
est destiné à couper les poils au-dessus de
l'encolure uniquement.
1 Placez le capuchon à clipser pour barbe de
troisjours sur l'appareil.
2 Pour allumer l'appareil, appuyez une fois sur le
bouton marche/arrêt.
3 Appuyez doucement l'appareil sur la peau.
Effectuez des mouvements rectilignes et
circulaires pour un résultat optimal.
4 Pour éteindre l'appareil, appuyez sur le bouton
marche/arrêt.
5 Retirez le capuchon pour barbe de trois jours
de l'appareil.
6 Nettoyez l'appareil et le capuchon à clipser
pour barbe de troisjours après chaque
utilisation.
89
Page 90

Français
90
Nettoyage et entretien
Danger : Retirez le cordon amovible de la
partie à main avant de nettoyer cette
partie dans l'eau.
Attention : N'utilisez jamais d'air comprimé, de
tampons à récurer, de produits abrasifs ou de
détergents agressifs tels que de l'essence ou de
l'acétone pour nettoyer l'appareil.
- Pour garantir des performances de rasage
optimales, nettoyez l'appareil après chaque
utilisation.
- Nettoyez régulièrement l'appareil pour obtenir
des résultats de rasage optimaux.
- Attention avec l'eau chaude. Veillez à ce que
l'eau ne soit pas trop chaude pour ne pas vous
brûler.
Remarque: Lorsque vous rincez l'appareil, de l'eau
peut s'écouler par la prise inférieure. Ceci est
normal et n'est pas dangereux, car tous les
composants électroniques, logés à l'intérieur du
bloc d'alimentation du rasoir, sont protégés par
une protection hermétique.
Nettoyage de l'unité de rasage sous l'eau
1 Éteignez l'appareil et assurez-vous qu'il est
débranché de la prise murale.
2 Appuyez sur le bouton de déverrouillage pour
ouvrir la tête de rasoir. Rincez l'intérieur de
l'unité de rasage et le compartiment à poils
sous l'eau chaude pendant 30secondes.
Page 91

- Rincez l'extérieur de l'unité de rasage.
2
1
3 Fermez l'unité de rasage et secouez le rasoir
pour en retirer l'eau.
Attention : Veillez à ne pas cogner l'unité de
rasage lorsque vous la secouez pour en retirer
l'excès d'eau.
Attention : Ne séchez jamais l'unit de rasage et le
compartiment à poils à l'aide d'une serviette ou
d'un mouchoir au risque d'endommager l'unité de
rasage.
4 Ouvrez à nouveau l'unité de rasage et laissez-la
ouverte pour que l'appareil sèche
complètement.
Nettoyage en profondeur
Pour garantir des performances de rasage
optimales, nettoyez les têtes de rasoir en
profondeur une fois par mois.
1 Éteignez l'appareil et assurez-vous qu'il est
débranché de la prise murale.
2 Appuyez sur le bouton de déverrouillage pour
ouvrir la tête de rasoir. Retirez l'unité de rasage
de l'appareil.
Français
91
3 Faites tourner le système de verrouillage dans
le sens inverse des aiguilles d'une montre et
retirez le système de fixation.
Page 92

1
2
92
Français
4 Enlevez et nettoyez une tête de rasoir à la fois.
Chaque tête de rasoir comprend une lame et
une grille.
Remarque: Ne nettoyez qu'une lame et une
grille à la fois, car elles sont assemblées par
paires. Si vous intervertissez accidentellement
des lames et des grilles, plusieurs semaines
peuvent être nécessaires avant de retrouver un
rasage optimal.
- Enlevez la lame de la grille et passez les deux
parties sous l'eau pour les nettoyer.
5 Replacez la lame dans la grille.
6 Replacez les têtes de rasoir sur la tête de rasoir.
Remarque: Veillez à ce que les têtes de rasage
s'encastrent parfaitement dans les encoches de
leur support.
7 Replacez le système de fixation sur la tête de
rasoir, puis faites-le tourner dans le sens des
aiguilles d'une montre.
Page 93

Français
8 Insérez la languette de l'unité de rasage dans la
fente située sur la partie supérieure de
l'appareil. Puis, fermez l'unité de rasage («clic»).
Remarque: Si la tête de rasoir ne se ferme pas
facilement, vérifiez que vous avez correctement
inséré les têtes de rasoir et que le système de
fixation est verrouillé.
Nettoyage de la tondeuse sous l'eau du robinet (S3520, S3510 seulement)
Nettoyez la tondeuse après chaque utilisation.
1 Éteignez l'appareil et assurez-vous qu'il est
débranché de la prise murale.
2 Dégagez la tondeuse en faisant glisser le
bouton coulissant vers le bas.
3 Allumez l'appareil et nettoyez la tondeuse sous
l'eau du robinet.
4 Éteignez l'appareil, puis laissez la tondeuse
ouverte pour la laisser sécher.
5 Fermez la tondeuse («clic»).
Conseil: Pour garantir des performances de tonte
optimales, appliquez une goutte d'huile pour
machine à coudre sur les dents de la tondeuse
tous les six mois.
93
Nettoyage du capuchon à clipser pour barbe de
troisjours (S3520, S3510 uniquement)
Nettoyez le capuchon à clipser après chaque
coupe pour des performances optimales.
Page 94

Français
94
Rangement
Attention : Attention avec l'eau chaude. Veillez à
ce que l'eau ne soit pas trop chaude afin de ne
pas vous brûler.
Ne séchez jamais le capuchon pour barbe de
trois jours à l'aide d'une serviette ou d'un
mouchoir, car vous risqueriez de l'endommager.
1 Retirez le capuchon de l'appareil.
2 Rincez le capuchon sous l'eau du robinet
chaude.
3 Éliminez l'excès d'eau en secouant le capuchon,
puis laissez-le sécher.
Remarque: Nous vous conseillons de laisser
sécher l'appareil avant de replacer le couvercle de
protection.
Placez le capot de protection sur l'appareil pour
éviter tout dommage.
Page 95

Remplacement
2yrs
2
1
Pour garantir des performances de rasage
optimales, nous vous recommandons de
remplacer les têtes de rasoir tous les deuxans.
Remplacez immédiatement les têtes de rasage
endommagées. Remplacez toujours les têtes de
rasoir par les têtes (voir 'Commande d'accessoires')
de rasoirPhilips d'origine.
Rappel de remplacement
Le symbole de l'unité de rasage s'allume pour
indiquer que les têtes de rasoir doivent être
remplacées.
1 Le symbole d'unité de rasage s'allume en
2 Éteignez l'appareil et assurez-vous qu'il est
3 Appuyez sur le bouton de déverrouillage pour
4 Faites tourner le système de verrouillage dans
Français
orange de manière continue.
débranché de la prise murale.
ouvrir la tête de rasoir. Retirez l'unité de rasage
de l'appareil.
le sens inverse des aiguilles d'une montre et
retirez le système de fixation.
95
Page 96

1
2
5 sec.
96
Français
5 Retirez les têtes de rasoir de l'unité de rasage,
puis mettez-les au rebut.
6 Installez de nouvelles têtes de rasoir dans
l'unité de rasage.
Remarque: Veillez à ce que les têtes de rasage
s'encastrent parfaitement dans les encoches de
leur support.
7 Replacez le système de fixation sur la tête de
rasoir, puis faites-le tourner dans le sens des
aiguilles d'une montre.
8 Insérez la languette de l'unité de rasage dans la
fente située sur la partie supérieure de
l'appareil. Puis, fermez l'unité de rasage («clic»).
Remarque: Si la tête de rasoir ne se ferme pas
facilement, vérifiez que vous avez correctement
inséré les têtes de rasoir et que le système de
fixation est verrouillé.
9 Maintenez le bouton marche/arrêt enfoncé
pendant 5secondes pour réinitialiser le rappel
de remplacement du rasoir. Le voyant de
orange s'éteint.
Commande d'accessoires
Pour acheter des accessoires ou des pièces de
rechange, consultez le site Web
www.shop.philips.com/service ou rendez-vous
chez votre revendeur Philips. Vous pouvez
également contacter le Service Consommateurs
Philips de votre pays (consultez le dépliant de
Page 97

Recyclage
Français
garantie internationale pour obtenir les
coordonnées).
Les pièces et accessoires de rechange suivants
sont disponibles:
- Têtes de rasoir Philips SH30.
- Aérosol de nettoyage pour têtes de rasoir
Philips HQ110
- Ce symbole signifie que ce produit ne doit pas
être jeté avec les déchets ménagers
(2012/19/EU).
- Ce symbole signifie que ce produit contient une
batterie rechargeable intégrée, qui ne doit pas
être mise au rebut avec les déchets ménagers
(2006/66/CE). Veuillez déposer votre produit
dans un point de collecte agréé ou un centre de
service après-vente Philips pour faire retirer la
batterie rechargeable par un professionnel.
- Respectez les réglementations de votre pays
concernant la collecte séparée des appareils
électriques et électroniques et des piles
rechargeables. La mise au rebut appropriée des
piles permet de protéger l'environnement et la
santé.
97
Garantie et assistance
Si vous avez besoin d'une assistance ou
d'informations supplémentaires, consultez le site
Web www.philips.com/support ou lisez le dépliant
sur la garantie internationale.
Page 98

Français
98
Restrictions de garantie
Étant susceptibles de s'user, les têtes de rasoir
(lames et grilles) ne sont pas couvertes par la
garantie internationale.
Dépannage
Cette rubrique récapitule les problèmes les plus
courants que vous pouvez rencontrer avec
l'appareil. Si vous ne parvenez pas à résoudre un
problème à l'aide des renseignements ci-dessous,
rendez-vous sur le site www.philips.com/support
et consultez la liste des questions fréquemment
posées ou contactez le
ServiceConsommateursPhilips de votre pays.
Problème Cause possible Solution
Les résultats de
rasage ne sont
pas aussi
satisfaisants que
d'habitude.
L'appareil ne
fonctionne pas
lorsque j'appuie
sur le bouton
marche/arrêt.
Les têtes de rasoir
sont
endommagées ou
usées.
Les têtes de rasoir
sont bloquées par
de longs poils.
Vous n'avez pas
inséré les têtes de
rasoir
correctement.
La batterie
rechargeable est
vide.
Remplacez les têtes de
rasoir (voir le chapitre
«Remplacement»).
Nettoyez les têtes de rasoir
une à une (voir le chapitre
«Nettoyage et entretien»).
Veillez à ce que les têtes
de rasoir s'encastrent
parfaitement dans les
encoches (voir le chapitre
«Nettoyage et entretien»).
Rechargez la batterie (voir
le chapitre «Charge»).
Page 99

Problème Cause possible Solution
Français
99
La température de
l'appareil est trop
élevée. Dans ce
cas, l'appareil ne
fonctionne pas.
Dès que la température de
l'appareil est suffisamment
basse, vous pouvez le
rallumer.
Page 100

Italiano
100
Introduzione
Congratulazioni per l'acquisto e benvenuti in
Philips! Per trarre il massimo vantaggio
dall'assistenza fornita da Philips, registrate il vostro
prodotto sul sito www.philips.com/welcome.
Descrizione generale (Fig. 1)
1 Cappuccio di protezione a scatto (solo S3520,
S3510)
2 Unità di rasatura
3 Pulsante di rilascio dell'unità di rasatura
4 Pulsante on/off
5 Simbolo della testina di rasatura
6 Spia di ricarica
7 Cappuccio di protezione
8 Rifinitore (solo S3540, S3530, S3520, S3510)
9 Interruttore di sgancio del rifinitorez (solo
S3540, S3530, S3520, S3510)
10 Unità di alimentazione (adattatore, modello
HQ8505)
11 Spinotto
Informazioni di sicurezza importanti
Prima di utilizzare l'apparecchio e i relativi
accessori, leggete attentamente queste
informazioni importanti e conservatele per
eventuali riferimenti futuri. Gli accessori forniti
potrebbero variare a seconda del prodotto.
Pericolo
- Tenete l'unità di alimentazione
lontano dall'acqua.
Italiano
 Loading...