

Page 1
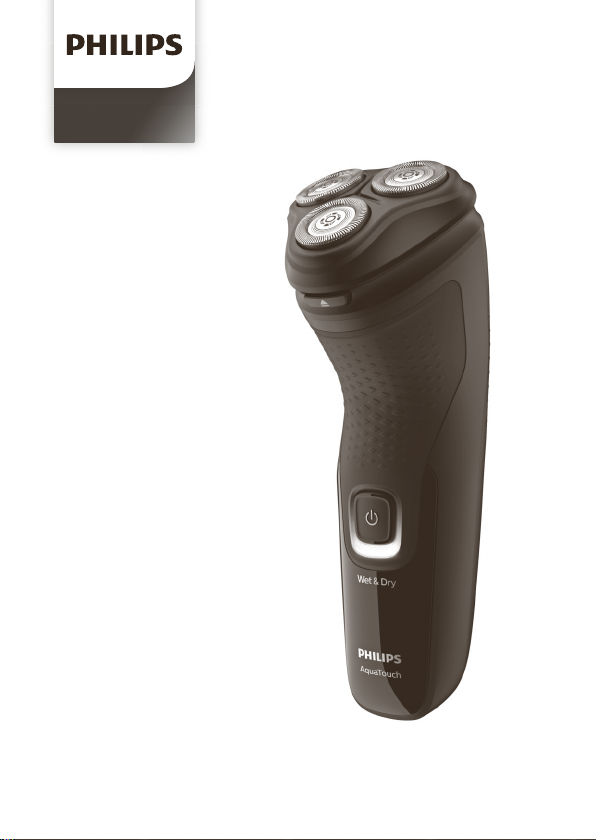
S1121, S1223
Page 2

Page 3
2
1
7
8
3
4
5
10
9
6
Page 4

Page 5

English 6
Bahasa Indonesia 21
Page 6

English
6
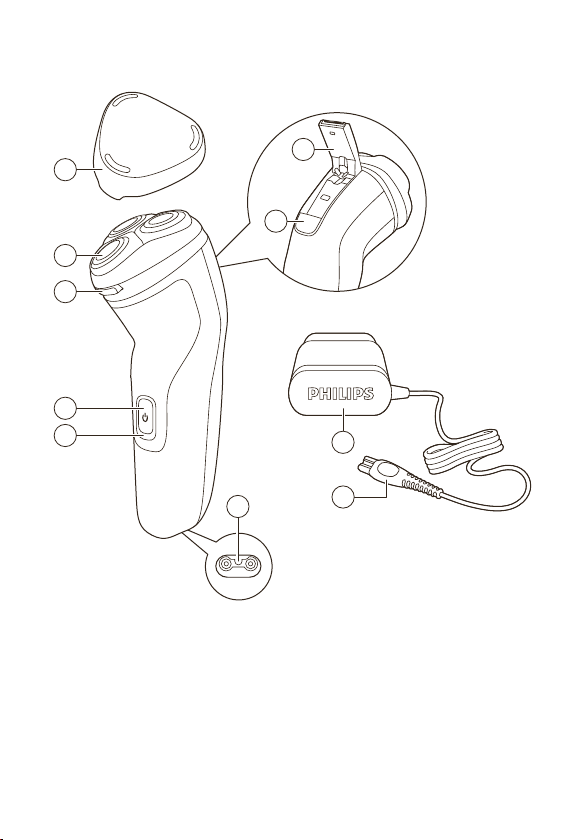
General description (Fig. 1)
1 Protective cap
2 Shaving unit
3 Shaving unit release button
4 On/off button
5 Charging light
6 Socket for small plug
7 Pop-up trimmer (S1223 only)
8 Trimmer release slide switch (S1223 only)
9 Supply unit
10 Small plug
Introduction
Congratulations on your purchase and welcome to
Philips! To fully benefit from the support that
Philips offers, register your product at
www.philips.com/welcome.
Important safety information
Read this important information carefully before
you use the appliance and save it for future
reference.
Danger
- Keep the supply unit dry.
Warning
- To charge the battery, only use the detachable
supply unit (A00390/A00380) provided with
the appliance.
Page 7

Caution
English
- The supply unit contains a transformer. Do not
cut off the supply unit to replace it with another
plug, as this causes a hazardous situation.
- This appliance can be used by children aged
from 8 years and above and persons with
reduced physical, sensory or mental capabilities
or lack of experience and knowledge if they
have been given supervision or instruction
concerning use of the appliance in a safe way
and understand the hazards involved. Children
shall not play with the appliance. Cleaning and
user maintenance shall not be made by
children without supervision.
- Always unplug the shaver before you clean it
under the tap.
- Always check the appliance before you use it.
Do not use the appliance if it is damaged, as
this may cause injury. Always replace a
damaged part with one of the original type.
- This appliance contains batteries that are nonreplaceable.
- Do not open the appliance to replace the
rechargeable battery.
- Never use water hotter than 60°C to rinse the
shaver.
- Only use this appliance for its intended purpose
as shown in the user manual.
- For hygienic reasons, the appliance should only
be used by one person.
- Never use compressed air, scouring pads,
abrasive cleaning agents or aggressive liquids
such as petrol or acetone to clean the
appliance.
7
Page 8

English
8
- Water may drip from the socket at the bottom
of the shaver when you rinse it. This is normal
and not dangerous because all electronics are
enclosed in a sealed power unit inside the
shaver.
- Do not use the supply unit in or near wall
sockets that contain an electric air freshener to
prevent irreparable damage to the supply unit.
Electromagnetic fields (EMF)
This Philips appliance complies with all applicable
standards and regulations regarding exposure to
electromagnetic fields.
General
- This shaver is waterproof. It is suitable for use in
the bath or shower and for cleaning under the
tap. For safety reasons, the shaver can
therefore only be used without cord.
- The supply unit is suitable for mains voltages
ranging from 100 to 240 volts.
- The supply unit transforms 100-240 volts to a
safe low voltage of less than 24 volts.
Charging
Charge the appliance before first use and when
the display indicates that the battery is almost
empty.
When you charge the appliance for the first time or
after a long period of disuse, let it charge until the
charging light lights up continuously.
Charging takes approx. 8 hours. A fully charged
appliance has a cordless operating time of up to
40 minutes.
Page 9
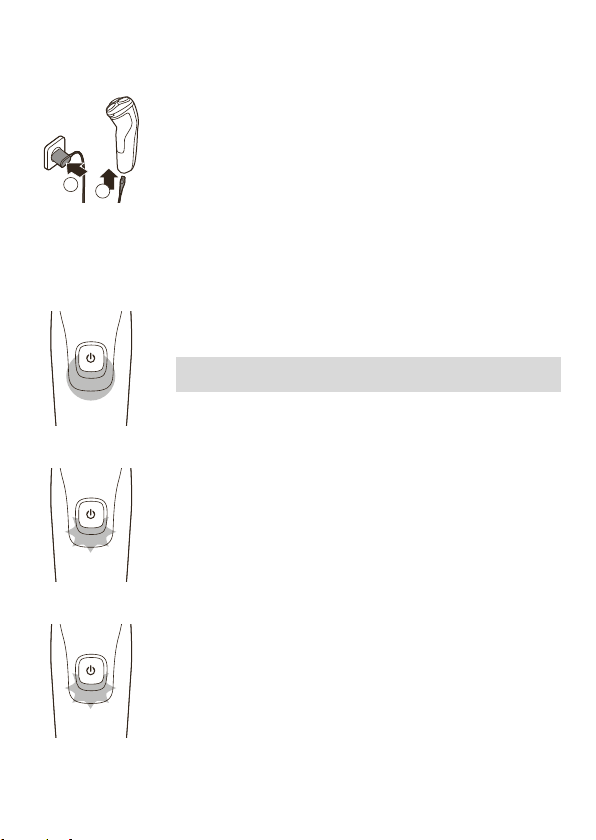
Charging with the supply unit
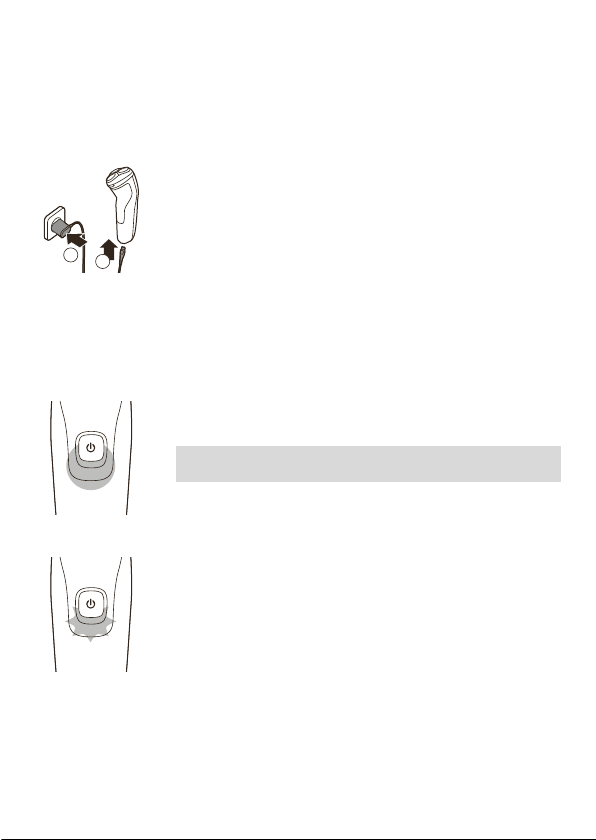
2
1
1 Put the small plug in the appliance.
2 Put the supply unit in the wall socket.
- The charging light shows the charging status of
the appliance (see 'Charging light').
3 After charging, remove the supply unit from the
wall socket and pull the small plug out of the
appliance.
Charging light
Battery fully charged
When the battery is fully charged, the charging
light lights up white continuously.
Note: After approx. 30 minutes, the charging light
goes out to save energy.
Battery low
- When the battery is almost empty (when there
are only 5 or fewer shaving minutes left), the
charging light flashes orange.
- When you switch off the appliance, the charging
light continues flashing orange for a few
seconds.
Charging
The charging light flashes white to indicate that the
appliance is charging.
English
9
Page 10
English
10
Using the appliance
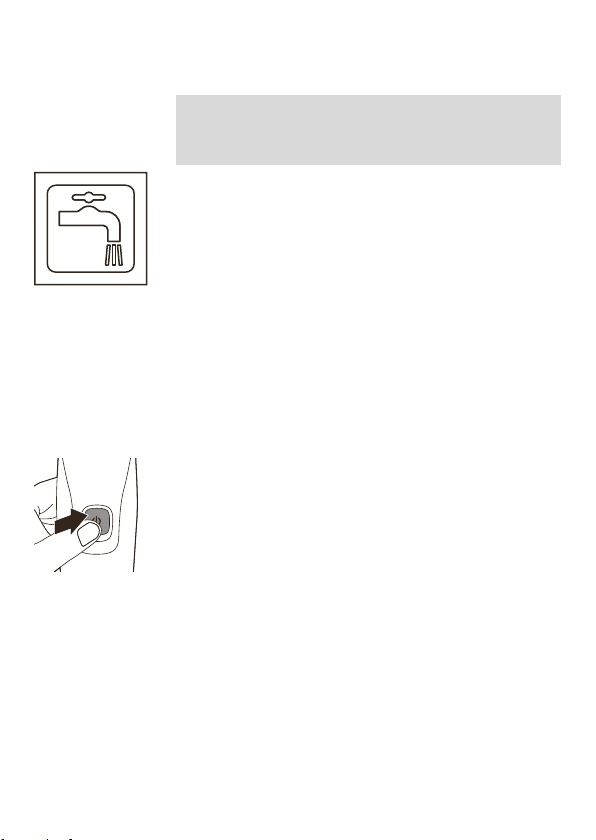
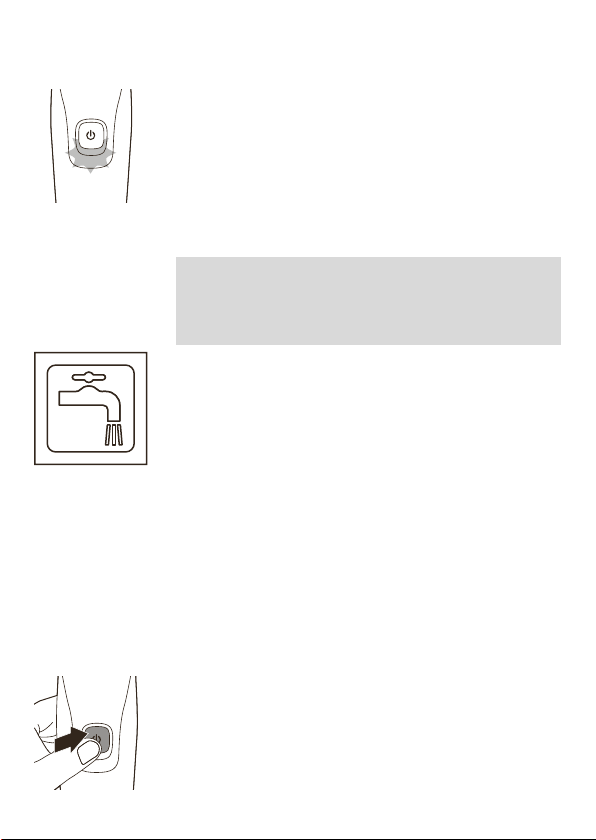
Note: This appliance is waterproof. It is suitable for
use in the bath or shower and for cleaning under
the tap. For safety reasons, this appliance can
therefore only be used without cord.
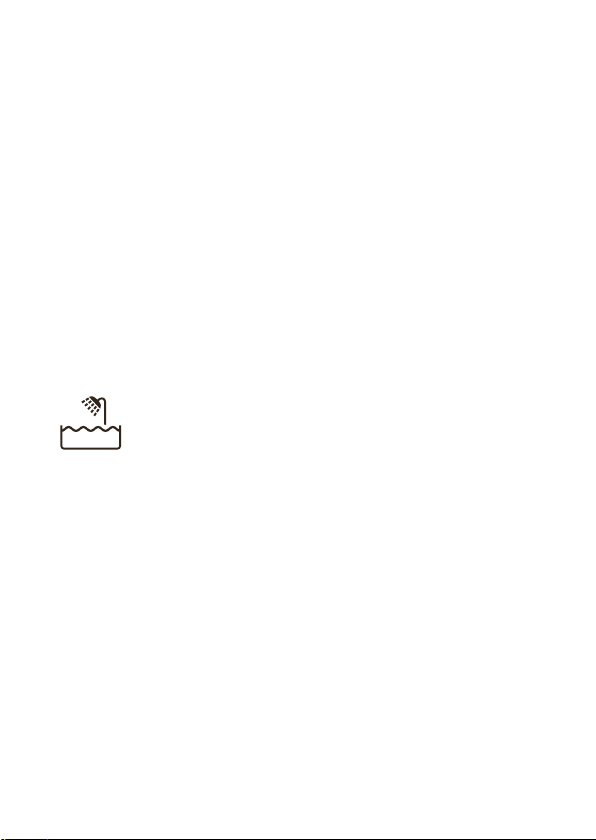
This symbol indicates that the product can be
rinsed under running tap water.
Shaving tips and tricks
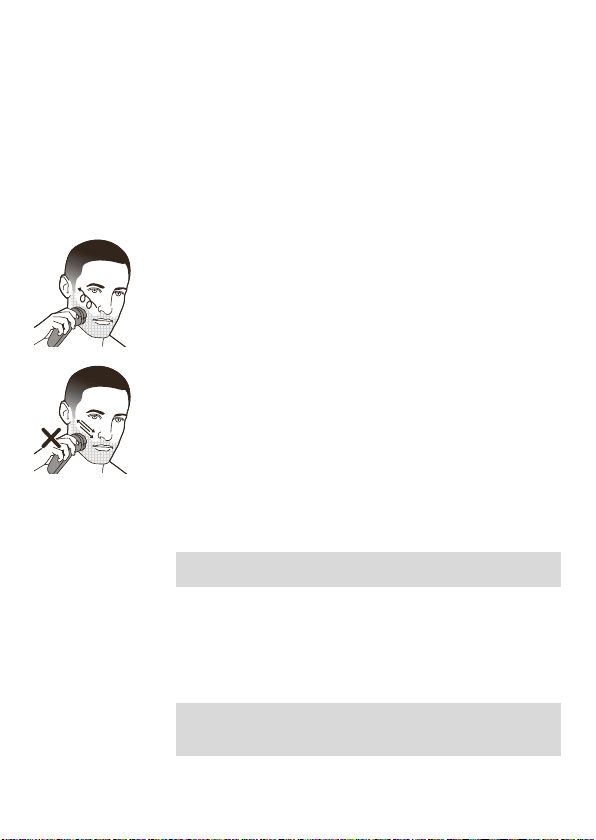
- Make circular movements during use. Circular
movements provide better shaving results than
straight movements.
- Your skin may need 2 or 3 weeks to get
accustomed to the Philips shaving system.
Switching the appliance on and off
To switch the appliance on or off, press the on/off
button once.
Shaving
- For the best results on skin comfort, pre-trim
your beard if you have not shaved for 3 days or
longer.
Dry shaving
1 Switch on the appliance.
Page 11

Wet shaving
English
2 Move the shaving heads in circular movements
over your skin to catch all hairs growing in
different directions.
3 Stretch your skin with your free hand so the
blades can lift and cut hair. Gently press the
shaver onto you skin so the floating heads can
follow the contours of your face.
Note: Do not press too hard as too much
pressure can pinch the skin.
4 Switch off and clean the appliance after each
use.
5 Put the protective cap on the appliance to
protect the shaving heads during storage and
travel.
Note: You can also use the shaver while it is
plugged-in and charging.
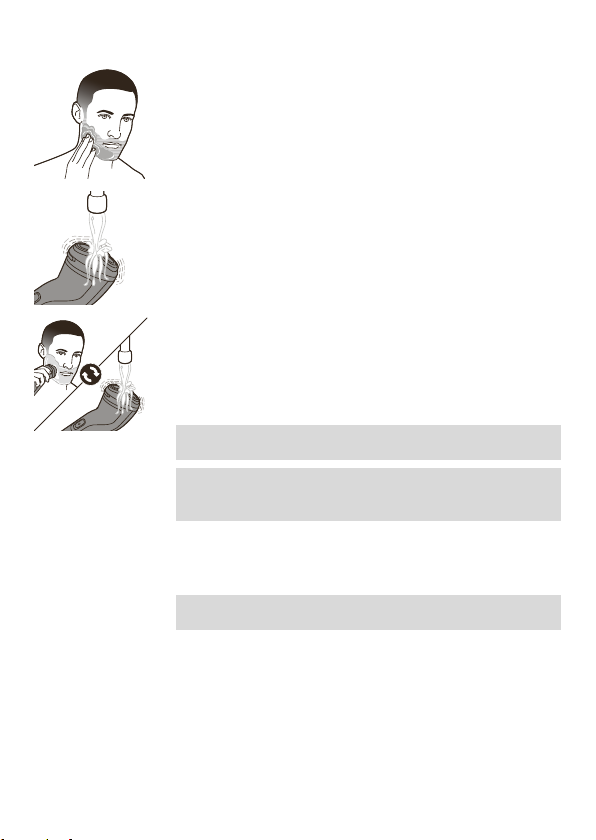
For a more comfortable shave, you can also use
this appliance on a wet face with shaving foam or
shaving gel.
1 Apply some water to your skin.
11
Page 12
12
English
2 Apply shaving foam or gel to your skin.
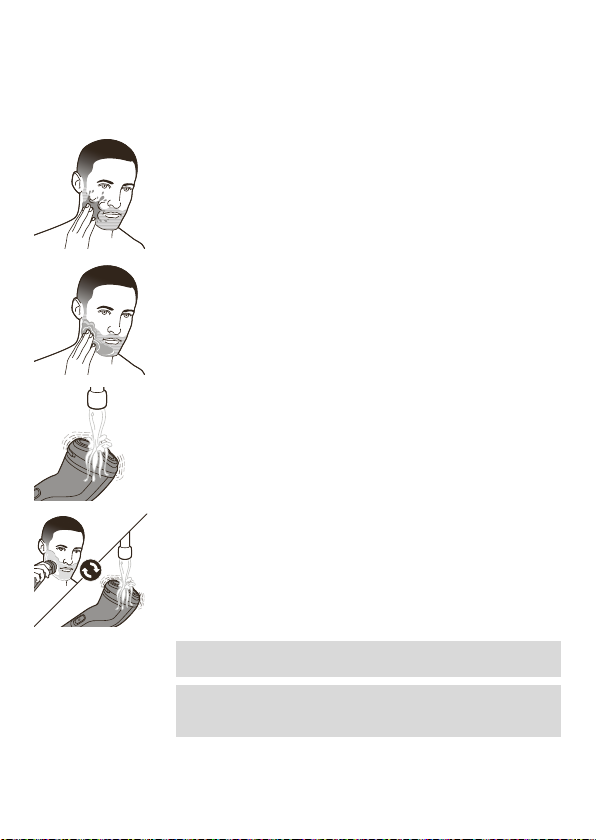
3 Rinse the shaving unit under the tap to ensure
that it glides smoothly over your skin.
4 Switch on the appliance.
5 Move the shaving heads over your skin in
circular movements to catch all hairs growing in
different directions. Make sure each shaving
head is fully in contact with the skin. Exert
gentle pressure for a close, comfortable shave.
Note: Do not press too hard, this can cause skin
irritation.
Note: Rinse the shaving unit regularly to ensure
that it continues to glide smoothly over your
skin.
6 Switch off and clean the appliance after each
use.
7 Dry your face.
Note: Make sure that you rinse all foam or
shaving gel off the appliance with warm water.
8 Put the protective cap on the appliance to
protect the shaving heads during storage and
travel.
Trimming with pop-up trimmer (S1223 only)
You can use the trimmer to groom your sideburns
and moustache.
Page 13
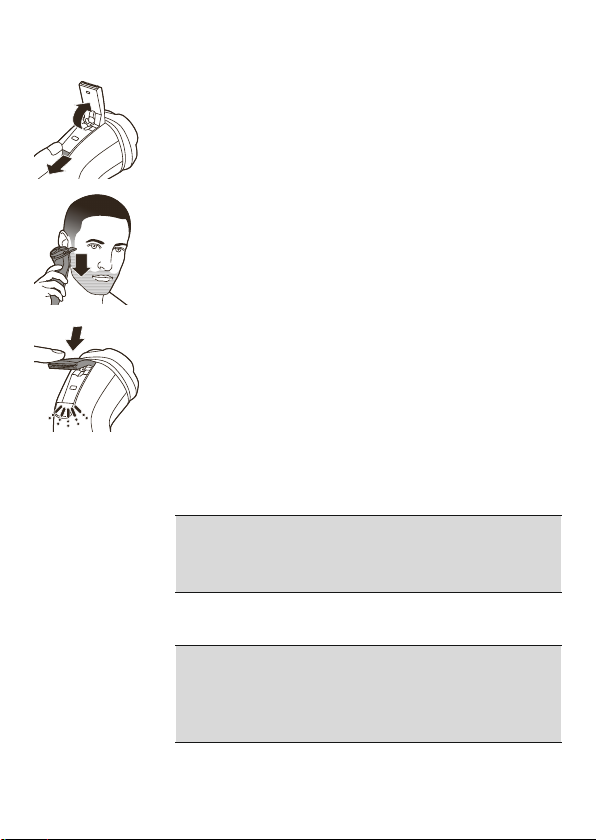
1 Push the trimmer release slide downwards to
open the trimmer.
2 Switch on the appliance.
3 Hold the trimmer perpendicular to the skin and
move the appliance downwards while you exert
gentle pressure.
4 Switch off and clean the trimmer after each use.
5 Close the pop-up trimmer (‘click’).
Cleaning and maintenance
Cleaning the shaver
Caution: Never use compressed air, scouring
pads, abrasive cleaning agents or aggressive
liquids such as petrol or acetone to clean the
appliance.
Clean the shaver after every use for optimal
performance (see 'Cleaning and maintenance').
Caution: While rinsing the shaving heads, water
may drip out of the base of the appliance. This is
a normal occurrence. Internal electric parts are in
a waterproof compartment so the appliance will
be protected against water damage.
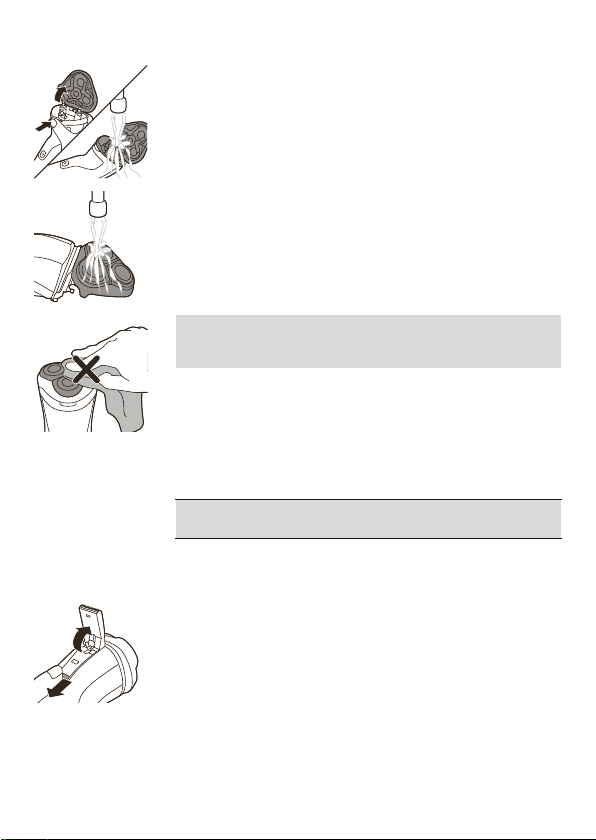
1 Switch off the appliance and make sure it is
disconnected from the wall socket.
English
13
Page 14
English
14
2 Press the release button to open the shaving
unit.
3 Rinse the shaving unit and hair chamber with
lukewarm water.
4 Rinse the outside of the shaving unit with
lukewarm water.
Caution: Never dry the shaving unit with a
towel or tissue, as this may damage the
shaving heads.
5 Carefully shake off excess water and let air dry
completely.
6 Close the shaving unit.
Cleaning the pop-up trimmer (S1223 only)
Clean the pop-up trimmer after each use.
Caution: Never dry the trimmer teeth with a towel
or tissue, as this may damage the trimmer teeth.
1 Switch off the appliance and make sure it is
disconnected from the wall socket.
2 Push the trimmer release slide button down to
open the pop-up trimmer.
Page 15
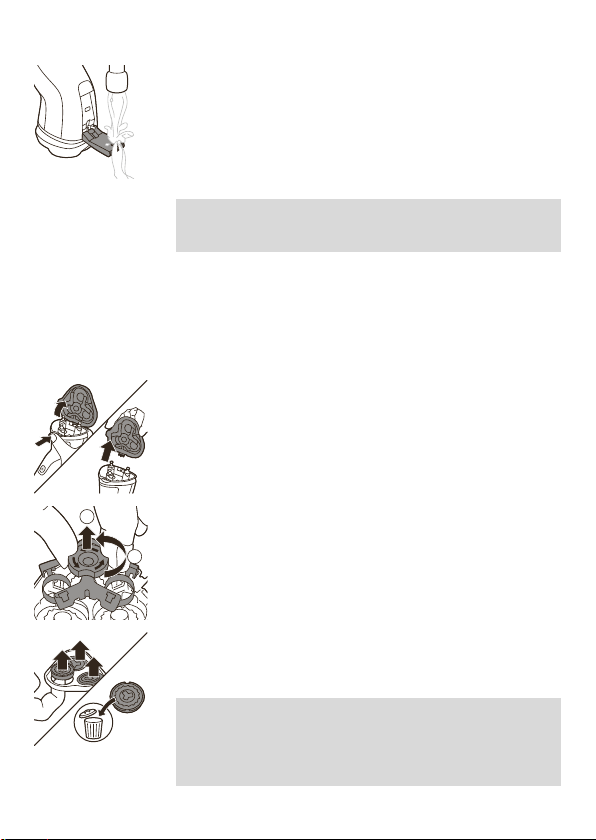
3 Switch on the appliance and rinse the pop-up
2
1
4 After cleaning, switch off the appliance.
5 Carefully shake off excess water and let the
6 Close the pop-up trimmer (‘click’).
Tip: For optimal performance, lubricate the teeth
of the pop-up trimmer with a drop of mineral oil
every six months (oil not included).
Thorough cleaning
Clean the shaving heads thoroughly once a month
for optimal performance.
1 Switch off the appliance and make sure it is
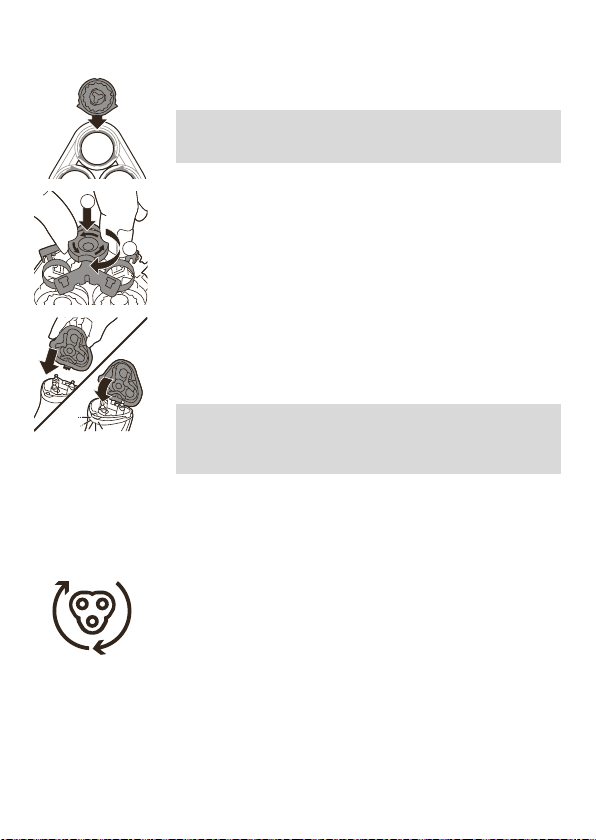
2 Press the release button to open the shaving
3 Turn the lock anticlockwise and remove the
English
trimmer with warm water.
pop-up trimmer air dry.
disconnected from the wall socket.
unit. Pull the shaving unit off the appliance.
retaining frame.
15
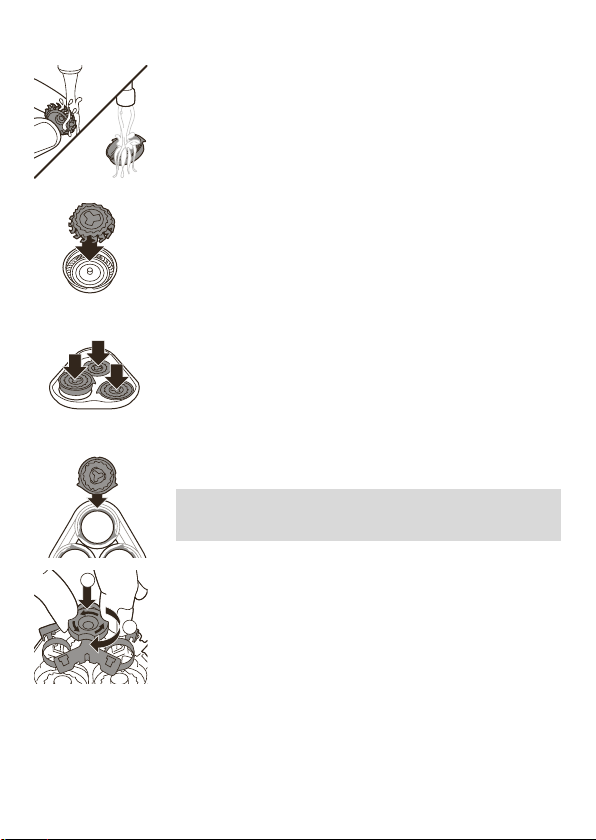
4 Remove and clean one shaving head at a time.
Each shaving head consists of a cutter and a
guard.
Note: Do not clean more than one cutter and
guard at a time, since they are all matching sets.
If you accidentally mix up the cutters and
guards, it may take several weeks before
optimal shaving performance is restored.
Page 16
1
2
16
English
- Remove the cutter from the shaving guard and
clean both parts under the tap.
5 Put the cutter back into the guard.
6 Put the shaving heads back into the shaving
unit.
Note: Make sure that the projections of the
shaving heads fit exactly into the recesses of
the shaving head holder.
7 Put the retaining frame back into the shaving
unit and turn the lock clockwise.
Page 17
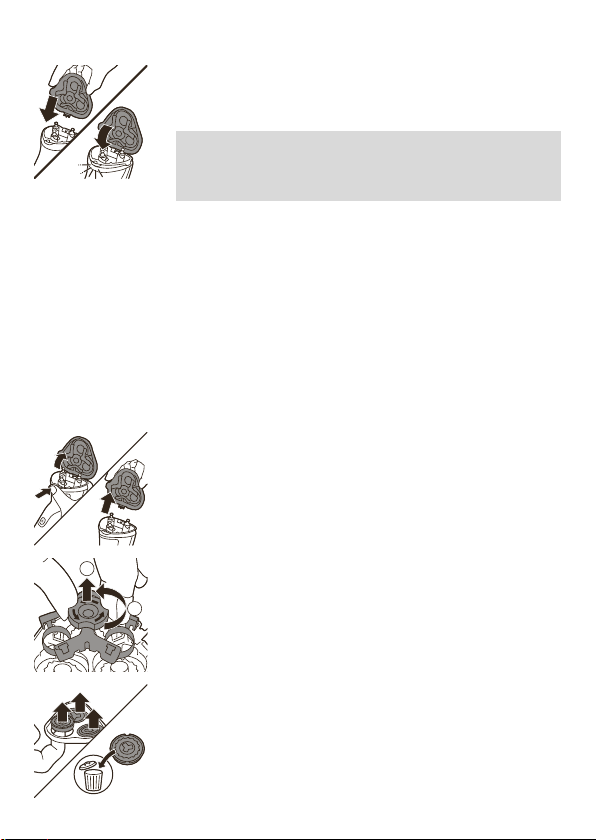
8 Insert the lug of the shaving unit into the slot in
2
1
the top of the appliance. Then close the shaving
unit ('click').
Note: If the shaving unit does not close
smoothly, check if you have inserted the
shaving heads properly and if the retaining
frame is locked.
Replacement
Replacing the shaving heads
For maximum shaving performance, we advise you
to replace the shaving heads every two years.
Replace damaged shaving heads immediately.
Always replace the shaving heads with original
Philips shaving heads (see 'Ordering accessories').
1 Switch off the appliance and make sure it is
disconnected from the wall socket.
2 Press the shaving unit release button to open
the shaving unit. Pull the shaving unit off the
appliance.
3 Turn the lock anticlockwise and remove the
retaining frame. Place it aside in a safe place.
English
17
4 Remove the shaving heads from the shaving
unit.
Discard the used shaving heads immediately to
avoid mixing them with the new shaving heads.
Page 18
1
2
18
English
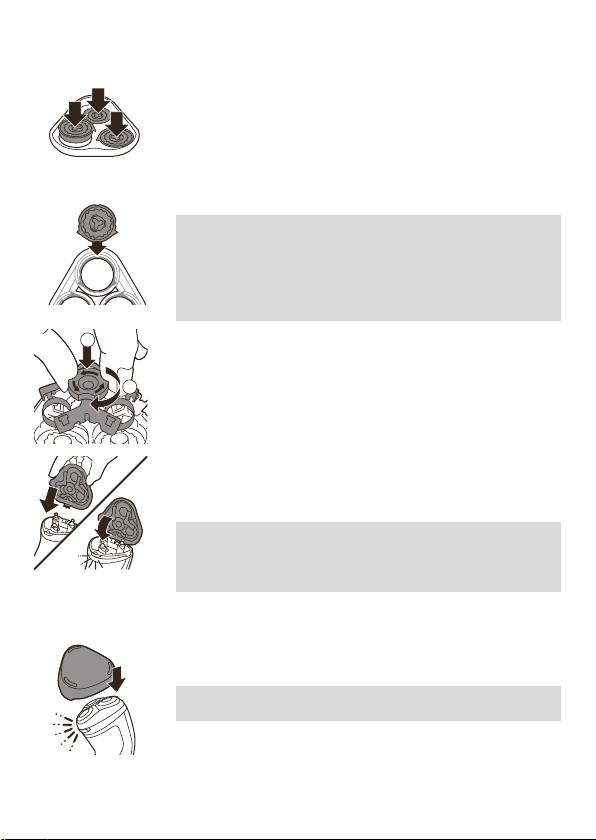
5 Place new shaving heads in the shaving unit.
Note: Make sure that the shaving heads with
the projections fit exactly onto the hooks of the
shaving head holder when placing them. The
shaving heads supplied with the shaver either
have notches or projections. Both shaving
systems are the same.
6 Put the retaining frame back into the shaving
unit and turn the lock clockwise.
7 Insert the hinge of the shaving unit into the slot
in the top of the shaver. Then close the shaving
unit.
Note: If the shaving unit does not close
smoothly, check if you have inserted the
shaving heads properly and if the retaining
frame is locked.
Storage
Put the protective cap on the shaver to prevent
damage.
Note: Always let the shaver dry completely before
storing.
Store the appliance in the pouch supplied.
Make sure the appliance is dry before you store it
in the pouch.
Page 19

Ordering accessories
To buy accessories or spare parts, visit
www.philips.com/parts-and-accessories or go to
your Philips dealer. You can also contact the
Philips Consumer Care Center in your country (see
the international warranty leaflet for contact
details).
Recycling
- Do not throw away the product with the normal
household waste at the end of its life, but hand
it in at an official collection point for recycling.
By doing this, you help to preserve the
environment.
- This product contains a built-in rechargeable
battery which shall not be disposed of with
normal household waste. Please take your
product to an official collection point or a
Philips service center to have a professional
remove the rechargeable battery.
- Follow your country’s rules for the separate
collection of electrical and electronic products
and rechargeable batteries. Correct disposal
helps prevent negative consequences for the
environment and human health.
Removing the rechargeable battery
Only remove the rechargeable battery when
you discard the shaver. Before you remove
the battery, make sure that the shaver is
disconnected from the wall socket and that
the battery is completely empty
Take any necessary safety precautions
when you handle tools to open the shaver
and when you dispose of the rechargeable
battery.
English
19
Page 20

English
20
1 Check if there are screws in the back of the
shaver or in the hair chamber. If so, remove
them.
2 Remove the outer panels of the shaver with a
screwdriver or other tool. If necessary, also
remove additional screws and/or parts until you
see the printed circuit board with the
rechargeable battery.
3 Remove the rechargeable battery.
Warranty and support
If you need information or support, please visit
www.philips.com/support or read the
international warranty leaflet.
Warranty restrictions
The shaving heads (cutters and guards) are not
covered by the terms of the international warranty
because they are subject to wear.
Page 21

Bahasa Indonesia
Keterangan umum (Gbr. 1)
1 Tutup pelindung
2 Unit pencukur
3 Tombol pelepas unit cukur
4 Tombol on/off
5 Lampu pengisian daya
6 Soket untuk steker kecil
7 Pemangkas pop-up (hanya model S1223)
8 Sakelar geseran pelepas pemangkas (hanya
model S1223)
9 Unit catu daya
10 Steker kecil
Pendahuluan
Selamat atas pembelian Anda dan selamat datang
di Philips! Untuk memanfaatkan sepenuhnya
dukungan yang ditawarkan Philips, daftarkan
produk Anda di www.philips.com/welcome.
Informasi keselamatan penting
Baca informasi penting ini dengan saksama
sebelum menggunakan alat dan simpanlah untuk
referensi nanti.
Bahaya
- Usahakan unit catu daya tetap kering.
21
Peringatan
- Untuk mengisi daya baterai, hanya gunakan
unit catu daya yang dapat dilepas
(A00390/A00380) yang disertakan dengan alat
ini.
Page 22

Bahasa Indonesia
22
Perhatian
- Unit catu daya terdiri atas transformator.
Jangan memotong unit catu daya dan
menggantinya dengan steker lain, karena hal ini
menimbulkan situasi berbahaya.
- Alat ini dapat digunakan oleh anak-anak
minimal berusia 8 tahun ke atas dan orang
dengan cacat fisik, indera atau kecakapan
mental yang kurang atau kurang pengalaman
dan pengetahuan jika mereka diberi
pengawasan atau petunjuk mengenai cara
penggunaan alat yang aman dan mengerti
bahayanya. Anak-anak dilarang memainkan
alat ini. Anak-anak tidak boleh membersihkan
dan memelihara alat ini tanpa pengawasan.
- Selalu cabut steker dari alat cukur sebelum
membersihkannya di bawah keran.
- Selalu periksa alat sebelum Anda
menggunakannya. Jangan gunakan alat jika
telah rusak, karena dapat menyebabkan
cedera. Selalu ganti komponen yang rusak
dengan yang asli.
- Alat ini memiliki baterai yang tidak bisa diganti.
- Jangan membuka alat untuk mengganti baterai
isi-ulang.
- Jangan sekali-kali menggunakan air yang lebih
panas dari 60 °C untuk membilas alat cukur.
- Hanya gunakan alat ini untuk keperluan yang
dimaksud di petunjuk pengguna.
- Untuk alasan higienis, alat sebaiknya hanya
digunakan oleh satu orang saja.
- Jangan sekali-kali menggunakan udara
bertekanan, sabut gosok, bahan pembersih
abrasif atau cairan agresif seperti bensin atau
aseton untuk membersihkan alat.
Page 23
- Air mungkin menetes keluar dari soket di bagian
bawah alat cukur saat Anda membilasnya. Hal
ini normal dan tidak berbahaya karena semua
perangkat elektronik terlindungi dalam unit
daya tertutup di dalam alat cukur.
- Jangan menggunakan unit catu daya di atau di
dekat stopkontak yang tersambung dengan
penyegar udara elektrik untuk mencegah
kerusakan permanen pada unit catu daya.
Medan elektromagnet (EMF)
Alat Philips ini mematuhi semua standar dan
peraturan yang berlaku terkait paparan terhadap
medan elektromagnet.
Umum
- Alat cukur ini kedap air. Alat ini cocok untuk
digunakan di bak mandi atau shower dan untuk
membersihkan di bawah keran. Untuk
keamanan, alat cukur ini hanya dapat
dioperasikan tanpa kabel.
- Unit catu daya cocok untuk tegangan listrik
berkisaran 100 hingga 240 volt.
- Unit catu daya mengubah tegangan 100-240
volt ke tegangan rendah yang aman kurang dari
24 volt.
Pengisian daya
Isi daya alat sebelum menggunakannya untuk
pertama kali dan saat layar menunjukkan bahwa
baterai hampir habis.
Ketika mengisi daya alat untuk pertama kalinya
atau setelah lama tidak digunakan, biarkan alat
mengisi daya sampai lampu pengisian daya
menyala terus.
Bahasa Indonesia
23
Page 24
2
1
Bahasa Indonesia
24
Pengisian baterai berlangsung kurang lebih 8
jam.Alat yang diisi daya penuh dapat dipakai
tanpa kabel hingga 40 menit.
Mengisi baterai dengan unit catu daya
1 Pasang steker kecil ke alat.
2 Tancapkan adaptor ke stopkontak dinding.
- Lampu pengisian menunjukkan status
pengisian daya dari alat (lihat 'Lampu pengisian
daya').
3 Setelah pengisian daya selesai, cabut unit catu
daya dari stopkontak dinding dan lepaskan
steker kecil dari alat.
Lampu pengisian daya
Baterai terisi penuh
Saat baterai terisi penuh, lampu pengisian daya
akan terus menyala putih.
Catatan:Setelah sekitar 30 menit, lampu pengisian
daya akan padam untuk menghemat energi.
Baterai tinggal sedikit
- Bila baterai hampir habis (hanya bisa digunakan
untuk mencukur selama 5 menit atau kurang),
lampu pengisian daya akan berkedip jingga.
- Ketika Anda mematikan alat, lampu pengisian
daya berkedip jingga terus-menerus selama
beberapa detik.
Page 25
Pengisian daya
Lampu pengisian daya akan berkedip putih untuk
menandakan bahwa perangkat sedang diisi.
Menggunakan alat
Catatan: Alat ini kedap air. Alat ini cocok untuk
digunakan di bak mandi atau shower dan untuk
membersihkan di bawah keran. Demi alasan
keamanan, alat ini hanya dapat dioperasikan
tanpa kabel.
Simbol ini menunjukkan bahwa produk dapat
dibilas di bawah air keran yang mengalir.
Tip dan trik pencukuran
- Lakukan gerakan melingkar selama
penggunaan. Gerakan melingkar memberikan
hasil pencukuran yang lebih baik daripada
gerakan lurus.
- Kulit Anda mungkin memerlukan 2 atau 3
minggu agar terbiasa dengan sistem
pencukuran Philips.
Menghidupkan dan mematikan alat
Untuk menghidupkan atau mematikan alat, tekan
tombol daya satu kali.
Bahasa Indonesia
25
Page 26
Bahasa Indonesia
26
Mencukur
Untuk mendapatkan hasil terbaik pada
kenyamanan kulit, sebaiknya pangkaslah jenggot
terlebih dahulu bila belum bercukur selama 3 hari
atau lebih.
Pencukuran kering
1 Hidupkan alat tersebut.
2 Gerakkan kepala pencukur pada kulit Anda
3 Kencangkan kulit Anda dengan salah satu
4 Matikan dan bersihkan alat setiap kali selesai
5 Letakkan tutup pelindung pada alat untuk
Catatan:Anda juga dapat menggunakan pencukur
ketika tersambung ke stopkontak dan mengisi
daya.
dengan gerakan melingkar untuk memotong
semua rambut yang tumbuh dengan arah yang
berbeda.
tangan agar pisau dapat mengangkat dan
memotong rambut. Tekan pencukur dengan
pelan ke kulit sehingga kepala gagang dapat
mengikuti kontur wajah Anda.
Catatan:Jangan menekan terlalu kuat karena
tekanan yang berlebihan dapat menjepit kulit.
digunakan.
melindungi kepala cukur selama penyimpanan
atau saat dibawa.
Page 27
Pencukuran basah
Anda juga dapat menggunakan alat ini pada muka
yang basah oleh busa atau gel cukur.
1 Basahi kulit Anda dengan sedikit air.
2 Oleskan busa atau gel pada kulit Anda.
3 Bilas unit pencukur di bawah keran untuk
4 Hidupkan alat tersebut.
5 Gerakkan kepala pencukur pada kulit Anda
6 Matikan dan bersihkan alat setiap kali selesai
7 Keringkan wajah Anda.
Bahasa Indonesia
memastikan alat meluncur mulus di atas kulit
Anda.
dengan gerakan melingkar untuk memotong
semua rambut yang tumbuh dengan arah yang
berbeda. Pastikan setiap kepala cukur
menyentuh kulit sepenuhnya. Berikan sedikit
tekanan agar nyaman ketika mencukur.
Catatan:Jangan menekan terlalu kuat, karena
dapat menyebabkan iritasi kulit.
Catatan: Bilas unit cukur secara teratur untuk
memastikannya tetap meluncur mulus di atas
kulit Anda.
digunakan.
27
Page 28
Bahasa Indonesia
28
Catatan: Pastikan Anda membilas semua busa
atau gel cukur dari alat dengan air hangat.
8 Letakkan tutup pelindung pada alat untuk
melindungi kepala cukur selama penyimpanan
atau saat dibawa.
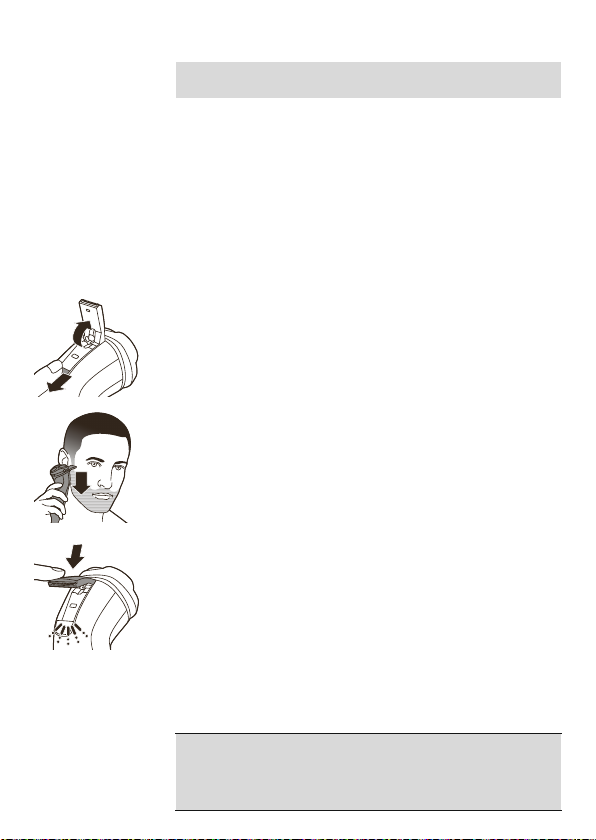
Memangkas dengan pemangkas pop-up (S1223 saja)
Anda dapat menggunakan pemangkas untuk
merapikan cambang dan kumis.
1 Dorong geseran pelepas pemangkas ke bawah
untuk membuka pemangkas.
2 Hidupkan alat tersebut.
3 Pegang sambungan secara tegak lurus pada
kulit dan geser alat ke bawah sambil menekan
lembut.
4 Matikan dan bersihkan pemangkas setiap kali
selesai digunakan.
5 Tutup pemangkas pop-up (hingga berbunyi
‘klik’).
Pembersihan dan perawatan
Membersihkan pencukur
Perhatian: Jangan sekali-kali menggunakan
udara bertekanan, sabut gosok, bahan pembersih
abrasif atau cairan agresif seperti bensin atau
aseton untuk membersihkan alat.
Page 29
Bahasa Indonesia
Bersihkan alat cukur setelah setiap kali selesai
digunakan agar performa tetap optimal (lihat
'Pembersihan dan perawatan').
Perhatian: Ketika membilas kepala alat cukur, air
mungkin menetes keluar dari bagian dasar alat.
Ini adalah kejadian yang normal. Bagian listrik
internal berada di tempat yang tahan air
sehingga alat akan terlindung dari kerusakan
yang timbul karena air.
1 Matikan alat dan pastikan kabel alat sudah
dicabut dari stopkontak.
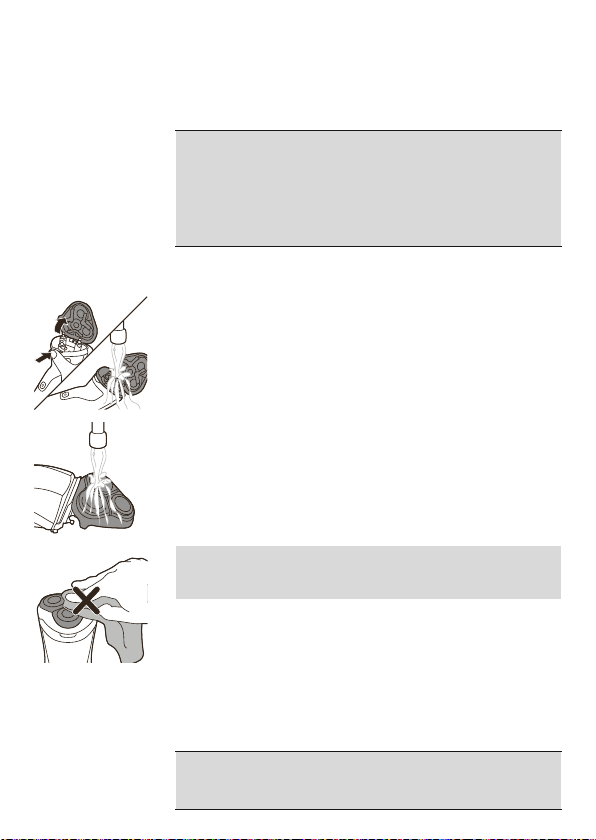
2 Tekan tombol pelepas untuk membuka unit
pencukur.
3 Bilas unit pencukur dan wadah rambut dengan
air hangat.
4 Bilas bagian luar unit pencukur dengan air
hangat.
Perhatian: Jangan sekali-kali mengeringkan
unit cukur dengan handuk atau kertas tisu,
karena dapat merusak kepala cukur.
5 Dengan hati-hati kibaskansisa air dan biarkan
hingga benar-benar kering.
6 Tutup unit pencukur.
Membersihkan pemangkas pop-up (S1223 saja)
Bersihkan pemangkas pop-up setiap kali selesai
digunakan.
Perhatian: Jangan sekali-kali mengeringkan gerigi
pemangkas dengan handuk atau kertas tisu,
karena dapat merusak gerigi pemangkas.
29
Page 30
Bahasa Indonesia
30
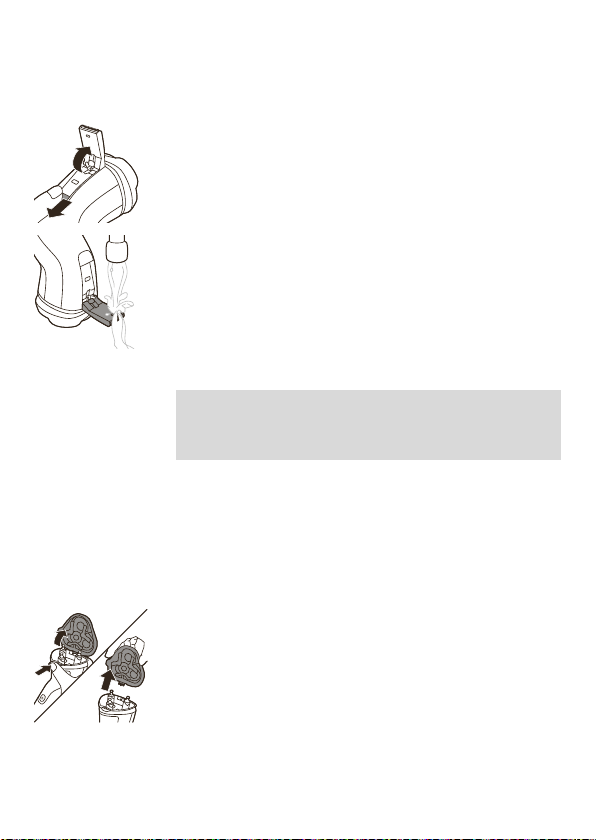
1 Matikan alat dan pastikan kabel alat sudah
dicabut dari stopkontak.
2 Dorong tombol geser pelepas pemangkas ke
bawah untuk membuka pemangkas pop-up.
3 Hidupkan alat dan bilas pemangkas pop-up
dengan air hangat.
4 Setelah membersihkan, matikan alat.
5 Dengan hati-hati, kibaskansisa air dan biarkan
pemangkas pop-up sampai benar-benar kering.
6 Tutup pemangkas pop-up (hingga berbunyi
‘klik’).
Tips: Untuk performa yang optimal, lumasi gigi
pemangkas pop-up dengan setetes minyak
mineral setiap enam bulan (minyak tidak
disertakan).
Pembersihan menyeluruh
Bersihkan kepala cukur secara menyeluruh
sebulan sekali untuk memperoleh kinerja yang
optimal.
1 Matikan alat dan pastikan kabel alat sudah
dicabut dari stopkontak.
2 Tekan tombol pelepas untuk membuka unit
pencukur. Tarik unit pencukur dari alat ke arah
luar hingga terlepas.
Page 31
2
1
Bahasa Indonesia
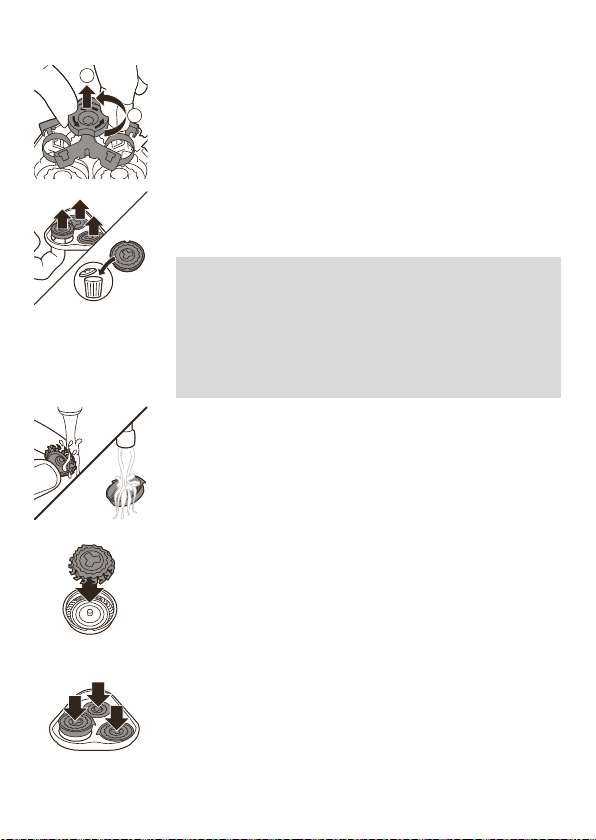
3 Putar berlawanan arah putaran jarum jam dan
lepaskan bingkai penahan.
4 Lepas dan bersihkan kepala cukur satu persatu.
Setiap kepala cukur terdiri atas satu mata pisau
dan satu pelindungnya.
Catatan:Jangan membersihkan lebih dari satu
mata pisau dan pelindungnya secara
bersamaan, bersihkan satu persatu karena
semuanya adalah komponen berpasangan. Jika
Anda tidak sengaja salah memasangkan mata
pisau dan pelindungnya, diperlukan beberapa
minggu untuk kembali mendapatkan kinerja
pencukuran yang optimal.
- Lepaskan mata pisau dari pelindungnya dan
bersihkan kedua bagian tersebut di bawah
pancuran air keran.
5 Masukkan kembali mata pisau ke dalam
pelindungnya.
31
Page 32
1
2
2yrs
Bahasa Indonesia
32
6 Kembalikan kepala cukur ke dalam unit
pencukur.
Catatan: Pastikan tonjolan kepala alat cukur
masuk dengan pas ke dalam ceruk pada
pemegang kepala alat cukur.
7 Pasang kembali bingkai penahan pada unit
pencukur dan putar searah putaran jarum jam.
8 Masukkan tonjolan pengunci pada unit
pencukur ke dalam lubang pada bagian atas
alat. Lalu tutup unit pencukur (hingga berbunyi
'klik').
Catatan:Jika unit pencukur tidak menutup
rapat, periksa apakah Anda sudah memasukkan
kepala cukur dengan tepat dan apakah bingkai
penahan terkunci.
Penggantian
Mengganti kepala alat cukur
Untuk memperoleh kinerja pencukuran maksimal,
sebaiknya Anda mengganti kepala cukur setiap
dua tahun.Segera ganti kepala cukur yang rusak.
Selalu ganti kepala cukur dengan kepala (lihat
'Memesan aksesori') cukur Philips yang asli.
1 Matikan alat dan pastikan kabel alat sudah
dicabut dari stopkontak.
Page 33
2
1
Bahasa Indonesia
33
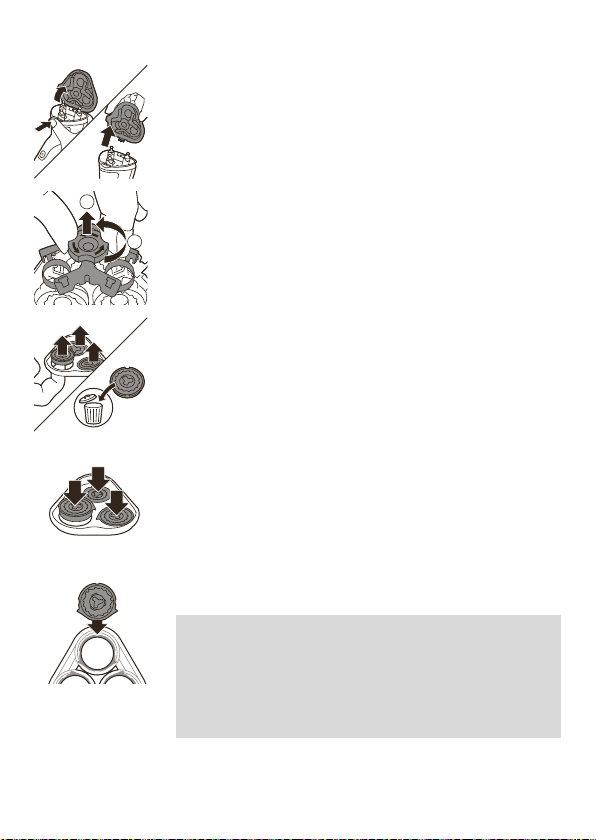
2 Tekan tombol pelepas unit pencukur untuk
membuka unit pencukur. Lepaskan unit
pencukur dari alat.
3 Putar berlawanan arah putaran jarum jam dan
lepaskan bingkai penahan. Letakkan di tempat
yang aman.
4 Lepaskan kepala pencukur dari unit pencukur.
Segera buang kepala cukur bekas agar tidak
tercampur dengan kepala cukur baru.
5 Pasang kepala cukur yang baru pada unit
pencukur.
Catatan:Pastikan tonjolan pada kepala
pencukur benar-benar pas dengan kait pada
penahan kepala pencukur ketika
memasangnya. Kepala pencukur yang
disertakan bersama pencukur ini memiliki lekuk
atau tonjolan. Konsep kedua sistem tersebut
sama.
Page 34
1
2
Bahasa Indonesia
34
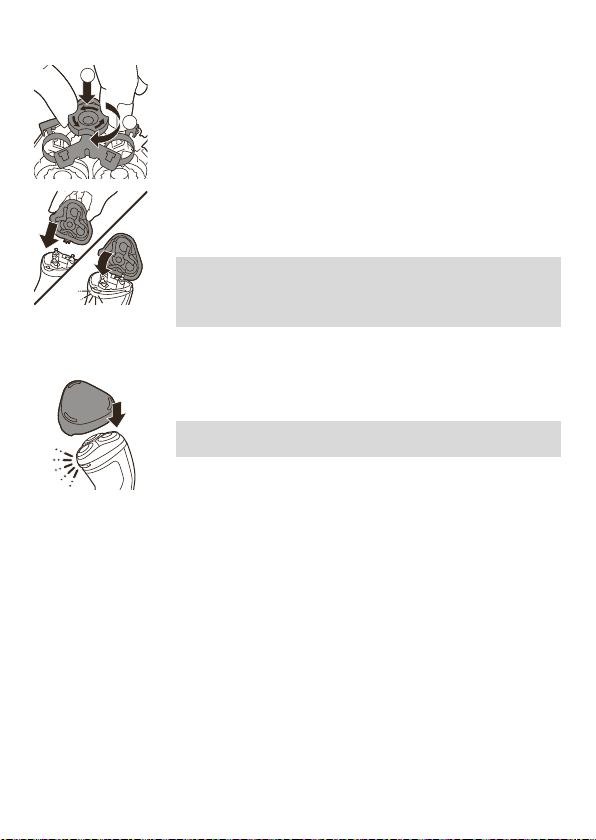
6 Pasang kembali bingkai penahan pada unit
pencukur dan putar searah putaran jarum jam.
7 Masukkan engsel unit pencukur ke dalam
lubang pada bagian atas alat cukur. Lalu tutup
unit pencukur.
Catatan:Jika unit pencukur tidak menutup
rapat, periksa apakah Anda sudah memasukkan
kepala cukur dengan tepat dan apakah bingkai
penahan terkunci.
Penyimpanan
Pasang penutup pelindung pada pencukur untuk
mencegah kerusakan.
Catatan: Biarkan alat cukur hingga benar-benar
kering di udara terbuka sebelum menyimpannya.
Simpan alat dalam kantung yang disediakan.
Pastikan alat kering sebelum disimpan di dalam
kantung.
Memesan aksesori
Untuk membeli aksesori atau suku cadang, buka
www.philips.com/parts-and-accessories atau
kunjungi dealer Philips terdekat. Anda juga dapat
menghubungi Pusat Layanan Pelanggan di negara
Anda (lihat brosur garansi internasional untuk
rincian kontak).
Page 35

Mendaur ulang
- Jangan membuang produk bersama limbah
rumah tangga biasa jika sudah tidak bisa
dipakai lagi, tetapi serahkan ke tempat
pengumpulan barang bekas yang resmi untuk
didaur ulang. Dengan melakukan ini, Andaturut
membantu melestarikan lingkungan.
- Produk ini berisi baterai isi ulang internal yang
tidak boleh dibuang bersama dengan sampah
rumah tangga biasa. Harap bawa produk Anda
ke lokasi pengumpulan resmi atau ke pusat
servis Philips untuk melepas baterai isi ulang
oleh teknisi profesional.
- Patuhi peraturan di negara Anda untuk
pengumpulan terpisah untuk produk listrik dan
elektronik serta baterai isi-ulang. Pembuangan
secara benar akan membantu mencegah
dampak negatif terhadap lingkungan dan
kesehatan manusia.
Melepas baterai isi ulang
Hanya keluarkan baterai isi ulang ketika
Anda membuang alat cukur. Sebelum
mengeluarkan baterai, pastikan bahwa alat
cukur sudah dicabut dari stopkontak dan
daya baterai sudah benar-benar habis
Lakukan semua tindakan pencegahan yang
diperlukan ketika menggunakan alat untuk
membuka alat cukur dan ketika membuang
baterai isi ulang.
1 Periksa apakah ada sekrup pada bagian
belakang alat cukur atau di dalam wadah
rambut. Jika ada, lepaskan.
Bahasa Indonesia
35
Page 36

PHILIPS
S1121, S1223
Pencukur dan Penata Elektrik
4.3 V ~ 50-60 Hz 0.3 W
Negara Pembuat: Indonesia
Diimpor oleh:
PT Philips Indonesia Commercial
Gedung Cibis Nine Lantai 10
JI. T.B. Simatupang No. 2
RT. 001 RW. 005
Kel. Cilandak Timur,
Kec. Pasar Minggu,
Jakarta Selatan 12560 - Indonesia
Bahasa Indonesia
36
2 Lepaskan panel luar alat cukur menggunakan
obeng atau alat lainnya. Jika perlu, lepaskan
juga sekrup dan/atau komponen lain sampai
Anda melihat papan sirkuit cetakan (PCB) dan
baterai isi-ulang.
3 Lepas baterai isi-ulang.
Garansi dan dukungan
Jika Anda membutuhkan informasi atau dukungan,
silakan kunjungi www.philips.com/support atau
bacalah pamflet garansi internasional.
Batasan garansi
Kepala pencukur (unit pemotong dan pelindung)
tidak tercakup oleh ketentuan garansi
internasional karena tergantung pada pemakaian.
Page 37

Page 38

© 2019 Koninklijke Philips N.V.
All rights reserved
3000.041.1813.1 (13/5/2019)
>75 % recycled paper
>75 % papier recyclé
 Loading...