

Philips S1110, S1100 User Manual [ar]
S1110, S1100
S1110
1
7
8
2
3
4
9
6
5

empty page before TOC

English 6
Bahasa Indonesia 18
Bahasa Melayu 30
Tiếng Việt 42
ภาษาไทย 53
简体中文 64
繁體中文 74
한국의 84
ﺔﻴﺑﺮﻌﻟﺍ
95
یسرﺍف
תירבע 116
105

English
6
Introduction
Congratulations on your purchase and welcome to
Philips! To fully benefit from the support that
Philips offers, register your product at
www.philips.com/welcome.
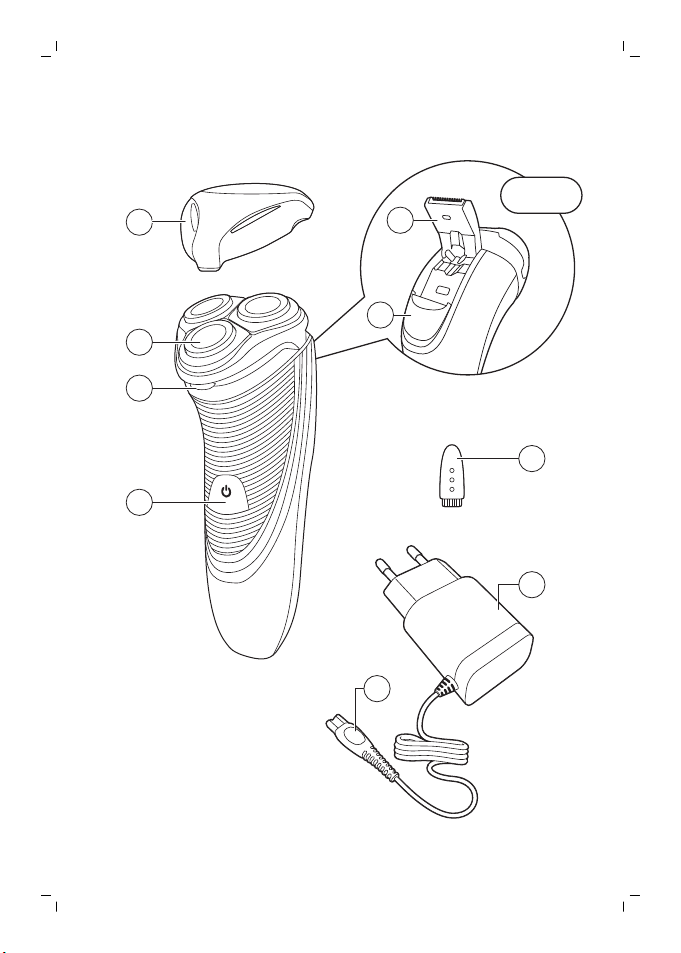
General description (Fig. 1)
1 Protection cap
2 Shaving unit
3 Shaving unit release button
4 On/off button
5 Trimmer (S1110 only)
6 Trimmer release slide (S1110 only)
7 Cleaning brush
8 Supply unit (adapter, type HQ8505)
9 Small plug
Important safety information
Read this important information carefully before
you use the appliance and its accessories and
save it for future reference. The accessories
supplied may vary for different products.
Danger
-
Keep the appliance and the
mains cord dry.
English

Warning
English
-
The appliance is a Class III
construction.
-
This appliance can be used by
children aged from 8 years and
above and persons with
reduced physical, sensory or
mental capabilities or lack of
experience and knowledge if
they have been given
supervision or instruction
concerning use of the
appliance in a safe way and
understand the hazards
involved. Children shall not play
with the appliance. Cleaning
and user maintenance shall not
be made by children without
supervision.
7

English
8
Caution
-
Always check the appliance
before you use it. Do not use
the appliance if it is damaged,
as this may cause injury. Always
replace a damaged part with
one of the original type.
-
Do not open the appliance to
replace the rechargeable
battery.
-
Only use this appliance for its
intended purpose as shown in
the user manual.
-
For hygienic reasons, the
appliance should only be used
by one person.
-
Never use compressed air,
scouring pads, abrasive
cleaning agents or aggressive
liquids such as petrol or
acetone to clean the appliance.
Electromagnetic fields (EMF)
1
2
-
This Philips appliance complies with all
applicable standards and regulations regarding
exposure to electromagnetic fields.
General
-
The appliance is suitable for mains voltages
ranging from 100 to 240 volts.
Using the appliance
Note: You can only use the appliance when it is
connected to the wall socket.
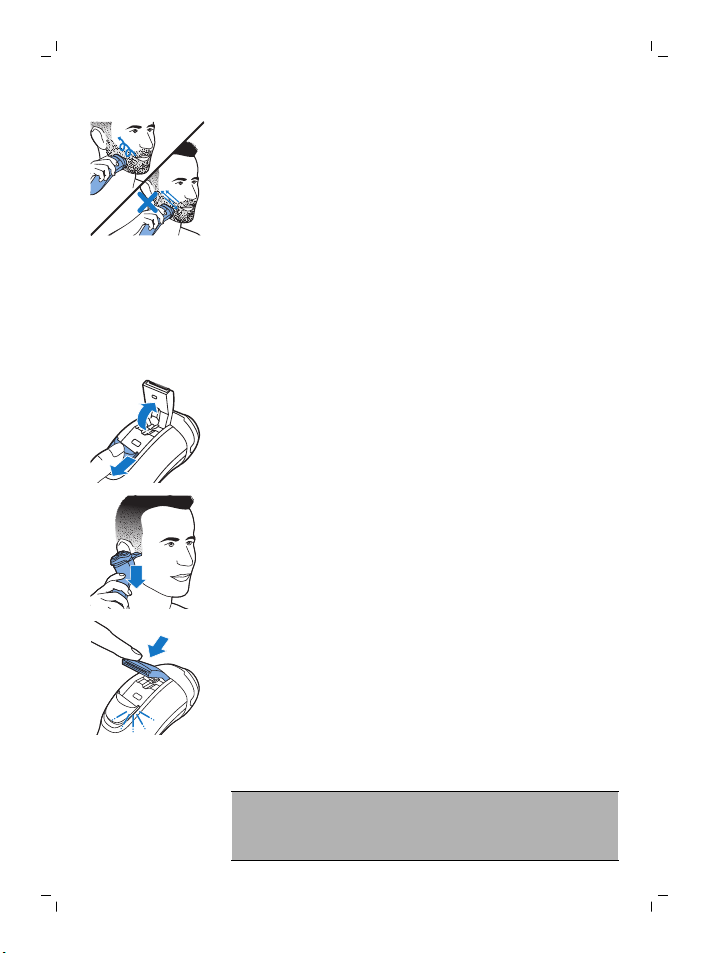
Shaving tips & tricks
-
Make circular movements during use. Circular
movements provide better shaving results than
straight movements.
-
Your skin may need 2 or 3 weeks to get
accustomed to the Philips shaving system.
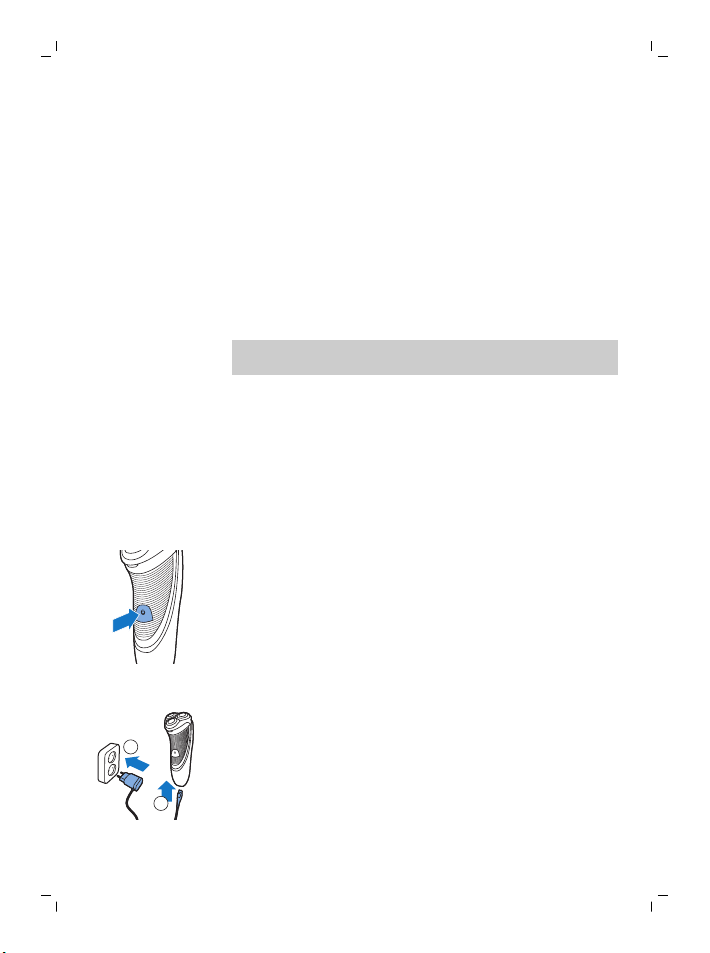
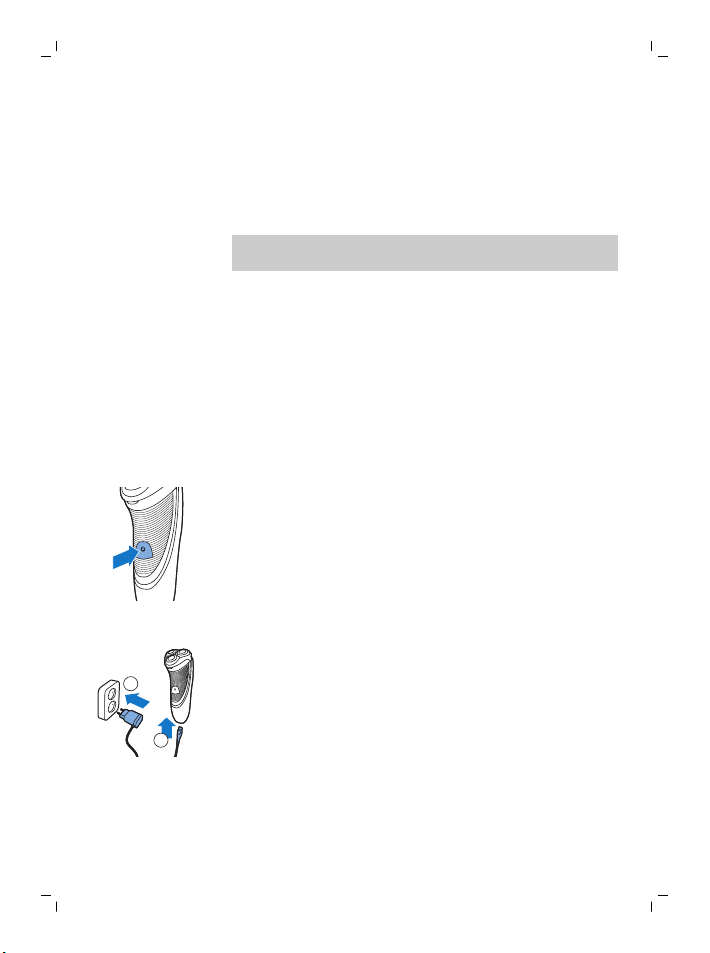
Switching the appliance on and off
1 To switch on the appliance, press the on/off
button once.
2 To switch off the appliance, press the on/off
button once.
English
9
Shaving
1 Put the small plug in the appliance.
2 Put the adapter in the wall socket.
3 Switch on the appliance.

English
10
4 Move the shaving heads over your skin in
circular movements.
5 After shaving, switch off the appliance.
6 Clean the appliance (see chapter 'Cleaning and
maintenance').
Trimming (S1110 only)
You can use the trimmer to groom your sideburns
and moustache.
1 Put the small plug in the appliance.
2 Put the adapter in the wall socket.
3 Push the trimmer slide downwards to open the
trimmer.
4 Switch on the appliance.
-
You can now start trimming.
5 After trimming, switch off the appliance.
6 Clean the trimmer (see chapter ‘Cleaning and
maintenance’).
7 Close the trimmer (‘click’).
Cleaning and maintenance
Danger: This appliance is not washable.
Never immerse the appliance in water,
nor rinse it under the tap.
English
Caution: Never use compressed air, scouring
pads, abrasive cleaning agents or aggressive
liquids such as petrol or acetone to clean the
appliance.
-
Clean the appliance after every shave for
optimal shaving performance.
-
Regular cleaning guarantees better shaving
performance.
-
For the best cleaning results, we advise you to
use the Philips Cleaning spray (HQ110).
-
Never clean the shaving unit and the hair
chamber with a towel or tissue, as this may
damage the shaving heads and the coupling
spindles.
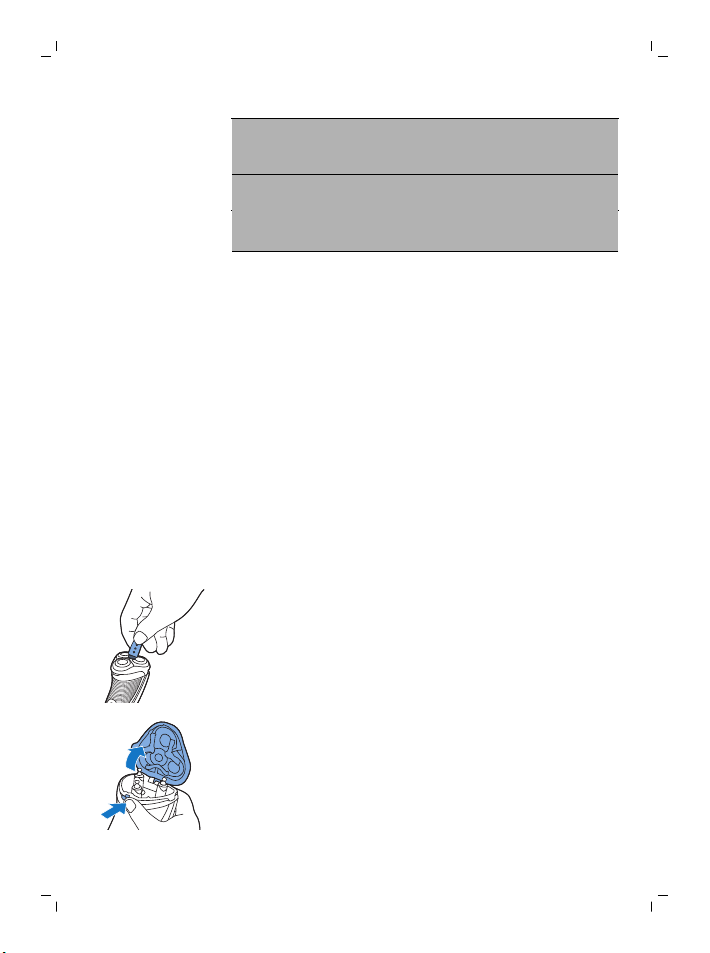
Cleaning the shaving unit with the cleaning brush
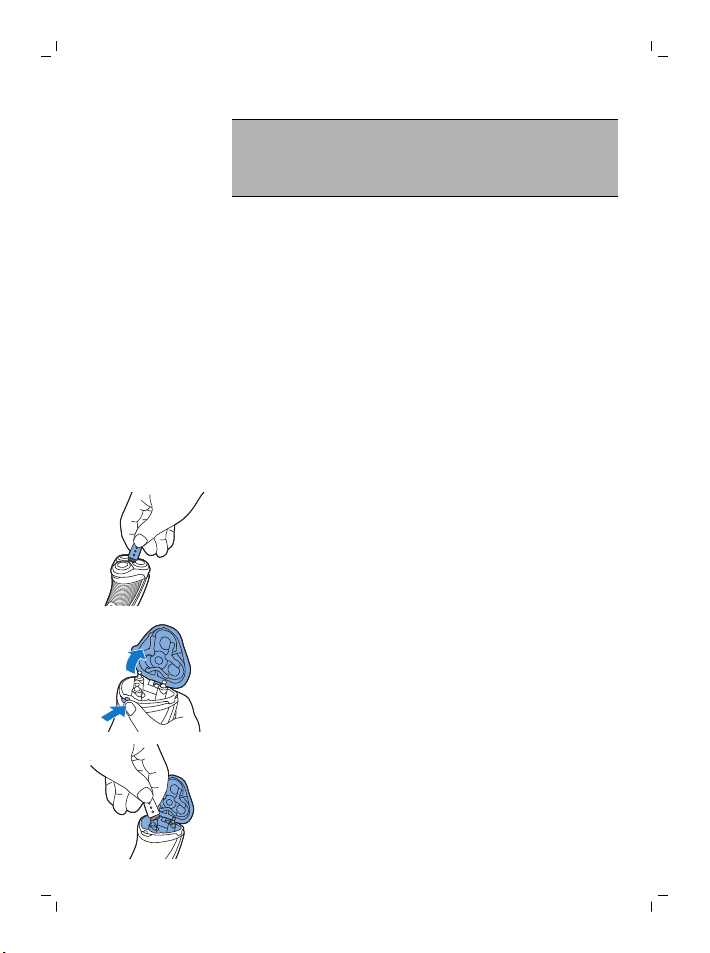
1 Switch off the appliance and make sure it is
disconnected from the wall socket.
2 Clean the outside of the shaving unit with the
cleaning brush.
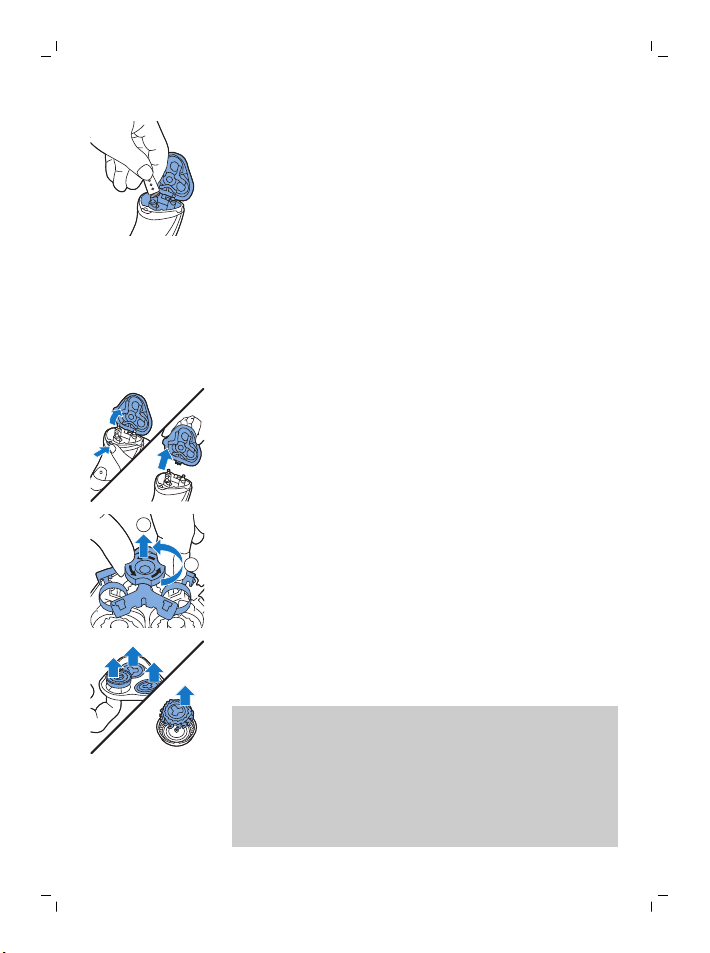
3 Press the release button to open the shaving
unit.
11
4 Clean the shaving unit and hair chamber with
the brush supplied.
5 Close the shaving unit ('click').
2
1
English
12
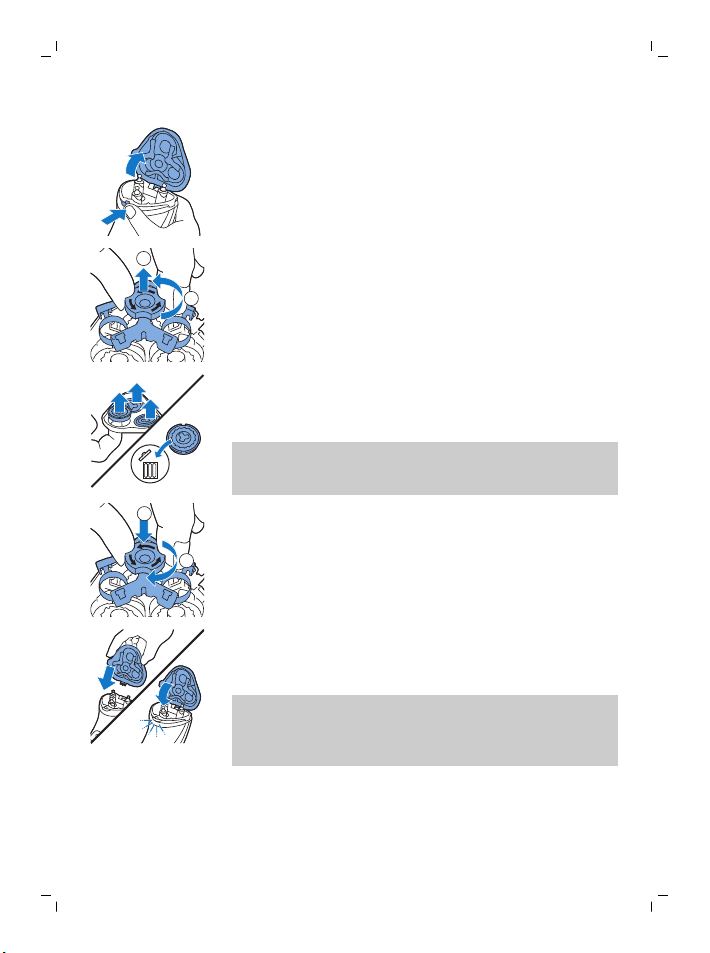
Thorough cleaning
Clean the shaving heads thoroughly once a month
for optimal performance.
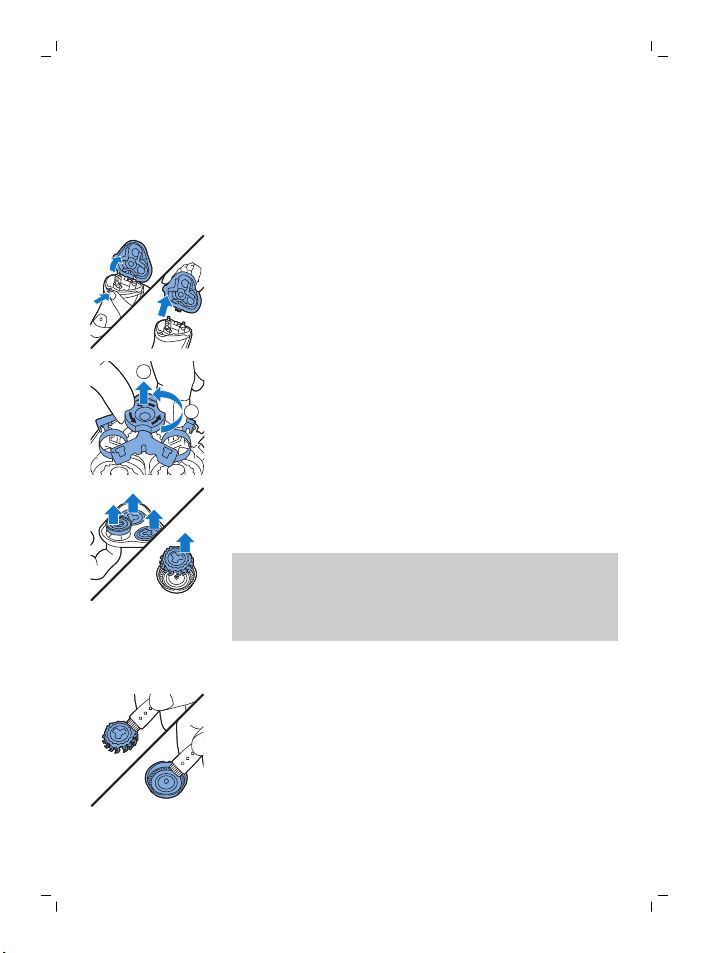
1 Switch off the appliance and make sure it is
2 Press the release button to open the shaving
3 Turn the lock anticlockwise and remove the
4 Remove and clean one shaving head at a time.
disconnected from the wall socket.
unit. Pull the shaving unit off the appliance.
retaining frame.
Each shaving head consists of a cutter and a
guard.
Note: Do not clean more than one cutter and
guard at a time, since they are all matching sets.
If you accidentally mix up the cutters and
guards, it may take several weeks before
optimal shaving performance is restored.
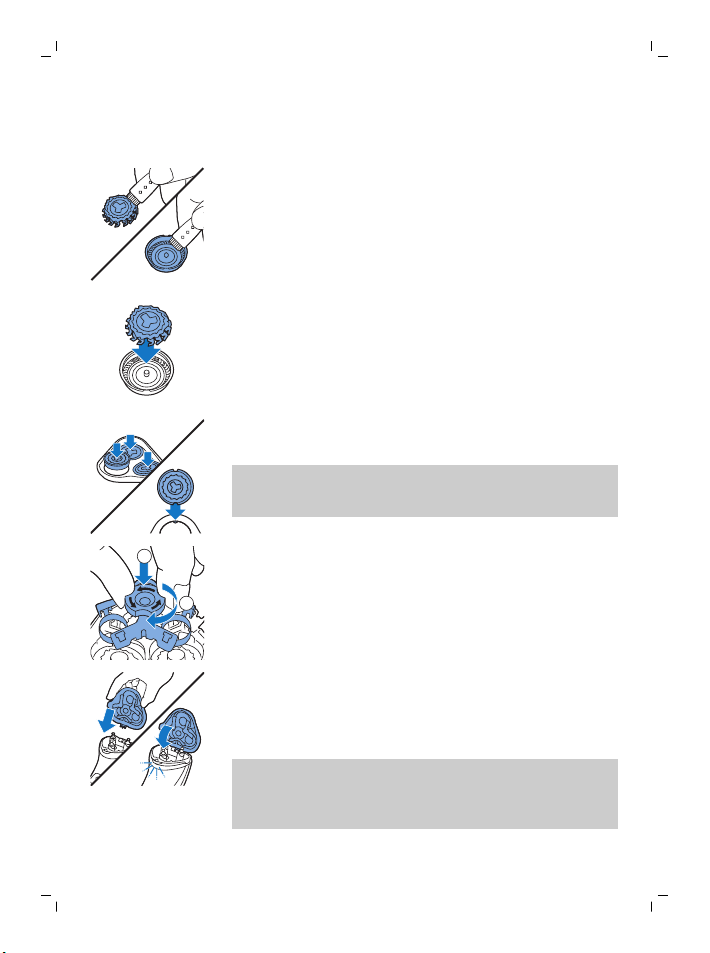
-
Remove the cutter from the shaving guard
and clean it with the brush.
-
Clean the inside and outside of the shaving
guard with the brush.
1
2
English
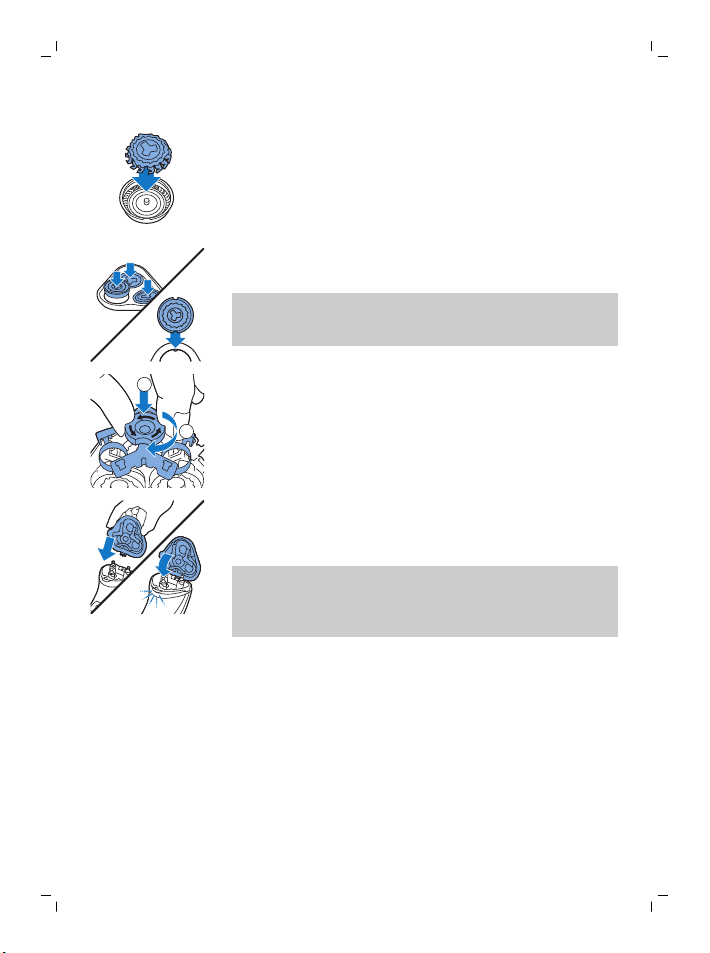
5 Put the cutter back into the guard.
6 Put the shaving heads back into the shaving
unit.
Note: Make sure the notches on both sides of
the shaving heads fit exactly onto the
projections in the shaving head holder.
7 Put the retaining frame back into the shaving
unit and turn the lock clockwise.
8 Insert the lug of the shaving unit into the slot in
the top of the appliance. Then close the shaving
unit ('click').
Note: If the shaving unit does not close
smoothly, check if you have inserted the
shaving heads properly and if the retaining
frame is locked.
Cleaning the trimmer with the cleaning brush (S1110 only)
Clean the trimmer every time you have used it.
1 Switch off the appliance and make sure it is
disconnected from the wall socket.
13
2yrs
English
14
Storage
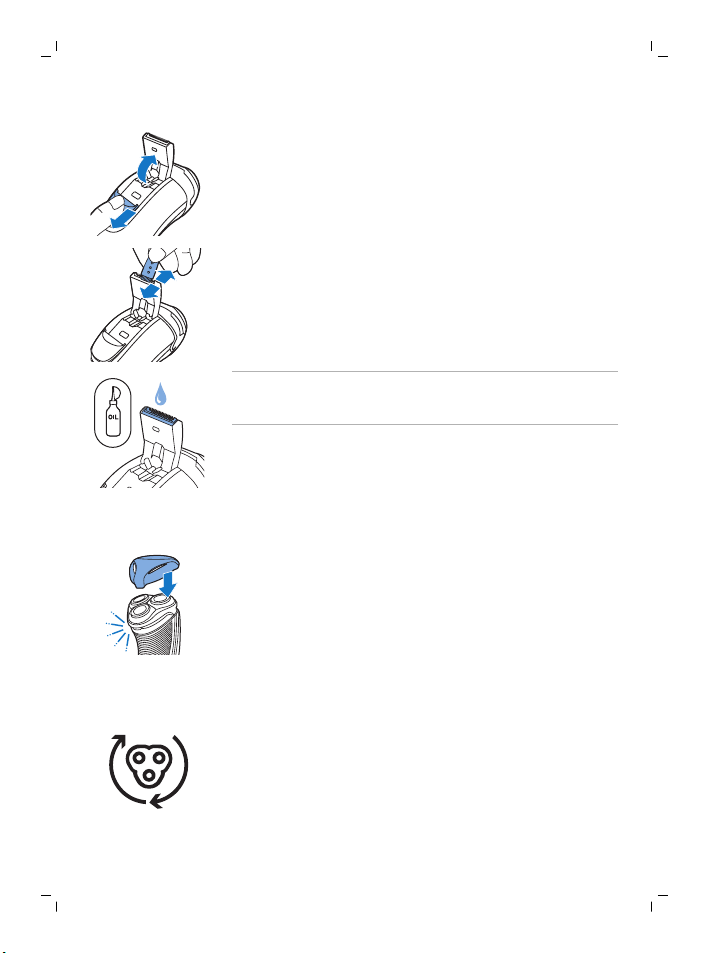
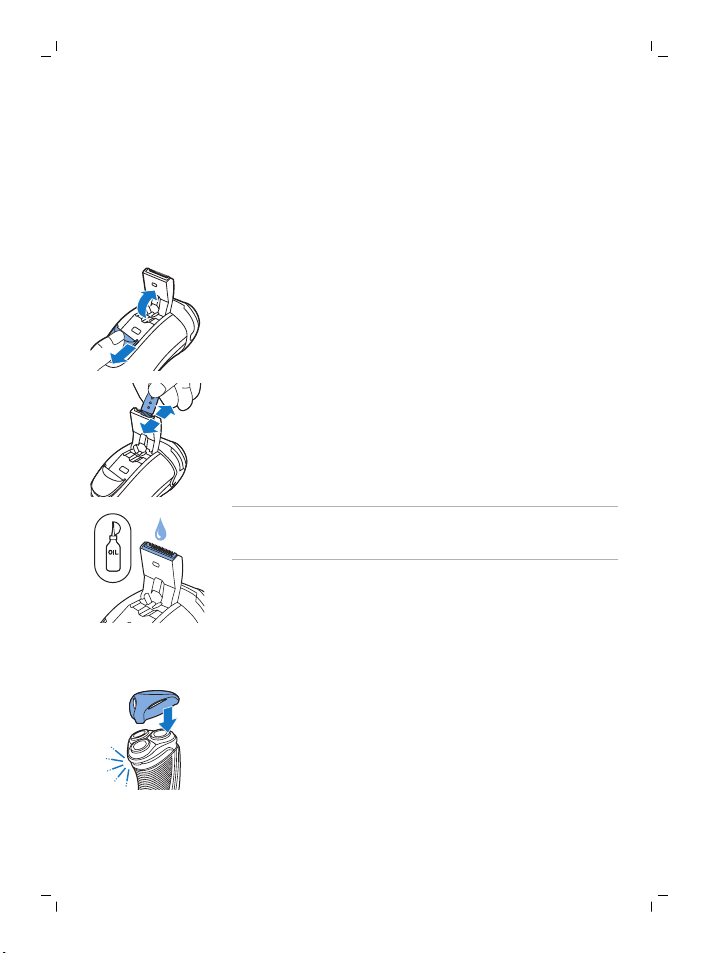
2 Push the trimmer slide downwards to open the
trimmer.
3 Clean the trimmer with the cleaning brush.
Brush up and down along the trimmer teeth.
4 Close the trimmer (‘click’).
Tip: For optimal trimming performance, lubricate
the trimmer teeth with a drop of sewing machine
oil every six months.
Put the protection cap on the appliance to prevent
damage.
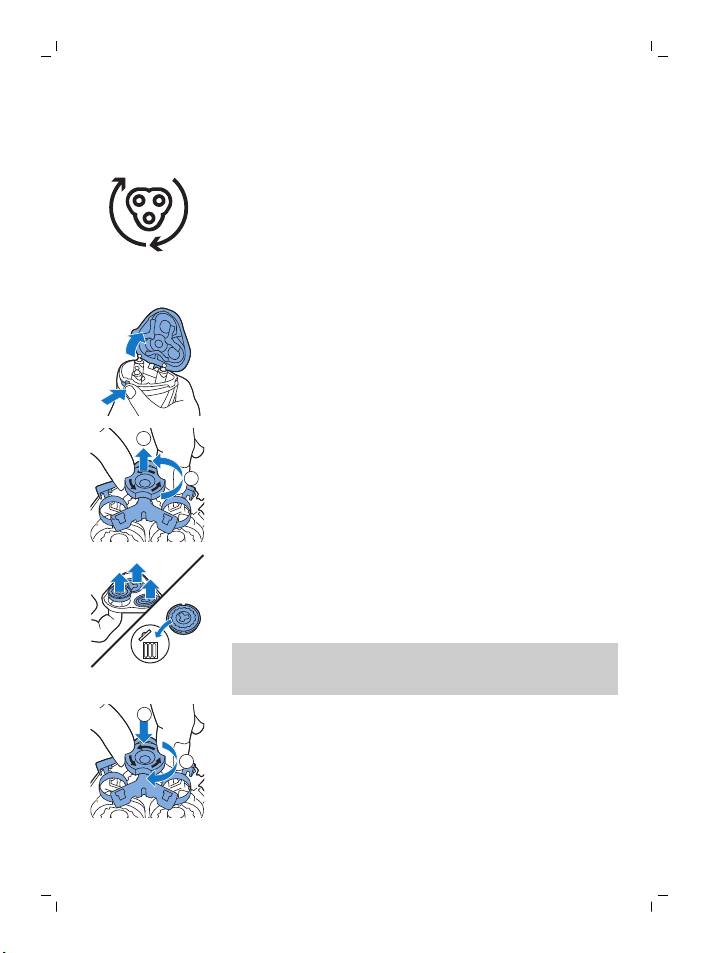
Replacement
For maximum shaving performance, we advise you
to replace the shaving heads every two years.
Replace damaged shaving heads immediately.
Always replace the shaving heads with original
Philips shaving heads (see 'Ordering accessories').
1 Switch off the appliance and make sure it is
disconnected from the wall socket.
2
1
1
2
English
2 Press the release button to open the shaving
unit. Pull the shaving unit off the appliance.
3 Turn the lock anticlockwise and remove the
retaining frame.
4 Remove the shaving heads from the shaving
unit and throw them away.
5 Place new shaving heads in the shaving unit.
Note: Make sure the notches on both sides of
the shaving heads fit exactly onto the
projections in the shaving head holder.
6 Put the retaining frame back into the shaving
unit and turn the lock clockwise.
7 Insert the lug of the shaving unit into the slot in
the top of the appliance. Then close the shaving
unit ('click').
Note: If the shaving unit does not close
smoothly, check if you have inserted the
shaving heads properly and if the retaining
frame is locked.
15
Ordering accessories
To buy accessories or spare parts, visit
www.shop.philips.com/service or go to your

English
16
Philips dealer. You can also contact the Philips
Consumer Care Center in your country (see the
worldwide guarantee leaflet for contact details).
The following accessories and spare parts are
available:
-
SH30 Philips Shaving Heads.
-
HQ110 Philips shaving head cleaning spray
Recycling
-
Follow your country's rules for the separate
collection of electrical and electronic products.
Correct disposal helps prevent negative
consequences for the environment and human
health.
Guarantee and support
If you need information or support, please visit
www.philips.com/support or read the separate
worldwide guarantee leaflet.
Guarantee restrictions
The shaving heads (cutters and guards) are not
covered by the terms of the international
guarantee because they are subject to wear.
Troubleshooting
This chapter summarizes the most common
problems you could encounter with the appliance.
If you are unable to solve the problem with the
information below, visit www.philips.com/support
for a list of frequently asked questions or contact
the Consumer Care Center in your country.

Problem Possible cause Solution
English
17
The appliance
does not shave as
well as it used to.
The appliance
does not work
when I press the
on/off button.
The shaving heads
are damaged or
worn.
Long hairs obstruct
the shaving heads.
You have not
inserted the
shaving heads
properly.
The temperature of
the appliance is too
high. In this case,
the appliance does
not work.
You have not
connected the
appliance to the
wall socket. This
appliance can only
be used directly
from the wall
socket.
Replace the shaving heads.
See chapter
'Replacement'.
Clean the shaving heads
one by one (see section
'Cleaning the shaving unit
with the cleaning brush' in
chapter 'Cleaning and
maintenance').
Make sure the notches on
both sides of the shaving
heads fit exactly onto the
projections in the shaving
head holder (see chapter
'Replacement').
As soon as the
temperature of the
appliance has dropped
sufficiently, you can switch
on the appliance again.
Put the small plug in the
appliance, put the adapter
in the wall socket, and
press the on/off button
again.

Bahasa Indonesia
18
Pendahuluan
Selamat atas pembelian Anda dan selamat datang
di Philips! Untuk memanfaatkan sepenuhnya
dukungan yang ditawarkan Philips, daftarkan
produk Anda di www.philips.com/welcome.
Keterangan umum (Gbr. 1)
1 Tutup pelindung
2 Unit pencukur
3 Tombol pelepas unit pencukur
4 Tombol daya
5 Pemangkas (S1110 saja)
6 Geseran pelepas pemangkas (S1110 saja)
7 Sikat pembersih
8 Unit catu daya (adaptor, jenis HQ8505)
9 Steker kecil
Informasi keselamatan penting
Baca informasi penting ini dengan saksama
sebelum menggunakan alat dan aksesorinya,
simpanlah untuk referensi di kemudian hari.
Aksesori yang disertakan dapat berbeda-beda,
tergantung pada produk.
Bahaya
-
Usahakan agar alat dan kabel daya tetap kering.
Bahasa Indonesia

Peringatan
Perhatian
Bahasa Indonesia
-
Alat ini termasuk alat Kelas III.
-
Alat ini dapat digunakan oleh anak-anak
minimal berusia 8 tahun ke atas dan orang
dengan cacat fisik, indera atau kecakapan
mental yang kurang atau kurang pengalaman
dan pengetahuan jika mereka diberi
pengawasan atau petunjuk mengenai cara
penggunaan alat yang aman dan mengerti
bahayanya. Anak-anak dilarang memainkan
alat ini. Anak-anak tidak boleh membersihkan
dan memelihara alat ini tanpa pengawasan.
-
Selalu periksa alat sebelum Anda
menggunakannya. Jangan gunakan alat jika
telah rusak, karena dapat menyebabkan
cedera. Selalu ganti komponen yang rusak
dengan yang asli.
-
Jangan membuka alat untuk mengganti baterai
isi-ulang.
-
Hanya gunakan alat ini untuk keperluan yang
dimaksud di petunjuk pengguna.
-
Untuk alasan higienis, alat sebaiknya hanya
digunakan oleh satu orang saja.
-
Jangan sekali-kali menggunakan udara
bertekanan, sabut gosok, bahan pembersih
abrasif atau cairan agresif seperti bensin atau
aseton untuk membersihkan alat.
19
Medan elektromagnet (EMF)
-
Alat Philips ini mematuhi semua standar dan
peraturan yang berlaku terkait paparan
terhadap medan elektromagnet.
1
2
Bahasa Indonesia
20
Umum
-
Alat ini cocok untuk tegangan listrik berkisaran
100 hingga 240 volt.
Menggunakan alat
Catatan: Anda hanya dapat menggunakan alat jika
tersambung ke stopkontak.
Tip & trik mencukur
-
Gerakkan secara memutar selama penggunaan.
Gerakan memutar memberikan hasil
pencukuran yang lebih baik daripada gerakan
lurus.
-
Kulit Anda mungkin memerlukan 2 atau 3
minggu agar terbiasa dengan sistem
pencukuran Philips.
Menghidupkan dan mematikan alat
1 Untuk menghidupkan alat, tekan tombol on/off
satu kali.
2 Untuk mematikan alat, tekan tombol on/off satu
kali.
Mencukur
1 Tancapkan steker kecil ke alat.
2 Tancapkan adaptor ke stopkontak dinding.
3 Hidupkan alat tersebut.
4 Gerakkan kepala cukur di kulit Anda dengan
gerakan memutar.
5 Setelah selesai mencukur, matikan alat.
6 Bersihkan alat (lihat bab 'Pembersihan dan
perawatan').
Memangkas (S1110 saja)
Anda dapat menggunakan pemangkas untuk
merapikan cambang dan kumis.
1 Tancapkan steker kecil ke alat.
2 Tancapkan adaptor ke stopkontak dinding.
3 Sorong penggeser ke bawah untuk membuka
pemangkas.
4 Hidupkan alat tersebut.
-
Sekarang Anda dapat mulai memangkas.
5 Setelah selesai memangkas, matikan alat.
6 Bersihkan pemangkas (lihat bab 'Pembersihan
dan perawatan’).
7 Tutup unit pemangkas (hingga berbunyi 'klik').
Bahasa Indonesia
21
Pembersihan dan perawatan
Bahaya: Alat ini tidak dapat dicuci.
Jangan sekali-kali merendam alat di
Bahasa Indonesia
22
dalam air atau membilasnya di bawah air
mengalir.
Perhatian: Jangan sekali-kali menggunakan
udara bertekanan, sabut gosok, bahan pembersih
abrasif atau cairan agresif seperti bensin atau
aseton untuk membersihkan alat.
-
Bersihkan alat setelah setiap kali selesai
mencukur untuk memperoleh kinerja
pencukuran yang optimal.
-
Membersihkan secara teratur akan menjamin
hasil pencukuran yang lebih baik.
-
Untuk hasil pembersihan terbaik, sebaiknya
Anda menggunakan semprotan Philips
Cleaning (HQ110).
-
Jangan sekali-kali membersihkan unit pencukur
dan wadah rambut dengan handuk atau tisu,
karena dapat merusak kepala cukur dan poros
sambungan.
Membersihkan unit cukur dengan sikat pembersih
1 Matikan alat dan pastikan kabel alat sudah
dicabut dari stopkontak.
2 Bersihkan bagian luar unit pencukur dengan
sikat pembersih.
3 Tekan tombol pelepas untuk membuka unit
pencukur.
4 Bersihkan unit pencukur dan wadah rambut
2
1
5 Tutup unit pencukur (hingga berbunyi 'klik').
Pembersihan menyeluruh
Bersihkan kepala cukur secara menyeluruh
sebulan sekali untuk memperoleh kinerja yang
optimal.
1 Matikan alat dan pastikan kabel alat sudah
2 Tekan tombol pelepas untuk membuka unit
3 Putar berlawanan arah putaran jarum jam dan
4 Lepas dan bersihkan kepala cukur satu persatu.
Bahasa Indonesia
23
dengan sikat yang disertakan.
dicabut dari stopkontak.
pencukur. Tarik unit pencukur dari alat ke arah
luar hingga terlepas.
lepaskan bingkai penahan.
Setiap kepala cukur terdiri atas satu mata pisau
dan satu pelindungnya.
Catatan: Jangan membersihkan lebih dari satu
mata pisau dan pelindungnya secara
bersamaan, bersihkan satu persatu karena
semuanya adalah komponen berpasangan. Jika
Anda tidak sengaja salah memasangkan mata
pisau dan pelindungnya, diperlukan beberapa
minggu untuk kembali mendapatkan kinerja
pencukuran yang optimal.
1
2
Bahasa Indonesia
24
-
Lepaskan mata pisau dari pelindungnya dan
bersihkan dengan sikat.
-
Bersihkan bagian dalam dan luar pelindung
cukur dengan sikat.
5 Masukkan kembali mata pisau ke dalam
pelindungnya.
6 Kembalikan kepala cukur ke dalam unit
pencukur.
Catatan: Pastikan lekuk di kedua sisi kepala
cukur benar-benar pas dengan tonjolan pada
pegangan kepala pencukur.
7 Pasang kembali bingkai penahan pada unit
pencukur dan putar searah putaran jarum jam.
8 Masukkan tonjolan pengunci pada unit
pencukur ke dalam lubang pada bagian atas
alat. Lalu tutup unit pencukur (hingga berbunyi
'klik').
Catatan: Jika unit pencukur tidak menutup
rapat, periksa apakah Anda sudah memasukkan
kepala cukur dengan tepat dan apakah bingkai
penahan terkunci.
Bahasa Indonesia
Membersihkan pemangkas dengan sikat pembersih (S1110 saja)
Bersihkan pemangkas setiap kali Anda selesai
menggunakannya.
1 Matikan alat dan pastikan kabel alat sudah
dicabut dari stopkontak.
2 Sorong penggeser ke bawah untuk membuka
pemangkas.
3 Bersihkan pemangkas dengan sikat pembersih.
Sikat ke atas dan ke bawah di sepanjang gigi
pemangkas.
4 Tutup unit pemangkas (hingga berbunyi 'klik').
Tip: Untuk memperoleh kinerja pemangkasan yang
optimal, lumasi gigi pemangkas dengan setetes
minyak mesin jahit setiap enam bulan.
Penyimpanan
Pasang tutup pelindung pada alat untuk
mencegah kerusakan.
25
2yrs
2
1
1
2
Bahasa Indonesia
26
Penggantian
Untuk memperoleh kinerja pencukuran maksimal,
sebaiknya Anda mengganti kepala cukur setiap
dua tahun. Segera ganti kepala cukur yang rusak.
Selalu ganti kepala cukur dengan kepala (lihat
'Memesan aksesori') cukur Philips yang asli.
1 Matikan alat dan pastikan kabel alat sudah
dicabut dari stopkontak.
2 Tekan tombol pelepas untuk membuka unit
pencukur. Tarik unit pencukur dari alat ke arah
luar hingga terlepas.
3 Putar berlawanan arah putaran jarum jam dan
lepaskan bingkai penahan.
4 Lepas kepala cukur dari unit pencukur
kemudian buanglah.
5 Pasang kepala cukur yang baru pada unit
pencukur.
Catatan: Pastikan lekuk di kedua sisi kepala
cukur benar-benar pas dengan tonjolan pada
pegangan kepala pencukur.
6 Pasang kembali bingkai penahan pada unit
pencukur dan putar searah putaran jarum jam.

7 Masukkan tonjolan pengunci pada unit
pencukur ke dalam lubang pada bagian atas
alat. Lalu tutup unit pencukur (hingga berbunyi
'klik').
Catatan: Jika unit pencukur tidak menutup
rapat, periksa apakah Anda sudah memasukkan
kepala cukur dengan tepat dan apakah bingkai
penahan terkunci.
Memesan aksesori
Untuk membeli aksesori atau suku cadang, buka
www.shop.philips.com/service atau kunjungi
dealer Philips terdekat. Anda juga dapat
menghubungi Pusat Layanan Konsumen Philips di
negara Anda (lihat informasi dalam brosur garansi
di seluruh dunia untuk perincian kontak).
Aksesori dan komponen berikut tersedia:
-
SH30 Philips Shaving Heads [kepala cukur]
-
HQ110 semprotan pembersih kepala cukur
Philips
Mendaur ulang
-
Simbol ini menandakan bahwa produk ini tidak
boleh dibuang bersama dengan sampah rumah
tangga biasa (2012/19/EU).
-
Ikuti peraturan setempat untuk pengumpulan
alat listrik dan produk elektronik secara terpisah.
Pembuangan secara benar akan membantu
mencegah dampak negatif terhadap lingkungan
dan kesehatan manusia.
Bahasa Indonesia
27
Garansi dan dukungan
Jika Anda memerlukan informasi atau dukungan,
silakan kunjungi www.philips.com/support atau
baca pamflet garansi internasional terpisah.

Bahasa Indonesia
28
Batasan garansi
Kepala cukur (unit pemotong dan pelindung) tidak
tercakup oleh ketentuan garansi internasional
karena dapat aus akibat pemakaian.
Mengatasi masalah
Bab ini merangkum masalah yang paling umum
terjadi pada alat Anda. Jika Anda tidak dapat
menyelesaikan masalah dengan informasi di
bawah, kunjungi www.philips.com/support untuk
daftar pertanyaan umum atau hubungi Pusat
Layanan Konsumen di negara Anda.
Masalah Kemungkinan
penyebab
Solusi
Kinerja
pencukuran alat
tidak sebaik
biasanya.
Alat tidak mau
hidup sewaktu
saya menekan
tombol daya.
Kepala cukur rusak
atau tumpul.
Rambut yang
panjang
menghalangi
kepala cukur.
Anda tidak
memasang kepala
cukur dengan
benar.
Suhu alat terlalu
panas. Dalam
kasus ini, alat tidak
akan dapat
berfungsi.
Ganti kepala cukur. Lihat
bab 'Penggantian'.
Bersihkan kepala cukur
satu per satu (lihat bagian
'Membersihkan unit
pencukur dengan sikat
pembersih' di bab
'Pembersihan dan
perawatan').
Pastikan lekuk di kedua sisi
kepala cukur benar-benar
pas dengan tonjolan pada
pegangan kepala cukur
(lihat bab 'Penggantian').
Setelah suhu alat turun
dan kembali normal, Anda
dapat menghidupkannya
lagi.

Bahasa Indonesia
29
Masalah Kemungkinan
penyebab
Anda tidak
menyambungkan
kabel alat ke
stopkontak. Alat
hanya dapat
digunakan jika
tersambung ke
stopkontak.
Solusi
Tancapkan steker kecil ke
alat, tancapkan adaptor ke
stopkontak, dan tekan lagi
tombol daya.

Bahasa Melayu
30
Pengenalan
Tahniah atas pembelian anda dan selamat
menggunakan Philips! Untuk memanfaatkan
sepenuhnya sokongan yang ditawarkan oleh
Philips, daftar produk anda di
www.philips.com/welcome.
Gambaran umum (Raj. 1)
1 Penutup pelindung
2 Unit pencukur
3 Butang pelepas unit pencukur
4 Butang on/off
5 Perapi (S1110 sahaja)
6 Gelangsar pelepas perapi (S1110 sahaja)
7 Berus pembersih
8 Unit bekalan (penyesuai, jenis HQ8505)
9 Palam kecil
Maklumat keselamatan penting
Baca maklumat penting ini dengan teliti sebelum
anda menggunakan perkakas dan aksesorinya dan
simpan untuk rujukan pada masa hadapan.
Aksesori yang dibekalkan mungkin berbeza-beza
untuk berlainan produk.
Bahaya
-
Pastikan perkakas dan kord utama kering.
Bahasa Melayu
 Loading...