

Philips S1070, S1030 User Manual

23456789101112
13
141516
>75% recycled paper
>75% papel reciclado
S1070, S1030
1
8
9
10
11
7
13
12
5 6
2
3
4
S1070
S1030
1
2
1
1718192021
1
2
22232425262728
English
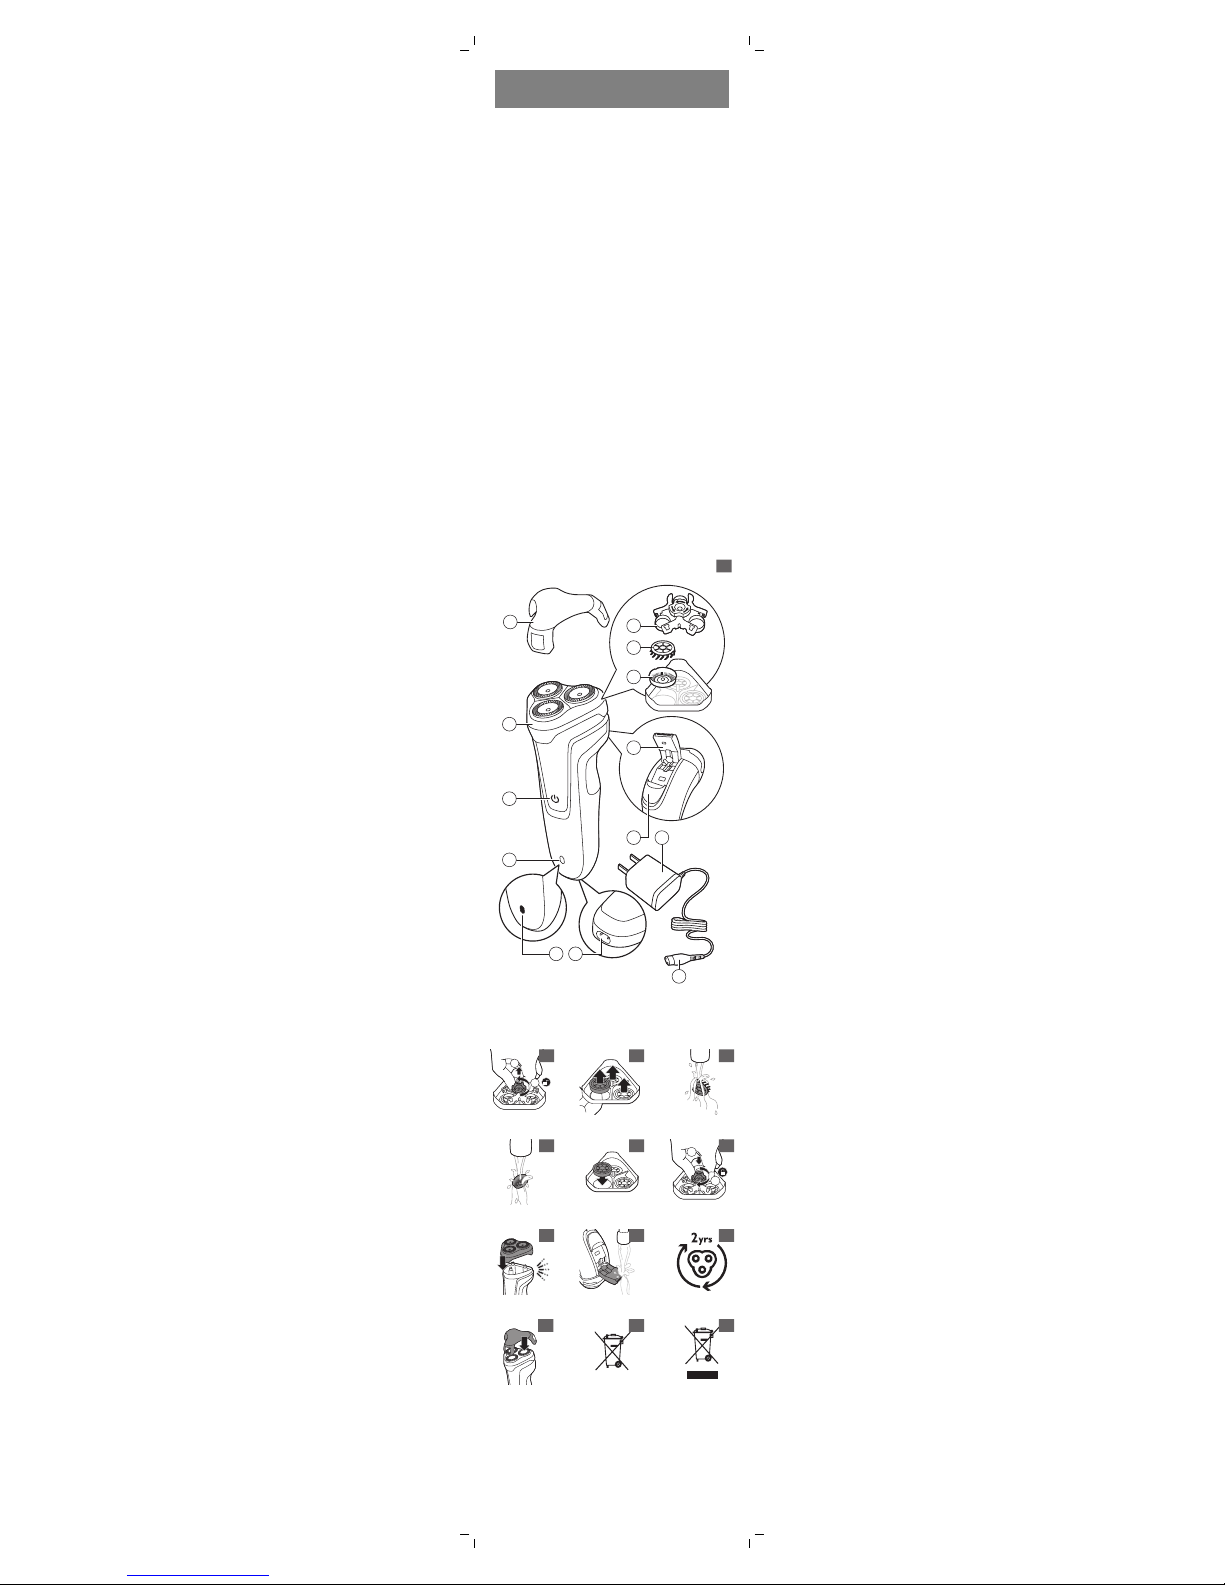
General description (Fig. 1)
1 Protection cap
2 Shaving unit
3 On/off button
4 Charging light (S1070)
5 Charging light (S1030)
6 Socket for small plug
7 Retaining frame
8 Cutter
9 Guard
10 Pop-up trimmer (S1070 only)
11 Trimmer release slide (S1070 only)
12 Supply unit
13 Small plug
Note: You can find the type number
on the back of the shaver.
Introduction
Congratulations on your purchase
and welcome to Philips! To fully
benefit from the support that Philips
offers, register your product at
www.philips.com/welcome.

Please read this user manual, as it
contains information about the
features of this shaver as well as
some tips to make shaving easier and
more enjoyable.
Important safety
information
Read this important information
carefully before you use the
appliance and its accessories and
save it for future reference. The
accessories supplied may vary for
different products.
Danger
- Keep the supply unit dry (Fig. 2).
Warning
- To charge the battery, only use
the detachable supply unit
(A00390) provided with the
appliance.
- The supply unit contains a
transformer. Do not cut off the
supply unit to replace it with
another plug, as this causes a
hazardous situation.
- This appliance can be used by
children aged from 8 years and
above and persons with reduced
physical, sensory or mental
capabilities or lack of experience
and knowledge if they have been
given supervision or instruction
concerning use of the appliance in
a safe way and understand the
hazards involved. Children shall
not play with the appliance.
Cleaning and user maintenance
shall not be made by children
without supervision.
- Always unplug the shaver before
you clean it under the tap.
- Always check the appliance
before you use it. Do not use the
appliance if it is damaged, as this
may cause injury. Always replace
a damaged part with one of the
original type.
- Do not open the appliance to
replace the rechargeable battery.
Caution
- Never immerse the cleaning
system or the charging stand in
water and do not rinse it under
the tap (Fig. 2).
- Never use water hotter than 60°C
to rinse the shaver.
- Only use this appliance for its
intended purpose as shown in the
user manual.
- For hygienic reasons, the
appliance should only be used by
one person.
- Never use compressed air,
scouring pads, abrasive cleaning
agents or aggressive liquids such
as petrol or acetone to clean the
appliance.
- If your shaver comes with a
cleaning system, always use the
original Philips cleaning fluid
(cartridge or bottle, depending on
the type of cleaning system).
- Always place the cleaning system
on a stable, level and horizontal
surface to prevent leakage.
- If your cleaning system uses a
cleaning cartridge, always make
sure the cartridge compartment is
closed before you use the
cleaning system to clean or
charge the shaver.
- When the cleaning system is
ready for use, do not move it to
prevent leakage of cleaning fluid.
- Water may drip from the socket at
the bottom of the shaver when
you rinse it. This is normal and not
dangerous because all electronics
are enclosed in a sealed power
unit inside the shaver.

- Do not use the supply unit in or
near wall sockets that contain an
electric air freshener to prevent
irreparable damage to the supply
unit.
Electromagnetic fields (EMF)
- This Philips appliance complies
with all applicable standards and
regulations regarding exposure to
electromagnetic fields.
General
- This shaver is waterproof (Fig. 3). It
is suitable for use in the bath or
shower and for cleaning under the
tap. For safety reasons, the shaver
can therefore only be used
without cord.
- The supply unit is suitable for
mains voltages ranging from 100
to 240 volts.
- The supply unit transforms
100-240 volts to a safe low
voltage of less than 24 volts.
Charging
Note: This appliance can only be
used without cord.
When you charge the appliance for
the first time or after a long period of
disuse, let it charge for at least 10
hours.
A fully charged appliance provides up
to 45 minutes of shaving time.
The shaving time may be less as a
result of your shaving behavior, your
cleaning habits or your beard type.
Charging with the supply unit
1 Make sure the shaver is switched
off.
2 Put the small plug in the shaver
and put the supply unit in the wall
socket.
The display of the shaver
indicates that the shaver is
charging.
3 After charging, remove the supply
unit from the wall socket and pull
the small plug out of the
appliance.
Charge indications
Battery low
When the battery is almost empty,
the appliance starts working more
slowly.
Charging
When the appliance is charging, the
charging light lights up white
continuously (Fig. 4).
- The charging light will keep
lighting up white when the
appliance is fully charged.
Note: After charging, remove the
supply unit from the wall socket and
pull the small plug out of the
appliance.
Using the appliance
Note: This appliance can only be
used without cord.
Switching the appliance on
and off
1 To switch the appliance on or off,
press the on/off button once (Fig.
5).
Shaving tips
- Use the shaver with shaving gel or
foam for extra skin comfort, or use
the shaver dry for extra
convenience.
-
We advise you to use the
shaver with shaving gel or
foam when you use it for a wet
shave. Do not use thick
shaving cream or shaving oil
with this shaver.

-
When you use the shaver for
dry shaving, we advise you to
make sure your skin is fully dry
so that the shaver glides
smoothly over your skin.
- For best results on skin comfort,
pre-trim your beard if you have
not shaved for 3 days or longer.
- For optimal shaving results, make
circular movements during use.
- The shaver is waterproof and can
be used in the bath or shower.
- Your skin may need 2 or 3 weeks
to get accustomed to the Philips
shaving system.
Wet shaving
For a more comfortable shave, you
can also use this appliance on a wet
face with shaving foam or shaving
gel.
To shave with shaving foam or
shaving gel, follow the steps below:
1 Apply some water to your skin
(Fig. 6).
2 Apply shaving foam or shaving gel
to your skin (Fig. 7).
3 Rinse the shaving unit under the
tap to ensure that the shaving unit
glides smoothly over your skin
(Fig. 8).
4 Switch on the appliance.
5 Move the shaving heads over your
skin in circular movements to
catch all hairs growing in different
directions (Fig. 9). Exert gentle
pressure for a close, comfortable
shave.
Note: Rinse the shaving unit
regularly to ensure that it
continues to glide smoothly over
your skin (Fig. 8).
6 Dry your face.
7 Clean the appliance after use (see
'Cleaning and maintenance').
Note: Make sure you rinse all
foam or shaving gel off the
appliance.
Dry shaving
1 Switch on the appliance.
2 Move the shaving heads over your
skin in circular movements to
catch all hairs growing in different
directions (Fig. 9). Exert gentle
pressure for a close, comfortable
shave.
Note: Do not press too hard, this
can cause skin irritation.
3 Clean the appliance after use (see
'Cleaning and maintenance').
Trimming
You can use the trimmer to groom
your sideburns and moustache.
1 Push the trimmer release slide
downwards to open the trimmer
(Fig. 10).
2 Switch on the appliance.
3 Hold the trimmer perpendicular to
the skin and move the appliance
downwards while you exert gentle
pressure (Fig. 11).
4 After trimming, switch off the
appliance.
5 Clean the trimmer.
6 Close the trimmer (‘click’) (Fig. 12).
Cleaning and maintenance
Cleaning the shaver under the
tap
Clean the shaver after every shave
for optimal performance.
Always unplug and switch off the
appliance before you clean it.
Note: Water may leak from the socket
at the bottom of the shaver when
you rinse it. This is normal and not
dangerous because all electronics
are enclosed in a sealed power unit
inside the shaver.
 Loading...