

Page 1
Always there to help you
Question?
Contact
Philips
Question?
Contact
Philips
Register your product and get support at
www.philips.com/welcome
Question?
Contact
Philips
S10
S10A
User manual
Page 2

Page 3

Contents
1 Important safety instructions 3
Compliance with EMF 3
2 Your phone 4
What is in the box 4
Overview of the phone 4
Overview of the base station 5
3 Get started 6
Connect the base station 6
Install the handset 7
Check your phone’s software version 7
Congure your phone (country
dependent) 7
Change the remote access PIN code 8
Charge the handset 8
Check the battery level 8
What is standby mode? 8
Check the signal strength 9
4 Overview of the home screens 10
Center home screen 10
Main menu screen 10
5 Display icons 12
6 Bluetooth 13
Pair your Bluetooth headset 13
Pair S10/S10A with your mobile phones 13
Manage your mobile phone’s
connection 14
Change the Bluetooth PIN/passcode 15
Set your phone’s Bluetooth device
name 15
Philips phone manager 15
7 Calls 16
Make a call 16
Answer a call 16
End a call 17
Adjust the earpiece/speaker volume 17
Mute the microphone 17
Turn the handsfree speaker on or off 17
Make a second call 17
Answer a second call with the landline
or mobile line 17
Answer a second call 17
Answer a second call with the landline
or mobile line 18
Switch between two calls 18
Switch between two calls on the
landline and mobile line 18
8 Text and numbers 19
9 Contacts 20
View contacts 20
Update the mobile’s contact 20
Make a call from the contacts 20
Access contacts during a call 20
Add a record 21
Edit a record 21
Silent mode exception 21
Set the personalized ringtone 21
Block a caller from the contact list 22
Sort the contact list 22
Delete a contact 22
My favorites 22
10 Call log 24
View call records 24
Call log options 24
Block a caller from the call log 24
Save a call record to the contacts 24
Return a call 25
Delete a call record 25
English
EN 1
Page 4

11 Telephone answering machine 26
Turn the answering machine on or off 26
Set the answer mode 26
Announcements 26
Incoming messages 27
19 Alarm clock 41
Create an alarm 41
Turn off an alarm 41
Edit an alarm 41
Delete an alarm 41
12 Settings 30
Phone settings 30
Call settings 31
Setup wizard 33
Set the date and time 33
Phone software version 34
Register additional handsets 34
Unregister handsets 34
13 Sounds 35
Set the handset’s ringtone volume 35
Set the handset’s ringtone 35
Set your sound preferences 35
Set the key tone 35
Set the docking tone 35
14 Set your sound preferences 36
Set your sound preferences during a
call 36
15 Screen saver 37
16 Silent mode 38
Exclude contacts from silent mode 38
20 Family notes 42
21 Technical data 43
22 Notice 44
Declaration of conformity 44
Use GAP standard compliance 44
23 Trademarks 46
Bluetooth 46
Google 46
24 Frequently asked questions 47
25 Index 49
17 Call barring 39
Activate/deactivate call barring 39
Change the call barring PIN/passcode 39
Add new numbers to the barred list 39
Delete a barred number 39
18 Calendar 40
Create new reminder events 40
Delete a reminder event 40
2 EN
Page 5

1 Important safety
instructions
Power requirements
• This product requires an electrical supply of
100-240 volts AC. In case of power failure,
the communication can be lost.
• The voltage on the network is classied
as TNV-3 (Telecommunication Network
Voltages), as dened in the standard EN
60950.
Warning
•
The Electrical network is classied as hazardous. The
only way to power down the charger is to unplug the
power supply from the electrical outlet. Ensure that the
electrical outlet is always easily accessible.
• Do not allow the product to come into contact with
liquids.
• Do not use any cleaning agents containing alcohol,
ammonia, benzene, or abrasives as these may harm
the set.
• Do not expose the phone to excessive heat caused by
heating equipment or direct sunlight.
• Do not drop your phone or allow objects to fall on
your phone.
• Active mobile phones in the vicinity may cause
interference.
About operating and storage temperatures
• Operate in a place where temperature is
always between 0°C to +40°C (up to 90%
relative humidity).
• Store in a place where temperature is
always between -20°C and +45°C (up to
95% relative humidity).
• Battery life may be shorter in low
temperature conditions.
English
To avoid damage or malfunction
Caution
Use only the power supply listed in the user
•
instructions.
• Use only the batteries listed in the user instructions.
• Risk of explosion if battery is replaced by an incorrect
type.
• Dispose of used batteries according to the instructions.
• Do not dispose of batteries in re.
• Always use the cables provided with the product.
• Do not allow the charging contacts or the battery to
come into contact with metal objects.
• Do not let small metal objects come into contact with
the product. This can deteriorate audio quality and
damage the product.
• Metallic objects may be retained if placed near or on
the handset receiver.
• Do not use the product in places where there are
explosive hazards.
• Do not open the handset, base station or charger as
you could be exposed to high voltages.
• For pluggable equipment, the socket-outlet shall
be installed near the equipment and shall be easily
accessible.
• Handsfree activation could suddenly increase the
volume in the earpiece to a very high level: make sure
the handset is not too close to your ear.
• This equipment is not designed to make emergency
calls when the power fails. An alternative has to be
made available to allow emergency calls.
Compliance with EMF
This product complies with all applicable
standards and regulations regarding exposure to
electromagnetic elds.
EN 3
Page 6
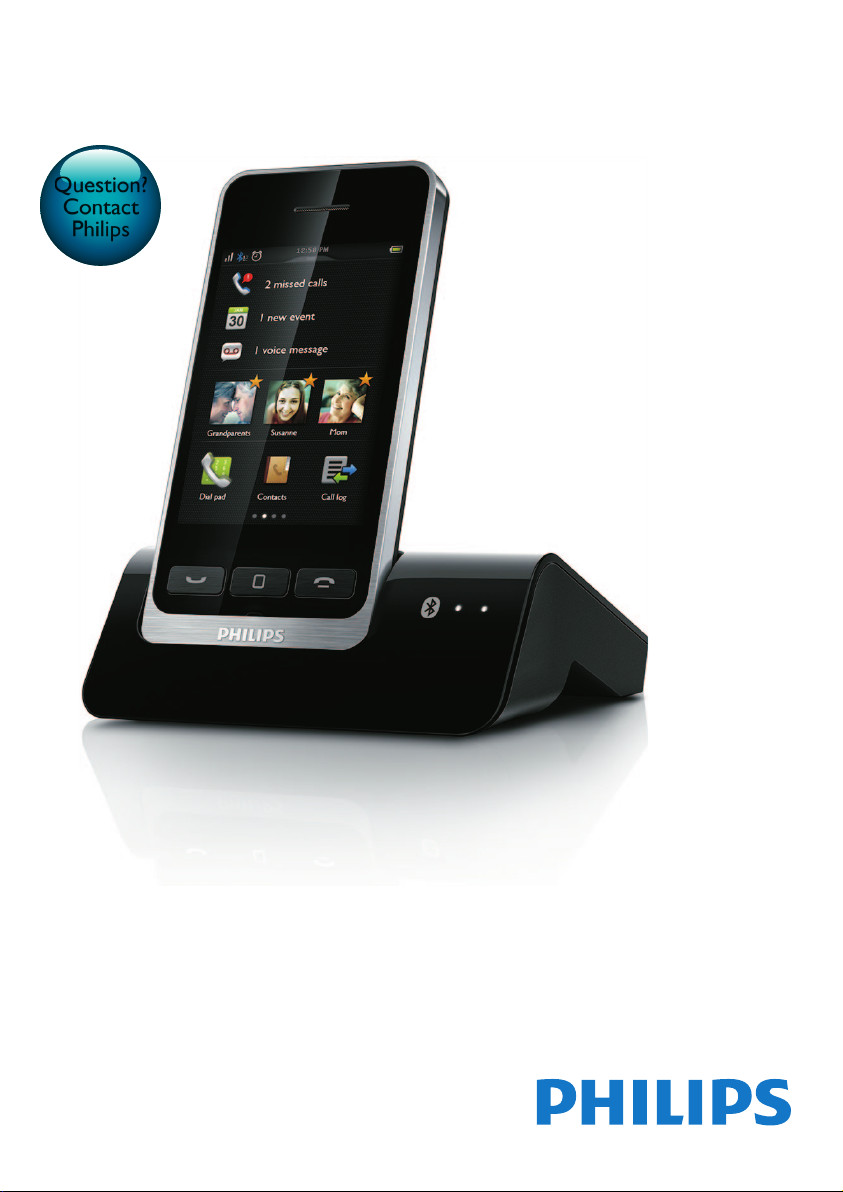
2 Your phone
Congratulations on your purchase and welcome
to Philips!
The Philips S10/S10A brings you the
convenience of MobileLink to make and receive
all calls - both landline and mobile - on your
home phone and easily download your mobile’s
contacts. It features a large touchscreen for easy
access to all its features.
To fully benet from the support that Philips
offers, including latest software updates, register
your product at www.philips.com/welcome.
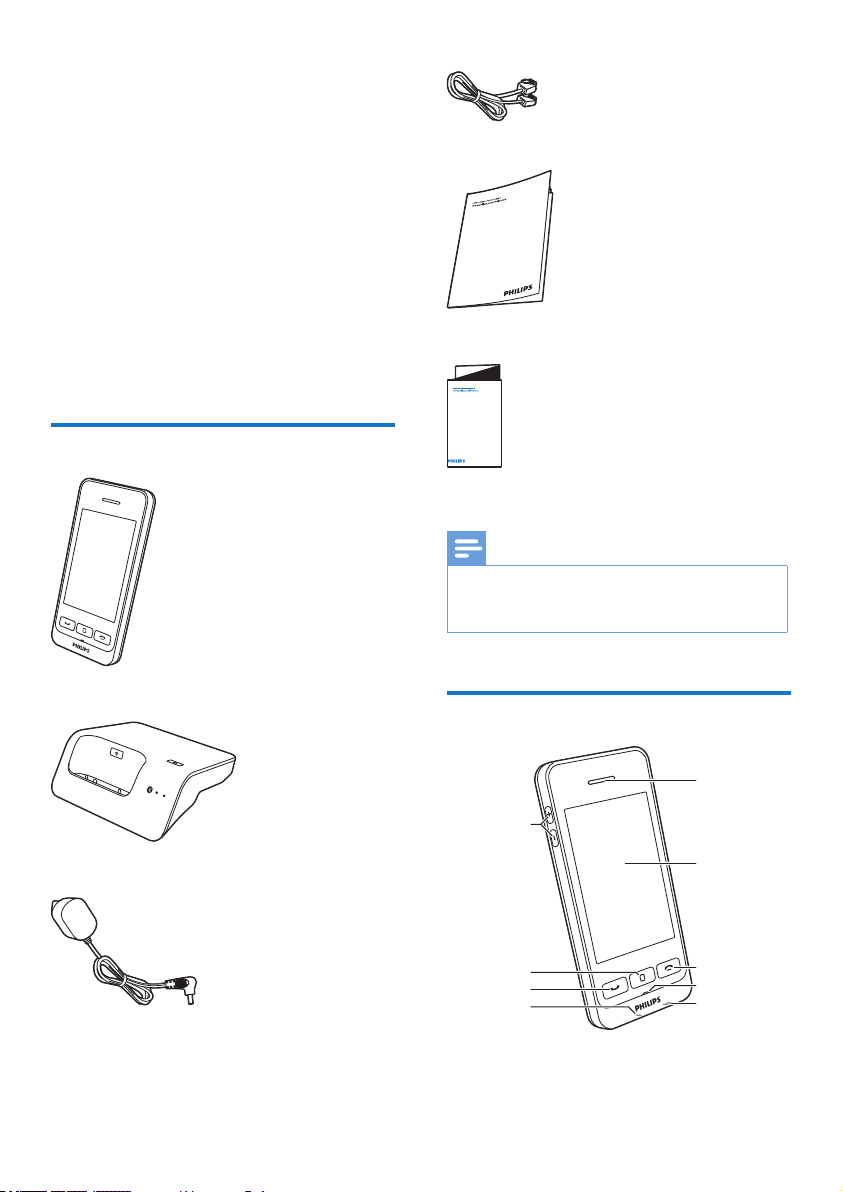
Line cord*
User manual
What is in the box
Handset
Base station
Power adapter
4XLFNVWDUWJXLGH
Quick start guide
Note
* In some countries, you have to connect the line
•
adapter to the line cord, then plug the line cord to the
telephone socket.
Overview of the phone
a
i
b
h
g
f
c
d
e
4 EN
Page 7
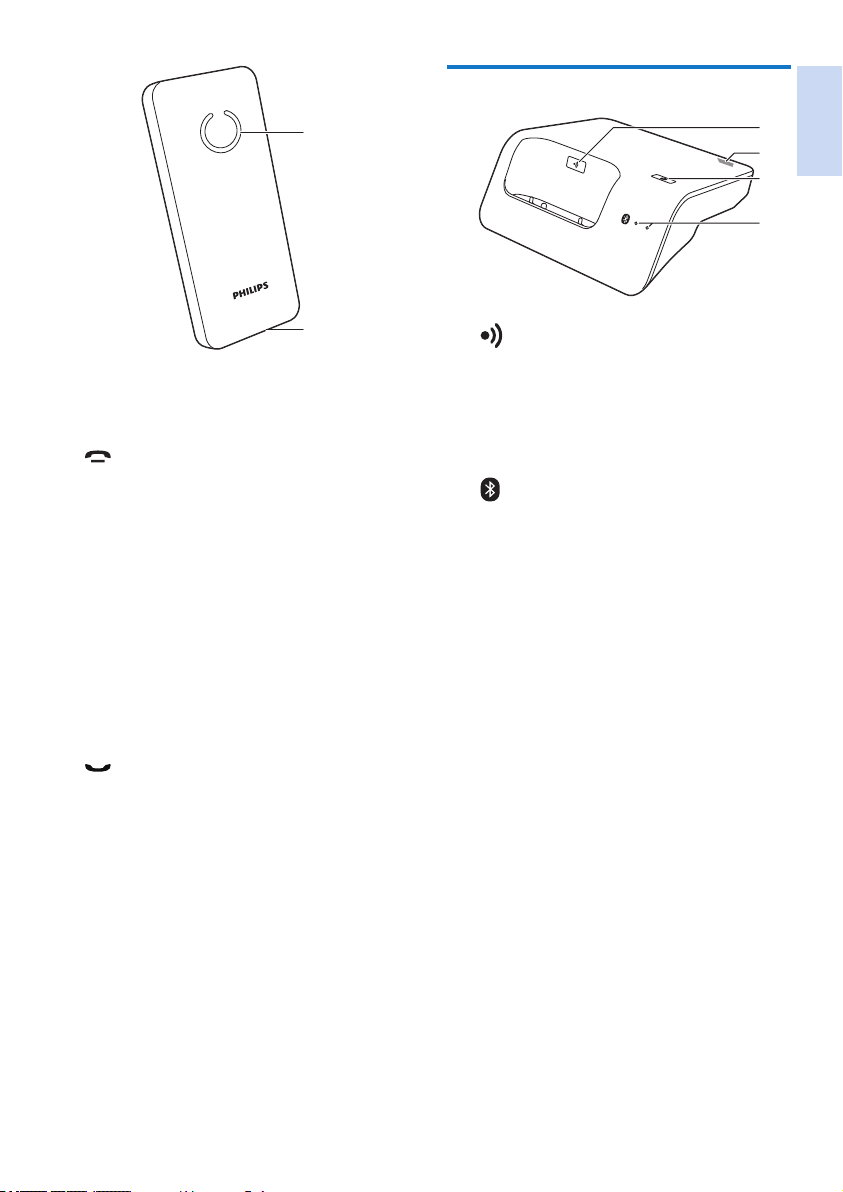
Overview of the base station
j
k
a Earpiece
b LCD touch screen
c
• End a call.
• Switch off the screen.
• Press to power on the handset.
• Press and hold to power off the
handset.
d Microphone
e Micro USB socket (bottom of the
handset)
f Headset jack (bottom of the handset,
compatible with mobile headset with
microphone)
g
• Make and receive calls.
• Show the dial pad.
h Center key
Enter the main menu in standby mode.
i +/-
Increase/decrease the volume.
j Loudspeaker
k Battery door opening
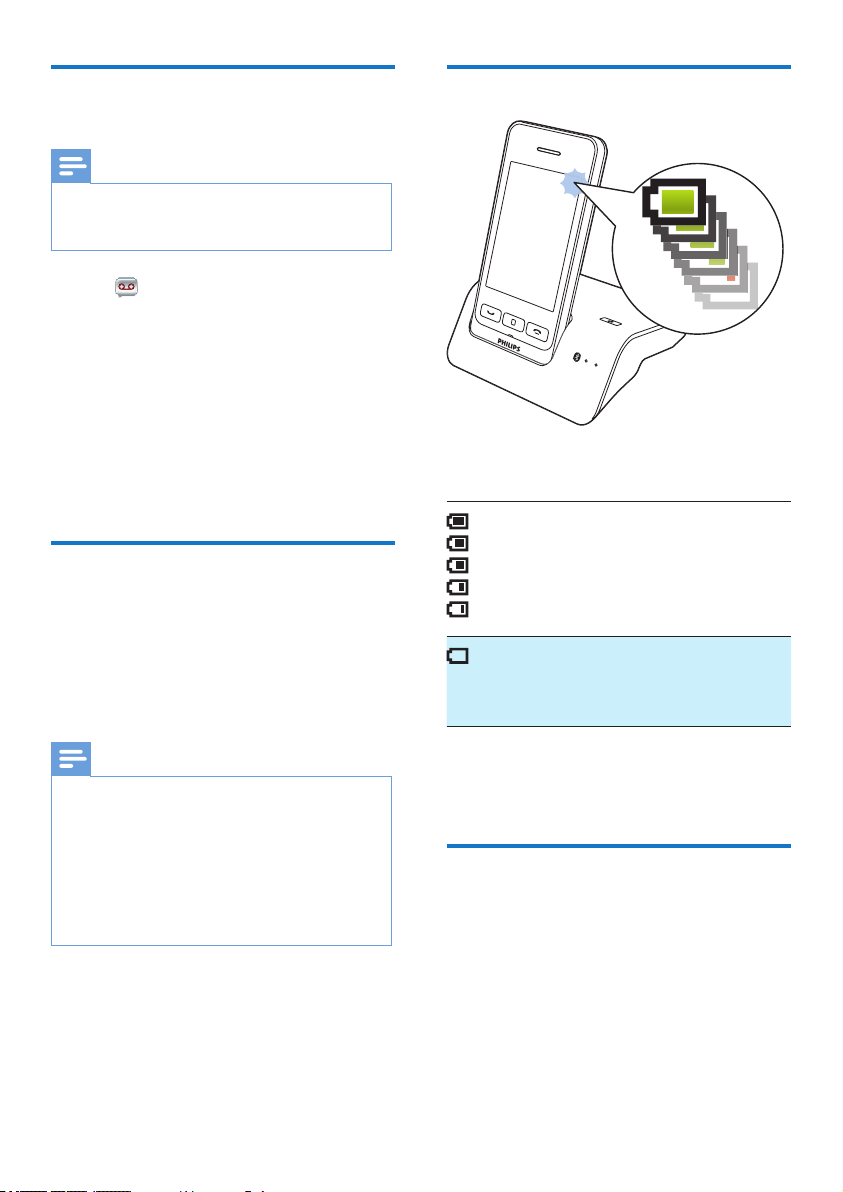
a
• Press to nd handsets.
• Press and hold for approximately 5
seconds to enter registration mode.
b Micro USB socket (back of the base
station)
c
Press and hold until both LEDs start
ashing, then star t pairing the landline
phone with your mobile phone through
Bluetooth.
d Bluetooth LEDs
• Single LED ashing: the corresponding
device is connected and in use through
Bluetooth connection.
• Single LED lit: the corresponding device
is connected.
• Both LEDs ashing alternately: the base
station is ready for pairing/registration.
• Off: No Bluetooth connection.
a
b
c
d
English
EN 5
Page 8
3 Get started
Caution
Make sure that you have read the safety instructions in
•
the ‘Impor tant safety instructions’ section before you
connect and install your handset.
Connect the base station
Warning
•
Risk of product damage! Make sure that the power
supply voltage corresponds to the voltage printed on
the back or underside of the phone.
• Use only the supplied power adapter to charge the
batteries.
Note
If you subscribe to the digital subscriber line (DSL)
•
high speed internet service through your telephone
line, ensure you install a DSL lter between the
telephone line cord and the power socket. The lter
prevents noise and caller ID problems caused by DSL
interference. For further information on DSL lters,
contact your DSL service provider.
• The type plate is located on the bottom of the base
station.
Connect the power adapter to:
1
• the DC input jack at the bottom of the
base station;
• the power socket on the wall.
Connect the line cord to:
2
• the telephone socket at the bottom of
the base station;
• the telephone socket on the wall.
Connect the power adapter to (for extra
3
handset versions only):
• the DC input jack at the back of the
extra handset charger.
• the power socket on the wall.
6 EN
Page 9
Install the handset
Your handset comes with a high quality Lithium
Ion Polymer battery to maximize battery
lifetime. However, over time the capacity of the
battery will decrease. You can order replacement
batteries through the Philips website or Philips
service.
Caution
Risk of explosion! Keep batteries away from heat,
•
sunshine or re. Never discard batteries in re.
• Use only the supplied battery.
Note
Charge the battery for 6.5 hour s before rst use.
•
Congure your phone
(country dependent)
Turn your phone on/off
Press until you see the Philips wordmark.
Set the country/language
Select your country/language, then tap [Apply]to
conrm.
» The country/language setting is saved.
Note
The country/language setting option is countr y
•
dependent. If no welcome message is displayed, it
means the country/language setting is preset for your
country. Then you can set the date and time.
English
Warning
•
Check the battery polarity when inser ting in the
battery compar tment. Incorrect polarity may damage
the product.
Check your phone’s software
version
Before setting up your phone, make sure you
have the latest software available for your phone.
Install the [Philips Phone Manager]available
1
for free at www.philips.com/support (see
chapter 8).
Connect the phone through a micro USB
2
cable (available at most electronics stores
or through Philips service network).
If a new software is available, the [Philips
3
Phone Manager] will display a message.
You can also check the current software version
in
> [Firmware version] and compare it
with the software version displayed at www.
philips.com/support.
To re-set the language, see the chapter ‘Settings’,
section ‘Phone settings’.
Set the date and time
Set your date, date format, time and time format,
then tap [Apply]to conrm.
Advanced settings
You can tap [Advanced setup] to set the [Eco
mode], [ECO+ mode] or [Silent mode]. For
information, refer to the chapter on [Phone
settings].
Tip
To set the menu under [Advanced setup] later, press
•
[OK] to skip this setting.
EN 7
Page 10
Change the remote access
PIN code
Note
The default answering machine remote access PIN
•
code is 0000 and it is important to change it to ensure
the security.
Tap from the main menu screen.
1
Select [Remote access] > [Change PIN].
2
Enter the old remote access PIN/passcode,
3
then tap [OK] to conrm.
Enter the new remote access PIN/passcode,
4
then tap [OK] to conrm.
Enter the new remote access PIN/passcode
5
again, then tap [OK] to conrm.
» The setting is saved.
Charge the handset
Place the handset on the base station to charge
the handset. When the handset is placed
correctly on the base station, you hear a docking
tone (see ‘Set the docking tone’ on page 35).
» The handset starts charging.
Check the battery level
The battery icon displays the current battery
level.
When the handset is off the base
station/charger, the bars indicate the
battery level (from full to low).
When the handset is on the base
station/charger, the bars keep scrolling
until charging is complete.
When the battery is empty, this icon
ashes. If you are in a call you hear an
alert tone.
The battery is low and needs recharging.
Note
Charge the battery for 6 hour s before rst use.
•
• It is normal for the handset to become warm during
charging.
• Over time, capacity of batteries decreases. This is a
normal battery behavior.
• You can order replacement batteries through www.
philips.com or the Philips Service organization.
• When the phone is not in use, place the handset to the
base station or charging cradle.
Your phone is now ready to use.
8 EN
If you are on the phone, you hear warning tones
when the battery is almost empty. The handset
turns off when the battery is completely empty.
What is standby mode?
Your phone is in standby mode when it is idle.
In standby mode the screen will display the
time and date and notications of missed calls
or messages. Depending on your settings, a
screensaver will also be displayed in standby
mode (see ‘Screen saver’ on page 37). The
screen will dim or turn off if the handset is not
on the base station or charging cradle.
Page 11

Check the signal strength
The number of bars indicates the
connection status between the handset
and base station. The more bars are
shown, the better the connection is.
• Make sure the handset is connected to the
base station before you make or receive
calls and carry out the functions and
features.
• If you hear warning tones when you are
on the phone, the handset is almost out
of battery or the handset is out of range.
Charge the battery or move the handset
close to the base station.
English
EN 9
Page 12
4 Overview of the
home screens
Center home screen
a
b
You can access the dial pad by swiping the
screen to the right and the main menu screen
by swiping the screen to the left.
c
d
a The pull-down menu
Pull down to quickly activate/deactivate
[Alarm] and [Silent mode].
b Notications/date and time
In this area, notications of missing
calls, messages etc. are displayed. If no
notication is available, the time and date
will be displayed.
c Favorite contacts
Select your most favorite contacts (see
‘Add your three favorite contacts on the
center home screen’ on page 23).
d Main menu icons
Your most favorite main menu icons are
displayed.
Press and hold an icon on the main menu
screen to drag it to this location to replace
an existing icon.
Main menu screen
It is an overview of the menu options that
are available in your S10/S10A. For detailed
explanation of the menu options, see the
corresponding sections in this user manual.
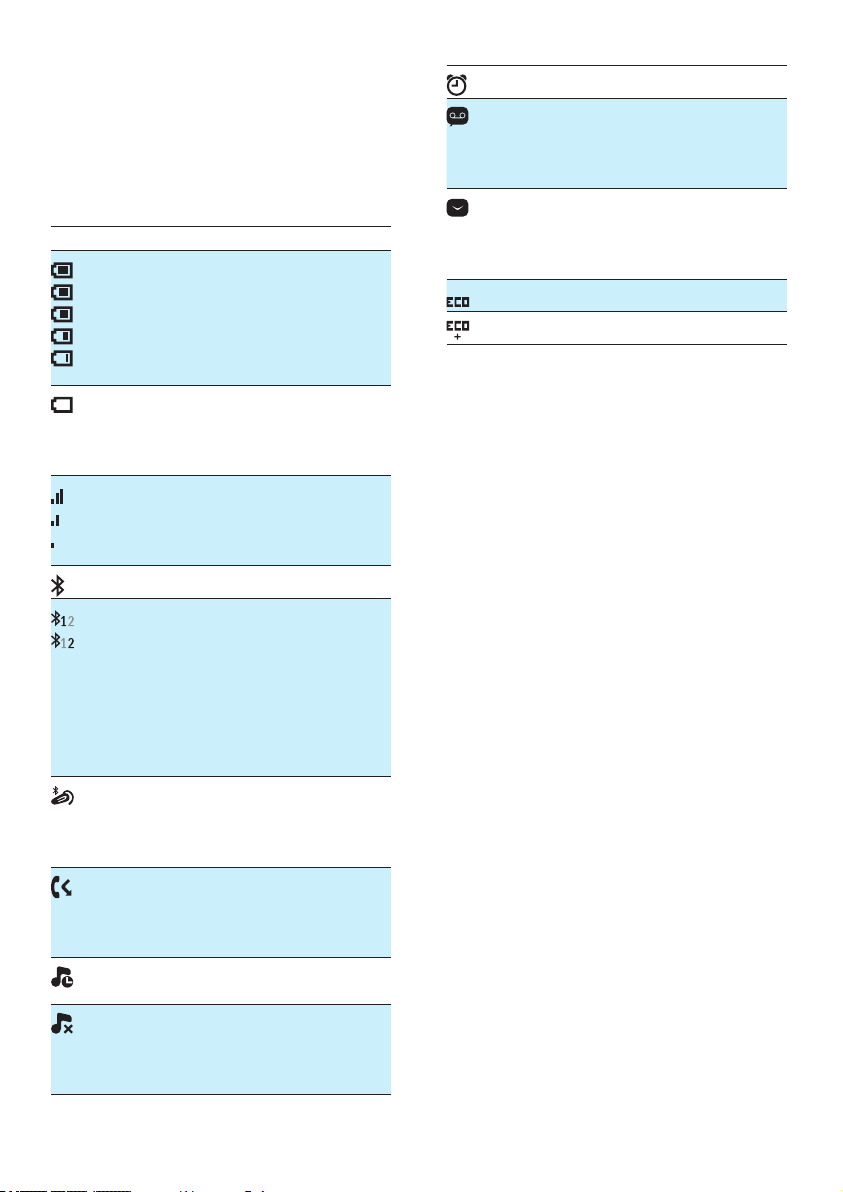
Icon Descriptions
[Settings] - Set date and time, ECO
mode, phone name, display, calls, etc.
Services are network and country
dependent.
[Contacts] - Add, edit, manage contact
lists, download the mobile phone’s
contacts, block specic number.
[Call log] - Displays the call history of all
missed, received or outgoing calls.
[Bluetooth] - Pair mobile phones,
computers and headsets, download the
mobile’s contacts.
[Dial pad] - Displays the dial pad.
10 EN
Page 13
[Answer machine] - Setup, listen to,
delete phone messages, etc. This icon is
only available on S10A.
[Call barring] - bar outgoing calls to
selected numbers.
[Screen saver] - Select your favorite
pictures as screen savers.
[Silent mode] - Disable ringtones for
times during which you do not want to
be disturbed.
[Calendar] - Create new, view and
delete reminder events.
[Family note] - Leave messages on your
phone.
[Clock] - Set the alarm, alarm name,
alarm tone etc.
[Sounds] - Set the ringtone, ring volume,
key tone and docking tone.
[MySound Pro] - Set the sound prole.
Note
The main menu screen and icons are only for reference
•
and are subject to change.
English
EN 11
Page 14
5 Display icons
In standby mode, the icons shown on top of the
main screen inform you about the status of your
phone.
Icon Descriptions
When the handset is off the base
station/charger, the bars indicate the
battery level (from full to low).
When the handset is on the base
station/charger, the bars keep scrolling
until charging is complete.
When the battery is empty, this icon
ashes. If you are in a call you hear an
alert tone.
The battery is low and needs recharging.
The number of bars indicates the
connection status between the handset
and base station. The more bars are
shown, the better the signal strength is.
Bluetooth is activated.
The Bluetooth function is activated. A
white number means that this mobile
phone (or computer) is active, i.e.
connected and within range. A grey
number indicates a device that has been
previously paired but is not active. If you
do not see a number, it means no device
is currently paired with the phone.
It remains steadily on when a Bluetooth
headset is paired and activated. It is grey
when a Bluetooth headset is paired but
deactivated.
It ashes when there is a new missed
call.
It disappears after all missed calls have
been viewed.
The silent mode is set, but is outside of
active period.
The silent mode is set and within active
period (the phone does not ring). It is
also visible if the ringer volume is set to
off.
The alarm is activated.
Answering machine: it ashes when
there is a new message. It is displayed
when the telephone answering machine
is turned on.
It ashes when there is a new voice
message.
The icon is not shown when there is no
voice message.
The ECO mode is activated.
The ECO+ mode is activated.
12 EN
Page 15
6 Bluetooth
The MobileLink features of S10/S10A are
enabled by Bluetooth wireless technology. With
MobileLink, you can connect your phone to a
compatible mobile phone to make and receive
mobile calls on your S10/S10A handset, or you
can download the contacts from your mobile
phone or computer. You can also connect a
Bluetooth headset to your phone’s base station.
Delete a Bluetooth headset/
Disconnect Bluetooth headset pairing
Tap from the main menu screen.
1
Select [Headset].
2
» The available headset devices are
displayed.
Select a device, then select [Delete device].
3
» The selected headset is deleted.
English
Note
Make sure that the other Bluetooth devices with which
•
you establish a connection support Bluetooth. See the
user manual of other devices for information.
• The Bluetooth connection offers a typical range of 10
meters (without obstruction between the base station
and Bluetooth devices), and is subject to interference
from obstructions such as walls or other electronic
devices.
Pair your Bluetooth headset
You can pair your Bluetooth headset with your
phone. Make sure that you turn the headset on
before you can start pairing.
Tap from the main menu screen.
1
Select [Headset] and tap to search
2
the Bluetooth headset.
» The available Bluetooth headset devices
are displayed.
Select a device, then tap [Connect device]
3
to start pairing.
» Pairing is done.
is displayed.
Pair S10/S10A with your
mobile phones
Make sure the Bluetooth function of the mobile
phones is activated and in searching status. Then
you can do the pairing in this way:
From the base
Make sure your mobile phone is within a
1
10-meter range of the base station.
Press and hold on the base station until
2
the Bluetooth LEDs on the base station
ash alternately.
On the mobile phone, select Philips S10
3
and connect.
Enter the PIN code (0000) on the mobile
4
phone, if necessary.
» When S10/S10A and the mobile phone
are paired,
the handset screen, the corresponding
LED on the base station remains
steadily on.
or is displayed on
EN 13
Page 16
From the handset
Tap from the main menu screen.
1
Place the mobile phone close to the base
2
station, then tap [Find Me] on the handset.
» The mobile phone name is displayed
on the handset screen.
On the mobile phone, select Philips S10
3
and connect.
Enter the Bluetooth PIN/passcode on the
4
mobile phone, if necessary.
» When S10/S10A and the mobile phone
are paired,
the handset screen.
Tip
The default Bluetooth PIN/passcode is 0000.
•
Note
The phone can be connected up to 2 Bluetooth
•
devices simultaneously.
• The phone can store up to 8 devices, to which it will
reconnect automatically if they are in range, and less
than 2 devices are connected. If more than 8 devices
have been paired, delete some devices from the list
before pairing another one. See ‘Manage your mobile
phone’s connection’ in this chapter for information.
• If the name of S10/S10A exists in your mobile phone,
you have to remove it from your mobile phone. Then
you can do the pairing again.
or is displayed on
Manage your mobile phone’s
connection
You can manage your mobile phones list in this way:
Tap from the main menu screen.
1
Select [Mobile/Computer].
2
» The mobile phones and computers list
are displayed.
Select a mobile phone, then select [Privacy
3
mode]/[Disconnect device]/[Delete device].
Note
If 2 devices are connected, you have to disconnect a
•
device before connecting another one.
• You can see [Disconnect device] in the option list only
when the mobile phone is connected; and [Connect]
only when the mobile phone is disconnected.
• For information on [Privacy mode], refer to the next
section.
Mobile settings
You can set the privacy mode or change the
PIN/passcode through [Mobile settings].
Privacy mode
You can select this option to set whether the
mobile’s contacts are available for viewing.
To access this menu, press the PIN/passcode
(0000). Select among 2 options: [Auto range]
and [Change PIN].
From [Auto range], you can set whether the
mobile’s contacts are available for viewing.
You can select among these 3 options:
• [Off] : no PIN/passcode is required to
access the mobile’s contacts which are
always available for viewing.
• [Auto range] : no PIN/passcode is
required to access the mobile’s contacts
which are available for viewing only
when the mobile phone is within the
Bluetooth range.
• [PIN] : follow the on-screen instruction
to activate or change the PIN/passcode.
If you choose this option, your mobile’s
contacts are always available on your
S10/S10A, but a PIN/passcode is
required anytime you want to access
them.
From [Change PIN], you can change your PIN/
passcode for the privacy mode.
14 EN
Page 17
Delete a device
You can select this option to delete your device.
Disconnect a device
You can select this option to disconnect your
device.
Note
If 2 devices are connected, you have to disconnect a
•
device, before connecting another one.
• You can see [Disconnect device] in the option list only
when the mobile phone is connected; and [Connected
devices] only when the mobile phone is disconnected.
Change the Bluetooth PIN/
passcode
Tap from the main menu screen.
1
Select [My Bluetooth info] > [My
2
Passkey:].
Tap [Delete] to remove the current PIN/
3
passcode.
Enter the new Bluetooth PIN/passcode.
4
» The new Bluetooth PIN/passcode is
saved.
Note
If you forget the Bluetooth PIN/passcode, you have to
•
reset your phone (see ‘Restore default settings’ on page
31). By doing this, all mobile’s records are removed
from your S10/S10A.
Set your phone’s Bluetooth
device name
The Bluetooth device name of your phone is
Philips S10 by default. This name will be shown
in the Bluetooth device list of your mobile
phone or computer. You can rename it in this
way:
Tab from the main menu screen.
1
Select [My Bluetooth info] > [My
2
Bluetooth name:].
Enter/edit the name.
3
» The setting is saved.
Philips phone manager
You can download the free [Philips Phone
Manager] software from www.philips.com/
support to:
• transfer contacts, ringtones and pictures
from your computer to your phone.
• update the software on your phone to the
latest available version.
After downloading and installing the software,
connect your S10/S10A through a micro USB
cable (available in most electronics, phone stores
or through Philips service network) to your
computer and you will be asked automatically if
you would like to upgrade to the latest software
version for your phone, in case a new version is
available.
English
EN 15
Page 18
7 Calls
Note
When the power fails, the phone cannot access
•
emergency services.
Tip
Check the signal strength before you make a call or
•
when you are in a call (see ‘Check the signal strength’
on page 9).
Make a call
Press .
1
» The virtual keypad is displayed.
Tip
You can also make a call from the contact list (see
•
‘Make a call from the contacts’ on page 20), call log (see
‘Return a call’ on page 25) and your favourite list (see
‘Make a call from the favorite list’ on page 23).
• You can make a call using a certain line (see ‘Line
settings’ on page 33), but make sure this line is available.
• You can select from the landline or one of the mobile
lines for an outgoing call. If a mobile line is selected and
it is busy, the landline will be selected automatically.
Answer a call
When there is an incoming call from the mobile
line, you will see if the call is from the landline or
mobile lines:
• press
• select [Divert to answering machine]
to send incoming call to the answering
machine (available for calls made to the
landline of S10A only).
• select [Silence] to turn off the ringer of the
current incoming call.
When there are incoming calls from the landline
and mobile line at the same time, tap to select a
call, then, press
to answer the call.
to answer the call.
Dial the phone number, then press .
2
Select the landline or mobile line from
3
which you want to make an outgoing call.
Note
The call timer displays the talk time of your current call.
•
• If you hear warning tones, the phone is almost out of
battery or out of range . Charge the battery or move
the phone close to the base station.
16 EN
Warning
•
When the handset rings or when the handsfree is
activated, keep the handset away from your ear to
avoid ear damage.
Tip
When there is a missed call, a notication message is
•
displayed.
• If a Bluetooth headset is connected, you can pick up the
call by accepting the call from that headset (see ‘Pair
your Bluetooth headset’ on page 13).
• Once a call has been accepted from the headset, it
cannot be transferred to the phone.
• If you have subscribed for a caller ID service with
the service provider, you will see the caller number
displayed on the handset. If the number is saved in the
contact list, the name will be displayed.
Page 19

End a call
Make a second call
Press .
Adjust the earpiece/speaker
volume
Press +/- on the left side of the handset to
adjust the volume during a call.
» The earpiece/speaker volume is
adjusted and the phone is back to the
call screen.
Mute the microphone
Tap to access the options menu during
1
a call.
Tap .
2
» The caller cannot hear you, but you can
still hear his voice.
Tap again to unmute the microphone.
3
»
becomes white.
» You can now communicate with the
caller.
Note
This service is network dependent.
•
Press during a call.
1
» The rst call is put on hold.
Tap to access the options menu.
2
Tap .
3
Dial the second number, then press .
4
» The number displayed on the screen is
dialed out.
Answer a second call with the
landline or mobile line
When you are in a call with the landline/mobile
line, you can also answer a second call through
the other line (mobile line/landline). You will see
a screen displaying the options. Select an option
to answer/reject the second incoming call. The
rst call is put on hold.
Answer a second call
English
Turn the handsfree speaker
on or off
Tap to access the options menu during
1
a call.
Tap / .
2
Note
This service is network dependent.
•
Press to answer the call.
1
» The rst call is put on hold, and you are
now connected to the second call.
Press to end the current call and
2
answer the rst call.
EN 17
Page 20

Answer a second call with the
landline or mobile line
When you are in a call with the landline/mobile
line, you can also answer a second call through
the other line (mobile line/landline). You will see
a screen displaying the options. Select an option
to answer/reject the second incoming call. The
rst call is put on hold.
Switch between two calls
Press during a call.
» The current call is put on hold, and you
are now connected to the other call.
Switch between two calls on
the landline and mobile line
You can switch the calls between the landline
and mobile line.
Make an outgoing call with the landline.
1
When there is an incoming call from the
2
mobile line, a screen is displayed. Select
an option to answer/reject the second
incoming call.
» The call from the landline is on hold.
To switch the call, tap to access the
3
options menu, then tap
between calls.
to switch
18 EN
Page 21

8 Text and
numbers
Your phone has a virtual keypad with which you
can enter text and numbers for handset name,
contact records, and other menu items.
English
EN 19
Page 22

9 Contacts
Update the mobile’s contact
This phone has a contact list that stores
up to 1000 entries entered on the phone
or downloaded from a computer. You can
download up to 500 entries each for up to 2
mobile phones. Each record can store up to 3
numbers. You can access any entry in the contact
list and use that entry to make a call using the
landline or the mobile network of a connected
mobile phone.
View contacts
Tap from the main menu screen to
1
access the contact lists.
Tap the drop-down menu ( ) on top of
2
the screen to select a contact list from the
landline/mobile line.
» The contact list is displayed.
You can select this option to download/update
the mobile’s contacts through the Bluetooth
connection.
Tap from the main menu screen to
1
access the contact lists.
Tap on the drop-down menu on the top
2
of the screen (
phone.
Tap [Update].
3
» The contact list from the mobile phone
is downloaded/updated.
) and select a mobile
Make a call from the contacts
Tap from the main menu screen to
1
access the contact lists.
Tap the drop-down menu to select a
2
contact list from the landline/mobile line.
» The contact list is displayed.
Select a contact, then tap .
3
Select a number.
4
Select an outgoing line.
5
» The number is dialed.
Select a contact, then tap to view the
3
contact’s information.
Tip
For information on how to set privacy options for
•
mobile phone contacts available for viewing, see the
chapter ‘Bluetooth’, section ‘Manage your mobile’s
connection’.
20 EN
Tip
You can set the phone to automatically select a line for
•
you, or to always make a call using a certain line (see
‘Line settings’ on page 33). If you force the phone to
use a certain line, make sure this line is available.
Access contacts during a call
Tap to access the options menu.
1
Select .
2
Select a contact, then tap to view the
3
number.
Page 23

Add a record
Silent mode exception
Tap from the main menu screen to
1
access the contact lists.
Tap the drop-down menu ( ) to select
2
a contact list from the landline/the mobile
line.
» The contact list is displayed.
Tap to access the options menu.
3
Select [Add new contact].
4
Enter the information, then tap [OK].
5
Tap to add the contact’s picture.
6
Tip
If multiple numbers are stored in a contact, you can
•
specify one of them as a default number by highlighting
the checkbox next to that number. If you do so, you
will not be asked which number to choose when calling
this contact.
Note
If the contact memory is full, a notication message is
•
displayed on the handset. Delete some records to add
new ones.
You can select a contact to be excluded them
from silent mode. When a contact, who has
been added to the silent mode exception list,
calls you, the phone will ring, even while silent
mode is active.
Tap from the main menu screen to
1
access the contact lists.
Tap the drop-down menu ( ) to select
2
a contact list from the landline/mobile line.
» The contact list is displayed.
Select a contact, then tap to access the
3
options menu.
Select [Silent mode except.]
4
Tap on the switch to turn it off.
5
» Grey is displayed.
Tip
For further information on how to set the silent mode,
•
see the chapter ‘Silent mode’.
Set the personalized ringtone
English
Edit a record
Tap from the main menu screen to
1
access the contact lists.
Tap the drop-down menu ( ) to select
2
a contact list from the landline/mobile line.
» The contact list is displayed.
Select a contact, then tap to access the
3
options menu.
Select [Edit contact].
4
Edit the information and/or update the
5
contact’s picture, then tap [OK].
You can personalize the ringtone played when
someone in the contact list calls you.
Note
Make sure you have subscribed to caller identication
•
before you use this feature.
Tap the drop-down menu ( ) to select
1
a contact list from the landline/mobile line.
» The contact list is displayed.
Select a contact, then tap to access the
2
options menu.
Select [Select ringtone], then select a
3
melody.
» The ringtone is set.
EN 21
Page 24

Block a caller from the
contact list
You can choose to block a contact. When this
contact calls you, the phone does not ring.
However, you will still see the call notication on
the handset screen.
Tap from the main menu screen to
1
access the contact lists.
Tap the drop-down menu ( ) to select
2
a contact list from the landline/mobile line.
» The contact list is displayed.
Select a contact, then tap to access the
3
options menu.
Select [Block caller].
4
Tap on the switch to turn it on.
5
» Blue is displayed.
Delete a contact
Tap from the main menu screen to
1
access the contact lists.
Tap the drop-down menu ( ) to select
2
a contact list from the landline/mobile line.
» The contact list is displayed.
Select a contact, Tap to access the
3
options menu.
Select one or multiple contacts, then tap
4
[Delete] to conrm.
» The selected contact are deleted.
Tip
If you select [Delete all], a conrmation request is
•
displayed. Tap [Yes] to delete all records.
Sort the contact list
You can sor t your contact list by rst name or
last name.
Tap from the main menu screen to
1
access the contact lists.
Tap the drop-down menu ( ) to select
2
a contact list from the landline/mobile line.
» The contact list is displayed.
Tap to access the options menu.
3
Select [Sort by: rst name]/[Sort by: last
4
name].
» The setting is saved.
Note
If your current contact list is already sorted by rst
•
name, then you can see only the option to sort the
contact list by last name, and vice versa.
My favorites
If you have contacts to whom you need to
access more often, you can add up to 1000
records to the favorite list so that you have
quick access to their information.
Add a contact to your favorite list
You can add your contact to your favorite list
so that you can access the contact’s information
quickly.
Tap from the main menu screen to
1
access the contact lists.
Tap the drop-down menu ( ) to select
2
a contact list from the landline/mobile line.
» The contact list is displayed.
Select a contact, tap .
3
Tap to add the contact to the favorite
4
list.
Tip
To remove the contact from the favorite list, tap again.
•
22 EN
Page 25

View the favorite list
Sort the favorite list
Tap from the main menu screen to
1
access the contact lists.
Tap the drop-down menu ( ) and select
2
[Favorites].
» The favorite list is displayed.
Add your three favorite contacts on
the center home screen
Press and hold one of the three favorite
1
contacts (
screen.
Select a contact.
2
» The contact’s name and/or picture
will be displayed on the center home
screen.
Tip
To replace the existing three favorite contacts, follow
•
the same instructions described above.
) from the center home
Make a call from the favorite list
Tap from the main menu screen to
1
access the contact lists.
Tap the drop-down menu ( ) to select
2
a contact list from the landline.
» The contact list is displayed.
Select [Favorites].
3
» The favorite list is displayed.
Select a contact, then tap .
4
Select a number.
5
Select an outgoing line.
6
» The number is dialed.
Tap from the main menu screen to
1
access the contact lists.
Tap the drop-down menu ( ) to select
2
a contact list from the landline.
» The contact list is displayed.
Select [Favorites].
3
» The favorite list is displayed.
Tap to access the options menu.
4
Select [Sort by: rst name]/[Sort by: last
5
name].
» The setting is saved.
Note
If your current contact list is already sorted by rst
•
name, then you can see only the option to sort the
contact list by last name, and vice versa.
Delete a record
Tap from the main menu screen to
1
access the contact lists.
Tap the drop-down menu ( ) to select
2
a contact list from the landline.
» The contact list is displayed.
Select [Favorites].
3
» The favorite list is displayed.
Tap to access the options menu.
4
Select [Delete], then select one or multiple
5
contacts to delete.
Tip
If you select [Delete all], a conrmation request is
•
displayed. Tap [Yes] to delete all records.
English
Tip
You can set the phone to automatically select a line for
•
you, or to always make a call using a certain line (see
‘Line settings’ on page 33). If you force the phone to
use a certain line, make sure this line is available.
» The selected records are deleted.
EN 23
Page 26

10 Call log
Call log options
The call log stores the call history of all incoming,
outgoing, or missed calls. The incoming call
history includes the name and number of the
caller, call time, and date. This feature is available
if you have subscribed to the caller ID service
with your service provider.
Your phone can store up to 50 call records. If
the caller allows the display of his identity, you
can view his name or number. The call records
are displayed in chronological order with the
most recent call at the top of the list.
Note
Make sure that the number in the call list is valid before
•
you can call back directly from the call list.
• If you enable privacy protection for your contacts (see
‘Privacy mode’ on page 14), these settings will also apply
to your call log.
The icons shown next to a call log entry indicate
whether the entry is a missed/incoming/outgoing
call.
Icons Description
It is displayed beside the missed call
records when browsing the call log.
It is displayed beside the outgoing call
records when browsing the call log.
It is displayed beside the incoming call
records when browsing the call log.
View call records
Tap from the main menu screen to
1
access the call log lists.
» The call log list from the landline is
displayed.
Tap to select a type of call log you want
2
to view.
Select a contact, then tap to view the
3
call record’s information.
You can sor t your call log by missed calls,
incoming calls, outgoing calls or all calls.
Tap from the main menu screen to
1
access the call log lists.
» The call log list from the landline is
displayed.
Tap to access the options menu.
2
Select an option.
3
» The setting is saved.
Block a caller from the call log
Tap from the main menu screen to
1
access the call log lists.
» The call log list from the landline is
displayed.
Select a call record, then select [Block
2
caller].
Select [Yes].
3
» The setting is saved.
Save a call record to the
contacts
Tap from the main menu screen to
1
access the call log lists.
» The call log list from the landline is
displayed.
Select a record, then tap .
2
Enter the information, then tap [OK] to
3
conrm.
» The record is saved.
24 EN
Page 27

Return a call
Tap from the main menu screen to
1
access the call log.
» The call log from the landline is
displayed.
Select a call record.
2
Select an outgoing line.
3
» The number is dialed.
Tip
You can set the phone to automatically select a line for
•
you, or to always make a call using a certain line (see
‘Line settings’ on page 33). If you force the phone to
use a certain line, make sure this line is available.
Delete a call record
Tap from the main menu screen to
1
access the call log lists.
» The call log list from the landline is
displayed.
Tap to access the options menu.
2
Select [Delete].
3
Select one or multiple call records, then tap
4
[Delete] to conrm.
» The selected records are deleted.
English
Tip
If you select [Delete all], a conrmation request is
•
displayed. Tap [Yes] to delete all records.
EN 25
Page 28

11 Telephone
Set the answer mode
answering
machine
Note
The answering machine feature is available only for S10A.
•
Your phone includes a telephone answering
machine that records unanswered calls when it
is on. By default, the answering machine is set to
the [Answer & rec.] mode. You can also access
the answering machine remotely and change the
settings through the answering machine menu
on the handset.
Turn the answering machine
on or off
Tap from the main menu screen.
1
Select [Answer mode].
2
Select [Answer only]/[Answer & rec.]/[Off].
3
» The setting is saved.
You can set the answering machine and select if
the callers can leave messages. Select [Answer &
rec.] if you allow the callers to leave messages.
Select [Answer only] to prevent callers from
leaving messages.
Tap from the main menu screen.
1
Select [Answer mode].
2
Select an answer mode.
3
» The setting is saved.
Note
If the memory is full, the answering machine switches to
•
[Answer only] mode automatically.
Announcements
The announcement is the message your caller
hears when the answering machine picks up the
call. The answering machine has 2 default prerecorded announcements: the [Answer & rec.]
mode and [Answer only] mode.
26 EN
Page 29

Record an announcement
The maximum length of the announcement you
can record is 3 minutes. The newly recorded
announcement automatically replaces the old one.
Tap from the main menu screen.
1
Select [Announcement] > [Answer & rec.]
2
> [Record new].
» Recording starts after the beep.
Tap to stop recording or the recording
3
stops after 3 minutes.
Tap [Play] listen to the newly recorded
4
announcement on the handset.
Note
Make sure that you speak close to the microphone
•
when you record an announcement.
• Pre-recorded announcements cannot be deleted.
Listen to the announcement
Tap from the main menu screen.
1
Select [Announcement] > [Answer & rec.]
2
or [Answer only] > [Play].
» You can listen to the current
announcement.
Restore the default announcement
Set the answering machine language
You can change the language used for the prerecorded default announcements.
Tap from the main menu screen.
1
Select [Announcement] > [Voice
2
language].
Select a language.
3
» The setting is saved.
Incoming messages
Each message can be up to 3 minutes long.
When you receive new messages, the new
message indicator ashes on the answering
machine and a conrmation request is displayed
on the handset.
Note
If you pick up the phone when the caller leaves a
•
message, the recording stops and you can talk to the
caller directly.
Note
If the memory is full, the answering machine switches
•
to [Answer only] automatically. Delete old messages to
receive new ones.
English
Tap from the main menu screen.
1
Select [Announcement] > [Answer & rec.]
2
or [Answer only] > [Use default].
» A conrmation request is displayed on
the handset.
Tap [Yes] to conrm.
3
» The default announcement is restored.
Listen to the incoming messages
You can listen to the incoming messages in the
sequence they are recorded.
Tap from the main menu screen.
1
Select [Play].
2
» New messages start playing. Old
messages start playing if there is no
new message.
• Tap [Back] to stop listening..
• Press +/- on the left side of the handset to
increase/decrease the volume.
EN 27
Page 30

Delete an incoming message
When you listen to the message, tap .
1
» The current message is deleted.
Delete all old incoming messages
Tap from the main menu screen.
1
Select [Delete all].
2
» The handset displays a conrmation
request.
Select [Yes] to conrm.
3
» All old messages are permanently
deleted.
Note
You can only delete the read messages. No deleted
•
messages can be recovered.
Call screening
You can hear the caller while he is leaving a
message. Press
to answer the call.
Set the ring delay
You can set the number of times the phone
rings before the call goes to the answering
machine.
Tap from the main menu screen.
1
Select [Ring delay].
2
Select a new setting.
3
» The setting is saved.
Set the sound quality of the message
You can adjust the sound quality of the
messages received from the answering machine.
Tap from the main menu screen.
1
Select [Message quality].
2
Select the new setting.
3
» The setting is saved.
Note
The sound quality can only be adjusted before
•
recording starts.
• Depending on the sound quality, the maximum
number/length of recorded messages changes. In high
quality setting, a maximum of 15 mins of messages can
be stored. In the low quality setting, approximately 60
minutes can be stored.
Remote access
You can operate your answering machine when
you are away from home. Simply make a call to
your phone with a touch tone phone and enter
your 4-digit PIN code.
Note
The remote access PIN code is the same as your
•
system PIN. The preset PIN is 0000.
Note
The answering machine needs to be switched on
•
before applying this setting.
28 EN
Page 31

Activate/deactivate the remote access
You can allow or block remote access to the
answering machine.
Tap from the main menu screen.
1
Select [Remote access].
2
Tap the switch to turn it on or off.
3
» The setting is saved.
Tip
When you access the answering machine remotely,
•
you are recommended to set the ring delay to[Toll
saver] mode. This is a cost effective way to manage your
messages. When there are new messages, the answering
machine picks up the call after 3 rings. When there is
no messages, it picks up the call after 5 rings, giving you
the opportunity to hang up before a connection is
established in case there are no new message.
Access the answering machine remotely
Make a call to your home number with a
1
touch tone phone.
Enter # when you hear the announcement.
2
Enter your PIN code.
3
» You now have access to your answering
machine, and you can listen to the new
messages.
Note
You have 2 chances to enter the correct PIN code
•
before your phone hangs up.
Press a key to carry out a function. See the
4
Remote access commands table below for
a list of available functions.
English
Change the PIN/passcode
Tap from the main menu screen.
1
Select [Remote access] > [Change PIN].
2
Enter the old remote access PIN/passcode,
3
then tap [OK] to conrm.
Enter the new remote access PIN/passcode,
4
then tap [OK] to conrm.
Enter the new remote access PIN/passcode
5
again, then tap [OK] to conrm.
» The setting is saved.
Note
When there is no message, the phone hangs up
•
automatically if no key is pressed for 8 seconds.
Remote access commands
Key Function
1 Repeat the current or listen to the
previous message.
2 Listen to messages.
3 Skip to the next message.
6 Delete the current message.
7 Switch the answering machine on.
(not available when you listen to the
messages).
8 Stop listening to the message.
9 Switch the answering machine off.
(not available when you listen to the
messages).
EN 29
Page 32

12 Settings
In [Settings] menu, you can customize the
phone to your preferences.
Phone settings
Set the display language
Tap from the main menu screen.
1
Select [Phone settings] > [Language].
2
Select a language.
3
» The setting is saved.
ECO mode
The ECO mode reduces the transmission
power and radiation of the handset and base
station when you are on a call or when the
phone is in standby mode.
Tap from the main menu screen.
1
Select [Phone settings] > [Eco mode].
2
Select [On]/[Off].
3
» The setting is saved.
»
is displayed in standby mode.
Note
When ECO mode is set to [On], the connection
•
range between the handset and the base station can
be reduced.
ECO+ mode
When the ECO+ mode is activated, it eliminates
the radiation of the handset and base station in
standby mode.
Tap from the main menu screen.
1
Select [Phone settings] > [ECO+ mode].
2
Select [On]/[Off].
3
» The setting is saved.
Note
Make sure that all the handsets registered to the base
•
station are S9 series or S10 series in order to have the
ECO+ feature functioning properly.
• When ECO+ is activated, the standby time is reduced.
This is because in ECO+ mode the base station is not
transmitting any signal in standby mode; therefore the
handset needs to “listen” more frequently for signals
from the base station to detect incoming calls or other
requests from the base station. The time it takes for the
handset to access features like call setup, call log, paging,
and contact browsing is also delayed. The handset
will not alert you to link loss in case of power loss or
moving out of range.
The following table shows you the current status
of the handset screen with different ECO mode
and ECO+ mode settings.
ECO
mode
[Off] [Off]
[Off] [On]
[On] [Off]
[On] [On]
ECO+
mode
Handset icon display
and are off.
is displayed only
after the ECO+ mode is
activated during standby
mode .
is displayed.
is displayed and
changed to
ECO+ mode is activated in
standby mode.
when the
30 EN
Page 33

Name the handset
The name of the handset can be up to 16
characters. It helps to identify a handset for
conference calls if multiple handsets are
connected to the base.
Tap from the main menu screen.
1
Select [Phone settings] > [Phone name].
2
Enter or edit the name with the keyboard.
3
» The setting is saved.
Display settings
You can change the display of the phone during
standby mode.
Set the brightness, wallpaper and backlight
You can change the display proper ties during
standby mode, such as display brightness,
backlight behaviour and wallpaper.
Tap from the main menu screen.
1
Select [Phone settings] > [Display] > [Brig
2
htness]/[Wallpaper]/[Backlight].
Select an option.
3
» The setting is saved.
Restore default settings
You can reset your phone settings to the original
factory settings.
Tap from the main menu screen.
1
Select [Phone settings] > [Factory
2
settings].
Select if you want to remove the data.
3
Tap [OK] to conrm.
4
» All settings are reset.
Note
If you select to keep the data when restoring default
•
settings, the contacts, call logs and answering machine
messages will be retained.
Demo mode
Demo mode shows key features of the product.
You can exit demo mode by tapping on the
screen.
Call settings
Auto prex
This feature checks and formats your outgoing
call number before it is dialed out. The prex
number can replace the detect number you
set in the menu. For example, you set 604 as
the detect number and 1250 as the prex.
When you have dialed out a number such as
6043338888, your phone changes the number
to 12503338888 when it dials out.
Note
The maximum length of a detect number is 5 digits. The
•
maximum length of an auto prex number is 10 digits.
Set auto prex
Tap from the main menu screen.
1
Select [Call settings] > [Auto prex].
2
Enter the detect number, then tap [OK] to
3
conrm.
Enter the prex number, then tap [OK] to
4
conrm.
» The setting is saved.
Note
This is a country dependent feature.
•
• To enter a pause, press and hold #.
• If the prex number is set and the detect number is left
empty, the prex number is added to all outgoing calls.
• The feature is unavailable if the dialed number starts
with * and #.
English
EN 31
Page 34

Set the carrier code, area code,
country code and domestic code
You can enter these values for your phone’s
current location if you have used them in
entering numbers on your computer. In case
you transfer a number to your phone, your
phone will use this information to remove these
codes from local numbers, as they can lead to
unsuccessful calls when dialed on a landline.
For example if on your computer you have stored
the number +49 40 1234567, with +49 being the
local country code and 40 being the area code,
the phone will save that number in your phone as
040 1234567 (that is, removing the country code
and add a ‘0’ for local numbers).
Tap from the main menu screen.
1
Select [Call settings] > [Carrier
2
code]/[Area code]/[Country
code]/[Domestic code].
Enter a code of 4 digits at maximum, then
3
tap [OK] to conrm.
» The setting is saved.
First ring
If you have subscribed to the caller ID service
with your service provider, your phone can
cancel the rst ring before the caller ID is
displayed on the screen. After the phone is reset,
it can detect automatically if there is a caller
subscription and start to cancel the rst ring. You
can change this setting to suit your preference.
This feature only applies to models with rst
ring support.
Turn the rst ring on/off
Tap from the main menu screen.
1
Select [Call settings] > [First ring].
2
Select [On]/[Off].
3
» The setting is saved.
Note
To reset the rst ring status, go to the reset menu (see
•
‘Restore default settings’ on page 31).
Select the recall duration
Make sure that the recall time is set correctly
before you can answer a second call. In normal
case, the phone is already preset for the recall
duration. You can select among 3 options:
[Short], [Medium] and [Long]. The number of
available options varies with different countries.
For details, consult your service provider.
Tap from the main menu screen.
1
Select [Call settings] > [Recall time].
2
Select an option.
3
» The setting is saved.
32 EN
Auto clock
Note
This service is network dependent.
•
• Make sure you have subscribed to the caller ID service
before you use this feature.
It synchronizes the date and time on your phone
with the public switched telephone network
(PSTN) automatically. For the date to be
synchronized, make sure the current year is set.
Tap from the main menu screen.
1
Select [Call settings] > [Auto clock]
2
Select [On]/[Off].
3
» The setting is saved.
Page 35

Dial mode
Setup wizard
Note
This feature is country dependent and only applies to
•
models that support both tone and pulse dial.
Dial mode is the telephone signal used in your
country. The phone supports tone (DTMF) and
pulse (rotary) dial. Consult the service provider
for detailed information.
Tap from the main menu screen.
1
Select [Call settings] > [Dial mode].
2
Select an option, then tap [OK] to conrm.
3
» The setting is saved.
Line settings
You can select whether to use the landline or a
connected mobile phone as the default line for
outgoing calls.
Tap from the main menu screen.
1
Select [Call settings] > [Line settings].
2
Select a new setting.
3
» The setting is saved.
Tip
You can select from [Home]/[Manual] or one of
•
the mobile lines for an outgoing call. If a mobile line
is selected and it is busy, [Home] will be selected
automatically.
• An idle line means a phone line is not busy at the
moment.
This option leads you to [Eco mode], [ECO+
mode] and [Silent mode] settings.
Tap from the main menu screen.
1
Select [Setup wizard].
2
» The setup screens are displayed.
Tip
For information, see the chapters on ‘Settings’ and ‘Silent
•
mode’.
Set the date and time
Set the date and time
Tap from the main menu screen.
1
Select [Date & time] > [Set date] or [Set
2
time].
Set the date or time, then tap [OK] to
3
conrm.
» The setting is saved.
Set the date and time format
Tap from the main menu screen.
1
Select [Date & time] > [Date format] or
2
[Time format].
Select an option.
3
» The setting is saved.
English
Voice mail and info service number
You can set the voice mail and info service
number.
Tap from the main menu screen.
1
Select [Call settings] > [Voicemail]/[Info
2
service]
Enter the number, then tap [OK] to
3
conrm.
» The setting is saved.
Note
The date and time format setting is country dependent.
•
EN 33
Page 36

Phone software version
Unregister handsets
You can check the current software version of
your phone.
Tap from the main menu screen.
1
Select [Phone settings] > [Firmware
2
version].
» The software version is displayed.
Tip
To update your phone’s software, download the
•
[Philips Phone Manager] software for your computer
from www.philips.com/support.
Register additional handsets
You can register additional handsets to the base
station. The base station can register up to 5
handsets.
Tap from the main menu screen.
1
Select [Registration] > [Register].
2
Press and hold on the base station for
3
5 seconds.
Enter the system PIN/passcode. Tap
4
[Delete] to make corrections.
Tap [OK] to conrm the PIN/passcode.
5
» Registration is complete in less than 2
minutes. The base automatically assigns
a handset number to the handset.
If two handsets share the same base station, you
can unregister a handset with another handset.
Tap from the main menu screen.
1
Select [Registration] > [Unregister].
2
Enter the system PIN/passcode. Tap
3
[Delete] to make corrections.
Select the handset number to be
4
unregistered.
» The handset is unregistered.
Tip
The handset number is displayed beside the handset
•
name in standby mode.
Note
If the PIN/passcode is incorrect or no base is found
•
within a certain period, a notication message will be
displayed on your handset. Repeat the above procedure
if registration fails.
• The preset PIN/passcode is 0000. No change can be
made on it.
34 EN
Page 37

13 Sounds
Set your sound preferences
Set the handset’s ringtone
volume
You can select among 5 ringtone volume levels,
(
) (that is, the ringtone star ts soft and gets
louder over time if the call is not answered).
Tap from the main menu screen.
1
Select [Ring volume].
2
Select [Home] for the landline or one of
3
the mobile lines.
Press +/- on the left side of the handset
4
to select a volume level, then tap [OK] to
conrm.
» The setting is saved.
Note
The ringtone volume is off when you set it to the
•
lowest level.
Set the handset’s ringtone
You can set the sound in the earpiece or
handsfree mode among 5 different proles using
the [MySound Pro] application.
Tap from the main menu screen.
1
Select [MySound Pro].
2
Select a prole.
3
» The setting is saved.
Tip
You can also access [MySound Pro] directly from the
•
main menu screen (see ‘Set your sound preferences’
on page 36).
Set the key tone
Key tone is the sound made when you press a
key on the handset.
Tap from the main menu screen.
1
Select [Key tone], then tap on the switch
2
to turn it on/off.
» The setting is saved.
English
You can select from multiple ringtones.
Tap from the main menu screen.
1
Select [Ring Tone].
2
Select [Home] for the landline or one of
3
the mobile lines.
Select a ringtone.
4
» The setting is saved.
Note
You can assign ringtones to specic contacts to identify
•
them (see ‘Set the personalized ringtone’ on page 21).
Set the docking tone
The docking tone is the sound made when you
place the handset on the base station or charger.
Tab from the main menu screen.
1
Select [Docking tone], then then tap on
2
the switch to turn it on/off.
» The setting is saved.
EN 35
Page 38

14 Set your sound
preferences
You can set the sound in the earpiece or
handsfree mode among 5 different proles using
the [MySound Pro] application.
Tap from the main menu screen.
1
Select a prole.
2
» The setting is saved.
Set your sound preferences
during a call
Tap to access the options menu, then tap
to change the sound prole during a call.
36 EN
Page 39

15 Screen saver
You can select your favorite pictures to be
displayed as a screen saver in idle mode.
Tap from the main menu screen.
1
Select one or multiple pictures, then tap
2
[Set] to conrm.
Tap to enter the options menu.
3
Select an option from:
4
• [Transition time] to set the time
each picture is shown before the next
picture is displayed.
• [Preview] to preview the screensaver.
• [Screen saver] to activate/deactivate it.
Tap [Set] to conrm.
5
» The setting is saved.
English
EN 37
Page 40

16 Silent mode
You can set your phone to silent mode and
enable it for a specic duration when you do
not want to be disturbed. When the silent mode
is turned on, your phone does not ring or send
any alerts or sound.
Note
•
When you press to nd your handset, or when
you activate the alarm, your phone still sends aler t even
when the silent mode is activated.
Tap from the main menu screen.
1
Follow the on-screen instruction, tap on the
2
switch to activate [Status].
» Blue is displayed.
Then select an option from [Status]/[Start
3
time]/[End time]/[Repeat].
» The setting is saved.
Note
When the silent mode is on, but the current time does
•
not fall within the time for which silent mode has been
activated,
time during which silent mode is active.
is displayed. is displayed during the
Exclude contacts from silent
mode
You can set exception to specic contacts from
silent mode in the Contacts options menu (see
‘Silent mode exception’ on page 21).
38 EN
Page 41

17 Call barring
You can block outgoing calls to numbers, such as
overseas calls or undesirable hotlines by barring
calls that start with certain digits. You can create
4 sets of numbers with 4 digits at maximum for
each set of numbers. When you make a call that
starts with one of these 4 sets of numbers, the
outgoing call is then barred.
Activate/deactivate call
barring
Tap from main menu screen.
1
Enter the call barring PIN/passcode. The
2
default PIN/passcode is 0000.
From [Call barring], tap on the switch to
3
turn it on/off.
» The setting is saved.
Change the call barring PIN/
passcode
Add new numbers to the
barred list
Tap from the main menu screen.
1
Enter the call barring PIN/passcode. The
2
default PIN is 0000.
Activate [Call barring].
3
Tap [Enter number], then enter/edit the
4
number, then tap [OK] to conrm.
» The setting is saved.
Delete a barred number
Tap from main menu screen.
1
Enter the call barring PIN/passcode. The
2
default PIN/passcode is 0000.
Tap the barred number.
3
Tap [Delete] to delete the digits.
4
» The selected numbers are deleted.
English
Tap from main menu screen.
1
Enter the call barring PIN/passcode. The
2
default PIN/passcode is 0000.
Select [Change PIN].
3
Enter the new PIN/passcode, then tap
4
[OK] to conrm.
Enter the new PIN/passcode again, then tap
5
[OK].
» The setting is saved.
EN 39
Page 42

18 Calendar
By default the monthly view is displayed in the
calendar and the current date is highlighted. You
can create new, view and delete reminder events.
Create new reminder events
Tap from the main menu screen.
1
Tap +.
2
Select the date and time.
3
Select [Reminder title], enter the text.
4
Select [Reminder tone], select a tone.
5
Select [Recurrence], select an option.
6
» The reminder event is set.
Note
If the memory for events is full, an alert message is
•
displayed on the phone screen.
• When you switch off the phone, the alert is postponed
until you switch on the phone again.
• If you change the date and time of the phone, the next
alert is based on the modied date and time of the phone.
Delete a reminder event
Tap from the main menu screen.
1
Select a reminder event, then tap to
2
enter the options menu.
Select [Delete], then select one or multiple
3
events.
Tap [Delete] to conrm.
4
» The selected events are deleted.
Tip
If you select [Delete all], a conrmation request is
•
displayed. Tap [Yes] to delete all events.
• Birthdays and anniversaries are also displayed in the
calendar but the reminder tone is disabled by default.
40 EN
Page 43

19 Alarm clock
Edit an alarm
Your phone has a built-in alarm clock. Check the
information below to set your alarm clock.
Create an alarm
Tap from the main menu screen.
1
Tap , then +.
2
Follow the on-screen instructions to set the
3
alarm name, alarm time, recurrence options
and alarm tones.
» The alarm is set and
the screen.
Tip
You can create a maximum of 10 alarms.
•
is displayed on
Turn off an alarm
Before the alarm rings
Tap from the main menu screen.
1
Tap , then +.
2
Select an existing alarm.
3
Tap the button on the right side to
4
deactivate the alarm.
» The button becomes grey.
Tap from the main menu screen.
1
Tap .
2
» The existing alarms are displayed.
Tap to enter the options menu.
3
Select [Edit].
4
Select an existing alarm.
5
Follow the screen instructions to edit the
6
alarm name, alarm time, recurrence options
and alarm tones.
» The setting is saved.
Delete an alarm
Tap from the main menu screen.
1
Tap .
2
» The existing alarms are displayed.
Tap to enter the options menu.
3
Select [Delete], then select one or multiple
4
alarms to be removed.
» The selected alarm are deleted.
Note
If you select [Delete all], a conrmation request is
•
displayed. Tap [Yes] to delete all alarms.
English
When the alarm rings
• Tap [Close] to turn off the alarm.
• Tap [Snooze]to snooze.
» The alarm rings again after 5 minutes.
After you snooze it for 3 times, the
snooze function is off.
EN 41
Page 44

20 Family notes
You can leave your family a message on the
phone screen.
Tap from the main menu screen.
1
Tap + to create a note.
2
Enter the text, then tap [Done] to save the
3
message.
Tap to add the photo.
4
Tap [Post] to post the message.
5
• To edit, select a message, then edit the
text and/or change the photo.
• To delete/delete all the posted
messages, tap
all], then select messages to be
removed.
> [Delete]/[Delete
42 EN
Page 45

21 Technical data
General specication and features
• 3.5” capacitive touchscreen with 16 million
colors
• Talk time: 14 hours
• Standby time: 170 hours
• Charging time: 6 hours
• Range indoor: 50 meters
• Range outdoor: 300 meters
• Bluetooth range indoor: 12 meters
• Multiple contact lists with up to 3 numbers
per contact:
• Home/computer: 1000 contacts
• Mobile 1: 500 contacts
• Mobile 2: 500 contacts
• Call log with 100 entries
• Answering machine with up to 60 minutes
recording time
• Caller identication standard support: FSK,
DTMF
Connectivity
• Bluetooth
• Mobile Phone book download
• Receive and make calls through
connected mobile phones
• Bluetooth headset connection
• Micro USB (using free computer software)
• Upload contacts, ringtones, screensaver
and caller pictures from the computer
to handset
• Phone software updates (requires
Internet connection)
Battery
• Philips: Li-ion Polymer (1300 mAh). User
replaceable.
Power adapter
Base and charger
• Philips, S003PV0500060, input: 100-240V,
50-60Hz 0.2A, output: 5V 600mA
Power consumption
• Power consumption at standby mode:
around 0.75 W
Note
It only applies when the screen saver is turned off (see
•
‘Screen saver’ on page 37).
Weight and dimensions (S10 and S10A)
• Handset: 121 grams
• 131.6 x 61 x 16.5 mm (H x W x D)
• Base: 126.5 grams
• 40.65 x 108 x 121.7 mm (H x W x D)
• Charger: 94 grams
• 41.3 x 80.1 x 75.1 mm (H x W x D)
English
EN 43
Page 46

22 Notice
Declaration of conformity
Hereby, WOOX Innovations declares that
this product is in compliance with the
essential requirements and other relevant
provisions of Directive 1999/5/EC. You
can nd the Declaration of Conformity on
www.p4c.philips.com.
This product has been designed, tested and
manufactured according the European R&TTE
directive 1999/5/EC.
Use GAP standard compliance
The GAP standard guarantees that all DECT™
GAP handsets and base stations comply with
a minimum operating standard irrespective of
their make. The handset and base station are
GAP compliant, which means they guarantee
the minimum functions: register a handset,
take the line, make a call and receive a call. The
advanced features may not be available if you
use them with other makes. To register and use
this handset with a GAP compliant base station
of different make, rst follow the procedure
described in the manufacturer’s instructions,
then follow the procedure described in this
manual for registering a handset. To register a
handset from different make to the base station,
put the base station in registration mode, then
follow the procedure described in the handset
manufacturer’s instructions.
Your product is designed and manufactured with
high quality materials and components, which
can be recycled and reused.
When this crossed-out wheeled bin symbol
is attached to a product it means that the
product is covered by the European Directive
2002/96/EC. Please inform yourself about the
local separate collection system for electrical
and electronic products.
Please act according to your local rules and
do not dispose of your old products with your
normal household waste.
Correct disposal of your old product helps to
prevent potential negative consequences for the
environment and human health.
Your product contains a built-in rechargeable
battery covered by the European Directive
2006/66/EC, which cannot be disposed of with
normal household waste.
Please inform yourself about the local rules on
separate collection of batteries because correct
disposal helps to prevent negative consequences
for the environmental and human health.
44 EN
Page 47

Remove the integrated battery
If there is no collection/recycling system for
electronic products in your country, you can
protect the environment by removing and
recycling the battery before disposing the
phone.
1 2
When this logo is attached to a product, it
means a nancial contribution has been paid to
the associated national recovery and recycling
system.
English
Environmental information
All unnecessary packaging has been omitted.
We have tried to make the packaging easy to
separate into three materials: cardboard (box),
polystyrene foam (buffer) and polyethylene
(bags, protective foam sheet.)
Your system consists of materials which can
be recycled and reused if disassembled by
a specialized company. Please observe the
local regulations regarding the disposal of
packaging materials, exhausted batteries and old
equipment.
EN 45
Page 48

23 Trademarks
Bluetooth
The Bluetooth word mark and logos are owned
by the Bluetooth SIG, Inc. and any use of such
marks by WOOX Innovations Limited is under
license.
Google
Google and the Google Logo are registered
trademarks of Google Inc.
46 EN
Page 49

24 Frequently asked
questions
No signal bar is displayed on the screen.
• The handset is out of range. Move it closer
to the base station.
• If the handset displays [Register your
Handset], register your handset.
Tip
For further information, see ‘Register additional
•
handsets’ on the ‘Settings’ section.
My handset is in searching status, what do I do?
• Make sure that the base station has power
supply.
• Register the handset to the base station.
• Move the handset closer to the base
station.
I cannot pair S10/S10A with my mobile, or
synchronize the phonebook or call log.
• When the Bluetooth device list is full,
remove one of the mobile phone/computer
names before trying to pair again.
• If Philips S10 exists in your mobile phone,
remove it from your mobile phone and try
to pair again.
• Upgrade the operating system of your
mobile phone.
• Your phone could be incompatible. You can
nd a list of compatible mobile phones at
www.philips.com/support. However, this
just represents a small section of phones
compatible with the product.
I cannot switch between two calls on the
landline and mobile line.
While most Bluetooth-enabled mobile
phones are compatible with your phone, in
rare cases the Bluetooth connection might
get disconnected due to compatibility issues.
Check at www.philips.com/support for a list of
compatible phones.
How can I transfer pictures or ringtones to my
phone?
Download the free [Philips Phone Manager]
from www.philips.com/support and connect
your phone through a micro USB cable to your
computer.
My phone does not work and the handset
screen is off.
Place the handset on the base station/charging
cradle for a few minutes.
My phone is charged, but it still does not work.
Press and hold
Philips logo appears to reset the phone.
If I fail to pair (register) additional handsets to
the base station, what do I do?
Your base memor y is full. Unregister the unused
handsets and try again.
I have chosen a wrong language which I cannot
read, what do I do?
Press to go back to the standby screen.
1
Press the center key to access the main
2
menu screen.
Select > [Phone settings], then you see
3
one of the following texts appear on the
screen:
Language
Langue
Sprache
Lingua
Select it to access the language options.
4
Select your own language.
5
No dialing tone
• Check your phone connections.
• The handset is out of range. Move it closer
to the base station.
No docking tone
• The handset is not placed properly on the
base station/charger.
• The charging contacts are dir ty. Disconnect
the power supply rst and clean the
contacts with a damp cloth.
I cannot change the settings of my voice mail,
what do I do?
The voice mail service is managed by your
service provider but not the phone itself.
for 10-15 seconds until the
English
EN 47
Page 50

Contact your service provider to change the
settings.
The handset is docked, but does not charge.
• Make sure the battery is inserted correctly.
• Make sure the handset is placed properly
on the charger. The battery icon animates
when charging.
• Make sure the docking tone setting is
turned on. When the handset is placed
correctly on the charger, you can hear a
docking tone.
• The charging contacts are dir ty. Disconnect
the power supply rst and clean the
contacts with a damp cloth.
• Batteries are defective. Purchase new ones
with the same specications. You can order
replacement batteries through www.philips.
com or the Philips Service organization.
No display
• Make sure the battery is charged.
• Make sure there is power and the phone is
connected.
Bad audio (crackles, echo, etc.)
• The handset is nearly out of range. Move it
closer to the base station.
• The phone receives interference from the
nearby electrical appliances. Move the base
station away from them.
• The phone is at a location with thick walls.
Move the base away from them.
The handset does not ring.
Make sure the handset ringtone is turned on.
The caller ID does not display.
• The service is not activated. Check with
your service provider.
• The caller’s information is withheld or
unavailable.
The caller ID is not displayed.
The service is not activated. Check with your
service provider. The caller’s information is
withheld or unavailable.
Note
If the above solutions do not help, disconnect the
•
power supply from both the handset and base station.
Tr y again after 1 minute.
48 EN
Page 51

25 Index
A
additional handsets 34
adjust the volume 17, 35
alarm 41
announcements 26
answer a call 16
answering machine 26
answering machine language 27
area code 32
auto clock 32
B
base station
installation 6
overview 5
battery 7, 8, 43
Bluetooth 13
Bluetooth headset 13
F
family notes 42
favorites 22
nd handsets 5
rst ring 32
G
GAP 44
H
home screens 10
I
incoming message 27
L
language setting
answering machine 27
handset 7, 30
line settings 33
English
C
calendar 40
call barring 39
call log 24
caller ID 16, 24, 32
calling 16
carrier code 32
charging 8
contacts 20
country code 32
D
default settings 31
delete messages 28
dial mode 33
display icons 12
display settings 31
domestic code 32
E
ECO mode 30
ECO+ mode 30
M
missed calls 16, 24
mute 17
N
name the handset 31
P
personalized ringtone 21
PIN
answering machine 8, 29
Bluetooth 15
calling barring 39
power adapter 43
R
recall time 32
register/unregister
remote access to the answering machine 28
ring delay 28, 38
ringtone 35
34
EN 49
Page 52

S
safety 3
save a call record 24
screen saver 37
set the date and time 7
signal strength 9
silent mode 38
silent mode exception 21
software version 34
sounds
docking 35
keytone 35
sound preferences 35
speaker phone 17
standby mode 8
T
text entry 19
troubleshooting/FAQ 47
two calls/call on hold
18
50 EN
Page 53

IMPORTANT. Read the following Freescale
Software License Agreement (“Agreement”)
completely. By selecting the “I Accept” button
at the end of this page, you indicate that you
accept the terms of the Agreement referenced
below. You may then download the le. If
this is a “shrink wrap license,” by opening the
package and installing the software contained,
you indicate that you accept the terms of the
Agreement referenced below.
OPEN SOURCE LICENSE
You are about to download cer tain software
that is subject to various open source licenses
such as the Apache License, the BSD license,
the Free Software Foundation General Public
License and Lesser General Public License, the
Mozilla Public License and others. The particular
les are listed in a le in the distribution, which
will typically be called “package_manifest.
txt” (“Manifest”). In the case of a discrepancy
between the Manifest and the les in the
distribution, the les in the distribution will
supersede this list. The les that are subject
to open source licenses will have the licensing
details contained in those les. If you do not
accept the terms of any of those licenses, stop
using those les immediately.
FREESCALE SOFTWARE LICENSE
AGREEMENT
This is a legal agreement between you (either as
an individual or as
an authorized representative of your employer)
and Freescale Semiconductor, Inc. (“Freescale”).
It concerns your rights to use these les and any
accompanying written materials (the “Software”
and the “Codec Software” (as dened below).
Except where specically indicated in the
License Grant below, Software will include
Codec Software including third party software
as more fully described below and identied
on Attachment A; and software created or
licensed to Freescale. This Agreement does not
concern your use of any les that are subject
to an “open source” software license, such as
the Free Software Foundation “General Public
License,” or “GNU GPL.” In consideration for
Freescale allowing you to access the Software,
you are agreeing to be bound by the terms of
this Agreement. If you do not agree to all of the
terms of this Agreement, do not download the
Software. If you change your mind later, stop
using the Software and delete all copies of the
Software in your possession or control. Any
copies of the Software that you have already
distributed, where permitted, and do not destroy
will continue to be governed by this Agreement.
Your prior use will also continue to be governed
by this Agreement.
LICENSE GRANT. Exclusively in conjunction
with your development and sale of a product
containing an i.MX or STMP programmable
processing unit (e.g. a microprocessor,
microcontroller) supplied directly or indirectly
from Freescale (“Freescale System”), Freescale
grants to you, free of charge, the non-exclusive,
non-transferable right (1) to use the Software,
(2) to reproduce the Software, (3) distribute
the Software, (4) to sublicense to others
the right to use the distributed Software as
included within the Freescale System and, to
the extent the Software is provided in source
code form (human readable), (5) to prepare
derivative works of the Software, (6) to
distribute derivative works thereof only in object
(machine-readable) form as part of a Freescale
System, and (7) to sublicense to others the
right to use the distributed derivative works as
included within the Freescale System. Exclusively
in conjunction with your development and sale
of a product containing a Freescale System,
Freescale grants to you, free of charge, the
non-exclusive, non-transferable right to use the
Codec Software evaluation and demonstration
purposes only. Codec Software is software
designed for processing multimedia streams
(audio and video). You agree that you are
responsible for obtaining any necessary licenses
or permission for all Essential Patents for Codec
Software. “Essential Patent” means a patent to
the limited extent that infringement of such
patent cannot be avoided in remaining compliant
English
EN 51
Page 54

with the technology standards implicated by the
usage of any of the Codec Software, including
optional implementation of such standards, on
technical but not commercial grounds, taking
into account normal technical practice and
the state of the art generally available at the
time of standardization. You may not translate,
reverse engineer, decompile, or disassemble
the Software except to the extent applicable
law specically prohibits such restriction. You
will not assert against Freescale any intellectual
property right that you create in preparation
of any derivative works of the Software. If
you violate any of the terms or restrictions of
this Agreement, Freescale may immediately
terminate this Agreement, and require that you
stop using and delete all copies of the Software
in your possession or control.
COPYRIGHT. The Software is licensed to you,
not sold. Freescale or its licensor owns the
Software, and United States copyright laws
and international treaty provisions protect
the Software. Therefore, you must treat the
Software like any other copyrighted material
(e.g. a book or musical recording). You may not
use or copy the Software for any other purpose
than what is described in this Agreement. Except
as expressly provided herein, Freescale does not
grant to you any express or implied rights under
any Freescale or third party patents, copyrights,
trademarks, or trade secrets. Additionally, you
must reproduce and apply any copyright or
other proprietary rights notices included on
or embedded in the Software to any copies or
derivative works made thereof, in whole or in
part, if any.
SUPPORT. Freescale is NOT obligated to
provide any support, upgrades or new releases
of the Software. If you wish, you may contact
Freescale and report problems and provide
suggestions regarding the Software. Freescale
has no obligation whatsoever to respond in any
way to such a problem report or suggestion.
Freescale may make changes to the Software
at any time, without any obligation to notify or
provide updated versions of the Software to
you.
EXCLUDED LICENSES. You will not take or
fail to take any action that could subject the
Software to an Excluded License. An Excluded
License means any license that requires as a
condition of use, modication and/or distribution
of software subject to the Excluded License,
that such software or other software combined
and/or distributed with such software be (A)
disclosed or distributed in source code form; (B)
licensed for the purpose of making derivative
works; or (C) redistributable at no charge.
FEEDBACK. You grant to Freescale a nonexclusive, non-transferable, irrevocable,
perpetual, worldwide, royalty-free, sub-licensable
license under your Intellectual Property Rights
to use without restriction and for any purpose
any suggestion, comment or other feedback
related to the Licensed Software (including, but
not limited to, error corrections and bug xes).
NO WARRANTY. TO THE MAXIMUM
EXTENT PERMITTED BY LAW, FREESCALE
EXPRESSLY DISCLAIMS ANY WARRANTY
FOR THE SOFTWARE. THE SOFTWARE IS
PROVIDED “AS IS”, WITHOUT WARRANTY
OF ANY KIND, EITHER EXPRESS OR
IMPLIED, INCLUDING, WITHOUT
LIMITATION, THE IMPLIED WARRANTIES
OF MERCHANTABILITY, FITNESS FOR
A PARTICULAR PURPOSE, OR NONINFRINGEMENT. YOU ASSUME THE ENTIRE
RISK ARISING OUT OF THE USE OR
PERFORMANCE OF THE SOFTWARE, OR
ANY SYSTEMS YOU DESIGN USING THE
SOFTWARE (IF ANY). NOTHING IN THIS
AGREEMENT MAY BE CONSTRUED AS A
WARRANTY OR REPRESENTATION BY
FREESCALE THAT THE SOFTWARE OR ANY
DERIVATIVE WORK DEVELOPED WITH OR
INCORPORATING THE SOFTWARE WILL
BE FREE FROM INFRINGEMENT OF THE
INTELLECTUAL PROPERTY RIGHTS OF
THIRD PARTIES.
52 EN
Page 55

INDEMNITY. You agree to fully defend and
indemnify Freescale from any and all claims,
liabilities, and costs (including reasonable
attorney’s fees) related to (1) your use (including
your sublicensee’s use, if permitted) of the
Software or (2) your violation of the terms and
conditions of this Agreement.
LIMITATION OF LIABILITY. IN NO EVENT
WILL FREESCALE BE LIABLE, WHETHER IN
CONTRACT, TORT, OR OTHERWISE, FOR
ANY INCIDENTAL, SPECIAL, INDIRECT,
CONSEQUENTIAL OR PUNITIVE DAMAGES,
INCLUDING, BUT NOT LIMITED TO,
DAMAGES FOR ANY LOSS OF USE, LOSS
OF TIME, INCONVENIENCE, COMMERCIAL
LOSS, OR LOST PROFITS, SAVINGS, OR
REVENUES TO THE FULL EXTENT SUCH
MAY BE DISCLAIMED BY LAW. FREESCALE’S
TOTAL LIABILITY FOR ANY AND ALL
COSTS, DAMAGES, CLAIMS, OR LOSSES
WHATSOEVER ARISING OUT OF OR IN
CONNECTION WITH THIS AGREEMENT
OR PRODUCT(S) SUPPLIED UNDER
THIS AGREEMENT IS LIMITED TO THE
AGGREGATE AMOUNT PAID BY LICENSEE
TO FREESCALE IN CONNECTION WITH THE
LICENSED SOFTWARE TO WHICH LOSSES
OR DAMAGES ARE CLAIMED.
COMPLIANCE WITH LAWS; EXPORT
RESTRICTIONS. You must use the Software
in accordance with all applicable export laws,
regulations and statutes. You agree that neither
you nor your licensees (if any) intend to or
will, directly or indirectly, expor t or transmit
the Software to any country in violation of. any
export restrictions.
GOVERNMENT USE. Use of the Software
and any corresponding documentation, if any,
is provided with RESTRICTED RIGHTS. Use,
duplication or disclosure by the Government
is subject to restrictions as set forth in
subparagraph (c)(1)(ii) of The Rights in Technical
Data and Computer Software clause at DFARS
252.227-7013 or subparagraphs (c)(l) and (2) of
the Commercial Computer Software--Restricted
Rights at 48 CFR 52.227-19, as applicable.
Manufacturer is Freescale Semiconductor, Inc.,
6501 William Cannon Drive West, Austin, TX,
78735.
HIGH RISK ACTIVITIES. You acknowledge that
the Software is not fault tolerant and is not
designed, manufactured or intended by Freescale
for incorporation into products intended for
use or resale in on-line control equipment
in hazardous, dangerous to life or potentially
life-threatening environments requiring fail-safe
performance, such as in the operation of nuclear
facilities, aircraft navigation or communication
systems, air trafc control, direct life support
machines or weapons systems, in which the
failure of products could lead directly to
death, personal injury or severe physical or
environmental damage (“High Risk Activities”).
You specically represent and warrant that you
will not use the Software or any derivative work
of the Software for High Risk Activities.
CHOICE OF LAW; VENUE; LIMITATIONS. You
agree that the statutes and laws of the United
States and the State of Texas, USA, without
regard to conicts of laws principles, will apply
to all matters relating to this Agreement or the
Software, and you agree that any litigation will
be subject to the exclusive jurisdiction of the
state or federal courts in Texas, USA.
PRODUCT LABELING. You are not authorized
to use any Freescale trademarks, brand names,
or logos.
ENTIRE AGREEMENT. This Agreement
constitutes the entire agreement between you
and Freescale regarding the subject matter
of this Agreement, and supersedes all prior
communications, negotiations, understandings,
agreements or representations, either written
or oral, if any. This Agreement may only be
amended in written form, executed by you and
Freescale.
SEVERABILITY. If any provision of this
Agreement is held for any reason to be invalid
English
EN 53
Page 56

or unenforceable, then the remaining provisions
of this Agreement will be unimpaired and, unless
a modication or replacement of the invalid
or unenforceable provision is further held to
deprive you or Freescale of a material benet,
in which case the Agreement will immediately
terminate, the invalid or unenforceable provision
will be replaced with a provision that is valid
and enforceable and that comes closest to the
intention underlying the invalid or unenforceable
provision.
NO WAIVER. The waiver by Freescale of any
breach of any provision of this Agreement will
not operate or be construed as a waiver of any
other or a subsequent breach of the same or a
different provision.
ATTACHMENT A:
SanDisk Corporation Software
The Board Support Package includes software
developed by SanDisk Corporation (“SanDisk”).
You must separately obtain the rights to
reproduce and distribute this software in source
code form from SanDisk. Please follow these
easy steps to obtain the license and software:
1. Contact your local SanDisk sales
representative to obtain the SanDisk License
Agreement.
2. Sign the license agreement. Fax the signed
agreement to SanDisk USA marketing
department at 408-542-0403. The license will
be valid when fully executed by SanDisk.
3. If you have specic questions, please send an
email to sales@sandisk.com You may only use
the SanDisk Corporation Software on products
compatible with a SanDisk Secure Digital Card.
You may not use the SanDisk Corporation
Software on any memory device product.
SanDisk retains all rights to any modications or
derivative works to the SanDisk Corporation
Software that you may create.
Global Locate
The Board Support Package includes software
and hardware developed by Global Locate, Inc.
(“Global Locate”) and acquired by Broadcom
Corporation. You must separately obtain
rights beyond evaluation and demonstration in
connection with the Board Support Package
from Broadcom Corporation.
CSR
The Board Support Package includes software
and hardware developed by Cambridge Silicon
Radio, Inc. (“CSR”). You must separately obtain
rights beyond evaluation and demonstration in
connection with the Board Support Package
from CSR.
CTS
The Board Support Package includes
software or technology developed by Coding
Technologies, AB (“CTS”). You only have the
right to use the CTS software in connection
with the Freescale System.
54 EN
Page 57

Page 58

2013 © WOOX Innovations Limited. All rights reserved.
Philips and the Philips’ Shield Emblem are registered
trademarks of Koninklijke Philips N.V. and are used by WOOX
Innovations Limited under license from Koninklijke Philips N.V.
UM_S10/S10A_05_EN_V3.0
WK13405
0168
 Loading...