

Page 1
~ MAINS
RS232
DVI-D
Y/C S-VHS
G/Y/Y
CVBS B/Pb/Cb
R/Pr/Cr V
H
VGA 1
VGA 2
RC-OUT
VIDEO 3
(AV3)
VIDEO 2
(AV2)
VIDEO 1
(AV1)
Page 2

Your International Philips First Choice Warranty
English - GB
Just a phone call away
Philips’ customer help desks are located worldwide.You can contact Philips Monday – Friday from
08.00 – 20.00 hrs Central European Time (CET) and on Saturdays and Sundays from 10.00 to 18.00
hrs CET.
Deutsch - DE-CH-BE
Nur einen Anruf entfernt
Philips verfügt über Hilfstellen für den Kunden in der ganzen Welt. Sie können Philips anrufen
Montags bis Freitags von 8 Uhr bis 20 Uhr zentraleuropäischer Zeit (CET) und Sonnabends und
Sontags zwischen 10 Uhr und 18 Uhr (CET).
Français - FR-BE-CH-LU
Juste un coup de telephone
Les services de consommateurs Philips sont situés partout dans le monde.Vous pouvez contacter
Philips, du lundi au vendredi de 8 heures à 20 heures et le samedi et le dimanche de 10 heures à 18
heures en utilisant les numéros vert ci-dessous.
Nederlands - BE-NL
Een telefoontje is voldoende
De Philips service desk is bereikbaar van over de gehele wereld. U kunt contact opnemen met Philips
van maandag t/m vrijdag van 8.00 – 20.00 u (Mid-europese tijd) en op zaterdag en zondag van 10.00
tot 18.00 uur door een van de onderstaande telefoonnummers te bellen.
Italiano - IT-CH
Basta una telefonata
I centri di assistenza clienti della Philips sono dislocati in tutto il mundo. E possibile chiamare uno dei
numeri verdi dal lunedi a venerdi, dalla 8:00 alle 20:00, orario centrale europeo (CET).
Español - ES
Con solo una llamada
Existen oficinas de atención al cliente de Philips en todo el mondo. Puedes ponerte en contacto con
Philips de lunes a viernes, de 08.00 a 20.00 horas y los sábados y domingos de 10.00 a 18.00.
Português - PT
Basta um único telefonerna
A Philips tem balcoes de assistencia aos cleintes em todo o mondo. Pode contactar com a Philips de
segunda a sexta-feira, entre as 08.00 e as 20.00 hrs hora da Europa Central (CET) e aos sábados e
domingos, entre as 10.00 e as 18.00 hrs CET.
Page 3

Dansk - DK
Philips’ kundeservice er fordelt over hele verden.
Philips kan kontaktes Mandag – Fredag fra 08.00 – 20.00 centraleuropæsk tid (CET) samt lørdag og
søndag fra 10.00 – 18.00 CET.
Norsk - NO
Ikke lenger unna enn en rask telefon
Philips’ kundestøttejenester finner du over hele verden. Du kan ta kontakt med Philips fra mandag til
fredag kl.9-21 og på lørdag og søndag kl.11-19.
Svenska - SE
Bara ett telefonsamtal borta
Philips kundservice finns i hela världen. Du kan kontakta Philips måndag-fredag från 08.00 – 20.00
Central Eurpeisk Tid (CET) och på lördagar och söndagar från 10.00 till 18.00 CET.
Suomi - FI
Philipsin asiakaspalvelupisteitä löytyy joka puolelta maaiimaa.
Voit ottaa yhteyttä Philipsiin maanantalsta perjantaihin klo 8.00 – 20.00 Keski-Euroopan (CET) sekä
lauantaisin ja sunnuntaisin klo 10.00 – 18.00 Keski-Euroopan (CET).
Greek - GR
To γραφείo βoηθείας της Philips (Philips Helpdesk) είναι διεθνές.
Mπoρείτε να επικoινωνήσετε απ ∆ευτέρα έως και Παρασκευή απ τις 08:00 - 20:00 ώρα
κεντρικής Eυρώπης (C.E.T.) καθώς και τo Σαββατoκύριακo απ τις 10:00 - 18:00 C.E.T.
Austria 01 546 575 603
Belgium 02 275 0701
France 03 8717 0033
Germany 0696 698 4712
Ireland 01 601 1161
Italy 02 48 27 11 53
Luxembourg 408 443 5501
The Netherlands 053 482 9800
Spain 09 17 45 62 46
Sweden 08 632 0016
Switzerland 02 23 10 21 16
United Kingdom 0207 949 0069
Website: http://www.philips.com/pcstuff
Page 4
Unpacking and wall mounting instructions
For the unpacking instructions follow the
illustrated steps printed on the packaging
(outside and inside). For the wall mounting
instructions follow the illustrated steps
‘
to § printed on the separate template.
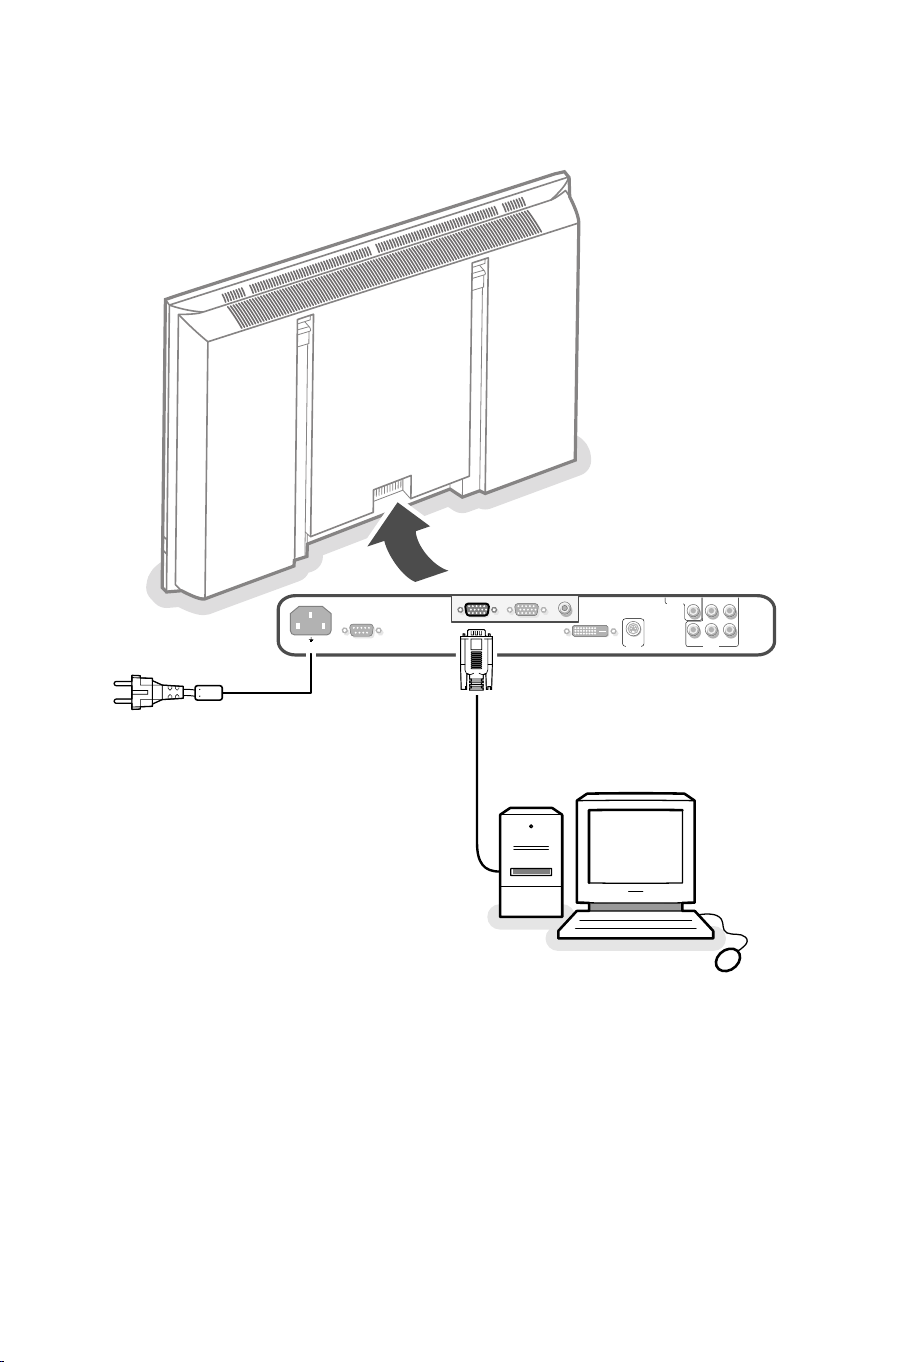
Connect your computer
Directly to the monitor
& Connect one end of a VGA cable to the video
card of the computer and the other end to
the VGA 1 connector at the rear side of the
monitor. Fix the connectors firmly with the
screws on the plug.
é In case of a multimedia computer, connect the
audio cable to the audio outputs of your
multimedia computer and to the audio inputs
of your external amplifier.
VGA 2:The video connector for VGA 2 can be
programmed to become an input or an output via
the Setup menu, see p. 6.The function of being
input or output is determined by the used mode. If
the monitor is used in video mode, the VGA 2
connector is VGA output. If the monitor is used in
monitor mode, the connector is VGA input or
output.
RC OUT
VGA 2
VGA 1
~ MAINS
RS232
Make sure that the wall mount is being fixed
securely enough so that it meets safety
standards.The weight of the monitor (excl.
packaging) is about 35 kg.
Note: Stands are optional accessories. Consult
your dealer.
To an electronic receiver box
See the handbook of the receiver box.
& Connect one end of a VGA cable to the
video card of the computer and the other
end to the
PC/MAC IN connector at the rear
side of the receiver box. Fix the connectors
firmly with the screws on the plug.
é In case of a Multimedia computer, connect
the audio cable to the audio outputs of your
Multimedia computer and to the
R and L inputs of the receiver box. For sound
AUDIO IN
reproduction, connect your external amplifier
to the receiver box.
Note: Only use the VGA cable supplied with the
monitor.
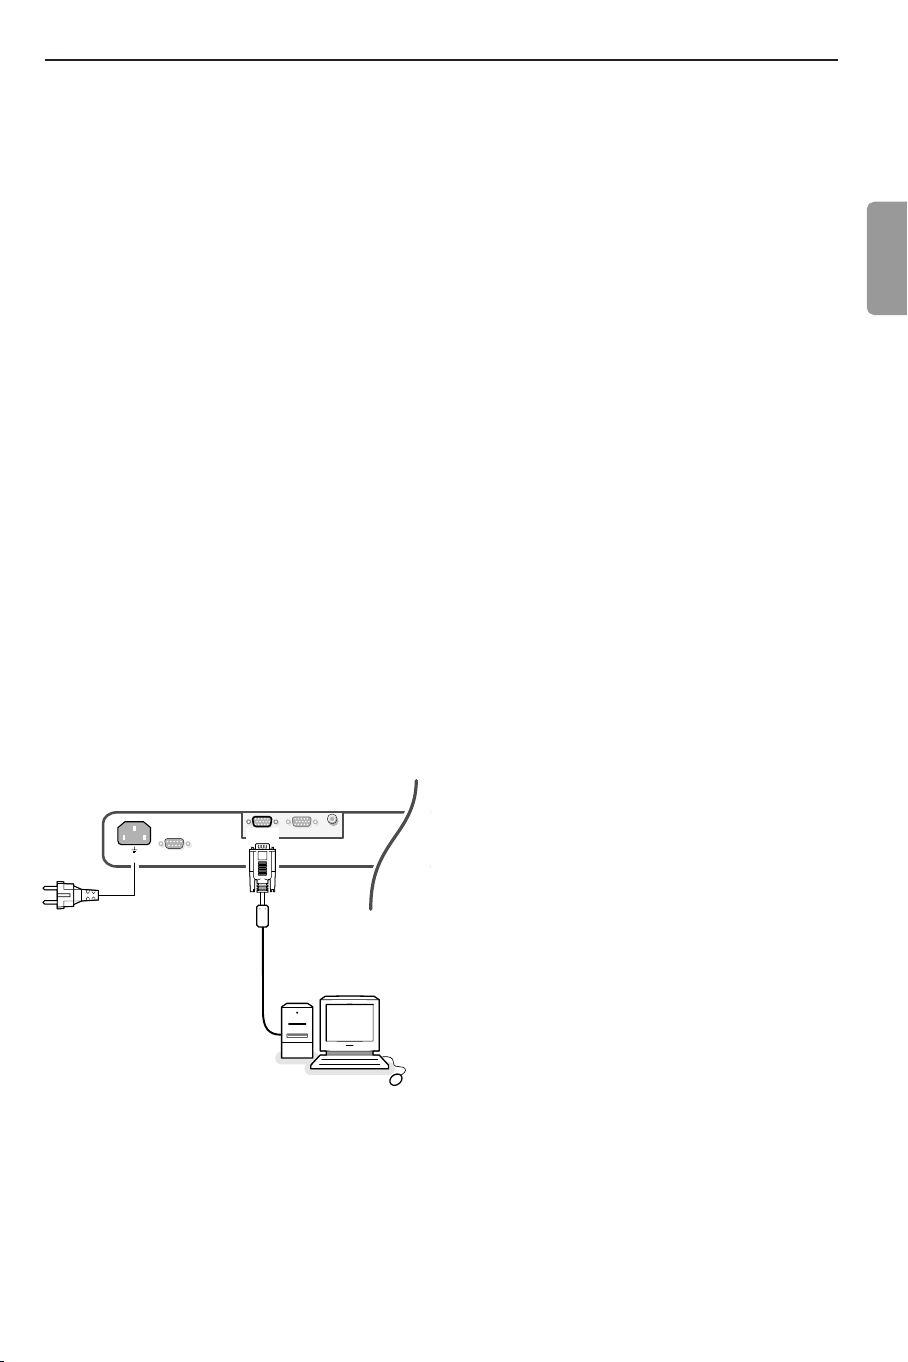
Daisy chaining
The Loop Through facility makes it possible
to make a daisy chain with a second monitor.
Connect one end of another VGA cable to
VGA 2 connector at the rear side of the
the
monitor and the other end to the VGA 1
connector of a second monitor.
English
Note:The RC out jack next to the VGA 2
connector makes it possible to daisy chain remote
control signals to other equipment.This output
cannot be used to daisy chain a second monitor.
1
Page 5

Computer Display modes
VGA 640x480 60, 72, 75, 85 Hz
Wide VGA 848x480 60 Hz
Wide VGA 852x480 60 Hz
MAC 640x480 66.67 Hz
MAC 832x624 74.55 Hz
MAC 1024x768 74.93 Hz
MAC 1152x870 75 Hz
SVGA 800x600 56, 60, 72, 75, 85 Hz
XGA 1024x768 60, 70, 75, 85 Hz
SXGA 1280x1024 60,
72 Hz (not with
DVI-D-source)
Operation
& Insert the mains plug supplied into the
mains inlet at the back of the monitor and in
the wall socket. Please, only use the supplied
rim-earthed mains cord which has to be
inserted in a grounded socket.
é Remote control: remove the cover of the
battery compartment.
Insert the 2 batteries supplied (Type LR6/AA-
1.5V).
When a VGA computer is connected, the
display selection is made automatically.
A message is displayed when the monitor does
not support the connected VGA mode.
Switch your computer to a correct display
mode.
‘ Switch the monitor on :Press the power
button B at the right side of the monitor.
A green indicator lights up and the screen
comes on.
R6 / AA
The batteries supplied do not contain the heavy
metals mercury and cadmium. Nevertheless in
many countries batteries may not be disposed of
with your household waste. Please check on how to
dispose of batteries according to local regulations.
“ Make sure that your receiver box and/or PC
are switched on and that your PC is in the
correct display mode.
22
B
When the monitor does not receive a
supported VGA signal and is not connected to
a receiver box the screen switches to standby
and the red indicator lights up.
When you switch on your monitor for the first
time, and the monitor is not connected to a
receiver box, the menu language automatically
appears on the screen.The explanation appears
in different languages one at a time.
Follow the instructions on screen to select the
correct language or see Setup menu, Language,
p. 6.
Page 6

POWER
BRIGHTNESS
CONTRAST
ZOOM OUTZOOM INZOOM ON/OFF
VGA AV1 AV2 AV3
MUTE
AV MUTE
q
1
2
3
4
5
6
7
8
9
0
V
CH/PR
MENU
OK
¬
B
Use of the remote control
VGA
press repeatedly to select
your computer connected to
the
VGA 1 or 2 connector or
to the
DVI-D connector.
AV1,AV2,AV3
press to select the peripherals
connected to the connector
indicated on the monitor.
BRIGHTNESS +/-
to adjust the brightness level
of the picture
CONTRAST +/-
to adjust the contrast level of
the picture
ZOOM ON/OFF
to activate/de-activate the
zoom function.
See p. 5.
ZOOM IN/OUT
to adjust the zoom factor and
to change the magnification of
the picture when zoom is
activated. See
p. 5.
B to switch to standby or
on again
MENU to switch the menu
on/off
cursor buttons to select your
choice and to alter a selected
adjustment.
OK to activate your choice
V no function (except when in
combination with a receiver box
and a Home Cinema audio
receiver)
¬ no function (except when in
combination with a receiver box
and a Home Cinema audio receiver)
CH/PR Program selection
To browse through the sources
selected.
AV MUTE to mute the picture
or restore it (if the monitor is
used in monitor mode).
When activated a green
indicator starts blinking in front
of the monitor.
q Picture format
See Picture 2 menu, p. 5.
Press the q key to switch
between the different picture
formats.
On screen information
When the monitor is used in the monitor mode, information about the active source
AV1,AV2,AV3,VGA1,VGA2 or DVI-D) and the supported video,VGA or HD-format of
(
the selected source is displayed on the screen together with the selected picture format
and icons informing about AV mute.
33
Page 7

Use of the menus and the menu system
12
Pict. a Pict. a Setup º
Brightness
Contrast
(Colour)
Colour temp.
(Tint)
Sharpness
G
H
C
@
è
à
SD video-mode
Pict. a
1
Brightness
Contrast
Colour
Colour temp.
(Tint)
Sharpness
G
H
C
@
è
à
VGA-mode + HD video mode
1
Pict. a
Brightness
Contrast
Colour temp.
Sharpness
G
H
@
à
& Press the MENU key on the remote control to
summon the different menu headers.
é Press the cursor left/right to move the cursor
horizontally through the menu headers.
“ Press the cursor down to access the menu.
In case of a slider, move the cursor left/right to
adjust.
In case of a list with options, move the cursor right
to enter and use the cursor up/down to select an
option.
Press the cursor left to leave the options list.
‘ Press the
MENU key again to switch off the menu.
Note: Sometimes not all the menu items are visible on
the screen.
Press the cursor down until all the items are displayed.
Only when the US English language has been selected
(see Setup menu,
Language, p. 6), the menu items will be displayed with
additional icons.
Operation
Press the MENU key on the remote control to
sun the main menu.
Picture 1 menu
Brightness
This control allows you to adjust the brightness
level of the picture.
Contrast
This control allows you to adjust the contrast level
of the picture.
Colour (only available when the source is AV1, AV2
or AV3 YCbCr)
This control allows you to adjust the saturation
level of the colours to suit your personal
preference.
Colour temperature
This control allows you to select the Colour
temperature of the picture.
Move the cursor up/down to make a selection.
Press the cursor left to return to the Picture 1
menu.
Tint (only with NTSC signals and when the source is
AV1 or AV2)
This control allows you to compensate for the
Colour variations in NTSC encoded transmissions.
Sharpness
This control allows you to adjust the edge
definition of a picture.
4
Page 8

SD video-mode
2
Pict. a
Format
q
4:3
Movie expand 16:9
Wide screen
Zoom
Z
Zoom factor
Â
VGA-mode + HD video mode
2
Pict. a
(Format)
Zoom factor
(Shift)
(Clock frequency)
(Phase)
(Auto align)
4:3 VGA-mode
4:3
Zoom
q
4:3
Wide screen
Z
Â
‹
S
fi
X
SD video-mode
4:3
Picture 2 menu
Format (only available in 4:3 VGA mode and SD
video mode)
Select Format to summon a list of available
display formats.
Press the cursor up/down to select another
display format: 4:3, Movie Expand 16:9 or Wide
screen.
Note: Movie Expand 16:9 is not available in VGA
mode.
Zoom
Select Zoom On to activate the zoom function.
You may also activate the zoom function with the
ZOOM ON/OFF key on the remote control.
If no zoom is active, press the cursor left/right,
up/down to select which part of the screen will be
zoomed.
Zoom factor
Select Zoom factor and press the cursor
left/right to adjust the zoom factor and to change
the magnification of the picture.
If zoom is not active changing the magnification
factor will have no effect on the displayed picture.
Shift (only available in VGA mode on VGA 1 or VGA
2 and in one of the HD modes. See Connect
Peripheral equipment, p. 7.)
This control allows you, when necessary, to move
the picture in a horizontal or vertical way.
& Use the cursor left/right, up/down to adjust.
é Press the OK key when done.
Wide screen
Movie expand 16:9
Wide screen
Clock frequency (only available in VGA mode on
VGA 1 or VGA 2. See Connect Peripheral equipment, p. 7.)
This control allows you, when necessary, to adjust
the values of the clock frequency so that
especially text can be displayed with an optimal
overall sharpness.
Use the cursor left/right to adjust.
Phase (only available in VGA mode on VGA 1 or
VGA 2. See Connect Peripheral equipment, p. 7.)
This control allows you, when necessary, to adjust
the pixel phase of the picture to avoid picture
interference.
Use the cursor left/right to adjust.
Auto align (only available in VGA mode on VGA1 or
VGA2 and in one of the HD modes. See Connect
Peripheral Equipment, p. 7.)
This control allows you to automatically adjust the
shift, the clock frequency and the phase in VGA
mode and the shift in HD modes.
Press OK to execute.
5
Page 9

Setup º
Language‡US English
Power savings
AV3
VGA2
)
English
(
Nederlands
§
Deutsch
Français
Español
Setup menu
Language
& Use the cursor down to select Language.
é Press the cursor right to enter the list of selectable
languages.
“ Use the cursor up/down to scroll through the list and to
bring up other languages which are not displayed on the
screen at present.
Note: Only with the US English language, the menu items will
be displayed with additional icons.
Power savings
This control allows you to overrule the automatic power
savings feature.
In case Power savings is switched Off, the power
always remains on until the monitor is forced to standby.
& Use the cursor down to select Power savings.
é Press the cursor left/right to select On or Off.
AV3
This control allows you to set the
RGB,YCbCr or HD-YPbPr.When having selected Auto,
the monitor makes the selection automatically between
YCbCr, HD-YPbPr or HD-RGB.
See also p. 7, Equipment with Component Video Output
connectors.
& Use the cursor down to select
é Press the cursor right to enter the list with options.
“ Press the cursor up/down to select one of the options.
AV3 input to HD-
AV3 .
VGA 2
This control allows you to select whether to set the
VGA 2 connector as input, output or even HD-input.
& Use the cursor down to select
VGA 2.
é Press the cursor right to enter the list with options:
VGA IN,VGA OUT or HD IN.
“ Press the cursor up/down to select one of the options.
Note: AV3 and VGA 2 will not be available in VGA loop
through mode, i.e. when a receiver box is connected to the
monitor and a VGA source is selected.
6
Page 10

Connect peripheral equipment
You may connect 3 possible VGA sources (VGA 1, VGA 2 or DVI-D)
and 3 possible video sources (VIDEO 1 (AV1), VIDEO 2 (AV2) and
VIDEO 3 (AV3)) to the monitor.
The following diagrams show you where you can connect your
peripheral equipment.
Note: in case the monitor is operating in combination with a receiver box, the
VGA and video inputs on the monitor will be disabled and the VGA 2
connector becomes an output.
Equipment with Y/C-SVHS output connectors
MAINS INLET
RC OUT
VGA 1 VGA 2
RS232
H
CVBS B/Pb/Cb
VIDEO 1
(AV1)
Y/C S-VHS
G/Y/Y
R/Pr/Cr V
VIDEO 2
VIDEO 3
DVI-d
(AV2)
(AV3)
~ MAINS
Connect the video cable to the
Equipment with CVBS output connectors
~ MAINS
H
CVBS B/Pb/Cb
VIDEO 1
Y/C S-VHS
VIDEO 2
(AV2)
VIDEO 2
(AV2)
(AV1)
G/Y/Y
R/Pr/Cr V
VIDEO 3
(AV3)
VGA 1 VGA 2
RS232
RC-OUT
DVI-D
Y/C S-VHS VIDEO 2 (AV2) connector.
VIDEO 1
(AV1)
H
CVBS B/Pb/Cb
VIDEO 1
Y/C S-VHS
(AV1)
G/Y/Y
R/Pr/Cr V
VIDEO 2
(AV2)
VIDEO 3
(AV3)
VGA 1 VGA 2
RS232
RC-OUT
DVI-D
Connect the video cable to the
CVBS VIDEO 1 (AV1) connector.
Equipment with Component Video Output connectors
H
CVBS B/Pb/Cb
VIDEO 1
Y/C S-VHS
(AV1)
G/Y/Y
R/Pr/Cr V
VIDEO 2
(AV2)
VIDEO 3
(AV3)
VIDEO 3
(AV3)
VGA 1 VGA 2
RS232
~ MAINS
RC-OUT
DVI-D
Note:VIDEO 3 (AV3) can handle the following video signals:YCbCr, HD-PbPr
and HD-RGB.The discrimination between the various input formats and the
appropriate video processing is done automatically. It is however possible to
overrule the automatic detection. See Setup menu, p. 6.
& Connect the video cables of your equipment with YPbPr output with
composite sync on Y, or of your equipment with YCbCr output with
composite sync on Y to the YPbPr, resp.YCbCr input
IN sockets of the monitor.
VIDEO 3 (AV3)
é Connect the video cables of your equipment with RGB output with
separate Horizontal and Vertical sync to the RGB input sockets and to
the H and V sockets
VIDEO 3 (AV3) of the monitor.
Note: when High Definition signals are inputted to the monitor via the
YPbPr/RGB input, the monitor switches to the HD Video Mode.
The following HD and ED video modes are supported by the monitor on the
YPbPr, RGB and VGA 2 HD input:
1920x1080/60I 720x480/60P
1280x720/60P 720x576/50P
The following SD video modes are supported by the monitor on the YCbCr
input:
720x480/60I
720x576/50I
7
Page 11

High Definition equipment with VGA connector
VGA 2
VGA 1 VGA 2
RS232
~ MAINS
RC-OUT
DVI-D
Y/C S-VHS
VIDEO 2
VIDEO 1
(AV2)
H
CVBS B/Pb/Cb
(AV1)
G/Y/Y
R/Pr/Cr V
VIDEO 3
(AV3)
Connect the VGA output of your equipment to the VGA2 connector.
Digital DVI output of your PC (DVI-D)
H
CVBS B/Pb/Cb
VIDEO 1
Y/C S-VHS
VIDEO 2
(AV1)
G/Y/Y
R/Pr/Cr V
VIDEO 3
(AV2)
(AV3)
VGA 1 VGA 2
RS232
~ MAINS
RC-OUT
DVI-D
DVI-D
Connect the Digital DVI output of your PC to the DVI-D connector.
RC out connector
RC-OUT
VGA 1 VGA 2
RS232
~ MAINS
RC-OUT
DVI-D
Y/C S-VHS
VIDEO 2
VIDEO 1
(AV2)
H
CVBS B/Pb/Cb
(AV1)
G/Y/Y
R/Pr/Cr V
VIDEO 3
(AV3)
This connector allows you to daisy chain remote control signals to
other equipment (e.g.AV receiver, IR repeater) which have an electrical
RC in.
Note: it is not possible to daisy chain a second monitor.
Serial I/O port RS232
H
CVBS B/Pb/Cb
VIDEO 1
Y/C S-VHS
VIDEO 2
(AV1)
G/Y/Y
R/Pr/Cr V
VIDEO 3
(AV2)
(AV3)
VGA 1 VGA 2
RS232
~ MAINS
RS 232
RC-OUT
DVI-D
The RS232 connector is only to be used with the monitor as stand
alone.
This connector allows you to control the monitor via your PC (as a
replacement of the remote control).
Note:This connector can also be used for dealer service tools.
8
Page 12

Tips
Ambient temperature
Do not hang up the monitor
above a central heating or other
heating sources.
Care of the screen
Clean the anti-reflex coated flat
glass screen with a slightly damp
soft cloth. Do not use abrasives
solvents as it can damage the
glass surface of the screen.
Plasma Display
characteristics
Caution:A video source (such
as a video game, DVD, or video
information channel) which
shows a constant non-moving
pattern on the monitor screen,
can cause damage to the screen.
When your Flat-Monitor is
continuously used with such a
source, the pattern of the nonmoving portion of the game
(DVD, etc.) could leave an image
permanently on the screen.
When not in use, turn the video
source OFF.
Regularly alternate the use of
such video sources with normal
viewing.
When switching over to another
picture after having displayed the
same still picture for a long time
(many hours), it may happen that
some parts from the previous
picture will remain on screen
due to a kind of memory effect.
This ghost picture will disappear
after some time.To avoid this
effect change the pictures
regularly or for PC use you can
turn on a screen saver in your
computer.
Philips has built in an automatic
shift of the picture in video
mode every 5 minutes to avoid
this effect and to prolong the life
of the screen.
Very incidentally and after a
longer period of unuse (approx.
1 year) the screen may display
some strange colour
deficiencies.This is quite normal
for plasma displays and these
effects will disappear after the
set has been turned on for some
time.
A plasma display consists of a
high number of colour pixels.
It is within industry standards
that very few pixels (< 0.001%)
may be defective, even for a new
set.There is however no reason
to doubt about the quality of
the set.
The plasma display technology
operates with rare gases which
are being influenced by air
pressure.
Up to an altitude of 2000 m
above sea-level (local air
pressure equal or above 800
hPa), the display is functioning
fine. Operating the set at a
higher altitude (lower air
pressure), the picture becomes
unstable and the picture
performance is deteriorating.
The plasma display might then
also produce a humming sound.
Bringing the set below 2000 m
(local air pressure equal or
above 800 hPa) it works fine
again.Transportation has no
influence.
Control of peripheral
equipment
The infrared radiation of the
screen may influence the
reception sensitivity of other
peripherals. Solution: replace the
batteries of the remote control
or change position of other
equipment. E.g. keep away a
wireless headphone from within
a radius of 1,5 m.
No stable or not
synchronised VGA
picture
Check if you have selected the
correct display mode in your
PC. See p. 2, Computer display
modes.
No picture
Are the supplied cables
connected properly? (The power
cable to the display, the VGA
cables,...)
Is your PC switched on?
Do you see a black screen and
the indicator in front of the
monitor lights up green, this
means that the display mode is
not supported.
Switch your VGA source to a
correct mode.
Remote control
If your monitor no longer
responds to the remote control,
the batteries may be exhausted.
If your problem is not
solved:
Switch your monitor off and
then on again.
Never attempt to repair a
defective monitor yourself.
Check with your dealer or call a
video technician.
Transport
Keep the original packaging to
transport the monitor if needed.
End of life directives
Philips is paying a lot of
attention to produce
environmentally-friendly in green
focal areas.Your new monitor
contains materials which can be
recycled and reused.
At the end of its life specialised
companies can dismantle the
discarded monitor to
concentrate the reusable
materials and to minimise the
amount of materials to be
disposed of.
Please ensure you dispose of
your old monitor according to
local regulations.
How to dispose of batteries ?
The batteries supplied do not
contain the heavy metals mercury
and cadmium. Nevertheless in
many countries batteries may not
be disposed of with your
household waste. Please ensure
you dispose of batteries according
to local regulations.
Miscellaneous
. Ambient temperature: + 5~ +
40°C
. Maximum operating altitude:
2000 m /6562 ft (min. air
pressure 800 hPa)
. Mains:AC 95-264V 50Hz/60Hz
.Power consumption: around
290W
. Standby consumption: < 2W
.Weight (excl. packaging)
Display: 35 kg
. Dimensions (wxhxd):
Display: 107 x 66 x 9 cm
.Wall mounting bracket
included
9
Page 13

 Loading...