

Page 1

RQ1297CC
User manual
Page 2
Page 3

1
Page 4

Page 5
ENGLISH 6
한국어 34
РУССКИЙ 62
简体中文 92
139
RQ1297CC
Page 6

6
ENGLISH
Introduction
Congratulations on your purchase and welcome to
Philips! To fully benet from the support that Philips
offers, register your product at www.philips.com/
welcome.
Please read this user manual, as it contains
information about the features of this shaver as
well as some tips to make shaving easier and more
enjoyable.
General description (Fig. 1)
A Shaver
1 Display
2 Shaver on/off button
3 Protection cap
4 RQ12 Shaving unit
5 Trimmer
6 Trimmer on/off slide
B RQ111 Beard Styler attachment
7 Hair length selector
8 Comb of Beard Styler attachment
C Foldable charger
D Jet Clean System
9 ‘Cleaning chamber empty’ symbol
10 Cleaning symbol
11 Drying symbol
12 Jet Clean System on/off button
13 Cleaning chamber release button
14 Shaver holder
E Cleaning brush
F HQ200 Cleaning uid
G Pouch
H Adapter
Page 7

ENGLISH 7
Important
Read this user manual carefully before you use the
shaver and the Jet Clean System and save it for
future reference.
Note: In this user manual the term ‘appliances’ refers
to the shaver and the Jet Clean System. If your shaver
does not come with a Jet Clean System, it refers to the
shaver only.
General
Danger
- Make sure the adapter does not get wet.
Warning
- The adapter contains a transformer. Do not cut
off the adapter to replace it with another plug, as
this causes a hazardous situation.
- These appliances are not intended for use by
persons (including children) with reduced physical,
sensory or mental capabilities, or lack of experience
and knowledge, unless they have been given
supervision or instruction concerning use of the
appliances by a person responsible for their safety.
- Children should be supervised to ensure that they
do not play with the appliances.
- Be careful with hot water when you clean the
appliances. Always check if the water is not too
hot, to prevent your hands from getting burnt.
Caution
- Never immerse the Jet Clean System and the
charger in water nor rinse them under the tap.
- The appliances and accessories are not
dishwasher-proof.
- Always place and use the appliances on a surface
that is uid-resistant.
Page 8

ENGLISH8
- Use, charge and store the appliances at a
temperature between 5°C and 35°C.
- Only use the accessories supplied.
- The adapter transforms 100-240 volts to a safe
low voltage of less than 24 volts.
- Do not use the appliances and accessories if
they are damaged.
- If the adapter or any of the other accessories is
damaged, always have it replaced with one of the
original type in order to avoid a hazard.
- Water may leak from the socket at the bottom
of the shaver when you rinse it. This is normal
and not dangerous because all electronics are
enclosed in a sealed power unit inside the shaver.
- Only use the attachments to trim facial hair
(beard, moustache and sideburns).
Jet Clean system
Caution
- Only use the Jet Clean System with the original
HQ200 cleaning uid.
- Always place the Jet Clean System on a stable,
level and horizontal surface to prevent leakage.
- Never immerse the Jet Clean System in water.
- Empty the cleaning chamber and clean it
thoroughly by rinsing it with hot tap water every
15 days.
- The Jet Clean System thoroughly cleans but does
not disinfect your shaver, therefore do not share
the shaver with others.
- The cleaning chamber of the Jet Clean System is
not dishwasher-proof.
- When the Jet Clean System is ready for use, do
not move it to prevent leakage of cleaning uid.
Page 9

MINUTES LEFT
MINUTES LEFT
ENGLISH 9
Compliance with standards
- This shaver complies with the internationally
approved safety regulations and can be safely used
in the bath or shower and cleaned under the tap.
- These Philips appliances comply with all standards
regarding electromagnetic elds (EMF). If handled
properly and according to the instructions in this
user manual, the appliances are safe to use based
on scientic evidence available today.
The display
Note: Before you use the shaver for the rst time,
remove the protective foil from the display.
Charging
- Charging takes approx. 1 hour.
- When the shaver is charging, the minutes
indication ashes.
- The shaving minutes increase until the shaver is
fully charged.
- Quick charge: When the shaver contains enough
energy for one shave, the display shows 5 minutes
in red.
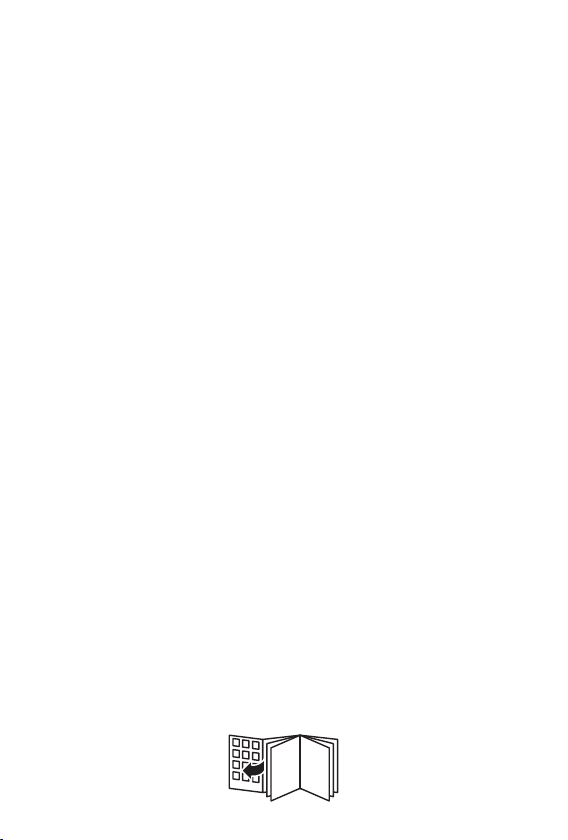
Battery fully charged
MINUTES LEFT
MINUTES LEFT
- When the battery is fully charged, the minutes
indication lights up continuously. After approx.
30 minutes, the display automatically switches off
again.
Page 10

ENGLISH10
Note: The shaver is equipped with an intelligent selflearning system that monitors the shaver’s energy
consumption and converts the remaining battery
capacity into shaving minutes. The energy consumption
and therefore the remaining number of shaving
minutes depend on your skin and beard type and your
shaving behaviour (e.g. the use of shaving gel). If the
number of shaving minutes of the fully charged shaver
is less than 60 minutes, this is completely normal and
does not mean that the battery capacity of the shaver
has diminished.
Battery low
MINUTES LEFT
MINUTES LEFT
MINUTES LEFT
MINUTES LEFT
MINUTES LEFT
MINUTES LEFT
- When the battery is almost empty (when there
are only 5 or fewer shaving minutes left), the
minutes indication starts to ash.
- When you switch off the shaver, the shaving
minutes continue to ash for a few more seconds.
You hear a beep when there are no shaving
minutes left.
Remaining battery capacity
- The remaining battery capacity is indicated by the
number of shaving minutes shown on the display.
Clean shaver
For optimal shaving performance, we advise you to
clean the shaver after every use.
- The tap symbol ashes to remind you to clean the
shaver.
Page 11
MINUTES LEFT
MINUTES LEFT
ENGLISH 11
Replace shaving unit
For maximum shaving performance, we advise you
to replace the shaving unit every two years.
- To remind you to replace the shaving unit,
the appliance is equipped with a replacement
reminder which is activated automatically after
approx. two years. The replacement reminder is
repeated with a beep and will reset at
3 successive shaves or until you reset the shaver.
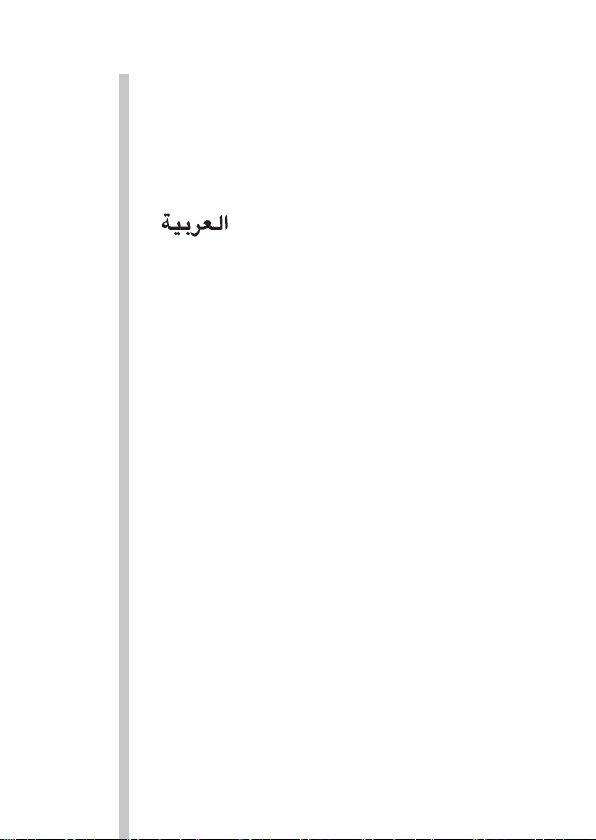
Power-saving mode
The appliance is equipped with an automatic powersaving mode. When the shaver enters the powersaving mode, the light in the on/off button goes out
to save energy.
- When the appliance is switched off but detects
movement for 5 minutes (for instance when you
are travelling with the shaver in your suitcase), it
automatically goes into power-saving mode. This
mode prevents the shaver from being switched on
by accident.
, The lock symbol ashes on the display to indicate
that the appliance is in power-saving mode.
- To deactivate the power-saving mode, simply press
the on/off button.
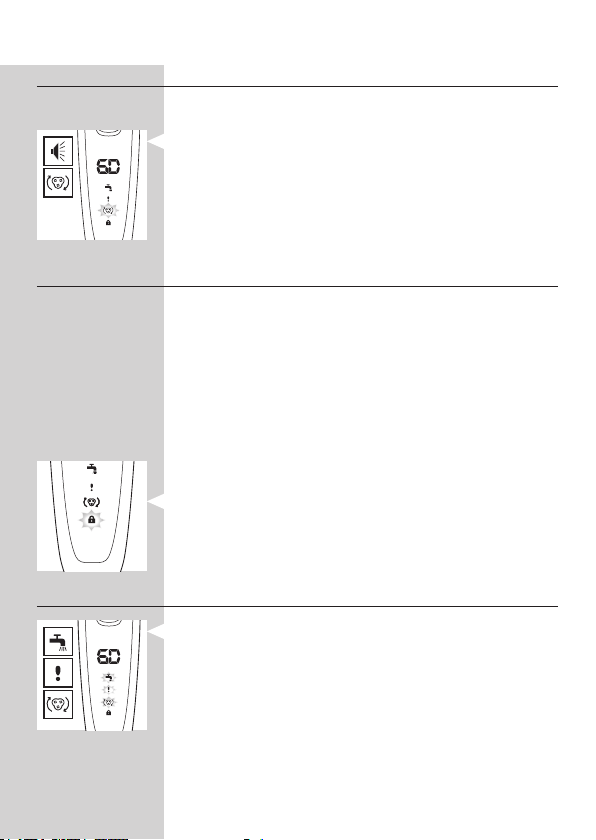
Blocked shaving heads
MINUTES LEFT
MINUTES LEFT
- If the shaving heads are blocked, the shaving unit
symbol, the tap symbol and the exclamation mark
ash. In this case, the motor cannot run because
the shaving heads are soiled or damaged.
- When this happens, you have to clean the shaving
unit or replace it.
- The shaving unit symbol, the tap symbol and
the exclamation mark continue to ash until you
unblock the shaving heads.
Page 12
ENGLISH12
Charging
Charging takes approx. 1 hour.
A fully charged shaver has a shaving time of up to 60
minutes or 20 days.
Note: When the battery is fully charged, the display
shows the actual remaining shaving minutes (see
section ‘Battery fully charged’ in chapter ‘The display’).
Charge the shaver before you use it for the rst
time and when the display indicates that the battery
is almost empty (see section ‘Battery low’ in chapter
‘The display’).
Quick charge
After the shaver has charged for 5 minutes,
it contains enough energy for one shave.
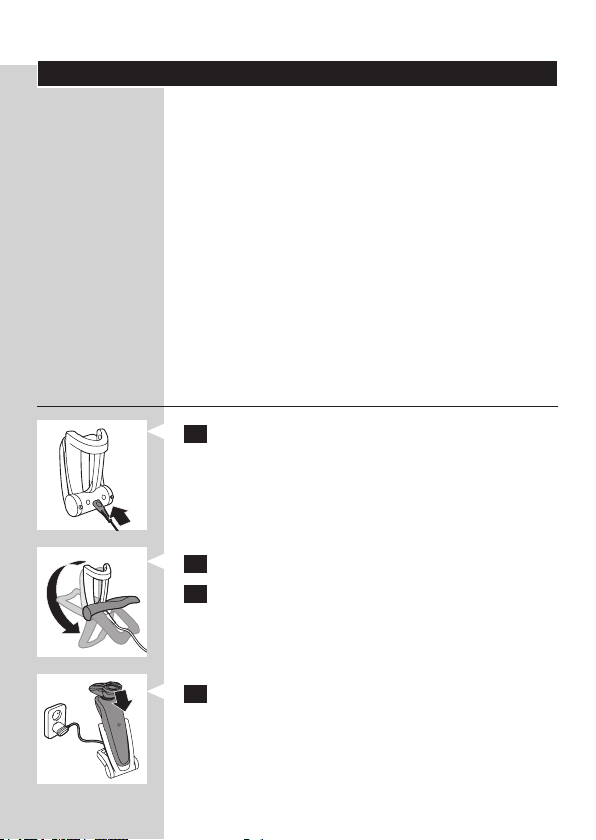
Charging in the charger
1 Insert the small plug into the charger.
2 Unfold the charger (‘click’).
3 Put the adapter in the wall socket.
4 Put the shaver in the charger.
, The display shows that the shaver is charging
(see chapter ‘The display’).
Page 13

ENGLISH 13
Charging in the Jet Clean System
1 Put the small plug in the Jet Clean System.
2 Put the adapter in the wall socket.
3 Hold the shaver upside down above the holder
with the back of the shaver pointing towards
the holder.
Note: The shaver cannot be placed in the Jet Clean
System when the protection cap is on the shaving unit.
Note: When you turn the shaver upside down, the minutes
indication on the display is also turned upside down so you
can still see to what level the battery is charged.
4 Place the shaver body in the holder behind the
two clips (1) and press it down until it locks
into place (2).
, The display shows that the shaver is charging
(see section ‘Charging’ in chapter ‘The display’).
Using the shaver
Shaving
Skin adaptation period
Your rst shaves may not bring you the result you
expect and your skin may even become slightly
irritated. This is normal. Your skin and beard need
time to adapt to any new shaving system.
We advise you to shave regularly (at least 3 times
a week) for a period of 3 weeks to allow your skin
to adapt to the new shaver. During this period, use
your new electric shaver exclusively and do not use
other shaving methods. If you use different shaving
methods, it is more difcult for your skin to adapt to
the new shaving system.
Page 14
ENGLISH14
1 Press the on/off button once to switch on the
shaver.
, The display lights up for a few seconds.
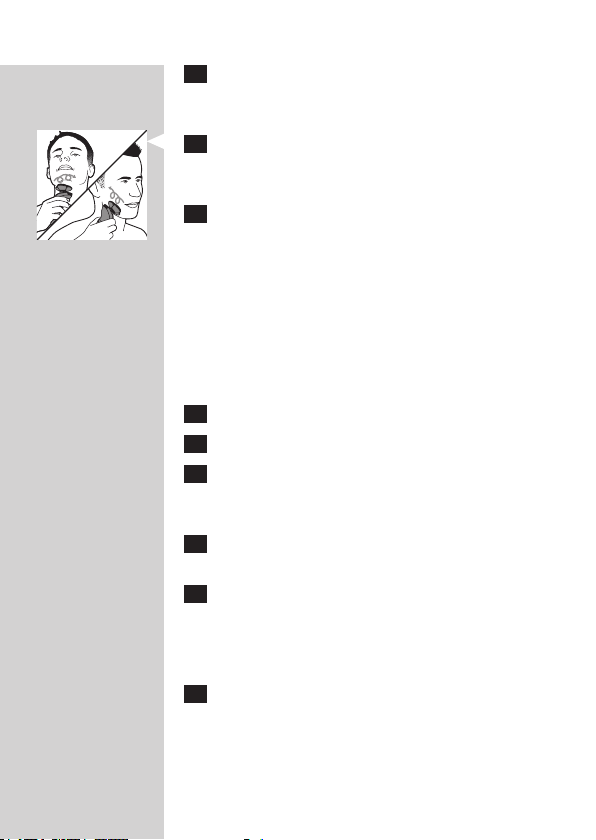
2 Move the shaving heads over your skin in
circular movements.
- Do not make straight movements.
3 Press the on/off button once to switch off the
shaver.
, The display lights up for a few seconds and then
shows the remaining battery capacity.
Wet shaving
You can also use this shaver on a wet face with
shaving foam or shaving gel.
To shave with shaving foam or shaving gel, follow the
steps below:
1 Apply some water to your skin.
2 Apply shaving foam or shaving gel to your skin.
3 Rinse the shaving unit under the tap to ensure
that the shaving unit glides smoothly over your
skin.
4 Press the on/off button once to switch on the
shaver.
5 Move the shaving heads over your skin in
circular movements.
Note: Rinse the shaver under the tap regularly to ensure
that it continues to glide smoothly over your skin.
6 Dry your face and thoroughly clean the
shaver after use (see chapter ‘Cleaning and
maintenance’).
Note: Make sure you rinse all foam or shaving gel off
the shaver.
Page 15
ENGLISH 15
Trimming
You can use the trimmer to groom your sideburns
and moustache.
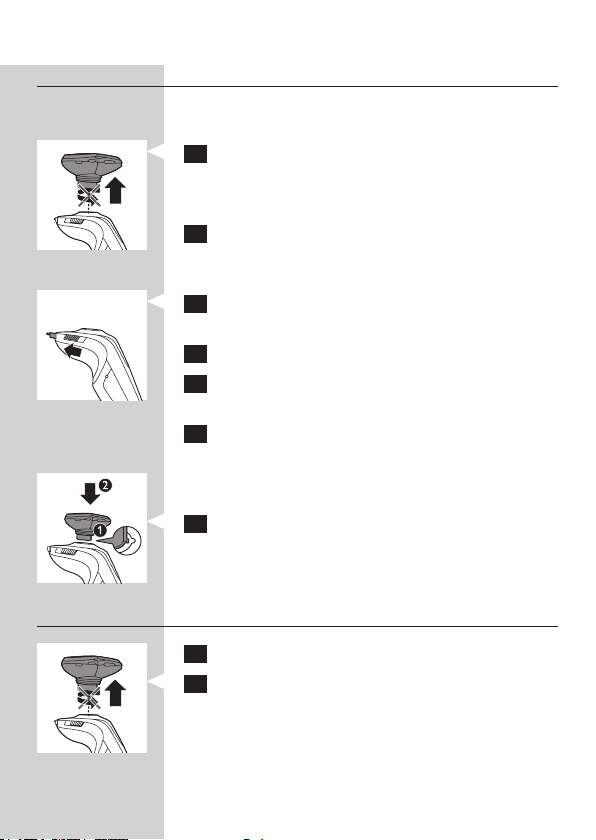
1 Pull the shaving unit straight off the shaver.
Note: Do not twist the shaving unit while you pull it off
the shaver.
2 Press the on/off button once to switch on the
shaver.
, The display lights up for a few seconds.
3 Slide the trimmer slide forwards to slide out
the trimmer.
4 You can now start trimming.
5 Slide the trimmer slide backwards to retract
the trimmer.
6 Press the on/off button once to switch off the
shaver.
, The display lights up for a few seconds and
shows the remaining battery capacity.
7 Insert the lug of the shaving unit into the slot
in the top of the shaver (1). Then press down
the shaving unit (2) to attach it to the shaver
(‘click’).
Using the Beard Styler attachment
1 Make sure the shaver is switched off.
2 Pull the shaving unit straight off the shaver.
Note: Do not twist the shaving unit while you pull it off
the shaver.
Page 16

ENGLISH16
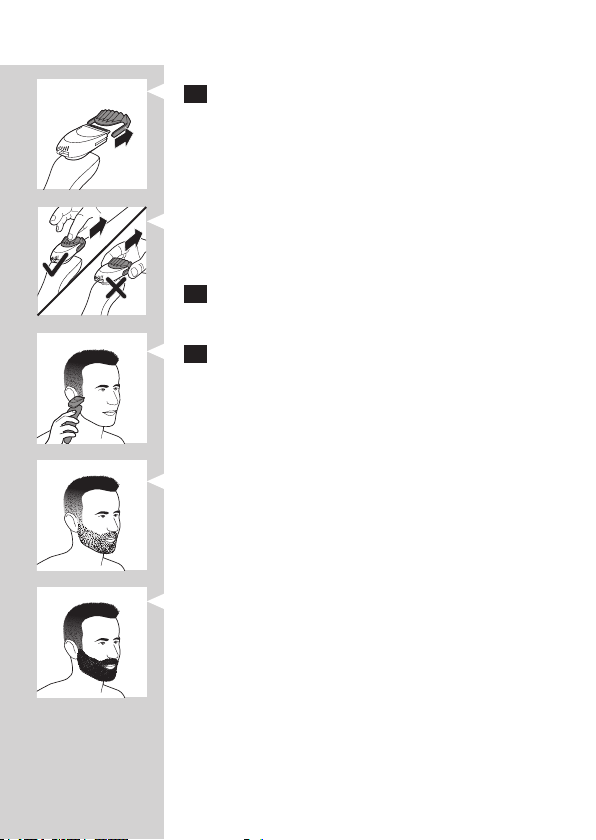
3 Insert the lug of the Beard Styler
attachment into the slot in the top of the
shaver (1). Then press down the beard styler
attachment (2) to attach it to the shaver
(‘click’).
Using the Beard Styler attachment with
comb
You can use the Beard Styler attachment with the
comb attached to style your beard at one xed
setting, but also at different length settings. The
hair length settings on the Beard Styler attachment
correspond to the remaining hair length after cutting
and range from 1 to 5mm.
1 Slide the comb straight into the guiding
grooves on both sides of the beard styler
attachment (‘click’).
2 Press the length selector (1) and then push it
to the left or right (2) to select the desired
hair length setting.
3 Press the on/off button on the shaver to switch
it on.
4 You can now start styling your beard.
Using the Beard Styler attachment without
comb
You can use the Beard Styler attachment without
the comb to contour your beard, moustache or
sideburns.
Page 17
ENGLISH 17
1 Pull the comb off the Beard Styler attachment.
Note: Grab the comb in the centre to pull it off the
Beard Styler attachment. Do not pull at the sides of the
comb.
2 Press the on/off button to switch on the shaver.
3 You can now start contouring your beard,
moustache, sideburns or neckline.
Beard styles
Below you nd some examples of beard styles you
can create.
- A stubble look
- A full beard
Page 18

ENGLISH18
- A moustache
- A goatee
Cleaning and maintenance
Never use scouring pads, abrasive cleaning agents
or aggressive liquids such as petrol or acetone to
clean the shaver, its accessories and the Jet Clean
System.
- The best and most hygienic way to clean the
shaver is in the Jet Clean System. You can also
rinse the shaver under the tap or clean it with the
cleaning brush supplied.
- Be careful with hot water. Always check if the
water is not too hot, to prevent your hands from
getting burnt.
- Clean the shaver after every shave for optimal
shaving performance.
- You can clean the outside of the shaver with a
damp cloth.
- Regular cleaning guarantees better shaving
performance.
Page 19
ENGLISH 19
Cleaning the shaving unit
Be careful with hot water. Always check if the
water is not too hot, to prevent your hands from
getting burnt.
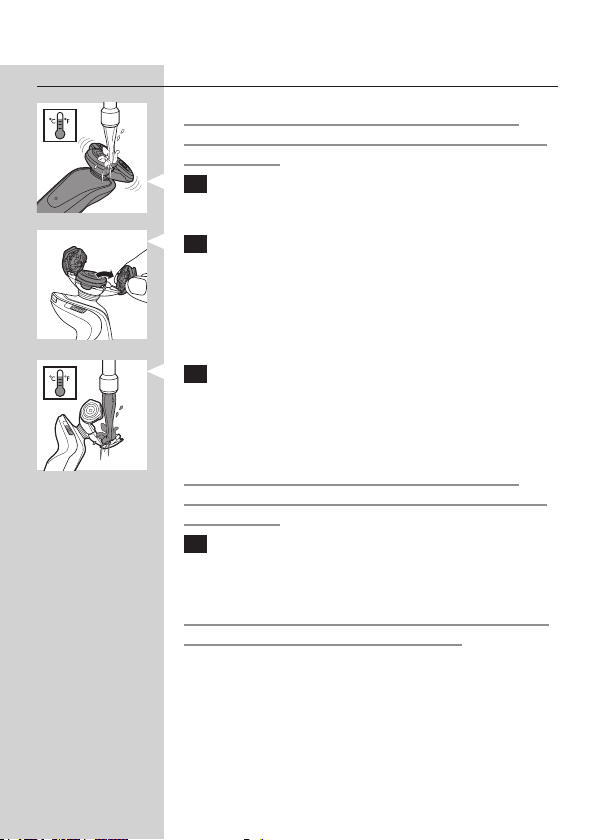
1 Rinse the shaving unit under a hot tap for some
time.
2 Pull open the three shaving heads one by one.
3 Rinse all three shaving heads and all three hair
chambers under a hot tap for 30 seconds.
Note: You can also brush the shaving heads and hair
chambers with the cleaning brush supplied.
Be careful with hot water. Always check if the
water is not too hot, to prevent your hands from
getting burnt.
4 Carefully shake off excess water and leave the
shaving heads open to let the shaving unit dry
completely.
Never dry the shaving unit with a towel or tissue,
as this may damage the shaving heads.
Page 20
ENGLISH20
Cleaning the shaving unit in the Jet Clean
System
- This shaver is equipped with type RQ1008 and
has three cleaning programs: the eco program,
the auto program and the intensive program.
Press the up/down button to select the cleaning
program you prefer.
Note: The eco program has a shorter drying time, to
save energy. The intensive program is a more thorough
cleaning program.
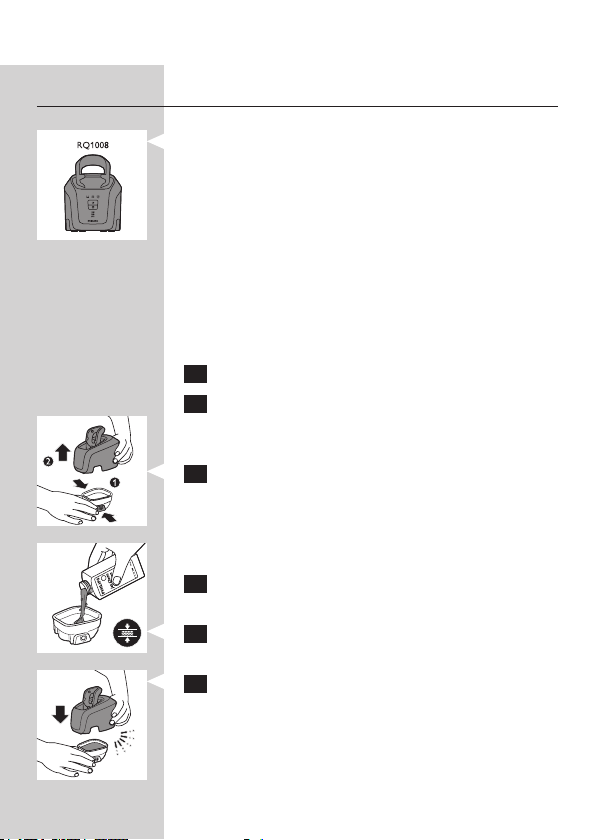
Preparing the Jet Clean System for use
Fill the cleaning chamber before rst use.
1 Put the small plug in the Jet Clean System.
2 Put the adapter in the wall socket.
, The holder automatically moves to the highest
position.
3 Simultaneously press the release buttons on
both sides of the cleaning chamber (1). Then lift
the Jet Clean System off the cleaning chamber (2).
, The cleaning chamber remains behind.
4 Unscrew the cap from the bottle with HQ200
cleaning uid.
5 Fill the cleaning chamber with HQ200 cleaning
uid to a level between the two lines.
6 Place the Jet Clean System back onto the
cleaning chamber.
Make sure the release buttons click back into place.
Page 21

ENGLISH 21
Using the Jet Clean System
Note: If you use the shaver with shaving foam or
shaving gel, we advise you to rinse it under the hot
tap before you clean it in the Jet Clean System. This
guarantees an optimal lifetime for the cleaning uid.
1 Hold the shaver upside down above the holder
with the back of the shaver pointing towards
the holder.
2 Place the shaver body in the holder behind the
two clips (1) and press it down until it locks
into place (2).
, The display shows that the shaver is charging
(see chapter ‘The display’).
3 Press the on/off button on the Jet Clean
System to start the cleaning program.
, The shaver display stops showing the charging
indication.
, The cleaning light starts to ash and the shaver is
automatically lowered into the cleaning uid.
, The cleaning light ashes throughout the
cleaning program, which takes a few minutes.
Note: The auto and eco cleaning programs take 4 to
6 minutes. The intensive program takes approx.
35 minutes.
, During the rst phase of the cleaning program,
the shaver automatically switches on and off
several times and moves up and down.
Page 22

ENGLISH22
, During the second phase of the cleaning
program, the shaver is placed in the drying
position, indicated by the ashing drying symbol.
This phase takes approx. 2 hours. The shaver
stays in this position until the end of the
program.
Note: The drying phase takes 1 hour when you have
selected the eco program.
, After the cleaning program, the charging
indication appears on the shaver display (see
chapter ‘The display’).
Note: If you press the on/off button of the Jet
Clean System during the cleaning program, the
program aborts. In this case, the cleaning or drying
light stops ashing and the holder moves to the highest
position.
Note: If you remove the adapter from the wall socket
during the cleaning program, the program aborts. The
holder remains in its current position. When you put
the adapter back into the wall socket, the holder moves
to the highest position.
- When the cleaning uid drops below the
minimum level, the ‘cleaning chamber empty’
symbol starts to ash and the holder returns to its
starting position.
- If you use the Jet Clean System to clean your
shaver every day, you need to rell the cleaning
chamber approx. every 15 days.
Cleaning the Jet Clean System
Clean the cleaning chamber every 15 days.
You can wipe the outside of the Jet Clean System
with a damp cloth.
Page 23
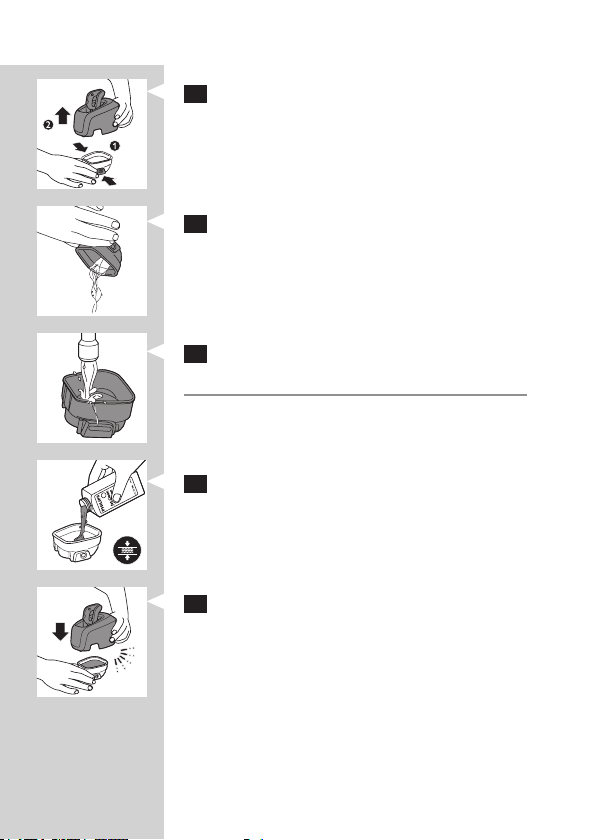
ENGLISH 23
1 Simultaneously press the release buttons on
both sides of the Jet Clean System (1). Then lift
the Jet Clean System off the cleaning chamber
(2).
, The cleaning chamber remains behind.
2 Pour any remaining cleaning uid out of the
cleaning chamber.
You can simply pour the cleaning uid down the sink.
3 Rinse the cleaning chamber under the tap.
The cleaning chamber is not dishwasher-proof.
4 Fill the cleaning chamber with HQ200 cleaning
uid to a level between the two lines.
5 Place the Jet Clean System back onto the
cleaning chamber.
Make sure the release buttons click back into place.
Page 24

ENGLISH24
Extra-thorough cleaning method
Make sure the appliance is switched off.
1 Pull the shaving unit straight off the shaver.
Note: Do not twist the shaving unit while you pull it off
the shaver.
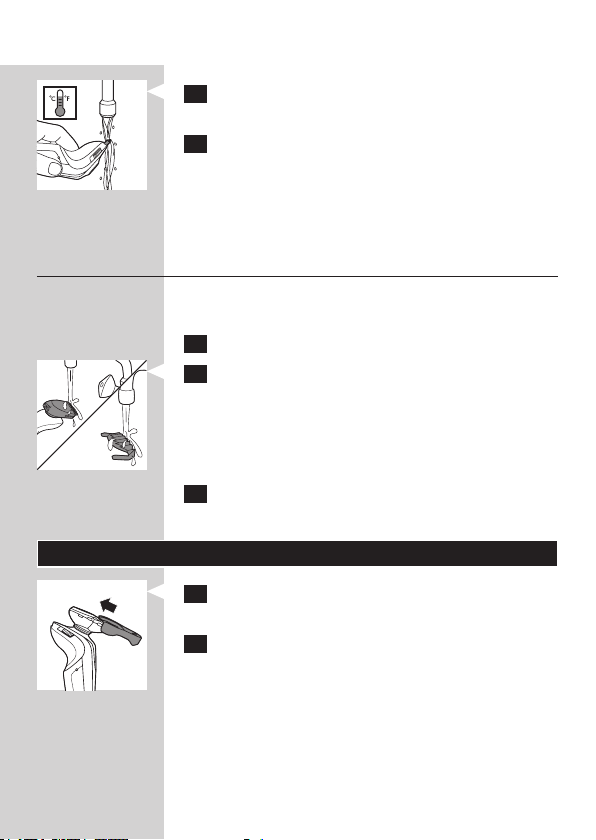
2 Pull open the three shaving heads one by one.
3 Press the retainer release tab (1) until the
retainer opens (2).
Note: Do not clean more than one cutter and shaving
guard at a time, since they are all matching sets. If you
accidentally put a cutter in the wrong shaving guard, it
may take several weeks before optimal shaving
performance is restored.
4 Remove the cutter from the shaving guard.
5 Clean the cutter with the cleaning brush
supplied.
Page 25

ENGLISH 25
6 Clean the inside of the shaving guard.
7 After cleaning, place the cutter back into the
shaving guard with the cutter legs pointing
downwards.
8 Press down the retainer over the cutter.
9 Close the shaving heads.
10 Insert the lug of the shaving unit into the slot
in the top of the shaver (1). Then press the
shaving unit downwards (2) to attach it to the
shaver (‘click’).
Cleaning the trimmer
Clean the trimmer every time you have used it.
1 Slide the trimmer slide forwards to slide out
the trimmer.
Page 26
ENGLISH26
2 Rinse the trimmer under a hot tap for some
time.
3 Slide the trimmer slide backwards to retract
the trimmer.
Tip: For optimal trimmer performance, lubricate the
trimmer teeth with a drop of sewing machine oil every
six months.
Cleaning the Beard Styler attachment
Clean the Beard Styler attachment every time you
have used it.
1 Pull the comb off the Beard Styler attachment.
2 Rinse the Beard Styler attachment and the
comb separately under a hot tap for some
time.
Note: You can also clean the Beard Styler attachment
and the comb with the cleaning brush supplied.
3 Lubricate the trimmer teeth with a drop of
sewing machine oil every six months.
Storage
1 Slide the protection cap onto the shaving unit
to prevent damage to the shaving heads.
2 Store the shaver in the pouch supplied.
Page 27
MINUTES LEFT
MINUTES LEFT
ENGLISH 27
Replacement
For maximum shaving performance, we advise you
to replace the shaving unit every two years.
Only replace the shaving unit with an original RQ12
Philips Shaving unit.
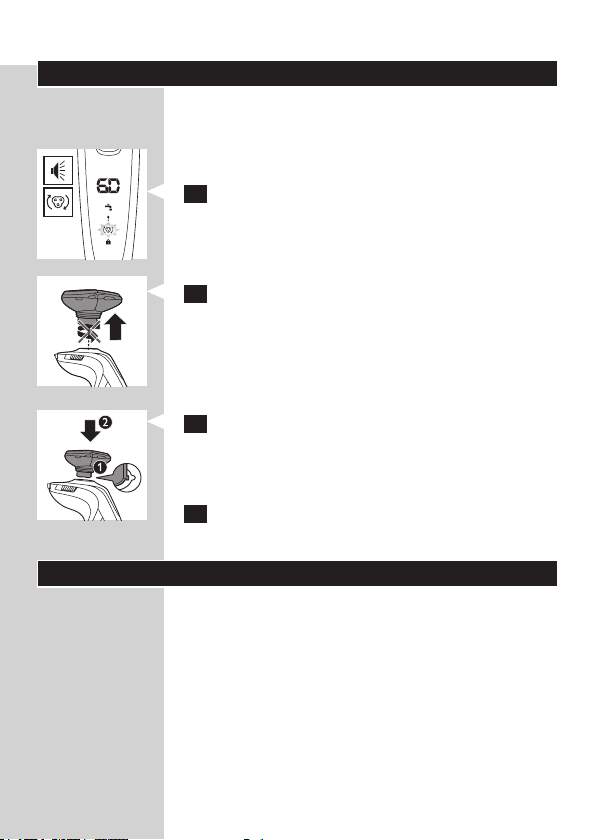
1 The shaving unit symbol ashes and you hear a
beep when you switch off the shaver .
Note: The displays of the different types look different,
but show the same symbol.
2 Pull the old shaving unit straight off the shaver.
Note: Do not twist the shaving unit while you pull it off
the shaver.
3 Insert the lug of the new RQ12 shaving unit
into the slot in the top of the shaver (1). Then
press down the shaving unit (2) to attach it to
the shaver (‘click’).
4 After 3 shaves, the replacement reminder is
deactivated automatically.
Ordering accessories
To purchase accessories for this appliance, please
visit our online shop at www.shop.philips.com/
service. If the online shop is not available in your
country, go to your Philips dealer or a Philips
service centre. If you have any difculties obtaining
accessories for your appliance, please contact the
Philips Consumer Care Centre in your country. You
nd its contact details in the worldwide guarantee
leaet.
Page 28

ENGLISH28
The following parts are available:
- HQ8505 adapter
- RQ12 Philips Shaving Unit
- HQ110 Philips Shaving Head Cleaning Spray
- HQ200 Philips Cleaning Fluid
- RQ111 Beard Styler attachment
Shaving heads
- We advise you to replace your shaving heads
every two years. Always replace the shaving unit
with an original RQ12 Philips Shaving Unit.
Cleaning
- Use Jet Clean Solution (HQ200) for regular
cleaning of the shaving heads.
Environment
- Do not throw away the appliances with the
normal household waste at the end of their life,
but hand them in at an ofcial collection point for
recycling. By doing this, you help to preserve the
environment.
- The built-in rechargeable shaver battery contains
substances that may pollute the environment.
Always remove the battery before you discard or
hand in the shaver at an ofcial collection point.
Dispose of the battery at an ofcial collection
point for batteries. If you have trouble removing
the battery, you can also take the appliance to a
Philips service centre. The staff of this centre will
remove the battery for you and will dispose of it
in an environmentally safe way.
Page 29
ENGLISH 29
Removing the rechargeable shaver battery
Only remove the rechargeable battery when
you discard the shaver. Make sure the battery is
completely empty when you remove it.
Be careful, the battery strips are sharp.
1 Remove the back panel of the shaver with a
screwdriver.
2 Remove the rechargeable battery.
Guarantee and support
If you need information or support, please visit
www.philips.com/support or read the separate
worldwide guarantee leaet.
Guarantee restrictions
The shaving heads (cutters and shaving guards)
are not covered by the terms of the international
guarantee because they are subject to wear.
Troubleshooting
This chapter summarises the most common
problems you could encounter with the appliance. If
you are unable to solve the problem with the
information below, visit www.philips.com/
support for a list of frequently asked questions or
contact the Consumer Care Centre in your country.
Page 30

ENGLISH30
Problem Possible cause Solution
The shaver does
not shave as well
as it used to.
The shaver does
not work when I
press the on/off
button.
The shaving heads are
damaged or worn.
Long hairs obstruct the
shaving heads.
The Jet Clean System
has not cleaned the
shaver properly, because
the cleaning uid in the
cleaning chamber is soiled
or the cleaning uid level is
too low.
The rechargeable battery
is empty.
Replace the shaving
unit (see chapter
‘Replacement’).
Clean the shaving
heads by following
the steps of the
extra-thorough
cleaning method
(see chapter
‘Cleaning and
maintenance’).
Clean the shaver
thoroughly before
you continue
shaving. If necessary,
clean and rell the
cleaning chamber
(see chapter
‘Cleaning and
maintenance’).
Recharge the
battery (see chapter
‘Charging’).
Page 31

ENGLISH 31
Problem Possible cause Solution
The shaver is not
entirely clean after
I clean it in the Jet
Clean System.
The shaving unit is soiled
or damaged to such an
extent that the motor
cannot run. In this case,
the shaving unit symbol,
the tap symbol and the
exclamation mark ash.
The temperature of the
shaver is too high. In this
case, the shaver does not
work and the exclamation
mark on the display ashes.
The cleaning uid in the
cleaning chamber is soiled.
The cleaning uid level is
too low. If the uid volume
in the cleaning chamber
drops below the minimum
level during the cleaning
program, the program
aborts.The cleaning light
and the ‘cleaning chamber
empty’ symbol ash at
intervals and the holder
returns to its starting
position.
Clean the shaving
unit or replace
it (see chapters
‘Cleaning and
maintenance’ and
‘Replacement’).
Switch off the shaver
and let it cool down.
As soon as the
temperature of the
shaver has dropped
sufciently, you can
switch on the shaver
again.
Empty and rinse the
cleaning chamber
and rell it with new
cleaning uid.
Rell the cleaning
chamber with
cleaning uid to
a level between
the two lines (see
chapter ‘Cleaning
and maintenance’).
Page 32

ENGLISH32
Problem Possible cause Solution
The Jet Clean
System does not
work when I press
the on/off button.
The shaver is not
fully charged after
I charge it in the
charger/Jet Clean
System.
You have used another
cleaning uid than the
original Philips cleaning
uid.
The Jet Clean System
is not connected to the
mains.
You have not placed the
shaver in the Jet Clean
System properly, so there
is no electrical connection
between the Jet Clean
System and the shaver.
You have not placed the
shaver in the charger/Jet
Clean System properly.
Only use HQ200
Philips Cleaning
Fluid.
Put the small plug in
the Jet Clean System
and put the adapter
in the wall socket.
Press the shaver
tightly into the
holder to lock it into
place.
Make sure you press
the shaver until it
locks into place.
Page 33

ENGLISH 33
Problem Possible cause Solution
The shaver is fully
charged, but the
display shows less
than 60 shaving
minutes.
The shaver is equipped
with an intelligent selflearning system that
monitors the shaver’s
energy consumption and
converts the remaining
battery capacity into
shaving minutes. The energy
consumption and therefore
the remaining number of
shaving minutes depend on
your skin and beard type
and your shaving behaviour
(e.g. the use of shaving gel).
If the number of
shaving minutes of
the fully charged
shaver is less than
60 minutes, this
is completely
normal and does
not mean that the
battery capacity
of the shaver has
diminished.
Page 34

34
한국어
소개
필립스 제품을 구입해 주셔서 감사합니다!
필립스가 드리는 다양한 혜택을 받으실 수
있도록 www.philips.co.kr/membership
에서 제품을 등록하십시오.
이 사용 설명서에는 이 면도기의 기능에 대한
정보뿐 아니라 보다 쉽고 즐겁게 면도할
수 있는 방법이 나와 있으므로 참고하시기
바랍니다.
제품정보 (그림 1)
A 면도기
1 디스플레이
2 면도기 전원 버튼
3 보호 캡
4 RQ12 쉐이빙 유닛
5 트리머
6 트리머 온/오프 슬라이드
B RQ111 턱수염 스타일러 액세서리
1 길이 선택 레버
2 턱수염 스타일러에 부착되는 빗
C 접이식 충전기
D 젯클린 시스템
1 ‘용기 비었음’ 표시
2 세척중 표시
3 건조중 표시
4 젯클린 시스템 전원 버튼
5 세척 용기 열림 버튼
6 면도기 거치대
E 청소용 브러시
F HQ200 세척액
G 파우치
H 어댑터
Page 35

한국어 35
중요 사항
면도기 및 젯클린시스템을 사용하기 전에 사용
설명서를 주의 깊게 읽고 나중에 참조할 수
있도록 잘 보관하십시오.
참고: 이 사용 설명서에서 ‘제품’이란
면도기 및 젯클린 시스템을 말합니다. 젯클린
시스템이 함께 제공되지 않는 면도기의 경우
면도기만을 지칭합니다.
일반
위험
- 어댑터가 물에 젖지 않도록 주의하십시오.
경고
- 어댑터에는 변압기가 내장되어 있습니다.
위험할 수 있으므로, 어댑터를 잘라내고
다른 플러그로 교체하지 마십시오.
- 신체 감각, 정신적인 능력이 떨어지거나
경험과 지식이 충분하지 않은 성인 및
어린이는 혼자 제품을 사용하지 말고 제품
사용과 관련하여 안전에 책임질 수 있도록
지시사항을 충분히 숙지한 사람의 도움을
받으십시오.
- 어린이가 제품을 가지고 놀지 못하도록
지도해 주십시오.
- 뜨거운 물을 사용하여 제품을 청소하는 경우
주의하십시오. 화상을 입지 않도록 물이
너무 뜨겁지 않은지 항상 확인하십시오.
주의
- 젯클린 시스템 및 충전기를 절대로 물에
담그거나 흐르는 물에 헹구지 마십시오.
- 제품 및 액세서리는 식기세척기에 세척할 수
없습니다.
- 제품은 반드시 액체가 없는 표면에 놓고
사용하십시오.
Page 36

한국어36
- 제품은 5°C - 35°C 사이의 온도에서
사용, 충전 및 보관하는 것이 적합합니다.
- 제품과 함께 제공된 액세서리만
사용하십시오.
- 어댑터는 100-240V 의 전압을 24V 이하의
안전한 저전압으로 변환해 줍니다.
- 제품 및 액세서리가 손상된 경우 사용하지
마십시오.
- 어댑터 또는 기타 모든 액세서리에 손상
부분이 있으면 위험할 수 있으므로 반드시
정품으로 교체하여 사용하십시오.
- 헹구는 동안 면도기 하단의 전원 소켓에서
물이 흘러나올 수 있습니다. 이러한 현상은
정상이며, 모든 전자부품은 면도기 내부에
밀봉되어 있으므로 위험하지 않습니다.
- 얼굴에 난 수염(턱수염, 콧수염 및 구레나룻)
을 트리밍할 때에는 이 액세서리만
사용하십시오.
젯클린 시스템
주의
- 젯클린 시스템에는 정품 HQ200 세척액만
사용하십시오.
- 액체가 새지 않도록 안정적이고 평평한
수평면에 젯클린 시스템을 두십시오.
- 젯클린 시스템을 절대로 물에 담그지
마십시오.
- 15 일에 한 번씩 세척 용기를 비우고 뜨거운
수돗물에 헹궈 깨끗하게 청소하십시오.
- 젯클린 시스템을 사용하면 깨끗하게 청소할
수 있지만 면도기가 소독되는 것은 아니므로
다른 사람과 면도기를 함께 사용하지
마십시오.
- 젯클린 시스템의 세척 용기는
식기세척기에서 사용할 수 없습니다.
Page 37

MINUTES LEFT
MINUTES LEFT
한국어 37
- 젯클린 시스템을 사용할 준비가 된 후에는
세척액이 새는 것을 방지하기 위해 이동하지
마십시오.
기준 준수
- 본 제품은 국제적으로 공인 받은 안전
기준을 따르고 있으며, 목욕이나 샤워
중에도 안전하게 사용할 수 있고 물로 물
세척이 가능합니다.
- 이 필립스 제품은 EMF(전자기장)와
관련된 모든 기준을 준수합니다. 이 사용
설명서의 지침에 따라 적절하게 취급할
경우 이 제품은 안전하게 사용할 수 있으며
이는 현재까지의 과학적 증거에 근거하고
있습니다.
디스플레이
참고: 면도기를 처음 사용하기 전에
디스플레이에 부착된 보호용 호일을
제거하십시오.
충전
- 충전 시간은 약 1시간 정도 소요됩니다.
- 면도기가 충전 중이면 시간(분) 표시가
깜박입니다.
- 면도기가 완전히 충전될 때까지 면도 시간
(분)이 증가합니다.
- 고속 충전: 면도기가 1회 면도에 충분할
정도로 충전되면 디스플레이에 적색으로
5분으로 표시됩니다.
Page 38

한국어38
배터리 완전 충전
MINUTES LEFT
MINUTES LEFT
MINUTES LEFT
MINUTES LEFT
MINUTES LEFT
MINUTES LEFT
- 배터리가 완전히 충전되면 시간(분) 표시가
계속 켜져 있습니다. 그 후 30분 정도 지나면
디스플레이가 자동으로 다시 꺼집니다.
참고: 면도기에는 면도기의 에너지 소비량을
모니터링하여 남은 배터리 용량을 면도
시간으로 전환하는 지능형 자체 학습 시스템이
탑재되어 있습니다. 에너지 소비량 및 남은
면도 시간(분)은 피부, 수염 형태 및 면도
습관에 따라 달라집니다(예: 쉐이빙 젤 사용
여부). 완전히 충전된 면도기의 면도 시간 (분)
이 60분 미만일 경우, 이것은 매우 일반적인
현상이며 면도기의 배터리 용량이 줄어든 것이
아닙니다.
배터리 부족
- 배터리가 거의 방전되면(면도 시간(분)
이 5분 이하로 남은 경우) 시간(분) 표시가
깜박이기 시작합니다.
- 면도기의 전원을 끄면 면도 시간(분)이 몇
초 동안 계속 깜박입니다. 남은 면도 시간이
없으면 신호음이 울립니다.
남은 배터리 용량
- 남은 배터리 용량은 디스플레이에 면도 시간
(분)으로 표시됩니다.
Page 39

MINUTES LEFT
MINUTES LEFT
MINUTES LEFT
MINUTES LEFT
한국어 39
면도기 청소
최적의 성능을 유지하기 위해서는 매번 사용
후 면도기를 청소하는 것이 좋습니다.
- 면도기를 청소할 시기가 되면 수도꼭지
표시가 깜박입니다.
쉐이빙 유닛 교체
최고의 면도 성능을 위해서는 2년마다 쉐이빙
유닛을 교체하는 것이 좋습니다.
- 제품에는 약 2년 후 자동으로 활성화되는
교체 알림 기능이 탑재되어 있어 쉐이빙
유닛을 교체할 시기를 알려줍니다. 교체
알림은 신호음과 함께 3회 연속 면도 시
또는 면도기를 재설정할 때까지 반복됩니다.
절전 모드
이 제품에는 자동 절전 모드가 내장되어
있습니다. 면도기가 절전 모드로 전환되면
에너지를 절약하기 위해 전원 버튼의 표시등이
꺼집니다.
- 전원이 꺼진 채로 제품이 5분간 작동하면
(예: 여행 시 가방에 면도기를 휴대할 경우)
자동으로 절전 모드로 전환됩니다. 이
모드는 면도기가 실수로 켜지는 것을 방지해
줍니다.
, 제품이 절전 모드에 있음을 알리는 자물쇠
표시가 디스플레이에서 깜박입니다.
- 절전 모드를 해제하려면 전원 버튼을
누르기만 하면 됩니다.
Page 40

한국어40
막힌 쉐이빙 헤드
MINUTES LEFT
MINUTES LEFT
- 쉐이빙 헤드가 막히면 쉐이빙 유닛 표시등,
수도꼭지 표시등 및 느낌표가 깜박입니다.
이 경우 쉐이빙 헤드가 더럽거나 손상되었기
때문에 모터가 작동할 수 없습니다.
- 이렇게 느낌표가 깜박이면 쉐이빙 유닛을
청소하거나 교체해야 합니다.
- 막힌 쉐이빙 헤드를 처치할 때까지 쉐이빙
유닛 표시등, 수도꼭지 표시등 및 느낌표가
계속해서 깜박입니다.
충전
충전 시간은 약 1시간 정도 소요됩니다.
완전히 충전된 면도기는 최대 60분 또는
20일까지 사용 가능합니다.
참고: 배터리가 완전히 충전되면,
디스플레이에 남은 면도 시간(분)이
표시됩니다(‘디스플레이’란의 ‘배터리
완전 충전’ 섹션 참조).
처음 사용하기 전이나 디스플레이에 배터리가
거의 방전되었다는 표시가 나타나면 면도기를
충전하십시오(‘디스플레이’란의 ‘배터리
부족’ 섹션 참조).
고속 충전
면도기를 5분 정도 충전하면 1회 면도에
충분합니다.
Page 41

한국어 41
충전기에서 충전
1 소형 플러그를 충전기에 꽂으십시오.
2 충전기를 ‘딸깍’ 소리가 나게
펼치십시오.
3 어댑터를 벽면 콘센트에 꽂으십시오.
4 충전기에 면도기를 끼웁니다.
, 디스플레이에 면도기가 충전 중임이
표시됩니다(‘디스플레이’란 참조).
젯 클린 시스템에서 충전
1 젯 클린 시스템에 소형 플러그를
꽂으십시오.
2 어댑터를 벽면 콘센트에 꽂으십시오.
3 면도기 뒤쪽이 거치대를 향하도록 거치대
위에 면도기를 거꾸로 걸어 놓으십시오.
참고: 쉐이빙 유닛에 보호 캡이 있는 경우에는
면도기를 젯 클린 시스템에 놓을 수 없습니다.
참고: 면도기를 거꾸로 돌리면 디스플레이의
시간(분) 표시등도 거꾸로 표시되므로 계속
배터리 충전 수준을 확인할 수 있습니다.
Page 42

한국어42
4 면도기를 2개의 클립 뒤에 있는 거치대에
놓고(1) 고정될 때까지 밀어 넣으십시오
(2).
, 디스플레이에 면도기가 충전 중임이
표시됩니다(‘디스플레이’란의 ‘충전’
섹션 참조).
면도기 사용법
면도
피부 적응 기간
처음으로 면도할 때 기대한 결과를 얻지 못할
수도 있으며 약간의 자극을 느낄 수 있습니다.
하지만 흔히 나타나는 현상이며 새로운 면도
시스템에 피부 및 수염이 익숙해지려면 시간이
걸립니다.
새로운 면도기에 피부가 익숙해지려면 3주간
정기적(1주일에 최소 3회)으로 면도하는 것이
좋습니다. 이 기간 동안 새로운 전기 면도기만
사용하고 다른 면도기를 사용하지 마십시오.
다른 면도기를 사용한 경우, 새로운 면도
시스템에 피부가 적응하기까지 시간이 좀 더
걸립니다.
1 전원 버튼을 한 번 눌러 면도기를
켜십시오.
, 디스플레이에 몇 초 동안 조명이
들어옵니다.
2 쉐이빙 헤드를 피부에 대고 원을 그리듯이
고루 문지르십시오.
- 직선으로 움직이지 마십시오.
Page 43

한국어 43
3 전원 버튼을 한 번 눌러 면도기를
끄십시오.
, 디스플레이에 몇 초 동안 조명이 들어온
다음 남은 배터리 용량이 표시됩니다.
습식 면도
쉐이빙 폼 또는 쉐이빙 젤을 이용하여 피부에
물기가 있는 상태에서도 이 면도기를 사용할
수 있습니다.
쉐이빙 폼 또는 쉐이빙 젤을 이용해 면도를
하려면 다음 단계를 따르십시오.
1 피부를 물로 적십니다.
2 쉐이빙 폼이나 쉐이빙 젤을 피부에
바르십시오.
3 쉐이빙 유닛이 피부 위에서 부드럽게
미끄러지도록 쉐이빙 유닛을 물에
헹구십시오.
4 전원 버튼을 한 번 눌러 면도기를
켜십시오.
5 쉐이빙 헤드를 피부에 대고 원을 그리듯이
고루 문지르십시오.
참고: 쉐이빙 유닛이 피부 위에서 계속
부드럽게 미끄러지도록 쉐이빙 유닛을
반복해서 물에 헹구십시오.
6 사용 후 얼굴을 말리고 면도기를 철저히
청소하십시오(‘청소 및 유지관리’란
참조).
참고: 모든 폼과 쉐이빙 젤이 면도기에서 씻겨
나갔는지 확인하십시오.
Page 44

한국어44
트리머 사용법
트리머를 사용하여 구레나룻 및 콧수염을
다듬을 수 있습니다.
1 쉐이빙 유닛을 앞으로 밀어 면도기에서
분리하십시오.
참고: 면도기에서 분리하는 도중에 쉐이빙
유닛을 비틀지 마십시오.
2 전원 버튼을 한 번 눌러 면도기를
켜십시오.
, 디스플레이에 몇 초 동안 조명이
들어옵니다.
3 트리머 슬라이드를 앞쪽으로 밀어
트리머를 빼내십시오.
4 이제 수염 다듬기를 시작할 수 있습니다.
5 트리머 슬라이드를 뒤쪽으로 밀어
트리머를 다시 넣으십시오.
6 전원 버튼을 한 번 눌러 면도기를
끄십시오.
, 디스플레이에 몇 초 동안 조명이 들어온
다음 남은 배터리 용량이 표시됩니다.
7 쉐이빙 유닛을 면도기 상단의 홈에 넣고
(1) 쉐이빙 유닛을 아래쪽으로 눌러 (2)
면도기에 연결하십시오 (‘딸깍’ 소리가
남).
Page 45

한국어 45
턱수염 스타일러 액세서리 사용
1 면도기의 전원이 꺼져 있는지
확인하십시오.
2 쉐이빙 유닛을 앞으로 밀어 면도기에서
분리하십시오.
참고: 면도기에서 분리하는 도중에 쉐이빙
유닛을 비틀지 마십시오.
3 턱수염 스타일러 액세서리를 면도기
상단의 홈에 넣고 (1) 턱수염 스타일러
액세서리를 아래쪽으로 눌러 (2) 면도기에
연결하십시오(‘딸깍’ 소리가 남).
빗이 장착된 턱수염 스타일러 액세서리 사용
빗이 장착된 턱수염 스타일러 액세서리를
사용하면 길이 설정 기능을 통해 다양한
길이로 턱수염을 스타일링할 수 있습니다.
수염 길이 설정은 면도 후 남겨지는 수염
길이를 나타내며 1 - 5mm의 범위입니다.
1 빗을 턱수염 스타일러 액세서리 양쪽에
있는 홈에 ‘딸깍’ 소리가 나도록 제대로
끼우십시오.
2 길이 선택 레버를 누른 후(1) 왼쪽 또는
오른쪽으로 밀어서(2) 원하는 체모 길이
설정을 선택하십시오.
Page 46

한국어46
3 전원 버튼을 눌러 면도기를 켜십시오.
4 이제 턱수염 스타일링을 시작할 수
있습니다.
빗 없이 턱수염 스타일러 액세서리 사용
빗 없이 턱수염 스타일러 액세서리를 사용하여
턱수염, 콧수염 또는 구레나룻을 윤곽 정리할
수 있습니다.
1 턱수염 스타일러 액세서리에서 빗을 당겨
빼내십시오.
참고: 턱수염 스타일러 액세서리에서
빗 중앙을 잡아 당겨 빼내십시오. 빗의
가장자리를 당기지 마십시오.
2 전원 버튼을 눌러 면도기를 켜십시오.
3 이제 턱수염, 콧수염, 구레나룻 또는
목선을 윤곽 정리할 수 있습니다.
턱수염 스타일링
다음과 같은 스타일로 수염을 연출할 수
있습니다.
Page 47

- 은은한 수염
- 풍성한 수염
- 콧수염
- 아래턱 수염
한국어 47
Page 48

한국어48
청소 및 유지관리
면도기 및 젯 클린 시스템을 청소할 때는
절대로 수세미, 연마성 세제 또는 휘발유,
아세톤과 같은 강력 세제를 사용하지
마십시오.
- 젯클린 시스템을 사용하는 것이 면도기를
청소하는 가장 효과적이고 위생적인
방법이지만 흐르는 물에 헹구거나 면도기와
함께 제공된 청소용 브러쉬로 청소할 수도
있습니다.
- 뜨거운 물을 사용하는 경우 주의하십시오.
화상을 입지 않도록 물이 너무 뜨겁지
않은지 항상 확인하십시오.
- 최적의 면도 성능을 유지하려면 매번 면도
후 면도기를 청소하십시오.
- 면도기의 외부는 젖은 천으로 닦으십시오.
- 면도기를 정기적으로 청소하면 더 좋은 면도
효과를 얻을 수 있습니다.
쉐이빙 유닛 청소
뜨거운 물을 사용하는 경우 주의하십시오.
화상을 입지 않도록 물이 너무 뜨겁지 않은지
항상 확인하십시오.
1 쉐이빙 유닛을 뜨거운 수돗물로 한동안
세척하십시오.
2 세 개의 쉐이빙 헤드를 하나씩 당겨서
여십시오.
Page 49

한국어 49
3 세 개의 쉐이빙 헤드와 수염받이를 모두
뜨거운 물로 30초간 헹구십시오.
참고: 함께 제공된 청소용 브러시로 쉐이빙
헤드와 수염받이를 청소할 수도 있습니다.
뜨거운 물을 사용하는 경우 주의하십시오.
화상을 입지 않도록 물이 너무 뜨겁지 않은지
항상 확인하십시오.
4 물기가 남아 있지 않도록 흔들어 털고
쉐이빙 유닛이 완전히 건조될 때까지
쉐이빙 헤드를 열린 상태로 두십시오.
절대로 수건이나 휴지로 쉐이빙 유닛의 물기를
닦아내지 마십시오. 쉐이빙 헤드가 손상될 수
있습니다.
젯 클린 시스템을 사용하여 쉐이빙유닛 청소
- 모델 RQ1008의 세척 프로그램에는
저전력(Eco), 일반(Auto), 집중(Intensive)
프로그램의 세 가지가 있습니다. 원하는
세척 프로그램을 선택하려면 업/다운 버튼을
누르십시오.
참고: 저전력 (Eco) 프로그램은 건조 시간이
짧기 때문에 에너지가 절약되며, 집중
(Intensive) 프로그램은 더욱 깨끗한 세척이
가능한 프로그램입니다.
젯 클린 시스템 사용 준비
처음 사용하기 전에 세척 용기를 채우십시오.
1 젯 클린 시스템에 소형 플러그를
꽂으십시오.
Page 50

한국어50
2 어댑터를 벽면 콘센트에 꽂으십시오.
, 거치대가 자동으로 가장 높은 위치로
이동합니다.
3 세척 용기 양쪽의 열림 버튼을 동시에
누르고(1) 젯 클린 시스템을 세척 용기에서
들어 올리십시오(2).
, 세척 용기만 남겨집니다.
4 HQ200 세정액이 들어있는 병의 뚜껑을
돌려서 여십시오.
5 세척 용기에 HQ200 세척액을 두 선 사이
정도까지 채우십시오.
6 젯 클린 시스템을 세척 용기 위에 다시
올려 놓으십시오.
열림 버튼이 다시 제자리에 고정되었는지
확인하십시오.
젯 클린 시스템 사용
참고: 쉐이빙 폼 또는 쉐이빙 젤을 이용하여
면도기를 사용하는 경우, 면도기를 젯 클린
시스템에서 세척하기 전에 뜨거운 수돗물로
헹구는 것이 좋습니다. 이렇게 하면 세척액의
최적 수명이 보장됩니다.
1 면도기 뒤쪽이 거치대를 향하도록 거치대
위에 면도기를 거꾸로 걸어 놓으십시오.
2 면도기를 2개의 클립 뒤에 있는 거치대에
놓고 (1) 고정될 때까지 밀어 넣으십시오
(2).
, 디스플레이에 면도기가 충전 중임이
표시됩니다 (‘디스플레이’란 참조).
Page 51

한국어 51
3 젯 클린 시스템의 전원 버튼을 눌러 세척
프로그램을 시작하십시오.
, 면도기 디스플레이에서 충전 표시등이
사라집니다.
, 세척 표시등이 깜박이기 시작하고 면도기가
자동으로 세척액에 잠깁니다.
, 세척 프로그램이 진행되는 내내 세척
표시등이 깜박이며, 이 과정은 몇 분 정도
소요됩니다.
참고: 일반(Auto) 및 저전력 (Eco) 프로그램은
4~6 분 정도 소요됩니다. 집중 (Intensive)
프로그램은 약 35분 소요됩니다.
, 세척 프로그램 1단계에서는 면도기의
전원이 여러 번 켜졌다 꺼지고 위 아래로
움직입니다.
, 세척 프로그램 2단계에서는 면도기 위치가
건조로 바뀌고 건조를 나타내는 표시등이
깜박입니다. 이 단계는 약 2시간 정도
소요되며 프로그램이 종료될 때까지 이
위치를 유지합니다.
참고: 저전력(Eco) 프로그램을 선택한 경우,
건조 단계에서 1시간이 소요됩니다.
, 세척 프로그램이 끝나면 면도기
디스플레이에 충전 표시등이 나타납니다
(‘디스플레이’란 참조).
참고: 세척이 진행되는 도중 젯 클린 시스템의
전원 버튼을 누르면 프로그램이 중지됩니다.
이런 경우 세척 또는 건조 표시등의
깜박임이 멈추고 거치대가 가장 높은 곳으로
이동합니다.
Page 52

한국어52
참고: 세척이 진행되는 도중 벽면 콘센트에서
어댑터를 빼면 세척 프로그램이 중지됩니다.
거치대는 현재 위치에서 이동하지 않습니다.
어댑터를 다시 벽면 콘센트에 꽂으면 거치대가
가장 높은 곳으로 이동합니다.
- 세척액이 최소 수준 이하로 떨어지면 세척
표시등과 ‘세척 용기 비었음’ 표시등이
깜박이기 시작하고 거치대가 시작 위치로
되돌아옵니다.
- 매일 젯 클린 시스템을 이용하여 면도기를
청소할 경우 15일에 한 번 정도 세척 용기를
채우면 됩니다.
젯 클린 시스템 청소
세척 용기는 15일마다 청소하십시오.
젯 클린 시스템의 외부는 젖은 천으로 닦을 수
있습니다.
1 젯 클린 시스템 양쪽의 열림 버튼을 동시에
누르고(1) 젯 클린 시스템을 세척 용기에서
들어 올리십시오(2).
, 세척 용기만 남겨집니다.
2 세척 용기에 남아 있는 세척액을
따라내십시오.
세척액은 싱크대 하수구에 버릴 수 있습니다.
3 세척 용기는 수돗물로 헹구십시오.
세척 용기는 식기 세척기에 사용할 수
없습니다.
Page 53

한국어 53
4 세척 용기에 HQ200 세척액을 두 선 사이
정도까지 채우십시오.
5 젯 클린 시스템을 세척 용기 위에 다시
올려 놓으십시오.
열림 버튼이 다시 제자리에 고정되었는지
확인하십시오.
부품별 청소 방법
제품의 전원이 꺼져 있는지 확인하십시오.
1 쉐이빙 유닛을 앞으로 밀어 면도기에서
분리하십시오.
참고: 면도기에서 분리하는 도중에 쉐이빙
유닛을 비틀지 마십시오.
2 세 개의 쉐이빙 헤드를 하나씩 당겨서
여십시오.
3 고정장치(2)가 열릴 때까지 고정장치 열림
탭(1)을 누르십시오.
Page 54

한국어54
참고: 쉐이빙 헤드는 커터와 쉐이빙 보호대가
한 조로 이루어져 있으므로 섞이지 않도록 한
조씩 청소하십시오. 커터를 잘못된 쉐이빙
보호대에 끼우면, 면도 성능이 정상으로
돌아오기까지 몇 주가 걸릴 수도 있습니다.
4 쉐이빙 보호대에서 제품을 꺼내십시오.
5 면도기와 함께 제공된 청소용 브러시로
커터를 청소하십시오.
6 쉐이빙 보호대 내부를 청소하십시오.
7 청소한 후에는 칼날 끝이 아래를 향하도록
칼날을 쉐이빙 보호대에 다시 끼우십시오.
8 고정장치를 커터 위로부터 아래쪽으로
누르십시오.
9 쉐이빙 헤드를 닫으십시오.
Page 55

한국어 55
10 쉐이빙 유닛을 면도기 상단의 홈에 넣고
(1) 쉐이빙 유닛을 아래쪽으로 눌러(2)
면도기에 연결하십시오(‘딸깍’ 소리가
남).
트리머 청소
트리머는 사용할 때마다 청소하십시오.
1 트리머 슬라이드를 앞쪽으로 밀어
트리머를 빼내십시오.
2 트리머를 뜨거운 수돗물로 한동안
세척하십시오.
3 트리머 슬라이드를 뒤쪽으로 밀어
트리머를 다시 넣으십시오.
도움말: 최적의 트리머 성능을 위해 6개월마다
트리머의 날 부분에 재봉틀용 기름을 한
방울씩 떨어 뜨려 바르십시오.
턱수염 스타일러 액세서리 세척
사용 후에는 항상 턱수염 스타일러 액세서리를
세척하십시오.
1 턱수염 스타일러 액세서리에서 빗을 당겨
빼내십시오.
2 턱수염 스타일러 액세서리와 빗을
분리하여 가끔씩 뜨거운 물로 헹구십시오.
Page 56

한국어56
참고: 제공된 청소용 브러시를 사용하여
턱수염 스타일러 액세서리 및 빗을 청소할
수도 있습니다.
3 6개월마다 트리머의 날 부분에 재봉틀용
기름을 한 방울씩 치십시오.
보관
1 쉐이빙 헤드가 손상되지 않도록 쉐이빙
유닛에 보호 캡을 씌우십시오.
2 면도기를 제공된 파우치에 넣어
보관하십시오.
교체
최고의 면도 성능을 위해서는 2년마다 쉐이빙
유닛을 교체하는 것이 좋습니다.
MINUTES LEFT
MINUTES LEFT
정품 RQ12 필립스 쉐이빙 유닛으로만 쉐이빙
유닛을 교체하십시오.
1 면도기의 전원을 끄면 전기면도기
표시등이 깜빡이고, 신호음이 울립니다.
참고: 다른 모델의 디스플레이는 모양이
다르지만 동일한 표시등이 나타납니다.
2 쉐이빙 유닛을 앞으로 밀어 면도기에서
분리하십시오.
참고: 면도기에서 분리하는 도중에 쉐이빙
유닛을 비틀지 마십시오.
3 쉐이빙 유닛을 면도기 상단의 홈에 넣고(1)
신제품 RQ12 쉐이빙 유닛을 아래쪽으로
눌러(2) 면도기에 연결하십시오(‘딸깍’
소리가 남).
Page 57

한국어 57
4 3회 면도 시 교체 알림이 자동으로
해제됩니다.
액세서리 주문
본 제품의 액세서리를 주문하려면 필립스
웹사이트 www.philips.co.kr 을 방문하십시오.
해당 국가에서 온라인 쇼핑이 불가능한 경우
필립스 대리점이나 필립스 서비스 센터에
문의하십시오. 본 제품의 액세서리를 구하기
어려운 경우에는 필립스 고객 상담실로
문의하십시오. 연락처 정보는 전세계 제품
보증서에 기재되어 있습니다.
다음과 같은 부품을 별도로 판매하고
있습니다만 국가별로 다를 수 있으니
고객상담실이나 서비스 센터에 문의하시기
바랍니다.
- HQ8505 어댑터
- RQ12 필립스 쉐이빙 유닛
- HQ110 필립스 쉐이빙헤드 클리닝 스프레이
- HQ200 필립스 세척액
- RQ111 턱수염 스타일러 액세서리
쉐이빙 헤드
- 2년에 한 번씩 쉐이빙헤드를 교체하는 것이
좋습니다. 교체 시에는 항상 정품 RQ12
필립스 쉐이빙 유닛으로 교체하십시오.
세정
- 젯클린 세정액(HQ200)으로 쉐이빙헤드를
정기적으로 청소하십시오.
Page 58

한국어58
환경
- 수명이 다 된 제품은 일반 가정용 쓰레기와
함께 버리지 마시고 지정된 재활용 수거
장소에 버리십시오. 이런 방법으로 환경
보호에 동참하실 수 있습니다.
- 내장형 충전식 면도기의 배터리에는
환경을 오염시키는 물질이 들어 있습니다.
면도기를 버리기 전에 항상 면도기에서
배터리를 분리하여 지정된 수거함에 버려
주십시오. 배터리는 지정된 배터리 수거함에
버리십시오. 배터리를 분리하기 어려울 경우
필립스 서비스 센터에 면도기를 가져오시면
배터리를 분리하여 안전한 방법으로 폐기해
드립니다.
면도기의 충전식 배터리 분리
면도기를 폐기할 때에만 충전식 배터리를
분리하십시오. 분리 시 배터리가 완전히
방전되었는지 확인하십시오.
배터리의 면이 날카로우니 조심하십시오.
1 드라이버로 면도기의 뒤쪽 패널을
분리하십시오.
2 충전식 배터리를 분리하십시오.
보증 및 지원
보다 자세한 정보나 지원이 필요한 경우에는
필립스 웹사이트 (www.philips.com/support)
를 방문하시거나 제품 보증서를 참조하십시오.
보증 제한
쉐이빙 헤드(커터 및 쉐이빙 보호대)는
소모품이므로 보증 대상이 아닙니다.
Page 59

문제 해결
이 란은 본 제품을 사용하면서 가장
일반적으로 경험하게 되는 문제와 그 해결
방법을 제시합니다. 아래의 정보로도 문제를
해결할 수 없는 경우 www.philips.com/
support 를 방문하여 자주 묻는 질문(FAQ)
목록을 참조하거나 필립스 고객 상담실로
문의하십시오.
문제점 가능한 원인 해결책
한국어 59
면도기가
예전처럼
잘 작동하
지 않습니
다.
전원 버튼
을 눌러도
면도기가
작동하지
않습니다.
쉐이빙헤드가 손상 또는
마모되었습니다.
긴 체모가 쉐이빙헤드에
걸렸을 수 있습니다.
세척 용기에 있는 세척액
이 더럽거나 조금 밖에 없
어 젯 클린 시스템이 면도
기를 제대로 세척하지 못
합니다.
충전식 배터리가 방전되었
습니다.
쉐이빙 유닛을 교체
하십시오
(‘교체’란 참조).
면도기 부품별 청소
방법을 참조하여 쉐
이빙 헤드를 청소하
십시오
(‘청소 및 유지 관
리’란 참조).
면도를 계속하기 전
에 면도기를 깨끗하
게 청소하십시오. 필
요한 경우 세척 용
기를 청소하고 세척
액을 다시 채우십시
오 (‘청소 및 유지관
리’란 참조).
배터리를 재충전 하
십시오 (‘충전’
란 참조).
Page 60

한국어60
문제점 가능한 원인 해결책
면도기를
젯 클린 시
스템에서
세척해도
깨끗하지
않습니다.
모터가 작동할 수 없을 만
큼 쉐이빙 유닛이 더럽거
나 손상되었습니다. 이런
경우 쉐이빙 유닛 표시등,
수도꼭지 표시등 및 느낌
표가 깜박입니다.
면도기의 온도가 너무 높
습니다. 이런 경우 면도기
가 작동하지 않고 디스플
레이에 느낌표가 깜박입
니다.
세척 용기에 있는 세척액
이 더럽습니다.
세척액이 조금 밖에 없습
니다. 세척 용기의 세척액
이 최저 수준 이하로 떨어
지면 청소 프로그램이 중
지됩니다. 세척 표시등과
‘세척 용기 비었음’ 표
시등이 일정 간격으로 깜
박이고 거치대가 시작 위
치로 되돌아옵니다.
정품 필립스 세척액이 아
닌 다른 세척액을 사용했
습니다.
쉐이빙 유닛을 청소
하거나 교체하십시오
(‘필터 청소 및 유지
관리’ 및
‘교체’ 부분 참조).
면도기를 끄고 식을
때까지 기다립니다.
면도기의 온도가 충
분히 낮아지면 즉시
면도기의 전원을 다
시 켤 수 있습니다.
세척 용기를 비워서
헹군 후 새 세척액으
로 채우십시오.
세척 용기에 세척액
을 두 선 사이 정도
까지 다시 채우십시
오 (‘청소 및 유지관
리’란 참조).
HQ200 필립스 세
척액만을 사용하십
시오.
Page 61

문제점 가능한 원인 해결책
한국어 61
전원 버튼
을 눌러도
젯 클린 시
스템이 작
동하지 않
습니다.
면도기를
충전기/젯
클린 시스
템에서 충
전했지만
완전히 충
전되지 않
습니다.
면도기가
완전히 충
전된 후에
도 디스플
레이에는
면도 시간
(분)이 60
분 미만으
로 표시됩
니다.
젯 클린 시스템이 주 전
원에 연결되어 있지 않습
니다.
젯 클린 시스템에 면도기
가 제대로 놓이지 않았기
때문에 젯 클린 시스템과
면도기가 연결되지 않았
습니다.
충전기/젯 클린 시스템에
면도기가 제대로 놓이지
않았습니다.
면도기에는 면도기의 에
너지 소비량을 모니터링하
고 남은 배터리 용량을 면
도 시간으로 전환하는 지
능형 자체 학습 시스템이
탑재되어 있습니다. 에너
지 소비량 및 남은 면도 시
간(분)은 피부, 수염 형태
및 면도 습관에 따라 달라
집니다
(예: 쉐이빙 젤 사용 여부).
젯 클린 시스템에 소
형 플러그를 꽂은 다
음 어댑터를 벽면 콘
센트에 꽂으십시오.
면도기를 거치대에
단단히 눌러 올바르
게 고정하십시오.
면도기를 고정될 때
까지 누르도록 하십
시오.
완전히 충전된 면도
기의 면도 시간(분)이
60분 미만일 경우,
이것은 매우 일반적
인 현상이며 면도기
의 배터리 용량이 줄
어든 것이 아닙니다.
Page 62

РУССКИЙ62
Введение
Поздравляем с покупкой продукции Philips! Для
получения полной поддержки, оказываемой
компанией Philips, зарегистрируйте прибор на
веб-сайте www.philips.com/welcome.
Прочтите данное руководство, содержащее
сведения о возможностях бритвы, а также
некоторые советы, которые сделают
использование бритвы более приятным.
Общее описание (Рис. 1)
A Бритва
1 Дисплей
2 Кнопка включения/выключения бритвы
3 Защитный колпачок
4 Бритвенный блок RQ12
5 Триммер
6 Переключатель включения/выключения
триммера
B Насадка-стайлер для бороды RQ111
7 Регулятор длины волос
8 Гребень насадки-стайлера для бороды
C Складное зарядное устройство
D Система очистки Jet Clean
9 Символ пустого отсека для очистки
10 Значок очистки
11 Значок сушки
12 Кнопка включения/выключения системы
очистки Jet Clean
13 Кнопка отсоединения отсека для очистки
14 Держатель бритвы
E Щеточка для очистки
F Чистящая жидкость HQ200
G Футляр
H Адаптер
Page 63

РУССКИЙ
Важная информация
Прежде чем пользоваться бритвой и системой
очистки Jet Clean, внимательно ознакомьтесь
с данным руководством и сохраните его для
дальнейшего использования.
Примечание В настоящем руководстве
пользователя понятие “приборы” означает
бритву и систему очистки Jet Clean. Если система
очистки Jet Clean не входит в комплект бритвы,
данное понятие подразумевает только бритву.
Общие сведения
Опасно!
- Убедитесь, что адаптер питания сухой.
Предупреждение
- В конструкцию адаптера входит
трансформатор. Запрещается заменять адаптер
или присоединять к нему другие штекеры: это
опасно.
- Данные приборы не предназначены
для использования лицами (включая
детей) с ограниченными возможностями
сенсорной системы или ограниченными
интеллектуальными возможностями, а также
лицами с недостаточным опытом и знаниями,
кроме случаев, когда приборы используются
под контролем и при инструктировании со
стороны лиц, ответственных за безопасность
таких людей.
- Не позволяйте детям играть с приборами.
- Соблюдайте осторожность при очистке
приборов горячей водой. Проверяйте
температуру воды, чтобы избежать ожогов.
63
Page 64

РУССКИЙ64
Внимание!
- Запрещается погружать систему очистки
Jet Clean и зарядное устройство в воду и
промывать под струей воды.
- Приборы и аксессуары запрещается мыть в
посудомоечной машине.
- Помещайте и используйте приборы на
водоустойчивой поверхности.
- Использование приборов, их зарядка и
хранение должны производиться при
температуре от 5 °C до 35 °C.
- Пользуйтесь только аксессуарами, входящими
в комплект.
- Адаптер вилки электропитания преобразует
напряжение 100-240 вольт до безопасного
напряжения ниже 24 вольт.
- Запрещается использовать поврежденные
приборы и аксессуары.
- Если адаптер или любой другой аксессуар
повреждены, заменяйте их только
оригинальными аксессуарами, чтобы
обеспечить безопасную эксплуатацию.
- При промывании бритвы из гнезда штекера
может вытекать вода. Это нормально и не
представляет опасности при использовании
бритвы, так как электроэлементы внутри
бритвы находятся в герметичном блоке
питания.
- Насадки предназначены только для
подравнивания волос на лице (бороды, усов и
висков).
Page 65

РУССКИЙ 65
Система очистки Jet Clean
Внимание!
- Для системы очистки Jet Clean используйте
только оригинальную чистящую жидкость
HQ200.
- Чтобы чистящая жидкость не пролилась,
обязательно устанавливайте систему очистки
Jet Clean на горизонтальной, ровной и
устойчивой поверхности.
- Запрещается погружать систему Jet Clean в воду.
- Жидкость из отсека для очистки необходимо
сливать и тщательно промывать отсек горячей
водопроводной водой каждые 15 дней.
- Система очистки Jet Clean тщательно очищает,
но не дезинфицирует бритву, поэтому
бритва должна оставаться предметом
индивидуального использования.
- Отсек для очистки системы очистки Jet Clean
нельзя мыть в посудомоечной машине.
- Когда система очистки Jet Clean готова к
работе, ее нельзя перемещать, чтобы не
разлить чистящую жидкость.
Соответствие стандартам
- Бритва соответствует принятому
международному стандарту по технике
безопасности, и ей можно пользоваться в ванной
или под душем и чистить ее под струей воды.
- Данные устройства Philips соответствуют
стандартам по электромагнитным полям
(ЭМП). При правильном обращении согласно
инструкциям, приведенным в руководстве
пользователя, применение устройств
безопасно в соответствии с современными
научными данными.
Page 66

РУССКИЙ66
MINUTES LEFT
MINUTES LEFT
Дисплей
Примечание Перед началом эксплуатации
прибора снимите защитную пленку с дисплея.
Зарядка
- Зарядка аккумулятора занимает около 1 часа.
- Во время зарядки бритвы на дисплее
отображается мигающая индикация времени в
минутах.
- Значение минут возрастает, пока аккумулятор
бритвы не будет полностью заряжен.
- Быстрая зарядка: при уровне заряда,
достаточном для одного сеанса бритья,
индикация времени (5 минут) отображается на
дисплее красным цветом.
Аккумулятор полностью заряжен
MINUTES LEFT
MINUTES LEFT
- При полной зарядке аккумулятора индикаторы
времени в минутах начинают гореть ровным
светом. Приблизительно через полчаса
дисплей снова автоматически выключается.
Примечание Бритва оснащена интеллектуальной
самообучающейся системой, которая на
основе информации об энергопотреблении
рассчитывает оставшееся время автономной
работы. Энергопотребление и оставшееся
время автономной работы зависят от типа
кожи и щетины, а также особенностей бритья
(например, от использования геля для бритья).
Если указанное время автономной работы
бритвы от полностью заряженного аккумулятора
составляет менее 60 минут, это не является
свидетельством неисправности или снижения
емкости аккумулятора.
Page 67

РУССКИЙ 67
Низкий уровень заряда аккумулятора
MINUTES LEFT
MINUTES LEFT
MINUTES LEFT
MINUTES LEFT
MINUTES LEFT
MINUTES LEFT
- При почти полной разрядке аккумулятора
(когда остается не более 5 минут автономной
работы прибора) индикация времени в
минутах на дисплее начинает мигать.
- После выключения бритвы индикация времени
в минутах продолжает мигать еще несколько
секунд. При полной разрядке прибора звучит
звуковой сигнал.
Текущее состояние зарядки аккумулятора
- Оставшийся заряд аккумулятора отображается
на дисплее в минутах.
Очистка бритвы
Для оптимального качества работы бритвы
рекомендуется очищать ее после каждого
использования.
- В качестве напоминания о необходимости
очистки бритвы на дисплее мигает символ
водопроводного крана.
Замена бритвенного блока
Для оптимального качества работы бритвы
рекомендуется заменять бритвенный блок раз в
два года.
Page 68

РУССКИЙ68
MINUTES LEFT
MINUTES LEFT
MINUTES LEFT
MINUTES LEFT
- Прибор оснащен функцией напоминания
о необходимости замены бритвенного
блока, которая включается автоматически
по истечении примерно двух лет. Звуковое
напоминание о замене отключается после
3 последовательных сеансов бритья или после
сброса параметров бритвы.
Режим энергосбережения
Прибор можно использовать в режиме
энергосбережения. При переводе бритвы в этот
режим индикатор кнопки включения/выключения
прибора выключается для экономии энергии.
- Если выключенная бритва зафиксирует
движение, которое будет продолжаться в
течение 5 минут (например, если вы взяли
ее с собой в дорогу), то она автоматически
перейдет в режим экономии энергии. В
этом режиме случайное включение бритвы
невозможно.
, На дисплее начнет мигать значок
блокировки, обозначающий переход в режим
энергосбережения.
- Чтобы отключить режим энергосбережения,
просто нажмите кнопку включения/
выключения.
Блокировка бритвенных головок
- Если бритвенные головки заблокированы, на
дисплее начнут мигать символ бритвенного
блока и символ водопроводного крана с
восклицательным знаком. В этом случае мотор
не включается, так как бритвенные головки
загрязнены или повреждены.
Page 69

РУССКИЙ 69
- При этом необходимо очистить бритвенный
блок или заменить его.
- На дисплее продолжают мигать символ
бритвенного блока и символ водопроводного
крана с восклицательным знаком, пока
блокировка бритвенных головок не будет
снята.
Зарядка
Зарядка аккумулятора занимает около 1 часа.
Полностью заряженный аккумулятор
обеспечивает автономную работу бритвы до
60 минут/20 дней.
Примечание Когда аккумулятор полностью
заряжен, на дисплее отображается фактическое
время оставшейся автономной работы в минутах
(см. раздел “Аккумулятор полностью заряжен” в
главе “Дисплей”).
Зарядите бритву перед первым использованием,
а затем выполняйте зарядку, когда на дисплее
будет загораться индикатор, обозначающий
низкий уровень заряда аккумулятора (см. раздел
“Низкий уровень заряда аккумулятора” главы
“Дисплей”).
Быстрая зарядка
После зарядки аккумулятора бритвы в течение
5 минут энергии достаточно для одного сеанса
бритья.
Page 70

РУССКИЙ70
Зарядка при помощи зарядного
устройства
1 Подключите малый штекер к зарядному
устройству.
2 Откройте зарядное устройство (должен
прозвучать щелчок).
3 Подключите адаптер к розетке электросети.
4 Поместите бритву в зарядное устройство.
, Индикация дисплея показывает, что идет
зарядка аккумулятора бритвы (см. главу
“Дисплей”).
Зарядка в системе очистки Jet Clean
1 Вставьте маленький штекер в систему
очистки Jet Clean.
2 Подключите адаптер к розетке электросети.
3 Переверните бритву и поместите ее над
держателем (задняя панель бритвы должна
быть обращена к держателю).
Примечание Если защитный колпачок установлен
на бритвенный блок, бритву невозможно
установить в систему очистки Jet Clean.
Page 71

РУССКИЙ 71
Примечание Если перевернуть бритву, индикация
времени в минутах, отображаемая на дисплее,
переворачивается соответственно для удобства
определения уровня заряда аккумулятора.
4 Установите бритву в держатель (1) и
прижмите так, чтобы она встала на место со
щелчком (2).
, Индикация дисплея показывает, что идет
зарядка аккумулятора бритвы (см. раздел
“Зарядка” главы “Дисплей”).
Использование бритвы
Бритье
Период адаптации кожи
В самом начале использования вы можете быть
немного разочарованы результатом бритья.
На коже возможно появление небольшого
раздражения. Чтобы кожа привыкла к новой
бритве, нужно время.
В течение первых 3 недель рекомендуем бриться
регулярно (не менее 3 раз в неделю), чтобы
дать коже возможность привыкнуть к новой
бритве. В это время пользуйтесь только новой
электробритвой и исключите другие способы
бритья. При использовании разных способов
бритья адаптация к новой бритве будет
проходить дольше и труднее.
1 Нажмите кнопку включения/выключения
для включения прибора.
, Дисплей подсвечивается в течение
нескольких секунд.
Page 72

РУССКИЙ72
2 Перемещайте бритвенные головки по коже,
совершая круговые движения.
- Не перемещайте бритву по коже прямыми
движениями.
3 Нажмите кнопку включения/выключения
для выключения прибора.
, На несколько секунд включается подсветка
дисплея, затем отображается оставшийся
заряд аккумулятора.
Влажное бритье
Эту бритву также можно использовать на смоченной
коже вместе с пеной или гелем для бритья.
Чтобы использовать бритву с пеной или гелем
для бритья, выполните следующие действия.
1 Смочите кожу водой.
2 Нанесите на кожу пену или гель для бритья.
3 Ополосните бритвенный блок под струей
воды, чтобы обеспечить легкое скольжение
по коже.
4 Нажмите кнопку включения/выключения
для включения прибора.
5 Перемещайте бритвенные головки по коже,
совершая круговые движения.
Примечание Чтобы обеспечить гладкое
скольжение по коже, регулярно промывайте
бритву под струей воды.
6 Высушите лицо и тщательно очистите
бритву после использования (см. главу
“Очистка и уход”).
Примечание Убедитесь, что после очистки на
бритве не осталось пены или геля для бритья.
Page 73

РУССКИЙ 73
Подравнивание
Триммер можно использовать для
подравнивания усов и висков.
1 Снимите бритвенный блок с бритвы,
потянув за него.
Примечание Снимая бритвенный блок с бритвы,
не вращайте его.
2 Нажмите кнопку включения/выключения
для включения прибора.
, Дисплей подсвечивается в течение
нескольких секунд.
3 Чтобы выдвинуть триммер, сдвиньте
ползунок триммера вперед.
4 Теперь можно начать подравнивание.
5 Чтобы убрать триммер, сдвиньте ползунок
триммера назад.
6 Нажмите кнопку включения/выключения
для выключения прибора.
, На несколько секунд включается подсветка
дисплея и отображается оставшийся заряд
аккумулятора.
7 Вставьте выступ бритвенного блока в паз в
верхней части бритвы (1). Затем надавите на
бритвенный блок (2), чтобы зафиксировать
его на бритве (должен прозвучать щелчок).
Page 74

РУССКИЙ74
Использование насадки-стайлера для
бороды
1 Убедитесь, что бритва выключена.
2 Снимите бритвенный блок с бритвы,
потянув за него.
Примечание Снимая бритвенный блок с бритвы,
не вращайте его.
3 Вставьте выступ на насадке-стайлере в паз в
верхней части бритвы (1). Затем надавите на
насадку-стайлер (2), чтобы зафиксировать ее
на бритве (должен прозвучать щелчок).
Использование насадки-стайлера для
бороды с гребнем
Насадку-стайлер можно использовать с гребнем
для подравнивания бороды до определенной
длины, а также без него. Установки длины на
насадке-стайлере для бороды означают длину
волос после стрижки (1–5 мм).
1 Установите гребень в направляющие пазы
по обеим сторонам насадки-стайлера и
надавите на него до щелчка.
2 Чтобы выбрать необходимую установку
длины волос, нажмите на регулятор длины
волос (1) и передвиньте его влево или
вправо (2).
3 Нажмите кнопку включения/выключения,
чтобы включить бритву.
Page 75

РУССКИЙ 75
4 Начните подравнивать бороду.
Использование насадки-стайлера для
бороды без гребня
Насадку-стайлер можно использовать без
гребня для моделирования бороды, усов или
бакенбардов.
1 Снимите гребень с насадки-стайлера для
бороды.
Примечание Снимите гребень. Взявшись за
центральную часть, снимите его с насадкистайлера для бороды. Не беритесь за боковые
панели гребня.
2 Нажмите кнопку включения/выключения
для включения бритвы.
3 Теперь вы можете начать моделировать
бороду, усы, бакенбарды или контур волос в
области шеи.
Формы бороды
Ниже приведены некоторые формы бороды,
которые вы можете создать сами.
- Эффект “трехдневной щетины”
Page 76

РУССКИЙ76
- Длинная борода
- Усы
- Эспаньолка
Очистка и уход
Для очистки бритвы, аксессуаров и системы
Jet Clean запрещается использовать губки с
абразивным покрытием, абразивные чистящие
средства и растворители типа бензина или
ацетона.
- Очистка бритвы в системе очистки Jet Clean
— это наиболее гигиеничный и эффективный
способ очистки. Однако бритву также можно
очищать под струей воды или при помощи
прилагаемой щеточки для очистки.
- Соблюдайте осторожность при обращении с
горячей водой. Проверяйте температуру воды,
чтобы избежать ожогов.
Page 77

РУССКИЙ 77
- Для достижения оптимальных результатов
бритья очищайте бритву после каждого сеанса
бритья.
- Наружную поверхность бритвы можно
очищать с помощью влажной ткани.
- Регулярная очистка обеспечивает лучшие
результаты бритья.
Очистка бритвенного блока
Соблюдайте осторожность при обращении с
горячей водой. Проверяйте температуру воды,
чтобы избежать ожогов.
1 Промойте бритвенный блок под струей
горячей воды.
2 Поочередно откройте три бритвенные
головки.
3 Промойте все три бритвенные головки
и все три отсека для волос под струей
горячей воды в течение 30 секунд.
Примечание Бритвенные головки и отсеки
для волос также можно очистить с помощью
прилагаемой щеточки для очистки.
Соблюдайте осторожность при обращении с
горячей водой. Проверяйте температуру воды,
чтобы избежать ожогов.
Page 78

РУССКИЙ78
4 Тщательно стряхните оставшуюся воду и
оставьте бритвенные головки открытыми,
чтобы бритвенный блок полностью высох.
Запрещается вытирать бритвенный блок
полотенцем или салфеткой. Это может
повредить бритвенные головки.
Очистка бритвенного блока в системе
очистки Jet Clean
- Бритва оснащена моделью RQ1008, которая
имеет три программы очистки: программу Eco,
автоматическую программу и интенсивную
программу. Необходимую программу очистки
можно выбрать с помощью кнопки вверх/вниз.
Примечание Программа Eco затрачивает
меньшее количество времени на просушку,
что позволяет экономить электророэнергию.
Интенсивная программа служит для выполнения
более тщательной очистки.
Подготовка системы очистки Jet Clean к
использованию
Заполните отсек для очистки перед первым
использованием.
1 Вставьте маленький штекер в систему
очистки Jet Clean.
2 Подключите адаптер к розетке электросети.
, Ручка автоматически переместится в верхнее
положение.
3 Одновременно нажмите кнопки
отсоединения по обеим сторонам отсека
для очистки (1) и, приподняв, снимите
систему очистки Jet Clean с отсека для
очистки (2).
Page 79

РУССКИЙ 79
, Отсек для очистки будет отсоединен.
4 Отвинтите колпачок с емкости для
чистящей жидкости HQ200.
5 Залейте в отсек для очистки чистящую
жидкость HQ200 до уровня между двумя
линиями.
6 Установите систему очистки Jet Clean
обратно в отсек для очистки.
Убедитесь, что кнопки отсоединения со щелчком
встали на место.
Порядок использования системы очистки
Jet Clean
Примечание При использовании бритвы с пеной
или гелем для бритья рекомендуется промывать
ее под струей горячей воды перед очисткой в
системе Jet Clean. Это позволит продлить срок
использования чистящей жидкости.
1 Переверните бритву и поместите ее над
держателем (задняя панель бритвы должна
быть обращена к держателю).
2 Установите бритву в держатель (1) и
прижмите так, чтобы она встала на место со
щелчком (2).
, Индикация дисплея показывает, что идет
зарядка аккумулятора бритвы (см. главу
“Дисплей”).
3 Нажмите кнопку включения/выключения
системы очистки Jet Clean для запуска
программы очистки.
, С дисплея исчезнет индикация зарядки.
Page 80

РУССКИЙ80
, Индикатор очистки начнет мигать, и бритва
автоматически погрузится в чистящую
жидкость.
, Во время программы очистки, которая
занимает несколько минут, индикатор
очистки непрерывно мигает.
Примечание Автоматическая программа очистки
и программа Eco занимают от 4 до 6 минут.
Интенсивная программа длится приблизительно
35 минут.
, В ходе первого этапа программы очистки
бритва несколько раз автоматически
включается и выключается и меняет
положение.
, Во время второго этапа программы очистки
бритва помещается в положение для
просушки, при этом начинает мигать символ
просушки. Этот этап занимает около 2 часов.
В этом положении бритва остается до конца
программы.
Примечание При выборе программы Eco этап
просушки занимает 1 час.
, По окончании программы очистки на дисплее
бритвы появляется индикация зарядки (см.
главу “Дисплей”).
Примечание Если во время выполнения программы
очистки нажать кнопку включения/выключения
системы очистки Jet Clean, программа будет
прервана. В этом случае индикатор очистки
или осушки перестанет мигать, а держатель
переместится в самое высокое положение.
Page 81

РУССКИЙ 81
Примечание Если во время выполнения программы
очистки отсоединить адаптер от розетки
электросети, программа будет прервана.
Держатель останется в текущем положении.
При повторном подключении адаптера к розетке
электросети, держатель переместится в
верхнее положение.
- Если объем чистящей жидкости ниже
минимального, индикатор очистки и символ
пустого отсека для очистки начнут мигать, а
держатель вернется в исходное положение.
- Если система очистки Jet Clean используется
для очистки бритвы ежедневно, отсек для
очистки следует заполнять приблизительно
каждые 15 дней.
Очистка системы очистки Jet Clean
Отсек для очистки следует очищать раз в
15 дней.
Наружную поверхность системы очистки Jet
Clean можно очищать с помощью влажной ткани.
1 Одновременно нажмите кнопки
отсоединения по обеим сторонам системы
очистки Jet Clean (1). Затем, приподняв,
снимите систему очистки Jet Clean с отсека
для очистки (2).
, Отсек для очистки будет отсоединен.
2 Слейте оставшуюся чистящую жидкость из
отсека для очистки.
Чистящую жидкость можно вылить в раковину.
3 Промойте отсек для очистки под струей
воды.
Отсек для очистки нельзя мыть в
посудомоечной машине.
Page 82

РУССКИЙ82
4 Залейте в отсек для очистки чистящую
жидкость HQ200 до уровня между двумя
линиями.
5 Установите систему очистки Jet Clean
обратно в отсек для очистки.
Убедитесь, что кнопки отсоединения со щелчком
встали на место.
Экстра тщательный способ очистки
Прибор должен быть выключен.
1 Снимите бритвенный блок с бритвы,
потянув за него.
Примечание Снимая бритвенный блок с бритвы,
не вращайте его.
2 Поочередно откройте три бритвенные
головки.
3 Нажмите кнопку открывания фиксатора (1)
и откройте фиксатор (2).
Page 83

РУССКИЙ 83
Примечание Не очищайте одновременно более
одной пары ножей, поскольку вращающийся и
неподвижный ножи каждой пары пригнаны друг
к другу. Если вы случайно перепутаете ножи, то
может потребоваться несколько недель, чтобы
восстановить оптимальные характеристики бритья.
4 Разъедините пару вращающегося и
неподвижного ножей.
5 Очищайте вращающийся нож, пользуясь
входящей в комплект щеточкой.
6 Очистите внутреннюю поверхность
неподвижного ножа.
7 После очистки установите вращающийся
нож на место так, чтобы опоры
вращающегося ножа были направлены
вверх.
8 Плотно прижмите фиксатор вращающегося
ножа.
9 Закройте бритвенные головки.
Page 84

РУССКИЙ84
10 Вставьте выступ бритвенного блока в
паз на верхней части бритвы (1). Затем
надавите на бритвенный блок (2), чтобы
присоединить его к бритве (должен
прозвучать щелчок).
Очистка триммера
Очищайте триммер после каждого
использования.
1 Чтобы выдвинуть триммер, сдвиньте
ползунок триммера вперед.
2 Промойте триммер под струей горячей
воды.
3 Чтобы убрать триммер, сдвиньте ползунок
триммера назад.
Совет. Для оптимальной работы прибора
смазывайте зубцы триммера каплей
швейного масла каждые шесть месяцев.
Очистка насадки-стайлера для бороды
Очистку насадки-стайлера для бороды
необходимо проводить после каждого
использования.
1 Снимите гребень с насадки-стайлера для
бороды.
2 Промойте насадку-стайлер для бороды и
гребень по отдельности под струей горячей
воды в течение некоторого времени.
Page 85

MINUTES LEFT
MINUTES LEFT
РУССКИЙ 85
Примечание Очистку насадки-стайлера для
бороды и гребня можно также проводить с
помощью прилагаемой щеточки.
3 Смазывайте зубцы триммера каплей
швейного масла каждые шесть месяцев.
Хранение
1 Наденьте защитный колпачок на
бритвенный блок для предотвращения
повреждения бритвенных головок.
2 Положите бритву в прилагаемый футляр.
Замена
Для оптимального качества работы бритвы
рекомендуется заменять бритвенный блок раз в
два года.
Бритвенный блок следует заменять только
оригинальным бритвенным блоком Philips RQ12.
1 При выключении бритвы мигает значок
бритвенного блока и раздается звуковой
сигнал.
Примечание Вид дисплеев бритв разных
моделей отличается, однако на всех дисплеях
отображаются одинаковые символы.
2 Снимите старый бритвенный блок с бритвы,
потянув за него.
Примечание Снимая бритвенный блок с бритвы,
не вращайте его.
Page 86

РУССКИЙ86
3
Вставьте выступ на бритвенном блоке RQ12 в
паз в верхней части бритвы (1). Затем надавите
на бритвенный блок (2), чтобы зафиксировать
его на бритве (должен прозвучать щелчок).
4 После 3 сеансов бритья напоминание о
замене выключится автоматически.
Заказ аксессуаров
Для приобретения принадлежностей для этого
прибора посетите наш интернет-магазин по
адресу www.shop.philips.com/service. Если
в вашей стране такой магазин отсутствует,
обратитесь в торговую организацию Philips или
в сервисный центр Philips. При возникновении
вопросов относительно заказа принадлежностей
для прибора, обратитесь в центр поддержки
потребителей Philips в вашей стране. Контактная
информация указана на гарантийном талоне.
В продаже имеются следующие детали:
- Адаптер HQ8505
- Бритвенный блок Philips RQ12
- Чистящий спрей для бритвенных головок
Philips HQ110
- Чистящая жидкость Philips HQ200
- Насадка-стайлер для бороды RQ111
Бритвенные головки
- Рекомендуется заменять бритвенные головки
раз в два года. Бритвенный блок следует
заменять только оригинальным бритвенным
блоком Philips RQ12.
Очистка
- Для регулярной очистки бритвенных головок
используйте жидкость для очистки Jet Clean
(HQ200).
Page 87

РУССКИЙ 87
Защита окружающей среды
- После окончания срока службы
не выбрасывайте прибор вместе с
бытовыми отходами. Передайте его в
специализированный пункт для дальнейшей
утилизации. Этим вы поможете защитить
окружающую среду.
- Встроенный аккумулятор содержит
вещества, загрязняющие окружающую среду.
После окончания срока службы бритвы и
передачи ее для утилизации, аккумулятор
необходимо извлечь. Аккумулятор следует
утилизировать в специализированных пунктах.
Если при извлечении аккумулятора возникли
затруднения, можно передать бритву в
сервисный центр Philips, где аккумулятор
извлекут и утилизируют безопасным для
окружающей среды способом.
Извлечение аккумулятора бритвы
Перед утилизацией бритвы извлеките из нее
аккумулятор. Убедитесь в полной разрядке
аккумулятора перед извлечением.
Будьте осторожны: контактные полосы
аккумулятора острые.
1 Снимите заднюю панель корпуса бритвы с
помощью отвертки.
2 Извлеките аккумулятор.
Page 88

РУССКИЙ88
Гарантия и поддержка
Для получения поддержки или информации
посетите веб-сайт www.philips.com/support
или ознакомьтесь с информацией на гарантийном
талоне.
Ограничения гарантии
Действие международной гарантии не
распространяется на бритвенные головки
(вращающиеся и неподвижные ножи), так как они
подвержены износу.
Поиск и устранение неисправностей
Данная глава посвящена наиболее
распространенным проблемам, возникающим при
использовании прибора. Если самостоятельно
справиться с возникшими проблемами не
удается, см. список часто задаваемых вопросов
на веб-странице www.philips.com/support или
обратитесь в центр поддержки потребителей в
вашей стране.
Проблема Возможная причина Способы решения
Бритва стала
работать
хуже, чем
раньше.
Бритвенные головки
повреждены или изношены.
Бритвенные головки могут
быть забиты длинными
волосами.
Замените блок (см.
“Замена”).
Очистите головки,
следуя инструкциям
по улучшенному
методу очистки (см.
главу “Очистка и
уход”).
Page 89

РУССКИЙ 89
Проблема Возможная причина Способы решения
При нажатии
кнопки
включения/
выключения
бритва не
включается.
Очистка бритвы в системе
Jet Clean неэффективна,
так как чистящая жидкость
в отсеке для очистки
загрязнена или ее объем
недостаточен.
Аккумулятор разряжен. Зарядите
Бритвенный блок
поврежден или изношен
настолько, что мотор не
может работать. В этом
случае на дисплее начнут
мигать символ бритвенного
блока и символ
водопроводного крана с
восклицательным знаком.
Бритва слишком сильно
нагрелась. В этом случае
бритва не будет работать,
а на дисплее будет мигать
восклицательный знак.
Тщательно очистите
электробритву,
прежде чем
продолжить бритье
(см. главу “Очистка и
уход”).
аккумулятор (см.
главу “Зарядка”).
Необходимо
очистить
бритвенный блок
или заменить его
(см. главы “Очистка и
уход” и “Замена”).
Выключите бритву и
дайте ей остыть. Как
только температура
бритвы понизится
до необходимого
уровня, ее снова
можно включить.
Page 90

РУССКИЙ90
Проблема Возможная причина Способы решения
После
очистки в
системе
Jet Clean
на бритве
по-прежнему
остаются
загрязнения.
При нажатии
кнопки
включения/
выключения
система
очистки Jet
Clean не
включается.
Чистящая жидкость
в отсеке для очистки
загрязнена, или ее объем
недостаточен.
Объем чистящей
жидкости недостаточен.
Если объем жидкости в
отсеке для очистки ниже
минимального, программа
очистки будет прервана.
Индикатор очистки и
символ пустого отсека
для очистки начнут мигать
через равные интервалы
времени, а держатель
вернется в исходное
положение.
Вы воспользовались другой
чистящей жидкостью.
Система очистки Jet
Clean не подключена к
электросети.
Слейте жидкость из
отсека для очистки,
промойте его и
наполните свежей
чистящей жидкостью.
Залейте в отсек для
очистки чистящую
жидкость до уровня
между двумя
линиями (см. главу
“Очистка и уход”).
Пользуйтесь только
чистящей жидкостью
Philips HQ200.
Вставьте маленький
штекер в систему
очистки Jet Clean
и подключите
адаптер к розетке
электросети.
Page 91

РУССКИЙ 91
Проблема Возможная причина Способы решения
Аккумулятор
бритвы не
полностью
заряжен
после
зарядки в
зарядном
устройстве/
системе
очистки Jet
Clean.
Аккумулятор
бритвы
полностью
заряжен,
однако на
дисплее
время
автономной
работы
составляет
менее
60 минут.
Бритва установлена
в систему очистки Jet
Clean неправильно, между
системой очистки Jet
Clean и бритвой нет
электроконтакта.
Бритва установлена в
систему очистки Jet Clean
неправильно.
Бритва оснащена
интеллектуальной
самообучающейся
системой, которая на
основе информации
об энергопотреблении
рассчитывает оставшееся
время автономной работы.
Энергопотребление
и оставшееся время
автономной работы зависят
от типа кожи и щетины,
а также особенностей
бритья (например, от
использования геля для
бритья).
Бритва должна
плотно закреплена
на своем месте в
держателе.
Убедитесь, что вы
надавили на бритву и
она правильно встала
на место.
Если указанное
время автономной
работы бритвы
от полностью
заряженного
аккумулятора
составляет
менее 60 минут,
это не является
свидетельством
неисправности или
снижения емкости
аккумулятора.
Page 92

92
简体中文
简介
感谢您的惠顾,欢迎光临飞利浦!为了您能充
分享受飞利浦提供的支持,请在
www.philips.com/welcome 上注册您的产品。
请阅读本用户手册,手册包含有关此剃须刀各
种功能的信息以及一些使用技巧,让您的剃须
体验更轻松更舒适。
基本说明 (图 1)
A 剃须刀
1 显示屏
2 剃须刀开/关按钮
3 保护盖
4 RQ12 剃须刀头部件
5 修发器
6 修发器开/关滑块
B RQ111 胡须造型器附件
7 须发长度选择器
8 胡须造型器附件的修剪梳
C 可折叠充电器
D Jet Clean 高效能清洁系统
9 “清洗仓已空”符号
10 清洁符号
11 干燥符号
12 Jet Clean 高效能清洁系统开/关按钮
13 清洗仓释放按钮
14 剃须刀支架
E 清洁刷
F HQ200 清洁剂
G 精美软袋
H 适配器
Page 93

简体中文 93
注意事项
使用剃须刀和 Jet Clean 高效能清洁系统之前,
请仔细阅读本用户手册,并妥善保管以供日后
参考。
注意: 在本使用说明书中,术语“产品”指剃
须刀和 Jet Clean 高效能清洁系统。如果您的剃
须刀不随附 Jet Clean 高效能清洁系统,则它专
指剃须刀。
概述
危险
- 确保电源适配器干燥。
警告
- 电源适配器内含有一个变压器。切勿将其剪
断,而用另一个插头代替,否则将导致严重
后果。
- 本产品不打算由肢体不健全、感觉或精神上
有障碍或缺乏相关经验和知识的人(包括儿
童)使用,除非有负责他们安全的人员对他
们使用这些产品进行监督或指导。
- 应照看好儿童,确保他们不会玩耍这些产品。
- 清洁产品时要小心使用热水。切记先检查水
温是否太高,以防手被烫伤。
注意
- 切勿将 Jet Clean 高效能清洁系统和充电器浸
入水中,也不要放在水龙头下冲洗。
- 产品和附件不可用洗碗机清洗。
- 一定要在抗有机溶剂腐蚀的表面上放置和使
用本产品。
- 必须在 5 摄氏度至 35 摄氏度之间的温度下使
用、存放和为本产品充电。
- 只能使用随附的附件。
- 电源适配器可将 100-240 伏的电压转换为
24 伏以下的安全低电压。
Page 94

简体中文94
- 如果产品损坏,请勿使用本产品和附件。
- 如果适配器或任何其他附件损坏,必须用原
装型号更换,以免发生危险。
- 冲洗产品时,水可能从剃须刀底部的插口漏
出。这是正常的,而且没有危险,因为所有的
电子线路都密封在剃须刀内的一个密封壳内。
- 仅使用该附件修剪面部须发(胡须、须髭和
鬓角)。
Jet Clean 高效能清洁系统
注意
- Jet Clean 高效能清洁系统只能使用原装
HQ200 清洁剂。
- Jet Clean 高效能清洁系统必须放在稳定、
平坦的水平表面上,以防漏液。
- 切勿将 Jet Clean 高效能清洁系统浸入水中。
- 每 15 天倒空清洗仓一次,并用热水彻底冲洗。
- Jet Clean 高效能清洁系统能彻底清洗您的剃
须刀,但不能消毒;因此切勿与他人共用剃
须刀。
- Jet Clean 高效能清洁系统的清洗仓不可在洗
碗机中清洗。
- 当Jet Clean 高效能清洁系统准备就绪时,
切勿移动本产品,以免清洁剂漏出。
符合标准
- 此剃须刀符合国际认可的安全标准,可在洗澡
或淋浴时安全地使用,并可在水龙头下清洗。
- 这些飞利浦产品符合关于电磁场 (EMF) 的所
有相关标准。据目前的科学证明,如果正确
使用并按照本用户手册中的说明进行操作,
本产品是安全的。
Page 95

MINUTES LEFT
MINUTES LEFT
简体中文 95
显示屏
注意: 初次使用剃须刀前,请从显示屏上取下
保护膜。
充电
- 充电约需 1小时。
- 当剃须刀正在充电时,分钟指示将闪烁。
- 剃须时间将不断增加,直至剃须刀已充满电。
- 快速充电:当剃须刀包含的电量仍够剃须一
次时,显示屏将显示 5 分钟红色。
电池已完全充满
MINUTES LEFT
MINUTES LEFT
MINUTES LEFT
MINUTES LEFT
- 当电池完全充满电时,分钟指示灯均会持续
亮起。大约 30 分钟后,显示屏会再次自动
关闭。
注意: 剃须刀配备有智能自学习系统,可监测
剃须刀的能耗并将剩余电量转化为剃须时间。
能耗和剩余剃须时间具体取决于您的皮肤、胡须
类型以及您的剃须行为(例如使用剃须啫喱)。
如果完全充电剃须刀的剃须时间不足 60 分钟,
这完全正常,并不表示剃须刀的电池容量降低。
电池电量不足
- 当电池电量快要耗尽时(仅剩 5 分钟或更少
的剃须时间),分钟指示将开始闪烁。
- 关闭剃须刀时,剃须分钟数将再持续闪烁几
秒钟。当剃须分钟数走完时,您将听到一声
哔声。
Page 96

简体中文96
电池剩余电量
MINUTES LEFT
MINUTES LEFT
MINUTES LEFT
MINUTES LEFT
MINUTES LEFT
MINUTES LEFT
- 显示屏上的剃须分钟数表示剩余电量的多
少。
清洁剃须刀
为获得最佳剃须效果,我们建议您每次使用之
后都要清洁剃须刀。
- 水龙头符号闪烁,提醒您需要清洁剃须刀。
更换剃须刀头部件
为获得最佳剃须效果,建议每两年更换一次剃
须刀头部件。
- 为了提醒您更换剃须刀头部件,产品配备了
更换提醒,该提醒约在 2 年后自动激活。更
换提醒会重复发出蜂鸣音,并在连续剃须
3 次后重置或直至您重置剃须刀。
节能模式
本产品配备自动节能模式。当剃须刀进入节能
模式时,开/关按钮上的指示灯将会熄灭,从而
节省能量。
- 当本产品关闭但检测到 5 分钟运动时(例如
旅行时在手提箱中携带剃须刀),它将自动
转为节能模式。此模式可防止剃须刀被意外
开启。
Page 97

简体中文 97
, 锁定符号在显示屏上闪烁即表示产品处于节
能模式。
- 要禁用节能模式,按开/关按钮即可。
剃须刀头被阻塞
MINUTES LEFT
MINUTES LEFT
- 如果剃须刀头被阻塞,则剃须刀头部件符
号、水龙头符号和感叹号将闪烁。此时,马
达将无法运行,因为剃须刀头被污染或损坏。
- 在这种情况下,您必须清洁或更换剃须刀头
部件。
- 剃须刀头部件符号、水龙头符号和感叹号将
持续闪烁,直到剃须刀头不再堵塞。
充电
充电约需 1小时。
充满电的剃须刀可提供长达 60 分钟或 20 天的
剃须时间。
注意: 电池充满电时,显示屏将显示实际剩余
剃须时间(参见“显示屏”一章中的“电池充
满电”部分)。
第一次使用剃须刀之前,或当显示屏指示电池
电量快要耗尽时,请先为剃须刀充电(参见“
显示屏”一章中的“电池电量不足”部分的内
容)。
快速充电
剃须刀在充电 5 分钟后,其含有的电量便足以
完成一次剃须。
Page 98

简体中文98
在充电器中充电
1 将小插头插入充电器。
2 解开充电器(可听到“咔哒”一声)。
3 将电源适配器插入电源插座。
4 将剃须刀放入充电器中。
, 显示屏将显示剃须刀正在充电(见“显示
屏”一章)。
在 Jet Clean 高效能清洁系统内充电
1 将小插头插入 Jet Clean 高效能清洁系统。
2 将电源适配器插入电源插座。
3 将剃须刀倒置按在支架上,使剃须刀的背面
朝向支架。
注意: 剃须刀头部件上安装了保护盖时,剃须
刀将无法放入 Jet Clean 高效能清洁系统内。
注意: 将剃须刀倒置时,显示屏上的分钟指示
也会倒置,因此您仍然能够看清电池充电的情
况。
Page 99

简体中文 99
4 将剃须刀机身放在两个固定夹后的支架中
(1) 并将其按下,直到其锁定到位 (2)。
, 显示屏将显示剃须刀正在充电(参见“显示
屏”一章中的“充电”部分的内容)。
使用剃须刀
剃须
皮肤适应期
前几次剃须可能不会带给您预期效果,并且您
的皮肤可能会受到轻度刺激。这是正常的。
您的皮肤和胡须需要时间适应新的剃须系统。
建议您在 3 周时间内定期剃须(至少每周 3
次),以便让您的皮肤适应新的剃须刀。在此
期间,请仅使用新的电动剃须刀,不要使用其
他剃须方法。如果您使用不同的剃须方法,
那么您的皮肤会更难适应新的剃须系统。
1 按一下开/关按钮以启动剃须刀。
, 显示屏将亮起几秒钟的时间。
2 将剃须刀头在您的皮肤上作迂回运动。
- 请勿作直线运动。
3 按一下开/关按钮关闭剃须刀电源。
, 显示屏将亮起几秒钟时间,然后显示电池剩
余电量。
湿剃
您也可以先用剃须泡沫或剃须啫喱将脸弄湿,
然后再用此剃须刀进行剃须。
要用剃须泡沫或剃须啫喱剃须,请按照下面的
步骤执行操作:
Page 100

简体中文100
1 用水润湿一下皮肤。
2 在皮肤上涂上剃须泡沫或剃须啫喱。
3 在水龙头上冲洗一下剃须刀头部件,确保剃
须刀头部件可以在您的皮肤上顺畅滑动。
4 按一下开/关按钮以启动剃须刀。
5 将剃须刀头在您的皮肤上作迂回运动。
注意: 在水龙头下定期冲洗剃须刀,确保其能
够继续在您的皮肤上顺畅滑动。
6 使用后,擦干您的脸并彻底清洁剃须刀
(见“清洁和保养”一章)。
注意: 确保冲洗干净剃须刀上的泡沫或剃须啫
喱。
修发
您可使用修剪器修剪鬓角和小胡子。
1 将剃须刀头部件竖直抽离剃须刀。
注意: 将其抽离剃须刀时,不要旋转剃须刀头
部件。
2 按一下开/关按钮以启动剃须刀。
, 显示屏将亮起几秒钟的时间。
3 向前滑动修剪器滑块以将修剪器滑出。
4 现在可以开始修剪了。
5 向后滑动修剪器滑块以使修剪器缩回。
6 按一下开/关按钮关闭剃须刀电源。
, 显示屏将亮起几秒钟时间,然后显示电池剩
余电量。
 Loading...