

Page 1

Manufactured for:
Philips Consumer Lifestyle
A Division of Philips Electronics North America
Corporation
P.O. Box 10313, Stamford, CT 06904
Norelco is a Registered Trademark of Philips Electronics
North America Corporation.
PHILIPS is a Registered Trademark of Koninklijke Philips N.V.
For assistance call 1-800-243-3050 or visit our website:
www.philips.com/norelco
© 2014 Philips Electronics North America Corporation.
All Rights Reserved.
4222 002 5666 2
ENGLISH
Replacing the Shaver Head
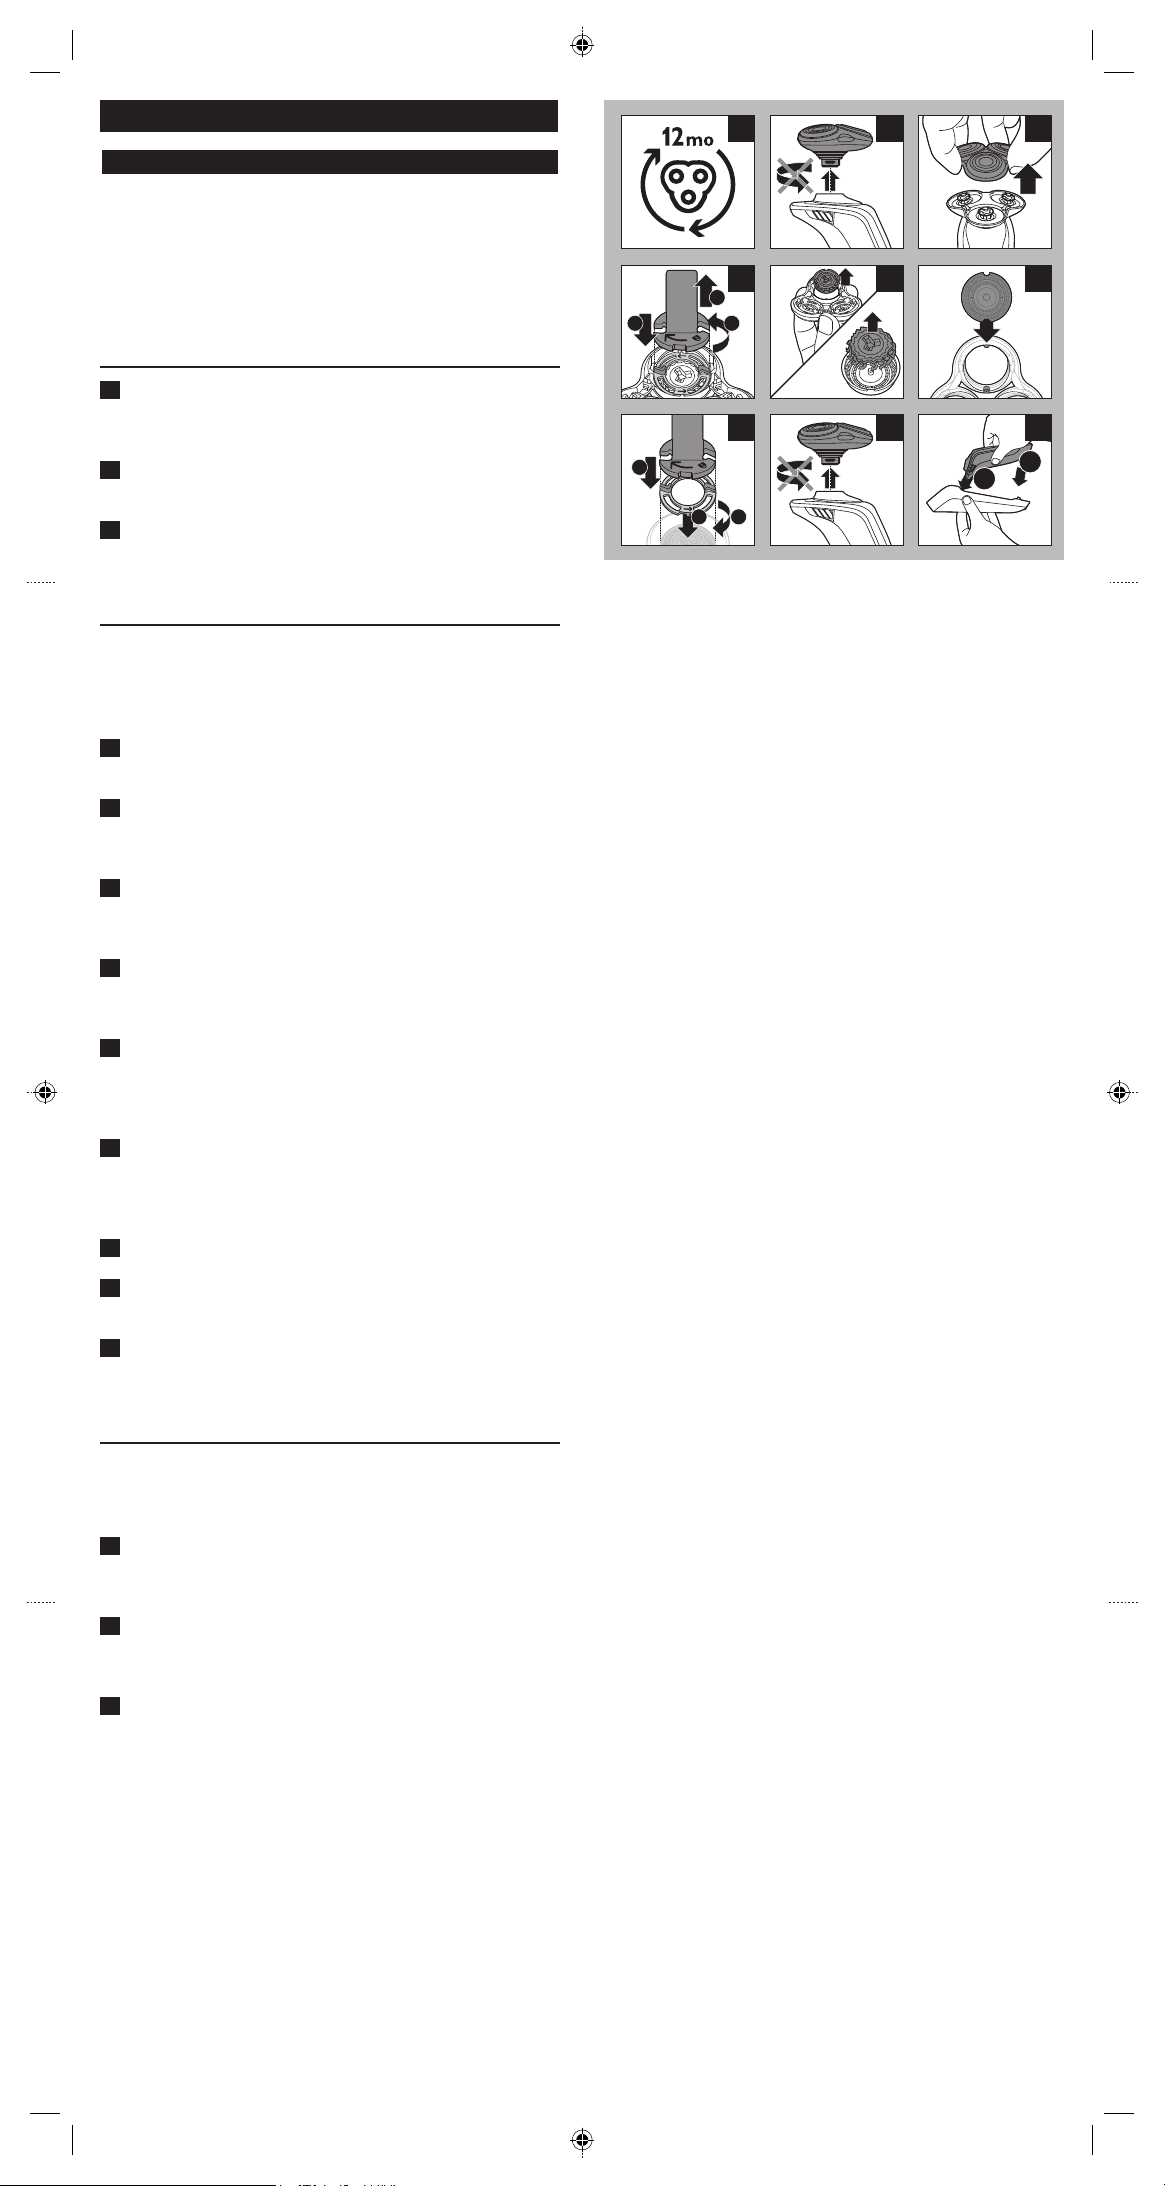
◗ For maximum shaving performance, we advise you to
replace the shaver head every year (Fig. 1).
◗ Replace damaged or worn shaver head with model
RQ12+ or SH90 Philips Norelco shaver head only.
◗ The shaving head replacement indicator symbol on the
shaver will blink.
RQ12+ Replacement Head
1 Pull the shaving unit straight off the shaver (Fig. 2).
Do not twist the shaving unit when removing from shaver.
2 Place the new shaving unit on the shaver and push
down (you will hear a click).
3 To reset the shaver, press and hold the ON/OFF button
for approximately 10 seconds.
RQ12+
Replacement
Shaving Head
Always here to help you
Register your product and get support at
www.norelco.com/register
Philips Norelco Arcitec Shavers Only
◗ With RQ12+ or SH90 Replacement Heads you must
remove the entire shaving unit when charging the shaver
in the Power Pod.
1 Pull the shaving unit straight off the shaver (Fig. 8).
Do not twist the shaving unit when removing from shaver.
2 Insert the top of the shaver into the power pod (1)
and then press the bottom part into the power pod (2)
(Fig. 9).
3 The display on the shaver will indicate shaver is
charging.
1
5
2
Question?
Question?
Contact
Contact
Philips
Philips
Norelco
Norelco
5
3
SH90 Replacement Heads
Note: The Philips Norelco model SH90 will replace model
RQ12+ and only contains individual shaver heads (cutters and
combs) so in the future you will no longer need to replace the
entire shaving unit.
1 Pull the top portion of the shaving unit straight off the
shaver (Fig. 3).
2 Place the retaining ring holder on the
retaining ring (1), turn counterclockwise (2) and lift it
off the shaving head (3) (Fig. 4).
3 Remove the retaining ring from the retaining ring
holder and repeat the process for the other retaining
rings.
4 Remove the shaving heads from the shaving head
holder and discard (Fig. 5).
DO NOT discard the retaining ring.
5 Place new shaving heads in the holder (Fig. 6).
Make sure the projections of the shaving heads fit exactly
into the recesses.
6 Place the retaining ring holder on the retaining ring (1),
place it on the shaving head (2) and turn clockwise (3)
to reattach the retaining ring (Fig. 7).
3
1 2
1
2
4
5
7
5
5
8
6
5
5
9
2
1
3
7 Repeat this process for the other retaining rings.
8 Reattach the shaving head holder to the bottom part
of the shaving unit.
9 To reset the shaver, press and hold the On/Off button
for approximately 7 seconds.
14_RQ12 Plus.indd 1 9/5/14 11:36 AM
Page 2
ESPAÑOL
Sustición de las cabeza de afeitado
◗ Para un rendimiento de afeitado óptimo, le aconsejamos
que sustituya los cabezas de afeitado cada año (Fig. 1).
◗ Reemplace los cabezales de afeitado danados o
desgastados solo con los cabezales para afeitadora Philips
Norelco modelo RQ12+ o SH90.
◗ El indicador de cambio de cabezales de afeitado símbolo
parpadeará.
RQ12+ cabezales de repuesto
1 Extraiga la unidad de afeitado de la afeitadora (Fig. 2).
No doblar la unidad de afeitado para la extracción de
afeitadora.
2 Coloque la unidad de afeitado nueva en la afeitadora y
presione hacia abajo (oirá un clic).
3 Para restablecer la afeitador, mantenga presionado el
botón de encendido/apagado durante aproximadamente
10 segundos.
3
1 2
1
2
1
4
7
3
5
8
32
6
9
2
1
SH90 cabezales de repuesto
Nota: La Philips Norelco modelo SH90 sustituir modelo RQ12+
y contiene sólo los cabezas de afeitado (cuchillas y peines) para
que en el futuro ya no es necesario sustituir toda la unidad de
afeitado.
1 Extraiga la parte superior de la unidad de afeitado de la
afeitadora (Fig. 3).
2 Coloque el soporte del anillo de retención en el anillo
de retención (1), gírelo a la izquierda (2) y levántelo del
cabezal de afeitado (3) (Fig. 4).
3 Quite el anillo de retención del soporte del anillo de
retención y repita el proceso con los otros anillos de
retención.
4 Quite los cabezales de afeitado del soporte del cabezal
de afeitado y deséchelos (Fig. 5).
No deseche el anillo de retención.
5 Coloque los nuevos cabezales de afeitado en el
soporte (Fig. 6).
Asegúrese de que los salientes de los cabezales de afeitado
encajen exactamente en las ranuras.
6 Coloque el soporte del anillo de retención en el anillo
de retención (1), colóquelo en el cabezal de afeitado (2)
y gírelo hacia la derecha (3) para volver a colocar el
anillo de retención (Fig. 7).
Fabricado por:
Philips Consumer Lifestyle
Una división de Philips Electronics North America
Corporation
P.O. Box 10313
Stamford, CT 06904
Norelco es una marca registrada de Philips Electronics
North America Corporation.
PHILIPS es una marca registrada de Koninklijke Philips N.V.
Para asistencia llame al teléfono 1-800-243-3050 o visite
e nuestra página web: www.philips.com/norelco
© 2014 Philips Electronics North America Corporation.
Todos los derechos reservados.
7 Repita este proceso con los otros anillos de retención.
8 Vuelva a colocar el soporte del cabezal de afeitado en
la parte inferior de la unidad de afeitado.
9 Para restablecer la afeitadora, mantenga presionado el
botón de encendido/apagado durante aproximadamente
7 segundos.
Afeitadoras Philips Norelco Arcitec sólo
◗ Con RQ12+ y SH90 reemplazo de cabezas debe quitar la
unidad de afeitado entero cuando se carga la afeitadora
en la vaina de la energía.
1 Extraiga la unidad de afeitado de la afeitadora (Fig. 8).
No doblar la unidad de afeitado para la extracción de
afeitadora.
2 Inserte la tapa de la afeitadora en la vaina de la energía
(1) despues presione la parte inferior en la vaina de la
energía (2) (Fig. 9).
3 La exhibición en la afeitadora indicará que la afeitadora
está cargando.
14_RQ12 Plus.indd 2 9/5/14 11:36 AM
 Loading...