

Page 1
取 扱 説 明 書
保証書付
保証 書は 、この取 扱 説明 書の 最 終
ページについておりますので販売店
で記入を受けてください。
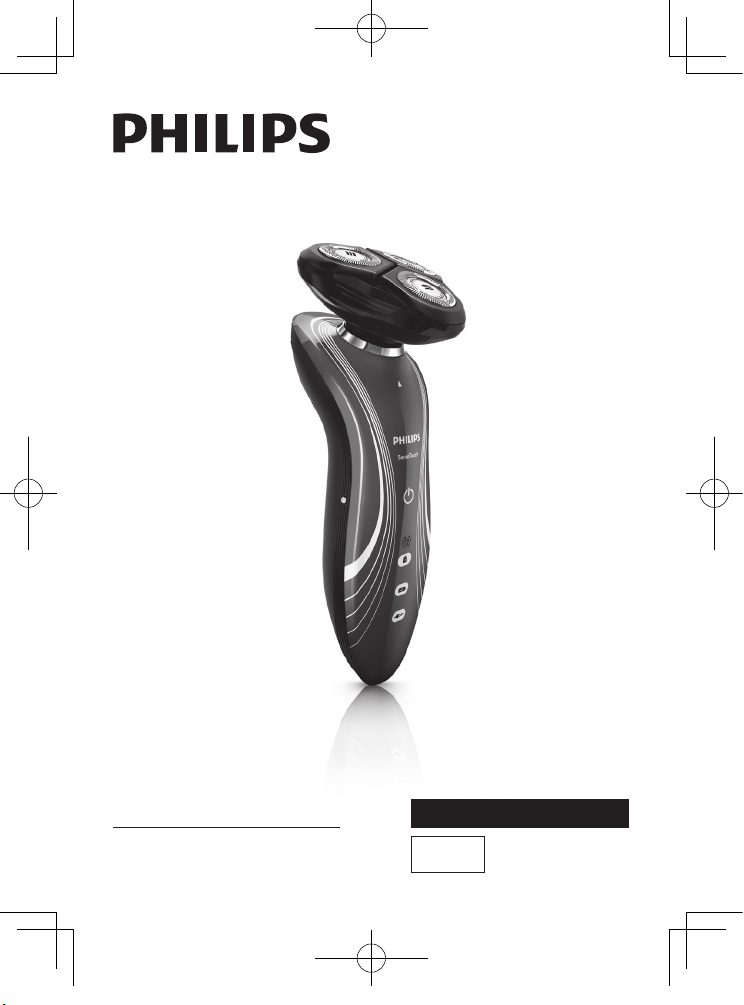
フィリップス 電動シェーバー
RQ1168
品
番
RQ1168_JP_CS2_A6.indd 1 13.7.31 10:03:11 PM
Page 2
フィリップス シェーバーをお買い上げいただき、まことにありがとう
ござ います。長い 間 ご愛用 い た だくた めに、ご使 用 前にこの 取扱
説明 書をよくお読みのうえ、正しくお使いください。
また、お読み になった後は、お使いになる方がいつでも 見られる
ところに必ず保管してください。
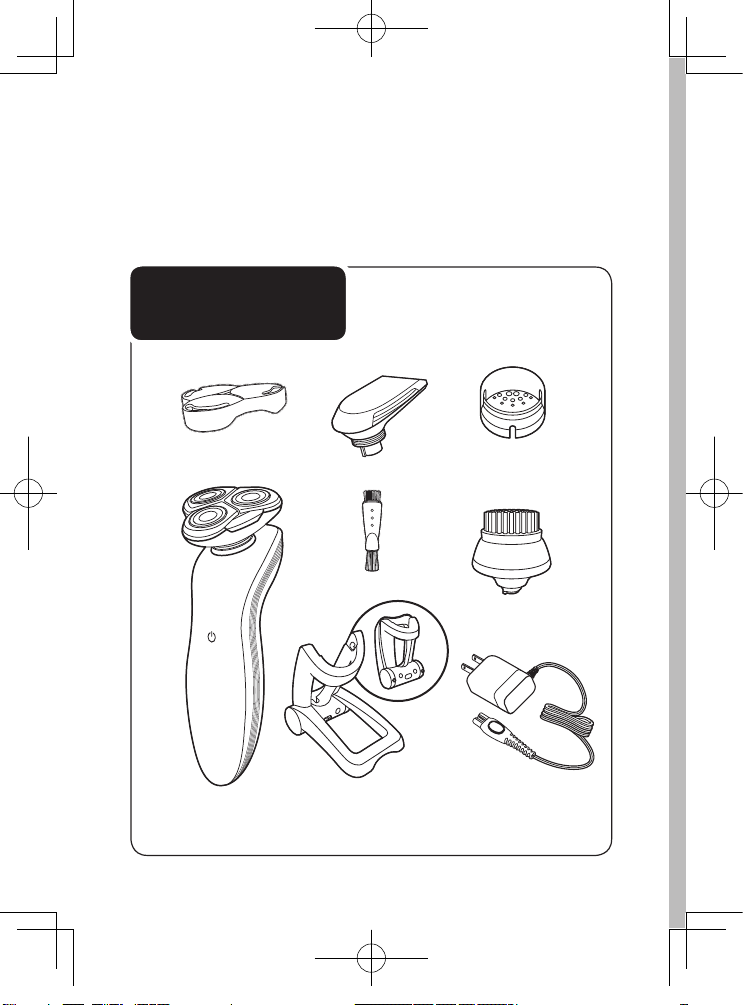
商品のご確認
商品をご確認ください。
※改良の為、仕様を予告なく変更することがあります。
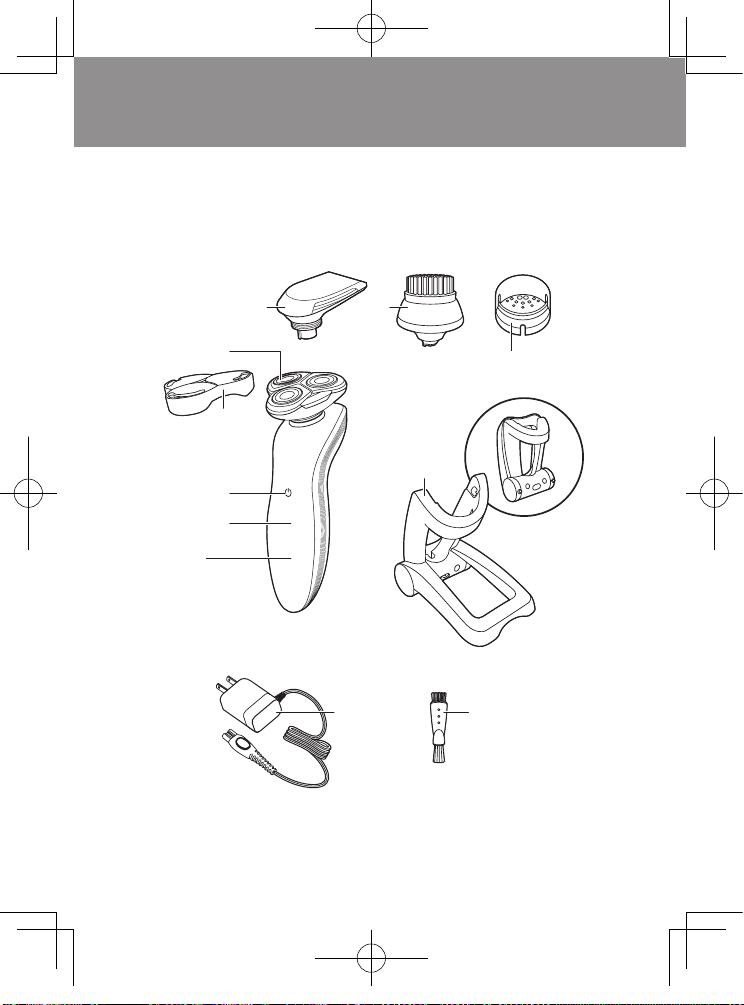
シェービングユニット
保護キャップ
本体
充電スタンド
洗顔ブラシヘッド
クリーニングブラシ
トリマー
充電アダプタ
(
HQ8505
)
洗顔ブラシ
保護キャップ
1
RQ1168_JP_CS2_A6.indd 1 13.7.31 10:03:12 PM
Page 3
目 次
商品のご確認
1
目次
2
必ずお守りく ださい
3・4
各部の名称/ 携帯の仕方
5・6
LED
表示について
7
充電の仕方
8
シェービング の仕方
9〜11
トリマーの使 い方
12
洗顔の仕方
13
お手入れ方法
14〜17
シェービングヘッドホルダー・洗顔ブラシの交換
18
シェーバ ー
を廃棄すると き
19
故障かな?と 思ったら
20・21
Guidance in English 22〜39
保証とアフタ ーサービス
40
仕様/お客様 情報センター
41
無料修理規定
42
保証書
最終ページ
は じ め に
ご 使 用 方 法
困 っ た と き
英 文 解 説
保 証
●
●
●
●
●
2
RQ1168_JP_CS2_A6.indd 2 13.7.31 10:03:13 PM
Page 4
必ずお守り
ください
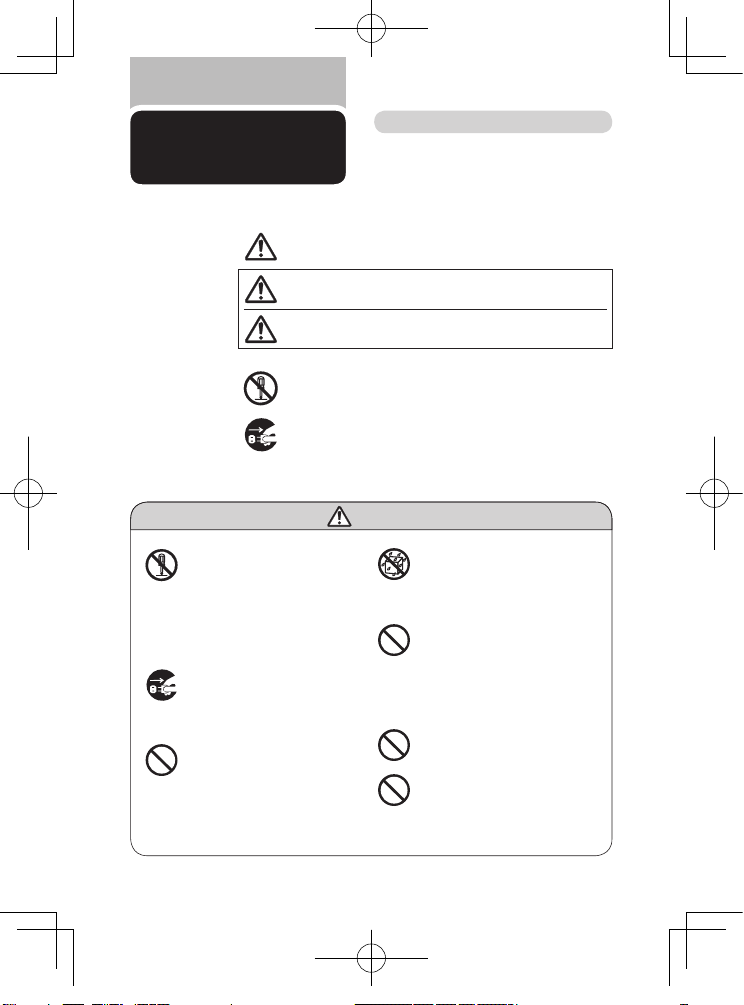
安 全 上 の ご 注 意
●ここに示した注意事項は、安全に関する重要
な内容ですので、必ず守ってください。
●誤った取扱いをしたときに想定される内容を
「警告」と「注意」とに区分けしています。
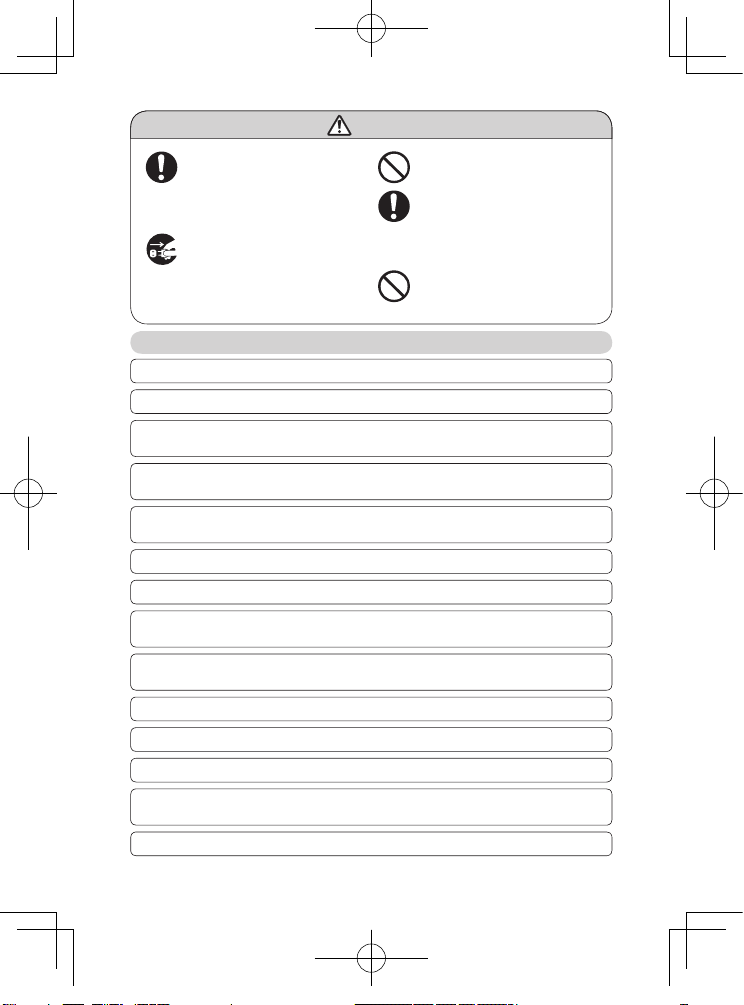
○絵表示について
記号は、「危険、警告、注意」を示します。
図の中や近くに具体的な注意内容を示します。
警 告
●シェーバー本体ならびに充電アダプ
タは改造しない。また、修 理技 術者
以外の 人は、分解したり修理をしな
い。火災、感 電、ケガの原因となりま
す。修理はお買い上げの販売店また
は小泉成器修理センターにご相談く
ださい。
●お手 入れの 際は必 ず充電 アダプタ
の電源プラグをコンセントから抜く。
また、濡れた手で抜き差ししない。感
電やケガをすることがあります。
●充電アダプタが傷んだり、コンセント
の差込みが緩いときは使用しない。
感電・ショート・発火の原因になります。
●充電アダプタおよび充電スタンドを
水につけたり、水をかけたりしない。
故障や、ショート・感電の原因になり
ます。
●充 電 アダ プタ を傷 付 けたり、電 源
コードを無理に曲げたり、引っ張った
り、ねじったり、たばねたり、重い物を
載せたり、挟み込んだり、加工したり
しない。電 源コードが破損し、火災・
感電の原因となります。
●乳幼児の手の届くところに本製品を
置かないでください。
●充電アダプタには変 圧器 が内蔵 さ
れています。充電アダプタを切り離
して別のプラグに接続するのは危険
ですのでおやめください。
○絵表示の例
記号は、してはいけない「禁止 」を示します。図の中や近くに
具体的な禁止内容(左図の場合は分解禁 止)を示します。
記号は、必ずしていただく「強制」を示します。図の中や近くに
具体 的な 強制内 容(左 図の場 合は 電源 プラグをコンセント
から抜くこと)を示します。
人が死亡または重傷を負う可能性が想定される内容。
人が傷 害を 負う可能 性及 び物 的損 害 のみ の発 生が
想定される内容。
注意
警告
3
RQ1168_JP_CS2_A6.indd 3 13.7.31 10:03:14 PM
Page 5
使 用 上 の ご 注 意
注 意
●充電アダプタの電源プラグを抜くと
きは、電源コード部を持たずに必 ず
先端 の電 源プラグ 部を持って引き
抜く。感電 やショートして発火 する
ことがあります。
●充電時以 外は、充電アダプタをコン
セントから抜く。ケガややけど、絶縁
劣化による感電・漏電・火災の原因
となります。
●刃は強く押さえない。破損して皮膚
を傷つけることがあります。
●刃が破損または故障した場合は、本
製品を使用しないでください。ケガ
の原因になります。交換 の際には必
ずフィリップ ス社 製 の 同型 部 品と
お取り替えください。
●電 源コネクタ 受部 にピンやごみ を
付着させない。感電・ショート・発火
の原因になります。
1.
本製品はヒゲを剃る・洗顔するためのものです。それ以外の目的で使用しないでください。
2.
フィリップスのシェーバーを初めてお使いの方は、剃り方に慣れるまで2〜3週間かかることがあります。
3.
本製品の使用、充電、保管は室温5℃〜35℃の環境下で行ってください。(尚、低温や高温で
充電すると、充電池の寿命が短くなります。)
7.
シェービングユニット・洗顔ブラシヘッドの清掃や着脱は、必ずスイッチを切ってから行ってください。
8.
切れ味が 衰えてきたり、刃が破損した場合は、使用せず 必ず新しいシェービングヘッドホ
ルダーと交換してください。
9.
極端に高温または低温の場 所、直 射日光の当たる場所には保管しないでください。夏場、
車の中に放置しないでください。
11.
本製品は、使用の都度、掃除をしてください。
12.
充電アダプタは付属の専用アダプタを使用してください。
13.
充電アダプタが破損、故障した場合は、事 故を避けるために必ずフィリップス社製の 同型
充電アダプタをお求めください。
10.
乳幼児の手の届かないところに保管してください。
4.
外刃は 、薄く仕上 げてありますので 、刃 部を強く押さえたり、硬い ものに当 てない よう、
ていねいに扱ってください。
14.
シェーバー本体は防水加工をしておりますが、水や液体の中に浸けないでください。
5.
洗顔ブラシヘッドをお使いの際は、自分で作った洗顔料、刺激の強い化学物質や粗い粒子を含
んだ洗顔料、スクラブ入りまたはピーリング作用のある洗顔料などを使用しないでください。
6.
洗顔ブラシヘッドは、1日に3回以上使用しないでください。
4
RQ1168_JP_CS2_A6.indd 4 13.7.31 10:03:15 PM
Page 6
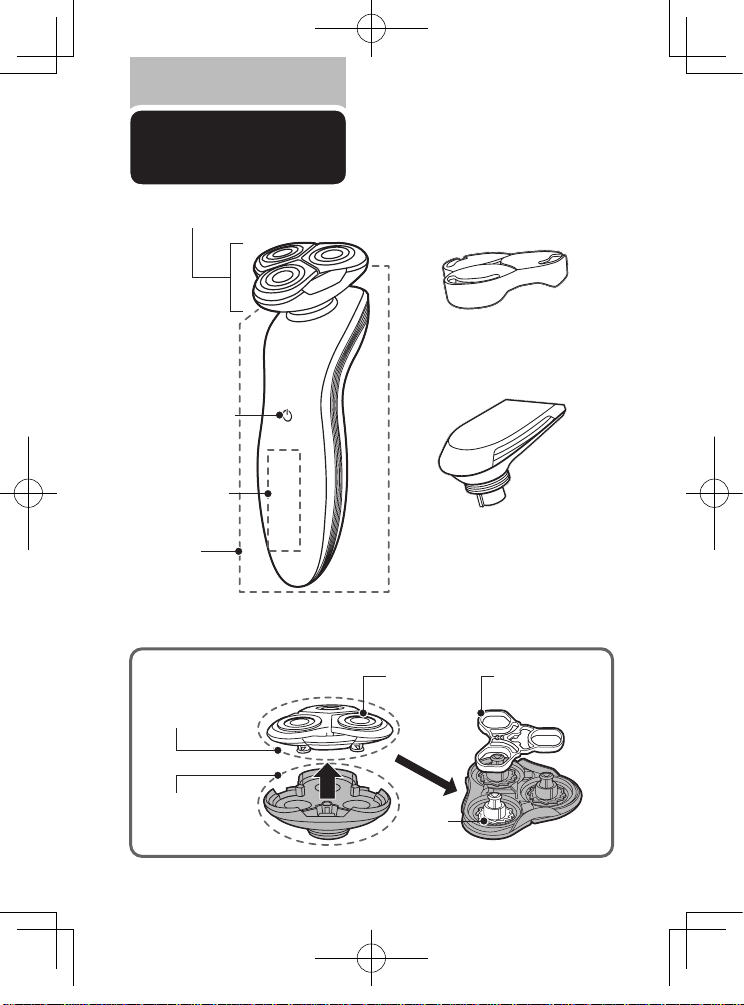
内刃
(裏側)
保持板
●シェービングユニット
充電スタンド
外刃
洗顔ブラシ
LED
表示
ON/OFF
スイッチ
本体
シェービングユニット
保護キャップ
トリマー
シェービング
ヘッドホルダー
(
RQ11
)
シェービング
ヘッドホルダー
受部
シェービングユニット
各部の名称
5
RQ1168_JP_CS2_A6.indd 5 13.7.31 10:03:15 PM
Page 7
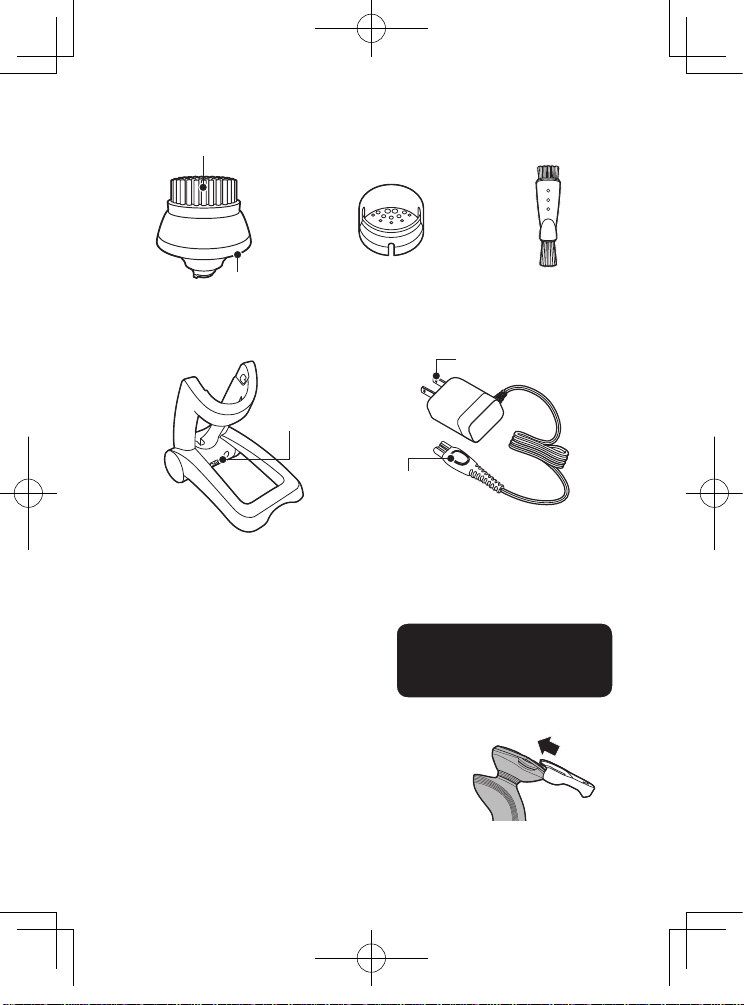
充電スタンド
クリーニング
ブラシ
洗顔ブラシ
保護キャップ洗顔ブラシヘッド
洗顔ブラシ
ブラシ台座
電源
コネクタ部
電源プラグ部
充電アダプタ
(
HQ8505
)
電源コネクタ
受部
携帯の仕方
携帯する場合は、保護キャップを
取り付けてください。
●シェービングユニット
シェービン グユニッ ト保護キャップを図 のように スライ
ドさせて、シェービングユニットに取り付け、保護します。
●洗顔ブラシヘッド
汚れを 防ぐ ために、洗顔ブ ラシヘッド に洗 顔ブラシ保 護
キャップを取り付けてください。
※取り付ける前に、完全に乾いているか確認してください。
6
RQ1168_JP_CS2_A6.indd 6 13.7.31 10:03:16 PM
Page 8
LED
表示について
初めてお使いになるときや、長い間ご使
用にならなかったときは、
LED
表示が出
るまでに時間がかかる場合があります。
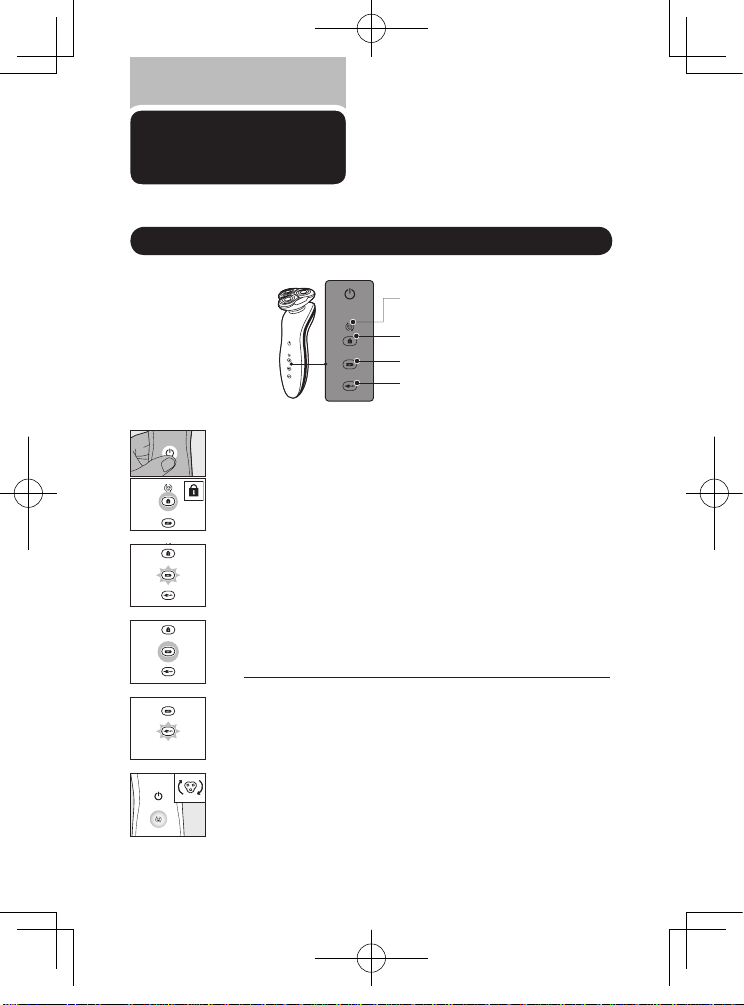
主な表示(本体)
充電表示ランプ
シェービングヘッドホルダー
交換表示ランプ
充電催促表示ランプ
ロック機能表示ランプ
●
ロック機能(カギマークが表示されていると電源は入りません)
スイッチを約3秒長押しすると、カギマークが表 示されてロックがかかり
ます。再度約3秒長押しすると解除できます。充電アダプタを接続し、通
電した充電スタンドにシェーバー本体を置くと、ロックは自動的に解除さ
れます。
●充電表示
充電残 量が5分以上になるまでは、白色の 充電表 示ランプとオレンジ色
の充電 催促表 示ランプが交互に点 滅します。その後、充電が完了 するま
では充電表示ランプが白色に点滅します。
●充電完了表示
充電が完了すると、白色の充電表示ランプが点灯し続けます。満充電後、約
30
分経過すると充電表示ランプが消えます。
※
満充電後に本体を再び充電スタンドに置くと、充電表示ランプが点滅しますが、故障ではありません。
●シェービングヘッドホルダー交換表示
電源を切った後にシェービングヘッドホルダーの交換マークが点滅すると、
交換時 期です。シェービングヘッドホルダーを交換してください(
P18
参
照)。この表示は約2年間(1日3分)ご使用いただくと表示されます。
●充電催促表示
動作中に充電残量が少なくなると(使用可能時間が残り約5分以下)、充電
催促表示ランプがオレンジ色に点滅します。スイッチを切ると、充電催促表
示ランプが数秒間オレンジ色に点滅後、消灯します。
7
RQ1168_JP_CS2_A6.indd 7 13.7.31 10:03:19 PM
Page 9
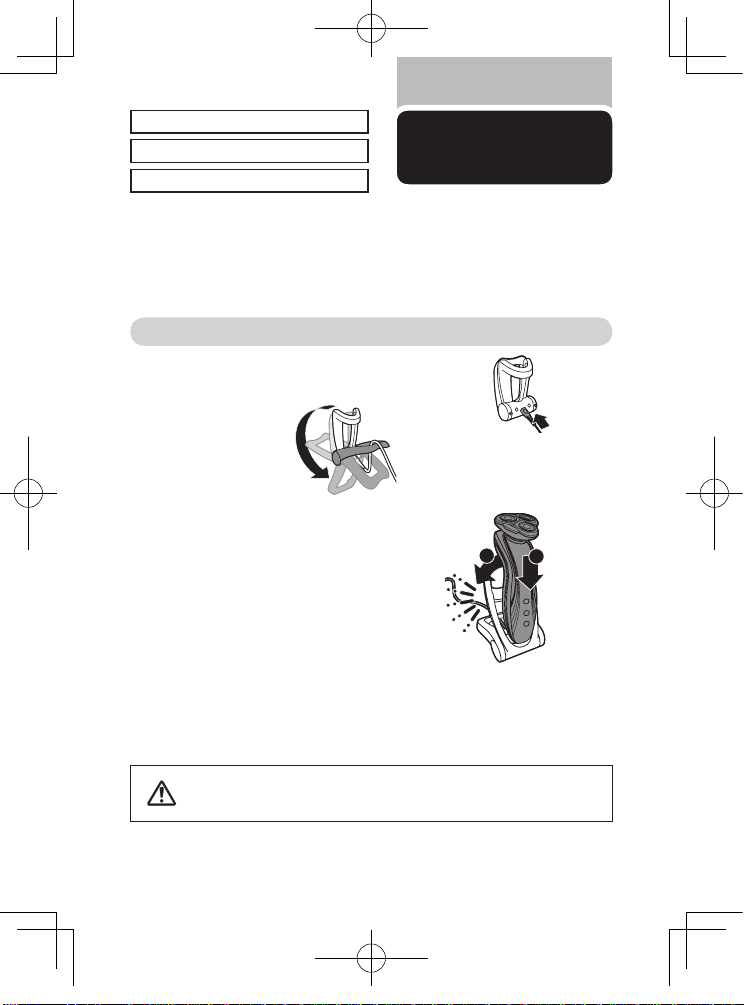
充電の仕方
初めてお使いになるときや、長い間ご使用にならなかったときは、充電しないと使用できません。ご使
用前に充電してください。充電時間は約1時間です。充電開始後数分間、充電表示ランプが点滅しない
ことがありますが、そのまま充電すると充電表示ランプが点滅します。海外(
100〜240V
)でのご使用
も可能です。ただし、コンセントの形状や電圧など現地で充分お確かめのうえご使用ください。
※本製品はリチウムイオン電池を使用していますが、ご使用の都度充電をしても充電池の寿命には影響ありません。
●当社専用 の充電アダプタ以外での充 電は行わないでください。
● 長期間使用しない場合や、使ったり使わなかったりして保管しておくと、
充電池が過放 電し液漏れして使えなくなります。
注意
満充電で約50分使用できます。
お客様による充電池の交換はできません。
この商品は通常約1時間充電です。
※通常の目安として満充電で1日3分使用し、約16日間使用できますが、ご使用状況(使用頻度、ヒゲの質、洗
顔の仕方、ジェル・シェービングフォームを使用する等)により変わります。
※クイックチャージ:5分の充電で、1回分のシェービングが可能です。
充電スタンドで充電する場合
1
充電アダプタの電源コネクタ部を充電スタンドの電源コネクタ
受部につなぎます。
3
ご家庭のコンセントに電源プラグ部を差し込みます。
4
シェーバーを充電スタンドに置き(図❶)、
後ろ側(図❷)に押し込みます。
充電中は充電表示ランプが点滅します。
(充電表示についてはP7をご参照ください)
1
2
2
充電スタンドを開きます。
8
RQ1168_JP_CS2_A6.indd 8 13.7.31 10:03:23 PM
Page 10
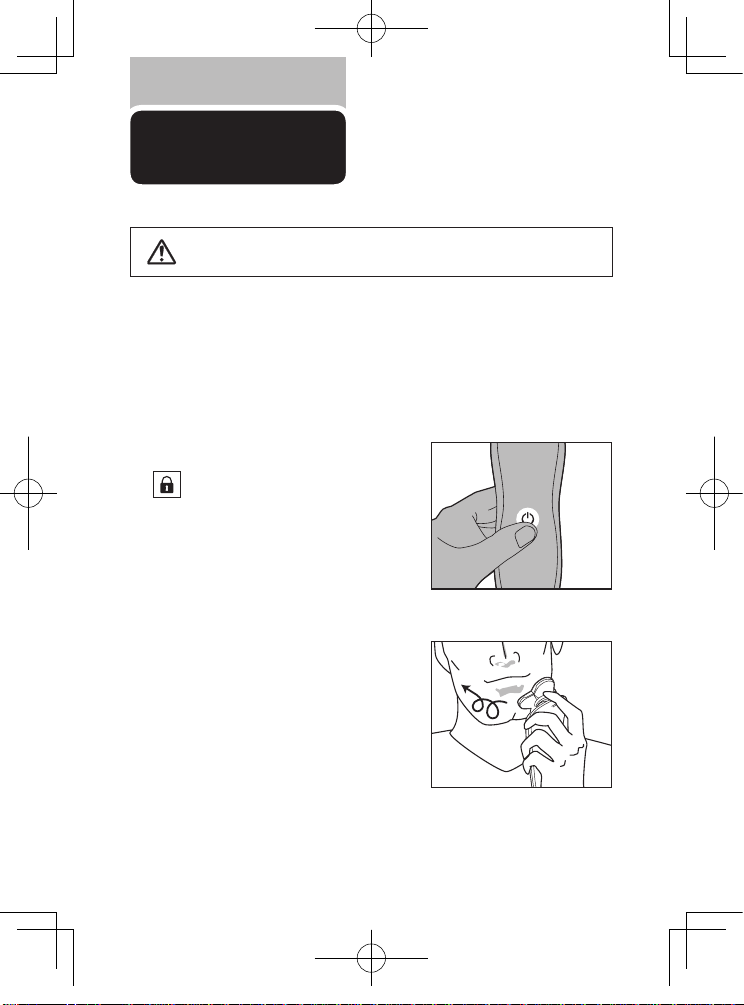
シェービングの
仕方(ドライ)
1
スイッチを押し電源をONにします。
3
シェービング後はスイッチを押し、電源を
OFF
にします。
2
刃を肌に軽く押しあて、円を描くように
動かしながら剃ります。
肌が乾いた状態でのシェービングの
仕方です。
シェーバー 本体は 防水加 工をしており、浴室でも使用 できますが、水や 液
体の中に浸けないでください(故障の原因となります)。
警告
●ほこりなどで肌が汚れている場合、ふきとってからご使用ください。
●ご使用の前に外刃の破れや変形がないか確認してください。
(外刃に破れや変形があると肌を傷つける原因になります)
●ヒゲ剃り以外の目的(頭髪など)には、使用しないでください。
※スイッチを押してカギマークが表示 され
ると電源は入りません。ロック機能を解除
してください。
※ロック機能 の解除は 、スイッチを3秒以上
長押ししてください。
9
RQ1168_JP_CS2_A6.indd 9 13.7.31 10:03:24 PM
Page 11
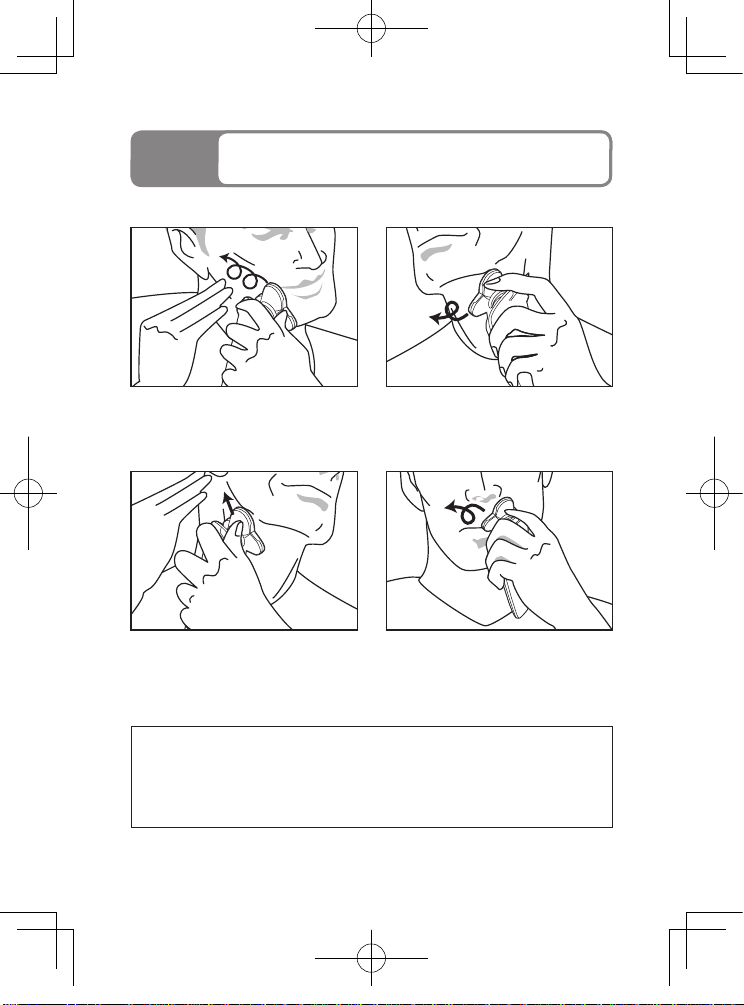
上手に
剃るには
ほお
肌を伸ばし、ヒゲを立たせるように小さく回
しながら剃ります。
あごの裏側
刃を肌に軽くあて、図のようにあごを上げて
回転させながら剃ります。
ほおの奥から首筋
片方の手で肌を後ろに引っ張り小さく回しな
がら剃ります。
鼻の下
鼻の下を伸ばし、小さく回しながら剃ります。
肌に強く押しつけるのではなく、軽く押しあてるのがコツです。
フィリップスのシェーバーを初めてお使いの方は、剃り方に慣れるまで2〜3週間かかることがあり
ます。初めてのシェービングで思い通りの結果が得られないことや、少し肌にヒリヒリ感が残る場合
がありますが、これは普通のことです。フィリップスのシェーバーに限らずシェービング方法を変え
る時には、肌もヒゲも新 しいシェービング方 法に慣れる時間 が必要です。新しいシ ェーバーに肌を
慣らす為、まずは3週間このシェーバーを使い続けてみてください(最低でも1週間に3回以上)。この
3
週間は、あまりシェービング方法を変えたりせず、同じシェーバーで肌を慣らすことが大切です。
10
RQ1168_JP_CS2_A6.indd 10 13.7.31 10:03:26 PM
Page 12
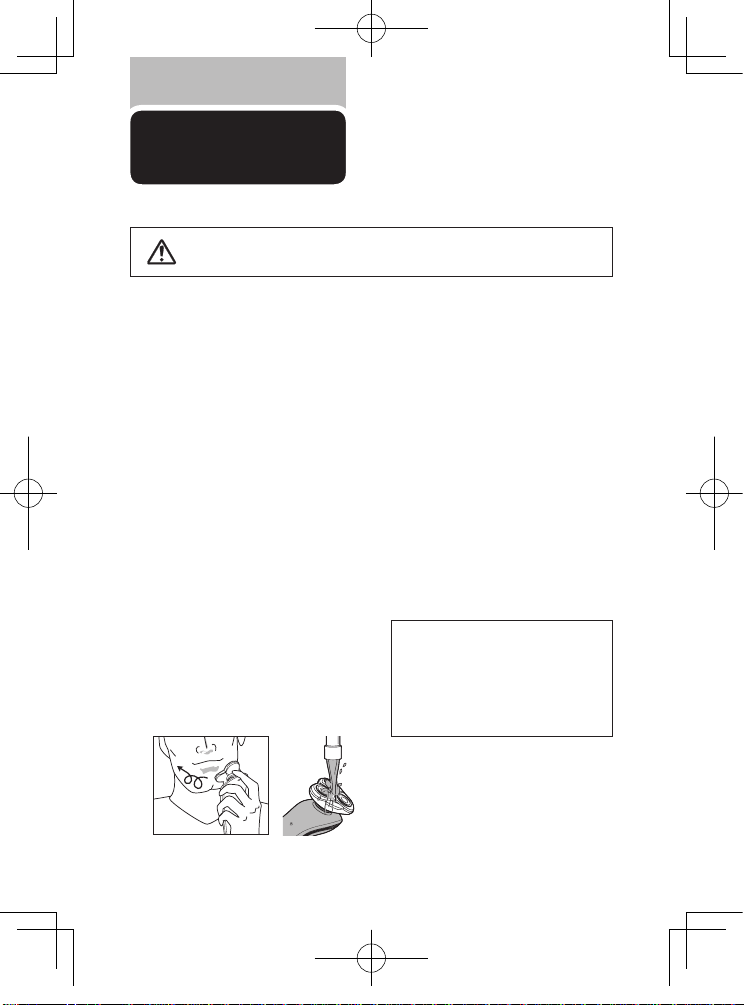
シェービングの
仕方(ウェット)
シェービングフォームやシェービング
ジェルを使ったシェービングの仕方で
す。剃った部分を実感しながら、なめら
かなシェービングができます。
1
顔を濡らし、市販のシェービングフォーム
またはシェービングジェルを付けます。
[重要 ]
シェ ー ビ ン グ 後 は、 シェ ー ビ ン グ
フォームやシェービングジェルがしっ
かりと洗い 流さ れて いるか を確 認し
てください。お手入 れが不 十分 な場
合、 臭い が出るばかりでなく、故 障
の原因にもなります。
2
シェービングヘッドを水で濡らし、肌の
上でなめらかに動くようにします。
3
スイッチを押し電源をONにします。
※スイッチを押してカギマークが表示される
と電源は入りません。ロック機能を解除して
ください。
※ロック機能の 解除 は、スイッチを3秒以 上
長押ししてください 。
4
刃を肌に 軽く押しあて、円を描くよう
に動かしながら剃ります。
シェービングフォームやシェービング
ジェルにより、鏡を見た時に剃った部分
を確認しやすくなります。
※途中、よりなめらかにシェービングするため
に、シェービングヘッドを水で濡らすと効果
的です。
5
シェービング後はスイッチを押し、電源
を
OFF
にします。
6
シェーバーをきれいに洗います(
P14
「お手入れ方法」)。
●ご使用の前に外刃の破れや変形がないか確認してください。
(外刃に破れや変形があると肌を傷つける原因になります)
●ヒゲ剃り以外の目的(頭髪など)には、使用しないでください。
●石けんもお使いいただけますが、肌の上での滑りをよくするため、
シェービングフォームやジェルの使用をお勧めします。
シェーバー 本体は 防水加 工をしており、浴室でも使用 できますが、水や 液
体の中に浸けないでください(故障の原因となります)。
警告
11
RQ1168_JP_CS2_A6.indd 11 13.7.31 10:03:26 PM
Page 13
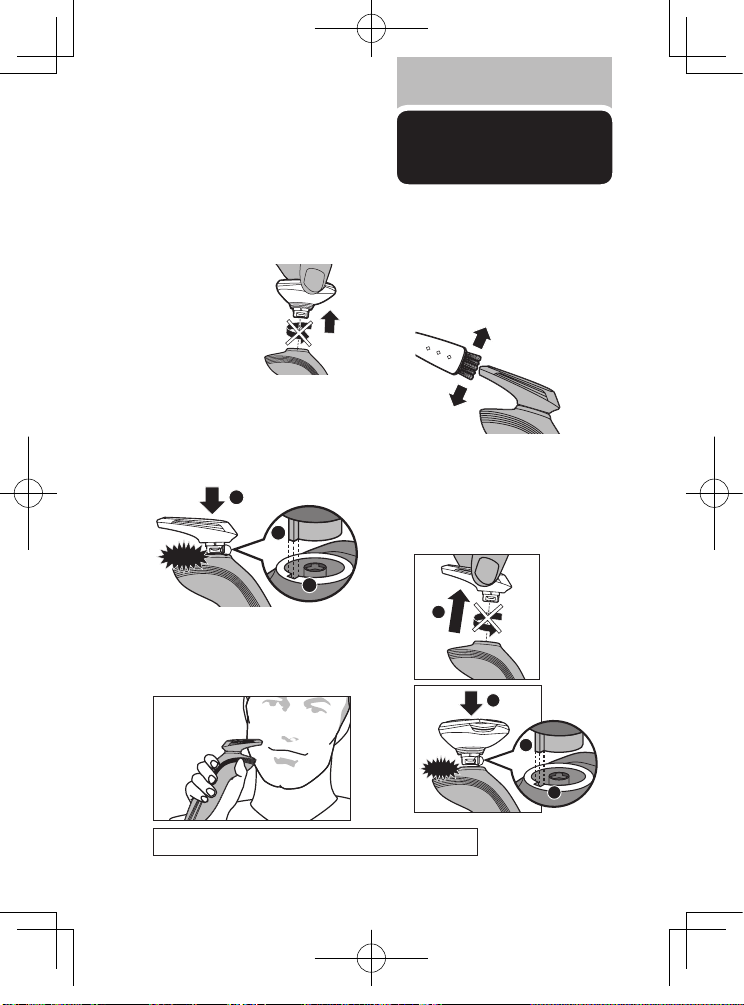
トリマーの使い方
1
シェービングユニットのはずし方
シェービングユニットを本 体からはず
します。
3
鏡を見ながらトリマーをカットしたいと
ころに直角にあたるようにしてくださ
い。一 度に切らずに、少しずつカットし
てください。
2
トリマ ー の 突 起 部( 図 ❶ )をシェ ー
バー上部の 溝(図❷)に合わせ、カチッ
と音がするまで押し込み(図❸)、本体
に取り付けます。スイッチをONにす
ると、トリマー先端の刃が往復してカッ
トします。
トリマーはヘアーライン、もみあげ、
ヒゲなどを整えるのに便利です。
カチッ
1
4
3
2
4
ご使用ごとに、必ずスイッチを
OFF
にし
てからクリーニングブラシの短い方の
毛で刃の部分を軽く掃除してください。
※トリマーの切れ味を保つため、使用後は必ず
ぬるま湯または水ですすぎ洗い をしてくだ
さい(
P15
「トリマーのお手入れ方法」)。
5
シェービングユニットのつけ方
トリマーをはずし(図❶)、シェービングユ
ニットの突起部(図❷)をシェーバー 上
部の溝(図❸)に合わせ、カチッと音がす
るまで押し込み(図❹)、本体に取りつけ
ます。
注意:あまり押し当て過ぎると肌を傷めますのでご注意ください。
カチッ
3
1
2
※シェービングユニット
は、回さ ずにまっすぐ
引き抜いてください。
※トリマーは、回
さずに まっす
ぐ引き抜い て
ください。
12
RQ1168_JP_CS2_A6.indd 12 13.7.31 10:03:28 PM
Page 14
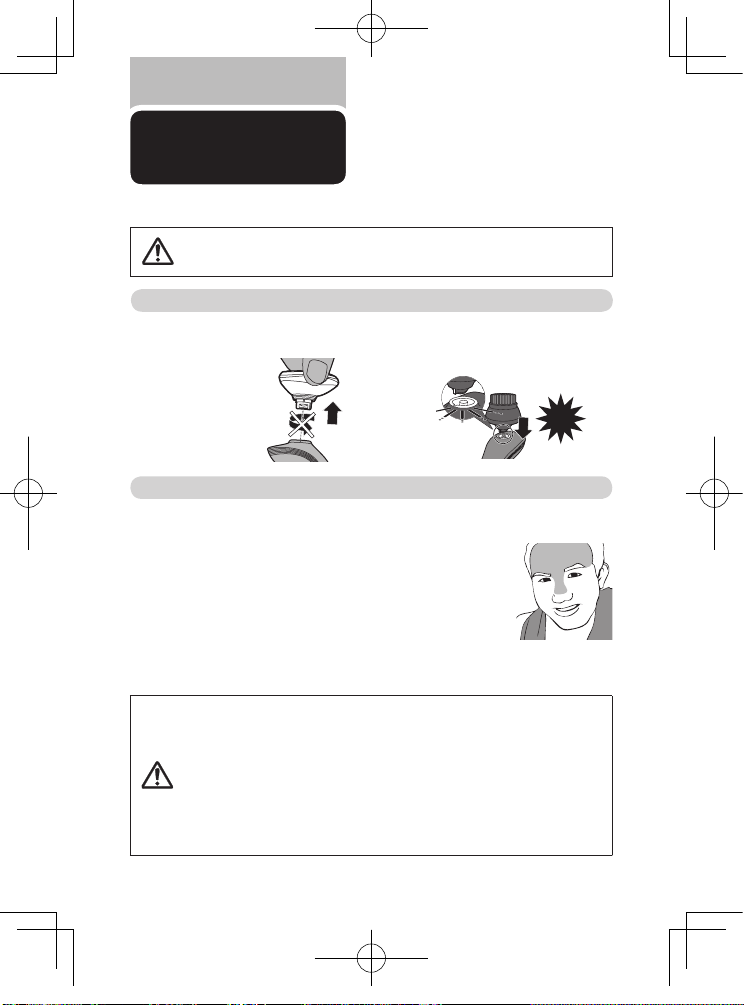
洗顔の仕方
警告
本体は防水加工を しており、浴室でも 使用できますが、水や 液体の中に浸
けないでください(故障の原因となります)。
1
シェ ー ビ ン グ ユ ニ ッ トを本 体 か ら
まっすぐ引き抜きます。
1
顔表面と 洗顔ブラ シをぬるま湯で濡
らします。
※シェービング前に洗顔ブラシをお使いいた
だくと、よ り効果的・ 衛生的にシ ェービン
グすることができます。
4
洗顔ブラシでTゾーン(図で示された
箇所)を洗顔します。
5
他の箇所も同じように洗顔していきます。
3
スイッチを押し、電源をONにします。
2
顔表面ま たは洗顔 ブラシに普段お使
いの洗顔料を適量塗布します。
洗顔する
カチッ
注意
●洗顔以外の目的には、使用しないでください。
●自分で作った洗顔料、刺激の強い化学物質や粗い粒子を含んだ洗顔料、
スクラブ入りまたはピーリング作用のある洗顔料などを使用しないでく
ださい。
●ご利用回数の目安は1日2回です。
●洗顔は約1分間、行ってください。肌にそって、円を描くようブラシをやさ
しく滑らせながら洗浄します。同じ部位で3回以上回さないでください。
●
肌の洗い過ぎを防ぐため、ひとつの箇所を20秒以上洗浄しないでください。
●ブラシを肌に強く押し付けないように気をつけてください。
●目の周りの敏感な部分には製品を使用しないでください。
●
肌に異常(傷・はれもの・湿疹等)がある場合は製品を使用しないでください。
2
洗顔ブラ シヘッド の突起部を本体上
部の 溝に 合わせ、カ チッ と音が する
まで押し込み、本体に取り付けます。
アタッチメントを取り付ける
※シェービングユニット
は、回さ ずにまっすぐ
引き抜いてください。
13
RQ1168_JP_CS2_A6.indd 13 13.7.31 10:03:30 PM
Page 15
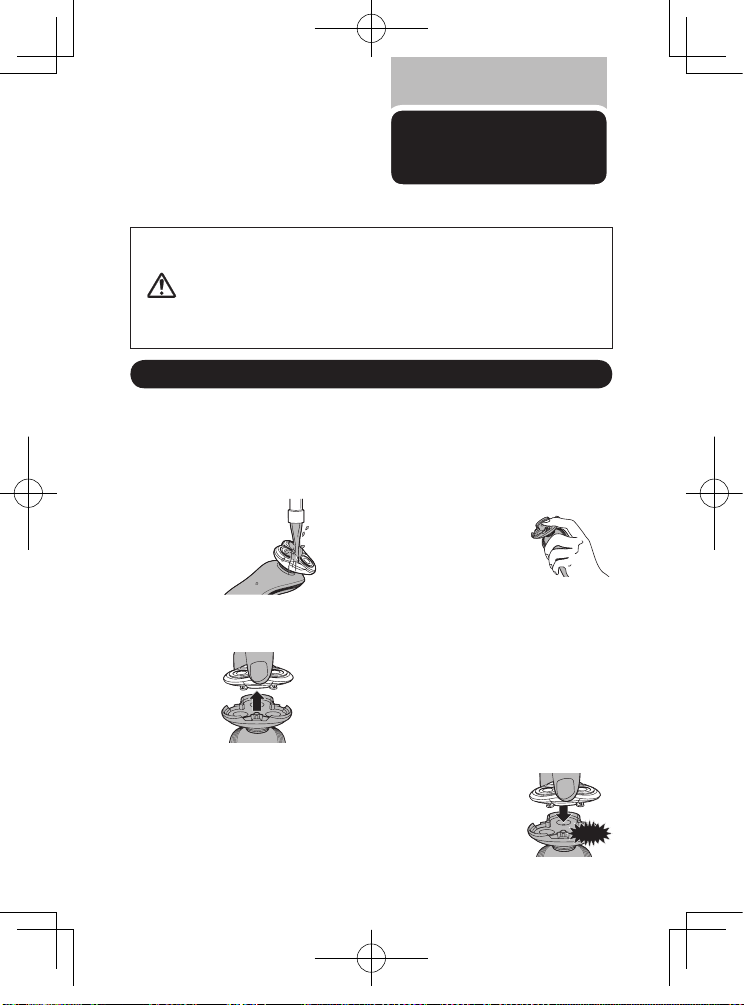
お手入れ方法
シェービングユニットについては
なるべく使用の都度クリーニング
ブラシで掃除をしてください。
1
シェービングユニットをぬるま湯または
水で約30秒洗います。
4
シェービ ング ヘッドホ ル ダ ー 受 部と
シェービングヘッドホルダーの水を 切
ります。
水洗いによるお手入れ方法
※洗 剤は使 用しないでください 。
※ぬるま 湯(40℃前後 )で のお 手入 れをお すすめします。臭 いのもととなる皮 脂や 汗などが 取れ やすくなり
ます。ただし、熱 湯はお 止めください。故 障の 原因となります。
※お手 入れ 中にシェ−バーの 底から水が 漏れてくる場合が ありますが、異常では ありません。
2
シェービングユニットからシェービング
ヘッドホルダーをはずします。
3
シェービ ング ヘッドホ ル ダ ー 受 部と
シェービングヘッドホルダー にたまっ
たヒゲ クズを、ぬるま 湯 また は 水 で
それぞれ 約30秒洗い 流します。
5
細かい部 分は 、シェービングヘッドホ
ルダー受 部とシェービングヘッドホル
ダーが乾いてからクリーニングブラシ
で掃除してください。
より細かいお手 入れ方 法は、
P16
をご参照く
ださい。
※シェービングヘッドホ
ルダー 受 部は抜 けな
いよう指 で 押さ えて
ください。
※周 囲 に気 をつ け てく
ださい。
6
シェービングヘッドホ
ルダー 受部 にシェー
ビングヘッドホルダー
を取り付けます。
カチッ
水洗 いの 後は 充分 乾 燥させ てからシェービング
ヘッドホルダーを取り付けてください。乾燥が 不充
分な場合、臭いが出る原因となります。
●圧縮空気、研磨パッド、研磨洗浄剤、ペトロールやアセトンなどの刺激性の
強い液体は絶対に使わないでください。
●この製品に潤滑剤を使う必要はありません。
●お手入れの際は、スイッチを
OFF
にしてから水洗いしてください。
●アタッチメントは水洗いできますが、本体は水中に浸けないでください。
●シェービングユニットを乾燥させる時に、タオルやティッシュペーパーを使
用しないでください。刃を傷める場合があります。
注意
14
RQ1168_JP_CS2_A6.indd 14 13.7.31 10:03:31 PM
Page 16
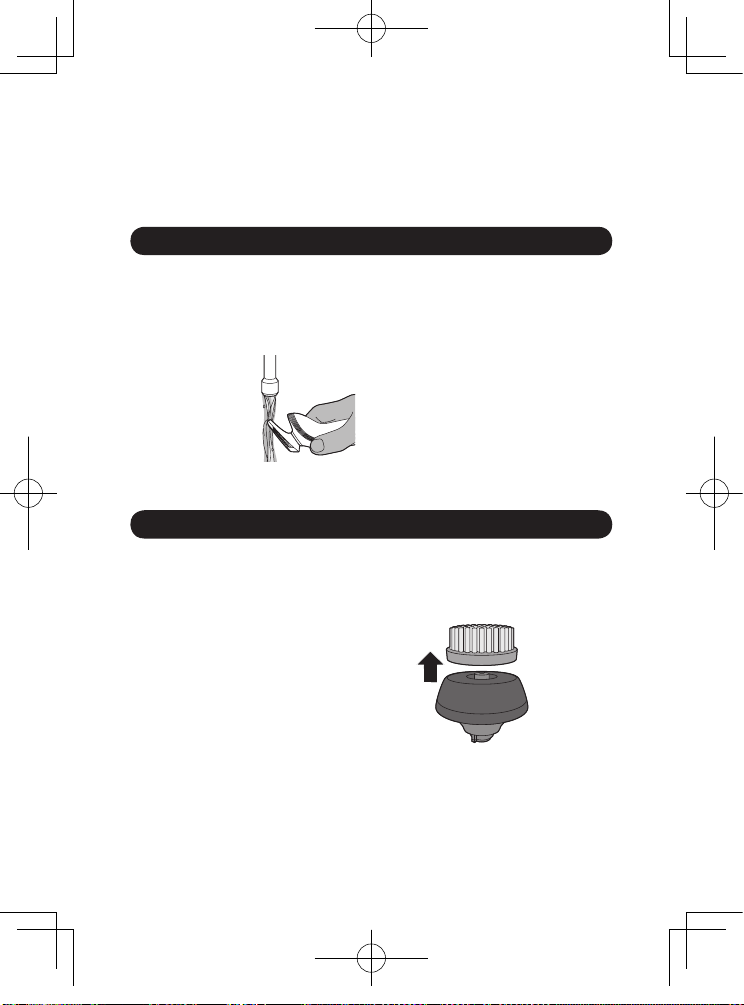
1
トリマー を取 り付けた 状 態 でシェー
バーのスイッチをONにし、ぬるま湯ま
たは水ですすぎ洗いをします。トリマー
にヒゲクズが残った
場合には、スイッチ
を
OFF
にし、クリー
ニン グブラ シ で
取り除 い てくだ
さい。
※トリマー は、使用後 必ずお手入れしてください。
2
お手入 れの後 、シェーバーのスイッチ
を
OFF
にします。
トリマーのお手入れ方法
1
お手入れする際には、スイッチを必ず
OFF
にします。
2
ブラシ台 座から洗顔ブラ シを取り 外
します。
3
ぬる ま 湯 と 石 け ん で 洗 顔 ブラシ を
しっかり洗います。
4
洗顔ブラシを乾い たタオル で水分 を
ふき取ります。
※洗顔ブラシヘッドは、使用後 必ずお手入れしてください。
洗顔ブラシヘッドのお手入れ方法
15
RQ1168_JP_CS2_A6.indd 15 13.7.31 10:03:32 PM
Page 17
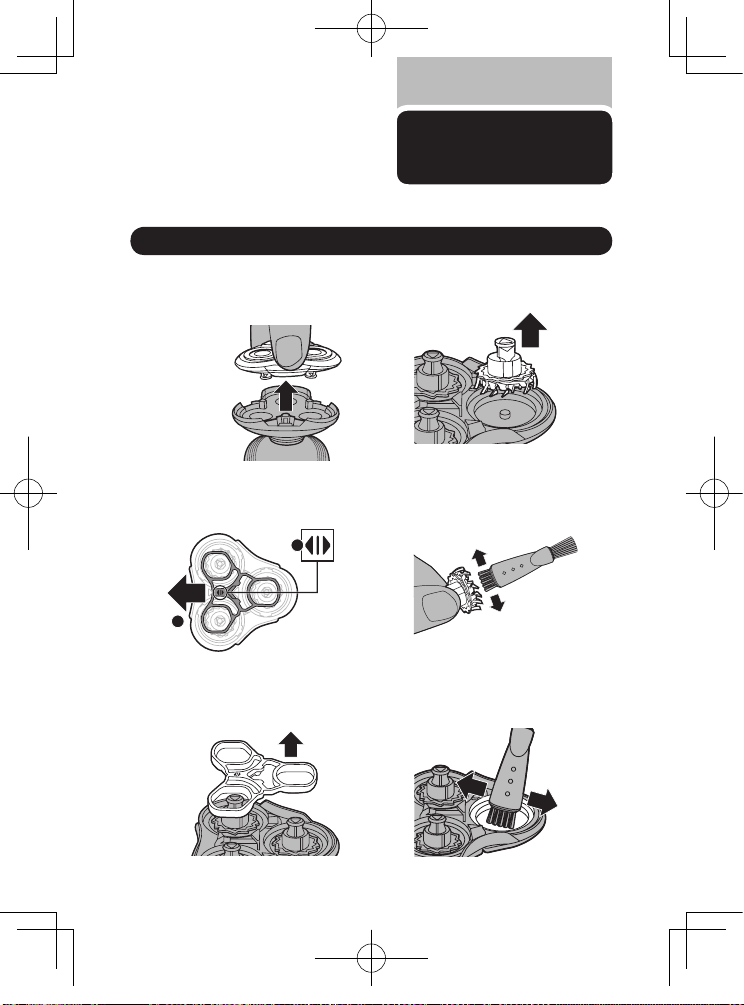
分解掃除の仕方
●分解掃除は約1カ月に1回が目安です。
●分解 掃除される場合は、内刃と外刃の 組み
合わせを変えないようにご注意ください。組
み合わせが変わると、刃の状態が元通りにな
るまで数週間かかる場合があります。
刃の取り外し方
1
シェービングヘッドホルダーをシェー
ビングユニットからはずします。
2
保持板のマーク(図❶)を指で押さえ、
図❷の方向にスライドさせます。
5
取りはずした 内 刃 を1つず つ ぬるま湯
(40℃前後)に浸して、皮脂やヒゲクズを
クリーニングブラシで掃除します。
6
外刃 の 内側をクリーニングブ ラシで
掃除します。
4
内刃を取り出します。
3
保持板を持ち上げてシェービングヘッ
ドホルダーからはずします。
1
2
16
RQ1168_JP_CS2_A6.indd 16 13.7.31 10:03:34 PM
Page 18
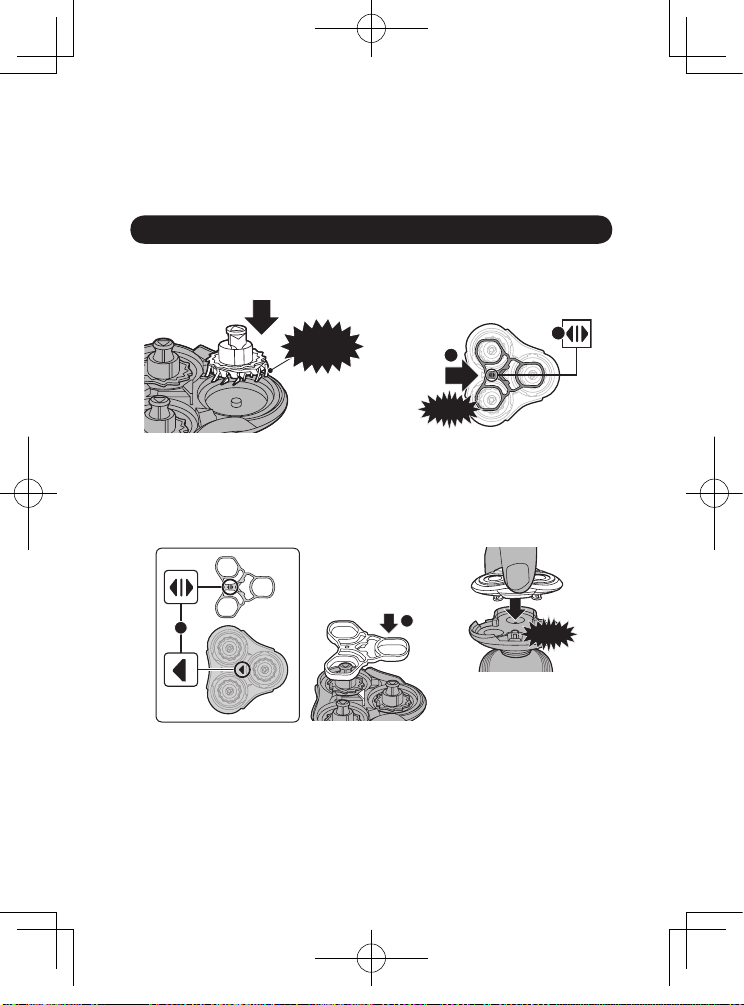
1
2
カチッ
刃の取り付け方
3
保持板のマーク(図❶)を指で押さえ、
図❷の方向にスライドさせます。
必ず刃は
下向きに
2
1
内刃 の カッター 部 分を 下 に向 け て、
外刃に戻します。
2
シェービングヘッドホルダーと保持 板
を図 ❶を目 印に 向き を合 わせて 、保
持板をシェービングヘッドホルダ ーに
取り付けます(図❷)。
4
シェービングヘッドホルダーをシェー
ビング ヘッドホ ル ダー 受 部 に 取り付
けます。
カチッ
突起部
マーク
1
※取り付けられる向きが決まっています。
17
RQ1168_JP_CS2_A6.indd 17 13.7.31 10:03:35 PM
Page 19
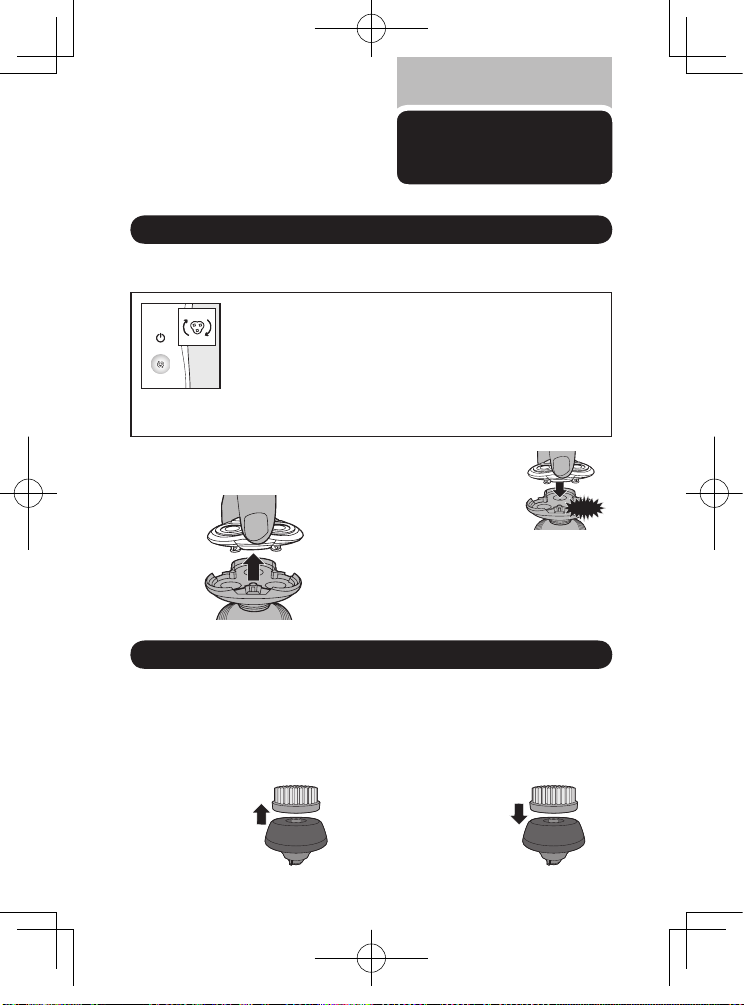
カチッ
シェービングヘッドホルダ
ー
・
洗顔ブラシの交換
シェービングヘッドホルダーは約2年(1日3分ご使用の場合)での交換が目安です。
専用のシェービングヘッドホルダー(品番:
RQ11
)と交換してください。
1
シェービングユニットからシェービン
グヘッドホルダ ーを取りはずします。
2
シェービングヘッド
ホルダー受 部に新
しいシェービング
ヘッドホ ルダー を
取り付けます。
シェービングヘッドホルダーの交換表示
電源を 切った後にシェービングヘッドホルダーの 交換 マークが点 滅したら、
シェービングヘッドホルダーの交換時期です。この表示が出たら、シェービング
ヘッドホルダ ーを交 換し、本体をリセットしてください。(リセット方法は 下記
「シェービングヘッドホルダーの交換」3をご参照ください)なお、お客様ご自身で
リセットされない場合は、合計9回のご使用の間、この表示が続き、9回目のご使
用が終わると自動的にリセットされます。(シェービングヘッドホルダー交換表示
についてはP7をご参照ください)
3
スイッチを押し電源 をONにします。
シェービングヘッド ホル ダ ー の 交 換
マークが点滅中にシェーバーをリセット
(
ON/OFF
スイッチを10秒間押し続け
る)してください。
洗顔ブラシの交換
1
ブラシ台 座から
洗顔ブラシを取
り外します。
2
新しい洗顔ブラ
シをブラシ台座
に取り付けます。
[替洗顔ブラシヘッド品番(ブラシ台座+洗顔ブラシ 各1個):
RQ585/51
]
[替洗顔ブラシ品番(1個):
RQ560/51
]
[替洗顔ブラシ品番(3個パック):
RQ563/51
]
洗顔ブラシが摩耗した状態で使用すると肌にダメージを与える恐れがあります。そのため
3〜6
カ月ごとのブラシ交換を お勧めしま す(使用頻度、使用方法によ り変化しま す)。万が
一洗顔ブラシが変形したり破損した場合は、3〜6カ月以内でも交換してください。
シェービングヘッドホルダーの交換
18
RQ1168_JP_CS2_A6.indd 18 13.7.31 10:03:36 PM
Page 20
シェーバーを
廃棄するとき
リチウムイオン電池のリサイクルについて
このシェーバーはリチウムイオン電池を使用しています。
リチウムイオン電池はリサイクル可能な貴重な 資源です。
ご使用 済み の製 品の廃 棄に際しては、リチウムイオン電池
を取り出し、各自治 体の処 理方法に従い、リサイクル協力店
にお持ちください。
●製品を廃棄するとき以外は、絶対に本体を分解しないでください。
●本体内部の金具は鋭いので、ご注意ください。
注意
※お客様による充電池の
修理交換はできません。
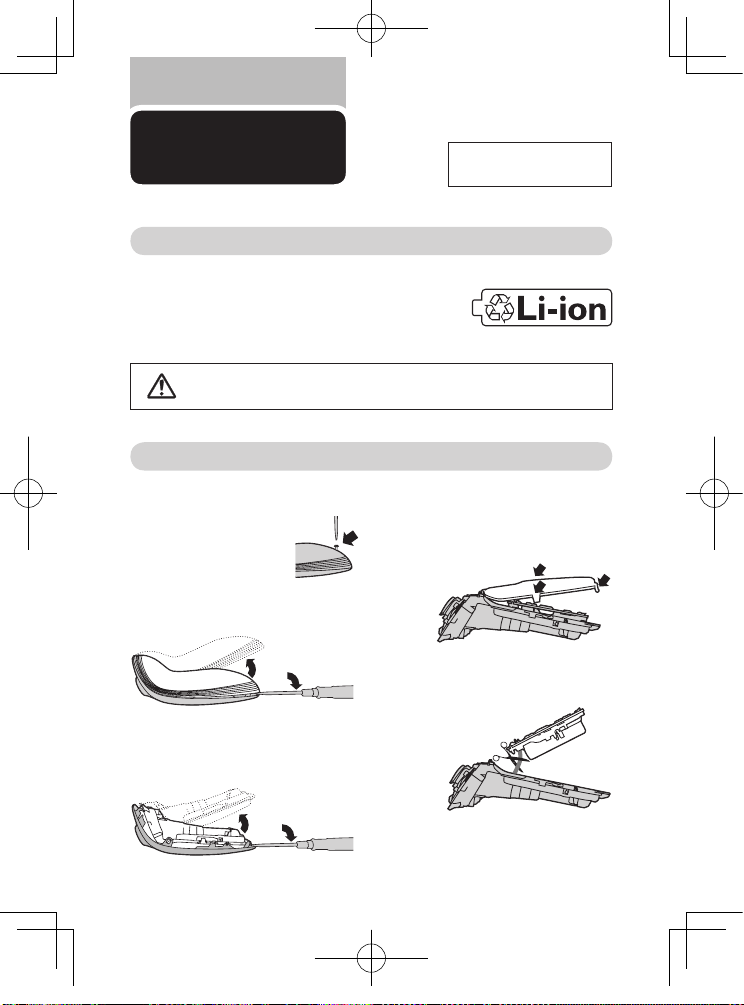
充電池の取り外し方
スイッチをONにして、完全に動作しなくなるまで充電池を放電させてから、行ってください。
1
シェービングユニットをはず
し、本体下部 のネジを⊖ド
ライバーではずします。
※充電池を取り外した後は、通電しないでください。
4
モーターユニットのカバー(透明 の部
分)にある3つのツメをはずし、カバーを
開けます。
5
充電池ホルダーを持ち上げて工具でワ
イヤーを切断し、取り出します。
2
本体下部の 穴にドライバーをこじ入れ
て、ユニットカバーをはずします。
3
フロントカバーとモーターユニット(灰
色の部分)のすき間にドライバーをこじ
入れて、モーターユニットをはずします。
19
RQ1168_JP_CS2_A6.indd 19 13.7.31 10:03:38 PM
Page 21
故障かな?
と思ったら
故障かな?と思ったら、
お調べください。
シェーバーのスイッチを押しても作動しない
▶充電はしましたか?
1
時間以上の充電をしてください。
▶ カギマークが表示されていませんか?
カギマークが表示されたらロックを解除してください。P7「ロック機能」の項をお読
みください。
▶ 刃が動かなくなるほど汚れているか、破損していませんか?
シェービングヘッドホルダーをお手入れするか、交換をしてください。
充電しても使用時間が極端に短い
▶シェーバーが完全に止まるまで作動させてから、もう一度充電してください。
それでも改善されないときは、充電池の寿命です。
だんだん切れ味が悪くなった
▶シェービングユニット部が汚れていませんか?
▶シェービングユニット部が損傷または摩耗していませんか?
損傷または摩耗しているときは、シェービングヘッドホルダーを交換してください。
(シェービングヘッドホルダー品番:
RQ11
)
▶シェービングユニットに長いヒゲがからまっていませんか?
P16・17
「分解掃除の仕方」の項をお読みください。
シェーバー本体のモーターは回転しているが、内刃が回転しない
▶外刃にキズ、ヘコミはありませんか?
シェービングヘッドホルダーを交換してください。
(シェービングヘッドホルダー品番:
RQ11
)
充電できない
▶充電アダプタの電源プラグ部はコンセントにきちんと差し込まれていますか?
充電スタンドの電源コネ クタ受部に充電アダプタ のコードがきちんと差し 込まれています
か?確認してください。
▶充電アダプタの電源コードが断線していませんか?
新しい充電アダプタ(品番:
HQ8505
)をお買い求めください。
20
RQ1168_JP_CS2_A6.indd 20 13.7.31 10:03:39 PM
Page 22
以上の点検により、正常な状態に戻らない場合は、
お買い求めの販売店か小泉成器修理センターにお問い合わせ願います。
充電スタンドで充電しても、満充電にならない
▶シェーバー本体が正しくセットされていますか?
しっかりと固定されるまで、シェーバーを押し込んでください。
ブラシが動かないのに本体から音がする、異音がする
▶ブラシは正しくセットされていますか?
ブラシ取付部に、カチッと音がするまで押し付けます。
ブラシが汚れている
▶ご使用後のすすぎは十分ですか?
ブラシはご使用の都度、水ですすいでください。
洗浄中、洗浄後に刺激を感じる
▶肌、ブラシはしっかり濡れていますか?
肌、ブラシを濡らしても刺激を感じる場合は、洗顔料を多めにご使用ください。
▶肌にブラシを強く当てていませんか?
ブラシの先端が肌にそっと触れる程度当ててください。
▶1日2回のご利用目安を超えていませんか?
ご利用頻度を低くしてお試しください。
▶肌が乾燥していませんか?
肌が乾燥していると肌本来のバリア機能が弱まり刺激を感じることがあります。
21
RQ1168_JP_CS2_A6.indd 21 13.7.31 10:03:39 PM
Page 23
A
D
1
3
4
E
2
B C
5
F
ENGLISH RQ1168
22
RQ1168_EN_CS2_A6.indd 22 13.7.31 10:30:14 PM
Page 24
Introduction
Congratulations on your purchase and welcome
to Philips! To fully benet from the support that
Philips offers, register your product at www.philips.
com/welcome.
Please read this user manual, as it contains
information about the features of this shaver as
well as some tips to make shaving easier and more
enjoyable.
General description (Fig. 1)
A Shaver
1 Display
2 Shaver on/off button
3 Protection cap
4 RQ11 Shaving unit
B Trimmer
C Cleansing brush
5 Protection cap for brush attachment
D Charging stand
E Cleaning brush
F Adapter
Important
Read this user manual carefully before you use the
shaver and save it for future reference.
General
Danger
Make sure the adapter does not get wet.
Warning
The adapter contains a transformer. Do not cut
off the adapter to replace it with another plug, as
this causes a hazardous situation.
-
-
ENGLISH
23
RQ1168_EN_CS2_A6.indd 23 13.7.31 10:30:14 PM
Page 25
These appliances are not intended for use
by persons (including children) with reduced
physical, sensory or mental capabilities, or lack of
experience and knowledge, unless they have been
given supervision or instruction concerning use of
these appliances by a person responsible for their
safety.
Children should be supervised to ensure that they
do not play with the shaver.
Before you use an attachment, always check it for
damage or wear. If the attachment is damaged or
worn, do not use it, as injury may occur. Replace a
damaged attachment before you use it again (see
chapter ‘Replacement’).
Be careful with hot water when you clean the
appliances. Always check if the water is not too
hot, to prevent your hands from getting burnt.
Caution
The appliances and accessories are not
dishwasher-proof.
Always place and use the appliances on a surface
that is uid-resistant.
Do not use the brush attachment on chapped
skin, open wounds, or if you suffer from skin
diseases or skin irritations, such as severe acne,
sunburn, skin infection, etc.
Do not use the brush attachment with self-made
cleansers or cleansers containing harsh chemicals
or rough particles.
Use, charge and store the shaver at a temperature
between 5°C and 35°C.
Only use the accessories supplied with this shaver
or that have been specically developed for this
shaver.
-
-
-
-
-
-
-
-
-
-
ENGLISH
24
RQ1168_EN_CS2_A6.indd 24 13.7.31 10:30:14 PM
Page 26
If the adapter or any of the other accessories is
damaged, always have it replaced with one of the
original type in order to avoid a hazard.
The adapter transforms 100-240 volts to a safe
low voltage of less than 24 volts.
Do not use the appliances and accessories if they
are damaged.
Water may leak from the socket at the bottom
of the shaver when you rinse it. This is normal
and not dangerous because all electronics are
enclosed in a sealed power unit inside the shaver.
Only use the attachments to trim facial hair
(beard, moustache and sideburns).
Compliance with standards
This shaver complies with the internationally
approved safety regulations and can be safely used
in the bath or shower and cleaned under the tap.
These Philips appliances comply comply with
all standards regarding electromagnetic elds
(EMF). If handled properly and according to the
instructions in this user manual, the appliances are
safe to use based on scientic evidence available
today.
The display
Charging
Charging takes approx. 1 hour.
When the shaver is charging, rst the plug symbol
and the battery symbol ash alternately. After
some time, the plug symbol goes out and the
battery symbol continues to ash until the shaver
is fully charged.
-
-
-
-
-
-
-
-
-
ENGLISH
25
RQ1168_EN_CS2_A6.indd 25 13.7.31 10:30:15 PM
Page 27
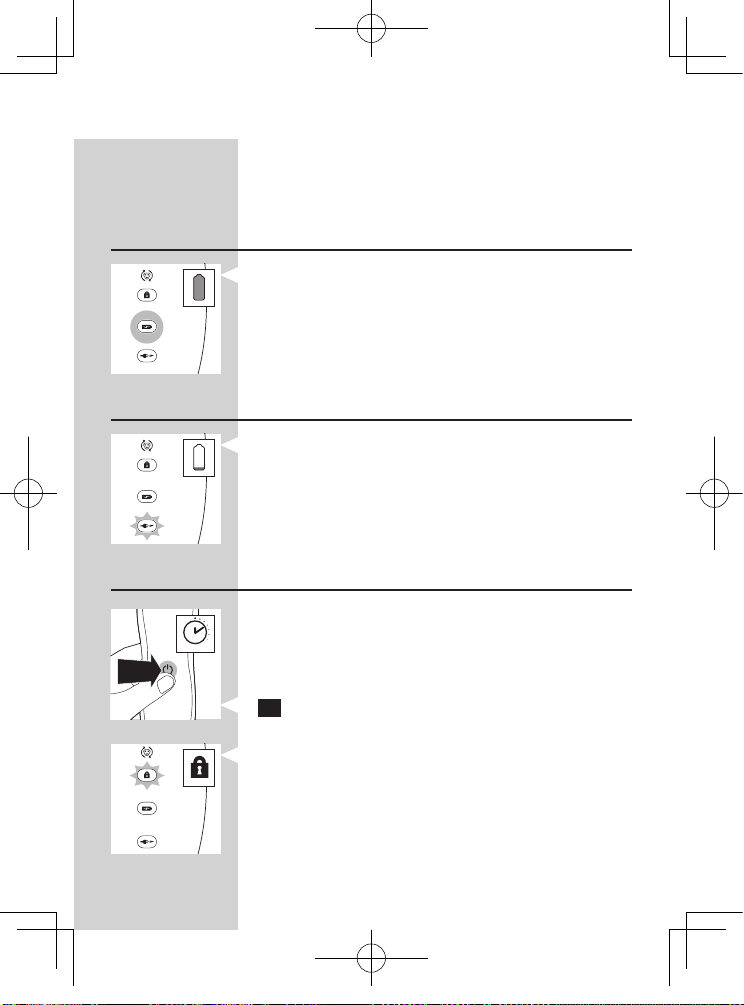
Quick charge: When the shaver contains enough
energy for one shave, the alternate ashing of the
plug symbol and battery symbol stops and only
the battery symbol ashes.
Battery fully charged
When the battery is fully charged, the battery
symbol lights up continuously. After approx. 30
minutes, the display automatically switches off
again.
Battery low
When the battery is almost empty (when there
are only 5 or fewer shaving minutes left), the plug
symbol ashes.
When you switch off the shaver, the plug
symbol continues to ash for a few seconds.
Travel lock
You can lock the shaver when you are going to
travel. The travel lock prevents the shaver from being
switched on by accident.
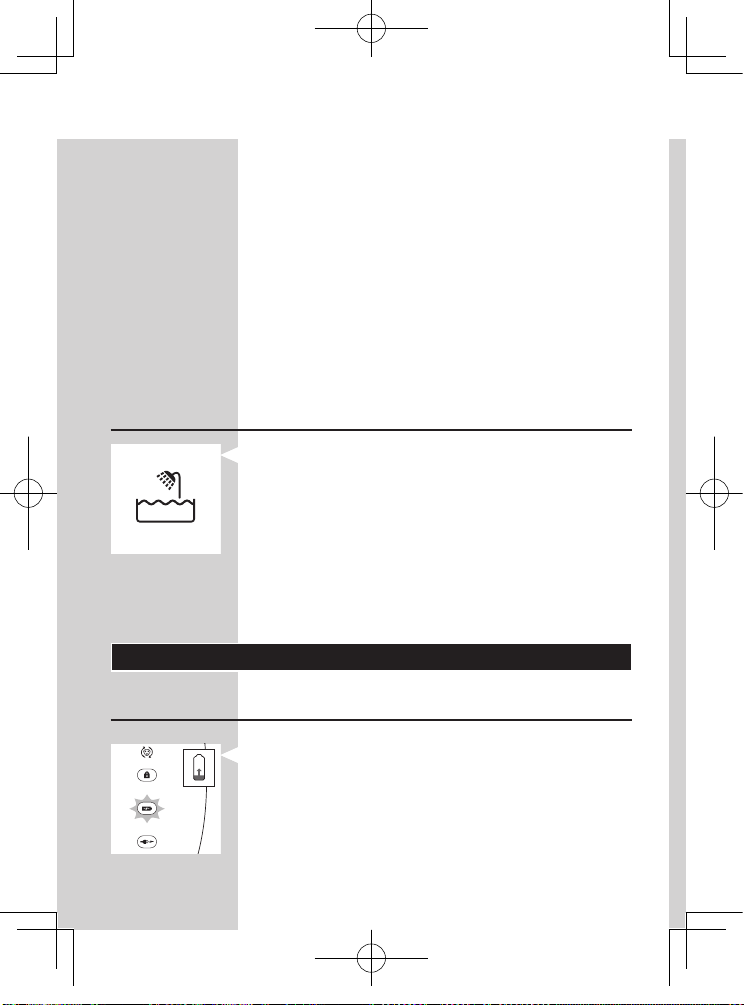
Activating the travel lock
1 Press the on/off button for 3 seconds to enter
the travel lock mode.
The lock symbol lights up on the display.
Note: The displays of the various shaver types look
different, but show the same symbol.
-
-
-
-
,
3 sec.3 sec.
ENGLISH
26
RQ1168_EN_CS2_A6.indd 26 13.7.31 10:30:15 PM
Page 28
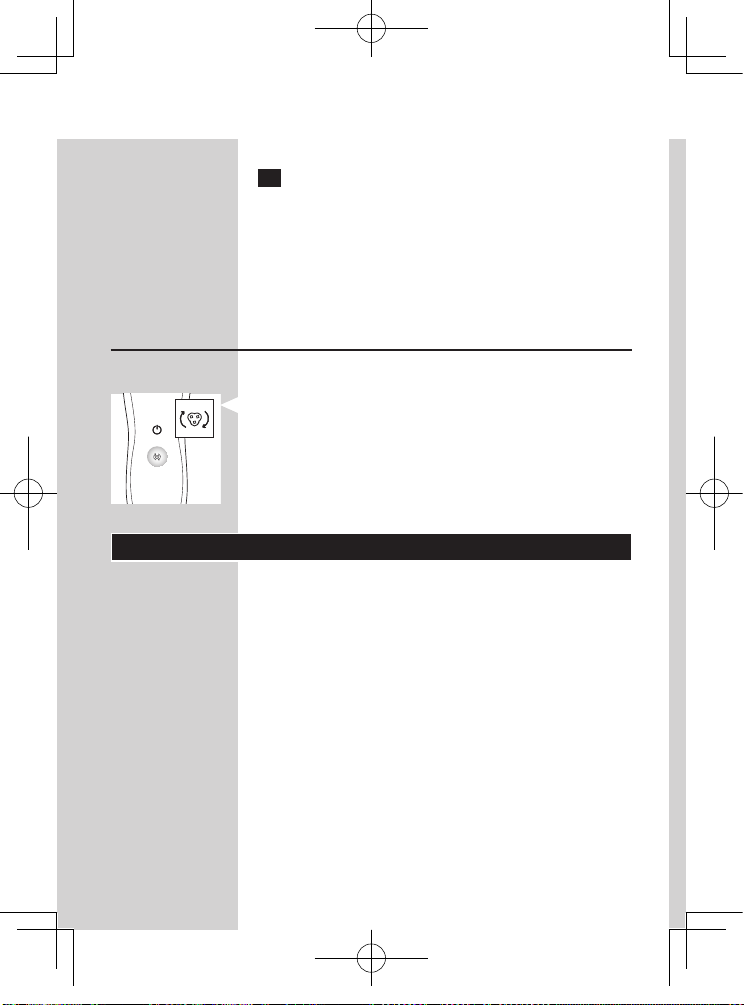
Deactivating the travel lock
1 Press the on/off button for 3 seconds.
The motor starts running to indicate that the
travel lock has been deactivated.
The shaver is now ready for use again.
Note: When you place the shaver in the pluggedin charger or Jet Clean System, the travel lock is
automatically deactivated.
Replace shaving head holder
For maximum shaving performance, we advise you
to replace the shaving head holder every two years.
To remind you to replace the shaving head holder,
the appliance is equipped with a replacement
reminder which is activated automatically after
approx. two years. The replacement reminder is
repeated at 9 successive shaves or until you reset
the shaver.
Charging
Charging takes approx. 1 hour.
A fully charged shaver has a shaving time of up to 50
minutes.
Charge the shaver before you use it for the rst
time and when the display indicates that the battery
is almost empty (see section ‘Battery low’ in chapter
‘The display’).
Quick charge
After the shaver has charged for 5 minutes,
it contains enough energy for one shave.
,
-
ENGLISH
27
RQ1168_EN_CS2_A6.indd 27 13.7.31 10:30:16 PM
Page 29
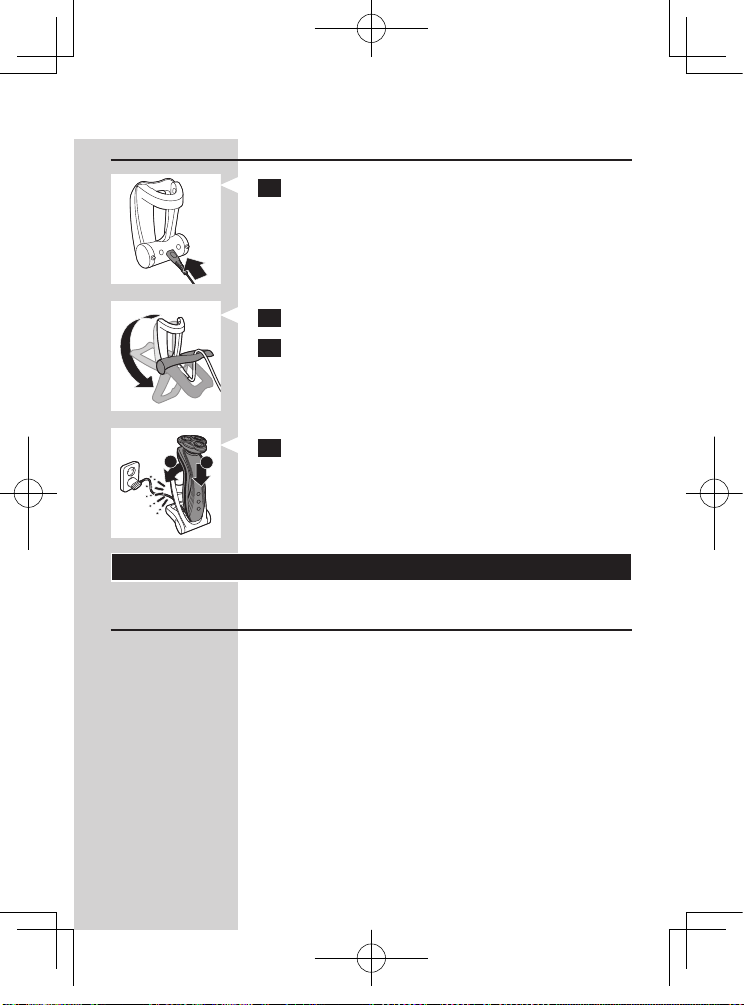
Charging in the charger
1 Insert the small plug into the charger.
2 Unfold the charger (‘click’).
3 Put the adapter in the wall socket.
4 Put the shaver in the charger (1) and press it
backwards until it locks into place (2).
The display shows that the shaver is charging
(see section ‘Charging’ in chapter ‘The display’).
Using the shaver
Shaving
Skin adaptation period
Your rst shaves may not bring you the result you
expect and your skin may even become slightly
irritated. This is normal. Your skin and beard need
time to adapt to any new shaving system.
We advise you to shave regularly (at least 3 times
a week) for a period of 3 weeks to allow your skin
to adapt to the new shaver. During this period, use
your new electric shaver exclusively and do not use
other shaving methods. If you use different shaving
,
121
2
ENGLISH
28
RQ1168_EN_CS2_A6.indd 28 13.7.31 10:30:16 PM
Page 30
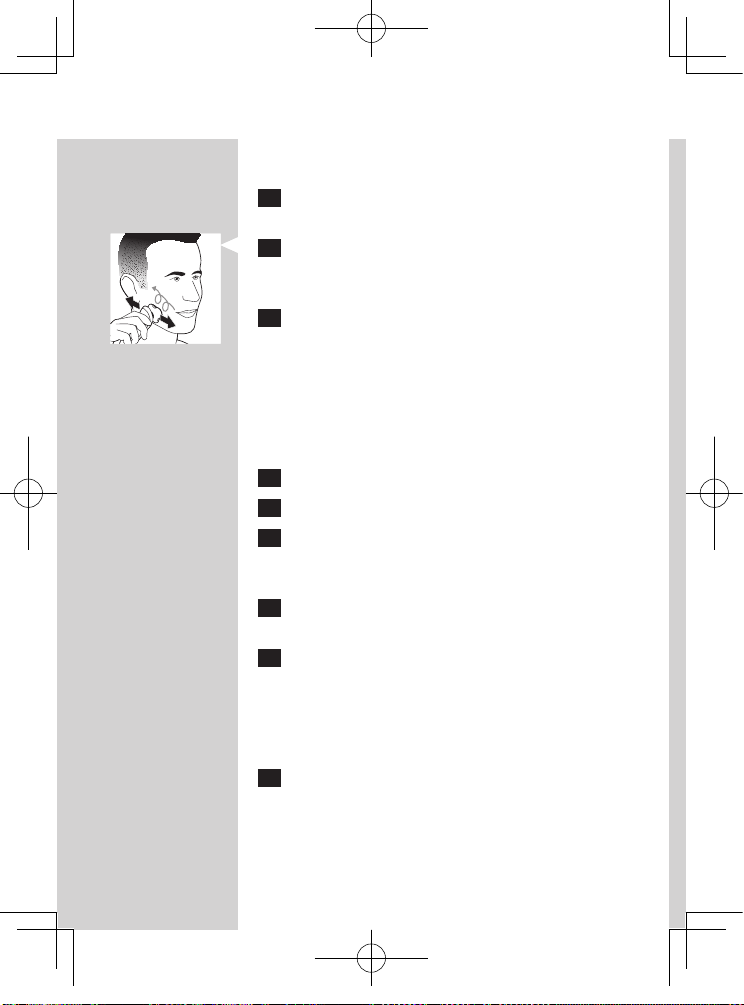
methods, it is more difcult for your skin to adapt to
the new shaving system.
1 Press the on/off button once to switch on the
shaver.
2 Move the shaving heads over your skin in
circular movements.
Do not make straight movements.
3 Press the on/off button once to switch off the
shaver.
Wet shaving
You can also use this shaver on a wet face with
shaving foam or shaving gel.
To shave with shaving foam or shaving gel, follow the
steps below:
1 Apply some water to your skin.
2 Apply shaving foam or shaving gel to your skin.
3 Rinse the shaving unit under the tap to ensure
that the shaving unit glides smoothly over your
skin.
4 Press the on/off button once to switch on the
shaver.
5 Move the shaving heads over your skin in
circular movements.
Note: Rinse the shaver under the tap regularly to
ensure that it continues to glide smoothly over your
skin.
6 Dry your face and thoroughly clean the
shaver after use (see chapter ‘Cleaning and
maintenance’).
-
ENGLISH
29
RQ1168_EN_CS2_A6.indd 29 13.7.31 10:30:17 PM
Page 31
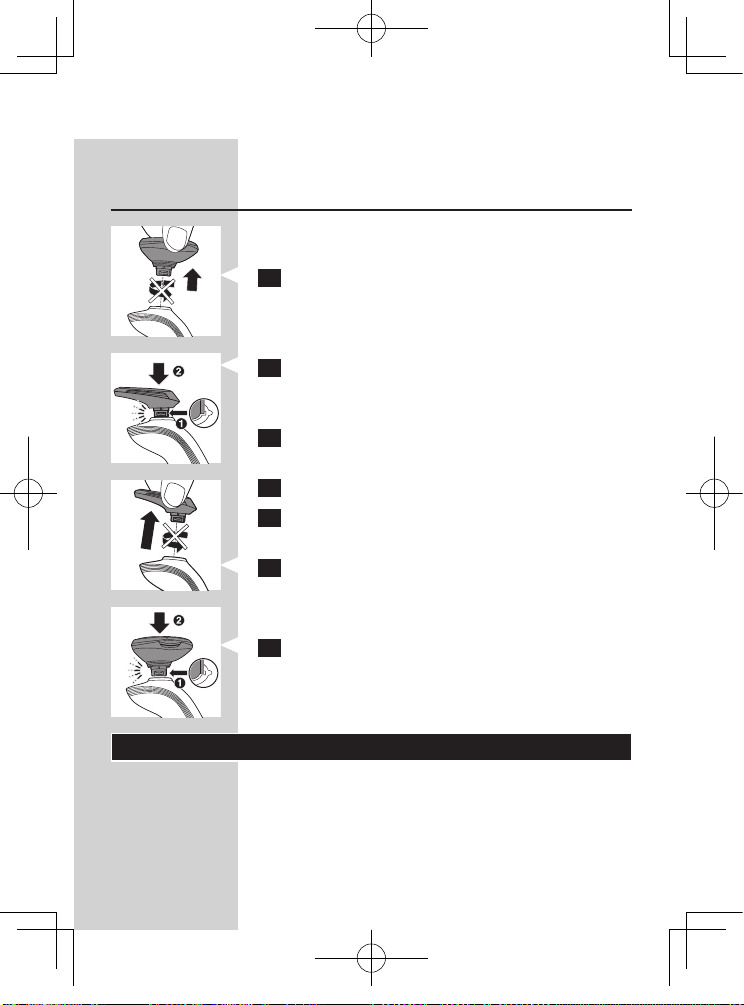
Note: Make sure you rinse all foam or shaving gel off
the shaver.
Using the trimmer
You can use the trimmer to groom your sideburns
and moustache.
1 Pull the shaving unit straight off the shaver.
Note: Do not twist the shaving unit while you pull it off
the shaver.
2 Insert the lug of the trimmer into the slot in
the top of the shaver (1). Then press down the
trimmer (2) to attach it to the shaver (‘click’).
3 Press the on/off button once to switch on the
trimmer.
4 You can now start trimming.
5 Press the on/off button once to switch off the
trimmer.
6 Pull the trimmer straight off the shaver.
Note: Do not twist the trimming unit while you pull it
off the shaver.
7 Insert the lug of the shaving unit into the slot
in the top of the shaver (1). Then press down
the shaving unit (2) to attach it to the shaver
(‘click’).
Facial cleansing with brush
Use the rotating brush with your daily cleansing
cream. The cleansing effect removes oil and dirt,
contributing to a healthy and oil free skin.
ENGLISH
30
RQ1168_EN_CS2_A6.indd 30 13.7.31 10:30:18 PM
Page 32
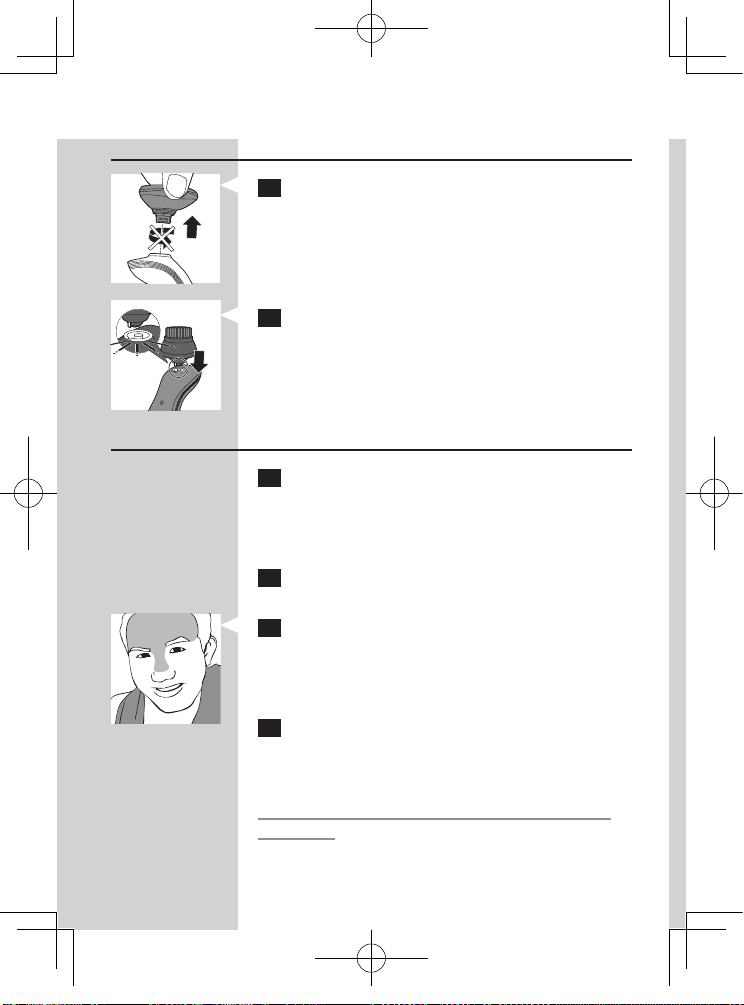
Attaching the cleansing brush
1 Pull the shaving attachment straight off the
appliance.
Do not twist the shaving attachment while you pull it
off the appliance.
2 Insert the lug of the brush attachment into
the slot in the top of the appliance. Press it
downwards to attach it to the appliance.
Using the cleansing brush attachment
1 Moisten the cleansing brush and your face with
warm water and cleansing cream.
Tip: Use the brush attachment before shaving for an
easier shaving and a more hygienic shaving result.
2 Press the on/off button to switch on the
appliance.
3 Start cleaning the T-zone with the brush
attachment.
Note: Make circular motions no more than 3 times in
one spot.
4 Start cleaning the rest of your face
Tip: Treat your face with the brush attachment for
about one minute.
Caution: Do not clean the sensitive area around
your eyes.
ENGLISH
31
RQ1168_EN_CS2_A6.indd 31 13.7.31 10:30:18 PM
Page 33
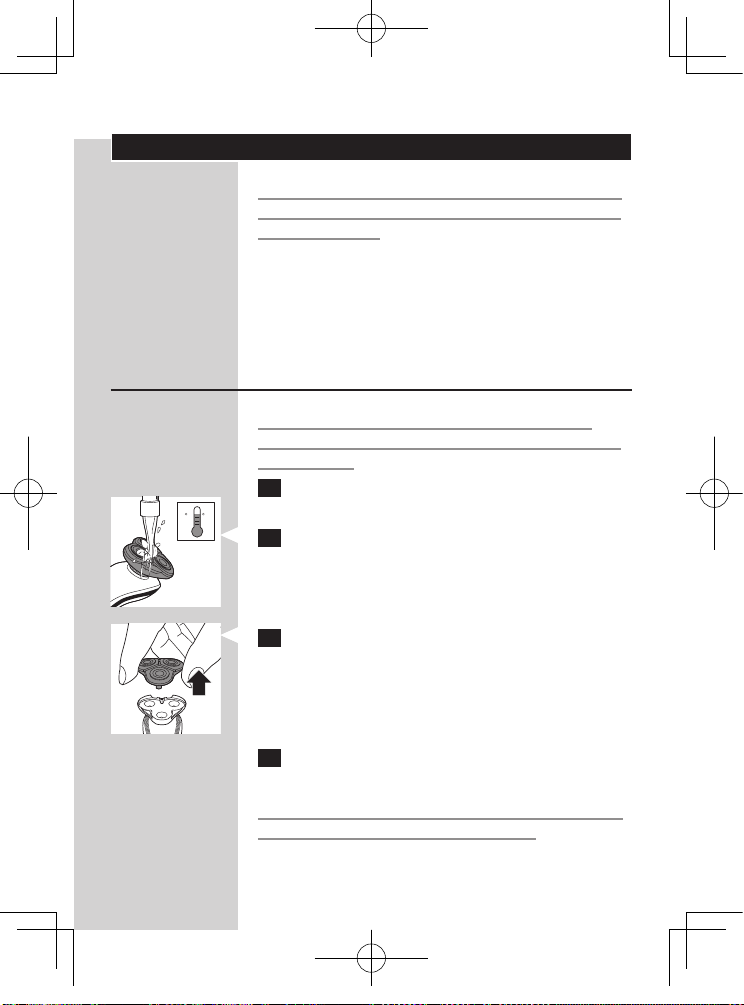
Cleaning and maintenance
Never use scouring pads, abrasive cleaning agents
or aggressive liquids such as petrol or acetone to
clean the shaver.
Clean the shaver after every shave for optimal
shaving performance.
You can clean the outside of the shaver with a
damp cloth.
Regular cleaning guarantees better shaving
performance.
Cleaning the shaving unit
Be careful with hot water. Always check if the
water is not too hot, to prevent your hands from
getting burnt.
1 Switch off the shaver. Remove it from the
charger.
2 Rinse the shaving unit under a hot tap for some
time.
Note: You can also clean the shaving unit with the
cleaning brush supplied.
3 Pull the shaving head holder off the bottom
part of the shaving unit and rinse it under a hot
tap for 30 seconds.
Note: You can also clean the shaving head holder with
the cleaning brush supplied.
4 Carefully shake off excess water and let the
shaving head holder dry.
Never dry the shaving unit with a towel or tissue,
as this may damage the shaving heads.
-
-
-
C FC F
ENGLISH
32
RQ1168_EN_CS2_A6.indd 32 13.7.31 10:30:19 PM
Page 34
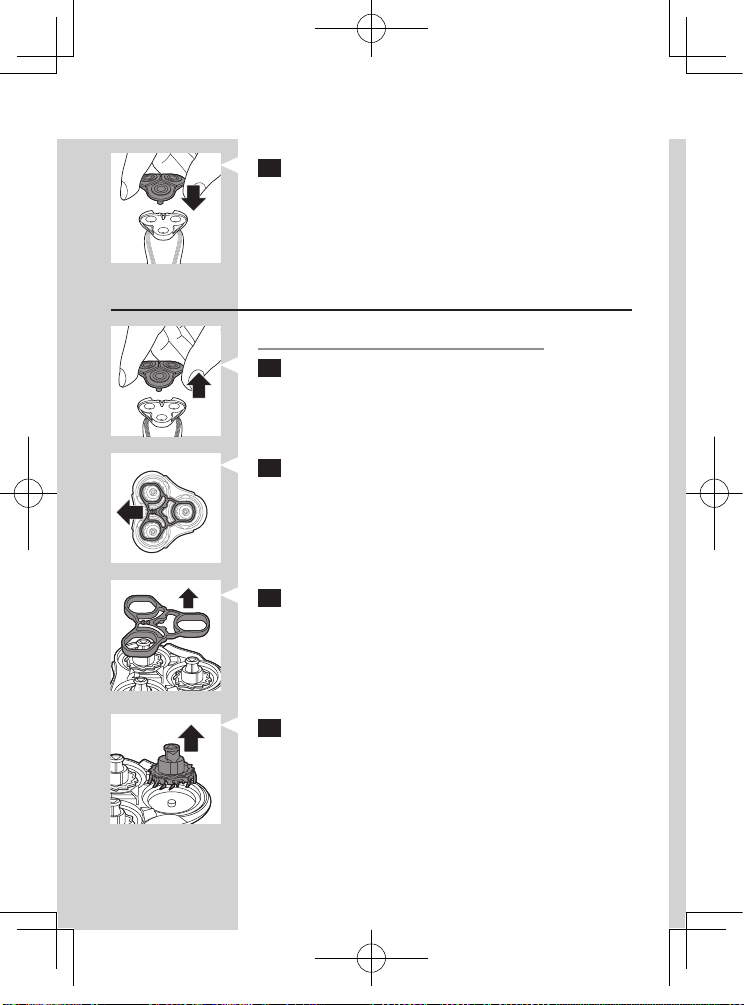
5 Reattach the shaving head holder to the
bottom part of the shaving unit (‘click’).
Extra-thorough cleaning method
Make sure the appliance is switched off.
1 Pull the shaving head holder off the bottom
part of the shaving unit.
2 Slide the green retaining frame in the direction
of the arrows indicated on the retaining frame.
3 Lift the retaining frame out of the shaving head
holder.
4 Remove the cutter from the shaving guard.
Note: Do not clean more than one cutter and shaving
guard at a time, since they are all matching sets. If you
accidentally put a cutter in the wrong shaving guard,
it may take several weeks before optimal shaving
performance is restored.
ENGLISH
33
RQ1168_EN_CS2_A6.indd 33 13.7.31 10:30:20 PM
Page 35
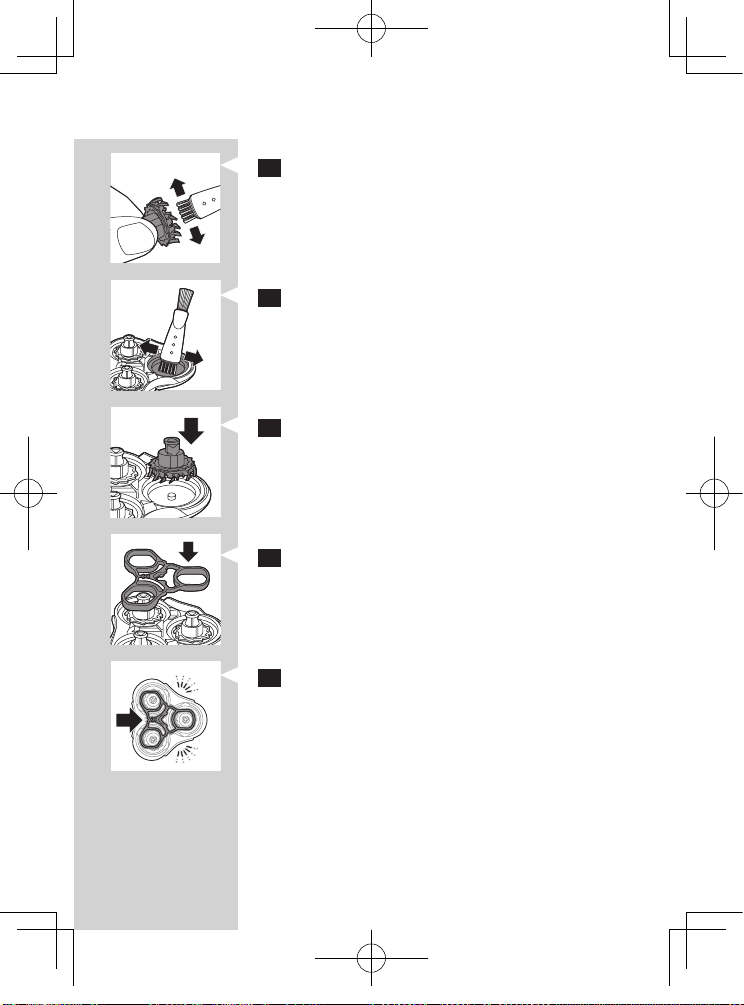
5 Clean the cutter with the cleaning brush
supplied.
6 Clean the inside of the shaving guard.
7 After cleaning, place the cutter back into the
shaving guard with the cutter legs pointing
downwards.
8 Place the retaining frame back onto the shaving
head holder.
9 Slide the guard back into place (‘click’).
ENGLISH
34
RQ1168_EN_CS2_A6.indd 34 13.7.31 10:30:21 PM
Page 36
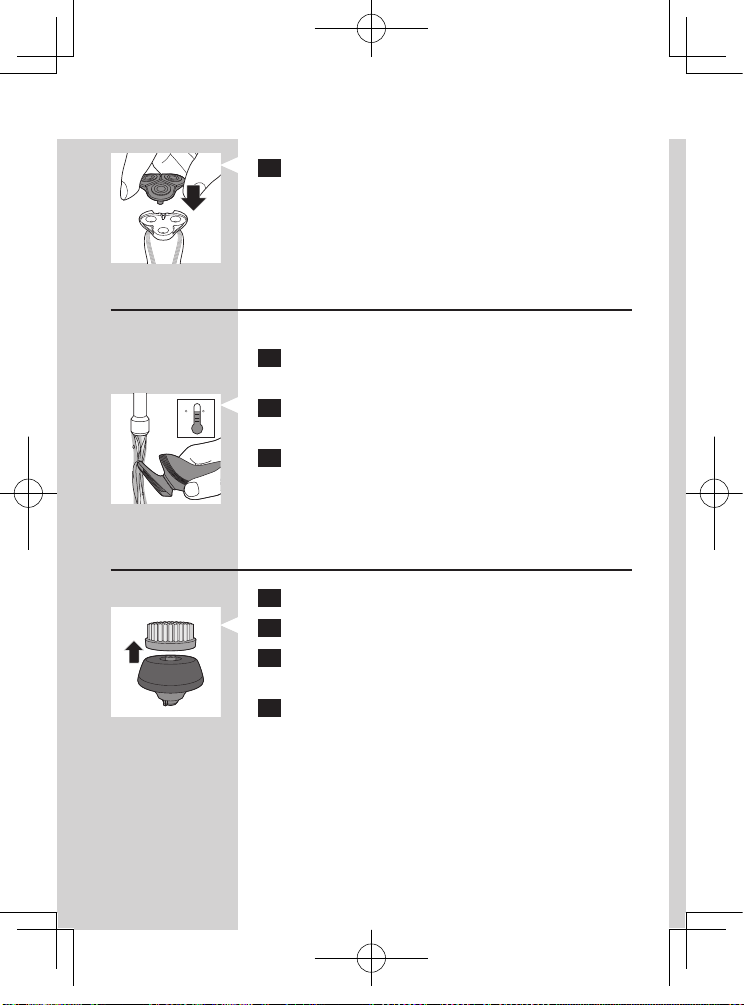
10 Reattach the shaving head holder to the
bottom part of the shaving unit.
Cleaning the trimmer
Clean the trimmer every time you have used it.
1 Switch on the appliance with the trimmer
attached.
2 Rinse the trimmer under a hot tap for some
time.
3 After cleaning, switch off the appliance.
Tip: For optimal trimmer performance, lubricate the
trimmer teeth with a drop of sewing machine oil every
six months.
Cleaning the cleansing brush attachment
1 Switch off the appliance.
2 Detach the brush head from the brush base.
3 Clean them thoroughly with warm water and
soap.
4 Dry the brush attachment with a towel.
C FC F
ENGLISH
35
RQ1168_EN_CS2_A6.indd 35 13.7.31 10:30:22 PM
Page 37
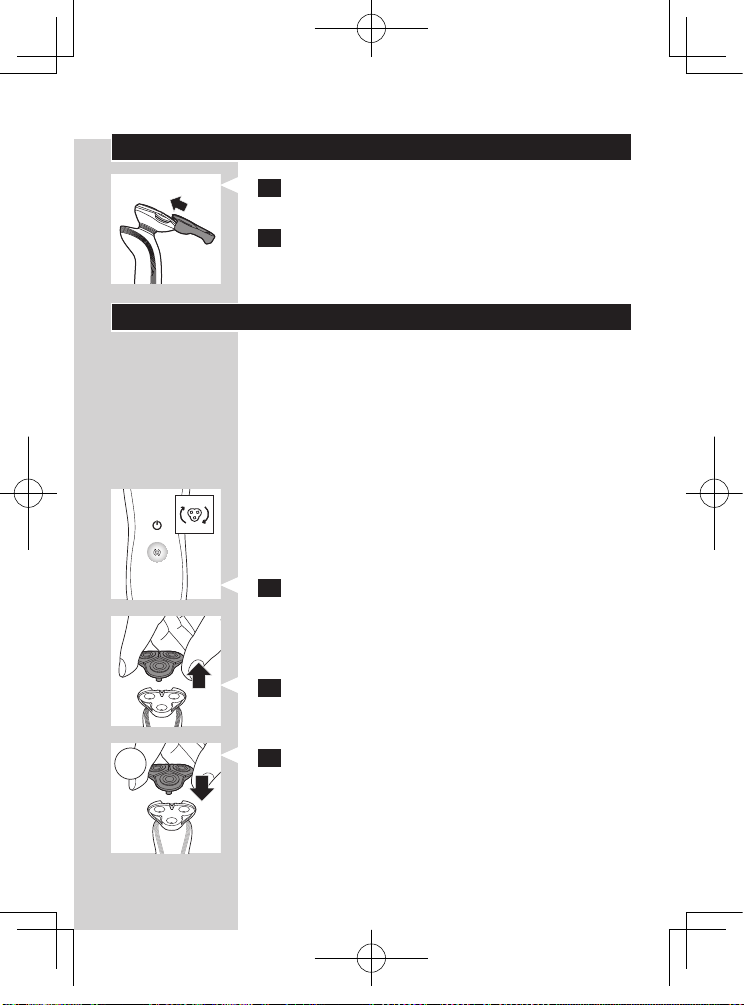
Storage
1 Slide the protection cap onto the shaving unit
to prevent damage to the shaving heads.
2 Put the protection cap on the cleansing brush
to protect it from dirt accumulation.
Replacement
For maximum shaving performance, we advise you
to replace the shaving head holder every two years.
Only replace the shaving head holder with an
original RQ11 Philips Shaving Head Holder.
Replacement reminder
To remind you to replace the shaving head holder,
the appliance is equipped with a replacement
reminder which is activated automatically after
approx. two years. The replacement reminder is
repeated at 9 successive shaves or until you reset
the shaver.
1 Theshavingunitsymbolasheswhenyou
switch off the shaver.
Note: The displays of the various shaver types look
different, but show the same symbol.
2 Pull the shaving head holder off the bottom
part of the shaving unit.
3 Attach the new shaving head holder to the
bottom part of the shaving unit (‘click’).
RQ11RQ11
ENGLISH
36
RQ1168_EN_CS2_A6.indd 36 13.7.31 10:30:23 PM
Page 38
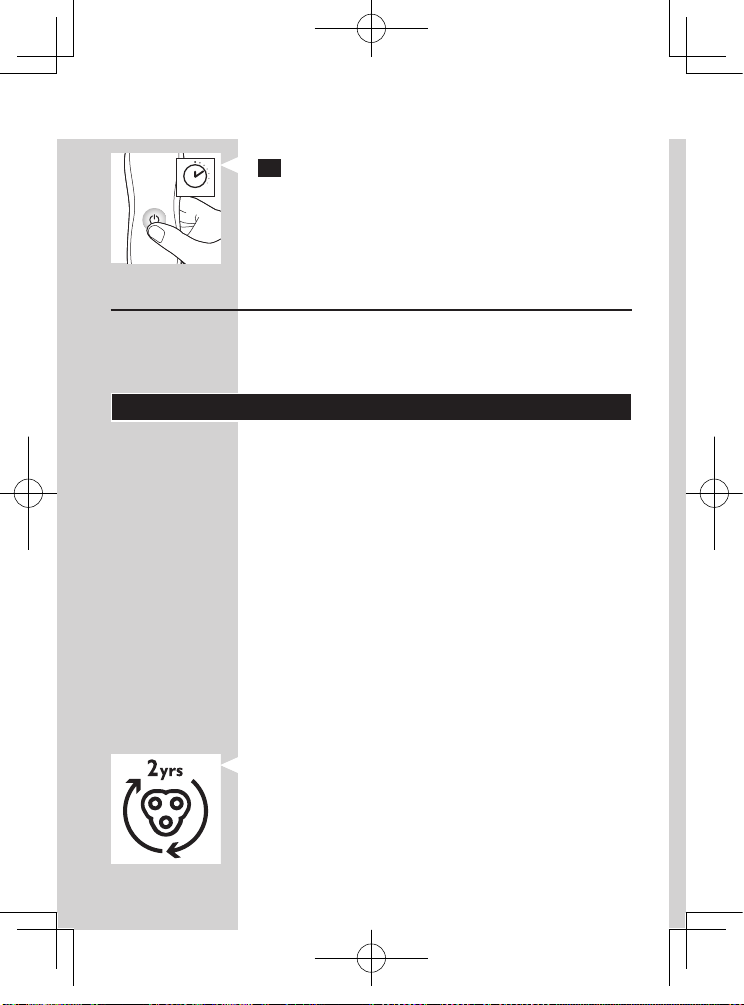
4 To reset the shaver, press and hold the on/off
button for approx. 10 seconds.
Note: The shaver will show the replacement reminder
symbol for 9 times before resetting automatically. You
can also reset the shaver manually.
Replacing the cleansing brush
The brush head replacement should be replaced
every 3 months or earlier if the laments are
deformed or damaged.
Ordering accessories
To purchase accessories for this appliance, please
visit our online shop at www.shop.philips.
com/service. If the online shop is not available in
your country, go to your Philips dealer or a Philips
service centre. If you have any difculties obtaining
accessories for your appliance, please contact the
Philips Consumer Care Centre in your country. You
nd its contact details in the worldwide guarantee
leaet.
The following parts are available
HQ8505 adapter
RQ11 Philips Shaving Head Holder
HQ200 Philips Cleaning Fluid
RQ111 Beard Styler attachment
RQ585 Philips oil-control cleansing brush pro
Shaving head holder
We advise you to replace the shaving head holder
every two years. Always replace the shaving head
holder with an original RQ11 Philips Shaving Head
Holder.
-
-
-
-
-
-
3 sec.10 sec.3 sec.10 sec.
ENGLISH
37
RQ1168_EN_CS2_A6.indd 37 13.7.31 10:30:23 PM
Page 39
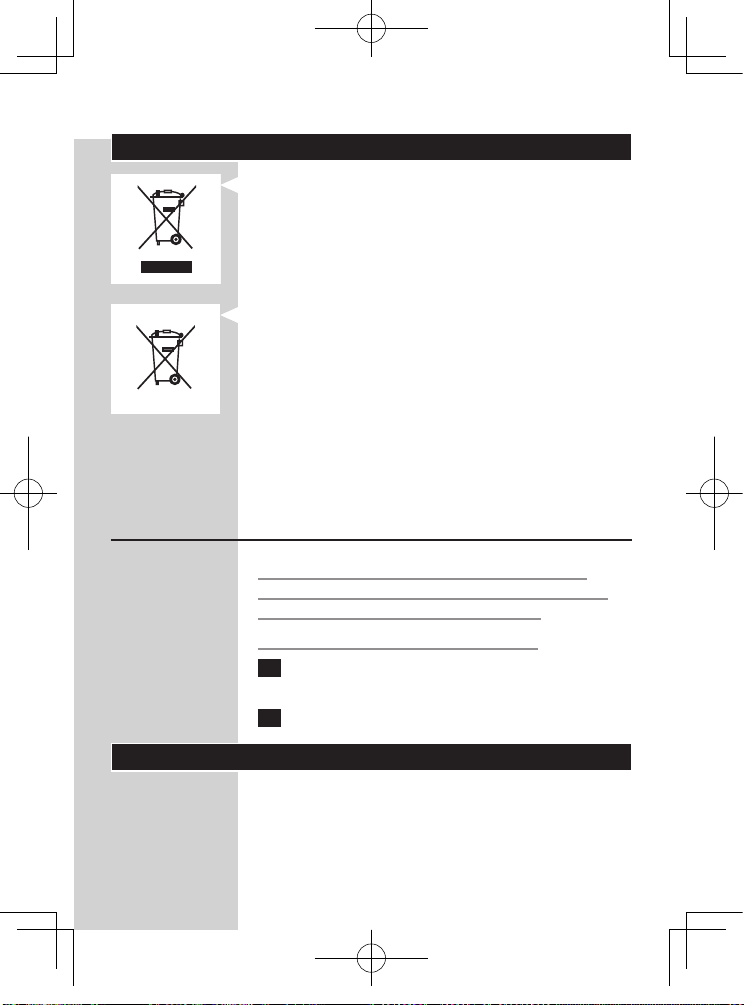
Environment
Do not throw away the shaver with the normal
household waste at the end of their life, but
hand them in at an ofcial collection point for
recycling. By doing this, you help to preserve the
environment.
The built-in rechargeable shaver battery contains
substances that may pollute the environment.
Always remove the battery before you discard or
hand in the shaver at an ofcial collection point.
Dispose of the battery at an ofcial collection
point for batteries. If you have trouble removing
the battery, you can also take the appliance to a
Philips service centre. The staff of this centre will
remove the battery for you and will dispose of it
in an environmentally safe way.
Removing the rechargeable shaver battery
Only remove the rechargeable battery when
you discard the shaver. Make sure the battery is
completely empty when you remove it.
Be careful, the battery strips are sharp.
1 Remove the back panel of the shaver with a
screwdriver.
2 Remove the rechargeable battery.
Guarantee and support
If you need information or support, please visit
www.philips.com/support or read the separate
worldwide guarantee leaet.
-
-
ENGLISH
38
RQ1168_EN_CS2_A6.indd 38 13.7.31 10:30:23 PM
Page 40
Guarantee restrictions
The shaving heads (cutters and shaving guards)
are not covered by the terms of the international
guarantee because they are subject to wear.
ENGLISH
39
RQ1168_EN_CS2_A6.indd 39 13.7.31 10:30:23 PM
Page 41
保証書と修理サービスについて
(必ずお読みください)
保証
期間
お買い上げ日から2年間
対象
部分
本体の み(シェービングユニット・
トリマー・洗顔ブラシヘッドは除く)
保証と
アフターサービス
〈保証書・最終ページに付属〉
● 保証書は、必ず「お買い上げ日・販売店名」等の記入
をお確かめのうえ、販売店から受け取っていただき
内容をよくお読みのあと大切に保管してください。
【補修用性能部品の最低保有期間】
● 補修用性能部品の最低保有期間は製造打ち切り後6年です。
● 性能部品とは、その製品の機能を維持するために必要な部品です。
【ご不明な点や修理に関するご相談は】
● 修理に関するご相談ならびにご不明な点は、お買い上げの販売店または、
小泉成器修理センターにお問い合わせください。
【修理を依頼されるときは】
● 修理をご依頼される前に、この取扱説明書をよくお読みいただき、再度点検ください。
尚、異常のあるときはご使用を中止し、お買い上げの販売店へご依頼ください。
【保証期間中は】
● 製品に保証書を添えてお買い上げの販売店にご持参ください。
保証書の記載内容により無料修理いたします。
【保証期間が過ぎているときは】
● 修理によって製品の機能が維持できる場合は、補修用性能部品の保有期間内であれば、ご希
望により有料で修理させていただきます。
【海外での本製品の保証及びアフターサービスについて】
● 本製品の保証は海外においても有効です。(同シリーズ製品の取り扱いがある国に限ります)
● 日本国以外のフィリップスサービス部門においても保証期間内及び保証期間の経過後の
アフターサービスを受けることができますが、この場合多少日数を要することもあります。
● 海外にてアフターサービスを受けられる場合は、現地のフィリップスサービス部門に
お問い合わせください。尚、お困りの点がございましたら下記までご連絡ください。
Philips Consumer Lifestyle Service Department P.O.Box 20100 9200 CA DRACHTEN
The Netherlands Fax:+31 51 259 2785
【お客様の個人情報のお取り扱いについて】
● お受けしましたお客様の個人情報は、株式会社フィリップスエレクトロニクスジャパンのホー
ムページ
http://www.philips.co.jp/
に掲載されている「お客様の個人情報の取り扱いにつ
いての当社の方針」に基づき適切に管理いたします。
40
RQ1168_JP_CS2_A6.indd 40 13.7.31 10:03:39 PM
Page 42
●本体にさわると時々電気を感じる。
●こげくさい臭いがする。
●電源コード部を動かすと通電したり、しなかったりする。
●その他の異常、故障がある。
お買い上げ
店名
お買い上げ日 年
月
日
TEL.
( )
便 利 メ モ
ご使用の時、このような症状はありませんか?
仕 様
● フィリップス製品の修理受付はお買い上げの
販売店にお申し出ください。
● 修理サービス等についておわかりにならない
ことは、下記にお問い合わせください。
このような症状の時は、故障や事故防止のため、スイッチを切り、充
電アダプタをコンセントから外して、必ず販売店にご相談ください。
製品に関するお問い合わせ:
フィリップスお客様情報センター
0570(07)6666
ナビダイヤル
(全国共通番号)
修理に関するお問い合わせ:
小泉成器修理センター
0570(09)8888
ナビダイヤル
(全国共通番号)
部品に関するお問い合わせ:
小泉成器部品センター
0570(09)2222
ナビダイヤル
(全国共通番号)
06(6261)8230
受付時間:平日9:00〜17:30(土・日・祝日・夏期 休暇・年 末年始を除く)
小泉成器東日本修理センター
TEL 048(718)3340 〒344-0127
埼玉県春日部市水角
1190
小泉成器西日本修理センター
TEL 06(6613)3145 〒559-0033
大阪市住之江区南港中1丁目3番98号
■ ナビダイヤルにかからない時は
ホーム ページ アドレス
ht tp :/ /ww w.p hili ps .co. jp /
品 番
RQ1168
電 源 方 式 充電式(専用充電アダプタ使用)
消 費 電 力
1.5W
定 格 電 圧
AC100-240V(50/60 Hz
)
本 体 質 量
167g
充 電 時 間 約1時間
交換用シェービングヘッドホルダー
RQ11
替 洗 顔 ブ ラ シ
替洗顔ブラシヘッド(ブラシ台座+洗顔ブラシ 各1個):
RQ585/51
替洗顔ブラシ(1個):
RQ560/51
替洗顔ブラシ(3個パック):
RQ563/51
※改良の為、仕様を予告なく変更することがあります。
フィリップス
コンシューマー ライフスタイル事業部
41
RQ1168_JP_CS2_A6.indd 41 13.7.31 10:03:40 PM
Page 43
〈無料修理規定〉
1.
取扱説明書、本体貼付ラベル等の注意書に従った正常な使用状態で保証期間
内に故障した場合には、無料修理します。
2.
保証期間内に故障して無料修理をお受けになる場合には、商品と保証書をご
持参、ご提示のうえ、お買い上げの販売店にご依頼ください。なお、商品を直接
メーカーへ送付した場合の送料等はお客様の負担となります。
3.
ご贈答、ご転居でお 買い 上げの販売店に修理を依頼できない 場合は、小泉
成器修理センターにご依頼ください。
4.
保証期間内でも次の場合には有料修理になります。
○
1
使用上の誤り及び不当な修理や改造による故障及び損傷。
○
2
お買い上げ後の輸送、移動、落下等による故障及び損傷。
○
3
火災、地震、水害、落雷、その他の天災地変、公害や異常電圧による故障及び損傷。
○
4
一般家庭以外(例えば、業務用の長時間使用)に使用された場合の故障及び損傷。
○
5
保証書の提示がない場合。
○
6
保証書にお買い上げ年月日、お客様名、販売店名の記 入のない場合、或は字句を書き
換えられた場合。
※ 保証書は、本書に明示した条件のもとにおいて無料修理をお約束するもの
です。従って保証書を発行している者(保証責任者)、及びそれ以外の事業者
に対するお客様の法律上の権利を制限するものではありません。
保証期間経過後の修理についてご不明の場合は、お買い上げの販売店または
小泉成器修理センターにお問い合わせください。
※ 保証期 間経 過後の修理・補修用性能部品の保有期間について詳しくは取扱
説明書の保証とアフターサービスの項目をご覧ください。
※ お客様にご記入いただいた個人情報(保証書の控え)は保証期間内のサービス
活動及びその後の安全点検活動のために利用させていただく場合がございま
す。ご了承ください。また個人情報は、株式会社フィリップスエレクトロニクス
ジャパンのホームページ
http://www.philips.co.jp/
に掲載されている「お
客様の個人情 報の取り扱いについての当社の方針 」に基づき適切に管理い
たします。
無料修理規定
42
RQ1168_JP_CS2_A6.indd 42 13.7.31 10:03:40 PM
Page 44
フィリップス 電動シェーバー 保証書
持込修理
C E R T I FI C AT E OF PU R CH A SE
この保証書は、「無料修 理規定」記載内容で無料修理を行うことをお約束するものです。
お買い上げの日から下記期 間中に故障 が発生した場合は 、本 書をご提示のうえ、お買い
上げの販売店に修理をご依頼ください。
お客様にご記入いただいた個人情 報(保証書の控 え)は、株式会社フィリップスエレクトロ
ニクスジャパンのホームページ
ht tp :/ /ww w.phil ip s. co .j p/
に掲載さ れている「お客様
の個人情 報の取り扱いについての当社の方針」に基づき適切に管理いたします。
品 名 電動シェーバー
品 番
RQ1168
保 証 期 間 お買い上げ日より2年
対 象 部 分
本体のみ(シェービングユニット・トリマー・洗顔ブラシヘッドは除く)
お 買 い 上 げ 日
年 月 日
お 客 様
ご住所 〒
ご芳名
電話番号
★ 販 売 店
販売店名・住所・電話番号
★ 保証書は再発行しませんので、大切に保管してください。
★ ご販売店様へ この保証書はお客様へのアフターサービスの実施と責任を明確にする
ものです。贈答品、記念品の場合も含めて必ず記入捺印してお客様にお渡しください。
修理に関するお問い合わせ★
製品に関するお問い合わせ★
部品に関するお問い合わせ★
ナビダイヤルにかからない時は
TEL 06(6261)8230 FAX 06(6268)1432
フィリップスコンシューマーライフスタイル事業部
日本販売代理店 小泉成器株式会社
〒
541-0051
大阪市中央区備後町
3-3-7
ナビダイヤルにかからない時は
TEL 06(6613)3211
〒
559-0033
大阪市住之江区南港中1丁目3番98号
ナビダイヤルにかからない時は
小泉成器東日本修理センター
TEL 048(718)3340
〒
344-0127
埼玉県春日部市水角
1190
小泉成器西日本修理センター
TEL 06(6613)3145
〒
559-0033
大阪市住之江区南港中1丁目3番98号
フィリップスお客様情報センター
ナビダイヤル(全国共通)
0570(07)6666
小泉成器部品センター
ナビダイヤル(全国共通)
0570(09)2222
小泉成器修理センター
ナビダイヤル(全国共通)
0570(09)8888
受付時 間:平日9:00〜17:30 (土・日・祝 日・夏期休暇・年 末年始を 除く)
この印刷物は再生紙を使用しております。
42 22. 00 2.5 58 5.1
©2013 Philips Electronics Japan, Ltd.
RQ1168_JP_CS2_A6.indd 4 13.7.31 10:03:10 PM
 Loading...