

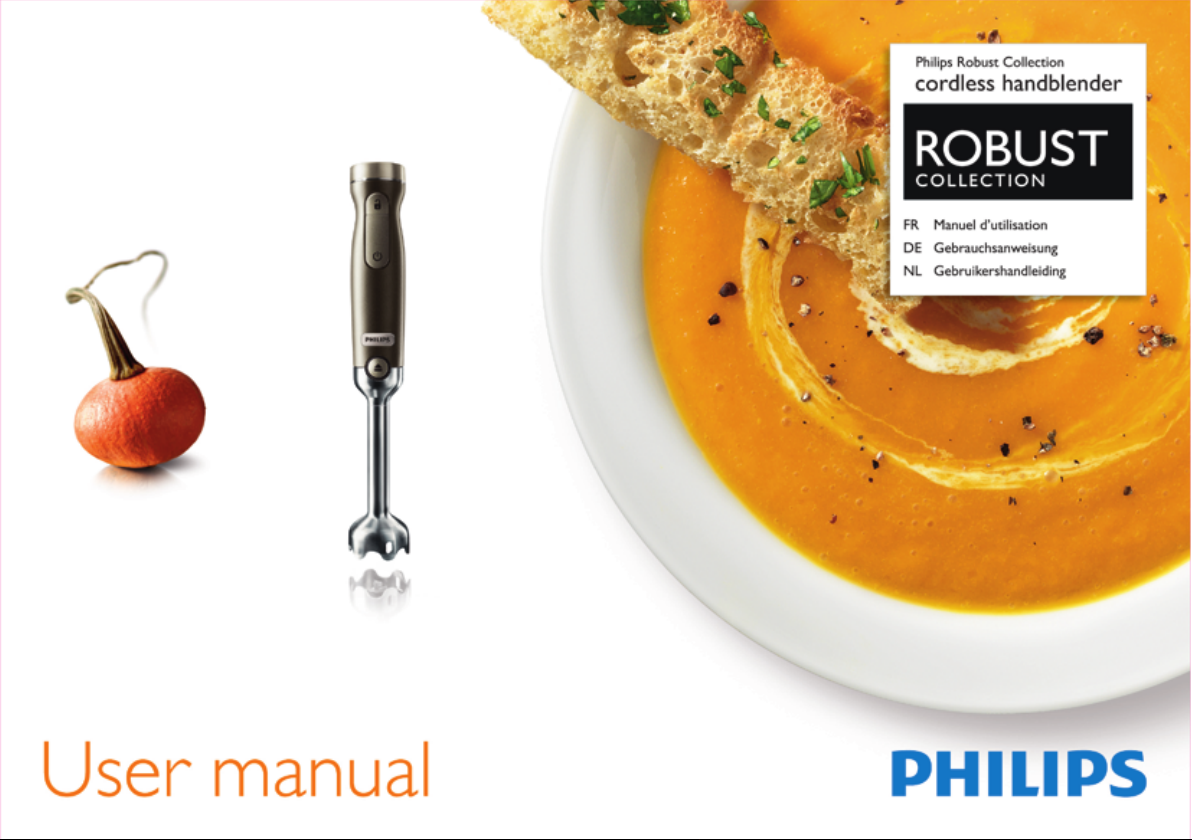
Page 1
Page 2

2
Page 3
3
A
H
I
B
C
D
J
E
K
F
L
G
M
1
N
O
P
Page 4

4
Page 5

ENGLISH 6
DEUTSCH 12
FRANÇAIS 18
NEDERLANDS 24
HR1379/00
Page 6

6
ENGLISH
Introduction
Congratulations on your purchase and welcome to Philips! To fully benet
from the support that Philips offers, register your product at www.philips.
com/welcome.
This hand blender has been developed to condently handle a broad
variety of ingredients and recipes and to deliver a long-lasting performance.
Its cordless technology gives you ultimate freedom to move around.
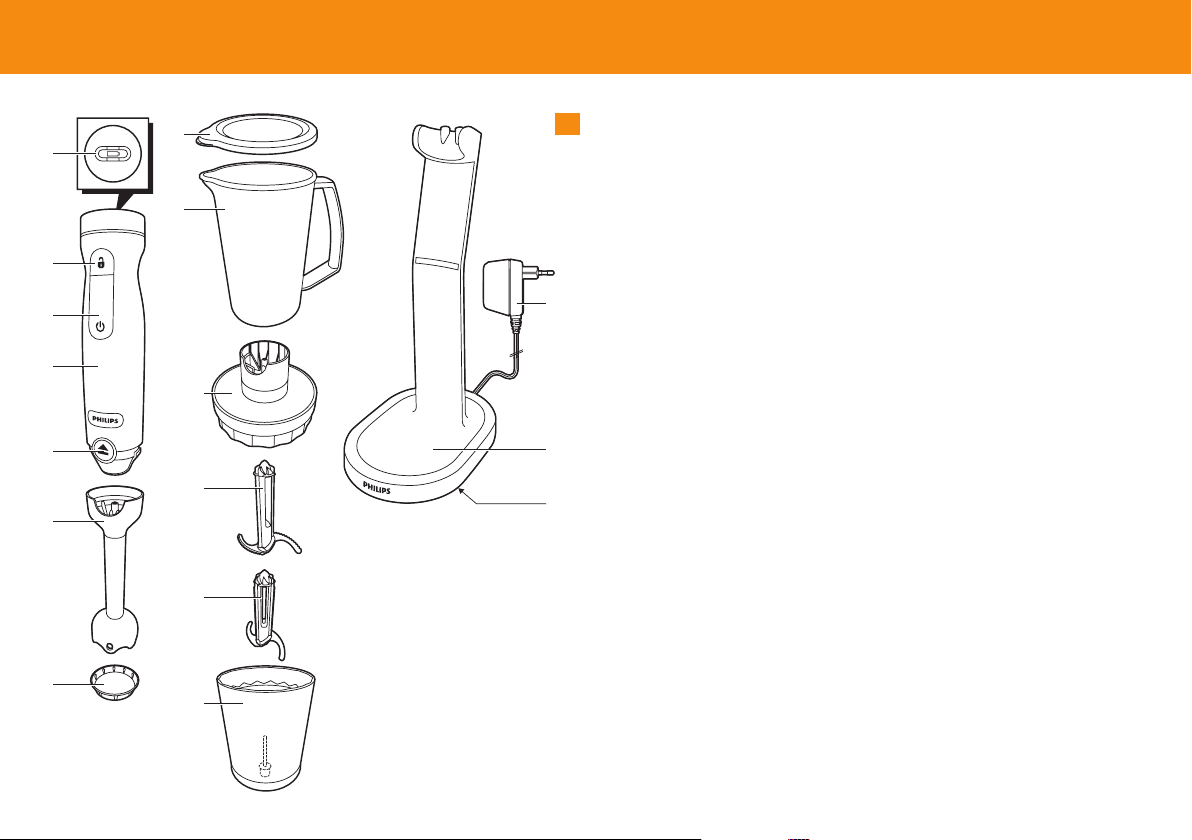
General description (Fig. 1)
A Charging light
B Unlock button
C Power-on button
D Motor unit
E Release button
F Blender bar
G Protective blade guard for the blender bar
H Beaker lid
I Beaker
J Chopper coupling unit
K Serrated chopper blade unit for crushing ice
L Chopper blade unit
M Chopper bowl
N Adapter
O Charging stand
P Cord storage
Important
Read these instructions for use carefully before you use the appliance and
save them for future reference.
Danger
- Never immerse the motor unit, the charging stand and the adapter in
water or any other liquid, nor rinse them under the tap.
Warning
- Avoid touching the blades, especially when the blender bar is attached
to the motor unit. The blades are very sharp.
- If the blades get stuck, remove the blender bar from the motor unit
before you remove the ingredients that block the blades.
- Never use the chopper blade unit without the chopper bowl.
- Do not switch on the appliance when you attach or detach accessories.
- Check if the voltage indicated on the adapter corresponds to the local
mains voltage before you connect the appliance.
- This appliance is intended for household use only. If the appliance is
used improperly or for professional or semi-professional purposes or if
it is not used according to the instructions in the user manual, the
guarantee becomes invalid and Philips refuses any liability for damage
caused.
- This appliance is not intended for use by persons (including children)
with reduced physical, sensory or mental capabilities, or lack of
experience and knowledge, unless they have been given supervision or
instruction concerning use of the appliance by a person responsible for
their safety.
- Children should be supervised to ensure that they do not play with the
appliance.
- Do not allow children to use the blender without supervision.
- Do not use the appliance if the adapter, the mains cord, the charging
stand or the appliance itself is damaged.
- The adapter contains a transformer. Do not cut off the adapter to
replace it with another plug, as this causes a hazardous situation.
- If the adapter or charging stand is damaged, always have it replaced with
one of the original type in order to avoid a hazard.
- Keep the motor unit, the charging stand and the adapter away from
heat, re, moisture and dirt.
Caution
- Only use the adapter and the charging stand supplied.
- Charge, store and use the appliance at a temperature between 5°C and
35°C.
- Do not exceed the quantities and processing times indicated in the
table.
Page 7

7
- Do not dismantle or short-circuit the batteries. Protect the batteries
from re, heat and direct sunlight.
- Never use any accessories or parts from other manufacturers or that
Philips does not specically recommend. If you use such accessories or
parts, your guarantee becomes invalid.
- If the ingredients stick to the wall of the beaker or the chopper bowl,
switch off the appliance and loosen them with a spatula or add some
liquid.
- Never ll the beaker or the chopper bowl with ingredients that are
hotter than 80°C/175°F.
Electromagnetic elds (EMF)
This Philips appliance complies with all standards regarding electromagnetic
elds (EMF). If handled properly and according to the instructions in this
user manual, the appliance is safe to use based on scientic evidence
available today.
Safety system
The appliance is equipped with a built-in safety system. The appliance only
functions if you press and hold the unlock button and then press and hold
the power-on button. Release the unlock button when the appliance starts
to operate. As soon as you release the power-on button, the safety
system automatically resets to its off position to protect against
unintentional operation of the appliance.
Overheat protection
The appliance is equipped with a built-in overheat protection. If you process
a heavy load, the motor unit may become hot. If this happens, the built-in
safety system switches off the appliance and the charging light lights up red.
Let the appliance cool down for 10 minutes before you continue to use it.
Error mode
If you press the unlock button longer than 2 seconds, the indicator lights
starts to ash red to indicate that the error mode is activated. If this
happens release all buttons and switch on the appliance again (see step 4, in
chapter ‘Using the appliance’).
ENGLISH
Before rst use
Thoroughly clean the parts that come into contact with food before you
use the appliance for the rst time (see chapter ‘Cleaning’).
Preparing for use
Charging
Charge the hand blender:
- before you use the appliance for the rst time, or
- when one segment of the blue charging light ashes to indicate that the
batteries are low.
1 Put the adapter in the wall socket.
2 Put the appliance in the charging stand. (Fig. 2)
, The blue charging light ashes to indicate that the appliance is
charging (Fig. 3).
Note: The adapter feels warm during charging. This is normal.
- It takes 2.5 hours to fully charge the appliance.
- Charge the appliance for at least 15 minutes to use it for a light blending
job (soup, puree).
Note: Keep the charging stand plugged in continuously and store the appliance
on the charging stand.
Light indications
Charging
- When the appliance is charging, the blue charging light ashes.
Batteries fully charged
- When the batteries are fully charged, the charging light lights up blue
continuously.
Batteries low
- When the batteries are low, one segment of the blue charging light
ashes (Fig. 4).
7
Page 8

ENGLISH8
Overheat protection
- If you process a too heavy load, the motor unit may become hot. The
built-in safety system switches off the appliance and the charging light
lights up red.
Error mode
If you press the unlock button longer than 2 seconds, the indicator lights
starts to ash red to indicate that the error mode is activated. If this
happens release all buttons and switch on the appliance again (see step 4, in
chapter ‘Using the appliance’).
Preparing the food
1 Let hot ingredients cool down before you chop them, blend them or
pour them into the beaker (max. temperature 80°C/175°F).
2 Cut large ingredients into pieces of approximately 2cm before you
process them.
Using the appliance
Hand blender
Avoid touching the blades, especially when the blender bar is attached to
the motor unit. The blades are very sharp.
If the blades get stuck, remove the blender bar from the motor unit
before you remove the ingredients that block the blades.
The hand blender is intended for:
- blending uids, e.g. dairy products, sauces, fruit juices, soups, mixed
drinks and shakes.
- mixing soft ingredients, e.g. pancake batter or mayonnaise.
- pureeing cooked ingredients, e.g. for making baby food.
1 Attach the blender bar to the motor unit (‘click’) (Fig. 5).
2 Put the ingredients in the beaker.
- See the table for the recommended quantities and processing times.
Blending quantities and processing times
Ingredients Blending quantity
(max.)
Fruits & vegetables 100-200g 60sec.
Baby food, soups & sauces 100-400ml 60sec.
Batters 100-500ml 60sec.
Shakes & mixed drinks 100-1000ml 60sec.
Note: Always let the appliance cool down to room temperature between
processing cycles.
3 Immerse the blade guard completely in the ingredients to avoid
splashing (Fig. 6).
4 Press and hold the unlock button (1) and then press and hold the
power-on button (2) within 2 seconds (Fig. 7).
Note: If you do not press the power-on button within 2 seconds, the charging
light ashes red and the appliance remains locked. To unlock the appliance,
repeat step 4.
, The appliance starts to operate.
- Release the unlock button when the appliance starts to operate.
- When you release the power-on button, the appliance switches off.
5 Move the appliance slowly up and down and in circles to blend the
ingredients (Fig. 8).
6 Clean the appliance after use (see chapter ‘Cleaning’) and then place
it in the protective blade guard.
Chopper
Be very careful when you handle the blade unit, the blades are very sharp.
Be particularly careful when you remove the blade unit from the chopper
bowl, when you empty the chopper bowl and during cleaning.
Time (max.)
Page 9

9
ENGLISH
9
The chopper is intended for chopping ingredients such as nuts, meat, onions,
hard cheese, boiled eggs, garlic, herbs, dr y bread etc.
1 Put the chopper blade unit in the chopper bowl (Fig. 9).
2 Put the ingredients in the chopper bowl.
- See the table for the recommended quantities and processing times.
Chopping quantities and processing times
Ingredients Chopping quantity
(max.)
Onions 200g 5sec.
Meat & sh 200g 10sec.
Boiled eggs 2 eggs 4sec.
Herbs 30g 10sec.
Almonds 200g 30sec.
Dry bread 80g 30sec.
Parmesan cheese 200g 20sec.
Dark chocolate 100g 20sec.
Ice cubes* 6 pieces 10sec.
* Note: Use the serrated blade unit to crush ice.
3 Put the chopper coupling unit on the chopper bowl (Fig. 10).
4 Fasten the motor unit onto the coupling unit (‘click’) (Fig. 11).
5 Press and hold the unlock button (1) and then press and hold the
power-on button (2) within 2 seconds (Fig. 7).
Note: If you do not press the power-on button within 2 seconds, the charging
light ashes red and the appliance remains locked. To unlock the appliance,
repeat step 5.
, The appliance starts to operate.
Time (max.)
- Release the unlock button when the appliance starts to operate.
- When you release the power-on button, the appliance switches off.
- If you want to pulse chop, keep the unlock button pressed and press
the power-on button a few times in quick succession.
- If the ingredients stick to the wall of the chopper bowl, loosen them
with a spatula or add some liquid.
- After processing one batch, let the appliance cool down to room
temperature before you continue processing.
6 Detach the chopper after use and clean it (see chapter ‘Cleaning’).
Cleaning (Fig. 12)
Do not immerse the motor unit, the charging stand, the adapter and the
chopper coupling unit in water.
Do not touch the blades when you clean them. They are very sharp.
1 Press the release button on the motor unit (1) to remove the blender
bar or chopper coupling unit (2). (Fig. 13)
2 Disassemble the rest of the parts.
Tip: You can also clean the blade of the blender bar while it is still attached to
the motor unit. Immerse the blade guard in warm water with some washing-up
liquid and let the appliance run for a while.
Tip: You can also remove the rubber rings from the chopper bowl for extra
thorough cleaning.
3 See the separate cleaning table for further instructions.
Storage
1 Keep the charging stand plugged in continuously and store the
appliance in the charging stand. This ensures that the appliance is
always ready for use.
2 Store the mains cord by winding it round the reel in the bottom of
the charging stand.
Page 10

ENGLISH10
Environment
- Do not throw away the appliance with the normal household waste at
the end of its life, but hand it in at an ofcial collection point for
recycling. By doing this, you help to preserve the environment (Fig. 14).
- The built-in rechargeable batteries contain substances that may pollute
the environment. Always remove the batteries before you discard and
hand in the appliance at an ofcial collection point. Dispose of the
batteries at an ofcial collection point for batteries. If you have trouble
removing the batteries, you can also take the appliance to a Philips
service centre. The staff of this centre will remove the batteries for you
and will dispose of them in an environmentally safe way (Fig. 15).
Disposal of the batteries
Only remove the batteries when they are completely empty to avoid a
hazard. Never let the batteries come into contact with metal.
1 Remove the blender bar or chopper coupling unit from the motor
unit.
2 Let the appliance run until it stops.
3 Press the unlock button and x it in this position with adhesive tape.
, The charging light starts to ash red. When the charging light goes
out, the batteries should be completely empty.
4 Try to switch on the appliance again to check if the batteries are
really empty. If the motor starts, repeat the procedure.
5 Remove the aluminium top cover with a screwdriver (Fig. 16).
6 Undo the two screws (Fig. 17).
7 Pull the top part of the motor unit with the batteries attached to it
out of the housing (Fig. 18).
8 Put the top part with the batteries attached to it in a bowl with one
litre of water and 1 teaspoon of salt and leave it in this bowl for 24
hours.
9 Take the top part with batteries attached to it from the bowl and cut
the wires that connect the batteries to the motor unit. (Fig. 19)
10 Bend the battery cover to detach it from the top part (Fig. 20).
11 You can either dispose of the complete battery pack at an ofcial
collection point for batteries (see above) or you can remove the
battery cover.
12 To remove the battery cover, bend the tab that holds the batteries in
place outwards and pull the batteries out of the battery
cover (Fig. 21).
Guarantee & service
Exceptional guarantee & service
You have bought a culinary tool for life and we want to ensure that
you remain satised. We would like you to register your purchase, so
that we can stay in contact with you and you can receive additional
services and benets from us. Register within 3 months of purchase
to receive benets including:
- 3 year product guarantee
- Fresh ideas for recipes via e-mail
- Tips and tricks to use and maintain your Robust product
- All the latest news on Robust Collection
The only thing you need to do to register your new product is visit
www.philips.com/kitchen or call your local Freephone Philips consumer
care hotline (United Kingdom: 0800 331 60 15). If you have questions about
your culinary tool (usage, maintenance, accessories etc) you can either
consult our on line support at www.philips.com/kitchen or call your local
hotline.
We have put all the maximum effort in developing, testing and designing this
high quality product. However in the unfortunate case that your
product needs repair, please call your local Philips consumer care hotline.
They will help you with arranging any necessary repairs in a minimum time
with maximum convenience - they can arrange a courier to come to your
home to collect your product and bring it back when it is repaired.
This way you can continue to enjoy your delicious homemade cooking.
Page 11

11
ENGLISH
11
Troubleshooting
This chapter summarises the most common problems you could encounter
with the appliance. If you are unable to solve the problem with the
information below, contact the Consumer Care Centre in your country.
Problem Solution
The appliance
does not work.
The appliance
suddenly stops
working.
The charging
light ashes red.
The batteries are empty. Recharge the batteries (see
chapter ‘Preparing for use’, section ‘Charging’).
The safety system is activated. In this case it is not
possible to switch on the appliance and the charging
light ashes red. Press and hold the unlock button and
then press and hold the power-on button within 2
seconds to switch on the appliance (see chapter
‘Using the appliance’).
The overheat protection may have switched off the
appliance because the motor is too hot. The charging
light lights up red. Let the appliance cool down for 10
minutes before you continue to use it. If the appliance
still does not work, contact your Philips dealer or a
service centre authorised by Philips.
Some hard ingredients may block the blades. Release
the power-on button to switch off the appliance,
detach the motor unit and remove the ingredients
that block the blades.
The safety system is activated. In this case it is not
possible to switch on the appliance and the charging
light lights up red. Press and hold the unlock button
and then press and hold the power-on button within
2 seconds to switch on the appliance (see chapter
‘Using the appliance’).
Problem Solution
The overheat protection has switched off the
appliance, because the motor is too hot. The charging
light lights up red. Let the appliance cool down for 10
minutes before you continue to use it. If the appliance
still does not work, contact your Philips dealer or a
service centre authorized by Philips.
The charging
light ashes blue
quickly.
The batteries are running low. Recharge the batteries
(see section ‘Charging’ in chapter ‘Preparing for use’).
Page 12

12
DEUTSCH
Einführung
Herzlichen Glückwunsch zu Ihrem Kauf und willkommen bei Philips! Um die
Unterstützung von Philips optimal nutzen zu können, registrieren Sie Ihr
Produkt bitte unter www.philips.com/welcome.
Dieser Stabmixer bietet Ihnen über einen langen Zeitraum optimale
Leistung für die Zubereitung zahlreicher Rezepte mit unterschiedlichsten
Zutaten. Darüber hinaus gewähr t Ihnen die kabellose Technik
uneingeschränkte Bewegungsfreiheit.
Allgemeine Beschreibung (Abb. 1)
A Ladeanzeige
B Freigabetaste
C Einschalttaste
D Motoreinheit
E Entriegelungstaste
F Pürierstab
G Messerschutzhülle für den Pürierstab
H Deckel für Becher
I Becher
J Verbindungseinheit für den Zerkleinerer
K Gezackte Messereinheit zum Zerkleinern von Eis
L Messereinheit des Zerkleinerers
M Zerkleinerer-Behälter
N Adapter
O Ladestation
P Kabelaufwicklung
Wichtig
Lesen Sie diese Bedienungsanleitung vor dem ersten Gebrauch des Geräts
sorgfältig durch, und bewahren Sie sie für eine spätere Verwendung auf.
Gefahr
- Tauchen Sie die Motoreinheit, die Ladestation und den Adapter
keinesfalls in Wasser oder andere Flüssigkeiten. Spülen Sie sie auch nicht
unter ießendem Wasser ab.
Warnhinweis
- Berühren Sie die Messer nicht! Das gilt insbesondere, wenn der
Pürierstab an der Motoreinheit befestigt ist. Die Klingen sind sehr scharf.
- Wenn die Messer blockier t sind, nehmen Sie den Pürierstab von der
Motoreinheit, bevor Sie die blockierenden Zutaten entfernen.
- Verwenden Sie die Messereinheit des Zerkleinerers niemals ohne den
Zerkleinerer-Behälter.
- Schalten Sie das Gerät nicht ein, wenn Sie Aufsätze befestigen oder
entfernen.
- Überprüfen Sie vor dem ersten Gebrauch, ob die Spannungsangabe auf
dem Adapter mit der örtlichen Netzspannung übereinstimmt.
- Dieses Gerät ist nur für den Gebrauch im Haushalt bestimmt. Bei
unsachgemäßem Gebrauch oder Verwendung für halbprofessionelle
oder professionelle Zwecke oder bei Nichtbeachtung der Anweisungen
in der Bedienungsanleitung erlischt die Garantie. In diesem Fall lehnt
Philips jegliche Haftung für entstandene Schäden ab.
- Dieses Gerät ist für Benutzer (einschl. Kinder) mit eingeschränkten
physischen, sensorischen oder psychischen Fähigkeiten bzw. ohne
jegliche Erfahrung oder Vorwissen nur dann geeignet, wenn eine
angemessene Aufsicht oder ausführliche Anleitung zur Benutzung des
Geräts durch eine verantwortliche Person sichergestellt ist.
- Achten Sie darauf, dass Kinder nicht mit dem Gerät spielen.
- Lassen Sie Kinder nicht unbeaufsichtigt mit dem Mixer hantieren.
- Benutzen Sie das Gerät nicht, wenn der Adapter, das Netzkabel, die
Ladestation oder das Gerät selbst beschädigt ist.
- Der Adapter enthält einen Transformator. Ersetzen Sie den Adapter
keinesfalls durch einen anderen Stecker. Dies kann den Benutzer
gefährden.
- Um Gefährdungen zu vermeiden, dürfen Adapter oder Ladestation bei
einem Defekt nur durch ein Original-Ersatzteil ausgetauscht werden.
- Achten Sie darauf, dass die Motoreinheit, die Ladestation und der
Adapter nicht mit Hitze, Feuer, Feuchtigkeit und Schmutz in Kontakt
kommen.
Achtung
- Verwenden Sie nur den mitgelieferten Adapter und die mitgelieferte
Ladestation.
Page 13

13
DEUTSCH
13
- Laden und benutzen Sie das Gerät bei Temperaturen zwischen 5° C
und 35° C. Bewahren Sie es auch in diesem Temperaturbereich auf.
- Überschreiten Sie nicht die in der Tabelle aufgeführten Mengen und
Verarbeitungszeiten.
- Bauen Sie die Akkus keinesfalls aus, und schließen Sie sie nicht kurz!
Setzen Sie die Akkus weder Feuer, Hitze noch direkter
Sonneneinstrahlung aus.
- Verwenden Sie keine Zubehör teile anderer Hersteller oder solche, die
von Philips nicht ausdrücklich empfohlen werden. Falls Sie derar tiges
Zubehör benutzen, erlischt die Garantie.
- Wenn die Zutaten am Becher oder am Zerkleinerer-Behälter haften
bleiben, schalten Sie das Gerät aus, und lösen Sie die Zutaten mit einem
Teigschaber, oder geben Sie etwas Flüssigkeit hinzu.
- Füllen Sie den Becher oder den Zerkleinerer-Behälter niemals mit
Zutaten, die heißer als 80 °C sind.
Elektromagnetische Felder
Dieses Philips Gerät erfüllt sämtliche Normen bezüglich elektromagnetischer
Felder (EMF). Nach aktuellen wissenschaftlichen Erkenntnissen ist das Gerät
sicher im Gebrauch, sofern es ordnungsgemäß und entsprechend den
Anweisungen in dieser Bedienungsanleitung gehandhabt wird.
Sicherheitssystem
Dieses Gerät ist mit einem Sicherheitssystem ausgestattet. Das Gerät
funktioniert nur, wenn Sie beim Drücken der Einschalttaste die Freigabetaste
gedrückt halten. Lassen Sie die Freigabetaste los, sobald das Gerät in Betrieb
ist. Sobald Sie die Einschalttaste loslassen, wird die Sicherheitseinstellung
automatisch reaktiviert. So wird ein versehentliches Betätigen des Geräts
vermieden.
Überhitzungsschutz
Das Gerät ist mit einem integrierten Überhitzungsschutz ausgestattet. Beim
Verarbeiten schwerer Zutaten kann die Motoreinheit heiß laufen. In diesem
Fall schaltet das Sicherheitssystem das Gerät ab, und die Ladeanzeige
leuchtet rot auf. Lassen Sie das Gerät 10 Minuten lang abkühlen, bevor Sie
weiterarbeiten.
Fehlermodus
Falls Sie die Freigabetaste länger als 2 Sekunden gedrückt halten, beginnen
die Anzeigen rot zu blinken. Damit wird angezeigt, dass der Fehlermodus
aktiviert ist. Lassen Sie in diesem Fall alle Tasten los, und schalten Sie das
Gerät wieder ein (siehe Kapitel “Das Gerät benutzen”, Schritt 4).
Vor dem ersten Gebrauch
Reinigen Sie vor dem ersten Gebrauch des Geräts gründlich alle Teile, die
mit Lebensmitteln in Kontakt kommen (siehe “Reinigung”).
Für den Gebrauch vorbereiten
Laden
Laden Sie den Stabmixer:
- vor dem ersten Gebrauch des Geräts oder
- wenn ein Bereich der blauen Ladeanzeige blinkt, um anzuzeigen, dass die
Akkus fast leer sind.
1 Stecken Sie den Adapter in die Steckdose.
2 Stellen Sie das Gerät in die Ladestation. (Abb. 2)
, Die blaue Ladeanzeige blinkt und zeigt an, dass das Gerät aufgeladen
wird (Abb. 3).
Hinweis: Während des Ladevorgangs wird der Adapter warm. Dies ist normal.
- Das vollständige Laden des Geräts dauert 2,5 Stunden.
- Laden Sie das Gerät zum Mixen leichter Zutaten (Suppen, Püree)
mindestens 15 Minuten lang auf.
Hinweis: Lassen Sie das Ladegerät immer eingesteckt, und stellen Sie das Gerät
zum Aufbewahren hinein.
Lichtanzeigen
Laden
- Während das Gerät auädt, blinkt die blaue Ladeanzeige.
Akkus vollständig aufgeladen
- Wenn die Akkus vollständig geladen sind, leuchtet die Ladeanzeige
ununterbrochen blau.
Page 14

DEUTSCH14
Akkuladestand niedrig
- Bei fast leeren Akkus blinkt ein Bereich der Ladeanzeige blau (Abb. 4).
Überhitzungsschutz
- Beim Verarbeiten schwerer Zutaten kann die Motoreinheit heiß laufen.
Das integrierte Sicherheitssystem schaltet das Gerät ab, und die
Ladeanzeige leuchtet rot auf.
Fehlermodus
Falls Sie die Freigabetaste länger als 2 Sekunden gedrückt halten, beginnen
die Anzeigen rot zu blinken. Damit wird angezeigt, dass der Fehlermodus
aktiviert ist. Lassen Sie in diesem Fall alle Tasten los, und schalten Sie das
Gerät wieder ein (siehe Kapitel “Das Gerät benutzen”, Schritt 4).
Zutaten vorbereiten
1 Lassen Sie heiße Zutaten auf unter 80°C abkühlen, bevor Sie diese
zerkleinern, mixen oder in den Becher gießen.
2 Schneiden Sie große Zutaten vor der Verarbeitung in 2 cm große
Würfel.
Das Gerät benutzen
Stabmixer
Berühren Sie die Messer nicht! Das gilt insbesondere, wenn der
Pürierstab an der Motoreinheit befestigt ist. Die Klingen sind sehr scharf.
Wenn die Messer blockiert sind, nehmen Sie den Pürierstab von der
Motoreinheit, bevor Sie die blockierenden Zutaten entfernen.
Der Stabmixer ist geeignet zum:
- Mixen von Flüssigkeiten, z. B. Milchprodukte, Soßen, Obstsäfte, Suppen,
Mixgetränke und Milchshakes.
- Mischen weicher Zutaten, z. B. Pfannkuchenteig und Mayonnaise.
- Pürieren gegarter Zutaten, z B. für Baby-Nahrung.
1 Befestigen Sie den Pürierstab an der Motoreinheit, bis er hörbar
einrastet (Abb. 5).
2 Geben Sie die Zutaten in den Becher.
- Die empfohlenen Mengen und Verarbeitungszeiten entnehmen Sie bitte
der Tabelle.
Mengen und Verarbeitungszeiten zum Mixen
Zutaten Menge zum
Obst & Gemüse 100 - 200 g 60 Sek.
Baby-Nahrung, Suppen
& Soßen
Teig 100 - 500 ml 60 Sek.
Milchshakes &
Mixgetränke
Hinweis: Lassen Sie das Gerät zwischen zwei Verarbeitungsgängen stets auf
Raumtemperatur abkühlen.
3 Tauchen Sie den Messerschutz des Pürierstabs vollständig in die
Zutaten ein, um Spritzer zu vermeiden (Abb. 6).
4 Halten Sie die Freigabetaste gedrückt (1), und drücken Sie dann
innerhalb von 2 Sekunden die Einschalttaste (2) (Abb. 7).
Hinweis: Wenn Sie die Einschalttaste nicht innerhalb von 2 Sekunden drücken,
blinkt die Ladeanzeige rot, und das Gerät bleibt gesperrt. Um das Gerät zu
entsperren, wiederholen Sie Schritt 4.
, Das Gerät ist in Betrieb.
- Lassen Sie die Freigabetaste los, sobald das Gerät in Betrieb ist.
- Sobald Sie die Einschalttaste loslassen, schaltet sich das Gerät aus.
5 Bewegen Sie das Gerät vorsichtig nach oben und unten, um die
Zutaten zu mischen (Abb. 8).
6 Reinigen Sie das Gerät nach jeder Anwendung (siehe Kapitel
“Reinigung”), und setzen Sie es in die Messerschutzhülle.
Mixen (max.)
100 - 400 ml 60 Sek.
100 - 1000 ml 60 Sek.
Verarbeitungszeit (max.)
Page 15

15
DEUTSCH
15
Zerkleinerer
Gehen Sie mit der Messereinheit sehr vorsichtig um; die Klingen sind sehr
scharf. Beim Entfernen der Messereinheit aus dem Zerkleinerer-Behälter,
beim Entleeren des Behälters sowie beim Reinigen ist besondere Vorsicht
geboten.
Der Zerkleinerer dient zum Zerkleinern von Zutaten wie Nüssen, Fleisch,
Zwiebeln, Har tkäse, gekochten Eiern, Knoblauch, Kräutern, trockenem Brot
usw.
1 Setzen Sie die Zerkleinerer-Messereinheit in den Zerkleinerer-
Behälter (Abb. 9).
2 Geben Sie die Zutaten in den Behälter
- Die empfohlenen Mengen und Verarbeitungszeiten entnehmen Sie bitte
der Tabelle.
Mengen zum Zerkleinern und Verarbeitungszeiten
Zutaten Mengen zum
Zerkleinern (max.)
Zwiebeln 200 g 5 Sek.
Fleisch & Fisch 200 g 10 Sek.
Gekochte Eier 2 Eier 4 Sek.
Kräuter 30 g 10 Sek.
Mandeln 200 g 30 Sek.
Trockenes Brot 80 g 30 Sek.
Parmesankäse 200 g 20 Sek.
Bitterschokolade 100 g 20 Sek.
Eiswürfel* 6 Stück 10 Sek.
* Hinweis: Verwenden Sie zum Zerkleinern von Eis die gezackte Messereinheit.
Verarbeitungszeit (max.)
3 Setzen Sie die Verbindungseinheit für den Zerkleinerer auf den
Zerkleinerer-Behälter (Abb. 10).
4 Befestigen Sie die Motoreinheit auf der Verbindungseinheit, bis sie
hörbar einrastet (Abb. 11).
5 Halten Sie die Freigabetaste gedrückt (1), und drücken Sie dann
innerhalb von 2 Sekunden die Einschalttaste (2) (Abb. 7).
Hinweis: Wenn Sie die Einschalttaste nicht innerhalb von 2 Sekunden drücken,
blinkt die Ladeanzeige rot und das Gerät bleibt gesperrt. Um das Gerät zu
entsperren, wiederholen Sie Schritt 5.
, Das Gerät ist in Betrieb.
- Lassen Sie die Freigabetaste los, sobald das Gerät in Betrieb ist.
- Sobald Sie die Einschalttaste loslassen, schaltet sich das Gerät aus.
- Wenn Sie die Puls-Funktion nutzen möchten, halten Sie die
Freigabetaste gedrückt, und drücken Sie die Einschalttaste mehrfach kurz
hintereinander.
- Wenn die Zutaten innen am Behälter haften bleiben, lösen Sie diese mit
einem Teigschaber oder geben Sie Flüssigkeit hinzu.
- Lassen Sie das Gerät nach der Verarbeitung einer Por tion auf
Zimmertemperatur abkühlen, bevor Sie mit der Verarbeitung fortfahren.
6 Nehmen Sie den Zerkleinerer nach dem Gebrauch ab, und reinigen
Sie ihn (siehe Kapitel “Reinigung”).
Reinigung (Abb. 12)
Tauchen Sie die Motoreinheit, die Ladestation, den Adapter und die
Verbindungseinheit des Zerkleinerers nicht in Wasser.
Vermeiden Sie es, die Messer beim Reinigen zu berühren. Sie sind sehr
scharf.
1 Drücken Sie die Entriegelungstaste an der Motoreinheit (1), um den
Pürierstab bzw. die Verbindungseinheit (2) für den Zerkleinerer zu
entfernen. (Abb. 13)
2 Nehmen Sie die übrigen Teile ab.
Page 16

DEUTSCH16
Tipp: Sie können das Messer des Pürierstabs auch bei aufgesetztem Stab
reinigen. Tauchen Sie den Messerschutz in warmes Wasser mit etwas
Geschirrspülmittel, und lassen Sie das Gerät eine Weile laufen.
Tipp: Sie können auch den Gummiring vom Zerkleinerer-Behälter entfernen, um
diesen besonders gründlich zu reinigen.
3 Weitere Informationen nden Sie in der Reinigungstabelle.
Aufbewahrung
1 Lassen Sie das Ladegerät immer eingesteckt, und stellen Sie den Mixer
zum Aufbewahren hinein. Dies garantiert, dass das Gerät immer
einsatzbereit ist.
2 Sie können zur Aufbewahrung das Netzkabel um die Spule an der
Unterseite der Ladestation wickeln.
Umweltschutz
- Werfen Sie das Gerät am Ende der Lebensdauer nicht in den normalen
Hausmüll. Bringen Sie es zum Recycling zu einer ofziellen Sammelstelle.
Auf diese Weise tragen Sie zum Umweltschutz bei (Abb. 14).
- Die integrierten Akkus enthalten Substanzen, die die Umwelt gefährden
können. Nehmen Sie die Akkus heraus, bevor Sie das Gerät an einer
ofziellen Recyclingstelle abgeben. Geben Sie gebrauchte Akkus bei
einer Batteriesammelstelle ab. Falls Sie beim Entfernen der Akkus
Probleme haben, können Sie das Gerät auch an ein Philips ServiceCenter geben. Dor t werden die Akkus herausgenommen und
umweltgerecht entsorgt (Abb. 15).
Die Akkus entsorgen
Entnehmen Sie die Akkus erst, wenn sie ganz leer sind, um eine
Gefährdung zu vermeiden. Die Akkus dürfen keinesfalls mit Metall in
Kontakt kommen.
1 Nehmen Sie den Pürierstab bzw. die Verbindungseinheit für den
Zerkleinerer von der Motoreinheit ab.
2 Lassen Sie das Gerät laufen, bis der Motor stillsteht.
3 Drücken Sie die Freigabetaste, und befestigen Sie sie in dieser Position
mit Klebeband.
, Die Ladeanzeige beginnt, rot zu blinken. Wenn die Ladeanzeige
erlischt, sind die Akkus normalerweise vollständig leer.
4 Überprüfen Sie, ob die Akkus wirklich vollständig leer sind, indem Sie
versuchen, das Gerät erneut einzuschalten. Falls der Motor startet,
wiederholen Sie den gesamten Vorgang.
5 Entfernen Sie den Aluminiumdeckel mit einem
Schraubendreher (Abb. 16).
6 Lösen Sie die beiden Schrauben (Abb. 17).
7 Ziehen Sie den oberen Teil der Motoreinheit mit den Akkus aus dem
Gehäuse (Abb. 18).
8 Legen Sie den oberen Teil mit den Akkus in eine Schüssel mit Wasser
und einem Teelöffel Salz, und lassen Sie sie dort für 24 Stunden liegen.
9 Nehmen Sie den oberen Teil mit den Akkus aus der Schüssel, und
schneiden Sie die Drähte durch, die die Akkus mit der Motoreinheit
verbinden. (Abb. 19)
10 Biegen Sie die Abdeckung des Akkufachs, um es vom oberen Teil zu
entfernen (Abb. 20).
11 Sie können entweder das gesamte Akkufach bei einer
Batteriesammelstelle abgeben (siehe oben) oder die Abdeckung des
Akkufachs entfernen.
12 Um die Abdeckung des Akkufachs zu entfernen, biegen Sie die
Halterung nach außen, und ziehen Sie die Akkus aus der Abdeckung
des Akkufachs (Abb. 21).
Garantie und Kundendienst
Herausragender Service und Garantie
Sie haben sich für ein Gerät der Robust Collection entschieden und Philips
möchte sicherstellen, dass Sie zufrieden sind. Bitte registrieren Sie Ihr
erworbenes Gerät innerhalb von drei Monaten nach Kaufdatum, damit wir
Page 17

17
17DEUTSCH
mit Ihnen in Kontakt bleiben können. Sie genießen dadurch zusätzliche
Serviceleistungen und Vorzüge.
- 3 Jahre Garantie
- Neue Rezeptideen per E-Mail
- Tipps und Tricks für die Verwendung Ihres Produktes der Robust Serie
- Informationen und Neuigkeiten zur Robust Serie
Sie müssen lediglich Ihr bevorzugtes Produkt unter
www.philips.com/kitchen registrieren oder kostenlos die Hotline des Philips
Kundendienstzentrums in Ihrem Land anrufen, um eine Registrierung
vorzunehmen (Deutschland 0800 000 7520 (gebührenfreie Hotline),
Österreich 0800 880 932, Die Schweiss 0844800544). Wenden Sie sich bei
Fragen zu Ihrem kulinarischen Werkzeug (Verwendung, War tung, Zubehör)
entweder an unseren Online-Support unter
www.philips.com/kitchen oder rufen Sie die Hotline an. Wir haben dieses
hochqualitative Produkt mit größter Sorgfalt entwickelt, getestet und
gestaltet. Sollte es dennoch leider zu Beanstandungen kommen, rufen Sie
bitte Ihren lokalen Philips Kundendienst an. Der Kundendienst wird Ihnen in
kürzester Zeit und mit größtmöglicher Verbraucherfreundlichkeit bei allen
Fragen rund um die Reparatur behilich sein. Ein Kurier wird das Produkt
bei Ihnen Zuhause abholen und es repariert zurückliefern. Sie können
anschließend wie gewohnt in Ihrer Küche alle Vorteile genießen.
Fehlerbehebung
In diesem Kapitel sind die häugsten Probleme aufgeführt, die beim
Gebrauch Ihres Geräts auftreten können. Sollten Sie ein Problem mithilfe
der nachstehenden Informationen nicht beheben können, wenden Sie sich
bitte an das Philips Service-Center in Ihrem Land.
Problem Lösung
Das Gerät
funktioniert nicht.
Die Akkus sind leer. Laden Sie die Akkus (siehe Kapitel “Für
den Gebrauch vorbereiten”, Abschnitt “Laden”).
Das Sicherheitssystem ist aktiviert. In diesem Fall kann das
Gerät nicht eingeschaltet werden, und die Ladeanzeige blinkt
rot. Halten Sie die Freigabetaste gedrückt, und drücken Sie
innerhalb von 2 Sekunden die Einschalttaste, um das Gerät
einzuschalten (siehe Kapitel “Das Gerät benutzen”).
Problem Lösung
Ggf. wurde das Gerät über den integrierten
Überhitzungsschutz ausgeschaltet, weil der Motor zu heiß
wurde. Die Ladeanzeige leuchtet rot. Lassen Sie das Gerät
vor dem weiteren Gebrauch 10 Minuten lang abkühlen.
Funktioniert das Gerät danach noch immer nicht, wenden Sie
sich bitte an Ihren Philips Händler oder ein Philips ServiceCenter.
Das Gerät steht
plötzlich still.
Die Ladeanzeige
blinkt rot.
Die Ladeanzeige
blinkt schnell blau.
Möglicherweise blockieren harte Zutaten die Messer. Schalten
Sie das Gerät über die Einschalttaste aus, nehmen Sie die
Motoreinheit ab, und entfernen Sie die blockierenden
Zutaten.
Das Sicherheitssystem ist aktiviert. In diesem Fall kann das
Gerät nicht eingeschaltet werden, und die Ladeanzeige
leuchtet rot. Halten Sie die Freigabetaste gedrückt, und
drücken Sie innerhalb von 2 Sekunden die Einschalttaste, um
das Gerät einzuschalten (siehe Kapitel “Das Gerät benutzen”).
Das Gerät wurde aufgrund des Überhitzungsschutzes
möglicherweise ausgeschaltet, weil der Motor zu heiß wurde.
Die Ladeanzeige leuchtet rot. Lassen Sie das Gerät vor dem
weiteren Gebrauch 10 Minuten lang abkühlen. Funktioniert
das Gerät danach noch immer nicht, wenden Sie sich bitte an
Ihren Philips Händler oder ein Philips Service-Center.
Die Akkus sind fast leer. Laden Sie die Akkus auf (siehe
Abschnitt “Laden” im Kapitel “Für den Gebrauch
vorbereiten”).
Page 18

18
FRANÇAIS
Introduction
Félicitations pour votre achat et bienvenue dans l’univers Philips ! Pour
proter pleinement de l’assistance Philips, enregistrez votre produit sur le
site à l’adresse suivante : www.philips.com/welcome.
Ce mixeur plongeant permet de préparer une large gamme d’aliments et
de recettes en toute sécurité et pour longtemps. Sa technologie sans l
vous assure une liberté de mouvement totale.
Description générale (g. 1)
A Témoin de charge
B Bouton de sécurité (avec symbole du verrou)
C Bouton de mise sous tension
D Bloc moteur
E Bouton de déverrouillage
F Mixeur plongeant
G Protection de sécurité pour le mixeur
H Couvercle du bol
I Bol
J Unité d’assemblage du hachoir
K Ensemble lames dentelées du hachoir pour obtenir de la glace pilée
L Ensemble lames du hachoir
M Bol du hachoir
N Adaptateur
O Base de recharge
P Rangement du cordon
Important
Avant d’utiliser l’appareil, lisez les instructions ci-dessous et conservez ce
mode d’emploi pour un usage ultérieur.
Danger
- Ne plongez jamais le bloc moteur, la base de recharge et l’adaptateur
dans l’eau ou dans tout autre liquide, et ne les rincez pas sous le robinet.
Avertissement
- Évitez de toucher les lames, sur tout lorsque le mixeur est xé au bloc
moteur. Elles sont en effet très coupantes.
- Si les lames se bloquent, retirez le mixeur du bloc moteur avant
d’enlever les ingrédients à l’origine du blocage.
- N’utilisez jamais l’ensemble lames du hachoir hors du bol du hachoir.
- N’allumez pas l’appareil lorsque vous xez ou retirez des accessoires.
- Avant de brancher l’appareil, vériez que la tension indiquée sur
l’adaptateur correspond à la tension du secteur.
- Cet appareil est destiné à un usage domestique uniquement. S’il est
employé de manière inappropriée, à des ns professionnelles ou
semi-professionnelles, ou en non-conformité avec les instructions du
mode d’emploi, la garantie peut être caduque et Philips décline toute
responsabilité concernant les dégâts occasionnés.
- Cet appareil n’est pas destiné à être utilisé par des personnes
(notamment des enfants) dont les capacités physiques, sensorielles ou
intellectuelles sont réduites, ou par des personnes manquant
d’expérience ou de connaissances, à moins que celles-ci ne soient sous
surveillance ou qu’elles n’aient reçu des instructions quant à l’utilisation
de l’appareil par une personne responsable de leur sécurité.
- Veillez à ce que les enfants ne puissent pas jouer avec l’appareil.
- Ne laissez pas des enfants utiliser le blender sans surveillance.
- N’utilisez pas l’appareil si le cordon d’alimentation, l’adaptateur, la base
de recharge ou l’appareil lui-même est endommagé.
- L’adaptateur contient un transformateur. An d’éviter tout accident,
n’essayez pas de remplacer la che de l’adaptateur.
- Si l’adaptateur ou la base de recharge est endommagé, il ne doit être
remplacé que par un adaptateur ou une base de recharge d’origine an
d’éviter tout accident.
- Tenez le bloc moteur, la base de recharge et l’adaptateur à l’écart de la
chaleur, du feu, de l’humidité et de la saleté.
Attention
- Utilisez exclusivement l’adaptateur et la base de recharge fournis.
- Utilisez, chargez et conservez l’appareil à une température comprise
entre 5 °C et 35 °C.
Page 19

19
FRANÇAIS
19
- Ne dépassez pas les quantités et les temps de préparation indiqués
dans le tableau.
- Ne démontez jamais la batterie. Mettez la batterie à l’abri du feu, de la
chaleur et des rayons du soleil.
- N’utilisez jamais d’accessoires, ni de pièces d’autres fabricants ou qui
n’ont pas été spéciquement recommandés par Philips. Votre garantie
ne sera pas valable en cas d’utilisation de tels accessoires ou pièces.
- Si les ingrédients s’accumulent sur les parois du bol ou sur le bol du
hachoir, arrêtez l’appareil et détachez les ingrédients des parois à l’aide
d’une spatule ou en ajoutant du liquide.
- Ne remplissez jamais le bol du hachoir avec des ingrédients dont la
température dépasse 80 °C/175 °F.
Champs électromagnétiques (CEM)
Cet appareil Philips est conforme à toutes les normes relatives aux champs
électromagnétiques (CEM). Il répond aux règles de sécurité établies sur la
base des connaissances scientiques actuelles s’il est manipulé correctement
et conformément aux instructions de ce mode d’emploi.
Système de sécurité
L’appareil intègre un système de sécurité qui l’empêche de fonctionner si
vous ne maintenez pas le bouton de sécurité enfoncé, tout en appuyant sur
le bouton de mise sous tension. Relâchez le bouton de sécurité dès que
l’appareil commence à fonctionner. Lorsque vous relâchez le bouton de
mise sous tension, le système de sécurité revient automatiquement en
position d’arrêt an d’éviter toute utilisation non intentionnelle de l’appareil.
Protection contre la surchauffe
L’appareil est équipé d’une protection contre la surchauffe intégrée. Lorsque
vous mixez une grande quantité d’ingrédients, il est possible que le bloc
moteur devienne très chaud. Dans ce cas, le système de sécurité intégré
éteint l’appareil et le témoin de charge s’allume en rouge. Laissez refroidir
l’appareil pendant 10 minutes avant de poursuivre.
Mode d’erreur
Si vous appuyez sur le bouton de sécurité pendant plus de 2 secondes, les
voyants se mettent à clignoter en rouge pour indiquer que le mode d’erreur
est activé. Si cela se produit, relâchez tous les boutons et remettez l’appareil
sous tension (voir l’étape 4 du chapitre « Utilisation de l’appareil »).
Avant la première utilisation
Avant la première utilisation, nettoyez soigneusement toutes les pièces en
contact avec des aliments (voir chapitre « Nettoyage »).
Avant l’utilisation
Charge
Chargez le mixeur :
- avant la première utilisation ou
- lorsqu’une partie du voyant de charge clignote en bleu pour indiquer
que la batterie est faible.
1 Branchez l’adaptateur sur la prise secteur.
2 Placez l’appareil sur la base de recharge. (g. 2)
, Le voyant de charge clignote en bleu pour indiquer que l’appareil se
charge (g. 3).
Remarque : L’adaptateur chauffe en cours de charge. Ce phénomène est
normal.
- La charge complète de cet appareil dure 2,5 heures.
- Chargez l’appareil pendant au moins 15 minutes pour une utilisation
limitée (soupe, purée).
Remarque : Laissez la base de recharge branchée en permanence et placez-y
l’appareil.
Signication des voyants
Charge
- Quand l’appareil est en charge, le voyant de charge clignote en bleu.
Batterie entièrement chargée
- Une fois la batterie entièrement chargée, le témoin de charge bleu
cesse de clignoter et s’allume en continu.
Batterie faible
- Lorsque la batterie est faible, une par tie du voyant de charge clignote
en bleu (g. 4).
Page 20

FRANÇAIS20
Protection contre la surchauffe
- Lorsque vous mixez une trop grande quantité d’ingrédients, il est
possible que le bloc moteur devienne très chaud. Le système de
sécurité intégré éteint l’appareil et le témoin de charge s’allume en
rouge.
Mode d’erreur
Si vous appuyez sur le bouton de sécurité pendant plus de 2 secondes, les
voyants se mettent à clignoter en rouge pour indiquer que le mode d’erreur
est activé. Si cela se produit, relâchez tous les boutons et remettez l’appareil
sous tension (voir l’étape 4 du chapitre « Utilisation de l’appareil »).
Préparation des aliments
1 Laissez refroidir les aliments chauds avant de les hacher, de les
mélanger ou de les verser dans le bol (température maximale :
80 °C/175 °F).
2 Coupez les grands aliments en morceaux d’environ 2 cm avant de les
hacher.
Utilisation de l’appareil
Mixeur plongeant
Évitez de toucher les lames, surtout lorsque le mixeur est xé au bloc
moteur. Elles sont en effet très coupantes.
Si les lames se bloquent, retirez le mixeur du bloc moteur avant d’enlever
les ingrédients à l’origine du blocage.
Le mixeur est destiné à :
- mélanger des ingrédients liquides, tels que des produits laitiers, sauces,
jus de fruits, soupes, cocktails et milk-shakes ;
- mixer des préparations à consistance molle, telles que de la pâte à
crêpes ou de la mayonnaise ;
- réduire en purée des aliments cuits, pour préparer des repas pour
bébés par exemple.
1 Fixez le mixeur plongeant au bloc moteur (clic) (g. 5).
2 Placez les ingrédients dans le bol.
- Pour connaître les quantités et les temps de préparation recommandés,
consultez le tableau ci-après.
Quantités et temps de préparation pour le mixeur
Ingrédients Quantité à mixer (max.) Temps (max.)
Fruits et légumes 100-200 g 60 s
Aliments pour bébé,
soupes et sauces
Pâte 100-500 ml 60 s
Milk-shakes et cocktails 100-1 000 ml 60 s
Remarque : Laissez toujours l’appareil refroidir entre deux préparations.
3 Plongez le mixeur dans les ingrédients an d’éviter les
éclaboussures (g. 6).
4 Maintenez le bouton de sécurité (1) enfoncé, puis appuyez sur le
bouton de mise sous tension (2) dans les 2 secondes (g. 7).
Remarque : Si vous n’appuyez pas sur le bouton de mise sous tension dans les
2 secondes, le voyant de charge clignote en rouge et l’appareil reste verrouillé.
Pour déverrouiller l’appareil, répétez l’étape 4.
, L’appareil commence à fonctionner.
- Relâchez le bouton de sécurité dès que l’appareil commence à
fonctionner.
- Dès que vous relâchez le bouton de mise sous tension, l’appareil
s’éteint.
5 Pour mixer les ingrédients, déplacez l’appareil lentement vers le haut,
vers le bas et en formant des cercles (g. 8).
6 Après utilisation, nettoyez l’appareil (voir chapitre « Nettoyage »),
puis placez-le dans la protection de sécurité.
100-400 ml 60 s
Page 21

21
FRANÇAIS
21
Hachoir
Soyez très prudent lorsque vous manipulez l’ensemble lames, car les
lames sont très coupantes. Faites particulièrement attention lorsque vous
retirez l’ensemble lames du bol du hachoir, lorsque vous videz ce dernier
et lors du nettoyage.
Le hachoir sert à hacher des ingrédients tels que noix, viande, oignons,
fromage à pâte dure, œufs durs, ail, herbes, pain sec, etc.
1 Placez l’ensemble lames du hachoir dans le bol du hachoir (g. 9).
2 Placez les ingrédients dans le bol du hachoir.
- Pour connaître les quantités et les temps de préparation recommandés,
consultez le tableau ci-après.
Quantités à hacher et temps de préparation
Ingrédients Quantité à hacher (max.) Temps (max.)
Oignons 200 g 5 s
Viande et poisson 200 g 10 s
Œufs durs 2 œufs 4 s
Herbes 30 g 10 s
Amandes 200 g 30 s
Pain sec 80 g 30 s
Parmesan 200 g 20 s
Chocolat fondant 100 g 20 s
Glaçons* 6 pièces 10 s
* Remarque : Utilisez l’ensemble lames dentelées pour obtenir de la glace pilée.
3 Placez l’unité d’assemblage sur le bol du hachoir (g. 10).
4 Fixez le bloc moteur à l’unité d’assemblage (clic) (g. 11).
5 Maintenez le bouton de sécurité (1) enfoncé, puis appuyez sur le
bouton de mise sous tension (2) dans les 2 secondes (g. 7).
Remarque : Si vous n’appuyez pas sur le bouton de mise sous tension dans les
2 secondes, le voyant de charge clignote en rouge et l’appareil reste verrouillé.
Pour déverrouiller l’appareil, répétez l’étape 5.
, L’appareil commence à fonctionner.
- Relâchez le bouton de sécurité dès que l’appareil commence à
fonctionner.
- Dès que vous relâchez le bouton de mise sous tension, l’appareil
s’éteint.
- Pour hacher par impulsions, maintenez le bouton de sécurité enfoncé et
appuyez sur le bouton de mise sous tension plusieurs fois
successivement.
- Si les ingrédients s’accumulent sur les parois du bol du hachoir,
détachez-les à l’aide d’une spatule ou ajoutez du liquide.
- Après avoir haché une portion, laissez refroidir l’appareil avant de
poursuivre.
6 Après utilisation, retirez le hachoir et nettoyez-le (voir le chapitre
« Nettoyage »).
Nettoyage (g. 12)
Ne plongez jamais le bloc moteur, la base de recharge, l’adaptateur ou
l’unité d’assemblage du hachoir dans l’eau.
Ne touchez pas les lames lorsque vous les nettoyez, car elles sont très
coupantes.
1 Appuyez sur le bouton de déverrouillage du bloc moteur (1) pour
retirer le mixeur ou l’unité d’assemblage du hachoir (2). (g. 13)
2 Enlevez ensuite les autres éléments.
Conseil : Vous pouvez également nettoyer la lame du mixeur lorsque ce dernier
est xé au bloc moteur. Plongez la protection anti-éclaboussure du mixeur dans
de l’eau chaude savonneuse et faites fonctionner l’appareil pendant quelques
instants.
Page 22

FRANÇAIS22
Conseil : Vous avez également la possibilité de retirer le joint du bol du hachoir
pour un nettoyage plus en profondeur.
3 Reportez-vous au tableau relatif au nettoyage pour obtenir des
instructions supplémentaires.
Rangement
1 Laissez la base de recharge branchée en permanence et placez-y
l’appareil. Ainsi, l’appareil est toujours prêt à être utilisé.
2 Pour ranger le cordon d’alimentation, enroulez-le autour des crochets
sous le socle de la base de recharge.
Environnement
- Lorsqu’il ne fonctionnera plus, ne jetez pas l’appareil avec les ordures
ménagères, mais déposez-le à un endroit assigné à cet effet, où il pourra
être recyclé. Vous contribuerez ainsi à la protection de
l’environnement (g. 14).
- La batterie rechargeable intégrée contient des substances qui peuvent
nuire à l’environnement. Veillez à toujours retirer la batterie avant de
mettre l’appareil au rebut ou de le déposer à un endroit assigné à cet
effet. Déposez la batterie usagée à un endroit assigné à cet effet. Si vous
n’arrivez pas à la retirer de l’appareil, vous pouvez appor ter ce dernier
dans un Centre Service Agréé Philips qui prendra toute l’opération en
charge pour préserver l’environnement (g. 15).
Mise au rebut de la batterie
Retirez la batterie uniquement lorsqu’elle est entièrement déchargée an
d’éviter tout accident. Évitez tout contact de la batterie avec des objets
métalliques.
1 Retirez le mixeur ou l’unité d’assemblage du hachoir du bloc moteur.
2 Laissez l’appareil fonctionner jusqu’à l’arrêt du moteur.
3 Appuyez sur le bouton de sécurité, puis maintenez-le dans cette
position à l’aide d’une bande adhésive.
, Le voyant de charge se met à clignoter en rouge. Lorsqu’il s’éteint, la
batterie est complètement déchargée.
4 Rallumez l’appareil pour vous assurer que la batterie est bien
déchargée. Si le moteur démarre, recommencez la procédure.
5 À l’aide d’un tournevis, retirez le capot supérieur en
aluminium (g. 16).
6 Dévissez les deux vis (g. 17).
7 Sortez la partie supérieure du bloc moteur intégrant la batterie du
logement (g. 18).
8 Placez la partie supérieure intégrant la batterie dans un bol contenant
un litre d’eau et une cuillère à café de sel. Laissez tremper pendant
24 heures.
9 Sortez la partie supérieure intégrant la batterie du bol, puis coupez
les ls reliant la batterie au bloc moteur. (g. 19)
10 Pliez le couvercle de la batterie an de la détacher de la partie
supérieure (g. 20).
11 Vous pouvez jeter l’ensemble de la batterie à un endroit assigné à cet
effet (voir ci-dessus) ou retirer le couvercle de la batterie.
12 Pour retirer le couvercle de la batterie, tirez la languette qui maintient
la batterie en place vers l’extérieur et séparez la batterie de son
couvercle (g. 21).
Garantie et service
Services et garanties exceptionnels
Vous venez de faire l’acquisition d’un outil culinaire pour la vie et nous
voulons nous assurer que vous en serez satisfait. Enregistrez-vous dans
les 3 mois suivant la date d’achat et bénéciez de services et d’avantages
complémentaires, tels que :
- extension de garantie de 3 ans pièces
- nouvelles idées de recettes par e-mail
- astuces et conseils pour entretenir votre appareil Robust
Page 23

23
FRANÇAIS
23
- informations les plus récentes sur la gamme
Il vous suft d’enregistrer votre produit à l’adresse www.philips.com/
kitchen ou de contacter gratuitement la hotline du Service
Consommateurs Philips de votre pays (Belgique: 0800 84434, Les
Pays-Bas: 0800 023 0076, Luxembourg: 80027861, France 0805 025 510,
Suisse 0844800544).
Pour toute question à propos de votre appareil culinaire (utilisation,
entretien, accessoires), consultez notre assistance en ligne sur le site
www.philips.com/kitchen ou contactez la hotline. Nous avons porté la
plus grande attention au développement, au design et aux contrôles de
ces produits de grande qualité. Cependant, au cas où, alencontreusement,
votre produit devrait être réparé, vous pouvez contacter votre revendeur
ou appeler le service consommateur Philips. Ils vous aideront à organiser
cette réparation, an qu’elle soit la plus rapide possible. Vous pourrez ainsi
continuer à préparer de savoureuses recettes.
Dépannage
Ce chapitre présente les problèmes les plus courants que vous pouvez
rencontrer avec votre appareil. Si vous ne parvenez pas à résoudre le
problème à l’aide des informations ci-dessous, contactez le
Service Consommateurs Philips de votre pays.
Problème Solution
L’appareil ne
fonctionne pas.
La batterie est vide. Rechargez-la (voir le chapitre
« Avant utilisation », section « Charge de
l’appareil »).
Le système de sécurité est activé. Dans ce cas, il est
impossible d’allumer l’appareil et le voyant de charge
clignote en rouge. Pour allumer l’appareil, maintenez
le bouton de sécurité enfoncé, tout en appuyant sur
le bouton de mise sous tension dans les 2 secondes
(voir chapitre « Utilisation de l’appareil »).
Problème Solution
La protection contre la surchauffe a peut-être éteint
l’appareil en raison d’une chaleur excessive au niveau
du moteur. Le témoin de charge s’allume en rouge.
Laissez refroidir l’appareil pendant 10 minutes avant
de poursuivre. Si l’appareil ne fonctionne toujours
pas, contactez votre distributeur Philips ou un
Centre Service Agréé.
L’appareil s’est
arrêté
brusquement.
Le témoin de
charge clignote
en rouge.
Le témoin de
charge clignote
rapidement en
bleu.
Certains ingrédients durs peuvent bloquer les lames.
Relâchez le bouton de mise sous tension pour
éteindre l’appareil, retirez le bloc moteur et enlevez
les ingrédients à l’origine du blocage.
Le système de sécurité est activé. Dans ce cas, il est
impossible d’allumer l’appareil et le voyant de charge
s’allume en rouge. Pour allumer l’appareil, maintenez
le bouton de sécurité enfoncé tout en appuyant sur
le bouton de mise sous tension dans les 2 secondes
(voir chapitre « Utilisation de l’appareil »).
La protection contre les surchauffes a éteint
l’appareil en raison d’une chaleur excessive au niveau
du moteur. Le voyant de charge s’allume en rouge.
Laissez refroidir l’appareil pendant 10 minutes avant
de poursuivre. Si l’appareil ne fonctionne toujours
pas, contactez votre distributeur Philips ou un
Centre Service Agréé.
La batterie est vide. Rechargez-la (voir le chapitre
« Avant utilisation », section « Charge de
l’appareil »).
Page 24

24
24
NEDERLANDS
Inleiding
Gefeliciteerd met uw aankoop en welkom bij Philips! Als u volledig wilt
proteren van de ondersteuning die Philips biedt, registreer uw product dan
op www.philips.com/welcome.
Deze handblender is ontwikkeld om moeiteloos een grote verscheidenheid
aan ingrediënten en recepten aan te kunnen en om langdurig goed te
presteren. Omdat het apparaat snoerloos is, proteert u van ultieme
bewegingsvrijheid.
Algemene beschrijving (g. 1)
A Oplaadlampje
B Ontgrendelknop
C Aan/uitknop
D Motorunit
E Ontgrendelknop
F Mixstaaf
G Beschermende meskap voor mixstaaf
H Deksel beker
I Beker
J Koppelunit hakmolen
K Getande mesunit voor hakmolen om ijs te vermalen
L Mesunit hakmolen
M Hakmolenkom
N Adapter
O Oplaadstandaard
P Snoeropbergmogelijkheid
Belangrijk
Lees deze gebruiksaanwijzing zorgvuldig door voordat u het apparaat gaat
gebruiken. Bewaar de gebruiksaanwijzing om deze indien nodig te kunnen
raadplegen.
Gevaar
- Dompel de motorunit, de oplaadstandaard en de adapter nooit in
water of een andere vloeistof en spoel ze ook niet af onder de kraan.
Waarschuwing
- Raak de messen niet aan, vooral niet als de mixstaaf aan de motorunit is
bevestigd. De messen zijn zeer scherp.
- Als de messen vastlopen, verwijder dan eerst de mixstaaf van de
motorunit voordat u de ingrediënten verwijdert die de messen
blokkeren.
- Gebruik de mesunit van de hakmolen nooit zonder de hakmolenkom.
- Schakel het apparaat niet in wanneer u accessoires bevestigt of
verwijdert.
- Controleer of het voltage dat wordt aangegeven op de adapter
overeenkomt met de plaatselijke netspanning voordat u het apparaat
aansluit.
- Dit apparaat is uitsluitend bedoeld voor huishoudelijk gebruik. Bij
(semi-)professioneel of onjuist gebruik en elk gebruik niet
overeenkomstig de gebruiksaanwijzing vervalt het recht op garantie en
aanvaardt Philips geen aansprakelijkheid voor eventueel hierdoor
ontstane schade.
- Dit apparaat is niet bedoeld voor gebruik door personen (waaronder
kinderen) met verminderde lichamelijke, zintuiglijke of geestelijke
vermogens, of die gebrek aan ervaring of kennis hebben, tenzij iemand
die verantwoordelijk is voor hun veiligheid toezicht op hen houdt of
hen heeft uitgelegd hoe het apparaat dient te worden gebruikt.
- Houd toezicht op jonge kinderen om te voorkomen dat ze met het
apparaat gaan spelen.
- Laat kinderen de blender niet zonder toezicht gebruiken.
- Gebruik het apparaat niet indien de adapter, het netsnoer, de
oplaadstandaard of het apparaat zelf beschadigd is.
- De adapter bevat een transformator. Knip de adapter niet af om deze te
vervangen door een andere stekker, aangezien dit een gevaarlijke
situatie oplevert.
- Indien de adapter of de oplaadstandaard beschadigd is, laat deze dan
altijd vervangen door een van het oorspronkelijke type om gevaar te
voorkomen.
- Houd de motorunit, de oplaadstandaard en de adapter uit de buurt van
hitte, vuur, vocht en vuil.
Page 25

25
NEDERLANDS
25
Let op
- Gebruik uitsluitend de bijgeleverde adapter en oplaadstandaard.
- Laad het apparaat op, bewaar het en gebruik het bij een temperatuur
tussen 5°C en 35°C.
- Overschrijd de hoeveelheden en bewerkingstijden aangegeven in de
tabel niet.
- Haal de accu’s niet uit elkaar en veroorzaak geen kortsluiting in de
accu’s. Bescherm de accu’s tegen vuur, hitte en direct zonlicht.
- Gebruik geen accessoires of onderdelen van andere fabrikanten of die
niet speciek door Philips worden aanbevolen. Als u dergelijke
accessoires of onderdelen gebruikt, vervalt de garantie.
- Als de ingrediënten aan de wand van de beker of de hakmolenkom
blijven kleven, schakel het apparaat dan uit en verwijder de ingrediënten
van de wand met een spatel of door vloeistof toe te voegen.
- Vul de beker of de hakmolenkom nooit met ingrediënten die heter zijn
dan 80°C.
Elektromagnetische velden (EMV)
Dit Philips-apparaat voldoet aan alle richtlijnen met betrekking tot
elektromagnetische velden (EMV). Mits het apparaat op de juiste wijze
en volgens de instructies in deze gebruiksaanwijzing wordt gebruikt, is het
veilig te gebruiken volgens het nu beschikbare wetenschappelijke bewijs.
Veiligheidssysteem
Het apparaat is voorzien van een ingebouwde beveiliging. Het apparaat
werkt alleen als u de ontgrendelknop en vervolgens de aan/uitknop
ingedrukt houdt. Laat de ontgrendelknop los wanneer het apparaat begint
te werken. Zodra u de aan/uitknop loslaat, keert het veiligheidssysteem
automatisch terug in de uit-stand om het apparaat tegen onbedoelde
inwerkingstelling te beveiligen.
Oververhittingsbeveiliging
Het apparaat is voorzien van een ingebouwde oververhittingsbeveiliging. Als
u het apparaat zwaar belast, kan de motorunit heet worden. Als dit gebeurt,
schakelt het ingebouwde beveiligingssysteem het apparaat uit en gaat het
oplaadlampje rood branden. Laat het apparaat 10 minuten afkoelen voordat
u verdergaat.
Foutmodus
Als u de ontgrendelknop langer dan 2 seconden ingedrukt houdt, begint het
indicatielampje rood te knipperen om aan te geven dat de foutmodus is
geactiveerd. Laat alle knoppen los en schakel het apparaat weer in als dit
gebeurt (zie stap 4 in hoofdstuk ‘Het apparaat gebruiken’).
Voor het eerste gebruik
Maak alle onderdelen die in aanraking komen met voedsel grondig schoon
voordat u het apparaat voor het eerst gebruikt (zie hoofdstuk
‘Schoonmaken’).
Klaarmaken voor gebruik
Opladen
Laad de handblender op:
- als u het apparaat voor de eerste keer gaat gebruiken of
- als één segment van het blauwe oplaadlampje knippert om aan te geven
dat de accu’s bijna leeg zijn.
1 Steek de adapter in het stopcontact.
2 Plaats het apparaat in de oplaadstandaard. (g. 2)
, Het blauwe oplaadlampje knippert om aan te geven dat het apparaat
wordt opgeladen (g. 3).
Opmerking: Tijdens het opladen voelt de adapter warm aan. Dit is normaal.
- Het duurt 2,5 uur om het apparaat volledig op te laden.
- Laad het apparaat minimaal 15 minuten op als u het wilt gebruiken voor
ingrediënten waarbij het apparaat slechts licht wordt belast (soep,
puree).
Opmerking: Laat de stekker van de oplaadstandaard continu in het stopcontact
zitten en plaats het apparaat steeds terug op de oplaadstandaard.
Aanwijzingen van het lampje
Opladen
- Als het apparaat wordt opgeladen, knippert het blauwe oplaadlampje.
Page 26

NEDERLANDS26
Accu’s volledig opgeladen
- Als de accu’s volledig zijn opgeladen, brandt het oplaadlampje continu
blauw.
Accu’s bijna leeg
- Als de accu’s bijna leeg zijn, knippert één segment van het blauwe
oplaadlampje (g. 4).
Oververhittingsbeveiliging
- Als u het apparaat te zwaar belast, kan de motorunit heet worden. Het
ingebouwde beveiligingssysteem schakelt het apparaat dan uit en het
oplaadlampje gaat rood branden.
Foutmodus
Als u de ontgrendelknop langer dan 2 seconden ingedrukt houdt, begint het
indicatielampje rood te knipperen om aan te geven dat de foutmodus is
geactiveerd. Laat alle knoppen los en schakel het apparaat weer in als dit
gebeurt (zie stap 4 in hoofdstuk ‘Het apparaat gebruiken’).
Het voedsel bereiden
1 Laat hete ingrediënten afkoelen voordat u deze gaat hakken, mengen
of in de beker doet (maximumtemperatuur 80°C).
2 Snijd grote ingrediënten in kleinere stukjes van ongeveer 2 cm
voordat u deze in de handblender doet.
Het apparaat gebruiken
Handblender
Raak de messen niet aan, vooral niet als de mixstaaf aan de motorunit is
bevestigd. De messen zijn zeer scherp.
Als de messen vastlopen, verwijder dan eerst de mixstaaf van de
motorunit voordat u de ingrediënten verwijdert die de messen blokkeren.
De handblender is bedoeld voor:
- het mengen van vloeistoffen, bijv. zuivelproducten, sauzen,
vruchtensappen, soepen, drankjes en milkshakes;
- het mixen van zachte ingrediënten, bijv. pannenkoekbeslag of mayonaise;
- het pureren van gekookte ingrediënten, bijv. voor het bereiden van
babyvoedsel.
1 Bevestig de mixstaaf aan de motorunit (‘klik’) (g. 5).
2 Doe de ingrediënten in de beker.
- Raadpleeg de tabel voor de aanbevolen hoeveelheden en
bewerkingstijden.
Hoeveelheden en bewerkingstijden - mengen
Ingrediënten Hoeveelheid (max.) Tijd (max.)
Groente en fruit 100-200 g 60 sec.
Babyvoeding, soep en saus 100-400 ml 60 sec.
Beslag 100-500 ml 60 sec.
Drankjes en milkshakes 100-1000 ml 60 sec.
Opmerking: Laat het apparaat na iedere bewerkingscyclus altijd tot
kamertemperatuur afkoelen.
3 Dompel de meskap volledig onder in de ingrediënten om spatten te
voorkomen (g. 6).
4 Houd de ontgrendelknop ingedrukt (1) en houd vervolgens binnen 2
seconden de aan/uitknop ingedrukt (2) (g. 7).
Opmerking: Als u niet binnen 2 seconden op de aan/uitknop drukt, gaat het
oplaadlampje rood knipperen en blijft het apparaat vergrendeld. U kunt het
apparaat ontgrendelen door stap 4 te herhalen.
, Het apparaat begint te werken.
- Laat de ontgrendelknop los wanneer het apparaat begint te werken.
- Wanneer u de aan/uitknop loslaat, schakelt het apparaat uit.
5 Beweeg het apparaat voorzichtig omhoog en omlaag, en maak
ronddraaiende bewegingen om de ingrediënten te mengen (g. 8).
6 Maak het apparaat na gebruik schoon (zie hoofdstuk ‘Schoonmaken’)
en plaats het vervolgens in de beschermende meskap.
Page 27

27
NEDERLANDS
27
Hakmolen
Wees voorzichtig wanneer u de mesunit beetpakt; de messen zijn zeer
scherp. Wees vooral voorzichtig wanneer u de mesunit uit de
hakmolenkom verwijdert, wanneer u de hakmolenkom leegt en tijdens
het schoonmaken.
De hakmolen is bedoeld voor het hakken van ingrediënten zoals noten,
vlees, uien, harde kaas, gekookte eieren, knoook, kruiden, droog brood enz.
1 Plaats de mesunit van de hakmolen in de hakmolenkom (g. 9).
2 Doe de ingrediënten in de hakmolenkom.
- Raadpleeg de tabel voor de aanbevolen hoeveelheden en
bewerkingstijden.
Hoeveelheden en bewerkingstijden - hakken
Ingrediënten Hakhoeveelheden
(max.)
Uien 200 g 5 sec.
Vlees en vis 200 g 10 sec.
Gekookte eieren 2 eieren 4 sec.
Kruiden 30 g 10 sec.
Amandelen 200 g 30 sec.
Droog brood 80 g 30 sec.
Parmezaanse kaas 200 g 20 sec.
Pure chocolade 100 g 20 sec.
IJsblokjes* 6 stuks 10 sec.
* Opmerking: Met de getande mesunit kunt u ijs vermalen.
3 Plaats de koppelunit voor de hakmolen op de hakmolenkom (g. 10).
4 Bevestig de motorunit op de koppelunit (‘klik’) (g. 11).
Tijd (max.)
5 Houd de ontgrendelknop ingedrukt (1) en houd vervolgens binnen 2
seconden de aan/uitknop ingedrukt (2) (g. 7).
Opmerking: Als u niet binnen 2 seconden op de aan/uitknop drukt, gaat het
oplaadlampje rood knipperen en blijft het apparaat vergrendeld. U kunt het
apparaat ontgrendelen door stap 5 te herhalen.
, Het apparaat begint te werken.
- Laat de ontgrendelknop los wanneer het apparaat begint te werken.
- Wanneer u de aan/uitknop loslaat, schakelt het apparaat uit.
- Als u pulserend wilt hakken, houd de ontgrendelknop dan ingedrukt en
druk een paar keer snel achter elkaar op de aan/uitknop.
- Als de ingrediënten tegen de zijkant van de hakmolenkom zitten, kunt u
ze verwijderen met een spatel of door wat vocht toe te voegen.
- Laat, als u een por tie hebt verwerkt, het apparaat afkoelen tot
kamertemperatuur voordat u verdergaat met verwerken.
6 Koppel de hakmolen na gebruik los om deze schoon te maken (zie
hoofdstuk ‘Schoonmaken’).
Schoonmaken (g. 12)
Dompel de motorunit, de oplaadstandaard, de adapter en de koppelunit
voor de hakmolen nooit in water.
Raak tijdens het schoonmaken nooit de messen aan. Deze zijn zeer
scherp.
1 Druk op de ontgrendelknop op de motorunit (1) om de mixstaaf of
de koppelunit voor de hakmolen te verwijderen (2). (g. 13)
2 Neem de rest van de onderdelen uit elkaar.
Tip U kunt het mes van de mixstaaf ook schoonmaken als deze nog aan de
motorunit zit. Dompel de meskap in warm water met wat afwasmiddel en laat
het apparaat even werken.
Tip U kunt ook de rubberen ringen van de hakmolenkom verwijderen voor
extra grondige reiniging.
3 Zie de aparte schoonmaaktabel voor verdere instructies.
Page 28

NEDERLANDS28
Opbergen
1 Laat de stekker van de oplaadstandaard continu in het stopcontact
zitten en plaats het apparaat steeds terug op de oplaadstandaard,
zodat het apparaat altijd klaar is voor gebruik.
2 Wind het snoer rond de haspel in de voet van de oplaadstandaard.
Milieu
- Gooi het apparaat aan het einde van zijn levensduur niet weg met het
normale huisvuil, maar lever het in op een door de overheid
aangewezen inzamelpunt om het te laten recyclen. Op die manier levert
u een bijdrage aan een schonere leefomgeving (g. 14).
- De ingebouwde accu’s bevatten stoffen die schadelijk kunnen zijn voor
het milieu. Verwijder de accu’s altijd voordat u het apparaat afdankt en
inlevert op een door de overheid aangewezen inzamelpunt. Lever de
accu’s in op een ofcieel inzamelpunt voor batterijen. Als u problemen
ondervindt bij het verwijderen van de accu’s, kunt u met het apparaat
ook naar een Philips-servicecentrum gaan. Medewerkers van dit
centrum verwijderen dan de accu’s voor u en zorgen ervoor dat deze
op milieuvriendelijke wijze worden verwerkt (g. 15).
Accu’s verwijderen
Verwijder de accu’s alleen als ze helemaal leeg zijn om gevaar te
voorkomen. Laat de accu’s nooit in contact komen met metaal.
1 Verwijder de mixstaaf of de koppelunit voor de hakmolen van de
motorunit.
2 Laat het apparaat lopen totdat het vanzelf stopt.
3 Druk op de ontgrendelknop en zet de knop in deze stand vast met
plakband.
, Het oplaadlampje begint rood te knipperen. Als het oplaadlampje uit
gaat, zouden de accu’s volledig leeg moeten zijn.
4 Probeer het apparaat opnieuw in te schakelen om te controleren of
de accu’s echt leeg zijn. Als de motor start, herhaalt u de procedure.
5 Verwijder de aluminium bovenplaat met een schroevendraaier (g. 16).
6 Draai de twee schroeven los (g. 17).
7 Trek het bovenste deel van de motorunit met de daaraan bevestigde
accu’s uit de behuizing (g. 18).
8 Plaats het bovenste deel met de daaraan bevestigde accu’s in een kom
met één liter water en 1 theelepel zout en laat het 24 uur in de kom
liggen.
9 Haal het bovenste deel met de daaraan bevestigde accu’s uit de kom
en knip de draden waarmee de accu’s aan de motorunit vastzitten
door. (g. 19)
10 Buig de accuhouder om deze los te maken van het bovenste
deel (g. 20).
11 U kunt het complete accupak inleveren bij een ofcieel inzamelpunt
voor batterijen (zie hierboven) of u kunt de accuhouder verwijderen.
12 Als u het accuhouder wilt verwijderen, buigt u het lipje dat de accu’s
op hun plek houdt naar buiten en trekt u de accu’s uit het
accuhouder (g. 21).
Garantie & service
Uitzonderlijke garantie en service
U hebt een “Robust” keukenhulpmiddel aangeschaft en wij willen ervoor
zorgen dat u tevreden blijft. Wij vragen u uw product te registreren, zodat u
eventueel kunt proteren van extra services en voordelen. Registreer uw
product binnen 3 maanden na aanschaf om van onder meer de volgende
voordelen te proteren:
- 3-jaar productgarantie
- Nieuwe receptideeën via e-mail
- Tips en trucs voor het gebruik en onderhoud van uw Robust-product
- De laatste nieuwtjes over de Robust-collectie
Om uw product te registreren, hoeft u alleen maar naar
www.philips.com/kitchen te gaan of met het gratis nummer van de
Philips-consumentenservice te bellen in uw land (België: 0800 84434,
Page 29

29
NEDERLANDS
29
Nederland: 0800 023 0076, Luxemburg: 80027861). Als u vragen hebt over
uw keukenapparaat (gebruik, onderhoud, accessoires, enz.) kunt u de pagina
Contact en ondersteuning raadplegen op www.philips.com/kitchen of
bellen met de lokale consumentenservice. Wij hebben ons maximaal
ingespannen om dit hoogwaardige product te ontwikkelen, testen en
ontwerpen.
Mocht uw product onverhoopt gerepareerd moeten worden, neem dan
contact op met de Philips-consumentenservice in uw land of met uw
verkoper. Zij staan klaar om uw product zo snel als mogelijk en met zo min
mogelijk ongemak te repareren.
Op deze manier kunt u blijven genieten van heerlijke zelfbereide gerechten.
Problemen oplossen
Dit hoofdstuk behandelt in het kort de problemen die u kunt tegenkomen
tijdens het gebruik van het apparaat. Als u er niet in slaagt het probleem op
te lossen met behulp van de onderstaande informatie, neem dan contact op
met het Consumer Care Centre in uw land.
Probleem Oplossing
Het apparaat
werkt niet.
De accu’s zijn leeg. Laad de accu’s op (zie ‘Opladen’ in
hoofdstuk ‘Klaarmaken voor gebruik’).
Het veiligheidssysteem is in werking getreden. In dat
geval is het niet mogelijk het apparaat in te schakelen
en knippert het oplaadlampje rood. Houd de
ontgrendelknop ingedrukt en houd vervolgens binnen
2 seconden de aan/uitknop ingedrukt om het apparaat
in te schakelen (zie hoofdstuk ‘Het apparaat
gebruiken’).
Probleem Oplossing
Mogelijk heeft de oververhittingsbeveiliging het
apparaat uitgeschakeld, omdat de motor te heet is
geworden. Het oplaadlampje brandt rood. Laat het
apparaat 10 minuten afkoelen voordat u verdergaat.
Werkt het apparaat daarna nog steeds niet, neem dan
contact op met uw Philips-dealer of met een door
Philips geautoriseerd servicecentrum.
Het apparaat
stopt opeens.
Het
oplaadlampje
knippert rood.
Het
oplaadlampje
knippert snel
blauw.
Mogelijk worden de messen geblokkeerd door harde
ingrediënten. Laat de aan/uitknop los om het apparaat
uit te schakelen, maak de motorunit los en verwijder
de ingrediënten die de messen blokkeren.
Het veiligheidssysteem is in werking getreden. In dat
geval is het niet mogelijk het apparaat in te schakelen
en gaat het oplaadlampje rood branden. Houd de
ontgrendelknop ingedrukt en houd vervolgens binnen
2 seconden de aan/uitknop ingedrukt om het apparaat
in te schakelen (zie hoofdstuk ‘Het apparaat
gebruiken’).
De oververhittingsbeveiliging heeft het apparaat
uitgeschakeld, omdat de motor te heet is geworden.
Het oplaadlampje brandt rood. Laat het apparaat 10
minuten afkoelen voordat u verdergaat. Werkt het
apparaat daarna nog steeds niet, neem dan contact op
met uw Philips-dealer of met een door Philips
geautoriseerd servicecentrum.
De accu’s zijn bijna leeg. Laad de accu’s op (zie
‘Opladen’ in hoofdstuk ‘Klaarmaken voor gebruik’).
Page 30

30
2 3 4 5
6
10 11 13 14
15 16 17
19 20 21
7 8 9
12
18
Page 31

31
Page 32

www.philips.com/kitchen 4203.064.5676.3
 Loading...