

Page 1
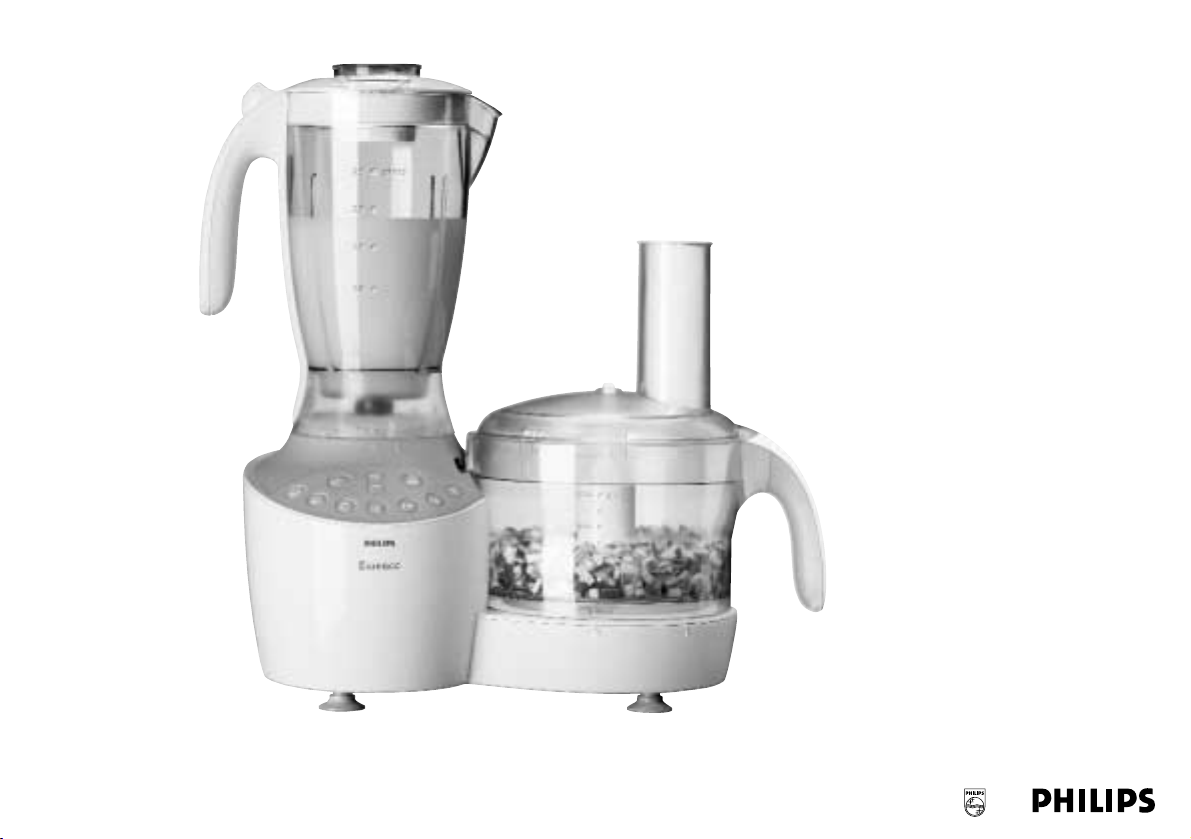
Essence HR7754
Recipes & Directions for use
Rezepte & Gebrauchanweisung
Recettes & Mode d'emploi
Recepten & Gebruiksaanwijzing
Ricette & Istruzioni per l'uso
Page 2

234
Page 3
Page 4

Page 5

ENGLISH 6
DEUTSCH 27
FRANÇAIS 49
NEDERLANDS 71
ITALIANO 93
HR7754
5
Page 6

ENGLISH6
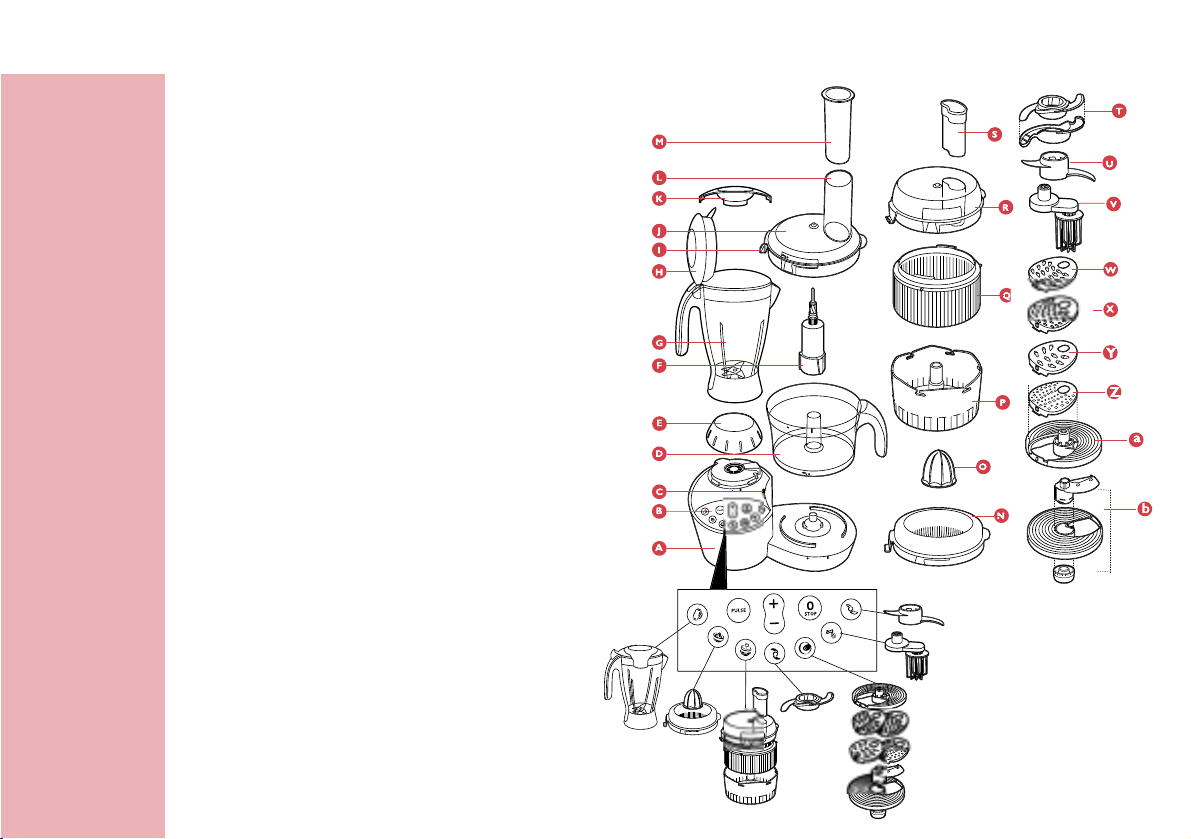
Parts and accessories
A Motor unit
B Smart process control panel
C Built-in safety lock
D Screw cap (must be placed to use bowl
functions)
E Food processing bowl
F Tool holder
G Blender jar
H Lid of blender jar
I Peg of lid (activates and deactivates the safety
switch)
J Lid of food processing bowl
K Stopper
L Feed tube
M Pusher
N Sieve of citrus press
O Cone of ccitrus press
P Juice extractor drum
Q Juice extractor pulp sieve
R Lid of juice extractor
S Pusher of juice extractor
T Metal blade + protective cover
U Kneading hook
V Balloon beater
W Shredding insert medium
X Shredding insert fine
Y Shredding insert coarse
Z Granulating insert
a Insert holder
b Adjustable slicing disc (slicing insert, carrier
and adjusting knob)
Introduction
This appliance is equipped with an automatic
thermal cut-out system.This system will
automatically cut off the power supply to the
appliance in case of overheating.
If your appliance suddenly stops
running:
1 Pull the mains plug out of the socket.
2 Let the appliance cool down for
60 minutes.
3 Put the mains plug in the socket.
4 Switch the appliance on again.
Please contact your Philips dealer or an
authorised Philips service centre if the automatic
thermal cut-out system is activated too often.
CAUTION: In order to avoid a hazardous
situation, this appliance must never be connected
to a timer switch.
Important
◗ Read these instructions for use carefully and
look at the illustrations before using the
appliance.
◗ Keep these instructions for use for future
reference.
Page 7

ENGLISH 7
◗ Check if the voltage indicated on the
appliance corresponds to the local mains
voltage before you connect the appliance.
◗ Never use any accessories or parts from
other manufacturers or that have not been
specifically advised by Philips.Your guarantee
will become invalid if such accessories or
parts have been used.
◗ Do not use the appliance if the mains cord,
the plug or other parts are damaged.
◗ If the mains cord is damaged, it must be
replaced by Philips, a service centre
authorised by Philips or similarly qualified
persons in order to avoid a hazard.
◗ Thoroughly clean the parts that will come
into contact with food before you use the
appliance for the first time.
◗ Do not exceed the quantities and preparation
times indicated in the table.
◗ Do not exceed the maximum content
indicated on the bowl, i.e. do not fill beyond
the top graduation.
◗ Unplug the appliance immediately after use.
◗ Never use your fingers or an object (e.g. a
spatula) to push ingredients down the feed
tube while the appliance is running. Only the
pusher is to be used for this purpose.
◗ Always unplug the appliance before reaching
into the blender jar with your fingers or an
object (e.g. a spatula).
◗ Keep the appliance out of the reach of
children.
◗ Never let the appliance run unattended.
◗ Place the lid on the bowl in the right position.
The build-in safety lock will now be deblocked
and you will be able to turn the appliance on.
Both the motor unit and the screw cap have
been provided with marks.The appliance will
only function if the mark on the motor unit is
directly opposite the mark on the screw cap.
◗ Switch the appliance off before detaching any
accessory.
◗ Always switch the appliance off by pressing
the STOP button.
◗ Wait until moving parts have stopped running
before you remove the lid of the appliance.
◗ The screw cap can only be removed if the lid
is not on the bowl or if the bowl has been
removed altogether.
◗ Never immerse the motor unit in water or
any other fluid, nor rinse it under the tap. Use
only a moist cloth to clean the motor unit.
◗ Remove the protective cover from the blade
before use.
◗ Let hot ingredients cool down before
processing them (max. temperature
80cC/175cF).
◗ If you are processing a liquid that is hot or
tends to foam, do not put more than 1 litre
into the blender jar to avoid spillage.
◗ Unplug the appliance immediately after use.
◗ For application times, see the table further on
in these instructions for use.
Note that it is not possible to use the
bowlfunctions when the blender is attached.
Page 8
ENGLISH8
Using the appliance
Smart Process Control
This appliance is equipped with a Smart Process
Control to ensure an optimal process and a
perfect end result. Each process button is linked
to a pre-programmed speed profile representing
the optimal process for a specific accessory.
You can increase or decrease the speed in three
steps by pressing + or - button.
If you press the pulse button, the appliance will
run at the highest speed. When you release the
button, the appliance will stop or return to the
previously selected working speed.
The process can always be stopped with the
Stop-button.
If you press the same process button again within
40 seconds the process starts where it has been
stopped.
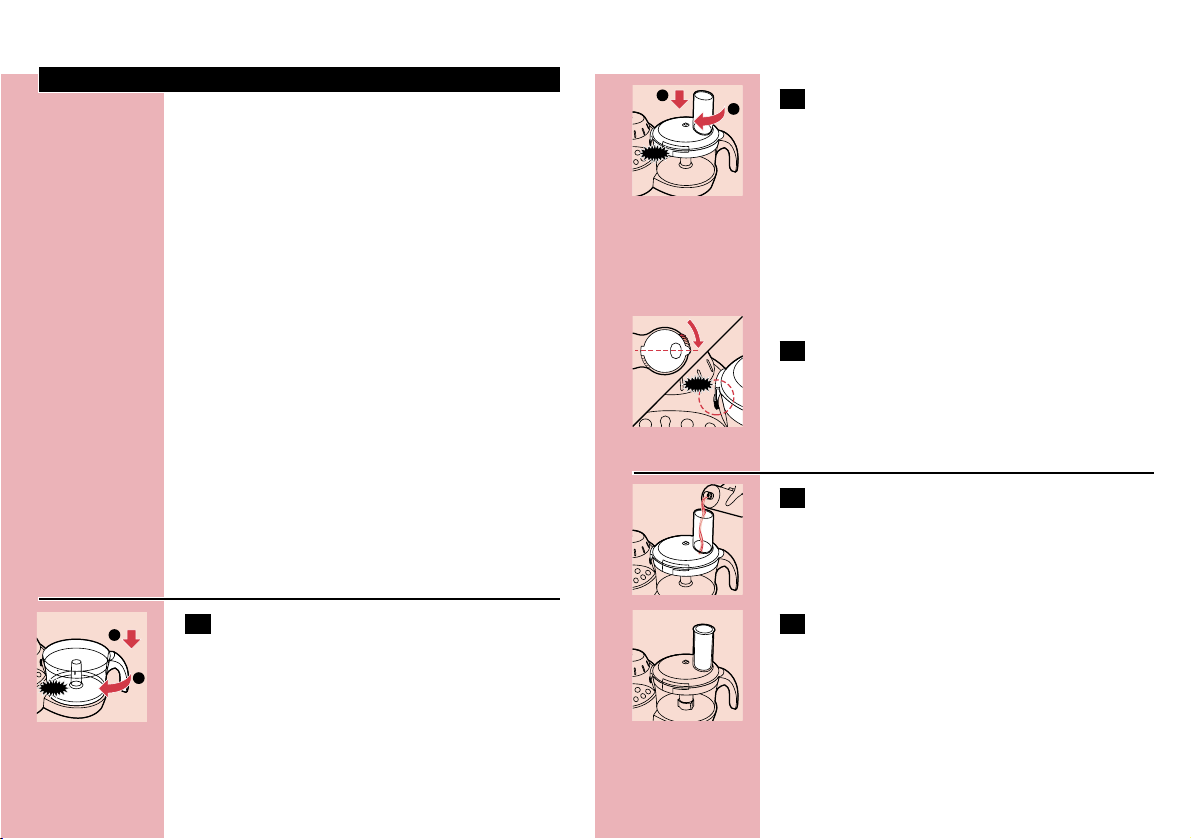
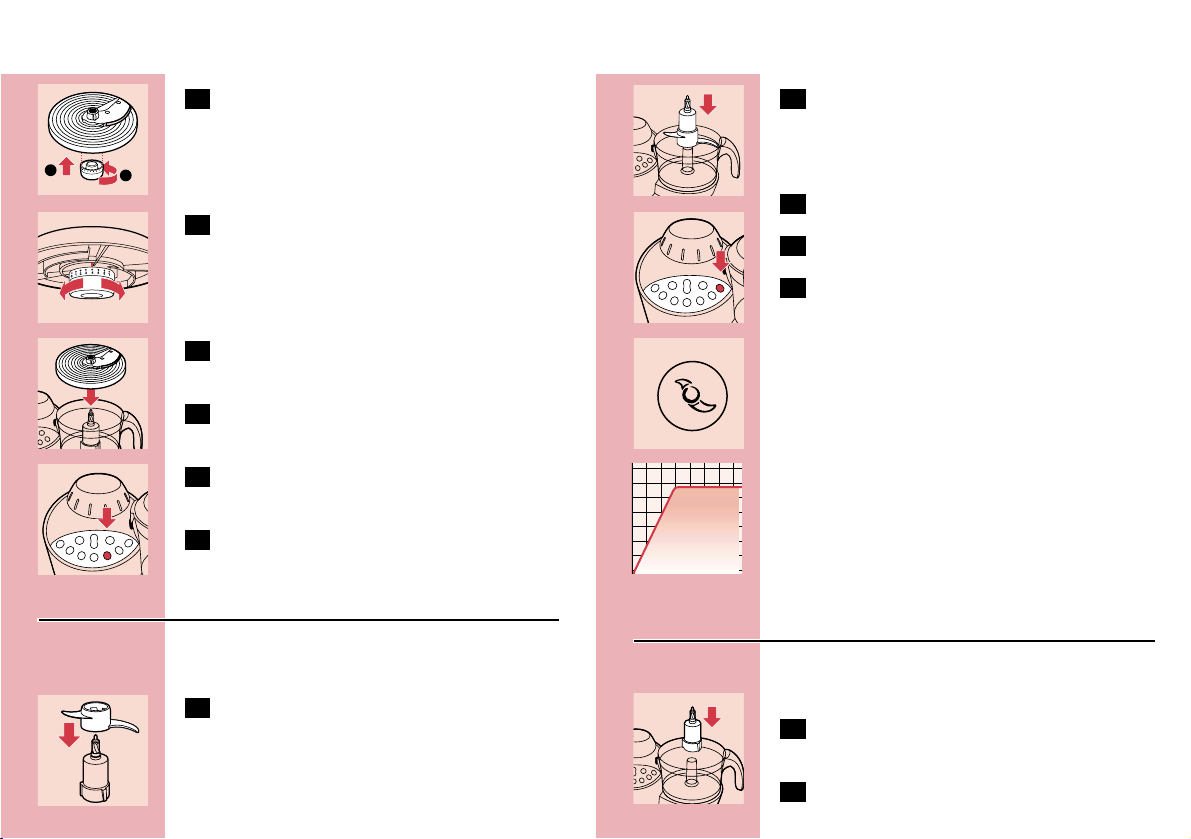
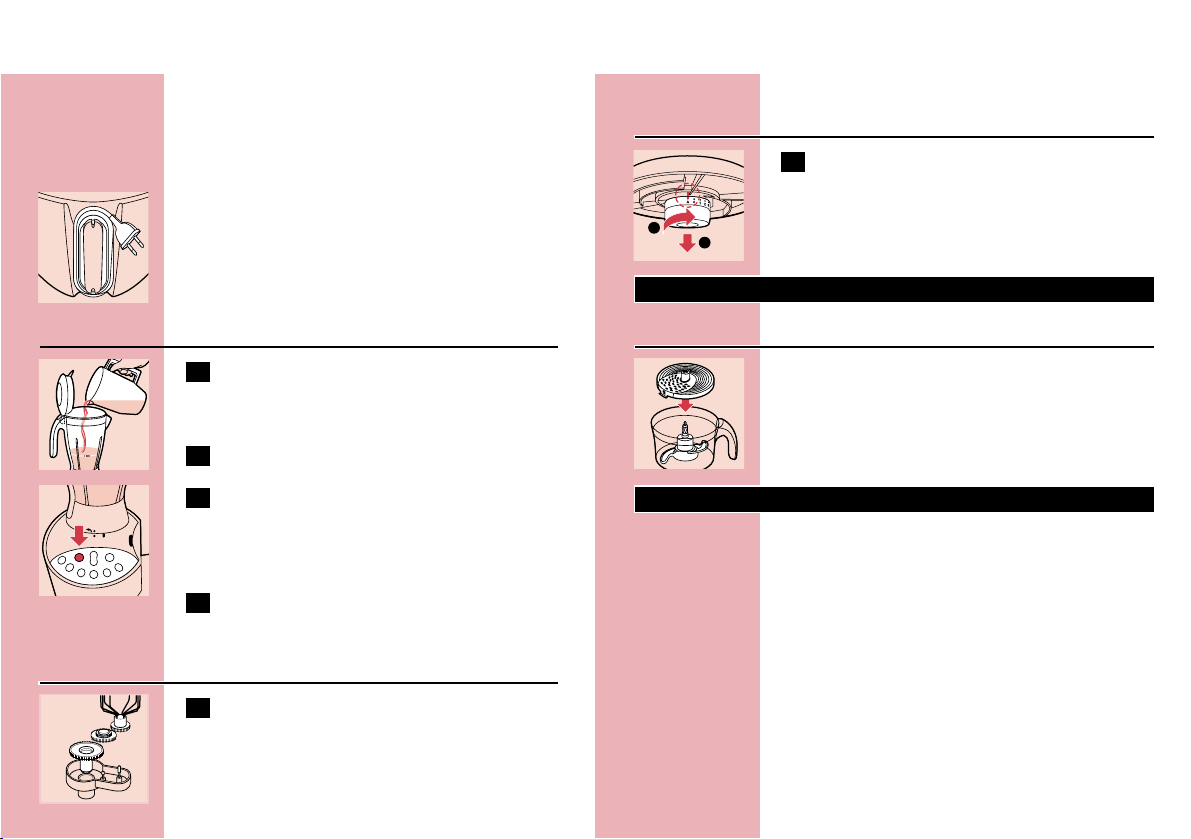
Food processing bowl
C
1 Mount the bowl on the food processor by
turning the handle in the direction of the
arrow until you hear a click.
C
2 Put the lid on the bowl.Turn the lid in the
direction of the arrow until you hear a
click (this requires some force).
Built-in safety lock
B
The motor unit, the bowl and the lid have been
provided with marks.The appliance will only
function if the mark on the motor unit is directly
opposite the mark on the screw cap.
C
1 Make sure that the dot on the lid and the
dot on the bowl are directly opposite each
other.The projection of the lid will
complete the shape of the handgrip.
Feed tube and pusher
C
1 Use the feed tube to add liquid and/or
solid ingredients. Use the pusher to push
solid ingredients through the feed tube.
C
2 You can also use the pusher to close the
feed tube in order to prevent ingredients
from escaping through the feed tube.
CLICK
CLICK
1
2
CLICK
1
2
Page 9

ENGLISH 9
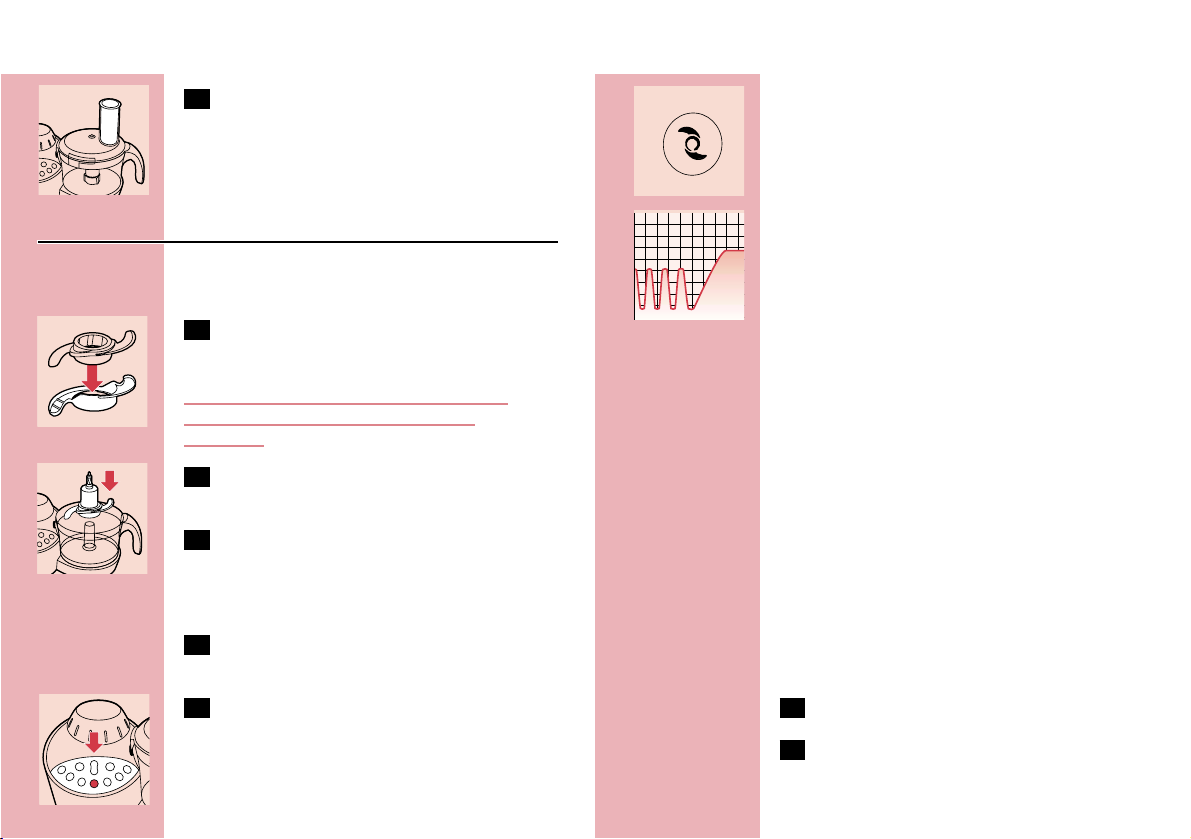
Metal blade
◗ The metal blade can be used for chopping,
mixing, blending and pureeing.
C
1 Remove the protective cover from the
blade.
The cutting edges of the blade are very sharp
Avoid touching them!
C
2 Put the tool holder in the bowl and the
blade on the tool holder.
3 Put the ingredients in the bowl. Pre-cut
large pieces of food into pieces of approx.
3 x 3 x 3 cm. Put the lid on the bowl.
4 Put the pusher in the feed tube.
C
5 Press the chopping process button on the
control panel.
- The process will start with 4 pulses to ensure
that the ingredients (i.e. onions or nuts) are
chopped regularly.
- Next the process will increase to max. speed
and continue until the STOP button is pressed.
◗ Press the - button to decrease the speed.
◗ The process can be stopped any time during
the pulses by pressing the STOP button.
Tips
◗ If you chop onions, stop the appliance after
the four pulses to prevent them from
becoming too finely chopped.
◗ Do not let the appliance run too long when
you are chopping (hard) cheese.The cheese
will become too hot, will start to melt and
will turn lumpy.
◗ Do not use the blade to chop very hard
ingredients like coffee beans,turmeric, nutmeg
and ice cubes, as this may cause the blade to
get blunt.
If food sticks to the blade or to the inside of the
bowl:
1 Turn the appliance off.
2 Remove the lid from the bowl.
3 Remove the ingredients from the blade or
from the wall of the bowl with a spatula.
Inserts
Never process hard ingredients like ice cubes
with the inserts.
Page 10
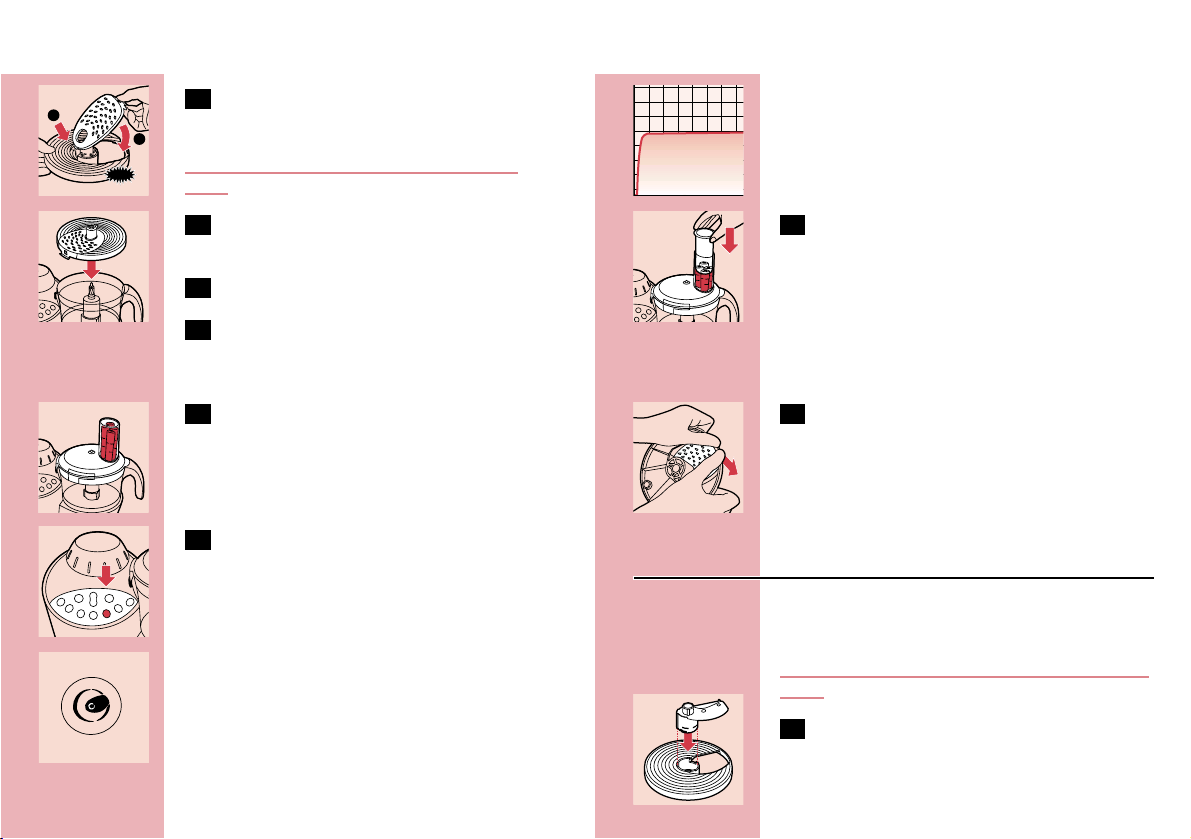
ENGLISH10
C
1 Put the selected insert in the insert holder
before you place it onto the toolholder.
Cutting edges are very sharp.Avoid touching
them!
C
2 Place the insert holder onto the tool
holder that stands in the bowl.
3 Put the lid on the bowl.
4 Put the ingredients in the feed tube. Pre-
cut large chunks to make them fit into the
feed tube.
C
5 Fill the feed tube evenly for the best
results.
When you have to cut large amounts of food,
process only small batches at a time and empty
the bowl regularly between the batches.
C
6 Select the 'shredding & slicing process' on
the control panel.
The process increases immediately to the defined
processing speed to guarantee the optimal
endresult.
The process speed can be increased up to
3 times pressing the + button and decreased up
to 3 times pressing the - button.
C
7 Press the pusher lightly onto the
ingredients in the feed tube.
◗ If you are shredding soft vegetables or fruits,
you can decrease the speed up to three steps
by pressing the - button to prevent the
shredded vegetables and fruits from turning
into puree.
C
8 To remove the insert from the insert
holder, take the insert holder in your
hands with its back pointing towards you.
Push the edges of the insert with your
thumbs to make the insert fall out of the
holder.
Adjustable slicing disc
The adjustable slicing disc allows you to cut
ingredients to any thickness you like.
Be careful: the cutting edges of the blade are very
sharp.
C
1 Insert the blade into the top of the carrier.
CLICK
2
1
Page 11
ENGLISH 11
C
2 Connect the knob from the bottom side
of the disc and turn it until the lines match.
Now the disc is locked.
C
3 Turn the adjusting knob to adjust the
thickness you prefer.
C
4 Place the adjustable slicing disc on the tool
holder.
5 Close the lid and put the ingredients in the
feed tube.
C
6 Select the 'shredding & slicing process' on
the control panel.
7 Press the ingredients slowly down with the
pusher, if necessary.
Kneading accessory
The kneading accessory can be used for kneading
yeast dough for bread and pizzas.
C
1 Fit the kneading accessory on the
toolholder.
C
2 Put the bowl on the motor unit, turn the
handle in the direction of the arrow and fit
the kneading accessory onto the driving
shaft.
3 Put the ingredients in the bowl.
4 Close the bowl with the lid.
C
5 Press the kneading process button on the
Smart Process Control.
The appliance will gradually increase the kneading
speed within 10 seconds to max. speed.The
appliance will continue to run at this speed until
the stop button is pressed.The speed can be
decreased up to 3 times by pressing the - button.
If the +/- button does not react the motor is
already at its physical limits.
Balloon beater
You can use the balloon beater to whisk eggs, egg
whites, instant puddings, cream.
1 Put the bowl on the motor unit and turn it
to the left until you hear a 'click'.
C
2 Put the tool holder in the bowl.
1
2
Page 12
ENGLISH12
C
3 Fit the balloon beater onto the tool
holder.
4 Put the ingredients into the bowl, put the
lid on the bowl and turn it to the right
until you hear a click.
C
5 Press the whisking process button on the
control panel.
The appliance will gradually increase the whisking
speed within 15 seconds to max. speed.The
appliance will continue to run at this speed until
the stop button is pressed.The speed can be
decreased up to 3 times by pressing the - button.
Blender
The blender is intended for:
- Blending fluids, e.g. dairy products, sauces, fruit
juices, soups, mixed drinks, sweat teas, shakes.
- Mixing soft ingredients, e.g. pancake batter or
mayonnaise.
- Pureeing cooked ingredients, e.g. for making
baby food.
◗ The appliance can be used with or without the
blender attached to the motor unit. If you use
the appliance without the blender, the appliance
will not function if the screw caphas not been
screwed properly onto the motor unit.
C
1 To attach the blender jar, remove the
screw cap above the panel.
C
2 Mount the blender jar onto the motor unit
by turning it in the direction of the arrow
until it is firmly fixed.The handle must be
facing to the left.
Do not exert too much pressure on the handle
of the blender jar.
3 Put the ingredients in the blender jar.
C
4 Close the lid.
C
5 Always connect the safety cover onto the
blender lid before you start processing.
C
6 Press the blending process button.The
blender will start to operate, the speed
increases to maximum speed and will
continue to run at this speed until the
STOP button is pressed. During the
blending process the speed can be
decreased up to three times by pressing
the - button.
1
2
2
1
Page 13
13ENGLISH
Tips
C
◗ Pour the liquid ingredients into the blender
jar through the hole in the lid.
◗ The longer you let the appliance run, the finer
the blending result will be.
◗ Pre-cut solid ingredients into smaller pieces
before putting them in the blender. If you
want to prepare a large quantity, process small
batches of ingredients instead of trying to
process a large quantity at once.
◗ Hard ingredients e.g. soy beans for soy bean
milk, must be soaked in water before they are
processed.
C
◗ Crush ice cubes by placing the ice cubes in
the jar, close the lid and use the pulse
function.
If ingredients stick to the wall of the blender jar:
1 Switch the appliance off and unplug it.
2 Open the lid.
Never open the lid while the appliance is still
running.
3 Use a spatula to remove the ingredients
from the wall of the jar.
Keep the spatula at a safe distance from the
blades (approx. 2 cm).
◗ If you are not satisfied with the results,let the
appliance run briefly a number of times by
pressing the pulse button.You can also achieve
a better result by stirring the ingredients with
a spatula (not while the blender is running), or
by pouring some of the contents out in order
to process a smaller amount.
◗ In some cases the ingredients are easier to
blend if you add some liquid e.g. lemon juice
when blending fruits.
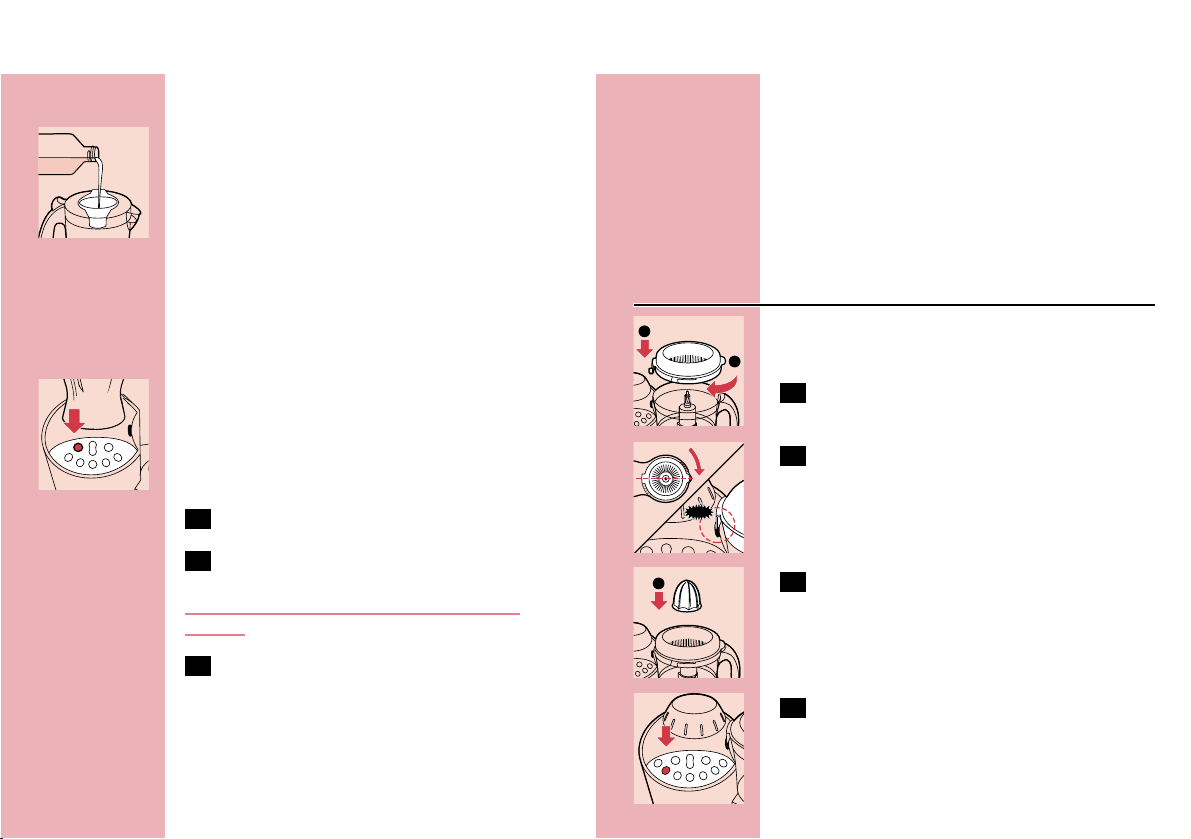
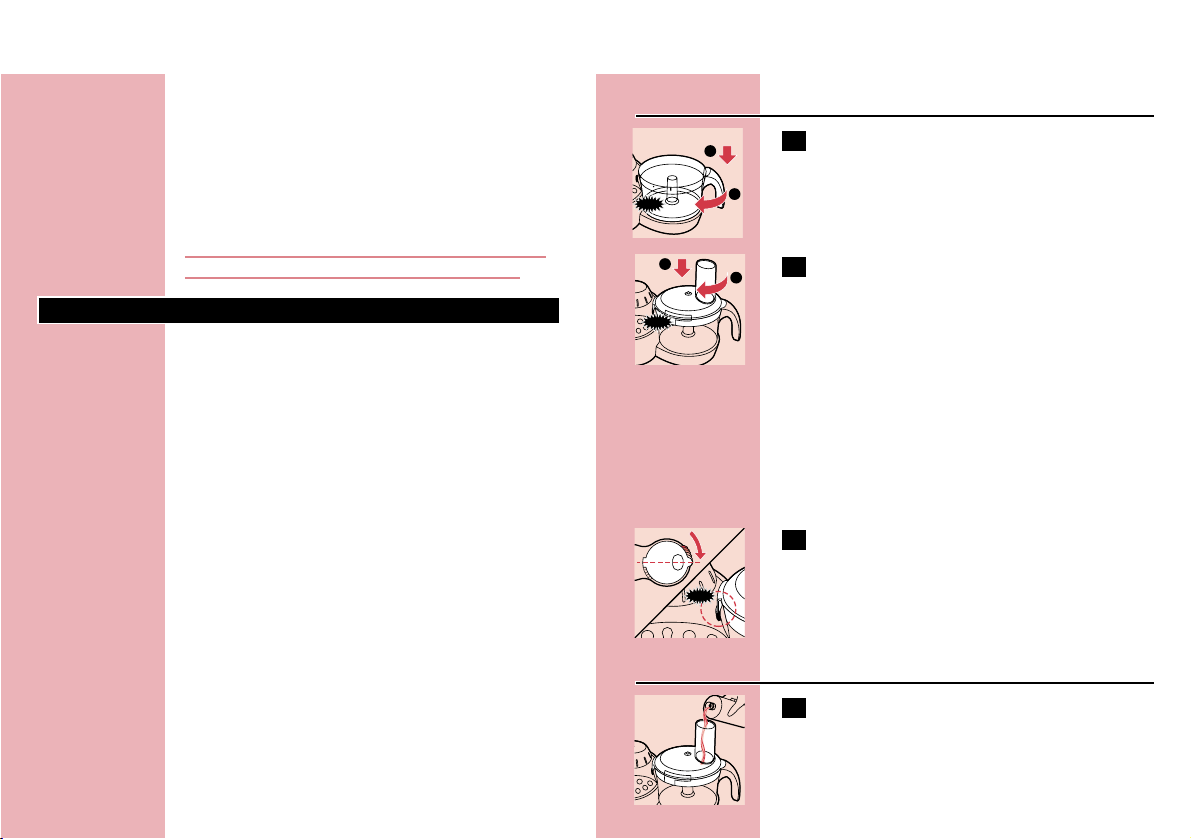
Citrus press
The citrus press can be used for all kinds of citrus
fruit.
C
1 Put the bowl on the motor unit and place
the sieve on the bowl.
C
2 Turn the sieve in the direction of the
arrow until the peg of the safety lock snaps
home in the motor unit.
C
3 Place the cone on the sieve by pressing it
lightly down.
C
4 Press the 'Citrus pressing button' on the
control panel.
The process speed can be increased up to
3 times by pressing the + button.
1
CLICK
1
2
Page 14
ENGLISH14
The process starts running and stops if the STOPbutton is pressed.
C
5 Press half of fruit firmly on the rotating
cone.
Tips
◗ Stop pressing from time to time to remove
the pulp from the sieve.
When you do so, switch off the appliance and
remove the bowl along with the sieve and cone.
C
◗ After use, remove the bowl along with the
Citrus press accessories to prevent juice from
leaking onto the appliance.
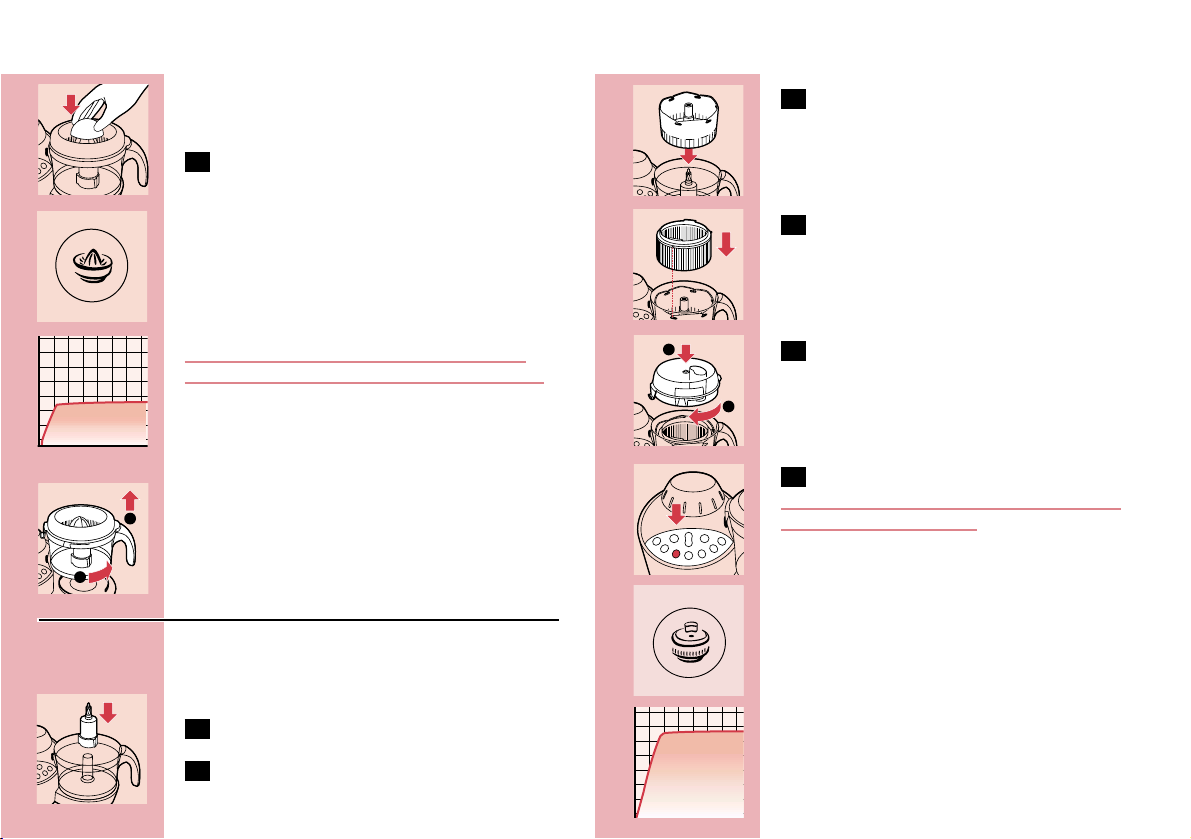
Juice extractor
The juice extractor can be used for preparing
fresh fruit and vegetable juices. Pulp, pips and skins
will be separated.
1 Put the bowl on the motor unit.
C
2 Put the toolholder in the bowl.
C
3 Attach the juicer drum on the toolholder.
C
4 Insert the pulp sieve into the juicer drum
and ensure that all 3 pins fit into the
notches of the juicer drum.
C
5 Put the lid of the juice extractor on the
bowl.
C
6 Press the juice extracting button.
Never use the juicing accessory if the rotating
sieve or drum is damaged.
The appliance will start with a slow start and
reaches finally maximum speed.The speed can be
decreased by pressing - button.The appliance will
turn off if the STOP button is pressed.
2
1
1
2
Page 15

ENGLISH 15
C
7 Drop the fruit or vegetables in the juice
extractor through the feed tube.
C
8 Press the ingredients firmly down with the
pusher if necessary.Keep the pusher in the
feed tube as much as possible to avoid
splashing.
9 Let the appliance run for another
20 seconds to obtain any juice still left in
the fruit or vegetables.
C
10 To avoid spilling juice on the appliance,
remove the bowl along with the juice
extractor accessories after use.
Tips
◗ Before you use the juice extractor:
- cut carrots, white radish, etc.
- peel citrus fruits, pineapples, melons, etc.
- stone cherries, plums, apricots, peaches, etc.
◗ Always switch on the appliance before you
put the fruit in the juice extractor.
◗ Switch the appliance off from time to time to
remove pulp from the sieve and the juicer
drum.
◗ Do not process large amounts of food at the
same time.
◗ Switch the appliance off if it starts to vibrate
strongly and clean the pulp sieve and the filter
before you switch the appliance on again.
Cleaning
Always unplug the appliance before you start
cleaning the motor unit.
1 Clean the motor unit with a damp cloth.
Do not immerse the motor unit in water
and do not rinse it either.
2 Always clean the parts that have come
into contact with food in hot water with
washing-up liquid immediately after use.
◗ The bowl, the lid of the bowl, the pusher and
the accessories (except for the blender jar)
can also be cleaned in a dishwasher.
These parts have been tested for dishwasher
resistance based on DIN EN 12875.
The blender jar is not dishwasherproof!
◗ To remove the lid,open it and then pull it
upwards.
Only remove the lid for cleaning purposes.
Clean the metal blade, the blade unit of the
blender and the inserts very carefully.Their cutting
edges are very sharp!
Make sure that the cutting edges of the blades
and the inserts do not come into contact with
hard objects.This could cause them to become
blunt.
2
1
Page 16
ENGLISH16
Certain ingredients may cause discolourations on
the surface of the accessories.This does not have
a negative effect on the accessories.The
discolourations usually disappear after some time.
C
◗ Wind the (excess) mains cord around the
reel on the back of the appliance.
Blender quick-clean operation
C
1 Pour lukewarm water (not more than
0.5 litres) and some washing-up liquid into
the blender jar.
2 Close the lid.
C
3 Let the appliance run for a few moments
by pressing the pulse button. (The
appliance stops running when you release
the button).
4 Detach the blender jar and rinse it with
clean water.
To clean the balloon beater thoroughly:
C
1 Disassemble the gearwheels from the
balloon beater.
Clean the gearwheels and balloon beater in warm
soapy water or in the dishwasher.
To clean the adjustable slicing disc
thoroughly:
C
1 Turn the adjusting knob to the right to pull
the blade out of the disc.
The disc, the blade and the adjusting knob can be
cleaned in warm soapy water or in the dishwasher.
Storage
MicroStore
C
◗ Put the accessories (blade, insert holder) on
the tool holder and store them in the bowl.
Always end up with the insert holder.
Guarantee & service
If you need information or if you have a problem,
please visit the Philips Web site at
www.philips.com or contact the Philips
Customer Care Centre in your country (you will
find its phone number in the worldwide
guarantee leaflet). If there is no Customer Care
Centre in your country, turn to your local Philips
dealer or contact the Service Department of
Philips Domestic Appliances and Personal Care BV.
1
2
Page 17

ENGLISH 17
Solution
Turn the bowl/or lid clockwise until you hear a click.
Make sure that the points on the bowl and on the lid
are placed directly opposite each other.
The automatic thermal cut-out system has probably cut
off the power supply to the appliance because it has
overheated. 1) Unplug the appliance. 2) Press the STOP
button. 3) Let the appliance cool down for 60 minutes.
4) Put the mains plug in the socket. 5) Switch the
appliance on again.
Press the button for the process you want.
This appliance is equipped with a memory-function. If
you restart the appliance within 40 seconds, the process
will start where it was interrupted. If you want the
process to start right from the beginning: 1) Briefly press
another process (e.g. the pulse button) 2) Then press
the STOP button. 3) Press the appropriate process
button to make the process start all over again.
If both the blender and the food-processing bowl have
been mounted correctly,only the blender will function. If
you want to use the food-processing bowl, detach the
blender and close the fixing hole with the screw cap.
The motor is already at its physical limit, i.e. at kneading
or when the speed is at the defined level where it can
not be decreased any further.
Problem
The appliance doesn't
switch on.
The appliance has
suddenly stopped
running.
You have pressed the
wrong process button.
The process doesn't
start at the beginning
after a restart.
Both the blender jar
and the food
processing bowl are
attached, but only the
blender works.
The +/- button does
not react at certain
applications.
Troubleshooting guide
Application times
10 - 60 sec.
10 - 60 sec.
10 - 60 sec.
60 - 180 sec.
30 - 180 sec.
10 - 60 sec.
depends on the
quantity
depends on the
quantity
Application
Chopping, pureeing,mixing
Shredding, grating
Slicing
Kneading, mixing
Whisking, whipping,emulsifying
Blending, pureeing
Pressing of citrus fruits
Extracting of fruit juices and
vegetable juices
Accessory
P
hjk
¬
{
˚
D
ƒ
©
Function
¥
^
^
¨
∆
†
“
‘
Functions, appliacations & application times
Page 18

ENGLISH18
Applications
Salads, raw
vegetables
Salads, raw
vegetables
Pancakes,
waffles
Breadcrumbed
dishes, au
gratin dishes
Deserts,
toppings
Procedure
Cut the vegetables into pieces
that fit into the tube. Fill the
tube with the pieces and slice
them while pressing the pusher
lightly.
Cut the vegetables into pieces
that fit into the tube. Fill the
tube with the pieces and slice
them while pressing the pusher
lightly.
First pour the milk into the
blender and then add the dry
ingredients. Mix the ingredients
for approx. 1 minute. If
necessary, repeat this
procedure 2 times.Then stop
for a few minutes to allow the
appliance to cool down to
ambient temperature.
Use dry, crispy bread.
Use soft butter for a light
result.
Proce
ss
butto
n /
access
ory
^ / k
^ / ¬
† / D
¥ / P
¨ / {
Max.
quanti
ty
500g
500g
750ml
milk
100g
300g
Ingredients &
results
Apples,
carrots,
celeriac shredding
Apples,
carrots,
celeriac slicing
Batter
(pancake) whisking
Bread crumbs
- chopping
Butter cream
(creme au
beurre) whisking
Quantities and preparation times
Applications
Garnishing,
soups, sauces,
au gratin
dishes
Sauces, pizzas,
au gratin
dishes, fondues
Garnishing,
sauces, pastry,
puddings,
mousses
Purees, soups
Baby and
infant food
Salads,
garnishing
Bread
Procedure
Use a piece of rindless
Parmesan and cut it into pieces
of approx. 3 x 3 cm.
Cut the cheese into pieces that
fit into the tube. Press carefully
with the pusher.
Use hard, plain chocolate. Break
it into pieces of 2 cm.
Use cooked peas or beans. If
necessary, add some liquid to
improve the consistency of the
mixture.
For a coarse puree, add only a
little liquid. For a fine puree,
keep adding liquid until the
mixture is smooth.
Put the cucumber in the tube
and press it down carefully.
Mix warm water with yeast and
sugar. Add flour, oil and salt and
knead the dough for approx.
90 seconds. Leave to rise for
30 minutes.
Proce
ss
butto
n /
access
ory
¥ / P
^ / h
¥ / P
¥ / P
¥ / P
^ / ¬
¨ / {
Max.
quanti
ty
200g
200g
200g
250g
500g
2
cucum
bers
500g
flour
Ingredients &
results
Cheese
(Parmesan) chopping
Cheese
(Gouda) shredding
Chocolate chopping
Cooked peas,
beans pureeing
Cooked
vegetables and
meats pureeing
Cucumbers slicing
Dough (for
bread) kneading
Page 19

1919ENGLISH
Applications
Pizza
Apple pies,
sweet biscuits,
open fruit flans
Luxury bread
Puddings,
soufflees,
meringues
Procedure
Follow the same procedure as
for bread dough. Knead the
dough for 1 minute. First put in
the flour and then the other
ingredients.
Use cold margarine, cut the
margarine into 2cm cubes. Put
the flour in the bowl and add
the margarine. Mix until the
dough has become crumbly.
Then add cold water while
mixing. Stop as soon as the
dough starts to turn into a ball.
Allow the dough to cool
before further processing.
First mix yeast, warm water
and some sugar in a separate
bowl. Put all ingredients in the
bowl and knead the dough
until it is smooth and does not
stick to the bowl (takes approx.
1 minute). Leave it to rise for
30 minutes.
Use egg whites at room
temperature. Note: use at least
2 egg whites.
Proce
ss
butto
n /
access
ory
¨ / {
¨ / {
¨ / {
∆ / ˚
Max.
quanti
ty
750g
flour
300g
flour
500g
flour
4 egg
whites
Ingredients &
results
Dough (for
pizzas) kneading
Dough
(shortcrust
pastry) kneading
Dough (yeast)
- kneading
Egg whites whisking
Applications
Sauces, jams,
puddings, baby
food
Sauces, jams,
puddings, baby
food
Garnishing,
dips
Sauces, soups,
garnishing,
herb butter
Fruit juices
Salads,
garnishing and
barbecue
sauces
Procedure
Tip: add a little lemon juice to
prevent the fruit from
discolouring. Add some liquid
to obtain a smooth puree.
Tip: add a little lemon juice to
prevent the fruit from
discolouring
Peel the garlic. Press the pulse
button several times to avoid
chopping the garlic too fine.
Use at least 150g.
Wash and dry the herbs before
chopping.
Juice the fruits in the juicer.
All the ingredients must be at
room temperature. Note: use
at least one large egg, two small
eggs or two egg yolks. Put the
egg and a little vinegar in the
bowl and add the oil drop by
drop.
Proce
ss
butto
n /
access
ory
† / D
¥ / P
¥ / P
¥ / P
‘ / ©
∆ / ˚
Max.
quanti
ty
500g
500g
300g
Min.
50g
500g
(total
amou
nt)
3 eggs
Ingredients &
results
Fruit (e.g.
apples,
bananas, water
chestnut) blending
Fruit (e.g.
apples,
bananas) chopping
Garlic chopping
Herbs (e.g.
parsley) chopping
Juices (e.g.
made of apple,
carrots etc.)
juicing) blending
Mayonnaise emulsifying
Page 20

ENGLISH20
Applications
Steaks tartar,
hamburgers,
meat balls
Steaks tartar,
hamburgers,
meat balls
Milkshakes
Various cakes.
Salads,
puddings, nut
bread, almond
paste
Salad, cooked
food, stir-fries,
garnishing
Procedure
First remove any sinews or
bones. Cut the meat into cubes
of 3cm. Press the pulse button
to get a coarser chopping
result.
First remove any sinews or
bones. Cut the meat into cubes
of 3cm. Press the pulse button
to get a coarser chopping
result.
Puree the fruit (e.g. bananas,
strawberries) with sugar, milk
and some ice cream and mix
well.
The ingredients must be at
room temperature. Mix the
softened butter and the sugar
until the mixture is smooth and
creamy.Then add milk, eggs and
flour.
Use the pulse button for
coarse chopping. Stop the
process if you want a coarse
result.
Peel the onions and cut them
into 4 pieces. Stop the process
after 2 pulses to check the
result.
Proce
ss
butto
n /
access
ory
¥ / P
¥ / P
† / D
¨ / {
¥ / P
¥ / P
Max.
quanti
ty
500g
400g
500ml
milk
4 eggs
250g
500g
Ingredients &
results
Meats (lean) mincing
Meats, fish,
poultry
(streaky) mincing
Milkshakes blending
Mixture (cake)
- mixing
Nuts chopping
Onions chopping
Applications
Salad, cooked
food, stir-fries,
garnishing
Minced meat
Soups, sauces
Garnishing,
cream, icecream
mixtures
Procedure
Peel the onions and cut them
into pieces that fit into the
tube. Note: use at least 100g.
First remove any sinews or
bones. Cut the meat into cubes
of 3cm. Use the pulse button
for a coarser chopping result.
Use cooked vegetables.
Use cream that comes straight
from the refrigerator. Note: use
at least 125ml cream.The
whipped cream is ready after
approx. 2 minutes.
Proce
ss
butto
n /
access
ory
^ / ¬
¥ / P
† / D
∆ / ˚
Max.
quanti
ty
300g
200g
500ml
500ml
Ingredients &
results
Onions slicing
Poultry mincing
Soups blending
Whipping
cream whipping
Page 21

21ENGLISH
Recipes
Courgette Sandwich Spread
Ingredients:
- 2 courgettes
- 3 cooked eggs
- 1 small onion
- 1 tbs. vegetable oil
- parsley
- 2-3 tbs. sour cream
- lemon juice,Tabasco sauce, salt, pepper, currypowder, paprika
B
Wash and dry the courgettes and shred them
with the fine shredding insert in the foodprocessing bowl.Transfer the shredded courgette
to a dish, sprinkle salt on it and leave for about
15 minutes so that the salt extracts the liquid
from the shredded courgette. Cut the onion in
4 pieces and chop them fine together with the
garlic clove. Remove parsley leaves from the stalks
and chop them.
B
Then put the shredded courgette on a clean towel
and press the liquid out. Pour some oil into a pan
and fry the chopped onions and garlic lightly,add
the shredded courgettes. All liquids should
evaporate from the ingredients.Allow the fried
ingredients to cool down for a while. Peel the eggs
and chop them in the food processing bowl for a
few seconds.Add the other ingredients to the food
processing bowl, season them and mix them with
the blade. Ser ve on toasted white bread.
Fruit cake
Ingredients:
- 180 g dates
- 270 g prunes
- 60 g almonds
- 60 g walnuts
- 60 g raisins
- 60 g sultanas
- 240 g rye full grain wheat
- 120 g wheat flour
- 120 g brown crystal sugar
- 360 g butter milk
- a pinch of salt
- 1 sachet of baking powder
B
Place the metal blade into the bowl. Put all
ingredients in the bowl, press the chopping process
button and mix the ingredients for 30 seconds. If
the dough sticks to the lid of the bowl, remove it
by means of the spatula. Bake the fruit cake in a
30 cm. long baking tin for 40 minutes at 170cC.
Leek Quiche
Ingredients for the dough:
- 250g wheat flour (or wholemeal wheat flour)
- pinch of salt
- 1 tbs honey
- 20g fresh yeast or 1/2 sachet of dry yeast
- 100g butter
- 6 tbs lukewarm water
Ingredients for the filling:
- 500g leeks
- vegetable oil
Page 22

ENGLISH22
- 4 eggs
- 500g sour cream
- salt, pepper, 1-2 tbs. of flour if needed
B
Put all the ingredients in the bowl and knead into
a consistent dough. Let the dough rise for about
30min.
B
Slice the leeks with the adjustable slicing disc (e.g.
setting 3). Put some oil in a pan and fr y the sliced
leeks for a few minutes. Put the rest of the
ingredients in the blender jar and let the blender
run until you have reached a creamy consistency.
Add 1-2 tbsp of flour to thicken the mixture.
B
Grease a baking tin with a diameter of 24 cm and
cover the bottom and sides evenly with dough.
Spread the leek mixture onto the dough and pour
the rest of the ingredients over it. Bake in a
preheated oven for about 40 min at 180cC. Can
be served warm or cold.
Hungarian-style goulash
Ingredients:
- 1 tbsp oil
- 1 medium onion
- 1 tsp paprika
- 400 g beef or pork
- 1 green pepper
- 1 tomato
-salt
- 200 g carrots
- 300 g potatoes
- caraway seeds
B
Wash the meat and cut it into 2 cm cubes. Peel
the onion and chop it in the food processing bowl
using the metal blade. Core the green pepper and
slice it into rings using the adjustable slicing disc.
Peel the tomato, remove the pips and cut it into
thin strips. Fry the chopped onion in the oil until
soft. Remove from the heat and sprinkle the
paprika over the onion, add the meat and fry over
a high heat for a few minutes while stirring
constantly.Add the green pepper, the tomato and
salt to taste, cover the pan and braise in its own
juice over a moderate heat until almost tender.
B
Meanwhile, peel and slice the carrots using the
adjustable slicing disc and peel and dice the
potatoes. Add them to the meat and pour enough
cold water for the amount of soup you want to
make (approx. 1,2 litres).Season with a pinch of
caraway seeds and simmer until everything is soft
as butter, adding more salt if necessary.
B
Serve hot.You could add a garnish of green
pepper rings and serve sharp cherry paprika on a
separate plate.
Strawberry tart
Ingredients:
- 100 g margarine
- 100 g sugar
- 3 egg yolks
- 240 g flour
- 100 g coconut
Filling:
- 80 g sugar
- 2 tsp. lemon juice
Page 23

23ENGLISH
- 400 g cream cheese
- 500 g strawberries
Glaze:
- 500 g strawberries
- 250 ml water
- 120 g sugar
- 60 g cornstarch
Garnishing:
- 250 g cream
B
Heat oven to 180cC. Cream margarine and sugar
in the bowl with the metal blade.
B
Blend in egg yolk, then stir in flour and flaked
coconut. Put the dough on the baking plate, flute
the edge and prick with a fork. Bake for 15 - 20
minutes until light brown. Let the tart cool on a
rack. Mix sugar, lemon juice and cream cheese in
the bowl until fluffy using the metal blade and
kneading tool. Spread on the cooled tart shell.
Arrange a part of the strawberries (stem side
down) on the tart. Put in the refrigerator.
B
Prepare the glaze. Blend the remaining
strawberries with the water and the sugar in the
blender jar. Dissolve the cornstarch in 125 ml of
the strawberry mixture. Bring the strawberry
mixture to boil.When it is boiling stir in the
dissolved cornstarch. Spoon the hot glaze over the
strawberries and chill for 2 hours.Top with cream
whipped to stiff peaks.
Fresh fruit milkshake
Ingredients:
- 100g bananas or strawberries
- 200ml fresh milk
- 50g vanilla ice cream
- granulated sugar to taste
B
Peel the bananas or rinse the strawberries. Cut
fruit into smaller pieces. Put all the ingredients in
the blender jar. Blend until smooth.
B
You can use fruit of your choice to make your
favourite fresh fruit milkshake.
Hazelnut Bread Ring
Ingredients dough:
- 500 g sieved flour
- 75 g sugar
- 1 tsp. salt
- 1 egg
- 250 ml milk (at 35cC)
- 100 g butter, softened
- 30 g fresh yeast (for dry yeast, read the
instructions on the package)
Filling:
- 250 g chopped hazelnuts
- 100 g sugar
- 2 sachets of vanilla sugar
- 125 ml cream
B
Heat oven to 200cC. Mix milk, yeast and sugar in
the bowl for 15 seconds using the kneading tool.
Add flour, salt, butter and egg. Knead the dough
mixture for 2 minutes. Put the dough into a
Page 24

ENGLISH24
separate bowl and cover it with a damp cloth and
allow the dough to rise in a lukewarm place for
20 minutes.
B
Chop the hazelnuts using the metal blade. Mix
ingredients for the filling. Roll the dough out into a
rectangular shape. Spread it with the hazelnut
mixture, then roll it up into a ring. Put the ring in a
buttered spring-release tin. Let the ring rise for
20 minutes. Brush some whipped egg yolk onto
the top and place the tin on a rack in the centre
of the oven. Bake for 25 - 30 minutes at 200cC.
Chocolate cake
Ingredients:
- 140 g butter, softened
- 110 g icing sugar
- 140 g chocolate
- 6 egg whites
- 6 egg yolks
- 110 g granulated sugar
- 140 g wheat flour
Filling:
- 200 g apricot jam
Glaze:
- 125 ml water
- 300 g sugar
- 250 g grated chocolate
- whipped cream, if desired
B
Heat oven to 160cC. Cream butter with icing
sugar using the metal blade. Melt the chocolate
and mix in.Add egg yolks one by one to the
mixture and mix until creamy.Whip the egg white
with the granulated sugar until stiff and foamy
using the metal blade.Add the egg white foam to
the mixture and stir in gently.Then fold in flour
with a spatula. Put the cake mixture into the
greased baking tin. Bake for one hour at 160cC.
The first 15 minutes the oven door should be kept
slightly ajar.
B
Allow the cake to cool for a while in the baking tin
(24 cm), then turn it onto a wire rack to cool
further. Cut the cake horizontally in half, spread
one half with apricot jam and put the two halves
together again. Heat the rest of the jam until
syrupy and spread it over the top of the cake.
Prepare the icing. Boil water, add sugar and
chocolate and cook over low heat. Stir continuously
until it has a smooth and of spreadable
consistency. Put the icing on the cake and allow it
to cool. Ser ve the cake with some whipped cream.
Broccoli soup (for 4 persons)
Ingredients:
- 50g mature Gouda cheese
- 300g cooked broccoli (stalks and florets)
- cooking liquid of the broccoli
- 2 boiled potatoes in pieces
- 2 stock cubes
- 2 tbsp whipping cream
-curry
-salt
- pepper
-nutmeg
Page 25

25ENGLISH
B
Shred the cheese. Puree the broccoli with the
boiled potatoes and some of the cooking liquid of
the broccoli. Put the broccoli puree and the
remaining liquid and stock cubes into a measuring
beaker and fill it up to 750ml.Transfer the soup to
a pan and bring it to the boil while stirring.Stir in
the cheese and season with curry, salt, pepper
and nutmeg and add the cream.
Pizza
Ingredients for the dough:
- 400g flour
- 1/2 tsp salt
- 20g fresh yeast or 1.5 sachets dried yeast
- 2 tbsp oil
- approx. 240ml water (35cC)
For the topping:
- 300ml sieved tomatoes (tinned)
- 1 tsp mixed Italian herbs (dried or fresh)
- 1 onion
- 2 cloves garlic
- salt and pepper
- sugar
Ingredients to be spread on the sauce:
- olives, salami, artichokes, mushrooms, anchovies,
Mozzarella cheese, peppers, grated mature
cheese and olive oil according to taste.
B
Place the kneading hook in the mixing bowl. Put
all the ingredients in the mixing bowl and select
the kneading process. Knead the dough for
approx. 1 minute until a smooth ball has formed.
Put the dough in a separate bowl, cover it with a
damp cloth and leave it to rise for about
30 minutes.
B
Chop the onions and garlic with the metal blade in
the food processing bowl and fry them in a pan
until they are transparent.Add the sieved
tomatoes and the herbs and simmer for about
10 minutes. Season to taste with salt, pepper and
sugar.Allow the sauce to cool down.
B
Heat the oven to 250cC.
B
Roll the dough out on a floured worktop and
make two round shapes. Place the dough shapes
on a greased baking tray. Spread the topping on
the pizza, leaving the edges free. Spread with the
desired ingredients, scatter some grated cheese
over the pizza and drip some olive oil over it.
B
Bake the pizzas for 12 to 15 minutes.
Vegetable and potato fry
Ingredients:
- 1 egg
- 50 cc milk
- 1 tbsp flour
- 1 tsp coriander
- salt and pepper
- 2 large potatoes (about 300 g)
- 100 g winter carrots
- 150 g celery
- 50 g sunflower seeds or 2 tbsp corn from the
cob
- oil to fry
B
Using the metal blade, mix the egg, milk, flour,
coriander, salt and pepper.
Page 26

ENGLISH26
B
Shred the peeled potatoes, the scraped carrots
and the cleaned celery with the coarse shredding
insert and add to the egg mixture. Stir the
vegetables, the egg mixture and the sunflower
seeds or corn from the cob together in a bowl.
B
Heat the oil in a frying pan and fry 8 flat patties
on both sides until they are golden brown.Allow to
drain on kitchen paper.
B
Cooking time: 3-4 minutes.
Bread (white)
Ingredients:
- 500 g bread flour
- 15 g soft butter or margarine
- 25 g fresh yeast or 20 g dried yeast
- 260 ml water
- 10 g salt
- 10 g sugar
B
Assemble the kneading hook in the mixing bowl.
Put flour, salt and margarine or butter in the bowl.
Add the fresh or dried yeast and the water. Put
the lid on the bowl and turn it into the direction of
the arrow until you hear a click. Press the
kneading process button and mix the dough (for
the maximum kneading time see the chapter
Quantities and preparation times).
B
Remove the dough from the bowl, put it in a large
bowl, cover with a damp tea towel and allow to
rise in a warm place for 20 minutes. After rising,
flatten the dough again, and shape into a ball.
B
Return the dough to the bowl, cover with the
damp cloth and leave it to rise for another
20 minutes. Flatten it again, and roll it up.
B
Place the dough in a greased baking tin, and leave
it to rise for another 45 minutes. Bake the bread
in the lower part of a pre-heated oven.
B
Bake the bread at about 225cC in the lower part
of a pre-heated oven in about 35 minutes.
Page 27

DEUTSCH 27
Allgemeine Beschreibung
A Motoreinheit
B Smart Process Bedienfeld
C Integrierte Sicherheitsverriegelung
D Schraubdeckel, bei Benutzung der Schüssel auf
die Motoreinheit schrauben.
E Schüssel
F Antriebsachse
G Mixbecher
H Deckel zum Mixbecher
I Haken, aktiviert bzw. desaktiviert die
Sicherheitsverriegelung
J Deckel zur Schüssel
K Einsatz für den Deckel
L Einfüllstutzen
M Stopfer
N Sieb zur Zitruspresse
O Presskegel
P Entsaftertrommel
Q Fruchtfleischsieb
R Deckel zum Entsafter
S Stopfer zum Entsafter
T Messer aus Metall mit Schneidschutz
U Knethaken
V Quirl
W Raspeleinsatz, mittel
X Raspeleinsatz, fein
Y Raspeleinsatz, grob
Z Granuliereinsatz
a Trägerscheibe für die Einsätze
b Schneideinsatz, verstellbar: Schneidscheibe,
Träger,Regelknopf
Einleitung
Um Schäden durch Überhitzung zu vermeiden, ist
dieses Gerät mit einem Überhitzungsschutz
versehen, der den Strom, falls erforderlich,
ausschaltet.
Wenn das Gerät plötzlich stillsteht:
1 ziehen Sie den Stecker aus der Steckdose,
2 lassen Sie das Gerät 60 Minuten abkühlen,
3 stecken Sie den Stecker in die Steckdose
und
4 schalten Sie das Gerät wieder ein.
Wenden Sie sich bitte an Ihren Philips Händler
oder an das Philips Service Center in Ihrem
Lande, wenn der automatische
Überhitzungsschutz das Gerät wiederholt
ausschaltet.
WICHTIG: Schließen Sie das Gerät niemals über
einen Zeitschalter an, um Schäden zu vermeiden.
Wichtig
◗ Lesen Sie diese Gebrauchsanweisung
sorgfältig durch und sehen Sie sich dabei die
Abbildungen an, bevor Sie das Gerät zum
ersten Mal gebrauchen.
◗ Bewahren Sie diese Gebrauchsanweisung zur
späteren Einsichtnahme gut auf.
Page 28

DEUTSCH28
◗ Prüfen Sie, bevor Sie das Gerät einschalten, ob
die Spannungsangabe auf dem Gerät mit der
örtlichen Netzspannung übereinstimmt.
◗ Verwenden Sie mit dieser Küchenmaschine
keine Zusatzgeräte oder andere Teile,die von
Philips nicht ausdrücklich empfohlen werden.
Ist das trotzdem der Fall, führt dies zum
Verlust der Garantie.
◗ Verwenden Sie das Gerät nicht, wenn das
Gehäuse der Motoreinheit, das Netzkabel
oder der Stecker beschädigt ist.
◗ Wenn das Netzkabel defekt oder beschädigt
ist, darf es aus Sicherheitsgründen nur von
einem Philips Service-Center oder einer von
Philips autorisierten Werkstatt ausgetauscht
werden.
◗ Waschen Sie vor dem ersten Gebrauch
sorgfältig alle Teile ab, die mit Lebensmitteln in
Berührung kommen können.
◗ Überschreiten Sie nicht die in der Tabelle
angeführten Mengen und Zubereitungszeiten.
◗ Füllen Sie die Schüssel nicht höher als bis zu
der höchsten Markierung.
◗ Ziehen Sie nach Gebrauch sofort den
Netzstecker aus der Steckdose.
◗ Stecken Sie niemals Ihre Finger oder
irgendwelche Gegenstände, auch nicht den
Spatel, in den Einfüllstutzen.Verwenden Sie
hierzu nur den Stopfer.
◗ Ziehen Sie stets den Netzstecker aus der
Steckdose, bevor Sie mit den Fingern oder
einem Gegenstand, z. B.mit dem Spatel, in den
Mixbecher langen.
◗ Halten Sie Kinder von dem Gerät fern.
◗ Lassen Sie das eingeschaltete Gerät niemals
unbeaufsichtigt.
◗ Setzen Sie den Deckel korrekt auf die
Schüssel. Die integrierte
Sicherheitsverriegelung wird nun entriegelt,so
dass das Gerät eingeschaltet werden kann.
Die Motoreinheit und der Deckel sind mit
Markierungen versehen, die sich
gegenüberstehen müssen, damit das Gerät
betrieben werden kann.
◗ Schalten Sie das Gerät aus, bevor Sie einen
Einsatz anbringen oder austauschen.
◗ Schalten Sie das Gerät nur mit der STOP-
Taste aus.
◗ Nehmen Sie erst dann den Deckel von der
Schüssel, wenn alle Teile still stehen.
◗ Der Schraubdeckel kann nur dann von der
Motoreinheit abgenommen werden,wenn sich
der Deckel nicht auf der Schüssel befindet
oder die Schüssel ganz abgenommen wurde.
◗ Tauchen Sie das Motorgehäuse niemals in
Wasser oder eine andere Flüssigkeit. Spülen
Sie es auch nicht unter fließendem Wasser ab.
Verwenden Sie zum Reinigen nur ein feuchtes
Tuch, auf das Sie bei Bedarf ein wenig
Spülmittel auftragen können.
◗ Nehmen Sie den Schneidschutz vom Messer
ab, bevor Sie das Messer einsetzen.
◗ Lassen Sie heiße Zutaten auf höchstens 80c C
abkühlen, bevor Sie sie im Gerät verarbeiten.
◗ Wenn Sie heiße Zutaten einfüllen oder
Zutaten, die schäumen könnten, so füllen Sie
Page 29
DEUTSCH 29
nicht mehr als 1 Liter in den Mixbecher, um zu
vermeiden, dass es spritzt.
◗ Ziehen Sie nach Gebrauch sofort den
Netzstecker aus der Steckdose.
◗ Die Verarbeitungszeiten entnehmen Sie bitte
der Tabelle in dieser Gebrauchsanweisung.
Hinweis: Die Schüsselfunktionen lassen sich nicht
benutzen, wenn der Mixbecher aufgesetzt ist.
Der Gebrauch des Geräts
Smart Process Bedienfeld
Das Gerät ist mit einem Smart Process Bedienfeld
versehen, das eine optimale Verarbeitung und ein
perfektes Ergebnis sicherstellt. Jede Taste ist mit
einem Programm verbunden, das mit einem
optimalen Ablauf für die einzenen Aufsätze
programmiert ist.
Die Geschwindigkeit lässt sich mit den Tasten (+)
herauf- bzw. mit der Taste (-) herabsetzen.
Wenn Sie den Momentschalter drücken, läuft der
Motor mit der höchsten Geschwindigkeit. Sobald
die Taste losgelassen wird, kehrt der Motor zu der
vorher eingestellten Geschwindigkeit zurück.
Die Verarbeitung kann jederzeit mit der STOPTaste abgebrochen werden.
Wenn Sie innerhalb von 40 Sekunden die davor
gedrückte Taste nochmals drücken, wird der
unterbrochene Vorgang fortgesetzt.
Die Schüssel
C
1 Setzen Sie die Schüssel auf das Gerät, und
drehen Sie den Griff in Pfeilrichtung, bis
die Schüssel hörbar einrastet ("Klick").
C
2 Setzen Sie den Deckel auf die Schüssel.
Drehen Sie den Deckel in Pfeilrichtung,bis
er hörbar einrastet. Dazu ist ein leichter
Widerstand zu überwinden.
Die integrierte
Sicherheitsverriegelung
B
Die Motoreinheit, die Schüssel und der Deckel zur
Schüssel sind mit Markierungen versehen. Das
Gerät lässt sich nur dann verwenden, wenn sich
die Markierungen genau gegenüberstehen.
C
1 Achten Sie darauf, dass der Punkt auf dem
Deckel und der Punkt auf der Schüssel
sich direkt gegenüber stehen. Der
Vorsprung am Deckel deckt den Griff an
der Schüssel ab.
Der Einfüllstutzen
C
1 Verwenden Sie den Einfüllstutzen um
flüssige und/oder feste Zutaten in die
Schüssel zu geben. Nehmen Sie den
Stopfer, um feste Bestandteile hinein zu
drücken.
CLICK
CLICK
1
2
1
2
CLICK
Page 30
DEUTSCH30
C
2 Sie können den Stopfer auch in den
Einfüllstutzen stecken, um zu verhindern,
dass Zutaten herausspritzen.
Das Messer
◗ Das Messer lässt sich zum Zerkleinern, Mixen,
Mischen und Pürieren verwenden.
C
1 Nehmen Sie den Schneidschutz vom
Messer ab.
Die Schneiden des Messers sind sehr scharf
Vermeiden Sie jede Berührung mit den
Schneiden!
C
2 Setzen Sie die Antriebsachse in die
Schüssel und darauf das Messer.
3 Geben Sie die Zutaten in die Schüssel.
Schneiden Sie größere Teile zuvor in
Stücke von ca.3 cm Kantenlänge. Setzen
Sie den Deckel auf die Schüssel.
4 Stecken Sie den Stopfer in den
Einfüllstutzen.
C
5 Drücken Sie auf dem Bedienfeld die Taste
zum Zerkleinern.
- Die Verarbeitung beginnt mit vier kurzen
Stößen, damit die Zutaten - z. B. Zwiebeln oder
Nusskerne -, korrekt zerkleinert werden.
- Danach wird die Verarbeitung mit maximaler
Geschwindigkeit fortgesetzt, bis die STOP-Taste
gedrückt wird.
◗ Drücken Sie die Taste (-) um die
Geschwindigkeit herab zu setzen.
◗ Der Vorgang kann jederzeit unterbrochen
werden, indem Sie die STOP-Taste drücken.
Hinweise
◗ Unterbrechen Sie das Zerkleinern von
Zwiebeln nach den vier kurzen Stößen , damit
die Zwiebeln nicht zu fein gehackt werden.
◗ Wenn Sie (Hart-)Käse verarbeiten, so lassen
Sie das Gerät nicht zu lange laufen. Dadurch
wird der Käse erhitzt, schmilzt und wird
flockig.
◗ Zerkleinern Sie mit dem Messer keine harten
Zutaten wie Kaffeebohnen, Kurkuma, Muskat
und Eiswürfel, das könnte die Schneiden
stumpf machen.
Wenn Zutaten am Messer kleben oder sich an
der Wand absetzen:
1 schalten Sie das Gerät aus,
2 nehmen Sie den Deckel von der Schüssel
ab und
Page 31

DEUTSCH 31
3 benutzen Sie einen Spatel, um die Zutaten
vom Messer und der Innenwand der
Schüssel zu entfernen.
Die Einsätze
Verarbeiten Sie mit den Einsätzen keine harten
Zutaten, z. B. Eiswürfel.
C
1 Setzen Sie die benötigten Einsätze in die
Trägerscheibe, bevor Sie die Trägerscheibe
auf der Antriebsachse anbringen.
Die Schneiden sind sehr scharf.Vermeiden Sie
jede Berührung!
C
2 Setzen Sie die Trägerscheibe auf die
Antriebsachse.
3 Setzen Sie den Deckel auf die Schüssel.
4 Geben Sie die Zutaten in die Schüssel.
Schneiden Sie größere Stücke so zurecht,
dass sie in den Einfüllstutzen passen.
C
5 Die besten Resultate erhalten Sie, wenn
Sie den Einfüllstutzen gleichmäßig füllen.
Verarbeiten Sie größere Mengen nach und nach
in kleineren Portionen. Leeren Sie die Schüssel
dann zwischendurch regelmäßig.
C
6 Wählen Sie auf dem Bedienfeld
"Zerkleinern u. Schneiden" (shredding &
slicing process).
Die Geschwindigkeit wird sofort auf den
eingestellten Wer t beschleunigt, damit ein
optimales Resultat erzielt wird.
Die Verarbeitungsgeschwindigkeit kann mit der
Taste (+) dreimal erhöht und mit der Taste (-)
dreimal herabgesetzt werden.
C
7 Drücken Sie die Zutaten mit dem Stopfer
unter leichtem Druck in den Einfüllstutzen.
◗ Beim Verarbeiten von weichen Zutaten wie
Obst und Gemüse können Sie die
Geschwindigkeit bis zu drei Stufen
herabsetzen. Drücken Sie die Taste (-), um zu
verhindern, dass Sie Obst- oder Gemüsepüree
erhalten.
C
8 Die Einsätze entnehmen Sie der
Trägerscheibe, indem Sie die Scheibe mit
der Rückseite zu Ihnen zeigend in die
Hände nehmen und auf die Ränder des
Einsatzes drücken, damit der Einsatz
herausfällt.
CLICK
2
1
Page 32

DEUTSCH32
Der verstellbare Schneideinsatz
Mit dem verstellbaren Schneideinsatz können Sie
die Zutaten in der gewünschten Dicke schneiden.
Seien Sie vorsichtig: die Schneiden sind sehr
scharf!
C
1 Setzen Sie den Schneideinsatz in die
Trägerscheibe.
C
2 Bringen Sie den Regelknopf auf der
Unterseite der Scheibe an, und drehen Sie
ihn so weit, dass die Linien
übereinstimmen. Die Scheibe ist jetzt fest
angebracht.
C
3 Drehen Sie den Reglerknopf, um die
gewünschte Dicke einzustellen.
C
4 Setzen Sie die verstellbare Schneidscheibe
auf die Antriebsachse.
5 Schließen Sie den Deckel und geben Sie die
Zutaten in den Einfüllstutzen.
C
6 Wählen Sie auf dem Bedienfeld
"Zerkleinern u. Schneiden" (shredding &
slicing process).
7 Drücken Sie, falls erforderlich, die Zutaten
mit dem Stopfer unter leichtem Druck in
den Einfüllstutzen.
Der Knetaufsatz
Der Knetaufsatz lässt sich zum Kneten von
Hefeteig für Brot und Pizzas verwenden.
C
1 Bringen Sie den Knetaufsatz auf der
Antriebsachse an.
C
2 Setzen Sie die Schüssel auf die
Motoreinheit, drehen Sie den Griff der
Schüssel in Pfeilrichtung und bringen Sie
den Knetaufsatz auf der Antriebsachse an.
3 Geben Sie die Zutaten in die Rührschüssel.
4 Setzen Sie den Deckel auf.
C
5 Drücken Sie auf dem Smart Process
Bedienfeld die Taste für "Kneten".
Der Motor beschleunigt den Knetaufsatz im Laufe
von 10 Sekunden auf die Höchstgeschwindigkeit.
Das Gerät läuft dann mit dieser Geschwindigkeit,
bis die STOP-Taste gedrückt wird. Die
Geschwindigkeit lässt sich mit der Taste (+)
dreimal erhöhen und mit der Tast (-) dreimal
herabsetzen. Reagiert der Motor nicht auf diese
Tasten, so hat er bereits die höchste bzw. die
geringste Geschwindigkeit erreicht.
1
2
Page 33

DEUTSCH 33
Der Quirl
Mit dem Quirl lassen sich Eier, Eiweiß, InstantPuddings und Sahne schlagen.
1 Setzen Sie die Schüssel auf die
Motoreinheit und drehen Sie sie gegen den
Uhrzeigersinn, bis sie einrastet ("Klick").
C
2 Setzen Sie die Antriebsachse in die
Schüssel.
C
3 Setzen Sie den Quirlaufsatz auf die
Antriebsachse.
4 Geben Sie die Zutaten in die Rührschüssel.
Setzen Sie den Deckel auf, indem Sie ihn
im Uhrzeigersinn drehen, bis er einrastet
("Klick").
C
5 Drücken Sie auf dem Bedienfeld die Taste
"whisking process" = Schlagen.
Der Motor beschleunigt den Quirlaufsatz im
Laufe von 15 Sekunden auf die
Höchstgeschwindigkeit. Das Gerät läuft dann mit
dieser Geschwindigkeit, bis die STOP-Taste
gedrückt wird. Die Geschwindigkeit lässt sich mit
der Taste (+) dreimal erhöhen und mit der Tast (-)
dreimal herabsetzen.
Der Mixer-Aufsatz
Der Mixer ist geeignet zum:
- Mixen von Flüssigkeiten, z. B.
Molkereiprodukten, Suppen, Soßen,
Fruchtsäften, Mixgetränken, süßen Tees,
Milchshakes.
- Mischen weicher Zutaten, z. B. Pfannkuchenteig
und Majonäse,
- Pürieren gegarter Zutaten, z.B. Zubereitung
von Baby-Nahrung.
◗ Das Gerät läßt sich sowohl mit aufgesetztem
Mixer als auch ohne ihn verwenden.Wird der
Mixer abgenommen, so kann das Gerät aber
nur funktionieren, wenn der Schraubdeckel
richtig auf die Motoreinheit geschraubt
worden ist.
C
1 Bevor Sie den Mixbecher auf der
Motoreinheit anbringen, müssen Sie den
Schraubdeckel entfernen.
C
2 Der Mixbecher wird aufgesetzt, indem Sie
ihn auf die Öfnung im Mototorgehäuse
stellen und in Pfeilrichtung festdrehen. Der
Griff muss sich auf der linken Seite
befinden.
Ziehen Sie nicht zu stark am Griff des
Mixbechers.
3 Geben Sie die Zutaten in den Mixbecher.
C
4 Schließen Sie den Deckel.
1
2
2
1
Page 34

DEUTSCH34
C
5 Setzen Sie stets den Sicherheitsverschluss
auf den Deckel des Mixbechers, bevor Sie
mit dem Mixen beginnen.
C
6 Drücken Sie auf dem Bedienfeld die Mixer-
Taste "Blending". Das Gerät steigert
langsam die Geschwindigkeit. Die
Endgeschwindigkeit wird beibehalten,bis
die STOP-Taste gedrückt wird. Die
Geschwindigkeit kann durch Drücken der
(-)Taste in 3 Stufen gesenkt werden.
Hinweise
C
◗ Gießen Sie flüssige Zutaten durch das Loch im
Deckel des Mixbechers.
◗ Je länger Sie das Gerät betreiben, um so feiner
wird das Ergebnis.
◗ Schneiden Sie größere Teile zuvor in kleinere
Stücke, bevor Sie sie in den Mixbecher geben.
Wenn Sie eine größere Menge zubereiten, so
verarbeiten Sie sie in mehreren kleinen
Portionen.
◗ Harte Zutaten, z.B. Sojabohnen für Sojamilch
u. dgl., sind vor der Verarbeitung ausreichend
lange einzuweichen.
C
◗ Eiswürfel zerkleinern Sie, indem Sie sie in den
Mixbecher legen, den Deckel schließen und
den Momentschalter betätigen.
Wenn Zutaten an der Wand des Mixbechers
haften:
1 Schalten Sie das Gerät aus, und ziehen Sie
den Netzstecker aus der Steckdose,
2 Öffnen Sie den Deckel.
Öffnen Sie den Deckel aber niemals bei
laufendem Motor.
3 Entfernen Sie die Zutaten, die an der Wand
haften, mit Hilfe eines Spatels.
Halten Sie den Spatel auf sicheren Abstand (ca.
2 cm) zu den Schneiden des Messers.
◗ Wenn Sie mit dem Ergebnis nicht zufrieden
sind, so drücken Sie einige Male kurz den
Momentschalter. Sie können das Ergebnis
verbessern, indem Sie den Inhalt bei
ausgeschaltetem Motor mit dem Spatel
umrühren oder etwas von dem Inhalt
entnehmen, um eine kleinere Menge zu
verarbeiten.
◗ Manchmal sind die Zutaten leichter zu
verarbeiten, wenn etwas Flüssigkeit zugefügt
wird, so z. B.Zitronensaft bei der Verarbeitung
von Früchten.
Page 35

DEUTSCH 35
Die Zitruspresse
Die Zitruspresse lässt sich für alle Sorten von
Zitrusfrüchten verwenden.
C
1 Setzen Sie die Schüssel auf die
Motoreinheit und das Sieb in die Schüssel.
C
2 Drehen Sie das Sieb in Pfeilrichtung, bis
der Haken der Sicherheitsverriegelung in
der Motoreinheit einrastet.
C
3 Setzen Sie den Presskegel ein.Drücken Sie
ihn leicht hinunter.
C
4 Drücken Sie die Taste "Zitruspresse" auf
dem Bedienfeld.
Die Verarbeitungsgeschwindigkeit lässt sich mit
der Taste (+) dreimal erhöhen und mit der Taste
(-) dreimal herabsetzen.
Die Verarbeitung beginnt und lässt sich mit der
STOP-Taste abbrechen.
C
5 Drücken Sie eine Hälfte der Zitrusfrucht
auf den Presskegel.
Hinweise
◗ Unterbrechen Sie den Vorgang von Zeit zu
Zeit, um das Fruchtfleisch aus dem Sieb zu
entfernen.
Schalten Sie zuvor das Gerät aus, und nehmen Sie
die Schüssel mitsamt dem Sieb und dem
Presskegel von der Motoreinheit.
C
◗ Nehmen Sie nach Beendigung der Arbeit die
Schüssel mitsamt dem Sieb und dem
Presskegels von der Motoreinheit.
Der Entsafter
Der Entsafter lässt sich zur Zubereitung von
Gemüse- und Fruchtsäften verwenden.
Fruchfleisch, Kerne und Häute werden dabei
ausgesondert.
1 Setzen Sie die Schüssel auf die
Motoreinheit.
C
2 Setzen Sie die Antriebachse in die Schüssel.
1
2
CLICK
1
1
2
Page 36

DEUTSCH36
C
3 Bringen Sie die Entsaftertrommel auf der
Antriebsachse an.
C
4 Achten Sie darauf, dass die drei Stifte in
die Aussparungen an der Entsaftertrommel
eingreifen.
C
5 Setzen Sie den Deckel zum Entsafter auf
die Schüssel.
C
6 Drücken Sie die Entsafter-Taste.
Verwenden Sie den Entsafter niemals, wenn das
Sieb oder die Entsaftertrommel defekt oder
beschädigt ist.
Der Motor setzt mit niedriger Geschwindigkeit
ein und beschleunigt auf Höchstgeschwindigkeit.
Die Geschwindigkeit kann mit der Taste (-)
dreimal herabgesetzt werden.
C
7 Lassen Sie die Früchte bzw.das Gemüse
durch den Einfüllstutzen in den Entsafter
fallen.
C
C
8 Drücken Sie die Zutaten bei Bedarf mit
dem Stopfer fest an. Halten Sie den Stopfer
so lange wie möglich im Einfüllstutzen, um
Spritzer zu vermeiden.
9 Lassen Sie den Motor zum Schluss noch
20 Sekunden laufen, um den restlichen Saft
aufzufangen.
C
10 Nehmen Sie die Schüssel mitsamt dem
Entsafter-Aufsatz von der Motoreinheit,
um zu vermeiden, dass der Saft
heraustropft.
Hinweise
◗ Beachten Sie vor Gebrauch des Entsafters:
- schneiden Sie Möhren, Rettich usw. vor,
- schälen Sie das Obst, z. B. Ananas, Melonen usw.
- entkernen Sie Kirschen, Pflaumen, Pfirsiche usw.
◗ Schalten Sie das Gerät immer ein, bevor Sie
das Obst bzw.das Gemüse in den Entsafter
geben.
◗ Schalten Sie das Gerät von Zeit zu Zeit aus,
um das Fruchtfleisch aus dem Sieb und der
Entsaftertrommel zu entfernen.
◗ Verarbeiten Sie nicht zu viel auf einmal.
◗ Schalten Sie das Gerät aus, wenn es zu
vibrieren beginnt, und reinigen Sie das Sieb
und den Filter, bevor Sie das Gerät wieder
einschalten.
1
2
2
1
Page 37

DEUTSCH 37
Reinigung
Ziehen Sie vor jeder Reinigung den Netzstecker
aus der Steckdose.
1 Reinigen Sie das Gehäuse der
Motoreinheit mit einem feuchten Tuch, auf
das Sie bei Bedarf ein wenig Spülmittel
auftragen können.Tauchen Sie die
Motoreinheit niemals in Wasser,und
spülen Sie sie auch nicht unter fließendem
Wasser ab.
2 Spülen Sie alle Teile, die mit Lebensmitteln
in Berührung gekommen sind, sofort nach
Gebrauch in warmem Wasser, dem Sie
etwas Spülmittel zugesetzt haben.
◗ Die Schüssel und der Deckel zur Schüssel, der
Stopfer und die Aufsätze (außer dem
Mixbecher) können auch im Geschirrspüler
gereinigt werden.
Diese Teile sind getestet und nach DIN EN 12875
geschirrspülerfest.
Der Mixbecher ist nicht geschirrspülerfest!
◗ Den Deckel nehmen Sie ab, indem Sie ihn
öffnen und nach oben herausziehen.
Nehmen Sie den Deckel nur zum Reinigen ab.
Seien Sie beim Reinigen des Messers, der
Schneiden, des Mixbechers und der Einsätze
äußerst vorsichtig. Die Schneiden sind sehr scharf!
Achten Sie darauf, dass die Schneiden der Messer
und der Einsätze nicht mit harten Gegenständen
in Berührung kommen. Sie könnten schartig und
stumpf werden.
Durch verschiedene Zutaten können sich die
Einsätze verfärben. Das beeinträchtigt nicht die
Funktion dieser Teile. Meist geht diese Verfärbung
nach einiger Zeit zurück.
C
◗ Überschüssiges Netzkabel können Sie an der
Rückseite des Geräts aufwickeln.
Schnellreinigung des Mixers
C
1 Gießen Sie nicht mehr als 500 ml
lauwarmes Wasser, dem Sie einige Tropfen
Spülmittel zugefügt haben, in den
Mixbecher.
2 Schließen Sie den Deckel.
C
3 Drücken Sie den Momentschalter, und
lassen Sie das Gerät kurze Zeit laufen. Der
Motor hält an, sobald Sie die Taste
loslassen.
4 Nehmen Sie den Mixbecher vom Gerät ab,
und spülen Sie ihn mit klarem Waser aus.
Zur gründlichen Reinigung des Quirls:
C
1 Trennen Sie die Zahnräder und den Quirl.
Reinigen Sie die Zahnräder und den Quirl
im Geschirrspüler oder in warmem
Wasser, dem Sie etwas Spülmittel zugefügt
haben.
Page 38

DEUTSCH38
Zur gründlichen Reingung der
Schneidscheibe:
C
1 Drehen Sie den Regelknopf im
Uhrzeigersinn und nehmen Sie den
verstellbaren Schneideinsatz heraus.
Die Scheibe, das Messer und der Regelknopf
können im Geschirrspüler gereinigt werden oder
in warmem Wasser, dem Sie etwas Spülmittel
zugefügt haben.
Aufbewahrung
MicroStore
C
◗ Platzieren Sie die einzelnen Teile (Messer,
Trägerscheibe) auf der Antriebsachse, und
bewahren Sie sie in der Schüssel auf. Setzen
Sie den Einsatzhalter immer zuletzt auf die
Trägerscheibe.
Garantie und Service
Informationen zu Ihren Fragen, Wünschen und
Problemen erhalten Sie auf unserer Homepage
www.philips.com oder beim Philips Service
Center in Ihrem Lande. Sollte sich in Ihrem Lande
kein solches Center befinden, so wenden Sie sich
bitte an das Service Department von Philips
Domestic Appliances and Personal Care BV. Die
Telefonnummern entnehmen Sie bitte der
beigefügten Garantieschrift.
Lösung
Drehen Sie die Schüssel und/oder den Deckel im
Uhrzeigersinn, bis beide einrasten ("Klick").Achten Sie
darauf, dass die Markierungen auf Schüssel und Deckel
genau gegenüber stehen.
Wahrscheinlich hat der Überhitzungsschutz das Gerät
ausgeschaltet, um Schaden zu vermeiden. - 1. Ziehen Sie
den Netzstecker. 2. Drücken Sie die STOP-Taste.
3. Lassen Sie das Gerät 60 Minuten abkühlen. 4. Stecken
Sie den Stecker in die Steckdose. 5. Schalten Sie das
Gerät wieder ein.
Drücken Sie die für den gewünschten Vorgang
bestimmte Taste.
Das Gerät ist mit einer Memory-Funktion ausgestattet.
Wenn Sie nach einer Pause bis zu 40 Sekunden das
Gerät wieder einschalten, wird der Vorgang dort
fortgesetzt, wo er unterbrochen wurde.Wollen Sie den
Vorgang neu beginnen, so 1. drücken Sie die Taste für
einen anderen Vorgang, 2. drücken Sie die STOP-Taste,
3. drücken Sie die Taste für den gewünschten Vorgang.
Wenn der Mixbecher und die Schüssel korrekt
aufgesetzt sind, funktioniert nur der Mixbecher. Um die
Schüssel verwenden zu können, müssen Sie den
Mixbecher abnehmen und die entstandene Öffnung mit
dem Schraubdeckel verschließen
Der Motor lässt sich nicht weiter verstellen. Er arbeitet
bereits mit der Höchstleistung, z.B. beim Kneten, bzw.
mit der Mindestleistung.
Problem
Das Gerät lässt sich
nicht einschalten.
Das Gerät stand
plötzlich still.
Sie haben die falsche
Taste gedrückt.
Das Gerät beginnt
nach einem Neustart
nicht mit dem Anfang
des Programms.
Der Mixbecher und
die Schüssel sind beide
aufgesetzt, aber nur
der Mixbecher
funktioniert.
Die Taste (+) bzw. (-)
reagiert bei manchen
Anwendungen nicht.
Problemlössungen
1
2
Page 39

DEUTSCH 39
Verarbeitungszeit
10 bis 60 Sekunden
10 bis 60 Sekunden
10 bis 60 Sekunden
60 bis 180 Sekunden
30 bis 180 Sekunden
10 bis 60 Sekunden
Von der Menge
abhängig
Von der Menge
abhängig
Anwendung
Zerkleinern, Pürieren, Mischen
Reiben, Raspeln
Schneiden
Kneten, Mischen
Schlagen, Emulgieren
Mixen, Pürieren
Zitrusfrüchte auspressen
Entsaften von Obst und Gemüse
Aufsatz
P
hjk
¬
{
˚
D
ƒ
©
Funktion
¥
^
^
¨
∆
†
“
‘
Funktionen, Einsätze und Anwendungen
Anwendungsb
eispiele
Salate,
Rohkost
Salate,
Rohkost
Pfannkuchen,
Waffeln
Panierte
Speisen,
Gratins
Desserts,
Garnituren
Garnituren,
Suppen,
Soßen, Gratins
Zubereitung
Das Gemüse in Stücke
schneiden, die in den
Einfüllstutzen passen. Dann die
Stücke, unter leichtem Druck
mit dem Stopfer, zerkleinern.
Das Gemüse in Stücke
schneiden, die in den
Einfüllstutzen passen. Dann die
Stücke, unter leichtem Druck
mit dem Stopfer, zerkleinern.
Zuerst die Milch in den
Mixbecher geben, danach die
trockenen Zutaten. Die
Zutaten ca. 1 Minute mischen.
Den Vorgang bei Bedarf
zweimal wiederholen. Das
Gerät bei Zimmertemperatur
einige Minuten abkühlen lassen.
Trockenes Brot oder trockene
Brötchen verwenden.
Weiche Butter ergibt ein
leichtes Resultat.
Parmesan ohne Rinde
verwenden. In Würfel von ca.
3 cm Kantenlänge schneiden.
Taste
/
Zubeh
ör
^ / k
^ / ¬
† / D
¥ / P
¨ / {
¥ / P
Höchs
tmeng
e
500 g
500 g
750
ml
Milch
100 g
300 g
200 g
Zutaten und
Ergebnisse
Äpfel, Möhren,
Sellerie Zerkleinern
Äpfel, Möhren,
Sellerie Schneiden
Pfannkuchente
ig - Schlagen
Paniermehl Zerkleinern
Buttercreme Schlagen
Käse
(Parmesan) Raspeln
Höchstmengen und Zubereitungszeiten
Page 40

DEUTSCH40
Anwendungsb
eispiele
Soßen, Pizzas,
Gratins,
Fondues
Garnituren,
Soßen,
Gebäck,
Pudding,
Mousse
Pürees,
Suppen
Baby- und
Kindernahrung
Salate,
Garnituren
(Weiß-)Brot
Pizza
Zubereitung
Den Käse in Stücke schneiden,
die in den Einfüllstutzen passen.
Vorsichtig mit dem Stopfer
andrücken.
Harte (Block-)Schokolade
verwenden.Vorher in Stücke
von 2 cm Größe brechen.
Gekochte Erbsen bzw.Bohnen
verwenden. Bei Bedarf etwas
Flüssigkeit zufügen.
Für ein grobes Püree nur wenig
Flüssigkeit hinzugeben. Für ein
feineres Püree langsam mehr
Flüssigkeit zufügen.
Die Gurke in den Einfüllstutzen
einführen und vorsichtig
andrücken.
Warmes Wasser mit Hefe und
Zucker mischen. Mehl, Öl und
Salz hinzugeben und ca.
90 Sekunden kneten.Teig
30 Minuten gehen lassen.
Wie bei Brotteig.
Taste
/
Zubeh
ör
^ /
h
¥ / P
¥ / P
¥ / P
^ / ¬
¨ / {
¨ / {
Höchs
tmeng
e
200 g
200 g
250 g
500 g
2
Salatg
urken
500 g
Mehl
750 g
Mehl
Zutaten und
Ergebnisse
Käse (Gouda)
- Raspeln
Schokolade Reiben
Hülsenfrüchte,
gekocht Pürieren
Gemüse und
Fleisch,
gekocht Pürieren
Gurken Schneiden
Brotteig Kneten
Pizzateig Kneten
Anwendungsb
eispiele
Apfelkuchen,
süße Biskuits,
ungedeckter
Obstkuchen
Feingebäck
Pudding,
Soufflee, Baiser
Soßen,
Konfitüren,
Pudding,
Säuglingsnahru
ng
Zubereitung
Kalte Butter/Margarine in
Stücke von ca. 2 cm
Kantenlänge schneiden. Mehl
und Butter zugleich in die
Schüssel geben. Kneten,bis der
Teig krümelig geworden ist.
Dann, während des Knetens,
kaltes Wasser hinzugeben.
Ausschalten, sobald der Teig zur
Kugel wird.Vor der weiteren
Verarbeitung im Kühlschrank
kühlen.
Zerst Hefe, warmes Wasser
und etwas Zucker in eine
gesonderte Schüssel geben.
Alle Zutaten in die Schüssel auf
dem Gerät geben und den Teig
ca. 1 Minute glatt kneten, bis er
nicht mehr an der Wand der
Schüssel klebt. 30 Minuten
gehen lassen.
Eier mit Raumtemperatur
verarbeiten. Mindestens 2 Eier
verwenden!
Hinweis: Etwas Zitronensaft
hinzugefügt verhindert, dass
sich das Obst verfärbt. Etwas
Flüssigkeit zufügen, um ein
glattes Püree zu erzielen.
Taste
/
Zubeh
ör
¨ / {
¨ / {
∆ / ˚
† / D
Höchs
tmeng
e
300 g
Mehl
500 g
Mehl
4
Eiweiß
e
500 g
Zutaten und
Ergebnisse
Mürbeteig I Kneten
Hefeteig Kneten
Eiweiß Schlagen
Obst (z. B.
Äpfel,
Bananen,
Esskastanien)
Page 41

41DEUTSCH
Anwendungsb
eispiele
Soßen,
Konfitüren,
Pudding,
Säuglingsnahru
ng
Garnituren,
Dips
Soßen,
Suppen,
Garnituren,
Kräuterbutter
Fruchtsäfte
Salate,
Garnituren,
BarbecueSoßen
Zubereitung
Hinweis: Etwas Zitronensaft
hinzugefügt, verhinder t dass
sich das Obst verfärbt.
Die Knoblauchzehen schälen.
Den Knoblauch zerkleinern,
indem einige Male der
Momentschalter bedient wird.
Mindestens 150 g verwenden.
Kräuter vor Verarbeitung
waschen und trocknen.
Den Entsafter verwenden.
Alle Zutaten mit
Raumtemperatur.Hinweis:
Wenigstens ein großes Ei oder
zwei kleine Eier bzw.Eigelbe
verwenden. Geben Sie das Ei
mit ein wenig Essig in die
Schüssel; und geben Sie das Öl
tropfenweise hinzu.
Taste
/
Zubeh
ör
¥ / P
¥ / P
¥ / P
‘ / ©
∆ / ˚
Höchs
tmeng
e
500 g
300 g
minde
stens
50 g
500 g
insges
amt
3 Eier
Zutaten und
Ergebnisse
Obst (z. B.
Äpfel,
Bananen) Zerkleinern
Knoblauch Zerkleinern
Kräuter (z. B.
Petersilie) Zerkleinern
Gemüse/Obstsäfte
(Äpfel,
Möhren) Mixen
Majonäse Emulgieren
Anwendungsb
eispiele
Steaks,Tartar,
Hamburger,
Frikadellen
Steaks,Tartar,
Hamburger,
Frikadellen
Milchshakes
Verschiedene
Kuchen
Salate,
Pudding, Brot,
Mandelpaste
Zubereitung
Zuerst Knochen und Sehnen
entfernen. Das Fleisch in Würfel
von ca. 3 cm Kantenlänge
schneiden. Den
Momentschalter drücken, um
ein gröberes Ergebnis zu
erzielen.
Zuerst Knochen und Sehnen
entfernen. Das Fleisch in Würfel
von ca. 3 cm Kantenlänge
schneiden. Den
Momentschalter drücken, um
ein gröberes Ergebnis zu
erzielen.
Das Obst (z. B. Bananen,
Erbeeren) pürieren. Mit Zucker,
Milch und etwas Eiscreme gut
vermischen.
Zutaten mit Raumtemperatur
verwenden. Mischen Sie weiche
Butter und Zucker, bis die
Mischung glatt und cremig ist.
Geben Sie dann Milch, Eier und
Zucker hinzu.
Den Momentschalter zum
groben Zerkleinern drücken.
Die Taste loslassen, wenn das
gewünschte Resultat erreicht
ist.
Taste
/
Zubeh
ör
¥ / P
¥ / P
† / D
¨ / {
¥ / P
Höchs
tmeng
e
500 g
400 g
500
ml
Milch
4 Eier
250 g
Zutaten und
Ergebnisse
Fleisch, mager
- Zerkleinern
Fleisch, Fisch,
Geflügel
(durchwachse
n) - Hacken
Milchshakes
Kuchenmische
n - Mischen
Nüsse Zerkleinern
Page 42

DEUTSCH42
Anwendungsb
eispiele
Salate,
Kochgerichte,
kurz
Gebratenes,
Garnituren
Salate,
Kochgerichte,
kurz
Gebratenes,
Garnituren
Hackfleisch
Suppen, Soßen
Garnituren,
Cremes,
Eiscreme
Zubereitung
Die Zwiebeln schälen und
vierteln. Den Momentschalter
2 Mal drücken und das
Ergebnis prüfen.
Zwiebeln schälen und in 4
Stücke teilen. Mindestens 100 g
verarbeiten.
Zuerst Knochen und Sehnen
entfernen. Das Fleisch in Würfel
von ca. 3 cm Kantenlänge
schneiden. Den
Momentschalter drücken, um
ein gröberes Ergebnis zu
erzielen.
Gekochtes Gemüse
verarbeiten
Sahne aus dem Kühlschrank
verwenden. Mindestens 125 ml
verarbeiten. Die Schlagsahne ist
nach ca. 2 Minuten fertig.
Taste
/
Zubeh
ör
¥ / P
^ / ¬
¥ / P
† / D
∆ / ˚
Höchs
tmeng
e
500 g
300 g
200 g
500
ml
500
ml
Zutaten und
Ergebnisse
Zwiebeln Zerkleinern
Zwiebeln Schneiden
Geflügel Zerkleinern
Suppen Mixen
Schlagsahne Schlagen
Rezepte
Zucchini-Sandwichbelag
Zutaten:
- 2 Zucchini
- 3 gekochte Eier
- 1 kleine Zwiebel
- 1 El pflanzliches Öl
- Petersilie
- 2 bis 3 El saure Sahne
- Zitronensaft,Tabasco, Salz, Pfeffer, Currypulver,
Paprika
B
Die Zucchini waschen und trocknen. Mit dem
feinen Zerkleinerer-Einsatz in der Schüssel
zerkleinern und auf einen Teller legen. Mit Salz
bestreuen und ca. 15 Minuten stehen lassen,
damit das Salz den Zucchini den Saft entzieht.
Eine Zwiebel in vier Teile schneiden und
zusammen mit einer Knoblauchzehe zerkleinern.
Die Petersilienblätter von den Stängeln lösen und
zerkleinern.
B
Die zerkleinerten Zucchini auf ein sauberes Tuch
legen und den Saft heraus pressen. Etwas Öl in
die Pfanne geben und die zerkleinerte Zwiebel
und mit dem Knoblauch braten, bis alle Flüssigkeit
verdampft ist. Eine Weile abkühlen lassen. Die
gekochten Eier schälen und einige Sekunden in
der Schüssel zerkleinern. Die anderen Zutaten in
die Schüssel zugeben, würzen und durchmischen.
Als Sandwich auf Toast servieren.
Page 43

43DEUTSCH
Früchtekuchen
Zutaten:
- 180 g Datteln
- 270 g Pflaumen
- 60 g Mandeln
- 60 g Walnüsse
- 60 g Rosinen
- 60 g Sultaninen
- 20 g Roggen-Vollkornmehl
- 120 g Weizenmehl
- 120 g brauner Kristallzucker
- 360 g Buttermilch
- 1 Prise Salz
- ! Beutel Backpulver
B
Das Messer in die Schüssel einsetzen.Alle Zutaten
hineingeben, die Zerkleinerer-Taste drücken und
die Zutaten 30 Sekunden lang mischen.Wenn der
Teig am Deckel der Schüssel haftet, so entfernen
Sie ihn mit dem Spatel. Den Teig in 30 cm lange
Streifen schneiden und 40 Minuten bei 170c C
backen.
Lauch-Quiche
Zutaten für den Teig:
- 250 g Weizenmehl (oder Vollkorn-Weizenmehl)
- Prise Salz
- 1 El Honig
- 20 g frische Hefe oder 1/2 Beutel Trockenhefe
- 100 g Butter
- 6 El lauwarmes Wasser
Zutaten für den Belag:
- 500 g Lauch (Porree)
- Pflanzenöl
- 4 Eier
- 500 g saure Sahne
- Salz, Pfeffer, bei Bedarf 1 bis 2 EL Mehl
B
Alle Zutaten in die Schüssel geben und zu einem
festen Teig kneten. Lassen Sie den Teig ca.
30 Minuten gehen.
B
Den Lauch mit dem verstellbaren Scheideinsatz
(z.B. bei Position 3) schneiden. Etwas Öl in die
Pfanne geben und den geschnittenen Lauch einige
Minuten darin anbraten. Die restlichen Zutaten in
den Mixbecher geben und mixen, bis eine sahnige
Konsistenz erreicht ist. Zum Andicken 1 bis 2 El
Mehl hinzugeben.
B
Ein Backblech von 24 cm Durchmesser einfetten.
Den Boden und den Rand gleichmäßig mit Teig
belegen. Die Lauchmischung auf dem Teig
verteilen und den Rest der Zutaten daraufgießen.
Im vorgeheizten Herd ca. 40 Minuten bei 180c C
backen. Kalt oder warm ser vieren.
Gulaschsuppe nach ungarischer Art
Zutaten:
- 1 El Speiseöl
- 1 mittelgroße Zwiebel
-1 Tl Paprika
- 400 g Rind- oder Schweinefleisch
- 1 grüne Chilischote
-1 Tomate
- Salz
- 200 g Möhren
- 300 g Kartoffeln
- Kümmel
Page 44

DEUTSCH44
B
Das Fleisch waschen und in Würfel von ca. 2 cm
Kantenlänge schneiden. Die Zwiebel schälen und
mit dem Messer in der Schüssel zerkleinern. Die
grüne Chilischote entkernen und mit dem
Schneideinsatz in Ringe schneiden. Die Tomate
schälen, entkernen und in dünne Streifen
schneiden. Die zerkleinerte Zwiebel in dem Öl
braten; vom Herd nehmen und mit Paprika
bestreuen. Das Fleisch hinzu geben und bei großer
Hitze unter ständigem Umrühren einige Minuten
braten. Die grüne Chilischote, die Tomaten und Salz
hinzugeben, die Pfanne zudecken und so lange bei
mäßiger Hitze schmoren lassen, bis die Zutaten
fast weich sind.
B
Unterdessen die Möhren schälen und mit dem
verstellbaren Schneideinsatz in Scheiben
schneiden. Die Kartoffeln schälen und würfeln. Alles
Fleisch hinzugeben und die zur Suppe gewünschte
Menge Wasser (ca. 1,2 Liter) hinzugeben. Mit
Kümmel würzen und köcheln lassen, bis alles
butterweich ist. Bei Bedarf nachsalzen.
B
Heiß servieren.Auf einem gesonderten Teller
lassen sich Ringe von Chili- und Paprikaschoten
zum Garnieren servieren.
Erdbeertorte
Zutaten:
- 100 g Butter/Margarine
- 100 g Zucker
- 3 Eidotter
- 240 g Mehl
- 100 g Kokosraspel
Belag:
- 80 g Zucker
- 2 Tl Zitronensaft
- 400 g Sahnequark
- 500 g Erdbeeren
Glasur:
- 500 g Erdbeeren
- 250 ml Wasser
- 120 g Zucker
- 60 g Maisstärke (Maizena/Mondamin)
Garnitur:
- 250 g Sahne
B
Den Backofen auf 180c C vorheizen. Sahne,
Butter/Margarine und Zucker in der Schüssel mit
dem Messer cremig rühren.
B
Das Eigelb daruntermischen, Mehl und
Kokosflocken einrühren. Den Teig auf einer
Springform auslegen, den Rand formen und mit
einer Gabel einstechen. 15 bis 20 Minuten
hellbraun backen.Auf einem Rost abkühlen lassen.
Zucker, Zitronensaft und Sahnequark in der
Schüssel mit dem Messer schaumig rühren.Alles
auf dem in der Springform gekühlten Tortenboden
auslegen. Die Torte mit einem Teil der Erdbeeren,
Spitze nach oben, garnieren. In den Kühlschrank
stellen.
B
Die Glasur zubereiten: Mischen Sie die restlichen
Erdbeeren im Mixbecher mit dem Wasser und
dem Zucker. Das Stärkemehl in 125 ml der
Erdbeer-Mischung auflösen. Die Mischung zum
Page 45

45DEUTSCH
Kochen bringen, und die Stärkemehl-Lösung
darunterrühren. Geben Sie dann die Glasur
löffelweise über die Erdbeeren, und lassen Sie alles
2 Stunden abkühlen. Mit geschlagener Sahne
garnieren.
Obst-Milchshake
Zutaten:
- 100 g Bananen oder Erdbeeren
- 200 ml frische Milch
- 50 g Vanille-Eiscreme
- Nach Belieben: Kristallzucker
B
Schälen Sie die Bananen bzw. waschen Sie die
Erdbeeren. Schneiden Sie die Früchte in kleinere
Stücke. Geben Sie alle Zutaten in den Mixbecher.
Mixen Sie die Zutaten glatt.
B
Sie können andere Früchte Ihrer Wahl verwenden
und damit Ihren Lieblingshake zubereiten.
Haselnuss-Kringel
Zutaten für den Teig:
- 500 g gesiebtes Mehl
- 75 g Zucker
- 1 Tl Salz
-1 Ei
- 250 ml Milch, 35c C
- 100 weiche Butter
- 30 g frische Hefe bzw.Trockenhefe nach
Angabe auf der Packung
Belag:
- 250 g Haselnüsse, gehackt
- 100 g Zucker
- 2 Päckchen Vanillin-Zucker
- 125 ml Sahne
B
Backofen auf 200c C vorheizen. Mischen Sie
Milch, Hefe und Zucker 15 Sekunden mit dem
Kneteinsatz in der Schüssel. Geben Sie dann Mehl,
Salz, Butter und das Ei hinzu. Kneten Sie den Teig
2 Minuten. Den Teig in eine getrennte Schüssel
geben, mit einem feuchten Tuch bedecken und
20 Minuten an einem lauwarmen Platz gehen
lassen.
B
Die Haselnüsse mit dem Messer in der Schüssel
zerkleinern. Die Zutaten für die Füllung mischen.
Den Teig zu einer rechteckigen Form ausrollen. Die
Haselnuss-Füllung auftragen. Den Teig zu einem
Ring aufrollen und 20 Minuten gehen lassen.
Etwas geschlagenes Eidotter aufpinseln. Die
Kuchenform auf einen mittleren Rost im Backofen
stellen und bei 200c C 25 bis 30 Minuten
backen.
Schokoladenkuchen
Zutaten:
- 140 g weiche Butter
- 110 g Puderzucker
- 140 g Schokolade
-6 Eiweiße
- 6 Eidotter
- 110 g Kristallzucker
- 140 g Weizenmehl
Belag:
- 200 g Aprikosen-Konfitüre
Page 46

DEUTSCH46
Glasur:
- 125 ml Wasser
- 300 g Zucker
- 250 g geriebene Schokolade
- Schlagsahne, nach Belieben
B
Den Backofen auf 160c C vorheizen. Die Butter
und den Puderzucker mit dem Messer in der
Schüssel cremig schlagen. Die Schokolade
schmelzen und darunter mischen. Nach und nach
die Eidotter hinzufügen, bis die Mischung cremig
geworden ist. Das Eiweiß und den Kristallzucker
mit dem Rühreinsatz steif und schaumig schlagen.
Den Eischaum vorsichtig unter die Mischung
rühren. Mit dem Spatel Mehl unter die Mischung
ziehen. Die Mischung in eine eingefettete
Backform (24 cm Durchmesser) geben. Eine
Stunde bei 160c C backen. Die ersten 15
Minuten die Backofentür leicht geöffnet halten.
B
Den Kuchen eine Weile in der Backform abkühlen
lassen, dann zur weiteren Abkühlung auf einen
Drahtrost stellen. Den Kuchen waagerecht
durchschneiden, die untere Hälfte mit der
Aprikosen-Konfitüre bestreichen und die beiden
Hälften wieder zusammenfügen. Die restliche
Konfitüre erhitzen und damit den Kuchen oben
bestreichen. - Die Glasur vorbereiten: Das Wasser
kochen, den Zucker und die Schokolade hinzu
geben und alles unter ständigem Rühren bei
schwacher Hitze köcheln lassen, bis eine glatte,
streichfähige Masse entstanden ist. Die Glasur
auftragen und abkühlen lassen. Den Kuchen mit
Schlagsahne servieren.
Brokkoli-Suppe
Zutaten:
- 50 g mittelalter Gouda
- 300 g gekochter Brokkoli (Röschen und
Zweige)
- Wasser, in dem der Brokkoli gekocht wurde
- 2 gekochte Kartoffeln, in Stücken
- 2 Brühwürfel
- 2 El ungeschlagene süße Sahne
-Curry
- Salz
-Pfeffer
- Muskat
B
Den Käse reiben/zerkleinern. Den Brokkoli mit den
gekochten Kartoffeln und etwas Sud vom Brokkoli
pürieren. Den Brokkoli-Püree, den verbkleibenden
Sud mit den Brühwürfeln in einen Messbecher
geben und auf 750 ml auffüllen. Die Suppe in
einem Kochtopf unter Umrühren zum Kochen
bringen. Den Käse hineinrühren und mit Curry,
Salz, Pfeffer und Muskat würzen. Die Sahne
hinzufügen.
Pizza
Zutaten für den Teig:
- 400 g Mehl
- 1/2 Tl Salz
- 20 g frische Hefe oder 1 1/2 Päckchen
Trockenhefe
- 2 El Speiseöl
- ca. 240 ml Wasser (35c C)
Zutaten für den Belag:
Page 47

47DEUTSCH
- 300 ml gesiebte Tomaten (aus der Dose)
- 1 Tl gemischte italienische Kräuter (trocken
oder frisch)
- 1 Zwiebel
- 2 Zehen Knoblauch
- Salz und Pfeffer
- Zucker
Zum Belag:
- Nach Belieben: Oliven, Salami,Artischocken,
Pilze, Anschovis, Mozzarella, Pfeffer, geriebener
abgelagerter Käse, Olivenöl.
B
Den Kneteinsatz in die Rührschüssel setzen.Alle
Zutaten in die Schüssel geben und die Taste für
den Knetvorgang drücken. Den Teig ca. 1 Minute
lang kneten, bis sich eine Kugel formt. Den Teig in
eine gesonderte Schüssel geben, mit einem
feuchten Tuch bedecken und ca. 30 Minuten
gehen lassen.
B
Zwiebeln und Knoblauch mit dem Messer in der
Schüssel zerkleinern und in einem Kochtopf glasig
braten. Die gesiebten Tomaten hinzugeben und
10 Minuten köcheln lassen. Mit Salz, Pfeffer und
Zucker abschmecken.Abkühlen lassen.
B
Den Backofen auf 250cC vorheizen.
B
Den Teig auf einer mit Mehl bestäubten Fläche
ausrollen und daraus zwei runde Scheiben formen.
Diese beiden Böden auf ein eingefettetes
Backblech legen. Dann den Belag auftragen; die
Ränder frei lassen. Die Garnitur darauflegen,
geriebenen Käse darüber streuen und etwas
Olivenöl daraufträufeln.
B
Die Pizza 12 bis 15 Minuten backen.
Gemüse-Kartoffel-Brätling
Zutaten:
-1 Ei
- 50 ml Milch
- 1 El Mehl
- 1 Tl Koriander
- Salz und Pfeffer
- 2 große Kartoffeln,ca. 300 g
- 100 Wintermöhren
- 150 g Sellerie
- 50 g Sonnenblumenkerne oder 2 El Maiskörner
- Öl zum Braten
B
Mischen Sie mit dem Messer das Ei, die Milch, das
Mehl, den Koriander, Salz und Pfeffer.
B
Die geschälten Kartoffeln, die geschrappten
Möhren und den gewaschenen Sellerie mit dem
groben Zerkleinerereinsatz reiben und zu der EiMischung geben. Das Gemüse, die Ei-Mischung
und die Sonnenblumenkerne bzw. Maiskörner in
einer getrennten Schüssel zusammenrühren.
B
Das Öl in einer Pfanne aufheizen, und 8 flache
Brätlinge goldbraun braten.Auf Küchenpapier
abtropfen lassen
B
Bratzeit: 3 bis 4 Minuten
Weißbrot
Zutaten:
- 500 g Mehl
- 15 g weiche Butter/Margarine
- 25 g frische Hefe oder 20 g Trockenhefe
- 260 ml Wasser
- 10 g Salz
- 10 g Zucker
Page 48

DEUTSCH48
B
Den Kneteinsatz in der Rührschüssel anbringen.
Mehl, Salz, Butter/Margarine in die Schüssel
geben. Die Hefe und das Wasser hinzugeben. Den
Deckel aufsetzen und in Pfeilrichtung drehen, bis
er hörbar einrastet. Die Taste Kneten drücken und
den Teig kneten lassen. - Vgl. die Tabelle "Mengen
und Zubereitungszeiten".
B
Den Teig aus der Rührschüssel nehmen, in eine
große gesonderte Schüssel legen und mit einem
feuchten Küchentuch bedecken. 20 Minuten
gehen lassen. Danach den Teig flachschlagen und
zu einer Kugel formen.
B
Den Teig wieder in die separate Schüssel
zurücklegen, wieder mit dem feuchten Tuch
bedecken und nochmals 20 Minuten gehen
lassen.Wieder flachschlagen und aufrollen.
B
Den Teig in ein vorgefettete Backform legen und
weitere 45 Minuten gehen lassen. Das Brot auf
unterem Rost im vorgeheizten Backofen backen.
B
Bei ca. 225c C auf einem unteren Rost im
vorgeheizten Backofen ca. 35 Minuten backen.
Page 49

FRANÇAIS 49
Composants et accessoirest
A Bloc moteur
B Panneau de commande
C Interrupteur de sécurité
D Capuchon de sécurité (doit être fixé pour
pouvoir utiliser les fonctions du bol)
E Bol pour préparer les aliments
F Axe d'entraînement
G Bol mixer
H Couvercle du bol mixer
I Doigt de sécurité du bol (active et désactive
l'interrupteur de sécurité)
J Couvercle du bol pour préparer les aliments
K Bouchon
L Cheminée de remplissage
M Poussoir
N Tamis du presse-agrumes
O Cône du presse-agrumes
P Tambour de la centrifugeuse
Q Tamis pour sélecter la pulpe
R Couvercle de la centrifugeuse
S Poussoir de la centrifugeuse
T Ensemble couteau + gaine de protection
U Crochet à pétrir
V Fouet ballon
W nsert à râper moyen
X Insert à râper fin
Y Insert à râper gros
Z Insert pour grainer
a Axe support
b Disque à trancher réglable (insert à trancher,
support et bouton de réglage)
Introduction
L'appareil est équipé d'un interrupteur
automatique de sécurité. En cas de surchauffe, ce
dispositif coupe automatiquement l'alimentation
électrique de l'appareil.
Si votre appareil s'arrête
brusquement:
1 Débranchez l'appareil.
2 Laissez refroidir l'appareil 60 minutes.
3 Branchez à nouveau l'appareil.
4 Remettez l'appareil en marche.
Consultez votre revendeur ou un Centre Service
Agréé Philips si l'interrupteur de sécurité se
déclenche trop fréquemment.
Avertissement: Afin d'éviter tout accident causé
par la remise en marche de l'interrupteur de
sécurité thermique, l'appareil ne doit pas être
connecté à un minuteur.
Important
◗ Lisez attentivement les instructions ainsi que
les illustrations avant d'utiliser votre appareil.
◗ Conservez ce mode d'emploi pour un usage
ultérieur.
Page 50

FRANÇAIS50
◗ Avant de brancher l'appareil, vérifiez que la
tension indiquée sur l'appareil correspond à la
tension du secteur de votre logement.
◗ N'utilisez jamais des accessoires ou des
composants des autres que ceux d'origine et
recommandés par Philips. Philips décline toute
résponsabilité envers la garantie si ce n'était
pas le cas.
◗ N'utilisez pas l'appareil si le cordon
d'alimentation, la fiche ou les autres pièces
sont détériorés.
◗ Si le cordon d'alimentation est endommagé, il
ne doit être remplacé que par Philips, par un
Centre Service Agréé Philips ou par des
personnes qualifiées pour éviter tout
accident.
◗ Avant la première utilisation,nettoyez toutes
les pièces en contact avec les aliments.
◗ Ne dépassez pas les quantités et les temps de
préparation indiqués dans le tableau.
◗ Ne dépassez pas le repère maximum du bol,
par ex. ne dépassez pas le trait supérieur de
graduation.
◗ Débranchez l'appareil immédiatement après
utilisation.
◗ Ne mettez jamais vos doigts ou tout autre
objet, (par ex. la spatule),dans la cheminée de
remplissage pour pousser les ingrédients sans
avoir au préalable arrêté l'appareil. Utilisez
uniquement le poussoir.
◗ Débranchez toujours l'appareil avant mettre
vos doigts ou tout autre objet dans le bol
mixer (par ex. la spatule).
◗ Tenez l'appareil hors de portée des enfants.
◗ Ne laissez jamais l'appareil fonctionner sans
surveillance.
◗ Placez correctement le couvercle sur le bol.
L'interrupteur de sécurité sera maintenant
désactivé et vous pouvez mettre l'appareil en
marche. Le bloc moteur et le capuchon de
sécurité comportent des repères. L'appareil
ne peut fonctionner que si la flèche du bloc
moteur coïncide exactement avec le repère
du capuchon.
◗ Arrêtez toujours l'appareil avant de détacher
un accessoire.
◗ Arrêtez l'appareil seulement en appuyant sur
le bouton STOP.
◗ Avant de retirer le couvercle, attendez que
toutes les pièces mobiles soient à l'arrêt.
◗ Vous ne pouvez pas retirer le capouchon de
sécurité si le couvercle n'est pas positionné
sur le bol ou si le bol a été enlevé avec le
couvercle.
◗ N'immergez jamais le bloc moteur dans l'eau
ni dans aucun autre liquide. Ne le rincez pas
non plus. Nettoyez-le avec un chiffon humide.
◗ Enlevez la gaine de protection du couteau
avant utilisation.
◗ Laissez les aliments cuits refroidir avant de les
hacher (température maximale 80cC/ 175cF).
◗ Si vous préparez un liquide chaud ou qui peut
mousser, n'ajoutez pas plus d'un litre dans le
bol mixer pour éviter tout débordement.
◗ Débranchez l'appareil immédiatement après
utilisation.
◗ Pour les durées de préparation, veuillez
consulter le tableau du mode d'emploi.
Page 51

FRANÇAIS 51
Notez que si le mixer est monté, vous ne pouvez
pas utiliser les fonctions du bol.
Utilisation de l'appareil
Smart Process Control (Contrôle
Intélligent de l'Opération)
Cet appareil est doté d'un système de Contrôle
Intélligent de l'Opération pour assurer une
préparation optimale des aliments et des résultats
parfaits.
Vous pouvez augmenter ou diminuer la vitesse en
trois étapes en appuyant sur le bouton + ou -.
Si vous appuyez sur la touche Eclair, l'appareil
fonctionnera à la vitesse maximale. Lorsque vous
relâchez le bouton, l'appareil s'arrête et revient à
la vitesse sélectionnée au préalable.
La procédure de préparation peut être arrêtée à
tout moment à l'aide du bouton Stop.
Si vous appuyez sur le bouton de l'opération
précedente au cours des 40 secondes suivantes la
procédure de préparation continuera là où elle a
été arrêtée.
Bol pour préparer les aliments
C
1 Montez le bol sur le robot en tournant la
poignée dans le sens de la flèche jusqu'à ce
que vous entendiez un clic.
C
2 Mettez le couvercle sur le bol.Tournez
fermement le couvercle dans le sens de la
flèche jusqu'à ce que vous entendiez un
clic.
Verrouillage de sûreté incorporé
B
Le bloc moteur, le bol et le couvercle comportent
des repères. L'appareil ne peut fonctionner que si
la flèche du bloc moteur coïncide exactement
avec le repère du couvercle.
C
1 Assurez-vous que le repère du bloc
moteur coïncide exactement avec le
repère du couvercle. L'ergot du couvercle
complètera l'ouverture de la poignée du
bol.
La cheminée de remplissage et le poussoir
C
1 Utilisez la cheminée de remplissage pour
ajouter du liquide et/ou des ingrédients
solides. Utilisez le poussoir pour pousser
les ingrédients dans la cheminée.
CLICK
CLICK
1
2
1
2
CLICK
Page 52

FRANÇAIS52
C
2 Le poussoir peut également servir à
fermer la cheminée pendant que l'appareil
est en marche, pour empêcher toute
projection.
Couteau
◗ Le couteau peut être utilisé pour hacher,
mélanger, mixer et réduire en purée.
C
1 Enlevez la gaine de protection du couteau.
Les lames du couteau sont très aiguisées et
tranchantes. Evitez de les toucher!
C
2 Placez l'axe d'entraînement dans le bol et
le couteau sur l'axe.
3 Mettez les ingrédients dans le bol.
Découpez les ingrédients en dés d'environ
3 cm de côté. Mettez le couvercle sur le
bol.
4 Placez le poussoir dans la cheminée de
remplissage.
C
5 Appuyez sur le bouton de l'opération de
hachage du panneau de commande.
- L'opération de hachage commencera par
4 impulsions pour assurer le hachage uniforme
des ingrédients (par ex. oignons ou noix).
- Ensuite la vitesse de hachage augmentera
jusqu'au maximum et continuera jusqu'à ce que
le bouton STOP soit actionné.
◗ Appuyez sur le bouton - pour diminuer la
vitesse.
◗ La procédure de préparation peut être
interrompue à tout moment en appuyant sur
le bouton STOP.
Suggestions
◗ Si vous hachez des oignons, arrêtez l'appareil
après quatre impulsions pour éviter de les
hacher trop fin.
◗ Ne laissez pas tourner l'appareil trop
longtemps lorsque vous hachez du fromage (à
pâte dure) : le fromage chaufferait trop,
commencerait à fondre et à devenir pâteux.
◗ Ne hachez pas des ingrédients trop durs tels
que des grains de café, noix de muscade ou
des glaçons. Cela pourrait émousser les lames
du couteau.
Si des aliments s'enroulent autour du couteau ou
collent à la paroi du bol :
1 Débranchez d'abord l'appareil.
2 Retirez le couvercle du bol.
Page 53

FRANÇAIS 53
3 Enlevez ensuite les aliments collés au
couteau ou à la paroi du bol avec la
spatule.
Inserts
Ne hachez jamais des ingrédients durs tels que les
glaçons avec les inserts.
C
1 Placez l'insert sélectionné sur l'axe
support avant de le placer sur l'axe
d'entraînement.
Les lames sont très affilées. Ne les touchez pas!
C
2 Placez l'axe des inserts sur l'axe
d'entraînement qui se trouve dans le bol.
3 Mettez le couvercle sur le bol.
4 Mettez les ingrédients dans la cheminée.
Coupez les gros morceaux pour pouvoir
les introduire dans la cheminée.
C
5 Pour les meilleurs résultats remplissez la
cheminée de façon régulière.
Si vous devez traiter d'importantes quantités
d'aliments, ne traitez que des petites portions à la
fois et videz le bol fréquemment.
C
6 Sélectionnez l'opération "hacher et
trancher" sur le panneau de commande.
La vitesse de la procédure de prépartion
augmente immédiatement à la vitesse de
préparation sélectionnée pour garantir des
résultats optimaux.
La vitesse de préparation peut augmenter jusqu'à
3 fois en appuyant sur le bouton + et diminuer
jusqu'à 3 fois en appuyant sur le bouton -.
C
7 Appuyez légèrement sur les ingrédients
avec le poussoir.
◗ Si vous râpez des légumes ou fruits tendres,
vous pouvez diminuer la vitesse de 3 étapes
en appuyant sur le bouton - pour ne pas
réduire les légumes ou les fruits râpés en
purée.
C
8 Pour retirer l'insert du support, prenez le
support dans la main. Poussez les ergots
pour faire sortir l'insert désiré.
Disque à trancher réglable
Le disque à trancher réglable vous permet de
trancher les ingrédients à l'épaisseur voulue.
CLICK
2
1
Page 54

FRANÇAIS54
Soyez attentif: les lames du couteau sont très
affilées.
C
1 Fixez le couteau sur le support.
C
2 Connectez le bouton qui se trouve au fond
du disque et tournez-le jusqu'à ce que les
répères coïncident. Maintenant le disque
est bloqué.
C
3 Tournez le bouton réglable et fixez-le à
l'épaisseur préférée.
C
4 Placez le disque à trancher réglable sur
l'axe d'entraînement.
5 Fermez le couvercle et mettez les
ingrédients dans la cheminée de
remplissage.
C
6 Sélectionnez l'opération "hacher et
trancher" sur le panneau de commande.
7 Si nécessaire, appuyez légèrement les
ingrédients avec le poussoir.
Accessoire de pétrissage
L'accessoire de pétrissage sert à pétrir la pâte à
pain ou à pizza.
C
1 Fixez l'accessoire de pétrissage sur l'axe
d'entraînement.
C
2 Placez le bol sur le bloc moteur, tournez la
poignée dans la direction de la flèche et
fixez l'accessoire de pétrissage sur l'axe.
3 Mettez les ingrédients dans le bol.
4 Fermez le bol avec le couvercle.
C
5 Appuyez sur le bouton pour l'opération
de pétrissage du Smart Process Control.
L'appareil augmente graduellement la vitesse de
pétrissage au cours de 10 secondes jusqu'à la
vitesse maximum. L'appareil continuera à
fonctionner à cette vitesse jusqu'à ce que vous
pressiez le bouton Stop. La vitesse peut être
diminuée jusqu'à 3 fois en appuyant le bouton -.
Si le bouton +/- ne peut plus être activé c'est
parce que le moteur est à sa limite.
1
2
Page 55

FRANÇAIS 55
Fouet ballon
Vous pouvez utiliser le fouet ballon pour battre
des oeufs, fouetter des blancs d'oeufs, des
puddings, faire de la crème fouettée. 1
Placez le bol sur le bloc moteur et tournez-le à
gauche jusqu'à ce que vous entendiez un 'clic'.
C
2 Placez l'axe d'entraînement dans le bol.
C
3 Fixez le fouet sur l'axe d'entraînement.
4 Mettez les ingrédients sur le bol, placez le
couvercle sur le bol et tournez-le à droite
jusqu'à ce vous entendiez un clic.
C
5 Appuyez sur le bouton pour fouetter sur
le panneau de commande.
L'appareil augmente graduellement la vitesse du
fouet pendant 15 secondes jusqu'à la vitesse
maximum. L'appareil continuera à fonctionner à
cette vitesse jusqu'à ce que vous pressiez le
bouton Stop. La vitesse peut être diminuée
jusqu'à 3 fois en appuyant le bouton -. Si le
bouton +/- ne peut plus être activé c'est parce
que le moteur est à sa limite.
Mixer
Le mixer est destiné à:
- Mélanger des ingrédients liquides, tels que les
produits laitiers, les sauces, les jus de fruits, les
soupes, les cocktails, les sweat teas, et les milkshakes.
- Mixer des ingrédients mous comme des pâtes à
crêpes ou de la mayonnaise.
- Réduire en purée des aliments cuits, pour les
nourrissons par exemple.
◗ L'appareil peut être utilisé avec ou sans le
mixer attaché au bloc moteur. Si vous utilisez
l'appareil sans le mixer, l'appareil ne
fonctionnera pas si le capuchon de sécurité
n'a pas été correctement visé sur le bloc
moteur.
C
1 Pour attacher le bol mixer, enlevez le
capuchon de sécurité situé au dessus du
panneau de commande.
C
2 Montez le bol mixer sur le bloc moteur en
le tournant dans la direction de la flèche
jusqu'à ce qu'il soit fermement fixé. La
poignée doit être dirigée vers la gauche.
N'exercez trop de pression sur la poignée du bol
mixer.
3 Mettez les ingrédients dans le bol.
C
4 Fermez le couvercle.
1
2
2
1
Page 56

FRANÇAIS56
C
5 Fixez toujours l'interrupteur de sécurité
sur le couvercle du mixer avant de
commencer la préparation des aliments.
C
6 Appuyez sur le bouton de l'opération de
mélange sur le panneau de commande. Le
mixer commence à fonctionner. La vitesse
augmente jusqu'au maximum. L'appareil
continuera à fonctionner à cette vitesse
jusqu'à ce que le bouton STOP soit
appuyé. Pendant le mélange des
ingrédients, la vitesse peut être diminuée
3 fois en appuyant sur le bouton -.
Suggestions
C
◗ Les ingrédients liquides peuvent être versés
dans le bol mixer par l'ouverture du
couvercle.
◗ Plus vous laissez l'appareil tourner longtemps,
plus le mélange que vous obtenez est fin.
◗ Coupez les aliments en morceaux pour les
introduire dans le bol mixer.Si vous devez
traiter d'importantes quantités d'aliments, ne
traitez que des petites portions à la fois.
◗ Faites tremper les ingrédients durs tels que
les germes de soja pour faire le lait de soja
avant de les préparer.
C
◗ Pour hacher des glaçons, introduisez-les dans
le bol mixer, fermez le couvercle et utilisez la
fonction impulse.
Si des aliments collent à la paroi du bol mixer:
1 Arrêtez l'appareil et débranchez-le.
2 Ouvrez le couvercle.
N'ouvrez jamais le couvercle pendant le
fonctionnement de l'appareil.
3 Enlevez les aliments avec une spatule.
Faites attention à tenir la spatule à une distance
sûre du couteaux (env.2 cm).
◗ Si vous n'êtes pas satisfait des résultats,
appuyez sur la touche éclair plusieurs fois
pour un usage momentané.Vous pouvez aussi
mélanger les ingrédients avec une spatule
(uniquement après l'arrêt complet du mixer)
ou verser un peu du contenu dans un autre
bol afin de préparer une quantité plus faible.
◗ Dans certains cas les ingrédients sont plus
facile à traiter si vous ajoutez un peu de
liquide tel que le jus de citron lorsque vous
traitez des fruits.
Page 57

FRANÇAIS 57
Presse-agrumes
Le presse-agrumes peut être utilisé avec tous
types d'agrumes.
C
1 Placez le bol sur le bloc moteur et le tamis
sur le bol.
C
2 Tournez le tamis dans la direction de la
flèche jusqu'à ce que le doigt du capuchon
de sécurité se fixe sur le bloc moteur.
C
3 Pressez doucement le cône sur le tamis
pour le fixer.
C
4 Appuyez sur le bouton du presse-agrumes
du panneau de commande.
La vitesse de préparation peut être augmentée
jusqu'à 3 fois en appuyant sur le bouton +.
L'opération commence et s'arrête si le bouton
STOP est appuyé.
C
5 Pressez fermement la moitié d'un fruit sur
le cône rotatif.
Suggestions
◗ De temps en temps arrêtez vous de presser
les fruits pour enlever la pulpe du tamis.
Lorsque vous enlevez la pulpe, arrêtez l'appareil
et retirez le bol avec le tamis et le cône attachés.
C
◗ Après usage, retirez le bol avec les accessoires
du presse-agrumes pour éviter que le jus
s'écoule sur l'appareil.
Centrifugeuse
La centrifugeuse peut être utilisée pour préparer
des jus frais de fruits et légumes. La pulpe, les
peaux et les pépins seront séparés.
1 Placez le bol sur le bloc moteur.
C
2 Placez l'axe d'entraînement dans le bol.
1
CLICK
1
2
2
1
Page 58

FRANÇAIS58
C
3 Attachez le tambour de la centrifugeuse à
l'axe.
C
4 Insérez le sélecteur de pulpe dans le
tambour de la centrifugeuse et fixez bien
les trois picots dans les fentes du tambour.
C
5 Mettez le couvercle de la centrifugeuse sur
le bol.
C
6 Appuyez sur le bouton de la centrifugeuse.
N'utilisez jamais l'accessoire centrifugeuse si le
tamis rotatif ou le tambour sont défecteux.
L'appareil commence à fonctionner lentement
jusqu'à la vitesse maximum. La vitesse peut être
diminuée en appuyant sur le bouton -. L'appareil
s'arrête si le bouton STOP est appuyé.
C
7 Introduisez les fruits ou les légumes dans
la centrifugeuse par la cheminée de
remplissage.
C
8 Si nécessaire, vous pouvez pressez les
ingrédients avec le poussoir.Tenez le
poussoir dans la cheminée de remplissage
aussi longtemps que possible pour
empêcher toute projection.
9 Laissez l'appareil fonctionner encore
20 secondes pour extraire tout le jus
restant dans les fruits ou les légumes.
C
10 Pour empêcher toute projection,enlevez
le bol avec les accessoires de la
centrifugeuse après utilisation.
Suggestions
◗ Avant d'utiliser la centrifugeuse:
- coupez les carottes, les radis, etc.
- écorcez les agrumes, les ananas, les melons, etc.
- dénoyautez les cerises, prunes, abricots, pêches,
etc.
◗ Mettez toujours l'appareil en marche avant de
mettre les fruits dans la centrifugeuse.
◗ Arrêtez l'appareil de temps en temps pour
retirer la pulpe du tamis ou du tambour de la
centrifugeuse.◗ Ne préparez pas des
quantités importantes d'aliments en une fois.
◗ Arrêtez l'appareil s'il commence à vibrer
fortement et nettoyez le tamis et le filtre
avant de remettre l'appareil en marche.
1
2
2
1
Page 59

FRANÇAIS 59
Nettoyage
Débranchez toujours l'appareil avant de nettoyer
le bloc moteur.
1 Le bloc moteur peut être nettoyé avec un
chiffon humide. N'immergez jamais le bloc
moteur dans l'eau et ne le rincez pas sous
l'eau non plus.
2 Lavez immédiatement après utilisation les
accessoires en contact avec les aliments, à
l'eau chaude savonneuse.
◗ Le bol, le couvercle du bol, le poussoir et les
accessoires (sauf le bol mixer) peuvent être
lavés dans le lave-vaisselle.
Ces composants ont été testés pour une
résistance au lave-vaisselle conformément à la
norme DIN EN 12875.
Le bol mixer n'est pas résistant au lave-vaisselle!
◗ Pour enlever le couvercle, ouvrez-le et puis
tirez-le vers le haut.
Ne retirez le couvercle que pour le
nettoyer.Faites attention en nettoyant le couteau
l'ensemble couteaux et les inserts. Leurs lames
sont très aiguisées !
Evitez de cogner les lames du couteau, et les
inserts contre des objets durs car cela pourrait les
émousser.
Certains aliments peuvent provoquer une
décoloration de la surface des accessoires. Cela
est sans importance sur le bon fonctionnement
de l'appareil. Les décolorations peuvent
disparaitre après quelque de temps.
C
◗ Enroulez le cordon restant au dos de
l'appareil.
Nettoyage rapide du mixer
C
1 Versez de l'eau tiède (pas plus de
0,5 litres) et un peu de produit lavevaisselle dans le bol mixer.
2 Fermez le couvercle.
C
3 Laissez l'appareil fonctionner quelques
instants en appuyant sur la touche Eclair.
(L'appareil ne fonctionne plus lorsque vous
relâchez le bouton.)
4 Détachez le bol mixer et rincez-le avec de
l'eau claire.
Pour nettoyer le fouet soigneusement:
C
1 Détachez le pignon du fouet.
Les pignons et les fouets peuvent être nettoyés à
l'eau chaude savonneuse ou au lave-vaisselle.
Page 60

FRANÇAIS60
Pour nettoyer le disque à trancher réglable
soigneusement:
C
1 Tournez le bouton de réglage à droite
pour ôter le couteau du disque.
Le disque, le couteau et le bouton de réglage
peuvent être nettoyés à l'eau chaude savonneuse
ou au lave-vaisselle.
Rangement
MicroRangement
C
◗ Mettez les accessoires (couteau, axe support)
sur l'axe d'entraînement et placez-les dans le
bol. Rangez toujours l'axe d'entraînement en
dernier.
Garantie et service
Pour toute réparation/information, ou en cas de
problème, visitez notre website: www.philips.com.
Ou veuillez contacter le Service Consommateurs
Philips de votre pays (vous trouverez le numéro
de téléphone dans le dépliant sur la garantie
internationale). S'il n'y a aucun Service
Consommateurs Philips dans votre pays,
contactez votre distributeur ou le Service
Department of Philips Domestic Appliances and
Personal Care BV.
Solution
Tournez le bol et/ou le couvercle dans le sens des
aiguilles d'une montre jusqu'à ce que vous entendiez un
clic.Vérifiez que les répères du bol et du couvercle
coïncident bien.
L'interrupteur de sécurité a probablement coupé
l'alimentation suite à une surchauffe de l'appareil. 1)
Débranchez l'appareil. 2) Appuyez sur le bouton STOP.
3) Laissez l'appareil refroidir pendant 60 minutes. 4)
Branchez à nouveau l'appareil. 5) Remettez l'appareil en
marche.
Appuyez sur le bouton qui correspond à l'application
voulue.
Cet appareil est équipé d'une mémoire. Si vous
remettez l'appareil en marche dans un délai de
40 secondes, l'appareil continuera l'application la où elle
a été interrompue. Si vous voulez recommencer la
procédure de préparation dès le début: 1) Appuyez
brièvement sur le bouton d'une autre application (par
ex. sur la touche Eclair).2) Puis appuyez sur le bouton
STOP. 3) Appuyez sur l'application correcte pour
recommencer dès le début.
Si le mixer et le bol pour préparer les aliments ont été
correctement attachés, seul le mixer fonctionnera.Si
vous voulez utiliser le bol pour préparer les aliments,
détachez le mixer et fermez l'orifice à l'aide du
capuchon de sécurité.
Le moteur est à sa limite, par ex. après une application
de pétrissage où si la vitesse est située à un niveau d'où
elle ne peut plus être diminuée.
Problème
L'appareil ne peut pas
être mis en marche.
L'appareil s'est arrêté
brusquement.
Vous n'avez pas
appuyé sur le bon
bouton.
Après avoir remis
l'appareil en marche, il
ne reprend pas
l'application dès le
début.
Le bol mixer et le bol
pour préparer les
aliments sont attachés,
mais le mixer seul
fonctionne.
Le bouton +/- ne
réagit pas à certaines
applications.
En cas de problèmes
1
2
Page 61

FRANÇAIS 61
Te m p s
d'application
10 - 60 sec.
10 - 60 sec.
10 - 60 sec.
60 - 180 sec.
30 - 180 sec.
10 - 60 sec.
selon la quantité
selon la quantité
Application
Hacher, réduire en puré, mélanger
Râper
Trancher
Pétrir,mixer
Fouetter, battre, émulsionner
Mélanger, réduire en purée
Presser des agrumes
Extraire des jus de fruits ou de
légumes
Accessoir
e
P
hjk
¬
{
˚
D
ƒ
©
Fonction
¥
^
^
¨
∆
†
“
‘
Fonctions, applications et temps d'application
Applications
Salades,
légumes crues
Salades,
légumes crues
Crêpes,
gaufres
Plats panés,
gratins
Desserts,
garnitures
Garnitures,
soupes, sauces,
gratins
Procédure
Coupez les légumes pour les
introduire dans la cheminée.
Remplissez la cheminée et
râpez-les en appuyant
doucement sur le poussoir.
Coupez les légumes pour les
introduire dans la cheminée.
Remplissez la cheminée et
râpez-les en appuyant
doucement sur le poussoir.
Versez d'abord le lait dans le
mixer, puis ajoutez les
ingrédients secs. Mélangez
pendant 1 minute environ. Si
nécessaire, répétez l'opération
2 fois.Arrêtez pendant
quelques minutes pour laisser
l'appareil refroidir à la
température ambiantale.
Utilisez du pain sec, croustillant
Prenez du beurre mou pour
obtenir une crème légère.
Utilisez un morceau de
parmesan sans croûte et
coupez-le en morceaux
d'environ 3 x 3 cm.
Bouto
n /
access
oire
^ / k
^ / ¬
† / D
¥ / P
¨ / {
¥ / P
Quant
ité
maxi
male
500g
500g
750ml
lait
100g
300g
200g
Ingrédients et
résultats
Pommes,
carottes, céleri
- râper
Pommes,
carottes, céleri
- trancher
Pâtes à crêpes
(crêpes) fouetter
Chapelure
Crème au
beurre - battre
Fromage
(parmesan)râper
Quantité et temps de préparation
Page 62

FRANÇAIS62
Applications
Sauces, pizzas,
gratins, fondue
Garnitures,
sauces,
pâtisseries,
flans, mousses
Purées, soupes
Aliments pour
bébés
Salades,
garnitures
Pain
Pizza
Procédure
Coupez le fromage en
morceaux pour les introduire
dans la cheminée. Appuyez
doucement sur le poussoir.
Utilisez du chocolat noir, dur.
Cassez en morceaux de 2 cm.
Utilisez les légumes cuits. Si
nécessaire, ajoutez du liquide
pour améliorer la consistance
du mélange.
Pour obtenir une purée
épaisse, ajoutez peu de liquide.
Pour une purée fine, ajoutez du
liquide jusqu'à ce que le
mélange soit suffisamment
onctueux.
Mettez le concombre dans la
cheminée et appuyez
doucement.
Mélangez la levure et le sucre
avec de l'eau chaude.Ajoutez
la farine, l'huile et le sel et
mélangez pendant 90 sec.
environ. Laissez lever 30 min.
Même opération que pour la
pâte à pain. Mélangez pendant
1 minute environ.Ajoutez tout
d'abord la farine et ensuite les
autres ingrédients.
Bouto
n /
access
oire
^ /
h
¥ / P
¥ / P
¥ / P
^ / ¬
¨ / {
¨ / {
Quant
ité
maxi
male
200g
200g
250g
500g
2
conco
mbres
500g
flour
750g
farine
Ingrédients et
résultats
Fromage râper
Chocolat hacher
Petits pois,
haricots cuits purée
Légumes et
viandes cuits purée
Concombre trancher
Pâte à pain pétrir
Pâte
Applications
Tourtes aux
pommes,
biscuits, tartes
aux fruits
Pain brioché
Entremets,
soufflés,
meringues
Sauces,
soufflés,
meringues,
aliments pour
bébés
Procédure
Utilisez de la margarine froide
et coupez-la en morceaux de
2 cm. Mettez la farine dans le
bol et ajoutez la margarine.
Pétrissez jusqu'à ce que la pâte
devienne friable, puis ajoutez
de l'eau froide tout en
mélangeant. Arrêtez dès que la
pâte commence à former une
boule. Laissez la pâte refroidir
avant de vous en servir.
Mélangez d'abord la levure, de
l'eau chaude et un peu de
sucre dans un bol séparé.
Ajoutez les ingrédients dans le
bol et pétrissez la pâte jusqu'à
ce qu'elle ne colle plus au bol
(environ 1 minute). Laissez
lever 30 minutes.
Utilisez les œufs à température
ambiante. Remarque : utilisez
au moins deux blancs d'œufs.
Suggestion: ajoutez un peu de
jus de citron pour empêcher la
décoloration des fruits. Ajoutez
du liquide pour une purée plus
onctueuse.
Bouto
n /
access
oire
¨ / {
¨ / {
ø /
ß
† / D
Quant
ité
maxi
male
300g
farine
500g
flour
4
blancs
d'œufs
500g
Ingrédients et
résultats
Pâte (pâte
brisée) - pétrir
Pâte (levure) pétrir
Blancs d'œufs
- fouetter
Fruits (par ex.
pommes,
bananes,
châtaignes
d'eau) mélanger
Page 63

63FRANÇAIS
Applications
Sauces,
soufflés,
meringues,
aliments pour
bébés
Garnitures,
fondues
Sauces, soupes,
garnitures,
beurre aux
herbes
Jus de fruits
Salades,
garnitures et
sauces de
barbecue
Steaks tartare,
hamburgers,
boulettes de
viande.
Procédure
Suggestion: ajoutez un peu de
jus de citron pour empêcher la
décoloration des fruits.
Pelez l'ail. Utilisez la touche
Eclair quelques fois pour éviter
un hachage trop fin. Utilisez au
moins 150g d'ail.
Lavez et séchez les herbes
avant de les hacher.
Pressez les fruits dans la
centrifugeuse.
Tous les ingrédients doivent
être à température ambiante.
Remarque : utilisez au minimum
un gros œuf, deux petits œufs
ou deux gros jaunes d'œufs.
Mettez l'œuf et un peu de
moutarde et un peu de vinaigre
dans le bol et ajoutez l'huile
goutte à goutte.
Retirez d'abord les nerfs ou les
os. Coupez la viande en dés de
3 cm. Utilisez la touche Eclair
pour un hachage grossier.
Bouto
n /
access
oire
¥ / P
¥ / P
¥ / P
‘ / ©
ø /
ß
¥ / P
Quant
ité
maxi
male
500g
300g
Min.
50g
500g
(quant
ité
totale)
3
œufs
500g
Ingrédients et
résultats
Fruits (par ex.
pommes,
bananes) hacher
Ail - hacher
Herbes (par
ex. persil) hacher
Jus (par ex.
pommes,
carottes, etc.) mélanger
Mayonnaise
Viande hacher
Applications
Sauces,
soufflés,
meringues,
aliments pour
bébés
Garnitures,
fondues
Sauces,
soupes,
garnitures,
beurre aux
herbes
Jus de fruits
Salades,
garnitures et
sauces de
barbecue
Steaks tartare,
hamburgers,
boulettes de
viande.
Procédure
Suggestion: ajoutez un peu de
jus de citron pour empêcher la
décoloration des fruits.
Pelez l'ail. Utilisez la touche
Eclair quelques fois pour éviter
un hachage trop fin. Utilisez au
moins 150g d'ail.
Lavez et séchez les herbes
avant de les hacher.
Pressez les fruits dans la
centrifugeuse.
Tous les ingrédients doivent
être à température ambiante.
Remarque : utilisez au
minimum un gros œuf, deux
petits œufs ou deux gros
jaunes d'œufs. Mettez l'œuf et
un peu de moutarde et un peu
de vinaigre dans le bol et
ajoutez l'huile goutte à goutte.
Retirez d'abord les nerfs ou les
os. Coupez la viande en dés de
3 cm. Utilisez la touche Eclair
pour un hachage grossier.
Bouto
n /
access
oire
¥ / P
¥ / P
¥ / P
‘ / ©
ø /
ß
¥ / P
Quant
ité
maxi
male
500g
300g
Min.
50g
500g
(quant
ité
totale)
3
œufs
500g
Ingrédients et
résultats
Fruits (par ex.
pommes,
bananes) hacher
Ail - hacher
Herbes (par
ex. persil) hacher
Jus (par ex.
pommes,
carottes, etc.) mélanger
Mayonnaise
Viande hacher
Page 64

FRANÇAIS64
Applications
Viande hachée
Soupes, sauces
Garnitures,
crèmes,
mélanges de
crèmes glacées
Procédure
Retirez d'abord les nerfs ou les
os. Coupez la viande en dés de
3 cm. Utilisez la touche Eclair
pour un hachage plus grossier.
Utilisez des légumes cuites.
Utilisez de la crème
préalablement refroidie dans le
réfrigérateur. Remarque: utilisez
au moins 125 ml de crème
liquide. La crème fouettée est
prête en 2 min.
Bouto
n /
access
oire
¥ / P
† / D
ø /
ß
Quant
ité
maxi
male
200g
500ml
500ml
Ingrédients et
résultats
Volaille hacher
Soupe - mixer
Crème
fouettée fouetter
Recettes
Pâte à tartiner au courgette
Ingrédients:
- 2 courgettes
- 3 oeufs durs
- 1 petit oignon
- 1 c. à s. d'huile végétale
- percil
- 2-3 c. à s. crème
- jus de citron, sauce Tabasco, sel, poivre, curry,
paprika
B
Lavez et séchez les courgettes, et râpez-les à
l'aide de l'insert à râper fin dans le bol.Transférez
les courgettes râpées sur une assiette, saupoudrez
de sel et laissez pendant 15 minutes afin que le
sel absorbe le liquide des courgettes râpées.
Coupez l'oignon en 4 morceaux et hachez-les
menu avec la gousse d'ail. Hachez le persil après
avoir enlevé les tiges.
B
Ensuite mettez la courgette râpée sur une
serviette propre et pressez-la pour extraire le jus.
Versez un peu d'huile dans une poêle et faites
cuire légèrement les oignons et l'ail hachés, et
ajoutez les courgettes râpées. Le jus doit
s'évaporer des ingrédients. Laissez les ingrédients
cuits refroidir quelque temps. Mettez les oeufs et
les autres ingrédients dans le bol, assaisonnez et
mixez-le tout. Servez sur pain grillé.
Page 65

65FRANÇAIS
Tarte aux fruits
Ingrédients:
- 180g dattes
- 270 g pruneaux
- 60 g amandes
- 60 g noix
- 60 g raisins
- 60 g raisins de Smyrne
- 240 g farine de seigle
- 120 g farine de blé
- 120 g sucre brun
- 360 g babeurre
- une pinçée de sel
- 1 sachet de levure
B
Introduisez le couteau dans le bol. Mettez tous les
ingrédients dans le bol, appuyez sur le bouton
pour l'application de hachage et mixez les
ingrédients pendant 30 secondes. Si la pâte colle
à la paroi du bol, retirez-la à l'aide d'une
spatule.Versez la pâte dans un moule de 30 cm
longueur et faites-la cuire pendant 40 minutes à
170cC.
Quiche aux poireaux
Ingrédients pour la pâte:
- 250 g farine de blé (ou farine de blé complète)
- une pincée de sel
- 1 c. à s. miel
- 20 g levure fraîche ou 1/2 sachet de levure en
poudre
- 100 g beurre
- 6 c. à s. eau tiède
Ingrédients pour la garniture:
- 500 g poireaux
- huile végétal
- 4 œufs
- 500 g crème aigre
- sel, poivre, 1-2 c. à s. de farine, si nécessaire
B
Mettez les ingrédients dans le bol et pétrissez
jusqu'à ce que vous obtenez une pâte homogène.
Laissez la pâte lever pendant 30 min.
B
Tranchez les poireaux avec le disque à trancher
réglable (par ex. réglage 3). Versez un peu d'huile
dans la poêle et faites cuire les poireaux tranchés
pendant quelques minutes. Mettez les autres
ingrédients dans le bol mixer et laissez le mixer
fonctionner jusqu'à ce que le mélange devienne
crémeux.Ajoutez-y 1-2 c. à s. de farine pour
épaissir le mélange.
B
Graissez un moule de 24 cm de diamètre et
étalez la pâte sur le fond et les côtés du moule.
Puis étalez le mélange à poireaux sur la pâte et
versez le reste des ingrédients au-dessus. Faites
cuire au four chaud pendant environ 40 minutes à
180cC. Vous pouvez servir chaud ou froid.
Goulache hongrois
Ingrédients:
- 1 c. à s. huile
- 1 oignon moyen
- 1 c. à c. paprika
- 400 g boeuf ou porc
- 1 poivron
- 1 tomate
- sel
Page 66

FRANÇAIS66
- 200 g carottes
- 300 g pommes de terre
- graines de cumin
B
Lavez la viande et coupez-la en dès de 2 cm.
Pelez l'oignon et hachez-le dans le bol à l'aide du
couteau métallique. Enlevez le trognon du poivron
et tranchez-le en rondelles à l'aide du disque à
trancher réglable. Pelez la tomate, enlevez les
pépins et coupez-la en bandes minces. Faites
revenir l'oignon haché dans l' huile. Retirez-le du
feu et aspergez l'oignon de paprika, ajoutez-y la
viande et faites frire à feu vif pendant quelques
minutes en remuant sans cesse.Ajoutez le poivron,
la tomate et le sel au goût, couvrez la poêle et
braisez le tout dans son propre jus à feu doux
jusqu'à ce que tous les ingrédients soient presque
tendres.
B
Pendant ce temps, pelez et tranchez les carottes
à l'aide du disque à trancher réglable et épluchez
et coupez en dès les pommes de terre. Ajoutez-les
à la viande et versez une quantité d'eau froide
suffisante pour la soupe que vous voulez préparer
(env. 1,2 litres). Assaisonnez de graines de cumin
et faites cuire à feu doux jusqu'à ce que la
préparation soit ramolli comme le beurre, en
ajoutant plus de sel, si nécessaire.
B
Servez chaud.Vous pouvez ajouter une garniture
de rondelles de poivron et servir des poivrons
rouges sur une autre assiette.
Tarte aux fraises
Ingrédients:
- 100 g margarine
- 100 g sucre
- 3 jaunes d'oeufs
- 240 g farine
- 100 g noix de coco
Garniture:
- 80 g sucre
- 2 c. à c. jus de citron
- 400 g fromage blanc
- 500 g fraises
Glaçage:
- 500 g fraises
- 250 ml eau
- 120 g sucre
- 60 g maizena
Garnissage:
- 250 g crème
B
Chauffez le four à 180cC.Travaillez la margarine
avec le sucre dans le bol en utilisant le couteau.
B
Incorporez le jaune d'oeuf, la farine et les flocons
de noix de coco. Mettez la pâte dans le moule,
pressez les bords et percez la pâte de quelques
trous avec une fourchette. Faites cuire pendant
15-20 minutes jusqu'à ce qu'à ce qu'elle devienne
dorée. Retournez la tarte sur une grille pour
refroidir. Mélangez le sucre, le jus de citron et le
fromage blanc jusqu'à ce qu'ils deviennent
Page 67

67FRANÇAIS
homogènes à l'aide du couteau et de l'accessoire
de pétrissage. Nappez le fond de la tarte refroidie
de la crème obtenue.Arrangez une partie des
fraises (queue en bas) sur la tarte. Laissez au
froid.
B
Préparez le glaçage. Mélangez les fraises
restantes avec de l'eau et sucre dans le bol mixer.
Faites dissoudre la maizena dans 125 ml de la
préparation à fraises. Faites bouillir le mélange à
fraises. Lorsqu'il est amené à ébullition, incorporez
la maizena dissoute. Couvrez les fraises du
glaçage chaud à l'aide d'une cuillère et laissez au
froid pendant 2 heures. Rajoutez la crème
fouettée.
Milkshake aux fruits frais
Ingrédients:
- 100 g bananes ou fraises
- 200 ml lait frais
- 50g glace à la vanille
- sucre semoule au goût
B
Pelez les bananes et rincez les fraises. Coupez-les
en petits morceaux. Mettez tous les ingrédients
dans le bol mixer.Mélangez jusqu'à ce qu'ils
deviennent mousseux.
B
Vous pouvez utiliser votre fruits préférés pour
préparer un milkshake aux fruits frais à votre
goût.
Rond de pain aux noisettes
Ingrédients pour la pâte:
- 500 g farine tamisée
- 75 g sucre
- 1 c. à c. de sel
- 1 oeuf
- 250 ml lait (à 35cC)
- 100 g beurre ramolli
- 30 g levure fraîche (pour la levure déshydratée,
voir les instructions sur l'emballage)
Garniture:
- 250 g noisettes hachées
- 100 g sucre
- 2 sachets de sucre vanillé
- 125 ml crème fraîche
B
Chauffez le four à 200cC. Mélangez le lait, la
levure et le sucre à l'aide de l'accessoire à pétrir
dans le bol pendant 15 secondes. Ajoutez-y la
farine, le sel,le beurre et l'oeuf. Pétrissez la pâte
pendant 2 minutes. Mettez la pâte dans un autre
bol et couvrez le bol avec un linge humide et
laissez lever au chaud 20 minutes.
B
Hachez les noisettes avec le couteau métallique.
Mélangez les ingrédients pour la garniture.
Rompez la pâte et étendez-la afin d'obtenir une
couche rectangulaire. Nappez la pâte du mélange
aux noisettes et roulez-la en forme d'anneau.
Mettez-la dans un moule beurré. Laissez lever
20 minutes. Couvrez le dessus d'un peu de jaune
d'oeuf battu et mettez le moule sur une grille au
centre du four. Faites cuire 25 - 30 minutes à
200cC.
Gâteau au chocolat
Ingrédients:
- 140 g beurre ramolli
- 110 g sucre glace
Page 68

FRANÇAIS68
- 140 g chocolat
- 6 blancs d'oeufs
- 6 jaunes d'oeufs
- 100 g sucre semoule
- 140 g farine de blé
Garniture:
- 200 g confitures d'abricots
Glaçage:
- 125 ml d'eau
- 300 g sucre
- 250 g chocolat râpé
- Crème fouettée, si vous le souhaitez
B
Chauffez le four à 160cC. Mélangez le beurre
avec le sucre glace à l'aide du couteau. Faites
fondre le chocolat et incorporez-le.Ajoutez-y les
jaunes d'oeufs un à un. Fouettez le tout jusqu'à ce
que vous obteniez une pâte crémeuse. Travaillez
au fouet les blancs d'oeufs avec le sucre semoule
jusqu'à ce que le mélange devienne blanc et
mousseux. Incorporez la mousse de blancs d'oeufs
au mélange et remuez doucement.Terminez par
incorporer la farine avec une spatule.Versez la
pâte dans le moule à gâteau beurré. Faites cuire
une heure à 160cC. Pendant les premières
15 minutes, il est conseillé de tenir la porte du
four entreouverte.
B
Laissez le gâteau refroidir pendant quelque temps
dans le moule (24 cm), ensuite retournez-le sur
une grille pour refroidir complètement. Coupez le
gâteau en deux dans le sens de la longueur,
nappez une moitié de gâteau de la confiture
d'abricots et recouvrez avec l'autre moitié. Faites
bouillir le reste de la confiture jusqu'à ce que vous
obteniez un sirop et enduisez le gâteau. Préparez
le glaçage. Faites bouillir l'eau, ajoutez le sucre et
le chocolat et laissez cuire à feu doux. Remuez
sans cesse jusqu'à ce que vous obteniez un
glaçage uniforme et consistent. Couvrez le gâteau
du glaçage et laissez-le refroidir. Servez le gâteau
avec un peu de crème fouettée.
Soupe de brocolis (pour 4 personnes)
Ingrédients:
- 50g fromage gouda
- 300g de brocolis cuits
- l'eau où les brocolis ont été préalablement cuits
- 2 pommes de terre bouillies coupés en
morceaux
- 2 bouillon-cubes
- 2 c. à c. crème
-curry
-sel
- poivre
- muscade
B
Râpez le fromage. Réduisez en purée les broccolis
et les pommes de terre cuites ; ajoutez-y un peu
d'eau de cuisson. Mettez la purée de broccolis, le
liquide restant et le bouillon-cubes dans un verre
gradué et remplissez-le jusqu'à 750ml.Versez le
tout dans une casserole et faites bouillir en
remuant.Ajoutez le fromage en tournant et
assaisonnez de curry,sel, poivre et muscade et
crème.
Page 69

69FRANÇAIS
Pizza
Ingrédients pour la pâte:
- 400g farine
- 1/2 c. à c. de sel
- 20g levure fraîche ou 1,5 paquet levure
déshydratée
- 2 c. à s. d'huile
- approx. 240ml d' eau (35cC)
Pour la garniture:
- 300ml tomates passées (en conserve)
- 1 c. à c. d'herbes mixtes (sèches ou fraiches)
- 1 oignon
- 2 gousses d'ail
- sel et poivre
- sucre
Ingrédients pour assaisonner la sauce:
- olives, salami, artichauts, champignons, anchois,
mozzarella, poivron, fromage râpé et huile
d'olive à volonté.
B
Placez le crochet à pétrir dans le bol. Mettez tous
les ingrédients dans le bol et sélectionnez la
bouton pour pétrissage. Pétrissez la pâte pendant
1 minute jusqu'à ce qu'elle commence à former
une boule. Mettez la pâte dans un autre bol,
couvre-la d'un linge humide et laissez lever
30 min.
B
Utilisez le couteau pour hacher l'oignon et l'ail
dans le bol du robot de cuisine et faites-les
revenir jusqu'à ce qu'ils deviennent transparents.
Ajoutez les tomates passées et les herbes et
faites cuire la sauce à feu doux pendant
10 minutes. Assaisonnez suivant votre goût avec
sel, poivre et sucre. Laissez refroidir la sauce.
B
Chauffez le four à 250cC.
B
Mélangez la pâte. Puis faite deux abaisses rondes
de la grandeur du plateau de cuisson. Placez-les
sur le plateau de cuisson légèrement graissé au
pléalable. Etalez bien les abaisses en relevant les
bords avec les doigts. Etalez les ingrédients désirés
à l'intérieur et saupoudrez de fromage râpé,
ajoutez y un peu d'huile d'olive.
B
Faites cuire les pizzas au four pendant 12 à
15 minutes.
Légumes et pommes de terre sautées
Ingrédients:
- 1 oeuf
- 50 cl lait
- 1 c. à s. farine
- 1 c. à c. coriandre
- sel et poivre
- 2 grandes pommes de terre (environ 300 g)
- 100 g carottes
- 150 g céleri
- 50 g graines de tournesol ou 2 c. à s. épi de
maïs
- huile à frire
B
Utilisez le couteau pour mixer l'oeuf, le lait, la
farine, le coriandre et le poivre.
B
Râpez les pommes de terre épluchées, les
carottes grattées et le céleri rincé à l'aide de
l'insert à râper grossier et ajoutez-les au mélange
Page 70

FRANÇAIS70
à oeuf. Remuez les légumes, le mélange à ouef et
les graines de tournesol ou l'épi de maïs dans un
bol.
B
Chauffez l'huile dans une poêle et faites frire
8 petits pâtés sur les deux côtés jusqu'à ce qu'ils
deviennent dorés. Laissez-les s'écouler sur un
essuie-tout.
B
Temps de cuisson: 3-4 minutes.
Pain (blanc)
Ingrédients:
- 500 g farine
- 15 g beurre ramolli ou margarine
- 25 g levure fraiche ou 20 g levure en poudre
- 260 ml d'eau
- 10 g sel
- 10 g sucre
B
Fixez le crochet à pétrir. Mettez la farine, le sel et
le beurre ou la margarine dans le bol. Placez le
couvercle sans le poussoir.Ajoutez-y la levure
fraiche ou en poudre et l'eau. Placez le couvercle
sur le bol et tournez-le dans le sens des aiguilles
d'une montre jusqu'à ce que vous entendiez un
clic. Appuyez sur le bouton pour l'application de
pétrissage et pétrissez la pâte (pour la vitesse
maximum de pétrissage, réportez-vous au
chapitre Quantités et temps de préparation).
B
Retirez la pâte du bol et mettez-la dans un grand
bol. Recouvrez-le d'un linge humide et laissez lever
la pâte dans un endroit chaud pendant environ
20 minutes. Lorsqu'elle est levée, aplatissez la
pâte et faites-en une boule.
B
Replacez la pâte dans le bol, couvrez-la du linge
humide et laissez-la lever à nouveau pendant
20 minutes. Aplatissez la pâte à nouveau à la main
puis au rouleau à pâtisserie.
B
Mettez la pâte dans un moule graissé et laissez
lever pendant encore 45 minutes. Faites-la cuire
dans le bas du four chauffé.
B
Faites-la cuire à 225cC dans le bas du four
chauffé pendant environ 35 minutes.
Page 71

NEDERLANDS 71
Onderdelen en accessoires
A Motorgedeelte
B Smart Process Control bedieningspaneel
C Ingebouwde beveiliging
D Schroefkap (moet geplaatst zijn om functies
waarvoor een kom nodig is te kunnen
gebruiken)
E Keukenmachinekom
F Accessoirehouder
G Blenderkan
H Deksel van blenderkan
I Nok van deksel (schakelt de beveiliging in en
uit)
J Deksel van keukenmachinekom
K Stop
L Vultrechter
M Stamper
N Zeef van de citruspers
O Perskegel
P Sapcentrifugebak
Q Sapcentrifugezeef
R Deksel van sapcentrifuge
S Stamper van sapcentrifuge
T Metalen sikkelmes met beschermkap
U Kneedaccessoire
V Klopper
W Middelfijne raspschijf
X Fijne raspschijf
Y Groffe raspschijf
Z Granuleerschijf
a Inzetschijfhouder
b Instelbare snijschijf (inzetsnijschijf, houder en
instelknop
Inleiding
Dit apparaat is uitgerust met een
oververhittingsbeveiliging die het apparaat
automatisch uitschakelt indien het oververhit
raakt.
Als het apparaat opeens ophoudt met
werken:
1 Trek de stekker uit het stopcontact.
2 Laat het apparaat 60 minuten afkoelen.
3 Steek de stekker weer in het stopcontact.
4 Schakel het apparaat weer in.
Neem contact op met uw Philips dealer of een
door Philips geautoriseerd servicecentrum als het
automatische uitschakelsysteem te vaak
geactiveerd wordt.
Pas op: om gevaarlijke situaties te voorkomen
mag u het apparaat nooit op een timer
aansluiten.
Belangrijk
◗ Lees deze gebruiksaanwijzing nauwkeurig
door en bekijk de plaatjes goed voordat u het
apparaat gaat gebruiken.
◗ Bewaar deze gebruiksaanwijzing om hem
indien nodig te kunnen raadplegen.
◗ Controleer of het voltage aangegeven op het
Page 72

NEDERLANDS72
apparaat overeenkomt met de plaatselijke
netspanning voordat u de stekker in het
stopcontact steekt.
◗ Gebruik nooit accessoires of onderdelen van
andere fabrikanten of die niet specifiek door
Philips aangeraden worden. Uw garantie
vervalt indien gebruik is gemaakt van
dergelijke onderdelen of accessoires.
◗ Gebruik het apparaat niet indien het snoer, de
stekker of andere onderdelen beschadigd zijn.
◗
Indien het netsnoer beschadigd is, moet het
vervangen worden door Philips, een door
Philips geautoriseerd servicecentrum of
personen met vergelijkbare kwalificaties om
gevaar te voorkomen.
◗ Maak de onderdelen die in contact komen
met voedsel goed schoon voordat u het
apparaat voor de eerste keer gebruikt.
◗ Overschrijd de hoeveelheden en
bereidingstijden aangegeven in de tabel niet.
◗ Vul de kom niet verder dan de
maximumindicatie, d.w.z. niet voorbij de
bovenste lijn van de schaalverdeling.
◗ Haal na gebruik altijd gelijk de stekker uit het
stopcontact.
◗ Gebruik nooit uw vingers of voorwerpen
(bijvoorbeeld een spatel) om etenswaren
door de vultrechter naar beneden te duwen
terwijl het apparaat werkt. Gebruik hiervoor
alleen de stamper.
◗ Steek nooit uw vingers of voorwerpen
(bijvoorbeeld een spatel) in de blenderkan
terwijl de stekker van het apparaat in het
stopcontact zit.
◗ Houd het apparaat uit de buurt van kinderen.
◗ Laat het apparaat nooit zonder toezicht
werken.
◗ Plaats het deksel op de juiste manier op de
kom. De ingebouwde beveiliging wordt nu
gedeblokkeerd en u kunt het apparaat
inschakelen. Op het motorgedeelte en de
schroefkap zitten markeringen.Het apparaat
werkt alleen als de stip op het motorgedeelte
recht tegenover de stip op de schroefkap
staat.
◗ Schakel het apparaat uit voordat u accessoires
van het apparaat losmaakt.
◗ Schakel het apparaat altijd uit door op de
stop-knop te drukken.
◗ Wacht tot bewegende delen stil staan voordat
u het deksel van het apparaat verwijderd.
◗ De schroefkap kan alleen verwijderd worden
als het deksel niet op de kom zit of als de
kom van het apparaat is afgenomen.
◗ Dompel het motorgedeelte nooit in water of
een andere vloeistof en spoel het niet af
onder de kraan. Gebruik alleen een vochtige
doek om het motorgedeelte schoon te
maken.
◗ Verwijder altijd de beschermkap van het
sikkelmes wanneer u dit mes gebruikt.
◗ Laat hete ingrediënten afkoelen voordat u ze
in de keukenmachine verwerkt (maximum
temperatuur 80cC).
◗ Als u een vloeistof verwerkt die heet is of
Page 73

NEDERLANDS 73
nogal snel gaat schuimen, doe dan niet meer
dan 1 liter in de blenderkan om morsen te
voorkomen.
◗ Haal na gebruik altijd gelijk de stekker uit het
stopcontact.
◗ Voor hoeveelheden en bereidingstijden, zie de
tabel verderop in deze gebruiksaanwijzing.
Let op: Het is niet mogelijk de functies waar voor
een kom nodig is (mixen, kneden, snijden, enz.) te
gebruiken als de blenderkan gemonteerd is.
Gebruik van het apparaat
Smart Process Control
Dit apparaat is uitgerust met Smar t Process
Control voor een optimaal proces en een perfect
eindresultaat. Achter iedere procesknop op het
bedieningspaneel zit een voorgeprogrammeerd
snelheidsprofiel dat hoort bij het optimale proces
voor een bepaalde accessoire.
De snelheid kan met 3 stappen worden verhoogd
of verlaagd door op de + of - knop te drukken.
Als u op de pulsknop drukt, zal het apparaat op
de hoogste snelheid draaien. Als u de knop
loslaat, stopt het apparaat of draait het verder op
de eerder gekozen snelheid.
U kunt het proces altijd beëindigen door op de
stop-knop te drukken.
Als u binnen 40 seconden nog een keer op de
eerder gebruikte procesknop drukt, gaat het
proces daar verder waar het gestopt is.
Keukenmachinekom
C
1 Bevestig de kom met het handvat op het
apparaat door het handvat in de richting
van de pijl te draaien tot u een klik hoort.
C
2 Plaats het deksel op de kom. Draai het
deksel in de richting van de pijl totdat u
een klik hoort (hier is enige kracht voor
nodig).
Ingebouwde beveiliging
B
Het motorgedeelte, de kom en het deksel zijn
voorzien van stippen. Het apparaat werkt alleen
als de stip op het motorgedeelte recht tegenover
de stip op de schroefkap staat.
C
1 Zorg ervoor dat de stip op het deksel en
de stip op de kom recht tegenover elkaar
staan. Het uitsteeksel aan het deksel sluit
dan aan bij de vorm van het handvat.
CLICK
CLICK
1
2
1
2
CLICK
Page 74

NEDERLANDS74
Vultrechter en stamper
C
1 Gebruik de vultrechter om vloeistoffen
en/of vaste ingrediënten toe te voegen.
Gebruik de stamper om ingrediënten door
de vultrechter naar beneden te duwen.
C
2 U kunt de stamper ook gebruiken om de
vultrechter af te sluiten om zo te
voorkomen dat ingrediënten door de
vultrechter naar buiten komen.
Metalen sikkelmes
◗ Het sikkelmes kan gebruikt worden om te
hakken, mixen, mengen en te pureren.
C
1 Verwijder de beschermkap van het
sikkelmes.
Raak de snijkanten van het mes niet aan; deze zijn
erg scherp!
C
2 Plaats de accessoirehouder in de kom en
plaats het mes op de accessoirehouder.
3 Doe de ingrediënten in de kom.Snijd grote
stukken voedsel in kleinere stukjes van
ongeveer 3 x 3 x 3 cm. Plaats het deksel op
de kom.
4 Plaats de stamper in de vultrechter.
C
5 Druk op de hakprocesknop op het
bedieningspaneel.
- Het proces start met drie korte stoten om
ervoor te zorgen dat de ingrediënten (bijv. uien
of noten) gelijkmatig worden gehakt.
- Daarna neemt de snelheid toe tot de
maximumsnelheid, waarop het apparaat blijft
draaien totdat op de stop-knop wordt gedrukt.
◗ Druk op de - knop om de snelheid te verlagen.
◗ Het proces kan op ieder moment worden
gestopt door op de stop-knop te drukken.
Tips
◗ Als u uien aan het hakken bent, zet het
apparaat dan stil na de eerste 4 stoten om te
voorkomen dat ze te fijn worden gehakt.
◗ Laat het apparaat niet te lang werken wanneer
u (harde) kaas aan het hakken bent.De kaas
wordt anders te heet, gaat smelten en wordt
klonterig.
◗ Gebruik het apparaat niet om zeer harde
ingrediënten zoals koffiebonen,kurkuma,
nootmuskaat en ijsblokjes te hakken, omdat
het mes hierdoor bot zou kunnen worden
Als er ingrediënten aan het mes of aan de
binnenkant van de kom blijven kleven:
1 Schakel het apparaat uit.
2 Haal het deksel van de kom.
3 Verwijder de ingrediënten met een spatel van
het sikkelmes en van de wand van de kom.
Page 75

NEDERLANDS 75
Inzetschijven
Gebruik de inzetschijven nooit om harde
ingrediënten zoals ijsblokjes te verwerken.
C
1 Plaats de gekozen inzetschijf in de
inzetschijfhouder voordat u deze op de
accessoirehouder plaatst.
De snijkanten zijn erg scherp. Raak ze daarom niet
aan!
C
2 Plaats de inzetschijfhouder op de
accessoirehouder in de kom.
3 Plaats het deksel op de kom.
4 Doe de ingrediënten in de vultrechter.
Snijd grote stukken voedsel in kleinere
stukjes die in de vultrechter passen.
C
5 Plaats de ingrediënten gelijkmatig in de
vultrechter voor het beste resultaat.
Wanneer u een grote hoeveelheid voedsel wilt
verwerken, doe dan niet alle ingrediënten in één
keer in de kom, maar verwerk kleine
hoeveelheden en maak de kom tussentijds
regelmatig leeg.
C
6 Kies het rasp- en snijproces op het
bedieningspaneel.
Het apparaat begint direct de snelheid op te
voeren tot de ingestelde verwerkingssnelheid om
een optimaal eindresultaat te kunnen garanderen.
De snelheid kan met 3 stappen worden verhoogd
of verlaagd door op de + of de - knop te
drukken.
◗ Als u zachte groenten of vruchten raspt, kunt
u de snelheid met 3 stappen omlaag brengen
door op de - knop te drukken om te
voorkomen dat de geraspte groente en
vruchten tot moes worden.
C
7 Druk met de stamper licht op de
ingrediënten in de vultrechter.
C
8 Om de inzetschijf uit de inzetschijfhouder
te verwijderen, neemt u de houder
ondersteboven in uw handen met de
onderkant naar u toe. Duw met uw
duimen op de randen van de inzetschijf om
deze uit de houder te doen loskomen
Instelbare snijschijf
Met de instelbare snijschijf kunt u ingrediënten op
iedere gewenste dikte snijden.
Pas op: de snijkanten van het mes zijn erg scherp.
C
1 Plaats het mes in de bovenkant van de
houder.
CLICK
2
1
Page 76

NEDERLANDS76
C
2 Plaats de knop vanaf de onderkant in de
schijf en draai hem dan totdat de lijnen
tegenover elkaar staan. De schijf is nu
vergrendeld.
C
3 Draai de instelknop om de gewenste
snijdikte in te stellen.
C
4 Plaats de instelbare snijschijf op de
accessoirehouder.
5 Sluit het deksel en plaats de ingrediënten
in de vultrechter.
C
6 Kies het rasp- en snijproces op het
bedieningspaneel.
7 Duw de ingrediënten, indien nodig,
langzaam naar beneden met de stamper.
Kneedaccessoire
Het kneedaccessoire kan worden gebruikt om
gistdeeg voor brood en pizza's te kneden.
C
1 Plaats de kneedaccessoire op de
accessoirehouder.
C
2 Plaats de kom op het motorgedeelte, draai
het handvat in de richting van de pijl en
plaats het kneedaccessoire op de
aandrijfas.
3 Doe de ingrediënten in de kom.
4 Plaats het deksel op de kom.
C
5 Druk op de kneedprocesknop op het
Smart Process Control bedieningspaneel.
Het apparaat zal de kneedsnelheid binnen
10 seconden geleidelijk opvoeren tot de
maximumsnelheid. Het apparaat blijft op deze
snelheid draaien tot er op de stop-knop wordt
gedrukt. De snelheid kan met 3 stappen worden
verlaagd door op de - knop te drukken. Als het
apparaat niet reageert op het indrukken van de knop, dan heeft de motor zijn fysieke grens reeds
bereikt.
1
2
Page 77

NEDERLANDS 77
Klopper
U kunt de klopper gebruiken om eieren, eiwitten,
instantpudding, en room te kloppen.
1 Plaats de kom op het motorgedeelte en
draai hem naar links totdat u een klik
hoort.
C
2 Plaats de accessoirehouder in de kom.
C
3 Plaats de klopper op de accessoirehouder.
4 Doe de ingrediënten in de kom,plaats het
deksel op de kom en draai het rechtsom
totdat u een klik hoort.
C
5 Druk op de klopprocesknop op het
bedieningspaneel.
Het apparaat voert de klopsnelheid binnen
15 seconden geleidelijk op tot de
maximumsnelheid. Het apparaat blijft daarna op
die snelheid lopen totdat op de stop-knop wordt
gedrukt. De snelheid kan met 3 stappen worden
verlaagd door op de -knop te drukken.
Blender
De blender is bedoeld voor:
- het mengen van vloeistoffen, bijv.
zuivelproducten, sauzen, vruchtensappen, soep,
drankjes en milkshakes
- het mixen van zachte ingrediënten, bijv.
pannenkoekbeslag of mayonaise.
- het pureren van gekookte ingrediënten, bijv.
voor het bereiden van babyvoedsel.
◗ Als de blenderkan op het apparaat
gemonteerd is, kunt u de overige functies niet
gebruiken.Als de blenderkan niet op het
apparaat gemonteerd is, werken de andere
functies alleen als de schroefkap goed op het
motorgedeelte is vastgeschroefd.
C
1 Om de blenderkan te plaatsen, moet de
schroefkap worden verwijderd.
C
2 Plaats de blenderkan op het
motorgedeelte door hem in de richting
van de pijl te draaien totdat hij stevig
vastzit. Het handvat moet dan naar links
wijzen.
Oefen niet te veel druk uit op het handvat van de
blenderkan.
3 Doe de ingrediënten in de blenderkan.
C
4 Sluit het deksel.
1
2
2
1
Page 78

NEDERLANDS78
C
5 Plaats altijd de veiligheidskap op het deksel
van de blenderkan voordat u het apparaat
inschakelt.
C
6 Druk op de blenderprocesknop op het
bedieningspaneel. De blender begint te
lopen. De snelheid loopt op naar de
maximumsnelheid en de blender blijft op
deze snelheid draaien totdat op de stopknop wordt gedrukt.Tijdens het proces
kan de snelheid met drie stappen worden
verlaagd door op de - knop te drukken.
Tips
C
◗ Giet vloeibare ingrediënten in de kan via de
opening in het deksel.
◗ Hoe langer u het apparaat laat draaien, hoe
fijner het de ingrediënten zal vermalen.
◗ Snijd vaste ingrediënten in kleinere stukjes
voordat u ze in de blenderkan doet.Wanneer
u een grote hoeveelheid voedsel wilt
bereiden, doe dan niet alle ingrediënten in één
keer in de kom,maar verwerk steeds kleine
hoeveelheden.
◗ Harde ingrediënten zoals sojabonen voor
sojamelk moeten in water worden geweekt
voordat ze worden verwerkt.
C
◗ Hak ijsblokjes door ze in de blenderkan te
doen, het deksel te sluiten en de pulsfunctie te
gebruiken.
Als de ingrediënten aan de wand van de
blenderkan blijven kleven:
1 Schakel het apparaat uit en haal de stekker
uit het stopcontact.
2 Open het deksel.
Open het deksel nooit terwijl het apparaat nog
draait.
3 Gebruik een spatel om de ingrediënten
van de wand van de kan te verwijderen.
Houd de spatel op veilige afstand van de
snijkanten van het blendermes (ongeveer 2 cm).
◗ Als u niet tevreden bent met het resultaat,laat
het apparaat dan een paar keer kort draaien
door op de pulsknop te drukken. U kunt ook
proberen een beter resultaat te krijgen door
de ingrediënten met een spatel door te roeren
(natuurlijk niet terwijl de blender draait!), of
door een deel van de ingrediënten uit de kan
te gieten en daarna per keer een kleinere
hoeveelheid te verwerken.
◗ In sommige gevallen zijn de ingrediënten
gemakkelijker te verwerken als u wat vloeistof
toevoegt, bijv.wat citroensap in geval van
vruchten.
Page 79

NEDERLANDS 79
Citruspers
De citruspers kan worden gebruikt voor het
persen van verschillende citrusvruchten.
C
1 Plaats de kom op het motorgedeelte en
plaats de zeef op de kom.
C
2 Draai de zeef in de richting van de pijl
totdat de nok van het beveiligingssysteem
vastklikt in het motorgedeelte.
C
3 Plaats de perskegel op de zeef door hem
zachtjes naar beneden te drukken.
C
4 Druk op de citruspersknop op het
bedieningspaneel.
De snelheid van de pers kan in 3 stappen worden
verhoogd door op de + knop te drukken.
Het apparaat begint te lopen en stopt pas als op
de stop-knop wordt gedrukt.
C
5 Druk de halve vruchten stevig op de
draaiende perskegel.
Tips
◗ Stop af en toe met persen om pulp uit de zeef
te verwijderen.
Schakel het apparaat uit als u dat doet en neem
de kom met de zeef en de perskegel erop van
het apparaat af.
C
◗ Verwijder na gebruik de kan met alle
citruspersaccessoires om te voorkomen dat
er sap op het motorgedeelte lekt.
Sapcentrifuge
De sapcentrifuge kan worden gebruikt om verse
vruchten- en groentesap te maken zonder dat er
pulp, pitten of velletjes in het sap terechtkomen.
1 Plaats de kom op het motorgedeelte.
C
2 Plaats de accessoirehouder in de kom.
1
CLICK
1
2
2
1
Page 80

NEDERLANDS80
C
3 Bevestig de sapcentrifugebak op de
accessoirehouder.
C
4 Plaats de pulpzeef in de sapcentrifugebak
en zorg ervoor dat de 3 pennen in de
inkepingen in de sapcentrifugebak vallen.
C
5 Plaats het deksel van de sapcentrifuge op
de kom.
C
6 Druk op de sapcentrifugeknop.
Gebruik de sapcentrifuge niet als de zeef of de
bak beschadigd is.
Het apparaat begint langzaam en daarna neemt
de snelheid toe tot de maximumsnelheid. De
snelheid kan worden verminderd door op de knop te drukken. Druk op de stop-knop om het
apparaat uit te schakelen.
C
7 Laat het fruit of de groente door de
vultrechter in de sapcentrifuge vallen.
C
8 Druk het fruit of de groente stevig naar
beneden, als dat nodig is. Laat de stamper
zo veel mogelijk in de vultrechter staan
om spatten te voorkomen.
9 Laat het apparaat na het verwerken van
het laatste stuk nog 20 seconden draaien
om ook uit het nog in de zeef aanwezige
materiaal sap te verkrijgen.
C
10 Verwijder na gebruik de kom met de
sapcentrifuge om te voorkomen dat er sap
op het apparaat lekt.
Tips
◗ Voordat u de sapcentrifuge gaat gebruiken:
- Snijd wortels, rettich, enz.
- Schil citrusvruchten, ananas, meloenen enz.
- Ontpit kersen, pruimen, abrikozen,perziken
enz.
◗ Schakel het apparaat in voordat u de vruchten
of groenten in de sapcentrifuge doet.
◗ Schakel het apparaat af en toe uit om pulp uit
de zeef en de sapcentrifugebak te
verwijderen.
◗ Verwerk niet te grote hoeveelheden vruchten
en groenten tegelijkertijd.
1
2
2
1
Page 81

NEDERLANDS 81
◗ Schakel het apparaat uit als het erg begint te
trillen en maak dan de pulpzeef schoon
voordat u het apparaat weer inschakelt.
Schoonmaken
Haal altijd de stekker uit het stopcontact voordat
u het motorgedeelte gaat schoonmaken.
1 Maak het motorgedeelte schoon met een
vochtige doek. Dompel het motorgedeelte
niet in water en spoel het ook niet af.
2 Was onderdelen die in aanraking zijn
geweest met voedsel altijd gelijk na gebruik
met wat afwasmiddel af.
◗ De kom, het deksel van de kom, de stamper
en de accessoires kunnen ook in de
vaatwasser worden gereinigd.
Deze onderdelen zijn getest op
vaatwasserbestendigheid volgens DIN EN 12875
De blenderkan is niet vaatwasserbestendig!
◗ Verwijder het deksel van de blenderkan door
het te openen en vervolgens omhoog te
trekken.
Verwijder het deksel alleen als u de kan gaat
schoonmaken.
Wees zeer voorzichtig wanneer u het sikkelmes
het mes van de blender en de inzetschijven
schoonmaakt. De snijkanten zijn erg scherp!
Voorkom dat de snijkanten van het sikkelmes, het
mes van de blender en de inzetschijven in contact
komen met harde voorwerpen, omdat ze
hierdoor bot zouden kunnen worden
Bepaalde ingrediënten kunnen verkleuringen
veroorzaken op de accessoires. Dit heeft geen
enkel negatief effect; de verkleuringen verdwijnen
na een tijdje meestal vanzelf.
C
◗ Wikkel het (niet benodigde deel van het)
snoer om de haspel aan de achterzijde van het
apparaat.
Snelreiniging blender
C
1 Giet lauwwarm water (niet meer dan
0,5 liter) en wat afwasmiddel in de
blenderkan.
2 Sluit het deksel.
C
3 Laat het apparaat een paar tellen lopen
door op de pulsknop te drukken (het
apparaat stopt zodra de knop wordt
losgelaten).
4 Haal de kan van het apparaat en spoel hem
met schoon water.
Page 82

NEDERLANDS82
Voor het grondig reinigen van de klopper:
C
1 Verwijder de klopper en de tandwielen van
elkaar.
De tandwielen en de klopper kunnen in een
warm sopje of in de vaatwasser worden
gereinigd.
Voor het grondig reinigen van de instelbare
snijschijf:
C
1 Draai de instelknop naar rechts, zodat het
mes uit de schijf kan worden getrokken.
De schijf, het mes en de instelknop kunnen in een
warm sopje of in de vaatwasser worden
gereinigd.
Opbergen
MicroStore
C
◗ Plaats de accessoires (mes, inzetschijfhouder)
op de accessoirehouder en plaats de houder
in de kom. De inzetschijfhouder wordt als
laatste geplaatst.
.
Informatie & service
Als u informatie nodig heeft of als u problemen
heeft, bezoek dan de Philips Website
(www.philips.com), of neem contact op met het
Philips Customer Care Centre in uw land (u
vindt het telefoonnummer in het 'worldwide
guarantee' vouwblad). Is er geen Customer Care
Centre in uw land, ga dan naar uw Philips dealer
of neem contact op met de afdeling Service van
Philips Domestic Appliances and Personal Care BV
1
2
Page 83

NEDERLANDS 83
Oplossing
Draai de kom of het deksel rechtsom totdat u een klik
hoort. Zorg ervoor dat de stip op het deksel recht
tegenover de stip op de kom staat.
De automatische oververhittingsbeveiliging heeft de
stroomtoevoer naar het apparaat waarschijnlijk
afgesneden omdat het apparaat oververhit was geraakt.
1) Trek de stekker uit het stopcontact. 2) Druk op de
stop-knop. 3) Laat het apparaat 60 minuten afkoelen. 4)
steek de stekker weer in het stopcontact. 5) Schakel het
apparaat weer in.
Druk op de knop die hoort bij het proces dat u
uitgevoerd wilt hebben.
Dit apparaat heeft een geheugenfunctie. Als u het
apparaat opnieuw start binnen 40 seconden nadat u op
de stop-knop heeft gedrukt, gaat het proces verder daar
waar het gestopt is. Als u het proces helemaal van voren
af aan wilt laten beginnen: 1) Druk kort op een andere
procesknop (bijv. de pulsknop). 2) Druk vervolgens op
de stop-knop. 3) Druk op de juiste procesknop om het
proces opnieuw te laten beginnen.
Als zowel de blenderkan als de kom is gemonteerd,
werkt inderdaad alleen de blender.Als u de kom wilt
gebruiken, dan moet u de blenderkan verwijderen en
het aansluitgat met de schroefkap afsluiten.
De motor heeft zijn fysieke grens bereikt, bijv. tijdens het
kneden of als de snelheid al op het laagste
geprogrammeerde niveau ligt en dus niet verder omlaag
kan worden gebracht.
Probleem
Het apparaat gaat niet
aan.
Het apparaat is
plotseling gestopt.
U heeft op de
verkeerde procesknop
gedrukt.
Het proces begint niet
bij het begin na een
herstart.
Zowel de blenderkan
als de kom is
gemonteerd, en alleen
de blender werkt.
De + en - knoppen
reageren niet tijdens
bepaalde processen.
Problemen oplossen
Benodigde tijd
10 - 60 sec.
10 - 60 sec.
10 - 60 sec.
60 - 180 sec.
30 - 180 sec.
10 - 60 sec.
Hangt af van
hoeveelheid.
Hangt af van
hoeveelheid.
Toepassing
Hakken, pureren, mengen
Raspen, schaven
Snijden
Kneden, mengen
Kloppen, emulgeren
Mengen, pureren
Citrusvruchten persen
Sap winnen uit vruchten en
groenten
Accessoir
e
P
hjk
¬
{
˚
D
ƒ
©
Functie
¥
^
^
¨
∆
†
“
‘
Functies, toepassingen en benodigde tijd
Page 84

NEDERLANDS84
Toepassingen
Salades,
rauwkost
Salades,
rauwkost
Pannenkoeken,
wafels
Gepaneerde
gerechten,
gegratineerde
gerechten
Desserts,
garnering
Werkwijze
Snijd de ingrediënten in stukken
die in de vultrechter passen.
Rasp de stukken terwijl u ze
zachtjes met de stamper naar
beneden duwt.
Snijd de ingrediënten in stukken
die in de vultrechter passen.
Rasp de stukken terwijl u ze
zachtjes met de stamper naar
beneden duwt.
Schenk eerst de melk in de
blenderkan en voeg dan de
droge ingrediënten toe. Laat de
blender ongeveer 1 minuut
lopen. Indien nodig,kunt u dit
max. twee keer herhalen. Stop
enkele minuten om het
apparaat weer tot
kamertemperatuur te laten
afkoelen
Gebruik droog, knapperig
brood.
Gebruik zachte boter voor een
luchtig resultaat.
Proce
sknop
/acces
soire
^ / k
^ / ¬
† / D
¥ / P
¨ / {
Max.
hoeve
elheid
500 g
500 g
750
ml
melk
100 g
300 g
Ingrediënten
& resultaten
Appels,
wortels,
knolselderij raspen
Appels,
wortels,
knolselderij snijden
Beslag
(pannenkoeke
n) - kloppen
Paneermeel hakken
Crème au
beurre kloppen
Hoeveelheden en bereidingstijden
Toepassingen
Garnering,
soepen,
sauzen,
gegratineerde
gerechten
Sauzen, pizza's,
gegratineerde
gerechten,
fondue
Garnering,
sauzen, gebak,
pudding,
mousse
Puree, soepen
Baby- en
peutervoeding
Salades,
garnering
Brood
Werkwijze
Gebruik een stuk korstloze
Parmezaanse kaas en snijd dit
in stukken van ongeveer 3 x 3
cm.
Snijd de kaas in stukjes die in
de vultrechter passen. Duw de
stukjes voorzichtig met de
stamper naar beneden.
Gebruik harde, pure chocolade.
Breek de chocolade in stukken
van 2 cm.
Gebruik gekookte erwten of
bonen.Voeg indien nodig wat
vloeistof toe om de samenhang
van de puree te verbeteren.
Voeg slechts een klein beetje
vocht toe voor groffe puree.
Wilt u een fijne puree, blijf dan
vocht toevoegen totdat de
puree glad genoeg is.
Doe stukken komkommer in
de vultrechter en duw ze
voorzichtig met de stamper
naar beneden.
Meng gist en suiker met warm
water.Voeg bloem, olie en zout
toe en kneed het deeg
ongeveer 90 seconden. Laat
het 30 minuten rijzen.
Proce
sknop
/acces
soire
¥ / P
^ /
h
¥ / P
¥ / P
¥ / P
^ / ¬
¨ / {
Max.
hoeve
elheid
200 g
200 g
200 g
250 g
500 g
2
komk
omme
rs
500 g
bloem
Ingrediënten
& resultaten
Kaas
(Parmezaanse)
- hakken
Kaas (Goudse)
- raspen
Chocolade hakken
Gekookte
erwten, bonen
- pureren
Gekookte
groenten en
vlees - pureren
Komkommers
- in plakjes
snijden
Deeg (voor
brood) kneden
Page 85

85NEDERLANDS
Toepassingen
Pizza
Appeltaart,
koekjes, open
vruchtenvlaaie
n
Luxe brood
Pudding,
soufflé,
schuimgebak
Sauzen, jam,
pudding,
babyvoeding
Werkwijze
Volg dezelfde werkwijze als bij
brooddeeg. Kneed het deeg
ongeveer 1 minuut. Doe eerst
de bloem in de kom en daarna
de andere ingrediënten.
Gebruik koude margarine; snijd
deze in stukken van 2 cm. Doe
de bloem in de kom en voeg
de margarine toe. Kneed het
deeg totdat het kruimelig is
geworden.Voeg dan koud
water toe en stop zodra het
deeg een bal is geworden. Laat
het deeg afkoelen voordat u
het verder verwerkt.
Meng gist, warm water en wat
suiker in een aparte kom. Doe
alle ingrediënten in de kom van
de keukenmachine en kneed
het deeg tot het glad is en niet
langer aan de wand van de
kom kleeft (duurt ongeveer 1
minuut). Laat het deeg 30
minuten rijzen.
Gebruik eieren op
kamertemperatuur. Gebruik
ten minste twee eiwitten.
Tip: voeg een beetje citroensap
toe om te voorkomen dat het
fruit verkleur t.Voeg wat
vloeistof toe om een gladde
puree te verkrijgen.
Proce
sknop
/acces
soire
¨ / {
¨ / {
¨ / {
ø /
ß
† / D
Max.
hoeve
elheid
750 g
meel
300 g
bloem
500 g
bloem
4
eiwitte
n
500 g
Ingrediënten
& resultaten
Deeg (voor
pizza's) kneden
Deeg
(zandtaart) kneden
Deeg
(gistdeeg) kneden
Eiwitten kloppen
Vruchten (bijv.
appels,
bananen) blender
Toepassingen
Sauzen, jam,
pudding,
babyvoeding
Garnering,
dipsauzen
Sauzen,
soepen,
garnering,
kruidenboter
Vruchtensapp
en
Salades,
garnering en
barbecuesauze
n
Tartaartjes,
hamburgers,
gehaktballen
Werkwijze
Tip: voeg een beetje citroensap
toe om te voorkomen dat het
fruit verkleur t.
Pel de teentjes knoflook. Druk
een paar keer op de pulsknop
om te voorkomen dat de
knoflook te fijn wordt gehakt.
Gebruik ten minste 150 g.
Was en droog de kruiden
voordat u ze hakt.
Verwerk de vruchten en
groenten tot sap in de
sapcentrifuge.
Alle ingrediënten moeten op
kamertemperatuur zijn.
Gebruik tenminste één groot
ei, twee kleine eieren of twee
eierdooiers. Doe het ei/de
eieren in de kom met een klein
beetje azijn en voeg de olie
druppelsgewijs toe.
Verwijder eerst zenen en
botten. Snijd het vlees in
blokjes van 3 cm. Druk op de
pulsknop voor een groffer
hakresultaat.
Proce
sknop
/acces
soire
¥ / P
¥ / P
¥ / P
‘ / ©
ø /
ß
¥ / P
Max.
hoeve
elheid
500 g
300 g
Min.
50g
500 g
in
totaal
3
eieren
500 g
Ingrediënten
& resultaten
Vruchten (bijv.
appels,
bananen) hakken
Knoflook hakken
Kruiden (bijv.
peterselie) hakken
Sappen (bijv.
van appels,
wortels enz. )
- sapcentrifuge
Mayonaise -
mengen
Mager vlees hakken
Page 86

NEDERLANDS86
Toepassingen
Tartaartjes,
hamburgers,
gehaktballen
Milkshakes
Verschillende
soorten cake
Salades,
pudding,
notenbrood,
amandelspijs
Salades,
gekookte
gerechten,
roerbakgerech
ten, garnering
Salades,
gekookte
gerechten,
roerbakgerech
ten, garnering
Werkwijze
Verwijder eerst zenen en
botten. Snijd het vlees in
blokjes van 3 cm. Druk op de
pulsknop voor een groffer
hakresultaat.
Pureer het fruit (bijv. bananen,
aardbeien). Suiker, melk en wat
ijs toevoegen en goed mengen.
De ingrediënten moeten op
kamertemperatuur zijn. Klop
de zachte boter en de suiker
totdat het mengsel glad en
schuimig is.Voeg hierna de
melk, eieren en bloem toe.
Gebruik de pulsknop voor een
grof resultaat. Stop het proces
tijdig als u een grof resultaat
wilt.
Pel de uien en snijd ze in 4
stukken. Stop het proces na
twee stoten om het resultaat
te controleren.
Pel de uien en snijd ze in
stukken die in de vultrechter
passen. Gebruik ten minste 100
g.
Proce
sknop
/acces
soire
¥ / P
† / D
&@5,1
85 /
∂
¥ / P
¥ / P
^ / ¬
Max.
hoeve
elheid
400 g
500
ml
melk
4
eieren
250 g
500 g
300 g
Ingrediënten
& resultaten
Vlees
(doorregen),
vis, gevogelte hakken
Milkshakes blender
Cakebeslag mixen
Noten hakken
Uien - hakken
Uien - in
plakjes snijden
Toepassingen
Gehakt
Soepen,
sauzen
Garnering,
crèmes,
ijsmengsels
Werkwijze
Verwijder eerst zenen en
botten. Snijd het vlees in
blokjes van 3 cm. Gebruik de
pulsstand voor een groffer
hakresultaat.
Gebruik gekookte groenten.
Gebruik slagroom die op
koelkasttemperatuur is.
Gebruik ten minste 125 ml. De
slagroom is na ongeveer
2 minuten klaar.
Proce
sknop
/acces
soire
¥ / P
† / D
ø /
ß
Max.
hoeve
elheid
200 g
500
ml
500
ml
Ingrediënten
& resultaten
Gevogelte hakken
Soepen blender
Slagroom kloppen
Page 87

87NEDERLANDS
Recepten
Courgette-sandwichspread
Ingrediënten
- 2 courgettes
- 3 gekookte eieren
- 1 kleine ui
- 1 eetl. plantaardige olie
- peterselie
- 2-3 eetl. zure room
- citroensap, tabasco, zout,peper, kerriepoeder,
paprikapoeder
B
Was en droog de courgettes en rasp ze met de
fijne raspschijf in de keukenmachinekom. Doe de
geraspte courgette over in een schaal en
besprenkel met zout. Laat 15 minuten staan
zodat het zout het vocht onttrekt aan de
courgette. Snijd de ui in 4 delen en hak deze
delen fijn samen met het knoflookteentje. Haal de
peterselieblaadjes van de steeltjes af en hak de
blaadjes.
B
Stort de geraspte courgette op een schone
droogdoek en druk al het vocht eruit. Giet wat olie
in een pan en bak de gehakte ui en de knoflook
licht aan, voeg de geraspte courgette toe. Al het
vocht moet verdampen. Laat de gebakken
ingrediënten vervolgens afkoelen. Pel de eieren en
hak ze gedurende een paar seconden in de
keukenmachinekom.Voeg de andere ingrediënten
toe, breng op smaak met tabasco, zout, peper,
kerriepoeder en paprikapoeder en meng met het
mes. Serveer op geroosterd wittebrood.
Vruchtencake
Ingrediënten
- 180 g dadels
- 270 g pruimen
- 60 g amandelen
- 60 g walnoten
- 60 g rozijnen
- 60 g sultana's
- 240 g volkoren roggemeel
- 120 g tarwebloem
- 120 g bruine suiker
- 360 g karnemelk
- een snufje zout
- 1 zakje bakpoeder
B
Plaats het sikkelmes in de kom. Doe al de
ingrediënten in de kom en druk op de
hakprocesknop om de ingrediënten 30 seconden
te mengen.Als het deeg aan het deksel van de
kom kleeft, verwijder het dan met behulp van de
spatel. Doe het cakedeeg in een cakeblik van
30 cm en bak de cake 40 minuten op 170cC
Preiquiche
Ingrediënten voor het deeg:
- 250 gram tarwebloem (of volkoren
tarwebloem)
- snufje zout
- 1 eetl. honing
- 20 g verse gist of 1/2 zakje gedroogde gist
- 100 g boter
- 6 eetl. lauwwarm water
Page 88

NEDERLANDS88
Ingrediënten voor de vulling:
- 500 g prei
- plantaardige olie
- 4 eieren
- 500 g zure room
- zout, peper, 1-2 eetl. bloem,indien nodig
B
Doe al de ingrediënten voor het deeg in de kom
en kneed tot een samenhangend deeg. Laat het
deeg ongeveer 30 minuten rijzen.
B
Snijd de prei met de instelbare snijschijf (bijv. stand
3). Doe wat olie in een pan en bak de gesneden
prei een paar minuten. Doe de rest van de
ingrediënten in de blenderkan en laat de blender
lopen totdat een romige substantie is ontstaan.
Voeg 1 of 2 eetlepels bloem toe om het mengsel
dikker te maken.
B
Vet een bakblik met een diameter van 24 cm in
en bedek de bodem en de zijkanten gelijkmatig
met deeg. Spreid de prei over het deeg uit en giet
de rest van de ingrediënten er overheen. Bak in
40 minuten gaar in een voorverwarmde oven op
80cC. De quiche kan zowel warm als koud
worden gegeten.
Hongaarse goulash
Ingrediënten
- 1 eetl. olie
- 1 middelgrote ui
- 1 eetl. paprikapoeder
- 400 g rundvlees of varkensvlees
- 1 groene paprika
- 1 tomaat
- zout
- 200 g wortels
- 300 g aardappels
- karwijzaad
B
Was het vlees en snijd het in blokjes van 2 cm.Pel
de ui en hak hem met het sikkelmes in de
keukenmachinekom.Verwijder de zaadlijsten uit de
paprika en snijd de paprika in ringen met behulp
van de instelbare snijschijf. Schil de tomaat.
Verwijder de pitten en snijd in dunne reepjes. Bak
de gehakte ui in olie totdat hij glazig wordt. Haal
de pan van het vuur en sprenkel de
paprikapoeder over de ui, voeg het vlees toe en
bak een paar minuten boven een hoog vuur onder
voortdurend roeren.Voeg de groene paprika en de
tomaat toe en zout naar smaak. Dek de pan af
en laat het vlees boven een matig vuur in zijn
eigen sap sudderen totdat het bijna mals is.
B
Schrap ondertussen de wortels en snijd ze in
plakjes met behulp van de instelbare snijschijf.
Snijd de aardappels in blokjes.Voeg de
wortelschijfjes en de aardappelblokjes toe aan het
vlees en voeg voldoende koud water toe voor de
hoeveelheid soep die u wilt (ongeveer 1,2 liter).
Breng op smaal met een beetje karwijzaad en
laat sudderen totdat alle ingrediënten boterzacht
zijn.Voeg eventueel nog wat zout toe.
B
Warm serveren. U kunt de goulash garneren met
ringen groene paprika en er scherpe rode
minipaprika's op een schoteltje bij serveren.
Aardbeientaart
Ingrediënten
- 100 g margarine
- 100 g suiker
Page 89

89NEDERLANDS
Aardbeientaart
Ingrediënten
- 100 g margarine
- 100 g suiker
- 3 eierdooiers
- 240 g bloem
- 100 g kokos
Vulling:
- 80 g suiker
- 2 theel. citroensap
- 400 g roomkaas
- 500 g aardbeien
Glazuur:
- 500 g aardbeien
- 250 ml water
- 120 g suiker
- 60 g maïzena
Garnering:
- 250 g room
B
Verwarm de oven voor op 180cC. Doe de
margarine en de suiker in de kom en klop ze met
het mes tot een romig mengsel.
B
Roer de eierdooiers erdoor en vervolgens de
bloem en de kokos. Leg het deeg op de bakplaat,
plooi de rand en prik er gaatjes in met een vork.
Bak 15-20 minuten totdat de bodem lichtbruin is.
Laat de bodem afkoelen. Meng de suiker, het
citroensap en de roomkaas in de kom tot een
romig mengsel. Smeer dit mengsel op de
afgekoelde bodem. Plaats een deel van de
aardbeien met de punt naar boven op de bodem.
Plaats de taart in de koelkast.
B
Doe om het glazuur te maken de overige
aardbeien met water en suiker in de blenderkan
en laat de blender draaien. Los de maïzena op in
125 ml van dit aardbeienmengsel. Breng de rest
van het aardbeienmengsel aan de kook en roer de
opgeloste maïzena erdoor zodra het kookt.Verdeel
het hete glazuurmengsel over de aardbeien en
laat de taart 2 uur afkoelen. Garneer vervolgens
met toefjes slagroom.
Milkshake van verse vruchten
Ingrediënten
- 100 g bananen of aardbeien
- 200 ml verse melk
- 50 g vanilleijs
- kristalsuiker naar smaak
B
Schil de bananen of was de aardbeien. Snijd de
vruchten in kleinere stukken en doe ze samen met
de overige ingrediënten in de blenderkan. Laat de
blender lopen tot een glad mengsel is ontstaan.
B
U kunt ook andere vruchten gebruiken om uw
eigen overheerlijke vruchtenmilkshake te maken.
Hazelnootkrans
Ingrediënten voor het deeg:
- 500 g gezeefde bloem
- 75 g suiker
- 1 theel. zout
-1 ei
- 250 ml melk (35cC)
- 100 g zachte boter
Page 90

NEDERLANDS90
- 30 g verse gist (bij gebruik van droge gist de
instructies op het pakje volgen)
Vulling:
- 250 g gehakte hazelnoten
- 100 g suiker
- 2 zakjes vanillesuiker
- 125 ml room
B
Verwarm de oven voor op 200cC. Meng de melk,
het gist en de suiker 15 seconden met het
kneedaccessoire. Doe het deeg in een aparte kom
en dek de kom af met een vochtige doek en laat
het deeg gedurende 20 minuten op een matig
warme plek rijzen.
B
Hak de hazelnoten met het sikkelmes. Meng de
ingrediënten voor de vulling. Rol het deeg uit tot een
rechthoekige lap.Verdeel het hazelnootmengsel
over de deeglap en rol deze op en maak een
krans. Plaats de krans in een beboterde springvorm
en laat hem 20 minuten rijzen. Strijk met een
kwastje wat opgeklopte eierdooier op de bovenkant
van de krans en plaats de springvorm op het
rooster in de midden van de oven en bak hem
25-30 minuten op 200cC.
Chocoladetaart
Ingrediënten
- 140 g zachte boter
- 110 poedersuiker
- 140 g chocolade
- 6 eiwitten
- 6 eidooiers
- 110 g kristalsuiker
- 140 g tarwebloem
Vulling:
- 200 g abrikozenjam
Glazuur:
- 125 ml water
- 300 g suiker
- 250 g geraspte chocolade
- geklopte slagroom, indien gewenst
B
Verwarm de oven voor op 160cC. Roer de boter
en de poedersuiker met het sikkelmes. Smelt de
chocolade en meng door het boter-suikermengsel.
Voeg de eierdooiers één voor één toe en laat het
sikkelmes draaien totdat er een romig mengsel is
ontstaan. Klop ver volgens de eiwitten met de
kristalsuiker met het sikkelmes stijf en schuimig.
Voeg het eiwitschuim toe aan het mengsel en roer
het er voorzichtig door. Schep vervolgens de bloem
er met een spatel doorheen. Doe het deeg in een
beboterd bakblik. Bak één uur op 160cC. Laat de
ovendeur de eerste 15 minuten op een kier staan.
B
Laat de taart even afkoelen in het bakblik
(24 cm). Stort de taart dan op een taartrooster en
laat hem verder afkoelen. Snijd de taart horizontaal
door. Smeer de ene helft in met abrikozenjam en
plaats de twee helften weer op elkaar.Verwarm de
rest van de jam en smeer de bovenkant er mee in.
Ga nu het glazuur klaarmaken. Kook het water,
voeg de suiker en de chocolade toe en laat dit
boven een laag vuur koken. Roer voortdurend tot
een glad, smeerbaar mengsel ontstaat. Breng het
glazuur aan op de taart en laat het afkoelen. Dien
de taart op met toefjes geklopte slagroom.
Page 91

91NEDERLANDS
Broccolisoep (voor 4 personen)
Ingrediënten
- 50 g belegen Goudse kaas
- 300 g gekookte broccoli (stelen en roosjes)
- kookvocht van de broccoli
- 2 gekookte aardappelen in stukken
- 2 bouillonblokjes
- 2 eetl. ongeklopte slagroom
-kerrie
- zout
- peper
- nootmuskaat
B
Rasp de kaas. Pureer de broccoli en de gekookte
aardappelen met een beetje kookvocht van de
broccoli. Doe de broccolipuree, het overgebleven
kookvocht en de bouillonblokjes in een maatbeker
en vul deze bij met water tot 750 ml. Doe het
mengsel in een pan en breng het al roerend aan
de kook. Roer de kaas door de soep, breng de
soep op smaak met kerrie, zout, peper en
nootmuskaat en voeg de slagroom toe.
Pizza
Ingrediënten voor het deeg:
- 400 g bloem
- 1/2 theel. zout
- 20 g verse gist of 1,5 zakje gedroogde gist
- 2 eetl. olie
- ongeveer 240 ml water (35cC)
Voor de tomatensaus:
- 300 g uitgelekte tomaten (uit blik)
- 1 theel. gemengde Italiaanse kruiden (gedroogd
of vers)
-1 ui
- 2 teentjes knoflook
- zout en peper
-suiker
Ingrediënten voor bovenop de saus:
- olijven, salami, artisjokken, champignons, ansjovis,
Mozzarella, paprika, geraspte belegen kaas en
olijfolie naar smaak.
B
Plaats het kneedaccessoire in de kom. Doe alle
ingrediënten in de kom en druk op de
kneedprocesknop. Kneed het deeg gedurende
1 minuut tot een gladde bal. Doe het deeg in een
aparte kom, dek de kom af met een vochtige
doek en laat het ongeveer 30 minuten rijzen
B
Hak de ui en de knoflook met het sikkelmes en
bak de stukjes totdat ze glazig zijn.Voeg de
gezeefde tomaten en de kruiden toe en laat de
saus ongeveer 10 minuten zachtjes koken. Breng
op smaak met zout, peper en suiker. Laat de saus
afkoelen.
B
Verwarm de oven voor op 250cC.
B
Rol het deeg uit op een met bloem bestoven
aanrecht en snijd twee ronde pizzabodems uit de
deeglap. Plaats de pizzabodems op een ingevette
bakplaat. Smeer de saus uit over de bodems maar
laat de randen vrij.Verdeel de ingrediënten over de
saus, strooi wat gemalen kaas over de pizza's en
druppel er wat olijfolie op.
B
Bak de pizza's 12 tot 15 minuten.
Page 92

NEDERLANDS92
Groente-aardappelkoeken
Ingrediënten
-1 ei
- 50 ml melk
- 1 eetl. bloem
- 1 theel. koriander
- zout en peper
- 2 grote aardappels (ong. 300 g)
- 100 g winterwortel
- 150 g selderij
- 50 g zonnebloemzaad or 2 eetl. maïs van de
kolf
- olie om te bakken
B
Gebruik het sikkelmes om ei, melk,bloem,
koriander, zout en peper te mengen.
B
Rasp de geschilde aardappelen, de geschrapte
wortel(s) en de schoongemaakte selderij met de
groffe raspschijf en voeg het geraspte
groentemengsel toe aan het eimengsel. Roer de
geraspte groente, het eimengsel en de
zonnebloemzaden of maïskorrels goed door
elkaar.
B
Verwarm de olie in een koekenpan.Vorm het
groentemengsel tot 8 koeken en bak deze
8 koeken aan beide zijden goudbruin. Laat de
koeken uitlekken op keukenpapier.
B
Baktijd: 3-4 minuten.
Wittebrood
Ingrediënten
- 500 g broodmeel
- 15 g zachte boter of margarine
- 25 g gist of 20 g gedroogde gist
- 260 ml water
- 10 g zout
- 10 g suiker
B
Monteer het kneedaccessoire in de kom en doe
bloem, zout en margarine of boter in de kom.
Voeg de verse of gedroogde gist toe samen met
het water. Doe het deksel op de kom en draai het
deksel in de richting van de pijl totdat u een klik
hoort. Druk op de kneedprocesknop en meng het
deeg. De maximale kneedtijd staat vermeld in de
tabel in het hoofdstuk 'Hoeveelheden en
bereidingstijden'.
B
Doe het deeg over van de kom in een grote kom
en dek de kom af met een vochtige theedoek.
Laat het deeg 20 minuten op een warme plek
rijzen. Sla het deeg daarna plat, kneed het en
vorm het tot een bal.
B
Leg de deegbal in de kom, dek opnieuw af met
een vochtige doek en laat het deeg nog eens
20 minuten rijzen. Sla het daarna opnieuw plat,
kneed het en rol het op.
B
Plaats het deeg in een beboterd bakblik en laat
het 45 minuten rijzen. Bak het brood in het
onderste deel van de voorverwarmde oven.
B
Bak het brood in ongeveer 35 minuten gaar op
225cC.
Page 93

ITALIANO 93
Componenti e accessori
A Motor unit
B Pannello controllo comandi
C Blocco di sicurezza incorporato
D Tappo a vite (deve essere usato per le
funzioni con il contenitore)
E Contenitore
F Porta accessori
G Vaso frullatore
H Coperchio vaso frullatore
I Perno del coperchio (attiva e disattiva
l'interruttore di sicurezza)
J Coperchio della ciotola
K Stopper
L Apertura inserimento cibo
M Pestello
N Setaccio dello spremiagrumi
O Cono dello spremiagrumi
P Tamburo centrifuga
Q Setaccio centrifuga
R Coperchio centrifuga
S Pestello centrifuga
T Lama di metallo + protezione
U Ganci per impastare
V Frullatore a sfera
W Disco per sminuzzare (medio)
X Disco per sminuzzare (fine)
Y Disco per sminuzzare (grosso)
Z Disco per granulare
a Porta-dischi
b Disco regolabile per affettare (disco per
affettare, supporto e pomello di regolazione)
Introduzione
L'apparecchio è provvisto di un dispositivo di
spegnimento automatico. In caso di
surriscaldamento, il dispositivo interrompe
automaticamente l'erogazione di corrente
elettrica all'apparecchio.
Se l'apparecchio smette
improvvisamente di funzionare:
1 Togliete la spina dalla presa di corrente.
2 Lasciate raffreddare l'apparecchio per
60 minuti.
3 Inserite la spina nella presa di corrente.
4 Accendete nuovamente l'apparecchio
Nel caso il dispositivo di spegnimento automatico
venisse attivato troppo spesso, vi preghiamo di
contattare il vostro rivenditore Philips oppure un
Centro Assistenza autorizzato Philips.
ATTENZIONE: Per evitare situazioni pericolose
l'apparecchio non deve mai essere collegato a un
timer.
Importante
◗ Leggete con attenzione le istruzioni e
osservate le illustrazioni prima di usare
l'apparecchio.
Page 94

ITALIANO94
◗ Conservate queste istruzioni per ulteriori
consultazioni.
◗ Prima di collegare l'apparecchio,controllate
che la tensione indicata sulla targhetta
corrisponda a quella della rete locale.
◗ Non usate mai accessori o componenti di altri
produttori o non specificatamente consigliati
da Philips. La garanzia decade nel caso
vengano utilizzati tali accessori.
◗ Non usate l'apparecchio nel caso in cui il cavo,
la spina o altri componenti risultassero
danneggiati.
◗ Nel caso il cavo di alimentazione fosse
danneggiato, dovrà essere sostituito da Philips,
presso un Centro Autorizzato Philips o
personale comunque qualificato, per evitare
situazioni a rischio.
◗ Prima di usare l'apparecchio per la prima
volta, lavate con cura tutti i pezzi a contatto
con il cibo.
◗ Non superate le quantità e i tempi di
preparazione indicati nella tabella.
◗ Non superate il contenuto massimo indicato
sul contenitore (non superate la linea
superiore).
◗ Togliete la spina dalla presa di corrente subito
dopo l'uso.
◗ Non usate mai le dita o altri oggetti (ad
esempio la spatola) per spingere gli ingredienti
nell'apertura di inserimento cibo mentre
l'apparecchio è in funzione.A tale scopo,
utilizzate esclusivamente il pestello a corredo.
◗ Togliete sempre la spina dalla presa di
corrente prima di infilare le dita o altri oggetti
(ad esempio la spatola) nel vaso del frullatore.
◗ Tenete l'apparecchio lontano dalla portata dei
bambini.
◗ Non lasciate mai in funzione l'apparecchio
senza sorveglianza.
◗ Mettete il coperchio sul contenitore nella
posizione corretta. In questo modo il
dispositivo di sicurezza viene sbloccato e
potrete accendere l'apparecchio. Sia il gruppo
motore che il tappo a vite sono
contrassegnati: l'apparecchio può funzionare
solo se il contrassegno sul gruppo motore si
trova esattamente di fronte al contrassegno
riportato sul tappo a vite.
◗ Spegnete sempre l'apparecchio prima di
togliere gli accessori.
◗ Per spegnere l'apparecchio utilizzate sempre il
pulsante STOP.
◗ Prima di togliere il coperchio dall'apparecchio,
aspettate che le parti in movimento si siano
fermate.
◗ Il tappo a vite può essere tolto solo se non è
stato messo il coperchio sul contenitore,
oppure se il contenitore è stato tolto.
◗ Non immergete il gruppo motore in acqua o
altri liquidi. Non risciacquatelo sotto l'acqua
corrente: per pulirlo, usate solo un panno
umido.
◗ togliete le protezioni delle lame prima
dell'uso.
◗ Lasciate raffreddare gli ingredienti prima di
lavorarli (temperatura massima ...).
◗ Se dovete utilizzare un liquido bollente o che
tende a fare schiuma, non versatene più di un
Page 95

ITALIANO 95
litro nel frullatore, per evitare eventuali
schizzi.
◗ Togliete la spina dalla presa di corrente subito
dopo l'uso.
◗ Per i tempi di lavorazione,vedere la tabella
fornita con queste istruzioni.
Attenzione: non è possibile usare le funzioni del
recipiente mentre è inserito il frullatore.
Come usare l'apparecchio
Comandi - Smart Process Control
Questo apparecchio è provvisto di uno speciale
dispositivo per il Controllo dei comandi che
garantisce una lavorazione ottimale e un perfetto
risultato finale. Ciascun pulsante del processo è
collegato ad un profilo di velocità preprogrammato, che stabilisce l'uso ottimale per
ciascun accessorio.
Potete aumentare o diminuire la velocità in tre
fasi, premendo il pulsante + o -.
Premendo il pulsante a intermittenza,
l'apparecchio funziona alla massima velocità.
Lasciando andare il pulsante, l'apparecchio si
ferma o ritorna alla velocità precedentemente
impostata.
Per interrompere, è sempre possibile utilizzare il
pulsante STOP.
Premendo nuovamente lo stesso pulsante entro
40 secondi, riprenderete da dove avevate
interrotto.
Contenitore
C
1 Montate il contenitore sull'apparecchio
ruotando il manico nella direzione della
freccia fino a quando sentirete un "click".
C
2 Mettete il coperchio sul contenitore.
Ruotate il coperchio nella direzione della
freccia fino a quando sentirete un "click"
(dovrete esercitare una certa forza).
Blocco di sicurezza incorporato
B
Il gruppo motore, il contenitore e il coperchio sono
provvisti di speciali contrassegni. L'apparecchio
funziona solo se il contrassegno posto sul gruppo
motore si trova esattamente di fronte a quello del
tappo a vite.
C
1 Controllate che il puntino sul coperchio e
quello sul contenitore siano uno di fronte
all'altro.La sporgenza del coperchio
completerà la forma dell'impugnatura.
CLICK
CLICK
1
2
1
2
CLICK
Page 96

ITALIANO96
Apertura inserimento cibo e pestello
C
1 Usate l'apertura inserimento cibo per
aggiungere ingredienti liquidi e/o solidi.
Usate il pestello per spingere gli
ingredienti solidi attraverso l'apertura di
inserimento cibo.
C
2 Potete usare anche il pestello per chiudere
l'apertura di inserimento cibo ed evitare
così la fuoriuscita degli ingredienti.
Lama di metallo
◗ La lama di metallo può essere usata per
tagliare, miscelare, sminuzzare e ridurre in
purea.
C
1 Togliete la protezione dalle lame.
Le lame sono estremamente affilate. Evitate di
toccarle!
C
2 Inserite il porta-accessori nel contenitore
e la lama nel porta-accessori.
3 Mettete gli ingredienti nel contenitore.
Tagliate a pezzi di 3x3 cm i cibi troppo
grossi. Mettete il coperchio sul
contenitore.
4 Infilate il pestello nell'apertura di
inserimento cibo.
C
5 Premete il pulsante per tritare posto sul
pannello di comando.
- L'apparecchio inizierà a funzionare con
4 movimenti a intermittenza per tritare
uniformemente gli ingredienti (cipolle o frutta
secca).
- L'apparecchio aumenterà poi la velocità fino a
raggiungere quella massima, che verrà
mantenuta fino a quando verrà premuto il
pulsante STOP.
◗ Premete il pulsante - per ridurre la velocità.
◗ Durante il funzionamento a intermittenza
potete interrompere il processo premendo il
pulsante STOP.
Consigli
◗ Se dovete tritare le cipolle, fermate
l'apparecchio dopo il funzionamento a
intermittenza per evitare di ridurle in poltiglia.
◗ Non tenete l'apparecchio in funzione per
periodi troppo lunghi quando grattuggiate il
formaggio (stagionato). Riscaldandosi, il
formaggio inizierebbe a fondersi e a
raggrumarsi.
◗ Non usate la lama per tritare ingredienti
molto duri come il caffè in chicchi, la noce
Page 97

ITALIANO 97
moscata e i cubetti di ghiaccio, per evitare di
danneggiarla o spuntarla.
Se il cibo si attacca alla lama o alle pareti del
contenitore:
1 Spegnete l'apparecchio.
2 Togliete il coperchio dal contenitore
3 Togliete gli ingredienti dalla lama o dalle
pareti del contenitore usando una spatola.
Dischi
Non utilizzate mai i dischi per tritare ingredienti
duri come i cubetti di ghiaccio.
C
1 Inserite il disco prescelto nel porta-dischi
prima di metterlo sul porta-accessori,
Le lame sono estremamente affilate. Evitate di
toccarle!
C
2 Inserite il porta-disco nel porta-accessori
posto nel contenitore.
3 Mettete il coperchio sul contenitore.
4 Mettete gli ingredienti nell'apertura per
l'inserimento del cibo. Se necessario,
tagliate a pezzi gli ingredienti troppo
grossi.
C
5 Per ottenere risultati migliori,riempite
l'apertura in modo uniforme.
Se dovete tagliare grosse quantità di cibo,
ricordate di infilare solo pochi pezzi alla volta,
svuotando il contenitore di tanto in tanto.
C
6 Selezionate "shredding & slicing process"
sul pannello di controllo.
L'apparecchio aumenterà immediatamente la
velocità fino a raggiungere la velocità pre-definita
per ottenere un risultato ottimale.
La velocità di lavorazione può essere aumentata
fino a 3 volte premendo il pulsante + e diminuita
fino a 3 volte premendo il pulsante -.
C
7 Premete leggermente il pestello per
spingere gli ingredienti nell'apertura di
inserimento cibo.
◗ Se dovete tagliare frutta o verdura morbida,
potete ridurre la velocità fino a 3 volte
premendo il pulsante - per evitare di
trasformare gli ingredienti in una purea.
CLICK
2
1
Page 98

ITALIANO98
C
8 Per togliere il disco dal porta-disco,
afferrate il porta-disco con le mani, in
modo che la parte posteriore sia rivolta
verso di voi. Premete i bordi del disco con
i pollici in modo da estrarlo dal portadisco.
Disco regolabile per affettare
Il disco regolabile per affettare permette di
tagliare gli ingredienti allo spessore desiderato.
Attenzione: i bordi della lama sono estremamente
affilati.
C
1 Inserite la lama in cima al supporto.
C
2 Collegate il pomello posto sul retro del
disco e ruotatelo fino a quando le linee
combaciano. In questo modo il disco è
bloccato.
C
3 Ruotate il pomello di regolazione per
ottenere lo spessore desiderato.
C
4 Mettete il disco regolabile sul porta-disco.
5 Chiudete il coperchio e infilate gli
ingredienti nell'apertura di inserimento
cibo.
C
6 Selezionate "shredding & slicing process"
sul pannello di controllo.
7 Se necessario, premete leggermente gli
ingredienti con il pestello.
Accessorio per impastare.
L'accessorio per impastare può essere usato per
preparare la pasta per il pane o la pizza.
C
1 Inserite l'accessorio per impastare nel
porta-accessori.
C
2 Mettete il contenitore sul gruppo motore,
ruotate la maniglia nella direzione della
freccia e sistemate l'accessorio sull'albero
motore.
3 Mettete gli ingredienti nel contenitore.
4 Chiudete il contenitore con il coperchio.
C
5 Premete il pulsante corrispondente alla
funzione "impastare" sul pannello dei
comandi.
Nel giro di 10 secondi l'apparecchio aumenterà
gradualmente la velocità fino a raggiungere la
velocità massima, che verrà mantenuta fino a
quando non verrà premuto il pulsante STOP. La
velocità può essere diminuita fino a 3 volte
premendo il pulsante -. Se il pulsante +/- non
risponde, significa che il motore è già al suo valore
limite.
1
2
Page 99

ITALIANO 99
Frusta
Potete usare la frusta per montare gli albumi e la
panna e per preparare creme e budini.
1 Mettete il contenitore sul gruppo motore
e ruotatelo a sinistra fino a quando
sentirete un "click".
C
2 Mettete il porta-accessorio nel
contenitore.
C
3 Inserite la frusta sul porta-accessori.
4 Mettete gli ingredienti nel contenitore,
mettete il coperchio sul contenitore e
ruotatelo verso destra fino a quando
sentirete un "click".
C
5 Premete il pulsante corrispondente alla
funzione "montare" posto sul pannello dei
comandi.
Nel giro di 15 secondi l'apparecchio aumenterà
gradualmente la velocità fino a raggiungere la
velocità massima, che verrà mantenuta fino a
quando non verrà premuto il pulsante STOP. La
velocità può essere diminuita fino a 3 volte
premendo il pulsante -.
Frullatore
Il frullatore è particolarmente adatto per:
- Frullare ingredienti liquidi come: latte, creme,
succhi di frutta, zuppe, cocktail, frappè, frullati.
- Miscelare ingredienti morbidi come la pastella
per i pancake o la maionese.
- Ridurre in purea cibi cotti (ad esempio le
pappe per bambini).
◗ L'apparecchio può essere usato con o senza
frullatore inserito sul gruppo motore. Se usate
l'apparecchio senza il frullatore, l'apparecchio
funzionerà solo se avrete avvitato
correttamente il tappo a vite sul gruppo
motore.
C
1 Per inserire il vaso del frullatore,togliete il
tappo a vite sopra il pannello.
C
2 Montate il vaso del frullatore sopra il
gruppo motore, ruotandolo nella direzione
della freccia fino a quando risulta ben
fissato. Il manico deve trovarsi sulla
sinistra.
Non esercitate troppa pressione sul manico del
frullatore.
3 Mettete gli ingredienti nel vaso del
frullatore.
C
4 Chiudete il coperchio.
1
2
2
1
Page 100

ITALIANO100
C
5 Prima di mettere in funzione l'apparecchio,
inserite sempre il coperchio di sicurezza
sul coperchio del frullatore.
C
6 Premete il pulsante corrispondente alla
funzione "frullare" posto sul pannello di
controllo.Il frullatore entrerà in funzione,
aumentando gradualmente la velocità fino
a raggiungere la velocità massima, che
verrà mantenuta fino a quando non verrà
premuto il pulsante STOP. La velocità può
essere diminuita fino a 3 volte premendo il
pulsante -.
Consigli
C
◗ Versate gli ingredienti liquidi nel vaso del
frullatore attraverso il foro nel coperchio.
◗ Più a lungo frullerete gli ingredienti e più fine
sarà il risultato ottenuto.
◗ Tagliate a piccoli pezzi gli ingredienti prima di
metterli nel vaso del frullatore. Se dovete
frullare grosse quantità di cibo, ricordate di
infilare solo pochi pezzi alla volta, invece di
riempire il vaso.
◗ Gli ingredienti duri come i semi di soia per
preparare il latte, devono essere ammollati in
acqua prima di essere frullati.
C
◗ Per tritare il ghiaccio,mettete i cubetti nel
vaso del frullatore, chiudete il coperchio e
azionate il funzionamento a intermittenza.
Se gli ingredienti si attaccano alla parete del vaso:
1 Spegnete l'apparecchio e togliete la spina.
2 Aprite il coperchio.
Non aprite mai il coperchio mentre l'apparecchio
è in funzione.
3 Usate una spatola per togliere gli
ingredienti dalla parete del vaso.
Tenete la spatola ad una distanza di sicurezza dalle
lame (circa 2 cm).
◗ Se non siete soddisfatti del risultato ottenuto,
fate funzionare ancora l'apparecchio,
premendo alcune volte sul pulsante a
intermittenza. Per ottenere un risultato
ancora migliore, potete anche mescolare gli
ingredienti usato la spatola (non mentre
l'apparecchio è in funzione!) oppure versare
parte del contenuto del vaso per frullare
quantità più piccole.
◗ In alcuni casi è più facile frullare gli ingredienti
aggiungendo un po' di liquido (ad es. del succo
di limone quando frullate della frutta).
 Loading...