

Page 1

The manufacturer reserves the right to change the features of the product without prior notice.
O fabricante reserva-se o direito de efectuar qualquer alteração sem aviso prévio.
Type SUP032OR Cod.-15003014 Rev.00 del 15-05-11
Page 2

Operation and maintenance manual
Before using the machine, please read the attached operating instructions.
Carefully read the safety rules.
Manual de uso e manutenção
Antes de utilizar a máquina consulte estas instruções.
Leia atentamente as normas de segurança.
Page 3

2
CONTENTS - ÍNDICE
TECHNICAL DATA .................................................................................................................................................3
IMPORTANT PRECAUTIONARY MEASURES .....................................................................................................4
APPLIANCE ..........................................................................................................................................................8
ACCESSORIES ....................................................................................................................................................................................................... 8
INSTALLATION ......................................................................................................................................................9
STARTING THE MACHINE ..................................................................................................................................................................................... 9
RINSING OF THE INTERNAL CIRCUITS ............................................................................................................................................................. 10
FIRST USE - USE AFTER A LONG PERIOD OF INACTIVITY ..............................................................................................................................11
INSTALLING THE INTENZA WATER FILTER (OPTIONAL) ................................................................................................................................. 13
CONTROL PANEL ...............................................................................................................................................14
ADJUSTMENTS ..................................................................................................................................................16
COFFEE VOLUME ADJUSTMENT PER CUP ...................................................................................................................................................... 16
DRIP TRAY HEIGHT ADJUSTMENT ..................................................................................................................................................................... 16
AROMA OPTI-DOSE (ADJUSTS THE COFFEE DOSE PER CUP) .....................................................................................................................17
SAECO ADAPTING SYSTEM ............................................................................................................................................................................... 17
COFFEE GRINDER ADJUSTMENT .....................................................................................................................................................................18
COFFEE STRENGTH ........................................................................................................................................................................................... 19
STANDBY ..............................................................................................................................................................................................................19
SETTING WATER HARDNESS ............................................................................................................................................................................. 20
COFFEE BREWING ............................................................................................................................................21
HOT WATER DISPENSING ................................................................................................................................24
CAPPUCCINO .....................................................................................................................................................25
MILK ISLAND (OPTIONAL) .................................................................................................................................27
DESCALING ........................................................................................................................................................29
CLEANING AND MAINTENANCE .......................................................................................................................34
MAINTENANCE DURING OPERATION................................................................................................................................................................34
GENERAL MACHINE CLEANING .........................................................................................................................................................................35
CLEANING THE BREW GROUP ..........................................................................................................................................................................36
TROUBLESHOOTING.........................................................................................................................................38
SAFETY RULES ..................................................................................................................................................40
DADOS TÉCNICOS ..............................................................................................................................................3
PRECAUÇÕES IMPORTANTES ...........................................................................................................................5
APARELHO ...........................................................................................................................................................8
ACESSÓRIOS ......................................................................................................................................................................................................... 8
INSTALAÇÃO ........................................................................................................................................................9
LIGAÇÃO DA MÁQUINA.......................................................................................................................................................................................... 9
ENXÁGÜE DOS CIRCUITOS INTERNOS ............................................................................................................................................................ 10
PRIMEIRA UTILIZAÇÃO - APÓS UM LONGO PERÍODO DE INUTILIZAÇÃO ......................................................................................................11
FILTRO ÁGUA INTENZA (OPCIONAL) .................................................................................................................................................................13
PAINEL DE COMANDO .......................................................................................................................................14
AJUSTES ............................................................................................................................................................16
ALTURA DO CAFÉ NA CHÁVENA ........................................................................................................................................................................ 16
AJUSTE DA ALTURA DA BANDEJA DE LIMPEZA ................................................................................................................................................ 16
(OPTI-DOSE) INDICAÇÃO DA QUANTIDADE DE CAFÉ MOÍDO........................................................................................................................17
SAECO ADAPTING SYSTEM ............................................................................................................................................................................... 17
AJUSTE DO MOINHO DE CAFÉ ..........................................................................................................................................................................18
CONSISTÊNCIA DO CAFÉ ................................................................................................................................................................................... 19
STANDBY ..............................................................................................................................................................................................................19
CONFIGURAÇÃO DA DUREZA DA ÁGUA ...........................................................................................................................................................20
DISTRIBUIÇÃO CAFÉ.........................................................................................................................................21
DISTRIBUIÇÃO DE ÁGUA QUENTE ..................................................................................................................24
CAPPUCCINO .....................................................................................................................................................25
MILK ISLAND (OPCIONAL) ................................................................................................................................27
DESCALCIFICAÇÃO ...........................................................................................................................................29
LIMPEZA E MANUTENÇÃO ................................................................................................................................34
MANUTENÇÃO DURANTE O FUNCIONAMENTO ..............................................................................................................................................34
LIMPEZA DA MÁQUINA ........................................................................................................................................................................................35
LIMPEZA DO GRUPO DE DISTRIBUIÇÃO ..........................................................................................................................................................36
PROBLEMAS - CAUSAS - SOLUÇÕES .............................................................................................................39
NORMAS DE SEGURANÇA ...............................................................................................................................41
Page 4
TECHNICAL DATA - DADOS TÉCNICOS
TECHNICAL DATA
• Nominal voltage See label on the appliance
• Power rating See label on the appliance
• Power supply See label on the appliance
• Shell material ABS - Thermoplastic
• Size (w x h x d) 313 x 372 x 408 mm - 12.60 x 14.57 x 15.75 in
• Weight 9 Kg - 19.8 lbs
• Cord length 1200 mm - 47.24 in
• Control panel Front
• Water tank 1.7 liters - 57.5 oz / Removable
• Pump pressure (bars) 15
• Boiler Stainless steel
• Coffee bean hopper capacity 250 grams - 8.9 oz coffee beans
• Quantity of ground coffee 7 - 10.5 grams / 0.25 - 0.37 oz.
• Dregdrawer capacity 14 portions
• Safety devices Boiler pressure safety valve – Double safety
thermostat.
Subject to engineering and manufacturing changes due to technological developments. The machine
conforms to the European Directive 89/336/EEC (Italian Legislative Decree 476 dated 04/12/92) concerning
electromagnetic compatibility.
3
DADOS TÉCNICOS
• Tensão nominal Veja plaqueta posicionada no aparelho
• Potência nominal Veja plaqueta posicionada no aparelho
• Alimentação Veja plaqueta posicionada no aparelho
• Material do corpo ABS - Termoplástico
• Dimensões (c x a x p) (mm) 313 x 372 x 408
• Peso (Kg) 9
• Comprimento do cabo (mm) 1200
• Painel de comando Frontal
• Reservatório de água (l.) 1,7 - Extraível
• Pressão da bomba (bares) 15
• Caldeira Aço Inox
• Capacidade do recipiente de café (g) 250 de café em grãos
• Quantidade de café moído 7 - 10,5 g
• Capacidade gaveta de recolha das borras 14
• Dispositivos de segurança Válvula de segurança de pressão caldeira – duplo
termóstato de segurança.
Sob reserva de alterações de construção e realização devidas ao progresso tecnológico. Máquina conforme
com a Directiva Europeia 89/336/CEE (Decreto legislativo 476 de 04/12/92), relativa à eliminação das rádiointerferências.
Page 5

4
IMPORTANT PRECAUTIONARY MEASURES
During use, every precaution must be taken to limit the risk of fi re, electric shock and/or accidents.
• Read carefully all the instructions and information listed in this manual and in any other booklet contained in
the packaging before turning on or using the espresso machine.
• Do not touch hot surfaces.
• To avoid fi res, electric shocks or accidents, do not immerse the cord, plug or body of the machine in water or
other liquid.
• Be especially careful when using the espresso machine in the presence of children.
• Unplug the cord when the machine is not in use or during cleaning. Let it cool down before inserting or
removing parts and before cleaning.
• Do not use the machine with a damaged cord or plug or in the case of failure or breakdown. Have the machine
checked or repaired at the nearest customer service center.
• The use of accessories not recommended by the manufacturer can cause damage to property or injury to
persons.
• Do not use the espresso machine outdoors.
• Make sure the cord does not dangle or touch hot surfaces.
• Keep the espresso machine away from heat sources.
• Make sure the espresso machine's main switch is in the "Off" position before plugging it in. To turn it off, turn
the switch to "Off" and unplug the cord from the socket.
• Be extremely careful while using the steamer.
WARNING
Any repair and/or assistance, with the exception of normal cleaning and maintenance operations, must
be performed by an authorized customer service center. Do not immerse the machine in water.
• Check that the voltage indicated on the tag corresponds to that of the electrical system.
• Never use warm or hot water to fi ll the water tank. Use only cold water.
• Do not touch the machine's hot parts or the power cord with your bare hands during operation.
• Never wash the machine with corrosive detergents or abrasive utensils. Use only a soft cloth dampened with
water.
• To slow down the formation of limescale, we recommend using fi ltered water.
• Do not use caramelized coffee .
Page 6

PRECAUÇÕES IMPORTANTES
Durante a utilização da maquina, aconselha-se a tomar algumas precauções a fi m de limitar o risco de
incêndios, choques eléctricos e/ou acidentes.
• Leia atentamente todas as instruções e informações indicadas neste manual e em qualquer outro folheto
contido na embalagem antes de ligar ou utilizar a máquina de café expresso.
• Não toque nas superfícies quentes.
• Não mergulhe o cabo, a fi cha ou o corpo da máquina na água ou outro líquido a fi m de evitar incêndios,
choques eléctricos ou acidentes.
• Preste particular atenção em utilizar a máquina de café expresso na presença de crianças.
• Tire a fi cha da tomada se a máquina não for utilizada ou durante a limpeza. Deixe arrefecê-la antes de
introduzir ou remover peças e antes de realizar a sua limpeza.
• Não utilize a máquina com o cabo ou a fi cha danifi cados ou em caso de avarias ou rupturas. Faça controlar
ou consertar o aparelho no centro de assistência mais próximo.
• A utilização de acessórios não aconselhados pelo fabricante pode causar danos a coisas e pessoas.
• Não utilize a máquina de café expresso ao ar livre.
• Evite que o cabo penda da mesa ou que toque em superfícies quentes.
• Ponha a máquna de café expresso longe de fontes de calor.
• Certifi que-se de que a máquina de café expresso tenha o interruptor geral sobre a posição “Desligado” antes
de introduzir a fi cha na tomada. Para desligá-la, posicione-a sobre “Desligado” e tire após a fi cha da tomada.
• Preste extrema atenção durante a utilização do vapor.
5
ADVERTÊNCIA
Qualquer intervenção de conserto e/ou assistência, excepto as operações de normal limpeza e
manutenção, deverão ser realizadas unicamente por um centro de assistência autorizado. Não mergulhe
a máquina na água.
• Controle que a voltagem indicada na plaqueta corresponda àquela da instalação eléctrica.
• Nunca utilize água morna ou quente para encher o recipiente de água. Utilize apenas água fria.
• Não toque com as mãos nas partes quentes da máquina e no cabo de alimentação durante o funcionamento.
• Nunca utilize detergentes corrosivos para a limpeza ou ferramentas que arranham. É sufi ciente um pano
macio humedecido com água.
• Não utilize café caramelizado.
Page 7

6
IMPORTANT PRECAUTIONARY MEASURES
INSTRUCTIONS FOR THE ELECTRICAL CORD
• A short electrical cord has been provided to keep it from twisting or causing tripping.
• Extension cords can be used, but must be used with great care.
When an extension cord is used, check that:
a. the voltage listed on the extension cord corresponds to the electrical voltage of the appliance;
b. the cord has a grounded, three-prong plug (if the appliance's cord is of this type);
c. the cord does not dangle from the table to avoid tripping.
• Do not use multi-sockets
GENERAL INFORMATION
This coffee machine is made for brewing espresso coffee using coffee beans, and it is equipped with a
device to dispense steam and hot water.
Warning: no liability is assumed for any damage caused by:
• incorrect use not in accordance with the intended uses;
• repairs not carried out by authorized customer service centers;
• tampering with the power cord;
• tampering with any part of the machine;
• the use of non-original spare parts and accessories;
• failure to descale the machine or use at temperatures below 0°C (32°F)
IN THESE CASES, THE WARRANTY IS NOT VALID.
THE WARNING TRIANGLE INDICATES ALL IMPORTANT
INSTRUCTIONS FOR THE USER’S SAFETY. PLEASE FOLLOW THESE
INSTRUCTIONS CAREFULLY TO PREVENT SERIOUS INJURIES!
HOW TO USE THESE OPERATING INSTRUCTIONS
Keep these operating instructions in a safe place and make them available to anyone else who may use the
coffee machine. For further information or if you experience problems not completely or suffi ciently addressed in
these instructions, please contact an Authorized Customer Service Center.
KEEP THESE INSTRUCTIONS
Page 8

PRECAUÇÕES IMPORTANTES
INSTRUÇÕES SOBRE O CABO ELÉCTRICO
• É fornecido um cabo eléctrico bastante curto para evitar enrolamentos ou de tropeçar nele.
• É possível utilizar, com muito cuidado, extensões.
Quando for utilizada uma extensão, certifi que-se de que:
a. a voltagem indicada na extensão corresponda à voltagem eléctrica do electrodoméstico;
b. esteja equipada com uma fi cha de três pinos e com ligação à terra (se o cabo do electrodoméstico
for deste tipo);
c. o cabo não penda da mesa para evitar tropeçar nele.
• Não utilize tomadas múltiplas
GENERALIDADES
A máquina de café é indicada para a preparação de café expresso utilizando café em grãos e está
equipada com um dispositivo para a distribuição de vapor e água quente.
Atenção: não se assume qualquer responsabilidade por eventuais danos ocorridos por:
• uso errado ou não conforme com as fi nalidades previstas;
• consertos não realizados nos centros de assistência autorizados;
• alteração do cabo de alimentação;
• alteração de qualquer componente da máquina;
• uso de peças sobresselentes e acessórios não originais;
• não descalcifi cação da máquina ou utilização com temperaturas debaixo de 0°C.
7
NESTES CASOS A GARANTIA PERDERÁ A SUA VALIDADE.
O TRIÂNGULO DE ADVERTÊNCIA INDICA TODAS AS INSTRUÇÕES
IMPORTANTES PARA A SEGURANÇA DO UTILIZADOR. SIGA
ESCRUPULOSAMENTE ESTAS INDICAÇÕES PARA EVITAR
FERIMENTOS GRAVES!
USO DESTAS INSTRUÇÕES
Guarde estas instruções de uso em lugar seguro e coloque-as junto da máquina de café se por acaso for
utilizada por terceiros. Para mais informações ou no caso de problemas contacte os Centros de Assistência
Autorizados.
GUARDE SEMPRE ESTAS INSTRUÇÕES.
Page 9

8
APPLIANCE - APARELHO
Coffee bean hopper lid
Tampa recipiente de café em grãos
Coffee bean hopper
Recipiente de café em grãos
SBS dial
SBS
Dispensing head
Distribuidor
Drip tray + grill
Bandeja de limpeza + grelha
Hot water / steam knob
Botão da torneira água quente/vapor
Pre-ground bypass doser
Compartimento para café pré-moído
Cup warming surface
Plano de apoio para chávenas
Power button
Interruptor geral
Service door
Portinhola de serviço
Dregdrawer
Gaveta de recolha das borras
Brew group
Grupo de distribuição
Control panel
Painel de comando
Hot water / steam wand
Tubo de distribuição de
água quente/vapor
Milk Island connection
Engate “Milk Island”
Water tank
Reservatório de água
ACCESSORIES - ACESSÓRIOS
Pre-ground coffee
measuring scoop and
grinder adjustment key
Medidor de café pré-moído
e chave para a regulação
da moagem
Socket for power cord
Tomada de encaixe para cabo de alimentação
Water hardness test strip
Papel para teste de dureza água
Lubricant for the brew group
Graxa para grupo de distribuição
Drip tray
Reservatório de recuperação
de líquidos
Intenza water fi lter
Filtro água Intenza
Power cord
Cabo de alimentação
Page 10

INSTALLATION - INSTALAÇÃO
STARTING THE MACHINE - LIGAÇÃO DA MÁQUINA
Make sure the power button is not pressed and the machine is turned off. Check the machine features on
the label on the bottom of the appliance.
Check the water hardness as indicated on page 20. Use this information to adjust the machine. To install
the Intenza water fi lter, see page 13.
Assegure-se de que o interruptor geral não esteja pressionado. Verifi que as características da máquina,
indicadas na plaqueta de dados posicionada na parte inferior.
Verifi que a dureza da água como indicado na pág. 20; utilize esta informação para regular a máquina e o
Intenza Aroma System descrito na pág. 13.
9
1 2
Lift the lid off the coffee bean
hopper.
Levante a tampa do recipiente
de café em grãos.
Fill the container with coffee
beans. Close the lid placing it
correctly on the hopper.
Encha o recipiente com café em
grãos. Recoloque correctamente
a tampa no recipiente de café.
4 5 6
Fill the tank with fresh drinking
water up to the MAX level.
Re-insert the tank.
Encha o reservatório com água
fresca potável, até o nível
MAX indicado. Recoloque o
reservatório.
Insert the plug into the socket
located on the back of the
machine and insert the other end
into a power outlet with suitable
current.
Introduza a fi cha na tomada
posicionada na parte traseira da
máquina, e a outra extremidade
numa tomada de corrente
apropriada.
3
Remove the water tank. It is
recommended to install the water
fi lter as described on page 13.
Extraia o reservatório da água.
Sugerimos que instale o fi ltro água
Intenza (Veja pág. 13).
Firmly push down the power
button to turn on the machine.
The machine performs a selftest.
Pressione até ao fundo o
interruptor geral para ligar a
máquina. O aparelho realizará
um diagnóstico das funções.
Page 11
10
INSTALLATION - INSTALAÇÃO
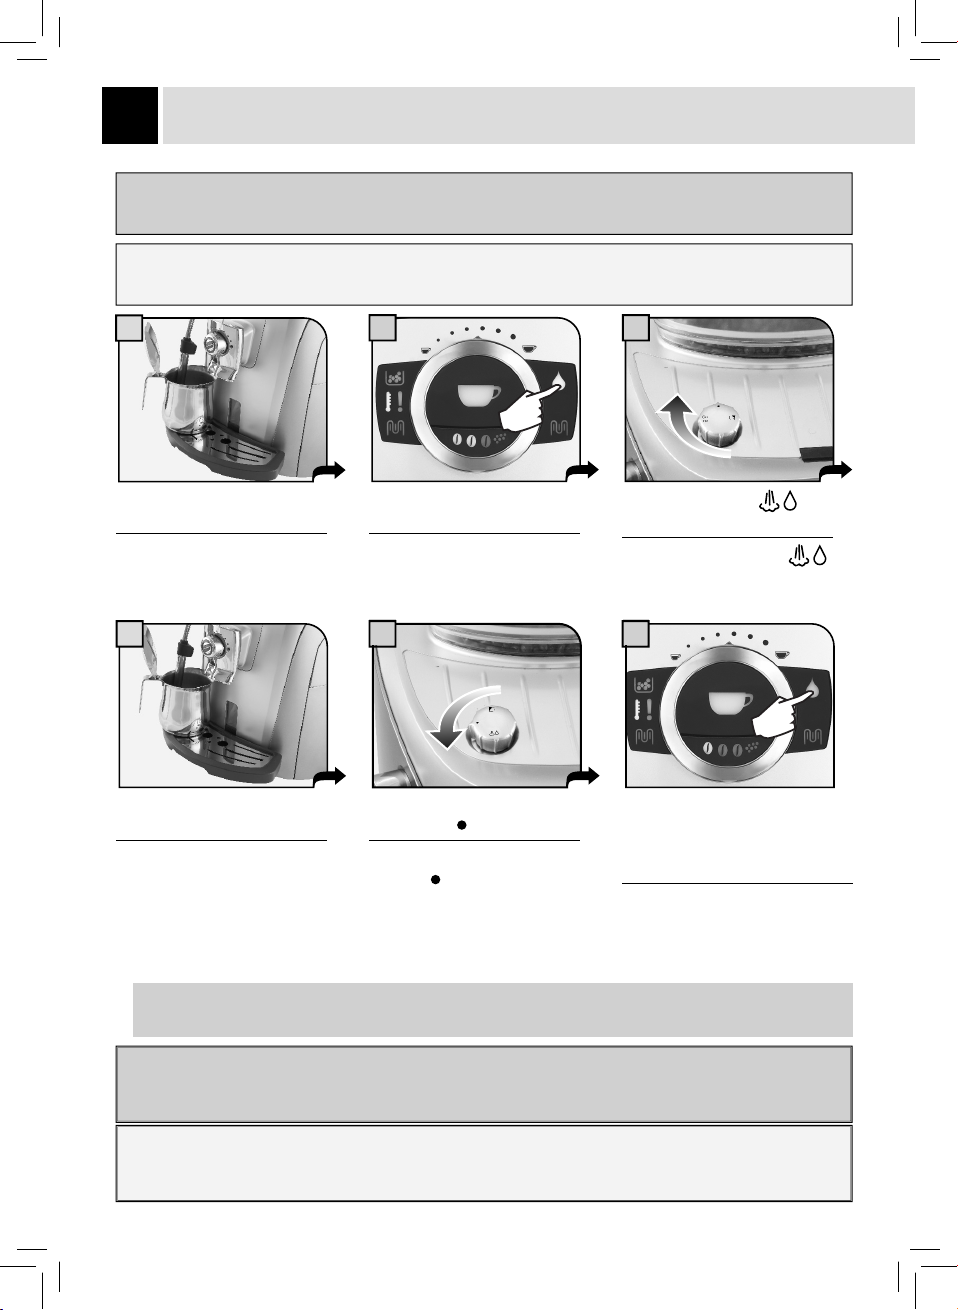
The machine automatically primes the water circuit. If this operation is not completed, proceed manually as
described from step 7 to 12.
A máquina providencia automaticamente o carregamento do circuito. Caso esta operação não termine, deverá
prosseguir manualmente como descrito nas etapas de 7 a 12.
7
Place a container beneath the
hot water wand.
Coloque um recipiente por
baixo do tubo do vapor.
10
Wait until a steady fl ow of water
comes out of the wand.
Aguarde até a água sair de uma
maneira regular.
8 9
Press the water button. The
indicator light turns on.
Pressione o botão. O indicador
luminoso acender-se-á.
Turn the knob until it is in the
rest position (
Vire o botão até a posição de
repouso (
).
).
Turn the knob to the
position.
Vire o botão até a marca
1211
Press the water button again. The
indicator light turns off. Remove
the container. The machine is
ready for use.
Pressione de novo o botão. O
indicador luminoso apagar-se-á.
Remova o recipiente. A máquina
está pronta.
.
RINSING OF THE INTERNAL CIRCUITS
ENXÁGÜE DOS CIRCUITOS INTERNOS
When the correct temperature is reached, the machine performs a rinse cycle of the internal circuits. A small
amount of water is dispensed; during this phase, the indicator lights fl ash counter-clockwise. Wait for this cycle
to be completed.
Depois de terminado o aquecimento, a máquina realizará um ciclo de enxagúe dos circuitos internos.
Será distribuída uma pequena quantidade de água; durante esta fase os indicadores luminosos lampejam
ciclicamente no sentido anti-horário. Aguarde este ciclo terminar automaticamente.
Page 12
FIRST USE - USE AFTER A LONG PERIOD OF INACTIVITY
PRIMEIRA UTILIZAÇÃO - APÓS UM LONGO PERÍODO DE INUTILIZAÇÃO
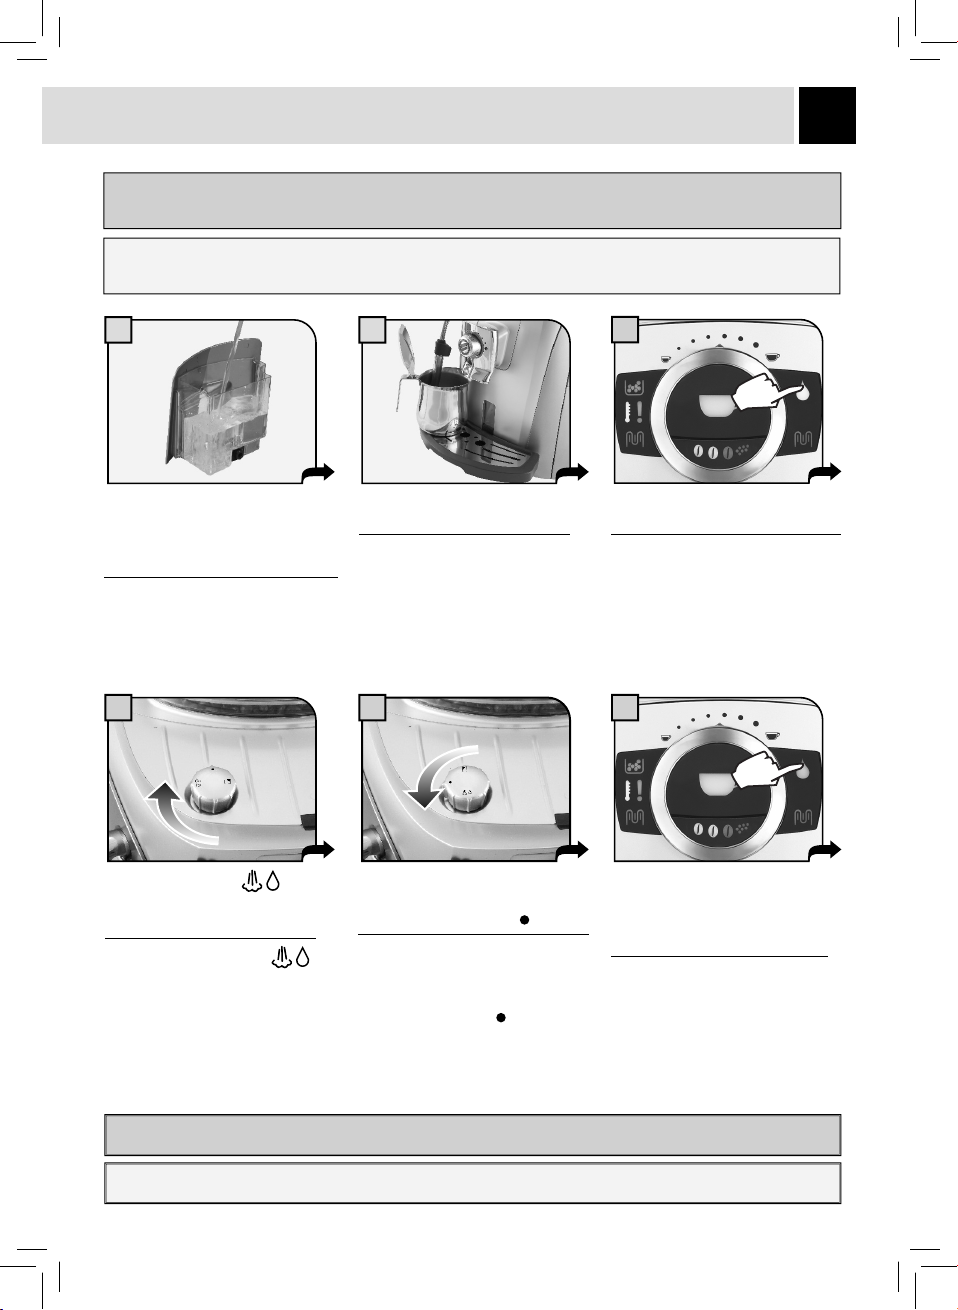
These operations ensure an optimum brewing and must be performed: 1) At fi rst start-up - 2) When the
machine remains inactive for a long time (more than 2 weeks).
Estas operações asseguram-lhe uma óptima distribuição e devem ser realizadas: 1) Na primeira utilização - 2)
Quando a máquina permanecer inutilizada por um longo período de tempo (por mais de 2 semanas).
11
Rinse the water tank thoroughly
and fi ll it again with fresh drinking
water up to the MAX level indicated. Reposition the tank.
Enxagúe bem e encha o reservatório com água fresca potável até
ao nível MÁX indicado. Posicione
novamente o reservatório.
Turn the knob to the
position to start dispensing
water.
Vire o botão até à marca
para iniciar a distribuição de
água.
21
Place a container under the
steam wand.
Coloque um recipiente debaixo
do tubo de vapor.
Dispense all the water in the tank.
Once fi nished, turn the knob until it
reaches the off position ( ).
Distribua toda a água contida no
reservatório. Depois de terminado,
vire o botão até colocá-lo na
posição de repouso (
).
3
Press the button. The indicator
light turns on.
Pressione o botão. O indicador
luminoso acende-se.
64 5
Press the button again. The
indicator light turns off.
Remove the container and fi ll the
water tank again.
Pressione novamente o botão.
O indicador luminoso apaga-se.
Remova o recipiente e encha
novamente o reservatório de
água.
Water dispensed during this washing operation must be thrown away.
A água distribuída durante esta lavagem deve ser eliminada.
Page 13
FIRST USE - USE AFTER A LONG PERIOD OF INACTIVITY
12
PRIMEIRA UTILIZAÇÃO - APÓS UM LONGO PERÍODO DE INUTILIZAÇÃO
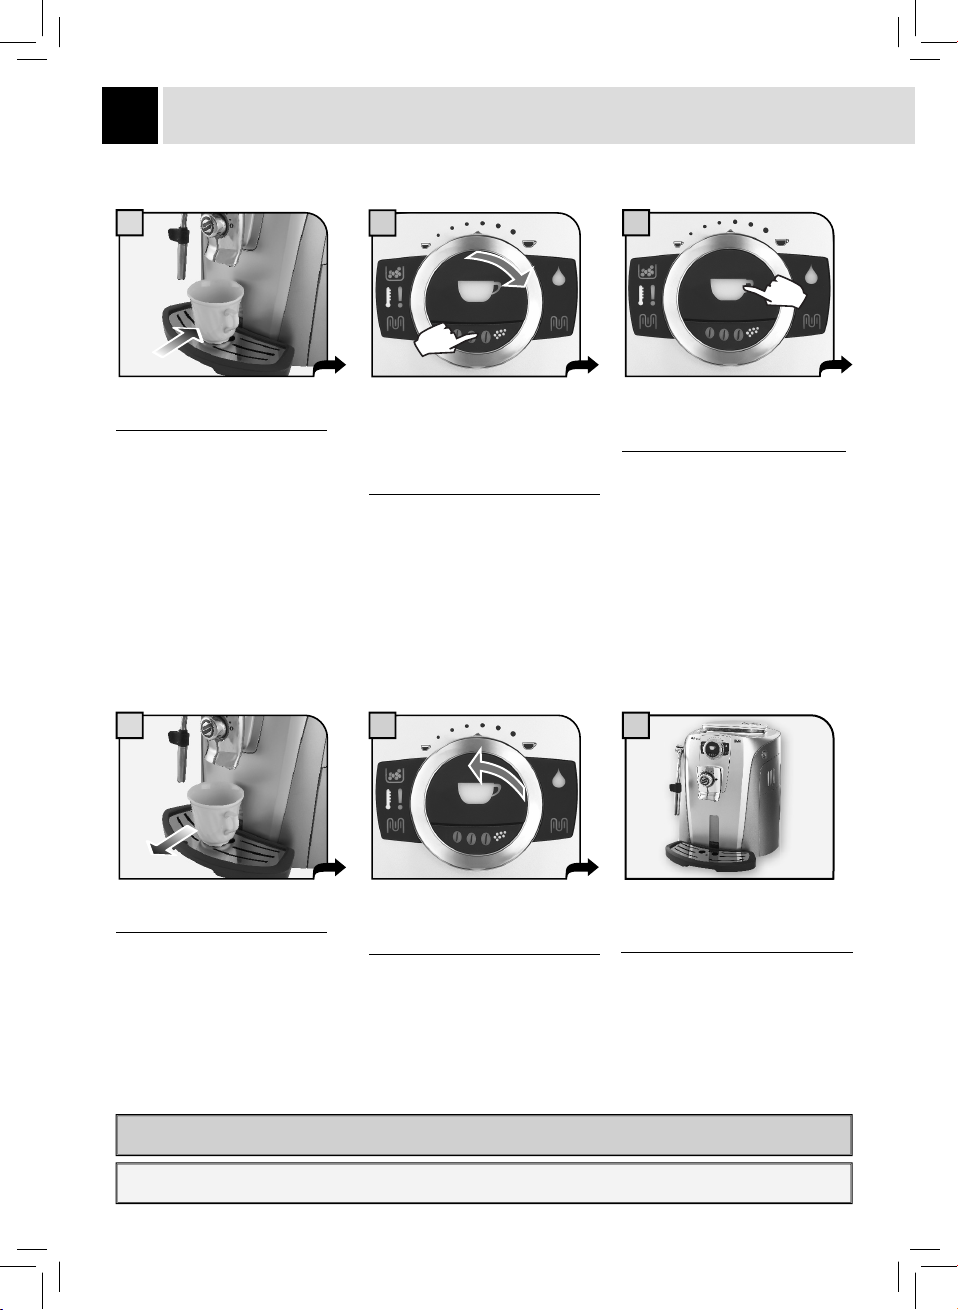
7
Place a container under the
dispensing spout.
Coloque um recipiente debaixo
do distribuidor.
10
8
Adjust the coffee length by turning
the knob clockwise to its limit stop.
Select the pre-ground coffee
function by pressing the button one
or more times (see page 17).
Regule a quantidade máxima de
café rodando o botão no sentido
dos ponteiros do relógio até ao fi m.
Seleccione a função pré-moído
pressionando uma ou mais vezes
o botão (veja a pág. 17).
11
9
Press the central button to start
dispensing. DO NOT insert coffee
at this stage.
SEM INTRODUZIR O CAFÉ,
pressione o botão central para
iniciar a distribuição.
12
At the end of the procedure
empty the container.
No fi nal da distribuição, esvazie
o recipiente.
Water dispensed during this washing operation must be thrown away.
A água distribuída durante esta lavagem deve ser eliminada.
Turn the knob counter-clockwise
to the desired position for brewing
coffee.
Rode o botão no sentido contrário
ao dos ponteiros do relógio até
fi car da posição que pretende para
a distribuição de café.
Fill the water tank again.
The machine is now ready to be
used.
Encha novamente o reservatório
de água.
A máquina está pronta para utilizar.
Page 14
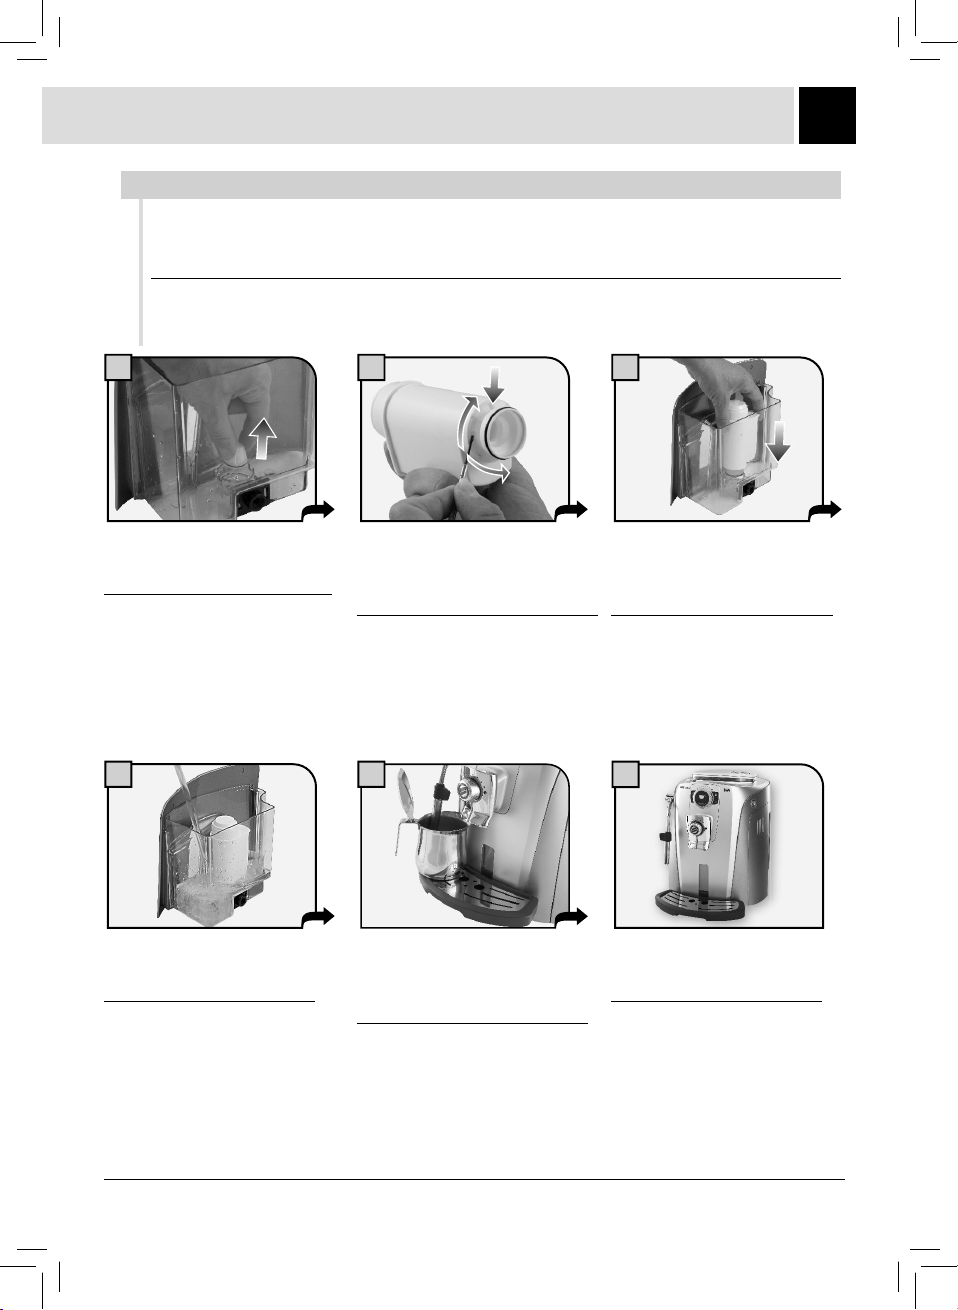
WATER FILTER - FILTRO ÁGUA
INTENZA WATER FILTER - FILTRO ÁGUA INTENZA
To improve the quality of the water used, it is recommended to install the water fi lter.
Remove the water fi lter from its packaging, immerse it vertically (with the opening facing
upwards) in cold water and gently press the sides so as to let the air bubbles out.
Para melhorar a qualidade da água utilizada, aconselhamos que instale o fi ltro água.
Tire o fi ltro da embalagem e mergulhe-o na posição vertical (com a abertura para cima) em água
fria e pressione delicadamente os lados para que saiam as bolhas de ar.
1
2 3
13
Remove the small white fi lter from
the water tank and store it in a dry
place sheltered from dust.
Remova o fi ltro branco presente
no reservatório, guarde-o num
lugar seco protegido do pó.
4
Fill the water tank with fresh
drinking water and re-insert it
into the machine.
Encha o reservatório com água
fresca potável e reintroduza-o
na máquina.
Set the Intenza Aroma System:
A = Soft water
B = Medium water (standard)
C = Hard water
Programar o Intenza Aroma System:
A = Água leve
B = Água neutra (padrão)
C = Água dura
5
Place a container beneath the hot
water wand. Dispense all the water
in the tank using the hot water
function (see page 24).
Coloque um recipiente por baixo
do tubo do vapor. Distribua a água
contida no reservatório através da
função água quente (veja pág.24)
Insert the fi lter in the empty tank.
The reference mark and the
groove must match. Push fi rmly
until it is completely inserted.
Introduza o fi ltro no reservatório
vazio; o ponto de referência e a
estria deverá coincidir. Pressione
até o ponto de paragem.
6
Fill the tank again with fresh
drinking water.
The machine is ready for use.
Encha de novo o reservatório
com água fresca potável.
A máquina está pronta.
NOTE: if the Intenza water fi lter is not used, insert the small white fi lter that was previously removed (step 1) into the water tank.
NOTA: quando o fi ltro água Intenza não estiver presente, deve-se introduzir, no reservatório, o fi ltro branco removido no ponto 1.
Page 15
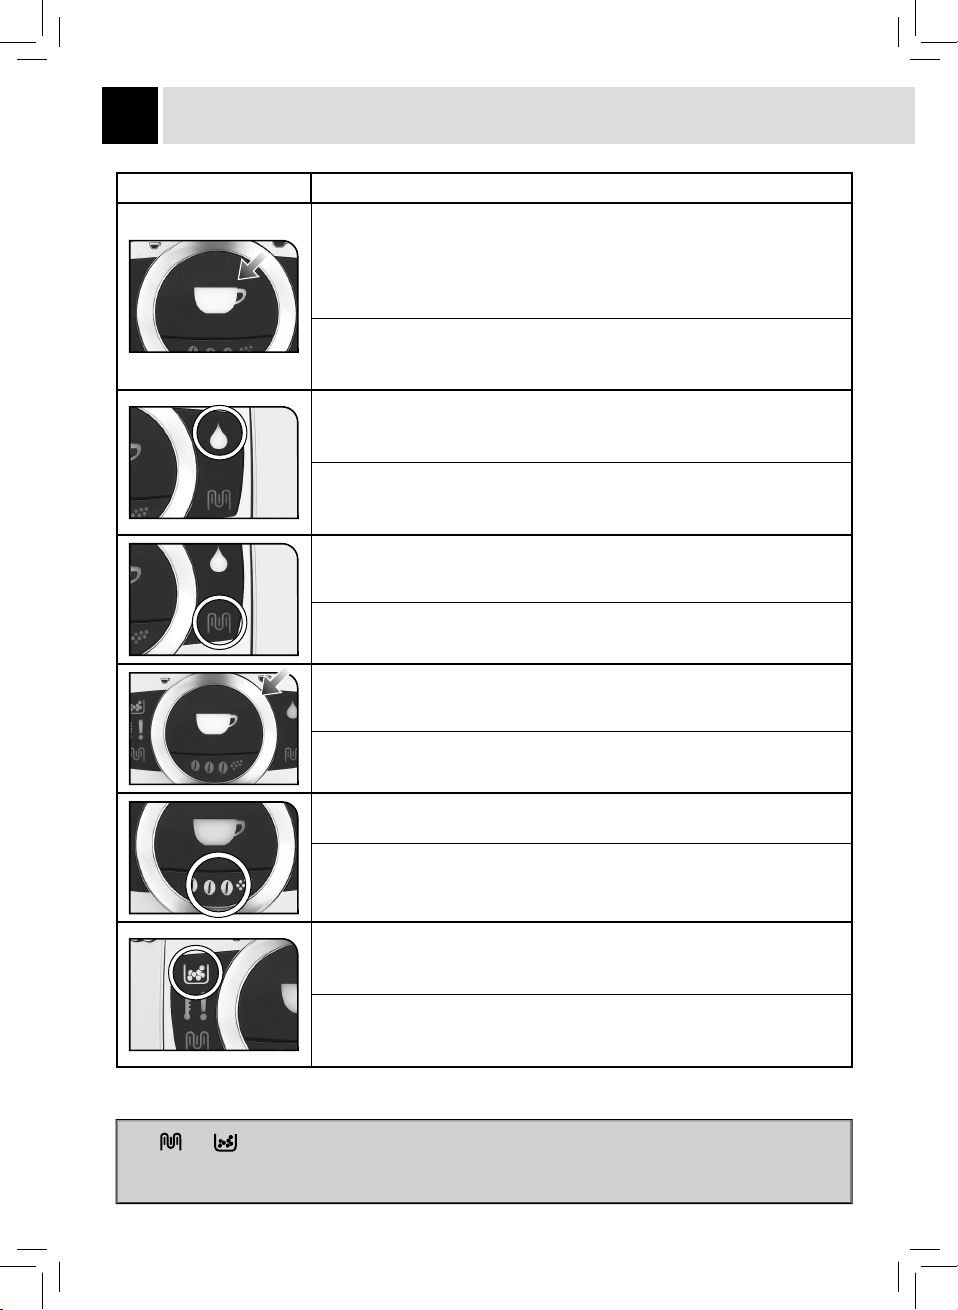
14
CONTROL PANEL - PAINEL DE COMANDO
LED Light - Tecla / LED Description - Descrição
Coffee button:
• slowly fl ashing: 1 coffee has been selected (the button has been pushed
once).
• quickly fl ashing: 2 coffees have been selected (the button has been pushed
twice).
Botão de distribuição do café:
• lampejo lento: foi seleccionado 1 café (tecla pressionada uma vez).
• lampejo rápido: foram seleccionados 2 cafés (tecla pressionada duas vezes).
Hot water button:
• off: steam function is selected
• on: hot water function is selected
Botão de distribuição de água quente:
• desligado: a máquina distribui vapor
• ligado: a máquina distribui água quente.
Descaling button (see page 29)
Botão de descalcifi cação (veja pág. 29)
Coffee volume knob (see page 16).
Botão de ajuste da altura do café na chávena (veja pág.16).
Aroma Opti-Dose button: Adjusts the coffee dose per cup or selects pre-ground
coffee (see page 17).
Botão “aroma” – quantidade de café a moer (Opti-dose) e selecção da função
café moído (veja pág. 17).
Dregdrawer indicator light:
• permanently on: signals the need to empty the dregdrawer; this operation
must be performed when the machine is turned on (steps 1 and 2, page 34).
Indicador luminoso de alarme borras:
• aceso fi xo: sinaliza a necessidade de esvaziar as borras; esta operação
deve ser realizada com a máquina ligada (Itens 1 e 2 de pág.34).
If the and lights fl ash alternately, turn off the machine. Turn it on again after 30 seconds, wait until the
machine stops and then turn it off again. Remove and thoroughly clean the brew group (see page 36). If this
signal appears again when the machine is turned back on, contact the Saeco customer service center.
Page 16
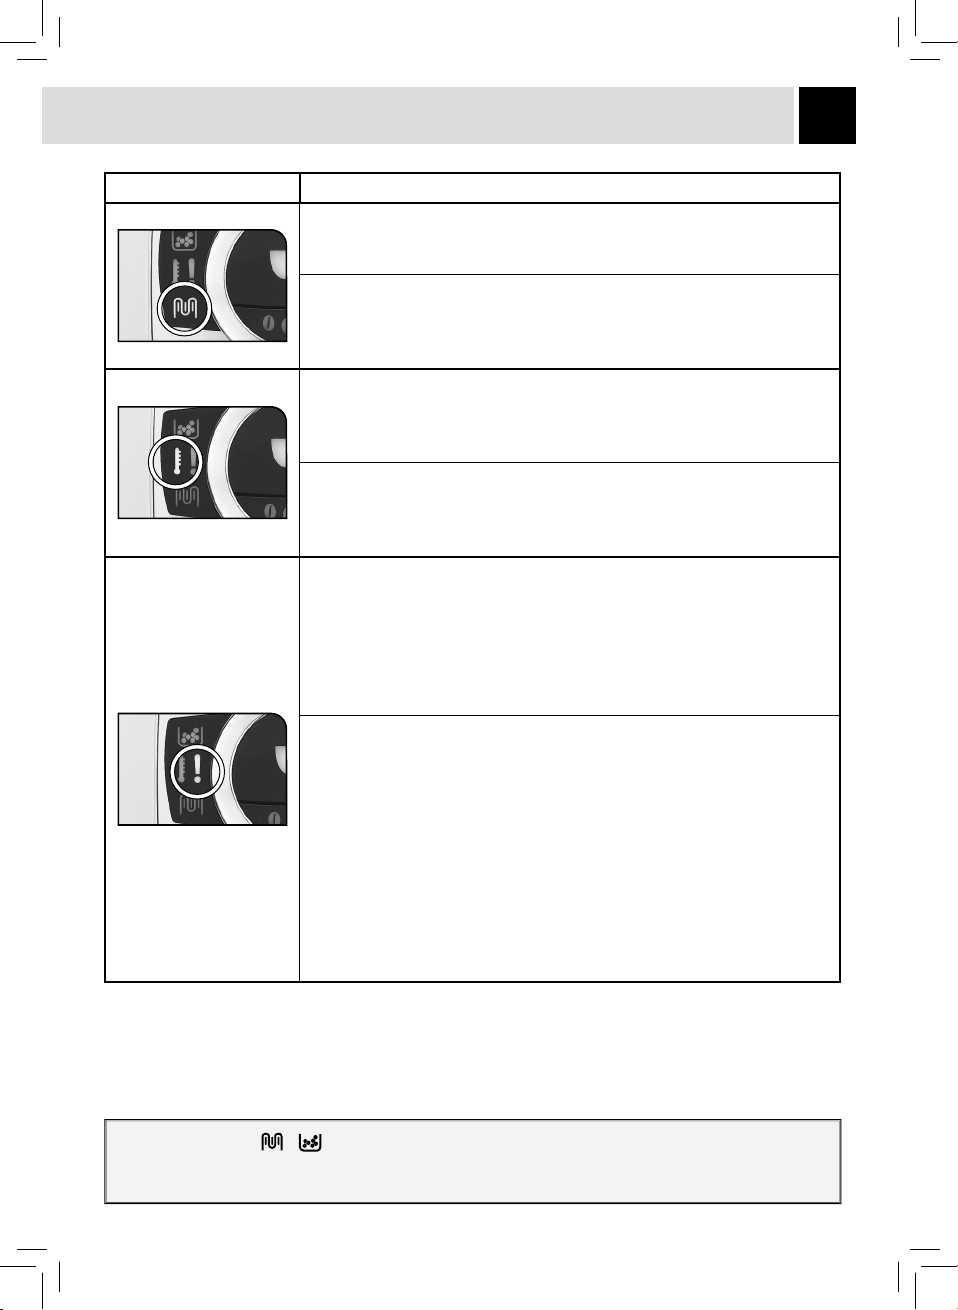
LED Light - Tecla / LED Description - Descrição
Descaling light:
• permanently on: the machine is performing the descaling cycle (see page 29).
• on and fl ashing: signals the need to perform a descaling cycle (see page 29).
Indicador luminoso de descalcifi cação:
• ligado: a máquina está a efectuar o ciclo de descalcifi cação (veja pág. 29).
• aceso lampejante: sinaliza a necessidade de realizar o ciclo de
descalcifi cação (veja pág.29).
Machine ready light:
• permanently on: signals that the machine is ready for use.
• quickly fl ashing: signals that the machine is warming up.
• slowly fl ashing: signals the machine is in stand-by (see page 19).
Indicador luminoso de máquina pronta:
• aceso fi xo: sinaliza que a máquina está pronta para funcionar;
• aceso lampejante: sinaliza que a máquina está na fase de aquecimento.
• aceso lampejante lento: máquina em STAND-BY (veja pág. 19).
Alarm light:
• permanently on: signals the machine is out of coffee, the water tank is
empty, the drip tray is full or the dregdrawer is full.
• slowly fl ashing: signals that the brew group is not inserted, the dregdrawer
is not inserted, the coffee bean hopper lid is not on, the service door is open
or the steam/hot water knob is not correctly turned to the desired position.
• quickly fl ashing: signals the need to prime the water circuit (see page 10).
Indicador luminoso de alarme:
• aceso fi xo (um ou mais eventos): sinaliza: falta de café; reservatório de
água vazio, necessidade de esvaziar o reservatório de recuperação dos
líquidos (neste caso deite fora também as borras de café para evitar mal
funcionamentos).
• aceso lampejante lento (um ou mais eventos): sinaliza: falta do grupo
de distribuição, gaveta de recolha das borras não introduzida, tampa do
recipiente de café não introduzida, portinhola de serviço aberta, botão de
distribuição de água quente/vapor posicionado incorrectamente sobre a
posição desejada.
• aceso lampejante rápido: sinaliza a necessidade de carregar o circuito de
água.
15
Indicadores luminosos e lampejantes alternativamente: desligue a máquina. Depois de 30”, volte a ligála e aguarde a máquina parar; desligue-a novamente. Retire e limpe cuidadosamente o grupo de distribuição
(veja pág.36). Se a sinalização reaparecer ao ligar de novo a máquina, contacte o centro de assistência.
Page 17
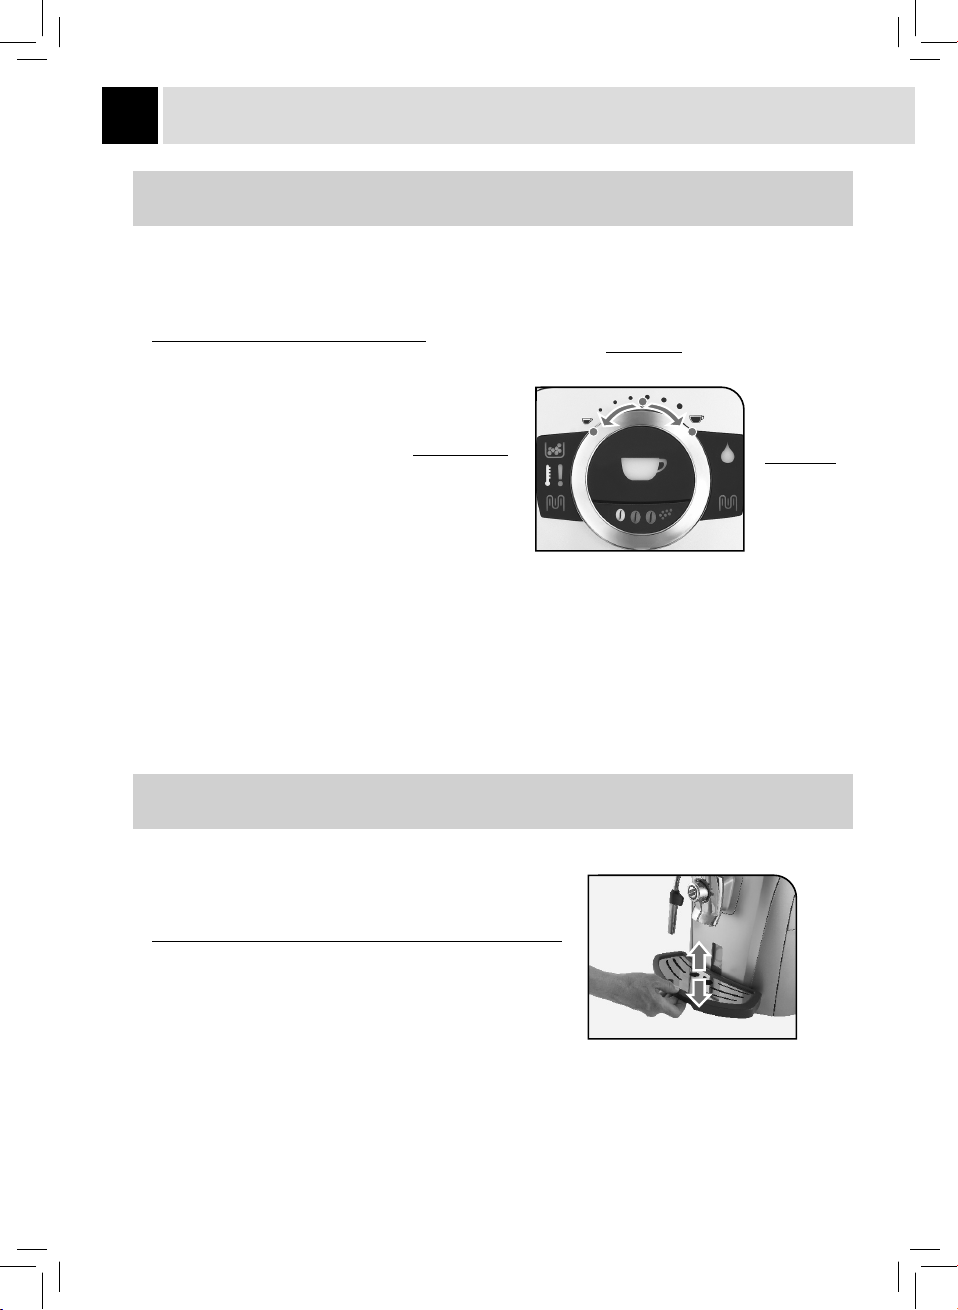
16
ADJUSTMENTS - AJUSTES
COFFEE VOLUME ADJUSTMENT PER CUP
ALTURA DO CAFÉ NA CHÁVENA
The coffee volume knob adjusts the
amount of coffee brewed per cup.
This adjustment has an immediate effect
on the selected type of brewing.
Para seleccionar a quantidade de café a
ser distribuído na chávena.
Este ajuste tem um efeito imediato na
distribuição seleccionada.
Espresso coffee
Café expresso
Medium coffee
Café médio
Long coffee
Café longo
DRIP TRAY HEIGHT ADJUSTMENT
AJUSTE DA ALTURA DA BANDEJA DE LIMPEZA
The drip tray height is adjustable to fi t different sized cups.
To adjust the drip tray, lift it or lower it manually until it reaches
the desired height.
Bandeja de limpeza ajustável em altura.
Para ajustar a bandeja de limpeza, levante-a ou baixe-a
manualmente até alcançar a altura desejada.
Page 18
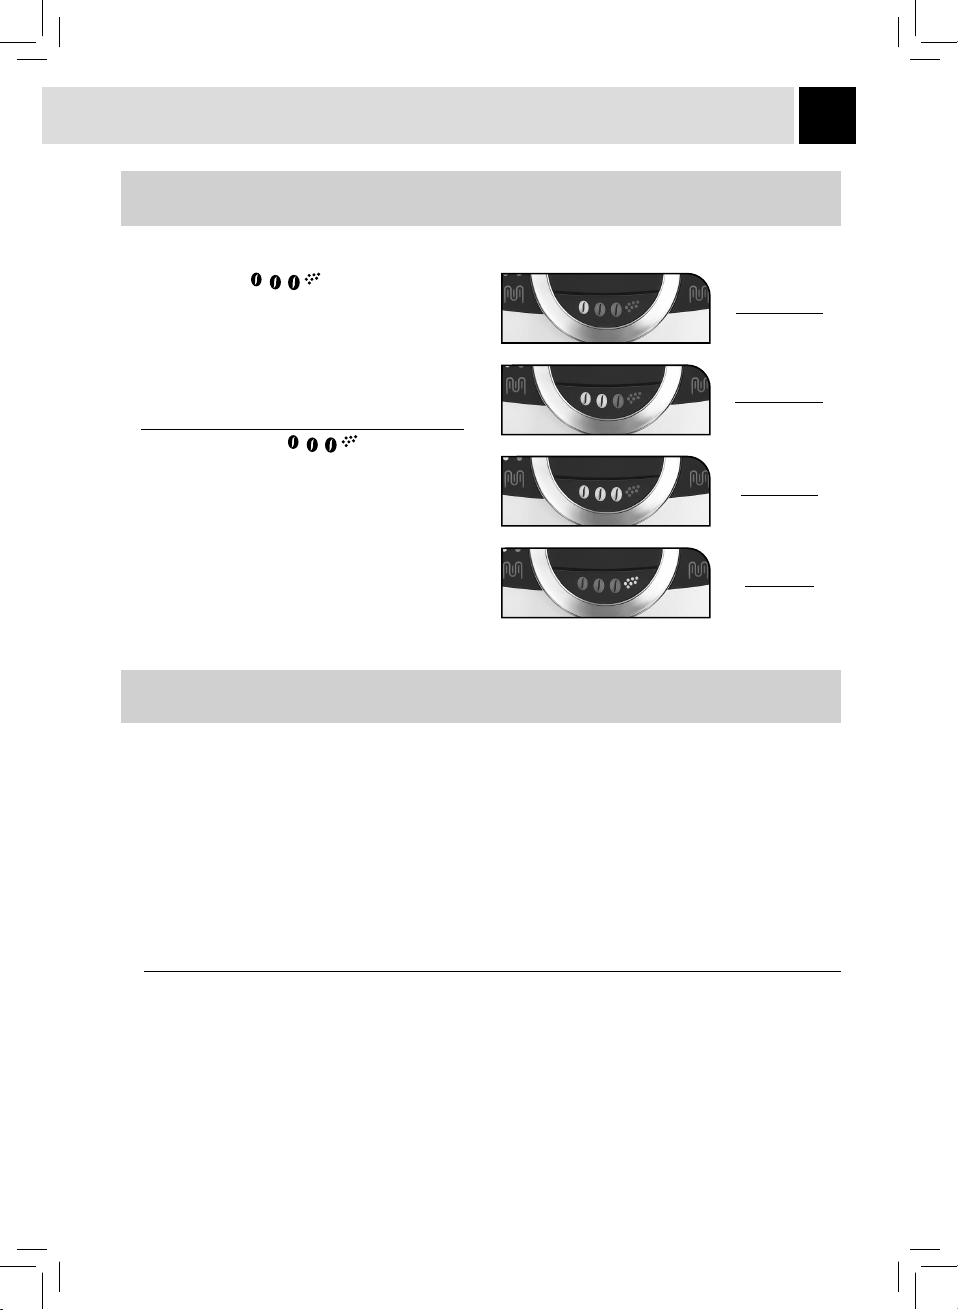
AROMA OPTI-DOSE (ADJUSTS THE COFFEE DOSE PER CUP)
(OPTI-DOSE) INDICAÇÃO DA QUANTIDADE DE CAFÉ MOÍDO
17
By pressing the button there are
four possible choices (strong, medium or mild
aroma, and pre-ground coffee). The coffee beans
indicate the quantity of coffee to be ground for
the brewing of the product. It is recommended
that the special measuring scoop be used for
pre-ground coffee (1 dose).
Ao pressionar a tecla
escolher entre quatro selecções (forte, médio,
suave e café moído). Os grãos indicam a
quantidade de café que a máquina mói para
a preparação do produto. Para o café moído
aconselha-se a utilização do medidor adequado
(1 dose).
será possível
Mild aroma
Aroma suave
Medium aroma
Aroma médio
Strong aroma
Aroma forte
Pre-ground coffee
Pré-moído
SAECO ADAPTING SYSTEM
SAECO ADAPTING SYSTEM
Coffee is a natural product and its characteristics may change according to its origin, blend and roast. The
Saeco coffee machine is equipped with a self-adjusting system that allows the use of all types of coffee
beans available on the market (not including fl avored or carmelized).
• The machine automatically adjusts itself in order to optimize the extraction of the coffee, ensuring
perfect compression of the beans to obtain a creamy espresso coffee that is able to release all the
aromas, regardless of the type of coffee used.
• The optimization process is a learning process that requires the brewing of a certain number of coffees
to allow the machine to adjust the compactness of the ground coffee.
• Attention should be given to special blends, which require grinder adjustments in order to optimize the
extraction of the coffee (see page 18).
O café é um produto natural e as suas características podem mudar em função da origem, da mistura e
da torrefacção. A máquina de café Saeco é equipada com um sistema de ajuste automático que permite
utilizar todos os tipos de café em grão existentes no mercado (não caramelizados).
• A máquina regula-se automaticamente para optimizar a extracção do café, assegurando a perfeita
compactação da pastilha para obter um café expresso cremoso, capaz de libertar todos os aromas,
independentemente do tipo de café utilizado.
• o processo de optimização é um processo de aprendizagem que exige a distribuição de um certo
número de café para permitir que a máquina regule a compactação do pó.
• atenção, pois podem haver certas misturas particulares, que necessitam de uma regulação da moagem
para optimizar a extracção do café – (veja pág. 18).
Page 19
18
ADJUSTMENTS - AJUSTES
COFFEE GRINDER ADJUSTMENT - AJUSTE DO MOINHO DE CAFÉ
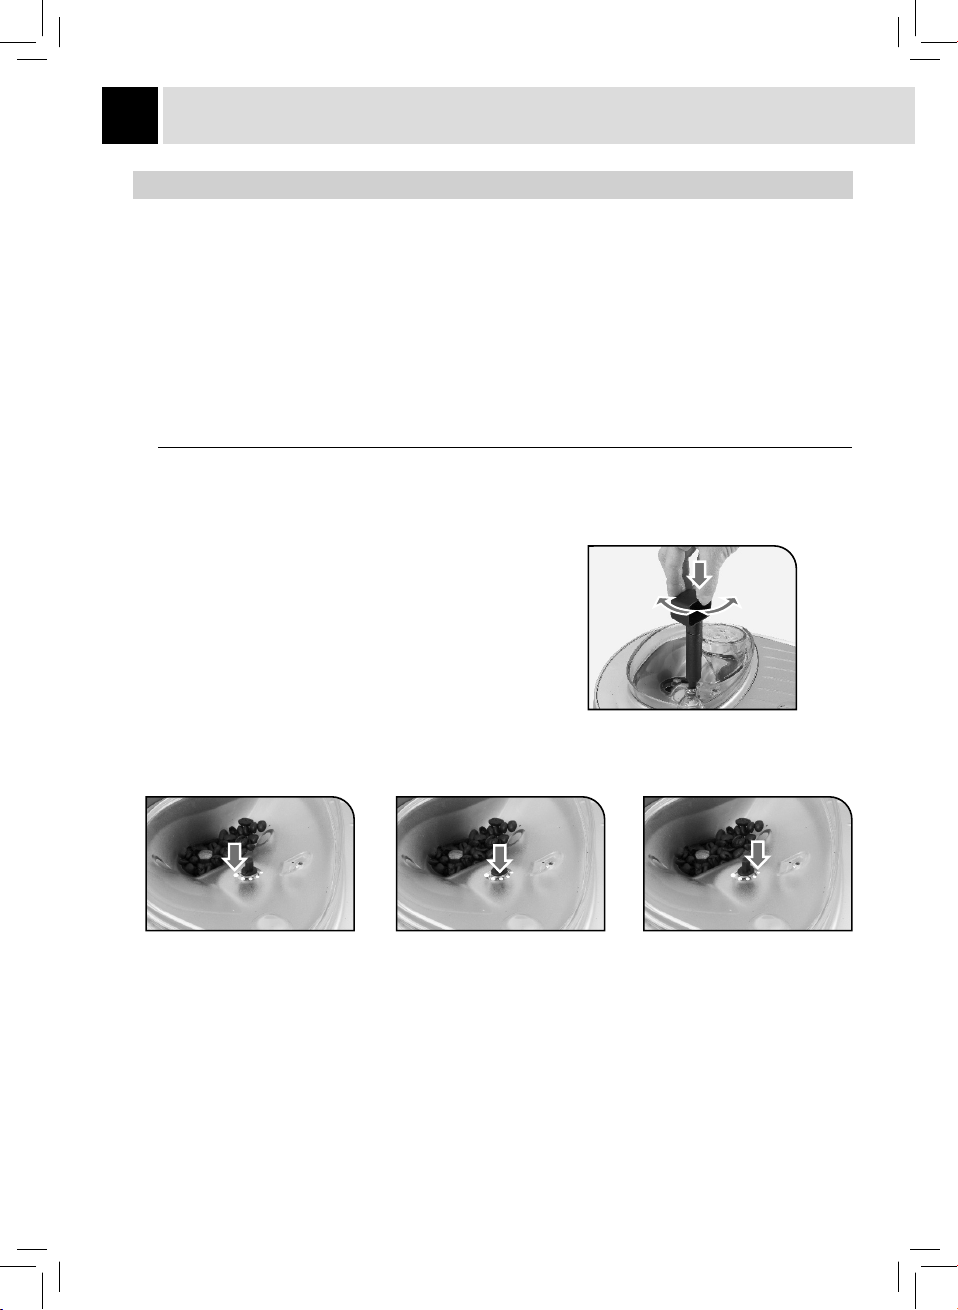
The machine enables a slight adjustment of the coffee grinder. Coffee may be ground according to your
own tastes.
The adjustment must be performed using the small pin located inside the coffee bean hopper. This must
be pressed down and turned using the supplied grinder adjustment key only.
Press and turn the pin one notch at a time.
You must brew 2-3 coffees before you will taste a difference.
The references located inside the bean hopper indicate the grind setting.
A máquina permite realizar um leve ajuste do grau de moagem do café. Isto permitir-lhe-á optimizar a
distribuição de café a seu gosto.
O ajuste deverá ser realizado através do pino presente
dentro do recipiente de café; este deverá ser pressionado
e virado só através da chave fornecida. Pressione e vire o
pino de uma posição de cada vez e distribua 2-3 cafés; só
desta maneira será possível notar a variação do grau de
moagem.
As marcas no interior do recipiente indicam o grau de
moagem seleccionado
FINE GRINDMEDIUM GRINDCOARSE GRIND
MOAGEM FINAMOAGEM MÉDIAMOAGEM GROSSA
Page 20
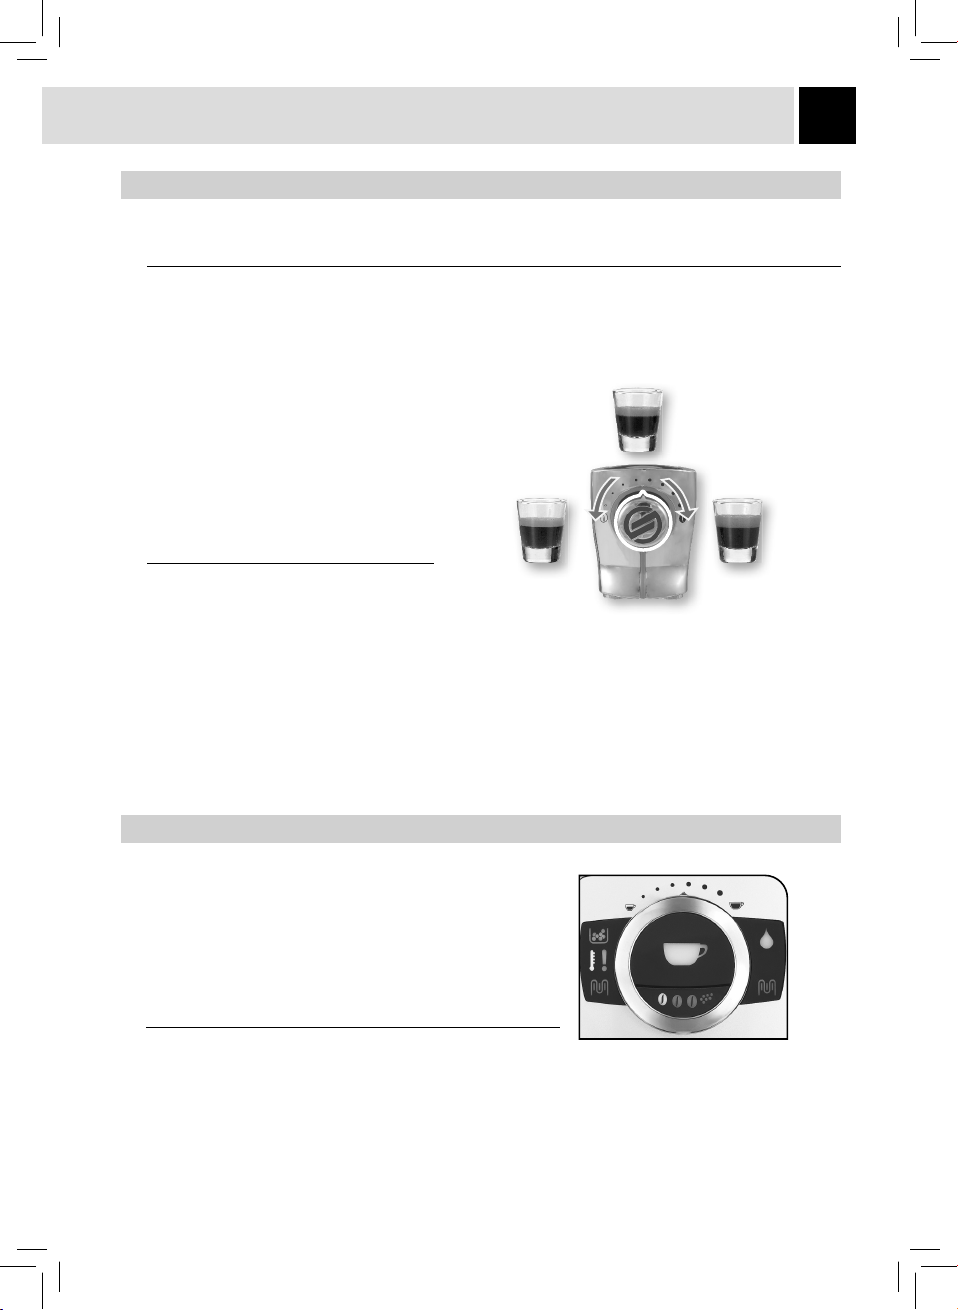
COFFEE STRENGTH - CONSISTÊNCIA DO CAFÉ
The SBS dial has been carefully designed to give your coffee the fullness and intensity you desire. Simply
turn the dial, and you will notice that the coffee brewed will adjust to the setting selected.
O dispositivo SBS foi realizado de propósito para dar ao café a consistência e a intensidade de gosto
desejada. Com uma simples rotação do botão será possível adaptar o carácter do café a seu gosto.
19
SBS – SAECO BREWING SYSTEM
The Saeco Brewing System (SBS) adjusts
the fullness of the brewed coffee. The
coffee may even be adjusted while it is
brewing. This adjustment has an immediate
effect on the selected type of brewing.
Para programar a consistência do café
distribuído. O ajuste pode ser efectuado
também durante a distribuição do café.
Este ajuste tem um efeito imediato na
distribuição seleccionada.
MILD
COFFEE
CAFÉ
SUAVE
MEDIUM
COFFEE
CAFÉ
MÉDIO
STRONG
COFFEE
CAFÉ
FORTE
STAND-BY - STAND-BY
The machine is designed for energy saving. After 60 minutes
of inactivity, the machine goes into stand-by mode, the boiler is
no longer heated and all the lights turn off with the exception of
the temperature light which will blink slowly.
Power consumption is reduced to a minimum.
To turn the machine on again simply press the brew button.
The machine will go through the rinse cycle if the circuit is cold.
A máquina está predisposta para a poupança de energia. Após
60 minutos da última utilização a máquina passa para o modo stand-by, a caldeira não é alimentada,
todos os indicadores luminosos se apagam, à excepção do indicador luminoso da temperatura, que
piscará lentamente.
Os consumos são reduzidos para o mínimo.
Para ligar novamente a máquina é sufi ciente pressionar a tecla café. A máquina executará o enxágüe se
o circuito estiver arrefecido.
Page 21
20
ADJUSTMENTS - AJUSTES
SETTING WATER HARDNESS
CONFIGURAÇÃO DA DUREZA DA ÁGUA
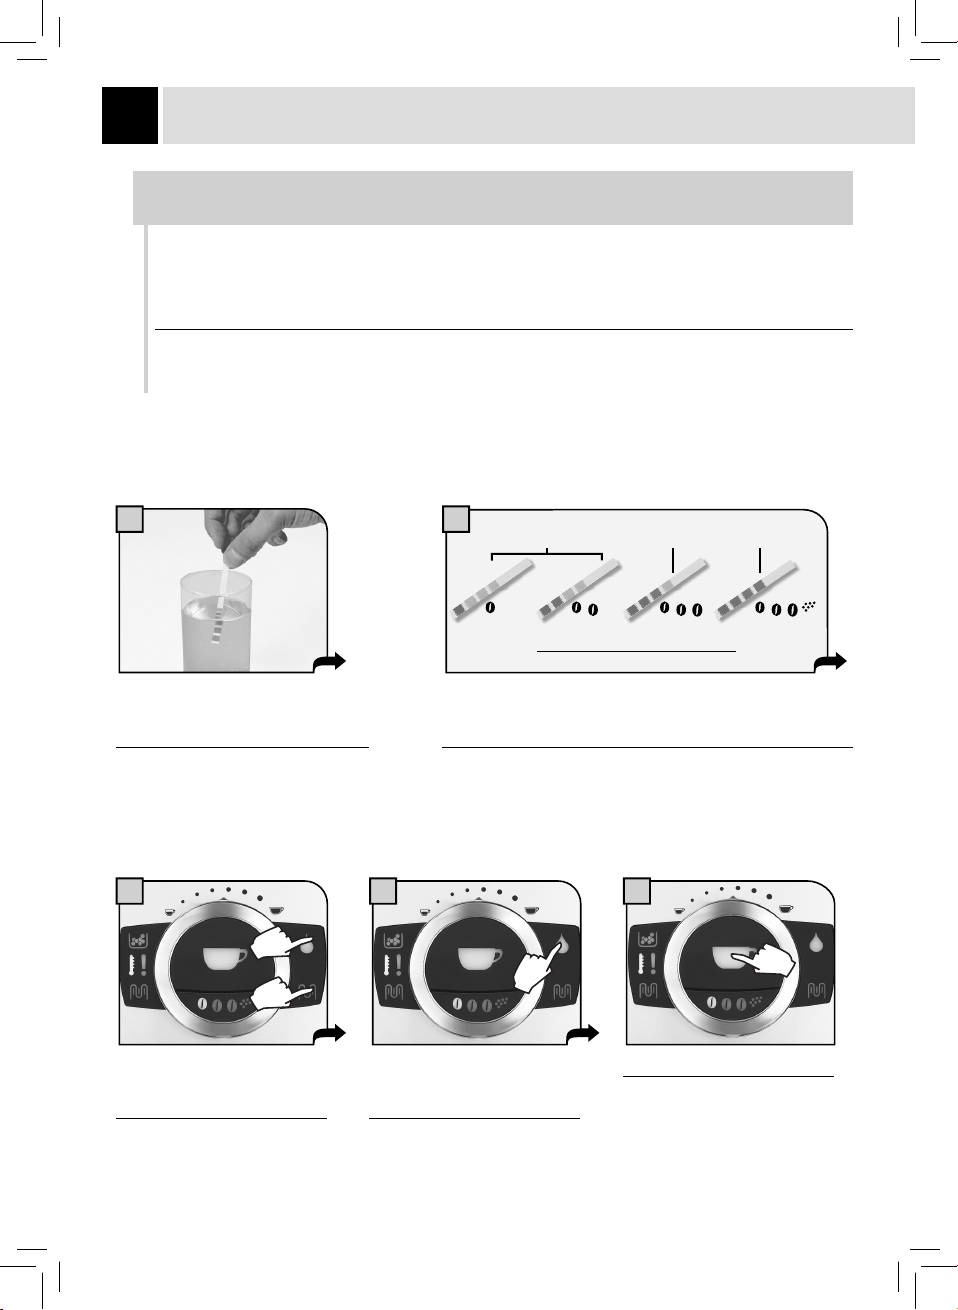
This function allows you to adjust your machine to the level of hardness of the water you use, so that the
machine will request descaling at the right time. The machine expresses the hardness using a scale from 1
to 4; the Intenza Aroma System is expressed on a scale from A to C.
Graças a esta função pode adaptar a sua máquina ao grau de dureza da água que utiliza, de modo a que
a máquina lhe peça para descalcifi car no momento exacto.
A dureza da máquina é expressa numa escala de 1 a 4; para o Intenza Aroma System é expressa numa
escala de A a C.
THE TEST STRIP CAN ONLY BE USED FOR ONE MEASUREMENT.
O TESTE SÓ PODE SER USADO PARA UMA MEDIÇÃO.
1 2
Immerse the water hardness test strip
provided with the machine in water for
1 second.
Mergulhe, por 1 segundo na água, o
papel para o teste da dureza da água,
presente na máquina.
3 4 5
Simultaneously press and hold
for 3 seconds to access the
programming mode.
Pressione simultaneamente
durante 3 segundos para
aceder à programação.
Press the water button until
the water hardness value is
reached.
Pressione a tecla até alcançar o
valor medido.
Check the water hardness value and set:
- The machine water hardness level;
- The Intenza Aroma System (page 13).
Verifi que o valor da dureza da água e programe:
- o grau de dureza da água na máquina;
- o Intenza Aroma System (pág.13).
Intenza Aroma System
A
12 3 4
Machine water hardness setting
Programação dureza máquina
B
Press the brew button to save.
Pressione para memorizar.
C
Page 22
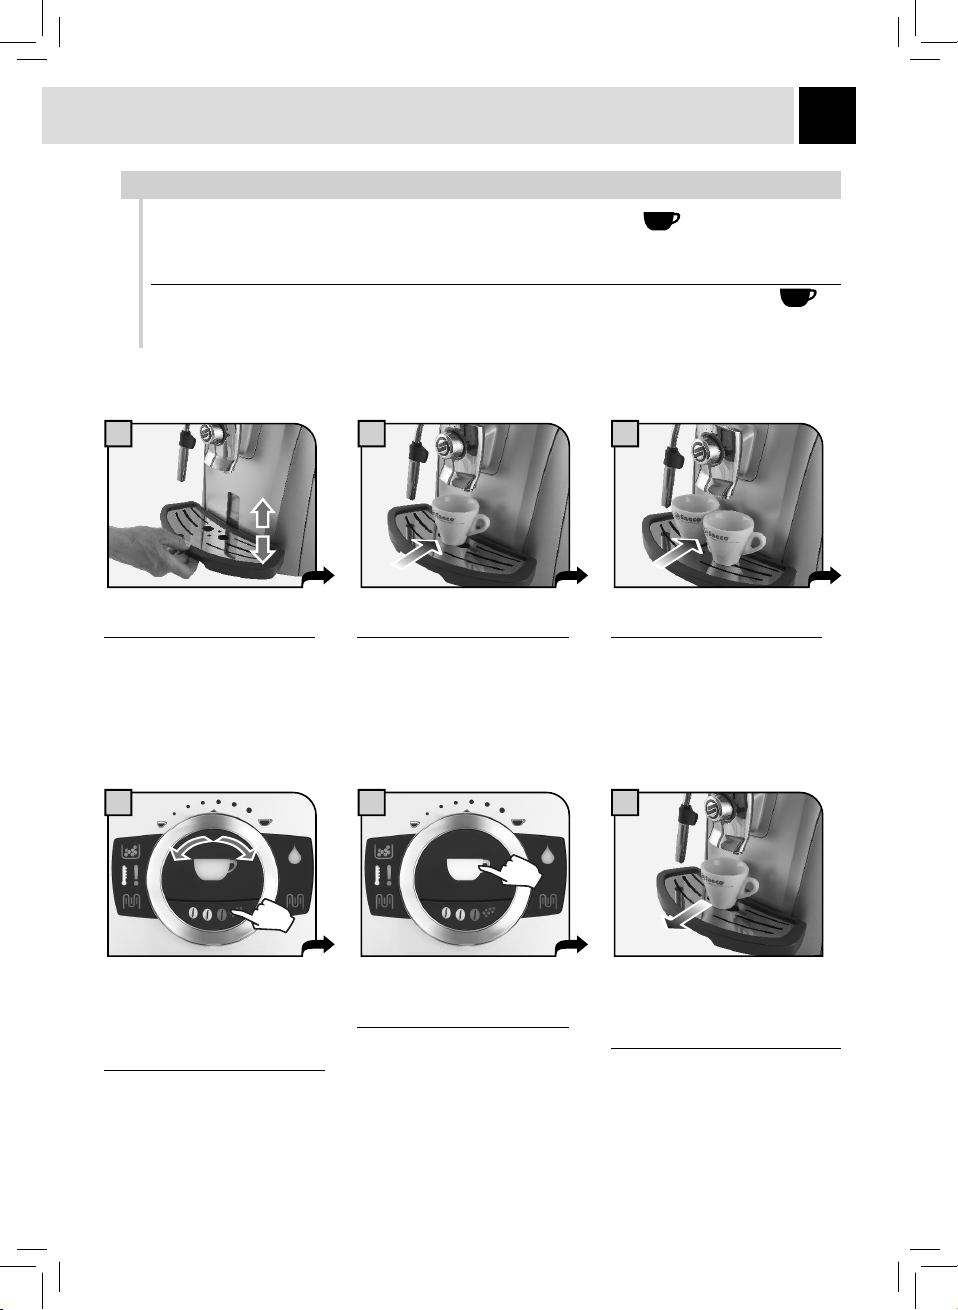
COFFEE BREWING - DISTRIBUIÇÃO DE CAFÉ
BREWING WITH WHOLE BEANS - DISTRIBUIÇÃO DE CAFÉ
The coffee brewing cycle can be interrupted at any moment by pushing the button.
To brew 2 cups, the machine dispenses the fi rst coffee and briefl y interrupts dispensing in order to grind
the second serving of coffee. Coffee dispensing is then restarted and completed.
O ciclo de distribuição de café pode ser interrompido a qualquer momento pressionando a tecla
Para distribuir 2 chávenas, a máquina distribui metade da quantidade seleccionada e interrompe
brevemente a distribuição para moer a segunda dose de café. A distribuição de café será portanto
reiniciada e terminada.
1 2 3
21
.
Adjust the drip tray according to
the height of the cup(s).
Ajuste a altura da bandeja de
limpeza de acordo com a altura
da(s) chávena(s).
4 5 6
Adjust the quantity of coffee to
be brewed by turning the knob.
Select the aroma by pushing the
button one or more times (see
page 17).
Seleccione a altura do café
virando o botão. Seleccione o
aroma pressionando uma ou
mais vezes o botão (veja pág.17).
Place one cup if you want one
coffee only.
Posicione uma chávena se
quiser apenas um café.
Press the coffee button:
once for 1 coffee
twice for 2 coffees
Pressione o botão central:
1 vez para 1 café
2 vezes para 2 cafés
Place two cups if you want two
coffees.
Posicione duas chávenas se
quiser dois cafés.
The machine automatically starts
brewing coffee. When the machine
has fi nished brewing, remove the
cup(s).
A máquina controla automaticamente a distribuição de café.
Quando a máquina terminar, retire
a(s) chávena(s).
Page 23
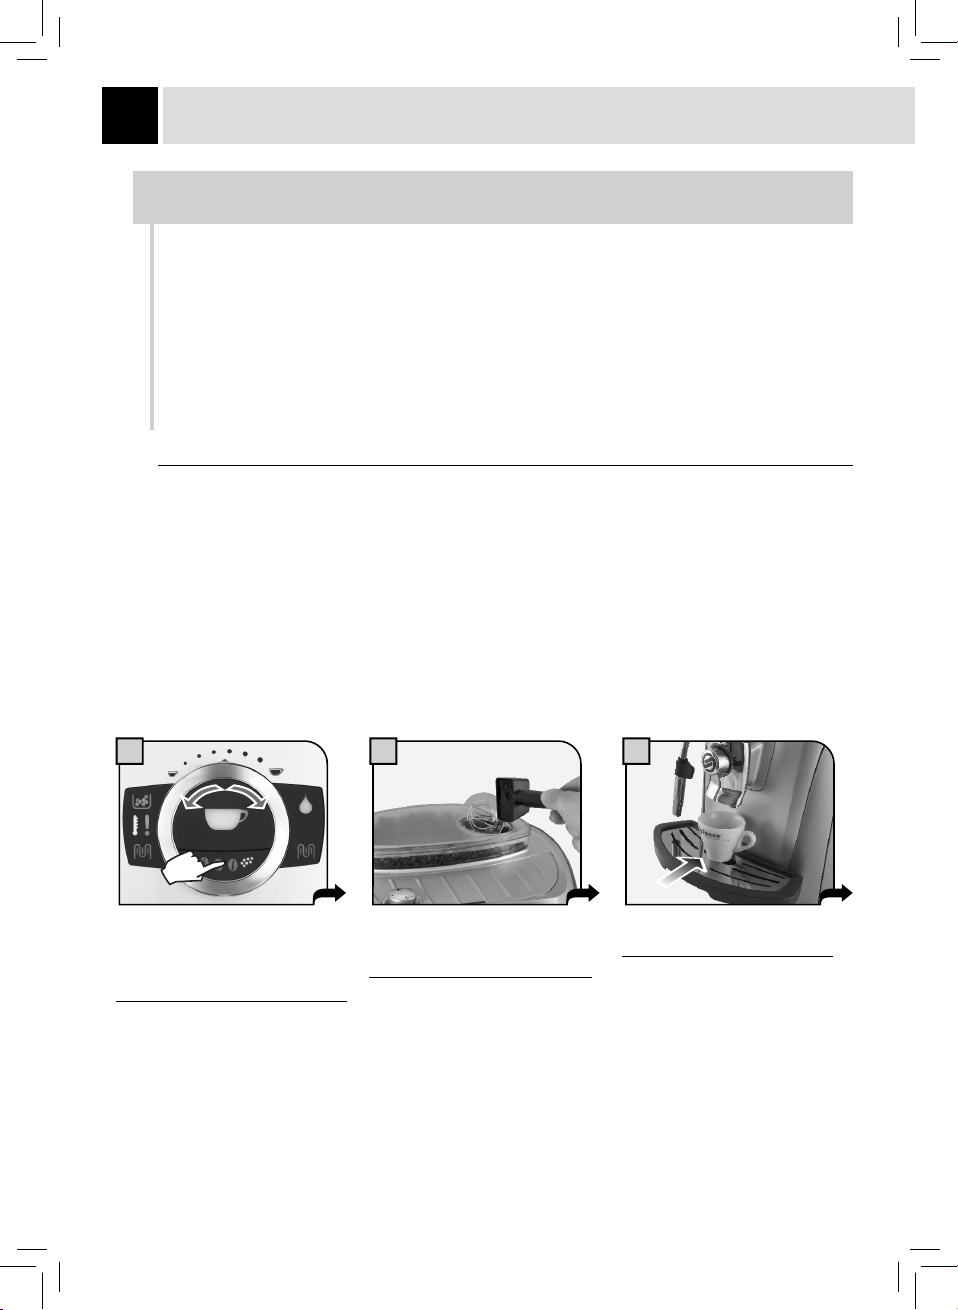
22
COFFEE BREWING - DISTRIBUIÇÃO DE CAFÉ
BREWING WITH PRE-GROUND COFFEE
DISTRIBUIÇÃO DE BEBIDA COM CAFÉ PRÉ-MOÍDO
The machine allows you to use pre-ground and decaffeinated coffee.
Pre-ground coffee must be poured into the bypass doser positioned next to the coffee bean hopper. Only
use coffee ground for espresso machines and never coffee beans or instant coffee.
WARNING: ONLY PUT PRE-GROUND COFFEE INTO THE BYPASS DOSER WHEN YOU
WISH TO DISPENSE THIS TYPE OF PRODUCT.
ONLY INSERT ONE SCOOP OF GROUND COFFEE AT A TIME. TWO COFFEES CANNOT
BE BREWED AT THE SAME TIME WHEN USING PRE-GROUND COFFEE.
A máquina permite utilizar café pré-moído e descafeinado.
O café pré-moído deve ser deitado no compartimento apropriado posicionado ao lado do recipiente de
café em grãos. Deite apenas café para máquinas de café expresso moído e nunca café em grãos ou
solúvel.
ATENÇÃO: QUANDO DESEJAR APENAS UM PRODUTO COM CAFÉ PRÉ-MOÍDO DEITE
NO COMPARTIMENTO ESTE TIPO DE CAFÉ.
INTRODUZA SÓ UM MEDIDOR DE CAFÉ MOÍDO POR CADA VEZ. NÃO É POSSÍVEL
DISTRIBUIR DOIS CAFÉS AO MESMO TEMPO.
Adjust the quantity of coffee to be
brewed by turning the knob. Press
the aroma button until the preground icon is illuminated.
Seleccione a altura do café virando
o botão.
Seleccione a função pressionando
uma ou mais vezes o botão (veja
pág.17).
Pour ground coffee into
the bypass doser using the
measuring scoop provided.
Deite o café moído no
compartimento apropriado
utilizando o medidor fornecido em
dotação.
221
Place a cup under the
dispensing spout.
Coloque uma chávena debaixo
do distribuidor de café.
Page 24
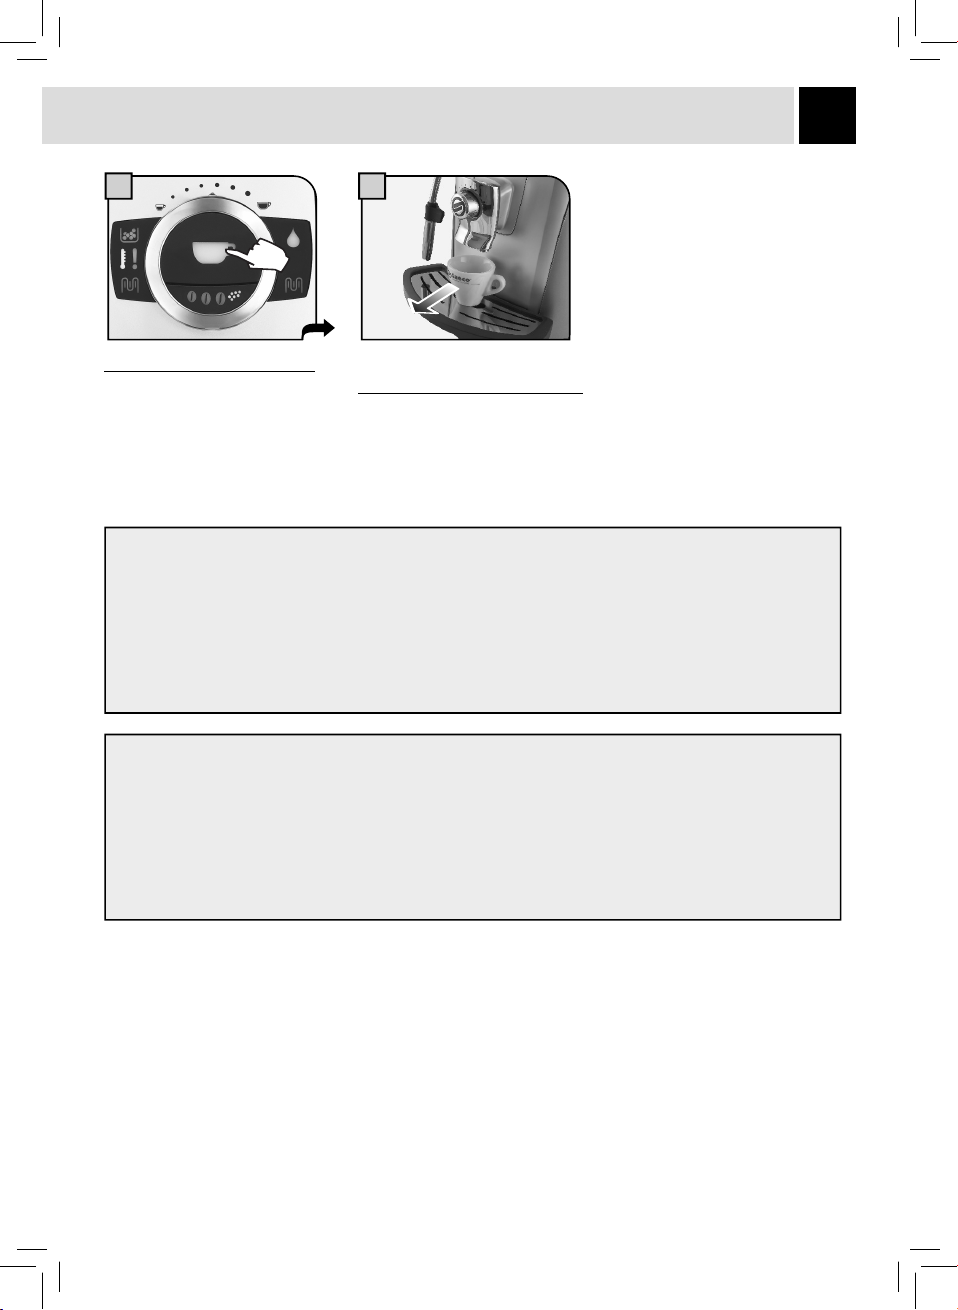
5 6
23
Press the brew button.
Pressione o botão central.
Note:
• If no pre-ground coffee is poured into the compartment, only water will be dispensed;
• If the dose is excessive and 2 or more measuring scoops of coffee are used, the machine will not brew
the product. Also in this case, the machine will run an empty cycle and discharge any ground coffee into
the dregdrawer.
Obs.:
• Se o café pré-moído não for deitado no compartimento, acontecerá apenas a distribuição de água;
• Se a dose for excessiva e forem deitadas 2 ou mais medidas de café, a máquina não distribui o produto.
Também neste caso a máquina efectua um ciclo a vazio e descarrega o café em pó na gaveta de borras.
When the machine stops brewing,
remove the cup.
Quando a máquina terminar, retire
a chávena.
Page 25
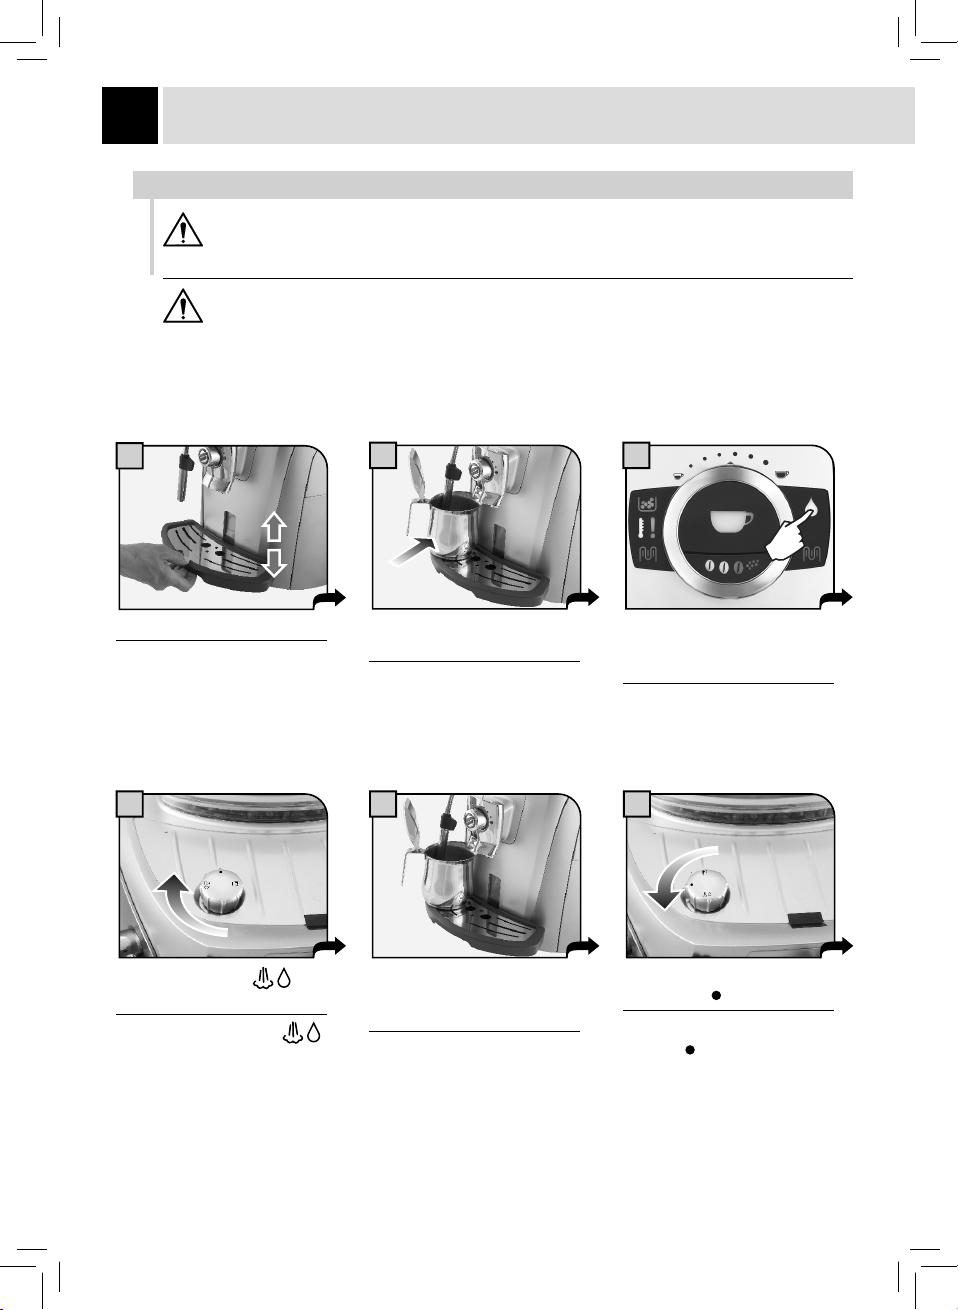
HOT WATER DISPENSING
24
DISTRIBUIÇÃO DE ÁGUA QUENTE
HOT WATER DISPENSING - DISTRIBUIÇÃO DE ÁGUA QUENTE
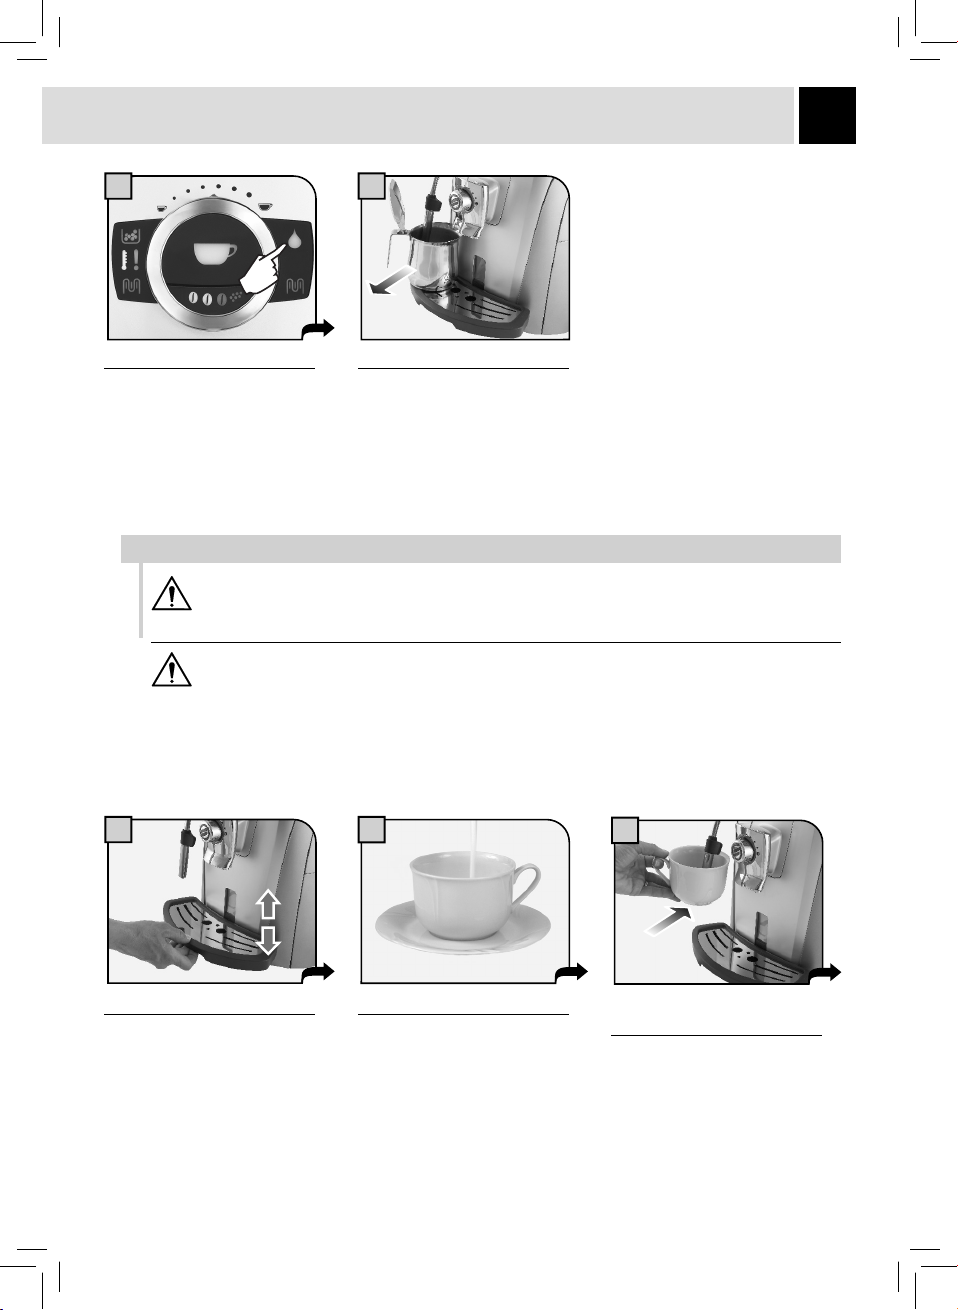
Dispensing may be preceded by short sprays of hot water, and scalding is possible. The
hot water/steam wand may reach high temperatures: do not touch it with bare hands. Use
the appropriate handle only.
No início da distribuição podem se verifi car breves jactos de água quente com perigo de
queimaduras. O bico de distribuição de água quente/vapor pode alcançar temperaturas
elevadas: evite tocar nele directamente com as mãos, utilize exclusivamente a pega apropriada.
1
Adjust the height of the drip tray.
Ajuste a altura da bandeja de
limpeza.
Turn the knob to the
position.
Vire o botão até a marca
2 3
Place a container beneath the
hot water wand.
Coloque um recipiente por
baixo do tubo do vapor.
54 6
Wait for the container to be fi lled
with the desired quantity of hot
water.
.
Aguarde o recipiente se encher
com a quantidade de água
desejada.
Press the hot water button to
select the hot water function.
The hot water light will turn on.
Pressione o botão para activar
a função. O indicador luminoso
acender-se-á.
Turn the knob until it is in the
rest position ( ).
Vire o botão até a posição de
repouso ( ).
Page 26
HOT WATER DISPENSING / CAPPUCCINO
7 8
25
Press the hot water button.
Pressione o botão.
Remove the container.
Retire o recipiente com a água
quente.
CAPPUCCINO
Dispensing may be preceded by short sprays of hot water, and scalding is possible. The
hot water/steam wand may reach high temperatures: do not touch it with bare hands. Use
the appropriate handle only.
No início da distribuição podem-se verifi car breves jactos de água quente com perigo de
queimaduras. O bico de distribuição de água quente/vapor pode alcançar temperaturas
elevadas: evite tocar nele directamente com as mãos, utilize exclusivamente a pega apropriada.
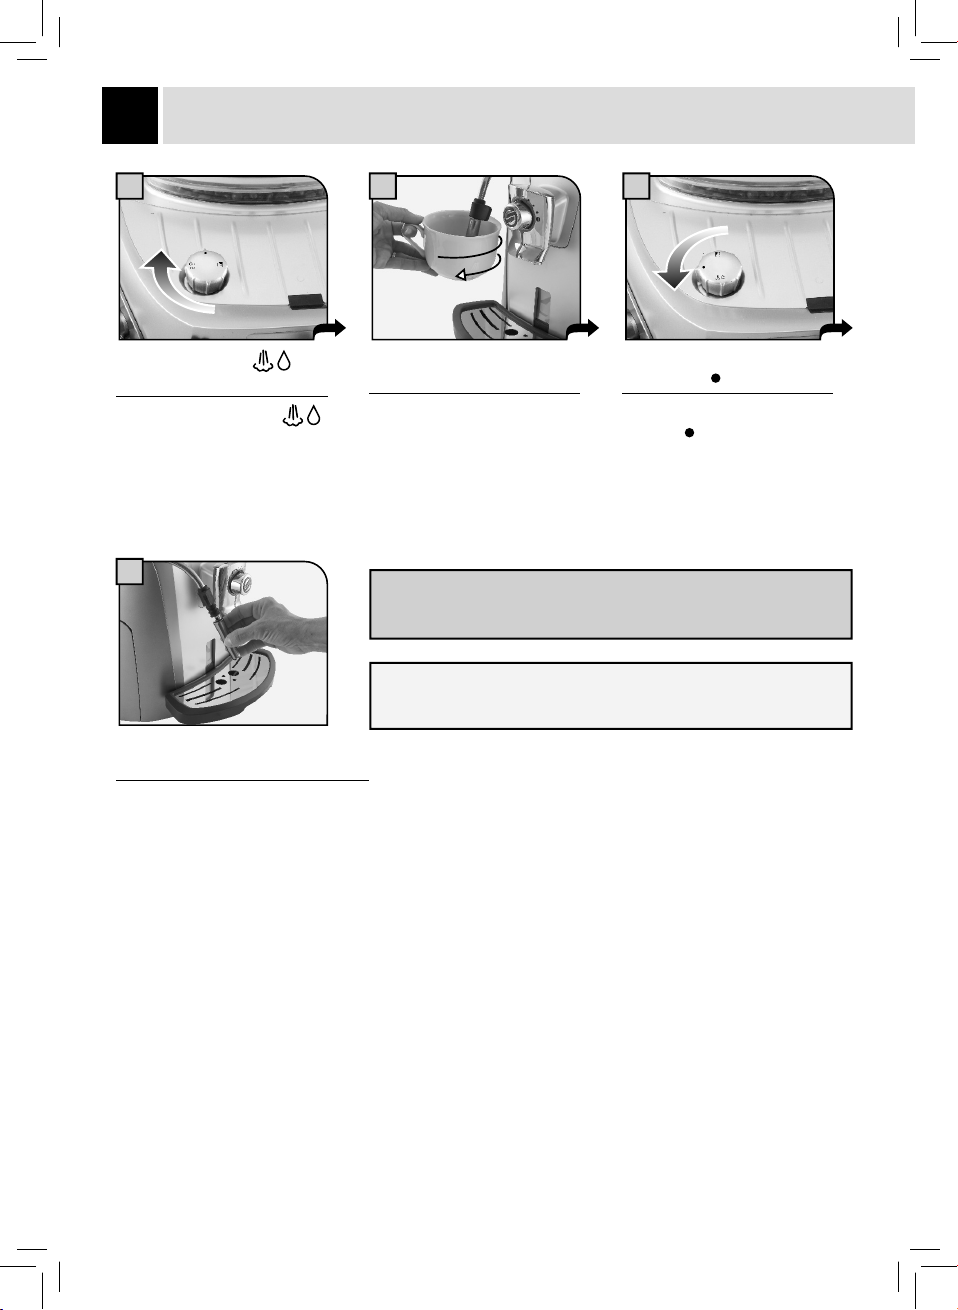
1
2
3
Adjust the height of the drip tray.
Ajuste a altura da bandeja de
limpeza.
Fill 1/3 of the cup with cold milk.
Encha 1/3 da chávena com
leite frio.
Immerse the steam wand in
the milk.
Mergulhe o tubo de vapor no
leite.
Page 27
26
CAPPUCCINO
4 6
Turn the knob to the
position.
Vire o botão até a marca .
7
When the wand has cooled down,
disassemble it and wash it carefully.
Quando o bico estiver frio, desmonte-o
e lave-o cuidadosamente.
5
Froth the milk by gently swirling
the cup.
Bata o leite efectuando uns
leves movimentos circulares.
After frothing the milk, brew coffee into the cup for a creamy cappuccino.
Depois de batido o leite, prossiga logo depois com a distribuição de
café para obter um óptimo cappuccino.
Turn the knob until it is in the
rest position ( ).
Vire o botão até a posição de
repouso (
).
Page 28
MILK ISLAND (OPTIONAL) - MILK ISLAND (OPCIONAL)
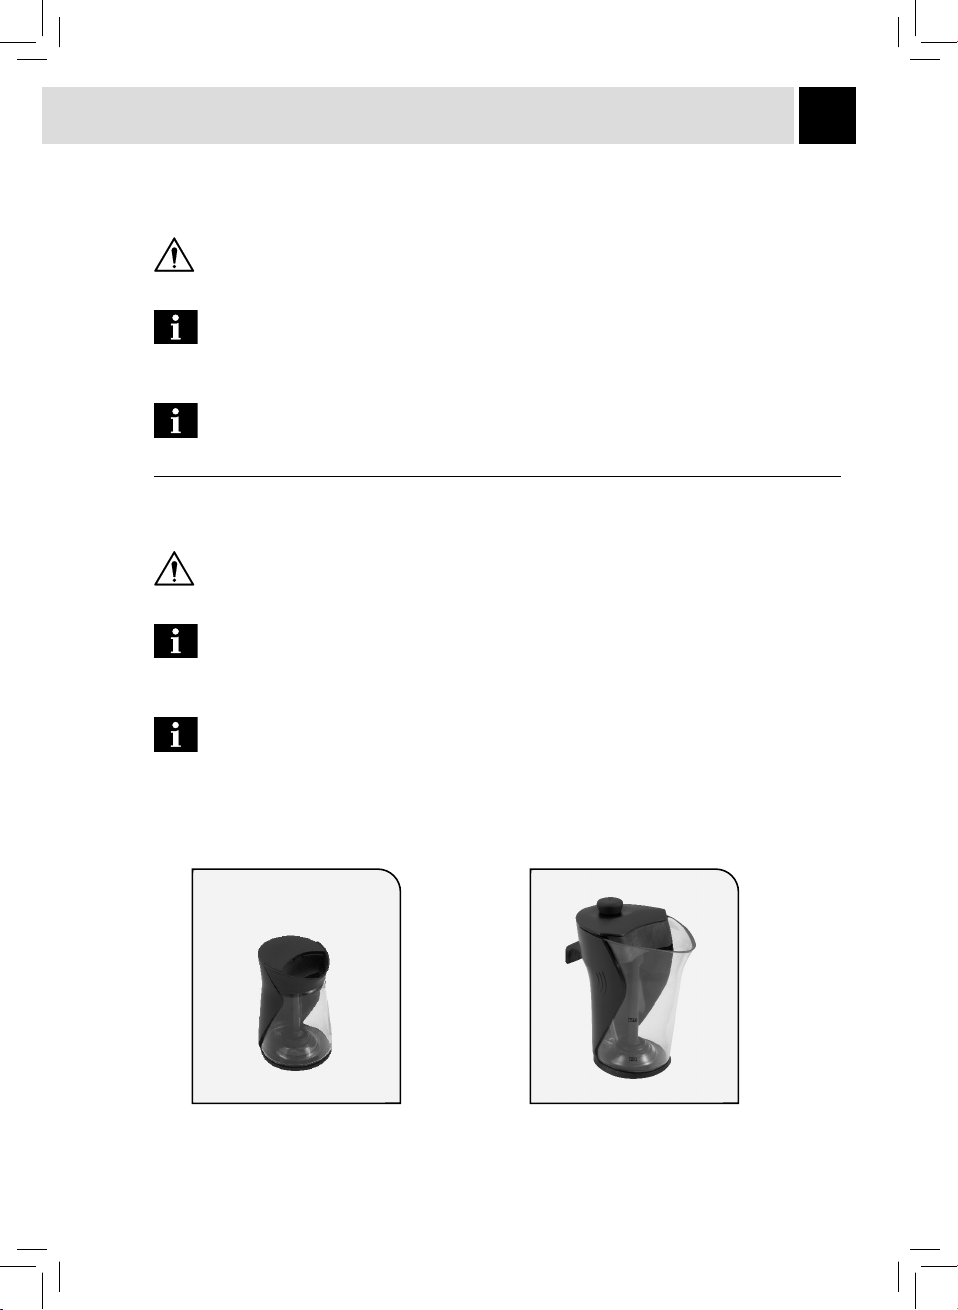
This device, which may be purchased separately, enables you to easily and comfortably prepare
delicious cappuccinos.
Warning: before using the Milk Island, read the manual and all precautions carefully for
correct use.
Important Note: the quantity of milk in the carafe must never be below the “MIN” minimum
level nor exceed the “MAX” maximum level. After using the Milk Island, thoroughly clean
all its components.
To guarantee best results when preparing a cappuccino, use cold milk (0-8°C / 32-45°F).
We recommend using partially skimmed milk.
Este dispositivo, que pode ser comprado separadamente, permite-lhe preparar com muita facilidade e
comodidade óptimos cappuccinos.
Atenção: antes de utilizar o Milk Island consulte o respectivo manual onde são indicadas
todas as precauções para uma correcta utilização.
Nota importante: a quantidade de leite na jarra não deve ser inferior ao nível mínimo “MIN”
e nunca deve ultrapassar o nível máximo “MAX”. Depois de utilizado o Milk Island, limpe
cuidadosamente todos os seus componentes.
27
Para garantir o melhor resultado durante a preparação do cappuccino, utilize leite frio (08°C). Aconselha-se a utilizar leite parcialmente desnatado.
Models available (vary depending on country)
Versões disponíveis (em função do país)
Milk Island - 04
Type MKI001
Milk Island - 08
Type MKI002
Page 29
28
MILK ISLAND (OPTIONAL) - MILK ISLAND (OPCIONAL)
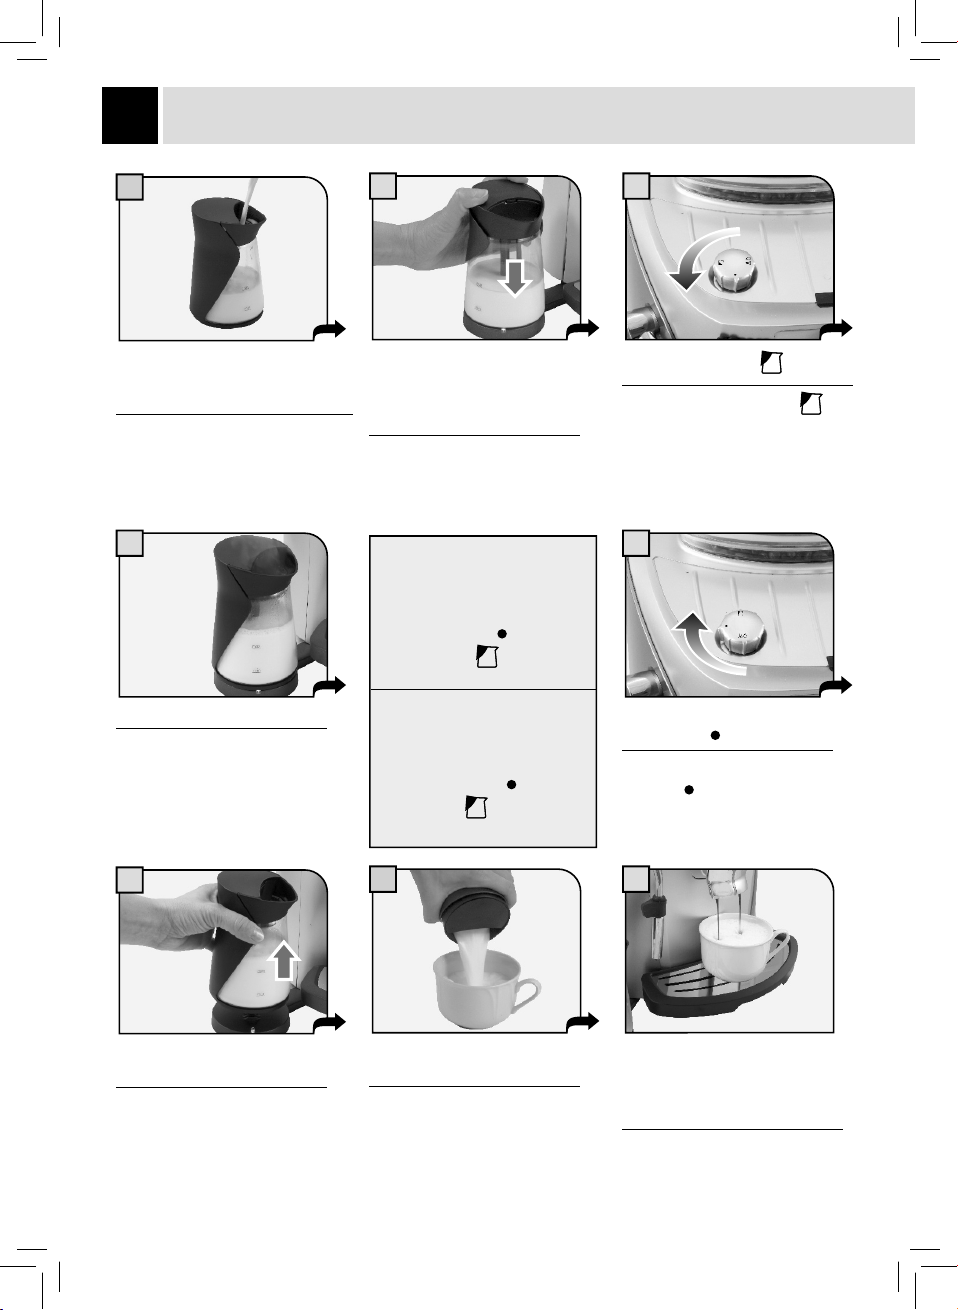
1
Fill the milk carafe with the quantity
of milk desired (between the MIN
and MAX levels indicated).
Encha a jarra do leite com a
quantidade de leite desejado.
2 3
Position the milk carafe on the
base of the Milk Island. Check
that the light on the base is
green.
Posicione a jarra de leite na
base do Milk Island.
4 5
The machine will stop automatically
after steaming continuously for 2
Wait for the milk to be frothed.
Aguarde até o leite ser batido.
minutes. To dispense more steam
turn the knob to the (
then back to the
Depois de distribuído continuamente
o vapor durante 2 minutos, a
máquina parará automaticamente.
Para distribuir mais vapor ponha o
botão para a posição (
para a posição
) position and
position.
) e de novo
.
Turn the knob to the position.
Vire o botão até a posição .
Turn the knob until it is in the
rest position (
).
Vire o botão até a posição de
repouso ( ).
6
Remove the carafe using the
handle.
Retire a jarra utilizando a pega.
7
Gently swirl the carafe and pour
the milk into the cup.
Depois de executados uns
leves movimentos circulares,
deite o leite na chávena.
8
Position the cup with frothed milk
under the dispensing head. Brew
coffee into the cup for a delicious
cappuccino.
Posicione a chávena com o leite
batido por baixo do distribuidor.
Distribua o café na chávena.
Page 30
DESCALING - DESCALCIFICAÇÃO
In case of confl ict, priority must be given to what is indicated in the operation and maintenance
manual over the instructions provided on separately sold accessories and materials.
Warning! Never drink the descaling solution or any products dispensed until the cycle has
been carried out to the end. Never use vinegar as a descaling solution.
When descaling is performed, someone must be present during the entire process (approx. 40
minutes).
Limescale normally builds up with the use of the appliance. Descaling should be performed every 1-2
months or when the machine displays the relevant message.
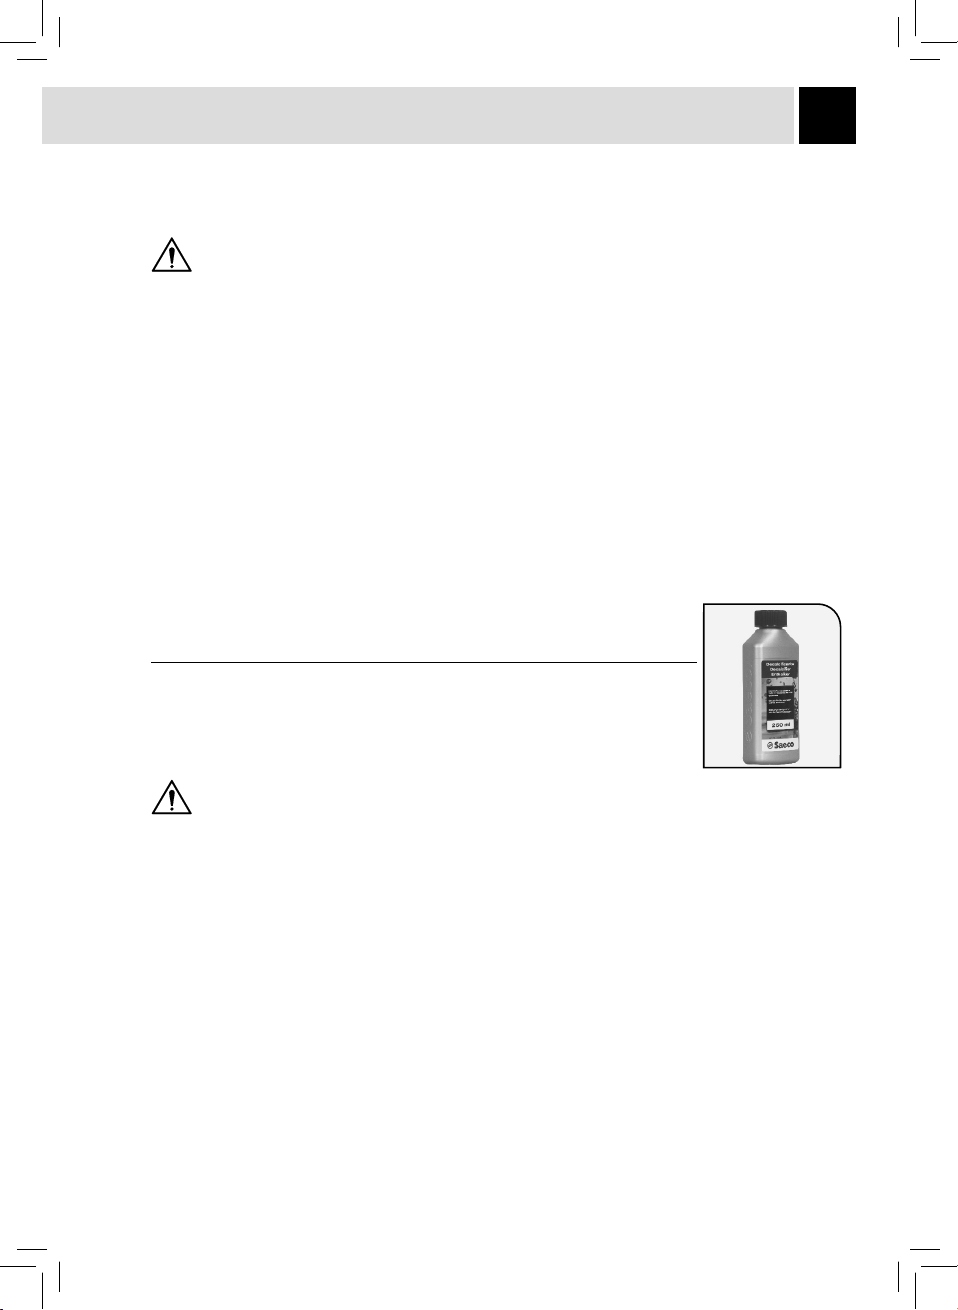
Use the Saeco descaling solution only, specially designed to comply with the technical
specifi cations of the machine, to ensure the machine performance will not decrease over time,
and to guarantee a safe and risk-free use. The descaling solution must be disposed of according
to the manufacturer’s instructions and/or applicable regulations in the country of use.
Note. Before starting a descaling cycle make sure that:
1 A large enough container is available;
2 The water fi lter (if supplied) has been removed.
29
O indicado no manual de uso e manutenção tem prioridade com relação às
indicações descritas nos acessórios e/ou materiais de uso vendidos separadamente, onde exista um problema.
Atenção! Não beba a solução descalcifi cante e os produtos
distribuídos até a conclusão do ciclo. Nunca utilize, baixo nenhuma circunstância, o
vinagre como descalcifi cante.
Quando é realizada a descalcifi cação, é preciso estar presente durante toda a duração do
processo (cerca de 40 minutos).
A formação de calcário é uma consequência natural da utilização do aparelho. A descalcifi cação é
necessária a cada 1-2 meses ou quando for assinalada pela máquina.
Utilize somente o descalcifi cante Saeco, que foi estudado para respeitar as características
técnicas da máquina, mantendo o seu desempenho ao longo do tempo, respeitando totalmente a
segurança para o consumidor. A solução descalcifi cante deverá ser eliminada de acordo com o
previsto pelo fabricante e/ou pelas normas vigentes no país de utilização.
Obs. Antes de iniciar a descalcifi cação certifi que-se de que:
1 está à sua disposição um recipiente com as dimensões adequadas;
2 tenha sido removido, se presente, o fi ltro de água.
Page 31
30
DESCALING - DESCALCIFICAÇÃO
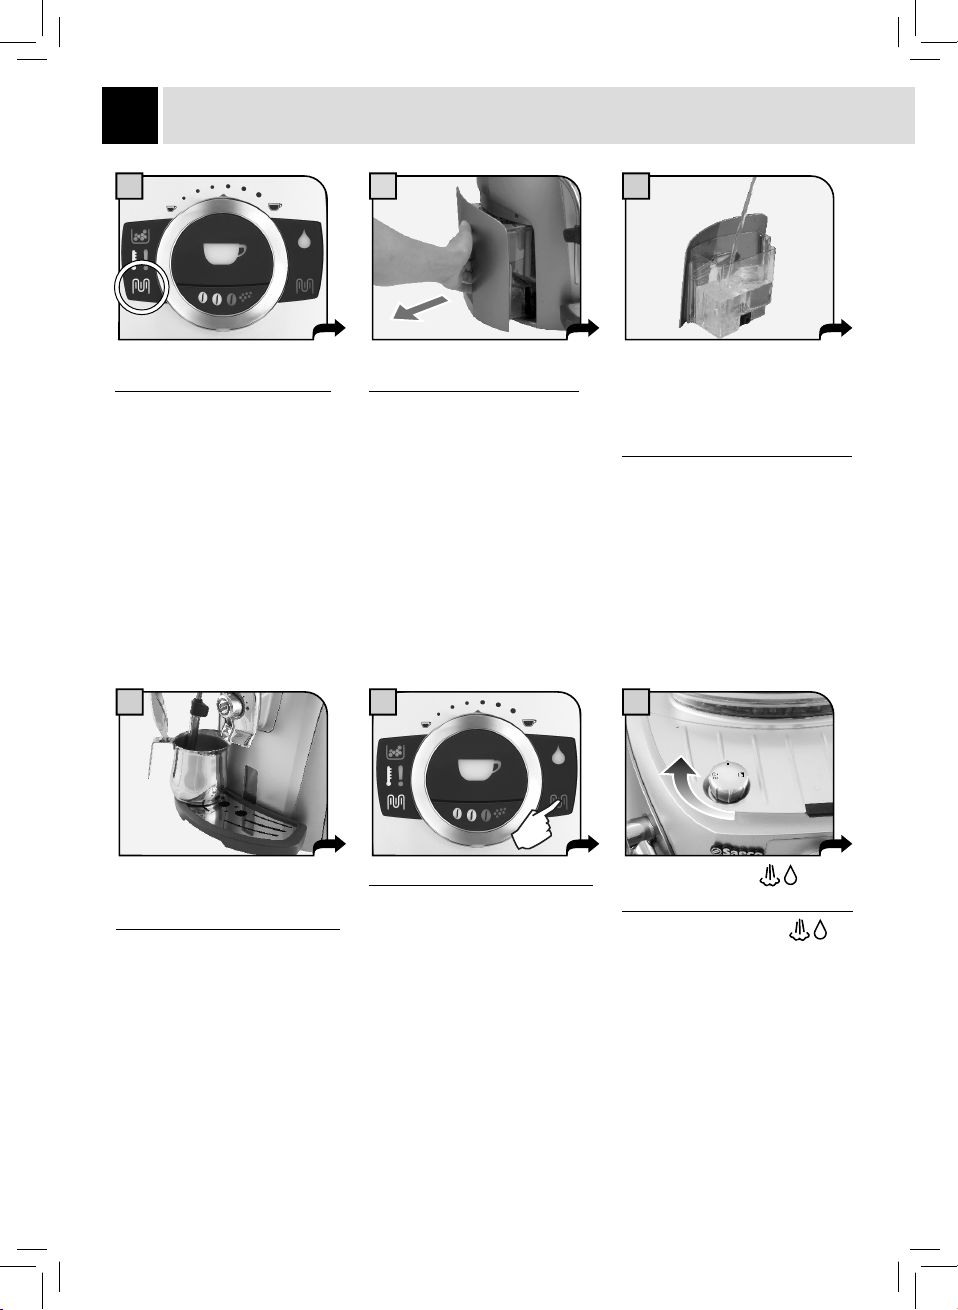
1
Descaling must be performed
when the light is blinking.
Quando o indicador luminoso
lampejar, será preciso realizar a
descalcifi cação.
4
2
Empty the remaining water out
of the tank.
Esvazie a água restante do
reservatório.
5 6
3
Pour the entire content of the
Saeco concentrated descaling
solution into the water tank, and
then fi ll the tank with fresh drinking
water up to the MAX level.
Deite todo o conteúdo da garrafa
de descalcifi cante concentrado
Saeco no reservatório de água e
encha-o com água fresca potável
até alcançar o nível MÁX.
Place a large empty container
(about 500 ml capacity) under the
steam wand.
Coloque um recipiente grande
(cerca de 500 ml) e vazio debaixo
do tubo de vapor.
Press the button for "5" seconds.
Pressione o botão durante “5"
segundos.
Turn the knob to the
position.
Vire o botão até à marca
.
Page 32
31
8 97
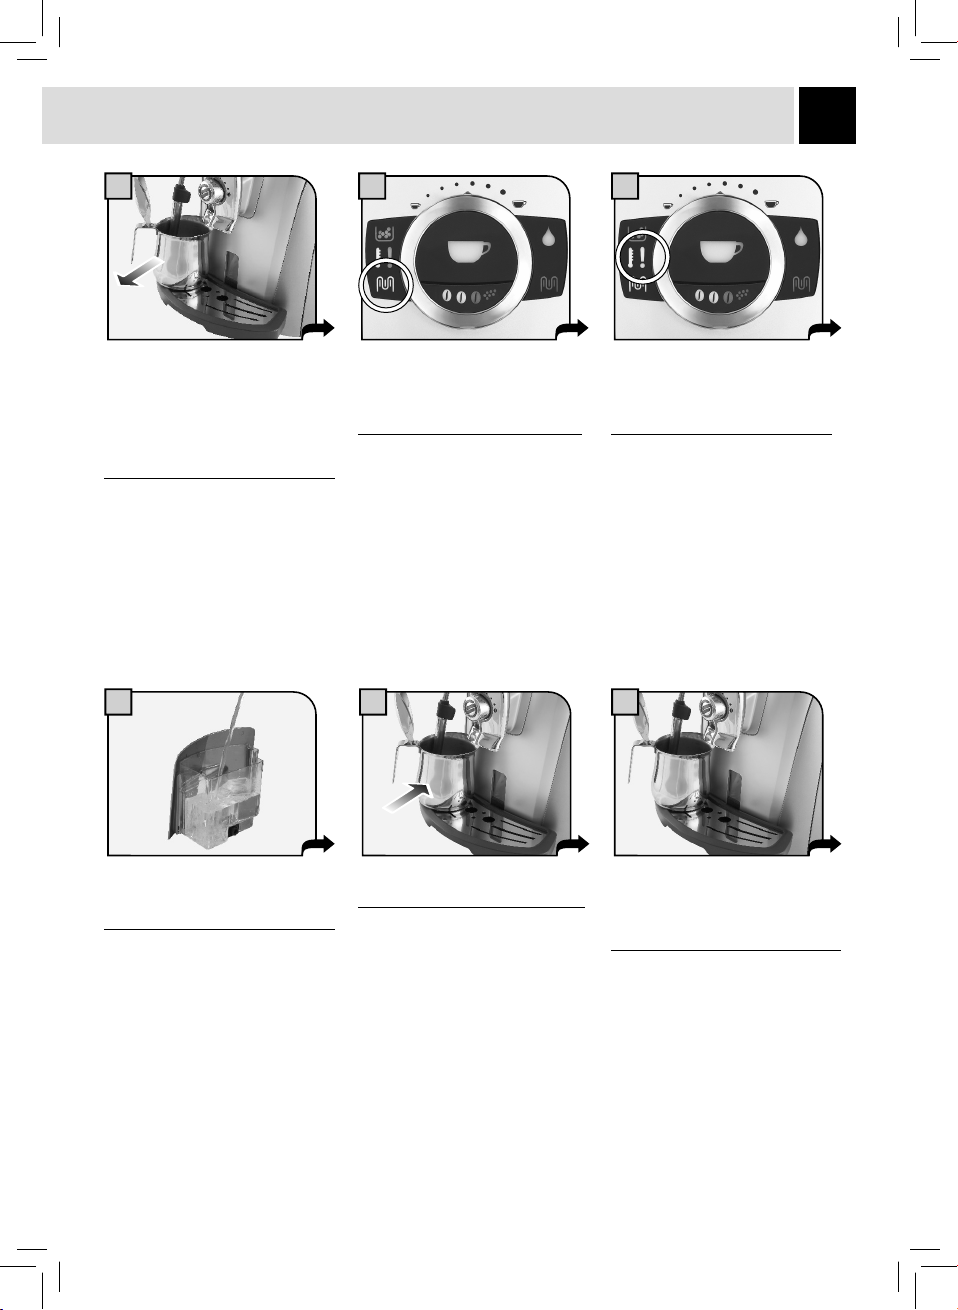
The machine starts dispensing
the descaling solution through the
hot water wand. The dispensing
occurs at predetermined intervals,
in order to allow the solution to be
more effective.
A máquina iniciará a distribuir a
solução descalcifi cante através
do tubo de distribuição de água
quente. A distribuição acontecerá
por intervalos preestabelecidos,
para permitir que a solução actue
de forma efi caz.
10 1211
Rinse and fi ll the water tank with
fresh drinking water up to the MAX
level marked on the tank.
Enxagúe e encha o reservatório
com água fresca potável até à
indicação MÁX localizada no
reservatório.
During the descaling and rinse
cycle the light is constantly on.
Empty the container if it is fi lled
up.
Durante o ciclo de descalcifi cação
e enxagúe o indicador luminoso
liga-se no modo fi xo.
Esvazie o recipiente se estiver
cheio.
Place a large enough empty
container under the steam wand.
Coloque debaixo do tubo de vapor
um recipiente vazio de capacidade
adequada.
When the light is on, the fi rst
phase of the descaling cycle is
complete. It is necessary to go to
the rinse phase.
Quando o indicador luminoso
acender, a primeira fase do
ciclo de descalcifi cação está
terminada. É necessário passar à
fase de enxagúe.
The machine will begin the fi rst
rinse cycle as soon as the water
tank is inserted.
Empty the container if it is fi lled up.
A máquina inicia o 1º ciclo de
enxagúe, assim que o reservatório
de água estiver introduzido.
Esvazie o recipiente se estiver
cheio.
Page 33
32
DESCALING - DESCALCIFICAÇÃO
13 1514
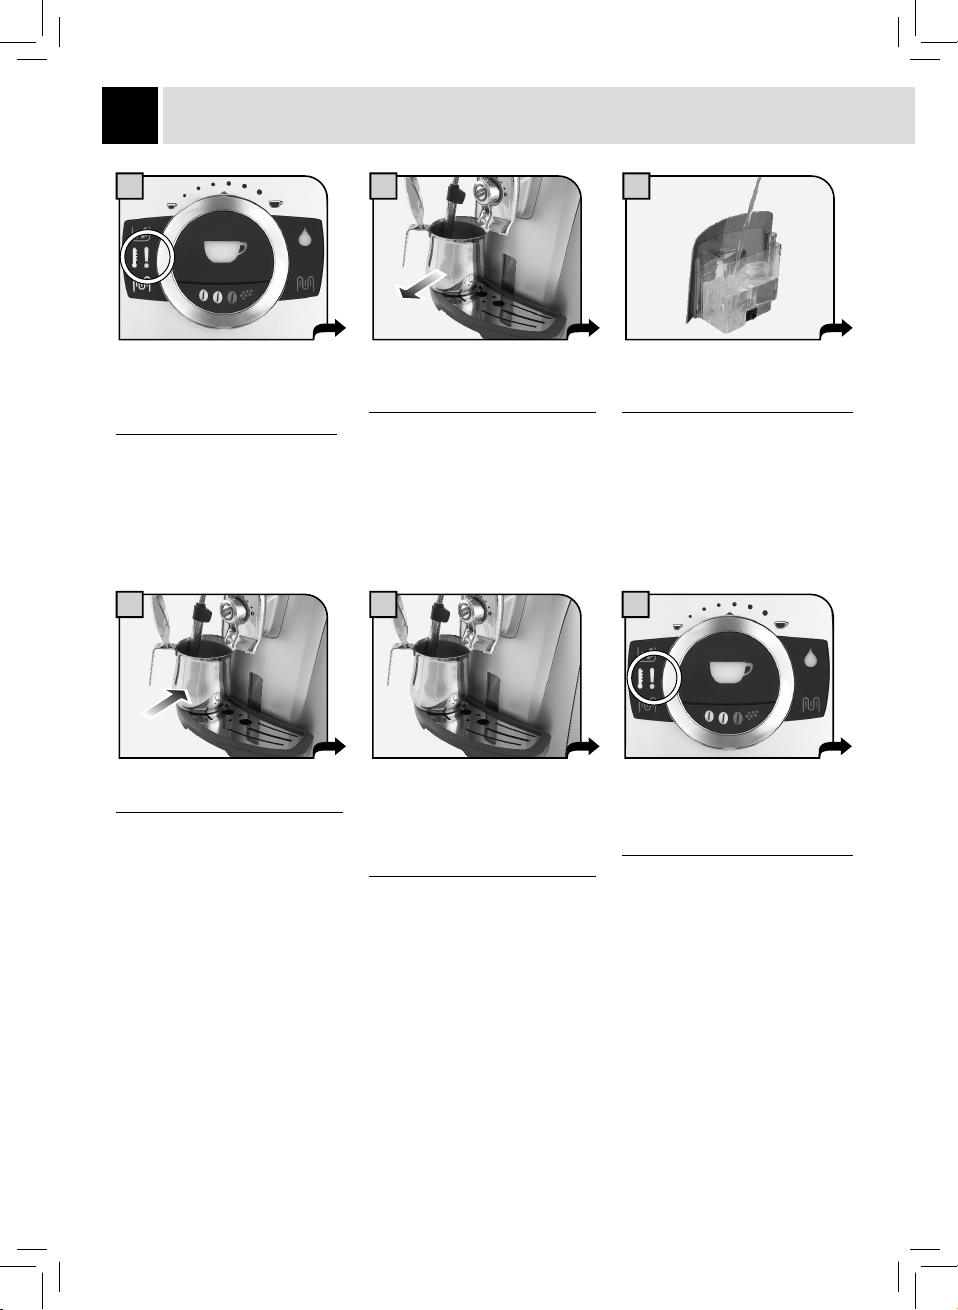
When the light is on, the fi rst
phase of the rinse cycle is
complete. The second rinse
phase needs to be performed.
Quando o indicador luminoso
acender, a primeira fase do ciclo
de enxagúe está terminada.
Deve efectuar a segunda fase de
enxagúe.
16 17
Place a large enough empty
container under the steam wand.
Coloque debaixo do tubo de vapor
um recipiente vazio de capacidade
adequada.
Remove and empty the container
previously placed under the steam
wand.
Remova e esvazie o recipiente
situado debaixo do tubo de vapor.
The machine starts the second
rinse cycle as soon as the water
tank is inserted.
Empty the container if it is fi lled
up.
A máquina inicia o 2º ciclo de
enxagúe, assim que o reservatório
de água estiver introduzido.
Esvazie o recipiente se estiver
cheio.
Rinse and fi ll again the tank with
fresh drinking water up to the MAX
level marked on the tank.
Enxagúe pela segunda vez e
encha o reservatório com água
fresca potável até à indicação MÁX
localizada no reservatório.
18
At the end of the second rinse
cycle, the descaling led turns off
and the alarm light turns on. The
descaling cycle is complete.
No fi nal do 2º enxagúe, o indicador
luminoso de descalcifi cação
apaga-se e o indicador luminoso
de alarme acende-se. O ciclo de
descalcifi cação está completo.
Page 34
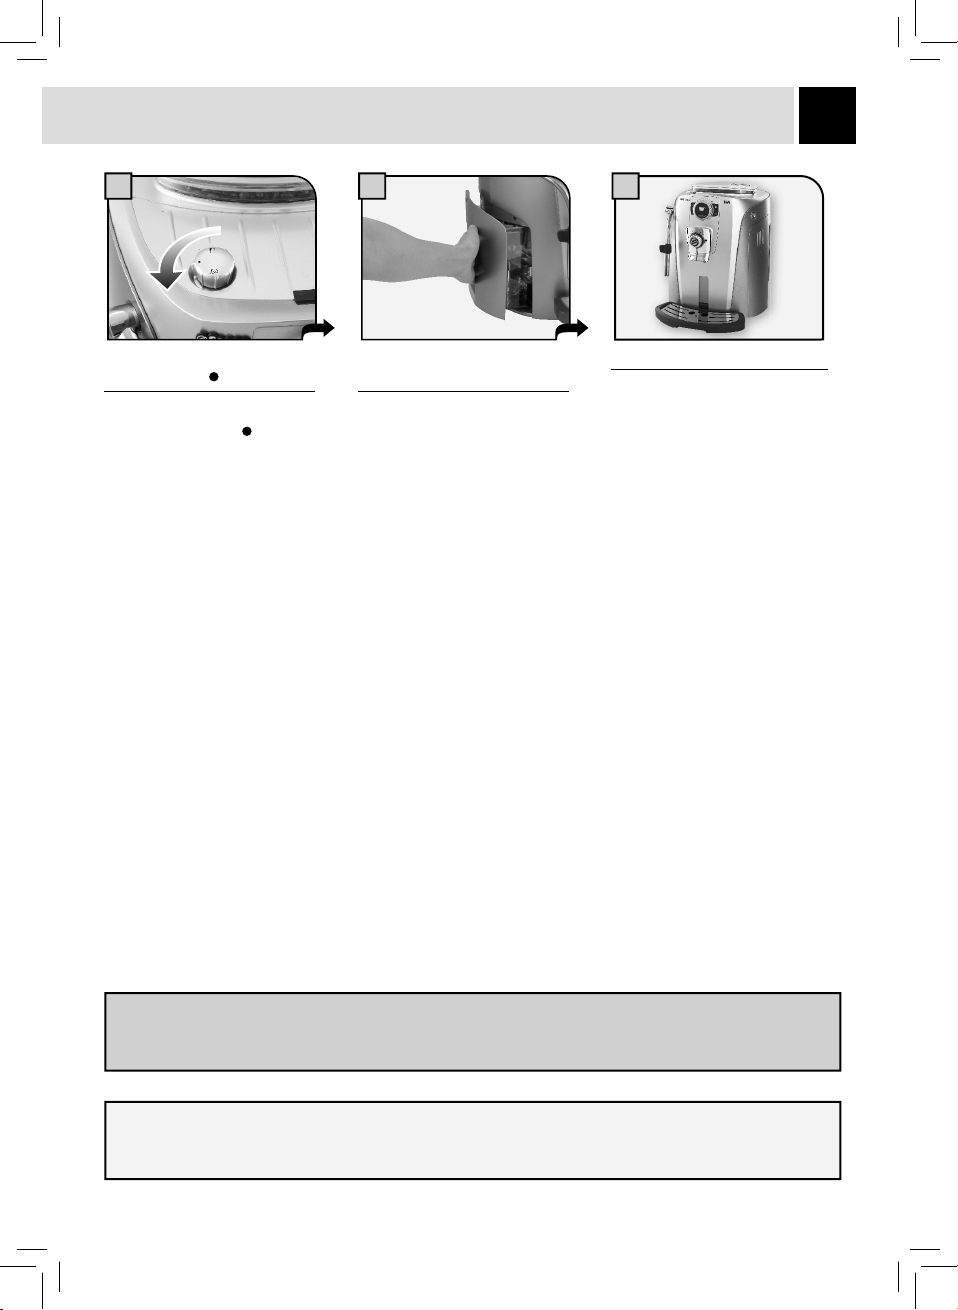
19 20 21
33
Turn the knob until it reaches
the off position ( ).
Vire o botão até colocá-lo na
posição de repouso (
).
Fill the tank again with fresh
drinking water.
Encha novamente o
reservatório com água fresca
potável.
The machine is ready for use.
A máquina está pronta.
Reinstall the Intenza water fi lter (if present) after descaling has been performed. If not present, check that the
small white fi lter described on page 13 is installed in the water tank.
Depois de ter realizado a descalcifi cação, instale novamente, se presente, o fi ltro de água Intenza. Caso
contrário, verifi que se no reservatório está presente o fi ltro branco descrito na pág. 13.
Page 35
CLEANING AND MAINTENANCE
34
LIMPEZA E MANUTENÇÃO
MAINTENANCE DURING OPERATION
MANUTENÇÃO DURANTE O FUNCIONAMENTO
During normal operation, the indicator light for emptying the coffee grounds may illuminate (see page 14).
This operation must be performed when the machine is on.
Durante o normal funcionamento pode aparecer a sinalização que indica de esvaziar as borras (veja
pág. 14). Esta operação deverá ser realizada com a máquina ligada.
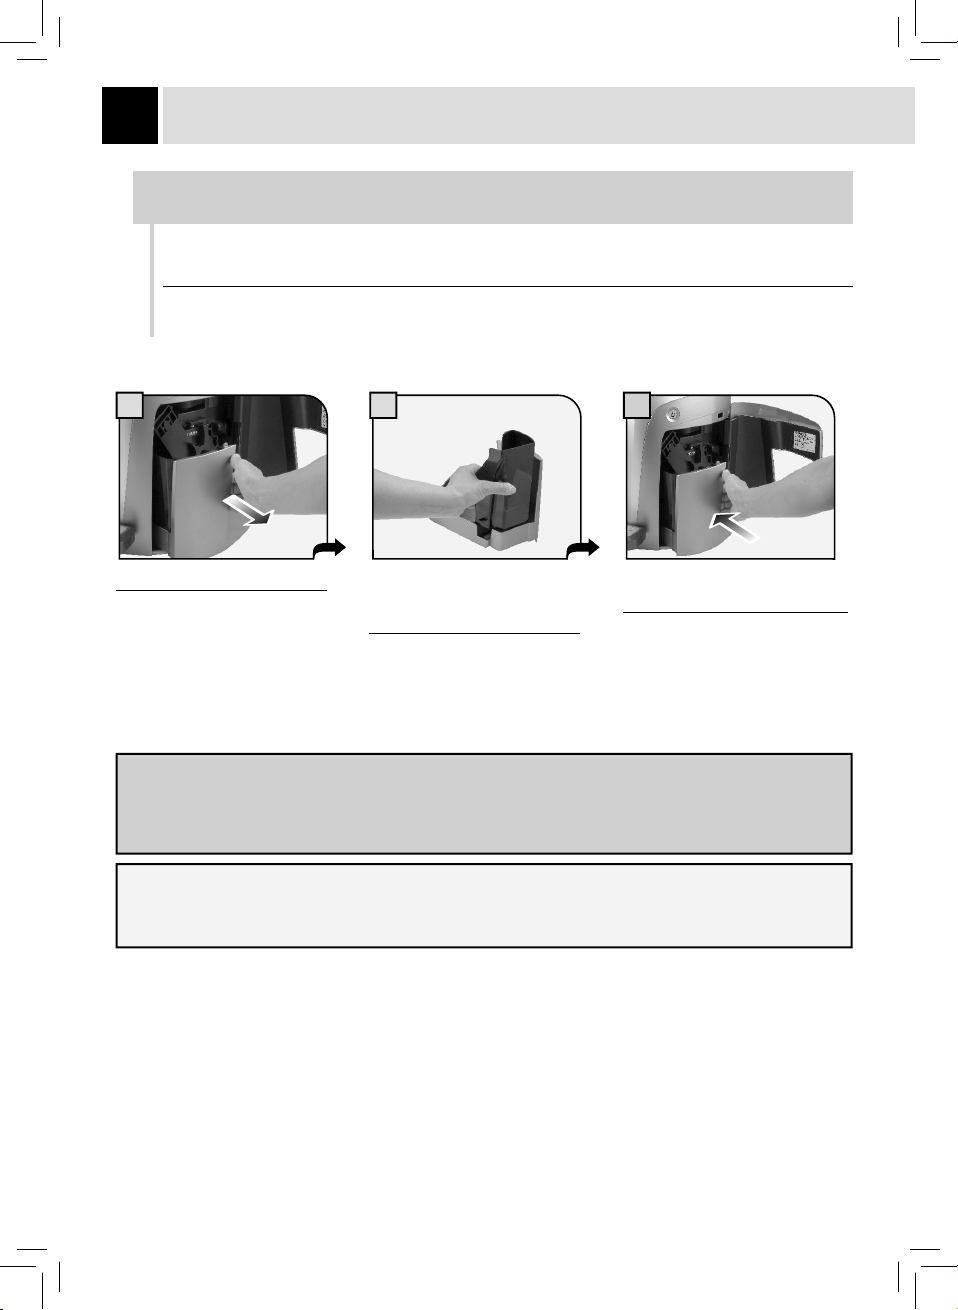
1 2
Remove the dregdrawer.
Retire a gaveta de recolha das
borras.
The indicator light to empty the dregdrawer illuminates approximately every 15 coffee cycles. If the
dregdrawer is emptied with the machine turned off, or when the indicator light is not illuminated not on
(see page 14), the count of the coffee cycles is not reset. For this reason, the indicator light to empty the
dregdrawer may illuminate even when it is not full.
Ao esvaziar as borras com a máquina desligada, ou quando o indicador luminoso “alarme esvaziar borras”
não estiver aceso (veja pág.14) não será reiniciada a contagem das borras depositadas na gaveta. Por isso, o
indicador luminoso “alarme esvaziar borras” poderá acender-se mesmo depois de preparados alguns cafés.
Empty the coffee grounds and
the residual liquids separately.
Wash both containers.
Elimine separadamente as
borras de café e os líquidos
residuais presentes. Lave todos
os recipientes.
3
Insert the dregdrawer and close
the service door.
Introduza a gaveta de recolha das
borras e feche a portinhola de
serviço.
Page 36
GENERAL MACHINE CLEANING - LIMPEZA DA MÁQUINA
The machine must be cleaned at least once a week.
Do not immerse the machine in water or place any of its parts in a dishwasher.
Do not use alcohol, solvents, and/or abrasive objects to clean the machine.
If water is left in the tank for several days, do not use it.
Do not dry the machine and/or its components using a microwave and/or conventional oven.
A limpeza da máquina deve ser realizada pelo menos uma vez por semana. Não mergulhe
a máquina na água e não lave os componentes na máquina de lavar louça. Não use
álcool etílico, solventes, gasolina e/ou objectos abrasivos para a limpeza da máquina. Se a água
permanecer no reservatório por muitos dias, deverá ser eliminada nas descargas apropriadas.
Não seque a máquina e/ou seus componentes utilizando um forno microondas e/ou um forno
convencional.
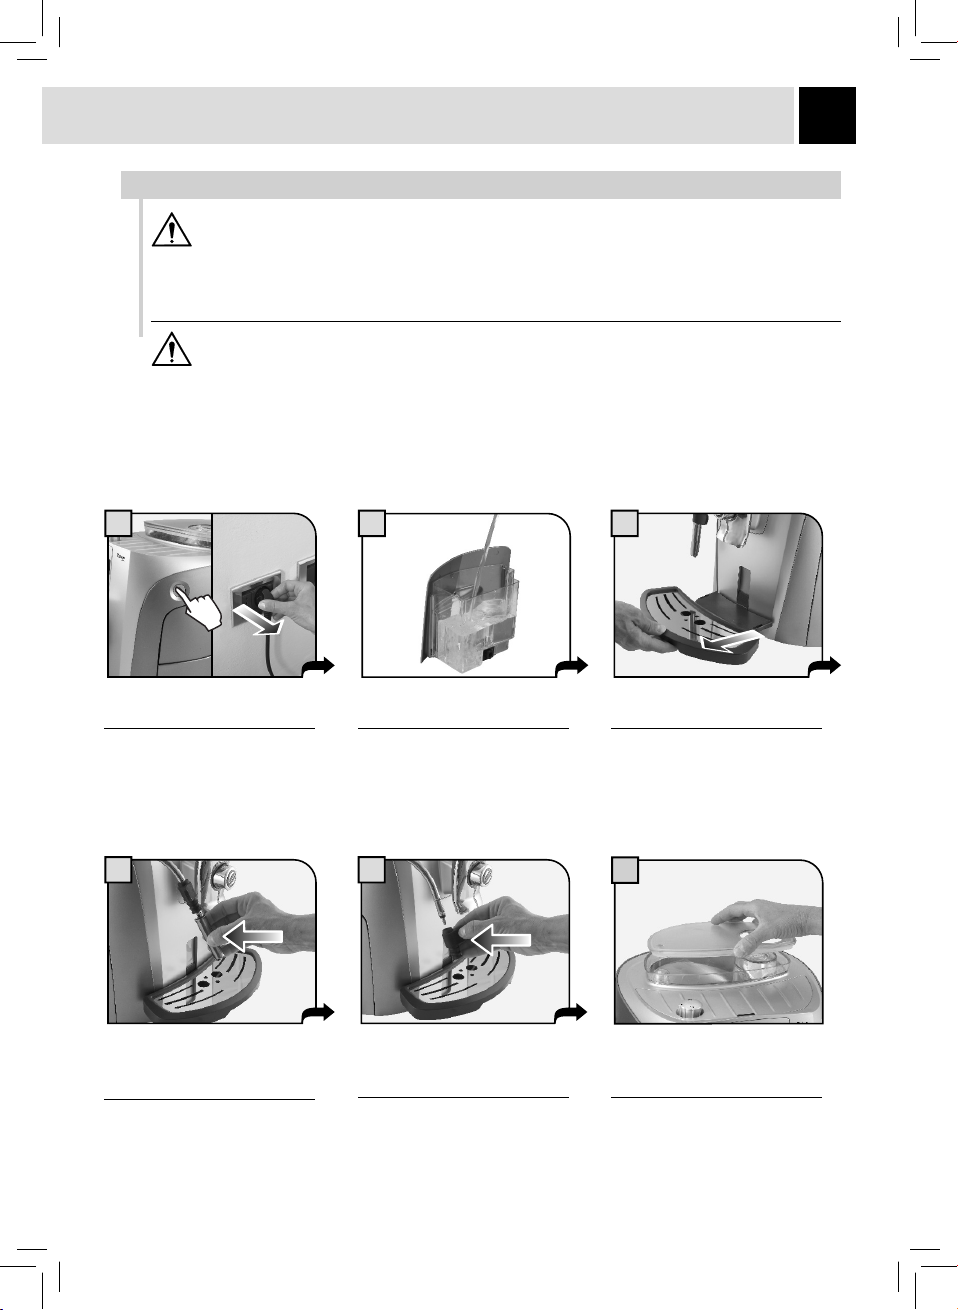
1 2 3
35
Turn off the machine and
unplug it.
Desligue a máquina e tire a
fi cha da tomada.
4 5
Remove and wash the hot
water wand. Wash all external
components.
Retire e lave a extremidade
do tubo vapor. Lave todos os
componentes presentes na
parte externa.
Remove the fi lter, if fi tted, and
wash the water tank.
Retire o fi ltro, quando presente,
e lave o reservatório de água.
Remove and wash the support
piece of the wand under running
water.
Retire e lave a pega.
Remove the drip tray and rinse
it under running water.
Retire a bandeja de limpeza e
lave-a com água corrente.
6
Before fi lling the coffee bean
hopper, clean it using a soft
damp cloth.
Antes de encher o recipiente
de café, limpe-o utilizando um
pano húmido.
Page 37
CLEANING AND MAINTENANCE
36
LIMPEZA E MANUTENÇÃO
CLEANING THE BREW GROUP
LIMPEZA DO GRUPO DE DISTRIBUIÇÃO
The brew group must be cleaned at least once a week. Before removing the brew group, remove the
dregdrawer drawer as shown in fi g. 1 on page 34. Once you have washed and inserted the brew group,
insert the dregdrawer and close the service door.
Lubricate the brew group after approximately 500 brewing cycles. The brew group lubricant can be
purchased through Saeco or authorized service centers.
In the U.S., it can be purchased by calling 1-800-933-7876, or by visiting www.saecooutlet.com.
In Canada, please call +1 514 3855551.
O grupo de distribuição deve ser limpo pelo menos uma vez por semana.
Antes de extrair o grupo será preciso retirar a gaveta de recolha das borras como indicado na fi g. 1 da
pág.34.
Depois de lavado e introduzido o grupo de distribuição, introduza a gaveta de recolha das borras e
feche a portinhola de serviço. Lubrifi que o grupo de distribuição depois de cerca de 500 distribuições.
É possível comprar a graxa para a lubrifi cação do grupo de distribuição nos centros de assistência
autorizados.
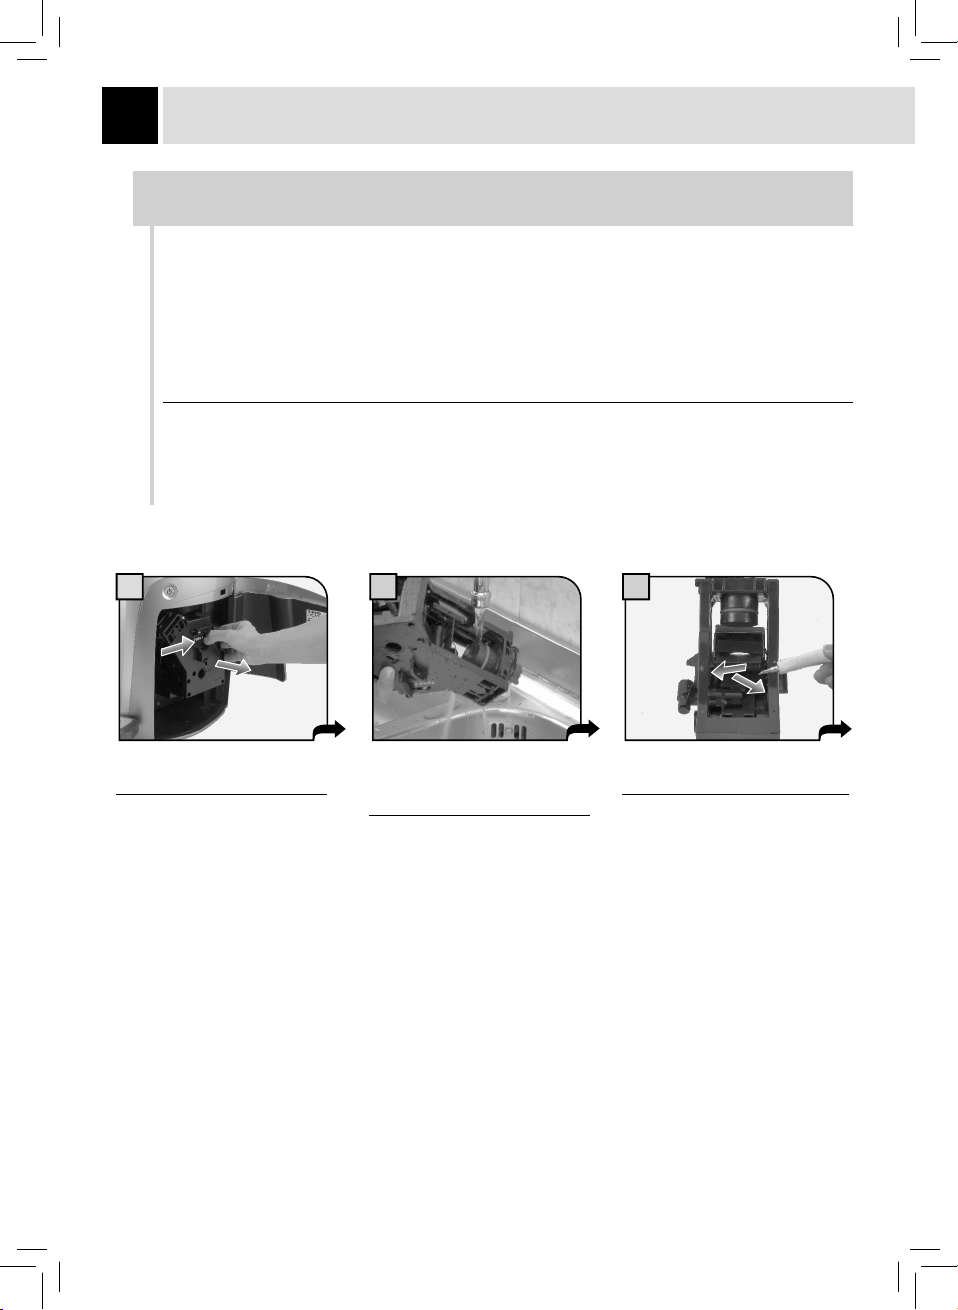
1
Press the “PUSH” button to
remove the brew group.
Pressione o botão “PUSH” para
extrair o grupo.
2
Wash the brew group with
running water. Wash fi lters
carefully.
Lave o grupo com água corrente.
Lave os fi ltros com cuidado.
3
Lubricate the brew group guides
using the supplied lubricant.
Lubrifi que as guias do grupo só
com a graxa fornecida.
Page 38
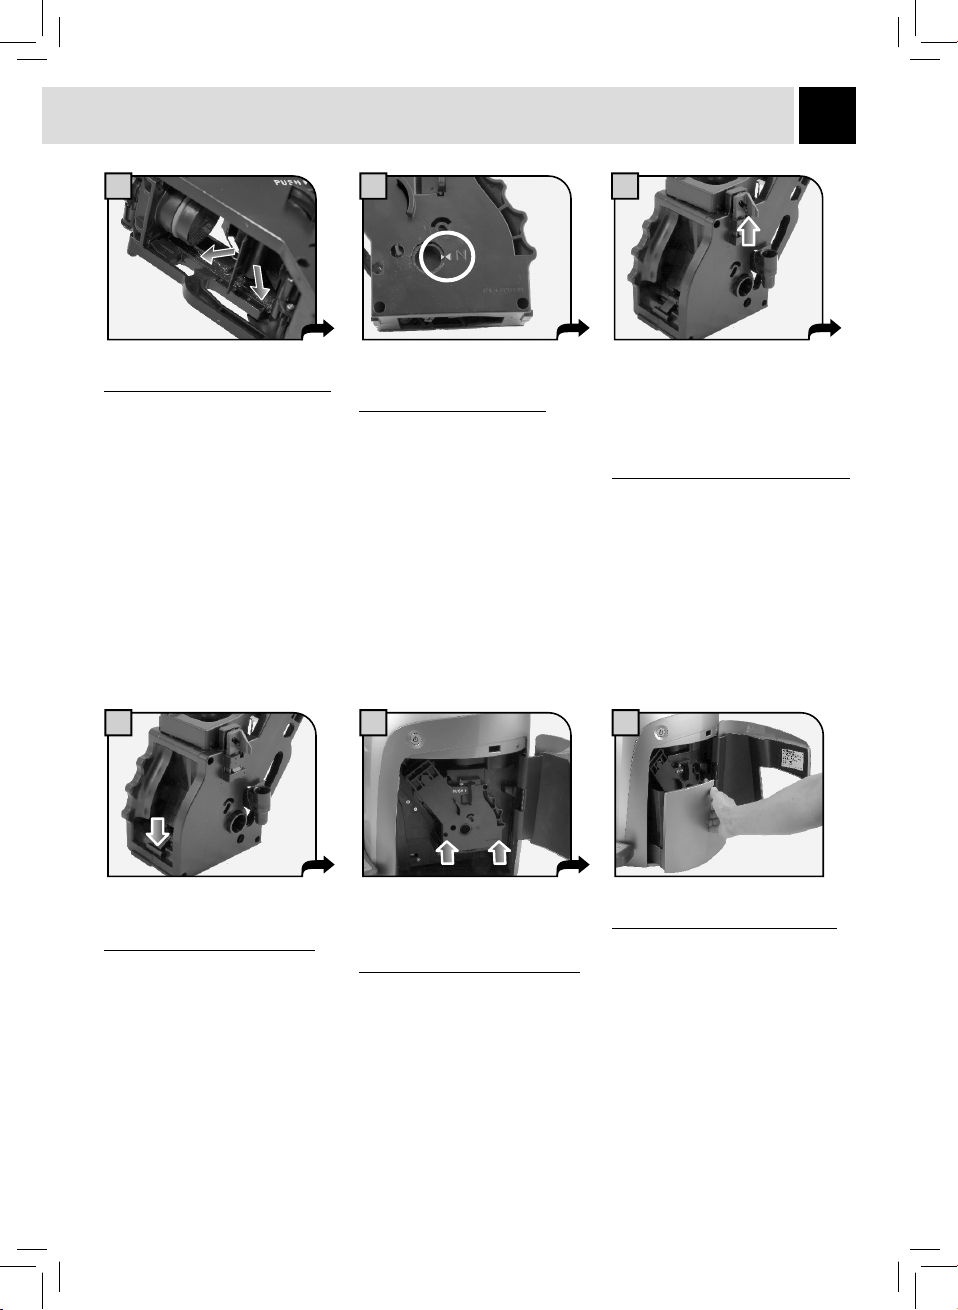
37
Apply the lubricant evenly on both
side guides.
Distribua a graxa uniformemente
nas duas guias laterais.
54
Make sure the brew group is in
rest position; the two references
must match.
Certifi que-se de que o grupo
esteja na posição de repouso; as
duas marcas deverão coincidir.
8 97
6
Make sure the components are in
the correct position.
The hook shown must be in the
correct position; to check its
position, fi rmly press the “PUSH”
button.
Certifi que-se de que os
componentes estejam na posição
correcta. O gancho mostrado deve
fi car na posição correcta; para
verifi cá-lo pressione fi rmemente a
tecla “PUSH”.
The lever on the rear part of the
group must be in contact with
the group base.
A alavanca posicionada na
parte traseira do grupo deve
fi car em contacto com a base.
Insert the washed and dried brew
group.
DO NOT PRESS THE “PUSH”
BUTTON.
Introduza o grupo lavado e seco.
NÃO PRESSIONE O BOTÃO
“PUSH”.
Insert the dregdrawer and close
the service door.
Introduza a gaveta de recolha das
borras e feche a portinhola de
serviço.
Page 39
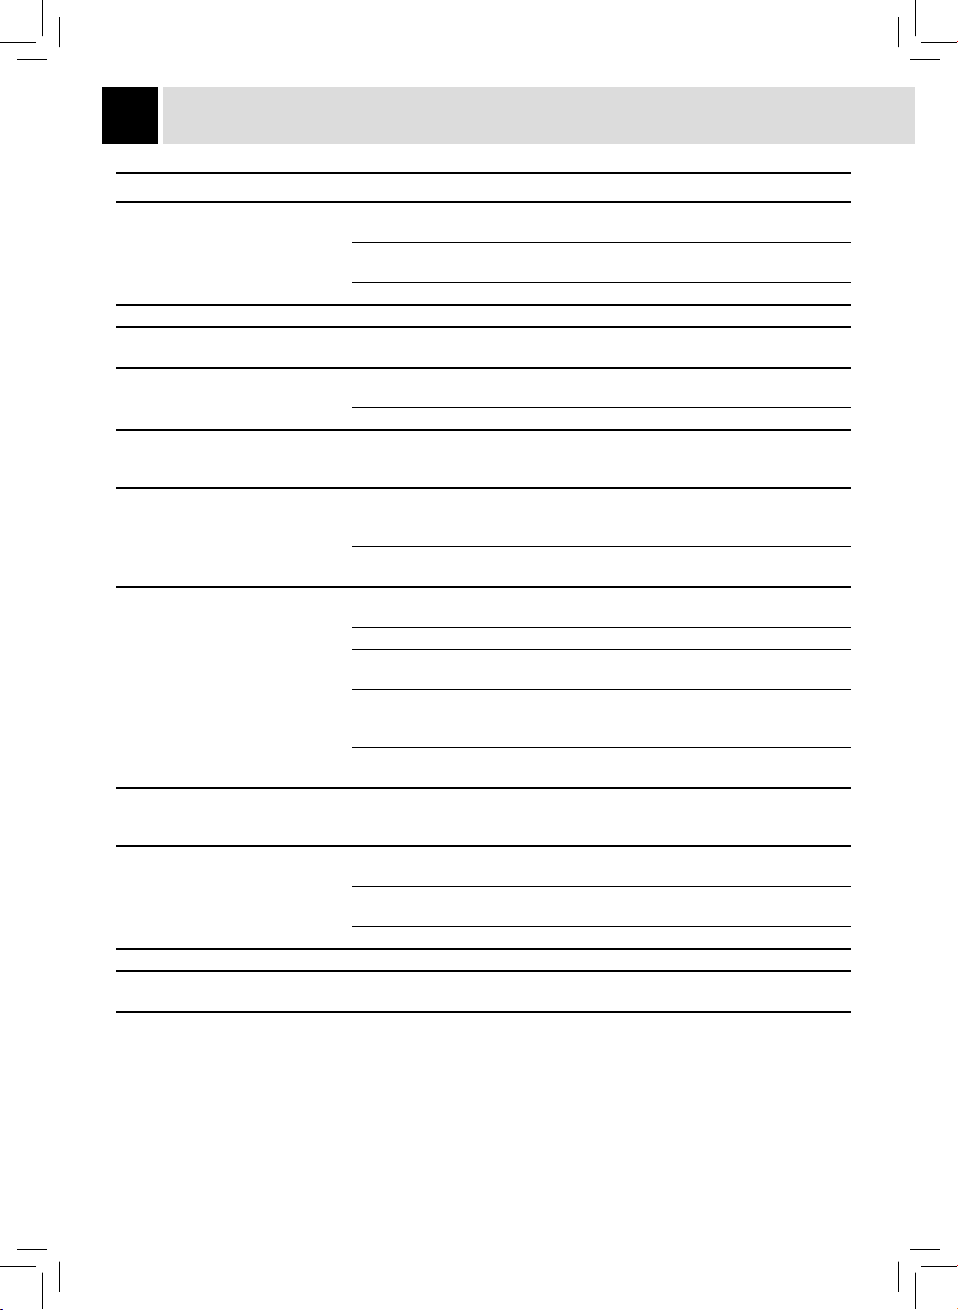
38
TROUBLESHOOTING
Problems Causes Solutions
The machine does not turn on. The machine is not connected to the
Coffee is not hot enough. The cups are cold. Warm the cups with hot water.
Hot water or steam is not dispensed. The hole of the hot water wand is
Coffee has little crema. The coffee blend is unsuitable or coffee
The machine takes a long time to warm
up or the amount of water dispensed
from the wand is too little.
The brew group does not come out. The brew group is out of place. Turn the machine on. Close the service door.
The machine grinds the coffee beans but
no coffee comes out.
(see note)
The coffee is too weak.
(see note)
Coffee is brewed slowly.
(see note)
Coffee leaks out of the dispensing head. Dispensing head is clogged. Clean the dispensing holes with a soft cloth.
Brewing does not start. Coffee bean lid is not closed properly. Correctly place the lid on the coffee bean
Note: If dealing with an initial start-up or if the coffee blend has been changed, a certain number of coffees must be brewed in
order to allow the machine to optimize the parameters.
power source.
The plug has not been plugged into the
back of the machine.
Machine in stand-by. Press the brew button to start the machine.
clogged.
is not freshly roasted.
The SBS dial is turned towards the left Turn the SBS dial to the right
The machine’s water circuit is obstructed
by limescale build-up.
Dregdrawer is inserted. Remove the dregdrawer fi rst, then the brew
Water tank is empty. Fill the water tank and prime the water circuit
Brew group is dirty. Clean the brew group.
Circuit is not primed. Prime the circuit again by dispensing water
Rare event that occurs when the
machine is automatically adjusting the
dose.
The coffee volume knob is turned to
the left.
Rare event that occurs when the
machine is automatically adjusting the
dose.
Coffee is too fi ne. Adjust the grinder to a coarse grind (see
The water circuit is not primed. Prime the circuit again by dispensing water
The brew group is dirty. Clean the brew group.
Connect the machine to the power source.
Insert the plug into the machine’s power
socket.
Clean the hole of the hot water wand using
a pin.
Change coffee blend.
Descale the machine.
The brew group is automatically placed in the
correct position.
group.
again.
from the hot water wand.
Brew a few coffees as described in the
manual.
Turn the knob clockwise.
Brew a few coffees as described in the
manual.
page 17).
from the hot water wand.
hopper and press it fi rmly.
Please contact Saeco or an authorized service center for any problems not covered in the above table or when the suggested
solutions do not solve the problem.
Page 40
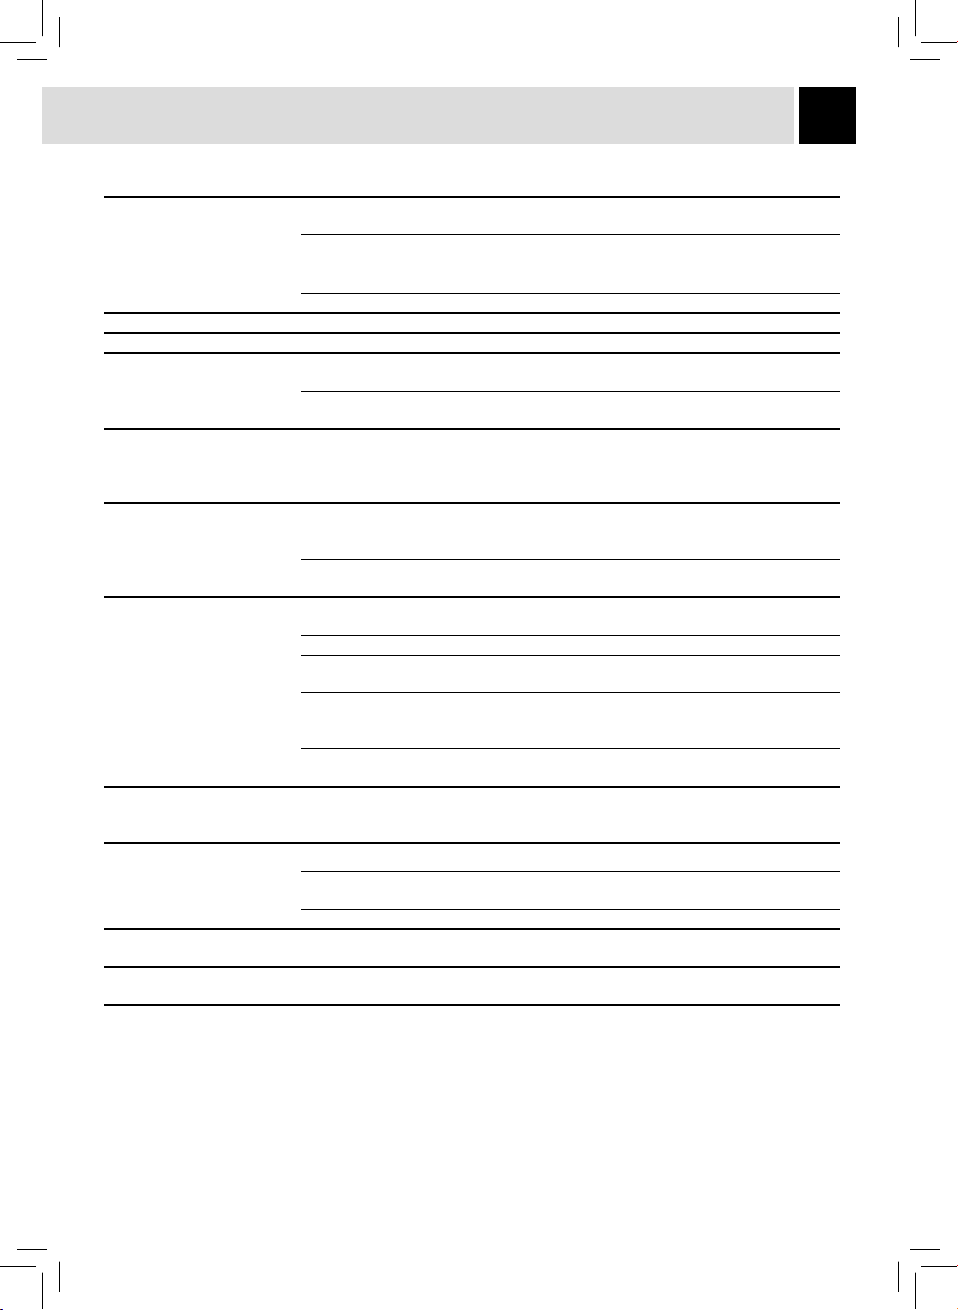
PROBLEMAS - CAUSAS - SOLUÇÕES
39
Problemas Causas Soluções
A máquina não se liga. A máquina não está ligada à rede
O café não está bastante quente. As chávenas estão frias. Aqueça as chávenas distribuindo nelas água quente.
Não sai água quente ou vapor. O furo do tubo vapor está entupido. Limpe o furo do tubo vapor com um alfi nete.
O café tem pouca espuma. A mistura não está apropriada ou o café
A máquina precisa de muito
tempo para aquecer-se ou a
quantidade de água a sair pelo
tubo está limitada.
O grupo de distribuição não pode
ser extraído.
A máquina mói, mas o café não
sai.
(Ver obs.)
Café demasiado aquoso.
(Ver obs.)
O café sai lentamente.
(Ver obs.)
O café sai fora do grupo de
distribuição.
A distribuição não inicia. Tampa do recipiente de café não
Obs.: no caso da primeira ligação ou se a mistura de café foi modifi cada, é necessário distribuir um certo número de café, de
modo a que a máquina optimize os parâmetros.
eléctrica.
Não foi ligada a fi cha na tomada
posicionada na parte traseira da
máquina.
Máquina em Stand-by. Pressione a tecla café para iniciar a máquina.
não está fresco de torrefacção.
O botão do sistema SBS está virado à
esquerda.
O circuito da máquina está entupido por
causa do calcário.
Grupo de distribuição fora da posição. Ligue a máquina. Feche a portinhola de serviço. O
Gaveta de recolha das borras
introduzida.
Falta a água. Encha o reservatório de água e recarregue o
Grupo sujo. Limpe o grupo de distribuição.
Circuito não carregado. Recarregue o circuito distribuindo água pelo tubo
Caso extremo que ocorre quando a
máquina está a regular automaticamente
a dose.
Botão de ajuste da quantidade de café
na chávena em posição incorrecta.
Caso extremo que ocorre quando a
máquina está a regular automaticamente
a dose.
Café demasiado fi no. Ajuste do moinho de café (pág.17)
Circuito não carregado. Recarregue o circuito distribuindo água pelo tubo
Grupo de distribuição sujo. Limpe o grupo de distribuição.
Distribuidor entupido. Limpe o distribuidor e os seus furos de saída com
posicionada correctamente.
Ligue a máquina à rede eléctrica.
Introduza a fi cha na tomada da máquina.
Troque a mistura de café.
Vire o botão do sistema SBS à direita.
Descalcifi que a máquina.
grupo de distribuição voltará automaticamente para
a posição inicial.
Retire a gaveta de recolha das borras antes de
extrair o grupo de distribuição.
circuito.
vapor.
Realize alguns ciclos de café como descrito no
manual
Vire o botão no sentido horário.
Realize alguns ciclos de café como descrito no
manual
vapor.
um pano.
Posicione correctamente a tampa no recipiente de
café e pressione-a fi rmemente.
Para as avarias não incluídas na tabela acima indicada ou problemas não resolvidos, contacte um centro de assistência.
Page 41

40
SAFETY RULES
IN CASE OF EMERGENCY
Immediately unplug the cable from the outlet.
USE THE APPLIANCE ONLY
- Indoors.
- To prepare coffee, dispense hot water, froth milk or heat beverages using steam.
NEVER USE THE APPLIANCE
For purposes other than those indicated above, in order to avoid danger.
Do not introduce any substances other than those indicated in the instruction manual.
During the normal fi lling of any reservoirs, all nearby reservoirs must be closed.
Fill the water tank only with fresh drinking water: Hot water and/or any other liquid may damage the machine.
Do not use carbonated water.
Do not put fi ngers or any material other than coffee beans in the coffee grinder. Before manipulating the coffee
grinder, turn off the machine’s main switch and unplug the cable.
POWER CONNECTION
Only connect the coffee machine to a suitable power socket. The voltage must correspond to the indication on
the machine’s label.
INSTALLATION
- Choose a level surface. Do not place on heated surfaces!
- Allow a distance of 10 cm (4 in) between walls and cooking hotplates.
- Do not keep the machine at temperatures below 0°C (32°F) – danger of freezing damage.
- There must be easy access to the socket at all times.
- The power cable must not be damaged, tied up with clamps, placed on very hot surfaces, etc.
- The power cable must not hang. (Danger of tripping or dropping the appliance).
- Do not use the power cable to carry or pull the coffee machine.
DANGER
- This appliance is not intended for use by persons (including children) with reduced physical, sensory or mental
capabilities, or lack of experience and knowledge, unless they have been given supervision or instruction
concerning use of the appliance by a person responsible for their safety.
- Children should be supervised to ensure that they do not play with the appliance.
- The appliance is dangerous to children. If left unattended, please disable it.
- Do not leave the coffee machine packaging within the reach of children.
- Never direct the jet of hot water and/or steam towards yourself or others. Danger of scalding.
- Do not insert objects through the appliance’s openings (Danger! Electrical current!).
- Do not touch the plug with wet hands and feet. Do not remove the plug by pulling the cable.
- Warning, danger of burns caused by hot water, steam and hot water/steam spout.
Page 42

NORMAS DE SEGURANÇA
41
EM CASO DE EMERGÊNCIA
Retire imediatamente a fi cha da tomada de rede.
UTILIZE EXCLUSIVAMENTE O APARELHO
- Em lugar fechado
- Para preparar café, água quente, para bater o leite ou para aquecer bebidas utilizando o vapor.
NUNCA UTILIZE O APARELHO
para fi ns diferentes daqueles acima indicados, a fi m de evitar perigos.
Não introduza nos recipientes substâncias diferentes daquelas indicadas no manual de instruções.
Durante o normal enchimento de qualquer recipiente, é obrigatório fechar todos os recipientes próximos.
Encha o reservatório de água apenas com água fresca potável: água quente e/ou outros líquidos poderiam
danifi car a máquina.
Não utilize água adicionada com dióxido de carbono.
No moinho de café é proibido introduzir os dedos e qualquer material que não seja café em grãos. Antes de
trabalhar no interior do moinho de café desligue a máquina através do interruptor geral e tire a fi cha da tomada
de corrente.
LIGAÇÃO À REDE
Ligue a máquina de café só numa tomada de corrente apropriada. A tensão deve corresponder àquela indicada
na plaqueta posicionada no aparelho.
INSTALAÇÃO
- Escolha uma superfície de apoio bem nivelada. Não coloque-a sobre superfícies incandescentes!
- Ponha a máquina a 10 cm de distância das paredes e das chapas de cozinhar.
- Não deixe-a a temperaturas inferiores a 0°C, perigo de danos por congelação.
- A tomada de corrente deve ser alcançável a qualquer momento.
- O cabo de alimentação não deve estar danifi cado, ligado com bornes, posicionado sobre superfícies
incandescentes, etc.
- Não deixe pender o cabo de alimentação. (Atenção: Perigo de tropeçar ou de fazer cair o aparelho no chão.)
- Não carregue ou puxe a máquina de café segurando-a pelo cabo de alimentação.
PERIGOS
- O aparelho não é destinado a ser utilizado por pessoas (inclusive as crianças) com capacidades físicas,
mentais ou sensoriais reduzidas ou com experiência e/ou competências insufi cientes, a não ser que não
estejam sob a supervisão de uma pessoa responsável pela segurança deles ou não sejam ensinadas por ela
sobre o uso do aparelho.
- Mantenha as crianças sob a supervisão, para evitar que brinquem com o aparelho.
- O aparelho é perigoso para as crianças. Se fi car sem guarda, desactive-o.
- Não deixe os materiais utilizados para a embalagem da máquina ao alcance das crianças.
- Não dirija para si e/ou para outros o jacto de vapor sobreaquecido e/ou de água quente: perigo de
queimaduras.
- Não introduza objectos nas aberturas do aparelho (Perigo! Corrente eléctrica!).
- Não toque na fi cha com mãos e pés molhados, não retire-a da tomada puxando o cabo.
- Atenção: perigo de queimaduras devido ao contacto com a água quente, o vapor e o bico de água quente/
vapor.
Page 43
42
SAFETY RULES
FAILURES
- Do not use the appliance in case of sure or suspected faults such as after falls.
- Any repairs must be performed by an authorized customer service center.
- Do not use the appliance with a defective power cable. If damaged, the power cable must be replaced by the
manufacturer or authorized service center. (Caution! Electrical current).
- Turn off the appliance before opening the service door.
CLEANING / DESCALING
- Before cleaning, unplug the machine and let the appliance cool.
- Keep the appliance from coming into contact with splashes of water or immersing in water.
- Do not dry the machine’s parts in conventional or microwave ovens.
SPARE PARTS
For safety reasons, use only original spare parts and original accessories.
DISPOSAL
- The packing materials can be recycled.
- Appliance: unplug the appliance and cut the power cord.
- Deliver the appliance and power cord to a service center or public waste disposal facility.
This product complies with EU Directive 2002/96/EC.
The symbol on the product or on its packaging indicates that this product may not be treated as
household waste. Instead it shall be handed over to the applicable collection point for the recycling of electrical
and electronic equipment.
By ensuring this product is disposed of correctly, you will help prevent potential negative consequences for
the environment and human health, which could otherwise be caused by inappropriate waste handling of this
product. For more detailed information about recycling of this product, please contact your local city offi ce, your
household waste disposal service or the retailer where you purchased the product.
ADDITIONAL INFORMATION FOR THE CORRECT USE OF THE INTENZA WATER FILTER
To correctly use the Intenza water fi lter, please consider the following instructions:
1. Store the water fi lter in a cool area in which the room temperature is between +1°C to +50°C (34°F to 122°F).
Do not store it in direct sunlight.
2. Carefully read the operating instructions and the safety warnings provided with each fi lter.
3. Keep the fi lter instructions together with the manual.
4. These instructions integrate the ones in the manual, as they take into consideration the specifi c application of
the fi lter in the machine.
Page 44
NORMAS DE SEGURANÇA
AVARIAS
- Não utilize o aparelho no caso de avaria verifi cada ou suspeita, por exemplo após uma queda.
- Consertos eventuais deverão ser realizados pelo serviço de assistência autorizado.
- Não utilize um aparelho com cabo de alimentação defeituoso. Se o cabo de alimentação estiver danifi cado,
deverá ser substituído pelo fabricante ou pelo seu serviço de assistência aos clientes. (Perigo! Corrente
eléctrica!).
- Desligue o aparelho antes de abrir a portinhola de serviço.
LIMPEZA / DESCALCIFICAÇÃO
- Antes da limpeza, retire a fi cha da tomada e deixe arrefecer o aparelho.
- Não permita que o aparelho entre em contacto com jactos de água ou seja mergulhado em água.
- Não seque as peças da máquina em fornos convencionais e/ou de microondas.
PEÇAS SOBRESSELENTES
Por razões de segurança, utilize apenas peças sobresselentes e acessórios originais.
Desmantelamento
Este produto está conforme a directiva EU 2002/96/EC.
43
O simbolo
como lixo doméstico normal.
Este produto deve ser entregue num ponto de recolha de equipamentos eléctricos e electrónicos para
reciclagem. Ao assegurar-se que este produto é eliminado correctamente, estará a ajudar a evitar possiveis
consequências negativas para o ambiente e saúde pública que resultariam se este produto não fosse
manipulado de forma adquada. Para obter informações mais detalhadas sobre a reciclagem deste produto, por
favor contacte o gabinete da câmara municipal da sua cidade ou a loja onde comprou o produto.
impresso no produto ou na sua embalagem indica que este produto não se pode tratar
INFORMAÇÕES ADICIONAIS PARA UTILIZAR CORRECTAMENTE O FILTRO INTENZA
Para utilizar correctamente o fi ltro água Intenza enumeramo-vos algumas advertências que se devem ter em
consideração:
1. Guarde o fi ltro água num ambiente fresco e protegido do sol; a temperatura do ambiente deve estar
compreendida entre os +1°C e os +50°C;
2. Leia atentamente as instruções de utilização e as advertências de segurança anexas em cada fi ltro.
3. Guarde as instruções do fi ltro em anexo juntamente com o manual.
4. As instruções descritas no presente manual integram aquelas introduzidas no manual, porque analisam a
aplicação específi ca do fi ltro na máquina.
 Loading...