

Page 1
TYPE SUP 018M
OPERATING INSTRUCTIONS
MODE D’EMPLOI
INSTRUCCIONES DE USO
INSTRUCÇOES E MODO DE EMPREGO
EnglishFrançaisEspañolPortuguês
FOR HOUSEHOLD USE ONLY
USAGE DOMESTIQUE SEULEMENT
Page 2

2
16
11
13
10
7
6
8
3
12
4
2
1
14
9
5 23 18 19 20 21
17 22
15
Page 3
3
+
-
Page 4
4
Page 5
IMPORTANT SAFEGUARDS
5
When using electrical appliances, basic safety precautions should always
be followed, including the following:
1. Read all instructions.
2. Do not touch hot surfaces. Use handles or knobs.
3. To protect against fire, electric shock and injury to persons do not
immerse cord, plugs, or appliance in water or other liquid.
4. Close supervision is necessary when the appliance is used by or near
children.
5. Unplug from outlet when not in use and before cleaning. Allow to
cool before putting on or taking off parts, and before cleaning the
appliance.
6. Do not operate any appliance with a damaged cord or plug or after the
appliance malfunctions, or has been damaged in any manner. Return
appliance to the nearest authorized service facility for examination,
repair or adjustment.
7. The use of accessory attachments not recommended by the appliance
manufacturer may result in fire, electric shock or injury to persons.
8. Do not use outdoors.
9. Do not let cord hang over edge of table or counter, or touch hot
surfaces.
10. Do not place on or near a hot gas or electric burner, or in a heated
oven.
11. Always attach plug to appliance first, then plug cord into wall outlet.
To disconnect, turn any control to “off”, then remove plug from wall
outlet.
12. Do not use appliance for other than intended use.
13. Save these instructions.
English
SAVE THESE INSTRUCTIONS
Page 6

6
CAUTION
This appliance is for household use only. Any servicing, other than
cleaning and user maintenance, should be performed by an authorized
service centre. Do not immerse machine in water. To reduce the risk of
fire or electric shock, do not disassemble the machine. There are no
parts inside the machine serviceable by the user. Repair should be done
by authorized service personnel only.
1 Check voltage to be sure that the voltage indicated on the nameplate
corresponds with your voltage.
2 Never use warm or hot water to fill the water tank. Use cold water only.
3 Keep your hands and the cord away from hot parts of the appliance
during operation.
4 Never clean with scrubbing powders or harsh cleaners. Simply use a
soft cloth dampened with water.
5 For optimal taste of your coffee, use purified or bottled water. Periodic
descaling is still recommended every 2-3 months.
6 Do not use caramelized or flavored coffee beans.
INSTRUCTIONS FOR THE POWER SUPPLY CORD
A. A short power-supply cord (or detachable power-supply cord) is to
be provided to reduce risks resulting from becoming entangled in or
tripping over a longer cord.
B. Longer detachable power-supply cords or extension cords are available
and may used if care is exercised in their use.
C. If a long detachable power-supply cord or extension cord is used,
1. The marked electrical rating of the detachable power-supply cord
or extension cord should be at least as great as the electrical rating
of the appliance
2. If the appliance is of the grounded type, the extension cord should
be a grounding-type 3-wire cord, and
3. The longer cord should be arranged so that it will not drape over
the counter top or table top where it can be pulled on by children or
tripped over.
Page 7
GENERAL INFORMATION - TECHNICAL DATA
7
1
GENERAL INFORMATION
The coffee machine is suitable to make espresso coffee using coffee beans and is equipped with a device
for the distribution of steam and hot water.
The machine has been designed for domestic use and
is not suitable for a heavy or professional use.
Warning. No liability is assumed for any
damage caused by:
• incorrect use not in accordance with the intended uses;
• repairs not carried out by Authorized Service
Centres;
• tampering with the power cable;
• tampering with any part of the machine;
• the use of non-original spare parts and accessories.
In these cases, the warranty is not valid.
1.1 To facilitate reading
A warning triangle draws the attention to
all the instructions that are important for
the user’s safety.
Please carefully follow these instructions to
avoid serious injury!
(Fig. 2) - Reference to fi gures, parts of the machine
and controls is indicated by numbers or letters, like
the reference to fi gure 2 in this section.
This symbol is used to highlight the
information that is particularly important
for ensuring an optimal use of the machine.
1.2 How to use these operating
instructions
Keep these operating instructions in a safe place
and make them available to anyone else who
would use the coffee machine.
For further information or in case of problems that
are not included or not completely explained in these
instructions, please contact the Authorized Service
Centres.
2 TECHNICAL DATA
• Nominal voltage - Power rating - Power supply
See label on the appliance
• Shell material
Thermoplastic
• Size (mm)
337 x 325 x 377
• Weight (kg)
8,5
• Cable length (mm)
1200
• Control panel
Front
• Water tank
1,7 (l) - Removable
• Coffee bean hopper capacity (g)
350 g of coffee beans
• Pump pressure (bar)
15
• Boiler
Stainless steel
• Safety devices
Boiler pressure safety valve;
safety thermostat.
English
Subject to engineering and manufacturing changes due to technological developments.
Page 8
8
SAFETY REGULATIONS
O I L
sizes in millimeter
Page 9
SAFETY REGULATIONS
9
3 SAFETY REGULATIONS
Never place live parts in contact with water:
danger of short circuit! Steam and hot water may
cause scalding! Do not direct the steam or hot water jet toward parts of the body; handle the steam/
hot water spout with care: danger of scalding!
Intended use
The coffee machine is intended for domestic use
only. Do not make any technical changes or use the
machine for unauthorized purposes since this would
create serious hazards! The appliance is not to be
used by persons (including children) with reduced
physical, mental or sensory abilities or with scarce
experience and/or expertise, unless they are supervised by a person responsible for their safety, or they
are instructed by this person on how to properly use
the machine.
Power supply
Only connect the coffee machine to a suitable power
socket.
The voltage must correspond to the indication on the
machine’s label.
Power cable
Never use the coffee machine if the power cable is
defective.
If damaged, the power cable must be replaced by the
manufacturer or its customer service department.
Do not pass the cable around corners, over sharp
edges or over hot objects and keep it away from oil.
Do not use the power cable to carry or pull the coffee
machine.
Do not pull out the plug by pulling on the power cable
or touch it with wet hands.
Do not let the power cable hang freely from tables
or shelves.
Protecting others
Make sure that the coffee machine is out of children’s
reach. Children are not aware of the risks linked with
electrical appliances.
Danger of burning
Never direct the jet of hot steam and/or hot water towards yourself and/or others: danger of scalding!
Always use the handles or knobs provided.
Location
Position the coffee machine in a safe place, where
nobody may overturn it or be injured.
Do not use the coffee machine outdoors.
Do not place the machine on hot surfaces and close
to open fl ames to prevent the body from melting or
being damaged.
Cleaning
Before cleaning the machine, the main power button
(5) must be switched to the -0- position and the plug
must be removed from the socket.
Then wait for the machine to cool down.
Never immerse the machine in water!
It is strictly forbidden to tamper with the inside of the
machine.
Space for use and maintenance
To ensure that the coffee machine works properly
and effi ciently, the following conditions are recom-
mended:
• Choose a level surface;
• Select a location that is suffi ciently well-lit, clean
and near an easily reachable socket;
• Allow for a minimum distance from the sides of the
machine as shown in the fi gure.
Storing the machine
If the machine is to remain out of use for a long time,
turn it off and unplug it. Store it in a dry place out of children’s reach. Keep it protected from dust and dirt.
Servicing / Maintenance
In case of failure, faults or a suspected fault after dropping, immediately remove the plug from the socket.
Never attempt to operate a faulty machine.
Servicing and repairs may only be carried out by
Authorized Service Centres.Repairs must only be
carried out by an Authorised Service Centre.
All liability for damages caused by works not carried
out in a professional manner is declined.
English
Page 10
10
SAFETY REGULATIONS - INSTALLATION
Fire safety
In case of fi re, use Carbon Dioxide extinguishers
(CO
). Do not use water or dry-powder extinguish-
2
ers.
Key to machine components
Coffee bean hopper
Coffee bean hopper cover
Grinder adjustment knob
Coffee dose adjustment knob
Main power button (ON/OFF)
Water tank cover
Water tank
Grounds drawer
Power cable
Drip tray + grill
Height-adjustable dispensing spout
Steam/hot water spout with pannarello
Front door
Steam knob
Coffee Brew Group
Cleaning brush
Control panel
Coffee dose per cup adjustment knob
Coffee button
Temperature ready / coffee function light
Steam function button
Steam temperature light
Alarm light
Machine on light
4 INSTALLATION
For your safety and other people's safety, carefully
follow the "Safety Regulations" in section 3.
4.1 Packaging
The original packaging has been designed and constructed to protect the machine during transport.
We recommend keeping the packaging material for
possible future transport.
4.2. Preliminary Operations
• Remove the drip tray (10) with grill from the packaging.
• Remove the coffee machine from the packaging
and position it in a proper place in compliance with
the requirements described in the safety regulations
(section 3).
• Insert the drip tray (10) into the appropriate seat.
Make sure that the drip tray, the coffee grounds
drawer (8) and the coffee brew unit (15) are
correctly placed and that the front door (13) is
closed.
• Fit the cover of the coffee bean hopper (2) onto the
coffee bean hopper (1). Keep the cleaning brush
(16) to hand.
• Before plugging in the machine, make sure that the
power button (5) is switched to -0-.
If the red light (22) fl ashes when the machine is turned
on, it means that one of the above mentioned parts is
not placed correctly.
Important Note: Carefully read the explana-
tion of all the warnings displayed by the
machine to the user by means of the lights on the
control panel (section 13).
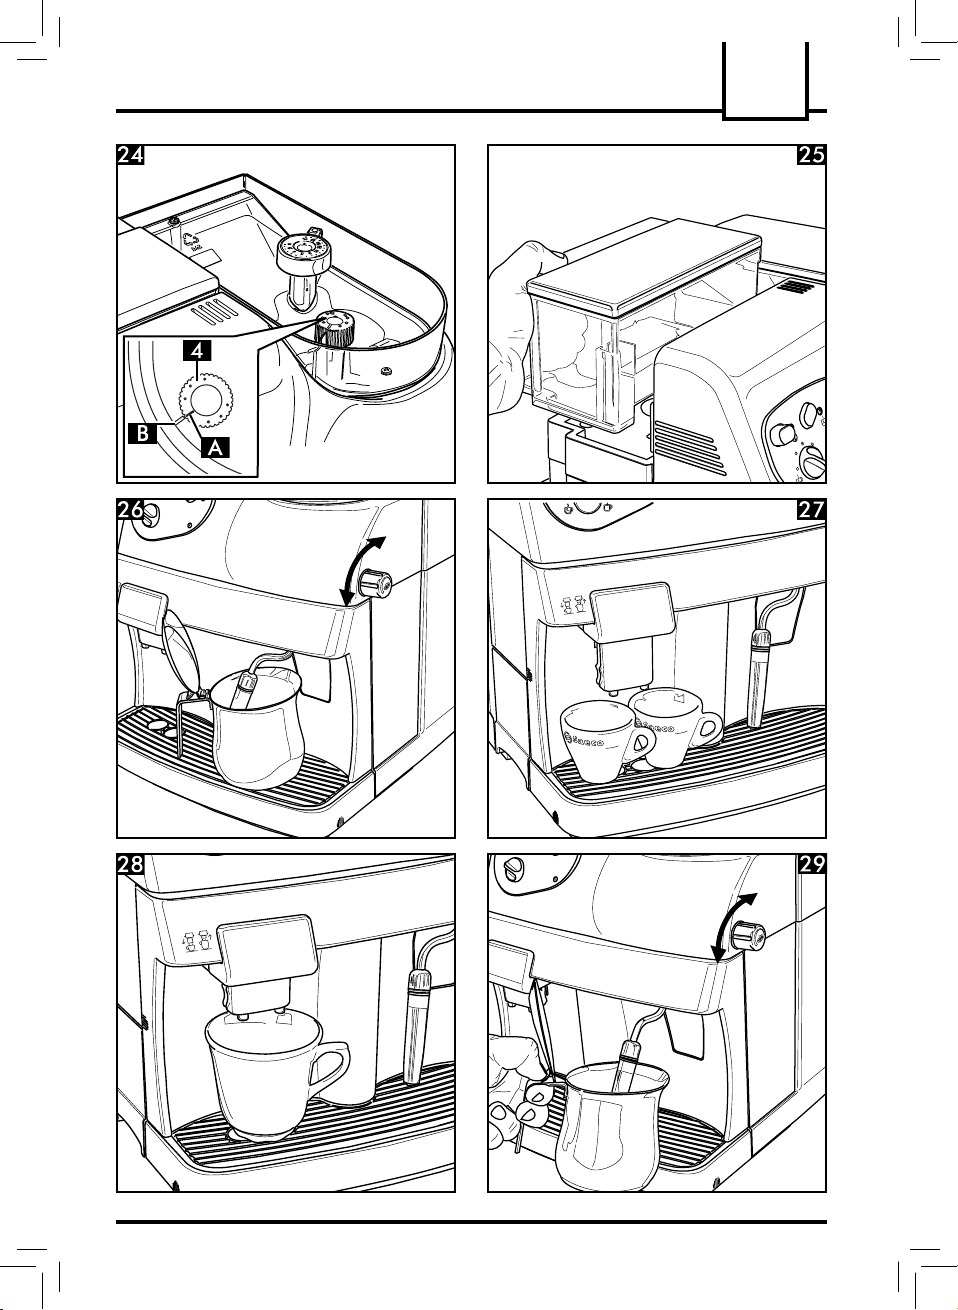
• (Fig.25) - Lift and extract the water tank (7) and
remove the cover (6). Rinse and fi ll it with fresh
water taking care not to overfi ll it. Reinsert the water
tank into the appropriate seat and replace the cover
(6) on top of it.
Always use only fresh, non-sparkling water
to fi ll the tank (7). Hot water or any other
liquid may damage the tank and/or the machine.
Page 11
INSTALLATION - COFFEE GRINDER
11
Do not turn on the machine without water: make
sure there is enough water in the tank.
• (Fig.24) - Remove the cover (2) and add the coffee
beans.
Always add only coffee beans in the coffee
bean hopper (1). Ground coffee, instant
coffee or any other object may damage the
machine.
• Replace the cover (2) on the coffee bean hopper (1).
• Insert the plug into a suitable socket.
4.3 Circuit Priming
In the beginning, after dispensing steam or when the
water tank is empty, the machine’s water circuit must
be primed.
• The power button (5) is switched to -0-. Press but-
ton (5) to turn on the machine. The light (23) on the
control panel will turn on.
• (Fig.26) - Place a container beneath the steam
wand (Pannarello)(12) to prime the circuit. Turn the
knob (14) counter-clockwise and wait until water
fl ows steadily out of the steam wand (Pannarello).
Turn the knob (14) clockwise to stop water dispensing.
• The circuit is now primed.
4.4 Using the machine for the
fi rst time or after a period of
inactivity
This simple operation ensures optimum brewing and
must be performed:
- At fi rst start-up;
- When the machine remains inactive for a long time
(more than 2 weeks).
Dispensed water must be emptied into an
adequate drain. It is not suitable for food
use. If the container fi lls up, stop dispensing water
during the cycle and empty it before resuming
the operation.
1 (Fig.25) - Make sure that the water tank (7) is fi lled
with drinking water; otherwise, empty the tank and
replace with fresh water.
2 Place a container beneath the steam wand
(Pannarello) (12) and turn the knob (14) counterclockwise.
3 After 30 seconds (or when the container is full)
stop dispensing water by turning the knob (14)
clockwise.
4 Wait about 60 seconds. Repeat the operations from
step 2 until emptying out the tank.
5 (Fig.25) - Once run out of water, fi ll the tank again
(7) and carry out a new cycle from step (2) as previously mentioned.
6 Once emptied the tank for the second time, fi ll it
again with water; the machine is now ready for
use.
Note: if required, prime the circuit.
• To brew coffee, dispense hot water or steam, and
for a proper use of the machine, carefully follow the
instructions provided.
5 COFFEE GRINDER
Caution! The grinder adjustment knob, inside
the coffee bean hopper, must be turned only
when the grinder is working. Do not pour ground and/
or instant coffee into the bean hopper.
Do not insert any material other than coffee
beans into the hopper. The grinder contains
moving parts that may be dangerous. Therefore,
do not insert fi ngers and/or other objects. Turn the
main power button to off and remove the plug from
the socket before carrying out any type of operation
inside the bean hopper. Do not pour coffee beans
when the grinder is working.
The quality and fl avour of coffee depend on the grind,
as well as on the blend used. The machine has a knob
(3) to adjust the coffee grind. Turn the knob when the
grinder is working to adjust the grind. The digits on
the knob indicate the grind.
English
Page 12

12
COFFEE BREWING - HOT WATER DISPENSING
The manufacturer confi gures each appliance on an
intermediate grind setting: if the grind is too fi ne, rotate
the knob to a higher setting; if the grind is too coarse,
turn the knob to a lower setting.
The variation in grind will only be seen when three/
four coffees have been brewed.
Note: If the value has been changed
excessively - by turning the knob to very
low settings - the "no coffee" alarm might be
activated. Press the coffee brew button again to
reactivate the machine and to complete the coffee
grinding cycle.
Use coffee bean blends for espresso machines. Try
not to use very high or very low grind settings (e.g.
1 - 16). Use different coffee blends for different settings. Keep coffee in a fresh place in a sealed, airtight
container.
The grind must only be regulated if coffee is not
brewed properly:
Too fast brewing = too coarse grind > Rotate the knob
to a lower setting;
Drip and/or absent brewing = too fi ne grind > Rotate
the knob to a higher setting.
6 COFFEE DOSE ADJUST-
MENT KNOB
(Fig. 24) - The desired coffee quantity (dose) to be
ground may be set in the machine.
The dose is set by the manufacturer to a medium value
that meets all tastes. Reference (A) in correspondence
with reference (B). By turning the knob (4) inside the
coffee bean hopper counterclockwise the quantity of
ground coffee is increased; by turning the knob clockwise the quantity of ground coffee is decreased.
The dose adjustment must be performed before pressing the coffee button.
This system allows an optimal brewing with any kind of
coffee on the market.
7 COFFEE BREWING
Note: If the machine does not brew coffee,
make sure that the water tank contains
enough water by verifying the water level on the
left side of the machine.
Before brewing coffee, make sure that
the green temperature ready light (19) is
permanently on and that the water tank and the
coffee hopper are full.
• (Fig. 27 - 28) - Place 1 or 2 cups beneath the
dispensing spout (11). You may adjust the height
of the dispensing spout to your cups.
• Adjust the desired quantity of coffee to be brewed
by means of the knob (17): by turning the knob
clockwise the quantity of coffee to be brewed is
increased; by turning the knob counterclockwise
the quantity of coffee to be brewed is decreased.
• Press the button (18) to brew coffee. The brewing
cycle starts: press the button (18) once to brew 1
coffee. Press it twice to brew 2 coffees.
In this operation mode, the machine grinds
and measures automatically the right quantity of coffee. Two coffees require two grinding and
brewing cycles that are automatically managed
by the machine.
• After the prebrewing cycle, coffee begins to come out
of the dispensing spout (11).
• On reaching the dose programmed with the knob
(17), the machine will automatically stop brewing. It is
nevertheless possible to interrupt coffee brewing by
pressing the button (18).
Page 13
STEAM EJECTION - CLEANING AND MAINTENANCE
13
8 HOT WATER DISPENS-
ING
Warning: at the beginning, short spurts of
hot water may come out: danger of scalding. The hot water spout may reach high temperatures: do not touch it with bare hands.
• Before dispensing hot water, make sure that the
green temperature ready light (19) is on.
When the machine is ready to brew coffee, proceed
as follows:
• Place a cup and/or a container beneath the hot
water/steam spout (12).
• (Fig. 29) - Open the knob (14) by turning it coun-
terclockwise.
• When the desired quantity of hot water has been
dispensed, turn the knob (14) clockwise to stop
dispensing. The machine returns to the normal
operating mode.
9 STEAM EJECTION /
PREPARING A CAPPUCCINO
Steam may be used to froth milk for cappuccino and
to heat beverages.
Danger of scalding! At the beginning, short
spurts of hot water may come out. The
steam spout may reach high temperatures: do
not touch it with bare hands.
• When the machine is ready to brew coffee, press
the button (20). The machine needs a heating
phase.
• Before steam ejection, wait until the green tempera-
ture ready light (21) is permanently on.
• (Fig. 26) - Place a container beneath the steam
spout (pannarello) (12) and open the “hot water/
steam” knob (14) for a few seconds so as to let
the remaining water come out of the steam spout
(pannarello). In a short time, only steam will come
out of the spout.
• Close the knob (14).
• Fill 1/3 of the container you wish to use to prepare
the cappuccino with cold milk.
English
Use cold milk and a cold cup for better
results when preparing a cappuccino.
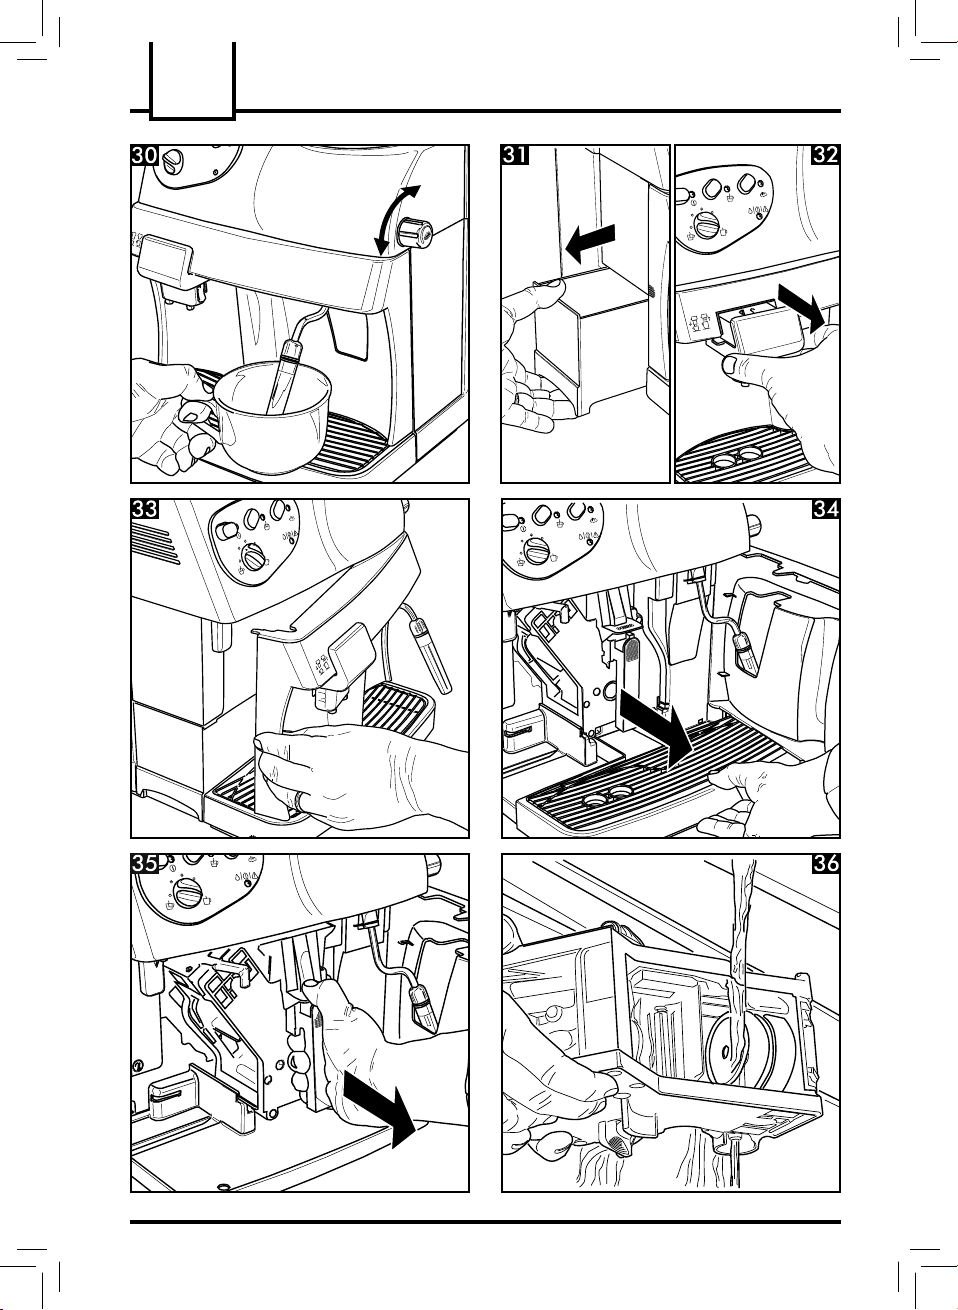
• (Fig. 30) - Immerse the steam spout (pannarello)
in the milk to be heated and open the knob (14).
Move the container gently up and down to level the
foam formation.
• After using the steam for the desired time, close
the knob (14).
• The same system may be used to heat other beverages.
After using the steam spout (pannarello), clean it
as described in the “Cleaning and Maintenance"
section.
9.1 Steam/coffee switchover
• Press the button (20) to brew coffee.
• During the switchover from steam to coffee brewing, the lights (19) and (21) fl ash simultaneously
showing the machine’s overtemperature. Coffee
may not be brewed.
• Discharge water to brew coffee. Place a container
beneath the steam spout (pannarello) (12). Turn
the steam knob (14) counterclockwise and wait
until only the green temperature ready light (19) is
permanently on. Then close the knob by turning it
clockwise.
Page 14
14
CLEANING AND MAINTENANCE - DESCALING
10 CLEANING AND MAIN-
TENANCE
General cleaning
• Maintenance and cleaning operations may only be
carried out when the machine has cooled down and
has been disconnected from the power supply.
• Do not immerse the machine in water or place any
of its parts in a dishwasher.
• Do not use sharp objects or harsh chemical products (solvents) for cleaning.
• Clean the pannarello after every use. Remove the
external part of the pannarello.
Wash the external part of the pannarello under
running water.
• For a thorough cleaning, remove the pannarello
from the steam spout.
Loosen the ring nut and remove the internal part
of the pannarello. After washing it thoroughly, reassemble it taking care to position it as shown in the
fi gure.
(Fig. 25) - Clean the water tank on a daily basis.
- Remove the fi lter in the water tank and wash it
under drinking running water.
- Reinsert the fi lter into its seat by gently pressing
and turning it.
- Fill the tank with fresh drinking water.
• Use a soft cloth moistened with water to clean the
appliance.
• Do not dry the machine and/or its components using
a microwave and/or conventional oven.
• (Fig.32) - Remove the dispensing spout by pulling
it outwards and wash it with lukewarm water. After
washing it, fi t it back in its seat by pushing it to its
limit stop.
• (Fig.31-34) - Clean the dispensing outlet.
We recommend emptying and cleaning (on a daily
basis):
- the grounds drawer (8)
- the drip tray (10)
10.1 Brew Group
• The Brew Group (15) must be cleaned every time
the coffee bean hopper is fi lled or at least once a
week.
• Turn off the machine by pressing the main power
button (5) to -0- and remove the plug from the
socket.
• (Fig.31-34) - Open the service door (13) and
remove the coffee grounds drawer (8), and then
remove the drip tray (12) as well.
• (Fig. 35) - Remove the Brew Group (15) by the
handle and press the «PRESS» key. The Brew
Group must be cleaned only with warm water and
no detergents.
• (Fig. 36) - Wash the Brew Group with lukewarm
water and carefully clean the upper fi lter.
• Thoroughly wash and dry all the parts of the Brew
Group.
• Thoroughly clean the dispensing outlet.
• Reinsert the Brew Group in the dispensing outlet
clicking it into place without pressing the “PRESS"
key.
Page 15
DESCALING - DISPOSAL
15
• Close the door, insert the grounds drawer and the
drip tray.
11 DESCALING
Limescale normally forms with the use of the appliance. Descaling is necessary every 1 - 2 months or if
you notice a reduction in water fl ow.
In case of confl ict, priority must be given to
what is indicated in the operation and maintenance manual over the instructions provided on
separately sold accessories and materials.
Use the Saeco descal-
ing product. Its formula
has been designed to ensure
better machine performance
and operation for its whole
operating life. If correctly
used, it also avoids alterations
in the brewed product.
Warning! Never drink the descaling solution
or any products dispensed until the cycle
has been carried out to the end. Never use vinegar
as a descaling solution.
Before descaling, remove the Pannarello from the
steam wand as described in the “Cleaning and Maintenance" section.
6 Repeat steps 2, 3 and 4 at intervals of 3 minutes,
until there is no descaling solution left in the water
tank.
7 Make sure the machine is on.
8 (Fig.25) -Rinse the water tank (7) and fi ll it with
fresh water.
9 (Fig.26) - Rinse the appliance circuits with fresh
water until the tank (7) is empty, by dispensing the
water through the steam wand (12) as described
in section 8 "HOT WATER DISPENSING".
10Repeat the rinse cycle (step 8 and 9) twice con-
secutively.
Only once reached this step, the descaling cycle is
complete.
Note: if required, prime the circuit (Section 4.3).
The descaling solution must be disposed of according to the manufacturer's instructions and/or
regulations in force in the country of use.
12 DISPOSAL
This product complies with EU Directive 2002/96/
EC.
English
1 Pour the entire content of the Saeco concentrated
descaling solution into the water tank (7), and then
fi ll the tank with fresh drinking water up to the MAX
level.
2 Turn on the machine at the main power button
(5).
3 (Fig.26) - Using the steam wand, (12) brew 2 cups
of descaling solution (approx. 150 ml each) as
described in section 8 "HOT WATER DISPENS-
ING".
4 Disconnect the machine at the main power button
(5).
5 Allow the descaling solution to take effect for about
15-20 minutes.
The symbol
aging indicates that this product may not be treated
as household waste. Instead it shall be handed over
to the applicable collection point for the recycling of
electrical and electronic equipment.
By ensuring this product is disposed of correctly, you
will help prevent potential negative consequences
for the environment and human health, which could
otherwise be caused by inappropriate waste handling
of this product. For more detailed information about
recycling of this product, please contact your local city
offi ce, your household waste disposal service or the
shop where you purchased the product.
on the product or on its pack-
Page 16
16
CONTROL PANEL LIGHTS
13 CONTROL PANEL LIGHTS
Warnings Causes Solutions
Green light (23) The machine is on.
Fixed green light (19) The machine has reached the right
temperature and is now ready:
- for coffee brewing;
- for hot water dispensing.
Flashing green light (19) The machine is warming up to
brew coffee and dispense hot
water.
Fixed green light (21) The machine has reached the
right temperature to eject steam.
Flashing green light (21) The machine is warming up to
eject steam.
Green light (19) and
green light (21)
are fl ashing simultaneously
Fixed red light (22) The water in the tank is
Flashing red light (22) The Brew Group, the grounds
Machine’s overtemperature:
coffee may not be brewed.
insuffi cient.
The coffee bean hopper is empty. Fill the hopper with coffee beans
drawer, the drip tray and the front
door are in a wrong position for
the machine’s operation.
Discharge water into the drip tray
by turning the steam knob (14)
until the green temperature ready
light (19) is permanently on and
green light (21) turns off.
Fill the tank with fresh drinking
water, prime the circuit and start
the procedure again.
and start the procedure again.
Make sure that all components
have been correctly inserted and
closed. The fi xed red light will
now turn off.
Page 17
PROBLEMS - CAUSES - SOLUTIONS
Problems Causes Solutions
The machine does not
turn on
Coffee is not hot enough The cups are cold. Warm the cups.
No hot water or steam is
dispensed
Coffee has little foam The coffee blend is unsuitable,
The machine takes a long
time to warm up or the
amount of water dispensed
from the spout is too little.
The Brew Group does not
come out.
Coffee is not brewed There is no water. Fill the water tank and prime the circuit
Coffee is brewed slowly The dose setting is high. Decrease the dose setting (section 6).
Coffee leaks out of the
dispensing spout
The machine is not connected to
the power supply.
The service door is open. Close the service door.
The hole of the steam spout is
clogged.
the coffee is not freshly roasted
or the grind is too coarse.
The machine’s circuit is obstructed by limescale.
The Brew Group is out of place. Turn on the machine. Close the service
The grounds drawer is inserted. Remove the grounds drawer before
The Brew Group is dirty. Clean the Brew Group (section 10.1).
The dose setting is high. Decrease the dose setting (section 6).
The circuit is not primed. Prime the circuit again (section 4.3).
The coffee is too fi ne. Change coffee blend or adjust the grind
The circuit is not primed. Prime the circuit again (section 4.3).
The Brew Group is dirty. Clean the Brew Group (section 10.1).
The dispensing spout is in a
wrong position.
The dispensing spout is clogged. Clean the dispensing spout and its
Connect the machine to the power
supply.
Clean the hole of the steam spout
using a pin.
Change coffee blend or adjust the grind
(section 5). Increase the dose (section 6).
Descale the machine.
door. The Brew Group is automatically
placed in the correct position.
removing the Brew Group.
again (section 4.3).
(section 5). Decrease the dose setting
(section 6).
Replace the dispensing spout in its
correct position.
holes.
17
English
Please contact an Authorized Service Centre for any faults not covered in the above table or when the
suggested solutions do not solve the problem.
Page 18
18
Page 19
19
IMPORTANT
Lors de l’utilisation d’appareils électriques, il est indispensable de
respecter toujours les précautions de sécurité principales, y compris les
suivantes :
1. Lire toutes les instructions.
2. Ne pas toucher de surfaces chaudes. Utiliser les poignées ou les boutons.
3. Afin d’éviter tout incendie, choc électrique et blessure, ne pas
plonger le cordon, la fiche ou l’appareil dans l’eau ou ni dans aucun
liquide.
4. Il est nécessaire de contrôler attentivement lorsque l’appareil est utilisé
par des enfants ou à leur proximité.
5. Débrancher de la prise de courant lorsque l’appareil n’est pas en service
et avant son nettoyage. Laisser refroidir l’appareil aussi bien avant de
retirer et de mettre en place ses accessoires qu’avant de le nettoyer.
6. Ne pas utiliser l’appareil avec un cordon ou une fiche détériorés, après
un mauvais fonctionnement de l’appareil ou son endommagement de
n’importe quelle manière. Renvoyer l’appareil au centre d’assistance
agréé le plus proche pour tout contrôle, réparation et réglage.
7. L’utilisation d’accessoires non recommandés par le constructeur de
l’appareil pourrait engendrer des incendies, des chocs électriques et
des blessures.
8. Ne pas utiliser à l’extérieur.
9. Ne pas laisser les cordons pendre des bords de la table ou du plan
de travail, ni toucher des surfaces chaudes.
10. Ne pas placer près du feu ou sur une cuisinière, électrique et à gaz,
ou dans un four chaud.
11. Toujours brancher le cordon d’alimentation à la machine d’abord et
ensuite à la prise de courant sur le mur. Pour débrancher, éteindre
toute commande en appuyant sur « OFF » et ensuite enlever la fiche
de la prise de courant sur le mur.
12. Ne pas utiliser l’appareil pour toute autre utilisation non prévue.
13. Conserver ces instructions.
Français
CONSERVER CES INSTRUCTIONS
Page 20
20
PRÉCAUTIONS
Machine réservé à un usage domestique. Tout entretien, en dehors du nettoyage
et de l’entretien usuel par l’usager, doit être fait par un service après-vente
autorisé. Ne pas plonger la base dans l’eau. Pour éviter les courts-circuits et
les décharges électriques, ne pas démonter la base. Elle ne contient aucune
pièce qui demande un entretien de la part de l’usager. Toute réparation doit
être effectuée par le personnel d’un service après-vente autorisé.
1. Vérifier si le voltage correspond bien aux spécifications apparaissant
sur la plaque signalétique.
2. Ne jamais mettre de l’eau tiède ou chaude dans le réservoir; mais
toujours de l’eau froide.
3. Ne pas toucher les surfaces chaudes de l’appareil pendant le
fonctionnement et en écarter le cordon électrique.
4. Ne pas utiliser d’alcool éthylique, de solvants, d’essences, de poudre
à récurer et/ou d’objets abrasifs pour le nettoyage de la machine
5. Utiliser de l’eau purifiée ou en bouteille ( faiblement minéralisée) pour
assurer le bon goût du café. Il sera toutefois nécessaire de procéder
au détartrage de votre machine tous les 2-3 mois.
6. Ne pas utiliser du café au caramel ou mélangé avec toute autre recette.
INSTRUCTIONS SUR LE CORDON ELECTRIQUE
A. Votre appareil est muni d’un cordon électrique court ou d’un cordon
d’alimentation détachable, afin d’éviter de trébucher ou de s’emmêler
avec un câble plus long.
B. Des cordons détachables plus longs ou bien des rallonges sont
disponibles et ne peuvent être utilisés que si l’on prend toutes les
précautions d’usage.
C. En cas d’utilisation d’un long cordon d‘alimentation détachable ou
d’une rallonge,
1. La tension électrique de fonctionnement marquée sur le cordon
d’alimentation détachable ou sur la rallonge doit être au moins égale à
celle de l’appareil.
2.
Si la fiche de l’appareil a une connexion de terre, la rallonge devrait être
une rallonge de terre à 3 fils et capable de supporter la puissance de
l'appareil. En cas de doute, demander conseil à votre distributeur.
3.
La rallonge ne devra pas encombrer le plan de travail ou le dessus de table,
afin d’éviter que les enfants la tirent ou trébuchent accidentellement.
Page 21

GÉNÉRALITÉS - DONNEES TECHNIQUES
21
1 GÉNÉRALITÉS
Cette machine à café est prévue pour la préparation
de café espresso à partir de café en grains; elle est
équipée avec un dispositif pour la distribution de vapeur et d’eau chaude. Au design élégant, cet appareil
a été conçu exclusivement pour un usage domestique
et n’est donc pas indiqué pour un fonctionnement
continu de type professionnel.
Attention. La société décline toute respon-
sabilité en cas de :
• emploi inapproprié et non conforme à l’usage
prévu ;
• réparations non effectuées dans des centres
d’assistance agréés ;
• altération du câble d’alimentation ;
• altération de tout composant de la machine ;
• emploi de pièces de rechange et d’accessoires
qui ne sont pas d’origine ;
Dans tous ces cas, la garantie cesse d’exister.
1.1 Pour faciliter la lecture
Le triangle d’avertissement indique toutes
les instructions importantes pour la sécurité
de l’utilisateur.
Respecter attentivement ces indications
pour éviter le risque de blessures graves !
(Fig.2) - Les chiffres et les lettres font référence à
des illustrations, des pièces de la machine et à des
éléments de commande, exemple, la référence à
l’illustration 2 de cette section.
Ce symbole met en évidence les informations importantes pour une meilleure utili-
sation de la machine.
1.2 Utiliser ces instructions pour
l’utilisation
Conserver ces instructions dans un lieu sûr. Les
joindre à la machine à café en cas de changement
d’utilisateur.
Pour plus d’informations ou en cas de problèmes non
résolus ou partiellement résolus dans les présentes
consignes, contacter les Centres d’Assistance
agréés.
2 DONNEES TECHNIQUES
• Tension nominale - Puissance nominale - Alimentation
Voir plaquette placée sur l’appareil
• Matériau du corps
Thermoplastique
• Dimensions (mm)
337 x 325 x 377
• Poids (kg)
8,5
• Longueur du câble (mm)
1200
• Bandeau de commande
Avant
• Réservoir à eau
1,7 (l) - Amovible
• Capacité du réservoir à café (g)
350 de café en grains
• Pression de la pompe (bar)
15
• Chaudière
Acier inox
• Dispositifs de sécurité
Soupape de sécurité pression chaudière ;
thermostat de sécurité.
Français
Sous réserve de modifi cations de construction et
d’exécution dues au progrès technologique.
Page 22

22
CONSIGNES DE SÉCURITÉ
O I L
mesures en millimètres
Page 23

CONSIGNES DE SÉCURITÉ
23
3 CONSIGNES DE SÉCURITÉ
Ne jamais mettre de pièces sous tension au
contact de l’eau : danger de court-circuit ! La
vapeur surchauffée et l’eau chaude peuvent provoquer des brûlures ! Ne jamais diriger le jet de
vapeur ou d’eau chaude vers des parties du corps,
toucher la buse vapeur/eau chaude en faisant très
attention : danger de brûlure !
Emploi prévu
Cette machine à café est destinée uniquement à un
usage domestique. Toute modifi cation technique de
la machine et toute utilisation impropre sont interdites
puisqu'elles engendrent des risques ! L’appareil ne
doit pas être utilisé par des personnes (y compris
les enfants) ayant de faibles capacités physiques,
mentales ou sensorielles, sans expérience et/ou aux
compétences insuffi santes, à moins qu'elles ne soient
sous la supervision d’une personne responsable de
leur sécurité ou formées par cette personne en ce qui
concerne l’utilisation de l’appareil.
Alimentation secteur
Ne brancher la machine à café que sur une prise de
courant appropriée. La tension doit correspondre à
celle indiquée sur la plaquette de l’appareil.
Câble d’alimentation
Ne jamais utiliser la machine à café, si le câble d’alimentation est défectueux. Si le câble d’alimentation
est abîmé, celui-ci doit être remplacé par le constructeur ou par son service clients.
Ne pas faire passer le câble d’alimentation sur des
arêtes ou des objets très chauds et le protéger contre
l’huile. Ne pas transporter ou tirer la machine par
le câble. Ne pas extraire la fi che en la tirant par le
câble. Ne pas la toucher avec les mains ou les pieds
mouillés. Éviter que le câble d’alimentation ne pende
librement des tables ou étagères.
Protection des personnes
S’assurer qu’aucun enfant n’a la possibilité de jouer
avec la machine à café. En effet, les enfants ne se
rendent pas compte des risques liés aux appareils
électroménagers.
Danger de brûlures
Ne pas diriger le jet d’eau chaude ou de vapeur
vers soi et/ou vers d’autres personnes : danger de
brûlure !
Utiliser toujours les poignées ou les boutons prévus
à cet effet.
Emplacement
Ranger la machine à café dans un endroit sûr pour
éviter tout risque de renversement ou de blessure.
Ne pas utiliser la machine à café en plein air.
Ne pas placer la machine sur des surfaces trop
chaudes ou à proximité d’une fl amme nue : le châssis
pourrait fondre ou s’abîmer.
Nettoyage
Avant de nettoyer la machine, il est indispensable de
placer l’interrupteur général (5) sur -0-. Ôter ensuite
la fi che de la prise de courant.
Attendre quelques instants pour que la machine se
refroidisse.
Ne jamais immerger la machine dans l’eau !
Il est sévèrement interdit d’essayer d’intervenir à
l’intérieur de la machine.
Espace pour l’utilisation et l’entretien
Pour un bon fonctionnement de la machine à café,
il convient de :
• choisir une surface d’appui plate et nivelée ;
• choisir un endroit assez bien éclairé, hygiénique et
avec une prise de courant facilement accessible.
• prévoir une distance min. des parois de la machine,
conformément à la fi gure
Rangement de la machine
Si la machine doit rester inutilisée pendant longtemps,
la mettre hors tension et ôter la fi che de la prise. La
conserver dans un lieu sec et non accessible aux enfants.
La protéger contre la poussière et les saletés.
Réparations / Entretien
En cas de dommages, de panne ou en cas de défaut
à la suite d’une chute, retirer immédiatement la prise
de courant. Ne jamais mettre en service une machine
Français
Page 24

24
CONSIGNES DE SÉCURITÉ - MISE EN PLACE
défectueuse.
Seuls les Centres d’Assistance Agréés peuvent effectuer des interventions et des réparations.
Les réparations ne doivent être effectuées que par un
Centre d’Assistance agréé.
Nous déclinons toute responsabilité en cas de dégâts
pour toute opération non effectuée dans les règles
de l’art.
En cas d’incendie
En cas d’incendie, utiliser des extincteurs à anhydride
carbonique (CO2). Ne pas utiliser d’eau ni d’extincteurs à poudre.
Les composants de la machine
Réservoir à café en grains
Couvercle du réservoir à café en grains
Bouton de réglage du degré de mouture
Bouton de réglage de la dose
Interrupteur général (ON/OFF)
Couvercle du réservoir à eau
Réservoir à eau
Tiroir à marc
Câble d’alimentation
Bac d’égouttement + grille
Distributeur de café réglable en hauteur
Buse de vapeur/eau chaude avec pannarello
Porte avant
Bouton de distribution de la vapeur
Groupe de distribution de café
Brosse pour le nettoyage
Bandeau de commande
Bouton de réglage de la quantité de café
dans la tasse
Bouton de distribution de café
DEL de température atteinte / fonction café
Bouton de sélection de la fonction vapeur
DEL température fonction vapeur
DEL de signalisation des alarmes
DEL machine allumée
4 MISE EN PLACE
Pour votre sécurité et celle des tiers, respecter
scrupuleusement les « Consignes de sécurité »
indiquées au chap. 3.
4.1 Emballage
L’emballage original a été conçu et réalisé pour
protéger la machine au cours de sa livraison.
Il est conseillé de le conserver pour tout éventuel
transport à venir.
4.2 Opérations préliminaires
• Retirer le bac d’égouttement (10) et sa grille de
l’emballage.
• Retirer la machine à café de son emballage.
Installer la machine dans un endroit approprié
satisfaisant les conditions requises décrites dans
les consignes de sécurité (chap.3).
• Insérer le bac d’égouttement (10) dans le logement
prévu à cet effet situé sur la machine ; s’assurer que
le bac, le tiroir à marc (8) et le groupe de distribution
du café (15) sont correctement insérés et que la
porte avant (13) est fermée.
• Positionner le couvercle du réservoir à café en
grains (2) sur le réservoir à café en grains (1).
Conserver la brosse pour le nettoyage (16) à portée
de main.
• Avant de brancher la fi che sur la prise de courant,
vérifi er que l’interrupteur général (5) est sur -0-.
Si lors de la mise en marche de la machine la DEL
rouge (22) clignote, cela signifi e que l’un des com-
posants décrits ci-dessus n’a pas été correctement
positionné.
Remarque importante : Il est important de
lire le contenu du chapitre 13 qui explique
en détail la signifi cation de toutes les signalisa-
tions que la machine fournit à l’utilisateur, par
l’intermédiaire de voyants positionnés sur le
bandeau de commande.
Page 25

MISE EN PLACE
25
• (Fig.25) - Retirer le réservoir à eau (7) en le sou-
levant et retirer ensuite le couvercle (6). Rincer
et remplir celui-ci avec de l’eau fraîche ; il est
recommandé de ne pas remplir le réservoir de
façon excessive. Réinsérer le réservoir dans son
logement et replacer le couvercle (6) au-dessus de
celui-ci.
Ne remplir le réservoir (7) qu’avec de l'eau
fraîche non pétillante. L’eau chaude, tout
comme les autres liquides, peut abîmer le réservoir et/ou la machine. Ne pas mettre la machine
en marche s’il n’y a pas d’eau : s’assurer que le
réservoir est suffi samment plein.
• (Fig.24) - Retirer le couvercle (2) verser le café en
grains.
Ne verser que du café en grains dans le
réservoir (1). Le café moulu, soluble ou
autre risquerait d’endommager la machine.
• Replacer le couvercle (2) sur le réservoir à café (1).
• Brancher la fi che sur une prise adaptée.
4.3 Amorçage du circuit
Au début, après avoir distribué de la vapeur ou après
avoir épuisé l'eau contenue dans le réservoir, le circuit
de la machine doit être réamorcé.
• La machine se présente avec l’interrupteur général
(5) sur -0- ; pour l'allumer il suffi t d’appuyer sur
l'interrupteur (5) : la DEL (23) du bandeau de commande s’allume.
• (Fig.26) - Pour amorcer le circuit, placer un bac
sous la buse de vapeur (Pannarello) (12) ; tourner
le bouton (14) dans le sens inverse des aiguilles
d’une montre et attendre que l’eau contenue dans
la buse de vapeur (Pannarello) s’écoule de façon
régulière ; pour interrompre la distribution d’eau,
tourner le bouton (14) dans le sens des aiguilles
d’une montre.
• Le circuit a été amorcé.
4.4 Première utilisation ou après
une période d'inactivité
Cette simple opération vous garantit une distribution
optimale et est à effectuer :
- lors du premier démarrage ;
- lorsque la machine reste inactive pendant une
longue période (pendant plus de 2 semaines).
L'eau distribuée doit être vidée dans une
vidange spéciale et ne peut plus être destinée à la consommation humaine. Si le récipient se
remplit, pendant le cycle, arrêter la distribution et
le vider avant de recommencer l'opération.
1 (Fig.25) - Veiller à ce que le réservoir à eau (7)
soit plein d'eau fraîche potable ; dans le cas contraire, vider l'eau résiduelle et remplir avec de l'eau
fraîche.
2 Placer un récipient sous la buse de vapeur
(Pannarello) (12) et tourner le sélecteur (14) dans
le sens inverse des aiguilles d’une montre.
3 Attendre 30 secondes environ ou jusqu'au remplis-
sage du réservoir et interrompre la distribution de
l'eau en tournant le bouton (14) dans le sens des
aiguilles d’une montre.
4 Attendre 60 secondes environ. Répéter les opéra-
tions en partant du point 2 jusqu'à vider complètement le réservoir.
5 (Fig.25) - Une fois l'eau terminée, remplir à nou-
veau le réservoir (7) et effectuer un nouveau cycle
à partir du point (2) comme indiqué plus haut.
6 Après le deuxième réservoir, le remplir à nouveau
avec de l'eau. La machine est prête à l'emploi.
Remarque : si nécessaire, effectuer l'amor-
çage du circuit.
• S’en tenir attentivement aux instructions suivantes
pour distribuer du café, de l’eau chaude ou de
la vapeur ainsi que pour utiliser correctement la
machine.
Français
Page 26

26
MOULIN À CAFÉ - RÉGLAGE DE LA DOSE DE CAFÉ
5 MOULIN À CAFÉ
Attention ! Tourner délicatement le bouton
de réglage du degré de mouture qui se
trouve à l’intérieur du réservoir à café seulement
lorsque le moulin à café est en fonction. Ne pas
introduire de café moulu et/ou soluble dans le
réservoir à café en grains.
Il est interdit d’y introduire une substance
autre que du café en grains. Le moulin à
café présente des éléments en mouvement qui
peuvent être dangereux ; il est interdit d’y introduire ses doigts et/ou d’autres objets. Désactiver
l’interrupteur général et ôter la fi che de la prise
de courant avant d’intervenir pour une raison
quelconque à l’intérieur du réservoir à café. Ne
pas verser de café en grains lorsque le moulin à
café est en marche.
La qualité et le goût du café dépendent du mélange
utilisé mais aussi du degré de mouture. La machine
est équipée d’un bouton (3) pour régler le degré de
mouture. Pour modifi er le degré de mouture, tourner le
bouton gradué lorsque le moulin à café est en marche
; les chiffres reportés sur le bouton indiquent le degré
de mouture. Chaque machine est réglée en usine sur
un degré de mouture moyen : si la mouture est trop
fi ne, tourner le bouton vers des valeurs plus hautes ;
si la mouture est au contraire trop grosse, tourner le
bouton vers des valeurs plus basses.
On ne remarque la variation du degré de mouture
qu’après avoir distribué trois ou quatre cafés.
mélanges de café. Conserver le café au frais, dans
un récipient fermé hermétiquement.
Régler le degré de mouture uniquement si le café
n’est pas distribué de façon optimale.
Distribution trop rapide = mouture trop grosse > tourner le bouton vers des valeurs plus basses ;
Distribution goutte à goutte et/ou inexistante = mouture trop fi ne > tourner le bouton vers des valeurs
plus hautes.
6 RÉGLAGE DE LA DOSE
DE CAFÉ
(Fig.24) - La machine permet de régler la quantité
de café (dose) que l’on souhaite moudre. La dose
est réglée par le fabricant sur une valeur moyenne
en mesure de satisfaire la plupart des exigences;
référence (A) en regard de la référence (B). En
tournant le bouton (4) situé à l’intérieur du réservoir à
café, dans le sens inverse des aiguilles d’une montre
on augmente la dose de café moulu ; en tournant
le bouton dans le sens des aiguilles d’une montre
on diminue la dose de café moulu. Le réglage de la
dose doit être effectué avant d’appuyer sur le bouton
de distribution de café. Ce système permet d’obtenir
une distribution optimale avec tous les types de café
que l’on trouve dans le commerce.
Remarque : au cas où la valeur serait
modifiée de façon excessive, en tournant le bouton vers un numéro trop bas, il est
possible que l'alarme d'absence café s'active.
Pour réactiver la machine et terminer le cycle de
mouture du café il suffi t d'appuyer à nouveau sur
la touche café.
Utiliser des mélanges de café en grains pour machines expresso. Éviter d’utiliser des degrés de mouture
extrêmes (Ex : 1 -16) ; dans ce cas, utiliser d’autres
Page 27

DISTRIBUTION DU CAFÉ - D’EAU CHAUDE
27
7 DISTRIBUTION DU
CAFÉ
Remarque : Si la machine ne distribue pas
de café, vérifi er si le réservoir d’eau est
rempli ; il est possible de contrôler le niveau d’eau
du réservoir sur le côté gauche de la machine.
Avant de distribuer le café, vérifi er que la
DEL verte de température atteinte (19) reste
fi xe, que le réservoir d’eau et que le réservoir à
café sont pleins.
• (Fig.27 - 28) - Placer une ou deux tasses sous les
buses du distributeur (11); ce dernier peut être réglé
en hauteur afi n qu’il s’adapte aux tasses.
• Régler la quantité de café souhaitée à l’aide du
bouton (17) : en le tournant dans le sens des
aiguilles d’une montre la quantité de café distribuée
augmente ; en le tournant dans le sens inverse des
aiguilles d’une montre la quantité de café distribuée
diminue.
• Pour distribuer le café il faut appuyer sur le bouton
(18), le cycle de distribution démarre ensuite :
pour distribuer 1 café appuyer une seule fois sur
le bouton (18) ; pour distribuer 2 cafés appuyer 2
fois de suite sur le bouton (18).
Dans cette modalité de fonctionnement,
la machine se charge automatiquement
de moudre et de doser la bonne quantité de café
; la préparation de deux cafés nécessite deux
cycles de mouture et deux cycles de distribution
automatiquement gérés par la machine.
8 DISTRIBUTION D’EAU
CHAUDE
Attention : il peut y avoir quelques écla-
boussures d’eau chaude au début : risque
de brûlures. La buse de l’eau chaude peut atteindre des températures élevées : éviter tout contact
direct avec les mains.
• Avant de distribuer l’eau chaude vérifi er que la
lumière verte de température atteinte (19) est
allumée.
Procéder comme suit lorsque la machine est prête à
distribuer du café :
• Placer une tasse et/ou un récipient sous la buse
eau chaude/vapeur (12).
• (Fig.29) - Tourner le bouton (14) dans le sens
inverse des aiguilles d’une montre.
• Prélever la quantité d’eau chaude désirée ; pour
interrompre la distribution d’eau chaude, tourner
le bouton (14) dans le sens des aiguilles d’une
montre. La machine se remet alors en mode de
fonctionnement normal.
Français
• Après avoir terminé le cycle de préinfusion, le
café commence à s’écouler depuis la buse de
distribution (11) ;
• La distribution de café s’arrêtera automatiquement lorsque le niveau fixé à l’aide du bouton
(17) sera atteint ; il est néanmoins possible
d’interrompre la distribution du café en appuyant
sur le bouton (18).
Page 28

28
DISTRIBUTION DE VAPEUR/PRÉPARATION DU CAPPUCCINO
9 DISTRIBUTION DE VA-
PEUR/PRÉPARATION DU
CAPPUCCINO
La vapeur peut être utilisée pour monter du lait pour le
cappuccino mais aussi pour réchauffer les boissons.
Danger de brûlure ! Au début de la distribu-
tion, il peut y avoir des éclaboussures d’eau
chaude. Le tuyau de distribution peut atteindre des
températures élevées : éviter tout contact direct
avec les mains.
• Lorsque la machine est prête à distribuer le café,
appuyer sur le bouton (20). La machine nécessite
un temps de préchauffage.
• Avant de distribuer la vapeur, attendre que la
lumière verte de température atteinte (21) reste
fi xe.
• (Fig.26) - Placer un bac sous la buse de vapeur
(pannarello) (12) ; ouvrir le bouton (14) « Eau
chaude/vapeur » pendant quelques secondes pour
laisser s’écouler l’eau résiduelle contenue dans la
buse de vapeur (pannarello). Quelques instants
après, seule la vapeur sera distribuée.
• Fermer le bouton (14).
• Remplir 1/3 du récipient servant à préparer le
cappuccino de lait froid.
9.1 Passage de vapeur à café
• Pour distribuer du café, appuyer sur le bouton
(20).
• Lors du passage de distribution de vapeur à distribution de café, les DELs (19) et (21) clignotent
simultanément, ce qui indique que la température
de la machine est trop élevée et que cette dernière
ne peut pas distribuer de café.
• Pour pouvoir distribuer le café il faut enlever de
l’eau. Placer un bac sous la buse de vapeur (pannarello) (12) et tourner le bouton vapeur (14) dans
le sens inverse des aiguilles d’une montre; attendre
jusqu’à ce la DEL de température atteinte (19) reste
fi xe. Enfi n, fermer le bouton en le tournant dans le
sens des aiguilles d’une montre.
Pour avoir un meilleur résultat lors de la
préparation du cappuccino, le lait et la
tasse utilisée doivent être froids.
• (Fig.30) - Plonger la buse de vapeur (pannarello)
dans le lait à chauffer et ouvrir le bouton (14) ; faire
tourner le récipient avec des mouvements lents du
bas vers le haut pour que la formation de mousse
soit uniforme.
• Après avoir terminé d’utiliser la vapeur, fermer le
bouton (14).
• Procéder de la même façon pour réchauffer d’autres
boissons.
Après avoir utilisé la buse de vapeur (pannarello),
nettoyer cette dernière comme décrit à la section
« Nettoyage et Entretien ».
Page 29

NETTOYAGE ET ENTRETIEN
29
10 NETTOYAGE ET ENTRE-
TIEN
Nettoyage général
• L’entretien et le nettoyage ne peuvent être effectués
que si la machine est froide et débranchée du
réseau électrique.
• Ne pas immerger la machine dans l’eau. Ne pas
laver les composants au lave-vaisselle.
• Ne pas utiliser d’objets pointus ou de produits
chimiques agressifs (solvants) pour le nettoyage.
• Nettoyer le pannarello après chaque utilisation ;
retirer la partie externe du pannarello.
Nettoyer la partie externe du pannarello avec de
l’eau courante.
• Pour un nettoyage plus en profondeur, extraire le
pannarello de la buse de vapeur.
Desserrer la bague et retirer la partie interne du
pannarello. Après l’avoir soigneusement nettoyée,
remonter la bague en prenant soin de l’insérer
conformément à la fi gure.
(Fig.25) - Il est conseillé de nettoyer quotidiennement
le réservoir à eau :
- Extraire le fi ltre situé à l’intérieur du réservoir et
le nettoyer avec de l’eau courante potable.
- Replacer le fi ltre dans son logement en exerçant
une légère pression et en effectuant une légère
rotation.
- Remplir le réservoir avec de l’eau fraîche potable.
• Pour le nettoyage de la machine, utiliser un chiffon
doux et propre, légèrement imbibé d’eau.
• Ne pas sécher la machine et/ou ses composants
dans un four à micro-ondes et/ou un four traditionnel.
• (Fig.32) - Enlever le groupe de distribution en le
tirant vers l'extérieur et le laver à l'eau tiède. Après
le nettoyage, remettre le groupe de distribution en
place en le poussant jusqu'à le butée.
• (Fig.31-34) - Nettoyer le logement de service. Nous
vous recommandons de nettoyer et de vider chaque
jour:
- le tiroir à marc (8)
- le bac d’égouttement (10)
10.1 Groupe de distribution
• Nettoyer le groupe de distribution (15) chaque fois
qu’il faut remplir le réservoir à café en grains et, en
tout cas, au moins une fois par semaine.
• Eteindre la machine en positionnant l’interrupteur
(5) sur -0- et ôter la fi che de la prise de courant.
• (Fig.31-34) - Ouvrir la porte de service (13) et
enlever le tiroir à marc (8) ; ensuite, enlever le bac
d'égouttement aussi (12).
• (Fig.35) - Enlever le groupe de distribution (15)
en le tenant par la poignée prévue à cet effet et
en appuyant sur la touche «PRESS». Ne laver
le groupe de distribution qu’à l’eau chaude, sans
détergent.
• (Fig.36) - Nettoyer le groupe de distribution avec
de l’eau tiède; nettoyer soigneusement le fi ltre
supérieur.
Français
Page 30

30
NETTOYAGE ET ENTRETIEN - DÉTARTRAGE
• Nettoyer et essuyer soigneusement tous les éléments du groupe de distribution.
• Nettoyer soigneusement le logement.
• Introduire à nouveau le groupe de distribution
dans le logement prévu à cet effet jusqu’à ce qu’il
soit bien enclenché sans appuyer sur la touche
« PRESS ».
• Fermer la porte, insérer le tiroir à marc et le bac
d’égouttement.
11 DÉTARTRAGE
La formation du calcaire est une conséquence naturelle entraînée par l’utilisation de l’appareil. Le cycle
de détartrage est nécessaire tous les 1 à 2 mois ou en
cas de réduction de la quantité d'eau débitée.
S’il y a du confl it, le contenu du mode d’em-
ploi et d’entretien est prioritaire par rapport
aux indications fi gurant sur les accessoires et/ou
sur les matériaux d’usage vendus séparément.
Utiliser le produit
détartrant Saeco. Ce
produit a été spécialement
conçu pour assurer, si utilisé
correctement, la meilleure
performance et fonctionnalité
de l'appareil pendant toute sa
vie opérationnelle et pour éviter toute altération du produit
distribué.
Attention ! Ne pas boire la solution détar-
trante et les produits distribués jusqu'à la
conclusion du cycle. Ne jamais utiliser de vinaigre
pour détartrer la machine.
2 Mettre en marche la machine au moyen de
l'interrupteur général (5).
3 (Fig.26) - Se servir de la buse de vapeur (12) pour
distribuer 2 tasses de solution détartrante (environ
150 ml chacune) comme indiqué au chapitre 8
« DISTRIBUTION D'EAU CHAUDE ».
4 Arrêter la machine au moyen de l'interrupteur
général (5).
5 Laisser agir le détartrant pendant 15-20 minutes.
6 Ensuite, répéter la procédure indiquée aux points
2, 3 et 4 toutes les 3 minutes, jusqu’à ce que la
solution dans le réservoir à eau soit terminée.
7 Veiller à ce que la machine soit allumée.
8 (Fig.25) - Rincer le réservoir (7) avec de l’eau
propre et le remplir complètement.
9 (Fig.26) - Rincer les circuits de l’appareil avec de
l’eau fraîche jusqu’à épuisement du contenu du
réservoir (7) au moyen de la buse de vapeur (12)
comme indiqué au chapitre 8 « DISTRIBUTION
D'EAU CHAUDE ».
10Répéter l'opération de rinçage (point 8 et 9) pendant
deux fois consécutives.
Uniquement à la fi n de cette procédure, le cycle de
détartrage est terminé.
Remarque : si nécessaire, effectuer l'amorçage du circuit (sect. 4.3).
La solution détartrante doit être éliminée conformément à ce qui est prévu par le producteur et/
ou par les normes en vigueur dans le Pays où la
machine est utilisée.
Avant de procéder au détartrage, extraire le Pannarello de la buse de vapeur comme décrit dans le
chapitre « Nettoyage et Entretien ».
1 Verser tout le contenu de la bouteille de détartrant
concentré Saeco dans le réservoir à eau (7) de
l'appareil et le remplir avec de l’eau fraîche potable
jusqu'au niveau MAX indiqué.
Page 31

DÉTARTRAGE - DÉMOLITION
12 DÉMOLITION
L’ appareil est en conçu et fabriqué pour faciliter sa
valorisation, son recyclage ou sa réutilisation conformément à la directive européenne 2002/96/CEE
relative aux appareils électriques et électroniques
usagés (waste electrical and electronic equipment
- WEEE).
31
Le logo
indique que ce produit ne peut pas être éliminé avec
les déchets ménagers non triés.
Lorsque vous aurez décidé de vous en séparer défi -
nitivement, il convient de faire procéder à la collecte
sélective de cet appareil en vous conformant au mode
de reprise mis en place dans votre commune (collecte
ponctuelle des encombrants, déchèterie), ou en faisant appel au service de reprise proposé par votre
distributeur, ou bien, en le confi ant à des organisations
caritatives et des associations à but non lucratif.
En vous assurant que ce produit est éliminé correctement, vous favorisez la prévention des conséquences négatives pour l’environnement et la santé
humaine.
ci-contre apposé sur l’appareil
Français
Page 32

32
VOYANTS DU BANDEAU DE COMMANDE
13 VOYANTS DU BANDEAU DE COMMANDE
Signalisations Causes Remèdes
Lumière verte (23) Machine activée
Lumière verte (19) fi xe Machine à la bonne température :
- pour la distribution du café ;
- pour la distribution d’eau
chaude
Lumière verte (19) clignotante Machine en phase de chauffage
pour la distribution de café et d’eau
chaude
Lumière verte (21) fi xe La machine a atteint la température
nécessaire pour la distribution de
la vapeur
Lumière verte (21) clignotante Machine en phase de chauffage
pour la distribution de vapeur
Lumière verte (19)
clignotante
Lumière verte (21)
clignotante simultanément
Lumière rouge (22) fi xe Quantité d’eau insuffi sante dans
Lumière rouge (22) clignotante Le groupe de distribution, le bac
La température de la machine est
trop élevée ; dans cette modalité
la machine ne peut pas distribuer
de café.
le réservoir.
Réservoir à café vide. Remplir le réservoir avec du café
d’égouttement, la porte avant
ne se trouvent pas dans la
position correcte, nécessaire au
fonctionnement de la machine.
Il est nécessaire de purger l’eau
dans le bac d’égouttement en
tournant le bouton Vapeur (14)
jusqu’à ce que la lumière verte
de température atteinte (19) reste
fi xe et que la lumière verte (21)
s’éteigne.
Remplir le réservoir avec de l’eau
froide potable, réamorcer le circuit
et recommencer la procédure
en grains et recommencer la
procédure.
Pour que la lumière rouge fixe
s’éteigne, il est nécessaire que tout
élément soit inséré ou bien serré
de façon correcte.
Page 33

PROBLÈMES - CAUSES - REMÈDES
33
Problèmes Causes Remèdes
La machine ne s'allume pas . La machine n’est pas branchée sur le
réseau électrique.
La porte de service est ouverte. Fermer la porte.
Le café n'est pas assez chaud. Les tasses sont froides. Chauffer les tasses.
La machine ne distribue ni eau chaude
ni vapeur.
Le café ne mousse pas Le mélange n’est pas approprié, le
La machine se chauffe lentement ou
bien très peu d’eau s’écoule du tuyau
Le groupe de distribution ne peut pas
être démonté.
Le café ne coule pas. Le réservoir à eau est vide. Remplir le réservoir à eau et réamorcer
Le café coule lentement. Dose excessive. Diminuer la dose (Sec.6).
Le café coule en dehors du distributeur.
Le trou de la buse de vapeur est
engorgé.
café torréfi é n’est pas frais ou bien il
est trop grossier.
Le circuit de la machine est engorgé
par du calcaire.
Groupe de distribution mal positionné. Allumer la machine. Fermer la porte
Tiroir à marc inséré. Extraire le tiroir à marc avant d’enlever
Le groupe est encrassé. Nettoyer le groupe de distribution
Dose excessive. Diminuer la dose (Sec.6).
Circuit non amorcé. Réamorcer le circuit (Sec.4.3).
Café trop fi n. Changer le mélange de café ou régler la
Circuit non amorcé Réamorcer le circuit (Sec. 4.3).
Le groupe de distribution est
encrassé.
Le distributeur est mal positionné. Remettre le distributeur dans sa posi-
Le distributeur est obturé. Nettoyer le distributeur et ses trous.
Brancher la machine sur le réseau
électrique.
Nettoyer le trou de la buse de vapeur
à l’aide d’une aiguille.
Changer le mélange de café ou régler
la mouture comme indiqué dans la
sec.5. Augmenter la dose sec. 5.
Détartrer la machine.
de service. Le groupe de distribution
retourne automatiquement à sa position d’origine.
le groupe de distribution.
le circuit (Sec.4.3).
(Sec.10.1).
mouture comme indiqué à la section 5.
Diminuer la dose (sec 6).
Nettoyer le groupe de distribution
(Sec.10.1).
tion correcte.
Français
Pour toute panne non détaillée dans le tableau ci-dessus ou en cas de solutions insuffi santes, s’adresser
à un centre d’assistance agréé.
Page 34

34
PRECAUCIONES
IMPORTANTES
Durante el uso de electrodomésticos, se aconseja tomar
algunas precauciones para evitar el riesgo de sacudidas
eléctricas o incendios.
1 Leer atentamente todas las instrucciones e infor-
maciones descritas en este manual y en cualquier
otro folleto que venga dentro del embalaje antes de
poner en marcha o utilizar la máquina espresso.
2 No tocar superficies calientes.
3 No sumergir el cable, los enchufes o el cuerpo de la
máquina en agua o en cualquier otro líquido para
evitar incendios, sacudidas eléctricas o accidentes.
4 Poner particular atención durante el uso de la
máquina espresso en presencia de niños.
5 Desenchufar la máquina cuando no se esté utilizan-
do o mientras que se está limpiando. Enfriarla antes
de introducir o quitar piezas y antes de empezar a
limpiarla.
6 No utilizar la máquina si el cable o el enchufe están
dañados o en caso de averías o roturas. Haga que
controlen o reparen el electrodoméstico en el centro
de asistencia más cercano.
7 El uso de accesorios no aconsejados por el fabricante
podrá causar daños a cosas y personas.
8 No utilizar la máquina espresso en espacios abiertos.
9 Evitar que el cable cuelgue de la mesa o que toque
superficies calientes.
10 Mantener la máquina espresso lejos de fuentes de calor.
11 Controlar que la máquina espresso esté en posición
“Apagado” antes de enchufarla. Para apagarla, ponerla
en “Apagado” y, a continuación, desenchufarla.
12 Utilizar la máquina únicamente para uso doméstico.
13 Extremar el cuidado durante la utilización de vapor.
CONSERVAR ESTAS
INSTRUCCIONES
ADVERTENCIA
La máquina espresso ha sido estudiada únicamente
para uso doméstico. Cualquier intervención de asistencia, excepto para las operaciones de limpieza y de
mantenimiento normal, deberá ser efectuada por un
centro de asistencia autorizado.
No sumergir la máquina en agua.
Cualquier reparación deberá ser efectuada únicamente
por el centro de asistencia autorizado.
1 Controlar que el voltaje indicado en la chapa
corresponda con el suyo.
2 Nunca utilice agua tibia o caliente para rellenar el
recipiente de agua. Utilice únicamente agua fría.
3 No toque con las manos las partes calientes de la
máquina ni el cable de alimentación durante el
funcionamiento.
4 Nunca limpie con detergentes agresivos o utensilios
que rayen. Es suficiente un paño suave humedecido
con agua.
5 Para evitar la formación de cal, se puede utilizar
agua mineral natural.
INSTRUCCIONES ACERCA
DEL CABLE ELÉCTRICO
A Se suministra un cable eléctrico corto para evitar
que se enrosque o que se enrede.
B También es posible utilizar extensiones pero se
aconceja utilizar con mucha atención.
C En caso de que se utilicen una extensión,verificar:
1 Que el voltaje anotado en la extensión sea por
lo menos igual al voltaje eléctrico del electrodoméstico.;
2 Que esté dotado de un enchufe de tres pin con
colocación a tierra (en caso de que el cable del
electrodoméstico sea de este tipo);
3 que el cable no cuelgue de la mesa para evitar
tropezar con él.
Page 35

INFORMACIÓN DE CARÁCTER GENERAL - DATOS TÉCNICOS
35
1 INFORMACIÓN DE CA-
RÁCTER GENERAL
La máquina de café es indicada para la preparación
de café exprés con empleo de café en granos y está
equipada con un dispositivo para el suministro de
vapor y de agua caliente. La elegante estructura de
la máquina ha sido diseñada para uso doméstico y no
está indicada para uso continuo de tipo profesional.
¡Atención! Se declina toda responsabilidad
por posibles daños en caso de:
• uso indebido y no conforme con el previsto;
• reparaciones realizadas en centros de asistencia no autorizados;
• alteración del cable de alimentación;
• alteración de cualquier pieza de la máquina;
• utilización de repuestos y accesorios no originales;
En dichos casos la garantía pierde su validez.
1.1 Para facilitar la lectura
El triángulo de advertencia señala todas las
instrucciones importantes para la seguridad
del usuario.
¡Observar atentamente dichas indicaciones
para evitar heridas graves!
(Fig. 2) - La referencia a las ilustraciones, las partes de
la máquina y los dispositivos de mando se indica con
números y letras como se muestra, por ejemplo, en la
referencia a la ilustración 2 del presente apartado.
Este símbolo señala las informaciones más
importantes para asegurar un mejor uso
de la máquina.
1.2 Cómo utilizar el manual de
instrucciones
Guardar estas instrucciones de uso en un lugar
seguro y adjuntarlas a la máquina de café en caso
de que otra persona vaya a utilizar la máquina.
Para más información o en caso de problemas no
mencionados o expuestos de manera incompleta
en estas instrucciones, contactar con los Centros de
Asistencia Autorizados.
2 DATOS TÉCNICOS
• Tensión nominal - Potencia nominal - Alimentación
Véase placa en el aparato
• Estructura exterior
Termoplástico
• Dimensiones (mm)
337 x 325 x 377
• Peso (Kg)
8,5
• Longitud cable (mm)
1200
• Panel de mandos
Frontal
• Depósito de agua
1,7 (l) - Extraíble
• Capacidad del contenedor de café (gr)
350 de café en grano
• Presión bomba (bar)
15
• Caldera
Acero inoxidable
• Dispositivos de seguridad
Válvula de seguridad presión caldera;
termostato de seguridad.
Español
Con reserva de modifi caciones de fabricación y
ejecución debidas al progreso tecnológico.
Page 36

36
NORMAS DE SEGURIDAD
O I L
medidas en milímetros
Page 37

NORMAS DE SEGURIDAD
3
NORMAS DE SEGURIDAD
No dejar nunca que las partes bajo tensión entren
en contacto con el agua: ¡Peligro de cortocircuito!
¡El vapor sobrecalentado y el agua caliente pueden
provocar quemaduras! No dirigir nunca el chorro
de vapor o del agua caliente hacia partes del cuerpo; manipular con cuidado la boquilla de salida de
vapor / agua caliente: ¡Riesgo de quemaduras!
Uso previsto
Esta máquina de café ha sido diseñada sólo para
uso doméstico. ¡Se prohíbe toda modifi cación técnica
y uso ilícito por los riesgos que éstos conllevan! El
aparato no está diseñado para que lo usen personas
(incluidos los niños) con reducidas capacidades
físicas, mentales o sensoriales o con experiencia y/o
competencias insufi cientes, a no ser que lo utilicen
bajo la supervisión de una persona responsable de
su seguridad o que ésta les enseñe a usarlo.
Alimentación de corriente eléctrica
Conectar la máquina de café sólo a una toma de
corriente adecuada. La tensión debe corresponder
al valor indicado en la placa del aparato.
Cable de alimentación
Nunca usar la máquina de café si el cable de alimentación es defectuoso. Si el cable de alimentación
está dañado, solicitar al fabricante o al servicio de
asistencia clientes la sustitución del mismo.
Procurar que el cable de alimentación no pase por
esquinas o cantos agudos ni por encima de objetos
muy calientes. Protegerlo del aceite.
No llevar ni tirar de la máquina agarrándola por el
cable. No desenchufar la máquina tirando del cable
ni tocar la toma con manos mojadas.
Procurar que el cable de alimentación no cuelgue
libremente de mesas o estanterías.
37
Riesgo de quemaduras
No dirigir contra sí mismo ni contra los demás el
chorro de vapor sobrecalentado o de agua caliente:.
¡Riesgo de quemaduras!
Usar siempre las empuñaduras o los mandos colocados para ello.
Colocación
Colocar la máquina de café en un lugar seguro, donde
nadie la puede volcar o quedar herido.
No usar la máquina de café en lugares abiertos.
No apoyar la máquina sobre superfi cies muy calien-
tes ni cerca de llamas abiertas a fi n de evitar que
su carrocería se derrita o que de cualquier manera
se dañe.
Español
Limpieza
Antes de proceder con la limpieza, es necesario
llevar el interruptor general (5) a la posición -0- y, a
continuación, desconectar la máquina de la toma de
corriente. Esperar a que la máquina se enfríe.
¡Nunca sumergir la máquina en el agua!
Queda prohibido tratar de intervenir en la estructura
interna de la máquina.
Espacio para el uso y el mantenimiento
Para un funcionamiento correcto de la máquina de
café se recomienda lo siguiente:
• Elegir una superfi cie de apoyo bien nivelada;
• Elegir un ambiente sufi cientemente iluminado e
higiénico. La toma de corriente debe ser de fácil
acceso.
• Calcular una distancia mínima de la máquina con
respecto a la pared como muestra la fi gura.
Conservación de la máquina
En caso de que no se vaya a usar la máquina durante
largos periodos de tiempo, deberá apagarse y desconectarse de la toma de corriente. Guardar la máquina en un
lugar seco y fuera del alcance de los niños. Proteger la
máquina del polvo y de la suciedad.
Protección de otras personas
Asegurarse de que ningún niño use la máquina de
café como un juego. Los niños no se dan cuenta de
los peligros relacionados con el uso indebido de un
electrodoméstico.
Reparaciones / Mantenimiento
En caso de averías, desperfectos o sospecha de desperfectos tras una caída, se recomienda desconectar
en seguida la máquina de la toma de corriente. Nunca
poner en funcionamiento una máquina que presente
Page 38

38
NORMAS DE SEGURIDAD - INSTALACIÓN
desperfectos.
Sólo los Centros de Asistencia Autorizados pueden
realizar intervenciones y reparaciones a la máquina.
Las reparaciones se efectúan únicamente en centros
de asistencia autorizados.
En caso de intervenciones mal hechas, se rechaza
toda responsabilidad por posibles daños.
Antiincendio
En caso de incendio usar extintores de anhídrido carbónico (CO
Componentes de la máquina
). No usar agua ni extintores de polvo.
2
Contenedor de café en grano
Tapa del contenedor de café en grano
Mando de regulación del grado de molido
Mando de regulación de la dosis
Interruptor general (ON/OFF)
Tapa del depósito de agua
Depósito de agua
Cajón de recogida de posos
Cable de alimentación
Bandeja de goteo + rejilla
Suministrador de café regulable en altura
Tubo de vapor/agua caliente con pannarello
Puerta delantera
Mando del suministro de vapor
Grupo suministrador de café
Cepillo de limpieza
4 INSTALACIÓN
Para su seguridad y la seguridad de terceras
personas observar atentamente las “Normas de
seguridad” descritas en el cap. 3.
4.1 Embalaje
El embalaje original ha sido diseñado y realizado para
proteger la máquina durante su transporte.
Se aconseja guardarlo para transportes futuros.
4.2 Operaciones previas
• Extraer del embalaje la bandeja de goteo (10) con
la rejilla.
• Extraer la máquina de café del embalaje y colocarla en un lugar adecuado según los requisitos
necesarios y descritos en las normas de seguridad
(cap.3).
• Introducir la bandeja de goteo (10) en el alojamiento
correspondiente en la máquina de café; asegurarse
de que la bandeja de goteo, el cajón de recogida
de posos (8) y el grupo suministrador de café (15)
se hayan introducido correctamente y de que se
haya cerrado la puerta delantera (13).
• Colocar la tapa del contenedor de café en grano
(2) en el contenedor de café en grano (1). Dejar a
mano el cepillo de limpieza (16).
• Antes de conectar la máquina a la toma de corriente
comprobar que el interruptor general (5) esté
posicionado en -0-.
Panel de mandos
Mando de regulación de la cantidad de café
en taza
Botón de suministro de café
Piloto luminoso de temperatura lista/ función
de café
Botón de selección función de vapor
Piloto luminoso de temperatura de la función
de vapor
Piloto luminoso señal de alarmas
Piloto luminoso máquina encendida
Si cuando se enciende la máquina el piloto luminoso
rojo (22) parpadea, indica que una de las partes arriba
mencionadas no se ha colocado correctamente.
Nota importante: es importante leer el Ca-
pítulo 13 donde se explica detalladamente
el signifi cado de todas las señales que la máquina
muestra al usuario mediante los pilotos luminosos
presentes en el panel de mandos.
• (Fig.25) - Extraer el depósito de agua (7) levan-
tándolo y quitar la tapa (6). Enjuagarlo y llenarlo
con agua fresca; se aconseja no llenar el depósito
Page 39

INSTALACIÓN
39
en exceso. Volver a introducir el depósito en su
alojamiento y colocar la tapa (6) encima.
Introducir siempre en el depósito (7) sólo
agua fresca sin gas. El agua caliente y otros
líquidos pueden dañar el depósito y la máquina.
No poner en funcionamiento la máquina sin
agua: asegurarse de que haya sufi ciente agua
en el depósito.
• (Fig.24) - Extraer la tapa (2) y echar el café en
grano.
Introducir siempre en el contenedor (1) sólo
café en grano. El café molido, el café soluble y otros objetos pueden dañar la máquina.
• Volver a colocar la tapa (2) sobre el contenedor de
café (1).
• Introducir el enchufe en una toma de corriente
adecuada.
4.3 Carga del circuito
Al principio, después de suministrar vapor o terminar
el agua en el depósito, se debe recargar el circuito
de la máquina.
• La máquina se entrega con el interruptor general
(5) en posición -0-; para encenderla, basta pulsar
el interruptor (5) y se encenderá el piloto luminoso
(23) del panel de mandos.
• (Fig.26) - Para cargar el circuito, colocar un reci-
piente debajo del tubo de vapor (Pannarello) (12);
girar el mando (14) en el sentido contrario a las
agujas del reloj y esperar hasta que salga agua del
tubo de vapor de forma regular (Pannarello); para
interrumpir el suministro de agua, girar el mando
(14) en el sentido de las agujas del reloj.
• Ahora el circuito está cargado.
4.4 Primer uso o después de un
período de inactividad
Esta simple operación asegura un suministro óptimo
y debe ser realizada:
- en la primera puesta en marcha;
- cuando la máquina permanece un largo período
sin usarse (más de 2 semanas).
Se debe vaciar el agua suministrada en un desagüe
apropiado y no se la puede utilizar para la alimentación. Si durante el ciclo el recipiente se llena,
detener el suministro y vaciarlo antes de reiniciar la
operación.
1 (Fig.25) - Asegurarse de que el depósito de agua
(7) esté lleno con agua potable fresca; de lo contrario vaciarlo y sustituir con agua fresca.
2 Colocar un recipiente debajo del tubo de vapor
(Pannarello) (12) y girar el mando (14) en el sentido
contrario a las agujas del reloj.
3 Esperar aproximadamente 30 segundos o hasta
que el recipiente esté lleno e interrumpir el suministro de agua girando el mando (14) en el sentido
de las agujas del reloj.
4 Esperar aproximadamente 60 segundos. Repetir
las operaciones desde el punto 2 hasta que el
depósito quede completamente vacío.
5 (Fig.25) - Una vez terminada el agua, llenar nue-
vamente el depósito (7) y efectuar un nuevo ciclo
partiendo desde el punto (2) como se ha efectuado
anteriormente.
6 Una vez terminado el segundo depósito, llenarlo
nuevamente con agua; ahora la máquina está lista
para el uso.
Nota: si es necesario proceder a la carga
del circuito.
• Para suministrar café, agua caliente o vapor y
utilizar correctamente la máquina, seguir atentamente las instrucciones que se describen a
continuación.
Español
Page 40

40
MOLINILLO DE CAFÉ - SUMINISTRO DE CAFÉ
5 MOLINILLO DE CAFÉ
¡Atención! El mando de regulación del grado
de molido, que se encuentra en el interior
del contenedor de café, se debe girar sólo cuando
el molinillo de café esté en funcionamiento. No
introducir café molido o soluble en el contenedor
de café en grano.
No se debe introducir ningún material que
no sea café en grano. El molinillo de café
contiene componentes en movimiento que pueden
ser peligrosos; no se deben introducir ni los dedos ni
otros objetos. Antes de manipular el interior del contenedor de café, sea por el motivo que sea, apagar
el interruptor general y desconectar el enchufe de la
toma de corriente. No echar café en grano cuando el
molinillo de café esté en funcionamiento.
La calidad y el sabor del café dependen, además de
la mezcla utilizada, del grado de molido. La máquina
está dotada de un mando (3) para la regulación del
grado de molido. Para cambiar el grado de molido,
girar el mando graduado cuando el molinillo de café
esté en funcionamiento; las cifras grabadas en el
mando indican el grado de molido.
Todos los aparatos se regulan en fábrica con un grado
de molido medio: si el molido resulta ser demasiado
fi no, girar el mando hacia valores más altos; si el
molido resulta ser demasiado grueso, girar el mando
hacia valores más bajos.
La variación del grado de molido se notará únicamente tras el suministro de tres o cuatro cafés.
Nota: si el valor se modifi ca de manera de-
masiado excesiva, girando el mando hacia
números demasiado bajos, puede que se active
la alarma de falta de café; para volver a activar la
máquina y completar el ciclo de molido de café
basta con volver a pulsar el botón café.
Utilizar mezclas de café en grano para máquinas
de café exprés. Evitar el uso de grados de molido
en posiciones extremas (ej.1 – 16); en estos casos,
utilizar mezclas de café diferentes. Conservar el
café en un lugar fresco, en un contenedor cerrado
herméticamente.
El molido se debe regular cuando el café no se
suministre de forma ideal:
Suministro demasiado rápido = molido demasiado grueso > Posicionar el mando en números más bajos;
Suministro a gotas o falta de suministro = molido
demasiado fi no > Posicionar el mando en números
más altos.
6 REGULACIÓN DOSIS
DE CAFÉ
(Fig.24) – En la máquina se puede regular la cantidad de café (dosis) que se desea moler. La dosis se
confi gura en fábrica con un valor medio que satisface
a la mayoría de los gustos; la referencia (A) debe
corresponder con la referencia (B). Girando el mando
(4), que se encuentra en el interior del contenedor de
café, en el sentido contrario a las agujas del reloj se
aumenta la dosis de café molido; en cambio, girándolo
en el sentido a las agujas del reloj se reduce la dosis
de café molido. La regulación de la dosis se debe
realizar antes de pulsar el botón de suministro de café.
Este sistema permite obtener un suministro óptimo
con todos los tipos de café del mercado.
7 SUMINISTRO DE CAFÉ
Nota: En el caso en que la máquina no
suministre café, comprobar que el depósito
de agua contenga agua observando el nivel de
agua del depósito presente en el lateral izquierdo
de la máquina.
Antes de suministrar café comprobar que el
piloto luminoso verde de temperatura lista
(19) permanezca fi jo y que el depósito de agua y
el contenedor de café estén llenos.
• (Fig.27 - 28) - Colocar 1 ó 2 tazas bajo las boquillas
del suministrador (11); es posible ajustar la altura
del suministrador para adaptarlo a las tazas utilizadas.
• Regular la cantidad de café que se desea verter
en la taza con el mando (17): para aumentar la
cantidad de café a suministrar, girarlo en el sentido
de las agujas del reloj; para reducirla, en cambio,
girar el mando en el sentido contrario a las agujas
Page 41

SUMINISTRO DE AGUA CALIENTE - PREPARACIÓN DEL CAPUCHINO
41
del reloj.
• Para suministrar café es necesario pulsar el
botón (18); posteriormente se activará el ciclo de
suministro: para suministrar 1 café pulsar el botón
(18) una sola vez; para suministrar 2 cafés pulsar
2 veces seguidas el botón (18).
En este modo de funcionamiento la má-
quina muele y dosifi ca automáticamente la
cantidad justa de café; la preparación de dos cafés
necesita dos ciclos de molido y dos de suministro
que controla automáticamente la máquina.
• Una vez finalizado el ciclo de preinfusión, el
café empezará a salir por la boquilla de salida
de café (11).
• El suministro de café se interrumpirá automáti-
camente cuando se alcance el nivel programado
con el mando (17); en cualquier momento se
podrá interrumpir el suministro de café pulsando
el botón (18).
8 SUMINISTRO DE AGUA
CALIENTE
¡Atención! Al empezar el suministro se
pueden producir pequeñas salpicaduras
de agua caliente: se corre el riesgo de sufrir quemaduras. El tubo de agua caliente puede alcanzar
temperaturas elevadas: no tocarlo directamente
con las manos.
• Antes de suministrar agua caliente comprobar que
el piloto luminoso verde de temperatura lista (19)
esté encendido.
Con la máquina lista para el suministro del café,
proceder de la siguiente forma:
• Colocar una taza o un recipiente bajo el tubo de
agua caliente/vapor (12).
• (Fig.29) - Girar el mando en el sentido contrario a
las agujas del reloj (14).
• Suministrar la cantidad de agua caliente deseada;
para interrumpir el suministro de agua caliente girar
el mando (14) en el sentido de las agujas del reloj.
La máquina vuelve a su funcionamiento normal.
9 SUMINISTRO DE VA-
POR / PREPARACIÓN
DEL CAPUCHINO
El vapor puede utilizarse para montar la leche del
capuchino o bien para calentar bebidas.
¡Riesgo de quemaduras! Al empezar el
suministro se pueden producir pequeñas
salpicaduras de agua caliente. El tubo de vapor
puede alcanzar temperaturas elevadas: no tocarlo
directamente con las manos.
• Cuando la máquina esté lista para suministrar café,
pulsar el botón (20). La máquina necesita una fase
de precalentamiento.
• Antes de suministrar vapor esperar a que el piloto
luminoso verde de temperatura lista (21) permanezca fi jo.
• (Fig.26) - Colocar un recipiente debajo del tubo de
vapor (pannarello) (12) y abrir el mando (14) “Agua
caliente/vapor” durante algunos segundos para
que salga el agua que se ha quedado en el tubo
de vapor (pannarello); en poco tiempo empezará
a salir sólo vapor.
• Cerrar el mando (14).
• Llenar con leche fría 1/3 del recipiente que desee
utilizar para preparar el capuchino.
Para obtener un mejor resultado en la
preparación del capuchino, la leche y la
taza utilizadas deben estar frías.
• (Fig.30) - Sumergir el tubo de vapor (pannarello)
en la leche que se desea calentar y girar el mando
(14); mover el recipiente lentamente con movimientos circulares de abajo para arriba para que
la formación de crema sea uniforme.
• Después de haber suministrado el vapor deseado
cerrar el mando (14).
• El mismo sistema puede ser utilizado para el
calentamiento de otras bebidas.
Después de haber usado el tubo de vapor (pannarello), lavarlo como se describe en el capítulo “Limpieza
y Mantenimiento”.
Español
Page 42

42
LIMPIEZA Y MANTENIMIENTO - DESCALCIFICACIÓN
9.1 Paso de vapor a café
• Para poder suministrar café es necesario pulsar el
botón (20).
• En el paso del suministro de vapor a suministro de
café, los pilotos luminosos (19) y (21) parpadean
contemporáneamente indicando que la temperatura de la máquina es elevada y que, por lo tanto, no
puede suministrar café.
• Para poder suministrar café es necesario descargar
el agua. Colocar un recipiente debajo del tubo de
vapor (pannarello) (12) y girar el mando del vapor
(14) en el sentido contrario a las agujas del reloj;
esperar hasta que permanezca encendido sólo el
piloto luminoso de temperatura lista (19) de forma
fi ja. Posteriormente, cerrar el mando en el sentido
de las agujas del reloj.
10 LIMPIEZA Y MANTENI-
MIENTO
Limpieza general
• El mantenimiento y la limpieza pueden ser realizados sólo cuando la máquina está fría y desconectada de la red eléctrica.
• No sumergir la máquina en el agua ni introducir sus
componentes en el lavavajillas.
• No usar objetos puntiagudos o productos químicos
agresivos (disolventes) para limpiar.
• Limpiar el pannarello cada vez que se utilice;
extraer la parte exterior del mismo.
• Para una limpieza más completa mejor desmontar
el pannarello del tubo de vapor.
Afl ojar la abrazadera y extraer la parte interior
del pannarello. Después de haberlo lavado con
cuidado, volverlo a montar como se muestra en la
fi gura.
(Fig.25) – Se aconseja limpiar diariamente el depósito
del agua:
- Extraer el fi ltro presente en el interior del depó-
sito y limpiarlo con agua corriente potable.
- Volver a colocar el filtro en su alojamiento
presionándolo y girándolo ligeramente.
- Volver a llenar el depósito con agua potable
fresca.
• Limpiar la máquina usando un paño humedecido
con agua.
• No secar la máquina ni sus componentes usando
un horno microondas o un horno convencional.
• (Fig.32) - Extraer la salida de café, tirando de ella
hacia el exterior y lavarla con agua tibia. Tras lavarla, volver a montarla en su alojamiento empujándola
hasta el tope.
• (Fig.31-34) - Limpiar la zona de servicio; se aconseja vaciar y limpiar cada día:
- el cajón de recogida de posos (8)
- la bandeja de goteo (10)
Lavar la parte exterior del pannarello con agua
corriente.
Page 43

LIMPIEZA Y MANTENIMIENTO - DESCALCIFICACIÓN
43
10.1 Grupo suministrador
• El grupo suministrador (15) se debe limpiar cada
vez que se llene el contenedor de café en grano
o, en cualquier caso, al menos una vez a la semana.
• Apagar la máquina pulsando el interruptor (5) en
la posición -0- y extraer el enchufe de la toma de
corriente.
• (Fig.31-34) - Abrir la puerta de servicio (13) y retirar
el cajón de recogida de posos (8); posteriormente
retirar también la bandeja de goteo (12).
• (Fig.35) - Extraer el grupo suministrador (15) sujetándolo por la empuñadura y pulsando el botón
«PRESS». El grupo suministrador sólo se puede
lavar con agua caliente sin detergente.
• (Fig.36) - Lavar el grupo suministrador con agua
tibia; lavar con cuidado el fi ltro superior.
• Lavar y secar con cuidado todas las partes del
grupo suministrador.
• Lavar el compartimento con cuidado.
• Volver a introducir correctamente el grupo suministrador en su compartimento sin pulsar el botón
“PRESS”.
• Cerrar la puerta e introducir el cajón de recogida
de posos y la bandeja de goteo.
11 DESCALCIFICACIÓN
La formación de cal se produce con el uso del aparato;
el ciclo de descalcifi cación debe efectuarse cada 1
ó 2 meses o cuando se observa una reducción del
volumen de agua.
En caso de confl icto, las instrucciones
presentes en el manual de uso y mantenimiento tienen prioridad respecto a las indicaciones relativas a accesorios y/o materiales de uso
vendidos por separado.
Utilizar el producto
descalcifi cante Saeco.
Ha sido formulado específicamente para mantener al
máximo el rendimiento y la
funcionalidad de la máquina
para toda su vida operativa, y también para evitar,
si se utiliza correctamente,
alteraciones de los productos
suministrados.
¡Atención! No beber la solución descalcifi -
cante ni los productos suministrados, hasta
completar el ciclo. No utilizar bajo ningún concepto vinagre como producto descalcifi cante.
Español
Antes de llevar a cabo el ciclo de descalcifi cación ex-
traer el Pannarello del tubo de vapor como se describe
en el capítulo “Limpieza y Mantenimiento”.
1 Verter todo el contenido de la botella de líquido
descalcifi cante concentrado Saeco en el depósito
de agua (7) del aparato y llenarlo con agua potable
fresca hasta el nivel MÁX.
2 Encender la máquina pulsando el interruptor gene-
ral (5).
3 (Fig.26) - A través del tubo de vapor (12) suministrar
2 tazas de solución descalcifi cante (aproximada-
mente 150 ml cada una) como se describe en el capítulo 8 "SUMINISTRO DE AGUA CALIENTE".
4 Apagar la máquina pulsando el interruptor ge-
neral (5).
Page 44

44
DESCALCIFICACIÓN - DESGUACE DEL APARATO
5 Dejar que el producto descalcifi cante actúe durante
15-20 minutos.
6 Repetir a continuación el procedimiento indicado
en los puntos 2, 3 y 4 cada 3 minutos, hasta que
la solución contenida en el depósito de agua se
agote completamente.
7 Asegurarse de que la máquina esté encendida.
8 (Fig.25) - Enjuagar el depósito (7) con agua limpia
y llenarlo completamente.
9 (Fig.26) - Realizar el enjuague de los circuitos del
aparato con agua fresca agotando el contenido
del depósito (7), a través del tubo de vapor (12)
como se describe en el capítulo 8 "SUMINISTRO
DE AGUA CALIENTE".
10Repetir la operación de enjuague (punto 8 y 9) dos
veces consecutivas.
Sólo entonces se ha terminado el ciclo de descalcifi cación.
Nota: si es necesario proceder a la carga
del circuito (Apart. 4.3)
La solución descalcificante se debe eliminar
según lo previsto por el fabricante y/o por las
normas vigentes en el país donde se usa.
12 DESGUACE DEL APARA-
TO
Este producto cumple con la Directiva EU 2002/96/
EC.
El simbolo
indica que este producto no se puede tratar como
desperdicios normales del hogar.
Este producto se debe entregar al punto de recolección de equipos eléctricos y electrónicos para
reciclaje.
Al asegurarse de que este producto se deseche
correctamente, usted ayudará a evitar posibles
consecuencias negativas para el ambiente y la
salud pública, lo cual podria acurrir si este producto
no se manipula de forma adecuada. Para abtener
información más detallada sobre el reciclaje de este
producto, póngase en contacto con la administración
de su ciudad, con su servicio de desechos del hogar
o con la tienda donde compró el producto.
en el producto o en su empaque
Page 45

PILOTOS LUMINOSOS DEL PANEL DE MANDOS
13 PILOTOS LUMINOSOS DEL PANEL DE MANDOS
Señales Causas Soluciones
Luz verde (23) Máquina encendida
Luz verde (19) fi ja Temperatura de la máquina lista:
- para suministrar café;
- para suministrar agua caliente.
Luz verde (19) intermitente Máquina en fase de calentamiento
para el suministro de café y el
suministro de agua caliente
Luz verde (21) fi ja La máquina tiene la temperatura
adecuada para comenzar el
suministro de vapor
Luz verde (21) intermitente Máquina en fase de calentamiento
para el suministro de vapor
Luz verde (19)
intermitente
Luz verde (21)
intermitente
contemporáneamente
Temperatura elevada de la
máquina; en está condición la
máquina no puede suministrar
café
Hay que descargar agua en la
bandeja de goteo girando el mando
del vapor (14) hasta que la luz
verde de temperatura lista (19)
permanezca fi ja y se apague la
luz verde (21).
45
Español
Luz roja (22) fi ja Cantidad de agua insufi ciente en
el depósito.
Contenedor de café vacío. Echar café en grano al contenedor y
Luz roja (22) intermitente Grupo suministrador, cajón de
recogida de posos, bandeja de
goteo, puerta delantera en posición
incorrecta para el funcionamiento
de la máquina.
Llenar el depósito con agua potable
fresca; cargar el circuito y volver a
iniciar el procedimiento.
volver a iniciar el procedimiento.
Para apagar la luz roja fija,
comprobar que cada componente
se haya introducido y cerrado
correctamente.
Page 46

46
PROBLEMAS - CAUSAS - SOLUCIONES
Problemas Causas Soluciones
La máquina no se enciende La máquina no está conectada a
la red eléctrica.
La puerta de servicio está abierta. Cerrar la puerta.
El café no está sufi cientemente caliente. Las tazas están frías. Calentar las tazas.
La máquina no suministra agua caliente
o vapor.
El café tiene poca crema La mezcla no es adecuada o la
La máquina necesita demasiado tiempo
para calentarse o la cantidad de agua
que sale del tubo es reducida.
El grupo suministrador no se puede
extraer,
No sale café Falta de agua. Llenar el depósito de agua y cargar el
El café sale lentamente Dosis elevada. Reducir la dosis (Apartado 6).
El café sale por fuera del suministrador Suministrador en posición
El orifi cio del tubo de vapor está
obstruido.
torrefacción del café no es recien-
te o bien el molido es demasiado
grueso.
El circuito de la máquina está
atascado por cal.
El grupo suministrador no está
correctamente colocado.
Cajón de recogida de posos
introducido.
Grupo suministrador sucio. Limpiar el grupo suministrador
Dosis elevada. Reducir la dosis (Apartado 6).
Circuito no cargado. Cargar el circuito (Apartado 4.3).
Café demasiado fi no. Cambiar el tipo de mezcla de café o
Circuito no cargado. Cargar el circuito (Apartado 4.3).
Grupo suministrador sucio. Limpiar el grupo suministrador
incorrecta
Conectar la máquina a la red
eléctrica.
Limpiar el orifi cio del tubo de vapor
con una aguja.
Cambiar tipo de mezcla de café o
regular el molido como se describe
en el apartado 5. Aumentar la dosis
como se indica en el apartado 6.
Descalcifi car la máquina.
Encender la máquina. Cerrar la puerta de servicio. El grupo suministrador
vuelve automáticamente a la posición
inicial.
Extraer el cajón de recogida de posos
antes de extraer el grupo suministrador.
circuito (Apartado 4.3).
(Apartado 10.1).
regular el molido como se describe
en el apartado 5. Reducir la dosis
como se indica en el apartado 6.
(Apartado 10.1).
Volver a colocar el suministrador
Suministrador obstruido Limpiar el suministrador y los orifi cios
de salida
Para las averías no mencionadas en la tabla o en caso de que las soluciones indicadas no funcionen,
llamar al teléfono de atención al cliente.
Page 47

47
Español
Page 48

48
PRECAUÇÕES IMPORTANTES
Quando se usam electrdomésticos é aconselhável tomar
algumas precauções para limitar o risco de incêndios,
choques eléctricos e/ou acidentes.
1 Ler atentamente todas a instruções e informações
apresentadas neste manual e em qualquer outro
folheto contido nas embalagens, antes de preparar
ou utilizar a máquina expresso.
2 Não tocar nas superfícies quentes.
3 Não mergulhar o fio, a ficha ou o corpo da máquina
em água ou outro líquido, para evitar incêndios,
choques eléctricos ou acidentes.
4 Ter particular cuidado ao utilizar a máquina expres-
so na presença de crianças.
5 Retirar a ficha da tomada quando a máquina não
estiver a ser utilizada, ou durante a sua limpeza.
Deixar a máquina arrefecer antes de inserir ou reti-
rar peças e antes de proceder à sua limpeza.
6 Não utilizar a máquina com o fio ou a ficha danifi-
cados, nem em caso de avarias ou roturas. Mandar
verificar ou reparar o aparelho no centro de assis-
tência mais próximo.
7 A utilização de acessórios não aconselhados pelo
fabricante pode provocar danos a coisas e pessoas.
8 Não utilizar a máquina expresso ao ar livre.
9 Evitar que o fio fique pendurado da mesa ou esteja
em contacto com superfícies quentes.
10 Manter a máquina expresso longe de fontes de calor.
11 Verificar se a máquina expresso está na posição
“Off” antes de inserir a ficha na tomada. Para a
desligar, colocá-la no “Off” e retirar depois a ficha
da tomada.
12 Utilizar a máquina unicamente para uso doméstico.
13 Ter muito cuidado durante a utilização do vapor.
GUARDAR AS PRESENTES
INSTRUÇÕES DE USO
CUIDADOS:
A máquina expresso foi concebida unicamente para uso
doméstico: Qualquer intervenção de assistência, com
excepção das operações de limpeza e de manutanção
normal deverá ser prestada por um centro de assistência
autorizado. Não mergulhar a máquina em água. Qualquer
reparação deverá ser efctuada unicamente por pessoal
do centro de assistência autorizado.
1 Verificar se a voltagem indicada na placa técnica
corresponde à sua.
2 Nunca utilizar água tépida ou quente para encher o
reservatório de água. Utilizar unicamente água fria.
3 Não tocar com as mãos nas partes quentes da má-
quina, nem no fio de alimentação durante o seu
funcionamento.
4 Nunca limpar com detergentes corrosivos, nem com
utensílios duros. É suficiente um pano macio humidecido com água.
5 Para evitar a formação de calcário, pode-se utilizar
água mineral natural.
INSTRUÇOS SOBRE O
CABO ELETRICO
A O cabo eletrico fornecido é curto para facilitar o uso
e para impedir que prenda-se em outros objetos.
B Podem ser utilizados prolongamentos mas prestan-
do muito cuidado.
C Se utilizar um prolongamento controlar:
1 que a voltagem do prolongamento seja igual à
do eletrodomestico.
2 que seja dotado de uma tomada com tres pin
com ponto de terra (seja o cabo do eletrodomestico deste tipo);
3 que o cabo não pendure da mesa para não
tropecar.
Page 49

GENERALIDADES - DADOS TÉCNICOS
49
1 GENERALIDADES
A máquina de café é indicada para a preparação de
café expresso, utilizando café em grãos e possui um
dispositivo para o fornecimento de vapor e de água
quente. O corpo da máquina apresenta um “design”
elegante projectado para um uso doméstico e não
é indicado para um funcionamento contínuo de tipo
profi ssional.
Atenção. Não assumimos qualquer responsabilidade para danos eventuais em caso
de:
• uso errado ou não conforme com as fi nalidades
previstas;
• consertos não realizados nos centros de assistência autorizados;
• alteração do cabo de alimentação;
• alteração de qualquer componente da máquina;
• uso de peças sobresselentes e acessórios não
originais.
Esses casos invalidarão a garantia.
1.1 Para facilitar a leitura
O triângulo de advertência indica todas as
instruções importantes para a segurança
do utilizador.
Siga escrupulosamente estas indicações
para evitar ferimentos graves!
(Fig.2) - A referência a ilustrações, partes da máquina
e órgãos de comando acontece através de números
e letras, como, por exemplo, a referência à ilustração
2 deste parágrafo.
Este símbolo evidencia as informações a
ter em vista, para uma melhor utilização da
máquina.
1.2 Utilização dessas instruções
de uso
Guarde estas instruções de uso em lugar seguro
e anexe-as à máquina de café se por acaso uma
outra pessoa precisar utilizá-la.
Para mais informações ou em caso de problemas
não tratados totalmente ou apenas insufi cientemente
nas presentes instruções, contacte os Centros de
Assistência Autorizados.
2 DADOS TÉCNICOS
• Tensão nominal - Potência nominal - Alimentação
Veja plaqueta posicionada no aparelho
• Material do corpo
Termoplástico
• Dimensões (mm)
337 x 325 x 377
• Peso (Kg)
8,5
• Comprimento do cabo (mm)
1200
• Painel de comando
Frontal
• Reservatório de água
1,7 (l) - Extraível
• Capacidade do recipiente de café (g)
350 de café em grãos
• Pressão da bomba (bares)
15
• Caldeira
Aço inox
• Dispositivos de segurança
Válvula de segurança de pressão da caldeira;
termóstato de segurança
Sob reserva de alterações de construção e realização devidas ao progresso tecnológico.
Português
Page 50

50
NORMAS DE SEGURANÇA
O I L
Medida en Milímetros
Page 51

NORMAS DE SEGURANÇA
51
3
NORMAS DE SEGURANÇA
Nunca ponha em contacto com água as partes
sob tensão: perigo de curto-circuito! O vapor
sobreaquecido e a água quente podem provocar
queimaduras! Nunca dirija o jacto de vapor ou a
água quente para as partes do corpo, toque com
cuidado no bico do vapor/água quente: perigo
de queimaduras!
Destino de uso
A máquina de café é indicada exclusivamente para
utilização doméstica. É proibido efectuar modifi cações
técnicas e qualquer utilização ilícita, devido aos riscos
que pode causar! O aparelho não se destina a ser utilizado por pessoas (incluindo crianças) com reduzidas
capacidades físicas, mentais ou sensoriais ou com
experiência e/ou competências insufi cientes, a não
ser que estejam sob a supervisão de uma pessoa responsável pela sua segurança ou que sejam ensinados
por essa mesma pessoa a utilizar o aparelho.
Alimentação de corrente
Ligue a máquina de café só numa tomada de corrente
apropriada.A tensão deve corresponder àquela indicada na plaqueta do aparelho.
Cabo de alimentação
Nunca use a máquina de café se o cabo de alimentação estiver defeituoso.
Se o cabo de alimentação estiver danifi cado, deverá
ser substituído pelo fabricante ou pelo seu serviço de
assistência aos clientes.
Não faça passar o cabo de alimentação por ângulos
e cantos vivos, acima de objectos muito quentes e
proteja-o contra o óleo.
Não carregue ou puxe a máquina de café segurando-a
pelo cabo. Não tire a fi cha puxando-a pelo cabo ou
toque nela com as mãos molhadas. Não deixe pender
o cabo de alimentação de mesas ou estantes.
Protecção de outras pessoas
Certifique-se de que nenhuma criança tenha a
possibilidade de brincar com a máquina de café. As
crianças não têm a noção do perigo ligado ao uso
dos electrodomésticos.
Perigo de queimaduras
Evite dirigir contra si mesmo e/ou outros o jacto de
vapor sobreaquecido e/ou água quente. Perigo de
queimaduras!
Utilize sempre as pegas ou os botões apropriados.
Colocação
Coloque a máquina de café em um lugar seguro,
onde ninguém possa virá-la ou ferir-se por causa da
própria máquina.
Não use a máquina de café em lugar aberto.
Não coloque a máquina acima de superfícies muito
quentes e perto de chamas vivas para evitar que a
carcaça funda ou de qualquer maneira se danifi que.
Limpeza
Antes de limpar a máquina, é indispensável posicionar
o interruptor geral (5) sobre -0- e desligar após a fi cha
da tomada de corrente.
Além disso, aguarde a máquina se arrefecer.
Nunca mergulhe a máquina na água!
É severamente proibido procurar intervir no interior
da máquina.
Espaço para o uso e a manutenção
Para um correcto e bom funcionamento da máquina
de café aconselha-se a:
• Escolher uma superfície de apoio bem nivelada;
• Escolher um ambiente sufi cientemente iluminado,
higiénico e com uma tomada de corrente facilmente
acessível;
• Prever uma distância mínima das paredes da
máquina como indicado na fi gura.
Custódia da máquina
Quando a máquina fi car inutilizada por um período
prolongado, desligue-a e tire a fi cha da tomada.
Guarde-a em um lugar seco e fora do alcance das
crianças. Proteja-a contra o pó e a sujeira.
Consertos / Manutenção
Em caso de avarias, defeitos ou suspeito de defeito
após uma queda, tire logo a fi cha da tomada. Nunca
ponha a funcionar uma máquina defeituosa.
Só os Centros de Assistência Autorizados poderão
Português
Page 52

52
NORMAS DE SEGURANÇA - INSTALAÇÃO
realizar intervenções e consertos. Os consertos devem ser realizados exclusivamente em um centro de
assistência autorizado. Em caso de intervenções não
realizadas correctamente, declina-se toda e qualquer
responsabilidade para danos eventuais.
Anti-incêndio
Em caso de incêndio utilize extintores de dióxido
de carbono (CO
de pó.
Legenda componentes da máquina
Recipiente de café em grãos
Tampa recipiente de café em grãos
Botão de ajuste da moagem
Botão de ajuste da dose
Interruptor geral (ON/OFF)
Tampa do reservatório de água
Reservatório de água
Gaveta de recolha das borras
Cabo de alimentação
Bandeja de limpeza + grade
Sistema de distribuição de café ajustável em
altura
Tubo de vapor/água quente com pannarello
Portinhola anterior
Botão de distribuição de vapor
Grupo de distribuição de café
Pincel de limpeza
Painel de comando
Botão de ajuste da quantidade de café na
chávena
Botão de distribuição de café
Indicador luminoso led de temperatura pronta
/ função café
Botão de selecção função vapor
Indicador luminoso led de temperatura
função vapor
Indicador luminoso led de sinalização
alarmes
Indicador luminoso led de máquina ligada
). Não utilize água ou extintores
2
4 INSTALAÇÃO
Para a sua segurança e a de terceiros, siga
escrupulosamente as "Normas de segurança"
indicadas no cap. 3.
4.1 Embalagem
A embalagem original foi projectada e realizada para
proteger a máquina durante a expedição.
Aconselha-se conservá-la para um eventual futuro
transporte.
4.2 Operações preliminares
• Retire da embalagem a bandeja de limpeza (10)
com grade.
• Retire da embalagem a máquina de café e
posicione-a em um lugar apropriado de acordo
com os requisitos pedidos e descritos nas normas
de segurança (cap.3).
• Introduza a bandeja de limpeza (10) na sede
apropriada na máquina; certifi que-se de que a
própria bandeja, a gaveta de recolha das borras
(8) e o grupo de distribuição de café (15) estejam
introduzidos correctamente e que a portinhola
dianteira (13) esteja encerrada.
• Posicione a tampa do recipiente de café em grãos
(2) no recipiente de café em grãos (1). Guarde ao
alcance da mão o pincel de limpeza (16).
• Antes de introduzir a fi cha na tomada de corrente
assegure-se de que o interruptor geral (5) esteja
sobre a posição -0-.
Se durante a ligação da máquina o indicador luminoso
led vermelho (22) piscar, signifi ca que uma das partes
acima descritas não foi posicionada correctamente.
Nota importante: É importante ler quanto
indicado no Capítulo 13, onde é explicado
pormenorizadamente o significado de todos
os avisos que a máquina mostra ao utilizador,
mediante as luzes posicionadas no painel de
comando.
Page 53

INSTALAÇÃO
53
• (Fig.25) - Retire o reservatório de água (7)
levantando-o e tire a tampa (6). Lave-o e encha-o
com água fresca; aconselha-se a não encher o
reservatório de maneira excessiva. Reintroduza
o reservatório na sede apropriada e reposicione a
tampa (6) sobre ele.
Deite no reservatório (7) sempre e só água
fresca sem gás. Água quente e outros
líquidos podem danifi car o reservatório e/ou a má-
quina. Não coloque a máquina em funcionamento
sem água: assegure-se de que há água sufi ciente
dentro do reservatório.
• (Fig.24) - Tire a tampa (2) e deite o café em
grãos.
Deite no recipiente (1) sempre e só café
em grãos. Café moído, solúvel, ou outros
produtos danifi cam a máquina.
• Reposicione a tampa (2) no recipiente de café (1).
• Introduza a fi cha numa tomada apropriada.
4.3 Carregamento do circuito
No início, depois de ter distribuído vapor ou após
a fi nalização da água no reservatório, o circuito da
máquina deve ser recarregado.
• A máquina encontra-se com o interruptor geral
(5) sobre a posição -0-; para ligá-la é sufi ciente
pressionar o botão (5); o indicador luminoso led
(23) do painel de comando iluminar-se-á.
• (Fig.26) - Para carregar o circuito, ponha um
recipiente debaixo do tubo de vapor (Pannarello)
(12); vire o botão (14) no sentido contrário ao dos
ponteiros do relógio e aguarde até sair água de
maneira regular pelo tubo de vapor (Pannarello);
para interromper a distribuição de água, vire o
botão (14) no sentido dos ponteiros do relógio.
• A este ponto o circuito é carregado.
4.4 Primeira utilização ou após
um período de inutilização
Esta simples operação assegura-lhe uma óptima
distribuição e deve ser realizada:
- na primeira utilização;
- quando a máquina permanecer inutilizada por
um longo período de tempo (por mais de 2 semanas).
A água distribuída deve ser esvaziada
em uma apropriada descarga e não pode
ser utilizada para a alimentação. Se o recipiente
se enche, durante o ciclo, pare a distribuição e
esvazie-o antes de recomeçar a operação.
1 (Fig.25) - Certifi que-se de que o reservatório de
água (7) esteja cheio de água fresca potável; no
caso contrário deite a água presente e substitua-a
por água fresca.
2 Introduza um recipiente debaixo do tubo de vapor
(Pannarello)(12) e vire o botão (14) no sentido
contrário ao dos ponteiros do relógio.
3 Aguarde cerca de 30 segundos ou o enchimento
do recipiente e interrompa a distribuição de água
ao virar o botão (14) no sentido dos ponteiros do
relógio.
4 Aguarde cerca de 60 segundos. Repita as opera-
ções desde o ponto 2 até o completo esvaziamento
do reservatório.
5 (Fig.25) - Depois de terminada a água, encha
novamente o reservatório (7) e realize um novo
ciclo partindo do ponto (2), conforme realizado
precedentemente.
6 Depois de terminado o segundo reservatório,
encha-o novamente com água; a este ponto a
máquina está pronta para o uso.
Obs.: se necessário proceda com o carre-
gamento do circuito.
• Para distribuir café, água quente ou vapor e utilizar
correctamente a máquina, siga atentamente as
instruções a seguir.
Português
Page 54

54
MOINHO DE CAFÉ - DISTRIBUIÇÃO DE CAFÉ
5 MOINHO DE CAFÉ
Atenção! O botão de ajuste da moagem, posi-
cionado dentro do recipiente de café, deverá
ser virado só quando o moinho de café estiver a
funcionar. Não introduza café moído e/ou solúvel
no recipiente de café em grãos.
É proibido introduzir qualquer material que
não seja café em grãos. O moinho de café
contém componentes em movimento que podem
ser perigosos; é proibido introduzir os dedos e/ou
outros objectos. Antes de trabalhar, por qualquer
motivo, no interior do recipiente de café, desligue
o interruptor geral e desligue a fi cha da tomada de
corrente. Não deite café em grãos quando o moinho
de café está a funcionar.
A qualidade e o gosto do café dependem, além da
mistura utilizada, também do grau de moagem. A
máquina está equipada com um botão (3) para o
ajuste do grau de moagem. Para variar o grau de
moagem vire o botão graduado quando o moinho de
café está a funcionar; os algarismos imprimidos no
botão indicam o grau de moagem.
Cada aparelho é programado, na fábrica, para um
grau de moagem médio: se a moagem for muito fi na
será necessário virar o botão para valores maiores;
se a moagem for muito grossa será necessário virar
o botão para valores menores.
A variação do grau de moagem notar-se-á só depois
da distribuição de três/quatro cafés.
Obs.: Se o valor for modifi cado de forma
demasiado excessiva, ao rodar a alavanca para números demasiado baixos, é possível
ocorrer o alarme de falta de café; para reactivar a
máquina e completar o ciclo de moagem do café é
sufi ciente pressionar de novo a tecla de café.
A moagem deve ser ajustada quando o café é distribuído de uma forma não óptima:
Distribuição demasiado rápida = moagem demasiado
grossa > Vire o botão para números menores;
Distribuição às pingas e/ou ausente = moagem demasiado fi na > Vire o botão para números maiores.
6 AJUSTE DA DOSE DE
CAFÉ
(Fig.24) - Na máquina é possível ajustar a quantidade
desejada de café (dose) a ser moído.
A dose é programada, pelo fabricante, sobre um valor
médio que satisfaz a maioria das exigências; referência (A) em correspondência da marca (B). Ao virar
o botão (4), posicionado no interior do recipiente de
café, no sentido anti-horário será aumentada a dose
de café moído; ao virar o botão no sentido horário
será diminuída a dose de café moído.
O ajuste da dose deve ser realizada antes de pressionar o botão de distribuição de café.
Este sistema permite obter uma distribuição óptima
com todos os tipos de cafés presentes à venda.
7 DISTRIBUIÇÃO DE
CAFÉ
Nota: Se a máquina não distribuir café,
certifique-se de que o reservatório de
água contenha água; no lado esquerdo da
máquina é possível verifi car o nível de água no
reservatório.
Antes de distribuir café certifi que-se de
que o indicador luminoso led verde de
temperatura pronta (19) esteja aceso e fi xo, que o
reservatório de água e o do café estejam cheios.
Utilize misturas de café em grãos para máquinas
expresso. Evite de utilizar grãos de moagem sobre
posições extremas (Es.1 – 16); nesses casos utilize
misturas de café diferentes. Guarde o café em lugar
fresco, num recipiente fechado hermeticamente.
• (Fig.27 - 28) - Posicione 1 ou 2 chávenas por baixo
dos bicos do grupo de distribuição (11); é possível
ajustar a altura do grupo de distribuição de maneira
a se adaptar às suas chávenas.
• Ajuste a quantidade de café desejado na chávena
mediante o botão (17): ao virá-lo no sentido horário será aumentada a quantidade de café a ser
distribuído; ao virá-lo no sentido anti-horário será
Page 55

DISTRIBUIÇÃO DE ÁGUA QUENTE - PREPARAÇÃO DO CAPPUCCINO
55
diminuída a quantidade de café a ser distribuído.
• Para distribuir o café será preciso pressionar o
botão (18), sucessivamente iniciará o ciclo de
distribuição: para distribuir 1 café pressione uma
vez o botão (18); para distribuir 2 cafés pressione
2 vezes o botão (18).
Nesta modalidade de funcionamento, a
máquina providenciará automaticamente
a moagem e a dosagem da quantidade certa de
café; a preparação de dois cafés precisa de dois
ciclos de moagem e dois ciclos de distribuição
geridos automaticamente pela máquina.
• Depois de concluído o ciclo de pré-infusão, o café
começará a sair do bico de distribuição (11).
• A distribuição de café parará automaticamente
quando for alcançado o nível programado com
o botão (17); de qualquer maneira é possível
interromper a distribuição de café pressionando o
botão (18).
8 DISTRIBUIÇÃO DE
ÁGUA QUENTE
Atenção: no começo podem verifi car-se
breves jactos de água quente: perigo de
queimaduras. O tubo de distribuição de água
quente pode alcançar temperaturas elevadas: não
toque nele directamente com as mãos.
• Antes de distribuir água quente certifi que-se de
que a luz verde de temperatura pronta (19) esteja
acesa.
Com a máquina pronta para distribuir café, prossiga
da maneira seguinte:
• Ponha uma chávena e/ou um recipiente por baixo
do tubo de água quente/vapor (12).
• (Fig.29) – Abra no sentido anti-horário o botão
(14).
• Distribua a quantidade desejada de água quente;
para parar a distribuição de água quente vire no
sentido horário o botão (14). A máquina voltará ao
funcionamento normal.
9
DISTRIBUIÇÃO DE VA-
POR / PREPARAÇÃO DO
CAPPUCCINO
O vapor pode ser utilizado para bater o leite para o
cappuccino, mas também para aquecer as bebidas.
Perigo de queimaduras! Durante o início
da distribuição podem-se verifi car breves
salpicos de água quente. O tubo de distribuição
pode alcançar temperaturas elevadas: não toque
nele directamente com as mãos.
• Com a máquina pronta para distribuir café, pressio-
ne o botão (20). A máquina necessita de um tempo
de pré-aquecimento.
• Antes de distribuir vapor aguarde a luz verde de
temperatura pronta (21) se acender de forma
fi xa.
• (Fig.26) - Introduza um recipiente por baixo do tubo
vapor (pannarello) (12); abra o botão (14) “Água
quente/vapor” por uns segundos, para fazer sair
a água restante do tubo vapor (pannarello); em
pouco tempo começará a sair apenas vapor.
• Feche o botão (14).
• Encha com leite frio 1/3 do recipiente desejado a
ser utilizado para preparar o cappuccino.
Para garantir um resultado melhor na preparação do cappuccino, o leite e a chávena
utilizada devem estar frios.
• (Fig.30) - Mergulhe o tubo vapor (pannarello) no
leite a ser aquecido e abra a torneira (14); rode
lentamente o recipiente e, ao mesmo tempo, mexao com movimentos verticais para tornar uniforme
a formação de espuma.
• Depois de utilizado o vapor para o tempo desejado,
feche o botão (14).
• É possível utilizar o mesmo sistema para aquecer
outras bebidas.
Depois de utilizado o tubo vapor (pannarello), lave-o
como descrito no capítulo “Limpeza e Manutenção”.
Português
Page 56

56
PREPARAÇÃO DO CAPPUCCINO - LIMPEZA E MANUTENÇÃO
9.1 Passar de vapor para café
• Para poder distribuir café é necessário pressionar
o botão (20).
• Durante a passagem da distribuição de vapor para
a distribuição de café, os indicadores luminosos led
(19) e (21) piscarão ao mesmo tempo, indicando
que a máquina está em sobreaquecimento e não
pode distribuir café.
• Para poder distribuir café, será necessário descarregar uma quantidade de água. Ponha um
recipiente por baixo do tubo vapor (pannarello) (12)
e vire o botão Vapor (14) no sentido anti-horário;
aguarde até o indicador luminoso led de temperatura pronta (19) estiver aceso e fi xo. Feche após
o botão virando-o no sentido horário.
10 LIMPEZA E MANUTEN-
ÇÃO
Limpeza geral
• A manutenção e a limpeza podem ser realizadas
só quando a máquina estiver fria e desligada da
rede eléctrica.
• Não mergulhe a máquina na água e não introduza
os componentes na máquina de lavar louça.
• Não utilize objectos pontiagudos ou produtos
químicos agressivos (solventes) para a limpeza.
• Limpe o pannarello depois de cada utilização; retire
a parte externa do pannarello
• Para uma limpeza mais cuidadosa desmonte o
pannarello do tubo vapor.
Afrouxe a virola e retire a parte interna do panna-
rello. Depois de lavado cuidadosamente, volte a
montá-lo cuidando de introduzi-lo como mostrado
na fi gura.
(Fig.25) – Aconselha-se a limpar quotidianamente o
reservatório de água:
- Retire o fi ltro posicionado no interior do reser-
vatório e limpe-o com água corrente potável.
- Reposicione o filtro no seu compartimento
pressionando levemente e, ao mesmo tempo,
realizando uma leve rotação.
- Encha o reservatório com água fresca potável.
• Para a limpeza do aparelho utilize um pano macio
humedecido com água.
• Não seque a máquina e/ou os seus componentes
utilizando um forno microondas e/ou um forno
convencional.
• (Fig.32) - Retire o distribuidor de café, puxando-o
para o exterior, e lave-o com água morna. Depois
da lavagem monte-o novamente no seu local
empurrando-o até ao fi nal.
• (Fig.31-34) - Limpe o compartimento de serviço;
aconselha-se, a cada dia, a esvaziar e limpar:
- a gaveta de recolha das borras (8)
- a bandeja de limpeza (10)
Lave a parte externa do pannarello com água
corrente.
Page 57

LIMPEZA E MANUTENÇÃO - DESCALCIFICAÇÃO
57
10.1 Grupo de distribuição
• O grupo de distribuição (15) deve ser limpo toda vez
que encher o recipiente de café em grãos ou, de
qualquer maneira, pelo menos uma vez por semana.
• Desligue a máquina pressionando o interruptor (5)
sobre a posição -0- e tire a fi cha da tomada de cor-
rente.
• (Fig.31-34) - Abra a portinhola de serviço
(13) e retire a gaveta de recolha das borras
(8); de seguida remova também a bandeja
de limpeza (12).
• (Fig.35) - Retire o grupo de distribuição (15) segurando-o com a pega apropriada e pressionando a
tecla «PRESS». Lave o grupo de distribuição só
com água quente sem detergente.
• (Fig.36) - Lave o grupo de distribuição com água
morna; lave com cuidado o fi ltro superior.
• Lave e seque cuidadosamente todas as partes do
grupo de distribuição.
• Limpe cuidadosamente o compartimento.
• Introduza de novo o grupo de distribuição no
compartimento apropriado até engatá-lo sem
pressionar a tecla “PRESS”.
• Feche após a portinhola, introduza a gaveta de
recolha das borras e a bandeja de limpeza.
11 DESCALCIFICAÇÃO
A formação de calcário é uma consequência natural
da utilização do aparelho; a descalcifi cação é neces-
sária a cada 1-2 meses ou quando se verifi ca uma
redução da capacidade de água.
O indicado no manual de uso e manutenção
tem prioridade com relação às indicações
descritas nos acessórios e/ou materiais de
uso vendidos separadamente, onde exista um
problema.
Utilize o produto des-
calcificante Saeco.
Ele foi concebido especificamente para manter da
melhor forma o desempenho
e o funcionamento da máquina durante toda a sua vida,
assim como para evitar, se
for utilizado correctamente,
qualquer alteração do produto
distribuído.
Atenção! Não beba a solução descalci-
fi cante e os produtos distribuídos até a
conclusão do ciclo. Nunca utilize, baixo nenhuma
circunstância, o vinagre como descalcifi cante.
Português
Antes de realizar a descalcifi cação remova o Pan-
narello do tubo vapor como descrito no capítulo
"Limpeza e Manutenção".
1 Deite todo o conteúdo da garrafa de descalcifi cante
concentrado Saeco no reservatório de água (7) do
aparelho e encha-o com água fresca potável até
alcançar o nível MÁX.
2 Ligue a máquina pressionando o interruptor geral (5).
3 (Fig.26) - Através do tubo de vapor (12) distribua 2
chávenas de solução descalcifi cante (aproximada-
mente 150 ml cada uma) como descrito no capítulo
8 "DISTRIBUIÇÃO DE ÁGUA QUENTE".
4 Desligue a máquina pressionando o interruptor
geral (5).
Page 58

58
DESCALCIFICAÇÃO - DESMANTELAMENTO
5 Deixe o descalcifi cante actuar por aproximadamen-
te 15-20 minutos.
6 Repita o procedimento indicado nos pontos 2, 3 e
4 a cada 3 minutos, até esgotar completamente a
solução contida no reservatório de água.
7 Certifi que-se que a máquina esteja ligada.
8 (Fig.25) - Enxagúe o reservatório (7) com água
limpa e encha-o completamente.
9 (Fig.26) - Realize o enxagúe dos circuitos do
aparelho com água fresca esgotando o conteúdo
do reservatório (7) através do tubo de vapor (12),
como descrito no capítulo 8 "DISTRIBUIÇÃO DE
ÁGUA QUENTE".
10Repita a operação de enxagúe (ponto 8 e 9) duas
vezes consecutivas.
Somente a este ponto o ciclo de descalcifi cação é
concluído.
Obs.: se necessário proceda com o carregamento do circuito (Par.4.3)
A solução descalcifi cante deverá ser eliminada de
acordo com o previsto pelo fabricante e/ou pelas
normas vigentes no país de utilização.
12 DESMANTELAMENTO
Este produto está conforme a directiva EU 2002/96/EC.
O simbolo impresso no produto ou na sua
embalagem indica que este produto não se pode tratar
como lixo doméstico normal.
Este produto deve ser entregue num ponto de recolha
de equipamentos eléctricos e electrónicos para reciclagem. Ao assegurar-se que este produto é eliminado
correctamente, estará a ajudar a evitar possiveis
consequências negativas para o ambiente e saúde
pública que resultariam se este produto não fosse manipulado de forma adquada. Para obter informações
mais detalhadas sobre a reciclagem deste produto,
por favor contacte o gabinete da câmara municipal da
sua cidade ou a loja onde comprou o produto.
Page 59

INDICADORES LUMINOSOS DO PAINEL DE COMANDO
59
13 INDICADORES LUMINOSOS DO PAINEL DE COMANDO
Sinalizações Causas Soluções
Luz verde (23) Máquina ligada
Luz verde (19) fi xa Máquina a temperatura pronta:
- para distribuir café;
- para distribuir água quente.
Luz verde (19) a piscar Máquina em fase de aquecimento
para a distribuição de café e água
quente.
Luz verde (21) fi xa Máquina em temperatura pronta
para a distribuição de vapor
Luz verde (21) a piscar Máquina em fase de aquecimento
para a distribuição de vapor
Luz verde (19)
a piscar
Luz verde (21)
a piscar ao mesmo tempo
Máquina em superaquecimento;
nesta modalidade a máquina não
pode distribuir o café.
É necessário descarregar água
na bandeja de limpeza virando o
botão Vapor (14) até a luz verde de
temperatura pronta (19) se tornar
fi xa e a luz verde (21) se apagar.
Português
Luz vermelha (22) fi xa Quantidade de água insufi ciente
no reservatório.
Recipiente de café vazio. Encha o recipiente com café
Luz vermelha (22) a piscar Grupo de distribuição, gaveta
de recolha das borras, bandeja
de limpeza, portinhola anterior
em posição incorrecta para o
funcionamento da máquina.
Encha o reservatório com água
fresca potável, carregue o circuito
e inicie novamente o processo.
em grãos e inicie novamente o
processo.
Para apagar a luz vermelha,
certifique-se de que todos os
componentes estejam introduzidos
ou fechados de maneira correcta.
Page 60

60
PROBLEMAS - CAUSAS - SOLUÇÕES
Problemas Causas Soluções
A máquina não se liga A máquina não está ligada à rede
eléctrica
A portinhola de serviço está aberta Feche a portinhola
O café não é bastante quente As chávenas estão frias Aqueça as chávenas
Não sai água quente ou vapor O furo do tubo vapor está entupido Limpe o furo do tubo vapor com um
O café tem pouca espuma A mistura não é apropriada ou o café
não é fresco de torrefacção ou é moído
demasiado grosso
A máquina precisa de muito tempo
para se aquecer ou a quantidade de
água a sair pelo tubo é limitada
O grupo de distribuição não pode
ser extraído
O café não sai Falta a água Encha o reservatório de água e recarregue
O café sai lentamente Dose alta Diminua a dose (Par.6)
O café sai fora do grupo de distribuição
O circuito da máquina está entupido
pelo calcário
Grupo de distribuição fora da posição Ligue a máquina. Feche a portinhola de
Gaveta de recolha das borras intro-
duzida
Grupo sujo Limpe o grupo de distribuição (Par. 10.1)
Dose alta Diminua a dose (Par.6)
Circuito não carregado Recarregue o circuito (Par. 4.3)
Café demasiado fi no Troque a mistura de café ou seleccione
Circuito não carregado Recarregue o circuito (Par. 4.3)
Grupo de distribuição sujo Limpe o grupo de distribuição (Par. 10.1)
Grupo de distribuição em posição
incorrecta
Grupo de distribuição entupido Limpe o grupo de distribuição e os seus
Ligue a máquina à rede eléctrica
alfi nete
Troque a mistura de café ou ajuste a
moagem como no par. 5 Aumente a
dose par. 6
Descalcifi que a máquina
serviço. O grupo de distribuição voltará
automaticamente para a posição inicial.
Retire a gaveta de recolha das borras
antes de tirar o grupo de distribuição
o circuito (Par. 4.3)
a moagem como no par. 5. Diminua a
dose par. 6
Coloque de novo em posição o grupo de
distribuição
furos de saída
Para as avarias não incluídas na tabela acima indicada ou problemas não resolvidos, contacte um
centro de assistência.
Page 61

61
Page 62

62
EC DECLARATION OF CONFORMITY
YEAR 09
EC 2006/95, EC 2004/108.
SAECO INTERNATIONAL GROUP S.P.A
Via Torretta, 240 - 40041 Gaggio Montano (Bo) - Italy
declare under our responsibility that the product :
AUTOMATIC COFFEE MAKER
SUP 018M
to which this declaration relates is in conformity with the
following standards or other normative documents :
• Safety of household and electrical appliances - General
requirements
EN 60335-1(2002) + A1(2004) + A2(2006) + A11(2004) +
A12(2006)+ A13(2008)
• Safety of household and electrical appliances - Part 2-15
Particular requirements for appliances for heating liquids
EN 60335-2-15(2002) + A1(2005) + A2 (2008).
• Household and similar electrical appliances - Electromagnetic
fi elds - methods for evaluation and measurement - EN 62233
(2008).
• Household and similar electrical appliances - safety Part 2-14 - Particular requirements for kitchen machines
EN 60335-2-14 (2006) + A1 (2008).
• Electromagnetic compatibility (EMC) - Requirements for household appliances , electric tools and similar apparatus - Part
1 - Emission EN 55014-1 (2006).
• Electromagnetic compatibility (EMC) - Part. 3^ Limits - Section
2 : Limits for harmonic current emissions (equipment input
current ≤ 16A for phase). EN 61000-3-2 (2006)
• Electromagnetic compatibility (EMC) - Part 3^ : Limits - Section
3 : Limitation of voltage changes , voltage fl uctuations and
fl icker in public low - voltage supply systems , for equipment
with rated current ≤ 16 A for phase and not subject to conditional connection
EN 61000-3-3 (1995)+ corr.(1997) +A1 (2001) + A2 (2005).
• Electromagnetic compatibility - Requirements for household
appliances , electric tools and similar apparatus - Part 2.
Immunity Product family standard - EN 55014-2 (1997) + A1 (2001)
following the provisions of the Directives:
EC 2006/95 , EC 2004/108.
DÉCLARATION CE DE CONFORMITÉ
AN 09
2006/95/CE, 2004/108/CE.
SAECO INTERNATIONAL GROUP S.P.A
Via Torretta, 240 - 40041 Gaggio Montano (Bo) - Italy
nous déclarons sous notre responsabilité que le produit :
MACHINE À CAFÉ AUTOMATIQUE
SUP 018M
auquel se réfère cette déclaration est conforme aux réglementations suivantes:
• Sécurité des appareils électrodomestiques et analogues Prescriptions générales
EN 60335-1 (2002) + A1(2004) + A2(2006) + A11(2004) +
A12 (2006) +A13 (2008).
• Sécurité des appareils électrodomestiques et analogues
Partie 2-15 - Règles particulières pour les appareils de
chauffage des liquides.
EN 60 335-2-15 (2002) + A1(2005) + A2 (2008) .
• Appareils électrodomestiques et analogues. Champs électromagnétiques. Méthodes d’évaluation et de mesure EN 62233
(2008).
• Sécurité des appareils électrodomestiques et analogues Partie 2-14 - Règles particulières pour pulvérisateurs et moulins
à café EN 60335-2-14 (2006) + A1 (2008).
• Limites et méthodes de mesure des perturbations radioélectriques produites par les appareils électrodomestiques
ou analogues comportant des moteurs ou des dispositifs
thermiques, par les outils électriques et par les appareils
électriques analogues -
EN 55014-1 (2006).
• Compatibilité électromagnétique (EMC) Partie 3, Limites Section 2 : Limites pour les émissions de courant harmonique
(courant appelé par les appareils ≤ 16 A par phase) -
EN 61000-3-2 (2006).
• Compatibilité électromagnétique (EMC) Partie 3, Limites
- Section 3 : Limitation des variations, des fluctuations
de tension et du papillotement dans les réseaux publics
d’alimentation basse tension ayant un courant assigné ≤ 16A
par phase et non soumis à un raccordement conditionnel.
EN 61000-3-3 (1995) + corr.(1997) + A1(2001) + A2 (2005).
• Exigences pour les appareils électrodomestiques, outillages
électriques et appareils analogues.
Norme de famille de produits - EN 55014-2 (1997) + A1 (2001).
Gaggio Montano
li, 28/04/2009
R & D Manager
Mr. Andrea Castellani
Selon les dispositions des directives:
EC 2006/95 , EC 2004/108.
Gaggio Montano
li, 28/04/2009
R & D Manager
M. Andrea Castellani
Page 63

63
DECLARACIÓN DE CONFORMIDAD CE
AÑO 09
2006/95/CE, 2004/108/CE.
SAECO INTERNATIONAL GROUP S.P.A
Via Torretta, 240 - 40041 Gaggio Montano (Bo) - Italy
declaramos bajo nuestra responsabilidad que el producto:
MÁQUINA DE CAFÉ AUTOMÁTICA
SUP 018M
al cual se refi ere esta declaración, cumple con las siguientes
normas:
• Seguridad de electrodomésticos y aparatos eléctricos - Requisitos generales
EN 60335-1 (2002) + A1(2004) + A2(2006) + A11(2004) +
A12 (2006) +A13 (2008).
• Seguridad de electrodomésticos y aparatos eléctricos Parte 2-15 Requisitos específicos para aparatos para
calentar líquidos
EN 60335-2-15 (2002) + A1 (2005) + A2 (2008) .
• Seguridad de aparatos para uso doméstico y análogos.
Campos electromagnéticos - Métodos de evaluación y
medición - EN 62233 (2008).
• Seguridad de electrodomésticos y aparatos eléctricos Parte 2-14 - Requisitos específi cos para pulverizadores y
molinillos de café EN 60335-2-14 (2006) + A1 (2008).
• Límites y métodos de medición de las interferencias de radio
características de aparatos con motor eléctrico y dispositivos
térmicos para uso doméstico y objetivos análogos, instrumentos eléctricos y equipos eléctricos análogos.
EN 55014-1 (2006).
• Compatibilidad electromagnética (EMC) Parte 3a Límites Sección 2: Límites para las emisiones de corriente armónica
(equipos con corriente de entrada ≤ 16A por fase) EN 61000-3-2 (2006).
• Compatibilidad electromagnética (EMC) Parte 3a Límites Sección 3:
Limitación de las fl uctuaciones y de los picos de tensión en los
sistemas de alimentación de baja tensión para equipos con
corriente nominal ≤ 16A.
EN 61000-3-3 (1995) + corr. (1997) + A1 (2001) + A2 (2005).
• Requisitos de inmunidad para electrodomésticos, instrumentos y equipos análogos.
Norma para familia de productos EN 55014-2 (1997) + A1 (2001).
de conformidad con las disposiciones de las directivas:
EC 2006/95 , EC 2004/108.
DECLARAÇÃO DE CONFORMIDADE CE
ANO 09
2006/95/CE, 2004/108/CE.
SAECO INTERNATIONAL GROUP S.P.A
Via Torretta, 240 - 40041 Gaggio Montano (Bo) - Italy
Declaramos sob a nossa responsabilidade que o produto:
MÁQUINA DE CAFÉ AUTOMÁTICA
SUP 018M
ao qual se refere esta declaração, está em conformidade
com as normas seguintes:
• Segurança de aparelhos electrodomésticos e análogos Requisitos gerais
EN 60335-1 (2002) + A1(2004) + A2(2006) + A11(2004) +
A12 (2006) +A13 (2008).
• Segurança de aparelhos electrodomésticos e análogos Parte 2-15 - Requisitos específi cos para equipamentos de
aquecimento de líquidos
EN 60 335-2-15 (2002) + A1(2005) + A2 (2008).
• Segurança de aparelhos domésticos e análogos. Campos
electromagnéticos.
Métodos de avaliação e medição - EN 62233 (2008).
• Segurança de aparelhos electrodomésticos e análogos Parte 2-14 - Requisitos específi cos para pulverizadores e
moinhos de café
EN 60335-2-14 (2006) + A1 (2008).
• Limites e métodos de medição das interferências rádio características de aparelhos com motor eléctrico e térmicos para
uso doméstico e utilizações análogas, instrumentos eléctricos
e aparelhagens eléctricas análogas - EN 55014-1 (2006).
• Compatibilidade electromagnética (CEM)
Parte 3 Limites - Secção 2 : Limites para emissões de corrente har-
mónica (corrente de entrada do equipamento até ≤ 16A por fase) EN 61000-3-2 (2006).
• Compatibilidade electromagnética (CEM)
Parte 3 Limites - Secção 3 : Limitação das fl utuações e dos
picos de tensão nos sistemas de alimentação de baixa tensão para equipamentos de corrente nominal até ≤ 16A. EN
61000-3-3 (1995) + corr.(1997) + A1 (2001) + A2 (2005).
• Requisitos de imunidade para electrodomésticos, instrumentos e aparelhos análogos.
Norma da família de produtos EN 55014-2 (1997) + A1 (2001).
segundo as disposições das directivas:
EC 2006/95 , EC 2004/108.
Gaggio Montano
li, 28/04/2009
R & D Manager
Ing. Andrea Castellani
Gaggio Montano
li, 28/04/2009
R & D Manager
Eng. Andrea Castellani
Page 64

Saeco
International Group S.p.A.
Via Torretta, 240
I-40041 Gaggio Montano, Bologna
Tel: + 39 0534 771111
Fax: + 39 0534 31025
www.saeco.com
The manufacturer reserves the right to change the features of the product without prior notice.
Le producteur se réserve le droit d“apporter toutes modifications sans préavis.
El fabricante se reserva el derecho de modificar el producto sin aviso previo.
O fabricante reser va-se o direito de efectuar qualquer alteração sem aviso prévio.
© Saeco International Group S.p. A.
Type SUP018M Cod.15002708 Rev.00 del 15-10-10
 Loading...