

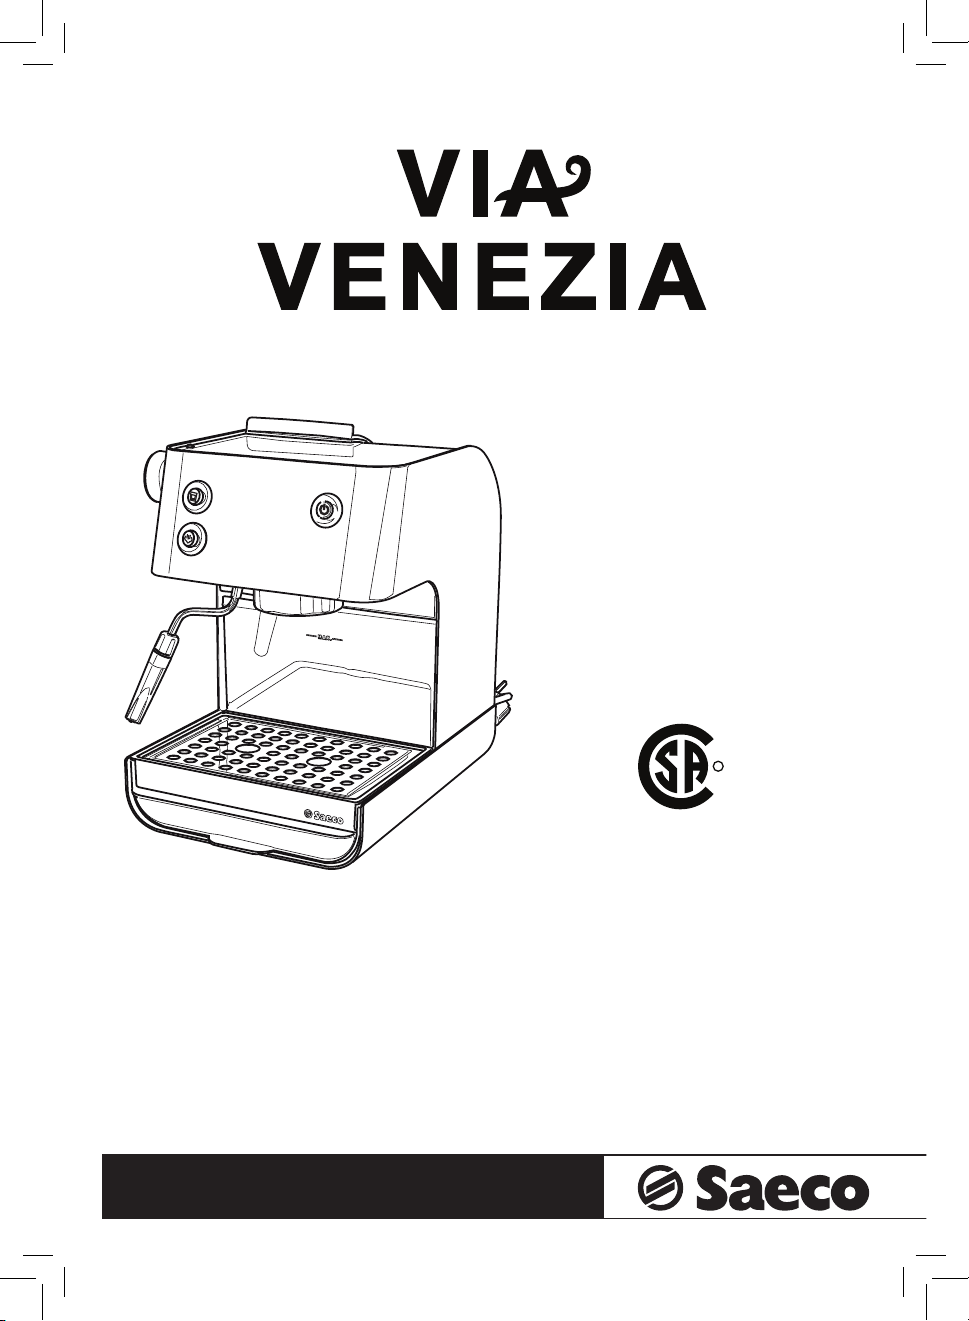
Page 1
OPERATING INSTRUCTIONS
MODE D’EMPLOI
INSTRUCCIONES PARA EL USO
READ THESE OPERATING INSTRUCTIONS CAREFULLY BEFORE USING THE MACHINE.
LIRE ATTENTIVEMENT CES INSTRUCTIONS AVANT D’UTILISER LA MACHINE.
LÉANSE ATENTAMENTE LAS SIGUIENTES INSTRUCCIONES DE USO ANTES DE UTILIZAR LA MÁQUINA.
Ideas with Passion
C
U
S
R
FOR HOUSEHOLD USE ONLY
USAGE DOMESTIQUE SEULEMENT
Page 2

ENGLISH
• 2 •
IMPORTANT SAFEGUARDS
When using electrical appliances, basic safety precautions should always be followed to
reduce the risk of fire, electric shock, and/or injury to persons, including the following:
1. Read all instructions and information in this instruction book and any other literature
included in the carton referring to this product before operating or using this
appliance.
2. Do not touch hot surfaces (i.e. steam wand, portafilter). Use handles or knobs.
3. To protect against fire, electric shock and personal inury, do not place cord, plugs or
appliance in water or other liquid.
4. This appliance must be kept out of the reach of children.
5. Unplug from outlet when not in use and before cleaning.
6. Allow to cool before putting on or taking off parts, and before cleaning the appliance.
7. Do not remove the portafilter during brewing cycles as there is a danger of burns.
8. The use of accessory attachments not recommended by the appliance manufacturer
may result in fire, electric shock, or personal injury.
9. Do not use outdoors.
10. Do not let cord hang over edge of table or counter, or touch hot surfaces.
11. Do not place on or near a hot gas or electric burner, or in a heated oven.
12. This machine was designed to process normal household quantities only. Not suitable
for continuous operation or commercial use.
13. Do not operate any appliance with a damaged cord or plug, if the appliance malfunctions,
or has been damaged in any manner. Return appliance to an authorized service facility
for examination, repair, or adjustment.
14. Do not use if the water tank is not filled.
15. Always use cold water. Warm water or other liquids could cause damage to the
appliance.
16. When plugging in the machine, always turn appliance “OFF”, attach power cord to the
machine first, then plug cord into wall outlet. To disconnect, always turn appliance
“OFF”, then remove plug from wall outlet.
17. Use extreme caution when using hot steam.
18. Do not use appliance for other than intended use.
SAVE THESE INSTRUCTIONS
Page 3

ENGLISH
• 3 •
ENGLISH
SHORT CORD INSTRUCTION
A short power supply cord is provided to reduce the risk of tripping over or becoming
entangled with a longer cord.
The cord should be accessible after installation of the machine in order to disconnect it at
any moment if necessary.
Longer extension cords are available at retailers authorized to sell electrical accessories, and
may be utilized if care is exercised in their use. If an extension cord is used:
• The marked electrical rating of the extension cord should be at least as great as the
electrical rating of the appliance.
• If the appliance plug is grounded, the extension cord should be a 3-wire grounded
extension cord.
• The longer cord should be arranged so that it will not drape over the countertop or
tabletop, where it may be pulled on by children or accidentally tripped over.
Page 4
ENGLISH
• 4 •
4 51 2 3
6 7 8 9 10
11
12
13
16
17
15
14
19
18
Fig.A
20 cm
8 in
20 cm
8 in
20 cm
8 in
40 cm
16 in
Page 5
ENGLISH
• 5 •
Fig.1 Fig.2 Fig.3
Fig.4 Fig.5 Fig.6
Fig.7 Fig.8 Fig.9
Fig.10 Fig.11 Fig.12
A
B
A
B
ENGLISH
Page 6

ENGLISH
• 6 •
Fig.13 Fig.14 Fig.15
Fig.16 Fig.17 Fig.18
Fig.19 Fig.20 Fig.21
Fig.22 Fig.23 Fig.24
Page 7

ENGLISH
• 7 •
ENGLISH
1 GENERAL INFORMATION
The coffee machine is made for brewing 1 or 2 cups of
espresso coffee and features a swivel steam and hot
water spout. The controls on the front of the machine are
labeled with easy-to-read symbols.
The machine has been designed for domestic use only
and is not suitable for professional, continuous use.
Warning. No liability is assumed for any damage
caused by:
• Incorrect use not in accordance with the intended
uses;
• Repairs not carried out by authorized service
centers;
• Tampering with the power cable;
• Tampering with any part of the machine;
• The use of non-original spare parts and accessories;
• Failure to descale the machine and storage at
temperatures below 0°C.
In these cases, the warranty is not valid.
1.1 To facilitate reading
A warning triangle draws the attention to all the instructions that
are important for the user’s safety.
Please carefully follow these instructions to avoid
serious injury!
The reference to illustrations, parts of the appliance or
controls, etc. is indicated by numbers or letters; in this
case please refer to the illustration.
This symbol is used to highlight the information
that is particularly important for ensuring opti-
mal use of the machine.
The illustrations corresponding to the text may be found
on the inside cover. Keep this page open while reading
the instructions.
1.2 How to use these operating instructions
Keep these operating instructions in a safe place and
make them available to anyone else who may use the
coffee machine.
For further information or in case of problems, please
refer to any authorized service center.
2 TECHNICAL DATA
The manufacturer reserves the right to make changes to
the technical specications of the product.
The machine conforms to the European Directive 89/336/
EEC (Italian Legislative Decree 476 dated 04/12/92)
concerning electromagnetic compatibility.
Nominal Voltage - Power rating - Power supply
See label on the appliance
Housing material
Metal
Size (w x h x d)
220mm x 300mm x 270mm - 9" x 12" x 11"
Weight
4 kg - 9 lbs
Cable length
1.2 m - 47"
Control panel
Front
Filter holder
Pressurized portalter
Pannarello
Plastic
Water tank (removable)
2 litres - 68 oz
Pump pressure
15 bar
Boiler
Stainless steel
Safety devices
Manual reset thermostat
Thermofuse
3 SAFETY REGULATIONS
Never place live parts in contact with water: danger of
short circuit! Steam and hot water may cause scalding!
Do not direct the steam or hot water jet toward parts of
the body; handle the steam/hot water spout with care:
danger of scalding!
Intended use
The coffee machine is intended for domestic use only.
Do not make any technical changes or use the machine
for unlawful purposes since this would create serious
hazards! The appliance is not for use by persons (included children) with reduced physical, mental or sensory
abilities or with scarce experience and/or competences,
unless they are under supervision of a person in charge
of their safety or they are informed by him/her on the use
of the appliance.
Power supply
Only connect the coffee machine to a suitable socket.
The voltage must correspond to the indication on the
machine’s label.
Page 8

ENGLISH
• 8 •
Power cable
Never use the coffee machine if the power cable is
defective. If damaged, the power cable must be replaced
by the manufacturer or its customer service department.
Do not pass the cable around corners, over sharp edges
or over hot objects and keep it away from oil.
Do not use the power cable to carry or pull the coffee
machine. Do not pull out the plug by pulling on the power
cable or touch it with wet hands.
Do not let the power cable hang freely from tables or
shelves.
Protecting others
Prevent children from playing with the appliance.
Children are not aware of the risks linked with electrical
appliances. Do not leave the coffee machine packaging
within the reach of children.
Danger of burning
Never direct the jet of hot steam and/or hot water towards
yourself or others. Always use the handles or knobs
provided.
Do not disconnect (remove) the portalter during coffee
brewing. Hot water drips may spill out from the coffee
brew unit during the warming phase.
Location
Position the coffee machine in a safe place, where
nobody may overturn it or be injured.
Hot water or steam may spill out: danger of scalding!
Do not keep the machine at a temperature below 0°C;
freezing may damage the machine.
Do not use the coffee machine outdoors.
Do not place the machine on hot surfaces and close to
open ames to prevent the housing from melting or being
damaged.
Cleaning
Before cleaning the machine, deselect all buttons and
then remove the plug from the socket.
Then wait for the machine to cool down. Never immerse
the machine in water!
It is strictly forbidden to tamper with the inside of the
machine.
Any water left in the tank for several days should not be
consumed. Wash the tank and ll it with fresh drinking
water.
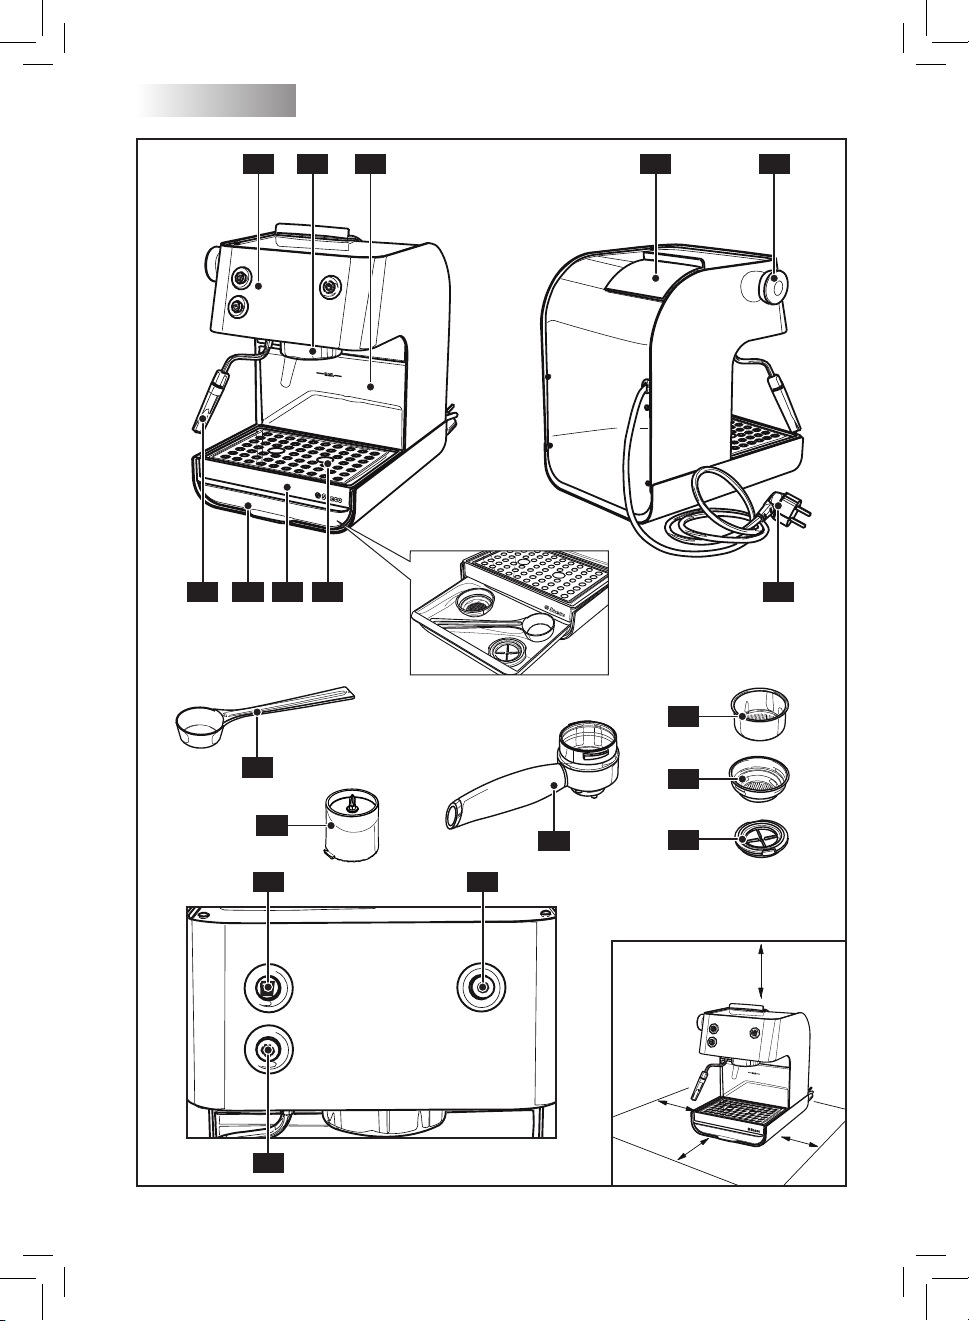
Space for use and maintenance
To ensure that the coffee machine works properly and
efciently, the following conditions are recommended:
• Choose a level surface;
• Select a location that is sufciently well-lit, clean and near
an easily reachable socket;
• Allow for a minimum distance from the sides of the ma-
chine as shown in the illustration (Fig.A).
Storing the machine
If the machine is to remain out of use for a long time, turn
it off and unplug it from the socket. Store it in a dry place
out of the reach of children. Keep it protected from dust
and dirt.
Servicing / Maintenance
In case of failure, faults or a suspected fault after
dropping, immediately remove the plug from the socket.
Never attempt to operate a faulty machine. Servicing
and repairs may only be carried out by authorized service
center. All liability for damages caused by works not
carried out in a professional manner is declined.
Fire safety
In case of re, use Carbon Dioxide extinguishers (CO2).
Do not use water or dry-powder extinguishers.
Key to machine components (Pag.4)
1 Control panel
2 Brew unit
3 Water tank
4 Funnel for water tank lling
5 Hot water/steam knob
6 Steam/hot water wand (Pannarello)
7 Accessory drawer
8 Drip tray
9 Metal grill
10 Power cord
11 Ground coffee measuring scoop
12 Ground coffee lter holder
(one only for brewing 1 or 2 coffees)
13 Pressurized portalter
14 Pod lter adapter
15 Pod lter
16 Brew button
17 Steam button
18 ON/OFF button
19 Scraper
4 INSTALLATION
For your own and for other people's safety, carefully
follow the "Safety Regulations" in section 3.
4.1 Packaging
The original packaging has been designed to protect the
machine during transport. We recommend keeping the
packaging for future transport.
4.2 Installation instructions
Before installing the machine, read the following safety
instructions carefully:
• Place the machine in a safe place;
• Make sure children cannot play with the machine;
• Do not place the machine on hot surfaces or near open
ames.
The coffee machine is now ready to be connected to the
power supply.
Page 9

ENGLISH
• 9 •
ENGLISH
Note: It is recommended to wash the parts before
their rst use and/or after they have not been
used for a certain period of time.
4.3 Machine connection
Electric current can be dangerous! It is there-
fore essential to follow the safety regulations
carefully. Never use faulty cords! Faulty cords and
plugs must be replaced immediately by authorized
service centers.
The voltage of the appliance has been set by the
manufacturer. Check that the voltage supplied matches
the indications on the identication label on the bottom of
the appliance.
• Check that the ON/OFF switch (18) is not pressed before
connecting the machine to the power supply.
• Connect the plug to a wall socket with suitable voltage.
4.4 Water tank
• (Fig.1) - Remove the accessory drawer (7), the drip tray
(8) and the grill (9).
• (Fig.2) - Remove the water tank (3). Be careful not to
damage the water suction pipe.
• (Fig.3) - Rinse and ll it with fresh drinking water taking
care not to overll.
• (Fig.4) - Reinsert the tank into its seat. Take care to
correctly replace the previously extracted pipe
Only use fresh, non-sparkling drinking water to
ll the tank. Hot water or any other liquid may
damage the tank. Do not turn on the machine without
water: make sure there is enough water in the tank.
Note: For a quick water tank rell, the funnel
placed in the upper part of the machine can be
used. Open the funnel (Fig.5) and rell with water (Fig.6).
After relling, always close the funnel.
4.5 Priming the water circuit
Before starting up the machine, after long storage and
when the water has been used up, the machine’s water
circuit must be primed.
• (Fig.7) - Press the ON/OFF switch (18). The inside light
turns on.
• (Fig.8) - Place a container below the steam spout.
Open the hot water/steam knob (5) by turning it counterclockwise.
• Wait until a steady jet of water is emitted from the steam/
hot water wand.
• Close the hot water/steam knob (5) by turning it clockwise.
Remove the container.
The machine is now ready to brew coffee and dispense
steam. Please see related sections for operating details.
5 COFFEE BREWING
Caution! Do not remove the portalter during the
coffee brewing. Danger of burning.
• During this operation, the brew button light (16) may ash
on and off; this operation should be considered normal
and not as a fault.
• Before using the machine, make sure that the hot water/
steam knob (5) is closed and that there is sufcient water
in the tank.
• (Fig.7) - Press the ON/OFF button (18). The inside light
turns on.
• Wait until the brew button light (16) turns on. The machine
is now ready for coffee brewing.
5.1 Using ground coffee
• (Fig.9-A) - Insert the ground coffee lter (12) into the
portalter (13).
• (Fig.11) - Insert the portalter in the brew unit from the
bottom (2).
• (Fig.12) - Turn the portalter from left to right until it locks
in place. Release the grip from the portalter. The handle
slightly turns on the left. This movement guarantees the
perfect operation of the portalter.
• (Fig.14) - Preheat the portalter by pressing the brew
button (16). Water will spill out of the portalter (this
operation is only necessary for the rst coffee).
• After 4 oz (50cc) of water has owed out, press the brew
button (16) again to stop hot water dispensing.
• (Fig.16) - Remove the portalter from the machine by
turning it to the left and pour out any water left. As the
machine is tted with the ground coffee lter (12), there is
no need to change the lter to make one or two coffees.
• (Fig.9-B) - Add 1 or 2 level measuring scoops of ground
coffee to the lter for one or two coffees; clean any coffee
residues from the edge of the lter holder.
• (Fig.11) - Insert the portalter (13) in the brew unit from
the bottom (2).
• (Fig.12) - Turn the portalter from left to right until it locks
in place.
• (Fig.13) - Take 1 or 2 preheated cups and place them
under the portalter; check that they are correctly placed
under the coffee dispensing holes.
• (Fig. 14) - Press the brew button (16).
• When the desired quantity of coffee has been obtained,
press the brew button again (16) to stop the coffee brewing
and remove the cups of coffee (Fig.15).
• (Fig.16) - Wait a few seconds after brewing, then remove
the portalter and empty the remaining coffee grounds.
Note: Keep the filter of the portafilter clean
by removing it from its seat and washing with
drinking water (Fig. 17).
Page 10
ENGLISH
• 10 •
5.2 Coffee pods
• (Fig.9-A) - Remove the ground coffee lter (12) from the
portalter (13) by pulling it up.
• (Fig.10) - Insert the coffee pod adapter (14), with the
curved part facing down, into the portalter (13); then
insert the pod lter (15).
• (Fig.11) - Insert the portalter in the brew unit from the
bottom (2).
• (Fig.12) - Turn the portalter from left to right until it locks
in place.
Release the grip from the portafilter. The handle is
automatically turned slightly towards the left.
This movement assures the perfect functioning of the
portalter.
• (Fig.14) - Preheat the portalter by pressing the brew
button (16). Water will spill out of the portalter (this
operation is only necessary for the rst coffee).
• After 4 oz. (50cc) of water has owed out, press the brew
button (16) again to stop hot water dispensing.
• (Fig.16) - Remove the portalter from the machine by
turning it from right to left and emptying out the remaining
water.
• Insert the pod in the portalter; make sure the paper from
the pod does not overhang the portalter.
• (Fig.11) - Insert the portalter in the brew unit from the
bottom (2).
• (Fig.12) - Turn the portalter from left to right until it locks
in place.
• Take 1 preheated cup and place it under the portalter;
check that it is correctly placed under the coffee
dispensing holes.
• (Fig.14) - Press the brew button (16).
• When the desired quantity of coffee has been obtained,
press the brew button (16) again to stop coffee brewing
and remove the cup of coffee.
• (Fig.16) - Wait a few seconds after dispensing, then
remove the portalter and dispose of the used pod.
Note: Keep the filter of the portafilter clean
by removing it from its seat and washing with
drinking water (Fig. 17).
6 TIPS FOR CHOOSING COFFEE
As a general rule any type of coffee available on the
market can be used. However, coffee is a natural product
and its avor changes according to its origin and blending. It is therefore a good idea to try different types, in
order to nd the most suited to your personal taste.
For best results, we recommend using blends which
are expressly indicated for espresso coffee machines.
Coffee should always be dispensed by the portalter
without dripping. The speed of coffee dispensing can be
modied by slightly changing the amount of coffee in the
lter and/or using a different coffee grind.
BEFORE USING THE HOT WATER/STEAM WAND,
MAKE SURE THAT THE WAND IS POSITIONED
OVER THE DRIP TRAY.
7 HOT WATER
Danger of scalding! At the beginning, short
spurts of hot water may come out. The brewing
spout can reach high temperatures: do not touch it with
bare hands.
• (Fig.7) - Press the ON/OFF button (18). The inside light
turns on.
• Wait until the brew button light (16) turns up. The machine
is now ready.
• (Fig.18) - Place a container or glass under the steam/hot
water wand (Pannarello). Open the knob (5) by turning it
counterclockwise.
• When the desired quantity of hot water has been dispen-
sed, close the knob (5) by turning it clockwise.
• Remove the container with hot water.
8 STEAM / CAPPUCCINO
Danger of scalding! At the beginning, short
spurts of hot water may come out. The brewing
spout can reach high temperatures: do not touch it with
bare hands.
• (Fig.7) - Press the ON/OFF button (18). The inside light
turns on.
• Wait until the brew button light (16) turns on.
• (Fig.19) - Press the steam button (17). The brew button
light goes off (16).
• Wait for the steam button (17) and brew button (16) lights
to turn on. Now the machine is ready to eject steam.
• (Fig.18) - Insert a container below the steam spout and
open the knob (5) for a few seconds, so that remaining
water exits from the steam/hot water wand (Pannarello);
in a short time only steam will come out.
• Close the knob (5) and put the container away.
• Fill 1/3 of the container you wish to use to prepare the
cappuccino with cold milk.
Use cold milk to get a better froth.
• (Fig.20) - Immerse the steam wand in the milk and open
the knob (5) by turning it counterclockwise; turn the
milk container with slow upward movements so that it is
warmed evenly.
• Close the knob (5); take the cup with the frothed milk.
• (Fig.19) - Press the steam button (17) again.
• Proceed with circuit priming as described in section 4.5
to make the machine ready for use.
Page 11
ENGLISH
• 11 •
ENGLISH
Note: The machine is ready when the brew button
light (16) is permanently on.
Note: If it is not possible to dispense a
cappuccino as described, prime the circuit as
explained in section 4.5 and then repeat the steps.
The same process can be used to heat other
beverages.
• After this operation, clean the steam wand with a wet
cloth.
9 CLEANING
Maintenance and cleaning operations may only be
carried out when the machine has cooled down and has
been disconnected from the power supply.
• Do not immerse the machine in water or place any of its
parts in a dishwasher.
• Do not use spirit, solvents and/or aggressive chemical
agents.
• We recommend cleaning the water tank and lling it up
with fresh water daily.
• (Fig.21-22) - Every day, after heating the milk, remove
the external part of the Pannarello and wash it with fresh
drinking water.
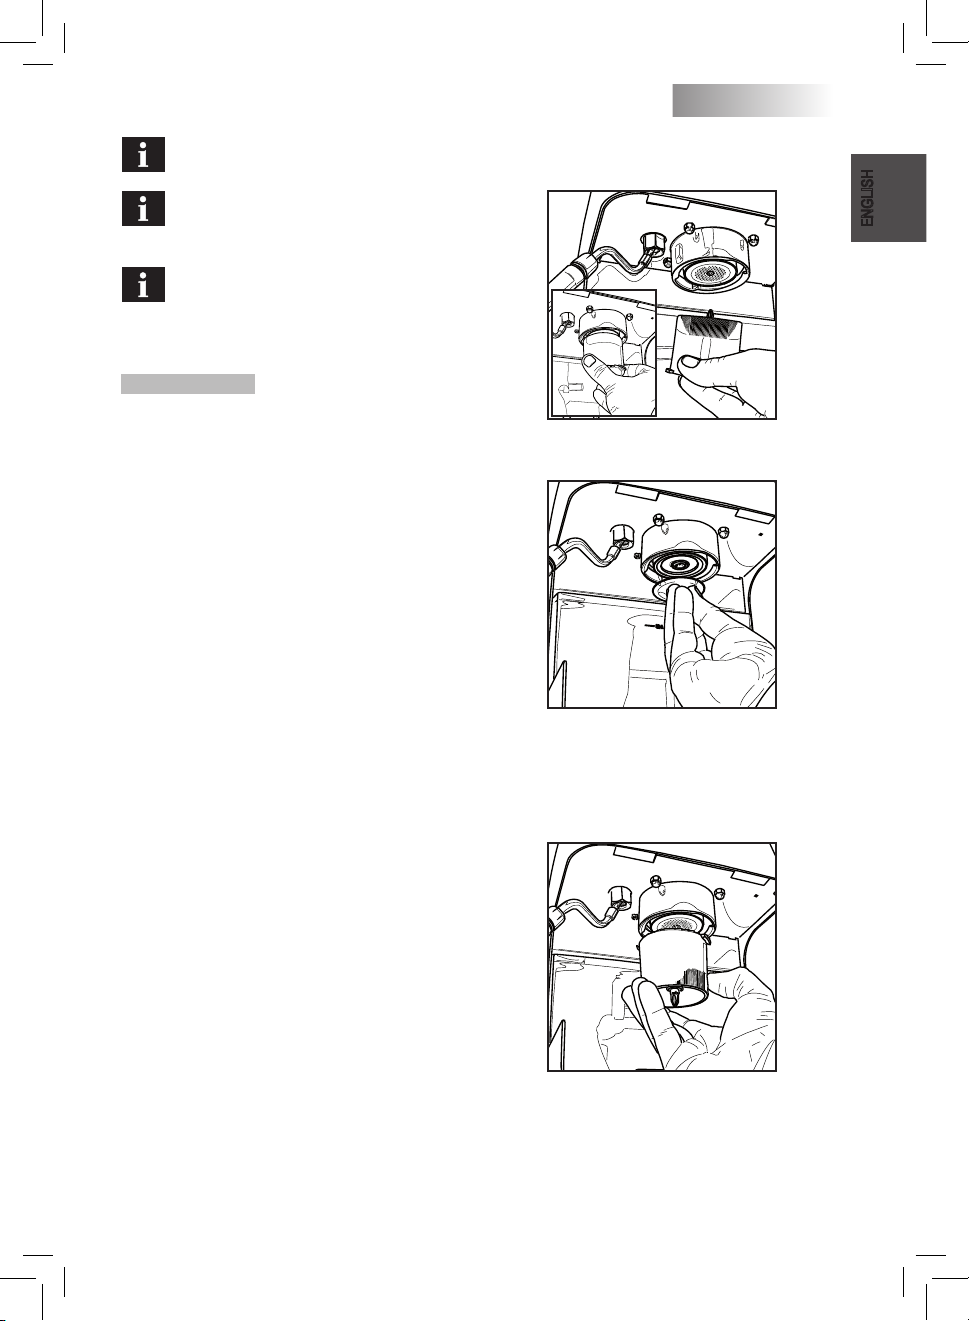
• (Fig.23) - The steam wand should be cleaned every week.
In order to do this operation, you have to:
- remove the external part of the Pannarello (for standard
cleaning);
- loosen the ring nut (without removing it);
- remove the upper part of the Pannarello from the steam
wand;
- wash the upper part of the Pannarello with fresh drinking
water;
- wash the steam wand with a wet cloth and remove any
milk residue;
- replace the upper part of the steam wand (make sure
it is completely inserted);
- tighten the ring nut.
Reassemble the external part of the Pannarello.
• (Fig.24) - Empty and clean the drip tray every day.
• Use a soft cloth damp cloth to clean the appliance.
• (Fig.17) - To clean the portalter proceed as follows:
- remove the lter, wash it thoroughly with hot water.
- remove the adapter (if tted), wash it thoroughly with
hot water.
- wash the internal part of the portalter.
• Do not dry the machine and/or its components using a
microwave and/or conventional oven.
Once descaling has been performed (see section 10), the
brew unit lter and the gasket should be cleaned.
To clean the lter, proceed as follows:
• Loosen the screw xing the lter to the brew unit by means
of the screwdriver which is supplied with the scraper.
• Remove the lter and wash it thoroughly with a neutral
detergent.
• Rinse and reinstall the lter; fasten the screw by means
of the screwdriver which is supplied with the scraper.
To clean the gasket, proceed as follows:
• insert the scraper into the brew unit as shown;
Page 12

ENGLISH
• 12 •
• Gently turn the scraper to remove any coffee residues
from the gasket;
• Finally remove the scraper and clean with a wet cloth to
eliminate any coffee traces.
10 DESCALING CYCLE
The formation of limescale inside the appliance is inevitable. It is necessary to descale the machine every 3-4
months of use and/or when you notice a reduction in the
water capacity of the appliance.
If you want to descale the machine yourself,
you can use a non-toxic and/or non-harmful
descaling product for coffee machines (commercially
available). We recommend using Saeco descaling
solution.
Caution! Do not use vinegar as a descaler.
• (Fig.2) - Remove and empty the water tank.
• (Fig.3) - Mix the descaling solution with water as specied
on the pack of the descaling product and ll the water tank;
insert the tank into the machine.
• (Fig.7) - Turn on the machine by pressing the ON/OFF
button (18).
• (Fig.8) - Place a container below the steam spout.
• Open the knob (5) to remove, at intervals and one cup at
a time, the whole descaling product. Close the knob (5)
to stop the dispensing.
• (Fig.7) - During each interval allow the descaling solution
to take effect for about 10-15 minutes, disconnecting the
ON/OFF button (18). Empty the container.
• (Fig.2-3) - When the descaling solution is finished,
remove the water tank, rinse it and ll it with fresh drinking
water.
• (Fig.4; Fig.8) - Reinsert the tank in the machine. Open
the knob (5) to empty 2/3 of the water. Close the steam
knob (5) clockwise to stop dispensing.
• Let the machine warm up and empty the water tank as
described above.
If you are using a product other than the
recommended one it is important to always
follow the manufacturer’s instructions shown on the
pack of the descaling product.
11 DISPOSAL
• Put unused appliances out of service.
• Disconnect the plug from the socket and cut the electrical
cord .
• At the end of its life, take the appliance to a suitable waste
collection site.
Page 13
ENGLISH
• 13 •
ENGLISH
Fault Possible cause Solution
The machine does not turn on. The machine is not connected to the
power supply.
Connect the machine to the power supply.
The pump is very noisy. No water in the tank. Rell with water (section 4.4).
The coffee is too cold.
The brew button light (16) was off when
the button was pressed.
Wait until the brew button light (16) turns
on.
The lter holder is not inserted for
preheating (section 5).
Preheat the lter holder.
Cold cups. Preheat the cups with hot water.
The milk does not froth.
It is not possible to prepare a
cappuccino.
Milk is not suitable. Use cold, whole milk.
The steam wand is dirty.
Clean the steam wand as described in
section 9.
There is no more steam in the boiler.
Prime the circuit (section 4.5) and repeat
the operations described in section 8.
The coffee is dispensed too
fast, no crema builds up.
Too little coffee in the lter holder. Add coffee (section 5).
The grind is too coarse. Use a different blend (section 6).
Coffee is old or not suitable. Use a different blend (section 6).
Old or not suitable pod. Change the pod.
Coffee does not come out or
drips only.
No water. Rell with water. (section 4.4).
The grind is too ne. Use a different blend (section 6).
Coffee pressed in the lter holder. Shake the ground coffee.
Too much coffee in the lter holder.
Reduce the quantity of coffee in the lter
holder.
Knob (5) is open. Close the knob (5).
Calcied machine. Descale the machine (section 10).
The lter in the lter holder is clogged. Clean the lter (section 9).
Not suitable pod. Change type of pod.
The coffee comes out from
the side.
The lter holder is incorrectly inserted
in the brew unit.
Insert the lter holder correctly (section 5).
Upper edge of the lter holder is dirty. Clean the rim of the lter holder.
The gasket of the boiler is dirty or
worn.
Clean or replace the gasket.
Pod wrongly inserted.
Insert the pod correctly. Make sure it
doesn’t come out of the lter holder.
Too much coffee in the lter holder.
Reduce the quantity of coffee by means of
the measuring scoop.
Please contact an authorized service center for any faults not covered in the above table or when the suggested
solutions do not solve the problem.
Page 14

FRANÇAIS
• 2 •
PRÉCAUTIONS IMPORTANTES
Lors de l’utilisation d’appareils électriques, afin de réduire les risques d’incendies, de chocs
électriques et/ou de blessures, il est indispensable de respecter toujours les précautions de
sécurité principales, y compris les suivantes :
1. Lire toutes les instructions et les informations dans ce manuel et dans tout autre
document contenu dans l’emballage concernant le produit avant de mettre en marche
ou d’utiliser cet appareil.
2. Ne pas toucher de surfaces chaudes (par exemple la buse de vapeur, le porte-filtre).
Utiliser les poignées ou les boutons.
3. Afin d’éviter tout incendie, choc électrique et blessure, ne pas plonger le cordon, la fiche
ou l’appareil dans l’eau ou dans n’importe quel liquide.
4. Cet appareil doit être conservé hors de portée des enfants.
5. Débrancher de la prise de courant lorsque l’appareil n’est pas en service et avant son
nettoyage.
6. Laisser refroidir l’appareil aussi bien avant de retirer et de mettre en place ses accessoires
qu’avant de le nettoyer.
7. Ne pas enlever le porte-filtre pendant les cycles de distribution puisque cela pourrait
causer des brûlures.
8. L’utilisation d’accessoires non recommandés par le constructeur de l’appareil pourrait
engendrer des incendies, des chocs électriques et des blessures.
9. Ne pas utiliser à l’extérieur.
10. Ne pas laisser le cordon pendre des bords de la table ou du plan de travail, ni toucher
des surfaces chaudes.
11. Ne pas placer près du feu ou sur une cuisinière, électrique et à gaz, ou dans un four
chaud.
12. Cette machine n’a été conçue que pour gérer des quantités à usage domestique. Cet
appareil n’est pas adéquat pour une utilisation continue ou à usage commercial.
13. Ne pas utiliser l’appareil avec un cordon ou une fiche détériorés, en cas de mauvais
fonctionnement de l’appareil ou après son endommagement de n’importe quelle
manière. Renvoyer l’appareil à un centre d’assistance agréé pour tout contrôle,
réparation et réglage.
14. Ne pas utiliser si le réservoir à eau n’est pas rempli.
Page 15

FRANÇAIS
• 3 •
FRANÇAIS
15. Utiliser toujours de l’eau froide. L’utilisation d’eau chaude ou d’autres liquides pourrait
endommager l’appareil.
16. Lorsqu’on branche la machine, éteindre toujours l’appareil en appuyant sur « OFF »,
brancher le cordon d’alimentation tout d’abord à la machine et ensuite à la prise de
courant sur le mur. Pour débrancher, éteindre toujours l’appareil en appuyant sur « OFF
» et ensuite enlever la fiche de la prise de courant sur le mur.
17. Agir avec prudence lorsqu’on utilise de la vapeur chaude.
18. Ne pas utiliser l’appareil pour toute autre utilisation non prévue.
GARDER CES INSTRUCTIONS
INSTRUCTIONS SUR LE CORDON COURT
Votre appareil est muni d’un cordon électrique court afin d’éviter de trébucher ou de
s’emmêler avec un câble plus long.
Après l’installation de la machine, le cordon doit être toujours accessible afin de pouvoir la
débrancher à tout moment, le cas échéant.
Des cordons plus longs sont disponibles chez les revendeurs autorisés à la vente de matériel
électrique et ne peuvent être utilisés que si l’on prend toutes les précautions d’usage. Si on
utilise une rallonge :
• La tension électrique de fonctionnement marquée sur la rallonge doit être au moins
égale à celle de l’appareil.
• Si la fiche de l’appareil a une connexion de terre, la rallonge devrait être une rallonge
de terre à 3 fils.
• La rallonge ne devra pas encombrer le plan de travail ou le dessus de table, afin
d’éviter que les enfants la tirent ou trébuchent accidentellement.
Page 16

FRANÇAIS
4 51 2 3
6 7 8 9 10
11
12
13
16
17
15
14
19
18
Fig.A
20 cm
8 in
20 cm
8 in
20 cm
8 in
40 cm
16 in
• 4 •
Page 17

FRANÇAIS
Fig.1 Fig.2 Fig.3
Fig.4 Fig.5 Fig.6
Fig.7 Fig.8 Fig.9
Fig.10 Fig.11 Fig.12
A
B
A
B
• 5 •
FRANÇAIS
Page 18

FRANÇAIS
• 6 •
Fig.13 Fig.14 Fig.15
Fig.16 Fig.17 Fig.18
Fig.19 Fig.20 Fig.21
Fig.22 Fig.23 Fig.24
Page 19

FRANÇAIS
• 7 •
FRANÇAIS
1 GÉNÉRALITÉS
Cette machine à café est appropriée pour la préparation
d’une ou de deux tasses de café expresso. Elle est
équipée d’une buse orientable pour la distribution de la
vapeur et de l’eau chaude. Les commandes sur la façade
de l’appareil sont marquées par des symboles faciles à
comprendre.
Cette machine a été conçue à usage domestique et n’est
pas adéquate pour un fonctionnement continu de type
professionnel.
Attention. La société décline toute responsabilité
pour les éventuels dommages se produisant en
cas de :
• Usage impropre non conforme aux utilisations
prévues ;
• Réparations non effectuées auprès des centres
d'assistance agréés ;
• Altération du cordon d'alimentation ;
• Altération de n’importe quel composant de la
machine ;
• Utilisation de pièces de rechange et d’accessoires
non d’origine ;
• Défaut de détartrage et stockage au-dessous de 0°C.
Dans tous ces cas, la garantie cesse d’exister.
1.1 Pour faciliter la lecture
Le triangle d’avertissement indique
toutes les instructions à retenir pour
la sécurité de l’utilisateur. Respecter
attentivement ces indications an d’éviter de graves
blessures !
Les images, les parties de l’appareil, les éléments de
commande, etc. sont marqués par des lettres ou des
chiffres. Dans ce cas-là, consulter les images.
Ce symbole met en évidence les informations
importantes pour une meilleure utilisation de la
machine.
Les images correspondant au texte se trouvent dans
le volet de couverture. Lire ce mode d’emploi avec les
images sous les yeux.
1.2 Utilisation de ce mode d’emploi
Garder ce mode d’emploi dans un endroit sûr. Le joindre
à la machine à café pour tout éventuel changement
d'utilisateur.
Pour plus d’informations ou en cas de problèmes,
s’adresser aux centres d’assistance agréés.
2 DONNÉES TECHNIQUES
Le constructeur se réserve le droit d'apporter des modications aux caractéristiques techniques du produit.
Machine conforme à la Directive Européenne 89/336/
CEE (Décret législatif italien 476 du 04/12/92), afférant à
l’élimination des brouillages radiotélévisés.
Tension nominale - Puissance nominale - Alimentation
Voir plaquette placée sur l'appareil
Matériau du châssis
Métal
Dimensions (l x h x p)
220 x 300 x 270
Poids
4 kg
Longueur du cordon
1,2 m
Bandeau de commande
En façade
Porte-ltre
Pressurisé mécanique
Pannarello
Spécial pour le cappuccino
Réservoir à eau
2 litres - Amovible
Pression de la pompe
15 bars
Chaudière
Acier inoxydable
Dispositifs de sécurité
Thermostat à réenclenchement manuel
Coupe-circuit thermique
3 CONSIGNES DE SÉCURITÉ
Ne jamais mettre de parties sous tension au contact de
l’eau : danger de court-circuit ! La vapeur surchauffée et
l’eau chaude peuvent provoquer des brûlures ! Ne jamais
diriger le jet de vapeur ou d’eau chaude vers des parties
du corps, toucher la buse de vapeur/d’eau chaude en
faisant très attention : danger de brûlures !
Utilisation prévue
Cette machine à café est destinée uniquement à un
usage domestique. Toute modication technique de la
machine et toute utilisation impropre sont interdites car
elles engendrent des risques ! L’appareil ne doit pas être
utilisé par des personnes (y compris les enfants) ayant
de faibles capacités physiques, mentales ou sensorielles,
sans expérience et/ou aux compétences insufsantes, à
moins qu'elles ne soient sous la supervision d’une personne responsable de leur sécurité ou formées par cette
personne en ce qui concerne l’utilisation de l’appareil.
Alimentation secteur
La machine à café ne peut être branchée que sur une
prise de courant appropriée. La tension doit correspondre à celle indiquée sur la plaquette de l’appareil.
Cordon d’alimentation
Ne jamais utiliser la machine à café, si le cordon d’ali-
Page 20

FRANÇAIS
• 8 •
mentation est défectueux. Si le cordon d’alimentation est
abîmé, il doit être remplacé par le constructeur ou par
son service d’assistance aux clients. Ne pas faire passer
le cordon d’alimentation sur des arêtes ou des objets très
chauds et le protéger contre l’huile.
Ne pas transporter ou tirer la machine par le cordon. Ne
pas extraire la che en la tirant par le cordon. Ne pas la
toucher avec les mains mouillées.
Éviter que le cordon d’alimentation ne pende librement
des tables ou des étagères.
Protection des autres personnes
Garder les enfants sous supervision, an d’éviter qu’ils
ne jouent avec l’appareil. Les enfants ne se rendent
pas compte des risques liés aux électroménagers. Les
matériaux utilisés pour l'emballage de la machine doivent
être gardés hors de portée des enfants.
Danger de brûlures
Ne pas diriger le jet d’eau chaude ou de vapeur surchauffée vers soi et/ou vers d’autres personnes. Utiliser
toujours les poignées ou les boutons prévus à cet effet.
Ne jamais ôter le porte-ltre « Crema » pendant la distribution du café. Pendant le chauffage, des gouttes d’eau
chaude peuvent sortir du groupe de distribution du café.
Emplacement
Ranger la machine à café dans un endroit sûr pour éviter
tout risque de renversement ou de blessures.
Risque de fuite d’eau chaude ou de vapeur surchauffée :
danger de brûlures !
Ne pas garder la machine à une température inférieure à
0°C : le gel pourrait endommager la machine.
Ne pas utiliser la machine à café en plein air.
Ne pas poser la machine sur une surface trop chaude ou
à proximité d'une amme nue : le châssis pourrait fondre
ou s'abîmer.
Nettoyage
Avant de nettoyer la machine, déconnecter tous les
boutons et ôter la che de la prise de courant.
Attendre quelques instants pour que la machine se refroidisse. Ne jamais plonger la machine dans l’eau !
Il est strictement interdit d’essayer d’intervenir à l’intérieur
de la machine.
Ne pas utiliser l’eau qui est restée pendant plusieurs
jours dans le réservoir pour un usage alimentaire ; laver
le réservoir et le remplir d’eau fraîche potable.
Espace pour l’utilisation et l’entretien
Pour un fonctionnement correct et efcace de la machine
à café, il est conseillé de :
• Choisir une surface d’appui plane et nivelée ;
• Choisir un endroit assez bien éclairé, propre et pourvu
d’une prise de courant facilement accessible ;
• Prévoir une distance minimum des parois de la machine,
conformément à la gure (Fig.A).
Rangement de la machine
Si la machine doit rester inutilisée pendant longtemps,
la mettre hors tension et ôter la che de la prise. La
ranger dans un lieu sec et hors de portée des enfants. La
protéger contre la poussière et les saletés.
Réparations / Entretien
En cas de pannes, de dommages ou de défauts présumées à la suite d’une chute, débrancher immédiatement
la che de la prise. Ne jamais mettre en service une
machine défectueuse. Seuls les Centres d'Assistance
Agréés peuvent effectuer des interventions et des
réparations. Nous déclinons toute responsabilité en cas
de dommages pour toute opération non effectuée dans
les règles de l’art.
En cas d’incendie
En cas d’incendie, utiliser des extincteurs à anhydride
carbonique (CO2). N’utiliser ni d’eau ni d’extincteurs à
poudre.
Légende des composants de la machine (Page 4)
1 Bandeau de commande
2 Groupe de distribution de café
3 Réservoir à eau
4 Entonnoir de remplissage du réservoir à eau
5 Bouton eau chaude/vapeur
6 Buse de vapeur (pannarello)
7 Tiroir des accessoires
8 Bac de récupération de l’eau
9 Grille en métal
10 Cordon d'alimentation
11 Mesure à café moulu
12 Porte-ltre à café moulu
(pour la préparation de 1 ou 2 doses de café)
13 Porte-ltre « Crema »
14 Adaptateur du ltre à dosettes de café
15 Filtre à dosettes de café
16 Touche lumineuse de distribution du café
17 Touche lumineuse de distribution de la vapeur
18 Interrupteur lumineux ON/OFF
19 Gratteur
4 MISE EN PLACE
Pour votre sécurité et celle des tiers, s’en tenir scrupu-
leusement aux « Consignes de sécurité » indiquées au
chapitre 3.
4.1 Emballage
L’emballage original a été conçu et réalisé pour protéger
la machine lors de son expédition. Il est conseillé de le
garder pour d’éventuels transports à venir.
4.2 Avertissements de mise en place
Avant d’installer la machine, s’en tenir aux consignes de
sécurité suivantes :
• placer la machine dans un endroit sûr ;
• s’assurer que les enfants n’ont pas la possibilité de jouer
Page 21

FRANÇAIS
• 9 •
FRANÇAIS
avec la machine ;
• éviter de placer la machine sur des surfaces très chaudes
ou à proximité de ammes nues.
La machine à café est prête pour être branchée sur le
réseau électrique.
Remarque : il est recommandé de laver les
composants avant la toute première utilisation
et/ou après des périodes d’inactivité.
4.3 Raccordement de la machine
Le courant électrique peut être dangereux !
Par conséquent, il est impératif de respecter
les consignes de sécurité. Ne jamais utiliser de câbles
défectueux ! Les câbles et les ches défectueux doivent être immédiatement remplacés par des Centres
d'Assistance Agréés.
La tension de l’appareil a été congurée à l’usine. Vérier
si la tension du réseau correspond aux indications
gurant sur la plaquette d'identication placée au fond
de l’appareil.
• Avant de brancher la machine sur le réseau électrique,
s’assurer que l’interrupteur ON/OFF (18) n’a pas été
appuyé.
• Brancher la che sur une prise de courant au mur ayant
une tension appropriée.
4.4 Réservoir à eau
• (Fig.1) - Retirer le tiroir à accessoires (7), le bac de
récupération de l’eau (8) et la grille (9).
• (Fig.2) - Retirer le réservoir à eau (3), faire attention à ne
pas endommager le tuyau d'aspiration de l’eau.
• (Fig.3) - Le rincer et le remplir d’eau fraîche potable ;
éviter d’en verser une quantité excessive.
• (Fig.4) - Réintroduire le réservoir dans son logement en
prenant soin à remettre correctement le tuyau que l’on
avait précédemment retiré.
Remplir le réservoir uniquement avec de l'eau
fraîche potable non pétillante. L'eau chaude ou
toute autre liquide peuvent endommager le réservoir. Ne
pas mettre la machine en service, s’il n’y a pas d’eau :
s’assurer que le réservoir est sufsamment plein.
Remarque : pour remplir rapidement le réser-
voir à eau, il est possible d'utiliser l'entonnoir
se trouvant dans la partie supérieure de la machine.
Ouvrir l'entonnoir (Fig.5) et remplir avec de l'eau (Fig.6).
Refermer toujours l’entonnoir, une fois le remplissage
terminé.
4.5 Amorçage du circuit
Après tout arrêt prolongé de la machine ou en cas d’épuisement d’eau, le circuit de la machine doit être réamorcé
avant sa mise en service.
• (Fig.7) - Appuyer sur l'interrupteur ON/OFF (18) ; le voyant
à l'intérieur s'allume.
• (Fig.8) - Placer un récipient sous la buse de vapeur. Ouvrir
le bouton (5) « eau chaude/vapeur » en le tournant dans
le sens inverse aux aiguilles d’une montre.
• Attendre jusqu’à ce que un jet d'eau régulier ne sorte de
la buse de vapeur (pannarello).
• Fermer le bouton (5) « eau chaude/vapeur » en le tournant dans le sens des aiguilles d'une montre. Enlever le
récipient.
La machine est prête à distribuer du café et de la vapeur.
Quant aux mécanismes de son fonctionnement, veuillez
consulter les chapitres correspondants.
5 DISTRIBUTION DU CAFÉ
Attention ! Pendant la distribution du café, il
est interdit d’ôter le porte-ltre « Crema », en le
tournant manuellement dans le sens des aiguilles d'une
montre. Danger de brûlures.
• Pendant cette opération, le voyant de la touche café «
machine prête » (16) peut s’allumer et s’éteindre. Ce
fonctionnement doit être considéré comme normal et ne
constitue pas une anomalie.
• Avant d’utiliser la machine, vérier que le bouton « eau
chaude/vapeur » (5) est fermé et que le réservoir à eau
de la machine contient une quantité d’eau sufsante.
• (Fig.7) - Appuyer sur l'interrupteur ON/OFF (18) ; le voyant
à l'intérieur s'allume.
• Attendre jusqu’à ce que le voyant de la touche café «
machine prête » (16) s'allume. La machine est prête pour
la distribution du café.
5.1 Avec du café moulu
• (Fig.9-A) - Introduire le ltre (12) dans le porte-ltre «
Crema » (13).
• (Fig.11) - Introduire le porte-ltre « Crema » par le bas
dans le groupe de distribution (2).
• (Fig.12) - Tourner le porte-ltre de gauche à droite jusqu’à
ce qu’il se bloque. Laisser la poignée du porte-ltre «
Crema » ; la poignée tourne légèrement vers la gauche.
Ce mouvement garantit le parfait fonctionnement du
porte-ltre :
• (Fig.14) - Préchauffer le porte-ltre « Crema », en appuyant sur la touche café (16). L’eau commencera à sortir
du porte-ltre « Crema » (cette opération n’est nécessaire
que pour le premier café).
• Après avoir laissé l'eau s'écouler (50 ml), appuyer à
nouveau sur la touche café (16) pour arrêter l’écoulement
de l'eau chaude.
• (Fig.16) - Enlever le porte-ltre de la machine en le tour-
nant de droite à gauche et vider l’eau résiduelle. Grâce
au porte-ltre spécial (12) dont la machine est pourvue,
il n’est pas nécessaire de changer de ltre pour obtenir
une ou deux doses de café.
• (Fig.9-B) - Verser 1 ou 2 mesures de café moulu à ras
Page 22

FRANÇAIS
• 10 •
bord dans le ltre pour obtenir une ou deux doses de café.
Nettoyer le bord du porte-ltre et éliminer les résidus de
café.
• (Fig.11) - Introduire le porte-ltre (13) par le bas dans le
groupe de distribution (2).
• (Fig.12) - Tourner le porte-ltre de gauche à droite jusqu’à
ce qu’il se bloque.
• (Fig.13) - Mettre 1 ou 2 tasses préchauffées sous le
porte-ltre « Crema » et vérier qu’elles sont correctement
placées sous les buses de distribution du café.
• (Fig.14) - Appuyer sur la touche café (16).
• Lorsque la machine a distribué la quantité de café désirée,
appuyer à nouveau sur la touche café (16) pour arrêter la
distribution du café et retirer les tasses (Fig.15).
• (Fig.16) - Une fois la distribution terminée, attendre
quelques secondes avant de sortir le porte-ltre « Crema
» et d’évacuer le marc du café.
Remarque de nettoyage : garder le ltre du porteltre « Crema » bien propre. Sortir le ltre de son
logement et rincer avec de l'eau potable (Fig.17).
5.2 Avec des dosettes de café
• (Fig.9-A) - Retirer le ltre à café moulu (12) du porte-ltre
« Crema » (13) en le tirant vers le haut.
• (Fig.10) - Introduire l’adaptateur à dosettes (14) dans le
porte-ltre « Crema » (13) la partie bombée tournée vers
le bas. Introduire ensuite le ltre (15).
• (Fig.11) - Introduire le porte-ltre « Crema » à partir du
bas dans le groupe de distribution (2).
• (Fig.12) - Tourner le porte-ltre de gauche à droite jusqu’à
ce qu’il se bloque.
• Laisser la prise de la poignée du porte-ltre « Crema ». Un
système automatique va ramener légèrement la poignée
vers la gauche.
Ce mouvement assure le fonctionnement optimal du
porte-ltre « Crema ».
•
(Fig.14) - Préchauffer le porte-ltre « Crema », en ap-
puyant sur la touche café (16). L’eau commencera à sortir
du porte-ltre « Crema » (cette opération n’est nécessaire
que pour le premier café).
• Après avoir laissé l'eau s'écouler (50ml), appuyer à nouveau sur la touche café (16) pour arrêter la distribution
d'eau chaude.
• (Fig.16) - Retirer le porte-ltre « Crema » en le tournant
de droite à gauche et vider l'eau résiduelle.
• Introduire la dosette dans le porte-ltre et s’assurer que
le papier de la dosette ne sort pas du porte-ltre.
• (Fig.11) - Introduire le porte-ltre « Crema » à partir du
bas dans le groupe de distribution (2).
• (Fig.12) - Tourner le porte-ltre de gauche à droite jusqu’à
ce qu’il se bloque.
• Mettre 1 tasse préchauffée sous le porte-ltre et vérier
qu’elle est correctement placée sous les buses de distribution du café.
• (Fig.14) - Appuyer sur la touche café (16).
• Lorsque la machine a distribué la quantité de café désirée,
appuyer à nouveau sur la touche café (16) pour arrêter la
distribution de café et retirer la tasse.
• (Fig.16) - Une fois la distribution terminée, attendre quel-
ques secondes avant de sortir le porte-ltre et d’évacuer
la dosette utilisée.
Remarque de nettoyage : garder le ltre du porteltre « Crema » bien propre. Sortir le ltre de son
logement et rincer avec de l'eau potable (Fig.17).
6 CHOIX DU TYPE DE CAFÉ - CONSEILS
Généralement, tous les types de café disponibles dans le
commerce peuvent être utilisés. Toutefois, le café est un
produit naturel et son goût change en fonction de l’origine
et des mélanges réalisés. Il est donc conseillé d’essayer
plusieurs types de café, an de trouver celui qui s’adapte
le mieux à vos goûts personnels.
Pour des résultats optimaux, il est quand même conseillé
d’utiliser des mélanges préparés spécialement pour
les machines à expresso. Le café est toujours censé
sortir régulièrement du porte-ltre « Crema » sans qu'il
s'égoutte.
La vitesse de distribution du café peut être modiée, en
changeant légèrement la dose de café dans le ltre et/ou
en utilisant une mouture différente.
AVANT TOUTE OPÉRATION DE DISTRIBUTION
DE VAPEUR OU D’EAU CHAUDE, VÉRIFIER QUE
LA BUSE DE VAPEUR (PANNARELLO) EST CORRECTEMENT ORIENTÉE VERS LE BAC DE RÉCUPÉRATION
D’EAU.
7 EAU CHAUDE
Danger de brûlure ! Au début de la distribution,
il peut y avoir des éclaboussures d'eau chaude.
Le tuyau de distribution peut atteindre des températures
élevées : éviter tout contact direct avec les mains.
• (Fig.7) - Appuyer sur l'interrupteur ON/OFF (18) ; le voyant
à l'intérieur s'allume.
• Attendre jusqu’à ce que le voyant de la touche café «
machine prête » (16) s'allume. La machine est prête pour
la distribution du café.
• (Fig.18) - Placer un récipient ou un verre à thé sous la
buse de vapeur (pannarello). Ouvrir le robinet (5) en le
tournant dans le sens inverse des aiguilles d’une montre.
• Une fois que la quantité d’eau désirée a été distribuée,
fermer le robinet (5) en le tournant dans le sens des
aiguilles d’une montre.
• Retirer le récipient contenant l’eau chaude.
Page 23

FRANÇAIS
• 11 •
FRANÇAIS
8 VAPEUR / CAPPUCCINO
Danger de brûlures ! Au début de la distribution,
il peut y avoir des éclaboussures d'eau chaude.
Le tuyau de distribution peut atteindre des températures
élevées : éviter tout contact direct avec les mains.
• (Fig.7) - Appuyer sur l'interrupteur ON/OFF (18) ; le voyant
à l'intérieur s'allume.
• Attendre jusqu’à ce que le voyant de la touche café «
machine prête » (16) s'allume.
• (Fig.19) - Appuyer sur la touche (17) vapeur. Le voyant
de la touche café (16) s’éteint.
• Attendre jusqu’à ce que les voyants de la touche vapeur
(17) et de la touche café (16) s’allument ; maintenant, la
machine est prête à distribuer de la vapeur.
• (Fig.18) - Placer un récipient sous la buse de vapeur et
ouvrir le bouton (5) pendant quelques secondes pour
que l'eau résiduelle contenue dans la buse de la vapeur
(pannarello) s’écoule. Quelques instants après, seule la
vapeur sera distribuée.
• Fermer le bouton (5) et retirer le récipient.
• Remplir 1/3 du récipient servant à préparer le cappuccino
de lait froid.
Pour obtenir de meilleurs résultats, utiliser du
lait froid.
• (Fig.20) - Plonger la buse de vapeur dans le lait et ouvrir
le bouton (5) en le tournant dans le sens inverse aux
aiguilles d’une montre. Déplacer lentement le récipient du
bas vers le haut, an d'obtenir un réchauffage uniforme.
• Une fois ce procédé terminé, fermer le robinet (5) et
prendre la tasse avec le lait émulsionné.
• (Fig.19) - Appuyer à nouveau sur la touche vapeur (17).
• Pour mettre la machine en service, amorcer le circuit
conformément à la section 4.5.
Remarque : la machina est prête lorsque le
voyant de la touche (16) « machine prête » est
allumé xe.
Nota bene : s’il n’est pas possible de distribuer
du cappuccino comme il a été décrit, il faut réa-
morcer le circuit selon ce qui est prévu à la section 4.5
et répéter par la suite toutes les opérations.
Procéder de la même façon pour réchauffer
d'autres boissons.
• Il faut ensuite nettoyer la buse de vapeur avec un chiffon
humide.
9 NETTOYAGE
L’entretien et le nettoyage ne peuvent être effectués
que si la machine est froide et débranchée du réseau
électrique.
• Ne pas plonger la machine dans l’eau. Ne pas laver ses
composants au lave-vaisselle.
• Ne pas utiliser d’alcool éthylique, de solvants ni d’agents
chimiques agressifs.
• Il est recommandé de nettoyer quotidiennement le réservoir à eau et de le remplir avec de l'eau fraîche.
• (Fig.21-22) - Une fois par jour, après avoir réchauffé le
lait, démonter la partie extérieure du pannarello et la laver
avec de l’eau potable fraîche.
• (Fig.23) - Il est nécessaire de nettoyer la buse de vapeur
une fois par semaine. Pour ce faire, il faut :
- enlever la partie extérieure du pannarello (pour le
nettoyage normal) ;
- desserrer le collier (ne pas l’enlever) ;
- retirer la partie supérieure du pannarello depuis la buse
de vapeur ;
- laver la partie supérieure du pannarello avec de l'eau
fraîche potable ;
- laver la buse de vapeur avec un chiffon humide et
enlever tout éventuel résidu de lait ;
- replacer la partie supérieure dans la buse de vapeur
(vérier qu’elle est insérée complètement) ;
- serrer le collier que l’on avait précédemment relâché.
Monter à nouveau la partie extérieure du pannarello.
• (Fig.24) - Vider et laver tous les jours le bac d'égouttement.
• Pour le nettoyage de l’appareil, utiliser un chiffon doux et
légèrement imbibé d’eau.
• (Fig.17) - Pour nettoyer le porte-ltre « Crema », procéder
comme il suit :
- retirer le ltre, le laver soigneusement avec de l’eau
chaude.
- retirer l’adaptateur (s’il est présent), le laver soigneuse-
ment avec de l’eau chaude.
- laver le porte-ltre « Crema » à l’intérieur.
• Ne pas sécher la machine et/ou ses composants dans un
four à micro-ondes et/ou un four traditionnel.
Une fois le détartrage effectué (voir Chap. 10), procéder
avec le nettoyage du ltre du groupe de distribution et le
nettoyage de la garniture.
Lors du nettoyage du ltre, il faut :
• dévisser la vis connectant le ltre au groupe de distribu-
tion au moyen du tournevis inclus dans le gratteur.
Page 24

FRANÇAIS
• 12 •
• Ôter le ltre et le nettoyer soigneusement à l'aide d'un
produit détergent neutre.
• rincer et réinstaller le ltre ; visser la vis au moyen du
tournevis inclus dans le gratteur.
Lors du nettoyage de la garniture, il faut :
• introduire le gratteur dans le groupe de distribution
comme le montre la gure ;
• tourner doucement le gratteur pour enlever les éventuels
résidus de café dans la garniture.
• Enn, ôter le gratteur et nettoyer à l'aide d'un chiffon
humide pour enlever toute trace de café.
10 DÉTARTRAGE
La formation de calcaire est liée à l’emploi de l’appareil.
Le cycle de détartrage est nécessaire tous les 3 ou 4
mois d’utilisation de la machine et/ou en cas de réduction
de la quantité d'eau débitée.
Si vous souhaitez effectuer cette opération
personnellement, il existe dans le commerce une
solution détartrante pour machines à café de type non
toxique et/ou non nocive. Nous recommandons l’emploi
de la solution détartrante Saeco.
Attention ! Ne jamais utiliser de vinaigre pour
détartrer la machine.
• (Fig.2) - Enlever et vider le réservoir à eau.
• (Fig.3) - Mélanger la solution détartrante avec de l'eau
comme il est indiqué sur l'emballage du produit et
remplir le réservoir à eau. Replacer le réservoir dans la
machine.
• (Fig.7) - Mettre en marche la machine, en appuyant sur
l'interrupteur ON/OFF (18).
• (Fig.8) - Placer un récipient sous la buse de vapeur.
• Ouvrir le bouton (5) pour prendre tout le détartrant par
intervalles (une tasse à la fois) ; pour arrêter la distribution,
fermer le bouton (5).
• (Fig.7) - Pendant les différents intervalles, mettre la
machine hors tension en appuyant sur l'interrupteur
ON/OFF (18) et attendre 10 à 15 minutes pour que la
solution détartrante ait son effet. Vider le récipient.
• (Fig.2 - 3) - Une fois la solution détartrante terminée,
extraire le réservoir à eau, rincer et le remplir avec de
l'eau fraîche potable.
• (Fig.4; Fig.8) - Réintroduire le réservoir dans la machine
; ouvrir le bouton (5) pour vider 2/3 de l’eau. Pour arrêter
la distribution, fermer le bouton de la vapeur (5) dans le
sens inverse.
• Laisser que la machine se chauffe et vider le contenu restant du réservoir à eau en suivant le procédé ci-dessus.
Si vous utilisez un produit autre que celui qui
a été conseillé, nous vous prions de toujours
respecter les instructions du fabricant indiquées sur
l'emballage de la solution détartrante.
11 ÉLIMINATION
• Mettre hors service les appareils inutilisés.
• Débrancher la che de la prise de courant et couper le
cordon d’alimentation électrique.
• En n de vie du produit, l’amener.
Page 25

FRANÇAIS
• 13 •
FRANÇAIS
Panne Causes possibles Remède
La machine ne se met pas en
marche.
La machine n’est pas branchée sur le
réseau électrique.
Brancher la machine sur le réseau
électrique.
La pompe est très bruyante. Manque d’eau dans le réservoir. Remplir d’eau (sect.4.4).
Le café est trop froid.
Le voyant de la touche « machine
prête » (16) était éteint lorsqu’on a
appuyé sur la touche.
Attendre jusqu’à ce que le voyant de la
touche (16) ne s’allume.
Le porte-ltre n’est pas inséré pour le
préchauffage (chap. 5).
Préchauffer le porte-ltre.
Les tasses sont froides.
Préchauffer les tasses avec de l’eau
chaude.
La crème du lait ne se forme
pas.
Il n’est pas possible de préparer du cappuccino.
Lait inapproprié : lait en poudre, lait
maigre.
Utiliser du lait entier.
Le Cappuccinatore est sale.
Nettoyer le cappuccinatore comme il a été
décrit au Chap.9.
Il n’y a plus de vapeur dans la chaudière.
Réamorcer le circuit (sect. 4.5) et répéter
les opérations décrites au Chap. 8.
Le café coule trop rapidement,
la crème ne se forme pas.
Pas assez de café dans le porte-ltre. Ajouter du café (chap. 5).
Mouture trop grossière. Changer de mélange (chap.6).
Café pas frais ou inapproprié. Changer de mélange (chap.6).
La dosette n’est pas fraîche ou
adéquate.
Changer de dosette.
Le café ne coule pas ou bien il
ne coule qu’en gouttes.
Eau insufsante. Remplir d’eau (sect.4.4).
Mouture trop ne. Changer de mélange (chap.6).
Café pressé dans le porte-ltre. Remuer le café moulu.
Trop de café dans le porte-ltre.
Réduire la quantité de café dans le porte-
ltre.
Bouton (5) ouvert. Fermer le bouton (5).
Machine entartrée. Détartrer la machine (chap.10).
Le ltre contenu dans le porte-ltre est
bouché.
Nettoyer le ltre (chap.9)
La dosette n’est pas adéquate. Changer de type de dosette.
Le café coule des bords.
Porte-ltre mal inséré dans le groupe
de distribution du café.
Insérer correctement le porte-ltre (chap.5).
Bord supérieur du porte-ltre encrassé. Nettoyer le bord du porte-ltre.
Garniture de la chaudière encrassée
ou usée.
Nettoyer ou remplacer la garniture.
Dosette introduite de manière incorrecte.
Introduire correctement la dosette en
prenant soin à ce qu’elle ne sorte pas du
porte-ltre.
Trop de café dans le porte-ltre.
Réduire la quantité de café à l’aide de la
mesure
Pour toute panne non détaillée dans le tableau ci-dessus ou en cas de solutions insufsantes à résoudre le problème,
s'adresser à un centre d'assistance agréé.
Page 26

ESPAÑOL
• 2 •
MEDIDAS DE SEGURIDAD IMPORTANTES
Durante el uso de electrodomésticos, se aconseja tomar algunas precauciones básicas de
seguridad para reducir el riesgo de incendios, sacudidas eléctricas y/o daños a personas,
entre las que se incluyen las siguientes:
1. Leer las instrucciones e informaciones contenidas en este manual de instrucciones y las
demás indicaciones presentes en el embalaje del producto antes de encender o utilizar
la máquina.
2. No tocar las superficies calientes (ej. tubo de vapor y portafiltro). Utilizar los mangos
o mandos.
3. No sumergir el cable, los enchufes o la máquina en agua o en cualquier otro líquido
para evitar incendios, sacudidas eléctricas o daños a personas.
4. Mantener la máquina fuera del alcance de los niños.
5. Desenchufar la máquina cuando no se esté utilizando y antes de empezar a limpiarla.
6. Dejarla enfriar antes de poner o quitar piezas y antes de empezar a limpiarla.
7. El portafiltro no se debe quitar durante los ciclos de suministro ya que hay peligro de
quemaduras.
8. El uso de accesorios no aconsejados por el fabricante podría causar incendios, sacudidas
eléctricas o daños a personas.
9. No utilizar la máquina en espacios abiertos.
10. Evitar que el cable cuelgue de la mesa o la superficie de trabajo, o que toque superficies
calientes.
11. Mantener la máquina lejos de fuentes de calor.
12. La máquina ha sido diseñada sólo para uso doméstico. La máquina no es adecuada
para un funcionamiento continuo o de tipo comercial.
13. No utilizar la máquina si el cable o el enchufe están dañados o en caso de averías o
roturas. Hacer que controlen, reparen o ajusten la máquina en un centro de asistencia
autorizado.
14. La máquina no se debe utilizar con el depósito de agua vacío.
15. Utilizar sólo agua fresca. La máquina se podría dañar si se utiliza agua caliente u otros
líquidos.
16. Para enchufar el cable poner primero la máquina en “OFF”, conectar el cable a la
Page 27

ESPAÑOL
• 3 •
ESPAÑOL
máquina y luego conectar el enchufe a la toma de corriente. Para desenchufar el cable
poner primero la máquina en “OFF” y luego desconectar el enchufe de la toma de
corriente.
17. Extremar las precauciones al utilizar el valor.
18. La máquina se debe utilizar sólo conforme al uso previsto.
CONSERVAR ESTAS INSTRUCCIONES
INSTRUCCIONES ACERCA DEL CABLE
ELÉCTRICO CORTO
Se suministra un cable eléctrico corto para evitar que se enrosque o que se enrede.
Después de la instalación de la máquina el cable debe quedar accesible para poderlo
desconectar cuando sea necesario.
Los alargadores están disponibles en los distribuidores autorizados a la venta de accesorios
eléctricos, pero se aconseja utilizarlos con mucha atención. En caso de utilizar un alargador
se debe comprobar:
• Que los valores eléctricos nominales anotados en el alargador sean por lo menos
iguales a los de la máquina.
• Si el enchufe de la máquina tiene una conexión de tierra, se debe utilizar un alargador
de 3 cables con cable de tierra.
• El alargador se debe colocar de manera que no cuelgue de la superficie de trabajo o
de la mesa, ya que pudiera ser tirado por los niños o causar tropiezos accidentales.
Page 28

ESPAÑOL
• 4 •
4 51 2 3
6 7 8 9 10
11
12
13
16
17
15
14
19
18
Fig.A
20 cm
8 in
20 cm
8 in
20 cm
8 in
40 cm
16 in
Page 29

ESPAÑOL
• 5 •
Fig.1 Fig.2 Fig.3
Fig.4 Fig.5 Fig.6
Fig.7 Fig.8 Fig.9
Fig.10 Fig.11 Fig.12
A
B
A
B
ESPAÑOL
Page 30

ESPAÑOL
• 6 •
Fig.13 Fig.14 Fig.15
Fig.16 Fig.17 Fig.18
Fig.19 Fig.20 Fig.21
Fig.22 Fig.23 Fig.24
Page 31

ESPAÑOL
• 7 •
ESPAÑOL
1 INFORMACIÓN DE CARÁCTER GENERAL
La máquina de café prepara 1 ó 2 tazas de café exprés
y dispone de un tubo orientable para el suministro del
vapor y del agua caliente. Los mandos situados en
la parte delantera del aparato llevan iconos de fácil
interpretación.
La máquina ha sido diseñada para uso doméstico y no se
aconseja un funcionamiento continuo de tipo profesional.
¡Atención! Se declina toda responsabilidad por
posibles daños en caso de:
• Uso indebido y no conforme a las instrucciones de
uso;
• Reparaciones realizadas en centros de asistencia
no autorizados;
• Alteración del cable de alimentación;
• Alteración de cualquier pieza de la máquina;
• Utilización de repuestos y accesorios no originales;
• Descalcicación de la máquina no realizada y
almacenamiento en locales con temperatura por
debajo de 0°C.
En dichos casos la garantía pierde su validez.
1.1 Para facilitar la lectura
El triángulo de advertencia señala
todas las instrucciones importan-
tes para la seguridad del usuario.
¡Observar atentamente dichas indicaciones para evitar
heridas graves!
La referencia a guras, partes del aparato o elementos
del panel de mandos, etc. está indicada con números o
letras; en este caso hacer referencia a las guras.
Este símbolo señala las informaciones más
importantes para asegurar un mejor uso de la
máquina.
Las guras que remiten al texto están en la solapa de
cubierta. Mantener abierta esta página durante la lectura
de las instrucciones de uso.
1.2 Cómo utilizar el manual de instrucciones
Guardar este manual de instrucciones de uso en un lugar
seguro y adjuntarlas a la máquina de café en caso de
que otra persona vaya a utilizar la máquina.
Para información más detallada o en caso de algún
problema, dirigirse a centros de asistencia autorizados.
2 DATOS TÉCNICOS
El fabricante se reserva el derecho de modicar las
características técnicas del producto.
Máquina conforme a la Directiva Europea 89/336/CEE
(Decreto legislativo italiano 476 del 04/12/92), relativa a
la eliminación de las interferencias radiotelevisivas.
Tensión nominal - Potencia nominal - Alimentación
Véase placa en el aparato
Estructura exterior
Metal
Dimensiones (l x a x p)
220 x 300 x 270
Peso
4 kg
Longitud cable
1,2 m
Panel de mandos
En la parte delantera
Portaltro
Presurizado mecánico
Pannarello
Especial para capuchinos
Depósito de agua
2 litros - Extraíble
Presión bomba
15 bar
Caldera
Acero inoxidable
Dispositivos de seguridad
Termostato de rearme manual
Termofusible
3 NORMAS DE SEGURIDAD
No dejar nunca que las partes bajo tensión entren en
contacto con el agua: ¡Peligro de cortocircuito! ¡El vapor sobrecalentado y el agua caliente pueden provocar
quemaduras! No dirigir nunca el chorro de vapor o del
agua caliente hacia partes del cuerpo; manipular con
cuidado la boquilla de salida de vapor / agua caliente:
¡Riesgo de quemaduras!
Uso previsto
Usar la máquina de café sólo en ámbito doméstico. ¡Se
prohíbe toda modicación técnica y uso ilícito por los
riesgos que éstos conllevan! El aparato no está diseñado
para que lo usen personas (incluidos los niños) con reducidas capacidades físicas, mentales o sensoriales o con
experiencia y/o competencias insucientes, a no ser que
lo utilicen bajo la supervisión de una persona responsable de su seguridad o que ésta les enseñe a usarlo.
Alimentación de corriente eléctrica
Conectar la máquina de café sólo a una toma de corriente adecuada. La tensión debe corresponder al valor
indicado en la placa del aparato.
Page 32

ESPAÑOL
• 8 •
Cable de alimentación
Nunca usar la máquina de café si el cable de alimentación es defectuoso. Si el cable de alimentación está
dañado, solicitar al fabricante o al servicio de asistencia
clientes la sustitución del mismo. Procurar que el cable
de alimentación no pase por esquinas o cantos agudos
ni por encima de objetos muy calientes. Protegerlo del
aceite.
No llevar ni tirar de la máquina agarrándola por el cable.
No desenchufar la máquina tirando del cable ni tocar la
toma con manos mojadas.
Procurar que el cable de alimentación no cuelgue libremente de mesas o estanterías.
Protección de otras personas
Mantener fuera del alcance de los niños para evitar que
jueguen con el aparato.
Los niños no se dan cuenta de los peligros relacionados
con el uso indebido de un electrodoméstico. No dejar al
alcance de los niños los materiales usados para embalar
la máquina.
Riesgo de quemaduras
No dirigir contra sí mismo ni contra los demás el chorro
de vapor sobrecalentado o de agua caliente. Usar siempre las empuñaduras o los mandos colocados para ello.
Nunca quitar el portaltro “Crema” durante el suministro
de café. Durante la fase de calentamiento del grupo de
café pueden salir unas gotas de agua caliente.
Colocación
Colocar la máquina de café en un lugar seguro, donde
nadie la puede volcar o quedar herido.
Agua caliente o vapor sobrecalentado podrían salir de los
tubos: ¡Riesgo de quemaduras!
No colocar la máquina en un lugar con temperatura
inferior a 0°C; se corre el riesgo de que las bajas temperaturas estropeen la máquina.
No usar la máquina de café en lugares abiertos.
No apoyar la máquina sobre supercies muy calientes ni
cerca de llamas abiertas a n de evitar que su carrocería
se derrita o que de cualquier manera se dañe.
Limpieza
Antes de limpiar la máquina, es necesario desactivar
todos los botones y, a continuación, desconectar la
máquina de la toma de corriente.
Esperar a que la máquina se enfríe. ¡Nunca sumergir la
máquina en el agua!
Queda prohibido tratar de intervenir en la estructura
interna de la máquina.
No usar el agua que ha quedado en el depósito durante
unos días para uso alimentario. Volver a llenar el depósito con agua potable fresca.
Espacio para el uso y el mantenimiento
Para un funcionamiento correcto de la máquina de café
se recomienda lo siguiente:
• Elegir una supercie de apoyo bien nivelada;
• Elegir un ambiente sucientemente iluminado e higiénico.
La toma de corriente debe ser de fácil acceso;
• Calcular una distancia mínima de la máquina con respecto
a la pared como muestra la gura (Fig.A).
Conservación de la máquina
En caso de que no se vaya a usar la máquina durante
largos periodos de tiempo, deberá apagarse y desconectarse de la toma de corriente. Guardar la máquina en
un lugar seco y fuera del alcance de los niños. Proteger
la máquina del polvo y de la suciedad.
Reparaciones / Mantenimiento
En caso de averías, desperfectos o sospecha de
desperfectos tras una caída, se recomienda desconectar
en seguida la máquina de la toma de corriente. Nunca
poner en funcionamiento una máquina que presente
desperfectos. Sólo los Centros de Asistencia Autorizados pueden realizar intervenciones y reparaciones a
la máquina. En caso de intervenciones mal hechas, se
rechaza toda responsabilidad por posibles daños.
Antiincendio
En caso de incendio usar extintores de anhídrido carbónico (CO2). No usar agua ni extintores de polvo.
Componentes de la máquina (Pág.4)
1 Panel de mandos
2 Grupo de café
3 Depósito de agua
4 Embudo de llenado del depósito de agua
5 Mando de agua caliente / vapor
6 Tubo de vapor (pannarello)
7 Cajón de accesorios
8 Bandeja de goteo
9 Rejilla de metal
10 Cable de alimentación
11 Cuchara dosicadora para café molido
12 Portaltro para café molido
(único para el suministro de 1 ó 2 cafés)
13 Portaltro “Crema”
14 Adaptador de ltro para pastillas de café
15 Filtro para pastillas de café
16 Botón luminoso de suministro de café
17 Botón luminoso de suministro de vapor
18 Botón luminoso ON/OFF
19 Raspador
4 INSTALACIÓN
Para su seguridad y la seguridad de terceras personas
observar atentamente las “Normas de seguridad”
descritas en el cap. 3.
4.1 Embalaje
El embalaje original ha sido diseñado y realizado para
proteger la máquina durante el transporte. Se aconseja
guardarlo para transportes futuros.
Page 33

ESPAÑOL
• 9 •
ESPAÑOL
4.2 Advertencia para la instalación
Antes de instalar la máquina, respetar las siguientes
normas de seguridad:
• colocar la máquina en un lugar seguro;
• asegurarse de que los niños no tengan la posibilidad de
jugar con la máquina;
• no apoyar la máquina sobre supercies muy calientes ni
cerca de llamas abiertas.
Ahora se puede conectar la máquina de café a la red
eléctrica.
Nota: se aconseja lavar los componentes antes
de utilizarlos por primera vez y/o después de un
largo período de inutilización.
4.3 Conexión de la máquina
¡La corriente eléctrica puede ser peligrosa! Por
tanto, observar siempre atentamente las normas
de seguridad. ¡Nunca usar cables defectuosos! Los
cables y las tomas defectuosos deben ser sustituidos en
seguida en los Centros de Asistencia Autorizados.
La tensión del aparato ha sido determinada en fábrica.
Comprobar que la tensión de la red corresponda a las in-
dicaciones inscritas en la placa de identicación situada
en la parte de abajo del aparato.
• Antes de conectar la máquina a la red eléctrica, compro-
bar que el botón ON/OFF (18) no esté en la posición de
encendido.
• Introducir el enchufe en una toma de corriente de pared
de tensión adecuada.
4.4 Depósito de agua
• (Fig.1) - Extraer el cajón de accesorios (7), la bandeja de
goteo (8) y la rejilla (9).
• (Fig.2) - Extraer el depósito de agua de su alojamiento
(3); no dañar el tubo de aspiración del agua.
• (Fig.3) - Aclarar y llenar con agua potable fresca evitando
añadir líquido hasta el tope.
• (Fig.4) - Volver a colocar el depósito en su alojamiento
prestando atención a la introducción correcta del tubo
previamente extraído.
Introducir en el depósito siempre y sólo agua
potable fresca sin gas. El agua caliente y otros
líquidos pueden estropear el depósito. No poner en
funcionamiento la máquina sin agua: asegurarse de que
haya suciente agua en el depósito.
Nota: para rellenar rápidamente el depósito de
agua se puede utilizar el embudo colocado en la
parte superior de la máquina. Abrir el embudo (Fig.5) y
rellenar con agua (Fig.6). Al nal de la operación, cerrar
siempre el embudo.
4.5 Carga del circuito
Antes de la puesta en funcionamiento del aparato, tras
un largo periodo sin usarlo y después de haber agotado
el agua, hay que recargar el circuito del mismo.
• (Fig.7) - Pulsar el botón ON/OFF (18). El piloto luminoso
colocado en el interior se enciende.
• (Fig.8) - Introducir un recipiente debajo del tubo de vapor.
Abrir el mando (5) “agua caliente/vapor” girándolo en el
sentido contrario a las agujas del reloj.
• Esperar a que desde el tubo de vapor (pannarello) salga
un chorro de agua regular.
• Cerrar el mando (5) “agua caliente/vapor” girándolo en el
sentido de las agujas del reloj. Retirar el recipiente.
Ahora la máquina está lista para el suministro de café y
el suministro de vapor; consultar los capítulos sobre el
funcionamiento de la máquina.
5 SUMINISTRO DE CAFÉ
¡Atención! Nunca quitar el portaltro “Crema”
girándolo manualmente en el sentido de las
agujas del reloj durante el suministro de café. Riesgo
de quemaduras.
• Durante esta operación el piloto luminoso del botón café
(16) “máquina lista” se puede encender y apagar; dicho
funcionamiento debe ser considerado normal y no una
anomalía.
• Asegurarse, antes de usar la máquina, de que el mando
(5) “Agua caliente/vapor” esté cerrado y que haya suciente agua en el depósito.
• (Fig.7) - Pulsar el botón ON/OFF (18). El piloto luminoso
colocado en el interior se enciende.
• Esperar a que el piloto luminoso del botón café (16)
“máquina lista” se encienda; a continuación la máquina
está lista para el suministro de café.
5.1 Con café molido
• (Fig.9-A) - Introducir el ltro (12) en el portaltro “Crema”
(13).
• (Fig.11) - Fijar el portaltro en el grupo suministro (2)
introduciéndolo debajo del grupo.
• (Fig.12) - Girar el portaltro de izquierda a derecha hasta
que se bloquee. Soltar el mango del portaltro “Crema”, el
mango gira levemente hacia la izquierda. Este movimiento
garantiza el perfecto funcionamiento del portaltro.
• (Fig.14) - Precalentar el portaltro “Crema” presionando
el botón café (16); empezará a salir agua del portaltro
“Crema” (esta operación es necesaria sólo para el primer
café).
• Después de haber dejado correr 50cc de agua, pulsar
otra vez el botón café (16) para detener el suministro de
agua caliente.
• (Fig.16) - Retirar el portaltro de la máquina girándolo de
derecha a izquierda y vaciar el agua restante. Gracias al
especial portaltro (12) de la máquina, no es necesario
cambiar ltro para obtener uno o dos cafés.
Page 34

ESPAÑOL
• 10 •
• (Fig.9-B) - Añadir 1 ó 2 medidas rasas de café molido en
el ltro para obtener uno o dos cafés; limpiar el borde del
portaltro de los restos de café.
• (Fig.11) - Fijar el portaltro (13) en el grupo suministro
(2) introduciéndolo debajo del grupo.
• (Fig.12) - Girar el portaltro de izquierda a derecha hasta
que se bloquee.
• (Fig.13) - Colocar 1 ó 2 tazas precalentadas debajo del
portaltro “Crema”; asegurarse de que las tazas estén
debajo de los oricios de suministro de café.
• (Fig.14) - Pulsar el botón café (16).
• Una vez obtenida la cantidad de café deseada, pulsar de
nuevo el botón café (16) para detener el suministro de
café y retirar las tazas con café (Fig.15).
•
(Fig.16) - Finalizado el suministro esperar unos segun-
dos, luego extraer el portaltro “Crema” y vaciarlo de los
posos.
Nota de limpieza: mantener el ltro del portaltro
“Crema” limpio, retirándolo de su alojamiento y
lavándolo con agua potable (Fig.17).
5.2 Con pastillas de café
• (Fig.9-A) - Extraer el ltro para café molido (12) del
portaltro “Crema” (13) tirándolo hacia arriba.
• (Fig.10) - Introducir el adaptador para pastillas de café
(14), con la parte convexa orientada hacia abajo, en el
portaltro “Crema” (13); luego introducir también el ltro
(15).
• (Fig.11) - Fijar el portaltro “Crema” en el grupo suministro
(2) introduciéndolo debajo del grupo.
• (Fig.12) - Girar el portaltro de izquierda a derecha hasta
que se bloquee.
• Soltar el mango del portaltro “Crema”. A continuación,
un sistema automático mueve el mango levemente
hacia la izquierda. Este movimiento garantiza el perfecto
funcionamiento del portaltro “Crema”.
• (Fig.14) - Precalentar el portaltro “Crema” presionando
el botón café (16); empezará a salir agua del portaltro
“Crema” (esta operación es necesaria sólo para el primer
café).
• Después de haber dejado correr 50cc de agua, pulsar
otra vez el botón café (16) para detener el suministro de
agua caliente.
• (Fig.16) - Retirar el portaltro “Crema” de la máquina
girándolo de derecha a izquierda y vaciar el agua
restante.
• Introducir la pastilla de café en el portaltro; asegurarse
de que el papel de la pastilla de café no salga del
portaltro.
• (Fig.11) - Fijar el portaltro “Crema” en el grupo suministro
(2) introduciéndolo debajo del grupo.
• (Fig.12) - Girar el portaltro de izquier da a derecha hasta
que se bloquee.
• Colocar 1 taza precalentada debajo del portafiltro;
asegurarse de que las tazas estén debajo de los oricios
de suministro de café.
• (Fig.14) - Pulsar el botón café (16).
• Una vez obtenida la cantidad de café deseada, pulsar de
nuevo el botón café (16) para detener el suministro de
café y retirar las tazas con café.
• (Fig.16) - Finalizado el suministro esperar unos segundos,
luego extraer el portafiltro y tirar la pastilla de café
usada.
Nota de limpieza: mantener el ltro del portaltro
“Crema” limpio, retirándolo de su alojamiento y
lavándolo con agua potable (Fig.17).
6 SELECCIÓN DEL TIPO DE CAFÉ - CONSEJOS
En general es posible utilizar cualquier tipo de café
que se encuentra en venta. Sin embargo, el café es un
producto natural y su sabor cambia en función del origen
y de la mezcla; por tanto es aconsejable probar varios
tipos hasta encontrar el café que nos agrada más.
De todas formas, para obtener mejores resultados se
aconseja utilizar mezclas preparadas especialmente
para las máquinas de café exprés. El café debiera salir
regularmente del portaltro “Crema” sin gotear.
Es posible modicar la velocidad de salida del café cambiando levemente la cantidad de café del ltro y/o usando
un café que tiene un grado de molido diferente.
ANTES DE REALIZAR CUALQUIER OPERACIÓN
DE SUMINISTRO DE VAPO R O DE AGUA
CALIENTE, COMPROBAR QUE EL TUBO DE VAPOR
(PANNARELLO) ESTÉ ORIENTADO HACIA LA BANDEJA
DE GOTEO.
7 AGUA CALIENTE
¡Riesgo de quemaduras! Al empezar el suministro
se pueden producir pequeñas salpicaduras de
agua caliente. El tubo de suministro puede alcanzar
temperaturas elevadas: no tocarlo directamente con
las manos.
• (Fig.7) - Pulsar el botón ON/OFF (18). El piloto luminoso
colocado en el interior se enciende.
• Esperar a que el piloto luminoso del botón café (16)
“máquina lista” se encienda; a continuación la máquina
está lista.
• (Fig.18) - Colocar un recipiente o una taza de té debajo del
tubo de vapor (pannarello). Abrir el mando (5) girándolo
en el sentido contrario a las agujas del reloj.
• Una vez obtenida la cantidad de agua caliente deseada,
cerrar el mando (5) girándolo en el sentido de las agujas
del reloj.
• Retirar el recipiente con el agua caliente.
Page 35

ESPAÑOL
• 11 •
ESPAÑOL
8 VAPOR / CAPUCHINO
¡Riesgo de quemaduras! Al empezar el suministro
se pueden producir pequeñas salpicaduras de
agua caliente. El tubo de suministro puede alcanzar
temperaturas elevadas: no tocarlo directamente con
las manos.
• (Fig.7) - Pulsar el botón ON/OFF (18). El piloto luminoso
colocado en el interior se enciende.
• Esperar a que el piloto luminoso del botón café (16)
“máquina lista” se encienda.
• (Fig.19) - Pulsar el botón vapor (17). El piloto luminoso
del botón café (16) se apaga.
• Esperar a que el piloto luminoso del botón vapor (17) y del
botón café (16) se enciendan; a continuación la máquina
está lista para el suministro de vapor.
• (Fig.18) - Colocar un recipiente debajo del tubo de vapor
y abrir el mando (5) durante algunos segundos para que
salga el agua que ha quedado en el tubo de vapor (pannarello); en poco tiempo empezará a salir sólo vapor.
• Cerrar el mando (5) y retirar el recipiente.
• Llenar con leche fría 1/3 del recipiente que desee utilizar
para preparar el capuchino.
Para garantizar un mejor resultado usar leche
fría
• (Fig.20) - Sumergir el tubo de vapor en la leche y abrir el
mando (5); girándolo en el sentido contrario a las agujas
del reloj; mover lentamente el recipiente que contiene
la leche de abajo para arriba para que la operación de
calentamiento sea uniforme.
• Al nal, cerrar el mando (5) y retirar la taza con la leche
montada.
• (Fig.19) - Pulsar de nuevo el botón vapor (17).
• Proceder con la operación de carga del circuito como
se indica en el apartado 4.5 para que la máquina sea
operativa.
Nota: la máquina está funcionando cuando el
piloto luminoso del botón (16) “máquina lista”
está encendido jo.
Nota: si no se puede preparar un capuchino
como se describe se debe recargar el circuito
como se describe en el apartado 4.5 y luego repetir las
operaciones.
El mismo sistema puede ser utilizado para el
calentamiento de otras bebidas.
• Tras el uso, limpiar el tubo de vapor con un paño hume-
decido.
9 LIMPIEZA
El mantenimiento y la limpieza pueden ser realizados
sólo cuando la máquina está fría y desconectada de la
red eléctrica.
• No sumergir la máquina en el agua ni introducir sus
componentes en el lavavajillas.
• No use alcohol etílico, disolventes y/o productos químicos
agresivos.
• Es aconsejable limpiar el depósito de agua diariamente
y llenarlo con agua fresca.
• (Fig.21-22) - Diariamente, después de haber calentado la
leche, desmontar la parte exterior del pannarello y lavarla
con agua potable fresca.
• (Fig.23) - Una vez a la semana hay que limpiar el tubo
de vapor. Para esto es necesario:
- desmontar la parte exterior del pannarello (para la
limpieza habitual);
- aojar la abrazadera (sin quitarla);
- retirar la parte superior del pannarello del tubo de
vapor;
- lavar la parte superior del pannarello con agua potable
fresca;
- lavar el tubo de vapor con un paño humedecido y quitar
los eventuales residuos de leche;
- volver a colocar la parte superior en el tubo de vapor (ase-
gurarse de que se haya introducido completamente);
- apretar la abrazadera aojada anteriormente.
Volver a montar la parte exterior del pannarello.
• (Fig.24) - Vaciar y lavar la bandeja de goteo diariamente.
• Limpiar la máquina usando un paño humedecido con
agua.
• (Fig.17) - Para limpiar el portaltro “Crema” observar las
siguientes indicaciones:
- extraer el ltro y lavarlo bien con agua caliente.
- extraer el adaptador (si está instalado) y lavarlo bien
con agua caliente.
- lavar el interior del portaltro “Crema”.
• No secar la máquina ni sus componentes usando un horno
microondas o un horno convencional.
Después de efectuar la descalcicación (ver Cap. 10) es
necesario limpiar el ltro del grupo de café y la junta.
Para limpiar el ltro es necesario:
• desenroscar el tornillo que ja el ltro al grupo de café
utilizando el destornillador presente en el raspador.
Page 36

ESPAÑOL
• 12 •
• quitar el ltro y lavarlo bien con un detergente neutro.
• aclarar y volver a montar el ltro; apretar el tornillo utili-
zando el destornillador presente en el raspador.
Para limpiar la junta es necesario:
• introducir el raspador en el grupo de café como se muestra
en la gura;
• girar delicadamente el raspador para quitar los eventuales
residuos de café presentes en la guarnición;
• al nal, extraer el raspador y pasar un paño húmedo para
eliminar las eventuales trazas de café.
10 DESCALCIFICACIÓN
La formación de cal se produce con el uso del aparato; el
ciclo de descalcicación debe efectuarse regularmente
cada 3-4 meses y/o cuando se observa una reducción
del volumen de agua.
Si se desea efectuar la limpieza personalmente,
se puede utilizar un producto descalcicante no
tóxico ni nocivo para máquinas de café que se encuentra
normalmente de venta en establecimientos. Se aconseja
el uso del líquido descalcicante Saeco.
¡Atención! No utilizar bajo ningún concepto
vinagre como líquido descalcicante.
• (Fig.2) - Retirar y vaciar el depósito de agua.
• (Fig.3) - Mezclar el líquido descalcicante con agua como
indicado en el embalaje del producto descalcicante y
verter la mezcla en el depósito; introducir el depósito en
la máquina.
• (Fig.7) - Encender la máquina pulsando el botón ON/OFF
(18).
• (Fig.8) - Introducir un recipiente debajo del tubo de
vapor.
• Abrir el mando (5) para retirar a intervalos (una taza cada
vez) todo el líquido descalcicante; cerrar el mando (5)
para detener el suministro.
• (Fig.7) - Dejar pasar unos 10-15 minutos entre cada
intervalo, desconectando la máquina a través del botón
ON/OFF (18), para que el líquido descalcicante haga
efecto. Vaciar el depósito.
• (Fig.2 - 3) - Una vez consumido el líquido descalcicante,
extraer el depósito de agua, aclararlo y llenarlo con agua
potable fresca.
• (Fig.4; Fig.8) - Volver a colocar el depósito en la máqui-
na; abrir el mando (5) para vaciar 2/3 del agua; cerrar
el mando (5) en el sentido de las agujas del reloj para
detener el suministro.
• Dejar calentar la máquina y vaciar el contenido residual
del depósito de agua como ya explicado.
Si se usa un producto distinto del aconsejado, se
recomienda respetar siempre las instrucciones
del fabricante indicadas en el envase del producto
descalcicante.
11 ELIMINACIÓN DEL APARATO
• Inutilizar los aparatos en desuso.
• Desconectar el aparato de la toma de corriente y cortar
el cable eléctrico.
• Al nal de su vida útil, entregar el aparato a un centro de
recogida idóneo.
Page 37

ESPAÑOL
• 13 •
ESPAÑOL
Avería Posibles causas Solución
La máquina no se enciende.
Máquina no conectada a la red
eléctrica.
Conectar la máquina a la red eléctrica.
La bomba es muy ruidosa. Falta agua en el depósito . Llenar con agua (apartado 4.4).
El café sale demasiado frío.
El piloto luminoso del botón (16)
“máquina lista” estaba apagado cuando se ha presionado el botón.
Esperar a que el piloto luminoso del botón
(16) se encienda.
No se ha introducido el portaltro para
el precalentamiento (cap. 5).
Precalentar el portaltro.
Tazas frías. Precalentar las tazas con agua caliente.
No se forma la crema de la
leche.
No es posible preparar el
capuchino.
Leche no adecuada: leche en polvo,
leche desnatada.
Utilizar leche entera.
Cappuccinatore sucio.
Limpiar el cappuccinatore como se describe en el Cap.9.
No hay más vapor en la caldera.
Cargar el circuito (apartado 4.5) y repetir
las operaciones descritas en el Cap. 8.
El café sale muy rápido y no
se forma la crema.
Hay poco café en el portaltro. Añadir café (cap. 5).
Molido demasiado grueso. Usar una mezcla diferente (cap.6).
Café viejo o no adecuado. Usar una mezcla diferente (cap.6).
Pastilla de café vieja o inadecuada. Cambiar la pastilla de café usada.
El café no sale o bien sale en
gotas.
Falta de agua. Llenar con agua (apartado 4.4).
Molido demasiado no. Usar una mezcla diferente (cap.6).
Café comprimido en el portaltro. Mover el café molido.
Hay demasiado café en el portaltro. Reducir la cantidad de café en el portaltro.
Mando (5) abierto. Cerrar el mando (5).
Máquina calcicada. Descalcicar la máquina (cap.10).
Filtro del portaltro obstruido. Limpiar el ltro (cap.9).
Pastilla de café inadecuada. Cambiar el tipo de pastilla de café.
El café sale fuera de los
bordes del portaltro.
Portaltro colocado de forma incor-
recta en el grupo de café.
Colocar el portaltro de forma correcta
(cap.5).
Borde superior del portaltro sucio. Limpiar el borde del portaltro.
Junta de la caldera sucia o desgastada.
Limpiar o sustituir la junta.
Pastilla de café colocada de forma
incorrecta.
Colocar la pastilla de café correctamente
de manera que no salga del portaltro.
Hay demasiado café en el portaltro.
Reducir la cantidad de café utilizando la
cuchara dosicadora.
Para las averías no mencionadas en la tabla o en caso de que las soluciones indicadas no funcionen, contactar
con un centro de asistencia.
Page 38

Limited Warranty & Descaling your
Espresso Coffee Machine
Limited Warranty
This warranty covers all defects in workmanship or
materials in the mechanical and electrical parts, arising
under normal usage and care, in this Saeco USA product
for a period of 1 (one) year from the date of purchase.
A valid proof-of-purchase must be provided prior to
any warranty service being rendered. A valid proof-ofpurchase is an authorized retailer receipt specifying
item, date purchased, and cost of item. An authorized
retailer gift receipt with date of purchase and item is also
an acceptable proof-of-purchase. Product is intended
for household use only. Any commercial use voids the
warranty. Exception: Royal machines are sold by Saeco
USA for commercial use and will be covered by a 1 (one)
year warranty on parts and labor both for household and
commercial applications.
Who is covered?
The original purchaser or gift recipient who can provide
proof-of-purchase from an authorized Saeco USA dealer.
What is not covered?
Improper usage and care can result in mineral buildup
that damages the product. Saeco USA is not responsible
for any expense resulting from such damage including
transportation, shipping, and repairs resulting from
mineral buildup, also known as calcium deposits, scale
and lime scale.
What will be done?
During the applicable warranty period under normal household usage and care, Saeco USA will repair or replace,
at their discretion, any mechanical or electrical part which
proves defective, or replace product with a comparable
model. The repaired or replacement product is warranted
for one year from the original date of purchase or 90
days, whichever is greater.
How can you receive service?
Call 1-800-933-7876 to request service. A Return
Authorization will be issued, when necessary. All
warranty service must be performed by Saeco USA or an
authorized Saeco USA Service Center or dealer. Please
contact Saeco USA for details. Repair or attempted repair
by unauthorized persons voids the warranty.
Unauthorized returned products will not be accepted and
will be returned to sender at sender’s expense.
In the event service is required:
• To obtain warranty service, a valid proof-of-purchase must
be submitted to Saeco USA before returning product.
Maintain a copy of proof-of-purchase for your records.
• Return Authorization number issued by Saeco USA is
necessary to obtain warranty service and must be clearly
labeled on box.
• Saeco USA is not responsible for loss or damage during
incoming shipment.
• Be sure to enclose any accessories or components related
to the product’s problem.
• Carefully package product. Saeco USA is not responsible
for any transportation and shipping expense.
• Retain tracking information for your protection in case of
loss or damage in shipment.
THIS LIMITED WARRANTY COVERS PRODUCTS
PURCHASED AND USED WITHIN THE UNITED STATES
AND DOES NOT COVER:
• Damages from improper installation.
• Damages in shipping.
• Defects other than manufacturing defects.
• Damages from misuse, abuse, accident, alteration, lack
of proper care and maintenance, or incorrect current or
voltage.
• Damage from service by other than a Saeco USA
authorized dealer or service center. Contact Saeco USA
for details.
• Any transportation and shipping charges.
Manufacturer makes no warranty, express or implied,
including without limitation, any warranties of tness
or merchantability, except as expressly set forth above
with respect to such products or parts therefor. Nor
shall manufacturer have incurred any other bligations or
liabilities on its part or be liable for any anticipated or lost
prots, incidental damages, consequential damages, time
charges, or any other losses incurred in connection with
the purchase, installation, replacement, or repair of such
products or any parts therefor whether original equipment
or installed as a replacement covered by this warranty or
otherwise; & manufacturer does not authorize any person
to assume for manufacturer any other liability in connection withthe products or parts therefor. Manufacturer
assumes no liability for delay in performing its obligations
hereunder if failure results, directly or indirectly, from any
cause beyond its control, including but not limited to acts
of god, acts of government, oods, res, shortages of
materials, strikes and other labor difculties, or delays,
or failures of transportation facilities. This warranty gives
you specic legal rights, and you may also have other
rights which vary from state to state.
DESCALING YOUR ESPRESSO COFFEE MACHINE
As part of normal preventative maintenance, espresso
makers should be descaled approx. every 2-3 months,
depending on the volume of use and hardness of your
local water supply.
Page 39

WARNINGS
Do not swallow. Avoid eye contact. Wash hands after
use. Do not expose to heat.
• Keep out of reach of children.
• This product is non-toxic.
To descale your espresso coffee machine, please follow
these steps:
MANUAL FILTER HOLDER MACHINES (ie: VIA VENEZIA, GRAN CREMA, AROMA, MAGIC CAPPUCCINO,
SIRENA):
1. Fill the water tank with the descaling solution. (1 packet
of Saeco descaling solution to one full tank of water.)
2. Turn on the machine and remove lter holder.
3. Run approximately 8 oz. of solution through the brew head.
Turn machine off and let the machine sit for 15 minutes.
4. Run approximately 8 oz. through the steam wand, and
again, turn machine off and let sit for 15 minutes.
5. Repeat this procedure, alternating between the brew head
and steam wand until the water tank is empty. Then rinse
water tank thoroughly and run two tanks of clear water
through the machine, alternating between the brew head
and steam wand.
Should be bold, just like other headers.
1. Fill the water tank with the descaling solution. (1 packet
of Saeco descaling solution to 4 cups of water.)
2. Turn on the machine.
3. Run approximately 8 oz. through the steam wand, turn
machine off and let sit for 15 minutes.
4. Repeat this procedure until the water tank is empty.
Then rinse water tank thoroughly and ush the machine
by running two tanks of clear water through the steam
wand.
PRIMEA / TALEA / ODEA / INCANTO / MAGIC / ROYAL /
V’SPRESSO AUTOMATIC MACHINES:
1. Fill the water tank with the descaling solution.
(1 packet of Saeco descaling solution to 4 cups of
water.)
2. Follow automatic descaling instructions as described in
manual.
This procedure, when performed as necessary, should
help avoid any major descaling requirements and related
expenses.
We always recommend the use of bottled or ltered
water to extend the longevity of your espresso machine.
Distilled water should not be used, as too many of the
necessary minerals are missing to make a good tasting
espresso.
To cancel the descale message upon completion of the
descaling cycle:
• Primea, Talea, Odea, Incanto or V’spresso: See individual
machine manuals.
• Magic Deluxe or Royal Digital: Press and hold the steam
button for 5-10 seconds.
• Royal Exclusive or Royal Professional: Enter programming
mode by pressing and holding the ENT (preground)
button. Scroll to the sub-menu ‘Sign.Descal’. Press the
enter button, scroll to yes, press the enter button. Scroll
to the ‘Exit’ sub-menu and press enter.
There are many good descaling agents on the market today including Saeco’s own product: Part number 524000,
3 packets, MSRP $7.00 plus $5.90 shipping & handling.
Any descaling product used for our machines should be
citric based. Do not use vinegar or lemon juice as this will
cause damage to the machine.
This product is non-toxic, biodegradable & odorless.
FIRST AID: If ingested, drink 2-3 glasses of water. In
case of eye contact, ush thoroughly with cool running
water for 15 minutes. Remove any contact lenses. Contact physician in either case, then get prompt medical
attention. For skin contact, ush with water.
If you have any questions or comments,
please call
Customer Service 1-800-933-7876
or visit: www.saecooutlet.com
Page 40

UNITED STATES SERVICE CENTER LISTING - LISTE DES CENTRES
D’ASSISTANCE - LISTA DE CENTROS DE ASISTENCIA
State City Service Center Telephone
Pays Ville Centre d’assistance Numéro de téléphone
Estado Ciudad Centro de asistencia Teléfono
AZ Phoenix Kitchen Classics/Kitchen Store 602-954-8141
CA Burlingame Espresso Equip Engineering LLC 650-375-8480
CA Escondido Mart's Appliance Service 760-745-7711
CA Gardena A Latte Hotte 310-294-9744
CA San Jose Appliance Repair Express 408-371-8853
CA Signal Hill Swiss Systems, Inc. 310-689-2372
CA Woodland Hills Speedy Appliance Service 818-225-7774
CO Colorado Springs Maric Beverage Systems 719-380-1610
FL Boca Raton SmArt Deco 561-620-0287
FL Sarasota Beanz, Inc. (The Beanz Man) 941-359-8916
IL Bensenville The Expresso Shoppe 630-350-0066
IL Chicago Longo & Siefer, Inc. (Coffee Exchange) 773-745-9295
IN Indianapolis Pro Tech Beverage Service 317-271-8515
MA Everett TC's Repair Service, Inc. 800-381-5001
MI Utica (Shelby Township) Espresso Machine Experts MI 586-739-9500
MN Minneapolis Kitchen Window / Alternative Con 612-824-4417
NC Cornelius The Coffeeboss, LLC 704-987-3310
NC Wilmington Personal Systems, Ltd 877-286-2833
NJ Berkeley Heights The Repair Shack 908-464-0797
NJ Somerville Butensky Services Co. 908-707-0912
NY Bronx Cerini Coffee Services Inc 718-584-6120
NY Brooklyn Solomon's Appliance Center 718-236-5065
NY Mount Kisco Enscrybe, Inc. (The Java Fix) 914-514-8042
OH Rocky River River Espresso 216-544-4954
OR Elmira Stefano's Espresso Care 541-935-1212
OR Medford Cafe West Distribution 877-701-2020
PA Bethel Park Espresso D'Milan, LLC 412-663-0125
PA Lansdale Services Unlimited, Inc. 215-361-7000
SC Myrtle Beach Coffee Joe's Repair 843-293-2886
TX Richardson Espresso RMI, Inc. 972-690-6969
UT Salt Lake City Rimini Coffee / Shea Service 801-539-1210
WA Seattle Home Espresso Repair Service 206-789-9513
WA Spokane Tech One Services 509-536-0524
WA Vancouver Espresso Resource NW 503-251-2970
Page 41

CANADA SERVICE CENTER LISTING - LISTE DES CENTRES D’ASSISTANCE LISTA DE CENTROS DE ASISTENCIA
State City Service Center Telephone
Pays Ville Centre d’assistance Numéro de téléphone
Estado Ciudad Centro de asistencia Teléfono
Quebec Montreal Saeco Canada ltée 514-385-5551
Quebec Québec Importation Mi-Ra 418-682-3878
Quebec Ste-Foy Café en grains 418-653-6265
Quebec Québec Importation Nuava 418-649-7858
Quebec Montreal Centre du Rasoir Fairview Pointe Claire 514-697-6343
Quebec Montreal Centre du Rasoir fine Lame Carré Phillips 514-842-2921
Quebec Baie Comeau Centre du Rasoir Centre Comm. Manicouagan 418-295-2161
Quebec Québec Centre du Rasoir Galerie de la Capitale 418-627-2378
Quebec Repentigny Centre du Rasoir Fine Lame Rive Nord 450-585-9895
Quebec Rimouski Centre du Rasoir Carrefour Rimouski 418-722-0419
Quebec Shawinigan Centre du Rasoir Fine Lame Plaza de la Mauricie 819-539-4382
Quebec Sherbrooke Centre du Rasoir Carrefour de L’Estrie 819-346-8979
Quebec St.Jean sur le Richelieu Centre du Rasoir Carrefour Richelieu 450-349-1605
Quebec Ste-Foy Centre du Rasoir Place Ste-Foy 418-653-1710
Quebec Ville d’Anjou Centre du Rasoir Galeries d’Anjou 514-493-0922
Quebec Drummondville Boutik Electrik / Drummondville 819-472-4244
Quebec Gatineau Boutik Electrik / Promenades de l’Outaouais 819-246-8400
Quebec Hull Boutik Electrik / Galeries de Hull 819-771-2434
Quebec Rivière-du-Loup Boutik Electrik / Centre Commerciale Rivière-du-Loup 418-867-8508
Quebec Rosemère Boutik Electrik Place Rosemère 450-437-9178
Quebec Rouyn-Noranda Boutik Electrik 819-762-1152
Quebec Sherbrooke Boutik Electrik Galeries Quatres Saisons 819-820-7890
Quebec St-Antoine des Laurentides Boutik Electrik Galeries de Laurentides 418-277-2884
Quebec Trois-Rivières Boutik Electrik 819-691-4125
Quebec Trois-Rivières Boutik ElectrikCentre Commercial Les Rivières 819-374-2545
Quebec Victoriaville Boutik Electrik Carrefour des Bois Francs 819-751-2321
Ontario Toronto Saeco Ontario Ltd. 416-256-9191
Ontario London Personal Edge / White Oaks Mall 519-681-0990
Ontario Hamilton Personal Edge / Lime Ridge Mall 905-318-6023
Ontario Kitchener Personal Edge / Fairview Park Mall 519-895-1328
Ontario Carlingwood Personal Edge / Carlingwood 613-725-0173
Ontario Kingston Personal Edge / Cataraqui Town Center) 613-634-9605
Ontario London Personal Edge / Masonville Place 519-672-7894
Ontario Oshawa Personal Edge 905-728-3503
Page 42

CANADA SERVICE CENTER LISTING - LISTE DES CENTRES D’ASSISTANCE LISTA DE CENTROS DE ASISTENCIA
State City Service Center Telephone
Pays Ville Centre d’assistance Numéro de téléphone
Estado Ciudad Centro de asistencia Teléfono
Ontario Thornhill Personal Edge 905-764-7190
British Columbia Vancouver Saeco West Ltd 604-299-7555
British Columbia Kelowna Pioneer Coffee 250-861-3308
British Columbia Victoria ABC Electric 250-382-7221
Alberta Calgary Espuccino 403-263-3224
Alberta Calgary National Cappuccino 403-571-8555
Alberta Edmonton Bilotta Food Equipment & Commercial Cappuccino Co. LTD 800-475-4656
Manitoba Winnipeg DeLuca Foods 204-775-8605
Nova Scotia Halifax Walkers Electronic 902-454-0291
Saskatchewan Saskatoon Bosch/Miele Kitchen Center 306-242-3744
Page 43

Page 44

Cod. 15001163 Rev.00 15-05-07
Saeco International Group S.p.A. Via Torretta, 240 - 40041 Gaggio Montano
Bologna - Italy - Tel. +39 0534.771.111 - Fax. +39 0534.31025
http://www.saeco.com
Type Sin006XN
Customer Service 1-800-933-7876
or visit: www.saecooutlet.com
 Loading...