

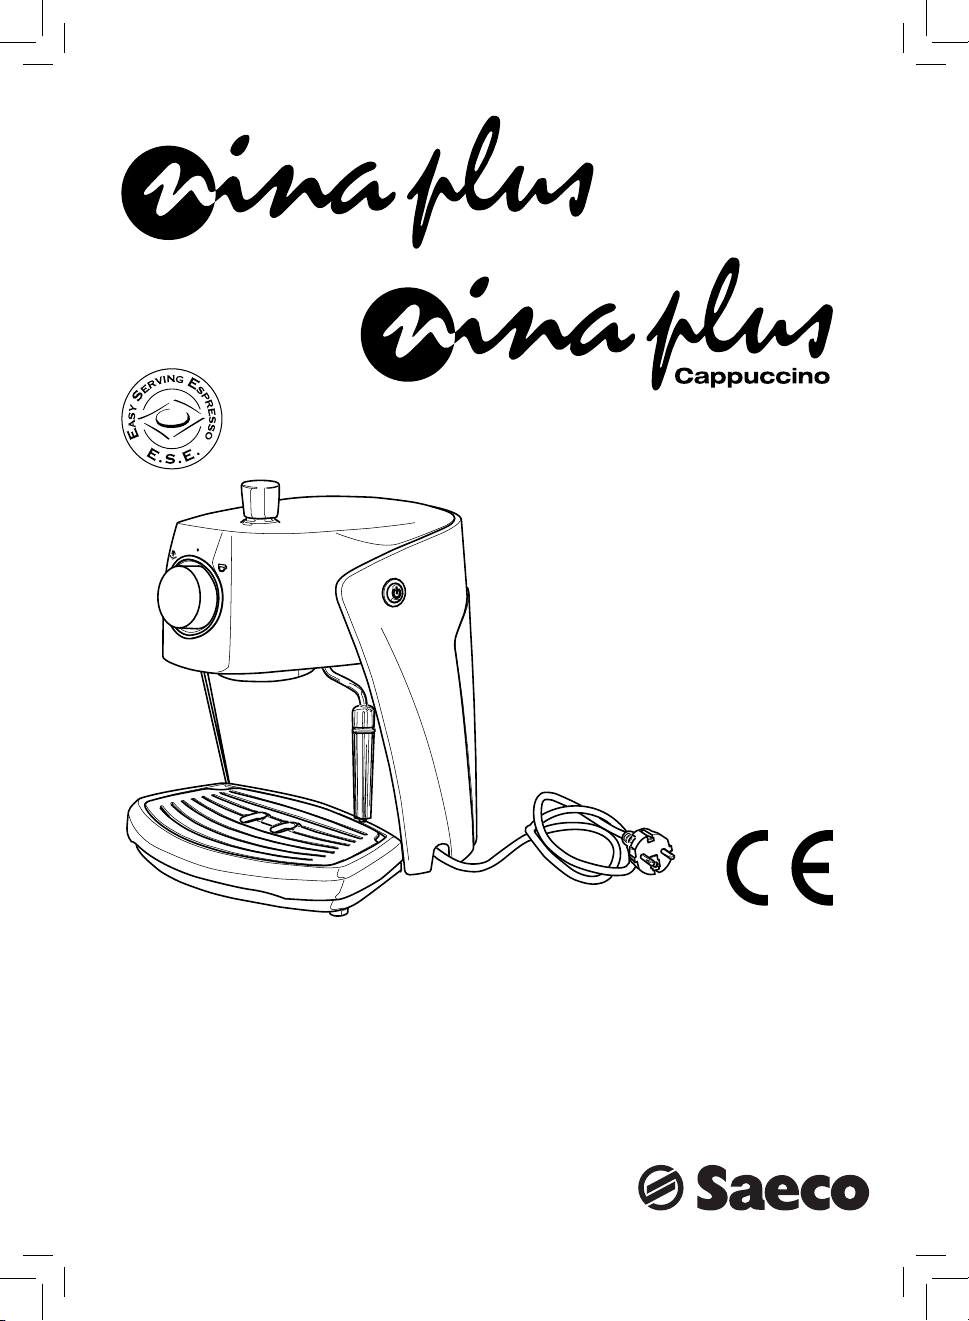
PHILIPS RI 9353, RI 9357 User Manual
ISTRUZIONI PER L'USO
OPERATING INSTRUCTIONS
MODE D’EMPLOI
BEDIENUNGSANLEITUNG
INSTRUÇÕES PARA O USO
INSTRUCCIONES PARA EL USO
GEBRUIKSAANWIJZING
INSTRUKCJE OBSŁUGI
LEGGERE ATTENTAMENTE QUESTE ISTRUZIONI D'USO PRIMA DI UTILIZZARE LA MACCHINA.
READ THESE OPERATING INSTRUCTIONS CAREFULLY BEFORE USING THE MACHINE.
DIESE BEDIENUNGSANLEITUNG IST VOR DEM ERSTEN GEBRAUCH DER MASCHINE AUFMERKSAM ZU LESEN.
LÉANSE ATENTAMENTE LAS SIGUIENTES INSTRUCCIONES DE USO ANTES DE UTILIZAR LA MÁQUINA.
PRZECZYTAĆ UWAŻNIE NINIEJSZE INSTRUKCJE OBSŁUGI PRZED UŻYTKOWANIEM URZĄDZENIA.
LIRE ATTENTIVEMENT CES INSTRUCTIONS AVANT D’UTILISER LA MACHINE.
LER ATENTAMENTE ESTAS INSTRUÇÕES PARA O USO ANTES DE USAR A MÁQUINA.
LEES DEZE INSTRUCTIES AANDACHTIG DOOR VOORDAT U HET APPARAAT IN GEBRUIK NEEMT.
3 41 2
5 6 7 8
10
9
15
1716
20 cm
8 in
20 cm
8 in
11
13
14
16 in
40 cm
20 cm
12
20 cm
8 in
8 in
• 2 •
Fig.A - Abb. A - Afb.A - Rys.A
Fig.B - Abb.B
Afb.B - Rys.B
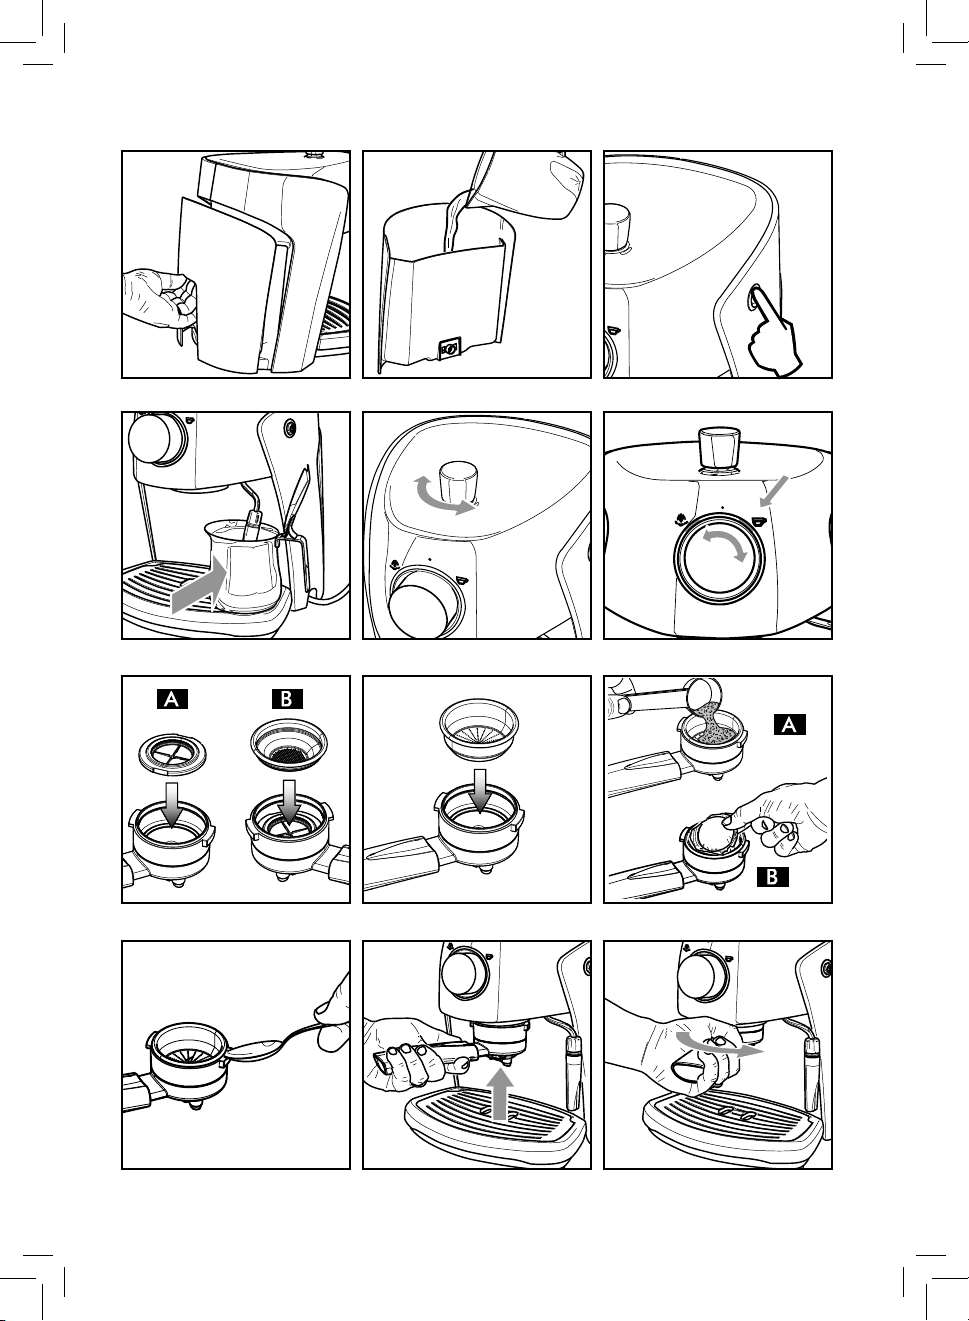
Fig.1 - Abb.1 - Afb.1 - Rys.1 Fig.2 - Abb.2 - Af b.2 - Rys.2 Fig.3 - Abb.3 - Afb.3 - Ry s.3
Fig.4 - Abb.4 - Afb.4 - Rys.4 Fig.5 - Abb.5 - Af b.5 - Rys.5 Fig.6 - Abb.6 - Afb.6 - Rys.6
Fig.7 - Abb.7 - Afb.7 - Rys.7 Fig.8 - Abb.8 - Afb.8 - Rys.8 Fig.9 - Abb.9 - Af b.9 - Rys.9
Fig.10 - Abb.10 - Afb.10 - Rys.10
Fig.11 - Abb.11 - Afb.11 - Rys.11 Fig.12 - Abb.12 - Afb.12 - Rys.12
• 3 •
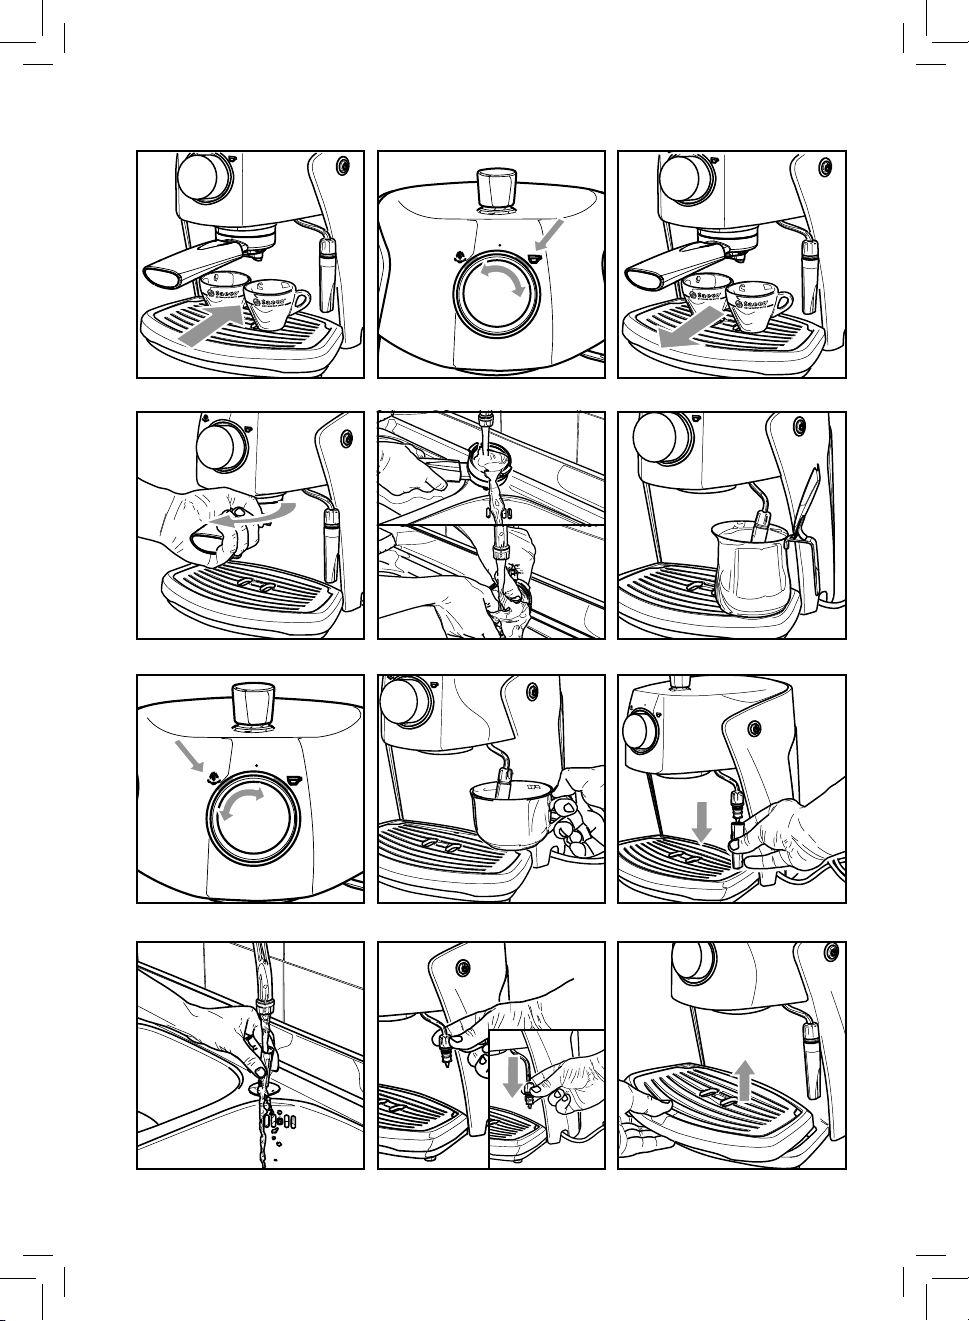
Fig.13 - Abb.13 - Afb.13 - Rys.13 Fig.14 - Abb.14 - Afb.14 - Rys.14 Fig.15 - Abb.15 - Afb.15 - Rys.15
Fig.16 - Abb.16 - Afb.16 - Rys.16 Fig.17 - Abb.17 - Afb.17 - Rys.17 Fig.18 - Abb.18 - Afb.18 - Rys.18
Fig.19 - Abb.19 - Afb.19 - Rys.19 Fig.20 - Abb. 20 - Afb.20 - Rys.20 Fig.21 - Abb.21 - Afb.21 - Rys. 21
Fig.22 - Abb.22 - Afb.22 - Rys.22 Fig.23 - Abb.23 - Afb.23 - Rys.23 Fig.24 - Abb.24 - Afb.24 - Rys.24
• 4 •
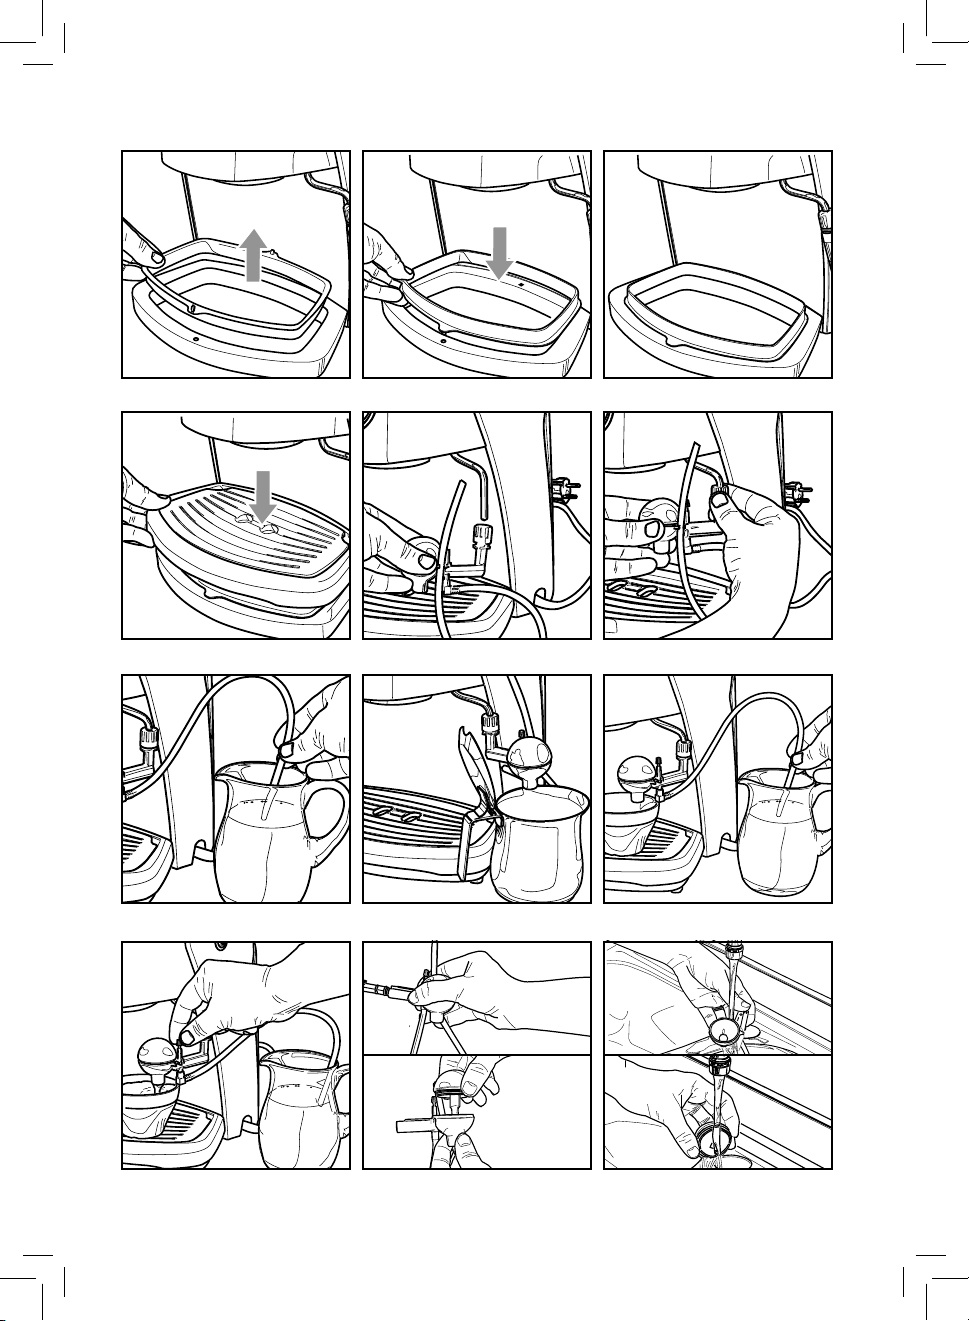
Fig.25 - Abb.25 - Afb.25 - Rys.25 Fig.26 - Abb.26 - Afb.26 - Rys.26 Fig.27 - Ab b.27 - Af b.27 - Rys.27
Fig.28 - Abb.28 - Afb.28 - Rys.28 Fig.29 - Abb. 29 - Afb.29 - Rys.29 Fig.30 - Abb.30 - Afb.30 - Rys.30
Fig.31 - Abb.31 - Afb.31 - Rys .31 Fig.32 - Abb.32 - Afb. 32 - Rys.32 Fig. 33 - Abb.33 - Af b.33 - Rys.33
Fig.34 - Abb.34 - Af b.34 - Rys.34 Fig.35 - Abb.35 - Afb.35 - Rys. 35 Fig.36 - Abb.36 - Af b.36 - Rys.36
• 5 •
1 GENERALITÀ
La macchina per ca è è indicata per la preparazione di 1 o 2
tazze di ca è espresso ed è dotata di un tubo orientabile per
l’erogazione del v apore e dell’acqua calda. I co man di sulla p arte
frontale del l’ap pa rec chio sono contrassegnati con simboli di
facile in ter pre ta zio ne.
La macchina è stata progettata per uso domestico e non è indicata per un f unzionamento continuo d i tipo professionale.
Attenzione. Non si assumono re spon sa bi li tà per
eventuali d anni in caso di:
• Impiego errato e non con for me agli sco pi previsti;
• Riparazioni non ese gui te presso centri d’assistenza
autorizzati;
• Manomis sione del cavo d'alimen tazione;
• Manomissione di qual si a si com po nen te della macchina;
• Impiego d i pezzi di ri cam bio e acc essori non orig inali;
• Mancata decalci cazione e stoccaggio in locali al di
sotto di 0°C.
In questi c asi viene a decade re la garanzia.
1.1 Per facilitare la lettura
Il triangolo d’avvertimento indica
tutte le istruzioni importanti per
la sicurezza del l’uten te. Attenersi
scrupolosamente a tali indicazioni per evitare ferimenti gra vi!
Il riferimento ad illustrazioni, parti dell’apparecchio o elementi
di co man do, ecc. è in di ca to da numeri o lettere; in questo caso
si rimanda all’illustrazione.
Questo simbolo evidenzia le in for ma zio ni da
tenere in maggiore con si de ra zio ne, per un mi-
gliore uti liz zo della mac chi na.
2 DATI TECNICI
Il costruttore si riserva il diritto di modi care le caratteristiche
tecniche del prodotto.
Tensione nominale - Poten za nominale - Alimentazi one
Vedi targhet ta posta sull’apparecchio
Materiale corp o
Plastica
Dimensioni (l x a x p) (mm)
270 x 350 x 300
Peso
4 kg
Lunghezza cavo
1,2 m
Pannello di comando
Sulla parte frontale
Porta ltro
Pressurizzato
Pannarello
Speciale per c appuccini
Serbatoio acqua
1,5 litri - Estraibile
Pressione p ompa
15 ba r
Caldaia
Inox
Dispositi vi di sicurezza
Ter mof usi bi le
3 NORME DI SICUREZZA
Le illustrazioni corrispondenti al te sto si trovano nelle
prime pagine del manuale. Consultare queste pagine
du ran te la lett ura delle istru zio ni per l ’uso.
1.2 Impiego di queste istruzioni per l’uso
Conservare queste istruzioni per l’uso in un luogo sicuro e allegarle alla mac chi na per ca è qualora un’altra persona dovesse
utilizzarla.
Per ulteriori informazioni o nel caso di problemi, rivolgetevi ai
centri assistenza autorizzati.
• 6 •
Mai mettere a contatto del l’ac qua le parti sotto corr e n t e : p e r i c o l o d i c o r t o c ir c u i t o ! Il v a p o r e s ur r i sc a l da t o
e l’acqua calda possono pro vo ca re scottature! Mai dirigere il getto di va po re o dell’acqua calda ver so parti
del corpo, toccare con pre cau zio ne il beccuccio vapore /
ac qua calda: pe ri co lo di scottature!
Destinazione d’uso
La macchina per ca è è prevista esclu si va men te per l’impiego
do me sti co. È vietato apportare modi che tec ni che e ogni impiego illec ito, a causa dei rischi che e ssi com p or t a no! L’apparecchio non è destinato ad essere utilizzato da persone (compresi
i bambini) con ridotte capacità siche, mentali o sensoriali o
con esperienza e/o competenze insu cienti, a meno che non
siano sotto la supervisione di una persona responsabile della
loro sicurezza o non vengano da essa istruite sull’uso dell’apparecchio.

Alimentazione di corrente
Collegare la macchi na per ca è soltanto ad una pres a di corrente adeguata. La tensione deve corrispondere a quella indicata
sulla targhet ta dell’apparecchio.
Cavo d’alimentazione
Mai usare la macchina per ca è se il cavo d’alimentazione è di fet to so. Se il cavo d’alimentazione è danneggiato, deve essere
cambiato dal produttore o dal suo servizio assistenza clienti.
Non far passare il cavo d’ali men ta zio ne per angoli e su spigoli
vivi, sopra o ggetti molto caldi e pr o teg ger lo dall’olio.
Non port are o tirare la macchina per c a è tenendola per il c avo.
Non estrarre la spina tirandola per il cavo oppure toccarla con
le mani bagnate.
Evitare che il cavo d’ali men ta zio ne cada liberamente da tavoli
o sca ali.
Protezione d’altre persone
Tenere i bambini sotto supervisione, per evitare che giochino
con l’apparecchio.
I bambini non si rendono conto del pericolo connesso agli elettrodomestici. Non lasciare alla portata dei bam bi ni i ma te ria li
utilizzati per im bal la re la mac chi na.
Pericolo d’ustioni
Evitare di di rigere contro se ste ssi e/o altri il getto di vap ore sur ri scal da to e/o d’acqua calda. Usare se mpre le apposite maniglie
o ma no po le.
Non disinser ire (to gli e re) mai il por ta ltro pressuriz zato durante l’erogazione del ca è. Durante la fase di riscaldamento dal
grup po erogazi one ca è pos so no uscire gocce d’acqua calda.
Ubicazione
Sistemare la macchina per ca è in un po sto sicuro, dove nessuno può rovesciarla o venirne f erito.
Acqua calda o vapore sur ri scal da to po treb be ro fuoriuscire: pe-
ricolo di s cottature!
Non tenere la macchina a temperatura inferiore a 0°C; c'è il pericolo che il ge lo possa danneggiare la macchina.
Non usare la macc hina per ca è al l’aper to.
Non posare la macc hina su su per ci mol to calde e nelle v icinanze di amme libere per evitare che la carcassa fonda o co mun que si danneggi.
Pulizia
Prima di pulir e la macchina, è in di sp ensa bi le disinserire la macchina con il ta sto ON/OFF tasti e poi st accare la spina dalla pres a
di corrente. Inoltre, aspettare che la macchina si ra red di. Mai
immergere la mac chi na nel l’ac qua!
È severamente vietato cercare d’in ter ve ni re all’interno della
macchina.
Non utilizzare, per scopi alimentari, l’acqua rimasta nel serbatoio per alcuni giorni, lavare il serbatoio e riempirlo con acqua
fresca potabile.
Spazio per l’uso e la ma nu ten zio ne
Per il corret to e buon funzioname nto della macchina per ca è s i
consiglia quanto segue:
• Scegliere un piano d’appoggio ben li vel la to;
• Scegliere un ambiente su cien te men te illuminato, igienico
e con presa di cor ren te facilmente accessibile;
• Prevedere una distanza minima dal le pa re ti della macchina
come indicato in gu ra (Fig.A).
Custodia della macchina
Quando la macchina rimane inutilizzata per un pe ri o do prolungato, disinserire la mac chi na e staccare la spina dalla pre sa.
Custodirla in luogo asciutto e non ac ces si bi le ai bam bi ni. Proteggerla dalla po lvere e dallo sporco.
Riparazioni / Manutenzione
Nel caso di gua sti, difetti o so spetto di di fet to dopo un a caduta,
stac ca re subito la spina dalla presa. Mai mettere in funzione
una macchina di fet to sa. Soltanto i Centri di Assistenza Au to riz za ti possono e ettuare in ter ven ti e riparazioni. Nel caso di
interventi non eseguiti a regola d’arte, si declina ogni re spon sa bi li tà per eventuali danni.
Antincendio
In caso di incendio utilizzare estin to ri ad anidride carbonica
). Non utilizz are acqua o estintori a p olvere.
(CO
2
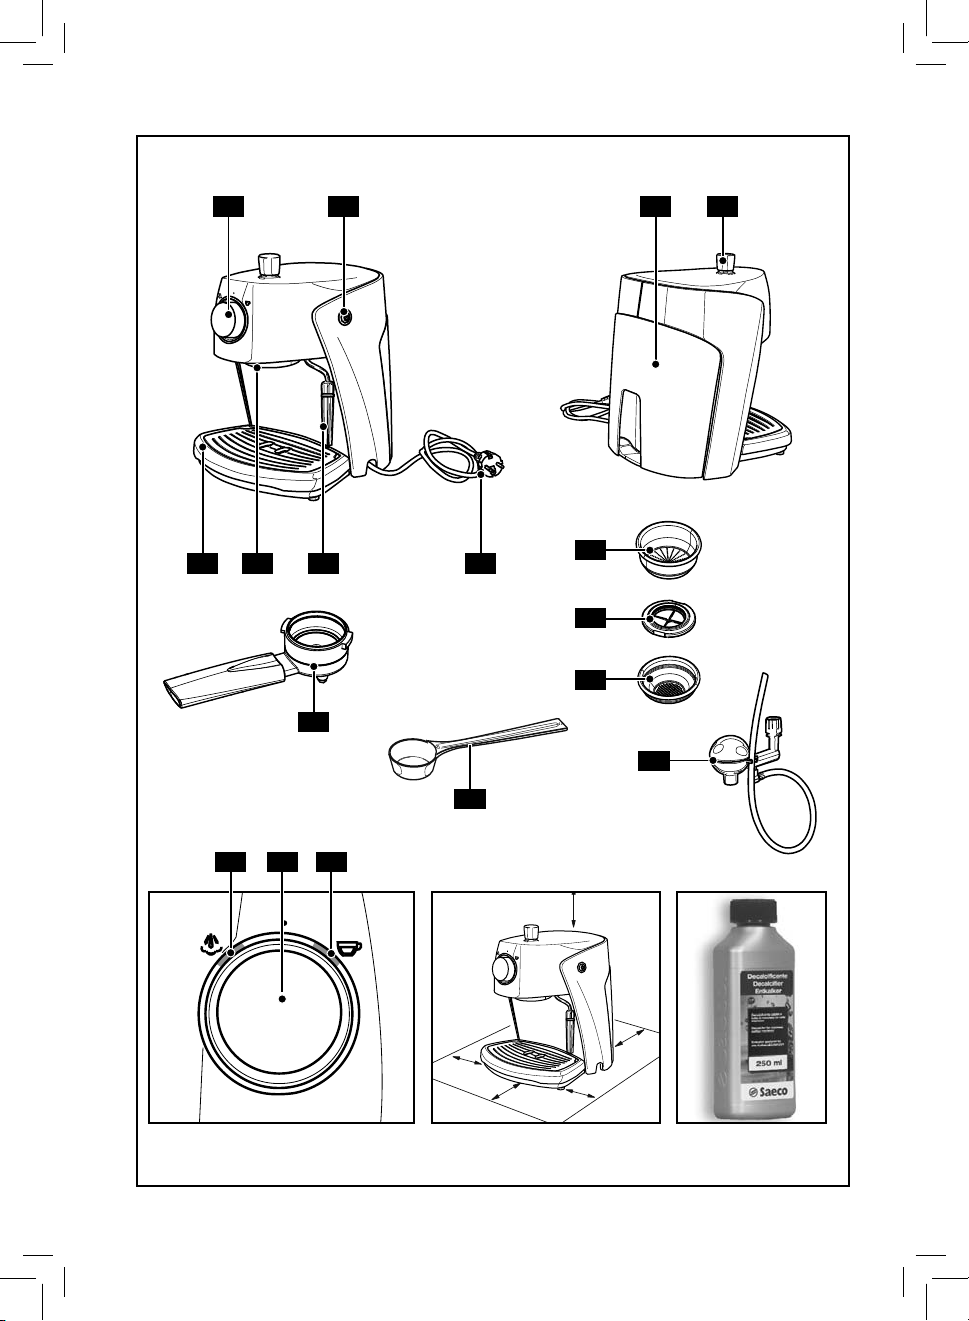
Legenda componenti macchina (Pag.2)
1 Pannello comandi
2 Interruttore ON/OFF
3 Serbatoio acqua
4 Pomello acqua calda / vapore
5 Vasca recupero acqua + griglia
6 Gruppo erogatore ca è
7 Tubo vapore (pannarello)
8 Cavo alimentazione
9 Misurino per c a è macinato
10 Porta ltro pressurizzato
11 Filtro per ca è macinato
(unico per l'erogazione di 1 o 2 ca è)
12 Cappuccinatore (opzionale)
13 Adattatore per ltro ca è in cialde
14 Filtro per ca è in cialde
15 Led ca è / acqua - "Pronto macchina"
16 Led "Pronto vapore"
17 Pomello di selez ione
Italiano
• 7 •

4 INSTALLAZIONE
Per la propria sicurezza e quella di ter zi at te ner si scrupolosamente alle “Nor me di si cu rez za” riportate nel
cap. 3.
4.1 Imballaggio
L’imballaggio originale è stato progettato e realizzato per proteggere la macchina durante la spedizione. Si consiglia di conservar lo per un eventuale traspo rto futuro.
4.2 Avvertenze d'installazione
Prima di installare la macchina, attenersi alle seguenti prescrizioni di sic urezza:
• sistemare la macchina in un luogo si cu ro;
• accertarsi che i bambini non ab bia no la possibilità di giocare
con la mac chi na;
• evitare che la macchina venga col lo ca ta su super ci molto
calde o vicino a am me libere.
La macchina per c a è è ora pron ta per es se re collegata alla rete
elettrica.
Nota: si consiglia di lavare i componenti prima
del loro primo utilizzo e/o dopo un periodo
d'inutilizzo.
4.3 Collegamento della macchina
La corrente elettrica può es se re pe ri co lo sa! Di
c o n s e gu e n z a , a t t e n e r s i s e m pr e s c r u p o l o s a m en te alle nor me di si cu rez za. Non usare mai cavi di fet to si!
I cavi e le spin e difettosi de vo no es se re so sti tu i ti im me dia ta men te da Centri di Assistenz a Autorizzati.
La tensione dell’apparecchio è stata impostata in fabbrica.
Veri care che la tensione della rete corrisponda alle indicazioni riportate sulla targhetta d’identi cazione posta sul fondo
dell’apparecchio.
• Veri care che l’interruttore ON/OFF (2) non sia premuto pri-
ma di collegare la macchina alla rete elettrica.
• Inserire la spina in una presa di corrente a parete di tensione
adeguata.
4.4 Ser ba to io ac qua
• (Fig.1) - Estrarre il serbatoio del l’ac qua (3).
• (Fig.2) - Sciacquarlo e riempirlo con ac qua fre sca potabile
evitando di immetterne una quantità eccessiva.
• (Fig.1) - Inserire il serbatoio assicurandosi di riposizionalo
correttamente nella sua sede.
Immettere nel ser ba to io sem pre e sol tan to ac-
qua fre sca po ta bi le non gas sa ta. Ac qua cal da
non ché al tri liquidi possono dan neg gia re il ser ba to io.
Non mettere in fun zio ne la mac chi na sen za acqua: ac cer tar si che ve ne sia a su c i en z a a l l ’ i n te r n o d e l s e r b atoio.
4.5 Caricamento del circuito
All'inizio, dopo aver erogato vapore o dopo aver terminato
l'acqua nel serbatoio, il circuito della macchina deve essere
ricaricato.
• (Fig.3) - Premere l’interruttore ON/OFF (2).
• (Fig.4) - Inserire un contenitore sotto al tubo vapore.
• (Fig.5) - Aprire il pomello (4) “ac qua cal da/va po re” ruotan-
dolo in sen so antiorario.
• (Fig.6) - Portare il pomello di selezione (17) nella posizione
".
"
• Attendere che dal tubo va po re (pannarello) fuoriesca un get to regolare d'acqua.
• (Fig.6) - Portare il pomello di selezione (17) nella posizione
".
"
• Chiudere il pomello (4) “ac qua calda/vapore” ruotandolo in
sen so orario. Rimuovere il contenitore.
4.6 Primo utilizzo o dopo un periodo di
inutilizzo
Questa semplice operazione vi assicura un'erogazione ottimale
e deve essere e seguita:
- al primo avvio;
- quando la macchina rimane inutilizzata per lungo tempo
(per più di 2 settimane).
L’acqua erogata deve essere vuotata in un ap-
posito scarico e non può essere utilizzata per
l’alimentazione. Se il contenitore si riempe, durante il
ciclo, fermare l’erogazione e vuotarlo prima di riprendere l’operazione.
• (Fig.2) - Risciacquare il serbatoio e riempirlo con acqua fre-
sca potabile.
• (Fig.4) - Sistemare un contenitore sot to al tubo va po re (pan-
narello). Aprire il rubinetto (4) ruotandolo in senso antiorario
e portare il pomello di selezione (17) nella posizione “
• Erogare tutto il contenuto del serbatoio dell’acqua dal tubo
vapore/acqua calda; per terminare l'erogazione portare il
pomello di selezione (17) nella posizione “
rubinetto (4) ruotandolo in senso orario.
• (Fig.2) - Riempire il serbatoio con acqua fresca potabile.
• (Fig.11-12) - Inserire dal basso il porta ltro nel gruppo
erogazione (6) e ruotarlo da sinistra verso destra no al suo
bloccaggio.
• (Fig.13) - Inserire un contenitore adeguato sotto al porta l-
tro.
• Ruotare il pomello di selezione (17) nella posizione “
erogare tutta l’acqua presente nel serbatoio. Terminata l’acqua,
fermare l’erogazione portare il pomello di selezione (17) nella
posizione “
• Riempire nuovamente il serbatoio ed attendere che il led di
”.
” e chiudere il
”.
” ed
• 8 •
“pronto macchina” (15) si accenda.
• (Fig.16) - Rimuovere il porta ltro dal gruppo ruotandolo da
destra verso sinistra e sciacquarlo con acqua fresca potabile.
La macchina ora è pronta; per i dettagli di funzionamento per
l’erogazione del ca è e del va po re si rimanda ai ca pi to li relativi.
4.7 Regolazione vasca recupero acqua
La vasca di recupero acqua può essere regolata per adattarsi
alle dimensioni d elle tazzine o delle taz ze utilizzate.
Per regolare l'altezza della vasca di recupero acqua procedere
come segue:
• (Fig.24) - Sollevare la vasca di recupero acqua e s lare la
griglia.
• (Fig.25) - S lare il supporto posto sotto alla vasca.
• (Fig.26 - 27) - Ruotare il supporto e posizionarlo nella mac-
china da ca è.
• (Fig.28) - Sistemare la vasca di recupero acqua sopra al sup-
porto e riposizionare la griglia.
5 EROGAZIONE DEL CAFFÈ
Attenzione! Durante l’erogazione del ca è è
vie ta to disinserire il porta ltro pressurizzato
ruotandolo ma nual men te in sen so ora rio. Pe ri co lo
d’ustio ni.
• Durante questa operazione, il led (15) "pronto macchina"
può accendersi e spegnersi; tale funzionamento deve essere
considerato normale e non un’anomalia.
• Assicurarsi, prima dell’uso, che il po mel lo (4) acqua calda/
va po re sia chiuso e che il ser ba to io acqua della macchina
con ten ga una quantità d'acqua su ciente.
• (Fig.3) - Premere l’interruttore ON/OFF (2).
• Attendere che il led (15) "pronto macchina" si accenda, ora la
macchina è pronta per l’erogazione del ca è.
5.1 Con caff è macinato
• (Fig.8) - Inserire il ltro (11) nel porta ltro pressurizzato
(10); al primo utilizzo il ltro è già inserito.
• (Fig.11) - Inserire dal basso il porta ltro nel gruppo eroga-
zione (6).
• (Fig.12) - Ruotare il porta ltro da si ni stra verso destra no
al suo bloccaggio. Lasciare la presa dal ma ni co del porta ltro
pressurizzato, il manico ruota leg ger men te verso sinistra.
Questo movimento garantisce il perfetto funzionamento del
porta ltro.
• (Fig.14) - Preriscaldare il porta ltro pressurizzato portando
il pomello di selezione (17) nella posizione "
co min ce rà ad usci re dal porta ltro pressurizzato (que sta
operazione si rende ne ces sa ria solo per il primo ca è).
• Dopo aver fatto scorrere 150cc di acqua, portare il pomello di
"; l’acqua
selezione (17) nella posizione " " per fer ma re l’erogazione.
• (Fig.16) - Togliere il porta ltro dalla macchina ruotandolo
da destra verso sinistra e vuotare l’acqua residua. Con lo
speciale ltro (11) di cui è dotata la mac chi na, non occorre
cambiare l tro per ottenere uno o due ca è.
• (Fig.9A) - Versare 1-1,5 misurini per il ca è singolo o 2 mi-
surini rasi per il ca è doppio; pulire il bor do del porta ltro
dai re si dui di ca è.
• (Fig.11) - Inserire dal basso il porta ltro (10) nel gruppo
erogazione (6).
• (Fig.12) - Ruotare il porta ltro da si ni stra verso destra no
al suo bloccaggio.
• (Fig.13) - Prelevare 1 o 2 tazzine preriscaldate e posizio-
narle sotto al porta ltro pressurizzato; veri care che siano
correttamente si ste ma te sotto ai fori di uscita ca è.
• (Fig.14) - Ruotare il pomello di selezione (17) nella posizio-
• Rag giun ta la quantità di ca è de si de ra ta, ruotare il pomello
• (Fig.16) - Estrar re il porta ltro pressurizzato e vuotarlo dai
carat teristiche del porta ltr o.
to. Lavare gi ornalmente a ne utilizzo.
".
ne "
di selezione (17) nella posizione "
zione del ca è. Al termine dell’erogazione at ten de re qual che
secondo; prelevare le tazzine con il ca è (Fig.15).
fondi residui.
Nota: nel porta ltro rimane una piccola quantità di acq ua; questo è normale ed è dovuto alle
Nota importante: Il ltro (11) deve essere mantenuto pulito per garantire un perfetto risulta-
" per fermare l’eroga-
5.2 Con caff è in cialde
• (Fig.10) - Togliere, utilizzando un cucchiaino da ca è, il ltro
per ca è macinato (11) dal porta ltro pressurizzato (10).
• (Fig.7A) - Inserire, nel porta ltro pressurizzato (10), l'adat-
tatore per cialde (13), con la parte bombata rivolta verso il
basso.
• (Fig.7B) - Dopo, inserire il ltro per cialde (14) nel porta l-
tro pressurizzato (10).
• (Fig.11) - Inserire dal basso il porta ltro pressurizzato nel
gruppo erogazione (6).
• (Fig.12) - Ruotare il porta ltro da si ni stra verso destra no
al suo bloccaggio. Lasciare la presa dal ma ni co del porta ltro
pressurizzato. Un si ste ma automatico riporta ora leg ger men te il manico verso sinistra.
Questo movimento garantisce il perfetto funzionamento del
porta ltro pressurizzato.
• (Fig.14) - Preriscaldare il porta ltro pressurizzato portando
il pomello di selezione (17) nella posizione "
co min ce rà ad usci re dal porta ltro pressurizzato (que sta
operazione si rende ne ces sa ria solo per il primo ca è).
• Dopo aver fatto scorrere 150cc di acqua, portare il pomello di
selezione (17) nella posizione "
d'acqua calda.
" per fer ma re l’erogazione
"; l’acqua
Italiano
• 9 •
• (Fig.16) - Togliere il porta ltro pressurizzato dalla macchina
ruotandolo da destra verso sinistra e vuotare l’acqua residua.
• (Fig.9B) - Inserire la cialda nel porta ltro; assicurarsi che la
carta della cialda non fuoriesca dal porta ltro.
• (Fig.11) - Inserire dal basso il porta ltro pressurizzato nel
gruppo erogazione (6).
• (Fig.12) - Ruotare il porta ltro da si ni stra verso destra no
al suo bloccaggio.
• Prelevare 1 tazzina preriscaldata e posizionarla sotto al
porta ltro; veri care che sia correttamente sistemata sotto
ai fori d'uscita ca è.
• (Fig.14) - Ruotare il pomello di selezione (17) nella posizio-
• Quando è stato rag giun ta la quantità di ca è de si de ra ta,
• (Fig.16) - Al termine dell’erogazione attendere qualche se-
perfe tto risultato. L avare giornalme nte a ne utilizzo.
"
ne "
ruotare il pomello di selezione (17) nella posizione "
per fermare l’erogazione del ca è; prelevare la tazzina con
il ca è.
condo, estrarre il porta ltro e smaltire la cialda utilizzata.
Nota importante: Il ltro (14) e l'adattatore (13)
devono esse re mantenuti p uliti per gara ntire un
6 SCELTA DEL TIPO DI CAF FÈ CON SI GLI
In linea di massima si possono uti liz za re tutti i tipi di ca è esistenti in com mercio. Tuttavia, il ca è è un pr odotto na tu ra le ed
il suo gusto cambia in funzione del l’ori gi ne e della mi sce la; è
preferib ile quindi pro var ne vari tipi, al ne di t rovare quello che
meglio si addice ai gusti per sonali.
Per migliori risultati si consiglia co mun que di utilizz are miscele
espres sa men te pre pa ra te per macchine espresso. Il ca è dovrebbe sempre fuo riu sci re re golar men te dal porta ltro pressurizzato senza goc cio la re.
La velocità di fuoriuscita del ca è può es se re modi cata cambiando leggermente la dose del ca è nel ltro e/o utilizzando
ca è con un grado di mac inatura di erente.
Per un miglior risultato in tazza e per facilità di pulizia e preparazione, S aeco consiglia l'utilizzo di c a è in cialde monodo se
contrasse gnate dal marchio ESE.
7 AC QUA CALDA
Pericolo di scottature! All’inizio dell’erogazione
posso no ve ri car si brevi spruzzi di acqua calda.
Il tubo d’erogazione può rag giun ge re temperature elevate: evitare di toc car lo di ret ta men te con le mani.
• (Fig.3) - Premere l’interruttore ON/OFF (2).
• Attendere che il led (15) "pronto macchina" si accenda; ora la
macchina è pronta.
• (Fig.18) - Sistemare un contenitore o un bic chie re da tè sot-
to al tubo va po re (pannarello).
• (Fig.5) - Aprire il po mel lo (4).
• (Fig.6) - Portare il pomello di selezione (17) nella posizione
".
"
"
• Quando è stata prelevata la quan ti tà de si de ra ta di ac qua
cal da, portare il pomello di selezione (17) nella posizione
".
"
• (Fig.5) - Chiudere il po mel lo (4)
• Prelevare il contenitore con l'acqua calda.
8 VA PO RE / CAPPUCCINO
Pericolo di scottature! All’inizio dell’erogazione
pos so no ve ri car si brevi spruzzi di acqua calda.
Il tubo d’erogazione può rag giun ge re temperature elevate: evitare di toc car lo di ret ta men te con le mani.
• (Fig.3) - Premere l’interruttore ON/OFF (2).
• Attendere che il led (15) "pronto macchina" si accenda.
• (Fig.19) - Portare il pomello di selezione (17) nella posizione
".
"
• Attendere che il led (16) si accenda; a questo punto la mac-
chi na è pron ta per l’erogazione del va po re.
• (Fig.18) - Inserire un contenitore sotto al tubo vapore.
• (Fig.5) - Aprire il po mel lo (4) per qual che istante, in modo
da far uscire l’ac qua residua dal tubo vapore (pannarello); in
breve tem po co min ce rà ad uscire solo vapore.
• Chiudere il pomello (4) e togliere il contenitore.
• Riempire con latte freddo 1/3 del con te ni to re che si desidera
uti liz za re per pre pa ra re il cappuccino.
Per garantire un miglior risultato utilizzare latte freddo
PRIMA DI ESEGUIRE QUALSIASI OPERA ZIONE RELA-
TIVA ALL’EROGAZIONE DEL VAPORE O DELL’ACQUA
CALDA VERIFICARE CHE IL TUBO VAPORE (PANNARELLO)
SIA ORIENTATO SOPRA LA VASCA RECUPERO ACQUA.
• 10 •
• (Fig.20) - Immergere il tubo vapore nel latte e aprire il po-
mello (4) ruotandolo in senso antiorario; far ruotare lentamente il recipiente contenente il latte, dal basso verso l’alto
per rendere uniforme il riscaldamento.
Si consiglia un'erogazione massima di 60 secondi.
• Al termine, chiudere il pomello (4); prelevare la tazza con il
latte montato.
• (Fig.19) - Portare il pomello di selezione (17) nella posi-
zione "
".
Se entrambi i led sono accesi, la macchina ha una tempera-
tura troppo elevata per l'erogazione del ca è.
• Procedere con il caricamento del cir cui to descritto nel par.4.5
per rendere ope ra ti va la macchina.
Nota: la macchina è operativa quando il led (15)
"pronto ma cchina" è acceso in modo sso.
Nota bene: se non si riesce ad erogare un cap-
puccino come descritto, si deve ricaricare il
circuito come descritto nel par. 4.5 e successivamente
ripetere le operazioni.
Lo stesso sistema può essere uti lizza to per il ri-
scal da men to di al tre be van de.
• Pulire, dopo questa operazione il tubo vapore con un panno
umido.
9 PULIZIA
La manutenzio ne e la pulizia possono ess ere e ettuate solt anto
quando la macchina è f redda e scollegata dalla rete elettrica.
• Non immergere la mac chi na nel l’ac qua e non inserire i com-
po nen ti nella la va sto vi glie.
• Non utilizzare alcol etilico, solventi e/o agenti chimici ag-
gressivi.
• Si consiglia di pulire quo ti dia na men te il serbatoio del l’ac qua
e di riempirlo con acqua fresca.
• (Fig.21-22) - Giornalmente, dopo aver riscaldato il lat te,
smontare la parte esterna del pannarello e lavarla con acqua
potabile fresca.
• (Fig.23) - Settimanalmente si deve pulire il tubo vapore. Per
eseguire questa operazione, si deve:
- rimuovere la parte esterna del pannarello (per la regolare
pulizia);
- allentare la ghiera (senza toglierla);
- s lare la parte superiore del pannarello dal tubo vapore;
- lavare la parte superiore del pannarello con acqua fresca
potabile;
- lavare il tubo vapore con un panno umido e rimuovere
eventuali residui di latte;
- riposizionare la parte superiore nel tubo vapore (assicurarsi
che sia completamente inserita);
- serrare la ghiera precedentemente allentata.
Rimontare la parte esterna del pannarello.
• (Fig.24) - Giornalmente vuotare e lavare la vasca raccogli
gocce.
• Per la pulizia dell’apparecchio utilizzare un panno morbido
inumidito d'acqua.
• (Fig.17) - Per la pulizia del porta ltro pressurizzato pro ce de re come segue:
- (Fig.10) - estrarre il ltro, lavarlo con cura con acqua cal-
da.
- estrarre l'adattatore (se presente), lavarlo con cura con acqua calda.
- lavare l’interno del porta ltro pressurizzato.
• Non asciugare la macchina e/o i suoi componenti utilizzando un forno a microonde e/o un forno convenzionale.
Nota: non lav are il porta ltro p ressurizza to nella lavastoviglie.
10 DE CAL CI FI CA ZIO NE
La formazione di calcare avviene con l’uso dell’apparecchio; la
decalci cazione è neces saria ogni 1-2 mesi di utilizzo de lla macchina e/o quando si osserva una riduzione della portata dell’acqua. Usare esclusivamente il prodot to decalci cante Saeco.
Quanto indicato nel manuale di uso e manuten-
zione ha priorità rispetto alle indicazioni riportate su accessori e/o materiali d’uso venduti separatamente, laddove sussista un con itto.
Usare il prodotto decalci cante Saeco (Fig.B). E'
stato fo rmulato spec i c atamente per m antenere
al meglio la performance e la funzionalità della macchina
per tutta la sua vi ta, nonchè per evit are, se corrett amente usato, ogni alterazione del prodotto erogato. prima
d’iniziare il ciclo di decalci cazione assicurarsi che: SIA
STATO RIMOSSO IL FILTRO ACQUA se utiliz zato.
Non bere la soluzione decalci cante e i prodotti
erogat i no al compl etamento del c iclo. Non uti-
lizzare in nessu n caso l’aceto come decalci ca nte.
1 (Fig.11-12) - Inserire dal basso il porta ltro nel gruppo
erogazione (6) e ruotarlo da sinistra verso destra no al suo
bloccaggio.
2 (Fig.1) - Rimuovere e svuotare il serbatoio dell’acqua.
3 (Fig.2) - Versare METÀ del contenuto della bottiglia di
decalci cante concentrato Saeco nel serbatoio dell’acqua
dell’apparecchio e riempire con acqua fresca potabile no al
livello MAX.
4 (Fig.2) - Accendere la macchina premendo l’interruttore ON/
OFF (2).
(Fig.4) - Prelevare (come descritto nel capitolo 7 del ma-
nuale), dal tubo vapore/acqua calda, 2 tazze (circa 150 ml.
ciascuna) di acqua; dopodichè spegnere la macchina tramite
l’interruttore ON/OFF (2).
5 Lasciare agire il decalci cante circa 15-20 minuti con la mac-
china spenta.
6 Accendere la macchina premendo l’interruttore ON/OFF (2).
(Fig.4) - Prelevare (come descritto nel capitolo 7 del manua-
le) dal tubo vapore/acqua calda 2 tazze (circa 150 ml ciascuna) di acqua. Successivamente spegnere la macchina tramite
l’interruttore ON/OFF (2) e lasciarla spenta per 3 minuti.
7 Ripetere le operazioni descritte al punto 6 no al completo
svuotamento del serbatoio dell’acqua.
8 (Fig.2) - Risciacquare il serbatoio con acqua fresca potabile e
riempirlo completamente.
9 Inserire un contenitore sotto al porta ltro.
10 (Fig.6) - Accendere la macchina premendo l’interruttore ON/
Italiano
• 11 •
OFF (2); ruotare il pomello di selezione (17) nella posizione
” e tramite il porta ltro, prelevare l’intero contenuto
“
del serbatoio. Per fermare l’erogazione portare il pomello di
selezione (17) nella posizione “
11 (Fig.2) - Riempire nuovamente il serbatoio con acqua fre-
sca.
(Fig.4) - Posizionare un contenitore capiente sotto al tubo
vapore. Aprire il rubinetto di erogazione dell’acqua (4) ruotandolo in senso anti orario. Ruotare il pomello di selezione
(17) nella posizione “
serbatoio tramite il tubo vapore/acqua calda.
12 Dopo aver nito il prelievo di acqua, per fermare l’erogazio-
ne portare il pomello di selezione (17) nella posizione “
Chiudere il rubinetto erogazione acqua (4) ruotando in senso
orario.
13 Ripetere un’altra volta le operazioni dal punto (8) per un
totale di 4 serbatoi.
14 (Fig.16) - Rimuovere il porta ltro dal gruppo ruotandolo da
destra verso sinistra e sciacquarlo con acqua fresca potabile.
”.
” e prelevare l’intero contenuto del
• (Fig.33) - Immergere il tubo d'aspirazione nel latte appena
preparato.
• (Fig.34) - Erogare vapore come descritto nel paragrafo 8;
agire sul perno per modi care la schiuma del latte.
Per una maggiore schiuma sollevare delicatamente il perno.
• Dopo aver preparato il cappuccino, immergere il tubo d'aspirazione in un contenitore contenente acqua pulita ed erogare vapore. Quando esce acqua chiara, il cappuccinatore è pulito. Pulire
esternamente il tubo d'aspirazione con un panno umido.
Settimanalmente il cappuccinatore deve essere
smontato e lavato completam ente.
”.
Per il lavaggio completo del cappuccinatore procedere come
segue:
• (Fig.35) - Estrarre la parte terminale del cappuccinatore dalla propria sede.
• Separare i componenti del cappuccinatore
Il ciclo di dec alci ca zione è cosi concluso.
(Fig.2) - Riempi re nuovamente il serbato io con acqua fresca. S e
necessario e ettuare il caricamento del circuito come descritto
nel par. 4.5.
La soluz ione decalci cante deve es sere smaltita
secondo q uanto previs to dal costrut tore e/o dal-
le norme vi genti nel Paese d’utilizzo.
11 CAPPUCCINATORE OPZIONALE
Il cap puccinat ore è pres ente solo su alcuni mod elli di mac china;
vi consente di preparare dei gustosi cappuccini rendendo più
pratica e veloce, ogni oper azione.
Per l'installaz ione si devono eseguire qu este semplici operaz ioni.
1 (Fig.29) - Allentare la ghiera posta nella parte superiore del
cappuccinatore.
2 Inserire completamente il cappuccinatore nel tubo vapore.
3 (Fig.30) - Serrare la ghiera.
Per l'utilizzo del cappuccinatore si deve preparare la macchi-
na come descritto nei relativi paragra .
Prima di utilizzare gli acce ssori consigliamo di lavarli con acqua
corrente; (Fig.31-32) immergere il tubo d'aspirazione in un
contenitore di acqua fresca ed erogare una piccola quantità di
vapore (consultare le relative istruzioni); questo consentirà di
garantire una p erfetta pulizia prima dell'utili zzo.
Per la pulizia del cappuccinatore, aspirare
dell'acqu a pulita per ese guire la puliz ia del tubo
d'aspirazione.
Durante la prep arazione della macchina, se p ossibile, preparare
un contenitore apposito con il latte da utilizzare oppure servirsi
direttamente del contenitore del latte; posizionarlo a anco
della macchina.
Attenzione. Non utilizzare il vapore quando la
parte terminale del cappuccinatore non è inse-
rita nella sua sede.
• (Fig.36) - Lavare la parte terminale con acqua tiepida. Assicurarsi che non rimangano tracce di sporco all’interno.
Dopo aver lavato i componenti del cappuccinatore, rimontarlo
sul raccordo che è rimasto mont ato sulla macchina.
12 SMALTIMENTO
INFORMAZIONE AGLI UTENTI: ai sensi dell’art. 13 del Decreto
Legislativo 25 luglio 2005, n. 151"Attuazione delle Direttive
2002/95/CE, 2002/96/CE e 2003/108/CE, relative alla riduzione
dell'uso di sostanze pericolose nelle apparecchiature elettriche
ed elett roniche, nonché allo smalti mento dei ri uti"
Il simbolo
parecchiatura o sulla sua confezione indica che il prodotto alla
ne della propria vita utile deve essere raccolto separatamente
dagli altri ri uti.
L’utente dovrà, pertanto, conferire l’apparecchiatura giunta
a ne vita agli idonei centri di raccolta di erenziata dei ri uti
elettronici ed elettrotecnici, oppure riconsegnarla al rivenditore al momento dell’acquisto di una nuova apparecchiatura di
tipo equivalente, in rag ione di uno a uno.
L’adeguata raccolta di erenziata per l’avvio successivo dell’apparecchiatura dismessa al riciclaggio, al trattamento e allo
smaltimento ambientalmente compatibile contribuisce ad
evitare possibili e etti negativi sull’ambiente e sulla salute e
favorisce il reimpiego e/o riciclo dei materiali di cui è composta
l’apparecchiatura.
Lo smaltimento abusivo del prodotto da parte dell’utente
comporta l’applicazione delle sanzioni amministrative previste
dalla normati va vigente.
del cassonetto barrato riportato sull’ap-
• 12 •
Guasto Cause possibili Rimedio
La macchina non si ac cen de. Macchina non colle gata alla rete elettric a. Colle gare la macchina alla rete elett rica.
La pompa è molto ru mo ro sa. Manc a acqua nel ser ba to io Rabboccare con acqua.(par.4.4).
Il ca è é troppo fre ddo.
Non si forma la schiu ma del lat te.
Non si riesce a preparare un cappuccino.
Il ca è sgorga troppo ve lo ce men te, non si forma la crema .
Il ca è non sgorga o sgor ga solo
a gocce.
Il ca è sgorga dai bordi.
Il led (15) "pronto macchina" era spen to
quan do è sta to portato il pomello di selezione (17) nella posizione "
Porta ltro non inserito per il preriscaldamento (cap. 5).
Tazzine fred de. Preriscadare le taz zine con acqua calda.
Latte non adatto: latte in polvere, latte
magro.
Pannarello spo rco. Pulire il pannarello come de scritto nel Cap.9.
Non è più prese nte vapore nella caldaia.
Troppo poco ca è nel port a ltro. Aggiungere i l ca è (cap. 5).
Macinatura t rop po grossa. Usare una misce la diversa (cap.6).
Ca è vecchio o non adat to. Usare una mi sce la divers a (cap.6).
Cialda vecchia o no n adatta. Cambiare la cialda utilizz ata.
Manca un componente nel por ta lt ro.
Mancanza d i acqua. Rabboccare con acqua (pa r.4.4).
Macinatura t rop po ne. Usare una misce la diversa (cap.6).
Ca è premuto nel por ta lt ro. Smuovere il ca è mac inato.
Troppo ca è nel port a ltro. Ridurre la quantità di ca è nel porta ltro.
Pomello (4) aperto. Chiudere il pomello (4).
Macchina calci cata. Decalci care la macchina (cap.10).
Filtro nel porta ltro otturato. Pulire il ltro (cap.9).
Cialda non adat ta. Cambiare il tipo di cialda.
Porta ltro inserito male nel grup po eroga-
zione ca è.
Bordo supe riore del porta ltro sporco. Pulire il bo rdo del porta ltro.
Cialda inser ita in modo errato.
Troppo ca è nel port a ltro.
".
Attendere ch e il led (15) si ac cen da.
Preriscaldare il porta ltro.
Utilizzare latte intero.
Ricaricare il circuito (par. 4.5) e ripetere le operazioni de scritte nel Cap. 8.
Veri care che t utti i componen ti siano presenti e
correttamente montati.
Inserire co rrettamente il por ta l tro (cap.5).
Inserire correttamente la cialda facendo in
modo che non e sca dal porta ltro.
Ridurre la quantità di ca è uti liz zan do il misurino.
Italiano
Per i guasti non con tem pla ti dalla suddetta ta bel la o in caso che i rimedi sug ge ri ti non li ri sol va no, rivolgersi ad un
centro assistenza.
• 13 •
1 GENERAL INFORMATION
The co ee machine is ideal for brewing 1 or 2 cups of espresso
co ee and it is provided with a swivel steam and hot water
spout. The con trols on the front side o f the machine are labelled
with easy-to-read symbols.
The machine ha s been designed for h ousehold use only. It is not
suitable f or professional, continuous us e.
Warning. N o liability is h eld for damages c aused
by:
• Improper and inco nsistent use of the machine.
• Repai rs carried ou t by anyone other than aut horized
service centres.
• Tampering wi th the power cord.
• Tampering with any comp onent of the machine.
• Use of non-origina l spare parts and accessor ies.
• Failed descaling and storage at temperatures below
0°C.
In such cases, the war ranty is not valid.
1.1 To Facilitate interpretation
The warning triangle indicates the
instructions that are important for
user's safety. Please follow these
instructions caref ully to avoid serious injur y!
Illustrations, parts of the machine and control elements are
referred to by numbers or letters; in this case please refer to
the illustration.
2 TECHNICAL SPECIFICATIONS
The manufac turer reserve s the right to make technical c hanges
to the produc t.
Nominal Voltage - Power rating - Power supp ly
See label on the appliance
Shell material
Plastic
Size (w x h x d) (mm)
270 x 350 x 300
Weigh t
4 kg
Cord length
1.2 m
Control pane l
Front side
Porta lter
Pressurized type
Pannarello
Special for c appuccinos
Water Tank
1.5 litres - Removable type
Pump pressu re
15 ba r
Boiler
Stainles s steel
Safety devices
Thermal fuse
This symbol emphasizes particularly important
information to take into greater account for a
better u se of the machine.
The illus trations corr esponding to th e text can be foun d
on the rst pages of the manual. Please refer to this
page while reading the operating instructions.
1.2 How to Use These Operating Instruc-
tions
Keep these operating instructions in a safe place and make
them available to anyone who may use the co ee machine.
For further information or in case of problems, please refer to
any authorize d ser vice centre.
• 14 •
3 SAFETY REGULATIONS
Do not put live parts in contact with water: Danger of
short circuit! Overheated steam and hot water may
cause sc alding! Do not direct the steam or hot water jet
towards body parts. Handle the steam/hot water spout
with car e: Danger of scalding!
Intended Use
The co ee machine is intended for domestic use only. Do not
make any technical changes or use the machine for unlawful
purposes since this would create serious hazards! The appliance is not for use by persons (included children) with reduced
physical, mental or sensory abilities or with scarce experience
and/or competences, unless they are supervised by a person
responsible for their safety or they are instructed by him/her
to use the machine.

Power Supply
Connect the co ee machine only to a suitable socket. The voltage must correspond to the value shown on the machine’s
label.
Power Cord
Do not use the co ee machine if the power cord is defective. If
damaged, the power cord must be replaced by the manufacturer or its customer service centre. Do not run the cord around
sharp corners and edges as well as on hot objects and keep it
away from oil.
Do not use the power cord to carry or pull the co ee machine.
Do not unplug the machine by pulling the power cord or touch
the plug with we t hands.
Do not let the power cord hang fr eely from tables or she lves.
Protecting Other People
Prevent chil dren from playing wit h the machine.
Children are not aware of the risks stemming from household
appliances. Do not leave the co ee machine packaging within
the reach of children.
Danger of Burns
Do not direct the jet of overheated steam and/or hot water towards yourself or other people. Always use the special handles
or knobs.
Do not disconnect (remove) the pressurized porta lter during
co ee brewing. Hot water drops may spill out of the co ee
brew unit dur ing the warming up.
Location
Place the co ee machine in a safe place, where nobody may
overturn it or be injured.
Hot water or overheated steam may spill out of the machine:
Danger of scalding!
Do not keep the ma chine at a temperature b elow 0°C; frost may
damage the machine.
Do not use the co ee machine outdoo rs.
Do not place the ma chine on very hot sur faces and close to op en
ames in order to prevent its housing from melting or being
damaged.
Cleaning
Before cleaning the machine, disconnect it by pressing the ON/
OFF button, t hen pull out the plug fro m the socket. Wait for the
machine to cool d own. Do not immerse the machine in water!
It is strictly forbidden to tamper with the internal parts of the
machine.
Water left in the tank for several days should not be consume d.
Wash the tank and ll it with fresh drinking water.
Space for Operation and Maintenance
To ensure that the co ee ma chine works proper ly and e ciently, read the following instructions.
• Choose an even surface.
• Choose an adequately lit and clean location with a socket
within easy reach.
• Allow for a minimum distance from the sides of the machine
as shown in Fig. A.
Storing the Machine
If the machine is to remain unused for a long time, turn it o
and unplug it f rom the socket. Keep it in a dry place out of children’s reach. Shelter it f rom dust and dirt.
Repairing / Maintenance
In case of failure, faults or a suspected fault af ter dropping, remove the plug from the socket immediately. Do not operate a
faulty m achine. Servi cing and repairin g should be carri ed out by
authorize d service centres only. All liab ility for damages cau sed
by works not c arried out in a profes sional manner is declined.
Fire Safety
In case of re, use carbon dioxide (CO2) extinguishers. Do not
use water or dr y powder extinguisher s.
Key to machine components (Page 2)
1 Control panel
2 ON/OFF button
3 Water Tank
4 Hot water/steam knob
5 Drip tray & gr ill
6 Co ee brew unit
7 Steam spout (Pannar ello)
8 Power cord
9 Ground co ee mea suring scoop
10 Pressurized porta lter
11 Ground co ee lter
(single piece for 1 or 2 co ee(s))
12 Cappuccinatore (optional)
13 Pod lter adapter
14 Co ee pod lter
15 Co ee/Water light - "Machine rea dy"
16 Steam ready light
17 Selection knob
English
• 15 •
4 INSTALLATION
For your and other people safety, follow the "Safety
Regulations" in sec tion 3 carefull y.
4.1 Packaging
The original packaging has been designed to protect the machine during transpor t. We recommend keeping the p ackaging
for future transport.
4.2 Installation Instructions
Before installing the machine, read the following safety instructions carefully.
• Put the machine in a safe place.
• Make sure children cannot play with the machine.
• Do not place the machine on hot surfaces or near open
ames.
The co ee machine is now ready to be connected to the power
supply.
Note: It is recommended to wash the compo-
nents before using them for the rst time and/
or after they have not been used for a certain period of
time.
4.3 Machine Connection
Electric power can be dangerous! It is therefore
essential to follow the safety regulations carefully. Do not use faulty cords! Faulty cords and plugs
must be immediately replaced by authorized service
centres.
Appliance voltage has been pre-set by the manufacturer. Make
sure that the power voltage matches the indications on the
identi cati on plate on the bottom of t he appliance.
• Make sure that the ON/OFF button (2) is not pressed before
connecting the machine to the power supply.
• Fit the plug into a wall socket with suitable power voltage.
4.4 Water Tank
• (Fig.1) - Remove the water tank (3).
• (Fig.2) - Rinse the water tank and ll it with fresh drinking
water taking care not to over ll it.
• (Fig.1) - Insert the water tank making sure that it has prop-
erly been replaced in its former seat.
Use only fresh, non-sparkling drinking water to
ll the tank. Hot water, as well as any other liquid, may damage the tank. Do not turn on the machine
with empt y water tank: make sure there is enough water in the ta nk.
4.5 Circuit Priming
In the beginning, after dispensing steam or when the water
tank is empt y, the machine’s water circuit must be primed.
• (Fig.3) - Press the ON/OFF button (2).
• (Fig.4) - Place a container under the steam spout.
• (Fig.5) - Open the "hot water/steam" knob (4) by turning it
anticlockwise.
• (Fig.6) - Switch the selection knob to the "
(17).
• Wait until a steady jet of water ows out of the steam spout
(Pannarello).
• (Fig.6) - Switch the selection knob to the "
(17).
• Close the "hot water/steam" knob (4) by turning it clockwise. Remove the container.
" position
"position
4.6 Using the machine for the fi rst time
or after a period of inactivity
This simple operation ensures an optimum brewing and must
be performed:
- at rst start-up;
- when the machine remains inactive for a long time (more
than 2 weeks).
Dispensed water must be emptied into an ad-
equate drain. It is not suitable for food use. If
the container lls up, stop dispensing water during the
cycle and empt y it before resumi ng the operation.
• (Fig.2) - Rinse the tank and ll it again with fresh drinking
water.
• (Fig.4) - Place a container under the steam wand (Pannarel-
lo). Open the knob (4) by turning it counter-clockwise and
switch the selection knob (17) to the “
• Dispense the whole water tank from the steam/hot water
wand. To end the operation, switch the selection knob (17)
” position and close the knob (4) by turning it
to the “
clockwise.
• (Fig. 2) - Fill the water tank with fresh drinking water.
• (Fig.11-12) - Insert the porta lter into the brew unit from
the bottom (6) and turn it from left to right until it locks into
place.
• (Fig.13) - Place a suitable container under the porta lter.
• Turn the selection knob (17) to the “
pense all the water in the water tank. Once the tank is empty,
stop dispensing and switch the selection knob (17) to the “
” position.
• Fill the tank again and wait until the “machine ready” light
(15) turns on.
• (Fig.16) - Remove the porta lter from the unit by turning it
from right to left and rinse it with fresh drinking water.
The machine is now ready; please s ee related sections f or operating detai ls on how to brew co ee and dispense steam.
” position.
” position and dis-
• 16 •

4.7 Drip Tray Adjustment
The drip tray c an be adjusted according to the cup size.
To adjust the drip tr ay height, do as follows.
• (Fig.24) - Lift the drip tray and remove the grill.
• (Fig.25) - Remove the support under the drip tray.
• (Fig.26 - 27) - Rotate the support and place it in the co ee
machine.
• (Fig.28) - Put the drip tray on the support and replace the
grill.
5 COFFEE BREWING
Warning! During the co ee brewing, do not remove the pressurized porta lter by manually
turning it clockwise. D anger of burns.
• During this operation, the "machine ready" light (15) may
ash; this is to be considered a standard and not a faulty
operating mode.
• Before using the machine, make sure that the hot water/
steam knob (4) is closed and that there is enough water in
the tank.
• (Fig.3) - Press the ON/OFF button (2).
• Wait until the "machine ready" light (15) turns on. The machine is now ready for co ee brewing.
5.1 Using Ground Coff ee
• (Fig.8) - Insert the lter (11) in the pressurized porta lter
(10); the lter is already inserted before using the machine
for the rst time.
• (Fig.11) - Insert the porta lter into the brew unit from the
bottom (6).
• (Fig.12) - Turn the porta lter from left to right until it locks
into place. Release the porta lter grip. The handle will
slightly turn to the left. This movement guarantees porta lter performance.
• (Fig. 14) - Preheat the pressurized porta lter by switching
the selection knob (17) to the "
water spills out of it. This is to be done only for the rst co ee
brewing.
• When 150cc of water have owed out, switch the selection
knob (17) to the "
• (Fig.16) - Remove the porta lter from the machine by turning it from right to left and drain any water left. There is no
need to change the lter to make one or two co ees, since
the machine is equipped with a special lter (11).
• (Fig.9A) - Add 1- 1.5 measuring scoop for single co ee and
2 measuring scoops for double co ee. Remove any co ee
residues from the rim of the lter.
• (Fig.11) - Insert the porta lter (10) into the brew unit from
the bottom (6).
• (Fig.12) - Turn the porta lter from left to right until it locks
in place.
" position in order to stop brewing.
" position until some
• (Fig.13) - Take 1 or 2 preheated cups and place them
under the pressurized porta lter. Make sure that they are
correctly placed under the co ee dispensing holes.
• (Fig.14) - Turn the selection knob (17) to the "
tion.
• When the desired quantity of co ee has been obtained,
turn the selection knob (17) to the "
to stop co ee brewing. Wait a few second after brewing has
stopped, then remove the cups of co ee (Fig. 15).
• (Fig.16) - Remove the pressurized porta lter and empty the
remaining co ee residues.
Note: If a small q uantity of wate r remains in the
porta lter, this is absolutely normal and is due
to the por ta lter featur es.
Important note: The lter (11) should be kept
clean to guarantee perfect results. Clean daily
after use.
" position in order
" posi-
5.2 Using Coff ee Pods
• (Fig.10) - Use a co ee spoon to remove the lter for ground
co ee (11) from the pressurized porta lter (10).
• (Fig.7A) - Insert the co ee pod adapter (13) - with the con-
vex part facing down - into the pressurized porta lter (10).
• (Fig.7B) - Then, insert the pod lter (14) into the pressurized porta lter (10).
• (Fig.11) - Insert the pressurized porta lter into the brew
unit (6) from the bottom.
• (Fig.12) - Turn the porta lter from left to right until it locks
into place. Release the grip from the pressurized porta lter.
The handle is automatically slightly turned leftwards.
This movement guarantees porta lter performance.
• (Fig. 14) - Preheat the pressurized porta lter by switching
the selection knob (17) to the "
water spills out of it. This is to be done only for the rst co ee
brewing.
• When 150cc of water have owed out, switch the selection
knob (17) to the "
pensing.
• (Fig.16) - Remove the pressurized porta lter from the machine by turning it from right to left. Be careful not to remove
the lter.
• (Fig.9B) - Insert the pod into the porta lter and make sure
the paper of the pod does not overhang the porta lter.
• (Fig.11) - Insert the porta lter into the brew unit from the
bottom (6).
• (Fig.12) - Turn the porta lter from left to right until it locks
in place.
• Take 1 preheated cup and place it under the porta lter;
make sure that it is correctly placed under the co ee dispensing holes.
• (Fig.14) - Turn the selection knob (17) to the "
tion.
• When the desired quantity of co ee has been obtained, turn
the selection knob (17) to the "
" position in order to stop hot water dis-
" position until some
" posi-
" position in order to stop
English
• 17 •
co ee brewing, then remove the co ee cup.
• (Fig.16) - Wait a few seconds after brewing, then remove
the porta lter and dispose of the used pod.
Important note: The lter (14) and the adapter
(13) should be kept clean to guarantee perfect
result s. Clean daily af ter use.
6 TIPS FOR CHOOSING COFFEE
As a genera l rule any type of co ee avai lable on the market can
be used. However, co ee is a natural product and its avour
changes according to its origin and blend; it is therefore a good
idea to try di erent types of co ee in order to nd the most
suited to your per sonal taste.
For optimal results, however, we recommend using espresso
machine blen ds. As a rule, Co ee should al ways come out of the
porta lter without any dripp ing.
The speed of co ee dispensing can be modi ed by slightly
changing the amount of co ee in the lter and/or by using a
d i e r e n t c o e e g r i n d .
Saeco recommends using single-dose co ee pods marked ESE
for a tast y co ee and easier cle aning and preparing.
BEFORE USING THE HOT WATER/STEAM JET, MAKE
SURE THAT THE STEAM SPOUT (PANNARELLO) IS
POSITIONED OVER THE DRIP TRAY.
7 HOT WATER
Danger of s calding! When br ewing start s, spurts
of hot water may come out. The spout can reach
high temperatures: do not touc h it with bare hands.
• (Fig.3) - Press the ON/OFF button (2).
• Wait until the "machine ready" light (15) turns on. The machine is now ready.
• (Fig.18) - Place a container or a teacup under the steam
spout (Pannarello).
• (Fig.5) - Open the knob (4).
• (Fig.6) - Switch the selection knob to the "
(17).
• When the desired quantity of hot water has been dispensed,
set the selection knob (17) to the "
• (Fig.5) - Close the knob (4).
• Remove the container with hot water.
" position.
" position
8 STEAM / CAPPUCCINO
Danger of s calding! When br ewing start s, spurts
of hot water may come out. The spout can reach
high temperatures: do not touc h it with bare hands.
• (Fig.3) - Press the ON/OFF button (2).
• Wait until the "machine ready" (15) light turns on.
• (Fig.19) - Switch the selection knob (17) to the "
tion.
• Wait until the light (16) turns on. The machine is now ready
for steam ejection.
• (Fig.18) - Place a container under the steam spout.
• (Fig.5) - Open the knob (4) for a few seconds, so that remaining water ows out of the steam spout (Pannarello). In
a short time only steam will come out.
• Close the knob (4) and remove the container.
• Fill 1/3 of the container you wish to use to prepare your cappuccino with cold milk.
Use cold mil k to get a better resul t.
• (Fig.20) - Immerse the steam spout in the milk and open the
knob (4) by turning it anticlockwise. Turn the milk container
with slow upward movements so that it warms up evenly.
A maximum steam brewing of 60 seconds is recommended.
• When brewing ends, close the knob (4) and remove the cup
with the frothed milk.
• (Fig.19) - Switch the selection knob (17) to the "
tion.
If both lights are on and the machine has reached a too high
temperature to brew co ee, prime the circuit as described in
section 4.5 to make the machine ready for use.
Note: The machine is ready when the "machine
ready" l ight (15) is permanently on.
Note: If brew ing a cappucci no as describ ed is not
possible, prime the circuit as explained in Sec-
tion.5, then repeat the procedure.
The same procedure can be used to heat other
beverages.
• After this operation, clean the steam spout with a wet cloth.
" posi-
" posi-
• 18 •
9 CLEANING
Maintenance and cleaning may only be carried out when the
machine has cooled down and has been disconnec ted from the
power supply.
• Do not immerse the machine in water nor place any of its
parts in a dishwasher.
• Do not use spirit, solvents and/or aggressive chemical
agents.
• We recommend cleaning the water tank and lling it up with
fresh water daily.
• (Fig.21-22) - Every day, after heating the milk, remove the
external part of the Pannarello and wash it with fresh drinking water.
• (Fig.23) - Clean the steam spout weekly. In order to do this,
please:
- Remove the external part of the Pannarello (for standard
cleaning).
- Loosen the ring nut (without removing it).
- Remove the upper part of the Pannarello from the steam
spout.
- Wash the upper part of the Pannarello with fresh drinking
water.
- Wash the steam spout with a wet cloth and remove any
milk residue.
- Replace the upper part of the steam spout (make sure it is
completely inserted).
- Tighten the previously loosened ring nut.
Reassemble the external part of the Pannarello.
• (Fig.24) - Empty and clean the drip tray daily
• Use a damp and soft cloth to clean the appliance.
• (Fig.17) - Perform the following operations to clean the
pressurized porta lter:
- (Fig.10) - Remove the lter, wash it thoroughly with hot
water.
- Remove the adapter (if tted), and wash it thoroughly with
hot water.
- Wash the internal part of the pressurized porta lter.
• Do not dry the machine and/or its components in a microwave and/or in a conventional oven.
Note: do not wash the pressurized porta lter in
the dishwasher.
10 DESCALING
The formation of limescale inside the appliance is inevitable.
It is necessary to descale the machine every 1-2 months of use
and/or when you notice a reduction in the water delivery. Use
the Saeco de scaling product only.
In case of con ict, priority must be given to
what is indicated in the operation and maintenance manual over the instructions provided on separately so ld accessories and materials.
Use the Saeco descaling product (Fig. B). Its for-
mula has been designed to ensure better machine performance and operation for its whole operating life. If correctly used, it also avoids alterations in the
brewed product. Before starting a descaling cycle make
sure that: THE WATER FILTER (if used) HAS BEEN REMOVED.
Never drink the descaling solution or any products dispensed until the cycle has nished.
Never use vinegar as a descalin g solution.
1 (Fig.11-12) - Insert the porta lter into the brew unit from
the bottom (6) and turn it from left to right until it locks into
place.
2 (Fig.1) - Remove and empty the water tank.
3 (Fig.2) - Pour HALF the content of the Saeco concentrated
descaling solution into the water tank, then ll the tank with
fresh drinking water up to the MAX level.
4 (Fig.2) - Switch on the machine by pressing the ON/OFF but-
ton (2).
(Fig.4) - Fill up (as described in Section 7 of the manual) two
cups of water (about 150 ml each) from the steam / hot water wand and turn o the machine by pressing the ON/OFF
button (2).
5 Leave the descaling solution to descale for approx.15-20
minutes with the machine turned o .
6 Switch on the machine by pressing the ON/OFF button (2).
(Fig.4) - Fill up (as described in Section 7 of the manual) two
cups of water (about 150 ml each) from the steam / hot water wand. Then turn the machine o by means of the ON/OFF
button (2) and leave it o for 3 minutes.
7 Repeat the operations as described in step 6 until the water
tank is completely empty.
8 (Fig.2) - Rinse the water tank with fresh drinking water and
ll it completely.
9 Place a container under the porta lter.
10 (Fig.6) - Switch on the machine by pressing the ON/OFF but-
ton (2); turn the selection knob (17) to the “
and, using the porta lter, dispense the whole content of the
tank. Switch the selection knob (17) to the “
stop the dispensing.
11 (Fig.2) - Fill the tank again with fresh water.
(Fig.4) - Place a large enough container under the steam
wand. Open the water dispensing knob (4) by turning it
counter-clockwise. Turn the selection knob (17) to the “
position and dispense the whole content of the tank by means
” position
” position to
English
”
• 19 •
of the steam / hot water wand.
12 After dispensing water, switch the selection knob (17) to the
” position in order to stop the dispensing. Close the water
“
dispensing knob (4) by turning it clockwise.
13 Repeat the operations once again from point (8) for a total
of 4 tanks.
14 (Fig.16) - Remove the porta lter from the unit by turning it
from right to left and rinse it with fresh drinking water.
The descaling cycle i s now complete.
(Fig.2) - Fill the t ank again with fresh wa ter. If necessary, prime
the circui t as described in Sec tion 4.5 of the manual.
Saeco descaling solution should be disposed
of according to the manufacturer instructions
and/or the regulati ons in the country of use.
11 CAPPUCCINATORE OPTIONAL
Not all machine models are provided with cappuccinatore. The
cappuccinatore allows you to easily and quickly prepare delicious cappuccinos.
Follow these sim ple instructions to install it.
1 (Fig.29) - Loosen the ring nut on the upper part of the cap-
puccinatore.
2 Insert the cappuccinatore completely into the steam spout.
3 (Fig.30) - Tighten the ring nut.
To use the cappuccinatore, prepare the machine as described
in the related sections.
Before using the accessories, we recommend washing them
with water (Fig. 31-32), immerse the suction pipe in a fresh
water container and eject a small quantity of steam (please refer to the related instructions). In this way, the accessories will
be perfectly clean before use.
To clean the cappuccinatore, suck up clean water to clean the suction pipe.
Wash the cappuccinato re as follows:
• (Fig.35) - Remove the extremity of the cappuccinatore from
its seat.
• Separate the cappuccinatore’s components.
Warning. Do not use steam when the extremity of the cappuccinatore is not inserted into its
seat.
• (Fig.36) - Wash the cappuccinatore extremity with luke-
warm water. Make sure no dirt is left inside.
After washing the components of the cappuccinatore, place it
back on the coupling locate d on the machine.
12 DISPOSAL
• Put unused appliances out of service.
• Disconnect the plug from the socket and cut the electrical
cord.
• At the end of its life, take the appliance to a suitable waste
collection site.
This produc t complies with EU Direc tive 2002/96/EC.
The symbo l
cates that this p roduct may not be treated as household waste.
Instead it shall b e handed over to the applicab le collection poin t
for the rec ycling of electrical and electronic equipment .
By ensuring this product is disposed of correctly, you will help
prevent potential negative consequences for the environment
and human health, which could otherwise be caused by inappropriate waste handling of this product. For more detailed information about recycling of this product, please contact your
local city o ce, your household waste disposal service or the
shop where you purchased th e product.
on the produ ct or on its pack aging indi-
While the machine is getting ready, prepare a special container with milk or use the milk container. Place it beside the
machine.
• (Fig.33) - Immerse the suction pipe in the prepared milk.
• (Fig.34) - Eject steam as described in section 8. Turn the pin
to modify the milk froth.
Lift the pin gently to obtain more froth.
• After preparing the cappuccino, immerse the suction pipe
into a container with fresh clean water and eject steam. The
cappuccinatore is clean when clean water is dispensed. Clean
the suction pipe externally with a damp cloth.
The cappuccinatore must be removed and completely w ashed once a week.
• 20 •
Fault Possible cause Solution
The machine does not turn on.
The pump is ver y noisy. No water in the tank. Re ll with water. (section 4.4).
The co ee is too cold.
Milk does not f roth.
It is not possible to prepare a cappuccino.
The co ee is dispensed too fast,
no foam builds up.
Co ee is not dispensed or dispensed only in dr ips.
Co ee drips from the e dges.
Machine not connected to the power supply.
The “machine read y” light (15) was o while switching the selection knob (17) to the
" position.
"
The porta lter is not inserted for prehea-
ting (section 5).
Cold cups. Preheat the cu ps with hot water.
Not suitable milk: powdered milk, low-fat
milk.
Dirt y Pannarello. Clean the Pannare llo as described in sec tion 9.
No steam in the b oiler.
Too little co ee in the porta lter. Add co ee (section 5).
Co ee ground is too coars e. Use a di ere nt blend (section 6).
Co ee is old or not suitable. Use a di erent blend (sec tion 6).
Old or not suit able pod. Chang e the pod.
One compone nt missing in the porta lter.
No water. Re ll with water. (section 4.4).
The grind is too ne. Use a di erent blend (sec tion 6).
Co ee pressed in the p orta lter. Shake the ground co ee.
Too much co ee in the port a lter. Red uce the quantity of co ee in th e porta lter.
Knob (4) is open. Close the kn ob (4).
Traces of limestone. Desca le the machine (section 10).
The lter in the porta lter is clogged. Clean t he lter (Section 9).
Not suitabl e pod. Change ty pe of pod.
The porta lter is incorrectly inserted into
the brew unit .
The upper ed ge of the porta lter is dir ty. Clean the rim of the por ta lter.
Pod wrongly inserted.
Too much co ee in the port a lter.
Connect the machine to the p ower supply.
Wait until the “machine ready” light (15) turns
on.
Preheat the porta lter.
Use whole milk.
Prime the circuit (section 4.5) and repeat the
operations described in sec tion 8.
Make sure that all components are present and
that they have been installe d properly.
Insert t he porta lter correctly (Sect ion 5).
Insert the pod correctly. Make sure it does not
come out of the p orta lter.
Reduce the quantity of co ee using the measuring scoop.
English
Please contact an authorized service centre for any faults not covered in the above table or when the suggested
solutio ns do not solve the pro blem.
• 21 •
1 ALLGEMEINES
Die Ka eemaschine eignet sich für die Zubereitung von 1
oder 2 Tassen Espresso und ist mit einem drehbaren Rohr für
die Dampf- und die Heißwasserausgabe ausgestattet. Die Bedienelemente auf der Vorderseite des Geräts sind mit einfach
verständlichen Symbolen gekennzeichnet.
Die Maschin e wurde für den Eins atz im Haushalt entw ickelt und
eignet sich daher nicht für den Dauerbetrieb im gewerblichen
Einsatz.
Achtung. In folgenden Fällen wird für eventuelle Schäden keine Haf tung übernommen:
• Falsche und nicht den vorgesehenen Verwendungszwecken entspre chende Verwendun g;
• Reparaturen, die nicht in autorisierten Kundendienststellen durchgeführt wurden;
• Veränderungen am Netzkabe l;
• Veränderungen an beliebigen Bestandteilen der
Vorr ichtu ng;
• Verwendu ng von anderen als ori ginalen Ersatz- und
Zubehörteilen;
• Fehlende Entkalkung und Lagerung in Räumen bei
Temperaturen unter 0°C.
In diesen Fällen erlischt die Garantie.
1.1 Hinweise zur einfacheren Lektüre
Das Warndreieck weist auf alle
wichtigen Anweisungen für die Si-
cherheit des Benutzers hin. Diese
Hinweise sind strikt zu beachten, um schwere Verletzungen zu vermeiden!
2 TECHNISCHE DATEN
Der Herste ller behält sich das Rech t vor, technische Änderunge n
am Produkt vorzunehme n.
Nennspannu ng - Nennleistung - Stromve rsorgung
Siehe Typenschild auf dem Gerät
Material des Ge rätekörpers
Kunsts to
Abmessungen (L x H x T) (mm)
270 x 350 x 300
Gewicht
4 kg
Kabellänge
1,2 m
Bedienfeld
Auf der Vorders eite
Filterhalter
druckverdichtet
Pannarello
Spezialzubehör für Cappuccinos
Wasse rtank
1,5 Liter - herausnehmb ar
Pumpendru ck
15 ba r
Durchlauferhitzer
Rostfreier Edelstahl
Sicherheitsvorrichtungen
Thermosicherung
Der Bezug auf Abbildungen, Teile des Geräts oder Bedienelemente usw. erfolgt über Zahlen oder Buchstaben. In diesem
Falle wird auf die Abbildung verw iesen.
Mit diesem Symbol werden Informationen ge-
kennzeichnet, auf die besonders geachtet werden muss, um den Betrieb der Vorrichtung zu optimieren.
Die dem Text entsprechenden Abbildungen be nden
sich auf der ersten Seite des Handbuchs. Diese Seite ist
beim Lesen der vorliegenden Bedienungsanleitung zu
berücksichtigen.
1.2 Gebrauch dieser Bedienungsanlei-
tung
Bewahren Sie diese Bedienungsanleitung an einem sicheren
Ort auf und legen Sie sie der Maschine immer bei, wenn diese
von anderen Per sonen benutzt w ird.
Für weitere Info rmationen oder bei Prob lemen wenden Sie sich
bitte an die au torisierten Kundendienststell en.
• 22 •
3 SICHERHEITSVORSCHRIFTEN
Die unter Strom stehenden Teile dürfen keinesfalls mit
Wasser in Berührung kommen: Kurzschlussgefahr! Der
heiße Dampf und das heiße Wasser können Verbrennungen verursachen! Den Dampf- oder Heißwasserstrahl keinesfalls auf Körperteile richten. Die Düse für
die Dampf-/Heißwasserausgabe vorsichtig berühren:
Verbrennungsgefahr!
Sachgemäßer Gebrauch
Die Ka eemaschine ist ausschließlich für den Betrieb in Haushalten vorgesehen. Technische Änderungen und unsachgemäßer Gebrauch sind wegen der damit verbundenen Risiken
verboten! Die Maschine ist nicht dazu bestimmt, von Personen
(einschließlich K indern) mit eingeschränk ten körperlichen od er
geistigen Fähigkeiten oder einer Beeinträchtigung der Sinnesorgane bzw. von Personen ohne ausreichender Erfahrung oder
Kompetenz verwendet zu werden, es sei denn, sie werden von
einer Person überwacht, die für ihre Sicherheit verantwortlich

sind oder sie wer den im Gebrauch der Masch ine geschult.
Stromversorgung
Die Ka eemaschine darf ausschließlich an eine geeignete
Steckdose angeschlossen werden. Die Spannung muss mit derjenigen übereinstimmen, die auf dem Typenschild des Geräts
angegeben ist.
Netzkabel
Die Ka eemaschine darf keinesfalls mit defektem Netzkabel
betrieben werden. Bei Schäden am Netzkabel muss dieses
vom Hersteller oder von dessen Kundendienst ausgetauscht
werden. Das Net zkabel darf nich t in Ecken, über scharfe K anten
oder auf sehr heißen Gegenständen verlegt werden. Es sollte
vor Öl geschützt werden. Die Ka eemaschine darf nicht am
Kabel getragen oder gezogen werden. Der Stecker darf nicht
durch Ziehen am Kabel herausgezogen werden. Er sollte nicht
mit nassen Händen berühr t werden.
Der freie Fall des Netzkabels von Tischen oder Regalen sollte
vermieden wer den.
Schutz anderer Personen
Kinder beau fsichtigen, damit sie nicht mit dem Ge rät spielen.
Kinder können die Gefahrensituationen, die durch Haushaltsgeräte entstehen können, nicht abschätzen. Die für die Verpackung der Maschine benutzten Materialien sollten nicht in
Reichweite von Kin dern aufbewahr t werden.
Verbrennungsgefahr
Den Heißwasser- oder Dampfstrahl keinesfalls auf sich selbst
oder auf andere Personen richten. Stets die entsprechenden
Gri e benutzen. Der Druck lterhalter darf keinesfalls während
der Ausgabe des Ka ees herausgenommen (abgenommen)
werden. Während der Aufheizphase der Brühgruppe besteht
die Möglichkeit des Austritts vo n Tropfen h eißen Wassers.
Standort
Die Ka eemaschine sollte an einem sicheren Ort aufgestellt
werden, an dem nicht die Gefahr des Umkippens oder der Verletzung vo n Personen besteht.
Es besteht die Möglichkeit des Austritts von heißem Wasser
oder Dampf: Verbrennungsgefahr!
Die Maschine sollte Temperaturen von unter 0°C nicht ausgesetzt werden. Es besteht die Gefahr, dass die Maschine durch
gefrierendes Wasser beschädigt wird.
Die Ka eemaschine darf nicht im Freien betr ieben werden.
Die Maschine nicht auf heißen Flächen oder in der Nähe von
o enem Feuer aufstellen, da das Gehäuse schmelzen oder auf
andere Ar t beschädigt werden könnte.
Reinigung
Bevor die Maschine gereinigt wird, muss die Maschine mit
der Taste EIN/AUS ausgeschaltet und dann der Stecker von der
Steckdose ab genommen werden. Dar über hinaus abwart en, bis
die Maschine abgekühlt ist. Die Maschine keinesfalls in Wasser
tauchen!
Der Versuch von Eingri en im Inneren der Maschine ist strengstens verboten.
Wasser, das einige Tage lang im Wassertank verblieben ist, darf
nicht für Leb ensmittelzwecke g enutzt oder getr unken werden.
Den Tank reinigen und mi t frischem Trinkwasser füllen.
Raumbedarf für den Betrieb und die Wartung
Für einen korrekten und einwandfreien Betrieb der Ka eemaschine sollten f olgende Empfehlungen berücksichtigt werden:
• Eine ebene Abstell äche rather auswählen;
• Der Raum sollte ausreichend beleuchtet und hygienisch
unbedenklich sein und die Steckdose muss leicht zugänglich
sein;
• Gemäß den Angaben in der Abbildung (Abb.A) einen Mindestabstand von den Maschinenwänden berücksichtigen.
Aufbewahrung der Maschine
Wird die Maschine für längere Zeit nicht benutzt, so ist sie auszuschalten und der Stecker ist aus der Steckdose zu ziehen. Die
Maschine an einem trockenen und für Kinder unzugänglichen
Ort auf bewahren. Vor Staub und S chmutz schützen.
Reparaturen/Wartungsarbeiten
Die Maschine bei Störungen, Defekten oder dem Verdacht auf
Defekte nach einem Sturz nicht verwenden und unverzüglich
den Netzstecker ziehen. Eine defekte Maschine keinesfalls in
Betrieb setzen. Eingri e und Reparaturen dürfen ausschließlich
von autorisierten Kundendienststellen vorgenommen werden.
Im Falle von nicht fachgerecht ausgeführten Eingri en wird
jede Haft ung für eventuelle Schäden abgelehnt.
Brandschutz
Im Fall eines Brandes einen Kohlensto dioxid-Löscher (CO2)
verwenden. Keinesfalls sind Wasser- oder Pulverlöscher einzusetzen.
Legende der Maschinenbestandteile (S. 2)
1 Bedienfeld
2 Schalter EIN/AUS
3 Wassertank
4 Drehknopf Heißwasser/Dampf
5 Wasserau angschale + Gitter
6 Ka eebrühgruppe
7 Dampfdüse (Pannarello)
8 Netzkabel
9 Messlö el für gemahlenen Ka ee
10 Druck lterhalter
11 Filter für gemahlenen Ka ee
(ein Filter für d ie Ausgabe von 1 oder 2 Tassen Ka e e)
12 Cappuccinatore (optional)
13 Filteradapter fü r Ka eepads
14 Filter für Ka eepa ds
15 LED Ka ee / Wasser - "Maschine b ereit"
16 LED "Dampf bereit "
17 Anwahlknopf
Deutsch
• 23 •
 Loading...