

Philips Respironics Wisp Youth Instructions For Use Manual

Instructions for Use
Wisp Nasal Mask
Intended Use
The Wisp Youth Nasal Mask is intended to provide an interface for application of CPAP or bi-level
therapy to patients. The mask is for single patient use in the home or multi-patient use in the hospital/
institutional environment. The mask is to be used on patients 7 years or older (>40 lbs/18kg) for whom
CPAP or bi-level therapy has been prescribed.
The Wisp Nasal Mask is intended to provide an interface for application of CPAP or bi-level therapy to
patients. The mask is for single patient use in the home or multi-patient use in the hospital/institutional
environment. The mask is to be used on patients (>66lbs/30kg) for whom CPAP or bi-level therapy has
been prescribed.
Notes:
• Exhalation is built into this mask so a separate exhalation device is not required.
• This mask is not made with natural rubber latex or DEHP.
Caution: U.S. Federal law restricts this device to sale by or on the order of a physician.
Symbols
Warning or Caution
Not Made with Natural Rubber Latex
Note
System One Resistance Control
X1
Tip
Warnings
• This mask is not suitable for providing life support ventilation.
• Hand wash prior to use. Inspect the mask for damage or wear (cracking, crazing, tears, etc). Discard and
replace any components as necessary.
• Some users may experience skin redness, irritation, or discomfort. If this happens, discontinue use and
contact your healthcare professional.
• Consult a physician or dentist if you encounter tooth, gum, or jaw soreness. Use of a mask may
aggravate an existing dental condition.
• Consult a physician if you experience the following symptoms while using the mask or after removing
it: Drying of the eyes, eye pain, eye infections, or blurred vision. Consult an ophthalmologist if
symptoms persist.
• The mask material should be away from your eyes.
• Do not block or seal o the exhalation ports.
• Do not overtighten the headgear straps. Watch for signs of overtightening, such as excessive
redness, sores, or bulging skin around the edges of the mask. Loosen the headgear straps to alleviate
symptoms.
• This mask is designed for use with CPAP or bi-level systems recommended by your health care
professional or respiratory therapist. Do not wear this mask unless the CPAP or bi-level system is
turned on and operating properly. Do not block or try to seal the exhalation port.
the Warning:
vent holes to allow continuous ow of air out of the mask. When the CPAP machine is turned on and
functioning properly, new air from the CPAP machine ushes the exhaled air out through the attached
CPAP systems are intended to be used with special masks with connectors which have
1
Explanation of

mask exhalation port. However, when the CPAP machine is not operating, enough fresh air will not be
provided through the mask, and exhaled air may be rebreathed. Rebreathing of exhaled air for longer
than several minutes can in some circumstances lead to suocation. This warning applies to most
models of CPAP systems.
• If oxygen is used with the device, the oxygen ow must be turned o when the device is not
operating.
Explanation of the Warning: When the device is not in operation, and the oxygen ow
is left on, oxygen delivered into the ventilator tubing may accumulate within the device enclosure.
Oxygen accumulated in the device enclosure will create a risk of re.
• At a xed ow rate of supplemental oxygen ow, the inhaled oxygen concentration will vary,
depending on the pressure settings, patient breathing pattern, mask selection, and the leak rate. This
warning applies to most types of CPAP and bi-level machines.
• At low CPAP or EPAP pressures the ow through the exhalation port may be inadequate to clear all
exhaled gas from the tubing. Some rebreathing may occur.
• Attaching an exhalation device requires therapy pressure level adjustment to compensate for
increased leak.
Features
K
I
A
H
E
F
G
J
B
C
D
L
M
A Mask Cushion
B Mask Frame (clear or fabric)
C Frame Bottom Slot
D Headgear Clip
E Quick Release Tabs
F Tubing Assembly
G Swivel
H Elbow with Built-in Exhalation (do not block)
I Frame Top Slot
J Headgear Top Strap
K Headgear Crown Strap with Loop for Tube Management (optional)
L Headgear Back Strap
M Headgear Bottom Strap
2
Before Use Read and Understand the Instructions Completely.
• Hand wash the entire mask a.
• Wash face. Do not use moisturizer/lotion on hands or face.
• Inspect the mask. Replace the cushion if hardened or torn. Replace any parts that are broken or
worn.
Cleaning Instructions
Daily: Hand wash the non-fabric parts.
Weekly: Hand wash the fabric parts.
1. Wash in warm water with liquid dishwashing detergent.
2. Rinse thoroughly.
3. Air dry completely before use.
Cautions:
• Do not clean the mask with bleach, alcohol, solutions containing bleach or alcohol, or solutions
containing conditioners or moisturizers.
• Inspect the mask for damage or wear (cracking, crazing, tears, etc). Discard and replace any
components as necessary.
• Any deviation from these instructions will impact the performance of the product.
Institutional Disinfection
• For multi-patient use in the hospital/institutional environment, use the Disinfection Guide to
reprocess the mask between patients. These instructions can be obtained by contacting Philips
Respironics Customer Service at 1-800-345-6443 (USA or Canada) or at 1-724-387-4000.
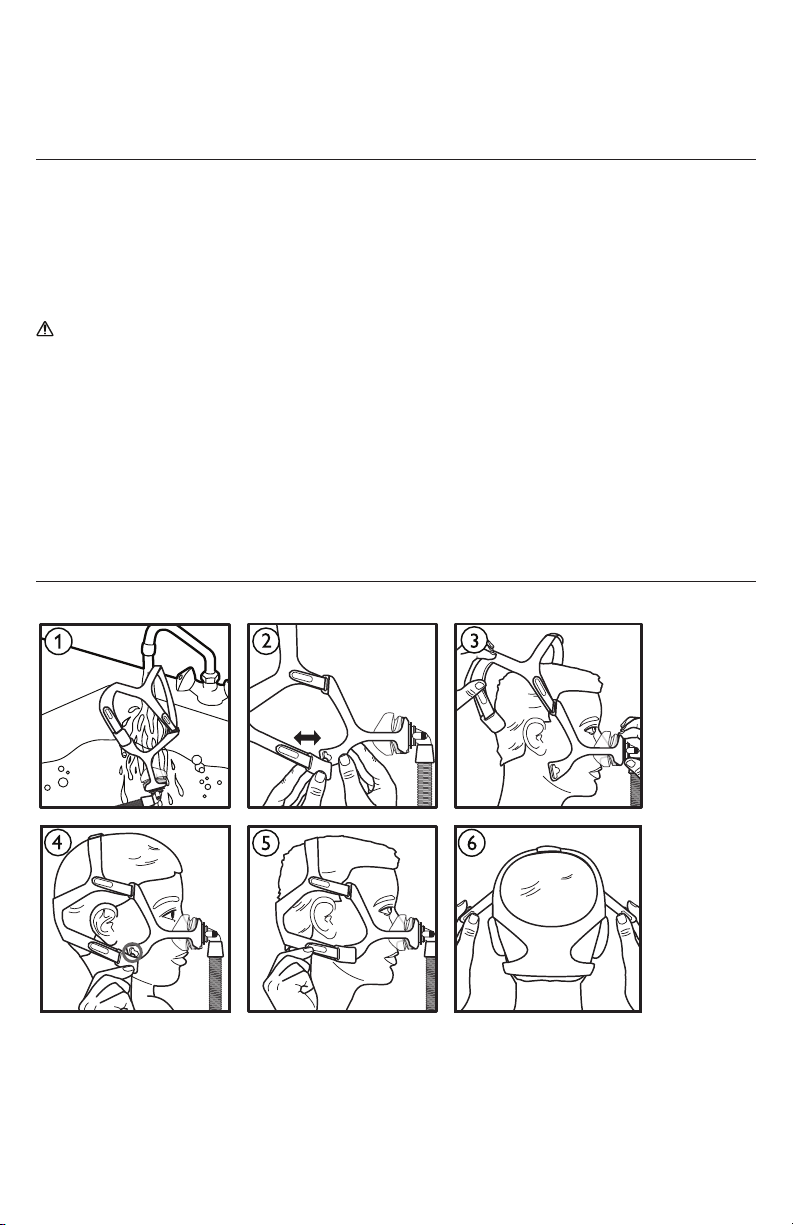
Achieving the Right Fit
3
Before Putting on the Mask
1. Sizing: Select the cushion that ts the width of the nose without blocking the nostrils. The top of
the cushion may sit between the bridge and tip of the nose.
Putting on the Mask
2. Headgear tab or clip: Disconnect one, or both b. Peel the headgear tabs away from the
headgear strap and pull through slot in the mask frame or if using the clip twist outward.
3. Headgear: Pull headgear on over head c.
4. Cushion: Place cushion over nose.
5. Headgear tab or clip: Thread tab through slot in mask frame or press clip against the headgear
slot to reattach d.
Adjusting the Mask
6. Headgear: Peel the headgear tabs away from the headgear straps then press tabs against the
headgear straps to reattach e.
Connect the side straps to the headgear tab located at the base of the crown strap.
Connect the bottom strap tabs near the back of the headgear.
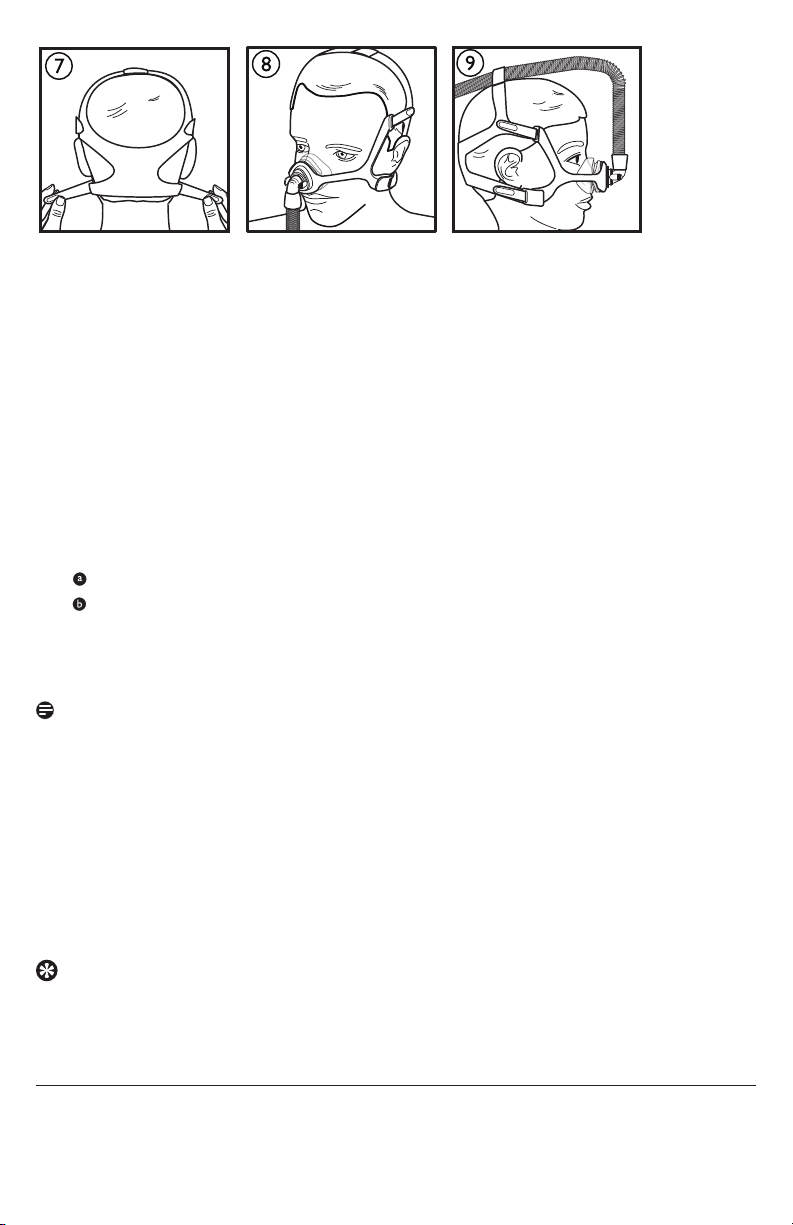
7. Headgear: Adjust side straps evenly f.
8. Headgear: Adjust bottom straps evenly g.
The mask should rest comfortably against face h.
Note: Do not overtighten the headgear.
Using Tube Management (Optional)
The exible tubing may be placed over head.
9. Slide the mask tubing through the headgear crown loop i before attaching the exible
tubing.
Using the Mask
10. Connect the exible tubing (included with the CPAP or bi-level device) to the swivel.
11. Turn the therapy device on. Lie down. Breathe normally.
12. Assume dierent sleeping positions. Move around until comfortable. If there are any excessive air
leaks, make nal adjustments. Some air leaking is normal.
Comfort Tips
• The most common mistake is overtightening headgear. The headgear should t loose and
comfortable. If the skin bulges around the mask or if red marks appear, loosen the headgear.
• Re-seat the mask by pulling it directly away from face and gently setting it back into place.
• Adjust the side headgear straps to reduce leaks around eyes.
Removing the Mask
Disconnect a bottom headgear clip. Slide the headgear forward over head.
4
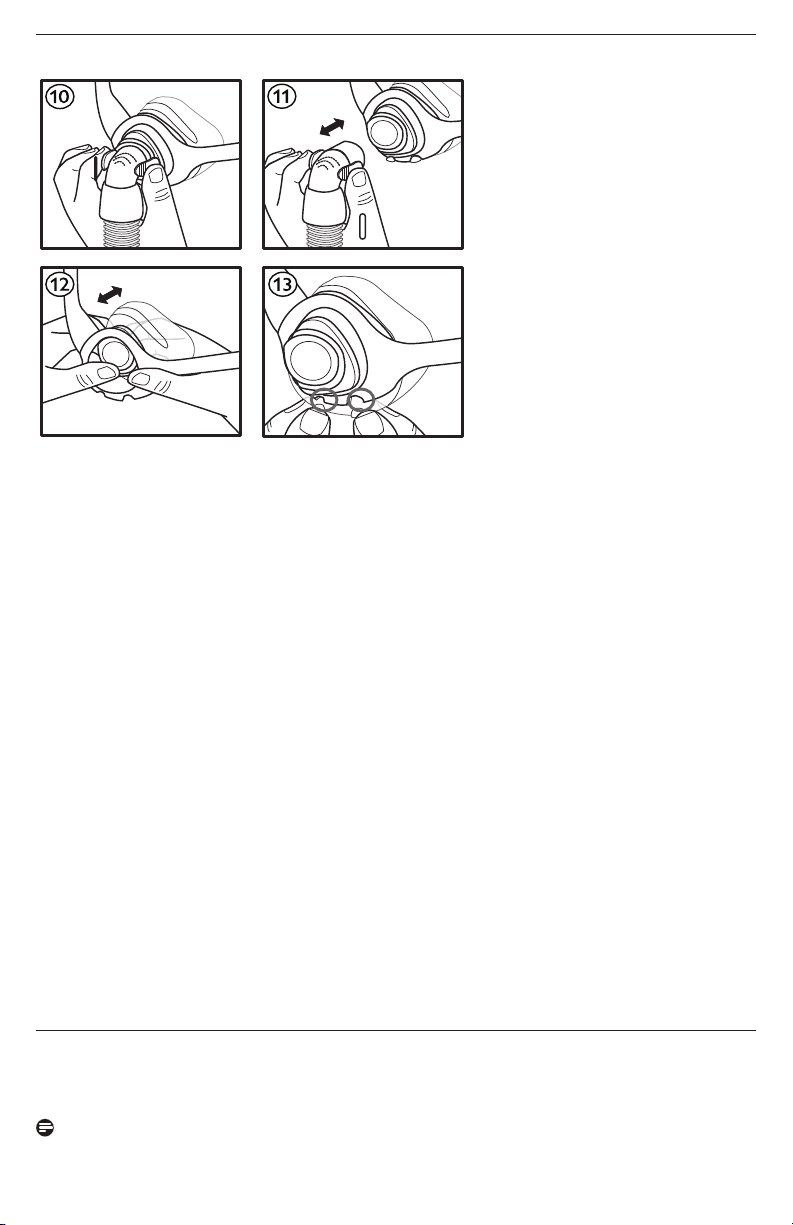
Disassembly / Assembly
Reversible Fabric Frame
Choose the fabric that feels comfortable against the skin. That side will face inward toward the
cushion and headgear. The clear frame is not reversible.
Removing the Elbow and Tubing
1. Squeeze the Quick Release Tabs j.
2. Pull the elbow away from the cushion k.
Removing the Cushion
Push the cushion backwards through the frame l.
Removing the Headgear
1. Detach the headgear bottom clips from the frame or undo the bottom tabs and pull.
2. Undo the headgear top tabs and pull the straps through the frame.
Attaching the Cushion
1. Push the cushion into the frame towards the front and press into place l.
2. The bottom of the cushion will match the alignment cutouts of mask frame m.
Attaching the Elbow and Tubing
Push the elbow into the cushion until the Quick Release Tabs click into place k.
Attaching the Headgear
1. Hold the crown strap upward.
2. Make sure the wide strap marked with “Philips Respironics” is outward.
3. Slide the headgear tabs into the longer frame arm slots.
4. Connect the headgear clips to the frame or slide the tabs into the shorter frame arm slots if not
using the headgear clips.
Philips Respironics System One Resistance Control
This mask when combined with a Philips Respironics System One device, provides optimal
resistance compensation. This mask value is X1 and should be set by the provider.
Notes:
• Compare the mask to the device. See the device manual if the values do not match.
• System One is not compatible with masks that use a separate exhalation device.
5
 Loading...