

Philips Respironics DreamWear Instructions For Use Manual
DreamWear
Full Face Mask
Instructions for use - e
1 Safety Information
Intended Use
This mask is intended to provide an interface for application of CPAP
or bi-level therapy to patients. The mask is for single patient use in the
home or multi-patient use in the hospital/institutional environment. The
mask is to be used on patients (>66lbs/30kg) for whom CPAP therapy
or bi-level therapy has been prescribed.
Note: This mask is not made with natural rubber latex or DEHP.
Contraindications
This mask is not for use on patients with the following conditions:
recent eye surgery or dry eyes, hiatal hernia, excessive reux, impaired
cough reex, and impaired cardiac sphincter function. This mask is
not for use on patients who are dependent on mechanical ventilation
for their life support. This mask is not for use on patients who are
taking a prescription drug that induces vomiting, or on patients who
are uncooperative, unresponsive or unable to remove the mask by
themselves.
Warnings
• Use of this mask while the system is not on and operating may
cause rebreathing of exhaled air. Rebreathing of exhaled air for
longer than several minutes can in some circumstances lead to
suocation.
• Discontinue use and contact your healthcare professional if any of
the following symptoms occur: skin redness, irritation, discomfort,
blurred vision, or drying of the eyes.
1

• Discontinue use and consult your healthcare professional if any of
the following symptoms occur: unusual chest discomfort, shortness
of breath, severe headache, eye pain or eye infections.
• Discontinue use and consult your healthcare professional if any of
the following symptoms occur: tooth, gum, or jaw soreness. Use of a
mask may aggravate an existing dental condition.
• A minimum of 3 cm H
mask.
O (hPa) must be maintained when using this
2
• Do not overtighten the headgear straps. Watch for signs of
overtightening, such as excessive redness, sores or bulging skin
around the edges of the mask. Loosen the headgear straps to
alleviate symptoms.
• The headgear clips and mask cushion contain magnets. Contact
your healthcare provider before you use this mask. Some medical
devices may be aected by magnetic elds. The magnetic clips in
this mask should be kept at least 2 in. (50 mm) away from any active
medical device with special attention to implanted devices such as
pacemakers, debrillators and cochlear implants.
• Do not use in or near magnetic resonance imaging (MRI) equipment.
• Do not block or seal the holes and exhalation ports.
2
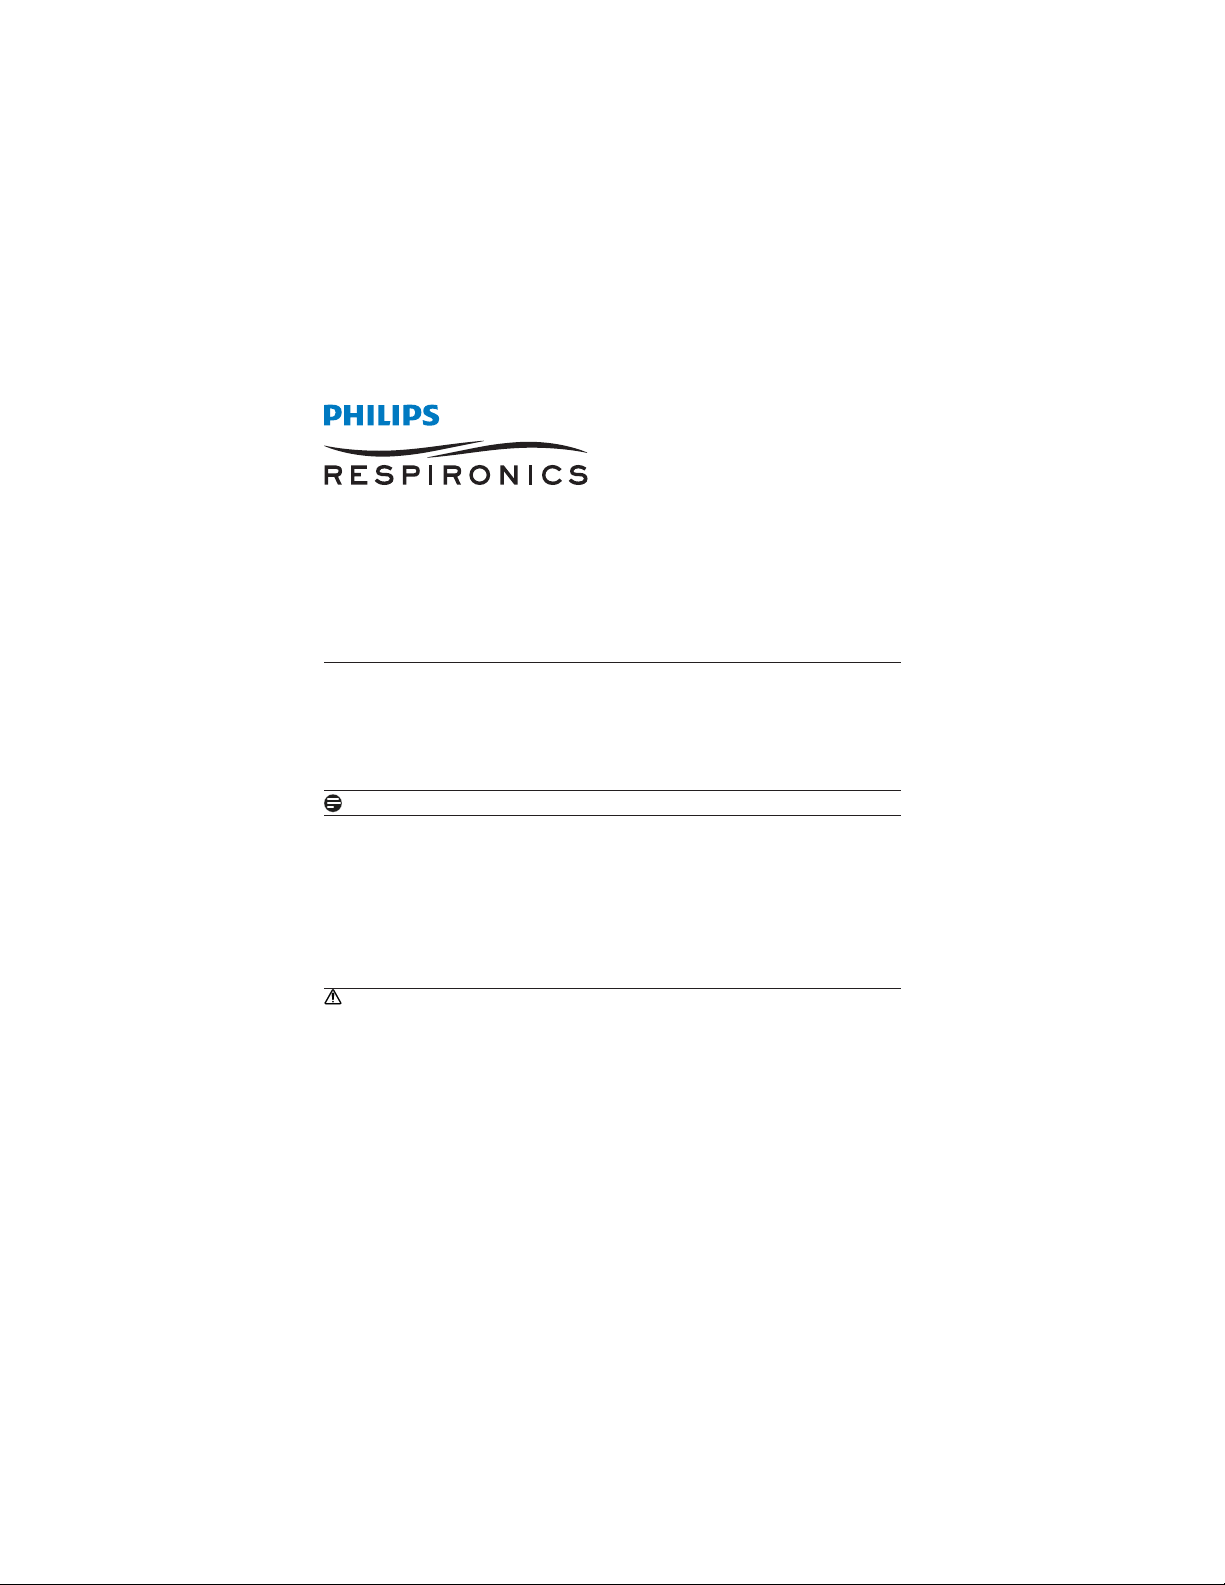
2 What’s in the Package
F
E
G
A
B
D
C
A Headgear
B Magnetic headgear clip
C Mask frame fabric sleeves (optional)
D Mask cushion (available in S, M, L, MW)
E Mask frame (available in small (SM), medium (MED), large (LG))
F Elbow with built-in exhalation (do not block)
G Tubing quick release (may remain in the CPAP hose)
3

Back of the Cushion Front of the Cushion
I
J
H
H
K
L
H Guards
I Magnetic Clips
J Flaps
K Large Holes (Two) in the Cushion (do not block)
L Small Holes in the Cushion (do not block)
J
K
4

3Before Use
DAILY BEFORE USE VERIFY FOR SAFETY
1. Look at the front of your mask cushion.
2. Find the two large holes.
3. Find the aps. The aps are clear, thin pieces that sit on the guards
behind the holes.
4. Do not use if the two large holes are blocked shut by the aps or
anything else (for example, mucus). a
Warning: Do not block any of the mask holes.
Note: The aps should cover the two large holes when the device is
on.
Before Use Read and Understand the Instructions Completely.
• Hand wash the entire mask before use (see Mask Care section).
• Wash your face. Do not use moisturizer or lotion on your hands or
face.
• Inspect the entire mask daily. Discard and replace any damaged or
worn parts.
5
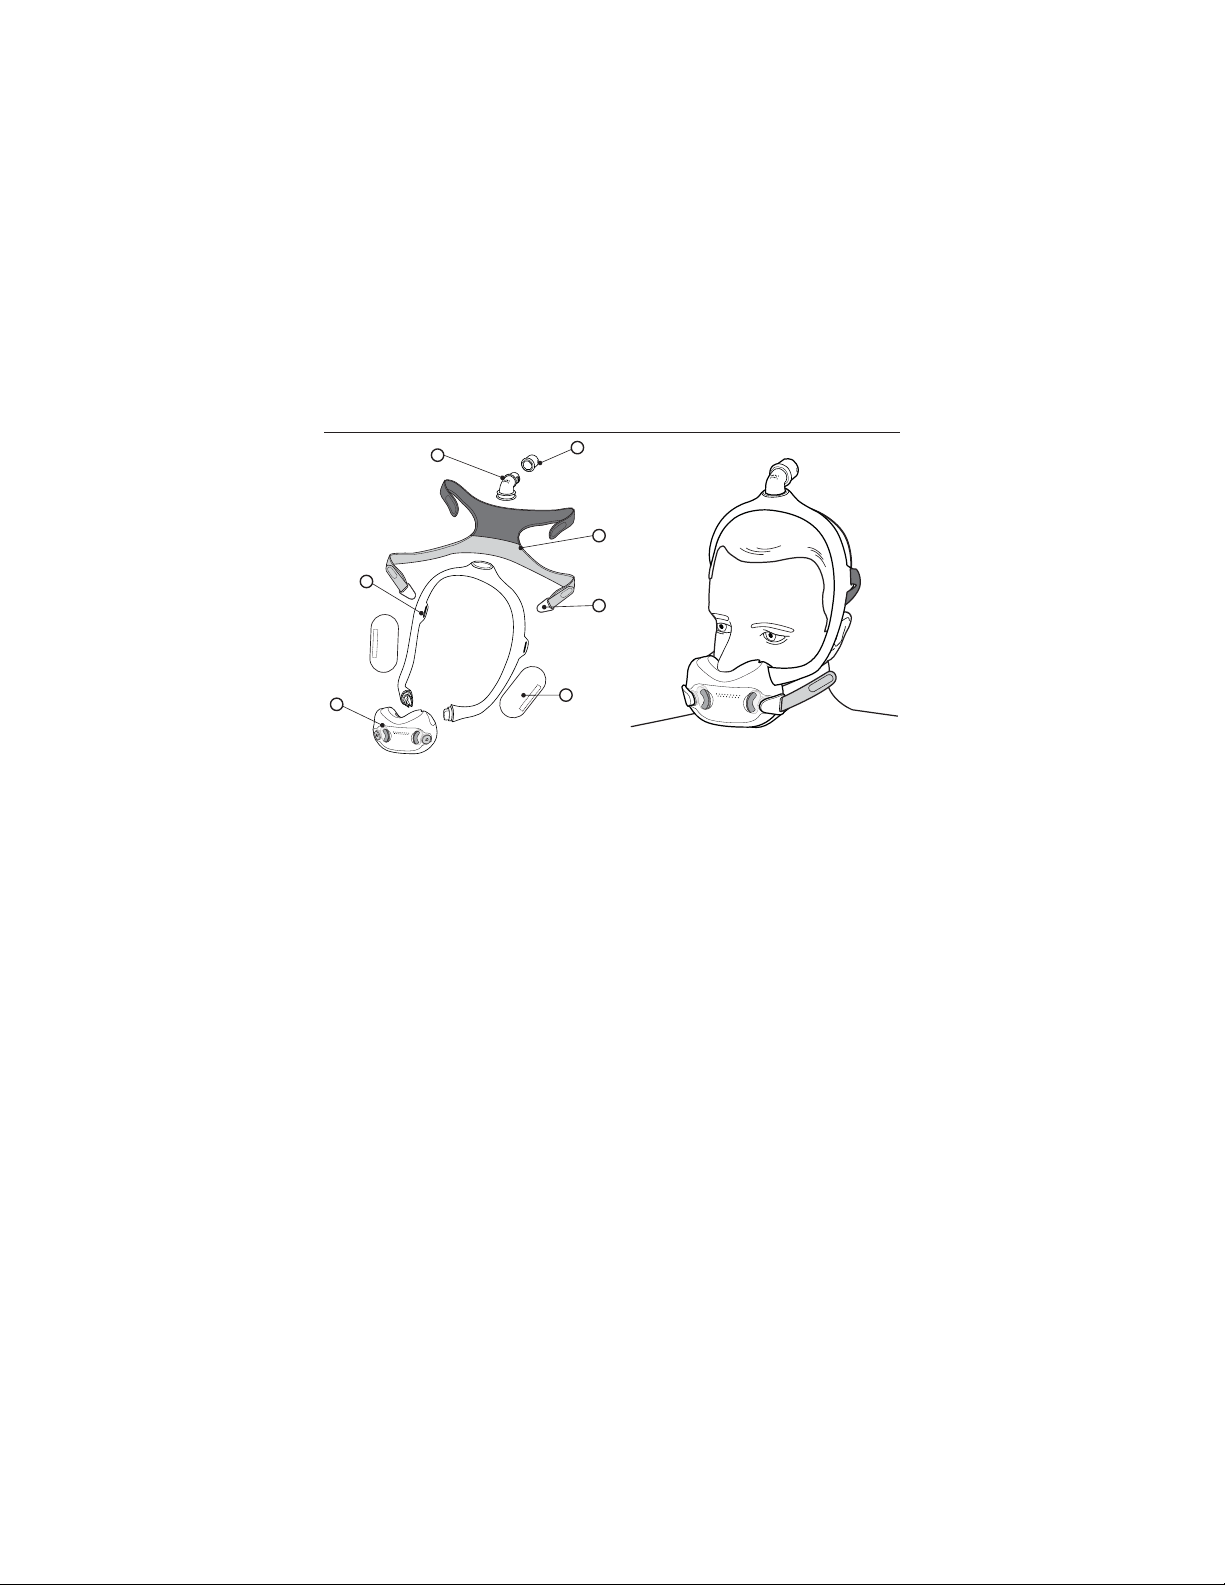
4 Achieving the Right Fit
Cushion Sizing
Four cushion sizes (S, M, L, MW)
are available. Place the cushion
sizing gauge under your nose
(as shown).
Tip: For the best
performance, use the smallest
cushion that ts your nose.
1. Hold the gauge horizontally
under your nose and select
the cushion size based on
where the outer edge of your
nostrils and tip of your nose
contact the gauge. A mirror
or another person may assist
with sizing.
2. The cushion opening will be directly under your nostrils. The
cushion will hug your nose and mouth, and leak will be minimal.
3. At no time should your nose be inside of the cushion opening. If
any part of the cushion overlaps your nose, the cushion is being
worn incorrectly. A dierent size cushion may be needed.
Contact your healthcare provider for additional information.
Philips Respironics DreamStation Mask Type and System One
Resistance Control Settings
Using your mask with a Philips Respironics DreamStation or System
One device provides optimal comfort. The provider sets this value (X1)
on your device.
6
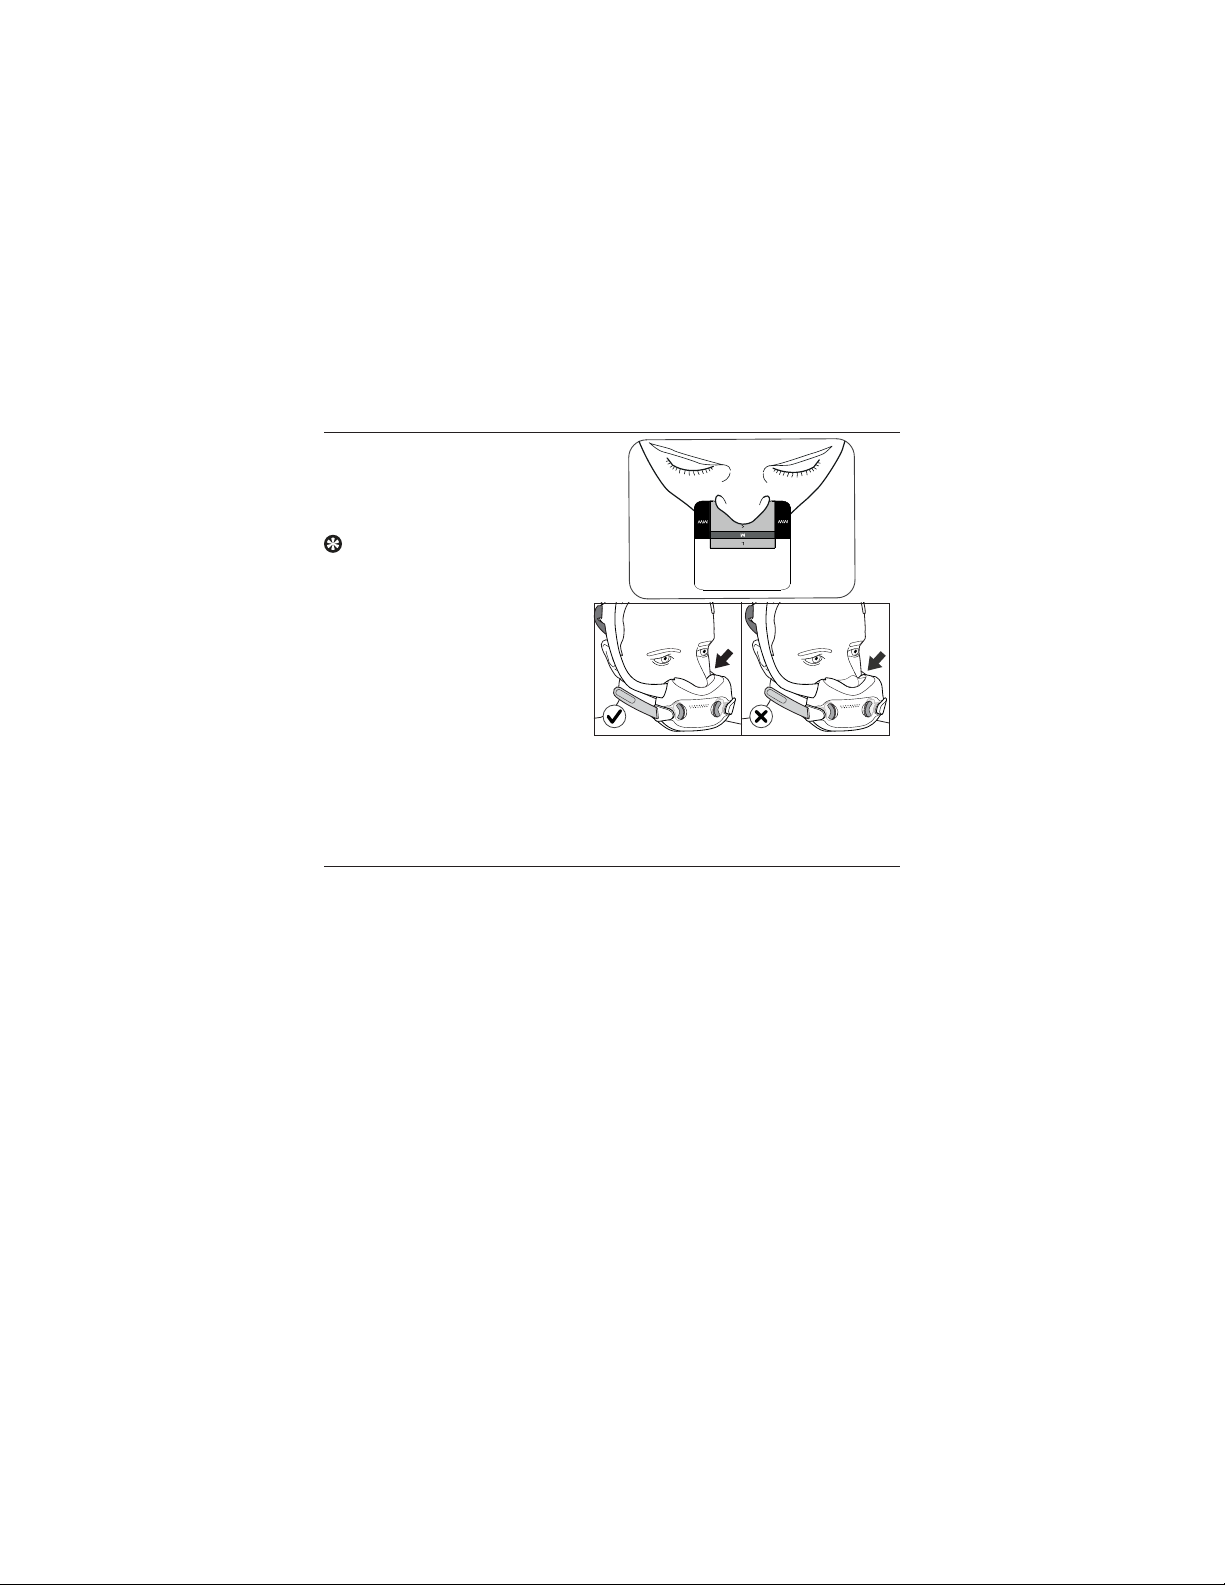
Putting on the Mask
1. With the mask assembled (see Assembly section), place the
cushion under the nose. b
2. Position the frame on the top of your head. c
Tip: For proper sizing, see Cushion Sizing and Mask Frame
Selection sections.
3. Pull the headgear over the back of the head. d
4. Attach the magnetic headgear clips to the mask cushion. e
2
3
5
4
Adjusting the Mask
1. Peel the headgear tabs away from the fabric. Adjust the length of
the top straps. Press the tabs back against the fabric to reattach.
Repeat this step with the bottom straps. f
Note: Do not overtighten the headgear. Signs of overtightening
include redness, sores, or bulging skin around the edges of the mask.
2. Position the mask until it ts comfortably. g
3. When nished the elbow should rest at the top of the head. h
6
7
8
7
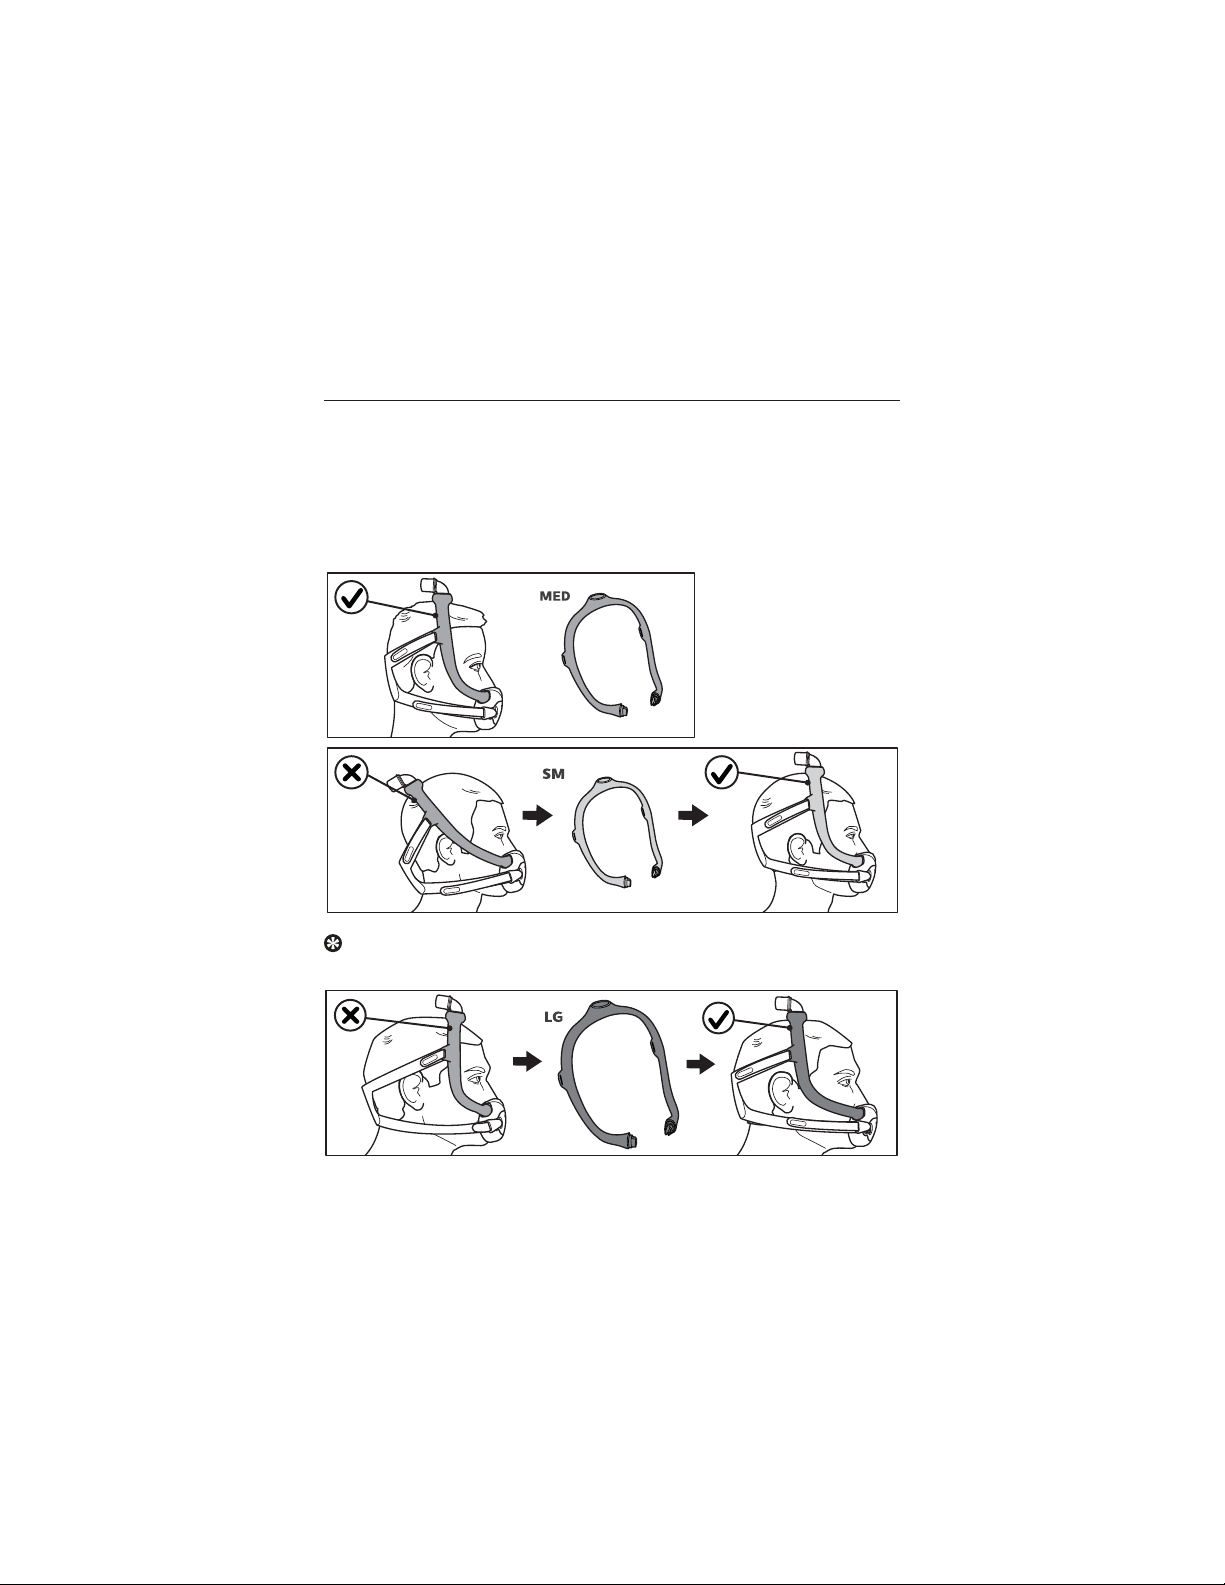
Mask Frame Sizing
• Medium (MED) frame
• Small (SM) frame
• Large (LG) frame
The medium (MED) mask frame will comfortably t most faces. If the
MED frame does not t your face, contact your healthcare provider to
see if a small (SM) or large (LG) mask frame would better suit your
needs.
Tip: If the mask frame falls backward and is too close to your ears
you may need a smaller mask frame.
8
Tip: If the mask frame falls forward on the head and is too close to
your eyes you may need a larger mask frame.
Using the Mask
1. Connect the CPAP tubing (included with the CPAP device) to the
tubing quick release on the elbow.
2. Turn the therapy device on. Lie down. Breathe normally.
3. Assume dierent sleeping positions. Move around until comfortable.
If there are any excessive air leaks, make nal adjustments. Some air
leaking is normal.
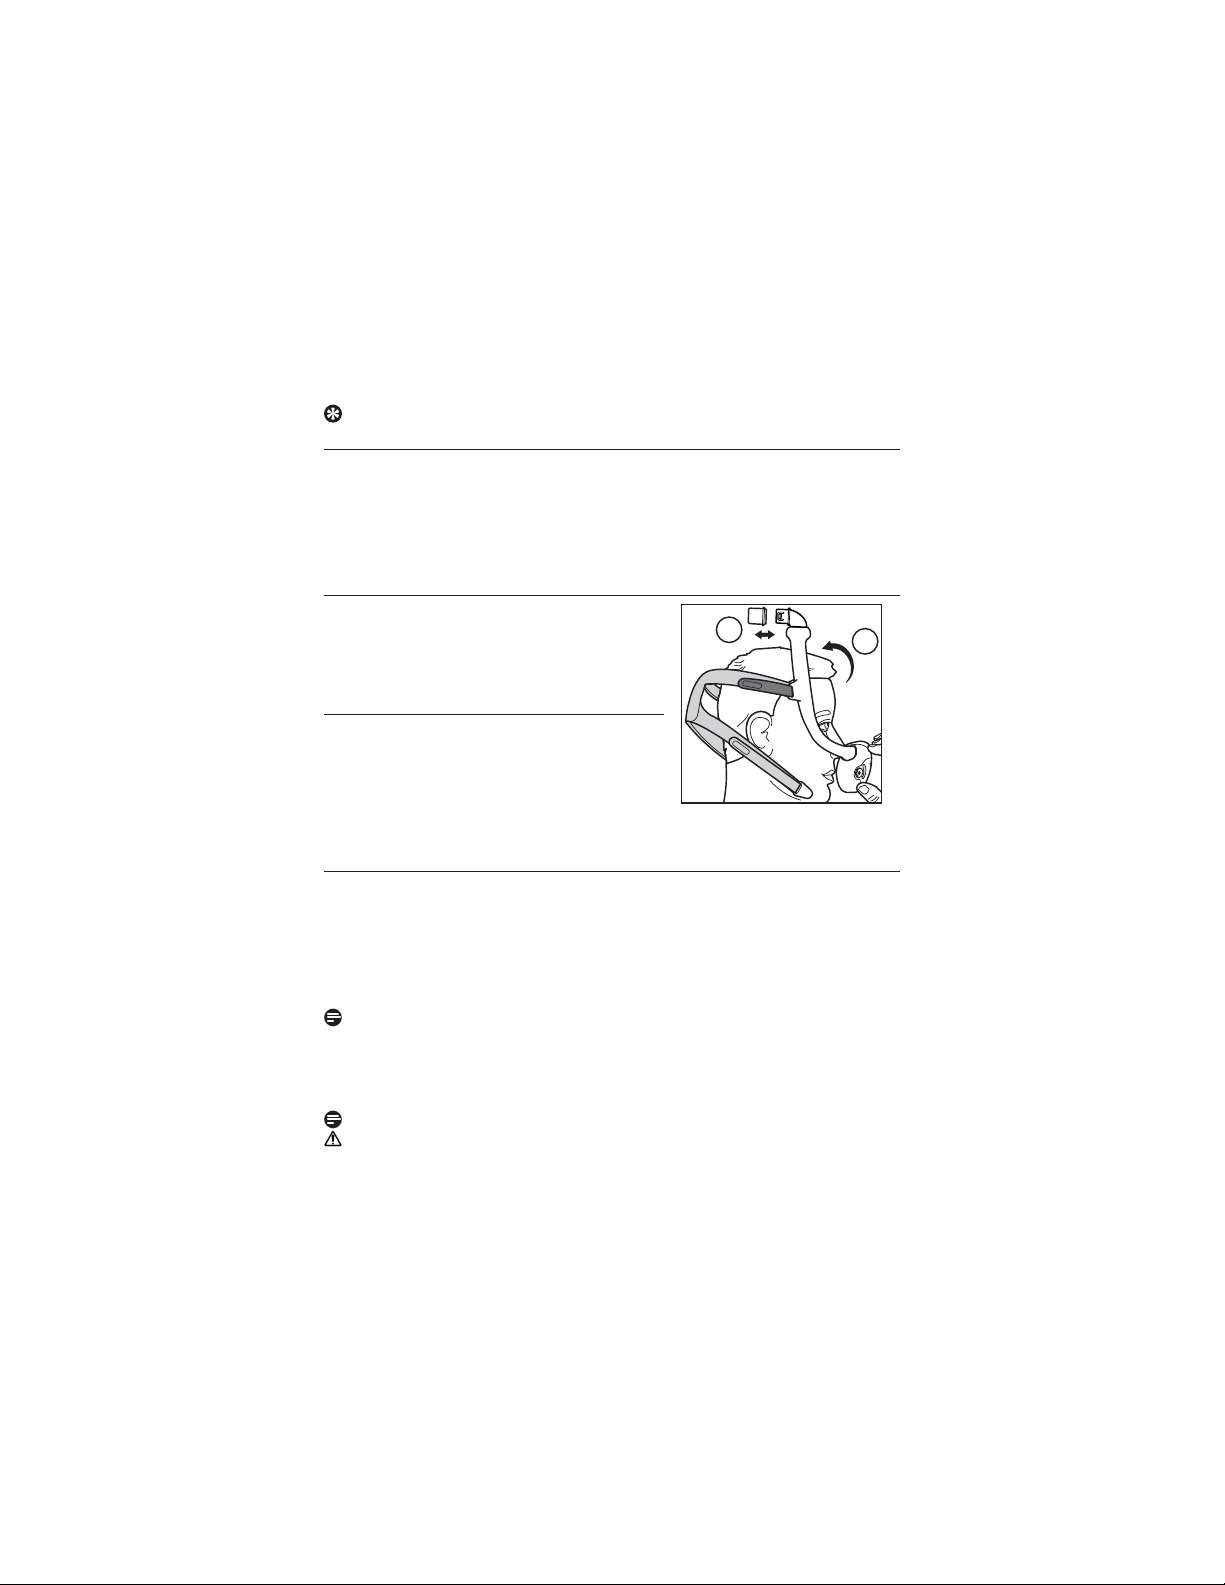
Tubing Quick Release
The elbow is equipped with a tubing
quick release. Pull on the tubing quick
release and it will disengage from
the elbow and come loose with the
tubing. i
Removing the Mask
To keep your adjustments, remove the
mask by grasping the cushion and pulling
forward away from the nose. Then pull
the cushion and mask up and o of the
head. j
9
10
5 Mask Care
Cleaning Instructions
Daily: Hand wash the non-fabric parts.
Weekly: Hand wash the fabric parts.
1. Disassemble the mask (see Disassembly section).
2. Submerge and hand wash the mask in warm water with liquid
dishwashing detergent.
Note: Ensure there are no air pockets present inside the mask parts
while submerged.
3. Rinse thoroughly.
4. Lay the headgear and fabric sleeves at or line dry. Make sure the
entire mask is dry before use.
Note: Do not place the fabric parts into a clothes dryer.
Caution: Any deviation from these instructions may impact the
performance of the product.
9
Caution: Do not use bleach, alcohol, cleaning solutions containing
bleach or alcohol, or cleaning solutions containing conditioners or
moisturizers.
Dishwashing Instructions
In addition to hand washing, the mask may be cleaned in the
dishwasher once a week.
Caution: Use a mild liquid dish washing detergent only to wash the
mask.
1. Remove the fabric parts. Do not wash the fabric parts in the
dishwasher.
2. Wash in the top shelf of the dishwasher.
Note: Do not use the drying cycle on the dishwasher.
3. Air dry. Make sure the mask is dry before use.
Caution: Do not use bleach, alcohol, cleaning solutions containing
bleach or alcohol, or cleaning solutions containing conditioners or
moisturizers.
6 Assembly and Disassembly
Assembly
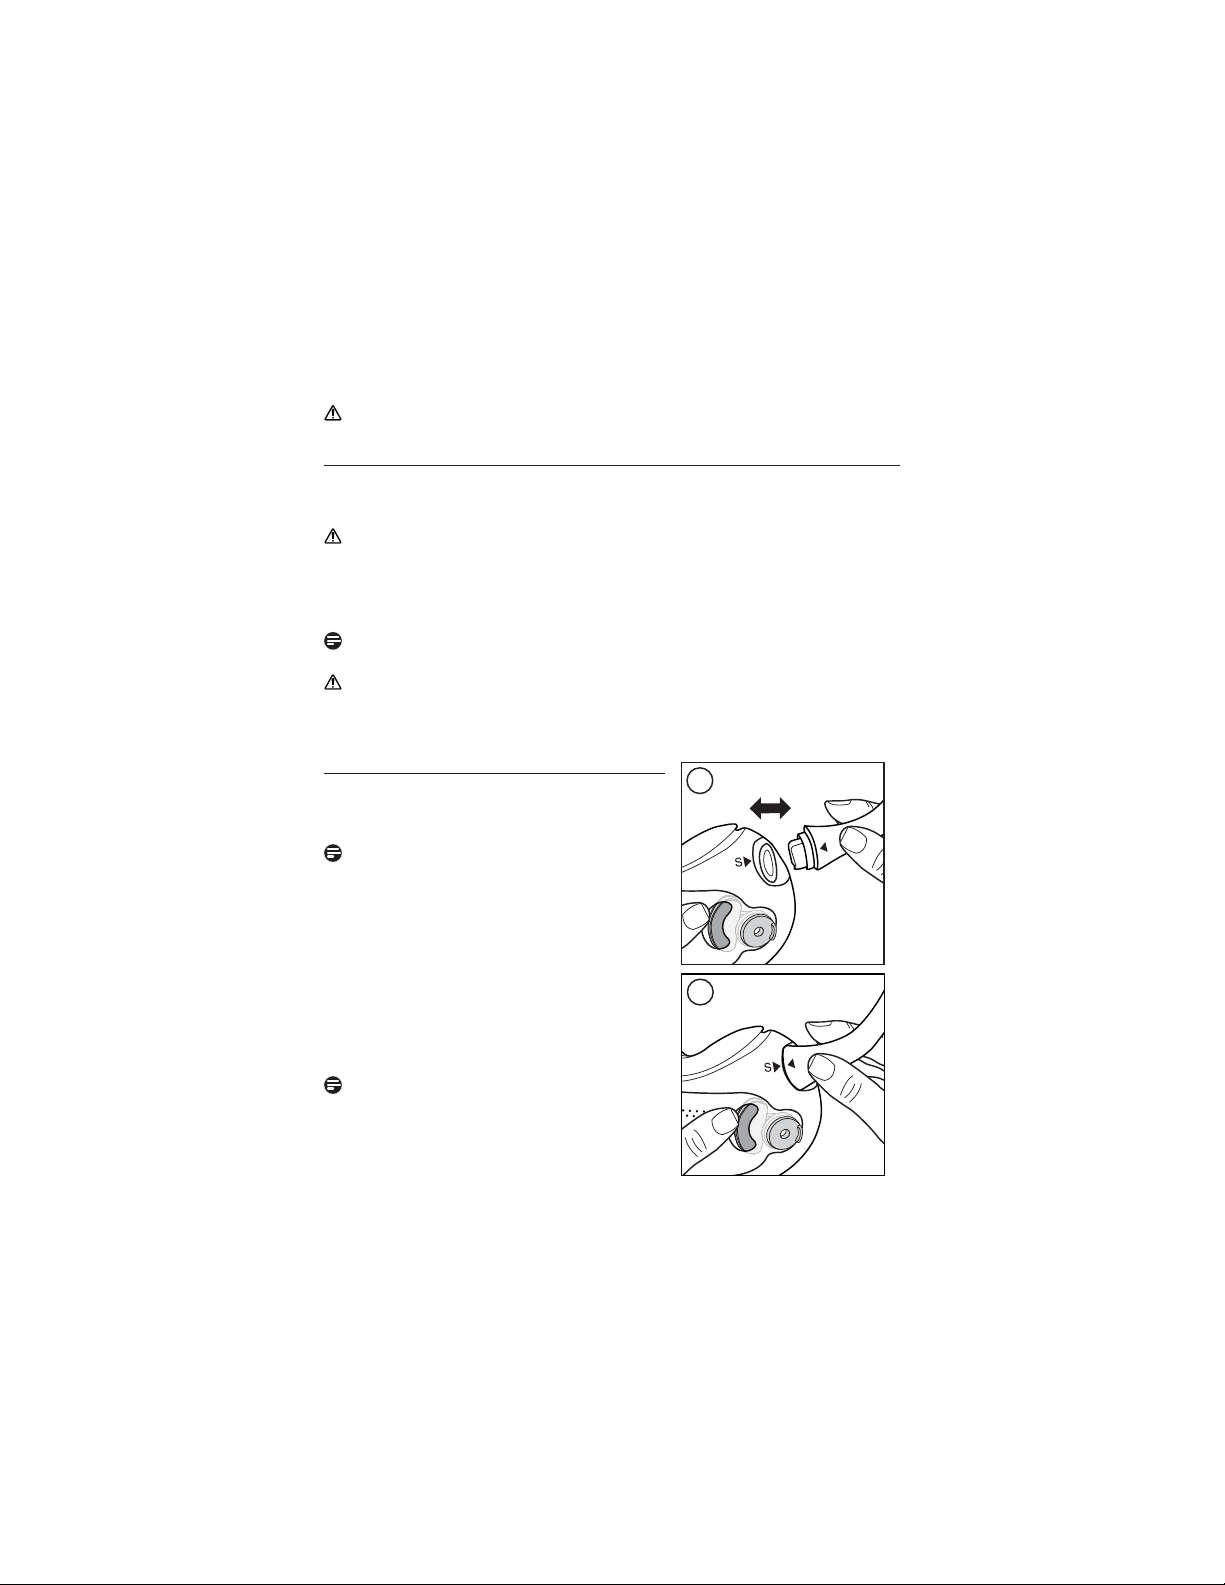
1. Cushion: Press into the mask frame
until the cushion clicks into place. kl
Note: The end of the cushion and
the opening in the mask frame are
‘D’ shaped. The cushion end should
match the frame.
2. Elbow: Insert into the top of the mask
frame.
3. Tubing quick release: Push the tubing
quick release onto the elbow until it
clicks into place.
4. (Optional) Fabric sleeves: Wrap the
sleeves around the mask frame and
press the strips together.
Note: The sleeve seams should be on
the outside of the frame.
11
12
10
 Loading...