

QT4090, QT4070
1
2
A
1
2
3
4
B
C
D
Q
P
5
6 7
O
E
F
G
H
N
8 9
10
I
M
11
J
K
L
14
12
15 16
13
17
20 21
23
26 27 28
29
18 19
24
22
25

ENGLISH
2
4222.002.8103.1
Introduction
Congratulations on your purchase and welcome to
Philips! To fully benet from the support that Philips offers,
register your product at www.philips.com/welcome.
This maintenance-free Philips vacuum beard trimmer
combines innovative technology and outstanding comfort
of use. It is excellently suited for cutting and contouring
your beard and sideburns.
The integrated vacuum system absorbs cut-off hairs
during use and gives you a cleaner washbasin after use.
The trimming comb, the self-sharpening cutting unit
and the adjustment ring to select hair lengths from 1 to
18mm ensure excellent cutting results and time-saving
operation. The ergonomic shape of the appliance allows
pleasant and comfortable handling.
QT4070 comes with a trimming comb that has been
specially designed to offer you a better view when you
want to create a stubble look.
QT4090 comes with a contour-following trimming comb
that has been specially designed to trim longer beards. It
also has a high-quality precision trimmer that guarantees a
precise and dened cut.
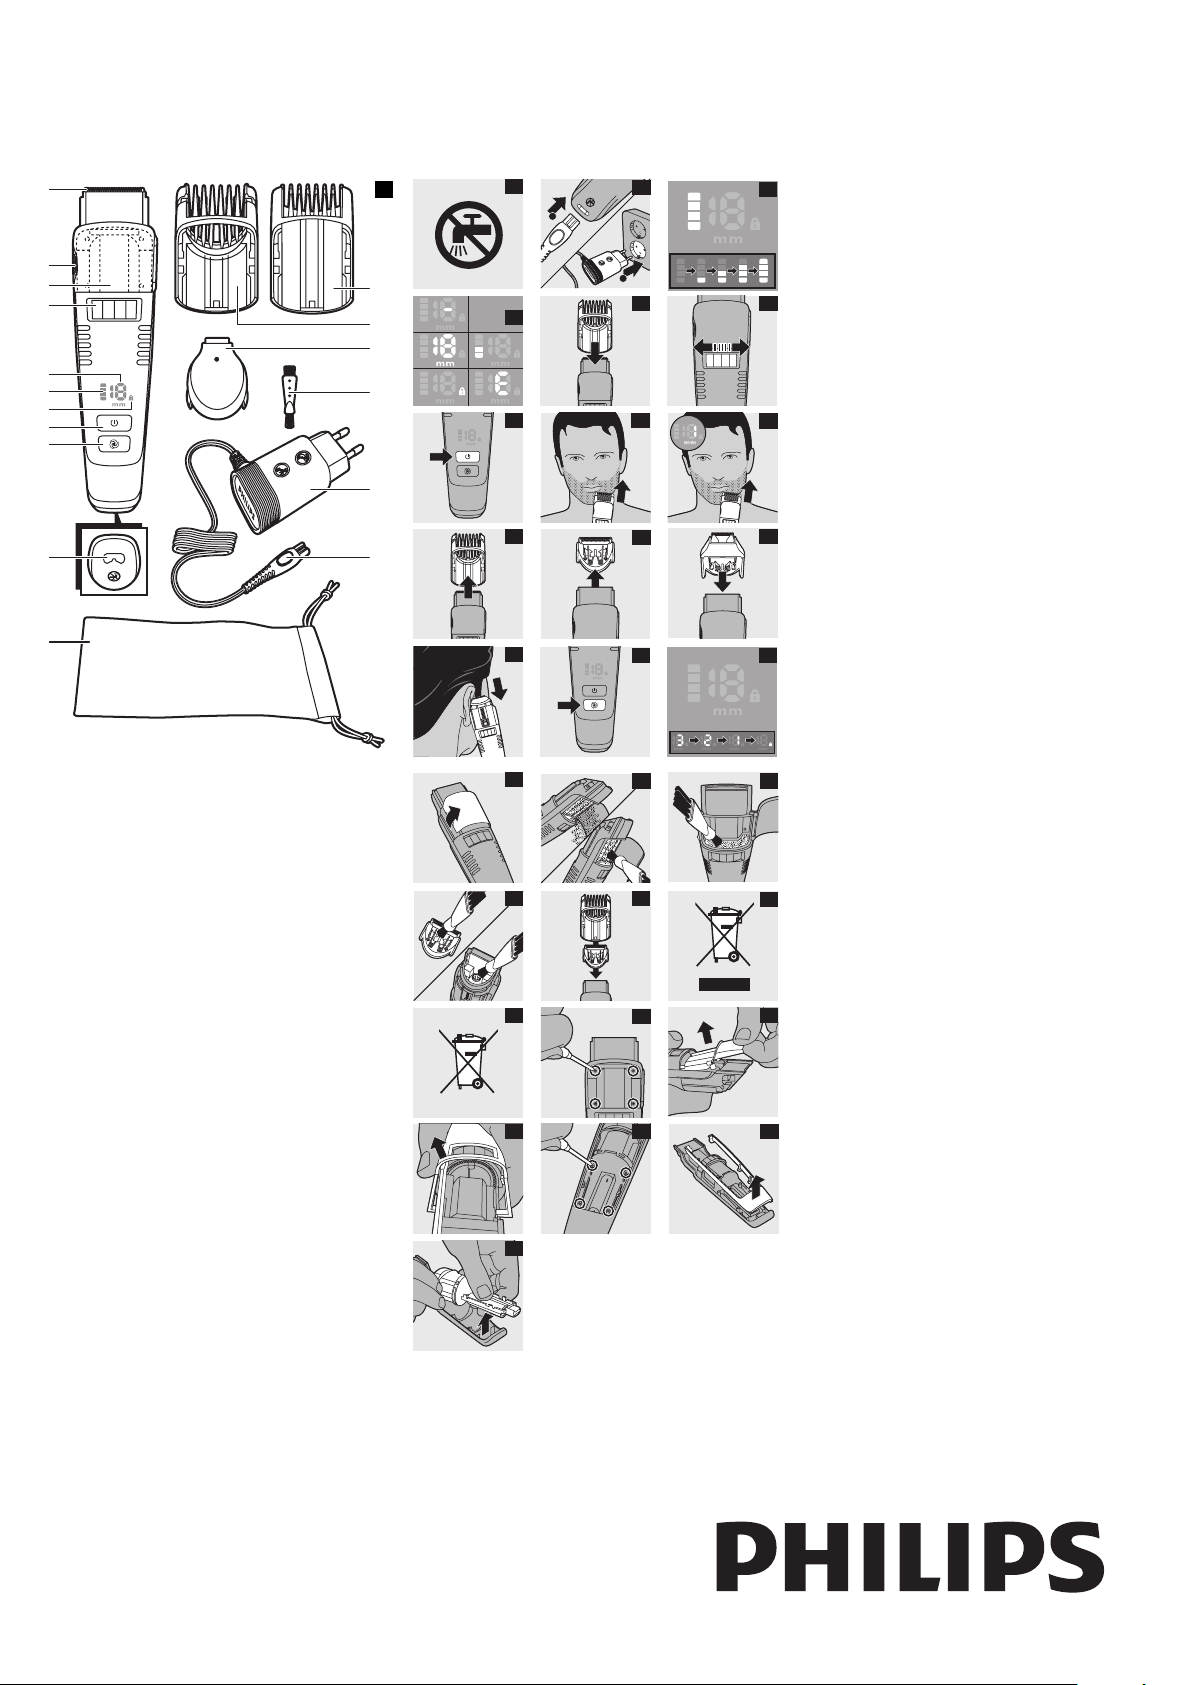
General description (Fig. 1)
A Detachable cutting unit
B Lid of hair collection chamber
C Hair-collection chamber & lter
D Adjustment ring (Precision Zoom Lock `)
E Hair length indicator
F Charge level indicator
G Travel lock indicator
H On/off button
I Turbo button
J Socket for appliance plug
K Storage pouch (QT4090 only)
L Appliance plug
M Adapter (2.5V/1500mA)
N Cleaning brush
O Precision trimmer (QT4090 only)
P Contour-following trimming comb (QT4090)
Q Trimming comb (QT4070)
Important
Read this user manual carefully before you use the
appliance and save it for future reference.
Danger
- Make sure the adapter does not get wet.
Warning
- Check if the voltage indicated on the appliance
corresponds to the local mains voltage before you
connect the appliance.
- The adapter contains a transformer. Do not cut
off the adapter to replace it with another plug, as
this causes a hazardous situation.
- This appliance is not intended for use by persons
(including children) with reduced physical, sensory
or mental capabilities, or lack of experience and
knowledge, unless they have been given supervision
or instruction concerning use of the appliance by a
person responsible for their safety.
- Children should be supervised to ensure that they
do not play with the appliance.
Caution
- Charge, use and store the appliance at a temperature
between 5°C and 35°C.
- Do not charge the appliance in the storage pouch
supplied.
- Do not immerse the appliance in water or any other
liquid, nor rinse it under the tap. (Fig. 2)
- Only use the adapter supplied.
- If the adapter, the cutting unit or one of the trimming
combs is damaged, always have it replaced with one
of the original type in order to avoid a hazard.
- The adapter transforms 220-240 volts to a safe low
voltage of less than 24 volts.
- Do not use the appliance if one of the trimming
combs or the cutting unit is damaged or broken, as
this may cause injury.
- This appliance is only intended for trimming the
human beard. Do not use it for any other purpose.
Electromagnetic elds (EMF)
- This Philips appliance complies with all standards
regarding electromagnetic elds (EMF). If handled
properly and according to the instructions in this
user manual, the appliance is safe to use based on
scientic evidence available today.
Preparing for use
Charging
Charge the appliance fully before you use it for the rst
time and after a long period of disuse.
Charging takes about 60 minutes if the appliance is
completely empty.
1 Make sure the appliance is switched off.
2 Insert the appliance plug into the appliance and put
the adapter in the wall socket (Fig. 3).
, When you start charging the empty appliance,
the bottom segment of the charge level indicator
ashes orange. When the battery contains enough
power for one trimming session of approx. 7
minutes, the bottom segment starts ashing blue.
, First the bottom segment of the charge level
indicator ashes blue, then the second segment and
so on, until the appliance is fully charged. (Fig. 4)
, When the appliance is fully charged, all segments of
the charge level indicator light up blue continuously.
, If the fully charged appliance is still connected to
the mains after 1 hour, the segments of the charge
level indicator go out.
Battery low
When the battery is almost empty (when there are
approx. 7 or fewer trimming minutes left), the bottom
segment of the charge level indicator turns orange. When
you switch off the trimmer, the bottom segment ashes
for a few seconds.
Corded trimming
When the rechargeable battery is low, you can also run
the appliance from the mains.
To use the appliance connected to the mains:
1 Switch off the trimmer and connect it to the mains.
2 Wait a few seconds and then switch on
the appliance.
Note: If the battery is completely empty, wait a few minutes
before you switch on the appliance.
Using the appliance
Display indications
The display is activated when you press the on/of button
and when you turn the adjustment ring.
- During trimming, the display provides the following
information: (Fig. 5)
, ’-’ when no comb is attached to the appliance.
, The selected hair length (i.e. the remaining hair
length after trimming) in millimetres.
, The remaining charge level.
, Travel lock indicator if the appliance is locked (see
section ‘Travel lock’ in this chapter).
, ’E’ if the cutting unit is blocked.
Beard trimming
Always comb your beard or moustache with a ne
comb before you start trimming.
Trimming with trimming comb
The hair length settings are indicated in millimetres on the
display of the appliance. The settings correspond to the
remaining hair length after cutting.
The trimming comb cuts hair to a length of 1-18mm.
If you trim for the rst time, start with the maximum
hair length setting (18mm).
1 Slide the trimming comb onto the appliance (Fig. 6).
2 Turn the adjustment ring (Precision Zoom Lock `)
to the desired hair length setting. (Fig. 7)
, The display shows the selected hair length.
3 Switch on the appliance (Fig. 8).
Note: During trimming, you can use the turbo function for
extra suction power and trimming speed (see section ‘Turbo
function’ below).
4 To trim most effectively, move the appliance against
the direction of hair growth (Fig. 9).
Note: Make smooth and gentle movements and make sure
the surface of the trimming comb always stays in contact
with the skin.
Note: Do not move the appliance too fast.
5 Switch off the appliance after use and clean it (see
chapter ‘Cleaning’).
Creating a stubble look
- Use the trimmer with the trimming comb set to a
hair length of 1mm to create a stubble look (Fig. 10).
- If you want even shorter stubble of 0.5mm, use the
trimmer without the trimming comb attached.
Trimming without trimming comb
Use the trimmer without trimming comb to trim full
beards and single hairs.
1 Remove the trimming comb (Fig. 11).
Note for QT4090: Never pull at the exible top of the
trimming comb. Always pull at the bottom part.
2 Make well-controlled movements and touch the
hair lightly with the cutting unit.
Shaping with the precision trimmer
(QT4090 only)
You can use the precision trimmer to shape your
moustache and sideburns, to dene contours and to cut
single hairs.
1 Remove the trimming comb (Fig. 11).
Note: Never pull at the exible top of the trimming comb.
Always pull at the bottom part.
2 Pull the cutting unit off the appliance (Fig. 12).
3 Place the precision trimmer on the
appliance (Fig. 13).
4 When you use the precision trimmer, hold the
appliance in such a way that the trimmer points
upwards and make downward strokes (Fig. 14).
Turbo function
You can use the turbo function for greater suction power
and increased cutting speed.
1 Switch on the appliance (Fig. 8).
2 Press the turbo button (Fig. 15).
When you switch off the appliance, the turbo function is
deactivated automatically.
Absorbing cut hairs
The vacuum system is activated automatically as soon as
you switch on the appliance. It absorbs cut hairs during
every kind of use, i.e. trimming with and without trimming
comb and contouring.
We advise you to empty the hair-collection chamber after
each trimming session. When you trim long, dense beards,
it may also be necessary to empty the hair-collection
chamber during the trimming session in order to maintain
optimal suction performance (see chapter ‘Cleaning’,
section ‘Hair-collection chamber’).
Note: To ensure optimal functioning of the vacuum system,
do not cut off more than approx. 7mm of your overall beard
length at a time. If you want to cut your beard shorter,
repeat the process one or more times.
Travel lock
You can lock the appliance when you are going to
travel. The travel lock prevents the appliance from being
switched on by accident.
Activating the travel lock
1 Press and hold the on/off button for at least 6
seconds.
, The display counts down from 3 to 1. Then the
travel lock indicator appears on the display to
indicate that the appliance is locked (Fig. 16).
Deactivating the travel lock
1 Press and hold the on/off button for at least 6
seconds.
, The display counts down from 3 to 1.
Then the travel lock indicator disappears from
the display to indicate that the appliance is
unlocked (Fig. 16).
Note: The travel lock is deactivated automatically when you
connect the appliance to the mains.

Cleaning
3
4222.002.8103.1
Never use scouring pads, abrasive cleaning agents or
aggressive liquids such as alcohol, petrol or acetone to
clean the appliance.
Do not immerse the appliance in water or any other
liquid, nor rinse it under the tap.
Hair-collection chamber
1 Switch off the appliance.
2 Open the lid of the hair-collection
chamber (Fig. 17).
3 Shake the hairs out of the hair-collection chamber
and/or remove them with the cleaning brush
supplied (Fig. 18).
4 Clean the lter inside the hair-collection chamber
with the cleaning brush supplied (Fig. 19).
Never use sharp or hard objects to clean the lter, to
avoid damaging it.
5 Close the lid of the hair-collection chamber.
Appliance
1 Pull the trimming comb off the appliance (Fig. 11).
2 Pull the cutting unit off the appliance (Fig. 12).
3 Clean the cutting unit and the inside of the
appliance with the cleaning brush supplied (Fig. 20).
4 Put the cutting unit and the trimming comb back
onto the appliance (‘click’) (Fig. 21).
Storage
1 QT4090 only: Put the appliance in the storage
pouch supplied.
2 Store the appliance in a safe and dry place.
Environment
- Do not throw away the appliance with the normal
household waste at the end of its life, but hand it in
at an ofcial collection point for recycling. By doing
this, you help to preserve the environment (Fig. 22).
- The built-in rechargeable battery contains substances
that may pollute the environment. Always remove
the battery before you discard and hand in the
appliance at an ofcial collection point. Dispose of
the battery at an ofcial collection point for batteries.
If you have trouble removing the battery, you can
also take the appliance to a Philips service centre.
The staff of this centre will remove the battery for
you and will dispose of it in an environmentally safe
way. (Fig. 23)
Removing the rechargeable battery
in the worldwide guarantee leaet). If there is no
Consumer Care Centre in your country, go to your local
Philips dealer.
Do not connect the appliance to the mains again after
you have opened it.
Follow the steps below to remove the rechargeable
battery.
1 Disconnect the appliance from the mains and let
the appliance run until the motor stops.
2 Open the lid of the hair-collection
chamber (Fig. 17).
3 Remove the 4 screws inside the hair chamber with
a screwdriver (Fig. 24).
4 Pull the hair-collection chamber out of the
appliance with some force (Fig. 25).
5 To remove the front panel, wedge a screwdriver
between the front panel and the inside of the
appliance (Fig. 26).
6 Remove the 4 screws on the inside of the
appliance (Fig. 27).
7 Remove the inner panel (Fig. 28).
8 Remove the printed circuit board with the
rechargeable battery connected to it (Fig. 29).
9 Cut the wires between the printed circuit board
and the rechargeable battery.
Guarantee and service
If you need service or information or if you have a
problem, please visit the Philips website at
www.philips.com or contact the Philips Consumer
Care Centre in your country (you nd its phone number

DEUTSCH
4
4222.002.8103.1
Einführung
Herzlichen Glückwunsch zu Ihrem Kauf und willkommen
bei Philips! Um die Unterstützung von Philips optimal
nutzen zu können, registrieren Sie Ihr Produkt bitte unter
www.philips.com/welcome.
Dieser ölungsfreie Philips Vakuum-Bartschneider verbindet
innovative Technik mit besonderem Bedienkomfort.
Er eignet sich hervorragend zum Schneiden und
Konturentrimmen von Bart und Koteletten.
Das integrierte Vakuumsystem fängt während des
Schneidens die abgeschnittenen Barthaare auf; so
bleibt das Waschbecken sauber. Der Kammaufsatz, die
selbstschärfende Schneideeinheit und der Zoom-Ring zur
Einstellung von Barthaarlängen zwischen 1 und 18 mm
sorgen für hervorragende und schnelle Ergebnisse. Durch
das ergonomische Design liegt das Gerät angenehm in
der Hand und lässt sich bequem handhaben.
Der QT4070 verfügt über einen Kammaufsatz, der Ihnen
eine bessere Sicht ermöglicht, wenn Sie einen 3-Tage-Bart
kreieren möchten.
Der QT4090 verfügt über einen Konturenkamm, der
sich besonders zur Pege eines Vollbarts eignet. Er bietet
ebenfalls einen hochwertigen Präzisionstrimmer, der eine
präzise denierte Rasur gewährleistet.
Allgemeine Beschreibung (Abb. 1)
A Abnehmbare Schneideeinheit
B Deckel der Haarauffangkammer
C Haarauffangkammer & Filter
D Zoom-Ring (Precision Zoom Lock `)
E Haarlängenanzeige
F Ladestandsanzeige
G Reisesicherungsanzeige
H Ein-/Ausschalter
I Turbotaste
J Buchse für Gerätestecker
K Aufbewahrungstasche (nur QT4090)
L Gerätestecker
M Adapter (2,5 V/1500 mA)
N Reinigungsbürste
O Präzisionstrimmer (nur QT4090)
P Konturenkamm (QT4090)
Q Kammaufsatz (QT4070)
Wichtig
Lesen Sie diese Bedienungsanleitung vor dem Gebrauch
des Geräts aufmerksam durch, und bewahren Sie sie für
eine spätere Verwendung auf.
Gefahr
- Achten Sie darauf, dass der Adapter nicht nass wird.
Warnhinweis
- Prüfen Sie, bevor Sie das Gerät in Betrieb nehmen,
ob die Spannungsangabe auf dem Gerät mit der
örtlichen Netzspannung übereinstimmt.
- Der Adapter enthält einen Transformator. Ersetzen
Sie den Adapter keinesfalls durch einen anderen
Stecker. Dies kann den Benutzer gefährden.
- Dieses Gerät ist für Benutzer (einschl. Kinder) mit
eingeschränkten physischen, sensorischen oder
psychischen Fähigkeiten bzw. ohne jegliche Erfahrung
oder Vorwissen nur dann geeignet, wenn eine
angemessene Aufsicht oder ausführliche Anleitung
zur Benutzung des Geräts durch eine verantwortliche
Person sichergestellt ist.
- Achten Sie darauf, dass Kinder nicht mit dem Gerät
spielen.
Achtung
- Benutzen, laden und verwahren Sie das Gerät bei
Temperaturen zwischen 5 °C und 35 °C.
- Nehmen Sie das Gerät zum Auaden aus der im
Lieferumfang enthaltenen Tasche.
- Tauchen Sie das Gerät niemals in Wasser oder
andere Flüssigkeiten; spülen Sie es auch nicht unter
ießendem Wasser ab. (Abb. 2)
- Verwenden Sie ausschließlich den
mitgelieferten Adapter.
- Wenn der Adapter, die Schneideeinheit oder einer
der Kammaufsätze beschädigt ist, darf dieses Teil nur
durch ein Original-Ersatzteil ausgetauscht werden, um
Gefährdungen zu vermeiden.
- Der Adapter wandelt Netzspannungen von 220 bis
240 Volt in eine sichere Betriebsspannung von unter
24 Volt um.
- Benutzen Sie das Gerät nicht, wenn einer der
Kämmaufsätze oder die Schneideeinheit beschädigt
oder defekt ist. So vermeiden Sie Verletzungen.
- Dieses Gerät ist ausschließlich zum Schneiden von
menschlichem Barthaar vorgesehen. Verwenden Sie
es nicht für andere Zwecke.
Elektromagnetische Felder
- Dieses Philips Gerät erfüllt sämtliche Normen
bezüglich elektromagnetischer Felder (EMF). Nach
aktuellen wissenschaftlichen Erkenntnissen ist das
Gerät sicher im Gebrauch, sofern es ordnungsgemäß
und entsprechend den Anweisungen in dieser
Bedienungsanleitung gehandhabt wird.
Für den Gebrauch vorbereiten
Laden
Laden Sie das Gerät vor dem ersten Gebrauch, und wenn
Sie es längere Zeit nicht benutzt haben, vollständig auf.
Wenn der Akku ganz leer ist, dauert der Ladevorgang
etwa 60 Minuten.
1 Vergewissern Sie sich, dass das Gerät ausgeschaltet
ist.
2 Stecken Sie den Gerätestecker in das Gerät, und
schließen Sie den Adapter an eine Steckdose
an (Abb. 3).
, Wenn Sie mit dem Auaden des leeren
Geräts beginnen, blinkt der untere Teil der
Ladestandsanzeige orange. Wenn der Akku über
genügend Energie für eine 7-minütige Verwendung
verfügt, blinkt der untere Teil der Anzeige blau.
, Zunächst blinkt der untere Teil der
Ladestandsanzeige blau, dann der nächste Teil usw.,
bis das Gerät vollständig aufgeladen ist. (Abb. 4)
, Ist das Gerät vollständig aufgeladen, leuchtet die
gesamte Ladestandsanzeige blau.
, Wenn das vollständig aufgeladene Gerät nach
1 Stunde weiterhin an das Stromnetz angeschlossen
ist, erlischt die Ladestandsanzeige.
Akku fast leer
Ist der Akku fast leer (es verbleiben ca. weitere
7 Minuten Betriebsdauer), leuchtet der untere Teil der
Ladestandsanzeige orange. Wenn Sie den Bartschneider
ausschalten, blinkt der untere Teil einige Sekunden lang.
Das Gerät am Netz betreiben
Wenn der Akkuladestand niedrig ist, können Sie das Gerät
auch am Netz betreiben.
So benutzen Sie Gerät mit Netzstrom:
1 Schalten Sie den Bartschneider aus, und schließen
Sie ihn an das Stromnetz an.
2 Warten Sie einige Sekunden, und schalten Sie dann
das Gerät ein.
Hinweis: Bei vollständig leerem Akku sollten Sie einige
Minuten warten, bevor Sie das Gerät einschalten.
Das Gerät benutzen
Informationen auf dem Display
Das Display wird aktiviert, wenn Sie den Ein-/Ausschalter
drücken oder den Einstellungsring drehen.
- Während des Schneidens liefert das Display folgende
Informationen: (Abb. 5)
, ”-” wird angezeigt, wenn kein Kammaufsatz auf das
Gerät aufgesetzt ist.
, Die ausgewählte Schnittlänge (d. h. die nach dem
Schnitt verbleibende Haarlänge) in Millimetern.
, Der verbleibende Ladestand.
, Das Symbol für die Reisesicherung wird angezeigt,
wenn das Gerät gesichert ist (siehe Abschnitt
“Reisesicherung” in diesem Kapitel).
, ”E” wird angezeigt, wenn die Schneideeinheit
blockiert ist.
Bart schneiden
Kämmen Sie Ihren Bart oder Schnurrbart vor dem
Schneiden immer mit einem feinen Kamm durch.
Mit dem Kammaufsatz schneiden
Die Schnittlängeneinstellungen werden auf dem Display
des Geräts in Millimetern angegeben. Sie zeigen die
verbleibende Haarlänge nach dem Schneiden an.
Der Kammaufsatz schneidet Haare auf eine Länge von
1 bis 18 mm.
Wenn Sie Ihren Bart zum ersten Mal schneiden, stellen
Sie die maximale Haarlänge (18 mm) ein.
1 Schieben Sie den Kammaufsatz auf das
Gerät (Abb. 6).
2 Drehen Sie den Zoom-Ring (Precision Zoom Lock
`) auf die gewünschte Haarlänge. (Abb. 7)
, Auf dem Display wird die ausgewählte Schnittlänge
angezeigt.
3 Schalten Sie das Gerät ein (Abb. 8).
Hinweis: Während des Schneidens lässt sich mithilfe der
Turbofunktion die Saugleistung und Schneidegeschwindigkeit
erhöhen (siehe Abschnitt “Turbofunktion” unten).
4 Die besten Ergebnisse erzielen Sie, wenn Sie das
Gerät gegen die Haarwuchsrichtung führen (Abb. 9).
Hinweis: Führen Sie das Gerät mit sanften Bewegungen über
das Gesicht, und achten Sie darauf, dass der Kammaufsatz
immer auf der Haut auiegt.
Hinweis: Bewegen Sie das Gerät nicht zu schnell.
5 Schalten Sie das Gerät nach Gebrauch aus, und
reinigen Sie es (siehe Kapitel “Reinigung”).
3-Tage-Bart
- Verwenden Sie den Bar tschneider mit dem
Kammaufsatz, und stellen Sie eine Haarlänge
von 1 mm ein, um einen 3-Tage-Bar t zu
kreieren (Abb. 10).
- Wenn Sie einen 3-Tage-Bart mit einer Haarlänge von
weniger als 0,5 mm kreieren möchten, verwenden
Sie den Bartschneider ohne Kammaufsatz.
Ohne den Kammaufsatz schneiden
Verwenden Sie den Bar tschneider ohne Kammaufsatz, um
Vollbärte und einzelne Haare zu schneiden.
1 Nehmen Sie den Kammaufsatz ab (Abb. 11).
Hinweis zum QT4090: Ziehen Sie keinesfalls am
beweglichen oberen Teil des Kammaufsatzes, sondern nur
am unteren Teil.
2 Schneiden Sie den Bart mit gezielten Bewegungen,
wobei die Schneideeinheit leicht das Barthaar
berührt.
Konturenschnitt mit dem Präzisionstrimmer
(nur QT4090)
Verwenden Sie den Präzisionstrimmer zum Schneiden
und Konturieren von Schnurrbart und Koteletten sowie
zum Trimmen einzelner Haare.
1 Nehmen Sie den Kammaufsatz ab (Abb. 11).
Hinweis: Ziehen Sie keinesfalls am beweglichen oberen Teil
des Kammaufsatzes, sondern nur am unteren Teil.
2 Ziehen Sie die Schneideeinheit vom Gerät
ab (Abb. 12).
3 Setzen Sie den Präzisionstrimmer auf das Gerät
auf (Abb. 13).
4 Halten Sie bei Verwendung des Präzisionstrimmers
das Gerät so, dass dieser nach oben zeigt, und
führen Sie es nach unten (Abb. 14).
Turbofunktion
Mithilfe der Turbofunktion werden Saugleistung und
Schneidegeschwindigkeit erhöht.
1 Schalten Sie das Gerät ein (Abb. 8).
2 Drücken Sie die Turbotaste (Abb. 15).
Wenn Sie das Gerät ausschalten, wird die Turbofunktion
automatisch deaktiviert.
Abgeschnittene Barthaare auffangen
Sobald Sie das Gerät einschalten, wird das Vakuumsystem
automatisch aktiviert. Bei jeder Art der Anwendung (beim
Schneiden mit oder ohne Kammaufsatz sowie beim
Konturenschneiden) werden die abgeschnittenen Haare
aufgefangen.
Entleeren Sie die Haarauffangkammer nach
jedem Gebrauch. Wenn Sie lange und dichte
Barthaare schneiden, kann es erforderlich sein,
die Haarauffangkammer während des Schneidens
zu entleeren, um eine optimale Saugleistung zu
erhalten (siehe Kapitel “Reinigung”, Abschnitt “Die
Haarauffangkammer”).
Hinweis: Damit das Vakuumsystem optimal funktioniert,
sollten Sie höchstens 7 mm der gesamten Barthaarlänge auf
einmal abschneiden. Wenn Sie Ihren Bart kürzer schneiden
möchten, wiederholen Sie den Vorgang nach Bedarf.

Reisesicherung
5
4222.002.8103.1
Sie können das Gerät für die Reise sichern. Die
Reisesicherung verhindert, dass das Gerät versehentlich
eingeschaltet wird.
Die Reisesicherung aktivieren
1 Halten Sie den Ein-/Ausschalter mindestens
6 Sekunden lang gedrückt.
, Auf dem Display beginnt ein Countdown von 3
bis 1. Das Symbol für die Reisesicherung im Display
zeigt Ihnen daraufhin an, dass das Gerät gesichert
ist (Abb. 16).
Die Reisesicherung deaktivieren
1 Halten Sie den Ein-/Ausschalter mindestens
6 Sekunden lang gedrückt.
, Auf dem Display beginnt ein Countdown von 3
bis 1. Das Symbol für die Reisesicherung im Display
wird ausgeblendet und zeigt Ihnen an, dass das
Gerät nicht länger gesichert ist (Abb. 16).
Hinweis: Die Reisesicherung wird automatisch deaktiviert,
wenn Sie das Gerät an das Stromnetz anschließen.
Reinigung
Benutzen Sie zum Reinigen des Geräts keine
Scheuerschwämme und -mittel oder aggressive
Flüssigkeiten wie Alkohol, Benzin oder Azeton.
Tauchen Sie das Gerät niemals in Wasser oder andere
Flüssigkeiten; spülen Sie es auch nicht unter ießendem
Wasser ab.
Die Haarauffangkammer
1 Trennen Sie das Gerät vom Stromnetz und lassen
Sie es so lange laufen, bis es zum Stillstand kommt.
2 Öffnen Sie den Deckel der
Haarauffangkammer (Abb. 17).
3 Entfernen Sie die 4 Schrauben in
der Haarauffangkammer mit einem
Schraubendreher (Abb. 24).
4 Ziehen Sie die Haarauffangkammer unter leichter
Kraftanwendung aus dem Gerät (Abb. 25).
5 Zur Entfernung der vorderen Abdeckung,
klemmen Sie einen Schraubendreher zwischen der
Abdeckung und dem Gerätinneren fest (Abb. 26).
6 Entfernen Sie die 4 Schrauben im Inneren des
Geräts (Abb. 27).
7 Entfernen Sie die innere Abdeckung (Abb. 28).
8 Entfernen Sie die Platine zusammen mit dem daran
angeschlossenen Akku (Abb. 29).
9 Durchtrennen Sie die Drähte zwischen der Platine
und dem Akku.
Garantie und Kundendienst
Benötigen Sie weitere Informationen oder treten
Probleme auf, besuchen Sie bitte die Philips Website
(www.philips.com), oder setzen Sie sich mit einem
Philips Service-Center in Ihrem Land in Verbindung
(Telefonnummer siehe internationale Garantieschrift).
Sollte es in Ihrem Land kein Service-Center geben,
wenden Sie sich bitte an Ihren Philips Händler.
1 Schalten Sie das Gerät aus.
2 Öffnen Sie den Deckel der
Haarauffangkammer (Abb. 17).
3 Schütteln Sie die Haare aus der Haarauffangkammer,
und/oder entfernen Sie sie mit der beiliegenden
Reinigungsbürste (Abb. 18).
4 Reinigen Sie den Filter in der Haarauffangkammer
mit der beiliegenden Reinigungsbürste (Abb. 19).
Verwenden Sie keine scharfen oder harten Gegenstände
zum Reinigen des Filters, um Beschädigungen zu
vermeiden.
5 Schließen Sie den Deckel der Haarauffangkammer.
Das Gerät
1 Ziehen Sie den Kammaufsatz vom Gerät
ab (Abb. 11).
2 Ziehen Sie die Schneideeinheit vom Gerät
ab (Abb. 12).
3 Reinigen Sie die Schneideeinheit und das
Innere des Geräts mit der beiliegenden
Reinigungsbürste (Abb. 20).
4 Setzen Sie die Schneideeinheit und den
Kammaufsatz wieder auf das Gerät, sodass sie
hörbar einrasten (Abb. 21).
Aufbewahrung
1 Nur für den QT4090: Bewahren Sie das Gerät in
der mitgelieferten Tasche auf.
2 Bewahren Sie das Gerät an einem sicheren und
trockenen Ort auf.
Umweltschutz
- Werfen Sie das Gerät am Ende der Lebensdauer
nicht in den normalen Hausmüll. Bringen Sie es zum
Recycling zu einer ofziellen Sammelstelle. Auf diese
Weise helfen Sie, die Umwelt zu schonen (Abb. 22).
- Der integrierte Akku enthält Substanzen, die die
Umwelt gefährden können. Entfernen Sie den Akku,
bevor Sie das Gerät an einer ofziellen Recyclingstelle
abgeben. Geben Sie den gebrauchten Akku bei einer
Batteriesammelstelle ab. Falls Sie beim Entfernen des
Akkus Probleme haben, können Sie das Gerät auch
an ein Philips Service-Center geben. Dort wird der
Akku umweltgerecht entsorgt. (Abb. 23)
Den Akku entfernen
Verbinden Sie das Gerät nicht mehr mit dem Stromnetz,
nachdem Sie es geöffnet haben.
Gehen Sie folgendermaßen vor, um den Akku zu
entfernen:

FRANçAIS
6
4222.002.8103.1
Introduction
Félicitations pour votre achat et bienvenue dans l’univers
Philips ! Pour proter pleinement de l’assistance Philips,
enregistrez votre produit sur le site à l’adresse suivante :
www.philips.com/welcome.
Cette tondeuse à barbe sans entretien avec système
d’aspiration intègre une technologie novatrice tout en
vous garantissant un excellent confort d’utilisation. Elle est
particulièrement recommandée pour tailler et suivre le
contour de la barbe et des pattes.
Grâce au système d’aspiration des poils coupés, votre
lavabo reste propre. Avec son sabot, ses lames autoaffutées et son anneau de réglage permettant de
sélectionner une longueur de coupe allant d’1 à 18 mm,
cette tondeuse vous garantit des résultats rapides et
excellents. Son design ergonomique offre en outre un
confort d’utilisation optimal.
La tondeuse QT4070 est fournie avec un sabot conçu
spécialement pour vous permettre d’obtenir un effet
« barbe de 3 jours » réussi.
La tondeuse QT4090 est fournie avec un sabot exible
conçu spécialement pour tailler les barbes les plus
longues. Elle est également dotée d’une tondeuse de
précision de haute qualité qui vous garantit une taille
précise.
Description générale (fig. 1)
A Bloc tondeuse amovible
B Couvercle du compar timent à poils
C Compartiment à poils et ltre
D Anneau de réglage (Precision Zoom Lock `)
E Indicateur de longueur de coupe
F Indicateur de niveau de charge
G Indicateur de verrouillage
H Bouton marche/arrêt
I Bouton Turbo
J Prise pour la che de l’appareil
K Housse de rangement (QT4090 uniquement)
L Fiche de l’appareil
M Adaptateur (2,5 V/1 500 mA)
N Brosse de nettoyage
O Tondeuse de précision (QT4090 uniquement)
P Sabot exible (QT4090)
Q Sabot (QT4070)
Important
Lisez attentivement ce mode d’emploi avant d’utiliser
l’appareil et conservez-le pour un usage ultérieur.
Danger
- Veillez à ce que l’adaptateur ne soit pas en contact
avec de l’eau.
Avertissement
- Avant de brancher l’appareil, vériez que la tension
indiquée sur l’appareil correspond à la tension
supportée par le secteur local.
- L’adaptateur secteur contient un transformateur. An
d’éviter tout accident, n’essayez pas de remplacer la
che de l’adaptateur.
- Cet appareil n’est pas destiné à être utilisé par
des personnes (notamment des enfants) dont les
capacités physiques, sensorielles ou intellectuelles
sont réduites, ou par des personnes manquant
d’expérience ou de connaissances, à moins que
celles-ci ne soient sous surveillance ou qu’elles n’aient
reçu des instructions quant à l’utilisation de l’appareil
par une personne responsable de leur sécurité.
- Veillez à ce que les enfants ne puissent pas jouer avec
l’appareil.
Attention
- Utilisez, chargez et conservez l’appareil à une
température comprise entre 5 °C et 35 °C.
- Ne chargez jamais l’appareil lorsqu’il se trouve dans
sa housse de rangement.
- Ne plongez pas l’appareil dans de l’eau, ni dans
d’autres liquides et ne le rincez pas sous le
robinet. (g. 2)
- Utilisez exclusivement l’adaptateur fourni.
- Si l’adaptateur, le bloc tondeuse ou l’un des sabots
est endommagé, remplacez-le exclusivement par un
élément d’origine pour éviter tout accident.
- L’adaptateur transforme la tension de 220-240 V en
une tension de sécurité de moins de 24 V.
- An d’éviter tout accident, n’utilisez pas l’appareil si le
bloc tondeuse ou si l’un des sabots est endommagé
ou cassé.
- L’appareil a été conçu pour tailler la barbe
exclusivement. Toute autre utilisation est à proscrire.
Champs électromagnétiques (CEM)
- Cet appareil Philips est conforme à toutes les
normes relatives aux champs électromagnétiques
(CEM). Il répond aux règles de sécurité établies sur
la base des connaissances scientiques actuelles s’il
est manipulé correctement et conformément aux
instructions de ce mode d’emploi.
Avant utilisation
Charge
Chargez l’appareil entièrement avant la première
utilisation et après une longue période d’inutilisation.
La charge dure environ 60 minutes si l’appareil est
complètement déchargé.
1 Assurez-vous que l’appareil est éteint.
2 Insérez la che dans l’appareil, puis branchez
l’adaptateur sur la prise murale (g. 3).
, Lorsque vous commencez à charger la tondeuse,
le voyant inférieur de l’indicateur de niveau de
charge clignote en orange. Lorsque l’appareil est
sufsamment chargé pour permettre une séance
de taille d’environ 7 minutes, il se met à clignoter
en bleu.
, Dans un premier temps, le voyant inférieur de
l’indicateur de niveau de charge clignote en bleu.
Ensuite, celui du second niveau de charge se met lui
aussi à clignoter en bleu, et ainsi de suite jusqu’à ce
que la tondeuse soit entièrement chargée. (g. 4)
, Lorsque l’appareil est entièrement chargé, tous les
voyants de l’indicateur de niveau de charge restent
allumés en bleu.
, Si la tondeuse est toujours branchée sur le secteur
1 heure après la n de la charge, tous les voyants
s’éteignent.
Batterie faible
Lorsque la batterie est presque vide (environ 7 minutes
ou moins de taille restantes), le voyant inférieur de
l’indicateur de niveau de charge s’allume en orange.
Lorsque vous éteignez l’appareil, ce voyant clignote
pendant quelques secondes.
Utilisation de la tondeuse sur secteur
Si le niveau de charge de la batterie est faible, vous
pouvez utiliser l’appareil sur le secteur.
Pour utiliser l’appareil lorsqu’il est branché sur le secteur :
1 Éteignez l’appareil, puis branchez-le sur le secteur.
2 Patientez quelques secondes, puis allumez l’appareil.
Remarque : Si la batterie est entièrement déchargée,
patientez quelques minutes avant de mettre l’appareil en
marche.
Utilisation de l’appareil
Indications gurant sur l’écran
L’écran s’active lorsque vous appuyez sur le bouton
marche/arrêt et lorsque vous tournez l’anneau de réglage.
- Au cours de la taille, l’écran afche les informations
suivantes : (g. 5)
, ’-’ lorsqu’aucun sabot n’est xé à l’appareil.
, La longueur de coupe choisie (c’est-à-dire la
longueur des poils après la taille) en millimètres.
, Le niveau de charge restant.
, L’indicateur de verrouillage si la tondeuse est
verrouillée (voir la section « Verrouillage » de ce
chapitre).
, ’E’ si le bloc tondeuse est verrouillé.
Taille de la barbe
Peignez toujours votre barbe ou moustache avec un
peigne n avant de la tailler.
Taille de la barbe avec le sabot
La longueur de coupe choisie est indiquée en millimètres
sur l’écran de l’appareil. Elle correspond à la longueur de
poils obtenue après la taille.
Le sabot vous offre une longueur de coupe allant d’1 à
18 mm.
Si vous utilisez l’appareil pour la première fois,
commencez par sélectionner le réglage de longueur
maximum (18 mm).
1 Insérez le sabot sur l’appareil (g. 6).
2 Tournez l’anneau de réglage (Precision Zoom Lock
`) sur la position souhaitée. (g. 7)
, L’écran indique la longueur de coupe sélectionnée.
3 Allumez l’appareil (g. 8).
Remarque : Lors de la taille, vous pouvez utiliser la fonction
Turbo pour une puissance d’aspiration plus élevée et une
rapidité accrue (voir la section « Fonction Turbo » ci-dessous).
4 Pour obtenir des résultats optimaux, déplacez
l’appareil dans le sens inverse de la pousse des
poils (g. 9).
Remarque : Effectuez des mouvements uniformes et tout
en douceur et veillez à ce que la surface du sabot reste
toujours en contact avec la peau.
Remarque : N’effectuez pas de mouvements brusques.
5 Éteignez l’appareil après utilisation et nettoyez-le
(voir le chapitre « Nettoyage »).
Réalisation d’une barbe de 3 jours.
- Si vous utilisez la tondeuse avec le sabot réglé pour
une longueur de coupe d’1 mm, vous obtiendrez un
effet « barbe de 3 jours » (g. 10).
- Si vous souhaitez créer un effet barbe de moins de
3 jours (env. 0,5 mm), utilisez la tondeuse sans le
sabot.
Taille de la barbe sans sabot
Utilisez la tondeuse sans le sabot pour vous raser
totalement la barbe ou pour éliminer les poils rebelles.
1 Retirez le sabot (g. 11).
Remarque concernant le QT4090 : Ne tirez jamais sur la
partie supérieure exible du sabot. Tirez toujours sur la
partie inférieure.
2 Effectuez des mouvements précis et touchez
légèrement les poils avec le bloc tondeuse.
Contours à l’aide de la tondeuse de précision
(QT4090 uniquement)
La tondeuse de précision permet de tailler la moustache
et les favoris, de dessiner des contours et d’éliminer les
poils rebelles.
1 Retirez le sabot (g. 11).
Remarque : Ne tirez jamais sur la partie supérieure exible
du sabot. Tirez toujours sur la partie inférieure.
2 Retirez le bloc tondeuse de l’appareil (g. 12).
3 Placez la tondeuse de précision sur
l’appareil (g. 13).
4 Lorsque vous utilisez la tondeuse de précision,
tenez l’appareil orienté vers le haut et déplacez-le
vers le bas (g. 14).
Fonction Turbo
Vous pouvez utiliser la fonction Turbo an d’obtenir une
puissance d’aspiration plus importante et une vitesse de
coupe plus élevée.
1 Allumez l’appareil (g. 8).
2 Appuyez sur le bouton Turbo (g. 15).
Lorsque vous éteignez l’appareil, la fonction Turbo se
désactive automatiquement.
Aspiration des poils coupés
Le système d’aspiration est activé automatiquement
lorsque vous mettez l’appareil en marche. Il aspire
systématiquement les poils coupés, que vous utilisiez ou
non le sabot.
Il est recommandé de vider le compartiment à poils après
chaque utilisation. Si vous avez une barbe longue et dense,
il peut être nécessaire de vider le compartiment pendant
l’utilisation pour maintenir une aspiration optimale (voir
le chapitre « Nettoyage », section « Compartiment à
poils »).
Remarque : Pour un fonctionnement optimal du système à
vide, ne taillez pas plus de 7 mm de barbe en une séance.
Répétez l’opération une ou plusieurs fois pour obtenir une
barbe plus courte.

Système de verrouillage pour voyage
7
4222.002.8103.1
Vous pouvez verrouiller la tondeuse si vous par tez
en voyage. Le verrouillage l’empêche de se mettre en
marche accidentellement.
Activation du verrouillage
1 Maintenez enfoncé le bouton marche/arrêt pendant
au moins 6 secondes.
, L’écran afche un décompte de 3 à 1, puis
l’indicateur de verrouillage apparaît, indiquant ainsi
que l’appareil est verrouillé (g. 16).
Désactivation du verrouillage
1 Maintenez enfoncé le bouton marche/arrêt pendant
au moins 6 secondes.
, L’écran afche un décompte de 3 à 1, puis
l’indicateur de verrouillage disparaît, indiquant ainsi
que l’appareil est déverrouillé (g. 16).
Remarque : Le verrouillage se désactive automatiquement
lorsque vous branchez la tondeuse sur le secteur.
Nettoyage
N’utilisez jamais de tampons à récurer, de produits
abrasifs ou de détergents agressifs tels que de l’alcool,
de l’essence ou de l’acétone pour nettoyer l’appareil.
Ne plongez jamais l’appareil dans l’eau, ni dans d’autres
liquides et ne le rincez pas.
Compartiment à poils
1 Éteignez l’appareil.
2 Ouvrez le couvercle du compartiment à
poils (g. 17).
3 Enlevez les poils en secouant le compartiment
à poils ou enlevez-les à l’aide de la brosse de
nettoyage fournie (g. 18).
4 Nettoyez le ltre situé dans le compartiment
à poils à l’aide de la brosse de nettoyage
fournie (g. 19).
Pour ne pas endommager le ltre, évitez d’utiliser des
objets pointus ou durs pour le nettoyer.
5 Refermez le couvercle du compartiment à poils.
Appareil
3 À l’aide d’un tournevis, retirez les 4 vis situées à
l’intérieur du compartiment à poils (g. 24).
4 Retirez-le de l’appareil en tirant fermement (g. 25).
5 Pour retirer le panneau avant de la tondeuse,
utilisez un tournevis que vous placerez entre le
panneau avant et l’intérieur de l’appareil (g. 26).
6 Retirez les 4 vis situées à l’intérieur de
l’appareil (g. 27).
7 Retirez le panneau intérieur (g. 28).
8 Retirez le circuit imprimé ainsi que la batterie qui
lui est reliée (g. 29).
9 Coupez les ls reliant le circuit imprimé à la
batterie.
Garantie et service
Si vous souhaitez obtenir des informations
supplémentaires ou faire réparer l’appareil, ou si vous
rencontrez un problème, rendez-vous sur le site Web
de Philips à l’adresse www.philips.com ou contactez
le Service Consommateurs Philips de votre pays (vous
trouverez le numéro de téléphone correspondant sur
le dépliant de garantie internationale). S’il n’existe pas
de Service Consommateurs Philips dans votre pays,
renseignez-vous auprès de votre revendeur Philips local.
1 Retirez le sabot de l’appareil (g. 11).
2 Retirez le bloc tondeuse de l’appareil (g. 12).
3 Nettoyez le bloc tondeuse et l’intérieur
de l’appareil avec la brosse de nettoyage
fournie (g. 20).
4 Replacez le bloc tondeuse et le sabot sur l’appareil
(clic) (g. 21).
Rangement
1 QT4090 uniquement : Rangez l’appareil dans la
housse de rangement fournie.
2 Placez l’appareil dans un endroit sûr et sec.
Environnement
- Lorsqu’il ne fonctionnera plus, ne jetez pas l’appareil
avec les ordures ménagères, mais déposez-le à
un endroit assigné à cet effet, où il pourra être
recyclé. Vous contribuerez ainsi à la protection de
l’environnement (g. 22).
- La batterie rechargeable intégrée contient des
substances qui peuvent nuire à l’environnement.
Veillez à toujours retirer la batterie avant de mettre
l’appareil au rebut ou de le déposer à un endroit
assigné à cet effet. Déposez la batterie usagée à
un endroit assigné à cet effet. Si vous n’arrivez
pas à retirer la batterie, vous pouvez apporter
l’appareil dans un Centre Service Agréé Philips qui
prendra toute l’opération en charge pour préser ver
l’environnement. (g. 23)
Retrait de la batterie rechargeable
Ne branchez plus l’appareil sur le secteur après avoir
l’avoir ouvert.
Suivez les étapes suivantes pour retirer la batterie.
1 Débranchez l’appareil de la prise secteur et laissez-
le fonctionner jusqu’à l’arrêt complet du moteur.
2 Ouvrez le couvercle du compartiment à
poils (g. 17).

NEDERLANDS
8
4222.002.8103.1
Inleiding
Gefeliciteerd met uw aankoop en welkom bij Philips! Als
u volledig wilt proteren van de ondersteuning die Philips
biedt, registreer uw product dan op www.philips.com/
welcome.
Deze onderhoudsvrije Philips-baardtrimmer met
afzuigfunctie combineert vernieuwende technologie
met voortreffelijk gebruiksgemak. Deze baardtrimmer
is bijzonder geschikt voor het knippen en bijwerken van
baard en bakkebaarden.
Het geïntegreerde vacuümsysteem zuigt afgeknipte
haren af tijdens het trimmen en zorgt voor een schonere
wastafel na gebruik. De trimkam, het zelfslijpende
knipelement en de instelring voor haarlengten van 1
tot 18 mm garanderen uitstekende knipresultaten en
tijdbesparing tijdens gebruik. Door de ergonomische
vorm is het apparaat aangenaam en comfortabel te
hanteren.
QT4070 wordt geleverd met een trimkam die speciaal is
ontworpen om u beter zicht te geven bij het maken van
een stoppelbaard.
QT4090 wordt geleverd met een contourvolgende
trimkam die speciaal is ontworpen om langere baarden
te trimmen. Verder zit er ook een hoogwaardige
precisietrimmer bij voor nauwkeurige en strakke
contouren.
Algemene beschrijving (fig. 1)
A Afneembaar knipelement
B Deksel van haarkamer
C Haarkamer en lter
D Instelring (Precision Zoom Lock `)
E Haarlengte-indicator
F Oplaadniveau-indicator
G Reisvergrendelingsindicator
H Aan/uitknop
I Turboknop
J Aansluiting voor apparaatstekkertje
K Opbergetui (alleen QT4090)
L Apparaatstekkertje
M Adapter (2,5V/1500mA)
N Schoonmaakborsteltje
O Precisietrimmer (alleen QT4090)
P Contourvolgende trimkam (QT4090)
Q Trimkam (QT4070)
Belangrijk
Lees deze gebruiksaanwijzing zorgvuldig door
voordat u het apparaat gaat gebruiken. Bewaar de
gebruiksaanwijzing om deze indien nodig te kunnen
raadplegen.
Gevaar
- Voorkom dat de adapter nat wordt.
Waarschuwing
- Controleer of het voltage dat wordt aangegeven
op het apparaat, overeenkomt met de plaatselijke
netspanning voordat u het apparaat aansluit.
- De adapter bevat een transformator. Knip de adapter
niet af om deze te vervangen door een andere
stekker, aangezien dit een gevaarlijke situatie oplevert.
- Dit apparaat is niet bedoeld voor gebruik door
personen (waaronder kinderen) met verminderde
lichamelijke, zintuiglijke of geestelijke vermogens,
of die gebrek aan ervaring of kennis hebben, tenzij
iemand die verantwoordelijk is voor hun veiligheid
toezicht op hen houdt of hen heeft uitgelegd hoe het
apparaat dient te worden gebruikt.
- Houd toezicht op jonge kinderen om te voorkomen
dat ze met het apparaat gaan spelen.
Let op
- Laad het apparaat op, gebruik het en bewaar het bij
een temperatuur tussen 5°C en 35°C.
- Laad het apparaat niet op in het bijgeleverde
opbergetui.
- Dompel het apparaat nooit in water of een
andere vloeistof en spoel het ook niet af onder de
kraan. (g. 2)
- Gebruik uitsluitend de bijgeleverde adapter.
- Als de adapter, het knipelement of een van
de trimkammen beschadigd is, laat deze dan
altijd vervangen door een exemplaar van het
oorspronkelijke type om gevaar te voorkomen.
- De adapter zet 220-240 volt om in een veilige
laagspanning van minder dan 24 volt.
- Gebruik het apparaat niet als een van de
trimkammen of het knipelement beschadigd of kapot
is, omdat dit tot verwondingen kan leiden.
- Dit apparaat is uitsluitend bedoeld voor het trimmen
van baarden bij mensen. Gebruik het niet voor
andere doeleinden.
Elektromagnetische velden (EMV)
- Dit Philips-apparaat voldoet aan alle richtlijnen met
betrekking tot elektromagnetische velden (EMV).
Mits het apparaat op de juiste wijze en volgens de
instructies in deze gebruiksaanwijzing wordt gebruikt,
is het veilig te gebruiken volgens het nu beschikbare
wetenschappelijke bewijs.
Klaarmaken voor gebruik
Opladen
Laad het apparaat volledig op voordat u het voor de
eerste keer gebruikt en wanneer u het langere tijd niet
hebt gebruikt.
Als het apparaat helemaal leeg is, duurt het opladen
ongeveer 60 minuten.
1 Zorg ervoor dat het apparaat is uitgeschakeld.
2 Steek het apparaatstekkertje in het apparaat en
steek de adapter in het stopcontact (g. 3).
, Als u het lege apparaat gaat opladen, knippert het
onderste segment van de oplaadniveau-indicator
oranje. Als de accu voldoende stroom voor een
trimsessie van ongeveer 7 minuten heeft, begint het
onderste segment blauw te knipperen.
, Eerst knippert het onderste segment van de
oplaadniveau-indicator blauw, dan het tweede
segment, enzovoort, tot het apparaat volledig
geladen is. (g. 4)
, Als het apparaat volledig is opgeladen, branden alle
segmenten van de oplaadniveau-indicator continu
blauw.
, Als het volledig opgeladen apparaat na 1 uur nog
steeds op netspanning is aangesloten, gaan de
segmenten van de oplaadniveau-indicator uit.
Accu bijna leeg
Als de accu bijna leeg is (als er ongeveer 7 minuten
trimtijd over is), wordt het onderste segment van de
oplaadniveau-indicator oranje. Wanneer u de trimmer
uitschakelt, knipper t het onderste segment enkele
seconden.
Gebruik met snoer
Als de accu bijna leeg is, kunt u het apparaat ook op
netspanning gebruiken.
Het apparaat op netspanning gebruiken:
1 Schakel de trimmer uit en sluit deze op netspanning
aan.
2 Wacht een paar seconden en schakel het apparaat
dan in.
Opmerking: Als de accu helemaal leeg is, wacht dan enkele
minuten voordat u het apparaat inschakelt.
Het apparaat gebruiken
Aanduidingen op het display
Het display wordt geactiveerd als u op de aan/uitknop
drukt en als u de instelring draait.
- Tijdens het trimmen geeft het display de volgende
informatie: (g. 5)
, ’-’ wanneer er geen kam op het apparaat is
bevestigd.
, De gekozen haarlengte (de resterende haarlengte
na het trimmen) in millimeters.
, Het resterende oplaadniveau.
, Reisvergrendelingsindicator als het apparaat
is vergrendeld (zie ‘Reisvergrendeling’ in dit
hoofdstuk).
, ’E’ als het knipelement geblokkeerd is.
Baardtrimmen
Kam uw baard of snor altijd goed door met een jne
kam voordat u het apparaat gaat gebruiken.
Trimmen met de trimkam
De haarlengtestanden worden in millimeters aangegeven
op het display van het apparaat. De standen komen
overeen met de resterende haarlengte na het knippen.
De trimkam knipt haren op een lengte van 1 mm tot 18
mm.
Als u voor de eerste keer een trimmer gebruikt, begin
dan met de hoogste haarlengtestand (18 mm).
1 Schuif de trimkam op het apparaat (g. 6).
2 Draai de instelring (Precision Zoom Lock `) naar
de gewenste haarlengtestand. (g. 7)
, Het display toont de gekozen haarlengte.
3 Schakel het apparaat in (g. 8).
Opmerking: U kunt tijdens het trimmen de turbofunctie
gebruiken voor extra zuigkracht en trimsnelheid (zie
‘Turbofunctie’ hieronder).
4 De meest effectieve trimmethode is om het
apparaat tegen de haargroeirichting in te
bewegen (g. 9).
Opmerking: Maak vloeiende, rustige bewegingen en zorg
ervoor dat de trimkam altijd in contact blijft met de huid.
Opmerking: Beweeg het apparaat niet te snel.
5 Schakel het apparaat na gebruik uit en maak het
schoon (zie hoofdstuk ‘Schoonmaken’).
Een stoppelbaard trimmen
- Gebruik de trimmer met de trimkam ingesteld op
een haarlengte van 1 mm om een stoppelbaard te
trimmen (g. 10).
- Als u nog kortere stoppels van 0,5 mm wilt, moet u
de trimmer zonder de trimkam gebruiken.
Trimmen zonder de trimkam
Gebruik de trimmer zonder trimkam wanneer u volle
baarden en losse haren wilt trimmen.
1 Verwijder de trimkam (g. 11).
Opmerking voor QT4090: Trek nooit aan de buigzame
bovenkant van de trimkam, maar altijd aan het onderste
deel.
2 Maak beheerste bewegingen en raak het haar licht
aan met het knipelement.
In vorm knippen met de precisietrimmer
(alleen QT4090)
Gebruik de precisietrimmer wanneer u uw bakkebaarden
en snor in vorm wilt knippen, contouren wilt bijwerken
en losse haren wilt knippen.
1 Verwijder de trimkam (g. 11).
Opmerking: Trek nooit aan de buigzame bovenkant van de
trimkam, maar altijd aan het onderste deel.
2 Trek het knipelement van het apparaat af (g. 12).
3 Zet de precisietrimmer op het apparaat (g. 13).
4 Wanneer u de precisietrimmer gebruikt, houd
het apparaat dan vast met de trimmer naar boven
gericht en maak neerwaartse bewegingen (g. 14).
Turbofunctie
U kunt de turbofunctie gebruiken voor een grotere
zuigkracht en een hogere knipsnelheid.
1 Schakel het apparaat in (g. 8).
2 Druk op de turboknop (g. 15).
Als u het apparaat uitschakelt, wordt de turbofunctie
automatisch uitgeschakeld.
Het afzuigmechanisme
Het vacuümsysteem wordt automatisch geactiveerd
wanneer u het apparaat inschakelt. Dit mechanisme
zuigt afgeknipte haren af tijdens elke toepassing, d.w.z. bij
gebruik met of zonder trimkam en bij het trimmen van
contouren.
We raden u aan de haarkamer na elke trimbeurt leeg te
maken. Wanneer u lange, dichte baarden trimt, kan het
nodig zijn de haarkamer tijdens de trimbeur t te legen om
ervoor te zorgen dat het apparaat optimaal blijft zuigen
(zie ‘Haarkamer’ in hoofdstuk ‘Schoonmaken’).
Opmerking: Om verzekerd te zijn van een optimaal
functioneren van het afzuigsysteem, mag u per keer niet
meer dan circa 7 mm van uw baard afknippen. Als u uw
baard korter wilt knippen, herhaal het proces dan één of
meerdere keren.

Reisvergrendeling
9
4222.002.8103.1
U kunt het apparaat vergrendelen als u het meeneemt op
reis. Deze reisvergrendeling voorkomt dat het apparaat
per ongeluk wordt ingeschakeld.
De reisvergrendeling activeren
1 Houd de aan/uitknop ten minste 6 seconden
ingedrukt.
, Het display telt af van 3 tot 1. Hierna verschijnt de
reisvergrendelingsindicator op het display om aan
te geven dat het apparaat is vergrendeld (g. 16).
De reisvergrendeling deactiveren
1 Houd de aan/uitknop ten minste 6 seconden
ingedrukt.
, Het display telt af van 3 tot 1. Hierna verschijnt de
reisvergrendelingsindicator op het display om aan
te geven dat het apparaat is ontgrendeld (g. 16).
Opmerking: De reisvergrendeling wordt automatisch
uitgeschakeld wanneer u het apparaat op netspanning
aansluit.
Schoonmaken
Gebruik nooit schuursponzen, schurende
schoonmaakmiddelen of agressieve vloeistoffen zoals
alcohol, benzine of aceton om het apparaat schoon te
maken.
Dompel het apparaat nooit in water of een andere
vloeistof en spoel het ook niet af onder de kraan.
Haarkamer
3 Verwijder de 4 schroeven in de haarkamer met een
schroevendraaier (g. 24).
4 Trek de haarkamer met enige kracht uit het
apparaat (g. 25).
5 Verwijder het voorpaneel door een
schroevendraaier tussen het voorpaneel en de
binnenzijde van het apparaat te plaatsen (g. 26).
6 Verwijder de 4 schroeven aan de binnenzijde van
het apparaat (g. 27).
7 Verwijder het binnenste paneel (g. 28).
8 Verwijder de printplaat samen met de accu (g. 29).
9 Knip de draden tussen de printplaat en de accu
door.
Garantie en service
Als u service of informatie nodig hebt of als u een
probleem hebt, bezoek dan de Philips-website
(www.philips.nl) of neem contact op met het
Philips Consumer Care Centre in uw land (u vindt het
telefoonnummer in het ‘worldwide guarantee’-vouwblad).
Als er geen Consumer Care Centre in uw land is, ga dan
naar uw Philips-dealer.
1 Schakel het apparaat uit.
2 Open het deksel van de haarkamer (g. 17).
3 Schud de haren uit de haarkamer en/
of verwijder de haren met het bijgeleverde
schoonmaakborsteltje (g. 18).
4 Maak het lter in de haarkamer schoon met het
bijgeleverde schoonmaakborsteltje (g. 19).
Gebruik geen scherpe of harde voorwerpen om het
lter te reinigen om beschadiging te voorkomen.
5 Sluit het deksel van de haarkamer.
Apparaat
1 Trek de trimkam van het apparaat af (g. 11).
2 Trek het knipelement van het apparaat af (g. 12).
3 Maak het knipelement en de binnenkant van
het apparaat schoon met het bijgeleverde
schoonmaakborsteltje (g. 20).
4 Plaats het knipelement en de trimkam terug op het
apparaat (‘klik’) (g. 21).
Opbergen
1 Alleen QT4090: doe het apparaat in het
bijgeleverde opbergetui.
2 Berg het apparaat op op een veilige en droge plaats.
Milieu
- Gooi het apparaat aan het einde van zijn levensduur
niet weg met het normale huisvuil, maar lever het in
op een door de overheid aangewezen inzamelpunt
om het te laten recyclen. Op die manier levert u een
bijdrage aan een schonere leefomgeving (g. 22).
- De ingebouwde accu bevat stoffen die schadelijk
kunnen zijn voor het milieu. Verwijder altijd de accu
voordat u het apparaat afdankt en inlevert op een
door de overheid aangewezen inzamelpunt. Lever de
accu in op een ofcieel inzamelpunt voor batterijen.
Als u problemen ondervindt bij het verwijderen
van de accu, kunt u met het apparaat ook naar een
Philips-servicecentrum gaan. Medewerkers van dit
centrum verwijderen dan de accu voor u en zorgen
ervoor dat deze op milieuvriendelijke wijze wordt
verwerkt. (g. 23)
De accu verwijderen
Sluit het apparaat niet meer aan op netspanning nadat u
het hebt geopend.
Verwijder de accu als volgt:
1 Haal het apparaat van de netspanning en laat de
motor lopen totdat deze stopt.
2 Open het deksel van de haarkamer (g. 17).
 Loading...