

Page 1
QT4060,
QT4040
Page 2

234
Page 3
Page 4

Page 5

ENGLISH 6
DEUTSCH 14
NORSK 22
SVENSKA 29
SUOMI 37
DANSK 44
QT4060, QT4040
Page 6

Introduction
Dear customer, you have made the right choice!
Your new maintenance-free Philips vacuum beard trimmer combines
innovative technology and outstanding comfort of use.
The integrated vacuum mechanism absorbs cut-off hairs during use and
guarantees a clean washbasin after use.
The contour-following comb, the self-sharpening cutting element and
the adjustment ring for selecting hair lengths of 1.5 to 18 mm ensure
excellent cutting results and time-saving operation.The high-quality
trimmer guarantees a precise and defined cut and the ergonomic shape
of the appliance allows pleasant and comfortable handling.
Your new Philips vacuum beard trimmer is excellently suited for cutting
and contouring your beard and sideburns.
General description
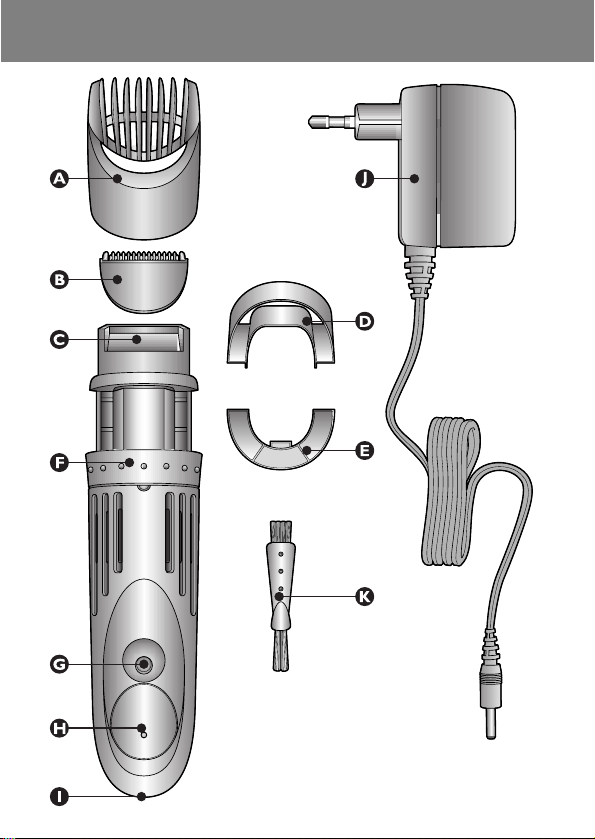
A Comb attachment
B Detachable cutting unit
C Flexible hair guide
D Hair-collection chamber
E Filter
F Adjustment ring (Precision Zoom Lock`)
G On/off button
H Charging light
I Socket for appliance plug
J Powerplug
K Cleaning brush
Important
Read these instructions for use carefully before using the appliance and
save them for future reference.
◗ Check if the voltage indicated on the powerplug corresponds to
the local mains voltage before you connect the appliance.
◗ Only use the powerplug supplied.
◗ The powerplug contains a transformer.Do not cut off the
powerplug to replace it with another plug,as this will cause a
hazardous situation.
ENGLISH6
Page 7

◗ Do not use the appliance when the cutting unit is damaged or
broken,as this may cause injury.
◗ Do not use a damaged powerplug.
◗ If the powerplug is damaged, always have it replaced by one of the
original type in order to avoid a hazard.
◗ Make sure the appliance and the powerplug do not get wet.
◗ Keep the appliance out of the reach of children.
◗ Use, charge and store the appliance at a temperature between
15cC and 35cC.
◗ This appliance is only intended for trimming the human beard.Do
not use it for any other purpose.
Charging
Charge the appliance fully before you start using it for the first time or
after a long period of disuse.
1 Make sure the appliance is switched off before you start charging
it.
2 Insert the appliance plug into the appliance and put the
powerplug in the wall socket.
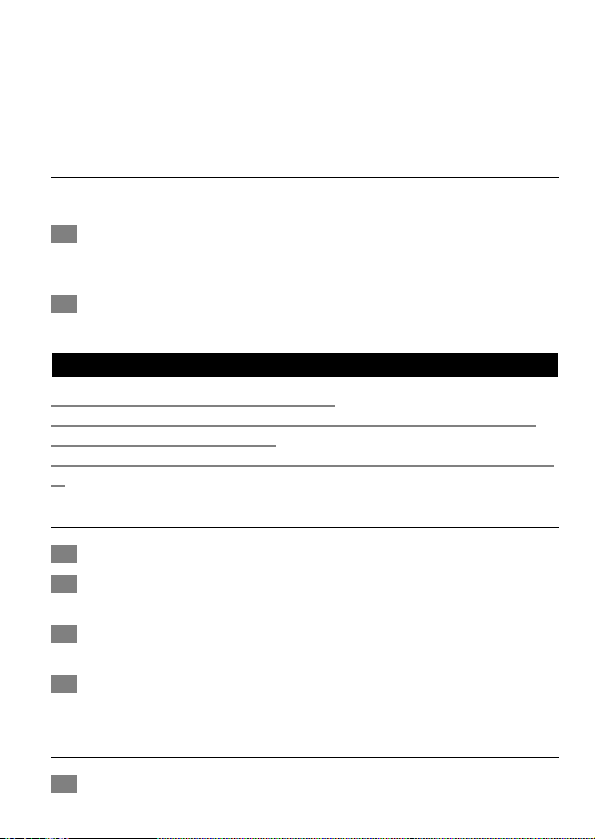
◗ The charging light goes on to indicate that the appliance is
charging (fig. 2).
◗ It will take approx. 10 hours to fully charge the battery.
◗ A fully charged appliance has a cordless trimming time of up to
50 minutes.
B
When the appliance has been charged for the first time, we advise you
to use it until the battery is completely empty.
B
For a single trimming session the appliance must be charged for at
least 90 minutes.
Optimising the lifetime of the rechargeable battery.
- After the appliance has been charged for the first time, use it until
the battery is completely empty.
- Do not charge the appliance for more than 24 hours.
- Do not keep the powerplug plugged into the wall socket all the
time.
ENGLISH 7
Page 8

- Do not recharge the appliance between trimming sessions.
- Discharge the battery completely twice a year by letting the motor
run until it stops.Then fully recharge the battery.
- If the appliance has not been used for a long period of time, it must
be fully recharged.
Preparing for use
Always comb your beard or moustache with a fine comb before you
start trimming.
Using the appliance
Corded trimming (QT4060 only)
Do not run the appliance from the mains when the battery is fully
charged.
B
If the battery is low,you can also use the appliance from the mains:
1 Switch the trimmer off, connect it to the mains and wait a few
seconds before switching it on.
2 If the battery is completely empty, wait a few minutes before
switching the appliance on.
Absorbing cut hairs
The suction system is activated automatically as soon as you switch the
appliance on. It absorbs cut hairs during every kind of use, i.e. trimming
with and without comb attachment and contouring.The flexible hair
guide follows the contours of the face and directs cut hairs towards the
nozzle of the vacuum mechanism.
We advise you to empty the hair-collection chamber after each
trimming session.When trimming long, dense beards it may also be
necessary to empty the hair-collection chamber during the trimming
session in order to maintain optimal suction performance (also see
chapter 'Cleaning', section 'Hair-collection chamber').
ENGLISH8
Page 9

B
To ensure optimal functioning of the vacuum system, do not cut off
more than approx. 7mm of your overall beard length at a time.If you
want to cut your beard shorter, repeat the process one or more times.
Trimming with comb attachment
1 Turn the adjustment ring (Precision Zoom Lock`) to the desired
trimming length setting (see table) (fig. 3).
◗ The setting will appear in the window below the adjustment ring
(Precision Zoom Lock`).
If you are trimming for the first time, start with the maximum
trimming length setting (9).
2 To trim in the most effective way,move the trimmer against the
direction of hair growth.Do not move the trimmer too fast.
Make smooth and gentle movements and make sure the surface
of the comb always stays in contact with the skin (fig. 4).
ENGLISH 9
Resulting hair length
1.5 mm
2.5 mm
4 mm
5.5 mm
7.5 mm
9.5 mm
12 mm
15 mm
18 mm
Setting
1
2
3
4
5
6
7
8
9
Trimming length settings
Page 10
Trimming at the unique 'stubble look' setting
◗ Use the trimmer with the comb attachment set to length setting
1.This allows you to create a 'stubble look' (fig. 5).
Trimming without comb attachment
Full beards and single hairs.
1 Remove the comb attachment (fig. 6).
B
Never pull at the flexible top of the comb attachment.Always pull at
the bottom part.
2 Make well-controlled movements and touch the hair lightly with
the trimmer (fig. 7).
Cleaning
The appliance may only be cleaned dry.
Do not use abrasives, scourers or liquids such as alcohol, petrol or
acetone to clean the appliance.
Never use sharp or hard objects to clean the filter to avoid damaging
it.
Hair-collection chamber
1 Switch the appliance off.
2 Remove the hair-collection chamber and remove the hairs by
shaking or brushing them out (fig. 8).
3 For extra thorough cleaning and to maintain optimal suction
performance, detach the filter...(fig. 9).
4 ...and carefully clean the hair-collection chamber and the filter
with the brush supplied (fig. 10).
Appliance
1 Remove the comb attachment.
ENGLISH10
Page 11

2 Remove the cutting unit (fig. 11).
3 Clean the cutting unit and the inside of the appliance with the
brush supplied (fig. 12).
4 Reattach the cutting unit and the comb attachment to the
appliance (fig. 13).
Replacement
Worn or damaged cutting units and filters should only be replaced with
original Philishave replacement parts which are available at your dealer
or at authorised Philips service centres.
Environment
◗ Do not throw the appliance away with the normal household
waste at the end of its life, but hand it in at an official collection
point for recycling. By doing this you will help to preserve the
environment (fig. 14).
The built-in rechargeable battery contains substances that may harm
the environment.
Remove the battery when you discard the appliance. Do not throw the
battery away with the normal household waste, but hand it in at an
official collection point.You can also take the appliance to a Philips
service centre, which will remove the battery for you and will dispose
of it in an environmentally safe way.
Removing the battery
Do not connect the appliance to the mains again after it has been
opened.
Follow the steps below to remove the battery.
1 Disconnect the appliance from the mains and let the appliance
run until the motor stops.
ENGLISH 11
Page 12

2 Separate the two housing parts by means of a screwdriver
(fig. 15).
3 Pull out the printed circuit board (fig. 16).
4 Remove the rechargeable battery by means of a screwdriver and
detach it by bending or turning it several times until the
connections break (fig. 17).
5 Dispose of the battery and the other components in an
environmentally safe way.
Do not connect the appliance to the mains again after it has been
opened.
Guarantee & service
If you need information or if you have a problem, please visit the Philips
website at www.philips.com or contact the Philips Customer Care
Centre in your country (you will find its phone number in the
worldwide guarantee leaflet). If there is no Customer Care Centre in
your country, turn to your local Philips dealer or contact the Service
Department of Philips Domestic Appliances and Personal Care BV.
Troubleshooting
The trimmer does not work when it is switched on and none of the
lights go on:
1 If the battery is completely empty, the trimmer will not work and
the lights will not go on when the appliance is switched on.
Charge the appliance until it is fully charged (also see chapter
'Charging'). Charging will take approx. 10 hours.
If the suction system of the vacuum beard trimmer performs poorly or
does not work at all, check the points listed below.
2 Is the hair-collection chamber empty? (fig. 10).
B
We advise you to empty the hair-collection chamber after each
trimming session.When cutting long, dense beards it may also be
necessary
ENGLISH12
Page 13

to empty the hair-collection chamber during the trimming session.
3 Is the hair-collection chamber or the filter wet?
B
Both parts may only be cleaned dry. If one of these parts becomes wet,
dry it carefully.
4 Does the flexible hair guide in front of the cutting unit jam?
(fig. 17).
B
The transparent hair guide needs to be flexible in order to be able to
adjust to the contours of the face. If it jams because hairs have got
stuck in it, remove the hairs carefully with the brush supplied.The
flexible hair guide should yield at the touch of a finger.
5 Do you move the appliance in the optimal direction? (fig. 6).
B
For the best possible cutting and suction performance we advise you to
move the trimmer upwards, against the direction of hair growth,making
smooth and gentle strokes.
ENGLISH 13
Page 14

Einleitung
Sehr geehrter Kunde, Sie haben die richtige Wahl getroffen!
Ihr neuer ölungsfreier Philips Bartschneider verbindet innovative Technik
mit besonderem Bedienkomfort.
Der integrierte Vakuummechanismus fängt während des Schneidens die
abgeschnittenen Barthaare auf. So bleibt das Waschbecken sauber!
Der sich den Gesichtskonturen anpassende Aufsteckkamm,die
selbstschärfende Schneideeinheit und der Zoom-Ring zur Einstellung
der Barthaarlänge von 1,5 bis 18 mm gewährleisten hervorragende
Ergebnisse und sparen Zeit. Der hochwertige Konturentrimmer
gewährleistet einen präzise definierten Schnitt; die ergonomische Form
des Geräts macht die Handhabung besonders angenehm.
Ihr neuer Philips Bartschneider eignet sich hervorragend zum Schneiden
und Konturentrimmen von Bart und Koteletten.
Allgemeine Beschreibung
A Aufsteckkamm
B Abnehmbare Schneideeinheit
C Bewegliche Haarführung
D Haarauffangkammer
E Filter
F Zoom-Ring zur Haarlängeneinstellung (Precision Zoom Lock`)
G Ein-/Ausschalter
H Ladekontrolllampe
I Buchse für Gerätestecker
J Netzteil
K Reinigungsbürste
Wichtig
Lesen Sie diese Bedienungsanleitung vor dem ersten Gebrauch des
Geräts sorgfältig durch und bewahren Sie sie zur späteren
Einsichtnahme auf.
◗ Prüfen Sie, bevor Sie das Gerät anschließen,ob die
Spannungsangabe auf dem Netzteil mit der örtlichen
Netzspannung übereinstimmt.
14
DEUTSCH
Page 15

◗ Verwenden Sie nur das mitgelieferte Netzteil.
◗ Das Netzteil enthält einen Transformator.Ersetzen Sie das
Netzteil keinesfalls durch einen anderen Stecker, da dies den
Benutzer gefährdet.
◗ Benutzen Sie das Gerät nicht, wenn die Schneideeinheit
beschädigt oder zerbrochen ist (Verletzungsgefahr!).
◗ Benutzen Sie kein beschädigtes Netzteil.
◗ Wenn das Netzteil defekt oder beschädigt ist, darf es nur von
einem Philips Service-Center oder einer von Philips autorisierten
Werkstatt durch ein Original-Ersatznetzteil ausgetauscht werden,
um Gefährdungen zu vermeiden.
◗ Gerät und Netzteil dürfen nicht nass werden!
◗ Bewahren Sie das Gerät außerhalb der Reichweite von Kindern
auf.
◗ Benutzen und laden Sie das Gerät bei Temperaturen zwischen
15c C und 35c C. Bewahren Sie es auch in diesem
Temperaturbereich auf.
◗ Das Gerät ist ausschließlich zum Schneiden von Gesichtshaar
vorgesehen.Verwenden Sie es nicht für andere Zwecke.
Den Akku aufladen
Laden Sie das Gerät vor dem ersten Gebrauch, und wenn Sie es
längere Zeit nicht benutzt haben, vollständig auf.
1 Das Gerät muss ausgeschaltet sein, wenn Sie mit dem Laden
beginnen.
2 Stecken Sie den Gerätestecker in das Gerät und das Netzteil in
die Steckdose.
◗ Die Ladekontrolllampe leuchtet und signalisiert, dass sich das
Gerät auflädt (Abb. 2).
◗ Nach ca. 10 Stunden ist der Akku voll aufgeladen.
◗ Mit dem voll aufgeladenen Akku können Sie das Gerät
ca. 50 Minuten kabelfrei benutzen.
B
Wir empfehlen Ihnen, den Bartschneider nach dem ersten vollständigen
Laden so lange zu benutzen, bis sich der Akku völlig entleert hat.
DEUTSCH 15
Page 16

B
Für einmaliges Schneiden muss das Gerät mindestens 90 Minuten lang
geladen werden.
Die Lebensdauer des Akkus optimieren.
- Verwenden Sie den Bartschneider nach dem ersten Aufladen so
lange, bis sich der Akku vollständig entleert hat.
- Lassen Sie das Gerät nicht länger als 24 Stunden am Netz.
- Lassen Sie das Netzteil nicht die ganze Zeit in der Steckdose.
- Laden Sie das Gerät nicht nach jedem Schneiden auf.
- Entladen Sie den Akku zweimal pro Jahr kompeltt, indem Sie den
Motor so lange laufen lassen, bis er anhält. Laden Sie den Akku dann
wieder voll auf.
- Wenn das Gerät längere Zeit nicht benutzt wurde, muss es wieder
voll aufgeladen werden.
Vorbereitung zum Gebrauch
Kämmen Sie Ihren Bart oder Schnurrbart vor dem Schneiden immer
mit einem feinen Kamm durch.
Benutzung des Geräts
Bartschneiden am Netz (nur QT4060)
Betreiben Sie das Gerät nicht am Netz, wenn der Akku voll
aufgeladen ist.
B
Wenn der Ladestand des Akkus niedrig ist, können Sie das Gerät auch
am Netz betreiben:
1 Schalten Sie den Bartschneider aus, schließen Sie ihn an das
Stromnetz an und warten Sie einige Sekunden, bevor Sie ihn
einschalten.
2 Ist der Akku ganz leer, warten Sie einige Minuten, bevor Sie das
Gerät einschalten.
DEUTSCH16
Page 17

Auffangen abgeschnittener Barthaare
Sobald Sie das Gerät einschalten, wird das Saugsystem automatisch
aktiviert. Bei jeder Art der Anwendung (beim Schneiden mit oder ohne
Kammaufsatz sowie beim Konturenschnitt) werden die abgeschnittenen
Haare aufgefangen. Die bewegliche Haarführung folgt den Konturen
Ihres Gesichts und führt die abgeschnittenen Haare direkt in die Düse
des Vakuummechanismus.
Entleeren Sie die Haarauffangkammer nach jedem Gebrauch. Wenn Sie
lange und dichte Barthaare schneiden, kann es erforderlich sein, die
Haarauffangkammer während des Trimmens zu entleeren: So bleibt die
optimale Saugleistung erhalten (siehe auch Kapitel "Reinigung", Abschnitt
"Die Haarauffangkammer".
B
Damit das Vakuumsystem optimal funktioniert, sollten Sie höchstens 7
mm der gesamten Barthaarlänge auf einmal abschneiden. Wenn Sie
Ihren Bart kürzer schneiden möchten, wiederholen Sie den Vorgang
nach Bedarf.
Bartschneiden mit dem Kammaufsatz
1 Drehen Sie den Zoom-Ring (Precision Zoom Lock `) auf die
gewünschte Schnittlänge (siehe Tabelle) (Abb. 3).
◗ Die gewählte Einstellung wird in dem Fenster unterhalb des
Zoom-Rings (Precision Zoom Lock `) angezeigt.
Wenn Sie Ihren Bart zum ersten Mal schneiden, stellen Sie die
maximale Schnittlänge (9) ein.
2 Für das beste Ergebnis sollten Sie den Bartschneider gegen die
Bartwuchsrichtung führen. Bewegen Sie ihn jedoch nicht zu
schnell, sondern mit sanften,gleitenden Bewegungen, wobei der
Kamm stets in Berührung mit der Haut bleiben sollte (Abb. 4).
DEUTSCH 17
Page 18

18
3-Tage-Bart-Einstellung
◗ Mit dem Kammaufsatz in Einstellung 1 können Sie einen 3-Tage-
Bart kreieren (Abb. 5).
Verwendung ohne den Kammaufsatz
Vollbärte und einzelne Barthaare.
1 Nehmen Sie den Kammaufsatz vom Gerät (Abb. 6).
B
Ziehen Sie niemals an der beweglichen Spitze des Kammaufsatzes,
sondern nur am unteren Teil.
2 Schneiden Sie den Bart mit gezielten Bewegungen, wobei das
Gerät leicht das Barthaar berührt (Abb. 7).
Reinigung
Das Gerät darf nur trocken gereinigt werden.
Verwenden Sie zum Reinigen keine Scheuermittel oder Lösungsmittel
wie Alkohol, Benzin oder Azeton.
Verwenden Sie keine scharfen oder harten Gegenstände zum
Reinigen des Filters, um Beschädigungen zu vermeiden.
DEUTSCH
Verbleibende Barthaarlänge
1,5 mm
2,5 mm
4 mm
5,5 mm
7,5 mm
9,5 mm
12 mm
15 mm
18 mm
Einstellung
1
2
3
4
5
6
7
8
9
Schnittlängeneinstellungen
Page 19

Die Haarauffangkammer
1 Schalten Sie das Gerät aus.
2 Nehmen Sie die Haarauffangkammer ab und entfernen Sie die
Barthaare durch Ausschütteln oder Ausbürsten (Abb. 8).
3 Zur besonders gründlichen Reinigung - und zur Erhaltung der
optimalen Saugleistung - nehmen Sie den Filter ab.. (Abb.9).
4 ... und reinigen Sie die Haarauffangkammer und den Filter
vorsichtig mit der beiliegenden Bürste (Abb. 10).
Das Gerät
1 Nehmen Sie den Kammaufsatz vom Gerät.
2 Nehmen Sie die Schneideeinheit ab (Abb. 11).
3 Reinigen Sie die Schneideeinheit und das Innere des Geräts mit
der beiliegenden Bürste (Abb. 12).
4 Setzen Sie die Schneideeinheit und den Kammaufsatz wieder auf
das Gerät (Abb. 13).
Ersatzteile
Abgenutzte oder beschädigte Schneideeinheiten und Filter dürfen nur
durch Philishave Original-Ersatzteile ausgetauscht werden, die bei Ihrem
Händler oder einem Philips Service-Center erhältlich sind.
Umweltschutz
◗ Geben Sie das Gerät am Ende der Lebensdauer nicht in den
normalen Hausmüll. Bringen Sie es zum Recycling zu einer
offiziellen Sammelstelle.Auf diese Weise helfen Sie die Umwelt zu
schonen (Abb. 14).
Der integrierte Akku enthält Substanzen, welche die Umwelt gefährden
können.
DEUTSCH 19
Page 20

20
Entnehmen Sie den Akku, bevor Sie das Gerät entsorgen. Der Akku
gehört nicht in den Hausmüll, sondern muss an einer offiziellen
Sammelstelle abgegeben werden. Sie können das Gerät auch an ein
Philips Service Center geben. Dort wird der Akku umweltgerecht
entsorgt.
Entnehmen des Akkus
Wenn der Akku entfernt worden ist,darf das Gerät nicht mehr an
das Stromnetz angeschlossen werden.
Den Akku können Sie wie folgt entfernen:
1 Ziehen Sie den Stecker aus der Steckdose, und lassen Sie den
Motor so lange laufen, bis er anhält.
2 Drücken Sie die beiden Gehäuseteile mit einem Schraubendreher
auseinander (Abb. 15).
3 Ziehen Sie die Platine heraus (Abb. 16).
4 Entnehmen Sie den Akku, indem Sie ihn mit einem
Schraubendreher so lange biegen und drehen, bis die
Verbindungen abbrechen (Abb. 17).
5 Entsorgen Sie den Akku und die anderen Komponenten
umweltgerecht.
Wenn der Akku entfernt worden ist,darf das Gerät nicht mehr an
das Stromnetz angeschlossen werden.
Garantie und Kundendienst
Benötigen Sie weitere Informationen oder treten Probleme auf, wenden
Sie sich bitte an Ihren Philips-Händler oder setzen Sie sich mit einem
Philips Service-Center in Ihrem Land in Verbindung
(Tel. Nr. 0180/5356767). Besuchen Sie auch die
Philips Website (www.philips.com).
DEUTSCH
Page 21

21
Problembehebung
Der Bartschneider funktioniert nicht, wenn er eingeschaltet wird. Es
leuchtet auch keine Kontrolllampe:
1 Wenn der Akku vollkommen leer ist, funktioniert der
Bartschneider beim Einschalten des Geräts nicht, und es leuchtet
auch keine Lampe. Laden Sie das Gerät vollständig auf (siehe auch
Kapitel "Den Akku aufladen"). Das Laden dauert ca. 10 Stunden.
Sollte das Vakuumsystem Ihres Bartschneiders nicht ordnungsgemäß
oder gar nicht funktionieren, überprüfen Sie bitte Folgendes:
2 Ist die Haarauffangkammer leer? (Abb. 10).
B
Entleeren Sie die Haarauffangkammer nach jedem Gebrauch des
Bartschneiders.Wenn Sie lange, dichte Barthaare schneiden, muss die
Haarauffangkammer möglicherweise auch während des Schneidens
entleert werden.
3 Ist die Haarauffangkammer oder der Filter nass?
B
Beide Komponenten dürfen nur trocken gereinigt werden. Sollten sie
nass geworden sein, trocknen Sie sie vorsichtig.
4 Ist die bewegliche Haarführung vorne an der Schneideeinheit
blockiert? (Abb. 17).
B
Die durchsichtige Haarführung muss beweglich bleiben, um sich den
Gesichtskonturen anzupassen. Sollte sie durch festsitzende Haare
blockiert sein, entfernen Sie die Haare vorsichtig mit der beiliegenden
Bürste. Die bewegliche Haarführung sollte bei Berührung nachgeben.
5 Bewegen Sie das Gerät in die optimale Richtung? (Abb. 6).
B
Um die bestmögliche Schneide- und Saugleistung zu erhalten, sollten Sie
den Bartschneider mit sanften, gleitenden Bewegungen nach oben,
gegen die Bartwuchsrichtung, führen.
DEUTSCH
Page 22

Innledning
Kjære kunde, du har gjort et riktig valg!
Din nye, vedlikeholdsfrie Philips vakuum-skjeggtrimmer kombinerer ny
teknologi med overlegen brukskomfort.
Den innebygde vakuummekanismen suger opp hår som blir klippet og
garanterer ren vaskeservant etter bruk.
Apparatet har en kam som følger ansiktets konturer, et selvslipende
kutteelementet og en justeringsring for valg av hårlengde fra 1,5 til 18
mm som sikrer et bra resultat og er samtidig tidsbesparende. Den høye
kvaliteten på denne trimmeren garanterer en nøyaktig klipp, og den
ergonomiske formen på apparatet gjør den behagelig å bruke.
Din nye Philips vakuum-skjeggtrimmer egner seg ypperlig for trimming
og forming av skjegg og kinnskjegg.
Generell beskrivelse
A Kam
B Avtakbar kutteenhet
C Fleksibel hårguide
D Håroppsamlingskammer
E Filter
F Justeringsring (Precision Zoom Lock`)
G Av/på-knapp
H Ladelys
I Kontakt for apparatplugg
J Strømplugg
K Rengjøringsbørste
Viktig
Les denne bruksanvisningen nøye før De tar maskinen i bruk, og ta vare
på den for fremtidig referanse.
◗ Kontroller at spenningen som er angitt på nettstøpselet tilsvarer
den lokale nettspenningen før du kobler til maskinen.
◗ Bruk kun strømpluggen som følger med apparatet.
◗ Strømpluggen inneholder en transformator. Du må ikke skjære av
strømpluggen og erstatte den med en annen plugg, da dette vil
medføre fare.
NORSK22
Page 23

◗ Ikke bruk maskinen hvis kutteenheten er skadet eller ødelagt, da
det kan medføre personskade.
◗ Ikke bruk strømpluggen hvis den er skadet.
◗ Dersom strømledningen er ødelagt, må du alltid sørge for å bytte
den ut med en av original type for å unngå at farlige situasjoner
oppstår.
◗ Pass på at det ikke kommer vann på apparatet og strømpluggen.
◗ Oppbevar apparatet utilgjengelig for barn.
◗ Bruk, lad og oppbevar apparatet ved en temperatur mellom
15cC og 35cC.
◗ Dette apparatet er kun beregnet på trimming av skjeggvekst på
mennesker. Det må ikke brukes til noe annet formål.
Lading
Fullad maskinen før du tar den i bruk for første gang eller etter at den
har ligget ubrukt over en lengre periode.
1 Sørg for at apparatet er slått av før du begynner å lade det.
2 Sett maskinpluggen inn i maskinen og sett nettstøpselet inn i
stikkontakten.
◗ Ladelyset tennes for å vise at apparatet lades (fig. 2).
◗ Det vil ta omtrent 10 timer å lade batteriet helt opp.
◗ En fulladet maskin kan brukes uten ledning i opptil 50 minutter.
B
Når apparatet er ladet opp første gang, anbefaler vi at du bruker det til
batteriet er helt tomt.
B
Apparatet må alltid lades i minst 90 minutter før du skal bruke det.
Optimalisere levetiden til det oppladbare batteriet.
- Første gang maskinen er ladet, må den brukes til batteriet er helt
tomt.
- Lad ikke maskinen i mer enn 24 timer.
- Ikke la nettstøpselet stå i stikkontakten hele tiden.
- Ikke lad maskinen hver gang etter bruk.
- Tøm batteriet helt to ganger i året ved å la motoren gå til den
stopper. Fullad deretter batteriet.
NORSK 23
Page 24

- Hvis maskinen ikke har vært brukt på lenge, må den fullades.
Før bruk
Gre alltid skjegget eller barten med en fintannet kam før du starter
trimmingen.
Bruke apparatet
Bruke apparatet med ledning (gjelder kun QT4060)
Bruk ikke maskinen med strøm når batteriet er fulladet.
B
Hvis batteriet er dårlig, kan maskinen også brukes med strøm.
1 Slå av trimmeren, koble den til strømnettet og vent noen
sekunder før du slår den på.
2 Hvis batteriet er helt tomt, må du vente noen minutter før du
slår maskinen på.
Suge opp hår som er klippet
Oppsugingssystemet aktiveres automatisk når du slår på maskinen. Det
suger opp hår fra alle typer bruk, dvs. trimming med og uten kam og
forming. Den fleksible føringsmekanismen følger konturene i ansiktet og
leder avklippede hår mot dysen til vakuummekanismen.
Vi anbefaler at håroppsamleren tømmes etter hver gang maskinen har
vært i bruk.Ved trimming av langt og tett skjegg kan det hende at den
også må tømmes under bruk for å opprettholde optimal
oppsugingsevne (se også kapittelet "Rengjøring", avsnittet
"Håroppsamler").
B
For at vakuumsystemet skal fungere optimalt, må ikke mer enn ca. 7
mm av den totale skjegglengden klippes av gangen. Hvis du vil klippe
skjegget kortere, må prosessen gjentas én eller flere ganger.
NORSK24
Page 25

Trimming med kam
1 Vri innstillingsringen (Precision Zoom Lock `) til ønsket
lengdeinnstilling (se tabellen) (fig. 3).
◗ Innstillingen vises i vinduet under innstillingsringen
(Precision Zoom Lock `).
Hvis det er første gang du trimmer skjegget eller barten, begynner du
med maksimal lengdeinnstilling (9).
2 Mest effektiv trimming oppnår du ved å føre maskinen mot
hårenes vokseretning.Ikke beveg maskinen for fort. Bruk jevne og
rolige bevegelser og pass på at overflaten på kammen alltid er i
kontakt med huden (fig. 4).
Bruke den unike "3-dagers"-innstillingen
◗ Bruk trimmeren med kammen på lengdeinnstilling 1. Da kan du
lage "3-dagersskjegg" (fig. 5).
NORSK 25
Skjegglengde etter trimming
1,5 mm
2,5 mm
4 mm
5,5 mm
7,5 mm
9,5 mm
12 mm
15 mm
18 mm
Innstilling
1
2
3
4
5
6
7
8
9
Lengdeinnstillinger
Page 26

Trimming uten kam
Helskjegg og enkelthår.
1 Fjern kammen fra maskinen (fig. 6).
B
Trekk aldri i den bøyelige, øverste delen av kammen.Ta i stedet tak i
den nederste delen.
2 Bruk kontrollerte bevegelser og berør håret lett med trimmeren
(fig. 7).
Rengjøring
Maskinen tåler kun tørr rengjøring.
Bruk ikke slipemidler, avfettingsmidler eller væsker som alkohol,
bensin eller aceton for å rengjøre maskinen.
Bruk aldri skarpe eller harde gjenstander til rengjøring av filteret.
Ellers kan det bli ødelagt.
Håroppsamler
1 Slå av apparatet.
2 Ta av håroppsamleren og fjern hårene ved å riste eller børste
dem ut (fig. 8).
3 For en ekstra grundig rengjøring og for å sikre optimal sugeevne,
fjerner du filteret .. (fig. 9).
4 ... og rengjør håroppsamleren og filteret nøye med den
medfølgende børsten (fig. 10).
Maskinen
1 Fjern kammen fra maskinen.
2 Fjern kutteenheten (fig. 11).
3 Rengjør kutteenheten og innsiden av maskinen med den
medfølgende børsten (fig. 12).
NORSK26
Page 27

4 Sett kutteenheten og kammen tilbake på maskinen igjen (fig. 13).
Utskifting
Slitte eller ødelagte kutteenheter og filtre må bare skiftes ut med
originale Philips-deler,som er å få hos din forhandler eller godkjente
Philips servicesenter.
Miljø
◗ Ikke kast apparatet sammen med vanlig husholdningaavfall når
produktets levetid er over, men lever det på et anvist
oppsamlingssted for resirkulering.Ved å gjøre dette, vil du hjelpe
til å verne miljøet (fig. 14).
Det innebygde oppladbare batteriet inneholder miljøskadelige stoffer.
Ta ut batteriet før du kaster apparatet. Batteriet skal ikke kastes som
vanlig husholdningsavfall, men leveres på mottak for spesialavfall. Du kan
også ta med apparatet til et Philips-servicesenter, som vil fjerne batteriet
for deg og deponere det på en miljømessig forsvarlig måte.
Ta ut batteriet
Ikke koble maskinen til strømnettet igjen etter at den er blitt åpnet.
Batteriene tas ut ved å følge trinnene nedenfor.
1 Koble maskinen fra strømnettet, og la den gå til motoren stopper.
2 Ta fra hverandre de to delene til huset med en skrutrekker
(fig. 15).
3 Trekk ut kretskortet (fig. 16).
4 Ta ut det oppladbare batteriet med en skrutrekker og løsne det
ved å bøye og vri det flere ganger, til koblingene brekker (fig.17).
5 Avhend batteriet og øvrige deler på en miljømessig forsvarlig
måte.
Ikke koble maskinen til strømnettet igjen etter at den er blitt åpnet.
NORSK 27
Page 28

Garanti og service
Hvis du trenger informasjon eller hvis du har et problem med
produktet, kan du besøke Philips' websider på www.philips.com.Du
kan også kontakte Philips Kundetjeneste i ditt land (du finner
telefonnummeret i garantiheftet). Hvis det ikke finnes en slik
Kundetjeneste i landet hvor du befinner deg, kan du kontakte din lokale
Philips-forhandler eller serviceavdelingen ved Philips Domestic
Appliances and Personal Care BV.
Feilsøking
Trimmeren virker ikke når den er slått på, og ingen av lysene tennes:
1 Hvis batteriet er helt utladet, virker ikke trimmeren og lysene vil
ikke bli tent når apparatet slås på.Apparatet må lades helt opp (se
også kapitlet "Lading"). Dette vil ta omtrent 10 timer.
Hvis oppsugingssystemet til vakuum-skjeggtrimmeren virker dårlig eller
ikke virker i det hele tatt, må punktene nedenfor kontrolleres.
2 Er håroppsamleren tom? (fig. 10).
B
Vi anbefaler at du tømmer håroppsamleren etter hver gang maskinen
har vært i bruk. Ved klipping av langt og tett skjegg kan det også hende
at håroppsamleren må tømmes under bruk.
3 Er håroppsamleren eller filteret vått?
B
Begge deler tåler kun tørr rengjøring. Hvis en av delene blir våte, må du
sørge for å tørke den grundig.
4 Sitter den fleksible føringsmekanismen foran kutteenheten fast?
(fig. 17).
B
Den gjennomsiktige føringsmekanismen må være fleksibel for å kunne
føye seg etter konturene i ansiktet. Hvis den setter seg fast fordi det
sitter hår i den, må du fjerne hårene forsiktig med den medfølgende
børsten.
5 Fører du maskinen i optimal retning? (fig. 6).
B
For å oppnå best mulig klippe- og oppsugingsevne, anbefaler vi at du
fører maskinen oppover, mot hårenes vokseretning. Bruk jevne og rolige
bevegelser.
NORSK28
Page 29

Introduktion
Bästa kund - du har valt rätt!
Din nya, underhållsfria skäggtrimmer med uppsugningsfunktion från
Philips är skapad med innovativ teknik och är otroligt bekväm att
använda.
Den integrerade uppsugningsmekanismen tar hand om allt avklippt hår,
och garanterar att tvättstället är fritt från skäggstubb efter användningen.
Den konturföljande kammen, det självvässande skärelementet och
justeringsringen för att välja hårlängder på 1,5 till 18 mm säkerställer att
trimningen blir utmärkt och att du sparar tid. Högkvalitetstrimmern
garanterar att skägget klipps med precision och den ergonomiska
formen på apparaten gör att den är trevlig och bekväm att använda.
Din nya skäggtrimmer från Philips med uppsugningsfunktion är perfekt
för klippning och formning av skägg och polisonger.
Allmän beskrivning
A Kamtillsats
B Löstagbar trimsax
C Rörlig hårförare
D Hårbehållare
E Filter
F Justeringsring (Precision Zoom-lås`)
G Strömknapp
H Laddningslampa
I Uttag för apparatkontakten
J Nätadapter
K Rengöringsborste
Viktigt
Läs noggrant dessa instruktioner innan du använder trimmern, och
spara dem för framtida bruk.
◗ Kontrollera att den spänning som finns angiven på nätadaptern
överensstämmer med nätspänningen innan du ansluter trimmern.
◗ Använd endast den medföljande nätadaptern.
SVENSKA 29
Page 30

◗ Nätadaptern innehåller en transformator. Skär inte av nätadapern
för att byta ut den mot en annan adapter, eftersom det kommer
att orsaka en farlig situation.
◗ Använd inte trimmern när trimsaxen är skadad eller trasig,
eftersom detta kan skada dig.
◗ Använd inte en skadad nätadapter.
◗ Om stickproppen är skadad skall den alltid bytas ut mot en ny av
samma typ.
◗ Apparaten och nätadaptern får inte bli våta.
◗ Förvara trimmern utom räckhåll för barn.
◗ Använd, ladda och förvara apparaten vid en temperatur mellan
15cC och 35cC.
◗ Apparaten är endast avsedd för att trimma mänskligt skägg.
Använd den inte till andra ändamål.
Laddning
Ladda upp trimmern helt innan du börjar använda den för första
gången, eller om den inte varit använd under en längre tid.
1 Se till att rakapparaten är avstängd innan du påbörjar laddningen
av den.
2 Sätt i kontakten i trimmern och sätt sedan nätadaptern i ett
vägguttag.
◗ Laddningslampan tänds för att indikera att apparaten laddas
(bild 2).
◗ Det tar cirka 10 timmar för batteriet att laddas helt.
◗ En fulladdad apparat kan användas sladdlöst upp till 50 minuter.
B
När apparaten har laddats för första gången rekommenderar vi att du
använder den tills batteriet är helt tomt.
B
Apparaten måste laddas i minst 90 minuter för en trimning.
Optimera livslängden på det uppladdningsbara batteriet.
- När du laddat trimmern för första gången, ska du använda den tills
batteriet är helt tomt.
- Ladda inte apparaten längre än 24 timmar.
SVENSKA30
Page 31

- Låt inte nätadaptern sitta i vägguttaget hela tiden.
- Ladda inte upp apparaten mellan varje trimning.
- Ladda ur batteriet helt två gånger om året genom att låta motorn
gå tills den stannar. Ladda sedan upp batteriet helt igen.
- Om trimmern inte använts på länge, måste den laddas upp helt
igen.
Före användning
Kamma alltid skägget eller mustaschen med en fintandad kam innan du
börjar trimma.
Använda apparaten
Trimning med nätsladd (endast QT4060)
Använd inte apparaten ansluten till vägguttaget om batteriet är helt
fulladdat.
B
Om batteriet är urladdat kan du även använda trimmern ansluten till
vägguttaget:
1 Stäng av trimmern, anslut sladden till vägguttaget och vänta några
sekunder innan du sätter på trimmern.
2 Om batteriet är helt urladdat bör du vänta några minuter innan
du sätter på trimmern.
Håruppsamling
Uppsugningsfunktionen startar automatiskt när du sätter igång
trimmern. Hår samlas upp oavsett vad du använder trimmern till, alltså
både vid trimning med eller utan kammen och vid konturklippning. Den
rörliga hårföraren följer ansiktets kontur och styr det avklippta håret
mot uppsugningsmunstycket.
Du bör tömma hårbehållaren efter varje trimning. Om du trimmar långt,
tätt skägg, kanske du behöver tömma behållaren även under trimningen
SVENSKA 31
Page 32

så att inte sugförmågan minskar (se även kapitlet 'Rengöring', avsnittet
'Håruppsamlingskammaren').
B
För att uppsugningsfunktionen ska fungera på bästa sätt, bör du inte
klippa av mer än cirka 7 mm av skäggets längd åt gången. Om du vill
klippa skägget kortare måste du upprepa processen flera gånger.
Trimning med kamtillsats
1 Vrid justeringsringen (Precision Zoom Lock`) till önskad
trimningslängd (se tabell) (bild 3).
◗ Inställningen visas i fönstret under justeringsringen
(Precision Zoom Lock`).
Om det är första gången du trimmar börjar du med den maximala
längden (9).
2 Du får den mest effektiva trimningen om du för trimmern mot
den riktning skägget växer. Rör inte trimmern för snabbt.Använd
mjuka och försiktiga rörelser och se till att kammen alltid ligger
an mot huden (bild 4).
SVENSKA32
Hårlängd efter trimning
1,5 mm
2,5 mm
4 mm
5,5 mm
7,5 mm
9,5 mm
12 mm
15 mm
18 mm
Inställning
1
2
3
4
5
6
7
8
9
Inställning av trimningslängd
Page 33

Trimning med inställning för 'skäggstubbseffekt'
◗ Använd trimmern med kamtillsatsen inställd på 1. Det ger en
'skäggstubbseffekt' (bild 5).
Trimning utan kamtillsats
Helskägg och enstaka hår.
1 Ta av kamtillsatsen (bild 6).
B
Dra aldrig i den mjuka/flexibla överdelen på kammen. Dra alltid i den
kraftiga bottendelen.
2 Gör försiktiga rörelser och var lätt på handen (bild 7).
Rengöring
Trimmern får endast utsättas för torr rengöring.
Använd inte nötande rengöringsmedel eller vätskor som sprit,bensin
eller aceton för att rengöra trimmern.
Undvik att skada filtret genom att aldrig använda vassa eller hårda
föremål vid rengöringen.
Hårbehållaren
1 Slå av apparaten.
2 Lösgör hårbehållaren och töm den genom att skaka ur eller
borsta bort håret (bild 8).
3 För extra noggrann rengöring och för att upprätthålla optimal
uppsugningsförmåga, ta loss filtret..(bild 9).
4 ... och rengör försiktigt hårbehållaren och filtret med den
medföljande borsten (bild 10).
Trimmern
1 Ta av kamtillsatsen.
2 Ta bort trimsaxen (bild 11).
SVENSKA 33
Page 34

3 Rengör trimsaxen och apparatens insida med den medlevererade
borsten (bild 12).
4 Sätt tillbaka trimsaxen och kamtillsatsen på trimmern (bild 13).
Byte
Utslitna eller skadade trimsaxar och filter ska endast ersättas med
Philishave-originaldelar, som du kan köpa hos din lokala återförsäljare
eller ett av Philips auktoriserade serviceombud.
Miljö
◗ När apparatens livslängd är slut ska du inte slänga den med de
vanliga hushållssoporna utan lämna in den på en offentlig
återvinningsstation. Om du gör det hjälper du till att skydda
miljön (bild 14).
Det inbyggda laddningsbara batteriet innehåller ämnen som kan vara
skadliga för miljön.
Ta ut batteriet när du kasserar apparaten. Kasta inte batteriet i de
vanliga hushållssoporna utan lämna in det på en offentlig samlingsplats.
Du kan också ta med apparaten till ett Philips servicecenter som tar ut
batteriet åt dig och kasserar det på ett för miljön säkert sätt.
Ta bort batteriet
Anslut inte trimmern till nätet igen när du har öppnat den.
Följ nedanstående beskrivning om du ska ta bort batteriet.
1 Ta ut stickkontakten ur vägguttaget och låt trimmern gå tills
motorn stannar.
2 Dela höljet i två delar med hjälp av en skruvmejsel (bild 15).
3 Dra ut kretskortet (bild 16).
SVENSKA34
Page 35

4 Lossa det laddningsbara batteriet med hjälp av en skruvmejsel
och ta bort det genom att böja eller vrida det flera gånger tills
anslutningarna går sönder (bild 17).
5 Deponera batteriet och de övriga delarna på ett sätt som inte
skadar miljön.
Anslut inte trimmern till nätet igen när du har öppnat den.
Garanti & service
Om du behöver information eller om du har ett problem, besök Philips
webbplats på www.philips.com eller kontakta Philips kundtjänst i ditt
land (du finner telefonnumret i världsgarantibroschyren). Om det inte
finns någon kundtjänst i ditt land kan du vända dig till din lokala Philipsåterförsäljare eller kontakta Service Department of Philips Domestic
Appliances and Personal Care BV.
Felsökning
Trimmern fungerar inte när den sätts igång och ingen av lamporna
tänds:
1 Om batteriet är helt tomt fungerar inte trimmern och lamporna
tänds inte när apparaten sätts igång. Ladda apparaten tills den är
helt laddad (se även kapitlet 'Laddning').Laddningen tar cirka 10
timmar.
Om uppsugningsfunktionen i trimmern fungerar dåligt eller inte alls
kontrollerar du nedanstående punkter.
2 Är hårbehållaren tom? (bild 10).
B
Du bör tömma hårbehållaren efter varje trimning. Om du klipper långt,
tätt skägg, kanske du behöver tömma behållaren en extra gång under
trimningen.
3 Är hårbehållaren eller filtret våta?
B
Dessa delar får endast utsättas för torr rengöring. Om någon del blir
våt, torka den omsorgsfullt.
SVENSKA 35
Page 36

4 Har den rörliga hårföraren framför trimsaxen fastnat? (bild 17).
B
Den genomskinliga hårföraren måste vara rörlig för att kunna följa
ansiktets konturer. Om den fastnar på grund av hår som klämts fast,
måste du noggrant ta bort håret med den medföljande borsten. Den
rörliga hårföraren ska ge med sig om du rör den med ett finger.
5 För du trimmern i rätt riktning? (bild 6).
B
Den bästa klippningen och håruppsamlingen får du om du för
trimmern uppåt, mot hårets riktning, med mjuka och försiktiga rörelser.
SVENSKA36
Page 37

Johdanto
Hyvä asiakkaamme, olet tehnyt oikean valinnan!
Uudessa Philips-partatrimmerissä ei tarvita erityistä huoltoa, ja siinä
yhdistyvät innovatiivinen tekniikka ja erinomainen käyttömukavuus.
Sisäänrakennettu tyhjiömekanismi imee leikatut partakarvat ajon aikana,
ja näin pesuallas pysyy puhtaana.
Kasvojen muotoja seuraava kampa, itseteroittuva terä ja säätörengas,
jonka avulla partakarvojen pituudeksi voidaan valita 1,5 - 18 mm,
takaavat erinomaisen leikkuutuloksen ja nopeuttavat parran muotoilua.
Korkealaatuisella trimmerillä muotoilet parran tarkasti, ja ergonomisen
muodon ansiosta laitetta on mukava käyttää.
Uusi Philips-partatrimmeri sopii erinomaisesti parran ja pulisonkien
tasaamiseen ja muotoiluun.
Laitteen osat
A Ohjauskampa
B Irrotettava terä
C Joustava karvanohjain
D Partakarvalokero
E Suodatin
F Säätörengas (Precision Zoom Lock`)
G Käynnistyspainike
H Latauksen merkkivalo
I Liitosjohdon pistokkeen vastake
J Verkkolaite
K Puhdistusharja
Tärkeää
Lue tämä käyttöohje huolellisesti, ennen kuin alat käyttää laitetta. Säilytä
käyttöohje vastaisen varalle.
◗ Tarkasta, että verkkolaitteen jännitemerkintä vastaa paikallista
verkkojännitettä.
◗ Käytä vain laitteen mukana tulevaa verkkolaitetta.
◗ Verkkolaite sisältää jännitemuuntajan.Älä vaihda verkkolaitteen
tilalle toisenlaista pistotulppaa, ettet aiheuta vaaratilannetta.
SUOMI 37
Page 38

38
◗ Älä käytä laitetta, jos sen teräyksikkö on vaurioitunut,sillä
käyttämisestä voi tuolloin aiheutua vahinkoa.
◗ Älä käytä vahingoittunutta verkkolaitetta.
◗ Jos verkkolaite on vahingoittunut, vaihda sen tilalle oman
turvallisuutesi vuoksi vain alkuperäistyyppiä oleva verkkolaite.
◗ Huolehdi siitä, että laite ja verkkolaite eivät kastu.
◗ Pidä laite poissa lasten ulottuvilta.
◗ Käytä, lataa ja säilytä laite 15 - 35 cC:n lämpötilassa.
◗ Tämä laite on tarkoitettu vain parran ajamiseen ja tasaamiseen.
Älä käytä sitä muuhun tarkoitukseen.
Lataus
Lataa akku täyteen, ennen kuin alat ensimmäisen kerran käyttää laitetta
tai kun se on ollut pitkään käyttämättä.
1 Varmista, että laitteen virta on katkaistu, ennen kuin alat ladata
laitetta.
2 Työnnä pistoke laitteeseen ja liitä verkkolaite pistorasiaan.
◗ Latauksen merkkivalo syttyy osoittamaan, että laite latautuu
(kuva 2).
◗ Akun lataaminen täyteen kestää noin kymmenen tuntia.
◗ Täyteen ladatulla laitteella voi ajaa keskimäärin 50 minuuttia ilman
johtoa.
B
Kun laite on ladattu täyteen ensimmäisen kerran, on suositeltavaa
käyttää laitetta kunnes akku on aivan tyhjä.
B
Yhtä käyttökertaa varten laitetta on ladattava vähintään 90 minuuttia.
Akun käyttöiän pidentäminen
- Kun laite on ladattu täyteen ensimmäisen kerran, käytä sitä niin
kauan, kunnes akku on aivan tyhjä.
- Älä lataa laitetta yli 24:ää tuntia.
- Älä pidä verkkolaitetta pistorasiassa jatkuvasti.
- Älä lataa laitetta uudelleen käyttökertojen välillä.
SUOMI
Page 39

39
- Käytä laitetta kaksi kertaa vuodessa niin kauan, että moottori lakkaa
toimimasta. Lataa sitten akku uudelleen.
- Jos laite on ollut pitkään käyttämättä, lataa se uudelleen täyteen.
Käyttöönotto
Kampaa parta tai viikset aina ennen tasaamisen aloittamista.
Käyttö
Parran muotoilu verkkojännitettä käyttäen
(vain QT4060)
Älä käytä laitetta verkkovirralla silloin kun akku on ladattu täyteen.
B
Jos akku on tyhjä, voit myös käyttää laitetta suoraan verkkojännitteellä:
1 Katkaise virta, yhdistä pistorasiaan ja odota muutama sekunti,
ennen kuin käynnistät laitteen.
2 Jos akku on täysin tyhjä, odota muutama minuutti, ennen kuin
käynnistät laitteen.
Leikattujen partakarvojen keräys
Imujärjestelmä aktivoituu automaattisesti heti kun laite käynnistetään. Se
kerää partakar vat riippumatta siitä miten laitetta käytetään, eli
ohjauskamman kanssa tai ilman sitä.Taipuisa parranohjain seuraa
kasvojen muotoja ja ohjaa leikatut partakarvat imujärjestelmän suutinta
kohti.
Partakarvalokero kannattaa tyhjentää jokaisen käytön jälkeen. Pitkää,
tuuheaa partaa tasattaessa voi olla tarpeen tyhjentää partakarvalokero
käytön aikana, niin että imuteho säilyy hyvänä (katso myös kohtaa
Puhdistus, Partakarvalokero).
B
Jotta imujärjestelmä toimisi kunnolla, lyhennä partaa kerralla enintään
noin 7 mm. Jos haluat lyhentää partaa enemmän, toista toimenpide
yhden kerran tai useamman kerran.
SUOMI
Page 40

40
Käyttö ohjauskamman kanssa
1 Kierrä säätörengasta (Precision Zoom Lock`) haluamasi parran
pituuden kohdalle (katso taulukkoa) (kuva 3).
◗ Asetus näkyy säätörenkaan (Precision Zoom Lock`) alla olevasta
ikkunasta.
Jos käytät laitetta ensimmäistä kertaa, aloita suurimmasta pituudesta
(9).
2 Parhaiten tasaaminen onnistuu liikuttamalla laitetta partakarvojen
kasvusuuntaa vastaan. Älä liikuta laitetta liian nopeasti.Tee tasaisia
ja rauhallisia liikkeitä ja pidä huoli siitä, että ohjauskamman
alapuoli koskettaa koko ajan ihoa (kuva 4).
Tasaaminen käyttäen ainutlaatuista "sänkiparta"-asentoa
◗ Käytä partatrimmeriä ohjauskampa asetettuna asennolle 1. Näin
saat aikaan muodikkaan "sänkiparran" (kuva 5).
SUOMI
Parran pituus
1,5 mm
2,5 mm
4 mm
5,5 mm
7,5 mm
9,5 mm
12 mm
15 mm
18 mm
Asento
1
2
3
4
5
6
7
8
9
Parranpituuden asetukset
Page 41

41
Käyttö ilman ohjauskampaa
Täysparrat ja yksittäiset karvat.
1 Irrota ohjauskampa (kuva 6).
B
Älä vedä ohjauskampaa taipuisasta yläosasta.Vedä aina
ohjauskamman pohjasta.
2 Liikuta laitetta tasaisesti ja rauhallisesti ja kosketa partakarvaa
kevyesti partatrimmerillä (kuva 7).
Puhdistus
Laitteen saa puhdistaa vain kuivana.
Älä käytä laitteen puhdistamiseen syövyttäviä tai naarmuttavia
puhdistusaineita tai alkoholia, bensiiniä, asetonia ynnä muuta sellaista
sisältäviä puhdistusaineita.
Älä käytä teräviä tai kovia esineitä suodattimen puhdistamiseen, ettei
suodatin vahingoitu.
Partakarvalokero
1 Katkaise laitteesta virta.
2 Irrota partakarvalokero ja poista partakarvat ravistamalla tai
harjaamalla (kuva 8).
3 Jos haluat parantaa imutehoa puhdistamalla partakarvalokeron
erityisen tehokkaasti, irrota suodatin.. (kuva 9).
4 ... ja puhdista partakarvalokero ja suodatin huolellisesti mukana
tulevalla harjalla (kuva 10).
Laite
1 Irrota ohjauskampa.
2 Irrota terä (kuva 11).
3 Puhdista terä ja laitteen sisäpuoli mukana olevalla harjalla
(kuva 12).
SUOMI
Page 42

42
4 Kiinnitä terä ja ohjauskampa takaisin laitteeseen (kuva 13).
Varaosat
Kuluneiden tai vahingoittuneiden terien ja suodattimien tilalle saa vaihtaa
vain alkuperäiset Philishave-varaosat, joita on saatavissa myyjältä tai
Philips Kodinkoneiden valtuuttamista huoltoliikkeistä.
Ympäristöasiaa
◗ Älä hävitä loppuun käytettyä laitetta tavallisen kotitalousjätteen
mukana, vaan toimita se asianmukaiseen keräyspisteeseen. Näin
autat suojelemaan ympäristöä (kuva 14).
Sisäänrakennettu akku sisältää ympäristölle haitallisia aineita.
Poista akku ennen laitteen hävittämistä. Älä hävitä akkua tavallisen
kotitalousjätteen mukana, vaan toimita se asianmukaiseen
keräyspisteeseen.Voit myös palauttaa laitteen Philipsin valtuuttamaan
huoltoliikkeeseen, jossa akku poistetaan ja hävitetään asianmukaisesti.
Akun poistaminen
Älä liitä laitetta pistorasiaan sen jälkeen kun laite on avattu.
Poista akku alla neuvotulla tavalla.
1 Irrota laite sähköverkosta ja anna laitteen käydä, kunnes moottori
pysähtyy.
2 Irrota kotelon puoliskot toisistaan ruuvitaltalla (kuva 15).
3 Vedä piirikortti irti (kuva 16).
4 Irrota akku ruuvitaltalla ja taivuttele ja kääntele sitä useita kertoja,
niin että liitännät katkeavat (kuva 17).
5 Hävitä akku ja muut osat ympäristön kannalta turvallisesti.
Älä liitä laitetta pistorasiaan sen jälkeen kun laite on avattu.
SUOMI
Page 43

43
Takuu & huolto
Jos haluat lisätietoja tai jos laitteen suhteen tulee ongelmia, katso
Philipsin www-sivuja osoitteesta www.philips.com tai ota yhteys
Philipsin asiakaspalveluun (puhelinnumero löytyy takuulehtisestä).Voit
myös kääntyä lähimmän Philips-kauppiaan puoleen tai ottaa suoraan
yhteyden Hollantiin Philips Domestic Appliances and Personal Care
BV:n Service-osastoon.
Tarkistusluettelo
Trimmeri ei toimi käynnistettäessä, eikä mikään merkkivaloista pala:
1 Jos akku on aivan tyhjä, trimmeri ei toimi eivätkä merkkivalot
pala, vaikka laite käynnistetään.Anna laitteen latautua täyteen
(katso myös lukua Lataus). Lataaminen kestää noin kymmenen
tuntia.
Jos partatrimmerin imujärjestelmä toimii huonosti tai ei toimi lainkaan,
tarkista alla luetellut kohdat.
2 Onko partakarvalokero tyhjä? (kuva 10).
B
Partakarvalokero kannattaa tyhjentää jokaisen käytön jälkeen. Kun
leikataan pitkää, tuuheaa partaa, voi olla tarpeen tyhjentää
partakarvalokero välillä käytön aikana.
3 Onko partakarvalokero tai suodatin märkä?
B
Molemmat osat saa puhdistaa vain kuivana. Jos jompikumpi näistä
osista on kastunut, kuivaa se huolellisesti.
4 Jumiutuuko terän edessä oleva taipuisa parranohjain? (kuva 17).
B
Läpinäkyvän parranohjaimen tulee olla joustava, jotta se pystyy
seuraamaan kasvojen muotoja. Jos se jumiutuu, koska siihen on
tarttunut karvoja, poista karvat varovasti mukana tulevalla harjalla.
Joustavan ohjaimen tulee joustaa sormen kosketuksesta.
5 Liikutatko laitetta oikeaan suuntaan? (kuva 6).
B
Paras tulos leikkauksen ja imun kannalta saadaan, kun partatrimmeriä
liikutetaan tasaisin ja rauhallisin vedoin ylöspäin, partakarvojen
kasvusuuntaa vastaan.
SUOMI
Page 44

Introduktion
Kære kunde, du har netop truffet det helt rigtige valg!
Din nye vedligeholdelsesfrie Philips vakum skægtrimmer kombinerer
innovativ teknologi med fremragende komfort og brugervenlighed.
Det integrerede vakum-system absorberer de afklippede skæghår og
garanterer en ren håndvask.
Den konturfølgende kam, den selvslibende knivenhed og
justeringsringen med længdeindstillinger fra 1,5 til 18 mm sikrer et
perfekt resultat på kortest mulig tid.
Din nye Philips vakum skægtrimmer er utroligt velegnet til pleje,
trimning og afretning af skæg og bakkenbarter.
Generel beskrivelse
A Konturfølgende kam
B Aftagelig skærenhed
C Flexibel styrekam
D Opsamlingskammer til skæghår
E Filter
F Justeringsring (Precision Zoom Lock`)
G On/off-knap
H Opladeindikator
I Stik til apparatstik
J Netstik
K Rensebørste
Vigtigt
Læs brugsvejledningen omhyggeligt igennem, inden trimmeren tages i
brug første gang, og gem den til eventuelt senere brug.
◗ Før der sluttes strøm til apparatet, skal du kontrollere, at den
angivne netspænding på netstikket svarer til den lokale
netspænding.
◗ Brug kun det medfølgende stik.
◗ Netstikket indeholder en transformer. Stikket må ikke klippes af
og udskiftes med et andet stik, da dette kan være meget risikabelt
ved efterfølgende brug.
DANSK44
Page 45

◗ Undlad at bruge skægtrimmeren, hvis skærenheden er beskadiget
eller defekt, da det kan medføre personskade.
◗ Brug aldrig et beskadiget netstik.
◗ Hvis netstikket beskadiges, må det kun udskiftes med et originalt
stik af samme type for at undgå enhver risiko ved efterfølgende
brug.
◗ Sørg for, at hverken apparat eller netstik bliver vådt.
◗ Sørg for, at børn ikke kan få fat i trimmeren.
◗ Brug, oplad og opbevar altid skægtrimmeren ved en temperatur
mellem 15cC og 35cC.
◗ Dette apparat er udelukkende beregnet til trimning af
menneskeskæg og bør ikke anvendes til andre formål.
Opladning
Trimmeren skal oplades helt, inden den tages i brug første gang - eller
hvis den ikke har været brugt i en længere periode.
1 Sørg for,at trimmeren er slukket, inden opladningen påbegyndes.
2 Sæt det lille apparatstik ind i trimmeren og netstikket i en
stikkontakt.
◗ Opladeindikatoren lyser for at indikere, at trimmeren oplades
(fig. 2).
◗ En fuld opladning tager ca. 10 timer.
◗ En fuld opladning giver mulighed for op til 50 minutters
ledningsfri brug af skægtrimmeren.
B
Når skægtrimmeren er opladet første gang, anbefales det at bruge den,
indtil batteriet er helt afladet.
B
En enkelt trimning kræver mindst 90 minutters opladning.
Forlængelse af batteriets levetid
- Når trimmeren er opladet første gang, anbefales det at bruge den,
indtil batteriet er løbet helt tør for strøm.
- Lad aldrig skægtrimmeren stå til opladning i mere end 24 timer.
DANSK 45
Page 46

- Lad ikke netstikket sidde konstant i stikkontakten.
- Oplad ikke trimmeren mellem hver trimning.
- Aflad batteriet helt to gange om året ved at lade trimmeren køre, til
motoren stopper. Genoplad herefter batteriet.
- Hvis trimmeren ikke har været brugt i en længere periode, skal
batteriet oplades helt.
Klargøring
Red altid skæg og/eller moustache igennem med en fin kam, inden
trimningen.
Brug af skægtrimmeren
Trimning med ledning (gælder kun QT4060)
Brug ikke trimmeren via lysnettet,når batteriet er fuldt opladet.
B
Hvis batteriet er ved at løbe tør for strøm, kan trimmeren sluttes direkte
til lysnettet:
1 Sluk for trimmeren - slut den til lysnettet og vent et par sekunder
- inden du tænder den.
2 Hvis batteriet er helt tomt, skal der gå et par minutter, inden
trimmeren tændes.
Absorbering af skæghår
Sugesystemet aktiveres automatisk, så snart trimmeren tændes. De
afklippede skæghår absorberes både under trimning med og uden kam
og ved afretning af kanter. Den flexible styrekam følger ansigtets
konturer og leder de afklippede skæghår hen til vakum-systemets
mundstykke.
Det tilrådes at tømme skægkammeret efter hver trimning.Ved trimning
af langt, kraftigt skæg, kan det være nødvendigt at tømme
skægkammeret en ekstra gang under trimningen for at bevare den
optimale sugeeffekt (se også afsnittet "Rengøring" under
"Skægkammer").
DANSK46
Page 47

B
For at sikre optimal vakum-effekt, skal du højst skære 7 mm af
skæglængden ad gangen. Skal skægget være kortere, gentages
processen en eller flere gange.
Trimning med påsat kam
1 Drej justeringsringen (Precision Zoom Lock`) til den ønskede
trimme-længdeindstilling (se tabellen) (fig. 3).
◗ Den valgte indstilling ses i "vinduet" under justeringsringen
(Precision Zoom Lock`).
Hvis det er første gang, du bruger en trimmer, anbefales det at starte
med den længste længdeindstilling (9).
2 Trimningen bliver mest effektiv,når trimmeren bevæges imod
skæghårenes vækstretning.Trimmeren skal ikke bevæges for
hurtigt - men føres i langsomme og rolige bevægelser. Sørg for, at
kammens overflade hele tiden er i kontakt med huden (fig.4).
DANSK 47
Skæglængde efter trimning
1,5 mm
2,5 mm
4 mm
5,5 mm
7,5 mm
9,5 mm
12 mm
15 mm
18 mm
Indstilling
1
2
3
4
5
6
7
8
9
Indstilling af trimmelængden
Page 48

Unik indstilling til det rå "skægstubbe-look"
◗ Brug trimmeren med påsat kam og længdeindstilling 1. Derved
opnår du det trendy "skægstubbe-look" (fig. 5).
Trimning uden kam
Fuldskæg og enkle hår.
1 Tag kammen af (fig.6).
B
Træk aldrig i den øverste, fleksible del af kammen.Træk kun i den
nederste del.
2 Før trimmeren i velkontrollerede bevægelser og berør kun
hårene ganske let (fig.7).
Rengøring
Apparatet må aldrig rengøres med vand (eller væske).
Brug aldrig skrappe rengørings- og skuremidler eller væsker som
f.eks. sprit,benzin eller acetone til rengøring af apparatet.
Brug ikke skarpe eller hårde genstande til rensning af filteret, da du
derved risikerer at beskadige det.
Skægkammer
1 Sluk for apparatet.
2 Tag skægkammeret af og ryst eller børst hårene ud ( 8).
3 For ekstra grundig rengøring og for at bevare den optimale
sugeevne, tages filteret af ...(fig. 9).
4 .... og skægkammer og filter renses omhyggeligt med den
medleverede børste (fig.10).
Trimmeren
1 Tag kammen af.
DANSK48
Page 49

2 Tag skærenheden af (fig. 11).
3 Rengør skærenhed og apparatets inderside med den medfølgende
børste (fig. 12).
4 Sæt skærenhed og kam tilbage på plads (fig. 13).
Udskiftning
En slidt eller beskadiget skærenhed eller filter må kun udskiftes med
originale Philips dele, som fås eller bestilles hos din Philips forhandler.
Miljøbeskyttelse
◗ Smid ikke apparatet ud sammen med det almindelige
husholdningsaffald, når det til sin tid kasseres.Indlevér det istedet
på det kommunale indsamlingssted for genbrugsmaterialer.
Derved er du med til at beskytte miljøet (fig. 14).
Det indbyggede opladelige batteri indeholder substanser, som kan være
skadelige for miljøet.
Tag batteriet ud, inden du til sin tid kasserer trimmeren. Smid ikke
batteriet væk sammen med det almindelige husholdningsaffald, men
aflevér det på et godkendt indsamlingssted. Du kan også aflevere
trimmeren til Philips, hvor batteriet fjernes og bortskaffes på en
miljømæssigt forsvarlig måde.
Udtagning af batteriet
Slut aldrig strøm til apparatet igen, efter det har været åbnet.
Følg nedennævnte vejledning.
1 Tag stikket ud af stikkontakten, og lad trimmeren køre, indtil
motoren stopper af sig selv.
2 Adskil apparatet i to dele ved hjælp af en skruetrækker (fig. 15).
3 Træk printpladen ud (fig.16).
DANSK 49
Page 50

4 Tag det opladelige batteri ud ved hjælp af en skruetrækker - og
frigør det ved at bøje/dreje det et par gange, til tilslutningerne
knækker (fig. 17).
5 Skil dig af med batteri og de øvrige dele på en miljømæssig sikker
og forsvarlig måde.
Slut aldrig strøm til apparatet igen, efter det har været åbnet.
Reklamationsret & service
For alle yderligere oplysninger eller ved eventuelle problemer med
apparatet henvises venligst til Philps' hjemmeside på adressen:
www.philips.com eller det lokale Philips Kundecenter
(telefonnummeret findes i vedlagte "World-Wide Guarantee"-folder).
Hvis der ikke findes et kundecenter i dit land, bedes du venligst
kontakte din lokale Philips-forhandler eller serviceafdelingen i Philips
Domestic Appliances and Personal Care BV. Dette apparat opfylder de
gældende EU-direktiver vedrørende sikkerhed og radiostøj.
Fejlsøgning
Skægtrimmeren virker ikke, når den er tændt og der er intet lys i
lysdioderne:
1 Hvis batteriet er løbet helt tør for strøm, virker trimmeren ikke
og lysdioderne tænder ikke, når trimmeren tilsluttes. Oplad
apparatet, indtil det er fuldt opladet (se også afsnittet
'Opladaning'). En fuld opladning tager ca.10 timer.
Hvis vakum skægtrimmerens sugesystem ikke fungerer tilfredsstillende eller slet ikke virker,kontrolleres følgende punkter i nedennævnte
checkliste.
2 Er skægkammeret tomt? (fig. 10).
B
Det anbefales at tømme skægkammeret efter hver trimning.Ved
trimning af langt, kraftigt skæg kan det være nødvendigt at tømme
skægkammeret en ekstra gang under brug.
3 Er skægkammeret eller filteret vådt?
DANSK50
Page 51

B
Ingen af delene må rengøres med vand (eller væske). Bliver de våde,
skal de tørres omhyggeligt.
4 Er den flexible styrekam foran skærenheden blokeret? (fig. 17).
B
Den gennemsigtige styrekam skal være flexibel og bevægelig for at
kunne følge ansigtets konturer. Sætter den sig fast på grund af
afklippede skæghår, fjernes disse omhyggeligt med den medleverede
børste. Styrekammen skal være bevægelig ved en let berøring med en
finger.
5 Fører du trimmeren i den optimale retning? (fig. 6).
B
Det bedste trimmeresultat og den mest effektive sugeeffekt opnås ved
at føre trimmeren opad - imod skæghårenes vækstretning - i rolige og
kontrollerede bevægelser.
DANSK 51
Page 52

52
Page 53

53
Page 54

54
2
3 4
5
6 7 8 9
10 11 12 13
14 15 16 17
17
Page 55

55
Page 56

www.philips.com
u
4203 000 31791
 Loading...