

Philips QT4020 User Manual [de]
ENGLISH
Important
.
Read these instructions for use carefully before
using the appliance and save them for future
reference.
◗ Make sure the appliance, the cord and the
powerplug do not get wet.
◗ Check if the voltage indicated on the
powerplug corresponds to the local mains
voltage before you connect the appliance.
◗ Only use the powerplug supplied.
◗ Keep the appliance out of the reach of
children.
◗ Charge, use and store the appliance at a
temperature between 15cC and 35cC.
◗ This appliance is only intented for trimming
the human beard. Do not use it for any other
purpose.
◗ Do not use the appliance when the cutting
unit is damaged or broken, as this may cause
injury.
◗ If the powerplug is damaged, always have it
replaced by one of the original type in order
to avoid a hazard.
◗ The powerplug contains a transformer. Do
not cut off the powerplug to replace it with
another plug, as this will cause a hazardous
situation.
Charging
.
Charge the appliance fully before you start using it
for the first time.
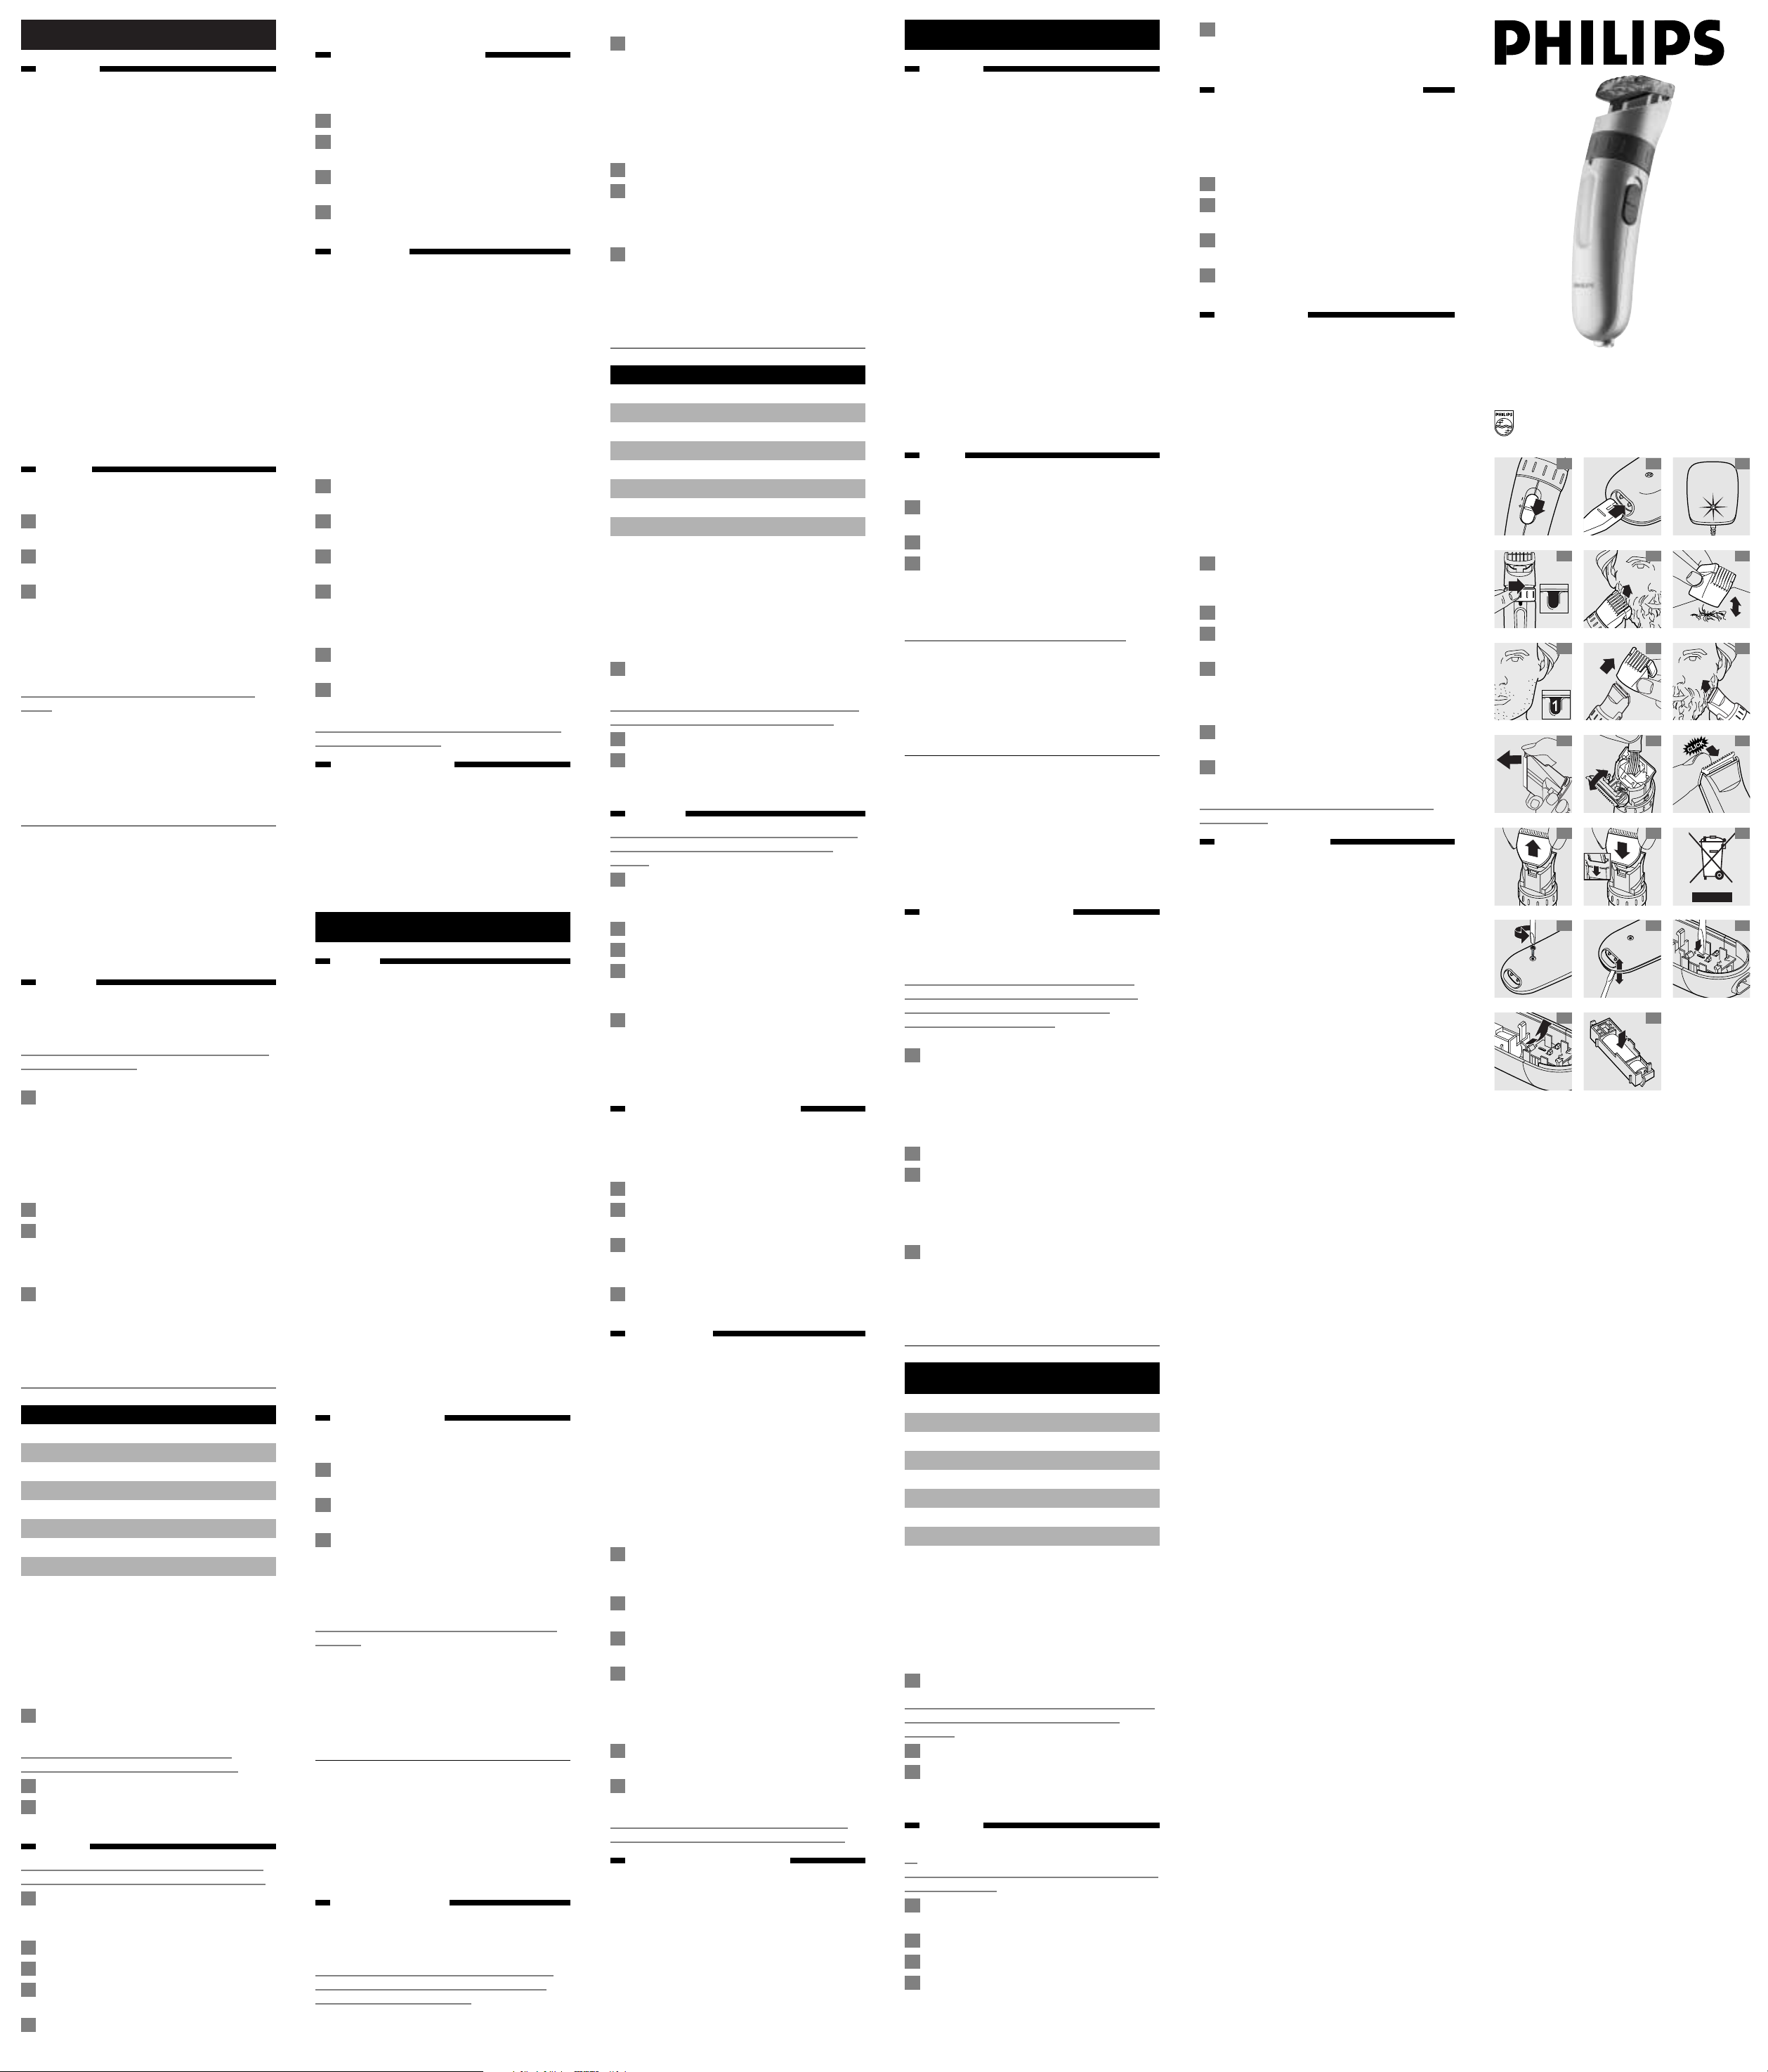
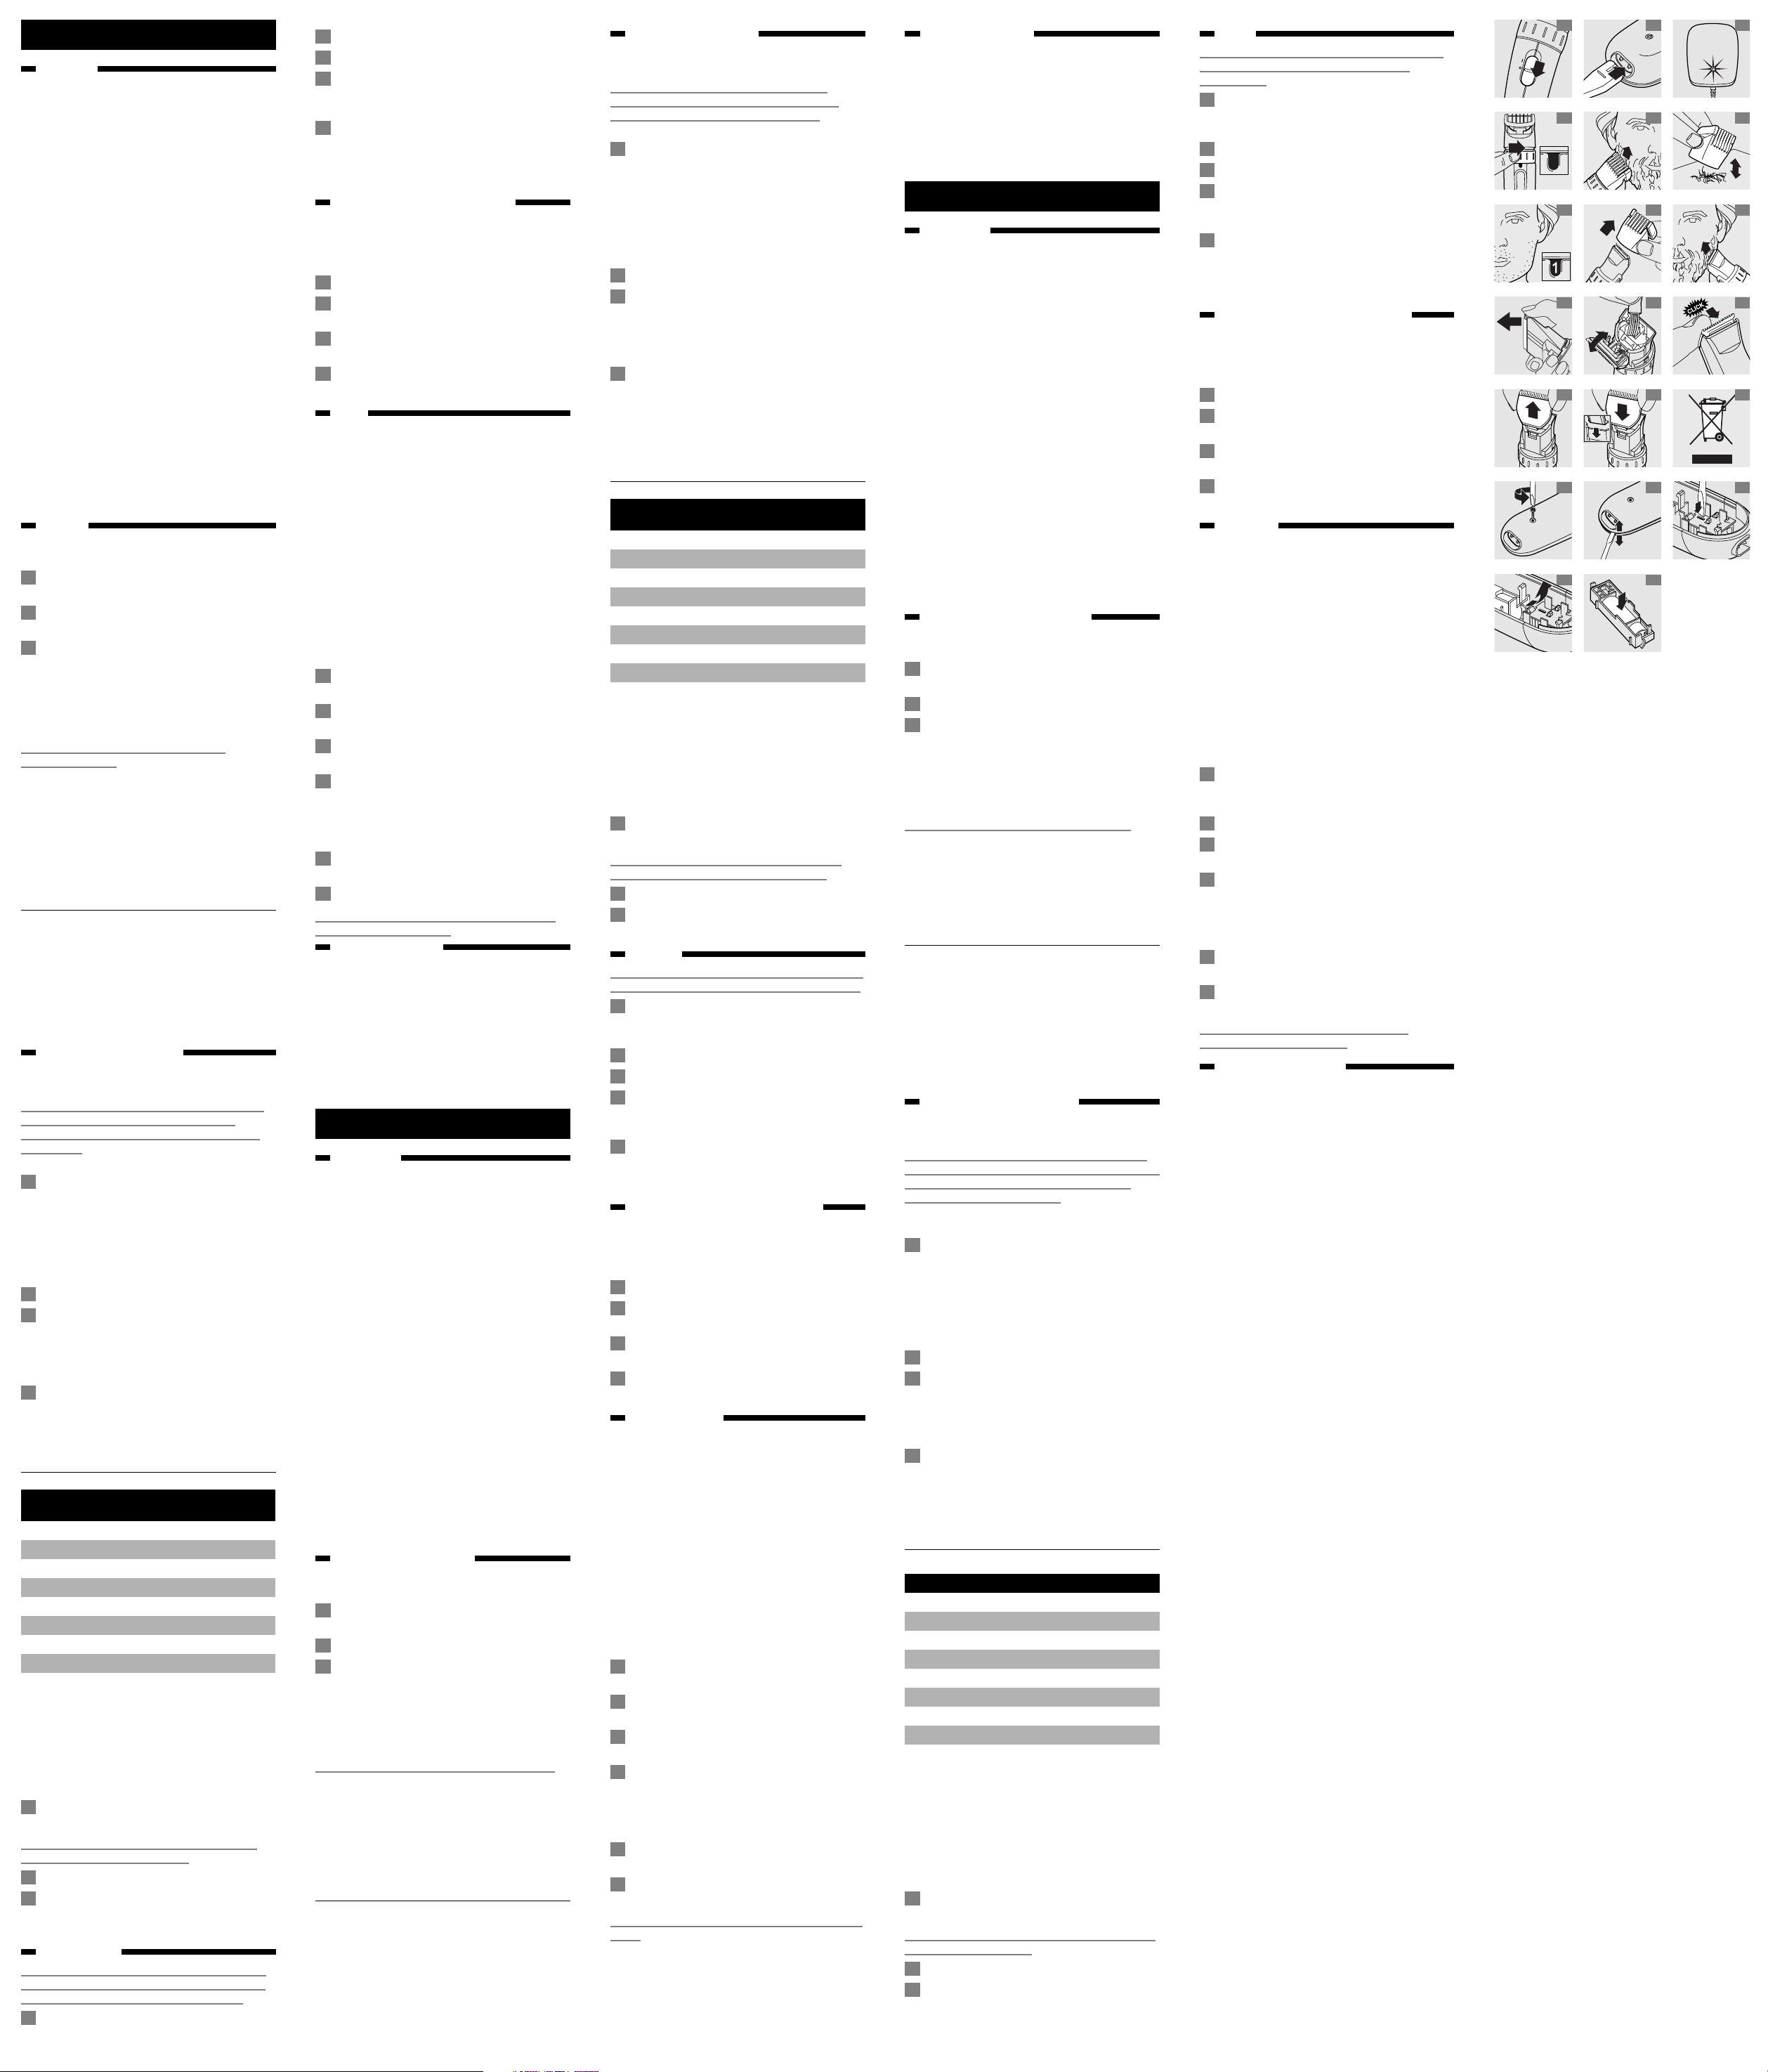
1 Make sure the appliance is switched off
(fig. 1).
2 Insert the appliance plug into the appliance
(fig. 2).
3 Put the powerplug in the wall socket.
◗ The green light on the powerplug will go on
to indicate that the appliance is charging
(fig. 3).
It will take approx. 10 hours to fully charge the
battery.
Do not charge the appliance for more than 24
hours.
A fully charged appliance has a cordless trimming
time of up to 35 minutes.
◗ The appliance does not run from the mains.
When the battery is empty, charge it as
described above.
Optimising the lifetime of the battery
When the appliance has been charged for the first
time, we advise you to use it until the battery is
completely empty.
Do not recharge the appliance in between the
trimming sessions.
Continue using the appliance until the motor
almost stops running during a session. Then
recharge the battery. Follow this procedure at least
twice a year.
Trimming
.
Always comb the beard and/or moustache with a
fine comb before you start trimming.
If you are trimming for the first time, be careful.
Do not move the trimmer too fast. Make smooth
and gentle movements.
Trimming with comb attachment
1 Turn the Precision Zoom Lock` to the
desired trimming length setting (see table)
(fig. 4).
The setting will appear in the window below the
Precision Zoom Lock`.
B
If you are trimming for the first time, start by
using the maximum trimming length setting (9).
2 Switch the appliance on.
3 To trim in the most effective way, move the
trimmer against the direction of hair growth.
Make sure the surface of the comb always
stays in contact with the skin (fig. 5).
4 If a lot of hair has accumulated in the comb,
remove the comb attachment and blow
and/or shake the hair out of the comb.The
selected trimming length setting will not
change when you do this (fig. 6).
Trimming length settings table
Trimming with the unique 'stubble look'
setting
◗ Using the minimum setting (1) will result in a
'stubble look' (fig. 7).
Trimming without comb attachment
Full beards and single hairs
1 Remove the comb attachment by pulling it off
the appliance (fig. 8).
Never pull at the flexible top of the comb
attachment. Always pull at the bottom part.
2 Switch the appliance on.
3 Make well-controlled movements.Touch the
hair lightly with the trimmer (fig. 9).
Cleaning
.
Do not use abrasives, scourers or liquids such as
alcohol, petrol or acetone to clean the appliance.
1 Make sure the appliance is switched off and
disconnected from the mains before you start
cleaning it.
2 Remove the comb attachment.
3 Open the cutting unit (fig. 10).
4 Clean the cutting unit and the inside of the
appliance with the brush supplied (fig. 11).
5 Close the cutting unit by pushing it back onto
the appliance until you hear a click (fig. 12).
The appliance does not need any lubrication.
Replacing the cutting unit
.
A worn or damaged cutting unit should only be
replaced with an original Philips cutting unit,
available from authorised Philips service centres.
1 Open the cutting unit.
2 Remove the old cutting unit by pulling it
upwards (fig. 13).
3 Place the two lugs of the new cutting unit
into the guiding slots (fig. 14).
4 Push the cutting unit back onto the appliance
until you hear a click (fig. 12).
Environment
.
◗ Do not throw the appliance away with the
normal household waste at the end of its life,
but hand it in at an official collection point for
recycling. By doing this you will help to
preserve the environment (fig. 15).
The built-in rechargeable battery contains
substances that may pollute the environment.
Remove the battery when you discard the
appliance. Do not throw the battery away with
the normal household waste, but hand it in at an
official collection point.You can also take the
appliance to a Philips service centre, which will
remove the battery for you and will dispose of it
in an environmentally safe way.
1 Disconnect the appliance from the mains and
let the appliance run until the motor stops.
2 Undo the screw in the housing of the
trimmer (fig. 16).
3 Separate the 2 housing parts by means of a
screwdriver (fig. 17).
4 Insert the screwdriver into the small slot in
the printed circuit board marked with an
arrow. Push the screwdriver down until parts
of the printed circuit board break off (fig. 18).
5 Remove the battery holder including the
rechargeable battery (fig. 19).
6 Separate the rechargeable battery from the
battery holder (fig. 20).
Do not connect the appliance to the mains again
after it has been opened!
Guarantee & service
.
If you need information or if you have a problem,
please visit the Philips Web site at
www.philips.com or contact the Philips Customer
Care Centre in your country (you will find its
phone number in the worldwide guarantee
leaflet). If there is no Customer Care Centre in
your country, turn to your local Philips dealer or
contact the Service Depar tment of Philips
Domestic Appliances and Personal Care BV.
1 2
3
4 5 6
7 8 9
10 11 12
13 14 15
16 17 18
19 20
Wichtig
.
Lesen Sie diese Bedienungsanleitung vor dem
ersten Gebrauch des Geräts sorgfältig durch und
bewahren Sie sie zur späteren Einsichtnahme auf.
◗ Gerät, Netzkabel und Netzteil dürfen nicht
nass werden.
◗ Prüfen Sie, bevor Sie das Gerät anschließen,
ob die Spannungsangabe auf dem Netzteil mit
der örtlichen Netzspannung übereinstimmt.
◗ Verwenden Sie nur das mitgelieferte Netzteil.
◗ Bewahren Sie das Gerät außerhalb der
Reichweite von Kindern auf.
◗ Benutzen und laden Sie das Gerät bei
Temperaturen zwischen 15c C und 35c C.
Bewahren Sie es auch in diesem
Temperaturbereich auf.
◗ Das Gerät ist ausschließlich zum Schneiden
von menschlichem Barthaar vorgesehen.
Verwenden Sie es nicht für andere Zwecke.
◗ Benutzen Sie das Gerät nicht, wenn die
Schneideeinheit beschädigt oder zerbrochen
ist (Verletzungsgefahr!).
◗ Wenn das Netzteil defekt oder beschädigt ist,
darf es nur von einem Philips Service-Center
oder einer von Philips autorisierten Werkstatt
durch ein Original-Ersatznetzteil ausgetauscht
werden, um Gefährdungen zu vermeiden.
◗ Das Netzteil enthält einen Transformator.
Ersetzen Sie das Netzteil keinesfalls durch
einen anderen Stecker, da dies den Benutzer
gefährdet.
Den Akku aufladen
.
Laden Sie den Akku voll auf, bevor Sie das Gerät
zum ersten Mal benutzen.
1 Achten Sie darauf, dass das Gerät
ausgeschaltet ist (Abb. 1).
2 Stecken Sie den Gerätestecker in das Gerät
(Abb. 2).
3 Stecken Sie das Netzteil in die Steckdose.
◗ Die grüne Lampe am Netzteil leuchtet und
signalisiert, dass sich das Gerät auflädt
(Abb. 3).
Nach ca. 10 Stunden ist der Akku voll aufgeladen.
Lassen Sie das Gerät nicht länger als 24 Stunden
am Netz.
Mit voll aufgeladenem Akku können Sie das Gerät
ca. 35 Minuten kabelfrei betreiben.
◗ Das Gerät kann nicht direkt am Netz
betrieben werden. Ist der Akku leer, so laden
Sie ihn wie oben beschrieben auf.
Die Lebensdauer des Akkus optimieren
Wir empfehlen Ihnen, den Bar tschneider nach
dem ersten vollständigen Laden so lange zu
benutzen, bis sich der Akku völlig entleert hat.
Laden Sie den Akku nicht zwischendurch nach.
Warten Sie immer so lange, bis der Motor
während des Schneidens beinahe anhält. Laden Sie
den Akku dann wieder auf.Verfahren Sie zweimal
jährlich auf diese Weise.
Den Bart schneiden
.
Kämmen Sie den Bart/Schnurrbart vor jedem
Gebrauch des Geräts mit einem feinen Kamm
durch.
Seien Sie bei der ersten Anwendung besonders
vorsichtig. Gehen Sie langsam, mit ruhigen und
kontrollierten Bewegungen vor.
Bartschneiden mit dem Kammaufsatz
1 Stellen Sie zunächst den Precision Zoom
Lock` auf die Position, die der gewünschten
Bartlänge entspricht.- Vgl. die Tabelle (Abb. 4).
Die eingestellte Position können Sie im Fenster
unter dem Precision Zoom Lock` ablesen.
B
Beim ersten Gebrauch des Geräts empfiehlt es
sich, mit der maximalen Längeneinstellung (9) zu
beginnen.
2 Schalten Sie das Gerät ein.
3 Den besten Erfolg erzielen Sie, wenn Sie das
Gerät gegen die natürliche Bartwuchsrichtung
führen.Achten Sie darauf, dass der Kamm
stets Kontakt zur Haut behält (Abb. 5).
4 Hat sich viel Barthaar im Kamm angesammelt,
so ziehen Sie den Kammaufsatz vom Gerät
und pusten/schütteln das Haar aus dem
Kamm. Die eingestellte Barthaarlänge wird
dabei nicht verändert (Abb. 6).
Tabelle der Barthaarlängen
3-Tage-Bart schneiden
◗ Mit der niedrigsten Einstellung (1) erhalten
Sie einen "3-Tage-Bart" (Abb. 7).
Verwendung ohne den Kammaufsatz
Vollbart konturieren und einzelne Haare
zurückschneiden
1 Ziehen Sie den Kammaufsatz vom Gerät
(Abb. 8).
Ziehen Sie niemals an der beweglichen Spitze des
Kammaufsatzes, sondern nur am unteren Teil.
2 Schalten Sie das Gerät ein.
3 Gehen Sie mit ruhigen und gleichmäßigen
Bewegungen vor. Berühren Sie die Barthaare
nur leicht mit dem Gerät (Abb. 9).
Reinigung
.
Verwenden Sie zum Reinigen keine Scheuermittel
oder Lösungsmittel wie Alkohol, Benzin oder
Azeton.
1 Achten Sie vor dem Reinigen darauf, dass das
Gerät ausgeschaltet und nicht an das
Stromnetz angeschlossen ist.
2 Nehmen Sie den Kammaufsatz vom Gerät.
3 Klappen Sie die Schneideeinheit auf (Abb. 10).
4 Reinigen Sie die Schneideeinheit und das
Innere des Geräts mit der beiliegenden
Bürste (Abb. 11).
5 Schließen Sie die Schneideeinheit, indem Sie
sie wieder auf das Gerät drücken, bis sie
hörbar einrastet (Abb. 12).
Das Gerät muss nicht geölt oder geschmiert
werden.
Die Schneideeinheit ersetzen
.
Eine verbrauchte oder beschädigte Schneideeinheit
darf nur durch eine original Philips Schneideeinheit
ersetzt werden. Wenden Sie sich bitte an das
Philips Service Center.
1 Klappen Sie die Schneideeinheit auf.
2 Ziehen Sie die alte Schneideeinheit vom
Gerät ab (Abb. 13).
3 Setzen Sie die beiden Laschen der neuen
Schneideeinheit in die Führungsschlitze am
Gerät (Abb. 14).
4 Drücken Sie die Schneideeinheit an, bis Sie ein
Geräusch ("Klick") hören (Abb. 12).
Umweltschutz
.
◗ Geben Sie das Gerät am Ende der
Lebensdauer nicht in den normalen Hausmüll.
Bringen Sie es zum Recycling zu einer
offiziellen Sammelstelle. Auf diese Weise
helfen Sie die Umwelt zu schonen (Abb. 15).
Der integrierte Akku enthält Substanzen, welche
die Umwelt gefährden können.
Entnehmen Sie den Akku, bevor Sie das Gerät
entsorgen. Der Akku gehör t nicht in den Hausmüll,
sondern muss an einer offiziellen Sammelstelle
abgegeben werden. Sie können das Gerät auch an
ein Philips Service-Center geben. Dort wird der
Akku umweltgerecht entsorgt.
1 Ziehen Sie den Stecker aus der Steckdose,
und lassen Sie den Motor so lange laufen, bis
er anhält.
2 Lösen Sie die Schraube am Gehäuse des
Geräts (Abb. 16).
3 Trennen Sie die beiden Teile des Gehäuses mit
einem Schraubendreher (Abb. 17).
4 Setzen Sie den Schraubendreher in den
kleinen Schlitz, der mit einem Pfeil
gekennzeichnet ist. Drücken Sie den
Schraubendreher hinab, bis ein Teil des
Bauteils wegbricht (Abb. 18).
5 Entnehmen Sie das Akkufach zusammen mit
dem Akku (Abb. 19).
6 Trennen Sie den Akku vom Akkufach
(Abb. 20).
Nach Entnahme des Akkus darf das Gerät nicht
mehr an das Stromnetz angeschlossen werden!
Garantie und Kundendienst
.
Benötigen Sie weitere Informationen oder treten
Probleme auf, wenden Sie sich bitte an Ihren
Philips-Händler oder setzen Sie sich mit einem
Philips Service-Center in Ihrem Land in Verbindung
(Tel. Nr. 0180/5356767). Besuchen Sie auch die
Philips Website www.philips.com.
Important
.
Lisez soigneusement ce mode d'emploi avant
d'utiliser l'appareil et conservez-le pour une
consultation ultérieure.
◗ Veillez à ce que l'appareil, le cordon
d'alimentation et le chargeur ne soient pas
exposés à l'humidité.
◗ Vérifiez si la tension mentionnée sur le
chargeur correspond à la tension du réseau
avant de connecter l'appareil.
◗ Utilisez uniquement le chargeur fourni.
◗ Tenez l'appareil hors de portée des enfants.
◗ Utilisez, chargez et conservez l'appareil à une
température comprise entre 15cC et 35cC.
◗ L'appareil a été conçu pour tailler la barbe
exclusivement.Toute autre utilisation est à
proscrire.
◗ N'utilisez pas l'appareil si l'unité de coupe est
endommagée ou cassée, pour éviter tout
accident.
◗ Lorsque le chargeur est endommagé,
remplacez-le par un chargeur d'origine pour
éviter tout accident.
◗ Le chargeur est doté d'un transformateur de
tension. N'essayez pas de remplacer la fiche
du chargeur pour éviter tout accident.
Charge
.
Chargez l'appareil complètement avant de l'utiliser
pour la première fois.
1 Assurez-vous que l'appareil est bien sur la
position arrêt (fig. 1).
2 Insérez le connecteur dans l'appareil (fig. 2).
3 Mettez le chargeur dans la prise de courant.
◗ Lors de la charge le témoin vert de
l'adaptateur s'allume (fig. 3).
Une charge complète dure environ 10 heures.
Ne chargez pas l'appareil plus de 24 heures.
Un appareil correctement rechargé offre une
autonomie de 35 minutes environ.
◗ L'appareil ne fonctionne pas sur secteur
quand les accumulateurs sont déchargés.
Rechargez-les comme il est décrit ci-dessus.
Optimiser la durée de vie des accumulateurs
Après avoir chargé l'appareil pour la première fois,
il est conseillé de l'utiliser jusqu'à ce que les
accumulateurs soient complètement déchargés.
Ne rechargez pas l'appareil entre les séances de
taille.
Laissez l'appareil fonctionner jusqu'à ce que le
moteur s'arrête pendant une séance. Ensuite
rechargez les accumulateurs. Effectuez cette
opération au moins deux fois par an.
Utilisation de la tondeuse
.
Peignez toujours la barbe et/ou la moustache à
l'aide d'un peigne avant de commencer à utiliser la
tondeuse.
Si vous taillez pour la première fois, soyez très
attentif. Ne faites pas des mouvements rapides
avec la tondeuse. Faites des mouvements
uniformes et tout en douceur.
Taille avec guide de coupe
1 Tournez le Precision Zoom Lock&@5,096 sur
la position désirée (voir tableau) (fig. 4).
Le réglage apparaîtra dans la fenêtre au dessus du
Precision Zoom Lock`.
B
Si vous taillez pour la première fois, commencez
par le réglage maximum (9).
2 Mettez l'appareil en marche.
3 Pour tailler d'une manière efficace, taillez dans
le sens inverse de la pousse des poils.
Assurez-vous que la surface du guide de
coupe est toujours en contact avec la peau
(fig. 5).
4 Si des cheveux se sont accumulés dans le
peigne du guide de coupe, retirez-le et
enlevez les cheveux en secouant et/ou
soufflant. La position sélectionnée ne changera
pas (fig. 6).
Réglages de la hauteur de coupe
Taille à l'aide du réglage spécifique pour
une barbe de plusieurs jours
◗ Utilisez le réglage maximum (1) pour obtenir
une "barbe de plusieurs jours" (fig. 7).
Taille sans guide de coupe
Barbes entières et poils rebels
1 Retirez le guide de coupe de l'appareil (fig. 8).
Ne tirez jamais sur la partie supérieure flexible du
guide de coupe. Tirez toujours sur la par tie
inférieure.
2 Mettez l'appareil en marche.
3 Faites toujours des mouvements précis.
Touchez légèrement les poils avec la tondeuse
(fig. 9).
Nettoyage
.
N'utilisez pas d'abrasifs, de tampons à récurer ni
de
liquides tels que de l'essence ou de l'acétone pour
nettoyer l'appareil.
1 Avant de commencer à nettoyer l'appareil,
assurez-vous de l'avoir éteint et débranché.
2 Retirez le guide de coupe.
3 Ouvrez l'unité de coupe (fig. 10).
4 Nettoyez l'unité de coupe et l'intérieur de
l'appareil avec la brosse fournie (fig. 11).
resulting beard length
1.5 mm
2.5 mm
4 mm
5.5 mm
7.5 mm
9.5 mm
12 mm
15 mm
18 mm
setting
1
2
3
4
5
6
7
8
9
DEUTSCH
FRANÇAIS
5 Remontez le couteau en le replaçant sur la
tête jusqu'à entendre un "click" (fig. 12).
Il n'est pas nécessaire de lubrifier le couteau.
Remplacement de l'unité de coupe
.
Si l'unité de coupe est usée ou endommagée, elle
ne doit être remplacée que par une unité de
coupe Philips d'origine, disponible chez votre
revendeur ou auprès d'un Centre Service Agréé
Philips.
1 Ouvrez l'unité de coupe.
2 Retirez la tête de coupe usée en la tirant
vers le haut (fig. 13).
3 Placez les deux ergots de la nouvelle tête de
coupe dans les rainures (fig. 14).
4 Repoussez la tête de coupe dans l'appareil
jusqu'à ce que vous entendiez un clic (fig. 12).
Environnement
.
◗ Ne jetez pas l'appareil en fin de vie avec les
ordures ménagères, mais déposez-le à un
endroit prévu à cet effet par les pouvoirs
publics pour son recyclage.Vous aiderez, ainsi,
à protéger l'environnement (fig. 15).
Les accumulateurs rechargeables incorporés
contiennent des substances qui peuvent polluer
l'environnement.
Lorsque vous vous séparerez de votre appareil en
fin de vie, retirez les accumulateurs. Ne jetez pas
les accumulateurs avec les ordures ménagères
habituelles, mais dans un lieu assigné à cet effet.
Vous pouvez également déposer votre appareil
dans un Centre Service Agréé Philips, où l'on s'en
chargera.
1 Débranchez l'appareil de la prise de courant,
et laissez-le fonctionner jusqu'à l'arrêt
complet du moteur.
2 Dévissez le corps de la tondeuse (fig. 16).
3 Séparez les deux parties à l'aide d'un
tournevis (fig. 17).
4 Insérez un tournevis dans la petite fente du
circuit imprimé marquée d'une flèche. Poussez
le tournevis vers le bas jusqu'à ce que la
partie du circuit imprimé se casse (fig. 18).
5 Enlevez le support avec les accumulateurs
rechargeables (fig. 19).
6 Détachez les accumulateurs du support
(fig. 20).
Ne branchez pas l'appareil sur le secteur après
l'avoir ouvert.
Garantie et service
.
Pour plus d'informations, visitez notre site Internet
www.philips.com ou veuillez contacter le Service
Consommateurs Philips de votre pays (vous
trouverez le numéro de téléphone dans le dépliant
sur la garantie internationale). S'il n'y a aucun
Service Consommateurs Philips dans votre pays,
contactez votre distributeur ou le Service
Department of Philips Domestic Appliances and
Personal Care BV.
Resultierende Bartlänge
1,5 mm
2,5 mm
4 mm
5,5 mm
7,5 mm
9,5 mm
12 mm
15 mm
18 mm
Einstellung
1
2
3
4
5
6
7
8
9
longueur de barbe
obtenue
1,5 mm
2,5 mm
4 mm
5,5 mm
7,5 mm
9,5 mm
12 mm
15 mm
18 mm
réglages
1
2
3
4
5
6
7
8
9
Trimmer
QT4020
www.philips.com
u
4203 000 31432
9
9
CHARGE
Belangrijk
.
Lees deze gebruiksaanwijzing zorgvuldig door
voordat u het apparaat gaat gebruiken. Bewaar de
gebruiksaanwijzing om hem indien nodig te
kunnen raadplegen.
◗ Voorkom dat het apparaat, het snoer en de
powerplug nat worden.
◗ Controleer of het voltage dat op de
powerplug is vermeld overeenkomt met de
plaatselijke netspanning voordat u het
apparaat aansluit.
◗ Gebruik uitsluitend de meegeleverde
powerplug.
◗ Houd het apparaat buiten het bereik van
kinderen.
◗ Laad het apparaat op, gebruik het en bewaar
het bij een temperatuur tussen 15c en 35c.
◗ Dit apparaat is uitsluitend bedoeld voor het
knippen van baarden bij mensen. Gebruik het
niet voor andere doeleinden.
◗ Gebruik het apparaat niet indien het
knipelement beschadigd of kapot is, omdat dit
verwondingen kan veroorzaken.
◗ Indien de powerplug beschadigd is, laat hem
dan altijd vervangen door een van het
oorspronkelijke type om gevaar te
voorkomen.
◗ De powerplug bevat een transformator. Knip
de powerplug niet af om hem te vervangen
door een andere stekker, omdat dit een
gevaarlijke situatie kan opleveren.
Opladen
.
Laad het apparaat volledig op voordat u het voor
de eerste keer gebruikt.
1 Zorg ervoor dat het apparaat uitgeschakeld is
(fig. 1).
2 Steek het apparaatstekkertje in het apparaat
(fig. 2).
3 Steek de powerplug in het stopcontact.
◗ Het groene lampje op de powerplug gaat
branden om aan te geven dat het apparaat aan
het opladen is (fig. 3).
Het duurt ongeveer 10 uur om de accu volledig
op te laden.
Laad het apparaat niet langer dan 24 uur
aaneengesloten op.
Wanneer het apparaat volledig is opgeladen, heeft
het een snoerloze gebruikstijd van maximaal 35
minuten.
◗ Dit apparaat kan niet op het elektriciteitsnet
worden aangesloten. Laad het apparaat op
zoals hierboven beschreven wanneer de accu
leeg is.
De levensduur van de accu optimaliseren
Wanneer u het apparaat voor de eerste keer
heeft opgeladen, adviseren we u het te gebruiken
totdat de accu helemaal leeg is.
Laad in dit geval de accu niet tussendoor op.
Gebruik het apparaat totdat de motor tijdens een
knipbeurt bijna ophoudt met draaien en laad dan
pas de accu weer op.Volg deze procedure ten
minste twee keer per jaar.
Gebruik van de trimmer
.
Kam de baard en/of snor altijd door met een fijne
kam voordat u met bijknippen begint.
Als dit de eerste keer is dat u een baardtrimmer
gebruikt, wees dan voorzichtig. Beweeg het
apparaat niet te snel, en maak rustige, vloeiende
bewegingen.
Uw baard bijknippen met opzetkam
1 Stel de precisie-zoomring` in op de
gewenste kniplengte (zie tabel) (fig. 4).
De gekozen instelling verschijnt in het venstertje
onder de precisie-zoomring`.
B
Als dit de eerste keer is dat u een baardtrimmer
gebruikt, begin dan op de hoogste kniplengtestand
(9).
2 Schakel het apparaat in.
3 De meest effectieve methode is om de
trimmer tegen de groeirichting van het haar
in te bewegen. Zorg ervoor dat de platte zijde
van de opzetkam steeds goed in contact blijft
met de huid (fig. 5).
4 Als zich veel haar heeft verzameld in de kam,
verwijder dan de opzetkam en blaas en/of
schud het haar eruit. De ingestelde kniplengte
verandert hierdoor niet (fig. 6).
Kniplengtestanden
Uw baard bijknippen met de unieke
stoppelbaardstand
◗ Gebruik van de laagste stand (1) resulteert in
een korte stoppelbaard (fig. 7).
Uw baard bijknippen zonder opzetkam
Volle baarden en afzonderlijke haren
1 Verwijder de opzetkam door deze van het
apparaat te trekken (fig. 8).
Trek nooit aan de bovenkant van de opzetkam,
maar altijd aan het onderste deel.
2 Schakel het apparaat in.
3 Maak gecontroleerde bewegingen, waarbij u
het baardhaar voorzichtig aanraakt met de
trimmer (fig. 9).
Schoonmaken
.
Gebruik voor het reinigen van het apparaat geen
agressieve schoonmaakmiddelen, schuurmiddelen
of vloeistoffen als alcohol, benzine of aceton.
1 Schakel het apparaat uit en neem de adapter
uit het stopcontact voordat u het apparaat
gaat schoonmaken.
NEDERLANDS
Importante
.
Antes de usar el aparato, lea atentamente estas
instrucciones y consérvelas por si necesitara
consultarlas en el futuro.
◗ Asegúrese de que no se mojan ni el aparato
ni el cable ni la clavija.
◗ Antes de conectar el aparato, compruebe si el
voltaje indicado en la clavija adaptadora se
corresponde con el voltaje de red local.
◗ Use únicamente la clavija que se suministra.
◗ Mantenga el aparato fuera del alcance de los
niños.
◗ Cargue, utilice y guarde el aparato a una
temperatura entre 15cC y 35cC.
◗ Este aparato está pensado únicamente para
cortar la barba humana. No lo utilice para
ningún otro propósito.
◗ No utilice el aparato si la unidad de corte
está dañada o rota, ya que podría ocasionar
heridas.
◗ Si la clavija está dañada, sustitúyala siempre
por un modelo original para evitar situaciones
de peligro.
◗ La clavija adaptadora incorpora un
transformador. No quite la clavija adaptadora
para sustituirla por otro enchufe, ya que
podría producirse una situación de peligro.
Cómo cargar el aparato
.
Antes de usarlo por primera vez, cargue
completamente el aparato.
1 Asegúrese de que el aparato esté apagado
(fig. 1).
2 Inserte la clavija en el aparato (fig. 2).
3 Enchufe la clavija correspondiente a la red.
◗ El piloto verde del adaptador se iluminará
para indicar que el aparato se está cargando
(fig. 3).
La batería tardará aproximadamente 10 horas en
cargarse completamente.
No cargue el aparato durante más de 24 horas.
El aparato completamente cargado le
proporcionará un tiempo de uso sin cable de
hasta 35 minutos.
◗ El aparato no funciona enchufado a la red.
Cuando la batería esté descargada, cárguela
tal como se ha descrito anteriormente.
Cómo optimizar la vida útil de la batería
Cuando se haya cargado el aparato por primera
vez, le aconsejamos que lo use hasta que la batería
se descargue por completo.
No recargue el aparato entre sesiones de recor te
de la barba.
Siga usando el aparato hasta que el motor casi
deje de funcionar durante una sesión. Recargue
entonces la batería. Siga este procedimiento por lo
menos dos veces al año.
1 2
3
4 5 6
7 8 9
10 11 12
13 14 15
16 17 18
19 20
Cómo cortar/recortar
.
Antes de empezar a recortar, peine la barba y/o el
bigote con un peine fino.
Tenga cuidado si va a utilizar el aparato por
primera vez. No mueva el aparato demasiado
rápido. Haga movimientos lentos y suaves.
Cómo recortar con el peine-guía
1 Haga girar el Precision Zoom Lock` a la
posición deseada de longitud de corte de la
barba (fig. 4).
La posición aparecerá en la ventana debajo del
Precision Zoom Lock`.
B
Si está utilizando el aparato por primera vez,
comience utilizando la posición más alta de
longitud de corte (9).
2 Encienda el aparato.
3 Para recortar la barba de la forma más eficaz,
mueva el barbero en sentido contrario al de
crecimiento del pelo.Asegúrese de que la
superficie del peine permanezca siempre en
contacto con la piel (fig. 5).
4 Si se ha acumulado mucho pelo en el peine,
desmonte el peine-guía y elimine el pelo
soplando y/o sacudiendo el peine. Al hacerlo,
la posición seleccionada de longitud de corte
de la barba no cambiará (fig. 6).
Tabla de posiciones de longitud de corte de
la barba
Cómo recortar la barba con la posición
"barba de dos días"
◗ Utilice la posición más baja (1) para obtener
una "barba de dos días" (fig. 7).
Cómo recortar sin el peine-guía
Barbas completas y pelos sueltos
1 Tire del peine-guía para sacarlo del aparato
(fig. 8).
No tire nunca de la parte superior flexible del
peine-guía.Tire siempre de la parte inferior.
2 Encienda el aparato.
3 Haga movimientos bien controlados.Toque
ligeramente el pelo con el barbero (fig. 9).
Limpieza
.
No use productos abrasivos ni líquidos tales como
alcohol, gasolina o acetona, para limpiar el aparato
1 Antes de empezar a limpiarlo, asegúrese de
que el aparato esté desconectado y
desenchufado de la red.
2 Quite el peine-guía.
3 Abra la unidad de corte (fig. 10).
4 Limpie la unidad de corte y el interior del
aparato con el cepillo que se suministra
(fig. 11).
5 Cierre la unidad de corte presionándola en el
aparato hasta que oiga un clic (fig. 12).
El aparato no necesita lubricación.
Sustitución de la unidad de corte
.
Una unidad de corte gastada o deteriorada sólo
debe ser sustituida por una unidad de corte
original Philips, disponible en los Servicios de
Asistencia Técnica de Philips.
1 Abra la unidad de corte.
2 Quite la unidad de corte vieja tirando de ella
hacia arriba (fig. 13).
3 Coloque los dos salientes de la unidad de
corte nueva en las ranuras de guía (fig. 14).
4 Vuelva a presionar la unidad de corte en el
aparato hasta que oiga un "clic" (fig. 12).
Medio ambiente
.
◗ Cuando vaya a deshacerse de este aparato, no
lo tire con la basura normal del hogar;
deposítelo en un punto de recogida oficial
para su reciclado.Al hacerlo, contribuirá a
preservar el medio ambiente (fig. 15).
La batería recargable incorporada contiene
sustancias que pueden ser nocivas para el medio
ambiente.
Quite la batería cuando vaya a deshacerse del
aparato. No tire la batería junto con la basura
normal del hogar. Llévela a un lugar de recogida
oficial.También puede llevar el aparato a un centro
de servicio de Philips, donde el personal le
ayudará a extraer la batería y a deshacerse de ella
sin dañar el medio ambiente.
1 Desenchufe el aparato de la red y deje que
funcione hasta que el motor se pare.
2 Desatornille el tornillo de la carcasa del
barbero (fig. 16).
3 Utilice un destornillador para separar las dos
partes de la carcasa (fig. 17).
4 Introduzca el destornillador en la pequeña
ranura del circuito impreso marcada con una
flecha. Presione con el destornillador hacia
abajo hasta que el circuito impreso se rompa
(fig. 18).
5 Extraiga el soporte de la batería con la
batería recargable incluida (fig. 19).
6 Separe la batería recargable de su soporte
(fig. 20).
Una vez abierto, no vuelva a enchufar el aparato a
la red.
Importante
.
Prima di usare l'apparecchio, leggete con attenzioe
queste istruzioni e conservatele per eventuali
riferimenti futuri.
◗ Fate attenzione a non bagnare l'apparecchio, il
cavo e la spina.
◗ Prima di collegare l'apparecchio, controllate
che la tensione indicata sulla spina
corrisponda alla tensione locale.
◗ Utilizzate esclusivamente la spina fornita.
◗ Tenete l'apparecchio fuori dalla portata dei
bambini.
◗ Caricate, usate e riponete l'apparecchio ad
una temperatura compresa fra 15c e 35cC.
◗ Questo apparecchio è indicato solo per
regolare la barba degli uomini. Non usatelo
per nessun altro scopo.
◗ Non usate l'apparecchio nel caso in cui il
blocco coltelli sia danneggiato o rotto, per
evitare il rischio di abrasioni.
◗ Nel caso la spina fosse danneggiata, dovrà
essere sostituita esclusivamente con una spina
originale, per evitare situazioni a rischio.
◗ La spina contiene un trasformatore. Non
tagliate la spina per sostituirla con un'altra,
per evitare situazioni a rischio.
Come caricare l'apparecchio
.
Caricare completamente l'apparecchio prima di
usarlo per la prima volta.
1 Controllate che l'apparecchio sia spento
(fig. 1).
2 Inserite lo spinotto nell'apparecchio (fig. 2).
3 Inserite la spina nella presa di corrente.
◗ Si accenderà la spia verde sull'adattatore per
indicare che l'apparecchio è sotto carica
(fig. 3).
Per caricare completamente la batteria ci vorranno
circa 10 ore.
Non caricate l'apparecchio per più di 24 ore.
Un apparecchio a piena carica ha un'autonomia di
rasatura cordless di 35 minuti.
◗ L'apparecchio non può funzionare a corrente.
Quando le batterie sono scariche, procedete
alla ricarica come descritto qui sopra.
Come ottimizzare la durata della batteria
Dopo aver caricato la batteria, vi consigliamo di
usare l'apparecchio fino a quando la batteria sarà
completamente scarica.
Non ricaricate l'apparecchio fra un utilizzo e
l'altro.
Continuate ad usare l'apparecchio fino a quando il
motore quasi si arresterà durante l'uso. A questo
punto ricaricate la batteria. Ripetete questa
procedura almeno due volte all'anno.
Come usare il regolabarba
.
Prima di usare il regolabarba, pettinatevi sempre la
barba e/o i baffi con un pettine a denti stretti.
Se state usando l'apparecchio per la prima volta,
prestate la massima attenzione! Evitate i movimenti
bruschi e troppo veloci e cercate di muovere
l'apparecchio in modo delicato.
Come usare il regolabarba con il
pettine
1 Ruotate il Precision Zoom Lock` per
ottenere la lunghezza di taglio desiderata
(vedere tabella) (fig. 4).
Il valore impostato apparirà nella finestrella posta
sotto il Precision Zoom Lock`.
B
Se usate il regolabarba per la prima volta,
impostate il valore massimo della lunghezza (9).
2 Accendete l'apparecchio.
3 Per ottenere i migliori risultati, muovete
l'apparecchio nella direzione opposta alla
crescita del pelo. Controllate che la superficie
del pettine sia sempre a contatto della pelle
(fig. 5).
4 Se tra i denti del pettine si sono accumulati
troppi peli, sfilate il pettine e togliete i peli
scrollandolo e/o soffiandoci sopra. La
lunghezza della barba impostata non verrà
comunque modificata (fig. 6).
Tabella per impostare la lunghezza di taglio
Come usare il regolabarba per ottenere
l'effetto "barba incolta".
◗ Per ottenere l'effetto "barba incolta" utilizzate
l'impostazione di lunghezza minima (1)
(fig. 7).
Come usare il regolabarba senza il
pettine
Per regolare la barba e tagliare i peli isolati
1 Togliete il pettine tirandolo dall'apparecchio
(fig. 8).
Non tirate mai la parte flessibile del pettine. Tirate
sempre la parte inferiore.
2 Accendete l'apparecchio.
3 Cercate di eseguire movimenti molto
controllati, sfiorando appena la barba (fig. 9).
Pulizia
.
Non usate detergenti abrasivi, spugnette o liquidi
come alcool, benzina o acetone per pulire
l'apparecchio.
1 Controllate che l'apparecchio sia spento e
scollegato dalla presa di corrente prima di
procedere alla pulizia.
2 Rimuovete il pettine.
3 Aprite il blocco coltelli (fig. 10).
4 Pulite il blocco coltelli e la parte interna
dell'apparecchio con l'apposito spazzolino
(fig. 11).
5 Chiudete l'unita' di taglio premendola
nell'apparecchio fino a quando sentirete un
click (fig. 12).
L'apparecchio non ha bisogno di essere lubrificato.
Come sostituire il blocco coltelli.
.
Se danneggiato o usurato, il blocco coltelli dovrà
essere sostituito esclusivamente con un ricambio
originale Philips, disponibile presso i centri di
assistenza autorizzati Philips.
1 Aprite il blocco coltelli.
2 Estraete il blocco coltelli vecchio tirandolo
verso l'alto (fig. 13).
3 Infilate i due denti del nuovo blocco coltelli
nelle scanalature guida (fig. 14).
4 Spingete il blocco coltelli nell'apparecchio fino
a quando sentirete un click (fig. 12).
Ambiente.
◗ A fine vita non gettare questo apparecchio
nella normale raccolta dei rifiuti, ma portalo
presso uno dei punti di raccolta autorizzati. In
questo modo contribuirai a preservare
l'ambiente (fig. 15).
La batteria ricaricabile incorporata contiene
sostanza che possono danneggiare l'ambiente.
Prima di gettare l'apparecchio, ricordate di togliere
la batteria. Non gettate la batteria insieme ai
normali rifiuti domestici, ma portatela presso un
centro di raccolta differenziata. Potete anche
portare l'apparecchio presso un Centro Assistenza
Philips: il personale provvederà a togliere la
batteria e a smaltirla in modo da non danneggiare
l'ambiente.
1 Scollegate l'apparecchio dalla presa di
corrente e lasciate funzionare l'apparecchio
fino a quando il motore non si ferma.
2 Svitate la custodia dell'apparecchio (fig. 16).
3 Separate le due parti della custodia usando un
cacciavite (fig. 17).
4 Infilate il cacciavite nella piccola fessura del
circuito stampato contraddistinta da una
freccia. Spingete il cacciavite fino a quando si
romperà una parte del circuito stampato
(fig. 18).
5 Togliete il portabatterie che contengono le
batterie ricaricabili ( 19).
6 Separate la batteria ricaricabile dal
porta-batteria (fig. 20).
Non ricollegate l'apparecchio alla presa di
corrente dopo averlo aperto!
Garanzia e Assistenza
.
Se avete bisogno di assistenza o di ulteriori
informazioni, vi preghiamo di visitare il nostro sito
web: www.philips.com oppure di contattare il
Centro Assistenza Clienti Philips del vostro Paese
(per conoscere il numero di telefono, vedere
l'opuscolo della garanzia). Qualora nel vostro
paese non ci fosse un Centro Assistenza Clienti,
rivolgetevi al rivenditore autorizzato Philips oppure
contattate il Service Depar tment of Philips
Domestic Appliances and Personal Care BV.
ITALIANO
resulterende
baardlengte
1,5 mm
2,5 mm
4 mm
5,5 mm
7,5 mm
9,5 mm
12 mm
15 mm
18 mm
stand
1
2
3
4
5
6
7
8
9
lunghezza della barba
1.5 mm
2,5 mm
4 mm.
5,5 mm
7,5 mm
9,5 mm
12 mm
15 mm
18 mm
impostazione
1
2
3
4
5
6
7
8
9
2 Verwijder de opzetkam.
3 Open het messenblok (fig. 10).
4 Maak het knipelement en de binnenkant van
het apparaat schoon met het bijgeleverde
borsteltje (fig. 11).
5 Sluit het knipelement door het terug op het
apparaat te duwen totdat u een klik hoort
(fig. 12).
Het apparaat hoeft niet gesmeerd te worden.
Vervangen van het messenblok
.
Een versleten of beschadigd messenblok moet
worden vervangen door een origineel Philips
messenblok dat bij geautoriseerde Philips
servicecentra verkrijgbaar is.
1 Open het messenblok.
2 Verwijder het oude messenblok door het
omhoog te trekken (fig. 13).
3 Plaats de twee lippen van het nieuwe
messenblok in de geleidegleuven (fig. 14).
4 Druk het nieuwe messenblok op het apparaat
totdat u het vast hoort klikken (fig. 12).
Milieu
.
◗ Gooi het apparaat aan het einde van zijn
levensduur niet weg met het normale huisvuil,
maar lever het in op een officieel
verzamelpunt om het te laten recyclen. Op
deze wijze helpt u om het milieu te
beschermen (fig. 15).
De ingebouwde accu bevat stoffen die schadelijk
kunnen zijn voor het milieu.
Verwijder de accu wanneer u het apparaat
afdankt. Gooi de accu niet bij het normale huisvuil,
maar lever deze apart in op een door de overheid
daartoe aangewezen plaats. U kunt het apparaat
ook naar een Philips servicecentrum brengen,
waar men de accu voor u zal verwijderen en
ervoor zal zorgen dat deze op milieuvriendelijke
wijze wordt verwerkt.
1 Haal de powerplug uit het stopcontact en laat
het apparaat lopen totdat de motor stopt.
2 Draai de schroef in het trimmerhuis los
(fig. 16).
3 Haal de twee huishelften van elkaar met
behulp van een schroevendraaier (fig. 17).
4 Steek de schroevendraaier in de kleine
opening in de printplaat die gemarkeerd is
met een pijl. Druk de schroevendraaier
omlaag totdat er delen van de printplaat
afbreken (fig. 18).
5 Verwijder de accuhouder met daarin de accu
(fig. 19).
6 Haal de accu uit de accuhouder (fig. 20).
Sluit het apparaat niet meer aan op netspanning
nadat u het geopend heeft!
Garantie & service
.
Als u informatie nodig heeft of als u een probleem
heeft, bezoek dan onze website
(www.philips.com), of neem contact op met het
Philips Customer Care Centre in uw land (u vindt
het telefoonnummer in het 'worldwide guarantee'
vouwblad). Als er geen Customer Care Centre in
uw land is, ga dan naar uw Philips dealer of neem
contact op met de afdeling Service van Philips
Domestic Appliances and Personal Care BV.
ESPAÑOL
Longitud resultante de
la barba
1,5 mm.
2,5 mm.
4 mm.
5,5 mm.
7,5 mm.
9,5 mm.
12 mm.
15 mm.
18 mm.
Posición
1
2
3
4
5
6
7
8
9
Garantía y servicio
.
Si necesita información o si tiene algún problema,
visite la página web de Philips en www.philips.com
o póngase en contacto con el Servicio Philips de
Atención al Cliente de su país (hallará el número
de teléfono en el folleto de la Garantía Mundial).
Si en su país no hay Servicio Philips de Atención al
Cliente, póngase en contacto con su distribuidor
Philips local o con el Service Depar tment of
Philips Domestic Appliances and Personal Care BV.
9
9
CHARGE
 Loading...