

Philips QT4020 User Manual [fi]
QT4020
9
9
321
4
7
13
65
98
121110
1514
181716
19
20

ENGLISH
4203.000.3154.3
2/7
Introduction
Congratulations on your purchase and welcome to
Philips! To fully benet from the support that Philips offers,
register your product at www.philips.com/welcome.
Important
Read this user manual carefully before you use the
appliance and save it for future reference.
Danger
Make sure the adapter does not get wet.
-
Warning
The adapter contains a transformer. Do not cut
-
off the adapter to replace it with another plug, as
this causes a hazardous situation.
Check if the voltage indicated on the appliance
corresponds to the local mains voltage before you
connect the appliance.
This appliance is not intended for use by persons
-
(including children) with reduced physical, sensory
or mental capabilities, or lack of experience and
knowledge, unless they have been given supervision
or instruction concerning use of the appliance by a
person responsible for their safety.
Children should be supervised to ensure that they
do not play with the appliance.
Caution
Use, charge and store the appliance at a temperature
between 15°C and 35°C.
Only use the adapter supplied.
Never immerse the appliance in water or rinse it
under the tap.
If the adapter is damaged, always have it replaced
with one of the original type in order to avoid a
hazard.
This appliance is only intended for trimming the
human beard. Do not use it for any other purpose.
Do not use the appliance if the cutting unit is
-
damaged or broken, as this may cause injury.
Electromagnetic elds
This Philips appliance complies with all standards
regarding electromagnetic elds (EMF). If handled
properly and according to the instructions in this user
manual, the appliance is safe to use based on scientic
evidence available today.
Charging
Charge the appliance fully before you use it for the rst
time.
It takes approximately 10 hours to fully charge the
battery.
A fully charged appliance has a cordless trimming time of
up to 35 minutes.
Note: The appliance does not run from the mains. When the
battery is empty, charge it as described below.
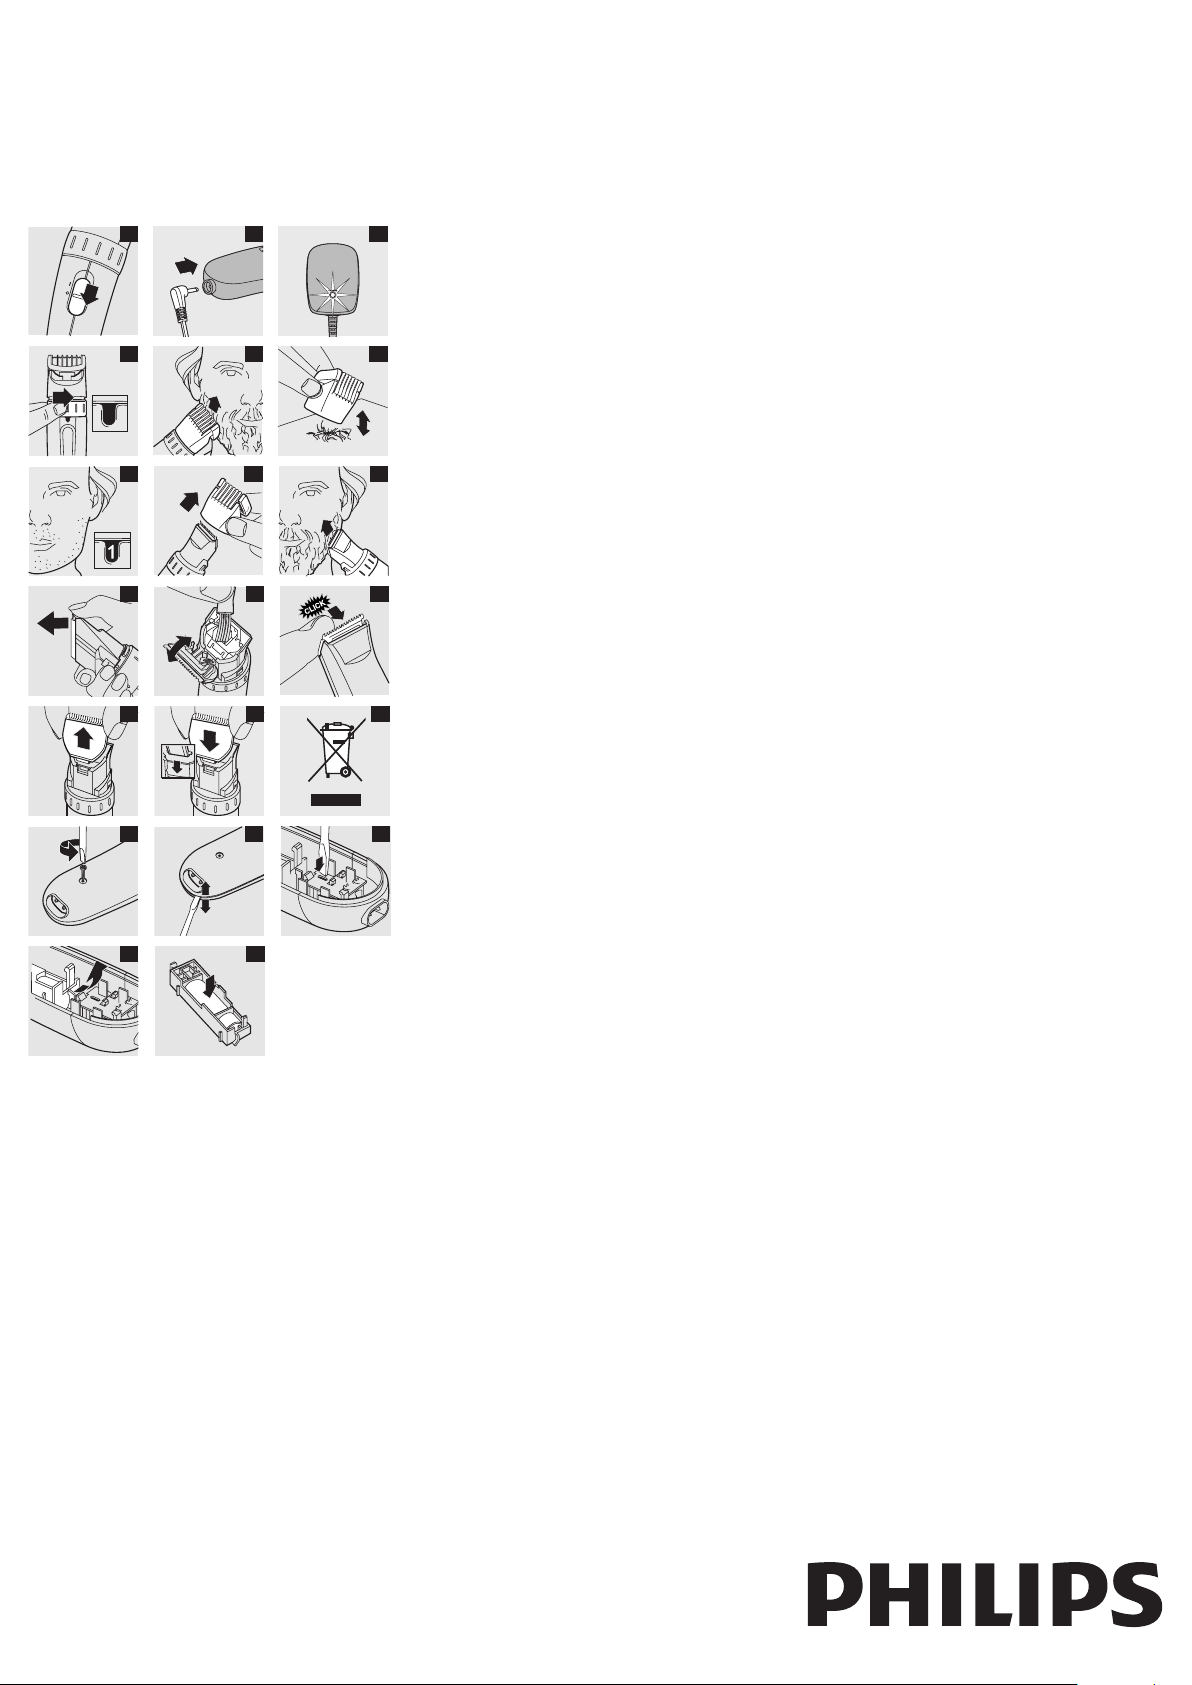
1 Make sure the appliance is switched off (Fig. 1).
2 Insert the appliance plug into the appliance (Fig. 2).
3 Put the adapter in the wall socket.
The green light on the adapter goes on to indicate
,
that the appliance is charging. (Fig. 3)
Do not charge the appliance for more than 24 hours.
Optimising the lifetime of the battery
When the appliance has been charged for the rst time,
we advise you to use it until the battery is completely
empty.
Do not recharge the appliance in between the trimming
sessions.
Continue to use the appliance until the motor almost
stops running during a session. Then recharge the battery.
Follow this procedure at least twice a year.
Trimming
Always comb the beard and/or moustache with a ne
comb before you start trimming.
When you trim for the rst time, be careful. Do not
move the trimmer too fast. Make smooth and gentle
movements.
Trimming with beard trimming comb
1 Turn the Precision Zoom Lock ` to the desired
hair length setting. (Fig. 4)
See the table below for an overview of the hair length
settings and the corresponding hair lengths.
Setting Resulting hair length
1 1.5mm
2 2.5mm
3 4mm
4 5.5mm
5 7.5mm
6 9.5mm
7 12mm
8 15mm
9 19mm
The setting appears in the window below the Precision
Zoom Lock `.
Note: When you trim for the rst time, start at the highest
setting (9) to familiarise yourself with the appliance.
2 Switch on the appliance.
3 To trim in the most effective way, move the
trimmer against the direction of hair growth.
Make sure the surface of the comb always stays in
contact with the skin (Fig. 5).
4 If a lot of hair has accumulated in the comb, remove
the beard trimming comb and blow and/or shake
the hair out of the comb. The selected hair length
setting does not change when you do this (Fig. 6).
Trimming with the unique ‘stubble look’
setting
1 To create a ‘stubble look’, trim with the beard
trimming comb set to hair length setting 1 (Fig. 7).
Trimming without beard trimming comb
Use the trimmer without beard trimming comb to trim
full beards and single hairs.
1 Pull the comb off the appliance to remove it (Fig. 8).
Never pull at the exible top of the beard
trimming comb. Always pull at the bottom part.
2 Switch on the appliance.
3 Make well-controlled movements. Touch the hair
lightly with the trimmer (Fig. 9).
Cleaning
Never use scouring pads, abrasive cleaning agents or
aggressive liquids such as alcohol, petrol or acetone to
clean the appliance.
1 Make sure the appliance is switched off and
disconnected from the mains before you clean it.
2 Remove the beard trimming comb.
3 Open the cutting unit (Fig. 10).
4 Clean the cutting unit and the inside of the
appliance with the cleaning brush supplied (Fig. 11).
5 Push the cutting unit back onto the appliance to
close it (‘click’) (Fig. 12).
Note: The appliance does not need any lubrication.
Replacing the cutting unit
Only replace a worn or damaged cutting unit with an
original Philips cutting unit, available from authorised
Philips service centres.
1 Open the cutting unit.
2 Pull the old cutting unit upwards to remove
it (Fig. 13).
3 Insert the two lugs of the new cutting unit into the
guiding slots (Fig. 14).
4 Push the cutting unit back onto the appliance
(‘click’) (Fig. 12).
Environment
Do not throw away the appliance with the normal
-
household waste at the end of its life, but hand it in
at an ofcial collection point for recycling. By doing
this, you help to preserve the environment (Fig. 15).
The built-in rechargeable battery contains substances
that may pollute the environment. Always remove
the battery before you discard and hand in the
appliance at an ofcial collection point. Dispose of
the battery at an ofcial collection point for batteries.
If you have trouble removing the battery, you can
also take the appliance to a Philips service centre. The
staff of this centre will remove the battery for you
and will dispose of it in an environmentally safe way.
1 Disconnect the appliance from the mains and let
the appliance run until the motor stops.
2 Undo the screw in the housing of the
trimmer (Fig. 16).
3 Separate the 2 housing parts with a
screwdriver (Fig. 17).
4 Insert the screwdriver into the small slot in the
printed circuit board marked with an arrow. Push
the screwdriver down until parts of the printed
circuit board break off (Fig. 18).
5 Remove the battery holder including the
rechargeable battery (Fig. 19).
6 Separate the rechargeable battery from the battery
holder (Fig. 20).
Do not connect the appliance to the mains again after it
has been opened!
Guarantee & service
If you need service or information or if you have a
problem, please visit the Philips website at
www.philips.com or contact the Philips Consumer Care
Centre in your country (you nd its phone number in
the worldwide guarantee leaet). If there is no Consumer
Care Centre in your country, go to your local Philips
dealer.

DANSK
4203.000.3154.3
3/7
Introduktion
Tillykke med dit køb og velkommen til Philips! For at
få fuldt udbytte af den støtte, Philips tilbyder, skal du
registrere dit produkt på www.philips.com/welcome.
Vigtigt
Læs denne brugsvejledning omhyggeligt igennem, inden
apparatet tages i brug, og gem den til eventuelt senere
brug.
Fare
Sørg for, at stikket ikke bliver vådt.
-
Advarsel
Adapteren indeholder en transformer og må ikke
-
klippes af og udskiftes med et andet stik, da dette kan
være meget risikabelt.
Kontrollér, om den angivne netspænding på apparatet
-
svarer til den lokale netspænding, før du slutter strøm
til apparatet.
Dette apparat er ikke beregnet til at blive brugt af
personer (herunder børn) med nedsatte fysiske
og mentale evner, nedsat følesans eller manglende
erfaring og viden, medmindre de er blevet vejledt
eller instrueret i apparatets anvendelse af en person,
der er ansvarlig for deres sikkerhed.
Apparatet bør holdes uden for børns rækkevidde for
-
at sikre, at de ikke kan komme til at lege med det.
Forsigtig
Brug, oplad og opbevar altid apparatet ved en
temperatur mellem 15°C og 35°C.
Brug kun den medfølgende adapter.
Apparatet må ikke kommes ned i vand eller skylles
under vandhanen.
Hvis adapteren beskadiges, skal den altid udskiftes
med en original adapter af samme type for at undgå
enhver risiko.
Dette apparat er udelukkende beregnet til trimning
af skæg. Apparatet må ikke anvendes til andre formål.
Brug ikke trimmeren, hvis skærhovedet er beskadiget
-
eller knækket, da du kan risikere at komme til skade.
Elektromagnetiske felter
Dette Philips-apparat overholder alle standarder for
elektromagnetiske felter (EMF). Ved korrekt anvendelse
i overensstemmelse med instruktionerne i denne
brugsvejledning, er apparatet sikkert at anvende, ifølge
den videnskabelige viden, der er tilgængelig i dag.
Opladning
Før apparatet bruges første gang, skal det være helt
opladet.
En fuld opladning af batteriet tager ca. 10 timer.
En fuld opladning giver op til 35 minutters ledningsfri
brugstid.
Bemærk: Apparatet kan ikke benyttes ved tilslutning til
lysnettet. Når batteriet er aadet, skal det oplades som
beskrevet nedenfor.
1 Kontrollér, at apparatet er slukket (g. 1).
2 Sæt det lille apparatstik ind i apparatet (g. 2).
3 Sæt adapteren i stikkontakten.
Det grønne lys på adapteren lyser for at indikere, at
,
apparatet oplades. (g. 3)
Oplad aldrig apparatet i mere end 24 timer i træk.
Forlængelse af batteriets levetid
Når apparatet er blevet opladet første gang, anbefales det
at bruge det, indtil batteriet er helt aadet.
Oplad ikke apparatet mellem trimningerne.
Fortsæt med at bruge apparatet, indtil motoren næsten
holder op med at køre. Genoplad derefter batteriet. Følg
denne procedure mindst to gange om året.
Trimning
Red altid skæg og/eller overskæg igennem med en n kam
inden trimningen.
Vær forsigtig første gang du trimmer. Trimmeren skal
ikke bevæges for hurtigt. Brug kun langsomme og rolige
bevægelser.
Trimning med skægtrimmerkammen
1 Drej Precision Zoom Lock ` til den ønskede
hårlængdeindstilling. (g. 4)
Nedenstående tabel indeholder en oversigt over
hårlængdeindstillingerne og de tilsvarende hårlængder.
Indstilling Skæglængde efter trimning
1 1,5 mm
2 2,5 mm
3 4 mm
4 5,5 mm
5 7,5 mm
6 9,5 mm
7 12 mm
8 15 mm
9 19 mm
Den valgte indstilling vises i vinduet under Precision
Zoom Lock `.
Bemærk: Når du trimmer første gang, skal du starte med
den højeste indstilling (9) for at gøre dig fortrolig med
apparatet.
2 Tænd for apparatet.
3 Trimningen bliver mest effektiv, når trimmeren
bevæges imod skæghårenes vækstretning. Sørg for,
at kammens overade hele tiden har kontakt med
huden (g. 5).
4 Hvis der har samlet sig meget hår i kammen, skal
du tage skægtrimmerkammen af og puste og/eller
ryste hårene væk. Den valgte længdeindstilling
ændres ikke, når kammen tages af (g. 6).
Trimning med den unikke “skægstubbelook”-indstilling
1 Ønsker du et råt “skægstubbe-look”, skal du
trimme skægget med skægtrimmerkammen ved
længdeindstilling 1 (g. 7).
Trimning uden skægtrimmerkam
Brug trimmeren uden skægtrimmerkam, hvis du vil
trimme fuldskæg og enkelte skæghår.
1 Fjern kammen ved at trække den af
apparatet (g. 8).
Træk aldrig i den øverste, eksible del af
skægtrimmerkammen. Træk kun i den nederste del.
2 Tænd for apparatet.
3 Foretag kontrollerede bevægelser. Berør kun
hårene ganske let med trimmeren (g. 9).
Rensning
Brug aldrig skuresvampe eller skrappe rengøringsmidler
såsom sprit, benzin eller acetone til rengøring af
apparatet.
1 Kontrollér, at apparatet er slukket, og at stikket er
taget ud af stikkontakten, før det rengøres.
2 Fjern skægtrimmerkammen
3 Åbn skærhovedet (g. 10).
4 Rengør skærhovedet og apparatets inderside med
den medfølgende rengøringsbørste (g. 11).
5 Skub skærhovedet tilbage på plads på apparatet for
at lukke det (“klik”) (g. 12).
Bemærk: Apparatet kræver ikke smøring.
Udskiftning af skærhovedet
Hvis skærenheden er slidt eller beskadiget, må den kun
udskiftes med en ny original Philips skærenhed, som kan
fås hos din Philips-forhandler.
1 Åbn skærhovedet.
2 Træk det gamle skærhoved opad for at fjerne
det (g. 13).
3 Anbring de to tapper på det nye skærhoved i
styrerillerne (g. 14).
4 Skub skærhovedet tilbage på plads på apparatet
(klik”) (g. 12).
Miljøhensyn
Apparatet må ikke smides ud sammen med
-
almindeligt husholdningsaffald, når det til sin tid
kasseres. Aevér det i stedet på en kommunal
genbrugsstation. På den måde er du med til at
beskytte miljøet (g. 15).
Det indbyggede genopladelige batteri indeholder
-
stoffer, der kan forurene miljøet. Fjern altid batteriet,
før du kasserer apparatet, og aeverer det på en
genbrugsstation. Aevér batteriet på et ofcielt
indsamlingssted for brugte batterier. Kan du ikke få
batteriet ud, kan du aevere apparatet til Philips, som
vil sørge for at tage batteriet ud og bortskaffe det på
en miljømæssig forsvarlig måde.
1 Tag stikket ud af stikkontakten, og lad apparatet
køre, indtil motoren stopper af sig selv.
2 Fjern skruen i trimmerens kabinet (g. 16).
3 Adskil kabinettets 2 dele med en
skruetrækker (g. 17).
4 Stik skruetrækkeren ind i den lille åbning markeret
med en pil på printpladen. Tryk skruetrækkeren ned,
indtil dele af printpladen knækker af (g. 18).
5 Fjern batteriholderen med det genopladelige
batteri (g. 19).
6 Tag det genopladelige batteri ud af
batteriholderen (g. 20).
Apparatet må ikke sluttes til en stikkontakt, efter det er
blevet åbnet.
Reklamationsret og service
For alle yderligere oplysninger eller ved eventuelle
problemer med apparatet henvises til Philips’ hjemmeside
på adressen www.philips.com eller det lokale Philips
Kundecenter (telefonnumre ndes i vedlagte “Worldwide
Guarantee”-folder). Hvis der ikke ndes et kundecenter i
dit land, bedes du kontakte din lokale Philips-forhandler.
 Loading...