

Page 1

Register your product and get support at
www.philips.com/welcome
QS6160, QS6140
Page 2
Page 3

1
Page 4

Page 5

ENGLISH 6
DANSK 17
DEUTSCH 28
40
ESPAÑOL 52
SUOMI 64
FRANÇAIS 75
ITALIANO 87
NEDERLANDS 99
NORSK 111
PORTUGUÊS 122
SVENSKA 134
TÜRKÇE 145
QS6160, QS6140
Page 6

6
ENGLISH
Introduction
Congratulations on your purchase and welcome to Philips! To fully
benet from the support that Philips offers, register your product at
www.philips.com/welcome.
General description (Fig. 1)
1 Precision trimmer (32 mm)
2 Trimming head
3 Precision trimmer (15 mm)
4 Guiding groove
5 Hair length setting selector
6 Trimming head on/off button
7 Travel lock indication (QS6160 only)
8 Shaving head on/off button
9 Shaving head
10 Battery status indicator
11 Trimming comb
12 Trimming comb (QS6160 only)
13 Charging stand
14 Adapter with small plug
15 Protection cap
16 Cleaning brush
17 Storage pouch (QS6160 only)
Important
Read this user manual carefully before you use the appliance and save it for
future reference.
Danger
- Keep the adapter dry.
Warning
- Check if the voltage indicated on the adapter corresponds to the local
mains voltage before you connect the appliance.
- The adapter contains a transformer. Do not cut off the adapter to
replace it with another plug, as this causes a hazardous situation.
- This appliance is not intended for use by persons (including children)
with reduced physical, sensory or mental capabilities, or lack of
experience and knowledge, unless they have been given supervision or
instruction concerning use of the appliance by a person responsible for
their safety.
- This appliance is not intended for use by children. Children should be
supervised to ensure that they do not play with the appliance.
Caution
- Use, charge and store the appliance at a temperature between 5°C
and 35°C.
- Do not charge the appliance in the storage pouch.
- Only use the adapter and the charging stand supplied.
- Never immerse the appliance in water or any other liquid, nor use it in
the shower. Only rinse the appliance under the tap to clean it.
Page 7

ENGLISH 7
- If the appliance is subjected to a major change in temperature, pressure
or humidity, let the appliance acclimatise for 30 minutes before you use
it.
- If the adapter or the charging stand is damaged, always have it replaced
with one of the original types in order to avoid a hazard.
- Do not use the appliance if the shaving head or one of the trimming
combs is damaged or broken, as this may cause injury.
- This appliance is only intended for trimming and dry shaving facial hair
(beard, moustache and sideburns).
General
- The appliance complies with the internationally approved IEC safety
regulations and can be safely cleaned under the tap.
Compliance with standards
This Philips appliance complies with all standards regarding electromagnetic
elds (EMF). If handled according to the instructions in this user manual, the
appliance is safe to use based on scientic evidence available today.
Charging
QS6160 only: Charging normally takes approx. 1 hour.
QS6140 only: Charging normally takes approx. 4 hours.
When the appliance is fully charged, it has an operating time of 50 minutes.
Battery status indicator :
- When the battery status indicator ashes white, the battery is being
charged.
- When the battery status indicator lights up white continuously, the
battery is fully charged. This indication is shown for 30 minutes and
then the battery status indicator goes out.
- When the battery status indicator ashes orange, the battery is almost
empty (approx. 10 minutes of operating time left).
- When the battery status indicator ashes orange quickly, the battery
is empty and you have to charge the appliance before you can use it
again.
Note: The appliance can only be charged in the charging stand.
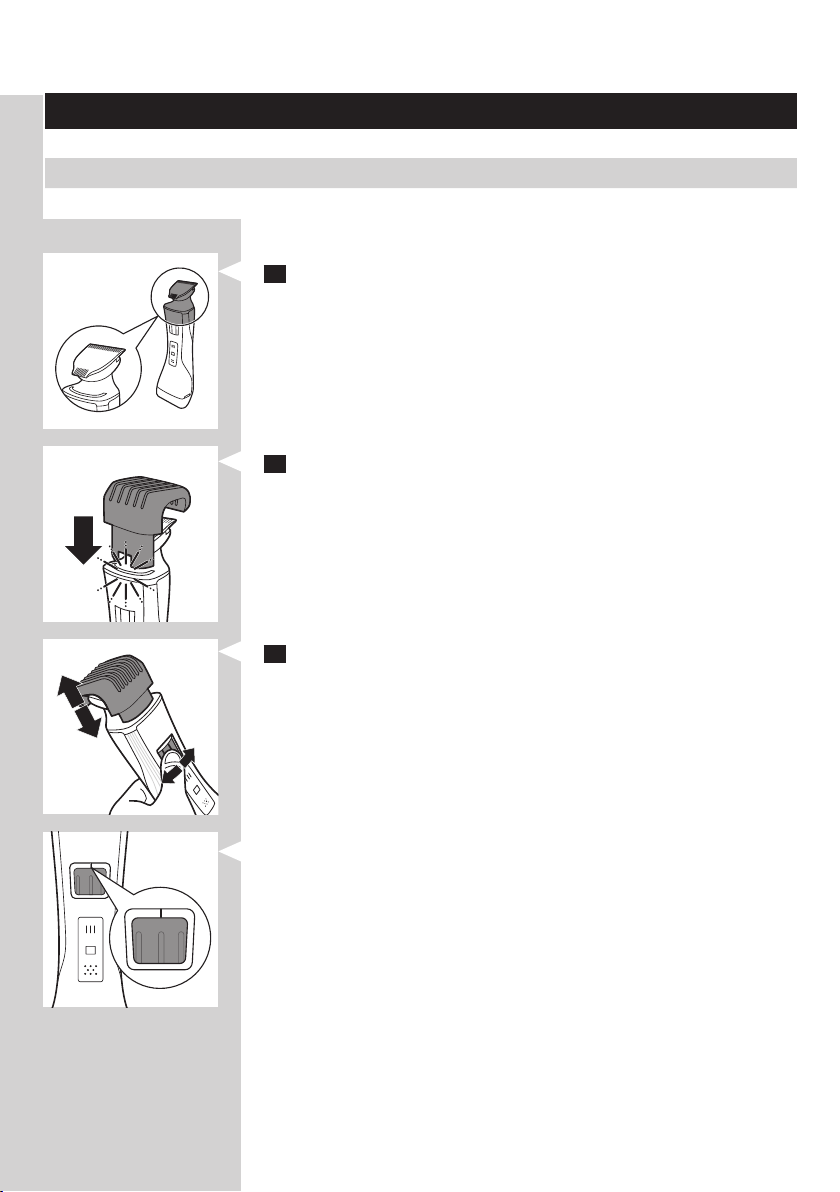
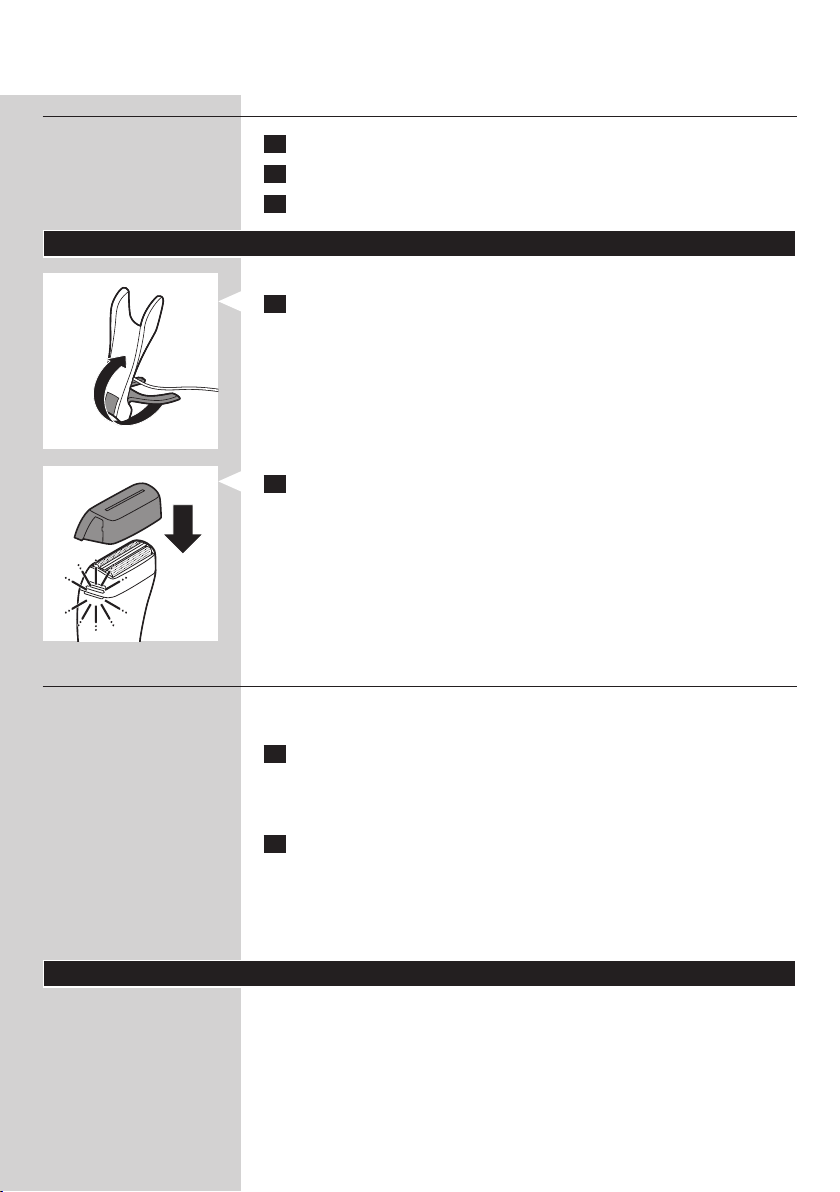
1 Insert the small plug into the charging stand.
Note: The small plug is easiest to insert when the charging stand is folded.
2 Unfold the charging stand (‘click’).
3 Put the adapter in the wall socket.
Page 8

ENGLISH8
4 Put the appliance in the charging stand.
, The battery status indicator starts to ash white to indicate that the
appliance is charging.
, When the battery is fully charged, the battery status indicator lights
up white continuously.
Using the appliance
You can use the appliance to trim or dr y shave facial hair (beard,
moustache and sideburns). This appliance is not intended for shaving or
trimming lower body parts.
Tip: Take your time when you rst start to shave. You have to acquire practice
with the appliance. Your skin also needs some time to adjust to the procedure.
Trimming with comb
The trimming combs allow you to trim to different lengths.
Start at the highest setting to acquire practice with this appliance.
See the table below for an overview of the hair length settings and the
corresponding hair lengths.
Setting Hair length after trimming
1 1 mm - 3/64 inch
. 1.5 mm - 1/16 inch
2 2 mm - 5/65 inch
. 2.5 mm - 3/32 inch
3 3 mm - 1/8 inch
4 4 mm - 5/32 inch
5 5 mm - 3/16 inch
6 6 mm - 1/4 inch
7 7 mm - 9/32 inch
8 8 mm - 5/15 inch
Page 9
Setting Hair length after trimming
9 9 mm - 3/8 inch
10 10 mm - 13/32 inch
* no comb = 0.5mm - 1/32 inch
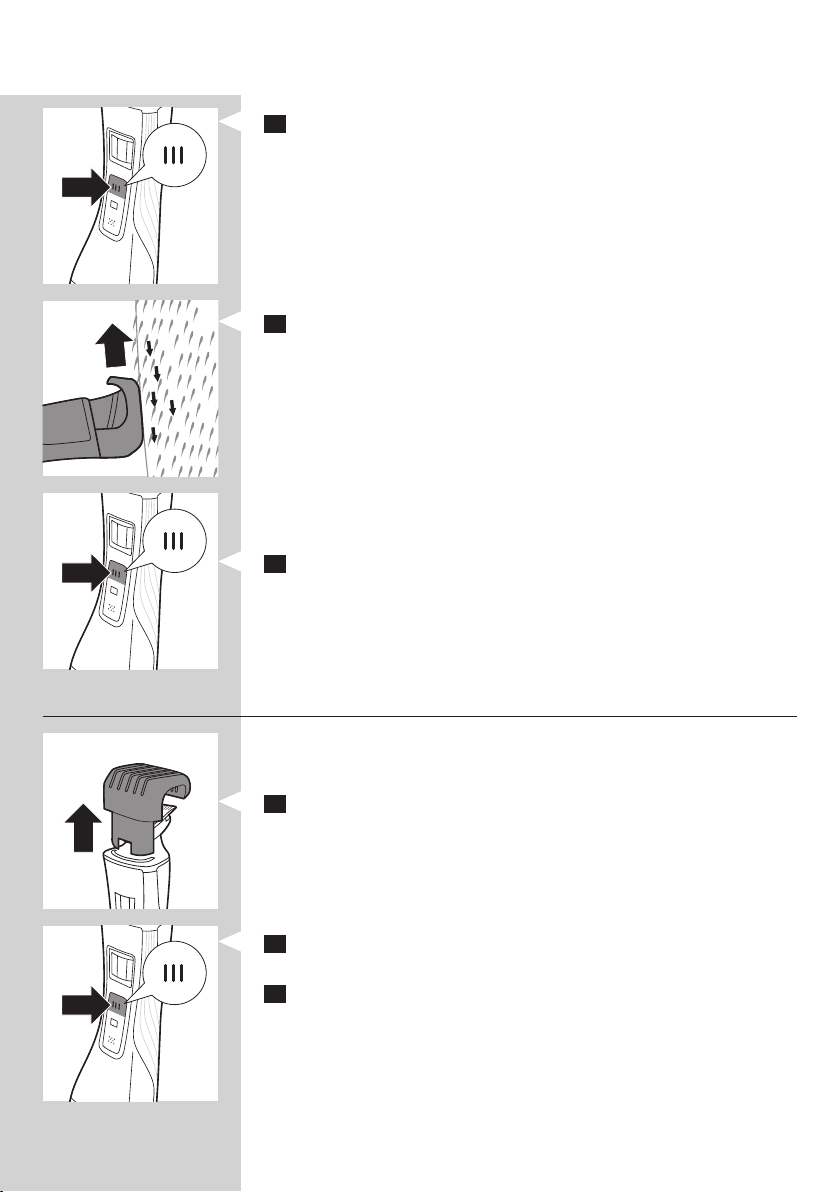
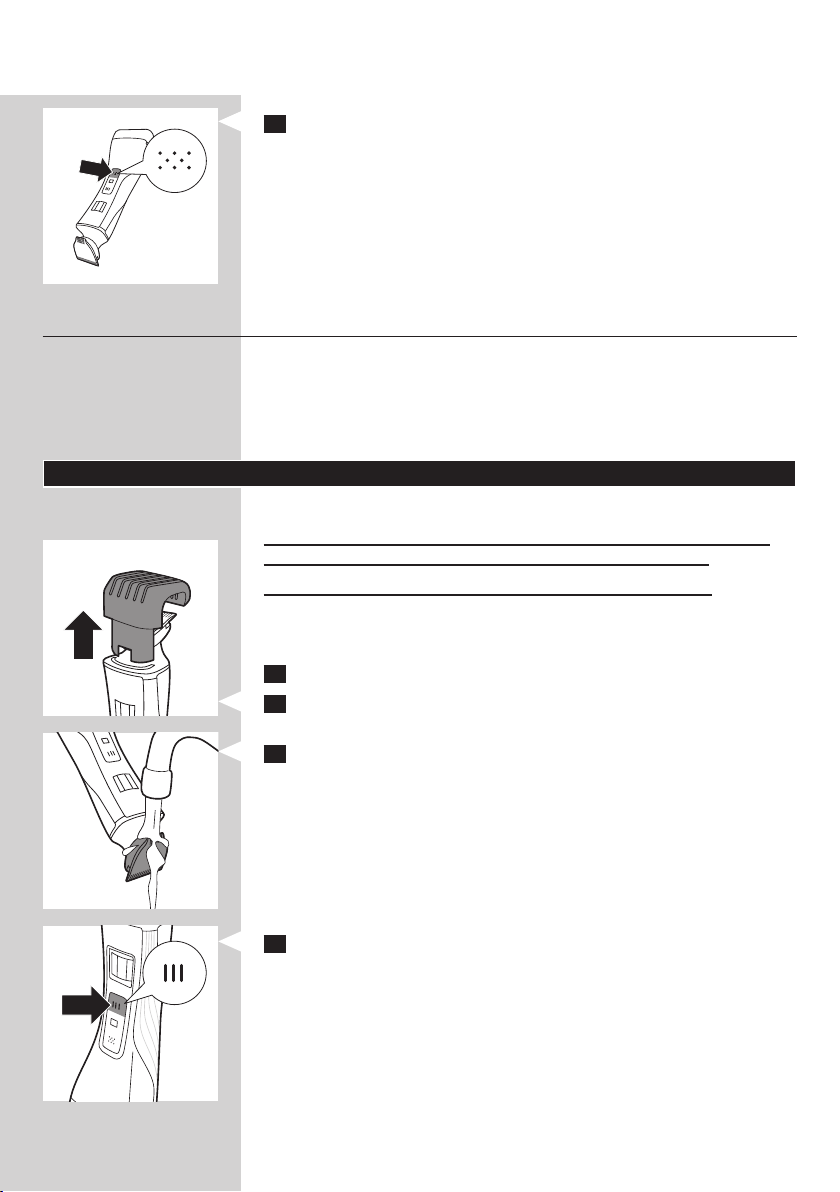
1 Hold the appliance in the trimming position, with the trimming head
pointing upwards and the shaving head pointing downwards.
2 Slide the comb into guiding groove of the appliance (‘click’).
ENGLISH 9
3 Press the hair length setting selector and then move it from left to
right or right to left to select a setting.
- The line above the hair length setting selector shows which setting you
have selected.
3 24
Page 10

ENGLISH10
4 Press the trimming head on/off button once to switch on the
trimming head.
, QS6160 only: The on/off button lights up to indicate that the
trimming head is operating.
5 To trim the hair, move the trimming comb through the hair slowly.
Tips
- Always make sure that the tip of the trimming comb points in the
direction in which you move the appliance.
- Make sure that the at part of the trimming comb is always in full
contact with the skin to obtain an even hair length result.
- Since hair grows in different directions, you need to move the appliance
in different directions as well (upward, downward or across).
- You can switch on the trimming head while the shaving head is
operating. If you do this, the shaving head is switched off immediately.
- Trimming is easier when the skin and hair are dry.
6 When you are nished, press the trimming head on/off button again
to switch off the trimming head.
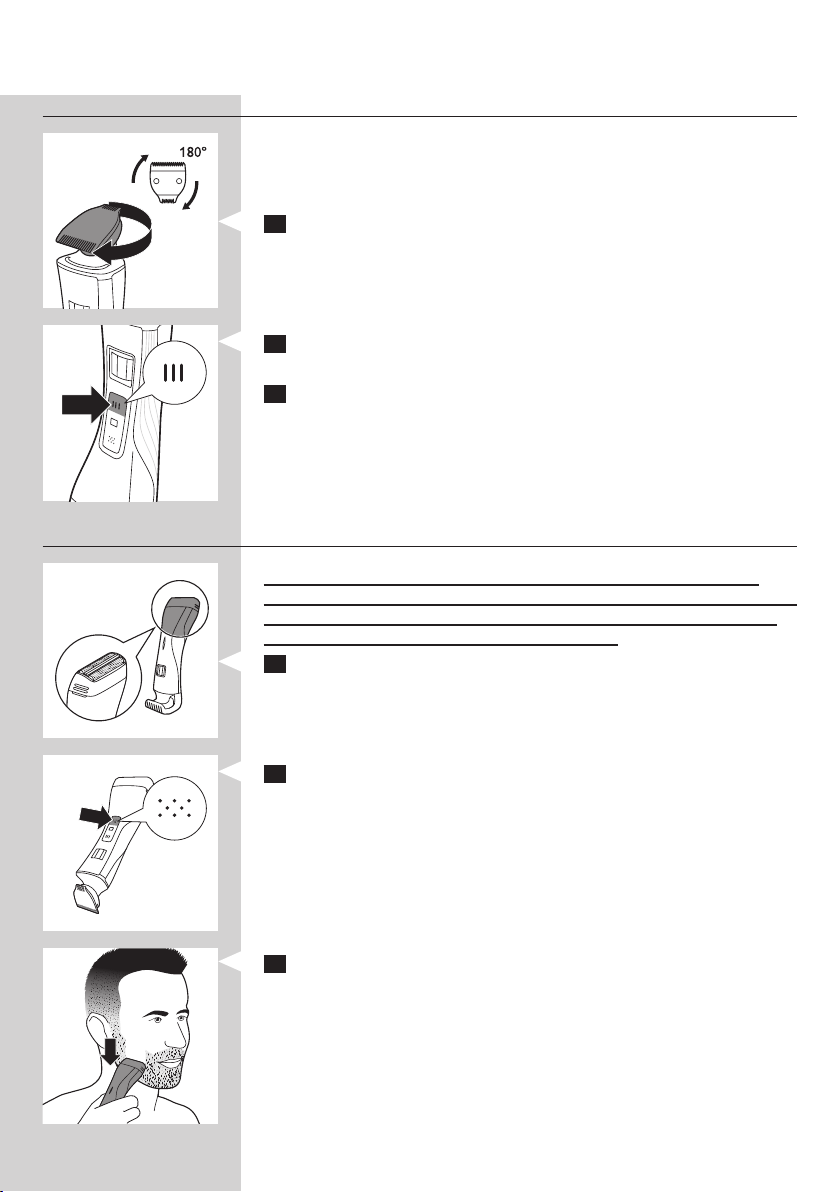
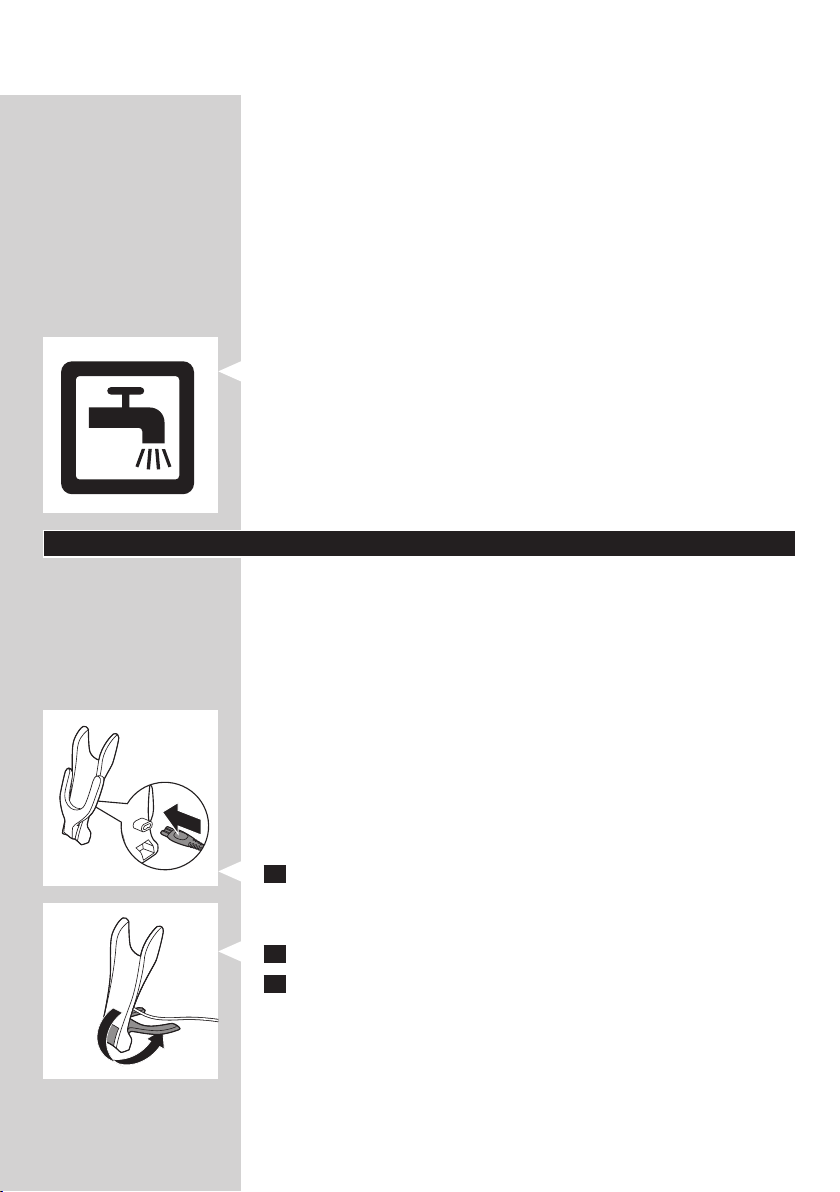
Trimming without comb
The comb keeps the trimming head at a set distance from your head. You
can use the trimming head without comb.If you use the trimming head
without comb, your hair is cut off close to the skin (approx. 0.5 mm).
1 To remove the comb, pull it off the appliance.
Never pull at the exible top of the comb. Always pull at the bottom part.
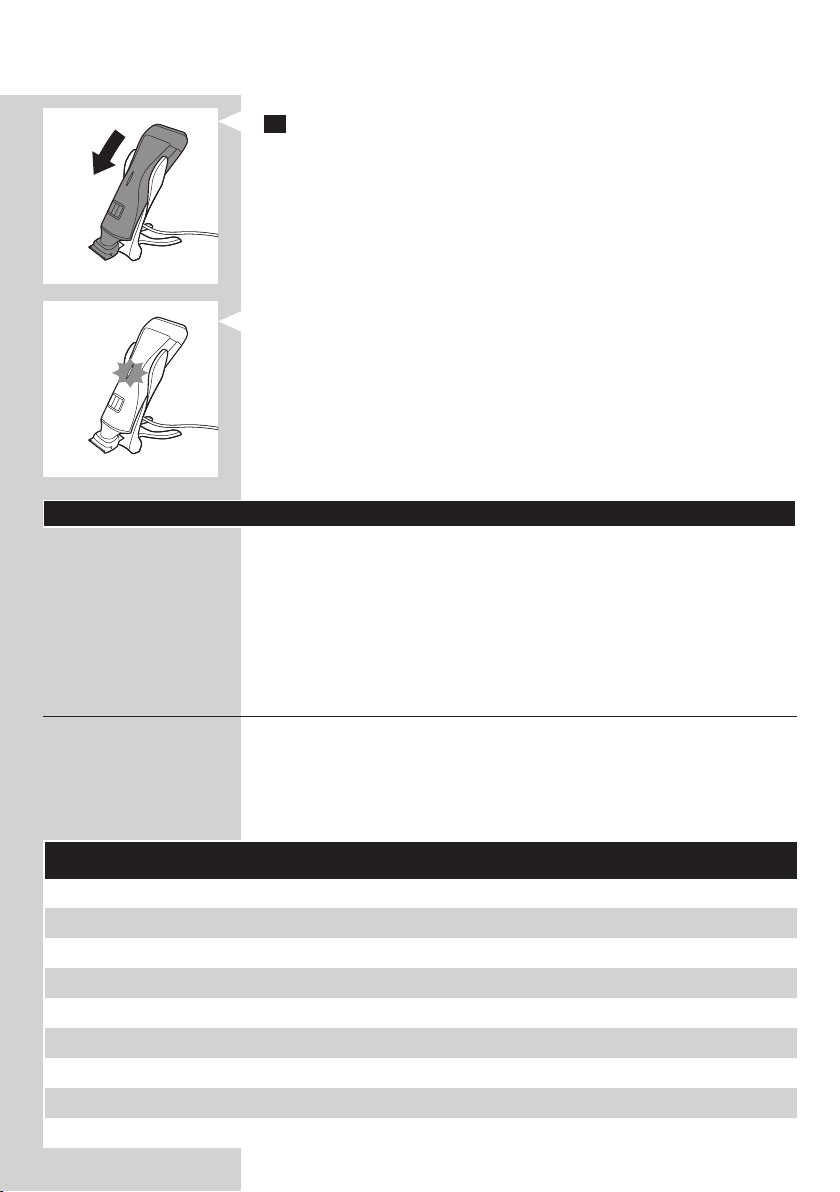
2 Press the trimming head on/off button to switch on the trimming
head.
3 Hold the appliance with the trimming head pointing upwards and
make downward strokes with the broad side of the trimming head.
Page 11

ENGLISH 11
Using the precision trimmer
The precision trimmer is only half as wide as the broad side of the
trimming head. It therefore allows more precise styling of the area around
the ears, the sideburns and also around the mouth and under the nose.
1 To use the precision trimmer, simply turn the cutting unit until the
precision trimmer points towards the front of the appliance.
2 Press the trimming head on/off button to switch on the trimming
head.
3 Hold the appliance with the trimming head pointing upwards and
make downward strokes with the precision trimmer.
Shaving
Before you use the shaving head, always check it for damage or wear. If
the shaving head is damaged or worn, do not use it, as injury may occur.
Replace a damaged shaving head before you use it again (see chapter
‘Replacement’).
1 Hold the appliance in the shaving position, with the shaving head
pointing upwards and the trimming head pointing downwards.
2 Press the shaving head on/off button once to switch on the shaving
head.
, QS6160 only: The on/off button lights up to indicate that the shaving
head is operating.
3 Place the shaving head on the skin and move the appliance against
the direction of hair growth while you press it lightly.
Tip
- Make sure that the shaving head is in full contact with the skin.
- You can switch on the shaving head while the trimming head is
operating. If you do this, the trimming head is switched off immediately.
Page 12

ENGLISH12
4 To switch off the shaving head after use, press the shaving head on/off
button again.
Overload protection
If you press the trimming head or shaving head too hard onto your skin or
if its cutting element gets blocked (e.g. by clothes etc.), the on/off button of
the blocked trimming head or shaving head ashes quickly (QS6160 only)
and the appliance switches off automatically. Remove whatever is blocking
the cutting elements before you use the appliance again.
Cleaning and maintenance
Clean the appliance after every use.
Never use compressed air, scouring pads, abrasive cleaning agents or
aggressive liquids such as petrol or acetone to clean the appliance.
Only clean the appliance and the adapter with the cleaning brush
supplied.
Note: The trimming head and shaving head do not need any lubrication.
Cleaning the trimming head
1 Switch off the appliance.
2 Pull the comb off the trimming head.
3 Clean the trimming head under the tap.
Cleaning the trimming head connector
Note: Make sure you clean the trimming head connector at least once every
three months.
1 Switch off the appliance.
Page 13

ENGLISH 13
2 Gently pull the trimming head off the appliance.
3 Remove the hairs from the inside of the trimming head connector
with the cleaning brush.
4 Clean the inside of the trimming head with the cleaning brush.
5 After cleaning, put the trimming head back onto the appliance.
Cleaning the shaving head
1 Switch off the appliance.
Page 14

ENGLISH14
2 Pull the shaving head off the appliance.
Note: The shaving head is very delicate. Handle it carefully. Replace the shaving
head if it is damaged.
3 Rinse the shaving head with lukewarm water.
Do not clean the shaving head with the cleaning brush, as this may cause
damage.
4 Remove hairs from the cutters with the cleaning brush.
5 After cleaning, snap the shaving head back onto the appliance (‘click’).
Replacement
In case of frequent use, replace the shaving foil and the cutters every year.
Shaving foil
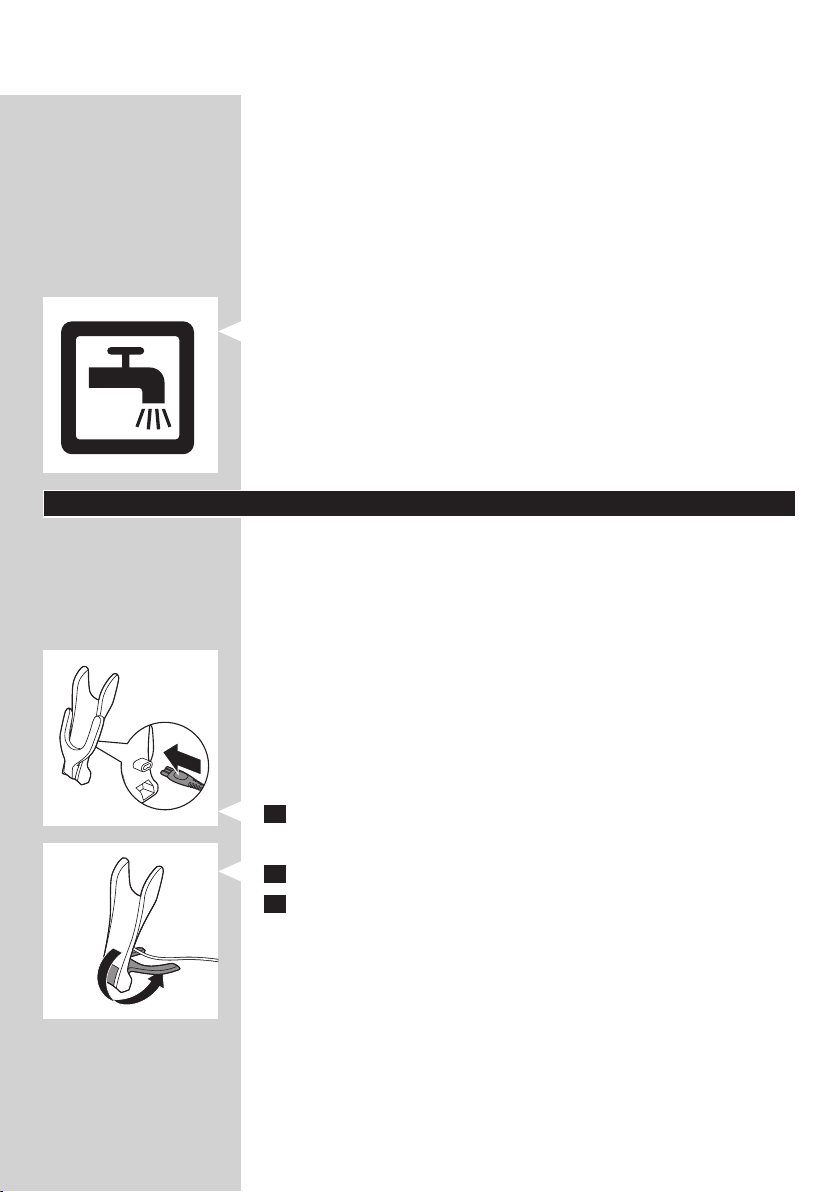
1 Pull the shaving head off the appliance.
2 Remove the old shaving foil from the shaving head.
3 Snap the new shaving foil into the shaving head (‘click’).
Page 15

ENGLISH 15
Cutters
1 Pull the shaving head off the appliance.
2 Remove the cutters.
3 Snap the new cutters onto the appliance (‘click’).
Storage
You can fold the charger for easy travelling or storage.
1 To fold the charger: fold the base of the charger against the appliance
holder.
2 Put the protection cap on the shaving unit.
Travel lock (QS6160 only)
The appliance has an integrated travel lock which prevents the appliance
from accidentally being switched on during travel.
1 To activate the travel lock, press and hold the trimming head on/off
button, the shaving head on/off button or both for at least 4 seconds
while the travel lock indication ashes 3 times.
, The travel lock is only activated when the indication lights up
continuously.
2 To deactivate the travel lock, press and hold the trimming head on/
off button, the shaving head on/off button or both for at least
4 seconds while the travel lock indication ashes 4 times.
, The travel lock is now deactivated and the appliance switches on.
Note: The travel lock can also be deactivated by charging the appliance.
Ordering accessories
To purchase accessories for this appliance, please visit our online shop at
www.shop.philips.com/service. If the online shop is not available in
your country, go to your Philips dealer or a Philips service centre. If you
have any difculties obtaining accessories for your appliance, please contact
the Philips Consumer Care Centre in your country. You nd its contact
details in the worldwide guarantee leaet.
Page 16
ENGLISH16
Environment
- Do not throw away the appliance with the normal household waste
at the end of its life, but hand it in at an ofcial collection point for
recycling. By doing this, you help to preserve the environment.
- The built-in rechargeable battery contains substances that may pollute
the environment. Always remove the battery before you discard and
hand in the appliance at an ofcial collection point. Dispose of the
battery at an ofcial collection point for batteries. If you have trouble
removing the battery, you can also take the appliance to a Philips
service centre. The staff of this centre will remove the battery for you
and will dispose of it in an environmentally safe way.
Removing the rechargeable battery
Only remove the rechargeable battery if it is completely empty.
1 Disconnect the appliance from the mains and let the appliance run
until the motor stops.
2 Remove the shaving head and the cutters from the appliance.
3 Undo the four screws of the top cover with a screwdriver.
4 Remove the cover.
5 Insert a screwdriver under the back panel and remove the panel.
6 Insert the screwdriver under the cover of the basic body and
remove the cover.
, Now you see a printed-circuit board.
7 Break the battery from the printed-circuit board.
Be careful, the battery strips are very sharp.
Guarantee and service
If you need service or information or if you have a problem, please visit
the Philips website at www.philips.com/support or contact the Philips
Consumer Care Centre in your country. You nd its phone number in the
worldwide guarantee leaet. If there is no Consumer Care Centre in your
country, go to your local Philips dealer.
Page 17

DANSK
Introduktion
Tillykke med dit køb og velkommen til Philips! For at få fuldt udbytte
af den support, Philips tilbyder, skal du registrere dit produkt på
www.philips.com/welcome.
1 Præcisionstrimmer (32 mm)
2 Trimmehoved
3 Præcisionstrimmer (15 mm)
4 Styrerille
5 Indstillingsvælger for hårlængde
6 On/off-knap for trimmerhoved
7 Rejselås-indikator (kun QS6160)
8 On/off-knap for shaverhoved
9 Shaverhoved
10 Batteristatusindikator
11 Trimmekam
12 Trimmekam (kun QS6160)
13 Opladeenhed
14 Adapter med lille stik
15 Beskyttelseskappe
16 Rensebørste
17 Opbevaringsetui (kun QS6160)
Vigtigt
Læs denne brugsvejledning omhyggeligt igennem, inden apparatet tages i
brug, og gem den til eventuelt senere brug.
Fare
- Hold adapteren tør.
Advarsel
- Kontrollér, om den angivne netspænding på adapteren svarer til den
lokale netspænding, før du slutter strøm til opladeren.
- Adapteren indeholder en transformer. Adapteren må ikke klippes af og
udskiftes med et andet stik, da dette vil forårsage en farlig situation.
- Dette apparat er ikke beregnet til at blive brugt af personer (herunder
børn) med nedsatte fysiske og mentale evner, nedsat følesans eller
manglende erfaring og viden, medmindre de er blevet vejledt eller
instrueret i apparatets anvendelse af en person, der er ansvarlig for
deres sikkerhed.
- Dette apparat er ikke beregnet til at blive brugt af børn. Hold apparatet
uden for børns rækkevidde for at sikre, at de ikke leger med det.
Forsigtig
- Brug, oplad og opbevar altid apparatet ved en temperatur mellem 5°C
og 35°C.
- Oplad ikke apparatet i opbevaringsetuiet.
- Brug kun medfølgende adapter og opladeenhed.
- Apparatet må aldrig nedsænkes ned i vand eller andre væsker eller
bruges i badet. Skyl kun apparatet under vandhanen for at rengøre det.
17
Page 18
DANSK18
- Hvis apparatet udsættes for store temperatursvingninger, tryk eller
fugtighed, skal du lade det akklimatisere sig i 30 minutter, inden det
tages i brug.
- Hvis adapteren eller opladeenheden beskadiges, må delene kun
udskiftes med tilsvarende originale dele af samme type for at undgå
enhver risiko.
- Brug ikke apparatet, hvis shaverhovedet eller en af trimmekammene er
beskadiget eller i stykker, da det kan forårsage personskade.
- Dette apparat er udelukkende beregnet til trimning og tør barbering af
ansigtshår (skæg, moustache og bakkenbarter).
Generelt
- Produktet opfylder de internationalt godkendte IEC-sikkerhedsregler og
kan skylles under rindende vand uden risiko.
Overholdelse af standarder
Dette Philips-apparat overholder alle standarder for elektromagnetiske
felter (EMF). Ved korrekt anvendelse i overensstemmelse med
instruktionerne i denne brugsvejleding, er apparatet sikkert at anvende,
ifølge den videnskabelige viden, der er tilgængelig i dag.
Opladning
Kun QS6160: Opladning tager normalt ca. 1 time.
Kun QS6140: Opladning tager normalt ca. 4 timer.
Når apparatet er fuldt opladet, har det en brugstid på 50 minutter.
Batteristatusindikator:
- Når batteristatusindikatoren blinker hvidt, oplades batteriet.
- Når batteristatusindikatoren lyser konstant hvidt, er batteriet fuldt
opladet. Denne indikation vises i 30 minutter, og derefter slukkes
batteristatusindikatoren.
- Når batteristatusindikatoren blinker orange, er batteriet næsten tomt
(ca. 10 minutters brugstid tilbage).
- Når batteristatusindikatoren blinker orange hurtigt, er batteriet tomt,
og du skal oplade apparatet, før du kan bruge det igen.
Bemærk: Apparatet kan kun oplades i opladeenheden.
1 Sæt det lille stik i opladeren.
Bemærk: Det lille stik er lettest at sætte i, når opladeren er sammenfoldet.
2 Fold opladeenheden ud (“klik”).
3 Slut adapteren til stikkontakten.
Page 19

DANSK 19
4 Placer apparatet i opladeindikatoren.
, Batteristatusindikatoren begynder at blinke hvidt for at angive, at
apparatet er under opladning.
, Når batteriet er fuldt opladet, lyser batteristatusindikatoren konstant.
Sådan bruges apparatet
Du kan bruge apparatet til trimning eller tør barbering af ansigtshår (skæg,
moustache og bakkenbarter). Dette apparat er ikke beregnet til barbering
eller trimning af lavere kropszoner.
Tip: Giv dig ekstra god tid, når du barberer dig, indtil du har vænnet dig til at
bruge apparatet. Det tager også lidt tid, inden huden har vænnet sig til denne
metode.
Trimning med kam
Med trimmekammene kan du trimme til forskellige længder.
Begynd med den højeste indstilling for at vænne dig til at bruge apparatet.
Nedenstående tabel indeholder en oversigt over
hårlængdeindstillingerne og de tilsvarende hårlængder.
Indstilling Hårlængde efter trimning
1 1 mm - 3/64 tommer
. 1,5 mm - 1/16 tommer
2 2 mm - 5/65 tommer
. 2,5 mm - 3/32 tommer
3 3 mm - 1/8 tommer
4 4 mm - 5/32 tommer
5 5 mm - 3/16 tommer
6 6 mm - 1/4 tommer
7 7 mm - 9/32 tommer
8 8 mm - 5/15 tommer
Page 20

DANSK20
Indstilling Hårlængde efter trimning
9 9 mm - 3/8 tommer
10 10 mm - 13/32 tommer
* uden kam = 0,5 mm - 1/32 tommer
1 Hold apparatet i trimmeposition, hvor trimmerhovedet peger opad,
og shaverhovedet peger nedad.
2 Skub kammen ind i styrerillen på apparatet (“klik”).
3 Tryk på hårlængdeindstillingsvælgeren, og yt det derefter fra venstre
mod højre eller højre mod venstre for at vælge en indstilling.
- Linjen over hårlængdeindstillingsvælgeren viser, hvilken indstilling du har
valgt.
3 24
Page 21
DANSK 21
4 Kun QS6160: Tryk på on/off-knappen til trimmerhovedet én gang for
at tænde for enheden.
, Kun QS6160: On/off-knappen lyser for at vise, at trimmerhovedet er
i brug.
5 Bevæg trimmekammen langsomt gennem håret for at trimme det.
Gode råd
- Sørg altid for, at trimmekammens spids peger i den retning, du bevæger
apparatet.
- Sørg for, at den ade del af trimmekammen altid er i fuld kontakt med
huden for at opnå et ensartet resultat.
- Da hår vokser i forskellige retninger, skal du bevæge apparatet i
forskellige retninger (opad, nedad eller på tværs).
- Du kan tænde trimmerhovedet mens shaverhovedet er i brug. Hvis du
gør det, slukkes shaverhovedet med det samme.
- Trimningen er nemmest på tør hud og hår.
6 Når du er færdig, skal du trykke på on/off-knappen til
trimmerhovedet igen for at slukke for enheden.
Trimning uden kam
Kammen holder trimmerhovedet på en indstillet afstand fra dit hoved. Du
kan bruge trimmerhovedet uden kam. Hvis du bruger trimmerhovedet
uden kam, klippes håret tæt mod huden (ca. 0,5 mm).
1 Hvis du vil fjerne kammen, skal du trække den af apparatet.
Træk aldrig i den øverste, eksible del af afstandskammen. Træk kun i den
nederste del.
2 Tryk på on/off-knappen til trimmerhovedet én gang for at tænde for
enheden.
3 Hold apparatet, så trimmerhovedet peger opad, og bevæg det i
nedadgående strøg med den brede del af trimmerhovedet.
Page 22
DANSK22
Brug af præcisions-trimmeren
Præcisionstrimmeren er kun halvt så bred som den brede del af
trimmerhovedet. Den giver derfor mulighed for mere præcis styling af
området omkring ørerne, bakkenbarter og også omkring munden og under
næsen.
1 Brug præcisionstrimmeren ved at dreje skærenheden, indtil
præcisionstrimmeren peger mod apparatets forside.
2 Tryk på on/off-knappen til trimmerhovedet én gang for at tænde for
enheden.
3 Hold apparatet, så trimmerhovedet peger opad, og bevæg det i
nedadgående strøg med præcisionstrimmeren.
Barbering
Før du anvender shaverhovedet, skal du altid kontrollere, om det er
beskadiget eller slidt. Hvis det er det, må du ikke anvende det, da det kan
medføre risiko for personskade. Udskift det beskadigede shaverhoved,
før du bruger det igen (se kapitlet “Udskiftning”).
1 Hold apparatet i barberingsposition, så shaverhovedet vender opad,
og trimmerhovedet peger nedad.
2 Tryk på on/off-knappen til shaverhovedet én gang for at tænde for
enheden.
, Kun QS6160: On/off-knappen lyser for at vise, at shaverhovedet er i
brug.
3 Sæt shaverhovedet ned på huden, og før apparatet med ganske let
tryk imod hårenes vækstretning.
Tips
- Sørg for, at shaverhovedet altid er i fuld kontakt med huden.
- Du kan tænde shaverhovedet, mens trimmerhovedet er i brug. Hvis du
gør det, slukkes trimmerhovedet med det samme.
Page 23
DANSK 23
4 For at slukke shaverhovedet efter brug skal du trykke på on/off-
knappen igen.
Overbelastningssikring
Hvis du trykker trimmerhovedet eller shaverhovedet for hårdt mod huden,
eller hvis skærenheden blokeres (f.eks. af tøj), blinker on/off-knappen for
det blokerede trimmerhovedet eller shaverhovedet (kun QS6160) og
apparatet slukkes automatisk. Fjern det, der blokerer skærenheden, før du
tager apparatet i brug igen.
Rengøring og vedligeholdelse
Rengør altid apparatet efter brug.
Brug aldrig trykluft, skuresvampe eller skrappe rengøringsmidler som
f.eks. benzin, acetone eller lignende til rengøring af apparatet.
Rengør kun apparat og adapter med den medfølgende børste.
Bemærk: Trimmerhovedet og shaverhovedet skal ikke smøres.
Rengøring af trimmerhovedet
1 Sluk for apparatet.
2 Træk kammen af trimmerhovedet.
3 Rengør trimmerhovedet under vandhanen.
Rengøring af trimmerhovedets tilslutningsdel
Bemærk: Sørg for at rengøre trimmerhovedets tilslutningsdel mindst en gang
hver tredje måned.
1 Sluk for apparatet.
Page 24

DANSK24
2 Træk forsigtigt trimmerhovedet af apparatet.
3 Fjern hårene fra indersiden af trimmerhovedets tilslutningsdel med
rensebørsten.
4 Rengør trimmerhovedets inderside med rensebørsten.
5 Sæt trimmerhovedet tilbage på apparatet.
Rengøring af shaverhovedet
1 Sluk for apparatet.
Page 25

DANSK 25
2 Træk shaverhovedet af apparatet.
Bemærk: Shaverhovedet er meget sart og skal håndteres varsomt. Udskift
shaverhovedet, hvis det er beskadiget.
3 Skyl shaverhovedet med lunkent vand.
Rengør ikke shaverhovedet med rensebørsten, da dette kan beskadige
den.
4 Fjern hår fra skærene med rensebørsten.
5 Tryk shaverhovedet på apparatet igen (“klik”) efter rengøringen.
Udskiftning
I tilfælde af hyppig brug udskiftes skærfolien og skærene hvert år.
Skærfolie
1 Træk shaverhovedet af apparatet.
2 Fjern den gamle skærfolie fra shaverhovedet.
3 Sæt den nye skærefolie på shaverhovedet (“klik”).
Page 26
DANSK26
Skær
1 Træk shaverhovedet af apparatet.
2 Fjern skærene.
3 Tryk de nye skær på apparatet (“klik”).
Opbevaring
Du kan folde opladeren for nem transport eller opbevaring.
1 Foldning af opladeren: Fold bunden af opladeren mod
apparatholderen.
2 Sæt beskyttelseshætten på shaverenheden.
Rejselås (kun QS6160)
Apparatet er udstyret med en integreret rejselås, der forhindrer, at
apparatet tændes utilsigtet under transport.
1 For at aktivere rejselåsen skal du trykke på og holde
trimmerhovedets on/off-knap, shaverhovedets on/off-knap eller begge
i min. 4 sekunder, mens rejselås-indikatoren blinker 3 gange.
, Rejselåsen er kun aktiveret, når indikatoren lyser konstant.
2 For at deaktivere rejselåsen skal du trykke på og holde
trimmerhovedets on/off-knap, shaverhovedets on/off-knap eller begge
i min. 4 sekunder, mens rejselås-indikatoren blinker 4 gange.
, Rejselåsen er nu deaktiveret og apparatet tændes.
Bemærk: Rejselåsen kan også deaktiveres ved opladning af apparatet.
Bestilling af tilbehør
Hvis du vil købe tilbehør til dette apparat, skal du besøge vores
onlinebutik på www.shop.philips.com/service. Hvis onlinebutikken
ikke er tilgængelig i dit land, skal du gå til din Philips-forhandler eller et
Philips Kundecenter. Hvis du har problemer med at skaffe tilbehør til
apparatet, kan du kontakte dit lokale Philips Kundecenter. Du kan nde
kontaktoplysningerne i folderen “World-Wide Guarantee.
Page 27

DANSK 27
Miljøhensyn
- Apparatet må ikke smides ud sammen med almindeligt
husholdningsaffald, når det til sin tid kasseres. Aevér det i stedet på
en kommunal genbrugsstation. På den måde er du med til at beskytte
miljøet.
- Det indbyggede genopladelige batteri indeholder stoffer, der kan
forurene miljøet. Fjern altid batteriet, før du kasserer apparatet og
aeverer det på en genbrugsstation. Aevér batteriet på et ofcielt
indsamlingssted for brugte batterier. Kan du ikke få batteriet ud, kan du
aevere apparatet til Philips, som vil sørge for at tage batteriet ud og
bortskaffe det på en miljømæssig forsvarlig måde.
Udtagning af det genopladelige batteri
Tag kun det genopladelige batteri ud, hvis det er helt aadet.
1 Tag stikket ud af stikkontakten, og lad apparatet køre, indtil motoren
stopper af sig selv.
2 Fjern shaverhovedet og skærene fra apparatet.
3 Løsn de re skruer på topdækslet med en skruetrækker.
4 Fjern dækslet.
5 Sæt en skruetrækker ind under bagpanelet, og fjern panelet.
6 Sæt skruetrækkeren ind under dækslet på basisdelen, og fjern
dækslet.
, Nu kan du se en printplade.
7 Tag batteriet af printpladen.
Pas på - strimlerne på batteriet er meget skarpe.
Reklamationsret og service
Hvis du har brug for hjælp eller oplysninger, eller hvis der opstår et
problem, skal du besøge Philips’ websted på www.philips.com/support
eller kontakte dit lokale Philips Kundecenter. Telefonnumre ndes i vedlagte
“worldwide guarantee”-folder. Hvis der ikke ndes et kundecenter i dit
land, bedes du kontakte din lokale Philips-forhandler.
Page 28

28
DEUTSCH
Einführung
Herzlichen Glückwunsch zu Ihrem Kauf und willkommen bei Philips! Um
das Kundendienstangebot von Philips vollständig nutzen zu können, sollten
Sie Ihr Produkt unter www.philips.com/welcome registrieren.
Allgemeine Beschreibung (Abb. 1)
1 Präzisionstrimmer (32 mm)
2 Trimmkopf
3 Präzisionstrimmer (15 mm)
4 Führungsrille
5 Schnittlängenregler
6 Ein-/Ausschalter des Tr immkopfes
7 Reisesicherungsanzeige (nur QS6160)
8 Ein-/Ausschalter des Scherkopfes
9 Scherkopf
10 Akkustandanzeige
11 Kammaufsatz
12 Kammaufsatz (nur QS6160)
13 Ladegerät
14 Adapter mit kleinem Stecker
15 Schutzkappe
16 Reinigungsbürste
17 Aufbewahrungstasche (nur QS6160)
Wichtig
Lesen Sie diese Bedienungsanleitung vor dem Gebrauch des Geräts
aufmerksam durch, und bewahren Sie sie für eine spätere Verwendung auf.
Gefahr
- Halten Sie den Adapter trocken.
Warnhinweis
- Überprüfen Sie vor dem ersten Gebrauch, ob die Spannungsangabe auf
dem Adapter mit der örtlichen Netzspannung übereinstimmt.
- Der Adapter enthält einen Transformator. Ersetzen Sie den
Adapter keinesfalls durch einen anderen Stecker, da dies eine
Gefährdungssituation darstellt.
- Dieses Gerät ist für Benutzer (einschl. Kinder) mit eingeschränkten
physischen, sensorischen oder psychischen Fähigkeiten bzw. ohne
jegliche Erfahrung oder Vorwissen nur dann geeignet, wenn eine
angemessene Aufsicht oder ausführliche Anleitung zur Benutzung des
Geräts durch eine verantwortliche Person sichergestellt ist.
- Kinder sollten dieses Gerät nicht benutzen. Achten Sie darauf, dass
Kinder nicht mit dem Gerät spielen.
Achtung
- Benutzen und laden Sie das Gerät bei Temperaturen zwischen 5 °C
und 35 °C. Bewahren Sie es auch in diesem Temperaturbereich auf.
- Nehmen Sie das Gerät zum Auaden aus der Aufbewahrungstasche.
- Verwenden Sie nur den mitgelieferten Adapter und die mitgelieferte
Ladestation.
Page 29
DEUTSCH 29
- Tauchen Sie das Gerät nicht in Wasser oder eine andere Flüssigkeit, und
verwenden Sie es nicht unter der Dusche. Spülen Sie das Gerät zum
Reinigen nur unter ießendem Wasser ab.
- Wird das Gerät hohen Temperatur-, Druck- oder
Feuchtigkeitsschwankungen ausgesetzt, sollten Sie es vor Gebrauch
30 Minuten an die Umgebung anpassen lassen.
- Um Gefährdungen zu vermeiden, dürfen Adapter oder Ladestation bei
einem Defekt nur durch ein Original-Ersatzteil ausgetauscht werden.
- Um Verletzungen zu vermeiden, benutzen Sie das Gerät nicht, wenn
der Scherkopf oder einer der Kammaufsätze beschädigt oder defekt ist.
- Dieses Gerät ist nur zum Trimmen und trockenen Rasieren von
Gesichtshaar vorgesehen (Bart, Schnurrbart und Koteletten).
Allgemeines
- Das Gerät erfüllt die internationalen IEC-Sicherheitsvorschriften und
kann ohne Bedenken unter ießendem Wasser gereinigt werden.
Normerfüllung
Dieses Philips Gerät erfüllt sämtliche Normen bezüglich
elektromagnetischer Felder (EMF). Nach aktuellen wissenschaftlichen
Erkenntnissen ist das Gerät sicher im Gebrauch, sofern es entsprechend
den Anweisungen in dieser Bedienungsanleitung gehandhabt wird.
Laden
Nur QS6160: Das Auaden dauert normalerweise etwa 1 Stunde.
Nur QS6140: Das Auaden dauert normalerweise etwa 4 Stunden.
Das voll aufgeladene Gerät hat eine Betriebsdauer von 50 Minuten.
Akkustandanzeige
- Wenn die Akkustandanzeige weiß blinkt, wird der Akku aufgeladen.
- Wenn die Akkustandanzeige dauerhaft weiß leuchtet, ist der Akku
vollständig aufgeladen. Diese Anzeige wird 30 Minuten lang angezeigt,
danach erlischt die Akkustandanzeige
- Wenn die Akkustandanzeige orange blinkt ist der Akku fast leer
(ungefähr 10 Minuten Betriebsdauer verbleiben).
- Wenn die Akkustandanzeige schnell orange blinkt, ist der Akku leer,
und Sie müssen das Gerät auaden, bevor Sie es wieder verwenden
können.
Hinweis: Das Gerät kann nur in der Ladestation aufgeladen werden.
1 Stecken Sie den kleinen Stecker in die Ladestation.
Hinweis: Der kleine Stecker lässt sich am einfachsten einstecken, wenn die
Ladestation zusammengeklappt ist.
2 Klappen Sie die Ladestation aus, bis sie hörbar einrastet.
3 Stecken Sie den Adapter in die Steckdose.
Page 30
DEUTSCH30
4 Stellen Sie das Gerät in die Ladestation.
, Die Akkustandanzeige beginnt weiß zu blinken. Dies bedeutet, dass
das Gerät aufgeladen wird.
, Ist der Akku vollständig geladen, leuchtet die Akkustandanzeige
dauerhaft weiß.
Das Gerät benutzen
Sie können das Gerät zum Trimmen oder trockenen Rasieren von
Gesichtshaar verwenden (Bart, Schnurrbart und Koteletten). Dieses Gerät
ist nicht zum Rasieren oder Trimmen von Haaren an anderen Körperstellen
geeignet.
Tipp: Nehmen Sie sich ausreichend Zeit, wenn Sie sich erstmals mit dem Gerät
rasieren. Die Anwendung des Geräts bedarf einiger Übung. Auch muss sich Ihre
Haut erst daran gewöhnen.
Mit Kammaufsatz schneiden
Mit den Kammaufsätzen können Sie verschiedene Schnittlängen einstellen.
Beginnen Sie mit der maximalen Schnittlänge, um sich mit dem Gerät
vertraut zu machen.
In der nachstehenden Tabelle nden Sie eine Übersicht über die
Schnittlängeneinstellungen und die entsprechenden Haarlängen.
Einstellung Haarlänge nach dem Schneiden
1 1 mm
. 1,5 mm
2 2 mm
. 2,5 mm
3 3 mm
4 4 mm
5 5 mm
6 6 mm
7 7 mm
Page 31

Einstellung Haarlänge nach dem Schneiden
8 8 mm
9 9 mm
10 10 mm
* Kein Kammaufsatz = 0,5 mm
1 Halten Sie das Gerät in der Schneideposition, mit dem Trimmkopf
nach oben und dem Scherkopf nach unten.
2 Schieben Sie den Kammaufsatz in die Führungsrille an dem Gerät, bis
er hörbar einrastet.
DEUTSCH 31
3 Drücken Sie den Auswahlschalter für die Schnittlänge, und bewegen
Sie ihn dann von links nach rechts bzw. von rechts nach links, um eine
Einstellung auszuwählen.
- Die Linie über dem Auswahlschalter für die Schnittlänge zeigt die
eingestellte Schnittlänge an.
3 24
Page 32

DEUTSCH32
4 Drücken Sie einmal auf den Ein-/Ausschalter des Schneidekopfes, um
den Schneidekopf einzuschalten.
, Nur QS6160: Der Ein-/Ausschalter leuchtet auf und zeigt damit an
,dass der Schneidekopf in Betrieb ist.
5 Um das Haar zu schneiden, führen Sie den Kammaufsatz langsam
durch das Haar.
Tipps
- Die Spitze des Kammaufsatzes muss in die Richtung zeigen, in die Sie
das Gerät bewegen.
- Die ache Seite des Kammaufsatzes muss immer vollständig auf der
Haut auiegen, um einen gleichmäßigen Schnitt zu erzielen.
- Da Haare in unterschiedliche Richtungen wachsen, müssen Sie das
Gerät auch in unterschiedliche Richtungen bewegen (nach oben, nach
unten, seitlich).
- Sie können den Schneidekopf einschalten, wenn der Scherkopf in
Betrieb ist. Der Scherkopf wird dann sofort ausgeschaltet.
- Das Schneiden von Körperhaar ist bei trockener Haut und trockenem
Haar am einfachsten.
6 Wenn Sie das Haar fertig geschnitten haben, drücken Sie erneut
auf den Ein-/Ausschalter des Schneidekopfes, um den Schneidekopf
auszuschalten.
Ohne Kammaufsatz schneiden
Der Kammaufsatz sorgt dafür, dass der Schneidekopf einen bestimmten
Abstand zum Kopf einhält. Sie können den Schneidekopf auch ohne
Kammaufsatz verwenden. Dann wird Ihr Haar sehr nah an der Haut
abgeschnitten (etwa 0,5 mm).
1 Nehmen Sie den Kammaufsatz ab, indem Sie ihn vom Gerät abziehen.
Ziehen Sie keinesfalls an der beweglichen Spitze des Kammaufsatzes,
sondern nur am unteren Teil.
2 Drücken Sie einmal auf den Ein-/Ausschalter des Schneidekopfes, um
den Schneidekopf einzuschalten.
3 Halten Sie das Gerät so, dass der Schneidekopf nach oben zeigt, und
führen Sie es dann mit der breiten Seite des Schneidekopfes nach
unten.
Page 33

DEUTSCH 33
Den Präzisionstrimmer benutzen
Der Präzisionstrimmer ist nur halb so breit wie die breite Seite des
Schneidekopfes. Er ermöglicht daher präzises Stylen an Ohren, Koteletten,
Mund und Nase.
1 Wenn Sie den Präzisionstrimmer verwenden möchten, drehen Sie
die Schneideeinheit einfach so weit, bis der Präzisionstrimmer zur
Vorderseite des Geräts zeigt.
2 Drücken Sie einmal auf den Ein-/Ausschalter des Schneidekopfes, um
den Schneidekopf einzuschalten.
3 Halten Sie das Gerät so, dass der Schneidekopf nach oben zeigt, und
führen Sie es dann mit dem Präzisionstrimmer nach unten.
Rasieren
Überprüfen Sie den Scherkopf vor Gebrauch auf eventuelle Schäden
oder Abnutzungserscheinungen. Ist der Scherkopf beschädigt oder
abgenutzt, sollten Sie diesen nicht verwenden, um Verletzungen zu
vermeiden. Einen beschädigten Scherkopf sollten Sie austauschen, bevor
Sie das Gerät erneut verwenden (siehe Kapitel “Ersatz”).
1 Halten Sie das Gerät in der Rasierposition, mit dem Scherkopf nach
oben und dem Schneidekopf nach unten.
2 Drücken Sie einmal auf den Ein-/Ausschalter des Scherkopfes, um
den Scherkopf einzuschalten.
, Nur QS6160: Der Ein-/Ausschalter leuchtet auf und zeigt damit an,
dass der Scherkopf in Betrieb ist.
3 Setzen Sie die Schereinheit auf die Haut, und bewegen Sie das Gerät
unter leichtem Druck gegen die Haarwuchsrichtung.
Tipp
- Achten Sie darauf, dass der Scherkopf stets vollen Kontakt zur Haut
hat.
- Sie können den Scherkopf einschalten, wenn der Schneidekopf in
Betrieb ist. Der Schneidekopf wird dann sofort ausgeschaltet.
Page 34

DEUTSCH34
4 Um den Scherkopf nach Gebrauch auszuschalten, drücken Sie erneut
auf den Ein-/Ausschalter des Scherkopfes.
Überlastungsschutz
Wenn Sie den Schneidekopf oder den Scherkopf zu stark gegen die Haut
drücken oder wenn die Schneideeinheit blockiert wird (z. B. durch Kleidung
usw.), blinkt der Ein-/Ausschalter des blockierten Schneidekopfes bzw.
des Scherkopfes schnell (nur QS6160), und das Gerät wird automatisch
ausgeschaltet. Entfernen Sie die Ursache der Blockierung, bevor Sie das
Gerät erneut verwenden.
Reinigen Sie das Gerät nach jedem Gebrauch.
Benutzen Sie zum Reinigen des Geräts keine Druckluft,
Scheuerschwämme und -mittel oder aggressive Flüssigkeiten wie Benzin
oder Azeton.
Reinigen Sie das Gerät und den Adapter nur mit der beiliegenden
Reinigungsbürste.
Hinweis: Schneide- und Scherkopf müssen nicht geölt werden.
Den Schneidekopf reinigen
1 Schalten Sie das Gerät aus.
2 Ziehen Sie den Kammaufsatz vom Schneidekopf ab.
3 Reinigen Sie den Schneidekopf unter ießendem Wasser.
Verbindungsstück des Schneidekopfes reinigen
Hinweis: Das Verbindungsstück des Schneidekopfes muss mindestens einmal
alle drei Monate gereinigt werden.
Page 35

DEUTSCH 35
1 Schalten Sie das Gerät aus.
2 Ziehen Sie den Schneidekopf vorsichtig vom Gerät ab.
3 Entfernen Sie die Haare mit der Reinigungsbürste aus dem Inneren
des Verbindungsstücks.
4 Reinigen Sie das Innere des Schneidekopfes mit der Reinigungsbürste.
5 Setzen Sie den Schneidekopf nach dem Reinigen wieder auf das
Gerät.
Page 36

DEUTSCH36
Den Scherkopf reinigen
1 Schalten Sie das Gerät aus.
2 Ziehen Sie den Scherkopf vom Gerät.
Hinweis: Der Scherkopf ist sehr empndlich, gehen Sie vorsichtig damit um.
Ersetzen Sie den Scherkopf, wenn dieser beschädigt ist.
3 Spülen Sie den Scherkopf mit lauwarmem Wasser ab.
Reinigen Sie den Scherkopf nicht mit der Bürste, um Beschädigungen zu
vermeiden.
4 Entfernen Sie mit der Reinigungsbürste lose Haare von den
Schermessern.
5 Drücken Sie den Scherkopf nach dem Reinigen wieder auf das Gerät
(bis er hörbar einrastet).
Page 37

DEUTSCH 37
Ersatz
Ersetzen Sie die Scherfolie und die Schermesser bei regelmäßiger
Verwendung einmal jährlich.
Scherfolie
1 Ziehen Sie den Scherkopf vom Gerät.
2 Entfernen Sie die alte Scherfolie vom Scherkopf.
3 Drücken Sie die neue Scherfolie in den Scherkopf (bis sie hörbar
einrastet).
Schermesser
1 Ziehen Sie den Scherkopf vom Gerät.
2 Nehmen Sie die Schermesser heraus.
3 Stecken Sie die neuen Schermesser auf das Gerät (bis sie hörbar
einrasten).
Aufbewahrung
Sie können das Ladegerät zur einfachen Reinigung und Aufbewahrung
zusammenklappen.
1 So klappen Sie das Ladegerät zusammen: Klappen Sie den Fuß des
Ladegeräts in Richtung Gerätehalterung.
2 Setzen Sie die Schutzkappe auf die Schereinheit.
Reisesicherung (nur QS6160)
Das Gerät verfügt über eine integrierte Reisesicherung, die verhindert, dass
das Gerät während einer Reise versehentlich eingeschaltet wird.
1 Um die Reisesicherung zu aktivieren, halten Sie den Ein-/Ausschalter
des Schneidekopfes, den Ein-/Ausschalter des Scherkopfes oder beide
mindestens 4 Sekunden lang gedrückt. Die Reisesicherungsanzeige
blinkt 3 Mal.
, Die Reisesicherung wird erst aktiviert, wenn die Anzeige dauerhaft
leuchtet.
Page 38

DEUTSCH38
2 Um die Reisesicherung zu deaktivieren, halten Sie den Ein-/
Ausschalter des Schneidekopfes, den Ein-/Ausschalter des
Scherkopfes oder beide mindestens 4 Sekunden lang gedrückt. Die
Reisesicherungsanzeige blinkt 4 Mal.
, Die Reisesicherung ist nun deaktiviert, und das Gerät wird
eingeschaltet.
Hinweis: Die Reisesicherung kann auch durch Auaden des Geräts deaktiviert
werden.
Zubehör bestellen
Um Zubehör für dieses Gerät zu kaufen, besuchen Sie unseren OnlineShop unter www.shop.philips.com/service. Wenn der Online-
Shop in Ihrem Land nicht verfügbar ist, wenden Sie sich an Ihren Philips
Händler oder ein Philips Service-Center. Sollten Sie Schwierigkeiten
bei der Beschaffung von Zubehör für Ihr Gerät haben, wenden Sie sich
bitte an ein Philips Service-Center in Ihrem Land. Die entsprechenden
Kontaktinformationen nden Sie in der beiliegenden Garantieschrift.
Umwelt
- Geben Sie das Gerät am Ende der Lebensdauer nicht in den
normalen Hausmüll. Bringen Sie es zum Recycling zu einer ofziellen
Sammelstelle. Auf diese Weise tragen Sie zum Umweltschutz bei.
- Der integrierte Akku enthält Substanzen, die die Umwelt gefährden
können. Entfernen Sie den Akku, bevor Sie das Gerät an einer ofziellen
Recyclingstelle abgeben. Geben Sie den gebrauchten Akku bei einer
Batteriesammelstelle ab. Falls Sie beim Entfernen des Akkus Probleme
haben, können Sie das Gerät auch an ein Philips Service-Center geben.
Dort wird der Akku umweltgerecht entsorgt.
Den Akku entfernen
Entnehmen Sie den Akku erst, wenn er ganz leer ist.
1 Trennen Sie das Gerät vom Stromnetz, und lassen Sie es so lange
laufen, bis es zum Stillstand kommt.
2 Nehmen Sie den Scherkopf und die Schermesser vom Gerät.
3 Lösen Sie mit einem Schraubenzieher die vier Schrauben an der
oberen Abdeckung.
4 Nehmen Sie die Abdeckung ab.
5 Gehen Sie mit einem Schraubenzieher unter die hintere Abdeckung,
und nehmen Sie die Abdeckung ab.
6 Gehen Sie mit dem Schraubenzieher unter die Abdeckung des
Hauptelements, und nehmen Sie die Abdeckung ab.
Page 39

DEUTSCH 39
, Jetzt sehen Sie eine Platine.
7 Brechen Sie den Akku von der Platine ab.
Vorsicht: Die Schienen am Akku sind sehr scharf!
Garantie und Kundendienst
Benötigen Sie weitere Informationen oder treten Probleme auf, besuchen
Sie bitte die Philips Website www.philips.com/support, oder setzen
Sie sich mit einem Philips Service-Center in Ihrem Land in Verbindung. Die
Telefonnummer nden Sie in der internationalen Garantieschrift. Sollte es
in Ihrem Land kein Service-Center geben, wenden Sie sich bitte an Ihren
Philips Händler.
Page 40

40
Συγχαρητήρια για την αγορά σας και καλώς ήρθατε στη Philips! Για
να επωφεληθείτε πλήρως από την υποστήριξη που παρέχει η Philips,
δηλώστε το προϊόν σας στην ιστοσελίδα www.philips.com/welcome.
1 Κόπτης ακριβείας (32 χιλ.)
2 Κεφαλή κοπής
3 Κόπτης ακριβείας (15 χιλ.)
4 Εγκοπή-οδηγός
5 Επιλογέας ρυθμίσεων μήκους τριχών
6 Κουμπί ενεργοποίησης/απενεργοποίησης κεφαλής κοπής
7 Ένδειξη κλειδώματος ταξιδίου (μόνο στο QS6160)
8 Κουμπί ενεργοποίησης/απενεργοποίησης ξυριστικής κεφαλής
9 Ξυριστική κεφαλή
10 Ένδειξη κατάστασης μπαταρίας
11 Οδηγός κοπής
12 Χτένα κοπής (μόνο στο QS6160)
13 Βάση φόρτισης
14 Τροφοδοτικό με μικρό βύσμα
15 Προστατευτικό κάλυμμα
16 Βουρτσάκι καθαρισμού
17 Θήκη αποθήκευσης (μόνο στο QS6160)
Διαβάστε προσεκτικά το παρόν εγχειρίδιο χρήσης προτού
χρησιμοποιήσετε τη συσκευή και κρατήστε το για μελλοντική αναφορά.
- Διατηρείτε το τροφοδοτικό στεγνό.
- Προτού συνδέσετε τη συσκευή, ελέγξτε αν η τάση που αναγράφεται
στο τροφοδοτικό αντιστοιχεί στην τοπική τάση ρεύματος.
- Το τροφοδοτικό περιέχει μετασχηματιστή. Μην κόψετε το βύσμα
του τροφοδοτικού για να το αντικαταστήσετε με άλλο, καθώς αυτή
η διαδικασία ενέχει κινδύνους.
- Αυτή η συσκευή δεν προορίζεται για χρήση από άτομα
(συμπεριλαμβανομένων των παιδιών) με περιορισμένες σωματικές,
αισθητήριες ή διανοητικές ικανότητες ή από άτομα χωρίς εμπειρία
και γνώση, εκτός και εάν την χρησιμοποιούν υπό επιτήρηση ή
έχουν λάβει οδηγίες σχετικά με τη χρήση της από άτομο υπεύθυνο
για την ασφάλειά τους.
- Αυτή η συσκευή δεν προορίζεται για χρήση από παιδιά. Τα παιδιά
πρέπει να επιβλέπονται, ώστε να μην παίζουν με τη συσκευή.
- Να χρησιμοποιείτε, να φορτίζετε και να αποθηκεύετε τη συσκευή
σε θερμοκρασία μεταξύ 5°C και 35°C.
- Μην φορτίζετε τη συσκευή μέσα στη θήκη αποθήκευσης.
- Να χρησιμοποιείτε μόνο το τροφοδοτικό και τη βάση φόρτισης
που παρέχονται.
Page 41

41
- Μην βυθίζετε ποτέ τη συσκευή σε νερό ή σε οποιοδήποτε άλλο
υγρό και μην τη χρησιμοποιείτε στο ντους. Να ξεπλένετε τη
συσκευή με τρεχούμενο νερό μόνο για να την καθαρίσετε.
- Αν σημειωθεί μεγάλη αλλαγή στη θερμοκρασία, την πίεση ή
την υγρασία του περιβάλλοντος της συσκευής, αφήστε την να
εγκλιματιστεί για 30 λεπτά πριν τη χρησιμοποιήσετε.
- Αν το τροφοδοτικό ή η βάση φόρτισης υποστούν φθορά,
αντικαταστήστε το ελαττωματικό εξάρτημα μόνο με γνήσιο, προς
αποφυγή κινδύνου.
- Μην χρησιμοποιείτε τη συσκευή αν η ξυριστική κεφαλή ή κάποια
από τις χτένες κοπής έχει φθαρεί ή σπάσει, καθώς μπορεί να
προκληθεί τραυματισμός.
- Αυτή η συσκευή προορίζεται αποκλειστικά για τριμάρισμα και
στεγνό ξύρισμα των τριχών του προσώπου (γένια, μουστάκι και
φαβορίτες).
- Η συσκευή πληροί τους διεθνώς εγκεκριμένους κανονισμούς
ασφαλείας IEC και μπορεί να καθαριστεί με τρεχούμενο νερό με
ασφάλεια.
Αυτή η συσκευή Philips συμμορφώνεται με όλα τα πρότυπα που
αφορούν τα ηλεκτρομαγνητικά πεδία (EMF). Αν τη χρησιμοποιείτε
σύμφωνα με τις οδηγίες αυτού του εγχειριδίου, η συσκευή είναι
ασφαλής στη χρήση βάσει των επιστημονικών αποδείξεων που είναι
διαθέσιμες μέχρι σήμερα.
Μόνο QS6160: Η φόρτιση διαρκεί συνήθως 1 ώρα περίπου.
Μόνο QS6140: Η φόρτιση διαρκεί συνήθως 4 ώρες περίπου.
Όταν η συσκευή είναι πλήρως φορτισμένη, διαθέτει χρόνο λειτουργίας
έως και 50 λεπτά.
Ένδειξη κατάστασης μπαταρίας:
- Όταν η ένδειξη κατάστασης μπαταρίας αναβοσβήνει με λευκό
χρώμα, η μπαταρία φορτίζεται.
- Όταν η ένδειξη κατάστασης μπαταρίας ανάβει σταθερά με λευκό
χρώμα, η μπαταρία είναι πλήρως φορτισμένη. Η ένδειξη παραμένει
αναμμένη για 30 λεπτά και στη συνέχεια σβήνει.
- Όταν η ένδειξη κατάστασης μπαταρίας αναβοσβήνει με πορτοκαλί
χρώμα, η μπαταρία είναι σχεδόν άδεια (απομένουν περίπου 10
λεπτά χρόνου λειτουργίας).
- Όταν η ένδειξη κατάστασης μπαταρίας αναβοσβήνει γρήγορα
με πορτοκαλί χρώμα, η μπαταρία έχει εξαντληθεί και πρέπει να
επαναφορτίσετε τη συσκευή προτού την χρησιμοποιήσετε ξανά.
Σημείωση: Η συσκευή μπορεί να φορτιστεί μόνο στη βάση φόρτισης.
Page 42

42
1 Συνδέστε το μικρό βύσμα στη βάση φόρτισης.
Σημείωση: Το μικρό βύσμα συνδέεται ευκολότερα αν η βάση
φόρτισης είναι αναδιπλωμένη.
2 Αναδιπλώστε τη βάση φόρτισης (“κλικ”).
3 Συνδέστε το τροφοδοτικό στην πρίζα.
4 Τοποθετήστε τη συσκευή στη βάση φόρτισης.
, Η ένδειξη κατάστασης μπαταρίας αρχίζει να αναβοσβήνει με
λευκό χρώμα, υποδεικνύοντας ότι η συσκευή φορτίζεται.
, Όταν η μπαταρία φορτιστεί πλήρως, η ένδειξη κατάστασης
μπαταρίας ανάβει σταθερά με λευκό χρώμα.
Μπορείτε να χρησιμοποιήσετε τη συσκευή για τριμάρισμα και στεγνό
ξύρισμα των τριχών του προσώπου (γένια, μουστάκι και φαβορίτες). Η
συσκευή δεν προορίζεται για ξύρισμα και τριμάρισμα τριχών στα
υπόλοιπα μέρη του σώματος.
Συμβουλή: Μην βιάζεστε όταν ξεκινήσετε για πρώτη φορά το ξύρισμα.
Πρέπει να εξοικειωθείτε με τη χρήση της συσκευής. Το δέρμα σας
χρειάζεται επίσης κάποιο χρόνο για να προσαρμοστεί στη διαδικασία.
Page 43

Οι χτένες κοπής σάς επιτρέπουν να τριμάρετε τις τρίχες σε
διαφορετικά μήκη.
Ξεκινήστε με την υψηλότερη ρύθμιση για να εξοικειωθείτε με τη χρήση
της συσκευής.
Ανατρέξτε στον παρακάτω πίνακα για να δείτε συνοπτικά τις
ρυθμίσεις μήκους τριχών και τα αντίστοιχα μήκη τριχών.
Ρύθμιση Μήκος τριχών μετά την κοπή
1 1 χιλ. - 3/64 ίντσες
. 1,5 χιλ. - 1/16 ίντσες
2 2 χιλ. - 5/65 ίντσες
. 2,5 χιλ. - 3/32 ίντσες
3 3 χιλ. - 1/8 ίντσες
4 4 χιλ. - 5/32 ίντσες
5 5 χιλ. - 3/16 ίντσες
6 6 χιλ. - 1/4 ίντσες
7 7 χιλ. - 9/32 ίντσες
8 8 χιλ. - 5/15 ίντσες
9 9 χιλ. - 3/8 ίντσες
10 10 χιλ. - 13/32 ίντσες
* χωρίς χτένα = 0,5 χιλ.- 1/32 ίντσες
43
1 Κρατήστε τη συσκευή στη θέση τριμαρίσματος, με την κεφαλή
κοπής προς τα πάνω και την ξυριστική κεφαλή προς τα κάτω.
2 Σύρετε τη χτένα στην εγκοπή-οδηγό της συσκευής (‘’κλικ’’).
Page 44

44
3 Πιέστε τον επιλογέα ρύθμισης μήκους τριχών και στη συνέχεια
μετακινήστε τον προς τα αριστερά ή προς τα δεξιά για να
επιλέξετε ρύθμιση.
- Η γραμμή πάνω από τον επιλογέα ρύθμισης υποδεικνύει τη
ρύθμιση που έχετε επιλέξει.
3 24
4 Πιέστε το κουμπί ενεργοποίησης/απενεργοποίησης της κεφαλής
κοπής μία φορά για να την ενεργοποιήσετε.
, Μόνο QS6160: Η λυχνία του κουμπιού ενεργοποίησης/
απενεργοποίησης αναβοσβήνει, υποδεικνύοντας ότι η κεφαλή
κοπής βρίσκεται σε λειτουργία.
5 Για να κόψετε τις τρίχες, περάστε αργά τον οδηγό κοπής μέσα
από αυτές.
- Να βεβαιώνεστε πάντα ότι η άκρη της χτένας κοπής δείχνει προς
την κατεύθυνση προς την οποία μετακινείτε τη συσκευή.
- Να βεβαιώνεστε πάντα ότι το επίπεδο μέρος της χτένας κοπής
ακουμπά εντελώς το δέρμα, για να έχετε ένα ομοιόμορφο
αποτέλεσμα.
- Δεδομένου ότι τα μαλλιά μακραίνουν σε διαφορετικές διευθύνσεις,
πρέπει κι εσείς να περνάτε τη συσκευή από διαφορετικές
διευθύνσεις (προς τα πάνω, προς τα κάτω, προς το πλάι).
- Μπορείτε να ενεργοποιήσετε την κεφαλή κοπής ενώ λειτουργεί
η ξυριστική κεφαλή. Σε αυτήν την περίπτωση, η ξυριστική κεφαλή
απενεργοποιείται αμέσως.
- Το τριμάρισμα είναι πιο εύκολα όταν το δέρμα και οι τρίχες είναι
στεγνά.
Page 45

45
6 Μόλις τελειώσετε, πιέστε ξανά το κουμπί ενεργοποίησης/
απενεργοποίησης της κεφαλής κοπής για να την
απενεργοποιήσετε.
Η χτένα κρατάει την κεφαλή κοπής σε συγκεκριμένη απόσταση από το
κεφάλι σας. Μπορείτε να χρησιμοποιήσετε την κεφαλή κοπής χωρίς τη
χτένα. Σε αυτήν την περίπτωση, τα μαλλιά σας θα κοπούν πολύ κοντά
(περίπου 0,5 χιλ.).
1 Για να αφαιρέσετε τη χτένα, τραβήξτε την από τη συσκευή.
Μην τραβάτε ποτέ τη χτένα από το εύκαμπτο επάνω μέρος της. Να την
τραβάτε πάντα από το κάτω μέρος.
2 Πιέστε το κουμπί ενεργοποίησης/απενεργοποίησης για να
ενεργοποιήσετε την κεφαλή κοπής.
3 Κρατήστε τη συσκευή με την κεφαλή κοπής προς τα πάνω και
κάντε κινήσεις προς τα κάτω με την πλατιά πλευρά της κεφαλής
κοπής.
Ο κόπτης ακριβείας έχει μόλις το μισό πλάτος από την κεφαλή κοπής.
Γι’ αυτό και σας επιτρέπει να τριμάρετε με ακρίβεια την περιοχή γύρω
από τα αυτιά, τις φαβορίτες, καθώς και την περιοχή γύρω από το
στόμα και κάτω από τη μύτη.
1 Για να χρησιμοποιήσετε τον κόπτη ακριβείας, απλώς γυρίστε τη
μονάδα κοπής μέχρι ο κόπτης ακριβείας να είναι στραμμένος
προς το μπροστινό μέρος της συσκευής.
Page 46

46
2 Πιέστε το κουμπί ενεργοποίησης/απενεργοποίησης για να
ενεργοποιήσετε την κεφαλή κοπής.
3 Κρατήστε τη συσκευή με την κεφαλή κοπής προς τα πάνω και
κάντε κινήσεις προς τα κάτω με τον κόπτη ακριβείας.
Προτού χρησιμοποιήσετε την ξυριστική κεφαλή, ελέγχετέ τη
για τυχόν βλάβη ή φθορά. Εάν εντοπίσετε βλάβη ή φθορά στην
ξυριστική κεφαλή, μην την χρησιμοποιήσετε, καθώς υπάρχει
κίνδυνος τραυματισμού. Αντικαταστήστε τη φθαρμένη ξυριστική
κεφαλή προτού την ξαναχρησιμοποιήσετε (δείτε το κεφάλαιο
“Αντικατάσταση’’).
1 Κρατήστε τη συσκευή στη θέση ξυρίσματος, με την ξυριστική
κεφαλή προς τα πάνω και την κεφαλή κοπής προς τα κάτω.
2 Πιέστε το κουμπί ενεργοποίησης/απενεργοποίησης της
ξυριστικής κεφαλής μία φορά για να την ενεργοποιήσετε.
, Μόνο QS6160: Η λυχνία του κουμπιού ενεργοποίησης/
απενεργοποίησης αναβοσβήνει, υποδεικνύοντας ότι η ξυριστική
κεφαλή βρίσκεται σε λειτουργία.
3 Τοποθετήστε την ξυριστική κεφαλή πάνω στο δέρμα και
μετακινήστε τη συσκευή αντίθετα από τη φορά των τριχών, ενώ
την πιέζετε ελαφρά.
- Βεβαιωθείτε ότι η ξυριστική κεφαλή ακουμπά εντελώς το δέρμα.
- Μπορείτε να ενεργοποιήσετε την ξυριστική κεφαλή ενώ λειτουργεί
η κεφαλή κοπής. Σε αυτήν την περίπτωση, η κεφαλή κοπής
απενεργοποιείται αμέσως.
4 Για να απενεργοποιήσετε την ξυριστική κεφαλή μετά τη χρήση,
πιέστε ξανά το κουμπί ενεργοποίησης/απενεργοποίησης.
Page 47

47
Αν πιέσετε την κεφαλή κοπής ή την ξυριστική κεφαλή πολύ δυνατά
στο δέρμα σας ή αν μπλοκάρει ο κόπτης (π.χ. από ρούχα κ.λπ.),
αναβοσβήνει γρήγορα το κουμπί ενεργοποίησης/απενεργοποίησης
της κεφαλής κοπής ή της ξυριστικής κεφαλής (μόνο QS6160) και η
συσκευή απενεργοποιείται αυτόματα. Αφαιρέστε οτιδήποτε μπλοκάρει
τον κόπτη προτού χρησιμοποιήσετε ξανά τη συσκευή.
Να καθαρίζετε τη συσκευή μετά από κάθε χρήση.
Μην χρησιμοποιείτε ποτέ πεπιεσμένο αέρα, συρμάτινα σφουγγαράκια,
στιλβωτικά καθαριστικά ή υγρά όπως πετρέλαιο ή ασετόν για τον
καθαρισμό της συσκευής.
Να καθαρίζετε τη συσκευή και το τροφοδοτικό μόνο με το βουρτσάκι
καθαρισμού που παρέχεται.
Σημείωση: Η κεφαλή κοπής και η ξυριστική κεφαλή δεν χρειάζονται
λίπανση.
1 Απενεργοποιήστε τη συσκευή.
2 Τραβήξτε τη χτένα από την κεφαλή κοπής.
3 Ξεπλύνετε την κεφαλή κοπής κάτω από τη βρύση.
Σημείωση: Φροντίστε να καθαρίζετε το εξάρτημα σύνδεσης της κεφαλής
κοπής τουλάχιστον μία φορά κάθε 3 μήνες.
1 Απενεργοποιήστε τη συσκευή.
2 Τραβήξτε απαλά την κεφαλή κοπής από τη συσκευή.
Page 48

48
3 Αφαιρέστε τις τρίχες από το εσωτερικό του εξαρτήματος
σύνδεσης της κεφαλής κοπής με το βουρτσάκι καθαρισμού.
4 Καθαρίστε επίσης το εσωτερικό της κεφαλής κοπής με το
βουρτσάκι καθαρισμού.
5 Μετά τον καθαρισμό, τοποθετήστε ξανά την κεφαλή κοπής στη
συσκευή.
1 Απενεργοποιήστε τη συσκευή.
2 Αφαιρέστε την παλιά ξυριστική κεφαλή από τη συσκευή.
Σημείωση: Η ξυριστική κεφαλή είναι ευπαθής. Χειριστείτε την με προσοχή.
Αντικαταστήστε την ξυριστική κεφαλή εάν έχει υποστεί φθορά.
Page 49

49
3 Ξεπλύνετε την ξυριστική κεφαλή με χλιαρό νερό.
Μην καθαρίζετε την ξυριστική κεφαλή με το βουρτσάκι καθαρισμού,
καθώς μπορεί να προκληθεί βλάβη.
4 Αφαιρέστε τις τρίχες από τους κόπτες με το βουρτσάκι
καθαρισμού.
5 Μετά τον καθαρισμό, τοποθετήστε ξανά την ξυριστική κεφαλή
στη συσκευή (‘’κλικ’’).
Αν χρησιμοποιείτε συχνά τη συσκευή, να αντικαθιστάτε το πλέγμα
ξυρίσματος και τους κόπτες κάθε χρόνο.
1 Αφαιρέστε την παλιά ξυριστική κεφαλή από τη συσκευή.
2 Αφαιρέστε το παλιό πλέγμα ξυρίσματος από την ξυριστική
κεφαλή.
3 Τοποθετήστε το νέο πλέγμα ξυρίσματος στην ξυριστική κεφαλή
(‘’κλικ’’).
1 Αφαιρέστε την παλιά ξυριστική κεφαλή από τη συσκευή.
2 Αφαιρέστε τους κόπτες.
3 Τοποθετήστε τους νέους κόπτες στη συσκευή (‘’κλικ’’).
Page 50

50
Μπορείτε να αναδιπλώσετε το φορτιστή για εύκολη μεταφορά ή
αποθήκευση.
1 Για να αναδιπλώσετε το φορτιστή: αναδιπλώστε τη βάση του
φορτιστή προς τη βάση της συσκευής.
2 Τοποθετήστε το προστατευτικό κάλυμμα στην ξυριστική κεφαλή.
Η συσκευή διαθέτει ενσωματωμένο κλείδωμα ταξιδίου, το οποίο
την εμποδίζει να ενεργοποιηθεί κατά λάθος κατά τη διάρκεια της
μεταφοράς.
1 Για να ενεργοποιήσετε το κλείδωμα ταξιδίου, πιέστε το κουμπί
ενεργοποίησης/απενεργοποίησης της κεφαλής κοπής ή της
ξυριστικής κεφαλής ή και τα δύο για τουλάχιστον 4 δευτερόλεπτα,
μέχρι η ένδειξη κλειδώματος ταξιδίου να αναβοσβήσει 3 φορές.
, Το κλείδωμα ταξιδιού έχει ενεργοποιηθεί μόνο εάν οι ενδεικτικές
λυχνίες ανάβουν σταθερά.
2 Για να απενεργοποιήσετε το κλείδωμα ταξιδίου, πιέστε το κουμπί
ενεργοποίησης/απενεργοποίησης της κεφαλής κοπής ή της
ξυριστικής κεφαλής ή και τα δύο για τουλάχιστον 4 δευτερόλεπτα,
μέχρι η ένδειξη κλειδώματος ταξιδίου να αναβοσβήσει 4 φορές.
, Το κλείδωμα ταξιδίου απενεργοποιήθηκε και η συσκευή έχει
ενεργοποιηθεί.
Σημείωση: Το κλείδωμα ταξιδιού απενεργοποιείται επίσης με τη φόρτιση
της συσκευής.
Για να προμηθευτείτε εξαρτήματα για αυτήν τη συσκευή, επισκεφτείτε
το ηλεκτρονικό μας κατάστημα στη διεύθυνση www.shop.philips.
com/service. Αν το ηλεκτρονικό κατάστημα δεν είναι διαθέσιμο για
τη χώρα σας, απευθυνθείτε στον τοπικό αντιπρόσωπο της Philips ή σε
κάποιο κέντρο επισκευών της Philips. Αν αντιμετωπίσετε δυσκολίες
στην ανεύρεση εξαρτημάτων για τη συσκευή, επικοινωνήστε με το
Κέντρο Εξυπηρέτησης Καταναλωτών της Philips στη χώρα σας. Θα
βρείτε τα στοιχεία επικοινωνίας στο φυλλάδιο της διεθνούς εγγύησης.
Page 51

51
- Στο τέλος της ζωής της συσκευής μην την πετάξετε μαζί με τα
συνηθισμένα απορρίμματα του σπιτιού σας, αλλά παραδώστε την
σε ένα επίσημο σημείο συλλογής για ανακύκλωση. Με αυτόν τον
τρόπο θα συμβάλετε στην προστασία του περιβάλλοντος.
- Η ενσωματωμένη επαναφορτιζόμενη μπαταρία περιέχει ουσίες
που ενδέχεται να μολύνουν το περιβάλλον. Να αφαιρείτε πάντα
την μπαταρία πριν απορρίψετε τη συσκευή και την παραδώσετε
σε ένα επίσημο σημείο συλλογής. Να απορρίπτετε την μπαταρία
σε επίσημο σημείο συλλογής για μπαταρίες. Εάν αντιμετωπίσετε
δυσκολίες στην αφαίρεση της μπαταρίας, μπορείτε να απευθυνθείτε
σε ένα εξουσιοδοτημένο κέντρο σέρβις της Philips, όπου θα
αφαιρέσουν την μπαταρία για εσάς και θα την απορρίψουν με
τρόπο ασφαλή για το περιβάλλον.
Αφαιρέστε την επαναφορτιζόμενη μπαταρία μόνο όταν είναι εντελώς
άδεια.
1 Αποσυνδέστε τη συσκευή από την πρίζα και αφήστε τη να
λειτουργήσει μέχρι το μοτέρ να σταματήσει.
2 Αφαιρέστε την ξυριστική μηχανή και τους κόπτες από τη συσκευή.
3
Ξεβιδώστε τις τέσσερις βίδες του επάνω καλύμματος με ένα κατσαβίδι.
4 Αφαιρέστε το κάλυμμα.
5 Εισαγάγετε ένα κατσαβίδι στο πίσω μέρος του περιβλήματος και
αφαιρέστε το περίβλημα.
6 Εισαγάγετε το κατσαβίδι κάτω από το κάλυμμα του κυρίως
σώματος και αφαιρέστε το κάλυμμα.
, Θα πρέπει να βλέπετε την πλακέτα τυπωμένου κυκλώματος.
7 Αποσπάστε την μπαταρία από την πλακέτα τυπωμένου κυκλώματος.
Να είστε προσεχτικοί, καθώς οι επαφές της μπαταρίας είναι πολύ
αιχμηρές.
Αν χρειάζεστε επισκευή ή πληροφορίες ή αν αντιμετωπίζετε κάποιο
πρόβλημα, επισκεφθείτε την τοποθεσία της Philips στη διεύθυνση
www.philips.com/support ή επικοινωνήστε με το Κέντρο
Εξυπηρέτησης Καταναλωτών της Philips στη χώρα σας. Θα βρείτε
το τηλέφωνο στο φυλλάδιο της διεθνούς εγγύησης. Αν δεν υπάρχει
Κέντρο Εξυπηρέτησης Καταναλωτών στη χώρα σας, απευθυνθείτε στον
τοπικό αντιπρόσωπο της Philips.
Page 52

52
ESPAÑOL
Introducción
Enhorabuena por la compra de este producto y bienvenido a Philips. Para
sacar el mayor partido de la asistencia que Philips le ofrece, registre su
producto en www.philips.com/welcome.
1 Recortador de precisión (32 mm)
2 Cabezal de corte
3 Recortador de precisión (15 mm)
4 Ranura de guía
5 Selector de posiciones de longitud de corte
6 Botón de encendido/apagado del cabezal de corte
7 Indicación de bloqueo para viajes (solo modelo QS6160)
8 Botón de encendido/apagado del cabezal de afeitado
9 Cabezal de afeitado
10 Indicador del estado de la pila
11 Peine-guía
12 Peine-guía (solo modelo QS6160)
13 Soporte de carga
14 Adaptador con clavija pequeña
15 Tapa protectora
16 Cepillo de limpieza
17 Funda (solo modelo QS6160)
Importante
Antes de usar el aparato, lea atentamente este manual de usuario y
consérvelo por si necesitara consultarlo en el futuro.
Peligro
- Mantenga el adaptador seco.
Advertencia
- Antes de enchufar el aparato, compruebe si el voltaje indicado en el
adaptador se corresponde con el voltaje de red local.
- El adaptador incorpora un transformador. No corte el adaptador
para sustituirlo por otra clavija, ya que podría provocar situaciones de
peligro.
- Este aparato no debe ser usado por personas (adultos o niños) con su
capacidad física, psíquica o sensorial reducida, ni por quienes no tengan
los conocimientos y la experiencia necesarios, a menos que sean
supervisados o instruidos acerca del uso del aparato por una persona
responsable de su seguridad.
- Este aparato no debe ser usado por niños. Asegúrese de que los niños
no jueguen con él.
Precaución
- Utilice, cargue y guarde el aparato a una temperatura entre 5 °C y
35 °C.
- No cargue el aparato en la funda.
- Utilice sólo el adaptador y el soporte de carga suministrados.
- No sumerja nunca el aparato en agua u otros líquidos, ni lo utilice en la
ducha. Enjuague el aparato solo bajo el grifo para limpiarlo.
Page 53

ESPAÑOL 53
- Si el aparato sufre un cambio brusco de temperatura, presión o
humedad, deje que se aclimate durante 30 minutos antes de utilizarlo.
- Si el adaptador o el soporte de carga están dañados, sustitúyalos
siempre por otros del modelo original para evitar situaciones de
peligro.
- No utilice el aparato si la lámina de afeitado o alguno de los peinesguía están dañados o rotos, ya que podría ocasionarle lesiones.
- Este aparato está diseñado únicamente para recortar y afeitar en seco
el vello facial (barba, bigote y patillas).
General
- El aparato cumple las normas de seguridad IEC aprobadas
internacionalmente y se puede limpiar bajo el grifo de forma segura.
Cumplimiento de normas
Este aparato Philips cumple todos los estándares sobre campos
electromagnéticos (CEM). Si se utiliza de acuerdo con las instrucciones
de este manual, el aparato se puede usar de forma segura según los
conocimientos cientícos disponibles hoy en día.
Carga
Solo modelo QS6160: La afeitadora suele tardar aproximadamente 1 hora
en cargarse.
Solo modelo QS6140: La afeitadora suele tardar aproximadamente 4 horas
en cargarse.
Cuando el aparato esté completamente cargado, proporcionará un tiempo
de funcionamiento de hasta 50 minutos.
Indicador de estado de la batería:
- Si el indicador de estado de la batería parpadea en blanco, la batería se
está cargando.
- Si el indicador de estado de la batería se ilumina en blanco de forma
permanente, la batería está totalmente cargada. Esta indicación se
muestra durante 30 minutos y, a continuación, el indicador de estado
de la batería se apaga.
- Si el indicador de estado de la batería parpadea en naranja, la batería
está casi vacía (quedan aproximadamente 10 minutos de tiempo de
funcionamiento).
- Si el indicador de estado de la batería parpadea rápidamente en
naranja, la batería está vacía y debe cargar el aparato antes de volver a
utilizarlo.
Nota: Solo es posible recargar el aparato en el soporte de carga.
1 Inserte la clavija pequeña en el soporte de carga.
Nota: Es más fácil introducir la clavija pequeña cuando el soporte de carga
está plegado.
Page 54

ESPAÑOL54
2 Despliegue el soporte que carga (“clic”).
3 Enchufe el adaptador a la toma de corriente.
4 Coloque el aparato en el soporte de carga.
, El indicador de estado de la batería comienza a parpadear en blanco
para indicar que el aparato se está cargando.
, Cuando la batería está completamente cargada, el indicador de
estado de la batería se ilumina en blanco de forma continua.
Uso del aparato
Puede utilizar el aparato para recortar o afeitar en seco el vello facial
(barba, bigote y patillas). Este aparato no ha sido diseñado para afeitar o
recortar las partes inferiores del cuerpo.
Consejo: Tómese su tiempo la primera vez que se afeite. Debe adquirir
práctica con el aparato. Su piel también necesita algún tiempo para adaptarse
al procedimiento.
Cómo recortar con el peine-guía
Los peines-guía le permiten recortar con longitudes diferentes.
Comience con la posición más alta para adquirir práctica con el aparato.
Consulte la tabla que aparece más abajo para ver las distintas posiciones de
longitud y la correspondiente longitud de barba.
Posición Longitud del pelo después del corte
1 1 mm - 3/64 pulgadas
. 1,5 mm - 1/16 pulgadas
2 2 mm - 5/65 pulgadas
. 2,5 mm - 3/32 pulgadas
Page 55

ESPAÑOL 55
Posición Longitud del pelo después del corte
3 3 mm - 1/8 pulgadas
4 4 mm - 5/32 pulgadas
5 5 mm - 3/16 pulgadas
6 6 mm - 1/4 pulgadas
7 7 mm - 9/32 pulgadas
8 8 mm - 5/15 pulgadas
9 9 mm - 3/8 pulgadas
10 10 mm - 13/32 pulgadas
* sin peine-guía = 0,5 mm - 1/32 pulgadas
1 Sostenga el aparato en la posición de recorte con el cabezal de corte
hacia arriba y el cabezal de afeitado hacia abajo.
2 Deslice el peine-guía por la ranura de guía del aparato (“clic”).
3 Pulse el selector de posiciones de longitud de corte y, a continuación,
muévalo de izquierda a derecha o de derecha a izquierda para
seleccionar una posición.
Page 56

ESPAÑOL56
- La línea que hay sobre el selector de posiciones de longitud de corte
muestra la posición que ha seleccionado.
3 24
4 Pulse el botón de encendido/apagado del cabezal de corte una vez
para encenderlo.
, Solo modelo QS6160: El botón de encendido/apagado se ilumina
para indicar que el cabezal de corte está funcionando.
5 Para recortar el vello, mueva el peine-guía por el vello lentamente.
Consejos
- Asegúrese siempre de que la punta del peine-guía apunta en la
dirección en la que mueve el aparato.
- Asegúrese de que la parte plana del peine-guía esté siempre
totalmente en contacto con la piel, para conseguir un resultado
uniforme en la longitud del vello.
- Debido a que el cabello crece en direcciones diferentes, necesita
también mover el aparato en diferentes direcciones (hacia arriba, hacia
abajo o en diagonal).
- Puede encender el cabezal de corte mientras el cabezal de afeitado
está funcionando. Si lo hace, el cabezal de afeitado se apagará
inmediatamente.
- Es más fácil recortar el vello cuando éste y la piel están secos.
6 Cuando acabe, vuelva a pulsar el botón de encendido/apagado del
cabezal de corte para apagarlo.
Cómo recortar sin peine-guía
El peine-guía mantiene el cabezal de corte a una distancia determinada
de la cabeza. Puede utilizar el cabezal de corte sin peine-guía. Si utiliza el
cabezal de corte sin peine-guía, el vello se cortará al ras (aproximadamente
0,5 mm).
Page 57

ESPAÑOL 57
1 Tire del peine-guía para sacarlo del aparato.
Nunca tire de la parte superior exible del peine-guía. Tire siempre de la
parte inferior.
2 Pulse el botón de encendido/apagado del cabezal de corte para
encenderlo.
3 Sujete el aparato con el cabezal de corte orientado hacia arriba y
haga pasadas hacia bajo con el lado ancho del cabezal de corte.
Uso del recortador de precisión
El recortador de precisión es la mitad de ancho que el lado ancho del
cabezal de corte, por lo que permite perlar de forma más precisa la zona
alrededor de las orejas, las patillas y las zonas alrededor de la boca y debajo
de la nariz.
1 Para utilizar el recortador de precisión, sólo tiene que girar la unidad
de corte hasta que el recortador esté orientado hacia la parte
frontal del aparato.
2 Pulse el botón de encendido/apagado del cabezal de corte para
encenderlo.
3 Sujete el aparato con el cabezal de corte orientado hacia arriba y
haga pasadas hacia abajo con el recortador de precisión.
Afeitado
Antes de utilizar el cabezal de afeitado, compruebe siempre que no
esté dañado o deteriorado. Si el cabezal de afeitado está dañado o
deteriorado, no lo utilice, ya que puede ocasionar lesiones. Sustituya el
cabezal de afeitado dañado antes de volver a usar el aparato (consulte el
capítulo “Sustitución”).
Page 58

ESPAÑOL58
1 Sostenga el aparato en la posición de afeitado con el cabezal de
afeitado hacia arriba y el cabezal de corte hacia abajo.
2 Pulse el botón de encendido/apagado de l cabezal de afeitado una vez
para encenderlo.
, Solo modelo QS6160: El botón de encendido/apagado se ilumina
para indicar que el cabezal de afeitado está funcionando.
3 Coloque el cabezal de afeitado sobre la piel y mueva el aparato en
dirección contraria a la de crecimiento del vello ejerciendo una ligera
presión.
Consejo
- Asegúrese de que el cabezal de afeitado esté totalmente en contacto
con la piel.
- Puede encender el cabezal de afeitado mientras el cabezal de
corte está funcionando. Si lo hace, el cabezal de corte se apagará
inmediatamente.
4 Para apagar el cabezal de afeitado después de utilizarlo, pulse otra
vez el botón de encendido/apagado del cabezal de afeitado.
Protección contra sobrecarga
Si presiona el cabezal de corte o el cabezal de afeitado demasiado sobre
la piel o si sus elementos de corte se bloquean (por ejemplo, debido a
la ropa, etc.), el botón de encendido/apagado del cabezal de corte o el
cabezal de afeitado bloqueado parpadeará rápidamente (solo modelo
QS6160) y el aparato se apagará automáticamente. Quite cualquier cosa
que esté bloqueando los elementos de corte antes de volver a utilizar el
aparato.
Page 59

ESPAÑOL 59
Limpieza y mantenimiento
Limpie siempre el aparato después de usarlo.
No utilice nunca aire comprimido, estropajos, agentes abrasivos ni
líquidos agresivos, como gasolina o acetona, para limpiar el aparato.
Limpie el aparato y el adaptador únicamente con el cepillo de limpieza
que se suministra.
Nota: El cabezal de corte y el cabezal de afeitado no necesitan lubricación.
Limpieza del cabezal de corte
1 Apague el aparato.
2 Extraiga el peine-guía del cabezal de corte.
3 Limpie el cabezal de corte bajo el grifo.
Limpieza del conector del cabezal de corte
Nota: Asegúrese de limpiar el conector del cabezal de corte al menos un vez
cada tres meses.
1 Apague el aparato.
2 Extraiga suavemente el cabezal de corte del aparato.
3 Quite el vello del interior del conector del cabezal de corte con el
cepillo de limpieza.
Page 60

ESPAÑOL60
4 Limpie el interior del cabezal del corte con el cepillo de limpieza.
5 Después de limpiarlo, vuelva a colocar el cabezal de corte en el
aparato.
Limpieza del cabezal de corte
1 Apague el aparato.
2 Tire del cabezal de afeitado para quitarlo del aparato.
Nota: El cabezal de afeitado es muy delicado. Manipúlelo con cuidado.
Sustituya el cabezal de afeitado en caso de que esté deteriorado.
3 Enjuague el cabezal de afeitado con agua tibia.
No limpie el cabezal de afeitado con el cepillo de limpieza, ya que podría
dañarlo.
Page 61

ESPAÑOL 61
4 Elimine el vello de las cuchillas con el cepillo de limpieza.
5 Después de la limpieza, vuelva a colocar el cabezal de afeitado en el
aparato (“clic”).
Sustitución
Si utiliza el aparato con frecuencia, sustituya la lámina de afeitado y las
cuchillas cada año.
Lámina de afeitado
1 Tire del cabezal de afeitado para quitarlo del aparato.
2 Quite la lámina de afeitado antigua del cabezal de corte.
3 Coloque la lámina de afeitado nueva en el cabezal de afeitado (‘clic’).
Cuchillas
1 Tire del cabezal de afeitado para quitarlo del aparato.
2 Quite las cuchillas.
3 Coloque las cuchillas nuevas en el aparato (“clic”).
Almacenamiento
Puede plegar el cargador para viajar o guardarlo fácilmente.
1 Para plegar el cargador: pliegue la base del cargador sobre el soporte
del aparato.
Page 62

ESPAÑOL62
2 Ponga la tapa protectora en la unidad de afeitado.
Bloqueo para viajes (solo modelo QS6160)
El aparato integra un bloqueo para viajes que impide que se encienda
accidentalmente durante los viajes.
1 Para activar el bloqueo para viajes, mantenga pulsado el botón de
encendido/apagado del cabezal de corte, el botón de encendido/
apagado del cabezal de afeitado o ambos durante al menos
4 segundos mientras la indicación del bloqueo para viajes parpadea
3 veces.
, El bloqueo para viajes solo se activa cuando la indicación se ilumina
de forma permanente.
2 Para desactivar el bloqueo para viajes, mantenga pulsado el botón
de encendido/apagado del cabezal de corte, el botón de encendido/
apagado del cabezal de afeitado o ambos durante al menos
4 segundos mientras la indicación del bloqueo para viajes parpadea
4 veces.
, El bloqueo para viajes ya está desactivado y el aparato se enciende.
Nota: El bloqueo para viajes también se puede desactivar cargando el aparato.
Solicitud de accesorios
Si desea adquirir accesorios para este aparato, visite nuestra tienda en
línea en www.shop.philips.com/service. Si la tienda en línea no está
disponible en su país, diríjase a su distribuidor Philips o a un centro de
servicio Philips. Si tiene cualquier dicultad para obtener accesorios para
su aparato, póngase en contacto con el Servicio de Atención al Cliente
de Philips en su país. Encontrará los datos de contacto en el folleto de la
Garantía Mundial.
Medio ambiente
- Al nal de su vida útil, no tire el aparato junto con la basura normal del
hogar. Llévelo a un punto de recogida ocial para su reciclado. De esta
manera ayudará a conservar el medio ambiente.
Page 63

ESPAÑOL 63
- La batería recargable incorporada contiene sustancias que pueden
contaminar el medio ambiente. Quite siempre la batería antes de
deshacerse del aparato o de llevarlo a un punto de recogida ocial.
Deposite la batería en un lugar de recogida ocial. Si no puede extraer
la batería, puede llevar el aparato a un servicio de asistencia técnica
de Philips. El personal del servicio de asistencia extraerá la batería y se
deshará de ella de forma no perjudicial para el medio ambiente.
Cómo extraer la batería recargable
Quite la batería recargable sólo si está completamente descargada.
1 Desenchufe el aparato de la red y deje que funcione hasta que el
motor se pare.
2 Quite el cabezal de afeitado y las cuchillas del aparato.
3 Desenrosque los cuatro tornillos de la cubierta superior con un
destornillador.
4 Quite la cubierta.
5 Introduzca un destornillador debajo del panel posterior y quite el
panel.
6 Introduzca el destornillador debajo de la cubierta de la carcasa básica
y quite la cubierta.
, En ese momento verá un circuito impreso.
7 Quite la batería del circuito impreso.
Tenga cuidado con las tiras de la batería ya que están muy aladas.
Garantía y servicio
Si necesita información o si tiene algún problema, visite la página Web de
Philips en www.philips.com/support, o póngase en contacto con el
Servicio de Atención al Cliente de Philips de su país. Hallará el número de
teléfono en el folleto de la garantía mundial. Si no hay Servicio de Atención
al Cliente en su país, diríjase a su distribuidor local de Philips.
Page 64

64
SUOMI
Johdanto
Onnittelut ostoksestasi ja tervetuloa Philips-tuotteiden käyttäjäksi!
Hyödynnä Philipsin tuki ja rekisteröi tuotteesi osoitteessa
www.philips.com/welcome.
Yleiskuvaus (Kuva 1)
1 Tarkkuustrimmeri (32 mm)
2 Trimmausosa
3 Tarkkuustrimmeri (15 mm)
4 Ohjausura
5 Leikkauspituusasetuksen valitsin
6 Trimmausosan virtapainike
7 Matkalukon merkkivalo (vain mallissa QS6160)
8 Ajopään virtapainike
9 Ajopää
10 Akun latauksen ilmaisin
11 Ohjauskampa
12 Ohjauskampa (vain mallissa QS6160)
13 Latausteline
14 Verkkolaite, pieni liitin
15 Teräsuojus
16 Puhdistusharja
17 Säilytyspussi (vain mallissa QS6160)
Tärkeää
Lue tämä käyttöopas huolellisesti ennen käyttöä ja säilytä se myöhempää
tarvetta varten.
Vaara
- Suojaa latauslaite kosteudelta.
Varoitus
- Tarkista, että verkkolaitteen jännitemerkintä vastaa paikallista
verkkojännitettä, ennen kuin yhdistät laitteen sähköverkkoon.
- Verkkolaitteessa on jännitemuuntaja. Älä vaihda verkkolaitteen tilalle
toisenlaista pistoketta, jotta et aiheuta vaaratilannetta.
- Laitetta ei ole tarkoitettu lasten tai sellaisten henkilöiden käyttöön,
joiden fyysinen tai henkinen toimintakyky on rajoittunut tai joilla
ei ole kokemusta tai tietoa laitteen käytöstä, muuten kuin heidän
turvallisuudestaan vastaavan henkilön valvonnassa ja ohjauksessa.
- Laitetta ei ole tarkoitettu lasten käyttöön. Lasten ei saa antaa leikkiä
laitteella.
Varoitus
- Käytä, lataa ja säilytä laitetta 5 - 35 °C:n lämpötilassa.
- Älä lataa laitetta säilytyspussissa.
- Käytä vain mukana tulevaa latauslaitetta ja lataustelinettä.
- Älä upota laitetta veteen tai muuhun nesteeseen äläkä käytä sitä
suihkussa. Puhdista laite huuhtelemalla juoksevalla vedellä.
- Jos laite altistuu suurille lämpötilan, paineen tai kosteuden vaihteluille,
anna sen mukautua 30 minuuttia ennen käyttöä.
- Jos latauslaite tai latausteline on vaurioitunut, vaihda vaaratilanteiden
välttämiseksi tilalle aina alkuperäisen tyyppinen latauslaite tai latausteline.
Page 65

SUOMI 65
- Älä käytä laitetta, jos ajopää tai ohjauskampa on viallinen tai rikki, koska
laitteen käyttö saattaa tällöin aiheuttaa vammoja.
- Tämä laite on tarkoitettu vain parran, viiksien ja pulisonkien kuiva-ajoon
ja trimmaamiseen.
Yleistä
- Laite täyttää kansainvälisesti hyväksytyt IEC:n turvamääräykset, ja se
voidaan puhdistaa turvallisesti vesihanan alla.
Vastaavuus standardien kanssa
Tämä Philips-laite vastaa kaikkia sähkömagneettisia kenttiä (EMF) koskevia
standardeja. Jos laitetta käytetään tämän käyttöohjeen ohjeiden mukaisesti,
sen käyttäminen on turvallista tämänhetkisen tutkimustiedon perusteella.
Lataaminen
Vain malli QS6160: lataaminen kestää normaalisti n. 1 tunnin.
Vain malli QS6140: lataaminen kestää normaalisti n. 4 tuntia.
Kun akku on ladattu täyteen, sitä voi käyttää 50 minuuttia.
Akun latauksen ilmaisin:
- Kun akun latauksen ilmaisin vilkkuu valkoisena, akku latautuu.
- Kun akun latauksen ilmaisin palaa yhtäjaksoisesti valkoisena, akku on
täynnä. Merkkivalo palaa 30 minuuttia, jonka jälkeen se sammuu.
- Kun akun latauksen ilmaisin vilkkuu oranssina, akku on lähes tyhjä
(käyttöaikaa on jäljellä n. 10 minuuttia).
- Kun akun latauksen ilmaisin vilkkuu tiheään oranssina, akku on tyhjä ja
laite on ladattava ennen kuin sitä voi käyttää jälleen.
Huomautus: Laite voidaan ladata vain lataustelineessä.
1 Kiinnitä pieni liitin lataustelineeseen.
Huomautus: Pieni liitin on helpoin asettaa paikalleen, kun latausteline on
taitettuna.
2 Avaa latausteline niin, että kuulet napsahduksen.
3 Yhdistä latauslaite pistorasiaan.
4 Aseta laite lataustelineeseen.
Page 66

SUOMI66
, Akun latauksen ilmaisin alkaa vilkkua valkoisena latauksen merkiksi.
, Kun akku on ladattu täyteen, akun latauksen ilmaisin palaa jatkuvasti.
Käyttö
Laitetta voi käyttää parran, viiksien tai pulisonkien kuiva-ajoon tai
trimmaamiseen. Tätä laitetta ei ole tarkoitettu muiden vartalonosien ajeluun.
Vinkki: Varaa reilusti aikaa ensimmäistä ajokertaa varten. Laitteen käyttö
edellyttää harjoittelua. Anna ihollesi aikaa totutella laitteen käyttöön.
Käyttö ohjauskammalla
Ohjauskampojen avulla voit tasata parran eri pituuksille.
Aloita suurimmalla asetuksella, jotta saat tuntumaa laitteeseen.
Katso seuraavasta taulukosta pituusasetukset ja niitä vastaavat
karvanpituudet.
Asento Leikatun ihokarvan pituus
1 1 mm - 3/64 tuumaa
. 1,5 mm - 1/16 tuumaa
2 2 mm - 5/65 tuumaa
. 2,5 mm - 3/32 tuumaa
3 3 mm - 1/8 tuumaa
4 4 mm - 5/32 tuumaa
5 5 mm - 3/16 tuumaa
6 6 mm - 1/4 tuumaa
7 7 mm - 9/32 tuumaa
8 8 mm - 5/15 tuumaa
9 9 mm - 3/8 tuumaa
10 10 mm - 13/32 tuumaa
* ilman kampaa = 0,5 mm - 1/32 tuumaa
Page 67

SUOMI 67
1 Pidä laitetta trimmausasennossa siten, että trimmausosa on ylöspäin
ja ajopää alaspäin.
2 Työnnä ohjauskampa laitteessa olevaan ohjausuraan siten, että se
napsahtaa paikalleen.
3 Valitse pituusasetus painamalla leikkauspituusasetuksen valitsinta ja
liikuttamalla sitä vasemmalta oikealle tai oikealta vasemmalle.
- Leikkauspituusasetuksen valitsimen yläpuolella oleva viiva osoittaa
valitsemasi asetuksen.
3 24
4 Kytke trimmausosaan virta painamalla sen virtapainiketta kerran.
, Vain mallissa QS6160: virtapainikkeeseen syttyvä valo ilmaisee
trimmausosan olevan käytössä.
Page 68

SUOMI68
5 Trimmaa ihokarvat liikuttamalla ohjauskampaa hitaasti.
Vinkkejä
- Varmista aina, että ohjauskamman kärki osoittaa suuntaan, johon liikutat
laitetta.
- Varmista, että ohjauskamman sileä osa on aina tiiviisti kiinni ihossa,
jolloin tuloksesta tulee tasainen.
- Hiukset kasvavat eri suuntiin, joten liikuta myös laitetta eri suuntiin
(ylös- ja alaspäin sekä sivusuunnassa).
- Voit käynnistää trimmausosan ajopään ollessa käytössä. Kun teet näin,
ajopään virta katkeaa heti.
- Muotoileminen on helpompaa ihon ja ihokarvojen ollessa kuivat.
6 Kun olet valmis, katkaise trimmausosasta virta painamalla sen
virtapainiketta uudelleen.
Käyttö ilman ohjauskampaa
Ohjauskampa pitää trimmausosan tietyllä etäisyydellä päästäsi. Voit käyttää
trimmausosaa ilman ohjauskampaa. Kun käytät sitä ilman ohjauskampaa,
parta ajellaan läheltä ihoa (n. 0,5 mm).
1 Irrota kampa vetämällä se irti laitteesta.
Älä vedä ohjauskamman taipuisasta yläosasta. Vedä aina alaosasta.
2 Kytke trimmausosaan virta painamalla sen virtapainiketta.
3 Pitele laitetta niin, että trimmausosa on ylöspäin ja liikuta
trimmausosan leveää puolta alaspäin.
Tarkkuustrimmerin käyttäminen
Tarkkuustrimmeri on vain puoliksi yhtä leveä kuin trimmausosan leveä puoli.
Siksi sillä voi muotoilla korvien, pulisonkien ja suun ympäristön ja nenän
alapuolen ihokarvoja tarkemmin.
Page 69

SUOMI 69
1 Voit käyttää tarkkuustrimmeriä kääntämällä terää, kunnes
tarkkuustrimmeri on laitteen etuosaa kohti.
2 Kytke trimmausosaan virta painamalla sen virtapainiketta.
3 Pitele laitetta niin että trimmausosa on ylöspäin ja liikuta
tarkkuustrimmeriä alaspäin.
Parran ajaminen
Tarkista aina ennen ajopään käyttöä, ettei siinä ole merkkejä vaurioista tai
kulumisesta. Älä käytä vaurioitunutta tai kulunutta ajopäätä, koska laitteen
käyttö saattaa tällöin aiheuttaa vammoja. Vaihda ajopää, ennen kuin käytät
laitetta uudelleen (katso kohtaa Varaosat).
1 Pidä laitetta ajoasennossa siten, että ajopää on ylöspäin ja
trimmausosa alaspäin.
2 Kytke ajopäähän virta painamalla sen virtapainiketta.
, Vain mallissa QS6160: virtapainikkeeseen syttyvä valo ilmaisee
ajopään olevan käytössä.
3 Aseta ajopää ihoa vasten ja liikuta laitetta hitaasti karvojen
kasvusuuntaa vastaan painaen sitä samalla kevyesti.
Vinkki
- Varmista, että ajopää koskettaa koko ajan ihoa.
- Voit käynnistää ajopään trimmausosan ollessa käytössä. Kun teet näin,
trimmausosa sammuu heti.
Page 70

SUOMI70
4 Katkaise virta ajopäästä käytön jälkeen painamalla sen virtapainiketta
uudelleen.
Ylikuormitussuoja
Jos painat trimmausosaa tai ajopäätä liian kovaa ihoa vasten, tai jos
teräyksikkö tukkeutuu (esim. vaatteen tms. takia.), tukkeutuneen ajopään
virtapainikkeen valo vilkkuu nopeasti (vain mallissa QS6160) ja laite
sammuu automaattisesti. Poista tukos teräyksiköistä ennen kuin jatkat
laitteen käyttöä.
Puhdistus ja hoito
Puhdista laite aina käytön jälkeen.
Älä käytä paineilmaa, naarmuttavia tai syövyttäviä puhdistusaineita tai
-välineitä laitteen puhdistamiseen (kuten bensiiniä tai asetonia).
Laitteen ja latauslaitteen saa puhdistaa vain mukana tulevalla harjalla.
Huomautus: Trimmausosaa ja ajopäätä ei tarvitse voidella.
Trimmausosan puhdistaminen
1 Katkaise laitteesta virta.
2 Vedä ohjauskampa irti trimmausosasta.
3 Puhdista trimmausosa juoksevalla vedellä.
Trimmausosan liittimen puhdistaminen
Huomautus: Puhdista trimmausosan liitin vähintään kolmen kuukauden välein.
1 Katkaise laitteesta virta.
Page 71

SUOMI 71
2 Vedä trimmausosa varovasti irti laitteesta.
3 Poista ihokarvat trimmausosan liittimen sisältä puhdistusharjalla.
4 Puhdista trimmausosan sisäpuoli puhdistusharjalla.
5 Aseta trimmausosa takaisin laitteeseen puhdistuksen jälkeen.
Ajopään puhdistus
1 Katkaise laitteesta virta.
Page 72

SUOMI72
2 Vedä ajopää irti laitteesta.
Huomautus: Ajopää on hyvin herkkä. Käsittele sitä varovasti. Vaihda ajopää, jos
se on vioittunut.
3 Huuhtele ajopää haalealla vedellä.
Älä puhdista ajopäätä puhdistusharjalla, sillä se saattaa aiheuttaa vahinkoa.
4 Poista ihokarvat teristä puhdistusharjalla.
5 Kiinnitä puhdistamisen jälkeen ajopää uudelleen laitteeseen
napsauttamalla se paikalleen.
Varaosat
Jos laitetta käytetään usein, vaihda teräverkko ja terät vuosittain.
Teräosa
1 Vedä ajopää irti laitteesta.
2 Irrota vanha teräverkko ajopäästä.
3 Napsauta uusi teräverkko paikalleen ajopäähän.
Page 73

SUOMI 73
Terät
1 Vedä ajopää irti laitteesta.
2 Irrota terät.
3 Napsauta uudet terät paikalleen laitteeseen.
Säilytys
Laturin voi taitella säilytykseen tai mukaan matkalle.
1 Taittele laturi taittamalla laturin alusta laitetelinettä vasten.
2 Aseta ajopään suojus paikalleen.
Matkalukko (vain mallissa QS6160)
Laitteessa on matkalukko, joka estää laitteen käynnistymisen matkalaukussa.
1 Ota matkalukko käyttöön pitämällä trimmausosan tai ajopään
virtapainiketta tai molempia painettuna vähintään 4 sekuntia, jolloin
matkalukon valo vilkkuu 3 kertaa.
, Matkalukko on käytössä, kun merkkivalo palaa yhtäjaksoisesti.
2 Ota matkalukko pois käytöstä pitämällä trimmausosan tai ajopään
virtapainiketta tai molempia painettuna vähintään 4 sekuntia, jolloin
matkalukon valo vilkkuu 4 kertaa.
, Matkalukko on pois käytöstä ja laite käynnistyy.
Huomautus: Matkalukon voi poistaa käytöstä lataamalla laitteen.
Tarvikkeiden tilaaminen
Voit ostaa laitteen lisäosia osoitteesta www.shop.philips.com/service.
Jos verkkokauppa ei ole saatavilla maassasi, ota yhteys Philips-jälleenmyyjään
tai Philipsin valtuuttamaan huoltoliikkeeseen. Jos lisäosien ostamisessa
on hankaluuksia, ota yhteys Philipsin maakohtaiseen asiakaspalveluun.
Yhteystiedot löytyvät kansainvälisestä takuulehtisestä.
Page 74

SUOMI74
Ympäristöasiaa
- Älä hävitä vanhoja laitteita tavallisen talousjätteen mukana, vaan
toimita ne valtuutettuun kierrätyspisteeseen. Näin autat vähentämään
ympäristölle aiheutuvia haittavaikutuksia.
- Laitteen kiinteät ladattavat akut sisältävät ympäristölle haitallisia
aineita. Poista akku aina ennen laitteen toimittamista valtuutettuun
keräyspisteeseen, ja toimita se valtuutettuun akkujen keräyspisteeseen.
Jos et pysty irrottamaan akkua laitteesta, voit toimittaa laitteen
Philipsin huoltopalveluun, jossa akku poistetaan ja laite hävitetään
ympäristöystävällisellä tavalla.
Akun poistaminen
Varmista, että akku on poistettaessa täysin tyhjä.
1 Irrota laite sähköverkosta ja anna laitteen käydä, kunnes moottori
pysähtyy.
2 Irrota ajopää ja terät laitteesta.
3 Avaa suojakannen neljä ruuvia ruuvitaltalla.
4 Irrota kansi.
5 Aseta ruuvitaltta takapaneelin alle ja irrota paneeli.
6 Aseta ruuvitaltta rungon kannen alle ja irrota kansi.
, Piirikortti on nyt näkyvissä.
7 Murra akku irti piirikortista.
Ole varovainen, sillä akun metalliliuskat ovat teräviä.
Takuu ja huolto
Jos haluat lisätietoja tai laitteen kanssa ilmenee ongelmia, tutustu
Philipsin sivustoon osoitteessa www.philips.com/support tai kysy
neuvoa Philipsin maakohtaisesta asiakaspalvelusta. Puhelinnumero on
kansainvälisessä takuulehtisessä. Jos maassasi ei ole asiakaspalvelua, ota
yhteys Philipsin jälleenmyyjään.
Page 75

FRANÇAIS
Introduction
Félicitations pour votre achat et bienvenue dans l’univers Philips ! Pour
proter pleinement de l’assistance Philips, enregistrez votre produit sur le
site à l’adresse suivante : www.philips.com/welcome.
1 Tondeuse de précision (32 mm)
2 Tête de tonte
3 Tondeuse de précision (15 mm)
4 Rainure
5 Sélecteur de hauteur de coupe
6 Bouton marche/arrêt de la tête de tonte
7 Voyant de verrouillage (QS6160 uniquement)
8 Bouton marche/arrêt de la tête de rasage
9 Tête de rasage
10 Témoin d’état de la batterie
11 Sabot
12 Sabot (QS6160 uniquement)
13 Socle de recharge
14 Adaptateur avec petite che
15 Coque de protection
16 Brossette de nettoyage
17 Housse de rangement (QS6160 uniquement)
Important
Lisez attentivement ce mode d’emploi avant d’utiliser l’appareil et
conservez-le pour un usage ultérieur.
Danger
- Évitez de mouiller l’adaptateur.
Avertissement
- Avant de brancher l’appareil, vériez que la tension indiquée sur
l’adaptateur secteur correspond à la tension du secteur.
- L’adaptateur contient un transformateur. N’essayez pas de remplacer la
che de l’adaptateur pour éviter tout accident.
- Cet appareil n’est pas destiné à être utilisé par des personnes
(notamment des enfants) dont les capacités physiques, sensorielles
ou intellectuelles sont réduites, ou par des personnes manquant
d’expérience ou de connaissances, à moins que celles-ci ne soient sous
surveillance ou qu’elles n’aient reçu des instructions quant à l’utilisation
de l’appareil par une personne responsable de leur sécurité.
- Cet appareil n’est pas destiné à être utilisé par des enfants. Veillez à ce
que les enfants ne puissent pas jouer avec l’appareil.
Attention
- Utilisez, rechargez et conservez l’appareil à une température comprise
entre 5 °C et 35 °C.
- Ne chargez jamais l’appareil lorsqu’il se trouve dans sa housse de
rangement.
- Utilisez exclusivement l’adaptateur et la base de recharge fournis.
75
Page 76

FRANÇAIS76
- Ne plongez jamais l’appareil dans l’eau, ni dans d’autres liquides, et
ne l’utilisez pas sous la douche. Rincez l’appareil uniquement sous le
robinet pour le nettoyer.
- Si l’appareil devait être soumis à une forte variation de température, de
pression ou d’humidité, laissez-le s’acclimater pendant 30 minutes avant
de l’utiliser.
- Si l’adaptateur ou la base de recharge est endommagé, il ne doit être
remplacé que par un adaptateur ou une base de recharge d’origine an
d’éviter tout accident.
- An d’éviter tout accident, n’utilisez pas l’appareil si la grille de rasage
ou l’un des sabots est endommagé ou cassé.
- Cet appareil a été conçu uniquement pour tondre et raser à sec les
poils du visage (barbe, moustache et favoris).
Général
- Ce rasoir est conforme aux normes internationales IEC et peut être
nettoyé à l’eau en toute sécurité.
Conformité aux normes
Cet appareil Philips est conforme à toutes les normes relatives aux champs
électromagnétiques (CEM). Il répond aux règles de sécurité établies
sur la base des connaissances scientiques actuelles s’il est manipulé
conformément aux instructions de ce mode d’emploi.
Charge
QS6160 uniquement : une charge normale dure environ 1 heure.
QS6140 uniquement : Une charge normale dure environ 4 heures.
Une fois chargé, l’appareil a une autonomie de 50 minutes environ.
Témoin d’état de la batterie :
- lorsque le témoin d’état de la batterie clignote en blanc, la batterie est
chargée.
- Lorsque le témoin d’état de la batterie s’allume en blanc de manière
continue, la batterie est entièrement chargée. Cette indication apparaît
pendant 30 minutes, puis le témoin d’état de la batterie s’éteint.
- Lorsque le témoin d’état de la batterie clignote en orange, la batterie
est presque vide (il reste alors environ 10 minutes d’autonomie).
- Lorsque le témoin d’état de la batterie clignote en orange rapidement,
la batterie est vide et vous devez charger l’appareil avant de pouvoir le
réutiliser.
Remarque : Vous pouvez charger l’appareil uniquement à l’aide de la base de
recharge.
1 Insérez la petite che dans la base de recharge.
Remarque : Il est plus facile d’insérer l’embout de charge lorsque la base de
recharge est pliée.
Page 77

FRANÇAIS 77
2 Dépliez la base de recharge (clic).
3 Branchez l’adaptateur sur la prise secteur.
4 Placez l’appareil sur la base de recharge.
, Le témoin d’état de la batterie se met à clignoter en blanc pour
indiquer que l’appareil est en cours de charge.
, Lorsque la batterie est entièrement chargée, le témoin d’état de la
batterie s’allume en blanc de manière continue.
Utilisation de l’appareil
Vous pouvez utiliser l’appareil pour tondre ou raser à sec les poils du visage
(barbe, moustache et favoris). Cet appareil n’est pas destiné au rasage ou à
la tonte des parties inférieures du corps.
Conseil : Lorsque vous vous rasez pour la première fois, prenez le temps de
vous familiariser avec l’appareil. Votre peau doit également s’y habituer.
Tonte avec le sabot
Les sabots vous permettent de tondre à différentes longueurs.
Commencez par sélectionner le réglage maximum pour vous faire la main.
Consultez le tableau ci-dessous pour connaître les réglages et les longueurs
de coupe correspondantes.
Réglage Hauteur obtenue
1 1 mm
. 1,5 mm
2 2 mm
. 2,5 mm
Page 78

FRANÇAIS78
Réglage Hauteur obtenue
3 3 mm
4 4 mm
5 5 mm
6 6 mm
7 7 mm
8 8 mm
9 9 mm
10 10 mm
* aucun sabot = 0,5 mm
1 Tenez l’appareil en position de tonte, la tête de tonte orientée vers
le haut et la tête de rasage vers le bas.
2 Faites glisser le sabot dans la rainure de l’appareil (clic).
3 Appuyez sur le sélecteur de hauteur de coupe, puis déplacez-le de
gauche à droite ou de droite à gauche pour sélectionner un réglage.
Page 79

FRANÇAIS 79
- La ligne située au-dessus du sélecteur de hauteur de coupe indique le
réglage que vous avez sélectionné.
3 24
4 Appuyez sur le bouton marche/arrêt de la tête de tonte pour la
mettre en marche.
, QS6160 uniquement : le bouton marche/arrêt s’allume pour indiquer
que la tête de tonte fonctionne.
5 Pour tondre vos poils, déplacez lentement le sabot sur votre peau.
Conseils
- Assurez-vous que la pointe du sabot est orientée dans le sens de
déplacement de l’appareil.
- Assurez-vous que la partie plate du sabot est toujours bien en contact
avec la peau pour obtenir une coupe régulière.
- Dans la mesure où les cheveux ne poussent pas tous dans le même
sens, vous devez adapter les mouvements de l’appareil (vers le haut, le
bas ou en travers).
- Vous pouvez allumer la tête de tonte lorsque la tête de rasage
fonctionne. Dans un tel cas, la tête de rasage s’éteint immédiatement.
- Vous obtiendrez de meilleurs résultats si vous utilisez la tondeuse sur
une peau ou des poils secs.
6 Lorsque vous avez ni, appuyez à nouveau sur le bouton marche/
arrêt de la tête de tonte pour l’éteindre.
Tonte sans sabot
Le sabot permet de maintenir la tête de tonte à une distance dénie de la
tête. Vous pouvez utiliser la tête de tonte sans sabot. Si vous utilisez la tête
de tonte sans le sabot, vos cheveux seront donc coupés au plus près du
cuir chevelu (environ 0,5 mm).
Page 80

FRANÇAIS80
1 Tirez sur le sabot pour le détacher de l’appareil.
Ne tirez jamais sur la partie supérieure exible du sabot. Tirez toujours sur
la partie inférieure.
2 Appuyez sur le bouton marche/arrêt de la tête de tonte pour la
mettre en marche.
3 Tenez l’appareil avec la tête de tonte orientée vers le haut et passez
la partie large de la tête de tonte en effectuant des mouvements
descendants.
Utilisation de la tondeuse de précision
La tondeuse de précision est deux fois moins large que la partie large de
la tête de tonte. Elle offre donc plus de précision pour tondre le tour des
oreilles, les favoris et autour de la bouche et sous le nez.
1 Pour utiliser la tondeuse de précision, tournez le bloc tondeuse de
manière à ce que la tondeuse de précision soit orientée vers l’avant
de l’appareil.
2 Appuyez sur le bouton marche/arrêt de la tête de tonte pour la
mettre en marche.
3 Tenez l’appareil avec la tête de tonte orientée vers le haut et passez
la tondeuse de précision en effectuant des mouvements descendants.
Rasage
Avant d’utiliser la tête de rasage, vériez toujours qu’elle n’est pas
endommagée ou usée. Si la tête de rasage est endommagée ou usée, ne
l’utilisez pas : vous risqueriez de vous blesser. Remplacez d’abord la tête
de rasage endommagée (voir le chapitre « Remplacement »).
Page 81

FRANÇAIS 81
1 Tenez l’appareil en position de rasage, la tête de rasage orientée vers
le haut et la tête de tonte vers le bas.
2 Appuyez sur le bouton marche/arrêt de la tête de rasage pour la
mettre en marche.
, QS6160 uniquement : le bouton marche/arrêt s’allume pour indiquer
que la tête de rasage fonctionne.
3 Placez la tête de rasage sur la peau et déplacez l’appareil dans le sens
inverse de la pousse des poils tout en exerçant une faible pression.
Conseil
- Veillez à ce que la tête de rasage soit toujours en contact avec la peau.
- Vous pouvez allumer la tête de rasage lorsque la tête de tonte
fonctionne. Dans un tel cas, la tête de tonte s’éteint immédiatement.
4 Après utilisation, appuyez à nouveau sur le bouton marche/arrêt de
la tête de rasage pour l’éteindre.
Protection anti-surcharge
Si vous appuyez la tête de tonte ou la tête de rasage trop fortement sur
votre peau ou si son bloc tondeuse se bloque (par ex., par des vêtements,
etc.), le bouton marche/arrêt de la tête de tonte ou la tête de rasage
bloquée clignote rapidement (QS6160 uniquement) et l’appareil s’éteint
automatiquement. Retirez l’élément responsable du blocage avant de
réutiliser l’appareil.
Page 82

FRANÇAIS82
Nettoyage et entretien
Nettoyez l’appareil après chaque utilisation.
N’utilisez jamais d’air comprimé, de tampons à récurer, de produits
abrasifs ou de détergents agressifs tels que de l’essence ou de l’acétone
pour nettoyer l’appareil.
Nettoyez l’appareil et l’adaptateur uniquement à l’aide de la brosse de
nettoyage fournie.
Remarque : La tête de tonte et la tête de rasage n’ont pas besoin d’être lubriées.
Nettoyage de la tête de tonte
1 Éteignez l’appareil.
2 Retirez le sabot de la tête de tonte.
3 Nettoyez la tête de tonte sous le robinet.
Nettoyage du connecteur de la tête de tonte
Remarque : Veillez à nettoyer le connecteur de la tête de tonte au moins une
fois tous les trois mois.
1 Éteignez l’appareil.
2 Retirez doucement la tête de tonte de l’appareil.
3 Enlevez les poils à l’intérieur du connecteur de la tête de tonte à
l’aide de la brossette de nettoyage.
Page 83

FRANÇAIS 83
4 Nettoyez l’intérieur de la tête de tonte à l’aide de la brossette de
nettoyage.
5 Une fois le nettoyage terminé, replacez la tête de tonte sur l’appareil.
Nettoyage de la tête de rasage
1 Éteignez l’appareil.
2 Retirez la tête de rasage de l’appareil.
Remarque : La tête de rasage est très fragile. Manipulez-la avec précaution.
Remplacez-la si elle est endommagée.
3 Rincez la tête de rasage à l’eau tiède.
Ne nettoyez pas la tête de rasage avec la brossette de nettoyage pour
éviter tout dommage.
Page 84

FRANÇAIS84
4 Retirez les poils des lames à l’aide de la brossette de nettoyage.
5 Une fois le nettoyage terminé, replacez la tête de rasage sur
l’appareil (clic).
Remplacement
En cas d’utilisation fréquente, remplacez la grille de rasage et les lames tous
les ans.
Grille
1 Retirez la tête de rasage de l’appareil.
2 Retirez l’ancienne grille de rasage de la tête de rasage.
3 Placez la nouvelle grille de rasage sur la tête de rasage (clic).
Lames
1 Retirez la tête de rasage de l’appareil.
2 Enlevez les lames.
3 Fixez les nouvelles lames sur l’appareil (clic).
Rangement
Vous pouvez plier le chargeur pour faciliter le transpor t ou le rangement.
1 Pour plier le chargeur : rabattez la base du chargeur contre le
support de l’appareil.
Page 85

FRANÇAIS 85
2 Placez le capot de protection sur l’unité de rasage.
Verrouillage (QS6160 uniquement)
L’appareil est équipé d’un verrouillage intégré qui évite que l’appareil ne
s’allume intempestivement pendant le transport.
1 Pour activer le verrouillage, maintenez enfoncé(s) le bouton marche/
arrêt de la tête de tonte, le bouton marche/arrêt de la tête de rasage
ou ces deux boutons pendant au moins 4 secondes tandis que le
voyant de verrouillage clignote 3 fois.
, Le verrouillage est activé uniquement lorsque le voyant s’allume de
manière continue.
2 Pour désactiver le verrouillage, maintenez enfoncé(s) le bouton
marche/arrêt de la tête de tonte, le bouton marche/arrêt de la tête
de rasage ou ces deux boutons pendant au moins 4 secondes tandis
que le voyant de verrouillage clignote 3 fois.
, Le verrouillage est maintenant désactivé et l’appareil s’allume.
Remarque : Le verrouillage peut également être désactivé par la mise en
charge de l’appareil.
Commande d’accessoires
Pour acheter des accessoires pour cet appareil, rendez-vous sur notre
boutique en ligne à l’adresse www.shop.philips.com/service. Si la
boutique en ligne n’est pas disponible dans votre pays, contactez votre
revendeur Philips ou un Centre Service Agréé Philips. Si vous rencontrez
des problèmes pour vous procurer des accessoires pour votre appareil,
contactez le Service Consommateurs Philips de votre pays. Vous en
trouverez les coordonnées dans le dépliant de garantie internationale.
Environnement
- Lorsqu’il ne fonctionnera plus, ne jetez pas l’appareil avec les ordures
ménagères, mais déposez-le à un endroit assigné à cet effet, où
il pourra être recyclé. Vous contribuerez ainsi à la protection de
l’environnement.
Page 86

FRANÇAIS86
- La batterie rechargeable intégrée contient des substances qui peuvent
nuire à l’environnement. Veillez à toujours retirer la batterie avant de
mettre l’appareil au rebut ou de le déposer à un endroit assigné à cet
effet. Déposez la batterie usagée à un endroit assigné à cet effet. Si
vous n’arrivez pas à retirer la batterie, vous pouvez apporter l’appareil
dans un Centre Service Agréé Philips qui prendra toute l’opération en
charge pour préserver l’environnement.
Retrait de la batterie rechargeable
Retirez la batterie rechargeable lorsqu’elle est complètement déchargée.
1 Débranchez l’appareil de la prise secteur et laissez-le fonctionner
jusqu’à l’arrêt complet du moteur.
2 Retirez la tête de rasage et les lames de l’appareil.
3 Dévissez les quatre vis du couvercle supérieur à l’aide d’un tournevis.
4 Enlevez le couvercle.
5 Insérez un tournevis sous le panneau arrière et enlevez le panneau.
6 Insérez le tournevis sous le couvercle du corps de l’appareil et
enlevez le couvercle.
, Vous voyez alors un circuit imprimé.
7 Rompez la batterie du circuit imprimé.
Soyez prudent car les languettes de la batterie sont coupantes.
Garantie et service
Si vous souhaitez obtenir des informations supplémentaires, faire réparer
l’appareil ou si vous rencontrez un problème, rendez-vous sur le site
Web de Philips à l’adresse www.philips.com/support ou contactez le
Service Consommateurs Philips de votre pays. Vous trouverez le numéro
de téléphone correspondant sur le dépliant de garantie internationale.
S’il n’existe pas de Service Consommateurs Philips dans votre pays,
renseignez-vous auprès de votre revendeur Philips local.
Page 87

ITALIANO
Introduzione
Congratulazioni per l’acquisto e benvenuti in Philips! Per trarre il
massimo vantaggio dall’assistenza Philips, registrate il vostro prodotto
su www.philips.com/welcome.
1 Rinitore di precisione (32 mm)
2 Testina di precisione
3 Rinitore di precisione (15 mm)
4 Scanalatura guida
5 Selettore delle impostazioni lunghezza di taglio
6 Pulsante on/off testina di regolazione
7 Indicazione blocco da viaggio (solo QS6160)
8 Pulsante on/off testina di precisione
9 Testina di rasatura
10 Indicatore dello stato della batteria
11 Pettine regola altezze
12 Pettine regola altezza (solo QS6160)
13 Supporto di ricarica
14 Adattatore con spinotto
15 Cappuccio di protezione
16 Spazzolina per la pulizia
17 Astuccio di conservazione (solo QS6160)
Importante
Prima di utilizzare l’apparecchio, leggete attentamente il presente manuale e
conservatelo per eventuali riferimenti futuri.
Pericolo
- Mantenete sempre asciutto l’adattatore.
Avviso
- Prima di collegare l’apparecchio, vericate che la tensione ripor tata
sull’adattatore corrisponda alla tensione disponibile.
- L’adattatore contiene un trasformatore. Non tagliate l’adattatore per
sostituirlo con un’altra spina onde evitare situazioni pericolose.
- L’apparecchio non è destinato a persone (inclusi bambini) con capacità
mentali, siche o sensoriali ridotte, fatti salvi i casi in cui tali persone
abbiano ricevuto assistenza o formazione per l’uso dell’apparecchio da
una persona responsabile della loro sicurezza.
- L’apparecchio non è destinato a bambini, pertanto fate in modo che
non giochino con esso.
Attenzione
- Utilizzate, ricaricate e riponete l’apparecchio a temperature comprese
tra 5 e 35 °C.
- Non caricate l’apparecchio all’interno dell’astuccio per il
riposizionamento.
- Usate esclusivamente l’adattatore e il supporto di ricarica forniti con
l’apparecchio.
- Non immergete mai l’apparecchio in acqua o in altri liquidi, né usatelo
nella doccia. Risciacquate l’apparecchio solo sotto l’acqua corrente per
pulirlo.
87
Page 88

ITALIANO88
- Se l’apparecchio è sottoposto a un forte sbalzo di temperatura,
pressione o umidità, attendete 30 minuti prima di utilizzarlo.
- Se l’adattatore o il supporto di ricarica sono danneggiati, devono
essere sostituiti esclusivamente con pezzi originali, per evitare situazioni
pericolose.
- Non utilizzate l’apparecchio quando la testina di rasatura o uno dei
pettini regola altezza sono danneggiati o rotti, per evitare il rischio di
lesioni.
- Quest’apparecchio è stato realizzato esclusivamente per radere e
rinire i peli del viso (barba, baf e basette).
Indicazioni generali
- L’apparecchio è conforme alle norme di sicurezza IEC approvate a
livello internazionale e può essere lavato tranquillamente sotto l’acqua
corrente.
Conformità agli standard
Questo apparecchio Philips è conforme a tutti gli standard relativi ai campi
elettromagnetici (EMF). Se utilizzato seguendo le istruzioni contenute nel
presente manuale dell’utente, l’apparecchio consente un utilizzo sicuro
come confermato dai risultati scientici attualmente disponibili.
Come ricaricare l’apparecchio
Solo QS6160: per una ricarica normale è necessaria circa 1 ora.
Solo QS6140: per una ricarica normale sono necessarie circa 4 ore.
Quando l’apparecchio è completamente carico ha un’autonomia di
funzionamento di circa 50 minuti.
Indicatore dello stato della batteria:
- Quando l’indicatore dello stato della batteria lampeggia in bianco, la
batteria è sotto carica.
- Quando l’indicatore dello stato della batteria diventa bianco sso, la
batteria è completamente carica. L’indicatore rimane in questo stato
per 30 minuti nché non si spegne.
- Quando l’indicatore dello stato della batteria lampeggia in arancione, la
batteria è quasi scarica (rimangono circa 10 minuti di autonomia).
- Quando l’indicatore dello stato della batteria lampeggia in arancione
rapidamente, la batteria è scarica e deve essere caricata per usare di
nuovo l’apparecchio.
Nota: l’apparecchio può essere ricaricato solo mediante l’apposito supporto di
ricarica.
1 Inserite lo spinotto nel supporto di ricarica.
Nota: lo spinotto è più semplice da inserire quando il supporto di
ricarica è chiuso.
Page 89

ITALIANO 89
2 Aprite il supporto di ricarica (“clic”).
3 Inserite la spina dell’adattatore nella presa di corrente a muro.
4 Posizionate l’apparecchio sul supporto di ricarica.
, L’indicatore dello stato della batteria inizia a lampeggiare in bianco ad
indicare che l’apparecchio è in fase di ricarica.
, Quando la batteria è completamente carica, l’indicatore dello stato
della batteria diventa sso.
Modalità d’uso dell’apparecchio
Potete usare l’apparecchio per rinire o radere i peli del viso su pelle
asciutta (barba, baf e basette). Quest’apparecchio non è stato progettato
per la rasatura o la rinitura dei peli al di sotto del collo.
Consiglio La prima volta che utilizzate l’apparecchio, prestate particolare
cautela per acquisire familiarità e consentire alla pelle di abituarsi al metodo
di rasatura.
I pettini regola altezza consentono di tagliare i peli di lunghezza differente.
Iniziate con l’impostazione massima per acquisire familiarità con
l’apparecchio.
Consultate la tabella riportata in basso per un riepilogo delle
impostazioni e della lunghezza corrispondente.
Impostazione Lunghezza dei peli dopo la rinitura
1 1 mm - 3/64”
. 1,5 mm - 1/16”
Page 90

ITALIANO90
Impostazione Lunghezza dei peli dopo la rinitura
2 2 mm - 5/65”
. 2,5 mm - 3/32”
3 3 mm - 1/8”
4 4 mm - 5/32”
5 5 mm - 3/16”
6 6 mm - 1/4”
7 7 mm - 9/32”
8 8 mm - 5/15”
9 9 mm - 3/8”
10 10 mm - 13/32”
* senza pettine = 0,5 mm - 1/32”
1 Tenete l’apparecchio nella posizione di rinitura, con la testina di
precisione rivolta verso l’alto e la testina di rasatura verso il basso.
2 Fate scorrere il pettine nella scanalatura posta sull’apparecchio no a
farlo scattare in posizione.
3 Premete il selettore delle impostazioni di lunghezza e muovetelo da
sinistra a destra o viceversa per selezionare un’impostazione.
Page 91

ITALIANO 91
- La linea sopra il selettore delle impostazioni di lunghezza mostra
l’impostazione selezionata.
3 24
4 Premete una volta il pulsante on/off della testina di precisione per
accenderla.
, Solo QS6160: il pulsante on/off si accende per indicare che la testina
di precisione è in funzione.
5 Per regolare i peli, muovere lentamente il pettine regola altezza sui
peli.
Consigli
- Controllate sempre che l’estremità del pettine regola altezza sia rivolta
nella direzione nella quale state muovendo l’apparecchio.
- Controllate che la parte piatta del pettine regola altezza sia sempre
perfettamente a contatto con la pelle, per ottenere un risultato
uniforme.
- Poiché i capelli crescono in diverse direzioni, anche l’apparecchio si
deve muovere in più punti (verso l’alto, verso il basso e in diagonale).
- Potete accendere la testina di precisione mentre la testina di rasatura è
in funzione. In questo caso, quest’ultima si spegne subito.
- La regolazione dell’altezza dei peli risulta più facile con la pelle e i peli
asciutti.
6 Quando avete nito, premete di nuovo il pulsante on/off della testina
di precisione per spegnerla.
Il pettine tiene la testina di precisione a una distanza predenita dalla
testina. Potete usare la testina di precisione senza il pettine. Se usate la
testina di precisione senza pettine, i peli verranno tagliati molto vicino alla
cute (circa. 0,5 mm).
Page 92

ITALIANO92
1 Rimuovete il pettine estraendolo dall’apparecchio.
Non tirate la parte essibile del pettine ma afferrate sempre la parte
inferiore.
2 Premete il pulsante on/off della testina di precisione per accenderla.
3 Tenete l’apparecchio con la testina di precisione rivolta verso l’alto
e passatelo dall’alto verso il basso con il lato largo della testina di
precisione.
Il rinitore di precisione ha un’ampiezza pari alla metà della testina di
precisione. Consente quindi di ottenere uno stile più preciso dell’area
intorno alle orecchie, le basette e anche intorno alla bocca e sotto il naso.
1 Per utilizzare il rinitore di precisione, basta ruotare il blocco
lame nché il rinitore stesso non risulta rivolto verso la parte
anteriore dell’apparecchio.
2 Premete il pulsante on/off della testina di precisione per accenderla.
3 Tenete l’apparecchio con la testina di precisione rivolta verso l’alto e
fate piccoli movimenti verso il basso con il rinitore di precisione.
Rasatura
Prima di utilizzare la testina di rasatura, controllate sempre che non
mostri segni di usura o danni. Se la testina di rasatura è danneggiata
o usurata, non utilizzate l’apparecchio per evitare tagli o abrasioni. Se
danneggiata, sostituite la testina di rasatura prima di utilizzarla (vedere il
capitolo “Sostituzione”).
Page 93

ITALIANO 93
1 Tenete l’apparecchio nella posizione di rasatura, con la testina di
rasatura rivolta verso l’alto e la testina di precisione verso il basso.
2 Premete una volta il pulsante on/off della testina di rasatura per
accenderla.
, Solo QS6160: il pulsante on/off si accende per indicare che la testina
di rasatura è in funzione.
3 Appoggiate delicatamente la testina di rasatura sulla pelle e muovete
lentamente l’apparecchio nel senso opposto alla crescita del pelo,
esercitando una leggera pressione.
Consiglio
- Controllate che la testina di rasatura sia sempre a contatto con la pelle.
- Potete accendere la testina di rasatura mentre la testina di precisione è
in funzione. In questo caso, la testina di precisione si spegne subito.
4 Per spegnere la testina di rasatura dopo l’uso, premere nuovamente il
pulsante on/off.
Protezione da sovraccarico
Se premete la testina di precisione o la testina di rasatura esercitando
una pressione eccessiva sulla pelle o se il gruppo lame rimane bloccato
(ad esempio dai vestiti ecc.), il pulsante on/off della testina di precisione o
della testina di rasatura bloccata lampeggia rapidamente (solo QS6160)
e l’apparecchio si spegne automaticamente. Rimuovete l’ostruzione che
blocca il gruppo lame prima di usare l’apparecchio di nuovo.
Page 94

ITALIANO94
Pulizia e manutenzione
Pulite l’apparecchio ogni volta che lo usate.
Non usate aria compressa, prodotti o sostanze abrasive o detergenti
aggressivi, come benzina o acetone, per pulire l’apparecchio.
Pulite l’apparecchio e l’adattatore solo con la spazzolina in dotazione.
Nota: Le testine di precisione e rasatura non necessitano di lubricazione.
Pulizia della testina di precisione
1 Spegnete l’apparecchio.
2 Estraete il pettine dalla testina di precisione.
3 Pulite la testina di precisione sotto il rubinetto.
Pulizia del connettore della testina di precisione
Nota: assicuratevi di pulire il connettore della testina di precisione almeno una
volta ogni tre mesi.
1 Spegnete l’apparecchio.
2 Estraete delicatamente la testina di precisione dall’apparecchio.
3 Rimuovete i peli dall’interno del connettore della testina di
precisione con la spazzolina per la pulizia.
Page 95

ITALIANO 95
4 Pulite anche la parte interna della testina di precisione con la
spazzolina per la pulizia in dotazione.
5 Dopo la pulizia, riponete la testina di precisione sull’apparecchio.
Pulizia della testina di rasatura
1 Spegnete l’apparecchio.
2 Rimuovete la testina di rasatura dall’apparecchio.
Nota: La testina di rasatura è molto delicata. Maneggiatela con cura. Se
danneggiata, sostituitela.
3 Risciacquate la testina di rasatura con acqua tiepida.
non pulite la lamina con la spazzolina fornita, per evitare di danneggiarla.
Page 96

ITALIANO96
4 Aiutandovi con l’apposita spazzolina, rimuovete i peli dalle lame.
5 Al termine delle operazioni di pulizia, inserite nuovamente la testina
di rasatura nell’apparecchio (“clic”).
Sostituzione
In caso di uso frequente, sostituite la lamina di rasatura e le lame ogni anno.
Lamina di rasatura
1 Rimuovete la testina di rasatura dall’apparecchio.
2 Rimuovete la lamina da sostituire dalla testina di rasatura.
3 Inserite la nuova lamina di rasatura nel relativo accessorio no a che
non si blocca in posizione (“clic”).
Lame
1 Rimuovete la testina di rasatura dall’apparecchio.
2 Rimuovete le lame.
3 Inserite le nuove lame nell’apparecchio (“clic”).
Conservazione
Il caricatore può essere comodamente ripiegato per essere traspor tato o
riposto semplicemente.
1 Per ripiegare il caricatore: piegate la base del caricatore nell’apposito
supporto.
Page 97

ITALIANO 97
2 Inserite il cappuccio di protezione sull’unità di rasatura.
Blocco da viaggio (solo QS6160)
L’apparecchio è dotato di un blocco da viaggio integrato per evitare
l’accensione accidentale.
1 Per attivare il blocco da viaggio, tenete premuto il pulsante on/off
della testina di precisione, il pulsante on/off della testina di rasatura
o entrambi i pulsanti per almeno 4 secondi mentre l’indicazione di
blocco da viaggio lampeggia 3 volte.
, Il blocco da viaggio viene attivato solo quando le spie luminose
lampeggiano continuamente.
2 Per disattivare il blocco da viaggio, tenete premuto il pulsante on/off
della testina di precisione, il pulsante on/off della testina di rasatura
o entrambi i pulsanti per almeno 4 secondi mentre l’indicazione di
blocco da viaggio lampeggia 4 volte.
, Il blocco da viaggio ora è disattivato e l’apparecchio si accende.
Nota: il blocco da viaggio può essere disattivato anche mettendo l’apparecchio
sotto carica.
Ordinazione degli accessori
Per acquistare degli accessori per questo apparecchio, visitate il nostro
Online Shop all’indirizzo www.shop.philips.com/service. Se l’Online
Shop non è disponibile nel vostro paese, rivolgetevi al vostro rivenditore
Philips o a un centro assistenza Philips. Se avete difcoltà nel reperire gli
accessori per il vostro apparecchio, contattate un centro assistenza clienti
Philips del vostro paese. I dettagli di contatto si trovano nel volantino della
garanzia internazionale.
Tutela dell’ambiente
- Per contribuire alla tutela dell’ambiente, non smaltite l’apparecchio
insieme ai riuti domestici, ma consegnatelo a un centro di raccolta
ufciale.
Page 98

ITALIANO98
- La batteria ricaricabile integrata contiene sostanze potenzialmente
nocive per l’ambiente. Rimuovete sempre la batteria prima di smaltire
l’apparecchio e consegnarlo a un centro di raccolta ufciale. Smaltite la
batteria in un apposito centro di raccolta. In caso di difcoltà durante
la rimozione della batteria, consegnate l’apparecchio a un centro di
assistenza Philips, che si occuperà della rimozione della batteria e dello
smaltimento dell’apparecchio.
Rimozione della batteria ricaricabile
Rimuovete la batteria ricaricabile solo se completamente scarica.
1 Scollegate l’apparecchio dalla presa di corrente e lasciatelo in
funzione no al completo arresto.
2 Rimuovete la testina di rasatura e le lame dall’apparecchio.
3 Svitate le quattro viti del coperchio superiore con un cacciavite.
4 Rimuovete il coperchio.
5 Inserite un cacciavite sotto il pannello posteriore e rimuovete il
pannello.
6 Inserite il cacciavite sotto il coperchio del corpo principale e
rimuovete il coperchio.
, Ora risulterà visibile la scheda a circuiti stampati.
7 Scollegate la batteria dalla scheda a circuiti stampati.
Attenzione: le estremità delle batterie sono molto aflate!
Garanzia e assistenza
Per assistenza o informazioni e in caso di problemi, visitate il sito Web di
Philips www.philips.com/support oppure contattate il centro assistenza
clienti Philips del vostro paese. Per conoscere il numero di telefono,
consultate l’opuscolo della garanzia internazionale. Se nel vostro paese non
esiste un centro assistenza clienti, rivolgetevi al vostro rivenditore Philips.
Page 99

NEDERLANDS
Inleiding
Gefeliciteerd met uw aankoop en welkom bij Philips! Als u volledig wilt
proteren van de ondersteuning die Philips biedt, registreer uw product
dan op www.philips.com/welcome.
1 Precisietrimmer (32 mm)
2 Trimhoofd
3 Precisietrimmer (15 mm)
4 Geleidegroef
5 Keuzeknop haarlengtestand
6 Aan/uitknop trimhoofd
7 Reisvergrendelingindicatie (alleen QS6160)
8 Aan/uitknop scheerhoofd
9 Scheerhoofd
10 Accustatusindicator
11 Trimkam
12 Trimkam (alleen QS6160)
13 Oplaadstandaard
14 Adapter met klein stekkertje
15 Beschermkap
16 Schoonmaakborsteltje
17 Opbergetui (alleen QS6160)
Belangrijk
Lees deze gebruiksaanwijzing zorgvuldig door voordat u het apparaat gaat
gebruiken. Bewaar de gebruiksaanwijzing om deze zo nodig later te kunnen
raadplegen.
Gevaar
- Houd de adapter droog.
Waarschuwing
- Controleer of het voltage dat wordt aangegeven op de adapter
overeenkomt met de plaatselijke netspanning voordat u het apparaat
aansluit.
- De adapter bevat een transformator. Knip de adapter niet af om deze
te vervangen door een andere stekker, aangezien dit een gevaarlijke
situatie oplevert.
- Dit apparaat is niet bedoeld voor gebruik door personen (waaronder
kinderen) met verminderde lichamelijke, zintuiglijke of geestelijke
vermogens, of die gebrek aan ervaring of kennis hebben, tenzij iemand
die verantwoordelijk is voor hun veiligheid toezicht op hen houdt of
hun heeft uitgelegd hoe het apparaat dient te worden gebruikt.
- Dit apparaat is niet bedoeld voor gebruik door kinderen. Houd
toezicht op kinderen om te voorkomen dat ze met het apparaat gaan
spelen.
Let op
- Laad het apparaat op, gebruik het en bewaar het bij een temperatuur
tussen 5°C en 35°C.
- Laad het apparaat niet op in het opbergetui.
99
Page 100

NEDERLANDS100
- Gebruik uitsluitend de bijgeleverde adapter en oplaadstandaard.
- Dompel het apparaat nooit onder in water of andere vloeistoffen en
gebruik het niet onder de douche. Spoel het apparaat alleen af onder
de kraan om het schoon te maken.
- Wanneer het apparaat wordt blootgesteld aan grote temperatuur-,
druk- of vochtigheidsverschillen, dient u het apparaat 30 minuten te
laten acclimatiseren voordat u het gaat gebruiken.
- Indien de adapter of de oplaadstandaard beschadigd is, laat deze dan
altijd vervangen door een exemplaar van het oorspronkelijke type om
gevaar te voorkomen.
- Gebruik het apparaat niet wanneer het scheerhoofd of een van de
trimkammen beschadigd of kapot is, omdat dit tot verwondingen kan
leiden.
- Dit apparaat is alleen bedoeld voor het trimmen en droog scheren van
gezichtshaar (baard, snor en bakkebaarden).
Algemeen
- Het apparaat voldoet aan de internationaal erkende IEC
veiligheidsvoorschriften en kan veilig onder de kraan worden gereinigd.
Naleving van richtlijnen
Dit Philips-apparaat voldoet aan alle richtlijnen met betrekking tot
elektromagnetische velden (EMV). Als het apparaat volgens de instructies
in deze gebruiksaanwijzing wordt gebruikt, is het veilig te gebruiken volgens
het nu beschikbare wetenschappelijke bewijs.
Opladen
Alleen QS6160: opladen duurt normaal ongeveer 1 uur.
Alleen QS6140: opladen duurt normaal ongeveer 4 uur.
Wanneer het apparaat volledig is opgeladen, kunt u het 50 minuten
gebruiken.
Accustatusindicator:
- Wanneer de accustatusindicator wit knippert, wordt de accu
opgeladen.
- Wanneer de accustatusindicator ononderbroken wit brandt, is de accu
helemaal opgeladen. Deze aanduiding wordt gedurende 30 minuten
getoond en dan gaat de accustatusindicator uit.
- Wanneer de accustatusindicator oranje knippert, is de accu bijna leeg
(circa 10 minuten gebruiksduur over).
- Wanneer de accustatusindicator snel oranje knippert, is de accu leeg
en moet u het apparaat opladen voor u het opnieuw kunt gebruiken.
Opmerking: Het apparaat kan alleen worden opgeladen in de
oplaadstandaard.
1 Steek de kleine stekker in de oplader.
Opmerking: De kleine stekker is het eenvoudigst te plaatsen als de
oplaadstandaard is ingeklapt.
 Loading...