

Page 1
QP6620, QP6610
Page 2
Page 3
3mm
QP6620
QP6610
QP6520 QP6520
1
2
7
8
9
11
12
13
14
15
17
16
18
10
6
3
4
5
Page 4

empty page before TOC
Page 5

English 6
Čeština 28
Eesti 51
Hrvatski 74
Latviešu 97
Lietuviškai 120
Magyar 142
Polski 166
Română 191
Slovenščina 216
Slovensky 239
Български 263
Русский 288
Українська 313
Қазақша
336
Page 6

English
6
Introduction
Congratulations on your purchase and welcome to
Philips! To fully benefit from the support that
Philips offers, register your product at
www.philips.com/welcome.
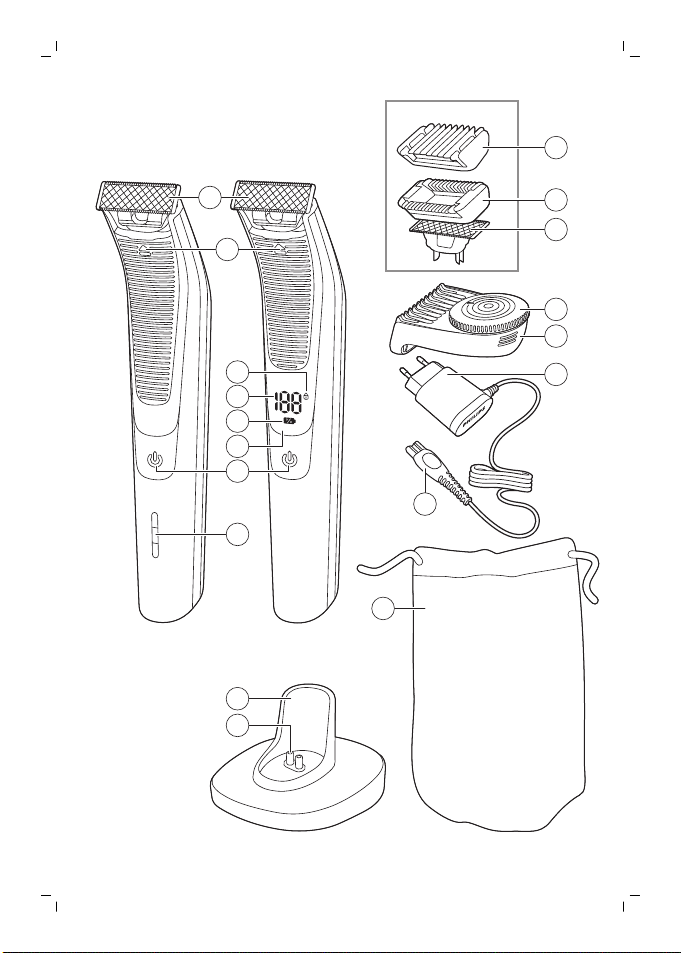
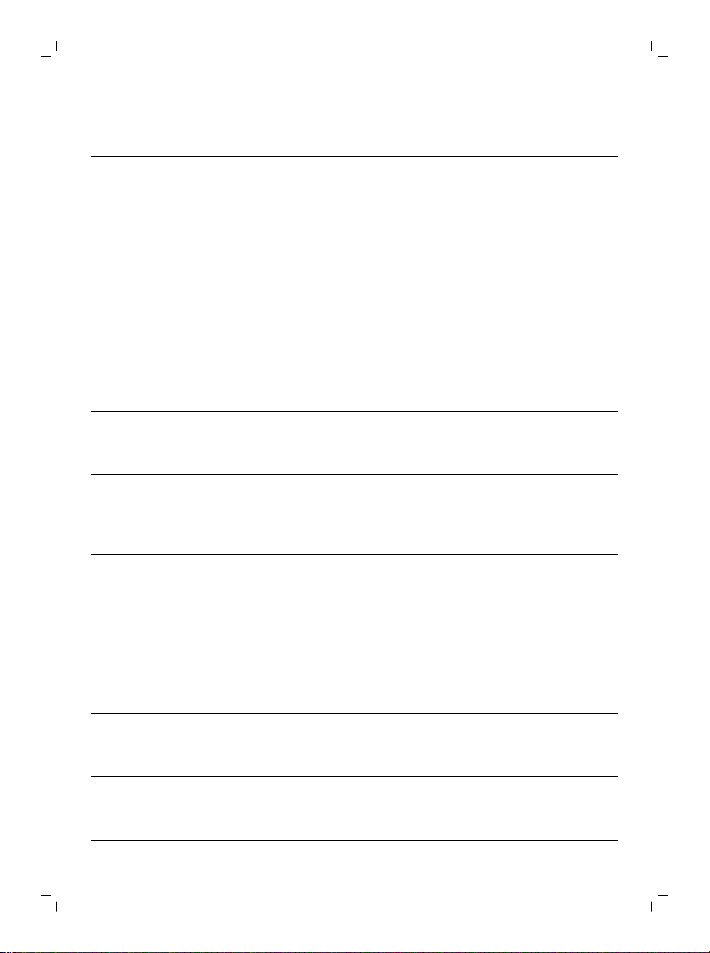
General description (Fig. 1)
1 Face blade
2 Blade release slide
3 Travel lock (QP6620 only)
4 Battery status percentage (QP6620 only)
5 Charge symbol (QP6620 only)
6 Display (QP6620 only)
7 On/off button
8 Battery status indicator (QP6610 only)
9 Charging stand (QP6620 only)
10 Small plug of the charging stand (QP6620 only)
11 Pouch (QP6620 only)
12 Small plug
13 Supply unit
14 Precision trimming comb
15 Hair length setting wheel
16 Body blade
17 Sensitive skin guard
18 Body comb 3mm
Important safety information
Read this important information carefully before
you use the appliance and its accessories and save
it for future reference. The accessories supplied
may vary for different products.
English
Page 7
English
Danger
- Keep the supply unit dry.
Warning
- To charge the battery, only use the
detachable supply unit (HQ8505) provided
with the appliance.
- The supply unit contains a transformer. Do
not cut off the supply unit to replace it with
another plug, as this causes a hazardous
situation.
- This appliance can be used by children aged
from 8 years and above and persons with
reduced physical, sensory or mental
capabilities or lack of experience and
knowledge if they have been given
supervision or instruction concerning use of
the appliance in a safe way and understand
the hazards involved. Children shall not play
with the appliance. Cleaning and user
maintenance shall not be made by children
without supervision.
7
Page 8
English
8
- Always unplug the appliance before you
clean it under the tap.
- Always check the appliance before you use
it. Do not use the appliance if it is damaged,
as this may cause injury. Always replace a
damaged part with one of the original type.
- Do not open the appliance to replace the
rechargeable battery.
Caution
- Never immerse the charging
stand in water and do not rinse
it under the tap.
- Do not use the supply unit in or
near wall sockets that contain
an electric air freshener to
prevent irreparable damage to
the supply unit.
- Only use this appliance for its
intended purpose as shown in
the user manual.
- For hygienic reasons, the
appliance should only be used
by one person.
- Never use water hotter than
60°C to rinse the appliance.
Page 9

- Never use compressed air,
scouring pads, abrasive
cleaning agents or aggressive
liquids such as petrol or
acetone to clean the appliance.
Electromagnetic fields (EMF)
This Philips appliance complies with all applicable
standards and regulations regarding exposure to
electromagnetic fields.
General
- This appliance is waterproof. It is suitable for
use in the bath or shower and for cleaning
under the tap. For safety reasons, the appliance
can therefore only be used without cord.
- The supply unit is suitable for mains voltages
ranging from 100 to 240 volts.
- The supply unit transforms 100-240 volts to a
safe low voltage of less than 24 volts.
- Maximum noise level: Lc = 75dB(A).
Charging
Charge the appliance before first use and when
the display indicates that the battery is almost
empty.
Charging takes approx. 1 hour.
A fully charged appliance has an operating time of
up to 90 minutes (QP6620) or 60 minutes
(QP6610).
Note: This appliance can only be used without
cord.
English
9
Page 10
English
10
Battery status indicator QP6620
- When the charge symbol flashes orange, the
battery is almost empty. The remaining battery
capacity is indicated by the battery status
percentage shown on the display.
- To indicate that the appliance is charging, the
charge symbol flashes white.
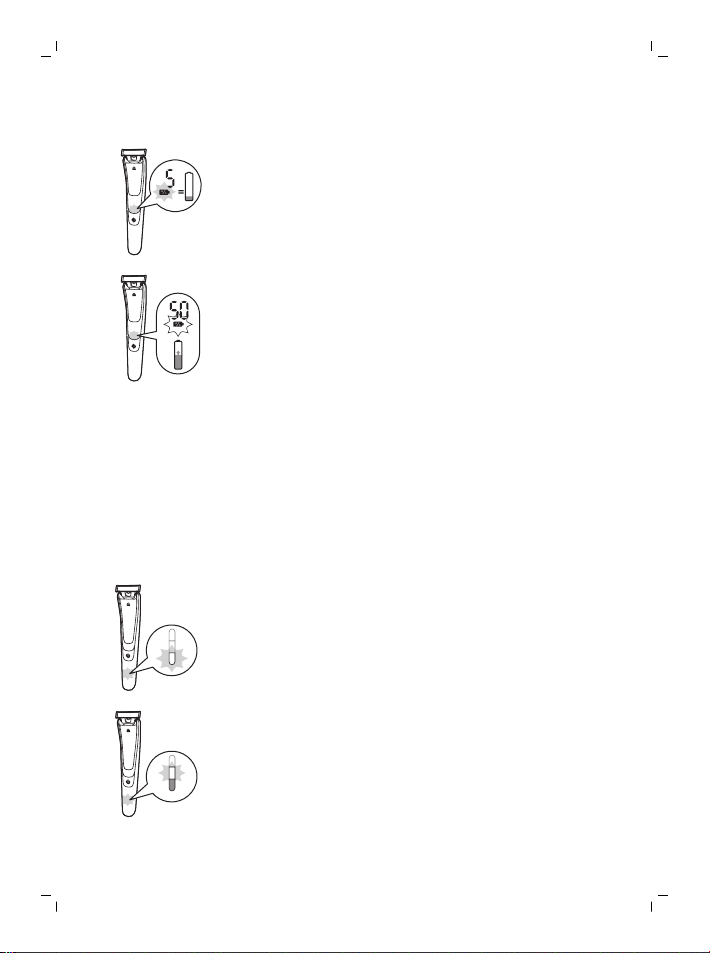
- Quick charge: after approx. 5 minutes charging,
the appliance contains enough energy for 5
minutes using. During quick charge the charge
symbol flashes white quickly until quick charge
is finished.
- The battery is fully charged when the battery
status percentage shown on the display is 100%
and the charge symbol lights up continuously.
- Approx. 30 minutes after the battery is fully
charged or when you disconnect the appliance
from the mains, the display switches off
automatically.
Battery status indicator QP6610
- When the battery status indicator flashes
orange, the battery is almost empty.
- To indicate that the appliance is charging, first
the bottom light flashes white and then lights
up white continuously. Then the second light
flashes and then lights up continuously, and so
on until the appliance is fully charged.
Page 11
English
- Quick charge: after approx. 5 minutes charging,
the appliance contains enough energy for 5
minutes using. During quick charge the lights of
the battery status indicator will light up
continuously one after another and then all
switch off. This will repeat itself until quick
charge is finished.
- The battery is fully charged when all lights of
the battery status indicator light up
continuously.
- Approx. 30 minutes after the battery is fully
charged or when you disconnect the appliance
from the mains, the lights of the battery status
indicator switch off automatically.
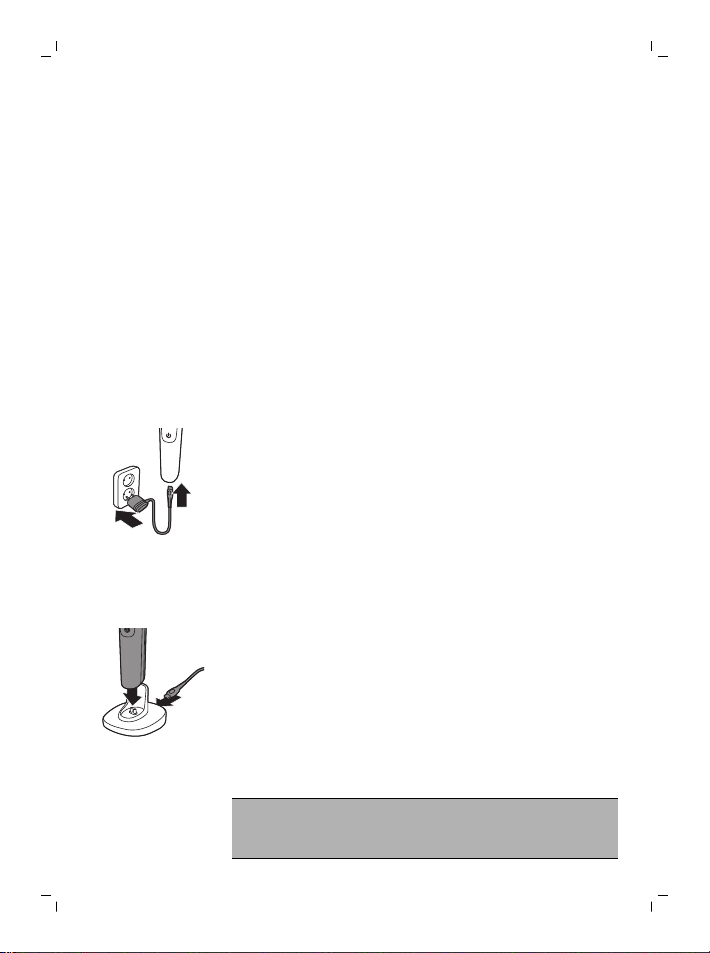
Charging with the supply unit
1 Insert the small plug into the appliance and put
the supply unit in the wall socket.
2 After charging, remove the supply unit from the
wall socket and pull the small plug out of the
appliance.
Charging in the charging stand (QP6620 only)
1 Insert the small plug into the charging stand
and put the adapter in the wall socket.
2 Put the appliance in the charging stand.
3 After charging, remove the adapter from the
wall socket and pull the small plug out of the
charging stand.
11
Using the appliance
Your appliance comes with 2 blades. Use
one blade for your face only and the other
blade for your body.
Page 12
English
12
The face blade and the stubble combs are
for use on facial hair. It is not intended for
shaving, edging or trimming hairs on lower
body parts or scalp hair.
The body blade and body comb are for use
on body parts below the neck.
The body blade with the skin guard
attached are for use on sensitive body
areas.
Note: This appliance can only be used without
cord.
- Use the appliance with the face blade to trim,
edge or shave facial hair (beard, moustache and
sideburns). Shave for a smooth result, trim with
the stubble comb to obtain a certain length and
edge to create perfect edges and sharp lines.
- Use the appliance with the body blade to trim
and/or shave your body hair. Shave your chest
without the skin guard or body comb for a
smooth result, shave your sensitive areas (e.g.
groin, armpits) with the skin guard, use the body
comb to trim your body.
- Take your time when you first start to use the
appliance. You have to acquire practice with the
appliance.
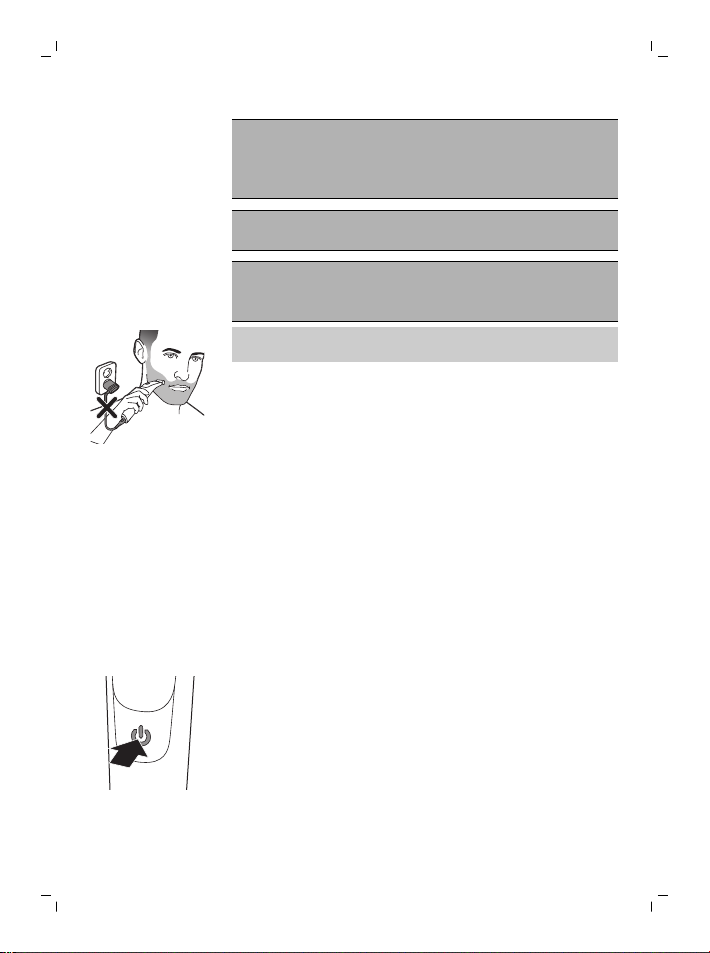
Switching the appliance on and off
1 To switch on the appliance, press the on/off
button once.
2 To switch off the appliance, press the on/off
button once.
Page 13
Face
English
13
Before you use the appliance, always check
the blade for damage or wear. If the blade is
damaged or worn, do not use the appliance,
as injury may occur. Replace a damaged
blade before you use the appliance (see
chapter ‘Replacement’).
Shaving tips and tricks
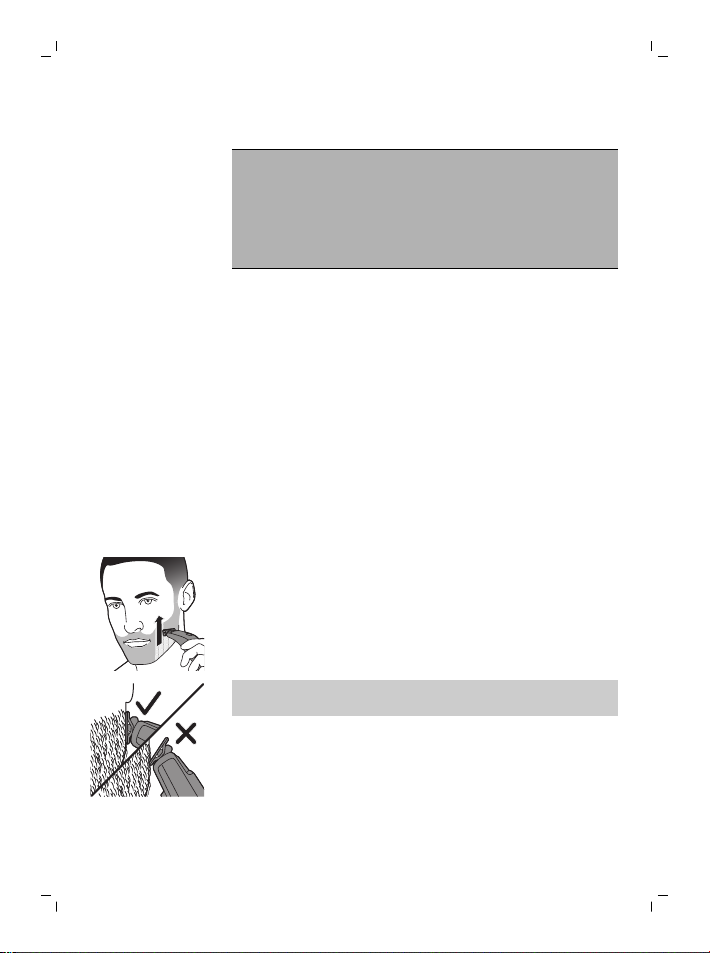
- Make sure that the blade is in full contact with
the skin by placing it flat on the skin.
- For the best result, move the appliance against
the grain.
- Make long strokes while pressing lightly.
- You can use the appliance dry or wet with gel or
foam. You can even use the appliance in the
shower.
- Shaving a clean beard and face gives the best
results.
Shaving
1 Switch on the appliance.
2 Place the blade on the skin and move the
appliance up or against the grain in long strokes
while you press it lightly.
Note: Make sure you hold the surface of the
blade flat against your skin.
3 Switch off and clean the appliance after every
use (see ‘Cleaning and maintenance’).
Edging
You can also use both edges of the blade to create
sharp lines and perfect edges. Hold the appliance
in such a way that the blade is perpendicular to
Page 14
14
English
the skin and one of its edges touches the skin. This
allows more precise detailing of sideburns and the
area around the mouth and nose.
1 To create sharp edges and lines, you can use
either edge of the blade.
2 Switch on the appliance.
3 Place the edge of the blade perpendicular onto
the skin.
- Make straight strokes while applying gentle
pressure.
4 Switch off and clean the appliance after every
use (see ‘Cleaning and maintenance’).
Trimming
Trimming tips
- Always trim in the direction of the teeth of the
precision trimming comb making sure the flat
part of the comb is in full contact with the skin
for an even trimming result.
- Since hair grows in different directions, you
need to hold the appliance in different
positions as well. However, always make sure
that you move the appliance upwards against
the grain.
- Trimming is easier when the skin and hair are
dry.
Page 15
1 2
English
Trimming with comb
The precision trimming comb allows you to trim
hair to different lengths. Start at the highest setting
to acquire practice with this appliance. The
settings on the wheel correspond to the hair
lengths in millimeters.
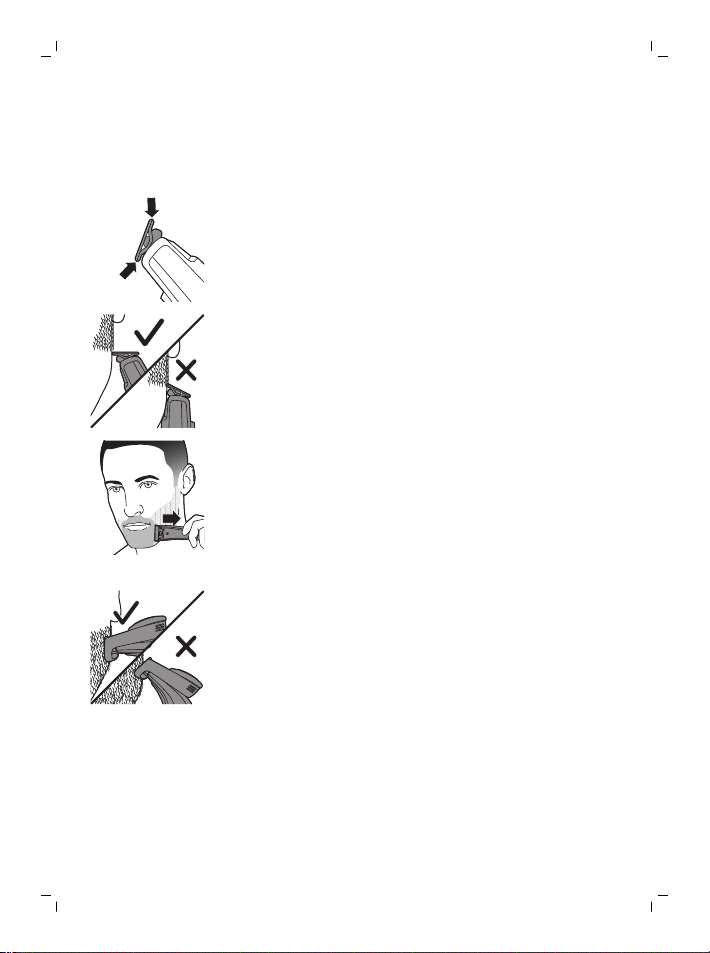
1 Place the front part of the comb onto the blade
and push the projection at the back of the
comb into the appliance (‘click’).
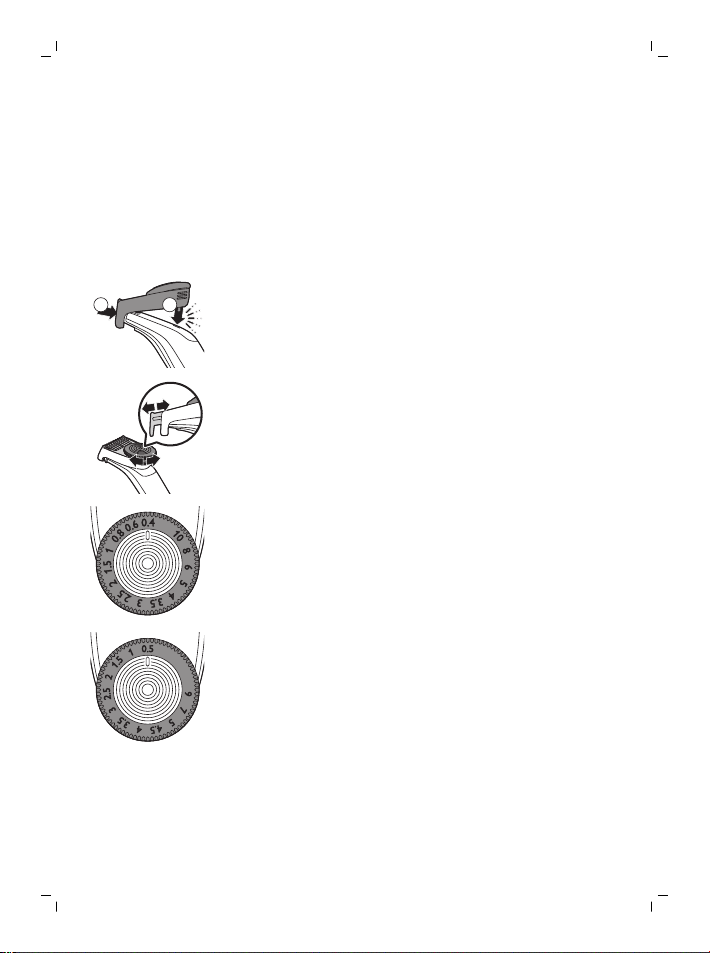
2 Turn the hair length setting wheel to select the
desired hair length setting.
The settings on the wheel correspond to the
hair lengths in millimeters.
- QP6620
- QP6610
3 Switch on the appliance.
15
Page 16
1
2
16
Body
English
4 Place the comb onto the skin and move the
appliance upwards slowly, against the grain.
5 Switch off and clean the appliance after every
use (see ‘Cleaning and maintenance’).
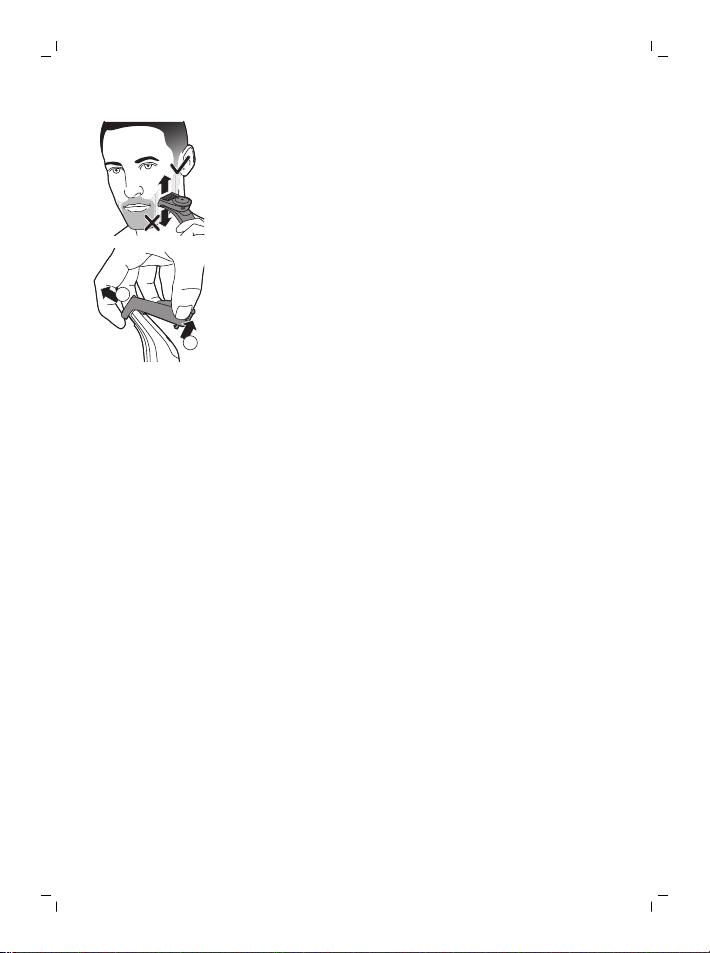
6 To remove the comb, pull its back part off the
appliance and then slide it off the blade.
- For hygienic reasons, only use the body blade
for trimming and shaving your body.
- For body trimming and shaving, make sure hair
is clean and dry as wet hair tends to stick to the
body and, when shaving sensitive areas, always
use the skin guard.
- Since all hairs do not grow in the same
direction, you may want to try different
trimming positions (i.e. upwards, downwards, or
across). Practice is best for optimum results.
- For the best result, move the appliance against
the grain.
- Make long strokes while pressing lightly.
- Use the appliance dry or wet with gel or foam,
even in the shower.
- Shaving a clean body gives the best results.
Shaving with skin guard
For optimal performance, use the skin guard only
on sensitive areas (for example the scrotum and
armpits).
Page 17
1
2
1
2
English
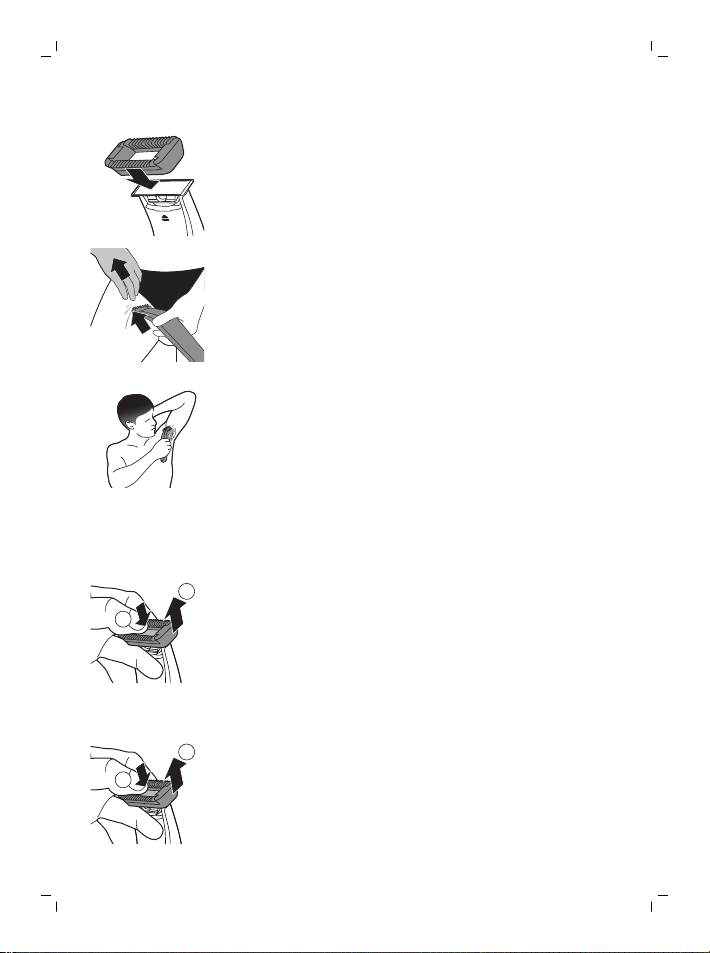
1 Hold the skin guard on both sides and press
onto the blade.
2 Switch the appliance on.
3 Place the skin guard onto the skin and stretch
the skin with your free hand. Move the
appliance upwards slowly, against the grain.
-
When using the appliance on your armpits,
raise your arm and put your hand on the
back of your head to stretch the skin.
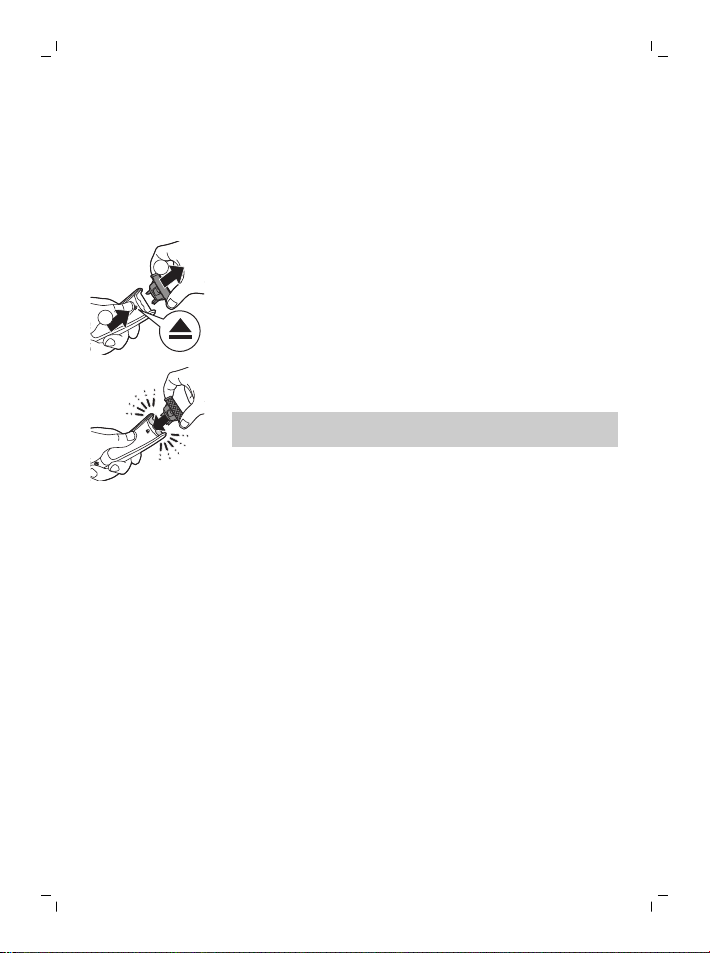
-
Regularly remove cut hair from the guard. If a
lot of hair has accumulated in the guard,
remove it from the appliance and blow
and/or shake out the hairs.
4 Switch off and clean the appliance after each
use.
5 To remove the skin guard, put one finger under
the edge of the guard and press on the blade
with your thumb.
Shaving without skin guard
The body blade without the skin guard allows you
to shave hair on your body below the neckline (for
example the chest) with a smooth result.
1 To remove the skin guard, put one finger under
the edge of the guard and press with your
thumb on the blade.
2 Switch the appliance on.
17
Page 18

18
English
3 Place the blade on the skin and move the
appliance against the grain in long strokes while
pressing lightly. Stretch the skin with your free
hand.
Note: Make sure you hold the surface of the
blade flat against your skin.
-
When you use the appliance on your
armpits, raise your arm and put your hand
on the back of your head to stretch the skin.
4 Switch off and clean the appliance after every
use.
Trimming with body comb
The 3mm (1.8in.) body comb allows you to trim hair
on your body below the neckline (for example
chest, armpits, scrotum).
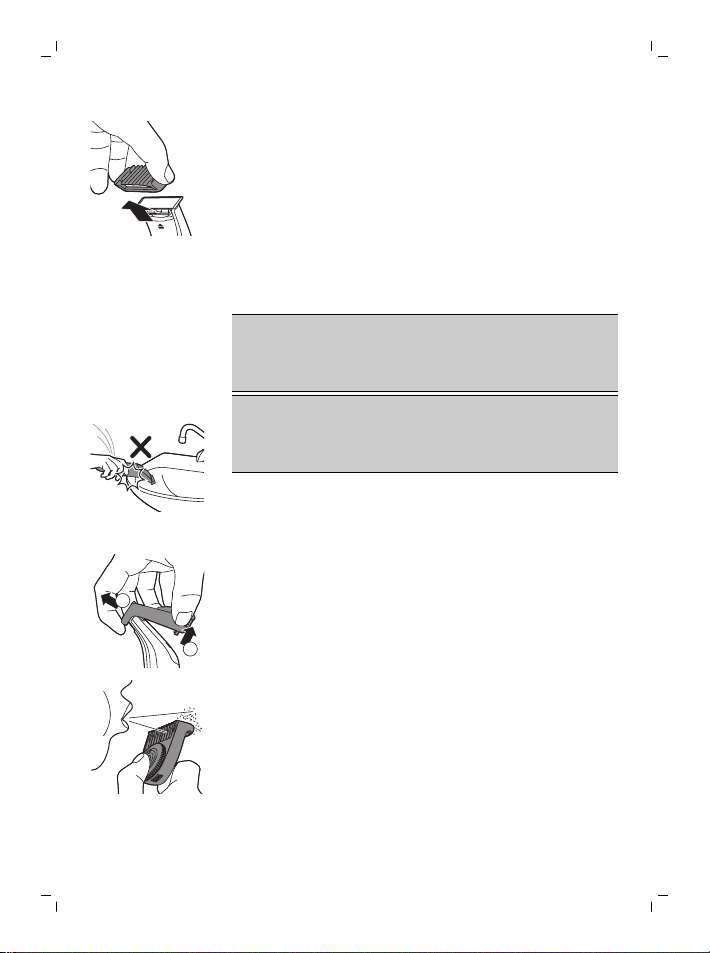
1 Hold the body comb on both sides and press
onto the blade.
2 Switch the appliance on.
3 Place the comb onto the skin and stretch the
skin with your free hand. Move the appliance
upwards slowly, against the grain.
-
When you use the appliance on your
armpits, raise your arm and put your hand
on the back of your head to stretch the skin.
-
Regularly remove cut hair from the guard. If a
lot of hair has accumulated in the guard,
remove it from the appliance and blow
and/or shake out the hairs.
4 Switch off and clean the appliance after each
use.
Page 19
5 To remove the comb, hold it on both sides and
1
2
pull it off the blade.
Cleaning and maintenance
Clean the appliance after every use.
Caution: Never use compressed air, scouring
pads, abrasive cleaning agents or aggressive
liquids such as petrol or acetone to clean the
appliance.
Caution: Do not tap the appliance against a
surface to remove water from it, as this may
cause damage. Replace the blade if it is
damaged.
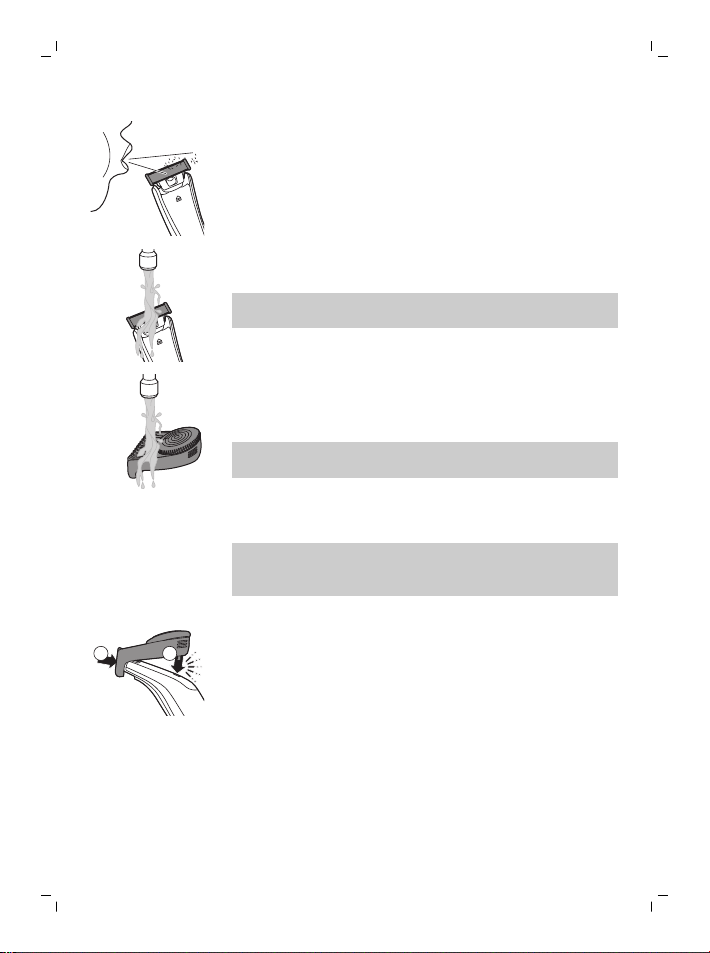
Cleaning the appliance
1 Remove the comb from the blade. Always turn
the appliance off before putting on or taking off
the comb.
English
19
2 If a lot of hairs have accumulated on the comb,
first blow them off.
Page 20
1 2
English
20
Storage
3 If a lot of hairs have accumulated on the
appliance, first blow them off.
4 Switch on the appliance and rinse the blade
with lukewarm water.
Caution: Do not dry the blade with a towel or a
tissue as this may cause damage.
5 Rinse the combs with lukewarm water.
6 Carefully shake off excess water and let all parts
air dry completely.
Note: The blade is fragile. Handle it carefully.
Replace the blade if it is damaged.
Note: We advise you to let the appliance and its
attachments dry before you store them for the
next use.
- Always attach the precision trimming comb on
the blade to protect the blade from damage
during travelling or storage.
- Attach the body comb on the body blade to
protect the blade from damage.
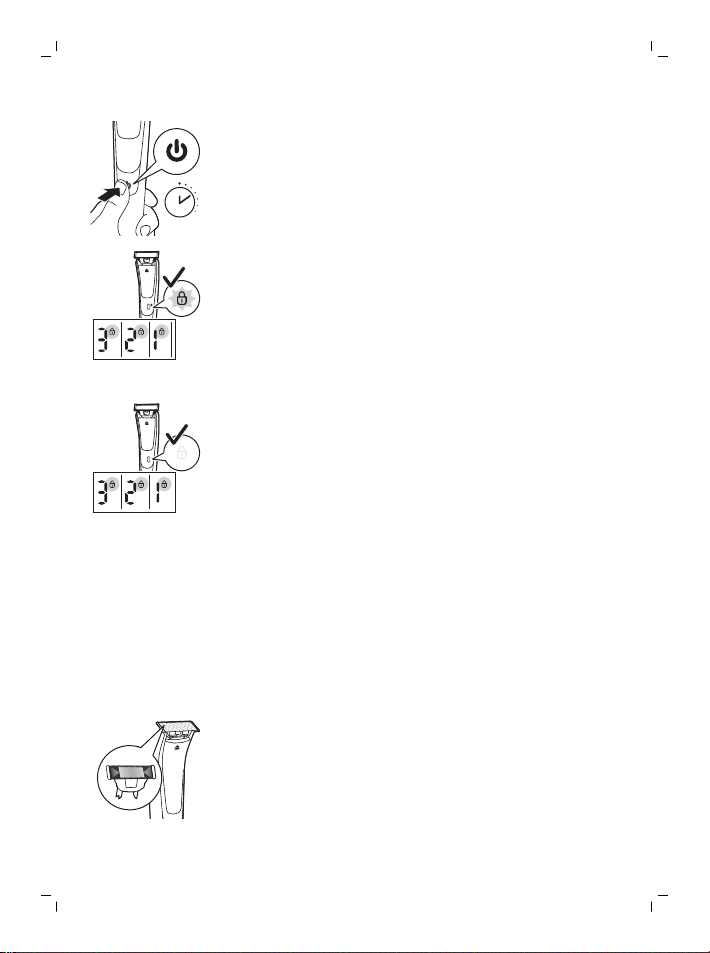
Travel lock (QP6620 only)
You can lock the appliance when you are going to
travel. The travel lock prevents the appliance from
being switched on by accident.
Activating the travel lock
Page 21
3 sec.
Replacement
Usage indicator
English
1 Press the on/off button for 3 seconds.
- While you activate the travel lock, the travel lock
symbol lights up and the digital display counts
down.
- When the travel lock is activated, the travel lock
symbol flashes.
21
Deactivating the travel lock
1 Press the on/off button for 3 seconds.
- While you deactivate the travel lock, the display
counts down. Then the travel lock symbol lights
up and switches off.
- The appliance is now ready for use again.
For optimal cutting and gliding performance, we
advise you to replace the blade every 4 months,
when it no longer provides the shaving or trimming
results you expect or when the usage indicator
appears.
The blade is equipped with a usage indicator
which gradually turns green. When the green bar is
highly visible, it is recommended to replace your
blade. Always replace the blade with an original
Philips blade.
Depending on your usage behavior, the exact
lifetime of the blade could be longer or shorter.
Page 22
2
1
English
22
Similar to a manual blade, the blade becomes
blunt over time, which results in increased hair
pulling and reduced cutting performance.
Replacing the blade
1 Switch off the appliance.
2 Push the blade release slide upwards carefully,
and hold the blade on both sides to remove the
blade. This will prevent the blade from flying off
the handle.
3 Hold the new blade on its sides and press it
onto the handle (‘click’).
Note: When you hear a click, the new blade is
placed correctly and ready for use.
Ordering accessories
To buy accessories or spare parts, visit
www.shop.philips.com/service or go to your
Philips dealer. You can also contact the Philips
Consumer Care Center in your country (see the
international warranty leaflet for contact details).
The following parts are available:
- Model QP210 Philips Replacement Blade,
1-Pack
- Model QP220 Philips Replacement Blade,
2-Pack
- Model QP610 Philips Body replacement pack
- Model QP620 Philips Face and Body
replacement pack.
Page 23
Recycling
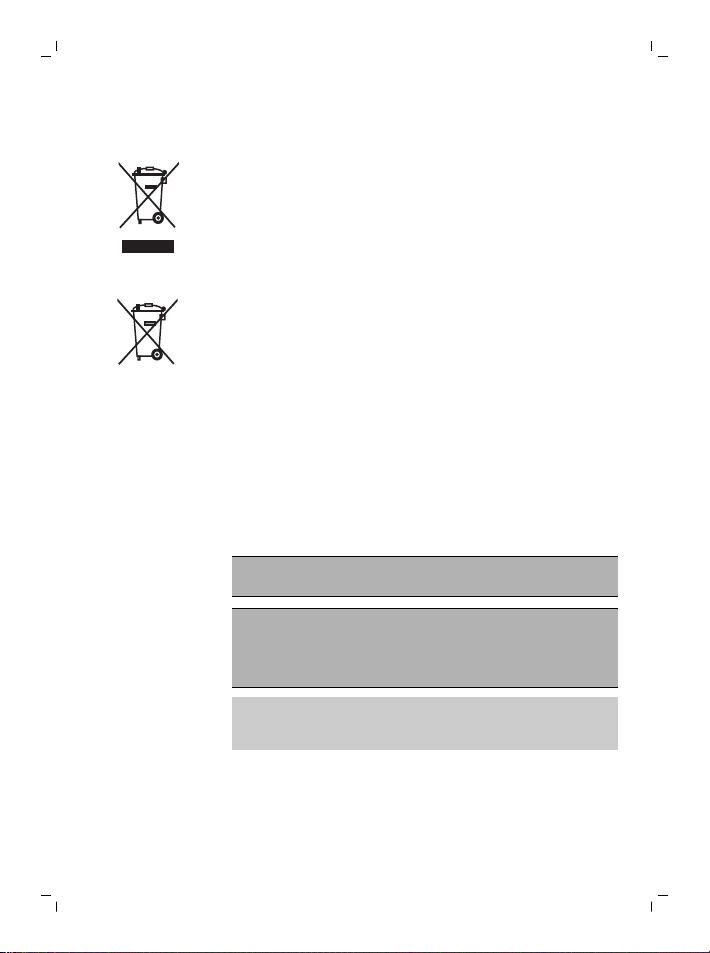
- This symbol means that this product shall not
be disposed of with normal household waste
(2012/19/EU).
- This symbol means that this product contains a
built-in rechargeable battery which shall not be
disposed of with normal household waste
(2006/66/EC). Please take your product to an
official collection point or a Philips service
center to have a professional remove the
rechargeable battery.
- Follow your country’s rules for the separate
collection of electrical and electronic products
and rechargeable batteries. Correct disposal
helps prevent negative consequences for the
environment and human health.
Removing the rechargeable battery
Only remove the rechargeable battery when
you discard the appliance.
Before you remove the battery, make sure
that the product is disconnected from the
wall socket and that the battery is
completely empty.
Take any necessary safety precautions when you
handle tools to open the product and when you
dispose of the rechargeable battery.
1 Disconnect the appliance from the mains and
let the appliance run until the motor stops.
2 Remove the blade from the appliance.
English
23
Page 24
24
English
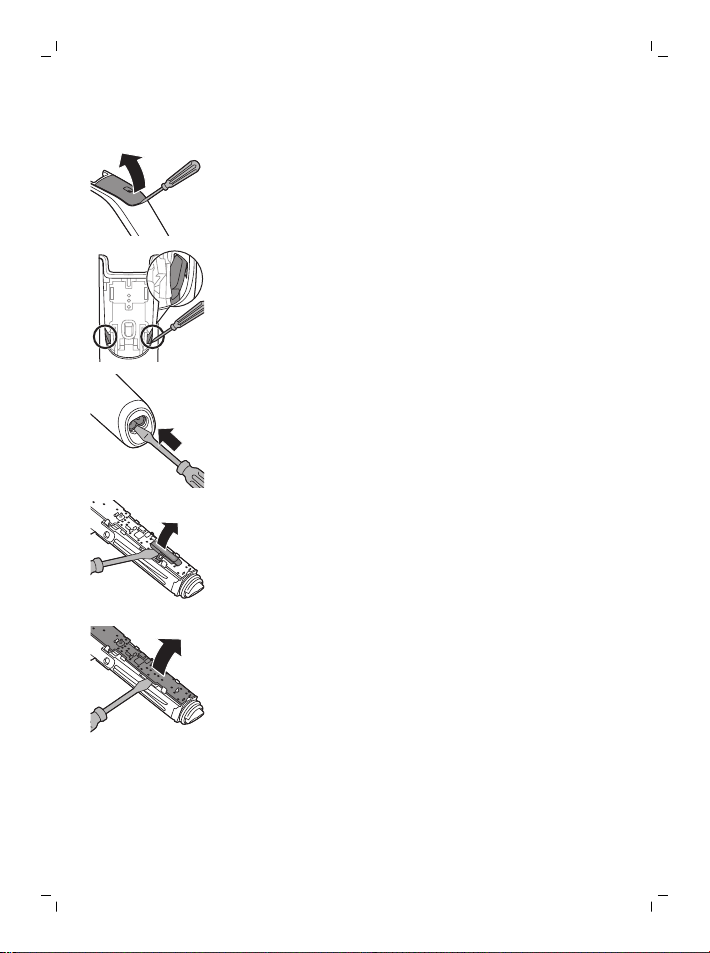
3 Insert a screwdriver under the back panel and
remove the panel.
4 Break the snap connections on both sides with
the screwdriver.
5 Push out the inner body by pushing the
screwdriver into the bottom of the handle.
- Now you see the printed circuit board.
6 QP6510: remove the cover of the printed circuit
board with the screwdriver.
7 Remove the printed circuit board from the inner
body with the screwdriver.
Page 25
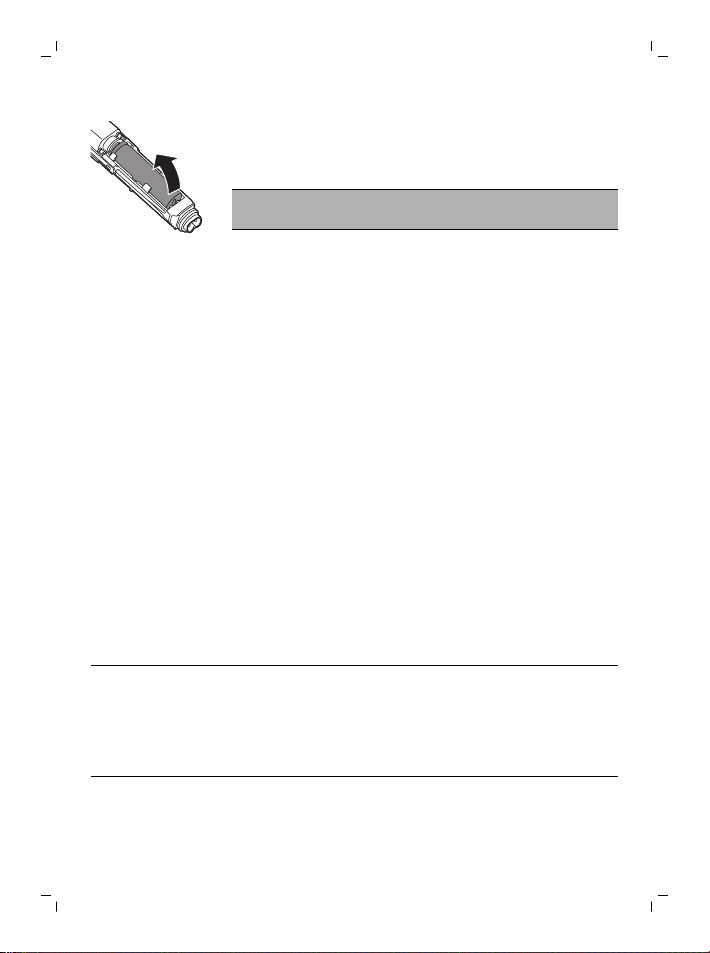
8 Lift the battery out of the inner body with the
screwdriver. The battery is connected with
double-sided tape.
Warning: Be careful, the battery strips are
very sharp.
Warranty and support
If you need information or support, please visit
www.philips.com/support or read the
international warranty leaflet.
Guarantee restrictions
The blade is not covered by the terms of the
international guarantee because it is subject to
wear.
Troubleshooting
This chapter summarizes the most common
problems you could encounter with the appliance.
If you are unable to solve the problem with the
information below, visit www.philips.com/support
for a list of frequently asked questions or contact
the Consumer Care Center in your country.
Problem Possible cause Solution
English
25
I cannot switch
on the appliance
when it is
connected to the
mains.
You cannot use the
appliance when it
is charging. You can
only use the
appliance without
cord.
Disconnect the appliance
from the mains before use.
Page 26
English
26
Problem Possible cause Solution
The appliance
does not work
anymore.
The appliance
does not cut hairs
anymore.
The rechargeable
battery is empty.
The blade is
blocked by dirt.
Travel lock is
activated.
The blade is placed
on the handle
incorrectly.
The blade is
damaged or worn.
Charge the appliance (see
chapter ‘Charging’). During
charging, the battery
charge indicator flashes
white. If the battery charge
indicator does not flash,
check whether there is a
power failure or if the wall
socket is live. If there is no
power failure and the wall
socket is live but the
battery charge indicator
still does not flash, take the
appliance to your dealer or
a Philips service center.
Switch on the appliance
and rinse the blade under
the tap with warm water.
Hold the blade in a cup
with warm water (60°C and
not hotter) for approx. 30
seconds.
Press the on/off button for
3 seconds to deactivate
travel lock.While you
deactivate the travel lock,
the display counts down.
Then the travel lock
symbol lights up and
switches off.The appliance
is now ready for use again.
Push the blade onto the
appliance until you hear a
click.
Replace the blade with a
new one. See chapter
‘Replacement’.
Page 27
Problem Possible cause Solution
English
27
The appliance
makes a strange
noise.
The appliance
does not function
optimally
anymore.
The blade is
damaged or worn.
The blade is placed
on the handle
incorrectly.
The blade is
blocked by dirt.
The blade is
blocked by dirt.
The blade is
subject to wear
and therefore its
performance
decreases over
time.
The blade is a
delicate part of the
appliance and can
easily be damaged.
If the blade is
damaged, it may
not function
optimally anymore.
Replace the blade with a
new one. See chapter
‘Replacement’.
Remove and reattach the
blade. Push it onto the
appliance until you hear a
click.
Remove the blade and
clean the blade thoroughly.
Remove the blade and
clean the blade thoroughly.
Replace the blade with a
new one. See chapter
‘Replacement’.
Replace the blade with a
new one. See chapter
‘Replacement’.
Page 28

Čeština
28
Úvod
Společnost Philips Vám gratuluje ke koupi a vítá
Vás! Chcete-li využívat všech výhod podpory
nabízené společností Philips, zaregistrujte svůj
výrobek na stránkách www.philips.com/welcome.
Všeobecný popis (obr. 1)
1 Čepel na obličej
2 Uvolňovací posuvné tlačítko čepele
3 Cestovní zámek (pouze model QP6620)
4 Procenta stavu baterie (pouze model QP6620)
5 Symbol nabíjení (pouze model QP6620)
6 Displej (pouze model QP6620)
7 Vypínač
8 Ukazatel stavu baterie (pouze model QP6610)
9 Nabíjecí stojánek (pouze model QP6620)
10 Malá zástrčka nabíjecího stojánku (pouze
model QP6620)
11 Pouzdro (pouze model QP6620)
12 Malá zástrčka
13 Napájecí jednotka
14 Hřeben pro přesné zastřihování
15 Kolečko nastavení délky vousů
16 Čepel na tělo
17 Ochranný nástavec pro citlivou pleť
18 Hřeben na zastřihování chloupků na těle 3 mm
Důležité bezpečnostní informace
Před použitím přístroje ajeho příslušenství si
pečlivě přečtěte tuto příručku sdůležitými
informacemi auschovejte ji pro budoucí použití.
Dodané příslušenství se může pro různé výrobky
lišit.
Čeština
Page 29

Čeština
Nebezpečí
- Zdroj udržujte vsuchu.
Varování
- Knabíjení baterie používejte pouze
odnímatelnou napájecí jednotku (HQ8505)
dodávanou stímto přístrojem.
- Zdroj obsahuje transformátor. U zdroje
nikdy neodřezávejte a nenahrazujte
zástrčku. Mohlo by tak dojít knebezpečné
situaci.
- Tento přístroj mohou používat děti od 8let
věku. Osoby somezenými fyzickými,
smyslovými nebo duševními schopnostmi
nebo nedostatkem zkušeností aznalostí jej
mohou používat, pokud jsou pod dohledem
nebo byly poučeny obezpečném používání
přístroje apokud chápou související rizika.
Děti si spřístrojem nesmí hrát. Děti nesmí
provádět bez dozoru čištění auživatelskou
údržbu.
- Před čištěním pod tekoucí vodou přístroj
vždy odpojte od sítě.
29
Page 30

Čeština
30
- Před použitím přístroj vždy zkontrolujte.
Přístroj nepoužívejte, je-li poškozený, aby
nedošlo ke zranění. Poškozenou součástku
vyměňujte vždy za původní typ.
- Neotvírejte přístroj, ani se nepokoušejte
vyměnit akumulátor.
Upozornění
- Dobíjecí stojan nesmíte nikdy
ponořit do vody ani ho mýt pod
tekoucí vodou.
- Nepoužívejte zdroj vzásuvce,
ve které je zapojen elektrický
osvěžovač vzduchu, ani vjejí
blízkosti. Předejdete tak
nenapravitelnému poškození
zdroje.
- Přístroj používejte pouze
kúčelu, ke kterému je určen, jak
je vyobrazeno vuživatelské
příručce.
- Zhygienických důvodů by měla
přístroj používat pouze jedna
osoba.
Page 31

- Koplachování přístroje nikdy
nepoužívejte vodu teplejší než
60°C.
- Kčištění přístroje nikdy
nepoužívejte stlačený vzduch,
kovové žínky, abrazivní ani
agresivní čisticí prostředky, jako
je například benzín nebo
aceton.
Elektromagnetická pole (EMP)
Tento přístroj Philips odpovídá všem platným
normám a předpisům týkajícím se vystavení
účinkům elektromagnetických polí.
Obecné informace
- Tento přístroje je voděodolný. Je vhodný pro
použití ve vaně nebo sprše a pro čištění pod
tekoucí vodou. Přístroj lze proto
zbezpečnostních důvodů používat pouze bez
napájecího kabelu.
- Napájecí jednotku lze připojit do sítě onapětí
vrozmezí 100 až 240V.
- Zdroj transformuje 100V až 240V na bezpečné
nízké napětí nižší než 24V.
- Maximální hladina hluku: Lc = 75dB(A).
Čeština
31
Nabíjení
Přístroj nabijte před prvním použitím nebokdyž
displej ukazuje, že je baterie téměř vybitá.
Nabíjení trvá přibližně 1hodinu.
Plně nabitý přístroj lze používat po dobu až
90minut (QP6620), případně 60minut (QP6610).
Page 32

Čeština
32
Poznámka: Tento přístroj lze používat pouze bez
kabelu.
Ukazatel stavu baterie modelu QP6620
- Když začne symbol nabíjení blikat oranžově, je
baterie téměř vybitá. Zbývající kapacita baterie
se zobrazuje na displeji ve formě procent stavu
baterie.
- Když symbol nabíjení bliká bíle, signalizuje, že
se přístroj nabíjí.
- Rychlé nabíjení: po cca 5minutách nabíjení je
kapacita baterie holicího strojku dostatečná pro
5minut používání. Během rychlého nabití bliká
symbol nabíjení rychle bíle, dokud není rychlé
nabití dokončeno.
- Baterie je plně nabitá, pokud procenta stavu
baterie na displeji zobrazí hodnotu 100% a
symbol nabíjení se trvale rozsvítí.
- Přibližně 30minut po úplném nabití baterie
nebo po odpojení zařízení od elektrické sítě
displej automaticky zhasne.
Ukazatel stavu baterie modelu QP6610
- Když ukazatel stavu baterie bliká oranžově, je
baterie téměř vybitá.
- Na znamení, že se přístroj nabíjí, spodní
kontrolka nejprve bíle zabliká a potom se
rozsvítí bílým nepřerušovaným světlem. Potom
zabliká a následně se nepřerušovaně rozsvítí
druhá kontrolka. Tento cyklus se opakuje,
dokud není přístroj zcela nabitý.
Page 33

Čeština
- Rychlé nabíjení: po cca 5minutách nabíjení je
kapacita baterie holicího strojku dostatečná pro
5minut používání. Během rychlého nabíjení se
kontrolky stavu baterie postupně
nepřerušovaně rozsvítí jedna po druhé a
následně všechny zhasnou. Tento cyklus se
opakuje, dokud není rychlé nabíjení dokončeno.
- Baterie je plně nabitá, když všechny kontrolky
stavu baterie svítí nepřerušovaným světlem.
- Přibližně 30minut po úplném nabití baterie
nebo po odpojení zařízení od elektrické sítě
kontrolky stavu baterie automaticky zhasnou.
Nabíjení pomocí adaptéru
1 Zasuňte malý konektor do zastřihovače a
adaptér do zásuvky vezdi.
2 Po nabití vytáhněte napájecí jednotku
zelektrické zásuvky amalý konektor vytáhněte
zpřístroje.
Nabíjení vnabíjecím stojánku (pouze model QP6620)
1 Malou zástrčku zasuňte do nabíjecího
podstavce a adaptér připojte do zásuvky.
2 Umístěte přístroj na nabíjecí podstavec.
3 Po nabití vytáhněte adaptér ze zásuvky ve zdi
amalou zástrčku vytáhněte znabíjecího
stojanu.
33
Používání přístroje
Přístroj je dodáván se dvěma čepelemi.
Jednu čepel používejte pouze na obličej a
druhou pouze na tělo.
Page 34

Čeština
34
Čepel na obličej a hřebenové nástavce na
vousy jsou určeny k zastřihování vousů.
Nejsou určeny k holení, tvarování ani
zastřihávání ochlupení na dolních částech
těla nebo vlasů.
Čepel na tělo a hřeben na zastřihování
chloupků na těle jsou určeny k použití na
částech těla od krku dolů.
Čepel na tělo s připevněným ochranným
nástavcem je určena k použití na citlivých
částech těla.
Poznámka: Tento přístroj lze používat pouze bez
kabelu.
- Přístroj sčepelí na obličej používejte
kzastřihování, tvarování a holení vousů na
obličeji (bradka, knír a kotlety). Holením získáte
hladký výsledek, zastřihováním shřebenovým
nástavcem na vousy dosáhnete určité délky a
tvarováním vytvoříte dokonalé okraje a ostré
linie.
- Přístroj sčepelí na tělo používejte kzastřihování
nebo holení chloupků na těle. Holte si hrudník
bez ochranného nástavce nebo hřebenu na
zastřihování chloupků na těle, abyste dosáhli
hladkého výsledku, citlivé oblasti (např. rozkrok,
podpaží) si holte sochranným nástavcem a při
zastřihování chloupků používejte hřeben na
zastřihování chloupků na těle.
- Při prvním holení nespěchejte. Vpoužívání
zastřihovače je třeba získat praxi.
Zapínání avypínaní přístroje
Zapínání a vypínaní přístroje
Page 35

Obličej
Čeština
1 Zastřihovač zapněte jedním stisknutím
vypínače.
2 Zastřihovač vypněte opětovným stisknutím
vypínače.
Holení
Před použitím zastřihovače vždy
zkontrolujte, zda není čepel poškozená
nebo opotřebovaná. Pokud je čepel
poškozena, zastřihovač nepoužívejte, aby
nedošlo ke zranění. Před použitím
zastřihovače vždy zkontrolujte, zda není
čepel poškozená nebo opotřebovaná (viz
kapitola „Výměna“).
Tipy atriky kholení
- Dbejte na to, aby čepel byla zcela vkontaktu
spokožkou, proto ji kpokožce přiložte celou
plochou.
- Nejlepšího výsledku dosáhnete pohybováním
přístroje proti směru růstu vousů.
- Provádějte dlouhé tahy spoužitím mírného
tlaku.
- Přístroj je vhodný kpoužití za sucha nebo
mokra, sgelem nebo spěnou. Přístroj můžete
používat ive sprše.
- Nejlepších výsledků při holení dosáhnete,
pokud je pokožka tváře a brady čistá..
Tipy atriky holení
- Dbejte na to, aby čepel byla zcela vkontaktu
spokožkou, proto ji kpokožce přiložte celou
plochou.
- Nejlepšího výsledku dosáhnete pohybem proti
směru růstu chloupků.
35
Page 36

36
Čeština
- Provádějte dlouhé tahy spoužitím mírného
tlaku.
- Přístroj je vhodný kpoužití za sucha nebo
mokra, sgelem nebo spěnou. Přístroj můžete
používat ive sprše.
- Nejlepších výsledků při holení dosáhnete,
pokud je pokožka tváře a brady čistá.
1 Zapněte přístroj.
2 Opatrně přiložte čepel kpokožce a smírným
tlakem a dlouhými tahy pomalu pohybujte
zastřihovačem nahoru nebo proti směru růstu
chloupků.
Poznámka: Povrch čepele držte přiložený
plochou stranou na pokožku.
3 Zastřihovač po každém použití vypněte a
vyčistěte (viz kapitola „Čištění a údržba“).
Tvarování
Použitím obou hran břitu můžete vytvářet ostré
linie adokonalé kontury. Přidržte přístroj tak, aby
břit byl kolmo vkontaktu spokožkou aaby se
pokožky dotýkala jedna zjeho hran. Tímto
způsobem můžete přesně zastřihovat kotlety
aoblast kolem úst anosu.
1 Chcete-li vytvořit ostré kontury alinie, můžete
použít kteroukoli zhran břitu.
2 Zapněte přístroj.
Page 37

Čeština
3 Přiložte hranu břitu kolmo kpokožce.
- Provádějte rovné tahy pod lehkým tlakem.
4 Zastřihovač po každém použití vypněte a
vyčistěte (viz kapitola „Čištění a údržba“).
37
Zastřihování
Tipy pro zastřihování.
- Hřebenem pro přesné zastřihování vždy
pohybujte ve směru růstu vlasů či vousů. Dbejte
na to, aby plochá část hřebene byla zcela
vkontaktu spokožkou. To zajišťuje rovnoměrný
výsledek zastřihnutí.
- Protože vlasy ivousy rostou různými směry, je
nutné zastřihovačem rovněž pohybovat
různými směry. Vždy však dbejte na to, abyste
zastřihovačem pohybovali vzhůru proti směru
růstu vlasů či vousů.
- Zastřihování je jednodušší, jsou-li pokožka a
chloupky suché.
Zastřihování shřebenovým nástavcem
Hřeben pro přesné zastřihování umožňuje
zastřižení vlasů či vousů na různé délky. Pro získání
praxe spoužíváním přístroje začněte smaximálním
nastavením. Nastavení na kolečku odpovídají délce
střihu vmilimetrech.
Page 38

1 2
38
Čeština
1 Umístěte přední část hřebenového nástavce na
čepel a zatlačte výstupek na zadní straně
hřebenového nástavce do zastřihovače (ozve
se „klapnutí“).
2 Otočením kolečkem nastavení délky vousů
zvolte požadované nastavení délky střihu.
Nastavení na kolečku odpovídají délce střihu
vmilimetrech.
- QP6620
- QP6610
3 Zapněte přístroj.
4 Přiložte hřebenový nástavec kpokožce a
zastřihovač posunujte pomalu vzhůru proti
směru růstu vlasů či vousů.
5 Zastřihovač po každém použití vypněte a
vyčistěte (viz kapitola „Čištění a údržba“).
Page 39

1
2
Tělo
Čeština
6 Pokud chcete hřebenový nástavec odejmout,
stáhněte jeho zadní část ze zastřihovače a
potom ho vytáhněte zčepele.
- Z hygienických důvodů používejte čepel na tělo
pouze kzastřihování a holení těla.
- Při zastřihování a holení těla se ujistěte, že
chloupky jsou čisté a suché, neboť mokré
chloupky mají tendenci lepit se na pokožku. Při
holení citlivých oblastí vždy používejte
ochranný nástavec.
- Protože všechny chloupky nerostou ve stejném
směru, je třeba při zastřihování vyzkoušet různé
polohy přístroje (nahoru, dolů nebo napříč).
Dosažení nejlepších výsledků vyžaduje určitou
praxi.
- Nejlepšího výsledku dosáhnete pohybováním
přístroje proti směru růstu vousů.
- Provádějte dlouhé tahy spoužitím mírného
tlaku.
- Zastřihovač je vhodný kpoužití za sucha nebo
mokra, sgelem nebo spěnou, dokonce i ve
sprše.
- Nejlepších výsledků při holení dosáhnete,
pokud je vaše tělo čisté.
Holení s ochranným nástavcem
Pro optimální výkon používejte ochranný nástavec
pouze u citlivých partií (např. voblasti šourku a
podpaží).
39
Page 40

1
2
1
2
40
Čeština
1 Uchopte ochranný nástavec na obou stranách a
zatlačte jej na čepel.
2 Zapněte přístroj.
3 Přiložte ochranný nástavec na pokožku a
volnou rukou pokožku napněte. Pohybujte
přístrojem pomalu nahoru proti směru růstu
chloupků.
-
Používáte-li přístroj na podpaží, zvedněte
paži a dlaň si opřete otýl hlavy, abyste
napnuli pokožku.
-
Ochranný nástavec pravidelně čistěte
odostříhaných chloupků. Pokud se
vnástavci nahromadí větší množství
chloupků, sejměte jej zpřístroje achloupky
zněj vytřepte nebovyfoukejte.
4 Po každém použití přístroj vypněte avyčistěte.
5 Chcete-li ochranný nástavec sejmout, umístěte
prst pod okraj nástavce a palcem zatlačte na
čepel.
Holení bez ochranného nástavce
Čepel na tělo bez ochranného nástavce umožňuje
hladce holit chloupky na těle pod krkem (např. na
hrudi).
1 Chcete-li sejmout ochranný nástavec, umístěte
prst pod okraj nástavce a palcem zatlačte na
čepel.
2 Zapněte přístroj.
Page 41

Čeština
3 Opatrně přiložte čepel kpokožce apod mírným
tlakem adlouhými tahy pomalu pohybujte
přístrojem proti směru růstu chloupků. Volnou
rukou napínejte pokožku.
Poznámka: Povrch čepele držte přiložený
plochou stranou na pokožku.
-
Používáte-li přístroj na podpaží, zvedněte
paži a dlaň si opřete otýl hlavy, abyste
napnuli pokožku.
4 Po každém použití přístroj vypněte avyčistěte.
Zastřihování shřebenem na zastřihování
chloupků na těle
3mm hřeben na zastřihování chloupků na těle
umožňuje zastřihovat chloupky na těle od krku
dolů (např. na hrudi, vpodpaží a na šourku).
1 Uchopte hřeben na zastřihování chloupků na
těle na obou stranách a zatlačte jej na čepel.
2 Zapněte přístroj.
3 Přiložte hřeben na pokožku a volnou rukou
pokožku napněte. Pohybujte přístrojem pomalu
nahoru proti směru růstu chloupků.
-
Používáte-li přístroj na podpaží, zvedněte
paži a dlaň si opřete otýl hlavy, abyste
napnuli pokožku.
-
Ochranný nástavec pravidelně čistěte
odostříhaných chloupků. Pokud se
vnástavci nahromadí větší množství
chloupků, sejměte jej zpřístroje achloupky
zněj vytřepte nebovyfoukejte.
4 Po každém použití přístroj vypněte avyčistěte.
41
Page 42

1
2
Čeština
42
5 Pokud chcete hřebenový nástavec odejmout,
uchopte ho zobou stran astáhněte zčepele.
Čištění a údržba
Po každém použití zastřihovač vyčistěte.
Upozornění: K čištění zastřihovače nikdy
nepoužívejte stlačený vzduch, drátěnky, abrazivní
ani agresivní čisticí prostředky, jako je například
benzín nebo aceton.
Upozornění: Neodstraňujte vodu ze zastřihovače
oklepáváním o jiný povrch, protože by mohlo
dojít k poškození. Je-li čepel poškozená, vyměňte
ji.
Čištění přístroje
1 Sejměte hřeben zčepele. Před nasazením nebo
odejmutím hřebenového nástavce zastřihovač
vždy vypněte.
2 Pokud se vhřebenovém nástavci nahromadí
větší množství vlasů, nejprve je vyfoukejte.
Page 43

3 Pokud se vzastřihovači nahromadí větší
1 2
množství vlasů, nejprve je vyfoukejte.
4 Poté zastřihovač zapněte aopláchněte čepel
vlažnou vodou.
Upozornění: Čepel nesušte ručníkem ani jinou
tkaninou, protože by mohlo dojít k poškození.
5 Poté opláchněte hřebenový nástavec vlažnou
vodou.
6 Nechte zastřihovač i hřebenový nástavec
uschnout.
Poznámka: Čepel je křehká. Zacházejte sní
opatrně. Je-li čepel poškozená, vyměňte ji.
Skladování
Skladování
Poznámka: Zastřihovač a nástavce doporučujeme
před uložením a dalším použitím nechat zcela
vyschnout.
1 Při cestování nebo skladování na čepel vždy
připevněte hřeben pro přesné zastřihování,
abyste ji ochránili před poškozením.
- Vzájmu ochrany čepele před poškozením
připevněte na čepel na tělo hřeben
kzastřihování chloupků na těle.
Cestovní zámek (pouze model QP6620)
Před cestováním lze zastřihovač uzamknout.
Cestovní zámek zabraňuje nechtěnému zapnutí
přístroje.
Čeština
43
Page 44

3 sec.
Čeština
44
Aktivace cestovního zámku
1 Podržte vypínač po dobu 3sekund.
- Při aktivaci cestovního zámku se rozsvítí symbol
- Když zapnete cestovní zámek, zabliká symbol
Deaktivace cestovního zámku
1 Podržte vypínač po dobu 3sekund.
- Při deaktivaci cestovního zámku začne digitální
- Nyní je přístroj znovu připraven kpoužití.
Výměna
Indikace výměny
Abyste dosáhli optimálního výsledku při
zastřihování asnadného klouzání břitu,
doporučujeme břit měnit každé 4měsíce, když při
holení nebo zastřihování už nefunguje dle
očekávání nebo pokud se zobrazí indikátor
opotřebení.
Břit je vybaven indikací výměny, jehož barva se
postupně mění na zelenou. Pokud je zelený
proužek zřetelně viditelný, je čas vyměnit břit za
náhradní. Břit vyměňte vždy výhradně za originální
náhradní břit Philips.
cestovního zámku a digitální displej začne
odpočítávat.
cestovního zámku.
displej odpočítávat. Potom se rozsvítí symbol
cestovního zámku a následně zhasne.
Page 45

Vzávislosti na způsobu používání může být
2
1
skutečná životnost břitu delší nebo kratší.
Podobně jako uruční čepelky se itento břit časem
otupí, apak více tahá za vousy aklesne jeho řezný
výkon.
Výměna břitu
1 Opatrně posuňte uvolňovací posuvné tlačítko
břitu směrem nahoru auchopte břit zobou
stran tak, abyste jej mohli vyjmout. Tím
zabráníte, aby břit odskočil zrukojeti.
2 Uchopte nový břit ze stran azatlačte jej na
rukojeť (ozve se zacvaknutí).
Poznámka: Když se ozve zacvaknutí, je nový břit
umístěn správně aje připraven kpoužití.
Objednávání příslušenství
Chcete-li koupit příslušenství nebo náhradní díly,
navštivte adresu www.shop.philips.com/service
nebo se obraťte na prodejce výrobků Philips.
Můžete se také obrátit na středisko péče
ozákazníky společnosti Philips ve své zemi
(kontaktní údaje naleznete na letáčku
scelosvětovou zárukou).
Lze objednat následující díly:
- Náhradní čepel Philips model QP210, 1 kus
- Náhradní čepel Philips model QP220, 2 kusy
- Náhradní balení Philips na tělo model QP610
- Náhradní balení Philips na obličej a tělo model
QP620.
Čeština
45
Page 46

Čeština
46
Recyklace
- Tento symbol znamená, že výrobek nelze
likvidovat sběžným komunálním odpadem
(2012/19/EU).
- Symbol na výrobku znamená, že tento výrobek
obsahuje vestavěný dobíjecí akumulátor, který
nemůže být likvidován společně sběžným
domácím odpadem (2006/66/ES). Odneste
prosím výrobek do oficiálního sběrného dvora
nebo do servisního střediska společnosti Philips
apožádejte tamního odborníka ovyjmutí
nabíjecí baterie.
- Dodržujte předpisy vaší země týkající se sběru
tříděného odpadu elektrických a elektronických
výrobků a také akumulátorů. Správnou likvidací
pomůžete zabránit negativním dopadům na
životní prostředí a lidské zdraví.
Vyjmutí akumulátoru
Upozornění: Až budete přístroj likvidovat,
vyjměte z něj akumulátor. Před vyjmutím
akumulátoru se ujistěte, že je úplně prázdný.
Poznámka: Důrazně doporučujeme, abyste vyjmutí
akumulátoru nechali na odbornících.
1 Odpojte zastřihovač od sítě a nechte motorek
vchodu, dokud se sám nezastaví.
2 Zezastřihovače sejměte čepel.
3 Pod zadní panel vložte šroubovák a vyjměte
panel.
Page 47

Čeština
4 Pomocí šroubováku rozlomte spojovací díly na
obou stranách.
5 Tlakem šroubováku na dolní část rukojeti
vytlačte vnitřní část přístroje.
- Nyní uvidíte desku splošnými spoji.
6 QP6510: pomocí šroubováku sejměte kryt a
odkryjte desku splošnými spoji.
7 Pomocí šroubováku vyjměte desku splošnými
spoji zvnitřní části přístroje.
8 Vyzvedněte akumulátor zvnitřního těla pomocí
šroubováku. Baterie je připevněna
oboustrannou lepicí páskou.
Varování: Pozor, pásky od akumulátoru jsou
velmi ostré.
47
Záruka a podpora
Potřebujete-li další informace či podporu,
navštivte web www.philips.com/support nebo si
prostudujte záruční list s mezinárodní platností.
Page 48

Čeština
48
Omezení záruky
Na čepel se nevztahují podmínky mezinárodní
záruky, neboť podléhá opotřebení.
Řešení problémů
Vtéto kapitole jsou shrnuty nejběžnější problémy,
se kterými se můžete upřístroje setkat. Pokud se
vám nepodaří problém vyřešit podle následujících
informací, navštivte web www.philips.com/support,
kde jsou uvedeny odpovědi na nejčastější dotazy,
nebo kontaktujte středisko zákaznické péče ve své
zemi.
Problém Možná příčina Řešení
Zastřihovač nelze
zapnout, pokud je
připojen do sítě.
Zastřihovač už
nefunguje.
Během nabíjení
nelze zastřihovač
používat.
Zastřihovač lze
používat pouze bez
kabelu.
Nabíjecí baterie je
prázdná.
Čepel je
zablokovaná
nečistotami.
Před použitím odpojte
zastřihovač od sítě.
Zastřihovač nabijte (viz
kapitola „Nabíjení“).
Ukazatel stavu baterie
během nabíjení bliká bíle.
Pokud ukazatel stavu
baterie nebliká,
zkontrolujte, zda nedošlo
kvýpadku proudu a zda
funguje zásuvka. Pokud
nedošlo kvýpadku proudu
a zásuvka funguje, ale
ukazatel stavu baterie stále
nebliká, odneste
zastřihovač kprodejci
nebo do servisního
střediska Philips.
Zapněte zastřihovač a
opláchněte čepel vlažnou
vodou.
Page 49

Problém Možná příčina Řešení
Ponořte čepel do nádoby
steplou vodou (do 60°C)
po dobu přibližně
30sekund.
Zastřihovač
přestal stříhat.
Zastřihovač
vydává divný
zvuk.
Zastřihovač už
nefunguje
optimálně.
Cestovní zámek je
zapnutý.
Čepel je na rukojeti
nesprávně
nasazena.
Čepel je poškozená
nebo
opotřebovaná.
Čepel je poškozená
nebo
opotřebovaná.
Čepel je na rukojeti
nesprávně
nasazena.
Čepel je
zablokovaná
nečistotami.
Čepel je
zablokovaná
nečistotami.
Cestovní zámek
deaktivujete podržením
tlačítka pro
zapnutí/vypnutí po dobu
3sekund. Při deaktivaci
cestovního zámku začne
digitální displej
odpočítávat. Potom se
rozsvítí symbol cestovního
zámku a následně zhasne.
Nyní je přístroj znovu
připraven kpoužití.
Natlačte čepel zpět na
zastřihovač, dokud
neuslyšíte zacvaknutí.
Vyměňte čepel za novou.
Viz kapitola „Výměna“.
Vyměňte čepel za novou.
Viz kapitola „Výměna“.
Sejměte čepel a nasaďte ji
znovu. Natlačte ji zpět na
zastřihovač, dokud
neuslyšíte zacvaknutí.
Vyjměte čepel a důkladně
ji vyčistěte.
Vyjměte čepel a důkladně
ji vyčistěte.
Čeština
49
Page 50

Čeština
50
Problém Možná příčina Řešení
Čepel podléhá
opotřebení, proto
se její výkon časem
snižuje.
Čepel je křehká a
může se snadno
poškodit. Pokud
dojde kpoškození
čepele, nemusí
správně fungovat.
Vyměňte čepel za novou.
Viz kapitola „Výměna“.
Vyměňte čepel za novou.
Viz kapitola „Výměna“.
Page 51

Sissejuhatus
Õnnitleme ostu puhul ja tervitame Philipsi poolt!
Philipsi pakutava tootetoe eeliste täielikuks
kasutamiseks registreerige oma toode veebisaidil
www.philips.com/welcome.
Üldine kirjeldus (joon. 1)
1 Žiletitera näo jaoks
2 Žiletitera vabastusliugur
3 Reisiluku märgutuli (ainult QP6620)
4 Aku seisundi protsent (ainult QP6620)
5 Laadimise sümbol (ainult QP6620)
6 Näidik (ainult QP6620)
7 Toitenupp
8 Aku seisundi näit (ainult QP6610)
9 Laadimisalus (ainult QP6620)
10 Laadimisaluse väike pistikupesa (ainult
QP6620)
11 Kott (ainult QP6620)
12 Väike pistik
13 Toiteplokk
14 Täppispiirlikamm
15 Karvapikkuse seadeketas
16 Žiletitera keha jaoks
17 Tundliku naha kaitse
18 Kehakamm 3 mm
Tähtis ohutusteave
Enne seadme ja selle tarvikute kasutamist lugege
antud oluline teave hoolikalt läbi ja hoidke see
edaspidiseks alles. Toote juurde kuuluvad tarvikud
võivad olenevalt tootest erineda.
Eesti
51
Eesti
Page 52

Eesti
52
Oht
- Hoidke toiteplokk kuivana.
Hoiatus
- Kasutage aku laadimiseks ainult äravõetavat
toiteplokki (HQ8505), mis on seadmega
kaasas.
- Toiteplokis on trafo. Ärge lõigake toiteplokki
ära, et asendada seda mõne teise pistikuga,
kuna see põhjustabohtliku olukorra.
- Seda seadet võivad kasutada lapsed alates
8. eluaastast ning füüsiliste puuete ja
vaimuhäiretega isikud või isikud, kellel
puuduvad kogemused ja teadmised, kui
neid valvatakse või neile on antud juhendid
seadme ohutu kasutamise kohta ja nad
mõistavad sellega seotud ohte. Lapsed ei
tohi seadmega mängida. Ärge laske lastel
seadet järelevalveta puhastada ja hooldada.
- Enne seadme kraani all pesemist võtke
pistik alati pistikupesast välja.
Page 53

Eesti
- Kontrollige alati enne seadme kasutamist
selle korrasolekut. Vigastuste vältimiseks
ärge kasutage seadet, kui see on
kahjustatud. Vahetage alati kahjustatud osa
originaalvaruosa vastu välja.
- Ärge avage seadet, et laetavaid akusid ise
välja vahetada.
Ettevaatust
- Ärge kunagi kastke
laadimisalust vette ega
loputage seda voolava veega.
- Toiteploki pöördumatu
kahjustamise vältimiseks ärge
kasutage seda sellises
pistikupesas või sellise
pistikupesa lähedal, mis
sisaldab elektrilist
õhuvärskendit.
- Kasutage seda seadet üksnes
selleks ettenähtud otstarbel
kasutusjuhendi kohaselt.
- Hügieenilistel põhjustel peaks
seadet ainult üks isik kasutama.
53
Page 54

Eesti
54
- Ärge kunagi kasutage seadme
loputamiseks 60 °C-st
kuumemat vett.
- Ärge kunagi kasutage seadme
puhastamiseks suruõhku,
küürimiskäsna, abrasiivseid
puhastusvahendeid ega ka
sööbivaid vedelikke nagu
bensiin või atsetoon.
Elektromagnetväljad (EMF)
See Philips seade vastab kõikidele
elektromagnetiliste väljadega kokkupuudet
käsitlevatele kohaldatavatele standarditele ja
õigusnormidele.
Üldteave
- See seade on veekindel. Sobib kasutamiseks
vannis või dušši all ning puhastamiseks kraani
all. Ohutuse tagamiseks saab epilaatorit vaid
juhtmeta kasutada.
- Toiteplokki sobib kasutada elektrivõrgu
toitepingel 100–240 volti.
- Toiteplokk muundab 100–240 voldise pinge
trafo abil ohutuks 24-voldiseks pingeks.
- Maksimaalne müratase: Lc = 75dB(A).
Laadimine
Laadige seadet enne esimest kasutamist ja kui
näidikul on näha, et aku on peaaegu tühi.
Laadimine kestab umbes 1 tund.
Täielikult laetud seadme tööaeg on kuni 90 minutit
(QP6620) või 60 minutit (QP6610).
Page 55

Märkus. Seda seadet saab kasutada ainult
juhtmevabalt.
Aku seisundi näit QP6620
- Kui aku on peaaegu tühi, vilgub laadimise
sümbol oranžilt. Näidikul olev aku seisundi
protsent näitab aku jääkmahtuvust.
- Laadimise tähistamiseks vilgub laadimise
sümbol laadimise ajal valgelt.
- Kiirlaadimine: pärast umbes 5-minutist
laadimist on seadmes piisavalt energiat
5-minutiliseks kasutamiseks. Kiirlaadimise ajal
vilgub laadimise sümbol kiiresti valgelt, kuni
kiirlaadimine lõpeb.
- Aku on täielikult laetud, kui aku seisundi
protsent näidikul on 100% ja laadimise sümbol
põleb püsivalt.
- Umbes 30 minutit pärast aku täis laadimist või
kui seade elektritoitevõrgust lahti ühendatakse,
lülitub näidik automaatselt välja.
Aku seisundi näit QP6610
- Kui aku oleku näidik vilgub oranžilt, siis on aku
peaaegu tühi.
Eesti
55
- Kui seade laeb, vilgub alumine märgutuli
kõigepealt valgelt ja jääb siis pidevalt valgelt
põlema. Seejärel vilgub järgmine märgutuli ja
jääb pidevalt põlema, kuni seade on täielikult
laetud.
Page 56

Eesti
56
- Kiirlaadimine: pärast umbes 5-minutist
laadimist on seadmes piisavalt energiat
5-minutiliseks kasutamiseks. Kiirlaadimise ajal
jäävad aku seisundi näidu märgutuled üksteise
järel püsivalt põlema ja seejärel lülituvad kõik
välja. See kordub, kuni kiirlaadimine on
lõppenud.
- Aku on täielikult laetud, kui aku seisundi näidu
kõik märgutuled põlevad püsivalt.
- Umbes 30 minutit pärast aku täis laadimist või
kui seade elektritoitevõrgust lahti ühendatakse,
lülituvad aku seisundi näidu märgutuled
automaatselt välja.
Adapteriga laadimine
1 Sisestage väike pistik pistikupessa ja adapter
seinakontakti.
2 Eemaldage toiteplokk pärast laadimist
seinakontaktist ja tõmmake väike pistik
seadmest välja.
Laadimisalusel laadimine (ainult QP6620)
1 Pange väike pistik laadimisalusesse ja adapter
seina pistikupessa.
2 Asetage seade laadimisalusele
3 Eemaldage adapter pärast laadimist
seinakontaktist ja tõmmake väike pistik
laadimisalusest välja.
Seadme kasutamine
Seadme komplekti kuulub 2 lõiketera.
Kasutage ühte lõiketera ainult näo jaoks ja
teist lõiketera keha jaoks.
Page 57

Näo jaoks ettenähtud lõiketera ja
tüükakamm on ette nähtud näokarvade
jaoks. Seda ei tohi kasutada alakehaosa
karvade ega juuste raseerimiseks,
ääristamiseks ega piiramiseks.
Keha jaoks ettenähtud lõiketera ja
kehakamm on ette nähtud kaelast allpool
olevatel kehaosadel kasutamiseks.
Keha jaoks ettenähtud lõiketera koos
kinnitatud nahakaitsega on mõeldud
tundlikes kehapiirkondades kasutamiseks.
Märkus. Seda seadet saab kasutada ainult
juhtmevabalt.
- Näo jaoks ettenähtud lõiketeraga kasutage
seadet näokarvade (habeme, vuntside ja
põskhabeme) piiramiseks, ääristamiseks või
raseerimiseks. Raseerige ühtlase tulemuse
saavutamiseks, piirake tüükakammiga teatud
pikkuse saavutamiseks ja ääristage, et
saavutada täiusliku servad ja teravad jooned.
- Keha jaoks ettenähtud lõiketeraga kasutage
seadet kehakarvade piiramiseks ja/või
raseerimiseks. Ühtlase tulemuse saavutamiseks
raseerige rinnakarvu ilma nahakaitseta või
kehakammita. Tundlikke piirkondi (näiteks
kubemepiirkond, kaenlaaugud) raseerige
nahakaitsega. Kehakarvade piiramiseks
kasutage kehakammi.
- Seadme esmakordsel kasutamisel ei tohi
kiirustada. Peate selle kasutamist harjutama.
Seadme sisse- ja väljalülitamine
Seadme sisse- ja väljalülitamine
Eesti
57
Page 58

58
Nägu
Eesti
1 Seadme sisselülitamiseks vajutage üks kord
on/off nuppu.
2 Seadme väljalülitamiseks vajutage üks kord
toitenuppu.
Raseerimine
Kontrollige alati enne seadme kasutamist
selle lõiketera kahjustuste ja kulumise
suhtes. Ärge kasutage seadet, kui lõiketera
on kahjustatud või katki, sest see võib
tekitada vigastusi. Vahetage enne seadme
kasutamist kahjustatud lõiketera (vt ptk
"Osade vahetamine").
Raseerimise nõuanded ja nipid
- Veenduge, et lõiketera on täielikult vastu nahka,
asetades selle nahale lapikult.
- Parima tulemuse saavutamiseks liigutage
seadet vastukarva.
- Tehke pikki tõmbeid samas kergelt vajutades.
- Seade sobib kasutamiseks kuivalt ja märjalt
koos geeli või vahuga. Võite seadet isegi duši all
kasutada.
- Parima tulemuse saate siis, kui raseerite puhast
habet ja nahka..
Raseerimise nõuanded ja nipid
- Veenduge, et lõiketera oleks täielikult vastu
nahka, see lapikult nahale asetades.
- Parima tulemuse saavutamiseks liigutage
seadet vastukarva.
- Tehke pikki tõmbeid samas kergelt vajutades.
- Seade sobib kasutamiseks kuivalt ja märjalt
koos geeli või vahuga. Võite seadet isegi duši all
kasutada.
Page 59

Eesti
- Parima tulemuse saate siis, kui raseerite puhast
habet ja nahka.
1 Lülitage seade sisse.
2 Asetage lõiketera nahale ja liigutage seadet
aeglaselt üles või vastukarva, samaaegselt seda
õrnalt surudes.
Märkus. Veenduge, et hoiate lõiketera pinda
lapikult oma naha vastas.
3 Lülitage seade pärast iga kasutamist välja ja
puhastage see (vt ptk „Puhastamine ja
hooldus“).
59
Küljendamine
Lõiketera mõlemaid servasid saab kasutada
teravate joonte ja ideaalsete servade loomiseks.
Hoidke seadet nii, et lõiketera oleks nahaga risti
ning selle üks ots puudutaks nahka. See võimaldab
põskhabeme ning suud ja nina ümbritseva
piirkonna täpsemat kujundamist.
1 Teravate joonte ja servade loomiseks saate
kasutada lõiketera mõlemat serva.
2 Lülitage seade sisse.
3 Asetage lõiketera serv nahaga risti.
Page 60

1 2
60
Eesti
- Kasutage sirgeid liigutusi, samas õrnalt peale
vajutades.
4 Lülitage seade pärast iga kasutamist välja ja
puhastage see (vt ptk „Puhastamine ja
hooldus“).
Piiramine
Nõuandeid piiramiseks
- Ühtlase piiramistulemuse saavutamiseks piirake
alati täppispiirlikammi piide suunas, nii et
kammi lame osa on täielikult vastu nahka.
- Et karvad kasvavad eri suundades, tuleb seadet
samuti eri asendites hoida. Siiski tuleb alati
kontrollida, et liigutate seadet üles vastukarva.
- Piiramine on lihtsam, kui nahk ja karvad on
kuivad.
Kammiga piiramine
Täppispiirlikammiga saab karvu eri pikkusele
piirata. Alustage harjutamist kõige suurema
väärtusega. Kettal olevad väärtused vastavad
karvade pikkusele millimeetrites.
1 Pange kammi esiosa žiletiterale ja vajutage
kammi taga olev väljaulatuv osa seadmesse
(kostab klõpsatus).
2 Keerake karvapikkuse seadeketas soovitud
väärtusele.
Kettal olevad väärtused vastavad karvade
pikkusele millimeetrites.
Page 61

1
2
Keha
Eesti
- QP6620
- QP6610
3 Lülitage seade sisse.
4 Pange kamm vastu nahka ja liigutage seadet
aeglaselt üles vastukarva.
5 Lülitage seade pärast iga kasutamist välja ja
puhastage see (vt ptk „Puhastamine ja
hooldus“).
6 Kammi eemaldamiseks tõmmake selle tagaosa
seadme küljest lahti ja libistage see žiletiteralt
ära.
- Hügieeni tagamiseks kasutage kehakarvade
piiramiseks ja raseerimiseks ainult keha jaoks
ettenähtud lõiketera.
- Kehakarvade piiramisel ja raseerimisel
veenduge, et karvad on puhtad ja kuivad, sest
märjad karvad võivad kehale kleepuda.
Tundlike kehapiirkondade raseerimisel
kasutage alati nahakaitset.
61
Page 62

62
Eesti
- Kõik karvad ei kasva ühes suunas, seetõttu
peaksite piiramisel erinevaid suundasid
proovima (nt ülespoole, allapoole või risti).
Praktika on optimaalsete tulemuste
saavutamiseks parim.
- Parima tulemuse saavutamiseks liigutage
seadet vastukarva.
- Liigutage seadet pikkade tõmmetega ja õrnalt
surudes.
- Võite seadet kasutada nii märjalt kui ka kuivalt
koos geeli või vahuga, kasvõi duši all.
- Puhta keha raseerimisel saavutate parima
tulemuse.
Nahakaitsega raseerimine
Optimaalse tulemuse saavutamiseks kasutage
tundlikes piirkondades (nt kubemepiirkonnas ja
kaenlaalustes) nahakaitset.
1 Vajutage nahakaitse mõlemalt küljelt hoides
žiletiterale.
2 Lülitage seade sisse.
3 Pange nahakaitse vastu nahka ja venitage
nahka vaba käega. Liigutage seadet aeglaselt
üles vastukarva.
-
Kui kasutate seadet kaenlaalustes, tõstke
naha venitamiseks käsi üles ja hoidke seda
pea taga.
Page 63

1
2
1
2
Eesti
-
Eemaldage regulaarselt kaitsekattes olevad
63
karvad. Kui kaitsekattes on väga palju karvu,
eemaldage kaitsekate seadmelt ning puhuge
ja/või raputage karvad välja.
4 Pärast iga kasutamist lülitage seade välja ja
puhastage seda.
5 Nahakaitse eemaldamiseks pange üks sõrm
kaitse serva alla ja vajutage pöidlaga žiletiterale.
Ilma nahakaitseta raseerimine
Sileda tulemuse saavutamiseks võimaldab keha
jaoks ettenähtud žiletitera (ilma nahakaitseta)
raseerida kaelast allpool olevaid karvu (nt
rinnakarvu).
1 Nahakaitse eemaldamiseks pange üks sõrm
kaitse serva alla ja vajutage pöidlaga žiletiterale.
2 Lülitage seade sisse.
3 Pange žiletitera vastu nahka ning liigutage
seadet pikkade tõmmetega ja õrnalt surudes
vastukarva. Tõmmake vaba käega nahk pingule.
Märkus. Kontrollige, et žiletitera pind on
paralleelselt vastu nahka.
-
Kui kasutate seadet kaenlaalustes, tõstke
naha venitamiseks käsi üles ja hoidke seda
pea taga.
4 Pärast iga kasutamist lülitage seade välja ja
puhastage seda.
Kehakammiga piiramine
3 mm kehakammiga saab piirata kaelast allpool
olevaid karvu (näiteks rind, kaenlaalused,
kubemepiirkond).
Page 64

Eesti
64
1 Vajutage kehakamm mõlemalt küljelt hoides
žiletiterale.
2 Lülitage seade sisse.
3 Pange kamm vastu nahka ja venitage nahka
vaba käega. Liigutage seadet aeglaselt üles
vastukarva.
-
Kui kasutate seadet kaenlaalustes, tõstke
naha venitamiseks käsi üles ja hoidke seda
pea taga.
-
Eemaldage regulaarselt kaitsekattes olevad
karvad. Kui kaitsekattes on väga palju karvu,
eemaldage kaitsekate seadmelt ning puhuge
ja/või raputage karvad välja.
4 Pärast iga kasutamist lülitage seade välja ja
puhastage seda.
5 Kammi eemaldamiseks hoidke seda mõlemalt
küljelt kinni ja tõmmake see žiletiteralt ära.
Puhastamine ja hooldus
Puhastage seadet alati pärast kasutamist.
Ettevaatust! Ärge kunagi kasutage seadme
puhastamiseks suruõhku, küürimiskäsna,
abrasiivseid puhastusvahendeid ega ka sööbivaid
vedelikke nagu bensiin või atsetoon.
Page 65

Ettevaatust! Ärge koputage seadet vee
1
2
eemaldamiseks vastu pindasid, sest see võib
tekitada kahjustusi. Kui lõiketera on kahjustatud,
vahetage see välja.
Seadme puhastamine
1 Eemaldage kamm lõiketeralt. Enne kammi
kinnitamist või eemaldamist lülitage seade alati
välja.
2 Kui kammile on kogunenud palju karvu, puhuge
need kõigepealt minema.
3 Kui kammile on kogunenud palju karvu, puhuge
need kõigepealt minema.
4 Lülitage seade sisse ja loputage lõiketera
voolava leige vee all.
Ettevaatust! Ärge kuivatage lõiketera käteräti
ega salvrätiga, sest see võib põhjustada
kahjustusi.
Eesti
65
Page 66

1 2
3 sec.
Eesti
66
5 Seejärel loputage kammi leige veega.
6 Laske seadmel ja kammil kuivada.
Märkus. Lõiketera on habras. Käsitsege seda
hoolikalt. Kui lõiketera on kahjustatud, vahetage
see välja.
Hoiustamine
Hoiundamine
Märkus. Soovitame seadmel ja selle tarvikutel
kuivada lasta, enne kui need järgmiseks
kasutuseks ära panete.
1 Lõiketera kahjustuste eest kaitsmiseks
reisimisel või hoiustamisel, kinnitage sellele alati
täppispiirlikamm.
- Lõiketera kahjustuste vältimiseks kinnitage
kehakamm keha jaoks ettenähtud lõiketerale.
Reisiluku märgutuli (ainult QP6620)
Reisile minekul saab seadme lukku panna.
Reisilukk hoiab ära seadme juhusliku
sisselülitamise.
Reisiluku aktiveerimine
1 Vajutage kolme sekundi jooksul toitenuppu.
Page 67

- Reisiluku aktiveerimisel süttib reisiluku sümbol
põlema ning ekraanil algab mahaloendus.
- Reisilukku sisse lülitades selle sümbol vilgub.
Reisiluku funktsiooni väljalülitamine
1 Vajutage kolme sekundi jooksul toitenuppu.
- Reisilukku inaktiveerides algab ekraanil
mahaloendus. Reisiluku sümbol süttib põlema
ja lülitub välja.
- Seadet võib nüüd uuesti kasutada.
Osade vahetamine
Kasutuse indikaator
Optimaalse lõikamis- ja libisemisjõudluse
saavutamiseks soovitame teil tera vahetada iga
nelja kuu tagant, kui see enam loodetud
habemeajamise või piiramise tulemusi ei anna või
kui ilmub kasutuse indikaator.
Tera on varustatud kasutuse indikaatoriga, mis
muutub vähehaaval roheliseks. Kui roheline riba on
väga selgesti nähtav, on soovitatav tera välja
vahetada. Asendage tera alati Philipsi
originaalteraga.
Sõltuvalt teie kasutusviisist võib lõiketera täpne
eluiga olla pikem või lühem. Sarnaselt käsitsi
kasutatavale raseerimisterale, muutub lõiketera aja
möödudes nüriks, hakates karvu kakkuma, ja tera
lõikejõudlus väheneb.
Eesti
67
Page 68

2
1
Eesti
68
Lõiketera vahetamine
1 Lükake lõiketera avamise liugur hoolikalt üles ja
lõiketera eemaldamiseks hoidke selle mõlemalt
küljelt. See ei lase teral käepidemelt minema
lennata.
2 Hoidke uut lõiketera külgedelt ning vajutage
see käepideme külge (kuulete klõpsatust).
Märkus. Klõpsatuse kuulmisel on uus lõiketera
õigesti paigaldatud ning kasutamiseks valmis.
Tarvikute tellimine
Seadme jaoks tarvikute või varuosade ostmiseks
minge veebilehele www.shop.philips.com/service
või külastage Philipsi edasimüüjat. Samuti võite
pöörduda oma riigi Philipsi klienditoe keskusesse
(vt kontaktandmeid ülemaailmse garantii lehelt).
Saadaval on järgmised osad:
- Mudeli QP210 Philipsi asenduslõiketera (1 tk)
- Mudeli QP220 Philipsi asenduslõiketera (2 tk)
- Mudeli QP610 Philipsi keha jaoks ettenähtud
asenduslõiketerade komplekt
- Mudel QP620 Philipsi näole ja kehale
ettenähtud asenduslõiketerade komplekt.
Ringlussevõtt
- See sümbol tähendab, et seda toodet ei tohi
visata tavaliste olmejäätmete hulka
(2012/19/EL).
Page 69

- See sümbol tähendab, et käesolev toode
sisaldab sisseehitatud akupatareid, mida ei tohi
visata tavaliste olmejäätmete hulka
(2006/66/EÜ). Viige toode Philipsi ametlikku
kogumispunkti või teeninduskeskusesse, et
akupatarei asjatundjal eemaldada lasta.
- Järgige oma riigi elektriliste ja elektrooniliste
toodete ning akupatareide lahuskogumist
reguleerivaid eeskirju. Õigel viisil kasutusest
kõrvaldamine aitab ära hoida kahjulikke
tagajärgi keskkonnale ja inimeste tervisele.
Akupatarei eemaldamine
Ettevaatust! Eemaldage akupatarei seadmest
vaid siis, kui seadme kasutusest kõrvaldate. Enne
aku eemaldamist kontrollige, et see oleks täiest
tühi.
Märkus. Soovitame teil tungivalt lasta laetav aku
asjatundjal eemaldada.
1 Eemaldage seade elektrivõrgust ja laske sellel
mootori seiskumiseni töötada.
2 Eemaldage lõiketera seadmest.
3 Pange kruvikeeraja tagapaneeli alla ja
eemaldage paneel.
Eesti
69
4 Katkestage kruvikeerajaga mõlema poole
klõpsuga ühendused.
Page 70

Eesti
70
5 Pange kruvikeeraja käepideme põhja ja
kangutage sisemine osa välja.
- Nüüd näete trükkplaati.
6 QP6510: eemaldage trükkplaadi kate
kruvikeerajaga.
7 Eemaldage sisemiselt osalt kruvikeerajaga
trükkplaat.
8 Võtke aku kruvikeerajaga sisemisest osast välja.
Aku on kinnitatud kahepoolse teibiga.
Hoiatus. Ettevaatust, sest aku plaadid on
väga teravad.
Garantii ja tootetugi
Kui vajate teavet või abi, külastage Philipsi
veebilehte www.philips.com/support või lugege
läbi üleilmne garantiileht.
Garantiipiirangud
Lõiketera pole rahvusvaheliste
garantiitingimustega reguleeritud, sest see on
kuluv osa.
Page 71

Veaotsing
Selles peatükis võetakse kokku kõige levinumad
probleemid, mis teil seadmega tekkida võivad. Kui
te ei suuda alljärgneva teabe abil ise probleemi
lahendada, külastage veebilehte
www.philips.com/support, kus on loetelu korduma
kippuvatest küsimustest, või võtke ühendust oma
riigi klienditeeninduskeskusega.
Probleem Võimalik põhjus Lahendus
Eesti
71
Ma ei saa seadet
sisse lülitada ajal,
mil see on
vooluvõrku
ühendatud.
Seade lõpetas
töötamise.
Seadet ei saa
laadimise ajal
kasutada. Seadet
saab kasutada
ainult
juhtmevabalt.
Laetav aku on tühi. Laadige seadet (vt ptk
Lõiketera on
mustuse poolt
blokeeritud .
Enne kasutamist tõmmake
seadme pistik
seinakontaktist välja.
„Laadimine”). Laadimise
ajal vilgub aku oleku näidik
valgelt. Kui aku oleku
näidik ei vilgu, kontrollige,
et tegemist ei oleks
elektrivõrgu rikkega ja et
seinakontaktis oleks vool
olemas. Kui tegemist ei ole
elektrivõrgu rikkega ning
voolupistikus on vool
olemas, kuid aku oleku
näidik ikka ei vilgu, viige
seade edasimüüjale või
Philips'i
hoolduskeskusesse.
Lülitage seade sisse ja
loputage lõiketera sooja
veega kraani all.
Pange lõiketera u. 30
sekundiks sooja veega
tassi (mitte rohkem kui
60°C).
Page 72

Eesti
72
Probleem Võimalik põhjus Lahendus
Seade ei lõika
enam karvu.
Seade teeb
kummalist müra.
Seade ei tööta
enam
optimaalselt.
Reisilukk on
aktiveeritud.
Lõiketera on valesti
käepidemele
asetatud.
Lõiketera on
kahjustatud või
kulunud.
Lõiketera on
kahjustatud või
kulunud.
Lõiketera on valesti
käepidemele
asetatud.
Lõiketera on
mustuse poolt
blokeeritud .
Lõiketera on
mustuse poolt
blokeeritud .
Lõiketera võib
kuluda ning
seetõttu selle
jõudlus ajapikku
väheneb.
Vajutage kolme sekundi
jooksul sisse-välja lüliti
nupule reisiluku
deaktiveerimiseks.
Reisiluku deaktiveerimisel
algab ekraanil
mahaloendus. Seejärel
reisiluku sümbol süttib ning
lülitub välja. Seade on taas
kasutamiseks valmis.
Lükake lõiketera
seadmesse tagasi, kuni
kuulete klõpsatust.
Vahetage lõiketera uue
vastu välja. Vt peatükk
„Osade vahetamine”
Vahetage lõiketera uue
vastu välja. Vt peatükk
„Osade vahetamine”
Eemaldage lõiketera ja
paigaldage see uuesti.
Lükake see seadmesse
tagasi, kuni kuulete
klõpsatust.
Eemaldage lõiketera ning
puhastage seda
põhjalikult.
Eemaldage lõiketera ning
puhastage seda
põhjalikult.
Vahetage lõiketera uue
vastu välja. Vt peatükk
„Osade vahetamine”
Page 73

Probleem Võimalik põhjus Lahendus
Eesti
73
Lõiketera on
seadme delikaatne
osa ning see on
kergesti
kahjustatav. Kui
lõiketera on
kahjustatud, ei
pruugi see enam
optimaalselt
töötada.
Vahetage lõiketera uue
vastu välja. Vt peatükk
„Osade vahetamine”
Page 74

Hrvatski
74
Uvod
Čestitamo na kupnji i dobro došli u Philips! Kako
biste potpuno iskoristili podršku koju nudi tvrtka
Philips, registrirajte svoj proizvod na
www.philips.com/welcome.
Opći opis (sl. 1)
1 Oštrica za lice
2 Klizač za otpuštanje oštrice
3 Putno zaključavanje (samo QP6620)
4 Postotak napunjenosti baterije (samo QP6620)
5 Simbol punjenja (samo QP6620)
6 Zaslon (samo QP6620)
7 Gumb za uključivanje/isključivanje
8 Indikator napunjenosti baterije (samo QP6610)
9 Postolje za punjenje (samo QP6620)
10 Mali utikač postolja za punjenje (samo QP6620)
11 Torbica (samo QP6620)
12 Mali utikač
13 Jedinica napajanja
14 Precizni češalj za podrezivanje
15 Kotačić za postavku dužine dlačica
16 Oštrica za tijelo
17 Štitnik za osjetljivu kožu
18 Češalj za tijelo od 3 mm
Važne sigurnosne informacije
Pažljivo pročitajte te važne informacije prije nego li
se budete koristili uređajem i njegovim dodacima
te ih pohranite za buduću upotrebu. Isporučeni
dodaci mogu se razlikovati za različite proizvode.
Hrvatski
Page 75

Hrvatski
Opasnost
- Održavajte jedinicu za
napajanje suhom.
Upozorenje
- Za punjenje baterije, koristite samo odvojivu
jedinicu za napajanje (HQ8505) dostavljenu
s uređajem.
- Jedinica za napajanje sadržava
transformator. Nikada nemojte odrezati
jedinicu za napajanje da biste postavili drugi
utikač jer to stvara opasnu situaciju.
- Ovaj aparat mogu koristiti djeca od 8 ili više
godina te osobe sa smanjenim fizičkim,
osjetilnim ili mentalnim sposobnostima ili
nedostatkom iskustva i znanja, ako su pod
nadzorom ili su dobile upute o sigurnom
korištenju aparata i ako razumiju moguće
opasnosti. Djeca se ne smiju igrati aparatom.
Djeca bez nadzora ne smiju obavljati
čišćenje i korisničko održavanje.
- Obavezno iskopčajte aparat prije čišćenja
pod mlazom vode.
75
Page 76

Hrvatski
76
- Aparat obavezno provjerite prije uporabe.
Nemojte se koristiti uređajem ako je oštećen
jer to može prouzročiti ozljedu. Uvijek
zamijenite oštećeni dio dijelom originalne
vrste.
- Ne otvarajte uređaj da zamijenite punjivu
bateriju.
Oprez
- Nikada ne uranjajte stalak za
punjenje u vodu i ne ispirite ga
pod pipom.
- Ne koristite jedinicu napajanja u
ili blizu zidnih utičnica koje
sadrže električni ovlaživač zraka
da spriječite nepopravljivu štetu
jedinice napajanja.
- Aparat koristite isključivo za
svrhu kojoj je namijenjen, kao
što je prikazano u korisničkom
priručniku.
- Iz higijenskih razloga, aparat bi
trebala koristiti samo jedna
osoba.
- Nikada ne koristite vodu topliju
od 60 °C za ispiranje aparata.
Page 77

- Za čišćenje aparata nikada
nemojte upotrebljavati zračni
mlaz, spužvice za ribanje,
abrazivna sredstva za čišćenje
ili agresivne tekućine poput
benzina ili acetona.
Elektromagnetska polja (EMF)
Ovaj Philips aparat zadovoljava sve važeće
standarde i propise u vezi izlaganja
elektromagnetskim poljima.
Općenito
- Ovaj je uređaj vodootporan. Pogodan je za
upotrebu u kadi ili tušu te za čišćenje pod
slavinom. Uređaj se stoga zbog sigurnosnih
razloga može upotrebljavati samo bez kabela.
- Jedinica napajanja prikladna je za napone od
100 do 240 V.
- Jedinica za napajanje pretvara napon od 100 –
240 volti u sigurni niski napon manji od 24 volta.
- Maksimalna razina buke: Lc = 75dB(A).
Punjenje
Napunite aparat prije prve upotrebe i kad je na
zaslonu prikazano da je baterija gotovo prazna.
Punjenje traje približno 1 sat.
Potpuno napunjen aparat može raditi do 90
minuta (QP6620) ili 60 minuta (QP6610).
Napomena: Uređaj se smije koristiti samo bez žice.
Hrvatski
77
Page 78

Hrvatski
78
Indikator napunjenosti baterije QP6620
- Kada simbol punjenja počne treperiti
narančastom bojom, baterija je gotovoprazna.
Preostali kapacitet baterije naznačen je
postotkom napunjenosti baterije koji se
prikazuje na zaslonu.
- Kao znak da se aparat puni, simbol punjenja
treperi bijelom bojom.
- Brzo punjenje: nakon približno 5
minutapunjenja, aparat ima dovoljno energije
za 5 minuta upotrebe. Tijekom brzog punjenja,
simbol punjenja brzo treperi bijelim svjetlom
dok se brzo punjenje ne dovrši.
- Baterija je potpuno napunjena kada postotak
napunjenosti baterije na zaslonu iznosi 100% i
simbol punjenja počne svijetliti bez prekida.
- Približno 30 minuta nakon što se baterija
potpuno napuni ili kada isključite aparat iz
napajanja, zaslon se automatski isključuje.
Indikator napunjenosti baterije QP6610
- Ako indikator statusa baterije treperi
narančastom bojom, baterija je gotovo prazna.
- Kao znak da se aparat puni, donje svjetlo
najprije treperi bijelom bojom, a zatim počne
svijetliti bez prekida. Zatim drugo svjetlo treperi
i počne svijetliti bez prekida, sve dok se aparat
ne napuni do kraja.
Page 79

Hrvatski
- Brzo punjenje: nakon približno 5
minutapunjenja, aparat ima dovoljno energije
za 5 minuta upotrebe. Tijekom brzog punjenja,
svjetla indikatora napunjenosti baterije
uključivat će se neprekidno jedno za drugim i
zatim će se sva isključiti. To će se ponavljati dok
se brzo punjenje ne dovrši.
- Baterija je potpuno napunjena kada sva
svjetlaindikatora napunjenosti baterije
svijetlebez prekida.
- Približno 30 minuta nakon što se baterija
potpuno napuni ili kada isključite aparat iz
napajanja, svjetla indikatora napunjenosti
baterije isključuju se automatski.
Punjenje pomoću adaptera
1 Umetnite mali utikač u aparat, a adapter u
zidnu utičnicu.
2 Nakon punjenja, uklonite jedinicu napajanja iz
zidne utičnice i isključite mali utikač iz uređaja.
Punjenje na postolju za punjenje (samo QP6620)
1 Umetnite mali utikač u postolje za punjenje i
utaknite adapter u zidnu utičnicu.
2 Stavite aparat u postolje za punjenje.
3 Nakon punjenja iskopčajte adapter iz zidne
utičnice i izvucite mali utikač iz postolja za
punjenje.
79
Upotreba aparata
Vaš aparat isporučuje se s dvije oštrice.
Jednom se oštricom koristite samo za lice, a
drugom za tijelo.
Page 80

Hrvatski
80
Oštrica za lice i češljevi za kratko
podrezivanje namijenjeni su za upotrebu na
licu. Nije namijenjeno za brijanje, rezanje
vrhova ni podrezivanje dlačica na donjim
dijelovima tijela ni za kosu vlasišta.
Oštrica za tijelo i češalj za tijelo namijenjeni
su za upotrebu na dijelovima tijela ispod
vrata.
Oštrica za tijelo s pričvršćenim štitnikom za
kožu namijenjeni su za upotrebu na
osjetljivim dijelovima tijela.
Napomena: Uređaj se smije koristiti samo bez žice.
- Koristite se aparatom s oštricom za lice kako
biste podrezali ili obrijali dlačice na licu ili
odrezali vrhove (brada, brkovi, zalisci). Obrijte se
za glatki rezultat, podrežite češljem za kratko
podrezivanje kako biste postigli određenu
duljinu i rub za savršene rubove i oštre linije.
- Koristite se aparatom s oštricom za tijelo kako
biste podrezali i/ili obrijali dlačice na tijelu.
Brijanje prsa bez zaštite za kožu ili češlja za
tijelo za glatki rezultat, obrijte osjetljiva područja
(npr. prepone, pazuha) sa štitnikom za kožu,
koristite se češljem za tijelo kako biste podrezali
dlačice na tijelu.
- Nemojte žuriti tijekom prve upotrebe aparata.
Morate steći praksu služenja aparatom.
Uključivanje ili isključivanje aparata
Uključivanje ili isključivanje aparata
1 Kako biste uključili aparat, jednom pritisnite
gumb za uključivanje/isključivanje.
2 Jednom pritisnite gumb za
uključivanje/isključivanje kako biste isključili
aparat.
Page 81

Lice
Hrvatski
Brijanje
Prije upotrebe aparata uvijek provjerite ima
li na oštrici znakova oštećenja ili
istrošenosti. Ako je oštrica oštećena ili
istrošena, nemojte se koristiti aparatom jer
može doći do ozljede. Zamijenite oštećenu
oštricu prije upotrebe aparata (vidi
poglavlje „Zamjena dijelova”).
Savjeti i trikovi za brijanje
- Pobrinite se da oštrica bude u potpunom
dodiru s kožom postavljajući je ravno na kožu.
- Kako biste dobili najbolji rezultat, pomičite
aparat suprotno smjeru rasta dlačica.
- Radite velike zamahe laganim pritiskom.
- Aparatom se možete koristiti pri suhim ili
mokrim uvjetima, s gelom ili pjenom. Uređaj
možete koristiti i pod tušem.
- Najbolji se rezultati ostvaruju brijanjem čiste
brade i lica.
Savjeti i trikovi za brijanje
- Pobrinite se da oštrica bude u potpunom
dodiru s kožom postavljajući je ravno na kožu.
- Da biste dobili najbolji rezultat, pomičite aparat
suprotno smjeru rasta dlačica.
- Radite velike zamahe laganim pritiskom.
- Aparatom se možete koristiti pri suhim ili
mokrim uvjetima, s gelom ili pjenom. Uređaj
možete koristiti i pod tušem.
- Najbolji se rezultati ostvaruju brijanjem čiste
brade i lica.
1 Uključite aparat.
81
Page 82

82
Hrvatski
2 Oštricu postavite stavite na kožu i pomičite
aparat niz ili suprotno smjeru rasta dlačica
dugim potezima istodobno lagano pritišćući.
Napomena: Pobrinite se da površinu oštrice
držite ravno na koži.
3 Nakon svake upotrebe isključite i očistite aparat
(pogledajte poglavlje „Čišćenje i održavanje”).
Oblikovanje rubova
Možete upotrebljavati i oba ruba oštrice kako biste
stvorili oštre linije i savršene rubove. Držite aparat
tako da oštrica bude okomito prema koži, a jedan
od njezinih rubova da dodiruje kožu. Time je
moguće preciznije uređivanje detalja zalizaka te
područja oko usta i nosa.
1 Da biste stvorili oštre rubove i linije, možete
upotrebljavati bilo koji rub oštrice.
2 Uključite aparat.
3 Postavite rub oštrice okomito na kožu.
- Povucite ravne poteze istodobno nježno
pritišćući.
4 Nakon svake upotrebe isključite i očistite aparat
(pogledajte poglavlje „Čišćenje i održavanje”).
Podrezivanje
Page 83

1 2
Hrvatski
Savjeti za podrezivanje
- Uvijek podrezujte u smjeru zubaca preciznog
češlja za podrezivanje, pazeći da plosnati dio
češlja bude u punom dodiru s kožom radi
jednolikog rezultata podrezivanja.
- Budući da dlačice rastu u različitim smjerovima,
i aparat morate držati u različitim položajima.
Međutim, uvijek pazite da pomičete aparat u
suprotnom smjeru od rasta dlačica.
- Podrezivanje će biti jednostavnije ako su koža i
dlačice suhi.
Podrezivanje s pomoću češlja
Precizni češalj za podrezivanje omogućuje
podrezivanje dlačica na razne duljine. Počnite s
najvišompostavkom da biste se naučilislužiti
aparatom. Postavke na kotačiću odgovaraju duljini
dlačica u milimetrima.
1 Stavite prednji dio češlja na oštricu i pritisnite
jezičac na stražnjoj strani češlja u aparat ("klik").
2 Okrećite kotačić za podešavanje dužine dlačica
da biste odabrali željenu dužinu dlačica.
Postavke na kotačiću odgovaraju duljini dlačica
u milimetrima.
83
- QP6620
Page 84

1
2
Hrvatski
84
- QP6610
3 Uključite aparat.
4 Postavite češalj na kožu i polako pomičite
aparat prema gore, u suprotnom smjeru od
rasta dlačica.
5 Nakon svake upotrebe isključite i očistite aparat
(pogledajte poglavlje „Čišćenje i održavanje”).
6 Da biste uklonili češalj, povucite njegov stražnji
dio s aparata i skinite ga s oštrice.
Tijelo
- Zbog higijenskih se razloga koristite samo
oštricom za tijelo za podrezivanje brijanje
dlačica na tijelu.
- Pri obrezivanju i brijanju dlačica na tijelu
provjerite jesu li dlačice čiste i suhe, jer se
mokre dlačice obično lijepe za tijelo i, kada
brijete osjetljiva područja, uvijek se koristite
zaštitom za kožu.
- Budući da sve dlačice ne rastu u istom smjeru,
možda biste trebali isprobati različite položaje
podrezivanja (npr. prema gore, prema dolje ili
poprijeko). Za optimalne rezultate najbolje je
vježbanje.
- Kako biste dobili najbolji rezultat, pomičite
aparat suprotno smjeru rasta dlačica.
- Pomičite dugim potezima istodobno lagano
pritišćući.
Page 85

1
2
Hrvatski
- Koristite se suhim ili mokrim aparatom s gelom
ili pjenom, čak i pod tušem.
- Brijanje čistog tijela daje najbolje rezultate.
85
Brijanje sa štitnikom za kožu
Za optimalnu učinkovitost, štitnik za kožu koristite
samo na osjetljivim područjima (npr. na mošnjama
i pod pazuhom).
1 Držite štitnik za kožu na bočnim stranama i
pritisnite ga na oštricu.
2 Uključite aparat.
3 Postavite štitnik na kožu i slobodnom rukom
zategnite kožu. Pomičite aparat lagano prema
gore, suprotno smjeru rasta dlačica.
-
Kad koristite uređaj pod pazuhom, podignite
ruku i stavite šaku sa stražnje strane glave da
rastegnete kožu.
-
Redovito uklanjajte kosu sa štitnika. Ako se u
štitniku nakupilo mnogo dlačica, skinite ga s
aparata i otpuhnite i/ili otresite dlačice s
njega.
4 Nakon svake uporabe isključite i očistite aparat.
5 Kako biste uklonili štitnik za kožu, stavite prst
ispod donjeg ruba štitnika i palcem pritisnite na
oštricu.
Brijanje bez štitnika za kožu
Oštrica za tijelo bez štitnika za kožu omogućuje
vam da glatko izbrijete dlake na tijelu ispod linije
vrata (npr. na prsima).
Page 86

1
2
86
Hrvatski
1 Kako biste uklonili štitnik za kožu, stavite prst
ispod donjeg ruba štitnika i palcem pritisnite
oštricu.
2 Uključite aparat.
3 Oštricu postavite na kožu i dugim potezima
pomičite aparat suprotno smjeru rasta dlačica,
istodobno lagano pritišćući. Slobodnom rukom
zategnite kožu.
Napomena: Pobrinite se da površinu oštrice
držite ravno na koži.
-
Kad koristite uređaj pod pazuhom, podignite
ruku i stavite šaku sa stražnje strane glave da
rastegnete kožu.
4 Nakon svake uporabe isključite i očistite aparat.
Podrezivanje češljem za tijelo
Češalj za tijelo od 3 mm (1,8 in) omogućuje vam da
podrežete dlake na tijelu ispod linije vrata (npr.
prsa, pazuh, mošnje).
1 Držite češalj za tijelo na bočnim stranama i
pritisnite ga na oštricu.
2 Uključite aparat.
3 Postavite češalj na kožu i slobodnom rukom
zategnite kožu. Pomičite aparat lagano prema
gore, suprotno smjeru rasta dlačica.
-
Kad koristite uređaj pod pazuhom, podignite
ruku i stavite šaku sa stražnje strane glave da
rastegnete kožu.
Page 87

-
1
2
Redovito uklanjajte kosu sa štitnika. Ako se u
štitniku nakupilo mnogo dlačica, skinite ga s
aparata i otpuhnite i/ili otresite dlačice s
njega.
4 Nakon svake uporabe isključite i očistite aparat.
5 Kako biste uklonili češalj, držite ga s obje strane
i povucite ga s oštrice.
Čišćenje i održavanje
Očistite aparat nakon svake upotrebe.
Oprez: Nikada nemojte upotrebljavati
komprimirani zrak, spužvice za ribanje, abrazivna
sredstva za čišćenje ili agresivne tekućine, kao što
su benzin ili aceton, za čišćenje aparata.
Oprez: Nemojte kuckati uređajem o površinu da
uklonite vodu iz njega jer to može uzrokovati
oštećenje. Zamijenite oštricu ako je oštećena.
Čišćenje uređaja
1 Skinitečešalj s oštrice. Uvijek isključite aparat
prije postavljanja ili skidanja češlja.
Hrvatski
87
Page 88

Hrvatski
88
2 Ako se puno dlaka nakupilo na češlju, prvo ih
3 Ako se puno dlaka nakupilo na uređaju, prvo ih
4 Zatim uključite aparat i isperite oštricu mlazom
5 Zatim isperite češalj mlakom vodom.
6 Ostavite aparat i češalj da se osuše.
Napomena: Oštrica je krhka. Rukujte njome
pažljivo. Zamijenite oštricu ako je oštećena.
Pohranjivanje
Spremanje
Napomena: Savjetujemo vam da aparat i nastavke
ostavite da se osuše prije nego li ih spremite do
sljedeće upotrebe.
otpušite.
otpušite.
mlake vode.
Oprez: Oštricu nemojte sušiti ručnikom ili
rupčićem jer to može prouzročiti oštećenje.
Page 89

1 2
1 Uvijek pričvrstite precizni češalj za podrezivanje
3 sec.
na oštricu da biste zaštitili oštricu od oštećenja
tijekom putovanja ili spremanja.
- Pričvrstite češalj za tijelo na oštricu za tijelo
kako biste zaštitili oštricu od oštećenja.
Putno zaključavanje (samo QP6620)
Kada idete na putovanje, možete zaključati aparat.
Putno zaključavanje sprječava nehotično
uključivanje aparata.
Aktivacija putnog zaključavanja
1 Gumb za uključivanje/isključivanje držite
pritisnutim 3 sekunde.
- Kada aktivirate putno zaključavanje, simbol
putnog zaključavanja počne svijetliti i digitalni
zaslon počne odbrojavanje.
- Kad je putno zaključavanje aktivirano, simbol
putnog zaključavanja treperi.
Deaktiviranje putnog zaključavanja
1 Gumb za uključivanje/isključivanje držite
pritisnutim 3 sekunde.
- Kada isključite putno zaključavanje, zaslon
odbrojava. Zatim simbol putnog zaključavanja
počne svijetliti i isključuje se.
- Aparat je sada spreman za ponovno korištenje.
Hrvatski
89
Page 90

2
1
Hrvatski
90
Zamjena dijelova
Indikator korištenja
Kako biste postigli optimalno rezanje i klizanje
oštrice, savjetujemo vam da oštricu zamijenite
svaka 4 mjeseca, kada više ne pruža rezultate
brijanja ili podrezivanja koje očekujete te kada se
pojavi indikator korištenja.
Oštrica ima indikator korištenja koji postepeno
postaje zelene boje. Preporučuje se da zamijenite
oštricu kada crtica zelene boje postane jasno
vidljiva. Oštricu uvijek zamijenite originalnom
Philips oštricom.
Ovisno o vašem ponašanju pri korištenju, točan
vijek trajanja oštrice može biti dulji ili kraći. Slično
onome što možete očekivati kod ručne oštrice,
oštrica otupljuje tijekom vremena, što rezultira
povećanim čupanjem dlačica i smanjenom
učinkovitošću rezanja.
Mijenjanje oštrice
1 Pažljivo gurnite klizač za otpuštanje oštrice
prema gore i držite oštricu na bočnim stranama
kako biste je uklonili. Tako ćete spriječiti da
oštrica ne odleti s drške.
2 Držite novu oštricu na bočnim stranama i
pritisnite je na ručku („klik”).
Napomena: Kada čujete klik nova je oštrica
ispravno postavljena i spremna za uporabu.
Page 91

Naručivanje dodatnog pribora
Da biste kupili dodatke ili rezervne dijelove,
posjetite www.shop.philips.com/service ili se
obratite dobavljaču tvrtke Philips. Također se
možete obratiti centru za potrošače tvrtke Philips u
svojoj državi (pogledajte međunarodni jamstveni
list radi detalja o kontaktu).
Dostupni su sljedeći dijelovi:
- Model QP210 Philips zamjenska oštrica, 1
pakiranje
- Model QP220 Philips zamjenska oštrica, 2
pakiranje
- Model QP610 Philips Body zamjensko pakiranje
- Model QP620 Philips Face and Body zamjensko
pakiranje.
Recikliranje
- Ovaj simbol znači da se ovaj proizvod ne smije
odlagati zajedno s običnim kućanskim otpadom
(2012/19/EU).
- Ovaj simbol znači da proizvod sadržava
ugrađenu punjivu bateriju koja se ne odlaže s
uobičajenim kućanskim otpadom
(2006/66/EC). Svoj proizvod odnesete na
službeno mjesto za prikupljanje otpada ili u
servisni centar tvrtke Philips kako bi stručnjak
uklonio punjivu bateriju.
- Pridržavajte se pravila vaše zemlje o odvojenom
prikupljanju električnih i elektroničkih proizvoda
i punjivih baterija. Pravilno odlaganje otpada
pomaže u sprječavanju negativnih posljedica za
okoliš i ljudsko zdravlje.
Hrvatski
91
Page 92

Hrvatski
92
Vađenje punjive baterije
Oprez: Uklonite punjivu bateriju tek kada odlučite
baciti uređaj. Pobrinite se da baterija bude
potpuno prazna dok je uklanjate.
Napomena: Izričito preporučujemo da vađenje
punjive baterije prepustite profesionalcu.
1 Isključite aparat iz napajanja i pustite ga da radi
dok se motor ne zaustavi.
2 Uklonite oštricu s aparata.
3 Umetnite odvijač ispod stražnje ploče i uklonite
ploču.
4 Odlomite lomljive spone s obje strane pomoću
odvijača.
5 Izgurajte unutarnje kućište guranjem odvijača u
dno ručke.
- Vidjet ćete tiskanu pločicu.
6 QP6510: uklonite poklopac tiskane pločice
pomoću odvijača.
Page 93

7 Uklonite tiskanu pločicu iz unutarnjeg kućišta
pomoću odvijača.
8 Podignite bateriju iz unutarnjeg kućišta pomoću
odvijača. Baterija je spojena dvostranom
vrpcom.
Upozorenje: Budite oprezni, stranice
baterija su vrlo oštre.
Jamstvo i podrška
Ako su Vam potrebne informacije ili podrška,
molimo posjetite www.philips.com/support ili
pročitajte brošuru o međunarodnom jamstvu.
Ograničenja jamstva
Oštrica nije obuhvaćena odredbama
međunarodnog jamstva jer je podložna trošenju.
Rješavanje problema
U ovom je poglavlju sažetak većine osnovnih
problema s uređajem s kojima se možete susresti.
Ako problem ne možete riješiti s pomoću
informacija u nastavku, posjetite
www.philips.com/support kako biste pronašli
popis često postavljanih pitanja ili se obratite
centru za korisničku podršku u svojoj državi.
Hrvatski
93
Page 94

Hrvatski
94
Problem Mogući uzrok Rješenje
Ne mogu uključiti
aparat dok je
priključen na
napajanje.
Aparat više ne
radi.
Ne možete
upotrebljavati
aparat dok se puni.
Aparatom se
možete koristiti
samo bez kabela.
Punjiva baterija je
prazna.
Oštrica je blokirana
prljavštinom.
Prije upotrebe isključite
aparat iz napajanja.
Napunite aparat
(pogledajte poglavlje
„Punjenje”). Tijekom
punjenja, indikator
napunjenosti baterije
treperi bijelom bojom. Ako
indikator punjenja baterije
ne treperi, provjerite je li
došlo do nestanka struje te
je li zidna utičnica pod
naponom. Ako nije došlo
do nestanka struje i zidna
je utičnica pod naponom,
ali indikator punjenja
baterije i dalje ne treperi,
odnesite aparat
dobavljaču ili u servisni
centar tvrtke Philips.
Uključite aparat i isperite
oštricu toplom vodom iz
slavine.
Držite oštricu u šalici s
toplom vodom (60°C, ali
ne više) tijekom približno
30 sekundi.
Page 95

Problem Mogući uzrok Rješenje
Hrvatski
95
Aparat više ne
reže dlačice.
Aparat proizvodi
čudan zvuk.
Aparat više ne
radi optimalno.
Putno
zaključavanje je
aktivirano.
Oštrica nije
pravilno
postavljena na
dršku.
Oštrica je oštećena
ili istrošena.
Oštrica je oštećena
ili istrošena.
Oštrica nije
pravilno
postavljena na
dršku.
Oštrica je blokirana
prljavštinom.
Oštrica je blokirana
prljavštinom.
Oštrica je podložna
trošenju te se stoga
njezina
učinkovitost
smanjuje tijekom
vremena.
Pritisnite gumb za
uključivanje/isključivanje
na 3 sekunde da biste
isključili putno
zaključavanje. Kada
isključite putno
zaključavanje, zaslon
odbrojava. Zatim simbol
putnog zaključavanja
počne svijetliti i isključuje
se. Aparat je sada spreman
za ponovno korištenje.
Gurnite oštricu na aparat
dok ne čujete zvuk klika.
Zamijenite oštricu novom.
Vidi poglavlje „Zamjena
dijelova”.
Zamijenite oštricu novom.
Vidi poglavlje „Zamjena
dijelova”.
Odvojite i ponovo
pričvrstite oštricu. Gurnite
je na aparat dok ne čujete
zvuk klika.
Odvojite oštricu i temeljito
je očistite.
Odvojite oštricu i temeljito
je očistite.
Zamijenite oštricu novom.
Vidi poglavlje „Zamjena
dijelova”.
Page 96

Hrvatski
96
Problem Mogući uzrok Rješenje
Oštrica je osjetljivi
dio aparata i može
se lako oštetiti. Ako
se oštrica ošteti,
možda više neće
raditi optimalno.
Zamijenite oštricu novom.
Vidi poglavlje „Zamjena
dijelova”.
Page 97

Ievads
Apsveicam ar pirkumu un laipni lūdzam Philips! Lai
pilnvērtīgi izmantotu Philips piedāvātā atbalsta
iespējas, reģistrējiet produktu vietnē
www.philips.com/welcome.
Vispārīgs apraksts (1. att.)
1 Asmens sejai
2 Asmens atbrīvošanas slīdslēdzis
3 Ceļojuma bloķētājs (tikai modelim QP6620)
4 Procentuālais akumulatora uzlādes statuss
(tikai modelim QP6620)
5 Uzlādes simbols (tikai modelim QP6620)
6 Displejs (tikai modelim QP6620)
7 Ieslēgšanas/izslēgšanas poga
8 Akumulatora statusa indikators (tikai modelim
QP6610)
9 Uzlādes statīvs (tikai modelim QP6620)
10 Uzlādes statīva mazā kontaktdakša (tikai
modelim QP6620)
11 Somiņa (tikai modelim QP6620)
12 Mazais spraudnis
13 Barošanas bloks
14 Precīzās apgriešanas ķemme
15 Matiņu garuma iestatījuma ritenītis
16 Asmens ķermenim
17 Aizsargs jutīgai ādai
18 Ķermeņa ķemme 3mm
Latviešu
97
Svarīga informācija par drošību
Pirms ierīces un tās piederumu lietošanas rūpīgi
izlasiet šo svarīgo informāciju un saglabājiet to
turpmākām uzziņām. Komplektā iekļautie
piederumi dažādiem produktiem var atšķirties.
Latviešu
Page 98

Latviešu
98
Bīstami
- Glabājiet adaptera bloku
sausumā.
Brīdinājums
- Lai uzlādētu akumulatoru, izmantojiet tikai
noņemamo barošanas bloku (HQ8505), kas
piegādāts kopā ar ierīci.
- Barošanas blokā ir iebūvēts strāvas
pārveidotājs. Nenogrieziet barošanas bloku,
lai pievienotu tam citu spraudni, jo tādējādi
tiek radīta bīstama situācija.
- Šo ierīci var izmantot bērni no 8 gadu
vecuma un personas ar ierobežotām
fiziskajām, uztveres vai garīgajām spējām vai
bez pieredzes un zināšanām, ja šīm
personām tiek nodrošināta uzraudzība vai
sniegti norādījumi par ierīces drošu
lietošanu un tās saprot iespējamo
bīstamību. Bērni nedrīkst rotaļāties ar ierīci.
Bērni bez uzraudzības nedrīkst tīrīt ierīci vai
veikt tās tehnisko apkopi.
- Pirms ierīces tīrīšanas ar tekošu krāna ūdeni
vienmēr atvienojiet ierīci no strāvas.
Page 99

Latviešu
- Pirms ierīces lietošanas vienmēr pārbaudiet
to. Nelietojiet bojātu ierīci, jo tā var gūt
savainojumus. Vienmēr nomainiet bojātu
detaļu ar oriģinālu detaļu.
- Neatveriet ierīci un nemēģiniet nomainīt
atkārtoti uzlādējamo akumulatoru.
Ievērībai
- Nekad nelieciet lādēšanas
statīvu ūdenī un neskalojiet to
zem krāna.
- Neizmantojiet barošanas bloku
kontaktligzdās vai blakus
kontaktligzdām, kurās pašlaik ir
ievietots vai ir bijis ievietots
elektriskais gaisa
atsvaidzinātājs. Pretējā
gadījumā var neatgriezeniski
bojāt barošanas bloku.
- Izmantojiet šo ierīci tikai
paredzētajiem mērķiem, kā
norādīts lietotāja rokasgrāmatā.
- Ievērojot higiēnas prasības,
ierīci ir ieteicams lietot tikai
vienam cilvēkam.
99
Page 100

Latviešu
100
- Nekad neskalojiet ierīci ūdenī,
kura temperatūra pārsniedz
60°C.
- Ierīces tīrīšanai nekad
nelietojiet saspiestu gaisu,
tīrīšanas drāniņas, abrazīvus
tīrīšanas līdzekļus vai kodīgus
šķidrumus, piemēram, benzīnu
vai acetonu.
Elektromagnētiskie lauki (EML)
Šī Philips ierīce atbilst visiem piemērojamajiem
standartiem un noteikumiem, kas attiecas uz
elektromagnētisko lauku iedarbību.
Vispārīgi
- Šī ierīce ir ūdensdroša. Ierīce ir piemērota
izmantošanai vannā vai dušā un tīrīšanai zem
tekoša krāna ūdens. Drošības apsvērumu dēļ
ierīci drīkst lietot tikai bez vada.
- Šī ierīce ir paredzēta elektrotīklam ar spriegumu
no 100līdz 240voltiem.
- Barošanas bloks transformē 100–240 voltu
spriegumu uz drošu spriegumu, kas ir mazāks
par 24 voltiem.
- Maksimālais trokšņa līmenis: Lc = 75dB(A).
Uzlāde
Uzlādējiet ierīci pirms pirmās lietošanas reizes, kā
arī, ja displejā ir norāde, ka akumulators ir gandrīz
tukšs.
Uzlāde ilgst apmēram vienu stundu.
 Loading...