

Philips QG3040/10, QG3040/00, HQG267/10, HQG265/11, HQG265/10 User Manual [es]
QG3040, QG3030, QG3020,
HQG267, HQG265
C
L
N
K
A
1
B
H
D
E
F
G
M
432
765
1098
131211
23
161514
191817
222120

ENGLISH
2
4203.000.5369.6
Introduction
Congratulations on your purchase and welcome to
Philips! To fully benet from the support that Philips offers,
register your product at www.philips.com/welcome.
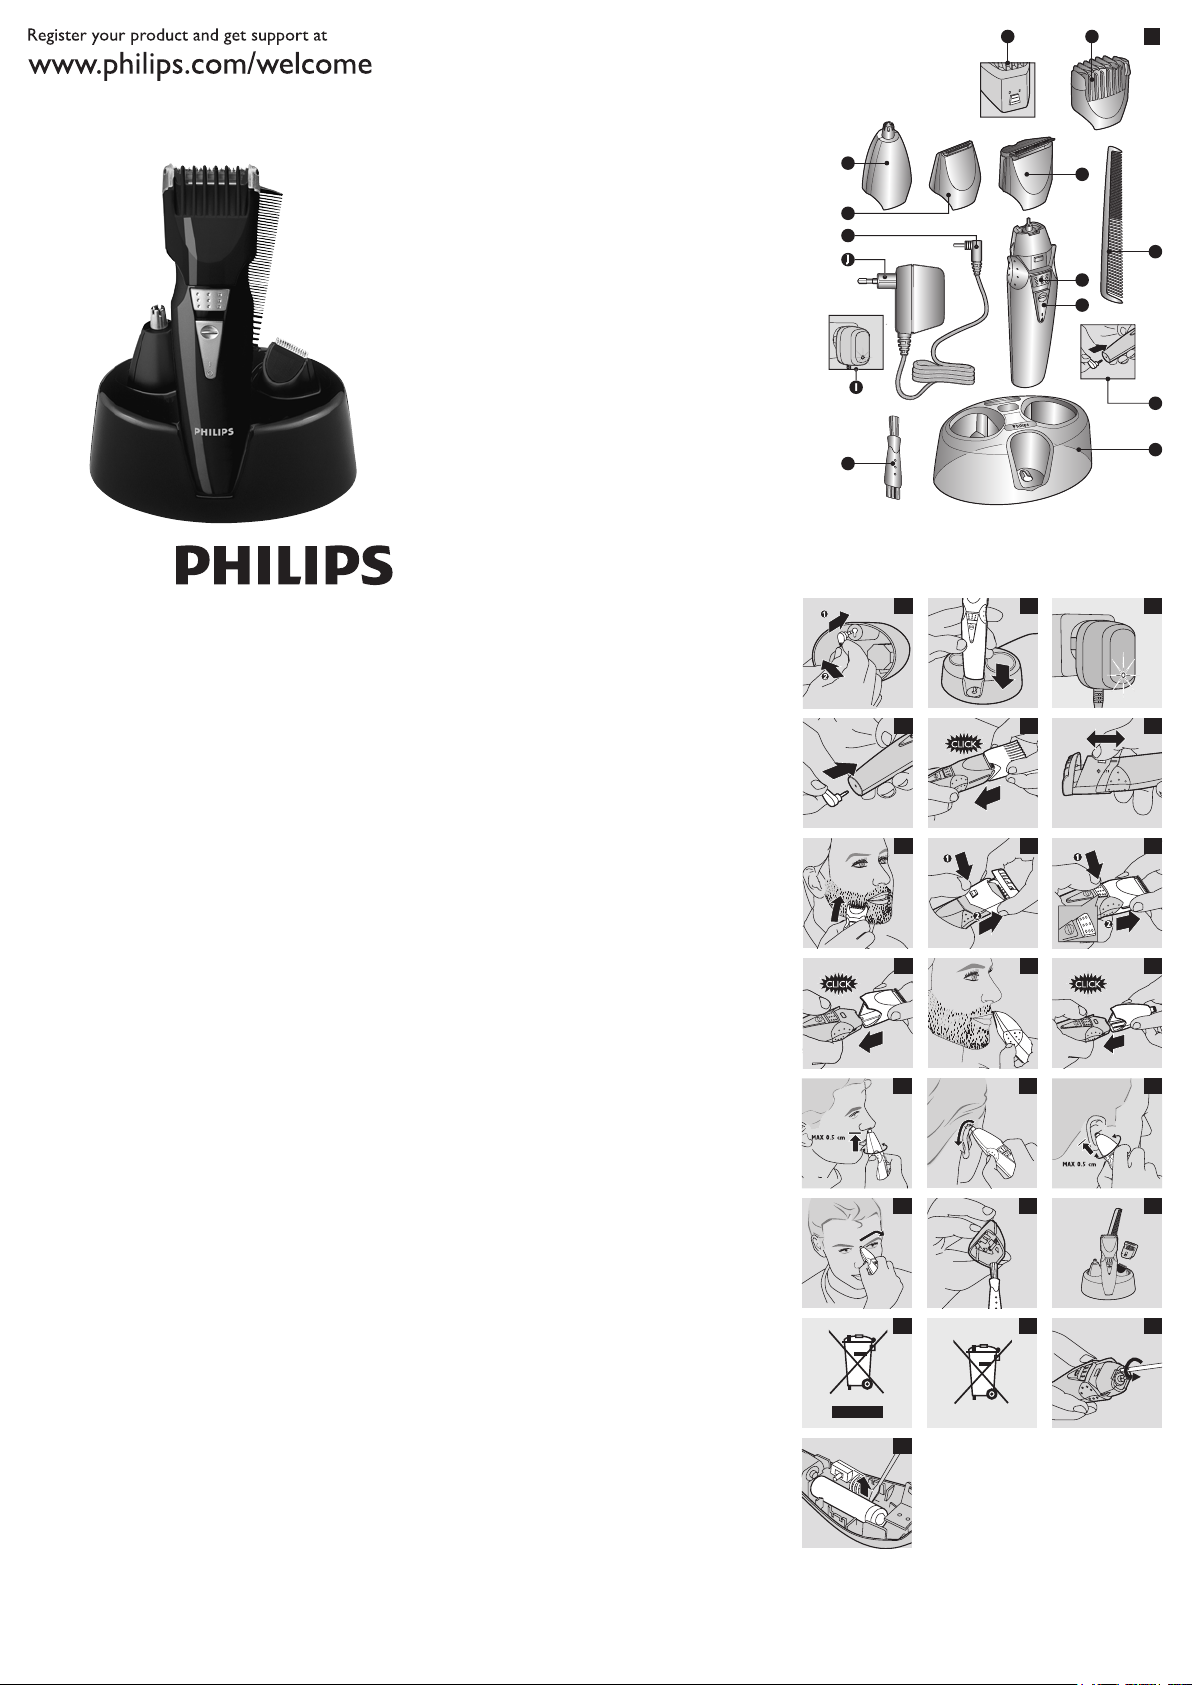
General description (Fig. 1)
A 2D Contour Tracking beard trimming comb
B Trimming attachment
C Hair length selector
D Release button
E On/off slide
F Socket for appliance plug
G Cleaning brush
H Barber’s comb
I Charging light
J Adapter
K Appliance plug
L Nose/ear/eyebrow attachment
M Charging stand with storage facility
N Precision attachment (HQG267/QG3040 only)
Important
Read this user manual carefully before you use the
appliance and save it for future reference.
Danger
- Make sure the adapter does not get wet.
Warning
- Check if the voltage indicated on the appliance
corresponds to the local mains voltage before you
connect the appliance.
- The adapter contains a transformer. Do not cut
off the adapter to replace it with another plug, as
this causes a hazardous situation.
- This appliance is not intended for use by persons
(including children) with reduced physical, sensory
or mental capabilities, or lack of experience and
knowledge, unless they have been given supervision
or instruction concerning use of the appliance by a
person responsible for their safety.
- Children should be supervised to ensure that they
do not play with the appliance.
Caution
- Do not immerse the appliance in water or any other
liquid, nor rinse it under the tap.
- Use, charge and store the appliance at a temperature
between 15°C and 35°C.
- Only use the adapter supplied.
- Do not use a damaged adapter.
- If the adapter is damaged, always have it replaced
with one of the original type in order to avoid a
hazard.
- Do not use the appliance if one of the attachments
or combs is damaged or broken, as this may cause
injury.
- This appliance is only intended for trimming the
human beard, moustache, sideburns, nose hair,
ear hair and eyebrows. Do not use it for another
purpose.
- Never try to trim your eyelashes.
- If the appliance is subjected to a major change in
temperature, pressure or humidity, let the appliance
acclimatise for 30 minutes before you use it.
Compliance with standards
- This Philips appliance complies with all standards
regarding electromagnetic elds (EMF). If handled
properly and according to the instructions in this
user manual, the appliance is safe to use based on
scientic evidence available today.
Preparing for use
Charging
Charge the appliance for at least 10 hours before you use
it for the rst time and after a long period of disuse.
When the appliance is fully charged, it has a cordless
operating time of up to 35 minutes.
Do not charge the appliance for more than 24 hours.
Note: The appliance is not suitable for mains operation.
You can charge the appliance in 2 different ways:
Charging in the charging stand
1 Make sure the appliance is switched off.
2 Insert the pin of the appliance plug into the opening
in the bottom of the stand (1) and push the plug
sideways to lock it into place (2) (Fig. 2).
3 Place the appliance in the charging stand on the
appliance plug (Fig. 3).
4 Put the adapter in the wall socket.
, The charging light goes on. The light stays on
as long as the appliance is connected to the
mains (Fig. 4).
Charging outside the charging stand
1 Make sure the appliance is switched off.
2 Insert the appliance plug into the socket of the
appliance (Fig. 5).
3 Put the adapter in the wall socket.
, The charging light goes on. The light stays on
as long as the appliance is connected to the
mains (Fig. 4).
Optimising the lifetime of the rechargeable
battery
- Do not leave the appliance plugged into the wall
socket for more than 24 hours.
- Discharge the battery completely twice a year
by letting the motor run until it stops. Then fully
recharge the battery.
Using the appliance
Note: Always comb the hair with a ne comb in the hair
growth direction before you start trimming.Make sure that
the hair is dry and clean.
Beard trimming with comb
1 Put the beard trimming comb on the trimming
attachment and push it home (‘click’) (Fig. 6).
2 Press the hair length selector and slide it to the
desired setting. See the table below (Fig. 7).
The selected setting appears in the window to the left of
the hair length selector.
- When you trim for the rst time, start at the highest
setting (9) to familiarise yourself with the appliance.
- To create a ‘stubble look’, trim with the beard
trimming comb set to hair length setting 1.
Settings of the beard trimming comb
Setting Hair length after trimming
1 2mm
2 4mm
3 6mm
4 8mm
5 10mm
6 12mm
7 14mm
8 16mm
9 18mm
3 To trim most effectively, move the appliance against
the hair growth direction (Fig. 8).
Do not move the appliance too fast. Make smooth and
gentle movements and make sure the surface of the
comb always stays in contact with the skin.
If a lot of hair has accumulated in the comb, remove the
comb from the appliance and blow and/or shake the hair
out of it.
Note: You have to set the hair length selector to the
desired setting again after you have removed the comb.
Beard trimming without comb
Trimming without the comb results in a very short
stubble beard.
1 Press and slide the hair length selector upwards (1)
and pull the beard trimming comb off the appliance
(2) (Fig. 9).
Note: Never pull at the exible top of the comb. Always pull
at the bottom part.
2 Make well-controlled movements and touch your
beard only lightly with the trimming attachment.
Using the precision attachment (HQG267/
QG3040 only).
You can use the precision attachment to dene the
contours of your beard, moustache and sideburns.
1 Press and slide the hair length selector upwards
(1) and pull the beard trimming comb off the
appliance (2) (Fig. 9).
Note: Never pull at the exible top of the comb. Always pull
at the bottom part.
2 Press the release button (1) and pull the trimming
attachment off the appliance (2) (Fig. 10).
3 Put the precision attachment on the
appliance (Fig. 11).
4 Hold the appliance upright when you use the
precision attachment (Fig. 12).
Grooming nose hair, ear hair and eyebrows
1 Press and slide the hair length selector upwards (1)
and pull the beard trimming comb off the appliance
(2) (Fig. 9).
Note: Never pull at the exible top of the comb. Always pull
at the bottom part.
2 Press the release button (1) and pull the trimming
attachment off the appliance (2) (Fig. 10).
3 Put the nose/ear/eyebrow attachment on the
appliance (‘click’) (Fig. 13).
Trimming nose hair
1 Make sure your nostrils are clean.
2 Switch on the appliance and insert the tip of the
trimmer into one of your nostrils (Fig. 14).
Do not insert the tip more than 0.5cm into your nostril.
3 Slowly move the tip in and out while turning it
round at the same time to remove unwanted hair.
To reduce the tickling effect, make sure that you press the
side of the tip rmly against the skin.
Trimming ear hair
1 Clean the outer ear channel. Make sure it is free
from wax.
2 Switch on the appliance and move the tip softly
round the ear to remove hairs that stick out
beyond the rim of the ear (Fig. 15).
3 Carefully insert the tip into the outer ear
channel (Fig. 16).
Do not insert the tip more than 0.5cm into the ear
channel as this could damage the eardrum.
Trimming eyebrows
Use the tip to cut individual eyebrow hairs.
Do not use the appliance to dene or trim the entire
eyebrow.
1 Place the tip of the attachment on the upper edge
of the eyebrow.
2 Move the tip of the attachment along the edge of
the eyebrow from the base of the nose towards the
outer tip of the eyebrow (Fig. 17).
Cleaning
Never use scouring pads, abrasive cleaning agents or
aggressive liquids such as alcohol, petrol or acetone to
clean the appliance.
Note: The appliance does not need any lubrication.
Clean the appliance every time you have used it.
1 Make sure the appliance is switched off and
disconnected from the mains.
2 Remove any comb and/or attachment from the
appliance.
3 Blow and/or shake out any hair that has
accumulated in the attachment and/or comb.
4 Clean the outside and inside of the attachment
with the brush cleaning brush (Fig. 18).

5 Clean the adapter and the appliance with the
3
4203.000.5369.6
cleaning brush or a dry cloth.
Do not use water or a moist cloth to clean the adapter
and the appliance.
Storage
- Store the appliance and its accessories in the
charging stand to prevent damage (Fig. 19).
Replacement
If the adapter is damaged, always have it replaced with
one of the original type in order to avoid a hazard.
Only replace a damaged or worn attachment or comb
with an original Philips replacement attachment or comb.
Philips replacement attachments, combs and adapters are
available from your Philips dealer and authorised Philips
service centres.
If you have any difculties obtaining an adapter or
replacement attachments and combs for the appliance,
contact the Philips Consumer Care Centre in your
country (you nd its phone number in the worldwide
guarantee leaet).
Environment
- Do not throw away the appliance with the normal
household waste at the end of its life, but hand it in
at an ofcial collection point for recycling. By doing
this, you help to preserve the environment (Fig. 20).
- The built-in rechargeable battery contains substances
that may pollute the environment. Always remove
the battery before you discard and hand in the
appliance at an ofcial collection point. Dispose of
the battery at an ofcial collection point for batteries.
If you have trouble removing the battery, you can
also take the appliance to a Philips service centre.
The staff of this centre will remove the battery for
you and will dispose of it in an environmentally safe
way (Fig. 21).
Removing the rechargeable battery
Only remove the rechargeable battery when it
is completely empty.
1 Disconnect the appliance from the mains and let
the appliance run until the motor stops.
2 Remove any comb and/or attachment from the
appliance.
3 Insert a screwdriver in the groove next to the shaft
at the top of the appliance.Turn the screwdriver to
separate the two housing halves (Fig. 22).
4 Lift the battery out of the housing with a
screwdriver. Twist the connecting wires until they
break (Fig. 23).
Do not connect the appliance to the mains again after
you have removed the battery.
Guarantee & service
If you need service or information or if you have a
problem, please visit the Philips website at
www.philips.com or contact the Philips Consumer Care
Centre in your country (you nd its phone number in
the worldwide guarantee leaet). If there is no Consumer
Care Centre in your country, go to your local Philips
dealer.

DEUTSCH
4
4203.000.5369.6
Einführung
Herzlichen Glückwunsch zu Ihrem Kauf und willkommen
bei Philips! Um den Support von Philips optimal nutzen
zu können, registrieren Sie Ihr Produkt bitte unter www.
philips.com/welcome.
Allgemeine Beschreibung (Abb. 1)
A 2D Contour-Tracking Bartschneidekamm
B Trimmeraufsatz
C Schnittlängenregler
D Entriegelungstaste
E Ein-/Ausschalter
F Buchse für Gerätestecker
G Reinigungsbürste
H Frisierkamm
I Ladeanzeige
J Adapter
K Gerätestecker
L Aufsatz für Nase/Ohren/Augenbrauen
M Ladestation mit Aufbewahrungsfach
N Präzisionsaufsatz (nur für HQG267/QG3040)
Wichtig
Lesen Sie diese Bedienungsanleitung vor dem Gebrauch
des Geräts aufmerksam durch, und bewahren Sie sie für
eine spätere Verwendung auf.
Gefahr
- Achten Sie darauf, dass der Adapter nicht nass wird.
Warnhinweis
- Bevor Sie das Gerät in Betrieb nehmen, prüfen Sie,
ob die Spannungsangabe auf dem Gerät mit der
örtlichen Netzspannung übereinstimmt.
- Der Adapter enthält einen Transformator. Ersetzen
Sie den Adapter keinesfalls durch einen anderen
Stecker, da dies den Benutzer gefährden kann.
- Dieses Gerät ist für Benutzer (einschl. Kinder) mit
eingeschränkten physischen, sensorischen oder
psychischen Fähigkeiten bzw. ohne jegliche Erfahrung
oder Vorwissen nur dann geeignet, wenn eine
angemessene Aufsicht oder ausführliche Anleitung
zur Benutzung des Geräts durch eine verantwortliche
Person sichergestellt ist.
- Achten Sie darauf, dass Kinder nicht mit dem Gerät
spielen.
Achtung
- Tauchen Sie das Gerät niemals in Wasser oder
andere Flüssigkeiten; spülen Sie es auch nicht unter
ießendem Wasser ab.
- Benutzen und laden Sie das Gerät bei Temperaturen
zwischen 15 °C und 35 °C. Bewahren Sie es auch in
diesem Temperaturbereich auf.
- Verwenden Sie ausschließlich den
mitgelieferten Adapter.
- Verwenden Sie keinesfalls einen beschädigten
Adapter.
- Wenn der Adapter defekt oder beschädigt ist, darf
er nur durch ein Original-Ersatzteil ausgetauscht
werden, um Gefährdungen zu vermeiden.
- Um Verletzungen zu vermeiden, benutzen Sie das
Gerät nicht mit einem beschädigten oder defekten
Aufsatz oder Kamm.
- Dieses Gerät ist ausschließlich zum Schneiden von
menschlichem Barthaar sowie für das Kürzen von
Koteletten, Augenbrauen und Haaren in Nase und
Ohren vorgesehen. Verwenden Sie es nicht für
andere Zwecke.
- Versuchen Sie niemals, Ihre Wimpern mit dem Gerät
zu schneiden.
- Wird das Gerät hohen Temperatur-, Druck- oder
Feuchtigkeitsschwankungen ausgesetzt, sollten Sie
es vor Gebrauch 30 Minuten an die Umgebung
anpassen lassen.
Normerfüllung
- Dieses Philips Gerät erfüllt sämtliche Normen
bezüglich elektromagnetischer Felder (EMF). Nach
aktuellen wissenschaftlichen Erkenntnissen ist das
Gerät sicher im Gebrauch, sofern es ordnungsgemäß
und entsprechend den Anweisungen in dieser
Bedienungsanleitung gehandhabt wird.
Für den Gebrauch vorbereiten
Laden
Laden Sie das Gerät vor dem ersten Gebrauch oder nach
längerer Gebrauchspause mindestens 10 Stunden lang auf.
Das vollständig aufgeladene Gerät hat eine kabellose
Betriebsdauer von bis zu 35 Minuten.
Laden Sie das Gerät nicht länger als 24 Stunden.
Hinweis: Das Gerät ist nicht für den Netzbetrieb geeignet.
Es gibt zwei Möglichkeiten zum Auaden des Geräts:
Auaden in der Ladestation:
1 Vergewissern Sie sich, dass das Gerät ausgeschaltet
ist.
2 Stecken Sie den Gerätestecker in die Buchse im
Boden der Ladestation (1), und schieben Sie ihn
seitwärts, bis er einrastet (2) (Abb. 2).
3 Setzen Sie das Gerät in die Ladestation auf den
Gerätestecker (Abb. 3).
4 Stecken Sie den Adapter in die Steckdose.
, Die Ladeanzeige leuchtet so lange auf, wie das
Gerät an das Stromnetz angeschlossen ist (Abb. 4).
Auaden außerhalb der Ladestation:
1 Vergewissern Sie sich, dass das Gerät ausgeschaltet
ist.
2 Stecken Sie den Gerätestecker in die Buchse am
Gerät (Abb. 5).
3 Stecken Sie den Adapter in die Steckdose.
, Die Ladeanzeige leuchtet so lange auf, wie das
Gerät an das Stromnetz angeschlossen ist (Abb. 4).
Die Lebensdauer des Akkus optimieren
- Lassen Sie das Gerät nicht länger als 24 Stunden am
Netz.
- Entladen Sie den Akku zweimal pro Jahr vollständig,
indem Sie den Motor so lange laufen lassen, bis er
anhält. Laden Sie den Akku dann wieder vollständig
auf.
Das Gerät benutzen
Hinweis: Kämmen Sie das Haar vor dem Schneiden mit
einem feinen Kamm in Haarwuchsrichtung.Das Haar muss
sauber und trocken sein.
Bartschneiden mit dem Kammaufsatz
1 Stecken Sie den Bartschneidekamm auf den
Trimmeraufsatz, bis er hörbar einrastet (Abb. 6).
2 Drücken Sie auf den Schnittlängenregler, und
schieben Sie ihn auf die gewünschte Einstellung
(siehe unten stehende Tabelle) (Abb. 7).
Die gewählte Einstellung wird in dem Fenster links neben
dem Schnittlängenregler angezeigt.
- Wenn Sie das Gerät zum ersten Mal verwenden,
schneiden Sie zunächst mit der maximalen
Schnittlänge (9), um sich mit dem Gerät vertraut zu
machen.
- Mit dem Bartschneidekamm in Einstellung 1 können
Sie einen 3-Tage-Bart kreieren.
Einstellungen des Bartschneidekamms
Einstellung Haarlänge nach dem
Schneiden
1 2 mm
2 4 mm
3 6 mm
4 8 mm
5 10 mm
6 12 mm
7 14 mm
8 16 mm
9 18 mm
3 Die besten Ergebnisse erzielen Sie, wenn Sie das
Gerät gegen die Haarwuchsrichtung führen (Abb. 8).
Bewegen Sie das Gerät nicht zu schnell. Führen Sie es
mit sanften Bewegungen über das Gesicht, und achten
Sie darauf, dass der Kamm stets in Kontakt mit der Haut
bleibt.
Wenn sich viel Haar im Kammaufsatz angesammelt hat,
nehmen Sie diesen ab und pusten oder schütteln Sie die
Haare heraus.
Hinweis: Sie müssen die gewünschte Einstellung des
Schnittlängenreglers erneut festlegen, wenn Sie den
Kammaufsatz entfernt haben.
Bartschneiden ohne Kammaufsatz
Wenn Sie ohne Kammaufsatz schneiden, erhalten Sie
einen sehr kurzen “Drei-Tage-Bart”.
1 Drücken Sie auf den Schnittlängenregler, und
drücken Sie ihn nach oben (1); ziehen Sie dann den
Bartschneidekamm vom Gerät ab (2) (Abb. 9).
Hinweis: Ziehen Sie keinesfalls an der beweglichen Spitze
des Kammaufsatzes, sondern nur am unteren Teil.
2 Führen Sie den Trimmeraufsatz mit kontrollierten
Bewegungen und berühren Sie dabei Ihren Bart nur
leicht mit dem Aufsatz.
Den Präzisionsaufsatz benutzen (nur für
HQG267/QG3040).
Sie können mit dem Präzisionsaufsatz die Konturen von
Bart, Schnurrbart oder Koteletten trimmen.
1 Drücken Sie auf den Schnittlängenregler, und
drücken Sie ihn nach oben (1); ziehen Sie dann den
Bartschneidekamm vom Gerät (2) (Abb. 9).
Hinweis: Ziehen Sie keinesfalls an der beweglichen Spitze
des Kammaufsatzes, sondern nur am unteren Teil.
2 Drücken Sie die Entriegelungstaste (1), und ziehen
Sie den Trimmeraufsatz vom Gerät (2) (Abb. 10).
3 Stecken Sie den Präzisionsaufsatz auf das
Gerät (Abb. 11).
4 Halten Sie das Gerät bei Anwendung mit dem
Präzisionsaufsatz senkrecht (Abb. 12).
Augenbrauen und Haare in Nase und Ohren
schneiden
1 Drücken Sie auf den Schnittlängenregler, und
drücken Sie ihn nach oben (1); ziehen Sie dann den
Bartschneidekamm vom Gerät ab (2) (Abb. 9).
Hinweis: Ziehen Sie keinesfalls an der beweglichen Spitze
des Kammaufsatzes, sondern nur am unteren Teil.
2 Drücken Sie die Entriegelungstaste (1), und ziehen
Sie den Trimmeraufsatz vom Gerät (2) (Abb. 10).
3 Setzen Sie den Aufsatz für Nase/Ohren/
Augenbrauen auf das Gerät (er muss hörbar
einrasten) (Abb. 13).
Haare in der Nase schneiden
1 Achten Sie darauf, dass die Nasenlöcher sauber
sind.
2 Schalten Sie das Gerät ein und führen Sie die Spitze
des Trimmers in ein Nasenloch (Abb. 14).
Führen Sie die Spitze nicht weiter als 5 mm in die Nase
ein.
3 Führen Sie die Spitze langsam hinein und wieder
heraus. Drehen Sie sie gleichzeitig, um so
unerwünschte Haare zu entfernen.
Um unerwünschtes Kitzeln zu verhindern, drücken Sie die
Spitze seitlich fest gegen die Haut.
Haare in den Ohren schneiden
1 Reinigen Sie die äußere Ohrmuschel und achten Sie
darauf, dass der Ohrkanal frei von Ohrenschmalz
ist.
2 Schalten Sie das Gerät ein und führen Sie die Spitze
sanft um die Ohrmuschel herum, um die über
den Rand des Ohres herausragenden Haare zu
entfernen (Abb. 15).
3 Führen Sie die Spitze vorsichtig in den äußeren
Ohrkanal (Abb. 16).
 Loading...