

Page 1
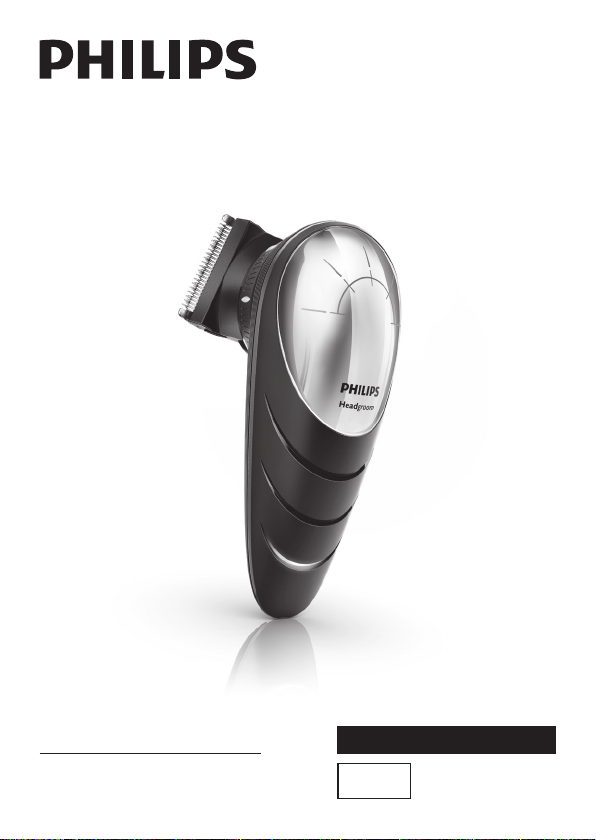
フィリップス ヘアーカッター
品
番
QC5580
保証書付
取 扱 説 明 書
保 証 書 は 、こ の 取 扱 説 明 書 の 最 終
ページに ついて おりますの で販 売店
で記 入 を 受 けてく だ さい 。
Page 2
1
1mm
フィリップス ヘアーカッターをお買い上げいただき、まことにあり
がとうございます。長い間ご愛用いただくために、ご使用前にこの取
扱説明書をよくお読みのうえ、正しくお使いください。
また、お読みになった後は、お使いになる方がいつでも見られる
ところに必ず保管してください。
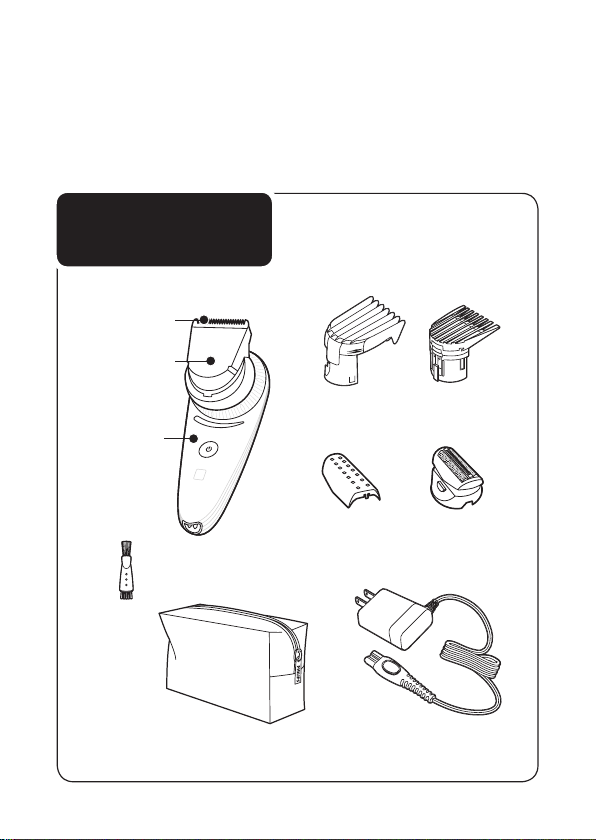
商品のご確認
刃
ヘアートリミング
ヘッド
本体
クリーニングブラシ
収納ポーチ
※改良の為、仕様を予告なく変更することがあります。
商品をご確認ください
レギュラー
コーム
保護キャップ
充電アダプタ(
細部コーム
ヘアーシェービング
ヘッド
)
HQ8505
Page 3
は じ め に
●
ご 使 用 方 法
●
廃棄について
●
英 文 解 説
●
困 っ た と き
●
目 次
商品のご確認
目次
2
必ずお守りください
各部の名称
充電の仕方
基本的な使い方
ヘアーカットの 仕方
ヘアーシェービングの仕方
お手入れ方 法
刃の交換
製品を廃棄するとき
Guidance in English
故障かな?と思ったら
1
3・4
5・6
7・8
9~11
12~15
16
17・18
19・20
21
39
22~37
保
●
保証とアフターサービス
証
仕様/お客様 情報センター
無料修理規定
保証書
42
2
40
41
最終ページ
Page 4
3
必ずお守り
ください
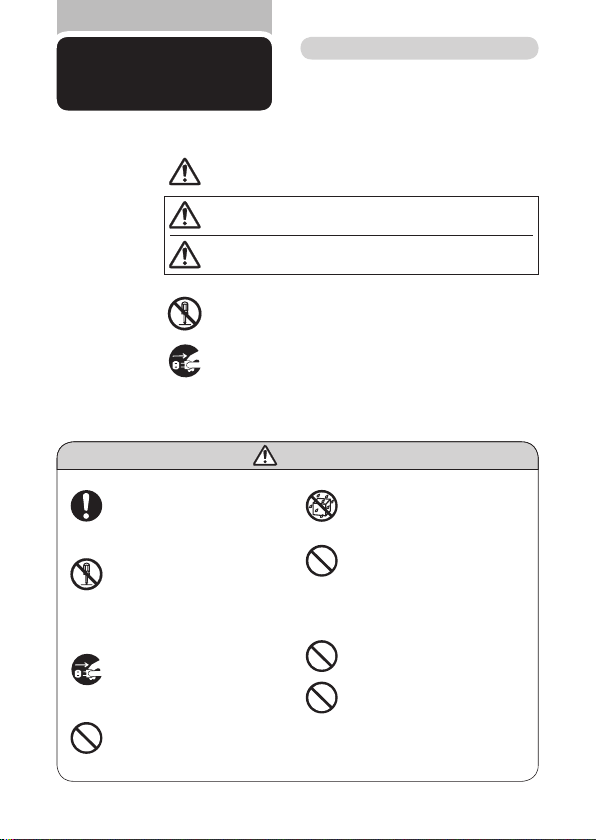
安 全 上 の ご 注 意
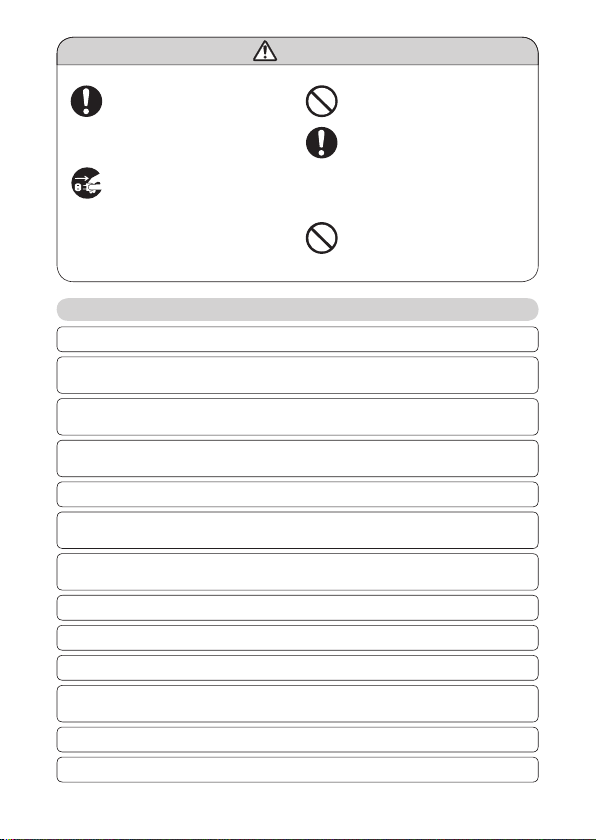
●ここに示した注意事項は、安全に関する重要
な内容ですので、必ず守ってください。
●誤った取扱いをしたときに想定される内容を
「警告」と「注意」とに区分けしています。
○絵表示について
○絵表示の例
● 本製品の電源を入 れる前に、充電ア
ダプタに表示されている電圧 が、ご
使用になる地域の電圧に適している
か確認してください。
● 本体ならびに充電アダプタは改造し
ない。また、修理技術者以外の人は、
分解したり修理 をしない。火災、感
電、ケガの原因となります。修理はお
買い上 げの販 売店または小 泉成 器
修理センターにご相談ください。
● お手入 れの際 は必 ず充電 アダプタ
の電源プラグをコンセントから抜く。
また、濡れた手で抜き差ししない。感
電やケガをすることがあります。
● 充電アダプタが傷んだり、コンセント
の差込 みが緩いときは使用しない。
感電・ショート・発火の原因になります。
記号は、「危険、警告、注意」を示します。
図の中や近くに具体的な注意内容を示します。
人が死亡または重傷を負う可能性が想定される内容。
警告
人が傷害を負う可能性及び物的損害のみの発生が想
注意
定される内容。
・ 記号は、してはいけない「禁止」を示します。図の 中や近くに具
体的な禁止内容(左図の場合は分解禁止)を示します。
・ 記号は、必ずしていただく「強制」を示します。図の中や近くに
具体的な強制内容(左図の場合は電源プラグをコンセントから
抜くこと)を示します。
警 告
● 充電アダプタを水につけたり、水を
かけたりしない。故 障や、ショート・
感電の原因になります。
● 充電 ア ダプ タを 傷 付 けたり、電 源
コードを無理に曲げたり、引っ張った
り、ねじったり、たばねたり、重い物を
載せたり、挟み込んだり、加工したり
しない。電源コ ードが破 損し、火災・
感電の原因となります。
● 乳幼児の手の届くところに本製品を
置かないでください。
● 充電アダプ タには変 圧器が内蔵 さ
れています。充電アダプタを切り離
して別のプラグに接続するのは危険
ですのでおやめください。
Page 5
注 意
● 充電アダプタの電源プラグを抜くと
きは、電 源コード部を持た ずに必ず
先端 の電 源プラグ 部を持って引 き
抜く。感電やショートして発火するこ
とがあります。
● 充電時以 外は、充電 アダプタをコン
セントから抜く。ケガややけど、絶縁
劣化による感電・漏電・火災の原因
となります。
● 刃は 強く押 さえ な い。破損して 皮
膚を傷つけることがあります。
● 刃やコー ムなどの部 品が 破損また
は故障した場合は、本製品を使用し
ないでください。ケガの 原因になり
ます。交換 の 際には必 ずフィリップ
ス社 製の 同型 部 品とお取り替 えく
ださい。
● 電源 コネクタ受 部にピ ンやごみ を
付着 させ な い。感 電・ショート・発
火の原因になります。
使 用 上 の ご 注 意
本製品は、人の頭髪のカットとシェービング専用です。それ以外の目的で使用しないでください。
1.
本製品の使 用、充電、保管は室温5℃~35℃の環境下で行ってください。(尚、低温や高温
2.
で充電すると、充電池の寿命が短くなります。)
室温、気 圧、湿 度が急激に変化する状況でご使用になる場合は、本製品をその環境下で
3.
分ほど慣らしてからお使いください。
刃は、薄く仕上げてありますので、刃部を強く押さえたり、硬いものに当てないよう、ていね
4.
いに扱ってください。
刃の清掃やコームの着脱は必ずスイッチを切ってから行ってください。
5.
切れ味が衰えてきたり、刃やコームなどの部品が破損した場合は、使用せず必 ず新しい同
6.
型部品と交換してください。
極端に高温または低温の場所、直射 日光の当たる場所には保管しないでください。夏場、
7.
車の中に放置しないでください。
乳幼児の手の届かないところに保管してください。
8.
本製品は、使用の都度、掃除をしてください。
9.
充電するときは、専用の充電アダプタを使用してください。
10.
充電アダプタが破損、故障した場合は、事故を避けるために必ずフィリップス社製の同型部
11.
品をお求めください。
本製品は防水加工をしておりますが、水や液体の中に浸けないでください。
12.
本製品をシャワー中に使用しないでください。
13.
30
4
Page 6
5
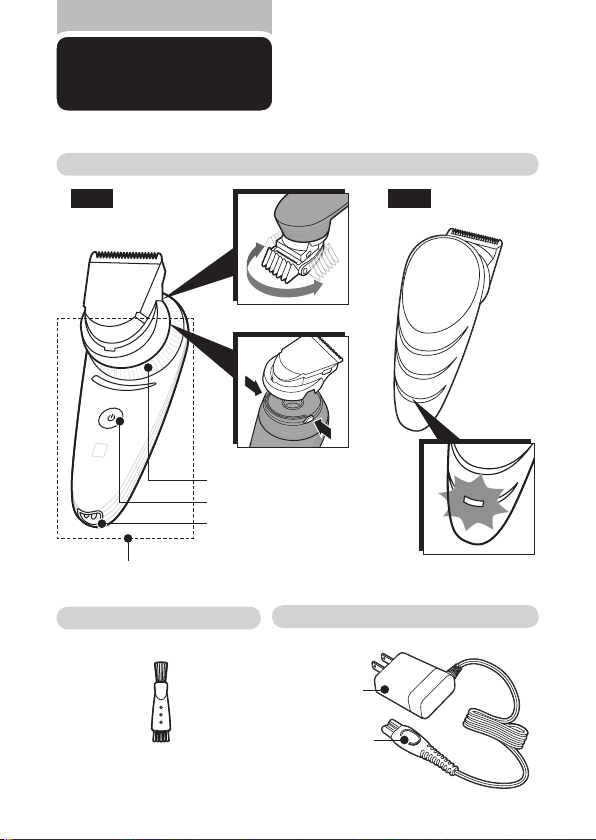
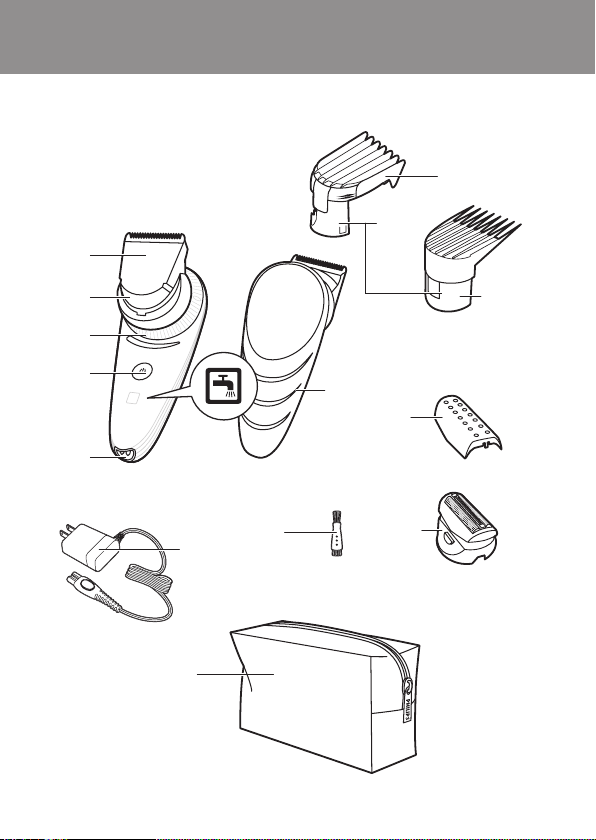
各部の名称
本体
正面 背面
本体
クリーニングブラシ ▶
回転ヘッド▶
解除ボタン▶
ズームリング▶
スイッチ
ON/OFF
電源コネクタ受部
P.17
P.13
P.10
P.11
充電アダプタ ▶
電源プラグ部
電源コネクタ部
充電表示ランプ▶
P.7
P.7
Page 7
–
3
m
m
–
–
7
–
–
11
–
1mm
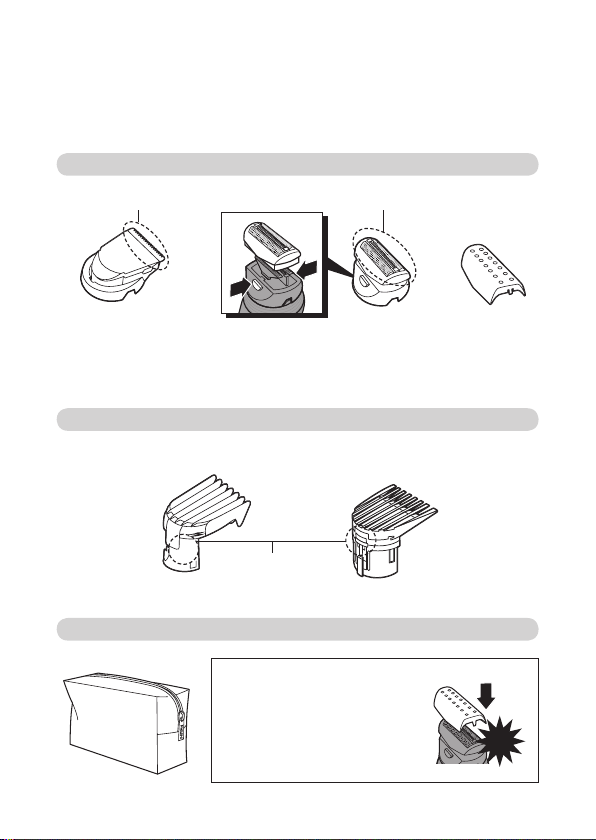
刃 網刃
ヘアートリミングヘッド
▶
P.10,12,15
ヘッド
網刃解除ボタン
ヘアーシェービングヘッド
▶
P.10,16
保護キャップ
コーム ▶
P.9~14
レギュラーコーム 細部コーム
長さ設定表示
収納ポーチ
●収納する
ヘアーシェービングヘッド( 網刃)に保
護キャップを取り付け、スイッチが
になっていることを確認して本体と付
属品を収納ポーチに入れます。コーム
には保護 キャップはありません。そ の
まま収納ポーチに入れてください。
6
OFF
カチッ
Page 8
7
お客様による充電池の交換はできません。
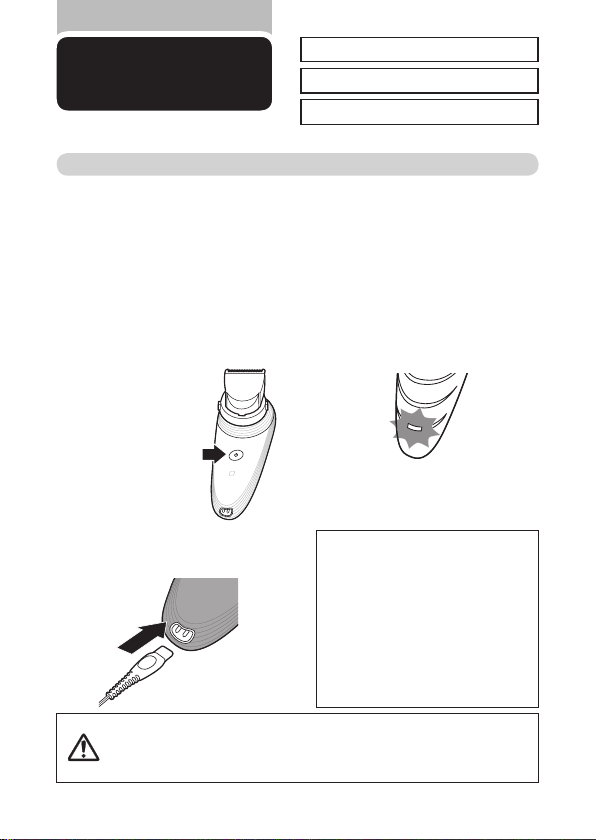
充電の仕方
この商品は通常約1時間充電です。
満充電で約1時間使用できます。
充電式(コードレス)で使う場合
初めてお使いになるときや、長い間ご使用にならなかったときは、充電しないと使用できませ
ん。ご使用前に充電してください。初めての充電時間は約
た状態で、約
ンセントの形状や電圧など現地で充分お確かめのうえご使用ください。
時間ご使用になれます。海外(
1
100~240V
時間です。本製品は完全に充電し
1
)でのご使用も可能です。ただし、コ
充電表示ランプがオレンジ色に点滅し
1
たら、充電が少なくなっています(残り
の使用時間は約
品を充電する必要があります。
充 電 す る 際 には、ス
2
イッチを必ず
てください。動作中は
スイッチを
になります。
OFF
※
の状態では
ON
充電できません。
充電アダプタの電源コネクタ部を、本体
3
の電源コネクタ受部に差し込みます
注意
分です)ので、本製
10
にし
OFF
回押すと
1
●当社専用の充電アダプタ以外での充電はしないでください。
長期間使用しない場合は、充電池が過放電して使えなくなることがあり
●
ます。充電できない場合は、活性化させるために
ください。
充電アダプタの電源プラグ部をコンセ
4
ントに差し込むと充電表示 ランプが白
色に点滅し、充電中であることを示しま
す。(満充電になると充電表示ランプが
白色に点灯し、約
※ 満充電後、約30分経過すると節電のため充電表示
ランプが消えます。
※ 本体を水洗 いした場合は、水分をふき 取ってから
充電してください。
ポイント
充電中、テレビ等に雑音が入る場合、別の
●
。
コンセントで充電してください。
充電・ご使用中は本体・充電アダプタが多
●
少熱くなりますが、異常ではありません。
● 充電池の寿命は使用・保管などの状態に
より大きく変化します。
ニッケル水素電 池の特性 上、電池 容量を
●
使い切らずに充電を繰り返すと使用可能
時間が減少することがあります。これを避
ける為、最後まで充電を使いきってから、
充電することをおすすめ致します。
24
時間使用できます。)
1
時間以上充電させて
Page 9
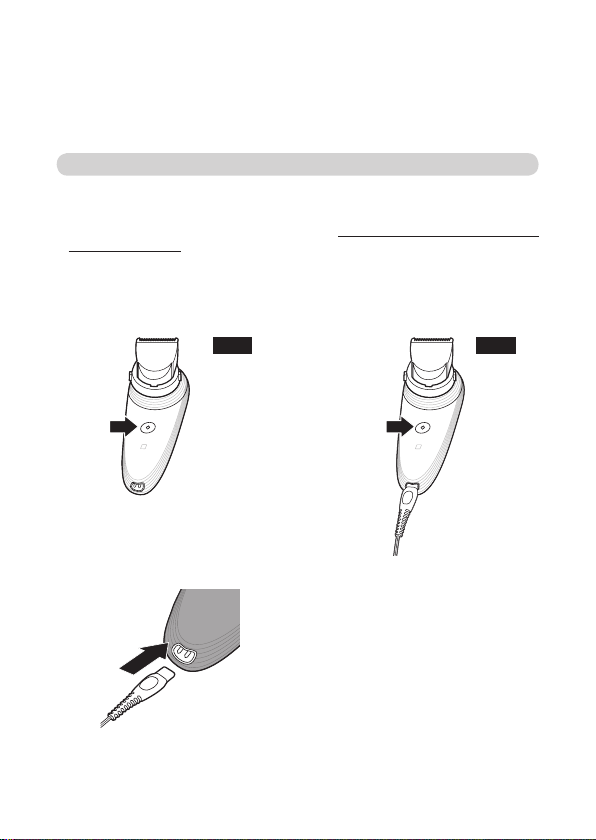
交流式(充電アダプタをつなげたまま)で使う場合
●交流式でお使いの 場合でも、充電残量がない状態でご使用されますと、作動しない場合が
あります。約
●交流式でのご使用でも、充電池は消耗します。また、充電アダプタはご使用の都度コンセン
トから抜いてください。
分位の充電を行ってから、ご使用ください。
3
ヘアーカッターの電源スイッチを
1
にします。
充電アダプタの電源コネクタ部を本体
2
の電源コネクタ受部に差し込み、充電
アダプタをコンセントに差し込みます。
OFF
約3分位待ってからスイッチをONにし
3
ます。(
秒以上長押し)
2
8
ONOFF
Page 10
9
基本的な使い方
電源スイッチの
動作していない状態で電 源スイッチを1回
押すと
(ONは2秒以上長押し)
、もう1回押すと
ON
ON/OFF
になります。
OFF
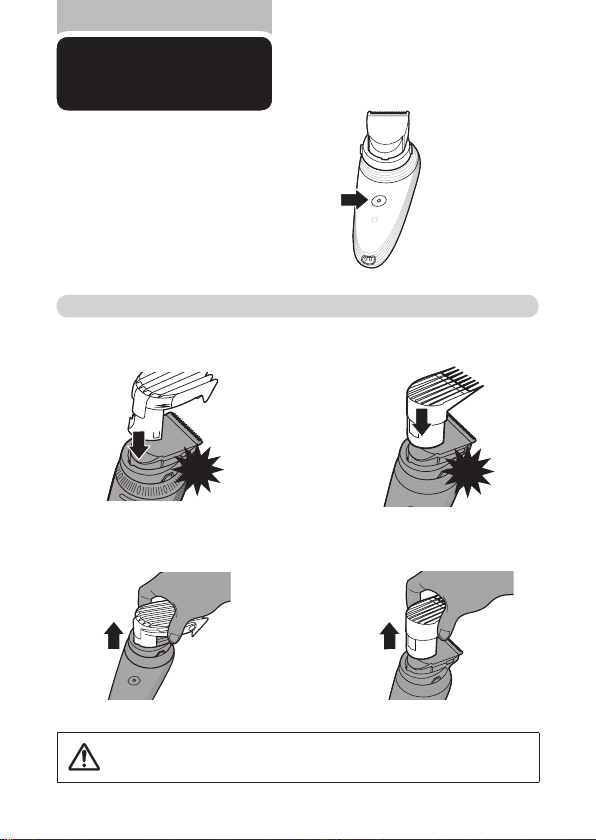
コームの使い方
レギュラーコームの取り付け
レギュラーコームを本体に差し込みます。
カチッ
レギュラーコームの取り外し
レギュラーコームを本体から真上に引き抜
きます。
細部コームの取り付け
細部コームを本体に差し込みます。
カチッ
細部コームの取り外し
細部コームを本体から真上に引き抜きます。
●コームを取り外す時、強い力を加えないでください。コームの先端ではなく
注意
根元部分を持ち、ゆっくり引き上げてください。
Page 11
ヘッドの使い方
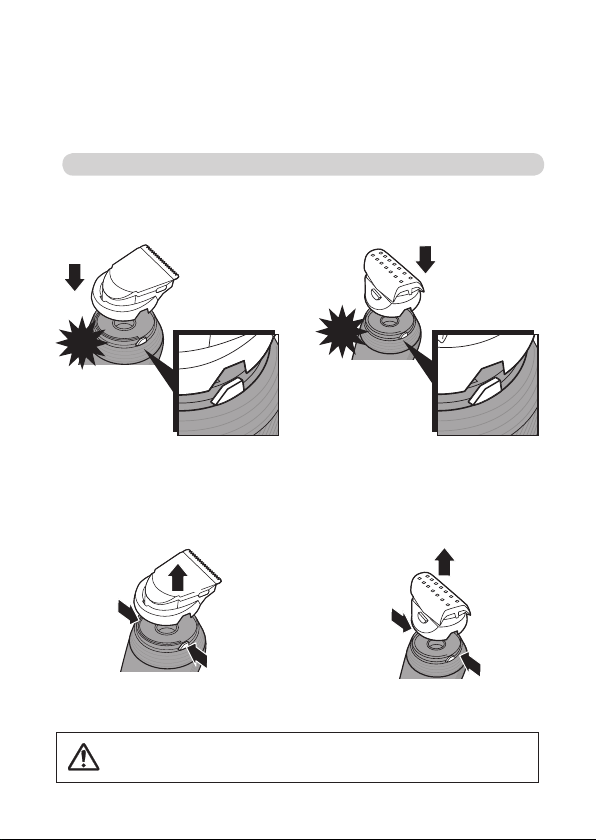
ヘアートリミングヘッドの取り付け
ヘアートリミングヘッドを本体に差し込みます。
カチッ
ヘアートリミングヘッドの取り外し
左右 の 解 除ボタンを同 時に押し(図❶)ヘ
アートリミングヘッドを本体から引き抜きます
(図❷)。
❷
❶
●ヘアーシェービングヘッドは非常に精巧な部品のため、取扱いには充分ご
注意
注意ください。
ヘアーシェービングヘッドの取り付け
ヘアーシェービングヘッドを本体に差し込
みます。
カチッ
ヘアーシェービングヘッドの取り外し
左右の解除ボタンを同時に押し(
アーシェービングヘッドを本体から引き抜
きます(
図
❷)。
図
❶)ヘ
❷
❶
10
Page 12
11
– 3 mm
–
– 7
– 11
–
1mm
1 mm
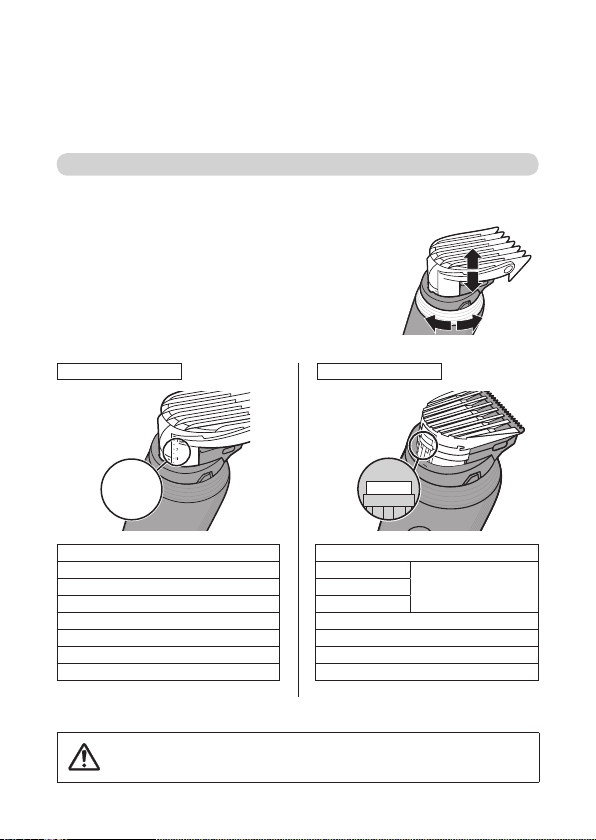
仕上がりの長さ設定
コームを使用し、カット後の仕上がりの長さを選べます。仕上がりの長さは、それぞれのコーム
の長さ設定表示で確認できます。
ズームリングを回して仕上がりの長さを選ぶ
コームをヘアートリミングヘッドに取り付け、ズームリングを回しま
す。時計回りに回すと仕上がりが長く、反時計回りに回すと仕上が
りが短くなります。それぞれの長さ設定表示は下記の通りです。
レギュラーコーム 細部コーム
長さ設定表示 長さ設定表示
※
単位で調節可能(7段階)
2mm
注意
仕上がりの長さ
3mm
5mm
7mm
9mm
11mm
13mm
15mm
※
0.5mm
● ズームリングは、最小設定値から最大設定値の間で使用し、それ以上は回さ
ないでください。故障の原因となります。
仕上がりの長さ
1mm
1mm
1mm
※3目盛分 は同じ仕上がりの
長さ(
1.5mm
2mm
2.5mm
3mm
単位で調節可能(5段階)
1mm
)となります。
Page 13
本製 品を シャワー中 に使 用
しないでください。
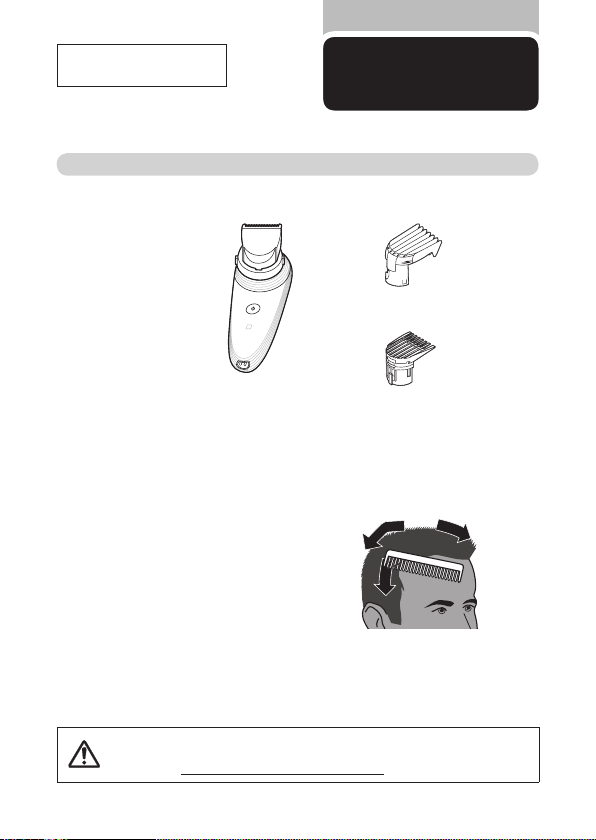
[用意するもの]
・くし
・首に巻くタオル
・肩にかけるケープ
・毛払いブラシ
[準備する]
ヘアーカットの準備
本体/
ヘアートリミングヘッド
ヘアーカットの
仕方
レギュラーコーム
細部コーム
室内でカットするときは、下に新聞紙か
1
ビニールクロスなどを敷きます。
首から肩にタオルをかけて、ケープを
2
とめます。
● 洗髪後、髪を乾かした状態で使用してください。
注意
髪がぬれた状態でヘアーカッターを使用しないでください。
●カット時は整髪剤は使用しないでください
髪を毛の流れに沿ってとかします。
3
。
12
Page 14
13
コームを使用してカットする
● 回転ヘッドは、左右90°以上回転させないでください。故障の原因となります。
● コームの平らな部分が頭皮に密着するようヘアーカッターを動かして、ご使用
注意
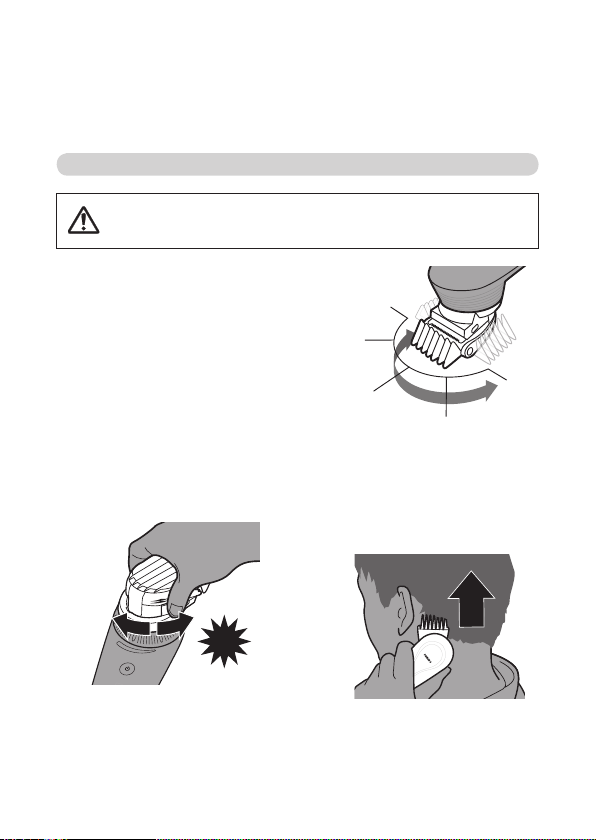
刃が前方を向いた位置を0°の起点として、回転ヘッ
ドは左右
°または90°回転させることができます。
45
カットする部位に合わせて刃の向きを変えられる
ので、使いやすい角度でカットできます。
ください。
お好みの位置まで回転ヘッドをカチッ
1
と音がするまで回します。刃の位置は、
必ず回転ヘッドで調節してください。
ヘアーカッターの電源スイッチをONに
2
します。
(2秒以上長押し)
カチッ
回転ヘッドの角度を合わせ、ヘアーカッ
3
ターをヘアーブラシのように持ち、使う
ことができます。カットする部位により
回転ヘッドを調整し、腕を楽に動かせる
位置に調整してください。
Page 15
7mm
5mm
2mm
1mm
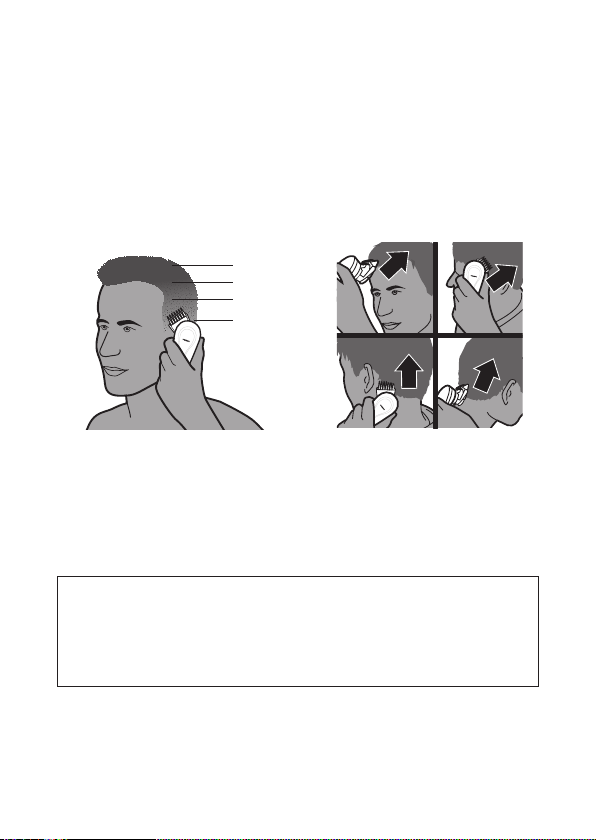
えり足から頭頂部にかけての髪の長さ
4
は変化に富 んでいるので、自然でなめ
らかにカットするには部位に応じて長さ
設定を変えてください。(
の長さ設定」の項をお読みください。)
P.11
[仕上がりの長さの例]
「仕上がり
頭髪は 部位によって毛の向きが 異なり
6
ます。毛の向きに合わせて、カットする方
向(上下・左右)を変えてみてください。
皮 膚に強 く押し つけず、ヘア ー カッ
5
ターをすべらすようにゆっくり動かし
て髪をカットします。効率よく髪をカッ
トするには毛の 流れに逆らってヘアー
カッターを動かしてください。
ポイント
●使い始めは、レギュラーコームの最も長い設定である
の設定を短くしていくことをおすすめします。
●カットの仕上がりを均一にするために、コームの平らな部分が頭皮と密着するようにヘアーカッ
ターを動かしてください。
●カットした部分と、次にカットする部分が重なるようにヘアーカッターを動かすと、髪の刈り残しが
なくなります。
カットした髪 の毛 がコームにたまった
7
場合 は、
電源 スイッチを
アーカッターからコームを取り外し、髪
を取り除いてください。
でカットし、少しずつ仕上がりの長さ
15mm
OFF
にして
14
ヘ
Page 16
15
コームを取り外してカットする
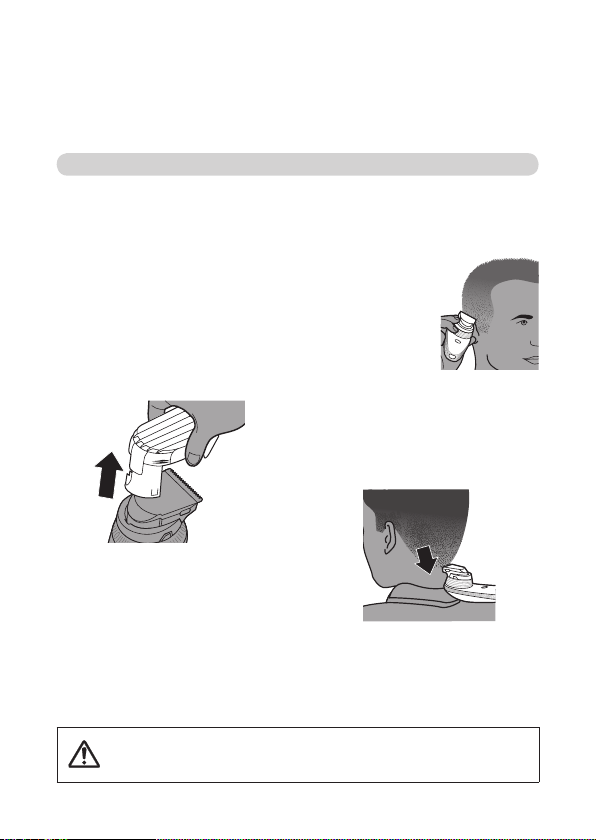
コームを取り外すと、とても短く(頭皮から
りを整える際にお使いいただけます。
)カットすることができます。首筋や耳まわ
0.5mm
ヘアーカッターの電源スイッチが
1
になっていることを確かめてください。
コームをヘアートリミングヘッドから引
2
き抜いて取り外します。
※コームを取り外す時、強い力を加えないでく
ださい。コームの先端ではなく根元部分を持
ち、ゆっくり引き上げてください。
耳のまわりのラインを整える前に、髪が
3
耳にかぶさるようにくしでとかします。
ヘアーカッター の電 源スイッチを
4
にします。(2秒以上長押し)
● コームを装着せずにカットするときは、刃が触れた部分の髪がとても短く
注意
(頭皮から
回転ヘッドは、左右90°以上回転させないでください。故障の原因となります。
●
OFF
ON
)カットされますのでご注意ください。
0.5mm
耳のまわりのライ
5
ンを整えるときは
刃の一端だけが毛
先に触 れるように
し、毛先だけをカッ
トします。髪の際が
耳に近くなるよう
にします。
えり足やもみ あ げの 形を 整えるとき
6
は、ヘアーカッターの向きを変え下向
きに動かします。ヘアーカッターをすべ
らすようにゆっくりと滑らかに、髪の生
え際に沿って動かします。
頭の 輪 郭に沿って楽に動 かせ るよう
7
に、回転ヘッドの向きを調整します。
Page 17
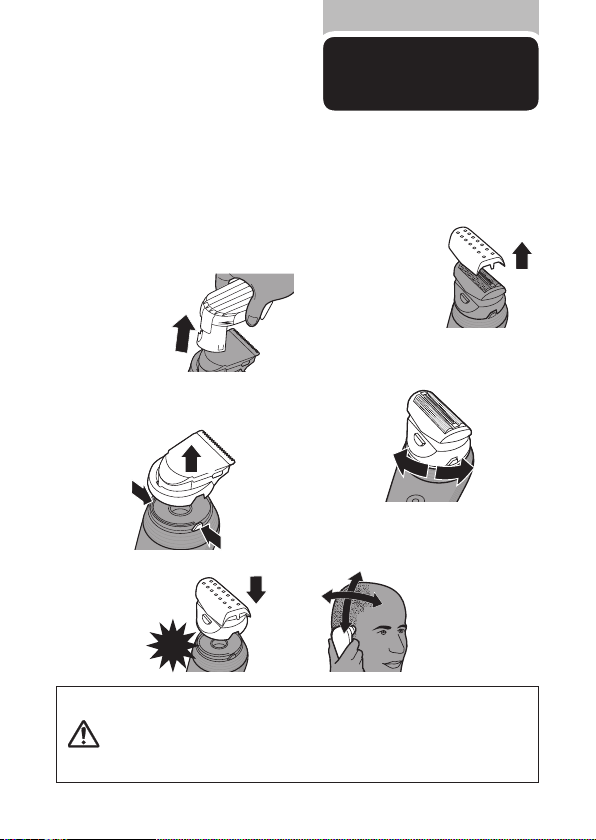
ヘアーシェービング
の仕方
シェービングがしやすいのは、髪 の毛の長さが
ヘアートリミングヘッドの刃で事前に短くカットすることをお勧めします。(
外してカットする」の項をお読みください。)
ヘアーカッターの電源スイッチを
1
します。
コームをヘアー
2
トリミングヘッド
から引き抜いて
取り外します。
左右の解除ボタンを同時に押し(図❶)
3
ヘアートリミング
抜きます(図❷)。
ヘア ー シェービ
4
ングヘッドを本体
に差し込みます。
ヘッドを本体から引き
❷
カチッ
●ヘアーシェービングヘッドは非常に精巧な部品のため、取扱いには充分ご
注意ください。
●シェービング前に、必ずヘアーシェービングヘッドが本体にきちんと装着さ
注意
れているか確認してください。
●網刃は常に皮膚に密着するようにシェービングしてください。
●頭髪以外のシェービングはしないでください。
に
OFF
❶
未満の場合です。
1mm
ヘアー シェービ
5
ング ヘッド から
保護 キャップを
取り外します。
シェービングしやすいように回転ヘッド
6
の角度を調整します。
電源スイッチをON(2秒以上長押し)
7
にし、皮 膚 に 沿って 軽く押 し当 て て
シェービングします。
※ヘアーシェービングヘッ
ドを皮膚に強く押し当て
く剃れず皮膚を傷つける
以上の場合は、
1mm
「コームを取り
P.15
ないでください。皮 膚に
強く押し当てると、上 手
恐れがあります。
16
Page 18
17
本製品 は防水 加工をしていますが、本体
お手入れ方法
●圧縮空気、研磨パッド、研磨洗浄剤、ペトロールやアセトンなどの刺激性
注意
部品の取り替え
ヘッドやコーム、刃、網刃が破損・摩耗した場合は、必ずフィリップス社製の同型部品とお取り替えく
ださい。(メーカー保証の対象外です。有償となります。)
の強い液体は絶対に使わないでください。
●本製品に潤滑剤を使う必要はありません。
●充電アダプタは絶対に濡らさないでください。
を水の中に浸さないでください。
※
本製品はご使用のたびに掃除をしてください。
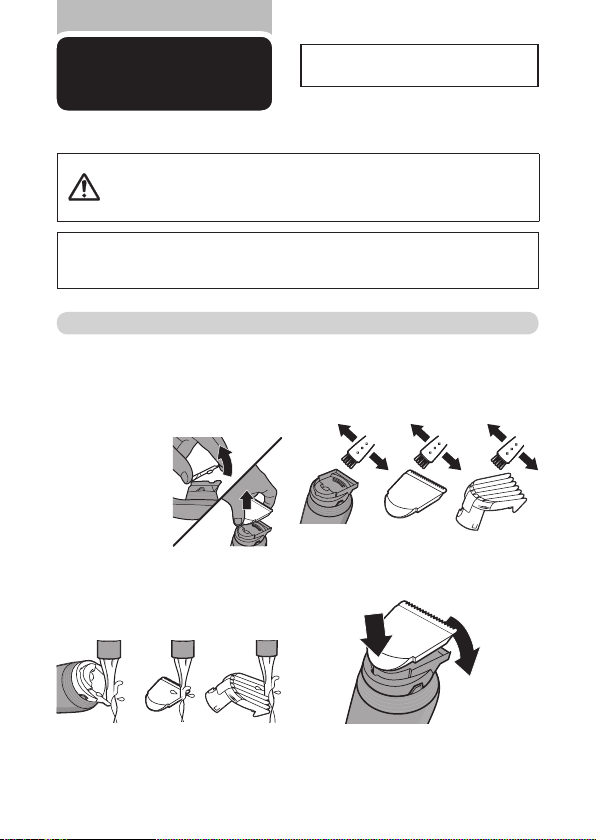
ヘアートリミングヘッド、コームのお手入れ
掃除をする前に、電源スイッチが
1
になっていることを確かめてください。
コームを取り外します。
2
刃を親指で押さ
3
えな がら人 差し
指で開け(図 ❶)
ヘアートリミング
ヘッドから取り外
します(図❷)。
ぬる ま 湯(40℃前 後 )ま た は 水 で ヘ
4
アートリミングヘッド、刃、コームをそれ
ぞれ洗います。
[
ヘアートリミングヘッド
]
❷
[刃]
OFF
❶
[コーム]
細かい部分は、各部品が充分に乾いて
5
からクリーニングブラシで掃除します。
ヘアートリミングヘッド
[
6
]
[刃]
刃のツメ部分をヘアートリミングヘッドの
溝に合わせ(図❶)取り付けます(図❷)。
❶
[コーム]
❷
※本体水 洗いの場 合はヘアートリミングヘッド受け
をつけた状態で水洗いしてください。
※水洗い後は、刃を開いた状態で完全に乾燥させてからご使用ください。生乾きのままご使用になりますと、臭 い
のもととなるだけでなく、故障の原因となります。
Page 19
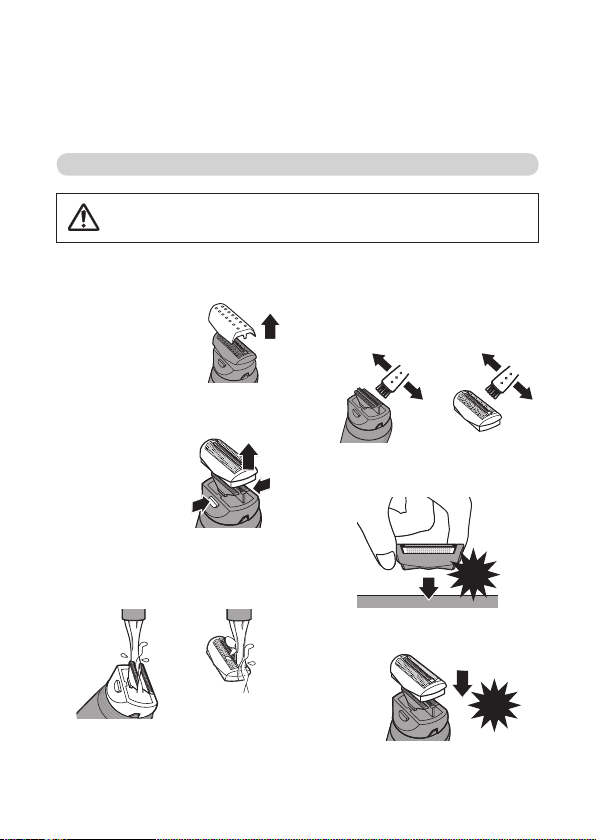
ヘアーシェービングヘッドのお手入れ
●ヘアーシェービングヘッドは非常に精巧な部品のため、取扱いには充分
注意
ご注意ください。
掃除をする前に、電源スイッチが
1
になっていることを確かめてください。
保護キャップを取り外
2
します。
ヘアーシェービングヘッドの網刃解除
3
ボタンを
つ同時に押し(図❶)網刃を
2
取り外します(
※網 刃 解 除ボ タン
は、本体にある解
除ボタンとは異な
ります。
ぬる ま 湯(40℃前 後 )ま た は 水 で ヘ
4
アーシェービングヘッドと網刃をそれ
ぞれ洗います。
[ヘアーシェービングヘッド]
※本体水洗い の場合はヘアーシェービングヘッド受
けをつけた状態で水洗いしてください。
※水洗い後は、網刃を取り外した状態で完全に乾燥させてからご使用ください。生乾きのままご使用になりますと、
臭いのもととなるだけでなく、故障の原因となります。
図
❷)。
❶
OFF
❷
[網刃]
細かい部分は、各部品が充分に乾いて
5
からクリーニングブラシで掃除します。
※網刃は 外側のみ をクリーニングブラシで掃
除します。
[ヘアーシェービングヘッド]
網刃の内側についた毛は、網刃の底を平
6
らな面の上で軽く叩いて取り除きます。
網刃をヘアーシェービングヘッドに取
7
り付けます。
18
[網刃]
トン
トン
カチッ
Page 20
19
ヘアーシェービングヘッド、ヘアートリ
刃の交換
部品の取り替え
網刃や内刃が 破損した場合や切れ味が落ちた場 合は、お 買い上げの 販売店または小泉 成器部品
センターで取扱いしているフィリップス社製の同型部品をご注文後、交換してください。(メーカー
保証の対象外です。有償となります。)
ミングヘッド、トリマーは保証対象外と
なります。
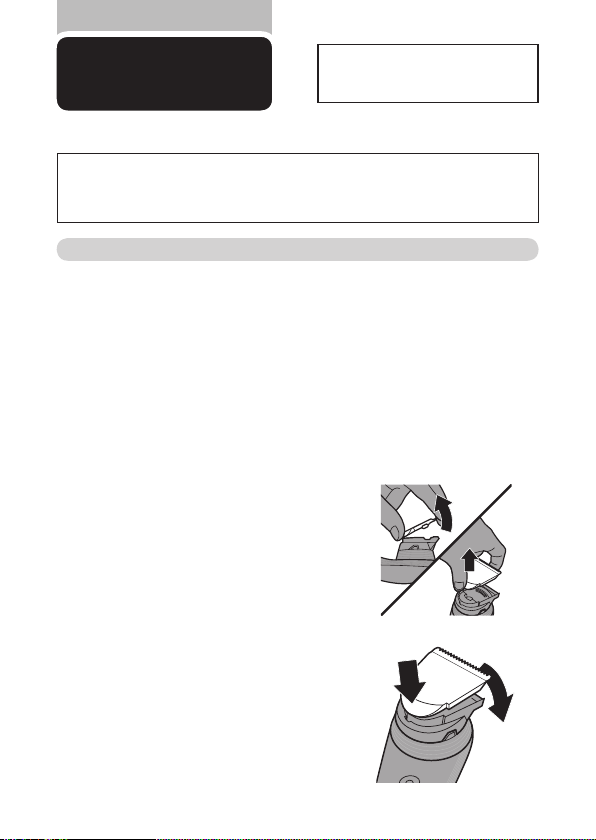
ヘアートリミングヘッドの刃の交換
・ヘアートリミングヘッドの刃の交換時期は、1回約30分、月2回の使用で約5年が目安ですが、
使用時間・使用回数により異なります。
掃除をする前に、電源スイッチが
1
ることを確かめてください。
コームを取り外します。
2
刃を親指で押さえながら人差し指で開け(図❶)
3
ヘアートリミングヘッドから取り外します(
新しい刃のツメ部分をヘアートリミングヘッドの
4
溝に合わせ(
図
❶)取り付けます(図❷)。
OFF
になってい
図
❷)。
❶
❷
❶
❷
Page 21
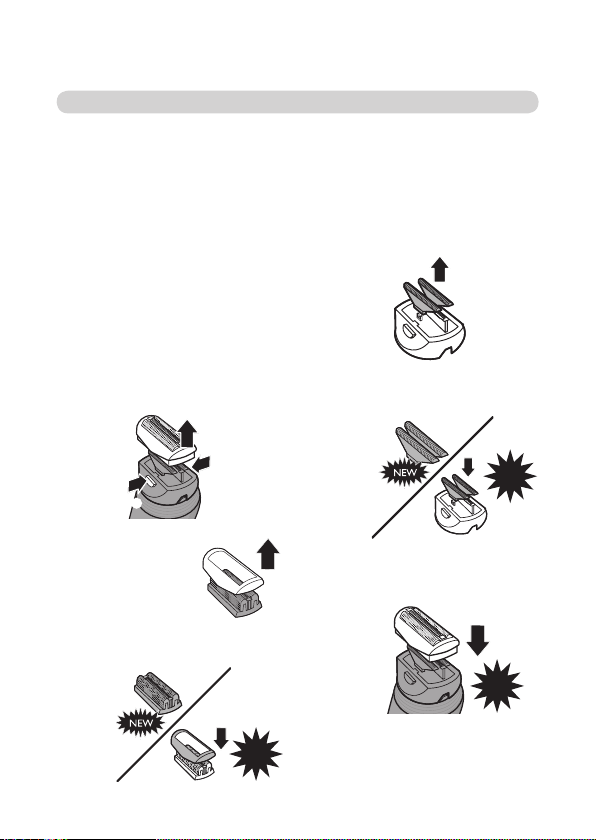
ヘアーシェービングヘッドの刃の交換
・交換は網刃と内刃を同時に交換してください。
・ヘアーシェービングヘッドの刃の交換時期は、毎日
週
回使用の場合:約1年が目安ですが、使用時間・使用回数により異なります。
1
・ヘアーシェービングヘッドの刃と網刃フレームは別となりますので、お使いの 網刃フレーム
をお使いください。
分使用の場合:2~3ヵ月、1回20分、
20
交換をする前に、電源スイッチが
1
になっていることを確かめてください。
保護キャップを取り外します。
2
ヘアーシェービングヘッドの網刃解除ボ
3
タンを
つ同時に押し(図❶)網刃を取り
2
外します(
図
※網刃解除ボタンは、本体にある解除ボタンと
使用済みの網刃からフ
4
レームを取り外します。
フレームを新しい網刃に取り付けます。
5
❷)。
は異なります。
❷
❶
カチッ
OFF
使用済みの内刃を取り外します。
6
新しい内刃をヘアーシェービングヘッ
7
ドに取り付けます。
網刃をヘアーシェービングヘッドに取
8
り付けます。
20
カチッ
カチッ
Page 22
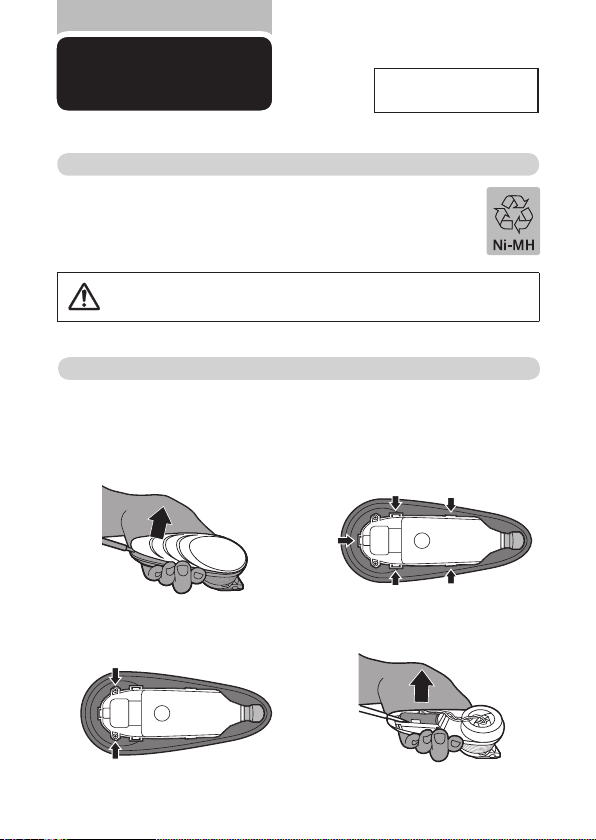
製品を
廃棄するとき
ニッケル水素電池のリサイクルについて
本製品はニッケル水素電池を使用しています。
ニッケル水素電池はリサイクル可能な貴重な資源です。
ご使用済みの製品の廃棄に際しては、ニッケル水素 電池を取り出し、
各自治体の処理方法に従い、リサイクル協力店にお持ちください。
●製品を廃棄するとき以外は、絶対に本体を分解しないでください。
注意
●本体内部の金具は鋭いので、ご注意ください。
充電池の取り外し方
スイッチをON(2秒以上長押し)にして、完全に動作しなくなるまで充電池を放電させてから、
行ってください。
※ お客様による充電池の
修理交換はできません。
本体の上部カバーにドライバーをこじ
1
入れ、取り外します。
ミニマイナスドライバーを使い2本のね
2
じを外します。
充電池ホルダーにある5つのツメを外
3
し、充電池ホルダーを開けます。
充電池 を持ち 上げて工 具でワイヤー
4
を切断し、充電池を取り出します。
※充電池を取り外した後は、通電しないでください。
21
Page 23
ENGLISH QC5580, QC5570
1
7
8
9
10
11
12
14
13
2
3
4
5
6
22
Page 24

ENGLISH
Introduction
Congratulations on your purchase and welcome
to Philips! To fully benet from the support that
Philips offers, register your product at www.philips.
com/welcome.
Your new Philips hair clipper with new ergonomic
design and 180° adjustable cutting element allows
you to clip your own hair easily. You can move
the clipper over all areas of your head as easily as
running your ngers through your hair. To enjoy using
the hair clipper, we advise you to read the following
information.
General description (Fig. 1)
1 Cutting element
2 Swivel head
3 Length setting adjustment ring
4 On/off button
5 Socket for small plug
6 Charging lights
7 Regular comb attachment
8 Length setting indicator
9 Precision comb attachment
10 Protection cap of shaving head (only QC5580)
11 Shaving head with retaining frame and shaving
foil (only QC5580)
12 Adapter
13 Cleaning brush
14 Storage pouch (only QC5580)
Important
Read this user manual carefully before you use the
appliance and save it for future reference.
23
Page 25

ENGLISH
Danger
Make sure the adapter does not get wet. -
Warning
The adapter contains a transformer. Do not cut off the adapter to replace it with another plug, as
this causes a hazardous situation.
This appliance is not intended for use by persons (including children) with reduced physical, sensory
or mental capabilities, or lack of experience
and knowledge, unless they have been given
supervision or instruction concerning use of the
appliance by a person responsible for their safety.
Keep the appliance and its cord out of the reach of children.
Caution
Do not use the appliance in the bath or in the shower.
Use, charge and store the appliance at a temperature between 5°C and 35°C.
Only use the adapter supplied to charge the appliance.
If the adapter is damaged, always have it replaced with one of the original type in order to avoid a
hazard.
Do not use the appliance when the shaving head, the cutting element or one of the comb
attachments is damaged or broken, as this may
cause injury.
This appliance is only intended for clipping human scalp hair. Do not use it for any other purpose.
If the appliance is subjected to a major change in temperature, pressure or humidity, let the
appliance acclimatise for 30 minutes before you
use it.
24
Page 26
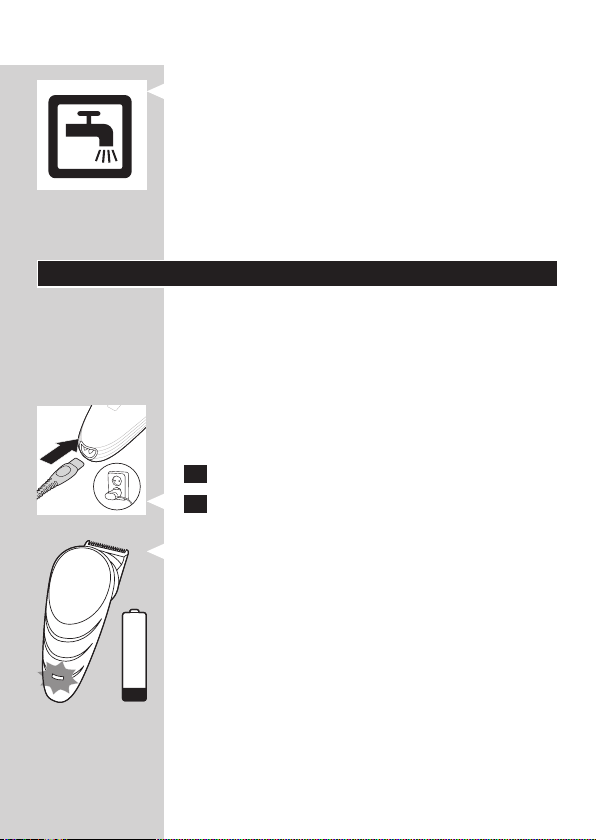
ENGLISH
Compliance with standards
- The appliance complies with the internationally
approved IEC safety regulations and can be safely
cleaned under the tap.
This Philips appliance complies with all standards -
regarding electromagnetic elds (EMF). If handled
properly and according to the instructions in this
user manual, the appliance is safe to use based on
scientic evidence available today.
Charging
Charge the appliance for at least 1 hour before you
use it for the rst time or after a long period of
non-use.
When the appliance is fully charged, it has a cordless
clipping time of up to 1 hour.
When the charging light ashes orange, the batter y
is running low (approx. 10 minutes of operating time
left) and you need to charge the appliance.
1 Make sure the appliance is switched off.
2 Insert the appliance plug into the appliance and
insert the adapter into the wall socket.
, The charging light starts to ash white to
indicate that the appliance is charging.
When the battery is fully charged, the charging ,
light lights up white continuously.
After approx. 30 minutes the charging light goes ,
out to save energy.
Optimising the lifetime of the rechargeable
battery
Discharge the rechargeable battery completely twice
a year by letting the motor run until it stops. Then
fully recharge the battery.
25
Page 27
– 3 mm
–
– 7
–
– 11
–
– 3 mm
–
– 7
– 11
–
ENGLISH
Corded clipping
1 Switch off the appliance.
2 Connect the appliance to the mains and wait a
few seconds before you switch it on.
Note: If the battery is completely empty, wait a few
minutes before you switch on the appliance.
Using the appliance
Make sure your hair is clean and dry. Do not use the
appliance on freshly washed hair.
Preparing for hair clipping
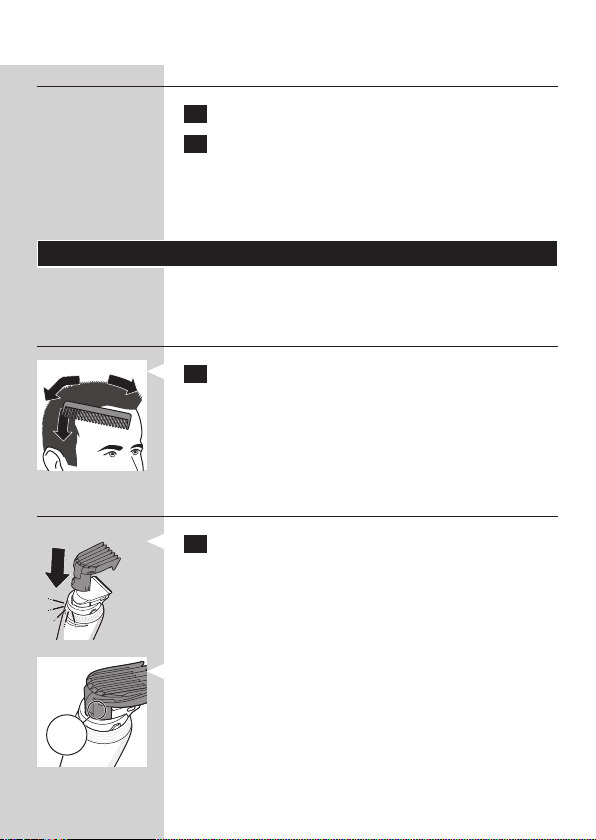
1 Comb your hair with a styling comb in the
direction of hair growth.
Clipping with comb attachment
1 Insert the edge of the comb attachment into
the swivel head.
Make sure the comb attachment locks into position
properly
Note: The length settings are indicated on the comb
attachment.
26
Page 28
– 5
– 7
– 9
– 11
– 15
7
5
2
1
45º
180º
90º
0º
45º
90º
ENGLISH
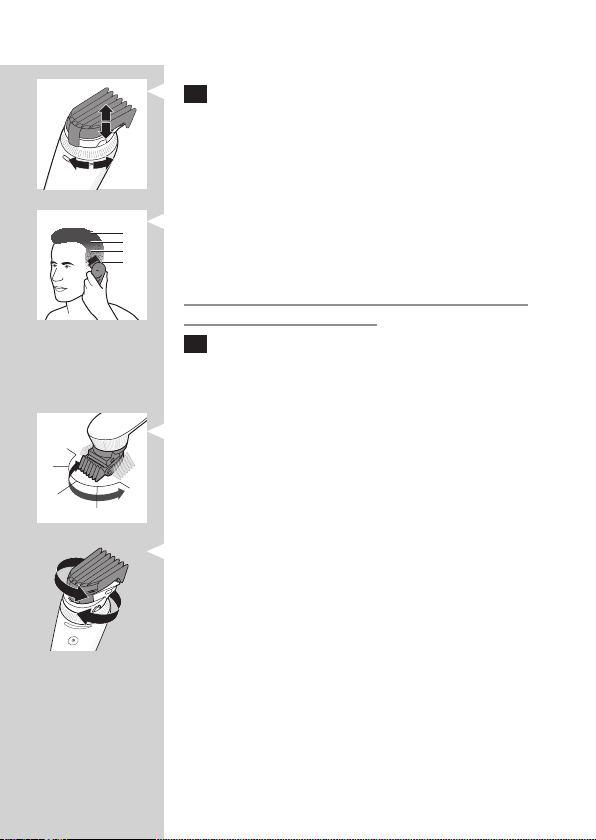
2 Turn the length setting adjustment ring to set
the comb attachment to the desired setting.
The arrowhead on the appliance indicates which ,
setting you have selected.
Tip: Use different settings to create a natural and
smooth transition between the various hair lengths
from your neckline to the top of your head.
Do not turn the length setting adjustment ring
beyond the highest setting.
3 Turn the swivel head to the position that is
most comfortable for your arm when you clip
the different parts of your head.
Using the swivel head
- From its starting position of 0° (pointing
forwards), you can turn the swivel head 45° or
90° to the left or right. This enables you to adjust
the position of the cutting element to the part
of your head that you are clipping. This makes it
much easier to clip your own hair.
- To set the cutting element to the desired position,
turn the swivel head (‘click’).
Note: Always adjust the position of the cutting element
by turning the swivel head. Do not turn the cutting
element or the comb attachment.
Note: Do not turn the swivel head more than 90° to
the left or right.
27
Page 29
ENGLISH
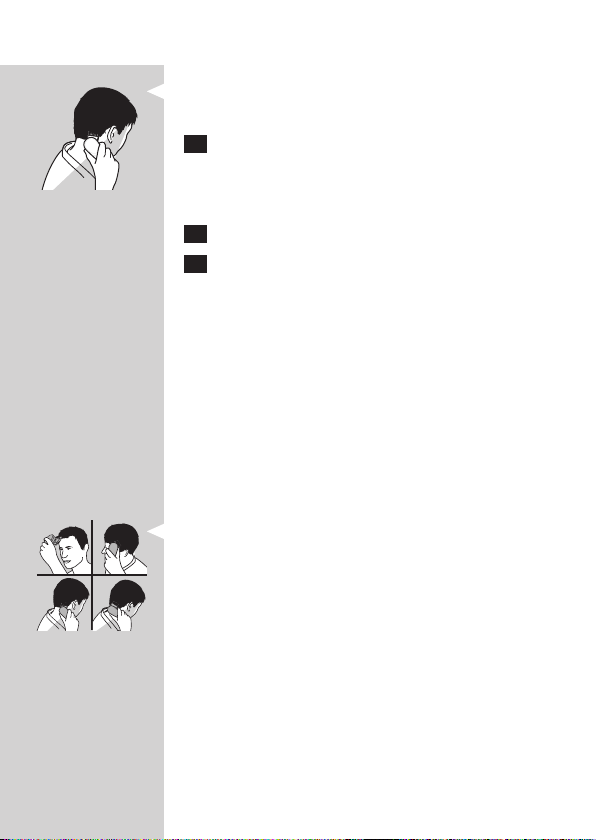
- The swivel head allows you to hold and use the
appliance like a styling comb.
4 Press the on/off button to switch on the
appliance.
QC5570: Press the button briey.
QC5580: Press the button more than 2 seconds.
5 Move the clipper through the hair slowly.
6 Regularly remove cut hair from the comb
attachment.
If a lot of hair has accumulated in the comb
attachment, remove the comb attachment from
the appliance and blow and/or shake the hair out
of it. When you remove the comb attachment, the
selected setting does not change.
Tips
We advise you to star t clipping at the highest setting of the regular comb attachment and to
reduce the setting gradually.
To clip most effectively, move the appliance against the hair growth direction.
- Since all hair does not grow in the same direction,
you need to move the appliance in different
directions (upwards, downwards and across).
Make sure that the at part of the comb attachment is always fully in contact with the scalp
to obtain an even result
Write down the settings you use to create a certain hairstyle as a reminder for future clipping
sessions.
28
Page 30
– 5
– 7
– 9
– 11
– 15
ENGLISH
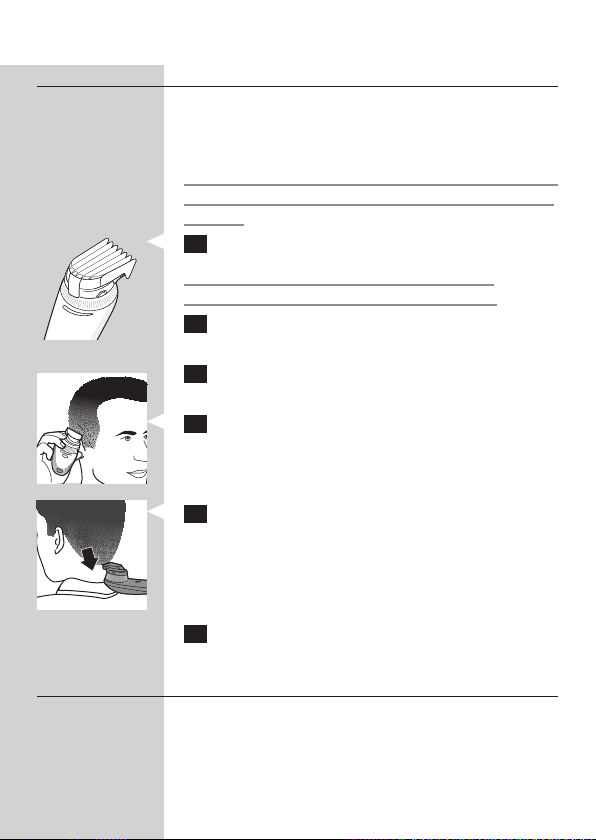
Contouring without comb attachment
You can use the appliance without comb attachment
to clip your hair very close to the skin (0,5mm) or to
contour the neckline and the area around the ears.
Be careful when you clip without comb attachment
because the cutting element removes every hair it
touches.
1 Pull the comb attachment off the swivel head.
Never pull at the exible top of the comb
attachment. Always pull at the bottom part.
2 Comb the hair ends over the ears before you
start to contour the hairline.
3 Press the on/off button to switch on the
appliance.
4 When you shape the contours around the ears,
tilt the appliance in such a way that only one
edge of the cutting element touches the hair
ends.
5 To contour the neckline and the sideburns,
turn the appliance and make downward
strokes.
Note: Move the appliance slowly and smoothly. Just
follow the natural hairline.
6 Adjust the position of the swivel head to make
contouring easier.
Shaving
Tip: Shaving is easier when the hairs are shorter
than 1mm. If the hairs are longer than 1mm, we
recommend that you use the cutting element without
29
Page 31
2
1
ENGLISH
the comb attachment to pre-cut hairs to the shortest
setting.
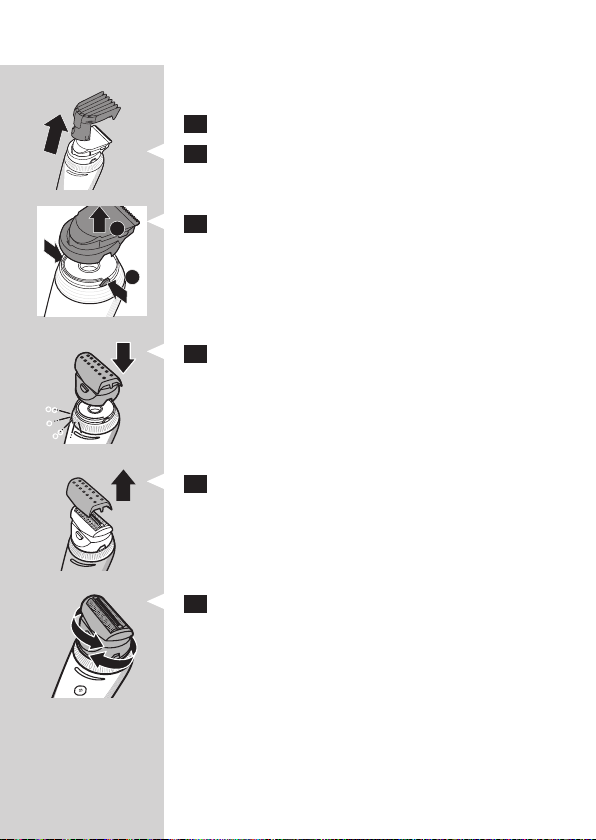
1 Switch off the appliance.
2 Pull the comb attachment off the swivel head.
3 Press the release buttons (1) and remove the
cutting unit from the handle (2).
4 Attach the shaving head by pressing it onto the
appliance (‘click’).
Make sure that the shaving head locks into position
properly.
5 Remove the protection cap from the shaving
head.
6 Adjust the position of the swivel head to make
shaving easier. You can do this before and/or
during use.
30
Page 32
1
2
ENGLISH
7 Place the shaving head on your scalp and start
shaving.
Press the shaving head onto your scalp lightly.
Note: Make sure that the shaving foil is always in full
contact with your scalp.
Cleaning and maintenance
Clean the appliance every time you have used it by
rinsing it under the tap or with the cleaning brush
supplied.
Never use compressed air, scouring pads, abrasive
cleaning agents or aggressive liquids such as petrol,
acetone or ethereal oils to clean the appliance.
Be careful that the cutting element does not fall on
the oor.
Cleaning the cutting element and comb
attachments
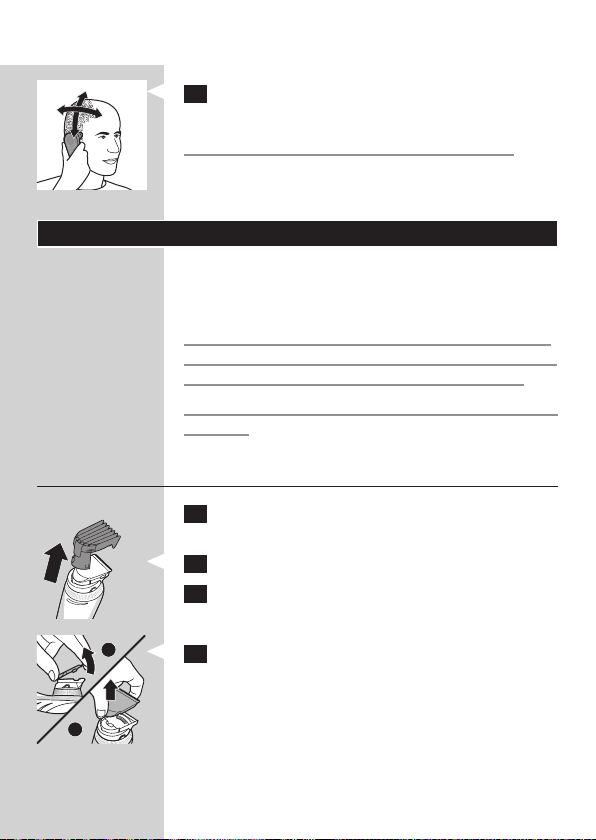
1 Switch off the appliance and disconnect it from
the mains.
2 Remove the comb attachment.
3 Rinse the comb attachment under the tap or
clean it with the cleaning brush supplied.
4 Place your thumb in the center of the round
side of the cutting element and your index
nger on the teeth of the cutting element
(1). Use your index nger to lift the cutting
element from the swivel head (2).
31
Page 33
1
2
ENGLISH
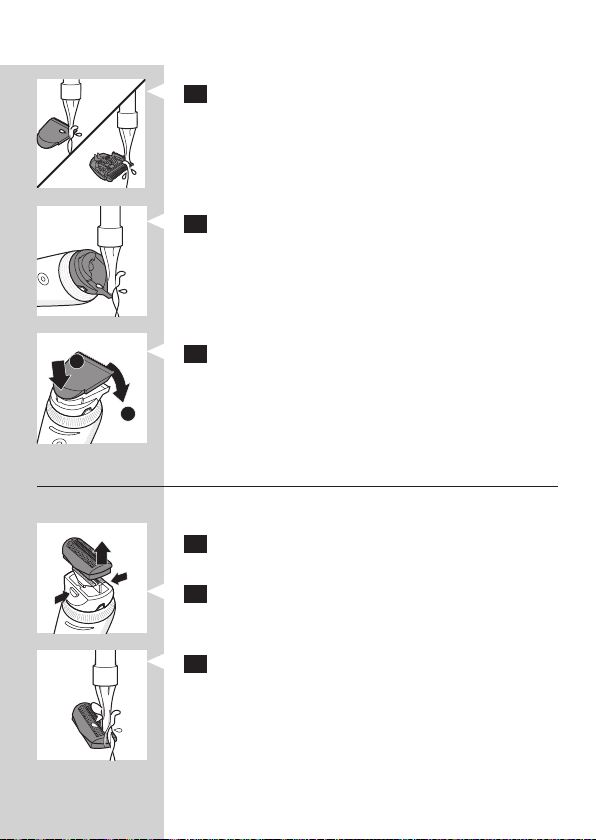
5 Rinse the cutting element under the tap or
clean it with the cleaning brush supplied.
6 Rinse the inside of the appliance under the tap
or clean it with the cleaning brush supplied.
7 Insert the lug of the cutting element into the
slot (1) and push the cutting element back
onto the swivel head (2).
Cleaning the shaving head
Note: Regulary check the shaving foil for cracks.
1 Switch off the appliance and disconnect it from
the mains.
2 Press the release buttons on the shaving
head (1) and remove the shaving foil from the
shaving head (2).
3 Rinse the shaving head and shaving foil under
the tap.
Note: To clean the shaving head with the cleaning
brush, brush the inside and outside of the shaving head
and the outside of the shaving foil. To remove cut hairs
32
Page 34

ENGLISH
from the inside of the shaving foil, tap the bottom of
the shaving foil gently on a at surface.
33
Page 35
ENGLISH
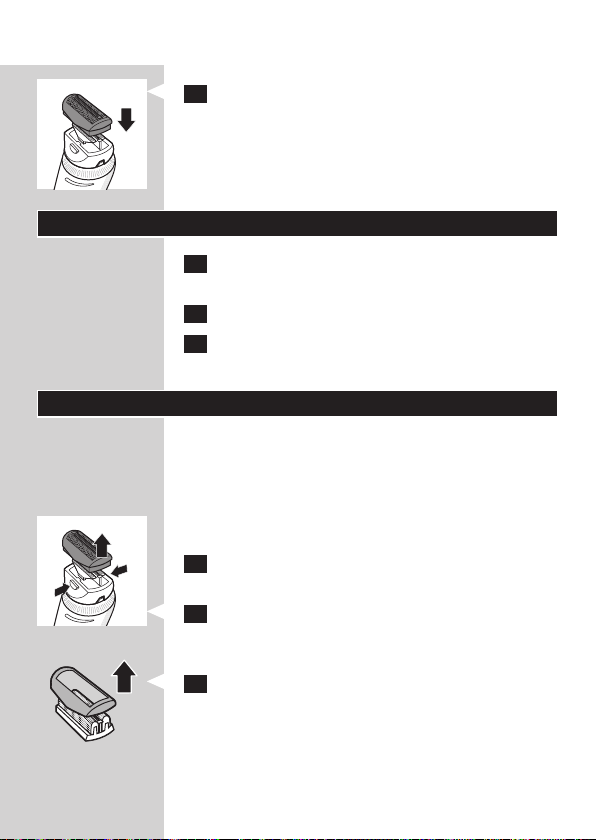
4 Press the shaving foil back into the shaving
head.
Storage
1 Switch off the appliance and disconnect it from
the mains.
2 Put the protection cap on the shaving head.
3 Store the appliance and its accessories in the
storage pouch supplied.
Replacement
Only replace a worn or damaged cutting element
with an original Philips cutting element, available from
authorised Philips service centres.
For an optimal shaving result, replace the shaving foil
and shaving cutter once a year.
To replace the shaving foil and shaving cutter:
1 Switch off the appliance and disconnect it from
the mains.
2 Press the release buttons on the shaving head
and remove the shaving foil from the shaving
head.
3 Remove the retaining frame from the old
shaving foil.
34
Page 36
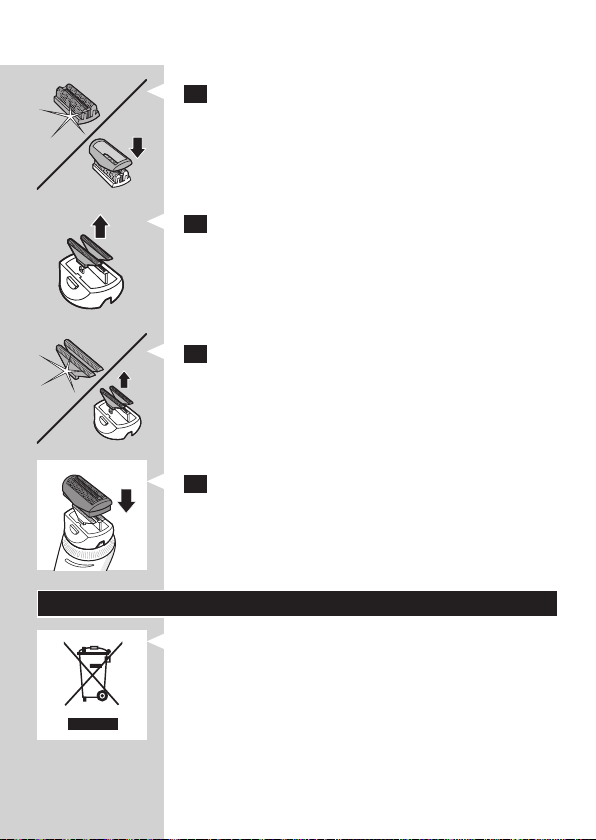
ENGLISH
4 Place the retaining frame on the new shaving
foil.
5 Remove the old shaving cutters.
6 Place the new cutters on the shaving head
(‘click’).
7 Press the shaving foil back into the shaving
head.
Environment
- Do not throw away the appliance with the normal
household waste at the end of its life, but hand
it in at an ofcial collection point for recycling. By
doing this, you help to preserve the environment.
35
Page 37
ENGLISH
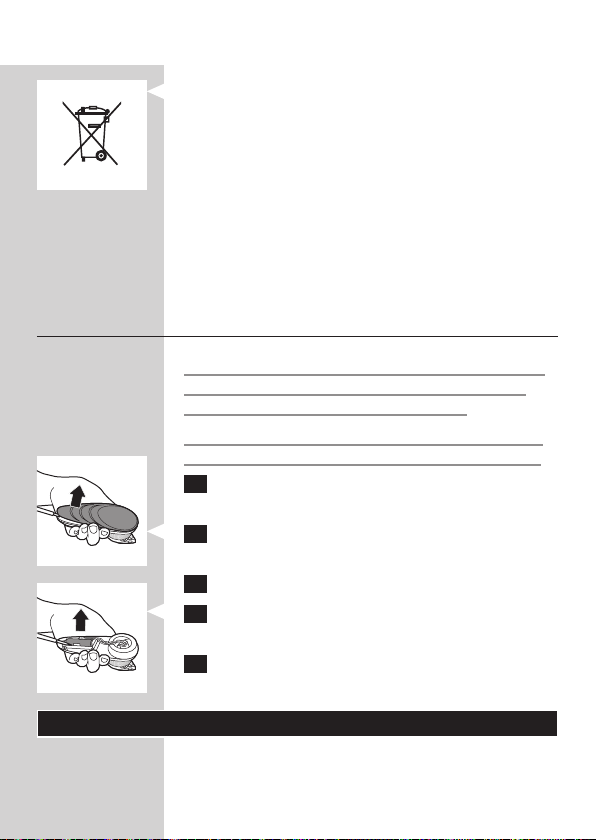
- The built-in rechargeable battery contains
substances that may pollute the environment.
Always remove the battery before you discard
and hand in the appliance at an ofcial collection
point. Dispose of the batter y at an ofcial
collection point for batteries. If you have trouble
removing the battery, you can also take the
appliance to a Philips service centre. The staff of
this centre will remove the battery for you and
will dispose of them in an environmentally safe
way.
Removing the rechargeable battery
Only remove the rechargeable battery when you
discard the appliance. Make sure the battery is
completely empty when you remove it.
Do not connect the appliance to the mains again
after you have removed the rechargeable battery.
1 Disconnect the appliance from the mains and
let the appliance run until the motor stops.
2 Remove the upper housing part of the
appliance.
3 Open the inner body with a screwdriver.
4 Use a screwdriver to remove the rechargeable
battery from the appliance.
5 Cut the wires with a pair of household
scissors.
Guarantee and service
If you need service or information or if you have a
problem, please visit the Philips website at www.
36
Page 38

ENGLISH
philips.com/support or contact the Philips
Consumer Care Centre in your country. You nd its
phone number in the worldwide guarantee leaet. If
there is no Consumer Care Centre in your country,
go to your local Philips dealer.
37
Page 39

38
Page 40
39
故障かな?
と思ったら
故障かな?と思ったら、
お調べください。
充電しても使用時間が極端に短い
▶刃の掃除はしていますか?
▶本製品が完全に止まるまで作動させてからもう一度約
▶それでも改善されないときは、充電池の寿命です。
時間充電してください。
1
だんだん切れ味が悪くなった
▶刃が損傷または摩耗していませんか?
ヘアートリミングヘッドの刃の交換時期は、1回約30分、月2回の使用で約5年が目安ですが、使
用時間・使用回数により異なります。
ヘアーシェービングヘッドの刃の交換時期は、、毎日
回使用の場合:約1年が目安ですが、使用時間・使用回数により異なります。
1
分使用の場合:2〜3ヵ月、1回20分、週
20
スイッチを押しても作動しない
▶刃の掃除はしていますか?
▶充電はされていますか?
約1時間、充電をしてください。
▶刃と本体が正しくセットされていますか?
異常な音がする
▶刃に傷が付いていませんか?
▶刃が正しくセットされていますか?
充電できない
▶充電アダプタの電源コードが断線していませんか?
新しい充電アダプタをお買い求めください。
▶充電アダプタの電源プラグ部はコンセントにきちんと差し込まれていますか?
本体の電源コネクタ受部に充電アダプタのコネクタ部がきちんと差し込まれていますか? 確認し
てください。
▶スイッチがONの状態で充電していませんか?
充電する際にはスイッチを必ず
にしてから充電してください。
OFF
以上の点検により、正常な状態に戻らない場合は、
お買い求めの販売店か小泉成器修理センターへお問い合わせ願います。
Page 41
保証書と修理サービスについて
(必ずお読みください)
保証と
アフターサービス
〈保証書・最終ページに付属〉
● 保証書は、必ず「お買い上げ日・販売店名」等の記入
をお確かめのうえ、販売店から受け取っていただき
内容をよくお読みのあと大切に保管してください。
【補修用性能部品の最低保有期間】
● 補修用性能部品の最低保有期間は製造打ち切り後6年です。
性能部品とは、その製品の機能を維持するために必要な部品です。
●
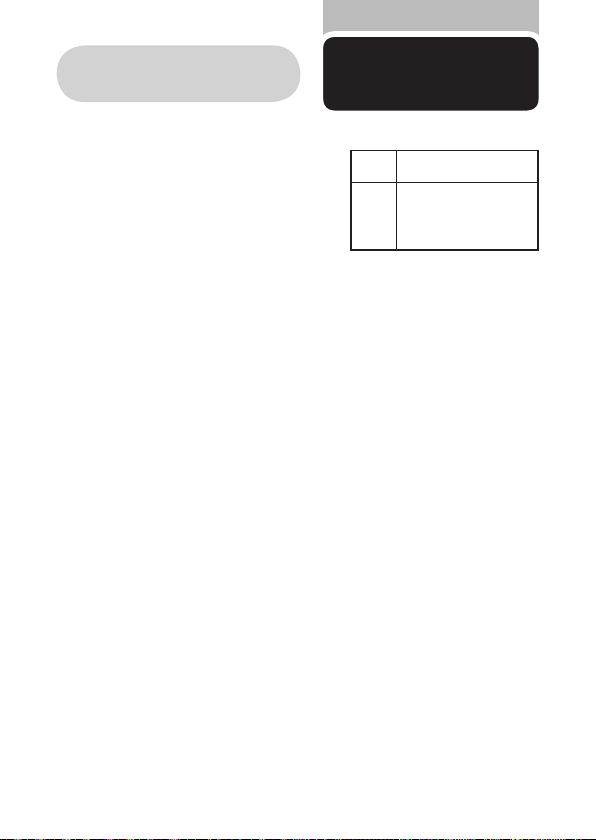
保証
お買い上げ日から
期間
本体(刃・ヘアートリミングヘッ
ド・ヘアーシェービングヘッド・
対象
レギュラーコーム・細部コーム・
部分
保護キャップ・収納ポー チ・ク
リーニングブラシを除く)
年間
2
【ご不明な点や修理に関するご相談は】
● 修理に関するご相談ならびにご不明な点は、お買い上げの販売店または、
小泉成器修理センターにお問い合わせください。
【修理を依頼されるときは】
● 修理をご依頼される前に、この取扱説明書をよくお読みいただき、再度点検ください。
尚、異常のあるときはご使用を中止し、お買い上げの販売店へご依頼ください。
【保証期間中は】
● 製品に保証書を添えてお買い上げの販売店にご持参ください。
保証書の記載内容により無料修理いたします。
【保証期間が過ぎているときは】
● 修理によって商品の機能が維持できる場合は、補修 用性能部 品の保有 期間内であれば、
ご希望により有料で修理させていただきます。
【海外での本製品の保証及びアフターサービスについて】
● 本製品の保証は海外においても有効です。(同シリーズ製品の取り扱いがある国に限ります)
日本国以外のフィリップスサービス部門においても保証期間内及び保証期間の経過後の
●
アフターサービスを受けることができますが、この場合多少日数を要することもあります。
海外にてアフターサービスを受けられる場合は、現地のフィリップスサービス部門に
●
お問い合わせください。尚、お困りの点がございましたら下記までご連絡ください。
Philips Consumer Lifestyle Service Department P.O.Box 20100 9200 CA DRACHTEN
The Netherlands Fax:+3
1 51 259 2785
【お客様の個人情報のお取り扱いについて】
● お受けしましたお客様の個人情報は、株式会社フィリップスエレクトロニクスジャパンのホー
ムページ
http://www.philips.co.jp/
いての当社の方針」に基づき適切に管理いたします。
に掲載されている「お客様の個人情報の取り扱いにつ
40
Page 42
41
便 利 メ モ
お買い上げ日 年
月
日
お買い上げ
店名
ご使用の時、このような症状はありませんか?
●本体にさわると時々電気を感じる。
●こげくさい臭いがする。
●電源コード部を動かすと通電したり、しなかったりする。
●その他の異常、故障がある。
このような症状の 時は、故障や事故 防止のため、スイッチを切り、充
電アダプタをコンセントから外して、必ず販売店にご相談ください。
仕 様
TEL.
( )
品 番
電 源 方 式 充電交流式(専用充電アダプタ使用)
消 費 電 力 交流使用時:
定 格 電 圧
本 体 質 量
充 電 時 間 約
※改良の為、仕様を予告なく変更することがあります。
フィリップス製品の修理受付はお買い上げの
●
販売店にお申し出ください。
修理サービス等についておわかりにならない
●
ことは、下記にお問い合わせください。
製品に関するお問い合わせ:
フィリップスお客様情報センター
修理に関するお問い合わせ:
小泉成器修理センター
部品に関するお問い合わせ:
小泉成器部品センター
■ ナビダイヤルにかからない時は
小泉成器東日本修理センター
小泉成器西日本修理センター
TEL 048(718)3340 〒344-0127
TEL 06(6613)3145 〒559-0033
ホーム ページ アドレス
ナビダイヤル
(全国共通番号)
ナビダイヤル
(全国共通番号)
ナビダイヤル
(全国共通番号)
受付時間:平日9:00〜17:30(土・日・祝日・夏期休暇・年末年始を除く)
ht tp :/ /w ww.phi li ps .c o.jp /
QC5580
1.6W
AC100-240V(50/60Hz
(本体のみ)
180g
時間
1
フィリップス
コンシューマー
0570(07)6666
0570(09)8888
0570(09)2222
埼玉県春日部市水角
大阪市住之江区南港中1丁目3番98号
充電時:
4.1W
)
ライフスタイル事業部
06(6261)8230
1190
Page 43

無料修理規定
〈無料修理規定〉
取扱説明書、本体貼付ラベル等の注意書に従った正常な使用状態で保証期間
1.
内に故障した場合には、無料修理します。
保証期間内に故障して無料修理をお受けになる場合には、商品と保証書をご
2.
持参、ご提示のうえ、お買い上げの販売店にご依頼ください。なお、商品を直接
メーカーへ送付した場合の送料等はお客様の負担となります。
ご贈答、ご転居でお買い上げの 販売 店に修理を依頼できない場合は、小泉
3.
成器修理センターにご依頼ください。
保証期間内でも次の場合には有料修理になります。
4.
1
使用上の誤り及び不当な修理や改造による故障及び損傷。
○
2
お買い上げ後の輸送、移動、落下等による故障及び損傷。
○
3
火災、地震、水害、落雷、その他の天災地変、公害や異常電圧による故障及び損傷。
○
4
一般家庭以外(例えば、業務用の長時間使用)に使用された場合の故障及び損傷。
○
5
保証書の提示がない場合。
○
6
保証書にお買い上げ年月日、お客様名、販売店名の記入のない場合、或は字句を書き
○
換えられた場合。
※保証書は、本書に明示した条件のもとにおいて無料修理をお約束するもの
です。従って保証書を発行している者(保証責任者)、及びそれ以外の事業者
に対するお客様の法律上の権利を制限するものではありません。
保証期間経過後の修理についてご不明の場合は、お買い上げの販売店または
小泉成器修理センターにお問い合わせください。
※保証期間経過後の修理・補修用性能部品の保有期間について詳しくは取扱
説明書の保証とアフターサービスの項目をご覧ください。
※お客様にご記入いただいた個人情報(保証書の控え)は保証期間内のサービス
活動及びその後の安全点検活動のために利用させていただく場合がございま
す。ご了承ください。また個人情報は、株式会社フィリップスエレクトロニクス
ジャパンのホームページ
http://www.philips.co.jp/
客様の個人情報の取り扱いについての当社の方針」に基づき適切に管理い
たします。
に掲載されている「お
42
Page 44
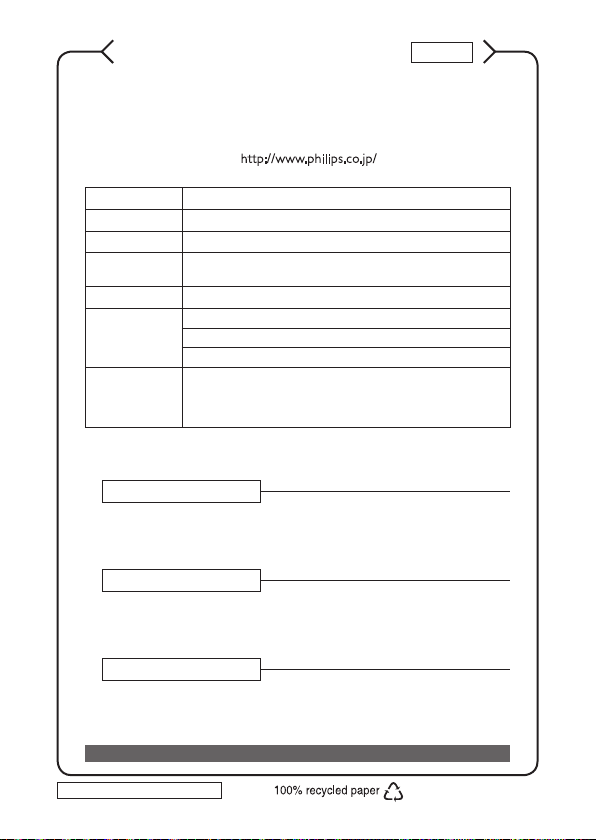
フィリップス ヘアーカッター 保証書
持込修理
C E R T I FI C AT E OF P UR C HA S E
この保証書は、「無料修理規定」記載内容で無料修理を行うことをお約束するものです。
お買い上げの日から下記期間中に故障が発生した場合は、本書をご提示のうえ、お買い
上げの販売店に修理をご依頼ください。
お客様にご記入いただいた個人情報(保証書の控え)は、株式会社フィリップスエレクトロ
ニクスジャパンのホームページ
の個人情報の取り扱いについての当社の方針」に基づき適切に管理いたします。
htt p:/ /www.p hilips.c o.j p/
に掲載されている「お客様
品 名 ヘアーカッター
品 番
QC5580
保 証 期 間 お買い上げ日より2年
対 象 部 分
お 買 い 上 げ 日
お 客 様
本体(刃・ヘアートリミングヘッド・ヘアーシェービングヘッド・レギュラーコー
ム・細部コーム・保護キャップ・収納ポーチ・クリーニングブラシを除く)
年 月 日
ご住所 〒
ご芳名
電話番号
販売店名・住所・電話番号
★ 販 売 店
★ 保証書は再発行しませんので、大切に保管してください。
★
ご販売店様へ この保証書はお客様へのアフターサービスの実施と責任を明確にする
ものです。贈答品、記念品の場合も含めて必ず記入捺印してお客様にお渡しください。
製品に関するお問い合わせ★
フィリップスお客様情報センター
ナビダイヤル(全国共通)
0570(07)6666
修理に関するお問い合わせ★
小泉成器修理センター
ナビダイヤル(全国共通)
0570(09)8888
部品に関するお問い合わせ★
小泉成器部品センター
ナビダイヤル(全国共通)
ナビダイヤルにかからない時は
TEL 06(6261)8230 FAX 06(6268)1432
フィリップスコンシューマーライフスタイル事業部
日本販売代理店
〒
541-0051
ナビダイヤルにかからない時は
小泉成器東日本修理センター
〒
344-0127
小泉成器西日本修理センター
〒
559-0033
ナビダイヤルにかからない時は
TEL 06(6613)3211
〒
559-0033
小泉成器株式会社
大阪市中央区備後町
埼玉県春日部市水角
大阪市住之江区南港中1丁目3番98号
大阪市住之江区南港中1丁目3番98号
3-3-7
TEL 048(718)3340
1190
TEL 06(6613)3145
0570(09)2222
受付時 間:平日9:00~17:30 (土・日・祝日・夏期休暇・年末年 始を除く)
この印刷物は再生紙を使用しております。
42 22. 00 2.8 31 5.2
 Loading...