

Page 1
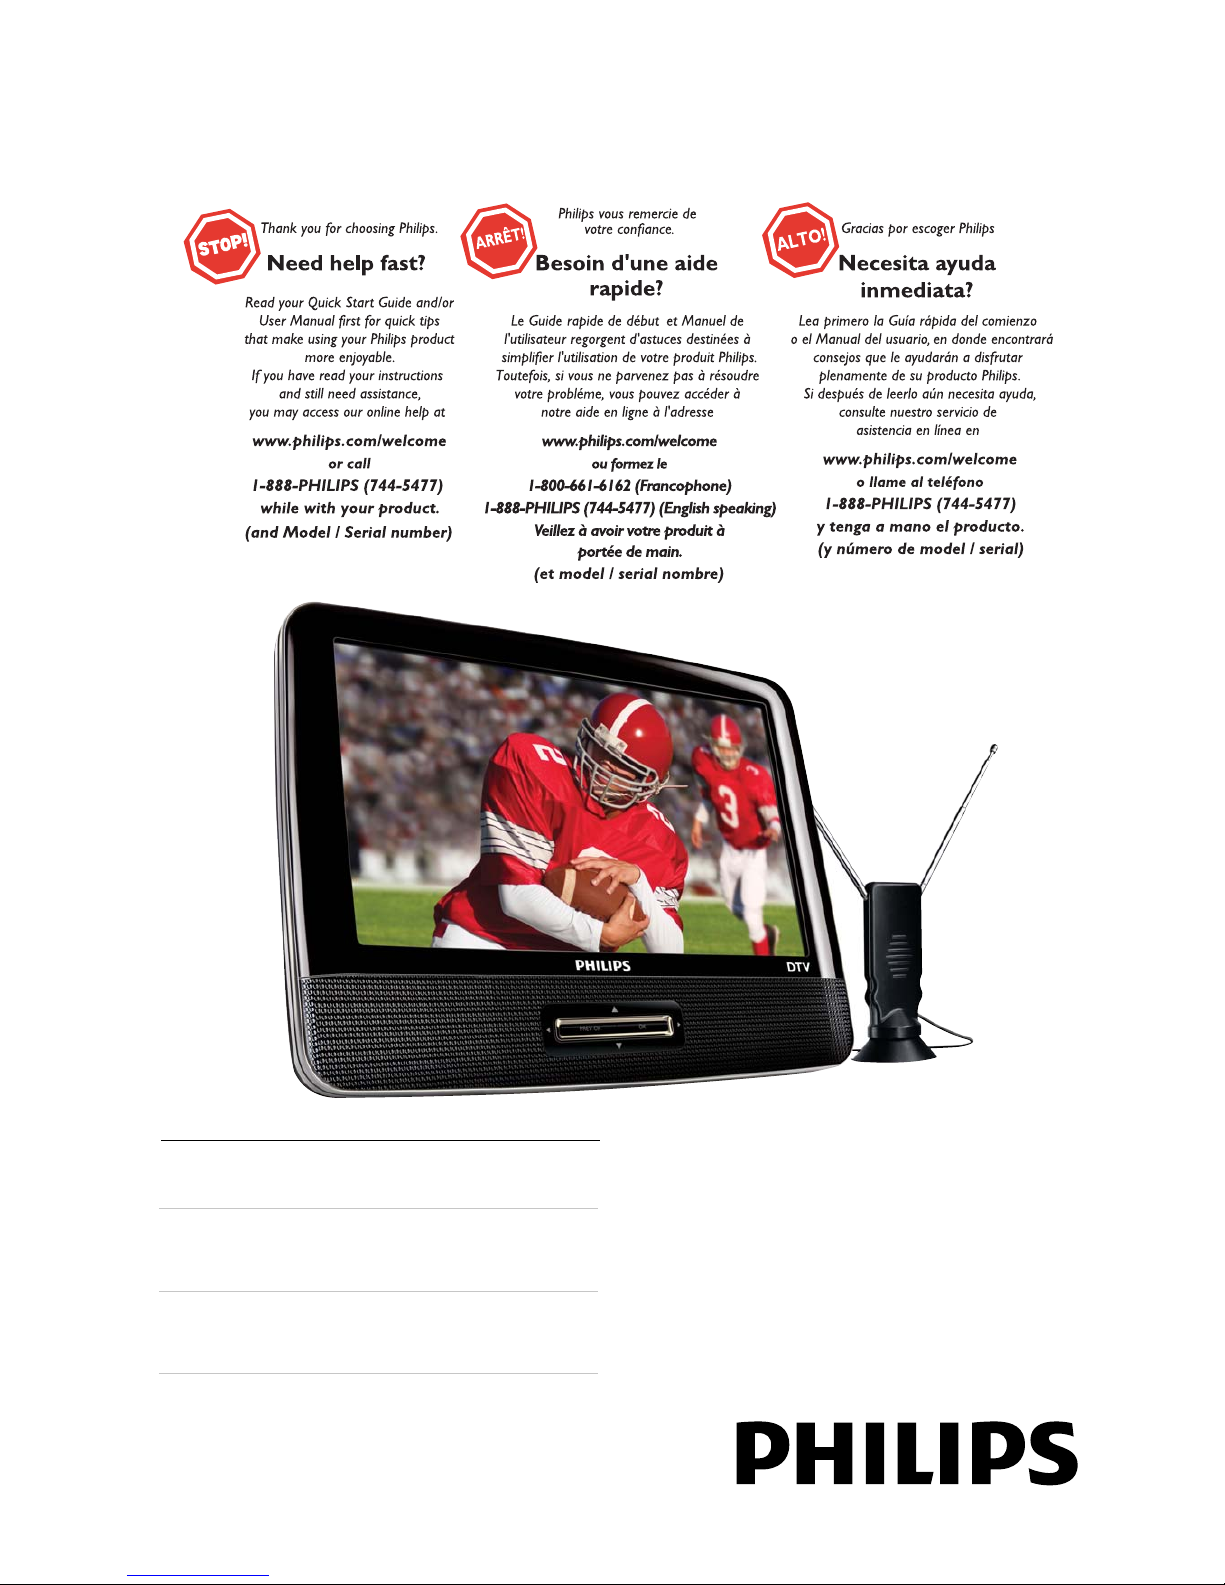
Register your product and get support at
www.philips.com/welcome
EN User manual
ES Manual del usuario
FR Mode d’emploi
PVD700/37
Page 2

2 EN
Canada
English:
This digital apparatus does not exceed the Class B limits for radio noise emissions
from digital apparatus as set out in the Radio Interference Regulations of the Canadian
Department of Communications.This Class B digital apparatus complies with Canadian
ICES-003.
Français:
Cet appareil numérique n’émet pas de bruits radioélectriques dépassant les limites
applicables aux appareils numériques de Classe B prescrites dans le Règlement sur le
Brouillage Radioélectrique édicté par le Ministère des Communications du Canada. Cet
appareil numérique de la classe B est conforme à la norme NMB-003 du Canada.
The set complies with the FCC-Rules, Part 15 and with 21 CFR 1040.10. Operation is
subject to the following two conditions:
1. This device may not cause harmful interference, and
2. This device must accept any interference received, including interference that may
cause undesired operation.
L’appareil est conforme à la réglementation FCC, section 15, et à la norme
21 CFR 1040.10. Son utilisation est soumise à deux conditions :
1. L’appareil ne doit pas provoquer d’interférences nuisibles, et
2. L’appareil doit supporter les interférences reçues, y compris les interférences
empêchant son fonctionnement correct.
Page 3
3
English
EN
Contents
1 Important 6
Important safety instructions 6
Notice 9
2 Your portable TV 10
Introduction 10
What’s in the box 11
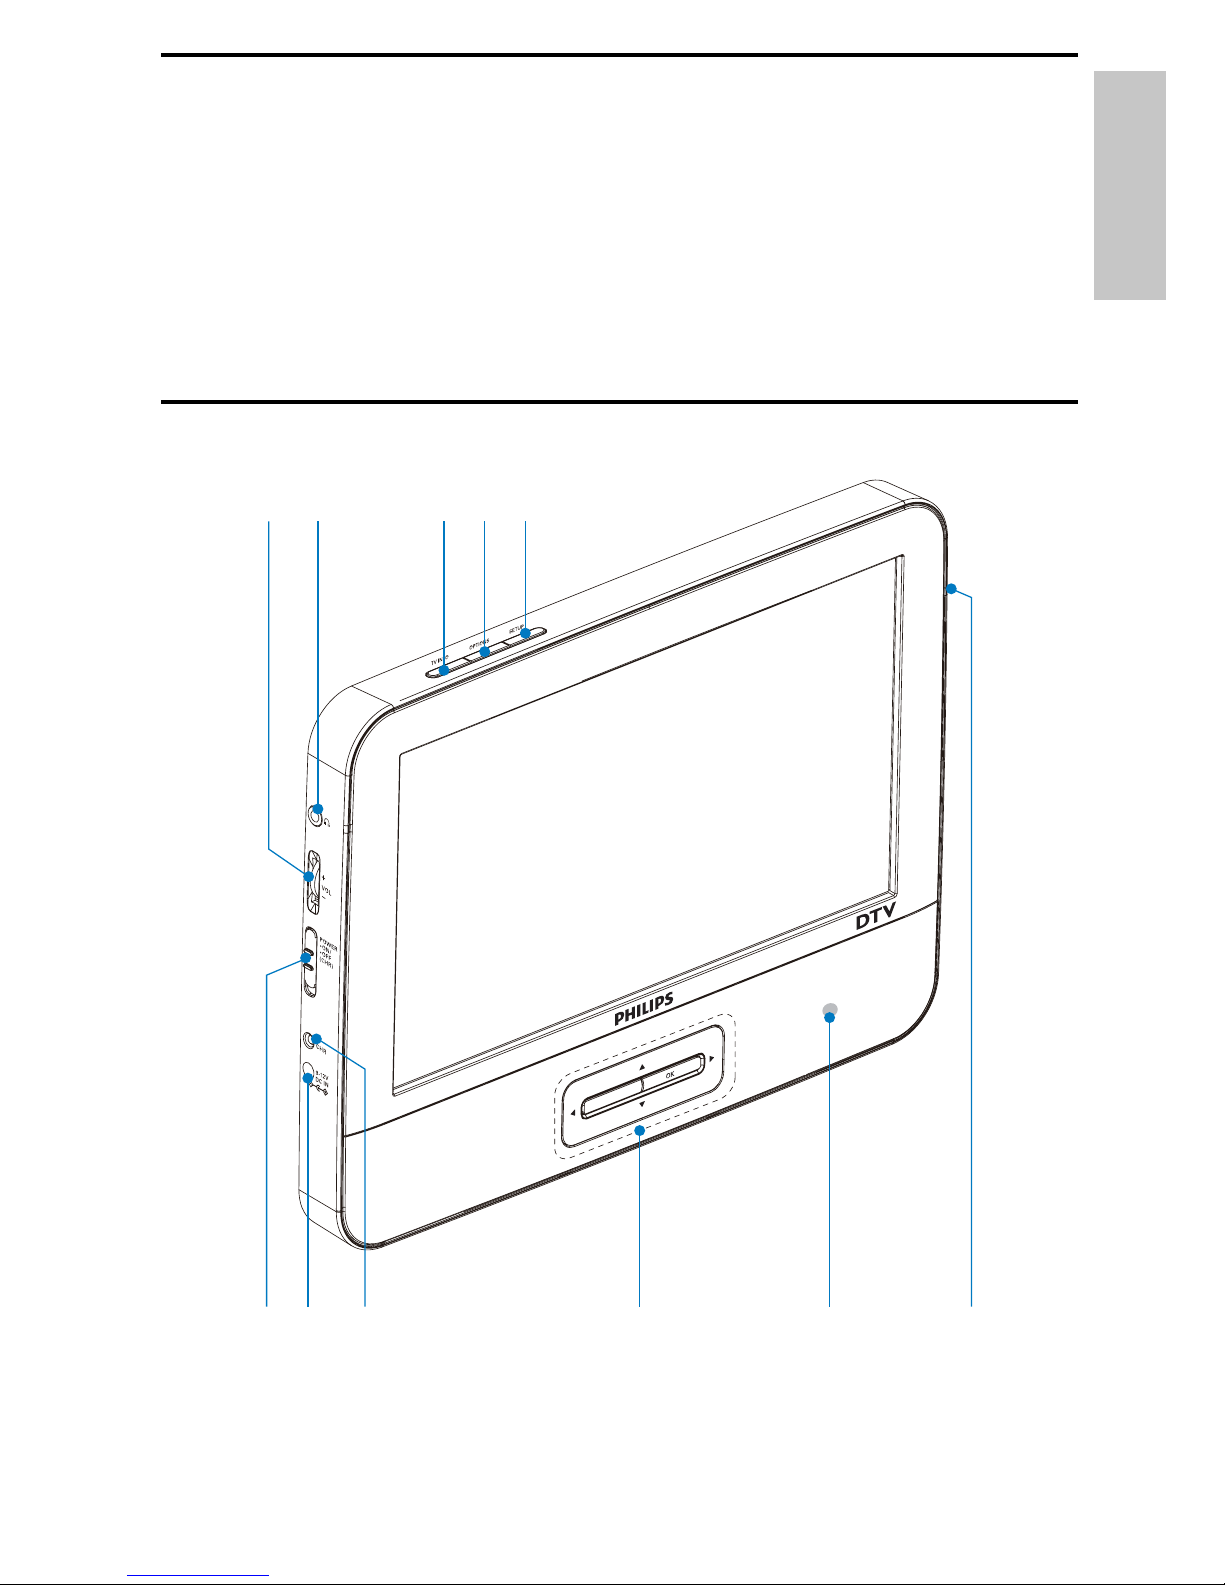
Overview of the main unit 11
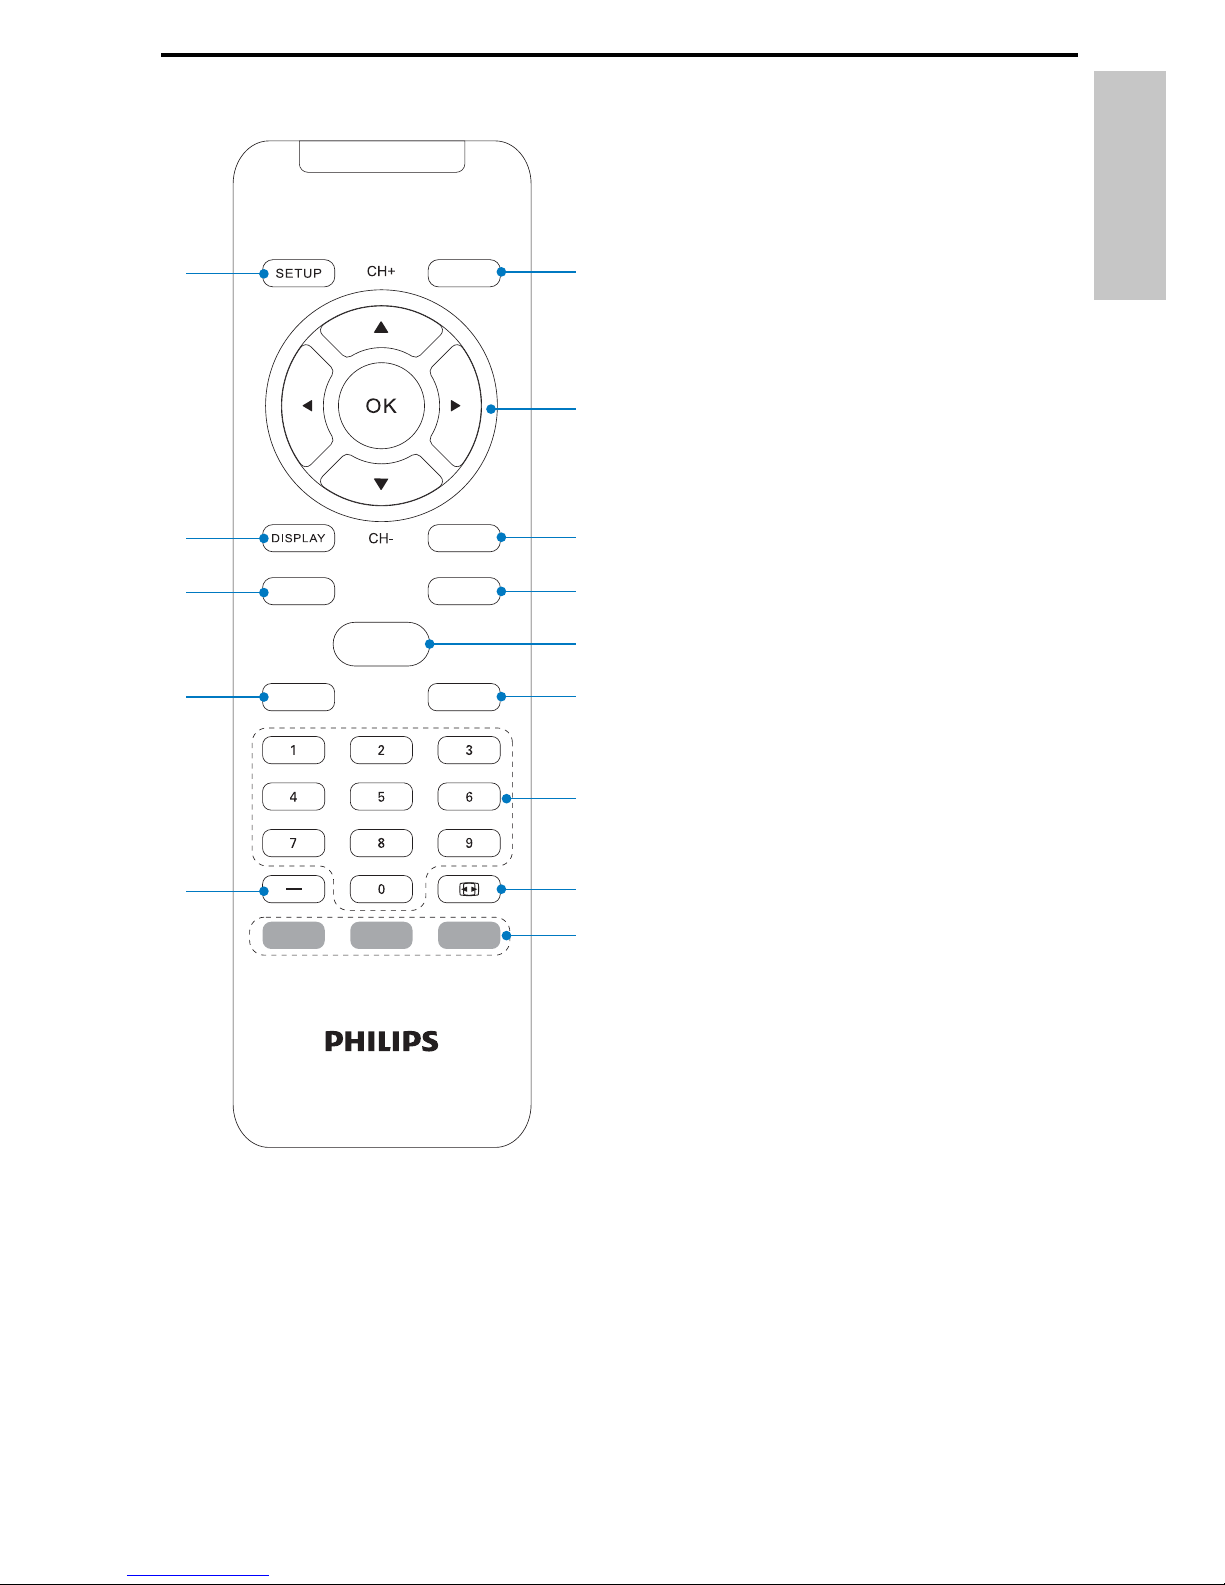
Overview of the remote control 13
3 Get started 15
Preparation 15
Charge the battery 16
Install remote control battery 17
Connect TV antenna 17
4 Watch TV 18
Turn on 18
First time installation 19
Switch channels 20
View program information 21
Manage channels 21
Play options 22
5 Adjust settings 22
View closed captions (subtitles) 23
6 Product information 27
7 Troubleshooting 28
Page 4
4 EN
Page 5
5
English
EN
Page 6
6
1 Important
Important safety instructions
a Read these instructions.
b Keep these instructions.
c Heed all warnings.
d Follow all instructions.
e Do not use this apparatus near water.
f Clean only with dry cloth.
g Do not block any ventilation openings. Install in accordance with
the manufacturer’s instructions.
h Do not install near any heat sources such as radiators, heat
registers, stoves, or other apparatus (including amplifi ers) that
produce heat.
i For countries with a polarized mains, do not defeat the safety
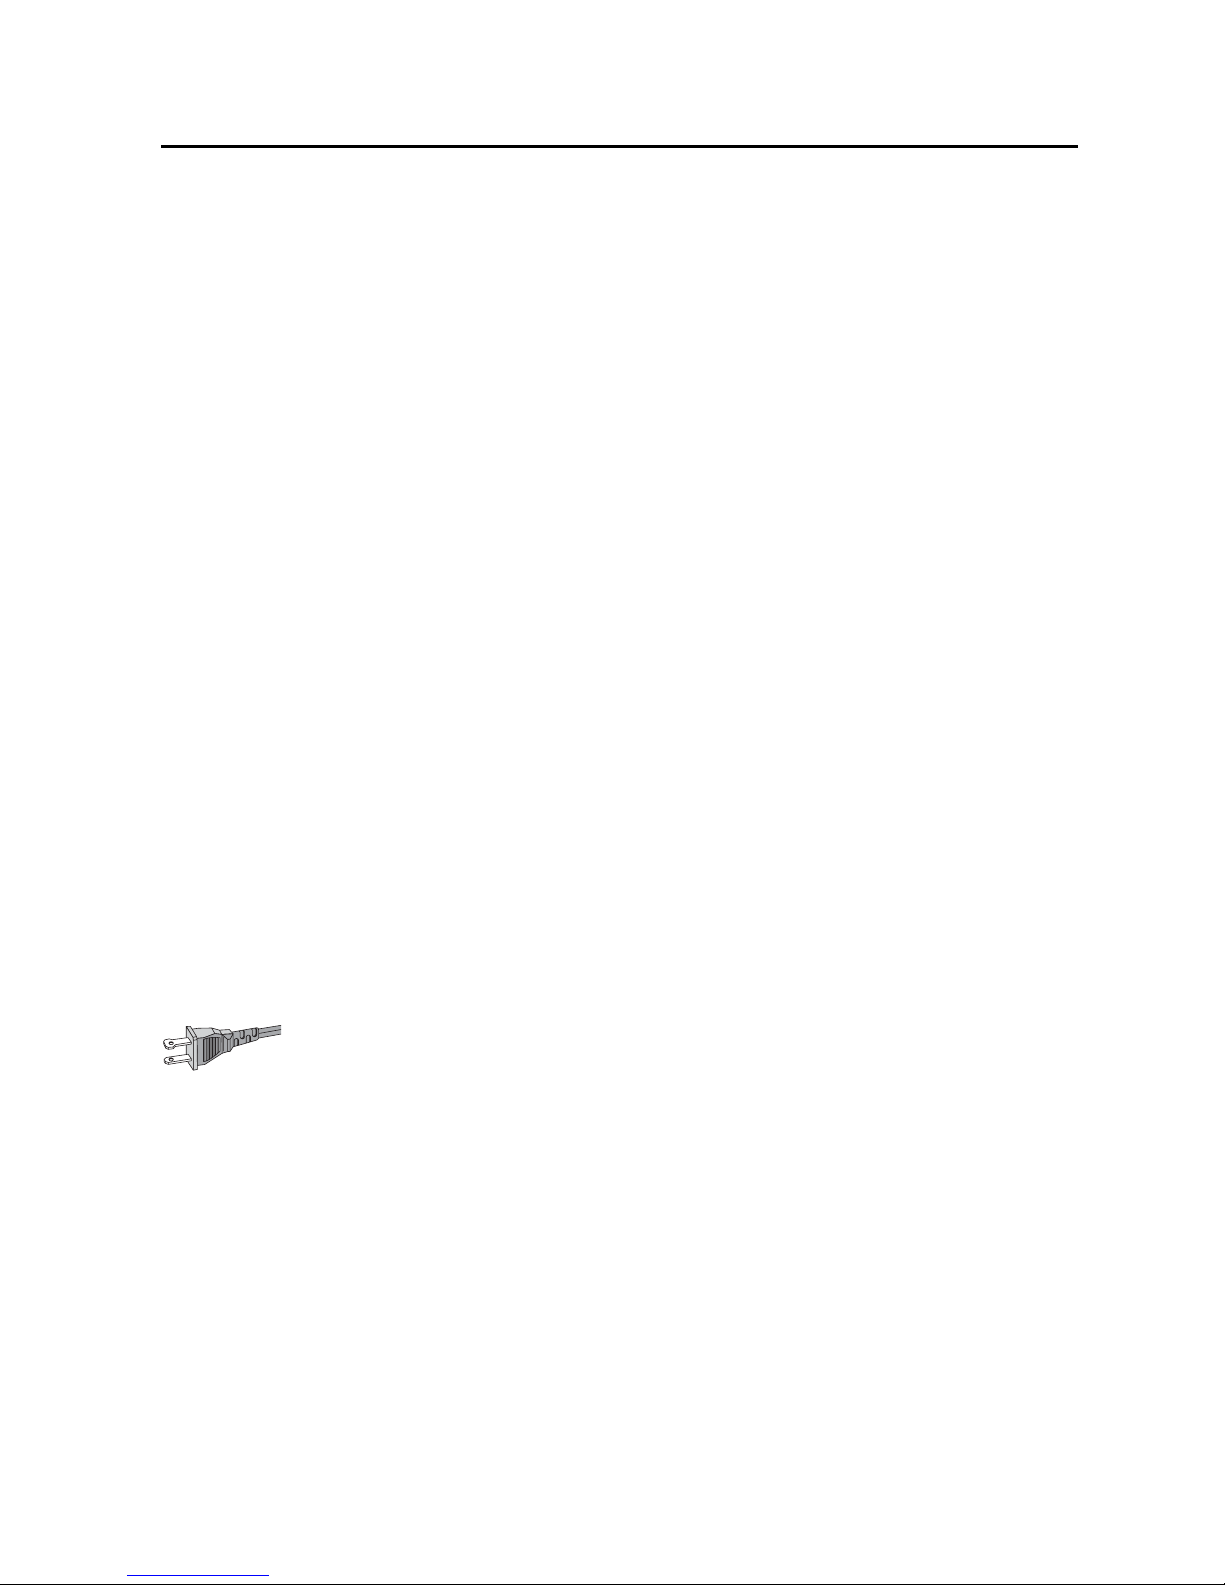
purpose of the polarized or grounding-type plug. A polarized plug
has two blades with one wider than the other. A grounding type
plug has two blades and a third grounding prong. The wide blade or
the third prong are provided for your safety. If the provided plug
does not fi t into your outlet, consult an electrician for replacement
of the obsolete outlet.
Caution: To prevent electric shock, match the wide blade of the plug
to the wide slot, fully insert.
j Protect the power cord from being walked on or pinched,
particularly at plugs, convenience receptacles, and the point where
they exit from the apparatus.
k Only use attachments/accessories specifi ed by the manufacturer.
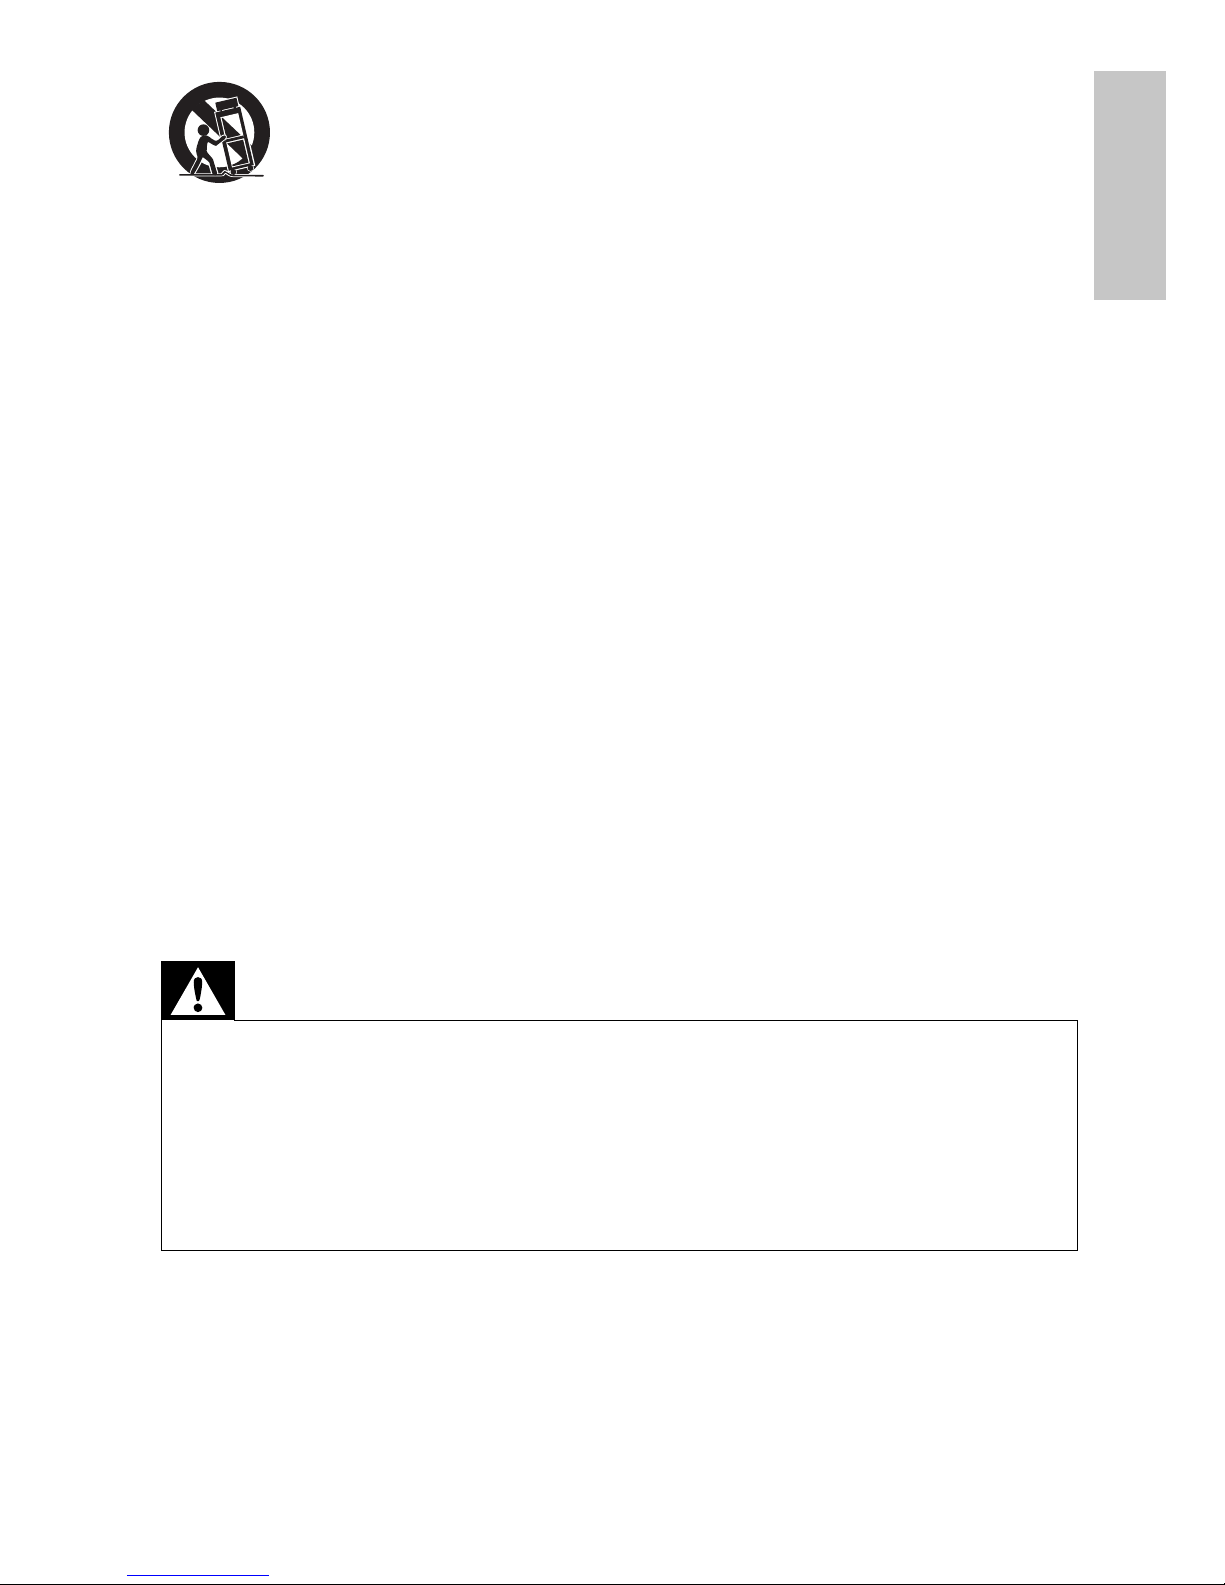
l Use only with the cart, stand, tripod, bracket, or table specifi ed by
the manufacturer or sold with the apparatus. When a cart is used,
use caution when moving the cart/apparatus combination to avoid
injury from tip-over.
EN
Page 7
7
m Unplug this apparatus during lightning storms or when unused for
long periods of time.
n Refer all servicing to qualifi ed service personnel. Servicing is
required when the apparatus has been damaged in any way, such
as power-supply cord or plug is damaged, liquid has been spilled
or objects have fallen into the apparatus, the apparatus has been
exposed to rain or moisture, does not operate normally, or has
been dropped.
o Apparatus shall not be exposed to dripping or splashing.
p Do not place any sources of danger on the apparatus (e.g. liquid
fi lled objects, lighted candles).
q This product may contain lead and mercury. Disposal of these
materials may be regulated due to environmental considerations.
For disposal or recycling information, please contact your local
authorities or the Electronic Industries Alliance: www.eiae.org.
r Where the MAINS plug or an appliance coupler is used as the
disconnect device, the disconnect device shall remain readily
operable.
Warning
Never remove the casing of this apparatus. •
Never lubricate any part of this apparatus.•
Never place this apparatus on other electrical equipment.•
Keep this apparatus away from direct sunlight, naked fl ames or heat. •
Never look into the laser beam inside this apparatus.•
Ensure that you always have easy access to the power cord, plug or adaptor to •
disconnect this apparatus from the power.
English
EN
Page 8
8
Hearing safety
Listen at a moderate volume.
Using headphones at a high volume can impair your hearing. This •
product can produce sounds in decibel ranges that may cause hearing
loss for a normal person, even for exposure less than a minute. The
higher decibel ranges are offered for those that may have already
experienced some hearing loss.
Sound can be deceiving. Over time your hearing ‘comfort level’ •
adapts to higher volumes of sound. So after prolonged listening, what
sounds ‘normal’ can actually be loud and harmful to your hearing. To
guard against this, set your volume to a safe level before your hearing
adapts and leave it there.
Set your volume control at a low setting. •
Slowly increase the sound until you can hear it comfortably and •
clearly, without distortion.
Prolonged exposure to sound, even at normally ‘safe’ levels, can also •
cause hearing loss.
Be sure to use your equipment reasonably and take appropriate •
breaks.
Listen at reasonable volumes for reasonable periods of time.•
Be careful not to adjust the volume as your hearing adapts.•
Do not turn up the volume so high that you can’t hear what’s around •
you.
You should use caution or temporarily discontinue use in potentially •
hazardous situations. Do not use headphones while operating a
motorized vehicle, cycling, skateboarding, etc.; it may create a traffi c
hazard and is illegal in many areas.
Caution
Use of controls or adjustments or performance of procedures other than herein •
may result in hazardous radiation exposure or other unsafe operation.
EN
Page 9

9
Notice
Any changes or modifi cations made to this device that are not expressly
approved by Philips Consumer Lifestyle may void the user’s authority to
operate the equipment.
Notice for the USA
This equipment has been tested and found to comply with the limits for
a Class B digital device, pursuant to part 15 of the FCC Rules. These
limits are designed to provide reasonable protection against harmful
interference in a residential installation. This equipment generates, uses,
and can radiate radio frequency energy and, if not installed and used in
accordance with the instruction manual, may cause harmful interference to
radio communications.
However, there is no guarantee that interference will not occur in a
particular installation. If this equipment does cause harmful interference
to radio or television reception, which can be determined by turning
the equipment off and on, the user is encouraged to try to correct the
interference by one or more of the following measures:
Relocate the receiving antenna.•
Increase the separation between equipment and receiver.•
Connect the equipment into an outlet on a circuit different from that •
to which the receiver is connected.
Consult the dealer or an experienced radio/TV technician for help.•
Environmental information
All unnecessary packaging has been omitted. We have tried to make
the packaging easy to separate into three materials: cardboard (box),
polystyrene foam (buffer) and polyethylene (bags, protective foam sheet.)
Your system consists of materials which can be recycled and reused
if disassembled by a specialized company. Please observe the local
regulations regarding the disposal of packaging materials, exhausted
batteries and old equipment.
English
EN
Page 10
10
Disposal of your old product and batteries
Your product is designed and manufactured with high quality materials and
components, which can be recycled and reused.
Never dispose of your product with other household waste. Please inform
yourself about the local rules on the separate collection of electrical and
electronic products and batteries. The correct disposal of these products
helps prevent potentially negative consequences on the environment and
human health.
Your product contains batteries, which cannot be disposed of with normal
household waste.
Please inform yourself about the local rules on separate collection of
batteries. The correct disposal of batteries helps prevent potentially
negative consequences on the environment and human health.
Please visit www.recycle.philips.com for additional information on a
recycling center in your area.
Caution
Removal of the built-in battery invalidates the warranty and may destroy the •
product.
Recording and playback of material might require consent. See Copyright
Act 1956 and The Performer’s Protection Acts 1958 to 1972.
2 Your portable TV
Congratulations on your purchase, and welcome to Philips! To fully benefi t
from the support that Philips offers, register your product at www.philips.
com/welcome.
Introduction
With the portable TV, you can enjoy digital television with extra program
content.
EN
Page 11
11
What’s in the box
Check and identify the contents of your package:
Portable TV•
Remote control •
AC power adaptor, AY5808 (Philips)•
Antenna•
User manual•
Quick start guide•
Overview of the main unit
b c d ea
k j i h g f
PREV CH
English
EN
Page 12

12
a VOL+/-
Increases or decreases volume.•
b
Headphone jack.•
c TV INFO
Shows TV information.•
d OPTIONS
Accesses options relating to the current activity or selection.•
e SETUP
Accesses or exits the setup menu.•
f ANTENNA
Antenna jack.•
g IR
Remote control sensor.•
h
, , ,
Navigates menus.•
,
Switches to the next or previous channel.•
OK
Confi rms an entry or selection.•
Displays the channel list.•
PREV CH
Returns to the previously viewed channel.•
i CHR
Charging indicator. •
j DC IN
Power supply socket. •
k POWER ON /OFF ( CHR )
Turns on/off the unit.•
EN
Page 13
13
Overview of the remote control
a OPTIONS
Accesses options relating to the current activity or selection.•
AUDIO
MUTE
INFO
CC
FAV
OPTIONS
PREV CH
n
m
l
k
j
g
b
a
c
d
f
h
i
e
English
EN
Page 14

14
b ( CH+ ), ( CH- ), ,
Navigates menus.•
( CH+), ( CH-)
Switches to the next or previous channel.•
OK
Confi rms an entry or selection.•
Displays the channel list.•
c PREV CH
Returns to the previously viewed channel.•
d FAV
Accesses or exits the favorite list.•
e INFO
Displays program information.•
f MUTE
Mutes or restores volume.•
g 0-9
Numeric keypad. •
h
Adjusts screen aspect ratio.•
i Color keys
Selects tasks or options.•
j –
Inputs a separator for digital channel numbers. •
k AUDIO
Selects the audio language.•
l CC
Turn off or on display captions.•
m DISPLAY
Adjusts the display value of the system.•
n SETUP
Accesses or exits the setup menu.•
EN
Page 15
15
3 Get started
Caution
Use the controls only as stated in this user manual.•
Always follow the instructions in this chapter in sequence.•
If you contact Philips, you will be asked for the model and serial number of
your player. The model number and serial number are on the bottom of your
player. Write the numbers here:
Model No. __________________________
Serial No. ___________________________
Preparation
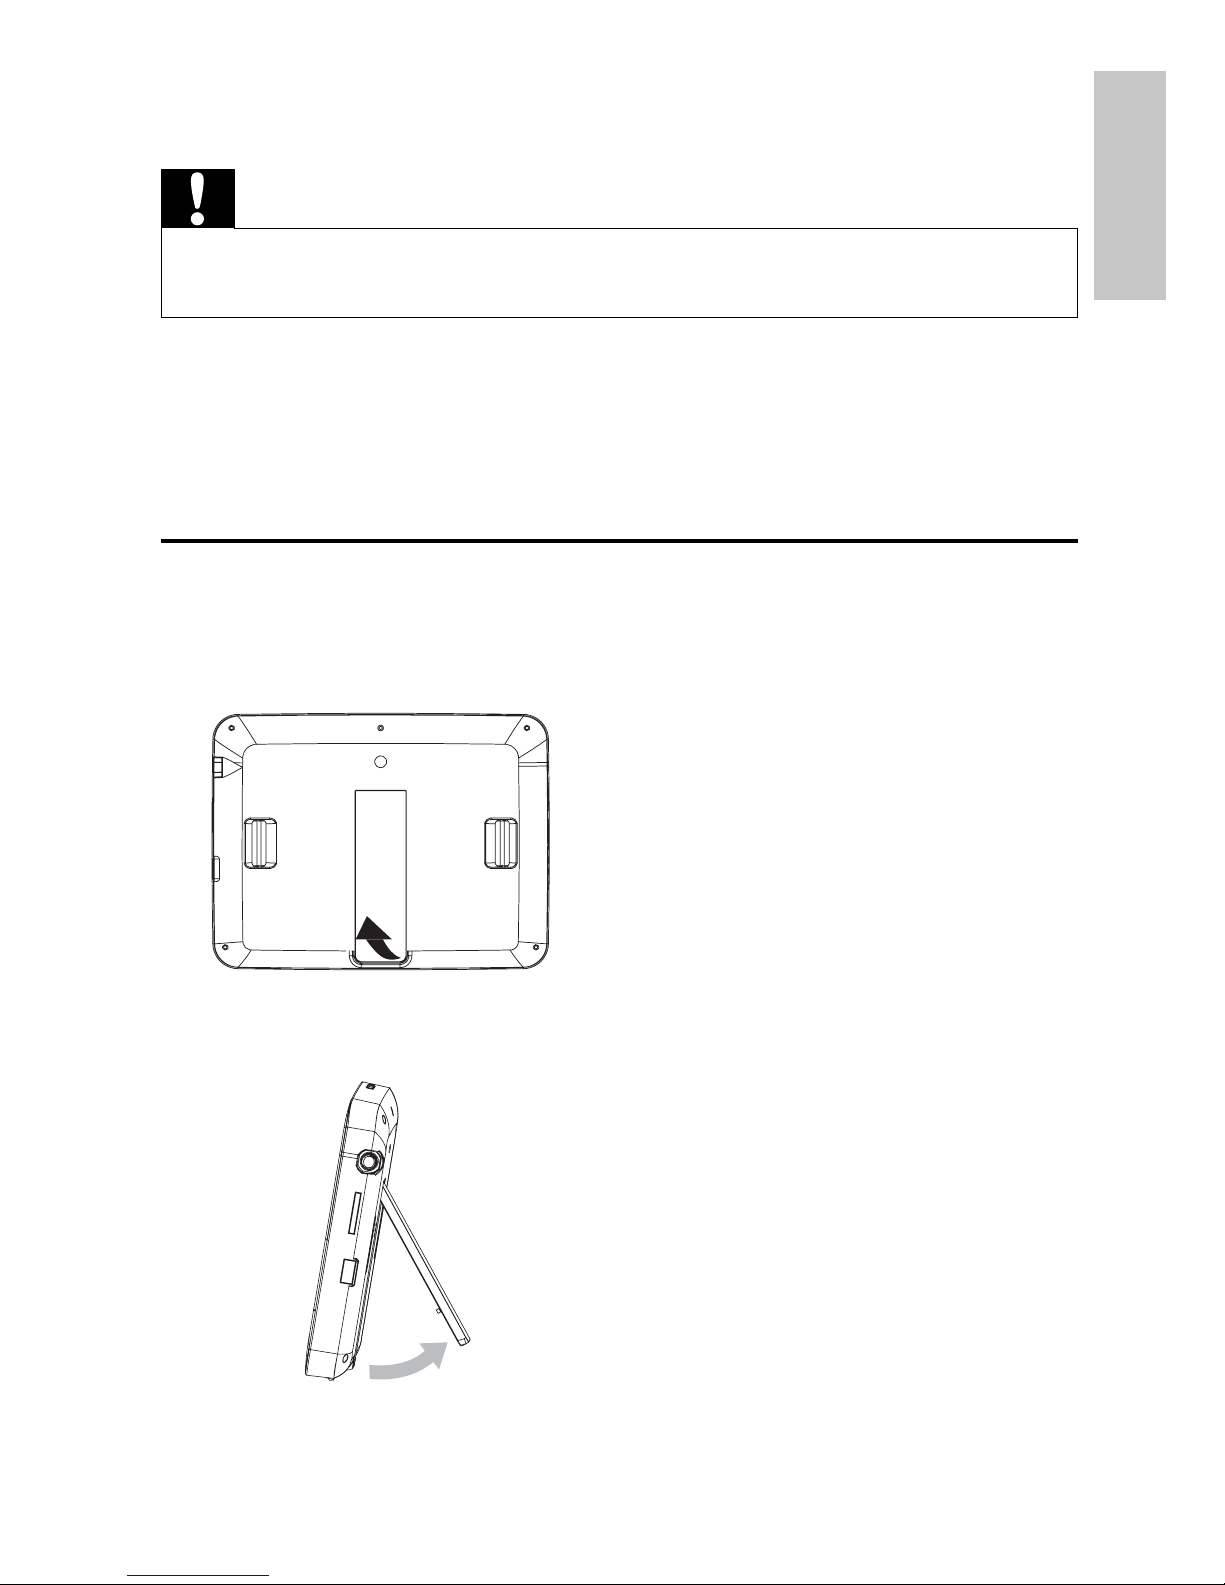
To place the player on a table for video viewing:
1 Pull to open the stand on the back of the player.
2 Prop up the player on the table.
PULL TO OPEN
English
EN
Page 16
16
Charge the battery
Caution
Risk of product damage! Ensure that the power supply voltage corresponds to the •
voltage printed on the bottom of the player.
Use only the supplied AC adaptor to charge the battery.
•
Note
The type plate is located on the back of the player.•
You can only charge the player when it is in power-off mode.•
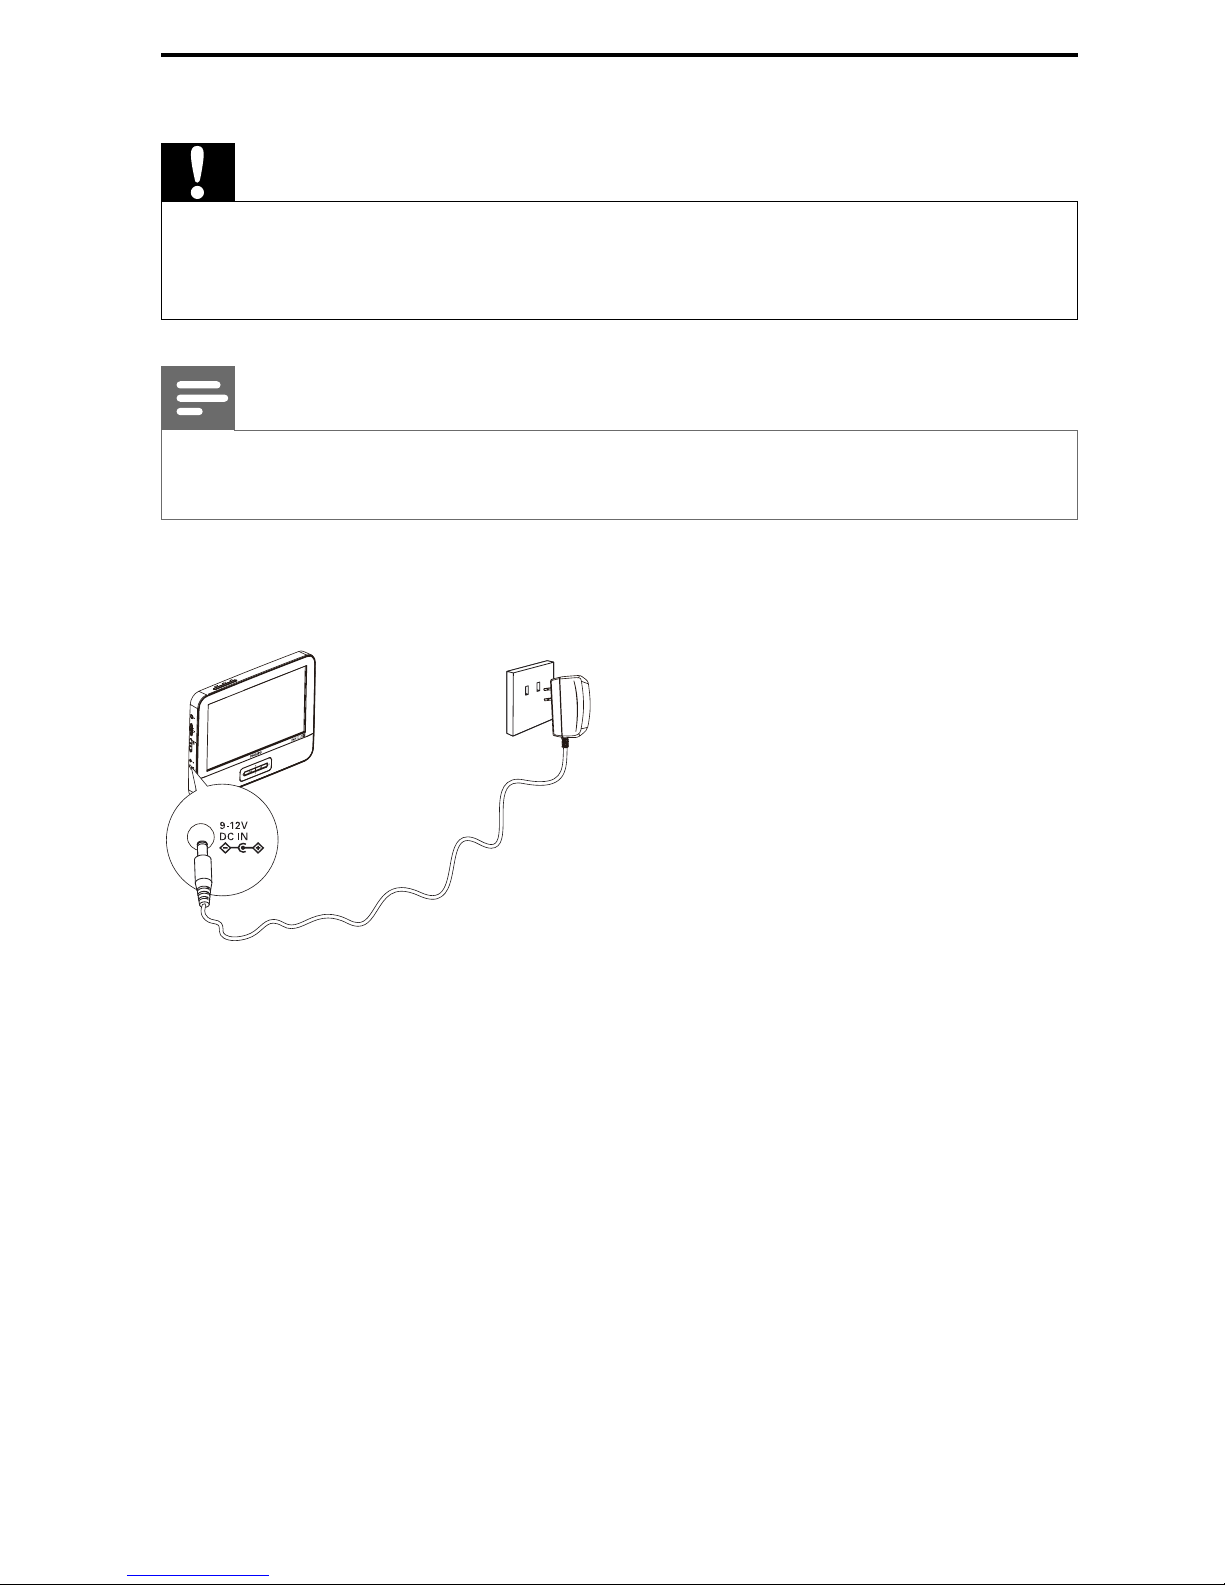
1 Slide the POWERON/OFF switch to OFF position.
2 Connect the supplied AC adaptor to the player and to the AC outlet.
The charge indicator turns on. It takes less than 6 hours to fully »
charge the battery.
When the battery is fully charged, the charge indicator turns off.»
EN
Page 17
17
Install remote control battery
Caution
Risk of explosion! Keep batteries away from heat, sunshine or fi re. Never discard •
batteries in fi re.
Danger of explosion if battery is incorrectly replaced. Replace only with the same or
•
equivalent type.
Batteries contain chemical substances, they should be disposed of properly.
•
Perchlorate Material - special handling may apply. See www.dtsc.ca.gov/•
hazardouswaste/perchlorate.
For fi rst-time use:
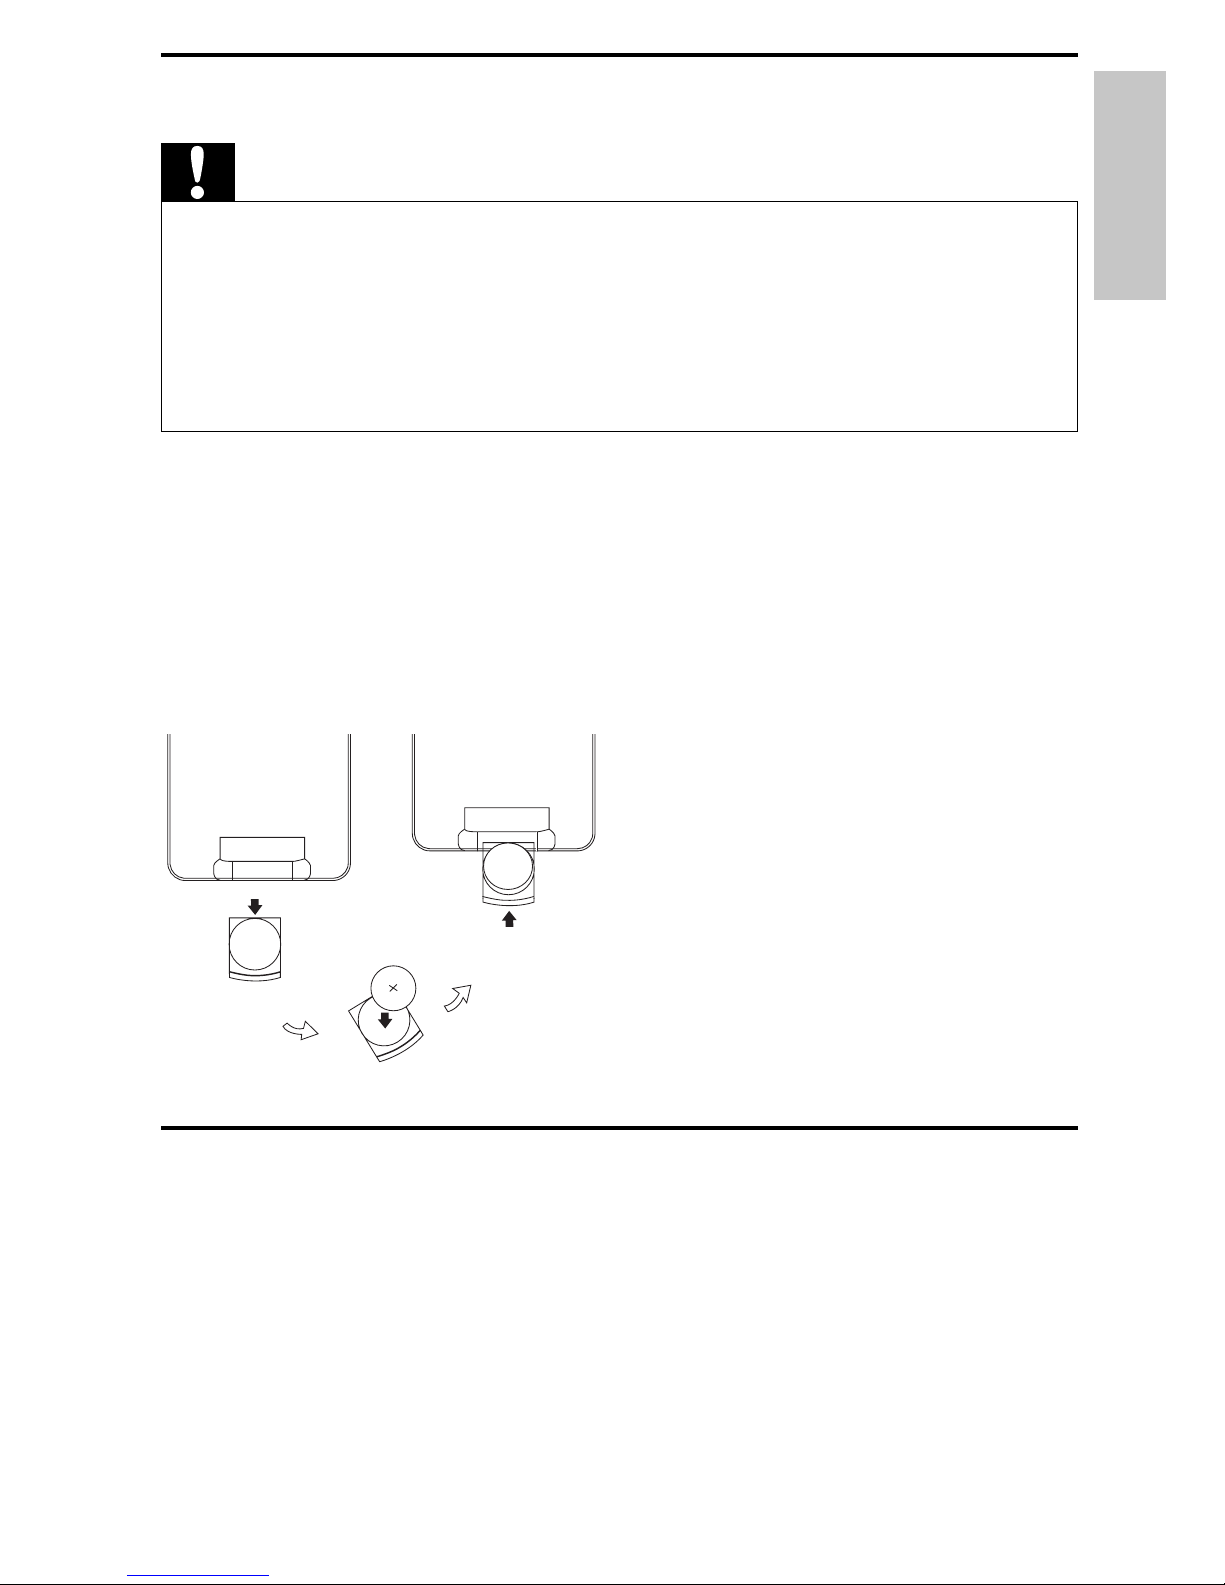
1 Remove the protective tab to activate the remote control battery.
To replace the remote control battery:
1 Open the battery compartment.
2 Insert 1 CR2025 battery with correct polarity (+/-) as indicated.
3 Close the battery compartment.
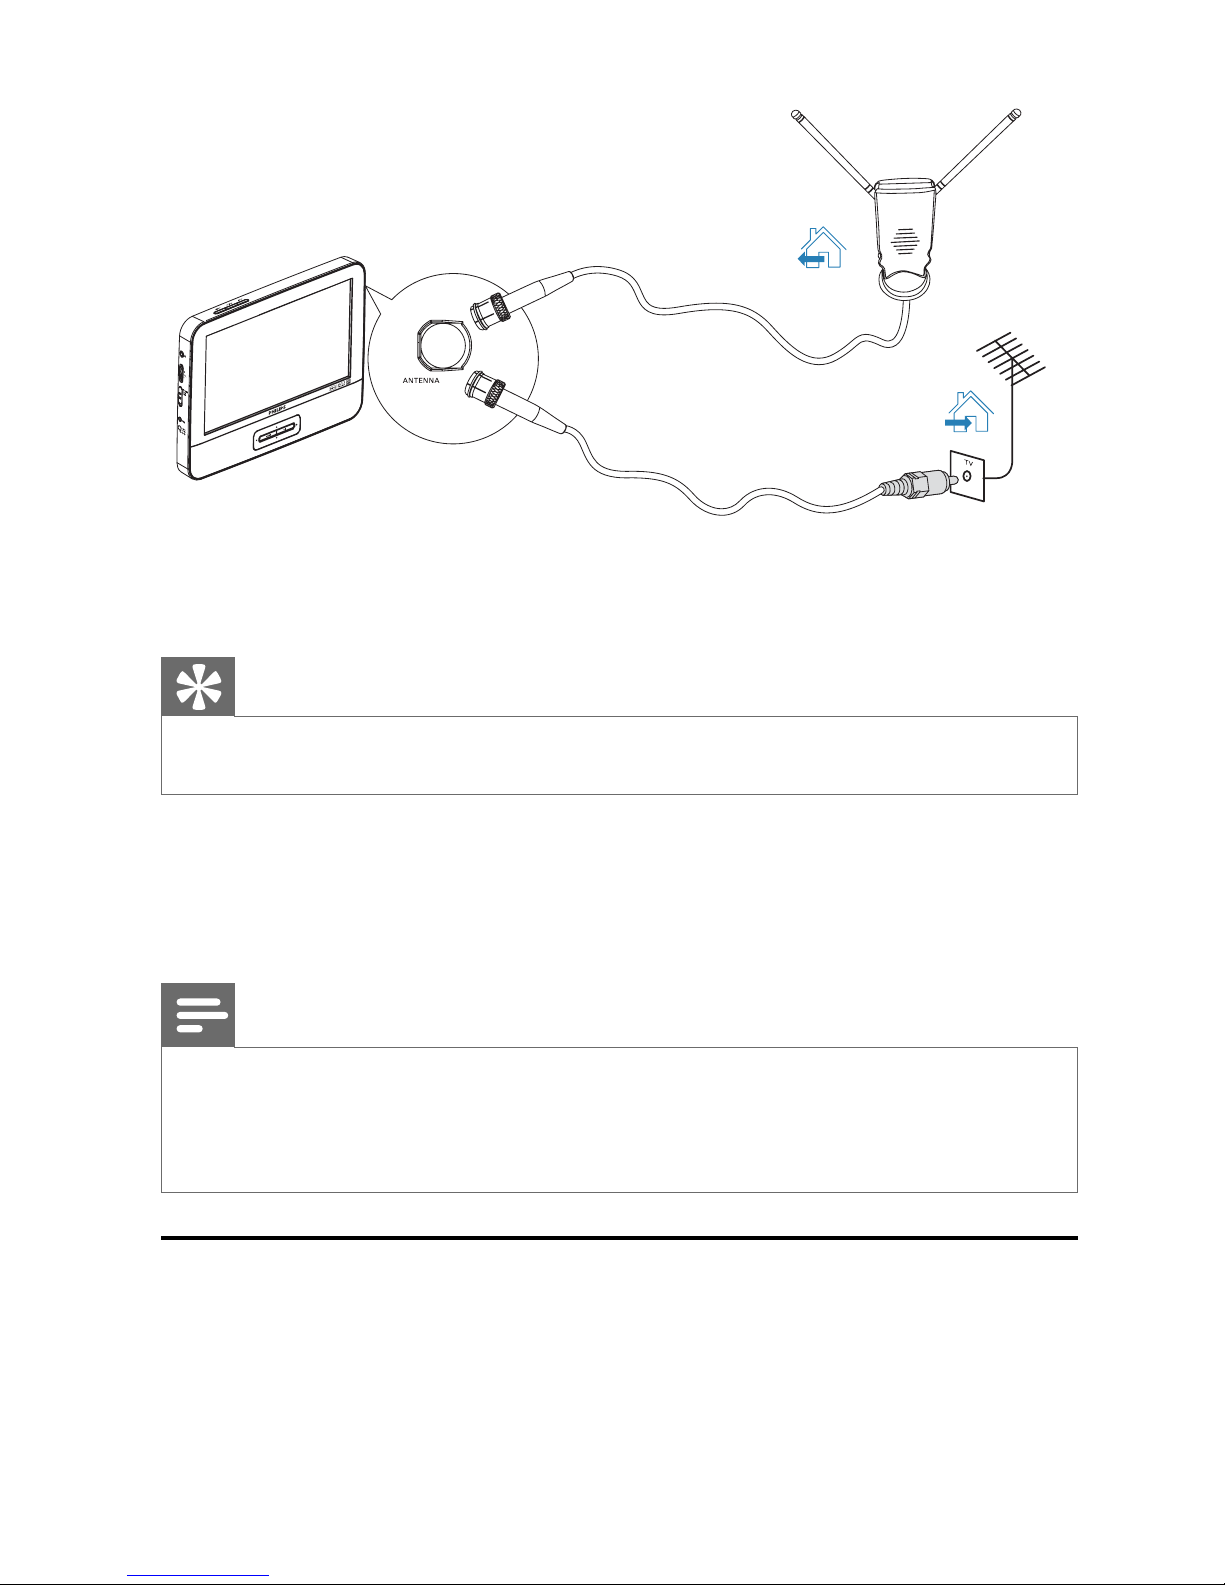
Connect TV antenna
You can connect your player to the supplied antenna or home antenna to
receive digital TV program.
English
EN
Page 18
18
1 Connect the antenna to the ANTENNA jack.
not supplied
or
Tip
Fully extend the antenna for better reception. •
4 Watch TV
Note
Before you start, ensure that you have connected the antenna to the player. •
Make sure you are in an area with suffi cient signal coverage. You can check the signal •
coverage with the TV broadcast authority of your country or visit www.philips.com/
support.
Turn on
Slide the POWERON/OFF switch to the ON position.
EN
Page 19
19
First time installation
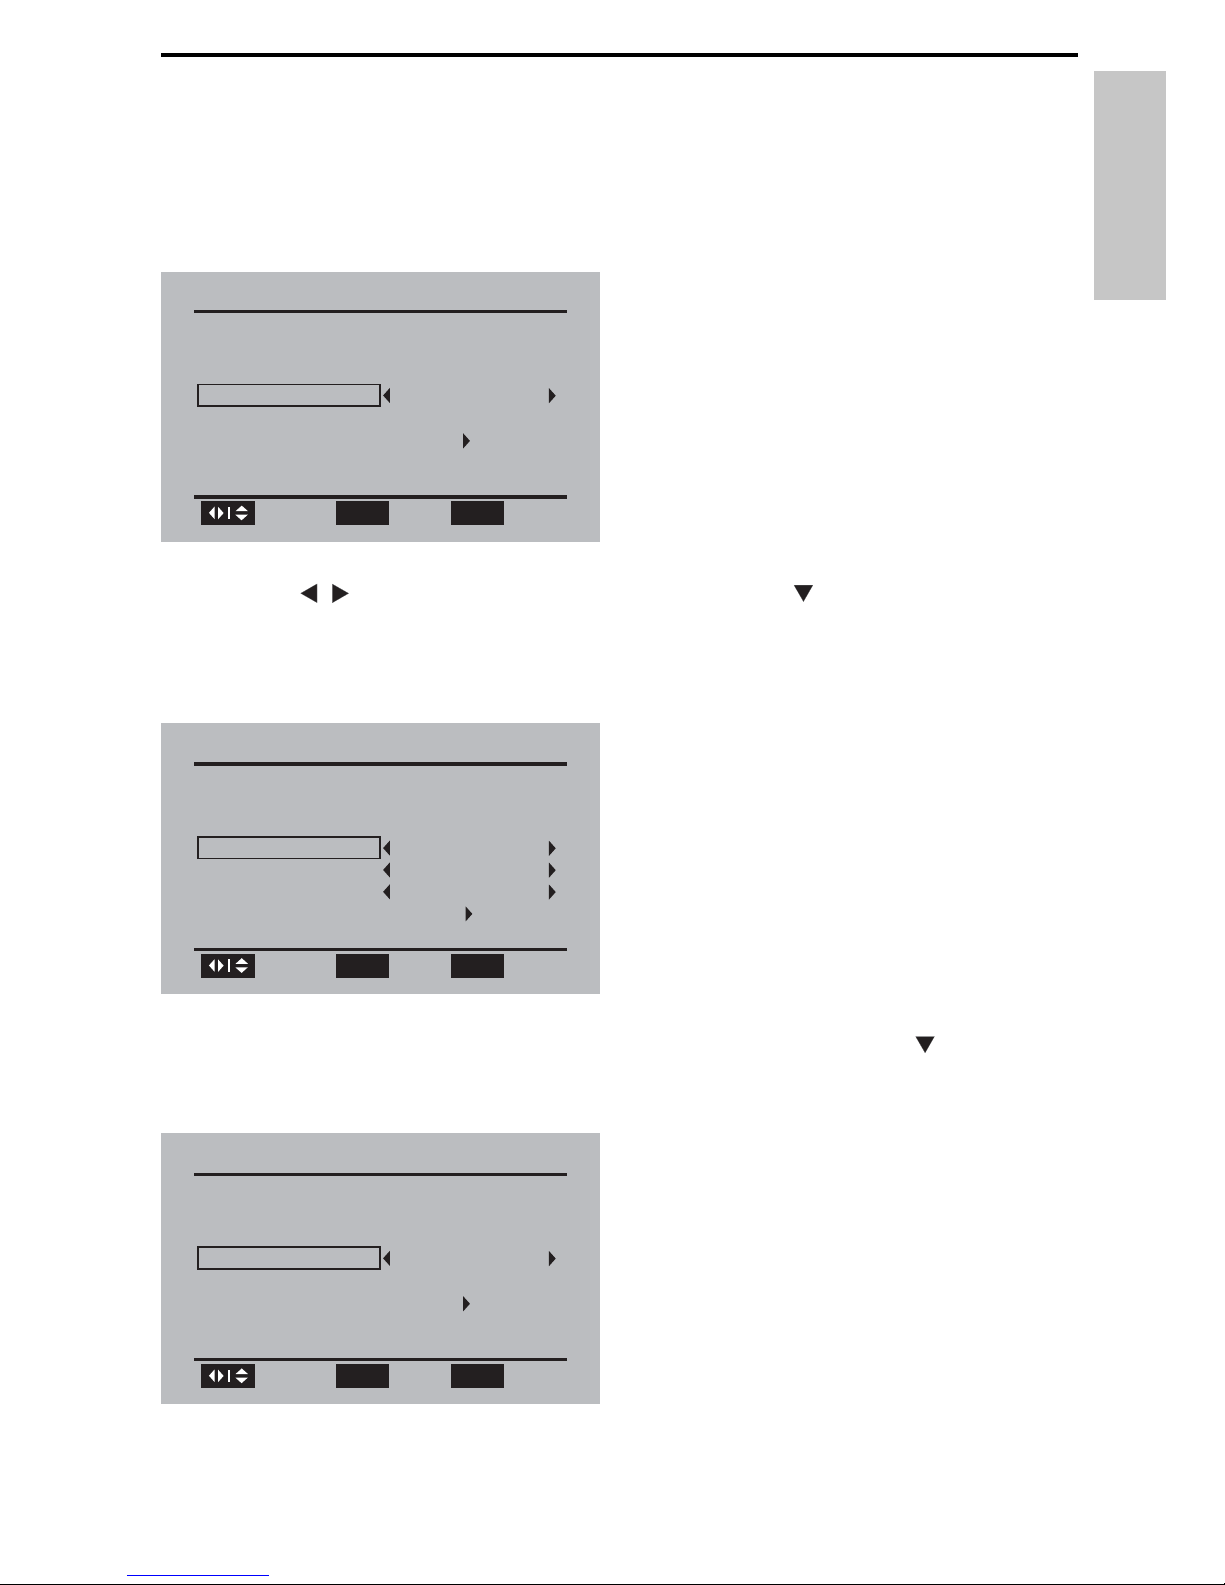
1 When the unit is turned on for the fi rst time, follow the on-screen
instructions.
You are prompted to select the menu language.»
2 Press / to select your language, then press to select [Go to
next step :] and press OK to confi rm.
You are prompted to select the time zone and daylight saving time.»
3 Select the time zone, DST and timer format, then press to select
[Go to next step :] and press OK to confi rm.
First Time Installation
Please select your prefer language :
Menu Language
Go to next step :
English
Browse
Select
OK SETUP
Exit
First Time Installation
Select the time zone & Daylight saving time
Time Zone
Hawaii
DST
Off
Time Format
12-hour
Go to next step :
Browse
Select
OK SETUP
Exit
First Time Installation
Please connect the product to air antenna
Air/Cable
Go to next step :
Cable
Browse
Select
OK SETUP
Exit
English
EN
Page 20
20
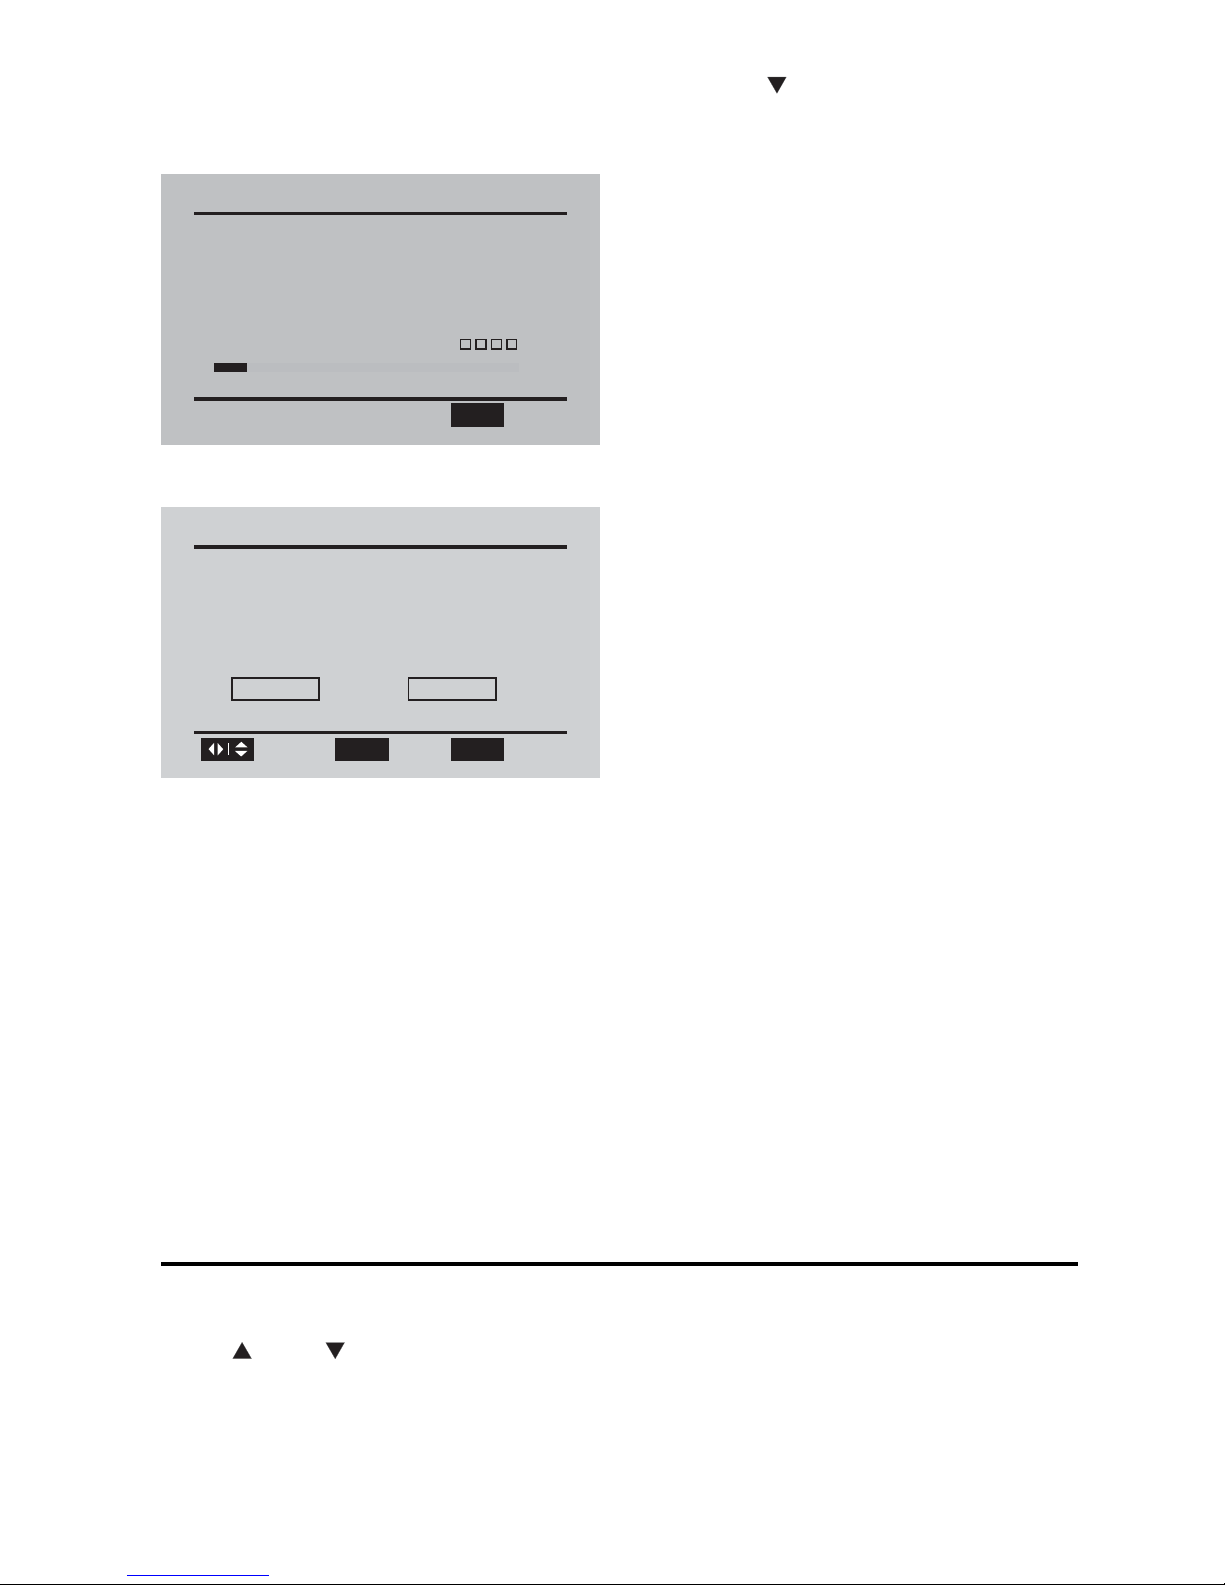
4 Select the antenna type as [Air], then press to select [Go to next
step :] and press OK to confi rm.
Auto channel search (Air) starts and will take a few minutes.»
When auto channel search is complete, the total number of TV and »
radio channels found is displayed.
5 To skip the cable channel search, select [Skip], and then press OK.
The programs of the fi rst found channel play automatically.»
6 If you connect the portable TV to a cable TV socket, select [Yes],
and then press OK.
Auto channel search (Cable) starts and will take a few minutes.»
When auto channel search is complete, the total number of TV and »
radio channels found is displayed.
To view the programs of the fi rst found channel, press • OK.
Switch channels
Press CH+/ CH- or Number keys on the remote control.
Press • PREV CH to return to the previously viewed channel.
Channel Search(Air)
Channel searching please wait...
RF Channel:
TV Channels Found: 0
10
0
Radio Channels Found:
Signal Quality:
SETUP
Exit
Channel Search
Channel Search End(Air)
TV Channels Found:
Radio Channels Found: 0
8
Search Cable Channel?
Yes Skip
Browse
Select
OK SETUP
Exit
EN
Page 21
21
View program information
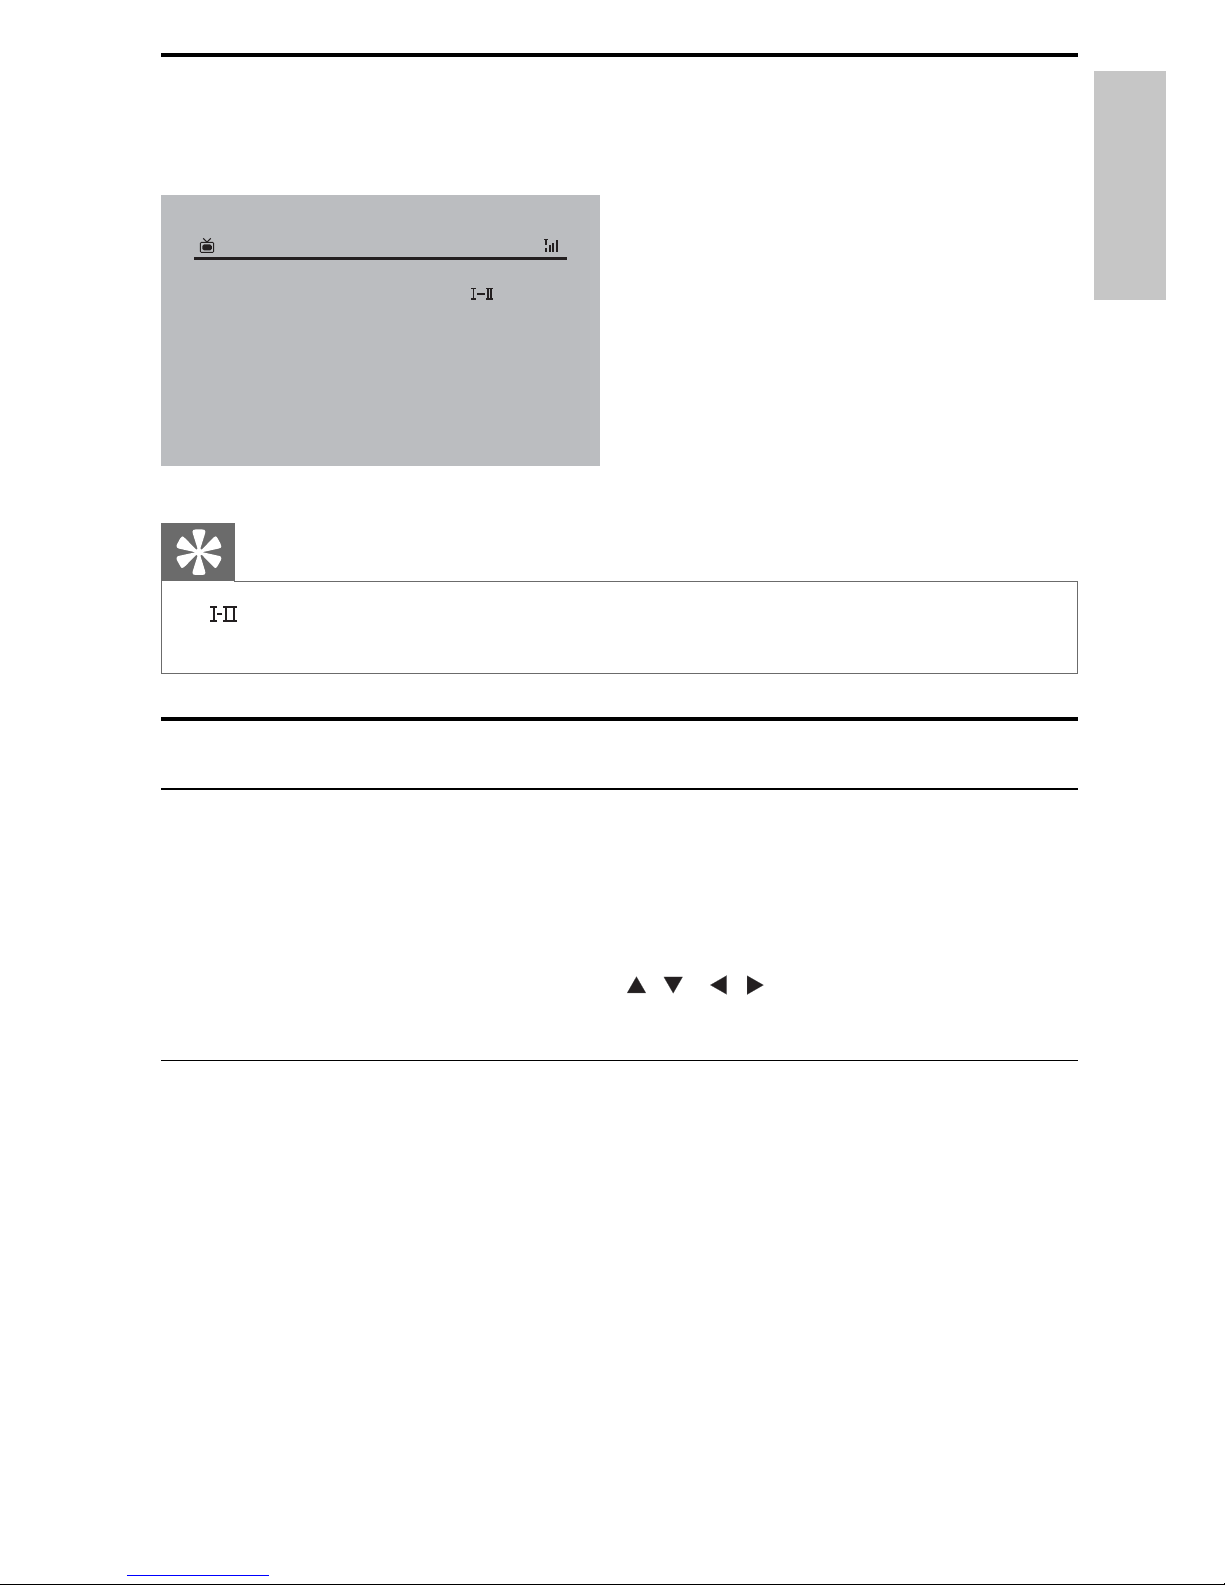
To view brief information of the current program, press INFO.
Tip
• : Program containing different audio languages. You can press AUDIO or
OPTIONS to access this function.
Manage channels
Change channel name
1 Press SETUP.
The setup menu is displayed.»
2 Select [Channel management] > [Channel name], and press OK.
3 Select a channel, and then press , , , to change the channel
name.
Edit channels
1 Press SETUP.
The setup menu is displayed.»
2 Select [Channel management] > [Channel edit], and press OK.
3 Select a channel.
To delete the channel, press the red button.•
To set the channel your favorite one, press the green button.•
To hide the channel, press the yellow button.•
18–1 WB18HD
Audio Language:
Daily Buzz
CC:
Video:
RF Channel:
Program Information:
English
CC Off
1080i HD 16:9
69/803. 0Hz 8VSB
04:48 AM
A lively morning news program focusing on entertainment and
lifestyle reports.
English
EN
Page 22
22
Play options
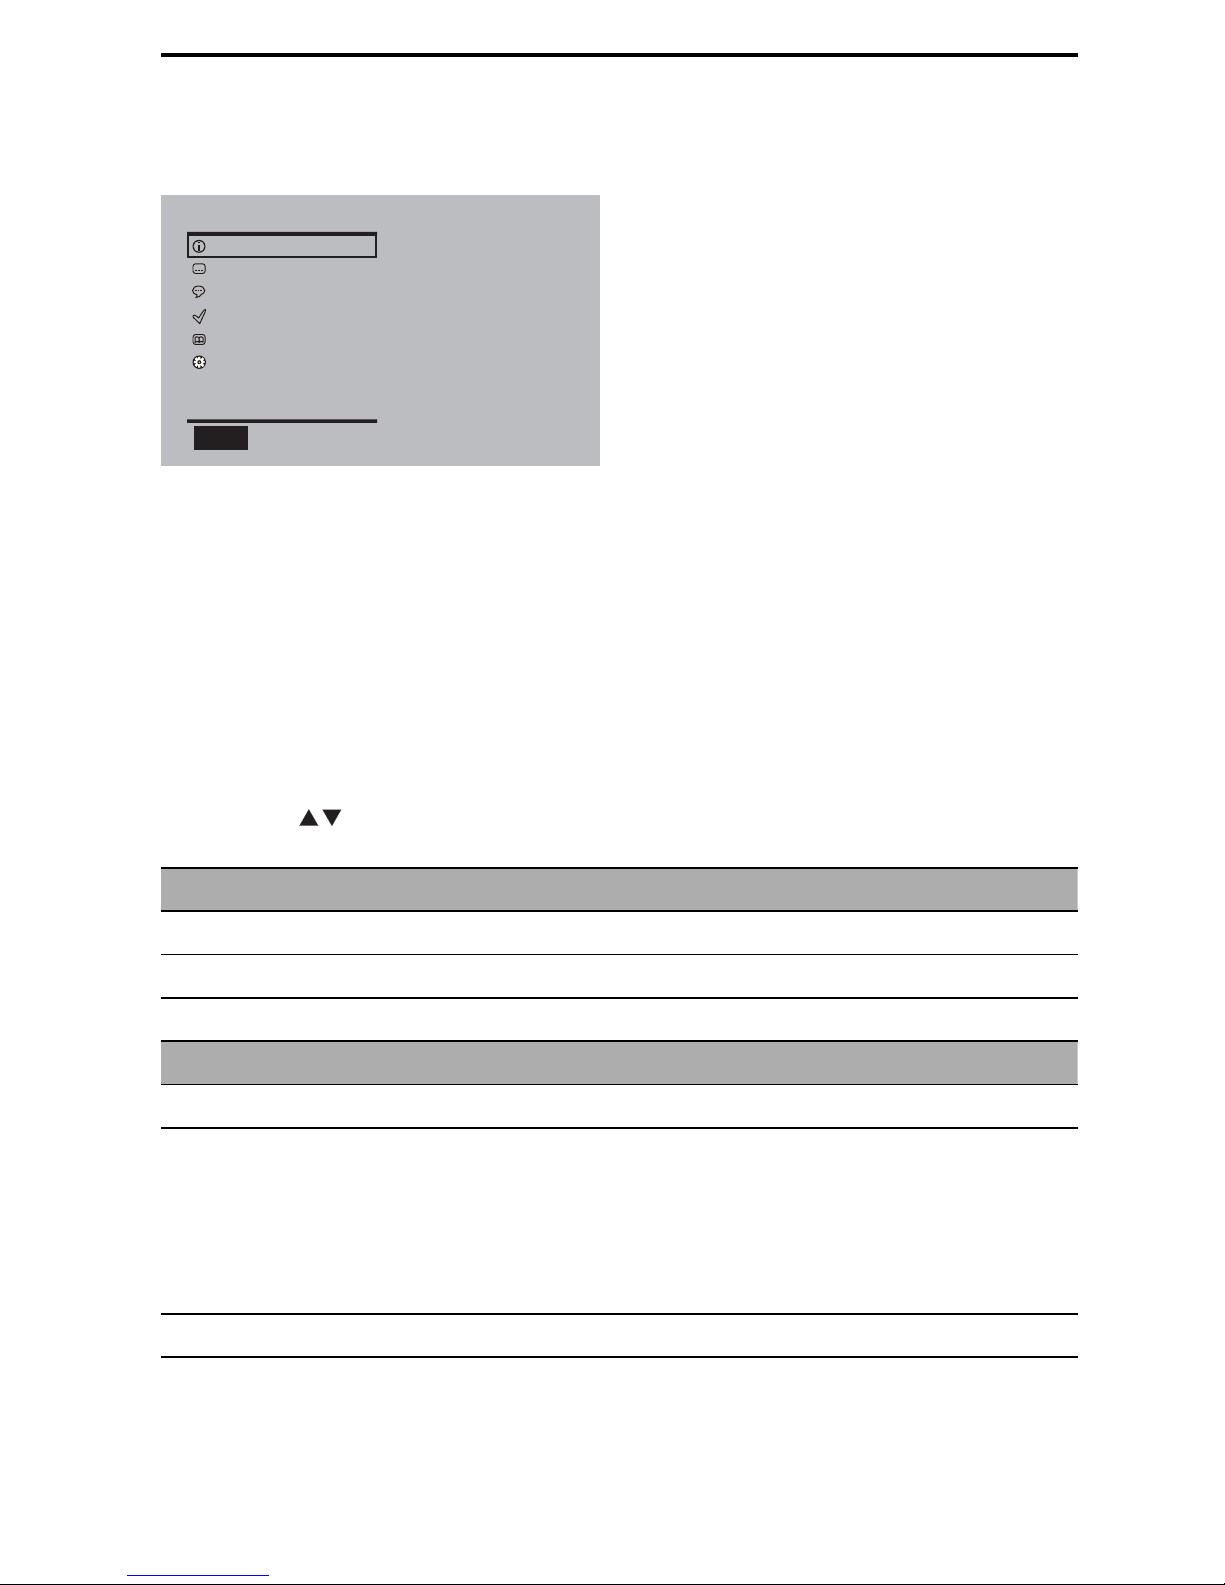
1 Press OPTIONS to select some play options.
2 Follow the on-screen instructions.
5 Adjust settings
To maximize your play experience, use SETUP to fi ne tune your settings.
1 Press SETUP.
The setup menu is displayed.»
2 Press to select an option and press OK to confi rm.
[General]
[Menu language] Select menu display language.
[Closed Caption] Select closed caption services.
[Factory reset] Restore original settings.
[Time]
[Time zone] Select the time zone.
[DST] Set the Daylight Saving Time.
[On]: If it is summer time, select this
option.
[Off]: If it is not summer time, select
this option.
[Time format] Select the time format.
Option
Info
Closed Caption
Audio Language
Favorite List
Channel List
Setup
OPTION
Exit
EN
Page 23
23
[Channel installation]
[Air/Cable] Select the antenna type.
[Auto scan] Search TV channels automatically.
[Manual scan] Search TV channels manually. This
option is not available in cable mode.
[Channel management]
[Channel name] Change channel name.
[Channel edit] Edit channels.
3 Press to go back to previous menu level.
4 Press SETUP to exit.
View closed captions (subtitles)
The caption service displays transmitted CC- and T- text. The caption text can
be displayed permanently or only when the TV is muted.
Note
This television provides a display of television closed captioning that conforms with •
the EIA-608 standard and in accordance with Sections 15.119 of the FCC rules.
The captions do not always use correct spelling and grammar.
•
Not all TV programs and product commercials include closed caption information. •
Refer to your area TV program listings for the TV channels and times of closed
caption shows. The captioned programs are usually noted in the TV listings with
service marks such as ‘CC’.
Closed captioning
Closed captioning is an assistive technology that allows persons with
hearing disabilities to access television programming. Closed captioning
displays the audio portion of programming as text superimposed over the
video.
Display captions
1 Press SETUP.
The setup menu is displayed.»
English
EN
Page 24
24
2 Select [General] > [Closed Caption] > [CC mode], and press OK
to confi rm.
3 Press or to select an option, and press OK to confi rm:
• [CC on]: The closed caption is enabled.
• [CC off]: The closed caption is disabled.
• [CC on Mute]: The closed caption is enabled in mute mode.
4 Press SETUP to exit.
Select caption services
1 Select a caption service for analog channels:
Press • SETUP and select [General] > [Closed Caption] > [Basic
selection], then press OK to confi rm.
Press •
or to select one of the listed caption services, and
press OK to confi rm.
Note
Not all caption services are used by a TV channel during the transmission of a closed •
caption program.
2 Press SETUP to exit.
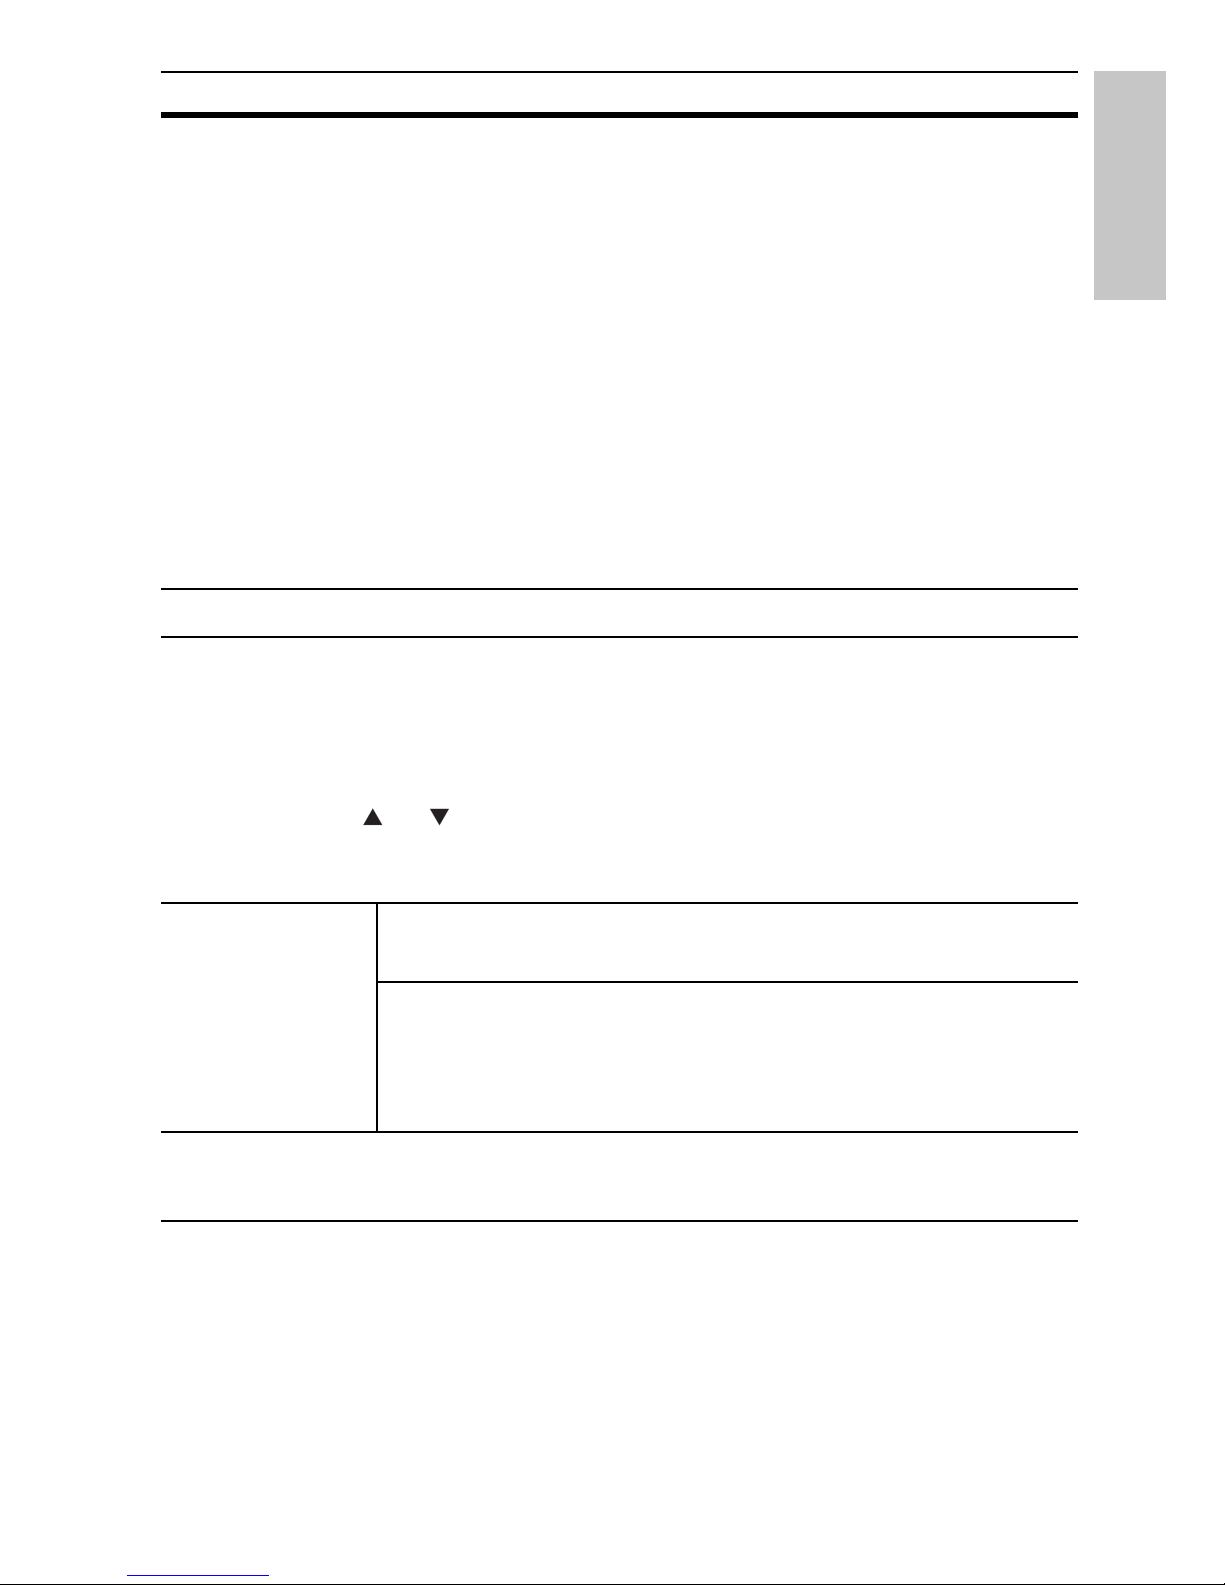
Summary of caption services
Service Description
CC-1 and T-1 are the primary caption and text services.
The captioning or text is displayed in the same
language as the program’s dialogue
(up to 4 lines of script on the TV screen, where it
does not obstruct relevant parts of the picture).
CC-3 and T-3; serve as the preferred data channels.
The captioning or text is often a secondary language.
EN
Page 25
25
Service Description
CC-2, CC-4, T-2
and T-4;
are rarely available and broadcasters use them only
in special conditions, such as when [CC-1] and
[CC-3] or [T-1] and [T-3] are not available.
• There are 3 display modes according to programs:
Paint-on mode:
Displays input characters on the TV screen
immediately.
Pop-on mode:
Once characters are stored in memory, they are
displayed all at once.
Roll-up mode:
Displays the characters continuously by scrolling
(max. 4 lines).
Select DTV caption services
1 Select a caption service for digital channels:
Press • SETUP and select [General] > [Closed Caption] >
[Advanced selection], then press OK to confi rm.
Press •
or to select one of the listed caption services, and
press OK to confi rm.
[Advanced
selection]
[Off] Select if you do not want Digital
Caption Service. This is the default.
[Service1] to
[Service6]
Select one of these before changing
any other item in [Closed Caption]
menu. Choose [Service1] under normal
circumstances.
2 Press SETUP to exit.
Select how digital captions are displayed
You can choose the size, font, color, background and other characteristics
of the caption text.
1 Press SETUP and select [General] > [Closed Caption] > [Option] >
[Mode], then press OK to confi rm.
English
EN
Page 26

26
2 Press / to select [Custom], then press OK to confi rm.
3 Press / to select an option, and press OK to confi rm.
• [Font style]: select the caption font style.
• [FG color]: select the caption font color.
• [BG color]: select the caption background color.
• [FG opacity]: select the caption font opacity.
• [BG opacity]: select the caption background opacity.
4 Press / to select a setting for the option, and press OK to
confi rm.
5 Press SETUP to exit.
Diffi culties viewing closed captions on DTV programming
If you have diffi culties viewing closed captions on DTV programming,
including HDTV, received from your subscription television provider, you
should:
consult any consumer information and manuals/guides on closed •
captions for DTV programming provided by your subscription
television provider;
ensure that the captioning function on your DTV is turned on.•
If you are still unable to view closed captions on DTV programming, you
should contact your subscription television provider for assistance.
EN
Page 27
27
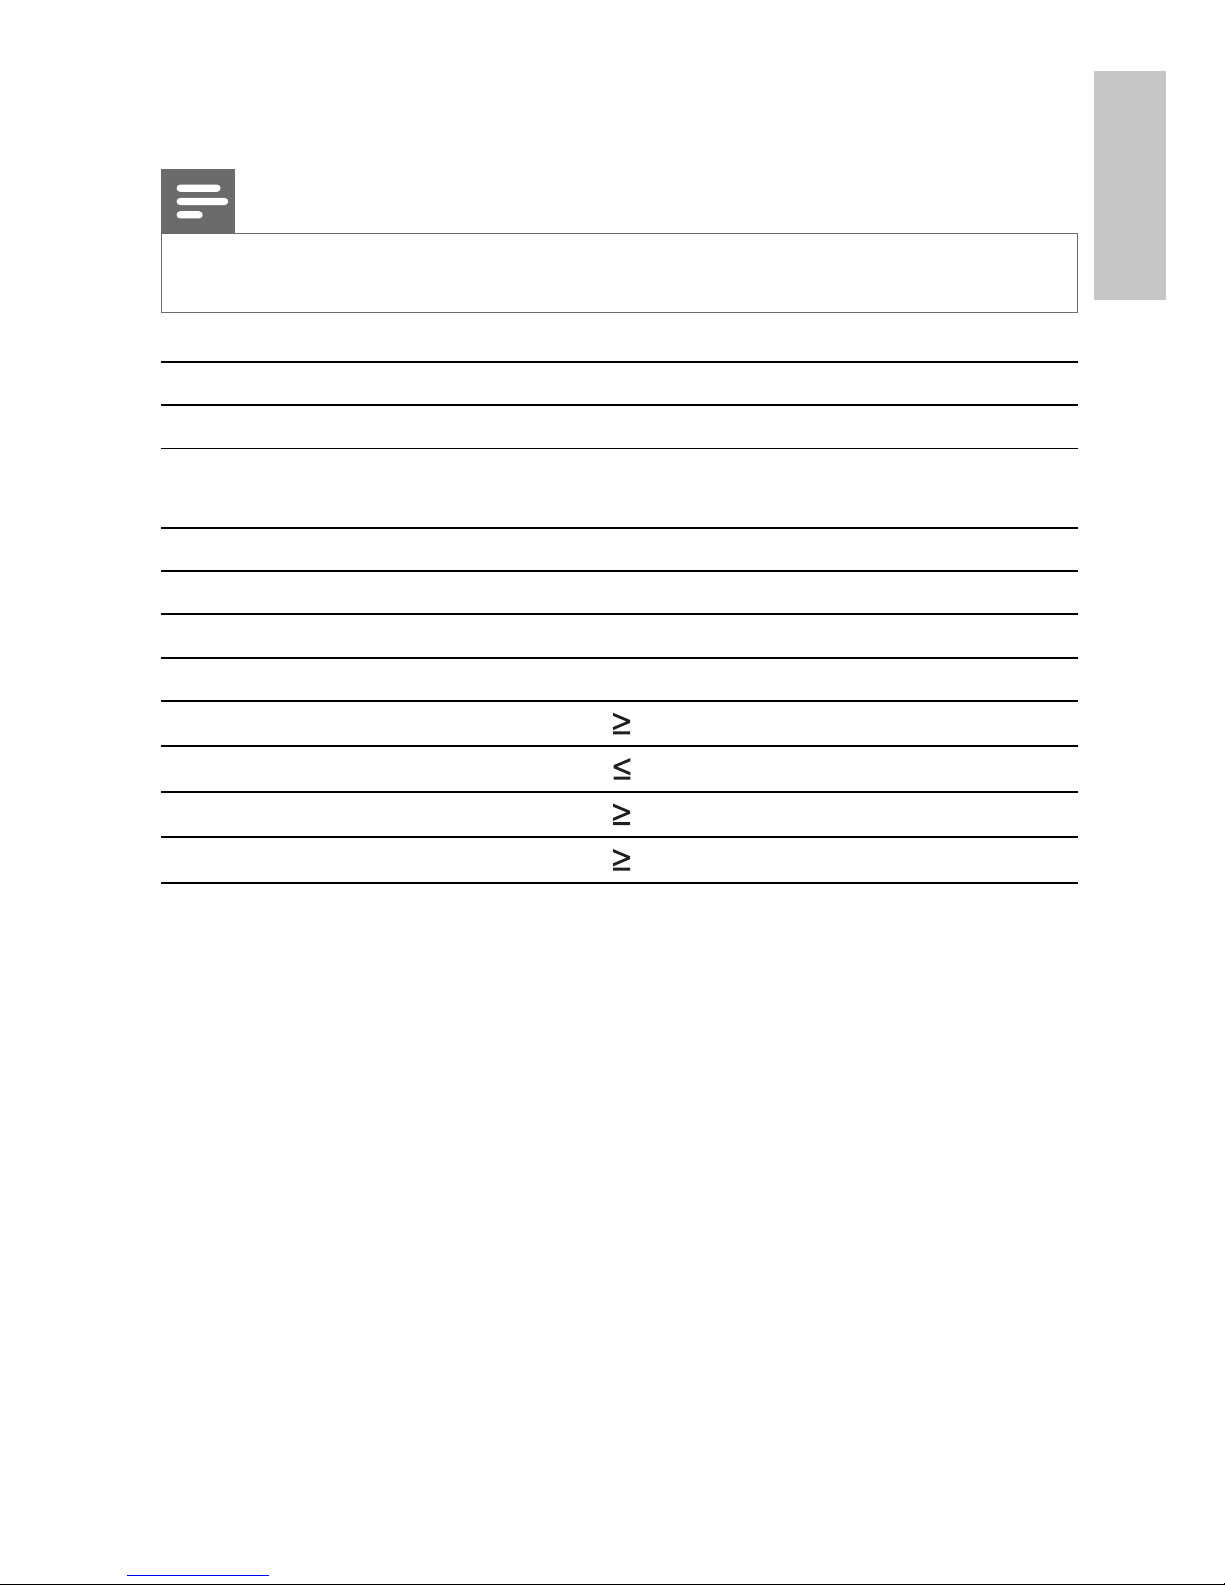
6 Product information
Note
Product information is subject to change without prior notice.•
Dimensions 200 x 27 x 155 mm
Weight 0.5 kg
Power supply Input: 100-240V 50/60 Hz
Output: DC 9V 1A
Power consumption 9 W
Operating temperature range 0-45°C
TV system ATSC
Frequency response 20 Hz-20 KHz ± 3 dB
Signal/noise ratio
80 dB
Audio distortion + noise
-80 (1KHz)
Channel separation
80 dB
Dynamic range
80 dB
English
EN
Page 28
28
7 Troubleshooting
Warning
Risk of electric shock. Never remove the casing of the player. •
To keep the warranty valid, never try to repair the system yourself.
If you encounter problems when using the player, check the following points
before requesting service. If the problem remains unsolved, register your
player and get support at www.philips.com/welcome.
No power
Ensure that both plugs of the mains cord are properly connected.•
Ensure that there is power at the AC outlet.•
Check if the built-in battery is drained.•
No sound
Adjust the volume.•
No response to the remote control
Ensure that the path between the remote control and the player is •
clear from obstacles.
From a close distance, point the remote control directly at the player.•
Replace the remote control batteries.•
Distorted picture
The LCD is manufactured using high precision technology. You may, •
however, see tiny black points and/or bright points(red, blue, green)
that continuously appear on the LCD. This is a normal result of the
manufacturing process and does not indicate a malfunction.
The player feels warm
When the player is in use for a long period of time, its surface will be •
heated. This is normal.
No/weak signal displayed on the screen or no channel found
TV signal is too weak or out of TV signal coverage.•
Make sure you are in an area with suffi cient signal coverage.•
EN
Page 29
29
Tip
For DTV signal coverage, please visit • http://www.fcc.gov/mb/engineering/maps/ .
Connect to your home roof antenna or attach the supplied antenna •
with the magnetic base to the ferrous surface for better reception.
Receiving TV in a driving car may cause signal problems.•
English
EN
Page 30
© 2009 Koninklijke Philips Electronics N.V.
All rights reserved.
Printed in China
PVD700_37_UM_V1.0
Philips Consumer Lifestyle
A Division of Philips Electronics North America Corporation
P.O. BOX 671539, Marietta, GA. 30006-0026
Meet Philips at the Internet
http://www.philips.com/welcome
 Loading...